
CitiDirect
®
Cash Statement Reports:
Account Statement – Comprehensive report
Contents
1. What is the Account Statement – Comprehensive report? 3
2. Locating the Account Statement – Comprehensive report 4
3. Statement report configuration options 6
4. Statement report formats 8
5. Citi Secure Email for seamless statement report delivery 11
6. Scheduling the statement report 13

3
CitiDirect — Account Statement — Comprehensive report
1. What is the Account Statement –
Comprehensive report?
The Account Statement – Comprehensive report in CitiDirect is an Account Statement report that offers an extensive level of
statement and transaction data reporting across all your company’s Citi accounts and registered third party bank accounts.
Alongside comprehensive data for each transaction, the report includes multiple balance indicators such as opening, closing,
intraday and running balances¹.
The report is available and optimised for multiple file formats, including PDF, Excel and CSV.
The PDF version of the report offers a clear and concise layout for viewing transaction and statement data at a glance across
almost any digital device. There are also configuration options available to view additional data elements.
The Excel and CSV versions of the report are the most comprehensive account statement reports available in CitiDirect
through the standard report suite and both formats cover at least sixty different data elements.
The structure and layout of the excel version of the report is enhanced for both users and most account reconciliation software
and applications. Users can view, search, analyse and augment the data to undertake account reconciliation analysis with
greater ease.
1. Running balance will be provided for where branch capability is enabled.
4
CitiDirect — Account Statement — Comprehensive report
2. Locating the Account Statement –
Comprehensive report
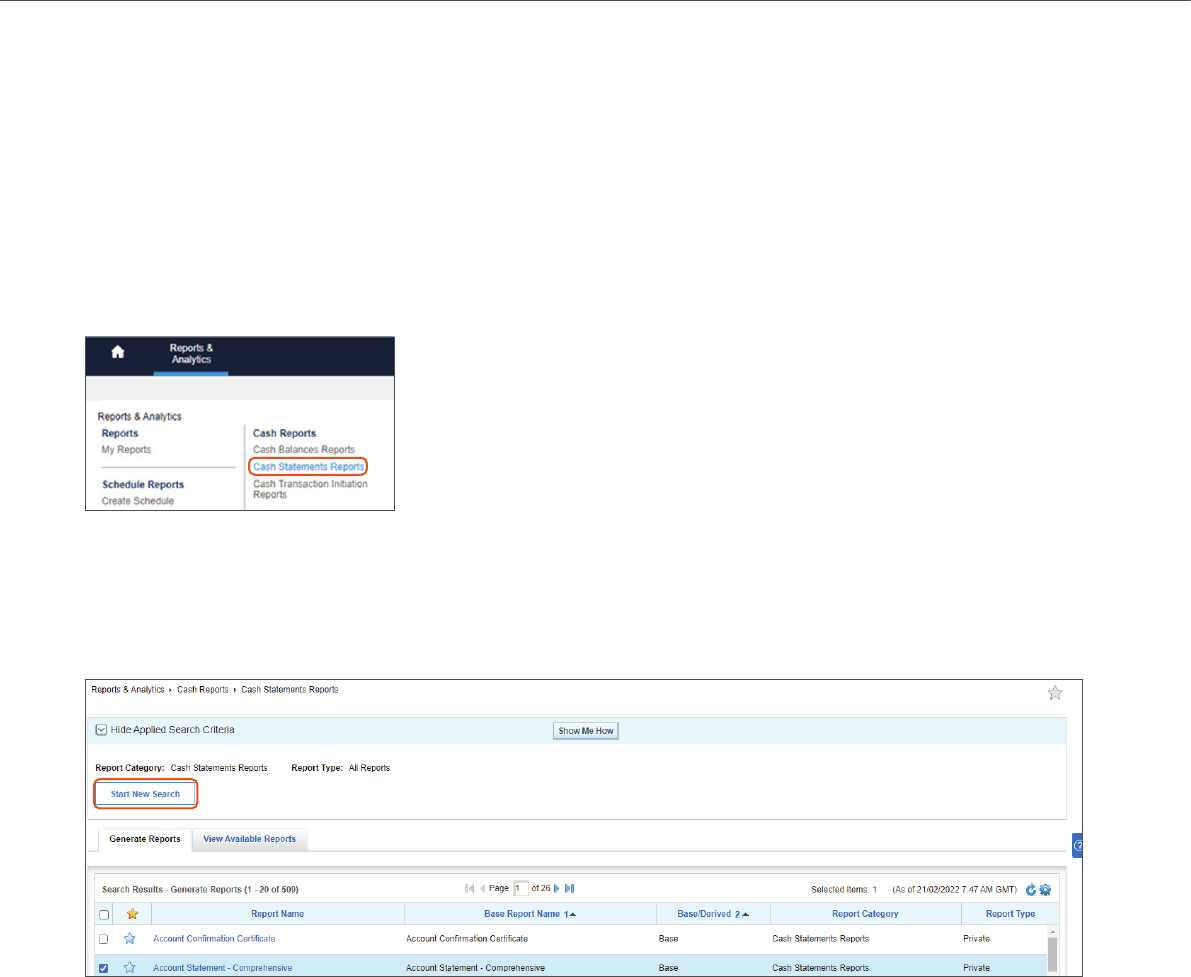
From the CitiDirect Homepage Screen, select the Reports & Analytics menu and navigate to the “Cash Reports” section.
From here, select “Cash Statements Reports”.
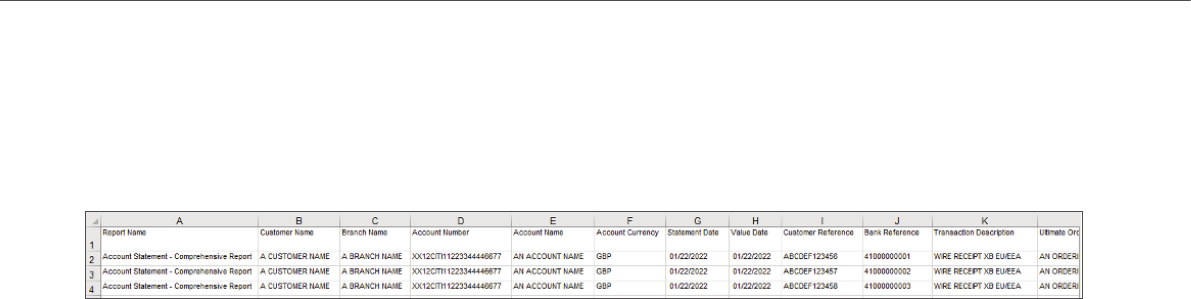
From within the Cash Statements Reports screen, the report ‘Account Statement — Comprehensive’ will appear by default
near the top of the default Cash Statement Reports listings (see below image). Click on the report name ‘Account Statement
— Comprehensive’ to access the report criteria screen and set-up the report. The next section of this guide provides further
guidance on the report criteria options available.
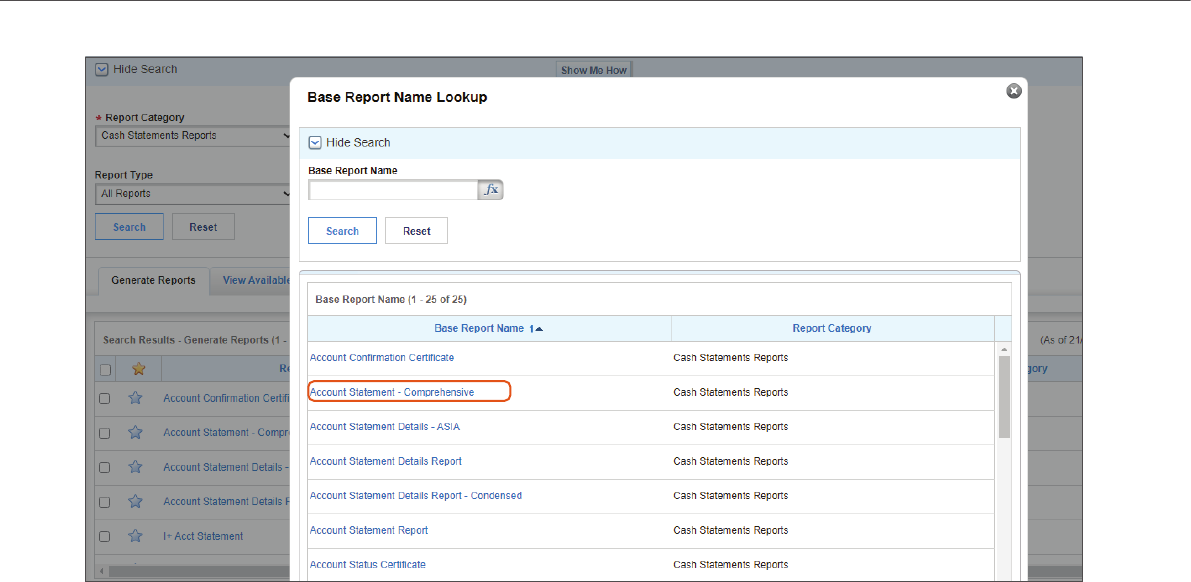
If the ‘Account Statement — Comprehensive’ report does not appear by default in the Cash Statement Reports listings, you
can search for the report by selecting the ‘Start New Search’ option. Within the Report search, ‘Cash Statements Reports’ will
appear as the default option under ‘Report Category’. Select the ‘Base Report Name’ lookup using the binocular icon and then
select the ‘Account Statement — Comprehensive Report’ option and select Search.
5
CitiDirect — Account Statement — Comprehensive report
The Report Criteria feature offers multiple options to tailor and adjust the report output to your exact account reconciliation
needs. The next section of this guide will cover this in further detail.

6
CitiDirect — Account Statement — Comprehensive report
3. Statement report configuration options
Let’s explore the main configuration options and considerations available for the Account Statement – Comprehensive report
Specify a name for the report in the ‘Derived Report Name’ field.
Next, select the desired file format option using the drop-down list. The following file Format options are available for the
Account Statement –
• Adobe PDF
• DHTML
• Comma Separated Value (CSV)
• Excel (XLS)
• Rich Text Format (RTF)
Section 4 of this guide will provide further detail on the more popular output file formats of PDF, Excel and CSV.
Under the Delivery Options, select the desired option for your preferred report delivery or continue with no option selected
to run the report and download the file from within CitiDirect itself. Section 5 of this guide provides more information on
Citi Secure Email.

7
CitiDirect — Account Statement — Comprehensive report
Use the Branch Number/Name, Customer Number/Name and/or Accounts Number/Name options to include one or
multiple accounts in the statement report. You can select accounts from any Citi branch and/or third party bank registered in
your CitiDirect service that your entitlements permit.
There are also additional criteria options that can tailor the statement data more closely to your reconciliation
requirements, including:
• Bank Reference
• Customer Reference
• Transaction Amount (range)
• Account Currency
• Transaction Description
• Cheque transactions (included by default)
• By Order Of/Beneficiary
• Transaction Code (Citi transactions code by default)
• Output Account Sub-Totals
• Output Grand Total
The Show Enhanced Transaction Detail is not selected by default, this option provides additional transaction details in the
statement report. Further guidance is provided in Section 4.
The Show Additional Ordering Party / Beneficiary Details is not selected by default, this option includes additional details
of the Debtor and or Creditor where the information is available for the payment transaction. Further guidance is provided in
Section 4.
The Statement Date is selected by default to ‘yesterday’. There are multiple standard date period options to select from,
including a date range option.
The Value Date is set by default to ‘No Date Selected’. There are multiple value date period options to select from including a
date range period option.
Page Breaks and Print Selection criteria options are selected by default but can be unselected if required.
The Activity Only feature offers the option to only show accounts where transactions have occurred for the selected
statement dates. If not selected, where certain accounts have no transaction activity for the specified statement date, the
accounts and balance information will continue to be displayed. This feature is not selected by default.
Once the report configuration options have been defined, you can select how you would like to generate the report. It can
be useful to the save the report first with your specific configuration options defined. Section 5 of this guide explores the
scheduling option further.
• Run: Run the report once with the selected report criteria
• Save & Run: Run the report and save the report criteria for future running use
• Save: Save the report criteria, but does not run the report
• Schedule: A Delivery Option library needs to be created and authorized before scheduling
8
CitiDirect — Account Statement — Comprehensive report
4. Statement report formats
The Account Statement – Comprehensive report is available in multiple file formats. This section examines the three most
popular formats.
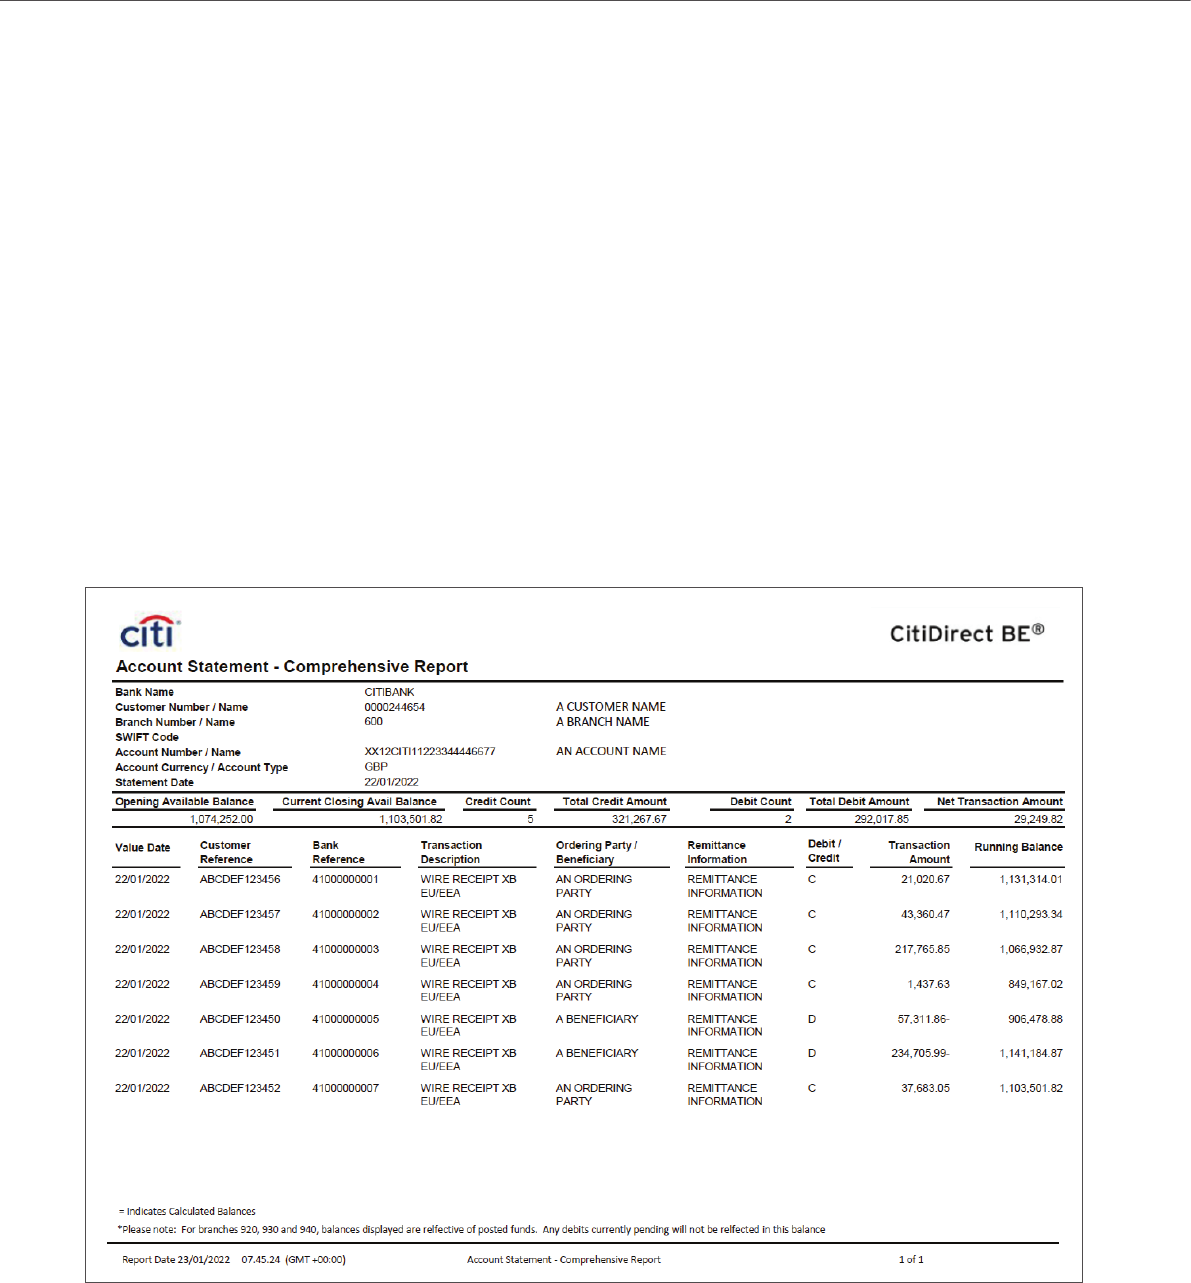
(1) PDF File Output
The PDF version provides a concise summary of the Account Statement – Comprehensive Report and can be opened and
viewed on almost any digital device which supports Adobe’s portable document format. The format of the report is suitable
for viewing at a glance on smartphones and tablets. Section 4 of this guide also explores using Citi Secure email to issue the
report immediately via email.
Within the report criteria covered in the previous section, there are options available including “Show Enhanced Transaction
Details” and “Show additional Ordering Party / Beneficiary details”. These options will display additional data items, when
available, in the PDF file output. This extended data is conveniently positioned under each reported transaction record and
provides separation between each transaction record.
A sample of the standard PDF file format output can be seen below.
9
CitiDirect — Account Statement — Comprehensive report
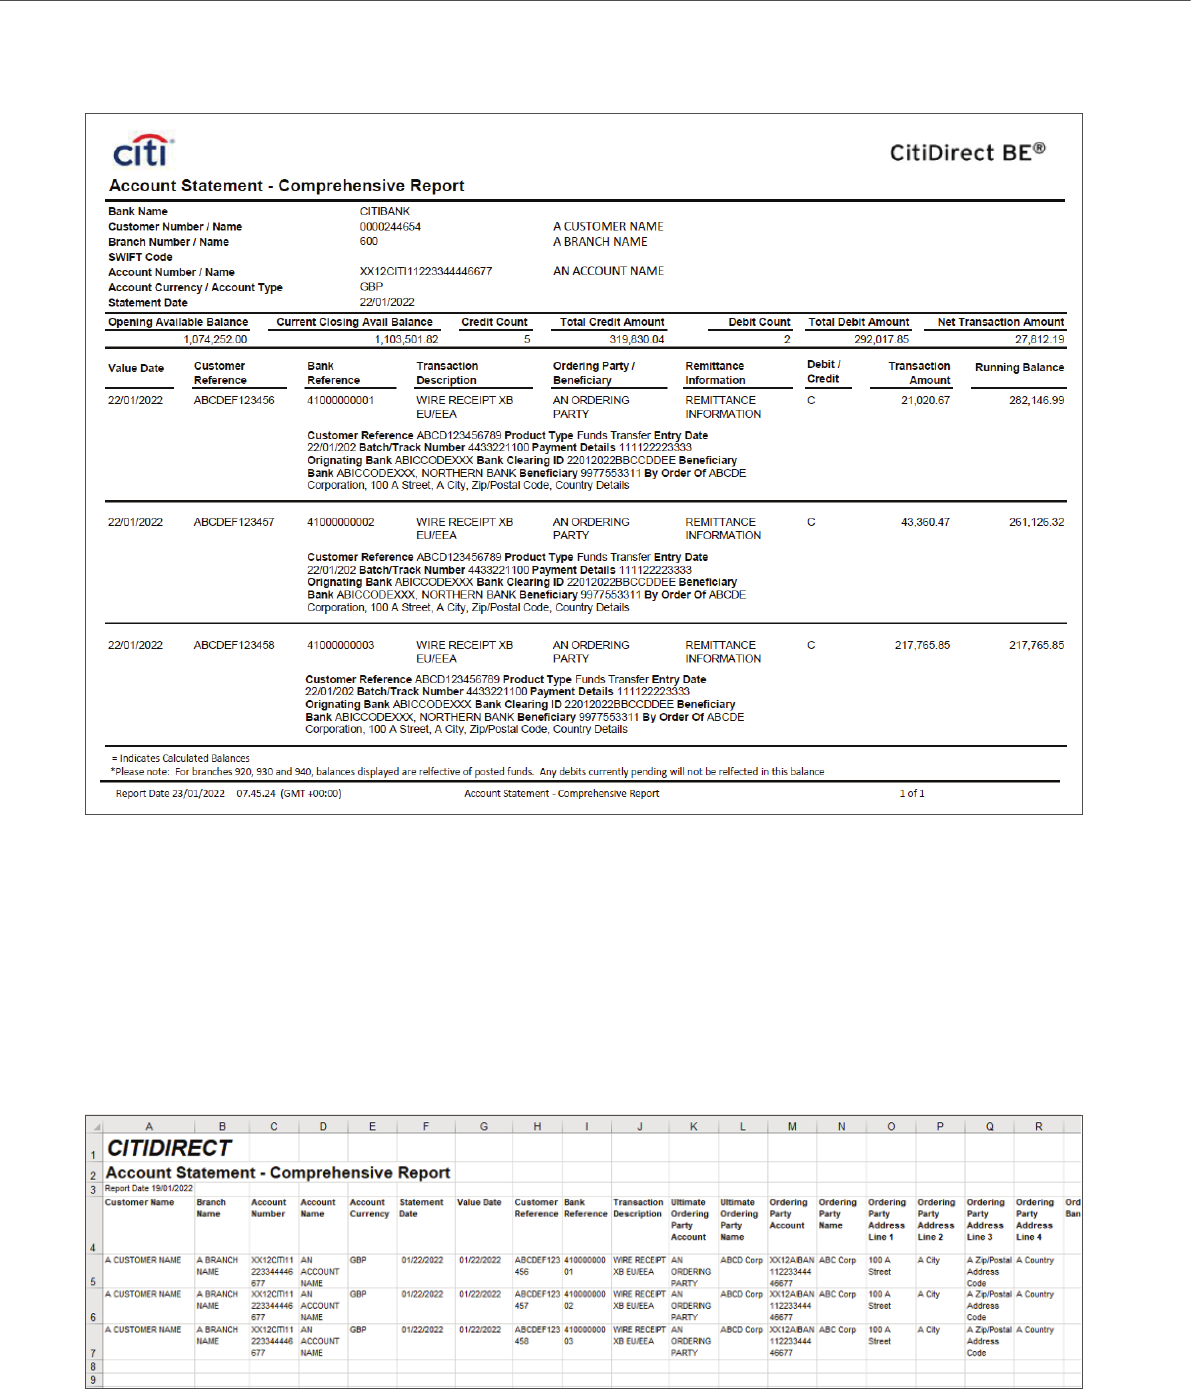
A second sample of the PDF file output format can be seen below with the extended data options configured:
The PDF file output format contains a more refined set of statement and transaction data elements compared to the Excel and
CSV output formats
(2) Excel and CSV Formats
The Excel file output of the Account Statement – Comprehensive report can be opened with Microsoft Excel to view, search,
analyse and augment the data available to support account reconciliation.
The different data elements are presented in dedicated columns which provides better compatibility with account
reconciliation software and applications to read the data.
10
CitiDirect — Account Statement — Comprehensive report
The Excel and CSV versions of the report contain the most comprehensive set of data elements available.
The CSV file output of the report can be opened with a range of applications including Microsoft Excel to view, search, analyse
and augment the financial data available to support account reconciliation activity.
The CSV format is the name of the output format and is not restricted to comma separation, other separators can be used.
11
CitiDirect — Account Statement — Comprehensive report
5. Citi Secure Email for seamless statement
report delivery
CitiDirect can deliver information to you using either Secure Mail or Encrypted Emails using digital certificates.
Secure Email is the simplest method of delivering statement reports, as it does not require encryption software on
your desktop.
Your secure encrypted email from Citi is held in your own account on the Citi Secure Webmail Center.
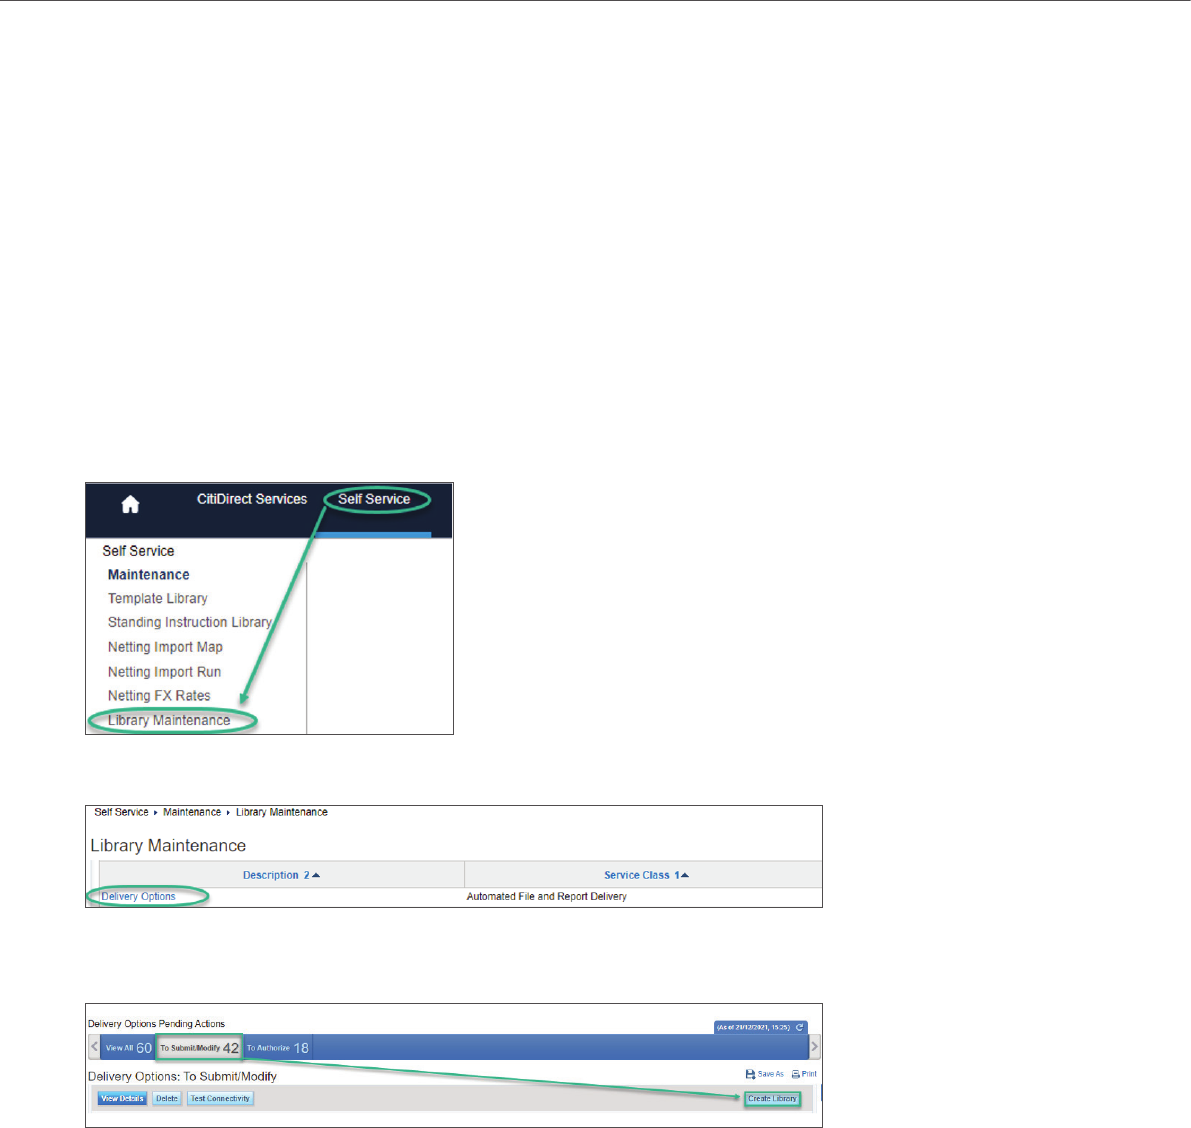
To use Citi Secure Email, the delivery option needs to be defined and configured in your CitiDirect library.
1. Select the Self Service menu in CitiDirect and navigate to ‘Library Maintenance’ under the Maintenance menu
2. Select the Delivery Options library for Service Class Automated File and Report
3. The Delivery Options Summary page will now be available. Ensure that you are in the ‘To Submit/Modify’ section.
Click the Create Library button to create a new delivery option.
Complete the following sections
• Delivery Option Name: Choose the applicable name (can be the same as the report)
• Delivery Option Description: Delivery Option Description
• Delivery Option Type: Email
• Security Method: Citi Secure E-Mail

12
CitiDirect — Account Statement — Comprehensive report
Enter the destination E-Mail address, the Message Subject and File Name. You can enter several email addresses separated
by a semi-colon.
4. Submitted delivery options may need to be authorized by another user who has access to Library Maintenance (depending
on the approval requirements set up by your security administrators)
5. To authorise the new setup, select the Delivery Options library for Service Class Automated File and Report, then select
the To Authorize tab
Help for external secure email is available 24/7, 365 days a year.
Immediate assistance by phone:
866.535.2504 (inside U.S.) or +001.904.954.6181
By email (response within 24 hours): secure.emailhelp@citi.com
13
CitiDirect — Account Statement — Comprehensive report
6. Scheduling the Statement Report
Scheduling reports in CitiDirect can save you valuable time and remove repetitive tasks. A schedule can be assigned to the
statement report in a few simple steps.
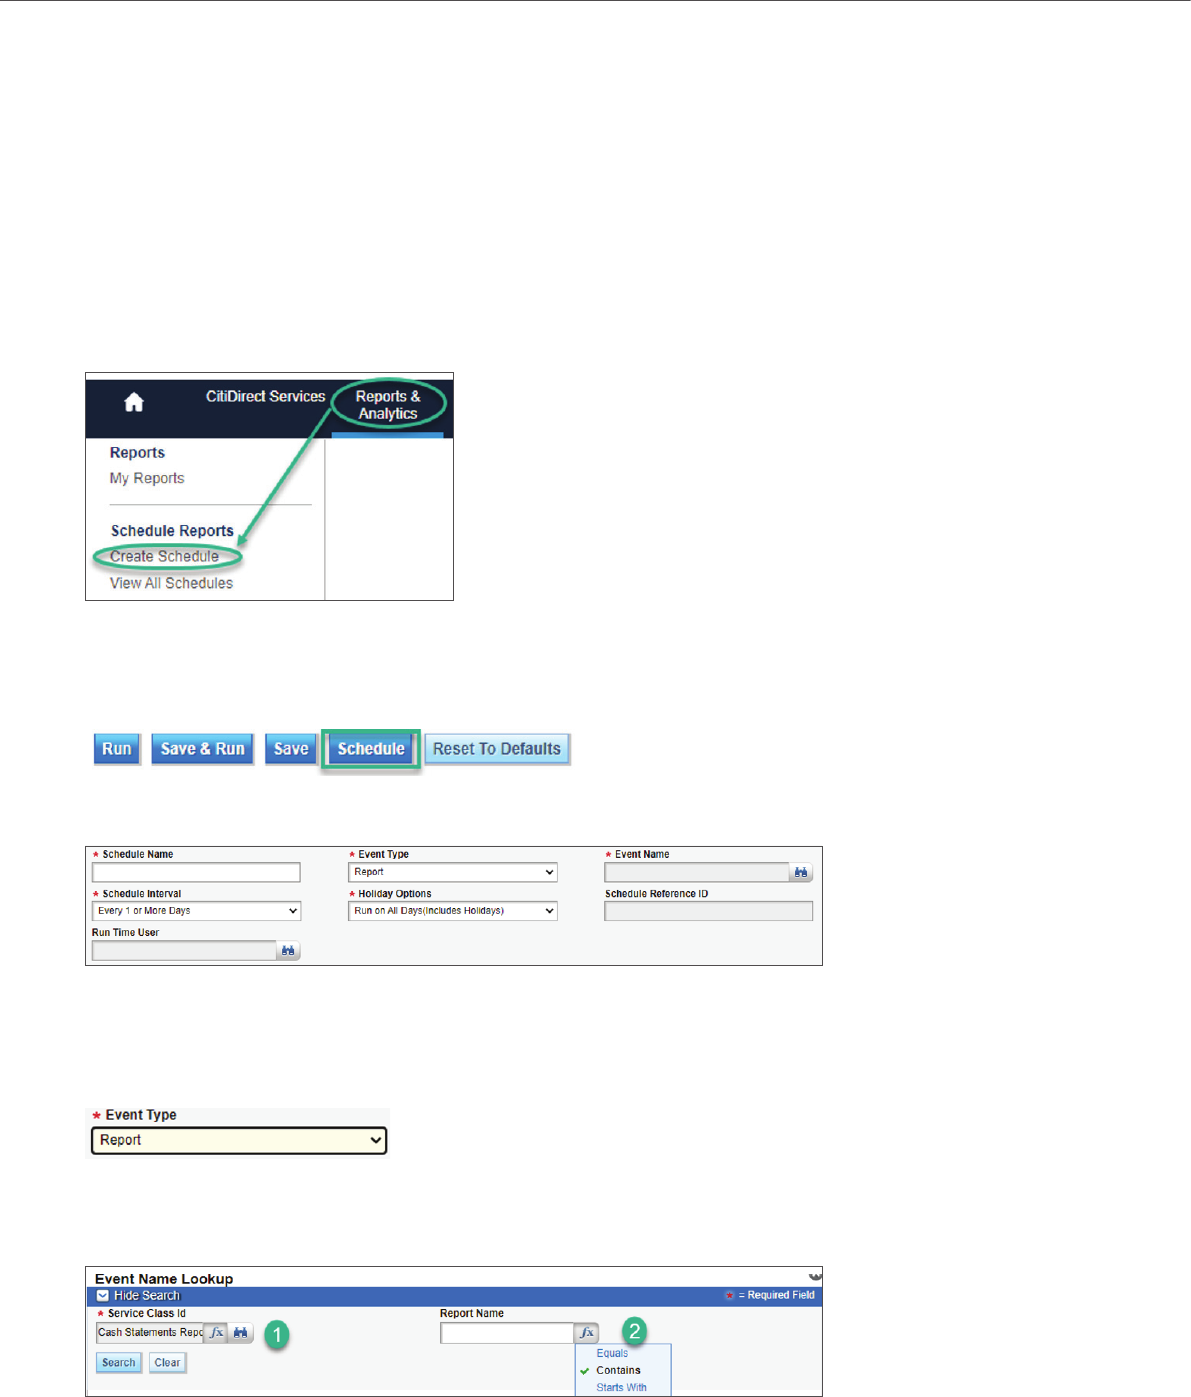
You can access the Create Schedule screen in two different ways, from the Reports & Analytics menu and from within the
Report Criteria screen of the statement report itself.
Reports and Analytics Menu:
Report Criteria screen:
Select the Schedule option at the bottom of the report. Always save the report you have setup before selecting Schedule.
Within the Create Schedule definition, complete the fields below
1. Schedule Name – enter a unique name for your schedule here, this can be the same name as the report to help with
identifying the report.
2. Event Type – select the Report option as the schedule is intended to automate a statement report.
3. Event Name – click on the binoculars icon to link the schedule to the saved report as per the below screenshot. This should
be auto populated if ‘Schedule’ option was selected from the ‘Report Criteria’ screen.
14
CitiDirect — Account Statement — Comprehensive report
Service Class ID: For the Account Statement – Comprehensive report the Service Class ID is Cash Statements Reports.
Report Name: Using your preferred method search for your saved report using its saved name.
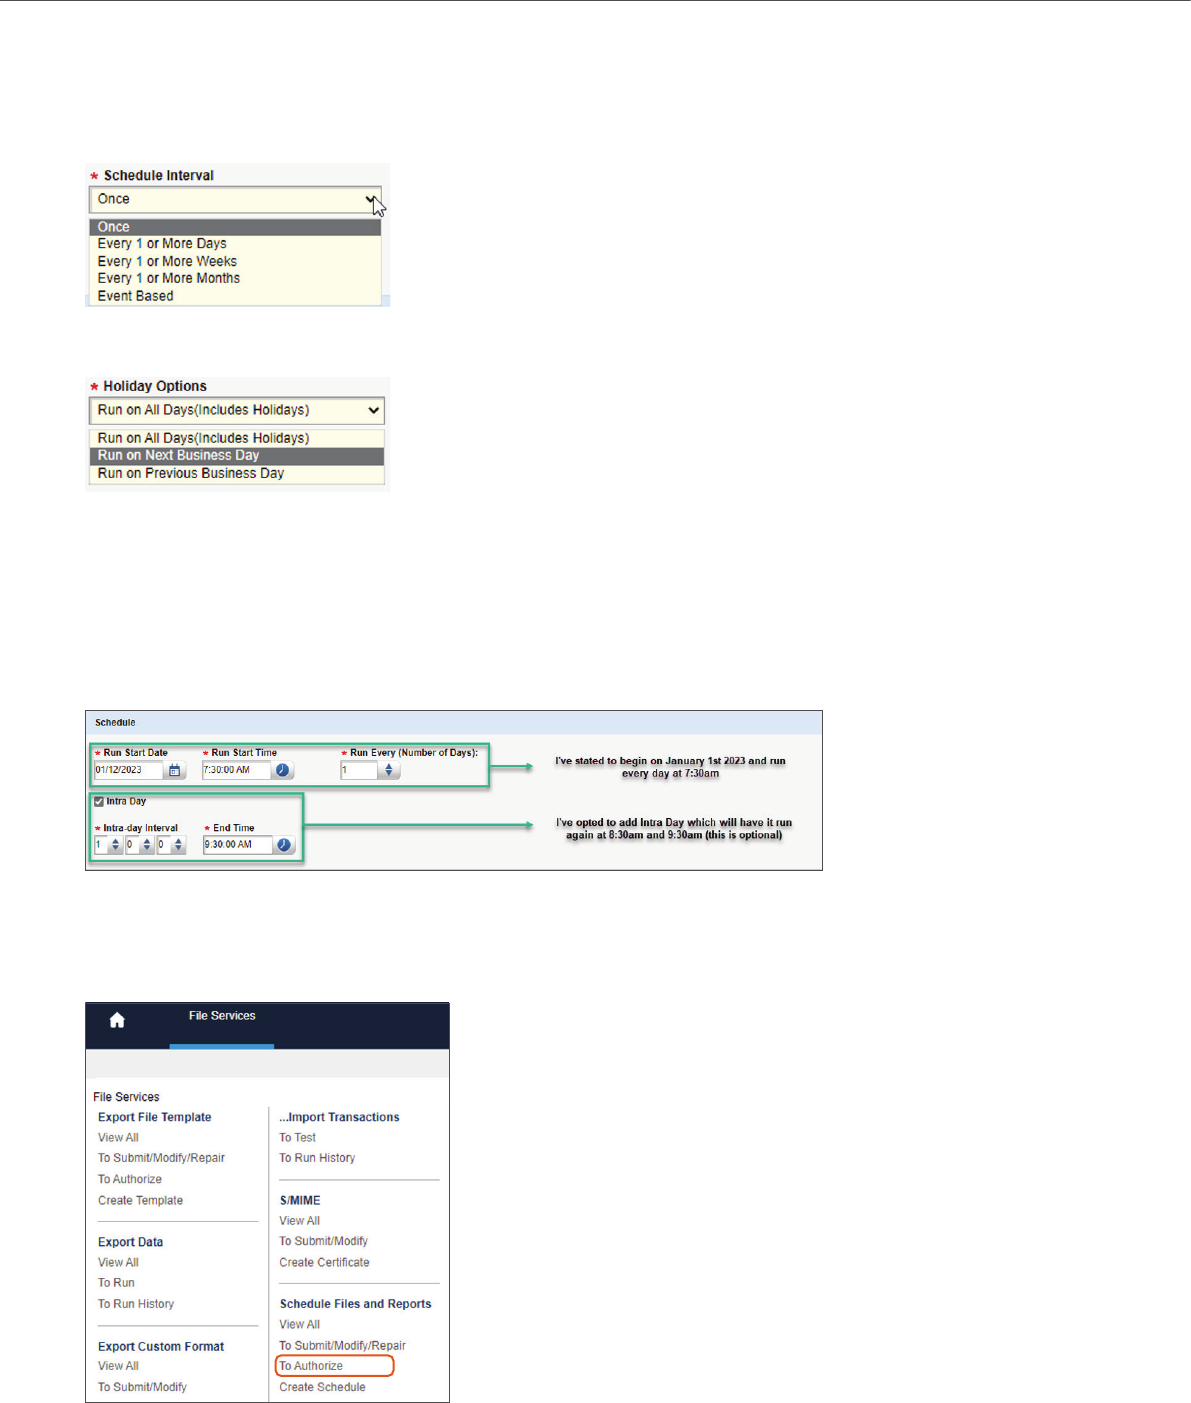
4. Schedule Interval: Select the desired frequency for your report to send. Further options will appear based on your choice.
5. Holiday Options – select the desired holiday option to determine how the schedule should operate on bank or public holidays.
6. Schedule Reference ID – this will be automatically populated by CitiDirect.
7. Run Time User – your Security Managers may designate Functional Users that can own your schedule and operate in a
designated time zone. If wish to use the Time Zone of your own profile and be the owner of the schedule leave this option
blank.
8. Frequency Options – set the frequency based on the option selected under the Schedule Interval (item 4 above). The
following example is a common configuration for the Interval Option of ‘Every 1 of More Days’.
After the desired setup is in place, it is time to select Submit. Submitted schedules may need to be authorised by another user
who has access to Schedules (depending on how your Security Admins have setup approval requirements).
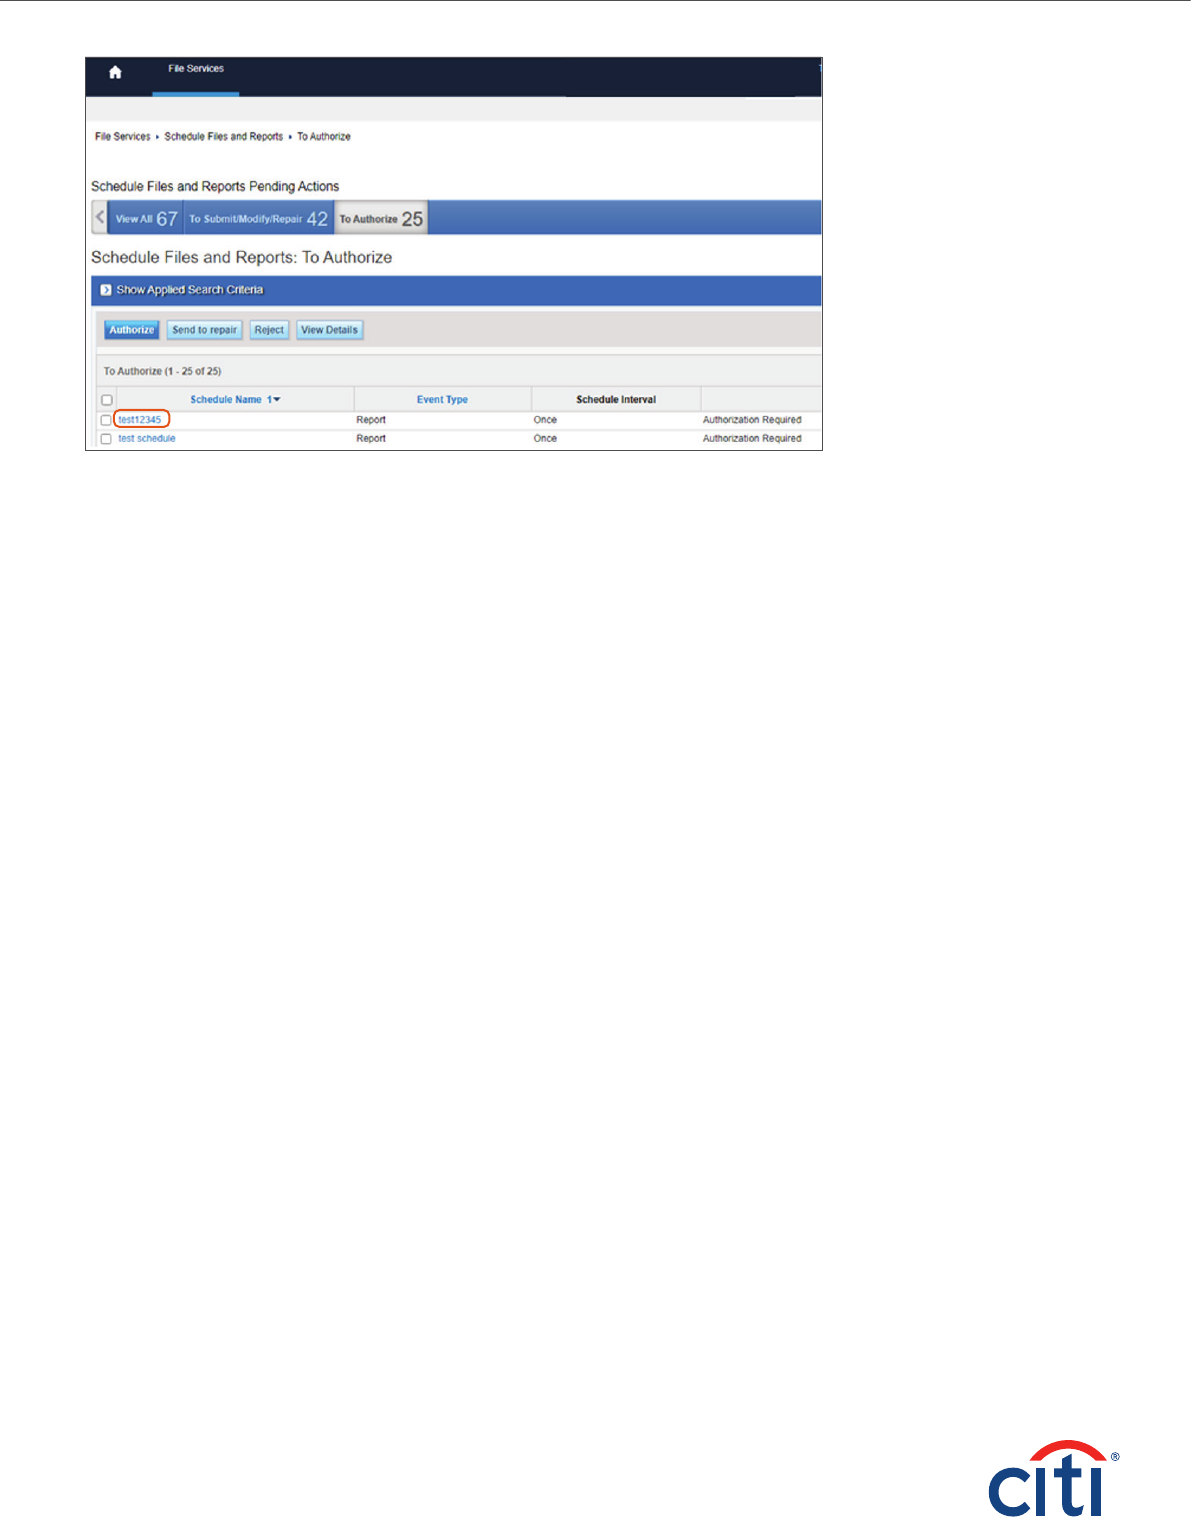
To approve a new schedule, go to the authorise schedules section as per below
15
CitiDirect — Account Statement — Comprehensive report
© 2022 Citibank, N.A. London. Authorised and regulated by the Office of the Comptroller of the Currency (USA)
and authorised by the Prudential Regulation Authority. Subject to regulation by the Financial Conduct Authority and
limited regulation by the Prudential Regulation Authority. Details about the extent of our regulation by the Prudential
Regulation Authority are available from us on request. All rights reserved. Citi, Citi and Arc Design and other marks
used herein are service marks of Citigroup Inc. or its affiliates, used and registered throughout the world.
CBS36222 02/22
Within this screen select the new schedule and click authorise.
The schedule is now active and the statement report is scheduled to be generated in accordance with the settings you
have defined.
