Cisco Commerce
Cisco Commerce Order
User Guide
Cisco Proprietary
Note: This document is no longer being actively updated as of March 2020.
Please contact c[email protected]om if an update is requested.

Cisco Commerce Order User Guide
Cisco Proprietary © 2020 Cisco and/or its affiliates. All rights reserved.
Last Updated: 17 March 2020 Page 2 of 143
Cisco.com | Privacy Statement | Trademarks Provide Feedback on this Training Resource
TABLE OF CONTENTS
Click a topic or sub-topic name below to move directly to that section.
1 Conventions Used in this Document ............................................................................................ 6
1.1 Order Support Enhancements ........................................................................................... 7
1.1.1 ChatBot ..................................................................................................................... 7
1.2 Special Processes or Programs ........................................................................................ 8
1.2.1 Global Customer Support Process ............................................................................ 8
2 Cisco Commerce Ordering Workflow ......................................................................................... 10
2.1 Creating an Order ............................................................................................................. 10
2.2 Using Options on the Orders Tab ................................................................................... 11
2.3 Limited Access to the Orders Tab ................................................................................... 12
2.3.1 Partner-initiated Customer Access .......................................................................... 12
2.3.2 Internet Commerce Agreement ............................................................................... 13
3 Converting Quotes to Orders ...................................................................................................... 15
3.1 Converting a Quote to an Order ...................................................................................... 15
3.2 Converting to Order from Within a Quote ....................................................................... 16
3.3 Verifying the Order Initiation Page Details ..................................................................... 17
3.3.1 Deal ID, Order Name, Price List, Intended Use, and Managed Service Order ......... 17
3.3.2 Address Information Section ................................................................................... 19
3.4 Completing the Conversion ............................................................................................. 28
3.4.1 Using the Conversion Options on the Items Tab ..................................................... 30
3.4.2 Using Additional Links on the Converted Quote Items Tab ..................................... 33
4 Creating a Standalone Order ....................................................................................................... 34
4.1 Verifying the Create Order Page Details ......................................................................... 34
4.1.1 Order Name, Intended Use, and Managed Service Order ....................................... 34
4.1.2 Address Information Section ................................................................................... 35
4.2 Completing the Order Initiation Page .............................................................................. 36
4.3 Adding Products and Services to the Order ................................................................... 36
5 Creating Orders from Existing Orders........................................................................................ 37
5.1 Creating a Cloned Order from a Favorite Order ............................................................. 37
5.2 Creating a New Order by Cloning an Order .................................................................... 39

Cisco Commerce Order User Guide
Cisco Proprietary © 2020 Cisco and/or its affiliates. All rights reserved.
Last Updated: 17 March 2020 Page 3 of 143
Cisco.com | Privacy Statement | Trademarks Provide Feedback on this Training Resource
6 Populating the Order Details ....................................................................................................... 40
6.1 Populating the Header Content ....................................................................................... 40
6.1.1 Expanding or Collapsing the Header Section .......................................................... 40
6.1.2 Changing the Order Name in the Header ................................................................ 41
6.1.3 Entering the Purchase Order (PO) Number............................................................. 41
6.1.4 Marking Order as a Favorite ................................................................................... 42
6.2 Setting Preferences for an Order .................................................................................... 43
6.2.1 Setting Order Service Preferences .......................................................................... 43
6.2.2 Federal Government Order Preferences ................................................................. 44
6.3 Adding Items to the Order ............................................................................................... 45
6.3.1 Finding Items Using a Search ................................................................................. 45
6.3.2 Adding Items by SKU .............................................................................................. 50
6.3.3 Importing an Estimate ............................................................................................. 51
6.3.4 Fulfillment Restrictions ............................................................................................ 54
6.4 Adding Different Types of SKUs ..................................................................................... 55
6.4.1 Adding Remanufactured Equipment........................................................................ 55
6.4.2 Adding Fixed Scope Consultancy SKUs ................................................................. 57
6.4.3 Adding a License SKU ............................................................................................ 57
6.4.4 Adding a Spare ....................................................................................................... 60
6.5 Choosing Options and Resolving Issues ....................................................................... 62
6.5.1 Using the Power Calculator ..................................................................................... 63
6.5.2 Searching for Multiple Known SKUs........................................................................ 64
6.5.3 Searching for a Single Known SKU ......................................................................... 66
6.5.4 Searching Unknown SKUs Individually ................................................................... 67
6.5.5 Viewing Full Summary ............................................................................................ 69
6.5.6 Using Cisco Feature Navigator ............................................................................... 70
6.6 Setting Quantities for Products ....................................................................................... 71
6.7 Adding Services ............................................................................................................... 71
6.7.1 Adding Services to Items in the Configuration ......................................................... 72
6.7.2 Remove Services .................................................................................................... 81
6.8 Identifying Target Contract Numbers .............................................................................. 82
6.9 Identifying Flexible Service Start Delay (FSSD) Value ................................................... 83

Cisco Commerce Order User Guide
Cisco Proprietary © 2020 Cisco and/or its affiliates. All rights reserved.
Last Updated: 17 March 2020 Page 4 of 143
Cisco.com | Privacy Statement | Trademarks Provide Feedback on this Training Resource
6.10 Adding a Smart Account .................................................................................................. 84
6.11 Renewing Software Subscriptions .................................................................................. 87
6.12 Adding and Deleting Item Notes or Comments .............................................................. 89
6.13 Populating the Purchase Order Line Reference ............................................................. 89
6.14 Removing a Line Item from an Order .............................................................................. 90
6.15 Verifying Country Rules Validations ............................................................................... 91
6.16 Reviewing Discounts ....................................................................................................... 92
6.17 Setting the Shipping and Installation Information ......................................................... 93
6.17.1 Setting Order Shipping Options ............................................................................... 93
6.17.2 Adding Ultimate Consignee Details ......................................................................... 94
6.17.3 Managing Shipping Groups ..................................................................................... 95
6.17.4 Moving Items Between Shipping Groups ................................................................ 97
6.17.5 Deleting a Shipping Group ...................................................................................... 97
6.17.6 Populating Shipping Information ............................................................................. 98
6.18 Verifying Billing Information .......................................................................................... 100
6.18.1 Verifying Tax Information ...................................................................................... 100
6.18.2 Populating the Billing Information Section ............................................................. 101
6.18.3 Populating the Payment Information Section ......................................................... 102
6.19 Reviewing and Submitting the Order ............................................................................ 103
6.19.1 Adding Landing Costs and Freight Charges .......................................................... 105
6.19.2 Submitting the Order ............................................................................................. 106
6.19.3 Order Notification .................................................................................................. 107
7 Using a Reusable Nonstandard Discount ................................................................................ 108
8 Creating Service Only Orders ................................................................................................... 109
9 Viewing the Order Status........................................................................................................... 110
9.1 Viewing the Order Details .............................................................................................. 111
9.1.1 Viewing the Items Tab .......................................................................................... 111
9.1.2 Viewing the Discounts Tab .................................................................................... 114
9.1.3 Viewing the Shipping and Install Tab .................................................................... 114
9.1.4 Viewing the Billing and Invoice Tab ....................................................................... 115
9.1.5 Viewing the Order History Tab .............................................................................. 117
10 Updating or Cancelling a Submitted Order .............................................................................. 118

Cisco Commerce Order User Guide
Cisco Proprietary © 2020 Cisco and/or its affiliates. All rights reserved.
Last Updated: 17 March 2020 Page 5 of 143
Cisco.com | Privacy Statement | Trademarks Provide Feedback on this Training Resource
10.1 Cancelling the Order ...................................................................................................... 119
10.2 Initiating Change Order .................................................................................................. 119
10.2.1 Changing Attributes on the Items Tab ................................................................... 121
10.2.2 Viewing the Discounts Tab in Change Order ......................................................... 123
10.2.3 Changing Shipping Attributes ................................................................................ 124
10.2.4 Changing Attributes on the Billing Tab .................................................................. 125
10.2.5 Reviewing and Submitting the Change Request ................................................... 126
10.2.6 Discarding Changes .............................................................................................. 126
11 Managing Invoices ..................................................................................................................... 127
11.1 Viewing Invoices ............................................................................................................ 127
11.2 Searching for Invoices ................................................................................................... 128
11.3 Paying Invoices .............................................................................................................. 129
11.3.1 View Activity .......................................................................................................... 131
11.3.2 Searching for Disputes .......................................................................................... 132
11.3.3 Creating a Dispute Request .................................................................................. 135
12 Managing Returns ...................................................................................................................... 137
13 Using the Common Utilities ...................................................................................................... 138
13.1 Searching for an Order................................................................................................... 138
13.1.1 Viewing and Creating a Backlog Report ................................................................ 139
13.1.2 Subscribe and Generate SaaS Backlog Order Reports ......................................... 140
13.2 Share an Order ............................................................................................................... 140
13.3 Deleting an Order ........................................................................................................... 141
13.4 Saving an Order as an Estimate .................................................................................... 142
13.5 Cloning an Order ............................................................................................................ 143
Cisco Commerce Order User Guide
Cisco Proprietary © 2020 Cisco and/or its affiliates. All rights reserved.
Last Updated: 17 March 2020 Page 6 of 143
Cisco.com | Privacy Statement | Trademarks Provide Feedback on this Training Resource
1 Conventions Used in this Document
• Keyboard sequences you press are shown in bold. Example: “Press Tab to move to the next field.”
• Links that display in blue on the Cisco Commerce homepage, whether underlined or not, are
underlined in the user guide. Example: “On the Items tab, click Find Products.”
• Menu or sub-menu paths are separated by a “>”. Example: “Select Intended Use > Managed
Service.”
• Tabs you click have no special formatting. Example: “Click the Items tab.”
• Buttons you click on the screen are shown in bold. Example: “Click Continue.”
• The labels on radio buttons, drop-down menus, checkboxes, and fields that correspond have no
special formatting. Examples: “Click the Yes radio button.” “Click the Service Program drop-down
menu.”
• When there are multiple ways of accomplishing a specific task, preferred methods are highlighted
as follows:
The blue circle around a lower case “i” means reader take note. Notes contain helpful
suggestions or reference to material not covered in the manual.
For example:
Best Practice: Search for an address before creating a new one. Add a shipping
address only if the address is not found.
• Active hyperlinks to other documents or within the same document are shown in blue (RGB: 0, 0,
255) and underlined. Example: “Additional information is available in the Getting Started with Cisco
Commerce User Guide.” or “See Creating an Order for more details.”
• In sections describing a process that starts from somewhere other than the Cisco Commerce
homepage, a process flow indicates how to get there. For example, you add products to a quote in
the Quote tab, which means you would have already created the quote through the Deals & Quotes
header tab. The following illustration would therefore display at the beginning of the Add Products to
a Quote section.
Cisco
Commerce
Deals & Quotes
Header Tab
Create Quote Quote Tab
Cisco Commerce Order User Guide
Cisco Proprietary © 2020 Cisco and/or its affiliates. All rights reserved.
Last Updated: 17 March 2020 Page 7 of 143
Cisco.com | Privacy Statement | Trademarks Provide Feedback on this Training Resource
1.1 Order Support Enhancements
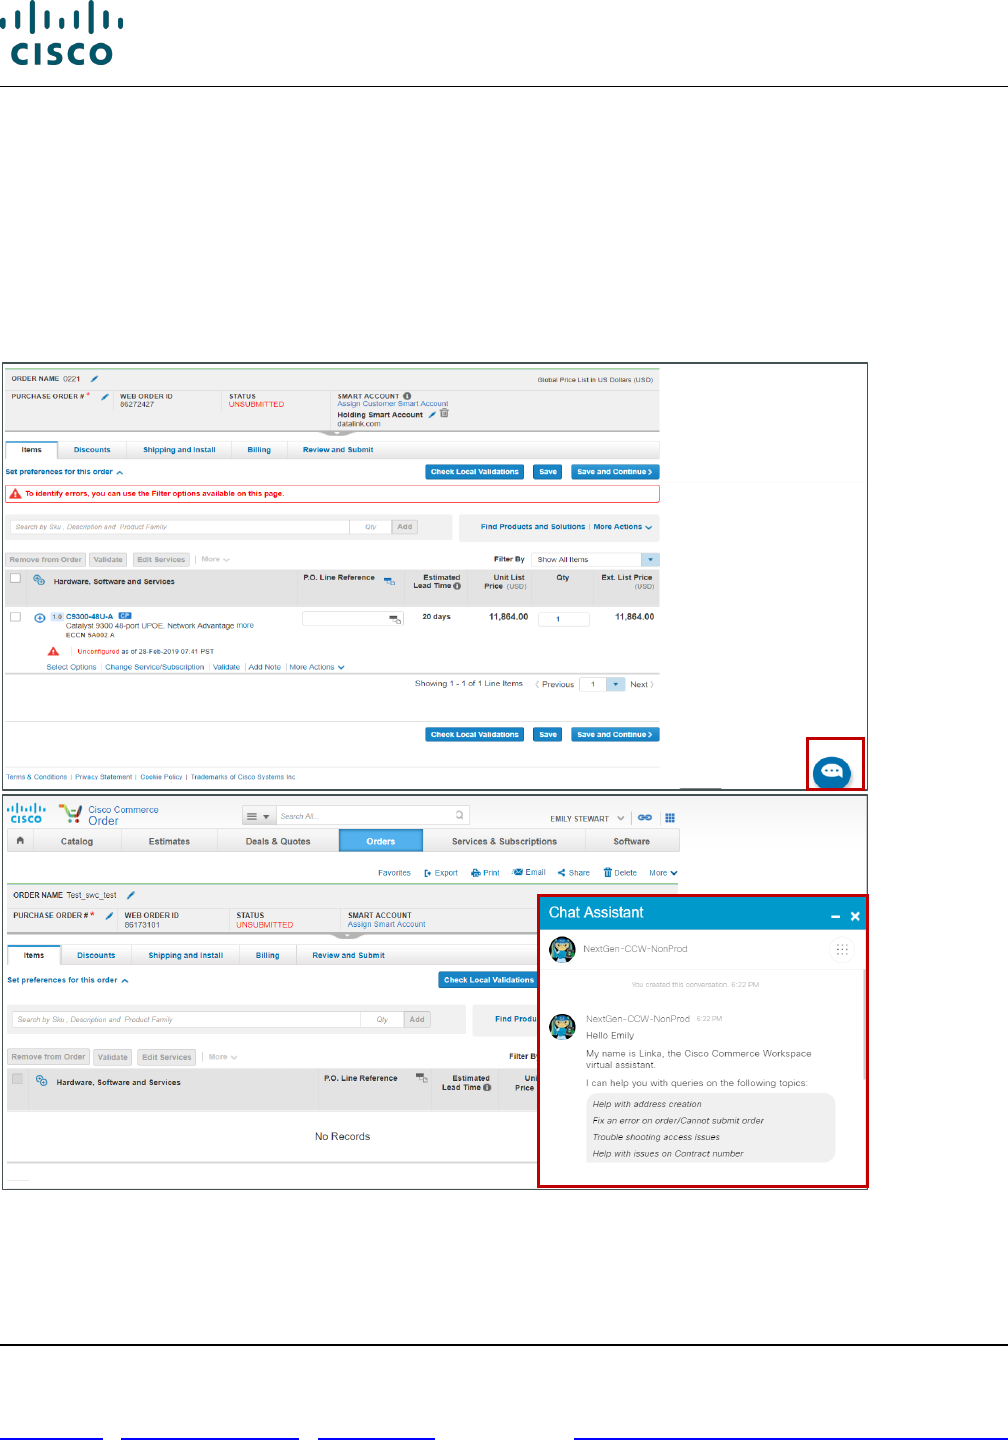
1.1.1 ChatBot
ChatBot is an AI assistant in core CCW. ChatBot is a quick customer service interaction that has the
intelligence to answer some of the more commonly asked Order related questions. It will specifically
support order validations, order search, discount validations, contract validations and order status.
ChatBot will be integrated with CCW Change Management documents to provide answers to frequently
asked questions, and direct users to right documentation based on the context.

Cisco Commerce Order User Guide
Cisco Proprietary © 2020 Cisco and/or its affiliates. All rights reserved.
Last Updated: 17 March 2020 Page 8 of 143
Cisco.com | Privacy Statement | Trademarks Provide Feedback on this Training Resource
1.2 Special Processes or Programs
1.2.1 Global Customer Support Process
The Global Customer Support Process (GCSP) is a program to allow a Partner to submit an Order for a
specific End Customer where the Partner does not have physical presence in that country. Partners
must register for GCSP and meet qualification criteria. End Users must be registered as GCSP eligible.
Once registered, Partners can then sell to a limited set of Cisco Global End Users without obtaining
Global Certification. The GCSP eligibility page is available here. Please contact the GCSP Program
Team at GCSP@cisco.com with any questions.
During Order creation, CCW will check if the Partner and End Customer have GCSP eligibility, then
check if the Partner is using the correct Bill To ID (BID) aligned with the GCSP registered End User.
When mismatches are discovered along the way, warning messages will display as you build the
Order.
PRO TIP: As you create your Order and select your Billing Information and End Customer, select “Copy
Address to: Shipping Address”, then select Continue. When a GCSP mismatch is present, the warning
GCSP message will appear and you will not be able to continue until it is resolved. If you do not select
Copy Address to Shipping Address then you do select continue, the warning message will appear later
in follow on tabs and to resolve it you will have to recreate the Order.
Cisco Commerce Order User Guide
Cisco Proprietary © 2020 Cisco and/or its affiliates. All rights reserved.
Last Updated: 17 March 2020 Page 9 of 143
Cisco.com | Privacy Statement | Trademarks Provide Feedback on this Training Resource
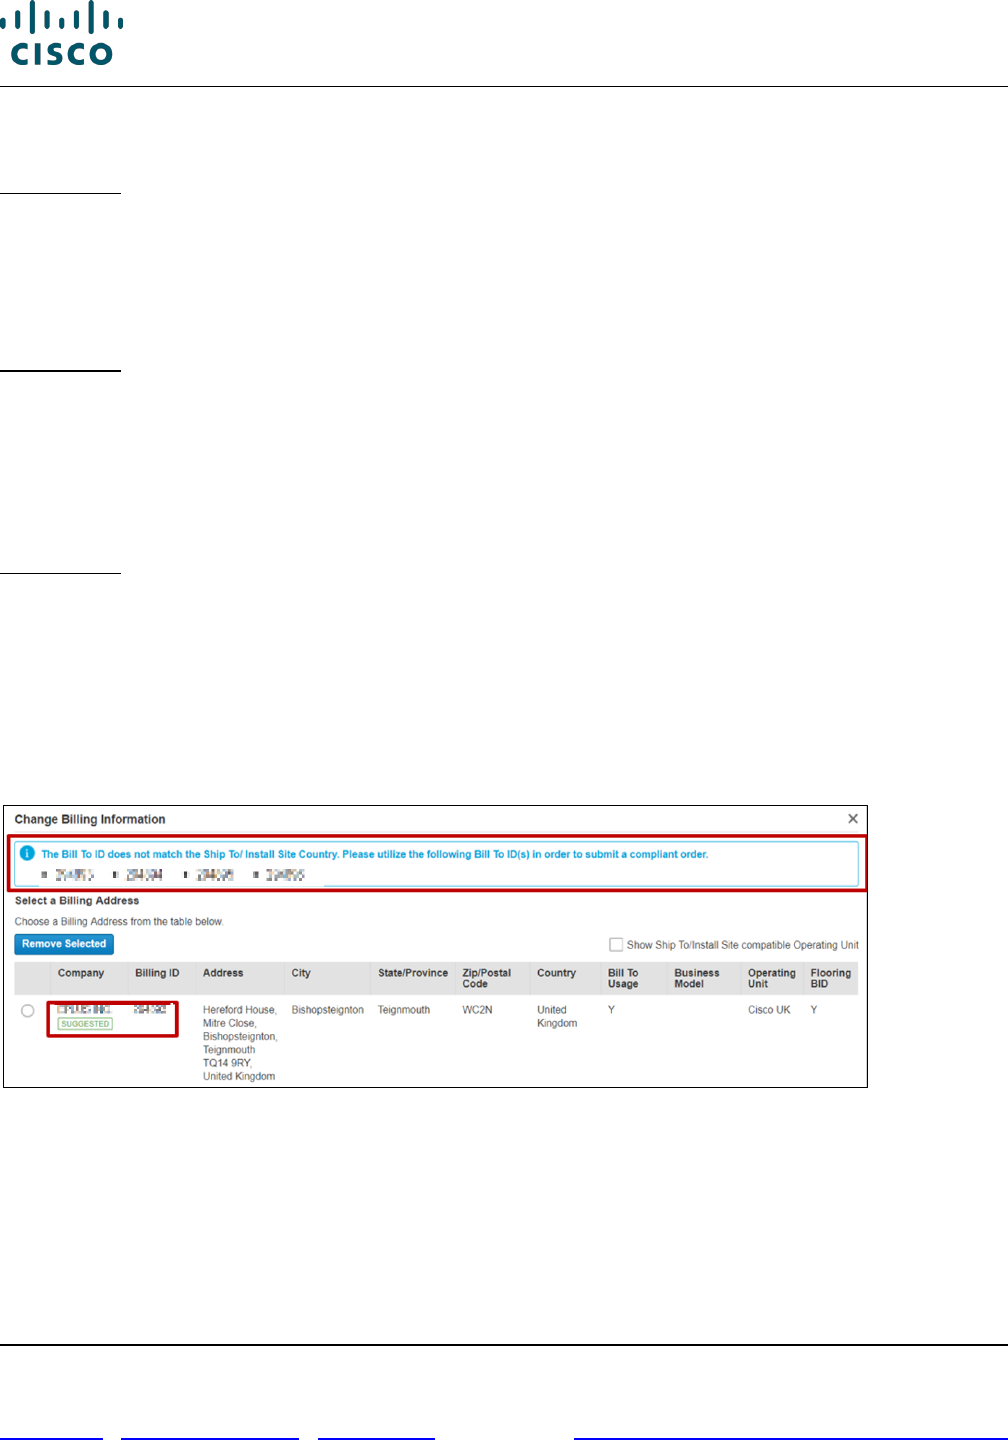
You will see three main warning messages regarding GCSP as follows.
Use Case 1:
When the customer is GCSP eligible, and CCW knows of a different Bill To ID to use, you will see this
warning message:
“The Bill to Id does not match the Ship to/Install Site Country. Please utilize the following Bill to IDs in
order to submit a compliant order (Bill to IDs will be listed within this message)”
Use Case 2:
When the customer is GCSP eligible, and CCW cannot locate a good Bill To ID to suggest, you will see
this warning message:
“Please use a Bill-To-ID with [Insert Operating Unit] Operating Unit. If you do not have a Bill To ID with
this Operating Unit, please work with your Partner Account Manager or contact our Customer Partner
Support Team.”
Use Case 3:
When the customer is GCSP eligible, and CCW identifies the Ship To Country/Install Site Country as
not yet approved for GCSP, you will see this message:
“Ship To /Install Site Country is not yet approved as GCSP. Please contact Partner Account Manager
for the Ship To/Install Site Country approval.”
When you change the Billing Information, you will see a “Suggested” icon to guide you to more
appropriate Bill Tos.
Cisco Commerce Order User Guide
Cisco Proprietary © 2020 Cisco and/or its affiliates. All rights reserved.
Last Updated: 17 March 2020 Page 10 of 143
Cisco.com | Privacy Statement | Trademarks Provide Feedback on this Training Resource
2 Cisco Commerce Ordering Workflow
To understand how the ordering module fits within Cisco Commerce and the Cisco sales structure, see
the Getting Started with Cisco Commerce User Guide.
Using the ordering functionality, you can create standalone orders, place orders created from quotes,
order services for previously purchased products, renew software subscriptions, view and pay invoices,
view the status of orders, and manage returns.
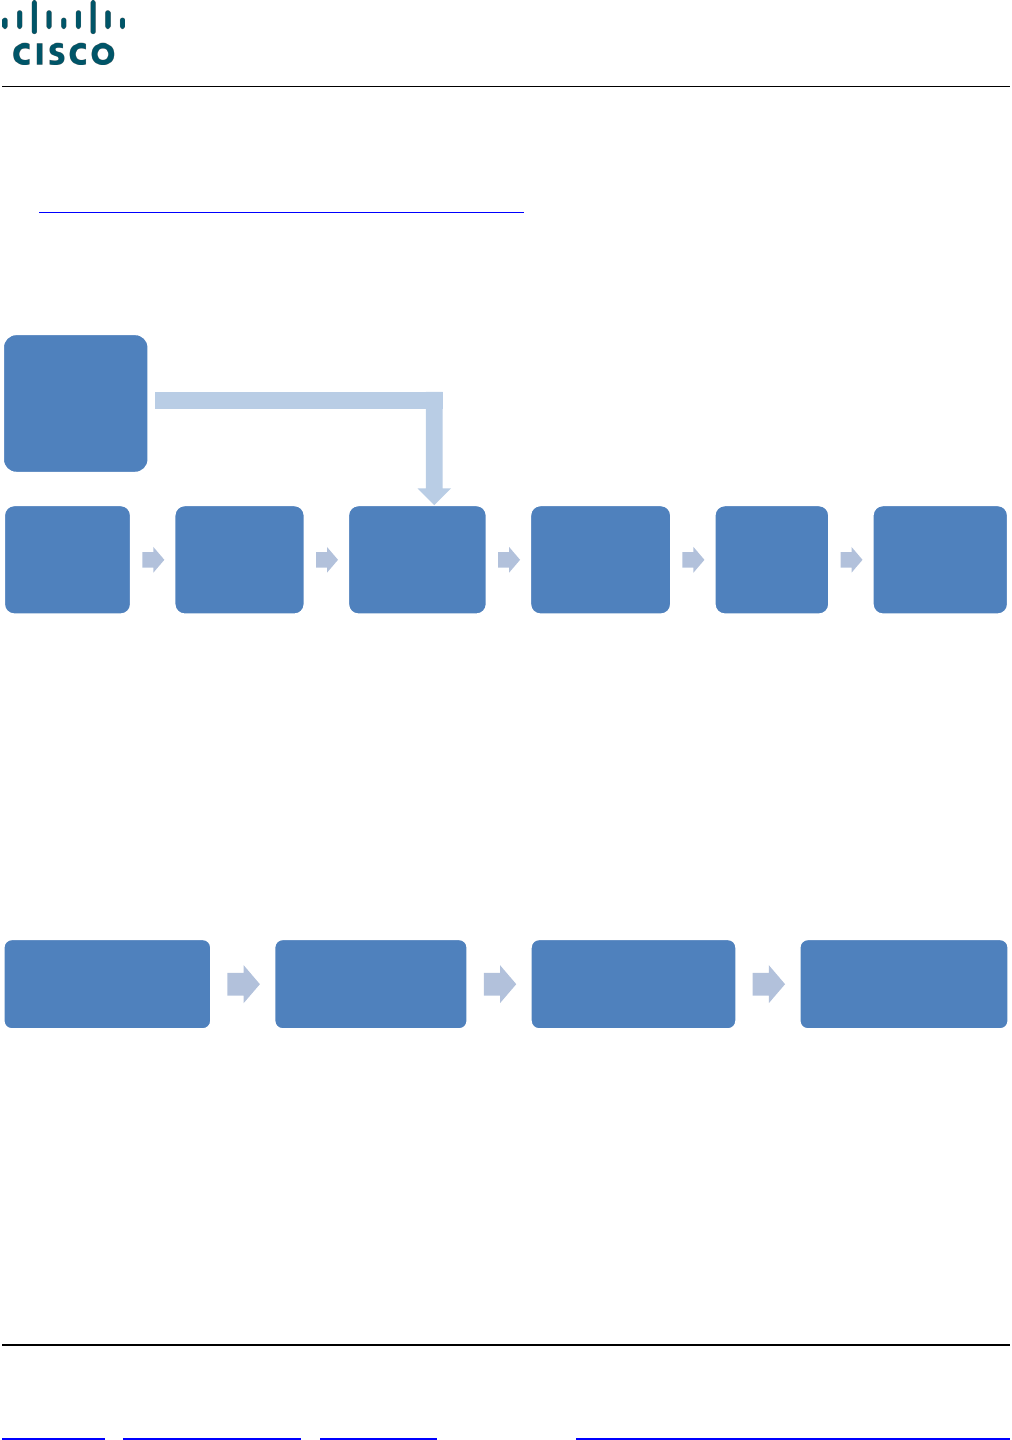
Ordering Workflow
2.1 Creating an Order
In Cisco Commerce, you can create an order in two ways:
1. Converting an approved quote to an order referencing a deal ID
To convert a quote to an order, you must have access to the quote before you can convert it to an
order. You can either:
• Convert a quote that you created to an order or,
• Convert a quote that was shared with you to an order using the Access Key
Convert Quote to an Order
Create a
Standalone
Order
Select
Approved
Quote to
Convert
Create the
order
Enter
Mandatory
Information
Select or
Add Items
to Order
Finalize
Order
Review and
Submit the
Order
Create a Quote
Cisco Commerce
Homepage
Orders Tab >
Create Order with
a Deal ID
Convert the Quote
to an Order
Cisco Commerce Order User Guide
Cisco Proprietary © 2020 Cisco and/or its affiliates. All rights reserved.
Last Updated: 17 March 2020 Page 11 of 143
Cisco.com | Privacy Statement | Trademarks Provide Feedback on this Training Resource
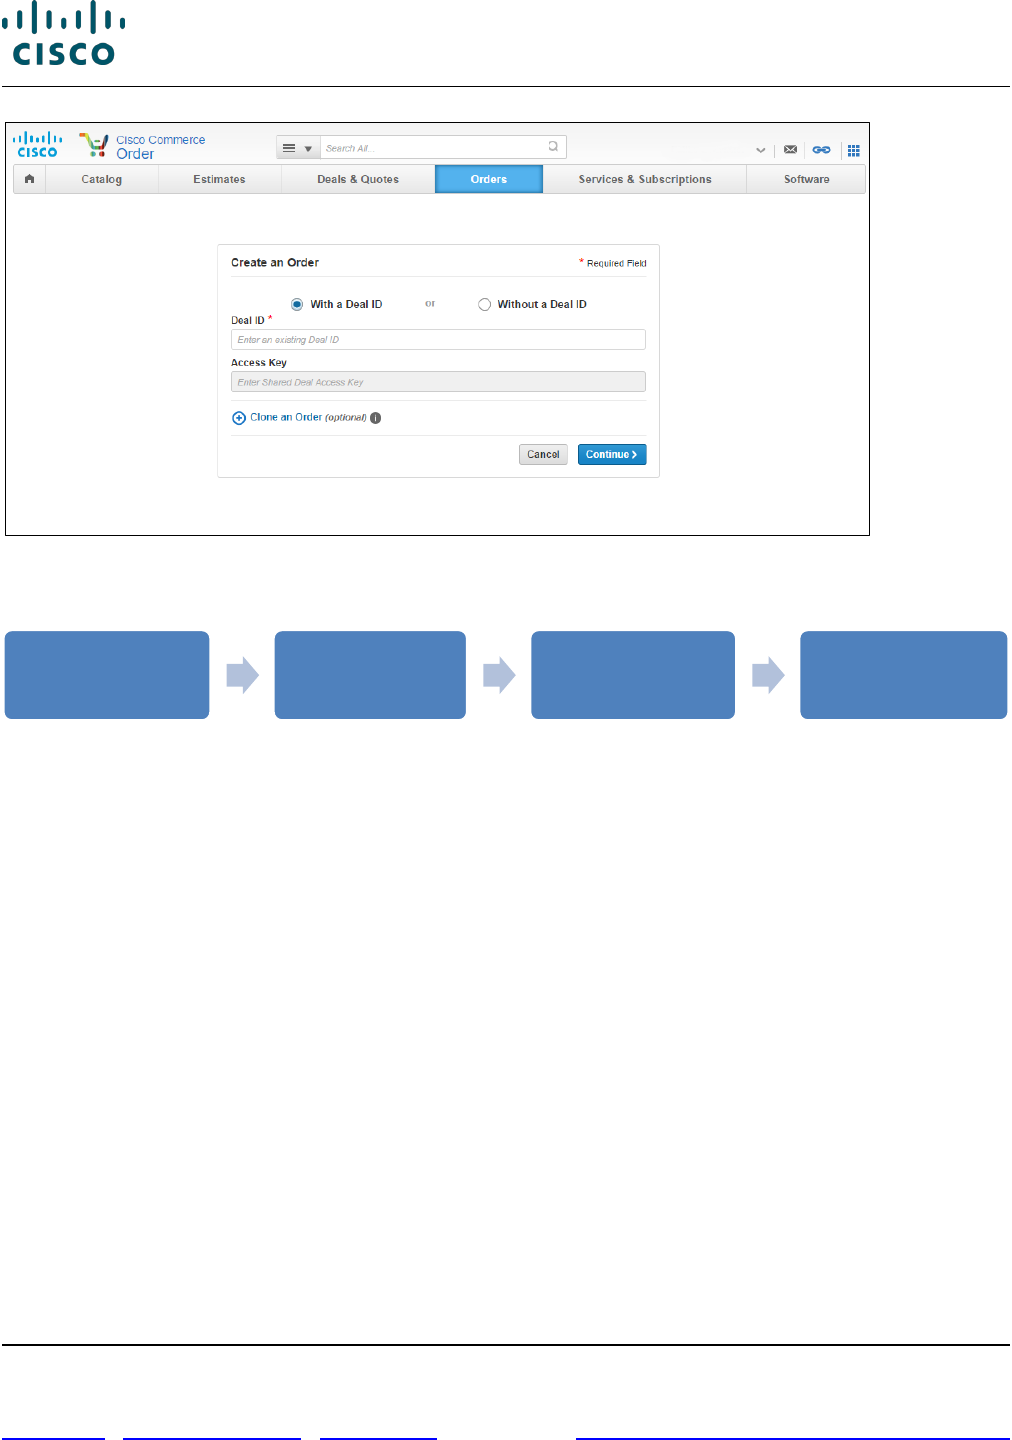
Cisco Commerce: Create Order Page
2. Creating a standalone order with no reference to a deal ID
Create a Standalone Order
To create a standalone order, you do not need to have a deal ID. You can:
• Create standalone new order
• Clone (or copy) a new order from an existing order
Once the order is created and the order number or name and the web order ID number display at the
top of the page, the process for populating order details and submission is the same no matter which of
the above methods was used to begin.
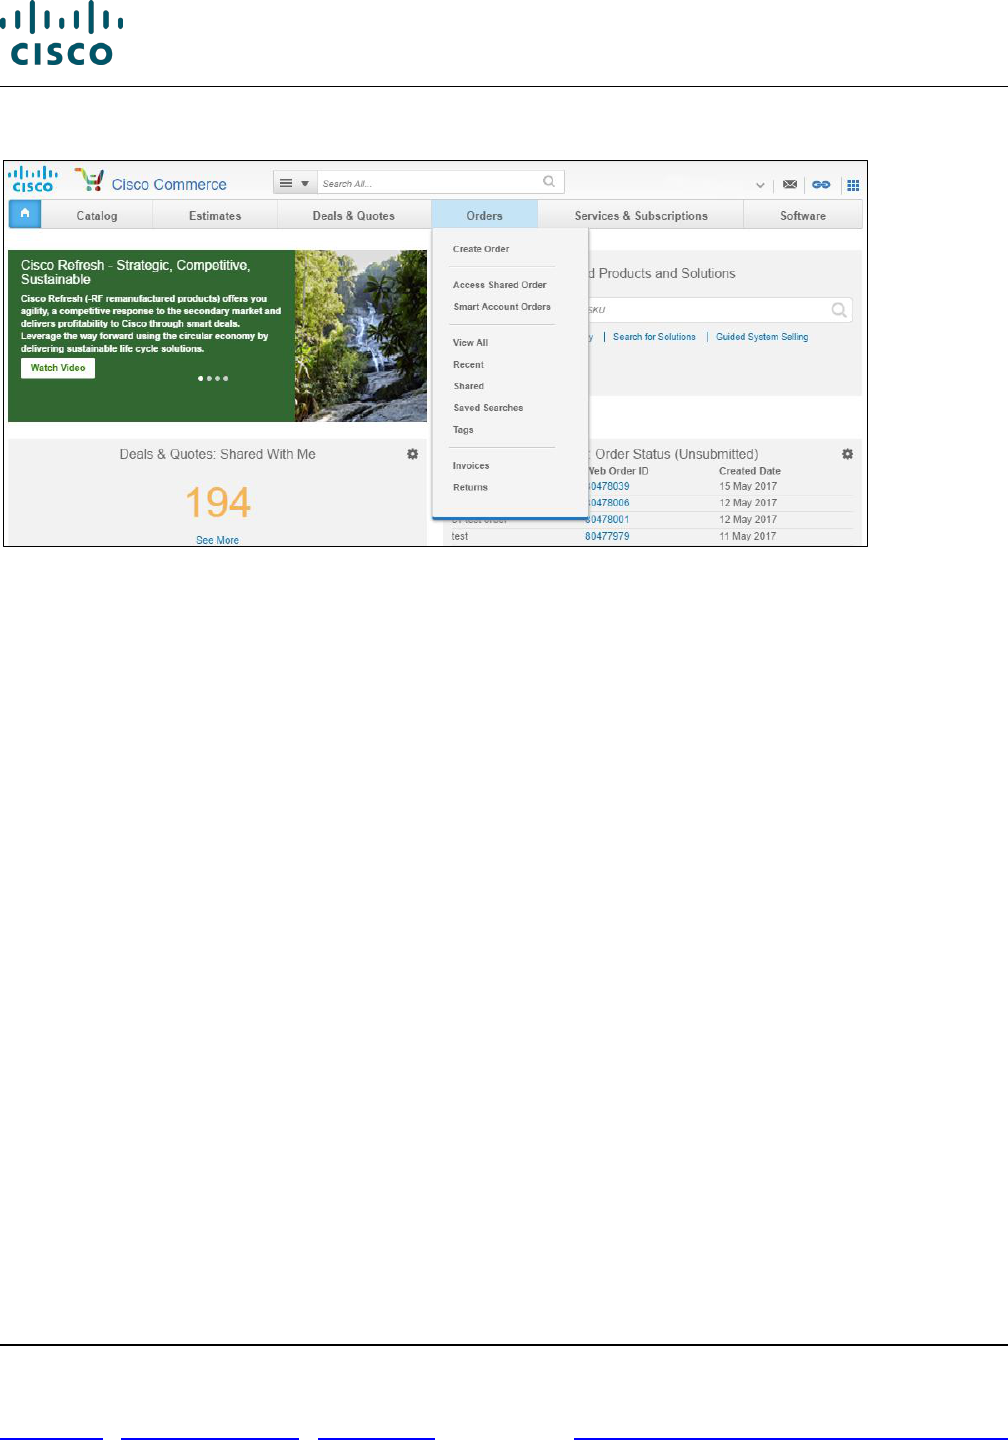
2.2 Using Options on the Orders Tab
In Cisco Commerce, the Orders tab allows you to:
• Create an order
• Access shared order
• View Smart Account Orders
• View all or specific orders
• Tag orders
• Manage invoices
Cisco Commerce
Homepage
Orders tab >
Create Order
Order without a
Deal ID
Create the order
Cisco Commerce Order User Guide
Cisco Proprietary © 2020 Cisco and/or its affiliates. All rights reserved.
Last Updated: 17 March 2020 Page 12 of 143
Cisco.com | Privacy Statement | Trademarks Provide Feedback on this Training Resource
• Manage returns
Options on the Orders Tab
2.3 Limited Access to the Orders Tab
Depending on your access levels, you may have limited view of the Cisco Commerce Orders tab.
2.3.1 Partner-initiated Customer Access
Partners who have a Partner-initiated Customer Access (PICA) contract with Cisco can grant PICA
user privileges to end customers, providing limited access to Cisco Commerce.
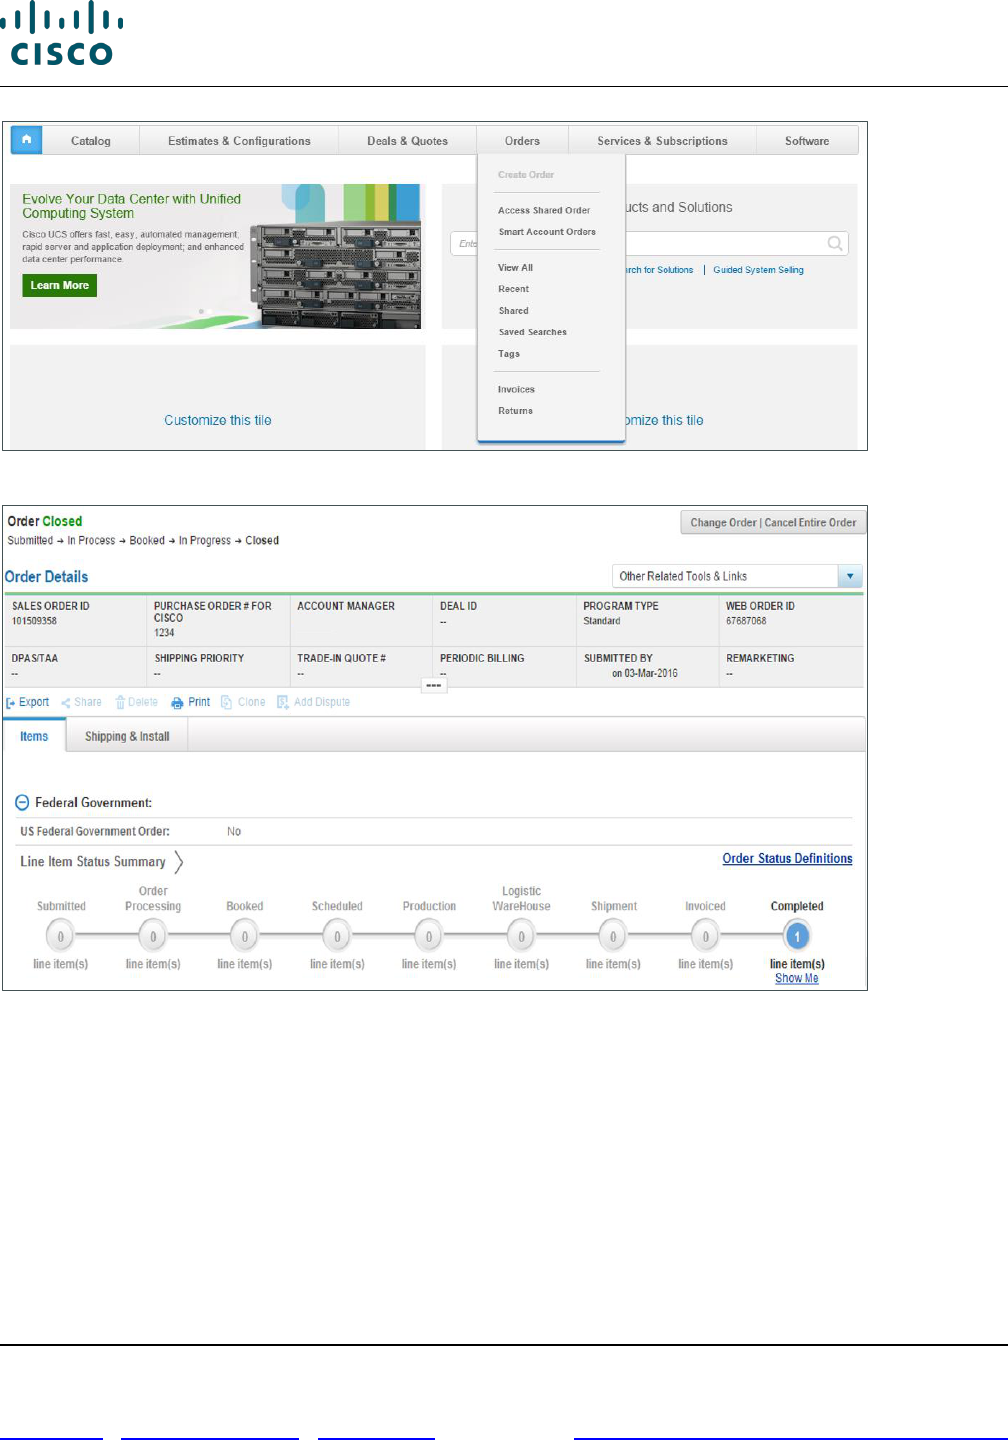
If you are a PICA user, you will have access to limited functionality in the orders tab. You can:
• View submitted orders (no unsubmitted orders display)
• View only the Items and Shipping & Install tabs in an order
• Use only the export and print common utilities for an order, other options will display but are not
enabled
Cisco Commerce Order User Guide
Cisco Proprietary © 2020 Cisco and/or its affiliates. All rights reserved.
Last Updated: 17 March 2020 Page 13 of 143
Cisco.com | Privacy Statement | Trademarks Provide Feedback on this Training Resource
PICA View of Orders Tab
PICA View of an Order
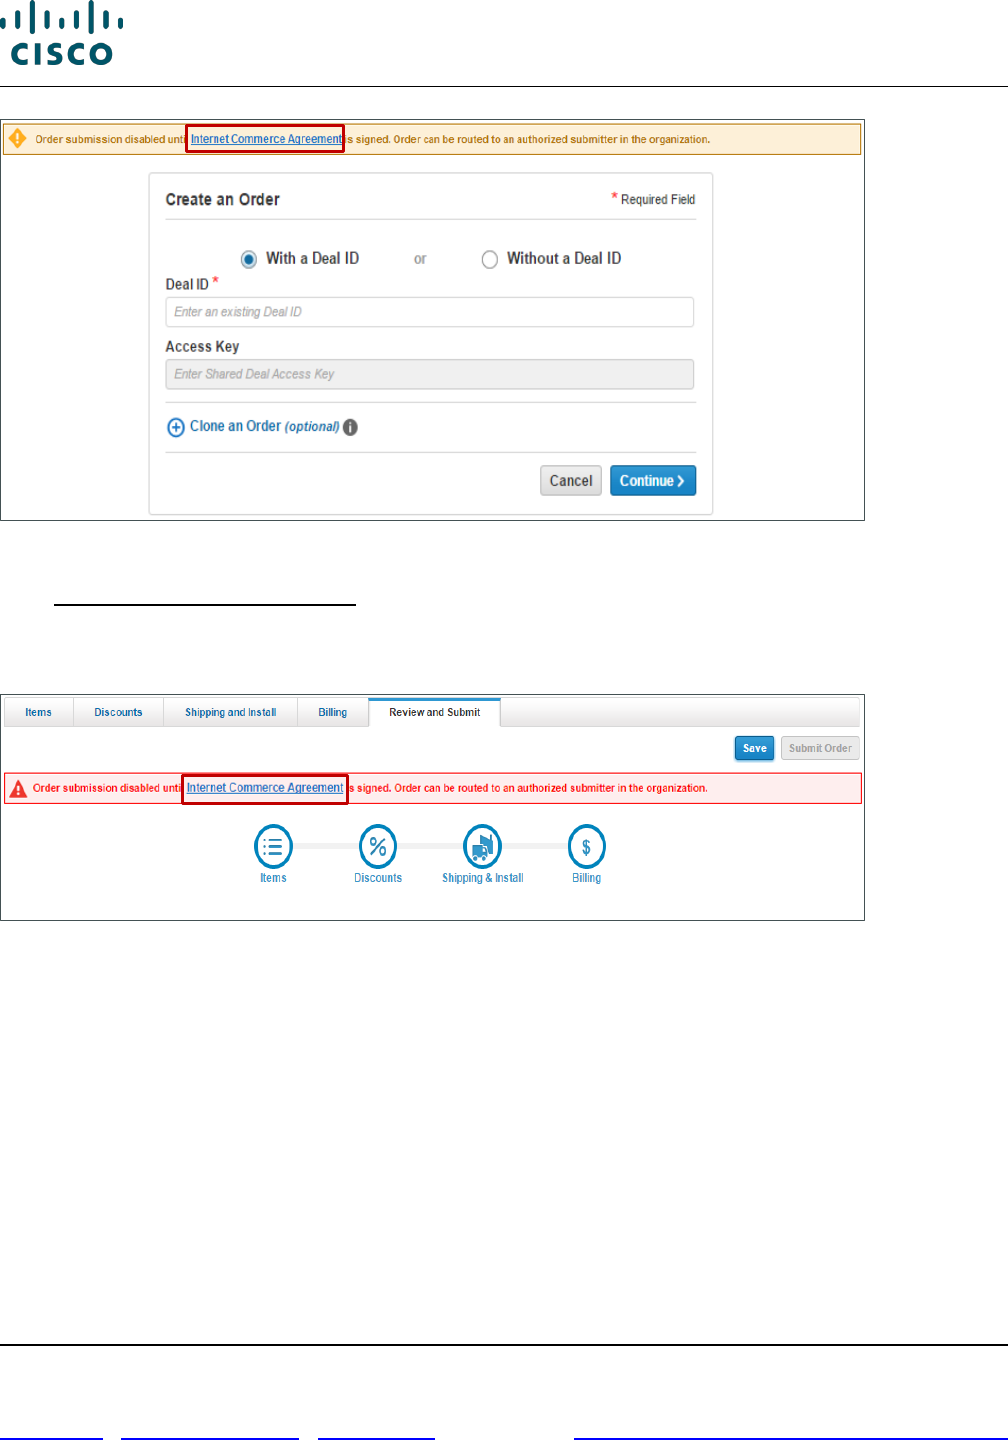
2.3.2 Internet Commerce Agreement
If you have not signed an Internet Commerce Agreement (ICA), you will not be authorized to submit
orders and will receive notification in both:
• Order Initiation page
• Review and Submit tab
It is possible to create an order without signing the ICA, however the Submit Order button will be
disabled on the Review and Submit tab.
Cisco Commerce Order User Guide
Cisco Proprietary © 2020 Cisco and/or its affiliates. All rights reserved.
Last Updated: 17 March 2020 Page 14 of 143
Cisco.com | Privacy Statement | Trademarks Provide Feedback on this Training Resource
Cisco Commerce: Order Initiation Page
Click Internet Commerce Agreement in the message to access the ICA website. Select your country
and click-to-accept the ICA. A case will be routed to Customer Service who will verify your access level
with your company’s admin before modifying your access level, so that you can submit orders in Cisco
Commerce.
Cisco Commerce Orders Page: Review and Submit Tab
Cisco Commerce Order User Guide
Cisco Proprietary © 2020 Cisco and/or its affiliates. All rights reserved.
Last Updated: 17 March 2020 Page 15 of 143
Cisco.com | Privacy Statement | Trademarks Provide Feedback on this Training Resource
3 Converting Quotes to Orders
You can convert your own quote to an order or a quote shared with you to an order. When you do so,
standard contractual discounts will apply to the order and any nonstandard ones that are approved on
the deal or quote.
If you make any changes to the items on the order, and need any nonstandard discount, then make the
appropriate changes to the quote and submit it for re-approval. A quote to be converted to an order
would need be resubmitted for approval in the following cases:
• If a configuration is replaced with another configuration in the same product family, but the new
price exceed variance limits
• If a configuration is replaced with another configuration outside of the original product family
• If services are added or removed from another family, other than what was originally approved
• If parts of the configuration is added or removed, other than in the original product family
• If needed parts are removed and defined as a spare
Best Practice: Accessing the Order page with a deal ID is recommended for deals
associated with a Reusable Nonstandard Discount (RNSD) without trade-in products.
If you are placing product lease orders, select Lease and enter or select the Cisco
Capital bill-to address and contact on the Quote tab. Product and service lease order
capabilities are available through Cisco Commerce Orders tab.
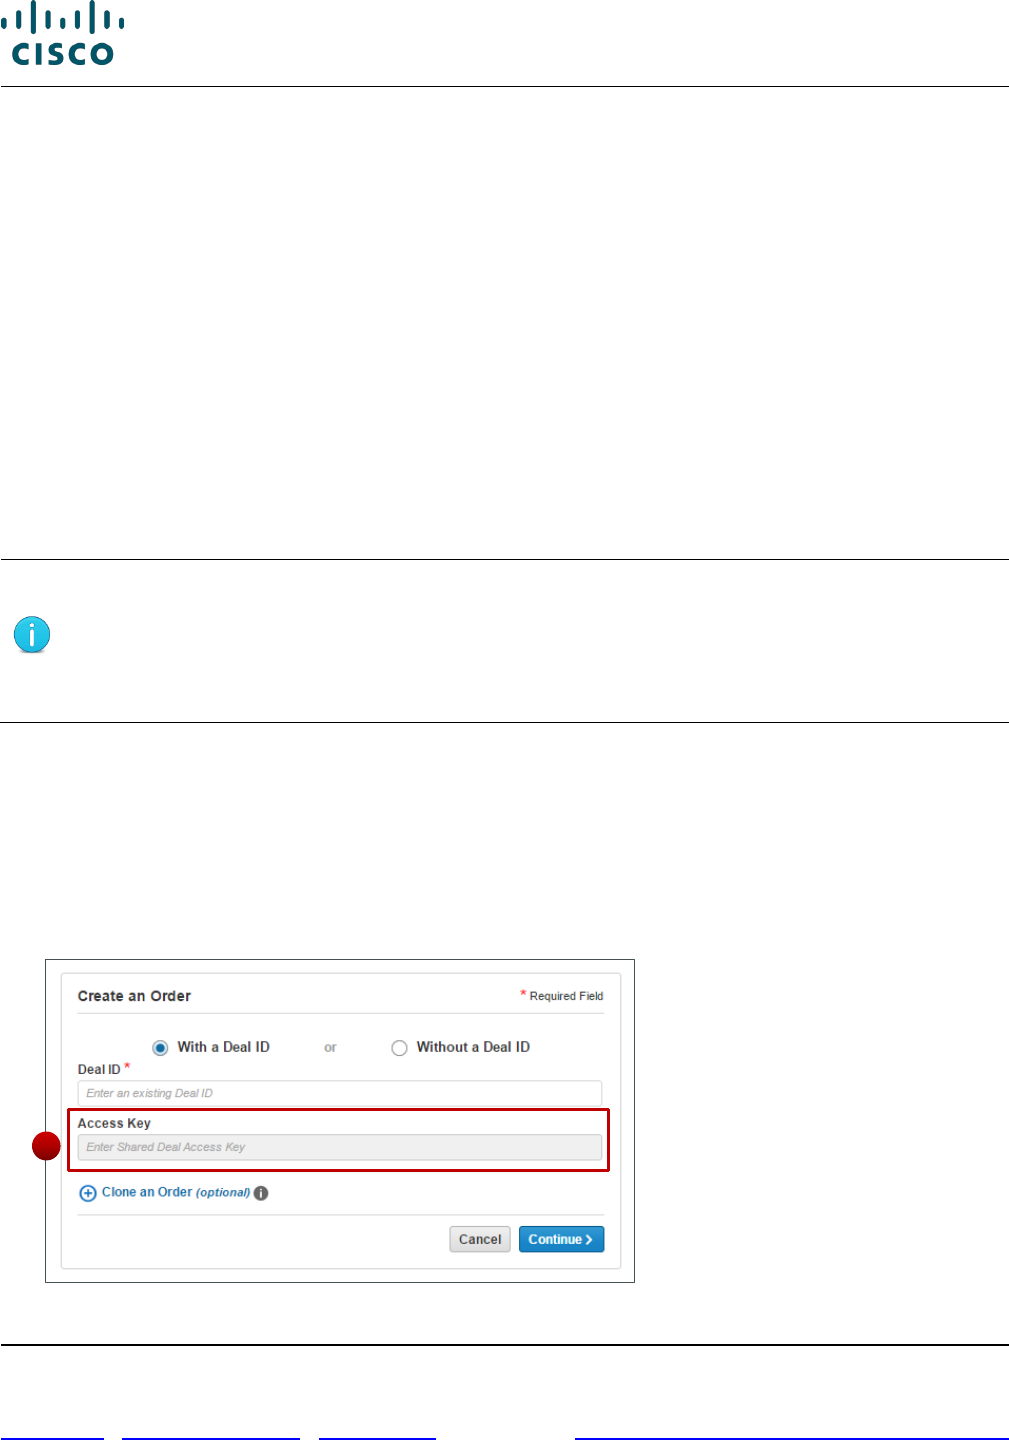
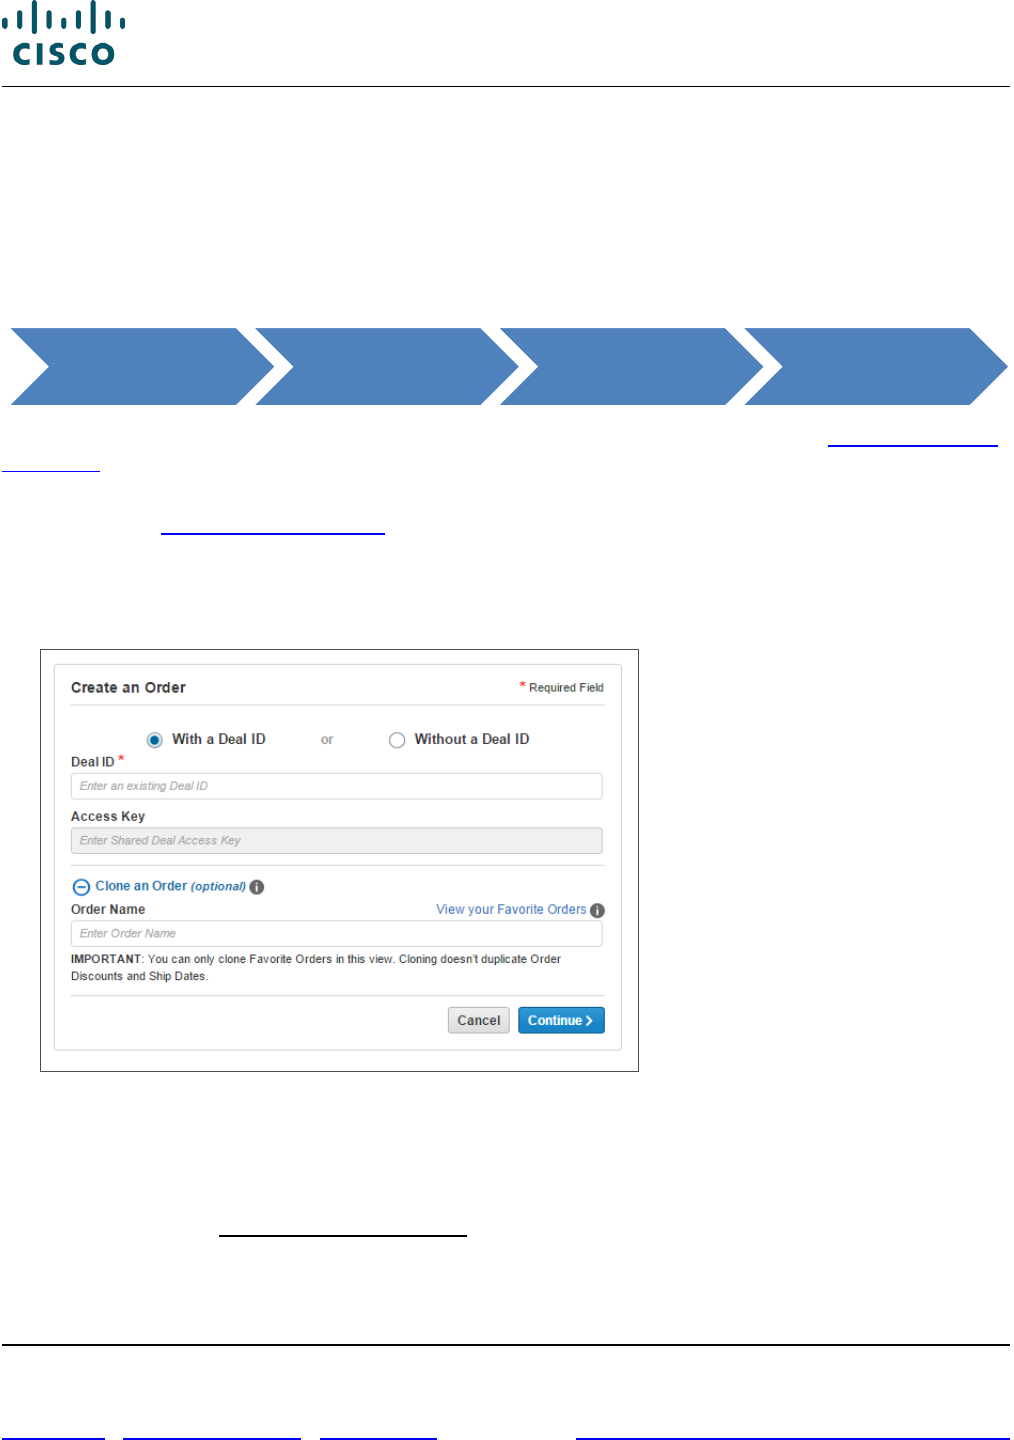
3.1 Converting a Quote to an Order
To create an order from an approved quote, complete the following steps:
1. From the Cisco Commerce homepage, click Create Order from the Orders tab. The Order with
Deal ID radio button is selected by default.
2. Click the Deal ID field and enter the appropriate deal ID.
3. If the deal was shared with you, enter the Access Key information from the email notification.
Create an Order Page: With a Deal ID
3
Cisco Commerce Order User Guide
Cisco Proprietary © 2020 Cisco and/or its affiliates. All rights reserved.
Last Updated: 17 March 2020 Page 16 of 143
Cisco.com | Privacy Statement | Trademarks Provide Feedback on this Training Resource
4. Click Continue. The Order Initiation page populates with information from the quote, such as
Intended Use and Billing Address.
5. Continue through the steps in the following document sections as applicable, beginning with
Verifying the Order Initiation Page Details.
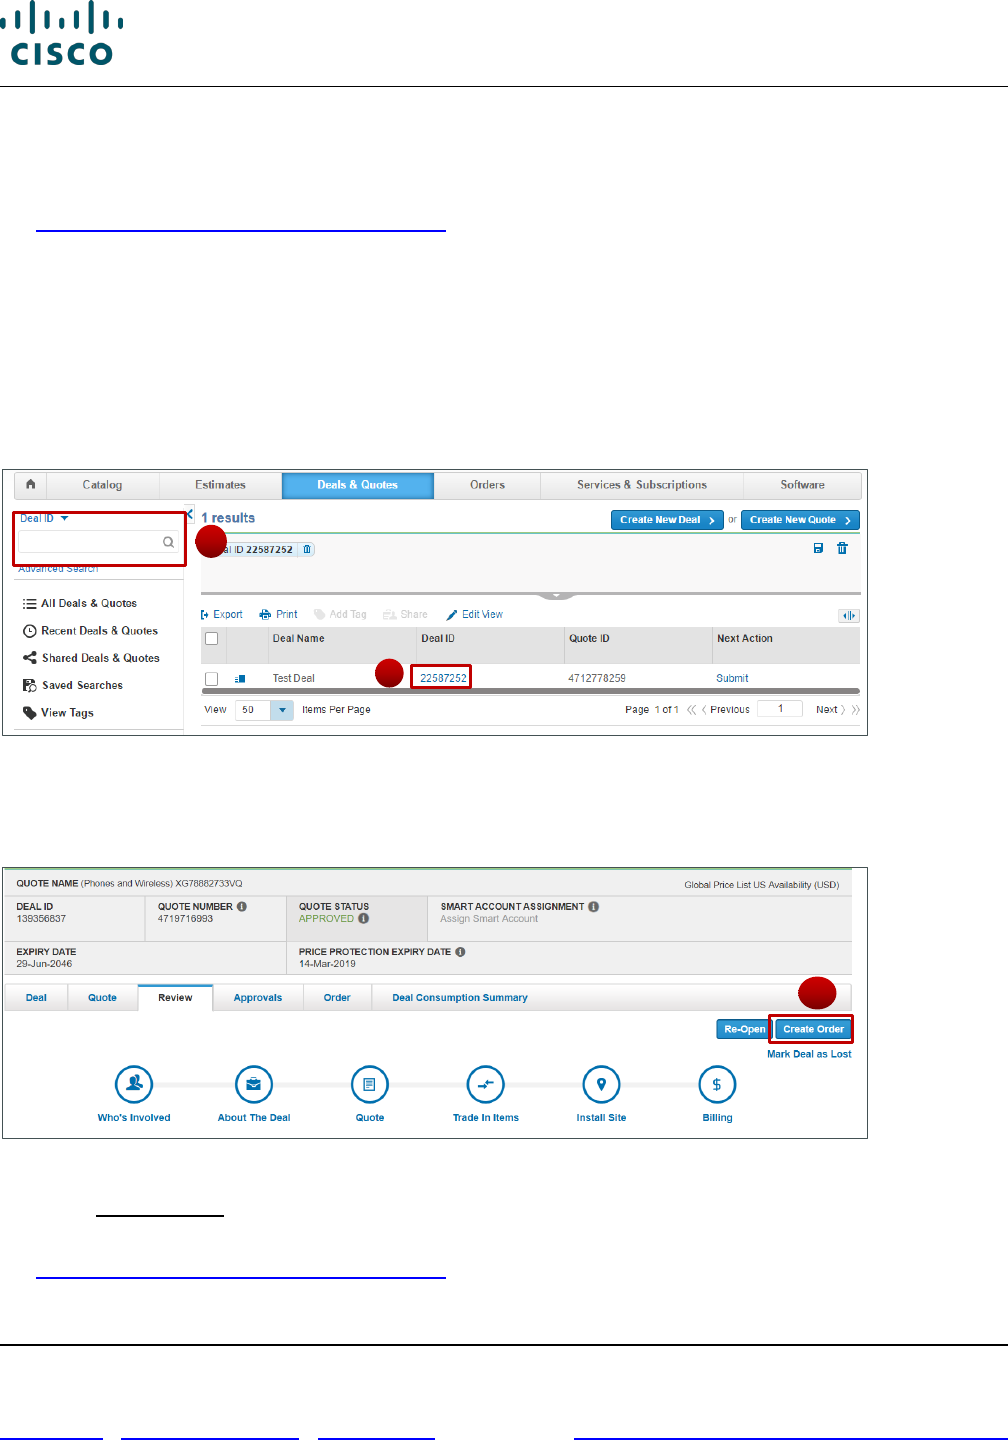
3.2 Converting to Order from Within a Quote
You can also convert a quote to an order from within a quote itself.
To search for a deal that you have access to, complete the following steps:
1. From the Deals & Quotes tab, perform a basic search using any of the search parameters by
clicking the drop-down arrow.
In this instance, enter the Deal ID in the search field.
Deals & Quotes Tab: Search Using a Deal ID
2. Click Search. The deal displays.
3. Click the numerical deal ID link. The deal displays in the Review tab.
Quote Page
4. Click Create Order from this quote. The Order Initiation page displays.
5. Continue through the steps in the following document sections as applicable, beginning with
Verifying the Order Initiation Page Details.
1
3
4
Cisco Commerce Order User Guide
Cisco Proprietary © 2020 Cisco and/or its affiliates. All rights reserved.
Last Updated: 17 March 2020 Page 17 of 143
Cisco.com | Privacy Statement | Trademarks Provide Feedback on this Training Resource
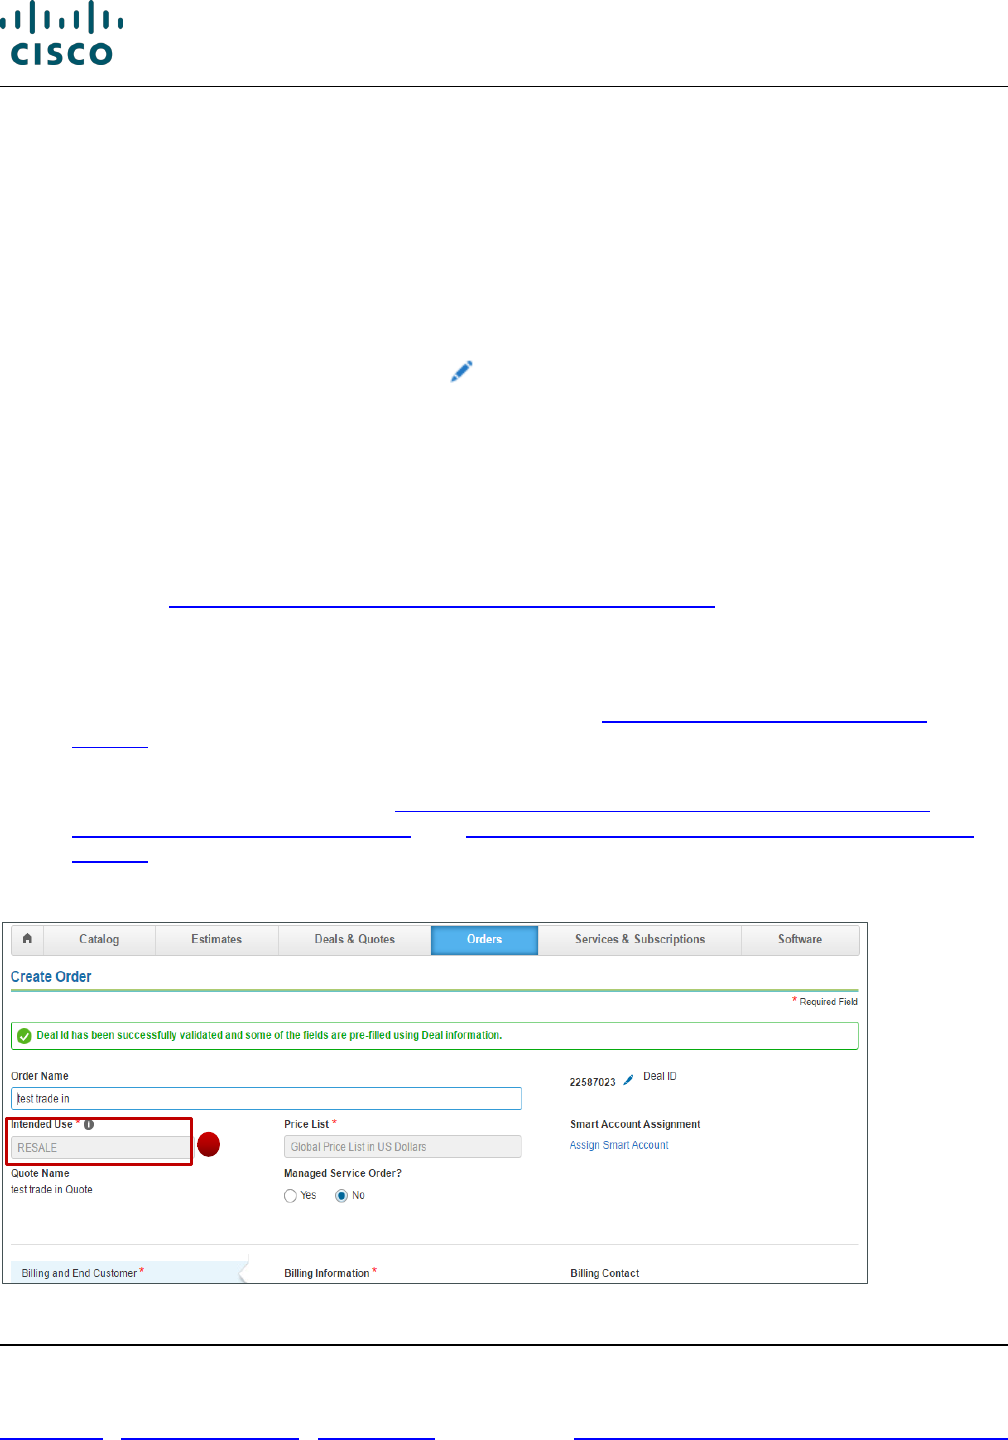
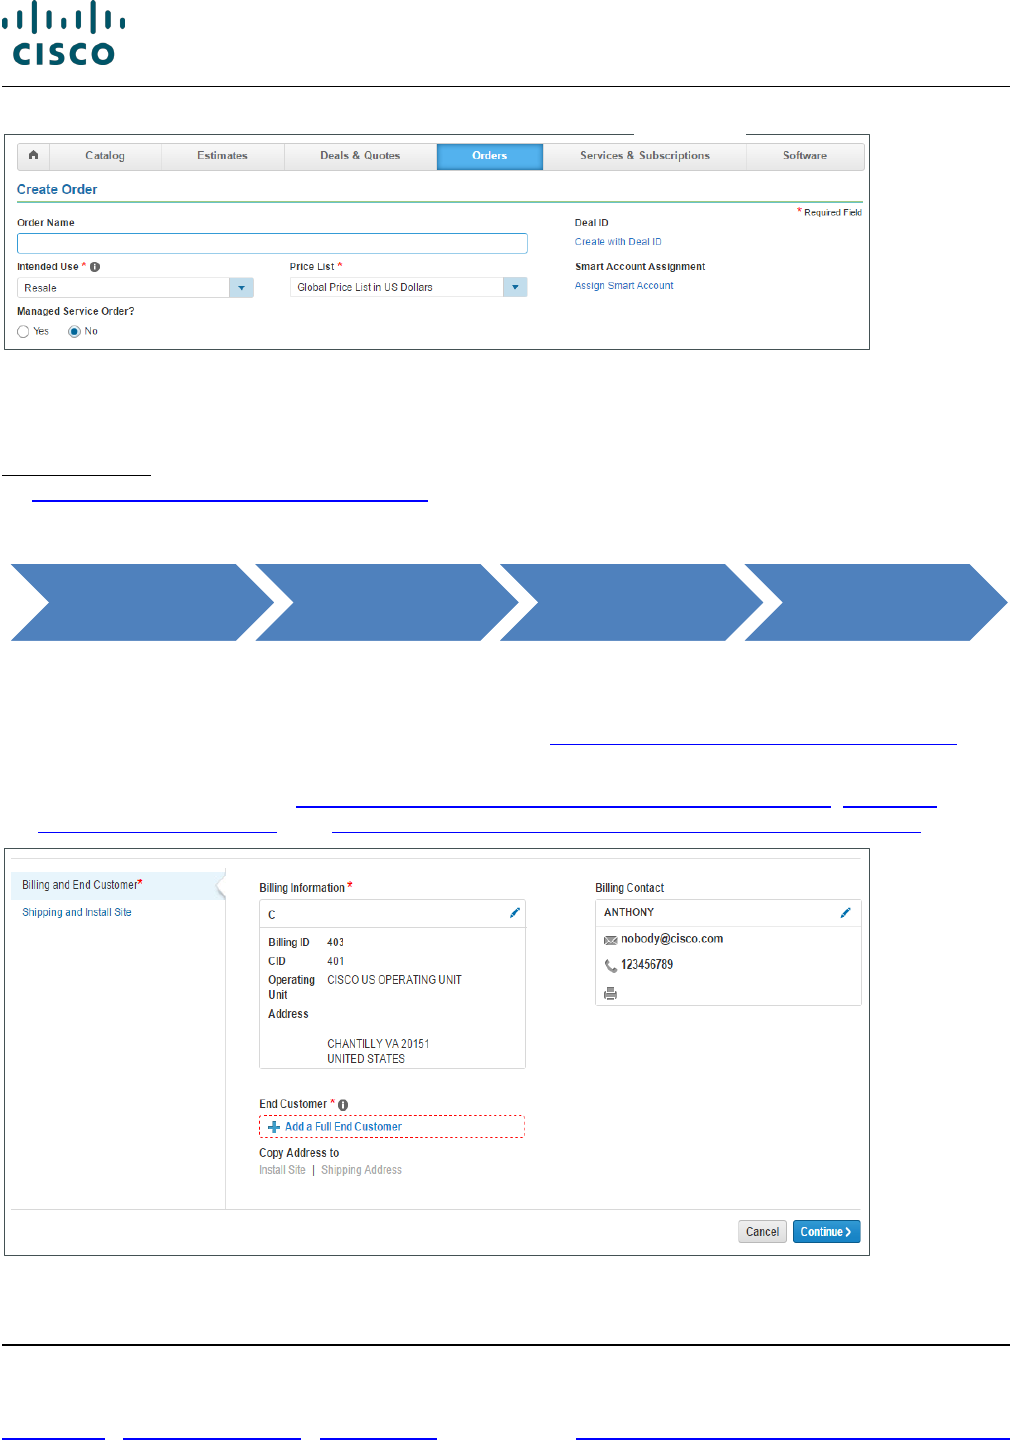
3.3 Verifying the Order Initiation Page Details
Verify the information that populates automatically on the Order Initiation page. If any information needs
to be changed, complete the steps in the following sections.
3.3.1 Deal ID, Order Name, Price List, Intended Use, and Managed Service
Order
The order populates with some of the information from the quote itself. Follow the given steps to
change editable options:
1. To change the deal ID, click the edit icon ( ) )next to it. The initial Create Order Page displays to
enter the new deal ID.
2. Click Continue.
3. To add or change the order name, click the Order Name field and enter the appropriate information.
This is optional.
4. The intended use defaults from the quote and is not editable.
5. To mark this order as a managed service order and indicate a managed service contractual
provider, see Managed Service Order from a Managed Service Quote.
6. Other fields on this page:
• The price list defaults from the quote and is not editable.
• To add or change the billing address and contact, see Changing the Billing Address and
Contact.
• The shipping address, install site, and end customer address sections are not editable until the
billing address is populated. See Adding or Changing the Shipping Address and Contact,
Adding or Changing the Install Site, and Adding or Changing the End Customer Address and
Contact.
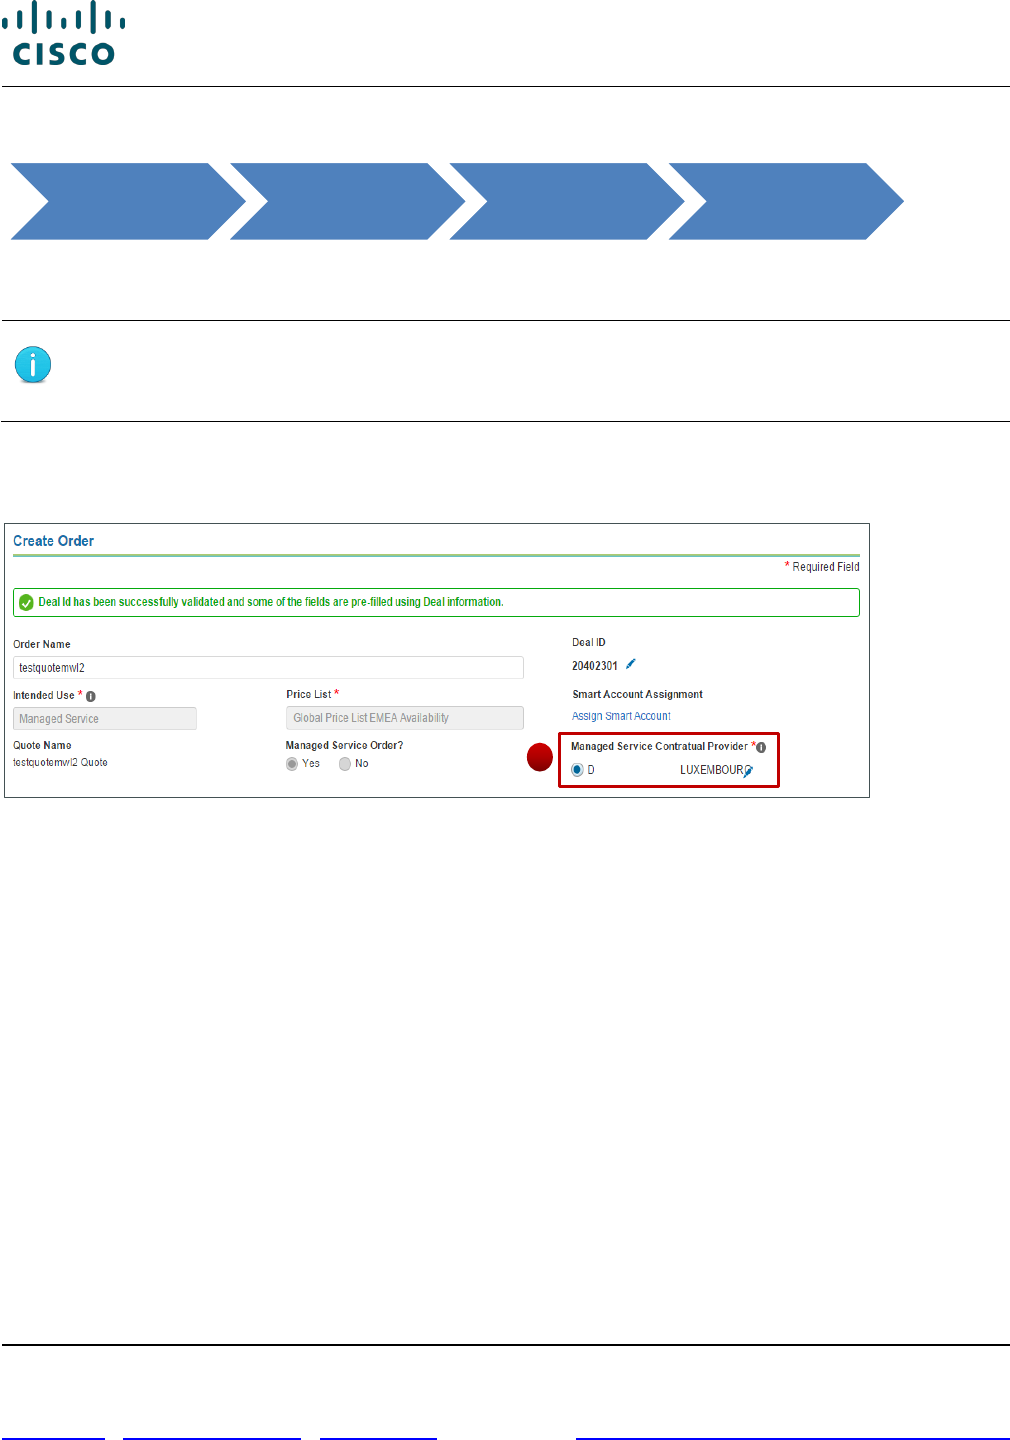
Create Order Page Details
4
Cisco Commerce Order User Guide
Cisco Proprietary © 2020 Cisco and/or its affiliates. All rights reserved.
Last Updated: 17 March 2020 Page 18 of 143
Cisco.com | Privacy Statement | Trademarks Provide Feedback on this Training Resource
3.3.1.1 Managed Service Order from a Managed Service Quote
You can create a managed service order by converting a managed service quote. Managed service
indicates that the deployment of your order is proactively monitored by a contractual provider.
Note: You can only view and change the contractual provider information for
managed service orders on this page. This information will not display anywhere else
in the Cisco Commerce Order process when a quote is converted to an order.
If Managed Service is the deal category on the original quote that is being converted, the Managed
Service Order radio button will default to Yes and cannot be changed. The information about
contractual provider defaults from the quote.
Create Order Page: Managed Service Order
3.3.1.1.1 Changing the Managed Service Provider
The Managed Service (MS) Contractual Provider is the entity that provides the proactive monitoring of
the deployment. To learn more about the Managed Service Contractual Provider, click the more
information icon.
If a different Managed Service Provider is required, complete the following steps:
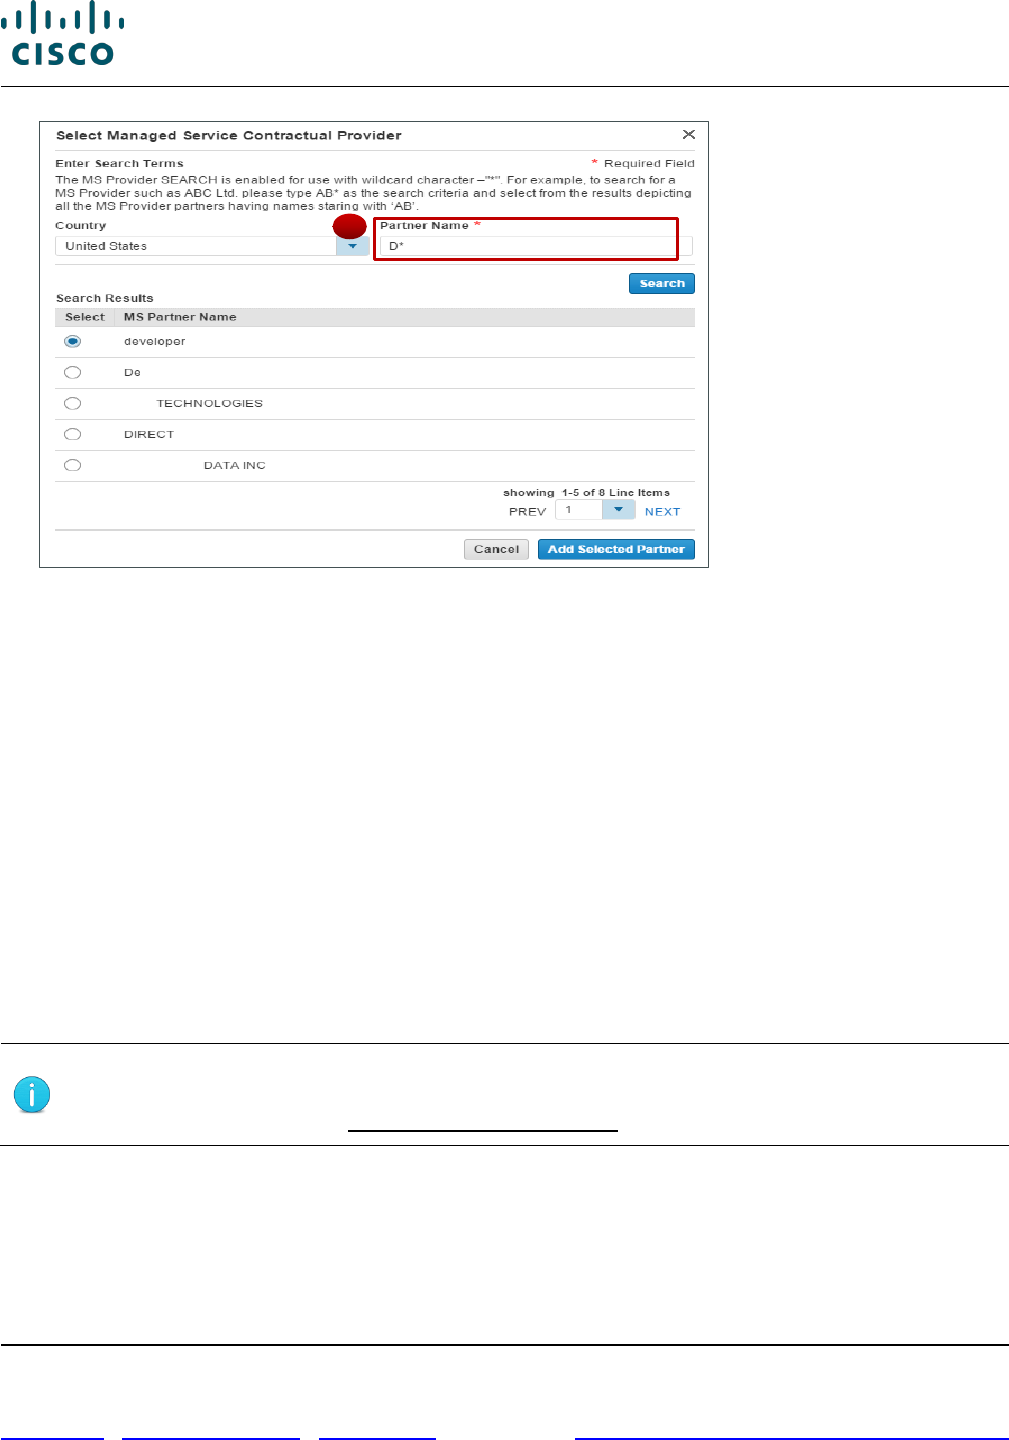
1. From the Create Order page, click the pencil icon under Managed Service Contractual Provider.
The Select Managed Service Contractual Provider dialog box displays.
Cisco
Commerce
Convert Quote
to Order
Create Order
Create Order
Page
1
Cisco Commerce Order User Guide
Cisco Proprietary © 2020 Cisco and/or its affiliates. All rights reserved.
Last Updated: 17 March 2020 Page 19 of 143
Cisco.com | Privacy Statement | Trademarks Provide Feedback on this Training Resource
Select Managed Service Contractual Provider Dialog Box
2. Click the Country drop-down arrow to display the list of countries. Select the appropriate country. It
is not a mandatory field, but narrows the search results to select the provider in the indicated
country. Some providers may operate in multiple regions.
3. Enter a partial or complete provider name in the Partner Name field and click Search.
To search using a wild card, enter a few letters of the partner name followed by an asterisk, for
example, AB*. All partners with a name that begin with AB display in the Search Results section.
4. Click the radio button for the appropriate MS partner from the Search Results section. Once a radio
button is selected, the Add Selected Partner button activates.
5. Click Add Selected Partner to continue. The order details get updated to reflect the changed
provider.
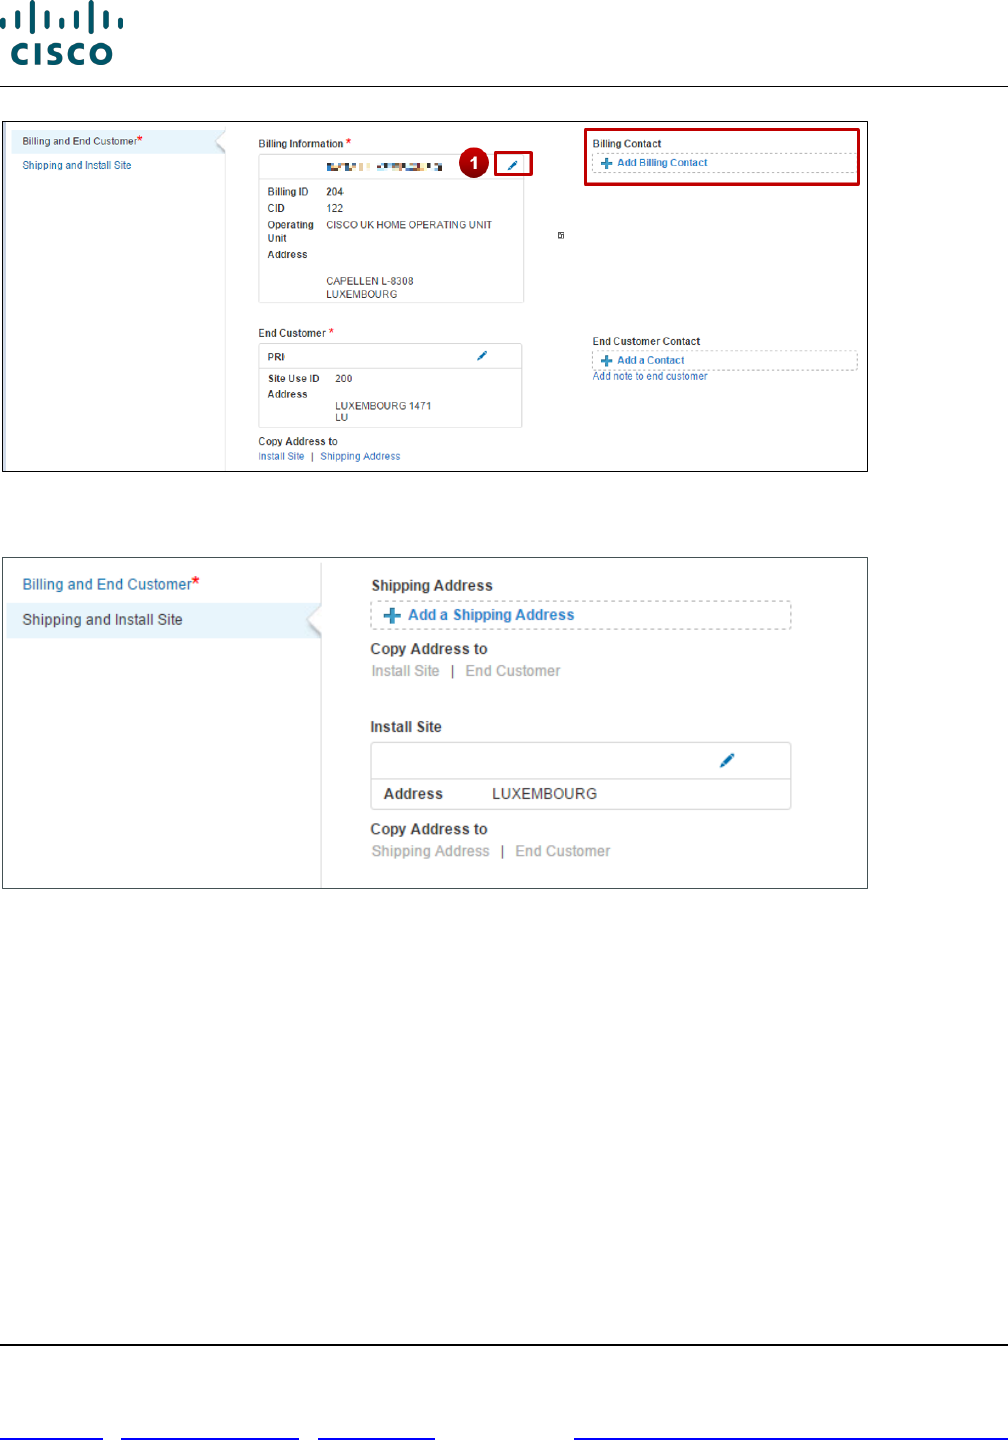
3.3.2 Address Information Section
You can update the Billing, Shipping, Install Site, and End Customer addresses and contacts in this
section. There are separate tabs for the Billing and End Customer, and Shipping and Install Site.
Note: Once the addresses are populated, additional links become active for copying
addresses. For example, you can copy the shipping address to install site address
section by clicking Copy Address to Install Site below shipping address section.
If the billing information was provided in the quote, the Billing Address and Contact populates
automatically.
If not, then add the billing address and contact.
3
Cisco Commerce Order User Guide
Cisco Proprietary © 2020 Cisco and/or its affiliates. All rights reserved.
Last Updated: 17 March 2020 Page 20 of 143
Cisco.com | Privacy Statement | Trademarks Provide Feedback on this Training Resource
Create Order Page: Address Information Section, Billing and End Customer
Create Order Page: Address Information Section, Shipping and Install Site
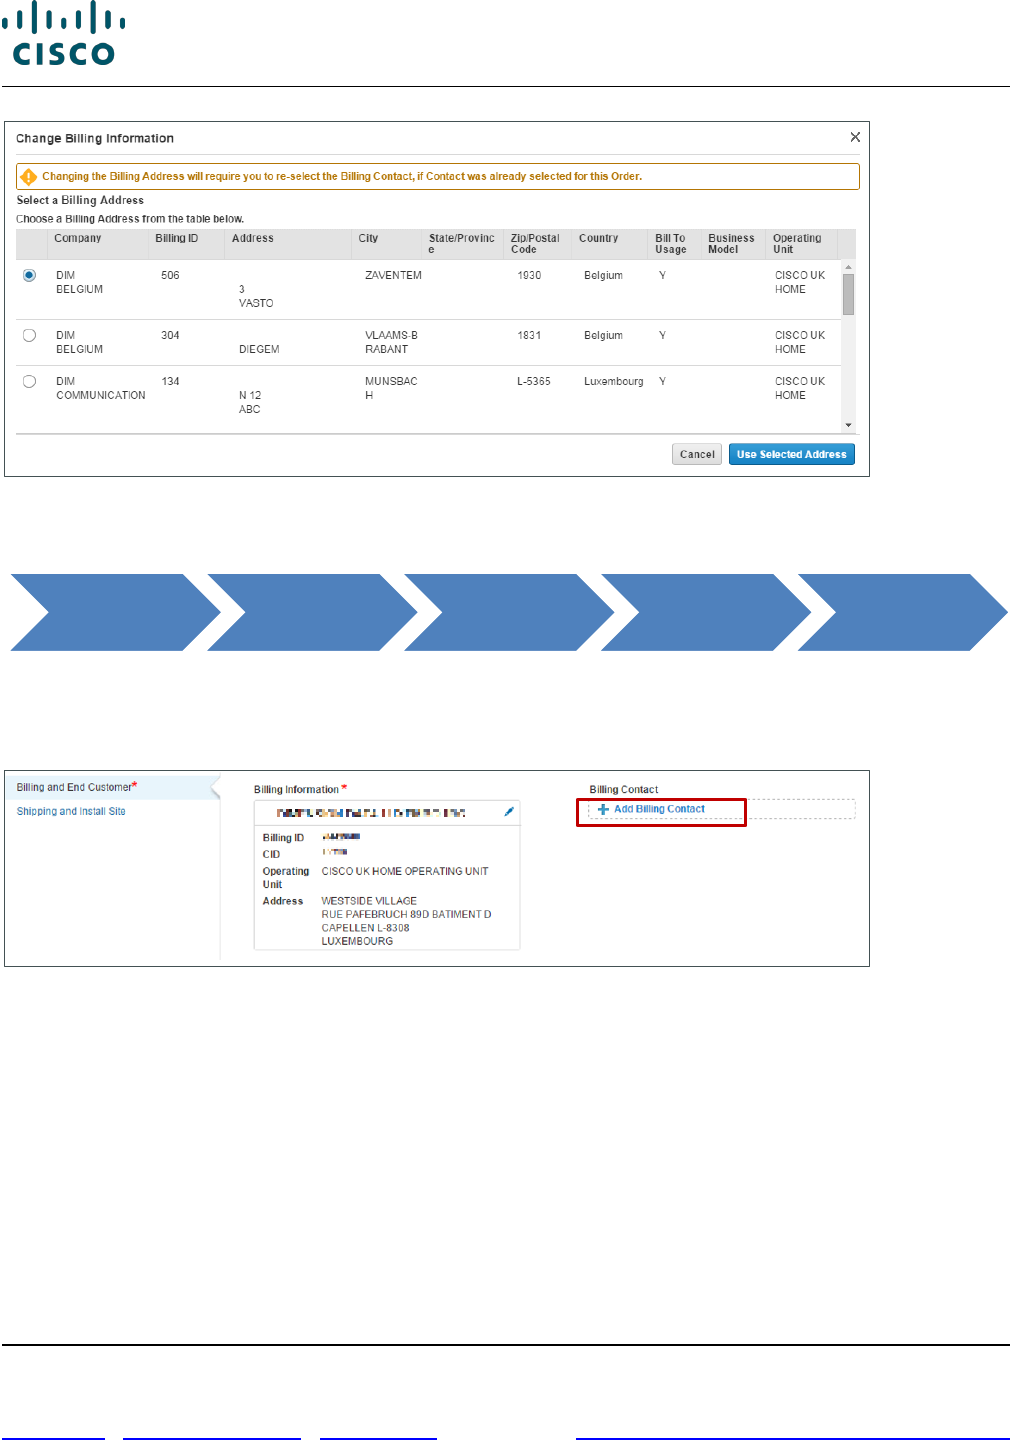
3.3.2.1 Changing the Billing Address and Contact
The billing address populates automatically from the quote. To change the billing address, complete the
following steps:
1. From the Create Order page, click the edit icon under Billing Information. The Change Billing
Information dialog box displays.
2. Click the appropriate radio button and click Use Selected Address. The dialog box closes and the
Order Initiation page displays.
3. To add a contact, see the next section.
Cisco Commerce Order User Guide
Cisco Proprietary © 2020 Cisco and/or its affiliates. All rights reserved.
Last Updated: 17 March 2020 Page 21 of 143
Cisco.com | Privacy Statement | Trademarks Provide Feedback on this Training Resource
Change Billing Information Dialog Box
3.3.2.1.1 Adding, Editing, or Creating a Contact
The billing contact automatically populates from the quote. Click the edit icon to change the contact.
If the contact is not provided in the quote, then you can add the contact in the Billing Address and
Contact section. From the Order Initiation page, click Add Billing Contact.
Billing Address and Contact Section: Add a Contact
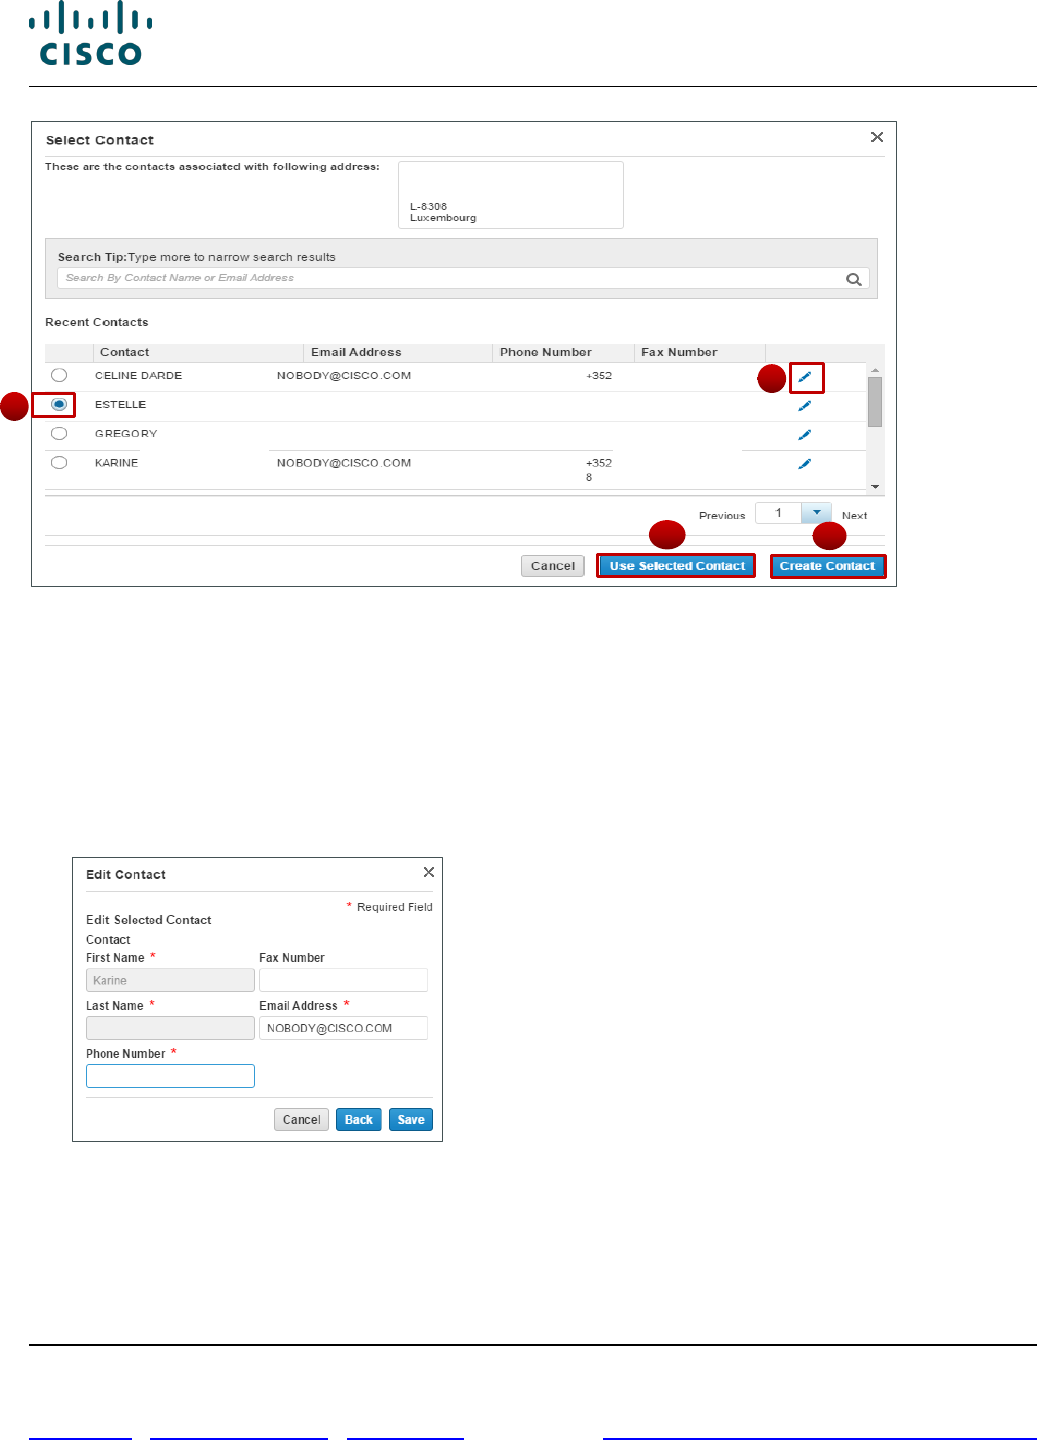
The Select Contact dialog box displays. From the Selected Contact dialog box, you can associate a
listed contact, edit a listed contact, or add a new contact.
Cisco
Commerce
Convert
Quote to
Order
Create Order
Create Order
Page
Price List
and Address
Information
Cisco Commerce Order User Guide
Cisco Proprietary © 2020 Cisco and/or its affiliates. All rights reserved.
Last Updated: 17 March 2020 Page 22 of 143
Cisco.com | Privacy Statement | Trademarks Provide Feedback on this Training Resource
Order Initiation Page: Add Contact – Select Contact Dialog Box
1. To associate a contact with the displayed address, click the radio button next to the appropriate
contact and click Use Selected Contact.
2. To edit existing contact information, click the edit icon in the appropriate contact line. The Edit
Contact dialog box displays.
• Click the appropriate field(s) and edit as necessary. Only the phone number, fax number, and
email address can be changed. Click Save. The Edit Contact dialog box closes, and the Select
Contact dialog box displays.
Edit Contact Dialog Box
3. Ensure the correct radio button is selected and click Use Selected Contact.
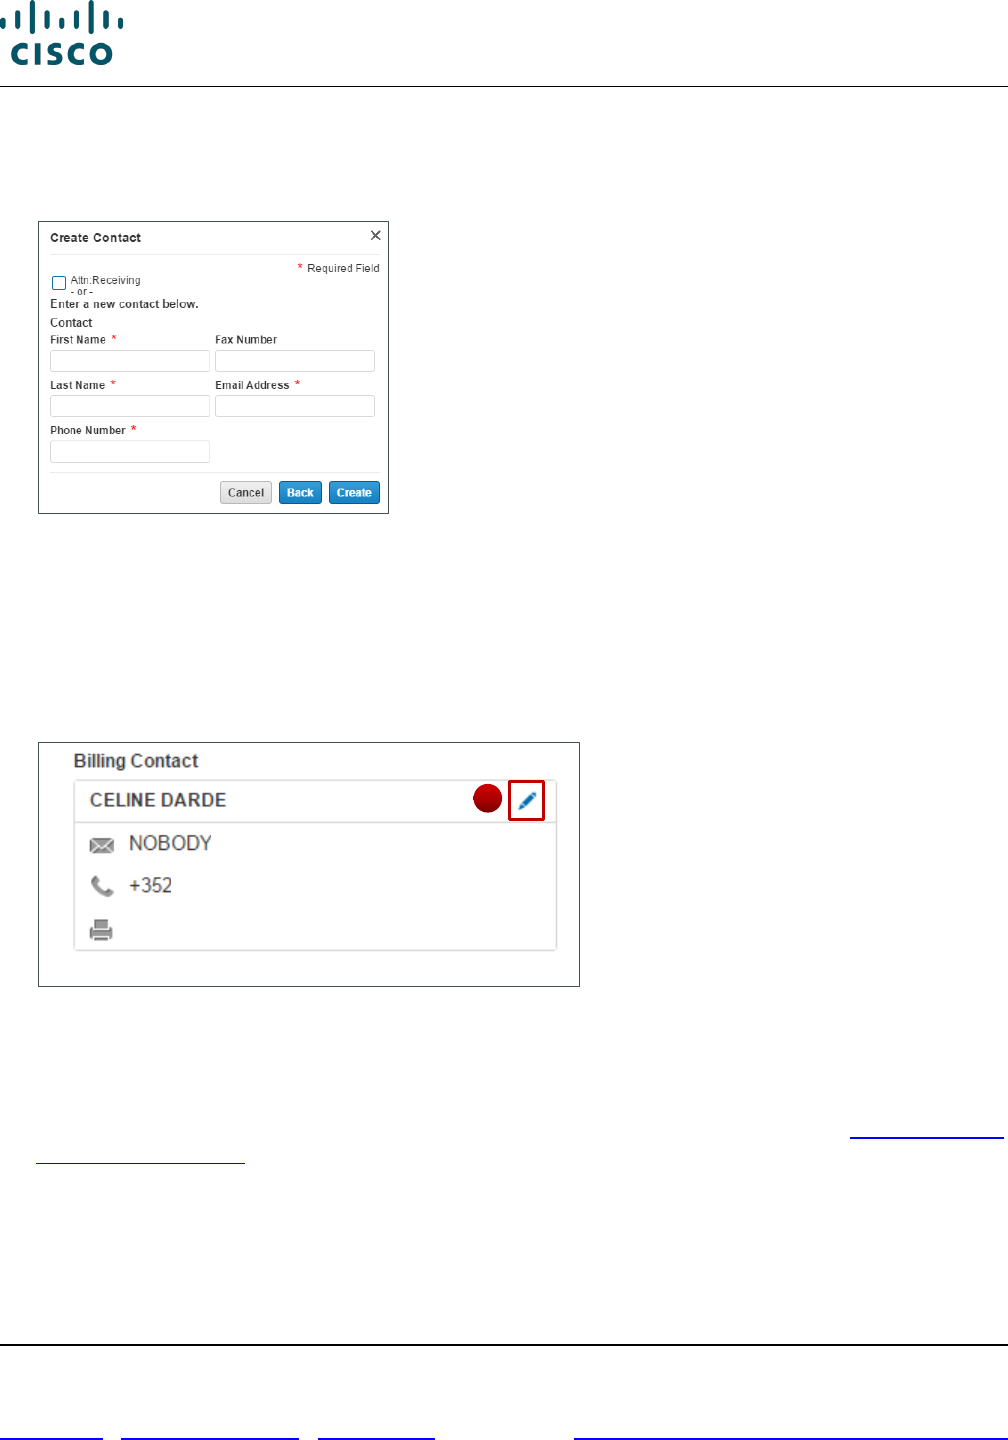
4. To create a contact for this address, click Create Contact from the Select Contact dialog box. The
Create Contact dialog box displays.
1
2
3
4
Cisco Commerce Order User Guide
Cisco Proprietary © 2020 Cisco and/or its affiliates. All rights reserved.
Last Updated: 17 March 2020 Page 23 of 143
Cisco.com | Privacy Statement | Trademarks Provide Feedback on this Training Resource
Populate the required fields, indicated with a red asterisk (*).
Click Create. The dialog box closes, and the contact information displays on the Create Order
page.
Create Contact Dialog Box
5. Alternatively, to create a contact titled Attn: Receiving, check the checkbox on the top left of the
Create Contact dialog box. The system greys out the contact information fields and no other contact
information is required.
3.3.2.1.2 Changing a Contact
You are able to change the identified billing contact.
Billing Contact Details
1. Click the edit icon. The Select Contact dialog box displays.
2. Click the appropriate radio button and click Use Selected Contact.
It is also possible to edit existing contact information and create a new contact (see Adding, Editing,
or Creating a Contact).
1
Cisco Commerce Order User Guide
Cisco Proprietary © 2020 Cisco and/or its affiliates. All rights reserved.
Last Updated: 17 March 2020 Page 24 of 143
Cisco.com | Privacy Statement | Trademarks Provide Feedback on this Training Resource
3.3.2.2 Adding or Changing the Shipping Address and Contact
3.3.2.2.1 Adding or Changing the Shipping Address
Best Practice: Search for an address before creating a new one. Create a shipping
address only if the address is not found.
To add or change the shipping address, complete the following steps:
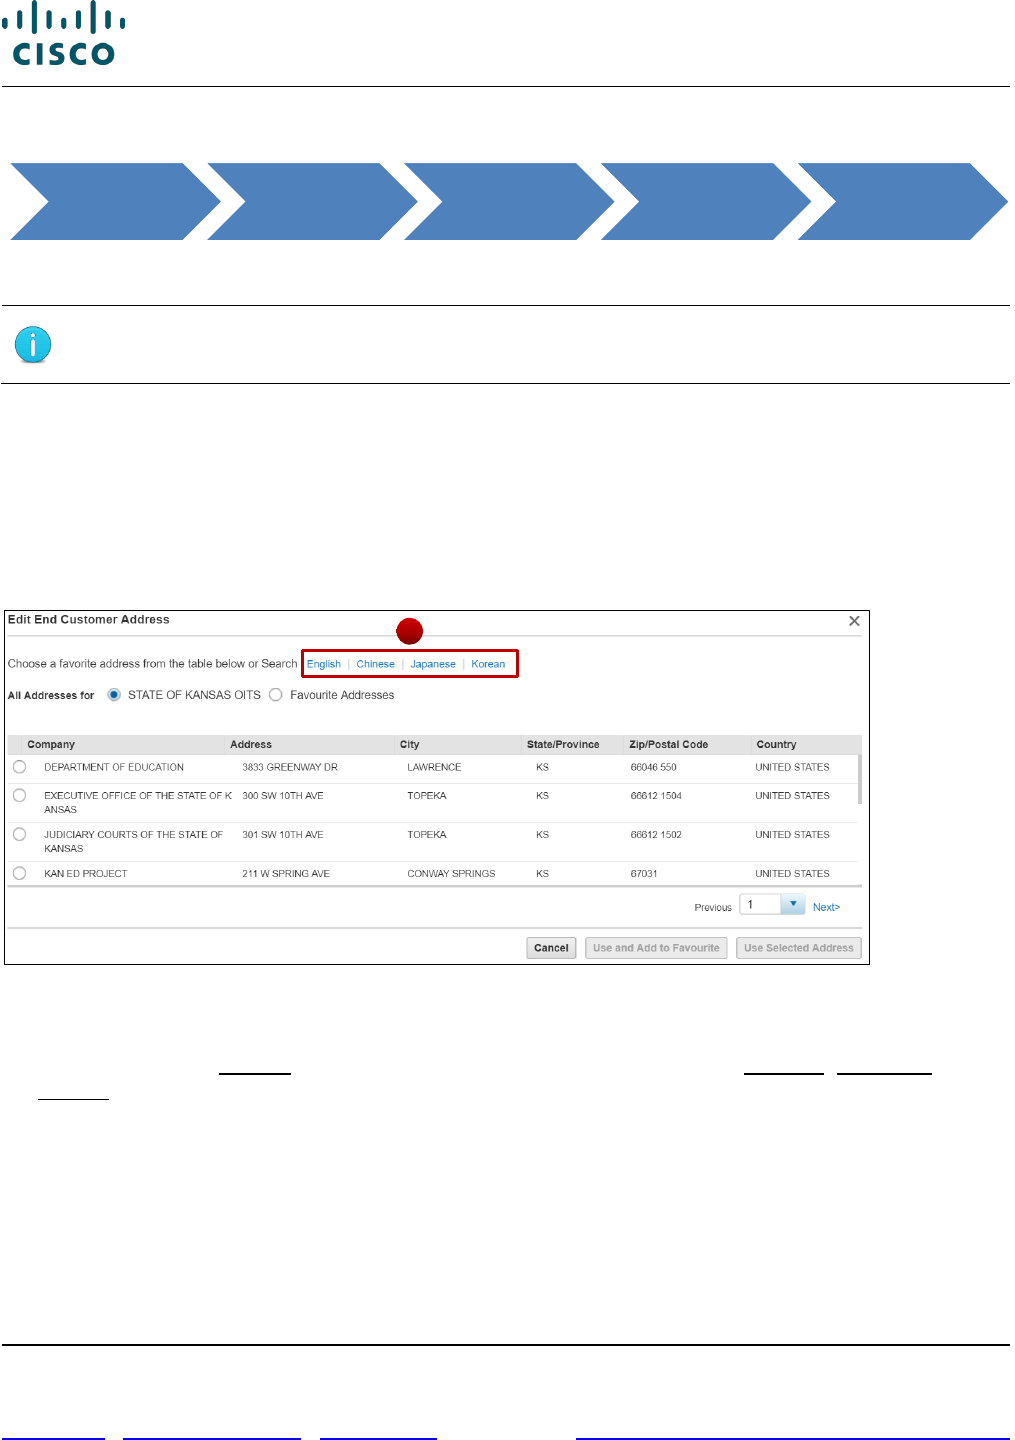
1. From the Create Order page, click the Shipping and Install Site tab, then click Add a Shipping
Address or the edit icon if it is already populated. The Address Search dialog box displays.
Click the delete icon if you wish to delete the already populated address.
2. To choose a favorite address, click the appropriate address radio button.
3. Click Use Selected Address.
Address Search Dialog Box
4. Alternatively, click English to search the Cisco directory in English. Click Chinese, Japanese, or
Korean to search the Cisco directory in Chinese, Japanese, or Korean. If Chinese is selected as the
language, the system will translate addresses entered in Chinese to English and you will have to
confirm or modify the translation.
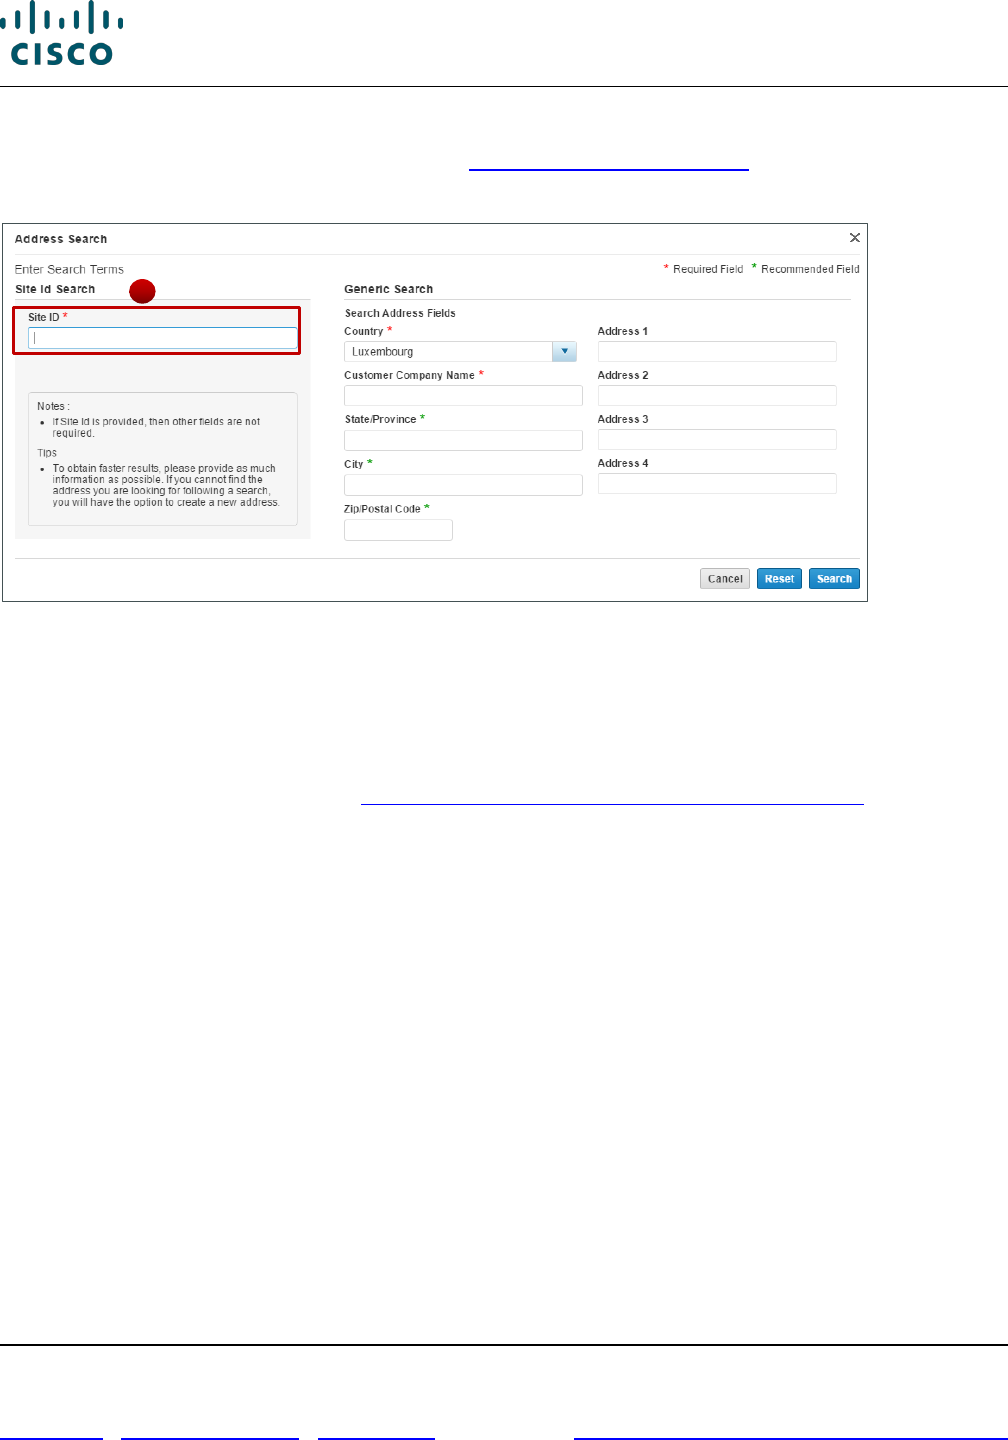
• The Address Search dialog box refreshes with search fields. Populate the required fields,
indicated with a red asterisk (*).
• Click Search.
Cisco
Commerce
Convert
Quote to
Order
Create Order
Order
Initiation
Page
Price List
and Address
Information
4
Cisco Commerce Order User Guide
Cisco Proprietary © 2020 Cisco and/or its affiliates. All rights reserved.
Last Updated: 17 March 2020 Page 25 of 143
Cisco.com | Privacy Statement | Trademarks Provide Feedback on this Training Resource
• Click the appropriate address radio button and click Use Selected Address or Use and Add to
Favourite or create a new address (see Creating a Shipping Address).
The Country field automatically populates from the billing country.
Address Search Dialog Box: Refreshed
5. If preferred, use the Site Id field to search. If the site ID is provided, then other fields on the Address
Search dialog box are not required.
6. If the desired address does not display as a result of a search, the option to create a new address
displays on the Address Search dialog box.
7. To add the shipping contact, see Adding, Changing, or Removing a Shipping Contact.
3.3.2.2.2 Creating a Shipping Address
If the desired address does not display as a result of a search, the option to create a new address
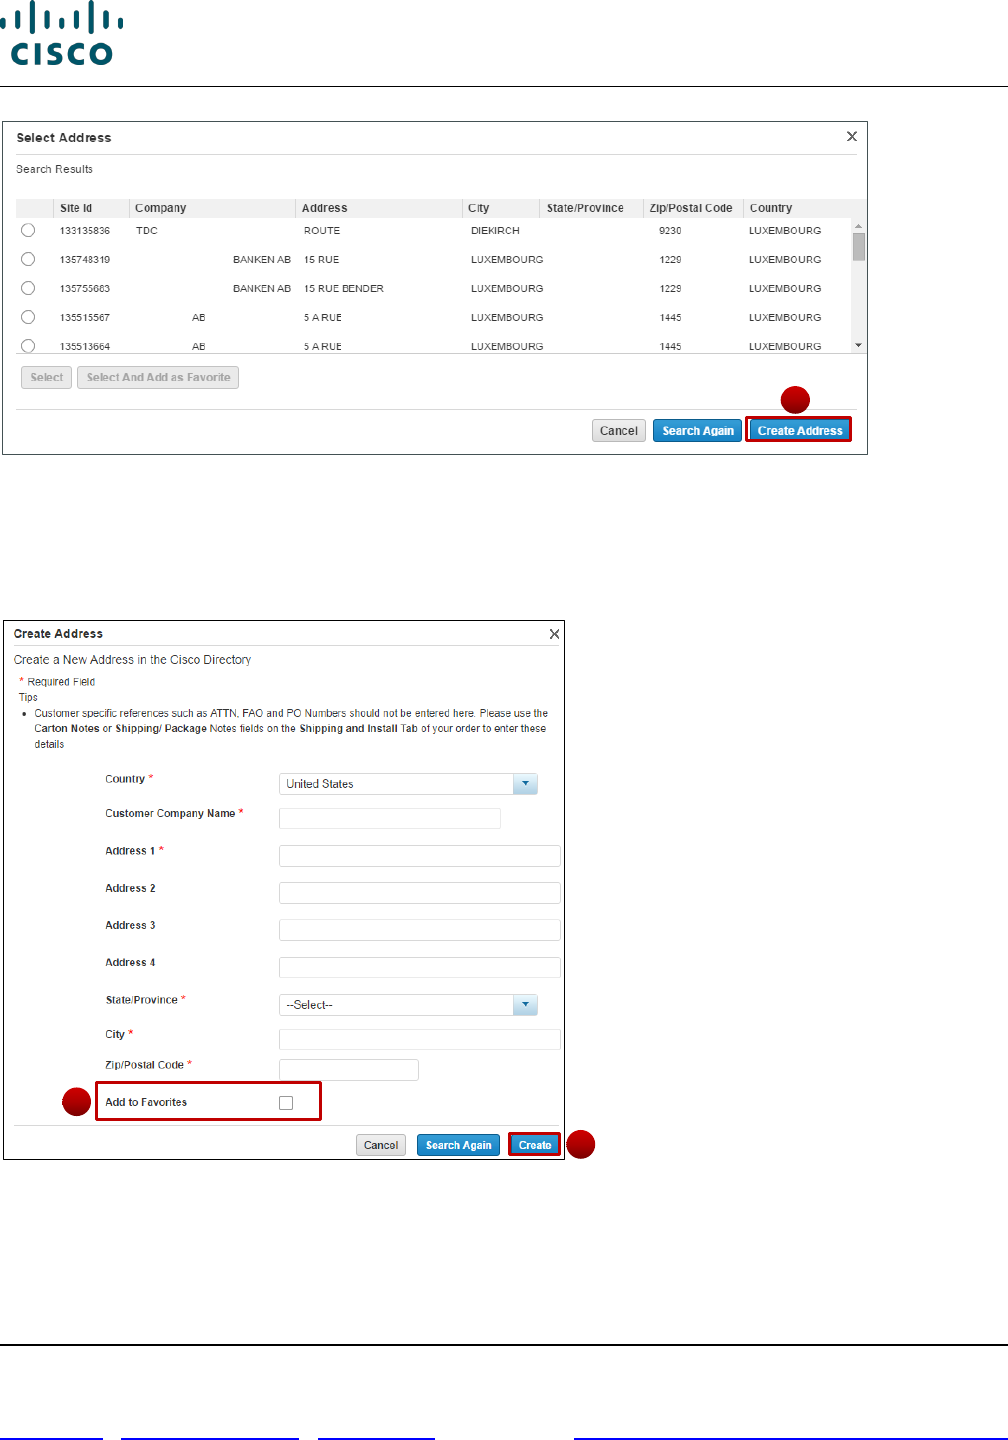
displays on the Address Search as well as Select Address dialog box.
To create a customer address, complete the following steps:
1. From the Select Address dialog box, click Create Address. The Create Address dialog box
displays.
5
Cisco Commerce Order User Guide
Cisco Proprietary © 2020 Cisco and/or its affiliates. All rights reserved.
Last Updated: 17 March 2020 Page 26 of 143
Cisco.com | Privacy Statement | Trademarks Provide Feedback on this Training Resource
Select Address Dialog Box
2. Populate the required fields, indicated with a red asterisk (*).
3. If applicable, check the Add to Favorites checkbox.
4. Click Create. The dialog box closes, and the address populates on the Order Initiation page.
Create Address Dialog Box
3
1
4
Cisco Commerce Order User Guide
Cisco Proprietary © 2020 Cisco and/or its affiliates. All rights reserved.
Last Updated: 17 March 2020 Page 27 of 143
Cisco.com | Privacy Statement | Trademarks Provide Feedback on this Training Resource
3.3.2.2.3 Adding, Changing, or Removing a Shipping Contact
The steps for adding, changing, or removing a shipping contact are the same as adding, changing, or
removing any contact. To add, change, or remove a contact under the Shipping Address, see Adding,
Editing, or Creating a Contact and Changing a Contact.
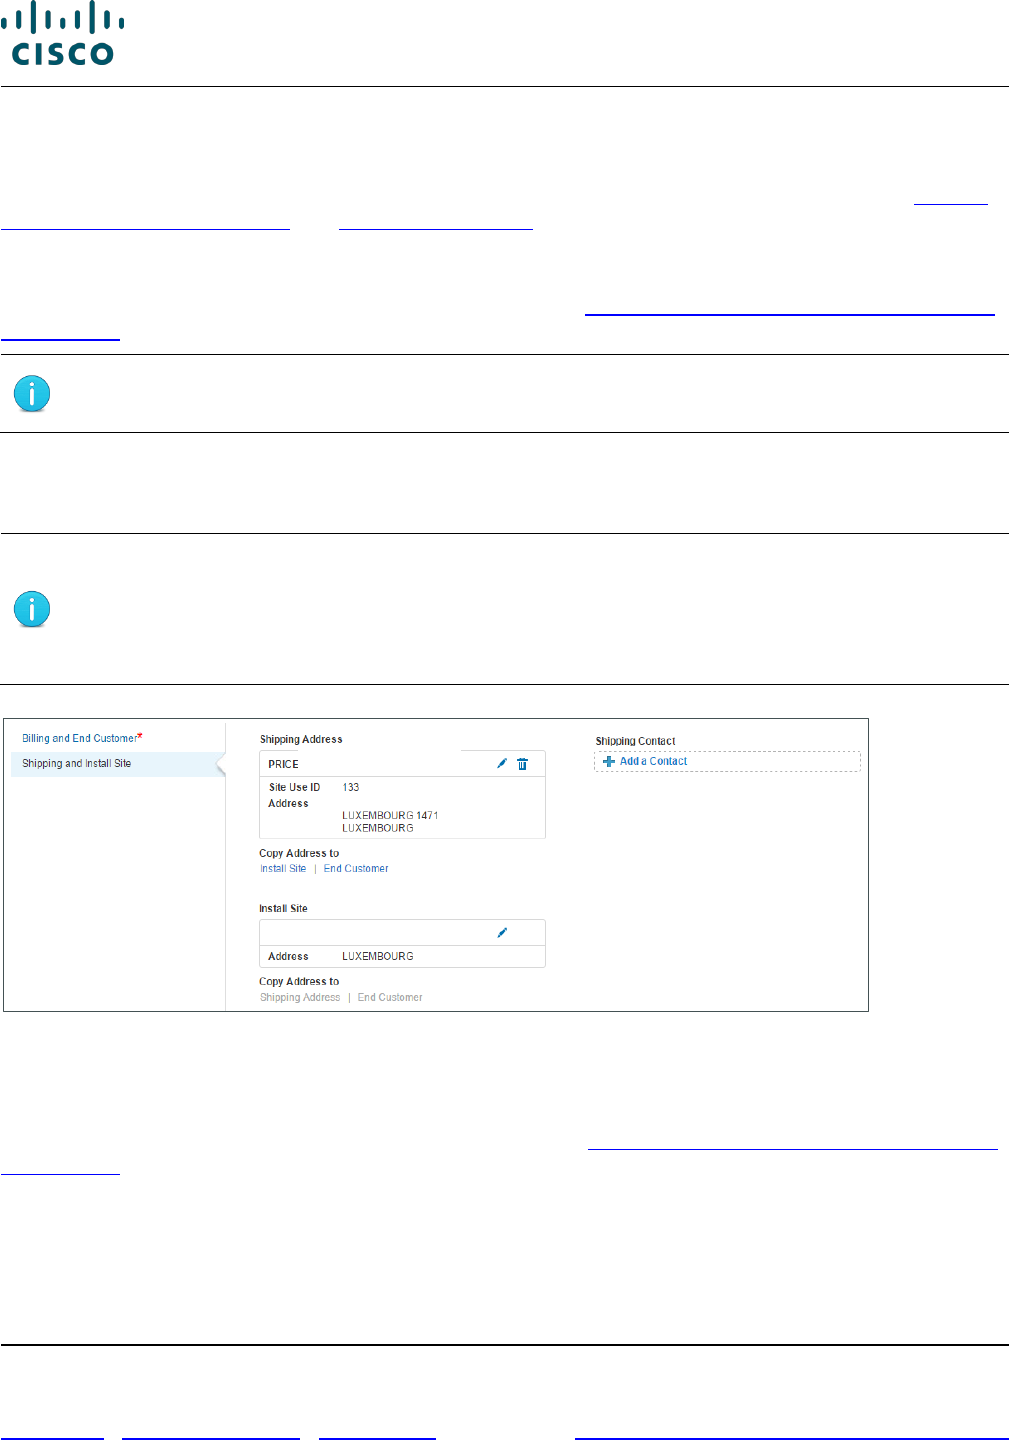
3.3.2.3 Adding or Changing the Install Site
Adding the install site or contact and changing it is same as Adding or Changing the Shipping Address
and Contact.
Note: The install site country and install site contact must be added to order services.
For resale orders, add a full install site address.
To change the install site address once it is populated, click the edit icon. A dialog box displays. Click
the radio button corresponding to the appropriate install site address and click Use Selected Address.
The dialog box closes.
Note: If the buy method is a distributor, and if the distributor bill-to ID (BID) and the
site ID of a quote line belong to different country pricelists, then Multi-National
Quoting (MNQ) discounts are applicable for the country pricelist of the install site
country. The MNQ discount is applied systematically so no manual process is
needed.
Install Site
3.3.2.4 Adding or Changing the End Customer Address and Contact
The end customer information automatically populates from the quote and can be modified. Adding and
changing the end customer address and contact is same as Adding or Changing the Shipping Address
and Contact.
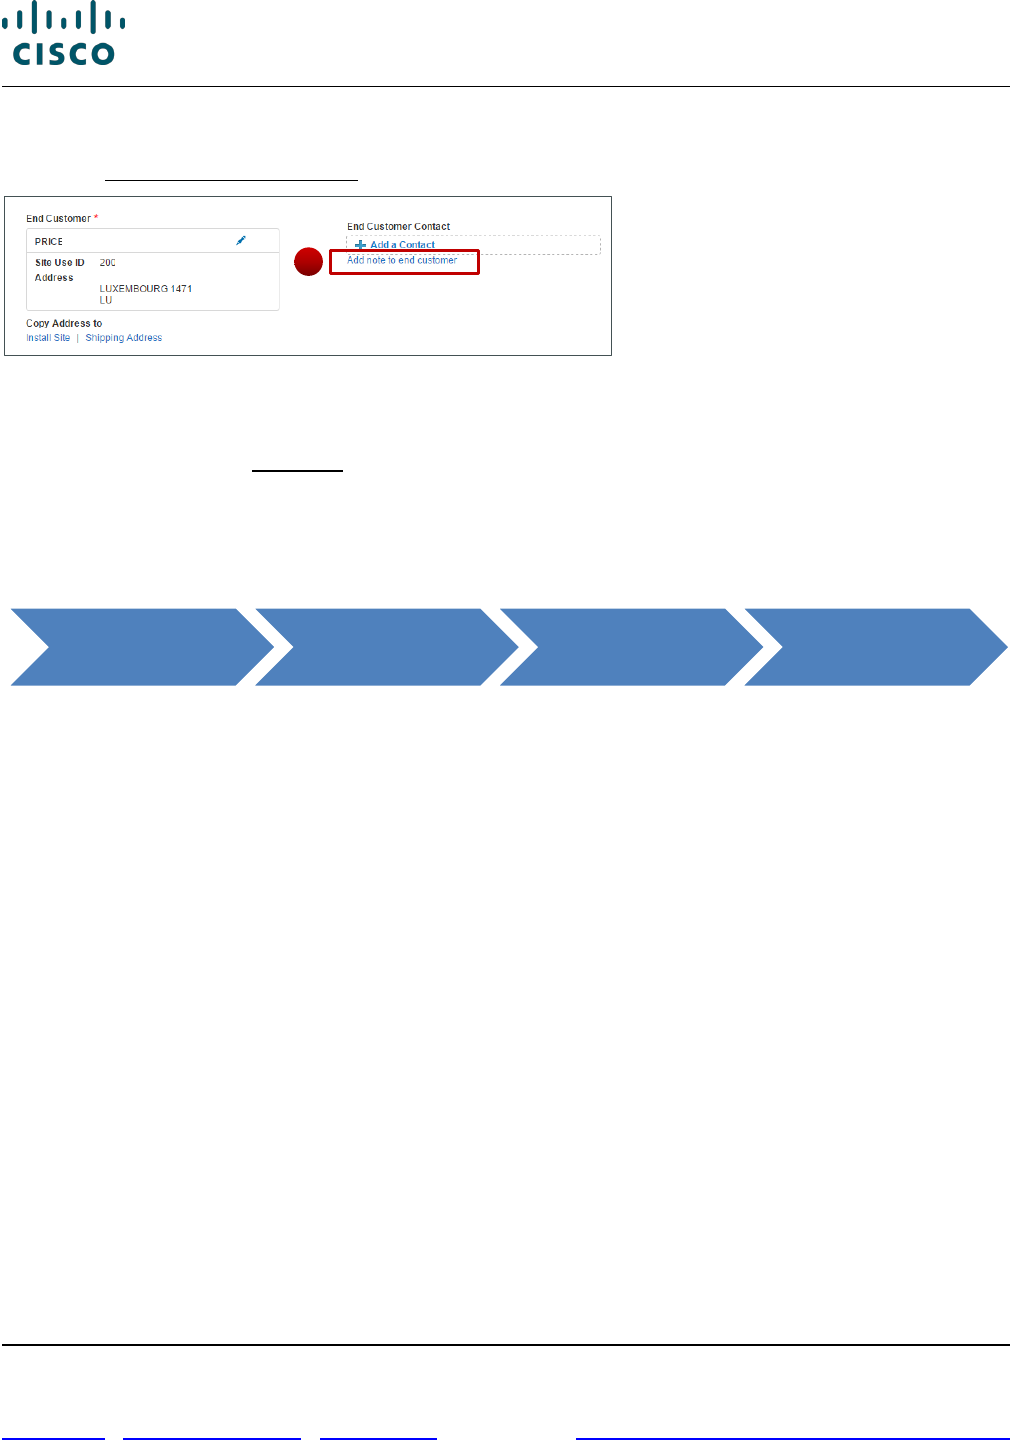
3.3.2.4.1 Adding or Removing End Customer Note
The Add note to end customer can be used to input any note, such as the Purchase Order (PO)
number or the contract number. The note is printed on shipping labels and is displayed in the View
Status of an order.
Cisco Commerce Order User Guide
Cisco Proprietary © 2020 Cisco and/or its affiliates. All rights reserved.
Last Updated: 17 March 2020 Page 28 of 143
Cisco.com | Privacy Statement | Trademarks Provide Feedback on this Training Resource
To input a note, complete the following steps:
1. Select Add note to end customer. The Add Note dialog box displays.
End Customer: Add Note
2. Type required text and click Save.
3. To edit the note, click Edit Note. The Edit Note dialog box displays.
4. Replace the existing note with the new text and click Save to update it.
5. Click Remove Note to delete it altogether.
3.4 Completing the Conversion
When converting a quote to an order, you can select specific items from the quote or purchase all items
from the quote in a single order.
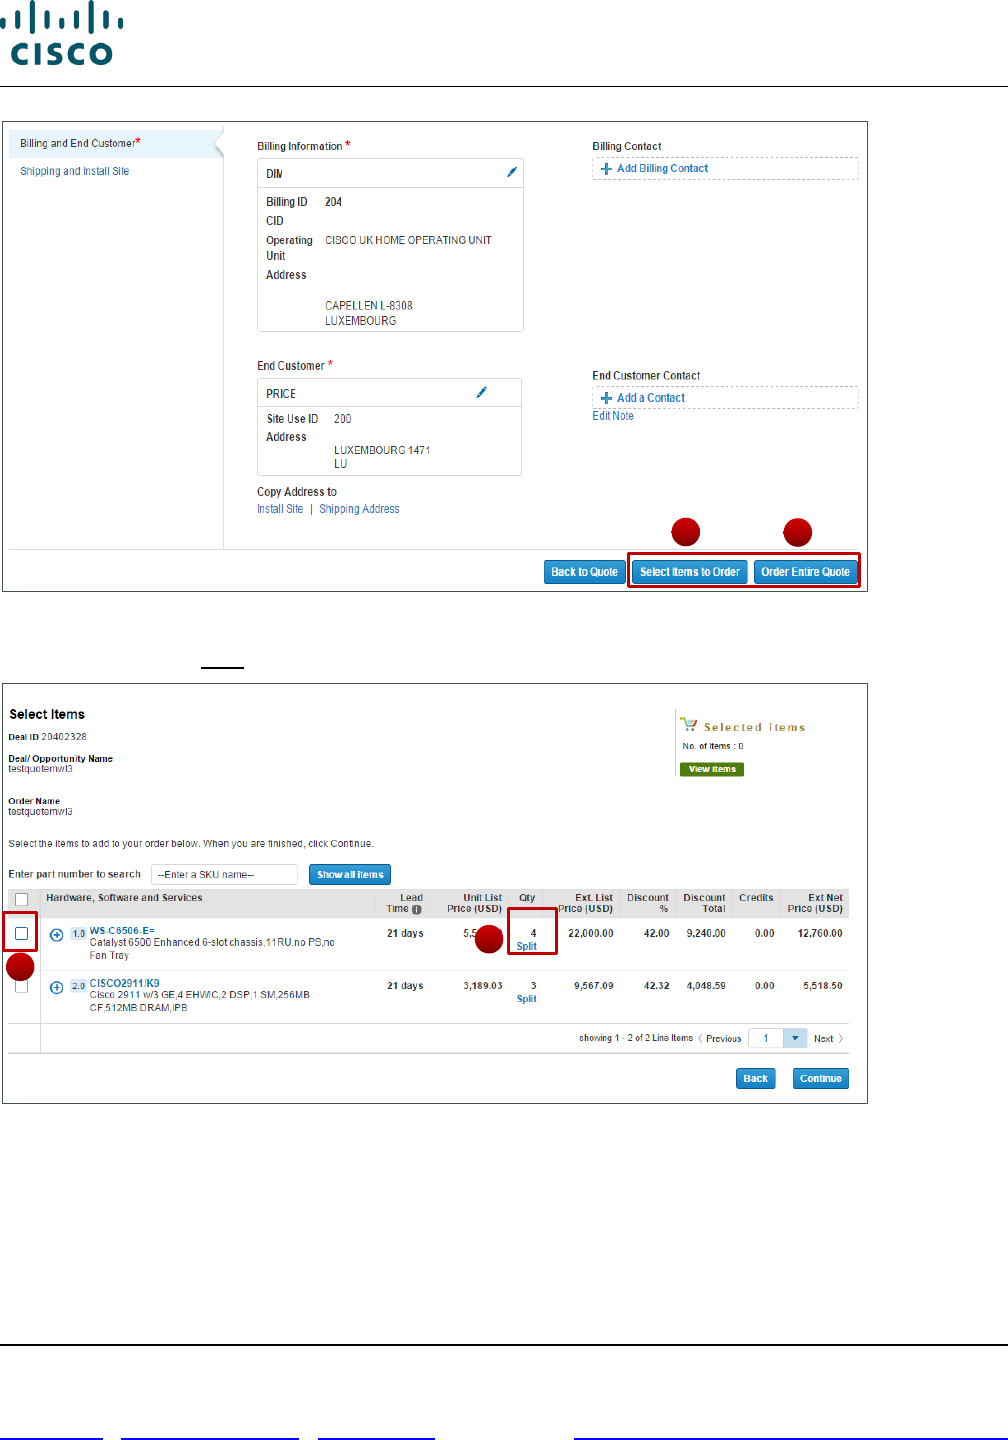
To complete the conversion, complete the following steps:
1. Ensure that you have populated all the required sections on the Create Order page.
2. To choose some of the items from the quote to place on the order, click Select Items to Order. The
Select Items page displays.
3. Check the appropriate checkbox(s). Click Continue.
Cisco Commerce
Convert Quote to
Order
Create Order
Order Initiation
Page
1
Cisco Commerce Order User Guide
Cisco Proprietary © 2020 Cisco and/or its affiliates. All rights reserved.
Last Updated: 17 March 2020 Page 29 of 143
Cisco.com | Privacy Statement | Trademarks Provide Feedback on this Training Resource
Order Initiation Page: Options for Converting a Quote to an Order
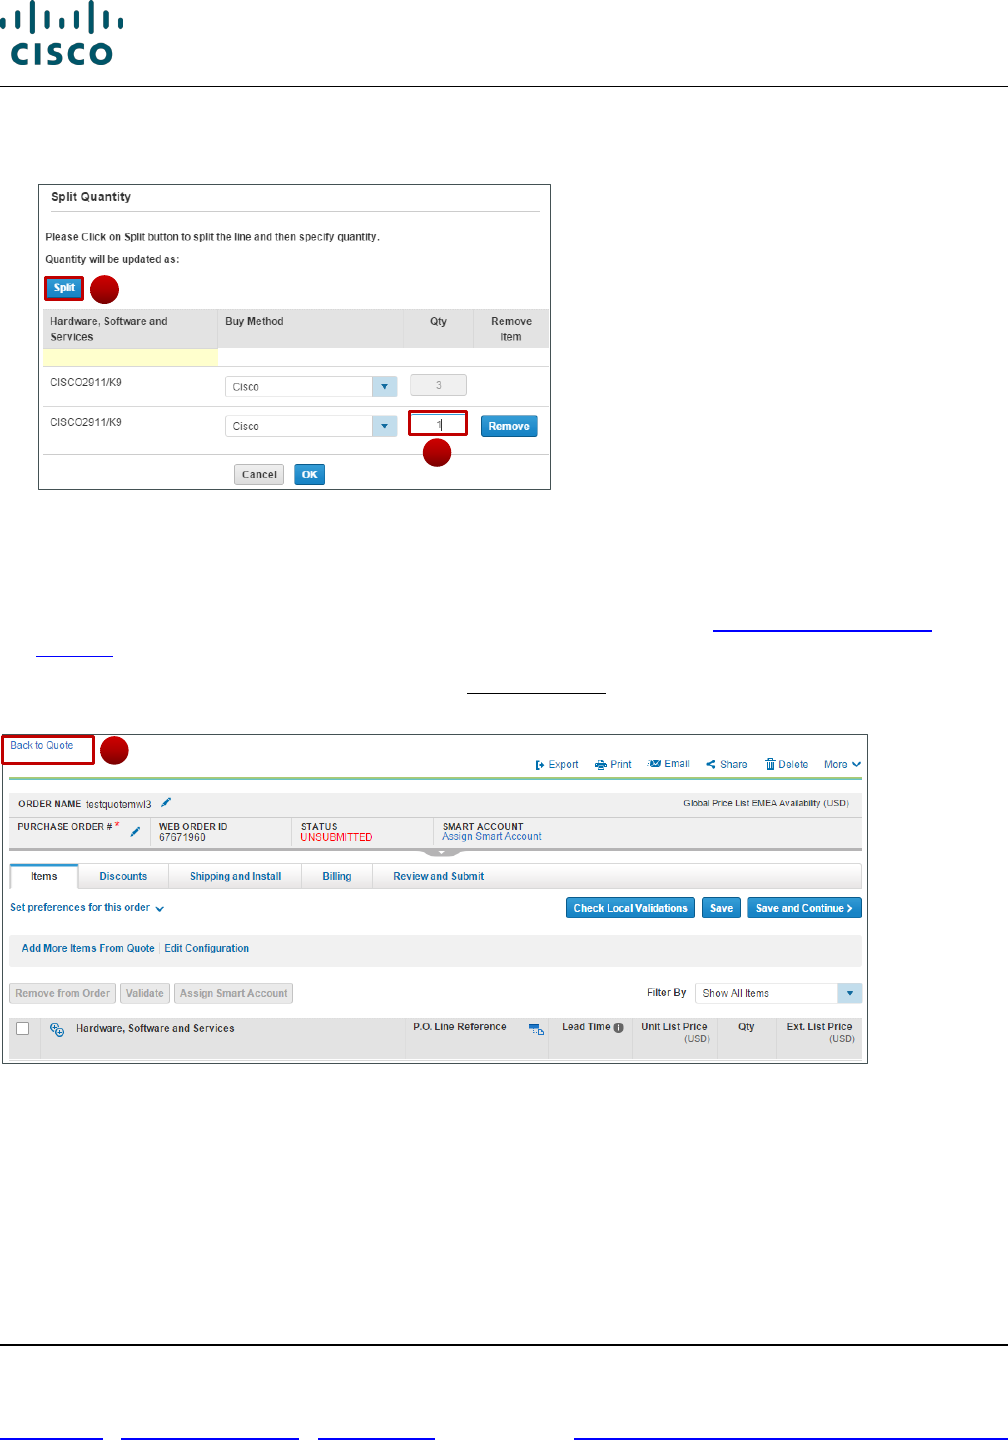
4. Alternately, click Split to order a partial quantity of the item. The Split Quantity dialog box displays.
Select Items to Order Page
5. Click Split. The dialog box refreshes.
6. Type the quantity to add to a new line and then click outside of the quantity field. The other
quantity(s) updates.
7. Click OK. The Select Items dialog box refreshes.
3
2
8
4
Cisco Commerce Order User Guide
Cisco Proprietary © 2020 Cisco and/or its affiliates. All rights reserved.
Last Updated: 17 March 2020 Page 30 of 143
Cisco.com | Privacy Statement | Trademarks Provide Feedback on this Training Resource
Check the appropriate checkbox(s). Click Continue.
Split Quantity Dialog Box
8. To order all of the items included on the quote, click Order Entire Quote.
9. In both cases, an order is created. The Order page: Items tab displays. The order number/name,
the web order ID number, and status display at the header level. See Populating the Header
Content. Expand the header to see additional information.
10. Alternatively, to cancel the conversion, click Back to Quote. The quote opens to the Quote page:
Review tab.
Order Page: Items Tab: Quote Converted Order
3.4.1 Using the Conversion Options on the Items Tab
From the Order page: Items tab, you can:
• View the remaining line items on the quote and add additional items to the order from the quote
• Enable the line items on the order converted from the quote for editing
10
6
5

Cisco Commerce Order User Guide
Cisco Proprietary © 2020 Cisco and/or its affiliates. All rights reserved.
Last Updated: 17 March 2020 Page 31 of 143
Cisco.com | Privacy Statement | Trademarks Provide Feedback on this Training Resource
Order Page: Items Tab – Conversion Options
3.4.1.1 Adding More Items from the Quote
From the Order page: Items tab, you can opt to add more items to the order from the original quote.
To add more items from the quote, complete the following steps:
1. Click Add More Items From Quote. The Items tab refreshes with the line items from the quote.
2. Check the appropriate checkbox(es).
3. Click Add to Order. The additional items from quote are added as line items to the order.
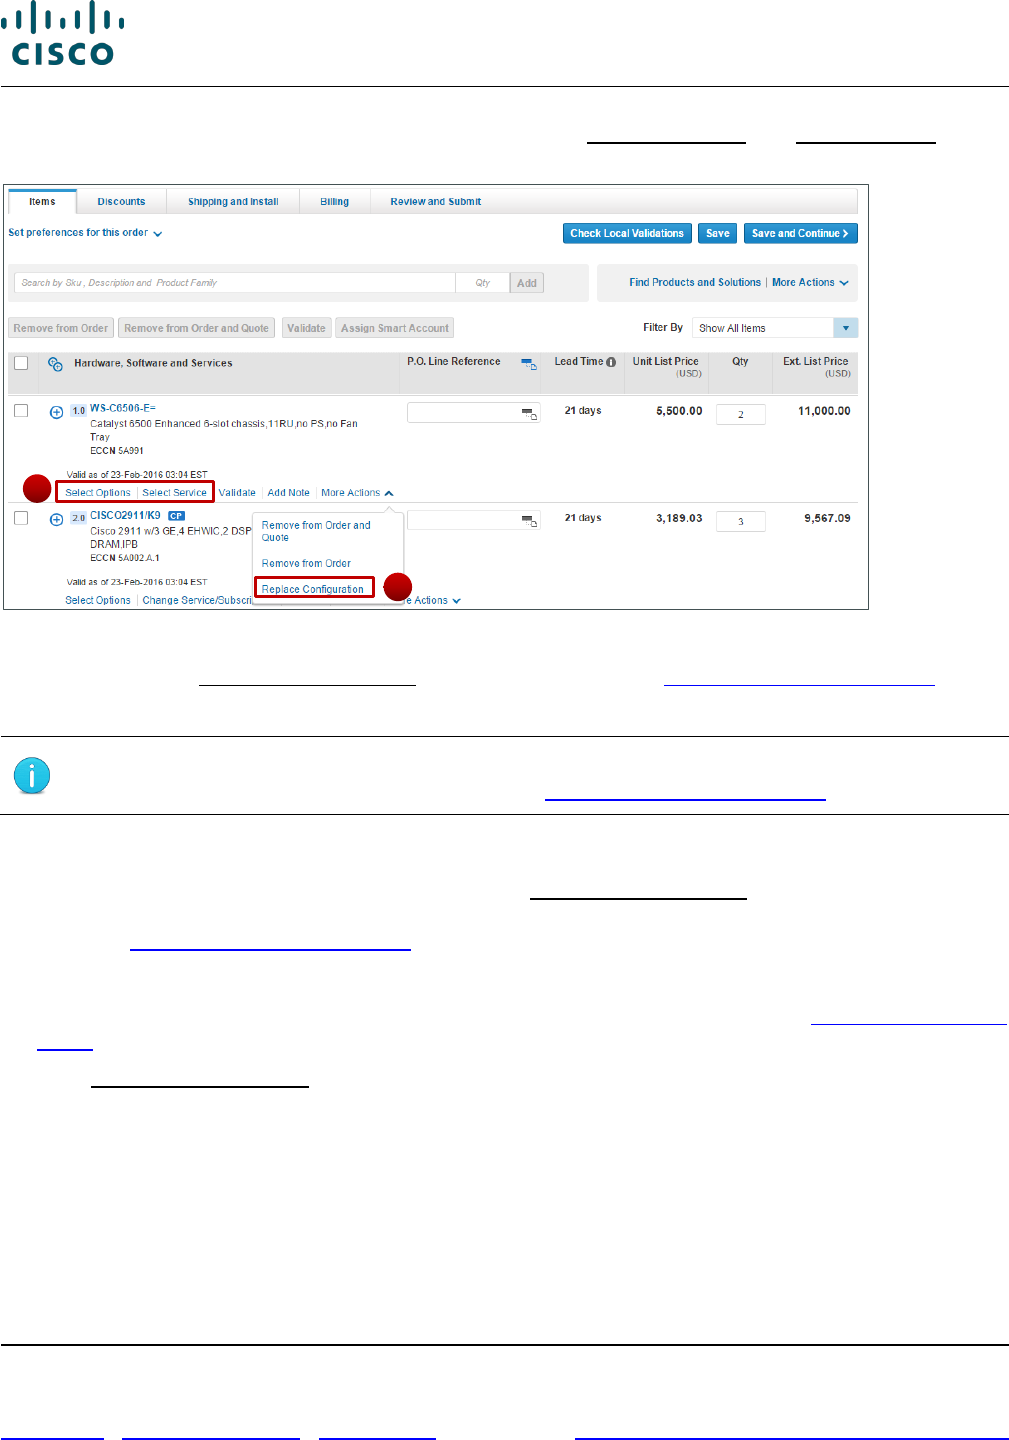
3.4.1.2 Enabling Editing for the Converted Line Items
When line items are converted from a quote to an order, the configuration is not editable by default. The
Select Options and Select Service (Change Service/Subscription if options already selected) links are
disabled.
Order Page: Items Tab - Line Items
To enable the links to edit the configuration, complete the following steps:
1. Click Edit Configuration. The Edit Configuration dialog box displays.
Edit Configuration Dialog Box
Cisco Commerce
Convert Quote to
Order
Create Order
Order Page: Items
Tab
1
Cisco Commerce Order User Guide
Cisco Proprietary © 2020 Cisco and/or its affiliates. All rights reserved.
Last Updated: 17 March 2020 Page 32 of 143
Cisco.com | Privacy Statement | Trademarks Provide Feedback on this Training Resource
2. Click Ok to continue. The Order page refreshes with the Change Options and Select Service links
enabled.
Order Page: Items Tab - Line Items (With Enabled Links)
3. Additionally, the Replace Configuration link is also enabled (see Replacing the Configuration).
4. Alternatively, click Cancel to return to the previous page without enabling the line items.
Note: Editing the configuration may require the quote to be modified and reapproved
to receive nonstandard discounts. See Converting Quotes to Orders.
3.4.1.3 Replacing the Configuration
Once the converted line items are enabled for editing, Replace Configuration is enabled. Use this
option to replace a specific line item with a compatible line item. Applicable discounts are automatically
applied. See Converting Quotes to Orders for details on when nonstandard discounts are not applied.
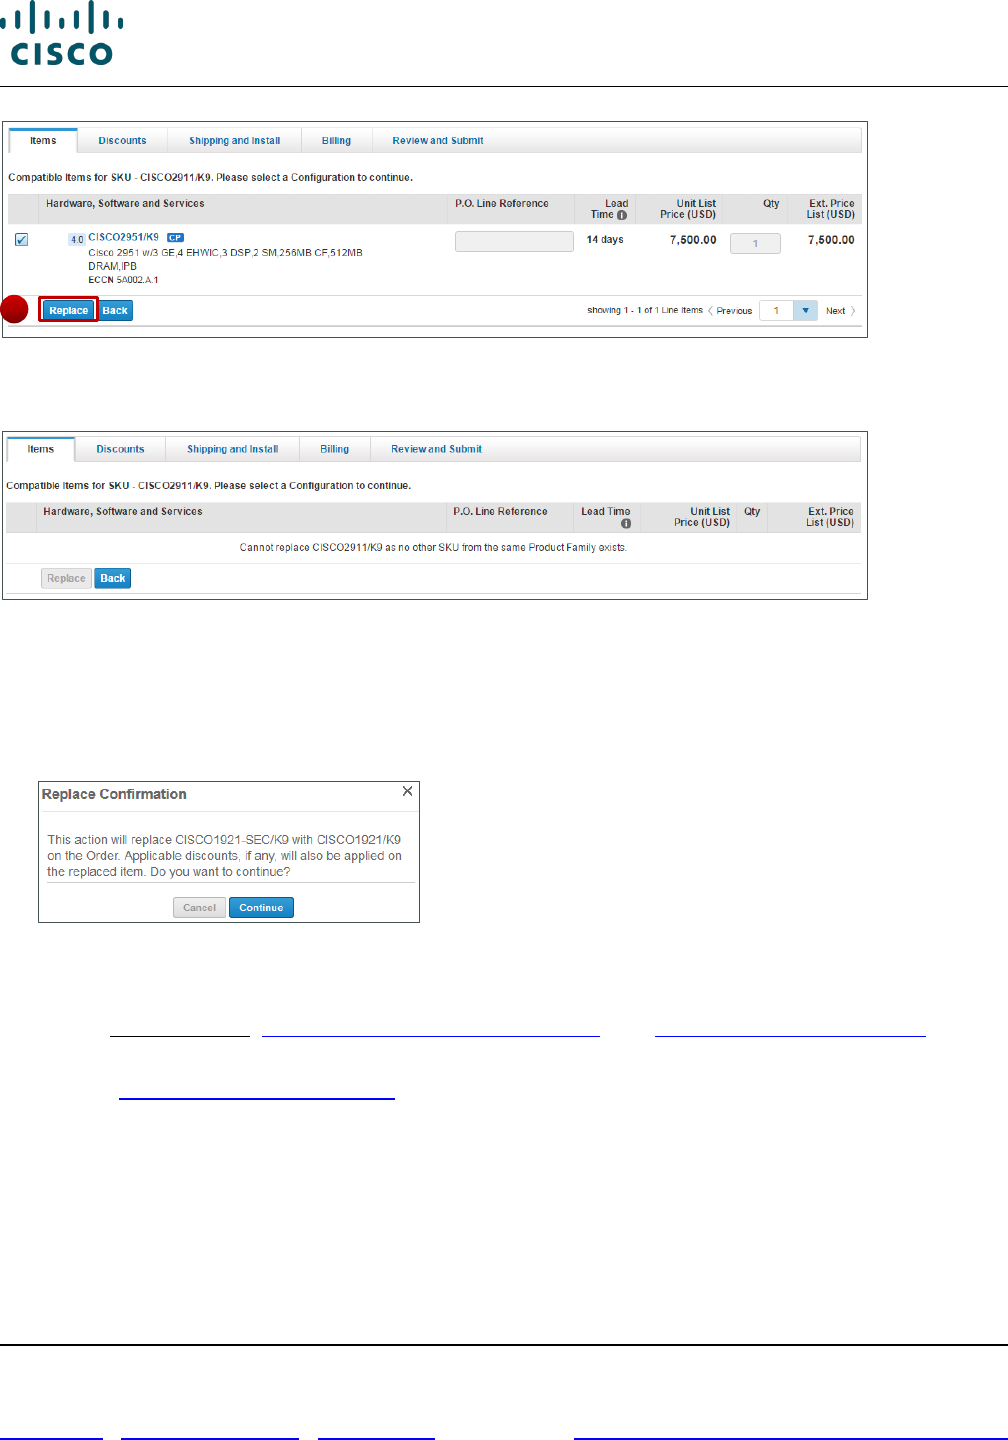
To replace a line item with another compatible item on the order, complete the following steps:
1. From the Order page: Items tab, add the replacement item(s) to your order (see Adding Items to the
Order).
2. Click Replace Configuration. The Items tab refreshes, displaying a list of compatible items for the
indicated SKU.
2
3
Cisco Commerce Order User Guide
Cisco Proprietary © 2020 Cisco and/or its affiliates. All rights reserved.
Last Updated: 17 March 2020 Page 33 of 143
Cisco.com | Privacy Statement | Trademarks Provide Feedback on this Training Resource
Order Page: Items Tab - With Replacement Items
If replacement items are not added, an error message displays.
Order Page: Items Tab - With Error Message
3. Click the radio button that corresponds to the appropriate SKU from the same Product Family and
click Replace.
4. The Replace Configuration dialog box displays. Click Continue. The configuration is replaced on
the items page of the Order with the selected configuration.
Replace Configuration Dialog Box
3.4.2 Using Additional Links on the Converted Quote Items Tab
Other than Back to Quote, Adding More Items from the Quote, and Replacing the Configuration, the
processes for creating an order with or without a deal ID are the same from the Order page.
Continue to Populating the Order Details for instructions on using the additional options available, such
as adding or removing items, adding service/subscriptions for previously purchased products, check
remanufactured availability, and others.
3
Cisco Commerce Order User Guide
Cisco Proprietary © 2020 Cisco and/or its affiliates. All rights reserved.
Last Updated: 17 March 2020 Page 34 of 143
Cisco.com | Privacy Statement | Trademarks Provide Feedback on this Training Resource
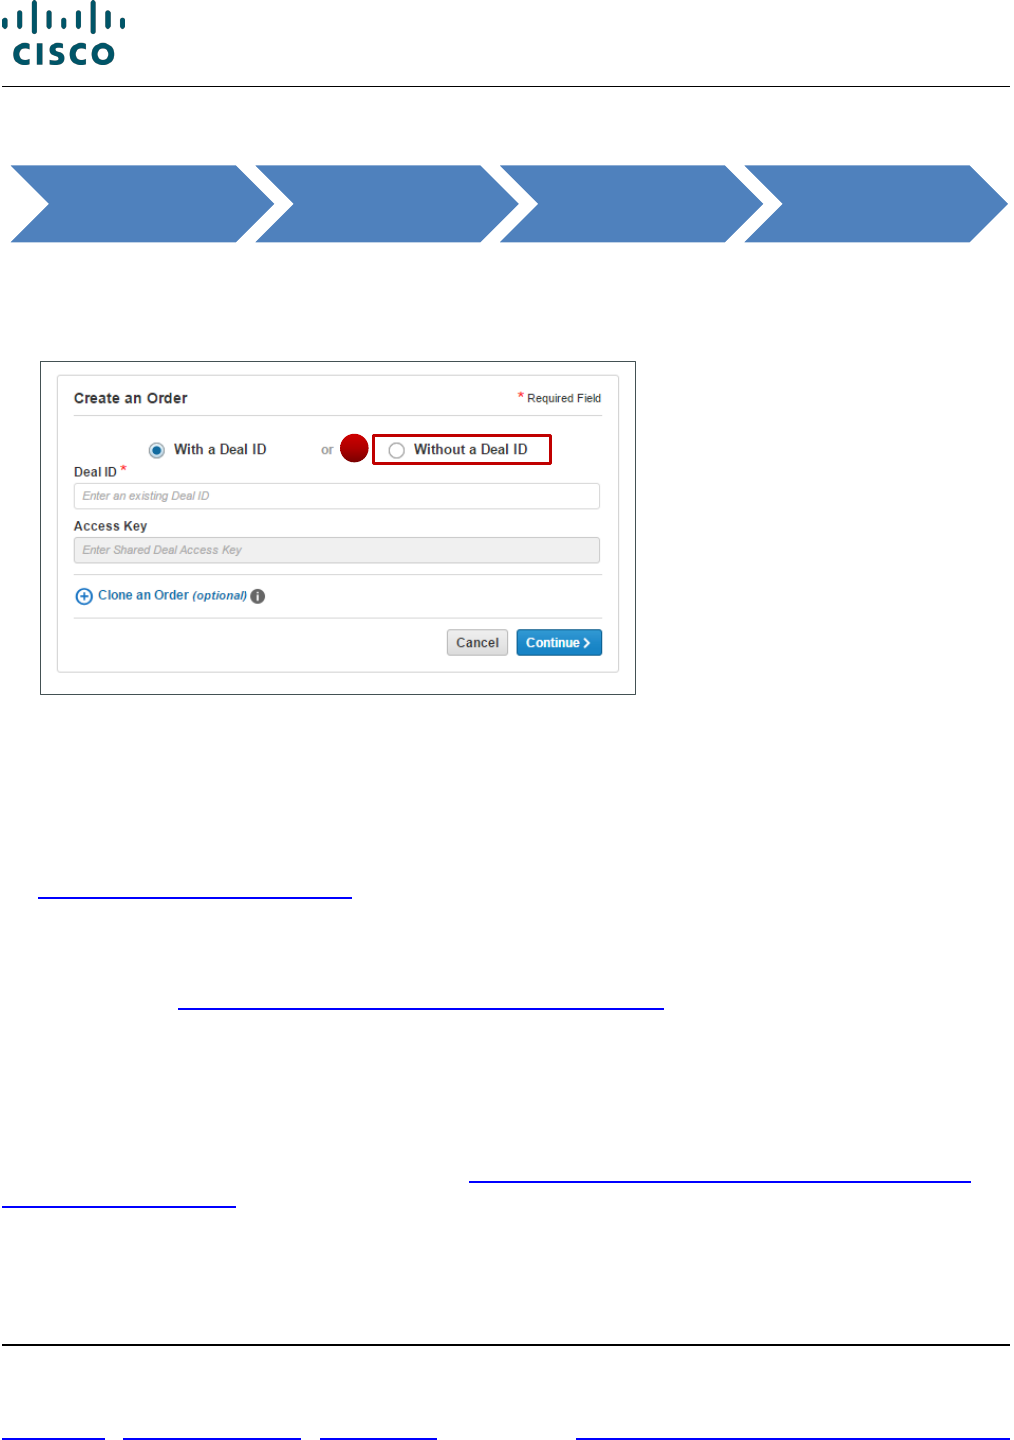
4 Creating a Standalone Order
To create a standalone order, complete the following steps:
1. From the Cisco Commerce homepage, click Create Order from the Orders tab. The following page
displays.
Create Order Page
2. Click the Without a Deal ID radio button.
3. Click Continue. The Create Order page populates with information from the default preferences set
within My Profile and Preferences.
4. Continue through the steps in the following document sections as applicable, beginning with
Verifying the Create Order Page Details.
4.1 Verifying the Create Order Page Details
Verify the information that populated automatically on the Create Order page from My Profile and
Preferences. See Getting Started with Cisco Commerce User Guide for information on setting default
preferences.
Refer to the sections ahead to change any information populated automatically.
4.1.1 Order Name, Intended Use, and Managed Service Order
Populating the Create Order page details is the same as populating these details when a quote is
converted to an order. See the relevant parts of Deal ID, Order Name, Price List, Intended Use, and
Managed Service Order section.
Cisco Commerce Orders Tab
Create Order
without a Deal ID
Order Without a
Deal ID
2
Cisco Commerce Order User Guide
Cisco Proprietary © 2020 Cisco and/or its affiliates. All rights reserved.
Last Updated: 17 March 2020 Page 35 of 143
Cisco.com | Privacy Statement | Trademarks Provide Feedback on this Training Resource
Order Initiation Page
To mark this order as a managed service order and indicate a managed service contractual provider,
click the Yes radio button below the Managed Service Order? section on the Order Initiation page. Click
Select Provider to select the Managed Service Contractual Provider. The steps from here on are same
as Changing the Managed Service Provider.
4.1.2 Address Information Section
In the Address Information section, you can update the address and contacts for billing, shipping, install
site, and end customer.
1. To add or change a billing address and contact, see Changing the Billing Address and Contact.
2. The shipping address, install site, and end customer sections are not editable until the billing
address is populated (see Adding or Changing the Shipping Address and Contact, Adding or
Changing the Install Site, and Adding or Changing the End Customer Address and Contact).
Order Initiation Page: Address Information Section
Cisco Commerce Orders Tab
Create Order
without a Deal ID
Order Initiation
Page

Cisco Commerce Order User Guide
Cisco Proprietary © 2020 Cisco and/or its affiliates. All rights reserved.
Last Updated: 17 March 2020 Page 36 of 143
Cisco.com | Privacy Statement | Trademarks Provide Feedback on this Training Resource
4.2 Completing the Order Initiation Page
Prior to creating the order, complete all required sections on the Create Order page.
1. To create the order, click Continue.
2. The order is created. The order name and web order ID number, among other information, display
on the header. You can edit the order name, if required.
Order Page: Header Details
4.3 Adding Products and Services to the Order
Prior to adding products and services, consider if any of the information at the top of the Order page
(order name, purchase order number) needs to be updated. See Populating the Order Details as
applicable.
To add products and services, see Adding Items to the Order and Adding Services.
2
Cisco Commerce Order User Guide
Cisco Proprietary © 2020 Cisco and/or its affiliates. All rights reserved.
Last Updated: 17 March 2020 Page 37 of 143
Cisco.com | Privacy Statement | Trademarks Provide Feedback on this Training Resource
5 Creating Orders from Existing Orders
You can create new orders from existing orders in Cisco Commerce. To create a cloned order,
• Unsubmitted orders need to be marked as a "favorite" before they can be cloned.
• Submitted orders can be cloned, even if they are not marked as a favorite.
5.1 Creating a Cloned Order from a Favorite Order
It is possible to create a clone of an order previously marked as a favorite order (see Marking Order as
a Favorite for more information about favorite orders).
Alternatively, you can search for a favorite order under the Orders tab from Cisco Commerce
homepage (see Searching for an Order).
To create a clone of a favorite order, complete the following steps:
1. From the Cisco Commerce homepage, click Orders tab> Create Order. The following initial Order
page displays where you can look up or view favorite orders.
Create Order Page
2. Click the Enter Order Name field, and begin entering the order name. The field expands to a drop-
down menu, displaying the favorite order names that match the entered characters. Click the
appropriate order. The order name displays in the Order Name field.
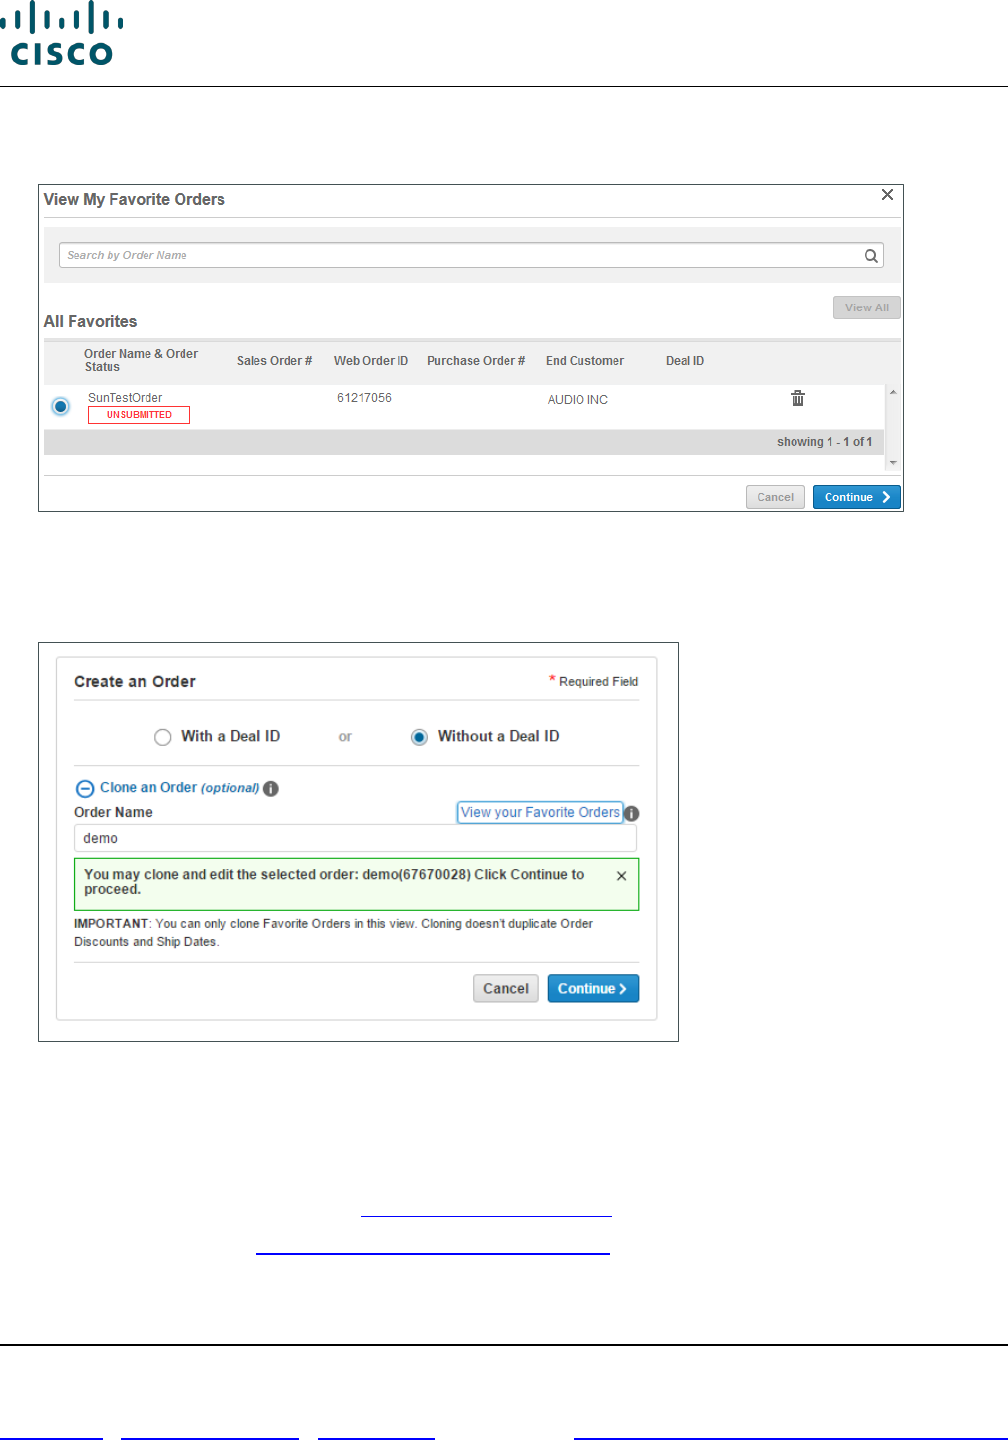
3. Alternatively, click View your favorite Orders.
4. The View My Favorite Orders dialog box displays.
Cisco Commerce Orders Tab Create Order
Clone a Favorite
Order
Cisco Commerce Order User Guide
Cisco Proprietary © 2020 Cisco and/or its affiliates. All rights reserved.
Last Updated: 17 March 2020 Page 38 of 143
Cisco.com | Privacy Statement | Trademarks Provide Feedback on this Training Resource
You can search using the order name in the search field or select from the list of previously added
favorites that display in the All Favorites section.
View My Favorite Orders Dialog Box
5. Click the appropriate Order Name radio button. Click Continue.
6. The order name displays in the Order Name field.
Create Order Page: Order Name Refreshed
7. Click either the With a Deal ID radio button or the Without a Deal ID radio button.
8. Click Continue. The new order is created matching the order details from the favorite order. The
Order page: Items tab displays.
9. Edit the order as applicable. See Adding Items to the Order.
10. Submit the order. See Reviewing and Submitting the Order.
Cisco Commerce Order User Guide
Cisco Proprietary © 2020 Cisco and/or its affiliates. All rights reserved.
Last Updated: 17 March 2020 Page 39 of 143
Cisco.com | Privacy Statement | Trademarks Provide Feedback on this Training Resource
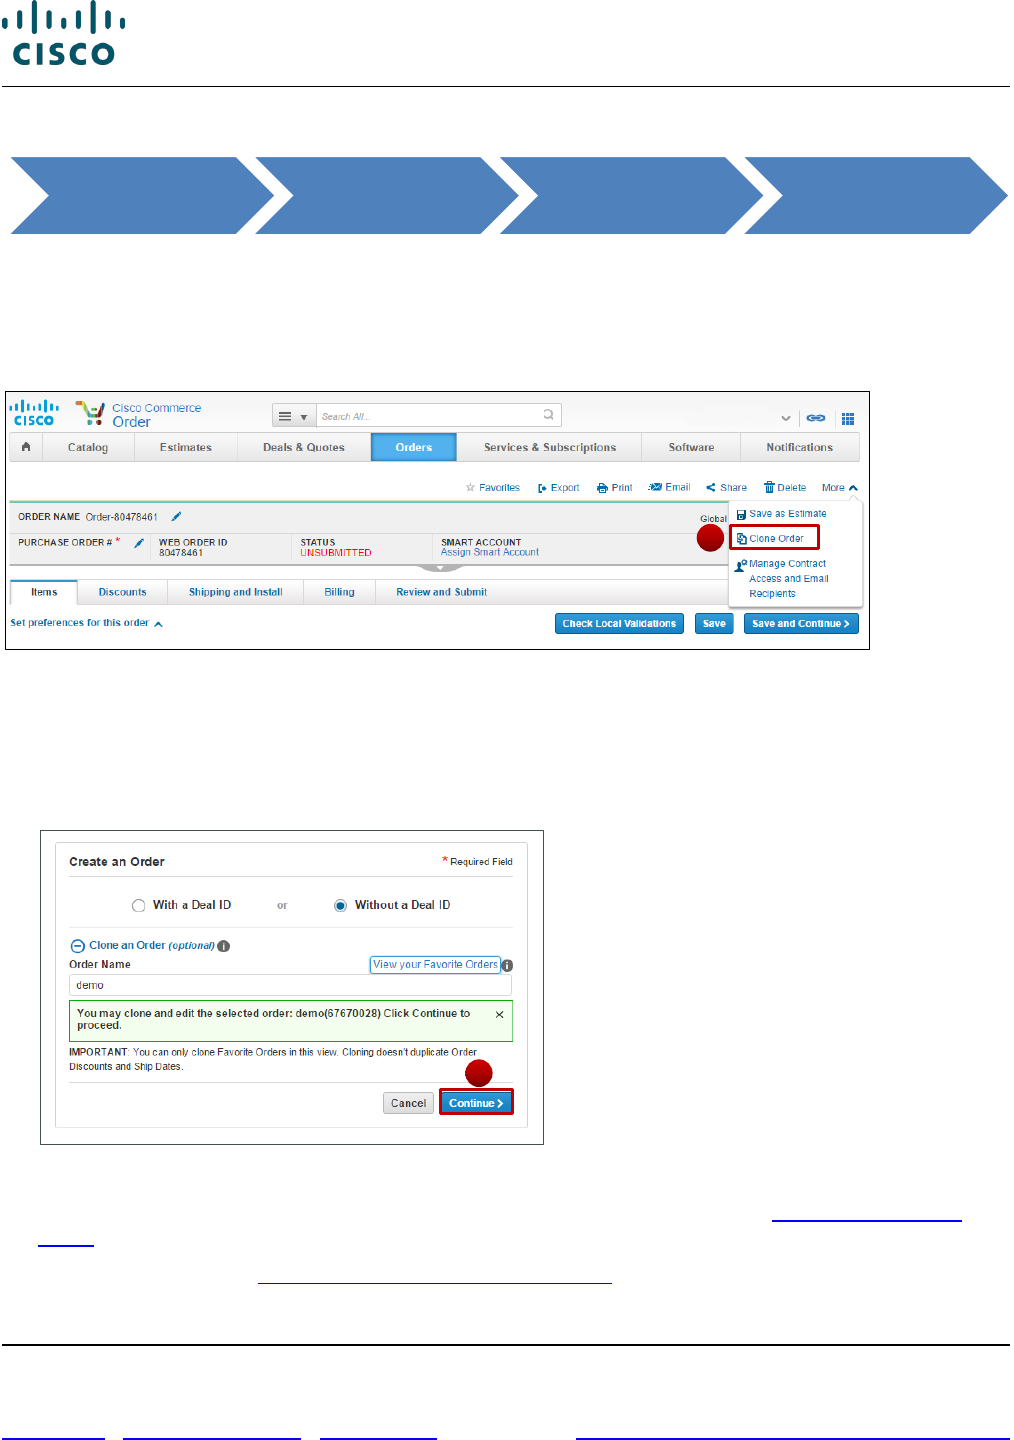
5.2 Creating a New Order by Cloning an Order
When you create and configure an order, that order can be instantly cloned for editing and/or reuse.
To clone an already created order, complete the following steps:
1. From the Order page: Items tab of a created order, click Clone Order. The initial Order page
displays (similar to after clicking Create Order from the Cisco Commerce Orders tab).
Order Page: Items Tab
2. Click either the With a Deal ID radio button or the Without a Deal ID radio button.
If applicable, click the Deal ID field and enter the appropriate information.
3. Click Continue. The new order is created matching the order details from the cloned order. The
Order page: Items tab displays.
Create Order Page: Clone an Order Page
4. Edit the order as applicable. You can add or remove items, if required. See Adding Items to the
Order.
5. Submit the order. See Reviewing and Submitting the Order.
Cisco Commerce Orders Tab
Open an Active
Order
Order Page: Items
Tab
3
1
Cisco Commerce Order User Guide
Cisco Proprietary © 2020 Cisco and/or its affiliates. All rights reserved.
Last Updated: 17 March 2020 Page 40 of 143
Cisco.com | Privacy Statement | Trademarks Provide Feedback on this Training Resource
6 Populating the Order Details
Regardless of the method used to create an order, populating the order details remains the same,
unless otherwise noted.
Populating the order details includes the following:
• Reviewing and updating the header content of an order
• Setting Specific Order Preferences for Services or Federal Government
• Assigning smart account to the order
• Adding or removing items to the order
• Resolving issues
• Adding or removing services to the order
• Renewing software subscriptions
• Reviewing and managing discounts
• Setting shipping and installation information
• Verifying billing information
• Reviewing and submitting the order
6.1 Populating the Header Content
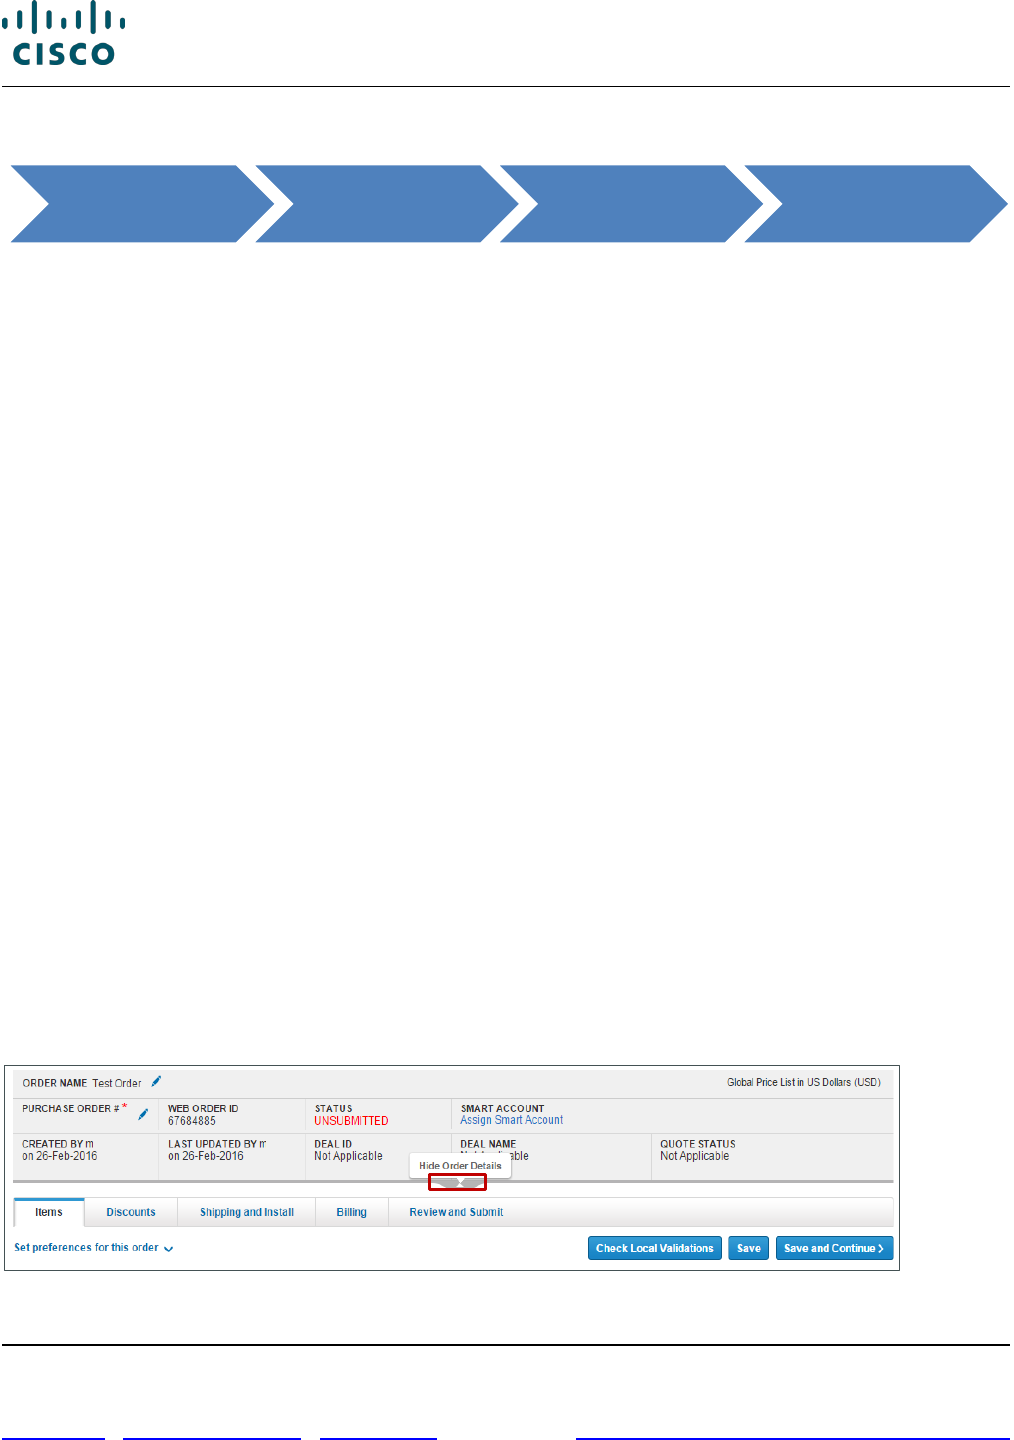
6.1.1 Expanding or Collapsing the Header Section
The order name, purchase order number, web order ID number, order status, and smart account
information displays at the header level on top of the page.
To display the full header content, click the Show Order Details icon. The header expands and the
following additional information displays: the deal ID number, the deal name, created and last modified
by information, and the quote status. To collapse the header section to show less information, click the
Hide Order Details icon.
Order Page: Items Tab – Show/Hide Order Details
Cisco Commerce Orders Tab Create Order
Order Page: Items
Tab
Cisco Commerce Order User Guide
Cisco Proprietary © 2020 Cisco and/or its affiliates. All rights reserved.
Last Updated: 17 March 2020 Page 41 of 143
Cisco.com | Privacy Statement | Trademarks Provide Feedback on this Training Resource
Note: Throughout the order process, there are messages at the top of the page that
guide you through.
• When additions are successful, the message is green.
• When there is additional information to note, the message is blue.
• Warning messages that indicate additional tasks may be needed display in
yellow.
• Error messages that must be resolved are in red.
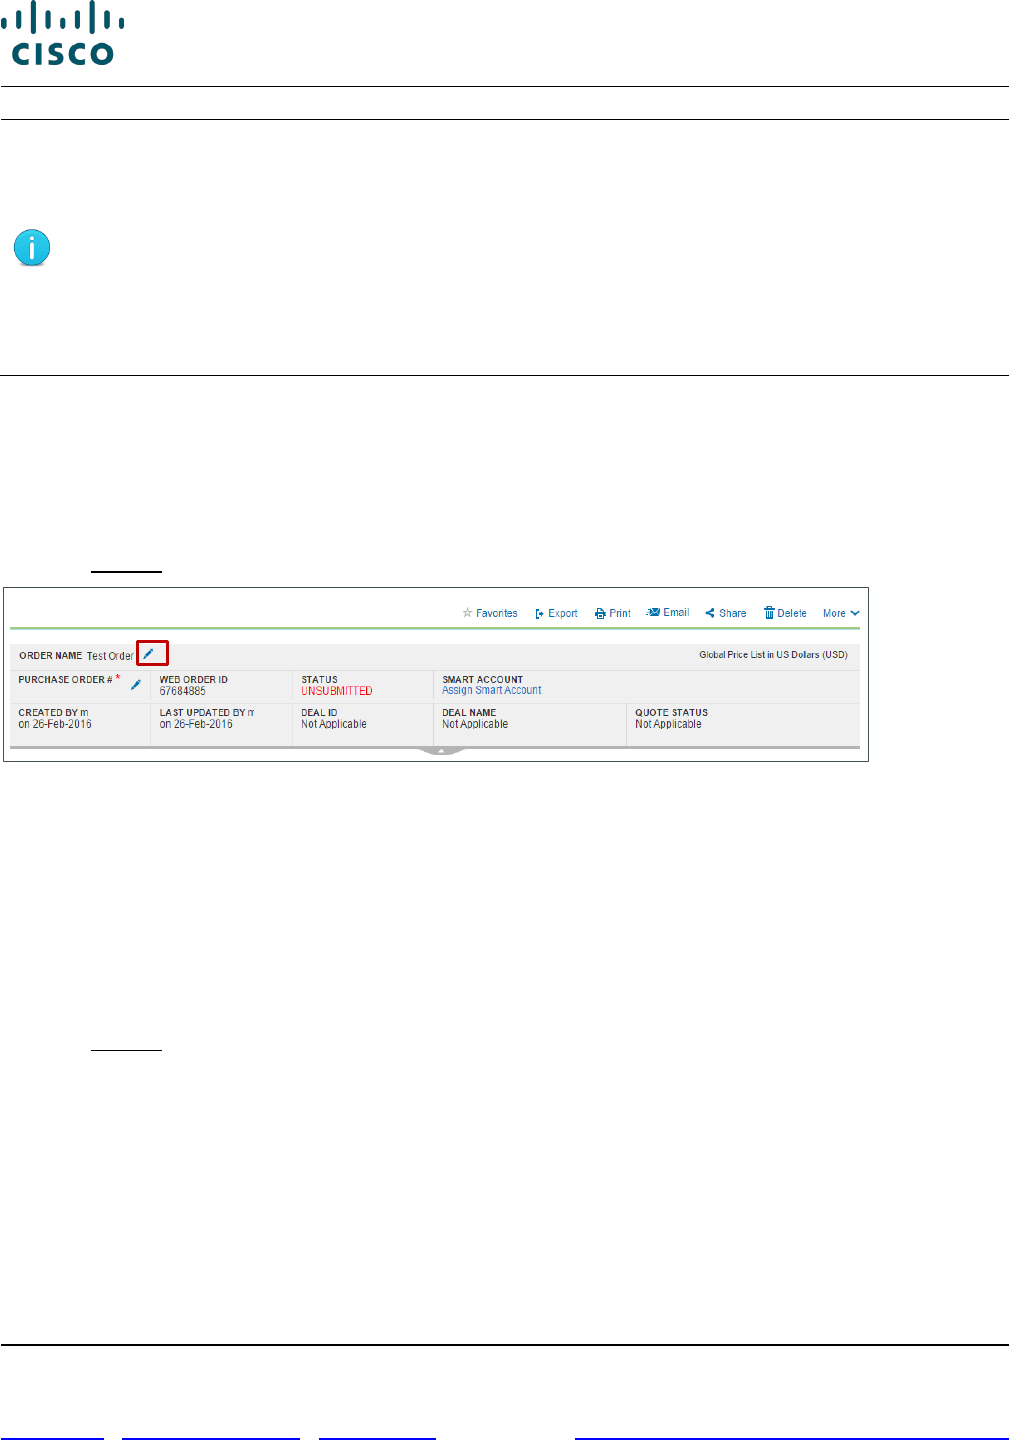
6.1.2 Changing the Order Name in the Header
To change the order name, complete the following steps:
1. Click the edit icon next to the already populated order name.
2. Enter the new name in the field.
3. Click Update.
Order Page: Order Name
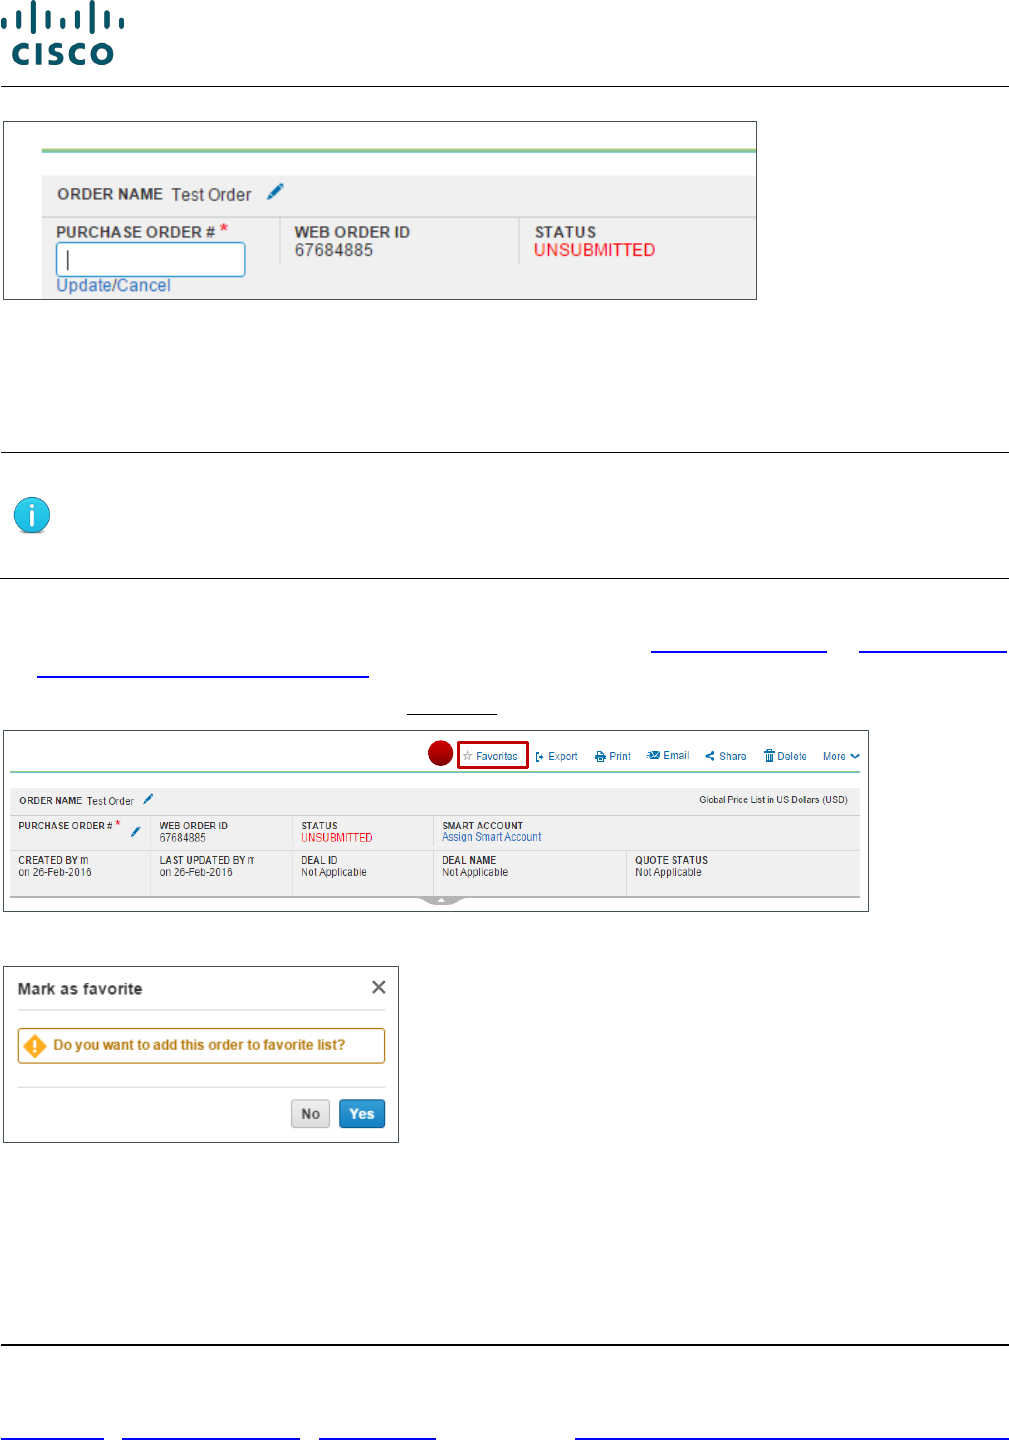
6.1.3 Entering the Purchase Order (PO) Number
Entering a PO number is mandatory prior to submitting the order. Purchase Order #* displays at the top
of the page.
To enter the PO number, complete the following steps:
1. Click the edit icon. The Purchase Order # field becomes active.
2. Click the Purchase Order # field and enter the purchase order number.
3. Click Update.
4. Once the Purchase Order # field is populated, you can still change the information. To change the
PO number, repeat steps 1-3.
Cisco Commerce Order User Guide
Cisco Proprietary © 2020 Cisco and/or its affiliates. All rights reserved.
Last Updated: 17 March 2020 Page 42 of 143
Cisco.com | Privacy Statement | Trademarks Provide Feedback on this Training Resource
Order Page: Purchase Order Field
6.1.4 Marking Order as a Favorite
You can mark a submitted or unsubmitted order as a favorite order, allowing you to easily access it for
cloning when creating future orders.
Note: ‘Favorite’ orders are specific to users and will not be automatically saved
universally to all those with access to that order. If more than one person has access
to a single order, all users with access to the specific order will need to separately
mark the order as a favorite in their log in.
To mark an order as a favorite, complete the following steps:
1. Create an order, or search for and open an existing order. See Creating an Order or Getting Started
with Cisco Commerce User Guide to perform a search using the Cisco Commerce homepage.
2. From the Order page: Items tab, click Favorites. The Mark as Favorite dialog box displays.
Order Page: Items Tab – Mark Order as Favorite
Mark as Favorite Dialog Box
3. Click Yes. The order is saved as a favorite.
4. The Favorites star is now yellow, indicating the order is saved as a favorite.
2

Cisco Commerce Order User Guide
Cisco Proprietary © 2020 Cisco and/or its affiliates. All rights reserved.
Last Updated: 17 March 2020 Page 43 of 143
Cisco.com | Privacy Statement | Trademarks Provide Feedback on this Training Resource
Order Page: Items Tab – Order Marked as a Favorite
5. Alternatively, click No on the Mark as Favorite dialog box to return to the order without marking it as
a favorite.
Once an existing order is marked as a favorite, you can create a new order out of it. See Creating a
Cloned Order from a Favorite Order.
6.2 Setting Preferences for an Order
You can set the Service Preferences for your order, which will override any preferences set from your
default ‘My Profile and Preferences’ set up. If you are a Federal Government customer, you will also be
able to mark the order as Federal Government and enter your DPAS rating or request TAA.
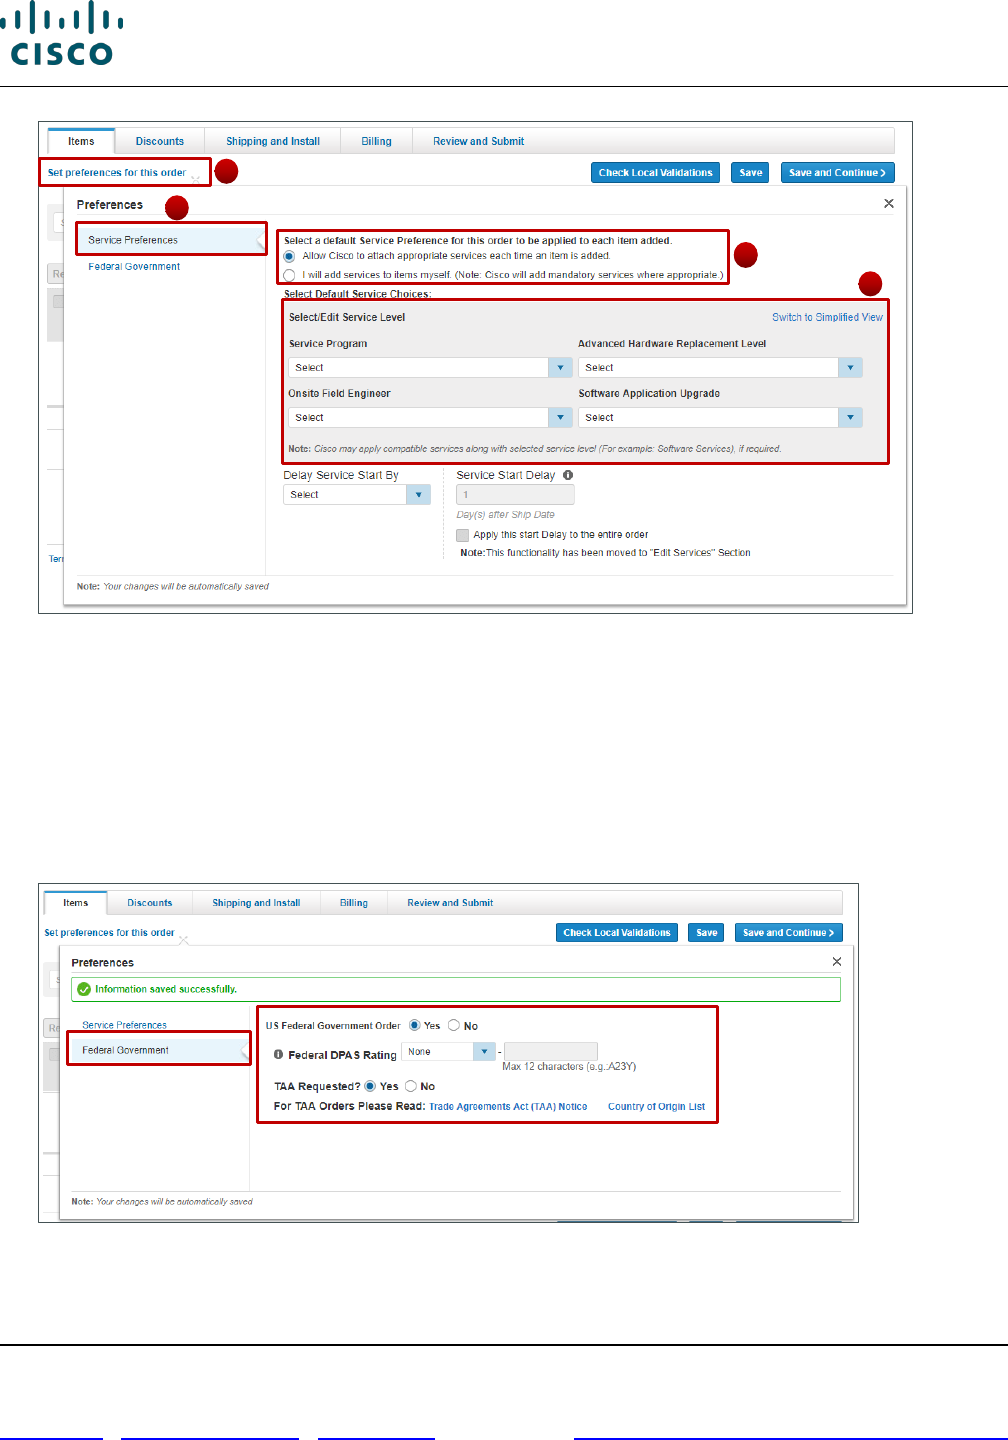
6.2.1 Setting Order Service Preferences
Within your Cisco Commerce ‘My Profile and Preference’ section, you can select your default service
choices, as well as determine whether you would like Cisco Commerce to automatically add services to
your valid configurations across all quotes, estimates, and orders in Cisco Commerce (refer to the
Getting Started with Cisco Commerce User Guide. You can also override these preferences at the
quote, estimate, or order level.
If you ask Cisco Commerce to automatically add services to your order, they will be chosen based on
the following:
• Services will be attached based on the service preferences set within the order
• If no services are set within the order, then preferences from your My Profile and Preferences will
be used
• If selected preferences are not applicable (or not set), the system attaches services based on
existing service attach rules, such as, products being ordered, service program availability,
certifications, Bill-to and install site and others
To set the service options in the items sub-tab (these will override any preferences that were set under
your My Profile and Preferences), complete the following steps:
1. In the Service Preferences window, your Default Service Preference appear. You can also
Search for the Service Level, select a service level, and your selection will be automatically
saved for this quote.
2. Click the appropriate radio button to allow Cisco to attach services automatically or to add
services manually.
3. Select/Edit Service Level box and a list of matching Services will appear; select the desired
Service Level
4
Cisco Commerce Order User Guide
Cisco Proprietary © 2020 Cisco and/or its affiliates. All rights reserved.
Last Updated: 17 March 2020 Page 44 of 143
Cisco.com | Privacy Statement | Trademarks Provide Feedback on this Training Resource
6.2.2 Setting Federal Government Order Preferences
If you are a Federal Government ccustomer and your CCO profile has been updated as Federal you
will also have the ability to set the Federal Government Order preferences:
• Federal Government Order - Choose Yes or No
• Federal DPAS Rating – Choose Either None, or you can enter a Priority Prefix and an alphanumeric
Program Identifier
• TAA Requested – Choose Yes or No
1
3
1
2
Cisco Commerce Order User Guide
Cisco Proprietary © 2020 Cisco and/or its affiliates. All rights reserved.
Last Updated: 17 March 2020 Page 45 of 143
Cisco.com | Privacy Statement | Trademarks Provide Feedback on this Training Resource
6.3 Adding Items to the Order
There are several ways to add items to an order:
• Finding items using a search (see Finding Items Using a Search)
• Adding items by SKU (see Adding Items by SKU)
• Importing an estimate (see Importing an Estimate )
Alternatively, to continue with the order, click Save and Continue. The Discounts tab displays.
6.3.1 Finding Items Using a Search
Searching for products allows you to add multiple products to the order at one time. There are three
options for finding items using a search:
• Search and add by product description or SKU (search by product description or SKU if a specific
SKU or portion of the product description is available): see Search and Add by Product Description
or SKU.
• Search and add by product family (search by product family to find the product by scanning through
a list of Cisco product families): see Search and Add by Product Family.
• Search and add by solution: see Search and Add by Solution.
Best Practice: If you know the product family, then use the Search and add by
product family option. It makes the search easier.
6.3.1.1 Search and Add by Product Description or SKU
To search for items to add to the order, complete the following steps:
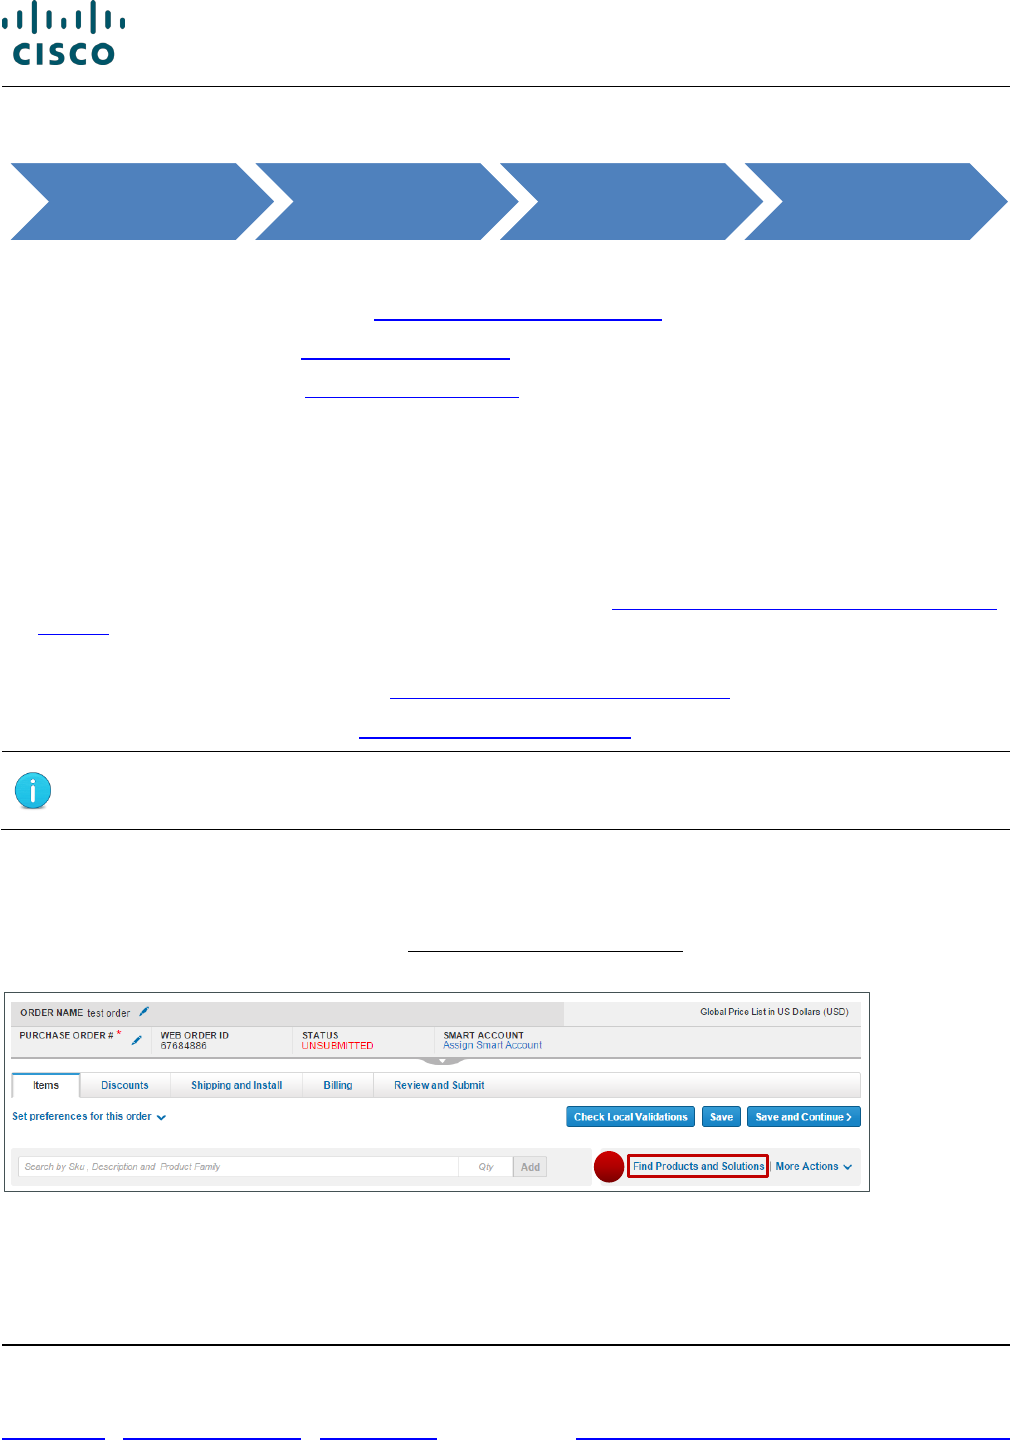
1. From the Order page: Items tab, click Find Products and Solutions. The Find Products page
displays.
Order Page: Items Tab – Find Products and Solutions
Cisco Commerce Orders Tab Create Order
Order Page: Items
Tab
1
Cisco Commerce Order User Guide
Cisco Proprietary © 2020 Cisco and/or its affiliates. All rights reserved.
Last Updated: 17 March 2020 Page 46 of 143
Cisco.com | Privacy Statement | Trademarks Provide Feedback on this Training Resource
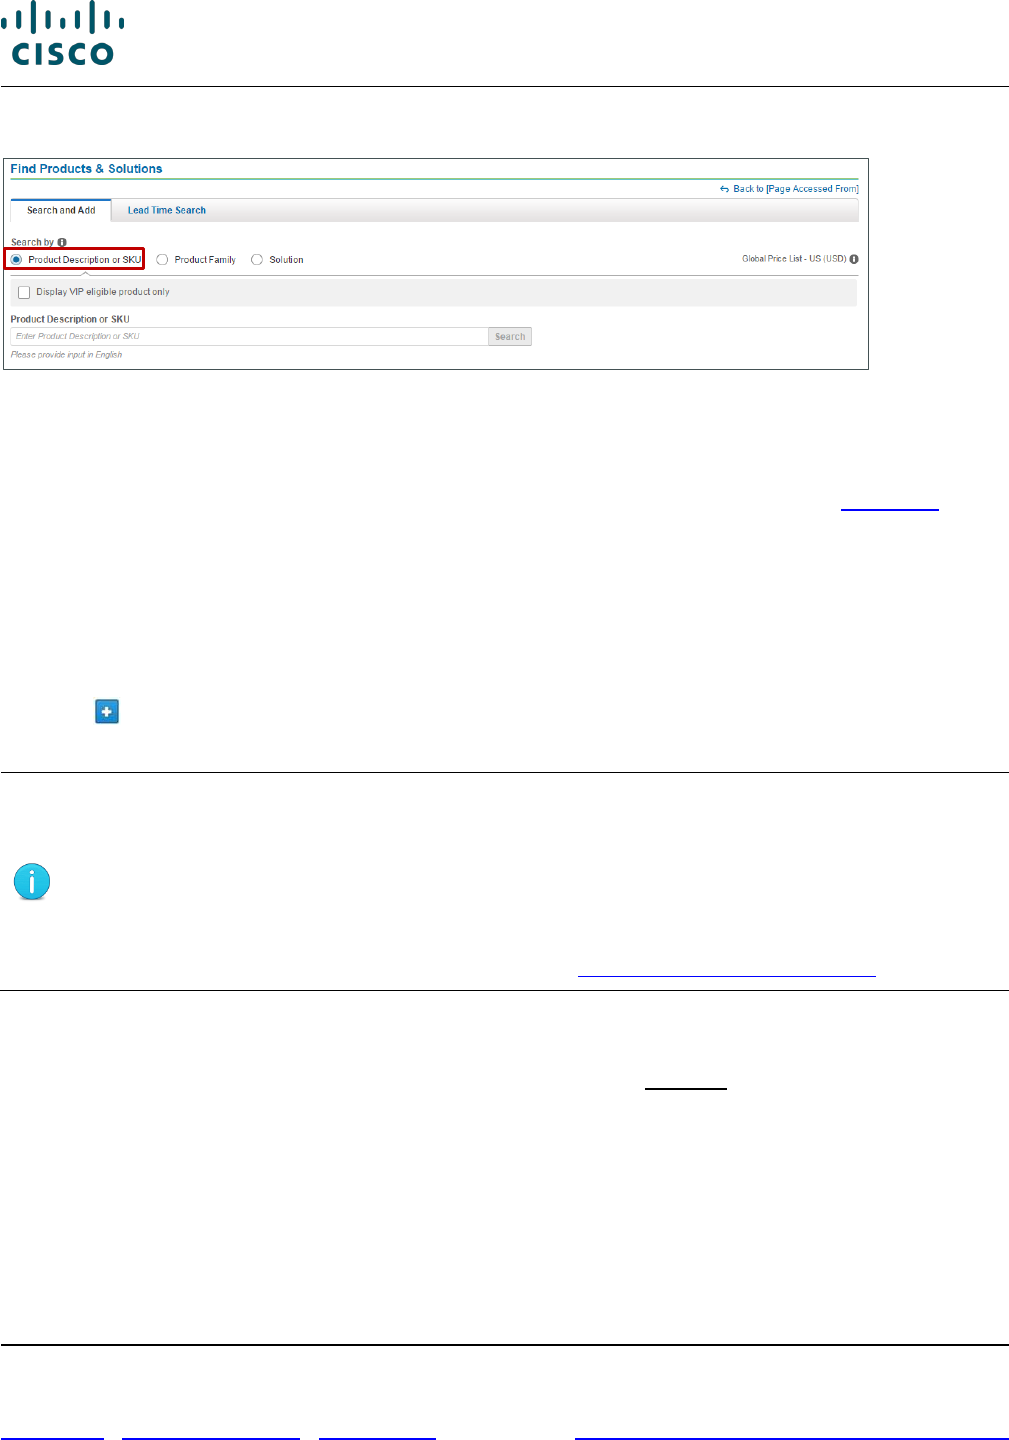
2. Click the Product description or SKU radio button.
Find Products & Solutions Page: Search By - Product Description or SKU
3. Check the checkbox(s) to display only Trade Agreements Act (TAA) compliant products and/or
products that are eligible for a Value Incentive Program (VIP).
Note that TAA displays only for US Federal orders. For more information, view the TAA page.
4. In the search field, enter a product description, SKU, or partial SKU, and click Search.
You do not need to enter the entire SKU. For example, to display all search results for the Cisco
1800 Series Integrated Service Router, enter CISCO1803. All of the Cisco 1803 SKUs display.
The page refreshes to display the results.
5. Locate the appropriate product(s).
6. Click . The product is added to the Selected Items cart.
7. Click the Qty field and enter the appropriate quantity.
Note: There are several ways to enter or change the quantity for a product.
• As listed in step 7 above (entering the quantity in the Selected Items cart).
• Locate the appropriate product (step 5). Click the Qty field and enter the
quantity. Continue to step 6 (entering the quantity before adding the product to
the Selected Items cart).
• On the Order page: Items tab (see Setting Quantities for Products).
8. Repeat steps 3 - 7 to populate the items in the order.
9. To remove unwanted items from the Selected Items cart, click Remove.
10. When you have added all the desired products from the search to the Select Items cart, click Add.
The Order page: Items tab displays with the new line(s).

Cisco Commerce Order User Guide
Cisco Proprietary © 2020 Cisco and/or its affiliates. All rights reserved.
Last Updated: 17 March 2020 Page 47 of 143
Cisco.com | Privacy Statement | Trademarks Provide Feedback on this Training Resource
Find Products & Solutions Page: Search Results
6.3.1.2 Search and Add by Product Family
To search by product family, complete the following steps:
1. From the Order page: Items tab, click Find Products and Solutions. The Find Products and
Solutions page displays.
2. Click the Product Family radio button.
3. Check the checkbox(s) to display only Trade Agreements Act (TAA) compliant products and/or
products that are eligible for a Value Incentive Program (VIP).
Note that TAA displays only for US Federal orders. For more information, view the TAA page.
Find Products &Solutions Page: Search By – Product Family
4. Click the Type to filter or click menu button drop-down arrow to see a full list of product families.
5. Scroll through the list and click the desired product family.
If you wish to search using a wild card, enter a few letters of the product name followed by an
asterisk (for example, ABCD*). All SKUs that begin with ABCD will display in the Search Results
section.
6. Click Search. Results display all applicable product families.
6
7
2
10
4
9
7
Cisco Commerce Order User Guide
Cisco Proprietary © 2020 Cisco and/or its affiliates. All rights reserved.
Last Updated: 17 March 2020 Page 48 of 143
Cisco.com | Privacy Statement | Trademarks Provide Feedback on this Training Resource
7. Locate the appropriate product(s).
8. Click . The product is added to the Selected Items cart.
9. Click the Qty field and enter the appropriate quantity.
Note: There are several ways to enter or change the quantity for a product.
• As listed in step 9 above (entering the quantity in the Selected Items cart).
• Locate the appropriate product (step 7). Click the Qty field and enter the quantity.
Continue to step 8 (entering the quantity before adding the product to the
Selected Items cart).
• On the Order page: Items tab (see Setting Quantities for Products).
10. Repeat steps 4–9 to populate the items in the order.
11. When all desired products from the search have been added to the Select Items cart, click Add.
The Order page: Items tab displays with the new line(s).
6.3.1.3 Search and Add by Solution
To search by solution, complete the following steps:
1. From the Quote tab: Items sub-tab, click Find Products & Solutions. The Find Products & Solutions
page displays.
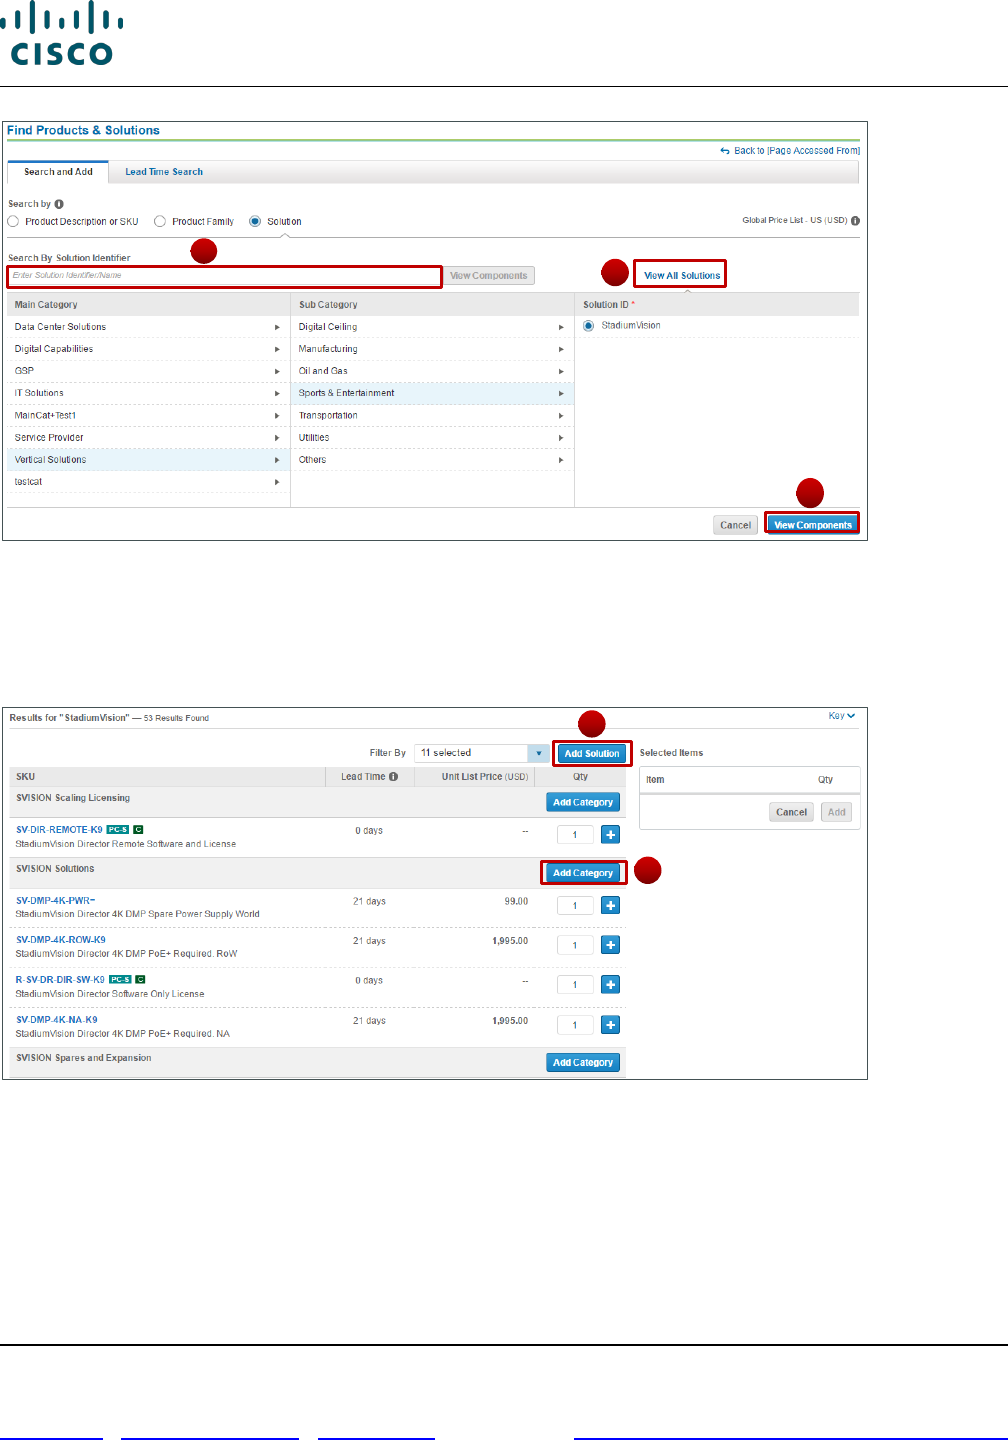
2. Click the Solution radio button.
3. Click View All Solutions to see a full list of solutions.
4. Browse through the Main Category and Sub Categories to find your desired solution.
5. Alternately, begin typing a Solution Identifier/Name in the Search field. Select the desired solution
from the drop-down.
6. Once you’ve selected the desired solution, click View Components to view the associated SKUs.
Cisco Commerce Order User Guide
Cisco Proprietary © 2020 Cisco and/or its affiliates. All rights reserved.
Last Updated: 17 March 2020 Page 49 of 143
Cisco.com | Privacy Statement | Trademarks Provide Feedback on this Training Resource
Find Products &Solutions Page: Search By – Solution
7. To add the default solution to your cart, click Add Solution.
8. To add all SKUs in a category, click Add Category.
9. Alternately, you can add individual SKUs to your cart.
Find Products &Solutions Page: Search By – Solution
6.3.1.4 Using the Lead Time Functionality
The Lead Time Search functionality allows you to obtain lead time information for both major and minor
lines. A lead time of a particular product or minor line option is the amount of time from order placement
to product shipment. It is possible to search for lead times by product family, product SKU, product
description, or a wild card search. You can then download or email the lead time information in either
an Excel or PDF format.
3
6
7
5
8

Cisco Commerce Order User Guide
Cisco Proprietary © 2020 Cisco and/or its affiliates. All rights reserved.
Last Updated: 17 March 2020 Page 50 of 143
Cisco.com | Privacy Statement | Trademarks Provide Feedback on this Training Resource
You can access the lead time tool in Quick Links also. Refer to the Getting Started with Cisco
Commerce User Guide to perform a lead time search.
6.3.2 Adding Items by SKU
To add items to the order by entering an SKU, complete the following steps:
1. On the Order page: Items tab, click the Search by SKU, Description, or Product Family field and
enter at least three letters or numbers of a SKU. A drop-down menu displays items with matching
SKUs.
Order Page: Items Tab – Add Product Item
To search using a wild card, enter a few letters of the product name followed by an asterisk (for
example, ABCD*). All SKUs that begin with ABCD will display in the Add Product Item drop-down
menu that populates.
2. Scroll down the drop-down menu and click an appropriate product.
Note: To locate products that are orderable but not published on the indicated price
list, enter the full SKU and press Enter. If the SKU is still not found, then the standard
process to address errors applies.
Prior to contacting support, verify that the SKUs cannot be located via the auto-
populate, wild card search, or general Cisco Commerce search functionalities and
that the SKU in question has been published to the price list selected on the order.
3. Click the Qty field and enter an appropriate quantity.
4. Click Add.
1
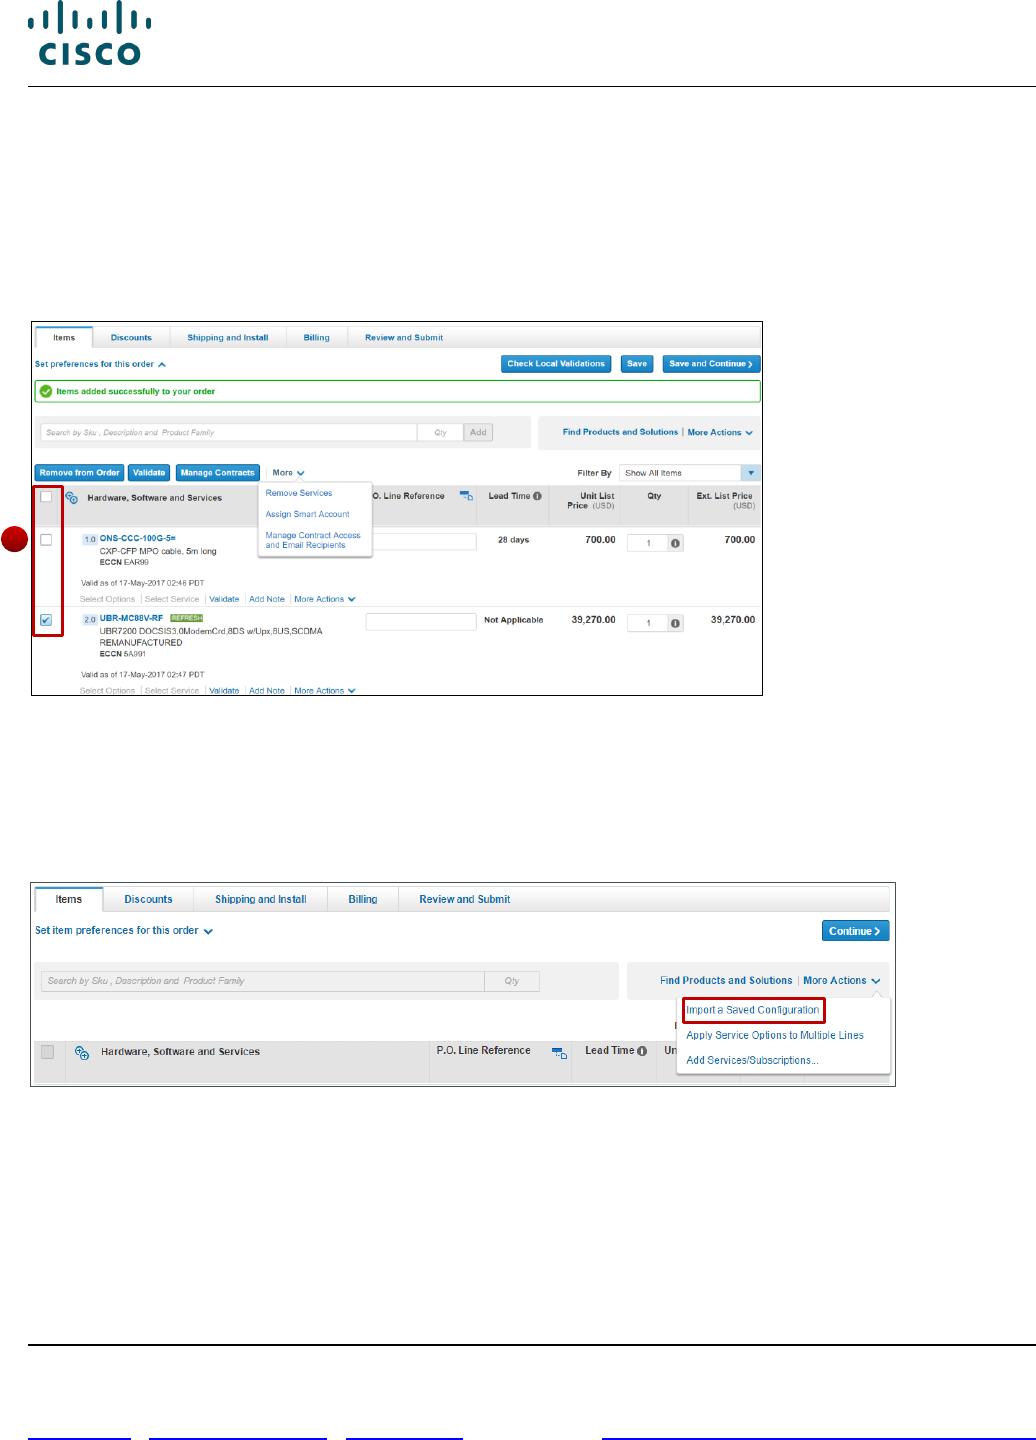
Cisco Commerce Order User Guide
Cisco Proprietary © 2020 Cisco and/or its affiliates. All rights reserved.
Last Updated: 17 March 2020 Page 51 of 143
Cisco.com | Privacy Statement | Trademarks Provide Feedback on this Training Resource
5. A green message displays, indicating that the part was added successfully. A new line displays the
added item.
6. To continue adding lines, click Save. The page remains unchanged, and additional lines can be
added by repeating the above process.
7. To remove a line, check the appropriate checkbox.
8. Click Remove from Order.
Order Page: Items Tab – Remove From Order
6.3.3 Importing an Estimate
Another way to add products to the order is to import a saved estimate. Cisco Commerce Orders tab
allows for saved estimates and BOMs to be imported into the order. Access the different tools via the
Import Saved Configuration dialog box.
Order Page: Items Tab – Import a Saved Configuration
7
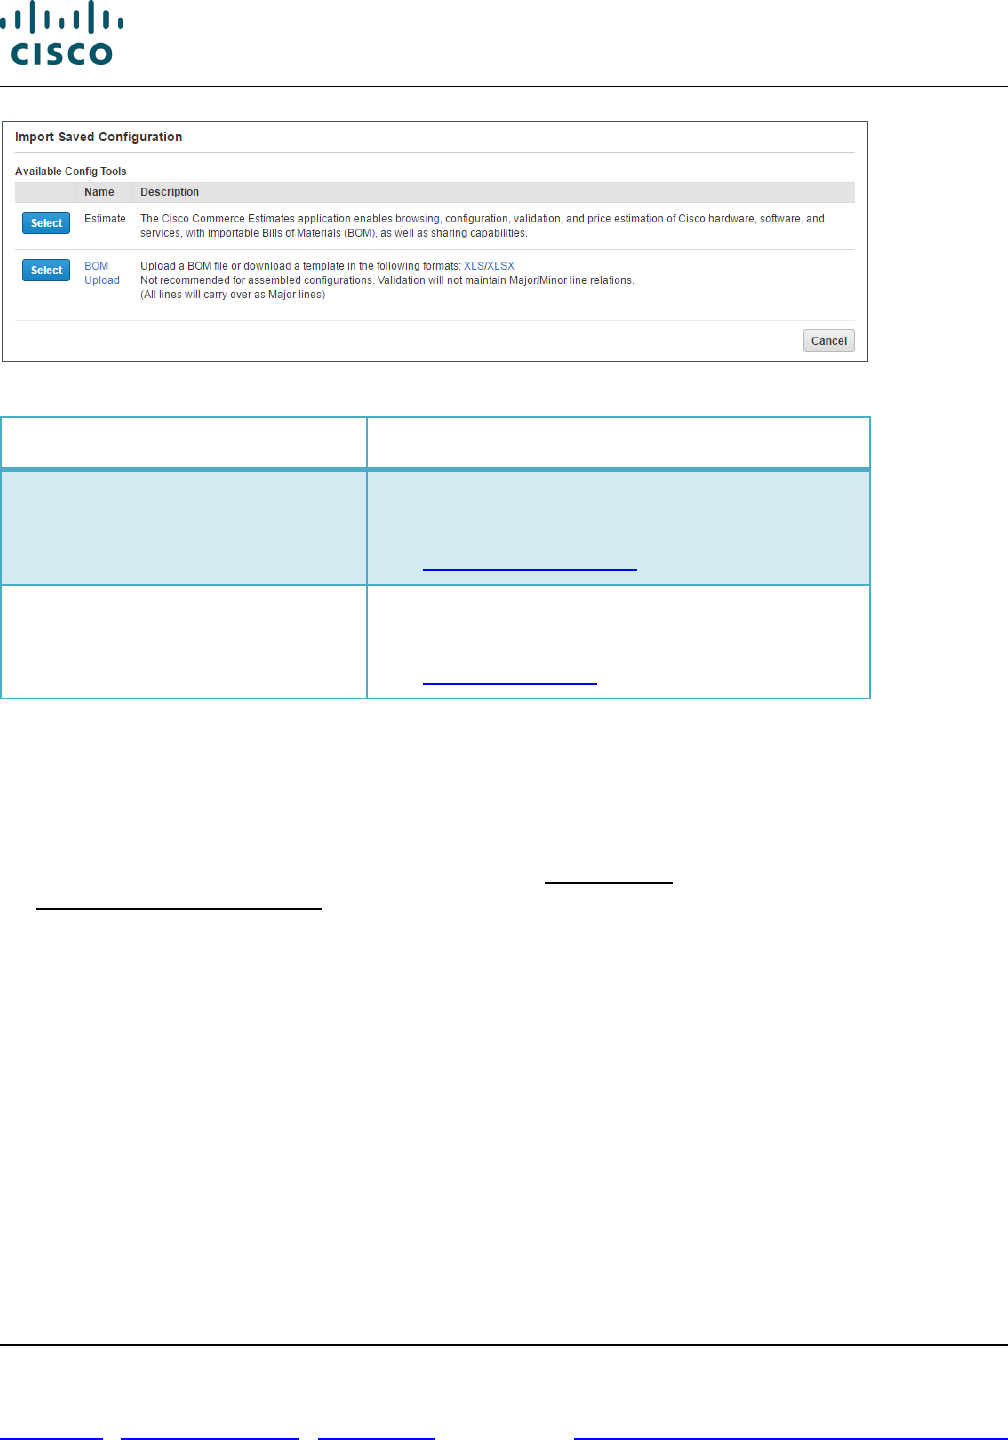
Cisco Commerce Order User Guide
Cisco Proprietary © 2020 Cisco and/or its affiliates. All rights reserved.
Last Updated: 17 March 2020 Page 52 of 143
Cisco.com | Privacy Statement | Trademarks Provide Feedback on this Training Resource
Order Page: Import Saved Configuration Dialog Box
Tool
Document Section
Estimate
Importing an Estimate is used for importing a
configuration that was saved from an order.
See Importing an Estimate
BOM Upload
BOM Upload is used for adding multiple spares
to the order.
See Uploading a BOM
6.3.3.1 Importing an Estimate
You can save a configuration from an order and then import that saved configuration, or estimate, into
another order.
To import an estimate, complete the following steps:
1. From the Order page: Items tab, click to expand the More Actions drop-down menu and then click
Import a Saved Configuration. The Import Saved Configuration dialog box displays.
2. Click Select next to Estimate. The Import Estimate page will load.
3. Search for the estimate you wish to import by using the Estimate ID, Estimate Name, Created By,
Created Date, Last Modified, and Status fields.
4. Click Search. The search results display.
5. Select the radio button associated with the desired estimate.

Cisco Commerce Order User Guide
Cisco Proprietary © 2020 Cisco and/or its affiliates. All rights reserved.
Last Updated: 17 March 2020 Page 53 of 143
Cisco.com | Privacy Statement | Trademarks Provide Feedback on this Training Resource
Importing an Estimate – Search Results
6. Click Import Entire Estimate. The Order page: Items tab displays the newly imported line items
from the selected estimate.
Order Page: Items Tab – Imported Estimate
6.3.3.2 Uploading a BOM
To upload a BOM, complete the following steps:
1. From the Order page: Items tab, click to expand the More Actions drop-down menu and then click
Import a Saved Configuration. The Import Saved Configuration dialog box displays. Click Select
next to BOM Upload.
2. Click Browse and locate the appropriate file.
Best Practice: Use the available templates in XLS/XLSX format to upload a BOM.
The template links are available in the Import Saved Configuration dialog box.
5
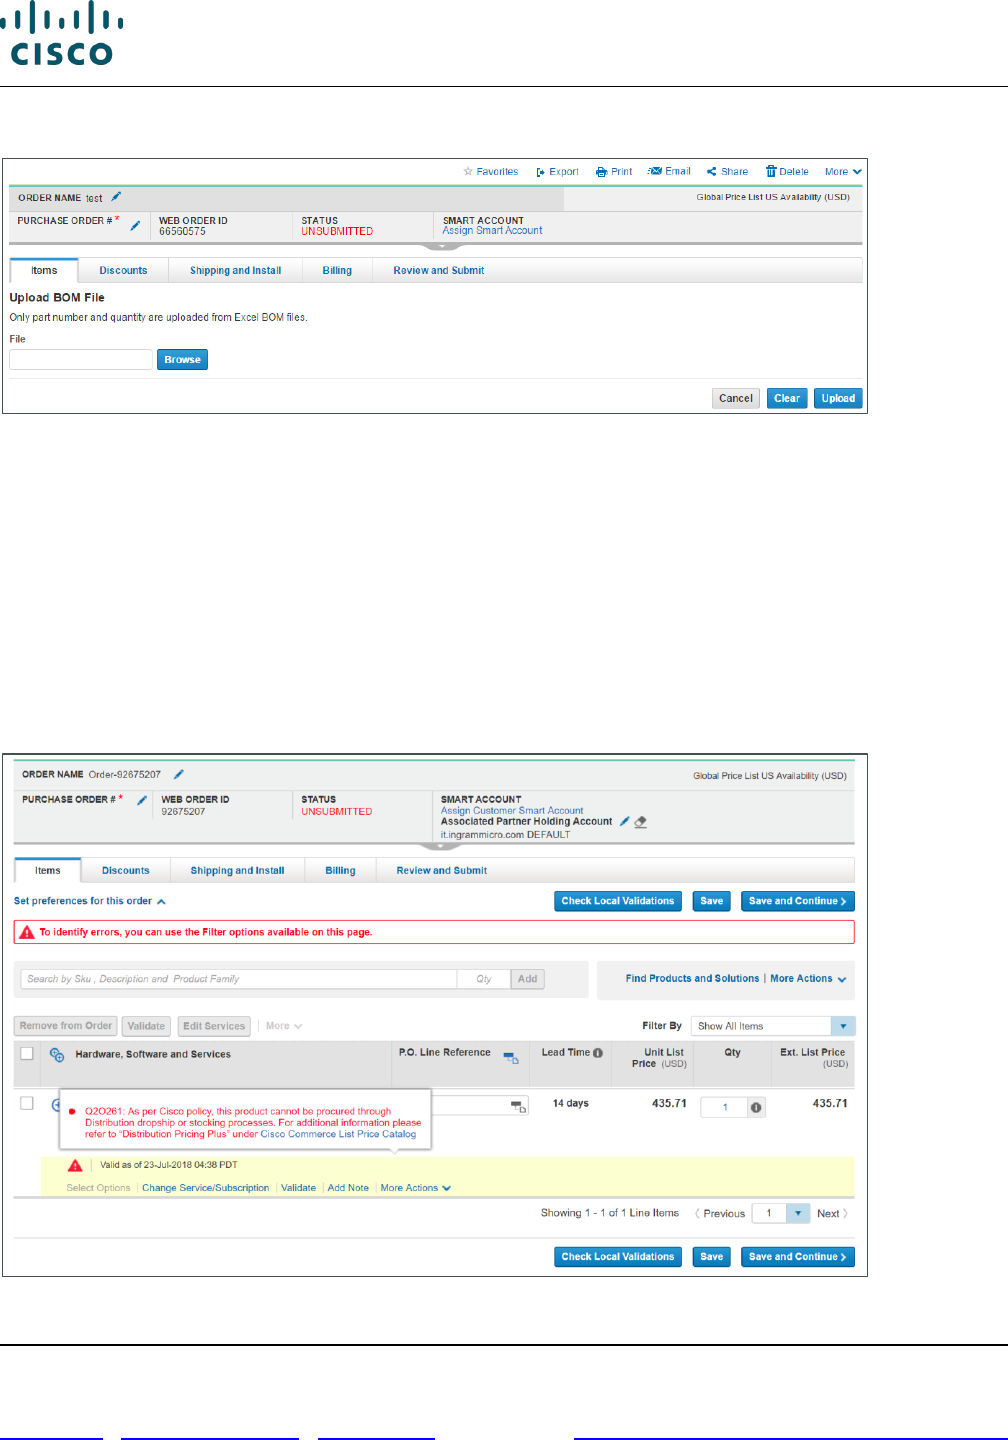
Cisco Commerce Order User Guide
Cisco Proprietary © 2020 Cisco and/or its affiliates. All rights reserved.
Last Updated: 17 March 2020 Page 54 of 143
Cisco.com | Privacy Statement | Trademarks Provide Feedback on this Training Resource
3. Click Upload File. The Items sub-tab displays the imported BOM as line items.
Importing a BOM
4. To continue adding lines, click Save. The page remains unchanged, and additional lines can be
added by repeating the above process or by using any of the other processes for adding products.
5. Alternatively, to continue with the deal, click Save and Continue. The Discounts & Credits sub-tab
displays.
6.3.4 Fulfillment Restrictions
Distributors will see a messages when adding SKUs that are on Fulfillment Restriction Flags “BLOCK”
and “No Stock”. CPS Agents will see updated Task Name and Task Message when B2B EDI orders
with fulfillment restriction SKUs are submitted.
Message if SKU status is “Blocked”:

Cisco Commerce Order User Guide
Cisco Proprietary © 2020 Cisco and/or its affiliates. All rights reserved.
Last Updated: 17 March 2020 Page 55 of 143
Cisco.com | Privacy Statement | Trademarks Provide Feedback on this Training Resource
Message if SKU status is “No Stock”:
6.4 Adding Different Types of SKUs
You can add different type of products, services, and configurations to the order on the Order Page:
Items tab before moving to the Discounts tab.
6.4.1 Adding Remanufactured Equipment
You can add remanufactured equipment (also known as Refresh), to a quote and/or an order with the
applicable services.
1. Add remanufactured products using any of the methods for adding items. See Adding Items to the
Order.
Note: Some remanufactured products require a power cord. For those products, you
must select the correct power cord for your country prior to submitting your order.
2. To select or change options for the remanufactured product, see Choosing Options and Resolving
Issues.
3. Hover over the icon to view the new equivalent product SKU and price. The icon will display
only for the remanufactured product.
Cisco Commerce Orders Tab Create Order
Order Page: Items
Tab
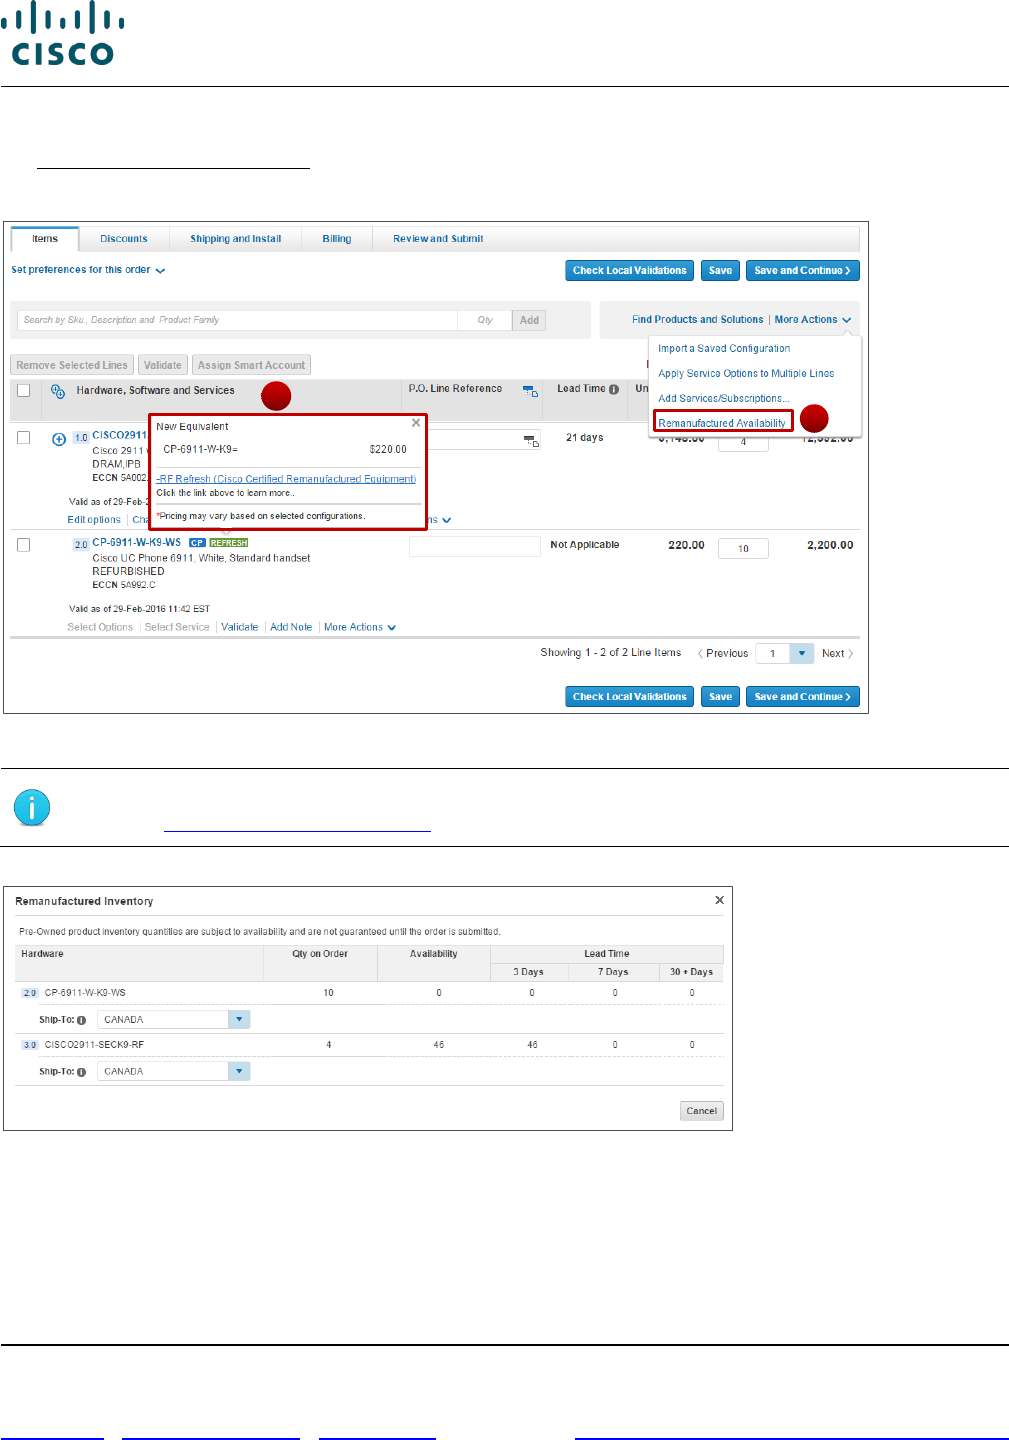
Cisco Commerce Order User Guide
Cisco Proprietary © 2020 Cisco and/or its affiliates. All rights reserved.
Last Updated: 17 March 2020 Page 56 of 143
Cisco.com | Privacy Statement | Trademarks Provide Feedback on this Training Resource
4. To view available inventory and shipment lead times in the Items tab in Order, click
Remanufactured Availability. The Remanufactured Inventory dialog box displays.
5. Click Cancel to return to the Items tab.
Orders Tab: Items Tab – Remanufactured Product
Note: Place new items and remanufactured items in different shipping groups. See
Managing Shipping Groups for more information.
Remanufactured Inventory Dialog Box
4
3
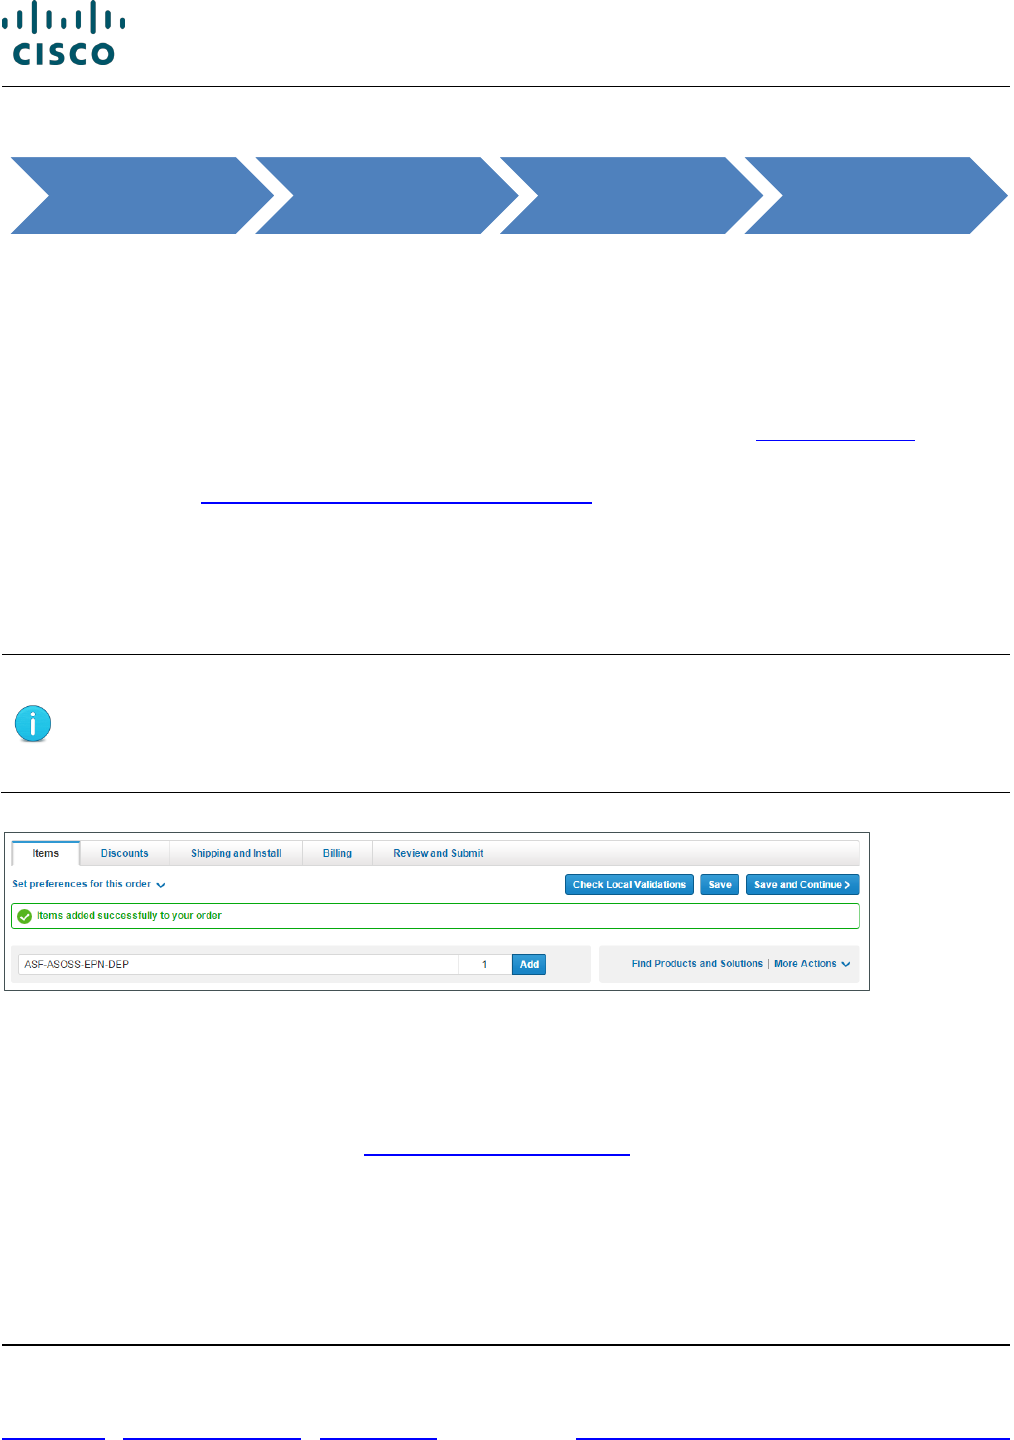
Cisco Commerce Order User Guide
Cisco Proprietary © 2020 Cisco and/or its affiliates. All rights reserved.
Last Updated: 17 March 2020 Page 57 of 143
Cisco.com | Privacy Statement | Trademarks Provide Feedback on this Training Resource
6.4.2 Adding Fixed Scope Consultancy SKUs
You can quote and order Fixed Scope Consultancy services only in Cisco Commerce. There are two
types of Fixed Scope Consultancy services:
• Installations
• Network Optimization
These services are fixed price, fixed scope, and fixed duration. Therefore, Fixed Scope Consultancy
services will always be purchased at net price. To add technical services see Adding Services.
Fixed Scope Consultancy SKUs can be added as a separate line, or configured as an option for eligible
software offers (see Choosing Options and Resolving Issues).
To add Fixed Scope Consultancy SKUs, complete the following steps:
1. From the Order page: Items tab, click the Add Product Item field and enter “ASF-“. A list of Fixed
Scope Consultancy SKUs display.
2. Select the desired SKU.
Best Practice: Contact information for Fixed Scope Consultancy SKUs must be
accurate and should be the contact with whom a project team will work to schedule
the installation. In most cases, this is not the Ship To contact.
Providing accurate information at the time of order results in seamless delivery.
Order Page: Items Tab – Fixed Scope Consultancy SKU
3. Verify the quantity is correct depending on the SKU and click Add. The Fixed Scope Consultancy
line is added to the line items of the order.
4. Before completing the order, you must verify the contact information and move these items to a new
shipping group if necessary. See Managing Shipping Groups.
6.4.3 Adding a License SKU
SKUs that begin with L or LIC and end with = are license SKUs. Cisco Commerce offers two
software/license delivery methods: electronic delivery (e-delivery) and physical delivery.
For example:
Cisco Commerce Orders Tab Create Order
Order Page: Items
Tab
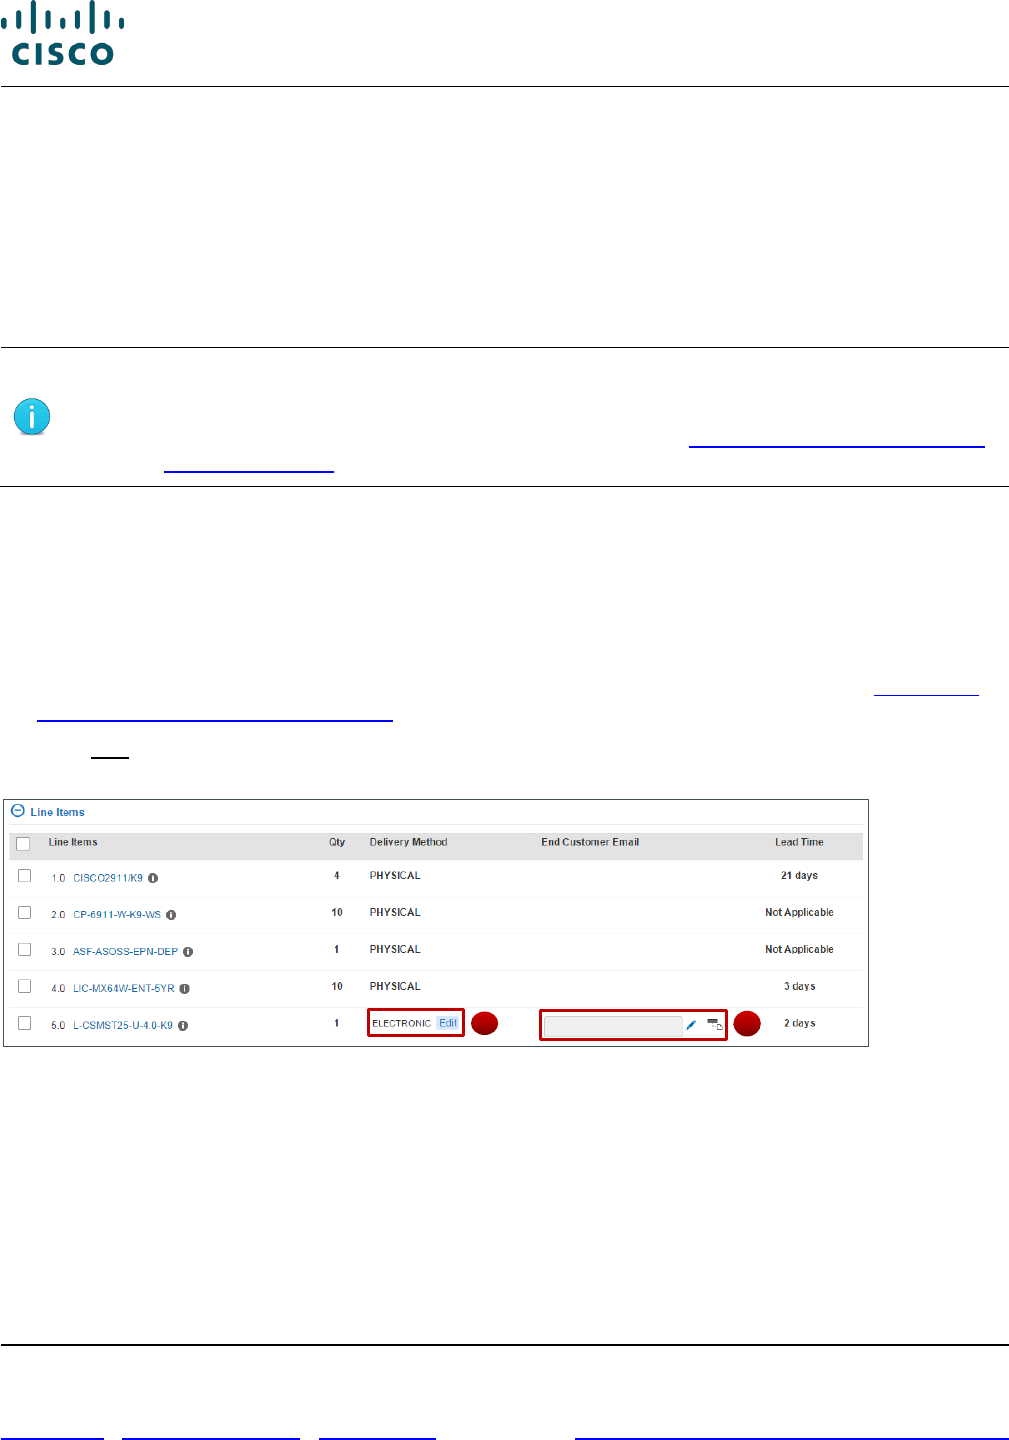
Cisco Commerce Order User Guide
Cisco Proprietary © 2020 Cisco and/or its affiliates. All rights reserved.
Last Updated: 17 March 2020 Page 58 of 143
Cisco.com | Privacy Statement | Trademarks Provide Feedback on this Training Resource
• License SKUs with e-delivery begin with the letter “L”, example: L-3PTY-DL-100K=
If you choose an L SKU, the license is sent electronically regardless of the indicated delivery
method.
• License SKUs with physical delivery begin with the letters “LIC”, example: LIC-3PTY-DL-100K=
If you choose an LIC SKU, which is physical delivery, the system looks to the delivery option
indicated. If e-delivery is the indicated delivery method, then the system overrides the LIC SKU and
delivers the license electronically.
Note: Add a license following the same directions as adding any other items.
Pay attention to choosing the SKUs and indicating the appropriate delivery method.
To change the delivery method of a license SKU, see Changing the Delivery Method
of a License SKU.
The same rules that govern software license delivery are applicable for e-software delivery. For
electronic delivery, you must provide a shipping email address or an end customer email address.
6.4.3.1 Changing the Delivery Method of a License SKU
To manage the delivery method for license SKUs, complete the following steps:
1. For licenses that are slated for physical delivery, choose a preferred carrier on the Shipping and
Install tab, (only if applicable for the particular order). To set shipping information, see Setting the
Shipping and Installation Information.
2. Click Edit corresponding to the Delivery Method column. The Change Line Shipping Options dialog
box displays.
Order Page: Shipping and Install Tab -Edit Delivery Method
3. If the line item is scheduled for e-delivery only, complete the following steps:
• Enter the shipping/end customer email and any customer reference information. Separate
multiple email addresses with commas.
• To make all line items eligible for electronic delivery, check the Apply to Group checkbox in the
Change Line Shipping Options dialog box.
• To update the delivery method, click Update.
2
3
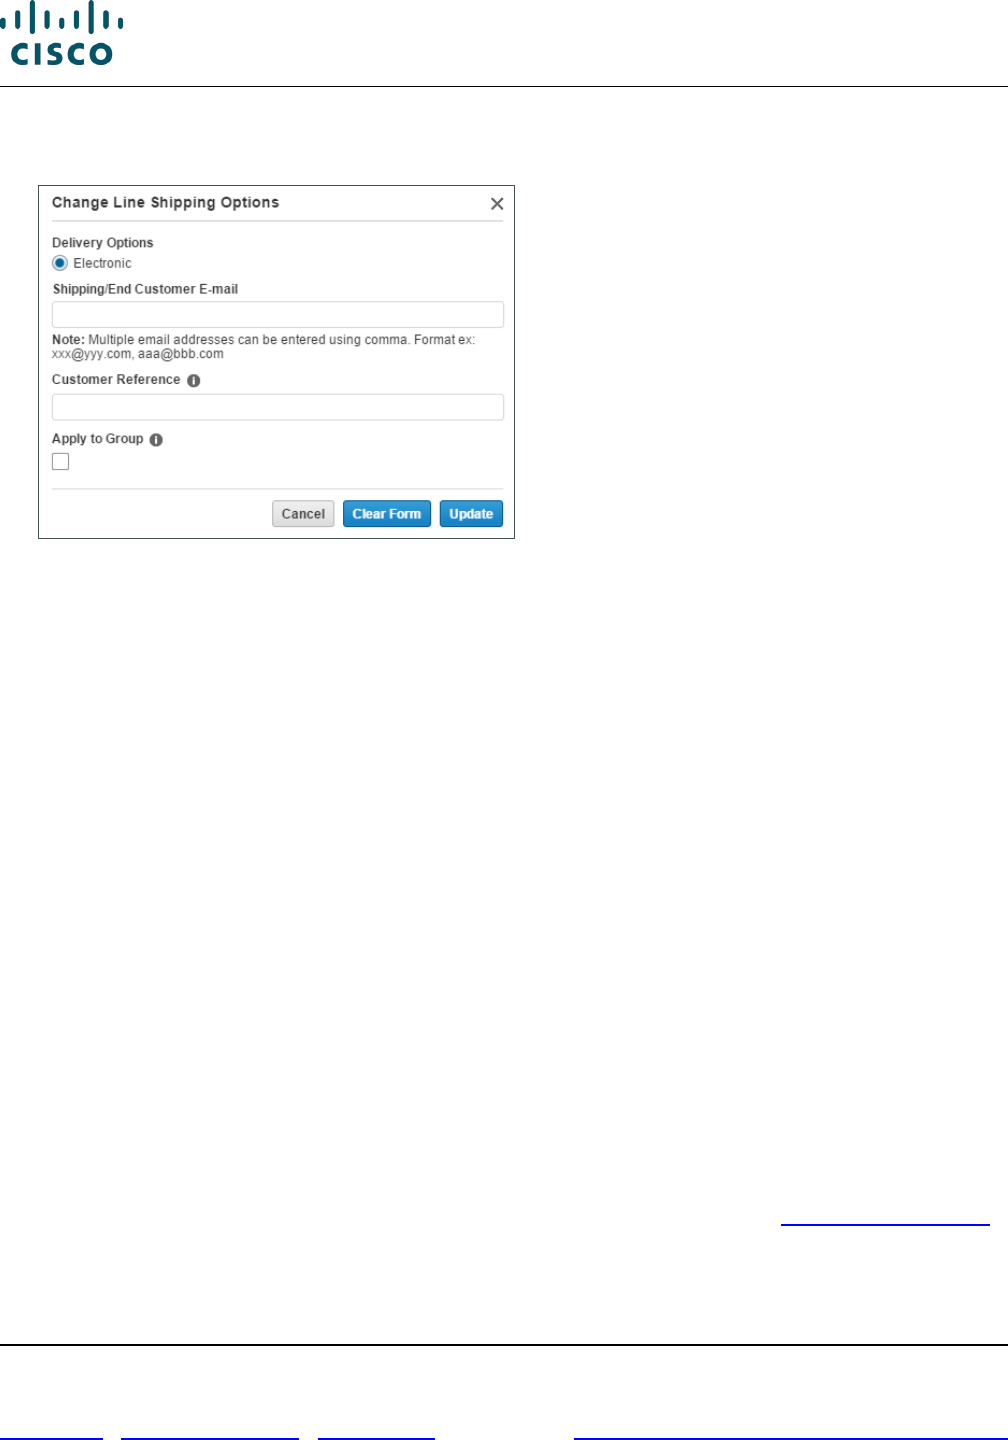
Cisco Commerce Order User Guide
Cisco Proprietary © 2020 Cisco and/or its affiliates. All rights reserved.
Last Updated: 17 March 2020 Page 59 of 143
Cisco.com | Privacy Statement | Trademarks Provide Feedback on this Training Resource
• Alternatively, you can also update this information in the line items list next to the corresponding
item.
Change Line Shipping Options
4. If the line item is scheduled for physical delivery only, complete the following steps:
• If applicable, choose the appropriate preferred carrier on the Shipping and Install tab.
• To make all line items eligible for physical delivery, check the Apply to Group checkbox in the
Change Line Shipping Options dialog box.
• To update the delivery method, click Update.
5. If a chosen line item is eligible for e-delivery or physical delivery, the option to change the service
level from either e-delivery or physical delivery is available.
• Click the radio button (either Electronic or Physical) corresponding to the appropriate option and
add the necessary email and customer reference information.
• To update the delivery method, click Update.
6.4.3.2 Changing From Physical to Electronic Delivery without Changing the
Discount
To change a license or software delivery from physical to electronic delivery without changing the
discount, complete the following steps:
1. Begin with an open order that already contains an LIC-…= SKU.
2. On the Order page, Items tab, click the Add Product Item field and enter the same SKU, except
beginning with L, as opposed to LIC. The drop-down menu displays matching options after you
enter a few characters.
3. Click the appropriate SKU from the Add Product Item drop-down menu. See Adding Items by SKU.
4. Click Add. The e-delivery item is added as a line item to the configuration.
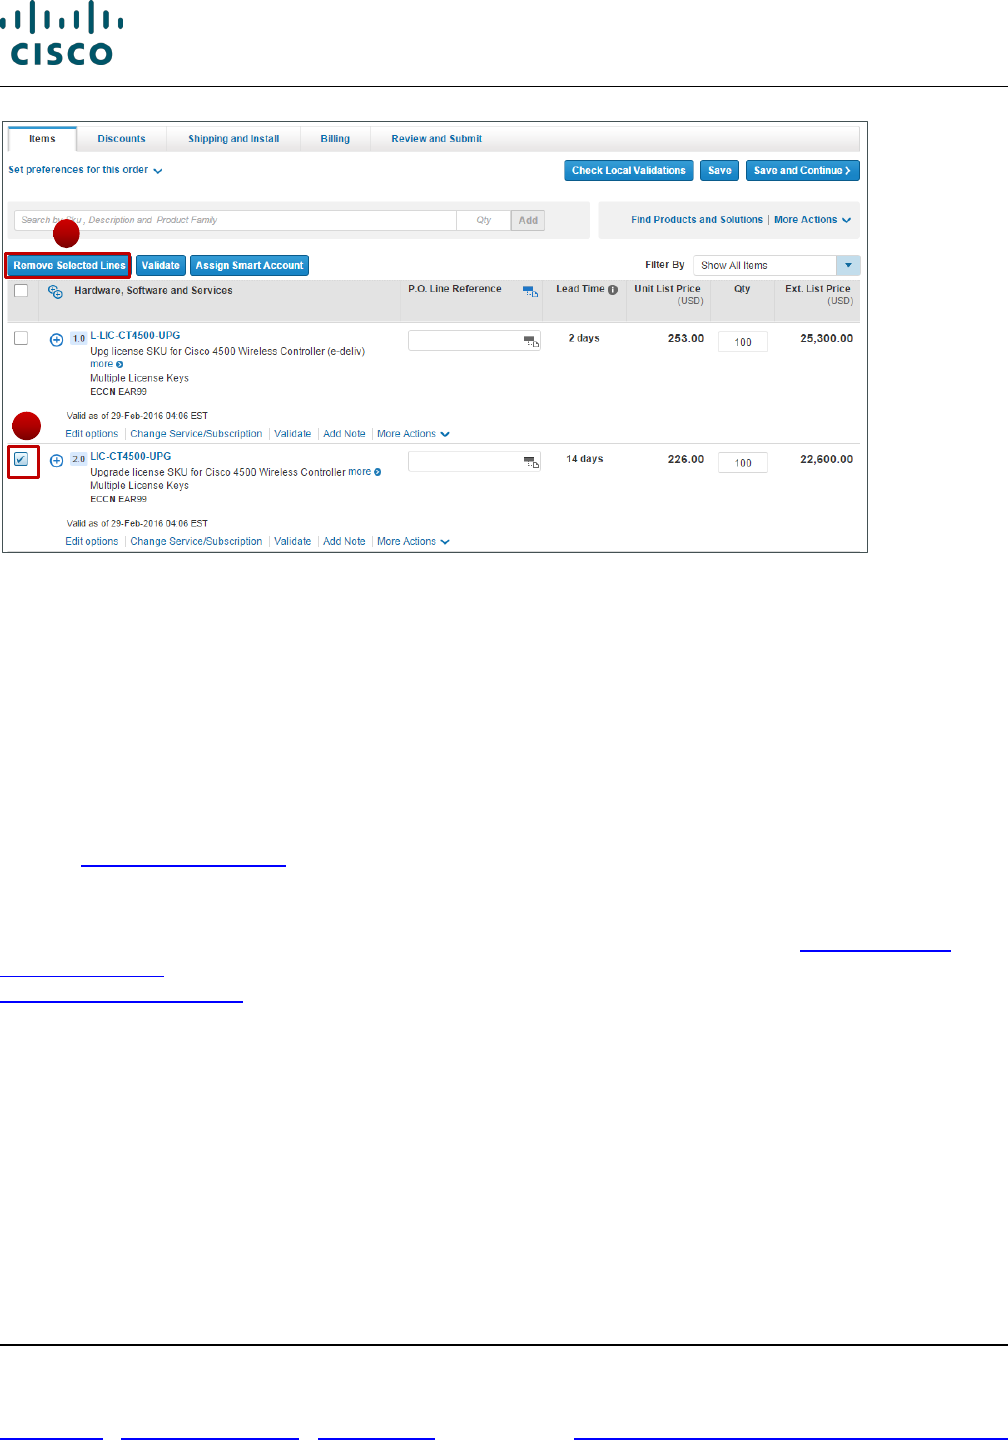
Cisco Commerce Order User Guide
Cisco Proprietary © 2020 Cisco and/or its affiliates. All rights reserved.
Last Updated: 17 March 2020 Page 60 of 143
Cisco.com | Privacy Statement | Trademarks Provide Feedback on this Training Resource
Order Page: Items Tab – License SKUs
5. Scroll through the line items to locate the original LIC…= SKU. Once located, check the checkbox
of the license that is set for physical delivery.
6. Click Remove Selected Lines. The Remove Items from Order dialog box displays.
7. Click Remove Items. This permanently removes the physical delivery item from the order.
8. Click the Discounts tab.
9. Review the discounts. The electronic delivery item has been added and the physical delivery
removed, and the discounting remains the same.
See Reviewing Discounts for more information on discounts in Cisco Commerce Orders.
6.4.4 Adding a Spare
You can add multiple spares to the order by uploading an Excel spreadsheet (see Adding Multiple
Spares via Excel). Alternatively, you can add spares individually by entering the appropriate SKU (see
Adding Individual Spares).
Spares have an = sign at the end of their SKU.
6.4.4.1 Adding Multiple Spares via Excel
The Cisco Commerce Orders tab enables you to add multiple line items by uploading an Excel
spreadsheet containing product numbers, quantities, and durations. Each line on the Excel file is added
as a major line on the order and therefore the system is not able to identify which items would be a
minor line of a different item. No validation is performed on uploaded items.
5
6
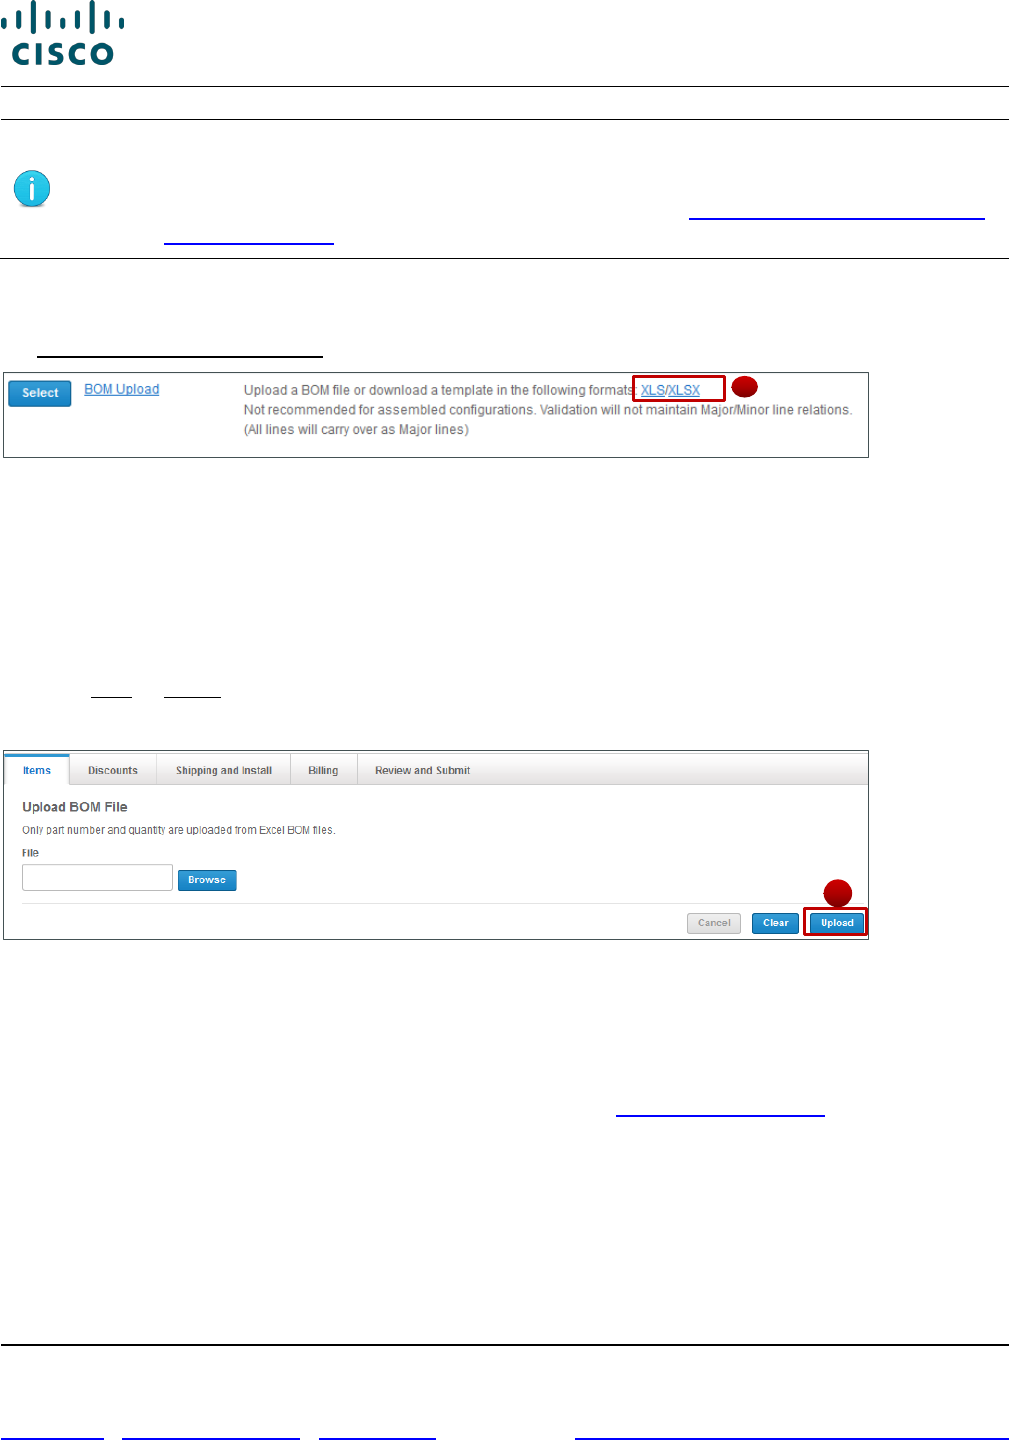
Cisco Commerce Order User Guide
Cisco Proprietary © 2020 Cisco and/or its affiliates. All rights reserved.
Last Updated: 17 March 2020 Page 61 of 143
Cisco.com | Privacy Statement | Trademarks Provide Feedback on this Training Resource
Note: Add a license following the same directions as adding any other items.
Pay attention to choosing the SKUs and indicating the appropriate delivery method.
To change the delivery method of a license SKU, see Changing the Delivery Method
of a License SKU.
To add multiple spares by uploading an Excel spreadsheet, complete the following steps:
1. From the Order page: Items tab, click to expand the More Actions drop-down menu, then click
Import a Saved Configuration. The Import Saved Configuration dialog box displays.
Import a Saved Configuration Dialog Box: BOM upload View
2. Click Select next to BOM Upload. The Order page: Items tab refreshes with an Upload BOM File
section.
3. Click Browse.
4. Locate the appropriate file and click Open.
The template for use with this function is located on the Import Saved Configuration dialog box.
Click XLS or XLSX in the text to the right of BOM Upload.
5. Click Upload.
Order Page: Upload BOM File Section
6.4.4.2 Adding Individual Spares
To add a spare one at a time, complete the following steps:
1. From the Order page: Items tab, click the Add Product Item field and begin entering the SKU or
partial SKU. For more information on entering by SKU, see Adding Items by SKU.
2. Click the appropriate SKU from the Add Product Item drop-down list.
3. Click the Qty field and enter the desired quantity.
4
5
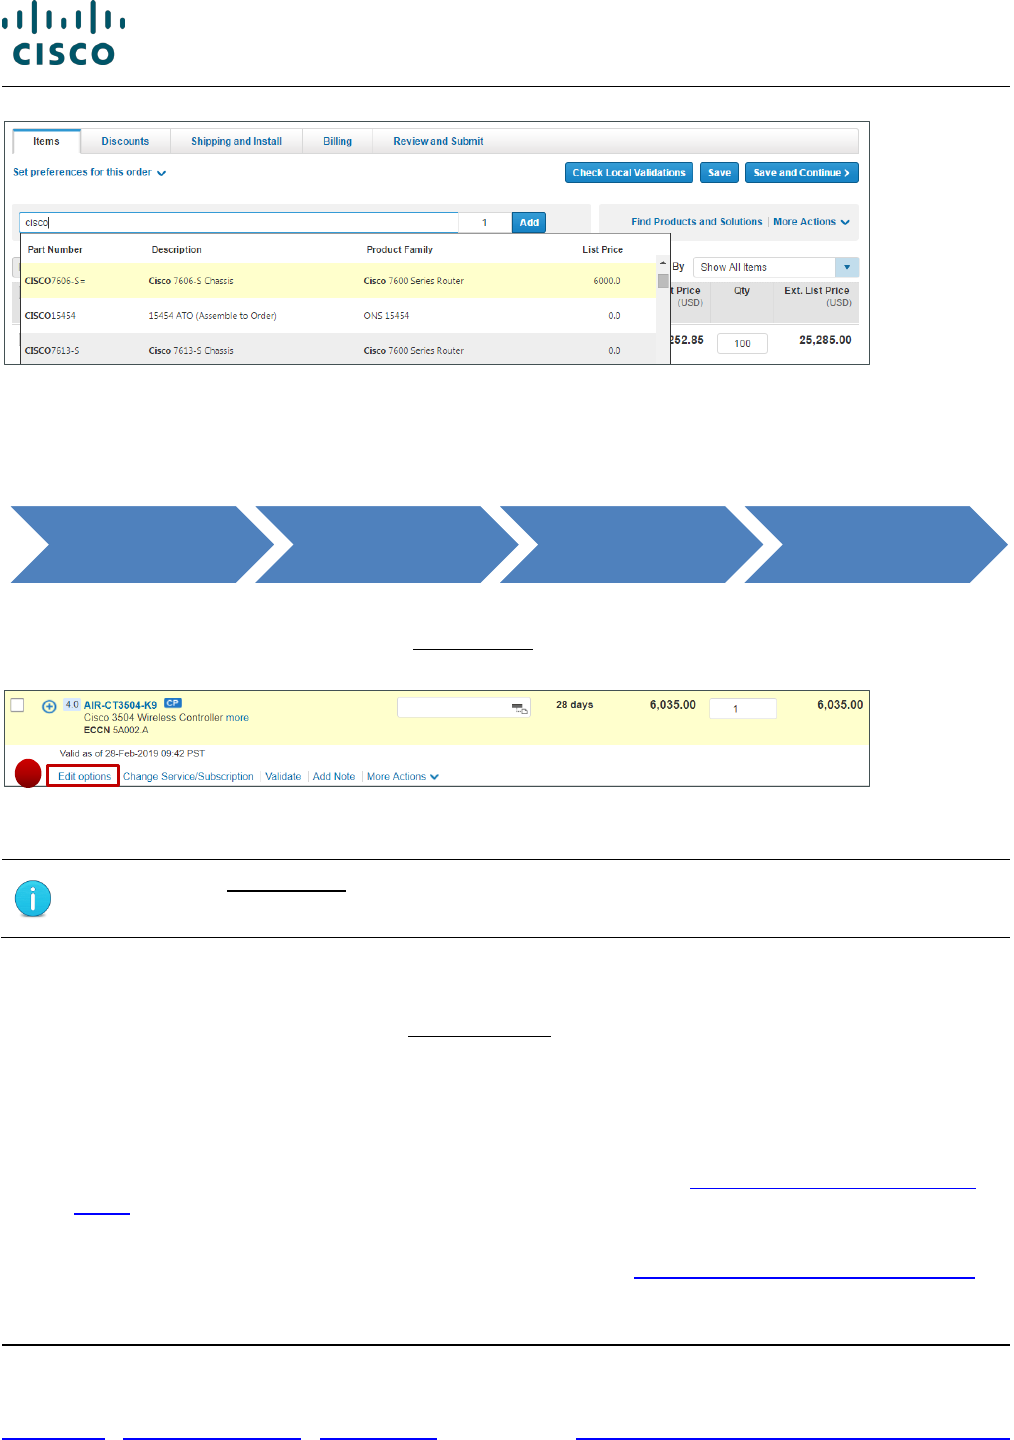
Cisco Commerce Order User Guide
Cisco Proprietary © 2020 Cisco and/or its affiliates. All rights reserved.
Last Updated: 17 March 2020 Page 62 of 143
Cisco.com | Privacy Statement | Trademarks Provide Feedback on this Training Resource
Order Page: Items Tab – Adding a Spare
4. Click Add. The spare is successfully added to the line items.
6.5 Choosing Options and Resolving Issues
When a product requires additional configuration, select the appropriate options and resolve any issues
so that the product is properly configured. Edit Options is active under products that require additional
configuration.
Order Page: Items Tab
Note: Edit Options displays for products already configured. However, you can select
new options.
To select options, configure products, and resolve any warnings or errors in the configuration, complete
the following steps:
1. From the Order page: Items tab, click Select Options below the line item that needs to be
configured so it can become valid. The Option Selection page displays.
The configuration can be completed for multiple options, individual options, when the SKUs are
known, and when the SKUs are not known.
• If the SKUs for the required items are known, use the multiple option search function to enter
the SKUs in a list and have all results display on the page (see Searching for Multiple Known
SKUs).
• To search for a known SKU one at a time, use the Option Search tab or search for a SKU
manually through the system of links and messages (see Searching for a Single Known SKU).
Cisco Commerce Orders Tab Create Order
Order Page: Items
Tab
1
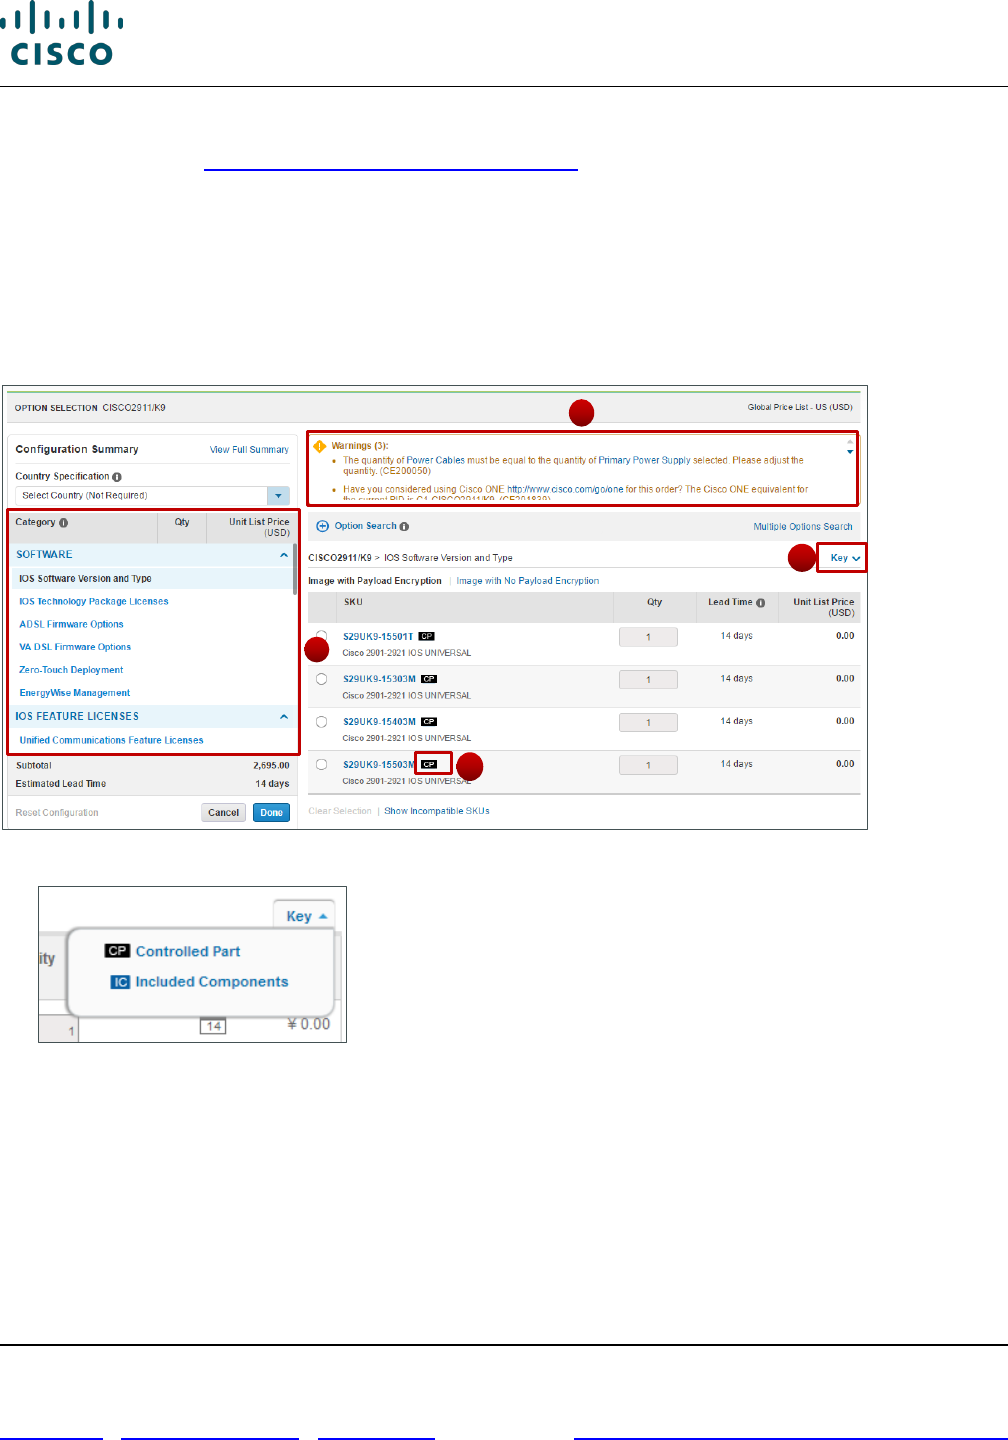
Cisco Commerce Order User Guide
Cisco Proprietary © 2020 Cisco and/or its affiliates. All rights reserved.
Last Updated: 17 March 2020 Page 63 of 143
Cisco.com | Privacy Statement | Trademarks Provide Feedback on this Training Resource
• If the SKUs are not known or to search by each required component, use the individual search
function (see Searching Unknown SKUs Individually).
2. Review the product list displaying on the left of the page in the Configuration Summary pane.
3. Attend to the warning or error messages displaying at the top of the page indicating corrections
within the configuration. You cannot submit the order without completing the configuration.
4. Some of the options have icons next to them. These icons give additional information about the
corresponding option. Hover over the icon to view related information.
5. Click the Key drop-down to view icon-related information.
Option Selection Page
Key Drop-Down List
6.5.1 Using the Power Calculator
Power Calculator option is only applicable to UCS products and identifies the electrical power
consumption of products to make better selection.
To view the power consumption information for a UCS product, complete the following steps:
1. Select the appropriate option and click Power Calculator drop-down arrow to view the consumption.
2. A legal disclaimer displays. Click Accept to view the power consumption details.
2
4
5
3
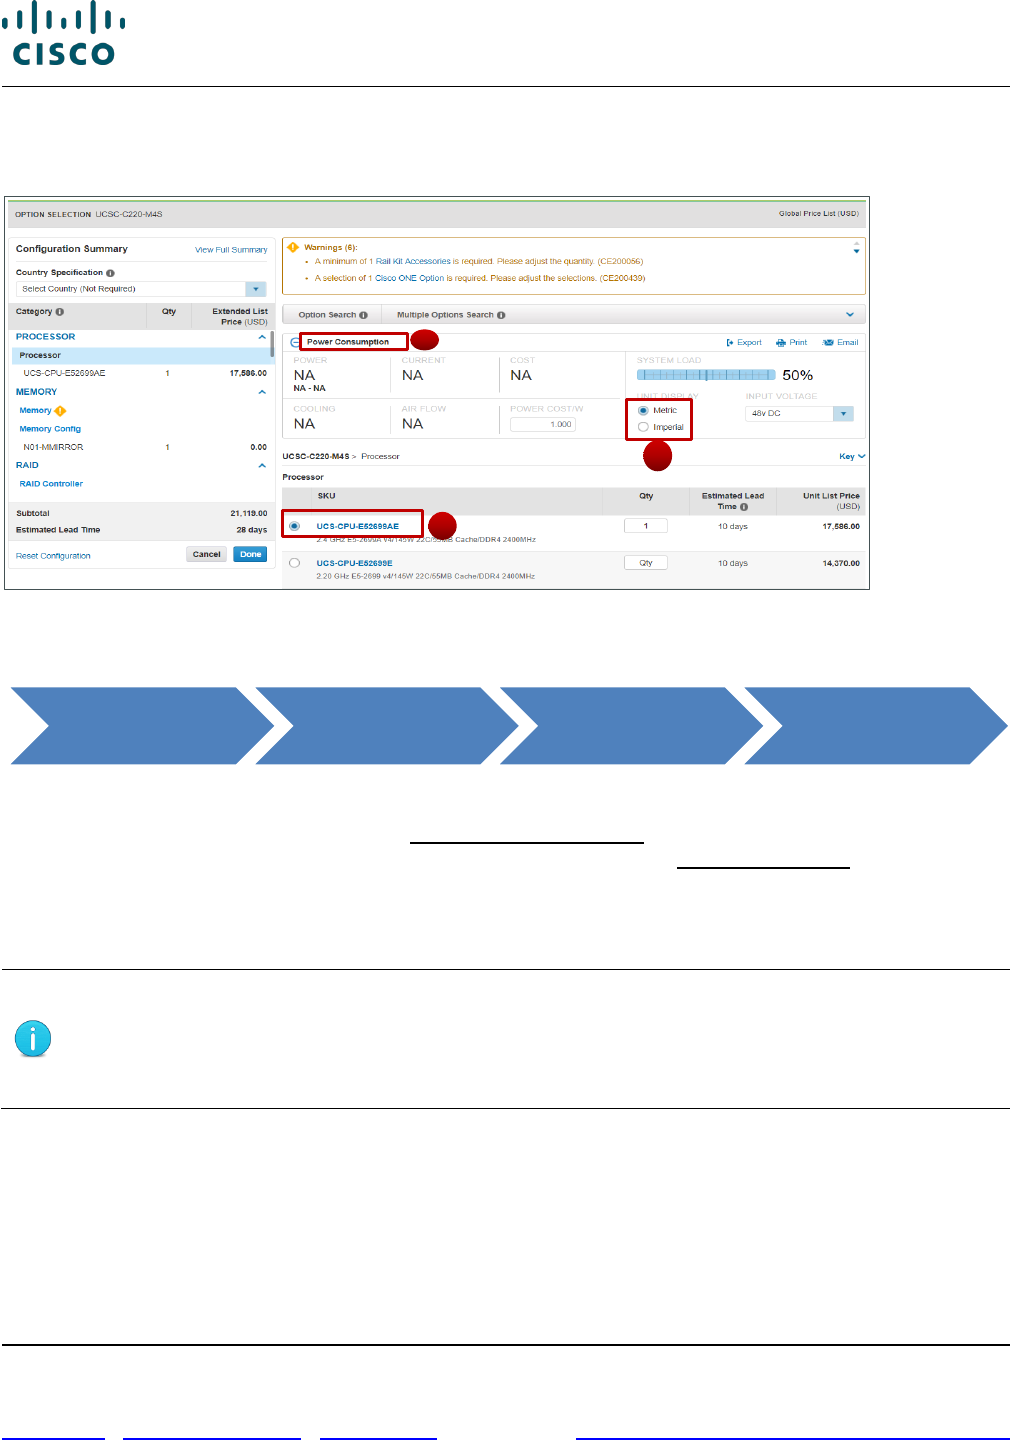
Cisco Commerce Order User Guide
Cisco Proprietary © 2020 Cisco and/or its affiliates. All rights reserved.
Last Updated: 17 March 2020 Page 64 of 143
Cisco.com | Privacy Statement | Trademarks Provide Feedback on this Training Resource
3. Click Metric or Imperial to view appropriate units in the power calculator drop-down menu.
4. Click again on Power Calculator to close the drop-down menu.
Option Selection Page – Power Consumption
6.5.2 Searching for Multiple Known SKUs
To search for multiple known option SKUs at a time, complete the following steps:
1. From the Option Selection page, click Multiple Options Search. The content on the right of the page
refreshes and displays the Multiple Options Search section. Click Show Instructions for support and
examples.
2. Click the text box and enter SKUs and respective quantities. Copy and paste information from
another source or enter the information manually if needed.
Note: Enter the SKU and respective quantity; separated by a space, a comma, a tab,
or a semi-colon on the same line, one SKU per line.
Enter the product items in a column. Do not enter the product items in a list separated
by commas.
Cisco Commerce
> Orders Tab
Create Order >
Items Tab
Populate Order >
Select Options
Option Selection
Page (Next Gen
Configuration)
1
3
1
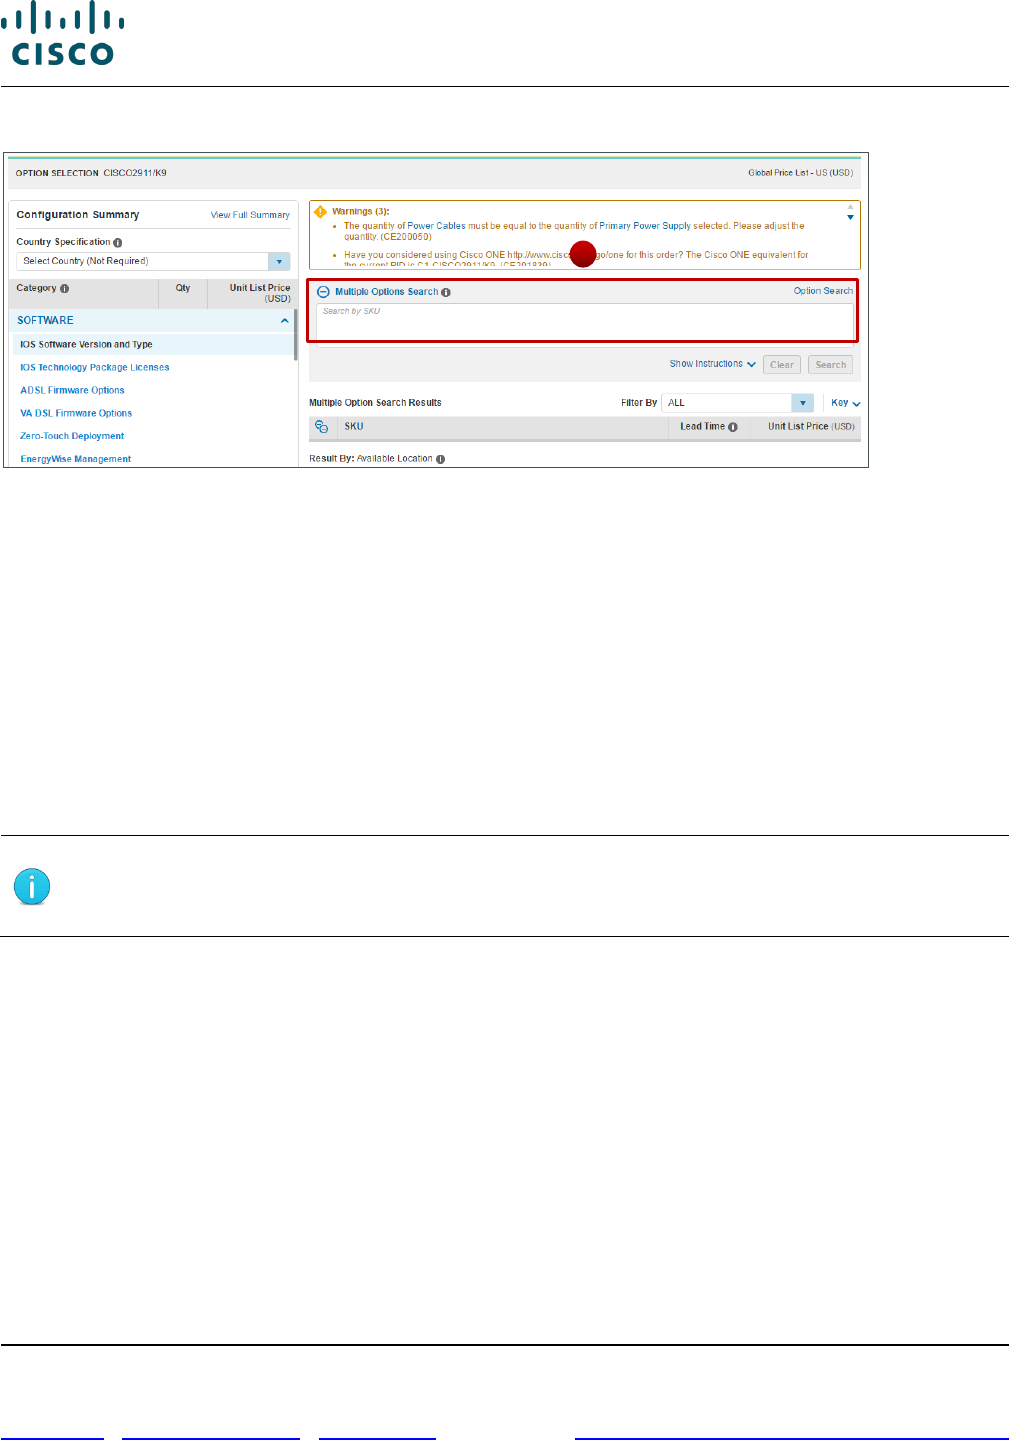
Cisco Commerce Order User Guide
Cisco Proprietary © 2020 Cisco and/or its affiliates. All rights reserved.
Last Updated: 17 March 2020 Page 65 of 143
Cisco.com | Privacy Statement | Trademarks Provide Feedback on this Training Resource
Option Selection Page: Multiple Options Search
3. Click Search.
4. The search results display at the bottom under Result: By Available Location, Result: By Potential
Location, and Result: Not available. Search results include estimates lead times, SKU list prices,
and locations (available and potential).
Some of the results have icons next to them. These icons give additional information about the
corresponding option. Mouse over the icon to view the information.
5. From the search results under Available Location section, check the checkbox(s) corresponding to
the desired items.
6. Errors with the indicated quantities display above the Multiple Options Search tab. Click each link to
resolve the error. Once the quantity errors are resolved, the items are added to the configuration.
Note: Some Qty fields are editable and some are not. If the Qty field is populated and
greyed out so that you cannot make edits, the quantity is controlled by the system
according to the rules of quantity limitations.
2
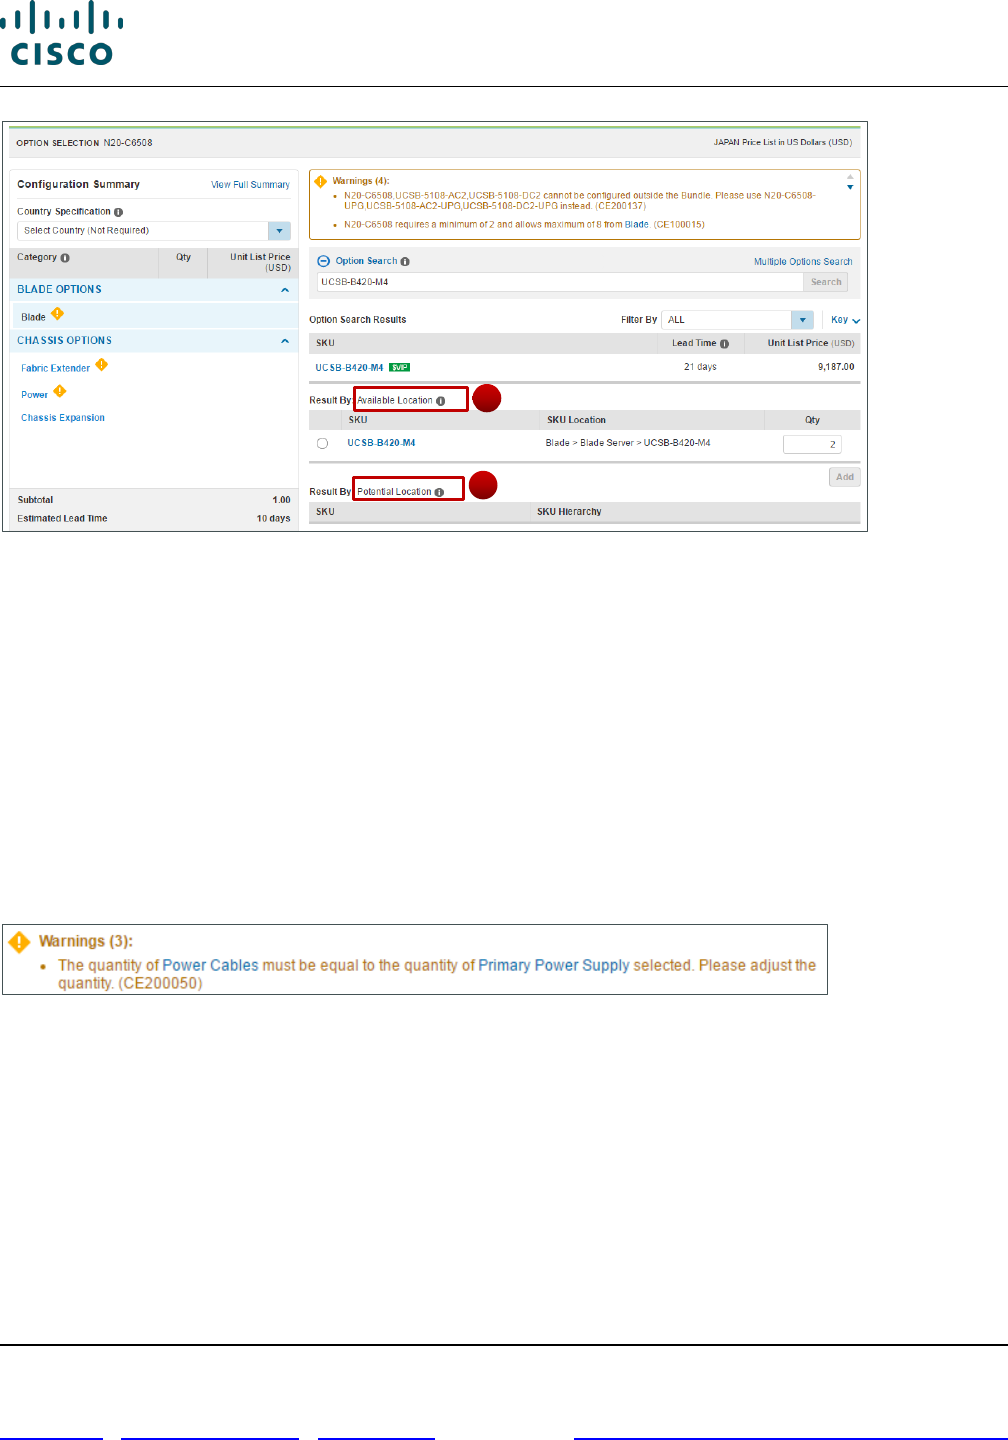
Cisco Commerce Order User Guide
Cisco Proprietary © 2020 Cisco and/or its affiliates. All rights reserved.
Last Updated: 17 March 2020 Page 66 of 143
Cisco.com | Privacy Statement | Trademarks Provide Feedback on this Training Resource
Multiple Option Search Tab: Search Results
7. Click Done. The Order page displays.
8. Available Location indicates the path to the SKU(s) under the Configuration Summary pane on the
left side of the page. Items can be added to the configuration by leaving the appropriate checkbox
(s) checked. To remove a product from the list of items to add, uncheck the checkbox
corresponding to that product.
9. The Potential Location indicates a possible path to the indicated SKU(s) under the Configuration
Summary pane on the left side of the page. Items cannot be added to the configuration from this
section. Click the link within the indicated path and select the appropriate product.
10. If there are any error messages associated with a SKU, the error message displays at the top of the
page and the SKU displays under Results: Not available. These SKUs are not selectable.
11. Hover over the information icon to learn more about available and potential locations.
Option Selection Page: Quantity Error Messages
6.5.3 Searching for a Single Known SKU
To search for a single known SKU, complete the following steps:
1. From the Option Selection page, expand the Option Search section.
2. Click the Option SKU field and enter the SKU.
9
8
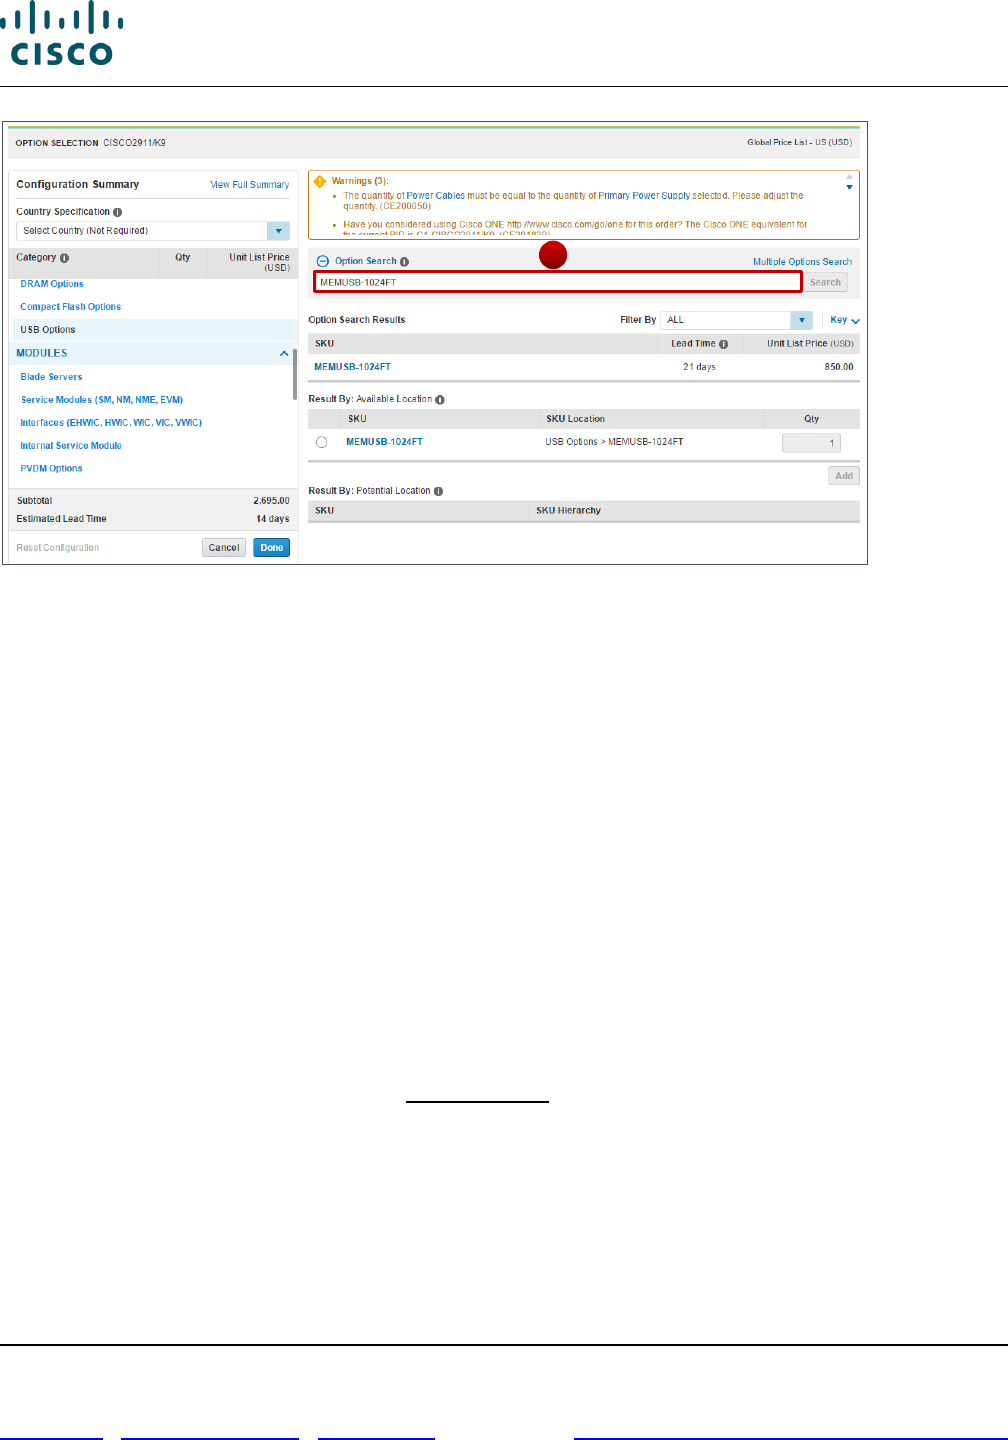
Cisco Commerce Order User Guide
Cisco Proprietary © 2020 Cisco and/or its affiliates. All rights reserved.
Last Updated: 17 March 2020 Page 67 of 143
Cisco.com | Privacy Statement | Trademarks Provide Feedback on this Training Resource
Option Selection Page: Option Search Tab
3. Enter the SKU and a drop-down menu displays all the available options based on what was
entered. Select the desired SKU from the drop-down list.
Once the correct SKU has been entered into the field, click Search. The Option Search tab displays
and the Option SKU field is automatically populated.
4. Click Search. The search results display at the bottom of the page under Result: By Available
Location, Result: By Potential Location, and Result: Not available. Search results include estimates
lead times, SKU list prices, and locations (available and potential).
Some of the results have icons next to them. These icons give additional information about the
corresponding option. Hover over the icon to view the information.
5. Click the radio button corresponding to the SKU.
6. Click Add.
6.5.4 Searching Unknown SKUs Individually
To select options, configure products, and resolve any warnings or errors in the configuration without
knowing the SKUs needed, complete the following steps:
1. From the Order page: Items tab, click Select Options below the line item. The Option Selection
page displays.
Options that require additional configuration have an orange icon next to them and are identified at
the top of page above the Option Search section.
2
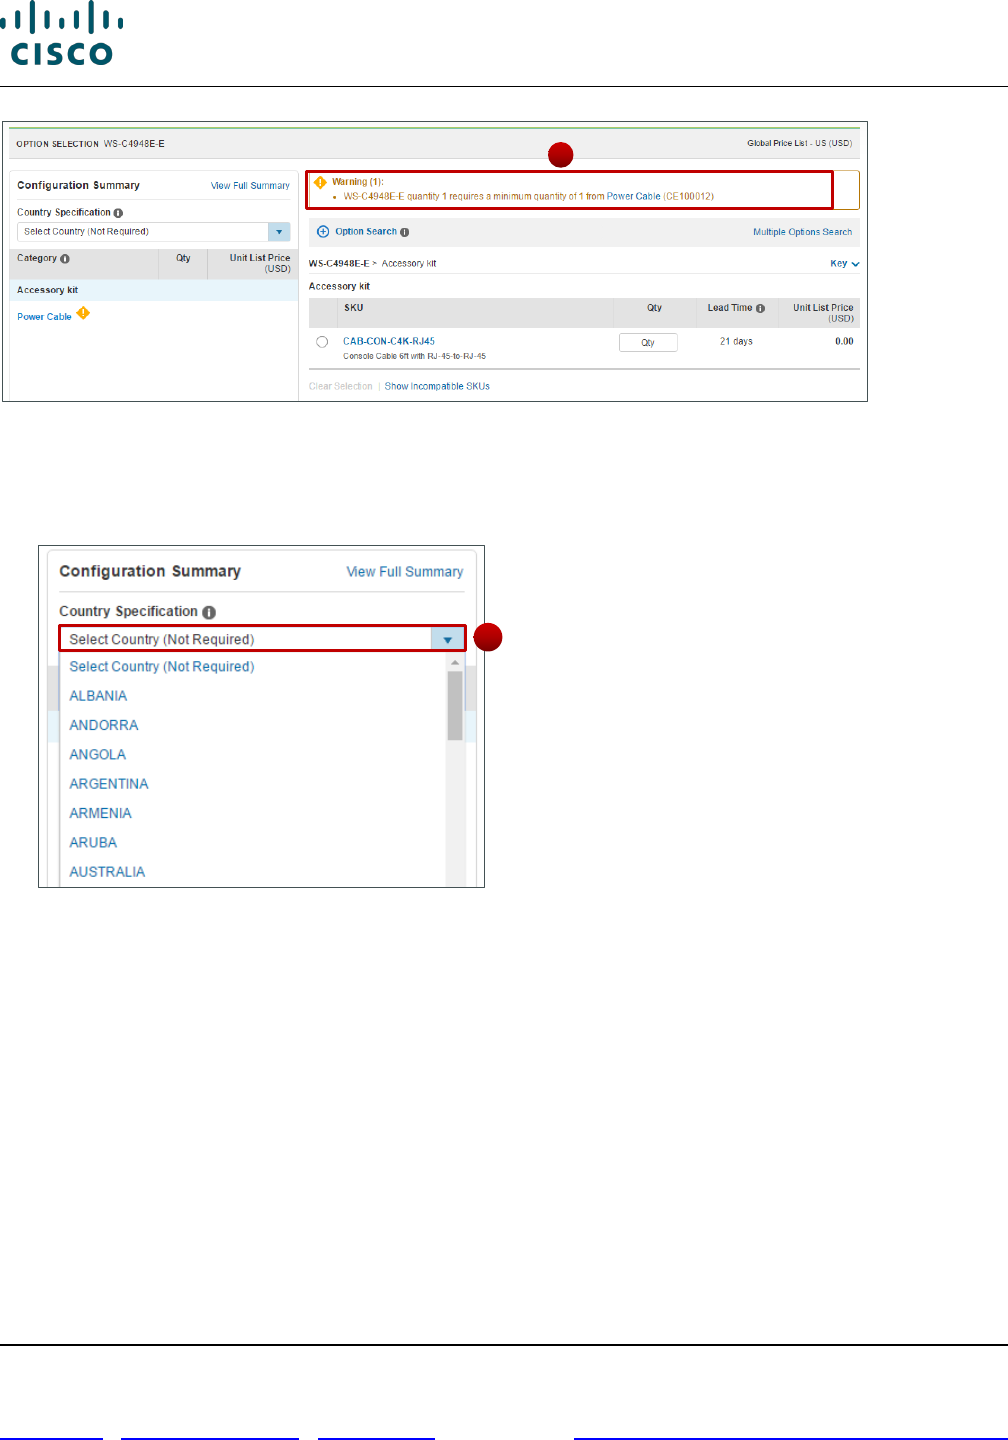
Cisco Commerce Order User Guide
Cisco Proprietary © 2020 Cisco and/or its affiliates. All rights reserved.
Last Updated: 17 March 2020 Page 68 of 143
Cisco.com | Privacy Statement | Trademarks Provide Feedback on this Training Resource
Option Selection Page
2. Scroll through the Configuration Summary pane. Using the warning messages at the top of the
page as a guide, click the appropriate link within the message to resolve each warning or error.
Click the appropriate option(s). Continue this process until all issues have been.
Option Selection Page: Country Specification Feature
3. Click the Country Specification drop-down arrow in the Configuration Summary pane and click the
appropriate country. The system will then filter the products based on the country selection, making
it easier and faster to configure products correctly.
4. Click Done. If issues remain, an error message displays in the Done Messages dialog box. Upon
clicking Done in the Done Messages dialog box, the Items tab displays a confirmation message
indicating that the changes have been saved.
5. To correct the error(s), click the Return to Configuration button or link.
1
3
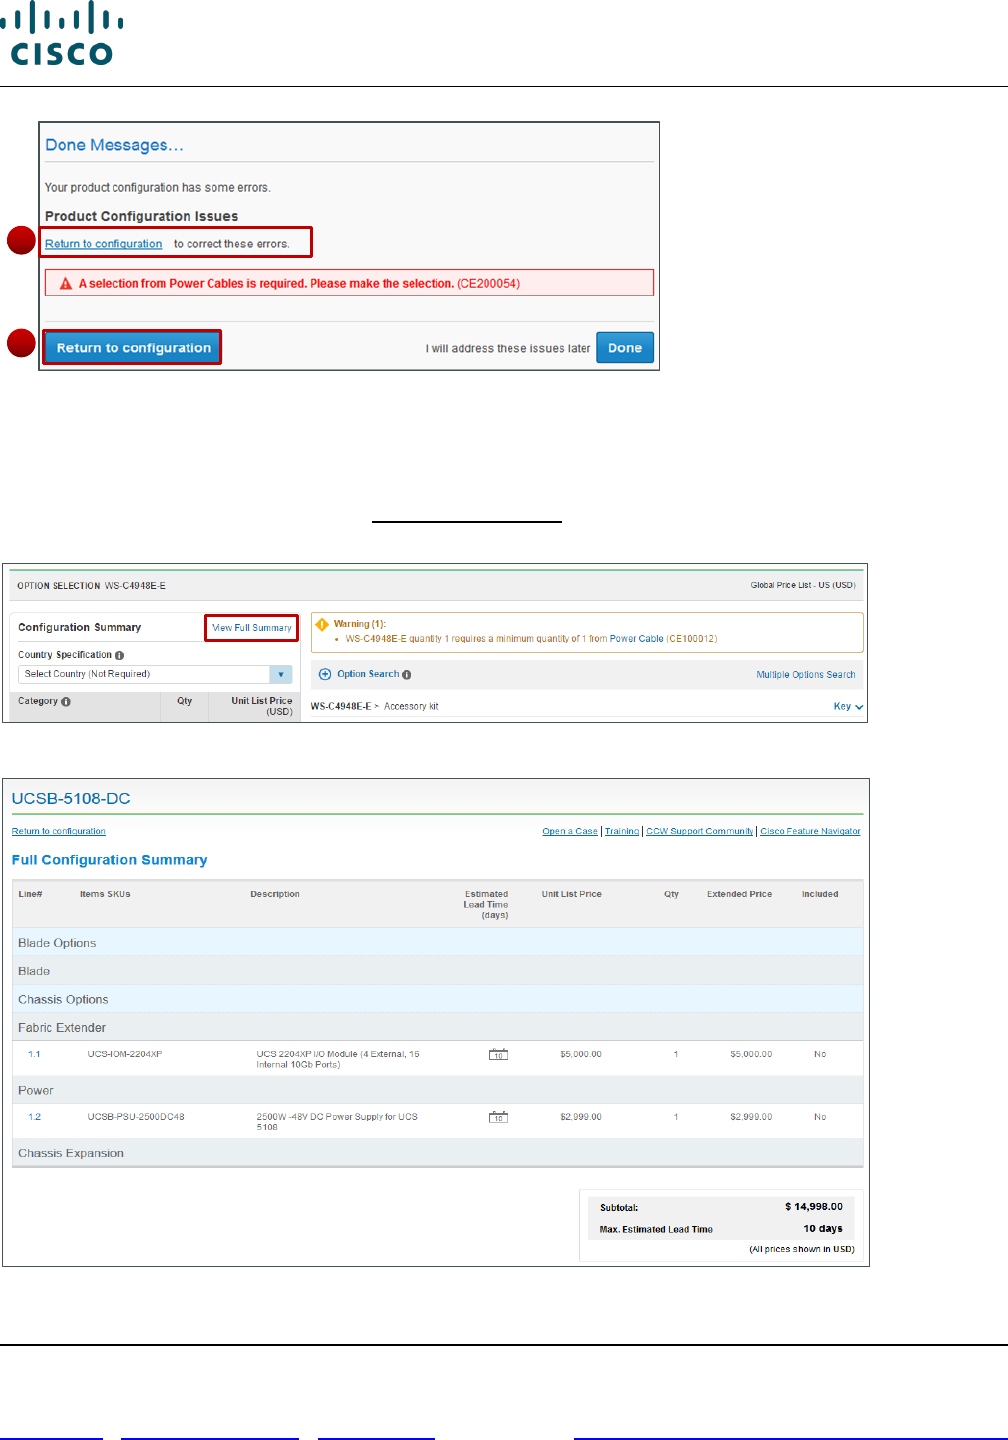
Cisco Commerce Order User Guide
Cisco Proprietary © 2020 Cisco and/or its affiliates. All rights reserved.
Last Updated: 17 March 2020 Page 69 of 143
Cisco.com | Privacy Statement | Trademarks Provide Feedback on this Training Resource
Done Messages Dialog Box
6.5.5 Viewing Full Summary
You have the option of viewing a summary page of the configuration with the selected options.
From the Option Selection page, click View Full Summary. The page refreshes to display the Full
Configuration Summary.
Option Selection Page: Configuration Summary Pane
Option Selection Page: Full Configuration Summary
5
5
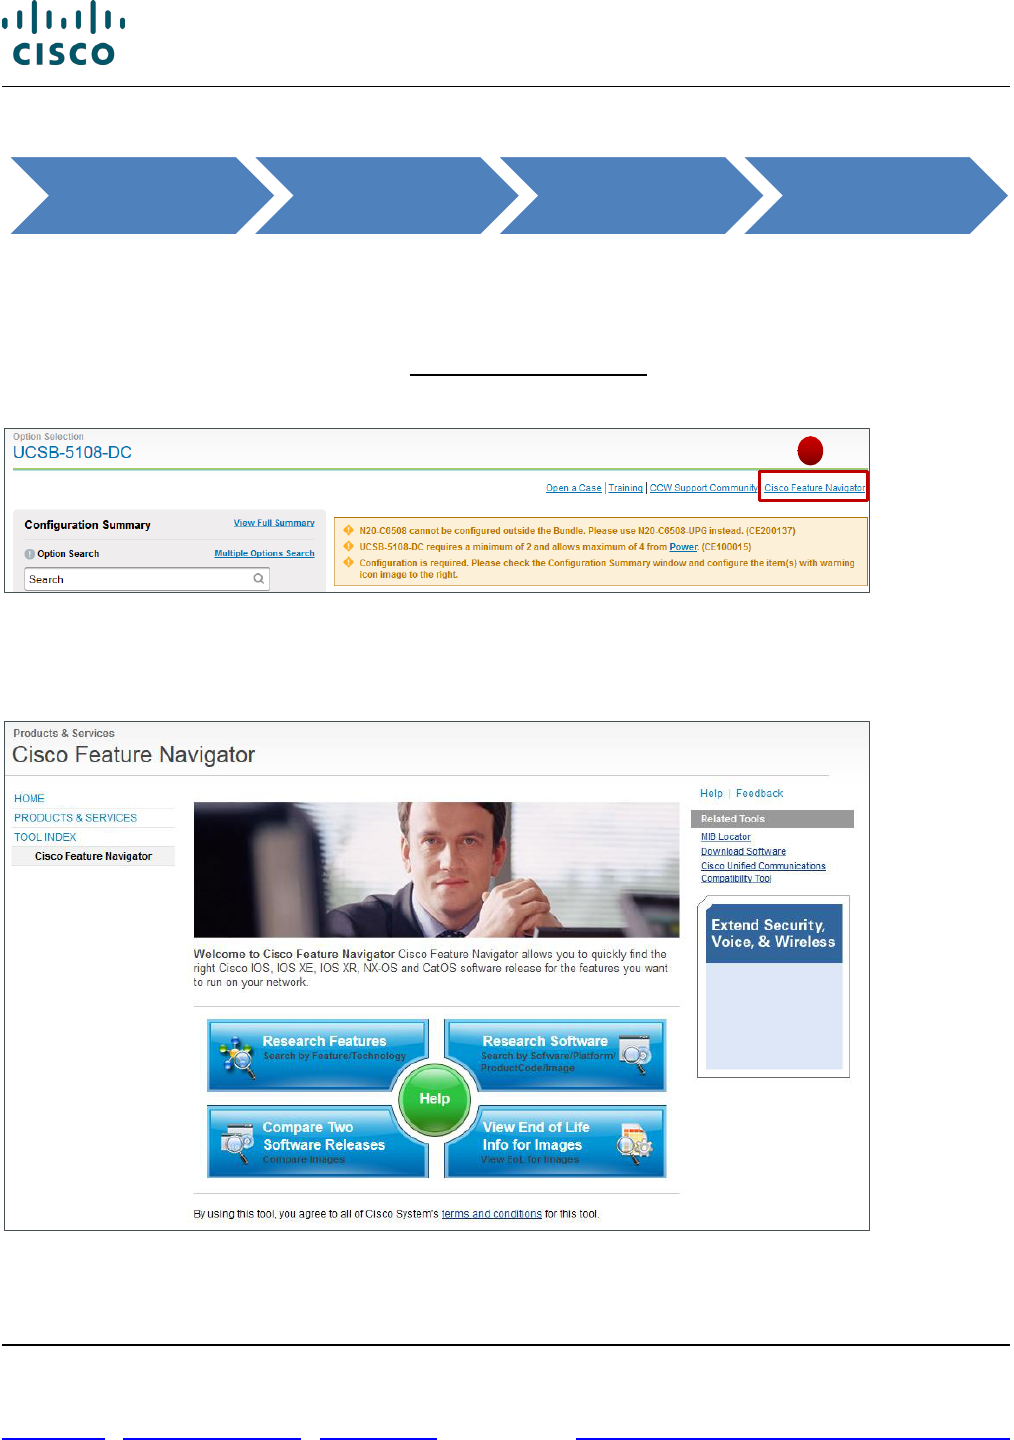
Cisco Commerce Order User Guide
Cisco Proprietary © 2020 Cisco and/or its affiliates. All rights reserved.
Last Updated: 17 March 2020 Page 70 of 143
Cisco.com | Privacy Statement | Trademarks Provide Feedback on this Training Resource
6.5.6 Using Cisco Feature Navigator
The Cisco Feature Navigator helps you to find the best software solution for the selected hardware. By
using this function, you can find the right product based on software or feature needs.
To access Cisco Feature Navigator, complete the following steps:
1. From the Option Selection page, click Cisco Feature Navigator.
The Cisco Feature Navigator page displays in a new window.
Option Selection Page: Cisco Feature Navigator
2. To return to Cisco Commerce, close the new window.
There is no navigation back to Cisco Commerce from the Cisco Feature Navigator page.
Cisco Feature Navigator Page
Cisco Commerce
> Orders Tab
Create Order >
Items Tab
Populate Order >
Select Options
Option Selection
Page (Next Gen
Configuration)
1
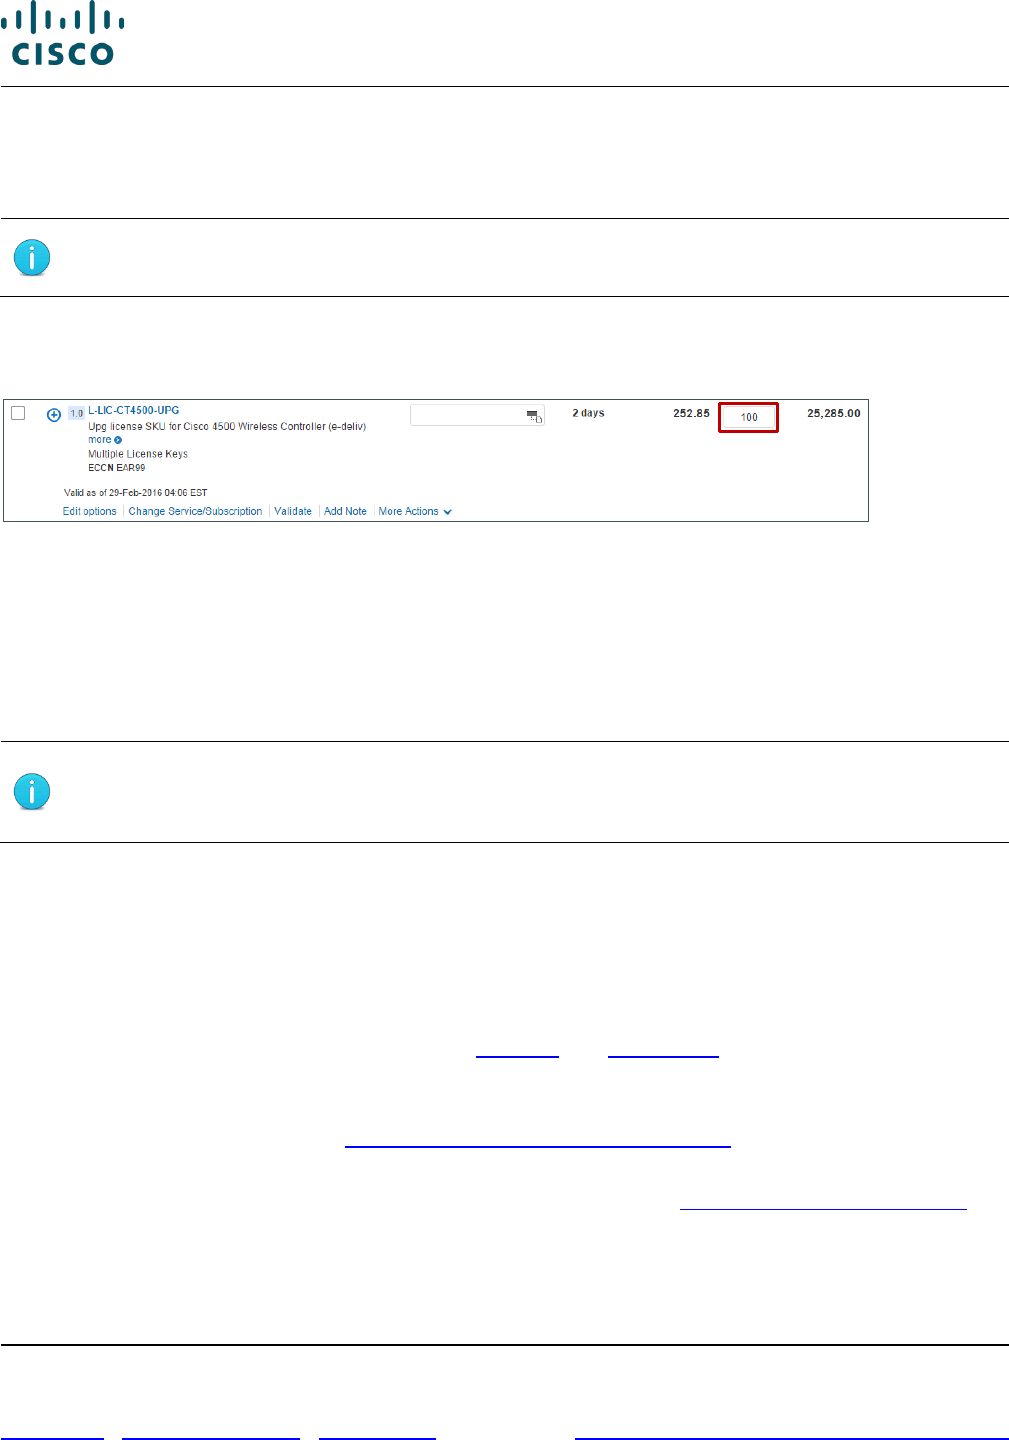
Cisco Commerce Order User Guide
Cisco Proprietary © 2020 Cisco and/or its affiliates. All rights reserved.
Last Updated: 17 March 2020 Page 71 of 143
Cisco.com | Privacy Statement | Trademarks Provide Feedback on this Training Resource
6.6 Setting Quantities for Products
You can add quantities of products when adding them to the Items tab or when they are already added
to the Items tab.
Note: The Quantity field in Cisco Commerce Orders tab accommodates up to ten
digits, for example, 1234567891.
To change the quantity for each of the products, enter the desired number of products or options in the
Qty field for that line and press Enter. For multiple products and options, repeat this step for each item.
The extended list price is the price per unit multiplied by the quantity.
Order Page: Items Tab – Qty Field
6.7 Adding Services
There are various types of Cisco service offerings:
Technical services are always attached to hardware or software product. They can either be ordered
at the point of sales (in Cisco Commerce) or purchased separately as a service only line (either in
Cisco Commerce or CCW-R).
Note: Standard durations for technical services can be between 12 and 60 months.
However, multi-year discounts for standard orders are not available for service
durations greater than 36 months.
Advanced Services (AS): Each type of Advanced Service has different deliverables, delivery model,
as well as ordering rules. Not all are orderable within Cisco Commerce.
• AS Transaction (AS-T): These cannot be ordered within Cisco Commerce, you must fax this
order.
• AS Subscription (AS-S): These can be ordered within Cisco Commerce. Refer Advanced
Services – Subscription Ordering QRG – Partners and Distributors
• AS-Fixed (AS-F): These services have a fixed scope, fixed price, and fixed cost and are
orderable with Cisco Commerce. For more information on ordering ASF SKUs in Cisco
Commerce Orders tab, see Adding Fixed Scope Consultancy SKUs.
You can add services to items as part of the product ordering process. Services for previously ordered
products can also be ordered separately as a service-only order. See Creating Service Only Orders.
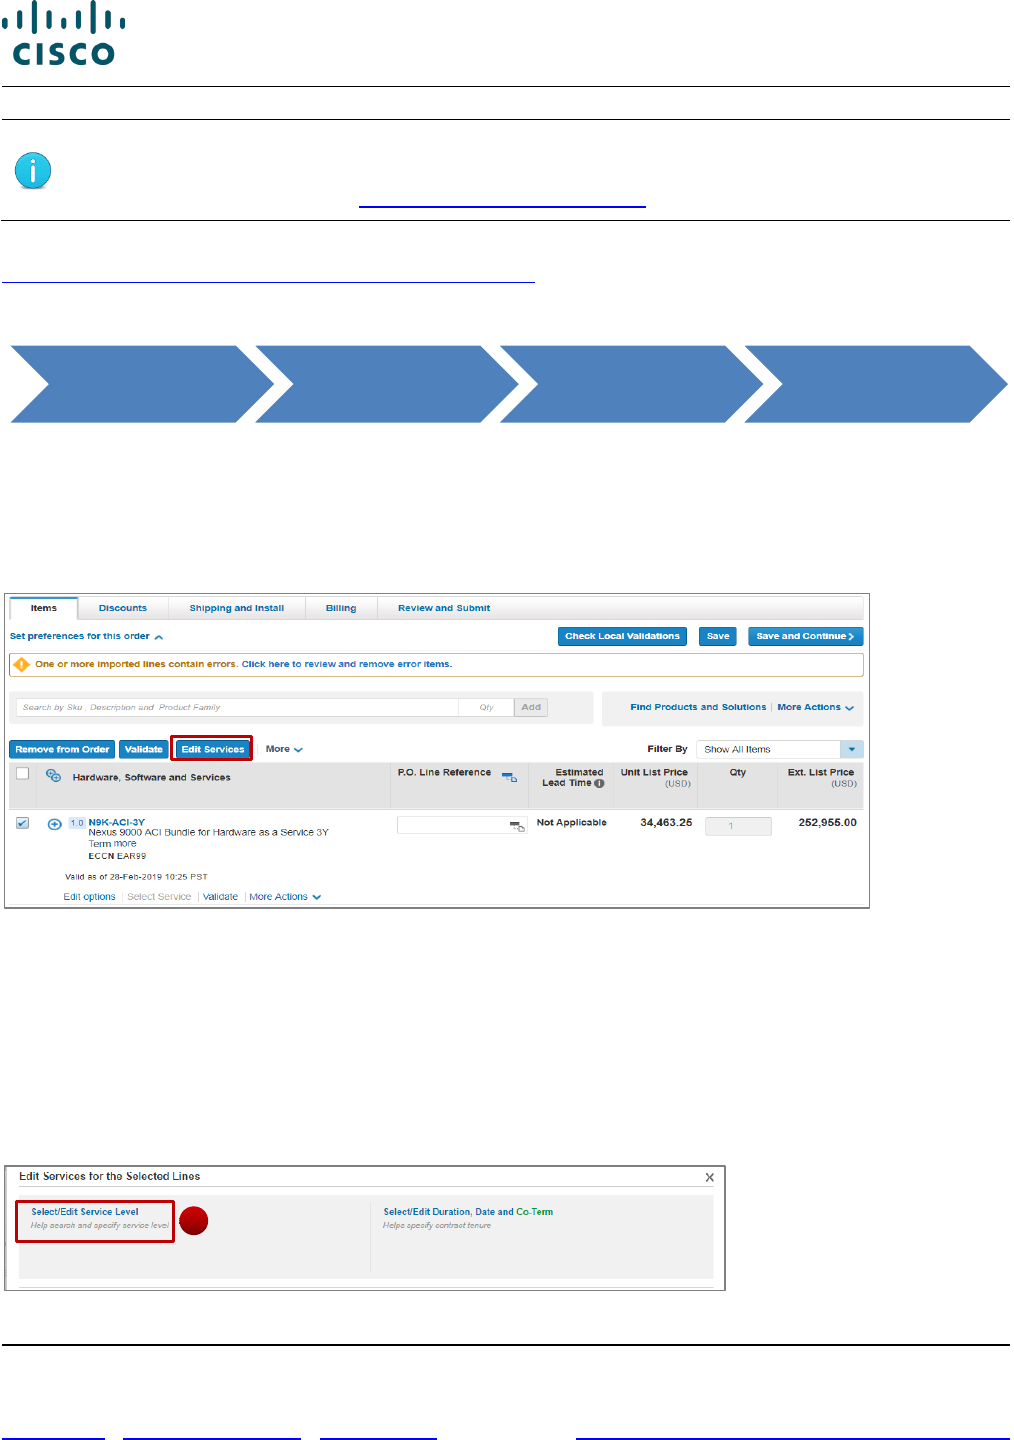
Cisco Commerce Order User Guide
Cisco Proprietary © 2020 Cisco and/or its affiliates. All rights reserved.
Last Updated: 17 March 2020 Page 72 of 143
Cisco.com | Privacy Statement | Trademarks Provide Feedback on this Training Resource
Best Practices: Add services as part of the product configuration within your quote or
order, rather than as a separate service-only line item. To create an order for service-
only line items, see Creating Service Only Orders.
For more information on Cisco services, you can reference:
http://www.cisco.com/web/partners/services/index.html
6.7.1 Adding Services to Items in the Configuration
There are two ways to edit services using the Services Option widget. You can attach services at the
Header level by clicking on Edit Services on your order. The Service Level you select will apply to all
selected lines of your configuration. Use this option for basic Service Level changes. You can also click
Edit/Remove Service on an individual line of your configuration. Use this option for more complex
Service Level changes.
You can attach Services at the Header level if you wish to apply the service level across all selected
lines of the configuration in the cart. However, because preferences in the cart are not filtered by
Product lines, the Service level may or may not successfully apply to each line. You should verify that
each line of your configuration has the correct Service level applied before proceeding with your order.
1. Place a checkmark next to the desired SKUs before selecting Edit Services from the More
dropdown.
2. Select/Edit Service Level
Cisco Commerce Orders Tab Create Order
Order Page: Items
Tab
2
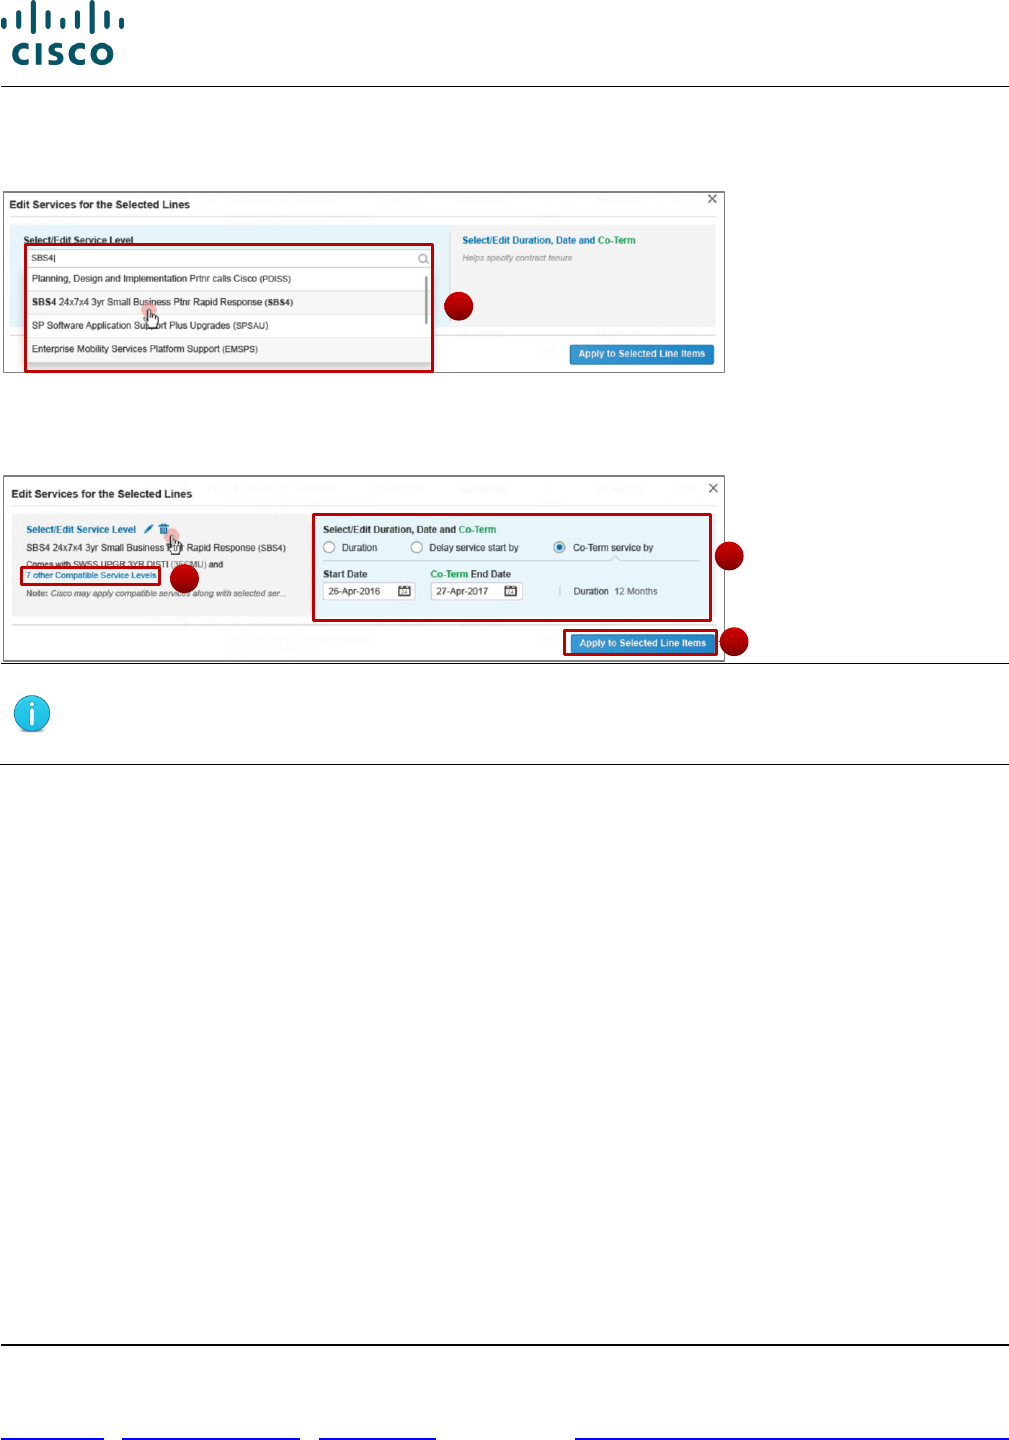
Cisco Commerce Order User Guide
Cisco Proprietary © 2020 Cisco and/or its affiliates. All rights reserved.
Last Updated: 17 March 2020 Page 73 of 143
Cisco.com | Privacy Statement | Trademarks Provide Feedback on this Training Resource
3. Start typing the name of the Service; the widget will display a list of potentially matching Service
Levels.
4. Notice the Compatible Service Lines display after selecting a service.
5. Change the duration by entering in number of months, start date, or start and end date.
6. Apply the Service to the Selected Lines (see Note below):
Note: applying the Service to the selected lines does not guarantee that the Service
will be added to each line; you should manually verify each individual configuration to
ensure it has the correct service level.
6.7.1.1 Attach Services on the Edit Services/Subscription Page
The Edit Services/Subscription page summarizes all attached services and subscriptions. You can use
this page to compare prices for different service offerings, see what services are available, or add
secondary services. You can also attach one or more service levels to one or more lines of your
configuration.
1. Click either Edit Service/Subscription or Select Service/Subscription on any line to open the
Edit Services page.
3
4
5
6
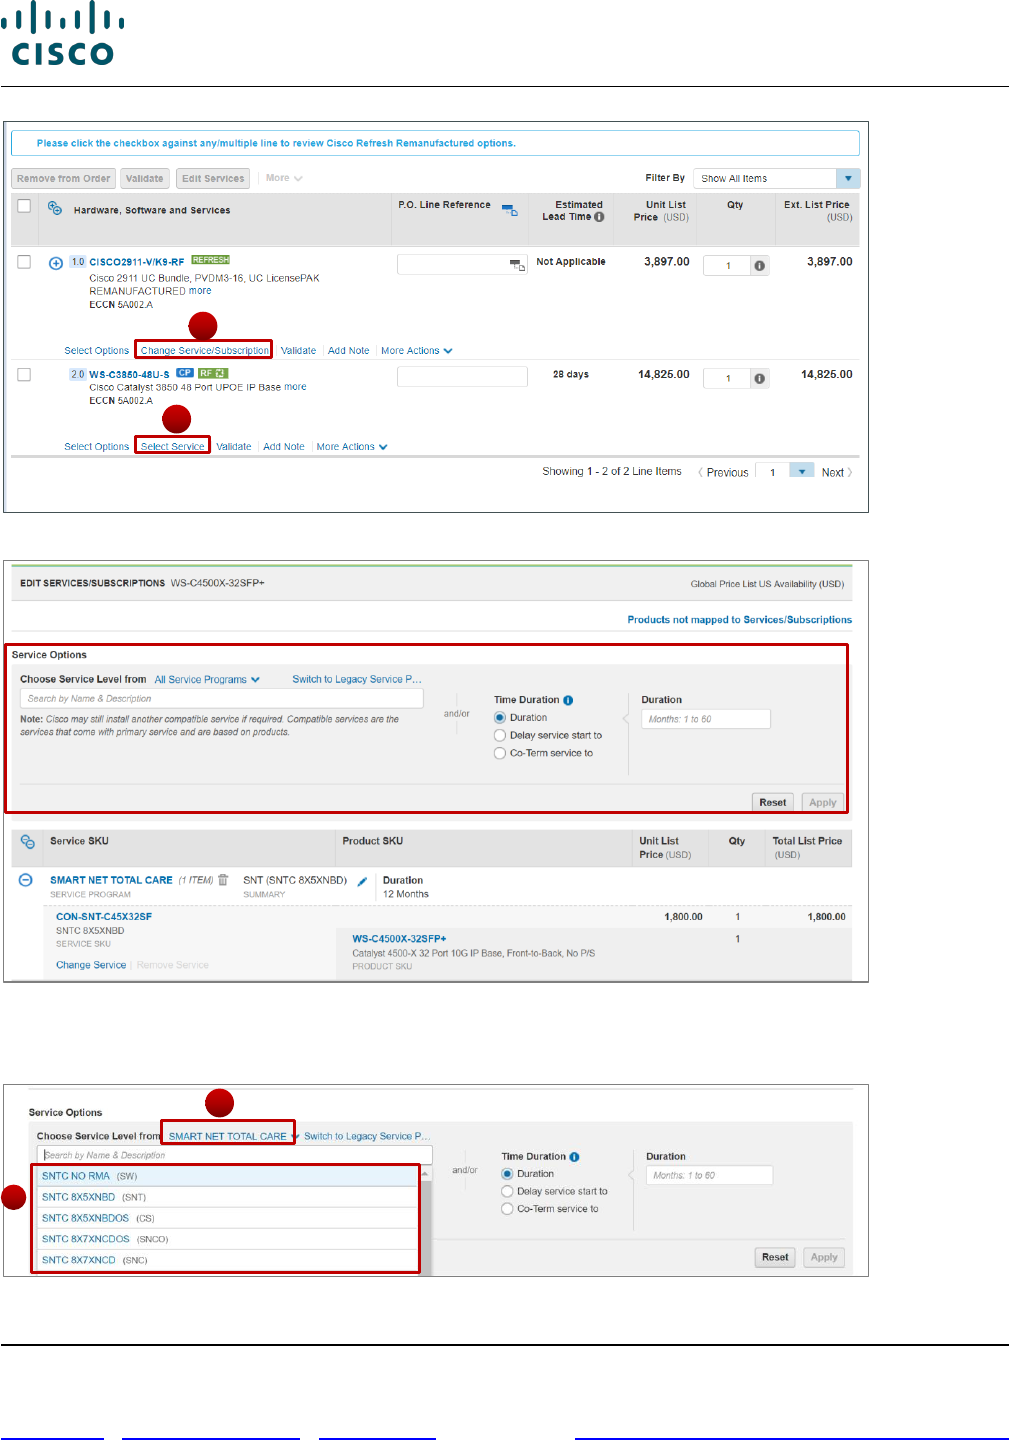
Cisco Commerce Order User Guide
Cisco Proprietary © 2020 Cisco and/or its affiliates. All rights reserved.
Last Updated: 17 March 2020 Page 74 of 143
Cisco.com | Privacy Statement | Trademarks Provide Feedback on this Training Resource
2. The Service Options widget will appear in Simplified View with the service-eligible lines below.
3. Search for specific service levels within a service program.
4. Select a service program from the dropdown list to focus your search to a specific program. All
included services and compatible services will be displayed after choosing a service.
3
4
1
1

Cisco Commerce Order User Guide
Cisco Proprietary © 2020 Cisco and/or its affiliates. All rights reserved.
Last Updated: 17 March 2020 Page 75 of 143
Cisco.com | Privacy Statement | Trademarks Provide Feedback on this Training Resource
5. Specify the Time Duration in months. You can also Delay Service start by selecting a start
date and duration. You can also Co-term Service by inputting the proper start and end dates.
6. Select Apply to add the service configuration.
7. After selecting Apply, you will see the updated Service and Duration.
8. You can always check the rest of your items by selecting Products not mapped to
Services/Subscriptions.
9. Delete all services at any time by selecting Remove All Services.
5
6
7
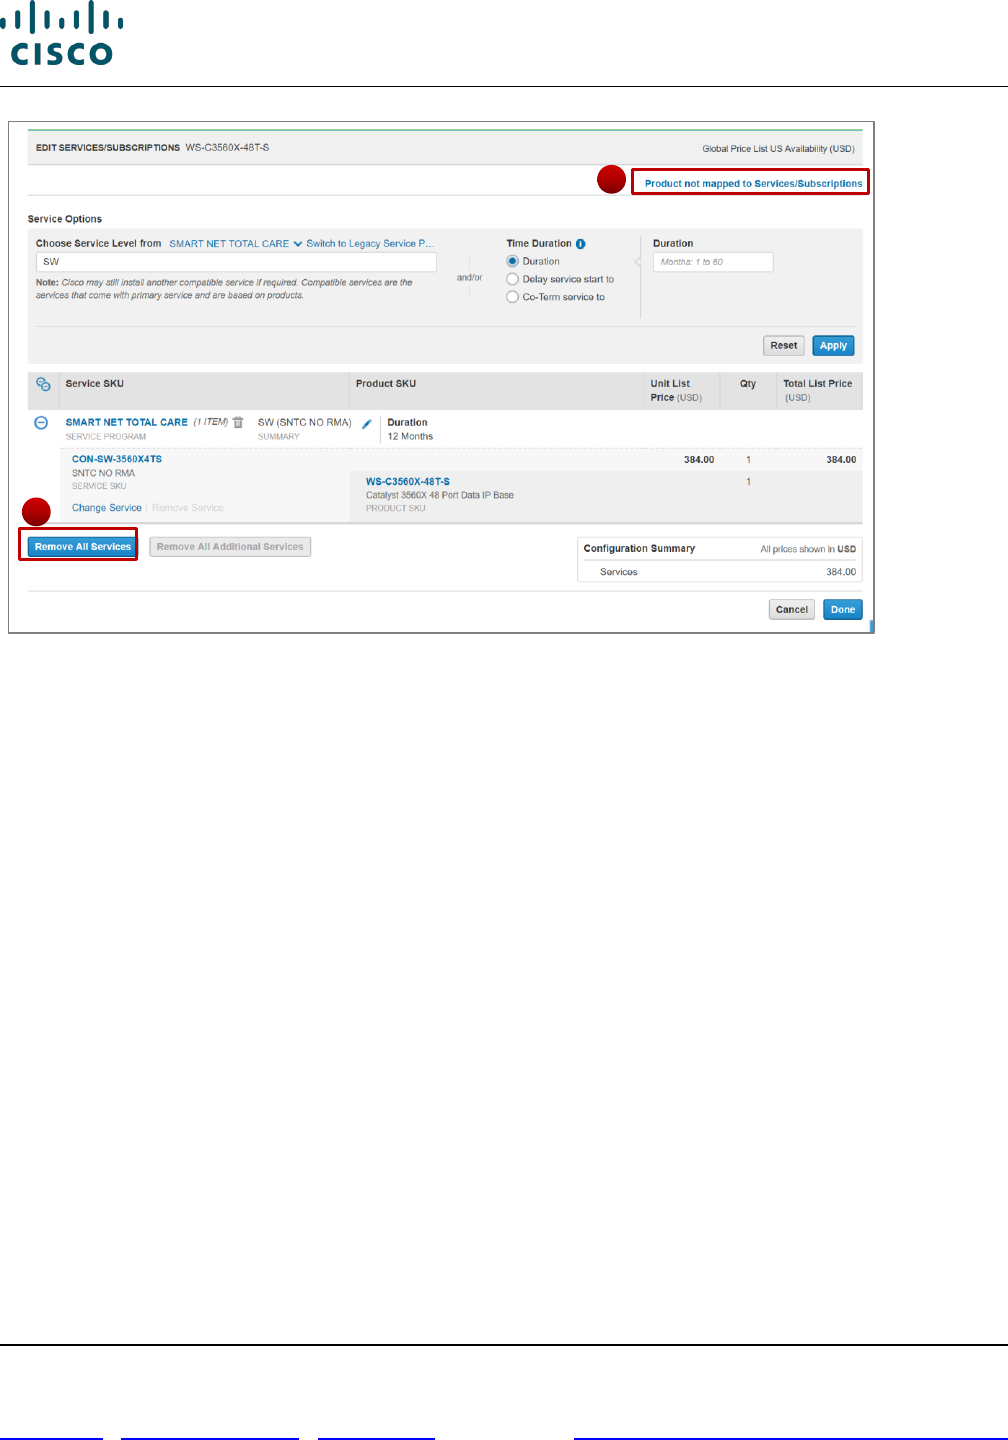
Cisco Commerce Order User Guide
Cisco Proprietary © 2020 Cisco and/or its affiliates. All rights reserved.
Last Updated: 17 March 2020 Page 76 of 143
Cisco.com | Privacy Statement | Trademarks Provide Feedback on this Training Resource
6.7.1.2 Attach Services to Unassigned Products
Products that don’t have services attached are listed under Unassigned.
1. To add services, click on Add a Service SKU.
2. Select the service you want to want to attach.
3. Click Apply.
8
9
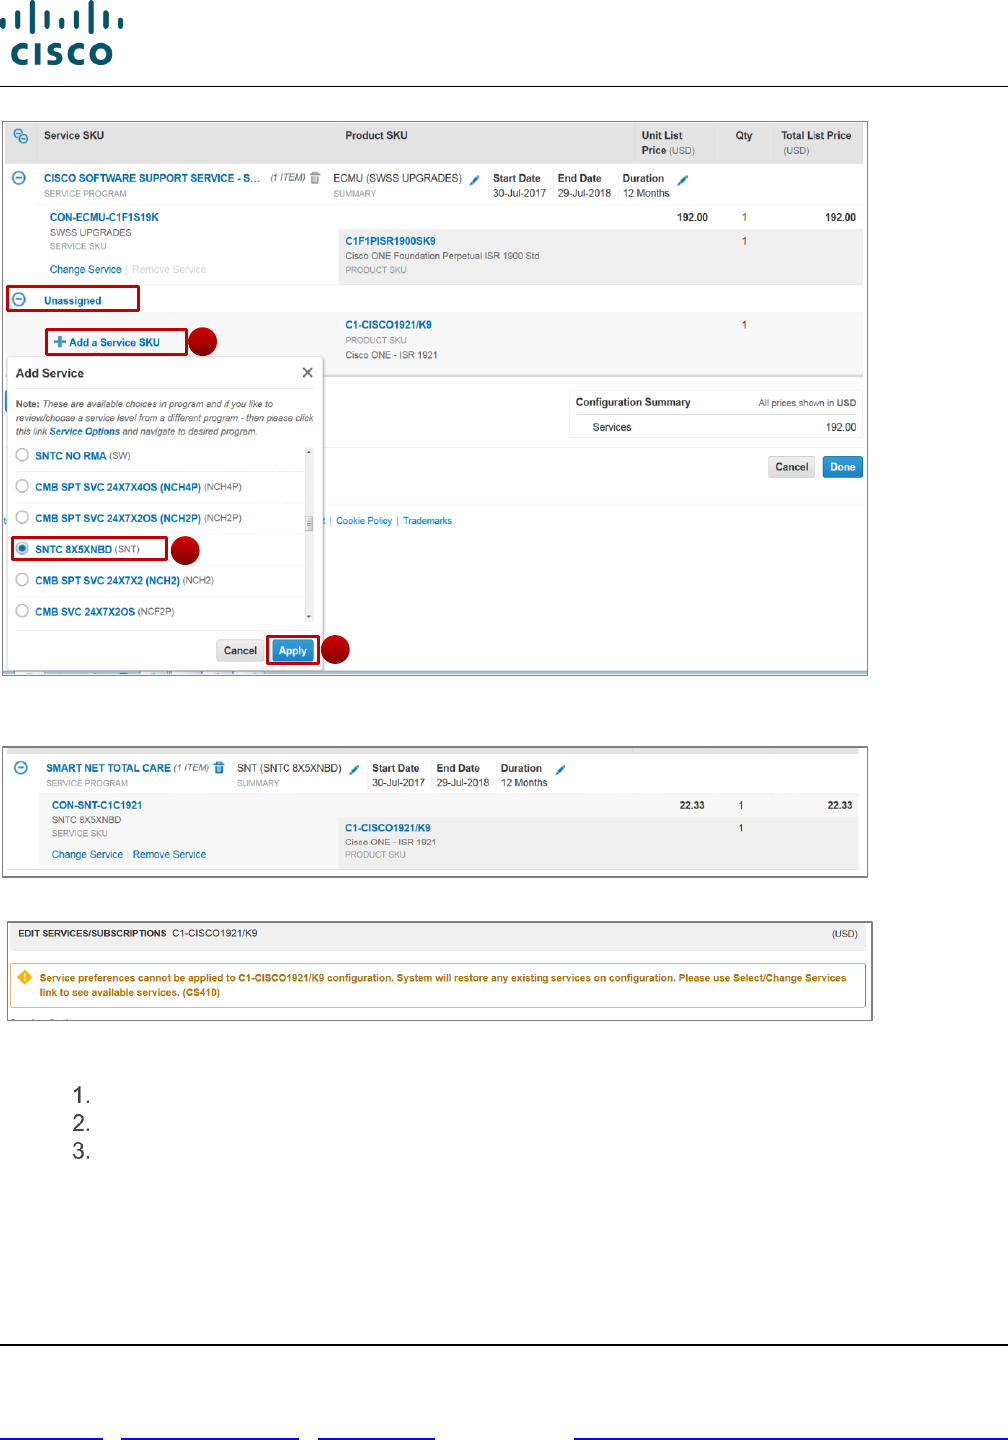
Cisco Commerce Order User Guide
Cisco Proprietary © 2020 Cisco and/or its affiliates. All rights reserved.
Last Updated: 17 March 2020 Page 77 of 143
Cisco.com | Privacy Statement | Trademarks Provide Feedback on this Training Resource
4. The product is moved off the Unassigned tab and is displayed with its attached Service
Program, Duration, and Service SKU.
5. If the service selected can’t be attached, a message will appear with instructions.
6.7.1.3 Adding Secondary Services in the Edit Services/Subscriptions Page
When available, click on Additional Services to show available secondary services
Select the appropriate service and duration.
Click Apply.
1
2
3
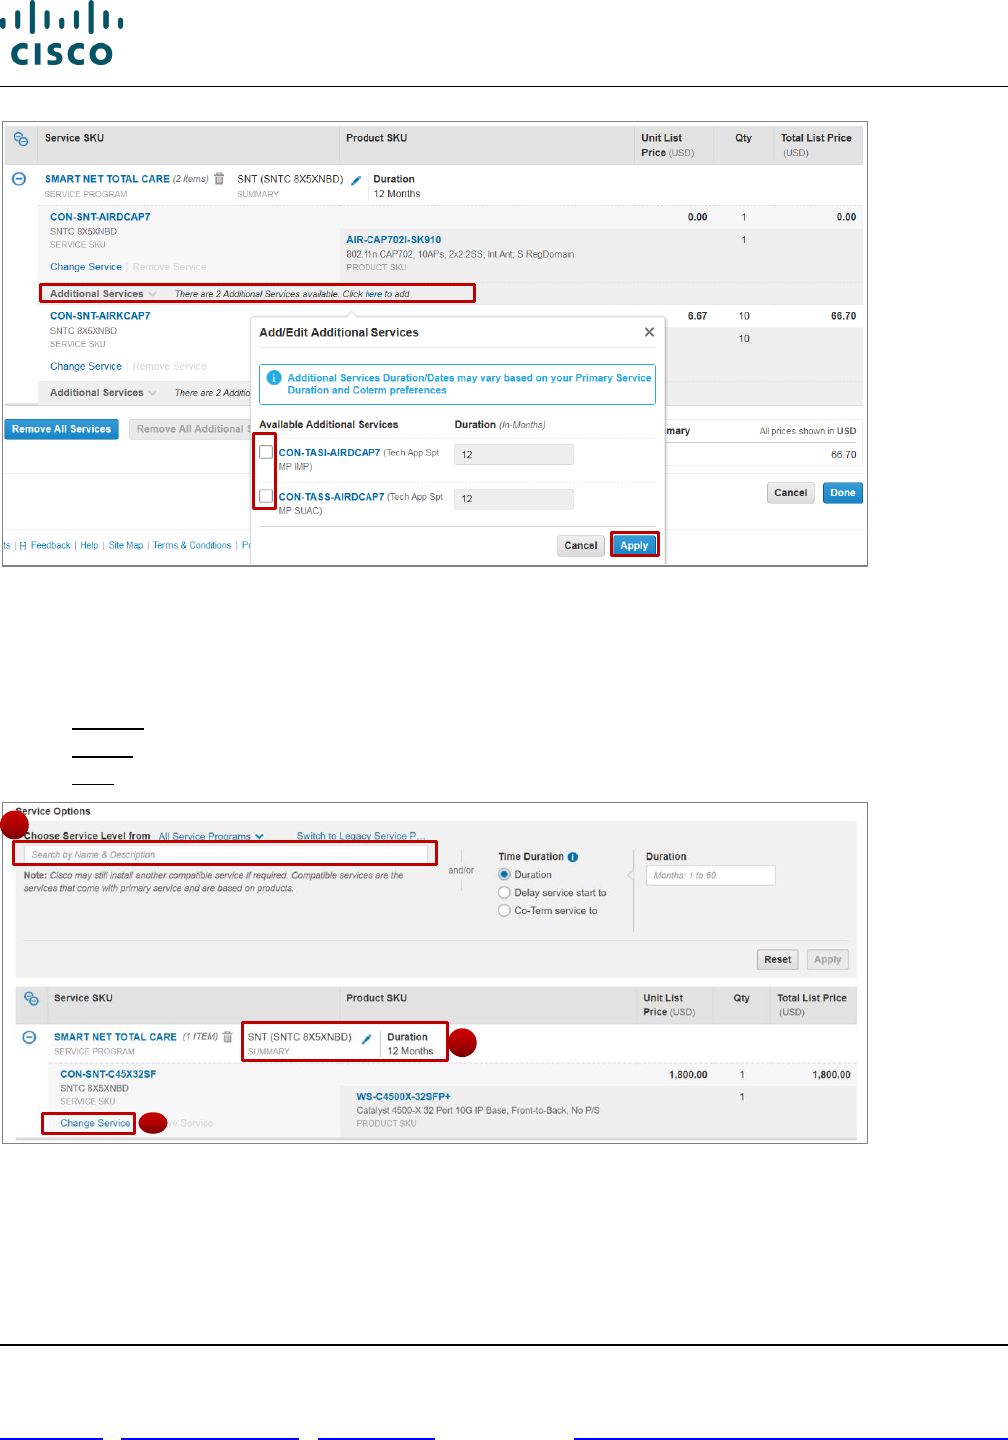
Cisco Commerce Order User Guide
Cisco Proprietary © 2020 Cisco and/or its affiliates. All rights reserved.
Last Updated: 17 March 2020 Page 78 of 143
Cisco.com | Privacy Statement | Trademarks Provide Feedback on this Training Resource
6.7.1.4 Changing Services in the Edit Services/Subscriptions Page
There are three different levels where you can make changes to your Service. It is important to
understand how your selections will affect your configuration. The following are three different
configuration level changes available and how they affect the entire configuration.
1. Header Level Changes
2. Group Level Changes
3. Line Level changes
C
1
2
3

Cisco Commerce Order User Guide
Cisco Proprietary © 2020 Cisco and/or its affiliates. All rights reserved.
Last Updated: 17 March 2020 Page 79 of 143
Cisco.com | Privacy Statement | Trademarks Provide Feedback on this Training Resource
1. On the Edit Services/Subscriptions Page, the eligible items will display and the option to
Change Service will be available to make a Line level change.
2. A dropdown menu will appear with possible options to change the service. Select the
appropriate service and click Apply to complete the Line level change.
3. If the required service is not available in the current program, click on Service Options to make
a Group level Service change.
1
Line Level
Change
Only the selected line changes. No other lines affected
Group
Level
Change
The Group Service will change. This might also affect other Service Groups
based on compatibility with the new Group Service
Header
Level
Change
All Service lines and Groups will be affected according to service compatibility
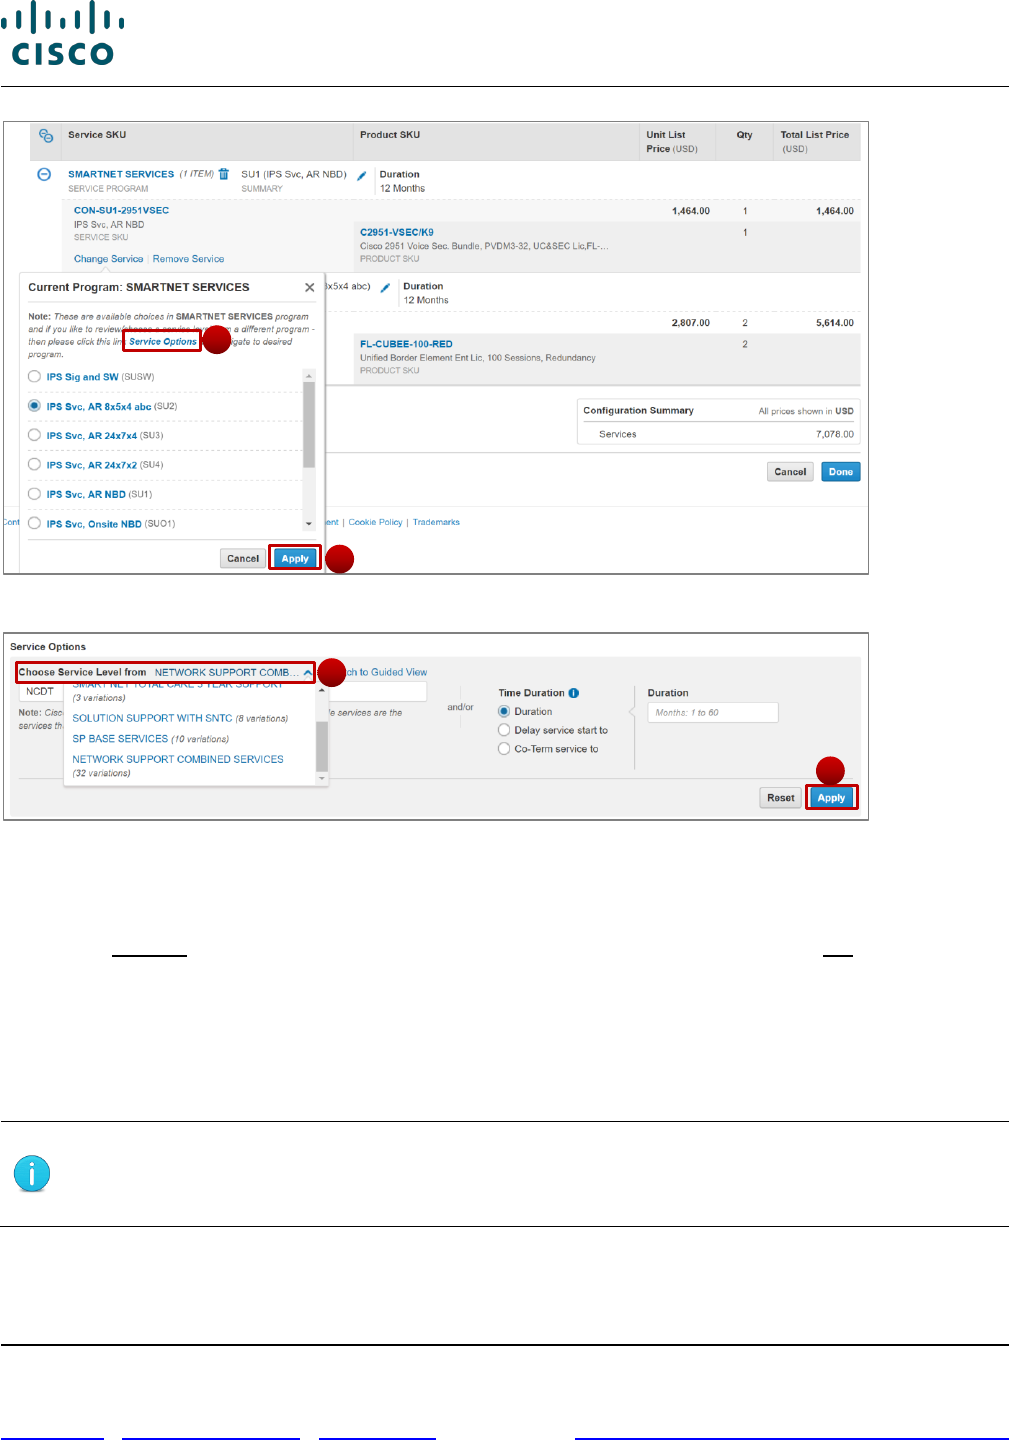
Cisco Commerce Order User Guide
Cisco Proprietary © 2020 Cisco and/or its affiliates. All rights reserved.
Last Updated: 17 March 2020 Page 80 of 143
Cisco.com | Privacy Statement | Trademarks Provide Feedback on this Training Resource
4. The system directs you to the top to search for an appropriate Service Program. Search and
select the appropriate Program and click Apply.
5. The system will automatically adjust all necessary Service programs in other Minor Product
Lines as necessary.
Note: This will not affect Unassigned Products eligible for service.
6. Once all changes are complete, Click Done.
For Header level changes, refer to section 2.1. Note: Header Level changes will affect
Unassigned Product lines eligible for service.
6.7.1.5 Add/Edit a Corresponding Subscription
Note: Only Product SKUs that have Subscriptions associated with them will have the option
of adjusting subscription licenses and durations. Otherwise, the Subscriptions Tab will not
appear in the Edit Services/Subscriptions Page.
1. Click Edit Subscription to change the details of the subscription.
2
3
4
4

Cisco Commerce Order User Guide
Cisco Proprietary © 2020 Cisco and/or its affiliates. All rights reserved.
Last Updated: 17 March 2020 Page 81 of 143
Cisco.com | Privacy Statement | Trademarks Provide Feedback on this Training Resource
2. You can edit the Start Date and duration of the subscriptions.
3. Click Apply and then Done to make updates to the subscription.
4. Once these steps are completed and the Services/Subscriptions are configured, proceed
normally with the Quote to Order process
6.7.2 Remove Services
There are multiple ways to remove services from a product. The following are the most common.
1. Select the Product lines that will have their services removed
2. Click on More to display the available options, if it has not already displayed.
3. Click on Remove Services. This will remove the attached services for all selected Product lines
1
2
2
3
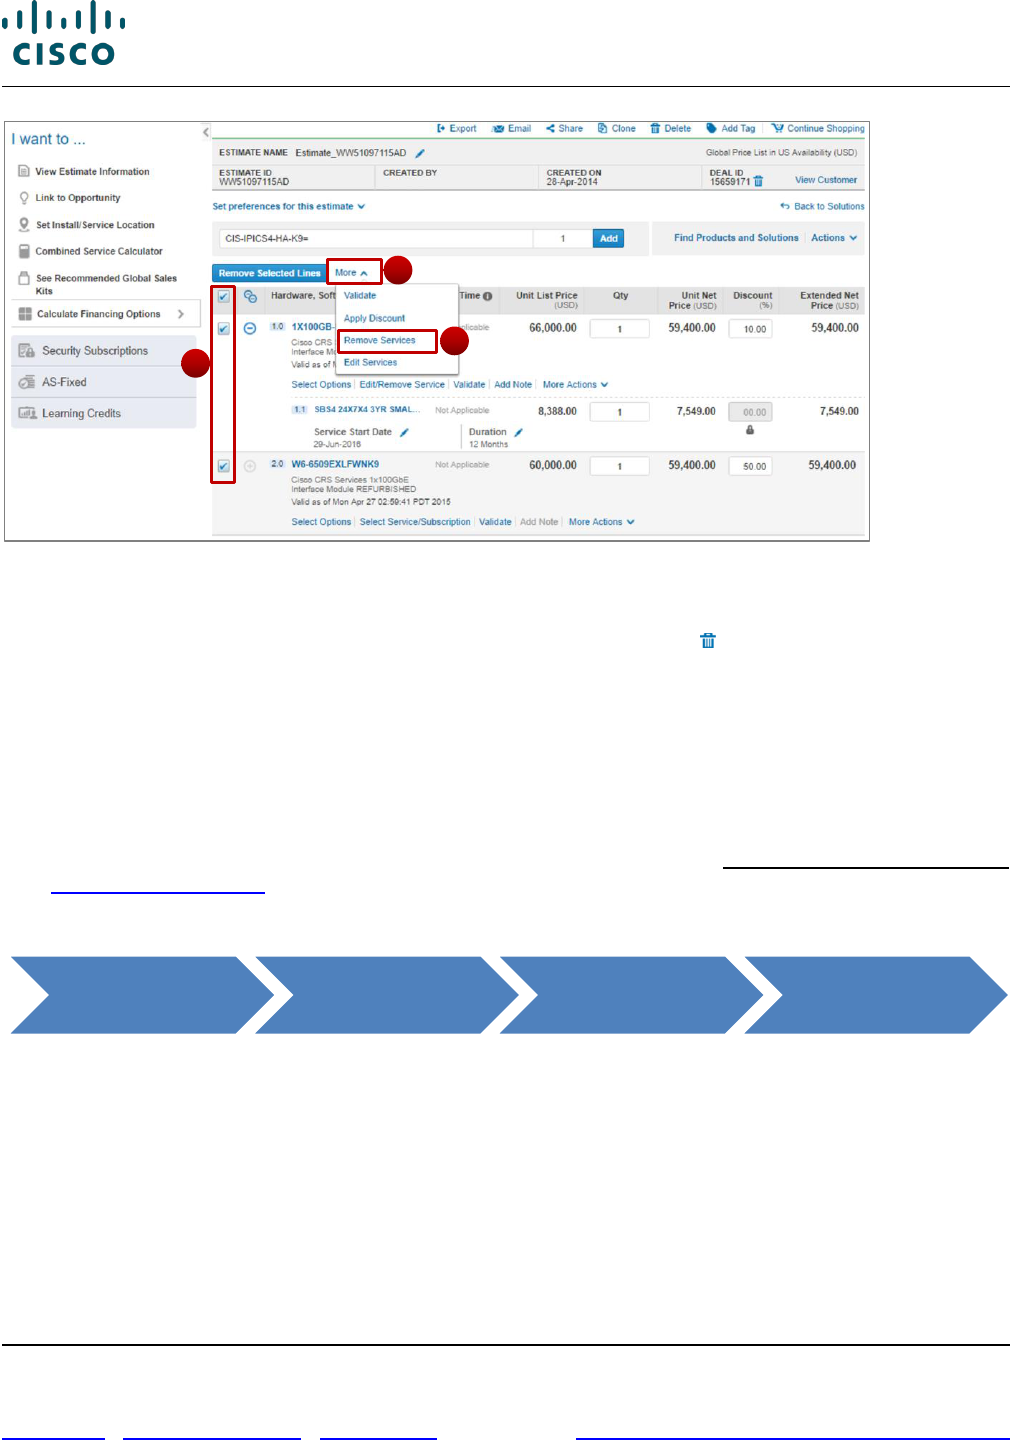
Cisco Commerce Order User Guide
Cisco Proprietary © 2020 Cisco and/or its affiliates. All rights reserved.
Last Updated: 17 March 2020 Page 82 of 143
Cisco.com | Privacy Statement | Trademarks Provide Feedback on this Training Resource
6.7.2.1 Remove services in Edit Service/Subscription page
1. On the Edit Service/Subscription page, click on the delete icon ( ) next to the service program
you want to remove. This will remove the service program for all products serviced by it.
2. Alternatively, if you only need to remove the service for one Product line, click on Remove
Service, if applicable
3. Lastly, click on Remove All Services or Remove All Additional Services to remove
accordingly.
Additional services can also be imported if saved as a configuration using Import a Saved Configuration
(see Importing an Estimate ).
6.8 Identifying Target Contract Numbers
You can set a target service contract, search for an existing target contract, or let the system
automatically assign to an eligible contract when ordering services in Cisco Commerce.
• This functionality applies to services and software subscriptions.
• The Service Contract Number link will not display when ordering services that do not have a
contract (for example: fixed scope consultancy SKUs).
• You must set the target contract for each line.
Cisco Commerce Orders Tab Create Order
Order Page: Items
Tab
1
2
3
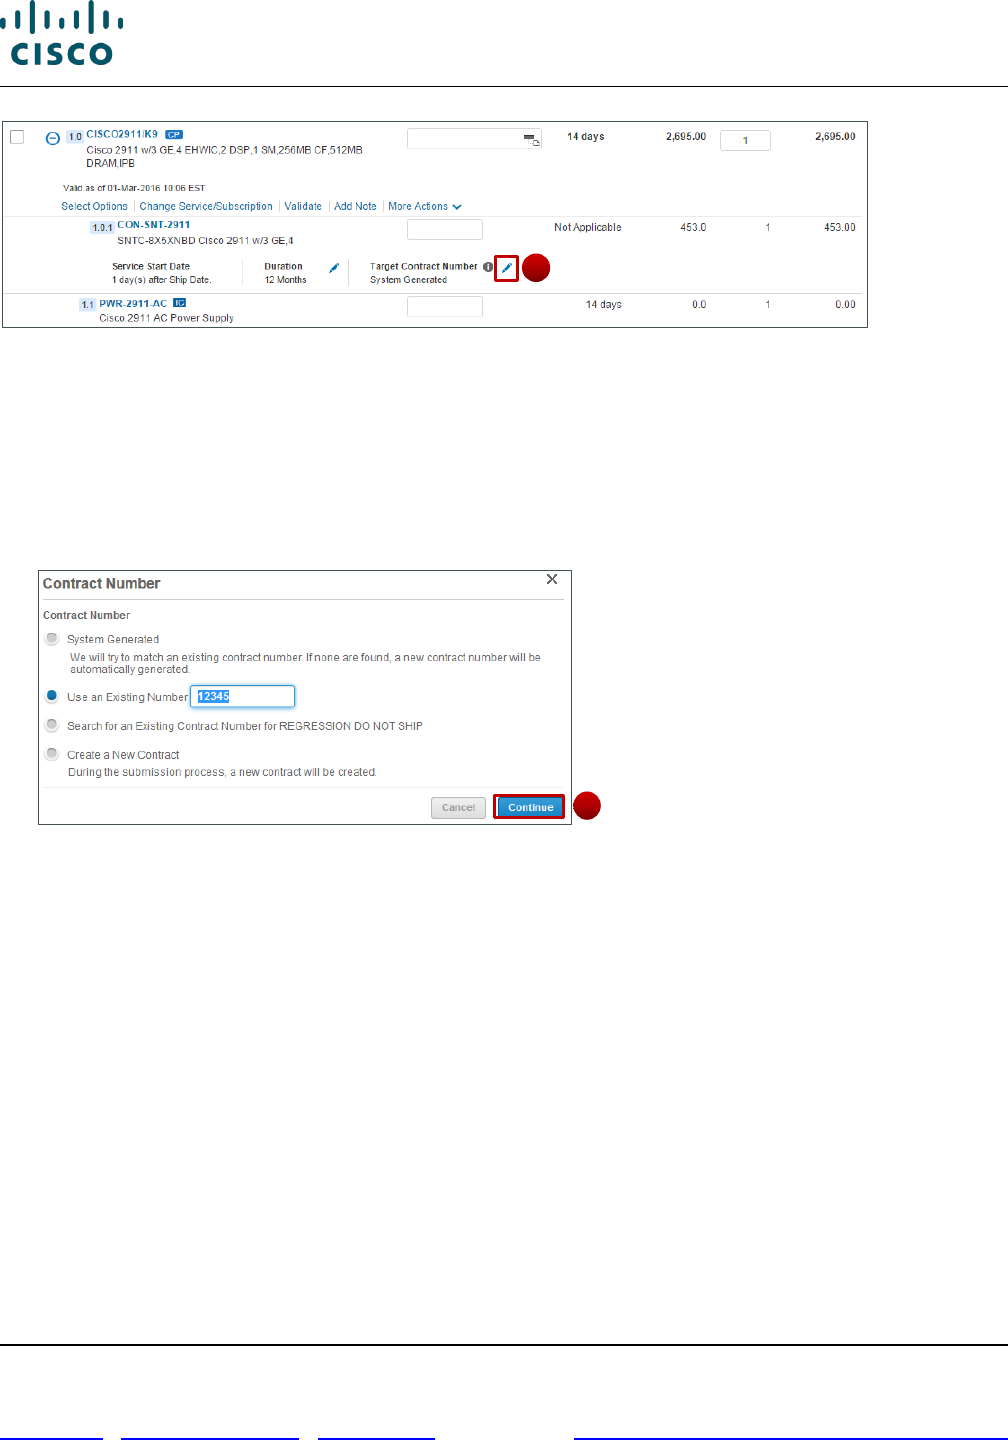
Cisco Commerce Order User Guide
Cisco Proprietary © 2020 Cisco and/or its affiliates. All rights reserved.
Last Updated: 17 March 2020 Page 83 of 143
Cisco.com | Privacy Statement | Trademarks Provide Feedback on this Training Resource
Order Page: Items Tab – Target Contract Number
The default option is established in your My Profile and Preferences. System Generated means that the
system will try to match an existing contract. If a compatible contract is not found, a new contract
number will be created. Alternately, you can set your default to have a new contract created.
To select a specific target contract number, complete the following steps:
1. From the Order page, expand the line and click the edit icon next to Target Contract Number. The
Contract Number dialog box displays.
Contract Number Dialog Box
2. Select the appropriate option from the following and click Continue:
• System Generated (this is the default value). The system will generate a new contract if a
compatible contract is not found.
• Use an Existing Contract: Enter the contract number
• Search for an Existing Contract Number: The system returns a list of valid contract numbers for
that service line.
• Create a New Contract: The system will create a new contract, even if there are existing
compatible contracts.
6.9 Identifying Flexible Service Start Delay (FSSD) Value
You can purchase a service at the point of product purchase and request a delayed service activation
date of up to 60 days from the product ship date. A delayed service activation date results in a delayed
service invoice date as well.
To identify the service start date, complete the following steps:
1
2
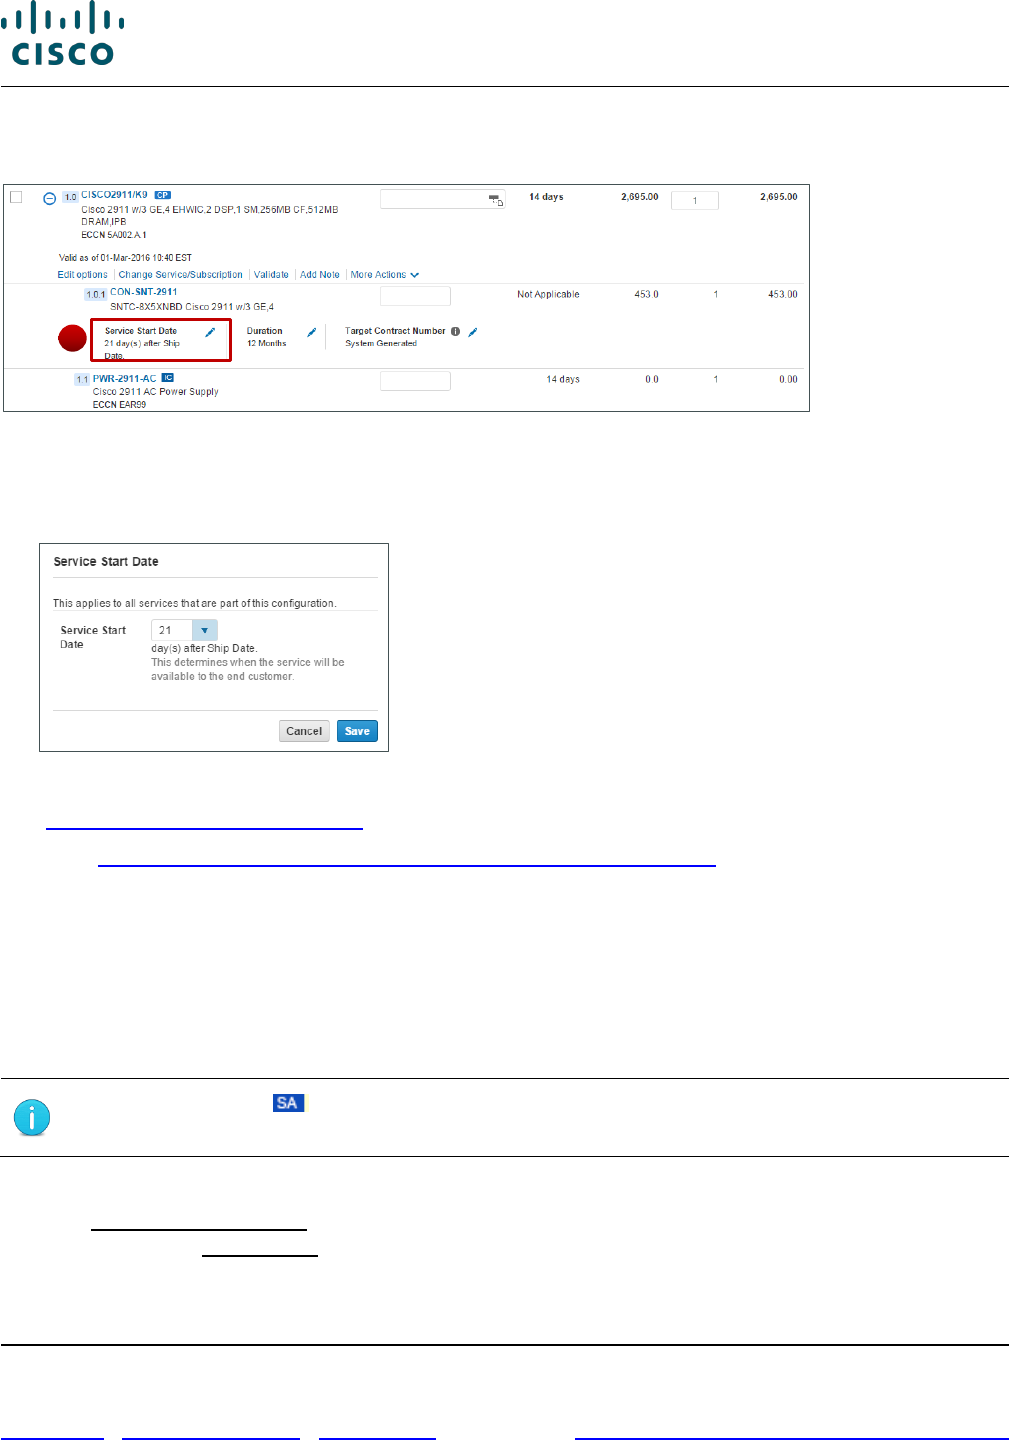
Cisco Commerce Order User Guide
Cisco Proprietary © 2020 Cisco and/or its affiliates. All rights reserved.
Last Updated: 17 March 2020 Page 84 of 143
Cisco.com | Privacy Statement | Trademarks Provide Feedback on this Training Resource
1. Navigate to the service line and click the edit icon next to Service Start Date. The Service Start
Date dialog box displays.
Order Details Page: Items Tab - Service Start Date
2. Select the desired start date from the drop-down list.
3. Click Save. The delay in service start is updated on the order.
Service Start Date Dialog Box
See Setting Default Services Options for details on how to setup FSSD for all services in your order.
Refer the QRG on how to setup FSSD on Services and Subscription lines
6.10 Adding a Smart Account
In order to standardize software licensing across Cisco, Assign Smart Account functionality is available
in Cisco Commerce Order - Items tab.
With Smart licensing, you will be able to log in to your Smart Account to activate licenses and view all
Smart Products you purchase from Cisco. Smart Accounts will be required when ordering Smart
Products in Cisco Commerce.
Note: The icon displays for all Smart-Mandatory SKUs. For smart-optional
SKUs, the assign now link will be available and the SA icon will not be displayed.
To assign a Smart Account, perform the following:
1. Click Assign Smart Account in the header area to assign a Smart Account for the entire order.
Alternately, click Assign Now at the line level to assign a Smart Account for a single line. The
Assign Smart Account dialog box opens.
1
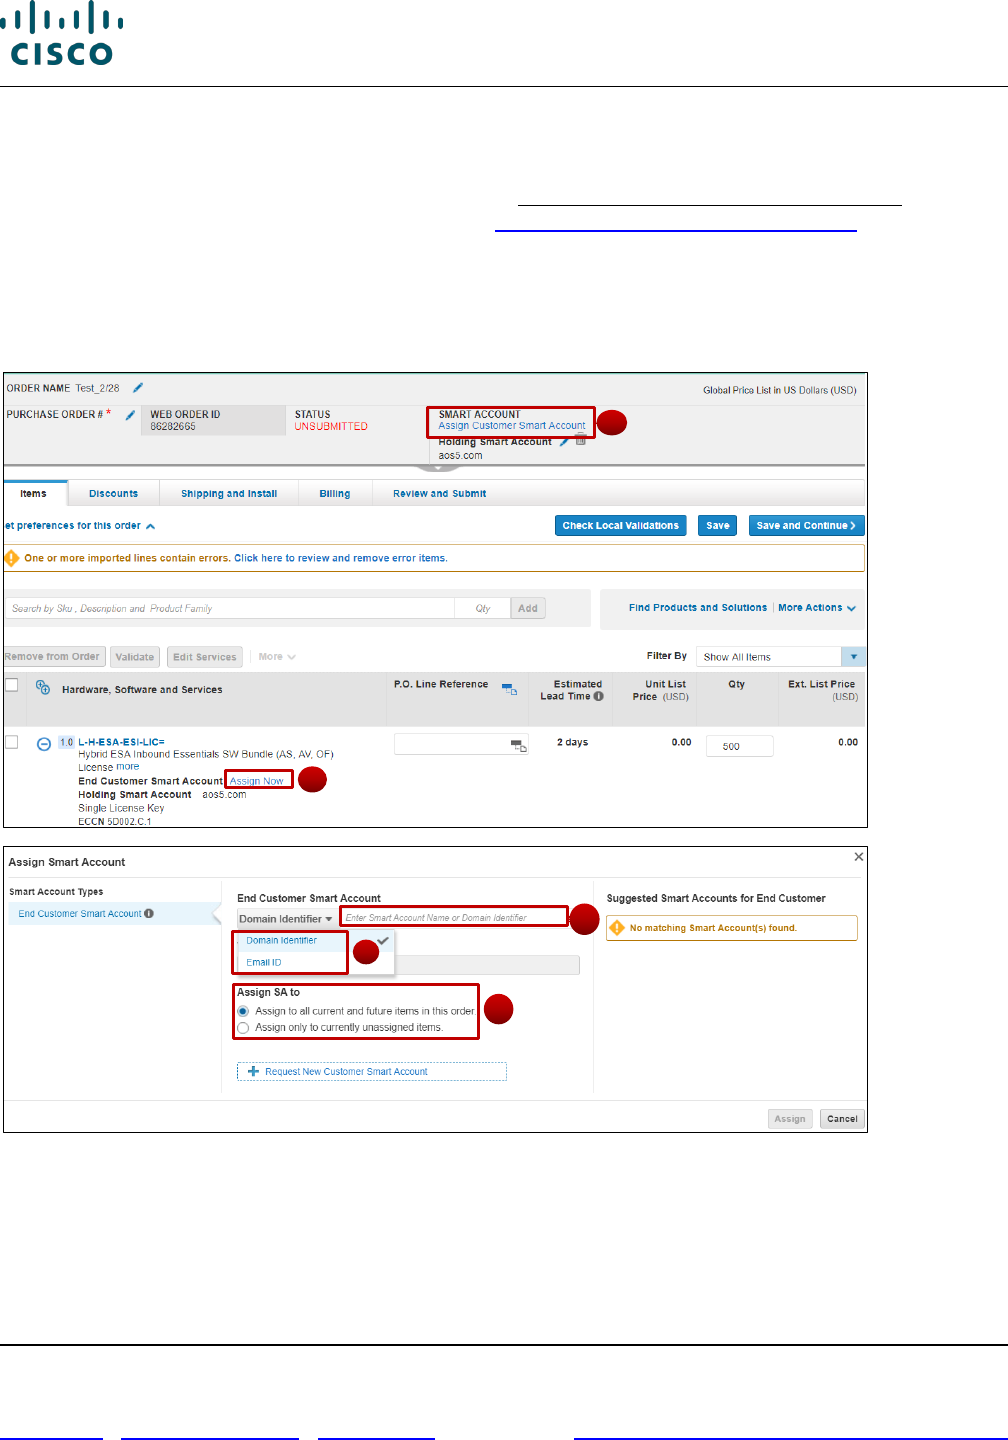
Cisco Commerce Order User Guide
Cisco Proprietary © 2020 Cisco and/or its affiliates. All rights reserved.
Last Updated: 17 March 2020 Page 85 of 143
Cisco.com | Privacy Statement | Trademarks Provide Feedback on this Training Resource
2. Use the radio buttons to select the Smart Account Type and your assignment preference.
3. Begin typing the desired Smart Account in the search field. Select the appropriate account from the
drop-down list of search results. Alternately, click Request New Customer Smart Account if the
desired Smart Account does not exist. See the Smart Account Operations Exchange page for more
information.
4. Click Assign. The Items tab refreshes with a Smart Account assigned.
5. Click the edit icon to change the assigned Smart Account or the delete icon to remove the assigned
Smart Account.
Order Page: Items Tab – Smart Account
1
1
2
3
2
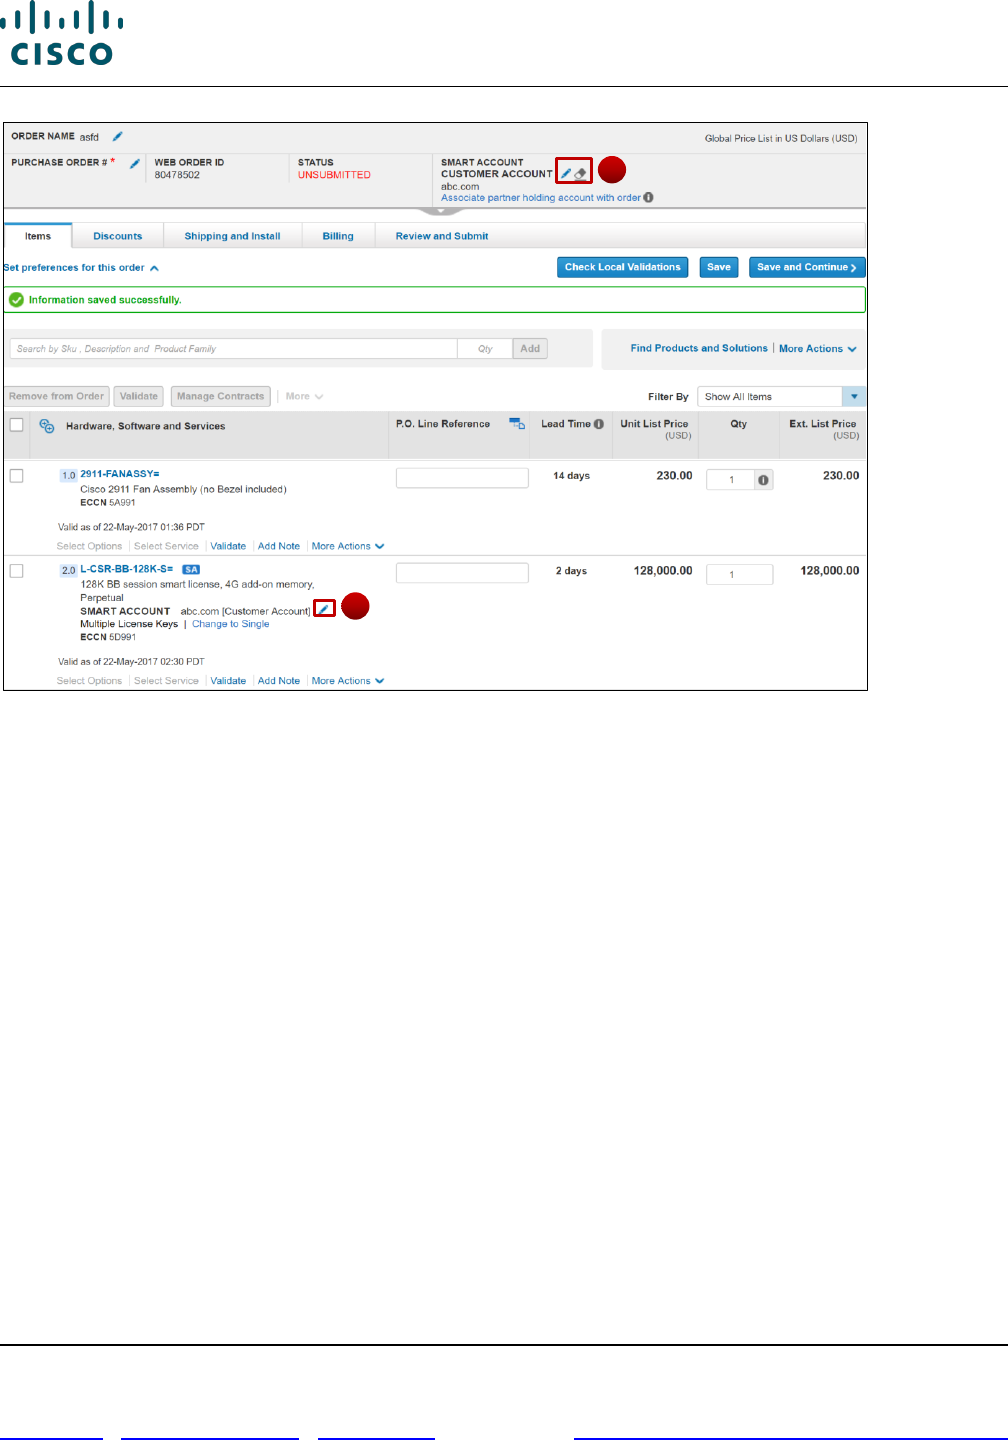
Cisco Commerce Order User Guide
Cisco Proprietary © 2020 Cisco and/or its affiliates. All rights reserved.
Last Updated: 17 March 2020 Page 86 of 143
Cisco.com | Privacy Statement | Trademarks Provide Feedback on this Training Resource
Order Page: Items Tabs Refreshed with Smart Account Information
5
5
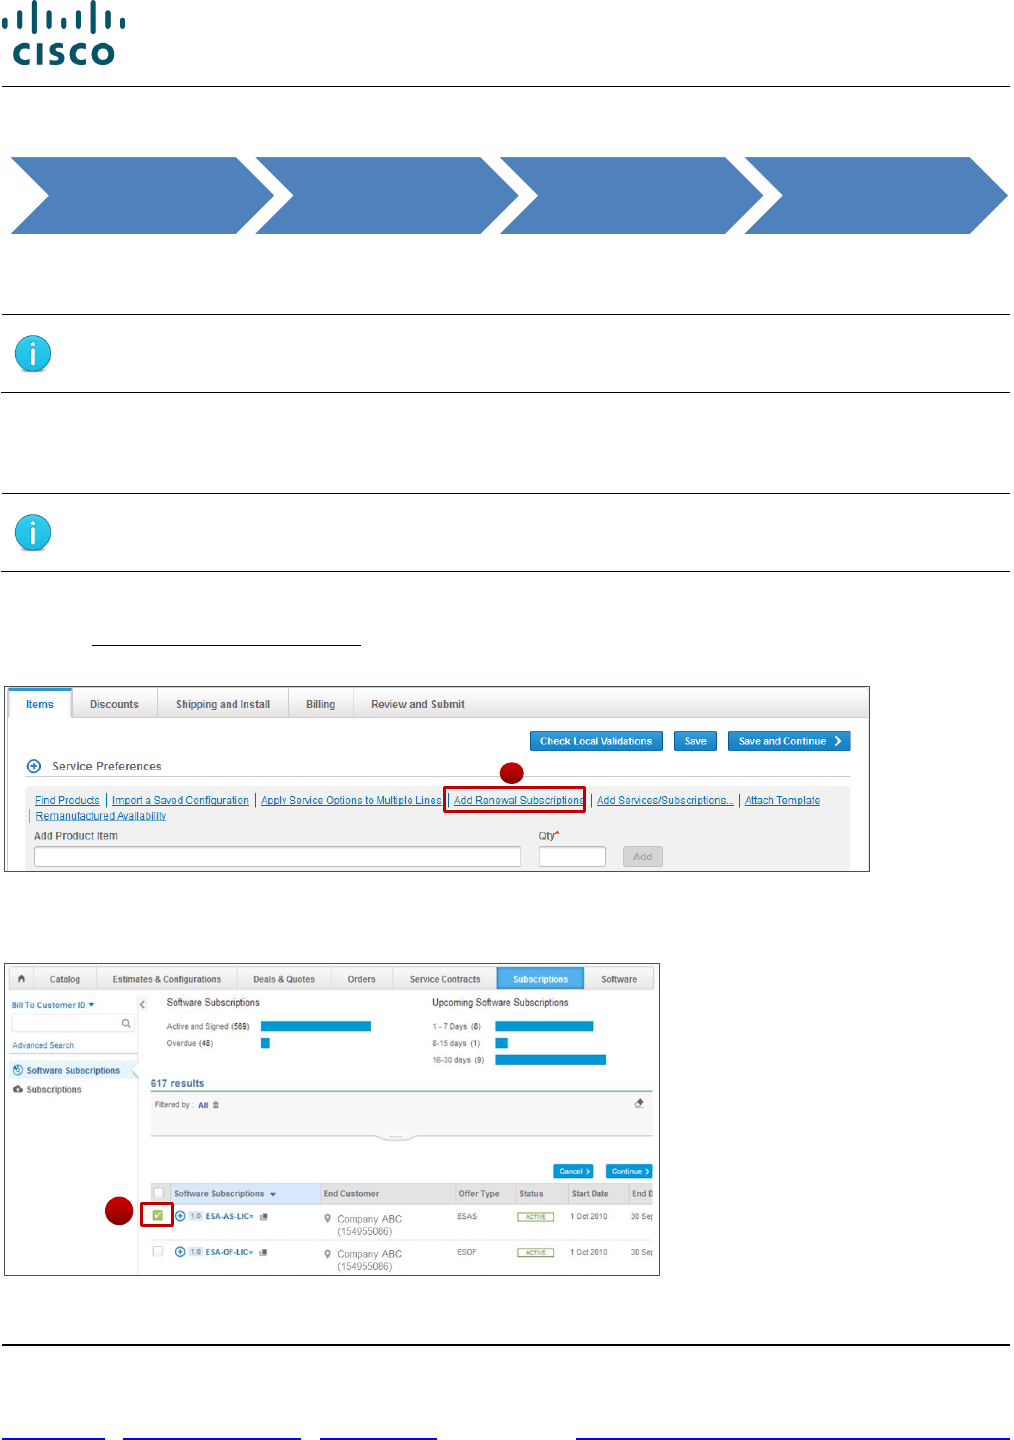
Cisco Commerce Order User Guide
Cisco Proprietary © 2020 Cisco and/or its affiliates. All rights reserved.
Last Updated: 17 March 2020 Page 87 of 143
Cisco.com | Privacy Statement | Trademarks Provide Feedback on this Training Resource
6.11 Renewing Software Subscriptions
You can renew existing subscription contracts and create new subscription contracts Using Cisco
Commerce, either directly through the Subscriptions tab or from within an order.
Note: This capability is limited in Cisco Commerce and has only been enabled for
limited offers. Use CCW-R to manage subscription offers that have not been enabled.
When adding a subscription renewal to an existing contract, you can co-term the end dates of the
software subscription renewal to an existing contract. However, this feature in Cisco Commerce is
available for 1-tier partners only.
Best Practices: Do not renew the same subscription through both Cisco Commerce
Orders tab and CCW-R.
To renew software subscription, complete the following steps:
1. Click Add Renewal Subscriptions to add software subscription renewals to the order. The
Subscription page displays in a new window.
Order Page: Items Tab
2. Select the subscriptions to add.
Subscriptions Page
Cisco Commerce Orders Tab Create Order
Order Page: Items
Tab
1
2
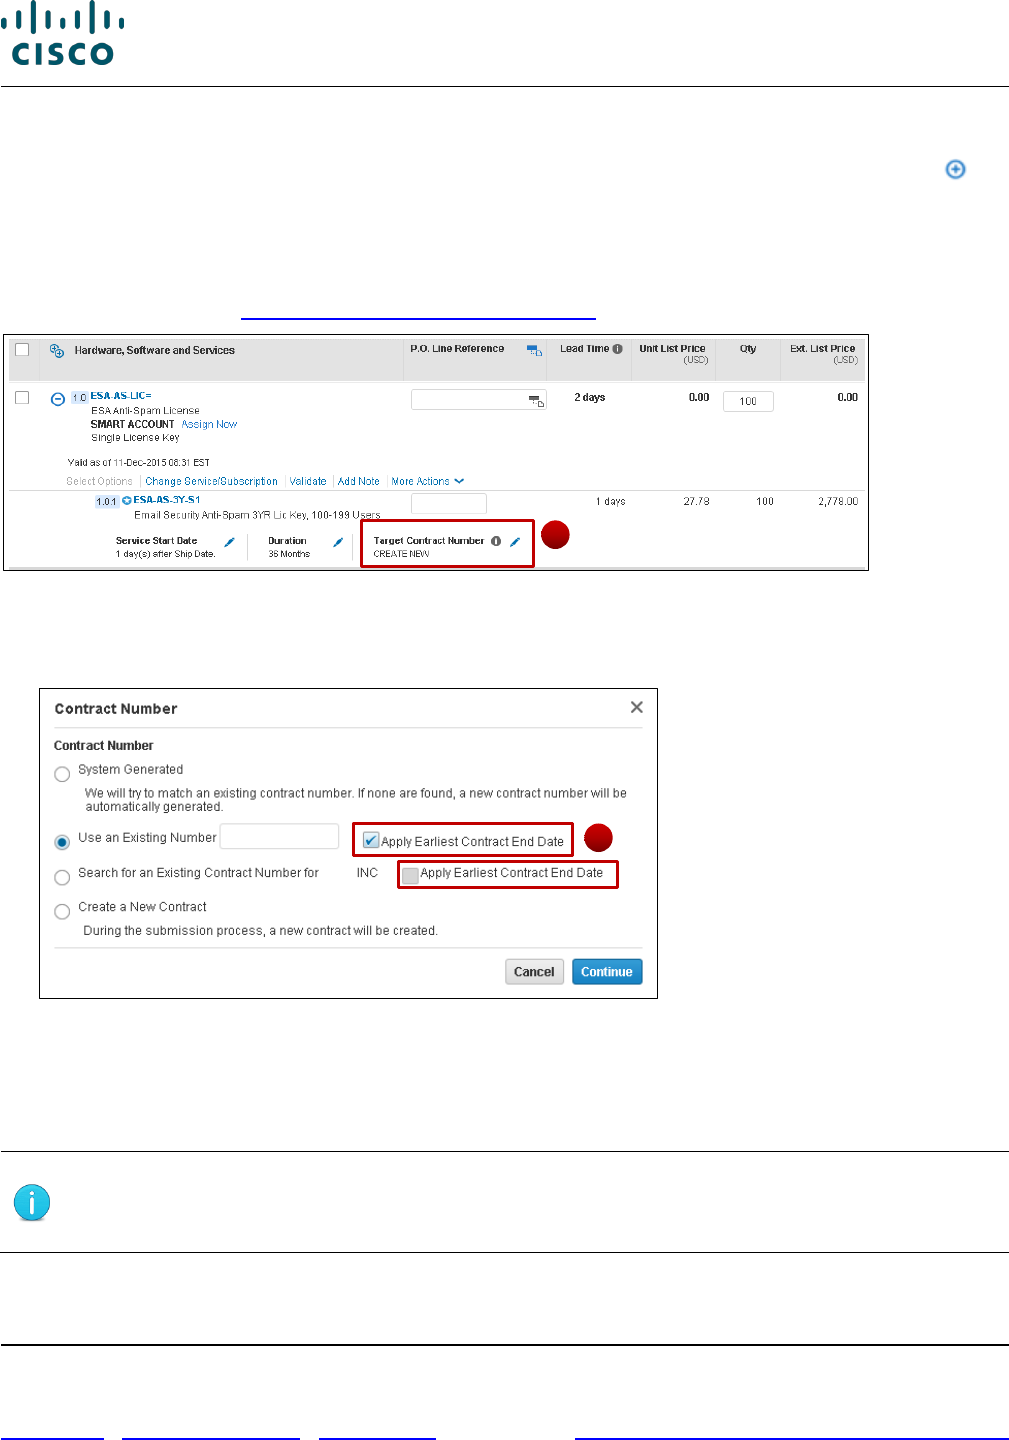
Cisco Commerce Order User Guide
Cisco Proprietary © 2020 Cisco and/or its affiliates. All rights reserved.
Last Updated: 17 March 2020 Page 88 of 143
Cisco.com | Privacy Statement | Trademarks Provide Feedback on this Training Resource
3. Click Continue to return to the Items tab.
4. To co-term the subscription renewal to an existing contract for end date alignment, click the ( )
icon next to the item to expand it.
5. Click the pencil icon next to the Target Contract Number. The Contract Number dialog box displays.
(By default, the current Contract Number becomes the Target Number as long as the order BID
matches the contract BID. If this is a new subscription, then the Contract Number will default to
CREATE NEW. See Identifying Target Contract Numbers for more information.)
Order Page: Items Tab – Added Subscriptions
6. Select the radio buttons corresponding to either “Use an Existing Number or Search for an Existing
Contract Number” to add your subscription renewal to an existing contract.
Contract Number Dialog Box
7. Check the Apply Earliest Contract End Date box. It ensures that the existing contract end date is
applied to the subscription renewal.
8. Click Continue. The Items tab displays the updated subscription.
Note: Only when co-terming to an existing contract will duration between 1 and 12
months be considered standard. For non co-termed subscription renewals, the
standard duration is between 12 and 60 months.
5
7
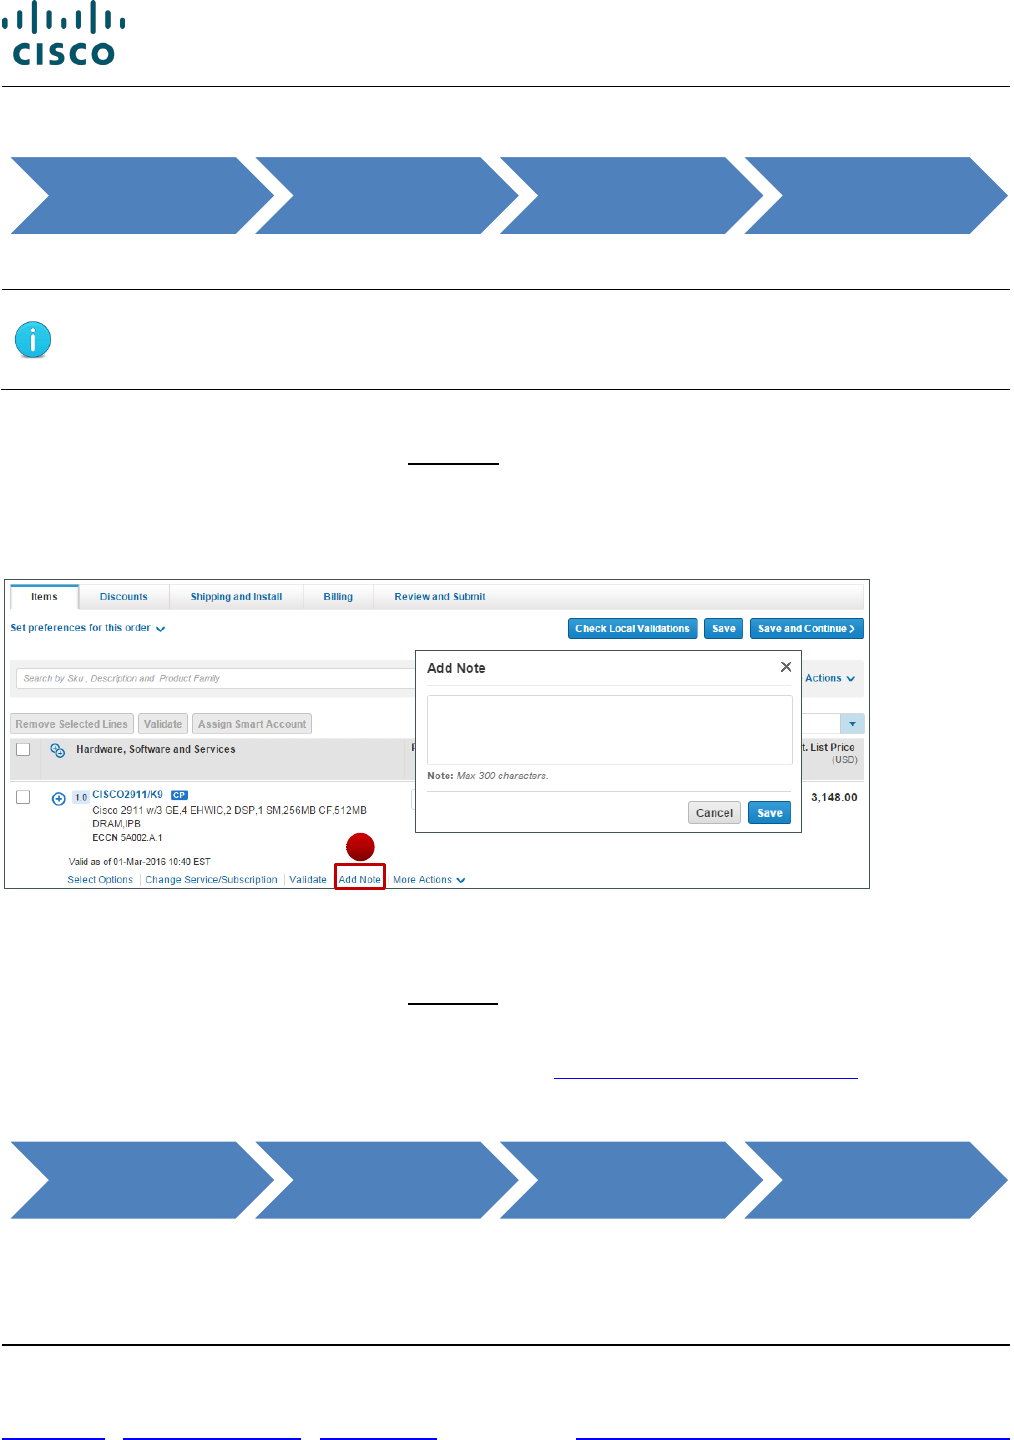
Cisco Commerce Order User Guide
Cisco Proprietary © 2020 Cisco and/or its affiliates. All rights reserved.
Last Updated: 17 March 2020 Page 89 of 143
Cisco.com | Privacy Statement | Trademarks Provide Feedback on this Training Resource
6.12 Adding and Deleting Item Notes or Comments
You can enter free-form notes at the major line level on an order.
Note: These notes are for your personal use only and will not put the order on hold,
not raise a case, and not be systematically reviewed by Customer and Partner
Services (CPS) team.
To create a note for a line, complete the following steps:
1. From the Order page: Items tab, click Add Note. The note field opens.
2. Click the field and enter up to 300 characters. This note is for your internal communication only.
Cisco does not view this note.
3. Click Save. The note is now saved.
Order Page: Items Tab – Add note to a Line Item
To delete an order note, complete the following steps:
4. From the Order page: Items tab, click Edit Note. The Note field opens.
5. Click Delete. The note is deleted.
You can add notes on your Shipping and Install tab, see Setting Order Shipping Options.
6.13 Populating the Purchase Order Line Reference
A PO Line Reference capability allows you to identify your internal Purchase Order (PO) line number to
each Cisco Commerce order line.
Cisco Commerce Orders Tab Create Order
Order Page: Items
Tab
Cisco Commerce Orders Tab Create Order
Order Page: Items
Tab
1
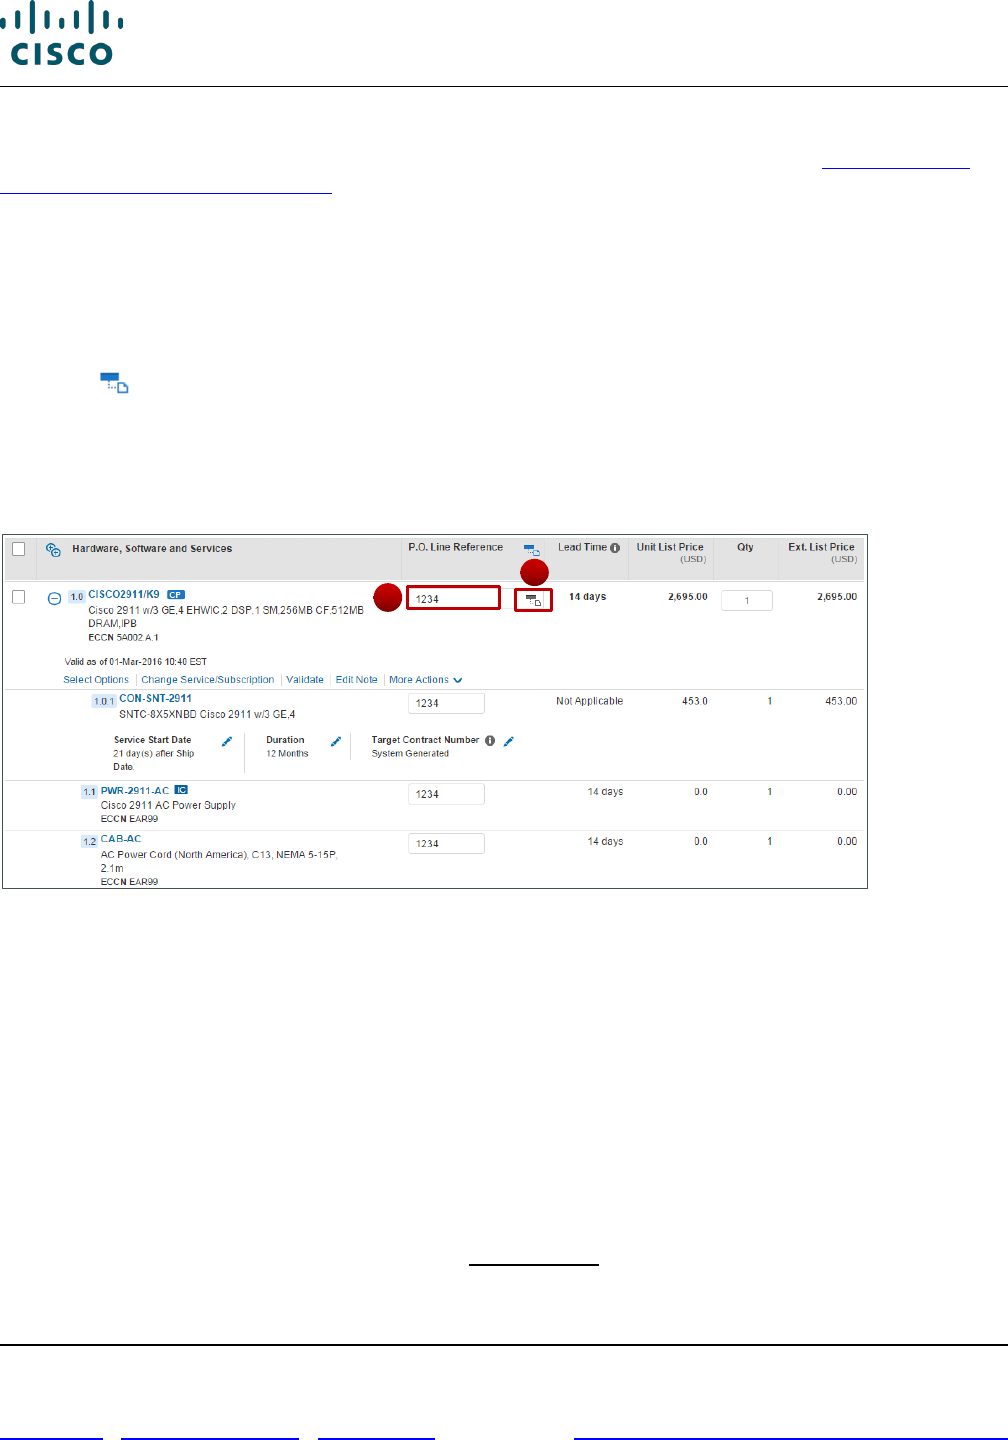
Cisco Commerce Order User Guide
Cisco Proprietary © 2020 Cisco and/or its affiliates. All rights reserved.
Last Updated: 17 March 2020 Page 90 of 143
Cisco.com | Privacy Statement | Trademarks Provide Feedback on this Training Resource
To display the PO line reference field on order lines, you must go to your Order Preferences in My
Profile and Preferences, and click the Yes radio button for PO Line References (see Getting Started
with Cisco Commerce User Guide). The customer ID must also be set correctly for any entered values
to appear on the invoice.
To populate the P.O. Line Reference field and cascade the information to the minor line levels,
complete the following steps:
1. From the Order page: Items tab, click the P.O. Line Reference field.
2. Enter the purchase order number, for major and/or minor lines.
3. Click to automatically populate the purchase order line reference number in the minor lines for
that major line. To verify that the purchase order number has populated through all lines, click to
expand a major line item to view the minor lines.
Note that the purchase order number populates for all the minor lines.
4. Repeat these steps as applicable for all line items within the order.
Order Page: Items Tab – PO Line Reference
6.14 Removing a Line Item from an Order
You can remove a line item(s) from an unsubmitted order. To do so, complete the following steps:
1. From the Order page: Items tab, check the appropriate checkbox for the line to remove.
2. To select all the lines on an order, simply check the header level checkbox. This would apply to
every line on the order.
3. Click Remove Selected Lines. The line item is removed.
4. If the order was converted from a quote, you can opt to remove the line item from both the quote
and the order, click Remove from Quote and Order. The line item is removed from both the quote
and the order.
5. To remove a single line, you can also select Remove Line from the More Actions drop-down menu
for the desired line.
2
3
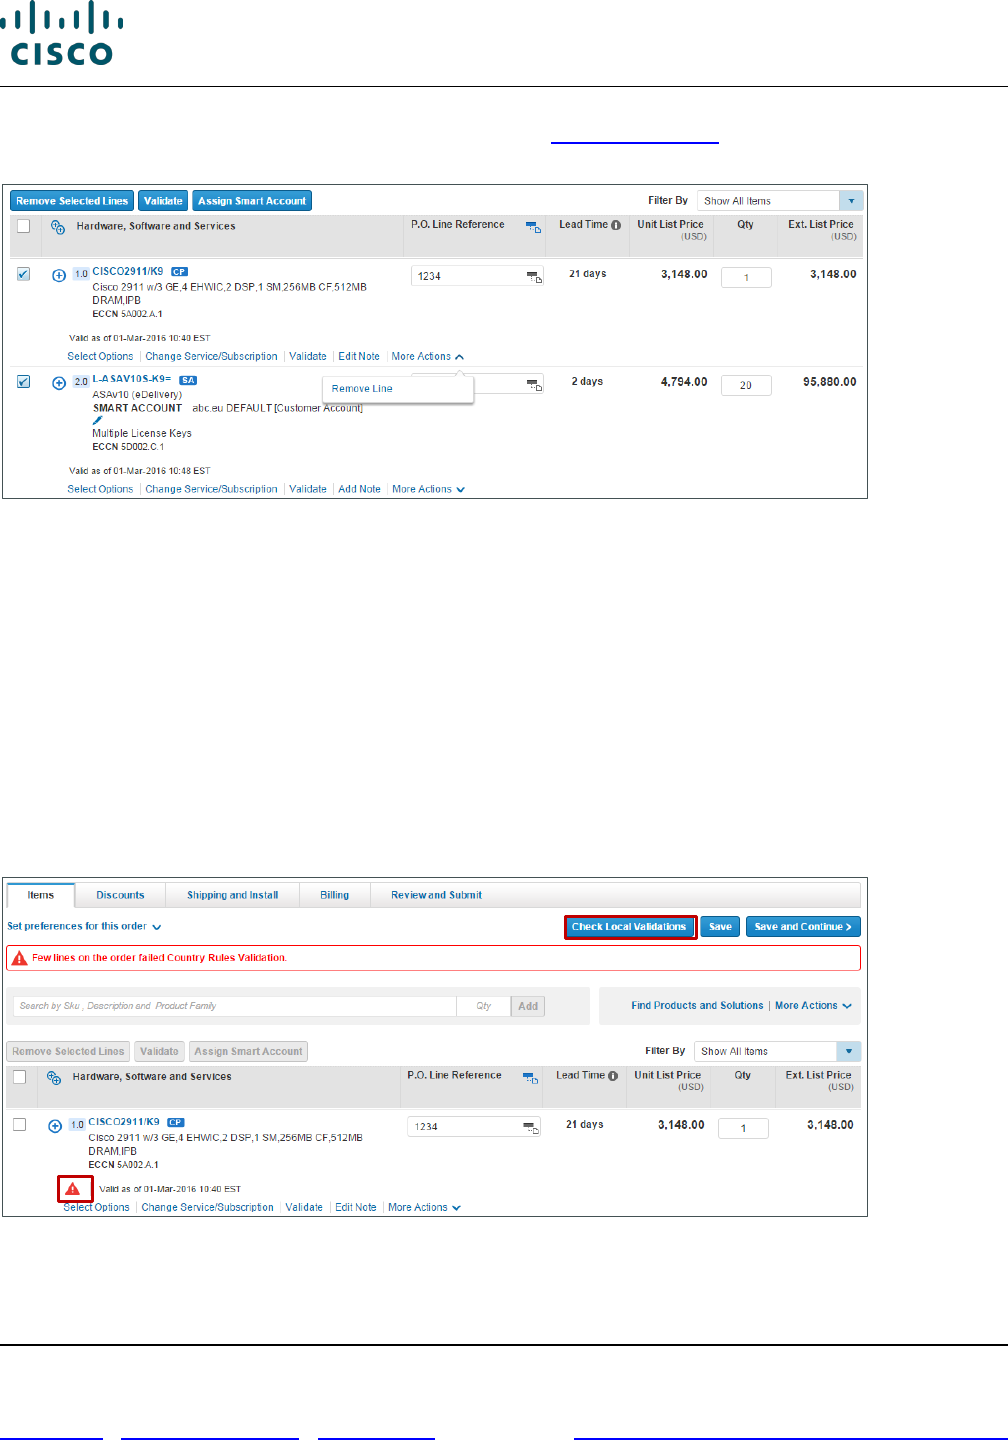
Cisco Commerce Order User Guide
Cisco Proprietary © 2020 Cisco and/or its affiliates. All rights reserved.
Last Updated: 17 March 2020 Page 91 of 143
Cisco.com | Privacy Statement | Trademarks Provide Feedback on this Training Resource
If you want to remove a line from a submitted order, see Cancelling a Line. A Change Order must be
initiated on a submitted order to change any of its attributes.
Order Page: Items Tab – Remove from Order
6.15 Verifying Country Rules Validations
Country rules validations ensure that the items on an order are valid and orderable for the selected
addresses.
When the order is submitted, country rule validations are automatically invoked. If all items pass the
validations, the order will be submitted successfully. If the items do not pass the validations, an error at
the header level will guide you to correct the issue. For example, an error will occur if an item fails
validation for shipment to a specific country.
To avoid the error, click Check Local Validations before proceeding to the Discounts tab. A green
success message will display once all items are verified to be orderable. An error message will display
if the validation fails; hover over the red exclamation at the line level to view information on why the line
failed the validation check.
Order Page: Items Tab – Country Rules Validations

Cisco Commerce Order User Guide
Cisco Proprietary © 2020 Cisco and/or its affiliates. All rights reserved.
Last Updated: 17 March 2020 Page 92 of 143
Cisco.com | Privacy Statement | Trademarks Provide Feedback on this Training Resource
6.16 Reviewing Discounts
From the Discounts tab, you can review the discounts for the order before proceeding through the
remaining order process. For the Discounts tab in the Cisco Commerce Change Order process, see
Viewing the Discounts Tab in Change Order.
Only contractual discounts are applied as a part of a standalone order. No special pricing/discounts
display on a standalone order. To apply discounts and special pricing, begin by creating a deal or quote
(see the Cisco Commerce Deals and Quotes User Guide). For more information, see Order Notification
Order Notifications that you receive through email will display Service Information in a consistent,
standardized format showing Start Date, End Date, Duration, Target Contract Number, and Original
Contract Number. This will apply to Order submission notifications for regular orders and auto-orders
and will apply to success and failure notifications.
Note: Based on the notification setting in CCW user profile, you will be receiving the notification(s) for
Order Submitted, Invoice, Billing Status, Shipping Status and RMA.
Using a Reusable Nonstandard Discount.
Follow the given steps to review discounts:
1. From the Discount tab, click the View By drop-down arrow and click the appropriate option.
The status can display by: Unit Net Price, Discount Type, Discount Details, Summary, or Product
and Service Totals. The information on the page redistributes according to what display you select.
2. Click the edit icon to change the Intended Use. Select the appropriate option from the drop-down
menu and click Update. The discounts may change based on the intended use of the order.
3. Click Continue. The Shipping and Install tab displays.
Cisco Commerce Orders Tab Create Order Discounts Tab
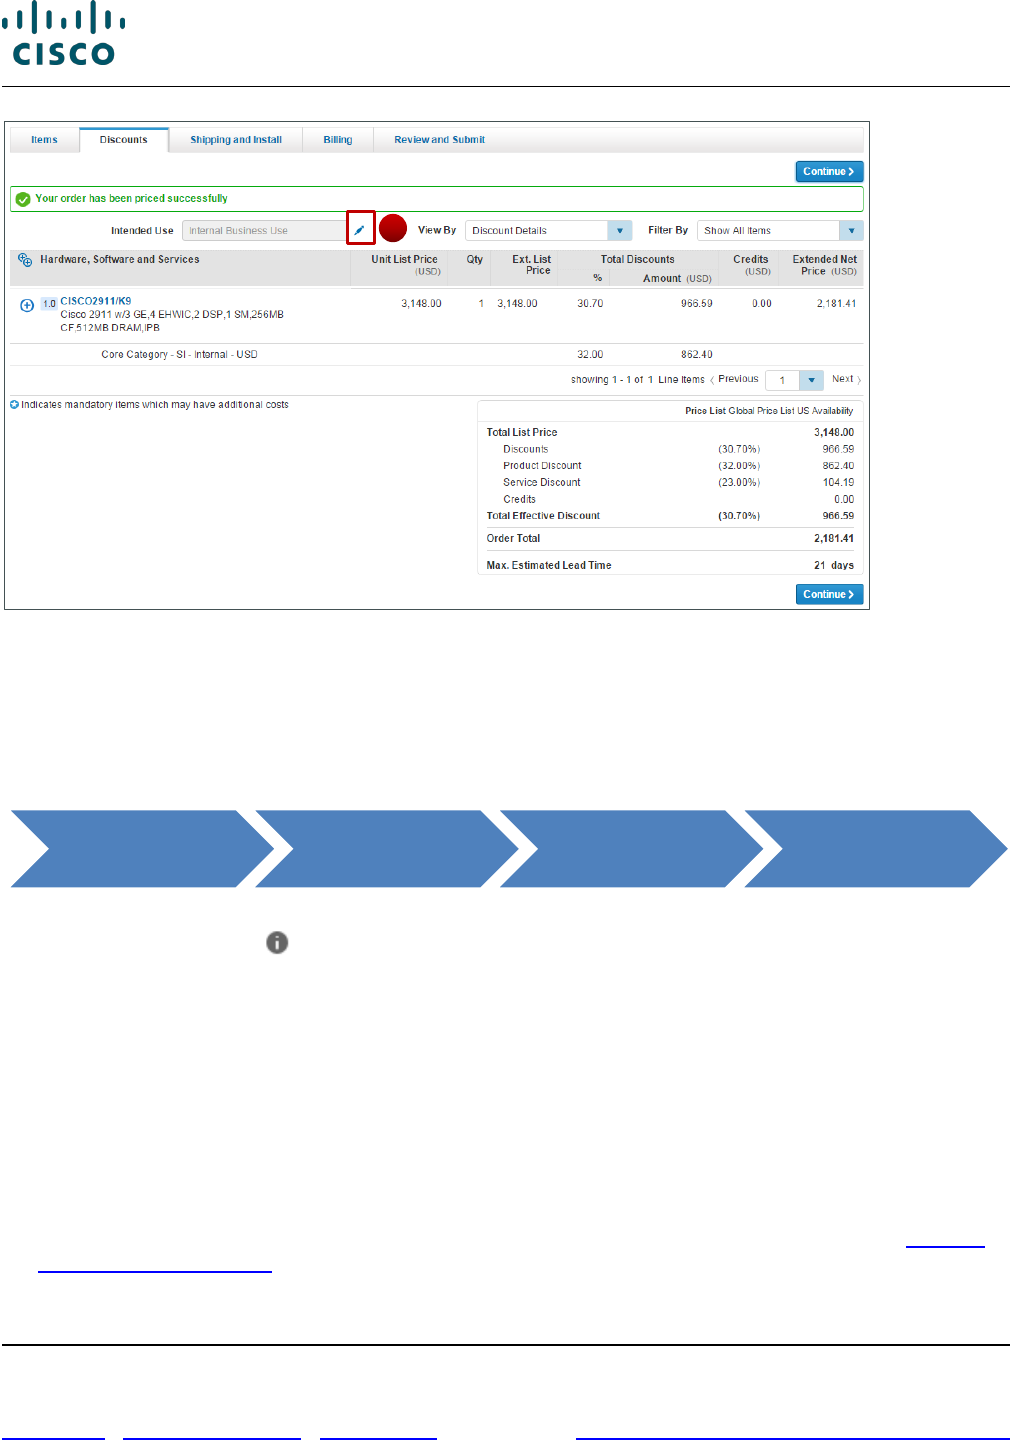
Cisco Commerce Order User Guide
Cisco Proprietary © 2020 Cisco and/or its affiliates. All rights reserved.
Last Updated: 17 March 2020 Page 93 of 143
Cisco.com | Privacy Statement | Trademarks Provide Feedback on this Training Resource
Order Page: Discounts Tab
6.17 Setting the Shipping and Installation Information
The Shipping and Install tab displays the default information from My Profile and Preferences section
and the Order page.
6.17.1 Setting Order Shipping Options
Under the Order Shipping Options section, set shipping and install site related options as applicable.
Click the information icon ( ) corresponding to each section for more information.
• Billing e-mail: To enter a billing email address, click the Billing Email field. Enter the appropriate
email address. To enter multiple email addresses, enter the addresses in a list separated by a
comma.
• Ship All Items Separately: Indicate whether it is acceptable for Cisco to ship the items separately.
Click the appropriate Ship All Items Separately radio button. If items are shipped separately then
separate invoices will be generated. Please note that even in cases when you select NO, items will
be shipped and invoiced separately if they originate from different manufacturing locations.
• Request Date Type: This field is automatically populated. If the field states “SHIP”, then Cisco will
inform you of when your order is due to ship from our logistics center. If the field states “ARRIVAL”,
then we will let you know when your order will arrive at the assigned destination. See the Delivery
Based Scheduling QRG for more information.
Cisco Commerce Orders Tab Create Order
Shipping and
Install Tab
2
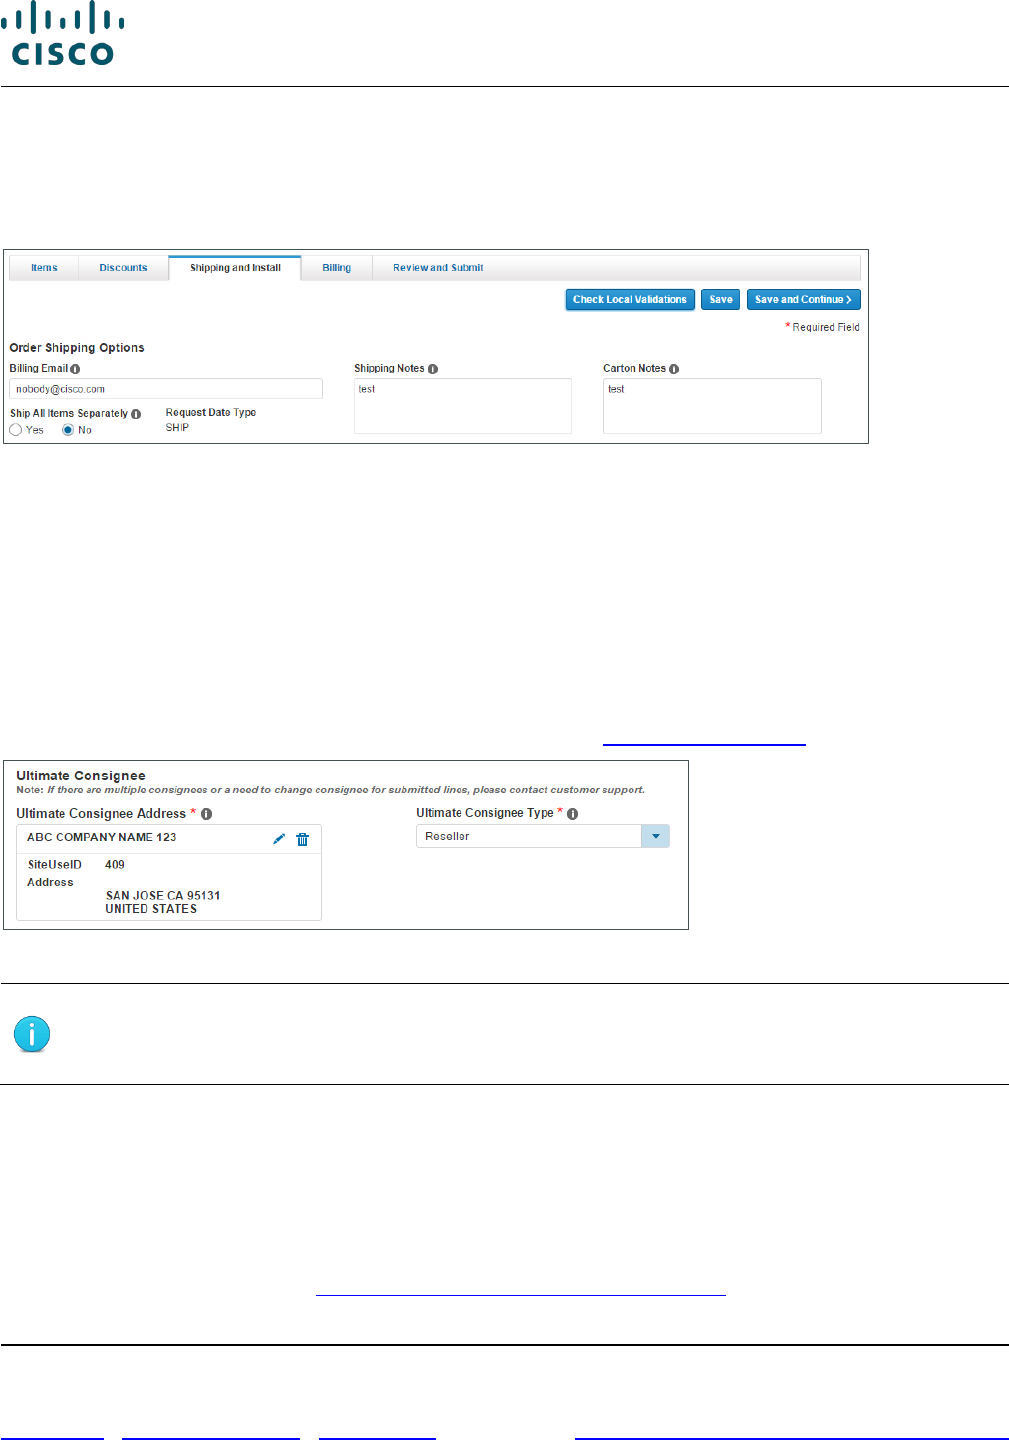
Cisco Commerce Order User Guide
Cisco Proprietary © 2020 Cisco and/or its affiliates. All rights reserved.
Last Updated: 17 March 2020 Page 94 of 143
Cisco.com | Privacy Statement | Trademarks Provide Feedback on this Training Resource
• Shipping Notes: Click the Shipping Notes field and enter any information that should display on all
packing slips and invoices.
• Carton Notes: Click the Carton Notes field and enter any information that should display on the
carton label.
Order Page: Shipping and Install Tab
6.17.2 Adding Ultimate Consignee Details
To comply with U.S. federal regulations and track all shipped products to their ultimate install site, Cisco
must capture ultimate consignee (UC) information for all orders (with at least one shippable good) that
are being physically exported from Cisco (US).
Before submitting orders, you are required to populate the UC Address and UC Type fields. UC
Address will default to the Ship To address and a separate entry will be required for each Ship To on an
order. UC Type will be defaulted to Reseller. You will have the option of editing either of these fields. In
addition, in the Review and Submit tab you will need to select an explicit agreement checkbox to allow
Cisco to use the UC information displayed on your order (see Submitting the Order).
Order Page: Shipping and Install Tab – Ultimate Consignee
Note: This information ensures accurate UC reporting, and you are required to
populate the UC information regardless of your region. Non-compliance with the UC
reporting requirements carries potential fees and penalties.
To add UC information, complete the following steps:
1. Click Add Address in the Ultimate Consignee Address section. The Address Search dialog box
displays.
2. Click the radio button for the appropriate address.
3. Click Use Selected Address.
4. To change the address, see Adding or Changing the Shipping Address.
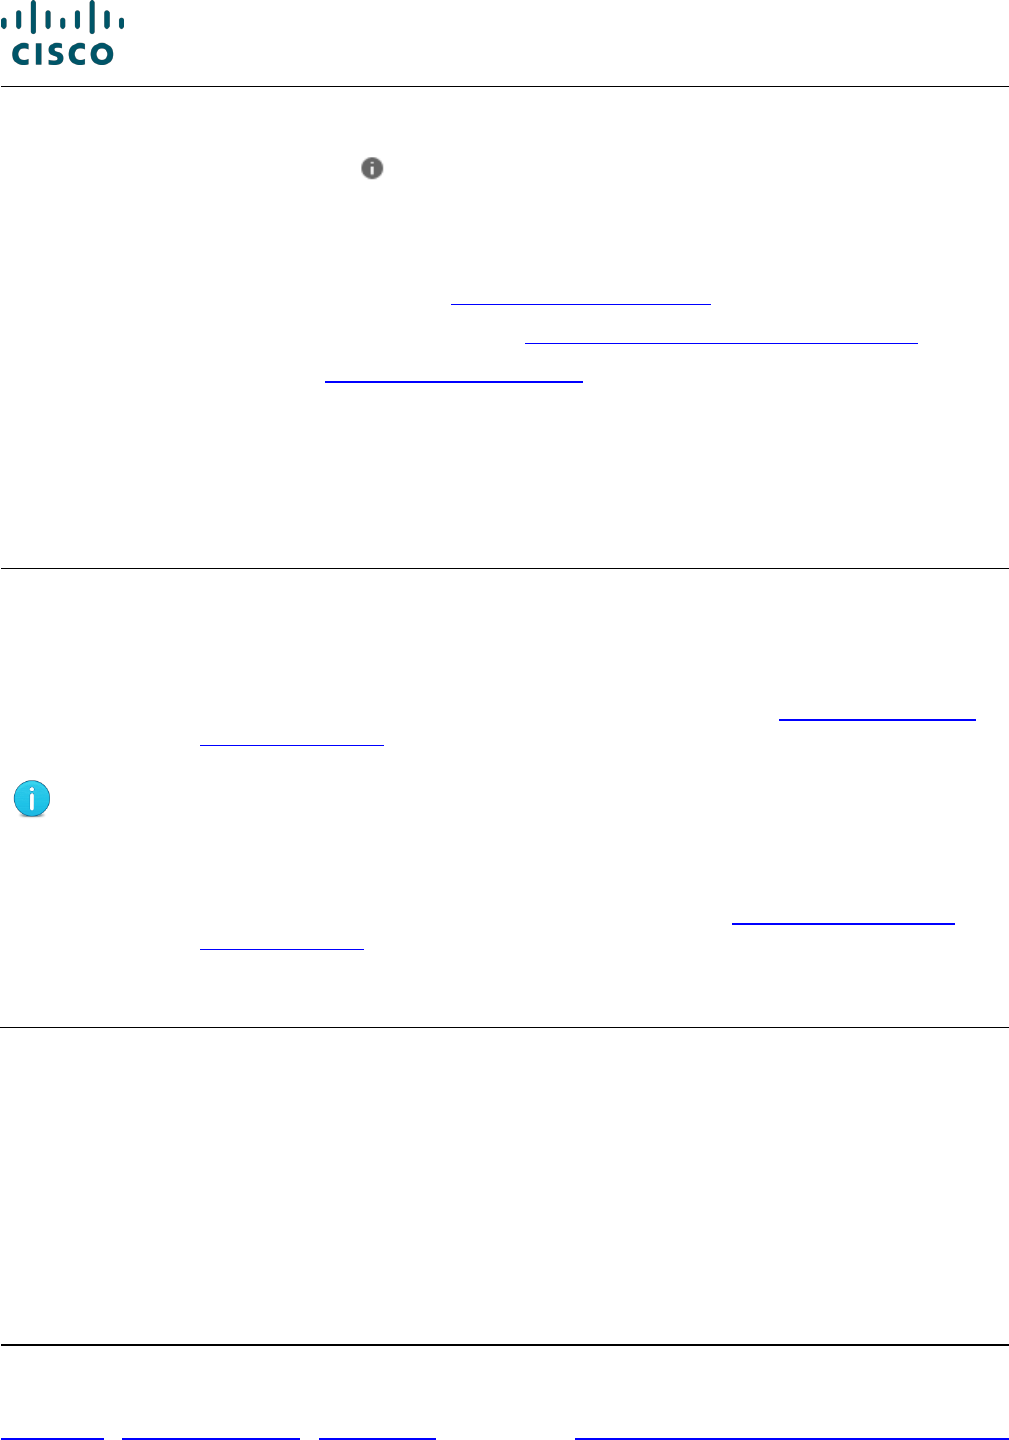
Cisco Commerce Order User Guide
Cisco Proprietary © 2020 Cisco and/or its affiliates. All rights reserved.
Last Updated: 17 March 2020 Page 95 of 143
Cisco.com | Privacy Statement | Trademarks Provide Feedback on this Training Resource
5. Click the Ultimate Consignee Type drop-down and select the appropriate option.
6. Hover over the information icon ( ) for more information.
6.17.3 Managing Shipping Groups
From the Shipping Groups section of the Shipping and Install tab, you can:
• Create and rename a shipping group (see Creating a Shipping Group)
• Move items among different shipping groups (see Moving Items Between Shipping Groups)
• Delete a shipping group (see Deleting a Shipping Group)
6.17.3.1 Creating a Shipping Group
The system automatically creates a Default Shipping group, with the addresses defaulting from the
order header information. Newly added items are automatically assigned to this default shipping group.
You would create a new shipping group to provide different shipping or install site information for lines
within an order.
Best Practice:
• Fixed Scope Consultancy products (SKUs that begin with ASF) should be in their
own unique shipping group with the install site contact information for the Fixed
Scope Consultancy service correctly identified. It is likely that this information will
not be the same as the product install site information. See Adding Fixed Scope
Consultancy SKUs.
• If you create a new shipping group and move only the Fixed Scope Consultancy
products to the new group, then the shipping preference, routing option, and
shipping service options will not be required. Note that this is applicable to
service-only orders as well.
• EXCEPTION: In cases where you add hardware AND a Fixed Scope Consultancy
SKU to an order, and in the same shipping group (see Moving Items Between
Shipping Groups), system will require the shipping preference, routing option, and
shipping service options for the hardware product.
• Place remanufactured and new products in separate shipping groups.
To create a new shipping group, complete the following steps:
1. From the Shipping Groups section, click Create New Shipping Group. The Create New Shipping
Group dialog box displays.
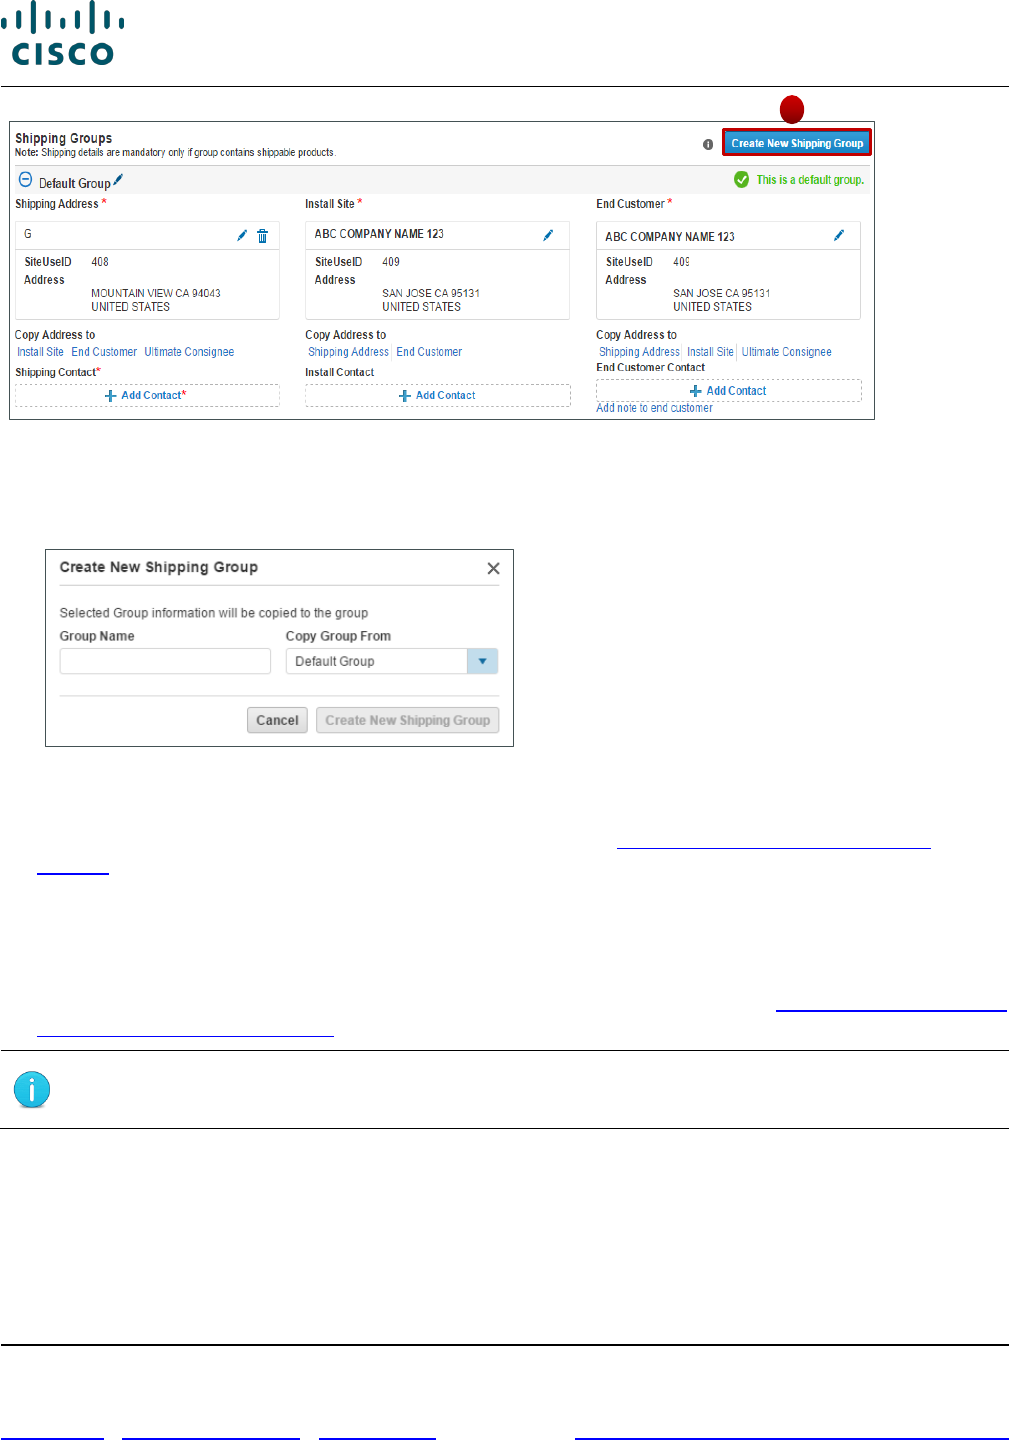
Cisco Commerce Order User Guide
Cisco Proprietary © 2020 Cisco and/or its affiliates. All rights reserved.
Last Updated: 17 March 2020 Page 96 of 143
Cisco.com | Privacy Statement | Trademarks Provide Feedback on this Training Resource
Order Page: Shipping and Install Tab – Shipping Groups Section
2. Click the Group Name field and enter a new group name.
3. Optionally, click the Copy Group From drop-down arrow and select an appropriate option.
Create New Shipping Group Dialog Box
The items currently under the shipping group selected will be moved into the new shipping group
being created. For moving items from shipping groups, see Moving Items Between Shipping
Groups.
4. Click Create New Shipping Group. The group is added below the Default Shipping Group.
5. Repeat these steps as necessary to create the required shipping groups.
6. Review the shipping group information. The default addresses display in the Shipping Group
Addresses section. Change or copy addresses as previously indicated (see Adding or Changing the
Shipping Address and Contact).
Best Practice: Name the shipping group based on the logical choice of grouping, for
example: purchase order, install site country, or end customer.
To change the name of a shipping group, complete the following steps:
1. Click the edit icon next to the group name. Change Group Name dialog box displays.
1
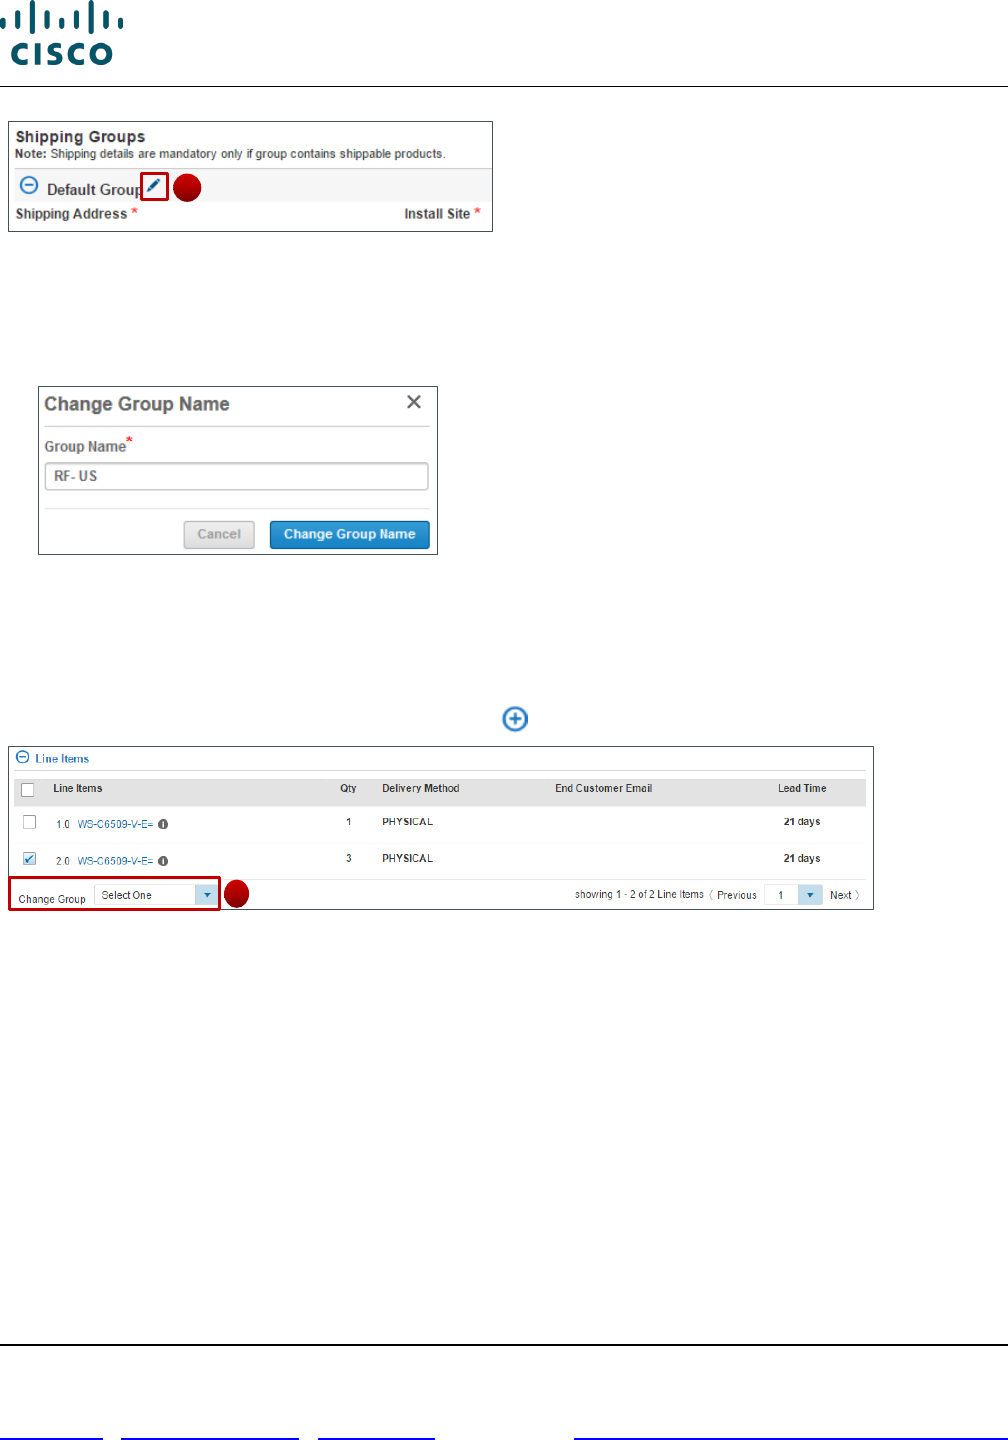
Cisco Commerce Order User Guide
Cisco Proprietary © 2020 Cisco and/or its affiliates. All rights reserved.
Last Updated: 17 March 2020 Page 97 of 143
Cisco.com | Privacy Statement | Trademarks Provide Feedback on this Training Resource
Order Page: Shipping and Install Tab – Shipping Groups Section
2. Click the Group Name field and enter a new name.
3. Click Change Group Name. The Shipping Groups section refreshes to display the new shipping
group name.
Change Group Name Dialog Box
6.17.4 Moving Items Between Shipping Groups
To move items from one shipping group into a different shipping group, complete the following steps:
1. From the Shipping and Install tab, go to the shipping group from where you need to move products
or services to a different shipping group. Click ( ) to expand the Line Items section.
Order Page: Shipping and Install Tab – Shipping Group Section
2. Check the appropriate checkbox(s) to indicate which items will be moved to another shipping group.
3. Click the Change Group drop-down arrow and select the appropriate shipping group. The Moving
Lines Confirmation dialog box displays.
4. Click OK. The items no longer display in the Default Shipping Group.
5. Repeat the above steps for all items that must be moved to other shipping groups.
6.17.5 Deleting a Shipping Group
You can delete any shipping group, except the default shipping group created by the system.
To delete a shipping group, complete the following steps:
1. Click the delete icon. The icon is only visible for added shipping groups. It is not visible for the
Default Shipping Group. The Delete Group dialog box displays.
3
1
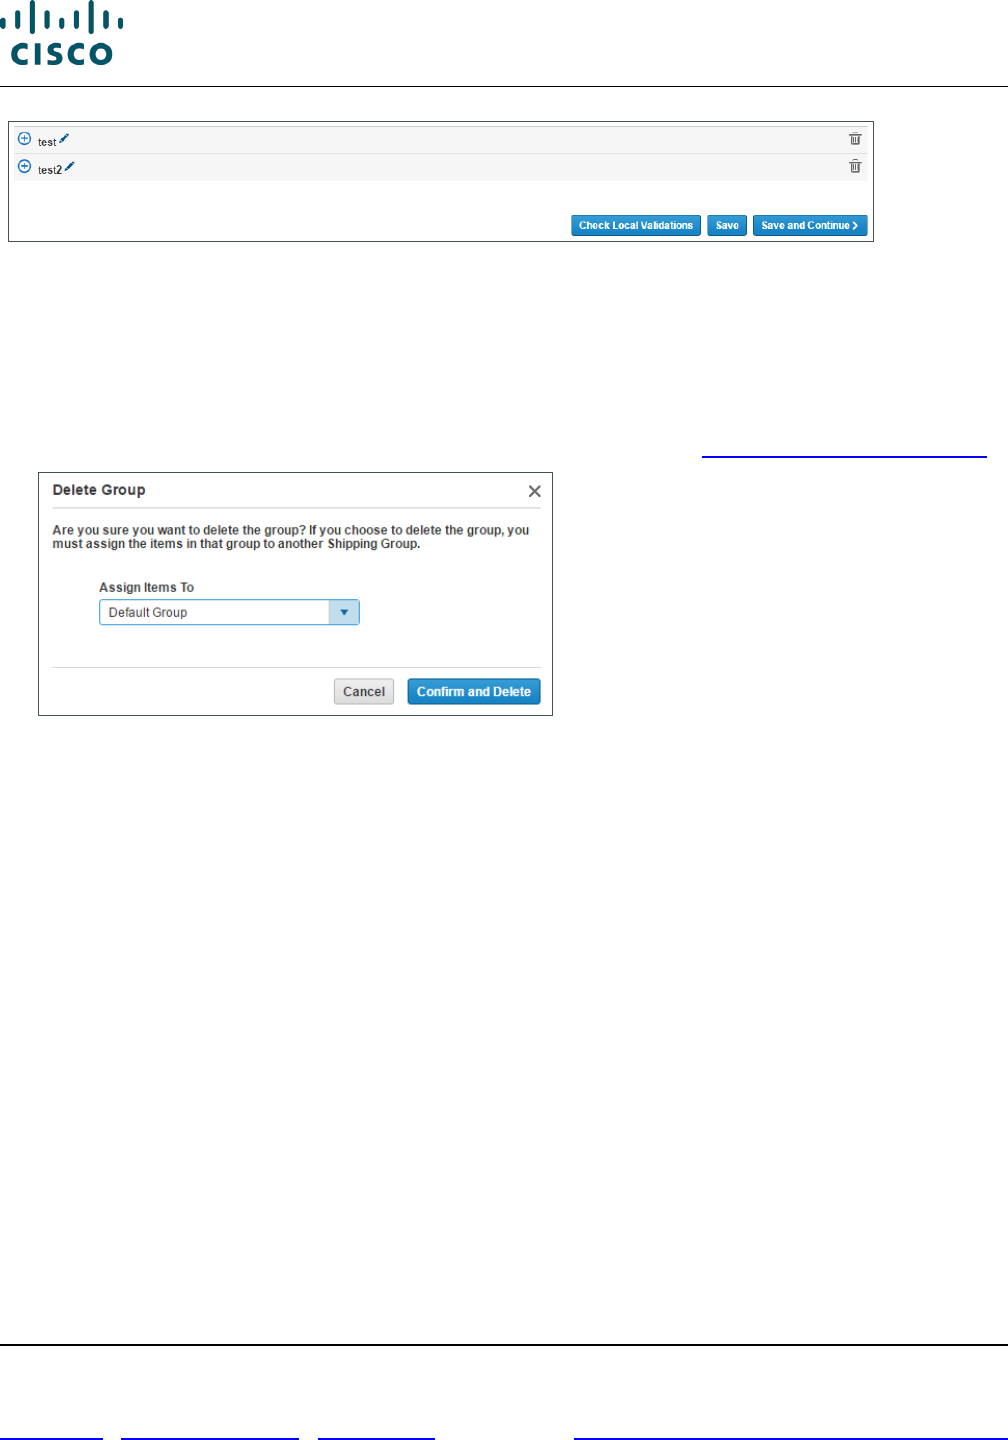
Cisco Commerce Order User Guide
Cisco Proprietary © 2020 Cisco and/or its affiliates. All rights reserved.
Last Updated: 17 March 2020 Page 98 of 143
Cisco.com | Privacy Statement | Trademarks Provide Feedback on this Training Resource
Order Page: Shipping and Install Tab – Shipping Groups Section
If the group to be deleted has items assigned to it, you would need to move the items to a different
group before deleting it.
2. Click the Assign Items To drop-down arrow and select a group to which you wish to move items to.
3. Click Confirm and Delete to delete the group and move the line items to the chosen group.
For managing a shipping group in Cisco Commerce Change Order, see Changing Shipping Attributes.
Delete Group Dialog Box
6.17.6 Populating Shipping Information
In the Shipping Information section, the Request Date, Routing Option, and Shipping Service Options
are mandatory drop-down menus.
Delivery options will be available for you to select specific delivery preferences and add additional
delivery information.
• The options displayed are based on a routing option selected in the drop-down menu (Cisco routed
or Self routed), the type of order created, and the user ID’s CCO ID credentials.
• These options will only be available for orders that contain shippable hardware or software
products. Service only orders and e-delivery only (software) orders will not display these delivery
options.
• The delivery options display as Yes or No radio buttons and the default value for all options is
selected as No.
6.17.6.1 Setting Cisco as Routing Option
If Cisco is the selected Routing Option, then complete the following steps:
1. The Carrier Override List and Carrier Account # display as blank fields and are not editable.
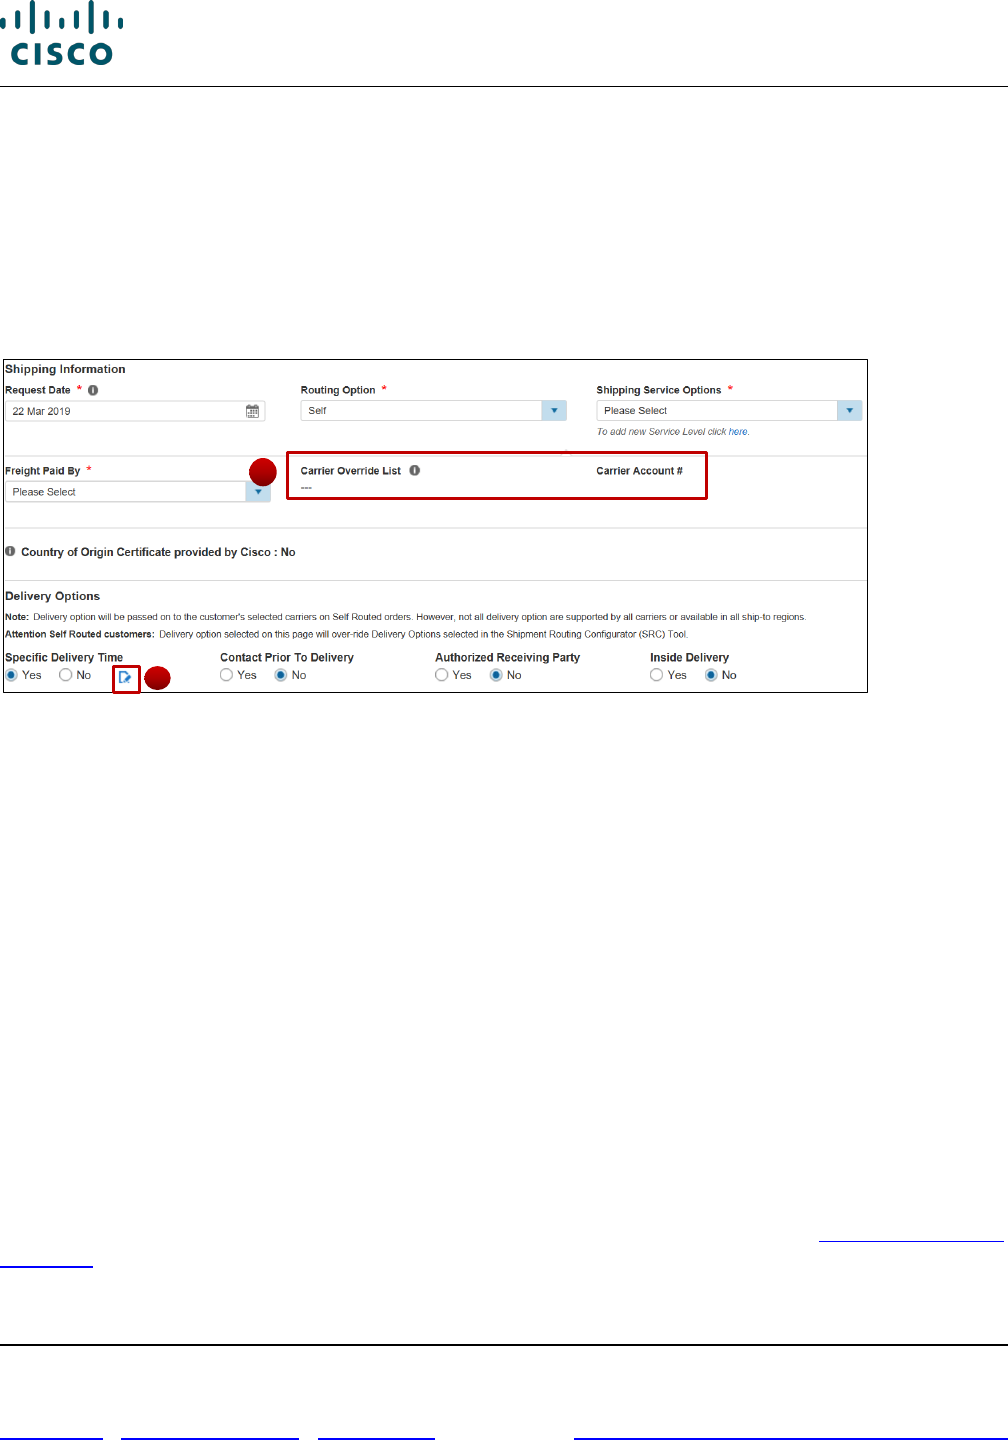
Cisco Commerce Order User Guide
Cisco Proprietary © 2020 Cisco and/or its affiliates. All rights reserved.
Last Updated: 17 March 2020 Page 99 of 143
Cisco.com | Privacy Statement | Trademarks Provide Feedback on this Training Resource
2. Select the appropriate options under Delivery Options: Pre-shipment Inspection and Special
Transport.
3. If you select the Special Transport radio button as Yes, the Add a Note icon will display.
4. Click the Add a Note icon.
5. The Add Special Transport Note dialog box displays. Click the text field and enter up to 300
characters to communicate any specific requests.
6. Click Save.
Order Page: Shipping and Install Tab – Cisco Routed
6.17.6.2 Setting Self as the Routing Option
If you selected Self as the Routing Option then complete the following steps:
1. Select your desired service level from the Shipping Service Options drop-down menu.
2. The Carrier Override List drop-down menu is active and editable. Once you select the carrier, the
Carrier Account # field activates and you can add an account number, if necessary.
3. For self-routing, the available delivery options expand to include Special Delivery Time, Carrier Will
Call, Contact Prior to Delivery, Pre-shipment Inspection, Authorized Receiving Party, Remove
Packaging, Inside Delivery, and Special Transport.
4. If some radio buttons are selected as Yes, the Add a Note icon displays.
5. Once clicked, a dialog box displays. Click the text field and enter extra information about the
specific shipping options for the order. Enter up to 300 characters to communicate any special
requests.
6. Click the information icons, where displayed, to learn more.
You will be able to modify delivery options in the change order process as well. See Changing Shipping
Attributes.
1
4
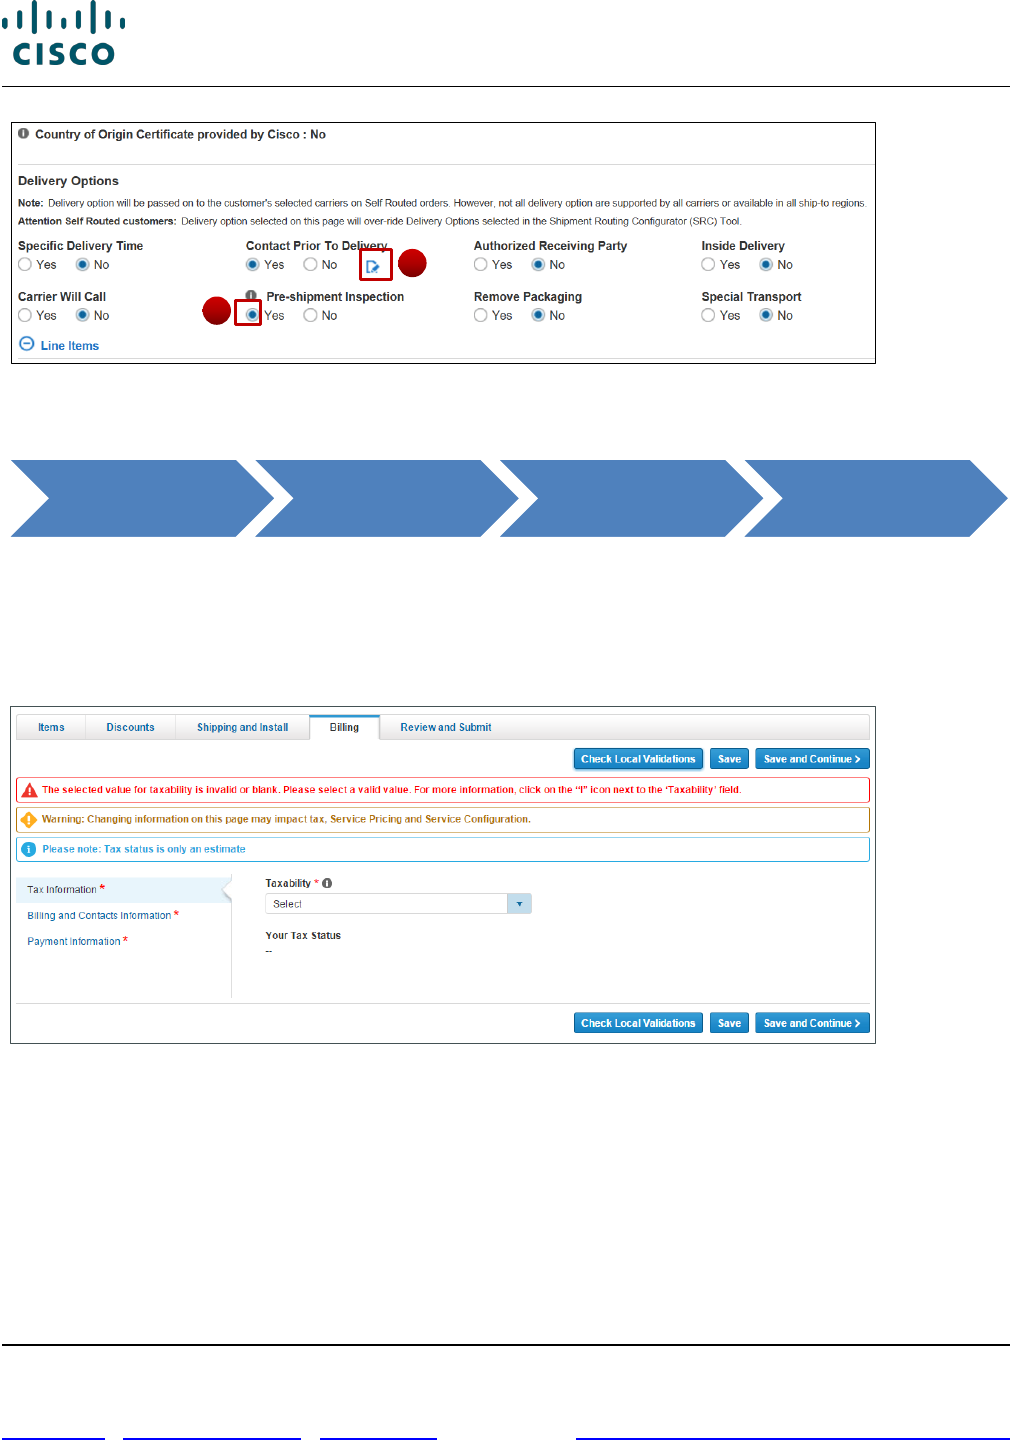
Cisco Commerce Order User Guide
Cisco Proprietary © 2020 Cisco and/or its affiliates. All rights reserved.
Last Updated: 17 March 2020 Page 100 of 143
Cisco.com | Privacy Statement | Trademarks Provide Feedback on this Training Resource
Order Page: Shipping and Install Tab – Self Routed
6.18 Verifying Billing Information
Click the Billing tab.
You can change the information on the Billing tab. However, changing information on the Billing tab
may result in additional errors or changes in other order information. If there are red error messages at
the top of the page, these must be fixed before the order can be submitted. Yellow warning messages
may indicate other optional changes could be performed, or provide important status information.
Order Page: Billing Tab
6.18.1 Verifying Tax Information
The tax information section displays the taxability and your tax status. To select the taxability option,
click the Taxability drop-down arrow on the Billing tab and select the appropriate option.
• Internal Use: If the purchases in this transaction are to be used internally, not to be resold, and do
not qualify for a state exemption, select Internal Use. The appropriate tax will be charged.
• Resale: If the purchases in this transaction are for resale purposes, select Resale. In order to select
this option, you must be registered as a wholesaler, reseller, or leasing company. If a valid (current)
Cisco Commerce Orders Tab Create Order Billing Tab
6
4
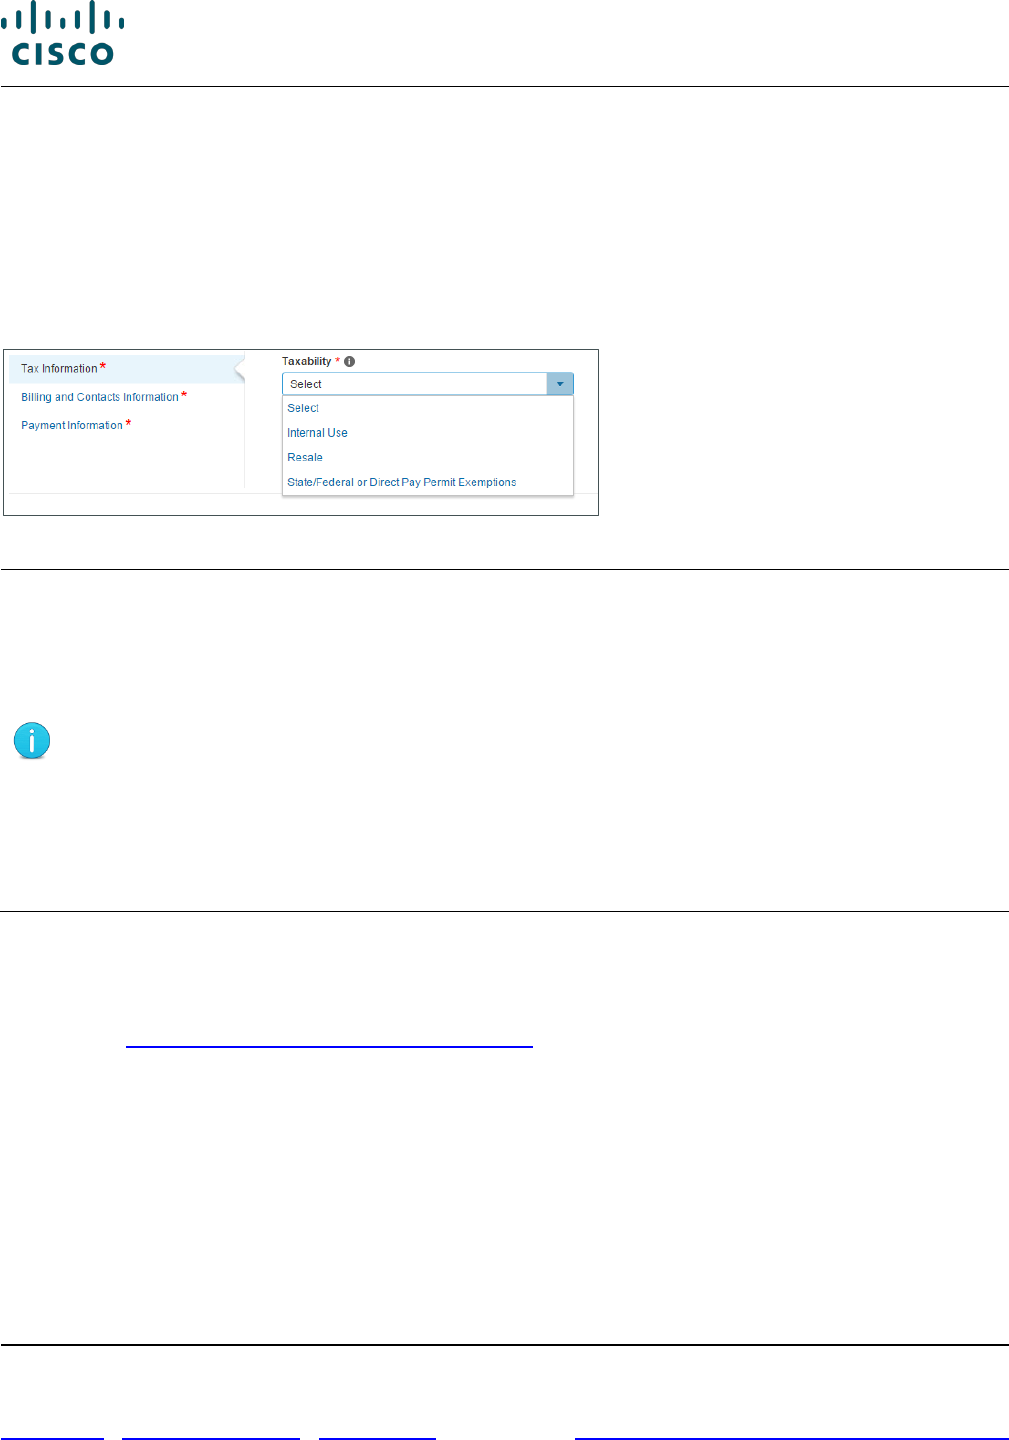
Cisco Commerce Order User Guide
Cisco Proprietary © 2020 Cisco and/or its affiliates. All rights reserved.
Last Updated: 17 March 2020 Page 101 of 143
Cisco.com | Privacy Statement | Trademarks Provide Feedback on this Training Resource
resale certificate has not been provided to Cisco, the appropriate tax will be charged and added to
the invoice.
• State/Federal or Direct Pay Permit Exemption: Applicable for a federal government entity that
qualifies for a state regulation exemption (for example, home office exemption, non-profit
organization, school, state agency) or is a direct pay permit holder. If the purchases in this
transaction are for export, select State/Federal or Direct Pay Permit Exemption. If a valid (current)
exemption certificate or copy of the direct pay permit has not been provided to Cisco, the
appropriate tax will be charged and added to the invoice.
Order Page: Billing Tab – Tax Information Section
Note: A tax note field displays for you to enter additional tax instructions for orders
containing the following information:
• The ship-to state is MA, MS, RI, or TN.
• The taxability is resale.
• The tax status is non-exempt.
If not all the requirements above are met, then the Tax Note field will not display on
the Billing tab.
The order is placed on hold until the third-party certificate is received and confirmed.
To enter special instructions in the Tax Note field, click the Tax Note field and enter
the desired information.
6.18.2 Populating the Billing Information Section
The billing information section displays the billing address and various contact information. Updating
the billing address and contacts is the same as populating and changing any other address and
contact, see Changing the Billing Address and Contact. Use the edit icon to change the address or
contact and the delete icon to remove the contact.
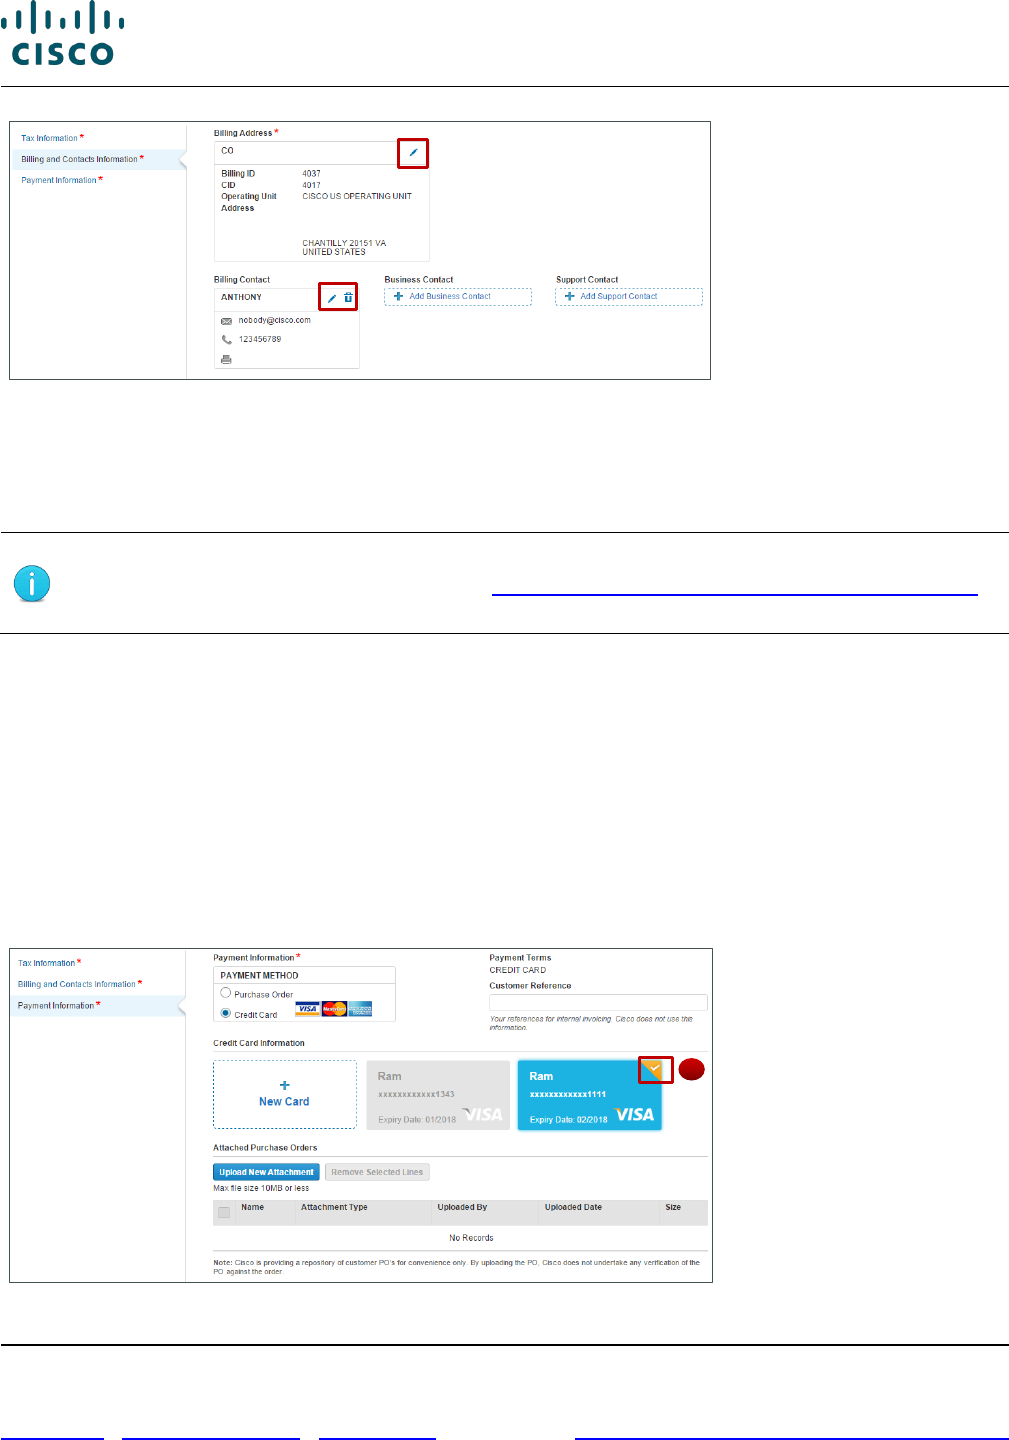
Cisco Commerce Order User Guide
Cisco Proprietary © 2020 Cisco and/or its affiliates. All rights reserved.
Last Updated: 17 March 2020 Page 102 of 143
Cisco.com | Privacy Statement | Trademarks Provide Feedback on this Training Resource
Order Page: Billing Tab - Billing Information Section
6.18.3 Populating the Payment Information Section
If your billing ID (BID) is US or Canada and you are eligible for the credit card payment method, the
option to select the credit card payment displays on the Payment Information tab.
Best Practice: The credit card information defaults from your My Profile and
Preferences section. Refer to the Getting Started with Cisco Commerce User Guide
to add a credit card to your profile.
If the BID is not from the US or Canada, you will not be eligible for credit card payment method, and the
credit card payment option does not display.
To select a credit card as the payment method, complete the following steps:
1. Click the Payment Information tab.
2. Under the Payment Information section, click the Credit Card radio button.
3. Under the Credit Card Information section, a checkmark indicates the default credit card, which will
be charged for the order. To select a different card from the profile, click the desired card.
4. You can add a new credit card by clicking + New Card. Enter all required information and click
Save.
Order Page: Billing Tab – Credit Card Option
3
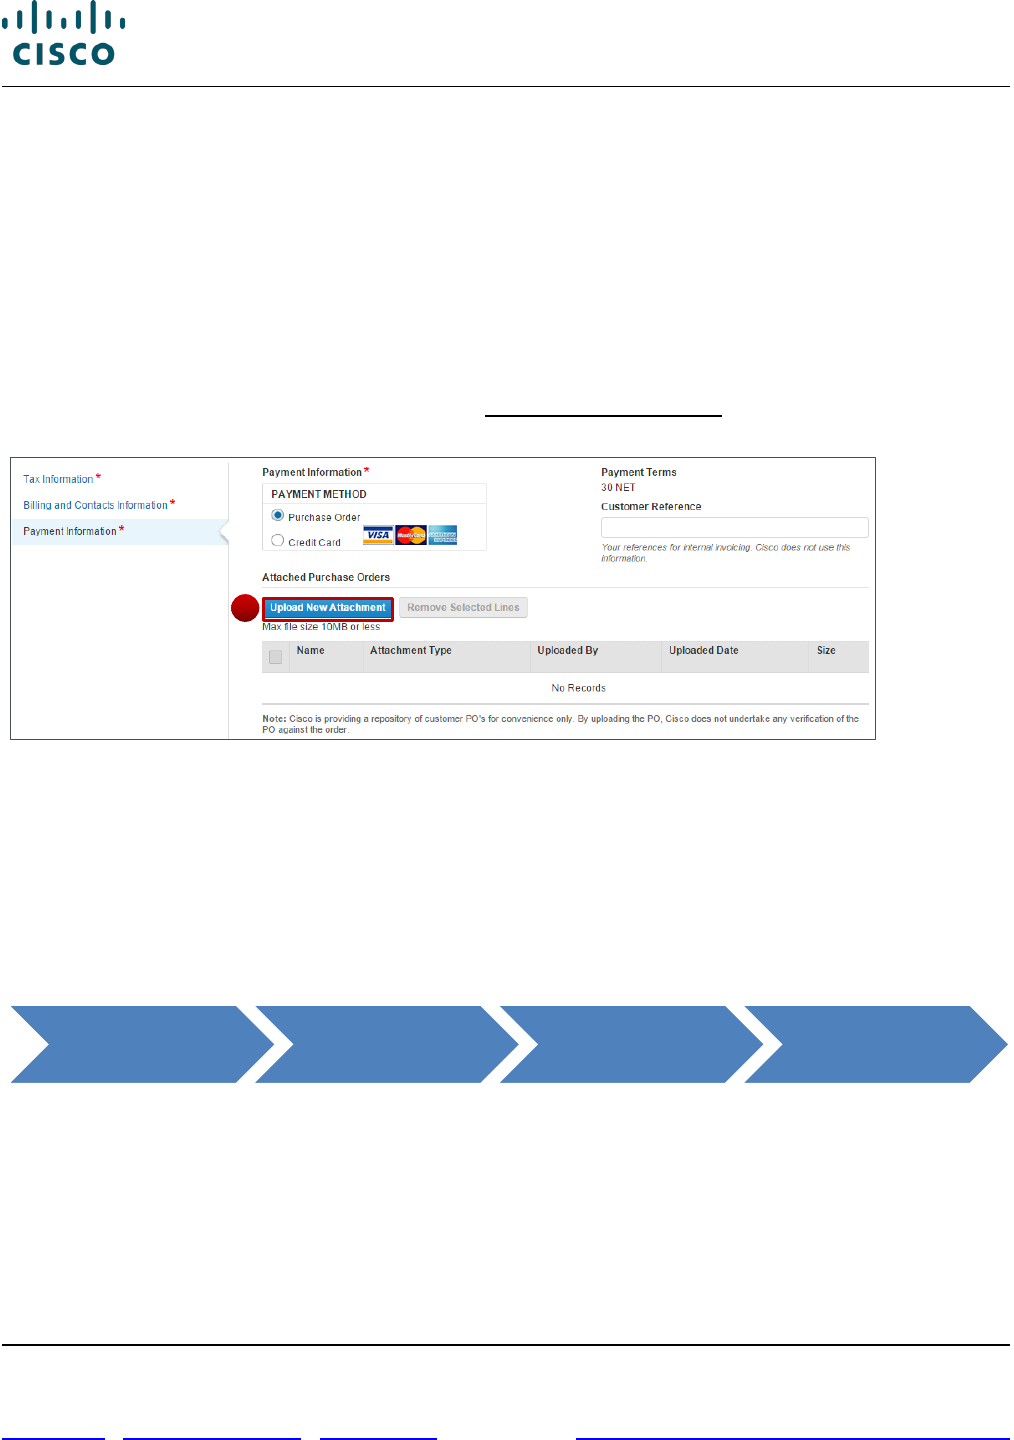
Cisco Commerce Order User Guide
Cisco Proprietary © 2020 Cisco and/or its affiliates. All rights reserved.
Last Updated: 17 March 2020 Page 103 of 143
Cisco.com | Privacy Statement | Trademarks Provide Feedback on this Training Resource
6.18.3.1 Using a Purchase Order (PO) Payment
If the BID is not from the US or Canada, you will not be eligible for credit card payment method, and the
credit card payment option does not display.
If eligible for credit card payment, but purchase order is preferred, select purchase order as the
payment method.
To select purchase order as the payment method, complete the following steps:
1. Click the Payment Information tab.
2. Under the Payment Information section, click the Purchase Order radio button.
3. To attach a copy of the Purchase Order, click Upload New Attachment. The Upload Files dialog box
displays.
Order Page: Billing Tab – Attach Purchase Order Section
4. Browse and select the appropriate file and click Attach.
5. To remove the purchase order attached, click the appropriate checkbox and click Remove
Selected Lines.
Attaching a PO is for your convenience and record, Cisco does not undertake any verification of the
PO against the order.
6.19 Reviewing and Submitting the Order
There are cases when some of the tab icons may display in red with error messages on top.
You can review the financial summary, order summary and modify, if required, the order submission
notification on the Review and Submit tab.
If all tabs are correctly populated, you have checked the box indicating that you accept the terms and
conditions, and have confirmed ultimate consignee information, then the Submit Order button will be
enabled.
Cisco Commerce Orders Tab Create Order
Review and
Submit Tab
3
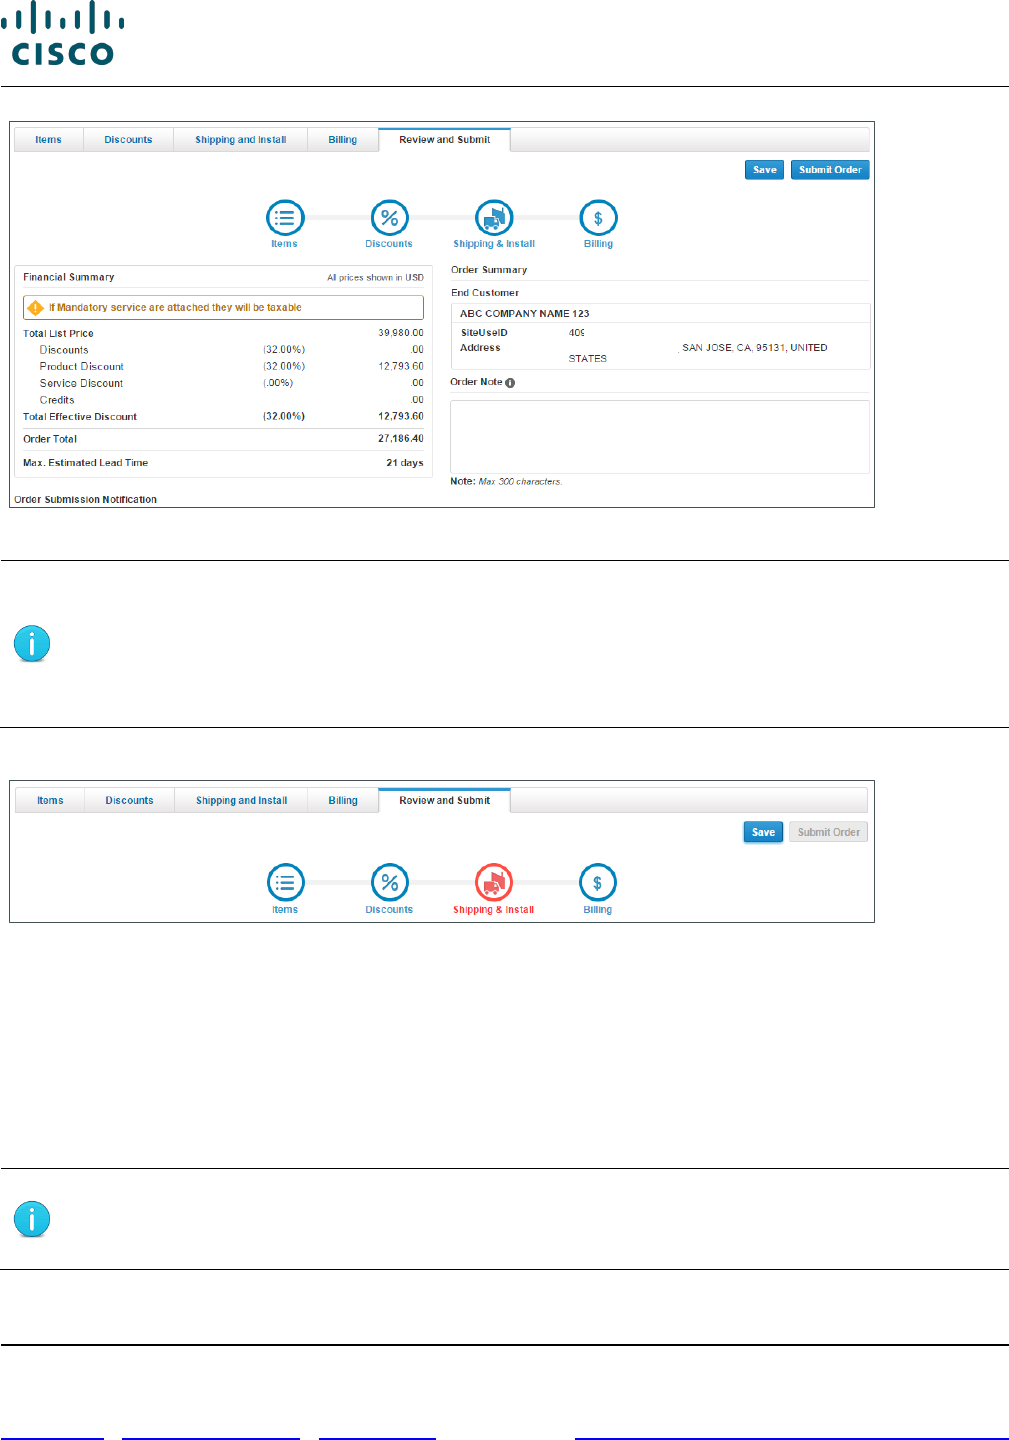
Cisco Commerce Order User Guide
Cisco Proprietary © 2020 Cisco and/or its affiliates. All rights reserved.
Last Updated: 17 March 2020 Page 104 of 143
Cisco.com | Privacy Statement | Trademarks Provide Feedback on this Training Resource
Order Page: Review and Submit Tab
Note: The Submit Order button will not be displayed if:
• You are not eligible to submit orders in Cisco Commerce
• You have not checked the box to accept the Terms and Conditions
• You have not confirmed the Ultimate Consignee Information
Click on the respective tab icons to resolve issues in order to submit the order.
Order Page: Review and Submit Tab – Error Messages
• Blue: If there are no errors for a specific tab, the corresponding icon displays as blue in color.
• Yellow: Warnings displayed in yellow may be fixed but are not required to be fixed. However, if
errors are not fixed before submission, then delays in booking and scheduling of the order may
result.
• Red: All errors displayed in red must be fixed prior to submitting an order. The icon corresponding
to the tab in which the error has occurred also appears red.
Best Practice: Click Save and Continue in each tab before proceeding to Review
and Submit tab. This reduces the number of errors displayed during order
submission.
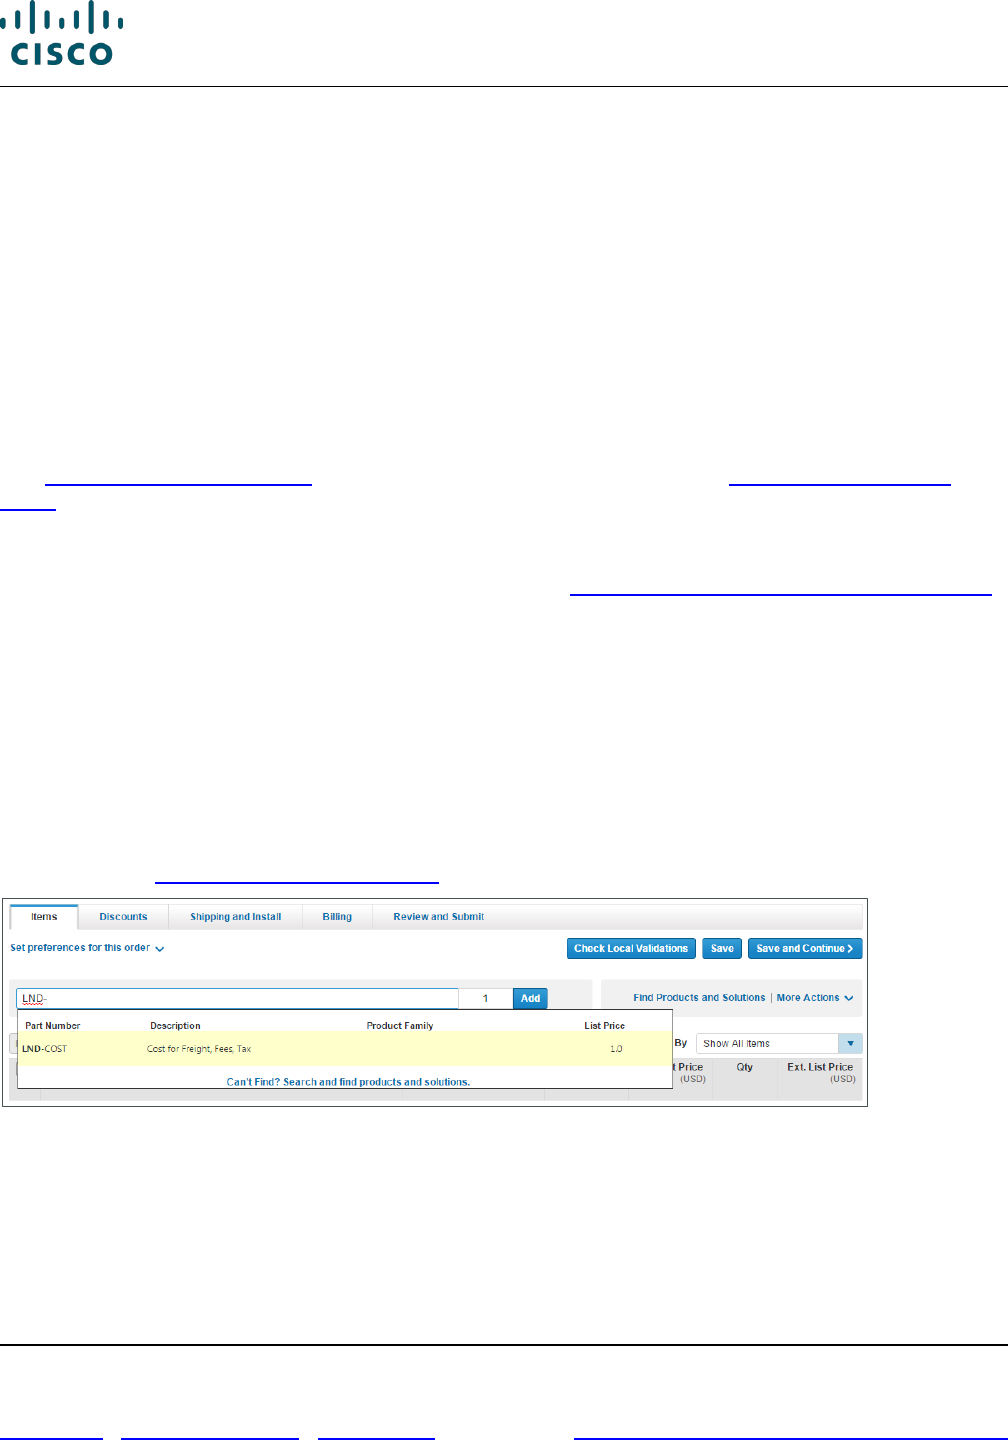
Cisco Commerce Order User Guide
Cisco Proprietary © 2020 Cisco and/or its affiliates. All rights reserved.
Last Updated: 17 March 2020 Page 105 of 143
Cisco.com | Privacy Statement | Trademarks Provide Feedback on this Training Resource
6.19.1 Adding Landing Costs and Freight Charges
On the Review and Submit tab, you will be prompted to add a landing SKU to the order in the following
cases:
• Order shipping country is Canada
• Order billing ID is other than 28949 (Cisco Canada)
• Price list on the order is other than Global Canada Price List in Canadian Dollars, Global Canada
Legacy Price List in Canadian Dollars, or Wholesale Canada Price List in Canadian Dollars
• Order is a standard order
Landing cost SKUs are applicable to standard orders shipped to Canada using non-Canadian price
lists. You can search and add these SKUs on the Items tab and review Discounts tab to price the SKU.
See Adding Landing Cost SKUs for more information on landing costs and Adding Freight Charge
SKUs for more information on freight charges.
6.19.1.1 Adding Landing Cost SKUs
Review the conditions for adding a landing cost SKU (See Adding Landing Costs and Freight Charges).
Landing cost SKUs will be 10% of the total product order. There will be no discounts on landing cost
SKUs. The order total and respective discounts will update with the new price calculated for the landing
cost SKU.
You can add only one landing cost SKU per order. If you add more, the system will not allow you to
submit the order.
To add a landing cost SKU, complete the following steps:
1. On the Order page: Items tab, click the Add Product Item field and enter LND-COST.
2. Click Add. The SKU is added to the list of items.
3. Continue to Adding Freight Charge SKUs.
Order Page: Items Tab – Landing Cost SKU
6.19.1.2 Adding Freight Charge SKUs
You can search for the freight charge SKU on Items tab and can modify the quantity. You can add only
a quantity of one per freight charge SKU, but there is no restriction to the number of freight charge
SKUs that can be ordered.
Freight charge SKUs are treated as miscellaneous lines. There will be no discount on these SKUs.
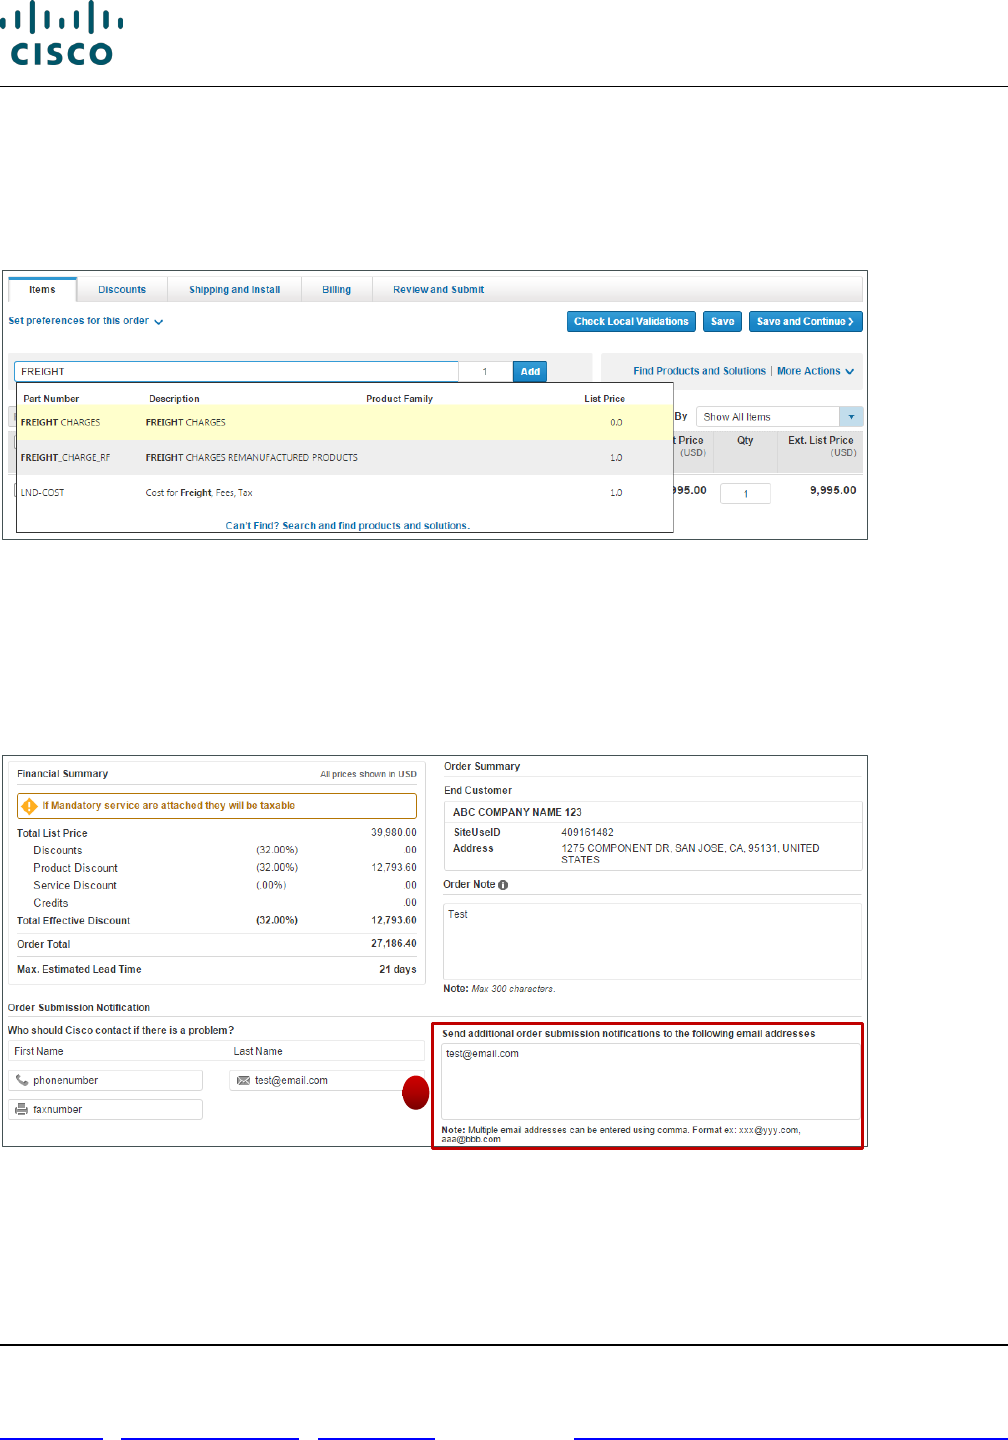
Cisco Commerce Order User Guide
Cisco Proprietary © 2020 Cisco and/or its affiliates. All rights reserved.
Last Updated: 17 March 2020 Page 106 of 143
Cisco.com | Privacy Statement | Trademarks Provide Feedback on this Training Resource
To add a freight charge SKU, complete the following steps:
1. On the Order page: Items tab, click the Add Product Item field and enter FREIGHT.
2. Click Add.
3. Click Save and Continue until you reach the Review and Submit tab to submit the order.
Order Page: Items Tab – Freight Charge SKU
6.19.2 Submitting the Order
When submitting the order, you can populate the order note, order notification details, and order
submission confirmation e-mail.
1. Click the Order Note field to add any instructions for those who have access to the order. Cisco
does not review this note for the ordering.
Order Page: Review and Submit Tab
2. Populate the Order Submission Notification details for Cisco to contact, if need be. This section is
not required, but it is recommended. These fields are not search fields; all of the information should
be entered completely and accurately. It is not necessary to complete all fields.
3
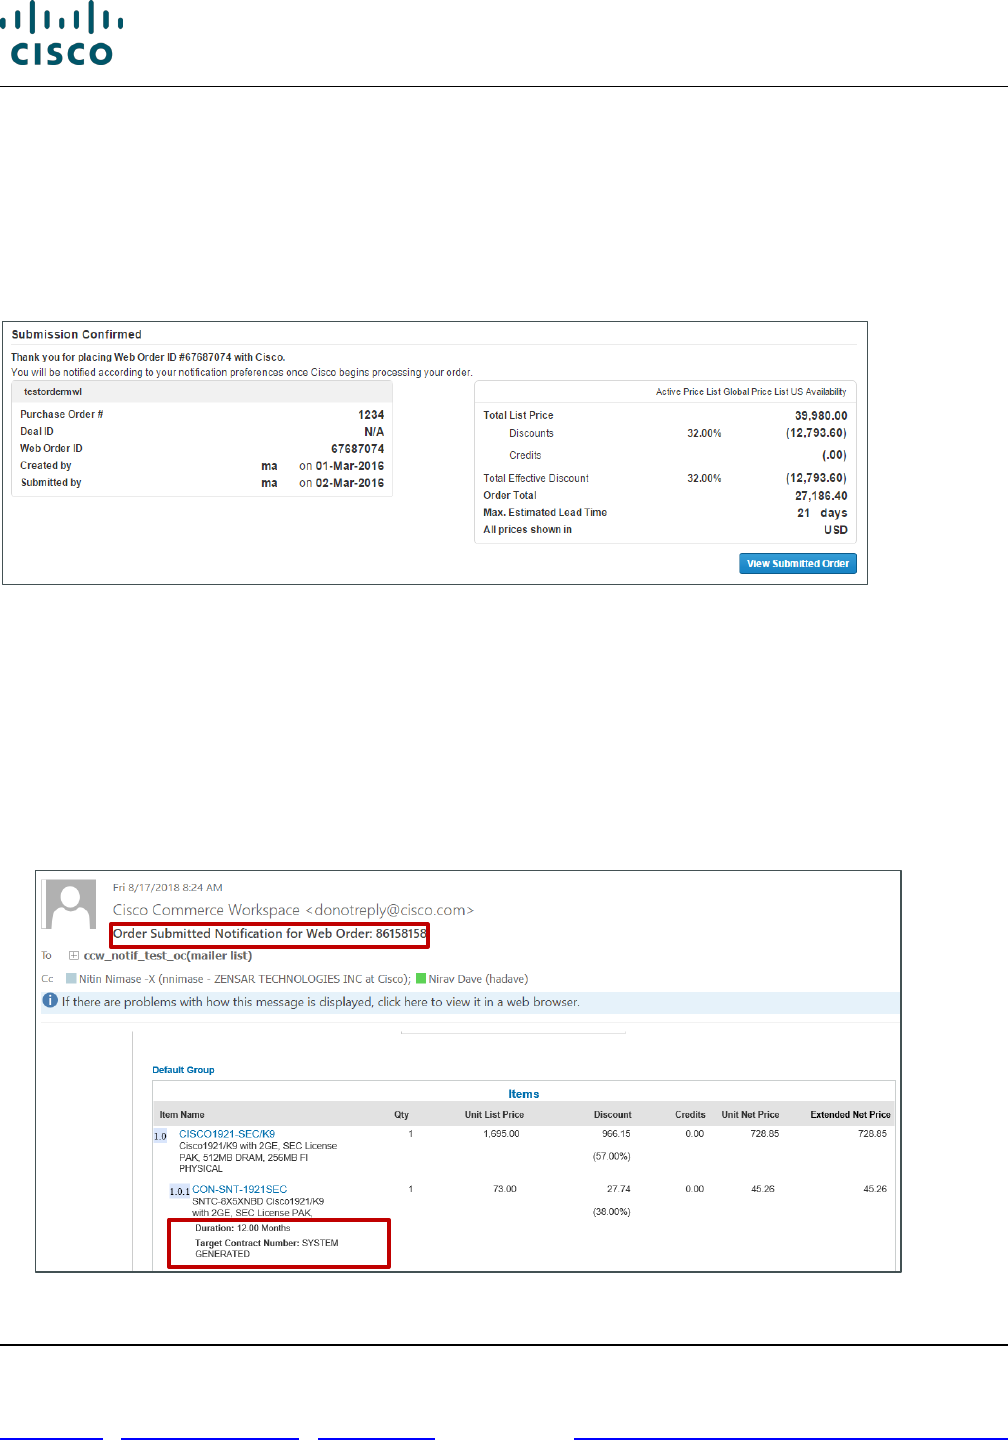
Cisco Commerce Order User Guide
Cisco Proprietary © 2020 Cisco and/or its affiliates. All rights reserved.
Last Updated: 17 March 2020 Page 107 of 143
Cisco.com | Privacy Statement | Trademarks Provide Feedback on this Training Resource
3. Enter email contacts in the blank field separated by a comma to send order submission
notifications.
4. Check the box to indicate that you accept the Terms and Conditions.
5. Click Submit Order when done.
Once the order is submitted, the Submission Confirmed page displays. You can view the submitted
order by clicking View Submitted Order.
Order Submission Page
6.19.3 Order Notification
Order Notifications that you receive through email will display Service Information in a consistent,
standardized format showing Start Date, End Date, Duration, Target Contract Number, and Original
Contract Number. This will apply to Order submission notifications for regular orders and auto-orders
and will apply to success and failure notifications.
Note: Based on the notification setting in CCW user profile, you will be receiving the notification(s) for
Order Submitted, Invoice, Billing Status, Shipping Status and RMA.
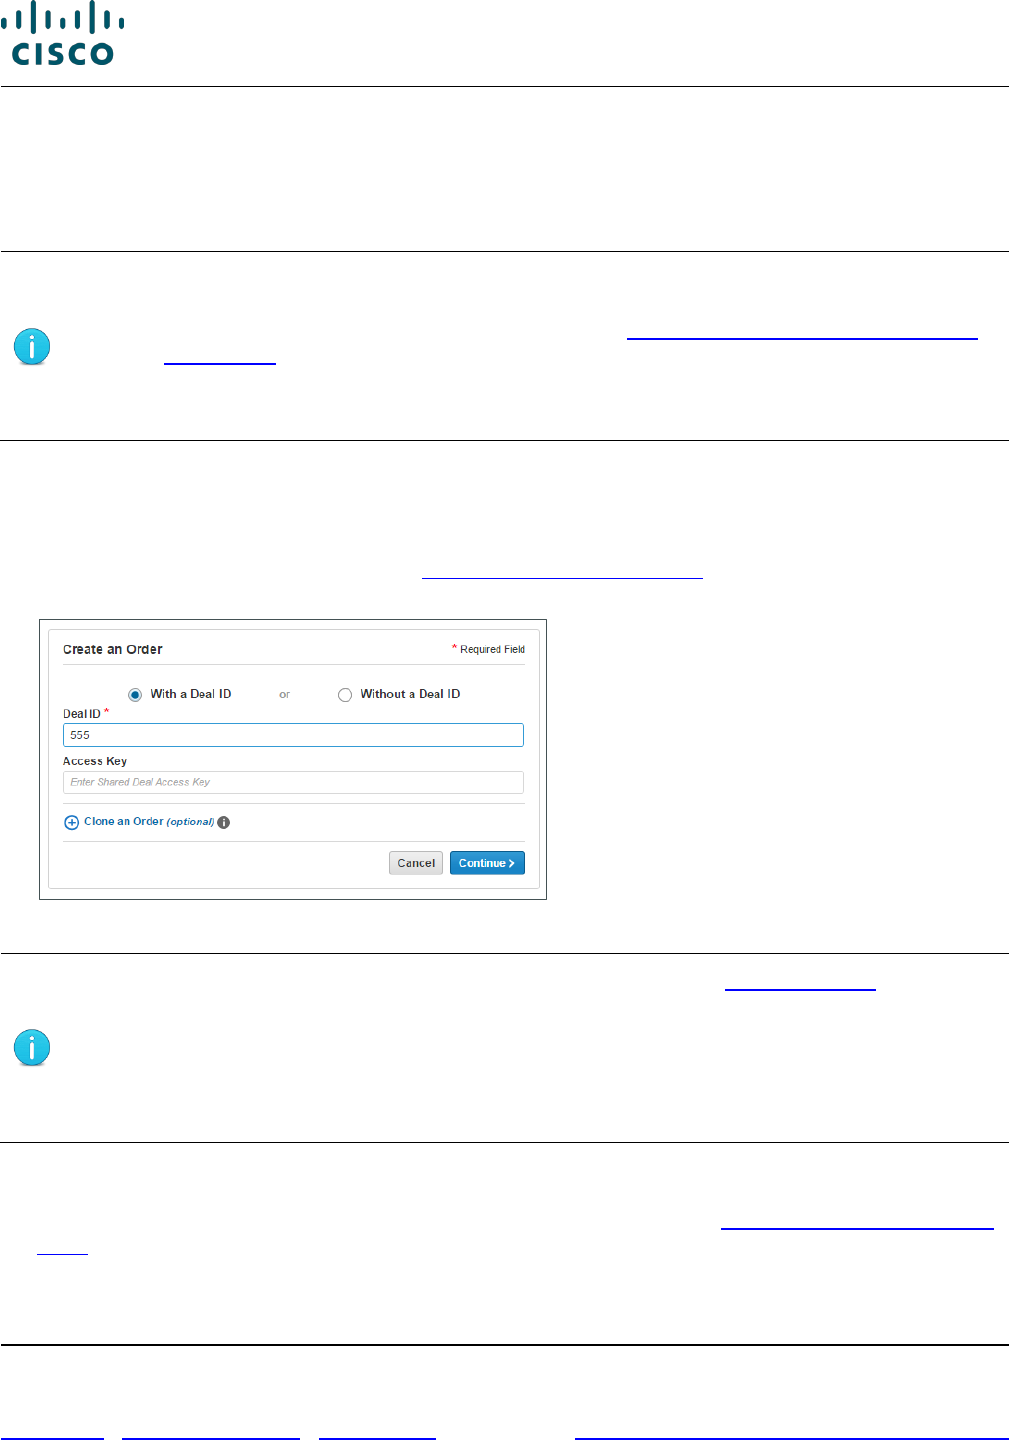
Cisco Commerce Order User Guide
Cisco Proprietary © 2020 Cisco and/or its affiliates. All rights reserved.
Last Updated: 17 March 2020 Page 108 of 143
Cisco.com | Privacy Statement | Trademarks Provide Feedback on this Training Resource
7 Using a Reusable Nonstandard Discount
A Cisco Account Manager (AM) might provide a Reusable Nonstandard Discount (RNSD) to a partner.
Unlike regular quotes that have to be collaborated, you can use an RNSD directly in Cisco Commerce
after the Cisco AM provides you the deal ID and approved discounts.
Best Practice: Reference the RNSD deal ID at the beginning of the order process.
However, if your order will include Try and Buy, trade-in items, and/or distribution
fulfillment, you must start with a quote. See the Cisco Commerce Deals and Quotes
User Guide for information on applying an RNSD to a quote. These must be provided
to you by a Cisco AM.
Note that you cannot search for RNSDs using Cisco Commerce Search options.
Only Cisco sales teams can create an RNSD. Once approved, a Cisco AM must communicate the deal
ID and discount information to you so the order can be created with the appropriate discounts.
To create an order that references an RNSD, complete the following steps:
• Create an order with a deal ID (see Converting Quotes to Orders). Enter the RNSD deal ID
provided by the Cisco AM in the Deal Id field on the initial Order page and click Continue.
Create an Order Page: RNSD Deal ID
Note: You can apply discounts to spare equivalents. See Adding a Spare. For
example, if an RNSD is set up for WS-C6509-E, the discount will be applied on both
WS-C6509-E and WS-C6509-E=.
The system will display warnings and provide explanations when the RNSD is
consumed, not in approved status, expired, not migrated to EDMS, not an RNSD, or
the deal ID is not found.
1. Once the RNSD is applied, follow the standard steps for ordering by entering all necessary
information (including any additional SKUs) and submit the order (see Verifying the Order Initiation
Page Details).
Depending on how the Cisco AM sets up the RNSD, you may see one of two things:
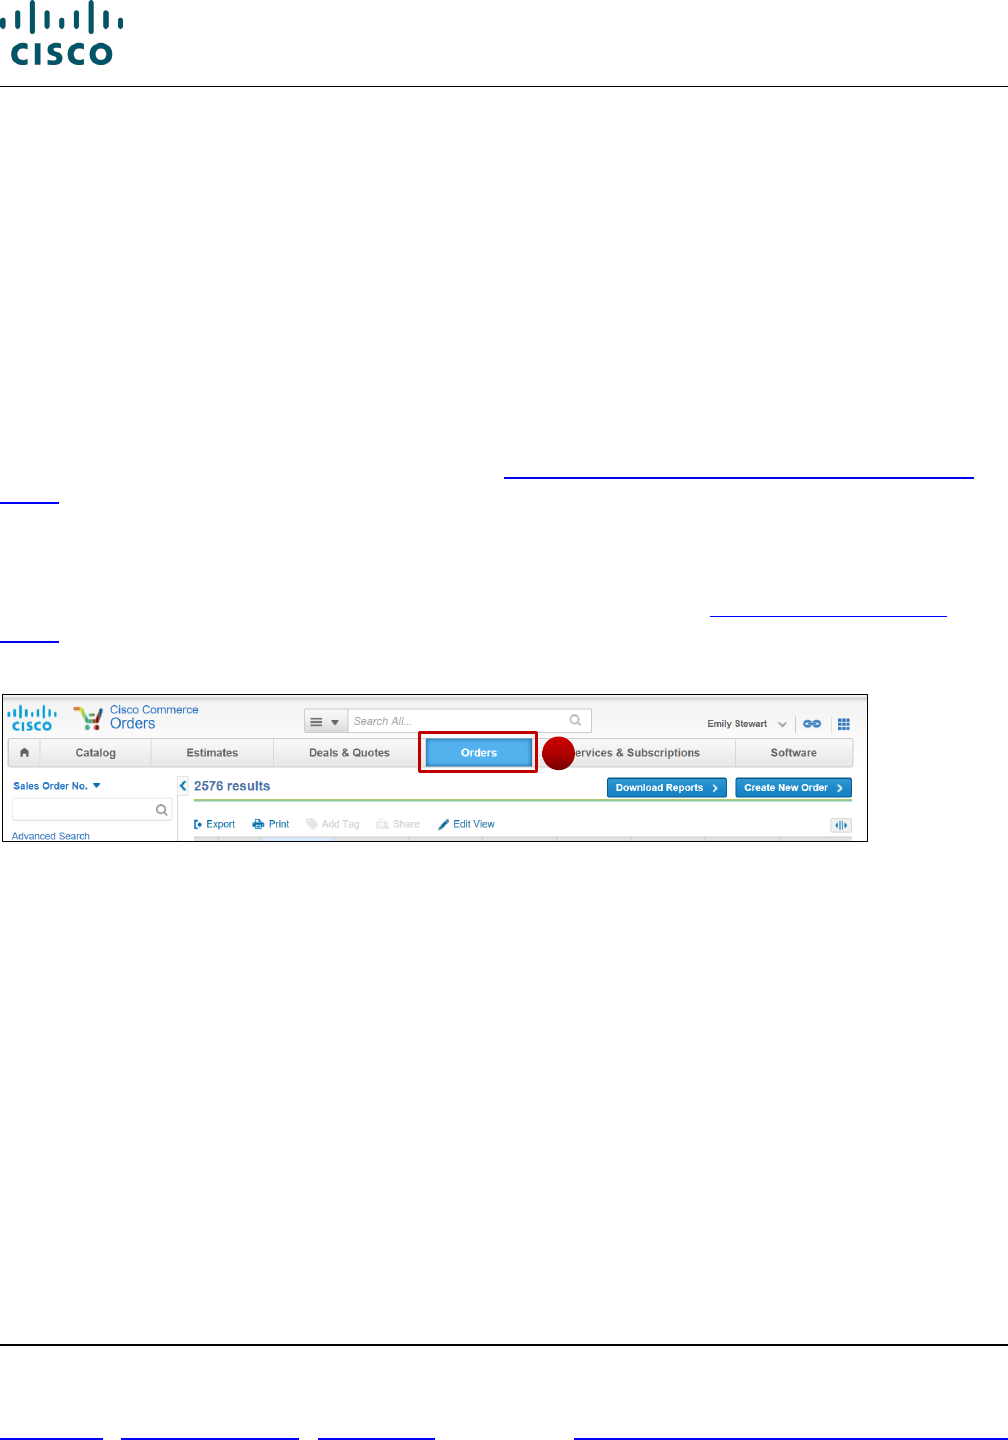
Cisco Commerce Order User Guide
Cisco Proprietary © 2020 Cisco and/or its affiliates. All rights reserved.
Last Updated: 17 March 2020 Page 109 of 143
Cisco.com | Privacy Statement | Trademarks Provide Feedback on this Training Resource
• Discounts may auto-apply to approved line items (products or service).
• An editable discount field will display where the discount information should be entered.
If the discount entered is greater than the amount provided by the AM, an error message displays. If
this occurs, you should contact the AM to confirm the agreed-upon discount and try again.
If the product or service is not included on the RNSD, only the standard contractual discount will auto-
populate. You should contact the Cisco AM if you believe the items should be receiving a discount not
reflected on the order or quote.
8 Creating Service Only Orders
You can create a service-only order within Cisco Commerce by either creating a standalone order, or
converting an approved quote to an order. How the quote was created will determine the exact steps
needed to complete the service only order. See the Cisco Commerce Service Only Quick Reference
Guide for step-by-step instructions on how to detach, and subsequently order, services.
For quote-converted orders, if you detach services from your order after May 22, 2016, those service
lines will contain all necessary product information and will be automatically added to the original quote.
You can then order those services separately at a later time without having to search for the original
product information (e.g., serial numbers, sales order numbers). See the Detached Services User
Guide for more information.
Cisco Commerce Orders Tab
1
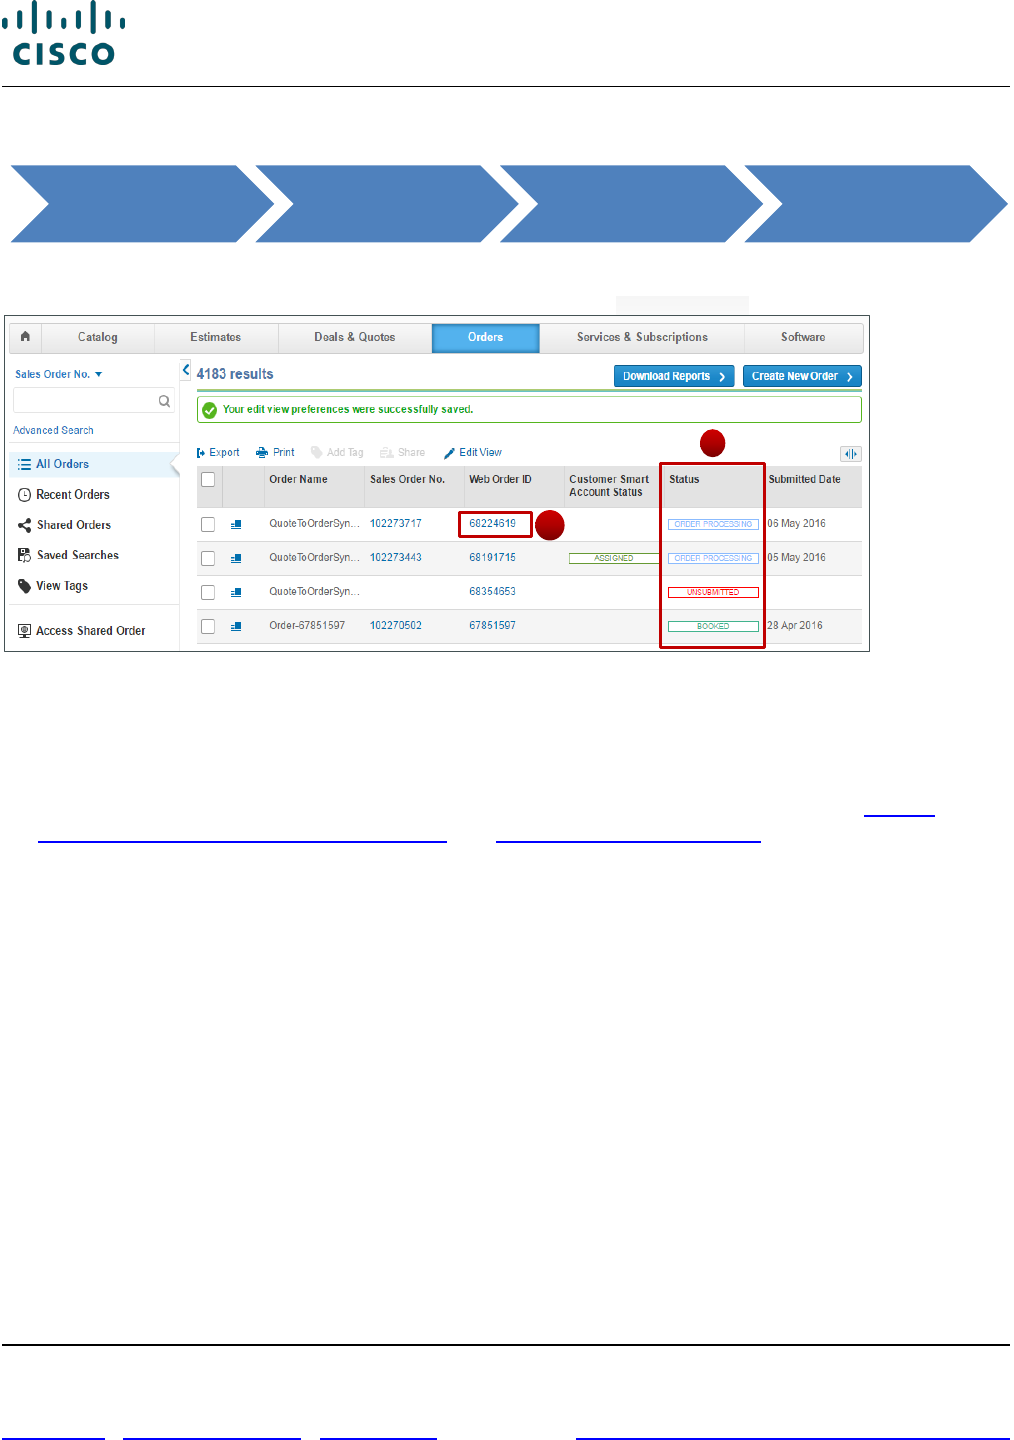
Cisco Commerce Order User Guide
Cisco Proprietary © 2020 Cisco and/or its affiliates. All rights reserved.
Last Updated: 17 March 2020 Page 110 of 143
Cisco.com | Privacy Statement | Trademarks Provide Feedback on this Training Resource
9 Viewing the Order Status
You can view the status of an order on the Orders tab.
Cisco Commerce Orders Tab: View All
1. Click the Cisco Commerce Orders tab. You can view all your orders here, including Try and Buy
orders, submitted product and service leasing orders, among others.
The order information; such as purchase order number, web order ID, and sales order ID; displays.
To edit the information to display and use some of the utilities on Orders tab, refer to Getting
Started with Cisco Commerce User Guide and Using the Common Utilities.
2. Review the status of orders.
3. Click the appropriate order to view. The Order Details page displays.
4. Review the overall order status at the top for the submitted order.
5. You can also access other related tools from the Order Details Page. Click Other Related Tools
drop-down menu and access links to Customer Service Central Portal, Invoice Tool, Print Shipping
Documents, among others.
Cisco Commerce Orders Tab View All
Order Details
Page: Items Tab
2
3

Cisco Commerce Order User Guide
Cisco Proprietary © 2020 Cisco and/or its affiliates. All rights reserved.
Last Updated: 17 March 2020 Page 111 of 143
Cisco.com | Privacy Statement | Trademarks Provide Feedback on this Training Resource
Order Details Page
If your order is a Change Subscription order (as opposed to a Base Order), you will be able to identify it
when viewing the order status.
9.1 Viewing the Order Details
The Order Details Page allows you to review Items, Discounts, Shipping & Install, Billing and Invoice,
and Order History tabs.
9.1.1 Viewing the Items Tab
The Order Details page displays the Items tab by default. To review the status of line items, complete
the following steps:
4
5
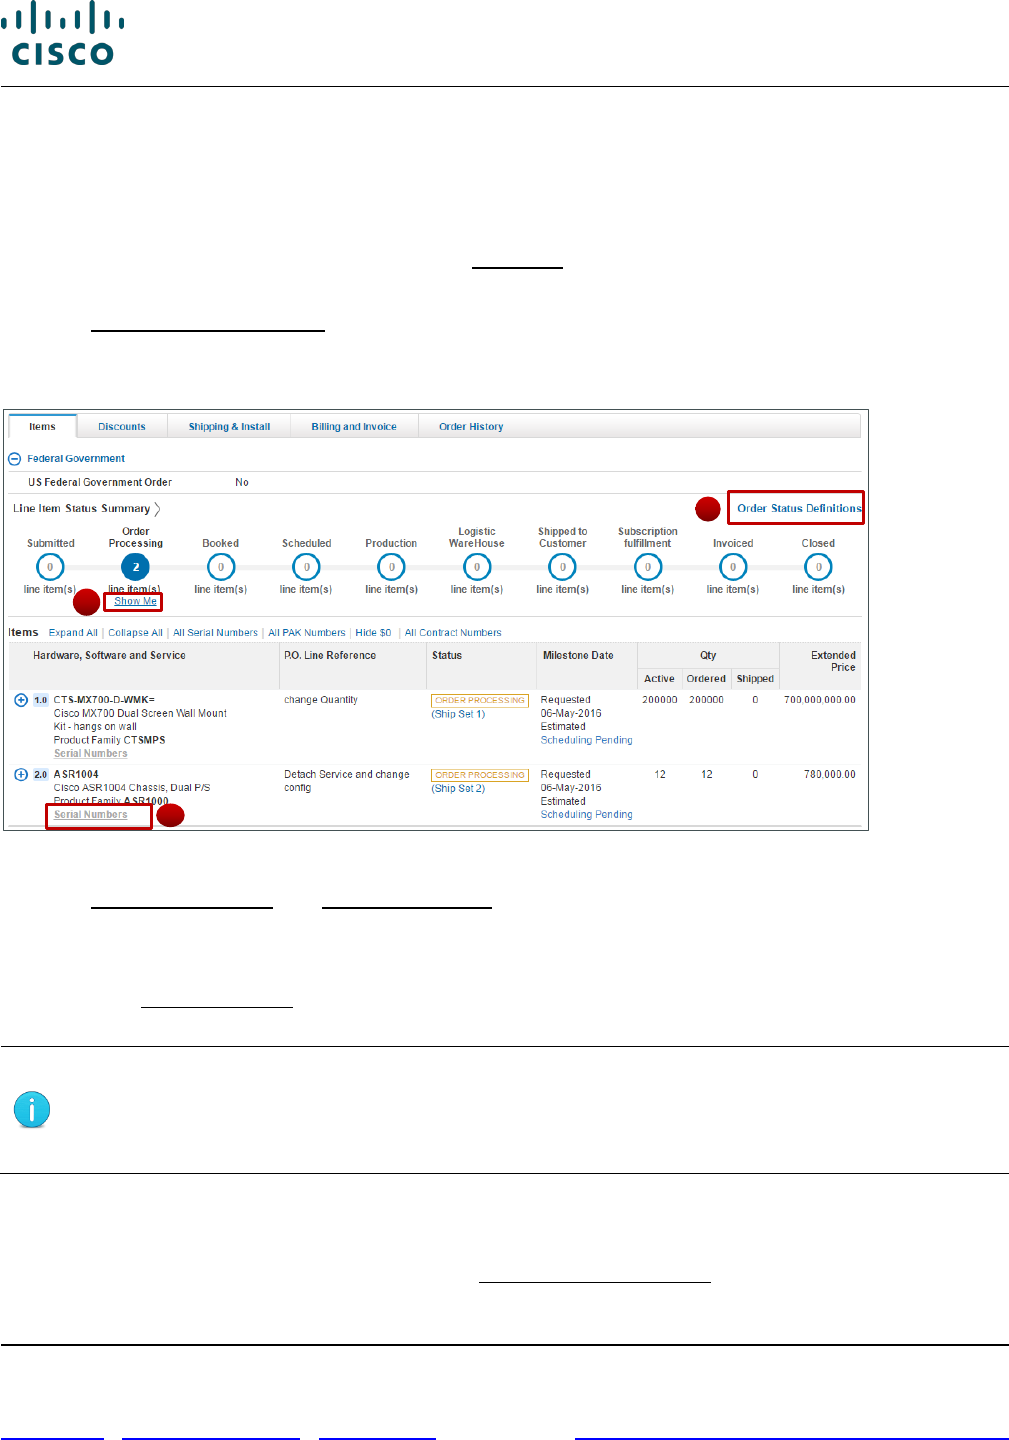
Cisco Commerce Order User Guide
Cisco Proprietary © 2020 Cisco and/or its affiliates. All rights reserved.
Last Updated: 17 March 2020 Page 112 of 143
Cisco.com | Privacy Statement | Trademarks Provide Feedback on this Training Resource
1. Review the Line Item Status Summary of the order and all of the information from the order tabs.
The Order History tab is one of the most important tabs in the Order Details page.
The Line Item Status Summary displays the count of lines at each given status. It also displays
information on the shipment preparation status of each line item.
2. Review the line item status detail by clicking Show Me below each status. Line items that are in
Shipment Preparation display.
3. Click Order Status Definitions to view the definitions of the order status.
4. The Order Details page: Items tab also displays the list of bundles, major and minor lines, ship date,
serial numbers, price information, and the order status at the major line level.
Order Details Page: Items Tab
5. Click All Serial Numbers and All PAK Numbers to view serial numbers and Product Access Key
(PAK) numbers.
6. Click Export Serial Data to export the serial numbers to a Microsoft Excel file and save.
7. Else, click Serial Numbers for each line item to view the serial numbers for only that line item. You
can also select and copy the serial numbers to paste into a document.
Note: You can view the International Mobile Equipment Identity (IMEI) number and
the SIM Serial Number (ICCID) along with the Serial Number. Export the IMEI and/or
ICCID numbers as soon as the product ships to reduce downtime for modem or
cellular service activation.
9.1.1.1 Viewing Status of Remanufactured Items
The status of remanufactured products or Refresh displays separately from the status of new products
since the fulfillment is through a third party. Click Remanufactured Status. The Remanufactured Status
dialog box displays.
2
3
7
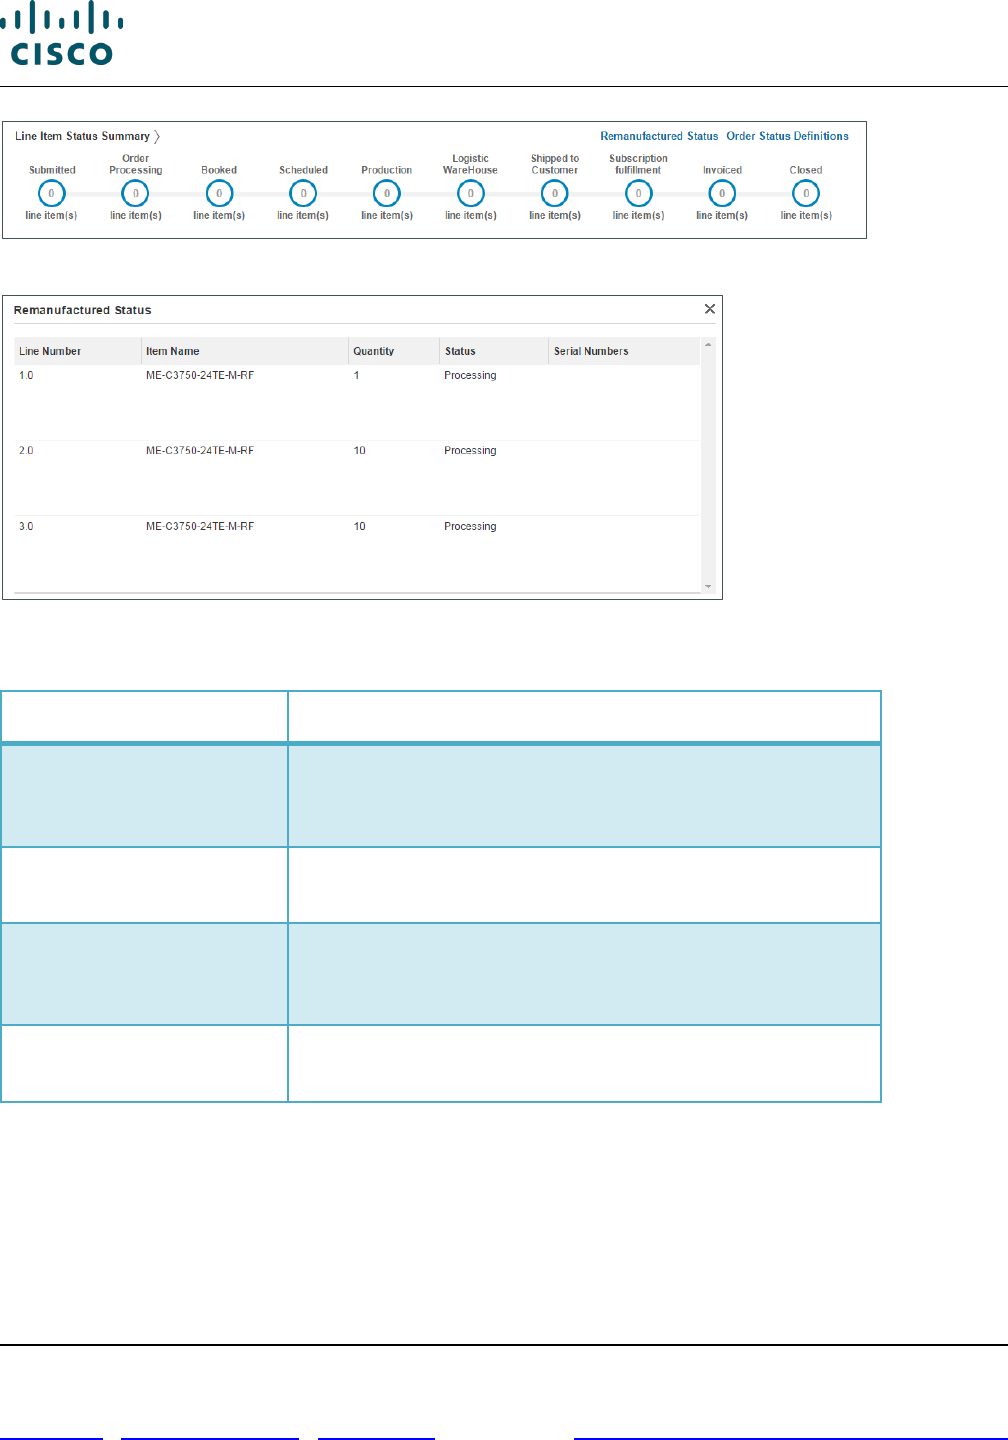
Cisco Commerce Order User Guide
Cisco Proprietary © 2020 Cisco and/or its affiliates. All rights reserved.
Last Updated: 17 March 2020 Page 113 of 143
Cisco.com | Privacy Statement | Trademarks Provide Feedback on this Training Resource
Order Details Page
Remanufactured Status Dialog Box
The status of the remanufactured equipment order displays as one of the following:
Status
Description
Processing
Order has been submitted in Cisco Commerce but is
waiting for inventory to become available at the
warehouses
Scheduled
Inventory is available at the appropriate shipment site, but
the order has not yet shipped
Shipped
The order has been shipped and is eligible for invoicing in
Cisco Commerce. Invoices can be seen on the Billing and
Invoice tab in View Status
Error
There was a technical error while processing the order.
Cisco’s technical support has been notified
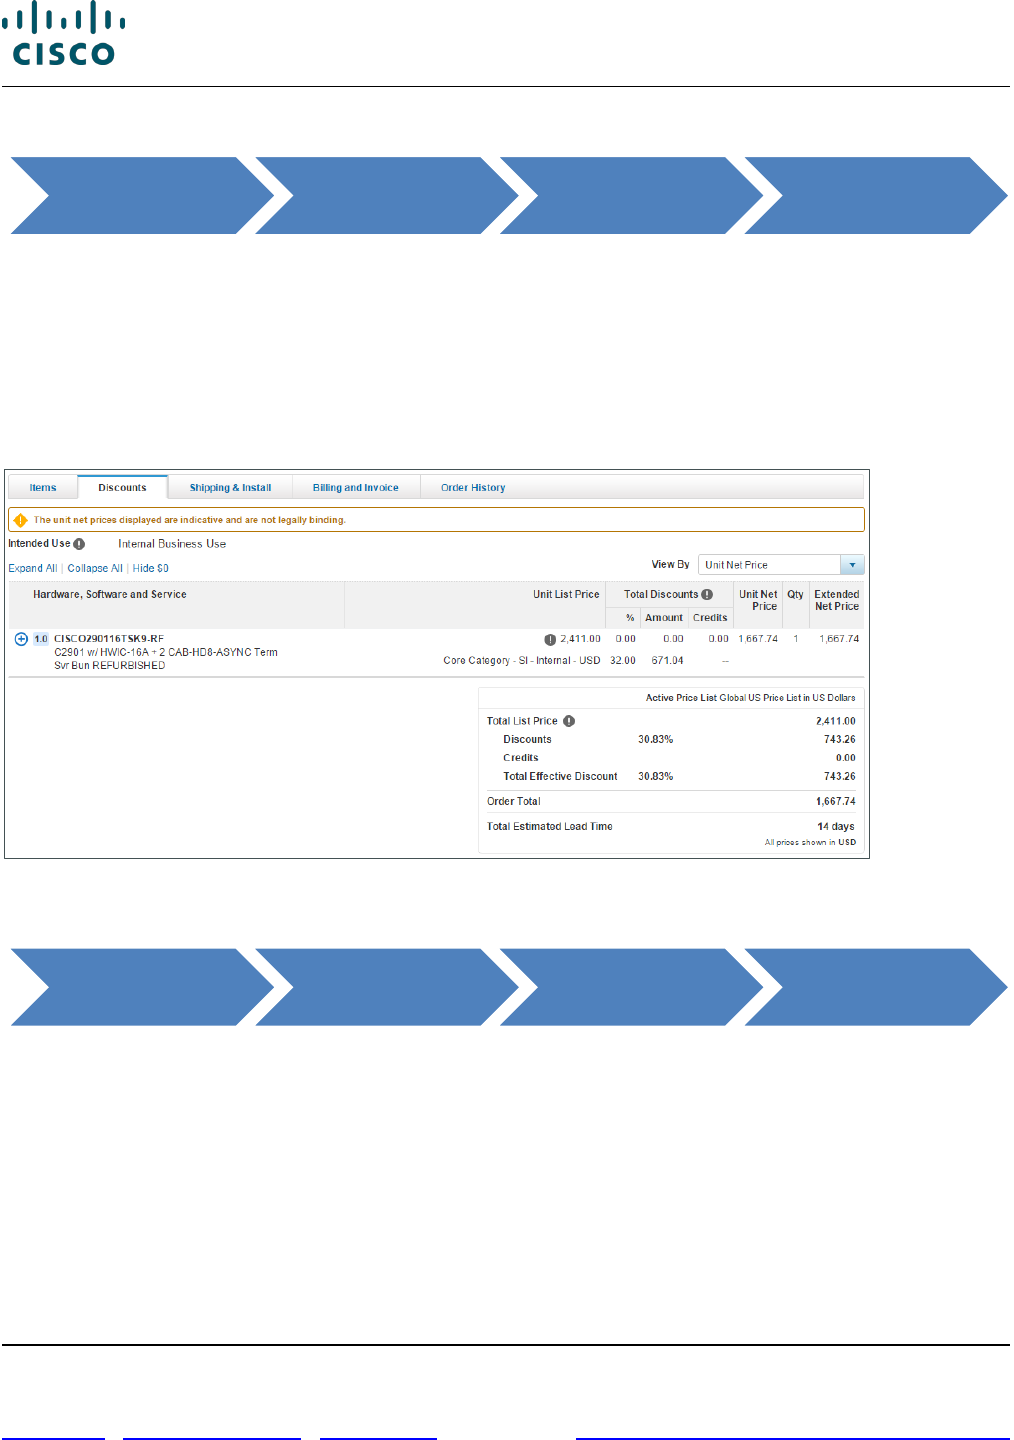
Cisco Commerce Order User Guide
Cisco Proprietary © 2020 Cisco and/or its affiliates. All rights reserved.
Last Updated: 17 March 2020 Page 114 of 143
Cisco.com | Privacy Statement | Trademarks Provide Feedback on this Training Resource
9.1.2 Viewing the Discounts Tab
Click the discounts tab. All of the discounting details from multiple sources are listed on one page. If
there are any price differences in a Business-to-Business order, the price is captured as an amount
associated with a tag: Other - Unverified Charge or Other - Unverified Discount.
• Other - Unverified Discount displays when the partner submits a net price less than the system
calculated net price.
• Other - Unverified Charge displays when the partner submits a net price greater than the system
calculated net price.
Order Details Page: Discounts Tab
9.1.3 Viewing the Shipping and Install Tab
Click Shipping & Install tab. This tab lists the various shipping options chosen, such as preferred
carrier, shipping date, carton details, shipping/packing notes, and Ultimate Consignee details.
• If the shipping cost is zero, N/A displays.
• The shipping priority is not displayed.
• The Shipping and Install tab tracks ordered items that have been shipped by listing the tracking
numbers and the shipping details.
Cisco Commerce Orders Tab
Order Details
Page
Disounts Tab
Cisco Commerce Orders Tab
Order Details
Page
Shipping & Install
Tab

Cisco Commerce Order User Guide
Cisco Proprietary © 2020 Cisco and/or its affiliates. All rights reserved.
Last Updated: 17 March 2020 Page 115 of 143
Cisco.com | Privacy Statement | Trademarks Provide Feedback on this Training Resource
Order Details Page: Shipping & Install Tab
To view the shipping details of remanufactured items, click Remanufactured Shipping Details.
Remanufactured Shipping Details Dialog Box
9.1.4 Viewing the Billing and Invoice Tab
The billing and invoice tab displays the billing, taxability information, and invoice for the order,
depending on its status.
Click the Invoices tab to view, export, and print an invoice, if available.
Order Details Page: Billing and Invoice Tab – Invoices
1. Use the common utilities to export, print or, email an Invoice.
2. In the resulting dialog box, select the appropriate option and click Export, Print, or Email as
appropriate.
1
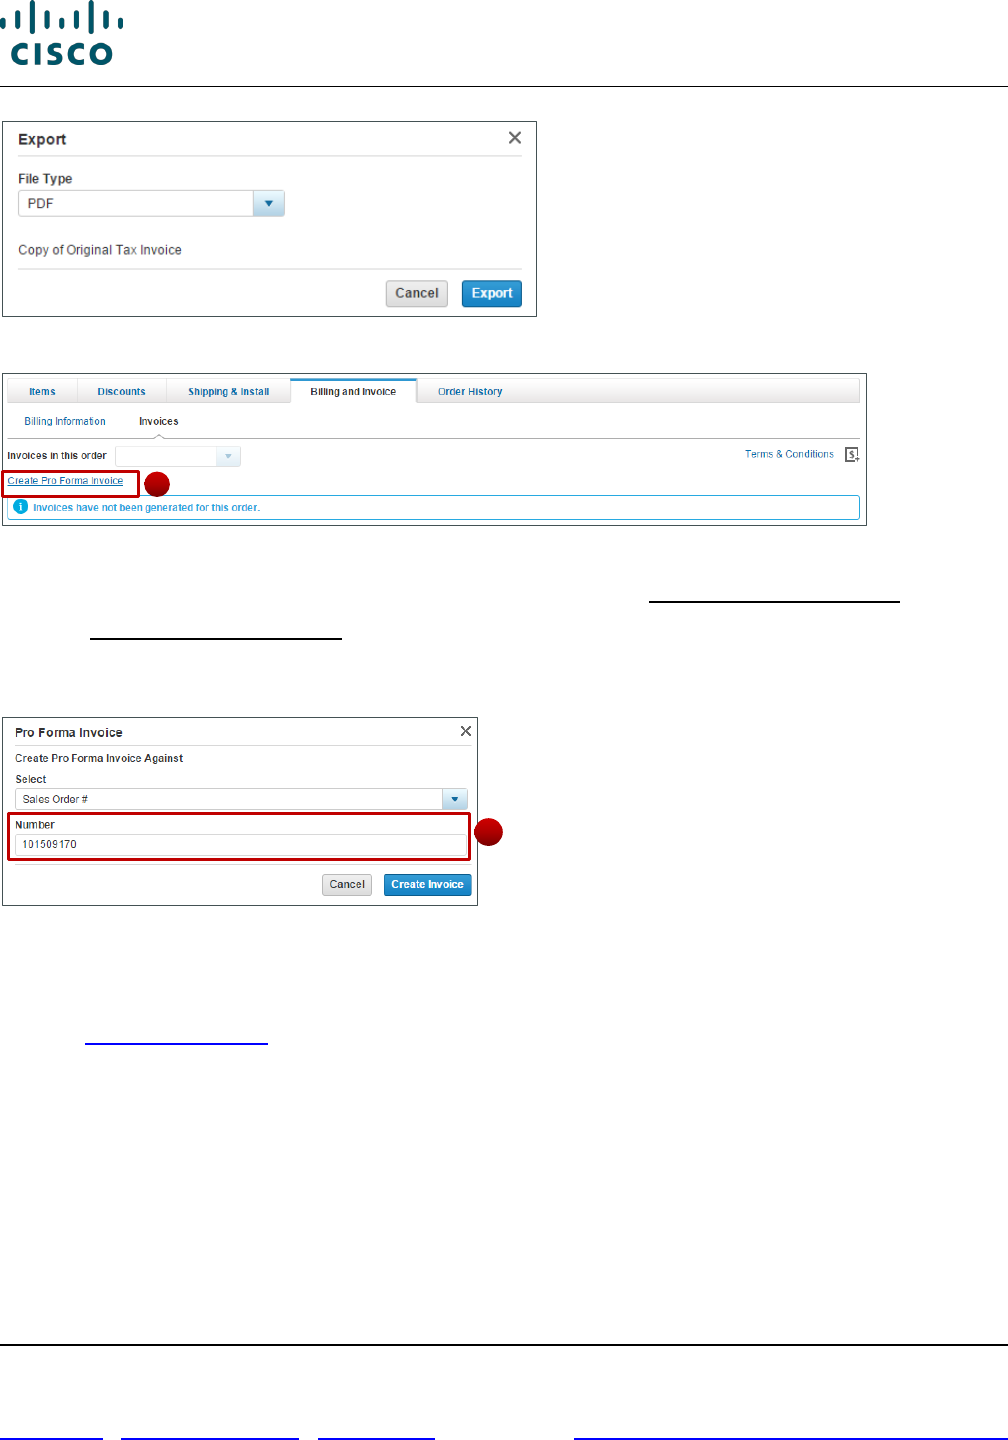
Cisco Commerce Order User Guide
Cisco Proprietary © 2020 Cisco and/or its affiliates. All rights reserved.
Last Updated: 17 March 2020 Page 116 of 143
Cisco.com | Privacy Statement | Trademarks Provide Feedback on this Training Resource
Export PDF Dialog Box
Order Details Page: Billing and Invoice Tab – Invoices
For cases where the invoice is not generated, the system displays Create Pro Forma Invoice.
3. Click Create Pro Forma Invoice. The Pro Forma Invoice page displays.
4. Make a selection from the drop-down menu, enter the purchase order number or sales order
number, and then click Create Invoice.
Pro Forma Invoice Dialog Box
The PDF displays, but does not include tax or freight. The pro forma invoice is an estimate before the
actual invoice is generated and cannot be used for payment, legal, or customs purposes.
Refer to Managing Invoices for more information on managing invoices.
4
3
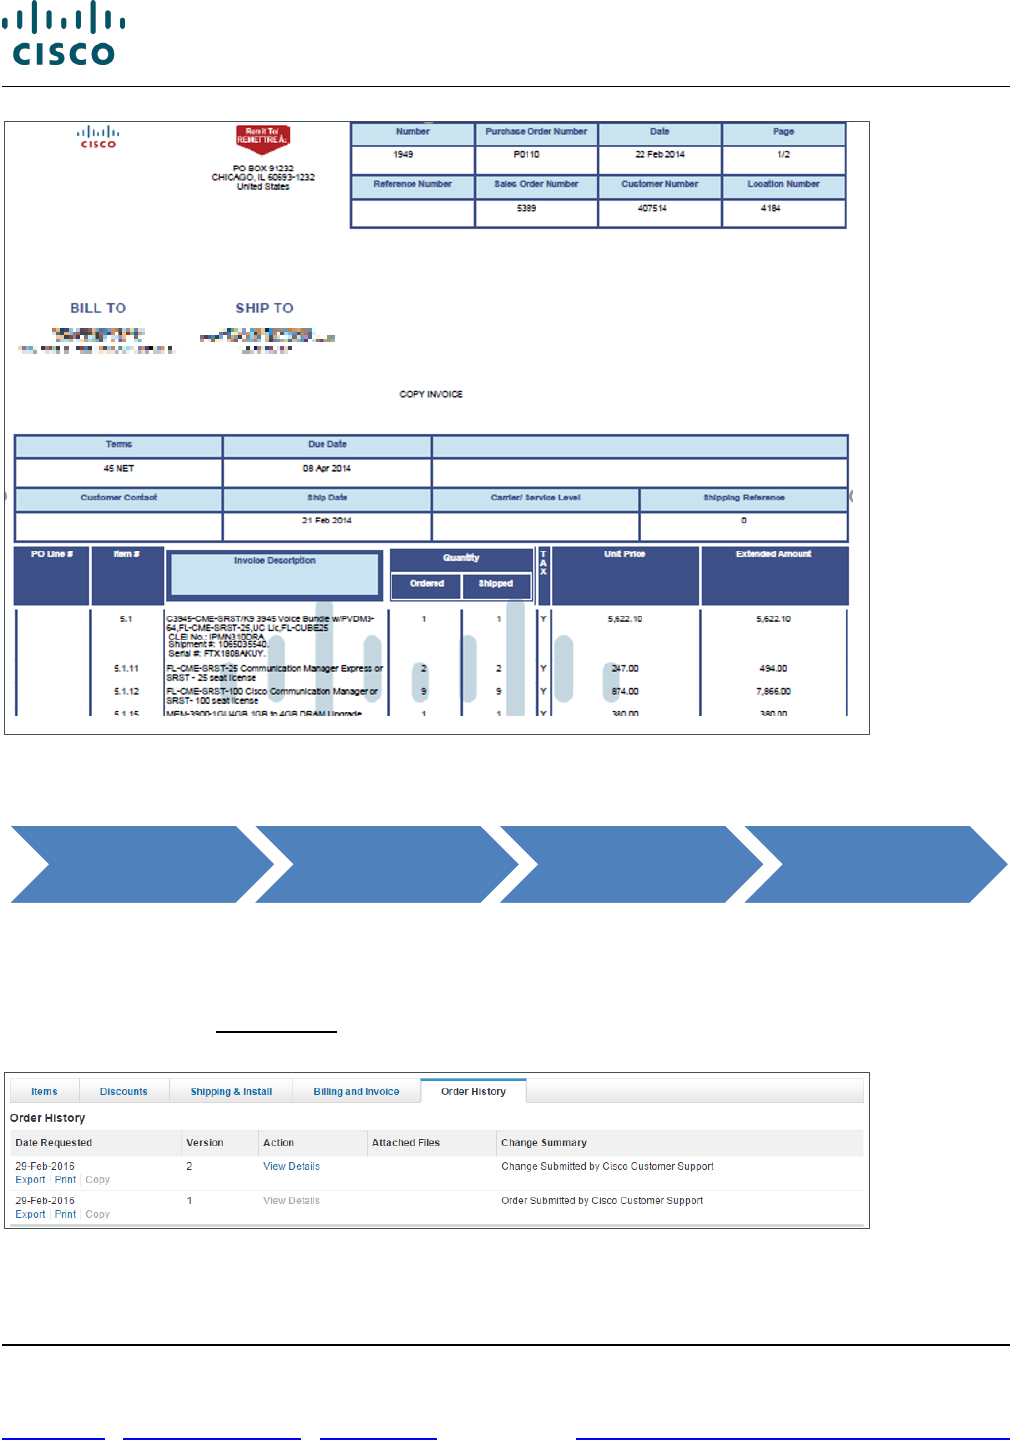
Cisco Commerce Order User Guide
Cisco Proprietary © 2020 Cisco and/or its affiliates. All rights reserved.
Last Updated: 17 March 2020 Page 117 of 143
Cisco.com | Privacy Statement | Trademarks Provide Feedback on this Training Resource
Sample Invoice
9.1.5 Viewing the Order History Tab
Click the Order History tab. The Order History tab records all the change requests and the details of the
changes made to the order, including the requester’s name and date of change request.
Use the export and print functionalities on the Order History tab to retrieve any version of an attached
purchase order. Click View Details to see a comparison of what’s changed from the previous version of
the order.
Order Details Page: Order History Tab
Cisco Commerce Orders Tab
Order Details
Page
Order History Tab
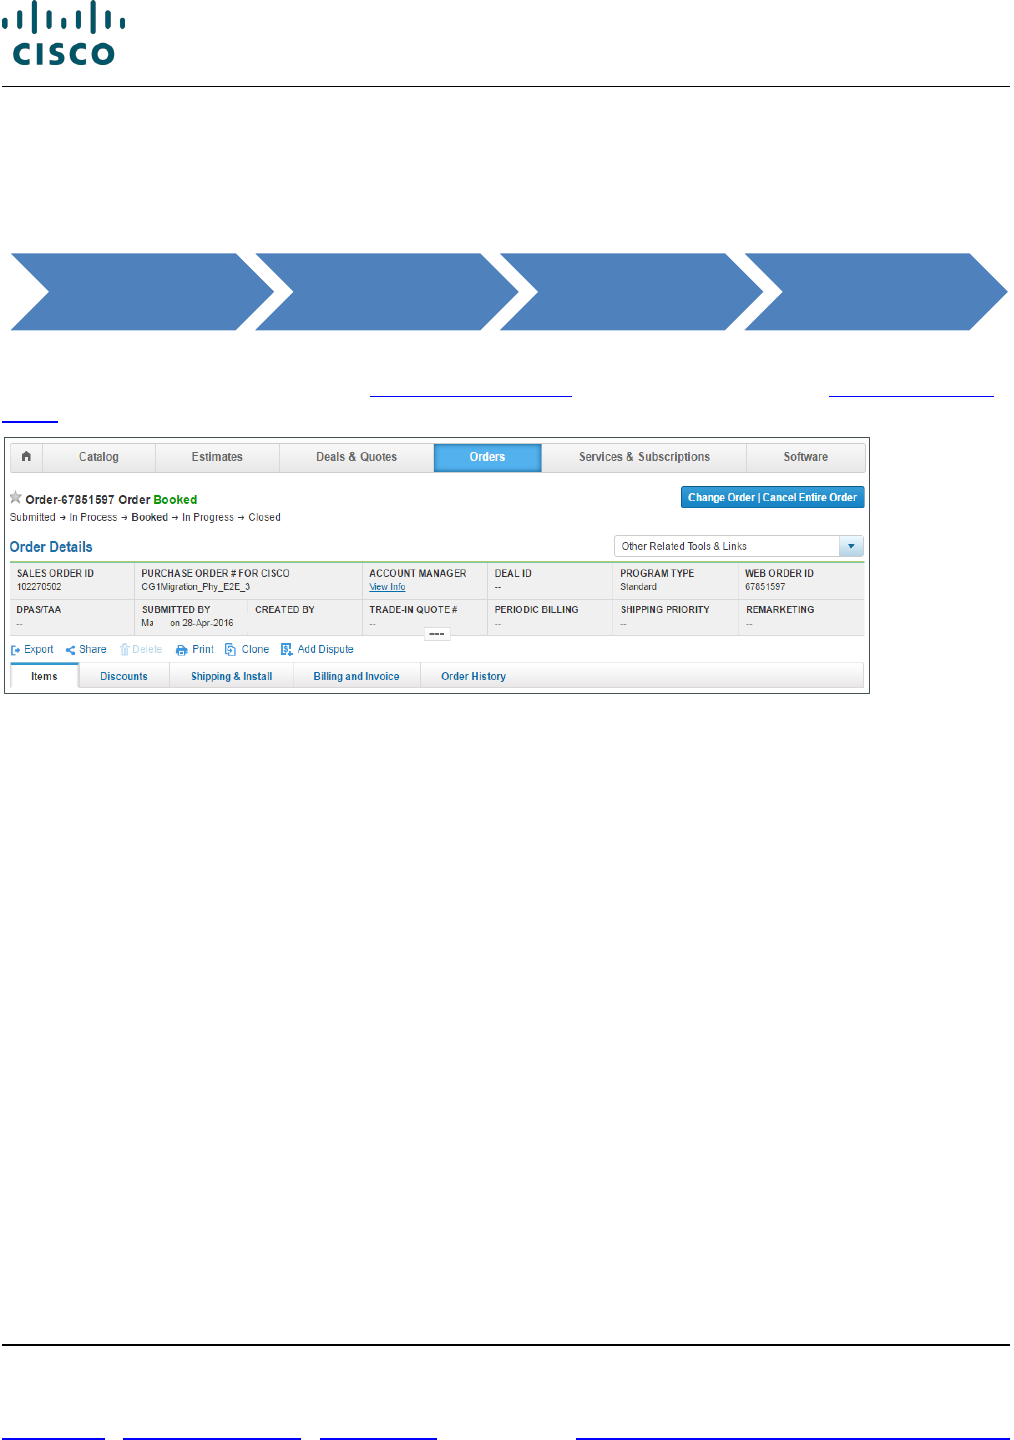
Cisco Commerce Order User Guide
Cisco Proprietary © 2020 Cisco and/or its affiliates. All rights reserved.
Last Updated: 17 March 2020 Page 118 of 143
Cisco.com | Privacy Statement | Trademarks Provide Feedback on this Training Resource
10 Updating or Cancelling a Submitted Order
You can use the self-serve Change Order functionality to make changes and cancellations on both
quote-converted and standalone orders using Cisco Commerce. The Change Order functionality
mirrors the look and feel of the initial order creation in Cisco Commerce.
Submitted orders are available for users to view on the CCW Order Details page. For orders that are
eligible for cancellation requests (see Cancelling the Order) or change requests (see Initiating Change
Order), Change Order | Cancel Entire Order displays on the Order Details page.
Order Details Page
Change Order functionality is not available in the following scenarios:
• An order cancellation request is in progress and the change request is not yet submitted.
• A previous change order request is still open and in Unsubmitted status.
• There is already a submitted change order that has placed the order on hold.
• Another user is making a change.
• Price impacting changes are not allowed for trade-in orders, or orders with the following payment
types: DOC, PREPAYMENT, CASH AGAINST DOCUMENTS, or COD.
• All lines / ship set status have reached the point of no return (PONR). There is a single PONR for
each line.
• Product lines are eligible for change until the line reaches Production in Progress status. When
manufacturing has started, no more changes are allowed to any attributes related to the line.
• Service lines with entitlement status of Awaiting Fulfillment will be eligible for changes. When a
service contract gets created, you will no longer be allowed to make any changes to the line.
• Lines with the delivery option for electronic delivery and with status eDispatch Eligible can be
changed. Beyond this point, you cannot modify or cancel any part of the line.
Cisco Commerce Orders Tab
Order Details
Page
Change or Cancel
Order
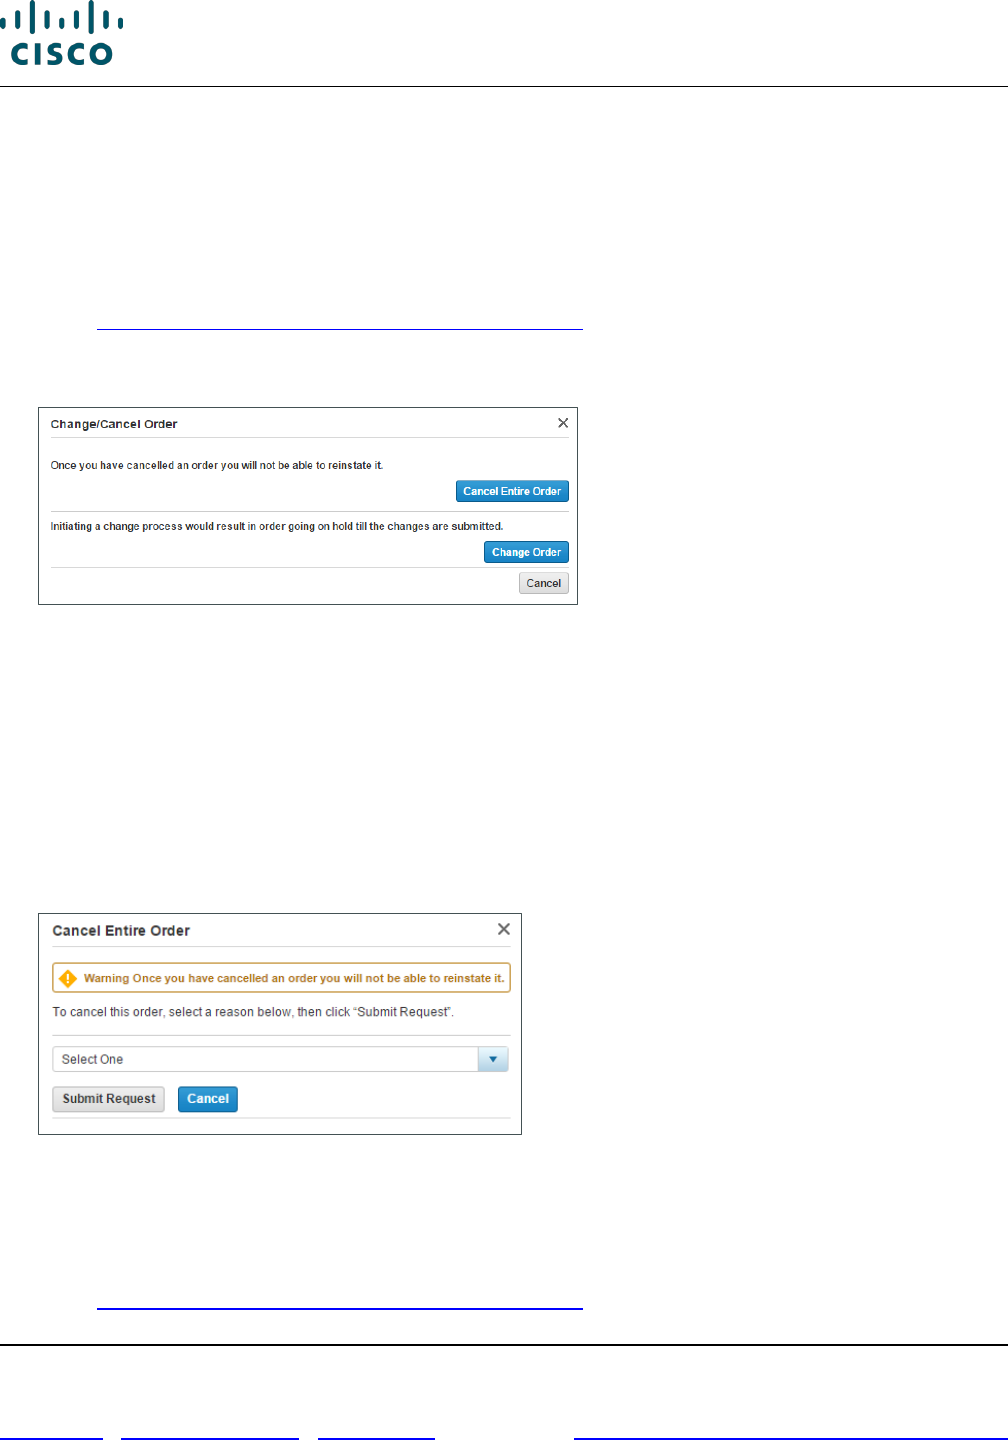
Cisco Commerce Order User Guide
Cisco Proprietary © 2020 Cisco and/or its affiliates. All rights reserved.
Last Updated: 17 March 2020 Page 119 of 143
Cisco.com | Privacy Statement | Trademarks Provide Feedback on this Training Resource
10.1 Cancelling the Order
If none of the lines on an order have passed the PONR, the entire order can be cancelled. Once an
order is cancelled, it cannot be reinstated. AMs will receive a notification for all cancellation requests
(either lines on an order or an entire order).
To cancel an entire order, complete the following steps:
1. Open a submitted order. To perform a search using the Cisco Commerce Search functionality, refer
to the Getting Started with Cisco Commerce User Guide.
2. From the Order Details page, click Change Order | Cancel Entire Order. The Change/Cancel
Order confirmation dialog box displays.
Change/Cancel Order Dialog Box
3. From the Change/Cancel Order dialog box, click Cancel Entire Order. The Cancel Entire Order
dialog box displays. A reason for cancellation is required.
4. Click the drop-down arrow and click one of the reasons:
• Duplicate PO
• Customer Cancelled Order
• Other
5. Click Submit Request.
Cancel Entire Order Dialog Box
10.2 Initiating Change Order
To initiate a change order request, complete the following steps:
1. Open a submitted order. To perform a search using the Cisco Commerce Search functionality, refer
to the Getting Started with Cisco Commerce User Guide.
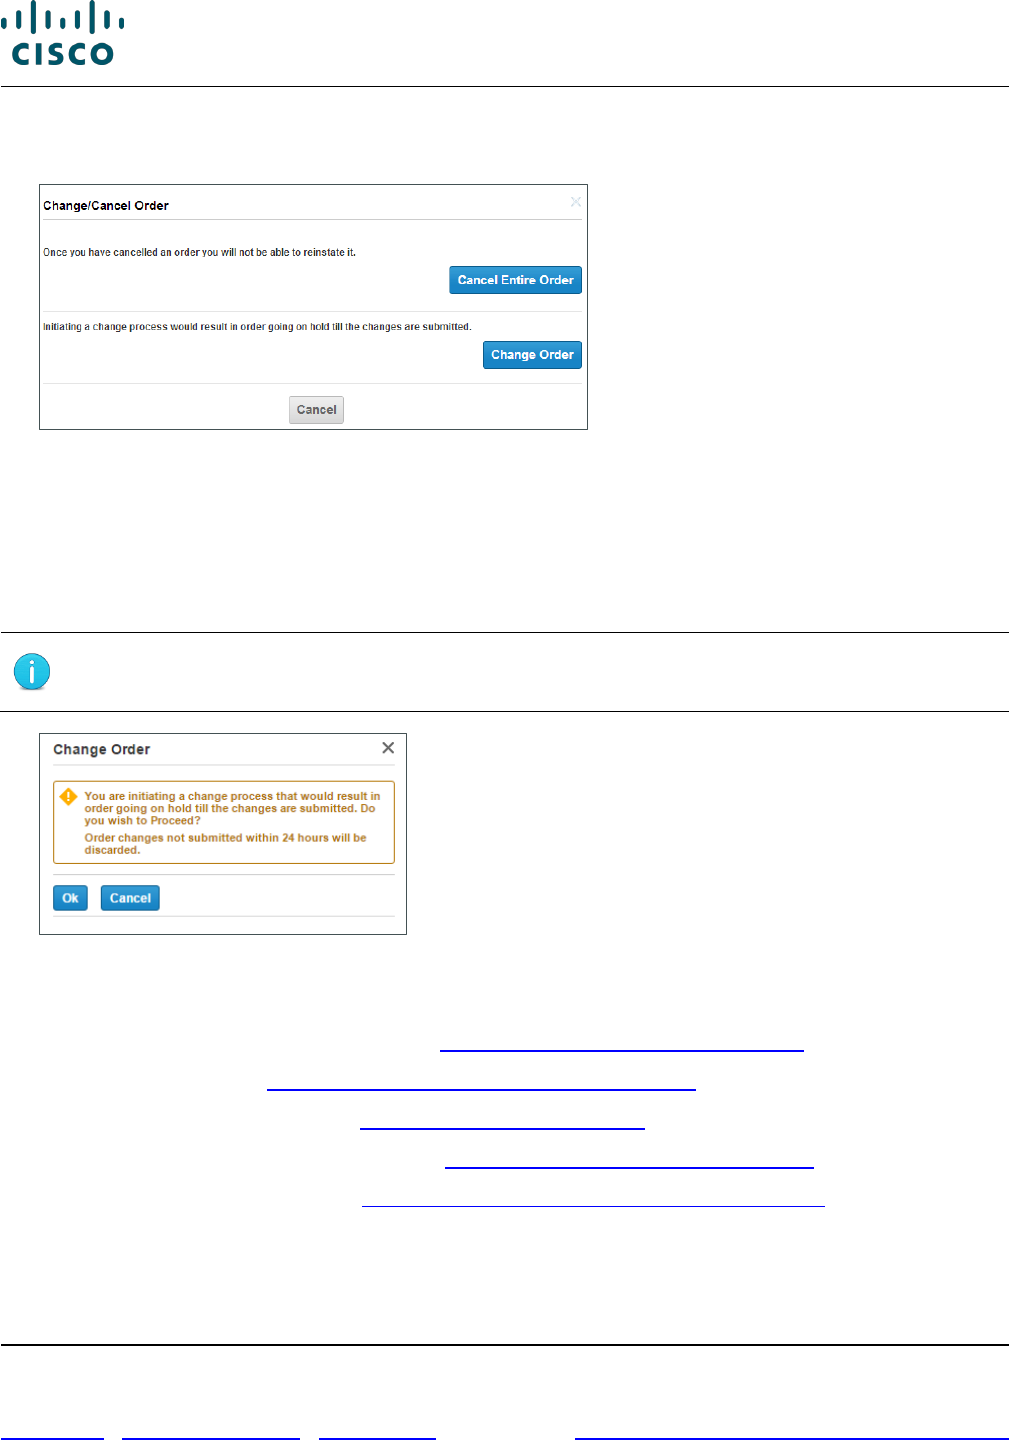
Cisco Commerce Order User Guide
Cisco Proprietary © 2020 Cisco and/or its affiliates. All rights reserved.
Last Updated: 17 March 2020 Page 120 of 143
Cisco.com | Privacy Statement | Trademarks Provide Feedback on this Training Resource
2. From the Order Details page, click Change Order | Cancel Entire Order. The Change/Cancel
Order confirmation dialog box displays.
Change/Cancel Order Dialog Box
3. From the Change/Cancel Order dialog box, click Change Order. The Change Order dialog box
displays with a message informing that the order will be placed on hold. A change order hold will
remain on the order until the change request is cancelled or change has been submitted and
applied to the order.
4. Click OK to proceed to Cisco Commerce Change Order.
Note: If you do not submit changes on the order within 24 hours, then the change
order request will be discarded.
Change Order Dialog Box
You can make the following changes through Cisco Commerce Change Order:
• Change Attributes on the Items Tab (see Changing Attributes on the Items Tab)
• Review Discounts (see Viewing the Discounts Tab in Change Order)
• Change Shipping Attributes (see Changing Shipping Attributes)
• Change Attributes on the Billing Tab (see Changing Attributes on the Billing Tab)
• Change Credit Card Orders (see Changing Credit Card Orders (US and Canada))
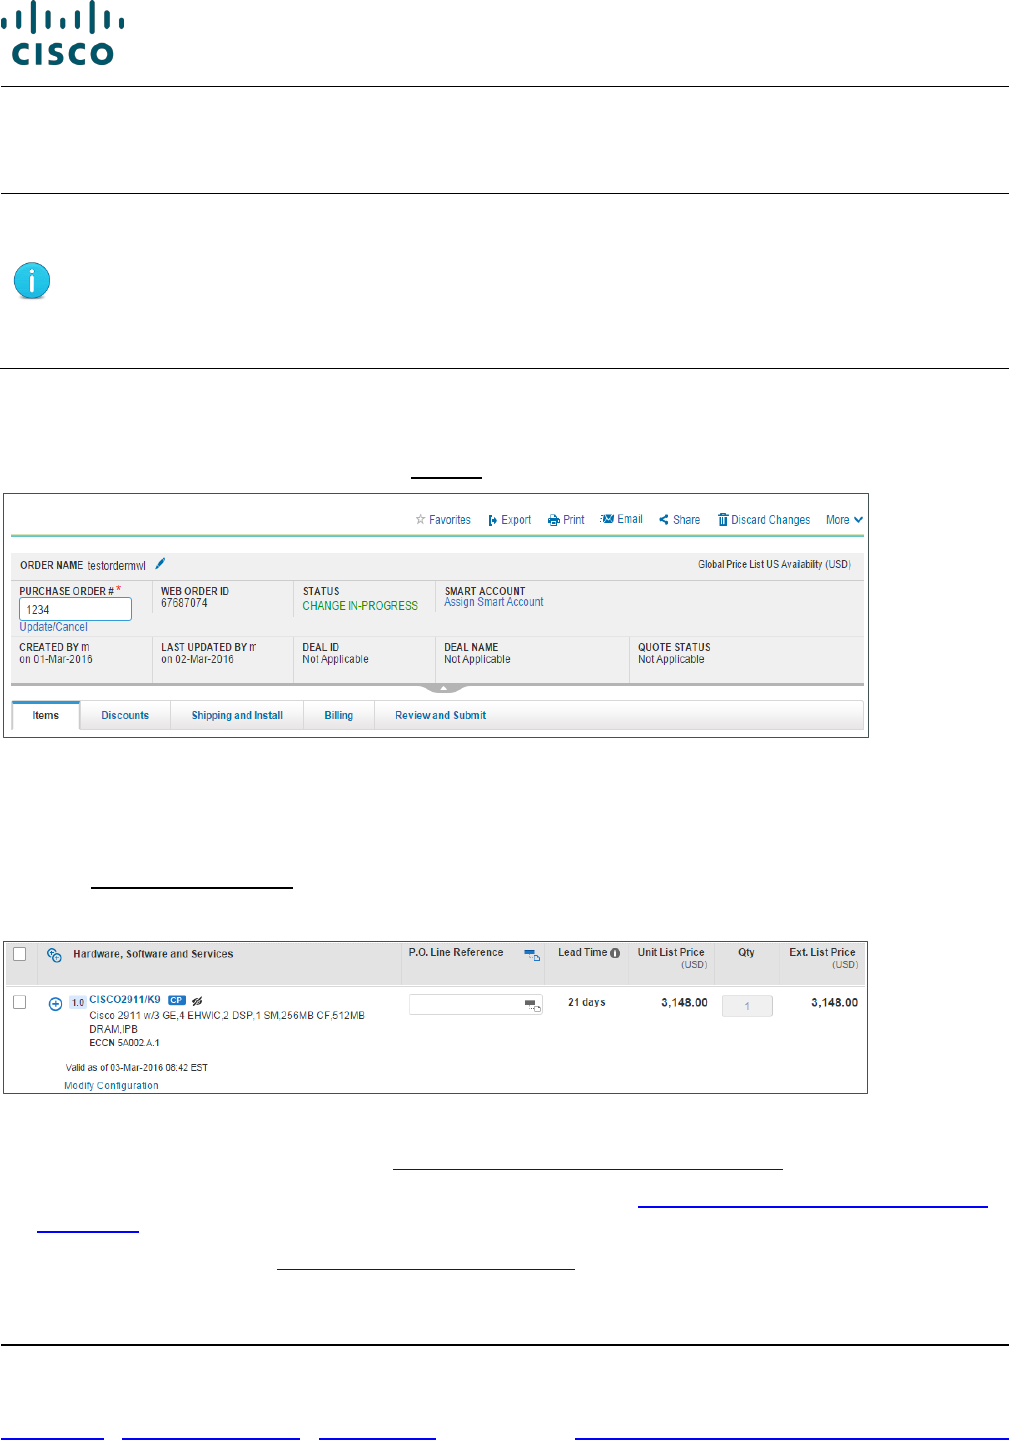
Cisco Commerce Order User Guide
Cisco Proprietary © 2020 Cisco and/or its affiliates. All rights reserved.
Last Updated: 17 March 2020 Page 121 of 143
Cisco.com | Privacy Statement | Trademarks Provide Feedback on this Training Resource
10.2.1 Changing Attributes on the Items Tab
From the Order Details page: Items tab, several attributes can be changed.
Note: For government orders, the Government Order flag and TAA compliance
selection cannot be modified.
For existing items that are on the order as a bundle, you cannot cancel the major
lines within a bundle. You can cancel the entire bundle if it has not passed the PONR.
You cannot make changes to any attribute for lines that have passed the PONR
10.2.1.1 Updating the Purchase Order Number
You can update the purchase order number by clicking the edit icon. The field becomes editable. Enter
the new purchase order number and click Update.
Order Details Page: Purchase Order Number
10.2.1.2 Modifying the Existing Lines
To modify existing lines, complete the following steps:
1. Click Modify Configuration. The configuration expands with additional functionalities.
Once the configuration expands, you can opt to make changes to many attributes.
Order Details Page: Items Tab – Modify Configuration
2. Select Options and/or Services: see Choosing Options and Resolving Issues.
3. Add or change P.O. Line Reference by line, if applicable: see Populating the Purchase Order Line
Reference.
4. Adjust the Quantity: see Setting Quantities for Products.
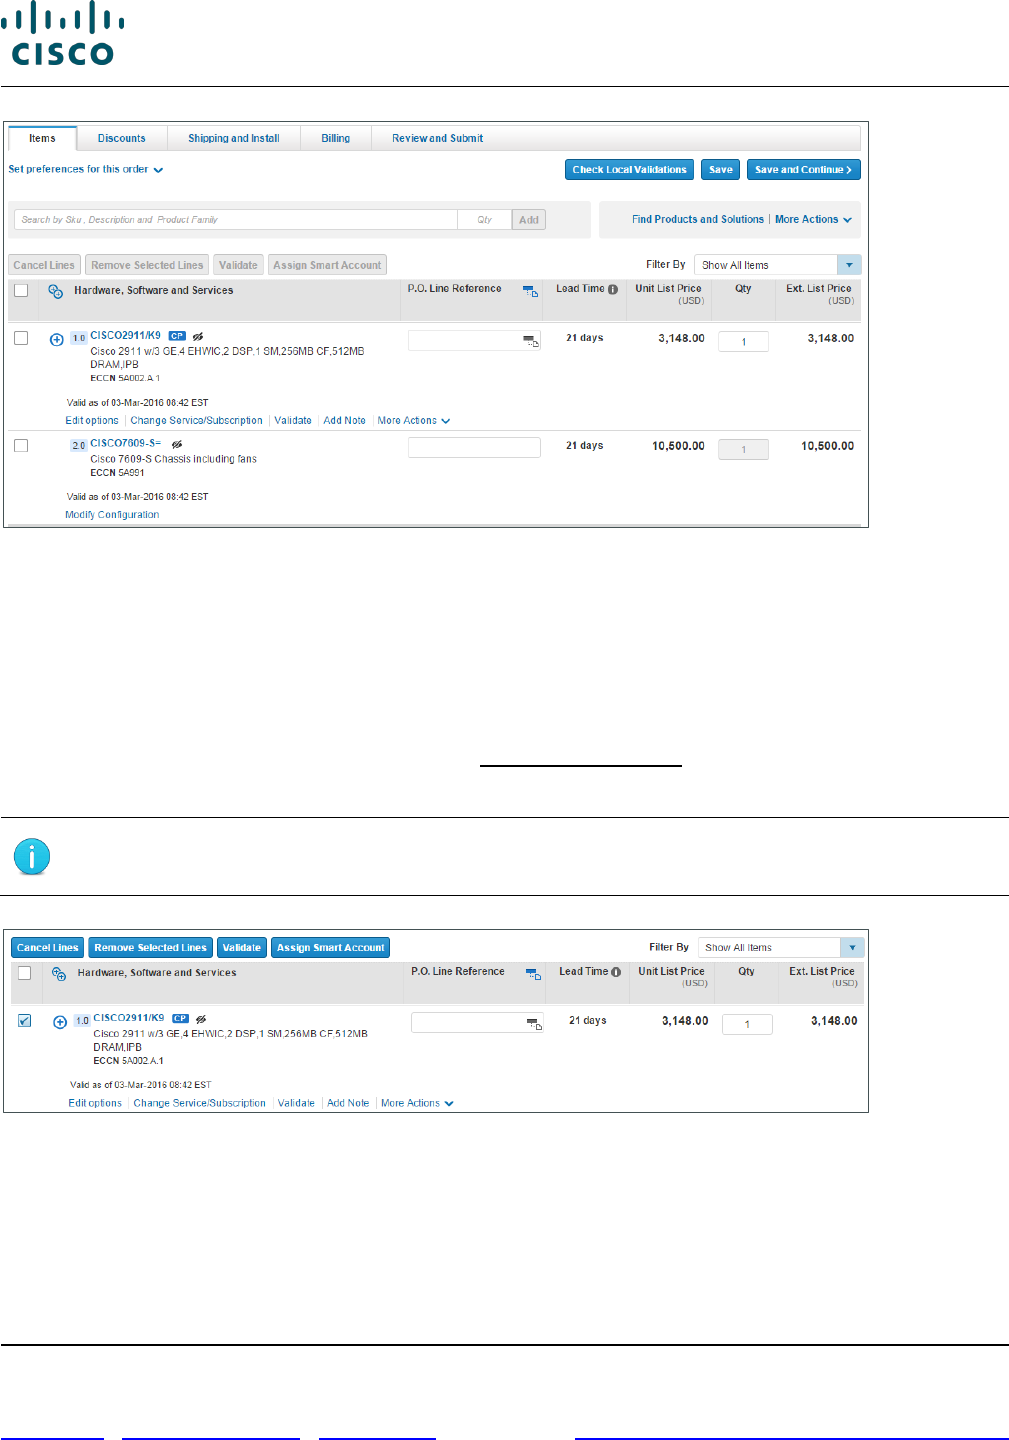
Cisco Commerce Order User Guide
Cisco Proprietary © 2020 Cisco and/or its affiliates. All rights reserved.
Last Updated: 17 March 2020 Page 122 of 143
Cisco.com | Privacy Statement | Trademarks Provide Feedback on this Training Resource
Order Details Page: Items Tab of a Quote-Converted Order
10.2.1.3 Cancelling a Line
You can cancel the lines from the order that have not yet passed the PONR. Lines past the PONR will
be grayed out and will not have checkboxes. A cancellation reason will be required for all cancellation
requests.
To cancel a line on an order that is in the process of being changed:
1. From the Order Details page: Items tab, click Modify Configuration.
2. Check the appropriate checkbox(es) for lines that need to be removed from the order.
Note: You can also check the checkbox next to a newly added line and click Remove
from Order to delete the line item.
Order Details Page: Items Tab – Cancel a Line
3. Click Cancel Lines. The Cancel Line dialog box displays.
4. Click the Reason drop-down arrow and click one of the cancellation reasons.
5. Click Submit Request.

Cisco Commerce Order User Guide
Cisco Proprietary © 2020 Cisco and/or its affiliates. All rights reserved.
Last Updated: 17 March 2020 Page 123 of 143
Cisco.com | Privacy Statement | Trademarks Provide Feedback on this Training Resource
Cancel Line Dialog Box
10.2.1.4 Adding a New Line
You can add new lines to an order being changed in three ways, just as with any other order (See
Adding Items to the Order):
1. Use the Find Products and Solutions functionality to search for and add products by SKU,
description, or product family: see Finding Items Using a Search
2. Import a saved configuration: see Importing an Estimate
3. Enter an full or partial SKU: see Adding Items by SKU
Order Details Page: Items Tab - Adding Items
10.2.1.5 Modifying Other Service Line Information
You can modify the Service Contract Number (Identifying Target Contract Numbers) for the services in
the items tab, change the service start date for service-only lines when eligible, and change the FSSD
value when eligible (see Identifying Flexible Service Start Delay (FSSD) Value).
10.2.2 Viewing the Discounts Tab in Change Order
From the Discounts tab, review the discounts for the order.
• Discounts are populated based on the linked deal ID or per standard contractual discounts.
• Discounts cannot usually be modified.
• For new or existing lines that are linked to an RNSD, depending on how the Cisco AM has set up
the deal, discounts may be applied to the order, or there could be a discount box where you can
enter the discount communicated by the Cisco AM.
Note: If you have converted the order from a quote, new lines added from the quote
will receive approved quote pricing. New lines added to an order that are not on the
original quote will be priced with standard contractual discounts.
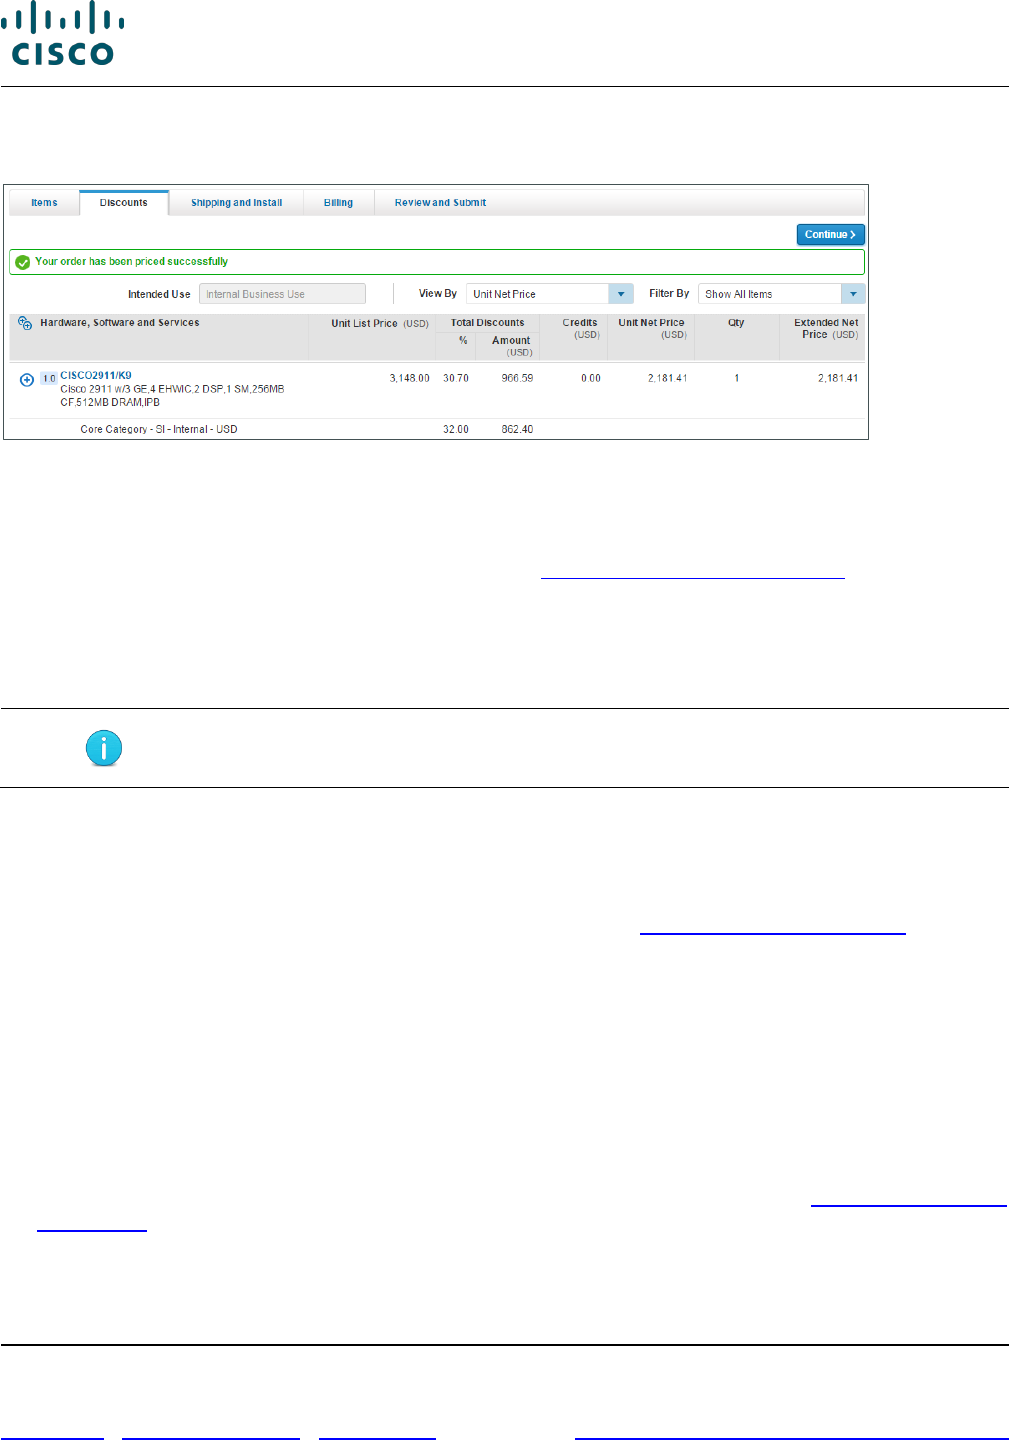
Cisco Commerce Order User Guide
Cisco Proprietary © 2020 Cisco and/or its affiliates. All rights reserved.
Last Updated: 17 March 2020 Page 124 of 143
Cisco.com | Privacy Statement | Trademarks Provide Feedback on this Training Resource
If the changes requested on the order result in nonstandard discounts that are beyond what is
approved on the quote, the order will remain on hold while the quote undergoes re-approval.
Order Details Page: Discounts Tab
10.2.3 Changing Shipping Attributes
You can modify all header level shipping fields from the Shipping and Install tab. The following changes
are allowed in the Order Shipping Options section (see Setting Order Shipping Options):
• Add, remove, or edit billing emails
• Add, remove, or edit shipping notes
• Add, remove, or edit carton notes
Note: The attributes on the Shipping and Install tab can be changed until the order
header level status reaches “Logistics Warehouse”.
10.2.3.1 Editing a Shipping Group in Change Order
You can move the existing lines to new shipping groups or the default shipping group, but not to other
existing shipping groups.
For each shipping group, you can modify the following fields (see Managing Shipping Groups):
• Address and contact information
• Requested ship date
• Routing option
• Shipping service option
• Carrier (editable field not shown, only available for Self Routed option)
• Carrier account number (editable field not shown, only available for Self Routed option)
• Delivery options (specific fields will vary based on routing option selected). See Populating Shipping
Information.
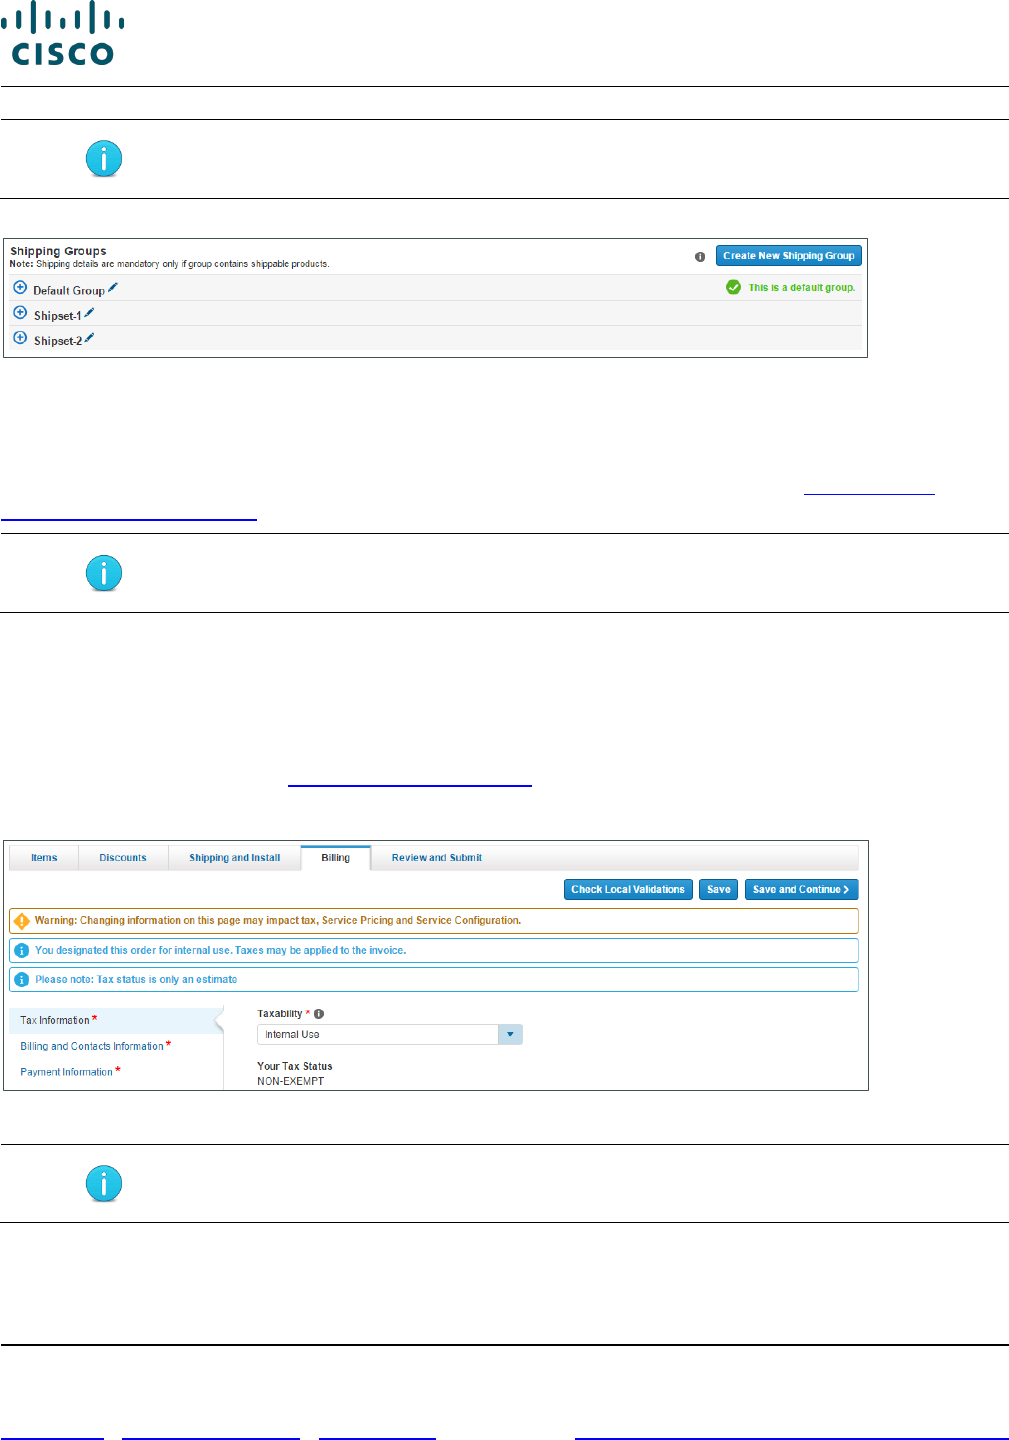
Cisco Commerce Order User Guide
Cisco Proprietary © 2020 Cisco and/or its affiliates. All rights reserved.
Last Updated: 17 March 2020 Page 125 of 143
Cisco.com | Privacy Statement | Trademarks Provide Feedback on this Training Resource
Note: You cannot make changes to shipping groups that have passed the PONR.
Order Details Page: Shipping and Install Tab – Shipping Groups
10.2.3.2 Placing New Lines in Shipping Groups
New lines added to the order are automatically placed in the default shipping group. You can move
them to a newly created shipping group, but not into existing shipping groups (see Moving Items
Between Shipping Groups).
Note: You cannot move a line whose status displays as “Production in Progress”.
10.2.4 Changing Attributes on the Billing Tab
Changing information on the Billing tab may impact tax, service pricing, and service configuration on
the order. The following changes are allowed on the Billing tab in change order:
• Change the taxability. System validations performed for this change will mirror those done in the
place order process. See Verifying Tax Information.
• Attach or remove purchase orders.
Order Details Page: Billing Tab – Tax Information Section
Note: You cannot modify billing address, payment terms, and payment types.
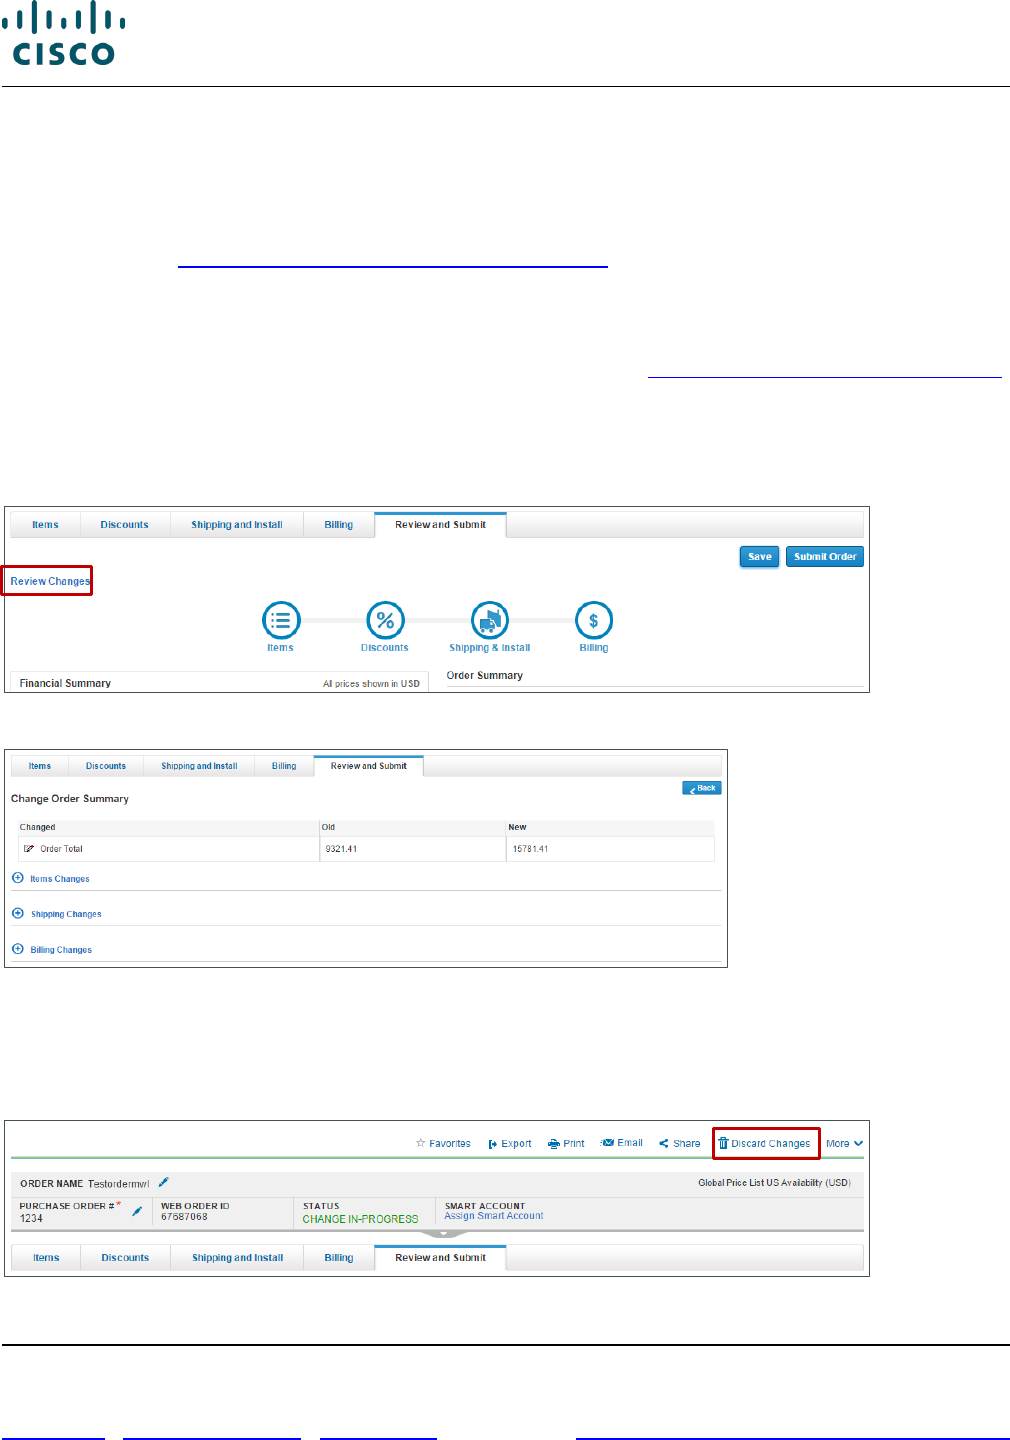
Cisco Commerce Order User Guide
Cisco Proprietary © 2020 Cisco and/or its affiliates. All rights reserved.
Last Updated: 17 March 2020 Page 126 of 143
Cisco.com | Privacy Statement | Trademarks Provide Feedback on this Training Resource
10.2.4.1 Changing Credit Card Orders (US and Canada)
If you had marked the original order with payment option as credit card, then you can change the
selected credit card. The currently selected card will be highlighted with an orange checkmark.
If the preferred credit card is not available, add the credit card information in your My Profile and
Preferences. See Populating the Payment Information Section.
10.2.5 Reviewing and Submitting the Change Request
The Review and Submit tab displays a link to a summary of the changes made to the order. System
validations will update the status of each section of the order. See Reviewing and Submitting the Order.
Follow the guiding messages to address any errors in each tab. Click Submit Order to submit the
change request.
The change order hold will be removed from the order once the change request is processed and
approved.
Order Details Page: Review and Submit Tab
Order Details Page: Review and Submit tab - Change Order Summary
10.2.6 Discarding Changes
To discard changes at any given time, click Discard Changes. The Discard Changes dialog box
displays. Select Submit Request to revert the Order to its previous version.
Common Utilities bar: Discard Changes
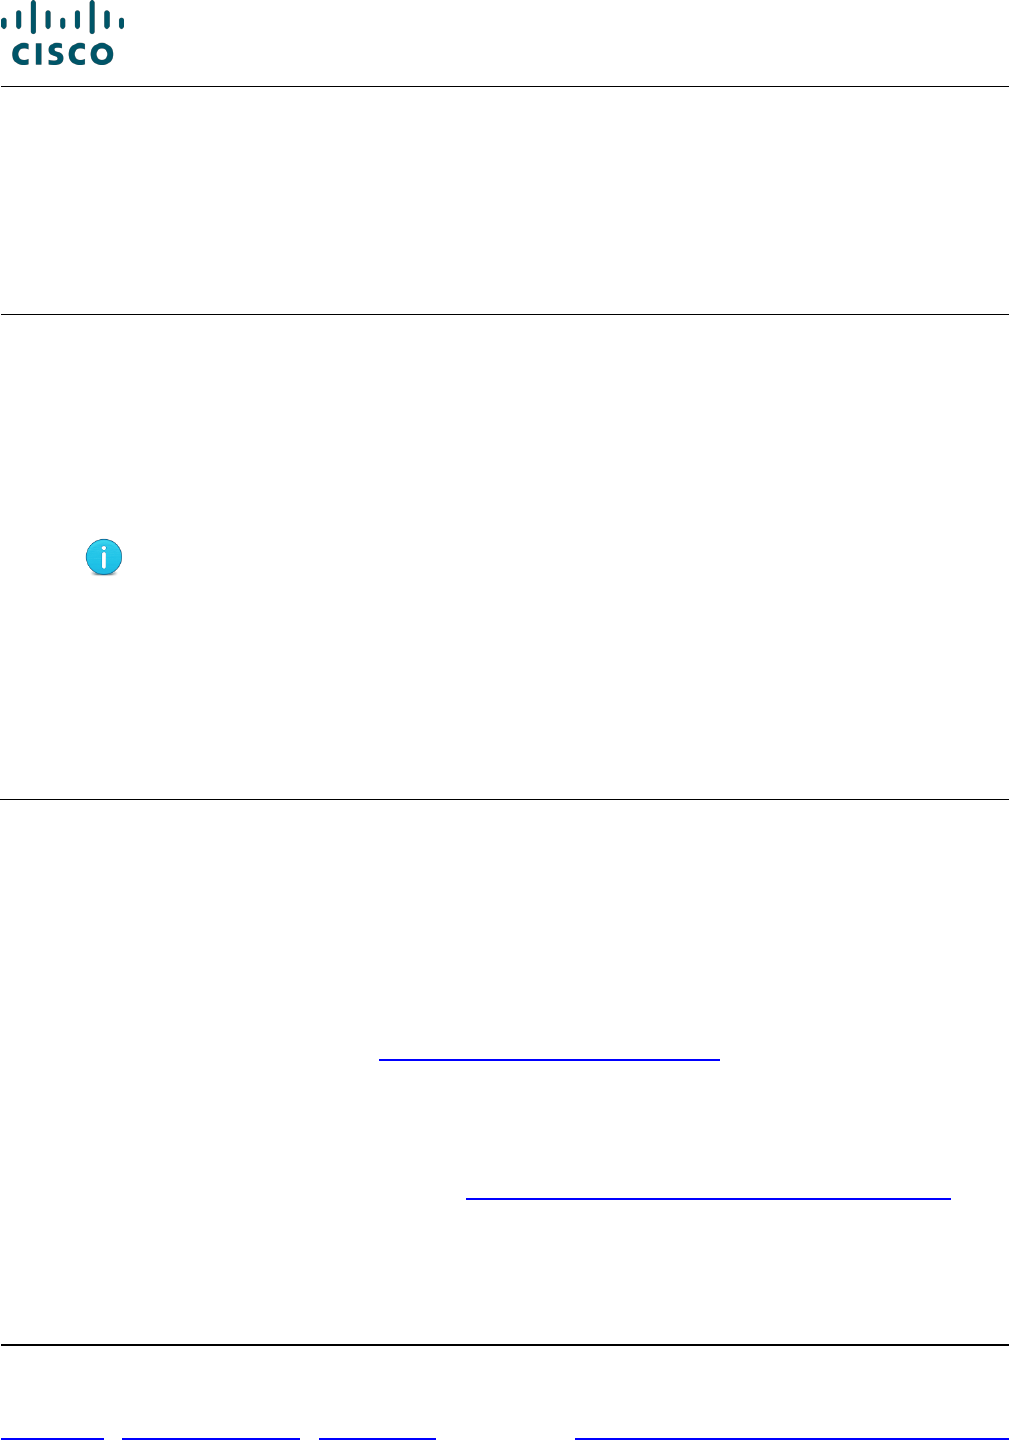
Cisco Commerce Order User Guide
Cisco Proprietary © 2020 Cisco and/or its affiliates. All rights reserved.
Last Updated: 17 March 2020 Page 127 of 143
Cisco.com | Privacy Statement | Trademarks Provide Feedback on this Training Resource
11 Managing Invoices
If the system has generated an invoice, then you can use exported invoices for payment / legal /
customs purposes. If there is not a system-generated invoice, you can create a pro forma invoice which
cannot be used for legal purposes but can serve as an estimate prior to the availability of the actual
invoice.
Invoices will be printed in English for Japan and Quebec.
Note:
• The same tax data elements display directly on the Invoice Details page and the
PDF invoice copy.
• Canada theater only displays the Cisco Systems Canada Corp. Canadian GST
registration number will be displayed on all Canadian transactions (credit memo /
debit memo / invoices).
• EMEA theater only displays the following tax attributes: Customer VAT Number,
VAT Amount, Tax Code, Tax Rate, Exchange Rate used to convert VAT Amount
to local currency, Tax Message, Service Reference Message, Doc Sequence
Number.
• All theaters display the freight amount as “Freight,” not as “Shipping and
Handling”.
• All theaters display trade-in amounts at line level.
• For all theaters, the original tax data elements will be maintained to ensure that
those elements do not change after the invoice has been generated.
11.1 Viewing Invoices
You can access invoices in two ways:
• From an open order:
1. Open a submitted order.
2. Click the Billing and Invoice tab.
You can access the Invoice information from this page, if it is generated. Else, create a Pro
Forma Invoice as needed. See Viewing the Billing and Invoice Tab.
• From Cisco Commerce Orders tab:
1. From Cisco Commerce Orders tab drop-down menu options, click Invoices.
You can access all invoices on the Invoices page. Search, export, print, or tag invoices using
the common utilities available here (see Getting Started with Cisco Commerce User Guide).
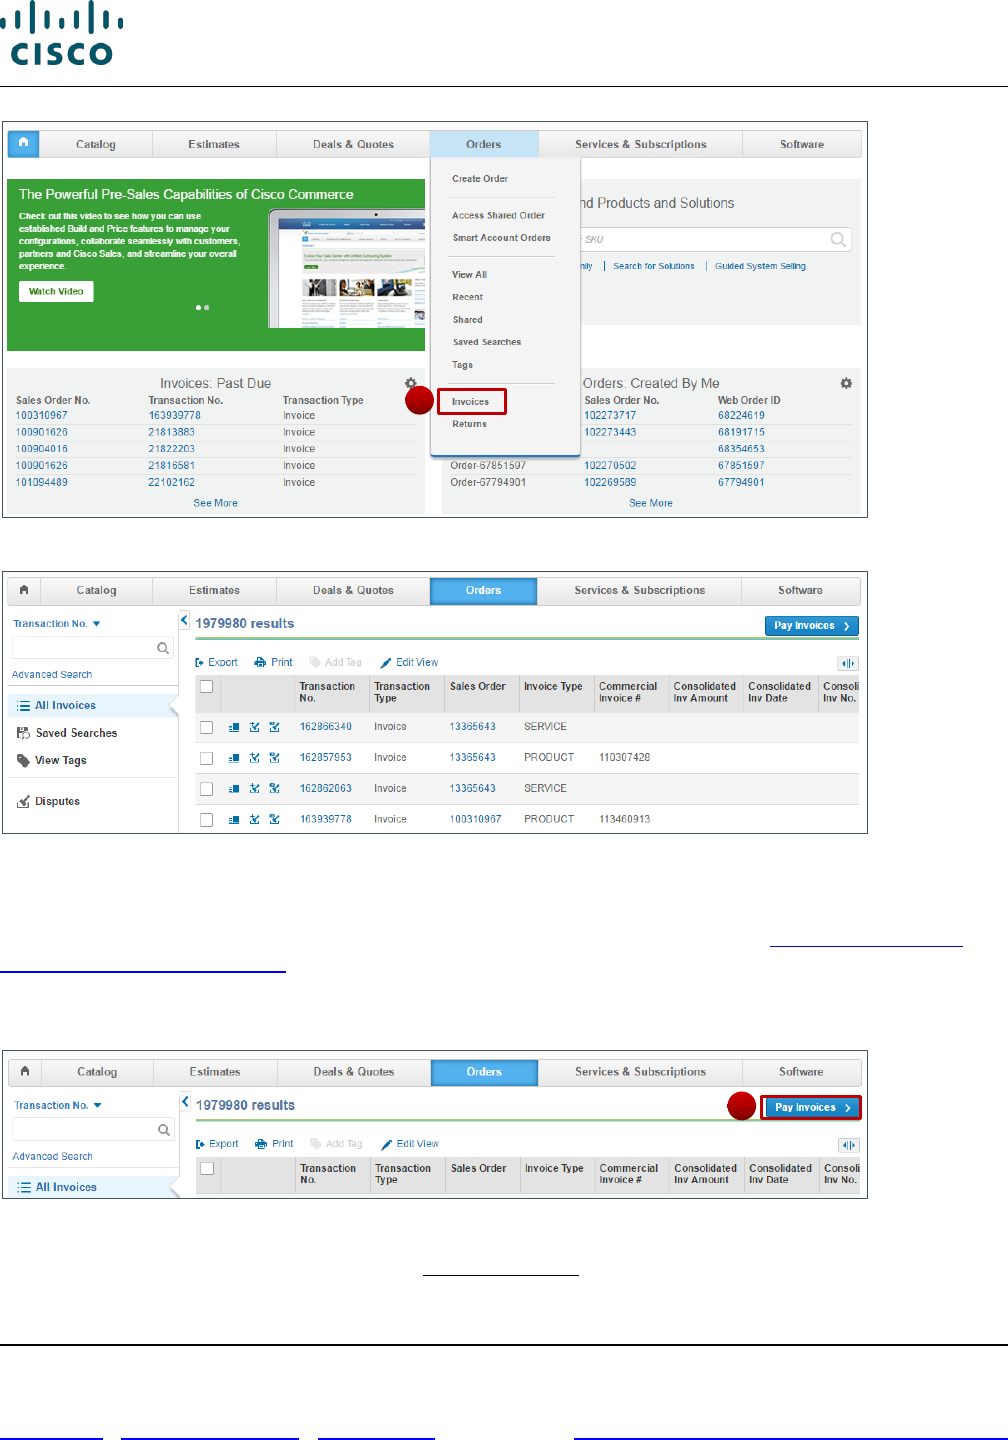
Cisco Commerce Order User Guide
Cisco Proprietary © 2020 Cisco and/or its affiliates. All rights reserved.
Last Updated: 17 March 2020 Page 128 of 143
Cisco.com | Privacy Statement | Trademarks Provide Feedback on this Training Resource
Cisco Commerce Orders Tab: Invoices
Cisco Commerce Invoices Page
11.2 Searching for Invoices
To search for specific invoices using the Cisco Commerce search options (see Getting Started with
Cisco Commerce User Guide). Additionally, if the Invoices page does not display invoices to pay,
complete the following steps:
1. From the Invoice records page, click Pay Invoices.
Cisco Commerce Invoice Records page
2. From the Available Invoices page, click Search Invoices.
1
1
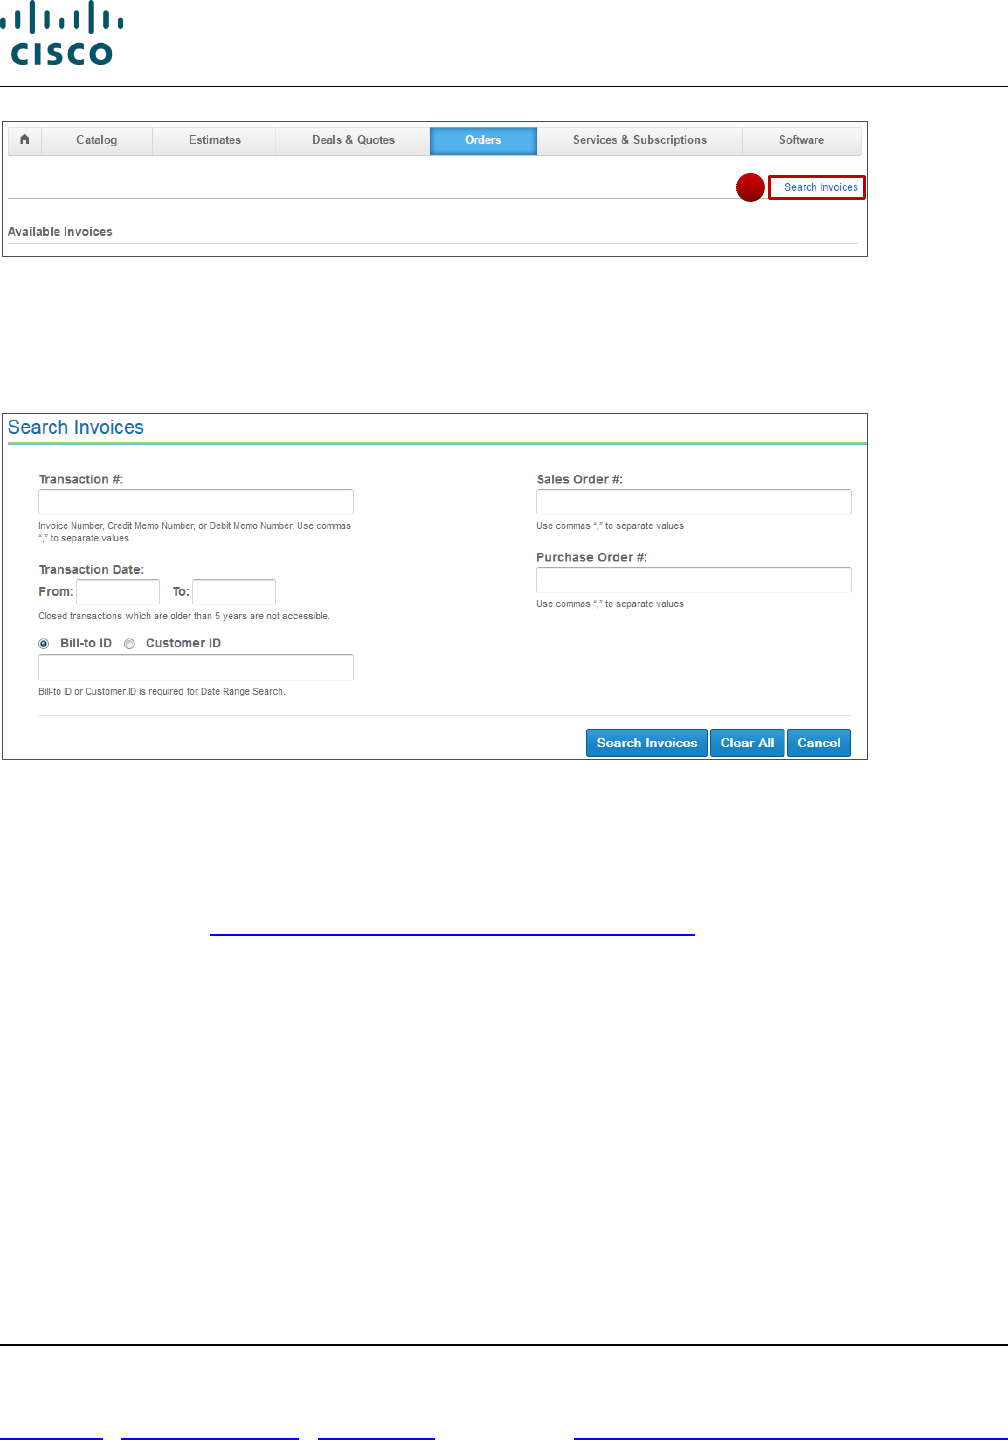
Cisco Commerce Order User Guide
Cisco Proprietary © 2020 Cisco and/or its affiliates. All rights reserved.
Last Updated: 17 March 2020 Page 129 of 143
Cisco.com | Privacy Statement | Trademarks Provide Feedback on this Training Resource
Available Invoices Page
3. Type the available criteria, such as Sales Order number or transaction date, to search for a specific
invoice.
4. Click Search Invoices. The results display.
Search Invoices Page
11.3 Paying Invoices
To pay open invoices with a credit card, complete the following steps:
1. Ensure the credit card is enabled as a valid payment method in Cisco Commerce My Profile and
Preferences (see Getting Started with Cisco Commerce User Guide).
2. From the Invoices page, click Pay Invoices. The list of available invoices displays.
3. To pay part of an invoice, click the fields in the Amount to Pay column. Enter the partial amount for
that line item. Portions of multiple invoices can be paid at one time.
4. Alternatively, to pay the full amount of an invoice, check the Pay in Full checkbox that corresponds
to the desired invoice line. Multiple invoices can be paid at one time.
5. Alternatively, in order to pay all of the outstanding invoices, check the Pay in Full checkbox at the
top of the column.
2
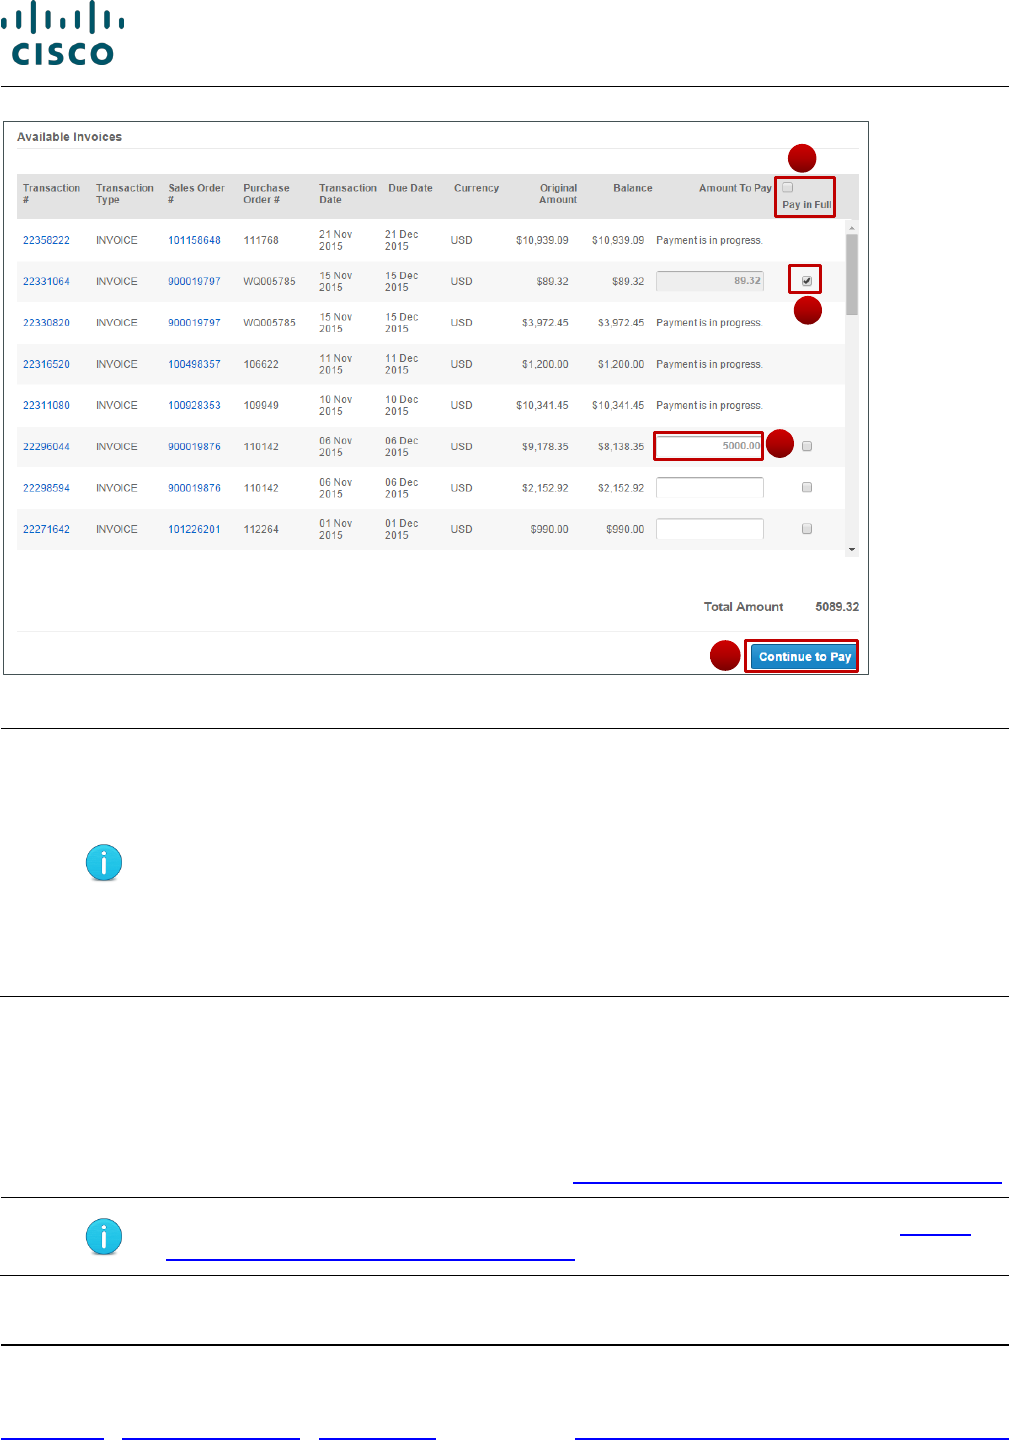
Cisco Commerce Order User Guide
Cisco Proprietary © 2020 Cisco and/or its affiliates. All rights reserved.
Last Updated: 17 March 2020 Page 130 of 143
Cisco.com | Privacy Statement | Trademarks Provide Feedback on this Training Resource
Available Invoices Page: With Selections
Note: It is important to note that there are three different options for paying invoices.
• Checking the Pay in Full checkbox at the top of the column will result in payment
of all the outstanding invoices.
• Checking the Pay in Full checkbox on the appropriate line(s) will result in
payment of that/those specific invoice(s).
• Entering a portion of the remaining balance of an invoice in the Amount to Pay
field on the desired line(s) will result in payment of that dollar figure against
that/those specific invoice(s).
6. Click Continue to Pay to proceed with authorization. The page refreshes. The default credit card
displays in color. Alternate credit cards display in grey.
7. Verify the invoice(s) and the amount(s) to be paid.
8. To select a credit card other than the default, click the desired card. The selected card becomes the
default card. For more information on credit cards, see Populating the Payment Information Section.
Note: You can add a new card only under My Profile and Preferences (see Getting
Started with Cisco Commerce User Guide).
6
5
4
3
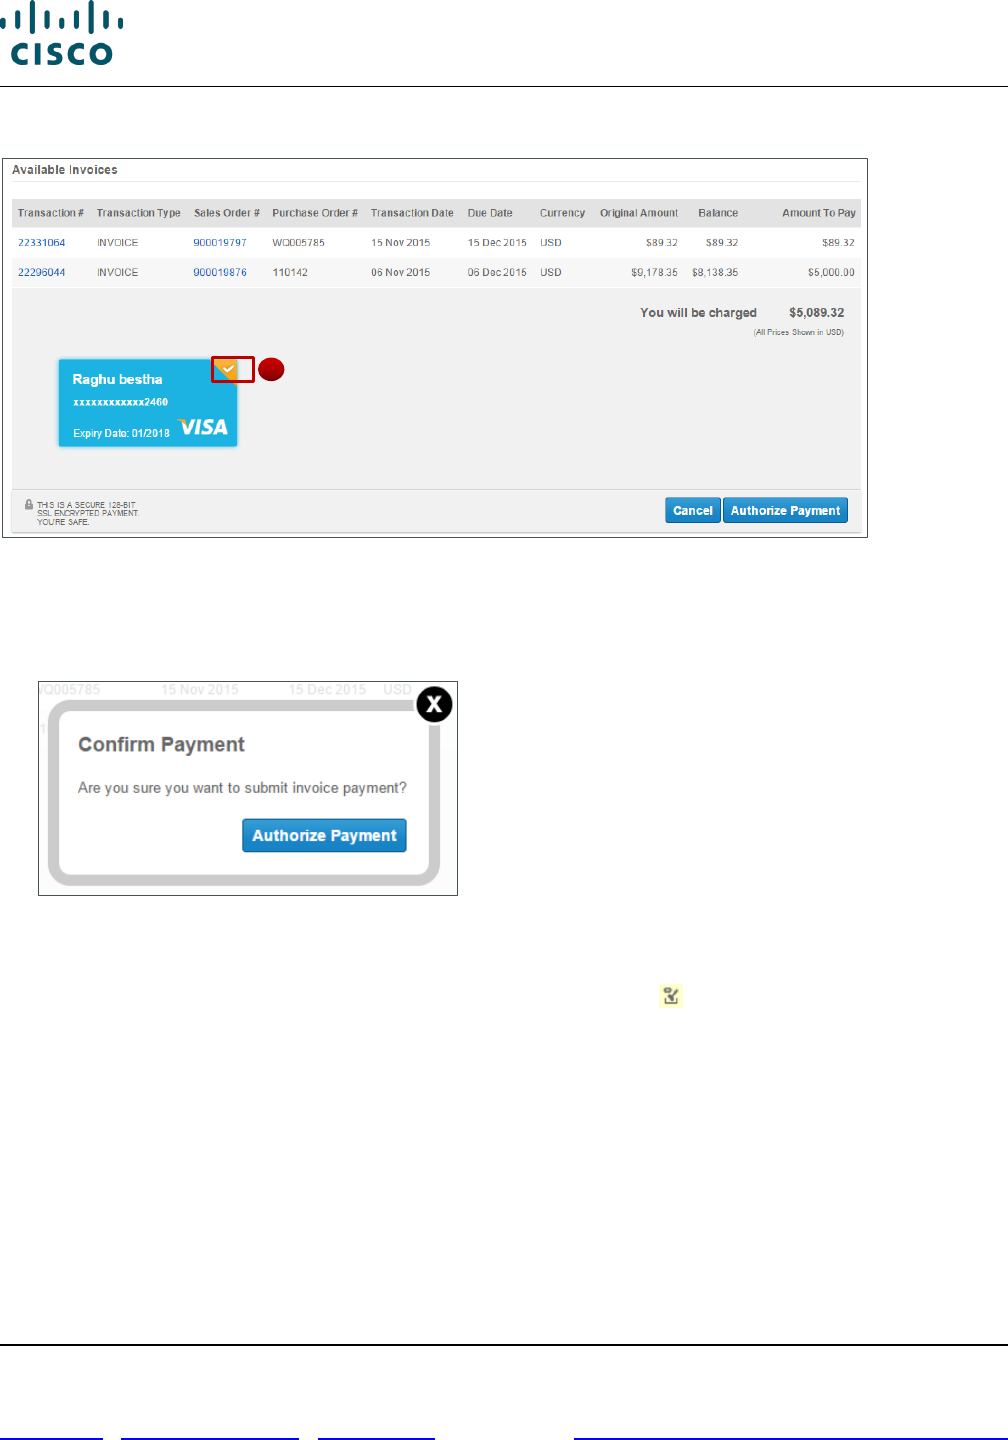
Cisco Commerce Order User Guide
Cisco Proprietary © 2020 Cisco and/or its affiliates. All rights reserved.
Last Updated: 17 March 2020 Page 131 of 143
Cisco.com | Privacy Statement | Trademarks Provide Feedback on this Training Resource
9. Click Authorize Payment. The Confirm Payment dialog box displays.
Available Invoices Page: Refreshed
10. Click Authorize Payment in the Confirm Payment dialog box. Once the payment has gone through,
a confirmation message displays at the top and “Payment is in progress” displays on each
appropriate line.
Confirm Payment Dialog Box
11.3.1 View Activity
To view activity from the Invoices page, click the View Activity icon ( ).
8
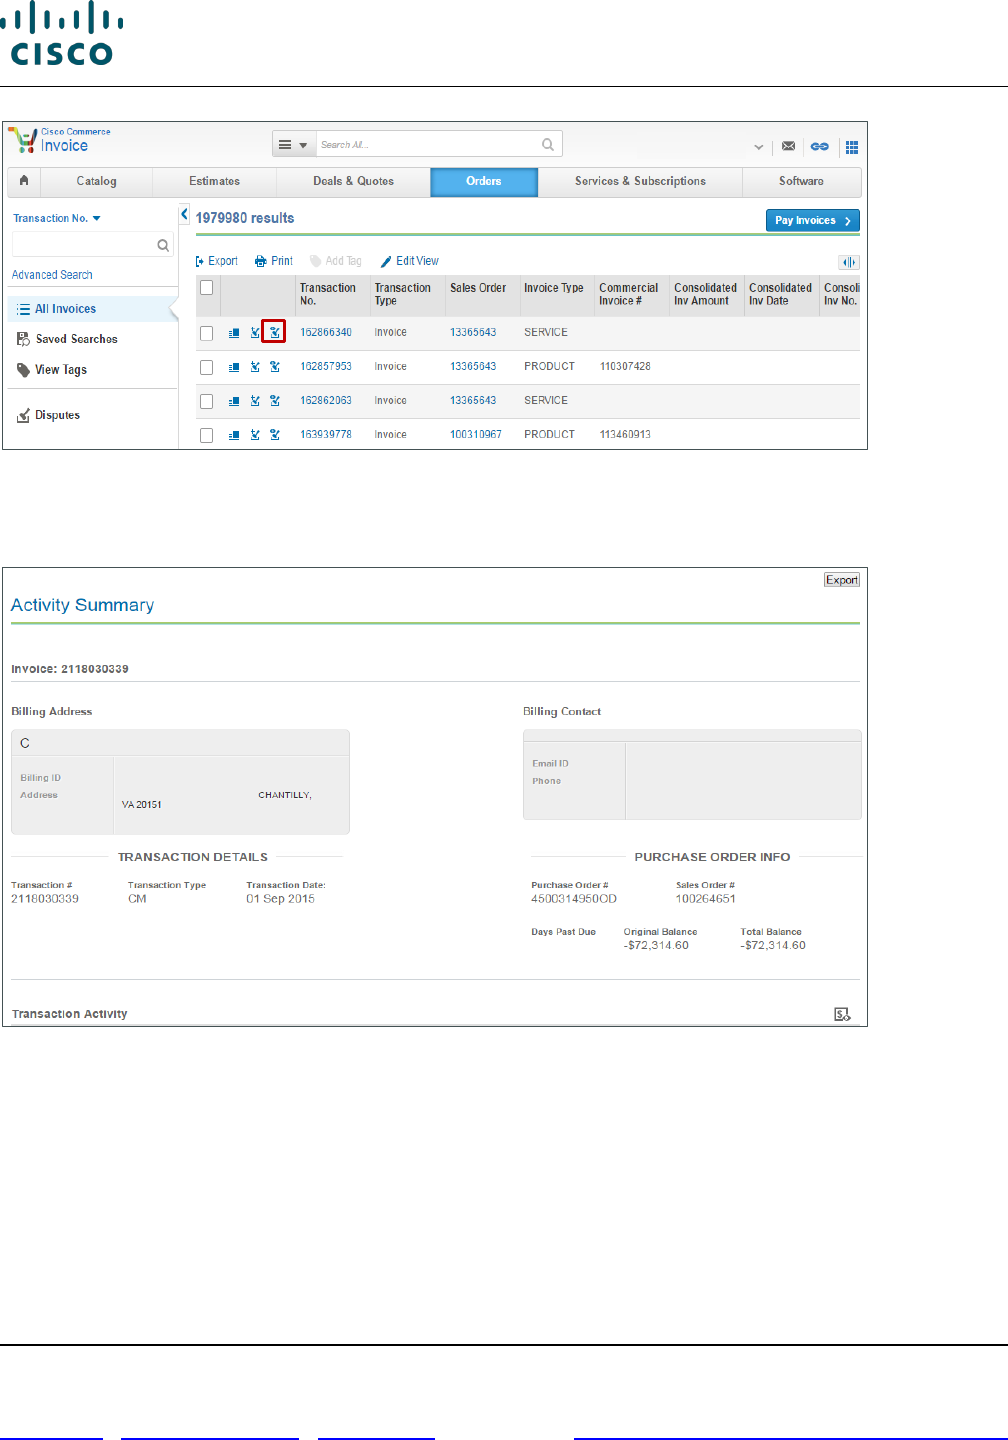
Cisco Commerce Order User Guide
Cisco Proprietary © 2020 Cisco and/or its affiliates. All rights reserved.
Last Updated: 17 March 2020 Page 132 of 143
Cisco.com | Privacy Statement | Trademarks Provide Feedback on this Training Resource
Invoices Page: View Activity Icon
The Activity Summary page displays. Any activity on the account displays under the Transaction
Activity section.
Activity Summary Page
11.3.2 Searching for Disputes
You can access disputes from several locations within Cisco Commerce:
1. On the Order Details page: Items tab, Add Dispute is an option in the common utilities. Selecting
this icon will take you to the disputes page where all invoices associated with the Sales Order will
be displayed. You will be able to add invoices or remove any invoices that are not in dispute. You
will be able to create a dispute at the order, invoice, or invoice line level.
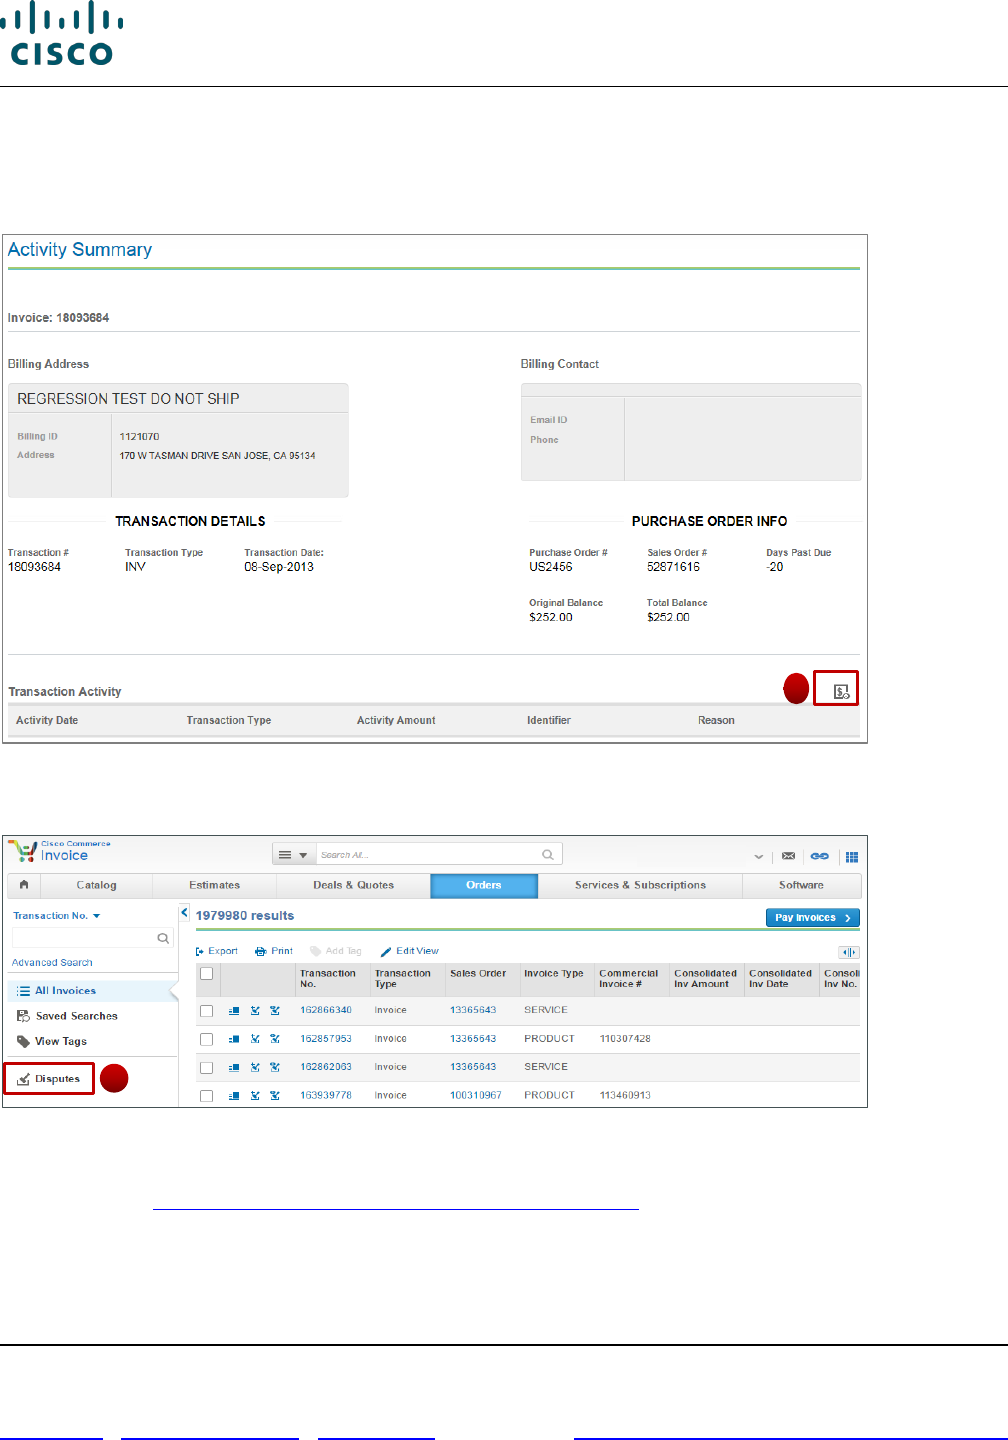
Cisco Commerce Order User Guide
Cisco Proprietary © 2020 Cisco and/or its affiliates. All rights reserved.
Last Updated: 17 March 2020 Page 133 of 143
Cisco.com | Privacy Statement | Trademarks Provide Feedback on this Training Resource
2. From the Invoices: Activity Summary page, click the Search Dispute icon to raise a dispute at the
invoice or invoice line level. You will be taken to the dispute page where you can enter the dispute
amount and reason. Depending on the selected dispute reason, additional fields will be displayed
that will need to be completed.
Activity Summary Page: Search Disputes Icon
3. From the Invoices Page within the Cisco Commerce Orders tab, click Disputes to view all disputes.
Invoices Page
4. Search for a dispute using Purchase Order #, Sales Order #, Transaction #, Dispute #, or Dispute
Status (see Getting Started with Cisco Commerce User Guide).Dispute details will be displayed for
the specific dispute. The comments section of the dispute details will be read only.
3
3
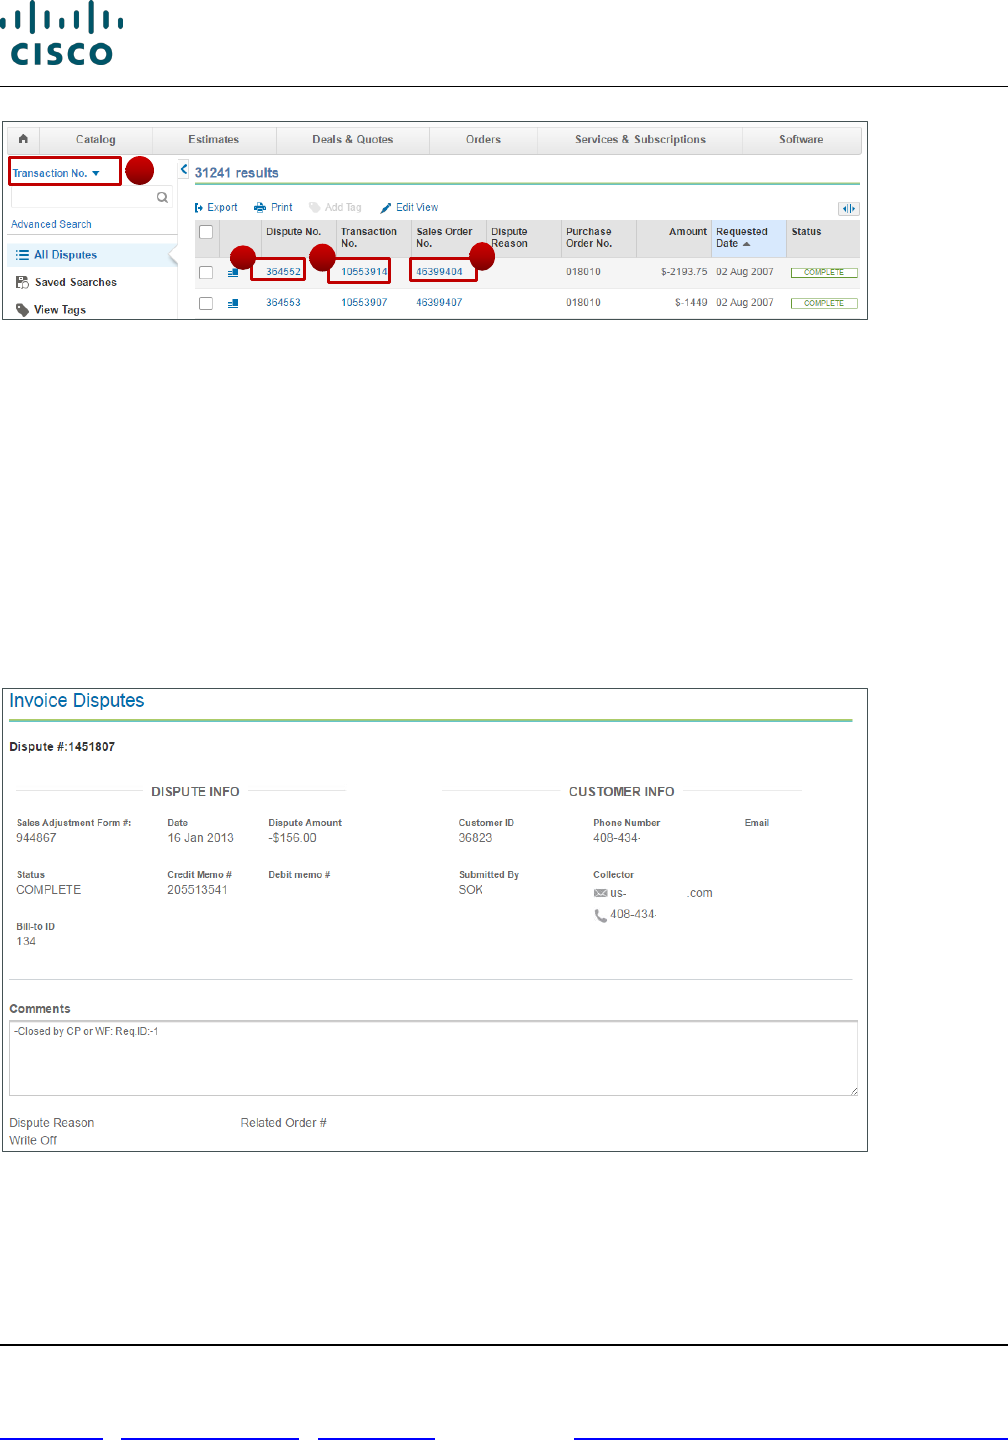
Cisco Commerce Order User Guide
Cisco Proprietary © 2020 Cisco and/or its affiliates. All rights reserved.
Last Updated: 17 March 2020 Page 134 of 143
Cisco.com | Privacy Statement | Trademarks Provide Feedback on this Training Resource
Dispute records page: Search for a dispute
Internal users with appropriate access level will be able to view all dispute data and account summary
data for any BID.
To search for a dispute, complete the following steps:
5. Click the Search by drop-down arrow.
6. Select the appropriate search criteria (Purchase Order #, Sales Order #, Transaction #, or Dispute
#) or enter search information.
7. Click the Sales Order number to view the Order details.
8. Click the Transaction number to display the Invoice details.
9. Click the Dispute number to display the Invoice Disputes page.
Invoice Disputes Page
10. On the Invoice Disputes page, the Comments box is read only; it displays the comments entered
when the dispute was created.
11. Click Back to return to the Search Results page.
5
7
8
9
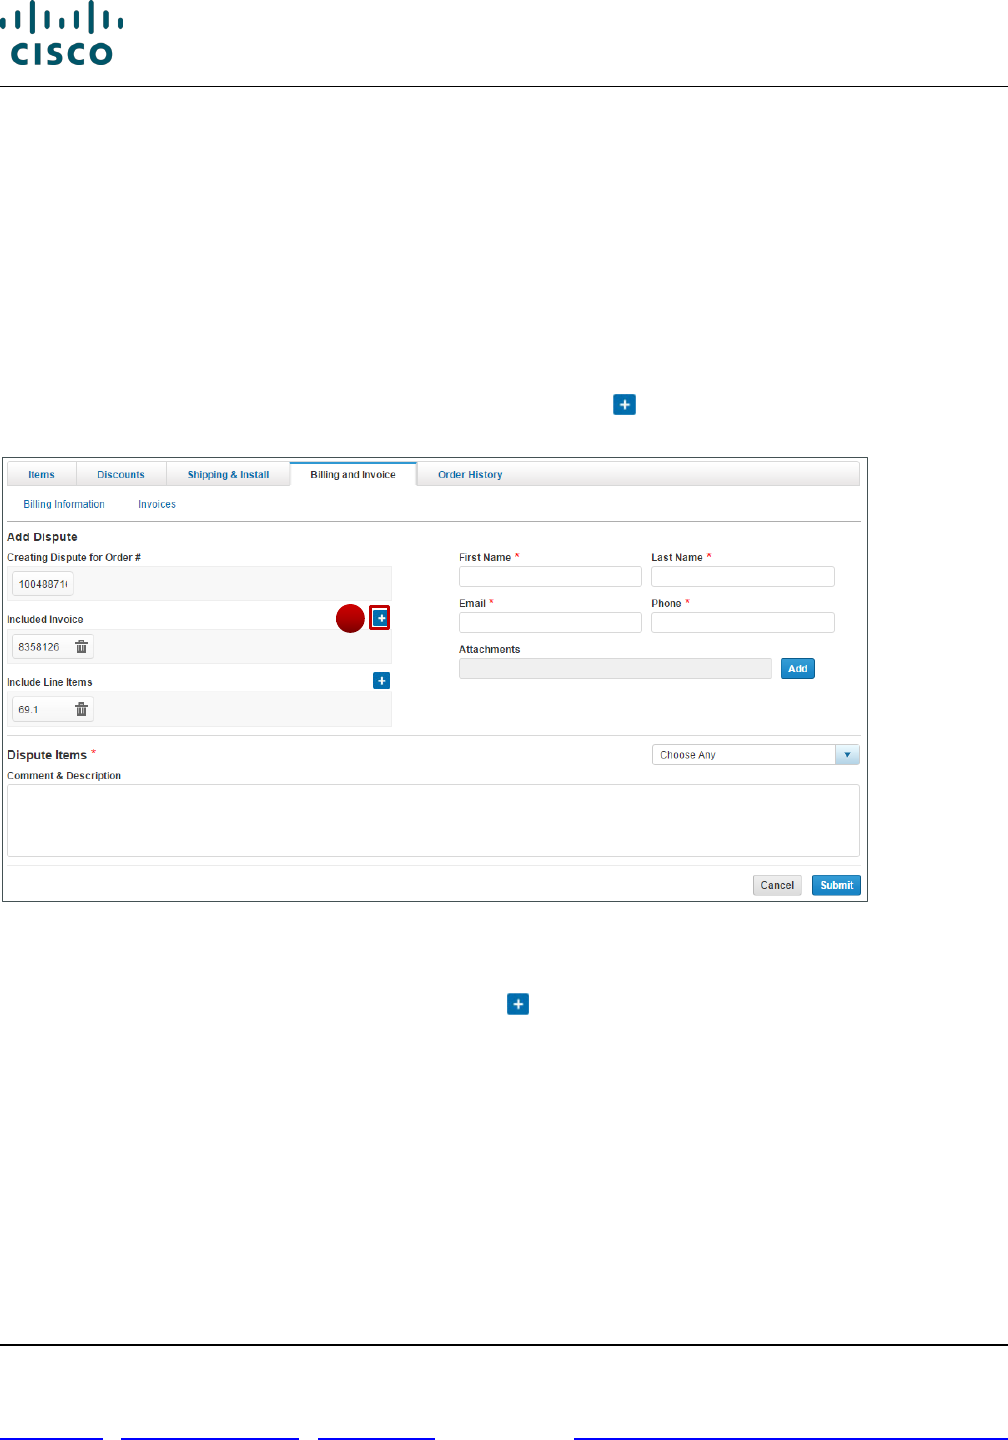
Cisco Commerce Order User Guide
Cisco Proprietary © 2020 Cisco and/or its affiliates. All rights reserved.
Last Updated: 17 March 2020 Page 135 of 143
Cisco.com | Privacy Statement | Trademarks Provide Feedback on this Training Resource
11.3.3 Creating a Dispute Request
To create a dispute, complete the following steps:
1. From the Cisco Commerce Invoices page, click the Create Dispute icon for a particular order.
2. Alternately, from the Billing and Invoice tab: Invoice Sub-tab click the Add Dispute icon to raise a
dispute at the invoice or invoice line level. The Dispute page displays.
Depending on the selected dispute reason, additional fields are displayed that will need to be
completed.
3. Complete the required fields, indicated with a red asterisk (*).
4. To add additional invoices, click the Included Invoice icon ( ). The Invoice pop-up window
displays.
Billing and Invoice Tab: Invoices Page: Add Dispute Form
5. If applicable, check the checkbox for particular invoices to include that invoice in the dispute.
6. To add a line item, click the Include Line Items ( ).
7. If applicable, check the checkbox (s) corresponding to the desired line(s) to add additional line
items to the dispute.
8. To add attachments, click Add and select the appropriate file.
4
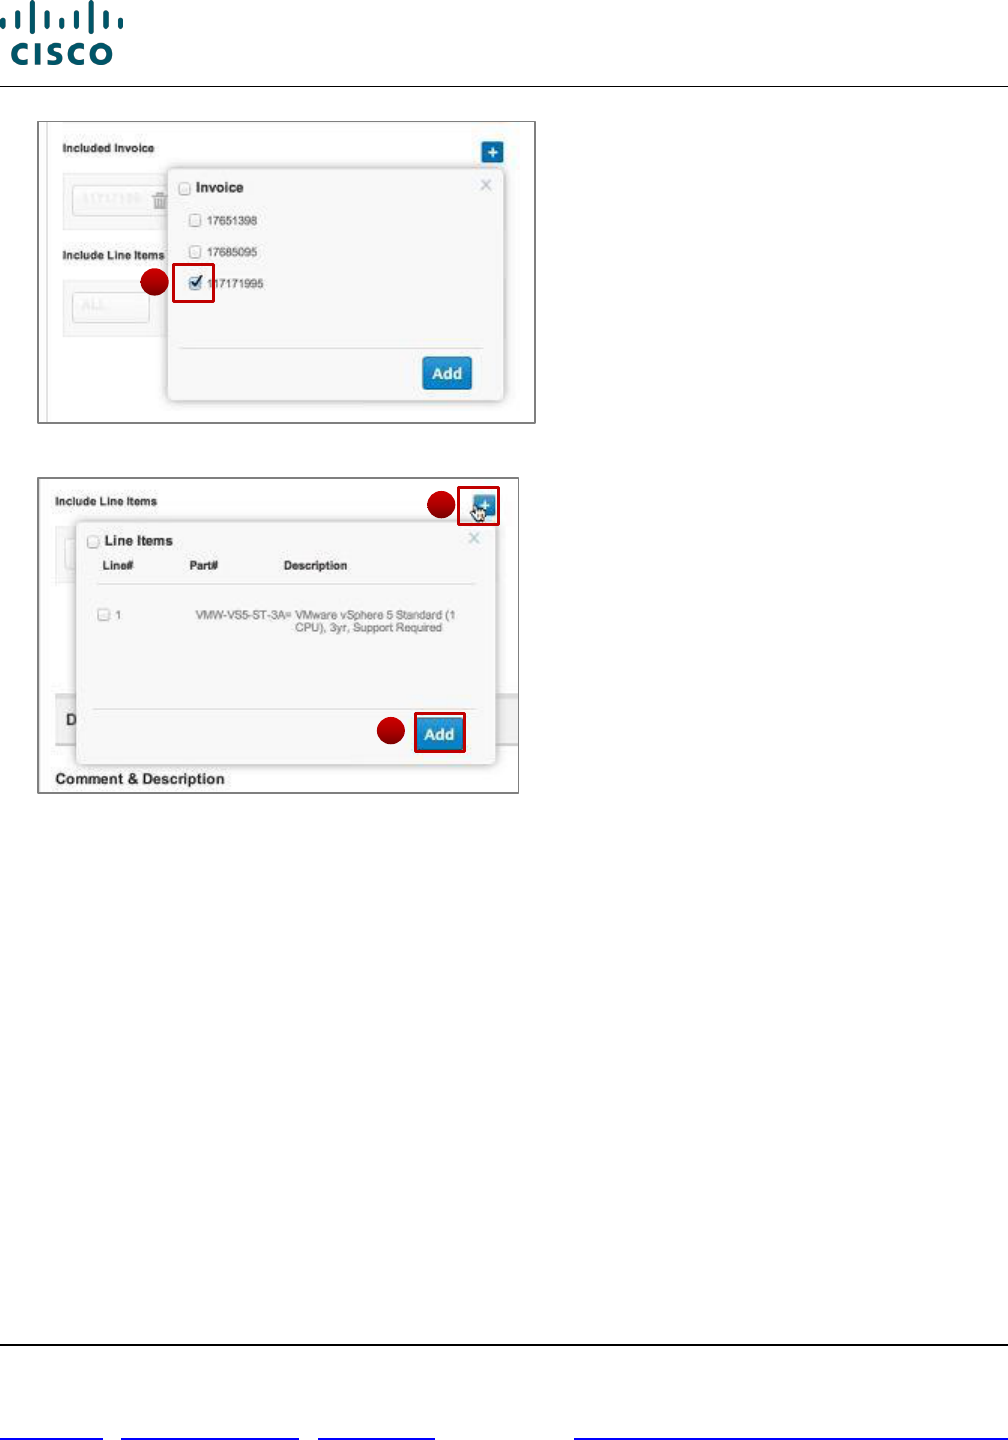
Cisco Commerce Order User Guide
Cisco Proprietary © 2020 Cisco and/or its affiliates. All rights reserved.
Last Updated: 17 March 2020 Page 136 of 143
Cisco.com | Privacy Statement | Trademarks Provide Feedback on this Training Resource
Included Invoice Section: Invoice Pop-up Window
Include Line Items
9. Click the Choose Any drop-down arrow in the Dispute Items section.
10. Choose a reason for the dispute. Depending on which option is selected, different fields display to
provide additional info.
11. The Comment & Description field is optional. Any information entered here displays when the
dispute is viewed.
12. Click Submit. A service request number is sent via e-mail. Once the request is validated, a
Dispute/SAF number is sent via e-mail.
5
6
8
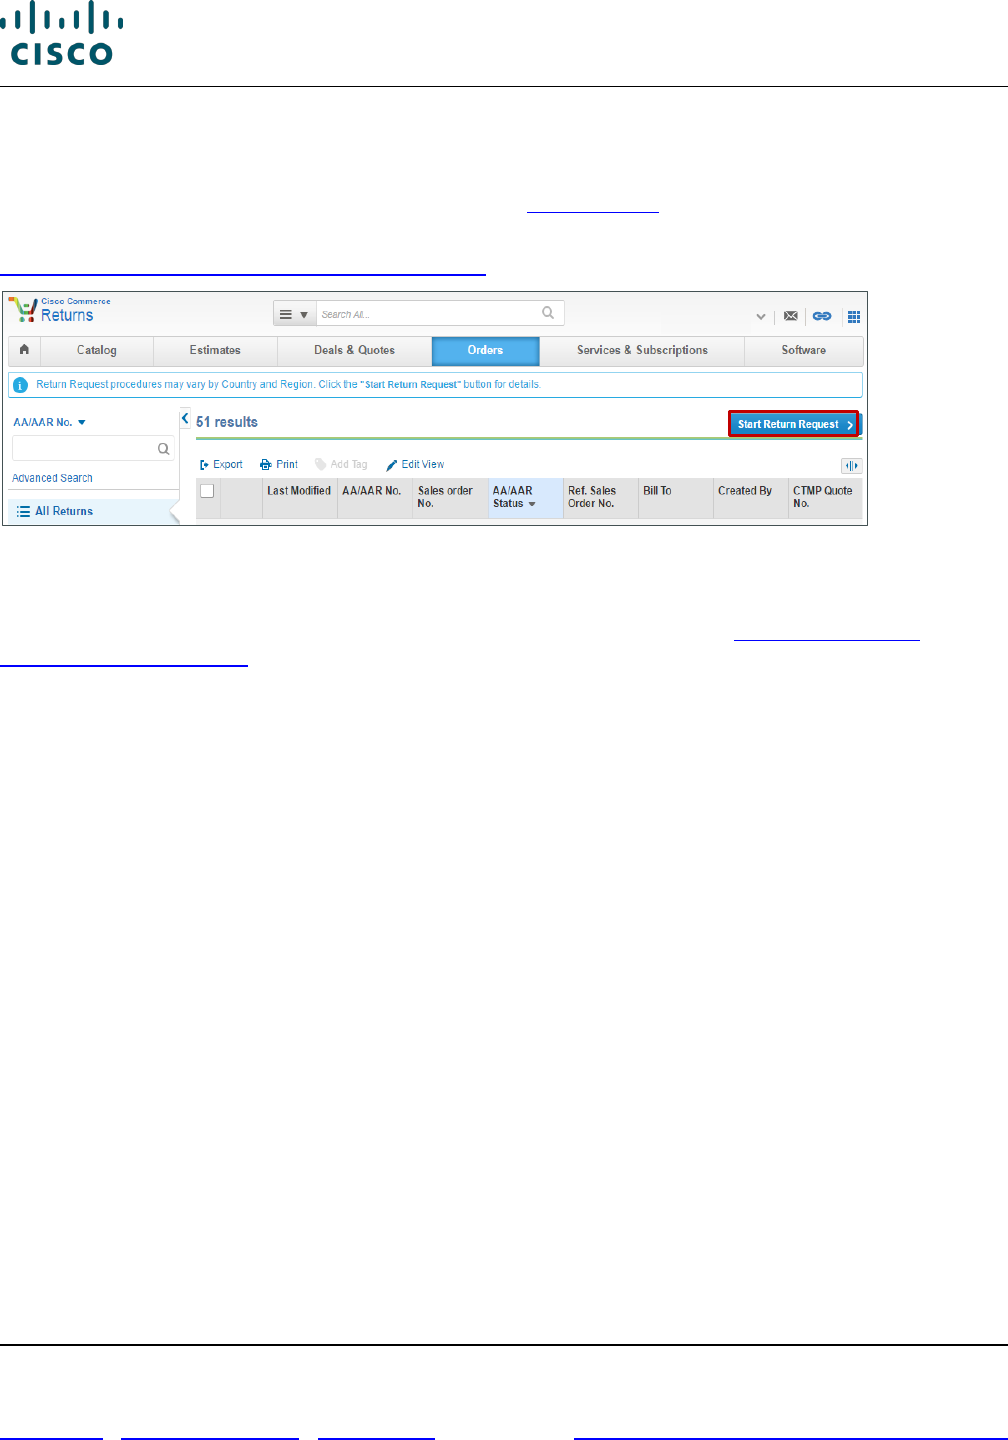
Cisco Commerce Order User Guide
Cisco Proprietary © 2020 Cisco and/or its affiliates. All rights reserved.
Last Updated: 17 March 2020 Page 137 of 143
Cisco.com | Privacy Statement | Trademarks Provide Feedback on this Training Resource
12 Managing Returns
You can view and manage you returns through Cisco Commerce Returns option on the Orders tab. To
view more information on returning a product, see the Returns page.
On the Returns page, you can search for returns using Cisco Commerce search functionality (see
Getting Started with Cisco Commerce User Guide).
Cisco Commerce Returns Page
To initiate a return request, click Start Return Request. The Returns Request page displays.
Returns request procedures may vary depending on country or region. (see Return a Product -
Cisco.com Order Support)
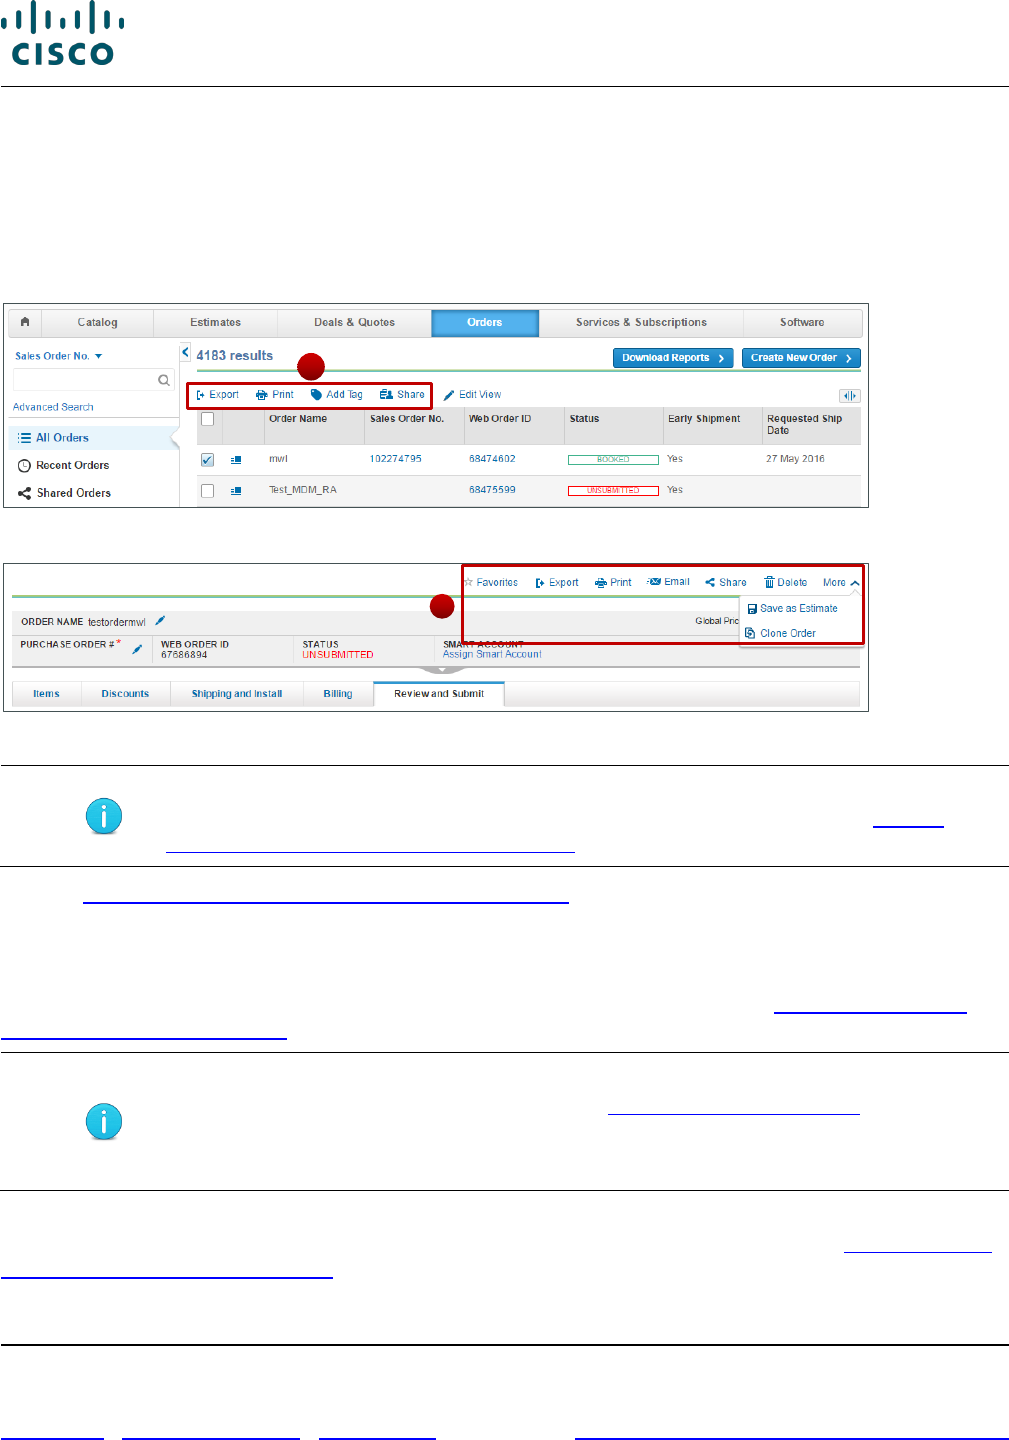
Cisco Commerce Order User Guide
Cisco Proprietary © 2020 Cisco and/or its affiliates. All rights reserved.
Last Updated: 17 March 2020 Page 138 of 143
Cisco.com | Privacy Statement | Trademarks Provide Feedback on this Training Resource
13 Using the Common Utilities
You can view, export, print, e-mail, share, delete, tag, save as an estimate, or clone an order using the
common utilities. You can access these utilities from:
1. The Orders tab
2. Within an order: Order Page
Cisco Commerce: Orders Tab
Orders Page: Common Utilities
Best Practice: Use the common utilities, such as Export, Print, Share, or Tag from
the Orders tab to export, print, share, or tag multiple orders at once (see Getting
Started with Cisco Commerce User Guide).
See the Getting Started with Cisco Commerce User Guide to export, print, share, or email an order.
The process is same as exporting, printing, sharing, or email multiple orders at once.
13.1 Searching for an Order
You can search for orders using the Cisco Commerce search functionality (see Getting Started with
Cisco Commerce User Guide).
Note: Orders with “Closed” status remain searchable for 15 months from the date of
closing. Once archived, open a case through Customer Service Central to access
them.
Other orders that are not closed remain searchable indefinitely.
You can also search for your favorite orders using Advanced Search functionality (see Getting Started
with Cisco Commerce User Guide).
2
1

Cisco Commerce Order User Guide
Cisco Proprietary © 2020 Cisco and/or its affiliates. All rights reserved.
Last Updated: 17 March 2020 Page 139 of 143
Cisco.com | Privacy Statement | Trademarks Provide Feedback on this Training Resource
Cisco Commerce Orders Tab: Advanced Search
13.1.1 Viewing and Creating a Backlog Report
You can view the status and related information of a large number of orders in Cisco Commerce. The
backlog reports can be accessed for up to a year. To view reports, complete the following steps:
1. Click Advanced Search in the Cisco Commerce Orders tab. The advanced search for orders
section displays.
2. To narrow the search, select dates in the Submit Date Range.
3. In the Order Status field, check the checkbox for Backlog Report.
4. Click Search. The search results display.
Advanced Search Page
5. Check the box next to the rows for which the backlog report needs to be generated. To select all
rows, check the box at the header level.
6. Click Export. The Export Options window displays.
7. Using the Add and Remove buttons, select the columns to include in the report.
8. In the file type drop-down menu, select CSV Entire Order (Comma Separated Values).
3
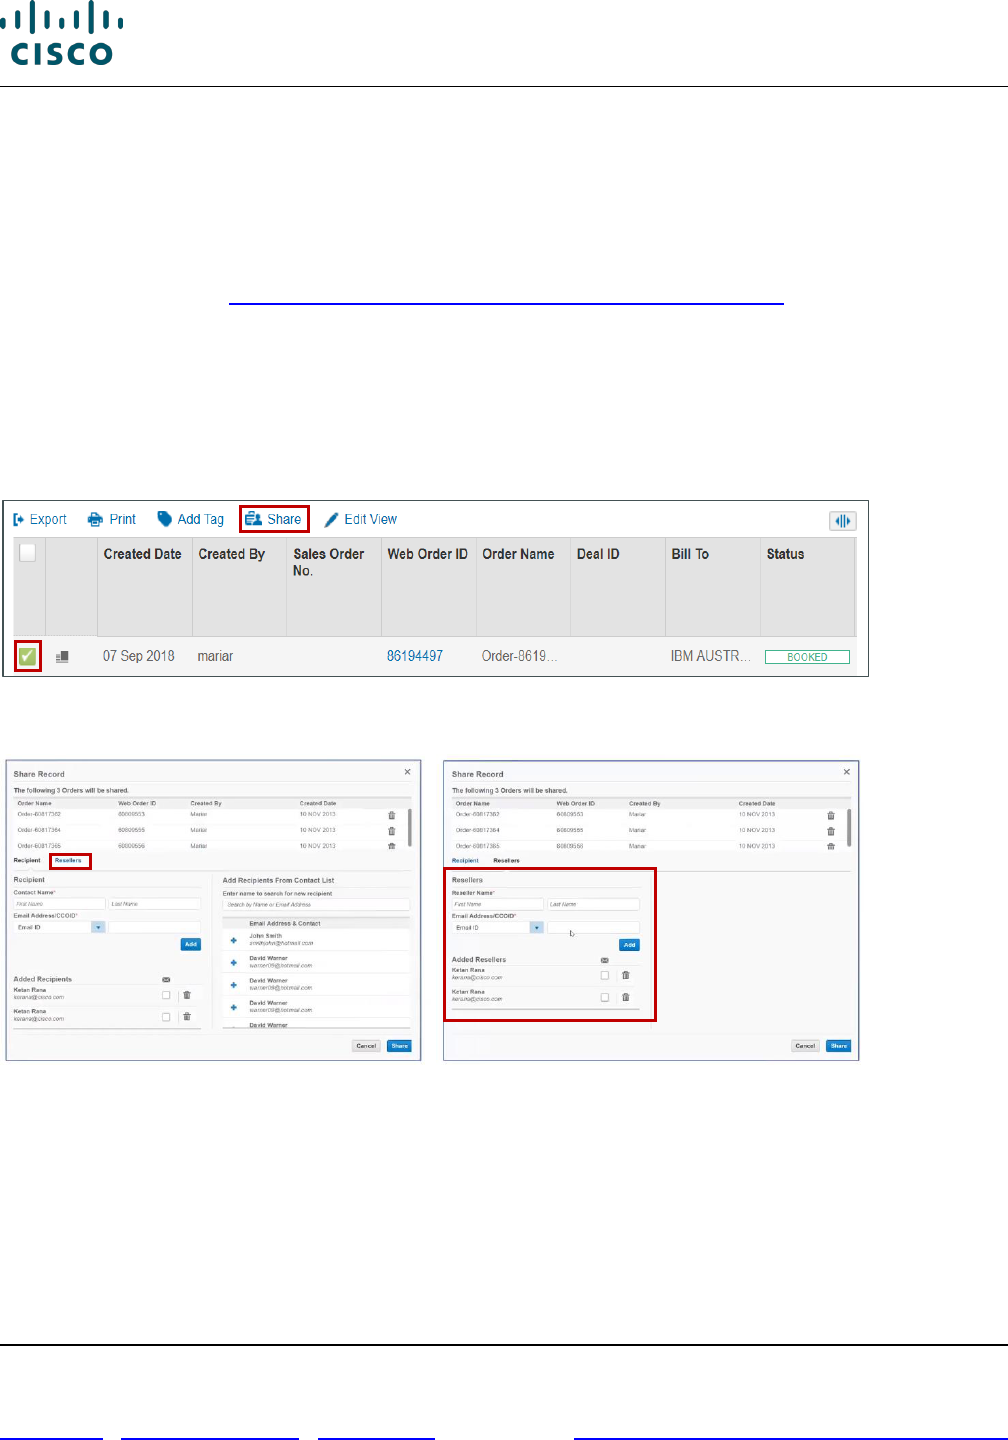
Cisco Commerce Order User Guide
Cisco Proprietary © 2020 Cisco and/or its affiliates. All rights reserved.
Last Updated: 17 March 2020 Page 140 of 143
Cisco.com | Privacy Statement | Trademarks Provide Feedback on this Training Resource
9. Click Export. The report is generated and you will receive an email once it’s ready. You can then
click Download Reports to access the report.
13.1.2 Subscribe and Generate SaaS Backlog Order Reports
You can generate and subscribe to the SaaS Backlog Orders report in Cisco Commerce. With the help
of the report, you will be able to take action on the orders not in End Complete or Cancelled status. For
more information, refer SaaS Backlog Reporting in Cisco Commerce User Guide.
13.2 Share an Order
Distributors will have the option to share a single submitted Order or multiple Orders with their
Resellers. Resellers will have the ability to view the items and their shipping information. No pricing or
billing information will be shared. This is a time saver for Resellers and for Distributors.
The Distributor will see a “Resellers” Tab within their CCW “Share Record” view. The Distributor can
add Reseller information and share the Order.
Resellers will see the Order status information shown below within their standard CCW View Order
Status.
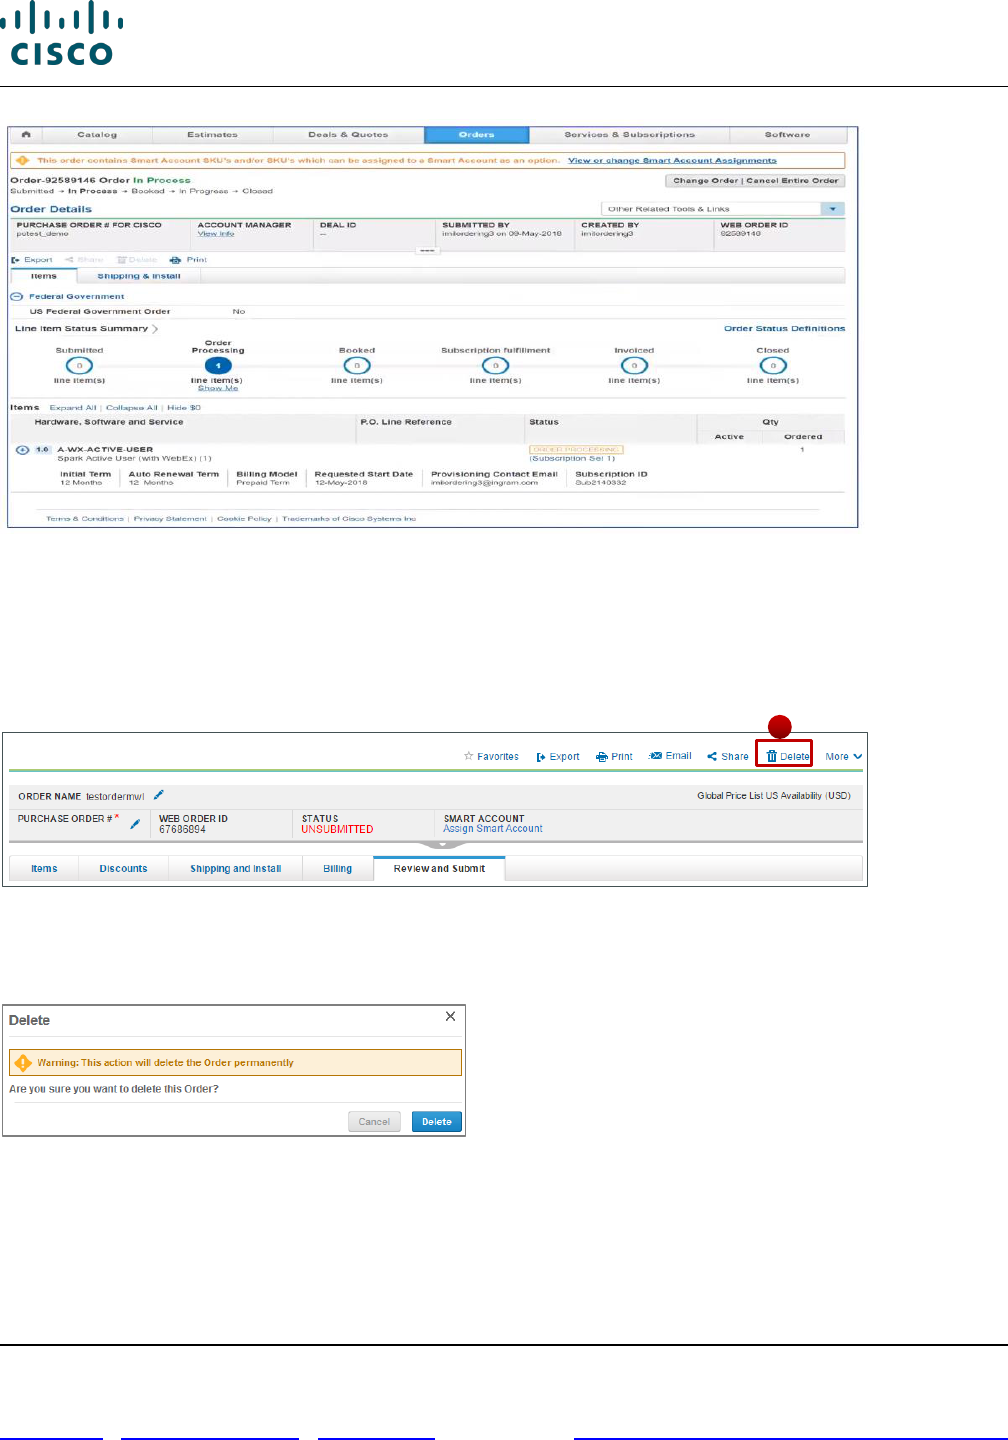
Cisco Commerce Order User Guide
Cisco Proprietary © 2020 Cisco and/or its affiliates. All rights reserved.
Last Updated: 17 March 2020 Page 141 of 143
Cisco.com | Privacy Statement | Trademarks Provide Feedback on this Training Resource
13.3 Deleting an Order
Only unsubmitted orders can be deleted. Deleting an order permanently removes the record and all
related data. Be advised that once deleted, it cannot be retrieved.
To delete an order, complete the following steps:
1. Click Delete.
Order Page: Delete
2. The Delete dialog box displays. The system displays a warning message that this will delete the
order permanently.
Delete Dialog Box
3. To permanently delete the order, click Delete.
4. To cancel and return to the Order Page, click Cancel.
1
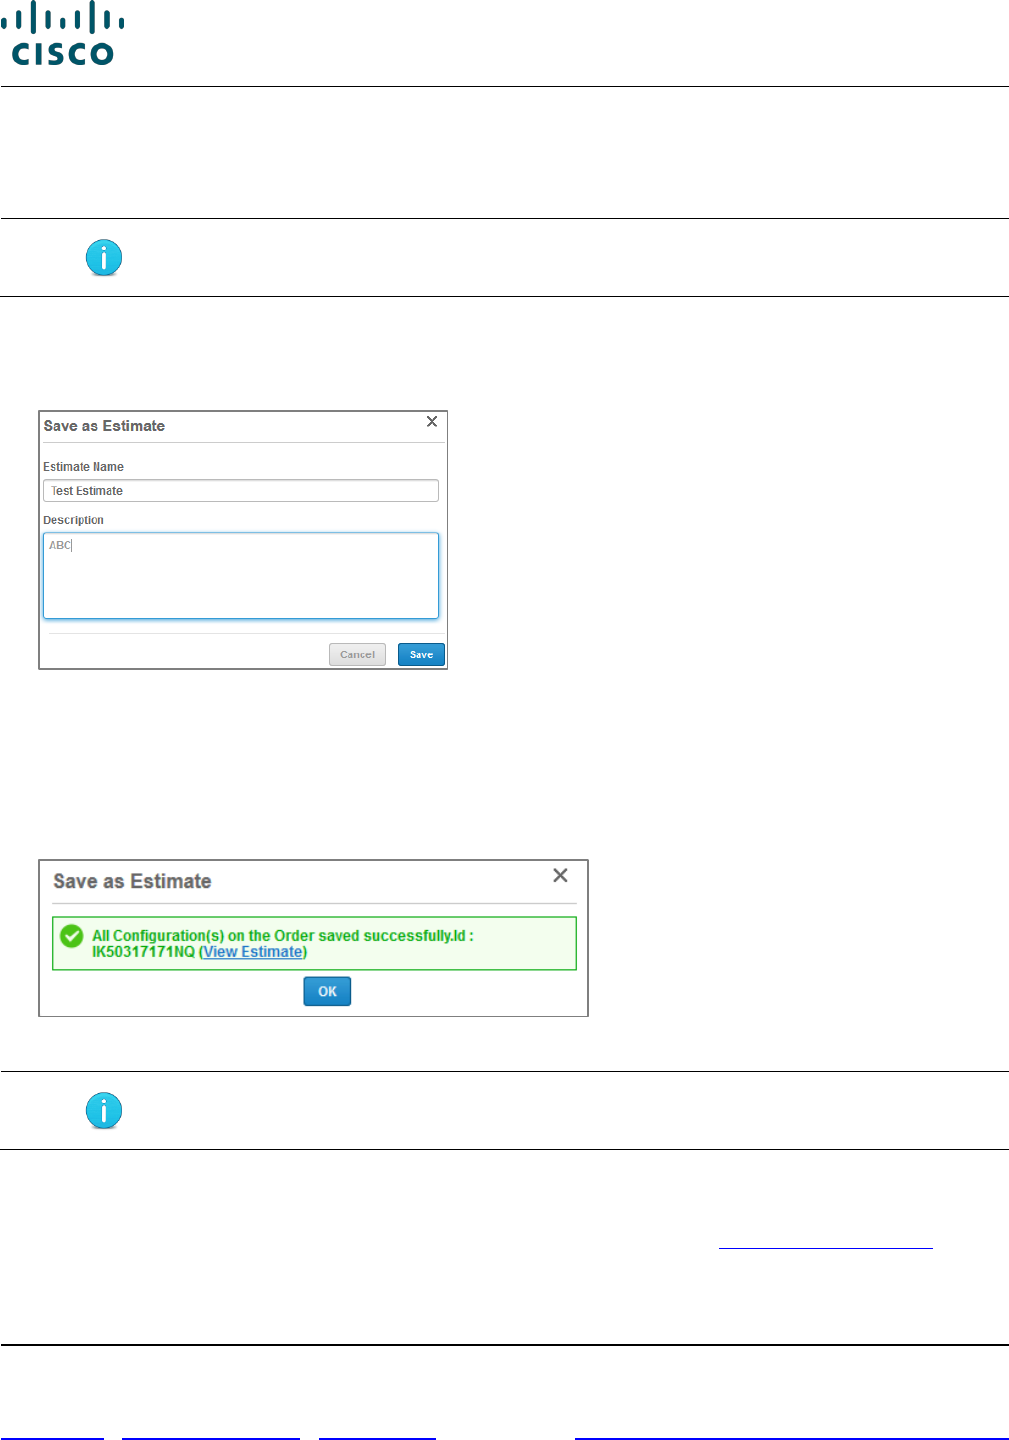
Cisco Commerce Order User Guide
Cisco Proprietary © 2020 Cisco and/or its affiliates. All rights reserved.
Last Updated: 17 March 2020 Page 142 of 143
Cisco.com | Privacy Statement | Trademarks Provide Feedback on this Training Resource
13.4 Saving an Order as an Estimate
When you create and configure an order, the configuration can be named and saved to be reused. The
system will save the configuration as an estimate and you will receive an estimate ID.
Note: The Save as Estimate icon does not display on RNSD orders.
To save the configuration set, complete the following steps:
1. From the Order page: Items tab, click Save as Estimate. The Save as Estimate dialog box
displays.
Save as Estimate Dialog Box
2. Click the Estimate Name field and enter the appropriate information.
3. Click the Description field and enter the appropriate information.
4. Click Save. A Save as Estimate dialog box refreshes with a success message that indicates the
estimate ID.
Save as Estimate Dialog Box
Best Practice: Make note of the estimate ID from the refreshed Save as Estimate
dialog box.
5. Click OK. The dialog box closes, and the Order page: Items tab displays.
To reuse the configuration, import a saved configuration to the order (see Importing an Estimate).
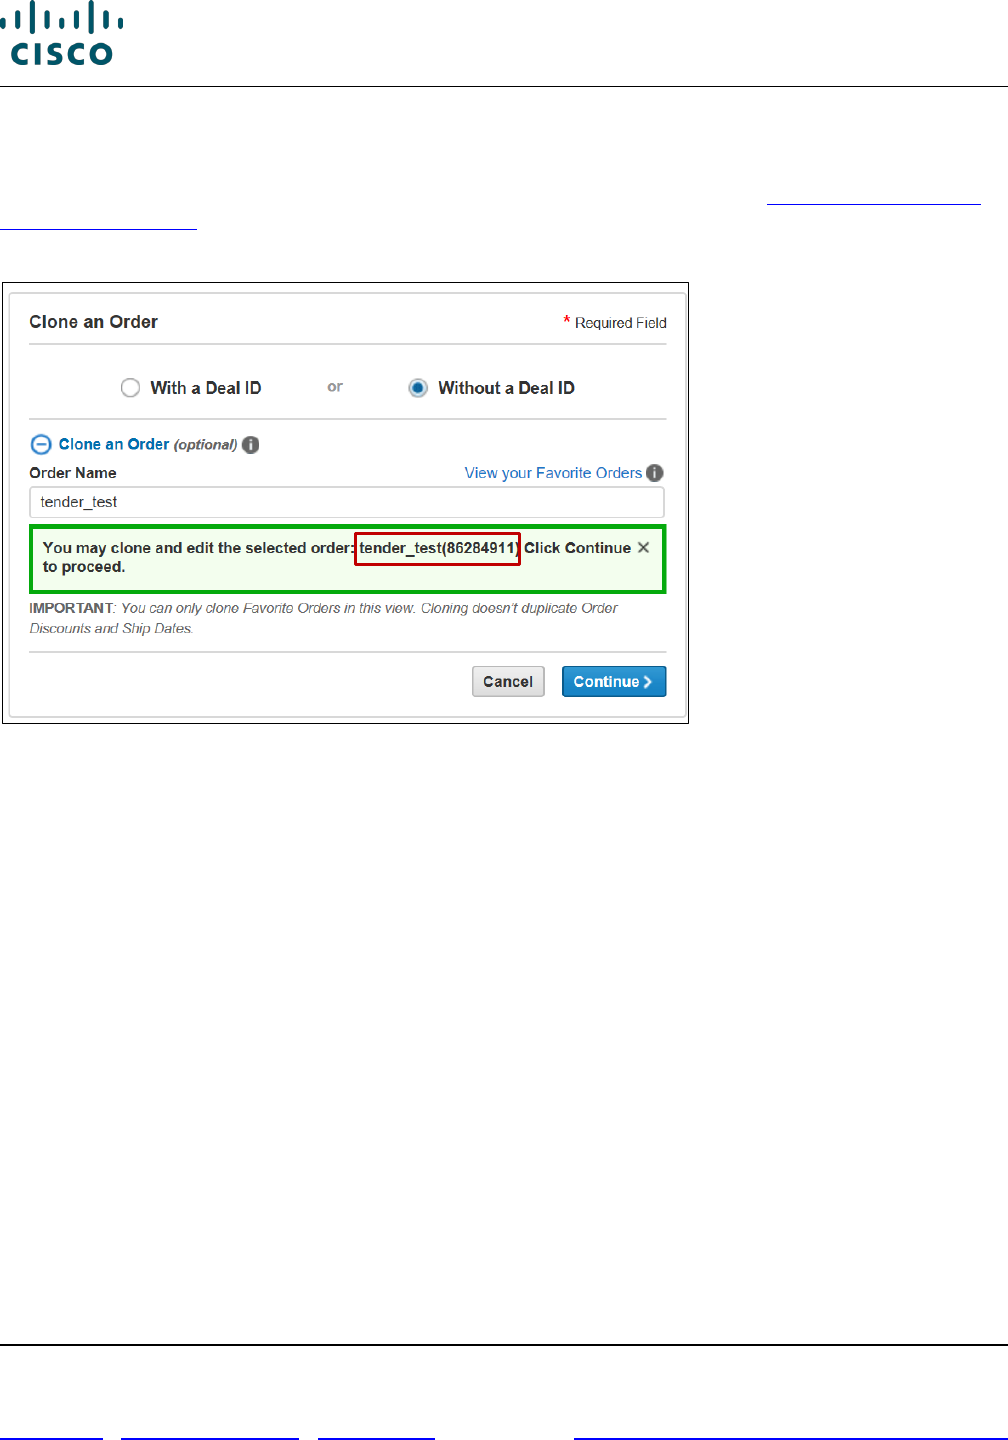
Cisco Commerce Order User Guide
Cisco Proprietary © 2020 Cisco and/or its affiliates. All rights reserved.
Last Updated: 17 March 2020 Page 143 of 143
Cisco.com | Privacy Statement | Trademarks Provide Feedback on this Training Resource
13.5 Cloning an Order
When you create and configure an order, the order can be cloned and edited. Clone Order in the
Common Utilities bar begins the Order process by cloning the open order (see Creating a New Order
by Cloning an Order).
