18"
8"
18"
10"
N
DaVinci Siding
INSTALLATION GUIDE
Hand-Split Shake Siding
DaVinci polymer shakes are carefully engineered to provide the authentic look of hand-split shakes with dramatically increased
durability and resistance to re and impact.
These Installation Instructions describe and illustrate the steps required to properly install DaVinci Hand-Split Shake siding on most
residential and light commercial structures and provide detailed information that will promote a successful installation. Deviation from
the requirements contained in this document may aect the product's appearance or long-term performance and may also aect cover-
age under the product warranty.
This information is provided for the use of professional contractors. This Installation Guide does not supersede local building codes
which should always be followed. DaVinci
®
Roofscapes does not warranty or have any responsibility for installation of its products. The
DaVinci Roofscapes Lifetime Limited Material Warranty outlines its warranty responsibilities for the roong and siding materials it manufactures.
For questions about DaVinci Siding or its application, contact Westlake DaVinci Roofscapes, LLC
913-599-0766 or 800-DaVinci (800-328-4624) or www.davinciroofscapes.com
Please be sure to check DaVinci’s website for updates. Installation Guide is subject to change without notice.
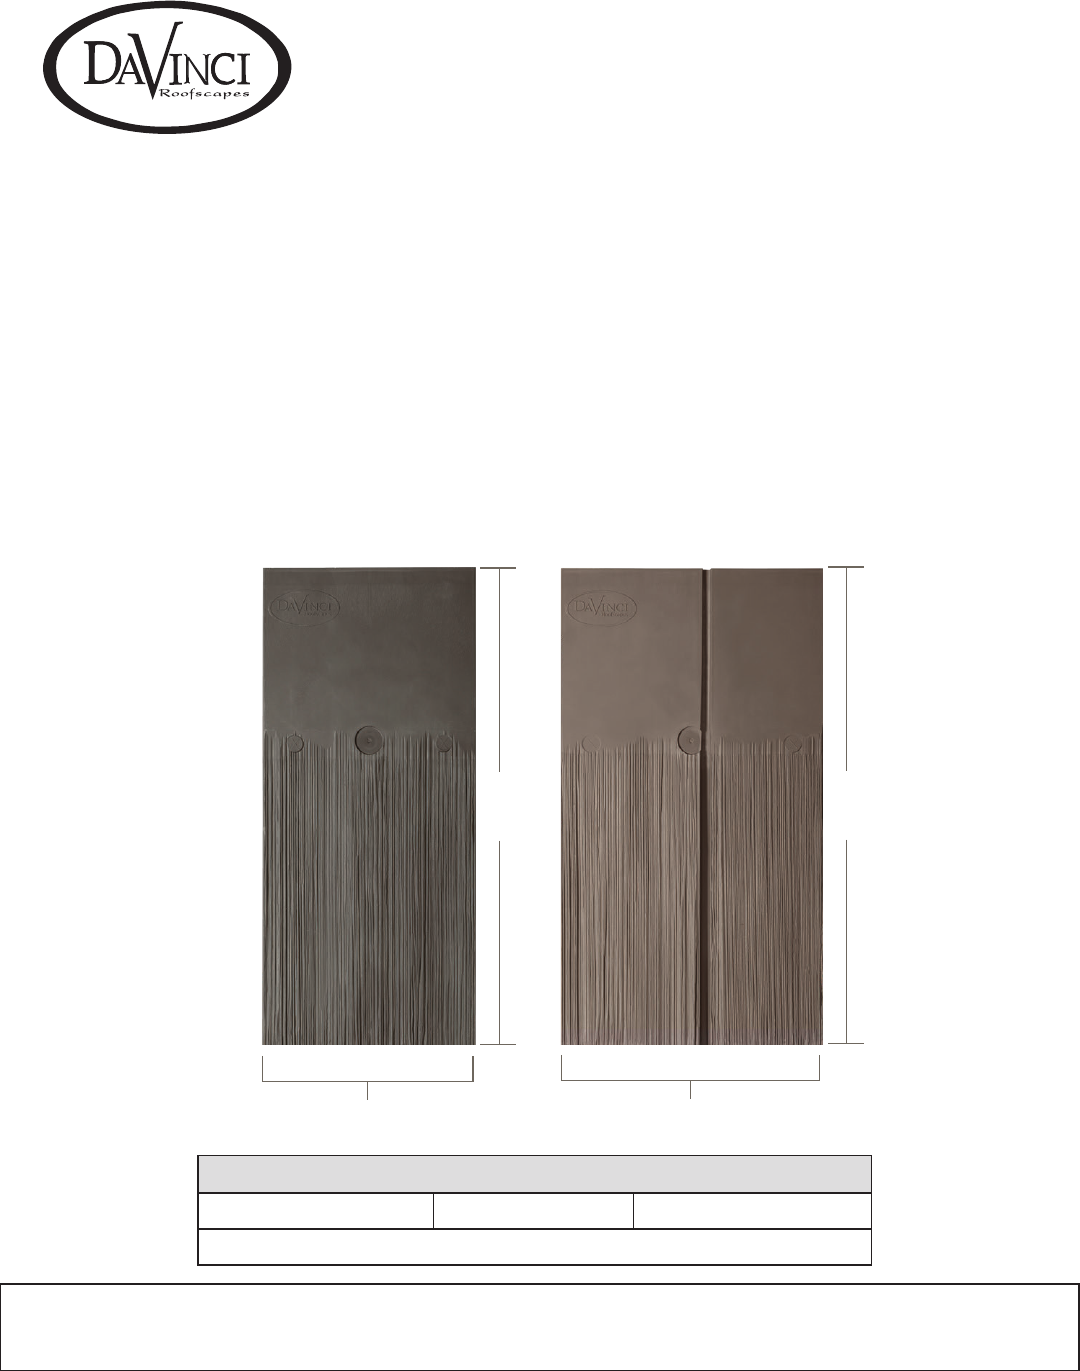
Select Shake
Widths: 10", 8" Length: 18" Thickness at butt: 5/8"
Exposure/Face Reveal: 6", 7", 8"
2/24
INSTALLATION
DaVinci Hand-Split Shake siding must be installed on at,
vertical wall applications only. DaVinci Roofscapes oers
multiple roong products for applications on sloped, tilted,
or Mansard type roofs.
DaVinci Hand-Split Shake siding can be installed on braced
wood or steel stud constructed walls. Any misaligned fram-
ing or irregularities must be corrected as they may mirror
through to the nished application.
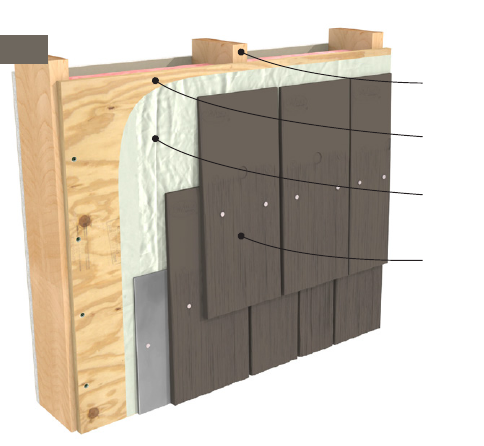
An APA rated, minimum thickness 7/16" OSB or ½"
plywood sheathing is required. DaVinci Hand-Split Shake
Siding may not be installed over non-structural sheathings
such as foam, ber builder board, or gypsum type panels.
(Fig. 1.1)
DaVinci shake siding may be installed on Structural
Insulated Panels (SIPS) providing the panels incorporate
the minimum thickness sheathing requirement of 7/16"
OSB and the SIP system is capable of supporting the load
imposed by the shake siding. Please contact the SIPS
manufacturer regarding the application of exterior cladding
requirements.
Davinci shake products must be installed with courses
oriented horizontally and may not be installed in an angled,
sloped, or otherwise non-horizontal fashion.
A weather resistive barrier is required in accordance with
local building codes. Use an approved weather resistive
barrier as dened by the 2015 IRC. The weather resistive
barrier must be installed in accordance with the manufac-
turer’s specications and requirements. DaVinci Roofs-
capes, LLC assumes no responsibility for water inltration.
Please contact DaVinci Roofscapes Technical Support
regarding wind load information and installations above 45
feet.
Section 2: Product Inspection
DaVinci Hand-Split Shake Siding is packaged in 22-piece
bundles. Each bundle will contain a mix of 8", 10" and
double 10" shakes.
All shakes should be visually inspected prior to instal-
lation. Do not install any product which may have been
damaged in shipment.
Please contact DaVinci Customer Service toll-free at
1-800-328-4624 prior to application should you have any
questions or product concerns.
Wall Framing
IRC Approved WRB
APA Rated 7/16 in. OSB
or 1/2 in.
plywood sheathing
DaVinci Hand Split
Shake Siding
Section 1: General Construction Requirements
2
1.1
Section 3: Storage and Handling
Due to our unique polymer construction, DaVinci Hand
Split Shake Siding products are more robust and damage re-
sistant than most other siding products. However, care must
be taken to avoid storage, delivery, and on-site damage.
DaVinci recommends that shakes be kept dry and stored in
a covered area or covered with a tarp.
Shakes must be stored at and o the ground prior to instal-
lation
The 22-piece bundles are easily carried and moved. Do not
roll, toss, or otherwise mishandle products as edge scung
or damage may occur.
IRC Approved WRB
APA Rated 7/16 in. OSB
or 1/2 in. plywood sheathing
DaVinci Starter Shingle
6 in. clearance to
finished grade
DaVinci Hand Split Shake
Siding
Section 4: Clearances
Please refer to local codes regarding clearance above n-
ished grade. DaVinci requires a minimum clearance of 6"
above nished grade. (Fig. 4.1)
A minimum ¼" clearance must be present between shakes
and decking, wood or concrete/masonry walks, steps,
stoops, or porches. (Fig. 4.2)
At roof-to-wall intersects, or any other cladded area above
a rooine, a minimum ¼" clearance above the roong
material must exist. Flashing and counter ashing must
be present in accordance with the roong manufacturer’s
requirements and local code. (Fig. 4.3)
A pre-engineered or site-fabricated "kick-out" ashing must
be present at roof-to- wall intersects to direct roof water
away from the wall. (Fig. 4.4)
Do not install gutter ends against or in contact with shakes.
A minimum clearance of 1/16" to 1/8" must exist above all
horizontal ashings. (Fig. 4.5)
Step Flashing
DaVinci Hand Split
Shake Siding
DaVinci Starter Tile
1/4 in. min. clearance
from high point of
roofing tiles to siding
Step Flashing
DaVinci Hand Split
Shake Siding
Kickout Flashing
DaVinci Starter Tile
Flashing
DaVinci Hand Split
Shake Siding
DaVinci Starter Tile
IRC Approved WRB
APA Rated 7/16 in. OSB
or 1/2 in. plywood sheathing
DaVinci Starter Shingle
1/4 in. min. clearance to
decking, wood or paved
surfaces
DaVinci Hand Split Shake
Siding
4.1
4.2
4.3
4.4
4.5
3
Section 5: Blocked Penetrations
DaVinci requires that all wall penetrations of 1-½" or larger
incorporate a “blocked” or “trimmed split-block” design.
(Fig. 5.1)
Trim must be of sucient thickness. Shake ends must not
extend beyond the face of the trim.
The top, horizontal portion of the block must be ashed to
deter water entry behind the siding.
Maintain a 1/16" to 1/8" gap above the horizontal ashing.
Do not caulk the gap.
In some cases, it may be necessary to "split" the trim attach-
ment around the opening for easier installation. A weather-
cut should be used at this cut.
Se c t i o n 6: Sa f e t y
DaVinci Hand Split Shakes are manufactured from our proprietary
blend of polymers which oer dust-free on-site fabrication. Da-
Vinci shakes can be safely and eciently drilled or cut with com-
mon tools and without the need for specialty tooling or equipment.
However, standard safety practices must always be observed when
drilling or cutting the product.
• Use best work practices to minimize any safety risk.
• Always wear protective safety glasses when using high-speed
cutting tools.
• Always wear protective safety glasses when using pneumatic
nailers.
• Wear cut-resistant gloves when cutting and nailing.
• Observe all applicable OSHA guidelines and local laws
regarding the usage of Personal Protective Equipment (PPE).
Additional information can be found at www.osha.gov/SLTC/
personalprotectiveequipment
Se c t i o n 7: cu t t i n g
Various common construction tools and methods may be used
to successfully cut DaVinci shakes. No specialized tooling or
equipment is required.
Hand held circular saws with blade diameters ranging from 4"
to 7-¼" may be used. For best quality of cut, we recommend a
minimum 24 to 32 tooth, carbide blade.
When using hand held saws, ensure the saw table’s bottom
surface is smooth and without nicks or heavy scratches, and
grit-free to avoid damage or marking of the product face.
Miter saws and extended reach, compound-slide miter saws
with 10" or 12" blades may also be used and oer the installer
a more precision cut and increased eciency. Use a carbide
blade with 32 to 60 teeth.
For radius or irregular shaped cuts, a jigsaw may be used with
a standard wood cutting blade.
Flashing
DaVinci Hand Split
Shake Siding
DaVinci Starter Tile or
cut portion of tiles
below opening
Always cut shakes face up.
Shakes may also be cut with a sharp razor/utility knife. Use a
straight edge to guide the blade at the desired location. More
than one pass may be required to adequately score the mate-
rial. A small amount of additional trimming of the structural
ribbing on the back side of the shake may be necessary.
Holes may be drilled using standard twist drills or hole saws.
4
5.1
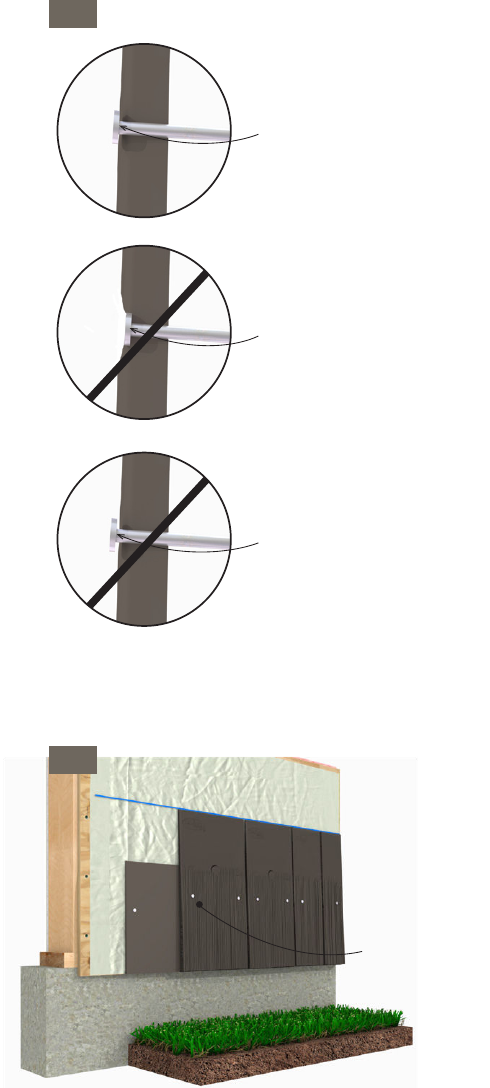
Se c t i o n 8: fa S t e n i n g
DaVinci Hand Split Shake siding must be installed with a
full round head, roong nail with a minimum length of 1-¾".
Fasteners must be corrosion resistant; hot dipped galvanized,
electro-galvanized, and stainless-steel fasteners are accept-
able. Please check with local code requirements in coastal
areas.
DaVinci shake siding products may be installed using hand-
driven nails, or fastened with a pneumatic tool. Pneumatic
fastening is recommended.
When pneumatic tools are used, it is important to control
the fastener depth of drive. Ensure the pressure from air
compressors is regulated and does not exceed the pneumatic
nailer’s manufacturer’s requirements. Additionally, ensure
the tool has an adjustable depth of drive or ush mount at-
tachment to control the nail seating depth.
Do not over drive or under drive fasteners. The nail head
should be snug against the face of the shake. Over driven
fasteners may slightly cup or bow the shake and result in the
lower edge of the shake not being tight against the underly-
ing course. (Fig. 8.1)
Framing nailers are not approved as product damage may
result.
Do not use siding nails, aluminum fasteners, staples, clipped
head or T-head nails.
As an alternative, a corrosion resistant, #8, wood thread,
minimum .375" head diameter, minimum 1-5/8" length,
bugle head screw may be used.
Fastening Location
Each piece of Davinci Shake Siding shall be fastened with 2,
1-3/4" long ring shanked nails placed below and in line with
the manufactured “x” fastener spots, approximately 1" above
the exposed portion of the tile. (Fig. 8.2)
Nail head snugly
against face of the
shake
Correctly Driven Nails
Nail head over-driven
Over-Driven Nails
Nail head under-driven
Under-Driven Nails
5
8.1
Nail location
approximately
1" above the
exposed portion
of the tile.
8.2
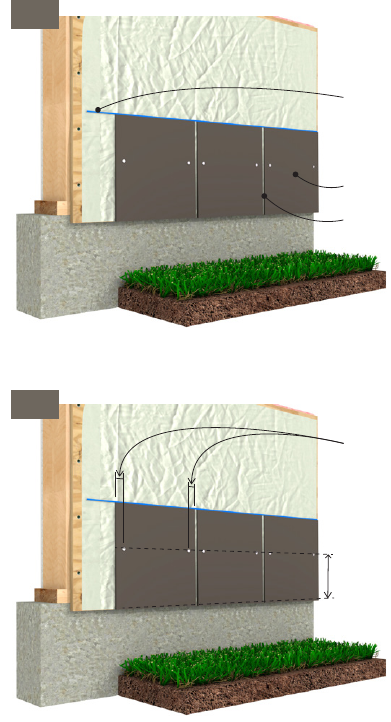
General
The bottom edge of the shakes should be aligned with the
corner trim.
The bottom edge of the rst course must exhibit a mini-
mum 6" clearance above nished grade; and a ¼" clearance
above hardscape, decks, or patios.
Starter Tile Course Installation
Individual shake siding applications require the application of
a starter course. DaVinci manufactures a specic starter tile for
this purpose. The starter tile is required to provide solid backing
on the initial course and also sets the rst course on the proper
angle. (Fig. 9.1)
The starter tile is 11-¾" in height and 11-13/16" in width. To
begin, snap a chalk line 11-¾" above the desired bottom edge
location. The bottom edge may be placed level with the bottom
of the wall sheathing or mudsill. Alternatively, the bottom edge
of the starter tile may overlap the foundation or other material
up to 1" below the sheathing or mudsill.
Each starter tile has a molded in nail placement locators. Secure
each starter tile with two approved fasteners at these locations.
(Fig. 9.2)
Continue to install the starter tiles by aligning the top edges of
the tiles to the chalk line. The starter tiles should be installed
with the DaVinci logo on top. Leave a 3/8" gap between each
tile.
Chalk line 11 3/4 in. above
desired bottom edge
DaVinci Starter Shingle
11 3/4 in. (H) x 11 13/16 in. (W)
3/8 in. gap
Fasten 1 in. from edges
Starter tiles nailed at dimple
locations ( 6 inches from
bottom edge)
6”
Se c t i o n 9: Ha n d -Sp l i t SH a k e in S ta l l at i o n
6
9.1
9.2
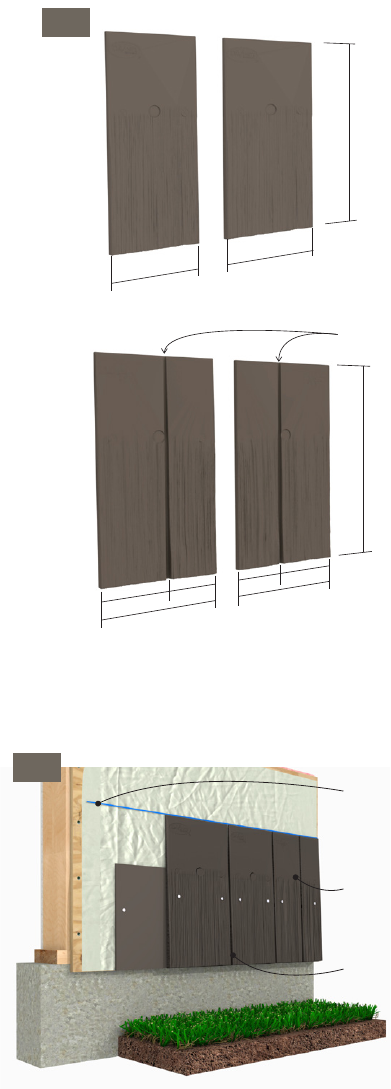
Layout and Staging
In any individual shingle/shake cladding application, proper
staging and layout is a key part of a successful installation.
DaVinci provides shake widths of 8", 10", and Split 10"
pieces which incorporate the look of a 4" and a 6" shake. Split
10" shakes are included that simulate a 6" piece, then a 4",
and also the reverse. This product mix aides the installer in
selecting the proper width combinations for the given course.
(Fig. 9.3)
In addition to the 4 styles of shake available in each bundle,
it is permissible to cut or "split" a Split 10" shake resulting in
the installer having a 5-3/8" width piece and a 4-5/16" width
piece. This option provides the installer with additional shake
width options.
As is common practice in an individual shingle installation,
the installer must take time to layout the courses as they
proceed up the wall to avoid creating patterns and stacked
keyways. DaVinci recommends the installer open 2-3 bundles
at a time to locate and note the size and quantity of shakes
available and proceed accordingly.
Space shakes no closer than ¼" and no greater than 3/8". The
ability to adjust the keyway spacing by 1/8" can aect the
width dimension of the course ending piece and oers the
installer greater exibility.
Course to course keyways must be spaced a minimum of
1-½" apart.
Shake First Course Installation
Use a level and chalk line to establish a level and straight
reference point for the rst course. DaVinci recommends
the installer continue to check for level lines throughout the
installation.
DaVinci shakes are 18-1/8" in height. To begin the rst
course, measure and mark a chalk line 18-1/8" up from the
bottom edge of the starter tile course. (Fig. 9.4)
The bottom edge of the shakes should not extend below the
starter course.
Install shakes by aligning the top edge of the shake with the
chalk line.
Continue the rst course by installing shakes in a random
manner mixing the available 8", 10" and Split 10" shakes.
Maintain a ¼" to 3/8" gap between shakes.
Chalk line 18 1/8 in. above
starter course bottom edge
DaVinci Shakes
18 1/8 in. (H)
8 in. and 10 in. widths
1/4 in to 3/8 in. gap
8 in.
18 in.
10 in.
10 in.
4 in.
6 in.
6 in.
4 in.
18 in.
False keyways
10 in.
7
9.3
9.4
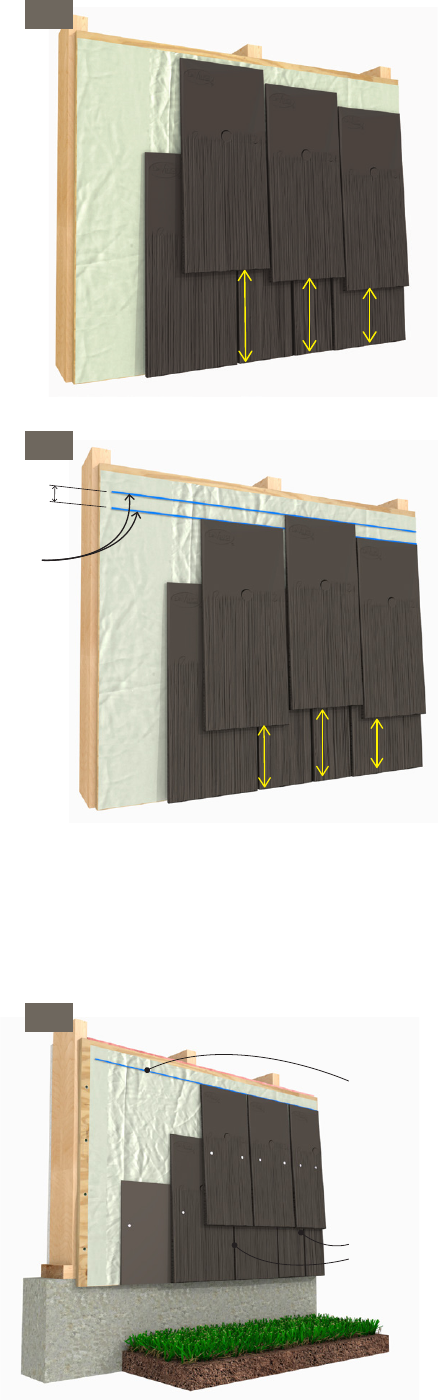
Reveal/Overlap
DaVinci Hand-Split Shake siding may be installed with a
face reveal of 6", 7" or 8". Reveals of less than 6" or greater
than 8" are not permitted. (Fig. 9.5)
A "staggered" installation is acceptable and may be achieved
by snapping chalk lines at 6" or 7". One tile will be placed
with its top on the line and the next will be lowered one inch.
This is continued in an alternating pattern across the plane of
wall.(Fig. 9.6)
Applying chalk lines to the face of the product is not recom-
mended.
Installing Subsequent Shake Courses
Determine the desired face reveal / exposure.
Example: 8" exposure: From the top edge of the rst course,
measure and mark the wall in 8" intervals up the full height
of the wall. Repeat the process on the opposite side of the
wall. Snap chalk lines. Begin the second course by placing
the top edge of the shakes along the chalk line and securing
with the appropriate fastener. (Fig. 9.7)
Space shingles ¼" to 3/8" apart. A common practice is to
fabricate a shim of the desired thickness and use as a spacer.
Mix the 8", 10", and Split 10" shakes in a random manner
and avoid creating a repetitive pattern. Layout of the course
may be needed to help avoid stacked keyways and noticeable
patterns.
Shake keyways from one course to the next must not line up
and be oset a minimum of 1 ½" to deter water entry.
Maintain course alignment around corners on adjacent walls.
Due to the overlapping of shakes a sealant is not required or
recommended at shake- to-shake joints or course-to-course
joints.
6 in.
7 in.
8 in.
6 in.
7 in.
6 in.
1 in. offset
Chalk Lines
Chalk line set for desired
exposure
Keyways offset 1 1/2 in. min.
1/4 in to 3/8 in. gap
8
9.5
9.6
9.7
Straight: 6", 7", or 8"
Stagger: 6" or 7" only
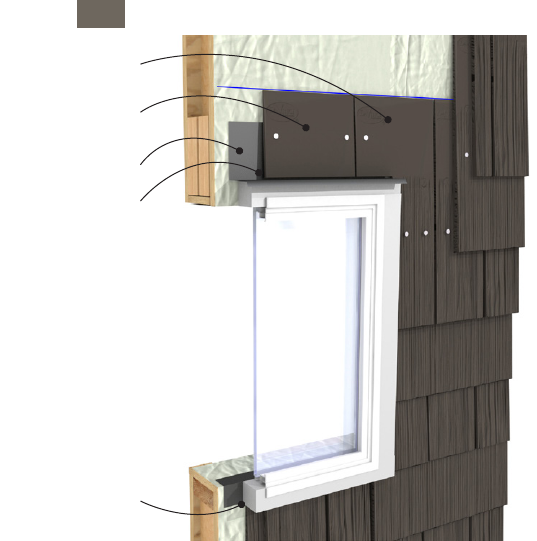
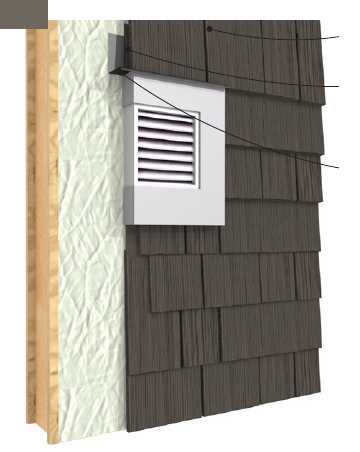
With any individual shingle/shake application, special care
must be taken at door/window/vent type openings. All
horizontal trim must be properly ashed, and all window
manufacturer’s requirements must be observed.
When abutting shakes to the window bottom and side trim
attachments, the shakes may be installed with light contact,
or a 1/16" gap.
Depending on the window/door size and course layout/
reveal chosen, in some cases smaller, less than full size
pieces will be required. These may be fastened with corro-
sion resistant 15-gauge nish nails or trim screws.
At the top of the opening, the installer may use cut-to-size
starter shingles or cut shakes at the appropriate height for
the underlying "ller" course.
We recommend the "next to the top of the opening" or pen-
ultimate course extend the top portion of the shake beyond
the corner of the opening. In other words, the shake should
not be installed so that a gap exists at the opening corner.
The shakes at the opening corner should be cut or notched.
This method will help deter unwanted water entry at this
juncture. (Fig. 9.8)
At the top course over openings, two methods may be used:
1) Continuing the existing course and cutting the bottom of
the shake to t. This method enables the installer to retain
top edge alignment and therefore the same shake thickness
across the opening. 2) An alternate method is to retain
the solid bottom edge of the shake and cut the shake to
the desired height by measuring from the bottom edge up
and removing the top portion of the shake. Please note this
method utilizes the thickest portion of the shake and may
cause a slight thickness variation/alignment issue across the
face of the shakes at this transition.
With either method, maintain a 1/16" to 1/8" clearance
above the horizontal ashing.
Window head flashing
1/16 in. gap between siding
and trim
1/16 in. to 1/8 in. clearance
between the bottom edge of
the siding and the head
flashing
Siding trimmed to continue
coursing
Siding notched at window
9
Openings and Window / Door Treatments
9.8
Se c t i o n 10: tr i m a n d te r m i n at i o n S
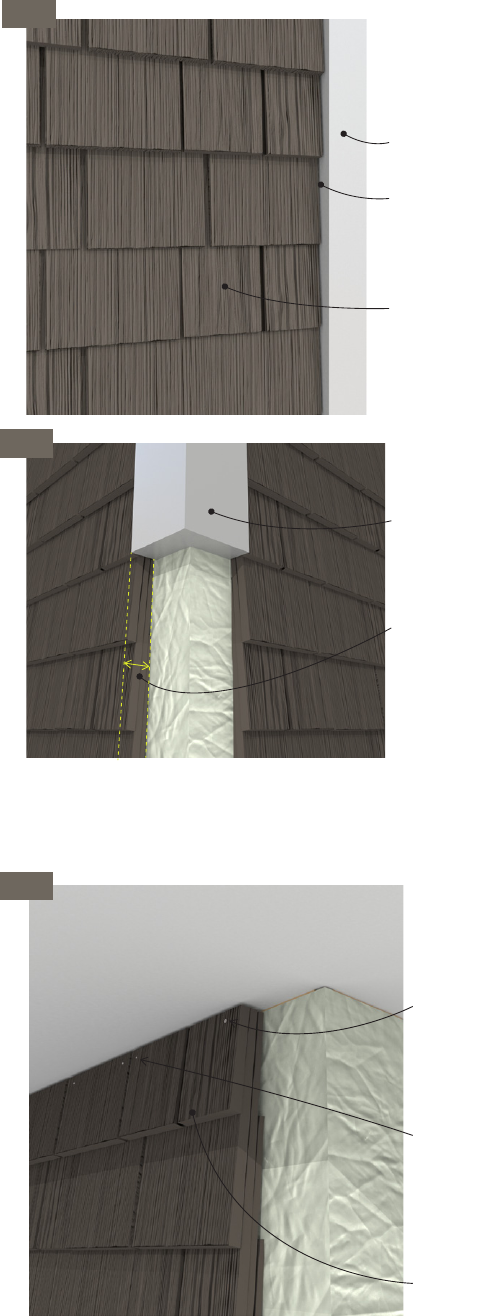
Trim Attachments
All installations must incorporate the use of corner boards.
Do not install in a laced or mitered corner installation.
At vertical trim-to-siding junctures (inside and outside cor-
ners, door, window, and other trim attachments) shakes may
be a) butted in light contact with trim; or b) leave a 1/8" gap
and seal with a high-quality exterior sealant. (Fig 10.1)
Approved sealants include high-quality, exterior grade, ure-
thane, polyurethane, or silicone based sealants which meet or
exceed ASTM C920 requirements.
The application of DaVinci shakes builds three layers of
shakes that build a total thickness of 1-½". If using a 6" face
exposure, these layers build a thickness of 1-5/8". As such, a
trim thickness of 1-¾" to 2" is recommended. All trim must
be of sucient thickness to cover or cap the course ends.
(Fig. 10.2)
Multiple solid trim options are available. Wood trim products
are available in 1-½" to 2" thicknesses, ber-cement trim
products are available in various designs and up to 1-¼"
thickness, and cellular PVC trim products are available in
1-½" thickness. In order to meet the required thickness, a
continuous, solid shim build out or "pack out" behind the
trim may be necessary.
Flashing must be present at all horizontal trim with a 1/16"
to 1/8" gap present between the shake bottom edge and ash-
ing. Do not caulk this gap. Do not use raw aluminum ash-
ings. Flashings must be galvanized, anodized or PVC coated.
Terminations
When the product is butted to an inside or outside corner
trim, or window/door surround (depending on the wall di-
mensions and layout of openings) it will be common to have
the need for a specic sized piece.
All cut edges should butt to the corner or trim attachment
with the factory edge to the eld joint side.
At top course terminations, depending on layout, wall
height, and reveal/exposure, a partial, less than full height
course may be necessary. These pieces may be secured with
15-gauge, corrosion resistant, nish nails through the face
of the shake. If a trim attachment such as a frieze board or
dental molding is to be used which will cover the top portion
of the top course, roong nails or appropriate screws may be
used. Position all fasteners a minimum of ½" from product
edges. Corrosion resistant trim screws may also be used.
(Fig. 10.3)
On gable ends and wall to roof junctures, less than full size
angle-cut pieces may be secured with a 15-gauge, corrosion
resistant, nish nail through the face of the shake. Position
all nails a minimum of ½" from the product edge. Corrosion
resistant trim screws may also be used.
Butted with light contact
or leave 1/8 in. gap & seal
with sealant
Trim
DaVinci Hand Split
Shake Siding
Trim 1 3/4 in. to 2 in. min.
thickness for exposures: 6 in., 7 in.
& 8 in.
DaVinci Hand Split Shake Siding
6 in.exposure builds total thick-
ness of 1 5/8 in.
7-8 in. exposure builds total
thickness of 1 1/2 in.
Trim screws through
face of shake - Ensure
the fastener penetrates
the solid sheathing by
at least 3/8 in.
15-gauge corrosion
resistant finish nails
may also be used
through face of shake
Ensure the fastener
penetrates the solid
sheathing by at least
3/8 in.
DaVinci Hand Split
Shake Siding trimmed
at soffit
10
10.1
10.2
10.3
J Channel
J channel type trim of sucient receiver thickness may be
used at multiple trim locations including corners and door
and window surrounds. Deep pocket J channel products are
available from various manufacturers.
Do not install shakes “tight” against inside of J channel.
Do not ll the J channel with caulk or sealants.
Se c t i o n 11 : f i n i S H i n g & ma i n t e n a n c e
DaVinci Hand-Split Shake siding products are made from
pure virgin resins fortied with state-of-the-art UV stabiliz-
ers and arrive at the job-site ready to use. No eld applied
nish or coatings are necessary. Our blended-in color process
creates rich long-lasting color requiring minimal mainte-
nance.
Do not apply any type of topcoat to DaVinci Shake products.
The occasional maintenance of any exterior cladding is
considered normal. DaVinci recommends that normal routine
maintenance should include:
• The removal of dirt and debris by washing down the
exterior surfaces periodically with a low-pressure spray
or garden hose. DO NOT use high pressure power
washers as they may blast water between the course
and behind the shakes.
• Keep gutters clear and unclogged to prevent overows.
• Maintain a minimum ground clearance of 6" by pre-
venting the build-up of decorative mulch, stone, etc.
• Keep vegetation, shrubs, and landscaping trimmed to
avoid direct contact with the shakes.
Deep pocket J-Channel
DaVinci Hand Split
Shake Siding
Do not install shakes
tight against inside of
channel - do not fill
with sealant
10.4
© 2024 Westlake Royal Building Products
DAV194007 2/24
