IMPORTANT: COMPLIANCE WITH MAIBEC’S INSTALLATION, STORAGE AND MAINTENANCE REQUIREMENTS, AND WITH ALL APPLICABLE
BUILDING CODES IS MANDATORY. PROBLEMS CAUSED BY FAILURE TO COMPLY WITH THESE REQUIREMENTS AND CODES MAY NOT BE
COVERED BY THE APPLICABLE WARRANTIES. 1
Individual Shingles
Installation Guide
Read this entire guide before installing Maibec individual shingles. For proper installation, you must
understand and follow all requirements and steps correctly. DOWNLOAD THE LATEST VERSION
ONLINE AT MAIBEC.COM. For any questions, please contact Maibec’s technical service toll-free at
1 800 363-1930, Monday to Friday from 8:30 a.m. to 4:30 p.m. (Eastern Time).
IMPORTANT: COMPLIANCE WITH MAIBEC’S INSTALLATION, STORAGE AND MAINTENANCE
REQUIREMENTS, AND WITH ALL APPLICABLE BUILDING CODES IS MANDATORY. PROBLEMS
CAUSED BY FAILURE TO COMPLY WITH THESE REQUIREMENTS AND CODES MAY NOT BE
COVERED BY THE APPLICABLE WARRANTIES.
Factory-stained white cedar individual shingles can only be installed to exterior wall surfaces.
Shingles have one side that is smoother and more uniform than the other. Be sure to install them with this
side facing outward.
1. STORAGE
• Store the shingle siding in an unheated, dry and ventilated area.
• Leave shingle boxes on pallet. Do not store the material in direct contact with the ground or a cement floor.
• Always cover the uninstalled material after a day’s work.
2. BEFORE YOU BEGIN INSTALLATION
CHECK YOUR ORDER
• Make sure the product(s) delivered matches your order (color, quantity etc.).
• Have touch-up stain on hand.
• Never install a product that appears to be or that you think may be defective. Installed defective products are not
covered by the warranty. Contact Maibec at 1 800 363-1930.
CONSULT THE BUILDING CODES
Consult the building codes applicable in your region for requirements regarding the installation of shingle siding,
breather membrane (housewrap), caulking, etc. Follow the manufacturer’s instructions for installing the breather
membrane and applying caulking.
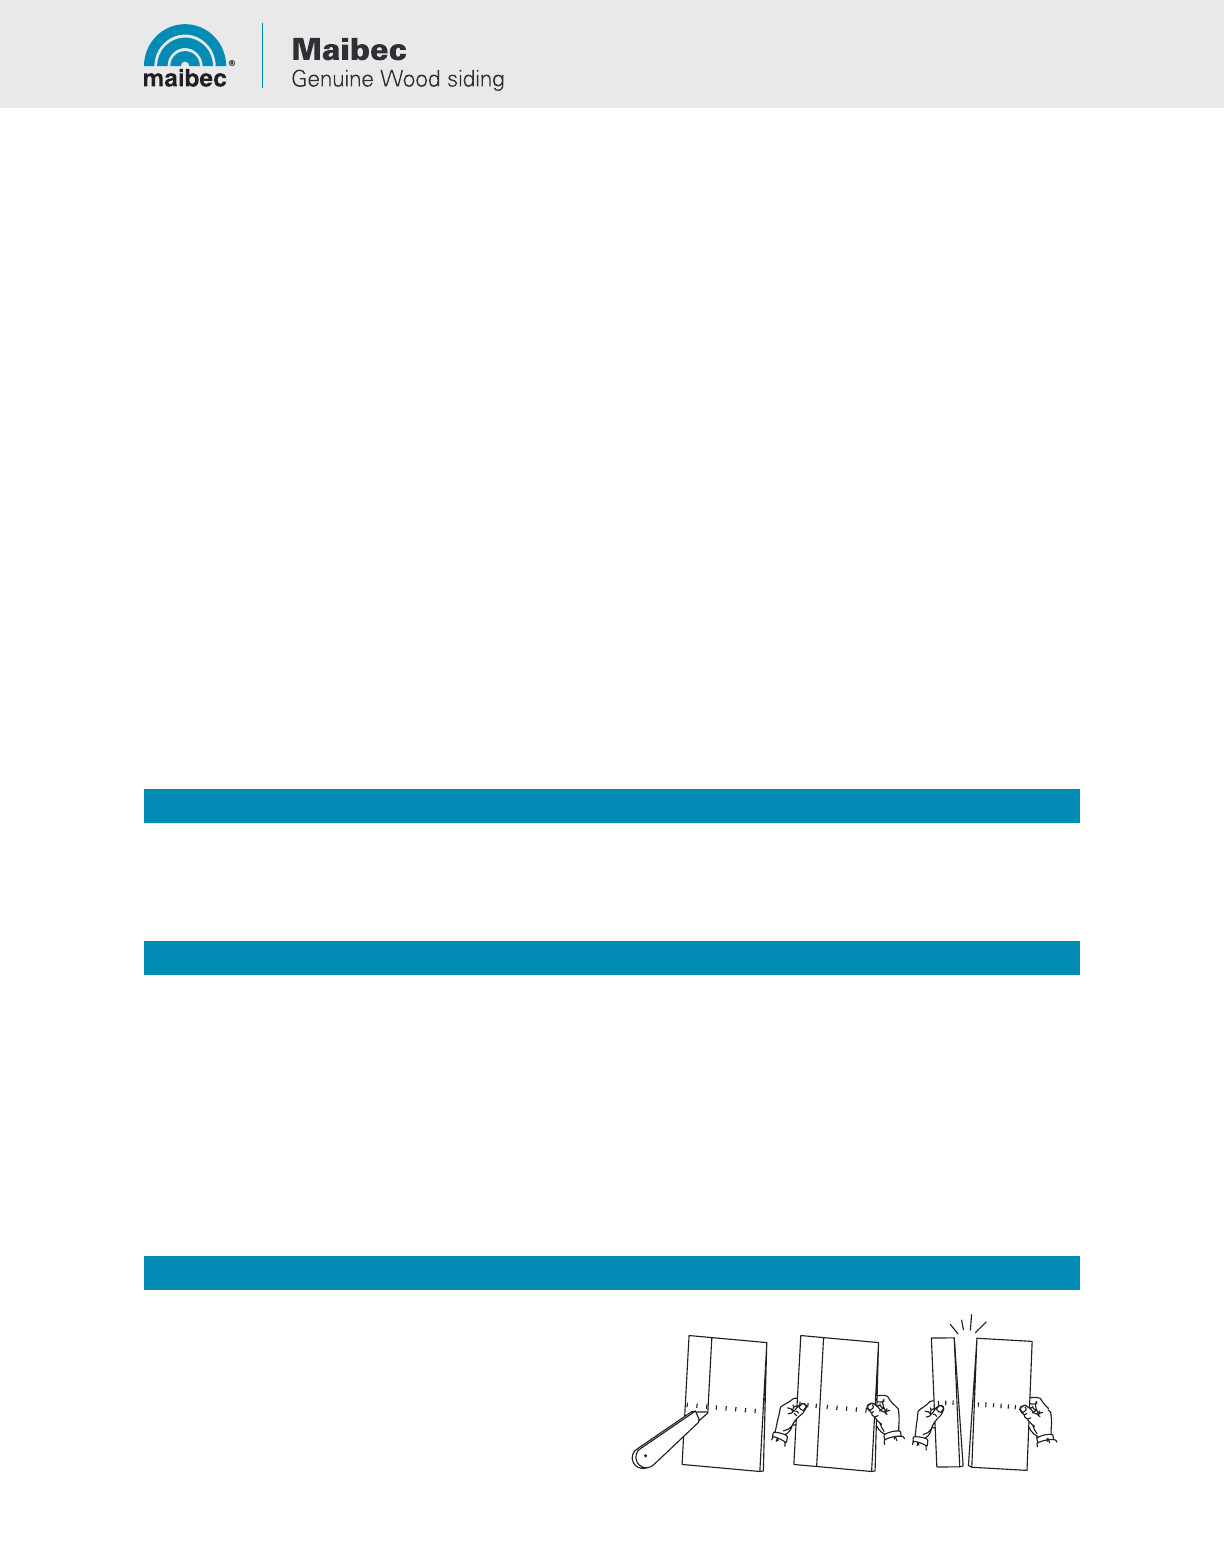
3. CUTTING SHINGLES
Since cedar is a soft wood, shingles can be easily cut with
a utility knife. Cutting a shingle lengthwise is simple: make
a straight cut into its surface, then snap the shingle cleanly
along the scored line or use a power saw.
FIGURE 1
Individual Shingles
Installation Guide
U.S. VERSION
| U.S. VERSION

IMPORTANT: COMPLIANCE WITH MAIBEC’S INSTALLATION, STORAGE AND MAINTENANCE REQUIREMENTS, AND WITH ALL APPLICABLE
BUILDING CODES IS MANDATORY. PROBLEMS CAUSED BY FAILURE TO COMPLY WITH THESE REQUIREMENTS AND CODES MAY NOT BE
COVERED BY THE APPLICABLE WARRANTIES. 2
4. TOUCH-UP STAIN
Apply touch-up stain on all cuts, planed edges, and small damaged areas. All bare wood must be touched-up,
regardless of whether it is visible or not once installed. Touch-up on cuts must be performed prior to shingle installation
.
For shingle touch-ups, use the Maibec touch-up applicator.
For shingle touch-ups when using touch-up stain in a can,
use a polyester, nylon, or any synthetic applicator with firm
bristles approved for water-based coatings. Do not use wide
brushes that could cause drips and give poor results. Carefully
dab, do not spillover or overbrush.
Touch-up stain is only meant to be used in the area in need
of it. It must not, under any circumstance, be applied over
non-damaged factory coated material.
For more information, see the touch-up guide that comes with
the touch-up stain cans or kits, or go to maibec.com/us/support.
5. DETERMINING EXPOSURE
The exposure is the part of the shingle that you see.
The exposure for
shingles is 5" but can vary between 1/8" to 1/4"
depending on the height
of the wall and the window positions.
To determine the number of courses needed and the exposure, measure
the height of the wall from its lowest point (above the foundations). The butt
edge of the first course of shingles must extend at least 1" beyond the
foundation, so add 1" to the height of the wall. To determine the number of
courses, divide the height of the wall by the exposure (5"). Then calculate back
by dividing the height of the wall by the number of courses previously obtained
(rounded off) to determine the exact exposure.
Use a wooden pole that is long enough to measure the exposure over several
courses. A straight furring strip should do the job. Once marked, place the pole
against the wall to check the alignment of the courses with the windows. If
possible, the shingle courses should be aligned with window tops and bottoms,
or the exposure should be at least 4" in these areas. The last course at the top of
the wall should also have at least 4" of exposure. If not, recalculate to get enough
exposure, then mark the pole once again. Using the pole, mark the exposure lines
on the wall. Keep the pole as a reference while installing the shingles.
6. FASTENERS
THE FASTENING REFERENCE LINE
Shingle fastening is simpler with this easily identifiable guide.
The reference line is found 6 1/4" from the base of the shingle.
For the 5" required shingle exposure, fasten just below the
reference line to respect the installation requirement. Each
individual shingle is marked on one side.
NAILS:
• stainless steel or hot dipped galvanized
• ring shank blunt tip nail with minimum 7/32" head or
STAPLES:
• stainless steel or aluminum staple with minimum 7/16" crown, minimum 16 gauge.
Two fasteners per shingle, regardless of its width. Located 3/4" from each edge and 1" above the butt line of the
overlapping shingle. Must penetrate solid nailable substrate minimum 1/2" (example: plywood).
FIGURE 3
SHINGLE
TOUCH-UP
APPLICATOR
TOUCH-UP
STAIN IN A CAN
4" MINIMUM
4" MINIMUM
EXPOSURE LINE
POLE
INCORRECT CORRECT
6 1/4"
BASE
FIGURE 5FIGURE 4
FIGURE 2
| U.S. VERSION
IMPORTANT: COMPLIANCE WITH MAIBEC’S INSTALLATION, STORAGE AND MAINTENANCE REQUIREMENTS, AND WITH ALL APPLICABLE
BUILDING CODES IS MANDATORY. PROBLEMS CAUSED BY FAILURE TO COMPLY WITH THESE REQUIREMENTS AND CODES MAY NOT BE
COVERED BY THE APPLICABLE WARRANTIES. 3
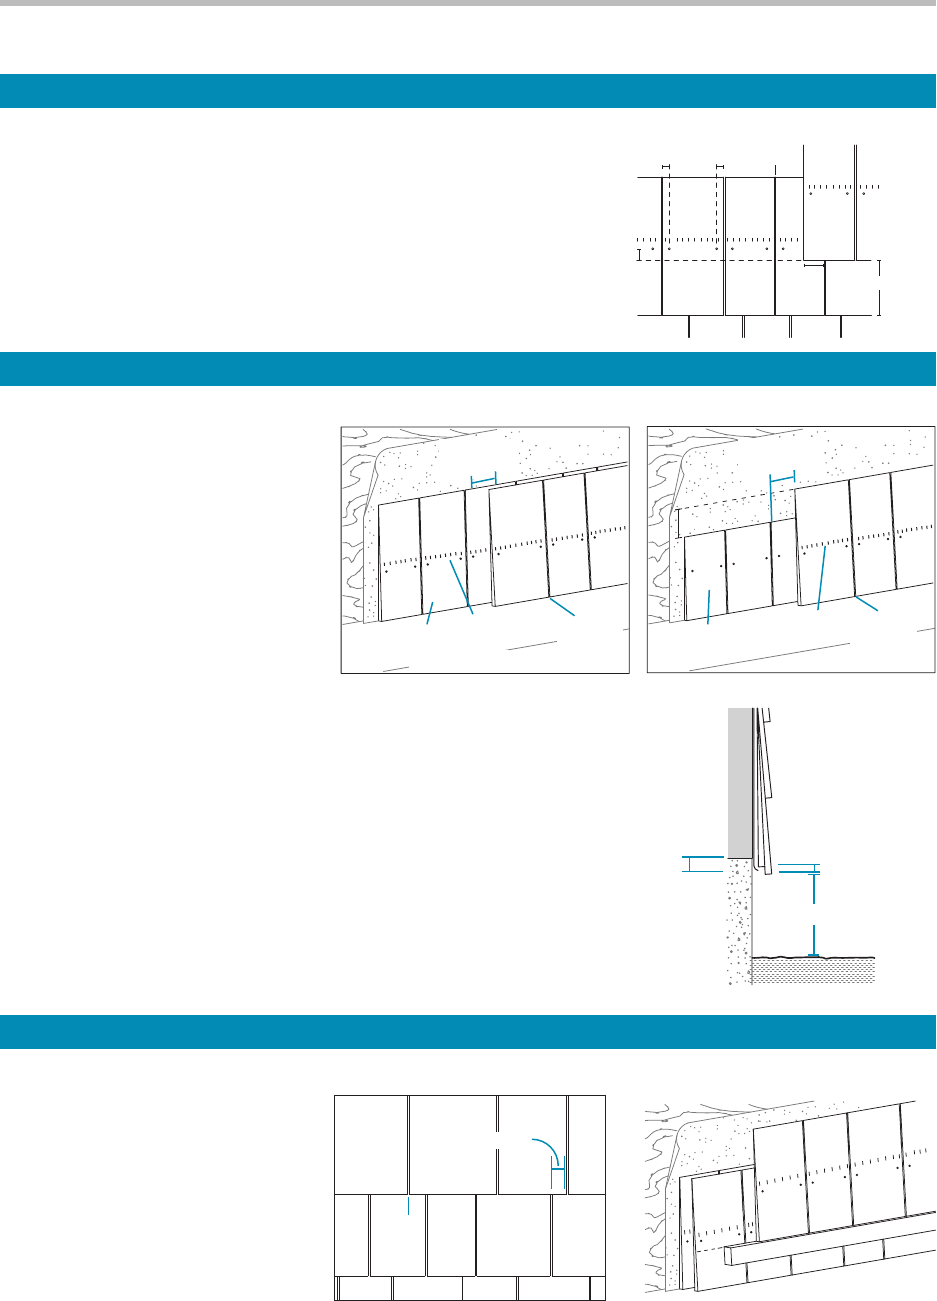
8. THE STARTER COURSE
The starter course has two layers of
shingles. The easiest method consists
of installing 2 courses of full-length
shingles one on top of the other,
making sure that joints aren’t aligned
over subsequent courses. [FIGURE 7]
Another method consists of installing
the first course using shingles trimmed
5" from the base, then continuing the
second course with full-length shingles,
making sure that joints aren’t aligned
over subsequent courses. With this
method, all the courses will have the
same thickness on the wall. [FIGURE 8]
The starter course must extend at least 1" beyond the foundation
to keep water off the wall. The second course extends slightly below
(1/2") the starter course to allow water to drip at the base of the
shingles by gravity. [FIGURE 9]
The butt line of the starter course must have a minimum clearance of
6" with the ground surrounding the building.
ALLOW A MINIMUM CLEARANCE OF:
• 1" from adjacent horizontal structures (example: deck),
• 1/2" from roof shingles or according to building code.
9. SUBSEQUENT COURSES
Shingles come in random widths,
so you must make sure that the
joints are not aligned over subsequent
courses. Leave a keyway spacing of
at least 1 1/2" from the shingles in the
previous course. Ideally, no joints
should be aligned over three subsequent
courses. No joint should occur over
a knot. [FIGURE 10]
Install subsequent courses in a single
layer on the rest of the wall according
to the determined exposure. Keep your
courses straight and level. To make shingle alignment easier, tack a furring strip beneath the exposure line or make a
chalk line. [FIGURE 11]
7. EXPOSURE AND KEYWAY SPACING
The exposure for shingles is 5".
Leave a keyway space of at least 1/8" between shingles. The edges
should not touch.
The keyway spacings on consecutive rows must
be offset a minimum 1 1/2".
Reference Line
Reference Line
1"
5"
3
/
4"
3
/
4"
1
/
8"
1
1
/
2"
FIGURE 8
1 1/2"
MINIMUM
1/8"
KEYWAY
UNDERCOURSE
5" SHORTER
REFERENCE
LINE
FIGURE 9
FIGURE 10 FIGURE 11
FIGURE 7
1/8"
KEYWAY
REFERENCE
LINE
1 1/2"
MINIMUM
FULL LENGTH
SHINGLE UNDERCOURSE
1/8"
1 1/2" MINIMUM
Reference Line
Reference Line
FIGURE 6
1"
1/2"
6"
Individual Shingles Installation GuideU.S. VERSION
IMPORTANT: COMPLIANCE WITH MAIBEC’S INSTALLATION, STORAGE AND MAINTENANCE REQUIREMENTS, AND WITH ALL APPLICABLE
BUILDING CODES IS MANDATORY. PROBLEMS CAUSED BY FAILURE TO COMPLY WITH THESE REQUIREMENTS AND CODES MAY NOT BE
COVERED BY THE APPLICABLE WARRANTIES. 4
EDGE OF SHINGLES
BUTTED TO TRIM
(CAULK FIRST)
WINDOW TRIM
APPLIED AROUND
THE PERIMETER OF
THE OPENING.
TRIM UNDER THE
WINDOWSILL
APPLIED OVER AND
AFTER THE SHINGLES.
FOLD HOUSEWRAP
INSIDE OPENING
JAMB FLUSH
TO WALL
SURFACE
FOLD HOUSEWRAP
INSIDE OPENING
JAMB PROJECTION
EXCEEDING WALL
SURFACE
EDGE OF
SHINGLES
BUTTED
TO TRIM
(CAULK FIRST)
WINDOW TRIM
APPLIED AROUND
THE PERIMETER
OF THE OPENING.
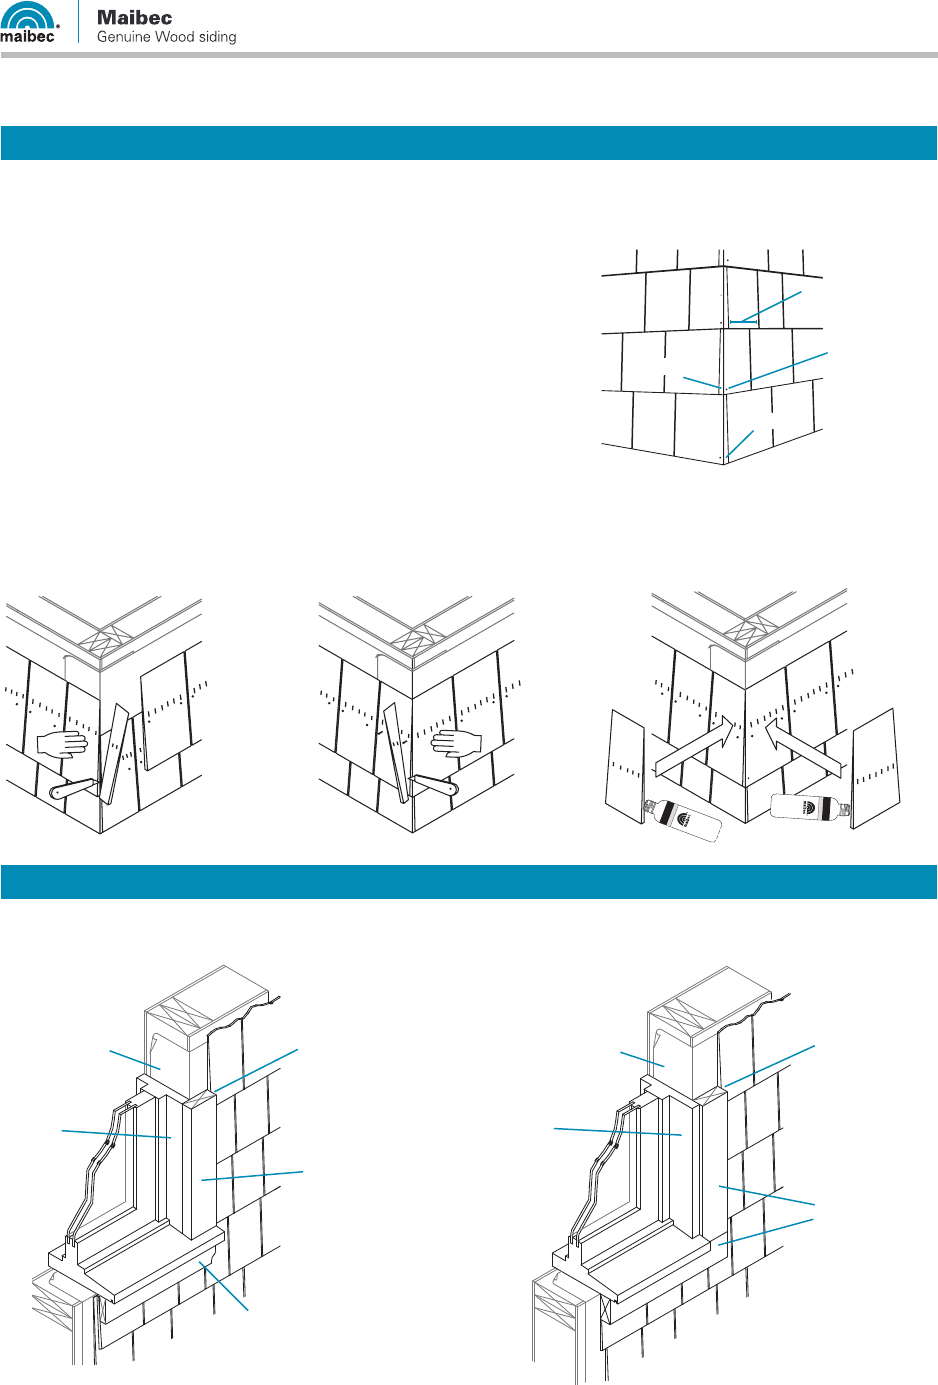
10. CORNERS FINISH DETAILS
The most common and traditional outside corner trim is made by
overlapping shingles so that the joints alternate successively on each
side of the corner. Nail the lower corner of the shingle with a ring
shank blunt tip nail. [FIGURE 12]
• Choose a corner shingle that is wide enough to extend beyond
the wall. Trim excess cleanly with a utility knife. You can trim it in
place using the corner of the wall as a guideline, but for greater
precision, you can mark a pencil line on the back of the shingle
and cut it flat. [FIGURE 13]
• Tack the shingle in place while you install a second shingle that
also extends beyond the wall on the other side. Trim the shingle,
using the first shingle as a guideline. For a smooth finish, use
a plane. [FIGURE 14]
• Apply touch-up stain to the cut edges, then nail the shingles in place according to the nailing recommendations.
[FIGURE 15]
11. WINDOW FINISH DETAILS
WOOD CASED TRIM
RIGHT JOINT
LEFT JOINT
FIGURE 12
FIGURE 16 FIGURE 17
PERIMETER WOOD TRIM
NAIL DRIVEN
INTO THE
SIDE SHINGLE
MINIMUM
WIDTH: 3"
| U.S. VERSION
TOUCH-UP ST
AI N
EHCUO
T
ER
E
D
E
RUT
N
I
ET
U
AE
D
RA
B
/
S
E
L
G
N
I
HS
Water based / À base d’eau
4.9 fl oz / 145 ml
Keep out of reach of children.
.
aera
d
e
tal
i
t
n
ev-ll
e
w a
n
i
yl
n
o
es
U
ol
p
m
e
’l
tn
a
va
r
e
tig
a n
e
iB
/
e
su erof
e
b
l
l
e
w
e
ka
hS i
Garder hors de la portée des enfants.
.
é
r
éa nei
b
t
i
o
r
dn
e
n
u
s
n
a
d t
n
eme
l
ue
s
res
i
li
t
U
t
nemecal
pm
e
’l
ed
t
amr
oF
e
t
na
llo
co
t
u
a
etteu
qi
t
é
’
l r
u
o
p
:
H
’
’
2
/
1
x
L’
’2
/1
-
1
TOUCH-UP ST AI
N
TEINTURE DE RETOUCHE
SHINGLES / BARDEAU
W
ater based / À base d’eau
4.9 fl oz / 145 ml
Keep out of reach of children.
Use only in a well-ventilated area.
Shake well before use / Bien agiter avant l’emploi
Garder hors de la portée des enfants.
Utiliser seulement dans un endroit bien aéré.
Format de l’emplacement
pour l’étiquette autocollante :
1-1/2’’L x 1/2’’H
FIGURE 13 FIGURE 14 FIGURE 15
IMPORTANT: COMPLIANCE WITH MAIBEC’S INSTALLATION, STORAGE AND MAINTENANCE REQUIREMENTS, AND WITH ALL APPLICABLE
BUILDING CODES IS MANDATORY. PROBLEMS CAUSED BY FAILURE TO COMPLY WITH THESE REQUIREMENTS AND CODES MAY NOT BE
COVERED BY THE APPLICABLE WARRANTIES. 5
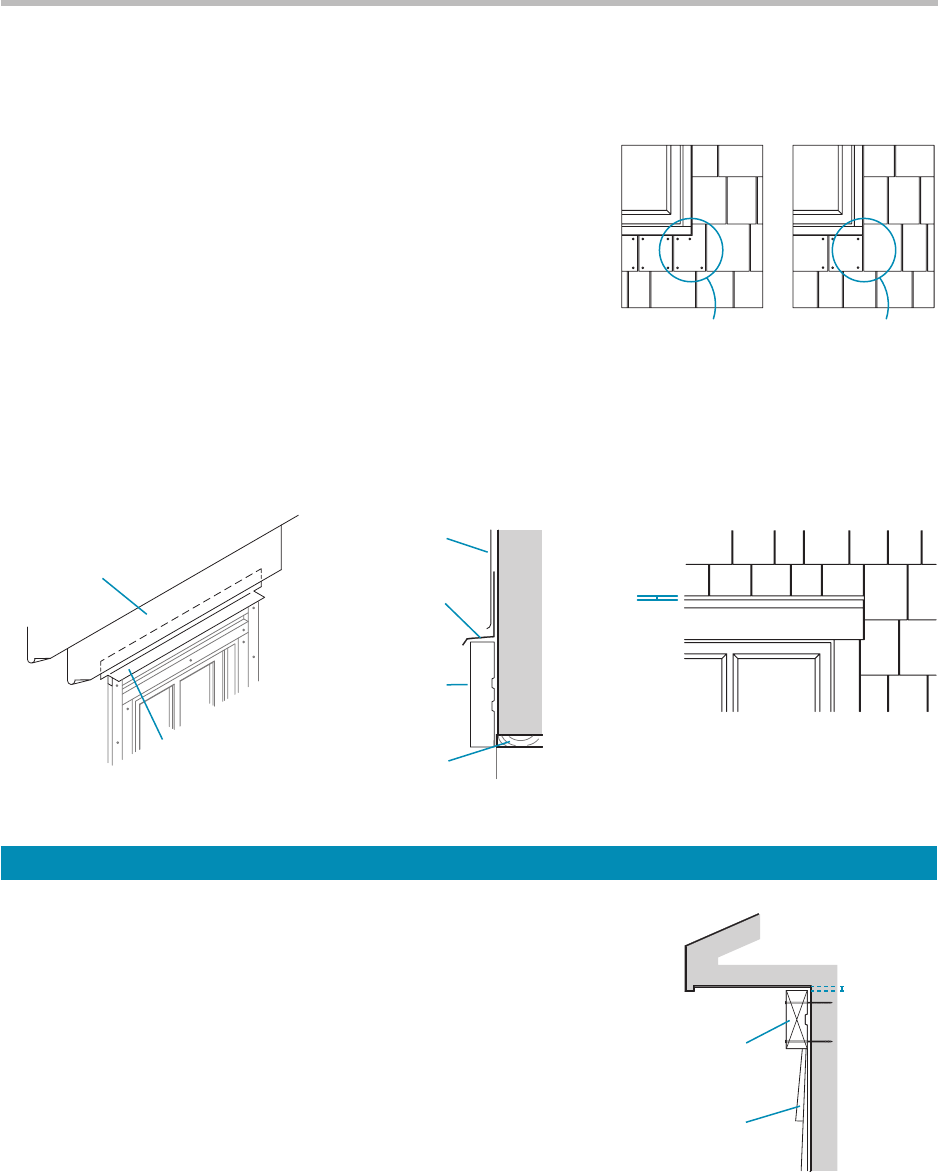
11. Window Finish Details (cont’d)
When a shingle is installed against the lower corner of the window
opening, the joint must be aligned with the edge of the opening.
For greater stability of shingles below openings, apply glue to the
back and nail the bottom corners. Pre-drilling of the shingles may
be required. [FIGURE 18]
THE WINDOW HEADER
The window header is a crucial element where water could accumulate
and seep behind shingles, which could affect the structural integrity of
the window frame. [FIGURE 19]
Metal flashing is essential to keep moisture away from the window
header. The flashing should extend beyond the trim that will be
installed. [FIGURE 20]
Shingles installed above window and door headers must be spaced 1/4" to 1/2" to ensure proper drainage and
airflow. [FIGURE 21]
12. TOP OF THE WALL FINISH DETAILS
The typical way to finish the top of a wall is to install a trim and have
the shingles butt directly to it. This is traditionnally done when the
shingle course is wide enough, a minimum 4" long shingle is the norm
for this type of application. To facilitate airflow at the top of the wall, it
is important to leave a 1/2" gap between the trim and the soffit.
INCORRECT
CORRECT
FOLDED METAL
FLASHING, PLACED
OVER WINDOW
HEADER TRIM
HOUSEWRAP
PLACED OVER
THE FLASHING
FLASHING
EXTENDING
PAST TRIM
HOUSEWRAP
WINDOW TRIM
WINDOW
FRAME
1/4" TO 1/2"
SPACING
FIGURE 18
FIGURE 19 FIGURE 20 FIGURE 21
FIGURE 22
2" TRIM
SHINGLES
(MINIMUM 4"
EXPOSURE)
1/2" SPACING
Individual Shingles Installation GuideU.S. VERSION
6
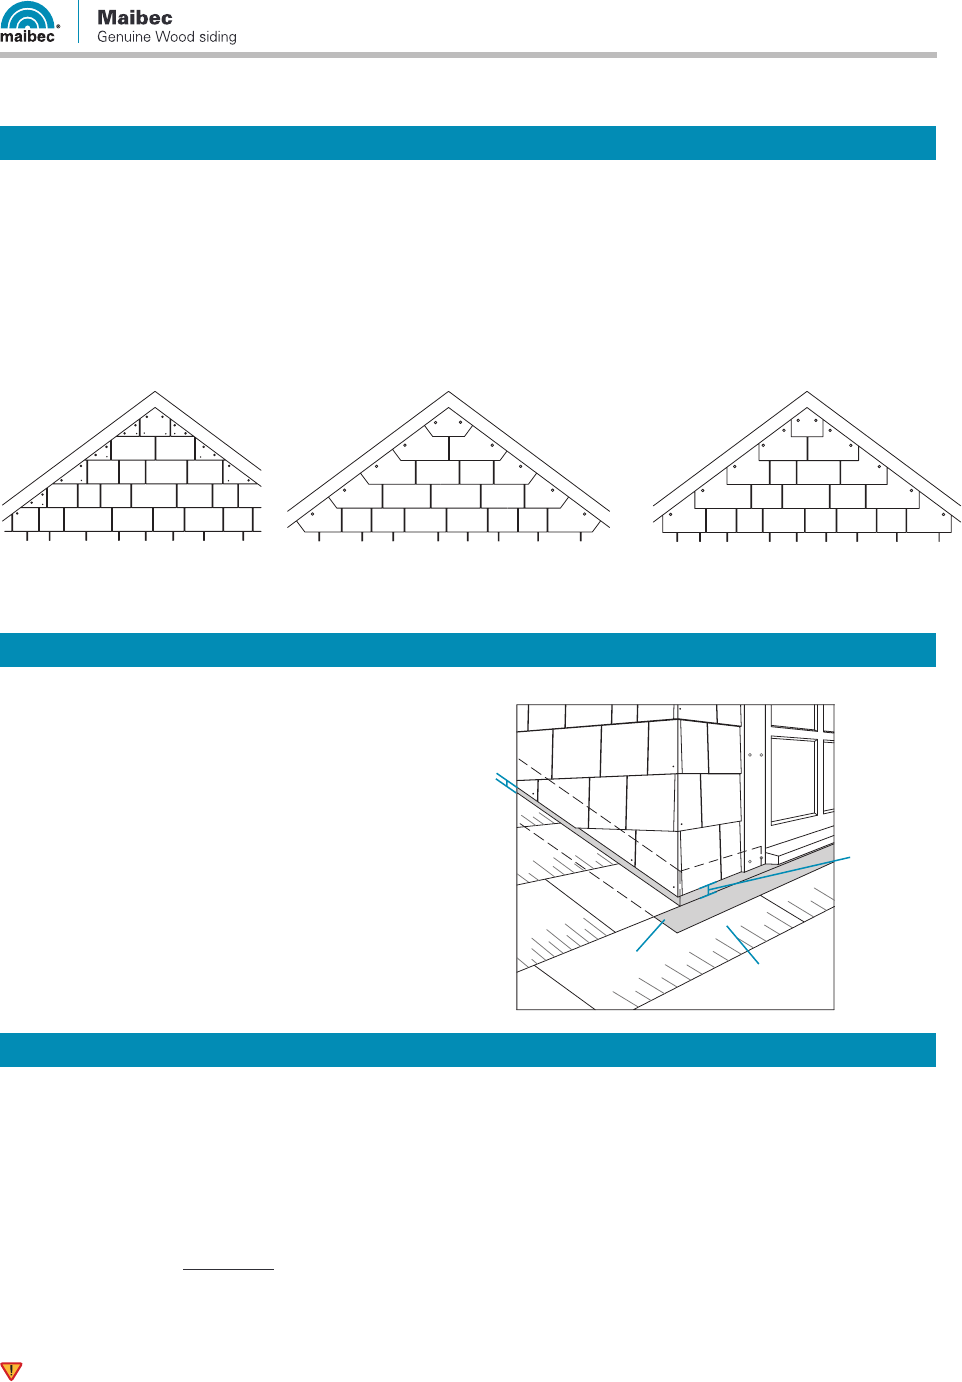
13. GABLES
Finishing under sloping soffits such as gables calls for special attention because the remaining triangular shingles
have visible nails. These shingles are often narrower and more fragile. You must glue the back, cover with a trim
and sometimes nail the lower corner for greater stability and to keep them from curling. There are several ways this
can be done.
Cut the shingles at the end of the course on the same angle as the gable. This way the end shingles need fewer nails.
[FIGURES 23 and 24]
OR Leave the section open at the end of the course. [FIGURE 25]
See the Maibec Wides Installation Guide at maibec.com/us/support.
14. DORMER/ROOF JUNCTION FINISH DETAILS
The shingle must be spaced at least 1/2" when it
ends adjacent to the roof surface (or according to
the building code). The spacing is necessary to
properly drain water and prevent the build-up
of ice against the shingles siding.
IMPORTANT: COMPLIANCE WITH MAIBEC’S INSTALLATION, STORAGE AND MAINTENANCE
REQUIREMENTS, AND WITH ALL APPLICABLE BUILDING CODES IS MANDATORY. PROBLEMS
CAUSED BY FAILURE TO COMPLY WITH THESE REQUIREMENTS AND CODES MAY NOT BE
COVERED BY THE APPLICABLE WARRANTIES.
® REGISTERED TRADE-MARK PROPERTY OF MAIBEC INC. © COPYRIGHT - MAIBEC INC
PRINTED IN CANADA MARCH 2021 E1017163.3A (US)
1 800 363-1930
maibec.com
202 – 1984, 5
e
Rue, Lévis QC
G6W 5M6 Canada
1/2" SPACING
1/2" SPACING
15. MAINTENANCE
As with all sidings, dirt build-up can occur; this can
be due to a number of factors such as surrounding
vegetation, dust or air pollution. Periodic cleaning may
be required. Clean the dirt off of the siding using a gentle
water spray from a household low-pressure garden hose
(under 100 psi). In rare instances where the dirt is not
removed with a simple spray of water, you can gently
scrub the surface using a soft brush and a non-abrasive
laundry detergent, or a dishwasher detergent diluted
as follows: 1/3 cup detergent for 0.8 gallon of water.
Because they produce suds, dish detergent are not
recommended.
Rinse gently with a low-pressure garden hose (less than
100 psi).
Do not use a pressure washer.
See the Maibec Sidings Maintenance Guide for more
details at maibec.com/us/support/maintenance-program.
Drawings not to scale.
FIGURE 23 FIGURE 24 FIGURE 25
FIGURE 26
METAL
FLASHING
ROOF
CLADDING
| U.S. VERSION
