
Page 1 of 3
e-Learning Services • Spring 2022
Setting Discussion Dates in Canvas
Most Discussions have a requirement of the initial post being due by a specific date followed by
a certain number of peer replies due a couple of days after the initial posting. Discussions are
usually set this way to encourage student interaction and control the pace of the activity. The
process explained below is the recommended way to handle tiered due dates for Discussions.
Please keep in mind that this process requires some work the first time, but after all the pieces
are in place, it is easy to shift dates in Canvas so it will not require much work to maintain.
Step 1: Create the Discussion
• Students will interact in the Discussion, so post the directions for the activity. Just be
sure not to include static date information in the directions. With all of the places
students can see due dates in Canvas, it is not necessary to include date information in
the directions. Doing so will cause you more revision work as you prep the course term-
to-term.
• Set the Points Possible setting to the point value of the Discussion.
• Set the Due date for the date and time by which you want students to complete their
peer replies. Please keep in mind the Due date does not shut off students’ ability to post
in the Discussion, it acts as a trigger to mark a submission late.
• Set the Available From date to the date on which you want students to be able to post
their initial posting in the Discussion.
• Set the Until date to the same date and time set for the Due date. The Until date is the
date condition that takes away students’ ability to post in the Discussion.
Note: Instructions on how to build discussions in Canvas are found at: How to Create a
Discussion Post
Step 2: Create an Assignment for the Initial Post
The purpose of the Assignment is only to communicate the due date for the initial posting. This
is not graded, and is not where you post the instructions.
• Go to assignments and Create a new Assignment
o If you are unsure of how to do this, please see: How to create an assignment.
• Name the Assignment with the following naming convention:
o Title of the Discussion Initial Post (e.g., Lesson 1 Discussion Initial Post)
• Do not post the directions for the Discussion as the directions for the Initial Post
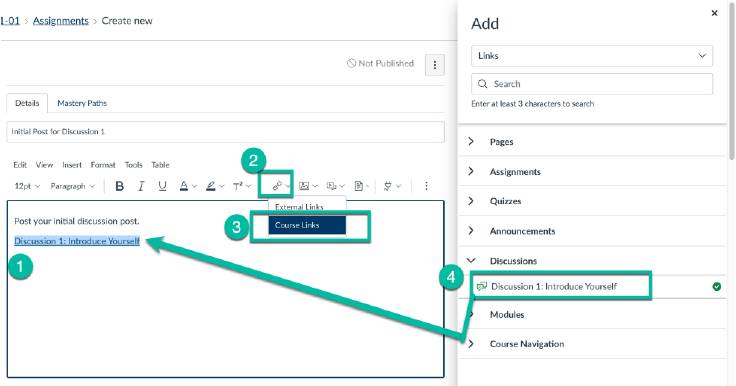
Assignment! Instead, post a link to the discussion post you already created. (See Screen
shot below)
Page 2 of 3
e-Learning Services • Spring 2022
o (1) Type instructions such as “Post your initial post by following this link” or
“Click the link to access the discussion board”
o (2) Click on the link icon in the toolbar
o (3) Select “Course links” and this will pop open the Add bar on the right.
o (4) Expand the Discussion section, and select the Discussion you made in Step 1.
This will add the link into the text box.
o Be sure to save.
• Set the Points setting to 0.
• Set the Assignment Group to the same Assignment Group in which you have the
Discussions organized.
• Set the Display Grade As setting to Not Graded.
o NOTE: It is important to set the Points to 0 and the Display Grade As setting to
Not Graded because you will not use this Assignment for grading, and having the
Assignment set to Not Graded keeps it from appearing in the gradebook.
• Set the Due date for the date and time by which you want students to complete their
initial posting.
• Be sure to Save and Publish!
• Depending on how you have the class setup, you may want to add the assignment to
the corresponding Module.
Timesaver Tip: After you have created the first Initial Post Assignment, you can click the
Assignments page, click the option button (three dots) for the Initial Post Assignment you
created, and select Duplicate. You can then make the needed revisions (such as the
updating the course link, title, and due dates) to the duplicate and save.
Page 3 of 3
e-Learning Services • Spring 2022
Why can’t I add manual entries on the Calendar instead of creating
Initial Post Assignments?
Technically, you can make manual entries on the Calendar to direct students to do the initial
post for each Discussion. The reasons creating Initial Post Assignments are preferred over
manual calendar entries are:
• When creating a manual calendar entry, there are more clicks to add a description than
there are when creating an Assignment.
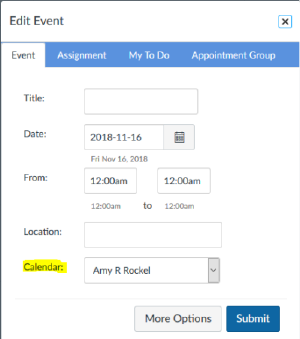
• It is very easy to get a manual calendar entry posted to the wrong calendar. Your
personal calendar is the default when creating a new entry, so you have to be very
careful to choose the correct Calendar for the entry.
• Manual calendar entries do feed to the Course Summary section of the Syllabus page
and students’ To Do list on the Home page, but clicking the link for a manual calendar
from either of those areas takes users to the Calendar. This can cause navigation issues
as it navigates the user away from the course and into the Calendar, which is a global
tool in Canvas.
• Manual calendar entries do not show in the Course Activity Stream.
• You cannot duplicate manual calendar entries. You would have to create each entry
individually. So many clicks!
