
Updated January 26, 2023
Back to Table of Contents
1
Cascade CMS Manual
1. Navigating Cascade .................................................................................................................................................................... 3
Accessing Cascade CMS ......................................................................................................................................................................... 3
Your Dashboard ..................................................................................................................................................................................... 4
How to Find Things ................................................................................................................................................................................ 5
Finding your Office/Department/Program Folder ............................................................................................................................ 5
Finding a Folder/Website’s Homepage ............................................................................................................................................. 6
Utilizing the “Training” folder ................................................................................................................................................................ 8
Finding the “Training” Folder ............................................................................................................................................................ 8
Making Your Own Test Folder/Page.................................................................................................................................................. 8
2. Main Web Content .................................................................................................................................................................... 9
Preexisting Webpages ........................................................................................................................................................................... 9
Creating New Pages & Folders ............................................................................................................................................................ 12
New page (sub-page) ...................................................................................................................................................................... 12
New folder (sub-folder) ................................................................................................................................................................... 12
Drafts (works-in-progress) .............................................................................................................................................................. 12
Two-Column Content ........................................................................................................................................................................... 13
Profile Listings ...................................................................................................................................................................................... 14
Profile Listings on a Regular Webpage ............................................................................................................................................ 14
Referencing a Page on the Directory Site........................................................................................................................................ 14
Editing Individual Profiles ................................................................................................................................................................ 15
Retired Faculty/Professors Emeritus/a ........................................................................................................................................... 15
Adding Videos ...................................................................................................................................................................................... 16
Hyperlinks ............................................................................................................................................................................................ 18
Email Addresses .............................................................................................................................................................................. 18
Internal Links (CC Pages and Documents) ....................................................................................................................................... 18
External Links (Non-CC Web Content) ............................................................................................................................................ 19
Anchors ................................................................................................................................................................................................ 20
Buttons and Image Cards .................................................................................................................................................................... 22
Forms ................................................................................................................................................................................................... 23
Creating/Editing Clive Forms ........................................................................................................................................................... 23
Adding Clive Forms .......................................................................................................................................................................... 23
Exporting Form Responses as a Spreadsheet .................................................................................................................................. 24
Embedding Non-Clive Forms ........................................................................................................................................................... 24
3. Reusable Content Blocks .......................................................................................................................................................... 26
Creating Reusable Content Blocks ....................................................................................................................................................... 26
Utilizing Reusable Content Blocks ........................................................................................................................................................ 27
Adding reusable content blocks to a sidebar .................................................................................................................................. 27
Adding reusable content blocks to a webpage’s main body ........................................................................................................... 27
Editing Reusable Content Blocks .......................................................................................................................................................... 29
4. Menu Navigation Adjustments ................................................................................................................................................ 30
Adding to the Menu Navigation .......................................................................................................................................................... 30

Updated January 26, 2023
Back to Table of Contents
2
Folders and its Subpages ................................................................................................................................................................. 30
Single Pages ..................................................................................................................................................................................... 31
Pages on Other CC Sites or Document Files (References) ............................................................................................................... 31
Pages Outside of the CC Site (External Links) .................................................................................................................................. 32
Changing the Order of Menu Items ..................................................................................................................................................... 33
Unpublishing Webpages and Removing Links from the Menu ............................................................................................................ 34
5. File Management (JPEG/JPG, PNG, PDF, DOCX, and HTML) ....................................................................................................... 35
Resizing Images BEFORE Uploading .................................................................................................................................................... 35
On a Mac ......................................................................................................................................................................................... 35
On a PC ............................................................................................................................................................................................ 35
In Cascade CMS ............................................................................................................................................................................... 36
Uploading Images and PDFs to Cascade ............................................................................................................................................. 37
Directly Uploading to the Images or Documents Folder ................................................................................................................. 37
Uploading While in the Edit Window .............................................................................................................................................. 37
Uploading a New Version of the Same Document/File ................................................................................................................... 37
Moving Files Around ............................................................................................................................................................................ 39
6. Special Webpages .................................................................................................................................................................... 40
Major/Minor Requirements ................................................................................................................................................................. 40
Campus News Stories .......................................................................................................................................................................... 41
Event Listings ....................................................................................................................................................................................... 42
7. Troubleshooting ...................................................................................................................................................................... 43
Need even more help? ................................................................................................................................................................ 44
Updated January 26, 2023
Back to Table of Contents
3
1. Navigating Cascade
Accessing Cascade CMS
Currently, Google Chrome is the most optimized browser for Cascade CMS
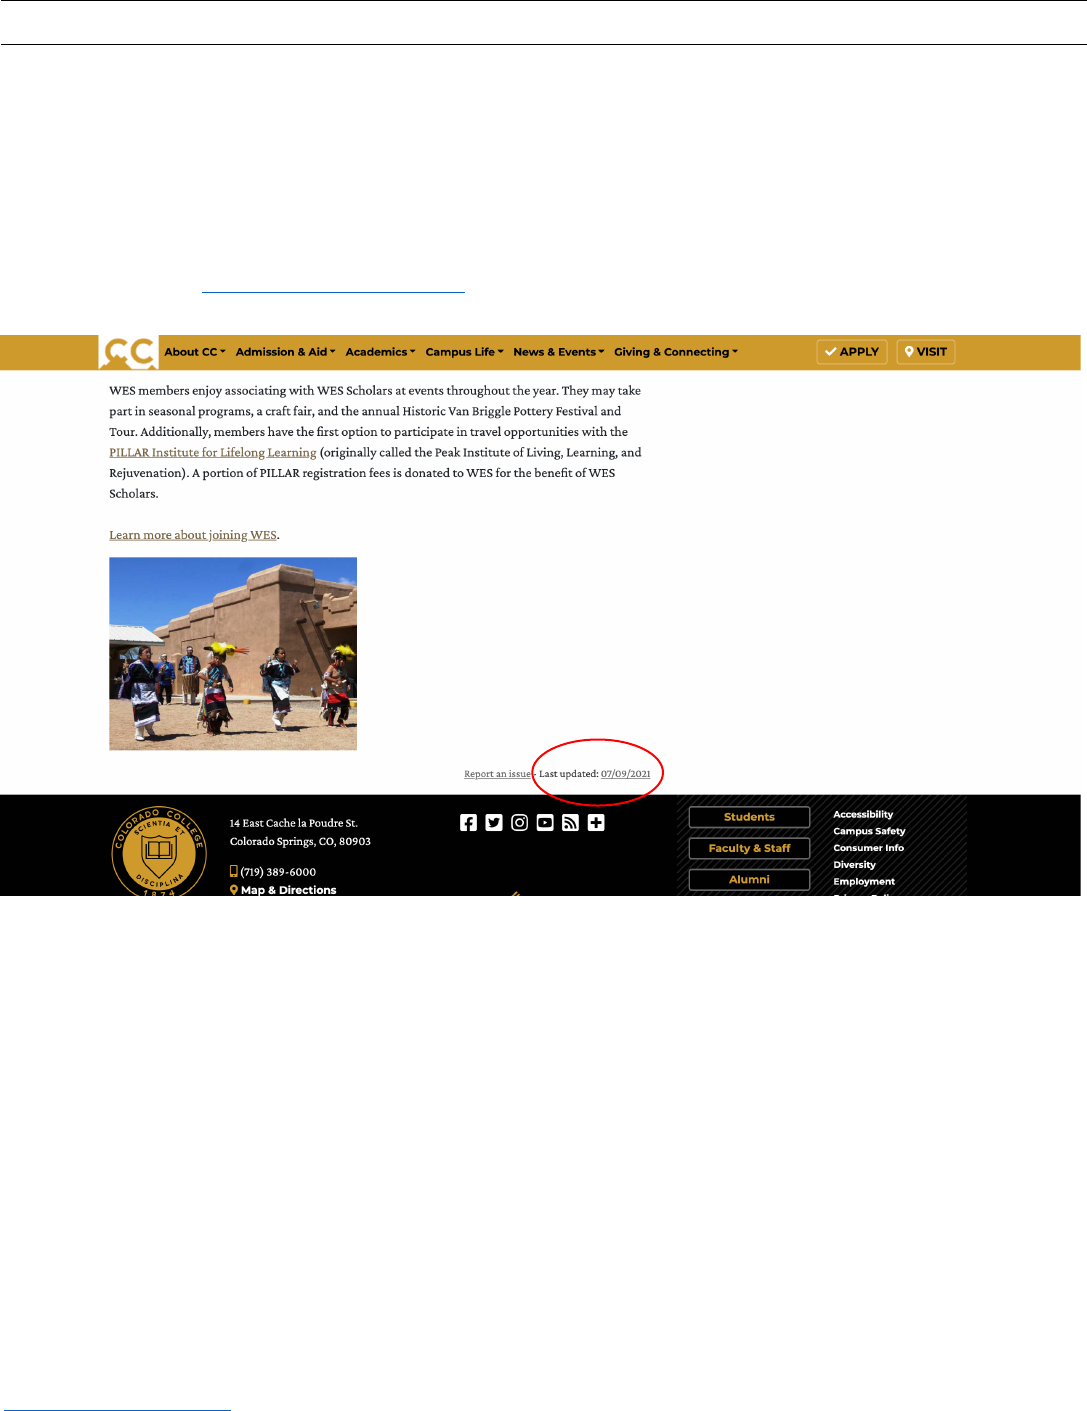
a. Go to the webpage you want to edit on the live CC website.
b. Click the underlined date next to “Last Updated” at the bottom of the page.
c. If you get an Internal Error message, that means you do not have an account in Cascade CMS. Email paraprof
Nicole Leung (nleung@coloradocollege.edu
) and she will get you set up.
Updated January 26, 2023
Back to Table of Contents
4
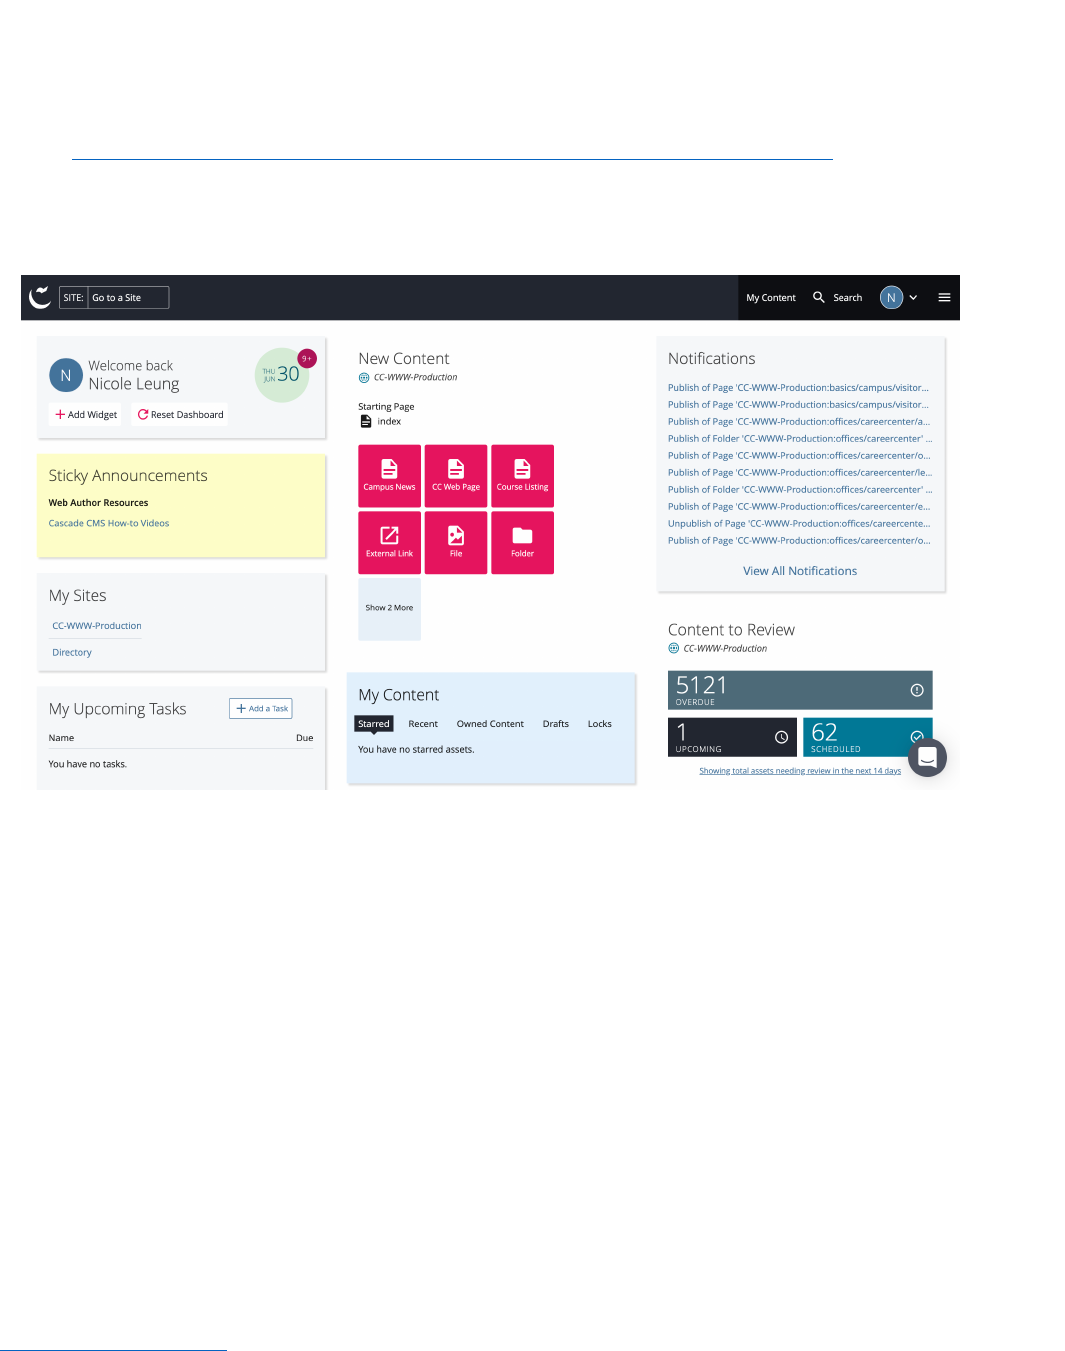
Your Dashboard
You can customize this as you please. Your dashboard is an overview of your webpages, action items, notifications, and
site content.
a. Add or customize widgets on your dashboard to reflect data from one or more of your sites.
b. Learn more about the Dashboard on the Hannon Hill Cascade Basics site:
https://www.hannonhill.com/cascadecms/latest/cascade-basics/the-dashboard.html. You can always return to
your dashboard by selecting the Cascade logo (tilde over the letter C) in the very top, left-hand corner of the
Admin Screen.
c. The yellow box that says Sticky Announcements includes a link to a video playlist of Cascade CMS tutorials.
Updated January 26, 2023
Back to Table of Contents
5
How to Find Things
The listed options are the most direct ways to find your content if not using the shortcut described in Accessing Cascade
CMS. You can also use the Search function (magnifying glass in top right). * Note that this function filters by file/page
name extensions so if the page/file you’re trying to find is incorrectly named, this will make it difficult to find what
you need with the Search function. A poorly organized site folder (i.e., documents and images are everywhere and
not in their designated folders) will also make it very difficult to find things. *
Finding your Office/Department/Program Folder
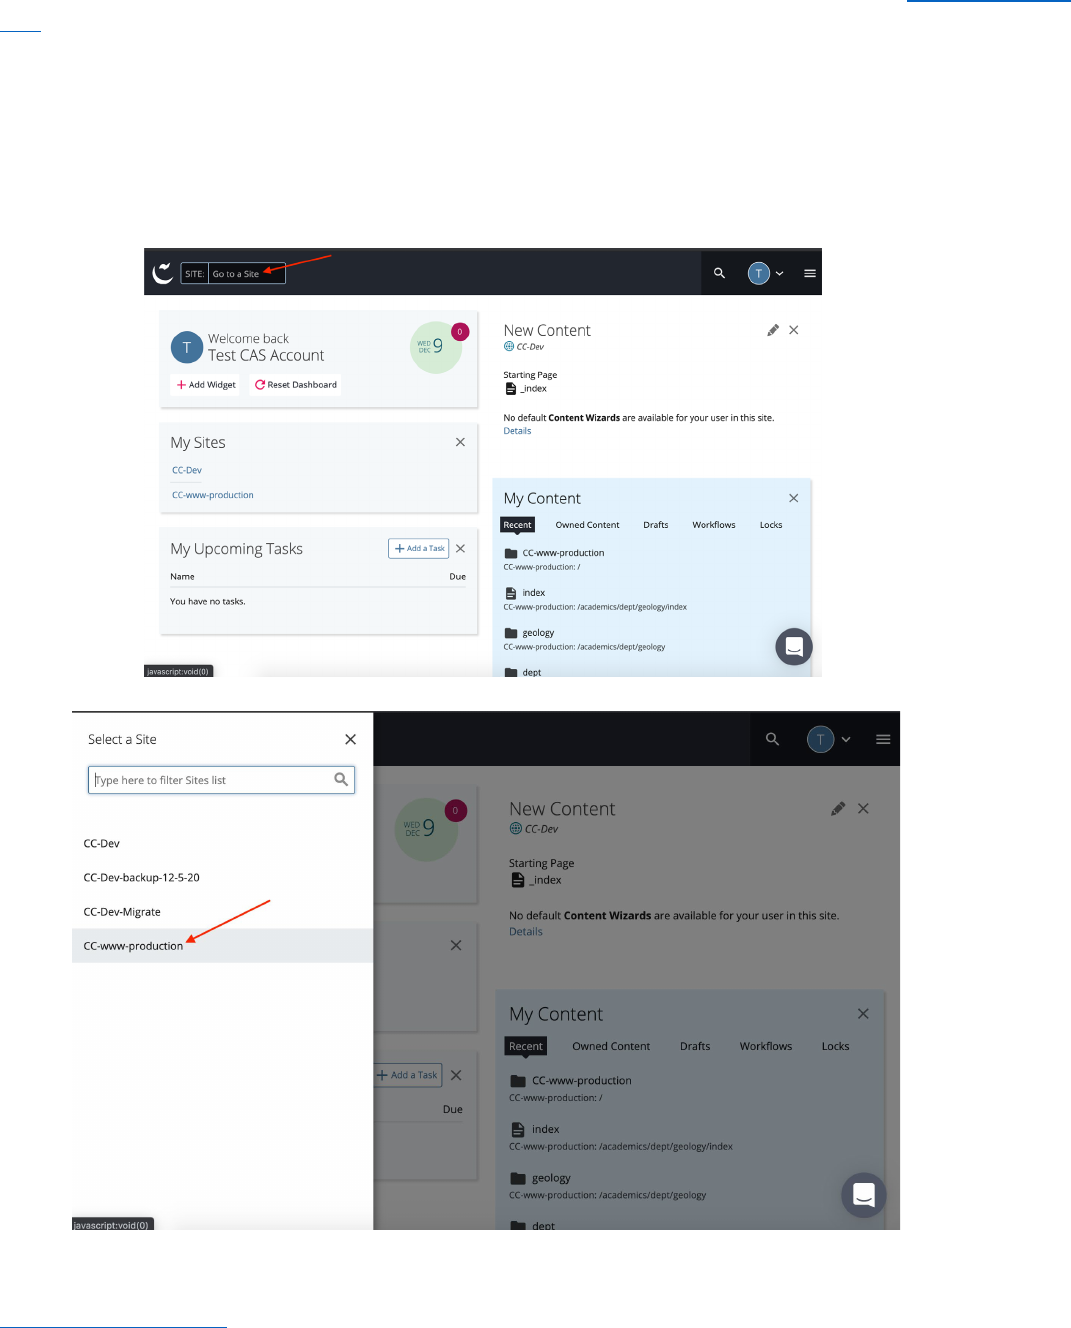
a. Click “SITE: Go to a Site”:
b. Click folder “CC-WWW-Production”:
c. CC-WWW-Production will open to many folders, which are sections of URLs. Follow a webpage’s URL path (each
section of the URL divided by backslashes) on the live site to find a page’s location in Cascade. Each word
Updated January 26, 2023
Back to Table of Contents
6
between backslashes is the name of a folder (besides the last section of the URL, which is the page name). Most
folders are organized alphabetically.
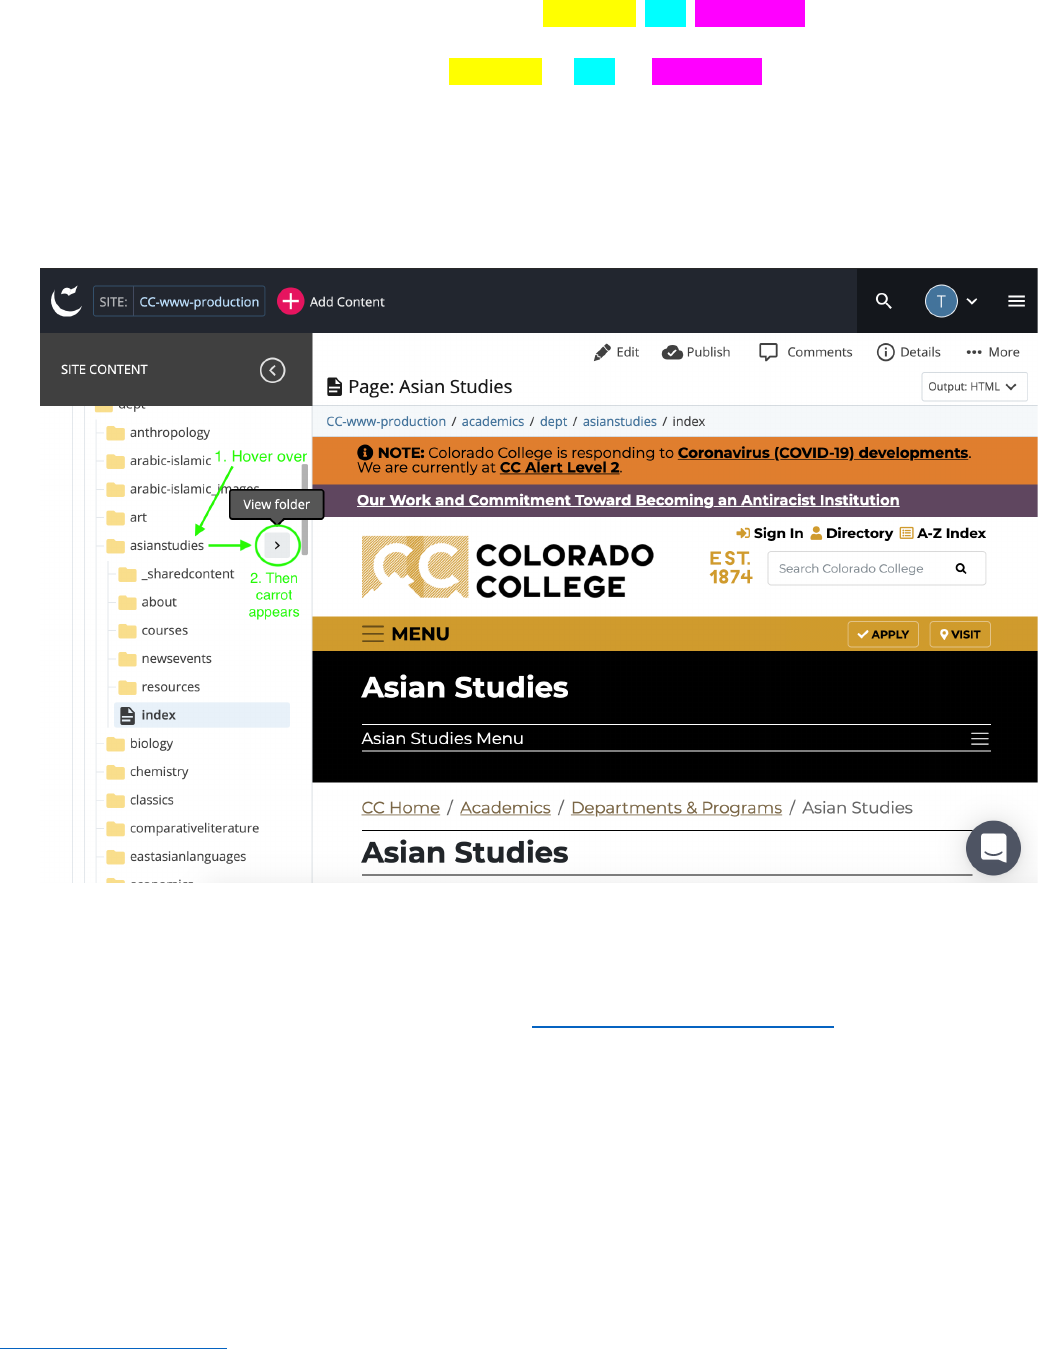
i. Example: https://www.coloradocollege.edu/academics/dept/asianstudies/
= folders: academics dept asianstudies
d. First, click the “academics” folder, then click the “dept” folder, then when you click the “asianstudies” folder, it
will expand to show you the subpages and subfolders (folders/pages within any folder) within the general
/asianstudies folder. When you hover over a folder name, you can click the right arrow/carrot that appears (see
below) to bring you to see all the folders, pages, and content saved in that folder:
e. All the Asian Studies* pages are within the /asianstudies* folder, aka website. Edit any page by double-clicking
its name. *insert any department/office/program name
f. **How to quickly find pages in Cascade pro-tip: Browse the live site and click the “Last updated: 1/11/2021”
link at the bottom right-hand side of any webpage (See #1 on Accessing Cascade CMS
)
Finding a Folder/Website’s Homepage
a. The index page is the homepage of any folder. The index inside your main folder, i.e., /asianstudies, will be your
site’s homepage.
i. Index is the computer/browser word to designate the main landing page within a given folder. Browsers
will try to guess what the main page is in an index-less folder. This can lead to a 404 error, so it is very
important to have an index in every folder with active webpages. The exceptions are archived,
unpublished folders, folders for document and media files, and style sheets.

Updated January 26, 2023
Back to Table of Contents
7
ii. DO NOT name your homepage “homepage,” “home,” “welcome,” and anything other than index. As
stated above, index is a collectively understood word by computers and web browsers.
b. You will not always see index.html at the end of a URL on the live site. When you see a URL that ends in “/”, i.e.,
https://www.coloradocollege.edu/academics/dept/asianstudies/, you know you are really being taken to:
https://www.coloradocollege.edu/academics/dept/asianstudies/index.html. Those URLs direct to the same
place, the Asian Studies (/asianstudies/) homepage:
=

Updated January 26, 2023
Back to Table of Contents
8
Utilizing the “Training” folder
For bigger website projects that will take some experimentation and time to complete (as opposed to regular content
updates), you might want to build your page(s)/folder(s) in the “training” folder in Cascade. Here, you can test out
anything you want to without fear of these changes accidentally showing up on the live site (you can copy a page you
want to work on), especially if you’re not comfortable with adjusting publishing settings.
Finding the “Training” Folder
a. Navigate to CC-WWW-Production -> training. It’s at the very bottom.
b. Create a folder for yourself that you can find easily. Go ahead and make your test pages and try whatever you
want. All assets in the “training” folder are not viewable by someone on the live site unless they have a specific
link to a published page.
c. You can copy/move a page or folder from the “training” folder to your office’s/department’s folder once you’re
happy with the setup (see Moving Files Around
).
Making Your Own Test Folder/Page
You can also create test pages and folders within your department’s/office’s site folder if you’re comfortable changing
the publishing settings (see Creating New Pages and Folders
). That way, you won’t need to go through the extra step of
moving assets around. Label your test page or folder so you know that it’s a work-in-progress, i.e., test-schedule.
Remember to rename your page/folder and update publishing settings before publishing to indicate that it’s no longer a
test or draft.

Updated January 26, 2023
Back to Table of Contents
9
2. Main Web Content
Preexisting Webpages
a. Click on the page name in the folder that you want to edit.
b. Select “Edit” (top, center, pencil icon):
c. A popup will appear with all the settings and content container options for your page. This is where you will
build/edit your webpage and spend most of you time in Cascade.
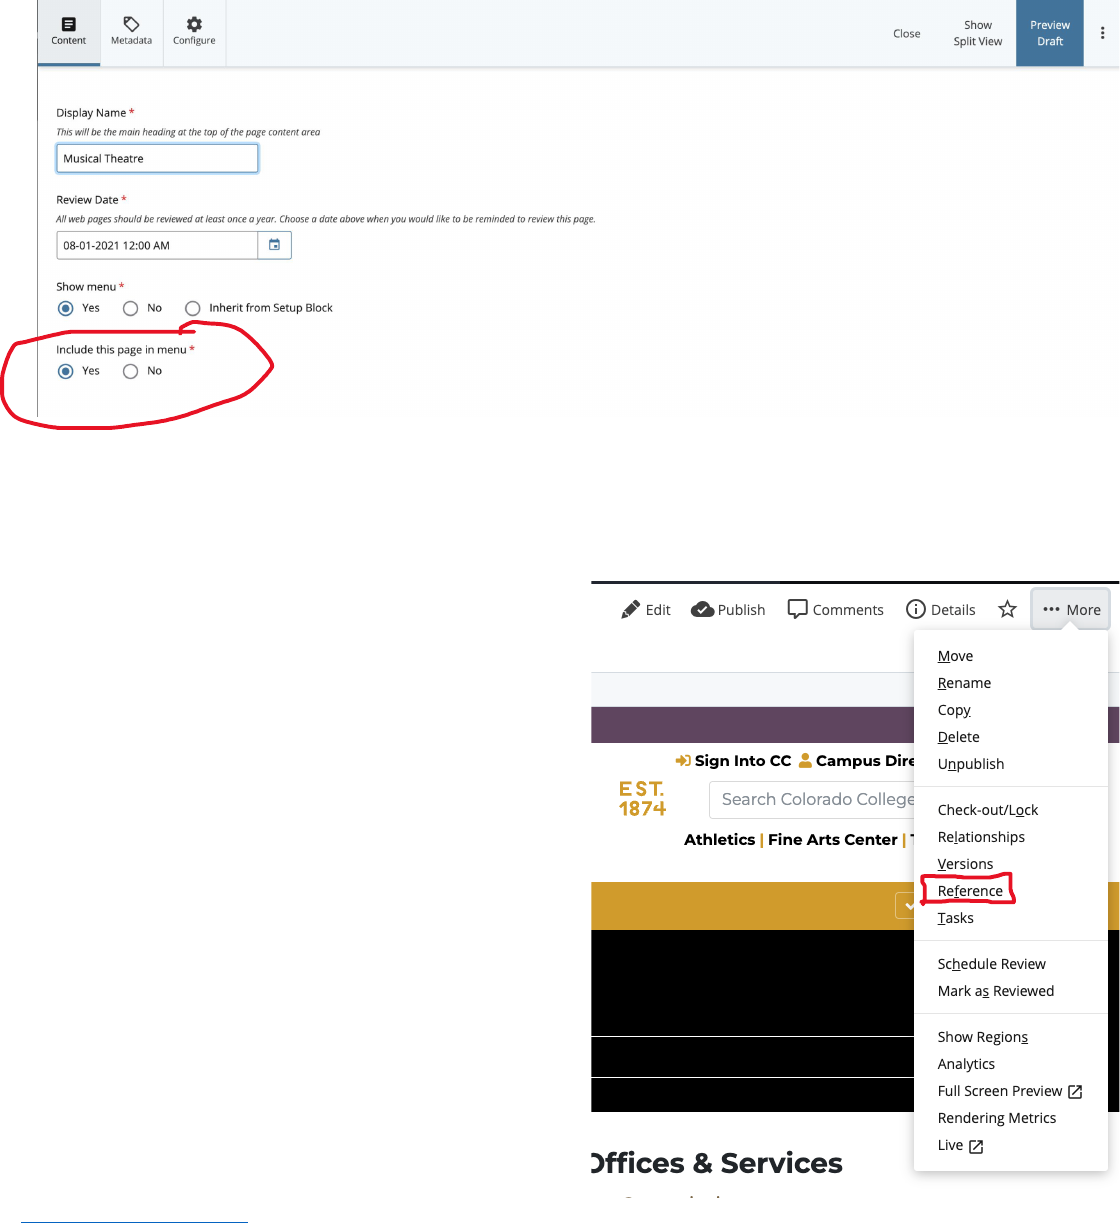
d. The “Display Name” will be the page title (the words in the black header). This can be changed any time without
breaking links. You’ll likely see that when you update the display name, the previous name might still show up in
the browser tab, the breadcrumb navigation, and a few other places. To update this, go to the Metadata tab in
the Edit popup and change the text in the Title field to be the same as the new Display name.
e. You must set a date and time for the “Review Date” field. This tells Cascade to send you a reminder to check on
this page and make any necessary updates. We recommend setting this to at least once a year. You can change
this date whenever is necessary.
f. Next, you’ll reach the page settings portion that offer options for menu configurations, banner images, and a
sidebar option. Set these as needed/desired.
g. Below that, you’ll see the outline for organizing content containers on your page:
i. Sidebar Content – Reusable Blocks
Content in sidebars are reusable blocks (see Creating Reusable Content Blocks for more details).
You can either edit the Reusable Content Block in the folder it’s stored or right-click/two-finger
click on the block and select Edit in the popup menu.
Updated January 26, 2023
Back to Table of Contents
10
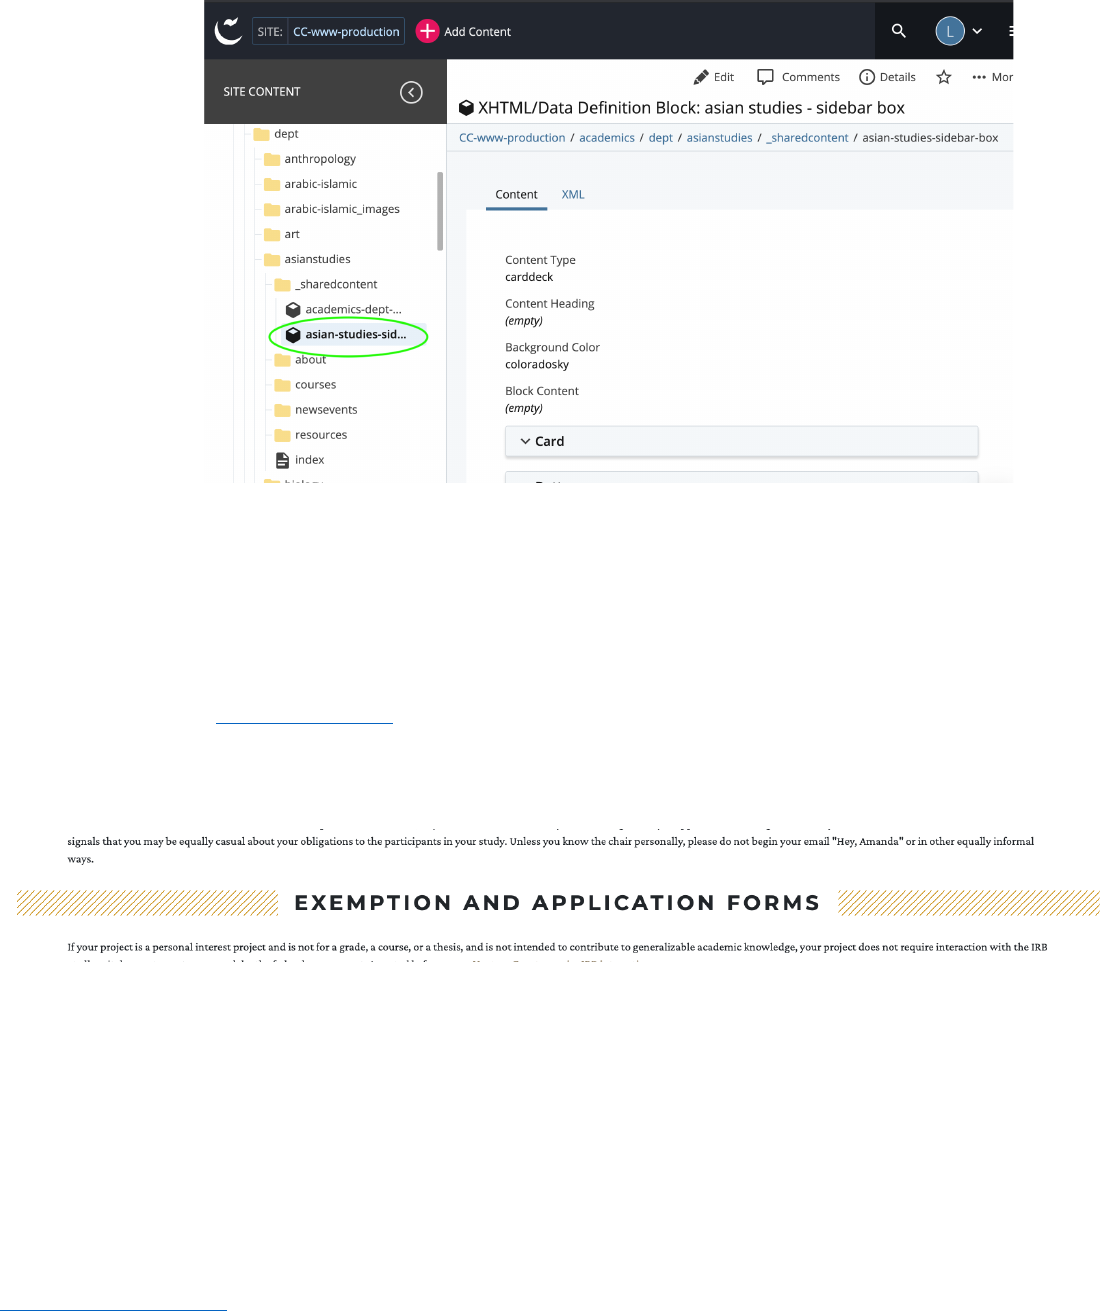
Sidebar content should live in the “/_sharedcontent/” folder, so we want to navigate to that
folder and find the block named “asian-studies-sidebar-box” (last part of the URL) to edit that
content that is already in the sidebar:
To add more sidebar content, click the green plus sign (+). This will open a right sidebar where
you can choose preexisting reusable content blocks.
To remove a content block, select the encircled “x” to the right of the block title. Clicking this “x”
will not delete this content from Cascade entirely; it will only remove it from the sidebar.
ii. Intro Text – brief introduction to your site or the content on your page.
iii. Content Containers – contain all content on your pages.
Content Type drop-down contains the following options, examples of which can be view on the
Content Types page
of the Web Author Community website
The “Heading” field will display as a striped section header (image below). Ignore the “Advanced
Page Properties” box unless you have metadata or CSS code to insert.
Tip: Break up different sections of text into different containers. To add content containers to
your page, select the green plus sign (+) in the top, right-hand corner of your container.
Rearrange the order with the up and down arrow buttons. Remove content containers with the
red x.
h. To make editing easier, I suggest turning on the “Show Edit Preview” option in the top right, next to “Preview
Draft.” This is fantastic if you’re working on a dual monitor or a larger desktop/laptop screen to give you a semi-
live preview of the change you’re making. You can change the proportion of the split screens by dragging the
divider in between them left and right.

Updated January 26, 2023
Back to Table of Contents
11
i. If the edit preview takes a long time to load, close out of the preview by clicking on the “Hide Edit
Preview” button and reopen the split screen view. This refreshes the preview and should bring up the
preview.
ii. Any edits you make will take a couple seconds to show up on the preview so be patient while the page
reloads.
iii. After you’re satisfied with the edits made, you can click on the three dots next to “Preview Draft” and
select “Advanced Submit.” This is a shortcut that allows you to skip “Preview Draft” as you’ve already
previewed the draft in split screen.
i. For those not using split screen preview: once you have added all your content, select “Preview Draft” in the
blue box in the upper right-hand corner. This will give you a preview of your page before it goes live; select
“Submit” again to see how your page will look or “Check Content & Submit” to review spelling, broken links, and
accessibility. You will be prompted to add an optional comment on the changes you made. Adding your own
comments is helpful if you think you’ll ever need to access a previous version of the page.
j. To make your updates go live, select “Publish” (with a check-marked cloud beside it to the right of “Edit”).
Updated January 26, 2023
Back to Table of Contents
12
Creating New Pages & Folders
Go to the folder in Cascade where you’d like your new folder or page. This will ensure your page or folder will be in the
correct place.
New page (sub-page)
a. Select “Add Content” at top (pink circle with a plus sign), then select “CC Web Page.”
b. Add a “Page Name,” which will be its portion of the URL, so it must be formatted with lowercase only, word
spaces replaced with hyphens, and no leading and trailing spaces.
c. “Placement Folder” will have already been selected, as this dictates the page’s location.
d. Set a “Review Date,” on which Cascade will remind you to review the content.
e. The “Display Name” will be the text that appears on the webpage.
f. Select “Yes” or “No” in the Show Page in Menu field .
g. The remaining options under “CC Standard Page” are the same options you get when updating content for a CC
Standard Content container (see #5 on editing Standard Webpage Content).
New folder (sub-folder)
a. Select “Add Content” at top (pink circle with a plus sign), then select “Folder.”
b. Add a “Folder Name,” which will be a portion of the URL, so it must be formatted with all lowercase, word
spaces replaced with hyphens, and no leading and trailing spaces.
c. “Placement Folder” will have already been selected, as this dictates the folder’s location.
d. Set a “Review Date,” on which Cascade will remind you to review the content.
e. The “Title” will be the text that appears in the menu.
f. You may then opt “yes” or “no” to display your folder in the menu. Note that must have at least one other page
(hopefully at least the index) within the folder also set to show on menu. This creates a menu drop-down.
g. Select “Submit” and opt to check for errors.
h. Select “Publish” to make folder appear live.
Drafts (works-in-progress)
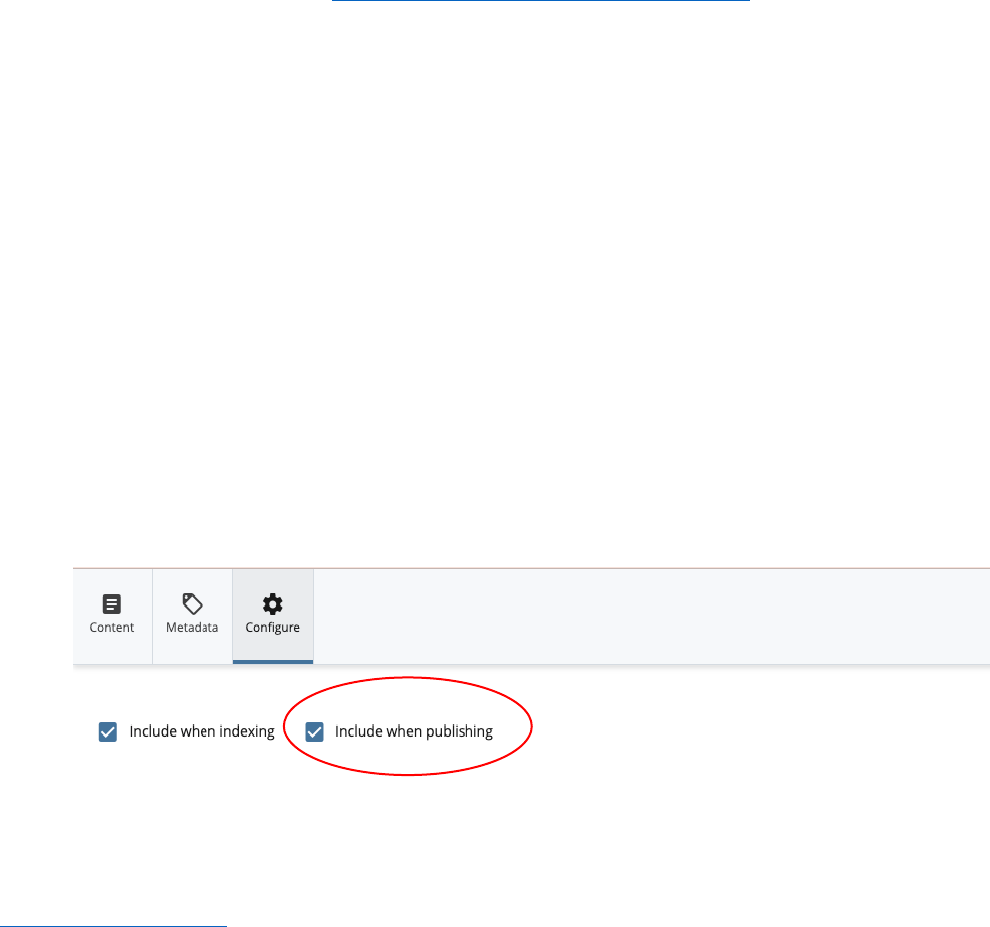
a. If you’re working on a folder or webpage that isn’t ready to go live, go to the Configure tab and uncheck “Include
when publishing.” This will keep the unfinished work from showing up on the live site.
b. Once you’re ready to publish, check this box, then go through the process of submitting and publishing. If you
forget to check this box, Cascade will give you an error message letting you know this asset isn’t set to publish.
c. If you unpublish a folder or page, make sure to uncheck this box so it doesn’t get republished overnight when
the CC site goes through its daily site-wide update.

Updated January 26, 2023
Back to Table of Contents
13
Two-Column Content
a. In editing mode, open or create a content container.
b. Select “Side-by-side text content” in the content type dropdown. OR, use card decks and select “2 card across.”
c. Add a heading if you choose. To add section headings, add “Heading” in only the top content of that section. For
example, on this page I would only add the “Class of…” headings on the top profile:
d. Select a 1/2 – 1/2 or a 1/3 – 2/3 content split for a “Side-by-side style.”
e. Fill out your left and right content containers.
f. Continue adding as many content containers of side-by-side content as needed.
g. It is highly recommended that you turn on descriptions for content containers when making numerous rows of
“side-by-side” content. The option is located at the bottom of the Editing menu and is a “Yes/No” toggle.

Updated January 26, 2023
Back to Table of Contents
14
Profile Listings
There are a few options for creating a People page depending on a person’s category in Banner.
• Academic departments and a few administrative offices can reference (
see Pages on Other CC Sites for
instructions on referencing) an autogenerated page in the Directory site.
• Other offices and programs can create a regular web page with Profile Listings as the Content Type and select
individual people to add.
• Students, even student-workers, are not automatically in the Directory for you to add them. For privacy reasons,
their Directory profiles will need to be created manually.
Profile Listings on a Regular Webpage
a. Create a new page in the desired folder (see New Page or New
Folder for directions) OR edit an existing people page.
b. Open an existing Content Container or create a new one and
select “Profile Listing” in the Content Type field.
c. Give this content container a heading if needed.
d. Decide if you need the “Expertise” in the Tags Label field.
e. Sorting profile listings by Last Name is the most common practice
when organizing names. However, you can also sort by first name
or custom (manual) order if you desire.
f. Select the first block “Choose Page” under Profile Page and
search for the person in the right sidebar popup. I recommend
using the search function and looking up people by their last
names.
g. To add more people, select the green plus sign “Add new field”
(+). To remove, select the red X sign “Remove” (X).
h. When finished, Preview Draft -> Submit -> Publish.
Referencing a Page on the Directory Site
a. Select “Directory” in the Site field in the top left-hand corner of
Cascade.
b. Find your department or office page (not all offices have an autogenerated page in the Directory).
c. Go to the 3 dots in the top right for More options and select Reference (see Pages on Other CC Sites
for more
detailed instructions).
d. Go to your department’s or office’s folder. You should see the reference link in there.
e. Rearrange the order of the reference link in your menu navigation if needed (see
Changing the Order of Menu
Items for directions).
f. Publish the entire site’s folder to update the live site.
g. Note that your editing abilities are much more limited in an autogenerated Directory page than if you created
your own. You can add or remove people from this page by adding or removing their office/department tag(s) in
the individual’s bio page.
Updated January 26, 2023
Back to Table of Contents
15
Editing Individual Profiles
a. Go to the profile page you want to edit on the live CC website and access Cascade through the “Last Updated”
link (See Accessing Cascade CMS
).
b. Click “Edit” in the top right and make your changes. *Fields with the
description “From Banner” require contacting HR and having them make
the requested changes.*
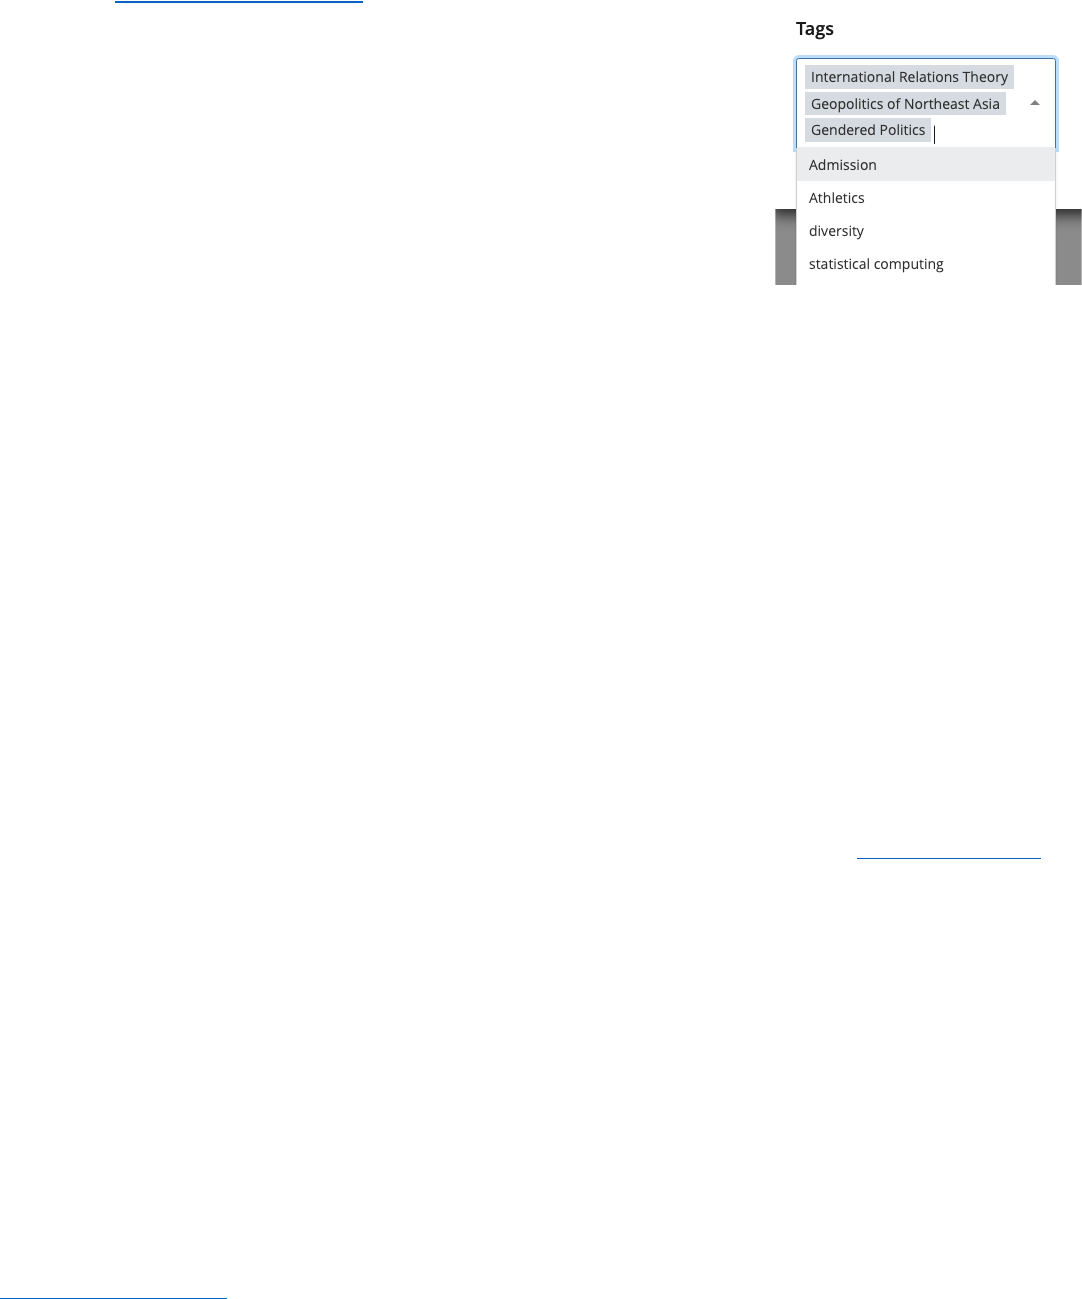
c. At the bottom of the “Edit” popup, there will be a section for Tags. Type in
the expertise areas, separate each tag by hitting enter/return or tab.
Backspace/delete to remove tags.
d. Once finished with your changes, Preview Draft -> Submit -> Publish.
e. Go back to the page this profile listing is on and republish it. This will make
your changes show up on the bio page AND on your people page.
Retired Faculty/Professors Emeritus/a
Many academic departments often have retired faculty members that still teach courses from time to time. As such, it’s
often desired to have them listed on your people page. However, since they are officially retired according to HR and
Banner, it’ll seem like they’ve disappeared from the Directory. All profiles of former employees are automatically moved
to the archive folder in the Directory once they leave/retire. You’ll need to do a few extra clicks to get any teaching
retired faculty member’s profile to be active again.
a. Find your professor emeritus/a in the archive folder in the Directory site.
b. Open up the Edit popup window. The first field in this window is an “Override Profile Display” checkbox. You’ll
notice that the help text to this field states that “retirees with this checked will still be displayed.” So, check
“Yes.”
c. Make any other necessary edits to the person’s profile. Since they’re classified as retired in HR’s system, their
Banner profiles are deactivated so changes you make in Metadata fields that state “From Banner” will no longer
be overridden. For example, updating their title from “Associate Professor” to “Professor Emeritus” is something
you as a web author can do without contacting HR. Your changes will stay.
d. Once you’re done editing their profile, submit your changes. DON’T publish at this moment.
e. Move the profile page from the archive folder to the people folder in the Directory (see Moving Files Around
for
in-depth directions). This will make your faculty’s profile page searchable when using the Profile Listings content
type.
f. Repeat for all other teaching required faculty in your department.
g. Publish the Directory people folder.
h. Go back to your department’s faculty page and add your professors emeritus/a as would other staff and faculty
members.
Updated January 26, 2023
Back to Table of Contents
16
Adding Videos
Your videos must be uploaded to a video hosting site (preferably something like YouTube or Vimeo) BEFORE
proceeding with these steps. DO NOT upload videos as an MP4, MP3, or MOV file into Cascade.
a. Create your webpage and choose your desired content type. You can add videos using any content type with a
WYSIWYG tool bar (i.e., side-by-side content, card deck, standard webpage content); however, using the “Video”
content type is the easiest formatting-wise.
b. If you’d like, add a heading. This will appear as an all-caps striped section heading (
see Preexisting Webpages for
an example).
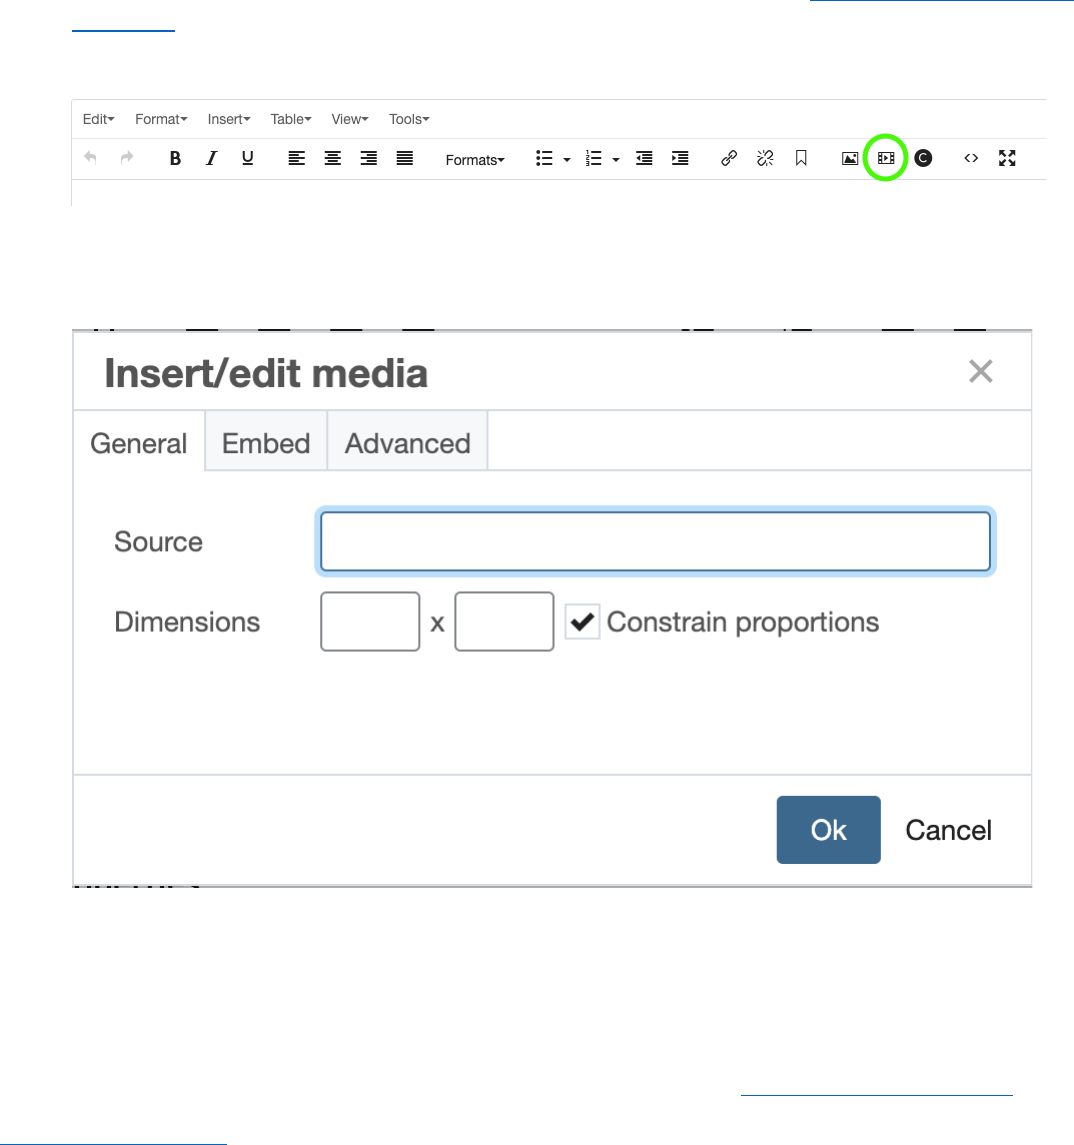
c. If using the WYSIWYG tool bar to add your video, select the “Insert/edit media” button
d. The popup menu gives you the option to either paste in the URL (the “Source” field in the “General” tab) or the
embed code (“Embed” tab) of the video. You only need to put in information in one of the tabs.
e. If you’re using the “Video” content type, your video(s) fill out the desired fields. CC videos typically have the title
or heading, video thumbnail, and associated text (is basically a caption but you get more control over it than the
actual “Caption” field) fields filled out. For accessibility purposes, at least fill out either the caption or associated
text fields describing what’s in the video and what important information the video is portraying.
f. The video thumbnail is typically just a screenshot of the video at some point. If you want to create a nicer
thumbnail, I recommend using the CC Canva account (email Naomi Trujillo ntrujillo@coloradocollege.edu
or

Updated January 26, 2023
Back to Table of Contents
17
Miriam Roth mroth@coloradocollege.edu for access). If there’s no thumbnail, the video will show up on the
webpage as a black/gray box with the play button in the center.
g. The “Video” content type only supports YouTube and Vimeo URLs. If your video is on a different platform, such
as Prezi Video, you’ll need to use a content type like “standard webpage content.”

Updated January 26, 2023
Back to Table of Contents
18
Hyperlinks
Email Addresses
a. Highlight the email address you want to make a link, i.e., “example@coloradocollege.edu”
b. Click the chain link symbol and select “External” for the Link Type field.
c. Enter in the email address in the Link Source field. Make sure the https:// is not included when typing or pasting
the email address.
d. Since emails are outside of Cascade CMS, I’d recommend choosing “New Window” in the Target field.
e. Click “Ok” to confirm your changes. Cascade will detect that the text is an email address and give you a popup
box confirming that the link is an email. Once you confirm, Cascade will automatically adjust the hyperlink code
accordingly.
f. To double-check that the email has the correct hyperlink, publish the page, go to the live CC site, and hover over
the hyperlinked email to see where it redirects (look at bottom left corner of your screen, the desired email
should be preceded by “mailto:”)
Internal Links (CC Pages and Documents)
a. Highlight the text you want to hyperlink. Refer to the Web Accessibility Guidelines on creating ADA-compliant
link text.
b. Click the chain link icon and select “Internal” for the Link Type field.
c. Instead of having a text field for the Link Source field, you have chooser field. Clicking on it will open a right
sidebar where you can browse through all CC pages in Cascade CMS. You can toggle between recently visited
pages (Recent), favorite pages (Starred), or all pages and documents (Browse). There’s also an Upload option for
documents that don’t currently exist in Cascade (see Option 2 under Uploading Images and PDFs
).
d. Click on the page you want to link to. You’ll know it’s selected because the circle next to the page is filled in.
e. To confirm your choice, click on the blue button in the right corner that says Choose. Your text is now
hyperlinked. Internal links are less likely to break and cause problems when pages move around. Cascade tracks
these pages even when they move so Internal links don’t break when the page’s URL changes.
f. To edit the Internal link, click on the Link Source field (don’t worry that another page is selected) to open up the
right sidebar and select a new page.
Updated January 26, 2023
Back to Table of Contents
19
External Links (Non-CC Web Content)
a. Highlight the text you want to hyperlink. Refer to the Web Accessibility Guidelines on creating ADA-compliant
link text.
b. Click the chain link icon and select “External” for the Link Type field.
c. Paste, or type, the page’s URL in the Link Source field. I’d recommend setting the Target field to “New Window”
since this link will be taking the web user away from the CC site.
Updated January 26, 2023
Back to Table of Contents
20
Anchors
Anchors allow you to create a table of contents for a single, long webpage or for creating hyperlinks that reference
specific parts within in the same page.
a. Decide where you want to have your table of contents and how you would like to format it. You can format this
the same way you format regular paragraph text. We will be essentially adding a hyperlink.
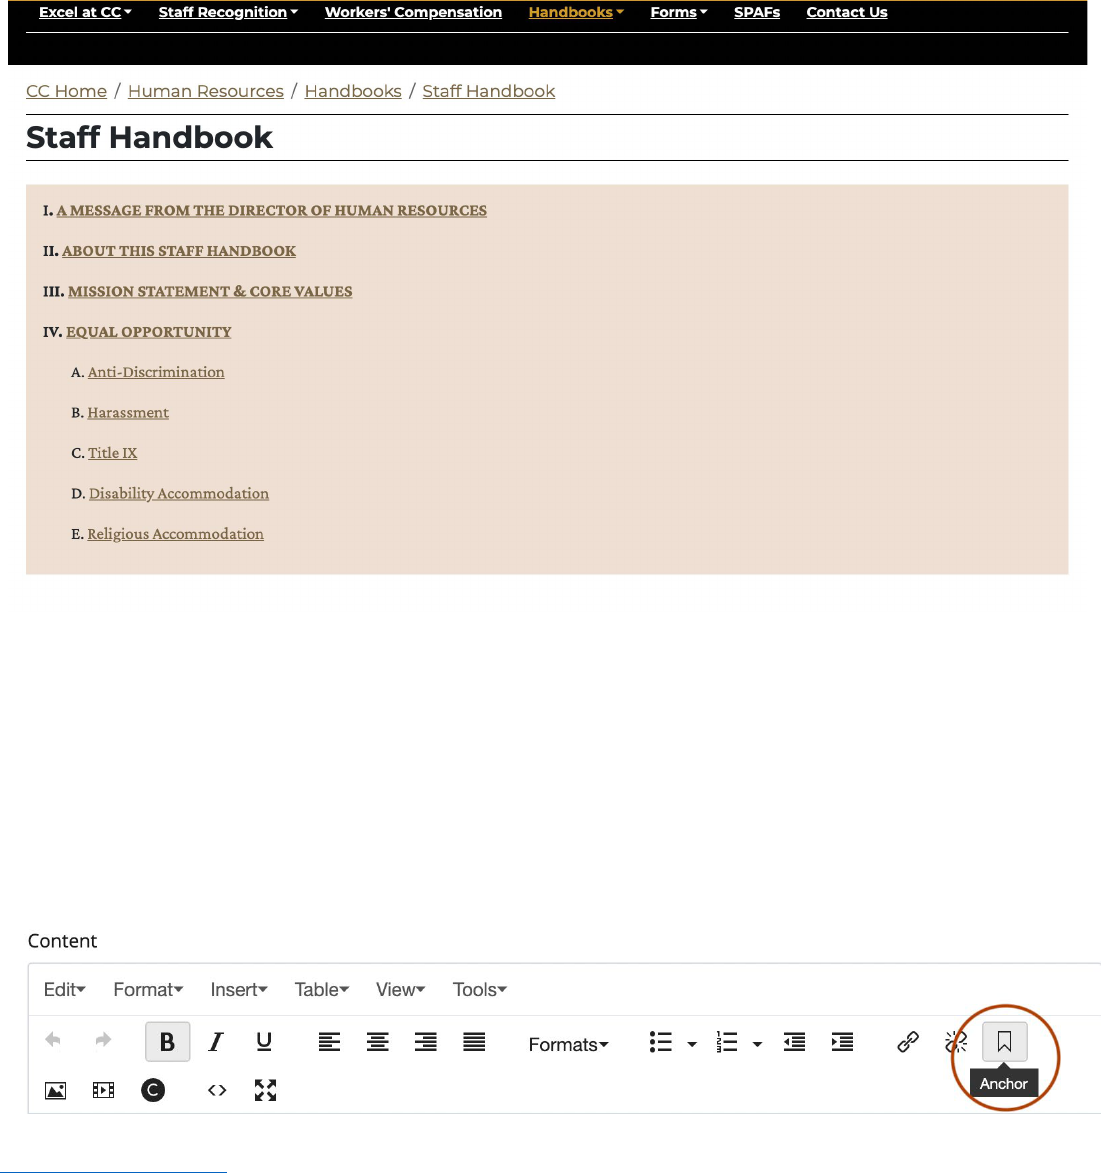
b. Navigate to the place on this webpage where you want to “bookmark” for quick reference (i.e., heading section,
certain paragraph, a person’s profile).
c. Click on the “anchor” icon – it looks like a banner or bookmark – and give this an ID. Try to keep this short,
ideally one word, but specific (i.e., intro, nicole, block3).
i. Notice that I don’t capitalize or use spaces or special characters. This is my way of keeping the IDs as
simple as possible to prevent typos. These IDs act like URLs that you can link to. They will appear as a

Updated January 26, 2023
Back to Table of Contents
21
little ship anchor in a box. They will not affect formatting and spacing on the live site like they do in this
“Edit” view.
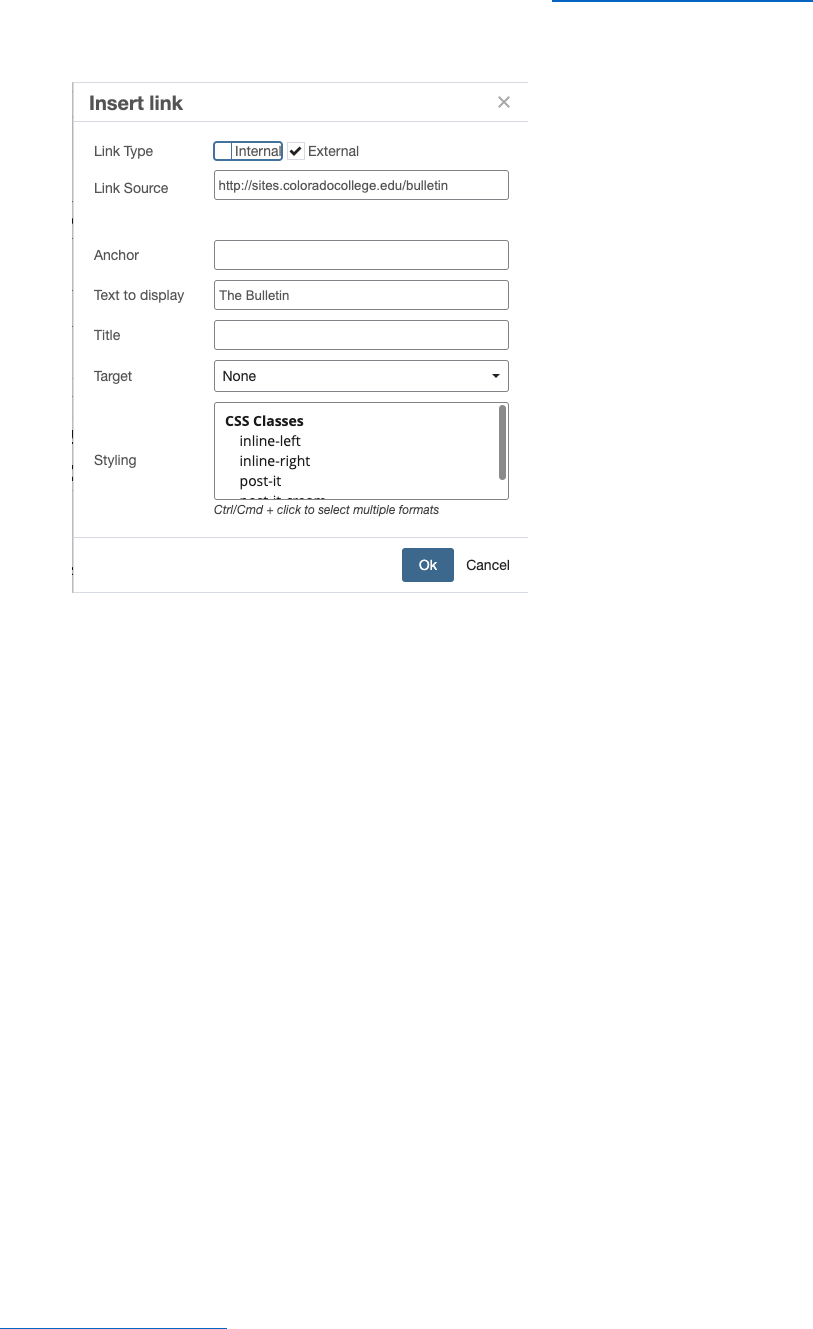
d. Go back to your table of contents/page navigation area. Select the text you want to highlight/make clickable and
click on “insert/edit link” (chain icon) in your toolbar.
e. In the field labeled “Anchor,” input the associated ID (copy and paste is my favorite method). Continue for all
the other titles in your table of contents/clickable navigation. If you’ve ever used an online version of book (they
often come with a clickable table of contents) this is the same idea.
f. Once you click “Ok” out of that pop-up menu, your text should look exactly like a hyperlink. You won’t be able to
text out the link in this “Edit” window and will need to “Preview Draft” so you can test the links Broken links with
anchors DO NOT display a 404 error page; they just simply don’t do anything when clicked on.
i. Remember to test out the links on the live site. You might need to adjust the placement of the anchor.

Updated January 26, 2023
Back to Table of Contents
22
Buttons and Image Cards
These two content types function very similarly. The only difference is that image cards require both an image and text
while buttons only require text. They both can link to internal and external sites as well as document and media files.
Buttons can also show popup content instead of linking elsewhere. See the Content Types page on the WAC site
or
peruse the CC site for examples.
a. Create a new content container or edit an existing one. Select Buttons or Image Cards in the Content Type
dropdown.
b. Fill out required fields. Follow on-screen directions for icons if desired. The default color is CC Gold; change if
desired.
c. For image cards, see Resizing Images
for directions on how to properly prepare images before putting them in
Cascade. DO NOT use large image files as they can take too long to load, breaking the image or the whole page.
d. For buttons, choose either to have the button link to another page or show popup content. Choosing popup
content will give you a text field to insert standard webpage content.
e. Ignore the Class and ID fields unless you have specific CSS formatting you want to apply (i.e., “centered” in the
class field to center single buttons) or want to create an anchor for that section that you can link to.
f. Buttons and Image Cards have a link selector for internal or external link types. Select appropriately and either
choose the internal page/file or paste the external page’s URL.
g. Keep adding buttons and image cards until finished. DO NOT create a new content container for each “row” of
buttons or image cards. The number of buttons or image cards per row will automatically adjust based on the
user’s screen size (image cards give you the option to choose the size of the cards, enter Edit Preview mode to
see the difference). They will stack and arrange accordingly. This will save you lots of time and effort if you need
to remove an image card or button as there won’t be a gap you’ll need to manually fix.
h. Use the arrows in each button or image card group to change the order.

Updated January 26, 2023
Back to Table of Contents
23
Forms
Cascade CMS has a sister program called Clive. Clive allows you to create intelligent forms that can easily be imported to
your webpage and allows for web admins and selected web authors to make edits and manage them. Creating forms
that are reliant on a personal email (i.e., Google or Microsoft forms) is highly discouraged since these forms and their
responses are lost if the original creator of the form leaves CC and had sole access to those forms and responses.
You can embed Clive forms into almost any webpage. The appearance of Clive forms will follow the global styling rules
set up for the entire CC site.
Creating/Editing Clive Forms
a. Contact the web communications paraprof, or another member of the web team, to create your user account.
Decide if you or others in your office only want to receive the form submissions (the web team will manage and
create the form(s)), or if you want accounts set up for your team so you can create and manage the form
yourselves.
b. Login to Clive
using your CC login. A link should’ve also been sent in your Welcome email from Clive.
c. On the left sidebar, navigate to the “Sites” button and find your site. You can confirm you’re on the right site in
the top right corner of your dashboard.
d. From the dashboard, click “Create a Form” button in the Forms section. Fill out the required premade fields and
add all fields needed for your form.
e. If you already have forms and need to make edits, go to the “Forms” button on the left sidebar and select the
desired form. The “Edit” button is in blue in the top left.
f. Clive allows users to create conditional forms/form logic. For example, if a user answers a field saying they’re a
student, then they get different fields from a user that says they’re a faculty member. A form needs at least two
fields for this to work. On any field after the first field, open up “Advanced” settings and fill out the
“Conditionally Show When” dropdown field and following fields where you set up the form rules. Continue this
with all other fields you want to have conditional rules.
g. Submit your form. This will take you to a form preview where you can see and test your form before you put it
on your site.
h. To set up form recipients and notifications, click the “Notifications” button next to the blue “Edit” button. Add
the email address of everyone who wants notifications of form submissions. Click the white plus sign in the blue
circle to add them.
Adding Clive Forms
a. Go to the web page you want to have this form on and open the “Edit” interface.
b. Locate or create the content container for your form wherever you want it on your web page.
c. Choose Standard Webpage Content for your content type, NOT Forms (yes, I realize this is counterintuitive).
Updated January 26, 2023
Back to Table of Contents
24
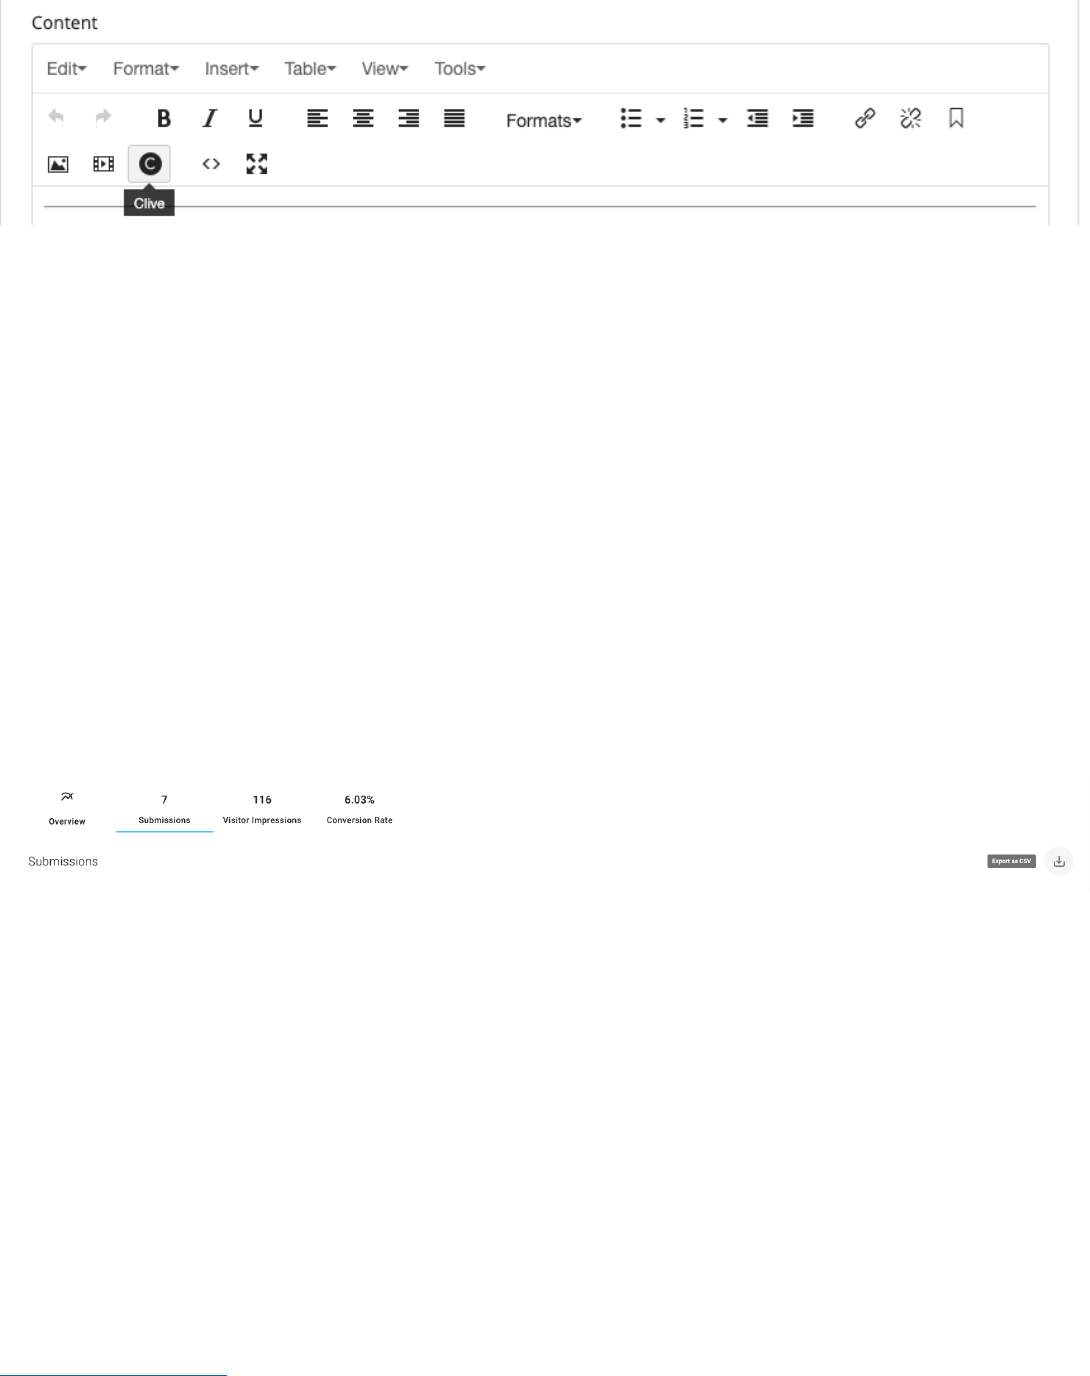
d. In the WYSIWYG toolbar of the content box, locate the “C” icon and click it.
e. A sidebar will open to the right like if you were inserting an image or profile listing. You’ll see a field for “Sites,”
click into it and find your site/office. This will show only the forms associated with your site/office/department.
f. Select the desired form. You can click on “Preview” to double-check you have the right one (or just have a well-
named form). Click on “Insert” in the top right corner to confirm your choice.
g. A grey box with the Clive logo will appear in your content box indicating your form has been inserted. You can
add additional text and image content above or below the form, but it’s recommended to give the Clive form its
own content container.
h. Preview Draft, Submit, and Publish. It’s highly recommended that you go to the live web page and fill out the
form to test that everything works. Any changes you need to make will happen directly in Clive. The live form
will usually update without you needing to go into Cascade to republish the web page after saving changes in
Clive.
Exporting Form Responses as a Spreadsheet
a. On your Clive dashboard, open the desired form so you can see the Overview and other form options.
b. Click on “Submissions” (next to “Overview”). This will tab you over to a detailed view of all the submissions. The
information displayed here will allow you to access form responses (including media submissions) if you’re
unable to locate the form submission email.
c. Locate the “Export as CSV” icon (arrow pointing down toward an open box) on the right side. Click on it to
download all submissions as a spreadsheet file.
d. CSV files are very simple text files by design. This allows you to open the file in numerous spreadsheet programs
such as Microsoft Excel, Google Sheets, and Numbers, and can be shared to others who do not have access to
Clive.
Embedding Non-Clive Forms
PLEASE use an email that your office has communal access to or create a shared login account, so the forms don’t get
lost as staff changes. Neither IT nor Communications and Marketing can access an ex-employee’s or ex-student’s email
to access the forms and its responses.
a. Create a new content container on your web page. Select “Form” in the content type dropdown. This gives you a
box where you paste the form’s embed code.
b. In the application used to create the form, the embed code is typically within the “Share” option. Copy the
whole code, usually there is a “Copy to Clipboard” option. Paste it into Cascade. If you have issues locating the
embed code, contact the support team of the program you’re using.

Updated January 26, 2023
Back to Table of Contents
25
c. Sometimes there will be a preview for the embedded code, but other times the form is only visible on the live
page after you publish your changes. This will depend on where the form is importing from.
d. “Submit” and “Publish.” Like with all forms, double-check the form works on the live site by filling out a test
submission. All changes needed for that form must be done on the platform that the form was created on
initially (i.e., Google Forms, Microsoft Forms, etc.).
e. Optional: if embedding a form doesn’t work for the web page or distorts the styling of the form greatly, consider
inserting a hyperlink to the form and have it open in a new tab.

Updated January 26, 2023
Back to Table of Contents
26
3. Reusable Content Blocks
Creating Reusable Content Blocks
When you want to put the same content on multiple pages, reusable content blocks are the preferred way to do this. If
you have edits, you’ll only need to make the edits once (as opposed to hunting down every occurrence of this content
and editing each one individually) and those changes will show up across all locations of the reusable content block on
your site. Reusable Content Blocks should all live together in a “_sharedcontent” folder. If you do not have this folder,
create it (see Creating New Pages & Folders
for more details).
a. Click the “Add Content” button in the upper left (pink circle with a plus sign) and choose “Reusable Content
Block.”
b. Important: Select “_sharedcontent” as the location folder for this block. Please keep this organized so there
aren’t duplicates and to avoid blocks getting lost.
c. For “Title,” put a short, yet informative description: i.e., “chemistry-contact-box.” Choose a content type and fill
out the fields.
d. When choosing a content type for your reusable content block, notice that you have fewer options (i.e., the
accordion is not available). Since reusable content is primarily used in sidebars, not all content types are suited
to be in a sidebar-sized space.
i. TIP: To add videos to the sidebar, you’ll need to use Standard Webpage Content and the “insert/edit
media” function.
e. When complete, select “Preview Draft” and the “Submit” in upper right-hand corner. You won’t be able to see
how the reusable content looks until you put it on a web page. This is because reusable content blocks are web
page elements, and its appearance heavily depends on the surrounding content and styling of the web page it’s
on. This container may now be added to multiple webpages in the body of the page and/or in sidebars.
f. When editing a Reusable Content Block in a “_sharedcontent” folder, those edits will appear on every page
where that block appears. You MUST republish the whole site to push your changes to the live site.

Updated January 26, 2023
Back to Table of Contents
27
Utilizing Reusable Content Blocks
Remember you must create reusable content blocks before attempting to add them to a webpage.
Adding reusable content blocks to a sidebar
a. Navigate to the “Sidebar Contents” portion of your webpage in the Edit menu.
b. Open the Sidebar Content container. If this container isn’t there, toggle to “yes” under the “Show Sidebar”
option. Ignore the “Inherit from Setup Block” option unless you’re comfortable with making edits to your site’s
Setup Block.
c. Select the “Choose Block” button. If you already have stuff in the sidebar, click on the green plus sign to add
space for another reusable content block. You can rearrange the order with the arrow buttons and remove
content with the red x.
d. In the right sidebar that pops up, find the Reusable Content Block you want to add. Cascade filters out all
content that isn’t a reusable content block. Once you find it, select it, then click “Choose” to confirm your
choice.
i. **Note about sidebars** Sidebars take up the entire right side of the page, even if the sidebar content
doesn’t extend all the way to the bottom. In other words, you might have a large column of empty space
on the right side. This sometimes create some strange alignment and compression issues, especially
with photos.
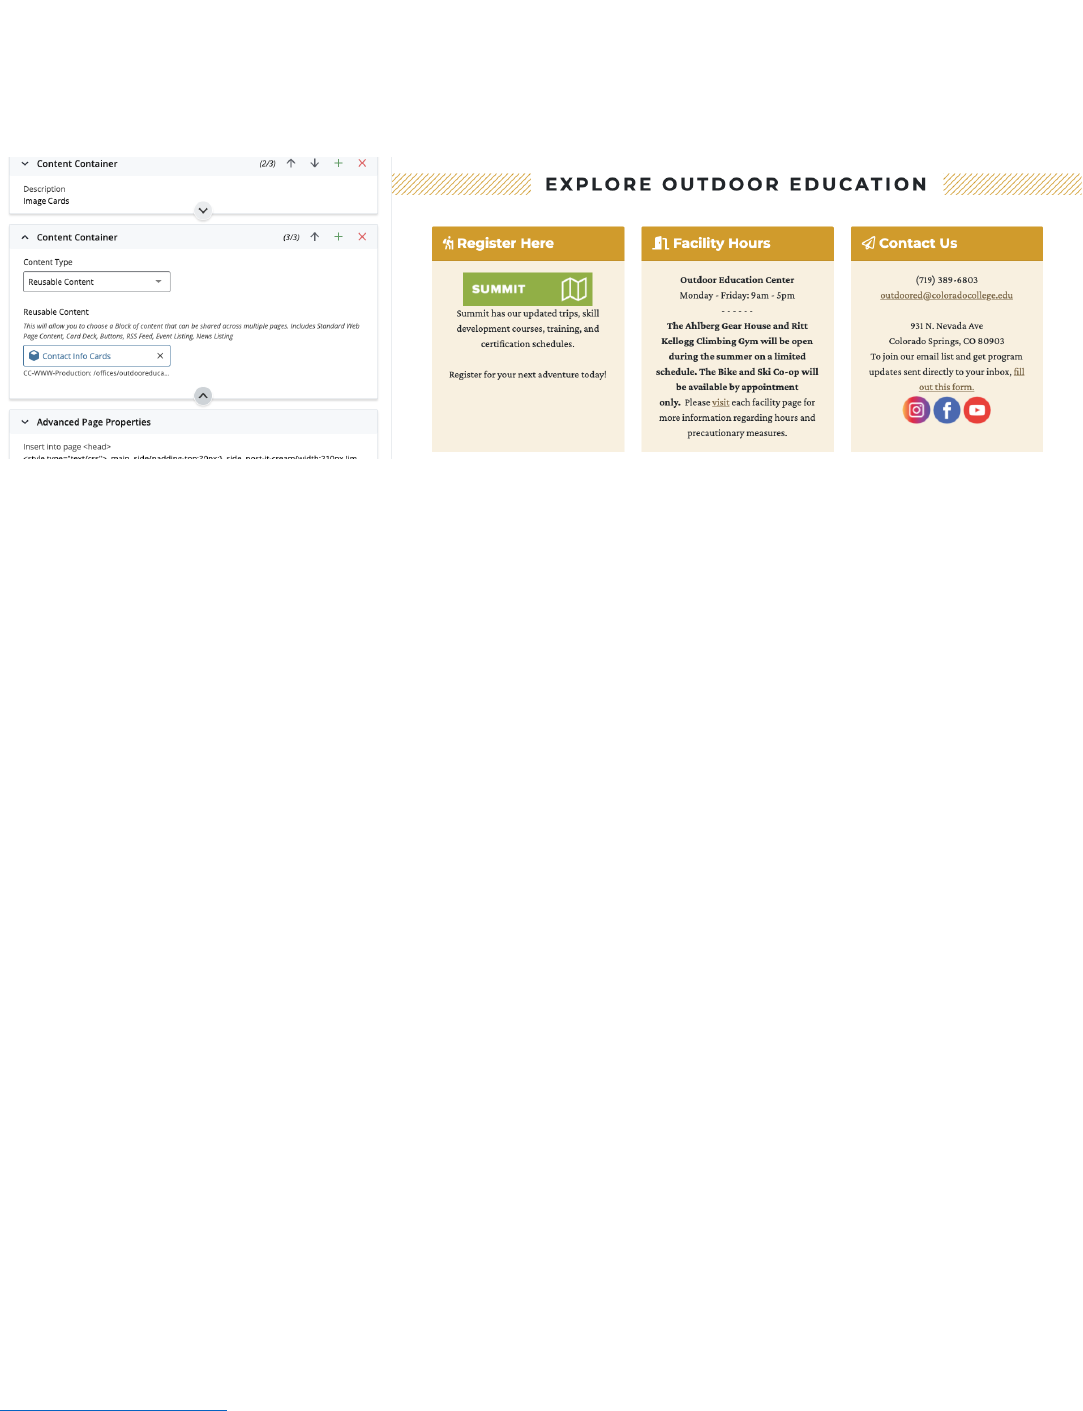
Adding reusable content blocks to a webpage’s main body
a. Navigate to the “Content Container” section in the Edit menu. Either open a preexisting content container you
want to change to Reusable Content or add a new content container.
b. Open the “Content Type” field and select “Reusable Content.”
c. Click on the “Choose Block” button that appears to open the right sidebar to select the desired Reusable
Content Block.
Excess empty space due
to inclusion of sidebar
with little content
Updated January 26, 2023
Back to Table of Contents
28
d. Once you find it, select it, then click “Choose” to confirm your choice. To add another reusable block to your
sidebar, repeat this process by selecting the green plus sign (+) to add a new content container. The image
below shows a split-screen view of what the editing process looks like and what the webpage with reusable
content looks like. Note how different these two views look.

Updated January 26, 2023
Back to Table of Contents
29
Editing Reusable Content Blocks
Be mindful that any changes made to the block will reflect on every page that the reusable content block appears.
a. To edit the content container itself once it’s on a webpage or in the sidebar, right-click /two-finger click on the
block, then select “Edit” from the mini popup menu. This will take you directly to the “_sharedcontent” folder
where the reusable content block is stored.
b. Click the “Edit” pencil in the top right, make the desired changes, preview draft, then submit.
c. To push changes live, publish the entire site folder. This is the fastest way as this publishes the “_sharedcontent”
folder and all pages with the reusable content at once.
Updated January 26, 2023
Back to Table of Contents
30
4. Menu Navigation Adjustments
Adding to the Menu Navigation
Folders and its Subpages
a. Hover over the folder you would like to show on the menu. Click on the arrow that appears. If you hover over
the arrow, you’ll see that it’s called “View Folder.” You are now in folder view.
b. Select “Edit” in the top center.
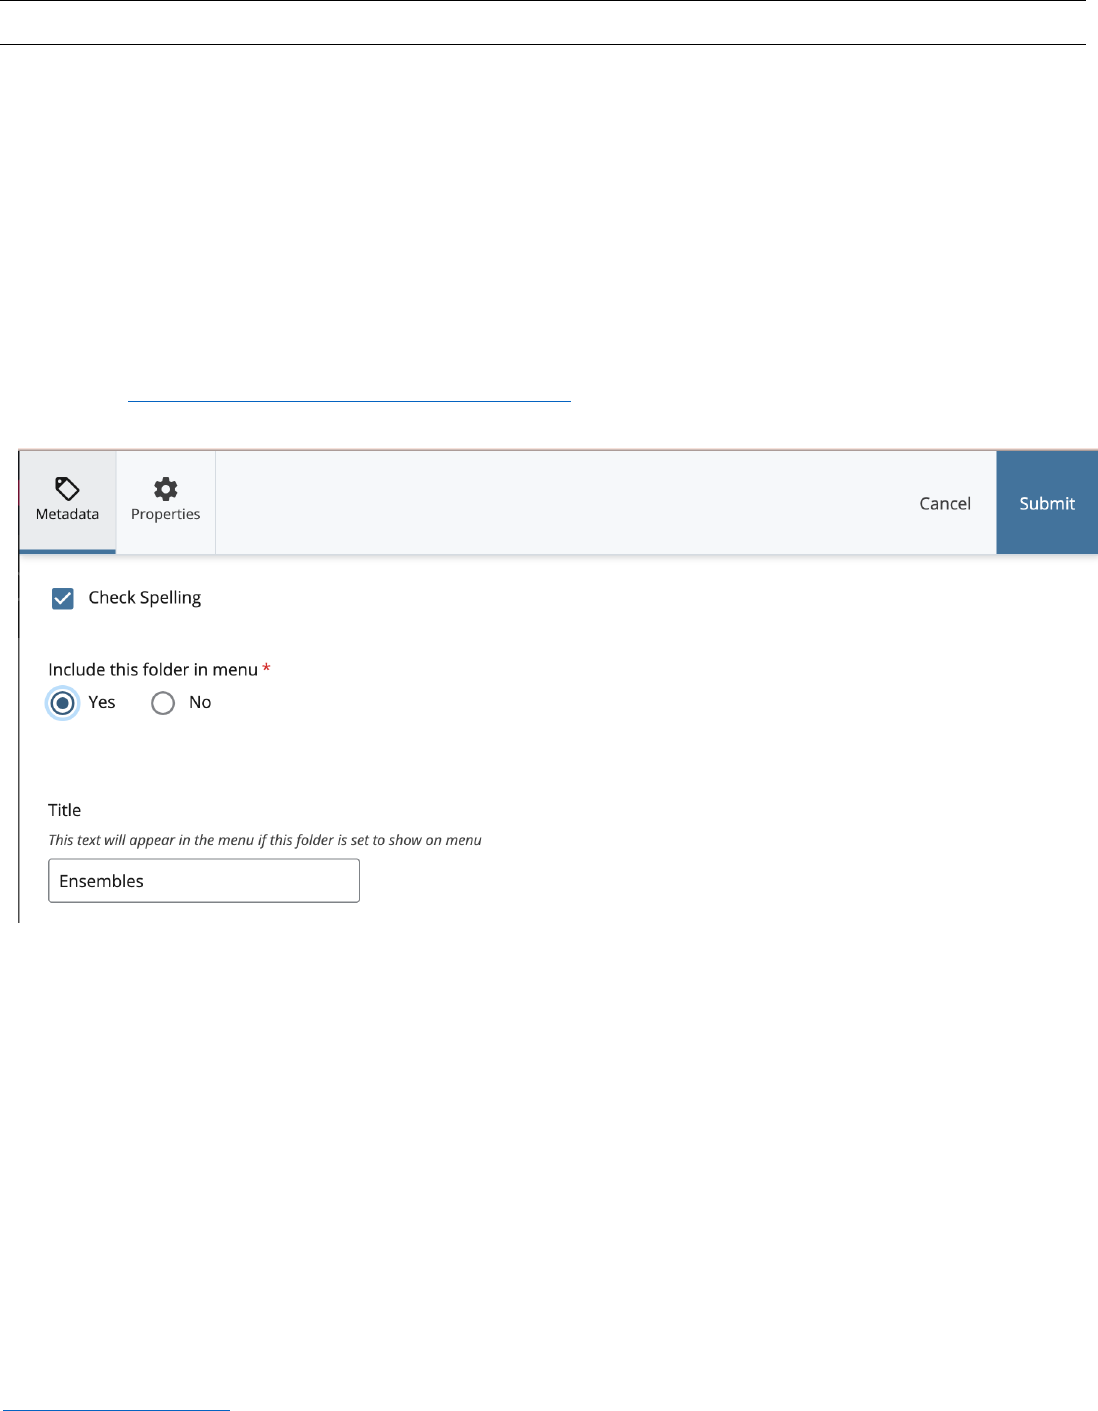
c. In the popup, opt “Yes” for “Include this folder in menu.” The “Title” field in this popup is the label for this folder
that will appear in the menu. Note that your folder will not appear in the menu unless at least one page in
your folder (usually the index) is also set to show on menu. DO NOT create dropdown menus with only one
item. See below for instructions on adding single items.
d. In the folder contents’ view, repeat this process for all the pages you want to show up in the menu (these will
appear as dropdown options).
e. To adjust the order of subpages and folders as they appear on the live site, go back to the folder view in
Cascade.
f. Select “Order” to make the pages sort from first to last. You can click and drag the contents in your folder into
the order you please, or you can use the arrows that appear. You’ll notice that every item in your folder has an
order number even if these items aren’t set to show on the menu. This is why it’s IMPERATIVE to separate your
webpages from your files (photos, PDFs, and other documents).
g. To review what contents are currently set to appear on your menu, you may select the index page of your folder
and see your menu. Changes are automatically saved but be sure to preview the menu before publishing.
h. After you have made all changes, such as moving/renaming, deleting, adding, and re-ordering, you must publish
the entire department/office/program folder by clicking the small arrow that says “view folder” next to its title
and publish that to push your changes live.
Updated January 26, 2023
Back to Table of Contents
31
Single Pages
a. Click the page you would like to show on the menu. You are now in page view. Here, select “Edit” in the top
center. In the popup, opt “Yes” for “Include this folder in menu.
b. Select “Preview Draft,” then “Submit.” Repeat this step for each page you would like to appear as a menu option
in your office/department/program’s folder.
c. To see the changes on the entire site, you’ll need to publish the entire department/office/program folder by
clicking the small arrow that says, “view folder” and select “publish.”
Pages on Other CC Sites or Document Files (References)
a. Find the page or document you want to reference in
Cascade.
b. In the top right corner, click on the 3 dots/ellipses for
More options.
c. Select the “Reference” option to open up the
“Reference” menu.
d. Choose the placement folder that you want this link
to be in. The reference will now be included in that
target folder and its order can be changed like any
other page.
e. The name of the reference as it appears in your
menu navigation will be the display name of the
page.
f. Unless you’re referencing your own documents and
webpages, you won’t have much ability to edit these
reference links as they likely belong to a site that you
don’t have the ability to edit.

Updated January 26, 2023
Back to Table of Contents
32
g. To remove reference links that no longer work, or no longer need, select the Delete option in that same
“…More” menu.
Pages Outside of the CC Site (External Links)
a. Navigate to the folder where you’d like the menu link.
b. In folder view, select “Add Content” at the very top of your screen next to the pink circle with a white plus sign.
c. In the popup, select “External Link” in the popup sidebar.
d. Fill out the necessary fields. “Link Name” will be its label in Cascade CMS and “Title” will be what will appear in
the menu. “Link” will be the actual URL of the page to which you want the menu option to direct.
e. When finished, select “Preview Draft” -> “Submit” -> “Publish.” You must also publish the entire
department/office/program folder by clicking the small arrow that says “view folder” next to the title and
publish that.
f. Since this is an external link, you’ll need to check back periodically to see if the link still works. To edit a link, use
the “Edit” button and update as needed.

Updated January 26, 2023
Back to Table of Contents
33
Changing the Order of Menu Items
Links in the main navigation menu and the drop-down menus appear in order of creation: most recently created
links/folders/pages will appear on the left (navigation) or on top (drop-down).
a. Open the folder where your menu items live. You’ll need to open the folder in the large folder view by clicking
on the arrow “>” next to the folder name in the left sidebar.
b. Arrange your folder items by clicking Order so that items are now listed in numerical order starting from 1.
c. Click on the box next to the item you want to move. You can only move items one at a time. Make sure to
uncheck the box when moving the next item.
d. A set of up and down arrows will appear after checking a box. Use these arrows to change the order of the
items. I recommend moving all the items that aren’t set to show in the menu to the bottom to reduce confusion
among the items that do show up on the navigation or drop-down menu.
e. Alternatively, you can click and drag the item and rearrange the order that way.
f. Once the folder items are ordered the way you want, publish the whole site’s folder to make these changes
appear on the live website. Menu changes sometimes take a little while to show up. Publishing the
homepage/index of that site can help make those changes appear if it’s taking a long time for your menu
changes to take effect.

Updated January 26, 2023
Back to Table of Contents
34
Unpublishing Webpages and Removing Links from the Menu
a. If you want to remove a webpage or folder from the menu but still have it accessible on the live site, check “No”
for the “Include this page in menu” field. Submit your changes and republish your site folder.
b. To completely remove a page or folder from the live site, navigate to the Configure tab in the Edit window and
uncheck “Include when indexing” and “Include when publishing.” This will tell Cascade to no longer update this
page/folder and tell search engines to not include the page’s link in search results on their next crawl.
c. Submit your changes. Do not publish as Cascade as this will give you an error message since this folder/page is
set to not publish.
d. Click on the “…More” options in the upper right corner. Select the “Unpublish” option from the popup menu.
The page/folder has now been unpublished.
e. Republish the whole site folder to update the menu options. This might seem counterintuitive, but this is how
your unpublish changes will be reflected on the live site.

Updated January 26, 2023
Back to Table of Contents
35
5. File Management (JPEG/JPG, PNG, PDF, DOCX, and HTML)
To make your everyone’s lives easier, including yours, DO NOT upload your documents and images willy nilly all over
your site folders. This makes an absolute mess of things and makes it extremely difficult to find anything specific. PDFs
and DOCX belong in the documents folder. JPEGs/JPGs and PNGs belong in the images folder. Reusable content blocks
belong in the shared content. Folders with webpages should have nothing but webpages or references to webpages.
Some notes on file types: JPEG/JPG is the preferred file type as they are smaller in file size than a PNG which means
they’ll load faster on the web. PDF is much preferred over DOCX (Word Documents) as PDFs are web and printer friendly
while DOCX files are not. It is acceptable to use DOCX files if the document is something like a fillable form until CC has
institution-wide access to Adobe Acrobat and Adobe Sign.
Resizing Images BEFORE Uploading
Excluding background/banner photos, it’s best to resize photos to smaller than 800px by 800px, 1720px by 720px for
banner/hero images, before uploading. If your page has photos that have been uploaded to Cascade at a large pixel size
(i.e., 2000px by 3000px), your webpage will load slowly because of the photo size. The photo link might also show up as
broken. Even though you may have set the photo to display at a smaller size, the page will still load the original file size.
Display size ≠ File size
This is a very simple image edit that you can do with your computer’s default photo editing software.
On a Mac
a. Open the image in "Preview."
b. Rename the file to describe it (i.e., “john-doe-headshot2020.jpg), and export it as a JPG if it’s not already a JPG.
c. Click the "Tools" Menu and then click "Adjust Size..."
d. In the "Image dimensions" dialog box that appears, type in the desired width in pixels (<800px), or percentage,
which will then adjust the height to scale proportionately. Make sure that "Scale proportionally" is checked. You
can crop the image if you want to adjust the proportions without stretching the image.
e. Click OK and save your image.
f. THEN, upload it into your “_images” or “images” folder in Cascade (see Uploading Images and PDFs to Cascade
for options).
g. You can now select the image as an internal file link within Cascade.
On a PC
a. Open the photo in "Paint."
b. Click the "Resize" button in the "Home" tab.
c. In the "Resize and Skew" dialog box that appears, adjust the size in percentages or pixels. Make sure "Maintain
aspect ratio" is checked.
d. Click OK, then “Save As.” Rename the file to describe it (i.e., “john-doe-headshot2020.jpg) and select “JPG” to
save your image as a JPG file.
e. Upload it into an “_images” or “images” folder in Cascade (see Uploading Images and PDFs to Cascade for
options).

Updated January 26, 2023
Back to Table of Contents
36
f. You can now select the image as an internal file link within Cascade.
In Cascade CMS
a. Find and open the photo in your “_images” or “images” folder and click on “Edit.” Alternatively, find where the
photo is inserted on a webpage and right-click/two-finger-click and click on “Edit” in the drop-down menu that
shows up.
b. In this edit menu, you can resize, crop, and rotate your image. Make sure to have ratio/proportions locked so
your image doesn’t get stretched out.
c. Submit and publish your changes. You’ll also have to publish your whole folder, or at least the page(s) where this
image shows up.
d. Editing images in Cascade is a little problematic as changes can sometimes not register even though you’ve
followed all the necessary steps. It is best to make these resizing edits outside of Cascade before uploading your
image(s) into Cascade to avoid any issues.

Updated January 26, 2023
Back to Table of Contents
37
Uploading Images and PDFs to Cascade
The most common issue with uploading any kind of file into Cascade is the naming convention. When naming your
documents, use only lowercase letters, numbers, and hyphens or underscores. Avoid capital letters, spaces, and special
characters.
Directly Uploading to the Images or Documents Folder
i. Navigate to the images or documents folder of your department/office/program folder. If you do not have
“images” and “docs” folders, create them (see New Folder
). In folder view, select the “Add Content” button,
then select “File” in the popup.
ii. Double-check “File Name” and “Placement Folder” to make sure that the file is going to the right place and
the name is what you want it to be. “Title.”
iii. Drag and drop or choose from your computer the files (JPGs or PDFs) you want to put on your website. You
will put ALL images and documents that will be used on your department/office/program’s subsite in these
folders. Select “Preview Draft,” then “Submit,” then “Publish.”
iv. To add these to a webpage, navigate to the page on which you want the image/document in Cascade, select
“Edit,” find the container you want it in, then select:
a. For a document, “insert/edit link” (chain icon), then check “Internal,” then “Choose file,” and search
for the document in your documents folder
b. For an image, “Insert/edit image” -> “Internal” -> “Choose file” and search for the image file in your
images folder.
c. Select “Preview Draft” -> “Submit” -> “Publish.”
Uploading While in the Edit Window
a. Navigate to the container on a page where you want the image or document.
b. For an image, select “insert/edit image.” In the popup, select “Internal” -> “Choose file” -> “Upload,” and choose
the image from your computer.
c. For a document, type the title of your document, then highlight the text and select “insert/edit link” (chain icon).
In the popup, select “Internal” -> “Choose file” -> “Upload,” and choose the document from your computer.
d. Once, your file or document has successfully uploaded, scroll down in the right sidebar popup to select the
appropriate upload location (document or images folder) for the file. Please do this step to ensure your site
folders don’t become a total mess.
e. To confirm your selection, click “Choose” in the top right corner.
f. From here, you can adjust the size of the image (keep “Constrain Proportions” checked) and its alignment or add
special formatting to a document link for emphasis (i.e., bold, post-it, small heading).
g. Select “Preview Draft” -> “Submit” -> “Publish” to push changes live.
Uploading a New Version of the Same Document/File
a. To avoid having many, many nearly identical versions of the same document or image, replace the previous
version with the new one. This will preserve internal links and ensure that any URLs you share of a document do
not break.

Updated January 26, 2023
Back to Table of Contents
38
b. Find and open the file you want to replace in your images or documents folder. Alternatively, you can right-
click/two-finger click on the internally linked file in the Edit window of your webpage. Select Edit in the mini
popup window that shows up.
c. Select Edit. You’ll notice that the Edit popup window for files gives you the option to upload a new file.
d. Upload the new version of the file. Consider if you want to update the Title of the file to reflect that this is an
updated version (useful for PDFs, not as useful for images).
e. Submit your changes. If uploading a PDF, a JPG/JPEG, or a PNG, you should be able to see a preview version of
this updated version. You now have replaced the old version of the file with the new one while preserving the
links that reference the old version of the file.
f. Republish your site folder. This will update all instances of the file on your webpages.

Updated January 26, 2023
Back to Table of Contents
39
Moving Files Around
You’ll probably find some stray files in your site folders at some point, especially if you have multiple web authors or
you’re not the first web author to work on the site. Remember to upload files to their correct folder so you don’t end up
spending hours cleaning up your folders and fixing broken file links. This process moving process is the same with
webpages and subfolders.
a. Right click/two-finger click on the file you want to move. You can be viewing the file either in folder view or in
the left sidebar.
b. In the mini popup window, select the “Move” option. This will open the associated popup window where you
will be able to select the folder you want this file to move. Cascade DOES NOT allow you to move files in bulk.
c. Check the folder you moved the file to and double check that the file is there.
d. Alternatively, you can drag and drop files to a new folder in the left navigation sidebar. This can get quite messy
and difficult if your site folder has many subfolders.
e. Check for any broken links caused by these moves in SiteImprove. Contact the web communications paraprof if
you do not have an account and would like one.

Updated January 26, 2023
Back to Table of Contents
40
6. Special Webpages
Major/Minor Requirements
Updates are made once a year during the spring catalog update window. Please reach out directly to the Registrar’s
Office if changes must be made outside that window. For more information about the Catalog of Courses, reference the
Editing Catalog of Courses guide put out by the Registrar’s Office. Visit their Faculty Resources page
for more
information.
If you have major/minor requirements page that lives in Cascade and doesn’t link to the Registrar’s Catalog of Courses,
you can edit the content like you would any other webpage in Cascade. However, it is HIGHLY RECOMMENDED to use
your major’s/minor’s Course Catalog page when conveying degree requirements as these pages are guaranteed to be
updated. You can supplement with your own page outside of the Catalog of Courses to convey extracurricular activities
or resources.

Updated January 26, 2023
Back to Table of Contents
41
Campus News Stories
All web authors are allowed to, and encouraged to, post news stories to highlight the CC community. Always remember
to proofread your writing.
a. Select “Add Content” just to the right of CC-WWW-Production.
b. Select “Campus News” from the pop-out and fill out your news story. Adding a photo is recommended for
interaction. Make sure to properly edit and resize your images (
see Resizing Images BEFORE Uploading for
instructions) before uploading the image.
c. To make the Campus News story appear on your department/office/program’s website, select your
department/office/program for “Office” when in editing mode of your Campus News Story. This will tag the
story and tell Cascade to put the story in your News widget.
d. Preview draft, Submit, Publish.
Updated January 26, 2023
Back to Table of Contents
42
Event Listings
Initial event creation is done through Ungerboeck, not Cascade CMS. Ungerboeck acts as both the event creator for the
Events Calendar and space reservation system.
Complete instructions for event creation
a. Create the event/reserve the space through Events Management on the Single Sign-in page.
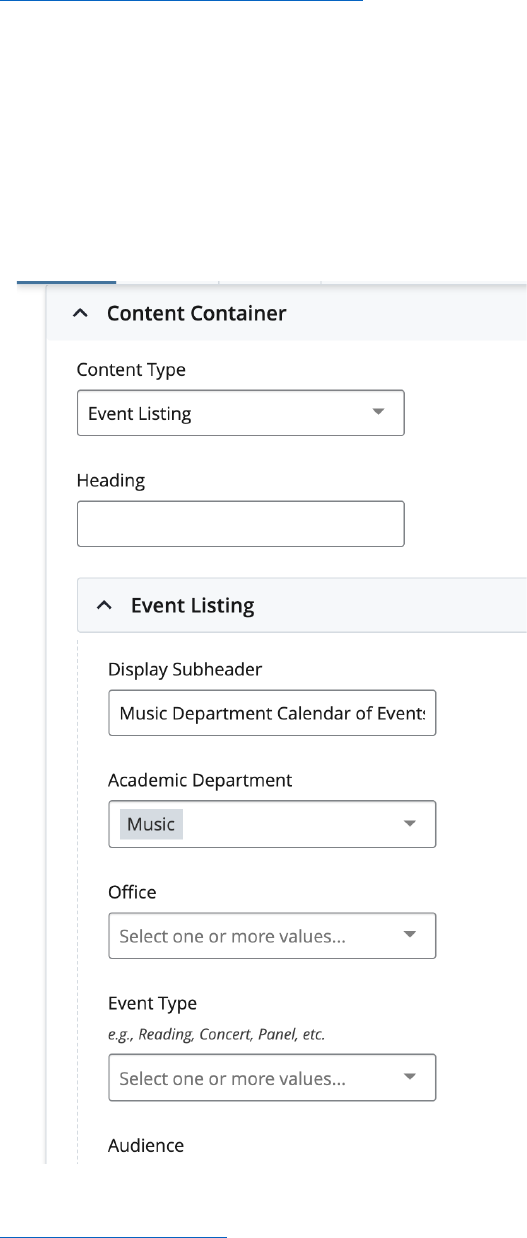
b. Afterwards, you can add the event through the “Event Listing” content type in your content container. Fill out
the appropriate tags in the dropdowns and Cascade will pull those events from Ungerboeck.
c. Typically, you will only need to fill out EITHER “Academic Department” or “Office,” but you can select multiple
tags if the event warrants it.
d. Only upcoming events will show up. Past events will automatically disappear from the event feed. If you want
to maintain a particularly important past event on your webpage, create a news story or give it its own page.

Updated January 26, 2023
Back to Table of Contents
43
7. Troubleshooting
If your published changes aren’t showing up on the live site after refreshing the page, wait a few minutes as web
updates are not instantaneous. If you’re still not seeing your changes, you probably need to clear your web browser
cache. Web browsers “cache” (or save) the old version of a web page to speed up processing since they don’t have to
reload the entire page from scratch every time. You will usually run into this problem when making large web updates
like menu changes, small changes to the page content (such as text and images) typically don’t run into this caching
issue. You can also check if your changes took effect by opening the page in a new browser window.
In the top bar of your web browser, select the web browser’s name (in this case, it’s “Chrome”), “Clear Browsing
Data…”, then “Clear Data” (or whatever the equivalent is on your web browser). In Google Chrome, you can choose
what types of data you want removed, but it will select all types by default.
If you made changes to content that appears on multiple web pages (i.e., sidebars and navigation menu), you would
need to publish the entire folder for the changes to show up. For example, if you made changes to the Art department
contact info box that appears on other Art department pages, you’ll need to publish the entire Art department folder on
Cascade CMS for the changes to take hold.
Updated January 26, 2023
Back to Table of Contents
44
Need even more help?
There is also a wealth of information available on the Cascade CMS Knowledge Base:
https://www.hannonhill.com/cascadecms/latest/
.
Any further Cascade questions should be directed to Nicole Leung, Karen To, or Mark Lee (Spencer Center, 4
th
floor)
Nicole Leung
Web Communications Paraprofessional
719-389-6139
nleung@coloradocollege.edu
Karen To
Director of Web & Digital Media
719-389-6144
kto@coloradocollege.edu
Mark Lee
Director of Web & Digital Media
719-389-6030
