
EU SEND WEB
USER GUIDE
EUROPEAN COMMISSION
DIRECTORATE-GENERAL INFORMATICS
Information Systems Directorate
October2023
Date: 10/07/2023
Contents
1. INTRODUCTION...............................................................................................................................3
2. DEFINITIONS....................................................................................................................................3
3. COMPATIBLEBROWSERS................................................................................................................3
4. ACCESStoEUSENDWEB.................................................................................................................4
4.1 HowtorequestanewEntity...................................................................................................4
4.2 HowtoaccessEUSENDWEB..................................................................................................5
5. INBOX..............................................................................................................................................6
5.1 MarkasRead...........................................................................................................................8
5.2
MessageDetails.......................................................................................................................8
5.3 DownloadFiles........................................................................................................................9
5.4 MessageReply.........................................................................................................................9
6. NEWMESSAGE................................................................................................................................9
7. SENTMESSAGES............................................................................................................................13
7.1 SentMessageDetails............................................................................................................14
7.2 SentMessageStatus.............................................................................................................15
7.3 DownloadSentFiles..............................................................................................................16
8. DRAFTMESSAGES..........................................................................................................................16
8.1 Savinga
Draft........................................................................................................................17
8.2 DraftDetails...........................................................................................................................18
9. NOTIFICATIONS.............................................................................................................................18
9.1 NewMessageNotification....................................................................................................18
9.2 StatusNotification.................................................................................................................19
9.3 RetentionWarningNotification............................................................................................20
10. INFORMATIONBANNER............................................................................................................20
11. SIGNATURE................................................................................................................................21
11.1 SendingwithSignature..........................................................................................................21
11.2 ReceivingwithSignature.......................................................................................................24
12. ENCRYPTION..............................................................................................................................25
12.1 DownloadEncryptedFiles.....................................................................................................25
12.2 RemoveCertificates..............................................................................................................27
13. APPLICATIONICONS..................................................................................................................27
14. PAGINATION..............................................................................................................................29
15. AccesstoeTrustEx–ONLYforoldeTrustExusers....................................................................29
16. CONTACTINFORMATION..........................................................................................................30
3
1. INTRODUCTION
This User Guide explains the main functionalities of EU Send Web for a new user.
Certain fonts, components, alignments and popups might look different from the screen captures,
depending on the browser and browser version.
2. DEFINITIONS
Key Description
Entity
An entity represents the part of an organisation or user entitled to use the
EU Send Web platform in order to exchan
g
e documents
User
An entity can designate one or more users. All users of an entity have
access to the same messages received/sent by that entity. A user can
have access to more than one entity.
Sender An entity which is the originator of a message sent through EU Send Web
Receiver An entity which is the recipient of a message sent through EU Send Web
Channel
A logical communication channel created to enable the communication
between two entities.
EU Login
credentials
EU Login is the European Commission's user authentication service.
In order to access EU Send Web, the user must have valid EU Login
credentials
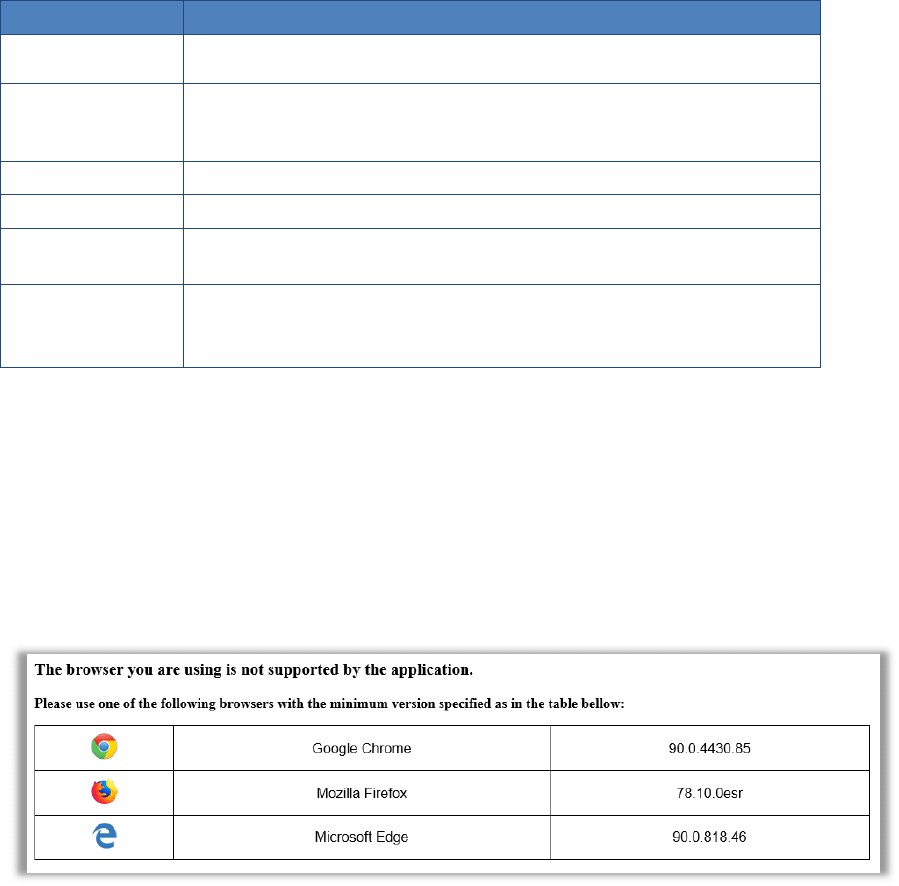
3. COMPATIBLE BROWSERS
The application is compatible with Google Chrome, Mozilla Firefox and Microsoft Edge browsers. If the
users try to login to the application with a browser that is not compatible, they will not be able to
connect and will be redirected to a page that lists the compatible browsers.
4
4. ACCESS to EU SEND WEB
The link to the application is: https://eusendweb.eusfx.ec.europa.eu/
Before having access to the application, the user’s profile must be configured in an Entity, either by
the Administrator of an existing Entity in EU SEND WEB or by requesting the creation of a new Entity
(see 4.1).
The “Unique identifier at the Commission” (UID) must be provided to the Administrator.
If the users have already an EU login account, the UID can be found as follows:
Go to the page https://webgate.ec.europa.eu/cas/login and log in.
Click on the icon displayed next to your name and choose “My Account”.
Click on “My Account details”. The “Unique identifier at the Commission” (or the UID) is
displayed on the next page.
If you do not have an EU Login account, you can create one following the instructions in the section
“Create an EU Login account” of the EU Login User Guide:
[https://webgate.ec.europa.eu/cas/manuals/EU_Login_Tutorial.pdf].
4.1 How to request a new Entity
EU SEND assigns to organizations (e.g. a law firm) one or several "Entities"(same as “parties” in
eTrustEx, the predecessor of EU SEND), that is to say shared spaces which contain an inbox, a sent
and drafts folders. Therefore, in order for an organization to use EU SEND to be able to exchange
documents with DG Competition, at least one “Entity” needs to be created in EU SEND. An Entity has
at least one Entity Administrator who is able to add and remove as many standard Users as
necessary. The Entity Administrator is responsible for the creation of additional users (in the same
Entity) and for the management of those (standard) users. The users of an Entity can access all
incoming and outgoing transmissions of that Entity. However, each Entity is independent and access
to documents received, submitted and drafts is limited to the users registered for that Entity.
Organisations can request the creation of multiple Entities.
To request the creation of a new Entity, please fill in DG Competition’s EU SEND registration form.
Then click on "I do not have an account. I would like to register".
In the registration form the first- and last name, the EU Login ID and the e-mail are pre-filled. Please
fill in the rest of the information and click on "Continue", then review everything and finally click on
"Submit". After the creation of the Entity, DG Competition will notify the Entity Administrator via email.
The Entity Administrator will then be able to add Users to the Entity. For Entity Administrators a
dedicated user guide is available in the help menu, accessible via the
icon.
NOTE: The creation (approval) of a new Entity needs human interaction from DG Competition’s side.
It happens quite fast (usually within an hour), if requested in normal business hours (8h-17h CET).
However, it can take longer if requested outside those hours.
5
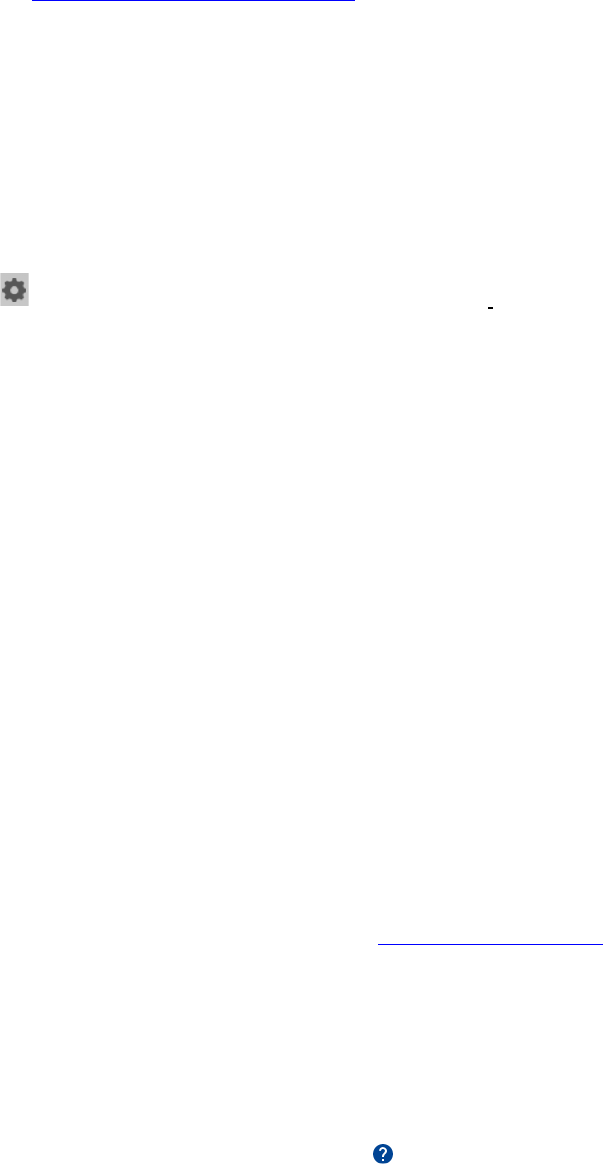
4.2 How to access EU SEND WEB
The application uses EU Login for authentication. Two Factor Authentication (2FA) is required. The
user needs to have a valid EU Login credential and be registered in EU Send Web with the correct
role.
When the user goes to the application or administration URL, he/she is redirected to EU Login page.
After going through EU Login authentication, the user will be redirected to the application.
Add your EU Login
UID or email address
registered in EU Login
and click on Next.
Add your password
Choose a verification
method from the
available options
6
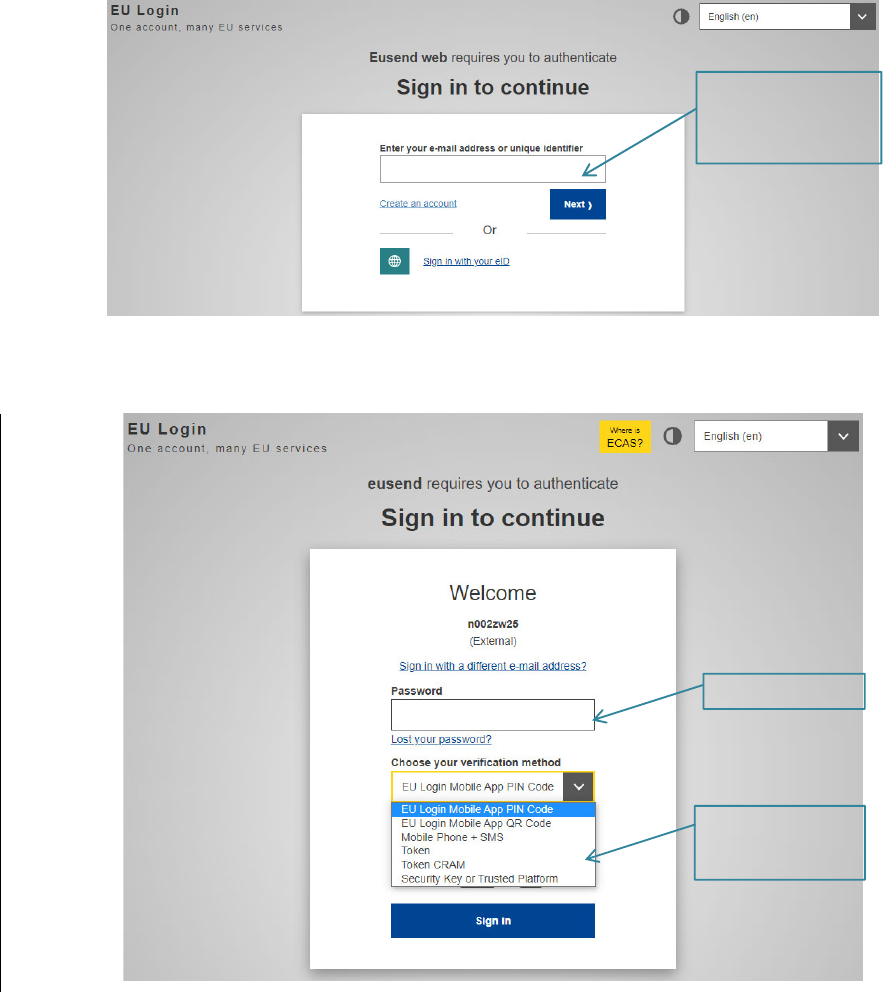
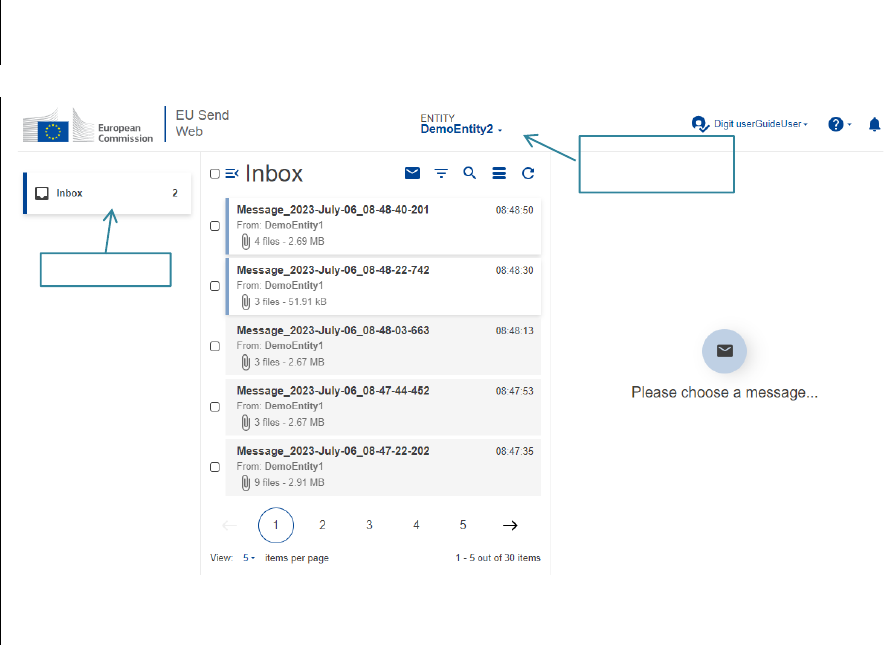
5. INBOX
The Inbox is the first page displayed after the user logs in.
NOTE: DG Competition uses EU SEND Web to receive messages from its external parties (entities),
DG Competition does not send messages to its external parties (entites) via EU SEND Web therefore
the Inbox is always empty for those external COMP entities.
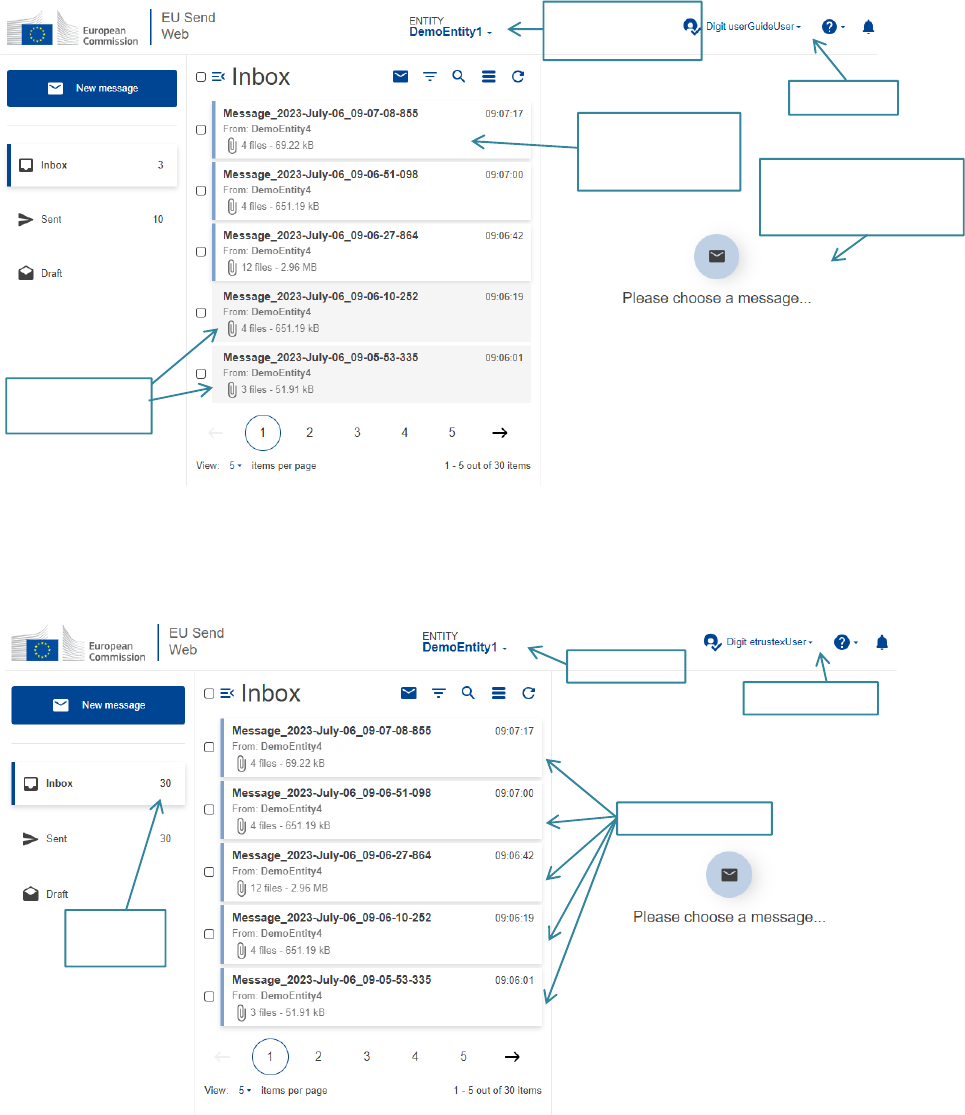
The Read/Unread message visual indication is specific to each user. Even when different users have
access to the Inbox of the same entity, they will see which messages they have or have not yet read.
Different user
Same entit
y
30 unread
messages
Unread messa
g
es
Unread message:
White box with light
blue line on the left
Entity for which the
user is logged in
Read messages:
Grey box
User name
The details of a message
are displayed when the
message is selected
7
NOTE: If the entity is only Receiver (not allowed to send messages), then only the Inbox will be
present and there will not be links to Draft, Sent and New message sections.
Entity configured
only as Receiver
Only the Inbox

8
5.1 Mark as Read
The user can mark several messages as ‘Read’ at once by selecting the checkbox beside the
messages they want to mark as read and then clicking on the button that will appear on top of the
messages.
5.2 Message Details
When the user selects a message, the details of that message are displayed on the right side.
Select/deselect
individual files
Select/deselect
all files
Sender
Unread
messages
Link to download
a single file
Number and
size of all files
Mark all selected
messa
g
es as ‘Read’
Date and time the message
was sent. For the current
date, just the time.
9
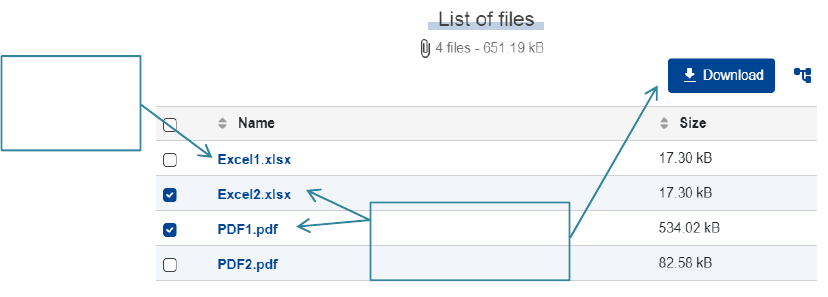
5.3 Download Files
There are two options to download files:
By clicking on the name of the file, to download only that file
By selecting the files and clicking on the download button.
NOTE: If the entity is configured with end-to-end encryption, please refer to Section 11 for more
information.
5.4 Message Reply
From the top right of the message details, the user can reply to a message.
If the user clicks on the button ‘Reply’, he/she will be redirected to the new message form with the
original sender already selected as recipient of the message and with the subject prefilled with the
prefix ‘Re:’.
It is only possible to reply to a message if the entity is configured as a sender and if it has the original
sender of the message configured as its recipient.
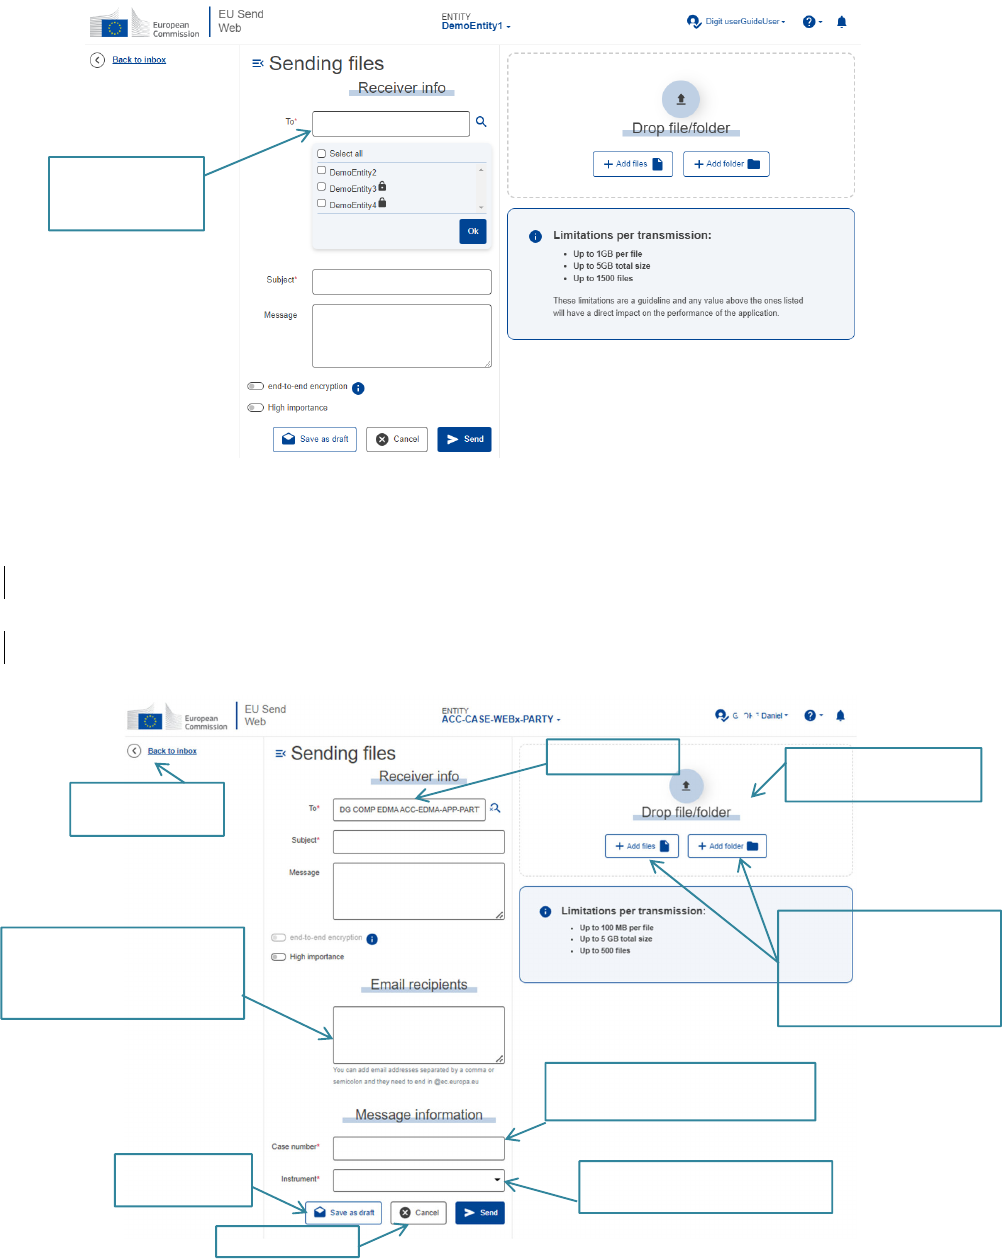
6. NEW MESSAGE
Only Entities configured as Sender have access to the “New Message” section.
From the left menu, click on the “New Message” button to be redirected to the new message section.
For two entities to be able to exchange messages, a channel of communication needs to be
configured between the Sender and Recipient entities.
Select the files to
download and then click
on the Download button
Click on the
name of the file
to download
only that file
10
If an entity configured as Sender has more than one Recipient, there will be a dropdown list in the
recipient field for new messages with the list of all possible entities. The user must select the ones for
which the message should be sent.
If the entity is configured to exchange with just one other entity, the recipient field will be prefilled with
the recipient entity name. All DG COMP external entities are configured like that, DG Competition
being the only recipient.
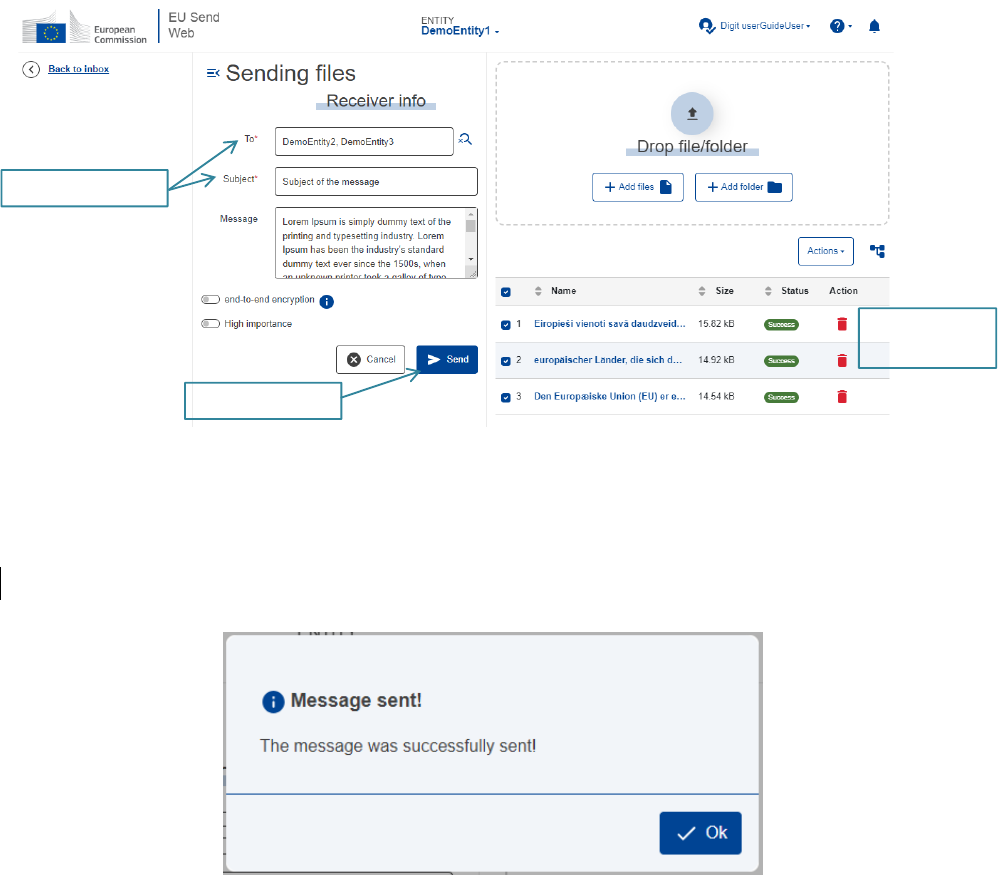
The user needs to fill in the form and add at least one file before sending the message.
Link to go back to
the Inbox
Recipient entity
Individual files can be added
using the Add files button.
A folder and its content can
be added using the Add
folder button
Area to drop the
files/folders to be added
Save as draft to
continue later
Cancel messa
g
e
Click on the
recipient field to
select from the list
Specify here a list of email
addresses of DG COMP staff to
be notified immediately when
the message is sent.
Select the corresponding DG
COMP instrument
This is the reference of the case as
known by DG COMP.
11
Email recipients: the User can specify here a list of email addresses of DG COMP staff to be notified
immediately when the message is sent. DG COMP staff indicated in this field will be notified by email
and have immediate access to the attachments submitted.
The list of mail addresses must be separated by semi-colon and be valid EU addresses (ending with
@ec.europa.eu).
If no specific DG COMP Email recipient is added, the case team will only be notified once the sending
is processed by DG COMP Registry.
Case number: this is the reference of the case as known by DG COMP. Generally, a state aid
reference begins with "SA.", a Horizontal reference with "HT.", a merger reference with "M.", "C." or
"T-" and an antitrust reference with “AT.” or “T-“. If your submission has no yet a case number
assigned, please fill "N/A" in this field.
Before adding files, the user has the option to save a Draft to continue editing later. It is only possible
to save drafts if there are no files added to the message. If files were already added, they need to be
removed before saving the draft.
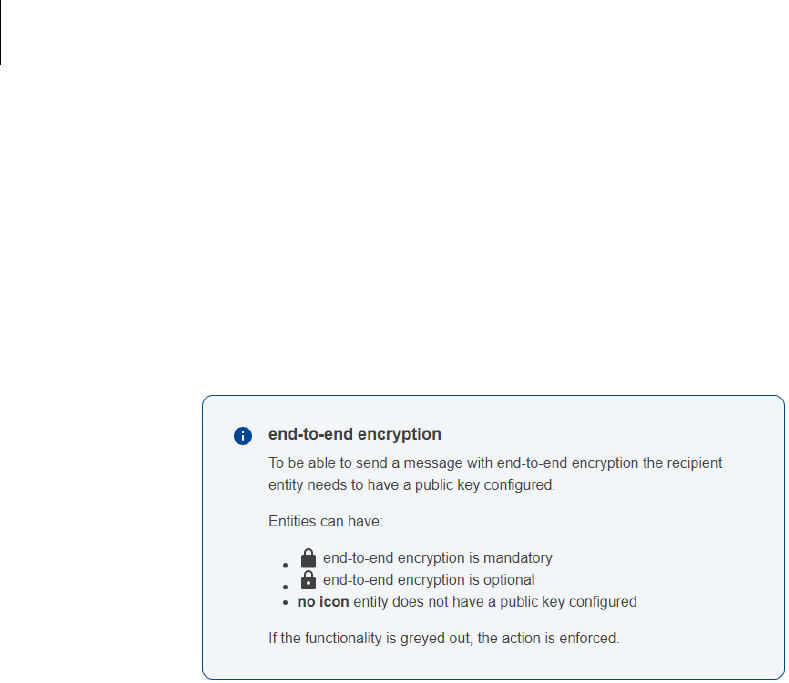
The user can select to send a message with or without end-to-end encryption using the toggle button
below the message field if the feature is enabled for that domain. To be able to send with end-to-end
encryption, the recipient entity needs to have a public key configured. The information icon beside the
toggle button explains how to identify if an entity is configured to receive messages with end-to-end
encryption or not.
Below the message field there is a toggle button to mark a message with high importance. If the
button is enabled, the message will have a visual indication that it was sent with high importance and
the notifications will also be flagged with high importance.
The user can add the files by dragging and dropping them to the files section or by clicking on the
buttons add file or add folder.

12
The user can change the name of the files that will be sent before they are uploaded. An edit icon will
be displayed on the actions column for each file and clicking on it will open a window to change the file
name.
When the files are added, an upload button is displayed at the top of the list of files and the user
needs to click on it to upload them.
If at least one file is selected, an ‘Actions’ button will be displayed, where the user can perform actions
on the selected files like the deletion of several files at once. The actions button is only available in the
List view.
Upload Files
List of added files
with size and status
Sort the files by
Name
,
size or status
Select files to
perform actions
Actions button
Change the
view of the files
13
When a file is uploaded correctly, it will have the status ‘Success’. All files need to be in status
‘Success’ before sending the message. The user can add new files after the upload, but the new files
also need to be uploaded.
NOTE: It is mandatory to have at least one attachment to be able to send a message.
After sending the message, the user will receive a confirmation popup that the message was
successfully sent and once the popup is closed, he/she will be redirected to the Inbox section. The
user can verify the message just sent in the Sent section.
NOTE: In addition to the above confirmation popup, each message sent to DG Competition will also
trigger an email notification to the user.
7. SENT MESSAGES
Only entities configured as Senders have access to the Sent section. The available functionalities are
indicated below.
Send the message
All files with
Status Success
Mandatory fields (*)

14
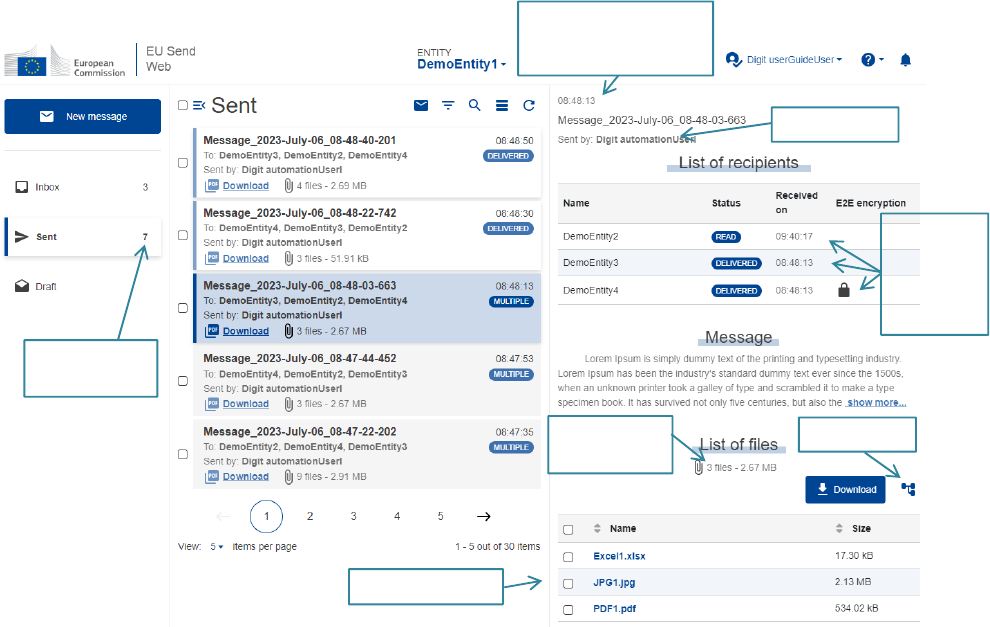
As we can have more than one user with rights to access the same entity, the name of the user who
has sent the message is displayed on the message preview. Also, if a different user sent a message,
in the sent folder the message will have an indication it was not visualized. This is to ensure that
different users that access the same entity can keep track of what is being done on behalf of that
entity.
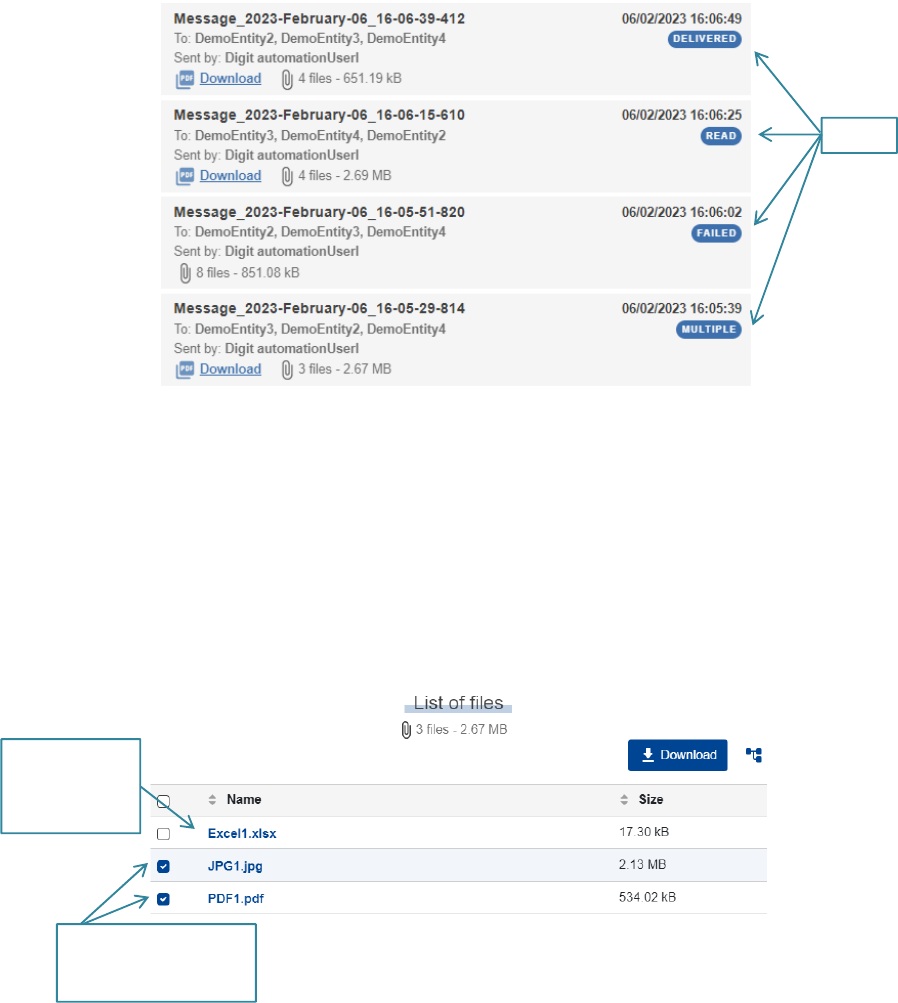
It is possible to see the overall status of the message. If the message was sent to multiple recipients,
the status will be displayed once all messages have the same status. If at least one recipient has the
message in a different status, the badge will display the status ‘multiple’. The user needs to select the
message to be able to see the individual status related to each recipient.
We can also extract a PDF file containing the details of the sent message by clicking on the download
link beside the PDF icon for each message.
7.1 Sent Message Details
When the user selects a message, the details of that message are displayed on the right side.
Message overall status
User that sent
the message
Reci
p
ient entities
List of sent
messa
g
es
Links to the
sections
The details of a message
are displayed when the
message is selected
Download PDF with
the details of the sent
message
Message that
was visualized:
Grey box
Message that was
not visualized:
White box with light
blue line on the left
15
On the list of recipients it is possible to see the recipients of the message, in which status each message is, the
date and time the status was changed and if the message was sent with or without end-to-end encryption.
7.2 Sent Message Status
There are three possible statuses for the sent messages: Failed, Delivered and Read.
The Failed status indicates that there was an issue when the application tried to send the
message and it was not successfully sent. The message did not reach the recipient.
The Delivered status indicates that the message was successfully sent to the recipient.
The Read status indicates that the message has been read for the first time from the recipient
entity’s inbox.
NOTE: Messages sent to DG Co mpetition are not read in EU SENDweb, but are transferred to DG
Competition’s own case management application. The READ status only indicates that thistransfer
tookplace.Itdoesnotmeanthatapersonhasreadorevenopenedthemessage.
Date and time the
message was sent. If
current day just the time
Number and
size of all files
List of
recipients
and their
respective
information
Sender User
List of all sent files
Switch views
7 message not
visualized yet
16
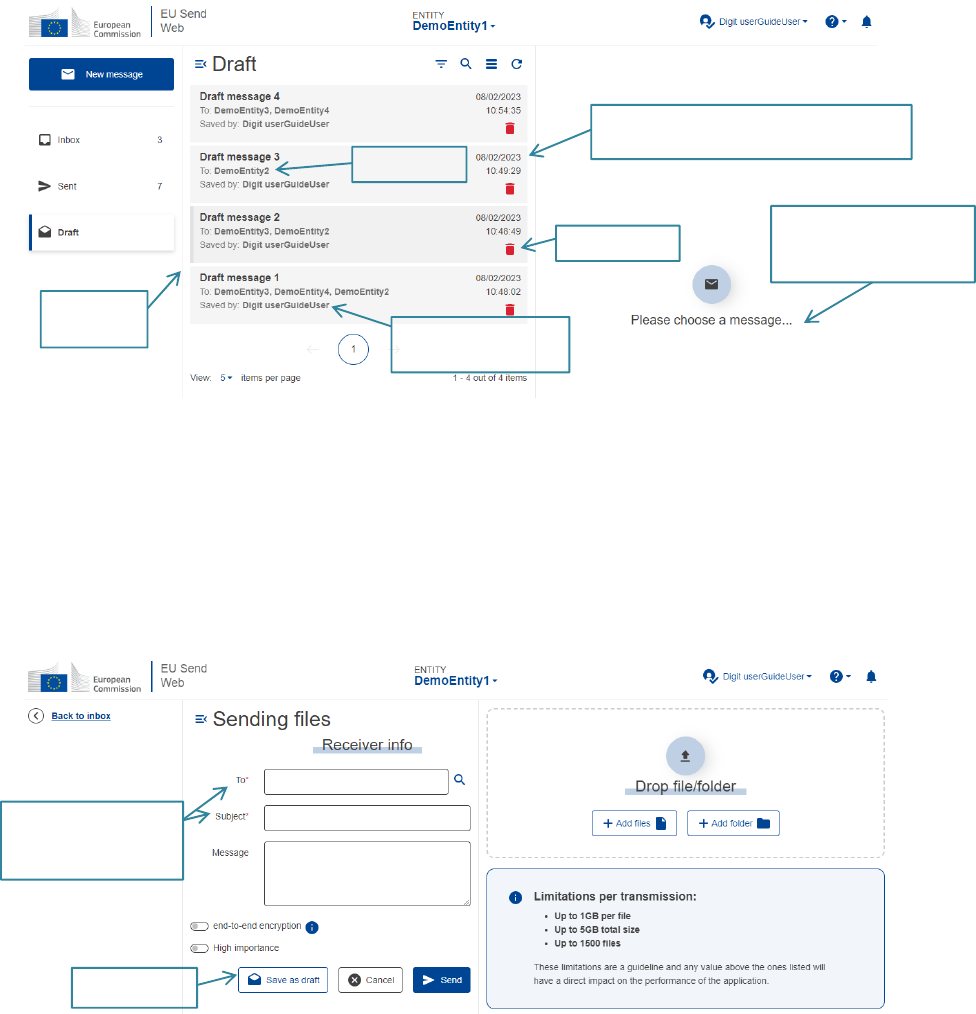
7.3 Download Sent Files
It is possible for the user to download files from a sent message.
There are two options to download files:
By clicking on the name of the file, to download only that file
By selecting the files and clicking on the download button.
From the message details:
NOTE: If the message was sent with end-to-end encryption, it is not possible to download the files
from the sent section.
8. DRAFT MESSAGES
Only entities configured as Senders have access to the Draft section.
When a message is saved as Draft it will be listed in the Draft section.
Select the files to
download and then click
on the Download button
Click on the
name of the file
to download
only that file
Status
17
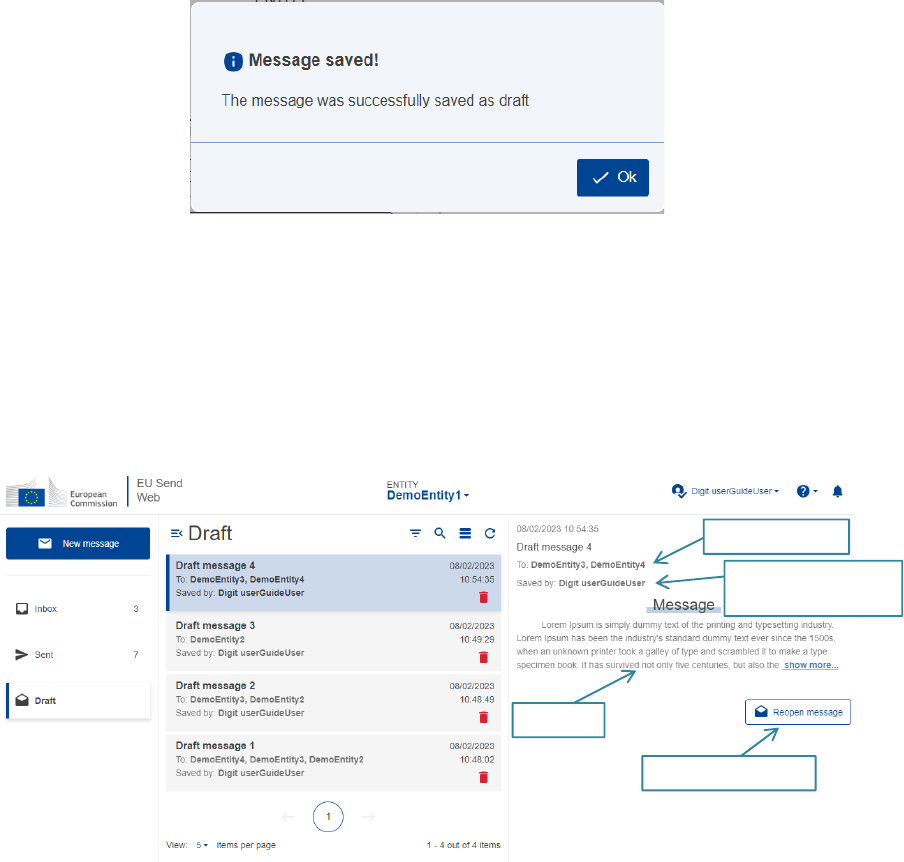
8.1 Saving a Draft
From the New message section, the user has the option to save as Draft.
A message cannot be saved as draft if there are any files added or if the message has signature
activated.
The user can save the message as draft as many times as needed.
A confirmation message will be displayed when the message is saved and the user can continue to
work on the message.
Save the Draft
Mandatory fields (*) to
be completed before
saving the draft.
List of draft
messages
Recipients
User that saved the
draft for the last time
The details of a message
are displayed when the
message is selected
Date and time the message was last saved.
If same day just the time
Delete a draft
18
When a user sends a message that was saved as draft, the message will not be available anymore in
the draft section.
8.2 Draft Details
When the user selects a message, the details of that message are displayed on the right side.
From the details of the message the user can reopen it. The message will be reopened in the New
message section where the user can continue to work on it.
9. NOTIFICATIONS
There are three types of notification: New Message, Status and Retention warning.
The user account can be configured to receive only one type of notification or a combination of them.
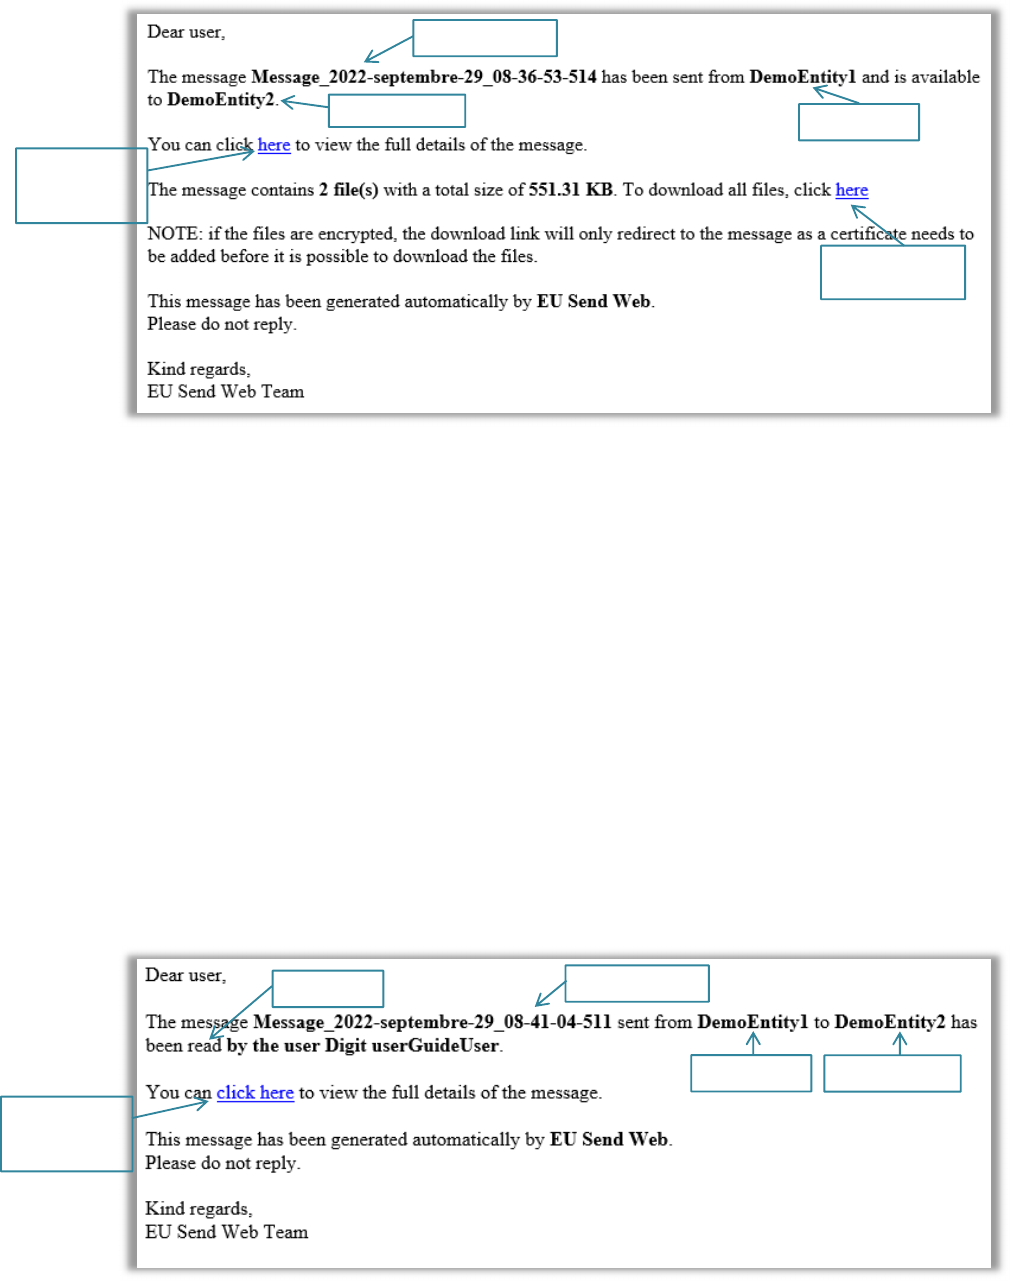
9.1 New Message Notification
When a new message arrives in the Inbox of an entity, a notification is sent to all users that belong to
that entity if they are registered to receive notifications for new messages.
Recipient entities
User that saved the
draft for the last time
Message
Reopen the message
19
There are two links in the notification:
The first link redirects the user to the application and to the respective message in the Inbox.
The second link redirects the user to the application and triggers the download of all files
automatically.
9.2 Status Notification
The status notification is sent to all users configured to receive notifications and belonging to the entity
that is sending messages whenever a status of a message changes.
For example, when a message has been Read by the Recipient entity, the users of the Sender entity
will receive a notification that indicates the message has been Read. NOTE: Messages sent to DG
Competition are not read in EU SEND web, but are transferred to DG Competition’s own case
management application. The READ status only indicates that this transfer took place. It does not
mean that a person has read or even opened the message.
From the link in the notification, the user is redirected to the application and to the respective message
in the Sent section.
Sender entity
Message subject
Recipient entit
y
Link to access
the message in
the application
Message subject
Sender entity
Recipient entity
Link to access
the message in
the application
Read status
Link to download
all files
20
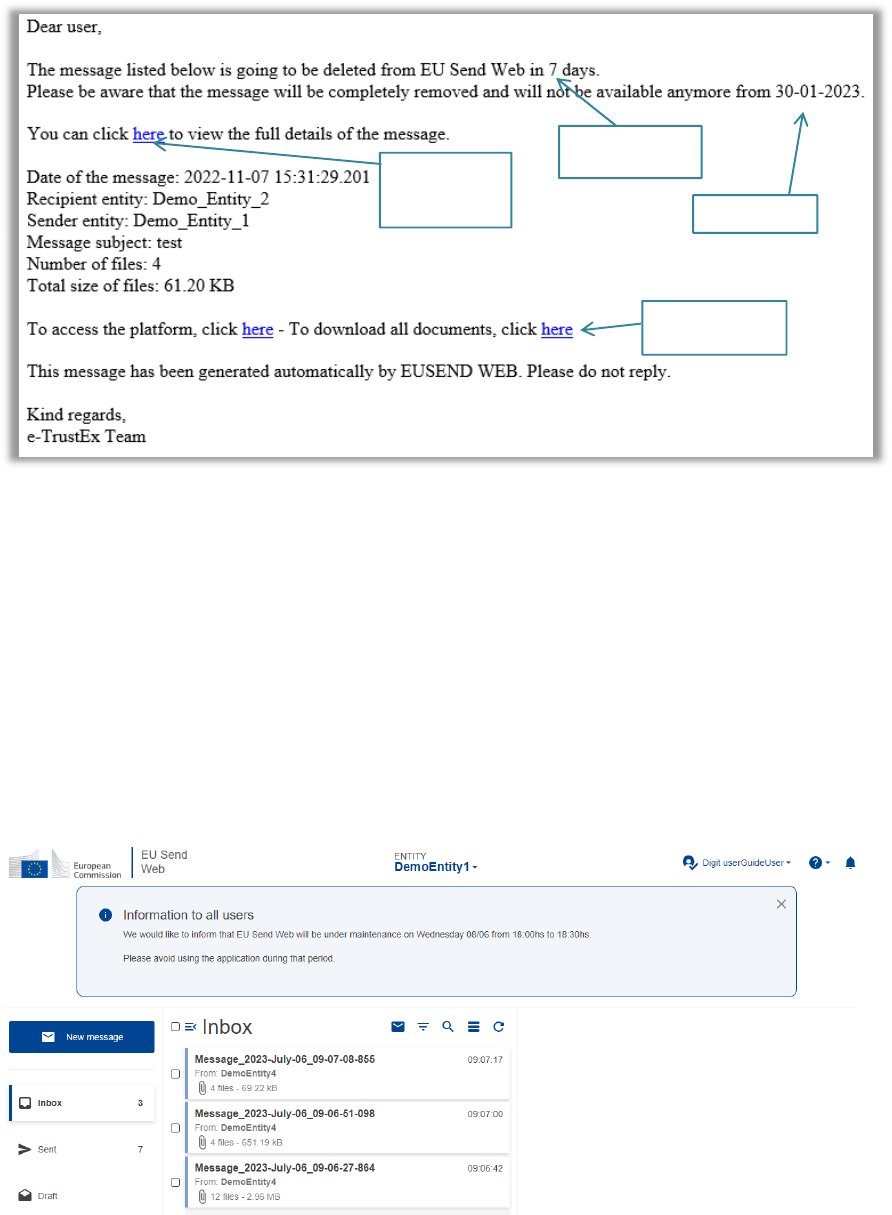
9.3 Retention Warning Notification
For users that are configured to receive retention policy warning notifications, a few days before a
message is deleted due to the retention policy, a notification is sent.
The number of days before the deletion of messages to send the notification depends on the business
configuration. DG Competition applies a 12 weeks retention period.
10. INFORMATION BANNER
When there is an important message to be shared with the users, one or more banners might be
displayed on the top of the application.
Remaining days
before deletion
Link to access
the message in
the application
Link to download
all files
Deletion date
21
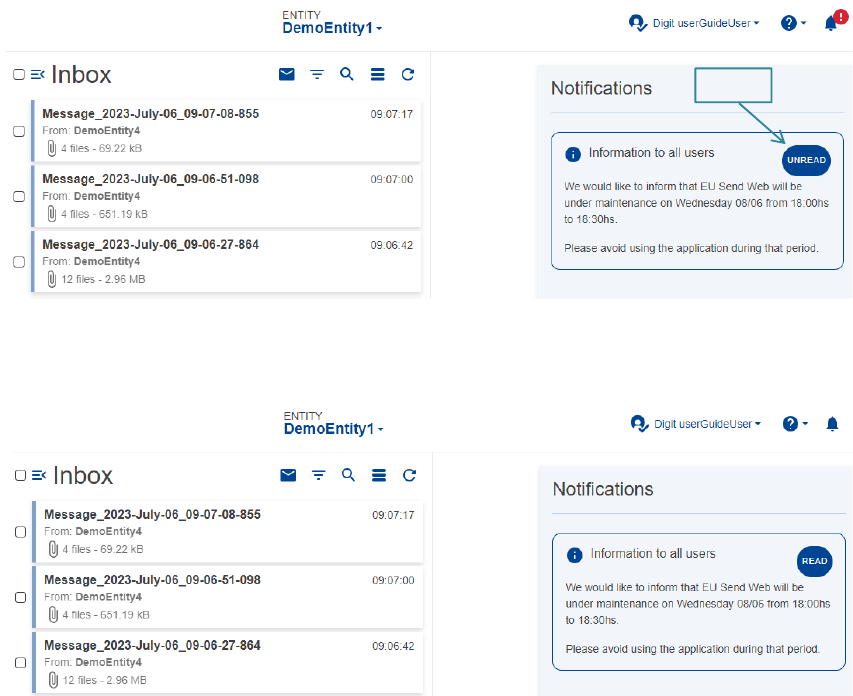
The banner will be displayed on every login while active.
If the user closes the banner, the information will be moved to the bell icon on the top right of the
application. The user can consult it at any time by clicking on the icon and a side bar will open
displaying the content of the banner.
When the banner is first closed, it will have an unread status and the icon will have a red circle with an
exclamation mark to indicate it is not read.
If the user clicks on the ‘Unread’ badge, the status will change to ‘Read’ and the red circle will no
longer be displayed. The user can still consult the information.
11. SIGNATURE
The application supports signature for sending messages. The business domain to which the entity
belongs to needs to have this feature enabled to be accessible from the application.
NOTE: This feature is set to disabled for DG Competition’s entities.
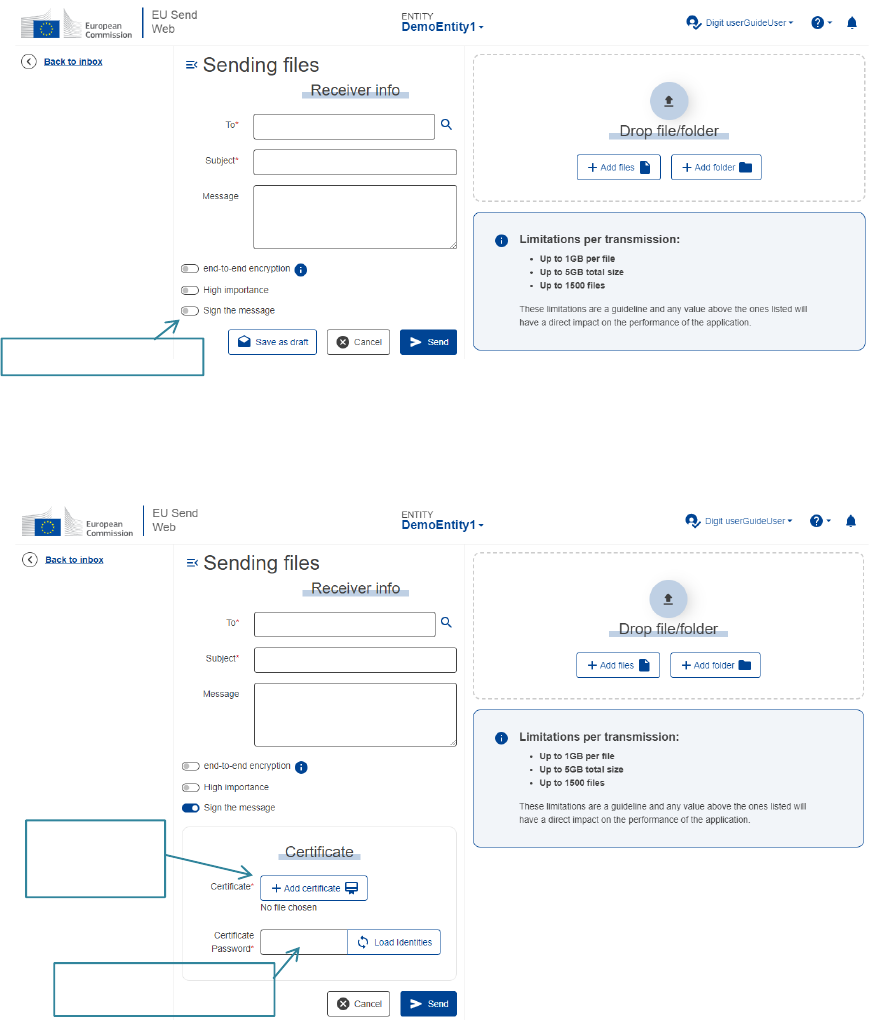
11.1 Sending with Signature
When the signature feature is enabled, a toggle switch will be present in the new message form
allowing the user to choose to sign or not to sign a message before sending it.
Status
22
If the user selects to sign a message, a new section will be displayed for him/her to add the certificate
for the signature.
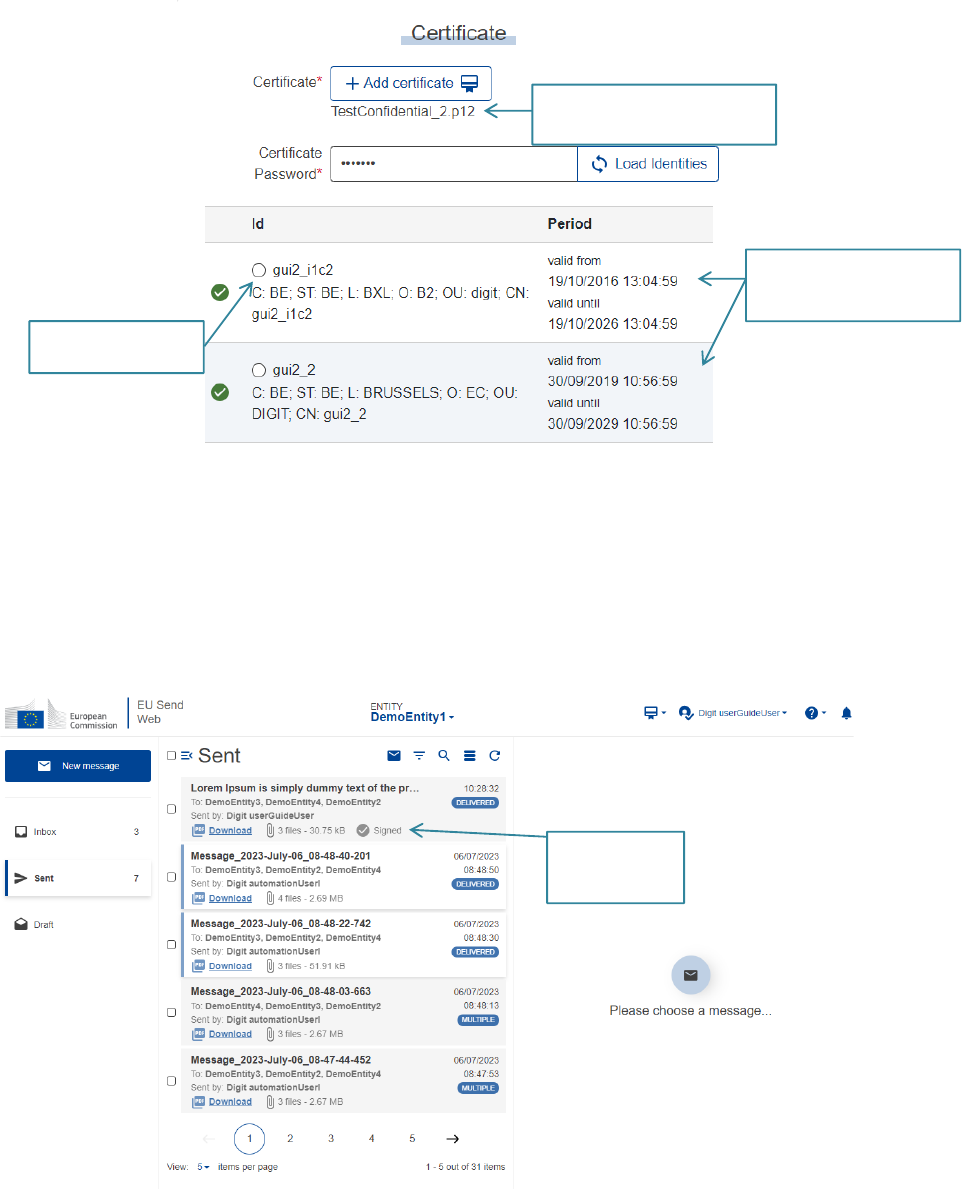
In case the certificate has more than one identity, the user needs to select one before sending the
message.
Click to select
the certificate
for the signature
Select to sign a message
After selecting the certificate
add the password
23
The identity that will be used to sign the message needs to be valid.
After filling in the certificate section, the user can continue to complete the message and send it.
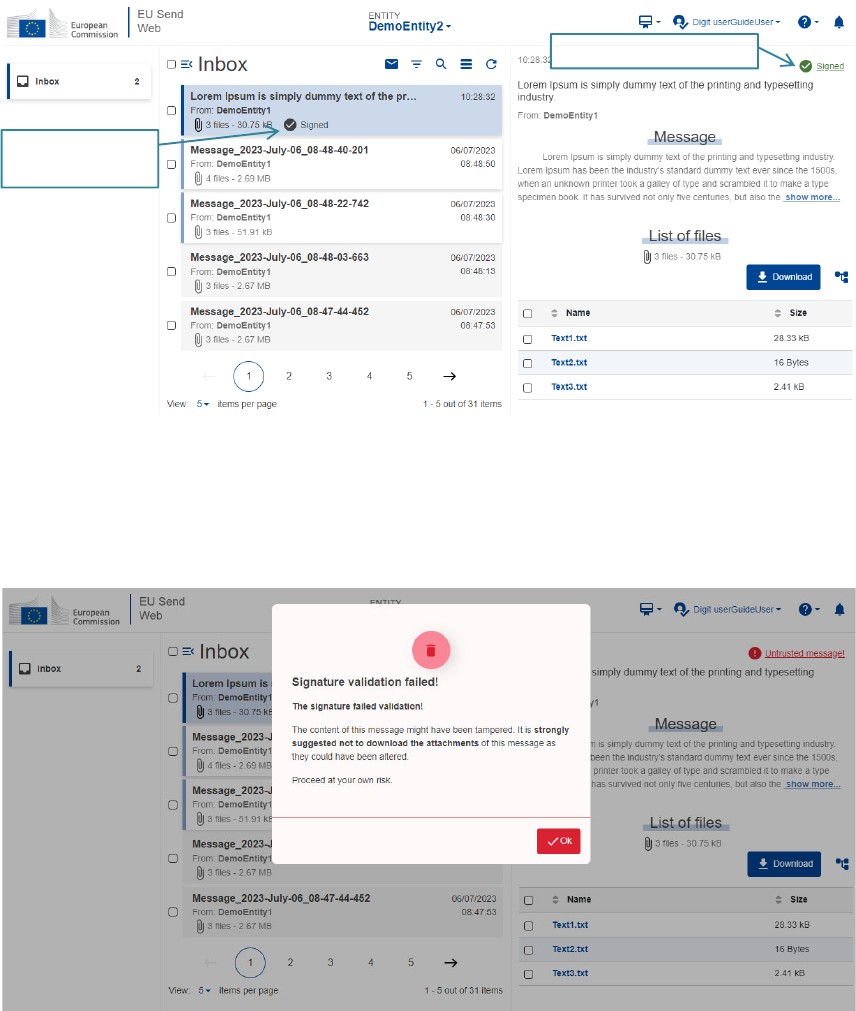
From the sent section we can see the messages that have been sent with signature from the ‘Signed’
label on the message summary.
Message sent
with signature
Select the Identity to
use for si
g
nature
After adding the password,
the identities of the
certificate are listed
When the certificate is selected
the name will be displayed
24
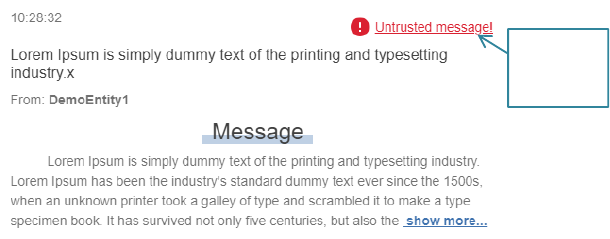
11.2 Receiving with Signature
When a received message was signed, the user will see the ‘Signed’ label on the message summary
and on the message details.
After verification, if the signed content is trustworthy, the signed icon and label in the message details
will be displayed in green.
If the validation fails and the message is considered not to be trusted, as soon as the user opens the
message a warning will be displayed and the label on the message details will be ‘untrusted
message!’
Message received
with signature
Signed content verification
25
Even if the message is untrusted, the user will still be able to download the files, but it is highly
recommended not to.
A .json file can be downloaded with the details of the content that was signed by clicking on the label
‘Signed’ or ‘Untrusted message!’ present on the message details.
12. ENCRYPTION
All files sent through EU Send Web are encrypted.
As soon as the user uploads files in the New Message section, the files always get encrypted client
side during the upload. They will be sent with encryption and the application will decrypt them server
side when the Recipient downloads the files unless the recipient is configured to use end-to-end
encryption.
The application supports end-to-end encryption as an extra layer of security for entities. To be able to
send a message with end-to-end encryption, the recipient entity needs to have a public key
configured. When a message is sent with this type of encryption, the public key is used in the
encryption process, the Recipient will need to add the corresponding private key to be able to
download the files and the decryption will be done client side. In that way the server does not have the
information for decryption and the files will only be readable by the intended recipient.
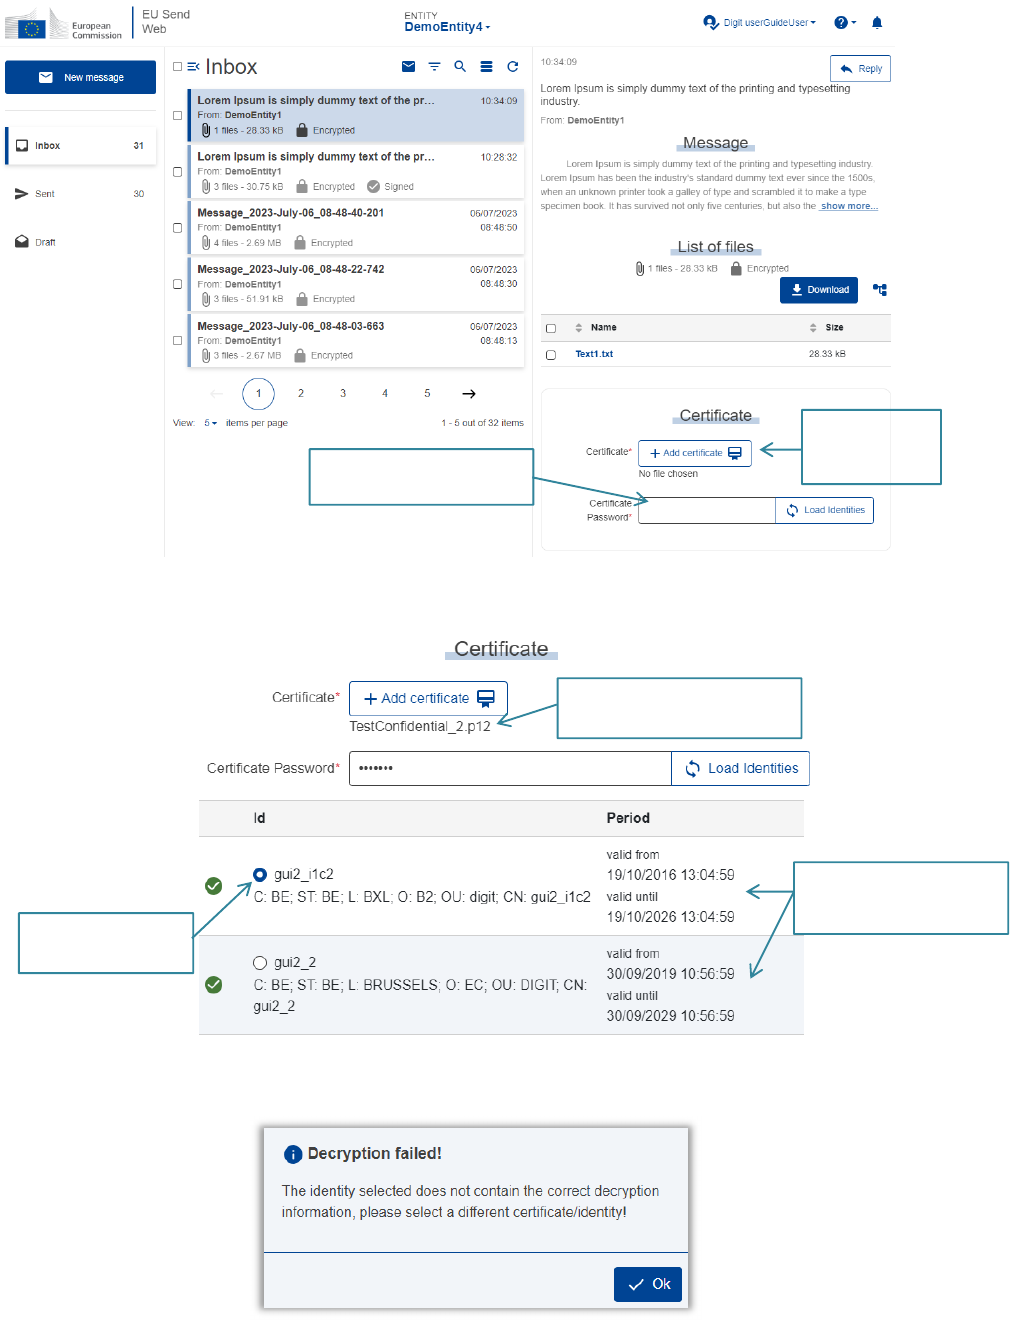
12.1 Download Encrypted Files
If the entity is configured with end-to-end encryption, the users of that entity need the private key to
decrypt and download files. In the message details there is a section related to the encryption
certificate. The user needs to add the correct private key before downloading the files.
Untrusted
message
26
In case the certificate has more than one identity, the correct one should be selected to download the
files.
If the identity selected has the correct decryption information, the files will be decrypted and
downloaded successfully, otherwise, an error message will be displayed.
Click to select
the private key
of the entity
After selecting the certificate,
add the password
When the certificate is selected
the name will be displayed
Select the Identity to
use for decryption
After adding the password,
the identities of the
certificate are listed

27
NOTE: when the user loads a certificate, the certificate remains selected and loaded while still in the
same session. The user can select different messages and doesn’t need to add the certificate again.
12.2 Remove Certificates
When a certificate is loaded in the application, an icon on the top right of the application will indicate
that a certificate is present.
Clicking on the icon, a dropdown with the list of all identities of the certificate will be displayed.
From the list, it is possible to remove the identities. Just click on the delete icon and the identity will be
removed from the session.
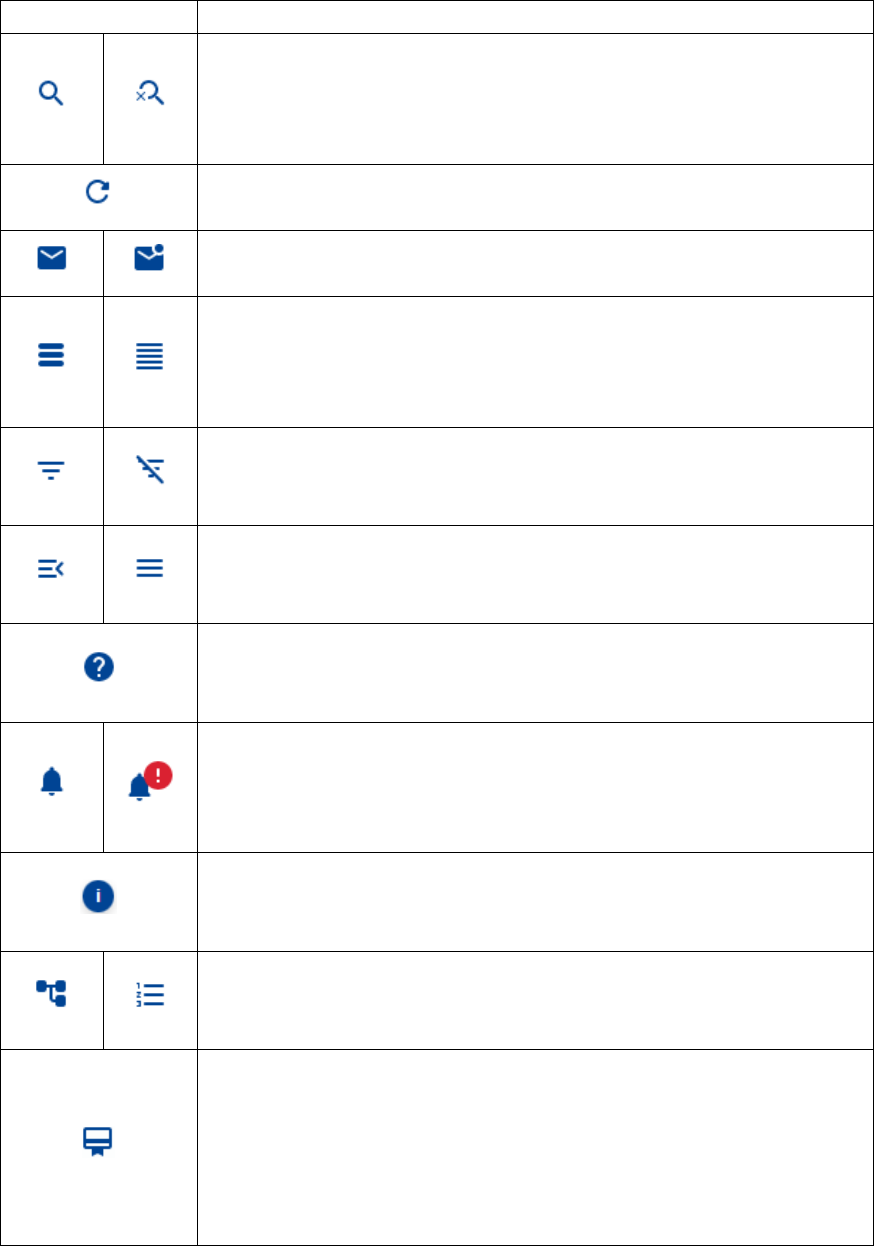
13. APPLICATION ICONS
In the application, several icons are used to represent possible actions and functionalities. See below
a list with the most important ones:
Certificate present
28
ICON DESCRIPTION
Search / Close search:
Clicking on the search icon will open the search section where the user can
search messages by subject or entity and set a date range.
In new message section the user can search for a recipient entity.
Refresh:
This button will refresh the list of messages.
Show unread messages / Show all messages:
The user can filter the messages listed by unread.
Expand subject list / Collapse subject list:
If there are messages with a long subject the user can collapse the subject in
the summary list. The subjects will be trimmed and displayed in one line
making it easier for the user to go through the messages.
Open filters / Close filters:
Clicking on the icon will open the filters section. From that section he user can
use the filters available.
Collapse left menu / Expand left menu:
The user can collapse and expand the left menu to gain space to display the
messages.
Help:
From the help icon on the top right of the application the user has a link to the
support email address and he/she can download the user guides.
Information banner:
The user can check the active banners that were closed at any time. If the bell
icon has a red circle with an exclamation mark, it indicates that there are
notifications that were not yet marked as read.
Information:
This icon indicates that there are extra information available for that feature.
The user just needs to click on it to display the information.
Tree view / List view:
The list of files can be displayed in two different views: tree view and list view.
The user can switch between them by clicking on the icon.
Certificate:
If this icon is displayed on the top of the application, it means that a certificate
was loaded for the session. The user can use the certificate to download
encrypted messages and use it for signature, without the need to upload the
certificate for every action. Clicking on the icon will display a dropdown with
the list of the certificate identities and they can be removed at any time.
29
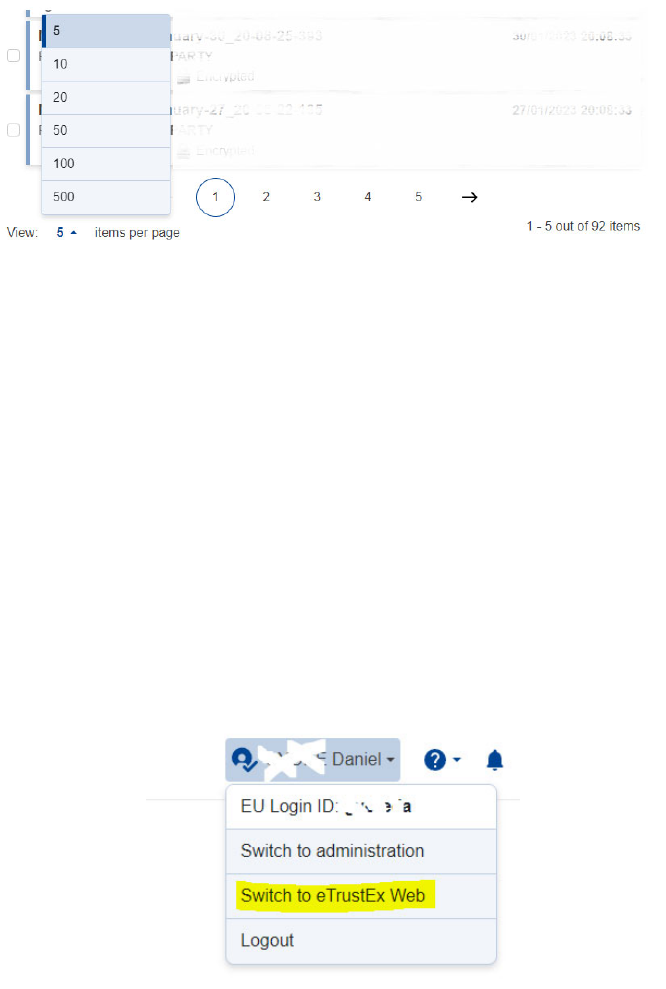
14. PAGINATION
In the application, the messages are listed and displayed in pages. The user can select how many
items per page he/she wants to display by clicking on the number and selecting from the options.
The number of items displayed per page is saved by user and when he/she logs in again, the last
value selected will be the one displayed.
To move between pages the user can use the arrows beside the page numbers or simply click on the
number of the page he/she wishes to access.
15. Access to eTrustEx – ONLY for old eTrustEx users
eTrustEx (the predecessor of EU SEND) will remain accessible in READ ONLY mode and only for
accounts/users which were registered before the migration (11/11/2023). This is to enable access to
already sent submissions (see the SENT folder) and only until 17/02/2024.
Old eTrustEx users can access eTrustEx from EU SEND via their user details menu (see in the upper-
right corner in EU SEND) or via a direct link.

30
16. CONTACT INFORMATION
Technical support for DG Competition’s entities/users only:
EU Send Service Desk
Standard Service:
• 8:00 - 18:00 CET on normal Commission working days
• Only by email: DIGIT-EU-[email protected]
Standby Service:
• 18:00 - 8:00 CET on normal Commission working days
• Available 24 hours on weekends, Commission and public holidays
• Only by phone: EC Central Helpdesk: +32 2 95 81 81
• Only for critical and urgent incidents in production environment
