HEAT
& EAT
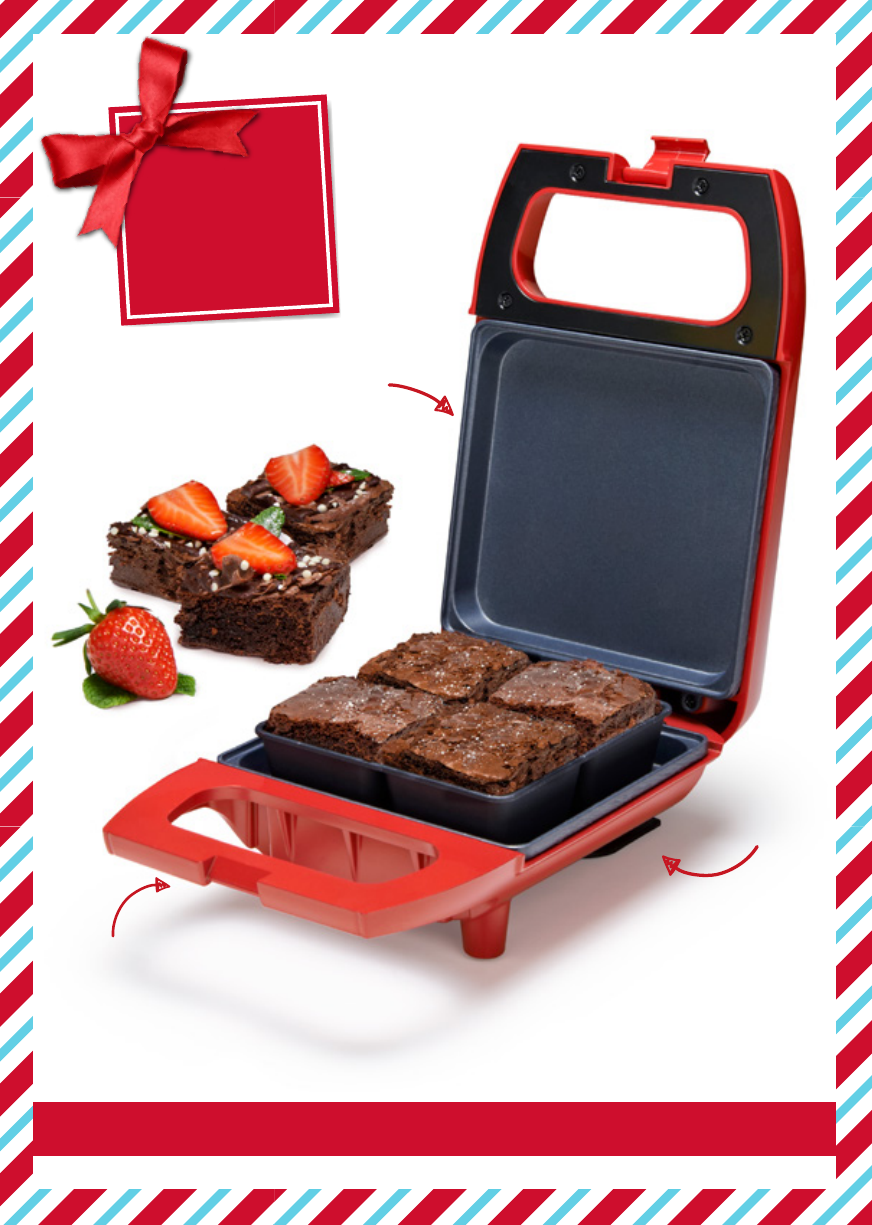
MAKES PERFECT BROWNIES EVERY TIME
BROWNIE MAKER
CO M PACT AND
EASY TO USE
EASY CLEAN
NON-STICK
SURFACE
NON-SLIP
FEET

• When using electrical appliances, basic safety precautions should always be followed.
• Check the voltage indicated on the rating plate corresponds with that of the local network before
connecting the appliance to the mains power supply.
• Children aged from 8 years and people with reduced physical, sensory or mental capabilities or lack
of experience and knowledge can use this appliance, only if they have been given supervision or
instruction concerning use of the appliance in a safe way and understand the hazards involved.
• Children should always be supervised to ensure that they do not play with the appliance.
• Unless they are older than 8 and supervised, children should not perform cleaning or user mainte-
nance.
• This appliance is not a toy.
• This appliance contains no user serviceable parts. If the power supply cord, plug or any part of the
appliance is malfunctioning or if it has been dropped or damaged, on a qualified electrician should
carry out repairs.
• Improper repairs may place the user at risk of harm.
• Keep the appliance and its power supply cord out of reach of children.
• Keep the appliance and its power cord away from heat or sharp edges that could cause damage.
• Keep the power supply cord away from any parts of the appliance that may become hot during use.
• Keep the appliance away from other heat emitting appliances.
• Do not immerse the appliance in water or any other liquid.
• Do not operate the appliance with wet hands.
• Do not leave the appliance unattended whilst connected to the mains power supply.
• Do not remove the appliance from the mains power supply by pulling the cord: switch it off and
remove the plug by hand.
• Do not use the appliance for anything other than its intended use.
• Do not use any accessories other than those supplied.
• Do not use this appliance outdoors.
• Do not store the appliance in direct sunlight or high humidity conditions.
• Do not move the appliance whilst it is in use.
• Do not touch any sections of the appliance that may become hot or the heating components of this
appliance, as this could cause injury.
Please read all of the instructions carefully and retain for future reference.
SAFETY INSTRUCTIONS
2

• Do not use sharp or abrasive items with this appliance: use only heat resistant plastic or wooden
spatulas to avoid damaging the non-stick surface.
• When lifting the lid, ensure you lift from the handle as the surface gets very hot and may cause injury.
• Always unplug the appliance after use and before any cleaning or user maintenance.
• Always ensure that the appliance has cooled fully after use before performing any cleaning, mainte-
nance or storing away.
• Always use the appliance on a stable, heat resistant surface, at a height that is comfortable for the user.
• Use of an extension cord with the appliance is not recommended.
• This appliance should not be operated by means of an external timer or separate remote control
system, other than supplied with this appliance.
• This appliance is intended for domestic use only.
• The lid or outer surface of the appliance may get hot during operation. Please use an oven mitt when
operating the appliance for safety.
• Steam may escape from the sides of the appliance during use. Ensure it is positioned where this will
not cause a hazard.
• CAUTION: Brownies may burn. Never use the appliance near or below flammable materials such as
curtains, drapes or wall coverings. Always ensure there is sufficient free space above and around all sides
for air circulation.
CAUTION: Hot surface
CARE AND MAINTENANCE
• Before attempting any cleaning or maintenance, unplug the appliance from the mains power supply
and check that it is fully cooled.
• STEP 1: Wipe the appliance housing with a soft, damp cloth and dry thoroughly.
• STEP 2: Remove baked on food by applying a small amount of warm water mixed with a mild
detergent to the non- stick coated cooking plates, wipe clean with a paper towel. Use a non-abrasive
scourer if the food is difficult to remove.
• Do not immerse the appliance in water or any other liquid.
• Never use harsh abrasive cleaning detergents to clean the appliance or its accessories, as this could
damage the non-stick cooking surface.
• NOTE: The appliance should be cleaned after every use.
3
GETTING STARTED
Remove the appliance from the box.
Remove any packaging from the appliance.
Place the packaging inside the box and store for future reference.
IN THE BOX
Brownie maker
Instruction Manual
FEATURES
Quick & easy to use
Non-stick cooking plates for easy cleaning
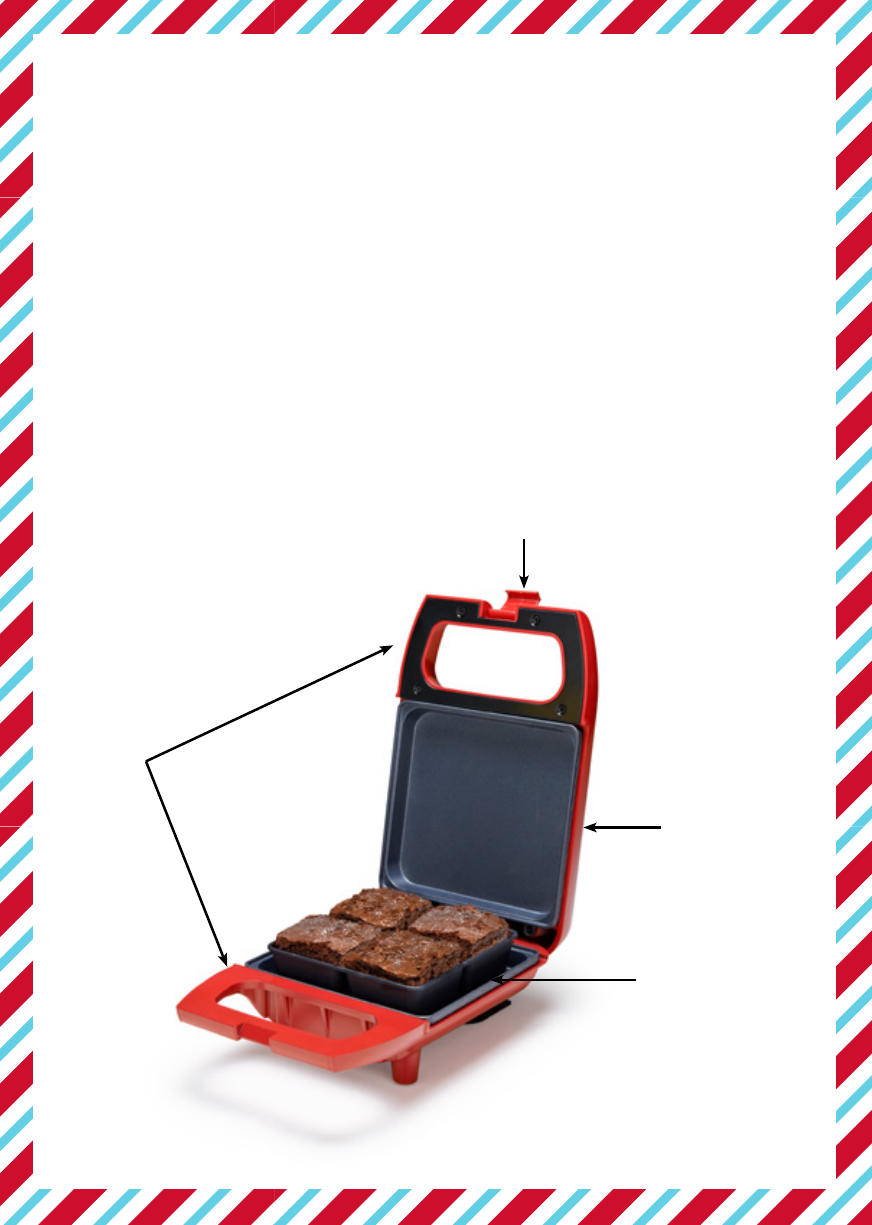
DESCRIPTION OF PARTS
Red power indicator
(on the lid)
Non-stick
brownie tray
Saftey lock clip
Handles
4

INSTRUCTIONS FOR USE
NOTE: When using the brownie maker for the first time, a slight smoke or odour may be emitted.
This is normal and will soon subside. Allow for sufficient ventilation around the appliance.
STEP 1: Before using your brownie maker for the first time, wash the non-stick brownie tray in
warm, soapy water, rinse and dry thoroughly. Wipe down the outer body with a damp cloth.
STEP 2: In the non-stick brownie tray, spray or wipe a little oil so that cooked brownies can be
removed easily once it is cooked.
STEP 3: Close the lid, lock the safety lock clip and ensure that the brownie maker is on a flat, level
surface. Plug the cord into a suitable power outlet.
STEP 4: Switch on at the power mains, the red indicator light will illuminate indicating that the
brownie maker is heating up. The light will go off once the appliance has heated up.
STEP 5: Carefully unclasp the safety lock clip and lift the cover by the handle, pour your brownie
mixture 2/3 of the way up.
NOTE: Do not overfill the non-stick coated brownie tray. Always pre-heat the brownie maker before
starting to cook.
STEP 6: Close the lid. Baking the brownies will take approximately 10-15 minutes, depending on
the consistency of your brownie mixture and your preferred degree of browning.
NOTE: The red indicator light will cycle on and off to signal that it is maintaining temperature.
STEP 8: At 10 minutes, carefully lift the lid up and check the brownies by sticking a stick in the
mixture and see if this pulls out clean. If they require further cooking, close the lid and bake for a
few more minutes.
STEP 9: Once cooked to your liking, carefully remove the non-stick brownie tray with heat
protector gloves and place this on the wire rack to cool down. Switch off and unplug the appliance
from the mains power supply. Leave the lid open and allow it to cool before cleaning.
STEP 10: Once the Brownies have cooled down, turn the tray upside down and the brownies will
come out.
NOTE: To make more brownies, repeat the above steps.
CAUTION: Exercise caution during cooking, the appliance will emit steam. Please use an oven
gloves when operating the appliance for safety.
5

HINTS
Mixture consistency: Brownie mixture should be fairly thick, but fluid enough to run off a spoon.
Take cold ingredients out of the fridge before making the brownie mixture to ensure all the
ingredients are of similar temperature.
CLASSIC BROWNIE RECIPE
113 grams butter
113 grams plain chocolate, broken in pieces
113 grams soft brown sugar
113 grams self-raising flour
2 eggs, beaten
1-2 tablespoon milk
Pinch of salt
METHOD
1. Preheat the brownie maker.
2. Put the butter and chocolate pieces in a heatproof bowl and stand over a pan of hot water until
melted, stirring occasionally.
3. Remove the bowl from the heat. Stir in the sugar and mix thoroughly. Leave to cool.
4. Sift the flour and salt into a mixing bowl.
5. Pour in the cooled chocolate mixture into the middle of the bowl.
6. Mix together, gradually drawing in the flour from the sides of the bowl.
7. Beat in the eggs and stir thoroughly to combine, adding enough milk to make a soft dropping
consistency.
8. Bake the brownies by following the instructions.
6
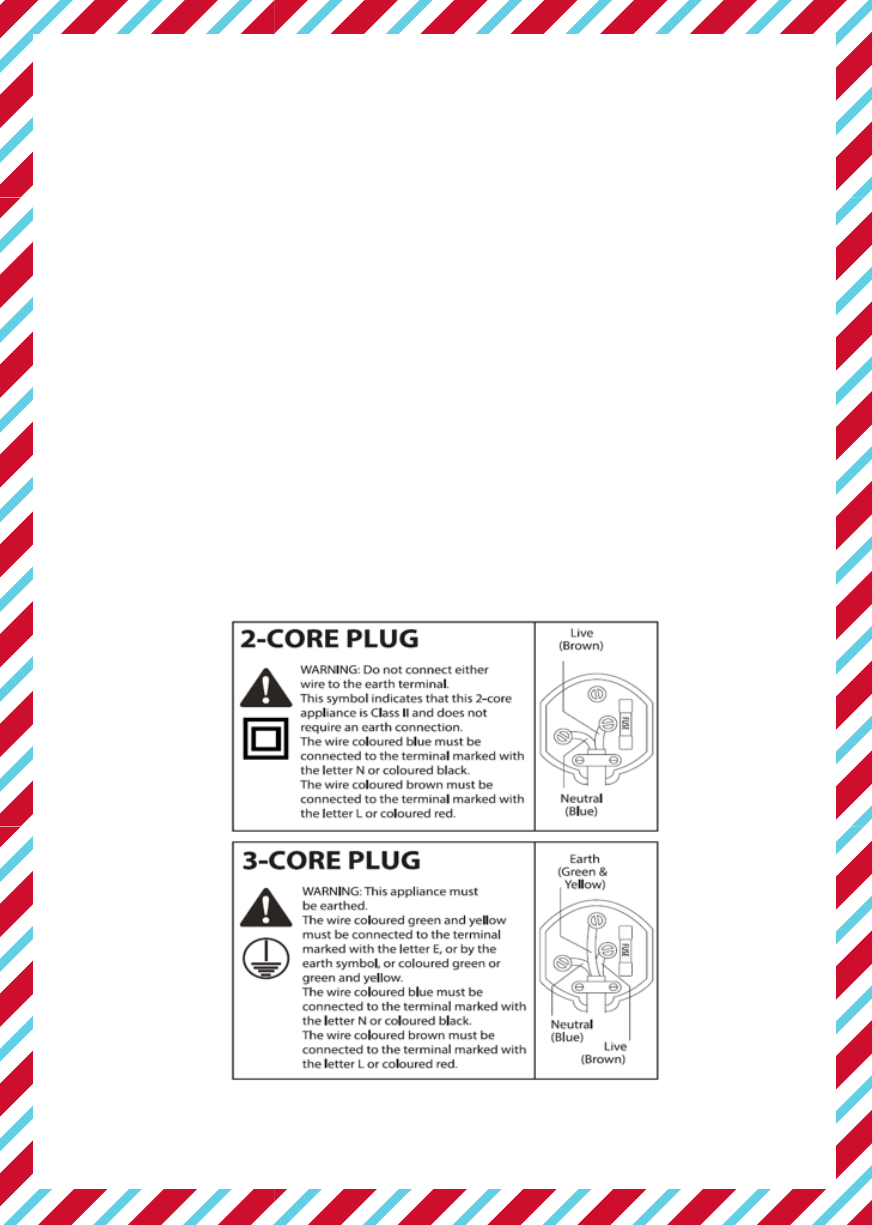
ELECTRICAL INFORMATION
(Fixed Mains Plug Only)
The mains lead supplied with this product is fitted with a BS1363/A 13amp plug. If it is not suitable
for your supply sockets it must be replaced with an appropriate plug.
If the plug becomes damaged and/or needs to be replaced please follow the wiring instructions
below. The plug removed must be disposed of immediately. It must not be plugged into a socket
supply as this will be an electrical hazard.
If the fuse needs to be replaced it needs to be the same rating and ASTA approved to BS1362. If
the plug is changed, a fuse of the appropriate rating must be fitted in the plug, adaptor or at the
distribution board. If the fuse in a moulded plug is replaced, the fuse cover must be refitted before
the application can be used.
WIRING INSTRUCTIONS
The supply cable will be either 2-core or 3-core. Follow the appropriate wiring instructions shown. In
both cases ensure that the outer sheath of the cable is held firmly in place by the cable clamp.
7
STORAGE
Ensure that the appliance is cool, clean and dry.
Never store the appliance whilst it is wet.
Never wrap the cord tightly around the appliance; wrap it loosely to avoid causing damage.
Store in a cool, dry place.
TECHNICAL SPECIFICATION
Model Number: 373340
Power Input: 220-240V 50Hz
Power Output: 600W
This appliance complies with the below listed EU Directives
2014/30/ EU Electromagnetic Compatibility Directive
2014/35/ EU Low Voltage Directive
2011/65/ EU Restriction of Hazardous Substances
1935/2004/EC Materials & Arcles in Contact with Food
(LFGB secons 30&31)
The complete declaraon of conformity is a vailable upon request for relevant enquiries
B&M Retail Ltd, Dakota Drive, Speke,
Liverpool, L24 8RJ, UK
Centz Stores 7 Ltd, 5 Old Dublin Road,
Dublin, A94 K1H5, Ireland
8
