
PureConnect®PureConnect®
2023 R32023 R3
Generated:
09-November-2023
Content last updated:
08-February-2018
See Change Log for summary of
changes.
Crystal Reports ImportCrystal Reports Import
UtilityUtility
Technical ReferenceTechnical Reference
AbstractAbstract
This document describes how to import a Crystal Report Template
(RPT) and how to congure it, to allow the report to run in Interaction
Reporter in IC Business Manager.
For the latest version of this document, see the PureConnect
Documentation Library at: http://help.genesys.com/pureconnect.
For copyright and trademark information, see
https://help.genesys.com/pureconnect/desktop/copyright_and_trademark_information.htm.
1

2
3
3
4
4
4
5
5
5
6
7
8
9
10
11
11
12
Table of ContentsTable of Contents
Table of Contents
About the Crystal Reports Import Utility
Download and install the Crystal Report Utility
Requirements
Software requirements
Additional requirements
Prerequisites
Create the source rpt file
Set up Interaction Administrator
Run the Crystal Reports Import Utility
Complete the Load Crystal Report Files and Set Name and Category page
Configure tables
Configure parameters
Confirm the import details
Test the report
Tips for testing reports
Change log
2

About the Crystal Reports Import UtilityAbout the Crystal Reports Import Utility
The Crystal Reports Import Utility allows you to import a Crystal Report Template (RPT) and to configure it to run in Interaction
Reporter in IC Business Manager.
Download and install the Crystal Report UtilityDownload and install the Crystal Report Utility
First, download the Crystal Reports Import Utility from:
https://my.inin.com/products/cic/Pages/Utilities-Downloads.aspx
And run the Crystal Report Import Utility setup wizard to install the Crystal Reports Import Utility.
3

RequirementsRequirements
Software requirementsSoftware requirements
CIC 2015 R2 or later
Additional requirementsAdditional requirements
In Interaction Administrator, the following security permissions must be configured for you:
Security right: Interaction Report Administrator
Access control right: Interaction Reporter Reports *[All]
4

PrerequisitesPrerequisites
The following are prerequisites for importing a Crystal Reports .rpt file.
Be sure the .rpt file is complete before you configure the report for use with CIC. For example, make sure that the .rpt file contains
all of the necessary report parameters.
Be sure a data source is specified in the .rpt file. If a data source is not set for the .rpt file, the file cannot load in Interaction
Reporter, which results in a run time error.
Report categories are defined in Interaction Administrator. If you need more categories for organizing your reports, see your
Interaction Administrator before you run the Crystal Reports Import Utility.
Create the source rpt fileCreate the source rpt file
Set up Interaction AdministratorSet up Interaction Administrator
5
Run the Crystal Reports Import UtilityRun the Crystal Reports Import Utility
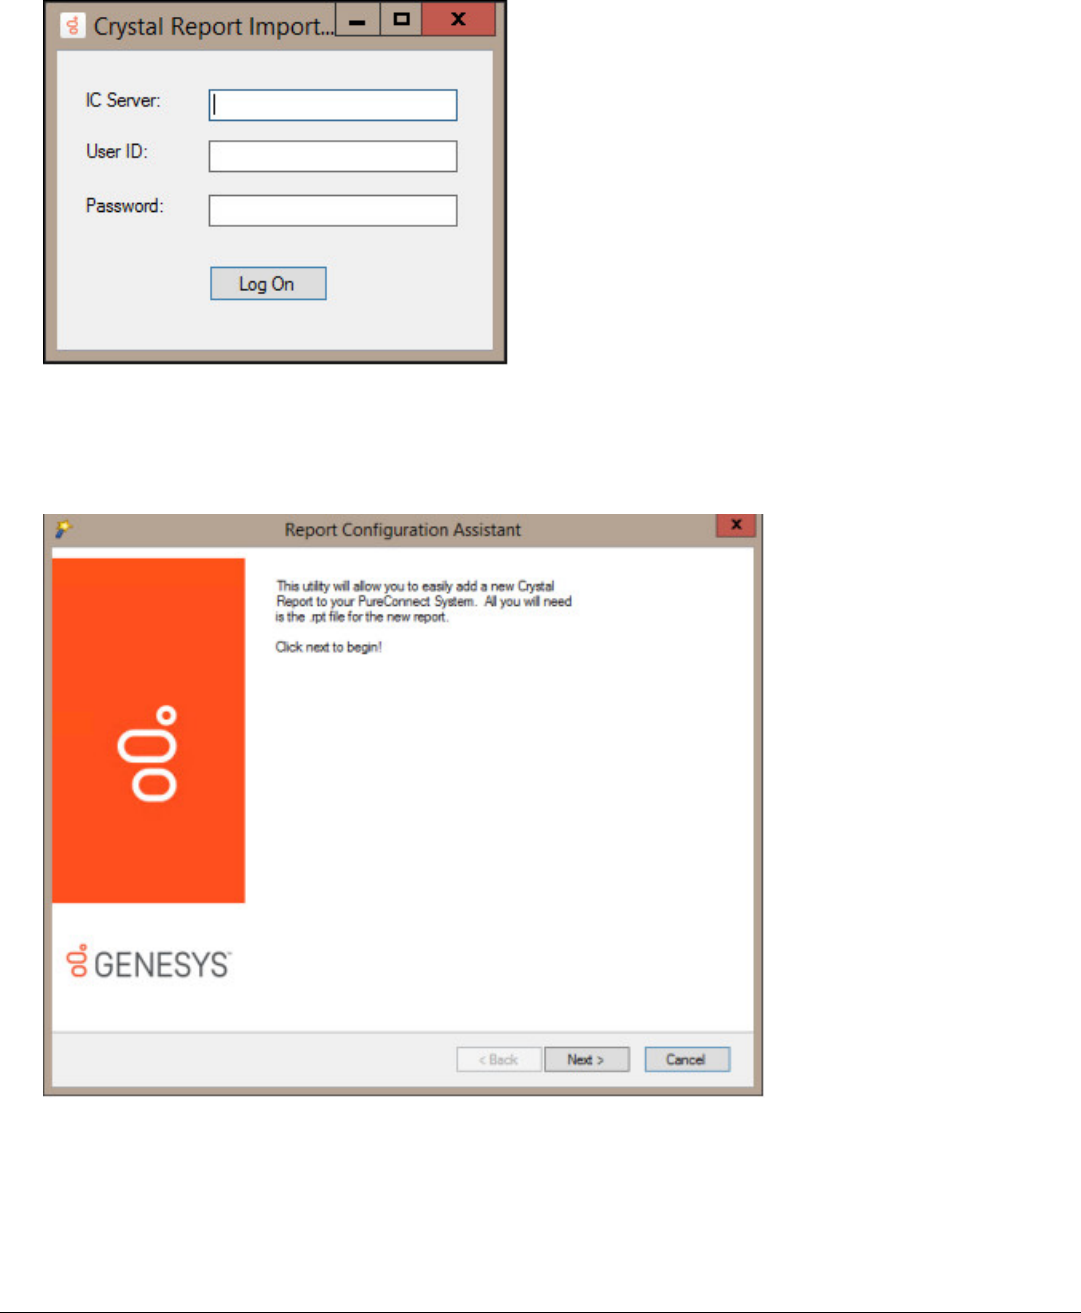
1. Run the CrystalReportImportUtility.exe file.
The Crystal Report Impo rt UtilityCrystal Report Impo rt Utility dialog box appears.
2. In the IC ServerIC Server box, type the address of your CIC server.
3. In the User IDUser ID box, type your CIC user ID.
4. In the PasswordPasswo rd box, type your CIC password.
5. Click BeginBegin.
The Report Configuration AssistantRepo rt Co nfiguration Assistant dialog box appears.
6. Click NextNext.
The Lo ad Crystal 2013 file and Set Name and CategoryLo ad Crystal 2013 file and Set Name and Category dialog is displayed.
6

Complete the Load Crystal Report Files and Set Name and Category pageComplete the Load Crystal Report Files and Set Name and Category page
1. To complete the File to ImportFile to Import box, click BrowseBro wse and select the Crystal Report (.rpt) file.
By default, the BrowseBrowse button takes you to the location where all of the Crystal Report .rpt files are stored.
2. To complete the Report DestinationRepo rt Destinatio n box, click Bro wseBrowse and select the location where CIC finds the report.
Note:Note:
The Report Destinatio nRepo rt Destination box automatically inserts the ${ReportFilePath}\ parameter before the destination that you select.
Do no t delete o r replace this parameter.Do no t delete o r replace this parameter.
3. In the Repo rt NameRepo rt Name box, type a meaningful name for the report.
4. In the Repo rt CategorRepo rt Category list, select the appropriate category. Categories are configured in Interaction Administrator. For more
information, see your CIC administrator.
5. In the Repo rt DescriptionReport Description box, type a brief explanation of the purpose of the report.
6. Click NextNext.
The Configure TablesConfigure Tables dialog is displayed.
7

Configure tablesConfigure tables
1. Do one of the following:
If your report uses multiple tables and you want to use a specific data source for each one, in the IC Data SourceIC Data Source list,
select the data source that you want to use.
If you want all the tables in your report to use the same data source, in the Set all tables to useSet all tables to use list, select the data
source.
2. Click NextNext.
The Configure ParametersConfigure Parameters dialog is displayed.
8
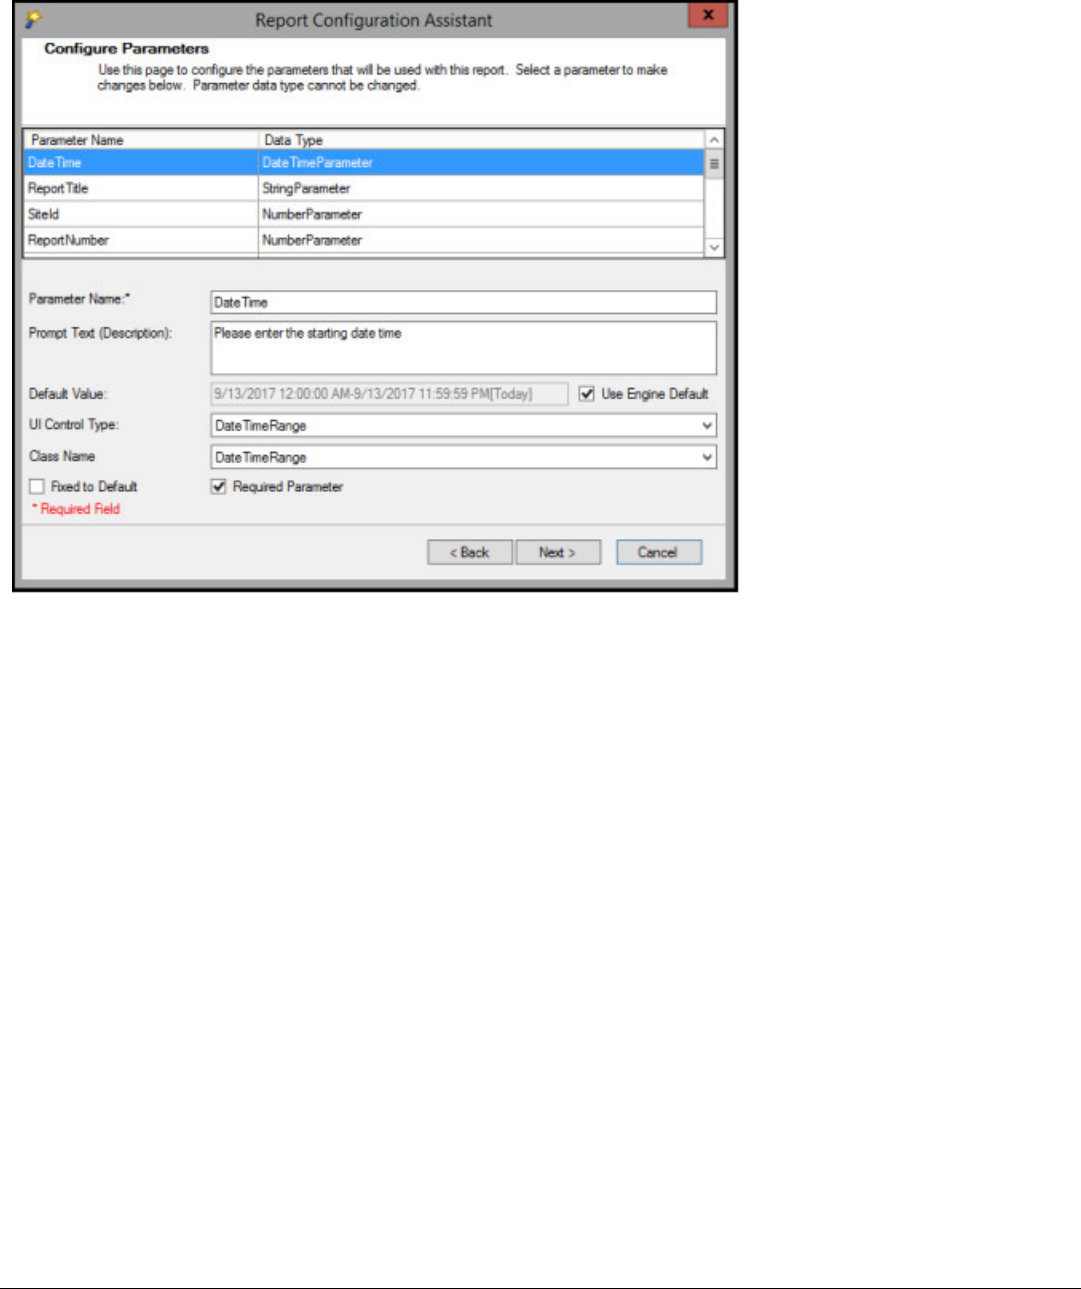
Configure parametersConfigure parameters
Report parameters are defined in the .rpt file. On this page of the Crystal Reports Import Utility, you configure the report parameters
that are defined in the .rpt file. You cannot create new parameters or delete existing parameters here. If you need to make those
types of changes, make them in the .rpt file first.
1. In the list, select the first parameter that you want to configure.
2. In the Parameter N ameParameter Name box, type the name of the report as you would like it to appear in IC Business Manager.
3. In the Prompt Text(Descriptio n)Prompt Text(Description) box, type a meaningful prompt value.
In the Default ValueDefault Value box, type the default value that is used if the user does not supply any other value.
4. In the UI Control TypeUI Co ntro l Type list, select the type of control that the user uses to select the value for the parameter.
For example, in the .rpt file, the control type is set to a simple numeric field. However, you want to change that to be a
NumericUpDo wnNumericUpDo wn control instead.
5. Do you want to hard code the value for the parameter? If yes, select the Fixed to DefaultFixed to Default check box. The parameter does not
appear in the form that the user uses to run the report.
6. To make this parameter a required parameter, select the Req uired Required ParameterParameter check box. The report does not run unless the
user supplies a value for this parameter.
7. Click NextNext.
The Import DetailsImpo rt Details dialog is displayed.
9

Confirm the import detailsConfirm the import details
1. Verify that you have configured the import correctly.
2. Click Import ReportImpo rt Report.
3. After the import completes, click NextNext to finish.
10

Test the reportTest the report
You have successfully configured the .rpt report. It is a good idea to test the report before you release it for general use.
For complete information on how to run reports, see
Interaction Report Help
, which you can access from the HelpHelp menu in IC
Business Manager. For more information about reports in general, see
PureConnect Reporting Technical Reference.
in the
PureConnect Documentation Library.
Tips for testing reportsTips for testing reports
Be sure to run the report with parameters that returns a non-empty data set.
If possible, run the report from Crystal Designer and then run it again from within IC Business Manager. You should get identical
results, if the source data remains the same.
11

Change logChange log
The following changes have been made to this
Crystal Reports Import Utility Technical Reference
, since Customer Interaction
Center 2015 R1 product availability.
DateDate ChangesChanges
03-September-2015 Document created.
12-November-2015 Added the location of the Crystal Report Utility download.
31-January-2016 Updated the title and all references to the Crystal Reports Import Utility.
12-September-2017 Updated for Genesys rebranding
12-September-2017 Updated screen captures for running Crystal Reports Import Utility
13-September-2017 Additional rebranding updates and general edits
08-February-2018 Updates for HTML5 project conversion
12
