
Getting Started With
ADOBE DIGITAL EDITIONS
4.5
Contents
Introduction
Automatic download of books across devices
eBook Formats Supported
Accessibility
Opening eBooks
Authorizing with an Adobe ID or Vendor ID
Authorizing without an ID
Bookseller-specific IDs
Organizing eBooks: Library and Bookshelves
Reading eBooks
Reading EPUBs
Reading PDFs
Bookmarks
Highlights
Notes (Annotations)
Searching text
Transferring eBooks between Computers

Transferring eBooks from / to a supported
eReader
Diagnosing Problems
Connectivity issues
Corrupted and deleted documents
Incorrectly formatted documents
Shortcut Keys
Known issues
Introduction
Welcome to Adobe Digital Editions 4.5! This application is
designed for simplified management and reading of eBooks.
It can be used in conjunction with screen reading software
for vision impaired users.
Automatic download of books across devices
Adobe Digital Editions 4.5 provides the ability
to sync your DRM-enabled books across all your
devices. Therefore, if you purchased a book
using one device, you can now easily access
the book on all your other devices too. This
feature is enabled by default (you can turn it
off through Library > Preferences (Windows) or
Adobe Digital Editions > Preferences (Mac OS)

eBook Formats Supported
ADE 4.5 supports EPUB 3.0, including its four specifications:
EPUB Publications,
EPUB Content Documents,
EPUB Open Container Format (OCF),
and EPUB Media Overlays.
ADE 4.5 also supports EPUB 2.0.1, EPUB 2 versions, and
PDF/A format.
Accessibility
To enable Adobe Digital Editions (ADE) for use with screen
readers, you need the JAWS or NVDA reader on Windows or
VoiceOver reader on the Macintosh.
Installation instructions can be found on the following web
sites:
Windows – JAWS:
http://www.freedomscientific.com/jaws/
Windows – NVDA: http://www.nvda-project.org/
Macintosh – VoiceOver:
http://www.apple.com/accessibility/voiceover/
ADE was designed with full keyboard support (tab
navigation and shortcuts), as well as high-contrast support.
Shortcuts are listed near the end of this book.
Opening eBooks

When you download a book from your library or bookseller’s
web site, simply open the book from the browser download
window, and Adobe Digital Editions (ADE) will launch. If ADE
doesn’t launch automatically, start it manually, and then
drag your book onto the application icon. Or, choose File >
Add to Library to browse for the file on your computer.
When ADE opens your book, it confirms you have
permission to read it. Many books are DRM (Digital Rights
Management) protected, such as books you check out from
the library or purchase at an online book seller. If it’s not a
protected book, ADE will open it and you can begin reading.
Authorizing with an Adobe ID or Vendor ID
The first time you open a protected book, ADE will ask you
to authorize your computer. The best way to do this is to
supply an Adobe ID or Vendor ID, associating the book with
your ID. If you later open the book on another computer,
you can simply supply the same ID to open the book.
If you don’t have an Adobe ID, click the Create an Adobe ID
link. After creating the ID on the Adobe website, you can
close that browser window, return to ADE, and enter the
newly-created Adobe ID.
Authorizing without an ID
If you choose to authorize without an ID, ADE will enable
reading of the book only on your computer. You will not be
able to read it on other eReader devices or other computers
(or the same computer if you re-install). If you don’t plan on
moving your books to other computers (or re-installing), this
approach will work for you.
Bookseller-specific IDs
Some booksellers use a special form of protection where
your book is locked to the bookseller’s ID. For example,
Barnes & Noble uses this method. When you buy a book,

download to your computer, and open in ADE, you’ll be
asked to supply the username and unlock code you use on
the bookseller’s web site (for example, for Barnes & Noble,
the name and number of the credit card associated with
your ebook purchase).
Organizing eBooks: Library and Bookshelves
When you are reading a book, it occupies the
whole Adobe Digital Editions (ADE) window. You
automatically enter reading mode when you
open a new book (described in “Opening
eBooks” above).
You can organize all your books by showing your library.
From reading mode, you can open your library by clicking
Library in the top-left corner of the screen.
The library view is broken into two panels:
The left panel shows your Last Read book plus the list
of bookshelves. (Click Read to resume reading the
Last Read book.) There are built-in bookshelves for all
books, unread books, borrowed books, and so on. You
can create your own bookshelf by clicking the Create
button (the plus sign). To fill a shelf, drag books to it.
(To view all available books, click All Items.)
Note: Removing a book from a user-created shelf
removes it only from that shelf, but removing it from a
built-in shelf removes it entirely from ADE. (User-created
shelves have a brown icon; built-in shelves have a blue
one.)
The right panel shows the contents of the selected
bookshelf. You can sort and change the view by
selecting the options shown in the top-right corner. To
enter reading mode, simply double-click a book. You
can also right-click and choose Read.
Reading eBooks
Adobe Digital Editions (ADE) was designed to help you start
reading books quickly, and to keep the reading experience
as simple and straightforward as possible. We hope you
enjoy reading your book!
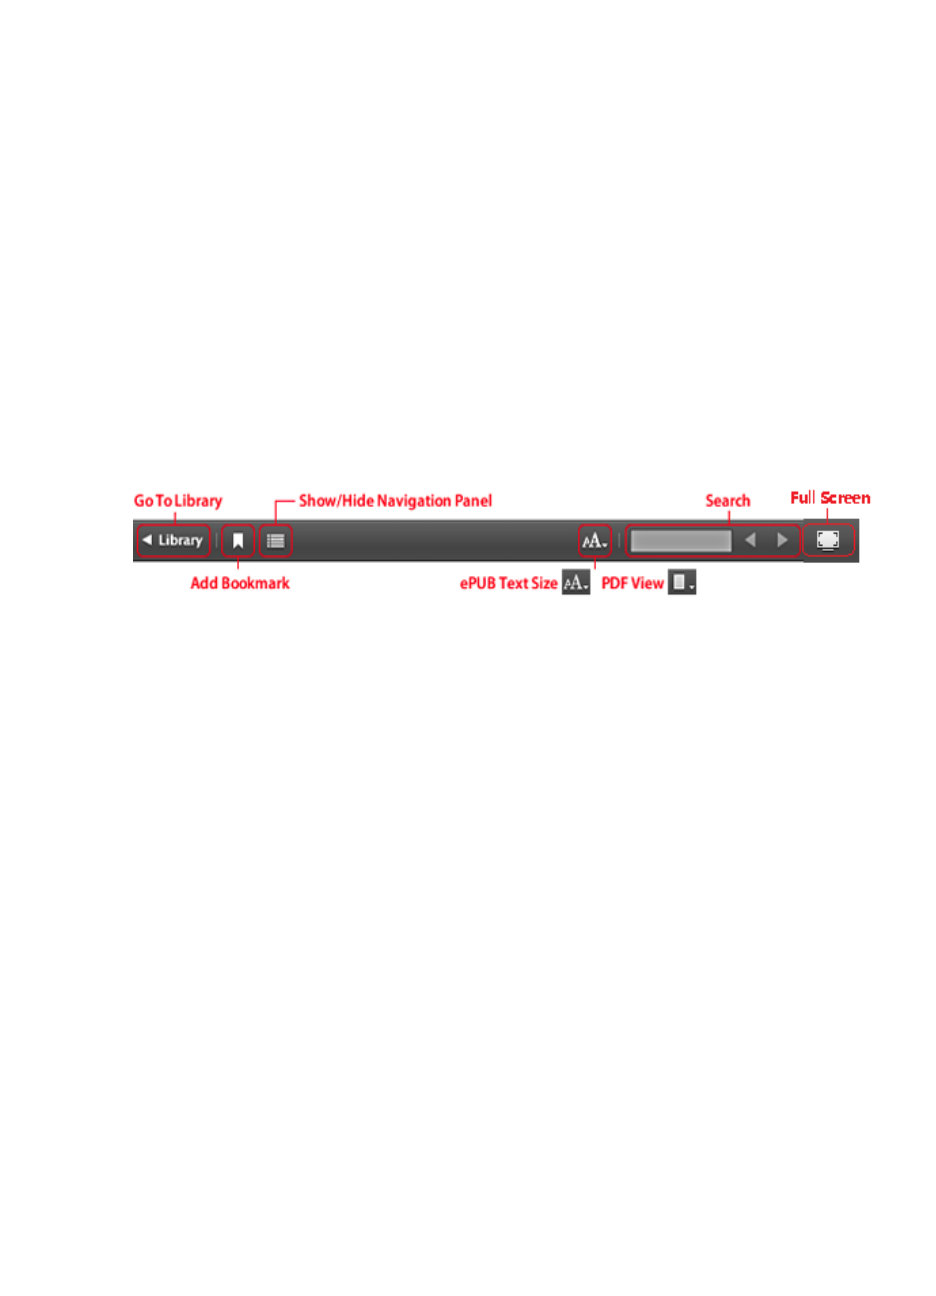
When you open a book, the Reading menu appears at the
top of the application window, providing navigation, search,
and other features. Below that is a row of icons representing
common actions you might want to take while reading, as
follows:
Go To Library. Takes you to the library view Add Bookmark. Creates a
bookmark for the current page Show/Hide Navigation Panel. Opens up
a left-side navigation panel; for table of contents or bookmarks Text size
(EPUB) or PDF View Options (PDF). Adjusts view settings Search
Box. Searches the document Full Screen. Toggle Full Screen View There
are two types of eBooks with slight differences in navigation and
magnification features: EPUBs and PDFs.
Reading EPUBs
For EPUBs, the navigation bar is across the bottom of the
screen, consistent with how most eReaders present a book
(scrolling left to right like flipping the pages of a book). The
Reading menu has an EPUB Text Size submenu for modifying
the text size.
Reading PDFs
For PDFs, the scroll bar is on the right side of the screen,
consistent with Adobe Reader software (and a better
compliment to its Fit Width view, in which top-down scrolling

is more natural). The Reading menu has a PDF View
submenu for adjusting the magnification of the PDF.
Bookmarks
To create a bookmark for the current page, simply click the
Add Bookmark button. To view your list of bookmarks, click
the Show/Hide Navigation Panel button. With the navigation
panel, you can page through the book and click the plus
sign (+) to add new bookmarks. The Option Menu allows
you to remove or rename bookmarks.
Highlights
To highlight text, select the text, right click to choose
Highlight from the pop up menu. To view your list of
highlights, click the Show/Hide Navigation panel button and
then choose the Bookmark tab. With the navigation panel,
you can navigate to the position where you added highlight.
The Option Menu allows you to remove or rename
highlights.
Notes (Annotations)
To add a note to text, select the text, right click to choose
Add Note to Text from the pop up menu, and then input your
notes or annotations on the yellow pop up panel. To view
your list of notes, click the Show/Hide Navigation Panel
button and then choose the Bookmark tab. With the
navigation panel, you can navigate to the position where
you added a note. The Option Menu allows you to edit,
remove or rename notes.
Searching text
To search your book, enter text in the top-right text box, or
choose Reading > Find on Windows (Edit > Find on
Macintosh). The reading panel highlights the found text. To
navigate to each instance of a search term, click the left or
right arrows on either side of the search box, or choose

Reading > Find > Find Next or Find Previous on Windows
(Edit > Find > Find Next or Find Previous on Macintosh).
Transferring eBooks between Computers If you
have authorized your computer using an ID
(see “Opening eBooks” above), you can copy
the book to another computer, run ADE, and
authorize with the same ID to open the book.
You can find your books in the My Digital Editions folder in
your computer’s documents folder. Locate the book you
want to copy, and transfer it to the other computer. On the
other computer, double-click the book or drag it into ADE.
Note that highlights and annotations are not copied when
items are transferred to another computer.
Transferring eBooks from / to a supported
eReader Adobe Digital Editions allows you to
transfer items from / to a supported eReader
device.
Connect the supported eReader device to your computer
and launch Digital Editions. Digital Editions automatically
detects the presence of your device. Both Digital Editions
and the device must be authorized to be able to transfer
protected content to and from the device. Unprotected
content can be transferred to and from the device without
authorizing either the device or Digital Editions, but Adobe
strongly advises authorizing Digital Editions as it gives you
content portability for your protected books, whether on
Digital Editions or the supported device.
After connection, the device appears in the library section.
You can transfer items to and from the device just as you do
with bookshelves in your library. You can read books that are
on your device or your own computer.

Note: Do not disconnect the device while transferring
library items to or from your computer.
Diagnosing Problems
Connectivity issues
When you first open a book, Adobe Digital Editions (ADE)
may encounter problems trying to confirm that you are
authorized to read the book. The most common messages
are “Activation Server Error” or “Connection Error,” which
means that ADE simply could not connect to the server from
which it was supposed to retrieve authentication
information. Confirm that you are connected to the network
(for example, open your browser and try to navigate to a
web site). Typically, retrying resolves this problem.
Corrupted and deleted documents In some cases, a
book may become corrupted or inadvertently
deleted. Or, ADE may report it is unable to find
lending information. Simply go back to your library or
bookseller website, re-download the book, and re-
open it in ADE.
Incorrectly formatted documents Documents may
produce minor errors or warnings if a PDF file uses
features not supported by ADE (for example, JPEG
2000 compression), or an EPUB document uses
markup that is not recommended. In most cases,
these minor warnings and errors do not produce any
visible problems, but the book may not be rendered
exactly as the author intended.
Shortcut Keys
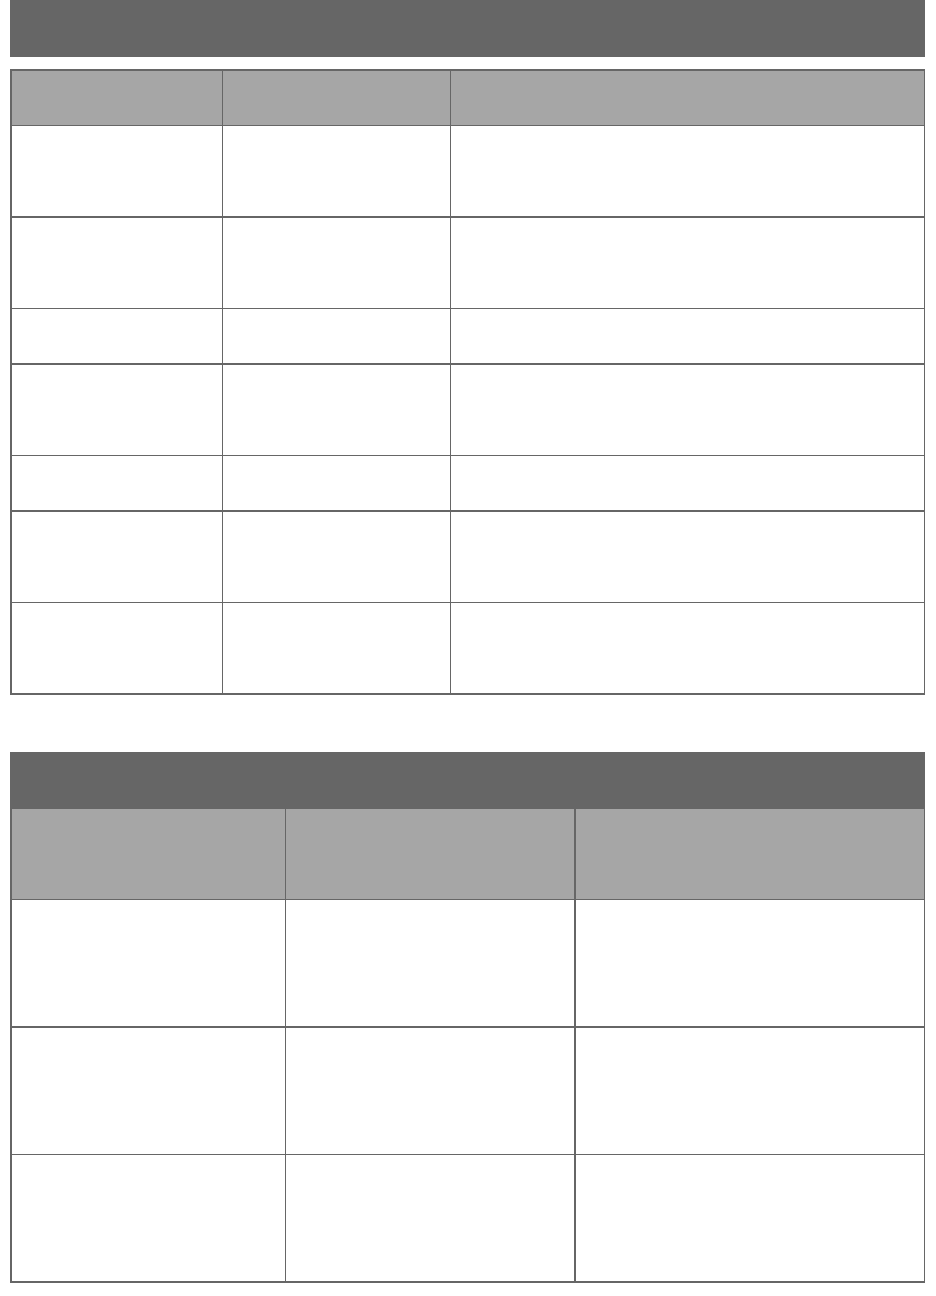
LIBRARY MODE

WIN KEYS MAC KEYS ACTION DESCRIPTIONLIBRARY MODE
WIN KEYS MAC KEYS ACTION DESCRIPTION
Ctrl+Shift+1 Ctrl+Cmd+1 Sorts by Title
Ctrl+Shift+2 Ctrl+Cmd+2 Sorts by Author
Ctrl+Shift+3 Ctrl+Cmd+3 Sorts by Publisher
Ctrl+Shift+4 Ctrl+Cmd+4 Sorts by Last Read
Ctrl+Shift+5 Ctrl+Cmd+5 Sorts by Date Added
Ctrl+Shift+6 Ctrl+Cmd+6 Sorts by Pages
Ctrl+Shift+7 Ctrl+Cmd+7 Sorts by Status
F2 Enter
Renames bookshelf (when
selected a user bookshelf)
Spacebar,
Enter
Spacebar
Opens selected item in
Reading Mode
Ctrl+A Cmd+A
Selects all items in current
bookshelf
Ctrl+Shift+A Cmd+Shift+A Deselects all items
Ctrl+I Cmd+I Opens Item Info dialog box
Ctrl+Shift+I Cmd+Shift+I
Displays computer
authorization Information
Ctrl+J Cmd+J
Changes current view
between thumbnail and list
views
Ctrl+K Cmd+K
Changes current view
between list and thumbnail
views
LIBRARY MODE
WIN KEYS MAC KEYS ACTION DESCRIPTION
Ctrl+L Cmd+L
Switches to Library Mode (No
menu item)
Ctrl+Shift+L Cmd+Shift+L
Navigates to bookshelf /
device content area
Ctrl+N Cmd+N Creates a new bookshelf
Ctrl+Shift+N Cmd+Shift+N
Copies selected item(s) to
new Bookshelf
Ctrl+O Cmd+O Opens Add Item dialog box
Ctrl+R Cmd+R
Switches to Reading Mode (No
menu Item)
Ctrl+Shift+U Cmd+Shift+U
Opens Computer
Authorization dialog box
READING MODE
WIN KEYS MAC KEYS
ACTION
DESCRIPTION
Ctrl+0 Cmd+0
Switches to Fit Page
view for PDF
document
Ctrl+1 Cmd+1
Switches to Actual
Size (1:1) view for
PDF document
Ctrl+2 Cmd+2
Switches to Fit Width
view for PDF
document

READING MODE
WIN KEYS MAC KEYS
ACTION
DESCRIPTION
Ctrl+Spacebar
Page Up
Page Up
Goes to previous
page (in Fit Width or
Fit Single Page views)
Spacebar
Page Down
Spacebar
Page Down
Goes to next page (in
Fit Width or Fit Single
Page views)
Ctrl+= Cmd+=
Zooms in (for PDF
documents)
Increases font size
(for EPUB documents)
Ctrl+- Cmd+-
Zooms out (for PDF
documents)
Decreases font size
(for EPUB documents)
F2 Enter
Renames bookmark
or annotation in
Bookmark Panel
Ctrl+F7 N/A
Opens the links
window (For EPUB
document)
Up Arrow Up Arrow
Scrolls up by line (in
Fit Width, Actual Size
(1:1) or Zoom level
views)
Scrolls up a page (in
Fit Page views)

READING MODE
WIN KEYS MAC KEYS
ACTION
DESCRIPTION
Down Arrow Down Arrow
Scrolls down by line
(in Fit Width, Actual
Size (1:1) or Zoom
level views)
Scrolls down a page
(in Fit Page view)
Left Arrow Left Arrow
Goes to previous half
screen (for PDF
documents)
Goes to previous
page (for EPUB
documents)
Right Arrow Right Arrow
Goes to next half
screen (for PDF
documents)
Goes to next page
(for EPUB documents)
Ctrl+Home
Shift+Ctrl+Page
Up
Shift+Ctrl+Up
Arrow
Home
Shift+Cmd+Up
Arrow
Goes to first page of
document
Ctrl+End
Shift+Ctrl+Page
Down
Shift+Ctrl+Down
Arrow
End
Shift+Cmd+Down
Arrow
Goes to last page of
document

READING MODE
WIN KEYS MAC KEYS
ACTION
DESCRIPTION
Ctrl+B Cmd+B
Adds a bookmark at
the top of current
screen
Ctrl+Alt+C Cmd+Alt+C
Collapses All items in
TOC panel
Ctrl+Alt+E Cmd+Alt+E
Expands All items in
TOC panel
Ctrl+E Cmd+E
Shows book file in
Explorer (Finder on
Macintosh)
Ctrl+Shift+F Cmd+Shift+F Toggles full screen
Ctrl+F Cmd+F
Moves keyboard
focus to find control
in toolbar
Ctrl+G Cmd+G
Finds next instance of
text in find control
Shift+Ctrl+G Shift+Cmd+G
Finds previous
instance of text in
find control
Ctrl+Shift+H Cmd+Shift+H
Shows/Hides page
numbers
Ctrl+I Cmd+I
Opens Item Info
dialog box
Ctrl+M Cmd+Shift+M Adds Highlight

READING MODE
WIN KEYS MAC KEYS
ACTION
DESCRIPTION
Ctrl+Shift+O N/A
Copies ebook to
Digital Editions library
Ctrl+P Cmd+P
Opens Print dialog
box
Ctrl+Shift+P Cmd+Shift+P
Opens Go to Page
dialog box
Ctrl+T Cmd+T
Shows/Hides
Navigation Panel
Ctrl+W N/A Go to Library
Ctrl+Shift+T Cmd+Shift+T
Switch to Single-page
/ Double-page view
mode
Ctrl+Shift+K Cmd+Shift+K
Start / Stop Playing
Media Overlay
Note: If JAWS is launched, the Up/Down/Left/Right arrow
keys will be redefined for JAWS.
JAWS/NVDA SCREEN READER (WINDOWS ONLY)
KEYS ACTION DESCRIPTION
READING TEXT
Left Arrow Says prior character
Right Arrow Says next character

JAWS/NVDA SCREEN READER (WINDOWS ONLY)
KEYS ACTION DESCRIPTION
Ctrl+Left
Arrow
Says prior word
Ctrl+Right
Arrow
Says next word
Up Arrow Says prior line
Down Arrow Says next line
Insert+Down
Arrow
Says all
Page Up
Increases voice rate during Say All (JAWS
Say All mode).
Move to previous page (others)
Page Down
Decreases voice rate during Say All (JAWS
Say All mode).
Move to next page (others)
INFORMATIONAL
Ctrl Interrupts speech
Insert+T Says window title
FOR DIALOG BOXES
Insert+B Reads window from top to bottom
Insert+E (JAWS
only)
Says default button of dialog box
Note: The above table is valid only when JAWS/NVDA is not
customized. For more information about NVDA shortcuts,
please check Start > Program Files > NVDA >
Documentation > Keyboard Commands. For JAWS, please

read the Using JAWS > Reading Screens and Documents
section in its help document.
Known issues
Digital Editions will not turn to the next page
automatically under the NVDA Say All mode. Unlike
JAWS, NVDA only reads the current page.
When using Mac OS X's VoiceOver screen reader (for
accessibility), press Ctrl+Option+W to read the
contents of dialogs.
When using Mac OS X's VoiceOver screen reader (for
accessibility), Digital Editions will not support
navigate and read by paragraph, line, word, or
character.
If you have both Adobe Digital Editions 1.7 and Adobe
Digital Editions 4.5 installed, uninstalling one of them
will de-associate the EPUB and ASCM file types with
the application. You’ll then need to manually
associate file types (see your operating system’s
instructions for associating file types).
Extremely large images (greater than 50MB) can
cause sluggish behavior in the application.
Some advanced rendering features (such as
knockout, overprint, small caps, and non-separable
blend modes) are not supported.
When DE returns an error message
W_ADEPT_CORE_LOAN_NOT_ONRECORD, it means no
record for this loan is found on this machine, which

most likely means you are attempting to open a
borrowed book that was previously expired or
returned.
