
Banner Student
User Guide
Release 8.11/9.3.2
December 2016

Without limitation: Ellucian®, Banner®, Colleague®, and Luminis® are trademarks of the Ellucian group of companies that are registered in the
U.S. and certain other countries; and Ellucian Advance™, Ellucian Course Signals™, Ellucian Degree Works™, Ellucian PowerCampus™,
Ellucian® CRM Recruit , Ellucian SmartCall™, are also trademarks of the Ellucian group of companies. Other names may be trademarks of their
respective owners.
© 1989, 2016 Ellucian.
Contains confidential and proprietary information of Ellucian and its subsidiaries. Use of these materials is limited to Ellucian licensees, and is
subject to the terms and conditions of one or more written license agreements between Ellucian and the licensee in question.
In preparing and providing this publication, Ellucian is not rendering legal, accounting, or other similar professional services. Ellucian makes no
claims that an institution's use of this publication or the software for which it is provided will guarantee compliance with applicable federal or state
laws, rules, or regulations. Each organization should seek legal, accounting, and other similar professional services from competent providers of
the organization's own choosing.
Prepared by: Ellucian
4375 Fair Lakes Court
Fairfax, Virginia 22033
United States of America

3
Banner Student User Guide | Contents
Contents
System Overview . . . . . . . . . . . . . . . . . . . . . . . . . . . . . . . . . . . . . . . . . . . . 20
Application Summary. . . . . . . . . . . . . . . . . . . . . . . . . . . . . . . . . . . . . . . . . . . . . . . . . 20
Functions and Features . . . . . . . . . . . . . . . . . . . . . . . . . . . . . . . . . . . . . . . . . . . . . . . 21
Chapter Organization . . . . . . . . . . . . . . . . . . . . . . . . . . . . . . . . . . . . . . . . . . . . . . . . . 23
Application Flow. . . . . . . . . . . . . . . . . . . . . . . . . . . . . . . . . . . . . . . . . . . . . . . . . . . . . 25
Flow Narrative . . . . . . . . . . . . . . . . . . . . . . . . . . . . . . . . . . . . . . . . . . . . . . . . . . . . . . . 25
Validation Reference . . . . . . . . . . . . . . . . . . . . . . . . . . . . . . . . . . . . . . . . . 27
Overall System Validation Forms Reference . . . . . . . . . . . . . . . . . . . . . . . . . . . . . . 27
Validation Forms Cross Reference . . . . . . . . . . . . . . . . . . . . . . . . . . . . . . . . . . . . . . 32
Required System Values for Validation Forms . . . . . . . . . . . . . . . . . . . . . . . . . . . . 34
Validation Forms Menu System . . . . . . . . . . . . . . . . . . . . . . . . . . . . . . . . . . . . . . . . 99
Validation Forms System Reference . . . . . . . . . . . . . . . . . . . . . . . . . . . . . . . . . . . . 101
Process Flows . . . . . . . . . . . . . . . . . . . . . . . . . . . . . . . . . . . . . . . . . . . . . . 199
Banner Student System Overview Process Flow . . . . . . . . . . . . . . . . . . . . . . . . . . 199
Communication Plan Process Flows . . . . . . . . . . . . . . . . . . . . . . . . . . . . . . . . . . . . 201
Establish Communication Rules. . . . . . . . . . . . . . . . . . . . . . . . . . . . . . . . . . . . . . . . . . 201
Establish Materials and Rules . . . . . . . . . . . . . . . . . . . . . . . . . . . . . . . . . . . . . . . . . . . 202
Assign Materials to Communication Plans . . . . . . . . . . . . . . . . . . . . . . . . . . . . . . . . . . 203
Processing Communication Plans Online . . . . . . . . . . . . . . . . . . . . . . . . . . . . . . . . . . 204
Processing Communication Plans in Batch . . . . . . . . . . . . . . . . . . . . . . . . . . . . . . . . . 205
Building Communication Plans. . . . . . . . . . . . . . . . . . . . . . . . . . . . . . . . . . . . . . . . . . . 206
Test Score Restrictions and Prerequisites Process Flow . . . . . . . . . . . . . . . . . . . 207

4
Banner Student User Guide | Contents
Test Score Restrictions and Prerequisites Process Flow Narrative . . . . . . . . . . . . . . . 209
Block Scheduling Process Flow . . . . . . . . . . . . . . . . . . . . . . . . . . . . . . . . . . . . . . . . 210
Block Scheduling Process Flow Narrative . . . . . . . . . . . . . . . . . . . . . . . . . . . . . . . . . . 211
Schedule25 Process Flows . . . . . . . . . . . . . . . . . . . . . . . . . . . . . . . . . . . . . . . . . . . . 212
Run Process Flow . . . . . . . . . . . . . . . . . . . . . . . . . . . . . . . . . . . . . . . . . . . . . . . . . . . . 212
Initial Setup of Schedule25 Data . . . . . . . . . . . . . . . . . . . . . . . . . . . . . . . . . . . . . . . . . 213
Electronic Prospects Data Load Process Flow . . . . . . . . . . . . . . . . . . . . . . . . . . . . 214
Concurrent Curricula Process Flow . . . . . . . . . . . . . . . . . . . . . . . . . . . . . . . . . . . . . 215
Loading Packages/Procedures from Temporary to Production Tables (SRKPREL)
Process Flows . . . . . . . . . . . . . . . . . . . . . . . . . . . . . . . . . . . . . . . . . . . . . . . . . . . . . . 216
Overview. . . . . . . . . . . . . . . . . . . . . . . . . . . . . . . . . . . . . . . . . . . . . . . . . . . . . . . . . . . . 216
Creating Person Data . . . . . . . . . . . . . . . . . . . . . . . . . . . . . . . . . . . . . . . . . . . . . . . . . . 217
Evaluating the Application . . . . . . . . . . . . . . . . . . . . . . . . . . . . . . . . . . . . . . . . . . . . . . 217
Inserting Recruiting Information . . . . . . . . . . . . . . . . . . . . . . . . . . . . . . . . . . . . . . . . . . 218
Updating Recruiting Information - Part 1 . . . . . . . . . . . . . . . . . . . . . . . . . . . . . . . . . . . 219
Updating Recruiting Information - Part 2 . . . . . . . . . . . . . . . . . . . . . . . . . . . . . . . . . . . 220
Admissions Process Flow . . . . . . . . . . . . . . . . . . . . . . . . . . . . . . . . . . . . . . . . . . . . . 221
Admissions Process Flow Narrative . . . . . . . . . . . . . . . . . . . . . . . . . . . . . . . . . . . . . . . 222
External Data Load Process Flow. . . . . . . . . . . . . . . . . . . . . . . . . . . . . . . . . . . . . . . 223
Registration Process Flow . . . . . . . . . . . . . . . . . . . . . . . . . . . . . . . . . . . . . . . . . . . . 224
Registration Process Flow Narrative . . . . . . . . . . . . . . . . . . . . . . . . . . . . . . . . . . . . . . 225
Student Right to Know Process Flows. . . . . . . . . . . . . . . . . . . . . . . . . . . . . . . . . . . 227
Persistence Reporting Process Flow . . . . . . . . . . . . . . . . . . . . . . . . . . . . . . . . . . . . . . 227
Persistence/Sport Reporting Process Flow . . . . . . . . . . . . . . . . . . . . . . . . . . . . . . . . . 228
Completion/Graduation Reporting Process Flow . . . . . . . . . . . . . . . . . . . . . . . . . . . . . 229
Completion/Graduation/Sport Reporting Process Flow . . . . . . . . . . . . . . . . . . . . . . . . 230
Fee Assessment Process Flows . . . . . . . . . . . . . . . . . . . . . . . . . . . . . . . . . . . . . . . . 231
Rules Process Flow . . . . . . . . . . . . . . . . . . . . . . . . . . . . . . . . . . . . . . . . . . . . . . . . . . . 231
Refunding Rules Process Flow . . . . . . . . . . . . . . . . . . . . . . . . . . . . . . . . . . . . . . . . . . 232
Open Learning Registration Process Flows . . . . . . . . . . . . . . . . . . . . . . . . . . . . . . 233

5
Banner Student User Guide | Contents
Section Set-up Process Flow . . . . . . . . . . . . . . . . . . . . . . . . . . . . . . . . . . . . . . . . . . . . 233
Data Process Flow . . . . . . . . . . . . . . . . . . . . . . . . . . . . . . . . . . . . . . . . . . . . . . . . . . . . 234
Overall Process Flow . . . . . . . . . . . . . . . . . . . . . . . . . . . . . . . . . . . . . . . . . . . . . . . . . . 235
Rules Use Process Flow . . . . . . . . . . . . . . . . . . . . . . . . . . . . . . . . . . . . . . . . . . . . . . . 236
Rule Tables Process Flow . . . . . . . . . . . . . . . . . . . . . . . . . . . . . . . . . . . . . . . . . . . . . . 236
Return of Title IV Funds Process Flow. . . . . . . . . . . . . . . . . . . . . . . . . . . . . . . . . . . 237
Academic History Repeat Processing Flow. . . . . . . . . . . . . . . . . . . . . . . . . . . . . . . 238
Academic History Repeat Processing Flow Narrative . . . . . . . . . . . . . . . . . . . . . . . . . 239
Academic History End of Term Flow . . . . . . . . . . . . . . . . . . . . . . . . . . . . . . . . . . . . 241
Academic History End of Term Flow Narrative . . . . . . . . . . . . . . . . . . . . . . . . . . . . . . . 242
Academic History Graduation Flow . . . . . . . . . . . . . . . . . . . . . . . . . . . . . . . . . . . . . 243
Academic History Graduation Flow Narrative. . . . . . . . . . . . . . . . . . . . . . . . . . . . . . . . 245
Graduation Application Process Flow . . . . . . . . . . . . . . . . . . . . . . . . . . . . . . . . . . . 248
Electronic Gradebook Process Flow . . . . . . . . . . . . . . . . . . . . . . . . . . . . . . . . . . . . 249
National Student Clearinghouse (NSC) Process Flows . . . . . . . . . . . . . . . . . . . . . 250
Establish Time Status Rules and NSC Equivalencies . . . . . . . . . . . . . . . . . . . . . . . . . 250
Establish Term Control for Calculating Time Status and Academic History FICE Code
Control . . . . . . . . . . . . . . . . . . . . . . . . . . . . . . . . . . . . . . . . . . . . . . . . . . . . . . . . . . . . . 251
Calculate Time Status and Update/Insert Time Status History Records. . . . . . . . . . . . 252
Report to NSC (National Student Clearinghouse) . . . . . . . . . . . . . . . . . . . . . . . . . . . . 256
XML Transcript Process Flow . . . . . . . . . . . . . . . . . . . . . . . . . . . . . . . . . . . . . . . . . . 257
Course Catalog . . . . . . . . . . . . . . . . . . . . . . . . . . . . . . . . . . . . . . . . . . . . . . 258
Course Catalog Procedures . . . . . . . . . . . . . . . . . . . . . . . . . . . . . . . . . . . . . . . . . . . 258
Building or Changing a Course Catalog . . . . . . . . . . . . . . . . . . . . . . . . . . . . . . . . . . . . 258
Course Contact Hours . . . . . . . . . . . . . . . . . . . . . . . . . . . . . . . . . . . . . . . . . . . . . . . . . 258
Open Learning Registration and Course Catalog. . . . . . . . . . . . . . . . . . . . . . . . . . . . . 258
Set Up New Course for Traditional and Open Learning Registration . . . . . . . . . . . . . . 260
Update Existing Course for Open Learning Registration . . . . . . . . . . . . . . . . . . . . . . . 261
Creating a Continuing Education Catalog Entry . . . . . . . . . . . . . . . . . . . . . . . . . . . . . . 261
Maintaining Faculty Workload. . . . . . . . . . . . . . . . . . . . . . . . . . . . . . . . . . . . . . . . . . . . 262

6
Banner Student User Guide | Contents
Building Registration Restrictions on Courses . . . . . . . . . . . . . . . . . . . . . . . . . . . . . . . 262
Building Schedule Restrictions on Courses . . . . . . . . . . . . . . . . . . . . . . . . . . . . . . . . . 270
Mutually Exclusive Courses . . . . . . . . . . . . . . . . . . . . . . . . . . . . . . . . . . . . . . . . . . . . . 270
Repeat/Equivalent Course Rules . . . . . . . . . . . . . . . . . . . . . . . . . . . . . . . . . . . . . . . . . 275
Tuition Fee Waivers . . . . . . . . . . . . . . . . . . . . . . . . . . . . . . . . . . . . . . . . . . . . . . . . . . . 276
Banner Course Data Extract Capabilities . . . . . . . . . . . . . . . . . . . . . . . . . . . . . . . . . . . 276
Catalog Extract and Load Processing . . . . . . . . . . . . . . . . . . . . . . . . . . . . . . . . . . . . . 279
Catalog Reports . . . . . . . . . . . . . . . . . . . . . . . . . . . . . . . . . . . . . . . . . . . . . . . . . . . . . 291
Class Schedule . . . . . . . . . . . . . . . . . . . . . . . . . . . . . . . . . . . . . . . . . . . . . . 292
Class Schedule Procedures . . . . . . . . . . . . . . . . . . . . . . . . . . . . . . . . . . . . . . . . . . . 292
Create Term Controls . . . . . . . . . . . . . . . . . . . . . . . . . . . . . . . . . . . . . . . . . . . . . . . . . . 292
Creating Instructors . . . . . . . . . . . . . . . . . . . . . . . . . . . . . . . . . . . . . . . . . . . . . . . . . . . 292
Building Available Rooms. . . . . . . . . . . . . . . . . . . . . . . . . . . . . . . . . . . . . . . . . . . . . . . 293
Creating Campus Security . . . . . . . . . . . . . . . . . . . . . . . . . . . . . . . . . . . . . . . . . . . . . . 293
Create Future Term Schedule . . . . . . . . . . . . . . . . . . . . . . . . . . . . . . . . . . . . . . . . . . . 293
Building/Changing Course Sections . . . . . . . . . . . . . . . . . . . . . . . . . . . . . . . . . . . . . . . 295
Meeting Time/Room Assignments . . . . . . . . . . . . . . . . . . . . . . . . . . . . . . . . . . . . . . . . 295
Session Creation . . . . . . . . . . . . . . . . . . . . . . . . . . . . . . . . . . . . . . . . . . . . . . . . . . . . . 295
Duplicate Section Creation . . . . . . . . . . . . . . . . . . . . . . . . . . . . . . . . . . . . . . . . . . . . . . 296
Create Duration Units . . . . . . . . . . . . . . . . . . . . . . . . . . . . . . . . . . . . . . . . . . . . . . . . . . 300
Create Instructional Methods . . . . . . . . . . . . . . . . . . . . . . . . . . . . . . . . . . . . . . . . . . . . 301
Open Learning and Class Schedule. . . . . . . . . . . . . . . . . . . . . . . . . . . . . . . . . . . . . . . 302
Set up an Open Learning Section . . . . . . . . . . . . . . . . . . . . . . . . . . . . . . . . . . . . . . . . 302
Update an Existing Section to be an Open Learning Section. . . . . . . . . . . . . . . . . . . . 305
Set Up Non-Open Learning Section . . . . . . . . . . . . . . . . . . . . . . . . . . . . . . . . . . . . . . . 306
Set Up Section Fee Assessment, Extension, and Refunding Rules for Open Learning
Courses . . . . . . . . . . . . . . . . . . . . . . . . . . . . . . . . . . . . . . . . . . . . . . . . . . . . . . . . . . . . 307
Faculty Assignments . . . . . . . . . . . . . . . . . . . . . . . . . . . . . . . . . . . . . . . . . . . . . . . . . . 308
Maintaining Section Comments . . . . . . . . . . . . . . . . . . . . . . . . . . . . . . . . . . . . . . . . . . 308
Reviewing Course Sections . . . . . . . . . . . . . . . . . . . . . . . . . . . . . . . . . . . . . . . . . . . . . 308
Reviewing Building/Room Schedule. . . . . . . . . . . . . . . . . . . . . . . . . . . . . . . . . . . . . . . 308
Producing a Schedule of Classes. . . . . . . . . . . . . . . . . . . . . . . . . . . . . . . . . . . . . . . . . 311
Reviewing Enrollment Counts. . . . . . . . . . . . . . . . . . . . . . . . . . . . . . . . . . . . . . . . . . . . 311
Schedule Contact Hours. . . . . . . . . . . . . . . . . . . . . . . . . . . . . . . . . . . . . . . . . . . . . . . . 311
Section Contact Hours . . . . . . . . . . . . . . . . . . . . . . . . . . . . . . . . . . . . . . . . . . . . . . . . . 313
Section Weekly Contact Hours. . . . . . . . . . . . . . . . . . . . . . . . . . . . . . . . . . . . . . . . . . . 313

7
Banner Student User Guide | Contents
Creating Cross List Definitions . . . . . . . . . . . . . . . . . . . . . . . . . . . . . . . . . . . . . . . . . . . 314
Schedule Module Links . . . . . . . . . . . . . . . . . . . . . . . . . . . . . . . . . . . . . . . . . . . . . . . . 315
Create Section Contract Information . . . . . . . . . . . . . . . . . . . . . . . . . . . . . . . . . . . . . . 318
Creating/Modifying Restrictions on Sections . . . . . . . . . . . . . . . . . . . . . . . . . . . . . . . . 318
Course Fee Assessment Rules by Level . . . . . . . . . . . . . . . . . . . . . . . . . . . . . . . . . . . 320
Tuition & Fee Analysis by Course. . . . . . . . . . . . . . . . . . . . . . . . . . . . . . . . . . . . . . . . . 320
Tuition Fee Waivers . . . . . . . . . . . . . . . . . . . . . . . . . . . . . . . . . . . . . . . . . . . . . . . . . . . 320
Reserved Seating . . . . . . . . . . . . . . . . . . . . . . . . . . . . . . . . . . . . . . . . . . . . . . . . . . . . . 321
Maintain Academic Calendar . . . . . . . . . . . . . . . . . . . . . . . . . . . . . . . . . . . . . . . . . . . . 326
Maintain Attendance Accounting Method . . . . . . . . . . . . . . . . . . . . . . . . . . . . . . . . . . . 329
Schedule Overrides . . . . . . . . . . . . . . . . . . . . . . . . . . . . . . . . . . . . . . . . . . . . . . . . . . . 330
Block Scheduling . . . . . . . . . . . . . . . . . . . . . . . . . . . . . . . . . . . . . . . . . . . . . . . . . . . . . 331
Auto Scheduling Processing. . . . . . . . . . . . . . . . . . . . . . . . . . . . . . . . . . . . . . . . . . . . . 339
Purge Process . . . . . . . . . . . . . . . . . . . . . . . . . . . . . . . . . . . . . . . . . . . . . . . . . . . . . . . 360
Class Schedule Reports. . . . . . . . . . . . . . . . . . . . . . . . . . . . . . . . . . . . . . . . . . . . . . . 361
General Person . . . . . . . . . . . . . . . . . . . . . . . . . . . . . . . . . . . . . . . . . . . . . . 362
General Person Procedures . . . . . . . . . . . . . . . . . . . . . . . . . . . . . . . . . . . . . . . . . . . 362
Establish Person. . . . . . . . . . . . . . . . . . . . . . . . . . . . . . . . . . . . . . . . . . . . . . . . . . . . . . 362
Common Matching Processing. . . . . . . . . . . . . . . . . . . . . . . . . . . . . . . . . . . . . . . . . . . 362
Maintaining Multiple Telephone Numbers. . . . . . . . . . . . . . . . . . . . . . . . . . . . . . . . . . . 385
Enter Biographic Information . . . . . . . . . . . . . . . . . . . . . . . . . . . . . . . . . . . . . . . . . . . . 386
Maintain Comments . . . . . . . . . . . . . . . . . . . . . . . . . . . . . . . . . . . . . . . . . . . . . . . . . . . 386
Enter Emergency Contacts. . . . . . . . . . . . . . . . . . . . . . . . . . . . . . . . . . . . . . . . . . . . . . 386
Enter Medical Information. . . . . . . . . . . . . . . . . . . . . . . . . . . . . . . . . . . . . . . . . . . . . . . 386
Maintain International Information . . . . . . . . . . . . . . . . . . . . . . . . . . . . . . . . . . . . . . . . 386
Add/Remove Holds. . . . . . . . . . . . . . . . . . . . . . . . . . . . . . . . . . . . . . . . . . . . . . . . . . . . 386
Schedule Appointments/Track Contacts. . . . . . . . . . . . . . . . . . . . . . . . . . . . . . . . . . . . 386
Support Services Processing . . . . . . . . . . . . . . . . . . . . . . . . . . . . . . . . . . . . . . . . . . . . 387
Produce List of Persons . . . . . . . . . . . . . . . . . . . . . . . . . . . . . . . . . . . . . . . . . . . . . . . . 388
Purge Process . . . . . . . . . . . . . . . . . . . . . . . . . . . . . . . . . . . . . . . . . . . . . . . . . . . . . . . 388
Banner Student Interface to Banner Human Resources . . . . . . . . . . . . . . . . . . . . . . . 388
General Person Reports. . . . . . . . . . . . . . . . . . . . . . . . . . . . . . . . . . . . . . . . . . . . . . . 388
Creating a Population Selection . . . . . . . . . . . . . . . . . . . . . . . . . . . . . . . . . . . . . . . . . . 389

8
Banner Student User Guide | Contents
Faculty Load . . . . . . . . . . . . . . . . . . . . . . . . . . . . . . . . . . . . . . . . . . . . . . . . 391
Faculty Load Procedures. . . . . . . . . . . . . . . . . . . . . . . . . . . . . . . . . . . . . . . . . . . . . . 391
Faculty Workload Rules Creation . . . . . . . . . . . . . . . . . . . . . . . . . . . . . . . . . . . . . . . . . 391
Faculty Information . . . . . . . . . . . . . . . . . . . . . . . . . . . . . . . . . . . . . . . . . . . . . . . . . . . . 393
Faculty Assignments . . . . . . . . . . . . . . . . . . . . . . . . . . . . . . . . . . . . . . . . . . . . . . . . . . 394
Faculty Contract Analysis . . . . . . . . . . . . . . . . . . . . . . . . . . . . . . . . . . . . . . . . . . . . . . . 399
Multiple Contracts. . . . . . . . . . . . . . . . . . . . . . . . . . . . . . . . . . . . . . . . . . . . . . . . . . . . . 399
Automatic PIN Creation . . . . . . . . . . . . . . . . . . . . . . . . . . . . . . . . . . . . . . . . . . . . . . . . 400
Automated Faculty Load and Compensation Processing. . . . . . . . . . . . . . . . . . . . . . . 400
Faculty Security Menu and Term Availability . . . . . . . . . . . . . . . . . . . . . . . . . . . . . . . . 408
Faculty Security Process Rules . . . . . . . . . . . . . . . . . . . . . . . . . . . . . . . . . . . . . . . . . . 413
Purge Process . . . . . . . . . . . . . . . . . . . . . . . . . . . . . . . . . . . . . . . . . . . . . . . . . . . . . . . 432
Banner Student Interface to Banner Human Resources . . . . . . . . . . . . . . . . . . . . . . . 432
Faculty Load Reports . . . . . . . . . . . . . . . . . . . . . . . . . . . . . . . . . . . . . . . . . . . . . . . . . 432
Location Management . . . . . . . . . . . . . . . . . . . . . . . . . . . . . . . . . . . . . . . . 433
Location Management Procedures. . . . . . . . . . . . . . . . . . . . . . . . . . . . . . . . . . . . . . 433
Housing Room Assignment Using Building and Room Genders . . . . . . . . . . . . . . . . . 433
Housing Module Deposits. . . . . . . . . . . . . . . . . . . . . . . . . . . . . . . . . . . . . . . . . . . . . . . 434
Housing Module Assessment . . . . . . . . . . . . . . . . . . . . . . . . . . . . . . . . . . . . . . . . . . . . 435
Batch Scheduling of Housing Assignments . . . . . . . . . . . . . . . . . . . . . . . . . . . . . . . . . 437
Assignment Roll Process . . . . . . . . . . . . . . . . . . . . . . . . . . . . . . . . . . . . . . . . . . . . . . . 443
Housing Letter Generation and Population Selection. . . . . . . . . . . . . . . . . . . . . . . . . . 443
Purge Process . . . . . . . . . . . . . . . . . . . . . . . . . . . . . . . . . . . . . . . . . . . . . . . . . . . . . . . 446
Location Management Reports . . . . . . . . . . . . . . . . . . . . . . . . . . . . . . . . . . . . . . . . . 446
Creating a Population Selection . . . . . . . . . . . . . . . . . . . . . . . . . . . . . . . . . . . . . . . . . . 446
Recruiting . . . . . . . . . . . . . . . . . . . . . . . . . . . . . . . . . . . . . . . . . . . . . . . . . . 448
Recruiting Procedures . . . . . . . . . . . . . . . . . . . . . . . . . . . . . . . . . . . . . . . . . . . . . . . . 448
Add/Maintain Prospects . . . . . . . . . . . . . . . . . . . . . . . . . . . . . . . . . . . . . . . . . . . . . . . . 448
Add/Maintain Test Scores . . . . . . . . . . . . . . . . . . . . . . . . . . . . . . . . . . . . . . . . . . . . . . . 448
Add/Maintain High School Data . . . . . . . . . . . . . . . . . . . . . . . . . . . . . . . . . . . . . . . . . . 449
Add/Maintain Prior College Data . . . . . . . . . . . . . . . . . . . . . . . . . . . . . . . . . . . . . . . . . 449
Review Prospects. . . . . . . . . . . . . . . . . . . . . . . . . . . . . . . . . . . . . . . . . . . . . . . . . . . . . 449

9
Banner Student User Guide | Contents
Assign/Review Recruiter's Appointments and Visits. . . . . . . . . . . . . . . . . . . . . . . . . . . 449
Establish Source, High School, or College . . . . . . . . . . . . . . . . . . . . . . . . . . . . . . . . . . 449
Build Statistical Information for a Source or Background Institution . . . . . . . . . . . . . . . 449
Review Prospects and Visits by Source . . . . . . . . . . . . . . . . . . . . . . . . . . . . . . . . . . . . 450
Produce System-Generated Letters . . . . . . . . . . . . . . . . . . . . . . . . . . . . . . . . . . . . . . . 450
Analyze Recruiting Enrollment . . . . . . . . . . . . . . . . . . . . . . . . . . . . . . . . . . . . . . . . . . . 450
Print/Delete Recruits Who Did Not Apply . . . . . . . . . . . . . . . . . . . . . . . . . . . . . . . . . . . 451
Appointment Scheduling. . . . . . . . . . . . . . . . . . . . . . . . . . . . . . . . . . . . . . . . . . . . . . . . 451
Communication Plan Processing . . . . . . . . . . . . . . . . . . . . . . . . . . . . . . . . . . . . . . . . . 452
Electronic Prospects Processing . . . . . . . . . . . . . . . . . . . . . . . . . . . . . . . . . . . . . . . . . 465
Data Load and Match Processing . . . . . . . . . . . . . . . . . . . . . . . . . . . . . . . . . . . . . . . . 484
Search and Test Score Data Load . . . . . . . . . . . . . . . . . . . . . . . . . . . . . . . . . . . . . . . . 495
Banner Recruiter Integration. . . . . . . . . . . . . . . . . . . . . . . . . . . . . . . . . . . . . . . . . . . 615
Processing Summary . . . . . . . . . . . . . . . . . . . . . . . . . . . . . . . . . . . . . . . . . . . . . . . . . . 616
Event Rules that Support Recruiter Funnel Processing . . . . . . . . . . . . . . . . . . . . . . . . 620
Banner Recruiter Integration Flow . . . . . . . . . . . . . . . . . . . . . . . . . . . . . . . . . . . . . . . . 631
Processing Details . . . . . . . . . . . . . . . . . . . . . . . . . . . . . . . . . . . . . . . . . . . . . . . . . . . . 632
Crosswalk Conversion Values . . . . . . . . . . . . . . . . . . . . . . . . . . . . . . . . . . . . . . . . . . . 640
Electronic Admissions Application Rules . . . . . . . . . . . . . . . . . . . . . . . . . . . . . . . . . . . 645
Data Loaded to Banner . . . . . . . . . . . . . . . . . . . . . . . . . . . . . . . . . . . . . . . . . . . . . . . . 654
Manage the Integration. . . . . . . . . . . . . . . . . . . . . . . . . . . . . . . . . . . . . . . . . . . . . . . . . 669
Extend the Integration . . . . . . . . . . . . . . . . . . . . . . . . . . . . . . . . . . . . . . . . . . . . . . . . . 670
Technical Information . . . . . . . . . . . . . . . . . . . . . . . . . . . . . . . . . . . . . . . . . . . . . . . . . . 671
Recruiting Reports . . . . . . . . . . . . . . . . . . . . . . . . . . . . . . . . . . . . . . . . . . . . . . . . . . . 678
Admissions . . . . . . . . . . . . . . . . . . . . . . . . . . . . . . . . . . . . . . . . . . . . . . . . . 679
Admissions Procedures . . . . . . . . . . . . . . . . . . . . . . . . . . . . . . . . . . . . . . . . . . . . . . 679
Build Admission Credentials. . . . . . . . . . . . . . . . . . . . . . . . . . . . . . . . . . . . . . . . . . . . . 679
Build Automated Decision Rules . . . . . . . . . . . . . . . . . . . . . . . . . . . . . . . . . . . . . . . . . 680
Review Decision Rules. . . . . . . . . . . . . . . . . . . . . . . . . . . . . . . . . . . . . . . . . . . . . . . . . 685
Create Application . . . . . . . . . . . . . . . . . . . . . . . . . . . . . . . . . . . . . . . . . . . . . . . . . . . . 685
Application Preference Number . . . . . . . . . . . . . . . . . . . . . . . . . . . . . . . . . . . . . . . . . . 685
Enter/Calculate Decision on Applicant . . . . . . . . . . . . . . . . . . . . . . . . . . . . . . . . . . . . . 686
Multiple Applicant Acceptance Decisions . . . . . . . . . . . . . . . . . . . . . . . . . . . . . . . . . . . 686
Add/Maintain Test Scores . . . . . . . . . . . . . . . . . . . . . . . . . . . . . . . . . . . . . . . . . . . . . . . 689

10
Banner Student User Guide | Contents
Add/Maintain High School Data . . . . . . . . . . . . . . . . . . . . . . . . . . . . . . . . . . . . . . . . . . 689
Add/Maintain Prior College Data . . . . . . . . . . . . . . . . . . . . . . . . . . . . . . . . . . . . . . . . . 689
Maintain Guardian Information . . . . . . . . . . . . . . . . . . . . . . . . . . . . . . . . . . . . . . . . . . . 690
Add Student Through Quick Entry . . . . . . . . . . . . . . . . . . . . . . . . . . . . . . . . . . . . . . . . 690
Review Application Data. . . . . . . . . . . . . . . . . . . . . . . . . . . . . . . . . . . . . . . . . . . . . . . . 690
Letter Generation—Letters, Paragraphs, and Variables. . . . . . . . . . . . . . . . . . . . . . . . 690
Build Curriculum Definition . . . . . . . . . . . . . . . . . . . . . . . . . . . . . . . . . . . . . . . . . . . . . . 698
Concurrent Curricula Processing . . . . . . . . . . . . . . . . . . . . . . . . . . . . . . . . . . . . . . . . . 699
Mass Entry Processing. . . . . . . . . . . . . . . . . . . . . . . . . . . . . . . . . . . . . . . . . . . . . . . . . 699
Study Path Processing . . . . . . . . . . . . . . . . . . . . . . . . . . . . . . . . . . . . . . . . . . . . . . . . . 699
Duplicating An Admissions Application . . . . . . . . . . . . . . . . . . . . . . . . . . . . . . . . . . . . 699
Admissions Application Set-Up Procedures for Banner Self-Service. . . . . . . . . . . . . . 700
Procedures Used in Self-Service Admissions Processing . . . . . . . . . . . . . . . . . . . . . . 716
Routines Used in Self-Service Admissions Processing . . . . . . . . . . . . . . . . . . . . . . . . 718
Rule Groups Used in Self-Service Admissions Processing . . . . . . . . . . . . . . . . . . . . . 722
Delivered Rule Groups Used in Self-Service Admissions Processing . . . . . . . . . . . . . 723
Cross-Reference Labels Used in Self-Service Admissions Processing . . . . . . . . . . . . 733
Include Cell Phone with Self-Service Admissions Applications . . . . . . . . . . . . . . . . . . 740
Processing Self-Service Admissions Applications . . . . . . . . . . . . . . . . . . . . . . . . . . . . 742
Update Null SSN during Admissions Push Process. . . . . . . . . . . . . . . . . . . . . . . . . . . 746
Manually Matching, Verifying, and Pushing Electronic Applications. . . . . . . . . . . . . . . 747
Quick Start Set-Up Procedures for Banner Student Self-Service . . . . . . . . . . . . . . . . . 753
Using Accept Admissions Offer in Self-Service . . . . . . . . . . . . . . . . . . . . . . . . . . . . . . 759
Admissions and Curriculum Processing in Banner Self-Service . . . . . . . . . . . . . . . . . 764
Setting Up Curriculum Processing for Self-Service Applications . . . . . . . . . . . . . . . . . 766
TS 189 Upload (SAR189U) of Electronic Applications . . . . . . . . . . . . . . . . . . . . . . . . . 769
EDI Set-Up Procedures . . . . . . . . . . . . . . . . . . . . . . . . . . . . . . . . . . . . . . . . . . . . . . . . 770
Procedures Used in EDI Processing . . . . . . . . . . . . . . . . . . . . . . . . . . . . . . . . . . . . . . 780
Routines Used in EDI Processing . . . . . . . . . . . . . . . . . . . . . . . . . . . . . . . . . . . . . . . . 782
Rule Groups Used in EDI Processing. . . . . . . . . . . . . . . . . . . . . . . . . . . . . . . . . . . . . . 787
Delivered Rule Groups Used in EDI Processing . . . . . . . . . . . . . . . . . . . . . . . . . . . . . 788
Cross-Reference Labels Used in EDI Processing . . . . . . . . . . . . . . . . . . . . . . . . . . . . 800
Receiving EDI Applications (to Temporary Tables). . . . . . . . . . . . . . . . . . . . . . . . . . . . 804
Processing EDI Applications . . . . . . . . . . . . . . . . . . . . . . . . . . . . . . . . . . . . . . . . . . . . 805
Manually Matching, Verifying, and Pushing Electronic Applications. . . . . . . . . . . . . . . 809
Race/Ethnicity Processing . . . . . . . . . . . . . . . . . . . . . . . . . . . . . . . . . . . . . . . . . . . . . . 812
AMCAS (American Medical College Application Service) Load Procedures Using
SRTLOAD. . . . . . . . . . . . . . . . . . . . . . . . . . . . . . . . . . . . . . . . . . . . . . . . . . . . . . . . . . . 818

11
Banner Student User Guide | Contents
AMCAS Admissions Action File Creation . . . . . . . . . . . . . . . . . . . . . . . . . . . . . . . . . . . 874
Selective Admissions - Communication Load and Removal . . . . . . . . . . . . . . . . . . . . 885
Selective Admissions - Secondary School Tracking. . . . . . . . . . . . . . . . . . . . . . . . . . . 887
Selective Admissions - Admissions Rating/Batch Entry . . . . . . . . . . . . . . . . . . . . . . . . 891
Data Load and Match Processing . . . . . . . . . . . . . . . . . . . . . . . . . . . . . . . . . . . . . . . . 893
Selective Admissions - Search and Test Score Data Load. . . . . . . . . . . . . . . . . . . . . . 893
Selective Admissions - Regionalization . . . . . . . . . . . . . . . . . . . . . . . . . . . . . . . . . . . . 894
Selective Admissions - Process Geographic Regions, Administrators, and Ratings . . 898
Purge Process . . . . . . . . . . . . . . . . . . . . . . . . . . . . . . . . . . . . . . . . . . . . . . . . . . . . . . . 902
Admissions Reports. . . . . . . . . . . . . . . . . . . . . . . . . . . . . . . . . . . . . . . . . . . . . . . . . . 902
Creating a Population Selection . . . . . . . . . . . . . . . . . . . . . . . . . . . . . . . . . . . . . . . . . . 903
General Student . . . . . . . . . . . . . . . . . . . . . . . . . . . . . . . . . . . . . . . . . . . . . 905
General Student Procedures . . . . . . . . . . . . . . . . . . . . . . . . . . . . . . . . . . . . . . . . . . . 905
Review/Change Current Student Information . . . . . . . . . . . . . . . . . . . . . . . . . . . . . . . . 905
Concurrent Curricula Processing . . . . . . . . . . . . . . . . . . . . . . . . . . . . . . . . . . . . . . . . . 906
Mass Entry Processing. . . . . . . . . . . . . . . . . . . . . . . . . . . . . . . . . . . . . . . . . . . . . . . . . 906
Study Path Processing . . . . . . . . . . . . . . . . . . . . . . . . . . . . . . . . . . . . . . . . . . . . . . . . . 906
Athletic Compliance Processing . . . . . . . . . . . . . . . . . . . . . . . . . . . . . . . . . . . . . . . . . . 906
Student Right to Know Reporting . . . . . . . . . . . . . . . . . . . . . . . . . . . . . . . . . . . . . . . . . 923
Assign Cooperative Education Program. . . . . . . . . . . . . . . . . . . . . . . . . . . . . . . . . . . . 933
Assign Education Opportunity Programs and Services . . . . . . . . . . . . . . . . . . . . . . . . 933
Establish Student Classification . . . . . . . . . . . . . . . . . . . . . . . . . . . . . . . . . . . . . . . . . . 933
Class Standing . . . . . . . . . . . . . . . . . . . . . . . . . . . . . . . . . . . . . . . . . . . . . . . . . . . . . . . 933
Add/Maintain Test Scores . . . . . . . . . . . . . . . . . . . . . . . . . . . . . . . . . . . . . . . . . . . . . . . 934
Add/Maintain High School Data . . . . . . . . . . . . . . . . . . . . . . . . . . . . . . . . . . . . . . . . . . 934
Add/Maintain Prior College Data . . . . . . . . . . . . . . . . . . . . . . . . . . . . . . . . . . . . . . . . . 934
Review Student Data . . . . . . . . . . . . . . . . . . . . . . . . . . . . . . . . . . . . . . . . . . . . . . . . . . 935
Review Veterans Data . . . . . . . . . . . . . . . . . . . . . . . . . . . . . . . . . . . . . . . . . . . . . . . . . 935
Cooperative Education (Co-op) Tracking . . . . . . . . . . . . . . . . . . . . . . . . . . . . . . . . . . . 935
Automatic PIN Creation . . . . . . . . . . . . . . . . . . . . . . . . . . . . . . . . . . . . . . . . . . . . . . . . 938
Purge Processes . . . . . . . . . . . . . . . . . . . . . . . . . . . . . . . . . . . . . . . . . . . . . . . . . . . . . 939
General Student Reports . . . . . . . . . . . . . . . . . . . . . . . . . . . . . . . . . . . . . . . . . . . . . . 940
Creating a Population Selection . . . . . . . . . . . . . . . . . . . . . . . . . . . . . . . . . . . . . . . . . . 940

12
Banner Student User Guide | Contents
Registration. . . . . . . . . . . . . . . . . . . . . . . . . . . . . . . . . . . . . . . . . . . . . . . . . 942
Registration Procedures . . . . . . . . . . . . . . . . . . . . . . . . . . . . . . . . . . . . . . . . . . . . . . 942
Registration Tables to be Updated Each Semester . . . . . . . . . . . . . . . . . . . . . . . . . . . 942
Concurrent Curricula Processing . . . . . . . . . . . . . . . . . . . . . . . . . . . . . . . . . . . . . . . . . 943
Mass Entry Processing. . . . . . . . . . . . . . . . . . . . . . . . . . . . . . . . . . . . . . . . . . . . . . . . . 943
Study Path Processing . . . . . . . . . . . . . . . . . . . . . . . . . . . . . . . . . . . . . . . . . . . . . . . . . 943
Mainline Edit Registration. . . . . . . . . . . . . . . . . . . . . . . . . . . . . . . . . . . . . . . . . . . . . . . 944
Registration Error Messages . . . . . . . . . . . . . . . . . . . . . . . . . . . . . . . . . . . . . . . . . . . . 947
Enrollment Count Scripts . . . . . . . . . . . . . . . . . . . . . . . . . . . . . . . . . . . . . . . . . . . . . . . 953
Create Term Controls . . . . . . . . . . . . . . . . . . . . . . . . . . . . . . . . . . . . . . . . . . . . . . . . . . 958
Set Up Registration Hours . . . . . . . . . . . . . . . . . . . . . . . . . . . . . . . . . . . . . . . . . . . . . . 958
Define Registration Statuses for Student and Course . . . . . . . . . . . . . . . . . . . . . . . . . 960
Student Registration Status and Course Registration Status . . . . . . . . . . . . . . . . . . . . 960
Student Levels Versus Course Levels in Registration . . . . . . . . . . . . . . . . . . . . . . . . . 962
Registration Course Error Flags . . . . . . . . . . . . . . . . . . . . . . . . . . . . . . . . . . . . . . . . . . 962
Build Tuition and Fees . . . . . . . . . . . . . . . . . . . . . . . . . . . . . . . . . . . . . . . . . . . . . . . . . 963
Assess Additional Fees . . . . . . . . . . . . . . . . . . . . . . . . . . . . . . . . . . . . . . . . . . . . . . . . 964
Assess Tuition and Fees . . . . . . . . . . . . . . . . . . . . . . . . . . . . . . . . . . . . . . . . . . . . . . . 965
Registration Fee Assessment Processing . . . . . . . . . . . . . . . . . . . . . . . . . . . . . . . . . . 965
Registration Fee Assessment and Open Learning Courses . . . . . . . . . . . . . . . . . . . . 1029
Registration Fee Assessment and Study Paths . . . . . . . . . . . . . . . . . . . . . . . . . . . . . . 1039
Registration Fee Assessment Combined Fee Assessment Process . . . . . . . . . . . . . . 1040
Register Students . . . . . . . . . . . . . . . . . . . . . . . . . . . . . . . . . . . . . . . . . . . . . . . . . . . . . 1042
Open Learning Registration . . . . . . . . . . . . . . . . . . . . . . . . . . . . . . . . . . . . . . . . . . . . . 1044
Enrollment Verification Processing . . . . . . . . . . . . . . . . . . . . . . . . . . . . . . . . . . . . . . . . 1053
Schedule/Invoice/Statement Options . . . . . . . . . . . . . . . . . . . . . . . . . . . . . . . . . . . . . . 1060
Produce Student's Schedule. . . . . . . . . . . . . . . . . . . . . . . . . . . . . . . . . . . . . . . . . . . . . 1064
Unsatisfied Links . . . . . . . . . . . . . . . . . . . . . . . . . . . . . . . . . . . . . . . . . . . . . . . . . . . . . 1064
Produce Student's Bill. . . . . . . . . . . . . . . . . . . . . . . . . . . . . . . . . . . . . . . . . . . . . . . . . . 1065
View Student's Registration . . . . . . . . . . . . . . . . . . . . . . . . . . . . . . . . . . . . . . . . . . . . . 1065
Produce Course Request Edit . . . . . . . . . . . . . . . . . . . . . . . . . . . . . . . . . . . . . . . . . . . 1065
Produce Course Request Update. . . . . . . . . . . . . . . . . . . . . . . . . . . . . . . . . . . . . . . . . 1065
Produce Class Roster. . . . . . . . . . . . . . . . . . . . . . . . . . . . . . . . . . . . . . . . . . . . . . . . . . 1065
Produce Headcount . . . . . . . . . . . . . . . . . . . . . . . . . . . . . . . . . . . . . . . . . . . . . . . . . . . 1066
View Class Roster/Enter Grades . . . . . . . . . . . . . . . . . . . . . . . . . . . . . . . . . . . . . . . . . 1066
Last Date of Attendance . . . . . . . . . . . . . . . . . . . . . . . . . . . . . . . . . . . . . . . . . . . . . . . . 1066
Handle Student's Registered, Not Paid . . . . . . . . . . . . . . . . . . . . . . . . . . . . . . . . . . . . 1067

13
Banner Student User Guide | Contents
Process Canceled Classes. . . . . . . . . . . . . . . . . . . . . . . . . . . . . . . . . . . . . . . . . . . . . . 1067
Faculty Feedback . . . . . . . . . . . . . . . . . . . . . . . . . . . . . . . . . . . . . . . . . . . . . . . . . . . . . 1067
Waitlisting . . . . . . . . . . . . . . . . . . . . . . . . . . . . . . . . . . . . . . . . . . . . . . . . . . . . . . . . . . . 1072
Automated Waitlisting . . . . . . . . . . . . . . . . . . . . . . . . . . . . . . . . . . . . . . . . . . . . . . . . . . 1074
Drop Last Class . . . . . . . . . . . . . . . . . . . . . . . . . . . . . . . . . . . . . . . . . . . . . . . . . . . . . . 1101
Drop/Withdrawal Processing for Connected Courses . . . . . . . . . . . . . . . . . . . . . . . . . 1101
Rules and Use of the Term Control Form (SOATERM) in Repeat Processing . . . . . . . 1111
National Student Clearinghouse (NSC) Reporting Procedures . . . . . . . . . . . . . . . . . . 1115
National Student Loan Data System (NSLDS) Student Status Confirmation Report
(SSCR) Roster File Procedures . . . . . . . . . . . . . . . . . . . . . . . . . . . . . . . . . . . . . . . . . . 1145
150 Percent Subsidized Stafford Usage Limit Reporting . . . . . . . . . . . . . . . . . . . . . . . 1158
Registration Set-Up Procedures for Banner Student Self-Service . . . . . . . . . . . . . . . . 1221
Display Term Date Ranges in Self-Service. . . . . . . . . . . . . . . . . . . . . . . . . . . . . . . . . . 1227
Registration Time-Ticketing in Banner Student Self-Service and Banner Voice
Response . . . . . . . . . . . . . . . . . . . . . . . . . . . . . . . . . . . . . . . . . . . . . . . . . . . . . . . . . . . 1228
Setting up Third-Party Controls . . . . . . . . . . . . . . . . . . . . . . . . . . . . . . . . . . . . . . . . . . 1235
Setting up Alternative PIN Processing . . . . . . . . . . . . . . . . . . . . . . . . . . . . . . . . . . . . . 1236
Student Registration Permit-Override Procedure . . . . . . . . . . . . . . . . . . . . . . . . . . . . . 1239
Registration Restrictions and Prerequisites . . . . . . . . . . . . . . . . . . . . . . . . . . . . . . . . . 1244
Implementing Area Prerequisite Processing . . . . . . . . . . . . . . . . . . . . . . . . . . . . . . . . 1255
Registration Prerequisite Checking using DegreeWorks . . . . . . . . . . . . . . . . . . . . . . . 1260
Return of Title IV Funds Processing . . . . . . . . . . . . . . . . . . . . . . . . . . . . . . . . . . . . . . . 1272
Student Centric Period Processing. . . . . . . . . . . . . . . . . . . . . . . . . . . . . . . . . . . . . . . . 1283
Gainful Employment Reporting. . . . . . . . . . . . . . . . . . . . . . . . . . . . . . . . . . . . . . . . . . . 1301
Course Program of Study Processing . . . . . . . . . . . . . . . . . . . . . . . . . . . . . . . . . . . . . 1328
Purge Processes . . . . . . . . . . . . . . . . . . . . . . . . . . . . . . . . . . . . . . . . . . . . . . . . . . . . . 1339
Setting Up Sleep/Wake Processes. . . . . . . . . . . . . . . . . . . . . . . . . . . . . . . . . . . . . . . . 1340
Registration Reports . . . . . . . . . . . . . . . . . . . . . . . . . . . . . . . . . . . . . . . . . . . . . . . . . 1343
Creating a Population Selection . . . . . . . . . . . . . . . . . . . . . . . . . . . . . . . . . . . . . . . . . . 1344
Academic History . . . . . . . . . . . . . . . . . . . . . . . . . . . . . . . . . . . . . . . . . . . . 1346
Academic History Procedures . . . . . . . . . . . . . . . . . . . . . . . . . . . . . . . . . . . . . . . . . 1346
Enter Pre-Banner Data . . . . . . . . . . . . . . . . . . . . . . . . . . . . . . . . . . . . . . . . . . . . . . . . . 1346
Concurrent Curricula Processing . . . . . . . . . . . . . . . . . . . . . . . . . . . . . . . . . . . . . . . . . 1346
Mass Entry Processing. . . . . . . . . . . . . . . . . . . . . . . . . . . . . . . . . . . . . . . . . . . . . . . . . 1346
Study Path Processing . . . . . . . . . . . . . . . . . . . . . . . . . . . . . . . . . . . . . . . . . . . . . . . . . 1347
Manual Curriculum Roll Processing . . . . . . . . . . . . . . . . . . . . . . . . . . . . . . . . . . . . . . . 1347

14
Banner Student User Guide | Contents
Open Learning Registration and Academic History . . . . . . . . . . . . . . . . . . . . . . . . . . . 1360
Build Grades. . . . . . . . . . . . . . . . . . . . . . . . . . . . . . . . . . . . . . . . . . . . . . . . . . . . . . . . . 1360
Enter Grades . . . . . . . . . . . . . . . . . . . . . . . . . . . . . . . . . . . . . . . . . . . . . . . . . . . . . . . . 1361
Roll Grades. . . . . . . . . . . . . . . . . . . . . . . . . . . . . . . . . . . . . . . . . . . . . . . . . . . . . . . . . . 1361
Build/Change Term Header . . . . . . . . . . . . . . . . . . . . . . . . . . . . . . . . . . . . . . . . . . . . . 1368
Change/Maintain Grades . . . . . . . . . . . . . . . . . . . . . . . . . . . . . . . . . . . . . . . . . . . . . . . 1369
Automated Incomplete Grade Processing . . . . . . . . . . . . . . . . . . . . . . . . . . . . . . . . . . 1369
Build Academic Standing Rules . . . . . . . . . . . . . . . . . . . . . . . . . . . . . . . . . . . . . . . . . . 1383
Calculate Academic Standing. . . . . . . . . . . . . . . . . . . . . . . . . . . . . . . . . . . . . . . . . . . . 1383
Produce Grade Mailers. . . . . . . . . . . . . . . . . . . . . . . . . . . . . . . . . . . . . . . . . . . . . . . . . 1388
Add/Change Degrees . . . . . . . . . . . . . . . . . . . . . . . . . . . . . . . . . . . . . . . . . . . . . . . . . . 1389
National Student Clearinghouse (NSC) Degree Verification Reporting . . . . . . . . . . . . 1389
Enter/Maintain Transfer Course Work . . . . . . . . . . . . . . . . . . . . . . . . . . . . . . . . . . . . . 1390
Add/Change Transcript Events and Comments . . . . . . . . . . . . . . . . . . . . . . . . . . . . . . 1390
Enter Qualifying Papers . . . . . . . . . . . . . . . . . . . . . . . . . . . . . . . . . . . . . . . . . . . . . . . . 1390
Review Academic History Online . . . . . . . . . . . . . . . . . . . . . . . . . . . . . . . . . . . . . . . . . 1391
Print Transcript . . . . . . . . . . . . . . . . . . . . . . . . . . . . . . . . . . . . . . . . . . . . . . . . . . . . . . . 1391
Transcript Population Process . . . . . . . . . . . . . . . . . . . . . . . . . . . . . . . . . . . . . . . . . . . 1402
Transcript Request Purge. . . . . . . . . . . . . . . . . . . . . . . . . . . . . . . . . . . . . . . . . . . . . . . 1403
EDI Transcript Download Processing . . . . . . . . . . . . . . . . . . . . . . . . . . . . . . . . . . . . . . 1404
EDI Transcript Upload Processing . . . . . . . . . . . . . . . . . . . . . . . . . . . . . . . . . . . . . . . . 1409
Establishing Crosswalks to Banner Values for Incoming EDI Transcript Data (TS130) 1418
XML Transcript Processing. . . . . . . . . . . . . . . . . . . . . . . . . . . . . . . . . . . . . . . . . . . . . . 1425
Web Transcript Request Processing Set-Up . . . . . . . . . . . . . . . . . . . . . . . . . . . . . . . . 1443
eTranscripts Processing . . . . . . . . . . . . . . . . . . . . . . . . . . . . . . . . . . . . . . . . . . . . . . . . 1447
Credits and Notations on Permanent Record. . . . . . . . . . . . . . . . . . . . . . . . . . . . . . . . 1491
Repeat/Equivalent Course Rules . . . . . . . . . . . . . . . . . . . . . . . . . . . . . . . . . . . . . . . . . 1494
Expanded Credit Hours and GPA Fields . . . . . . . . . . . . . . . . . . . . . . . . . . . . . . . . . . . 1518
Calculate GPA Using SHRCGPA . . . . . . . . . . . . . . . . . . . . . . . . . . . . . . . . . . . . . . . . . 1528
Calculate GPA by Student Centric Period . . . . . . . . . . . . . . . . . . . . . . . . . . . . . . . . . . 1529
Calculate Campus GPA . . . . . . . . . . . . . . . . . . . . . . . . . . . . . . . . . . . . . . . . . . . . . . . . 1529
Recalculate GPA. . . . . . . . . . . . . . . . . . . . . . . . . . . . . . . . . . . . . . . . . . . . . . . . . . . . . . 1531
End of Term . . . . . . . . . . . . . . . . . . . . . . . . . . . . . . . . . . . . . . . . . . . . . . . . . . . . . . . . . 1531
IPEDS Report Procedures . . . . . . . . . . . . . . . . . . . . . . . . . . . . . . . . . . . . . . . . . . . . . . 1532
Academic Standing Rules Processing . . . . . . . . . . . . . . . . . . . . . . . . . . . . . . . . . . . . . 1568
Progress Evaluation Processing and Combined Academic Standing . . . . . . . . . . . . . 1570
Satisfactory Academic Progress. . . . . . . . . . . . . . . . . . . . . . . . . . . . . . . . . . . . . . . . . . 1574
Student Type Update Procedures. . . . . . . . . . . . . . . . . . . . . . . . . . . . . . . . . . . . . . . . . 1578

15
Banner Student User Guide | Contents
Electronic Gradebook - Define Sub-Components. . . . . . . . . . . . . . . . . . . . . . . . . . . . . 1582
Electronic Gradebook - Enter Sub-Components . . . . . . . . . . . . . . . . . . . . . . . . . . . . . 1588
Electronic Gradebook - View Sub-Components . . . . . . . . . . . . . . . . . . . . . . . . . . . . . . 1589
Setting Up Sleep/Wake Processes. . . . . . . . . . . . . . . . . . . . . . . . . . . . . . . . . . . . . . . . 1590
Creating a Population Selection . . . . . . . . . . . . . . . . . . . . . . . . . . . . . . . . . . . . . . . . . . 1591
Purge Process . . . . . . . . . . . . . . . . . . . . . . . . . . . . . . . . . . . . . . . . . . . . . . . . . . . . . . . 1592
Transfer Articulation Procedures . . . . . . . . . . . . . . . . . . . . . . . . . . . . . . . . . . . . . . . 1593
Transfer Articulation Validation Tables . . . . . . . . . . . . . . . . . . . . . . . . . . . . . . . . . . . . . 1593
Transfer Articulation Institution Creation. . . . . . . . . . . . . . . . . . . . . . . . . . . . . . . . . . . . 1593
Transfer Articulation Grading Schemes . . . . . . . . . . . . . . . . . . . . . . . . . . . . . . . . . . . . 1593
Creating the Transfer Institution Courses . . . . . . . . . . . . . . . . . . . . . . . . . . . . . . . . . . . 1594
Creating the Transfer Institution Equivalency . . . . . . . . . . . . . . . . . . . . . . . . . . . . . . . . 1597
Transfer Course Attributes . . . . . . . . . . . . . . . . . . . . . . . . . . . . . . . . . . . . . . . . . . . . . . 1598
Transfer Course Title . . . . . . . . . . . . . . . . . . . . . . . . . . . . . . . . . . . . . . . . . . . . . . . . . . 1599
Performing Transfer Articulation for Students. . . . . . . . . . . . . . . . . . . . . . . . . . . . . . . . 1599
Graduation Procedures . . . . . . . . . . . . . . . . . . . . . . . . . . . . . . . . . . . . . . . . . . . . . . . 1601
Graduation Processing . . . . . . . . . . . . . . . . . . . . . . . . . . . . . . . . . . . . . . . . . . . . . . . . . 1601
Self-Service Graduation Application Processing . . . . . . . . . . . . . . . . . . . . . . . . . . . . . 1609
Graduate Student Tracking Procedures . . . . . . . . . . . . . . . . . . . . . . . . . . . . . . . . . . 1630
Graduate Student Tracking Overview. . . . . . . . . . . . . . . . . . . . . . . . . . . . . . . . . . . . . . 1630
Graduate Student Tracking Implementation Instructions . . . . . . . . . . . . . . . . . . . . . . . 1635
Academic History Reports. . . . . . . . . . . . . . . . . . . . . . . . . . . . . . . . . . . . . . . . . . . . . 1640
Banner Student System Management . . . . . . . . . . . . . . . . . . . . . . . . . . . 1642
Banner Student System Management Procedures . . . . . . . . . . . . . . . . . . . . . . . . . 1642
Value-Based Security and Personally Identifiable Information Security Using Fine-
Grained Access Control . . . . . . . . . . . . . . . . . . . . . . . . . . . . . . . . . . . . . . . . . . . . . . . . 1642
Banner Student Elevate Support . . . . . . . . . . . . . . . . . . . . . . . . . . . . . . . . . . . . . . . . . 1698
Using Elevate and Banner with FGAC and VBS . . . . . . . . . . . . . . . . . . . . . . . . . . . . . 1700
Interfaces. . . . . . . . . . . . . . . . . . . . . . . . . . . . . . . . . . . . . . . . . . . . . . . . . . . 1736
Interfaces Used With Banner Student . . . . . . . . . . . . . . . . . . . . . . . . . . . . . . . . . . . 1736
Banner Accounts Receivable Interface to Banner Finance . . . . . . . . . . . . . . . . . . . . . 1736

16
Banner Student User Guide | Contents
Banner Accounts Receivable Interface to Banner Financial Aid . . . . . . . . . . . . . . . . . 1736
Banner Student Interface to Banner Advancement . . . . . . . . . . . . . . . . . . . . . . . . . . . 1736
Banner Student Interface to Banner Human Resources . . . . . . . . . . . . . . . . . . . . . . . 1737
Appendix: List Reports Reference . . . . . . . . . . . . . . . . . . . . . . . . . . . . . . 1742
List of Reports and Processes by Module . . . . . . . . . . . . . . . . . . . . . . . . . . . . . . . . 1742
Appendix: EDI Job Aid. . . . . . . . . . . . . . . . . . . . . . . . . . . . . . . . . . . . . . . . 1743
Introduction. . . . . . . . . . . . . . . . . . . . . . . . . . . . . . . . . . . . . . . . . . . . . . . . . . . . . . . . . 1743
Procedures . . . . . . . . . . . . . . . . . . . . . . . . . . . . . . . . . . . . . . . . . . . . . . . . . . . . . . . . . 1745
Prerequisites. . . . . . . . . . . . . . . . . . . . . . . . . . . . . . . . . . . . . . . . . . . . . . . . . . . . . . . . . 1745
Materials . . . . . . . . . . . . . . . . . . . . . . . . . . . . . . . . . . . . . . . . . . . . . . . . . . . . . . . . . . . . 1746
Participants. . . . . . . . . . . . . . . . . . . . . . . . . . . . . . . . . . . . . . . . . . . . . . . . . . . . . . . . . . 1746
Part 1: Specifying Installation Options . . . . . . . . . . . . . . . . . . . . . . . . . . . . . . . . . . . . . 1746
Part 2: Modifying the Delivered Mappings, Interpolations, and Translations . . . . . . . . 1747
Part 3: Building the Translation File . . . . . . . . . . . . . . . . . . . . . . . . . . . . . . . . . . . . . . . 1748
Worksheets . . . . . . . . . . . . . . . . . . . . . . . . . . . . . . . . . . . . . . . . . . . . . . . . . . . . . . . . . 1749
Worksheet A: Country Codes #26 . . . . . . . . . . . . . . . . . . . . . . . . . . . . . . . . . . . . . . . . 1749
Worksheet B: State/Province Codes #156 . . . . . . . . . . . . . . . . . . . . . . . . . . . . . . . . . . 1749
Worksheet C: High School Code Qualifier #66. . . . . . . . . . . . . . . . . . . . . . . . . . . . . . . 1750
Worksheet D: College Code Qualifier #66 . . . . . . . . . . . . . . . . . . . . . . . . . . . . . . . . . . 1751
Worksheet E: Curriculum Code Qualifier (1 of 2) #66 . . . . . . . . . . . . . . . . . . . . . . . . . 1752
Worksheet E: Curriculum Code Qualifier (2 of 2) #66 . . . . . . . . . . . . . . . . . . . . . . . . . 1752
Worksheet Data Map . . . . . . . . . . . . . . . . . . . . . . . . . . . . . . . . . . . . . . . . . . . . . . . . . 1754
Worksheet 1: Explanation of Mapping Data Elements . . . . . . . . . . . . . . . . . . . . . . . . 1754
Flat File Notes . . . . . . . . . . . . . . . . . . . . . . . . . . . . . . . . . . . . . . . . . . . . . . . . . . . . . . . 1762
Worksheets 2.10-2.62 . . . . . . . . . . . . . . . . . . . . . . . . . . . . . . . . . . . . . . . . . . . . . . . . . 1766
Worksheet 2.10: EDI-PAPER-COPY #641 . . . . . . . . . . . . . . . . . . . . . . . . . . . . . . . . . . 1766
Worksheet 2.12: EDI-SEX #1068 . . . . . . . . . . . . . . . . . . . . . . . . . . . . . . . . . . . . . . . . . 1767
Worksheet 2.14: EDI-MARITAL-STAT #1067 . . . . . . . . . . . . . . . . . . . . . . . . . . . . . . . . 1768
Worksheet 2.16: EDI-ETHNICITY #1109 . . . . . . . . . . . . . . . . . . . . . . . . . . . . . . . . . . . 1769
Worksheet 2.18: EDI-CITIZ-STATUS #1066 . . . . . . . . . . . . . . . . . . . . . . . . . . . . . . . . 1770

17
Banner Student User Guide | Contents
Worksheet 2.20: EDI-RESIDENCY #1073 . . . . . . . . . . . . . . . . . . . . . . . . . . . . . . . . . . 1772
Worksheet 2.22: EDI-ENROLLED-NOW (1 of 2) #641. . . . . . . . . . . . . . . . . . . . . . . . . 1773
Worksheet 2.24: EDI-HS-CODE #67 . . . . . . . . . . . . . . . . . . . . . . . . . . . . . . . . . . . . . . 1774
Worksheet 2.26: EDI-HS-GRAD-TYPE #641 . . . . . . . . . . . . . . . . . . . . . . . . . . . . . . . . 1775
Worksheet 2.28: EDI-PD-SCHOOL #67 . . . . . . . . . . . . . . . . . . . . . . . . . . . . . . . . . . . . 1776
Worksheet 2.30: EDI-PD-CODE and EDI-DEG-CODE #1126 . . . . . . . . . . . . . . . . . . . 1777
Worksheet 2.32: EDI-SES-CODE #1139 . . . . . . . . . . . . . . . . . . . . . . . . . . . . . . . . . . . 1779
Worksheet 2.34: EDI-SES-STUDENT-LEVL #1131 . . . . . . . . . . . . . . . . . . . . . . . . . . . 1781
Worksheet 2.36: EDI-SES-STATUS #641 . . . . . . . . . . . . . . . . . . . . . . . . . . . . . . . . . . 1783
Worksheet 2.38: EDI-SUM-CREDIT-TYPE and EDI-CRS-CRED-TYPE #1141. . . . . . 1784
Worksheet 2.40: EDI-SUM-LEVEL-CODE and EDI-CRS-LVL-CODE #1142. . . . . . . . 1785
Worksheet 2.42: EDI-SUM-EXC-GPA #1073 . . . . . . . . . . . . . . . . . . . . . . . . . . . . . . . . 1786
Worksheet 2.44: EDI-SUM-GPA-MIN and EDI-SUM-GPA-MAX #740 and #741 . . . . . 1787
Worksheet 2.46: EDI-CRS-CRED-BASIS #1147 . . . . . . . . . . . . . . . . . . . . . . . . . . . . . 1788
Worksheet 2.48: EDI-CRS-GRADE-QUALIFIER #1148. . . . . . . . . . . . . . . . . . . . . . . . 1789
Worksheet 2.50: EDI-CRS-RPT-CNT #1150 . . . . . . . . . . . . . . . . . . . . . . . . . . . . . . . . 1790
Worksheet 2.52: EDI-DEG-HONORS #641 . . . . . . . . . . . . . . . . . . . . . . . . . . . . . . . . . 1791
Worksheet 2.54: EDI-DEG-FOS-TYPE #1153 . . . . . . . . . . . . . . . . . . . . . . . . . . . . . . . 1792
Worksheet 2.56: EDI-DEG-FOS-CODE #67 . . . . . . . . . . . . . . . . . . . . . . . . . . . . . . . . 1793
Worksheet 2.58: EDI-SCH-CODE #67 . . . . . . . . . . . . . . . . . . . . . . . . . . . . . . . . . . . . . 1794
Worksheet 2.60: SOBSEQN SEQUENCE NUMBER. . . . . . . . . . . . . . . . . . . . . . . . . . 1795
Worksheet 2.62: ELECTRONIC STATUS CODE . . . . . . . . . . . . . . . . . . . . . . . . . . . . . 1796
Appendix: Concurrent Curricula Processing . . . . . . . . . . . . . . . . . . . . . 1798
Using Concurrent Curricula Processing . . . . . . . . . . . . . . . . . . . . . . . . . . . . . . . . . 1798
Processing Summary . . . . . . . . . . . . . . . . . . . . . . . . . . . . . . . . . . . . . . . . . . . . . . . . . . 1798
Concepts . . . . . . . . . . . . . . . . . . . . . . . . . . . . . . . . . . . . . . . . . . . . . . . . . . . . . . . . . . . 1799
Details of Concurrent Curricula. . . . . . . . . . . . . . . . . . . . . . . . . . . . . . . . . . . . . . . . . . . 1808
Curricula Checking . . . . . . . . . . . . . . . . . . . . . . . . . . . . . . . . . . . . . . . . . . . . . . . . . . . . 1823
Curriculum API . . . . . . . . . . . . . . . . . . . . . . . . . . . . . . . . . . . . . . . . . . . . . . . . . . . . . . . 1828
Conversion of Curriculum Data. . . . . . . . . . . . . . . . . . . . . . . . . . . . . . . . . . . . . . . . . . . 1840
Determining Which Curriculum Rows are Current . . . . . . . . . . . . . . . . . . . . . . . . . . . . 1844
Creating and Updating Curriculum Data. . . . . . . . . . . . . . . . . . . . . . . . . . . . . . . . . . . . 1848
Purging Curriculum and Field of Study Rows . . . . . . . . . . . . . . . . . . . . . . . . . . . . . . . . 1853
Archiving Curriculum and Field of Study Rows. . . . . . . . . . . . . . . . . . . . . . . . . . . . . . . 1853
Banner Views Used in Concurrent Curricula Processing . . . . . . . . . . . . . . . . . . . . . . . 1854

18
Banner Student User Guide | Contents
View Examples for Recruiting, Admissions, and Academic History Current and Active
Curriculum Records . . . . . . . . . . . . . . . . . . . . . . . . . . . . . . . . . . . . . . . . . . . . . . . . . . . 1878
View Examples for General Student Current and Active Curriculum Records . . . . . . . 1879
Using the Recruiting Views. . . . . . . . . . . . . . . . . . . . . . . . . . . . . . . . . . . . . . . . . . . . . . 1879
Using the Admissions Views. . . . . . . . . . . . . . . . . . . . . . . . . . . . . . . . . . . . . . . . . . . . . 1880
Using the General Student Views. . . . . . . . . . . . . . . . . . . . . . . . . . . . . . . . . . . . . . . . . 1880
Using the Academic History Views . . . . . . . . . . . . . . . . . . . . . . . . . . . . . . . . . . . . . . . . 1880
Banner Student Admissions Self-Service and Curriculum Processing. . . . . . . . . . . . . 1881
Setting Up Curriculum Processing for Self-Service Applications . . . . . . . . . . . . . . . . . 1883
Appendix: Mass Entry Processing . . . . . . . . . . . . . . . . . . . . . . . . . . . . . . 1887
Using Mass Entry Processing . . . . . . . . . . . . . . . . . . . . . . . . . . . . . . . . . . . . . . . . . . 1887
Processing . . . . . . . . . . . . . . . . . . . . . . . . . . . . . . . . . . . . . . . . . . . . . . . . . . . . . . . . . . 1887
Admissions Mass Entry . . . . . . . . . . . . . . . . . . . . . . . . . . . . . . . . . . . . . . . . . . . . . . . . 1892
General Student Mass Entry. . . . . . . . . . . . . . . . . . . . . . . . . . . . . . . . . . . . . . . . . . . . . 1893
Athletic Compliance Mass Entry. . . . . . . . . . . . . . . . . . . . . . . . . . . . . . . . . . . . . . . . . . 1893
Registration Mass Entry . . . . . . . . . . . . . . . . . . . . . . . . . . . . . . . . . . . . . . . . . . . . . . . . 1896
Graduation Mass Entry. . . . . . . . . . . . . . . . . . . . . . . . . . . . . . . . . . . . . . . . . . . . . . . . . 1899
Audit of Mass Entry Information . . . . . . . . . . . . . . . . . . . . . . . . . . . . . . . . . . . . . . . . . . 1902
Batch Update Process for Mass Entry . . . . . . . . . . . . . . . . . . . . . . . . . . . . . . . . . . . . . 1903
Purge Process for Mass Entry . . . . . . . . . . . . . . . . . . . . . . . . . . . . . . . . . . . . . . . . . . . 1904
Mass Entry Column Codes. . . . . . . . . . . . . . . . . . . . . . . . . . . . . . . . . . . . . . . . . . . . . . 1904
Appendix: Study Path Processing . . . . . . . . . . . . . . . . . . . . . . . . . . . . . . 1930
Overview . . . . . . . . . . . . . . . . . . . . . . . . . . . . . . . . . . . . . . . . . . . . . . . . . . . . . . . . . . . 1930
Set up Study Paths. . . . . . . . . . . . . . . . . . . . . . . . . . . . . . . . . . . . . . . . . . . . . . . . . . . 1930
Name Study Paths . . . . . . . . . . . . . . . . . . . . . . . . . . . . . . . . . . . . . . . . . . . . . . . . . . . 1931
Processing . . . . . . . . . . . . . . . . . . . . . . . . . . . . . . . . . . . . . . . . . . . . . . . . . . . . . . . . . 1933
Admissions . . . . . . . . . . . . . . . . . . . . . . . . . . . . . . . . . . . . . . . . . . . . . . . . . . . . . . . . . . 1933
General Student . . . . . . . . . . . . . . . . . . . . . . . . . . . . . . . . . . . . . . . . . . . . . . . . . . . . . . 1935
Registration . . . . . . . . . . . . . . . . . . . . . . . . . . . . . . . . . . . . . . . . . . . . . . . . . . . . . . . . . 1938
Use Study Paths with Fee Assessment . . . . . . . . . . . . . . . . . . . . . . . . . . . . . . . . . . . . 1942
Academic History . . . . . . . . . . . . . . . . . . . . . . . . . . . . . . . . . . . . . . . . . . . . . . . . . . . . . 1952
Update Curriculum and Study Path Records . . . . . . . . . . . . . . . . . . . . . . . . . . . . . . . . 1954

19
Banner Student User Guide | Contents
Delete Study Path Records . . . . . . . . . . . . . . . . . . . . . . . . . . . . . . . . . . . . . . . . . . . . . 1955
Delete Curriculum Records . . . . . . . . . . . . . . . . . . . . . . . . . . . . . . . . . . . . . . . . . . . . . 1956
Study Path Conversion Scripts . . . . . . . . . . . . . . . . . . . . . . . . . . . . . . . . . . . . . . . . . 1957
susgrstsp_applicant.sql (Admissions). . . . . . . . . . . . . . . . . . . . . . . . . . . . . . . . . . . . . . 1957
susgrstsp_enroll.sql (Enrollment) . . . . . . . . . . . . . . . . . . . . . . . . . . . . . . . . . . . . . . . . . 1958
Banner Views Used with Study Path Processing . . . . . . . . . . . . . . . . . . . . . . . . . . 1959
Student Study Path Name View (SOVSPNM) . . . . . . . . . . . . . . . . . . . . . . . . . . . . . . . 1959
Student Study Path View (SGVSTSP) . . . . . . . . . . . . . . . . . . . . . . . . . . . . . . . . . . . . . 1960
Student Study Path Name for Fee Assessment Audit View (SOVFSPN). . . . . . . . . . . 1960
Use Study Paths in Self-Service . . . . . . . . . . . . . . . . . . . . . . . . . . . . . . . . . . . . . . . . 1961
Set up Study Paths in Self-Service . . . . . . . . . . . . . . . . . . . . . . . . . . . . . . . . . . . . . . 1961
Web Pages Used with Study Paths. . . . . . . . . . . . . . . . . . . . . . . . . . . . . . . . . . . . . . 1962

20
Banner Student User Guide | System Overview
System Overview
This chapter includes the following topics:
• Banner Student application summary
• functions and features of Banner Student by module
• user guide chapter organization
• product application process flow and flow narrative
Application Summary
Banner® software products support the integrated flow of information throughout your
institution to assist you in resource management. The Banner® product suite continues
this tradition with its diverse and interrelated applications.
A flexible, comprehensive solution to the problems of student administration, the Banner
Student System sets a new standard for scheduling, registration, accounts receivable,
academic history and other functions in higher education. It delivers the information you
need to better control your administrative costs, which typically represent the largest
single expenditure in your budget.
Banner Student supports the full range of functions necessary for student administration,
including: creation of catalogs; data collection for scheduling of classes, admissions,
assignment of housing, faculty workload analysis, and registration; all accounts
receivable; and academic history and degree audit reporting.
The Banner Student System benefits many of your administrative offices. To further
maximize its data availability, the Banner Student System can be fully integrated with the
Banner Finance, Banner Human Resources, Banner Advancement, and Banner Financial
Aid systems. It is also available as a comprehensive stand-alone system.
Banner places your institution at the forefront of student information technology through its
use of Oracle®--the relational database management system from Oracle Corporation--
and SQL, the standard for database access. By combining sophisticated technology with
an architecture based on user-defined rules, Banner creates an information environment
you can tailor to meet your unique requirements--without extensive technical support.
To accommodate the individual needs and preferences of your institution, Banner is
delivered in a variety of hardware environments, including AT&T, Data General, Digital,
Hewlett-Packard, IBM, NCR, Sequent, and SUN. This flexibility enables you to use your
Banner Student System with the hardware package that is right for you.

21
Banner Student User Guide | System Overview
Functions and Features
The Banner Student System is made up of many interactive functions. These functions are
organized into fourteen modules:
• Course Catalog enables you to define courses to be entered in the institution's catalog.
This involves compiling of data such as course title, department, credit hours,
corequisites or prerequisites, fee information, and restrictions for the course. Start and
end terms for each course are maintained, along with text to be printed on the course
bulletin.
• Class Schedule contains the data necessary to build and print a schedule of classes,
including term attributes (dates for each session within a term), and establishing a
Course Reference Number. In addition, instructors are assigned to classes, classes are
scheduled into rooms depending on the attributes needed and available, and course
sections with user defined comments are established. The Schedule module also
provides a means of "rolling" the schedule forward to the next applicable term to
decrease the data entry process. Block scheduling is maintained in this module.
• General Person supplies the means to identify both persons and non-persons, such as
third-party accounts, in the system. Identification number, name, address, and, where
applicable, biographic information are gathered and maintained. Emergency contact,
medical, and international student information are also collected for use in other
modules. Support Services such as goals, needs, and services can also be maintained.
• Faculty Load enables you to enter and maintain information including instructional and
non-instructional assignments for a faculty member or advisor. Personnel information,
such as tenure status and sabbatical dates, is maintained in this module along with
workload and contract information.
• Location Management and Housing allows for the definition of the institution's buildings
and room facilities. In addition, the Location Management and Housing module provides
a means of assigning rooms for special events, and provides a listing of available rooms
with attributes. Dormitory, meal plan, and phone assignments, as well as assessments,
may also be maintained in this module.
• Recruiting maintains information about potential recruits such as: source, intended
majors, test scores, high school and prior college information, and outside interests. It
builds statistical information about sources and a plan for producing materials, and
allows for creation of materials to be sent to prospects.
• Admissions establishes admission records and identifies items an applicant needs to
provide to continue application processing. It calculates whether an applicant can be
automatically admitted to the institution based on user defined rules. General Student
records are automatically created once an applicant has accepted and plans to attend.
Test scores, high school, and prior college information are maintained here, along with
guardian information. The Admissions module also provides the means to allow quick
entry for automatic registration eligibility.
• General Student modifies current information for students such as changes to major,
residency, and student type. It also provides a place for entering information on career
choice, including advisor, activities, and veteran information. Student classification and
cooperative information, as well as Student Right to Know information, is maintained
here.

22
Banner Student User Guide | System Overview
• Registration allows for creation of enrollment information for a specific term. It defines
rules determining student and course statuses, and controlling actions to be taken at
registration, such as amounts of allowable refunds. Tuition and fees policy is built in
Registration, along with rules to be used for the fee assessment algorithm. Student
schedules and bills are produced, and class rosters are maintained. It also allows for
sections to be graded and rolled into academic history.
• Accounts Receivable establishes accounts receivable controls: detail codes identifying
charges or payments; default values, methods of payment, and how credits are handled;
and messages to print on bills. The Accounts Receivable module displays term specific
tuition, housing, meal plan, and fee charges, and calculates exemptions and contracts
for eligible students. Along with maintaining account information for non-student
accounts, payments are entered here and accounts can be reviewed and updated. This
module allows for establishing installment plans for accounts and third-party contracts.
Billing and invoicing are controlled from this module, along with collection agency
assignments. Reports can be generated detailing activity of cashiers, unpaid charges for
accounts, and account transactions.
Note: This module is contained in a separate manual called the Banner
Accounts Receivable User Guide.
• Academic History enables you to build grading policies and maintain grades. Grades
are rolled to Academic History, and the system automatically checks for repeat courses.
Academic standing is calculated using user-defined rules regarding probation and
Dean's List policies. Grade mailers are produced in this module and term GPA
information is maintained here. Degrees and honors associated with each student are
entered in this module, along with information on majors, minors, and status. Transfer
course work is recorded in the Academic History module, and an automatic transfer
articulation process is available. The transcripts are also printed from here. Graduation
information, including diploma, ceremony, ceremony attendance, and graduation dress,
is maintained here.
• Curriculum, Advising and Program Planning (CAPP) builds degree program codes
establishing appropriate majors, minors, and concentrations for degree programs. All
requirements, both general (i.e., minimum GPA, minimum hours) and course specific
(i.e., humanity or social science requirement), are built in this module. Automatic
assignation of a degree program code occurs if a student meets all the requirements for
an established degree program. Non-course requirements are approved in this module.
This module is also used to assign courses to multiple requirements, and execute
compliance verification.
Note: This module is contained in a separate manual called the Banner
Student CAPP (Curriculum, Advising and Program Planing) Handbook.
• Banner Student System Management is used for data load processing and rule creation,
as well as for person and non-person system searches. The processing and use of
Value-Based Security using Fine Grained Access Control are discussed here.
These modules can be tailored to your institution using the Banner Student System's rule-
based architecture, which permits you to define your own calculation parameters and
processing rules.

23
Banner Student User Guide | System Overview
Application Flow
1. The Course Catalog module defines the courses offered by your institution.
2. Information about the courses is transferred to the Schedule module, where it is used
to build the schedule of classes. In turn, Schedule passes information on to
Registration to create class rosters, to Location Management for room scheduling,
and to Faculty Load for faculty workload analysis.
3. The General Person module is used to collect identification and demographic data
about persons and non-persons. The person information is used in the Faculty Load,
Admissions, and Recruiting modules.
The Support Services module receives information from the General Person module
to create goals and needs, and to monitor services which the person may have
received.
4. The Faculty Load module is used to maintain instructional and non-instructional
information pertaining to faculty members and advisors on a term and contract basis.
Information from the General Person module must be created first and is passed into
the Faculty Load module. Once the faculty members are established, and instructional
assignments are created, the information is passed to the Schedule module and may
be used in Academic History when creating committees, as well as in the General
Student module in conjunction with assistantship data.
5. The General Person information is also passed to Recruiting, which collects and
maintains information about potential recruits, such as sources, test scores, and high
school and prior college information. Information regarding intended degree, major,
department, etc., may be passed to the Admissions module when creating application
records.
6. Data from General Person is also passed to Admissions, creating applicant records.
Admissions, after establishing admission records, then passes the applicant data to
General Student and Academic History as applicable. Admissions also allows for
Quick Entry for eligible students.
7. The General Student module provides a place for changing established data for
students, such as changes in curriculum or residency. This information can be
updated by Registration and Academic History.
8. After rooms are defined in Location Management, information from the Schedule and
General Person modules is used to build room assignments. Location Management,
in turn, passes information back to Schedule. Location Management also sends data
to the Accounts Receivable module regarding room, meal, and phone assessments.
9. The Registration module interfaces with the Schedule and General Student modules
to create attributes for terms, and maintain class rosters. This information is then
passed to the Academic History module to update the student's academic records.
10. Data from the General Person, Location Management, and Registration modules is
fed into the Accounts Receivable module. Accounts Receivable not only displays
charges for housing, meals, and fees, but also establishes installment plans for third
party contracts.
11. Academic History, as noted, is updated by General Person, Admissions, and
Registration, and in turn updates Degree Audit. Grade mailers are produced in this
module.

24
Banner Student User Guide | System Overview
Transfer Articulation is available from the Academic History information. Information
pertaining to courses from outside institutions and the rules associated with their
acceptance are defined in this module.
12. Curriculum, Advising and Program Planning is updated by Registration and Academic
History, and is used to create degree program codes and build requirements.

27
Banner Student User Guide | Validation Reference
Validation Reference
This chapter includes the following topics:
• validation forms reference for overall forms (SO%)
• validation forms cross reference
• validation forms system required values
• validation forms menu system process flow
• validation forms system reference
Overall System Validation Forms Reference
This list references the system validation forms which are used by cross-modular
Banner® Student System functional/application forms. These cross-modular forms are
designated by the “O” for “overall system use” as the second letter of the form identifier.
Validation Form Application/Functional Form
STVACPR Acceptance Practice Code
Validation Form
SOABGTA Transfer Articulation Institution
Form
STVACST Institutional Accreditation
Status Validation Form
SOABGTA Transfer Articulation Institution
Form
STVADMR Admission Request Checklist
Code Validation Form
SOAHSCH High School Information Form
SOAPCOL Prior College Form
SOATEST Test Information Form
SOISBGI Source/Background Institution
Query-Only Form
STVADMT Admission Type Code
Validation Form
SOAIDNS Person Search Detail Form
STVATYP Address Type Code Validation
Form
SOAFOLK Guardian Information Form
SOAIDNS Person Search Detail Form
SOADDRQ Address Summary Form
STVBCHR Background Inst.
Characteristic Code Validation
Form
SOABGIY Source/Background Institution
Year Form

28
Banner Student User Guide | Validation Reference
STVCALD Calendar Type Code Validation
Form
SOABGTA Transfer Articulation Institution
Form
STVCAMP Campus Code Validation Form SOACURR Curriculum Rules Form
SOAPROF Campus Code Validation Form
STVCNTY County Code Validation Form SOAFOLK Guardian Information Form
SOAHSCH High School Information Form
SOAPCOL Prior College Form
SOASBGI Source or Background
Institution Base Form
SOTCNVT Tape Code Conversion Form
STVCOLL College Code Validation Form SOACURR Curriculum Rules Form
SOAIDNS Person Search Detail Form
SOAPCOL Prior College Form
SOAPCOQ Prior College Summary Form
STVCTYP Contact Type Code Validation
Form
SOAAPPT Person Appointments/Contacts
Form
STVDEGC Degree Code Validation Form SOABGIY Source/Background Institution
Year Form
SOACURR Curriculum Rules Form
SOAIDNS Person Search Detail Form
SOAPCOL Prior College Form
SOAPCOQ Prior College Summary Form
SOTCNVT Tape Code Conversion Form
STVDPLM Diploma Type Validation Form SOABGIY Source/Background Institution
Year Form
SOAHSCH High School Information Form
STVETHN Ethnic Code Validation Form SOABGIY Source/Background Institution
Year Form
SOTCNVT Tape Code Conversion Form
STVGEOD Geographic Region Division
Code Validation Form
SOAGEOR Geographic Region Rules
Form
STVGEOR Geographic Region Code
Validation Form
SOAGEOR Geographic Region Rules
Form
Validation Form Application/Functional Form

29
Banner Student User Guide | Validation Reference
STVHLDD Hold Type Code Validation
Form
SOAHOLD Hold Information Form
SOQHOLD Holds Query-Only Form
STVHLWK Highest Level of Work
Validation Form
SOABGTA Transfer Articulation Institution
Form
STVHONR Institutional Honors Code
Validation Form
SOAPCOL Prior College Form
SOAPCOQ Prior College Summary Form
STVINFC Interface Validation Form SOTCNVT Tape Code Conversion Form
STVLEVL Level Code Validation Form SOACURR Curriculum Rules Form
SOAIDNS Person Search Detail Form
STVMAJR Major, Minor, Concentration
Code Validation Form
SOACURR Curriculum Rules Form
SOAIDNS Person Search Detail Form
SOAPCOL Prior College Form
SOTCNVT Tape Code Conversion Form
STVNATN Nation Code Validation Form SOAFOLK Guardian Information Form
SOAHSCH High School Information Form
SOAPCOL Prior College Form
SOASBGI Source or Background
Institution Base Form
STVORIG Originator Code Validation
Form
SOAHOLD Hold Information Form
SOQHOLD Holds Query-Only Form
STVPRGA Program Accreditation Code
Validation Form
SOABGTA Transfer Articulation Institution
Form
STVPTRM Part of Term Code Validation
Form
SOATERM Term Control Form
STVPTYP Source Contact Person Type
Code Validation Form
SOASBGI Source or Background
Institution Base Form
STVRECR Recruiter Code Validation Form SOAAPPT Person Appointments/Contacts
Form
STVRELG Religion Code Validation Form SOTCNVT Tape Code Conversion Form
STVRELT Relationship Code Validation
Form
SOAFOLK Guardian Information Form
STVRESD Residence Code Validation
Form
SOAIDNS Person Search Detail Form
Validation Form Application/Functional Form

30
Banner Student User Guide | Validation Reference
STVRSLT Appointment Result Code
Validation Form
SOAAPPT Person Appointments/Contacts
Form
STVSBGI Source/Background Institution
Code Validation Form
SOAAPPT Person Appointments/Contacts
Form
SOABGIY Source/Background Institution
Year Form
SOABGTA Transfer Articulation Institution
Form
SOAHSCH High School Information Form
SOAPCOL Prior College Form
SOASBGI Source or Background
Institution Base Form
SOISBGI Source/Background Institution
Query-Only Form
STVSBJC High School Subject Validation
Form
SOAHSCH High School Information Form
STVSTAT State Code Validation Form SOAFOLK Guardian Information Form
SOAHSCH High School Information Form
SOAIDNS Person Search Detail Form
SOAPCOL Prior College Form
SOASBGI Source or Background
Institution Base Form
SOADDRQ Address Summary Form
STVSTST Student Status Code Validation
Form
SOAIDNS Person Search Detail Form
STVSTYP Student Type Code Validation
Form
SOACTRM Continuant Terms Rule Form
SOAIDNS Person Search Detail Form
SOQCTRM Continuant Terms Query Form
STVTAAU Acceptance Authority Code
Validation Form
SOABGTA Transfer Articulation Institution
Form
STVTADM Test Score Administration Type
Code Validation Form
SOATEST Test Score Information Form
SOTCNVT Tape Code Conversion Form
STVTEAC Test Accommodation
Validation Form
SOATEST Test Score Information Form
STVTEFR Test Form Validation Form SOATEST Test Score Information Form
Validation Form Application/Functional Form

31
Banner Student User Guide | Validation Reference
STVTEIN Test Instrument Validation
Form
SOATEST Test Score Information Form
STVTEPR Test Purpose Validation Form SOATEST Test Score Information Form
STVTERM Term Code Validation Form SOABGTA Transfer Articulation Institution
Form
SOACTRM Continuant Terms Rule Form
SOACURR Curriculum Rules Form
SOAIDNS Person Search Detail Form
SOATERM Term Control Form
SOQCTRM Continuant Term Query Form
SOTCNVT Tape Code Conversion Form
STVTESC Test Code Validation Form SOABGIY Source/Background Institution
Year Form
SOATEST Test Information Form
STVTLVL Transfer Level Code Validation
Form
SOABGTA Transfer Articulation Institution
Form
STVTSRC Admissions Test Score Source
Code Validation Form
SOATEST Test Information Form
Validation Form Application/Functional Form

32
Banner Student User Guide | Validation Reference
Validation Forms Cross Reference
This list indicates which validation forms validate against other validation forms.
Validation Form Validates Against Validation Forms
STVACTC Banner Student Activity Code
Validation Form
STVACCG Activity Category Validation
Form
STVACTP Activity Type Validation Form
STVATYP Address Type Code Validation
Form
STVTELE Telephone Type Validation
Form
STVCHRT Cohort Code Validation Form STVDLEV Degree Level Code Validation
Form
STVTERM Term Code Validation Form
STVCSTS Curriculum Status Validation
Form
STVAPDC Admission Application
Decision Code Validation Form
STVDEGS Degree Status Code Validation
Form
STVSTST Student Status Code Validation
Form
STVDEGC Degree Code Validation Form STVACAT Degree Award Category Code
Validation Form
STVDLEV Degree Level Code Validation
Form
STVEMPL Employer Code Validation
Form
GTVZIPC ZIP/Postal Code Validation
Form
STVNATN Nation Code Validation Form
STVSTAT State Code Validation Form
STVETHN Ethnic Code Validation Form STVACYR Academic Year Validation Form
STVETCT IPEDS Ethnic Code Validation
Form
STVINFC Interface Validation Form STVCTYP Contact Type Code Validation
Form
STVSBGI Source/Background Institution
Code Validation Form
STVTSRC Admissions Test Score Source
Code Validation Form
STVMAJR Major, Minor, Concentration
Code Validation Form
STVCIPC CIP Code Validation Form

33
Banner Student User Guide | Validation Reference
STVSBGI Source/Background Institution
Code Validation Form
STVADMR Admissions Checklist Code
Validation Form
STVSCHD Schedule Type Code Validation
Form
GTVINSM Instructional Method Validation
Form
STVSITE Site Code Validation Form GTVZIPC ZIP/Postal Code Validation
Form
STVNATN Nation Code Validation Form
STVSTAT State Code Validation Form
STVSTAT State Code Validation Form STVSITE Site Code Validation Form
STVTERM Term Code Validation Form STVACYR Academic Year Validation
Form
STVTESC Test Code Validation Form STVADMR Admissions Checklist Code
Validation Form
STVTRMT Term Type Validation Form STVTERM Term Code Validation Form
STVVTYP Visa Type Code Validation
Form
STVADMR Admissions Checklist Code
Validation Form
STVWAPP Application Type Code
Validation Form
STVADMT Admission Type Code
Validation Form
STVLEVL Level Code Validation Form
STVSTYP Student Type Code Validation
Form
STVWLTT Web Application Customized
Letter Type Validation Form
STVELMT HTML Letter Module Validation
Form
Validation Form Validates Against Validation Forms

34
Banner Student User Guide | Validation Reference
Required System Values for Validation Forms
System-required data rows in Banner Student are listed below. The list is organized
alphabetically by table name. Some Banner General tables are listed first, as the values
shown are used in Banner Student processing.
GTVLFST Learner Field of Study Type Validation Form
MAJOR Major
MINOR Minor
CONCENTRATION Concentration
GTVMTYP Meeting Type Validation Form
CLAS Classroom
GTVPRNT Printer Validation Form
SHRPESE_PRNT Printer setup for
SHRPESE
Command - Not used but required for
sleep/wake
SHRPESI_PRNT Printer setup for
SHRPESI
Command - Not used but required for
sleep/wake
GTVPROC Process Name Validation Form
WEBCCAPPDEP Web Credit Card Application Deposit
Process
WEBCCAPPFEES Web Credit Card Application Fees
Process
WEBCCENROLLDEP Web Credit Card Enrollment Deposit
WEBCCEPRTREQ Web Credit Card Enrollment
Verification Charge
WEBCCGRADAPP Web Credit Card Graduation
Application Process
WEBCCREGFEES Web Credit Card Registration Fees
Process
WEBCCTRANSREQ Web Credit Card Request Process

35
Banner Student User Guide | Validation Reference
GTVSCHS Scheduling Status Code Validation Form
NSM Class needs a room assignment.
1SM Class needs a room assignment and has
a preferred first choice room indicated in
the Room Name field. This code limits
the initial pool of candidate rooms in the
assignment algorithm.
WSM Class needs a room assignment and
must be assigned with the preceding
NSM or 1SM record to the same room at
the same time (cross-listed).
RSM Class is related to the preceding NSM or
1SM record and must be assigned to the
same room but not at the same days/
time.
NXM Class needs a room assignment and can
share a room with another class whose
times overlap with it (can be doubled-
booked).
1XM Class needs a room assignment, has a
preferred first choice room indicated in
the Room Name field, and can share a
room with another class whose times
overlap with it (can be double-booked).
RXM Class is related to the previous NXM or
1XM record and must be assigned to the
same room at the same or overlapping
times.
ASM Class has a room assignment that was
made manually or in another system,
such as the student information system.
AXM Class has a room assignment that was
made manually or in another system, and
the class time span overlaps part of all of
the time span of another class assigned
to the same room (double-booking or
intentional conflict).
HSM This is a set of home cross-listed classes
pre-assigned to the same room at
identical days and times.
VSM This is a set of visitor cross-listed classes
pre-assigned to the same room at
identical days and times.

36
Banner Student User Guide | Validation Reference
5SM Schedule25 assigned the class a room
during a previous run.
5XM Schedule25 assigned the class a room,
and it is double-booked with another
class.
STVACAT Degree Award Category Code Validation Form
11 Elementary School Program
12 Junior High School Program
13 High School Program
21 Post Secondary Certificate/Diploma <
one year
22 Post Secondary Certificate/Diploma >
one year and < two years
23 Associate’s Degree
24 Baccalaureate Degree (Bachelor’s)
25 Post Secondary Certificate/Diploma >
two years and < four years
41 Post-Baccalaureate Certificate
(Graduate)
42 Master's Degree
43, 32 Post-Masters’s Certificate (Intermediate
Graduate)
44 Doctoral Degree - Research/Scholarship
45, 31 Doctoral Degree - Professional Practice
46 Doctoral Degree - Other
STVACTP Activity Type Validation Form
SPRTS Sports
STVACYR Academic Year Validation Form
0000 Beginning of Time
9999 End of Time
GTVSCHS Scheduling Status Code Validation Form

37
Banner Student User Guide | Validation Reference
STVADDA Administrator Assignment Data Element Validation Form
Base Table Data Element Description
Validation
Table
GORPGEO GORPGEO_GEOD_CODE Person Geod Code STVGEOD
GORPGEO GORPGEO_GEOR_CODE Person Geor Code STVGEOR
SORHSCH GORSGEO_HSCH_GEOD_CODE HSCH SBGI Geod Code STVGEOD
SORHSCH GORSGEO_HSCH_GEOR_CODE HSCH SBGI Geor Code STVGEOR
SORPCOL GORSGEO_PCOL_GEOD_CODE PCOL SBGI Geod Code STVGEOD
SORPCOL GORSGEO_PCOL_GEOR_CODE PCOL SBGI Geor Code STVGEOR
GORVISA GORVISA_VTYP_CODE Visa - Current STVVTYP
SARAATT SARAATT_ATTS_CODE Applicant Attribute Code STVATTS
SARADAP SARADAP_ADMT_CODE App Admit Code STVADMT
SARADAP SARADAP_CAMP_CODE App Camp Code STVCAMP
SARADAP SARADAP_COLL_CODE_1 App Coll Code STVCOLL
SARADAP SARADAP_DEGC_CODE_1 App Degree Code STVDEGC
SARADAP SARADAP_DEPT_CODE App Dept Code STVDEPT
SARADAP SARADAP_FULL_PART_IND App Full/Part Time Ind N/A
SARADAP SARADAP_LEVL_CODE App Level Code STVLEVL
SARADAP SARADAP_MAJR_CODE_1 App Major Code STVMAJR
SARADAP SARADAP_PROGRAM_1 App Program SMRPRLE
SARADAP SARADAP_RESD_CODE App Residence Code STVRESD
SARADAP SARADAP_RTYP_CODE App Recruit Type Code STVRTYP
SARADAP SARADAP_STYP_CODE App Student Type Code STVSTYP
SARADAP SARADAP_TERM_CODE_ENTRY Applicant Term code STVTERM
SARADAP SARADAP_LFST_CODE_1 App 1st Curric LFST
Code
GTVLFST
SARADAP2 SARADAP_LFST_CODE_2 App 2nd Curric LFST
Code
GTVLFST
SARADAP2 SARADAP_CAMP_CODE_2 App 2nd Curric Camp
Code
STVCAMP
SARADAP2 SARADAP_COLL_CODE_2 App 2nd Curric Coll
Code
STVCOLL

38
Banner Student User Guide | Validation Reference
SARADAP2 SARADAP_DEGC_CODE_2 App 2nd Curr Degree
Code
STVDEGC
SARADAP2 SARADAP_DEPT_CODE_2 App 2nd Curr Dept Code STVDEPT
SARADAP2 SARADAP_LEVL_CODE_2 App 2nd Curr Level
Code
STVLEVL
SARADAP2 SARADAP_MAJR_CODE_2 App 2nd Curr Major
Code
STVMAJR
SARADAP2 SARADAP_PROGRAM_2 App 2nd Curr Program SMRPRLE
SARCHRT SARCHRT_CHRT_CODE Applicant Cohort Code STVCHRT
SORHSCH SOBSBGI_HSCH_CITY HSCH SBGI City N/A
SORHSCH SOBSBGI_HSCH_CNTY_CODE HSCH SBGI County
Code
STVCNTY
SORHSCH SOBSBGI_HSCH_EPSC_CODE HSCH SBGI EPS Code STVEPSC
SORHSCH SOBSBGI_HSCH_STAT_CODE HSCH SBGI State Code STVSTAT
SORHSCH SOBSBGI_HSCH_ZIP HSCH SBGI ZIP Code GTVZIPC
SORPCOL SOBSBGI_PCOL_CITY PCOL SBGI City N/A
SORPCOL SOBSBGI_PCOL_CNTY_CODE PCOL SBGI County
Code
STVCNTY
SORPCOL SOBSBGI_PCOL_EPSC_CODE PCOL SBGI EPS Code STVEPSC
SORPCOL SOBSBGI_PCOL_STAT_CODE PCOL SBGI State Code STVSTAT
SORPCOL SOBSBGI_PCOL_ZIP PCOL SBGI ZIP Code GTVZIPC
SORCONT SORCONT_CTYP_CODE Contact Code STVCTYP
SORHSCH SORHSCH_SBGI_CODE HSCH SBGI Code STVSBGI
SORINTS SORINTS_INTS_CODE Interest Code STVINTS
SORPCOL SORPCOL_PCOL_CODE PCOL SBGI Code STVSBGI
SORTEST SORTEST_TEAC_CODE Test Accommodation
Code
STVTEAC
SORTEST SORTEST_TEIN_CODE Test Instrument Code STVTEIN
SORTEST SORTEST_TESC_CODE Test Score Code STVTESC
SPBPERS SPBPERS_CITZ_CODE Citizenship Code STVCITZ
SPBPERS SPBPERS_ETHN_CODE Ethnic Code STVETHN
STVADDA Administrator Assignment Data Element Validation Form
Base Table Data Element Description
Validation
Table

39
Banner Student User Guide | Validation Reference
SPBPERS SPBPERS_LGCY_CODE Legacy Code STVLGCY
SPBPERS SPBPERS_SEX Gender Code N/A
SPRIDEN SPRIDEN_LAST_NAME Last Name N/A
SRBRECR SRBRECR_ADMT_CODE Recruit Admit Code STVADMT
SRBRECR SRBRECR_CAMP_CODE Recruit Camp Code STVCAMP
SRBRECR SRBRECR_COLL_CODE Recruit Coll Code STVCOLL
SRBRECR SRBRECR_DEGC_CODE Recruit Degree Code STVDEGC
SRBRECR SRBRECR_DEPT_CODE Recruit Dept Code STVDEPT
SRBRECR SRBRECR_LEVL_CODE Recruit Level Code STVLEVL
SRBRECR SRBRECR_MAJR_CODE Recruit Major Code STVMAJR
SRBRECR SRBRECR_PROGRAM_1 Recruit Program SMRPRLE
SRBRECR SRBRECR_RTYP_CODE Recruit Type Code STVRTYP
SRBRECR SRBRECR_STYP_CODE Recruit Student Type
Code
STVSTYP
SRBRECR SRBRECR_TERM_CODE Recruit Term Code STVTERM
SRBRECR SRBRECR_LFST_CODE_1 Recruit 1st Curr LFST
Code
GTVLFST
SRBRECR2 SRBRECR_LFST_CODE_2 Recruit 2nd Curr LFST
Code
GTVLFST
SRBRECR2 SRBRECR_CAMP_CODE_2 Recruit 2nd Curr Camp
Code
STVCAMP
SRBRECR2 SRBRECR_COLL_CODE_2 Recruit 2nd Curr Coll
Code
STVCOLL
SRBRECR2 SRBRECR_DEGC_CODE_2 Recruit 2nd Curr Degree
Code
STVDEGC
SRBRECR2 SRBRECR_DEPT_CODE_2 Recruit 2nd Curr Dept
Code
STVDEPT
SRBRECR2 SRBRECR_LEVL_CODE_2 Recruit 2nd Curr Level
Code
STVLEVL
SRBRECR2 SRBRECR_MAJR_CODE_2 Recruit 2nd Curr Major
Code
STVMAJR
SRBRECR2 SRBRECR_PROGRAM_2 Recruit 2nd Curr
Program
SMRPRLE
STVADDA Administrator Assignment Data Element Validation Form
Base Table Data Element Description
Validation
Table

40
Banner Student User Guide | Validation Reference
SRRCHRT SRRCHRT_CHRT_CODE Recruit Cohort Code STVCHRT
SRRRATT SRRRATT_ATTS_CODE Recruit Attribute Code STVATTS
STVAPLS EDI Application Source Code Validation Form
EDI Electronic Data Interchange
WEB World Wide Web
STVAPST Admissions Application Status Code Validation Form
C Complete/Ready for Review
D Decision Made
I Incomplete/Items Outstanding
STVASTD Academic Standing Code Validation Form
00 Good Standing
STVATYP Address Type Code Validation Form
MA Mailing
MA is required for data load processing
and is used by the Banner Advancement
System for Banner Student loading
processes.
PA Parents
PA is from the original system-required
values used on SOAFOLK when entering
a parent address.
BI Billing
BI is required for sample data purposes if
the Banner Finance System is installed.
STVADDA Administrator Assignment Data Element Validation Form
Base Table Data Element Description
Validation
Table

41
Banner Student User Guide | Validation Reference
Note: Please note that STVCACT does not contain a system-required
indicator. The indicator resides in the Curriculum Activity Status Rules
Table (SOBCACT). The specified values must exist in the table when
using curriculum processing.
BU Business
BU is required for sample data purposes
if the Banner Finance System is installed.
XX Accounts Payable
XX is reserved for use by TGRFEED.
STVCACT Curriculum Activity Status Validation Form
ACTIVE Active Curriculum
INACTIVE Inactive Curriculum
REMOVED Removed
STVCAST Combined Academic Standing Code Validation Form
00 Good Standing
STVCKSR Application Checklist Source Validation Form
BASELINE Originates from Banner
STVCOLL College Code Validation Form
00 No College Designated
99 College Used in Statistical Calculation
STVCSTS Curriculum Status Validation Form
ADMITREPLACE Application replaces learner
APPACCEPT Applicant Acceptance
APPLIED Application Exists
AWARDED Degree Awarded
STVATYP Address Type Code Validation Form

42
Banner Student User Guide | Validation Reference
Note: Please note that STVCSTS shares these required values with the
Curriculum Status Events Table (SORCSTS). The specified values must
exist in the SORCSTS table when using curriculum status events and
user-preferred translations for the value of the curriculum status code on
STVCSTS.
CHANGED Changed
COMPLETED Completed
DENIED Application has been rejected
INPROGRESS In Progress
INSTACCEPT Institution Acceptance
NOPUSH Self-Service No Push to Learner
OVERLOAD Overload
PENDING Pending
REMOVED Inactivate field of study
SOUGHT Degree has sought status
STUDYPATH Study Path Created
STVDAYS Days of the Week Validation Form
U Sunday
M Monday
T Tuesday
W Wednesday
R Thursday
FFriday
S Saturday
STVDEGC Degree Code Validation Form
000000 Degree Not Declared
STVCSTS Curriculum Status Validation Form

43
Banner Student User Guide | Validation Reference
STVDEGS Degree Status Code Validation Form
SO Sought
STVDEPT Department Code Validation Form
0000 Department Not Declared
STVDFLT Compliance Defaults Option Validation Form
ONLINE Online processing default
BATCH Batch processing default
WEB Web processing default
STVEAPL Electronic Application Status Validation Form
H Admissions Hold
I Can’t Insert Decision Code
RMatch Error
N Not Processed
Y Process Complete
P Push Error
U Suspended Record
V Verification Error
STVEDIS EDI Status Code Validation Form
P0 XML Request Received
P1 XML Transcript Exported
P2 XML Export had errors
P4 XML Export held for final grades
P5 XML Export held for awarded degree
STVEGRP EDI Rule Group Validation Form
ACHR AMCAS Course Summaries

44
Banner Student User Guide | Validation Reference
ADDR Address Source Rules
ADMS Admission Rules
AGPA AMCAS GPA Types
ATST AMCAS Test Codes
ATYP Address Type Rules
CHKL Checklist Rules
CQLF Code Qualifiers
CURR Curriculum Rules
DCSN Applicant Decision
DISP Web Display Rules
DTQL Date/Time Qualifier Rules
ENTY Entity Rules
FLVL Field of Study Level Rules
LGCY Legacy Rules
PATH System Path Rules
PCOL Prior College Rules
PQLF Phone Qualifier Code Rules
PREL Electronic Prospect Group
QSTN Question Code Rules
RESD Residency Rules
RFQL Reference Qualifier Rules
RLTN Relationship Qualifier Rules
TELE Telephone Pattern Rules
VCRL Verification Control Rules
STVELMT HTML Letter Module Validation Form
Module Description View
A Admissions
AS_ADMISSIONS_APPLICANT
E Electronic App
SAVEAPS
F Registration
AS_STUDENT_REGISTRATION_DETAIL
STVEGRP EDI Rule Group Validation Form

45
Banner Student User Guide | Validation Reference
P Electronic Prospect
SRVPREL
RRecruit
AS_RECRUITING_DATA
S Student
AS_STUDENT_DATA
TTranscripts
SHVTRE1
STVESTS Student Registration Status Code Validation Form
EL Eligible to Register
STVETCT IPEDS Ethnic Code Validation Form
1 Black Non-Hispanic
2 American Indian or Alaskan Native
3 Asian or Pacific Islander
4 Hispanic
5 White Non-Hispanic
6Other
STVEVEN Academic History Event Code Validation Form
999 Miscellaneous Event
STVFTYP Fee Type Validation Form
FLAT Flat Fee
BILL Per Bill Hour Fee
CRED Per Credit Hour Fee
DURN Per Duration Unit
STVGAST Graduation Application Status Validation Form
AC Active Application
IA Inactivate Application
STVELMT HTML Letter Module Validation Form
Module Description View

46
Banner Student User Guide | Validation Reference
STVGCHG Grade Change Code Validation Form
CC Composite Calculation
CR Capped Resit
DL Degraded Late Mark
OE Original Entry
RC Re-Calculated
SG Substitute Grade
STVINTS Outside Interest Code Validation Form
A1 Instrumental Music
A2 Vocal Music
A3 Student Government
A4 Publications, Literary
A5 Debate
A6 Departmental Clubs
A7 Dramatics, Theater
A8 Religious Organizations
A9 Racial or Ethnic Organizations
AA Intramural Athletics
AB Varsity Athletics
AC Political Organizations
AD Radio - TV
AE Fraternity or Sorority
AF Special Interest Groups
AG Campus or Community Service Groups
AH Art
AI Coop or Internship Programs
AJ Dance
AK Environmental or Ecology Activity
AL Foreign Study Abroad
AM Honors or Independent Study

47
Banner Student User Guide | Validation Reference
Note: Please note that STVLMOD does not contain a system-required
indicator. The indicator resides in the Learner Curriculum Frequency
Rules Table (SOBLMOD). The specified values must exist in the table
when using curriculum processing.
AN ROTC
STVLEVL Level Code Validation Form
00 Level Not Declared
STVLMOD Learner Module Validation Form
RECRUIT Recruiting
ADMISSIONS Admissions
LEARNER Student
OUTCOME Student Outcome
STVMAJR Major Code Validation Form
0000 Major Not Declared
STVMECL Mass Entry Column Validation Form
Mass Entry Code Description
Mass Entry
Forms Used
ACTC_CODE Athletic - Sports Code SGAMSPT
ADD_BILL_HRS Add registration bill hours SFAMREG
ADD_CAMP_CODE Add registration campus code SFAMREG
ADD_CREDIT_HRS Add registration credit hours SFAMREG
ADD_CRN Add registration CRN SFAMREG
ADD_END_DATE Add registration end date SFAMREG
ADD_GMOD_CODE Add registration grade mode
code
SFAMREG
ADD_INSM_CODE Add registration instructional
method code
SFAMREG
STVINTS Outside Interest Code Validation Form

48
Banner Student User Guide | Validation Reference
ADD_LEVL_CODE Add registration level code SFAMREG
ADD_PTRM_CODE Add registration part of term SFAMREG
ADD_RSTS_CODE Add registration status code SFAMREG
ADD_SSTS_CODE Add registration with registration
status code
SFAMREG
ADD_START_DATE Add registration start date SFAMREG
ADD_TMST_HRS Add registration with time status
hours
SFAMREG
ADMR_CODE Admissions checklist code SAAMAPP
ADMT_CODE Admissions Code SAAMAPP
APDC_CODE Decision code SAAMAPP
APDC_CODE_MOST_RECENT Most recent application decision SAAMAPP
APDC_DATE Decision date SAAMAPP
APDC_IND Current Decision: Accept; Reject;
Confirm
SAAMAPP
APST_CODE Application status SAAMAPP
APST_DATE Application status date SAAMAPP
ATHL_AID_IND Athletic - Aid Indicator SGAMSPT
ATTS_CODE Attribute SAAMAPP,
SGAMSTU
ATYP_CODE Address type code SHANDIP
BLCK_CODE Block code SFAMREG,
SGAMSTU
BLOCK_PROCESS_IND Block registration processing
indicator
SFAMREG
BLOCK_RSTS_CODE Block registration status code SFAMREG
BYPASS_REG_ELIG Bypass registration eligibility
check
SFAMREG
CAP_ORDER_DATE Cap-Gown-Hood tickets order
date
SHAMUCA
CAP_ORDER_IND Cap order indicator SHAMUCA
CAP_PICKUP_IND Cap picked up indicator SHAMUCA
STVMECL Mass Entry Column Validation Form
Mass Entry Code Description
Mass Entry
Forms Used

49
Banner Student User Guide | Validation Reference
CAP_RETURN_DATE Cap-Gown-Hood Returned date SHAMUCA
CAP_RETURN_IND Cap returned indicator SHAMUCA
CAP_SIZE Graduation Cap Size SHAMUCA
CAP_TYPE Cap Type SHAMUCA
CERT_CODE Ceremony code SHAMCAT,
SHAMUCA
CERT_ORDER_DATE Order date SHAMUCA
CERT_PICKUP_DATE Pickup date SHAMUCA
CERT_RETURN_DATE Return date SHAMUCA
CHKL_SOURCE Checklist source SAAMAPP
CHRT_CODE Cohort code SAAMAPP,
SGAMSTU
CKSR_CODE Checklist source SAAMAPP
CLAS_CODE Class code SFARMEG,
SGAMSTU,
SAAMAPP,
SHAMDEG,
SHAMCAT,
SHAMDIP
CONFIRM APDC IND, Student accept SAAMAPP
CONFIRM_APDC_IND Student accept SAAMAPP
COPY_ACTC_CODE Athletic Copy - Copy Sports
Code
SGAMSPT
COPY_ATTR_COHORT Copy attribute and cohort to new
term
SGAMSTU
COPY_ATTRIBUTES Athletic Copy - Copy All
Attributes from Search Term
SGAMSPT
COPY_ELIG_CODE Athletic Copy - Eligible SGAMSPT
COPY_SAAT_CODE Athletic Copy - Attribute Code SGAMSPT
COPY_SAEL_CODE Athletic Copy - Academic
Eligibility
SGAMSPT
COPY_SPST_CODE Athletic Copy - Status Code SGAMSPT
CREATE_CERT_IND Create Ceremony Attendance SHAMIP
STVMECL Mass Entry Column Validation Form
Mass Entry Code Description
Mass Entry
Forms Used

50
Banner Student User Guide | Validation Reference
CREATE_DIPL_IND Create Diploma SHAMDIP
CRN_REG Student is registered in CRN SFAMREG
CRN_RSTS_CODE Status code for currently
registered CRN
SFAMREG
DEGS_CODE Outcome status SHAMDEG,
SHAMCAT,
SHAMUCA,
SHAMDIP,
SHAMUDI
DIPL_MAILED_DATE Diploma mailed date SHAMUDI
DIPL_ORDER_DATE Diploma order date SHAMDIP,
SHAMUDI
DIPL_PICKUP_DATE Diploma pick up date SHAMUDI
DIPL_PICKUP_IND Pick up indicator for diploma SHAMUCA
DROP_ALL_CRN Drop registration for all CRNs
indicator
SFAMREG
DROP_CRN Drop registration CRN SFAMREG
DROP_CRSE_NUMB Drop registration course number SFAMREG
DROP_REMOVE_REG Drop all registration records SFAMREG
DROP_RSTS_CODE Drop registration status on drop SFAMREG
DROP_SEQ_NUMB Drop registration sequence
number
SFAMREG
DROP_SUBJ_CODE Drop registration subject code SFAMREG
EDLV_CODE Education level SGAMSTU
EGOL_CODE Education goal SGAMSTU
ELIG_CODE Athletic - Eligible SGAMSPT
EXP_GRAD_DATE Expected graduation date SGAMSTU
FEE_AMOUNT Fee Amount SHAMDEG,
SHAMDIP,
SHAMCAT
FEE_DATE Fee effective date SHAMDEG,
SHAMDIP,
SHAMCAT
STVMECL Mass Entry Column Validation Form
Mass Entry Code Description
Mass Entry
Forms Used

51
Banner Student User Guide | Validation Reference
FEE_DETC_CODE Fee detail code SHAMDEG,
SHAMDIP,
SHAMCAT
FEE_IND Y to charge fee; W to waive fee SHAMDEG,
SHAMDIP,
SHAMCAT
FEE_TERM_CODE Fee term code SHAMDEG,
SHAMDIP,
SHAMCAT
GAST_CODE Graduation Application Status SHAMDEG
GMOD_CODE CRN grade mode SFAMREG
GOWN_ORDER_IND Gown order indicator SHAMUCA
GOWN_PICKUP_IND Gown picked up indicator SHAMUCA
GOWN_RETURN_IND Gown returned indicator SHAMUCA
GOWN_SIZE Graduation Gown Size SHAMUCA
GOWN_TYPE Gown type SHAMUCA
GRAD_ATTEND_CDE Graduation Attend Value SHAMCAT
GRAD_ATTEND_IND Graduation Attend Ceremony
Indicator
SHAMUCA
GRAD_DATE Graduation date SGAMSTU,
SHAMDEG
GRAD_YEAR Graduation year SGAMSTU,
SHAMDEG
GRST_CODE Graduation status SHAMDEG
HOOD_ORDER_IND Hood order indicator SHAMUCA
HOOD_PICKUP_IND Hood picked up indicator SHAMUCA
HOOD_RETURN_IND Hood returned indicator SHAMUCA
HOOD_TYPE Hood type SHAMUCA
INNM_CODE Degree Awarded by Code SHAMDIP
INSERT_ACTC_CODE Athletic Insert - Sports Code SGAMSPT
INTS_CODE Interest code SAAMAPP
LCUR_ADMIT_TERM Learner admission term SGAMSTU
LCUR_ADMT_CODE Learner admission code SGAMSTU
STVMECL Mass Entry Column Validation Form
Mass Entry Code Description
Mass Entry
Forms Used

52
Banner Student User Guide | Validation Reference
LCUR_CAMP_CODE Campus SAAMAPP,
SFAMREG,
SGAMSTU,
SHAMDEG,
SHAMCAT,
SHAMDIP,
SHAMUDI
LCUR_COLL_CODE College SAAMAPP,
SFAMREG,
SGAMSTU,
SHAMDEG,
SHAMCAT,
SHAMDIP,
SHAMUDI
LCUR_CURRICULA Which curricula to review:
Primary, Secondary or All
SAAMAPP,
SFAMREG,
SGAMSTU,
SHAMDEG,
SHAMCAT,
SHAMDIP,
SHAMUDI
LCUR_DEGC_CODE Degree SAAMAPP,
SFAMREG,
SGAMSTU,
SHAMDEG,
SHAMCAT,
SHAMDIP,
SHAMUDI
LCUR_DEPT_CODE Department SAAMAPP,
SFAMREG,
SGAMSTU,
SHAMDEG,
SHAMCAT,
SHAMDIP,
SHAMUDI
LCUR_LEVL_CODE Level SAAMAPP,
SFAMREG,
SGAMSTU,
SHAMDEG,
SHAMCAT,
SHAMDIP,
SHAMUDI
STVMECL Mass Entry Column Validation Form
Mass Entry Code Description
Mass Entry
Forms Used

53
Banner Student User Guide | Validation Reference
LCUR_LFST_CODE Field of study type SAAMAPP,
SFAMREG,
SGAMSTU,
SHAMDEG,
SHAMCAT,
SHAMDIP,
SHAMUDI
LCUR_MAJR_CODE Field of study code SAAMAPP,
SFAMREG,
SGAMSTU,
SHAMDEG,
SHAMCAT,
SHAMDIP,
SHAMUDI
LCUR_MATRIC_TERM Learner matriculation term SGAMSTU
LCUR_PROGRAM Program SAAMAPP,
SFAMREG,
SGAMSTU,
SHAMDEG,
SHAMCAT,
SHAMDIP,
SHAMUDI
LETR_CODE Letter code SAAMAPP,
SGAMSPT,
SGAMSTU,
SHAMDEG,
SHAMCAT,
SHAMDIP,
SHAMUDI,
SHAMUCA
LETR_DATE Initiated date on the letter SAAMAPP,
SGAMSPT,
SGAMSTU,
SHAMDEG,
SHAMCAT,
SHAMDIP,
SHAMUDI,
SHAMUCA
STVMECL Mass Entry Column Validation Form
Mass Entry Code Description
Mass Entry
Forms Used

54
Banner Student User Guide | Validation Reference
LETR_INIT_CODE Letter initials code SAAMAPP,
SGAMSPT,
SGAMSTU,
SHAMDEG,
SHAMCAT,
SHAMDIP,
SHAMUDI,
SHAMUCA
LETR_PRINT_DATE Date letter was printed SAAMAPP,
SGAMSPT,
SGAMSTU,
SHAMDEG,
SHAMCAT,
SHAMDIP,
SHAMUDI,
SHAMUCA
LETR_WAIT_DAYS Wait days on the new letter SAAMAPP,
SGAMSPT,
SGAMSTU,
SHAMDEG,
SHAMCAT,
SHAMDIP,
SHAMUDI,
SHAMUCA
MANDATORY_IND Admissions checklist mandatory
indicator
SAAMAPP
NUMBER_TICKETS Number of Tickets SHAMUCA
POPSEL_APPLICATION_ID Population Selection Application SAAMAPP,
SGAMSPT,
SGAMSTU,
SHAMDEG,
SHAMCAT,
SHAMDIP,
SHAMUDI,
SHAMUCA,
SFAMREG
STVMECL Mass Entry Column Validation Form
Mass Entry Code Description
Mass Entry
Forms Used

55
Banner Student User Guide | Validation Reference
POPSEL_CREATOR_ID Population Selection Creator ID SAAMAPP,
SGAMSPT,
SGAMSTU,
SHAMDEG,
SHAMCAT,
SHAMDIP,
SHAMUDI,
SHAMUCA,
SFAMREG
POPSEL_SELECTION_ID Population Selection ID SAAMAPP,
SGAMSPT,
SGAMSTU,
SHAMDEG,
SHAMCAT,
SHAMDIP,
SHAMUDI,
SHAMUCA,
SFAMREG
POPSEL_USER_ID Population Selection User ID SAAMAPP,
SGAMSPT,
SGAMSTU,
SHAMDEG,
SHAMCAT,
SHAMDIP,
SHAMUDI,
SHAMUCA,
SFAMREG
RATE_CODE Student fee assessment rate
code
SGAMSTU,
SAAMAPP,
SFAMREG
REG_CHECK_APPR Indicator to check for approvals SFAMREG
REG_CHECK_ATTS Indicator to check for student
attributes
SFAMREG
REG_CHECK_CAMP Indicator to check for campus SFAMREG
REG_CHECK_CAPC Indicator to check for capacity SFAMREG
REG_CHECK_CHRT Indicator to check for cohort SFAMREG
REG_CHECK_CLAS Indicator to check for class SFAMREG
REG_CHECK_COLL Indicator to check for college SFAMREG
REG_CHECK_CORQ Indicator to check for
corequisites
SFAMREG
STVMECL Mass Entry Column Validation Form
Mass Entry Code Description
Mass Entry
Forms Used

56
Banner Student User Guide | Validation Reference
REG_CHECK_DEGREE Indicator to check for degree SFAMREG
REG_CHECK_DEPT Indicator to check for department SFAMREG
REG_CHECK_DUPL Indicator to check for duplicates SFAMREG
REG_CHECK_HOLD Indicator to check for holds SFAMREG
REG_CHECK_LEVL Indicator to check for level SFAMREG
REG_CHECK_LINK Indicator to check for linked
courses
SFAMREG
REG_CHECK_MAJR Indicator to check for fields of
study
SFAMREG
REG_CHECK_MAXH Indicator to check for maximum
hours
SFAMREG
REG_CHECK_MEXC Indicator to check for mutual
exclusions
SFAMREG
REG_CHECK_MINH Indicator to check for minimum
hours
SFAMREG
REG_CHECK_PREQ Indicator to check for
prerequisites
SFAMREG
REG_CHECK_PROGRAM Indicator to check for program SFAMREG
REG_CHECK_REPT Indicator to check for repeats SFAMREG
REG_CHECK_RPTH Indicator to check for repeat
hours
SFAMREG
REG_CHECK_TIME Indicator to check for time
conflict
SFAMREG
REG_CURRENT_CRN Currently in CRN SFAMREG
REG_DATE Registration date SFAMREG
REG_FEE_ASSESSMENT Process fees in batch or online SFAMREG
REG_GRADE_MODE Grade mode for currently
registered CRN
SFAMREG
REJECT ADPC IND, Student rejected SAAMAPP
REJECT_ADPC_IND Student rejected SAAMAPP
RESD_CODE Residence Code SAAMAPP,
SGAMSTU
RETURN_DATE Tickets returned date SHAMUCA
STVMECL Mass Entry Column Validation Form
Mass Entry Code Description
Mass Entry
Forms Used

57
Banner Student User Guide | Validation Reference
SAAT_CODE Athletic - Attribute Code SGAMSPT
SAEL_CODE Athletic - Academic Eligibility SGAMSPT
SBGI_INST_AWARD Awarding institution SHAMDIP
SEASON_USED_IND Athletic - Season Used Indicator SGAMSPT
SPST_CODE Athletic - Status Code SGAMSPT
STST_CODE Student status SGAMSTU
STYP_CODE Student type code SAAMAPP,
SGAMSTU
TERM_CODE_APPL Admissions application term SAAMAPP
TERM_CODE_ATHL_COMP Athletic - Compliance Term Code SGAMSPT
TERM_CODE_ATHL_COPY Athletic - Copy Compliance Term
Code
SGAMSPT
TERM_CODE_CERT Ceremony term SHAMCAT,
SHAMDIP,
SHAMUCA,
SHAMUDI
TERM_CODE_DEGREE_
COMPLETION
Term the degree is completed SHAMDEG
TERM_CODE_EFF Learner effective term SGAMSTU,
SFAMREG
TERM_CODE_EFF_IND Term code equal indicator SGAMSTU
TERM_CODE_GRAD Graduation term SHAMDEG,
SGAMSTU,
SHAMCAT,
SHAMDIP
TERM_CODE_REG Registration term SFAMREG
TICKET_MAILED Tickets mailed date SHAMUCA
TICKET_ORDER_IND Ticket order indicator SHAMUCA
TICKET_PICKUP_IND Ticket picked up indicator SHAMUCA
WITHDRAWN_IND Student withdrew SAAMAPP
STVMECL Mass Entry Column Validation Form
Mass Entry Code Description
Mass Entry
Forms Used

58
Banner Student User Guide | Validation Reference
Note: Please note that STVORIG does not contain a system-required
indicator. However, it is recommended that the value
AUTO exist when
CAPP compliance processing is used at your institution. If this value does
not exist, batch compliance will not run successfully.
STVNTCG Note Category Validation Form
Do not use the number range of 9900 - 9999 for your codes.
This range is reserved for future development.
STVNTIN Note Interaction Validation Form
Do not use the number range of 9900 - 9999 for your codes.
This range is reserved for future development.
STVORIG Originator Code Validation Form
AUTO Generated Automatically
STVPREV Progress Evaluation Code Validation Form
00 Good Standing
STVPROC Process Control Code Validation Form
COMPLIANCE Compliance Requests
DISPLAYGRADES Display Roster Grades
DISPLAYHOLDS Display Student Holds
DISPLAYSCHEDULE Display Student Schedule
DISPLAYTESTS Display Test Scores
ENTERGRADES Enter Roster Grades
TRANSCRIPT Transcript Request
STVPTRM Part of Term Code Validation Form
1 Full Term

59
Banner Student User Guide | Validation Reference
C Combined Parts of Term
STVRATP Admissions Rating Type Validation Form
0000 Admissions Rating
STVRECR Recruiter Code Validation Form
000 Recruiter Not Assigned
(for Data Load Interface users only)
STVRESD Residence Code Validation Form
0 Undeclared
Note for clients in production prior to 1994.
If your institution is already using 0 (zero) for a value other than
“Undeclared”, you must assign one value which is not otherwise
being used as a system-required “Undeclared” value.
STVRSTA Recruiting Status Code Validation Form
00 Undetermined - New Recruit
(for Data Load Interface users only)
STVRSTS Course Registration Status Code Validation Form
RE Registered
DD Delete
DC Drop Course
WL Waitlisted
STVSBGI Source/Background Institution Code Validation Form
999999 Miscellaneous Institution
STVPTRM Part of Term Code Validation Form

60
Banner Student User Guide | Validation Reference
Note: Please note that STVSBGI does not contain a system-required
indicator. However, it is recommended that the value
999999 exist when
AMCAS processing and/or transfer course processing is used at your
institution. If this value does not exist, processing may not run
successfully. It is also recommended that the value
999999 exist on
SHATRNS so you can enter a name for the institution when you are
entering transfer work for a person.
Note: Term codes are numeric and are in the format YYYYTT. The codes
must be constructed so that the codes maintain the appropriate sequence
of terms. Term codes are displayed in descending order with the highest
term first.
STVSTSP Student Study Path Status Code Validation Form
AS Active Study
Path
Active and Allow Registration = checked
(Yes) Y
STVSTST Student Status Code Validation Form
AS Active Allow Registration = checked (Yes) Y
IS Inactive Allow Registration - unchecked (No) N
STVSTYP Student Type Code Validation Form
0 Undeclared
Note for clients in production prior to 1994:
If your institution is already using 0 (zero) for a value other than
“Undeclared”, you must assign one value which is not otherwise
being used as a system-required “Undeclared” value.
STVTERM Term Code Validation Form
000000 The Beginning of Time
999999 The End of Time

61
Banner Student User Guide | Validation Reference
STVTESC Test Code Validation Form
Code
Test
Type Description
Number
Positions
Data
Type*
Min
Score
Max
Score
* The Data Type value of Numeric (checked) corresponds to a value of N in the database. The Data Type
value of Alphanumeric (unchecked) corresponds to a value of A in the database.
AA1 ASSET Asset 2 checked 00 99
A01 ACT English 2 checked 01 36
A02 ACT Math 2 checked 01 36
A03 ACT Reading 2 checked 01 36
A04 ACT Science Reasoning 2 checked 01 36
A05 ACT Composite 2 checked 01 36
A06 ACT Sum of Standard Scores 3 unchecked 001 180
A07 ACT ACT Combined English/Writing 2 checked 01 36
SWR ACT ACT Subscore Writing 2 checked 02 12
NEW ACT ACT Norm English/Writing 2 checked 01 99
NWR ACT ACT Norm Writing 2 checked 01 99
SUM ACT Subscore - Usage and Mech. 2 unchecked 01 18
SRH ACT Subscore - Rhetorical Skills 2 unchecked 01 18
SEA ACT Subscore - Elementary Algebra 2 unchecked 01 18
SAG ACT Subscore - Algebra/Geometry 2 unchecked 01 18
SGT ACT Subscore - Plane Geometry/Trig. 2 unchecked 01 18
SSS ACT Subscore - Social Studies 2 unchecked 01 18
SAL ACT Subscore - Arts/Literature 2 unchecked 01 18
NUM ACT Norm - Usage and Mech 2 unchecked 01 99
NRH ACT Norm - Rhetorical Skills 2 unchecked 01 99
NEA ACT Norm - Elementary Algebra 2 unchecked 01 99
NAG ACT Norm - Algebra/Geometry 2 unchecked 01 99
NGT ACT Norm - Plane Geometry/Trig 2 unchecked 01 99
NSS ACT Norm - Social Studies 2 unchecked 01 99
NAL ACT Norm - Arts/Literature 2 unchecked 01 99
G01 GMAT GMAT Verbal Percent 2 checked 00 99
G02 GMAT GMAT Quantitative Percent 2 checked 00 99

62
Banner Student User Guide | Validation Reference
G03 GMAT GMAT Total Converted Percent 3 checked 200 800
G04 GMAT GMAT Writing Percent 2 checked 00 99
G05 GMAT GMAT Total Percent 2 checked 00 99
G06 GMAT GMAT Verbal Converted 2 checked 00 60
G07 GMAT GMAT Quantitative Converted 2 checked 00 60
G08 GMAT GMAT Writing Converted 2 checked 00 60
G09 GMAT GMAT Integrated Reasoning Scor 2 checked 00 99
G10 GMAT GMAT Integrated Reasoning Conv 1 checked 0 8
G03Q GRE Revised General Quantitative 3 checked 130 170
G03V GRE Revised General Verbal 3 checked 130 170
G03W GRE Revised General Writing 3 checked 0.0 6.0
GR01 GRE Verbal Code 3 checked 200 800
GR02 GRE Quantitative Code 3 checked 200 800
GR03 GRE Analytical Code 3 checked 200 800
GR04 GRE Writing Assessment 3 checked 0.0 6.0
GR05 GRE Analytical Writing Test 3 checked 0.0 6.0
G22 GRE Biochem, C & M Total Score 3 checked 200 990
G221 GRE Biochem, C & M Subscore 1 3 checked 020 099
G222 GRE Biochem, C & M Subscore 2 3 checked 020 099
G223 GRE Biochem, C & M Subscore 3 3 checked 020 099
G24 GRE Biology Total Score 3 checked 200 990
G241 GRE Biology Subscore 1 3 checked 020 099
G242 GRE Biology Subscore 2 3 checked 020 099
G243 GRE Biology Subscore 3 3 checked 020 099
G27 GRE Chemistry Total Score 3 checked 200 990
G271 GRE Chemistry Subscore 1 3 checked 020 099
G272 GRE Chemistry Subscore 2 3 checked 020 099
G273 GRE Chemistry Subscore 3 3 checked 020 099
G29 GRE Computer Science Total Score 3 checked 200 990
STVTESC Test Code Validation Form
Code
Test
Type Description
Number
Positions
Data
Type*
Min
Score
Max
Score

63
Banner Student User Guide | Validation Reference
G291 GRE Computer Science Subscore 1 3 checked 020 099
G292 GRE Computer Science Subscore 2 3 checked 020 099
G293 GRE Computer Science Subscore 3 3 checked 020 099
G2QE GRE GRE Quantitative Estimated Cur 3 checked 130 170
G2VE GRE GRE Verbal Estimated Current 3 checked 130 170
G31 GRE Economics Total Score 3 checked 200 990
G311 GRE Economics Subscore 1 3 checked 020 099
G312 GRE Economics Subscore 2 3 checked 020 099
G313 GRE Economics Subscore 3 3 checked 020 099
G34 GRE Education Total Score * 3 checked 020 099
G341 GRE Education Subscore 1 * 3 checked 020 099
G342 GRE Education Subscore 2 * 3 checked 020 099
G343 GRE Education Subscore 3 * 3 checked 020 099
G35 GRE Rev. Education Total Score 3 checked 200 990
G351 GRE Rev. Education Subscore 1 3 checked 020 099
G352 GRE Rev. Education Subscore 2 3 checked 020 099
G353 GRE Rev. Education Subscore 3 3 checked 020 099
G37 GRE Engineering Total Score 3 checked 200 990
G371 GRE Engineering Subscore 1 3 checked 020 099
G372 GRE Engineering Subscore 2 3 checked 020 099
G373 GRE Engineering Subscore 3 3 checked 020 099
G44 GRE French Total Score * 3 checked 020 099
G441 GRE French Subscore 1 * 3 checked 020 099
G442 GRE French Subscore 2 * 3 checked 020 099
G443 GRE French Subscore 3 * 3 checked 020 099
G46 GRE Geography Total Score * 3 checked 020 099
G461 GRE Geography Subscore 1 * 3 checked 020 099
G462 GRE Geography Subscore 2 * 3 checked 020 099
G463 GRE Geography Subscore 3 * 3 checked 020 099
STVTESC Test Code Validation Form
Code
Test
Type Description
Number
Positions
Data
Type*
Min
Score
Max
Score

64
Banner Student User Guide | Validation Reference
G47 GRE Geology Total Score 3 checked 200 990
G471 GRE Geology Subscore 1 3 checked 020 099
G472 GRE Geology Subscore 2 3 checked 020 099
G473 GRE Geology Subscore 3 3 checked 020 099
G52 GRE German Total Score * 3 checked 020 099
G521 GRE German Subscore 1 * 3 checked 020 099
G522 GRE German Subscore 2 * 3 checked 020 099
G523 GRE German Subscore 3 * 3 checked 020 099
G57 GRE History Total Score 3 checked 200 990
G571 GRE History Subscore 1 3 checked 020 099
G572 GRE History Subscore 2 3 checked 020 099
G573 GRE History Subscore 3 3 checked 020 099
G64 GRE Literature Total Score 3 checked 200 990
G641 GRE Literature Subscore 1 3 checked 020 099
G642 GRE Literature Subscore 2 3 checked 020 099
G643 GRE Literature Subscore 3 3 checked 020 099
G67 GRE Mathematics Total Score 3 checked 200 990
G671 GRE Mathematics Subscore 1 3 checked 020 099
G672 GRE Mathematics Subscore 2 3 checked 020 099
G673 GRE Mathematics Subscore 3 3 checked 020 099
G68 GRE Mathematics Rs Total Score 3 checked 200 990
G681 GRE Mathematics Rs Subscore 1 3 checked 020 099
G682 GRE Mathematics Rs Subscore 2 3 checked 020 099
G683 GRE Mathematics Rs Subscore 3 3 checked 020 099
G71 GRE Music Total Score * 3 checked 020 099
G711 GRE Music Subscore 1 * 3 checked 020 099
G712 GRE Music Subscore 2 * 3 checked 020 099
G713 GRE Music Subscore 3 * 3 checked 020 099
G72 GRE Music Total Score 3 checked 200 990
STVTESC Test Code Validation Form
Code
Test
Type Description
Number
Positions
Data
Type*
Min
Score
Max
Score

65
Banner Student User Guide | Validation Reference
G721 GRE Music Subscore 1 3 checked 020 099
G722 GRE Music Subscore 2 3 checked 020 099
G723 GRE Music Subscore 3 3 checked 020 099
G74 GRE Philosophy Total Score * 3 checked 020 099
G741 GRE Philosophy Subscore 1 * 3 checked 020 099
G742 GRE Philosophy Subscore 2 * 3 checked 020 099
G743 GRE Philosophy Subscore 3 * 3 checked 020 099
G77 GRE Physics Total Score 3 checked 200 990
G771 GRE Physics Subscore 1 3 checked 020 099
G772 GRE Physics Subscore 2 3 checked 020 099
G773 GRE Physics Subscore 3 3 checked 020 099
G78 GRE Rev. Political Science Total Score 3 checked 200 990
G781 GRE Rev. Political Science Subscore 1 3 checked 020 099
G782 GRE Rev. Political Science Subscore 2 3 checked 020 099
G783 GRE Rev. Political Science Subscore 3 3 checked 020 099
G79 GRE Political Science Total Score * 3 checked 020 099
G791 GRE Political Science Subscore 1 * 3 checked 020 099
G792 GRE Political Science Subscore 2 * 3 checked 020 099
G793 GRE Political Science Subscore 3 * 3 checked 020 099
G81 GRE Psychology Total Score 3 checked 200 990
G811 GRE Psychology Subscore 1 3 checked 020 099
G812 GRE Psychology Subscore 2 3 checked 020 099
G813 GRE Psychology Subscore 3 3 checked 020 099
G87 GRE Sociology Total Score 3 checked 200 990
G871 GRE Sociology Subscore 1 3 checked 020 099
G872 GRE Sociology Subscore 2 3 checked 020 099
G873 GRE Sociology Subscore 3 3 checked 020 099
G91 GRE Spanish Total Score * 3 checked 020 099
G911 GRE Spanish Subscore 1 * 3 checked 020 099
STVTESC Test Code Validation Form
Code
Test
Type Description
Number
Positions
Data
Type*
Min
Score
Max
Score

66
Banner Student User Guide | Validation Reference
G912 GRE Spanish Subscore 2 * 3 checked 020 099
G913 GRE Spanish Subscore 3 * 3 checked 020 099
* These codes are no longer used for the GRE.
MBS MCAT MCAT Biological Science Score 2 checked 00 99
MPS MCAT MCAT Physical Science Score 2 checked 00 99
MVR MCAT MCAT Verbal Score 2 checked 00 99
MWS MCAT MCAT Writing Score 2 unchecked J T
S01 SAT Verbal Score 3 checked 200 800
S02 SAT Mathematics Score 3 checked 200 800
S03 SAT Reading Subscore 2 checked 20 80
S04 SAT Vocabulary Subscore 2 checked 20 80
S07 SAT SAT Writing 3 checked 200 800
S08 SAT SAT Essay Subscore 2 checked 00 12
S09 SAT SAT MC Subscore 2 checked 20 80
AH SATII American History/Social Studies 3 checked 200 800
BY SATII Biology 3 checked 200 800
CH SATII Chemistry 3 checked 200 800
CL SATII Chinese with Listening 3 checked 200 800
EB SATII Bio-Ecological Emphasis 3 checked 200 800
EH SATII European History/World Cultures 3 checked 200 800
EN SATII English Composition 3 checked 200 800
EP SATII English Proficiency 3 checked 200 800
ES SATII English Composition with Essay 3 checked 200 800
FL SATII French with Listening 3 checked 200 800
FR SATII French 3 checked 200 800
GL SATII German with Listening 3 checked 200 800
GM SATII German 3 checked 200 800
HB SATII Hebrew 3 checked 200 800
IT SATII Italian 3 checked 200 800
STVTESC Test Code Validation Form
Code
Test
Type Description
Number
Positions
Data
Type*
Min
Score
Max
Score

67
Banner Student User Guide | Validation Reference
Note: It is recommended that the listed values be checked periodically
against the current delivered file layout values, since changes occur over
time.
JL SATII Japanese with Listening 3 checked 200 800
KL SATII Korean with Listening 3 checked 200 800
LR SATII Literature 3 checked 200 800
LT SATII Latin 3 checked 200 800
MB SATII Bio-Molecular Emphasis 3 checked 200 800
M1 SATII Mathematics Level I 3 checked 200 800
M2 SATII Mathematics Level II 3 checked 200 800
1C SATII Mathematics Level IC 3 checked 200 800
2C SATII Mathematics Level IIC - Calculator 3 checked 200 800
MH SATII Modern Hebrew 3 checked 200 800
PH SATII Physics 3 checked 200 800
SL SATII Spanish with Listening 3 checked 200 800
SP SATII Spanish 3 checked 200 800
UH SATII U.S. History 3 checked 200 800
WH SATII World History 3 checked 200 800
WR SATII Writing 3 checked 200 800
STVTMST Time Status Code Validation Form
99 Error Calculating Time Status
STVTPFD Tape Field Names Validation Form
Field names with an * are no longer used for the ACT.
A01_NATIONAL_NORM ACT English National Norm
A01_TADM_CODE ACT A01 Test Admin Code
A01_TEST_MON ACT A01 Test Month
STVTESC Test Code Validation Form
Code
Test
Type Description
Number
Positions
Data
Type*
Min
Score
Max
Score

68
Banner Student User Guide | Validation Reference
A01_TEST_SCORE ACT A01 Test Score
A01_TEST_YEAR ACT A01 Test Year
A02_NATIONAL_NORM ACT Math National Norm
A02_TADM_CODE ACT A02 Test Admin Code
A02_TEST_MON ACT A02 Test Month
A02_TEST_SCORE ACT A02 Test Score
A02_TEST_YEAR ACT A02 Test Year
A03_NATIONAL_NORM ACT Reading National Norm
A03_TADM_CODE ACT A03 Test Admin Code
A03_TEST_MON ACT A03 Test Month
A03_TEST_SCORE ACT A03 Test Score
A03_TEST_YEAR ACT A03 Test Year
A04_NATIONAL_NORM ACT Science National Norm
A04_TADM_CODE ACT A04 Test Admin Code
A04_TEST_MON ACT A04 Test Month
A04_TEST_SCORE ACT A04 Test Score
A04_TEST_YEAR ACT A04 Test Year
A05_NATIONAL_NORM ACT Composite National Norm
A05_TADM_CODE ACT A05 Test Admin Code
A05_TEST_MON ACT A05 Test Month
A05_TEST_SCORE ACT A05 Test Score
A05_TEST_YEAR ACT A05 Test Year
A06_TADM_CODE ACT A06 Test Admin Code
A06_TEST_MON ACT A06 Test Month
A06_TEST_SCORE ACT A06 Test Score
A06_TEST_YEAR ACT A06 Test Year
A07_NATIONAL_NORM ACT Combined English/Writing
National Norm
A07_TEST_SCORE ACT A07 Test Score
A1_INTS_CODE A1 Interest Code Chosen
A2_INTS_CODE A2 Interest Code Chosen
STVTPFD Tape Field Names Validation Form

69
Banner Student User Guide | Validation Reference
A3_INTS_CODE A3 Interest Code Chosen
A4_INTS_CODE A4 Interest Code Chosen
A5_INTS_CODE A5 Interest Code Chosen
A6_INTS_CODE A6 Interest Code Chosen
A7_INTS_CODE A7 Interest Code Chosen
A8_INTS_CODE A8 Interest Code Chosen
A9_INTS_CODE A9 Interest Code Chosen
AA_INTS_CODE AA Interest Code Chosen
AB_INTS_CODE AB Interest Code Chosen
AC_INTS_CODE AC Interest Code Chosen
ADDITIONAL_ID Additional ID
ADDL_MCAT_INTENT_IND MCAT Intent Indicator Placehld
ADM_ACTION_CODE Admission Action Code
Placehld
ADM_ACTION_DATE Admission Action Date
Placehld
ADVISOR_INFO_RELEASE Advisor Info Release Placehold
AD_INTS_CODE AD Interest Code Chosen
AE_INTS_CODE AE Interest Code Chosen
AF_INTS_CODE AF Interest Code Chosen
AGE Age of Recruit/App Placeholder
AG_INTS_CODE AG Interest Code Chosen
AH_INTS_CODE AH Interest Code Chosen
AI_INTS_CODE AI Interest Code Chosen
AJ_INTS_CODE AJ Interest Code Chosen
AK_INTS_CODE AK Interest Code Chosen
AL_INTS_CODE AL Interest Code Chosen
AMCAS_ID AMCAS ID
AM_INTS_CODE AM Interest Code Chosen
AN_INTS_CODE AN Interest Code Chosen
AO_INTS_CODE AO Interest Code Chosen
APPL_TYPE Application Type
STVTPFD Tape Field Names Validation Form

70
Banner Student User Guide | Validation Reference
APP_YEAR Application Year
AP_HOURS Advanced Placement Hours
BIO_NUMBER Number of the Applicant
BIRTH_CENT Birth Date Century
BIRTH_CITY City of Birth
BIRTH_COUNTY_COUNTRY_CODE County or Country of Birth
BIRTH_COUNTY_COUNTRY_NAME Birth Cnty/Ctry Name
Placehold
BIRTH_COUNTY_RURAL_IND Birth County is Rural
BIRTH_DATE Full Birth Date
BIRTH_DAY Day of Month of Birth
BIRTH_MON Month of Birth
BIRTH_STATE State or Province of Birth
BIRTH_YEAR Year of Birth
CANADIAN_POSTAL_CODE Canadian Postal Code
CANADIAN_PROVINCE Canadian Province
CHANGE_FLAG Change Flag Placeholder
CHANGE_NBR Change Number Placeholder
CITIZENSHIP Citizenship Code
CITIZEN_NATN_CODE Nation Code of Citizenship
CITIZEN_NATN_NAME Nation Name of Citize Placehld
CITY Current Address City
CLEP_HOURS College Level Exam Prog
Hours
CNTY_CODE Current Address County Code
CUM_AO_GPA Cumulative All Other GPA
CUM_AO_HOURS Cumulative All Other Hours
CUM_BCPM_GPA Cumulative BioChemPhysMath
GPA
CUM_BCPM_HOURS Cumulative BioChemPhysMath
Hrs
CUM_TOTAL_GPA Cumulative Total GPA
STVTPFD Tape Field Names Validation Form

71
Banner Student User Guide | Validation Reference
CYCLE_ADD Cycle Add Placeholder
CYCLE_CHANGE Cycle Change Placeholder
DATE_APPLIED Application Date
DEGC_CODE Degree Code
DEPT_CODE Department Code
DISADVANTAGED_IND Disadvantaged Indicator
EARLY_DECISION Early Decision Indicator
EDUC_GOAL Education Goal
EFFECTIVE_DATE Effective Date of Test
EMAIL_ADDR Email Address
ENROLLMENT_DATE Intended Enrollment Date
ETHN_CODE Ethnic Code 1
ETHN_CODE10 Ethnic Code 10
ETHN_CODE2 Ethnic Code 2
ETHN_CODE3 Ethnic Code 3
ETHN_CODE4 Ethnic Code 4
ETHN_CODE5 Ethnic Code 5
ETHN_CODE6 Ethnic Code 6
ETHN_CODE7 Ethnic Code 7
ETHN_CODE8 Ethnic Code 8
ETHN_CODE9 Ethnic Code 9
EVALUATION Evaluation Placeholder
EXP_GRAD_DATE Expect Graduation Date Holder
FEE_WAIVER Fee Waiver
FELONY Felony Indicator
FELONY_PLACE_HOLDER Felony Placeholder
FOREIGN_ADDRESS Foreign Address Indicator
FOREIGN_NATION Foreign Nation
FOREIGN_SSN Foreign SSN
FR_AO_GPA Freshman All Other GPA
FR_AO_HOURS Freshman All Other Hours
STVTPFD Tape Field Names Validation Form

72
Banner Student User Guide | Validation Reference
FR_BCPM_GPA Freshman BioChemPhysMath
GPA
FR_BCPM_HOURS Freshman BioChemPhysMath
Hrs
FR_TOTAL_GPA Freshman Total GPA
G01_TADM_CODE GMAT G01 Test Admin Code
G01_TEST_MON GMAT G01 Test Month
G01_TEST_SCORE GMAT G01 Test Score
G01_TEST_YEAR GMAT G01 Test Year
G02_TEST_SCORE GMAT G02 Test Score
G03_TEST_SCORE GMAT G03 Test Score
G04_TEST_SCORE GMAT G04 Test Score
G05_TEST_SCORE GMAT G05 Test Score
G06_TEST_SCORE GMAT G06 Test Score
G07_TEST_SCORE GMAT G07 Test Score
G08_TEST_SCORE GMAT G08 Test Score
G09_TEST_SCORE GMAT G09 Test Score
G10_TEST_SCORE GMAT G10 Test Score
GENDER Gender
GRAD_AO_GPA Graduate All Other GPA
GRAD_AO_HOURS Graduate All Other Hours
GRAD_BCPM_GPA Graduate BioChemPhysMath
GPA
GRAD_BCPM_HOURS Graduate BioChemPhysMath
Hrs
GRAD_TOTAL_GPA Graduate Total GPA
GRE_EST_CURR0 GRE Estimated Current 0
GFRE_EST_CURR1 GRE Estimated Current 1
GRE_PERCENTILE0 GRE Percentile 0
GRE_PERCENTILE1 GRE Percentile 1
GRE_PERCENTILE2 GRE Percentile 2
GRE_PERCENTILE3 GRE Percentile 3
STVTPFD Tape Field Names Validation Form

73
Banner Student User Guide | Validation Reference
GRE_SCORE0 GRE Score 0
GRE_SCORE1 GRE Score 1
GRE_SCORE2 GRE Score 2
GRE_SCORE3 GRE Score 3
GRE_TEST_CENT GRE Test Century
GRE_TEST_CODE GRE Test Code
GRE_TEST_MON GRE Test Month
GRE_TEST_SCORE GRE Test Score
GRE_TEST_YEAR GRE Test Year
GRE_TYPE0 GRE Type 0
GRE_TYPE1 GRE Type 1
GRE_TYPE2 GRE Type 2
GRE_TYPE3 GRE Type 3
HISP_IND Hispanic Indicator
HSCH_AO_GPA High School All Other GPA
HSCH_AO_HOURS High School All Other Hours
HSCH_BCPM_GPA High School ChemBioPhyMath
GPA
HSCH_BCPM_HOURS High School ChemBioPhyMath
Hrs
HSCH_CITY High School City
HSCH_CLASS_RANK High School Class Rank
HSCH_CLASS_SIZE High School Class Size
HSCH_GPA High School Total GPA
HSCH_GRADE_LEVEL High School Grade Level
HSCH_GRAD_CENT High School Graduation
Century
HSCH_GRAD_DAY High School Graduation Day
HSCH_GRAD_MON High School Graduation Month
HSCH_GRAD_YEAR High School Graduation Year
HSCH_NAME High School Name
HSCH_NATION High School Nation
STVTPFD Tape Field Names Validation Form

74
Banner Student User Guide | Validation Reference
HSCH_SBGI_CODE High School SBGI Code
HSCH_STAT_CODE High School State Code
HSCH_STREET1 High School Street Address 1
HSCH_TOTAL_HOURS High School Total Hours
HSCH_ZIP High School ZIP Code
INSTITUTIONAL_ACTION Institutional Action
INTEREST Interest
INTS_CODE1 Interest Code 1
INTS_CODE2 Interest Code 2
INTS_CODE3 Interest Code 3
INTS_CODE4 Interest Code 4
INTS_CODE5 Interest Code 5
INTS_CODE6 Interest Code 6
INTS_CODE7 Interest Code 7
INTS_CODE8 Interest Code 8
INTS_CODE9 Interest Code 9
INTS_CODE10 Interest Code 10
INTS_CODE11 Interest Code 11
INTS_CODE12 Interest Code 12
INTS_CODE13 Interest Code 13
INTS_CODE14 Interest Code 14
JR_AO_GPA Junior All Other GPA
JR_AO_HOURS Junior All Other Hours
JR_BCPM_GPA Junior BioChemPhysMath GPA
JR_BCPM_HOURS Junior BioChemPhysMath
Hours
JR_TOTAL_GPA Junior Total GPA
LEGAL_COUNTY_CODE Legal County Code
LEGAL_COUNTY_NAME Legal County Name
Placeholder
LEGAL_COUNTY_RURAL_IND Legal County Rural Indicator
LEGAL_STATE Legal State Code
STVTPFD Tape Field Names Validation Form

75
Banner Student User Guide | Validation Reference
MAJR_CODE Major Code 1
MAJR_CODE2 Major Code 2
MAJR_CODE3 Major Code 3
MAJR_CODE4 Major Code 4
MAJR_CODE5 Major Code 5
MAJR_CODE6 Major Code 6
MAJR_PSAT PSAT Major Code
MATRIC_DATE Matriculation Date Placeholder
MBS_LITHOCODE MCAT BioSci Lcode Placehold
MBS_MED_MAR_IND MCAT BioSci Med Mar
Placehold
MBS_TEAC_CODE MCAT BioSci Test
Accommodation
MBS_TEFR_CODE MCAT BioSci Test Form Code
MBS_TEST_DATE MCAT MBS Test Date
MBS_TEST_SCORE MCAT MBS Test Score
MBS_UNUSED1 MCAT BioSci Unused
Placeholder
MBS_UNUSED2 MCAT BioSci Unused
Placeholder
MBS_UNUSED3 MCAT BioSci Unused
Placeholder
MBS_WS_FORM_NUM MCAT Writing Sample
Placehold
MCAT_INTENT_DATE MCAT Intent Test Date
MILITARY_DISCHARGE_IND Military Discharge Indicator
MILITARY_HON_DISCHARGE_IND Military Honorable Dischg Ind
MILITARY_SERVICE_IND Military Service Indicator
MISDEMEANOR_IND Misdemeanor Indicator
MPS_TEST_SCORE MCAT MPS Test Score
MVR_TEST_SCORE MCAT MVR Test Score
MWS_TEST_SCORE MCAT MWS Test Score
NAG_NATIONAL_NORM ACT Alg/Coord Geom National
Norm
STVTPFD Tape Field Names Validation Form

76
Banner Student User Guide | Validation Reference
NAG_TADM_CODE ACT NAG Test Admin Code
NAG_TEST_MON ACT NAG Test Month
NAG_TEST_SCORE * ACT NAG Test Score
NAG_TEST_YEAR ACT NAG Test Year
NAL_NATIONAL_NORM ACT Arts/Lit National Norm
NAL_TADM_CODE ACT NAL Test Admin Code
NAL_TEST_MON ACT NAL Test Month
NAL_TEST_SCORE * ACT NAL Test Score
NAL_TEST_YEAR ACT NAL Test Year
NAME_FIRST First Name
NAME_LAST Last Name
NAME_LAST_OLD Former Last Name
NAME_MI Middle Initial
NATION_CODE Nation Code
NATION_NAME Nation Name
NEA_NATIONAL_NORM ACT Elem Algebra National
Norm
NEA_TADM_CODE ACT NEA Test Admin Code
NEA_TEST_MON ACT NEA Test Month
NEA_TEST_SCORE * ACT NEA Test Score
NEA_TEST_YEAR ACT NEA Test Year
NEW_TADM_CODE ACT NEW Test Admin Code
NEW_TEST_MON ACT NEW Test Month
NEW_TEST_SCORE * ACT NEW Test Score
NEW_TEST_YEAR ACT NEW Test Year
NEXT_MCAT_DATE Next MCAT Date (pre-2008)
NGT_NATIONAL_NORM ACT Plane Geom/Trig National
Norm
NGT_TADM_CODE ACT NGT Test Admin Code
NGT_TEST_MON ACT NGT Test Month
NGT_TEST_SCORE * ACT NGT Test Score
NGT_TEST_YEAR ACT NGT Test Year
STVTPFD Tape Field Names Validation Form

77
Banner Student User Guide | Validation Reference
NRH_NATIONAL_NORM ACT Rhetorical Skills National
Norm
NRH_TADM_CODE ACT NRH Test Admin Code
NRH_TEST_MON ACT NRH Test Month
NRH_TEST_SCORE * ACT NRH Test Score
NRH_TEST_YEAR ACT NRH Test Year
NSS_NATIONAL_NORM ACT Soc Stud/Sci National
Norm
NSS_TADM_CODE ACT NSS Test Admin Code
NSS_TEST_MON ACT NSS Test Month
NSS_TEST_SCORE *‘ ACT NSS Test Score
NSS_TEST_YEAR ACT NSS Test Year
NUMBER_OF_DEPENDENTS Number of Dependents
NUM_MCATS Number of MCATS Placeholder
NUM_NATIONAL_NORM ACT Usage/Mech National
Norm
NUM_TADM_CODE ACT NUM Test Admin Code
NUM_TEST_MON ACT NUM Test Month
NUM_TEST_SCORE * ACT NUM Test Score
NUM_TEST_YEAR ACT NUM Test Year
NWR_NATIONAL_NORM ACT Writing National Norm
NWR_TADM_CODE ACT NWR Test Admin Code
NWR_TEST_MON ACT NWR Test Month
NWR_TEST_SCORE * ACT NWR Test Score
NWR_TEST_YEAR ACT NWR Test Year
OLDSAT1_PERCENTILE SAT II National Percentile
OLDSAT1_RCRV_IND Old SAT RCRV
OLDSAT1_TADM_CODE Old SAT Test Admin Code
OLDSAT1_TEST_CODE Old SAT Test Code
OLDSAT1_TEST_MON Old SAT Test Month
OLDSAT1_TEST_SCORE Old SAT Test Score
OLDSAT1_TEST_YEAR Old SAT Test Year
STVTPFD Tape Field Names Validation Form

78
Banner Student User Guide | Validation Reference
OLDSAT2_PERCENTILE SAT II National Percentile
OLDSAT2_TEST_CODE Old SAT Test Code
OLDSAT2_TEST_SCORE Old SAT Test Score
OLDSAT3_PERCENTILE SAT II National Percentile
OLDSAT3_TEST_CODE Old SAT Test Code
OLDSAT3_TEST_SCORE Old SAT Test Score
PBUG_AO_GPA Post Bac UG All Other GPA
PBUG_AO_HOURS Post Bac UG All Other Hours
PBUG_BCPM_GPA Post Bac UG
BioChemPhyMath GPA
PBUG_BCPM_HOURS Post Bac UG
BioChemPhyMath Hrs
PBUG_TOTAL_GPA Post Bac UG Total GPA
PCOL_CITY Prior College City
PCOL_DEGR_CODE Prior College Degree Code
PCOL_DEGR_CODE2 Previous College Degree 2
PCOL_DEGR_CODE3 Previous College Degree 3
PCOL_DEGR_CODE4 Previous College Degree 4
PCOL_DEGR_CODE5 Previous College Degree 5
PCOL_GPA Previous College GPA
PCOL_GRAD_CENT Previous College Grad Century
PCOL_GRAD_DATE Previous College Grad Date
PCOL_GRAD_DATE2 Previous College Grad Date 2
PCOL_GRAD_DATE3 Previous College Grad Date 3
PCOL_GRAD_DATE4 Previous College Grad Date 4
PCOL_GRAD_DATE5 Previous College Grad Date 5
PCOL_GRAD_DAY Previous College Grad Day
PCOL_GRAD_MON Previous College Grad Month
PCOL_GRAD_YEAR Previous College Grad Year
PCOL_LONG_DESC Previous College Long
Placehld
PCOL_MAJR_CODE Previous College Major 1
STVTPFD Tape Field Names Validation Form

79
Banner Student User Guide | Validation Reference
PCOL_MAJR_CODE2 Previous College Major 2
PCOL_MAJR_CODE3 Previous College Major 3
PCOL_MAJR_CODE4 Previous College Major 4
PCOL_MAJR_CODE5 Previous College Major 5
PCOL_MAJR_NAME Prev Coll Majr Desc 1 Placehld
PCOL_MAJR_NAME2 Prev Coll Majr Desc 2 Placehld
PCOL_MAJR_NAME3 Prev Coll Majr Desc 3 Placehld
PCOL_MAJR_NAME4 Prev Coll Majr Desc 4 Placehld
PCOL_MAJR_NAME5 Prev Coll Majr Desc 5 Placehld
PCOL_NAME Previous College Name
Placehld
PCOL_NATION Previous College Nation
PCOL_PROGRAM Previous College Program
PCOL_SBGI_CODE Previous College SBGI Code
PCOL_SHORT_DESC Previous College Shrt Placehld
PCOL_STAT_CODE Previous College State Code
PCOL_STREET1 Previous College Street Line 1
PCOL_YEARS_ATTEND Previous College To From
YYYY
PCOL_ZIP Previous College ZIP Code
PF_FAIL_HOURS Pass Fail - Failed Hours
PF_PASS_HOURS Pass Fail - Passed Hours
PHONE_AREA Phone Area Code
PHONE_COMMENT Phone Comment for GRE
PHONE_NUMBER Phone Number
PHONE_PREF Preferred Phone Number Ind
PIDM PIDM
PLUS_MINUS_GRADES Grades Use Plus or Minus
PREF_ADDRESS Preferred Address Placeholder
PREF_CITY Preferred City Placeholder
PREV_APP1 YYYY Previously Applied 1
PREV_APP2 YYYY Previously Applied 2
STVTPFD Tape Field Names Validation Form

80
Banner Student User Guide | Validation Reference
PREV_APP3 YYYY Previously Applied 3
PREV_APP4 YYYY Previously Applied 4
PREV_MATRIC Previous Matriculation
RACE1 Race Code 1
RACE10 Race Code 10
RACE2 Race Code 2
RACE3 Race Code 3
RACE4 Race Code 4
RACE5 Race Code 5
RACE6 Race Code 6
RACE7 Race Code 7
RACE8 Race Code 8
RACE9 Race Code 9
REC_NUMBER Record Number
RELG_CODE Religion Code
S01_NATIONAL_PERCENTILE SAT Verbal National Percentile
S01_RCRV_IND SAT S01 RCRV Indicator
S01_STATE_PERCENTILE SAT Verbal State Percentile
S01_TADM_CODE SAT S01 Test Admin Code
S01_TEST_MON SAT S01 Test Month
S01_TEST_SCORE SAT S01 Test Score
S01_TEST_YEAR SAT S01 Test Year
S02_NATIONAL_PERCENTILE SAT Math National Percentile
S02_RCRV_IND SAT S02 RCRV Indicator
S02_STATE_PERCENTILE SAT Math State Percentile
S02_TADM_CODE SAT S02 Test Admin Code
S02_TEST_MON SAT S02 Test Month
S02_TEST_SCORE SAT S02 Test Score
S02_TEST_YEAR SAT S02 Test Year
S03_RCRV_IND SAT S03 RCRV Indicator
S03_TADM_CODE SAT S03 Test Admin Code
STVTPFD Tape Field Names Validation Form

81
Banner Student User Guide | Validation Reference
S03_TEST_MON SAT S03 Test Month
S03_TEST_SCORE SAT S03 Test Score
S03_TEST_YEAR SAT S03 Test Year
S04_RCRV_IND SAT S04 RCRV Indicator
S04_TADM_CODE SAT S04 Test Admin Code
S04_TEST_MON SAT S04 Test Month
S04_TEST_SCORE SAT S04 Test Score
S04_TEST_YEAR SAT S04 Test Year
S05_RCRV_IND SAT S05 RCRV Indicator
S05_TADM_CODE SAT S05 Test Admin Code
S05_TEST_MON SAT S05 Test Month
S05_TEST_SCORE SAT S05 Test Score
S05_TEST_YEAR SAT S05 Test Year
S06_RCRV_IND SAT S06 RCRV Indicator
S06_TADM_CODE SAT S06 Test Admin Code
S06_TEST_MON SAT S06 Test Month
S06_TEST_SCORE SAT S06 Test Score
S06_TEST_YEAR SAT S06 Test Year
S07_NATIONAL_PERCENTILE SAT Writing Natl Percentile
S07_RCRV_IND SAT S07 RCRV Indicator
S07_STATE_PERCENTILE SAT Writing State Percentile
S07_TADM_CODE SAT S07 Test Admin Code
S07_TEST_MON SAT S07 Test Month
S07_TEST_SCORE SAT S07 Test Score
S07_TEST_YEAR SAT S07 Test Year
S08_RCRV_IND SAT S08 RCRV Indicator
S08_TADM_CODE SAT S08 Test Admin Code
S08_TEST_MON SAT S08 Test Month
S08_TEST_SCORE SAT S08 Test Score
S08_TEST_YEAR SAT S08 Test Year
S09_RCRV_IND SAT S09 RCRV Indicator
STVTPFD Tape Field Names Validation Form

82
Banner Student User Guide | Validation Reference
S09_TADM_CODE SAT S09 Test Admin Code
S09_TEST_MON SAT S09 Test Month
S09_TEST_SCORE SAT S09 Test Score
S09_TEST_YEAR SAT S09 Test Year
SAG_TADM_CODE ACT SAG Test Admin Code
SAG_TEST_MON ACT SAG Test Month
SAG_TEST_SCORE ACT SAG Test Score
SAG_TEST_YEAR ACT SAG Test Year
SAL_TADM_CODE ACT SAL Test Admin Code
SAL_TEST_MON ACT SAL Test Month
SAL_TEST_SCORE ACT SAL Test Score
SAL_TEST_YEAR ACT SAL Test Year
SAT_ESSAY_ID SAT Essay ID
SCHOOL_NUM School Number
SCHOOL_STATE School State
SCHOOL_UNUSED MCAT School Unused
Placeholder
SEA_TADM_CODE ACT SEA Test Admin Code
SEA_TEST_MON ACT SEA Test Month
SEA_TEST_SCORE ACT SEA Test Score
SEA_TEST_YEAR ACT SEA Test Year
SGT_TADM_CODE ACT SGT Test Admin Code
SGT_TEST_MON ACT SGT Test Month
SGT_TEST_SCORE ACT SGT Test Score
SGT_TEST_YEAR ACT SGT Test Year
SO_AO_GPA Sophomore All Other GPA
SO_AO_HOURS Sophomore All Other Hours
SO_BCPM_GPA Sophomore
BioChemPhysMath GPA
SO_BCPM_HOURS Sophomore
BioChemPhysMath Hrs
SO_TOTAL_GPA Sophomore Total GPA
STVTPFD Tape Field Names Validation Form

83
Banner Student User Guide | Validation Reference
SRH_TADM_CODE ACT SRH Test Admin Code
SRH_TEST_MON ACT SRH Test Month
SRH_TEST_SCORE ACT SRH Test Score
SRH_TEST_YEAR ACT SRH Test Year
SR_AO_GPA Senior All Other GPA
SR_AO_HOURS Senior All Other Hours
SR_BCPM_GPA Senior BioChemPhysMath
GPA
SR_BCPM_HOURS Senior BioChemPhysMath
Hours
SR_TOTAL_GPA Senior Total GPA
SSN Social Security Number
SSN_OLD Old SSN Placeholder
SSS_TADM_CODE ACT SSS Test Admin Code
SSS_TEST_MON ACT SSS Test Month
SSS_TEST_SCORE ACT SSS Test Score
SSS_TEST_YEAR ACT SSS Test Year
STAT_CODE State Code
STREET_LINE1 Street Address Line 1
STREET_LINE2 Street Address Line 2
STREET_LINE3 Street Address Line 3
STUDENT_TYPE Student Type
SUFFIX Name Suffix
SUM_TADM_CODE ACT SUM Test Admin Code
SUM_TEST_MON ACT SUM Test Month
SUM_TEST_SCORE ACT SUM Test Score
SUM_TEST_YEAR ACT SUM Test Year
SWR_TEST_SCORE ACT SWR Test Score
TELE_TYPE_CODE Telephone Type Code
URM_IND URM Indicator Placeholder
VERIFY_IND Verified Indicator Placeholder
VISA Visa Type
STVTPFD Tape Field Names Validation Form

84
Banner Student User Guide | Validation Reference
ZIP ZIP Code
STVTRNS Transcript Name Source Code Validation Form
IDEN General Person Identification
LEGAL General Person Legal Name
DIPLOMA Diploma Name
STVTSPT Test Score Percentile Type Validation Form
ANN ACT National Norm Cumulative Percent
GRP GRE Percentile
SMN SAT Math National College-Bound
Percentile
SMS SAT Math State College-Bound
Percentile
SVN SAT Verbal National College-Bound
Percentile
SVS SAT Verbal State College-Bound
Percentile
SWN SAT Writing National College-Bound
Percentile
SWS SAT Writing State College-Bound
Percentile
S2N SAT II National College-Bound Percentile
STVVTAB Web Display Tables Validation Form
GTVINSM Instructional Method Validation
STVATTR Attribute Validation
STVBLDG Building Code Validation
STVCAMP Campus Code Validation
STVCOLL College Code Validation
STVDEPT Department Code Validation
STVDIVS Division Code Validation
STVTPFD Tape Field Names Validation Form

85
Banner Student User Guide | Validation Reference
STVLEVL Level Code Validation
STVPTRM Part of Term Code Validation
STVSCHD Schedule Type Code Validation
STVSUBJ Subject Code Validation
STVSESS Session Code Validation
STVTESC Test Code Validation
STVWACK
Web Prospect Acknowledgment Letter Codes
Validation Form
ADDR1_ATYP_CODE Address 1 Address Code
ADDR1_CITY Address 1 City
ADDR1_FROM_DATE Address 1 From Date
ADDR1_HNUM Address 1 House Number
ADDR1_NATN_CODE Address 1 Nation Code
ADDR1_STAT_CODE Address 1 State Code
ADDR1_STR1 Address 1 Street 1
ADDR1_STR2 Address 1 Street 2
ADDR1_STR3 Address 1 Street 3
ADDR1_STR4 Address 1 Street 4
ADDR1_TO_DATE Address 1 To Date
ADDR1_ZIP Address 1 ZIP
ADDR2_ATYP_CODE Address 2 Address Code
ADDR2_CITY Address 2 City
ADDR2_FROM_DATE Address 2 From Date
ADDR2_HNUM Address 2 House Number
ADDR2_NATN_CODE Address 2 Nation Code
ADDR2_STAT_CODE Address 2 State Code
ADDR2_STR1 Address 2 Street 1
ADDR2_STR2 Address 2 Street 2
ADDR2_STR3 Address 2 Street 3
ADDR2_STR4 Address 2 Street 4
STVVTAB Web Display Tables Validation Form

86
Banner Student User Guide | Validation Reference
ADDR2_TO_DATE Address 2 To Date
ADDR2_ZIP Address 2 ZIP
BIRTHDATE Birth Date
CITZ_CODE Citizenship
EMAIL_ADDRESS Email Address
EMAL_CODE Email Address Code
ETHN_CODE Ethnicity
FIRST_NAME First Name
FOREIGN_SSN Foreign SSN
GENDER Gender
HS_CITY High School City
HS_CLASS_RANK High School Class Rank
HS_CLASS_SIZE High School Class Size
HS_GPA High School GPA
HS_GRAD_DATE High School Grad Date
HS_HNUM High School House Number
HS_NAME High School Name
HS_NATN_CODE High School Nation
HS_SBGI_CODE High School SBGI Code
HS_STAT_CODE High School State
HS_STR1 High School Street 1
HS_STR2 High School Street 2
HS_STR3 High School Street 3
HS_STR4 High School Street 4
HS_ZIP High School ZIP Code
INTS_CODE_1 Interest 1
INTS_CODE_2 Interest 2
INTS_CODE_3 Interest 3
INTS_CODE_4 Interest 4
INTS_CODE_5 Interest 5
STVWACK
Web Prospect Acknowledgment Letter Codes
Validation Form

87
Banner Student User Guide | Validation Reference
LAST_NAME Last Name
LAST_NAME_PREFIX Surname Prefix
LEND_CODE_1 How I Learned About
LEND_CODE_2 How I Learned About
LEND_CODE_3 How I Learned About
MAJR_CODE Major
MATL_CODE_1 Requested Material
MATL_CODE_2 Requested Material
MATL_CODE_3 Requested Material
MIDDLE_NAME Middle Name
NAME_PREFIX Name Prefix
NAME_SUFFIX Name Suffix
NATN_CODE_LEGAL Country of Citizenship
NICKNAME Nickname
NTYP_CODE Name Type Code
PCOL_CITY Prior College City
PCOL_GPA Prior College GPA
PCOL_GRAD_DATE Prior College Grad Date
PCOL_HNUM Prior College House Number
PCOL_NAME Prior College Name
PCOL_NATN_CODE Prior College Nation
PCOL_SBGI_CODE Prior College SBGI Code
PCOL_STAT_CODE Prior College State
PCOL_STR1 Prior College Street 1
PCOL_STR2 Prior College Street 2
PCOL_STR3 Prior College Street 3
PCOL_STR4 Prior College Street 4
PCOL_ZIP Prior College ZIP Code
SSNTINTFN SSN/TIN/TFN
STYP_CODE Student Type
STVWACK
Web Prospect Acknowledgment Letter Codes
Validation Form

88
Banner Student User Guide | Validation Reference
TELE1_ATYP_CODE Telephone 1 Address Code
TELE1_CTRY_PHONE Telephone 1 Country Code
TELE1_INTL_ACCESS Telephone 1 Inter Access
TELE1_PHONE_AREA Telephone 1 Phone Area
TELE1_PHONE_EXT Telephone 1 Phone Extension
TELE1_PHONE_NUMBER Telephone 1 Phone Number
TELE2_ATYP_CODE Telephone 2 Address Code
TELE2_CTRY_PHONE Telephone 2 Country Code
TELE2_INTL_ACCESS Telephone 2 Inter Access
TELE2_PHONE_AREA Telephone 2 Phone Area
TELE2_PHONE_EXT Telephone 2 Phone Extension
TELE2_PHONE_NUMBER Telephone 2 Phone Number
TELE3_CTRY_PHONE Telephone 3 Country Code
TELE3_INTL_ACCESS Telephone 3 Inter Access
TELE3_PHONE_AREA Telephone 3 Phone Area
TELE3_PHONE_EXT Telephone 3 Phone Extension
TELE3_PHONE_NUMBER Telephone 3 Phone Number
TELE4_CTRY_PHONE Telephone 4 Country Code
TELE4_INTL_ACCESS Telephone 4 Inter Access
TELE4_PHONE_AREA Telephone 4 Phone Area
TELE4_PHONE_EXT Telephone 4 Phone Extension
TELE4_PHONE_NUMBER Telephone 4 Phone Number
TELE5_CTRY_PHONE Telephone 5 Country Code
TELE5_INTL_ACCESS Telephone 5 Inter Access
TELE5_PHONE_AREA Telephone 5 Phone Area
TELE5_PHONE_EXT Telephone 5 Phone Extension
TELE5_PHONE_NUMBER Telephone 5 Phone Number
TERM_CODE Term Code
TEST1_DATE Test 1 Date
TEST1_SCORE Test 1 Score
STVWACK
Web Prospect Acknowledgment Letter Codes
Validation Form

89
Banner Student User Guide | Validation Reference
TEST1_TESC_CODE Test 1 TESC Code
TEST2_DATE Test 2 Date
TEST2_SCORE Test 2 Score
TEST2_TESC_CODE Test 2 TESC Code
TEST3_DATE Test 3 Date
TEST3_SCORE Test 3 Score
TEST3_TESC_CODE Test 3 TESC Code
TEST4_DATE Test 4 Date
TEST4_SCORE Test 4 Score
TEST4_TESC_CODE Test 4 TESC Code
TEST5_DATE Test 5 Date
TEST5_SCORE Test 5 Score
TEST5_TESC_CODE Test 5 TESC Code
VTYP_CODE Visa
STVWAPP Application Type Code Validation Form
00 Default Example - All Sections
W1 Undergraduate Freshman
W2 Undergraduate Transfer
W3 Internatnl Undergrad Freshman
W4 Internatnl Undergrad Transfer
W5 Graduate Studies
W6 International Graduate Studies
W7 Continuing Ed, Non-Degree
STVWLTT Web Application Customized Letter Type Validation Form
Letter Type
Code Module Description
APPLHOLD E Application Holds Exist Letter
DECNERR E Error on Decision Record Letter
STVWACK
Web Prospect Acknowledgment Letter Codes
Validation Form

90
Banner Student User Guide | Validation Reference
DEFAULT E Default Letter If Not Specified
MATCHERR E Matching Processing Returns Error Letter
NOSTUREC S Cannot Insert Student Record Letter
PUSHERR E Push Processing Returns Error Letter
QUIKADMT S Standard Quick Start Signature Letter
STANDARD E Standard Web Application Signature Letter
SUSPENSE E Suspended Match Status Signature Letter
VERERR E Verify Processing Returns Error Letter
STVWPIC Web Prospect Information Selection Validation Form
ADDRESS1 Primary Address
ADDRESS2 Secondary Address
BIRTHDATE Prospect Birthdate
CITIZENSHP Prospect Citizenship
EMAIL E-Mail Address
ENTRYTERM Prospect Entry Term
ETHNICITY Prospect Ethnicity/Race
GENDER Prospect Gender
HIGHSCHOOL Prospect High School
HOWILEARND How Prospect Learned About Us
INTERESTS Prospect Interests
INTERNATNL Prospect International Info
MAJOR Prospect Major
MATERIAL Requested Material
NAME Prospect Name
NTYPE Prospect Name Type
PRIORCOLL Prospect Prior College
SSNTINTFN Prospect SSN/TIN/TFN
STUDENTTYP Prospect Student Type
STVWLTT Web Application Customized Letter Type Validation Form
Letter Type
Code Module Description

91
Banner Student User Guide | Validation Reference
TELE3 Additional Telephone Numbers
TESTSCORES Prospect Test Scores
VISA Visa Information
STVWSCF Admissions Web Page Element Validation Form
Element Code Description Web Section
ACTIVITY Activity ACTIVITIES
ADDR2_CITY City ADDR2
ADDR2_COUNTY County ADDR2
ADDR2_HOUSE_NUMBER House Number ADDR2
ADDR2_INTL_ACCESS International Access ADDR2
ADDR2_NATION Country ADDR2
ADDR2_PHONE_CTRY_CODE Phone Country Code ADDR2
ADDR2_PHONE_NUMBER Phone Number ADDR2
ADDR2_STATE State/Province ADDR2
ADDR2_STREET1 Street Line 1 ADDR2
ADDR2_STREET2 Street Line 2 ADDR2
ADDR2_STREET3 Street Line 3 ADDR2
ADDR2_STREET4 Street Line 4 ADDR2
ADDR2_ZIP ZIP Code ADDR2
ATYP Address Type ADDR1
BIRTHDATE Birth Date PERSONAL
CELL_EXTENSION Cellular Phone Ext PERSONAL
CELL_INTL_ACCESS Cellular Phone Int
Access Code
PERSONAL
CELL_PHONE Cellular Phone
Number
PERSONAL
CELL_PHONE_CTRY_CODE Cellular Phone
Country Code
PERSONAL
CITIZEN Citizenship PERSONAL
CITY City ADDR1
CONCENTRATION Concentration PLAN
STVWPIC Web Prospect Information Selection Validation Form

92
Banner Student User Guide | Validation Reference
CONFIDENT Confidentiality PERSONAL
COUNTY County ADDR1
EMAIL Email PERSONAL
ETHNIC Ethnicity PERSONAL
ETHNIC_CATEGORY Ethnicity PERSONAL
FIRST_NAME First Name NAME
GENDER Gender PERSONAL
HOUSE_NUMBER House Number ADDR1
HSCH_CITY High School City HIGHSCH
HSCH_CLASS_SIZE High School Class
Size
HIGHSCH
HSCH_CODE High School Code HIGHSCH
HSCH_COUNTY High School County HIGHSCH
HSCH_GPA GPA HIGHSCH
HSCH_GRAD_DATE Graduation Date HIGHSCH
HSCH_HOME_SCHOOL Home School HIGHSCH
HSCH_HOUSE_NUMBER House Number HIGHSCH
HSCH_NAME High School Name HIGHSCH
HSCH_NATION High School Nation HIGHSCH
HSCH_RANK High School Rank HIGHSCH
HSCH_STATE High School State HIGHSCH
HSCH_STREET1 High School Street1 HIGHSCH
HSCH_STREET2 High School Street2 HIGHSCH
HSCH_STREET3 High School Street3 HIGHSCH
HSCH_STREET4 High School Street4 HIGHSCH
HSCH_ZIP High School ZIP Code HIGHSCH
INTL_ACCESS International Access ADDR1
LAST_NAME Last Name NAME
LAST_NAME_PREFIX Last Name Prefix NAME
LEGACY Legacy PERSONAL
STVWSCF Admissions Web Page Element Validation Form
Element Code Description Web Section

93
Banner Student User Guide | Validation Reference
MAJOR Major PLAN
MARITAL Marital Status PERSONAL
MATERIAL Requested Material MATERIALS
MEDICAL Medical Information PERSONAL
MID_NAME Middle Name NAME
MINOR Minor PLAN
NATION Nation ADDR1
NICKNAME Nickname NAME
OTHER_ACTIVITY Other Activity ACTIVITIES
PAR_CITY City PARENTS
PAR_CODE Relationship PARENTS
PAR_COUNTY County PARENTS
PAR_DECEASED Deceased PARENTS
PAR_FIRST_NAME First Name PARENTS
PAR_HOUSE_NUMBER House Number PARENTS
PAR_LAST_NAME Last Name PARENTS
PAR_MIDDLE_NAME Middle Name PARENTS
PAR_NATION Nation PARENTS
PAR_PHONE_CTRY_CODE Phone Country Code PARENTS
PAR_PREFIX Prefix PARENTS
PAR_STATE State/Province PARENTS
PAR_STREET1 Street Line 1 PARENTS
PAR_STREET2 Street Line 2 PARENTS
PAR_STREET3 Street Line 3 PARENTS
PAR_STREET4 Street Line 4 PARENTS
PAR_SUFFIX Suffix PARENTS
PAR_SURNAME_PREFIX Last Name Prefix PARENTS
PAR_ZIP ZIP Code PARENTS
PARENT_EMPLOYER Employer PARENTS
PARENT_INTL_ACCESS International Access PARENTS
STVWSCF Admissions Web Page Element Validation Form
Element Code Description Web Section

94
Banner Student User Guide | Validation Reference
PARENT_PHONE_NUMBER Phone Number PARENTS
PCOL_ATTEND_FROM College Attend From
Date
PRVCOLLEGE
PCOL_ATTEND_TO College Attend To
Date
PRVCOLLEGE
PCOL_CITY City PRVCOLLEGE
PCOL_CLASS_SIZE Class Size PRVCOLLEGE
PCOL_CODE College School Code PRVCOLLEGE
PCOL_COUNTY College County PRVCOLLEGE
PCOL_DEGREE College Degree PRVCOLLEGE
PCOL_DEGREE_DATE College Degree Date PRVCOLLEGE
PCOL_GPA GPA PRVCOLLEGE
PCOL_HOUSE_NUMBER House Number PRVCOLLEGE
PCOL_MAJOR College Major PRVCOLLEGE
PCOL_MINOR College Minor PRVCOLLEGE
PCOL_NAME College Name PRVCOLLEGE
PCOL_NATION College Nation PRVCOLLEGE
PCOL_RANK Rank PRVCOLLEGE
PCOL_STATE College State PRVCOLLEGE
PCOL_STREET1 Street1 PRVCOLLEGE
PCOL_STREET2 Street2 PRVCOLLEGE
PCOL_STREET3 Street3 PRVCOLLEGE
PCOL_STREET4 Street4 PRVCOLLEGE
PCOL_ZIP ZIP Code PRVCOLLEGE
PHONE_CTRY_CODE Phone Country Code ADDR1
PHONE_NUMBER Phone Number ADDR1
PREFIX Prefix NAME
PREV_APPL Previously Applied? NAME
PREV_ATTEND Previously Attended? NAME
PREV_LAST Previous Last Name NAME
STVWSCF Admissions Web Page Element Validation Form
Element Code Description Web Section

95
Banner Student User Guide | Validation Reference
QUESTION Question *
*You can select the Web section value that best suits the
QUESTION element
code for your site.
RACE Race PERSONAL
RELIGION Religion PERSONAL
RESID Resident PERSONAL
SSN SSN PERSONAL
STATE State ADDR1
STREET1 Street Line 1 ADDR1
STREET2 Street Line 2 ADDR1
STREET3 Street Line 3 ADDR1
STREET4 Street Line 4 ADDR1
SUFFIX Suffix NAME
TEST_INFO Test TESTS
VET_CATEGORY Veteran Classification PERSONAL
VET_FILE_NO Veteran ID PERSONAL
VISA_BIRTH_NATION Birth Country INTERNATL
VISA_CITZN_NATION Citizenship Country INTERNATL
VISA_EXPIRE_DATE Visa Expiration Date INTERNATL
VISA_ISSUE_DATE Visa Issue Date INTERNATL
VISA_LANGUAGE Native Language INTERNATL
VISA_NUMBER Visa Number INTERNATL
VISA_TYPE Visa INTERNATL
ZIP ZIP Code ADDR1
STVWSCT Web Prospect Information Selection Validation Form
ACTIVITIES Activities
ADDITIONAL Additional Information
ADDR1 First Address and Phone
ADDR2 Second Address and Phone
STVWSCF Admissions Web Page Element Validation Form
Element Code Description Web Section

96
Banner Student User Guide | Validation Reference
Note: You must also enter the appropriate Web procedure name in the
Procedure field for each section code.
ESSAY Essay Questions
HIGHSCH High School
INTERNATL International Information
MATERIALS Requested Materials
NAME Name
PARENTS Parental Information
PERSONAL Personal Information
PLAN Planned Course of Study
PRVCOLLEGE Previous College
TESTS Test Scores
STVXLBL EDI Verification Label Validation Form
AGEVERFY Age Verification Codes
ASESSLVL XML Import StudentLevelCode
CNTYRURL County Rural Indicators
CRDBASIS XML CourseCreditBasis to EDI
CRDUNIT XML CourseCreditUnits to EDI
CRDLEVEL XML CourseCreditLevel
CRSLEVEL XML CourseLevel to EDI
CRSOVERR XML CourseOverideSchool
CRSRPEAT XML CourseRepeatCode to EDI
DEGRLEVL Degree Level Codes
DFMTCODE Date Format Codes
EIDNCODE Entity Identifier Codes
FSTYIDQL Field of Study Qualifier Codes
FSTYLEVL Field of Study Level Codes
GENDER Gender Codes
GRCRLEVL Grade or Course Level Codes
STVWSCT Web Prospect Information Selection Validation Form

97
Banner Student User Guide | Validation Reference
GTVLFST Field of Study Types
HEADXPRP XML DocumentType to XPRP
HEADXRSN XML TransmissionType to XRSN
HONRLEVL Honor Level Codes
HSCHRSON High School Graduation Codes
IMMZRTYP Immunization Report Type
IMMZSTAT Immunization Status Codes
IMMZTYPE Immunization Type Codes
ITCCLEVL Individual Level Codes
LANGPROF Language Proficiency Codes
LANGUSE Language Use Codes
NTYPCODE Name Type Codes
QSTNCODE EDI Question Codes
RESDCRIT Residency Criteria Codes
RFNOQLFR Reference Qualifier Code
SBGIQLFR Educational Inst Qualifier
STVASTDD XML ASTD Delinquency codes
STVASTDH XML ASTD Honor codes
STVATTR Course Attributes
STVATYP Address Type Codes
STVATYPR Relatives Address Type Codes
STVCITZ Citizenship Type Codes
STVCLAS Class Codes
STVCNTY County Codes
STVDEGC Degree Level-Degree Code
STVEGOL College Program Type Codes
STVESEL Eligibility Factor Codes
STVETHN Ethnic Type Codes
STVHONR Honor codes
STVINTS Award and Activity Codes
STVLANGN Language Name Codes
STVXLBL EDI Verification Label Validation Form

98
Banner Student User Guide | Validation Reference
STVLANGW Written Language Codes
STVLEVL Course and Student Level codes
STVLGCY Legacy Codes
STVMAJR EDI Major Codes
STVMATL Requested Materials
STVMEDI Medical Condition Codes
STVMRTL Marital Status Codes
STVNATN Nation Codes
STVRELG Religion Codes
STVRELT Relationship Codes
STVSBGIC EDI College Codes
STVSBGIH EDI High School Codes
STVSTAT State Codes
STVTEAC MCAT Non-Standard Indicator
STVTEFR XML Test form codes
STVTELE Telephone Qualifier Codes
STVTESC Sub-Test Codes
STVTRMT Term Type codes
STVTRMTC Term Type for Credit Units
STVVETC Veteran Type Code
STVVTYP VISA Type Codes
STVWAIV Appl Waiver Code
SUMACTYP XML AcademicSummaryLevel=>CTYP
SUMASLVL XML AcademicSummaryType =>SLVL
TESTCODE EDI Test Qualifier Codes
STVXLBL EDI Verification Label Validation Form

99
Banner Student User Guide | Validation Reference
Validation Forms Menu System
The following page shows a diagram of the menu hierarchy for the Banner Student
System and Accounts Receivable module validation forms. All of the validation forms are
listed alphabetically and are grouped by submenu. Each submenu is listed with a notation
as to which validation forms are included on it. To find which menu a form is on, check the
alphabetic range in which it falls.
For example, to locate STVTERM, you see it falls between STVTELE and STVTRAC and
would be listed on submenu *STDVALD3F.
Use this menu system to view the validation forms used in the Banner Student System.
Updates to validation forms can also be done by entering the name of the form you want
and retrieving it directly in expert mode, or by using the subsystem of menus to navigate to
the desired form. The validation forms are listed alphabetically. Updates and additions are
made directly on the validation form.
101
Banner Student User Guide | Validation Reference
Validation Forms System Reference
This list references the system validation forms which are used by Banner Student System functional/application forms and their related
modules.
Validation Form Application/Functional Form Modules
GTVDUNT Duration Unit Validation Form SCACRSE Basic Course Information Form
SFAREGS Student Course Registration Form
SFARHST Student Registration History and
Extension Form
SSARULE Schedule Processing Rules Form
SSASECQ Schedule Section Query Form
SSASECT Schedule Form
Catalog
Registration
Registration
Schedule
Schedule
Schedule
GTVINSM Instructional Method Validation Form SCACRSE Basic Course Information Form
SFARGFE Registration Fee Assessment Rules
Form
SOAORUL Open Learning Section Default Rules
Form
SSADFEE Section Fees Assessment Control Form
SSASECQ Schedule Section Query Form
SSASECT Schedule Form
Catalog
Registration
Overall
Schedule
Schedule
Schedule

102
Banner Student User Guide | Validation Reference
GTVLETR Letter Code Validation Form SAAADMS Admissions Application Form
SAADCRV Admissions Decision Form
SAAMAPP Admissions Mass Entry Form
SGAMSPT Mass Entry Athletic Compliance Form
SGAMSTU General Student Mass Entry Form
SHAGADR Self-Service Graduation Application
Display Rules Form
SHAMCAT Mass Entry Ceremony Attendance Form
SHAMDEG Mass Entry Graduation Form
SHAMDIP Mass Entry Diploma Form
SHAMUCA Mass Update Ceremony Attendance
Form
SHAMUDI Mass Update Diploma Form
SHATPRT Transcript Type Rules Form
SOAMATL Material Form
SUAMAIL Student Mail Form
Admissions
Admissions
Admissions
General Student
General Student
Academic History
Academic History
Academic History
Academic History
Academic History
Academic History
Academic History
Overall
Recruiting/Admissions
Validation Form Application/Functional Form Modules

103
Banner Student User Guide | Validation Reference
GTVLFST Learner Field of Study Type Validation
Form
SAAADMS Admissions Application Form
SAAMAPP Admissions Mass Entry Form
SCADETL Course Detail Information Form
SCARRES Course Registration Restrictions Form
SFAMREG Registration Mass Entry Form
SFAMHRS Registration Minimum Maximum Hours
Form
SFAREGS Student Course Registration Form
SFARGFE Registration Fee Assessment Rules
Form
SFARQST Enrollment Verification Request Form
SFARWLP Reserved Seats Priority Management
Form
SGAMSTU General Student Mass Entry Form
SGASTDN General Student Form
SHADEGR Degrees and Other Formal Awards
Form
SHAGELR Graduation Application Eligibility Rules
Form
SHAMCAT Mass Entry Ceremony Attendance Form
SHAMDEG Mass Entry Graduation Form
SHAMDIP Mass Entry Diploma Form
SHAMUDI Mass Update Diploma Form
Admissions
Admissions
Catalog
Catalog
Registration
Registration
Registration
Registration
Registration
Registration
General Student
General Student
Academic History
Academic History
Academic History
Academic History
Academic History
Academic History
Validation Form Application/Functional Form Modules

104
Banner Student User Guide | Validation Reference
GTVLFST Learner Field of Study Type Validation
Form (cont.)
SRARECR Recruit Prospect Information Form
SOACTRL Curriculum Rules Control Form
SOAWLTC Automated Waitlist Term Control Form
SSADETL Schedule Detail Form
SSADFEE Section Fee Assessment Control Form
SSARRES Schedule Restrictions Form
SSASECT Schedule Form
SSIRESV Reserved Seats Inquiry Form
Recruiting
Overall
Overall
Schedule
Schedule
Schedule
Schedule
Schedule
GTVMTYP Meeting Type Validation Form SHAGADR Self-Service Graduation Application
Display Rules Form
SSASECT Schedule Form
SSAXMTI Cross List Meeting Time/Instructor
Query Form
Academic History
Schedule
Schedule
GTVPARA Paragraph Code Validation Form GUALETR Letter Process Form Overall
GTVPARS Partition Code Validation Form SCACRSE Basic Course Information Form
SLABLDG Building Definition Form
SLARDEF Room Definition Form
SSASBSH Subject Scheduling Rules Form
SSASECT Schedule Form
Catalog
Location Management
Location Management
Schedule
Schedule
GTVSCHS Scheduling Status Code Validation Form SSASCHW Schedule Work Form
SSASECT Schedule Form
Schedule
Schedule
Validation Form Application/Functional Form Modules

105
Banner Student User Guide | Validation Reference
GTVZIPC ZIP/Postal Code Validation Form GOAMTCH Common Matching Entry Form
SAAQUIK Quick Entry Form
SFARQST Enrollment Verification Request Form
SHADIPL Diploma Form
SHAGAPP Graduation Application Form
SHARQTC Transcript Request Form
SLABLDG Building Definition Form
SPAEMRG Emergency Contact Form
SPAIDEN General Person Identification Form
SRAQUIK Quick Recruit Form
SOAFOLK Guardian Information Form
General Person
Admissions
Registration
Academic History
Academic History
Academic History
Location Management
General Person
General Person
Recruiting
Recruiting/Admissions
PTRTENR Tenure Code Rule Form SIAFPER Faculty Personnel Form
SIAIQRY Faculty/Advisor Query Form
Faculty Load
Faculty Load
STVACCL Academic Calendar Type Validation
Form
SSAACRL Schedule Academic Calendar Rules
Form
SSAACCL Schedule Calendar Form
SSAQCRL Academic Calendar Rule Query Form
SSASECT Schedule Form
Schedule
Schedule
Schedule
Schedule
STVACCT Attendance Accounting Method
Validation Form
SSASECT Schedule Form Schedule
STVACPR Acceptance Practice Code Validation
Form
SOABGTA Transfer Articulation Institution Form Academic History
STVACST Institutional Accreditation Status
Validation Form
SOABGTA Transfer Articulation Institution Form Academic History
Validation Form Application/Functional Form Modules

106
Banner Student User Guide | Validation Reference
STVACTC Banner Student Activity Code Validation
Form
SFAMHRS Registration Minimum Maximum Hours
Form
SGAMSPT Mass Entry Athletic Compliance Form
SGASPRT Athletic Compliance Form
SGASTDN General Student Form
SGISPRT Athletic Compliance Inquiry Form
Registration
General Student
General Student
General Student
General Student
STVACTN Action Code Validation Form Please refer to the CAPP Handbook.CAPP
STVACYR Academic Year Validation Form SGAMSTU General Student Mass Entry Form
SGASTDN General Student Form
SHADEGR Degrees and Other Formal Awards
Form
SHADGMQ Degree Summary Form
SHAGADR Self-Service Graduation Application
Display Rules Form
SHAGAPP Graduation Application Form
SHAMDEG Mass Entry Graduation Form
General Student
General Student
Academic History
Academic History
Academic History
Academic History
Academic History
STVADMR Admission Request Checklist Code
Validation Form
SAAADMS Admissions Application Form
SAACHKB Admissions Checklist Rules Form
SAAMAPP Admissions Mass Entry Form
SOAHSCH High School Information Form
SOAPCOL Prior College Form
SOATEST Test Score Information Form
SOISBGI Source/Background Institution Query-
Only Form
Admissions
Admissions
Admissions
Overall
Overall
Overall
Recruiting
Validation Form Application/Functional Form Modules

107
Banner Student User Guide | Validation Reference
STVADMT Admission Type Code Validation Form SAAADMS Admissions Application Form
SAACHKB Admissions Checklist Rules Form
SAADCRV Admissions Decision Form
SAADCSN Admissions Decision Rules Form
SAAMAPP Admissions Mass Entry Form
SAAQKER Quick Entry Rules Form
SAAQUIK Quick Entry Form
SAASUMI Admissions Application Summary Form
SFAMHRS Registration Minimum Maximum Hours
Form
SGAMSTU General Student Mass Entry Form
SGASTDN General Student Form
SHAINST Term Course Maintenance Form
SOAIDNS Person Search Detail Form
SOAMATL Material Form
SRARECR Recruit Prospect Information Form
SRAQUIK Quick Recruit Form
Admissions
Admissions
Admissions
Admissions
Admissions
Admissions
Admissions
Admissions
Registration
General Student
General Student
Academic History
System Administration
Overall
Recruiting
Recruiting
STVADVR Advisor Type Validation Form SGAADVR Multiple Advisors Form
SGASTDN General Student Form
General Student
General Student
STVAFCT Admissions Factor Code Validation
Form
SAARRFT Admissions Rating Factor Rules Form
SAARRDF Admissions Rating Formula Definition
Form
Admissions
Admissions
STVAFDC Student CARE AFDC Duration
Validation Form
SGAEOPS Education Opportunity Programs and
Services Form
General Student
Validation Form Application/Functional Form Modules

108
Banner Student User Guide | Validation Reference
STVAPDC Admission Application Decision Code
Validation Form
SAAADMS Admissions Application Form
SAADCRV Admissions Decision Form
SAADCSN Admissions Decision Rules Form
SAAMAPP Admissions Mass Entry Form
SAAQKER Quick Entry Rules Form
SAAQUIK Quick Entry Form
SAASUMI Admissions Application Summary Form
SOAMATL Material Form
Admissions
Admissions
Admissions
Admissions
Admissions
Admissions
Admissions
Overall
STVAPRN Apprenticeship Validation Form SGASTDN General Student Form
SHAINST Term Course Maintenance Form
General Student
Academic History
STVAPLS EDI Application Source Code Validation
Form
SAAETBL Electronic Application Submitted Form Admissions
STVAPRV Catalog Approval Code Validation Form SCACRSE Basic Course Information Form Catalog
STVAPST Admission Application Status Code
Validation Form
SCACRSE Basic Course Information Form
SAADCRV Admissions Decision Form
SAAMAPP Admissions Mass Entry Form
SAAQKER Quick Entry Rules Form
SAAQUIK Quick Entry Form
SAASUMI Admissions Application Summary Form
Admissions
Admissions
Admissions
Admissions
Admissions
Admissions
Validation Form Application/Functional Form Modules
109
Banner Student User Guide | Validation Reference
STVARTP Room and Meal Application Type
Validation Form
SLAMASG Meal Assignment Form
SLAPASG Phone Assignment Form
SLARASG Room Assignment Form
SLARMAP Dorm Room and Meal Application Form
SLQRASG Room Assignment Query Form
SLQRMAP Application Query Form
Location Management
Location Management
Location Management
Location Management
Location Management
Location Management
STVASCD Room Assignment Status Code
Validation Form
SLAASCD Room Assignment Status Form
SLARASG Room Assignment Form
SLARMAT Roommate Application Form
SLARUSE Dorm Room Query Form
SLASGNQ Available Dorm Room Query Form
SLQASCD Room Assignment Status Query Form
SLQRASG Room Assignment Query Form
Location Management
Location Management
Location Management
Location Management
Location Management
Location Management
Location Management
STVASTA Application Verification Steps Validation
Form
SAAEAPS Electronic Application Process Form Admissions
Validation Form Application/Functional Form Modules

110
Banner Student User Guide | Validation Reference
STVASTD Academic Standing Code Validation
Form
SFAREGS Student Course Registration Form
SFARQST Enrollment Verification Request Form
SGASADD Additional Student Information Form
SGASPRT Athletic Compliance Form
SGASTDN General Student Form
SGISPRT Athletic Compliance Inquiry Form
SHAACST Academic Standing Rules Form
SHAGELR Graduation Application Eligibility Rules
Form
SHAINST Term Course Maintenance Form
SHARQTC Transcript Request Form
SHASTAT Academic Standing Query Form
SHASUBJ Subject Sequence History Form
SHATERM Term Sequence Course History Form
SHATRMC Course History By Term and Campus
Form
SHQTERM Term Summary Form
SOAWLTC Automated Waitlist Term Control Form
Registration
Registration
General Student
General Student
General Student
General Student
Academic History
Academic History
Academic History
Academic History
Academic History
Academic History
Academic History
Academic History
Academic History
Overall
STVASTY Assignment Type Code Validation Form SIAASGN Faculty Assignment Form Faculty Load
STVATRA Day Attribute One Validation Form SOACALD Calendar Day Information Form Schedule
STVATRB Day Attribute Two Validation Form SOACALD Calendar Day Information Form Schedule
STVATRC Day Attribute Three Validation Form SOACALD Calendar Day Information Form Schedule
STVATRD Day Attribute Four Validation Form SOACALD Calendar Day Information Form Schedule
STVATRE Day Attribute Five Validation Form SOACALD Calendar Day Information Form Schedule
Validation Form Application/Functional Form Modules

111
Banner Student User Guide | Validation Reference
STVATTR Attribute Validation Form SCADETL Course Detail Information Form
SSADETL Schedule Detail Form
SSQATTR Section Course Attribute Form
SHADEGR Degrees and Other Formal Awards
Form
SHARQTC Transcript Request Form
SHATATR Transfer Course Articulation Form
SHATCKN Course Maintenance Form
SHATRNS Transfer Course Form
SHATRTA Transfer Articulation Attributes Form
SOAWLTC Automated Waitlist Term Control Form
Catalog
Schedule
Schedule
Academic History
Academic History
Academic History
Academic History
Academic History
Academic History
Overall
Validation Form Application/Functional Form Modules

112
Banner Student User Guide | Validation Reference
STVATTS Student Attribute Validation Form SAAADMS Admissions Application Form
SAAMAPP Admissions Mass Entry Form
SCADETL Course Detail Information Form
SCARRES Course Registration Restrictions Form
SFAMHRS Registration Minimum Maximum Hours
Form
SFAMREG Registration Mass Entry Form
SFARWLP Reserved Seats Priority Management
Form
SGAMSTU General Student Mass Entry Form
SGASADD Additional Student Information Form
SHAGELR Graduation Application Eligibility Rules
Form
SOAMATL Material Form
SRARECR Recruit Prospect Information Form
SSADETL Schedule Detail Form
SSADFEE Section Fee Assessment Control Form
SSARRES Schedule Restrictions Form
SSASECT Schedule Form
SSIRESV Reserved Seats Inquiry Form
Admissions
Admissions
Catalog
Catalog
Registration
Registration
Registration
General Student
General Student
Academic History
Overall
Recruiting
Schedule
Schedule
Schedule
Schedule
Schedule
Validation Form Application/Functional Form Modules

113
Banner Student User Guide | Validation Reference
STVATYP Address Type Code Validation Form GOAMTCH Common Matching Entry Form
SAAQUIK Quick Entry Form
SAAWAPP Web Application Section Rules Form
SFARQST Enrollment Verification Request Form
SOAFOLK Guardian Information Form
SHADIPL Diploma Form
SHAMDIP Mass Entry Diploma Form
SHAGAPP Graduation Application Form
SHARQTC Transcript Request Form
SOAFOLK Guardian Information Form
SOADDRQ Address Summary Form
SOAIDNS Person Search Detail Form
SPAEMRG Emergency Contact Form
SPAIDEN General Person Identification Form
SPATELE General Person Telephone Form
SRAQUIK Quick Recruit Form
General Person
Admissions
Admissions
Registration
General Student
Academic History
Academic History
Academic History
Academic History
Overall
Overall
System Administration
General Person
General Person
General Person
Recruiting
STVBCHR Background Inst. Characteristic Code
Validation Form
SOABGIY Source/Background Institution Year
Form
Recruiting
Validation Form Application/Functional Form Modules

114
Banner Student User Guide | Validation Reference
STVBLCK Block Code Validation Form SFAMREG Registration Mass Entry Form
SGAMSTU General Student Mass Entry Form
SGASADD Additional Student Information Form
SGASPRT Athletic Compliance Form
SGASTDN General Student Form
SHAINST Term Course Maintenance Form
SSABLCK Block Schedule Control Form
SSABLKQ Block Schedule Query Form
SSABSCQ Block Schedule Section Query Form
SSADETL Schedule Detail Form
Registration
General Student
General Student
General Student
General Student
Academic History
Schedule
Schedule
Schedule
Schedule
STVBLDG Building Code Validation Form SFAREGQ Registration Query Form
SFQSECT Section Schedule Query Form
SHACATQ Ceremony Attendance Query Form
SHACPRQ Ceremonies By Attendee Query Form
SHACRMQ Ceremony Query Form
SHACRMY Ceremony Form
SIAASGQ Faculty Schedule Query Form
SIQSECM Faculty Course Section Query Form
SLABLDG Building Definition Form
SLABQRY Building Query Form
SLAEVNT Event Form
Registration
Registration
Academic History
Academic History
Academic History
Academic History
Faculty Load
Faculty Load
Location Management
Location Management
Location Management
Validation Form Application/Functional Form Modules

115
Banner Student User Guide | Validation Reference
STVBLDG Building Code Validation Form (cont.) SLARASG Room Assignment Form
SLARDEF Room Definition Form
SLARMAP Dorm Room and Meal Application Form
SLARMAT Roommate Application Form
SLARUSE Dorm Room Query Form
SLASGNQ Available Dorm Room Query Form
SLIAEVN Event Available Room Query Form
SLQBCAT Building Category Query Form
SLQMEET Available Class Room Query Form
SLQRASG Room Assignment Query Form
SLQROOM Room Query Form
SSAMATX Building/Room Schedule Form
SSASECT Schedule Form
SSAXMTI Cross List Meeting Time/Instructor
Query Form
SSQMEET Meeting Time Help Form
Location Management
Location Management
Location Management
Location Management
Location Management
Location Management
Location Management
Location Management
Location Management
Location Management
Location Management
Schedule
Schedule
Schedule
Schedule
STVBSKL Basic Skills Validation Form SGASTDN General Student Form
SHAINST Term Course Maintenance Form
General Student
Academic History
Validation Form Application/Functional Form Modules
116
Banner Student User Guide | Validation Reference
STVCACT Curriculum Activity Status Validation
Form
SRARECR Recruit Prospect Information Form
SAAADMS Admissions Application Form
SGASTDN General Student Form
SFAREGS Student Course Registration Form
SHADEGR Degrees and Other Formal Awards
Form
SORCACT Learner Curriculum Activity Rules Form
Recruiting
Admissions
General Student
Registration
Academic History
Overall
STVCALD Calendar Type Code Validation Form SHATAEQ Transfer Articulation Evaluation Form
SHATATC Transfer Institution Catalog Entry Form
SHATATR Transfer Course Articulation Form
SHATRTA Transfer Articulation Attributes Form
SOABGTA Transfer Articulation Institution Form
Academic History
Academic History
Academic History
Academic History
Academic History
Validation Form Application/Functional Form Modules

117
Banner Student User Guide | Validation Reference
STVCAMP Campus Code Validation Form SAAADMS Admissions Application Form
SAADCRV Admissions Decision Form
SAAMAPP Admissions Mass Entry Form
SAAQKER Quick Entry Rules Form
SAAQUIK Quick Entry Form
SCADETL Course Detail Information Form
SCARRES Course Registration Restrictions Form
SCASRES Catalog Schedule Restrictions Form
SFAALST Class Attendance Roster Form
SFAGEOR Gainful Employment OPEID Rules Form
SFAMHRS Registration Minimum Maximum Hours
Form
SFAMREG Registration Mass Entry Form
SFAREGF Student Course/Fee Assessment Query
Form
SFAREGS Student Course Registration Form
SFAREGQ Registration Query Form
SFARGFE Registration Fee Assessment Rules
Form
SFARQST Enrollment Verification Request Form
SFARWLP Reserved Seats Priority Management
Form
Admissions
Admissions
Admissions
Admissions
Admissions
Catalog
Catalog
Catalog
Registration
Registration
Registration
Registration
Registration
Registration
Registration
Registration
Registration
Registration
Validation Form Application/Functional Form Modules

118
Banner Student User Guide | Validation Reference
STVCAMP Campus Code Validation Form (cont.) SFASLST Class Roster Form
SFASTSR Student Centric Time Status Rules Form
SFATMST Time Status Rules Form
SFQSECM Registration Section Query Form
SFQSECT Section Schedule Query Form
SGADISA Student Disability Services Form
SGAMSTU General Student Mass Entry Form
SGASADD Additional Student Information Form
SGAPSRT Student Sport Form
SGASTDN General Student Form
SHACRSE History Course Summary Form
SHADEGR Degrees and Other Formal Awards
Form
SHADGMQ Degree Summary Form
SHAGADS Graduation Application Display Rule
Selection Form
SHAGELR Graduation Application Eligibility Rules
Form
SHAINST Term Course Maintenance Form
SHAMCAT Mass Entry Ceremony Attendance Form
SHAMDEG Mass Entry Graduation Form
SHAMDIP Mass Entry Diploma Form
SHAMUDI Mass Update Diploma Form
Registration
Registration
Registration
Registration
Registration
General Student
General Student
General Student
General Student
General Student
Academic History
Academic History
Academic History
Academic History
Academic History
Academic History
Academic History
Academic History
Academic History
Academic History
Validation Form Application/Functional Form Modules

119
Banner Student User Guide | Validation Reference
STVCAMP Campus Code Validation Form (cont.) SHAPCMP Pre-Banner Summary Hours and GPA
Form
SHASUBJ Subject Sequence History Form
SHATCKN Course Maintenance Form
SHATERM Term Sequence Course History Form
SHATRMC Course History by Term and Campus
Form
SHQSECT Academic History Section Query Form
SLABLDG Building Definition Form
SLABQRY Building Query Form
SLAEVNT Event Form
SLARMAP Dorm Room and Meal Application Form
SLARMAT Roommate Application Form
SLARUSE Dorm Room Query Form
SLIAEVN Event Available Room Query Form
SLQEVNT Event Query Form
SLQMEET Available Class Room Query Form
SOACURR Curriculum Rules Form
SOACOMM Communication Plan Form
SOAPROF Campus Security User Profile Form
SOAWLTC Automated Waitlist Term Control Form
Academic History
Academic History
Academic History
Academic History
Academic History
Academic History
Location Management
Location Management
Location Management
Location Management
Location Management
Location Management
Location Management
Location Management
Location Management
Overall
Overall
Overall
Overall
Validation Form Application/Functional Form Modules

120
Banner Student User Guide | Validation Reference
STVCAMP Campus Code Validation Form (cont.) SRARECR Recruit Prospect Information Form
SRAQUIK Quick Recruit Form
SSABLCK Block Schedule Control Form
SSABSCQ Block Schedule Section Query Form
SSADETL Schedule Detail Form
SSADFEE Section Fee Assessment Control Form
SSAMATX Building/Room Schedule Form
SSASECQ Schedule Section Query Form
SSASECT Schedule Form
SSAXLST Cross List Definition Form
SSARRES Schedule Restrictions Form
SSIRESV Reserved Seats Inquiry Form
Recruiting
Recruiting
Schedule
Schedule
Schedule
Schedule
Schedule
Schedule
Schedule
Schedule
Schedule
Schedule
STVCAPL Career Plan Code Validation Form SGASTDN General Student Form
SHAINST Term Course Maintenance Form
General Student
Academic History
STVCAST Combined Academic Standing Code
Validation Form
SGASTDN General Student Form
SGASTDQ General Student Summary Form
SFAREGS Student Course Registration Form
SHAACST Academic Standing Rules Form
SHAGELR Graduation Application Eligibility Rules
Form
SHAINST Term Course Maintenance Form
SHASUBJ Subject Sequence History Form
SHATERM Term Sequence Course History Form
General Student
General Student
Registration
Academic History
Academic History
Academic History
Academic History
Academic History
STVCCSL Classification Code Validation Form SCADETL Course Detail Information Form Catalog
Validation Form Application/Functional Form Modules
121
Banner Student User Guide | Validation Reference
STVCERT Ceremony Type Validation Form SHACATQ Ceremony Attendance Query Form
SHACATT Ceremony Attendance Form
SHACPRQ Ceremonies By Attendee Query Form
SHACRMQ Ceremony Query Form
SHACRMY Ceremony Form
SHADIPL Diploma Form
SHAMCAT Mass Entry Ceremony Attendance Form
SHAMDIP Mass Entry Diploma Form
SHAMUCA Mass Update Ceremony Attendance
Form
SHAMUDI Mass Update Diploma Form
Academic History
Academic History
Academic History
Academic History
Academic History
Academic History
Academic History
Academic History
Academic History
Academic History
STVCGRP Communication Group Code Validation
Form
SOACGRP Communication Group Form
SOACPLN Communication Plan Form
Overall
Overall
Validation Form Application/Functional Form Modules

122
Banner Student User Guide | Validation Reference
STVCHRT Cohort Code Validation Form SAAADMS Admissions Application Form
SAAMAPP Admissions Mass Entry Form
SCADETL Course Detail Information Form
SCARRES Course Registration Restrictions Form
SFAMHRS Registration Minimum Maximum Hours
Form
SFAMREG Registration Mass Entry Form
SFARWLP Reserved Seats Priority Management
Form
SGAMSTU General Student Mass Entry Form
SGASADD Additional Student Information Form
SHAGELR Graduation Application Eligibility Rules
Form
SHAINST Term Course Maintenance Form
SOAWLTC Automated Waitlist Term Control Form
SRARECR Recruit Prospect Information Form
SSADETL Schedule Detail Form
SSADFEE Section Fee Assessment Control Form
SSARRES Schedule Restrictions Form
SSIRESV Reserved Seats Inquiry Form
Admissions
Admissions
Catalog
Catalog
Registration
Registration
Registration
General Student
General Student
Academic History
Academic History
Overall
Recruiting
Schedule
Schedule
Schedule
Schedule
STVCIPC CIP Code Validation Form SCACRSE Basic Course Information Form Catalog
Validation Form Application/Functional Form Modules
123
Banner Student User Guide | Validation Reference
STVCITZ Citizen Type Code Validation Form SAAADMS Admissions Application Form
SAAQUIK Quick Entry Form
SGASTDN General Student Form
SHAINST Term Course Maintenance Form
SPAPERS General Person Form
SOAMATL Material Form
SRARECR Recruit Prospect Information Form
Admissions
Admissions
General Student
Academic History
General Person
Overall
Recruiting
STVCKSR Application Checklist Source Validation
Form
SAAADMS Admissions Application Form
SAAMAPP Admissions Mass Entry Form
Admissions
Admissions
STVCKST Application Checklist Status Validation
Form
SAAADMS Admissions Application Form
SAAACKL Admissions Application/Checklist
Summary Form
Admissions
Admissions
Validation Form Application/Functional Form Modules

124
Banner Student User Guide | Validation Reference
STVCLAS Class Code Validation Form SCADETL Course Detail Information Form
SCARRES Course Registration Restrictions Form
SFAMHRS Registration Minimum Maximum Hours
Form
SFAMREG Registration Mass Entry Form
SFAREGF Student Course/Fee Assessment Query
Form
SFAREGS Student Course Registration Form
SFARGFE Registration Fee Assessment Rules
Form
SFARWLP Reserved Seats Priority Management
Form
SGACLSR Student Class Rules Form
SGAMSTU General Student Mass Entry Form
SGASADD Additional Student Information Form
SGASPRT Athletic Compliance Form
SGASTDN General Student Form
SHAACST Academic Standing Rules Form
SHAGELR Graduation Application Eligibility Rules
Form
SHAINST Term Course Maintenance Form
Catalog
Catalog
Registration
Registration
Registration
Registration
Registration
Registration
General Student
General Student
General Student
General Student
General Student
Academic History
Academic History
Academic History
Validation Form Application/Functional Form Modules

125
Banner Student User Guide | Validation Reference
STVCLAS Class Code Validation Form (cont.) SHAMCAT Mass Entry Ceremony Attendance Form
SHAMDEG Mass Entry Graduation Form
SHAMDIP Mass Entry Diploma Form
SHAMUDI Mass Update Diploma Form
SHQSUBJ Academic History Catalog Query Form
SOAWLTC Automated Waitlist Term Control Form
SSADETL Schedule Detail Form
SSADFEE Section Fee Assessment Control Form
SSARRES Schedule Restrictions Form
SSASECT Schedule Form
SSIRESV Reserved Seats Inquiry Form
Academic History
Academic History
Academic History
Academic History
Academic History
Overall
Schedule
Schedule
Schedule
Schedule
Schedule
STVCMTT Comment Type Code Validation Form SPACMNT Person Comment Form
SGASPRT Athletic Compliance Form
General Person
General Student
STVCNTR Contract Rules Validation Form SIAASGN Faculty Assignment Form
SIACONA Faculty Contract Analysis Form
SIAFLCT Faculty Contract Term Rules Form
SIACONQ Faculty Contract Query Form
SIAINST Faculty/Advisor Information Form
SIAFLRC Faculty Workload Contract Rules Form
Faculty Load
Faculty Load
Faculty Load
Faculty Load
Faculty Load
Faculty Load
Validation Form Application/Functional Form Modules

126
Banner Student User Guide | Validation Reference
STVCNTY County Code Validation Form GOAMTCH Common Matching Entry Form
SAAQUIK Quick Entry Form
SLABLDG Building Definition Form
SOAFOLK Guardian Information Form
SOAHSCH High School Information Form
SOAPCOL Prior College Form
SOASBGI Source or Background Institution Base
Form
SOTCNVT Tape Code Conversion Form
SPAIDEN General Person Identification Form
SRAQUIK Quick Recruit Form
General Person
Admissions
Location Management
Overall
Overall
Overall
Overall
System Administration
General Person
Recruiting
Validation Form Application/Functional Form Modules

127
Banner Student User Guide | Validation Reference
STVCOLL College Code Validation Form SAAADMS Admissions Application Form
SAACHKB Admissions Checklist Rules Form
SAADCRV Admissions Decision Form
SAADCSN Admissions Decision Rules Form
SAAMAPP Admissions Mass Entry Form
SAAQKER Quick Entry Rules Form
SAAQUIK Quick Entry Form
SAASUMI Admissions Application Summary Form
SCACRSE Basic Course Information Form
SCADETL Course Detail Information Form
SCARRES Course Registration Restrictions Form
SCATEXT College Department Text Form
SFAMHRS Registration Minimum Maximum Hours
Form
SFAMREG Registration Mass Entry Form
SFAREGS Student Course Registration Form
SFARGFE Registration Fee Assessment Rules
Form
SFARQST Enrollment Verification Request Form
SFARWLP Reserved Seats Waitlist Priority
Management Form
SFASTSR Student Centric Time Status Rules Form
SFATMST Time Status Rules Form
Admissions
Admissions
Admissions
Admissions
Admissions
Admissions
Admissions
Admissions
Catalog
Catalog
Catalog
Catalog
Registration
Registration
Registration
Registration
Registration
Registration
Registration
Registration
Validation Form Application/Functional Form Modules

128
Banner Student User Guide | Validation Reference
STVCOLL College Code Validation Form (cont.) SGAASST Assistantship/Fellowship/Internship
Form
SGAMSTU General Student Mass Entry Form
SGASADD Additional Student Information Form
SGASPRT Athletic Compliance Form
SGASTDN General Student Form
SHAACST Academic Standing Rules Form
SHACOMI Committee/Service Form
SHADEGR Degrees and Other Formal Awards
Form
SHAGADS Graduation Application Display Rule
Selection Form
SHAGELR Graduation Application Eligibility Rules
Form
SHADGMQ Degree Summary Form
SHADIPL Diploma Form
SHAINST Term Course Maintenance Form
SHAMCAT Mass Entry Ceremony Attendance Form
SHAMDEG Mass Entry Graduation Form
SHAMDIP Mass Entry Diploma Form
SHAMUDI Mass Update Diploma Form
SHARQTC Transcript Request Form
SHQTERM Term Summary Form
General Student
General Student
General Student
General Student
General Student
Academic History
Academic History
Academic History
Academic History
Academic History
Academic History
Academic History
Academic History
Academic History
Academic History
Academic History
Academic History
Academic History
Academic History
Validation Form Application/Functional Form Modules

129
Banner Student User Guide | Validation Reference
STVCOLL College Code Validation Form (cont.) SHASTAT Academic Standing Query Form
SHATCKN Course Maintenance Form
SHQASTR Academic Standing Rules Query Form
SHQSUBJ Academic History Catalog Query Form
SIAASGN Faculty Assignment Form
SIACONA Faculty Contract Analysis Form
SIACONQ Faculty Contract Query Form
SIAFAVL Available Faculty Query Form
SIAFDEG Faculty Degree Information Form
SIAFLRC Faculty Workload Contract Rules Form
SIAINST Faculty/Advisor Information Form
SIAIQRY Faculty/Advisor Query Form
SLABLDG Building Definition Form
SLAEVNT Event Form
SLARDEF Room Definition Form
SLQEVNT Event Query Form
SLQROOM Room Query Form
Academic History
Academic History
Academic History
Academic History
Faculty Load
Faculty Load
Faculty Load
Faculty Load
Faculty Load
Faculty Load
Faculty Load
Faculty Load
Location Management
Location Management
Location Management
Location Management
Location Management
Validation Form Application/Functional Form Modules

130
Banner Student User Guide | Validation Reference
STVCOLL College Code Validation Form (cont.) SOACOMM Communication Rules Form
SOACURR Curriculum Rules Form
SOAIDNS Person Search Detail Form
SOAPCOL Prior College Form
SOAPCOQ Prior College Summary Form
SOAWLTC Automated Waitlist Term Control Form
SRAQUIK Quick Recruit Form
SRARECR Recruit Prospect Information Form
SSADETL Schedule Detail Form
SSADFEE Section Fee Assessment Control Form
SSARRES Schedule Restrictions Form
SSAOVRR Schedule Override Form
SSASECT Schedule Form
SSIRESV Reserved Seats Inquiry Form
Overall
Overall
System Administration
Overall
Overall
Overall
Recruiting
Recruiting
Schedule
Schedule
Schedule
Schedule
Schedule
Schedule
STVCOMF Committee Member Role/Function
Validation Form
SHACOMI Committee/Service Form Academic History
STVCOMS Committee/Service Status Validation
Form
SHACOMI Committee/Service Form Academic History
STVCOMT Committee/Service Type Validation
Form
SHACOMI Committee/Service Form Academic History
STVCOPC Cooperative Education Code Validation
Form
SGACOOP Cooperative Education Form General Student
Validation Form Application/Functional Form Modules
131
Banner Student User Guide | Validation Reference
STVCPLN Communication Plan Code Validation
Form
SOACCOL Communication Plan Collector Form
SOACOMM Communication Rules Form
SOACPLN Communication Plan Form
SOAPLAN Communication Plan Assignment Form
Overall
Overall
Overall
Overall
STVCPRT Compliance Type Code Validation Form Please refer to the CAPP Handbook. CAPP
STVCREA Cohort Reason Code Validation Form SGASADD Additional Student Information Form General Student
STVCSTA Course Status Code Validation Form SCACRSE Basic Course Information Form
SSASECT Schedule Form
Catalog
Schedule
STVCSTS Curriculum Status Validation Form SAAADMS Admissions Application Form
SAAQUIK Quick Entry Form
SFAREGS Student Course Registration Form
SGASTDN General Student Form
SHADEGR Degrees and Other Formal Awards
Form
SRARECR Recruit Prospect Information Form
SRAQUIK Quick Recruit Form
Admissions
Admissions
Registration
General Student
Academic History
Recruiting
Recruiting
STVCTYP Contact Type Code Validation Form SAAADMS Admissions Application Form
SRAQUIK Quick Recruit Form
SRARAPT Recruiter Appointments/Visits Form
SRARECR Recruit Prospect Information Form
SRASRCE Source Visit/Prospect Form
SOAAPPT Person Appointments/Contacts Form
SOAMATL Material Form
Admissions
Recruiting
Recruiting
Recruiting
Recruiting
Overall
Overall
STVCUDA Catalog Element One Validation Form SCADETL Course Detail Information Form Catalog
Validation Form Application/Functional Form Modules

132
Banner Student User Guide | Validation Reference
STVCUDB Catalog Element Two Validation Form SCADETL Course Detail Information Form Catalog
STVCUDC Catalog Element Three Validation Form SCADETL Course Detail Information Form Catalog
STVCUDD Catalog Element Four Validation Form SCADETL Course Detail Information Form Catalog
STVCUDE Catalog Element Five Validation Form SCADETL Course Detail Information Form Catalog
STVCUDF Catalog Element Six Validation Form SCADETL Course Detail Information Form Catalog
STVDAYS Day of Week Validation Form SFAREGQ Registration Query Form
SFATMST Time Status Rules Form
SFQSECM Registration Section Query Form
SFQSECT Section Schedule Query Form
SLAEVNT Event Form
SLIAEVN Event Available Room Query Form
SLQMEET Available Class Room Query Form
SSAMATX Building/Room Schedule Form
SSASECT Schedule Form
SSAXMTI Cross List Meeting Time/Instructor
Query Form
SSQMEET Meeting Time Help Form
Registration
Registration
Registration
Registration
Location Management
Location Management
Location Management
Schedule
Schedule
Schedule
Schedule
STVDAYT Institutional Type of Day Validation Form SOACALD Calendar Day Information Form Schedule
STVDCPR Degree Completion Change Reason
Validation Form
SGAAPRG Athletic Academic Progress Form General Student
Validation Form Application/Functional Form Modules

133
Banner Student User Guide | Validation Reference
STVDEGC Degree Code Validation Form SAAADMS Admissions Application Form
SAACHKB Admissions Checklist Rules Form
SAADCRV Admissions Decision Form
SAADCSN Admissions Decision Rules Form
SAAMAPP Admissions Mass Entry Form
SAAQKER Quick Entry Rules Form
SAAQUIK Quick Entry Form
SAASUMI Admissions Application Summary Form
SCADETL Course Detail Information Form
SFAGECR Gainful Employment Program Rules
Form
SFAMHRS Registration Minimum Maximum Hours
Form
SFAMREG Registration Mass Entry Form
SFAREGS Student Course Registration Form
SFARQST Enrollment Verification Request Form
SFARWLP Reserved Seats Waitlist Priority
Management Form
SFASTSR Student Centric Time Status Rules Form
SFATMST Time Status Rules Form
SGAMSTU General Student Mass Entry Form
SGASADD Additional Student Information Form
SGASPRT Athletic Compliance Form
SGASTDN General Student Form
Admissions
Admissions
Admissions
Admissions
Admissions
Admissions
Admissions
Admissions
Catalog
Registration
Registration
Registration
Registration
Registration
Registration
Registration
Registration
General Student
General Student
General Student
General Student
Validation Form Application/Functional Form Modules

134
Banner Student User Guide | Validation Reference
STVDEGC Degree Code Validation Form (cont.) SHADEGR Degrees and Other Formal Awards
Form
SHADGMQ Degree Summary Form
SHADIPL Diploma Form
SHAGADS Graduation Application Display Rule
Selection Form
SHAGELR Graduation Application Eligibility Rules
Form
SHAINST Term Course Maintenance Form
SHAMCAT Mass Entry Ceremony Attendance Form
SHAMDEG Mass Entry Graduation Form
SHAMDIP Mass Entry Diploma Form
SHAMUDI Mass Update Diploma Form
SHAQPNO Qualifying Paper Form
SHATRNS Transfer Course Form
SHQTERM Term Summary Form
SIAFDEG Faculty Degree Information Form
SOAIDNS Person Search Detail Form
SOTCNVT Tape Code Conversion Form
Academic History
Academic History
Academic History
Academic History
Academic History
Academic History
Academic History
Academic History
Academic History
Academic History
Academic History
Academic History
Academic History
Faculty Load
System Administration
System Administration
Validation Form Application/Functional Form Modules

135
Banner Student User Guide | Validation Reference
STVDEGC Degree Code Validation Form (cont.) SOABGIY Source/Background Institution Year
Form
SOACOMM Communication Rules Form
SOACURR Curriculum Rules Form
SOAPCOL Prior College Form
SOAWLTC Automated Waitlist Term Control Form
SRAQUIK Quick Recruit Form
SRARECR Recruit Prospect Information Form
SSADETL Schedule Detail Form
SSADFEE Section Fee Assessment Control Form
SSASECT Schedule Form
SSIRESV Reserved Seats Inquiry Form
Overall
Overall
Overall
Overall
Overall
Recruiting
Recruiting
Schedule
Schedule
Schedule
Schedule
Validation Form Application/Functional Form Modules

136
Banner Student User Guide | Validation Reference
STVDEGS Degree Status Code Validation Form SFAALST Class Attendance Roster Form
SFASLST Class Roster Form
SGAASST Assistantship/Fellowship/Internship
Form
SGASTDN General Student Form
SHADEGR Degrees and Other Formal Awards
Form
SHADGMQ Degree Summary Form
SHAGELR Graduation Application Eligibility Rules
Form
SHAMCAT Mass Entry Ceremony Attendance Form
SHAMDEG Mass Entry Graduation Form
SHAMDIP Mass Entry Diploma Form
SHAMUDI Mass Update Diploma Form
Registration
Registration
General Student
General Student
Academic History
Academic History
Academic History
Academic History
Academic History
Academic History
Academic History
STVDEPS Student CARE Number of Dependents
Validation Form
SGAEOPS Education Opportunity Programs and
Services Form
General Student
Validation Form Application/Functional Form Modules

137
Banner Student User Guide | Validation Reference
STVDEPT Department Code Validation Form SAAADMS Admissions Application Form
SAAMAPP Admissions Mass Entry Form
SAAQKER Quick Entry Rules Form
SAAQUIK Quick Entry Form
SCACRSE Basic Course Information Form
SCADETL Course Detail Information Form
SCARRES Course Registration Restrictions Form
SCATEXT College Department Text Form
SFAMHRS Registration Minimum Maximum Hours
Form
SFAMREG Registration Mass Entry Form
SFARWLP Reserved Seats Waitlist Priority
Management Form
SGAASST Assistantship/Fellowship/Internship
Form
SGAMSTU General Student Mass Entry Form
SGASTDN General Student Form
SHACOMI Committee/Service Form
SHAGADS Graduation Application Display Rule
Selection Form
SHAGELR Graduation Application Eligibility Rules
Form
SHAMCAT Mass Entry Ceremony Attendance Form
Admissions
Admissions
Admissions
Admissions
Catalog
Catalog
Catalog
Catalog
Registration
Registration
Registration
General Student
General Student
General Student
Academic History
Academic History
Academic History
Academic History
Validation Form Application/Functional Form Modules

138
Banner Student User Guide | Validation Reference
STVDEPT Department Code Validation Form
(cont.)
SHAMDIP Mass Entry Diploma Form
SHAMDEG Mass Entry Graduation Form
SHAMUDI Mass Update Diploma Form
SHATCKN Course Maintenance Form
SHQSUBJ Academic History Catalog Query Form
SIAASGN Faculty Assignment Form
SIACONA Faculty Contract Analysis Form
SIACONQ Faculty Contract Query Form
SIAFAVL Available Faculty Query Form
SIAINST Faculty/Advisor Information Form
SIAIQRY Faculty/Advisor Query Form
SIAFAVL Available Faculty Query Form
SLABLDG Building Definition Form
SLAEVNT Event Form
SLARDEF Room Definition Form
SLQEVNT Event Query Form
SLQROOM Room Query Form
Academic History
Academic History
Academic History
Academic History
Academic History
Faculty Load
Faculty Load
Faculty Load
Faculty Load
Faculty Load
Faculty Load
Faculty Load
Location Management
Location Management
Location Management
Location Management
Location Management
Validation Form Application/Functional Form Modules
139
Banner Student User Guide | Validation Reference
STVDEPT Department Code Validation Form
(cont.)
SOAMATL Material Form
SRARECR Recruit Prospect Information Form
SRAQUIK Quick Recruit Form
SSADETL Schedule Detail Form
SSADFEE Section Fee Assessment Control Form
SSAOVRR Schedule Override Form
SSARRES Schedule Restrictions Form
SSASECT Schedule Form
SSIRESV Reserved Seats Inquiry Form
Overall
Recruiting
Recruiting
Schedule
Schedule
Schedule
Schedule
Schedule
Schedule
STVDFLT Compliance Defaults Option Validation
Form
Please refer to the CAPP Handbook.CAPP
STVDISA Disability Type Code Validation Form SGADISA Student Disability Services Form General Student
STVDIVS Division Code Validation Form SCACRSE Basic Course Information Form
SHATCKN Course Maintenance Form
SHQSUBJ Academic History Catalog Query Form
SSAOVRR Schedule Override Form
Catalog
Academic History
Academic History
Schedule
STVDPLM Diploma Type Validation Form SAADCRV Admissions Decision Form
SAADCSN Admissions Decision Rules Form
SOAHSCH High School Information Form
SOABGIY Source Background Institution Year
Form
Admissions
Admissions
Overall
Overall
STVDPMR Duplicate Material Code Validation Form SOADPMR Duplicate Material Rules Form
SOAMATL Material Form
Overall
Overall
Validation Form Application/Functional Form Modules

140
Banner Student User Guide | Validation Reference
STVDRES Ceremony Dress Validation Form SHACRMY Ceremony Form
SHACPRQ Ceremonies By Attendee Query Form
Academic History
Academic History
STVDSTS Electronic Document Status Code
Validation Form
SHAEDIS Online Transcripts Activity List Form Academic History
STVEAPL Electronic Application Status Validation
Form
SAAEAPS Electronic Application Process Form Admissions
STVEDIS Electronic Status Code Validation Form SHARQTC Transcript Request Form Academic History
STVEDLV Education Level Code Validation Form SAAADMS Admissions Application Form
SAAQKER Quick Entry Rules Form
SAAQUIK Quick Entry Form
SGAMSTU General Student Mass Entry Form
SGASTDN General Student Form
SHAINST Term Course Maintenance Form
SRARECR Recruit Prospect Information Form
Admissions
Admissions
Admissions
General Student
General Student
Academic History
Recruiting
STVEGOL Education Goal Validation Form SAAADMS Admissions Application Form
SAAQKER Quick Entry Rules Form
SAAQUIK Quick Entry Form
SGAMSTU General Student Mass Entry Form
SGASTDN General Student Form
SHAMDEG Mass Entry Graduation Form
SRARECR Recruit Prospect Information Form
Admissions
Admissions
Admissions
General Student
General Student
Academic History
Recruiting
STVEGRP EDI Rule Group Validation Form SAAERUL Electronic Admissions Application Rules
Form
Admissions
Validation Form Application/Functional Form Modules

141
Banner Student User Guide | Validation Reference
STVELIG Eligibility Code Validation Form SGAMSPT Mass Entry Athletic Compliance Form
SGASPRT Athletic Compliance Form
SGISPRT Athletic Compliance Inquiry Form
General Student
General Student
General Student
STVELMT HTML Letter Module Validation Form SOAELTL HTML Letter Rules Form Overall
STVEMEX Employment Expectation Validation
Form
SGASTDN General Student Form
SHAINST Term Course Maintenance Form
General Student
Academic History
STVEMPL Employer Code Validation Form SFARQST Enrollment Verification Request Form
SGACOOP Cooperative Education Form
Registration
General Student
STVEOPS Education Opportunity Prog/Serv Status
Validation Form
SGAEOPS Education Opportunity Programs and
Services Form
General Student
STVEPRT Enrollment Verification Type Code
Validation Form
SFAEPRT Enrollment Verification Request Rules
Form
SFAMESG Enrollment Verification Message Form
SFARQSS Enrollment Verification Status Form
SFARQST Enrollment Verification Request Form
Registration
Registration
Registration
Registration
STVESEL Eligibility Factor Validation Form SGAEOPS Education Opportunity Programs and
Services Form
General Student
STVESTS Enrollment Status Code Validation Form SFAESTS Student Registration Status Form
SFAREGF Student Course/Fee Assessment Query
Form
SFAREGS Student Course Registration Form
SFARQST Enrollment Verification Request Form
SFQESTS Enrollment Status Query Form
SGASADD Additional Student Information Form
SGAPSRT Student Sport Form
Registration
Registration
Registration
Registration
Registration
General Student
General Student
Validation Form Application/Functional Form Modules

142
Banner Student User Guide | Validation Reference
STVETHN Ethnic Code Validation Form SAAQUIK Quick Entry Form
SPAPERS General Person Form
SOABGIY Source/Background Institution Year
Form
SOAMATL Material Form
SOTCNVT Tape Code Conversion Form
SRAQUIK Quick Recruit Form
Admissions
General Person
Overalls
Overall
System Administration
Recruiting
STVETYP Event/Function Type Code Validation
Form
SLAEVNT Event Form
SLQEVNT Event Query Form
Location Management
Location Management
STVEVAL Evaluation Question Code Validation
Form
SSAEVAL Schedule Evaluation Form Schedule
STVEVEN Academic History Event Code Validation
Form
SHATCMT Transcript Events and Comments Form Academic History
STVEXAM Examination Code Validation Form SHAINST Term Course Maintenance Form Academic History
STVFATT Faculty Member Attributes Code
Validation Form
SIAFAVL Available Faculty Query Form
SIAINST Faculty/Advisor Information Form
Faculty Load
Faculty Load
Validation Form Application/Functional Form Modules

143
Banner Student User Guide | Validation Reference
STVFCNT Faculty Contract Type Code Validation
Form
SIAASGN Faculty Assignment Form
SIACFTE Faculty Workload Contract FTE Form
SIACONA Faculty Contract Analysis Form
SIACONQ Faculty Contract Query Form
SIAFAVL Available Faculty Query Form
SIAFCTR Faculty Contract Type Term Rules Form
SIAFLCT Faculty Contract Term Rules Form
SIAFLRC Faculty Workload Contract Rules Form
SIAINST Faculty/Advisor Information Form
SIAIQRY Faculty/Advisor Query Form
SSASECT Schedule Form
Faculty Load
Faculty Load
Faculty Load
Faculty Load
Faculty Load
Faculty Load
Faculty Load
Faculty Load
Faculty Load
Faculty Load
Schedule
STVFCST Faculty Status Code Validation Form SGASTDN General Student Form
SHATCKN Course Maintenance Form
SIAASGN Faculty Assignment Form
SIACONQ Faculty Contract Query Form
SIAINST Faculty/Advisor Information Form
SIAIQRY Faculty/Advisor Query Form
SSASECT Schedule Form
General Student
Academic History
Faculty Load
Faculty Load
Faculty Load
Faculty Load
Schedule
Validation Form Application/Functional Form Modules

144
Banner Student User Guide | Validation Reference
Validation Form Application/Functional Form Modules
STVFCTG Faculty Category Code Validation Form SIAASGN Faculty Assignment Form
SIACONA Faculty Contract Analysis Form
SIACONQ Faculty Contract Query Form
SIAFAVL Available Faculty Query Form
SIAINST Faculty/Advisor Information Form
SIAIQRY Faculty/Advisor Query Form
Faculty Load
Faculty Load
Faculty Load
Faculty Load
Faculty Load
Faculty Load
STVFSTP Faculty Staff Type Code Validation Form SIAASGN Faculty Assignment Form
SIACONA Faculty Contract Analysis Form
SIACONQ Faculty Contract Query Form
SIAFAVL Available Faculty Query Form
SIAINST Faculty/Advisor Information Form
SIAIQRY Faculty/Advisor Query Form
Faculty Load
Faculty Load
Faculty Load
Faculty Load
Faculty Load
Faculty Load
STVFTYP Fee Type Validation Form SCADETL Course Detail Information Form
SSADETL Section Detail Information Form
SSADFEE Section Fee Assessment Control Form
SSARULE Schedule Processing Rules Form
SOAORUL Open Learning Section Default Rules
Form
Catalog
Schedule
Schedule
Schedule
Overall
STVGADR Graduation Application Display Rule
Code Validation Form
SHAGADR Self-Service Graduation Application
Display Rules Form
SHAGADS Graduation Application Display Rule
Selection Form
Academic History
Academic History
145
Banner Student User Guide | Validation Reference
STVGAIN Gain Status Code Validation Form SGASTDN General Student Form
SHAINST Term Course Maintenance Form
General Student
Academic History
STVGAST Graduation Application Status Validation
Form
SHAGADR Self-Service Graduation Application
Display Rules Form
SHAGAPP Graduation Application Form
SHAMDEG Mass Entry Graduation Form
Academic History
Academic History
Academic History
STVGATT Goal Attribute Validation Form SEAGDTL Goal Attributes and Comments Form General Person
STVGCHG Grade Change Code Validation Form SHATCKN Course Maintenance Form Academic History
STVGCMT Grade Comment Code Validation Form SFAALST Class Attendance Roster Form
SFASLST Class Roster Form
SHATCKN Course Maintenance Form
Registration
Registration
Academic History
Validation Form Application/Functional Form Modules

146
Banner Student User Guide | Validation Reference
STVGMOD Grading Mode Code Validation Form SCACRSE Basic Course Information Form
SFAALST Class Attendance Roster Form
SFACREQ Student Course Request Form
SFAMREG Registration Mass Entry Form
SFAREGF Student Course/Fee Assessment Query
Form
SFAREGS Student Course Registration Form
SFASLST Class Roster Form
SFQSECT Section Schedule Query Form
SHACRSE Course Summary Form
SHADEGR Degrees and Other Formal Awards
Form
SHAGRDE Grade Code Maintenance Form
SHAGRDS Grade Code Substitution Form
SHASUBJ Subject Sequence History Form
SHATAEQ Transfer Articulation Evaluation Form
SHATCKN Course Maintenance Form
SHATERM Term Sequence History Form
SHATGRD Transfer Grade Code Maintenance
Form
SHATRMC Degrees and Other Formal Awards
Form
Catalog
Registration
Registration
Registration
Registration
Registration
Registration
Registration
Academic History
Academic History
Academic History
Academic History
Academic History
Academic History
Academic History
Academic History
Academic History
Academic History
Validation Form Application/Functional Form Modules
147
Banner Student User Guide | Validation Reference
STVGMOD Grading Mode Code Validation Form
(cont.)
SHATRNS Transfer Course Form
SHQSECT Academic History Section Query Form
SHQSUBJ Academic History Catalog Query Form
SSABLCK Block Schedule Control Form
SSABSCQ Block Schedule Section Query Form
SSASECT Schedule Form
Academic History
Academic History
Academic History
Schedule
Schedule
Schedule
STVGOAL Goal Validation Form SEADETL Support Service Detail Form
SEAGDTL Goal Attributes and Comments Form
SEAGQRY Student Services Goal Query Form
SEAQGNS Support Services Query Form
SEASSGP Service Group Rules Form
General Person
General Person
General Person
General Person
General Person
STVGRST Graduation Status Validation Form SHADEGR Degrees and Other Formal Awards
Form
SHADGMQ Degree Summary Form
SHAGADR Self-Service Graduation Application
Display Rules Form
SHAGAPP Graduation Application Form
SHAGELR Graduation Application Eligibility Rules
Form
Academic History
Academic History
Academic History
Academic History
Academic History
STVGSTA A/F/I Status Validation Form SGAASST Assistantship/Fellowship/Internship
Form
General Student
STVGTYP A/F/I Type Validation Form SGAASST Assistantship/Fellowship/Internship
Form
General Student
Validation Form Application/Functional Form Modules
148
Banner Student User Guide | Validation Reference
STVHAPS Housing Application Status Code
Validation Form
SLAMASG Meal Assignment Form
SLAPASG Phone Assignment Form
SLARASG Room Assignment Form
SLARMAP Dorm Room and Meal Application Form
SLQRASG Room Assignment Query Form
SLQRMAP Application Query Form
Location Management
Location Management
Location Management
Location Management
Location Management
Location Management
STVHLDD Hold Type Code Validation Form SFARQST Enrollment Verification Request Form
SHACATT Ceremony Attendance Form
SHACPRQ Ceremonies By Attendee Query Form
SHADEGR Degrees and Other Formal Awards
Form
SHADIPL Diploma Form
SHARQTC Transcript Request Form
SOQHOLD Holds Query-Only Form
SOAHOLD Hold Information Form
Registration
Academic History
Academic History
Academic History
Academic History
Academic History
Overall
Overall
STVHLWK Highest Level of Work Validation Form SOABGTA Transfer Articulation Institution Form Academic History
STVHOND Departmental Honors Code Validation
Form
SHADEGR Degrees and Other Formal Awards
Form
Academic History
STVHONR Institutional Honors Code Validation
Form
SAADCRV Admissions Decision Form
SHADEGR Degrees and Other Formal Awards
Form
SIAFDEG Faculty Degree Information Form
SOAPCOL Prior College Form
SOAPCOQ Prior College Summary Form
SRAQUIK Quick Recruit Form
Admissions
Academic History
Faculty Load
Overall
Overall
Recruiting
Validation Form Application/Functional Form Modules
149
Banner Student User Guide | Validation Reference
STVINCM Income Range Code Validation Form SGASTDN General Student Form
SHAINST Term Course Maintenance Form
General Student
Academic History
STVINFC Interface Validation Form SOTCNVT Tape Code Conversion Form System Administration
STVINIT Initials Validation Form SAAADMS Admissions Application Form
SAADCRV Admissions Decision Form
SAAMAPP Admissions Mass Entry Form
SGAMSPT Mass Entry Athletic Compliance Form
SGAMSTU General Student Mass Entry Form
SHAMCAT Mass Entry Ceremony Attendance Form
SHAMDEG Mass Entry Graduation Form
SHAMDIP Mass Entry Diploma Form
SHAMUCA Mass Update Ceremony Attendance
Form
SHAMUDI Mass Update Diploma Form
SOAMATL Material Form
SUAMAIL Student Mail Form
Admissions
Admissions
Admissions
General Student
General Student
Academic History
Academic History
Academic History
Academic History
Academic History
Overall
Recruiting/Admissions
STVINNM Awarding Institution Validation Form SHADIPL Diploma Form
SHAGRDD Graduation Default Control Form
SHAMDIP Mass Entry Diploma Form
SHAMUDI Mass Update Diploma Form
Academic History
Academic History
Academic History
Academic History
Validation Form Application/Functional Form Modules

150
Banner Student User Guide | Validation Reference
STVINTS Outside Interest Code Validation Form SAAADMS Admissions Application Form
SAAMAPP Admissions Mass Entry Form
SRAQUIK Quick Recruit Form
SRARECR Recruit Prospect Information Form
SOAMATL Material Form
Admissions
Admissions
Recruiting
Recruiting
Overall
STVINTV Interview Code Validation Form SAAADMS Admissions Application Form Admissions
STVLEAV Leave of Absence Code Validation Form SGASTDN General Student Form
SHAINST Term Course Maintenance Form
General Student
Academic History
STVLEND Web Prospect How I Learned About
Validation Form
SRARECR Recruit Prospect Information Form Recruiting
Validation Form Application/Functional Form Modules

151
Banner Student User Guide | Validation Reference
STVLEVL Level Code Validation Form SAAADMS Admissions Application Form
SAACHKB Admissions Checklist Rules Form
SAADCRV Admissions Decision Form
SAADCSN Admissions Decision Rules Form
SAAMAPP Admissions Mass Entry Form
SAAQKER Quick Entry Rules Form
SAAQUIK Quick Entry Form
SAASUMI Admissions Application Summary Form
SCACRSE Basic Course Information Form
SCADETL Course Detail Information Form
SCARRES Course Registration Restrictions Form
SFAALST Class Attendance Roster Form
SFACREQ Student Course Request Form
SFAGECR Gainful Employment Program Rules
Form
SFAMHRS Registration Minimum Maximum Hours
Form
SFAMREG Registration Mass Entry Form
SFAREGF Student Course/Fee Assessment Query
Form
SFAREGQ Registration Query Form
SFARGFE Registration Fee Assessment Rules
Form
Admissions
Admissions
Admissions
Admissions
Admissions
Admissions
Admissions
Admissions
Catalog
Catalog
Catalog
Registration
Registration
Registration
Registration
Registration
Registration
Registration
Registration
Validation Form Application/Functional Form Modules

152
Banner Student User Guide | Validation Reference
STVLEVL Level Code Validation Form (cont.) SFAREGS Student Course Registration Form
SFARQST Enrollment Verification Request Form
SFARWLP Reserved Seats Waitlist Priority
Management Form
SFASLST Class Roster Form
SFASTSR Student Centric Time Status Rules Form
SFATMST Time Status Rules Form
SGAASST Assistantship/Fellowship/Internship
Form
SGACLSR Student Class Rules Form
SGACOOP Cooperative Education Form
SGAMSTU General Student Mass Entry Form
SGASADD Additional Student Information Form
SGASPRT Athletic Compliance Form
SGASTDN General Student Form
SHAACST Academic Standing Rules Form
SHACRSE Course Summary Form
SHADEGR Degrees and Other Formal Awards
Form
SHADGMQ Degree Summary Form
SHAGADS Graduation Application Display Rule
Selection Form
SHAGELR Graduation Application Eligibility Rules
Form
Registration
Registration
Registration
Registration
Registration
Registration
General Student
General Student
General Student
General Student
General Student
General Student
General Student
Academic History
Academic History
Academic History
Academic History
Academic History
Academic History
Validation Form Application/Functional Form Modules

153
Banner Student User Guide | Validation Reference
STVLEVL Level Code Validation Form (cont.) SHAGRDE Grade Code Maintenance Form
SHAGRDS Grade Code Substitution Form
SHAINCG Incomplete Grade Rules Form
SHAINST Term Course Maintenance Form
SHAMCAT Mass Entry Ceremony Attendance Form
SHAMDEG Mass Entry Graduation Form
SHAMDIP Mass Entry Diploma Form
SHAMUDI Mass Update Diploma Form
SHAPCMP Pre-Banner Summary Hours and GPA
Form
SHARPTR Repeat/Multiple Course Rules Form
SHARQTC Transcript Request Form
SHASTAT Academic Standing Query Form
SHASUBJ Subject Sequence History Form
SHATAEQ Transfer Articulation Evaluation Form
SHATCKN Course Maintenance Form
SHATCMT Transcript Events/Comments Form
SHATERM Term Sequence History Form
SHATGRD Transfer Grade Code Maintenance
Form
Academic History
Academic History
Academic History
Academic History
Academic History
Academic History
Academic History
Academic History
Academic History
Academic History
Academic History
Academic History
Academic History
Academic History
Academic History
Academic History
Academic History
Academic History
Validation Form Application/Functional Form Modules

154
Banner Student User Guide | Validation Reference
STVLEVL Level Code Validation Form (cont.) SHATRMC Course History by Campus and Term
Form
SHATRNS Transfer Course Form
SHATRTA Transfer Articulation Attributes Form
SHQASTR Academic Standing Rules Query Form
SHQSUBJ Academic History Catalog Query Form
SHQTERM Term Summary Form
SHQTRAM Transfer Attendance Period Form
SOAIDNS Person Search Detail Form
SOACOMM Communication Rules Form
SOACURR Curriculum Rules Form
SOAWLTC Automated Waitlist Term Control Form
SRAQUIK Quick Recruit Form
SRARECR Recruit Prospect Information Form
SSADETL Schedule Detail Form
SSADFEE Section Fee Assessment Control Form
SSARRES Schedule Restrictions Form
SSASECT Schedule Form
SSIRESV Reserved Seats Inquiry Form
Academic History
Academic History
Academic History
Academic History
Academic History
Academic History
Academic History
System Administration
Overall
Overall
Overall
Recruiting
Recruiting
Schedule
Schedule
Schedule
Schedule
Schedule
STVLGCY Legacy Code Validation Form SAAADMS Admissions Application Form
SPAPERS General Person Form
SRARECR Recruit Prospect Information Form
SOAMATL Material Form
Admissions
General Person
Recruiting
Overall
Validation Form Application/Functional Form Modules
155
Banner Student User Guide | Validation Reference
STVLMOD Learner Module Validation Form SOACTRL Curriculum Rules Control Form
SOILCUR Learner Curriculum Query Form
Overall
Overall
STVMAJR Major, Minor, Concentration Code
Validation Form
SAAADMS Admissions Application Form
SAACHKB Admissions Checklist Rules Form
SAADCRV Admissions Decision Form
SAADCSN Admissions Decision Rules Form
SAAMAPP Admissions Mass Entry Form
SAAQKER Quick Entry Rules Form
SAAQUIK Quick Entry Form
SAASUMI Admissions Application Summary Form
SCADETL Course Detail Information Form
SCARRES Course Registration Restrictions Form
SFAGECR Gainful Employment Program Rules
Form
SFAMHRS Registration Minimum Maximum Hours
Form
SFAMREG Registration Mass Entry Form
SFAREGS Student Course Registration Form
SFARGFE Registration Fee Assessment Rules
Form
SFARQST Enrollment Verification Request Form
SFARWLP Reserved Seats Waitlist Priority
Management Form
Admissions
Admissions
Admissions
Admissions
Admissions
Admissions
Admissions
Admissions
Catalog
Catalog
Registration
Registration
Registration
Registration
Registration
Registration
Registration
Validation Form Application/Functional Form Modules

156
Banner Student User Guide | Validation Reference
STVMAJR Major, Minor, Concentration Code
Validation Form (cont.)
SFASTSR Student Centric Time Status Rules Form
SFATMST Time Status Rules Form
SGAASST Assistantship/Fellowship/Internship
Form
SGAMSTU General Student Mass Entry Form
SGASADD Additional Student Information Form
SGASPRT Athletic Compliance Form
SGASTDN General Student Form
SHADEGR Degrees and Other Formal Awards
Form
SHADGMQ Degree Summary Form
SHADIPL Diploma Form
SHAGADS Graduation Application Display Rule
Selection Form
SHAGELR Graduation Application Eligibility Rules
Form
SHAMCAT Mass Entry Ceremony Attendance Form
SHAMDEG Mass Entry Graduation Form
SHAMDIP Mass Entry Diploma Form
SHAMUDI Mass Update Diploma Form
SHAINST Term Course Maintenance Form
SHASTAT Academic Standing Query Form
SHQTERM Term Summary Form
Registration
Registration
General Student
General Student
General Student
General Student
General Student
Academic History
Academic History
Academic History
Academic History
Academic History
Academic History
Academic History
Academic History
Academic History
Academic History
Academic History
Academic History
Validation Form Application/Functional Form Modules
157
Banner Student User Guide | Validation Reference
STVMAJR Major, Minor, Concentration Code
Validation Form (cont.)
SIAFDEG Faculty Degree Information Form
SOACURR Curriculum Rules Form
SOAIDNS Person Search Detail Form
SOAMATL Material Form
SOAPCOL Prior College Form
SOTCNVT Tape Code Conversion Form
SOAWLTC Automated Waitlist Term Control Form
SRAQUIK Quick Recruit Form
SRARECR Recruit Prospect Information Form
SSADETL Schedule Detail Form
SSADFEE Section Fee Assessment Control Form
SSARRES Schedule Restrictions Form
SSASECT Schedule Form
SSIRESV Reserved Seats Inquiry Form
Faculty Load
Overall
System Administration
Overall
Overall
System Administration
Overall
Recruiting
Recruiting
Schedule
Schedule
Schedule
Schedule
Schedule
STVMARS Student CARE Marital Status Validation
Form
SGAEOPS Education Opportunity Programs and
Services Form
General Student
STVMATL Material Code Validation Form SOACGRP Communication Group Form
SOACPLN Communication Plan Form
SOAMATL Material Form
SUAMAIL Student Mail Form
Overall
Overall
Overall
Recruiting/Admissions
STVMEAS Measurement Validation Form SHACATT Ceremony Attendance Form
SHAGRDD Graduation Default Control Form
SHASIZE Attendee Size Classification Rules Form
Academic History
Academic History
Academic History
STVMEDI Medical Code Validation Form SGADISA Student Disability Services Form General Student
Validation Form Application/Functional Form Modules

158
Banner Student User Guide | Validation Reference
STVMEET Meeting Time Code Validation Form SLQMEET Available Class Room Query Form
SSASECT Schedule Form
Location Management
Schedule
STVMRCD Meal Rate Code Validation Form SLALMFE Room/Meal/Phone/Rate Code Rules
Form
SLAMASG Meal Assignment Form
SLAMSCD Meal Assignment Status Form
SLARMAP Dorm Room and Meal Application Form
Location Management
Location Management
Location Management
Location Management/
STVMRTL Marital Status Code Validation Form SPAPERS General Person Form General Person
STVMSCD Meal Assignment Status Code Validation
Form
SLAMASG Meal Assignment Form
SLQMSCD Meal Assignment Status Query Form
Location Management
Location Management
STVNATN Nation Code Validation Form GOAMTCH Common Matching Entry Form
SAAQUIK Quick Entry Form
SGACOOP Cooperative Education Form
SHADIPL Diploma Form
SHAGAPP Graduation Application Form
SHARQTC Transcript Request Form
SOASBGI Source or Background Institution Base
Form
SOAFOLK Guardian Information Form
SOAHSCH High School Information Form
SOAPCOL Prior College Form
SPAEMRG Emergency Contact Form
SPAIDEN General Person Identification Form
SRAQUIK Quick Recruit Form
General Person
Admissions
General Student
Academic History
Academic History
Academic History
Overall
Overall
Overall
Overall
General Person
General Person
Recruiting
Validation Form Application/Functional Form Modules
159
Banner Student User Guide | Validation Reference
STVNATT Need Attribute Validation Form SEANDTL Need Attributes and Comments Form General Person
STVNCRQ Non-Course Requirements Code
Validation Form
SHANCRS Academic Non-Course Form Academic History
STVNCST Non-Course Requirements Status Code
Validation Form
SHANCRS Academic Non-Course Form Academic History
STVNDRF Need Referral Validation Form SEADETL Support Service Detail Form General Person
STVNEED Needs Validation Form SEADETL Support Service Detail Form
SEANDTL Need Attributes and Comments Form
SEANQRY Student Services Need Query Form
SEAQGNS Support Services Query Form
SEASSGP Service Group Rules Form
General Person
General Person
General Person
General Person
General Person
STVNIST Faculty Non-Instructional Type Code
Validation Form
SIAASGN Faculty Assignment Form Faculty Load
STVOCCS Occupational Course Code Validation
Form
SCADETL Course Detail Information Form Catalog
Validation Form Application/Functional Form Modules

160
Banner Student User Guide | Validation Reference
STVORIG Origin Code Validation Form SEADETL Support Services Detail Form
SGADISA Student Disability Services Form
SGASPRT Athletic Compliance Form
SHACATT Ceremony Attendance Form
SHADEGR Degrees and Other Formal Awards
Form
SHADIPL Diploma Form
SHATCMT Transcript Events and Comments Form
SOAHOLD Hold Information Form
SOQHOLD Holds Query-Only Form
SPACMNT Person Comment Form
SRARECR Recruit Prospect Information Form
General Person
General Student
General Student
Academic History
Academic History
Academic History
Academic History
Overall
Overall
General Person
Recruiting
STVORSN Orientation Session Code Validation
Form
SGASTDN General Student Form
SHAINST Term Course Maintenance Form
General Student
Academic History
STVPRAC Practical Training Code Validation Form SGASTDN General Student Form
SHAINST Term Course Maintenance Form
General Student
Academic History
STVPREV Progress Evaluation Code Validation
Form
SGASTDN General Student Form
SGASTDQ General Student Summary Form
SFAREGS Student Course Registration Form
SHAACST Academic Standing Rules Form
SHAINST Term Course Maintenance Form
SHASUBJ Subject Sequence History Form
SHATERM Term Sequence Course History Form
General Student
General Student
Registration
Academic History
Academic History
Academic History
Academic History
Validation Form Application/Functional Form Modules
161
Banner Student User Guide | Validation Reference
STVPRCD Phone Rate Code Validation Form SLABLDG Building Definition Form
SLALMFE Room/Meal/Phone/Rate Code Rules
Form
SLAPASG Phone Assignment Form
SLARDEF Room Definition Form
Location Management
Location Management
Location Management
Location Management
STVPRGA Program Accreditation Code Validation
Form
SOABGTA Transfer Articulation Institution Form Academic History
STVPRNT Compliance Print Code Validation Form Please refer to the CAPP Handbook.CAPP
STVPROC Process Control Code Validation Form SOAFACS Faculty/Advisor Process Rules Form Faculty Load
STVPSCD Phone Assignment Status Code
Validation Form
SLAPASG Phone Assignment Form
SLAPSCD Phone Assignment Status Form
SLQPSCD Phone Assignment Status Query Form
Location Management
Location Management
Location Management
STVPTRM Part of Term Code Validation Form SFAALST Class Attendance Roster Form
SFAREGF Student Course/Fee Assessment Query
Form
SFAREGQ Registration Query Form
SFAREGS Student Course Registration Form
SFARGFE Registration Fee Assessment Rules
Form
SFARSTS Course Registration Status Form
SFASLST Class Roster Form
SFQRSTS Course Registration Status Query Form
SFQSECM Registration Section Query Form
Registration
Registration
Registration
Registration
Registration
Registration
Registration
Registration
Registration
Validation Form Application/Functional Form Modules

162
Banner Student User Guide | Validation Reference
STVPTRM Part of Term Code Validation Form
(cont,)
SHACRSE Academic History Course Summary
Form
SHADEGR Degrees and Other Formal Awards
Form
SHATCKN Course Maintenance Form
SIQSECM Faculty Course Section Query Form
SOATERM Term Control Form
SOATEST Test Score Information Form
SSAACCL Schedule Calendar Form
SSABLCK Block Schedule Control Form
SSABSCQ Block Schedule Section Query Form
SSAEXCL Schedule Exclusion Rules Form
SSAMATX Building/Room Schedule Form
SSASECQ Schedule Section Query Form
SSASECT Schedule Form
SSAXLST Cross List Definition Form
Academic History
Academic History
Academic History
Faculty Load
Overall
Overall
Schedule
Schedule
Schedule
Schedule
Schedule
Schedule
Schedule
Schedule
STVPTYP Source Contact Person Type Code
Validation Form
SOASBGI Source or Background Institution Base
Form
SRAQUIK Quick Recruit Form
Overall
Recruiting
STVPWAV Prerequisite Waiver Code Validation
Form
SCACRSE Basic Course Information Form Catalog
STVQPTP Qualifying Paper Type Code Validation
Form
SHAQPNO Qualifying Papers Form
SHQQPNM Qualifying Papers by Person Form
Academic History
Academic History
Validation Form Application/Functional Form Modules

163
Banner Student User Guide | Validation Reference
STVRATE Student Fee Assessment Code
Validation Form
SAAADMS Admissions Application Form
SAAQKER Quick Entry Rules Form
SAAQUIK Quick Entry Form
SCADETL Course Detail Information Form
SFAREGS Student Course Registration Form
SFARGFE Registration Fee Assessment Rules
Form
SFARQST Enrollment Verification Request Form
SGAMSTU General Student Mass Entry Form
SGASADD Additional Student Information Form
SGASPRT Athletic Compliance Form
SGASTDN General Student Form
SHAINST Term Course Maintenance Form
SSADETL Schedule Detail Form
SSADFEE Section Fee Assessment Control Form
Admissions
Admissions
Admissions
Catalog
Registration
Registration
Registration
General Student
General Student
General Student
General Student
Academic History
Schedule
Schedule
Validation Form Application/Functional Form Modules

164
Banner Student User Guide | Validation Reference
STVRDEF Building/Room Attribute Code Validation
Form
SHACRMY Ceremony Form
SLABLDG Building Definition Form
SLAEVNT Event Form
SLARASG Phone Assignment Form
SLARDEF Room Definition Form
SLARMAP Dorm Room and Meal Application Form
SLARMAT Roommate Application Form
SLASGNQ Available Dorm Room Query Form
SLIAEVN Event Available Room Query Form
SLQMEET Available Class Room Query Form
SSASECT Schedule Form
Academic History
Location Management
Location Management
Location Management
Location Management
Location Management
Location Management
Location Management
Location Management
Location Management
Schedule
STVRECR Recruiter Code Validation Form SAAADMS Admissions Application Form
SOAAPPT Person Appointments/Contacts Form
SRAQUIK Quick Recruit Form
SRARAPT Recruiter Appointments/Visits Form
SRARECR Recruit Prospect Information Form
SRARINF Recruiter's Prospect Form
SRASRCE Source Visit/Prospect Form
Admissions
Overall
Recruiting
Recruiting
Recruiting
Recruiting
Recruiting
STVRELG Religion Code Validation Form SPAPERS General Person Form
SOTCNVT Tape Code Conversion Form
General Person
System Administration
STVRELT Relation Code Validation Form SOAFOLK Guardian Information Form
SPAEMRG Emergency Contact Form
Overall
General Person
Validation Form Application/Functional Form Modules
165
Banner Student User Guide | Validation Reference
STVREPS Repeat Status Code Validation Form SCACRSE Basic Course Information Form
SFQSECT Registration Course Query Form
SHQSUBJ Academic History Catalog Query Form
Catalog
Registration
Academic History
STVRESD Residence Code Validation Form SAAADMS Admissions Application Form
SAACHKB Admissions Checklist Rules Form
SAADCRV Admissions Decision Form
SAADCSN Admissions Decision Rules Form
SAAMAPP Admissions Mass Entry Form
SAAQKER Quick Entry Rules Form
SAAQUIK Quick Entry Form
SCADETL Course Detail Information Form
SFAMHRS Registration Minimum Maximum Hours
Form
SFAREGS Student Course Registration Form
SFARGFE Registration Fee Assessment Rules
Form
SFARQST Enrollment Verification Request Form
SGAMSTU General Student Mass Entry Form
SGASADD Additional Student Information Form
SGASPRT Athletic Compliance Form
SGASTDN General Student Form
Admissions
Admissions
Admissions
Admissions
Admissions
Admissions
Admissions
Catalog
Registration
Registration
Registration
Registration
General Student
General Student
General Student
General Student
Validation Form Application/Functional Form Modules

166
Banner Student User Guide | Validation Reference
STVRESD Residence Code Validation Form (cont.) SHAINST Term Course Maintenance Form
SOAIDNS Person Search Detail Form
SRARECR Recruit Prospect Information Form
SSADETL Schedule Detail Form
SSADFEE Section Fee Assessment Control Form
Academic History
System Administration
Recruiting
Schedule
Schedule
STVRGRE Registration Reason Code Validation
Form
SFAREGS Student Course Registration Form Registration
STVRMST Room Status Code Validation Form SSASECT Schedule Form
SLAEVNT Event Form
SLARASG Room Assignment Form
SLARDEF Room Definition Form
SLASGNQ Available Dorm Room Query Form
SLIAEVN Event Available Room Query Form
SLQMEET Available Class Room Query Form
SLQROOM Room Query Form
Schedule
Location Management
Location Management
Location Management
Location Management
Location Management
Location Management
Location Management
STVROLE Role Definition Validation Form SOAFPAC Faculty Attribute/Advisor Type Control
Form
SOAROLE Role Assignment Form
Overall
Overall
STVROVR Registration Permit-Override Code
Validation Form
SFAROVR Registration Permit-Override Control
Form
SFASRPO Student Registration Permit-Override
Form
Registration
Registration
Validation Form Application/Functional Form Modules

167
Banner Student User Guide | Validation Reference
STVRRCD Room Rate Code Validation Form SLABLDG Building Definition Form
SLALMFE Room/Meal/Phone Rate Code Rules
Form
SLARASG Room Assignment Form
SLARDEF Room Definition Form
SLASGNQ Available Dorm Room Query Form
SLQRASG Room Assignment Query Form
Location Management
Location Management
Location Management
Location Management
Location Management
Location Management
STVRSLT Appointment Result Code Validation
Form
SOAAPPT Person Appointments/Contacts Form
SRARECR Recruit Prospect Information Form
Overall
Recruiting
STVRSTA Recruiting Internal Status Code
Validation Form
SRAQUIK Quick Recruit Form
SRARECR Recruit Prospect Information Form
SRARINF Recruiter's Prospect Form
Recruiting
Recruiting
Recruiting
STVRSTS Course Registration Status Code
Validation Form
SFAALST Class Attendance Roster Form
SFAMREG Registration Mass Entry Form
SFAREGF Student Course/Fee Assessment Query
Form
SFAREGQ Registration Query Form
SFAREGS Student Course Registration Form
SFARSTS Course Registration Status Form
SFASLST Class Roster Form
SFQRSTS Course Registration Status Query Form
SFQSECM Registration Section Query Form
SSABLCK Block Schedule Control Form
SSABSCQ Block Schedule Section Query Form
Registration
Registration
Registration
Registration
Registration
Registration
Registration
Registration
Registration
Schedule
Schedule
Validation Form Application/Functional Form Modules

168
Banner Student User Guide | Validation Reference
STVRTRM Term Restriction Code Validation Form SCASRES Catalog Schedule Restrictions Form Catalog
STVRTYP Recruit Type Validation Form SAAADMS Admissions Application Form
SOAMATL Material Form
SRAQUIK Quick Recruit Form
SRARECR Recruit Prospect Information Form
Admissions
Overall
Recruiting
Recruiting
STVSAAT Athletic Attribute Validation Form SGAMSPT Mass Entry Athletic Compliance Form
SGASPRT Athletic Compliance Form
General Student
General Student
STVSAEL Athletic Academic Eligibility Validation
Form
SGAMSPT Mass Entry Athletic Compliance Form
SGASPRT Athletic Compliance Form
SGISPRT Athletic Compliance Inquiry Form
General Student
General Student
General Student
STVSAQS Athletic Qualifier Status Validation Form SGASPRT Athletic Compliance Form General Student
STVSARE Athletic Competition Reason Validation
Form
SGASPRT Athletic Compliance Form General Student
STVSAPR Special Approval Code Validation Form SFAREGS Student Course Registration Form
SSABLCK Block Schedule Control Form
SSABSCQ Block Schedule Section Query Form
SSASECT Schedule Form
Registration
Schedule
Schedule
Schedule
STVSARX Athletic Residency Exception Validation
Form
SGASPRT Athletic Compliance Form General Student
STVSATR Athlete Transfer Status Validation Form SGASPRT Athletic Compliance Form General Student
STVSATT Service Attribute Validation Form SEASDTL Service Attributes and Comments Form General Person
Validation Form Application/Functional Form Modules

169
Banner Student User Guide | Validation Reference
STVSBGI Source/Background Institution Code
Validation Form
SAAADMS Admissions Application Form
SAADCRV Admissions Decision Form
SAAQKER Quick Entry Rules Form
SAAQUIK Quick Entry Form
SCADETL Course Detail Information Form
SHACATT Ceremony Attendance Form
SHARQTC Transcript Request Form
SHATAEQ Transfer Articulation Evaluation Form
SHATATC Transfer Institution Catalog Entry Form
SHATATR Transfer Course Articulation Form
SHATGRD Transfer Grade Code Maintenance
Form
Admissions
Admissions
Admissions
Admissions
Catalog
Academic History
Academic History
Academic History
Academic History
Academic History
Academic History
Validation Form Application/Functional Form Modules

170
Banner Student User Guide | Validation Reference
STVSBGI Source/Background Institution Code
Validation Form (cont.)
SHATRNS Transfer Course Form
SHATRTA Transfer Articulation Attributes Form
SHQTATC Transfer Course Query Form
SHQTRAM Transfer Attendance Period by Person
Query Form
SHQTRIT Transfer Institution by Person Query
Form
SIAFDEG Faculty Degree Information Form
SOAAPPT Person Appointments/Contacts Form
SOABGIY Source/Background Institution Year
Form
SOABGTA Transfer Articulation Institution Form
SOAHSCH High School Information Form
SOAPCOL Prior College Form
SOAPCOQ Prior College Summary Form
SOASBGI Source or Background Institution Base
Form
SOISBGI Source/Background Institution Query-
Only Form
SRAQUIK Quick Recruit Form
SRARAPT Recruiter Appointments/Visits Form
SRARECR Recruit Prospect Information Form
SRASRCE Source Visit/Prospect Form
Academic History
Academic History
Academic History
Academic History
Academic History
Faculty Load
Overall
Overall
Overall
Overall
Overall
Overall
Overall
Overall
Recruiting
Recruiting
Recruiting
Recruiting
STVSBJC High School Subject Validation Form SAADCRV Admissions Decision Form
SAADCSN Admissions Decision Rules Form
SOAHSCH High School Information Form
Admissions
Admissions
Overall
Validation Form Application/Functional Form Modules

171
Banner Student User Guide | Validation Reference
STVSCCD Schedule Contract Code Validation Form SSADETL Schedule Detail Form Schedule
STVSCHD Schedule Type Code Validation Form SCACRSE Basic Course Information Form
SFAALST Class Attendance Roster Form
SFASLST Class Roster Form
SFQSECM Registration Section Query Form
SFQSECT Section Schedule Query Form
SHATCKN Course Maintenance Form
SHQSECT Academic History Section Query Form
SIQSECM Faculty Course Section Query Form
SSABLCK Block Schedule Control Form
SSABSCQ Block Schedule Section Query Form
SSADFEE Section Fee Assessment Control Form
SSASECQ Schedule Section Query Form
SSASECT Schedule Form
SSAXMTI Cross List Meeting Time/Instructor
Query Form
Catalog
Registration
Registration
Registration
Registration
Academic History
Academic History
Faculty Load
Schedule
Schedule
Schedule
Schedule
Schedule
Schedule
STVSCPC Student Centric Period Cycle Validation
Form
SOASCPT Student Centric Period Term Control
Form
Overall
STVSEPR Services Provided Validation Form SEADETL Support Service Detail Form
SGADISA Student Disability Services Form
General Person
General Student
Validation Form Application/Functional Form Modules

172
Banner Student User Guide | Validation Reference
STVSESS Session Code Validation Form SAAADMS Admissions Application Form
SAADCRV Admissions Decision Form
SAADCSN Admissions Decision Rules Form
SFAALST Class Attendance Roster Form
SFARGFE Registration Fee Assessment Rules
Form
SFASLST Class Roster Form
SGASTDN General Student Form
SHAINST Term Course Maintenance Form
SHATCKN Course Maintenance Form
SRARECR Recruit Prospect Information Form
SSASECT Schedule Form
Admissions
Admissions
Admissions
Registration
Registration
Registration
General Student
Academic History
Academic History
Recruiting
Schedule
STVSFAE State F/A Eligibility Validation Form SGAEOPS Education Opportunity Programs and
Services Form
General Student
Validation Form Application/Functional Form Modules

173
Banner Student User Guide | Validation Reference
STVSITE Site Code Validation Form SAAADMS Admissions Application Form
SGASTDN General Student Form
SHACATQ Ceremony Attendance Query Form
SHACRMQ Ceremony Query Form
SHACRMY Ceremony Form
SHACPRQ Ceremonies By Attendee Query Form
SLABLDG Building Definition Form
SLABQRY Building Query Form
SLAEVNT Event Form
SLIAEVN Event Available Room Query Form
SLQEVNT Event Query Form
SLQMEET Available Class Room Query Form
SRARECR Recruit Prospect Information Form
Admissions
General Student
Academic History
Academic History
Academic History
Academic History
Location Management
Location Management
Location Management
Location Management
Location Management
Location Management
Recruiting
STVSIZE Academic Dress Size Validation Form SHACATT Ceremony Attendance Form
SHACRMQ Ceremony Query Form
SHAMUCA Mass Update Ceremony Attendance
Form
SHASIZE Attendee Size Classification Rules Form
Academic History
Academic History
Academic History
Academic History
STVSOFF A/F/I Fund Source Validation Form SGAASST Assistantship/Fellowship/Internship
Form
General Student
STVSPRV Service Provider Validation Form SEADETL Support Service Validation Form
SGADISA Student Disability Services Form
General Person
General Student
STVSPSR Disability Service Code Validation Form SGADISA Student Disability Services Form General Student
Validation Form Application/Functional Form Modules

174
Banner Student User Guide | Validation Reference
STVSPST Sport Code Status Validation Form SGAMSPT Mass Entry Athletic Compliance Form
SGASPRT Athletic Compliance Form
SGISPRT Athletic Compliance Inquiry Form
General Student
General Student
General Student
STVSSEP Services Exemption Validation Form SEADETL Support Service Detail Form
SGADISA Student Disability Services Form
General Person
General Student
STVSSER Service Code Validation Form SEADETL Support Service Detail Form
SEASDTL Service Attributes and Comments Form
SEASQRY Student Services Service Query Form
SEASSGP Service Group Rules Form
SGADISA Student Disability Services Form
General Person
General Person
General Person
General Person
General Student
STVSSGP Service Group Validation Form SEAASGN Service Group Assignment Form
SEADETL Support Service Detail Form
SEAGQRY Student Services Goal Query Form
SEANQRY Student Services Need Query Form
SEAQGNS Support Services Query Form
SEASQRY Student Services Service Query Form
SEASSGP Service Group Rules Form
General Person
General Person
General Person
General Person
General Person
General Person
General Person
STVSSRS Service Result Validation Form SEADETL Support Services Detail Form
SGADISA Student Disability Services Form
General Person
General Student
STVSSST Services Status Validation Form SEADETL Support Services Detail Form
SGADISA Student Disability Services Form
General Person
General Student
Validation Form Application/Functional Form Modules

175
Banner Student User Guide | Validation Reference
Validation Form Application/Functional Form Modules
STVSSTS Section Status Code Validation Form SFAALST Class Attendance Roster Form
SFAREGS Student Course Registration Form
SFASLST Class Roster Form
SFQSECM Registration Section Query Form
SFQSECT Section Schedule Query Form
SHQSECT Academic History Section Query Form
SSABLCK Block Schedule Control Form
SSABSCQ Block Schedule Section Query Form
SSASECQ Schedule Section Query Form
SSASECT Schedule Form
Registration
Registration
Registration
Registration
Registration
Academic History
Schedule
Schedule
Schedule
Schedule

176
Banner Student User Guide | Validation Reference
STVSTAT State/Province Code Validation Form GOAMTCH Common Matching Entry Form
SAAQUIK Quick Entry Form
SFARQST Enrollment Verification Request Form
SGACOOP Cooperative Education Form
SHADIPL Diploma Form
SHAGAPP Graduation Application Form
SHARQTC Transcript Request Form
SLABLDG Building Definition Form
SOADDRQ Address Summary Form
SOAFOLK Guardian Information Form
SOAHSCH High School Information Form
SOAIDNS Person Search Detail Form
SOAMATL Material Form
SOAPCOL Prior College Form
SOASBGI Source or Background Institution Base
Form
SPAEMRG Emergency Contact Form
SPAIDEN General Person Identification Form
SRAQUIK Quick Recruit Form
General Person
Admissions
Registration
General Student
Academic History
Academic History
Academic History
Location Management
Overall
Overall
Overall
Overall
Overall
Overall
Overall
General Person
General Person
Recruiting
Validation Form Application/Functional Form Modules

177
Banner Student User Guide | Validation Reference
STVSTSP Student Study Path Status Validation
Form
SAAQUIK Quick Entry Form
SFAREGF Student Course/Fee Assessment Query
Form
SFAREGQ Registration Query Form
SFAREGS Student Course Registration Form
SFARHST Student Registration History and
Extension Form
SFASRPO Student Registration Permit-Override
Form
SFASTCA Student Course Registration Audit Form
SGASADD Additional Student Information Form
SGASTDN General Student Form
SHADEGR Degrees and Other Formal Awards
Form
SHADGMQ Degree Summary Form
SHATCKN Course Maintenance Form
Admissions
Registration
Registration
Registration
Registration
Registration
Registration
General Student
General Student
Academic History
Academic History
Academic History
Validation Form Application/Functional Form Modules

178
Banner Student User Guide | Validation Reference
STVSTST Student Status Code Validation Form SAAQKER Quick Entry Rules Form
SAAQUIK Quick Entry Form
SFAREGS Student Course Registration Form
SFARQST Enrollment Verification Request Form
SGAAPRG Athletic Academic Progress Form
SGAMSTU General Student Mass Entry Form
SGASADD Additional Student Information Form
SGASPRT Athletic Compliance Form
SGASTDN General Student Form
SGISPRT Athletic Compliance Inquiry Form
SHAGELR Graduation Application Eligibility Rules
Form
SHAINST Term Course Maintenance Form
SHQTERM Term Summary Form
SOAIDNS Person Search Detail Form
Admissions
Admissions
Registration
Registration
General Student
General Student
General Student
General Student
General Student
General Student
Academic History
Academic History
Academic History
System Administration
Validation Form Application/Functional Form Modules

179
Banner Student User Guide | Validation Reference
STVSTYP Student Type Code Validation Form SAAADMS Admissions Application Form
SAACHKB Admissions Checklist Rules Form
SAADCRV Admissions Decision Form
SAADCSN Admissions Decision Rules Form
SAAMAPP Admissions Mass Entry Form
SAAQKER Quick Entry Rules Form
SAAQUIK Quick Entry Form
SAASUMI Admissions Application Summary Form
SCADETL Course Detail Information Form
SFAMHRS Registration Minimum Maximum Hours
Form
SFAREGS Student Course Registration Form
SFARGFE Registration Fee Assessment Rules
Form
SFARQST Enrollment Verification Request Form
SFATMST Time Status Rules Form
SGAAPRG Athletic Academic Progress Form
SGAMSTU General Student Mass Entry Form
SGASADD Additional Student Information Form
SGASPRT Athletic Compliance Form
SGASTDN General Student Form
SHAINST Term Course Maintenance Form
Admissions
Admissions
Admissions
Admissions
Admissions
Admissions
Admissions
Admissions
Catalog
Registration
Registration
Registration
Registration
Registration
General Student
General Student
General Student
General Student
General Student
Academic History
Validation Form Application/Functional Form Modules

180
Banner Student User Guide | Validation Reference
STVSTYP Student Type Code Validation Form
(cont.)
SFASTSR Student Centric Time Status Rules Form
SOACSPC Continuant Student Centric Period Rule
Form
SOACTRM Continuant Term Rules Form
SOAIDNS Person Search Detail Form
SOAMATL Material Form
SOQCTRM Continuant Terms Query Form
SRAQUIK Quick Recruit Form
SRARECR Recruit Prospect Information Form
SSADFEE Section Fee Assessment Control Form
Registration
Overall
Overall
System Administration
Overall
Overall
Recruiting
Recruiting
Schedule
STVSUBJ Subject Code Validation Form SCABASE Course Base Maintenance Form
SCACRSE Basic Course Information Form
SCADETL Course Detail Information Form
SCARRES Course Registration Restrictions Form
SCASRES Catalog Schedule Restrictions Form
SFAALST Class Attendance Roster Form
SFAREGF Student Course/Fee Assessment Query
Form
SFAREGQ Registration Query Form
SFAREGS Student Course Registration Form
SFASLST Class Roster Form
SFASRPO Student Registration Permit-Override
Form
Catalog
Catalog
Catalog
Catalog
Catalog
Registration
Registration
Registration
Registration
Registration
Registration
Validation Form Application/Functional Form Modules

181
Banner Student User Guide | Validation Reference
STVSUBJ Subject Code Validation Form (cont.) SFQSECM Registration Section Query Form
SFQSECT Section Schedule Query Form
SHACRSE Academic History Course Summary
Form
SHADEGR Degrees and Other Formal Awards
Form
SHASUBJ Subject Sequence History Form
SHATRMC Course History by Term and Campus
Form
SHQTATC Transfer Course Query Form
SHATAEQ Transfer Articulation Evaluation Form
SHATATC Transfer Institution Catalog Entry Form
SHATATR Transfer Course Articulation Form
SHATCKN Course Maintenance Form
SHATERM Term Sequence History Form
SHATRNS Transfer Course Form
SHATRTA Transfer Articulation Attributes Form
SHQATTR Academic History Course Attribute Form
SHQSECT Academic History Section Query Form
SHQSUBJ Academic History Catalog Query Form
Registration
Registration
Academic History
Academic History
Academic History
Academic History
Academic History
Academic History
Academic History
Academic History
Academic History
Academic History
Academic History
Academic History
Academic History
Academic History
Academic History
Validation Form Application/Functional Form Modules

182
Banner Student User Guide | Validation Reference
STVSUBJ Subject Code Validation Form (cont.) SIAASGQ Faculty Schedule Query Form
SIQSECM Faculty Course Section Query Form
SOAWLTC Automated Waitlist Term Control Form
SSABLCK Block Schedule Control Form
SSABSCQ Block Schedule Section Query Form
SSADETL Schedule Detail Form
SSAMATX Building/Room Schedule Form
SSARRES Schedule Restrictions Form
SSASECQ Schedule Section Query Form
SSASECT Schedule Form
SSAXLST Cross List Definition Form
SSQATTR Section Course Attributes Form
Faculty Load
Faculty Load
Overall
Schedule
Schedule
Schedule
Schedule
Schedule
Schedule
Schedule
Schedule
Schedule
STVSUDA Student Element One Validation Form SGAUSDF Student Institutional Reporting
Requirements Form
General Student
STVSUDB Student Element Two Validation Form SGAUSDF Student Institutional Reporting
Requirements Form
General Student
STVSUDC Student Element Three Validation Form SGAUSDF Student Institutional Reporting
Requirements Form
General Student
STVSUDD Student Element Four Validation Form SGAUSDF Student Institutional Reporting
Requirements Form
General Student
STVSUDE Student Element Five Validation Form SGAUSDF Student Institutional Reporting
Requirements Form
General Student
STVSUDF Student Element Six Validation Form SGAUSDF Student Institutional Reporting
Requirements Form
General Student
STVSUDG Student Element Seven Validation Form SGAUSDF Student Institutional Reporting
Requirements Form
General Student
Validation Form Application/Functional Form Modules

183
Banner Student User Guide | Validation Reference
STVSUDH Student Element Eight Validation Form SGAUSDF Student Institutional Reporting
Requirements Form
General Student
STVSUDI Student Element Nine Validation Form SGAUSDF Student Institutional Reporting
Requirements Form
General Student
STVSUDJ Student Element Ten Validation Form SGAUSDF Student Institutional Reporting
Requirements Form
General Student
STVTAAU Acceptance Authority Code Validation
Form
SOABGTA Transfer Articulation Institution Form Overall
STVTADM Test Score Administration Type Code
Validation Form
SAADCRV Admissions Decision Form
SOATEST Test Score Information Form
SOTCNVT Tape Code Conversion Form
Admissions
Overall
System Administration
STVTASK A/F/I Task Validation Form SGAASST Assistantship/Fellowship/Internship
Form
General Student
STVTAST Transfer Articulation Course Status
Validation Form
SHATAEQ Transfer Articulation Evaluation Form
SHATATC Transfer Institution Catalog Entry Form
SHATATR Transfer Course Articulation Form
SHQTATC Transfer Course Query Form
Academic History
Academic History
Academic History
Academic History
STVTEAC Test Accommodation Validation Form SOATEST Test Score Information Form Overall
STVTEFR Test Form Validation Form SOATEST Test Score Information Form Overall
STVTEIN Test Instrument Validation Form SOATEST Test Score Information Form Overall
STVTELE Telephone Type Validation Form GOAMTCH Common Matching Entry Form
SAAQUIK Quick Entry Form
SPAIDEN General Person Identification Form
SPATELE General Person Telephone Form
SRAQUIK Quick Recruit Form
General Person
Admissions
General Person
General Person
Recruiting
STVTEPR Test Purpose Validation Form SOATEST Test Score Information Form Overall
Validation Form Application/Functional Form Modules

184
Banner Student User Guide | Validation Reference
STVTERM Term Code Validation Form SAAADMS Admissions Application Form
SAACHKB Admissions Checklist Rules Form
SAADCRV Admissions Decision Form
SAADCSN Admissions Decision Rules Form
SAAMAPP Admissions Mass Entry Form
SAAQKER Quick Entry Rules Form
SAAECTM EDI Cross-Reference Term Code Rules
Form
SAAQUIK Quick Entry Form
SAASUMI Admissions Application Summary Form
SCABASE Course Base Maintenance Form
SCACLBD Course Labor Distribution Form
SCACRSE Basic Course Information Form
SCADETL Course Detail Information Form
SCAMEXC Mutual Course Exclusion Form
Admissions
Admissions
Admissions
Admissions
Admissions
Admissions
Admissions
Admissions
Admissions
Catalog
Catalog
Catalog
Catalog
Catalog
Validation Form Application/Functional Form Modules

185
Banner Student User Guide | Validation Reference
STVTERM Term Code Validation Form (cont.) SCARRES Course Registration Restrictions Form
SCASRES Catalog Schedule Restrictions Form
SCATEXT College Department Text Form
SEAASGN Service Group Assignment Form
SEADETL Support Service Detail Form
SEAGDTL Goal Attributes and Comments Form
SEAGQRY Student Services Goal Query Form
SEANDTL Need Attributes and Comments Form
SEANQRY Student Services Need Query Form
SEAQGNS Support Services Query Form
SEASDTL Service Attributes and Comments Form
SEASQRY Student Services Service Query Form
SEASSGP Service Group Rules Form
SFAAFEE Additional Registration Fees Form
SFAALST Class Attendance Roster Form
SFACREQ Student Course Request Form
SFAGECR Gainful Employment Program Rules
Form
SFAGEDR Gainful Employment Detail Code Rules
Form
SFAGEOR Gainful Employment OPEID Rules Form
Catalog
Catalog
Catalog
General Person
General Person
General Person
General Person
General Person
General Person
General Person
General Person
General Person
General Person
Registration
Registration
Registration
Registration
Registration
Registration
Validation Form Application/Functional Form Modules

186
Banner Student User Guide | Validation Reference
STVTERM Term Code Validation Form (cont.) SFAFMAX Registration Fees Min/Max Charge
Control Form
SFAEFEE Registration Additional Fees Form
SFAESTS Student Registration Status Form
SFAMESG Enrollment Verification Message Form
SFAMHRS Registration Minimum Maximum Hours
Form
SFAMREG Registration Mass Entry Form
SFARCTL Registration Group Control Form
SFARCTT Registration Priority Control Form
SFAREGF Student Course/Fee Assessment Query
Form
SFAREGQ Registration Query Form
SFAREGS Student Course Registration Form
SFARFND Registration Fee Assessment Refund by
Total Rules Form
SFARGFE Registration Fee Assessment Rules
Form
SFARGRP Student Registration Group Form
SFAROVR Registration Permit-Override Control
Form
SFARQST Enrollment Verification Request Form
SFARSTS Course Registration Status Form
Registration
Registration
Registration
Registration
Registration
Registration
Registration
Registration
Registration
Registration
Registration
Registration
Registration
Registration
Registration
Registration
Registration
Validation Form Application/Functional Form Modules

187
Banner Student User Guide | Validation Reference
STVTERM Term Code Validation Form (cont.) SFARWLP Reserved Seats Priority Management
Form
SFASCPR Student Centric Registration History
Form
SFASLST Class Roster Form
SFASRPO Student Registration Permit-Override
Control Form
SFATMST Time Status Rules Form
SFAWLPR Waitlist Priority Management Form
SFAXWLP Cross List Waitlist Priority Management
Form
SFIRGRP Student Registration Group Query Form
SFIWLNT Waitlist Notification Query Form
SFQESTS Enrollment Status Query Form
SFQRESG Registration Query Form
SFQRSTS Course Registration Status Query Form
SFQSECM Registration Section Query Form
SFQSECT Section Schedule Query Form
SGAAPRG Athletic Academic Progress Form
SGACOOP Cooperative Education Form
SGADISA Student Disability Services Form
Registration
Registration
Registration
Registration
Registration
Registration
Registration
Registration
Registration
Registration
Registration
Registration
Registration
Registration
General Student
General Student
General Student
Validation Form Application/Functional Form Modules

188
Banner Student User Guide | Validation Reference
STVTERM Term Code Validation Form (cont.) SGAEOPS Education Opportunity Programs and
Services Form
SGAMSPT Mass Entry Athletic Compliance Form
SGAMSTU General Student Mass Entry Form
SGASADD Additional Student Information Form
SGASPRT Athletic Compliance Form
SGASTDN General Student Form
SGISPRT Athletic Compliance Inquiry Form
SHAACST Academic Standing Rules Form
SHACATQ Ceremony Attendance Query Form
SHACATT Ceremony Attendance Form
SHACPRQ Ceremonies By Attendee Query Form
SHACRMQ Ceremony Query Form
SHACRMY Ceremony Form
SHACRSE Academic History Course Summary
Form
SHADEGR Degrees and Other Formal Awards
Form
SHADGMQ Degree Summary Form
SHADIPL Diploma Form
SHAGADR Self-Service Graduation Application
Display Rules Form
SHAGAPP Graduation Application Form
General Student
General Student
General Student
General Student
General Student
General Student
General Student
Academic History
Academic History
Academic History
Academic History
Academic History
Academic History
Academic History
Academic History
Academic History
Academic History
Academic History
Academic History
Validation Form Application/Functional Form Modules

189
Banner Student User Guide | Validation Reference
STVTERM Term Code Validation Form (cont.) SHAGELR Graduation Application Eligibility Rules
Form
SHAGCOL Grade Mailer Status/Error Correction
Form
SHAGRDE Grade Code Maintenance Form
SHAGRDS Grade Code Substitution Form
SHAINCG Incomplete Grade Rules Form
SHAINST Term Course Maintenance Form
SHAMCAT Mass Entry Ceremony Attendance Form
SHAMDIP Mass Entry Diploma Form
SHAPCMP Pre-Banner Summary Hours Form
SHARPTR Repeat/Multiple Course Rules Form
SHARQTC Transcript Request Form
SHAMDEG Mass Entry Graduation Form
SHAMUCA Mass Update Ceremony Attendance
Form
SHAMUDI Mass Update Diploma Form
SHASTAT Academic Standing Query Form
SHASUBJ Subject Sequence History Form
SHATAEQ Transfer Articulation Evaluation Form
SHATATC Transfer Institution Catalog Entry Form
Academic History
Academic History
Academic History
Academic History
Academic History
Academic History
Academic History
Academic History
Academic History
Academic History
Academic History
Academic History
Academic History
Academic History
Academic History
Academic History
Academic History
Academic History
Validation Form Application/Functional Form Modules

190
Banner Student User Guide | Validation Reference
STVTERM Term Code Validation Form (cont.) SHATATR Transfer Course Articulation Form
SHATCKN Course Maintenance Form
SHATCMT Transcript Events/Comments Form
SHATERM Term Sequence Course History Form
SHATGRD Transfer Grade Code Maintenance
Form
SHATRMC Course History by Term and Campus
Form
SHATRNS Transfer Course Form
SHATRTA Transfer Articulation Attributes Form
SHQATTR Student Academic History Course
Attribute Form
SHQSECT Academic History Section Query Form
SHQTATC Transfer Course Query Form
SHQTERM Term Summary Form
SIAASGN Faculty Assignment Form
SIAASGQ Faculty Schedule Query Form
SIACFTE Faculty Workload Contract FTE Form
SIACONA Faculty Contract Analysis Form
SIACONQ Faculty Contract Query Form
SIAFAVL Available Faculty Query Form
SIAFCTR Faculty Contract Type Term Rules Form
Academic History
Academic History
Academic History
Academic History
Academic History
Academic History
Academic History
Academic History
Academic History
Academic History
Academic History
Academic History
Faculty Load
Faculty Load
Faculty Load
Faculty Load
Faculty Load
Faculty Load
Faculty Load
Validation Form Application/Functional Form Modules

191
Banner Student User Guide | Validation Reference
STVTERM Term Code Validation Form (cont.) SIAFLCT Faculty Contract Term Rules Form
SIAFLRC Faculty Workload Contract Rules Form
SIAFLRT Faculty Workload Term Rules Form
SIAINST Faculty/Advisor Information Form
SIAIQRY Faculty/Advisor Query Form
SIATERM Faculty Load Term Form
SIQSECM Faculty Course Section Query Form
SLAASCD Room Assignment Status Form
SLAEVNT Event Form
SLALMFE Room/Meal/Phone Rate Code Rules
Form
SLAMASG Meal Assignment Form
SLAMSCD Meal Assignment Status Form
SLAPASG Phone Assignment Form
SLAPSCD Phone Assignment Status Form
SLARASG Room Assignment Form
SLARDEF Room Definition Form
SLARMAP Dorm Room and Meal Application Form
SLARMAT Roommate Application Form
SLARUSE Dorm Room Query Form
SLATERM Housing Term Control Form
Faculty Load
Faculty Load
Faculty Load
Faculty Load
Faculty Load
Faculty Load
Faculty Load
Location Management
Location Management
Location Management
Location Management
Location Management
Location Management
Location Management
Location Management
Location Management
Location Management
Location Management
Location Management
Location Management
Validation Form Application/Functional Form Modules

192
Banner Student User Guide | Validation Reference
STVTERM Term Code Validation Form (cont.) SLIAEVN Event Available Room Query Form
SLQASCD Room Assignment Status Query Form
SLQMEET Available Class Room Query Form
SLQMSCD Meal Assignment Status Query Form
SLQROOM Room Query Form
SLQPSCD Phone Assignment Status Query Form
SLQRASG Room Assignment Query Form
SLQRMAT Roommate Application Query Form
SOAATRM Web Application Term Display Control
Form
SOABGTA Transfer Articulation Institution Form
SOACURR Curriculum Rules Form
SOACSPC Continuant Student Centric Period Rule
Form
SOACTRM Continuant Terms Rule Form
SOAFRYR Federal Reporting Year Rules Form
SOAIDNS Person Search Detail Form
SOASCPT Student Centric Period Term Control
Form
SOATERM Term Control Form
SOAWLTC Automated Waitlist Term Control Form
SOAXCUR EDI Cross-Reference Curriculum Rules
Form
Location Management
Location Management
Location Management
Location Management
Location Management
Location Management
Location Management
Location Management
Overall
Overall
Overall
Overall
Overall
Overall
System Administration
Overall
Overall
Overall
Overall
Validation Form Application/Functional Form Modules

193
Banner Student User Guide | Validation Reference
STVTERM Term Code Validation Form (cont.) SOILCUR Learner Curriculum Query Form
SOQCTRM Continuant Terms Query Form
SOTCNVT Tape Code Conversion Form
SUAMAIL Student Mail Form
SRARINF Recruiter's Prospect Form
SRASRCE Source Visit/Prospect Form
SRAQUIK Quick Recruit Form
SRARAPT Recruiter Appointments/Visits Form
SRARECR Recruit Prospect Information Form
SSABLCK Block Schedule Control Form
SSABLKQ Block Schedule Query Form
SSABSCQ Block Schedule Section Query Form
SSAACCL Schedule Calendar Form
SSAACRL Schedule Academic Calendar Rules
Form
SSACLBD Section Labor Distribution Form
SSADETL Schedule Detail Form
SSADFEE Section Fee Assessment Control Form
SSAEVAL Schedule Evaluation Form
SSAMATX Building/Room Schedule Form
SSAOVRR Schedule Override Form
Overall
Overall
System Administration
Recruiting/Admissions
Recruiting
Recruiting
Recruiting
Recruiting
Recruiting
Schedule
Schedule
Schedule
Schedule
Schedule
Schedule
Schedule
Schedule
Schedule
Schedule
Schedule
Validation Form Application/Functional Form Modules

194
Banner Student User Guide | Validation Reference
STVTERM Term Code Validation Form (cont.) SSAMATX Building/Room Schedule Form
SSAOVRR Schedule Override Form
SSAQCRL Academic Calendar Rule Query Form
SSARRES Schedule Restrictions Form
SSASECQ Schedule Section Query Form
SSASECT Schedule Form
SSATEXT Schedule Comment Form
SSAWLSC Waitlist Automation Section Control
Form
SSAXLST Cross List Definition Form
SSAXMTI Cross List Meeting Time/Instructor
Query Form
SSAXLSQ Schedule Cross List Query Form
SSIRESV Reserved Seats Inquiry Form
SSQATTR Section Course Attribute Form
Schedule
Schedule
Schedule
Schedule
Schedule
Schedule
Schedule
Schedule
Schedule
Schedule
Schedule
STVTESC Test Code Validation Form SAAADMS Admissions Application Form
SAADCRV Admissions Decision Form
SAADCSN Admissions Decision Rules Form
SCARRES Course Registration Restrictions Form
SOABGIY Source/Background Institution Year
Information Form
SOAMATL Material Form
SOATEST Test Score Information Form
SSARRES Schedule Restrictions Form
Admissions
Admissions
Admissions
Catalog
Overall
Overall
Overall
Schedule
Validation Form Application/Functional Form Modules

195
Banner Student User Guide | Validation Reference
STVTLVL Transfer Level Code Validation Form SHATATC Transfer Institution Catalog Entry Form
SHATATR Transfer Course Articulation Form
SHATRTA Transfer Articulation Attributes Form
SHQTATC Transfer Course Query Form
SOABGTA Transfer Articulation Institution Form
Academic History
Academic History
Academic History
Academic History
Overall
STVTMST Time Status Code Validation Form SFASCPR Student Centric Registration History
Form
SFASTSR Student Centric Time Status Rules Form
SFATMST Time Status Rules Form
Registration
Registration
Registration
STVTOPS Taxonomy of Program Code Validation
Form
SCADETL Course Detail Information Form
SIAASGN Faculty Assignment Form
SSAOVRR Schedule Override Form
Catalog
Faculty Load
Schedule
STVTPRT Transcript Type Code Validation Form SHACTRL Academic History Control Form
SHAGADR Self-Service Graduation Application
Display Rules Form
SHARQTC Transcript Request Form
SHATPRT Transcript Type Rules Form
Academic History
Academic History
Academic History
Academic History
STVTRAC Acceptance Reason Validation Form SGAEOPS Education Opportunity Programs and
Services Form
General Student
STVTRCN Transfer Center Code Validation Form SGASTDN General Student Form
SHAINST Term Course Maintenance Form
General Student
Academic History
STVTREQ Time Required Validation Form SEADETL Support Service Detail Form General Person
STVTRMT Term Type Validation Form SHACTRL Academic History Control Form Academic History
STVTRNS Transcript Name Source Code
Validation Form
SHRTRNS Transcript Name Source Rules Form Academic History
Validation Form Application/Functional Form Modules

196
Banner Student User Guide | Validation Reference
STVTSPT Test Score Percentile Type Validation
Form
SOATEST Test Score Information Form Overall
STVTSRC Admissions Test Score Source Code
Validation Form
SAADCRV Admissions Decision Form
SOATEST Test Score Information Form
Admissions
Overall
STVTYPE Academic Dress Type Validation Form SHACATQ Ceremony Attendance Query Form
SHACATT Ceremony Attendance Form
SHAMUCA Mass Update Ceremony Attendance
Form
SHACPRQ Ceremonies By Attendee Query Form
Academic History
Academic History
Academic History
Academic History
STVVETC Veteran Type Code Validation Form SGASTDN General Student Form General Student
STVVTAB Web Display Tables Validation Form SOAWDSP Web Display List Customization Form Overall
STVVTYP Visa Type Code Validation Form SAAADMS Admissions Application Form
SCADETL Course Detail Information Form
SFAMHRS Registration Minimum Maximum Hours
Form
SSADETL Schedule Detail Form
SSADFEE Section Fee Assessment Control Form
Admissions
Catalog
Registration
Schedule
Schedule
STVVOED Vocational Education Code Validation
Form
SGASTDN General Student Form
SHAINST Term Course Maintenance Form
General Student
Academic History
STVWACK Web Acknowledgment Validation Form SRAWACK Web for Prospects Acknowledgment
Letter Form
Recruiting
STVWAIV Application Waiver Reason Code
Validation Form
SAAADMS Admissions Application Form
SAAWADP Web Application Customized Lists Form
Admissions
Admissions
Validation Form Application/Functional Form Modules

197
Banner Student User Guide | Validation Reference
STVWAPP Application Type Code Validation Form SAAECRL Electronic Admissions Procedure/
Routine Control Form
SAAETBL Electronic Application Submitted Form
SAAWAPP Web Application Section Rules Form
SAAWUDQ Web User Defined Questions Form
Admissions
Admissions
Admissions
Admissions
STVWKLD Term Workload Rules Code Validation
Form
SIAASGN Faculty Assignment Form
SIAFLRT Faculty Workload Term Rules Form
SIAINST Faculty/Advisor Information Form
Faculty Load
Faculty Load
Faculty Load
STVWLTT Web Application Customized Letter
Type Validation Form
SAAWADF Electronic Applicant Web Default Rules
Form
Admissions
STVWPIC Web Prospect Information Selection
Validation Form
SRAWPRO Web for Prospects Selection Rules
Form
Recruiting
STVWPYO Web Payment Options Validation Form SFARQSS Enrollment Verification Status Form
SHAGADR Self-Service Graduation Application
Display Rules Form
SHARQTC Transcript Request Form
SHARQTS Transcript Request Status Form
SHATPRT Transcript Type Rules Form
Registration
Academic History
Academic History
Academic History
Academic History
STVWRSN Withdrawal Reason Code Validation
Form
SAAADMS Admissions Application Form
SRARECR Recruit Prospect Information Form
Admissions
Recruiting
STVWSCF Web Application Elements Validation
Form
SAAWAPP Web Application Section Rules Form Admissions
STVWSCT Web Application Section Validation
Form
SAAWAPP Web Application Section Rules Form Admissions
Validation Form Application/Functional Form Modules
198
Banner Student User Guide | Validation Reference
STVWSSO Web Self Service Options Validation
Form
SFARQSS Enrollment Verification Status Form
SHARQTC Transcript Request Form
SHARQTS Transcript Request Status Form
SHATPRT Transcript Type Rules Form
Registration
Academic History
Academic History
Academic History
STVWTHD Student EOPS/CARE Withdrawal
Reason Validation Form
SGAEOPS Education Opportunity Programs and
Services Form
General Student
STVXLBL EDI Verification Label Validation Form SOAXREF EDI Cross-Reference Rules Form Overall
Validation Form Application/Functional Form Modules

258
Banner Student User Guide | Course Catalog
Course Catalog
This chapter discusses processing and procedure information for Course Catalog.
Course Catalog Procedures
Here are tasks you can perform in this module.
Building or Changing a Course Catalog
Once you have compiled all the data you need to create a catalog for your institution, you’ll
need to enter it into Banner® using the Catalog module.
You use the Basic Course Information Form (SCACRSE) to enter the minimum
information needed for a catalog entry:
• the course title,
• department, and
• credit hours.
You maintain any additional information concerning a course (such as corequisites, fee
information, and text) on the Course Detail Information Form (SCADETL). Any changes
made to the Course Catalog may be kept as a historical record.
Course Contact Hours
The Contact (Hours) Low and Contact (Hours) High fields contain the totals of the
Lecture, Lab, and Other fields in the Hours section of the Basic Course Information Form
(SCACRSE). The default calculation may be overridden. Course contact hours high are
calculated using lecture/lab/other hours low when the corresponding high hours are not
entered. The first Or/To (Hours Indicator) entered for the Lecture/Lab/Other Hours
fields defaults to the Or/To (Hours Indicator) for the Contact (Hours) fields.
Open Learning Registration and Course Catalog
Open learning registration provides learners with the ability to register for a class based on
start/end dates rather than a term. This date-based approach is optional and works with
Banner Student’s registration processing for enrollment and administrative purposes.

259
Banner Student User Guide | Course Catalog
The differences between traditional courses and open learning courses are as follows:
• A traditional course is a part-of-term based class that is defined by and conducted within
a term structure.
• An open learning course, while still contained within a term, can be any class offering
where:
• section level controls are required,
• registration records are processed at the student level versus the class level,
• fees are to be calculated based on the duration of the class,
• course content delivery is other than classroom-based.
This may include but is not limited to:
• open entry/open exit classes,
• distance education classes,
• continuing education classes,
• classroom-based classes,
• independent study classes,
• practicums,
• apprenticeship classes,
• or any combination of these.
Open learning allows you to do the following in the Catalog module:
• Run reports using date ranges in place of term.
• Create a rudimentary syllabus (made up of student learning objectives, required
materials for the course, and technical requirements).
• Use an expanded course title (up to 100 characters).
• Store the URL for course content.
• Search for courses based on criteria other than term.
• Use free format text to store and display course descriptions and college and/or
department text.
• Specify dates when registration is accepted outside of the current parts-of-term defined
on SOATERM. (For open learning courses only.)
• Define instructional methods for courses.
• Specify the duration of the course (the amount of time to be given to the student to
complete the course) for the course and section levels to determine the expected course
completion date for the learner.
• Create a single course for both traditional and open learning class offerings. The
delivery method of the course is established when the individual section records are
created.

260
Banner Student User Guide | Course Catalog
Set Up New Course for Traditional and Open Learning
Registration
Before setting up new courses, make sure all course-related rules and validation codes
have been defined in Banner.
1. Access the Basic Course Information Form (SCACRSE), and enter the subject code,
course number and effective term in the Key Block.
2. Use Next Block to access the Course Information block, and enter all applicable
information including course high/low hour information.
•Check the Continuing Education checkbox if the course is considered as a
continuing education course.
• Enter the duration and duration units if the course could be offered as an open
learning course. If the course will not be offered in an open learning format, duration
is not required and will not be accepted for traditional sections.
3. Use Next Block to access the Course Level window, and add applicable course level
code information. For example, if the course is considered to be a continuing
education course and has been designated as such in the Course Information block,
assign a level for continuing education to the course in this window.
4. Use Next Block to access the Grading Mode window, and enter applicable grading
modes for the course. Make sure that one mode is designated as the default.
5. Use Next Block to access the Schedule Type window, and enter applicable schedule
types for the course. The schedule type codes are entered in the Schedule field or
selected using the List of Values from STVSCHD.
If the schedule type has been created with an attached instructional method, the
instructional method will also display when the schedule type code is added. This is
optional, as the schedule type/instructional method relationship can be established
when creating the individual sections. It is possible to override or delete the attached
instructional method.
6. Save the course. This causes the associated table entries to be created.
7. Access the Course Syllabus Form (SCASYLB) if course syllabus information (long
course title, URL, learning objectives, technical requirements and/or required
materials) is associated with this course for display on the Web.
Note: Unlike other course default information, course syllabus information
will not be displayed for the section. It is necessary to copy all or some of
this information to the individual sections, as syllabus information may not
be desired for all sections of the same course. The section syllabus copy
process is accomplished using the Copy button.

261
Banner Student User Guide | Course Catalog
Update Existing Course for Open Learning Registration
Before updating existing courses, make sure all course-related rules and validation codes
have been defined in Banner.
1. Access the Basic Course Information Form (SCACRSE), and enter the subject code,
course number and effective term in the Key Block.
2. Use Next Block to access the Course Information block, and enter the duration and
duration units for the course. This information will be used in the registration process
to calculate the student’s expected completion date based on the date the student
elects to start the course.
3. Save the course. This causes the associated table entries to be updated.
4. Access the Course Syllabus Form (SCASYLB) if course syllabus information (long
course title, URL, learning objectives, technical requirements and/or required
materials) is associated with this course for display on the Web.
Note: Unlike other course default information, course syllabus information
will not be displayed for the section. It is necessary to copy all or some of
this information to the individual sections, as syllabus information may not
be desired for all sections of the same course. Again, the section syllabus
copy process is accomplished very easily using the Copy from Course
button.
Creating a Continuing Education Catalog Entry
You enter and maintain catalog entries for CEU course offerings on the Course
Information Form (SCACRSE). You must check the Continuing Education box to
designate that this offering is only available as a CEU course.
The Course Level window can only contain valid CEU levels which have been established
on the Level Code Validation Form (STVLEVL). A course cannot be both a CEU and a
non-CEU course. Whenever the Continuing Education box changes, the Level (Code)
field in the Course Level window is checked by the system, to insure that the levels are
Continuing Education levels.
Banner automatically calculates the continuing education units associated with the CEU
course offering. This is done by leaving the CEU or Credit field blank and entering the
total contact hours associated with the course. The total contact hours will then be divided
by ten to generate the CEUs.
Here is an example of the CEU calculation:
Lecture 15.00
Lab 5.00
Other 5.00
Tota l 25 .0 0
System calculated CEUs: 2.5

262
Banner Student User Guide | Course Catalog
You may override the system-calculated CEU value. Ranges of CEUs and contact hours
can be maintained on CEU course offerings. Billing hours must also be specified on CEU
courses. If no billing hours exist, then a zero must be entered.
Maintaining Faculty Workload
The Schedule Type window on the Basic Course Information Form (SCACRSE) can be
used to specify the faculty workload information by schedule type for each course offering.
An adjusted workload which is used when the course section enrollment meets or
exceeds the overload enrollment may also be specified here.
For any class session with a schedule type of A, the default workload for an instructor
teaching the session will be 3.00. If more than 32 students are enrolled, then the workload
will automatically be displayed on the Schedule Form (SSASECT) as 3.25.
Building Registration Restrictions on Courses
After you have added a course to the system, use the Course Registration Restrictions
Form (SCARRES) to build restrictions on who may register for the course.
Note: Course and section restriction rules created prior to Release 8.0
are handled as follows. The (Field of Study) Type field on SCARRES
and SSARRES will be set to a default of
MAJOR when a current course or
section restriction rule exists for a major (STVMAJR). Since only the field
of study type of
MAJOR was previously considered, all registration
restriction rules will function as before. Processing checks the primary
and secondary curriculum elements.
You may restrict a course to include or exclude students specifically by the following data
items.
• department
• field of study (major)
• class
• level
• degree
• program
• campus
Schedule Type Workload Over-Enrollment Adjusted Workload
A Lecture 3.00 33 3.25
B Lab 2.00 14 2.30

263
Banner Student User Guide | Course Catalog
• college
• student attribute
• cohort
The restriction controls are used to enter and maintain the restriction indicators associated
with the restrictions for a course. The only values that can be selected in the Include
Exclude radio groups are
Include for include restrictions and Exclude for exclude
restrictions. An inclusion restriction means a course may be offered only for the values
displayed for that restriction. An exclusion restriction prohibits the offering of a course for
the specified restrictions.
To end restrictions:
• Select the Maintenance button and choose the End Restrictions option, or use
Duplicate Item from that restriction section (such as Department Restriction), and those
restrictions are ended for the term in the Key Information.
To modify restrictions:
• Select the Maintenance button and choose the Copy Restrictions option, or use
Duplicate Record from the appropriate section to create a new effective term record for
the term in the Key Information. This new effective term record may be modified at the
your discretion.
Campus Restrictions
Use the Campus Restriction section of the Course Registration Restriction Form
(SCARRES) to create rules to restrict registration of a course by campus. The course may
be included or excluded to a single campus or a group of campuses. These campus
restriction rules function in the same manner as the class and level restrictions which exist
on the form.
An inclusion restriction indicates that registration for the course is only permitted for those
students whose campus value equals the campuses in the Campus Restriction section.
An exclusion restriction prohibits the registration of the course for those students whose
campus value equals the campus in the Campus Restriction section.
For example, AUTO 123 has a campus registration restriction rule to include campus
1. This means that only those students whose campus value is equal to 1 on
SFAREGS (Campus field in the Curriculum window for the curriculum record that is
active and current) will be able to register for the course.
The course MATH 500 has a campus registration restriction rule to exclude campus 2
and campus 3. This means that a student whose campus value is equal to either 2 or
3 on SFAREGS (Campus field in the Curriculum window for the curriculum record that
is active and current) will be prevented from registering for the course.
These campus restrictions default to the schedule information and are maintained on the
Schedule Restrictions Form (SSARRES). Additional restrictions may then be added or
modified at the section via the Schedule Restrictions Form (SSARRES). The campus
restriction checking is controlled by a the Campus (Restriction Severity) registration
error flag on the Term Control Form (SOATERM).

264
Banner Student User Guide | Course Catalog
Test Score and Prerequisite Restrictions
You may also restrict courses by test score restrictions and prerequisites. Use the Catalog
Prerequisite and Test Score Restrictions Form (SCAPREQ) to set up course test score
and prerequisite restrictions and course area prerequisite restrictions. Use the Schedule
Prerequisite and Test Score Restrictions Form (SSAPREQ) to set up section test score
and prerequisite restrictions and section area prerequisite restrictions.
The combined prerequisite and test score restriction processing enables you to establish
specific tests and minimum scores, courses and minimum grades, or combinations of
these which must be attained prior to registering for the course.
You may specify multiple conditions using the AND (A) and OR (O) connectors along with
parentheses. For test restrictions, Test Code and Test Score are required. For basic
prerequisite checking, Subject and Course are required. If grade checking is to be
performed for a subject and course, then Grade and Level are also required. Grade
checking will check for the numeric value on the Grade Code Maintenance Form
(SHAGRDE). If a student is permitted to take a course and the prerequisite for the course
in the same term, the flag in the Concurrency field should be set to Yes from the pulldown
list.
Restrictions and prerequisites set at the course level on the Course Registration
Restrictions Form (SCARRES) and the Catalog Prerequisite and Test Score Restrictions
Form (SCAPREQ) will default to the schedule information and are maintained on the
Schedule Restrictions Form (SSARRES) and the Schedule Prerequisite and Test Score
Restrictions Form (SSAPREQ) respectively. These restrictions and prerequisites may
then be added to or modified for the section via SSARRES and SSAPREQ.
Test score and prerequisite restrictions are examined on the Student Course Registration
Form (SFAREGS) when the student attempts to register for the course. This restriction
checking is controlled by the Prerequisites (Course Severity) radio group on the Term
Control Form (SOATERM).
The student's test information must be maintained on the Test Score Information Form
(SOATEST). Prerequisite course restrictions will automatically check graded courses in
registration, academic history, and transfer work. The student's same term registration will
only be checked if the Concurrency (Indicator) on SCAPREQ or SSAPREQ is set to
Yes for the course being checked.
Note: Ungraded courses in registration will be unchecked and will
generate an In Progress error in registration. This error is different from
the Not Satisfied error.
Example:
The following is an example of a test score and prerequisite restriction.
• Math 400 requires a student to have taken the SAT math test and have received a
minimum score of 500.
• Or, they must have successfully completed Math 300.
• Or, they must have received a minimum score of 425 on the math SAT and
completed Math 200 at the undergraduate level and received a grade of A.

265
Banner Student User Guide | Course Catalog
These restrictions would be set up as follows:
TEST (Code, Score) and PREREQUISITE (Subject, Course, Level, Grade, and
Concurrency)
Note: Level 01 is undergraduate, and Test Code S01 is SAT math.
If the Prerequisites (Course Severity) radio group on SOATERM is set to check
these restrictions, and the student attempts to register for Math 400, the student's test
information on SOATEST, as well as the student's academic history and transfer
course work, are examined to see if the student meets any of the three requirements.
If the student does meet the required restrictions, then the registration will be
processed. If none of these restrictions are met, then an error message is generated
on SFAREGS, and an override may be performed.
Example:
The following is an example using stacked parentheses to create prerequisite
restrictions on SCAPREQ and SSAPREQ.
This example assumes a prerequisite of ((ENGL 101 or ENGL 102) AND (ENGL 103
or ENGL 104)) OR (LITR 101 and LITR 103).
• The student must have successfully completed ENGL 101 or 102 with a grade of C
AND ENGL 103 or ENGL 104 with a grade of C.
• OR
• The student must have successfully completed LITR 101 and LITR 103 with a grade
of C.
These restrictions would be set up as follows:
TEST (Code, Score) and PREREQUISITE (Subject, Course, Level, Grade, and
Concurrency)
A/O '(' Code Score Subj Crse Level Grade Concurrency ')'
( S01 500 )
O( MATH300 )
O ( S01 425
AMATH20001A)
A/O '(' Code Score Subj Crse Level Grade Concurrency ')'
(
(ENGL101C
OENGL102C)

266
Banner Student User Guide | Course Catalog
Test score and prerequisite restrictions are edited by an SQL Editor that parses the
entered data in the same format used to apply the restrictions within the registration
process. This allows you to know immediately if the syntax of the statement you created
will be executable and so prevents possible prerequisite execution errors.
Using All Field of Study Types with Restrictions
The All Field of Study Types checkbox on SCARRES and SSARRES is used to indicate
whether all field of study types should be considered for the field of study code entered.
When this field is checked, a field of study code must be entered in the (Field of Study)
Code field to activate the restriction rule. A message is displayed that the rule cannot be
saved without a field of study code. All field of study types (
MAJOR, MINOR,
CONCENTRATION, and so on) will be considered for any field of study codes that are
entered. You cannot enter a specific field of study type in the Type field when the All Field
of Study Types checkbox is checked. The user is taken to the Code field to select the
field of study value.
When the checkbox is not checked, you can access the Type field and enter field of study
types. Multiple field of study type rules can exist, but they must be unique. At least one
field of study code must be entered in the (Field of Study) Code field to activate the
restriction rule. Once a field of study type rule exists, the All Field of Study Types
checkbox is not accessible.
You can either check the All Field of Study Types checkbox, or enter one or more values
in (Field of Study) Type field, but you cannot do both. If you enter more than one value in
(Field of Study) Type field (
MAJOR, MINOR, CONCENTRATION, and so on) you must
set the Include Exclude radio group for each type. (Each field of study is independently
included or excluded.)
Field of study type restrictions use AND conditions, not OR conditions. For example, when
a section has
MAJOR, MINOR, and CONCENTRATION field of study types set to include
MATH, all three field of study types have to be satisfied for the student to register for the
course. When the All Field of Study Types checkbox is checked and the field of study
types include MATH, the student would only have to have MATH as a
MAJOR, MINOR, or
CONCENTRATION to register for the course.
A( ENGL103 C
OENGL104C)
)
O ( LITR 101 C
ALITR103C)
A/O '(' Code Score Subj Crse Level Grade Concurrency ')'

267
Banner Student User Guide | Course Catalog
Using Field of Study Type Codes with Restrictions
The (Field of Study) Type field displays the learner field of study type code and the
associated description from GTVLFST, such as
MAJOR, MINOR, CONCENTRATION.
When a field of study type is entered in the Type field, a field of study code must also be
entered in the (Field of Study) Code field to activate the restriction rule. A message is
displayed that the rule cannot be saved without a field of study code. The field of study
type for the code entered will be checked during processing. When a field of study type
exists in the Type field, you cannot access the All Field of Study Types checkbox.
The field of study type (in the Type field) is associated with the Include Exclude radio
group. Multiple field of study codes can be included in or excluded from the rule for each
particular field of study type. When a field of study type is selected, a field of study code
must exist. Only one inclusion or exclusion can exist per field of study type.
Include and exclude options can be modified at any time on SCARRES for any valid,
active, field of study type restriction rule when the header term is equal to the from term for
the rule. A rule with an existing field of study type allows you to add a new, unique, field of
study type rule. Otherwise, the Maintenance button must be used to end or copy the rule.
Once a field of study rule has been saved, the field of study type cannot be changed.
Example 1:
Valid Rule: One include/exclude rule per field of study type allowed.
Example 2:
Valid Rule: One include/exclude rule per field of study type allowed.
Include/Exclude Field of Study Type Field of Study Code
Include MINOR MATH
SPAN
CHEM
Exclude CONCENTRATION ENGL
Include CERTIFICATE YOGA
Include/Exclude Field of Study Type Field of Study Code
Include MINOR MATH
ENGL

268
Banner Student User Guide | Course Catalog
Example 3:
Invalid Rule: Multiple include/exclude rules per field of study type not allowed.
Example 4:
Valid Rule: One include/exclude rule when All Field of Study Types is checked
allowed.
or
Example 5:
Invalid Rule: Only one rule can exist when All Field of Study Types is checked. The
Type field rule (
MAJOR) cannot be created at the same time. (The Type field is not
available for data entry when the All Field of Study Types field is checked.)
Include/Exclude Field of Study Type Field of Study Code
Include MAJOR MATH
Exclude MAJOR ENGL
Include/Exclude Field of Study Type Field of Study Code
Include All Field of Study Types
checked (set to
Y)
MATH
ENGL
SPAN
Include/Exclude Field of Study Type Field of Study Code
Exclude All Field of Study Types
checked (set to
Y)
MATH
ENGL
SPAN
Include/Exclude Field of Study Type Field of Study Code
Include All Field of Study Types
checked (set to Y)
MATH
ENGL
SPAN
Exclude MAJOR BUSI

269
Banner Student User Guide | Course Catalog
Sample Rules for Field of Study Codes and Types
Here are some rules for how field of study codes and field of study types can be used with
restriction rules.
• When the (Field of Study) Type field is null and the All Field of Study Types checkbox
is checked, all field of study types (
MAJOR, MINOR, CONCENTRATION, and so on) are
considered for the entered field of study codes.
• When the (Field of Study) Type field is not-null, the All Field of Study Types checkbox
cannot be checked, and the specific field of study type entered in the Type field will be
considered for the field of study codes that are entered.
• When the All Field of Study Types checkbox is unchecked, the (Field of Study) Type
field is null, and the (Field of Study) Code field is null, no field of study restriction rule
exists.
• Only a single field of study rule can exist when the All Field of Study Types checkbox
is checked. However, multiple field of study codes can be entered.
• Multiple, active field of study type rules can be created (MAJOR, MINOR,
CONCENTRATION), as long as each field of study type that is entered is unique.
The Field of Study severity flag on SOATERM is used with registration error checking.
Although any number of field of study type restrictions can exist on a section restriction
rule (
MAJOR, MINOR, CONCENTRATION, and so on), there is only one registration
override flag associated with field of study. This means that when one field of study
restriction is overridden during registration processing, no further registration error
checking will be performed on any remaining fields of study.
Example:
On SSARRES, CRN 10012 has multiple field of study restrictions for MINOR,
CONCENTRATION, AND CERTIFICATE.
On SOATERM the Field of Study error checking is set to
FATAL.
On SFAREGS, a student registers for the CRN and does not meet any of the multiple
field of study restrictions. The first restriction that is encountered appears as a fatal
error.
If the operator overrides the
CONCENTRATION error, no further error checking is
performed for field of study restrictions on this course for this student.
Ending Field of Study Type Rules
Each field of study restriction rule must be ended independently on SCARRES. If multiple
rules exists and the Maintenance button is used to end a restriction, only the field of study
type in context is ended.
10112 ART 311 Field of Study Restriction
-
CONCENTRATION
.000 400.000 RE UG

270
Banner Student User Guide | Course Catalog
Example:
Field of study type rules exist for CONCENTRATION, MAJOR, and MINOR. Only the
MAJOR rule is to be ended. Scroll through (Field of Study) Type rules until MAJOR is
displayed, and use the Maintenance button to end the restriction. Only the
MAJOR
restriction is ended. The
CONCENTRATION and MINOR restrictions remain active.
If only one rule exists, whether it is a field of study type (such as
MAJOR) or all field of
study types (per the All Field of Study Types checkbox), that rule can be ended as
well by using the Maintenance button.
Building Schedule Restrictions on Courses
After you have added a course to the system, you can use the Catalog Schedule
Restrictions Form (SCASRES) to build restrictions on when sections can be created for a
course. You may restrict courses that are used on the Schedule Form (SSASECT) by
including or excluding courses for specific terms or campuses.
The term restriction control is used to enter and maintain the restriction indicator
associated with the term restrictions for a course. The only values that can be selected in
the Include Exclude radio group are
Include for include restrictions and Exclude for
exclude restrictions. An inclusion restriction means a course may be offered only for the
terms displayed in the Term Restriction section of the form. An exclusion restriction
prohibits the offering of a course for the specified terms.
The campus restriction control is used to enter and maintain the restriction indicator
associated with the campus restrictions for a course. The only values that can be entered
in the Include Exclude radio group are
Include for include restrictions and Exclude
for exclude restrictions. An inclusion restriction means a course may be offered only for
the campuses displayed in the Campus Restriction section of the form. An exclusion
restriction prohibits the offering of a course for the specified campuses.
Mutually Exclusive Courses
Institutions can track courses that are similar to other courses in content but are not
considered to be equivalent courses. These courses can be defined in Banner at the
catalog level as mutually exclusive courses. Students who have taken courses in this
category can be prevented from registering for other associated courses. This functionality
builds on existing equivalent course processing. It is similar to repeat processing but does
not use repeat hours or repeat limit error checking. Mutual exclusion error checking is
used instead. This processing is used in Banner Student baseline, Banner Student Self-
Service, and Voice Response.
Implementation Steps
Use the following steps to set up mutually exclusive courses and track them through
registration error checking and override processing.

271
Banner Student User Guide | Course Catalog
1. Set up registration error checking severity for mutually exclusive courses on the Term
Control Form (SOATERM).
2. Define mutually exclusive courses on the Mutual Course Exclusion Form
(SCAMEXC).
3. Set up custom error messages on the Registration Error Messages Form (SFARMSG)
if you wish, or use the delivered default error message for mutually exclusive courses.
4. Set up a registration permit-override code for mutually exclusive courses on the
Registration Permit-Override Validation Form (STVROVR). This is optional.
5. Set up registration permit-override rules on the Registration Permit-Override Control
Form (SFAROVR) where the rules include mutually exclusive courses. This is
optional.
6. Perform individual registration processing in Banner Student baseline on the Student
Course Registration Form (SFAREGS), in Banner Student Self-Service, and/or in
Banner Voice Response, and review any mutual exclusion errors.
7. Perform mass registration processing in baseline on the Registration Mass Entry
Form (SFAMREG), and review any mutual exclusion errors.
8. Define additional mutually exclusive courses as needed on the Mutual Course
Exclusion Form (SCAMEXC) after registration has occurred.
9. Run the Registration Admin Messages Report (SFRRGAM) to identify any affected
students who have already registered for those courses before they were defined as
mutual exclusions.
Set up Registration Error Checking for Mutually Exclusive Courses
Registration error checking can be set up for mutually exclusive courses on the Term
Control Form (SOATERM). Use the Mutual Exclusion radio group in the Student Options
in the Registration Error Checking window. This can be set to
Fatal to prevent
registration or
No Check to not have error checking occur.
When a mutually exclusive course exists, registration processing performs validation for
all sections of the course against the catalog record and the student’s academic history,
transfer coursework, and in-progress courses. If no mutual exclusions exist in the
student’s record, registration is allowed. If a mutual exclusion exists, an error message is
displayed (when error checking is set to
Fatal), and registration is not allowed.
• When academic history and transfer coursework are evaluated, and a mutually
exclusive course is found, an error is generated if the student attained the minimum
grade.
• When in-progress courses are evaluated, and a mutually exclusive course is found, an
error is generated. (A course is considered to be “in-progress” until it is graded, at which
time the grade is evaluated.)
When mutual exclusions are defined on SCAMEXC after registration has begun, the
SFRRGAM report should be run to identify students who are affected by the changes. If
these students then make changes to their schedules, they will receive mutual exclusion
errors on any existing registration records that are part of the newly defined mutual
exclusion groups.

272
Banner Student User Guide | Course Catalog
Note: Mutual exclusion error checking takes place independently of
repeat hours checking and repeat limit error checking. It is controlled
solely by the mutual exclusion error checking set up on SOATERM.
Define Mutually Exclusive Courses
Existing courses can be associated with similar courses by defining them as mutually
exclusive at the catalog level. Mutually exclusive courses are treated as reciprocal in
nature, the same way equivalent courses are. Once a course has been defined as a
mutual exclusion, it cannot also be defined as an equivalent. Registration error checking
validates the mutually exclusive courses when a student registers for those courses.
Mutually exclusive courses carry the minimum grade by level. A mutually exclusive course
cannot be taken if the minimum grade has already been achieved for any course in the
group.
The Mutual Course Exclusion Form (SCAMEXC) is used to define courses as mutually
exclusive. These course definitions are stored in the Mutually Exclusive Course
Definitions Rule Table (SCRMEXC). You can enter the subject, course, and effective term
in the Key Block, and then set up the course that is mutually exclusive to that course in the
Mutually Exclusive Course Definitions block. Multiple courses can be defined as mutual
exclusions. You can also modify an existing mutually excluded course, or you can delete a
mutually excluded course. The levels for the grade and the passing grade, which come
from the Grade Code Maintenance Form (SHAGRDE), are also entered in this block. If the
level is not valid for the course, a warning is displayed, but you can still enter the record.
Rules are created for an effective term in the Key Block and can be copied and ended for
a term range in the Mutuality Exclusive Course Definitions Block. The from and to term
information defaults in for the course from the Key Block. Use the Maintenance button to
create a new effective term and to copy and end the from and to term information for the
course. Remember that the end term is included in the term range. For example, if a
course is defined as a mutual exclusion from start term 200820 to end term 200920, term
200920 is included in the mutual exclusion definition time period. If you do not want to
include term 200920, use the previous term as the end term for the mutual exclusion
definition.
You do not need to set up reciprocal definitions for courses. When two courses are
associated and one is mutually exclusive to the other, registration processing will
recognize that the relationship exists for both courses. For example, ENGL 1005 is
defined as mutually exclusive to LIT 1007 on SCAMEXC. If a student has completed
ENGL 1005, that student is not permitted to register for LIT 1007. The reverse is also true.
If a student has completed LIT 1007, that student is not permitted to register for ENGL
1005.
Courses can be defined as mutually exclusive for the effective term, subject, course
number, level from SHAGRDE for the grade to be used, passing grade, and start and end
terms. A check is performed on the level entered to make sure it is valid for the course as
defined on SCACRSE. The passing grade is inclusive and is the lowest grade a student
can have that restricts registration for a mutually exclusive course. For example, LIT 1007
and ENGL 1005 are mutually exclusive. The passing grade for the mutually exclusive
course is “D”. A student who receives a “D” for ENGL 1005 would not be allowed to
register for LIT 1007. A student who receives an “F” for ENGL 1005, however, would be
allowed to register for LIT 1007.

273
Banner Student User Guide | Course Catalog
When a student tries to register for a course that has associated mutually exclusive
courses, the student’s academic history record and transfer coursework are checked to
see if he/she has successfully completed any of the courses defined on SCAMEXC,
based on the lowest grade allowed. In-progress courses are also checked for compliance
with the courses defined on SCAMEXC. (A course is considered to be in-progress until
grades are entered, whether or not those grades have been rolled to history.) If any
courses are found that are defined as mutual exclusions, the registration for that course
will fail, and an error will be displayed.
A course grouping can be defined as either equivalent courses or mutually exclusive
courses. The grouping cannot be defined as both. Edit checking occurs on SCAMEXC to
ensure that courses being entered as mutual exclusions do not already exist as
equivalencies. Edit checking occurs on SCADETL to ensure that courses being defined as
equivalencies do not already exist as mutual exclusions.
Note: Courses cannot be defined as mutual exclusions at the CRN level.
They are defined at the catalog level. Registration error checking
validates the catalog record. Therefore, when a course is defined as a
mutual exclusion, all sections of the course carry that definition. When a
course is associated with a mutually excluded course, all sections of the
course carry that association.
Course Detail Error Checking
The Course Information Detail Form (SCADETL) performs an edit check that prevents a
user from defining an equivalent course if the same course is already defined as a mutual
exclusion. When a conflicting entry is found, a mutual exclusions error message, *Error*
Mutual Exclusions exist for this course. Courses may not be mutually exclusive and
equivalent, is displayed. The error appears when the user attempts to navigate out of the
row (such as going to an empty row to create a new record) or when the user attempts to
save the record.
When a course is defined as an equivalent or a mutual exclusion, that qualification is in
effect for all terms within the effective term range and for all terms for which the start and
end terms are inclusive. When an error occurs, the user should check for overlapping
equivalencies or courses defined as mutual exclusions for the effective terms and the start
and end term ranges.
Set up Registration Error Messages for Mutually Exclusive Courses
If a student attempts to register for a mutually exclusive course when he/she has already
taken the associated course, a registration error message is displayed. The default error
message that is delivered for the Registration Error Message Rules Table (SFRRMSG)
and displayed on the Registration Error Messages Form (SFARMSG) is Mutual Exclusion
with %1% %2%, where %1% represents the subject code, and %2% represents the
course number. This error message can be customized on SFARMSG by modifying the
MEXC error message row. The mutual exclusion error message is displayed in the
Message field on the Student Course Registration Audit Form (SFASTCA).

274
Banner Student User Guide | Course Catalog
Use Registration Error Overrides with Mutually Exclusive Courses
Use the Mutual Exclusion checkbox on the Registration Permit-Override Control Form
(SFAROVR) to designate that mutual exclusion errors can be overridden for a registration
permit-override rule. You can create a standalone override code for mutual exclusion
errors on the Registration Permit-Override Validation Form (STVROVR) if you wish. This
code can then be used to set up a specific mutual exclusion permit-override rule on
SFAROVR. Or, you can use existing override codes from STVROVR to set up your
override rules on SFAROVR and include mutual exclusions in those rules as needed.
Use Registration Processing with Mutually Exclusive Courses
When registration is performed on the Student Course Registration Form (SFAREGS),
error checking for the term is determined by the severity level set on SOATERM. When a
student registers for a mutually exclusive course and has already taken the associated
course, an error is displayed from SFARMSG. When the error checking is set to Fatal, the
record must be deleted or overridden in order to continue with registration. When
registration is performed in Banner Student Self-Service, and the same scenario occurs,
registration is not allowed, unless an override has been entered through Banner Faculty
and Advisor Self-Service or Student baseline.
Mutual exclusion error checking looks for equivalent courses in the student’s academic
history, transfer coursework, and in-progress coursework. When a completed equivalent
course is found and a mutually exclusive course exists, the student cannot register for the
mutually exclusive course. For example, if a student completed ENGL 1004 with a passing
grade, and ENGL 1004 is defined as an equivalent to ENGL 1005, and ENGL 1005 is
defined as mutually exclusive with LIT 1007, that student is prevented from registering for
LIT 1007.
Use Mass Registration Processing with Mutually Exclusive Courses
When mass registration is performed using the Registration Mass Entry Form
(SFAMREG), mutual exclusion errors will be displayed in the Message field in the Results
window. The message that is displayed comes from SFARMSG. The message displayed
can be the default message that is delivered or a customized message of your choice.
The Mutual Exclusion radio group in the Student Options in the Error Checking window
can be set to
Fatal or No Check for mass registration error checking.
View Mutually Exclusive Courses in Self-Service
When students view courses through the catalog in Banner Student Self-Service, the
detailed course and class section information indicates when courses are defined as
mutually exclusive on SCAMEXC.
Mutual exclusion registration error checking is performed in Self-Service. The default error
message from SFARMSG is displayed during registration, but this error message can be
customized at your institution.

275
Banner Student User Guide | Course Catalog
Use Voice Response Registration
Voice Response processing recognizes mutual exclusion errors during telephone
registration as part of registration error checking.
Identify Students Affected by Courses Defined after Registration
The Registration Admin Messages Report (SFRRGAM) can be used to identify students
who are affected when courses are defined as mutual exclusions during registration or
after registration has occurred. If these students make changes to their schedules, they
will receive mutual exclusion errors on any existing registration records that are part of the
newly defined mutual exclusion groups. SFRRGAM displays the mutual exclusion errors
from the SFRRMSG table on the output.
Repeat/Equivalent Course Rules
Repeat/Equivalent Course processing is controlled by the (Repeat) Limit and the
(Repeat) Maximum Hours fields on the Basic Course Information Form (SCACRSE). You
can specify that a course may be repeated for only a specified maximum number of hours,
as well as the existing repeat limit. This is done using the (Repeat) Maximum Hours and
(Repeat) Limit fields on SCACRSE. These fields are invoked in the Registration module
according to the status of the registration error flags on the Term Control Form
(SOATERM) and are calculated in Academic History according to the Repeat/Equivalent
Course Rules Form (SHARPTR).
Note: The Repeat Status (Code) field on SCACRSE does not control
any processing. It is informational only.
Example 1:
Using both Repeat Limits and Repeat Maximum Hours in Repeat processing works like
this:
The course may be taken up to four times for an unlimited number of credits.
Example 2:
Repeat Limit 3
Repeat Maximum Hours Null
Repeat Limit Null
Repeat Maximum Hours 12

276
Banner Student User Guide | Course Catalog
The course may be taken up to as many times as desired, as long as the credit hours do
not exceed 12.
Example 3:
Using a three credit hour course, if the course is taken four times, as allowed by the
Repeat Limit, this would exceed the Repeat Maximum Hours of 10 (three credits multiplied
by four occurrences equals twelve), so the fourth occurrence would not be allowed.
Please see the Repeat/Equivalent Course Rules section in the “Academic History
Procedures” for a detailed explanation and more examples of Repeat processing.
Tuition Fee Waivers
To indicate that a course should not have the customary tuition and fee charges, check the
Tuition Waiver box on the Basic Course Information Form (SCACRSE). This indicates to
the system that this course is exempt from tuition and fees which are overrideable when
the Override box is checked on the Registration Fees Process Control Form (SFARGFE).
If this field is checked, all rules on SFARGFE which are overrideable will be ignored during
fee assessment. If this field is not checked, all rules on SFARGFE apply.
If it is determined by your institution that a fee other than the customary tuition and fees
should be charged for this course, check the Tuition Waiver box and assign a fee code on
the Course Detail Information Form (SCADETL). You must enter an amount when
assigning a fee code. A flat fee or a per credit hour fee may be charged. This
determination must be made by your institution when entering the fee code.
This information will default to each of the sections created for this course. This
information may be modified on section-by-section basis.
Note: Once a waiver has been created for a section and enrollment has
begun, the Tuition Waiver box should not be changed, so that fees are
assessed correctly.
Banner Course Data Extract Capabilities
Data extract capabilities allow flexibility for processing. A utility program is used to extract
course information from the Banner database. Extracted course data are written to an
XML file and conform to the IMS Enterprise Information Model 1.01.
The IMS Enterprise Information Model describes data structures that are used to provide
interoperability of Internet-based Instructional Management systems with other enterprise
systems used to support the operations of an organization. These structures provide the
basis for standardized data bindings that allow software developers and implementers to
Repeat Limit 3
Repeat Maximum Hours 10

277
Banner Student User Guide | Course Catalog
create instructional management processes that interoperate across systems developed
independently by various software developers. In other words, use of the IMS model
facilitates third party interfaces.
Overview
This section describes the basic integration components of the software that enables
users to extract course data for presentation to third parties.
Course Data Extract Processing
Banner extract processing will extract your course data and provide it in an XML format
readable to third parties using IMS standards. The Course Catalog IMS Extract
(SCRRIMS) creates the IMS Properties object and the IMS Course Group Data Object.
Course Data
This section outlines the course-related data elements passed between Banner and the
partner systems.
Course Data Details
Item Banner Source IMS Data Element
Course Identifier
SCBCRSE_SUBJ_CODE
concatenated with
SCBCRSE_CRSE_NUMB
SOURCEDID.ID
Course Title
SCBCRSE_TITLE DESCRIPTION.SHORT
Full Course
Description
SCRTEXT_TEXT DESCRIPTION.FULL
Course Department
SCBCRSE_DEPT_CODE ORG.ORGUNIT
Course Active Indicator Set to 0 (Not Accepting
Enrollments). Cannot enroll in
Banner course; enrollment occurs
in Banner course section.
ENROLLCONTROL.ENROLL
ACCEPT
Course Enrollment
Indicator
Set to 0 (Target system cannot
enroll).
ENROLLCONTROL.ENROLL
ALLOWED
Course Begin Date
STVTERM_START_DATE
Start date of the minimum
effective term.
TIMEFRAME.BEGIN
278
Banner Student User Guide | Course Catalog
IMS Properties Object
The XML file created by the extract program contains an IMS Properties Object. This
object contains basic packaging and control data that the target system(s) use to
determine the source, timing, and type of event that generated the data package. This
basic information and control data facilitate the exchange of data between systems.
The IMS Course Group Data Object
The Course Catalog IMS Extract (SCRRIMS) also creates an IMS Course Group Data
Object. This object contains course code, course title, full course descriptions, course start
and end dates, and course delivery mode. The collection of these IMS Course Data
Objects is a reflection of your institution’s course catalog for the selected academic year.
SCRRIMS Program Parameters
When you run the Course Catalog IMS Extract (SCRRIMS), you are prompted to enter the
academic year for which course catalog information will be extracted. Valid values come
from the Academic Year Validation Form (STVACYR).
SCRRIMS Program Output Files
The Course Catalog IMS Extract (SCRRIMS) runs through job submission and creates up
to three separate files that are written to the standard job submission subdirectory. If job
submission results are written to a personal job submission directory, these results will
usually also be written there.
Course End Date
STVTERM_END_DATE
End date of the maximum
effective term.
TIMEFRAME.END
Academic Year
STVACYR_DESC TIMEFRAME.ADMINPERIOD
Source ID
GUBINST_NAME concatenated
with “Banner”TYPEVALUE of 1
(Instruction), 3 (Course)
SOURCEDID.SOURCE
Institution Name
GUBINST_NAME ORG.ORGNAM
Institution FICE Code
SHBCGPA_INST_FICE ORG.ORGID
Delivery Mode
STVSCHD_DESC EXTENSION DELIVERY
MODE
Data Source
GUBINST_NAME concatenated
with “Banner”
DATASOURCE
Item Banner Source IMS Data Element

279
Banner Student User Guide | Course Catalog
The three files created by SCRRIMS are:
America’s Learning Exchange with Banner
America's Learning Exchange (ALX) no longer has an active website (www.alx.org).
The United States Department of Labor has discontinued support for uploading course
data to the ALX website. Institutions may continue to use the SCRIMMS process to extract
course data to send to any third party that accepts course information in XML format.
Catalog Extract and Load Processing
This processing allows a receiving institution to automatically extract catalog records from
a sending institution and then load those records into their own database. This aids in the
creation and setup of catalog records from multiple transfer institutions within the receiving
institution's database. This functionality is a base for self-service transfer credit modeling,
which can assist receiving institutions with processing prospective transfer students and
reducing paper work and coordination by admissions and advising staffs.
Catalog extract and load processing provides the ability to:
• Exchange the necessary course catalog data for transfer articulation purposes.
• Extract course catalog data into a file that can be transmitted to an external institution.
• Import external catalog data into the appropriate transfer articulation data structures.
• Update existing but previously imported transfer articulation data.
• Store course descriptions and course attributes for transfer courses.
• Copy transfer course data from one institution to another.
File Description
scrrims_<oneup>.log
This is a standard job submission log report. If the
process is successful, the log report contains a success
completion message.
If the process fails, the log may include error messages
that will assist in diagnosing problems.
scrrims_<oneup>.lis
This is the standard listing report, which includes the
standard report control page. This page lists the current
version number of the process and the parameters
used to run the process.
scrrims_<oneup>.xml
This is the XML file that will be imported into a partner’s
database.

280
Banner Student User Guide | Course Catalog
Exchanging Data for Transfer Articulation
Course catalog data can be exchanged for use with transfer articulation. Maintaining
transfer course data represents a large portion of the effort required for transfer
articulation, because institutional equivalents of transfer courses cannot be defined until
the transfer course data exists within the receiving school's database. This streamlined
exchange using the extract and import of catalog data between institutions significantly
reduces the amount of manual data entry.
Extracting Data for File Transmission
Course catalog data can be extracted into a file that can be transmitted to an external
institution. Course catalog data elements have been identified that need to be exchanged
between institutions for transfer articulation purposes. These data elements can be
extracted from the sending institution's database and written to a file that can be sent to
and retrieved by the receiving institution.
Note: This functionality takes into account the work being done by PESC
on an XML schema for course catalog data transmissions. When fields in
the Postsecondary Electronic Standards Council (PESC) Course Catalog
XML schema contain enumeration lists, values not on those lists will not
be included in the extract.
The Course Catalog Data Extract Process (SCRCATE) produces a course catalog data
extract file with specified results. The Course Catalog package (
bwckctlg.sql) in
Student Self-Service contains a link that produces query results in an XML format that can
be saved to a user’s desktop.
Different types of extract files can be created by SCRCATE:
• Extract file of course catalog data that includes all courses from a specific level and
catalog year and can be displayed on an unsecured page of the institution's website,
sent to a third party (such as another institution or a Web-based repository of catalog
data), or stored on a server to be transmitted upon request.
• Extract file of course catalog data that is limited to the courses from a specific college,
department, or subject for administrative and/or departmental review.
• Extract file of course catalog data that is limited to those courses that are returned by the
criteria entered using the unsecured Search for Courses Web page.
Importing External Data for Transfer Articulation
External catalog data can be imported into the appropriate transfer articulation data
structures. The Transfer Catalog Data Import Process (SHRTCIM) imports course catalog
data from other institutions into Banner. Extract files received from other institutions can
be imported into the tables behind the Transfer Institution Catalog Entry Form (SHATATC).
Data does not need to be entered manually.
Here are some different examples of how the batch import process could be used in
Update Mode:

281
Banner Student User Guide | Course Catalog
• A new institution is being set up for transfer articulation processing. All records in a
course catalog extract file are new to the system. (No transfer course records exist for
the institution.) SHRTCIM is run in Update Mode to import all records into the system.
• A new course catalog extract file is obtained from an institution from which the receiving
school has not had any transfer applicants in several years. All existing records in the
system are at least five years old. SHRTCIM is run in Update Mode to import all records
from the extract file, even though many already exist with an earlier effective term.
Updating Existing Imported Data
Existing, previously imported transfer articulation data can be updated. When SHRTCIM is
run in Audit Mode, a report is generated that shows which incoming courses are
completely new, which are exact matches of existing records, and which are partial
matches of existing records. You can choose to protect certain existing records from being
updated by the import process, because they match data that exists in the extract file
being imported.
Here are examples of how SHRTCIM could be run multiple times in Audit Mode:
• One or more incoming records are found to be duplicates of existing records based
upon several elements including effective term, subject, course number, and level. The
user needs to be able to protect those courses from being updated when the import
process is run again in Update Mode.
• Several incoming records are found to be similar to existing records based upon subject
and course number only. Some elements (such as effective term, level or credit hour
range values) of the existing records differ from those of the incoming record. The user
needs to be able to decide whether to include or exclude such records when the process
is run again in Update Mode.
Storing Course Details, Descriptions, and Attributes
Course details, descriptions, and attributes for transfer courses can be stored on the
Transfer Institution Catalog Entry Form (SHATATC) and the Transfer Course Articulation
Form (SHATATR) to assist with the review of transfer courses and assignment of
institutional equivalents. Until PESC delivers the course catalog schema, only 2000
characters of the course description will be captured and transmitted.
• On SHATATC, course detail and description information can be maintained in the
Transferring Course Block. Course attribute information can be maintained in the
Course Attributes block. This data can be collected to help in the determination of which
courses are institutional equivalents. The Protect from Import field in the Course
Details section is used to protect selected records from being updated by the Transfer
Catalog Data Import Process (SHRTCIM).
• On SHATATR, course detail and description information can be maintained in the
Transferring Course Block. Course attribute information can be maintained in the
Attributes section. This data can be collected to help in the determination of which
courses are institutional equivalents. The Protect from Import field in the Details
section is used to protect selected records from being updated by the Transfer Catalog
Data Import Process (SHRTCIM).

282
Banner Student User Guide | Course Catalog
Course attributes can be crosswalked on SOAXREF using the value of STVATTR on
STVXLBL and can then be used in the extract export file.
Copying Data to Another Institution
Transfer course data can be copied from one institution to another. Copy functionality can
be used when separate institution codes are being set up for different campuses of the
same school. Use the Transfer Institution Catalog Entry Form (SHATATC) and the
Transfer Course Articulation Form (SHATATR) to copy transfer course data from a default
institution code to another institution code for a specific program.
Using the Default Institution and Copy Options
You can use the Edit function from the Program field on SHATATC and SHATATR to
display a list of unique program codes for which transfer courses have been defined for
the institution code entered in the Key Block. (The Programs Defined for Institution item in
the Option List can also be used.)
You can enter a value in the Default Institution field on SHATATC and SHATATR and
perform a Next Block to copy all existing transfer course records associated with the
Default Institution value into the tables for the STVSBGI code entered in the Institution
field, subject to certain limitations. The limitations are that in order for a transfer course
record to be copied, its level code must be valid according to the records in the Transfer
Levels block of the Transfer Articulation Institution Form (SOABGTA).
Since it cannot be assumed that effective terms for different transfer level codes defined in
the Transfer Level block of SOABGTA are the same from institution to institution, transfer
level effective terms play an important role in determining the effective term of transfer
courses when they are defaulted from one institution to another. Please see the example
below for more details.
Institution A and Institution B have the following transfer levels defined on SOABGTA with
the corresponding effective terms:
Institution A has several courses defined at each transfer level shown above. All of the CE
level courses have an effective term of 199010, all of the GR courses have an effective
term of 199510, and all of the UG courses have an effective term of 200010. In other
words, each transfer course's effective term matches the effective term of its level as
defined on SOABGTA.
Effective Term Codes Effective Term Codes
Transfer Level Codes Institution A Institution B
CE 199010 N/A
GR 199510 199310
UG 200010 200510

283
Banner Student User Guide | Course Catalog
When a user defaults the courses from Institution A to Institution B, the expected results
are:
• None of the CE level courses are copied, because that level is not valid for Institution B.
• All of the GR level courses are copied with an effective term of 199510, because that
was the earliest (known) effective term for those courses. The system cannot assume
the courses were effective in 199310.
• All of the UG level courses are copied with an effective term of 200510, because that is
the earliest effective term for UG courses at Institution B.
If values are entered in both the Program and Default Institution fields before a Next
Block function is performed, this indicates the intent to copy only those course records
from the default institution that have been defined for that program. In this case, a warning
message is displayed that only those courses defined for that program will be copied, and
the Default Institution function cannot be used again. You have the option to cancel the
copy process, which will roll back all of the changes and remove the value from the
Program field. You also have the option to continue, in which case only those records
defined for the program will be copied.
If records exist with a value defined in the Minimum Grade field that has not been defined
in SHATGRD for the new institution, the Invalid Grade code exists warning message will
be displayed. You have the option to cancel the copy process, which will roll back all of the
changes and allow you to define the missing grade codes in SHATGRD. You also have the
option to continue, in which case the records will be copied, but with a null value in the
Minimum Grade field.
If records exist in the Comments block and/or Course Attributes block for the transfer
courses being defaulted from one institution to another, you are prompted once to decide
if the system should copy those records as well.
Course Catalog Data Extract Process (SCRCATE)
This Java process is used to extract course catalog data and create an XML output file of
that data. An institution can post the output file on an unsecured page of its website where
people seeking the data can download it to their workstations. Similarly, the output file can
be sent to a third-party organization that hosts a Web-based repository of course catalog
data.
The process uses the same search parameters that are available on the Search for
Courses page in Banner Student Self-Service, as well as additional parameters. These
additional parameters allow users to determine if the output file should include course
description data and/or course attributes. This process calls the
SP_CATALOG_EXPORT
process API, which contains all of the logic required to return the correct records and data
fields.
The XML output file for the extract process includes the fields listed in the table below. The
HTML output file for the extract contains a subset of those fields such as subject, course
number, and course short title. Additional fields can be included in the HTML file by
modifying the stylesheet template. The stylesheet can be configured at your institution to
display the fields you choose. To modify the stylesheet, do the following:

284
Banner Student User Guide | Course Catalog
1. Extract the stylesheet using the command: jar -xvf scrcate.jar
bwckctlg.xsl
2. Modify the stylesheet to display the selected fields in the HTML file.
3. Upload the modified stylesheet using the command:
jar -uvf scrcate.jar
bwckctlg.xs
l
Until a standard schema for the XML file has been adopted by the Postsecondary
Electronic Standards Council (PESC), the following fields will comprise the extract file.
XML Field Table Column Additional Information
Header Record Information
<Organization> Complex elements made up
of the items below
<FICE>
SHBCGPA_INST_FICE
Defined on SHACTRL
<OPEID/>
<OrganizationName>
GUBINST_NAME
Defined on GUAINST
<Contacts> Complex element made up
of the Address and Phone
complex elements
<Address> Complex element made up
of the items below
<AddressLine>
GUBINST_STREET_LINE1
Defined on GUAINST
<AddressLine>
GUBINST_STREET_LINE2
Defined on GUAINST
<AddressLine>
GUBINST_STREET_LINE3
Defined on GUAINST
<City>
GUBINST_CITY
Defined on GUAINST
<StateProvince>
GUBINST_STAT_CODE
Defined on GUAINST
<PostalCode>
GUBINST_ZIP
Defined on GUAINST
<CountryCode>
GUBINST_NATN_CODE
Defined on GUAINST
<Phone> Complex element made up
of the items below
<AreaCityCode>
GUBINST_PHONE_AREA
Defined on GUAINST
<PhoneNumber>
GUBINST_PHONE
Defined on GUAINST
<PhoneNumberExtension>
GUBINST_PHONE_EXT
Defined on GUAINST
Course Detail Record Information
<CourseSubjectAbbreviation>
SCBCRSE_SUBJ_CODE
Defined on SCACRSE
<CourseNumber>
SCBCRSE_CRSE_NUMB
Defined on SCACRSE

285
Banner Student User Guide | Course Catalog
<CourseShortTitle>
SCBCRSE_TITLE
Defined on SCACRSE
<CourseLongTitle>
SCBCRSE_TITLE
Defined on SCACRSE
Once the PESC schema for
course catalog data is
finalized, the source for this
field will most likely change
to the
SCRSYLN_LONG_COURSE
_TITLE
defined on
SCASYLB.
<CourseDescription>
SCBDESC_TEXT_
NARRATIVE
Defined on SCADETL
<CourseEffectiveDate>
STVTERM_START_DATE
The effective date for course
is derived from the start date
defined for the term code
that is assigned as the
effective term for the course.
<CourseCreditBasis> Hardcoded to "Regular" This value needed to be set
to an enumerated value
established for the PESC
college transcript schema
which uses the same field.
Given that "Regular" was
the value hardcoded into the
XML transcript export
process, it was also
selected for this process.
This value may be re-
evaluated once the PESC
course catalog schema is
adopted as a standard.
<CourseCreditUnits>
STVTERM_TRMT_CODE or
SHBCGPA_TRMT_CODE
The process checks the
Term Type value on
STVTERM, if it is not
defined, it then checks the
Term Type value on
SHACTRL to retrieve this
value.
<CourseCreditMinimumValue>
SCBCRSE_CREDIT_HR_
LOW
Defined on SCACRSE
<CourseCreditMaximumValue>
SCBCRSE_CREDIT_HR_
HIGH
Defined on SCACRSE
<CourseLevel> Complex element made up
of the items below
XML Field Table Column Additional Information
286
Banner Student User Guide | Course Catalog
Transfer Catalog Data Import Process (SHRTCIM)
This Java process is used to import an XML extract file of course catalog data into a
Banner database. After entering the input file name and other default values, the user can
choose between running the process in Audit Mode or Update Mode. In Audit Mode, the
process compares the records in the incoming data file with transfer course records that
already exist in the system. Records in the incoming data file that are found to match
existing records will be identified as partial or exact matches.
When run in Audit Mode, the process calls the
SB_TRANSFER_CRSE API for matching
logic.
• If an incoming transfer course does not match any existing transfer courses based on
the institution ID plus the subject plus the course number plus the transfer level, then it
will be identified as a new record.
• If an incoming transfer course matches an existing transfer course based on institution
ID, plus the program, plus the transfer level, plus the subject, plus the course number,
plus the effective term, plus the group, then it will be identified as an exact match (even
though values in the Title, Credit Hours Low, Credit Hours High, Minimum Grade,
Catalog Year, and Course Description fields may differ).
Existing transfer courses that have been entered with a value in the Program and/or
Group fields will not match incoming transfer course records. As such, many incoming
transfer course records that do match existing records based upon institution ID, plus
transfer level, plus the subject, plus the course number, plus the effective term, but not
on program or group, will fall into the next category.
• If an incoming transfer course does not satisfy the criteria to be identified as new or an
exact match, then it will be flagged as a partial match.
After the input file has been processed in Audit Mode, users can review those courses
identified as exact matches to see if any data exists in the Title, Credit Hours Low, Credit
Hours High, and/or Course Description fields that should be added to the system. If not,
<CourseLevelCode>
SCRLEVL_LEVL_CODE
Defined on SCACRSE
<CourseLevelDescription>
STVLEVL_DESC
Institutional course level
codes must be cross-
referenced on SOAXREF to
one of the enumerated
values defined by PESC.
<Attribute> Complex element made up
of the items below
<RAPCode>
SCRATTR_ATTR_CODE
Defined on SCADETL
<RAPName>
STVATTR_DESC
To be included in the catalog
extract, course attributes
must be cross-referenced
on SOAXREF.
XML Field Table Column Additional Information

287
Banner Student User Guide | Course Catalog
you can check the Protect from Import field for the existing transfer courses in the
Transfer Institution Catalog Entry form (SHATATC) or the Transfer Course Articulation
form (SHATATR). Those courses will not be updated when the input file is processed
again in Update Mode.
Similarly, after the input file has been processed in Audit Mode, users can review those
courses identified as partial matches to see if any data exists in the Title, Credit Hours
Low, Credit Hours High, and/ or Course Description fields that should not be added to the
system. If so, the Protect from Import field can be checked for those records, and those
courses will not be updated when the input file is processed again in Update Mode.
When the process is run in Update Mode, new records from the input file are imported into
the SHBTATC and SHRTCAT tables. Records identified as exact matches will update the
existing records, unless the Protect from Import field is checked. Records identified as
partial matches will update existing records if the matched fields are the Institution ID,
Effective Term, Transfer Level, Subject, and Course Number, unless the Protect from
Import field is checked. Otherwise, the partial matches will be loaded as new courses.
Banner Table Table Column Additional Information
SHBTATC Transfer Course Information
SBGI_CODE
Institution ID parameter
PROGRAM
Defaults to “......”
TLVL_CODE
Comes from <CourseLevelCode>
Value must be defined on STVTLVL and
be valid for the institution ID on
SOABGTA.
SUBJ_CODE_TRNS
Comes from
<CourseSubjectAbbreviation>
Value is not validated by Banner.
CRSE_NUMB_TRNS
Comes from <CourseNumber>
TERM_CODE_EFF_
TRNS
Effective Term parameter
ACTIVITY_DATE
Defaults to system date
TRNS_TITLE
Comes from <CourseShortTitle>
TRNS_LOW_HRS
Comes from
<CourseCreditMinimumValue>
TRNS_HIGH_HRS
Comes from
<CourseCreditMaximumValue>
TRNS_REVIEW_IND
Defaults to N
TAST_CODE
Status Code parameter
TRNS_CATALOG
Catalog Year parameter

288
Banner Student User Guide | Course Catalog
TGRD_CODE_MIN
Minimum Grade parameter
GROUP
Defaults to NULL
GROUP_PRIMARY_
IND
Defaults to NULL
CRSE_DESC
Comes from <CourseDescription>
USERID
Defaults to user ID of person running the
process
DATA_ORIGIN
Defaults to either SHATATC, SHATATR, or
SHRTCIM
PROTECT_IND
Defaults to N
SHRTCAT Transfer Course Attributes
SBGI_CODE
Institution ID parameter
PROGRAM
Defaults to “......”
TLVL_CODE
Comes from <CourseLevelCode>
Value must be defined on STVTLVL and
be valid for institution ID on SOABGTA.
SUBJ_CODE_TRNS
Comes from
<CourseSubjectAbbreviation>
Value is not validated by Banner.
CRSE_NUMB_TRNS
Comes from <CourseNumber>
TERM_CODE_EFF_
TRNS
Effective Term parameter
ATTR_CODE
Comes from <RAPCode>
Value is not validated by Banner.
ATTR_DESC
Comes from <RAPName>
USERID
Defaults to user ID of person running the
process
ACTIVITY_DATE
Defaults to system date
DATA_ORIGIN
Defaults to SHRTCIM
Banner Table Table Column Additional Information
289
Banner Student User Guide | Course Catalog
Oracle Object Types
Oracle object types are used with this processing. The delivered scripts listed below
create the object types.
The intent of the Oracle Object Type is to represent the PESC Course Catalog Schema
once it has been officially delivered. The version delivered with Release 8.0 represents a
very small subset of what PESC may deliver in the future for their final implementation of
the Course Catalog Schema. This subset is listed below.
Script Result
soo_xfer_crse0.sql
Creates the Oracle Object Type (OOT)
so_transfer_course
soo_xfer_crse_nt.sql
Creates a table of so_transfer_course
soo_xfer_crse_levl0.sql
Creates the Oracle Object Type (OOT)
so_transfer_course_level
soo_xfer_crse_levl_nt.sql
Creates a table of so_transfer_course_level
soo_xfer_crse_atr0.sql
Creates the Oracle Object Type (OOT)
so_transfer_course_attr
soo_xfer_crse_atr_nt.sql
Creates a table of so_transfer_course_attr
Course Catalog Schema Description
COURSESUBJECTABBREVIATION VARCHAR2(10 CHAR)
COURSENUMBER VARCHAR2(15 CHAR)
COURSESUBNUMBER VARCHAR2(15 CHAR)
PREVIOUSCOURSEID VARCHAR2(30 CHAR)
COURSESHORTTITLE VARCHAR2(60 CHAR)
COURSELONGTITLE VARCHAR2(60 CHAR)
COURSEDESCRIPTION VARCHAR2(2000 CHAR)
COURSEHONORSCODE VARCHAR2(13 CHAR)
COURSEEFFECTIVEDATE VARCHAR2(6 CHAR)
COURSEEXPIRATIONDATE VARCHAR2(6 CHAR)
COURSECREDITBASIS VARCHAR2(30 CHAR)
COURSECREDITLEVEL VARCHAR2(30 CHAR)
COURSECREDITUNITS VARCHAR2(30 CHAR)

290
Banner Student User Guide | Course Catalog
COURSECOLLEGECODE VARCHAR2(2 CHAR)
COURSECOLLEGEDESCRIPTION VARCHAR2(30 CHAR)
COURSEDIVSCODE VARCHAR2(4 CHAR)
COURSEDIVSDESCRIPTION VARCHAR2(30 CHAR)
COURSEDEPTCODE VARCHAR2(4 CHAR)
COURSEDEPTDESCRIPTION VARCHAR2(30 CHAR)
COURSECEUIND VARCHAR2(1 CHAR)
COURSECREDITHRIND VARCHAR2(2 CHAR)
COURSECREDITMINIMUMVALUE NUMBER(7,3)
COURSECREDITMAXIMUMVALUE NUMBER(7,3)
COURSELECHRIND VARCHAR2(2 CHAR)
COURSELECMINIMUMVALUE NUMBER(7,3)
COURSELECMAXIMUMVALUE NUMBER(7,3)
COURSELABHRIND VARCHAR2(2 CHAR)
COURSELABMINIMUMVALUE NUMBER(7,3)
COURSELABMAXIMUMVALUE NUMBER(7,3)
COURSEOTHHRIND VARCHAR2(2 CHAR)
COURSEOTHMINIMUMVALUE NUMBER(7,3)
COURSEOTHMAXIMUMVALUE NUMBER(7,3)
COURSEREPEATCODETYPE VARCHAR2(30 CHAR)
COURSELEVEL BANINST1.SO_TRANSFER_COURSE_
LEVL_NT
COURSEATTRIBUTE BANINST1.SO_TRANSFER_COURSE_
ATTR_NT
Course Catalog Schema Description

291
Banner Student User Guide | Course Catalog
Catalog Reports
The following reports are run through the Catalog module:
Please refer to the Banner Student Reports and Processes Handbook for report
descriptions, instructions, parameter definitions, and output samples.
Bulletin Report (SCRBULT)
Course Catalog IMS Extract (SCRRIMS)
Course Catalog Data Extract Process (SCRCATE)

292
Banner Student User Guide | Class Schedule
Class Schedule
This chapter discusses processing and procedure information for Class Schedule.
Class Schedule Procedures
Here are tasks you can perform in this module.
Create Term Controls
The first step in the schedule building process is to identify the characteristics of the term
in which classes are being scheduled. This is done via the Term Control Form
(SOATERM) where dates for each session within the term are established and where the
Course Reference Number starting number is established for the term.
The next step is to create any exclusion dates when classes are not being held. This is
done via the Schedule Exclusion Rules Form (SSAEXCL). A date established on this form
will be excluded from the number of meeting times for the section. Vacation days, in-
service dates, and breaks in the academic calendar should be maintained on this form.
The Part of Term field may be used to clearly define those days which are to be excluded
from the academic calendar by part of term and calendar year. New exclusion rules for
each part of term at the institution must be built by the user. This process may be
performed via the Default Part of Term window accessed from the Key Information. This
allows exclusion days to be copied from one part of term to another. A description may be
added for the excluded days, i.e., 01/18/1994 is a national holiday; 02/18/1994 is an in-
service day.
You also have the option to create academic calendar rules based on different calendar
types using the Schedule Academic Calendar Rules Form (SSAACRL).
Creating Instructors
Instructors must first be identified to the system using the General Person Identification
Form (SPAIDEN). Once this is completed, they are entered on the Faculty/Advisor
Information Form (SIAINST). Here, they may be identified as a faculty member, an
advisor, or as both. This process would be completed as an initial task; new hires and
terminations would be part of the maintenance process. Once a faculty member is
identified on the Faculty/Advisor Information Form (SIAINST) he/she may then be
assigned to class sections.

293
Banner Student User Guide | Class Schedule
Building Available Rooms
Buildings must first be defined on the Building Code Validation Form (STVBLDG) and the
Building Definition Form (SLABLDG). In order for classes to be scheduled into
classrooms, available rooms must first be identified on the Room Definition Form
(SLARDEF). This form is used to enter and maintain rooms and their characteristics
needed for querying their availability and attributes on the Available Classroom Query
Form (SLQMEET).
Creating Campus Security
If an institution wishes to restrict the class schedule by campus, then the Campus Security
User Profile Form (SOAPROF) should be used. Each user may be assigned to a particular
campus. Once this is done, the user is restricted from updating any class schedule
information not associated with his campus. This is an optional process which may be
omitted if class schedule campus security is not necessary.
A function also exists to restrict the access of the schedule and the class roster
information to a specific campus by user ID. When campus security is invoked, the user
whose access is restricted will only be able to view and modify the schedule and class list
information which is associated with their campus. These rules are established on the
Campus Security User Profile Form (SOAPROF). A user who is not maintained on this
form will have access to all schedule information regardless of campus. This campus
security function is used in the Schedule and Registration modules.
Create Future Term Schedule
The Term Roll Report (SSRROLL) will roll the class schedule forward from one specified
term to another specified term. This process has the option of also rolling meeting days,
times, and rooms, and block schedule codes and instructors. Instructors will not be rolled
if their associated meeting time information is not rolled. This process allows for the initial
creation of a specified schedule, then the roll forward will create the next specified
schedule at which time any necessary changes can be made to the new schedule. The
CRN Starting Sequence Number field on the Term Control Form (SOATERM) is updated
as each section is rolled. If the job is interrupted prior to completion, the counter will
remain in sync with the rolled sections.
The data in the Projected (Enrollment) field in the Enrollment Data window of the
Schedule Form (SSASECT) rolls to the Projected (Enrollment) field for the future term.
The actual enrollment from the term being rolled continues to roll to the Prior
(Enrollment) field in the Enrollment Data window for the future term.

294
Banner Student User Guide | Class Schedule
The following represents an example of the fields being updated in the Term Roll Report
(SSRROLL).
The Term Roll Report (SSRROLL) uses section restriction rules when rolling data
elements from one term to another term. A number of parameters allow the roll of data
elements from the Catalog module to the Schedule module. The value of
C can be used to
roll data elements from the course to the section. When a specified parameter is set to
Y,
the data element is rolled from the Schedule module for the term in the From Term
parameter to the term in the To Term parameter. When a specified parameter is set to
C,
the data element is rolled from the Catalog module by subject and course, as well as the
effective term that is less than or equal to the term in the Roll Term parameter.
The following parameters use the value of
C to roll data from Catalog:
• Roll Fees
• Roll Degree Attributes
• Roll Text
• Roll Class Restrictions
• Roll College Restrictions
• Roll Fld of Study Restrictions
• Roll Level Restrictions
• Roll Campus Restrictions
• Roll Test Restricts & Pre-reqs
• Roll CAPP Area or DW Pre-reqs
• Roll Degree Restrictions
• Roll Program Restrictions
• Roll Partition Codes
Actual Projected Prior
199301
10002 21 39 0
10003 11 20 0
- rolled to -
199502
10002 0 39 21
10003 0 20 11

295
Banner Student User Guide | Class Schedule
• Roll Room Attributes
• Roll Section Syllabus
• Roll Department Restrictions
• Roll Student Attr Restrictions
• Roll Cohort Restrictions
Building/Changing Course Sections
After the catalog records are established on the Banner® Student System, course
sections are entered into the system for production of the Class Schedule (SSRSECT)
and student registration. Sections being offered for a term are built using the Schedule
Form (SSASECT). The capacity of the section, and meeting days, times, and rooms, and
instructors are assigned using this form.
The Schedule Detail Form (SSADETL) permits the entry of additional information about a
course section, including section corequisites, section fees and block codes. The user is
permitted to enter only sections where subject and course number have been specified in
the Catalog as corequisites for the course. The section corequisite must be a subject of
the course corequisite defined on the Course Detail Information Form (SCADETL).
Meeting Time/Room Assignments
After a course section has been entered in the database, the section may be scheduled
into a building and room for specific days and times. The Available Class Room Query
Form (SLQMEET), which is accessed from the Schedule Form (SSASECT), will aid in the
room scheduling process by finding and displaying available rooms for user days and
times specified and that meet specific requirements for capacity, building, and room type.
The Building/Room Schedule Form (SSAMATX), which is also accessed from SSASECT,
will display the course sections which are scheduled into the building and room based on
the user-selected query information.
Session Creation
Individual sessions for a course section may be defined on the Meeting Time window of
the Schedule Form (SSASECT). A session may be used to specify the different meeting
time combinations or different schedule types associated with a section. For example, a
geology course which has a lecture, a lab, and a field trip may want to create three
separate sessions within the course section to further define each of the meeting types.
Sessions would not be used to define sections where there are multiple labs to choose
from. The link identifiers should be used in these situations.
The Meeting Time (Code) field in the Meeting Time window and the Session Indicator
field in the Instructor window prevent instructors from being attached to non-existent
session identifiers and also prevent a non-existent session identifier from being entered in
the Instructor window.

296
Banner Student User Guide | Class Schedule
If meeting times exist, you may not change the Part of Term field unless you first delete
the meeting information, then change the Part of Term field, and finally re-enter the
meeting information. This allows you to change Part of Term field without changing the
days on which the course is scheduled, and avoids possible room assignment for
inaccurate days.
Duplicate Section Creation
You may duplicate a section on the Schedule Form (SSASECT). When adding a new
section of a course, enter the term in the Term field for which you would like to add a
section and enter
ADD in the CRN field. Use Next Item to open the Default Section
Information window. This will default the term code from the Term field into the Default
Term field. This default term code reflects the term from which you would like to duplicate
a section. The default term can be changed. Perform a List function from the Default
Term field to display the Term Code Validation (STVTERM) list of values to view existing
term codes.
Move to the Default CRN field, where a CRN may be entered, or use Count Query Hits to
display the Schedule Section Query Form (SSASECQ) where you can query sections of
courses. Select the appropriate CRN to bring back to the Default CRN field. After all Key
Information has been entered, select the Process Default button or use Next Block to
duplicate section information. A new CRN is immediately assigned to the newly created
course. If you wish to discontinue processing with default data, use the Cancel button or
Rollback to close the window and return to the Key Block in SSASECT.
Note: When duplicating a section, all Key Block fields must be entered.
When simply adding a section from scratch, only the Term field and CRN
field must be entered.
Duplicate Section for Same Term
Duplicate sections may be created within the same term; that is, the add term and the
default term are the same. When duplicating sections within the same term, the default
section number must be zero (0). If the section number is not equal to zero, the section
may not be duplicated. Just as when entering a section from scratch on the Schedule
Form (SSASECT), if a section exists with the subject, course, or section number, the
section may not be entered, and therefore, may not be duplicated. Likewise, when
entering a section from scratch, if the section number is zero, the subject, course, or
section may be added multiple times to the same term, and therefore, can be duplicated.
When you have successfully duplicated a section within the same term, section
information will be duplicated from the forms listed below as follows:
From the Schedule Form (SSASECT):
•
All information in the Section portion of the form, with the exception of cross list data and
reserved seating, will be duplicated.
• Meeting Time window and Instructor window information is not duplicated.

297
Banner Student User Guide | Class Schedule
• Enrollment data is handled in the following manner:
From the Schedule Detail Form (SSADETL):
The following fields are duplicated: Maximum Enrollment for the Section
Projected Section Enrollment
Waitlist Maximum Capacity
The following fields are set to zero: Actual Enrollment
Prior Enrollment
Waitlist Actual
Generated Credit Hours
Census One
Census Two
The following fields are set to a value: Waitlist Remaining is set equal to Waitlist
Maximum
Seats Remaining is set equal to Maximum
Enrollment
Reserved Seat Indicator is unchecked
The following information will be
duplicated from the form sections and
windows:
Link Section
Section Fees
Degree Program Attribute
The following information will not be
duplicated from the form sections and
windows:
Corequisite Section
Contract
Block Schedule Code

298
Banner Student User Guide | Class Schedule
From the Schedule Restrictions Form (SSARRES):
From the Schedule Pre-requisite and Test Score Restrictions Form
(SSAPREQ):
Duplication From One Term to a Different Term
Sections may be duplicated from one term to another; that is, the add term and the default
term are different. When duplicating from one term to another, keep the following in mind:
• If the subject/course/section combination already exists for the add term, the section
may not be duplicated.
• The subject/course must be within the catalog range according to the Course Base
Maintenance Form (SCABASE) for the add term.
A section of LAW 415 created for term 199301 could not be duplicated for terms
earlier than 199301 or later than term 199401.
• In order to create duplicate sections from one term to a different term, the following
information must be valid at the catalog for the add term on the Basic Course
Information Form (SCACRSE):
• The status code for the course must be active.
• The billing and credit hours for the section must be valid at the catalog.
• The schedule type for this section must be valid at the catalog.
All information will be duplicated from
the form sections and windows. This
includes:
College Restriction
Major Restriction
Class Restriction
Level Restriction
Campus Restriction
Test Score and Prerequisite
The following information will be
duplicated from the form sections and
windows:
Test Score Restriction
Prerequisite Restriction
For example, LAW 415
Start Term 199301 End Term 199401

299
Banner Student User Guide | Class Schedule
• The default section's part of term must be defined on the Term Control Form
(SOATERM) for the add term.
• The CEU Indicator field on SSASECT will be set to Y or N according to the catalog for
the effective term of the section being added.
• A section may not be duplicated if the Catalog Schedule Restrictions Form (SCASRES)
prohibits the creation of sections for either term or campus scheduling restrictions.
• If a grading mode is specified at the section level, and this grading mode is not valid for
the add term according to SCACRSE, the default grading mode will be specified for the
new section.
When you have successfully duplicated a section within the same term, section
information will be duplicated from the forms listed below as follows from one term to
another:
• Schedule restrictions on the Schedule Restrictions Form (SSARRES) and schedule
detail on the Schedule Detail Form (SSADETL) will not be duplicated at the section level
from one term to another.
• If catalog restrictions on the Course Registration Restrictions Form (SCARRES) and/or
catalog detail on the Course Detail Information Form (SCADETL) exist for the course,
these values will be defaulted for the section, just as they are defaulted when a section
is created form scratch.
For example, If at the catalog (SCACRSE) for LAW 415,
From Term 199301 To Term 199301
Credit Hours 3.00 to 4.00
From Term 199302 To Term 999999
Credit Hours 2.50 to 3.00
and a section of LAW 415 is created in term 199301
with 3.50 credit hours specified at the section level, this
section cannot be duplicated for term 199302, because
the section specified hours are out of the valid credit
range. However, if no section specified range had been
entered, the section could be duplicated, and the valid
credit hour range from the catalog would default to the
new section's credit hour range.

300
Banner Student User Guide | Class Schedule
From the Schedule Form (SSASECT):
• All information on the Section area of the form, with the exception of cross list data and
reserved seating, will be duplicated.
• Meeting Time and Instructor information is not duplicated.
• Enrollment data is handled in the following manner:
Create Duration Units
Use the Duration Unit Validation Form (GTVDUNT) to create and maintain duration unit
codes that are associated with the calculation of an expected completion date for courses
and/or sections, such as
SEM (Semester), WEEK (Week), DAYS (Days), or MTHS (Month).
This calendar equivalent must be created to make sure that, regardless of when the
learner elects to start the course, they would have the same time frame in which to
complete it as other learners registering on different days. This do not reflect attendance
hours.
For example, if the learner starts the course on January 1, and the course has a duration
of six weeks (where a week equates to seven days), the learner’s expected completion
date for the course would be the 11th of February. Or, the course has a duration of ten
units (where a unit equates to 30 days). Or, the course has a duration of one semester
(which equates to x days).
The following fields are duplicated: Maximum Enrollment for the Section
Projected Section Enrollment
Waitlist Maximum Capacity
The following fields are set to zero: Actual Enrollment
Prior Enrollment
Waitlist Actual
Generated Credit Hours
Census 1
Census 2
The following fields are set to a value: Waitlist Remaining is set equal to Waitlist
Maximum
Seats Remaining is set equal to Maximum
Enrollment
Reserved Seat Indicator is unchecked

301
Banner Student User Guide | Class Schedule
The duration unit code is also used as an alternate method of assessing fees. For
example, an institution may require that tuition at a rate of $50 per week be assessed and
charged to the learner instead of an amount that is calculated by credit hours. This type of
section level fee assessment could be used for self-paced sections of a course, allowing
the learner to buy time in the course.
Other courses such as continuing education could also use this method of assessing fees
where individual learner progress in a course, rather than static date ranges, is required
for refunding purposes without the need to define a proliferation of parts-of-term. Section
level refunding rules would control any fee refunds in these instances.
Duration unit codes will only be used when associated with open learning courses in the
Schedule Form (SSASECT). The duration units can be established for a course in
SCACRSE and will default to the section record when it is created. (An open learning
course is characterized by the lack of a part-of-term code in SSASECT.)
• The calendar days information associated with the duration code is used to derive the
student’s expected completion date, if the learner has selected a start date when
registering for the course. Conversely, the student may choose their expected
completion date. In this case, the start date will be derived based on the duration days
information.
• The units will be associated with the course duration information entered in the Basic
Course Information Form (SCACRSE) for those courses that will be available for open
learning registration.
This information will be used in tandem with a numeric value representing the number of
units (for example, 16 weeks). Duration unit codes cannot be deleted if they have been
associated with a course or section.
Some example seed data might be:
Create Instructional Methods
Use the Instructional Method Validation Form (GTVINSM) to create and maintain
instructional method codes that can be applied to schedule type codes, courses, and/or
sections, such as
CLASS (Classroom based), TUTOR (Tutorial), or WEB (Web-based).
This represents the delivery method of the course content.
An instructional method code can be associated with a schedule type code in STVSCHD
or can be used as a standalone description of the content delivery method for the course
at the section level. Once an instructional method code has been assigned to a schedule
type or section record, it cannot be deleted until all its course and section associations
have been removed.
Code Description Days
WEEK Weeks 7
MTHS Months 31

302
Banner Student User Guide | Class Schedule
Use the Instructional Method field in the Schedule Types window of SCACRSE and on
the Schedule Form (SSASECT) to enter the code as a standalone value, with no
association with a particular schedule type, or if the code has been previously associated
with a course, the code will default and automatically populate the field. The defaulted
value may be accepted or updated.
Open Learning and Class Schedule
Open learning registration provides learners with the ability to register for a class based on
start/end dates rather than a term. This open learning approach is optional and works with
Banner Student’s registration processing for enrollment and administrative purposes.
Open learning allows you to do the following in the Schedule module:
• Run reports using date ranges in place of term.
• Establish de-centralized section level processing rules for registration, extensions, and
refunding based on the individual learner’s progress in the course versus static dates.
• Expand your fee assessment options using user-defined units (in addition to flat and per
credit fees) and registration processing rules.
• Use free-form text to store information for class requirements and display URLs for
Web-based courses so students can make informed decisions when selecting the class
that best suits their needs.
• Specify section-specific dates when registration is accepted outside of the current parts-
of-term defined on SOATERM.
• Define instructional methods for courses.
• Specify the duration of the course for the course and section levels to determine the
expected registration completion date for the learner.
Set up an Open Learning Section
Before setting up an open learning section, make sure all section-related rules and
validation codes have been defined in Banner.
1. Access the Schedule Form (SSASECT), and enter the term and then enter ADD in the
CRN field in the Key Block.
2. Use Next Block to access the Section Information block, and enter all applicable
information including the subject code and course number.
• The section will inherit the instructional method assigned to the course when the
schedule type is entered or selected. If this association has not been made prior to
the creation of the section, you will be required to enter this information for open
learning sections.
• The duration units and number of duration units will automatically be defaulted if
they are defined for the course. If they are not defined, you will be required to enter
this information for open learning sections.

303
Banner Student User Guide | Class Schedule
• The part-of-term information is not required for open learning courses.
• The registration from and to dates and start from and to dates are required. If the
date record in SOAORUL is defined with the Override (Indicator) checked, those
dates can be modified in SSASECT.
– The registration dates default from SOAORUL and represent the period of
time a learner may register in this section.
– The start dates also default from SOAORUL and represent the date range the
learner may actually start their course.
– The census one and census two dates (if defined) will be populated with the
corresponding information from SOAORUL.
• The maximum number of extensions that will be granted to an individual student
registered in this section will default to zero and should be changed if the
institution’s policy permits the extension of the expected completion date.
• If you are using the contract analysis functionality in the Faculty Load module, the
attendance method should be set to a code defined as Independent Studies if the
section will not have regular instructor/learner contact hours. Then the instructor will
not be penalized in the daily and weekly contact hour calculations. This information
is displayed in the main window.
• The lab, lecture, and other hours information are also displayed in the main window.
3. Save the course. At this time, a CRN is assigned, which replaces the word
ADD in the
Key Block, and the appropriate registration status code, extension and refunding rules
will be created for the section and housed in SSARULE. In addition, the Faculty Self
Service indicators, used to control the display of midterm grades, final grades, and
waitlists, will be created. These checkboxes will be defaulted to allow access and may
be changed in the Section Web Controls Form (SSAWSEC).
4. Use the Detail button next to the Registration Dates First and Last fields to view or
update the registration status code rules, refunding rules, or extension processing
rules which are stored on SSARULE.
5. Use Next Block to access the Meeting Time block to record scheduled meeting times
or other scheduled events.
6. It is not mandatory to establish contact times in the Meeting Time block if the section
has been deemed to be open learning one (i.e., no part-of-term has been defined).
• If there is a face-to-face component of the course or an online chat available to
students on a regular schedule, enter a meeting code to default in start and end
dates, days of the week, and times, or enter the meeting information manually.
• Also, enter the meeting type for the purpose of the meeting. A meeting type of
CLAS
will default into the Meeting Type field but may be changed to reflect the values
housed in the Meeting Type Validation Form (GTVMTYP).
This information appears on the student’s hardcopy class schedule or their Web
schedule in Banner Student Self-Service. For example, if there are regular chat
sessions established for a Web-based course, these can be defined as such and then
communicated to the student via their student schedule or via the Web.
7. Save the meeting time information.

304
Banner Student User Guide | Class Schedule
8. Use Next Block to access the Instructor block and assign an instructor or tutor to this
section.
Due to the fact that the section has been defined as open learning, instructor IDs can
be entered without the dependency of meeting time records (for open learning classes
only).
9. Save the instructor information.
10. Access the Section Syllabus Form (SSASYLB) using the *SCHEDULE menu or the
Section Syllabus Form item in the Options Menu to enter syllabus information for
display on the Web.
• If syllabus information has already been entered for the course, this information is
available to be copied from the Course Syllabus (SCASYLB) to the Section Syllabus
(SSASYLB) by selecting the Copy from Course button. This button can be found in
all blocks of this form. Once the information is copied to the section, it is updatable.
• If no course syllabus information has been stored, you can enter or cut and paste
information into any of these fields. These fields will store approximately one and
one half pages of text.
11. Access the Schedule Processing Rules Form (SSARULE) to review the defaulted
open learning rules.
• If the rule information that defaulted to the section from the Open Learning Section
Default Rules Form (SOAORUL) is acceptable, or the information cannot be
overridden, the section setup process is complete.
• If no registration status codes, extension rules, or refunding rules were defined in
SOAORUL, this information should now be entered to permit registration. All
registration processes will verify that the appropriate registration status codes and
rules were set up here.
• To enter, update, or delete the extension processing rule, position the cursor on the
status code record where Ext checkbox is checked, and use Next Block.
• To enter, update, or delete a refunding rule, position the cursor on the appropriate
status code record, and use Next Block.
Note: If there is a requirement for all students to start on the same date,
the start from/to dates may be set to the same date. For example, in
defining a continuing education class with set meeting times, the start
dates could be set to the first day of class. In doing so, all the benefits of
an opening learning class could be realized (i.e., section level rules)
without the requirement to define specific parts-of-term.
Additional Registration Information Table (SFRAREG)
The Additional Registration Information Table (SFRAREG) is used with registration
processing. One record for every registration, regardless of the type of section, will be
created through the registration processes and will house the start and/or end dates of the
registration (the part-of-term start and end dates for traditional sections), and the assigned
tutor (the primary instructor for the section).

305
Banner Student User Guide | Class Schedule
Also, for the assigned tutor information in SFRAREG, if the primary instructor has been
redefined for a section with existing enrollments, the tutor assignment for all students
registered in that section is updated to reflect the change. The same change occurs if the
primary instructor is removed and a new instructor is assigned.
When a new section is created, a record in the faculty self-service display controls
(SSBFSEC) is created with a value of
Y in the following fields:
• SSBFSEC_FAC_WAIT_LIST_DISP_IND
• SSBFSEC_FAC_MGRD_DISP_IND
• SSBFSEC_FAC_FGRD_DISP_IND
Update an Existing Section to be an Open Learning
Section
Before updating an existing section to be an open learning section, make sure all section-
related rules and validation codes have been defined in Banner.
Note: The following changes can only be accomplished if there are no
existing registration records for the section. It is possible to redefine an
existing traditional section as an open learning section. However, the
section must be physically deleted when you are redefining an open
learning section as a traditional one.
1. Access the Schedule Form (SSASECT), and enter the term and CRN in the Key
Block.
2. Use Next Block to access the Section Information block, and enter all applicable
information including the subject code and course number.
• An instructional method, registration from and to dates, start from and to dates,
duration, and duration units are required to identify this section as available for open
learning registration.
• Remove the existing part-of-term information to ensure that the registration from
and to dates will default from the Open Learning Section Default Rules Form
(SOAORUL). It may be necessary to delete any meeting time or instructor
assignments to accomplish this.
• Update the Maximum Extensions field if extensions are permitted for this section.
3. Save the changes to the section records.
4. Use Next Block to access the Meeting Time block, and add any meeting time records
(if required).
5. Save the changes to the meeting time information.
6. Use Next Block to access the Instructor block, and identify the instructor that will be
assigned to the registering students as the primary instructor, if there are multiple
instructors assigned to the section. The student-tutor allocation process will ignore
other instructor records at time of registration.

306
Banner Student User Guide | Class Schedule
7. Save the changes to the instructor information.
8. Access the Schedule Processing Rules Form (SSARULE) to add the open learning
rules.
• Open learning section rules should now be entered to permit registration. All
registration processes will verify that the appropriate registration status codes and
rules were set up here.
• To enter the extension processing rule, position the cursor on the status code record
where Extension checkbox is checked, and use Next Block.
• To enter a refunding rule, position the cursor on the appropriate status code record,
and use Next Block.
Set Up Non-Open Learning Section
Before setting up a non-open learning section, make sure all section-related rules and
validation codes have been defined in Banner.
1. Access the Schedule Form (SSASECT), and enter the term and then enter
ADD in the
CRN field in the Key Block.
2. Use Next Block to access the Section Information block, and enter all applicable
information including the subject code and course number.
The part-of-term information is mandatory, and an applicable part-of-term number
must be entered manually. (The value for part-of-term 1 is not defaulted in.)
3. Save the course. At this time, a CRN is assigned, which replaces the word
ADD in the
Key Block.
4. Use Next Block to access the Meeting Time block to record scheduled meeting times.
5. Enter a meeting code to default in start and end dates, days of the week, and times, or
enter the meeting information manually. Also enter the meeting type for the purpose of
the meeting. A meeting type of
CLAS will default into the Meeting Type field but may
be changed to reflect the values defined in the Meeting Type Validation Form
(GTVMTYP).
This information appears on the student’s hard copy class schedule or their Web
schedule in Banner Student Self-Service.
6. Save the meeting time information.
7. Use Next Block to access the Instructor block and assign an instructor or tutor to this
section.
8. Save the instructor information.
9. Access the Section Syllabus Form (SSASYLB) using the *SCHEDULE menu or the
Section Syllabus Form item in the Options Menu to enter syllabus information for
display on the Web.
• If syllabus information has already been entered for the course, this information is
available to be copied from the Course Syllabus (SCASYLB) to the Section Syllabus
(SSASYLB) by selecting the Copy from Course button. This button can be found in
all blocks of this form. Once the information is copied to the section, it is updatable.

307
Banner Student User Guide | Class Schedule
• If no course syllabus information has been stored, you can enter or cut and paste
information into any of these fields. These fields will store approximately one and
one half pages of text.
Note: SSASECT will permit a traditional section to be converted into an
open learning section, however, the reverse is not true.
Set Up Section Fee Assessment, Extension, and
Refunding Rules for Open Learning Courses
Before setting up section fee assessment, extension, and refunding rules for open
learning courses, make sure the term control record has been established in SOATERM,
and the required registration date values and registration status codes have been defined
in SOAORUL.
1. Create CRNS using the Term Roll Report (SSRROLL) or through the Schedule Form
(SSASECT) to default the appropriate registration, extension, and refunding rules to
the section.
• All new open learning sections (those sections defined with no part-of-term), will be
populated with section level registration dates. Registration status codes, extension
rules, and refunding rules will be defaulted, if they are defined on SOAORUL.
• This information is defaulted from the Open Learning Rules Form (SOAORUL). The
registration from and to dates will reflect the most appropriate registration dates as
per section characteristics defined in SOAORUL. These rules are accessible using
the new Schedule Processing Rules Form (SSARULE).
• Modifications to the registration and learner start dates, registration status codes (if
defaulted), extension rules (if defaulted), and refunding rules (if defaulted) will be
permitted if the original open learning rule has been denoted as overridable.
• If the status codes and rules have not been set up to default when a new section is
created, the registration status codes, at a minimum, will need to be established
prior to registration processing. If no extensions are permitted for this section, an
extension rule will not be necessary.
2. Establish fee assessment information in the Section Detail Form (SSADETL).
• If course level fees have been defined in the Course Detail Information Form
(SCADETL), they will be defaulted to the section when a new CRN is created. This
is also the case if fees are defined in the Section Fees Assessment Control Form
(SSADFEE). Note: If both are defined, both will default.
• If sections were created before default values were defined in SSADFEE, and this
information should be carried over to individual sections, run the Section Fee
Population Process (SSPMFEE) to generate fee records.
3. Once established at the section level, the Track by CRN function controlled in the
Term Control Form (SOATERM) will add the CRN number to all fee assessment
transactions on the student’s accounts receivable records, and the Track by Course
function will do the same in the refunding process. This capability facilitates the
tracking of fees to an individual registration.

308
Banner Student User Guide | Class Schedule
Faculty Assignments
Faculty members can be assigned to sections via the Instructor window on the Schedule
Form (SSASECT). Instructors must be created using the previously defined Create
Instructors procedures. Instructors may be assigned to multiple sessions or only part of a
session using the Instructional Workload and the Percent of Session fields. The
instructional workload value will default from the catalog information but may be adjusted
on the Faculty Assignment Form (SIAASGN). When a new section is added to an
instructor's schedule via SSASECT, the instructor's default contract type, specified on the
Faculty/Advisor Information Form (SIAINST), defaults to the Faculty Assignment Form
(SIAASGN).
All information entered in the Instructor window is displayed on SIAASGN, and any
assignments entered or updated on SIAASGN will be displayed here.
Instructors who have been inactivated on the Faculty/Advisor Information Form (SIAINST)
may not be assigned teaching assignments in the Instructor window of SSASECT. The
message Instructor is not active for this term is displayed when an inactive instructor is
scheduled.
Maintaining Section Comments
After the course sections have been added to the database, the Schedule Comment Form
(SSATEXT) may be used to enter section comments for the production of the Class
Schedule (SSRSECT). The comments may also be modified or deleted using this form.
These comments may be free-format descriptive text lines for each section requiring a
comment.
Reviewing Course Sections
The Schedule Section Query Form (SSASECQ) displays all the sections entered into the
system that match user-specified criteria. For example, the user may request to view all
sections of ENGL 101 or all sections of ENGL 101 on a particular campus. Enrollment
counts and remaining seats are also displayed here. This form may be used to locate the
course reference number for a particular section. The Block Schedule (Indicator) field is
used to indicate that a section is part of a block of courses.
Reviewing Building/Room Schedule
The Building/Room Schedule Form (SSAMATX) is used to display section information for
all sections scheduled into each building and room. The user may specify selection criteria
to determine what is displayed. For example: all classes scheduled in East Hall on
Mondays, or a list where all English classes are scheduled.
SSAMATX allows for queries to be processed in a flexible, useful manner. In the example
below, queries may be performed for a date range for the course, or for the beginning and
ending times of the course.
309
Banner Student User Guide | Class Schedule
If you have a course which meets from September 1, 1992, through December 15, 1992, it
will be returned when any of the above query dates are entered.
For example, if you want to know all meetings scheduled for a room at 8:30, all of the
following examples would be returned.
When entering search criteria for start or end date queries, the following rules hold true:
16-AUG-1992 16-SEP-1992
16-SEP-1992 16-OCT-1992
16-OCT-1992 30-DEC-1992
Begin Time End Time
0800 0900
0830 1000
0800 0930
Rule Result
If only start date entered: Retrieves record(s) if SSAMATX date is between
SSRMEET start and end dates (inclusive)
If only end date entered: Retrieves record(s) if SSAMATX date is between
SSRMEET start and end dates (inclusive)
Class A
15-DEC-1992
01-SEP-1992
15-AUG-1992
15-SEP-1992
15-SEP-1992
15-OCT-1992
15-OCT-1992
30-DEC-1992

310
Banner Student User Guide | Class Schedule
Example:
Note: The same logic applies to the time searches.
If both dates entered: Retrieves record(s) if SSRMEET start date between
SSAMATX start and end dates (inclusive)
- or -
SSRMEET end date between SSAMATX start and end
dates (inclusive)
- or -
SSRMEET start date less than or equal to the
SSAMATX start date and SSRMEET end date greater
than or equal to the SSAMATX end date
SSRMEET Start SSRMEET End
1 01-Jan-1999 31-Jan-1999
2 05-Jan-1999 28-Jan-1999
3 01-Feb-1999 28-Feb-1999
4 01-Mar-1999 31-Mar-1999
5 31-Mar-1999 30-Jun-1999
6 01-Mar-1999 01-Mar-1999
SSAMATX Start Entered SSAMATX End Entered Records Retrieved
01-Feb-1999 record 3
15-Feb-1999 record 3
15-Jan-1999 records 1, 2
01-Jan-1999 01-Mar-1999 records 1, 2, 3, 4, 6
01-Mar-1999 01-Mar-1999 records 4, 6
01-Dec-1998 01-Feb-1999 records 1, 2, 3
Rule Result

311
Banner Student User Guide | Class Schedule
Producing a Schedule of Classes
After the course schedule information has been entered into the system, the Class
Schedule Report (SSRSECT) may be produced. The Class Schedule lists all course
section information required for the registration process, including the title, meeting days
and times, and instructors. It is used by students and advisors in the registration process
for the upcoming term.
Reviewing Enrollment Counts
The Schedule Section Tally Report (SSRTALY) may be used to review past enrollments in
sections to aid in the determination of current capacity and may also be used to verify
current enrollment counts during and following registration. The report is able to show the
maximum, actual, and remaining waitlists for enrollment, as well as census two counts
and blocks associated with a CRN.
Schedule Contact Hours
The information in the Contact Hours field in the Section information of the Schedule
Form (SSASECT) defaults from the Contact field on SCACRSE. Scheduling contact
hours is defined for a term as follows:
• A Meeting Period is a pattern of days and meeting times within an established Start Date
and End Date.
• A Session is made up of one or more Meeting Periods.
• A Section is made up of one or more Sessions, as in the example below.
The data used for scheduling contact hours is as follows:
Example: Section 10001 - ENGL 100
Session 1 Meeting Period 1 MWF 8:00 - 8:50 29-AUG-1992 20-DEC-1992
Session 1 Meeting Period 2 TR 9:00 - 10:15 29-AUG-1992 20-DEC-1992
Session 2 Meeting Period 1 MWF 1:00 - 1:50 29-AUG-1992 20-DEC-1992
A Meeting Period Number.
B Days of the Week for the Meeting Period.
C Start Time and End Time of Meeting Period (in military time).
D Starting Date of the Meeting Period. (This is not necessarily a Monday or
Tuesday.)

312
Banner Student User Guide | Class Schedule
1992 Calendar
E Ending Date of the Meeting Period. (This is not necessarily a Thursday or
Friday.)
F Number of Days of the Week (B) that fall within the Start Date (D) and End
Date (E) of the Meeting Period.
ABCDEF
Meeting Period 1 MWF 8:00 - 8:50 29-AUG-1992 20-DEC-1992 48
Meeting Period 2 TR 14:00 - 16:00 29-AUG-1992 20-DEC-1992 32
80 days total
Month U M T W R F S
AUG 29
30 31 01 02 03 04 05
SEPT 06 07 08 09 10 11 12
13 14 15 16 17 18 19
20 21 22 23 24 25 26
27 28 29 30 01 02 03
OCT 04 05 06 07 08 09 10
11 12 13 14 15 16 17
18 19 20 21 22 23 24
25 26 27 28 29 30 31
NOV 01 02 03 04 05 06 07
08 09 10 11 12 13 14
15 16 17 18 19 29 21
22 23 24 25 26 27 28
29 30 01 02 03 04 05
DEC 06 07 08 09 10 11 12
13 14 15 16 17 18 19
20

313
Banner Student User Guide | Class Schedule
For the Exclusion Rules Form (SSAEXCL) for the year 1992:
On the Schedule Calendar Form (SSAACCL), the Number of Weeks field is calculated by
using the earliest Meeting Period Start Date (D) and the latest Meeting Period End Date
(E) to determine the actual Number of Days in the entire section. (This is the second
Number of Weeks field in the Schedule Academic Calendar section.) The Exclusion
Rules Form (SSAEXCL) is not checked for this calculation.
114 Actual Meeting Days / 7 days in a week = 16.28 weeks
Section Contact Hours
The Total Section Contact Hours figure is calculated in the Total Contact field of the
Faculty Instructional Assignment section on the Faculty Assignment Form (SIAASGN).
The equation is as follows:
[(Total Meeting Period Days of the Week - Exclusion Rule Days for Meeting Period) =
Number of Meeting Period Days * Number of Minutes in Meeting Period] / Duration
factor = Number of Meeting Period Contact Hours
Section Weekly Contact Hours
The Section Weekly Contact Hours figure is calculated in the Weekly Contact field of the
Faculty Instructional Assignment section on the Faculty Assignment Form (SIAASGN).
The equation is as follows:
(Number of Days in a Meeting Period Week * Number of Minutes per Meeting Period) /
Duration factor = Meeting Period Weekly Contact Hours
Monday November 23, 1992 Falls in Meeting Period 1
Tuesday November 24, 1992 Falls in Meeting Period 2
Wednesday November 25, 1992 Falls in Meeting Period 1
Thursday November 26, 1992 Falls in Meeting Period 2
Friday November 27, 1992 Falls in Meeting Period 1
Example:
[(48 - 3 = 45) * 50] = 2250 min/50 = 45 Contact Hours for Session 1
[(32 - 2 = 30) * 120] = 3600 min/50 = 72 Contact Hours for Session 2
Total Section Contact Hours is 45 + 72 = 117

314
Banner Student User Guide | Class Schedule
The sum of all Meeting Period Weekly Contact Hours = Section Weekly Contact Hours
Creating Cross List Definitions
If the institution will be establishing cross-listed sections, the cross list group identifiers
which will be used must be created on the Schedule Cross List Definition Form
(SSAXLST). The maximum enrollment for the cross list is also specified on this form.
SSAXLST uses the Block (Code) field to indicate that a section is part of a block of
courses.
After creating cross list group identifiers, these identifiers must be entered in the Cross
List field of the Schedule Form (SSASECT) for the appropriate courses. If cross-listed
courses are to be scheduled for the same room during the same time, one method to
accomplish this would be to assign meeting days, times, rooms, and instructors to one of
the cross-listed courses and save this data in the Schedule Form (SSASECT).
To quickly schedule the other cross-listed courses to the same room, enter SSASECT for
each of the remaining cross-listed courses, and use Duplicate Item to access the Cross
List Meeting Time/Instructor Query Form (SSAXMTI) from the Meeting Time window. This
form displays the meeting time and instructor information already associated with the
cross-listed group of courses.
You will see the room, time, and instructor information added previously via SSASECT for
other sections. Place your cursor in the CRN field of the course with previously added
schedule information. Use Select to default the meeting dates, days, times, rooms, and
instructors into SSASECT with the
O value (both time and room conflict) in the Override
Indicator fields in the Meeting Time and Instructor windows.
Save your records. They are automatically posted. Meeting time and instructor information
can also be added manually for each course, and overrides will need to be requested to
schedule the same rooms and instructors for the course.
Note: It is not necessary to schedule the cross-listed courses in the same
room or with the same instructor.
(3 * 50) / 50 = 3.0
(2 * 120) / 50 = 4.8
3.0 + 4.8 = 7.8

315
Banner Student User Guide | Class Schedule
Schedule Module Links
In the Banner Student System there are two methods of scheduling courses that must be
taken concurrently, corequisites and links.
Corequisites
Corequisites are two or more different courses that must be taken concurrently.
Corequisites are set up in the Catalog module by identifying the courses as corequisites of
each other in the Corequisite Course section of the Course Detail Form (SCADETL) for
each of the courses required.
If a specific section of a course is required as a corequisite, then that section must also be
identified in the Corequisite Section information of the Schedule Detail Form (SSADETL).
Link Processing
Links are used to connect sections of the “same course” when it is required that some
combination of these sections be taken concurrently. The same course can be defined as
a course having the same subject and the same course number but with different
schedule types, and that course can be used in the linking process.
Linking sections requires defining link identifiers on the Schedule Form (SSASECT) and
defining link connectors on the Schedule Detail Form (SSADETL). Both link identifiers and
link connectors are two-byte characters which are user-defined.
Example 1:
ARTS 201 and ARTS 210 must be taken concurrently.
SCADETL: Key Information Corequisite information
ARTS 201 Subject: ARTS Course: 210
ARTS 210 Subject: ARTS Course: 201
Example 2:
ARTS 201-01 and ARTS 210-10 must be taken concurrently.
SSADETL: Key Information Corequisite Section information
ARTS 201 01 CRN Subject: ARTS Course: 210 Section: 10
ARTS 210 10 CRN Subject: ARTS Course: 201 Section: 01

316
Banner Student User Guide | Class Schedule
In each of the following examples, the linking process places a link connector on a section
of a course and uses that same value as the link identifier on another section of the same
course. This action links the section with the connector to the section with that identifier. It
will create an error message at registration, should a student try to register for the section
with the connector, without registering for the section with the identifier of equal value.
(This error message is dependent upon (Registration) Links error checking being set to
Fatal on the Term Control Form (SOATERM) for the term.) For a linked course with a fatal
error, the error that is displayed is the translation of the
SSBSECT_SCHD_CODE of the
missing course.
The following courses will be used in the examples of linking sections in various
combinations:
Example 1:
Students may take a lab section without a lecture section, but not a lecture section
without a lab section (any lab section).
Note that for this combination, no connector is placed on the lab sections, and no
identifier is required on the lecture sections.
Example 2:
Students may take a lecture section without a lab section, but not a lab section without
a lecture section (any lecture section).
Note that for this combination, no connector is placed on the lecture sections, and no
identifier is required on the lab sections.
Course Section Title Schedule Type Credits
Chemistry 120 001 Chemistry I Lecture 4
Chemistry 120 002 Chemistry I Lecture 4
Chemistry 120 003 Chemistry I Lab 0
Chemistry 120 004 Chemistry I Lab 0
Course and
Section
Link Identifier
(SSASECT)
Link Connector
(SSADETL)
120-001 L1
120-002 L1
120-003 L1
120-004 L1

317
Banner Student User Guide | Class Schedule
Example 3:
Students may take any lab section with any lecture section, but must have both a lab
section and a lecture section.
Note that for this combination, all lecture sections have the same identifier, and all lab
sections have the same identifier.
Example 4:
Students in section 001 Lecture must take section 003 Lab, and students in section
002 Lecture must take section 004 Lab.
Note that for this combination, the identifiers are unique values for each section of the
lectures and each section of the labs.
When creating sections, each section must be defined as gradable (Gradable box is
checked) or non-gradable (Gradable box is unchecked) on SSASECT. If the lab and
lecture sections are one course and are graded as one course, then one of the sections,
Course and
Section
Link Identifier
(SSASECT)
Link Connector
(SSADETL)
120-001 A1
120-002 A1
120-003 A1
120-004 A1
Course and
Section
Link Identifier
(SSASECT)
Link Connector
(SSADETL)
120-001 A1 L1
120-002 A1 L1
120-003 L1 A1
120-004 L1 A1
Course and
Section
Link Identifier
(SSASECT)
Link Connector
(SSADETL)
120-001 A1 L1
120-002 A2 L2
120-003 L1 A1
120-004 L2 A2

318
Banner Student User Guide | Class Schedule
either the lab or the lecture, must be defined as non-gradable, and the credit hours/billing
hours must be changed to zero (0).
In order to change the credit hours and billing hours for a course at the section level, the
credit and billing hours at the catalog level must have been defined for variable credit, 0 or
3 credits, for example. This range will default on SSASECT when the section is created,
and the user can then define the lecture section, to follow the example, as offered for 3
credits. The lab section would be defined as available for zero (0) credits to avoid
duplicate credit and billing for the same course.
Create Section Contract Information
The Schedule Detail Form (SSADETL) allows the user to designate a section as a
contract section via the Section Contracts information on the Contract/Block Schedule
Code window. Examples of contract codes may be military contract, IBM contract, AICPA
contract, etc. The contract information is repeating. Therefore, multiple contract codes
may be listed for a section. The Percentage field is also provided to designate the
contract breakdown. The Primary Indicator designates the primary contractor if multiples
exist. No processing is performed with the information.
The following is an example of contract information: ELEC 121, Electrical Wiring, is a
contract course in the Continuing Education Division which is funded 80% by the
Electricians Union for their apprentices. The other 20% is funded by the Continuing
Education Division.
The Section Contracts information could be set up as follows:
Creating/Modifying Restrictions on Sections
When a course has been added to the system, restrictions as to who may register for the
course are built on the Course Registration Restrictions Form (SCARRES). When
sections of a course are added for a term, any restrictions set at the catalog level will
default to the sections at the schedule level. These restrictions are maintained on the
Schedule Restrictions Form (SSARRES) and may be added to or otherwise modified for
the Key Information. Please see the “Catalog Procedures” section for further information
and examples of setting restrictions.
Note: Course and section restriction rules created prior to Release 8.0
are handled as follows. The (Field of Study) Type field on SCARRES
and SSARRES will be set to a default of
MAJOR when a current course or
section restriction rule exists for a major (STVMAJR). Since only the field
of study type of
MAJOR was previously considered, all registration
restriction rules will function as before. Processing checks the primary
and secondary curriculum elements.
EU Electricians Union 80% Primary - checked
CE Continuing Education 20%

319
Banner Student User Guide | Class Schedule
You may restrict a course to include or exclude students specifically by the following data
items.
• department
• field of study (major)
• class
• level
• degree
• program
• campus
• college
• student attribute
• cohort
The restriction controls are used to enter and maintain the restriction indicators associated
with the restrictions for a course. The only values that can be selected in the Include
Exclude radio groups are
Include for include restrictions and Exclude for exclude
restrictions. An inclusion restriction means a course may be offered only for the values
displayed for that restriction. An exclusion restriction prohibits the offering of a course for
the specified restrictions.
The All Field of Study Types checkbox is used to indicate that all field of study types
should be considered. When this box is checked, the Type field is inactive, and the user is
taken to the Code field to select the field of study value.
The (Field of Study) Type field displays the code of the learner field of study type, such
as
MAJOR, MINOR, CONCENTRATION. Values are selected from the Learner Field of
Study Type (GTVLFST) list.
Please refer to the “Building Registration Restrictions on Courses” section of the “Course
Catalog Chapter” for more information on using the All Field of Study Types checkbox
and the (Field of Study) Type field.
Test Score Restrictions and Prerequisites
Use the Schedule Pre-requisite and Test Score Restrictions Form (SSAPREQ) to restrict
sections for test scores and area prerequisites. Restrictions set at the course level on the
Catalog Pre-requisite and Test Score Restrictions Form (SCAPREQ) will default to the
schedule prerequisite and test score restriction information maintained on SSAPREQ.
These restrictions may be added to or otherwise modified on SSAPREQ. Please see the
“Catalog Procedures” section for further information and examples of setting prerequisite
and test score restrictions.

320
Banner Student User Guide | Class Schedule
Course Fee Assessment Rules by Level
A Level field exists in the Section Fees information on the Schedule Detail Form
(SSADETL). The Section Fee Assessment Control Form (SSADFEE) allows an institution
to build fee assessment rules on a term basis for sections based on schedule type and
level. Once these section assessment rules have been built, they will default to the section
based on the schedule type of the section and the level entered in the Section Fees
information in the Section Fees/Degree Program Attribute window of SSADETL. The
Tuition and Fee Waiver checkbox on the Schedule Form (SSASECT) must be checked,
and the Override checkbox on the Registration Fee Assessment Rules Form (SFARGFE)
must be checked, if regular fee assessment processing is to be bypassed for this section.
When this section fee assessment process is used, the system stores the course
reference number with the account detail information generated for the section. This will
allow the institution to use the Tuition & Fee Analysis by Course View (SFVTFAN).
Tuition & Fee Analysis by Course
You have the ability to monitor the tuition income for those sections which were assessed
using course fee assessment rules by level. An Oracle view (SFVTFAN) is provided which
contains the information necessary to report this tuition income.
Fields in the view include: Term, CRN, Subject, Course Number, Sequence Number,
Detail Code, Detail Code Category, Admissions Type, Degree Code, Course Level,
Registration Status Code, Course Title, Primary Instructor Name, Transaction Number,
and Amount.
Tuition Fee Waivers
To indicate that a section should not have the customary tuition and fee charges, check
the Tuition and Fee Waiver box on the Schedule Form (SSASECT). This will indicate to
the system that this section is exempt from tuition and fees which are overrideable as
defined on the Registration Fees Process Control Form (SFARGFE), when the Override
box is checked. If this box is checked, all rules on SFARGFE which are overrideable will
ignore billing hours for this section during registration fee assessment. If this box is not
checked, all rules on SFARGFE apply.
If it is determined by your institution that a fee other than the customary tuition and fees
should be charged for this course, this is accomplished by checking the Tuition and Fee
Waiver box in conjunction with assigning a section fee on the Schedule Detail Form
(SSADETL). When assigning a fee code, an amount also needs to be entered. A flat fee
or a per credit hour fee may be charged. This determination must be made by the
institution when entering the fee code.
For a section, a level may also be specified for a fee. This level specifies the level at which
the course is taken. This allows for differing fees or additional fees to be charged, if the
section is taken at different levels. If no level is specified, the rule will apply to all levels. If
tuition fee waiver rules had been defined at the catalog level, these rules will default to the
section for all levels (level is null). These defaulted catalog rules may then be modified for
each section as needed.

321
Banner Student User Guide | Class Schedule
Note: Once a waiver has been created for a section and enrollment has
begun, the setting of the Tuition and Fee Waiver box should not be
changed, so that fees are assessed correctly.
This flag is not dynamically looked at in the registration fee assessment process.
Therefore, if a section has a waiver and a student registers for the course, they will be
given a waiver. However, if at a later date the setting of the Tuition and Fee Waiver box is
changed, even if this student is re-processed via registration fee assessment, they may
not be charged correctly, because the Tuition and Fee Waiver box has already been
populated.
Reserved Seating
Reserved seats rules are established in the Reserved Seats window of SSASECT after
enrollment information for non-reserved seats has been created for the section. You can
reserve a group of seats in a section for a particular group of students. Reservations can
be defined using curriculum and student components, including the primary and
secondary curriculum. Admission, matriculation, and graduation terms are included. The
user ID and activity date are displayed for each rule. Reserved and waitlist totals are also
displayed.
Reserved seat rules processing checks the curriculum data elements against SORLCUR
and SORLFOS. Student attributes are checked against SGRSATT. Cohort data is checked
against SGRCHRT. The admission and matriculation terms are checked against
SORLFOS. The graduation term is checked against SGBSTDN.
Overflow checking is used during processing to check unreserved available seats when
seats on the reserved rule are full. Students can register for those unreserved available
seats when overflow checking is turned on.
Values can be entered in the data elements for the rules, but once a rule has been saved,
it cannot be changed. The rule must be deleted and re-entered. The Overflow checkbox
can be checked (set to
Y) or unchecked (set to N) as needed. The Reserved Maximum
and Waitlist Maximum fields can also be modified by rule, for reserved or non-reserved
seating. When waitlist maximums have been set up, the waitlist messages, which are
displayed at registration, will reflect that this section has reserved seating in place.
The Reserved Seats Inquiry Form (SSIRESV) is used to query and review reserved seats
rules for a term and CRN combination. This form can be accessed from the Options Menu
on SSASECT.
When a Student Meets Multiple Rules
The reserved seats process will attempt to place the student in the most restrictive rule
that applies. The most restrictive rule is considered the rule with the most reserved rule
components. If the student meets rules with the same number of reserved rule
components, left-most components are considered most restrictive. If a student meets
multiple reserved seats rules that are equally restrictive, an attempt is made to place the
student in the reserved rule the process finds first.

322
Banner Student User Guide | Class Schedule
Example:
If a student meets rule 1 with a level of UG and rule 2 with an attribute of A1, the
student will be placed in rule 1.
If a student meets rule 1, where rule 1 has three data elements, and the student also
meets rule 2, where rule 2 has three data elements, the student will be placed in the
rule with the three elements that are listed left-most in the rule.
Once the process makes a hit, and the most restrictive rule is found for the student, the
student will be placed in the reserved seats bucket, if seats are available in that rule. The
reserved seats process does not check for additional restrictive rules for which the student
may apply.
Reserved seats processing does not consider the value of the components, rather the
quantity of components and/or the location of the components. The exception is
curriculum components. See additional information regarding curricula hierarchy, below.
When the student meets a rule, that student is placed in the reserved seat or waitlist
bucket for the rule when available seats exist. If no reserved seats are available in the
most restrictive rule for which the student qualifies, the system looks at the setting of the
Overflow checkbox.
• When the Overflow checkbox is unchecked (N), the student is not allowed to register for
the course.
• When the Overflow checkbox is checked (Y), the student can register for an unreserved
available seat in the course.
• When no unreserved available seats exist, the student is not allowed to register for the
course.
The components for the reserved seats rule are checked in order as they appear in the
Reserved Seats window. Rules are checked moving from left to right, and the data
elements that appear to the left carry more weight on the rule.
Curricula Hierarchy
The Curricula field is the exception to the above information. This field is used to
determine which of the student’s curriculum records should be checked against the
reserved rule. When curriculum components are considered, the following hierarchy is
used:
• Any or Null curricula are considered first.
• Primary curriculum is considered second.
• Secondary curriculum is considered last.
Example:
When the student meets multiple rules based on curriculum components, the student
is placed in the rule where the curriculum components are considered first. In the
example below, the student would be placed in the first rule with the Curricula field
set to
Null or Any.

323
Banner Student User Guide | Class Schedule
Rule Data Entry
Data entry of rules must be considered so that rules are valid and can be saved. Duplicate
reserved rules cannot be saved. Please note that the Curricula field is not considered
when determining equality. Therefore, the following rules are considered duplicates and
will generate an error message. Only one of the following rules can be successfully saved.
Here is another example of duplicate rules. Only one of the following can be saved.
Reserved Seats Rules Totals
Reserved seats rules totals are displayed separately in the Reserved Seats window.
These numbers are the totals for all the rules for the CRN. As the maximum reserved
seats and maximum waitlist seats values are modified by rule, the totals will automatically
be updated and displayed. These fields are display only.
The totals in the Reserved Seats window reflect the totals from the Enrollment Data block.
Use the Delete Reserved Seats button to delete all reserved seats rules if each reserved
rule has zero (0) actual seats taken. This removes all the reserved seating information and
returns the enrollment data to the section level.
Note: The system tests for reserved seating each time the Reserved
Seats window is entered. You can only delete reserved seating when no
enrollment exists for the reserved seating. When enrollment exists that
Level
Field of
Study
Type
Field of
Study
Code Curricula Attribute
Matriculation
Term
UG MAJOR MATH Null or Any A1 200510
UG MAJOR ENGL Primary A2 200510
Program
Field of Study
Type
Field of Study
Code Curricula
BA-MATH MAJOR MATH Primary
BA-MATH MAJOR MATH Secondary
Department
Field of Study
Type
Field of Study
Code Curricula
MAJOR MATH Null
MAJOR MATH Any

324
Banner Student User Guide | Class Schedule
meets the reserved seating requirement, you will not be allowed to delete
reserved seating.
Overflow Rule Option
The Overflow (Indicator) checkbox in the Reserved Seats window is used to check
unreserved available seats when seats on the reserved rule are full. Students can register
for those unreserved available seats when overflow checking is turned on. When a
student meets a reserved rule for which no reserved seats are available and the Overflow
(Indicator) is checked (set to
Y), an attempt is made to place the student in a non-
reserved available seat and successfully register the student for the course. If there are no
non-reserved available seats, processing will use the reserved rule and issue capacity
messages as usual.
When the Overflow checkbox is checked (set to
Y), students who met a reserved rule but
could not register because the maximum reserved seats value had been met are able to
register for unreserved available seats. The overflow processing works as follows:
• When the Overflow checkbox is unchecked (N) and no reserved seats are available,
the student is not allowed to register for the course. The reserved rule is used to issue
capacity messages.
• When the Overflow checkbox is checked (Y) and no reserved seats are available, the
student can register for an unreserved available seat in the course. The overflow option
is allowed. The reserved rule is deactivated so that unreserved available seats can be
used by students who would have normally met the reserved seats rule.
• When the Overflow checkbox is checked (Y) and no reserved seats are available and
no unreserved available seats exist, registration processing will go back and use the
reserved rule to issue associated capacity messages.
• When reserved seats rules are initially created, the Overflow checkbox is unchecked
(
N).
• The Overflow checkbox can be activated or inactivated at any time during registration.
• The Overflow checkbox cannot be activated for the unreserved rule.
• When seats are full for reserved and/or unreserved rules and the student who meets a
reserved rule is waitlisted, the student is waitlisted for the rule in which the requirements
are met, whether the Overflow checkbox is checked or unchecked.
• When the Overflow checkbox is checked (Y), it is used, regardless of the setting of the
Capacity section option in SOATERM.
Note: The reserved seats rule overflow option is also used by Waitlist
Automation processing. If a seat becomes available on the non-reserved
rule, then all students waitlisted in that rule and in reserved rules with the
Overflow checkbox checked (
Y) are treated as a single waitlist, and the
student with the highest priority is notified.
Please note that the setting of the Overflow checkbox is not considered
when the system attempts to waitlist a student. If a student meets a
reserved rule where the waitlist is full and the Overflow checkbox is

325
Banner Student User Guide | Class Schedule
checked (Y), the student will not overflow into the waitlist on the non-
reserved rule.
Querying Reserved Seats
The Reserved Seats Inquiry Form (SSIRESV) is used to query and view all reserved seats
rules for a term and CRN combination. Rules are displayed in their entirety, and multiple
rules are displayed for a section. This form can be accessed from the Options Menu on
SSASECT.
Queries are based on the Term and CRN fields in the Key Block. The Data block displays
the rules that are returned by the query for the term and CRN. Rule data elements are also
queryable. Rule components are displayed in the same order as in the Reserved Seats
window on SSASECT. The fields in the Reserved Seats Totals block are display only.
Rolling Reserved Seats
The Term Roll Report (SSRROLL) rolls the data elements from SSASECT (Reserved
Seats window) when reserved seats are rolled to a new term. The setting of the Overflow
checkbox for the rule is also rolled to the new term. The optional
sussrresv.sql script is used
to set the Overflow checkbox to checked (
Y) or unchecked (N) for all CRNs for a term.
The overflow options can be reset using the delivered script or can be updated manually
after the roll has been performed.
Note: When SSRROLL is run and the SSRRESV records are created for
the new term, the user ID for the user that runs SSRROLL will be the user
ID that populates the new SSRRESV records.
Reserved Seats Rules Script - srssrresv.sql
The srssrresv.sql PL/SQL script is used as a report. When run, it selects all
reserved seats rules by term and CRN. The script resides in the SQL*Plus directory.
The script uses the following prompts:
• Term (Required) - Enter the term for the reserved seats rule.
• CRN (Optional) - Enter the CRN for the reserved seats rule.
• Date (Optional) - Enter the date the report is being run.
The output includes:
• Report Name
• Date
• Ter m Co de
• CRN
• Subject

326
Banner Student User Guide | Class Schedule
• Course Number
• Enrollment Detail (seat counts) for the CRN
• Reserved Rules detail, including the Overflow checkbox setting associated with each
rule
• Reserved Detail (seat counts for the rule)
The output pages break on the CRN and print the sum of the seat counts for each CRN,
based on the rules for the CRN. The display order of the rules within a term and CRN
follows the sort order of the fields that make up the rule from left to right.
Converting Existing Reserved Seats Rules
Prior to Release 8.0, reserved seats rules were constructed using level, major, and class.
Only the primary curriculum was checked during registration processing to determine
which reserved seat rule was met by the student. During the upgrade to Banner Student
8.0, existing reserved seat rules were converted as follows, to ensure that all rules
function as they did in the previous release.
• Reserved seat components will be set to Null.
• The Overflow checkbox will be unchecked (N). (An optional script is delivered to set the
Overflow checkbox to checked (
Y) or unchecked (N) for all CRNs for a term.)
• If an existing rule contains a major value (STVMAJR), the Field of Study Type field will
be set to
MAJOR, and the Field of Study Code field will be populated with the existing
major value.
• If the Majr field (now the Field of Study Code field) is Null in the existing reserved
rule, both Field of Study Type and Field of Study Code will be set to
Null.
• If an existing rule contains a level or a major, the Curricula field will be set to Primary
to preserve prior registration processing that only checked the primary curriculum.
• If an existing rule used only class, the Curricula field will remain Null.
Maintain Academic Calendar
The academic calendar processing records and calculates the significant academic
calendar dates for a group of sections or a specific section.
Note: The academic calendar processing is an optional portion of the
Schedule module which does not need to be implemented unless it is
required.
Creating codes on the Academic Calendar Type Validation Form (STVACCL) is the first
step in establishing the academic calendar. These academic calendar type codes are
user-defined. Examples are: daily contact, weekly contact, CEU, or semester calendar.

327
Banner Student User Guide | Class Schedule
The Schedule Academic Calendar Rules Form (SSAACRL) may be used to build the rules
associated with an academic calendar. Once academic calendar rules are built, they may
be copied to another academic calendar type within the same term via the Default Type
field in the Default Calendar Type window.
The academic calendar contains an optional census two date. The Census Two Date
field is also on the Term Control Form (SOATERM) in the Base Part of Term section. If
census two is entered here, it will default to the Census Two information on the Schedule
Form (SSASECT). A census two enrollment will automatically be maintained if a census
two date is specified.
The information included in an academic calendar includes census one, census two,
enrollment date, record academic history date, and drop without a penalty date. There are
three fields associated with each of these rules: Numbers of Days, Percentage of Days,
and Date. The user may choose a specific date or have the system calculate the date
when the number of days or percentage of days is used. If number of days or percentage
of days is specified, then the system will automatically calculate the correct dates when an
academic calendar type is associated with a section. These three fields work in
conjunction with one another. If a census one date is entered, then the number of days to
census one and percentage of days to census one may not be entered.
The Census One Date and Census Two Date fields are used in processing the
registration information to calculate the census one and census two enrollment. The last
day to enroll, the last day to record academic history, and last day to drop without a
penalty are informational only and are not currently used in any process.
The Academic Calendar Rule Query Form (SSAQCRL), which is a stand alone query
form, may be used to view the academic calendar types for which rules are established for
the term.
The Schedule Calendar Form (SSAACCL) allows you to tie an academic calendar to a
section. The keys to the form are term and course reference number. Once a calendar
type is entered, this form examines the session meeting information from the Schedule
Form (SSASECT) and calculates the academic calendar information. An academic
calendar type may only be added or modified prior to enrollment existing for the section.
This is because a change in the census dates after enrollment exists would give an
inaccurate census enrollment count.
The dates on the Schedule Exclusion Rules Form (SSAEXCL) are excluded from the
academic calendar calculations. The Part of Term field in the Key Information of
SSAEXCL allows the institution to define those days which are to be excluded from the
academic calendar by parts of term and calendar year. A description may also be added
for the excluded days.
The Academic Calendar Type is included in the Section Roll Process (SSRROLL) to roll
the academic calendar information forward to the next term being processed.
Academic calendar types may only be associated with those sections whose part of term
allows override capabilities of start, end, and census dates on the Term Control Form
(SOATERM).

328
Banner Student User Guide | Class Schedule
Note: The academic calendar information on the Schedule Calendar
Form (SSAACCL) cannot be deleted with a Remove Record function.
The following is an example of academic calendar processing. An academic calendar rule
of daily contact is established on the Schedule Academic Calendar Rules Form
(SSAACRL) for 199301 (Fall 1992) as follows:
This rule is given to a section which meets Monday, Wednesday, and Friday, from August
29th till December 15th. Monday, September 7th, Thursday, November 26th, and Friday,
November 27th, have been defined as exclusion days on the Schedule Exclusion Rules
Form (SSAEXCL) for this section's part of term. Therefore, they are not used when
calculating the academic calendar dates.
When you examine all the Mondays, Wednesdays, and Fridays which fall between August
29th and December 15th, and remove the two exclusion days that follow Monday,
Wednesday, or Friday, you can determine that there are 44 actual meetings of this section.
Using the rules established on SSAACRL the dates calculate as follows:
Registration Dates:
Note: The Registration Dates are informational only.
# Days % Days Date
Census One: 10
Census Two: 50%
Enrollment: 20
Record Academic History: 10-NOV-1992
Drop Without Penalty: 35
Census One 10 Days 23-SEP-1992
Census Two 50% Days 21-OCT-1992
Last Date to Enroll 16-OCT-1992
Last Date to Record Academic History 10-NOV-1992
Last Date to Drop without Penalty 35 Days 20-NOV-1992

329
Banner Student User Guide | Class Schedule
Maintain Attendance Accounting Method
The Attendance (Accounting) Method field on the Schedule Form (SSASECT) is
validated against the Attendance Accounting Method Validation Form (STVACCT). This
validation form allows the user to specify the accounting method for the section. Examples
are weekly, daily, independent study, or actual. Only one method may be specified on the
validation form.
Both the Daily and Weekly Contact Hour calculations use the number of hours per week
when the session meets. The Hours Per Week field in the Meeting Time window is
updateable. This allows those sessions which do not meet for the standard duration factor,
and are maintained on the Faculty Load Term Control Form (SIATERM), to be updated to
reflect the correct hours of meeting per week.
In the meeting times listed below, the system, using a 50 minute duration factor
maintained on SIATERM, would calculate 4.4 and 4.8 hours per week. Due to break
periods, the institution only gives 4 hours of meeting time per week to the three examples.
To correctly specify the number of hours per week for these special sessions, the override
on SSASECT may be used.
Number of Weeks in the Session is calculated using the earliest session start date and the
latest session end date.
When a weekly attendance accounting method is specified on a section with multiple
meeting times, the value appearing in the Weekly Contact Hours field is calculated as
follows:
For the following course meeting information:
The calculation is as follows:
System Calculated Override Value
TR 0800 - 0950 4.40 4.00
TR 0810 - 1000 4.40 4.00
TR 0800 - 1000 4.80 4.00
Total Contact Hours/Week for
Meeting 1
+ Total Contact Hours/Week for
Meeting 2
Meeting 1 29-AUG-1992 20-DEC-1992 M W F 8:00 - 9:00 3 hours/week
Meeting 2 29-AUG-1992 20-DEC-1992 T R 8:30 - 9:00 1 hour/week

330
Banner Student User Guide | Class Schedule
When a daily attendance accounting method is specified on a section, the value appearing
in the Daily Contact Hours field is calculated as follows:
For the following course meeting information:
The calculations are as follows:
Total number of MWFs, taking exclusion days into account is 43.
Total number of TRs, taking exclusion days into account is 30.
Schedule Overrides
The Schedule Override Form (SSAOVRR) allows the user to override the following
catalog values associated with the section, such as College, Division, Department, and
Taxonomy of Program. There is no edit against the catalog information. If the Catalog
states that the course is in the College of Arts and Sciences in the English Department,
Meeting 1 = 3 hours/week
Meeting 2 = 1 hour/week
WCH = 3 + 1 = 4
Total Contact Hours for Meeting 1 + Total Contact Hours for Meeting 2
Number of Days in Meeting 1 Number of Days in Meeting 2
Meeting 1 29-AUG-1992 20-DEC-1992 M W F 8:00 - 9:00 3 hours/week
Meeting 2 29-AUG-1992 20-DEC-1992 T R 8:30 - 9:00 1 hour/week
Meeting 1 3 hours/week
3 meetings/week
x 43 meeting days = 43 contact hours
Meeting 2 1 hours/week
2 meetings/week
x 30 meeting days = 15 contact hours
Meeting 1 43 contact hours
43 meeting days
=1
Meeting 2 15 contact hours
30 meeting days
=.5
DCH = 1 + 5 = 1.5

331
Banner Student User Guide | Class Schedule
the class schedule information may be changed to the Business School, Economics
Department.
These override fields are used when the course is rolled to academic history either in
batch or online, and the overrides are used in the Class Roster (SFRSCST), Schedule
Section Tally (SSRTALY), and Class Schedule (SSRSECT) reports.
Block Scheduling
The Block Scheduling function will allow an institution to register students in a group of
user-defined courses through the use of user-defined block codes. This processing
impacts the Schedule, General Student, and Registration modules, which are set up as
follows.
Schedule Module
The first step in using the block scheduling function is defining the institution's blocks on
the Block Code Validation Form (STVBLCK). The block codes can be up to ten position
alphanumeric characters.
After defining the block codes, the institution should now begin to establish the sections of
courses that are to be associated with each block code on the Block Schedule Control
Form (SSABLCK), where the keys to the form are block code and term. Sections may also
be assigned to the blocks via the Schedule Detail Form (SSADETL).
When adding sections to the block of courses via the Block Schedule Control Form
(SSABLCK), the CRN is a required field that when entered will display the following data
elements: subject code, course number, section number, part of term, campus, maximum
enrollment, actual enrollment, and seats remaining. A section may be associated with
more than one block. A
Y displays in the Multiple Block field to indicate that the section
belongs to multiple blocks. When adding sections to a block code on SSABLCK, the user
may enter a valid subject, course, and section number to retrieve section data, just as
entering a valid CRN will retrieve all section information. Use Count Query Hits from the
CRN field to access the Schedule Section Query Form (SSASECQ) from which valid
section codes may be queried and selected.
Courses may also be entered on this form by entering a valid subject code, course
number, and section number combination. Use List from the Subject, Course Number, or
Section fields to display the Schedule Section Query Form (SSASECQ), from which valid
section information may be retrieved.
If the section has variable credit or billing hours, the system defaults in the low credit or
billing hours. Both credit and billing hours can be overridden for this CRN and all students
associated with the block on the Block Schedule Control Form (SSABLCK) or for an
individual student on the Student Course Registration Form (SFAREGS).
Total credit and billing hours for the Key Block Block (Code) field are displayed at the
bottom of SSABLCK. Please be aware that these hours are accurate only after saving all
of the changes.

332
Banner Student User Guide | Class Schedule
Note: Additional changes may be made to a student's registration on the
Student Course Registration Form (SFAREGS), so these values do not
necessarily reflect the registered credit hours for students associated with
the block.
If the section has multiple grading modes, the default grading mode is used in the Grade
Mode field of the Block Schedule Control Form (SSABLCK). The grading mode may be
overridden for this CRN and all students associated with the section of SSABLCK, or for
an individual student on the Student Course Registration Form (SFAREGS).
If a special approval code is required for the section, then the Special Approval field will
default to
Y. This flag can not be overridden on the Block Schedule Control Form
(SSABLCK).
The purpose of these defaults is to assure that the registration process occurs with a
minimal amount of data entry.
The Block Schedule Code information on the Schedule Detail Form (SSADETL) permits
the user to assign the course to a block code. This is a repeating section which lists all of
the block codes of which the course section is a part. Block codes may be added and
deleted in this section. If a block code is added through the Block Schedule Code
information, the special approval code override will be established when you save (as it is
in SSABLCK), and all other defaults will be set to the course as if they were added in
SSABLCK. If overrides are desired for this section and all students associated with the
block, the data must be overridden on the Block Schedule Control Form (SSABLCK). If
overrides are desired for an individual student, the changes must be made on the Student
Course Registration Form (SFAREGS).
All of the standard registration errors are still controlled by the Term Control Form
(SOATERM) and are performed at the time of registration on the Student Course
Registration Form (SFAREGS).
Block Scheduling Example
In the Fall of 1993, a freshman business student must take the following sections:
These sections would be added on the Block Schedule Control Form (SSABLCK) for the
Fall term 1993 and Freshman Business Student block. An example of a block code could
be FL93FRBS where:
10050 ACCT 101
10057 ECON 100
10087 ENGL 100
10197 HIST 105

333
Banner Student User Guide | Class Schedule
From the Block Schedule Control Form (SSABLCK), the user is able to access the
following forms via the Options Menu:
The Block Schedule Query Form (SSABLKQ), which is a stand alone query form, displays
all the block codes which have been created for a term. An optional CRN may be entered
in the key. If the CRN is entered, then only those blocks which contain the CRN entered
are returned. This limits the display of block schedule codes to those blocks to which the
CRN belongs. For example, if the mass lecture section of Psychology 101 belongs to five
different freshman blocks, then the CRN may be entered in the key to verify that all five
blocks have been given the Psychology 101 section.
SSABLKQ may be accessed from the Block (Code) field of SSABLCK using Count Query
Hits and from the CRN field of SSABLCK using List to display related blocks. It may also
be accessed using Count Query Hits from the Block Schedule field in the Student Term
window of the Student Course Registration Form (SFAREGS) to display valid blocks for
the registration term.
The Block Schedule Section Query Form (SSABSCQ), which is a stand alone query form,
lists all the sections associated with a block code. A valid term and block code are
required in the key. From the Block (Code) field, you can display an LOV from STVBLCK,
or use Count Query Hits to display SSABLKQ.
The Schedule Section Query Form (SSASECQ) has a Block Schedule field. Placing a
Y
in this field when entering a query will display only those courses that are related to a
block code.
The Schedule Cross List Definition Form (SSAXLST) has a Block (Code) field. If any of
the CRNs which are cross-listed also belong to a block code, the Block (Code) field
displays a value of
Y.
The Block Schedule Query Form (SSABLKQ) may be accessed from the Options Menu of
SSAXLST to see the detail information associated with the block. The Block Schedule
Control Form (SSABLCK) may be accessed from the Options Menu of the Schedule Form
(SSASECT).
FL93 = Fall 1993
FR = Freshman
BS = Business students
SSASECT Schedule Form
SSADETL Schedule Detail Form
SFAREGS Student Course Registration Form

334
Banner Student User Guide | Class Schedule
General Student and Registration Modules
To attach a block code to a student, use the General Student Form (SGASTDN), the
Student Course Registration Form (SFAREGS), or the Student Block Load Process
(SGPBLCK). Block codes are maintained by effective term, like all other general student
information. Hence, an institution may want to maintain a consistent block code for each
student so that the information need not be updated on a term-by-term basis.
To associate students with block codes online, the user may enter a valid code in the
Block (Code) field on either the General Student Form (SGASTDN) or the Block
Schedule field on the Student Course Registration Form (SFAREGS). You can access
SSABLKQ from the Student Term window on SFAREGS and from the Additional
Information block of SGASTDN. Use Count Query Hits from the Block (Code) field
(SGASTDN) or the Block Schedule field (SFAREGS) to display the Block Schedule
Query Form (SSABLKQ) and query for valid codes for the effective term. (The CRN is
optional.)
Students may be associated with block codes in batch by using population selection and
the Student Block Load Process (SGPBLCK). This process will associate the groups of
students defined through population selection to a block code for an effective term.
Population selection and the Student Block Load Process (SGPBLCK) must be performed
for each population and block code you wish to assign.
Assigning a block code to a student will not automatically register the student for the
CRNs associated with the block code.
If a block code is associated with a student for a term, this information will display in the
Block Schedule field in the Student Term window of the Student Course Registration
Form (SFAREGS). This information will assist the user when performing block scheduling
registration online.
Two fields located in the Registration information of this form, the Process Block and
Delete All CRNs fields, are described below.
Check the Process Block box and use Next Block to default the CRNs associated with
the student's block code into SFAREGS. If any values (grading mode, variable credit
hours) have options other than the defaults available, the user is permitted to override
these values at this time. However, the system will not prompt you to enter values in the
multiple value fields as it normally would in registration, because the system assumes you
have done the bulk of your adjustments at the section level when assigning CRNs to a
block code. Entering a student in a block does not register the student for the associated
CRNs; it simply defaults the CRNs to SFAREGS if this process is
selected.
Check the Delete All CRNs box and use Next Block to activate the system to delete all
the CRNs for the active person and term in the key. This enables you to quickly delete
CRNs if a student was associated with the wrong block, or if they have changed blocks.
The Process Block and Delete All CRNs requests cannot be processed concurrently.
For example, a student assigned in the Fall of 1993 to the Freshman Business Student
block code was registered for the following sections:
335
Banner Student User Guide | Class Schedule
At a later time during the registration period, the student needed to be removed from this
block and added into the Computer Science block.
In order to accurately perform this function, you must enter the Student Course
Registration Form (SFAREGS) and delete all CRNs. To do this, check the Delete All
CRNs box and use Next Block. Next, the block code for the student needs to be changed.
This can be done in SFAREGS. (It may also be changed in SGASTDN, but there is no
need to access this form, since SFAREGS is active.) Finally, after entering the Computer
Science block code for the student, you must check the Process Block box and use Next
Block. The CRNs associated with the block will default into the form.
Note: Delete All CRNs will work for any student, not just those students
assigned to a block code.
Additional individual courses may be added or deleted from the Student Course
Registration Form (SFAREGS) as needed to modify the student's registration.
The Block Indicator field located on the Registration Section Query Form (SFQSECM)
and the Block field located on the Registration Course Query Form (SFQSECT) indicate if
the course being queried is associated with a block code.
Note: Simply deleting the block code from SFAREGS or SGASTDN will
not remove the CRNs from the student's registration once the student has
been processed either online or in batch through Course Request and
Scheduling processing.
Block scheduling registration may be performed for mass registration using a block code
on the Registration Mass Entry Form (SFAMREG). Please refer to the “Mass Entry
Processing” appendix for more information.
Block Scheduling registration may be performed in batch using Course Request and
Scheduling. To begin this process, use population selection to populate the Student
Course Request Form (SFACREQ) with the CRNs of the selected students' block codes
via the Course Request Load Process (SFPBLCK). SFPBLCK defaults the CRNs of a
student's block code to that student's record on the Student Course Request Form
(SFACREQ).
The selected students will now have course requests for the term, and the steps for
Course Request and Scheduling may be performed. Below is a brief outline of the steps
which need to be followed to complete this process. Please refer to the Course Request
and Scheduling Handbook for more details. Note that any student, (not just those
associated with block codes), with student requests for the term will be processed through
Course Request and Scheduling.
10050 ACCT 101
10057 ECON 100
10087 ENGL 100
10197 HIST 105

336
Banner Student User Guide | Class Schedule
Reports and Processes
The following reports and processes are used with block scheduling:
• The Term Roll Report (SSRROLL) has a parameter that allows you to roll block
schedule codes from one term to another.
• The Scheduled Section Tally Report (SSRTALY) displays blocks associated with a CRN
along with the information that has been previously reported.
• The Student Report (SGRSTDN) also displays the student's block code.
• The Student Block Load Process (SGPBLCK) associates a group of students defined
through population selection to a block code for an effective term.
• The Course Request Load Process (SFPBLCK) defaults the CRNs of a student's block
code to the selected student's record on the Student Course Request Form (SFACREQ)
for the effective term.
Sample Test Plan
1. Create block codes on the Block Code Validation Form (STVBLCK).
2. In the Block Schedule Control Form (SSABLCK) or in the Schedule Detail Form
(SSADETL), associate sections with the block codes for the effective term.
FL94FRUD (Fall 1994, Freshman, Undecided)
FL94SOBS (Fall 1994, Sophomore, Business)
FL94JRNR (Fall 1994, Junior, Nursing)
199401 FL94FRUD:
ENGL 100
COMP 110
BIOL 101
HIST 100
199401 FL94SOBS:
BUAD 200
MKTG 200
MKTG 201
ECON 200
199401 FL94JRNR:
GENE 300

337
Banner Student User Guide | Class Schedule
3. Assign students to block codes online for the desired term via the General Student
Form (SGASTDN) or the Student Course Registration Form (SFAREGS). To assign
students to block codes using batch processing, perform population selection, and run
the Student Block Load Process (SGPBLCK) for that population.
A population selection for the new freshmen might specify effective term, level,
degree, and major. For example:
4. Process block codes for your students online by entering the Student Course
Registration Form (SFAREGS) and checking the Process Block box, and then use
Next Block. This will default the CRNs associated with the student's block code to
SFAREGS. Regular registration processing should be continued from this point.
(Additional courses may be added, and all error checking will be performed at this
time.)
To process block codes in batch, use population selection, and run the Course
Request Load Process (SFPBLCK) for the that population.
A population selection may include effective term and block codes. For example:
Running the Course Request Load Process (SFPBLCK) will populate the Student
Course Request Form (SFACREQ) with the CRNs of the student's block. To continue
batch block scheduling, the steps for Course Request and Scheduling must now be
followed.
Course Request Processing Operating Procedures
This section provides the user with step-by-step instructions for running Course Request
and Scheduling Processing. Refer to this section, along with the Module Flowchart in the
Course Request and Scheduling Handbook, as a guideline.
1. Enter the student's course requests using the Student Course Request Form
(SFACREQ), or load the request data to the SFBCREQ Oracle table using the
HCAD 300
NURS 300
BIOL 301
SGBSTDN_TERM_CODE_EFF
= ’199401’ AND
SGBSTDN_LEVL_CODE
=’01’ AND
SGBSTDN_DEGC_CODE
=’00’ AND
SGBSTDN_MAJR_CODE
= ’0000’
SGBSTDN_TERM_CODE_EFF
= ’199401’ AND
SGBSTDN_MAJR_CODE
= ’FL94JRNR’
338
Banner Student User Guide | Class Schedule
ORACLE*Loader Utility, and run the Course Request Load Process (SFPBLCK) for a
selected population.
2. Run the Course Request Edit Report (SFPCREQ) batch program to validate the
student's course request information. Review the report for error conditions, (i.e.,
student not admitted for this term or ID does not exist). Correct and rerun this step
until satisfactory results are obtained.
Note: At the time that course requests are entered online through the
Student Course Request Form (SFACREQ), the system validates that the
CRN exists but does not check for holds, level restrictions, etc. It is only
after the Course Request Validation Process has been run through
SFPCREQ that you will detect these errors on the Course Request Edit
Report (SFPCREQ). You should call up the Student Course Request
Form (SFACREQ) for each of the students listed on the Course Request
Edit Report, and make any necessary corrections.
Note: A check appears in the Status checkbox for every course request
combination (primary/alternate) that has passed the initial validation
criteria. The requests that are not valid have an unchecked Status box. If
the request has not yet been run through the Course Request Validation
Process, the Status box is blank.
3. Enter parameter values in job submission, and then run the job SCTH1000 to extract
course request and bio/demo data from Banner. Review the Control Report for errors
before continuing.
4. Enter parameter values in job submission, and then run the job
SCTC1000 to extract
course schedule data from Banner. Review the Control Report for errors before
continuing.
5. Enter parameter values in job submission, and then run the job SCTC1500 to create
the two Oracle tables SFBREST and SFBSECT that contain restriction and relative
course information for each section extracted from Banner. Review the Control Report
for errors before continuing.
6. Enter parameter values in job submission, and then run the job
SCTC2000 to begin
the course request process. This process produces an Update Change Register
(Audit Trail) that can be used to validate that the proper requests have been
processed and to detect errors (i.e., time conflicts, level restrictions, etc.) in a
student's course request set. If changes are made to the student's requests using
Banner, it will be necessary to re-run from Step 2. Review the Control Report for errors
before continuing.
7. Enter parameter values in job submission, and then run the job CRQC3000 to
produce selected reports from the course request process. Review these reports and
make corrective actions if necessary. If changes are made to Banner, then the
process must be re-started from Step 2. When you are ready for the final run of course
request (i.e., you are satisfied with the results and have no further changes to make to
Banner), then be sure the Create Registration File parameter is set to
Y. This option
creates the input Student Scheduling.

339
Banner Student User Guide | Class Schedule
Scheduling Process Operating Procedures
This section provides the user with step-by-step instructions for running the Schedule
Process. Refer to this section, along with the Module Flowchart in the Course Request
and Scheduling Handbook, as a guideline.
Before starting be sure you have completed the steps outlined in the Course Request and
Scheduling Operating Procedures.
1. Enter parameter values in job submission, and then run job SCTD0600 to begin the
Student Scheduling. Review the output from this process, and if no errors are
encountered, continue to the next step. If you make changes to the Banner data, then
you must re-run the Course Request Processing.
2. Enter parameter values in job submission, and then run job SCHC3000 to produce
selected reports from the Student Scheduling Process. Review these reports and
make corrective actions. If you make changes to the Banner data, then you must re-
run the Course Request Processing.
At this point the Scheduling process has been completed. The following steps deal with
loading the data from Scheduling to the Banner Registration module. Note that once the
load has been run for a student, that student's requests cannot be re-run.
3. Start up ORACLE*SQLLDR using the
stucreq.ctl control file and the enrollment
file
d1520.dat as input. This process will create an interim Oracle registration table
(SFRFREQ) that is used as input to the next step.
4. Run the Course Request Update (SFPFREQ) batch program to load the course
request and schedule data to the Banner registration tables and update the section
counts. Review the Audit Trail for errors.
Auto Scheduling Processing
This section discusses auto scheduling with Schedule25.
Overview
This functionality is used to create the interface between Banner Schedule processing and
the third party scheduling products Schedule25/Model25.
This includes:
• generating a campus profile for physical features, partitions, departments, rooms, and a
control file,
• capturing this information in the Catalog and Schedule modules and generating a class
descriptor file,
• extracting the Banner data to create all files required to interface to the scheduling tool,
• creating a work file and viewing/updating extraction data with an associated process to
be used for housekeeping of this file, and
• integrating classroom assignment information from Schedule25.

340
Banner Student User Guide | Class Schedule
You may view assignments made by Schedule25, accept or reject the assignments, and
accept and/or load the accepted assignments (and those that have not been rejected) into
Banner.
Getting Started
The following steps are suggested for the initial positioning of Banner for use with the third
party scheduling product.
1. Create validation table entries.
2. Define your campus.
3. Define room attributes and characteristics of your classrooms.
4. Record class location and required room characteristics at the subject level.
5. Record class location and room characteristic overrides (if any) at the course, section,
or meeting time level.
6. Complete your class setup.
7. Extract data from Banner.
8. Run Schedule25.
9. Review Scheduler output.
10. Update the Work Table and review.
11. Update class records in SSRMEET.
12. Purge appropriate work table entries.
Create your validation table entries
1. Define the scheduler number for the appropriate partition codes using the Scheduler
Sequence (Number) field on GTVPARS.
2. Define the room attribute codes using the Auto Schedule and Scheduler Number
checkboxes on STVRDEF.
3. Define which schedule types are eligible to be scheduled using the Automatic
Schedule checkbox on STVSCHD.
4. Ensure that scheduling status codes have been loaded to GTVSCHS from the seed
data that is provided.
Define your campus
If it is not necessary to define partitions at your institution, if they do not play a role in your
current classroom allocation. This step is not required. Otherwise, do the following.
1. Ensure that seed data that is provided has been loaded into the Scheduling Partition
Validation Form (GTVPARS). This seed data consists of a default partition code (00).
Once loaded, define your partitions (physical groupings of buildings and/or rooms) at
your school or campus on this form.

341
Banner Student User Guide | Class Schedule
2. Draw a blueprint of your school or campus by assigning a partition code to those
buildings containing classrooms to be used in the class assignment process. This can
be accomplished by entering a partition code on the Building Definition Form
(SLABLDG). All room records created after this update will automatically receive this
partition code.
3. Assign a partition code to a classroom using the Room Definition Form (SLARDEF).
Existing room records (i.e., rooms defined after a partition code was assigned to the
building record) do not need to have this code entered unless this classroom requires
an override of the building default.
Define room attributes and characteristics for your classrooms
Again, if room allocation according to room characteristics is not required, this step is not
required. Otherwise, do the following.
1. Identify those room attribute codes that will be used in the scheduling process using
the Auto Schedule and Scheduler Number fields on the Building/Room Attribute
Code Validation Form (STVRDEF).
2. Assign the classroom characteristics in the Room Attributes block of the Room
Definition Form (SLARDEF) by selecting attribute codes defined as auto schedule in
STVRDEF. For example: if the room is characterized as wheelchair accessible or has
Lab or Audio Visual equipment, this information should be associated with the room.
Although this step is not required, is strongly encouraged that it be used to ensure that
classes requiring these attributes will be allocated to the appropriate classroom.
3. If a classroom will be unavailable for scheduling for all or part of the term, use the
Room Inactivation block on SLARDEF to identify the dates, times, and/or days of the
week that classes should not be booked into these rooms.
Record class location and required room characteristics at the subject
level
Partition and room attribute preferences should be assigned at the subject level using the
Subject Scheduling Rules Form (SSASBSH). These preferences will be used as the basis
for the meeting time records during the extract process.
These preferences should represent the base requirements and should be applicable for
all sections created for this subject. These values can be overridden but not excluded in
the next step if required.
Partitions
1. Decide if you are using partitions.
If partitions are being used as a determining factor in room scheduling, then do the
following.
2. Define your partition preferences at the subject level using the Partition Preferences
block in the main window on SSASBSH.
3. Define your partition preferences at the course level using the Partition Preferences
block in the Partition and Room Attribute Preferences window on SCACRSE.

342
Banner Student User Guide | Class Schedule
4. Define your partition preferences at the section level using the Partition Preferences
block in the Section Scheduler Preferences window on SSASECT.
5. Define your partition preferences at the class level using the Partition Preferences
block in the Meeting Time Preferences window on SSASECT.
For example: English classes always held in a particular building.
Room Attributes
1. Decide if you are using room attributes.
If room attributes are being used as a determining factor in room scheduling, then do
the following.
2. Define your room attribute preferences optionally at the subject level using the Room
Attribute Preferences block in the main window on SSASBSH.
3. Define your room attribute preferences optionally at the course level using the Room
Attribute Preferences block in the Partition and Room Attribute Preferences window
on SCACRSE.
4. Define your room attribute preferences at the section level using the Room Attribute
Preferences block in the Section Scheduler Preferences window on SSASECT.
5. Define your room attribute preferences at the class level using the Room Attribute
Preferences block in the Meeting Time Preferences window on SSASECT.
For example: English classes always need an overhead projector.
6. Assign a scheduling status code to a class or meeting time using the Auto Scheduler
field in the Meeting Time window on SSASECT.
Record class location and room characteristic overrides (if any) at the
course, section, or meeting time level
You can also define partition preferences at other levels, but these are viewed as
overrides to the requirements set at the subject level.
• Course Preferences are set in the Partition Preferences block of the Course Catalog
Form (SCACRSE) and will apply to all sections and meeting times created for this
course.
• Section Preferences are set in the Section Partition Preferences block of the Schedule
Form (SSASECT) and will apply to all meetings times created for this section.
• Meeting Time Preferences are set in the Meeting Time Partition Preferences block of the
Schedule Form (SSASECT) and will apply to an individual meeting time only.
The extract process will first look to the meeting time preferences, then the section, and
lastly the course preferences to record overrides to the subject level definitions.
For example:
If overrides were identified at the section level, no meeting time preferences would be
entered causing the extract to look for section preferences. Having found those
records, no further search would be conducted.

343
Banner Student User Guide | Class Schedule
Therefore, in this example, if there were also course preferences defined, they would
not be picked up for the creation of the Class Descriptor records.
Complete the class setup
Assuming that all meeting time records have been created in the Schedule Form
(SSASECT), there are a few more requirements remaining for those classes requiring
classroom allocation.
1. Identify those schedule types that are eligible to be scheduled through the use of the
Automatic Scheduler checkbox on the Schedule Type Code Validation Form
(STVSCHD).
2. Ensure that the provided seed data is loaded into the Scheduling Status Code
Validation Form (GTVSCHS). These codes will be attached to those meeting times
requiring classroom assignment via Schedule25.
3. Assign an appropriate scheduling status code to a class and/or meeting time record
using the Auto Scheduler field in the Meeting Time window on SSASECT. This
scheduling status code should reflect the action that the scheduling tool must
accomplish, such as needs a classroom assignment.
4. Ensure that the schedule type for the section has been marked as eligible by checking
the Automatic Scheduler checkbox in STVSCHD.
Extract data from Banner
1. Define the control records required by Schedule25 for the terms to be processed in
the Scheduling Tool Interface Control Form (SSACTRL).
2. Create a subject code to be used in the creation of room inactivation “phantom class”
in the Subject Code Validation Form (STVSUBJ).
3. Run the Schedule25 and Work File Creation Process (SSRSCRM) for the required
term(s) and/or campus(es).
4. Review the extract data in Scheduler Work Form (SSASCHW). Any modifications or
corrections should be made in Banner, and the extract should be run.
Review scheduler output
Schedule25 produces many valuable reports from listings of classes placed, classes not
placed, placement analysis, and rooms still available for placement to process diagnostic
messages (exception or error messages).
See the third party Schedule25 Process Manual for report descriptions and examples.
Update work table and review
1. Run the Scheduler Work Table Update Process (SSRSCUP).

344
Banner Student User Guide | Class Schedule
2. If necessary, review the data returned from Schedule25. Updates to a select few fields
are possible but should be done with great caution. Please see the information on
SSRSCUP later in this section.
3. It is possible to produce a report of what the meeting time information would likely be,
prior to actually saving the information to the SSRMEET table, by running the Class
Schedule Report (SSRSECT).
Update class records in SSRMEET
1. Run the Building/Room Update Process (SSRSCMT).
2. If the update is successful, the Update (Indicator) will be updated on the Scheduler
Work Form (SSASCHW).
3. If a record has not been updated in Banner, research will be required to determine the
reason. It may be necessary to manually update the meeting time record if, for some
reason, the meeting time record in Banner has been changed since the extract
process was run.
Purge appropriate work table entries
Records may be purged from the work table by running the Scheduler Work Table Purge
Process (SSRSCPR) for the appropriate term and/or campus.
Forms Used in Schedule25 Processing
The following Banner forms are used with Schedule25 processing.
Scheduling Status Code Validation Form (GTVSCHS)
This form is used to store Schedule25 status codes. These codes control whether the
section is to be scheduled and listed.
The following codes are required by Schedule25 for assignment and are delivered as
seed data:
Code Description
NSM Class needs a room assignment.
1SM Class needs a room assignment and has a preferred first choice room
indicated in the Room Name field. This code limits the initial pool of
candidate rooms in the assignment algorithm.
WSM Class needs a room assignment and must be assigned with the preceding
NSM or 1SM record to the same room at the same time (cross-listed).
RSM Class is related to the preceding NSM or 1SM record and must be
assigned to the same room but not at the same days/time.

345
Banner Student User Guide | Class Schedule
The following codes are required by Schedule25 for pre-assignment and are delivered as
seed data:
Partition Code Validation Form (GTVPARS)
This form is used to define partition codes (a category or grouping of rooms). These codes
are optional, but can be instrumental in the scheduling process providing preferred
placement of classes in a geographic area of the school.
The partition can be placed at various levels:
• on the subject (referred to in Schedule25 documentation as department)
• on the course
• on the section
• on the meeting time for the section
• on the building
• on the individual room
NXM Class needs a room assignment and can share a room with another class
whose times overlap with it (can be doubled-booked).
1XM Class needs a room assignment, has a preferred first choice room
indicated in the Room Name field, and can share a room with another
class whose times overlap with it (can be double-booked).
RXM Class is related to the previous NXM or 1XM record and must be assigned
to the same room at the same or overlapping times.
Code Description
ASM Class has a room assignment that was made manually or in another
system, such as the student information system.
AXM Class has a room assignment that was made manually or in another
system, and the class time span overlaps part of all of the time span of
another class assigned to the same room (double-booking or intentional
conflict).
HSM This is a set of home cross-listed classes pre-assigned to the same room
at identical days and times.
VSM This is a set of visitor cross-listed classes pre-assigned to the same room
at identical days and times.
5SM Schedule25 assigned the class a room during a previous run.
5XM Schedule25 assigned the class a room, and it is double-booked with
another class.
Code Description
346
Banner Student User Guide | Class Schedule
When a new partition code and description are entered and saved in this form, a
sequence number is generated if the Scheduler Sequence (Number) field is Null. This
provides a unique identifier that will, in turn, be used in the Schedule25 algorithm. The
partition code serves as a convenience for the user and is not extracted to the Scheduler
software.
Note: You can add a campus code to a partition.
The Schedule25 Rooms file requires that each room have a partition. Use the seed entry
of code
00 for the default partition.
Subject Scheduling Rules Form (SSASBSH)
This form facilitates the assignment of partitions and room attribute preferences at the
subject level.
Scheduling Tool Interface Control Form (SSACTRL)
This form is used to enter and update the control file parameters necessary to run
Schedule25.
Scheduler Work Form (SSASCHW)
This form can be used to:
• View the data from Banner prior to being submitted to Schedule25.
• Preview the results of Schedule25 prior to its integration into Banner.
Note: Preference records are not viewable.
Schedule Type Code Validation Form (STVSCHD)
Use the Automatic Scheduler field to denote which sections to extract for input into the
Schedule25 process when the schedule type is assigned to a CRN. When this indicator is
checked, only sections with a schedule type defined to have classes automatically
scheduled will be extracted.
Building/Room Attribute Code Validation Form (STVRDEF)
Use the following fields for Schedule25 processing.
• The Auto Schedule checkbox is used to denote which sections to extract for input into
the Schedule25 process when the schedule type is assigned to a CRN. This checkbox
also controls the operation of the Scheduler Number field.
• If the Auto Schedule checkbox is checked, Scheduler Number field will be
automatically populated with a unique one-up number, if the Schedule25 Code is Null
when the attribute record is saved. Or, the user can enter a unique one-up number. If the
Auto Schedule checkbox is unchecked, the Scheduler Number value will be blank.

347
Banner Student User Guide | Class Schedule
• Use the Resequence item in the Options Menu to resequence the value in the
Scheduler Number field. This process will overwrite the existing code and replace it in
sequence starting with a value of
01.
• Although the (Attribute) Code is primarily for use with classroom requirements, it is also
used to populate the Schedule25 files.
Building Definition Form (SLABLDG)
Use the Partition field in the Building Definition block in the main window to define an
appropriate partition code for the building and provide a means to group rooms for
scheduling purposes. Valid values come from GTVPARS.
This partition code will default to the room when new entries are created on SLARDEF. If
the partition code is changed, it will not affect existing room definitions but will be reflected
in any new room records that are created.
• If all rooms in a building are considered one partition, then the partition code could be
defined at the building level, rather than at the individual room level, to save data entry.
• If a building is divided into several partitions, the partition code should not be assigned
to the building but should be entered for the individual rooms.
• If the majority of rooms within a building constitute one partition, you can record the
partition on the building and override the applicable code for rooms not considered part
of the “building” partition.
• The extract process reads the partition from the room definition. If a partition code is not
established on the room record, the partition code defined on this form will be retrieved.
Room Definition Form (SLARDEF)
Use the Partition field in the Room Definition block in the main window to define an
appropriate partition code for the room and provide a means to group rooms for
scheduling purposes. Valid values come from GTVPARS.
If a partition code has been defined for the corresponding building record, the building
partition code will default into this field. It is possible that you may wish to deviate from the
partition code that has been established for the building. In that case, you may change the
displayed value.
The extract process will first read the partition from the room definition. If a partition code
is not established on the room record, the partition code defined for the building will be
retrieved.
Attributes, Inactive Dates, and Comments Window
Use the Begin Time and End Time fields in the Room Inactivation block to enter the times
that the room will be unavailable to schedule classes. The time is entered in military
format.
The end date and end time must be greater than the start date and start time respectively.
Also, start dates and times cannot be entered without end dates and times and vice versa.
These checks will avoid diagnostic errors in the Schedule25 software.

348
Banner Student User Guide | Class Schedule
Use the checkboxes for the day s of the week (Mon, Tues, Wed, Thu, Fri, Sat, Sun) to
allow you to enter the days that the room will be unavailable to schedule classes.
A room may be de-activated a number of ways:
• If the room was unavailable every day for a particular time period, you would need to
enter the appropriate start and end dates.
• If the room was unavailable for a particular period of the day, the effective start and end
dates would need to be entered, as well as the start and end times of the inactivation.
• If the room was unavailable on a specific day of the week for a given time period, the
day of the week would be checked, and the affected start/end dates would be entered.
The room inactivation records will result in the creation of phantom classes in the
Scheduler Extract with a pre-assigned status to prevent class assignments. These
phantom classes will contain a CRN of
99999 and a course number of 9999.
Basic Course Information Form (SCACRSE)
You can access the Partition and Room Attribute Preferences window from other windows
in the form, using the Options Menu.
Partition and Room Attribute Preferences Window:
This window has two blocks, the Partition Preferences block and the Room Attribute
Preferences block.
Partition Preferences Block
Use the Partition Preferences block to inform the Scheduler software that classes for
related CRNs should be assigned to a particular location on campus and to provide the
option to state the room scheduling preferences for the course. The partition preferences
defined on the catalog record are defaulted to the CRN when new sections are created.
If the partition preference code in the Catalog module is blank, the preferences defined for
the subject are displayed. If you wish to modify this value, valid values come from
STVRDEF.
The Preference (Number) field accepts the entry of a two digit number. Valid values are
01, 02, 03, or 04. Multiple records for the same preference number can be entered.
Use the Copy button or a Duplicate Record function to copy preferences from one term
range to another.
Room Attribute Preferences Block
Use the Room Attribute Preferences block to define the room attributes (i.e., blackboard,
projector, overhead) required to facilitate the needs of the instructor.
If the room attribute preference code in the Catalog module is blank, the preferences
defined for the subject are displayed. If you wish to modify this value, valid values come
from GTVPARS.

349
Banner Student User Guide | Class Schedule
The Preference (Number) field accepts the entry of a two digit number. Valid values are
01, 02, 03, or 04. Multiple records for the same preference number can be entered.
Use the Copy button or a Duplicate Record function to copy preferences from one term
range to another.
Schedule Form (SSASECT)
Use the Options Menu selections to access the Section Scheduler Preferences window
and the Meeting Time Preferences window.
Meeting Time Window:
Use the following fields for Schedule25 processing.
• The Auto Scheduler field is used to display the assignment code for the meeting time,
whether the meeting time should be scheduled by Schedule25, and the scheduling
needs of the class i.e., cross-listed. Valid values come from GTVSCHS.
Meeting times with a pre-assigned status are processed without regard for blackout
times in the pre-assigned room.
• The Scheduler Preference button is used to access the Meeting Time Preferences
block to display the partition preferences and/or room attributes that are defined for an
individual meeting time.
• The Partition Details checkbox is display only. This checkbox is checked if meeting
time partition preferences have already been defined for this meeting time. Checked
indicates there are preferences; unchecked indicates there are no preferences.
• The Room Attribute Details checkbox is display only. This checkbox is checked if
meeting time room attribute preferences have already been defined for this meeting
time. Checked means there are preferences; unchecked means there are no
preferences.
Section Scheduler Preferences Window:
This window has two blocks, the Partition Preferences block and the Room Attribute
Preferences block.
Partition Preferences Block
Use the Partition Preferences block to define partition preferences for scheduling
purposes.
If the partition preference code in the section is blank, the Catalog preferences are
displayed. If the Catalog preferences are blank, the preferences defined for the subject
are displayed. If you wish to modify this value, valid values come from GTVPARS.
The Preference Number field accepts the entry of a two digit number. Valid values are
01, 02, 03, or 04. Multiple records for the same preference number can be entered.

350
Banner Student User Guide | Class Schedule
Room Attribute Preferences Block
Use the Room Attribute Preferences block to define room attributes (i.e., blackboard,
projector, overhead) that are required to ensure that the proper equipment is also
assigned to the room.
If the room attribute preference code in the section is blank, the Catalog preferences are
displayed. If the Catalog preferences are blank, the preferences defined for the subject
are displayed. If you wish to modify this value, valid values come from STVRDEF.
The Preference Number field accepts the entry of a two digit number. Valid values are
01, 02, 03, or 04. Multiple records for the same preference number can be entered.
Meeting Time Preferences Window:
This window is used to override the section preferences for an individual class. This block
is displayed by selecting the Scheduler Preference button in the Meeting Time block for
an individual meeting time.
The meeting time information displayed in this block defaults from the record where the
cursor was positioned in the Meeting Time block. The start and end dates and times are
displayed, as well as the days of the weeks for the class.
Partition Preferences Block
Use the Partition Preferences block to define partition preferences for scheduling
purposes.
If the partition preference code in the section is blank, the Catalog preferences are
displayed. If the Catalog preferences are blank, the preferences defined for the subject
are displayed. If you wish to modify this value, valid values come from GTVPARS.
The Preference Number field accepts the entry of a two digit number. Valid values are
01, 02, 03, or 04. Multiple records for the same preference number can be entered.
Room Attribute Preferences Block
Use the Room Attribute Preferences block to define room attributes (i.e., blackboard,
projector, overhead) that are required to facilitate the needs of the instructor.
If the room attribute preference code in the section is blank, the Catalog preferences are
displayed. If the Catalog preferences are blank, the preferences defined for the subject
are displayed. If you wish to modify this value, valid values come from STVRDEF.
The Preference Number field accepts the entry of a two digit number. Valid values are
01, 02, 03, or 04. Multiple records for the same preference number can be entered.

351
Banner Student User Guide | Class Schedule
Reports and Processes Used in Schedule25 Processing
Here are the Banner reports and processes used with Schedule25.
Room Attribute Sequence Update Process (SSRATSQ)
This process allows you to automatically populate the sequence number of the room
attribute information in the STVRDEF table. This process can be run at your discretion to
populate values, resequence existing values, or delete all values and can sort the
information by alpha or numeric organization.
Schedule25 Work File Creation Process (SSRSCRM)
This process is used to create the building, room, partition, department (subject), class
descriptor, and control files required to run the scheduling tool. It needs to be run a
minimum of once for each scheduling cycle. All files have a length of 81characters (if the
default values are used in the control file).
Even though Schedule25 requires a standard naming convention for these data (in lower
case), this process will permit you to change the file names. However, the files being read
into Schedule25 must follow the mandated naming convention.
The following files are created by running this process.
• Room Attribute File (phys.date)
• Partition File (part.dat)
• Room File (rooms.dat)
• Department Subject File (depts.dat)
• Control File (ctrl.dat)
• Class Descriptor File (datain.dat)
These files will be written to the same directory as the job listing.
Room Attribute File (phys.date)
This file represents all room attributes identified in STVRDEF as auto schedule. This data
is not room-specific. A maximum of 96 room attributes will be accepted by Schedule25.
Banner data exported:
Room Attribute Code and Name
STVRDEF_CODE
STVRDEF_DESC
Example:
AV Audio Visual
Equipment
Room Attribute Sequencer
Number
STVRDEF_SCHEDULER_
NUMBER
Example: 45

352
Banner Student User Guide | Class Schedule
Partition File (part.dat)
This file represents all partitions codes identified in GTVPARS. If the extract process is
being run for a specific campus (as defined in the Scheduling Campus Code parameter),
only partition codes with a matching campus code will be selected. If no campus code has
been selected at the running of this process, all GTVPARS rows will be selected. This data
is not room specific. A maximum of 96 partitions will be accepted by Schedule25.
Banner data exported:
Room File (rooms.dat)
This file represents active classrooms defined in SLARDEF based on the campus code
entered in the extract parameters. If multiple terms are entered, the minimum term entered
in the parameter is used in the selection of active rooms. If no campus is entered at the
time the extract process is run, then all rooms will be selected.
This file contains a minimum of three different records, with the P record being optional:
• Room Name information (N record)
• Room Size information (S record)
• Location/Partition information (L record)
• Room Attribute information (P record)
The location record will contain the partition code entered on the room definition in Banner.
If no partition is assigned at the room level, the partition code entered on the building
definition is extracted. If the building record has not been assigned a partition code, then
the default partition code (value 00) is used. The physical attributes, if any, reflect the
codes entered in the Room Attributes block of SLARDEF.
Banner data exported:
N (Name) Record
Partition Code and Name
GTVPARS_CODE
GTVPARS_DESC
Example:
Default Partition
Partition Sequencer Number
GTVPARS_SCHEDULER_
NUMBER
Example: 01
Room Name
SLBRDEF_BLDG_CODE
SLBRDEF_ROOM_
NUMBER
Example:
BIOL 101

353
Banner Student User Guide | Class Schedule
S (Size) Record
L (Location) Record
P (Physical Attribute) Record – Not required
Department Subject File (depts.dat)
This file represents information about each subject entered in STVSUBJ. Schedule25
requires that a location record be created for each department and/or subject. Preferences
used for extract purposes are drawn from the locations and room attributes entered on
SSASBSH. If no location preferences are defined on this form for the subject, the default
partition is used. Although only four location and room attribute preferences are written to
the file for each subject, multiple preferences will be concatenated on these records based
on the priority assigned (Preference Number). A maximum of 500 subjects will be
accepted by Schedule25.
This file contains a minimum of three different records with the P record being optional:
• Subject name information (N record)
• Subject key information (K record)
• Campus partition preferences (C record)
• Room attribute preferences (P record)
Banner data exported:
Seating Capacity
SLBRDEF_CAPACITY
Example:
50
Partition Number
GTVPARS_SCHEDULER_
NUMBER
Of partition assigned at
room level (if any), or
building level (if any) or
default partition
Example:
01
Room Attribute Number
If several attributes are defined,
they will be strung together
separated by a comma.
STVRDEF_SCHEDULER_
NUMBER
Of attributes assigned at
room level (if any), or
building level (if any)
Example:
37, 39

354
Banner Student User Guide | Class Schedule
N (Name) Record
K (Key) Record
Note: The placement and length of the subject code on this record is
dependent upon the parameters specified for the Department ID in the
Scheduling Tool Interface Control Form (SSACTRL).
C (Campus Partition) Record (up to 4 records will be created)
P (Physical Attribute) Record – Not required
Control File (ctrl.dat)
This file defines the placement of values in the Class Descriptor table for use by the
extract process, as well as parameters necessary for the execution of the assignment
algorithm. Input data for this file is retrieved from the Scheduling Tool Interface Control
Form (SSACTRL). The selection of the term and campus are determined by values
entered in the Scheduling Term Code and Scheduling Campus Code parameters.
One record will be created in this file for each of the fields contained in SSACTRL.
Class Descriptor File (datain.dat)
This file contains information about all active classes (sections containing a status code
identified as active in STVSSTS) requiring a room assignment by the Schedule25
assignment algorithms, manually assigned (pre-assigned) classes, as well as phantom
Subject Name
STVSUBJ_DESC
Example:
Introduction to Biology
Subject Code
STVSUBJ_CODE
Example:
BIOL
Partition Preferences
If several partitions are defined,
they will be strung together
separated by a comma.
GTVPARS_SCHEDULER_
NUMBER
Of partition entered
Example:
01, 45
Room Attribute Preference
If several attributes are defined,
they will be strung together
separated by a comma.
STVRDEF_SCHEDULER_
NUMBER
Of attributes entered
Example:
37, 39

355
Banner Student User Guide | Class Schedule
classes created to implement room inactivations identified in SLARDEF. Only those
classes matching the term code(s) or date ranges entered in the parameters will be
selected.
The following selection criteria will be used when examining a section for extraction:
• Are meeting times defined?
• Does the section have a schedule type defined to be automatically scheduled?
• Has a Schedule25 status code been assigned to the meeting time record?
This file contains three different record types:
• Class descriptor record
• Room attribute preferences overrides (P record)
• Partition preferences overrides (L record)
Note: Preference override records will only be created if the class
descriptor record contains a scheduling status code of
NSM or 1SM.
Cross-listed sections (identified by the cross link code assigned to the section in
SSASECT) requiring room assignment will be grouped together. Only one of these
sections should contain the scheduling code of
NSM (needs room assignment) on the
meeting time record, with the others identified as
WSM.
For a more in depth explanation of the various scheduling codes, please consult your third
party Schedule25 Process Manual.
This process will seek out preference overrides, first accessing the meeting time
preferences. If no records have been created at the meeting time level, the section
preferences will be examined. If no records have been identified there, the course
preference tables will be considered. If no preference overrides are defined at any of these
levels, no P or L records will be generated.
Banner data exported:
Department ID
SSBSECT_SUBJ_CODE
SSBSECT_CRN
SSBSECT_TERM_CODE
Example:
BIOL 10001 200110

356
Banner Student User Guide | Class Schedule
Note: The placement and length of the fields on this record are
dependent upon the parameters specified in the Scheduling Tool
Interface Control Form (SSACTRL).
Days of the Week
SSRMEET_SUN_DAY
SSRMEET_MON_DAY
SSRMEET_TUE_DAY
SSRMEET_WED_DAY
SSRMEET_THU_DAY
SSRMEET_FRI_DAY
SSRMEET_SAT_DAY
Example: UMTWRFS
Start Time (Hours & Minutes)
From
SSRMEET_BEGIN_
TIME
Example: 0800
Finish Time (Hours & Minutes)
From
SSRMEET_END_
TIME
Example: 0850
AM/PM Designator H (military time)
Maximum Enrollment
SSBSECT_MAX_ENRL
Or default value defined in
Default Enrollment field
in SSACTRL if none is
defined at the section
level.
Example: 0050
Begin Month and Day
From
SSRMEET_START_
DATE
Example: 1031
End Month and Day
From
SSRMEET_END_
DATE
Example: 1231
Room Name
(pre-assigned classes only)
SSBSECT_BLDG_CODE
SSBSECT_ROOM_CODE
Example: BIOL 101
Scheduling Assignment Code
SSRMEET_SCHS_CODE
Example: NSM

357
Banner Student User Guide | Class Schedule
P (Physical Attribute) Record – Overrides to those defined at the subject level, if
applicable
L (Campus Partition) Record – Overrides to those defined at the subject level, if applicable
Phantom Class Records
These records are created by the extract to reflect room inactivation periods defined in the
Room Inactivation block on SLARDEF. Rooms with inactive time periods in the term code
range selected in the Scheduling Term Code parameter are created as pre-assigned
classes. This prevents Schedule25 from assigning another class to that room.
Banner data exported:
Room Attribute
If several attributes are defined,
they will be strung together
separated by a comma.
STVRDEF_SCHEDULER_
NUMBER
Of attribute assigned at
meeting time level (if any),
or section level (if any) or
course level (if any)
Example: 37, 39
Partition Preference
If several partitions are defined,
they would be strung together
separated by a comma.
GTVPARS_SCHEDULER_
NUMBER
Of partition assigned at
meeting time level (if any),
or section level (if any) or
course level (if any)
Example: 01, 45
Department ID Subject Code defined in
run parameters
CRN of IR followed by a
sequential number
Appropriate term code
from run parameters
Example:
DUMN IR001 200110
Days of the Week
SLRRUSE_SUN_DAY
SLRRUSE_MON_DAY
SLRRUSE_TUE_DAY
SLRRUSE_WED_DAY
SLRRUSE_THU_DAY
SLRRUSE_FRI-DAY
SLRRUSE_SAT_DAY
Example: UMTWRFS

358
Banner Student User Guide | Class Schedule
Work File Creation
Work file records (SSTSCHW) will be created if the Create Work Table parameter has
been set to
Y. If work file records exist when this process is run, new entries will be added
to the table.
Scheduler Work Table Update Process (SSRSCUP)
This process reads the three Schedule25 output files (sortdp.dat, losers.dat,
notposs.dat), and updates the existing records in the Scheduler Work Table
(SSTSCHW). These entries can then be previewed via the SSASCHW form.
The following fields in the Scheduler Work Table (SSTSCHW) will be updated as a result
of the scheduling process:
Start Time (Hours & Minutes)
From
SLRRUSE_BEGIN_
TIME
Example: 001
Finish Time (Hours & Minutes)
From
SLRRUSE_END_
TIME
Example: 2400
AM/PM Designator H (military time)
Maximum Enrollment 0000
Begin Month and Day
From
SLRRUSE_START_
DATE
Example: 1031
End Month and Day
From
SLRRUSE_END_
DATE
Example: 1231
Room Name
(pre-assigned classes only)
SLRRUSE_BLDG_CODE
SLRRUSE_ROOM_
NUMBER
Example: BIOL 101
Scheduling Assignment Code 5SM
Field Description
Update (Indicator)
Y indicates that the class has been assigned a room (classes
contained in the
sortdp.dat file).
N and L indicate that no class assignment has taken place.
(
N represents classes contained in the notposs.dat file;
L from the losers.dat file.)
Status
If the Update (Indicator) has been set to
Y, and the original
scheduling status code was
NSM or 1SM, this will be changed
to
5SM.
Building
If the Update (Indicator) has been set to
Y, the building
assigned by Schedule25 will be displayed.
359
Banner Student User Guide | Class Schedule
Note: Meeting time records in SSRMEET are not updated at this time.
See the Update Building/Room Process (SSRSCMT).
Update Building/Room Process (SSRSCMT)
This process reads the Scheduler Work Table (SSTSCHW) entries (viewable on
SSASCHW) and updates the SSRMEET table with the room assignments generated in
Schedule25. Only those records with an Update Indicator of
Y will be applied. The Work
Table Update Indicator value will be changed to a
U (as a result of the upload process of
the scheduled sections) to indicate that the upload was successful for that record.
A possible cause for an unsuccessful upload may be attributable to a data change in
SSRMEET since the running of the extract. If the begin and/or end dates and/or times or
days of the week have been changed, this process will not be able to match the work table
records to SSRMEET. The work table represents a snapshot of how the record looked at
the time of the running of the extract.
If building and room information was previously entered in the SSRMEET record, and the
scheduling status code was originally set to one that required a classroom assignment,
that data will be overwritten with the new Schedule25 information.
Note: This process may be run as often as necessary to incorporate
changes to the work table. However, extreme caution should be exercised
if overriding values in the work table. Such changes could result in
double-booking of rooms, for example.
Scheduler Work Table Purge Process (SSRSCPR)
This process will delete Work Table (SSTSCHW) data based on the term and/or campus
specified in the process parameters.
Class Schedule Report (SSRSECT)
The Use Scheduler Results parameter can be used to interject the work file information
(for successful room assignments) giving the option to preview the report with newly
scheduled information prior to updating the SSRMEET table. It also serves as an optional
test phase for the schedule processing. Data from SSTSCHW is not displayed when the
Update Indicator is not Y (successfully scheduled). Valid values for the parameter are Y or
N, and the default is N.
Schedule Purge Process (SSPSCHD)
This process will delete the partition (SSRSPRT, SSRMPRT) and room attribute
preference (SSRSRDF, SRMRDF) table entries.
Room
If the Update (Indicator) has been set to
Y, the room
numbers assigned by Schedule25 will be displayed.
Field Description

360
Banner Student User Guide | Class Schedule
Term Roll Report (SSRROLL)
Use the following parameters to roll partition, preference, and room attribute information.
• Roll Partition Codes (Required) - Enter Y to roll the partition codes or N to not roll the
codes. The default is
Y.
• Roll Room Attributes (Required) - Enter Y to roll the cross room attributes or N to not roll
the attributes. The default is
Y.
• Roll CRN Scheduler Stat Code (Required) - Enter Y to roll CRN scheduler status codes
or
N to not roll the codes. The default is Y.
• Roll Meeting Time Part Pref (Required) - Enter Y to roll meeting time partition
preferences or
N to not roll the preferences. The default is Y.
• Roll Meeting Time Room Attrib (Required) - Enter Y to roll meeting time room attribute
preferences or
N to not roll the preferences. The default is Y.
Purge Process
The following purge process is part of the Schedule module.
Schedule Purge (SSPSCHD)
This process will purge the class schedule information that is less than or equal to the
term parameter when an enrollment record (SFBETRM) does not exist. Schedule
information will not be deleted if outstanding registration information exists for the term. A
new summary section history record is created in the table SCRSECT. Columns in this
table include: Subject Code, Course Number, Campus, Schedule Type, Term, Number of
Sections Offered, Total Enrollment, Total Census Enrollment, and Activity Date. This
history record allows institutions to review the historical course section information in
summary format.
Warning! When a third party product is used for scheduling, you may
need to rerun the report before you continue scheduling. Be aware that
the first time SSPSCHD is run, the SCRSECT table is populated with data
for the purged records. After the table has been populated, if the report is
a second time, data is not purged.

361
Banner Student User Guide | Class Schedule
Class Schedule Reports
The following reports are run through the Class Schedule module:
Please refer to the Banner Student Reports and Processes Handbook for report
descriptions, instructions, parameter definitions, and output samples.
Term Roll Report (SSRROLL)
Class Schedule Report (SSRSECT)
Scheduled Section Tally Report (SSRTALY)
Schedule Purge (SSPSCHD)
Room Attribute Sequence Update Process (SSRATSQ)
Schedule25 Work File Creation Process (SSRSCRM)
Scheduler Work Table Update Process (SSRSCUP)
Update Building/Room Process (SSRSCMT)
Schedule Work Table Purge Process (SSRSCPR)
Section Fee Population Process (SSPMFEE)
Schedule Open Learning Rule Default Process (SSPRDEF)
Available Seats to Zero Process (SSRASTZ)

362
Banner Student User Guide | General Person
General Person
This chapter discusses processing and procedure information for General Person.
General Person Procedures
Here are tasks you can perform in this module.
Establish Person
Before a person can become a recruit, applicant, student, instructor, advisor, or have an
account, the person must first be identified to the system with an identification number and
a name. A person is initially added to the system using the General Person Identification
Form (SPAIDEN) which maintains a person's identification number, name, and address
information. In addition to persons, the General Person Identification Form (SPAIDEN) is
also used to enter non-persons, such as companies for billing third-party accounts.
Common Matching Processing
Common Matching processing is used to prevent the creation of multiple PIDMs for a
single person or non-person in Banner®. Basic person APIs are used to provide common
logic for how all PIDMs are created. These APIs include: identification information
(SPRIDEN), biographic and demographic information (SPBPERS), address information
(SPRADDR), telephone information (SPRTELE), email information (GOREMAL), and
emergency contact information (SPREMRG). You can turn Common Matching on and off
as needed, either for the institution or for a specific user.
Common Matching uses a central, rule-based algorithm to check for possible database
matches before a new person or non-person record is inserted into the SPRIDEN table.
The same algorithm is used for new records created by data loaded via batch processes
and data entered in online forms (such as SPAIDEN). A match package is used to perform
the matching algorithm.
You can still perform searches from SPAIDEN before new records are inserted into the
database. If a person or non-person record already exists, you can update it with new
information from the current source, such as a new address type or a new email type. The
existing record will not be overwritten. Alias tables in Banner General are used to store
aliases (nicknames) for first and middle names, as well as non-person names. These
aliases are used by the matching algorithm.
Forms in Banner General are used to set up Common Matching. You can enable the
matching process at your institution using the Online Matching Process Enabled
(Indicator) on the Installation Controls Form (GUAINST). If the matching process is

363
Banner Student User Guide | General Person
enabled on GUAINST, all users are required to perform matching. The Common Matching
Entry Form (GOAMTCH) is used with SPAIDEN and other forms in Banner Student to
enter information for a new ID and then execute the matching process before a new PIDM
is created in Banner.
You can exempt selected users from the matching process on the Common Matching
User Setup Form (GORCMUS). You can also set up user online matching source defaults
on GORCMUS. You can build multiple rules on the Common Matching Rules Form
(GORCMRL) for matching persons or non-persons, using fields and field lengths from a
data dictionary. Special matching procedures can also be attached to rules allowing the
algorithm to match on fields that are not common (i.e., high school data).
Common Matching specifically affects the SPAIDEN, SRAQUIK, SAAQUIK, SRIPREL,
SAAEAPS, and SHAEDIS forms in Banner Student. The Common Matching Entry Form
(GOAMTCH) is used with these forms as follows:
• Users who are not excluded on GORCMUS will see GOAMTCH automatically from
SPAIDEN, SRAQUIK, and SAAQUIK. If they are excluded, data entry will remain the
same as in previous Banner releases.
• GOAMTCH can be turned off when a new person is created on SPAIDEN, SRAQUIK,
and SAAQUIK. It cannot be turned off when a new person is created on SRIPREL,
SAAEAPS, or SHAEDIS.
• Data in the temporary tables behind SRIPREL, SAAEAPS, and SHAEDIS is copied to
the GOAMTCH temporary table. If changes to that data are made on GOAMTCH, the
changed data is copied back to the temporary tables for the calling forms and will be
used by the calling forms (SRIPREL, SAAEAPS, or SHAEDIS) when a new record is
loaded.
• For SRIPREL, SAAEAPS, and SHAEDIS, GOAMTCH is used to attempt to match data
for a person in a temporary table to data for a person already created in Banner, before
the person is loaded into Banner.
• The interface codes on STVINFC are associated with Common Matching rules using the
Common Matching Source field. If the interface codes are not tied to a Common
Matching source code, they will not be used in the matching process.
Please refer to the Banner General User Guide for more information on the Banner
General forms used with this processing.
Setting Up Common Matching
In order to use Common Matching at your institution, you must enable it using the Online
Matching Process Enabled (Indicator) on the Installation Controls Form (GUAINST).
Use the following steps to set up Common Matching processing.
1. Create source codes.
Use the Common Matching Source Codes Validation Form (GTVCMSC) to create the
various source codes that may be used in Common Matching. These are similar to the
interface codes that exist in pre-7.0 Banner Student. Rules will be assigned to these
source codes to be used with the matching algorithm.

364
Banner Student User Guide | General Person
2. Set up defaults for the source codes.
Use the Common Matching Source Code Form (GORCMSC) to set up the defaults to
be used with a particular source code.
Be sure that you set up your matching source code on GORCMSC prior to setting up
the rules associated with it on GORCMRL.
For example, you can assign default address, telephone, and email types to the
source code which will default into GOAMTCH if the source code is used from there.
GORCMSC is also used to identify whether the source code will be used to perform
matching against person data and/or non-person data and whether the source code
can be used with online matching. Optionally, you can designate other specific forms a
user can navigate to in order to see more detailed information about possible matched
records by using the Details button on GOAMTCH.
3. Assign default online matching source codes to a user ID.
Use the Common Matching User Setup Form (GORCMUS) to assign a default online
matching source code to a specific Oracle user ID. In addition, you can specify
whether a specific user ID is allowed to choose from other matching source codes, or
if they are restricted to using just the default source code. You can also indicate if a
specific user ID is excluded from having to use online Common Matching.
For example, if a user is a “super-user” who never creates duplicate PIDM records,
they may be exempted from having the GOAMTCH form appear from SPAIDEN by
checking the Exclude User (Indicator).
4. Set up the matching rules associated with the source codes.
The Common Matching Rules Form (GORCMRL) is used to set up the actual
matching rules associated with the source codes.
Use this form to create each rule, assign a priority to it, and then assign the specific
database fields to each rule which will be used by the matching algorithm. You can
also copy previously created rules, as well as add specific procedures for matching
components that are not contained within Banner General (i.e, matching on high
school data for Banner Student). If a field is to be included in a rule but is not required,
the field is specified as
Exists on GORCMRL.
How the Matching Process Works
When you enter an ID on SPAIDEN that does not exist in Banner and then execute the
matching process, you can receive a match status of “New”, “Match”, or “Potential Match”.
New Records
Records are matched with a status of “New” if no records match, based on the rules that
have been set up. When a record is identified as being new, the General Person APIs are
used to insert the data into SPRIDEN, SPRADDR, SPRTELE, SPBPERS, and/or
GOREMAL. Once the record is made new, you are returned to SPAIDEN.

365
Banner Student User Guide | General Person
Matched Records
Records are matched with a status of “Match” if one, and only one, record in Banner
matches the incoming person based on the rules that have been set up.
Data for the matched PIDM is displayed for review by the user. You can select the
matched record and return to the main window of SPAIDEN, or you can update the
matched person with data entered in the Data Entry block on GOAMTCH before returning
to SPAIDEN.
Potentially Matched Records
Records are matched with a status of “Potential Match” (or “Suspense”) if some, but not
all, fields match someone in Banner based on the rules that have been set up. For
example, the first and last names for the record match, but the date of birth does not
match.
You can create the person as “New”, or you can select one of the potentially matched
records as the “Match”.
Rule Examples
Here is one set of rules that can be used in Banner Student.
Priority Column Name Data Element Length
Required/
Exists
1
SPRIDEN_SEARCH_
LAST_NAME
LAST NAME/NON-PERSON NAME 10 Required
SPRIDEN_SEARCH_
FIRST_NAME
FIRST NAME 10 Required
SPBPERS_SSN
SSN/SIN/TIN 9 Required
SPBPERS_BIRTH_DAY
DATE OF BIRTH DAY 2 Exists
SPBPERS_BIRTH_MON
DATE OF BIRTH MONTH 2 Exists
SPBPERS_BIRTH_YEAR
DATE OF BIRTH YEAR 4 Exists
SPRADDR_ZIP
ZIP/POSTAL CODE 5 Exists
2
SPRIDEN_SEARCH_
LAST_NAME
LAST NAME/NON-PERSON NAME 10 Required
SPRIDEN_SEARCH_
FIRST_NAME
FIRST NAME 10 Required
SPBPERS_SSN
SSN/SIN/TIN 9 Exists
SPBPERS_BIRTH_DAY
DATE OF BIRTH DAY 2 Exists
SPBPERS_BIRTH_MON
DATE OF BIRTH MONTH 2 Exists
366
Banner Student User Guide | General Person
Matching Algorithm
The matching algorithm used with Common Matching processing is composed of two
matches - primary and secondary. The primary match selects a pool of Banner records
that may match based on first, middle, and last name, and/or SSN and ID. If a record is
selected as part of the primary match, then at a minimum it will be a potential match. The
secondary match then looks at all the records from the primary match pool and uses the
rest of the fields in the matching rule to see if only one record matches exactly. If only one
record matches exactly, that record is a match. If more than one record matches, then all
those records that match or partially match become the potential matches.
An exception to this process is if an incoming record has passed the primary match, but all
of the other non-name elements included in the matching rule do not match (and none of
the fields are Null), then the person is made new.
For example, a rule could be set up as follows:
SPBPERS_BIRTH_YEAR
DATE OF BIRTH YEAR 4 Exists
SPRADDR_CITY
CITY 10 Exists
SPRADDR_ZIP
ZIP/POSTAL CODE 5 Exists
3
SPRIDEN_SEARCH_
LAST_NAME
LAST NAME/NON-PERSON NAME 10 Required
SPRIDEN_SEARCH_
FIRST_NAME
FIRST NAME 10 Required
SPBPERS_BIRTH_DAY
DATE OF BIRTH DAY 2 Exists
SPBPERS_BIRTH_MON
DATE OF BIRTH MONTH 2 Exists
SPBPERS_BIRTH_YEAR
DATE OF BIRTH YEAR 4 Exists
SPRADDR_CITY
CITY 10 Exists
SPRADDR_ZIP
ZIP/POSTAL CODE 5 Exists
Element Required Length
Last Name Required 10
First Name Exists 8
City Exists 8
ZIP Exists 5
Date of Birth Exists
Priority Column Name Data Element Length
Required/
Exists

367
Banner Student User Guide | General Person
Banner contains a SPRIDEN record for Joseph Smith in Tampa, FL, born on April 11,
1982. The incoming record is also for a Joseph Smith who lives in Boston, MA, and who
was born on August 18, 1981. Assuming there were no other Joseph Smiths in the Banner
database, the incoming record would be marked New. It would normally have been
marked as
Suspended, because the first and last names matched, but as the rest of the
elements in the rule (City, ZIP, Date of Birth) specifically did not match, the person was
made new.
How the Algorithm Works
The Common Matching algorithm allows for the processing of multiple rules. Priority
numbers must be defined for each rule indicating the sequence in which they are to be
processed. The strictest rule should be assigned the first priority (i.e., #1). The algorithm
will process each rule in order, separately and completely.
• The first step performed by the algorithm is primary matching for the rule. This step
defines the population on which the rest of the processing (secondary match) will be
performed. If no match occurs during the primary match, then the external record is
considered to be new.
• The second step performed by the algorithm is secondary matching processing against
the results of the primary match. If the secondary match determines an exact match on
only one record, the external source record is considered to be a match.
If more than one record is matched to the criteria, the external source record is considered
to be in suspense. The external source record will be considered to be in suspense if data
matches part of the criteria of the rules but does not match all the criteria. If the results of
the rule are new or matched, the results are returned to the calling process. No other rules
are processed.
When all the rules have been processed, the algorithm will interrogate the results and
return the results to the calling process. The match status (new, matched, or suspense)
will be returned, as well as a results message providing the elements that were matched,
not matched, or missing as a result of processing the rule.
When processing online, if a record is determined to be a match using one rule but to be in
suspense using one or more additional rules, the record's match status will be set to
match, but the user will still be able to view the potentially matched records.
Rule Indicators
The Data Required field on GORCMRL can be set to Exists or Required.
• A value of Required indicates that the data field associated with the indicator is
required and must be present on the external source and in Banner. If the field on either
the external source or in Banner is Null for a data element with the Data Required field
set to
Required, then the data element is considered to be not matched. If all data
elements are required, but all of the data elements in the secondary match are Null
either in Banner or the external source, the record will be suspended for review.
• A value of Exists indicates that either the external source or the Banner value can be
Null. If either or both values are Null, the field is considered to be a match.

368
Banner Student User Guide | General Person
Rule Priorities
The algorithm processes each rule that has been defined for the data source separately
based on the priority given in the Rule Priorities block. If the priority rule determines that
the input record is either
New or Matched, that status is the overall status that is returned
for the record.
Note: For online processing, the potential matches that result from
processing the rules may be viewed online from the Potential Matches
block on the Common Matching Entry Form (GOAMTCH). Potential
matches are listed in order by rule priority.
Field Length Values
Whenever a length is specified for a rule on the Common Matching Rules Form
(GORCMRL), the comparison is made using the rule length of the fields. For example,
using the last name, the comparison would be between the rule lengths of the last name
on the external source to the rule length of the last name in Banner. If the rule length is
five, then the first five characters of the external source last name are compared to the first
five characters of the Banner last name.
A negative length may be entered for the ID and SSN/SIN/TFN to reverse the order from
last to first. For example, if
-5 is entered for the length of the SSN/SIN/TIN, the last five
characters of the external source SSN will be compared to the last five characters of the
Banner SSN/SIN/TIN.
For example, for the rule below:
Last Name length = 4
First Name length = 3
SSN/SIN/TFN length = -4
Patricia Longnecker, SSN/SIN/TFN #555116789
The results would be:
The first four characters of the last name would be used: LONG
The first three characters of the first name would be used: PAT
The last four characters of the SSN/SIN/TFN would be used: 6789
Note: For performance reasons, it is recommended that you not use
negative lengths for SSN/SIN/TIN.
Primary Matching Logic
The primary matching process uses Last Name/Non-Person name
(
SPRIDEN_SEARCH_LAST_NAME), which is a required data element for Common
Matching. If First Name (
SPRIDEN_SEARCH_FIRST_NAME) or Middle Name
(
SPRIDEN_SEARCH_MI) are specified data elements in a rule, these will also be used
as part of the primary match for the name. In addition, if ID (
SPRIDEN_ID) and/or SSN/

369
Banner Student User Guide | General Person
SIN/TFN (SPBPERS_SSN) are specified data elements in a rule, they will be used as part
of the primary match.
The Common Matching process will use the Match Type (Indicator) setting that has been
established for the matching source on the Common Matching Source Code Rules Form
(GORCMSC) to determine which records are to be selected in Banner.
• When the Match Type (Indicator) is set to Person, person records will be selected.
When
GORCMSC_ENTITY_CDE is set to P, records will be selected from SPRIDEN
where
SPRIDEN_ENTITY_IND is set to P.
• When the Match Type (Indicator) is set to Non-Person, non-person records will be
selected. When
GORCMSC_ENTITY_CDE is set to C, records will be selected from
SPRIDEN where
SPRIDEN_ENTITY_IND is set to C.
• When the Match Type (Indicator) is set to Both, person and non-person records will
be selected. When
GORCMSC_ENTITY_CDE is set to B, records will be selected from
SPRIDEN where
SPRIDEN_ENTITY_IND is set to P or C.
The following steps are used in the primary matching process:
Either Step 1 or Step 2 below must be true for a record to pass the primary match. If the
external record fails the primary match, then the match status will be marked as new.
1. If the SSN/SIN/TFN is defined for the matching source and rule priority number,
retrieve all records from Banner with a matching SSN/SIN/TFN.
The SSN/SIN/TFN data element is defined as part of the rule, and the
SPBPERS_SSN is equal to the external source SSN/SIN/TFN.
2. If First Name and/or Middle Name are defined for the matching source and rule priority
number, combine them with the Last Name criteria, and retrieve all records from
Banner with a matching name.
Note: When matching non-person records, the First and Middle Names
should not be included as part of the rule.
2.1. The following must be true:
SPRIDEN_SEARCH_LAST_NAME must equal the last name on the external
source for the specified length.
Note: If the matching source is defined to match non-person records, and
SPRIDEN_SEARCH_LAST_NAME is not like the non-person name from
the external Source, the matching algorithm will check to see if a
matching record exists on the GORNPNM alias table.
2.2. One of the following must be true:
First Name data element is not defined.
or
First Name data element is defined for the rule, and
SPRIDEN_SEARCH_FIRST_NAME is equal to the external source first name
for the specified length.

370
Banner Student User Guide | General Person
Note: If the SPRIDEN_SEARCH_FIRST_NAME is not like the first name
from the external source, the matching algorithm will check to see if a
matching record exists on the GORNAME alias table (if the matching
source is defined to match person records).
2.3. One of the following must be true:
Middle Name data element is not defined.
or
Middle Name data element is defined for the rule, and
SPRIDEN_SEARCH_MI
is equal to the external source middle name for the specified length.
Note: If the SPRIDEN_SEARCH_MI is not like the middle name from the
external source, the matching algorithm will check to see if a matching
record exists on the GORNAME alias table (if the matching source is
defined to match person records).
3. If ID is defined for the matching source and rule priority number, retrieve all records
from Banner with a
SPRIDEN_ID that is equal to the external source ID.
Secondary Matching Logic
The secondary matching process compares the data elements defined for the matching
source and rule priority number for all records returned by the primary matching process.
The goal of the secondary match is to find an exact match between the external source
record and a Banner record.
When comparing a data field that has the Data Required (Indicator) set to
Exists, a
Null value may exist either in Banner or the external source. If a Null value exists either in
Banner or the external source for the data element, the data element is considered to be
matched.
When the Data Required (Indicator) is set to
Required, if a Null value exists either in
Banner or the external source for the data element, the data element is considered to be
not matched.
This step is repeated for each of the data elements for the rule, and one condition must be
true for each for an external source record to be considered to be a match.
• Data element is not defined.
• Data element Data Required (Indicator) is set to Exists or Required, and the
Banner value is equal to the external source value for the specified length.
or
• Data element Data Required (Indicator) is set to Exists, and the Banner value is
Null.
or

371
Banner Student User Guide | General Person
• Data element Data Required (Indicator) is set to Exists, and the external source
value is
Null.
When the data being matched is part of a logical unit (such as an address), the logical unit
is matched separately and completely. For example, when matching on city and ZIP code,
the city and ZIP code must be associated with one address.
Note: There is an exception to be aware of. For an external source record
to be considered as new when the record has already passed the primary
match, all non-name data elements must be determined as not being a
match, and none of the non-name elements may be Null.
Examples of Matching Algorithm Process and Results
Here are some examples of how the matching algorithm works.
Example 1:
If all required data elements are missing, the record will be suspended.
Last Name = Required
First Name = Required
Date of Birth Day = Required
Date of Birth Month = Required
Date of Birth Year = Required
City = Required
Banner values: Mildred Jones, Date of Birth = 08/17/1957, City = Topeka
External values: Mildred Jones
The external record will pass the primary match, because the first and last names match.
However, since all other data elements are missing (i.e, Null) from the external source (not
matched but are Null), the record will be suspended.
Example 2:
The external record passes the primary match as the first and last name matches against
two Banner records. These two records are then used in the secondary match.
Rule 1 Rule 2
Last Name = R Last Name = R
First Name = Y First Name = Y
SSN = Y Date of Birth = Y
Date of Birth = Y City = Y

372
Banner Student User Guide | General Person
Banner values:
Record 1 - Alberta Rockville, 330229101, Largesse, 06259, 05/01/1985
Record 2 - Alberta Rockville, no SSN, Pomfret, 19355, no Date of Birth
External values: Alberta Rockville, 330229101, Largesse, 06259, no Date of Birth
The external record will pass the primary match, because the first and last names match
at least one Banner record with the same first and last names.
• Using Rule 1 and the matching algorithm, the external record will be matched against
Banner record 1. It will be suspended against Banner record 2.
• Using Rule 2, the external record would be matched against Banner record 1, since the
Date of Birth is missing and the City and ZIP match.
Example 3:
The external record passes the primary match, which usually means that the match status
will be
Suspense at a minimum. However, in this case, because none of the non-name/
SSN fields match, the external record has a match status of
New.
Banner values: Tomasso Dalimonte, SSN = Null, Date of Birth = 06/02/78, City =
Marikesh, ZIP = 11233
External values: Tomasso Dalimonte, SSN = Null, Date of Birth = 09/07/59, City =
Woodstock, ZIP = 06281
The external record will pass the primary match, because the first and last names match.
Normally, this would mean that the record would be suspended at a minimum. However,
because the Date of Birth, City, and ZIP Code fields specifically do not match (i.e., none of
City = Y ZIP Code = Y
ZIP Code = Y
The value R stands for Required. The value Y stands for Exists.
Rule 1 Rule 2
Last Name = R Last Name = R
First Name = R First Name = R
SSN = Y Date of Birth = Y
Date of Birth = Y City = Y
City = Y ZIP Code = Y
ZIP Code = Y
The value R stands for Required. The value Y stands for Exists.
Rule 1 Rule 2

373
Banner Student User Guide | General Person
them are Null), then the record's match status is set to New. This is the only exception to
the basic matching algorithm.
Forms Used with Matching Process
The following Banner forms are used with the matching process.
Common Matching Entry Form (GOAMTCH)
Use this form to prevent the creation of multiple PIDMs for a single person or non-person
in Banner. It is used with SPAIDEN and other forms in Banner Student to enter information
for a new ID and then execute the matching process before a new PIDM is created in
Banner.
If Common Matching is turned on (on GUAINST), and the user is not excluded from
Common Matching on GORCMUS, GOAMTCH is called automatically from the Key Block
of SPAIDEN, SRAQUIK, SAAQUIK when an ID is generated or entered, and the ID does
not already exist in Banner. Whether or not Common Matching is turned on, the user will
access GOAMTCH from SRIPREL, SAAEAPS, and SHAEDIS as part of the matching
process for data loads.
You can enter information for name, address, telephone, date of birth, SSN, etc., in the
Data Entry block. The data entered can be used to assist with matching if the matching
rule contains the field being entered. Regardless, the data entered in the Data Entry block
will be stored in Banner if the person is found to be new.
The matching process is called when you perform a Next Block from the Data Entry block
or select the Duplicate Check button. Use the Duplicate Check button to execute the
matching process at any time during the entry of person information. Only those data
elements in this form can be used for online matching rules.
Note: If GOAMTCH is called from another form where you can create
identification records, the GENERATE ID button does not appear in the
Key Block.
Wildcards and Special Characters
You can use this form to search for identification records, and you do not need to use
wildcard characters (%). You can enter partial information without using a wildcard
character.
The programming logic treats searching and creating data differently:
• If you enter % in the First Name field, for example, and create a new record, % will be
stored as the person's first name.
• If you use a wildcard to search for a record, the Common Matching process will strip it
out. The process removes special characters and forces the data to be uppercase.
For example, if you search for
Jon%s, the Common Matching process will search for
JONS, and Jones will not be considered a match.

374
Banner Student User Guide | General Person
First name is required for all searches for person records. If you want to search on last
name only, you can enter the last name, and enter a special character for the first name.
Button Detail
The following buttons are used on GOAMTCH:
• Duplicate Check
Select this button to trigger the Common Matching process without performing a Next
Block function.
• Select ID
Select this button if Common Matching has found an existing record that is a match for
the one you are entering. This populates the form on which you were entering data with
the existing Banner data for that person or non-person. You are automatically taken
back to the original form, and a new PIDM is not added to the database.
• Details
Select this button if Common Matching has found potential matches and you need to do
additional research to see if any of them match the record you are adding. A list of forms
will appear, from which you can select the form you wish to access.
Note: The list of research forms displayed by selecting the Details button
is determined by how the matching source code is set up on the Common
Matching Source Code Rules Form (GORCMSC). If you do not set up any
forms to be called, the Details button will be disabled.
• Update ID
Select this button if Common Matching has found a record that matches the one you're
entering, and you have entered information in GOAMTCH that should be added to the
existing record. Only Null fields on the existing Banner record will be updated. The
record is changed, but a new PIDM is not added to the database.
For example, if Common Matching finds the person's record but there is no billing
address, and you have added the billing address in the Data Entry block, selecting this
button will add a billing address record to the existing address records.
• View Comments
Select this button to view non-technical details about the matching source and related
rule sets from GTVCMSC to better understand the type of data that should be entered in
GOAMTCH and the matching results that are produced.
• Create New
Select this button if the Common Matching process does not return a record that
matches the one you are entering, or if none of the potential matches that were returned
match the record you are entering. This creates a new PIDM in Banner. If biographical
data, email address, telephone number, or complete address information has been
entered in the Data Entry block, the corresponding records will created in Banner.
375
Banner Student User Guide | General Person
You can restrict whether a new ID is created or not if any APIs fail due to missing or
incomplete information, and an error message is generated. When the Create New
button is used, the system checks to see if any APIs have failed. If the new Prevent ID
Creation on API Failure checkbox on GORCMSC is checked, the appropriate error
message will be displayed, and you will be prompted to enter the missing or incomplete
information to complete the creation of the new ID. (The default value is unchecked on
GORCMSC).
Note: This functionality can only be used online. It is not available in
batch processing.
The following results will occur when the Duplicate Check button is used:
1. The record is new. No match has been found in the database. The record can be
created without any additional processing, and Banner will assign a new PIDM to it.
2. A match is found for the record. Common Matching has found one, and only one,
Banner record that matches the record based on the rules. The Common Matching
Entry Form (GOAMTCH) appears with the Match tab highlighted. The user must
review the displayed data to see if the matched Banner record is the same as the one
they are trying to enter.
2.1. If the record found in the database is the same as the one being entered, you
can select the person or non-person as a match, or update the record with
additional information, but Banner will not assign a new PIDM.
Note: You can only update fields on an existing Banner record if they are
Null in the Banner database. If data already exists for those fields, it will
not be overwritten.
2.2. If the record found in the database is not the same as the one being entered,
you can create a new record. Banner will assign a new PIDM to the record when
it is saved.
3. A potential match is found. Common Matching has found at least one record where
some of the fields identified in the rule match the record being entered, but not all.
For example, the first name and last name are the same, and the mailing address is
the same, but the date of birth is different. GOAMTCH then appears with the Potential
Matches tab highlighted. You can review each potential match to determine if one is,
in fact, a match. If multiple records meet the matching criteria, they are all displayed in
the Potential Matches block.
3.1. If one of the potential matches is the same as the one being entered, you can
select the record as a match, or update it with additional information. Banner will
not assign a new PIDM. If the record is updated, existing data will not be
overwritten.
3.2. If none of the potential matches is the same as the one being entered, you can
create a new record. Banner will assign a new PIDM to the record.

376
Banner Student User Guide | General Person
Key Block
Use this block to enter the ID to be matched and the matching source code for the match
rules to be used in the search.
Two buttons are used in this block.
• The Generate ID button is used to generate a new one-up Banner ID.
• The View Comments button is used to view matching source and rule details.
Data Entry Block
Use this block to enter the information for the person or non-person, unless it has been
populated automatically from the original form where you were working (i.e., SRIPREL).
You can enter either the SSN or the last name/non-person name for matching. The last
name is not required. (You should only use the SSN without last name in matching rules
sets for online matching. It should not be used in batch processing.) The Common
Matching algorithm will use the rules for the matching source to see if an identification
record already exists in the database for that person or non-person.
You have the option of displaying potential matches using the data entered on
GOAMTCH, even if the number of characters entered is less than the length specified in
the matching rule on GORCMRL. Use the Allow Length Override checkbox on
GORCMSC to capture any matches up to and including the specified length on for the
rule. For example, if you enter a last name with four characters, and the Length field on
GORCMRL has been set to 5 for the rule, the system would display any records where the
last name begins with the four characters entered on GOAMTCH.
Records are held in suspense, as partially matched, and you can use the following buttons
to continue processing.
• The Duplicate Check button is used to execute the match algorithm from the Data
Entry block and run it as needed until the match is satisfactory.
• The Select ID button is used to match the ID in the Data Entry block to the ID in the
Match block.
• The Details button is used to display a list of forms for additional match research.
• The Update ID button is used to match the ID in the Data Entry block to the ID in the
Match block and insert data into Null fields in the SPBPERS, SPRADDR, and/or
GOREMAL tables.
• The View Comments button is used to view matching source and rule set details.
• The Create New button is used to reject all matches and create the record as new.
Match Block
The Match block is automatically displayed after the matching process is completed if a
match is found. This block is accessed using Next Block or the Match tab. The data
entered remains in the Data Entry block. You can choose to clear the match information
using the Clear and Return to Data Entry button. You will then be returned to the Data
Entry block where you can add or change the data for the match. The address information

377
Banner Student User Guide | General Person
in the Match block displays the address type and address data, if the address was
matched as part of the matching algorithm.
If the record found by the matching process is a match for the record being entered, use
the Select ID button to bring the information back to the form on which you were entering
data, or use the Update ID button if you have added information to the Data Entry block
that does not exist in the database record. If you have a large number of potential
matches, you may want to select the Clear button to erase the information in this block
and enter more restrictive criteria in the Data Entry block.
You can enter additional information to reduce the number of potential matches found by
the Common Matching process. To see the new list of potential matches, you must
execute the process again by performing a Next Block function or selecting the Duplicate
Check button.
Note: The Common Matching process uses the rules defined for the
Matching Source in the Key Block to determine if the identification
record being entered already exists on the Banner database. If you do not
receive the results you expect after the Common Matching process has
been executed, review the rules for the Matching Source on GORCMRL.
Potential Matches Block
The Potential Matches block displays the potential matches (formerly known as suspense
records) found during the search. The number of PIDM records found is displayed in
parentheses in the tab, i.e., “Potential Matches (42)”. You can scroll through the potential
match records to see the information in each that potentially matches the information in
the Data Entry block. Only one row per record is displayed in this block. You can choose to
clear the match information using the Clear and Return to Data Entry button. This clears
the data in the Potential Matches block so you can add or change the data for the potential
match.
Logical sort order processing can be used to sort the matching results dynamically by ID
or name in ascending or descending order using the Sort up and down arrow buttons for
the ID and Name fields. The default sort order is by ID and priority (in descending order).
When you click on the Sort up arrow, the sort organizes the results in alpha order (A - Z).
When you click on the Sort down arrow, the sort organizes the results in reverse alpha
order (Z - A). Once you have clicked on an up or down arrow, you can mouse over the
arrow to see the tool switch hint message, click on the arrow again, reverse its direction,
and perform a new sort. For example, after you have sorted on ID or name in A - Z order
(using the Sort up arrow), you can then click on the arrow again to change it to a Sort
down arrow, and resort the data in Z - A order.
If any address fields are included in the matching rules being used, and a match exists on
the address of a potential match, then that address will be displayed for that record. To
see all address records for a selected potential match, select the All Addresses pulldown
list.
Note: If you use GOAMTCH by itself to match a person to an existing
person in Banner, and the existing person in Banner has an address of
the same address type (where the addresses themselves do not match),
the existing Banner address will be inactivated, and the address that was

378
Banner Student User Guide | General Person
entered on GOAMTCH will be inserted.
If you use SAAEAPS or SRIPREL to match a person via GOAMTCH and
the same scenario exists, SRIPREL and SAAEAPS will put an end date
on the existing Banner address and then insert the new address.
If the matching rule contains a row for telephone number and/or email address, and a
match exists on the telephone number or email address of a potential match, then the
phone number and/or email address will be displayed. The date of birth and gender will be
displayed for any potential match if they exist in Banner for the potentially matched record,
regardless of whether date of birth or gender are used in the matching rule.
You can define a hierarchy for the display of addresses, telephone numbers, and email
addresses. This hierarchy will be used for two conditions: 1) when no address fields are
used in the rule set, and/or 2) when address rules are used in the rule set, but the potential
match record does not have an address that matches.
• If address information has been included in a matching source rule set, and the potential
match record has an address which matches, that address will be displayed in the
Potential Matches block.
• If address information has been included in a matching source rule set, and the potential
match record has no address which matches, and a hierarchy has been established for
the matching source, and the potential match record has an address type listed in the
hierarchy, that address will be displayed in the Potential Matches block.
• If address has been included in a matching source rule set, and the potential match
record has no address which matches, and a display hierarchy has been established for
the matching source, and the potential match record has no address types listed on the
hierarchy, the message No Matching or Hierarchy Found will be displayed in the
Matching or Hierarchical Address field.
• This same logic is true for the telephone and email address information. If there is no
match or hierarchical type associated with the record, the message No Matches will be
displayed in the Telephone and E-mail fields. (This message is shorter, as these field
lengths are smaller.)
• The address source code data is passed from GOAMTCH to the GOTCMME table. The
value in the
GOTCMME_ASRC_CODE column is loaded to the SPRADDR_ASRC_CODE
column in GOAMTCH using the
gb_address API.
The Matching Rule Sets field displays the result of the matching algorithm for each field
included in the matching rule. This allows a user to know what data elements the matching
rule was using, even if they do not have access to the Common Matching Rules Form
(GORCMRL).
For example, you could view how the data for specific fields is displayed for all potential
matches, even though those fields do not exist in the matching rules. You could also view
the fields included in the matching rule, such as:
Name Match, Address Match,
Email Match. In addition, you could view all the Banner addresses for the selected
potential match using the All Addresses field pulldown list. A record could show an email
match, even though none exists. That occurs if the matching rule on GORCMRL has the
Element field set to
Email and the Data Required field set to Exists. A Null email
address on either the Banner record or the incoming record is still considered to be a
match.

379
Banner Student User Guide | General Person
To find more information about a record, select it and then select the Details button in the
Data Entry block. A list of forms will be displayed, and you can select the form you wish to
access.
General Person Identification Form (SPAIDEN)
You can access the Common Matching Entry Form (GOAMTCH) from SPAIDEN. To do
this, turn on Common Matching for the institution using the Online Matching Process
Enabled (Indicator) on GUAINST. In addition, the user attempting to access GOAMTCH
must not have been excluded from using it on GORCMUS. However, even if a user has
been excluded from Common Matching on GORCMUS, they can still access GOAMTCH
through the Banner General Common Matching Menu (*GENMATCH) or through the
Options Menu.
To open GOAMTCH from SPAIDEN: type
GENERATED in the ID field, select the
Generate ID button, or enter an ID in the ID field that does not exist in Banner. The
GOAMTCH form will automatically appear. If a person record is created using only the
GOAMTCH form, the Origin field (on SPAIDEN and SPRIDEN) will be set to
GOAMTCH. If
the person record is created using SRRSRIN or SRIPREL, then the Origin field will be set
to
SRKPREL.
Quick Recruit Form (SRAQUIK)
GOAMTCH will be called automatically from SRAQUIK if Common Matching has been
turned on in GUAINST and if the user has not been excluded from Common Matching on
GORCMUS. To open GOAMTCH from SRAQUIK: enter
GENERATED in the ID field,
select the Generate ID button, or enter an ID in the ID field that does not exist in Banner.
If the user has been excluded from Common Matching, and they enter
GENERATED in the
ID field, select the Generate ID button, or enter an ID in the ID field that does not exist in
Banner, the Current Identification window will be displayed, allowing the user to enter a
new person's first, middle, and last name.
Quick Entry Form (SAAQUIK)
GOAMTCH will be called automatically from SAAQUIK if Common Matching has been
turned on in GUAINST and if the user has not been excluded from Common Matching on
GORCMUS. To open GOAMTCH from SAAQUIK: enter
GENERATED in the ID field,
select the Generate ID button, or enter an ID in the ID field that does not exist in Banner.
If the user has been excluded from Common Matching, and they enter
GENERATED in the
ID field, select the Generate ID button, or enter an ID in the ID field that does not exist in
Banner, the Current Identification window will be displayed, allowing the user to enter a
new person's first, middle, and last name.

380
Banner Student User Guide | General Person
Data Loads Used with Matching Process
The following processes are used to load data for matching.
Electronic Prospect Inquiry Form (SRIPREL)
SRIPREL uses the GOAMTCH form and the Common Matching algorithm for data load
processing to determine if the incoming record matches an existing Banner record.
Use the following steps to resolve suspended records or to match and load new records
from SRIPREL.
1. Query for prospect records (where the Match Status is
S for “suspended”), or by
other parameters.
2. If you want to view details about the selected record, choose the Details (SRAPREL)
item from the Options Menu. If you want to use the matching algorithm against the
selected record, then choose the Match (GOAMTCH) item from the Options Menu.
3. Before you can access GOAMTCH, you will be asked to assign an ID to the new user,
either a generated ID or the person's SSN. When the data is saved, you will be taken
to GOAMTCH.
4. When you enter GOAMTCH, the ID field will contain either the word
GENERATED or
the selected record’s SSN. The Matching Source field will contain the matching
source code that has been assigned to the interface code, which is also assigned to
the electronic prospect code of the selected record on STVPREL.
If no matching source code has been assigned to the interface code, then the
Matching Source field will contain the default matching source code that has been
assigned to the user ID on GORCMUS. If no default source code has been assigned
on GORCMUS, then you will be able to select any matching source code from the List
of Values.
5. Perform a Next Block to populate the Data Entry block with all of the data for the
incoming prospect record that is present in the temporary tables.
6. You can update or adjust the data in the Data Entry block if it does not meet your
institution’s data standards. These updates will be copied back to the temporary tables
and used when the prospect's record is created.
7. Perform a Next Block to run the matching algorithm. The algorithm will determine if the
incoming record is new, matched, or a potential match.
8. Determine if the record is to be new or matched, and select the appropriate button.
9. The user will be automatically returned to SRIPREL. The match status will always be
Matched, as the person has now been created in Banner via GOAMTCH. Continue
with regular SRIPREL load processing.
Electronic Prospect Match (SRRSRIN) and Migrate Electronic Prospects
Process (SRRPREL)
Users should review how Common Matching works with electronic prospect processing
when using SRRSRIN and SRRPREL.

381
Banner Student User Guide | General Person
SRRSRIN will not load recruits to Banner when the Auto Load (Skip Dup Chk) parameter
is set to
Y and data does not conform to API restrictions. When records with a matched (M)
or new (
N) status are flagged, the records will not be loaded to Banner when the Auto
Load (Skip Dup Chk) parameter is set to
Y if information required to create the record
(such as an address) is incomplete.
SRRSRIN will flag records with incomplete addresses or other incomplete information as
having a status of suspense (
S), and these suspended records will need to be fixed
manually on SRIPREL and/or GOAMTCH. It is very important to fix the incorrect and/or
missing information at this point, prior to continuing with the matching process. If the
incomplete data is not corrected, SRRSRIN will fail.
Note: SRRSRIN is the only process that generates records with a match
status of
N. All records that are processed manually on SRIPREL using
GOAMTCH will have a match status of
M, even when you choose to
create a new record. This is due to the fact that when you return to
SRIPREL, the person’s record will have been created in Banner by
GOAMTCH.
Here is an example of SRRSRIN output when incomplete addresses are found after the
process is run with the Auto Load (Skip Dup Chk) parameter set to
Y.
When SRRSRIN is run with the Auto Load (Skip Dup Chk) parameter set to
N, there is no
address check, so records will be flagged as matched (
M) or new (N), whether they have
complete address information or not.
Since records with incomplete data such as incomplete addresses will not be loaded to
Banner, SRRPREL works so that records that were flagged
N or M and also have
incomplete data will have the match status changed to
S. Again, these suspended records
will need to be fixed manually on SRIPREL and/or GOAMTCH. It is very important to fix
the incorrect and/or missing information at this point, prior to continuing the matching
process. If the incomplete data is not corrected, SRRSRIN will fail.
Here is an example of SRRPREL output when incomplete addresses are found after
SRRSRIN is run with the Auto Load (Skip Dup Chk) parameter set to
N.
ID Name Status Term Level Major
High
School Result
P00002378 Adams, Adam S 199510 UG ARTS UNKNHS Prospect not loaded
A00024505 Adams, Alison M 199510 UG ARTS UNKNHS Loaded 29-NOV-
2004
P00002429 Adebowale, Morayo S 199510 UG ARTS UNKNHS Prospect not loaded
A00027348 Albert, Dawn M 199510 UG ARTS UNKNHS Loaded 29-NOV-
2004

382
Banner Student User Guide | General Person
When using SRIPREL, if an attempt is made to load a matched (M) or new (N) record (the
Create Recruit item is selected from the Options Menu), and data is incomplete, an error is
displayed in the autohint: Error: Data Error. Prospect has been put into suspense. At this
point the match status for the record is changed back to
S. You can then navigate to
GOAMTCH to update the incomplete data (such as missing address information) and
match the record appropriately.
When records are matched through batch processing, SRTLOAD loads the address
source from the temporary tables to the SPRADDR table. SRRSRIN then calls SRKPREL
to push the address data, and therefore loads the
SRTADDR_ASRC_CODE value to the
SPRADDR_ASRC_CODE field.
When matching is performed manually using SRIPREL and GOAMTCH, SRIPREL saves
the prospect’s address to the GOTCMME table. GOAMTCH then creates the address for
the new person record from the GOTCMME table, including the
ASCR_CODE data.
Electronic Application Process Form (SAAEAPS)
SAAEAPS uses the GOAMTCH form and Common Matching algorithm to assist in
matching incoming Web and EDI application records to existing Banner records.
Use the following steps to resolve suspended records or to match and load new records
from SAAEAPS.
1. Query for the admissions records that have been suspended (where the Application
Status is
U for “suspended”), or by any of the other fields.
2. Set the Accepted Indicator to
Y if it is still set to U.
3. Select the Verification Steps tab or the Manual Verification Steps option from the
Options Menu to access the Verification Steps window.
4. Mark any of the person or application steps complete, except for the
IDVR step, and
then save the changes.
5. Select the
IDVR step, and then choose the Associate Person with ID item from the
Options Menu.
6. This opens the Associate Person with ID window, where you can choose which type of
Banner ID to assign to the selected record.
7. After choosing the appropriate ID type, either save the changes or select the
Associate Person with an ID button. This will display GOAMTCH.
ID Name Status Term Level Major
High
School Result
A00023291 Abrams, Anthony S 199510 UG ARTS UNKNHS Prospect not loaded
A00024505 Adams, Alison M 199510 UG ARTS UNKNHS Loaded 30-NOV-
2004
A00027662 Martinez, Robert S 199510 UG ARTS UNKNHS Prospect not loaded

383
Banner Student User Guide | General Person
8. The ID displayed on GOAMTCH should match the option chosen in the Associate
Person with ID window. The Matching Source field should contain the source code
that has been assigned to the interface code on SAAWADF for the application type of
the selected Web application. This source code can be changed if desired.
If no interface code has been specified for the application type on SAAWADF, then the
Matching Source field will contain the default source code assigned to the user ID on
GORCMUS. If no default source code has been assigned on GORCMUS, you will be
able to select a source code from the List of Values.
Perform a Next Block to populate the Data Entry block with all of the data for the
incoming electronic applicant record that is present in the temporary tables.
9. You can update or adjust the data in the Data Entry block if it does not meet your
institution’s data standards. These updates will be copied back to the temporary tables
and used when the applicant's record is created.
10. Once the data has been “cleaned up”, use a Next Block function to call the matching
algorithm, or select the Duplicate Check button.
11. The incoming electronic application can be a match, a potential match, or a new
record:
11.1. If the incoming electronic application is found to be a match to someone in
Banner, the Banner record will be displayed in the Match block.
11.2. If the incoming electronic application is found to be a potential match against
more than one existing Banner record, then all of the possible matches will be
displayed in the Potential Matches window.
11.3. If the electronic application is found to be a new record, an Alert Box will be
displayed with a message asking if you want to create the new person.
12. If the person is found to be an exact match, you can do one of three things:
12.1. Match the incoming record to the Banner record but not update any Null fields
that exist for the person in Banner by selecting the Select ID button.
12.2. Match the incoming record to the Banner record and choose to update any Null
fields that exist for the person in Banner with data on the incoming record by
selecting the Update ID button.
12.3. Choose to ignore the matched status, and create the person as new by
selecting the Create New button.
13. After selecting one of the options above, the user will be returned to the Verification
Steps window, and the
IDVR step will be marked as complete. Continue processing
the electronic applicant as needed.
Online Transcripts Activity List Form (SHAEDIS)
SHAEDIS uses the GOAMTCH form and the Common Matching algorithm to assist in
matching incoming records to existing Banner records. In addition, you can create a new
person record from GOAMTCH for the person on SHAEDIS.
Use the following steps to determine if a person on SHAEDIS matches an existing Banner
record or if the person can be created as a new record.

384
Banner Student User Guide | General Person
1. Query for those records where the Status is VERF and the Pending or Complete
radio group is set to
Pending.
2. Select the record to be matched. Perform either a Next Block function, or select Verify
ID from the Options Menu to call GOAMTCH.
3. The form will display the ID of the record from SHAEDIS. If this ID already exists in
Banner, then you must replace the ID with the word
GENERATED. This will allow
GOAMTCH to use a generated ID if the person selected on SHAEDIS is new to
Banner.
4. The value in the Matching Source field will be defaulted from the Online Matching
Source field on GORCMUS for the user ID. If the user ID is allowed to use other
matching source codes (based on the setting of the Allow Other Matching Sources
checkbox on GORCMUS), then you can change the value on the Matching Source
field on GOAMTCH.
5. Use a Next Block to populate the Data Entry block with all of the data for the incoming
transcript record that is present in the temporary tables.
6. You can update or adjust the data in the Data Entry block if it does not meet your
institution’s data standards. These updates will be copied back to the temporary tables
and used when the prospect's record is created.
7. The incoming person’s transcript record can be a match, a potential match, or a new
record:
7.1. If the incoming transcript is found to be a match to someone in Banner, the
Banner record will be displayed in the Match block.
7.2. If the incoming transcript is found to be a possible match against more than one
existing Banner record, then all of the possible matches will be displayed in the
Potential Matches window.
7.3. If the transcript is found to be a new record, an Alert Box will be displayed with a
message asking if you want to create the new person.
8. If the person is found to be an exact match, you can do one of three things:
8.1. Match the incoming record to the Banner record but not update any Null fields
that exist for the person in Banner by selecting the Select ID button.
8.2. Match the incoming record to the Banner record and choose to update any Null
fields that exist for the person in Banner with data on the incoming record by
selecting the Update ID button.
8.3. Choose to ignore the matched status, and create the person as new by
selecting the Create New button.
9. After selecting one of the options above, the user will be returned to SHAEDIS where
they can continue processing the record. The asterisk (*) that had appeared in the
unlabeled field to the left of the Last Name field to indicate the person had not been
verified will no longer be displayed.

385
Banner Student User Guide | General Person
Maintaining Multiple Telephone Numbers
Since a person may have more than one telephone number associated with an address,
multiple types of phone numbers may be maintained on the General Person Telephone
Form (SPATELE). This form may be accessed directly from any form where a phone type
and number are entered or maintained, such as the General Person Identification Form
(SPAIDEN). Only one phone number associated with an address type and address
sequence number may be flagged as primary, and it is this primary phone number which
will be displayed with the address on various forms in Banner Student. If no primary
number exists, then no phone number is displayed with an address. Phone numbers may
also be inactivated via the Inactivate (Indicator).
To associate a phone number with an address, you must enter an address type and
sequence number. The Address Summary Form (SOADDRQ) may be queried to view all
of the addresses which exist for a person.
When an address is inactivated, all phone numbers associated with that address type and
sequence number are also inactivated. Inactivating phone numbers will uncheck the
Primary (Indicator), if present. Phone numbers can be reactivated on an individual basis
and are automatically reactivated if the associated address if reactivated.
A telephone type can be associated with an address type. For example, address types of
BI, BU, MA, and PA exist on the Address Type Code Validation Form (STVATYP). Phone
types of BI, BU, MA, and PA could then exist on the Telephone Type Validation Form
(STVTELE), and STVATYP would then contain with these phone types. The following
shows how the Address Type Code and Telephone Type Validation Forms could be
organized.
STVATYP
STVTELE
Address Type Description Telephone Type Description
BI Billing BI Billing
BU Business BU Business
MA Mailing MA Mailing
PA Parents PA Parents
Telephone Type Description
BI Billing
BU Business
MA Mailing
PA Parents

386
Banner Student User Guide | General Person
Enter Biographic Information
After a person is established on the database, the General Person Form (SPAPERS) is
used to enter biographic information about a person. It captures information such as birth
date, sex, and marital status.
Maintain Comments
After a person is established on the database, any comments relating to the person are
entered using the Person Comment Form (SPACMNT).
Enter Emergency Contacts
Emergency contact information including name, address, phone number, and relationship
can be entered on the Emergency Contact Information Form (SPAEMRG) after a person
has been added to the database.
Enter Medical Information
The Medical Information Form (GOAMEDI) is used to capture medical data necessary to
accommodate any special needs a person may require or disabilities a person may have
that affect their enrollment at the institution.
Maintain International Information
The International Information Form (GOAINTL) is used to add and update international
and visa information, including nation of citizenship and I-20 information.
Add/Remove Holds
The Hold Information Form (SOAHOLD) is used to assign, track, and remove holds for a
person on the system. Holds may prevent registration, graduation, or the production of
enrollment verification documents, transcripts and grade mailers. If a person has a hold, a
message is displayed in the appropriate area.
Schedule Appointments/Track Contacts
The Person Appointments/Contacts Form (SOAAPPT) is used to schedule appointments
for a person and to track any contact with the person.

387
Banner Student User Guide | General Person
Support Services Processing
After a person has been established on the database, they may begin to have information
associated with their goals and needs requirements, as well as any services which are
provided to them and are maintained. Examples of goals may be a two year degree, a
word processing certificate, or a reading certificate. Examples of needs may be academic
assistance or child care. Examples of services may be counseling, day care, and tutoring.
The Support Services information may be maintained for any person existing on the
system. The person does not need to be a student.
Goals, needs, and services may be maintained separately or may be grouped together to
create a service group. A service group is a combination of goals, needs, and services
which may be assigned together. A person may also be associated with a service group or
with multiple service groups. These service groups consist of a specified set of goals,
needs, and services. The service groups may then be assigned to persons existing on the
database either online or via population selection and a batch load process.
An example of a service group may be an Adult Literacy Program where all of the
participants have the same goal, a reading certificate; the same needs, remedial reading
and academic monitoring; and the same services are provided, tutoring, counseling, and
skills assessment.
This service group example would be defined on the Service Group Rules Form
(SEASSGP). Individuals in the Adult Literacy Program could then be assigned to the
service group via the Service Group Assignment Form (SEAASGN). Service groups may
also be assigned in batch using a user-defined population selection and the Support
Services Load Process (SERLOAD). The detail information about each individual's
progress can be reviewed or modified on the Support Services Detail Form (SEADETL)
for those persons who may have additional goals, needs, and services. The Support
Services Query Form (SEAQGNS) may be used to see which people have any
combination of goals, needs, and services.
The Support Services Load Process (SERLOAD) may be used to create the data for the
Service Group Assignment Form (SEAASGN) and the Support Service Detail Form
(SEADETL).
Once a goal, need, or service has been assigned to a person, they may be further
enhanced by creating information in the form of attributes or comments about the goal,
need, or service. These attributes or comments specific to a goal for a person may be
defined using the Goal Attributes and Comment Form (SEAGDTL). Attributes and
comments specific to a need for a person may be maintained on the Need Attributes and
Comment Form (SEANDTL). Attributes and comments specific to a s
ervice for a person
may be maintained on the Service Attributes and Comment Form (SEASDTL).
Three methods may be used to add support service data for an individual. They are as
follows:
1. When large volume processing is required, create a set of individuals via population
selection, then run the Support Services Load Process (SERLOAD) which assigns
that set of goals, needs, and services associated with the service group.
2. When working with individuals, use the Service Group Assignment Form (SEASSGP)
to create goals, needs and services based on service groups, then go to the Support
Service Detail Form (SEADETL) to view and modify the details.

388
Banner Student User Guide | General Person
3. Go directly to the Support Service Detail Form (SEADETL) to enter any combination
of goals, needs, and services. These may be associated with a service group or may
be independent of a service group.
Service groups are optional. A person may be associated with a single service such as
Study Skills Service or Matriculation Service without having a service group. Goals,
needs, and services are all independent of each other. A person may have a goal without
a need, or have a need without a goal, or have a service without a need or a goal. The
successful completion of goals and needs met, and the provision of services can be
tracked.
Produce List of Persons
The Person Directory (SPRPDIR) provides a list of persons, addresses, and phone
numbers in the system by type of person: recruit, applicant, student, and faculty.
Purge Process
The following purge process may be used to purge information in the General Person
Module.
Address Purge (GPPADDR)
This process will purge address information for a person. The user may choose either of
two options:
1. Address expiration date (date must exist to be purged)
2. Inactive address (regardless of date)
Please see the Banner General User Guide for further information.
Banner Student Interface to Banner Human Resources
Please refer to the "Interfaces" chapter for information on the interface between General
Person data and Banner Human Resources.
General Person Reports
The following reports and processes are run through the General Person module:
Person Directory (SPRPDIR)

389
Banner Student User Guide | General Person
Please refer to the Banner Student Reports and Processes Handbook for report
descriptions, instructions, parameter definitions, and output samples.
Creating a Population Selection
To perform population selection, the application you will be working with must first be
defined on the Application Definition Rules Form (GLRAPPL).
The second step is to enter the Population Selection Definition Rules Form (GLRSLCT),
enter the Application (Code), and create a Selection ID (Identifier) with a description.
In the Selection Definition section, define the Select and From portions of the SQL
statement that the selection represents.
Example:
Next, enter the Selection Rules for the population of records you would like to see.
Example:
Save your data and exit. Your population selection rules will be compiled. If any errors are
issued during the compilation process, resolve the errors before continuing. If you do not
resolve all errors given during the compile process, you will not be able to use the
population selection rules to extract a population.
You are now ready to extract the population of people. The Population Selection Extract
(GLBDATA) is run from the Process Submission Control Form (GJAPCTL). At minimum,
you will need to supply the parameters for Selection Identifier 1, Application, and Creator
ID, which are the values that were in the Key Information of the Population Selection
Definition Rules Form (GLRSLCT).
After extracting the population, you can use the Population Selection Extract Data Form
(GLAEXTR) to view and/or modify the people in the population. You can add or delete
people from the population using this form. The keys to the form are Application,
Selection ID, and Creator ID. (User ID is also displayed in the Key Information.) You will
be able to add or delete people only from populations that you selected.
Support Services Load Process (SERLOAD)
Select:
SARADAP_PIDM
From:
SARADAP
SARADAP_TERM_CODE_ENTRY
=
'200010'
AND
SARADAP_LEVL_CODE
=
'UG'

390
Banner Student User Guide | General Person
After extracting the population, and modifying the people in it if necessary, you can use the
population for a variety of purposes. Letters can be produced using Letter Generation,
based upon a population, and many Banner reports and processes also can accept a
population for processing.
For additional details on population selection, refer to the Banner General User Guide.

391
Banner Student User Guide | Faculty Load
Faculty Load
This chapter discusses processing and procedure information for Faculty Load.
Faculty Load Procedures
Here are tasks you can perform in this module.
Faculty Workload Rules Creation
The Faculty Load Term Control Form (SIATERM) must be established for each term for
which faculty assignments are created. The FTE (full time equivalency) factor is used as
the denominator to calculate the term FTE. For example, the faculty members workload
for the term is 12.00. To reach the full time equivalent the FTE factor of 15 is specified on
SIATERM, hence the faculty members term FTE is:
The Faculty Workload Contract FTE Form (SIACFTE) must then be used to establish the
contract FTE factor. The keys to this form are Contract (Type Code) and (Effective)
Term. The contract FTE factor may be maintained and will be used when performing
contract term analysis (contract term FTE) or contract analysis (contract FTE) on the
Faculty Contract Analysis Form (SIACONA).
All assignments with a like contract type are grouped together, and a contract term FTE
and contract FTE are calculated as follows:
A contract term FTE is calculated as:
Workload Term FTE
Term FTE factor
12 = .80
15
Term Workload for the Contract = Contract Term FTE
Contract FTE factor

392
Banner Student User Guide | Faculty Load
A contract FTE is calculated as:
The Faculty Contract Rules Form (SIAFCTR) is used to specify the terms included in a
contract type for an effective term. Contract types are established on the Faculty Contract
Type Code Validation Form (STVFCNT). For example, a Fall/Spring contract effective in
199901, Fall of 1999 can include the terms:
A Summer One/Summer Two contract effective in 199203 will include the terms:
Note: Contract types may be defined for either semester or quarter term
structures. These rules must be created prior to performing contract
analysis either online or in batch.
The Faculty Workload Term Rules Form (SIAFLRT) is used to create the workload rules to
be used when performing term analysis. Workload rules may be inactivated by unchecking
the Active (Workload Status) checkbox. Multiple rules may be created for a workload
rule code. When multiples exist all term rules will be used in the analysis. Each workload
rule can specify credit hour ranges, contact hour ranges, workload ranges, and a FTE
range. For example, a workload rule code for a full time professor in the college of Arts
and Science is created as follows:
Workload Rule Code: FTPR01 Full Time College 01
This rule specifies that the instructor should be teaching between 12 to 15 credit hours per
term with 12 instructional workload units, 3 to 5 non-instructional workload units for a total
workload of between 15 to 18. His overall FTE should also be in the 0.8 to 1.0 range.
Sum of all Term Workload associated with the Contract = Contract FTE
Contract FTE factor
199901 Fall 1999
199902 Spring 2000
199903 Summer One 2000
199904 Summer Two 2000
Credit Hour Range Contact Hour Range Workload Range
Total: 12 to 15 Weekly: Inst: 12.00
Generated: Total: Non-Inst: 3.00 5.00
Total: 15.00 18.00
FTE Range: 80 1.00

393
Banner Student User Guide | Faculty Load
Term rules may be rolled forward to a future term via the Default Term field in the Key
Information of the Faculty Workload Term Rules Form (SIAFLRT).
The Faculty Contract Term Rules Form (SIAFLCT) is used to create the rules which are to
be used when performing a contract analysis on a term-by-term basis.
The Faculty Workload Contract Rules Form (SIAFLRC) is used to create the workload
rules to be used when performing the contract analysis. This form works in the same
fashion as the Faculty Workload Term Rules Form (SIAFLRT) except that these rules are
effective term oriented.
In summary, there are three methods of faculty load analysis:
1. Faculty Workload Analysis
Performed on the Faculty Assignment Form (SIAASGN) using the rules established
on the Faculty Workload Term Rules Form (SIAFLRT).
2. Faculty Contract Term Analysis
Performed on the Faculty Contract Analysis Form (SIACONA) using the rules created
on the Faculty Contract Rules Form (SIAFLCT), the Faculty Workload Contract FTE
Form (SIACFTR), and the Faculty Load Term Control Form (SIATERM).
3. Faculty Contract Analysis
Performed on the Faculty Contract Analysis Form (SIACONA) using the rules created
on the Faculty Workload Contract Rules Form (SIAFLRC) and the Faculty Workload
Contract FTE Form (SIACFTE).
The batch Faculty Load Contract Analysis Report (SIRCTAL) handles multiple faculty
contract types and performs contract term analysis.
Faculty Information
The Faculty Load Module contains three different forms for maintaining faculty
information. They are:
1. The Faculty Personnel Form (SIAFPER) is used to maintain the tenure and sabbatical
information, as well as AAUP membership and years of teaching experience. This
form contains no required data elements and is not essential to processing.
Note: The information entered on this form is shared with the Banner®
Human Resources System. If your institution has the Banner Human
Resources System, then information is maintained on the Faculty Action
Tracking Form (PEAFACT) in that system.
Note: The Tenure Code Rule Form (PTRTENR) must be established prior
to entering or maintaining any tenure information on a faculty member.
This is a Banner Human Resources System form which will be delivered
with the Banner
Student System for those institutions which do not have
the Banner
Human Resources System.

394
Banner Student User Guide | Faculty Load
2. The Faculty/Advisor Information Form (SIAINST) must be created for faculty members
prior to them being available to teach a section or be assigned as an advisor. This
form is effective term oriented to maintain the information as it changes over time.
The Faculty Data information maintains the faculty status information (inactive faculty
members may not be assigned to sections), which indicates whether the persons are
faculty members or advisors as well as their category and staff time. The Workload
Rule (Code) maintained on this form is important in the term analysis process. This
code will determine the set of rules to be used to analyze the faculty members term
assignments.
The Faculty Contract information allows for an instructor or advisor to be associated
with multiple contracts and contract rules. One contract should be designated as the
default contract via the Default Indicator. The user-specified default contract will be
automatically placed on assignments when the instructor is assigned to the CRN on
the Faculty Assignment Form (SIAASGN) or the Schedule Form (SSASECT). If no
contract type is specified, then no contract analysis may be performed.
The Faculty College and Department information is used to specify the faculty
member's home administrative college and department. It may also be used to specify
the percentage breakdown if the faculty member is assigned to multiple departments
and/or colleges.
The Faculty Attributes information may be used to specify certain criteria about faculty
members, such as whether they have been certified to teach specific courses.
The Faculty Comments information may be used to record any additional information
about the faculty members.
3. The Faculty Degree Information Form (SIAFDEG) is used to maintain the degree
information associated with the faculty member. This form is not essential to
processing. Multiple degrees may be associated with a single prior college and each
degree may have major, minor, and concentration information associated with it. The
dates the transcript was received and reviewed are also available on this form.
Note: Information entered on the Prior College Form (SOAPCOL) or on
the General Information Form (PPAGENL) in the Banner Human
Resources System will be displayed on this form.
Faculty Assignments
Prior to assigning faculty members to classes, you should establish the instructional
workload. This process is done via the Basic Course Information Form (SCACRSE). The
Schedule Type information on SCACRSE allows the instructional workload to be assigned
for each schedule type. For example, the schedule type of lecture for BIOL 101 may have
a workload value of 3.00, the lab for BIOL 101 may have a workload value of 1.00.
Adjusted workload may also be established in the Schedule Type information. Adjusted
workload is based on over-enrollment of a section. For example, if more than 32 students
enroll for the lecture section of BIOL 101, then the instructor receives a workload of 3.25
instead of 3.00. This adjustment will occur automatically based on the section enrollment.
If workloads are not maintained at the catalog, then they may be entered when each
instructional assignment is entered.

395
Banner Student User Guide | Faculty Load
Instructional assignments may be entered on either the Schedule Form (SSASECT) or the
Faculty Assignment Form (SIAASGN). Assignments entered on the Schedule Form are
made in the Instructor information.
Faculty members may be assigned to sessions of a section or to the overall section. Here
are examples of how assignments can be made:
• One faculty member to one section which has multiple sessions
• One faculty member to one session
• Multiple faculty members to one section with multiple sessions
• Multiple faculty members to one session
When assigning instructors on the Schedule Form (SSASECT), the only fields which may
be modified are the Percent Responsibility and the Percent of Session. Updates to the
instruction workload must be performed on the Faculty Assignment Form (SIAASGN).
If an instructor's assignment conflicts with another assignment for the term, a message is
generated, and the conflict override must be entered to permit the time conflict in
assignments.
Inactive instructors may not be assigned to instructional or non-instructional assignments.
If an instructor has been inactivated on the Faculty/Advisor Information Form (SIAINST),
then the message Instructor is not active for this term is displayed when the instructor ID is
entered in the Key Information of SIAASGN.
The user will not be able to change the instructor's status to "inactive" on the Faculty/
Advisor Information Form (SIAINST), if assignments exist for the term being updated.
The Available Faculty Query Form (SIAFAVL), which may be used to find a faculty
member with the right attributes to teach the section, is accessed from the Instructor
window on the Schedule Form (SSASECT) using a Help function. The Faculty Schedule
Query Form (SIAASGQ) which may be used to view the faculty member's schedule for the
term comes from the same window, using a Count Query Hits function. This is a query
only form. Assignments entered on SSASECT will be displayed on the Faculty
Assignment Form (SIAASGN). The Faculty Course Query Form (SIQSECM), used to
display course section information associated with an instructor's existing schedule, is
query only and is accessed from SIAASGN.
The instructional and non-instructional assignments are entered and maintained on the
Faculty Assignment Form (SIAASGN). Instructional assignments entered here can have
the instructional workload adjusted. For example, if a full Professor has been required to
teach a remedial English course but will be given additional workload credit for doing so,
then the Override Workload field would be used. All instructional and non-instructional
assignments may be associated with a contract so that contract analysis may include only
the appropriate assignments for the contract.
The following are the definitions of some of the calculations performed in the Faculty Load
module. The legend below explains the examples for the calculations.

396
Banner Student User Guide | Faculty Load
Calculated Workload—This is calculated as follows:
Workload or Adjusted Workload * % of Responsibility
3.00 * 50% = 1.5 Calculated Workload
Instructor Credit—This is calculated as follows:
Session Credits * % of Responsibility
4.00 * 50% = 2.0 Instructor Credits
Weekly Contact Hours—This is the weekly contact hours associated with the session.
This calculation uses the duration factor and percentage of session assigned to the faculty
member. The following is an example of weekly contact hours:
Hours Per Meeting Per Week * % Responsibility * % of Session
3 * 50% * 100 = 1.5 Weekly Contact Hours
Total Contact Hours—This is the total contact hours for the session for the term. This
calculation uses the percentage of responsibility and percentage of session.
Letter Definition
A Total meeting period days for the term
B Excluded meeting days from Schedule Exclusion Rules Form (SSAEXCL)
C Number of minutes in a meeting period
D Duration factor from Faculty Load Term Control Form (SIATERM)
E% RES
F % SES
Hours Per Meeting Per Week
A - B * C
D
Total Contact Hours
A - B * C
D * F * E
Total Contact Hours = (# of Meetings * Hours Per Meeting) *%
Responsibility * % Session

397
Banner Student User Guide | Faculty Load
The total contact hour calculation on the Faculty Assignment Form (SIAASGN) uses the
override value, should one exist, for contact hours per week from the Schedule Form
(SSASECT).
If a section has multiple day and time combinations, the total contact hours are calculated
by determining the contact hours for each combination, and then calculating the sum of
these values, which will be the total contact hours.
Meeting Combination 1:
Meeting Combination 2:
Total Contact Hours:
An example is as follows:
For 199901, Anthropology 101, CRN 10030, meets with the following day and time
combinations:
Meeting 1:
Meeting 2:
Note: In this example, the hours/week values are overridden, but this
calculation will work the same should you leave the default values in
place.
Contact Hours
for Meeting 1
= Hours/Week from SSASECT
Number of Meeting Days/Week
x Total Meeting Days
Contact Hours
for Meeting 2
= Hours/Week from SSASECT
Number of Meeting Days/Week
x Total Meeting Days
= Contact Hours for Meeting
Combination 1
+ Contact Hours for
Meeting
Combination 2
29-AUG-1999 to 13-DEC-1999 M, W, F 8:00 - 8:50 3 hours/week
29-AUG-1999 to 13-DEC-1999 R 12:00 -
1:50
2 hours/week

398
Banner Student User Guide | Faculty Load
Meeting 1:
Meeting 2:
Total Contact Hours = 78.00
Generated Credit Hours (GCH)—This calculation uses the percentage of responsibility
and session credit hour value.
GCH = # Credits Per Session * % Responsibility * # students in section
Assignment FTE—A full time equivalent will be calculated for each assignment. This value
is calculated using the adjusted instructional workload and the term FTE factor from the
Faculty Load Term Control Form (SIATERM). The following example uses a Term FTE
factor of 15.
The non-instructional assignments are maintained in the Faculty Non-Instructional
Assignment information on SIAASGN. The workload may be entered here or it can default
from the information on the Faculty Non-Instructional Type Code Validation Form
(STVNIST). Non-Instructional assignments may also be associated with a college,
department and a TOPS code (Taxonomy of Programs and Services). An assignment FTE
similar to the one calculated for instructional assignments is also included for each non-
instructional assignment.
A position number may be entered for further integration with the Banner Human
Resources System.
The Faculty Workload Summary window on the Faculty Assignment Form contains the
Faculty Workload Summary information and the Faculty Workload Rules and Analysis
information. The Summary information displays the summary results for the term including
credit hours, generated credit hours, weekly contact hours, term contact hours,
instructional workload, non-instructional workload, total workload, and term FTE.
= Hours/week from SSASECT = 3 x Total Meeting Days = 46
Number of Meetings/Week = 3
=1 x 46
=46
= Hours/week from SSASECT = 2 x Total Meeting Days = 16
Number of Meetings/Week = 1
=2 x 16
=32
3 = .20 FTE
15

399
Banner Student User Guide | Faculty Load
A Next Block function from the Summary information performs the term analysis for the
faculty member. If no workload rules rule code has been established or no workload rules
are created, then no analysis can be performed. The term analysis will display the rule
associated with the workload rule code and indicate whether the faculty member is in an
underload or overload situation. A
U is displayed next to the workload rule code value for
underloads, an
O is displayed for overloads.
For example, a faculty member with workload rule code 000001 should teach between 12
and 15 credits. The faculty member is only assigned to 10 for the term so the form would
display as follows:
A message is displayed on the bottom of the form to indicate that the workload rules have
not been satisfied by the instructor.
Faculty Contract Analysis
The Faculty Contract Analysis Form (SIACONA) is used to perform the contract analysis
for the faculty member on a term basis and on an overall contract basis. This process
works in the same fashion as the term analysis which is performed on the Faculty
Assignment Form (SIAASGN). Contract analysis will summarize the terms associated with
the contract in the first section on the form. For example, if Fall and Spring are both
included in the contract, then the instructional workload for both Fall and Spring will be
summarized into one total. The Contract Term Analysis information will perform the
analysis and display an overload or underload indicator for those rules which are not
satisfied by the instructor's assignments. Only those assignments associated with a
contract will be used in the contract analysis.
Multiple Contracts
An instructor may be assigned to multiple contracts via the Faculty Contract information
on the Faculty/Advisor Information Form (SIAINST). This allows for an instructor to be
associated with an unlimited number of contracts within the effective terms specified. An
example where this may be useful is for a full-time professor who also has a secondary
contract to teach an evening course in the Continuing Education Division, which should
not impact his full-time contract. Each assignment, either instructional or non-instructional,
can now be associated with a specific contract code.
The Default Indicator must be specified when creating contract information. This default
contract code will be used when assignments are created on either the Schedule Form
(SSASECT) or on the Faculty Assignment Form (SIAASGN).
Faculty load analysis examines only the assignments associated with a contract when
performing contract analysis.
Low High
Credit
Hours
12.00 15.00U

400
Banner Student User Guide | Faculty Load
Two methods of contract analysis exist, contract term analysis and contract analysis.
Contract term analysis is supported using the Faculty Contract Term Rules Form
(SIAFLCT). This rules form allows for rules to be established by term and contract type.
There are two sections on the Faculty Contract Analysis Form (SIACONA), Contract Term
Workload and Contract Term Analysis, which display the contract term and workload rules,
and perform the contract term analysis.
An example where contract term analysis might be used is when a faculty member's
contract spans two terms, and the Dean needs analysis on the instructor's workload for a
single term within the contract.
Automatic PIN Creation
PINS can be added to Banner manually for an individual, by batch process using a
population selection, or automatically by database trigger.
You have the option to automatically create PINs when a general student record or faculty
record is inserted. Triggers on the SGBSTDN and SIBINST tables will create PINs when a
student or faculty record is inserted into either table, if the triggers are set up to do so. This
automatic creation allows the PIN to be available for use as soon as the person becomes
eligible to access the self-service processing. The triggers will fire when the record is
inserted, based upon the institution’s PIN preferences and table selections on the PIN
Preference Form (GUAPPRF).
Please note that performance issues may arise when the PIN triggers are used. You may
need to turn this functionality off if batch processing is involved. Student and faculty
records are generally processed individually and should not be affected. However, if you
assign decisions which create student records using the using the Admit Decision Calc
Report (SARBDSN), you may want to disable automatic PIN creation during batch
decision runs.
Please refer to the Banner General User Guide for more information on PIN functionality
and the PIN Preference Form (GUAPPRF).
Automated Faculty Load and Compensation Processing
This processing automatically calculates faculty load payroll compensation in Banner
Human Resources, based on faculty course load data from Banner Student. The matching
faculty assignment is then automatically created in Banner Human Resources in the
Faculty Load and Compensation module.
Please refer to the Banner Human Resources User Guide for more information.
Overview
Forms and reports in Banner Human Resources allow a faculty member’s assigned
workload (course assignments and non-instructional assignments in Banner Student) to
be used to automatically generate a compensation/job assignment record in Banner
Human Resources.
401
Banner Student User Guide | Faculty Load
• The Faculty/Advisor Information Form (SIAINST) and the Faculty Assignment Form
(SIAASGN) provide the necessary data. SIAASGN uses the position and suffix numbers
for the faculty assignment.
• The Faculty Non-Instructional Type Validation Form (STVNIST) is used to maintain
faculty non-instructional type codes.
• The Course Labor Distribution Form (SCACLBD and the Schedule Labor Distribution
Form (SSACLBD) are used to maintain labor distribution data for adjunct faculty
assignments.
You can calculate faculty compensation based on institution-specific rules. The calculation
results populate the employee's job record, and payment is made during the payroll
process. Banner Human Resources provides the rules and security controls needed to
compile the core compensation records. Data is also used in the Faculty Compensation
area of Employee Self-Service.
Note: The Banner Human Resources Faculty Load and Compensation
module does not affect the Banner Student Faculty Load module and is
not dependent on the Banner Student faculty workload rules.
Building Job Labor Distribution Data for Courses
The Course Labor Distribution Form (SCACLBD is used to build and maintain job labor
distribution data at the course catalog level for adjunct faculty assignments. This
information can be used for scheduling as well on the Schedule Labor Distribution Form
(SSACLBD). (Labor distribution data is entered in Banner Human Resources.) The use of
labor distribution information is optional. If this information is not entered on SCACLBD,
the FOAPAL (fund, organization, account, program, activity, location) distribution for the
associated position is used. The data on SCACLBD is used to override the budget factors
associated with the funding of a specific position in Banner Human Resources that has
been assigned to the employee on SIAASGN.
The form displays one of two windows, one if Banner Finance is installed and the other if
Banner Finance is not installed. When Banner Finance is installed, FOAPAL data is
validated by part-of-term or the effective term end date on STVTERM if no part-of-term
exists. This ensures that the FOAPAL elements are valid until that date. If Banner Finance
is not installed, the External Account Code field must be entered, and no validation takes
place. You can use the Maintenance button to copy and end the labor distribution
information by term.
Note: Banner Finance requires a timestamp. A midnight timestamp will
be associated with the end date when the date is submitted for validation.
You can use the Options Menu to access SIAASGN and view faculty assignments, to
access SSASECT and view term section details, and to access SSACLBD and view
schedule labor distribution information.

402
Banner Student User Guide | Faculty Load
Building Job Labor Distribution Data for Sections
The Schedule Labor Distribution Form (SSACLBD) is used to build and maintain job labor
distribution data at the section level (CRN) for adjunct faculty assignments. (Labor
distribution data is entered in Banner Human Resources.) The use of labor distribution
information is optional. If this information is not entered on SSACLBD, the FOAPAL (fund,
organization, account, program, activity, location) distribution for the associated position is
used. The data on SSACLBD is used to override the budget factors associated with the
funding of a specific position in Banner Human Resources that has been assigned to the
employee on SIAASGN.
Note: The class section must first have been created using the Schedule
Form (SSASECT), before using the Schedule Labor Distribution Form
(SSACLBD).
Schedule labor distribution data defaults into the Class Schedule module (SSACLBD)
based on the course labor distribution information defined in the Course Catalog module
(SCACLBD). The defaulted information can be overridden to create section specific labor
distribution records. Overrides take place when FOAPAL information exists on SSACLBD,
and the Use Schedule Labor Distributions checkbox is checked on the Faculty Load
Contract Type Control Rules Form (PTRFLCT) in Banner Human Resources. When this
checkbox is checked to use overrides with course-based faculty, a unit method is used to
determine the appropriate FOAPAL distribution. However, unit method processing is not
advised for job labor distribution overrides. FOAPAL overrides do not apply to non-
instructional assignments.
Processing takes place as follows:
When the Use Schedule Labor Distributions checkbox is checked (
Y), the Faculty Load
Extract Process (PEPFLAC) uses the FOAPAL on SSACLBD for the CRN if it exists.
• If the FOAPAL for the CRN does not exist, the process uses the FOAPAL from the job.
• If the FOAPAL from the job does not exist, the process uses the FOAPAL from the
position.
• Values are defaulted to the process.
When the Use Schedule Labor Distributions checkbox is unchecked (N), the Faculty
Load Extract Process (PEPFLAC) uses the FOAPAL from the job.
• If the FOAPAL from the job does not exist, the process uses the FOAPAL from the
position.
• Values are defaulted to the process.
When Banner Finance is not installed, the positions are funded through external account
codes.
The form displays one of two windows, one if Banner Finance is installed and the other if
Banner Finance is not installed. When Banner Finance is installed, FOAPAL data is
validated by part-of-term or the effective term end date on STVTERM if no part-of-term
exists. This ensures that the FOAPAL elements are valid until that date. If Banner Finance
is not installed, the External Account Code field must be entered, and no validation takes
place.

403
Banner Student User Guide | Faculty Load
Note: Banner Finance requires a timestamp. A midnight timestamp will
be associated with the end date when the date is submitted for validation.
You can use the Options Menu to access SIAASGN and view faculty assignments, to
access SSASECT and view term section details, and to access SSACLBD and view
course labor distribution information.
Tracking Compensation for Faculty Assignment Records
Instructional and non-instructional data elements on the Faculty Assignment Form
(SIAASGN) are used with the Banner Human Resources processing to build the faculty
assignment record and track compensation based on term start and end dates.
Note: Faculty members are created on the Faculty Advisor Information
Form (SIAINST) and must have the Status set to
AC (Active) and the
Faculty (Indicator) checked to be associated with assignments on
SIAASGN.
The instructional elements used by the automated faculty load and compensation
processing are: CRN, Subject, Course, Section, Session Credit, Workload, Override
Workload, Calculated Workload, Weekly Contact, Contract Type, Position Number,
and Position Number Suffix.
The non-instructional elements used are: (Non-Instructional) Type, Workload, Weekly
Contact, College, Department, Contract (Type), Position Number, and Position
Suffix.
The Position Number field is used to enter a position number for the faculty assignment.
It is used to tie the faculty member's assignment to a position defined in the Banner
Human Resources system. This is used when Position Control is installed.
• Use a List function to access the Position List Form (NBQPOSN) and view a list of all
positions for the organization in position number order. You can query to narrow the
results.
• Use a Count Query Hits function to access the Employee Job Inquiry Form (NBIJLST)
and view all jobs that are in effect as of the query date in the Key Block. You can query
to narrow the results.
When Position Control is not installed, the Count Query Hits and List functions are not
available.
The Position Number Suffix field is used to display a position number suffix from Banner
Human Resources. This is used when Position Control is installed.
Note: Banner Student users will need access to the NBQPOSN and
NBIJLST forms in Position Control to use the position number data.
These forms do not invoke Banner Human Resources Security. You can
evaluate who at your institution should be able to access these forms.

404
Banner Student User Guide | Faculty Load
The Compensation Extracted checkbox is enabled when the assignment has been
extracted into the Faculty Compensation module or has been applied to Banner Human
Resources from that module. This field cannot be changed. This checkbox is dynamically
set when Banner Human Resources is installed, where the faculty assignment exists in
the PERFASG table (instructional assignment) and the PERFNIS table (non-instructional
assignment).
The Compensation Applied checkbox is enabled when the assignment has been
extracted into the Faculty Compensation module or has been applied to Banner Human
Resources from that module. This field cannot be changed.This checkbox is dynamically
set when Banner Human Resources is installed, where the position and suffix for the
existing, active assignment have been applied to the NBRJOBS table and then mapped
from SIRASGN and SIRNIST to PERFASG and PERFNIS.
Note: When the Compensation Extracted checkbox is checked and the
Compensation Applied checkbox is unchecked, you can continue to
make adjustments to the faculty member's assignment and components.
Records will need to be unlocked in the Faculty Compensation module
before the changes will be apparent in Banner Employee Self-Service.
When the Compensation Applied checkbox is checked, you can
continue to make changes in Banner Student. However, manual
adjustments must be made to the faculty member’s job assignment in
Banner Human Resources to ensure that compensation is correct.
SIAASGN checks if the job assignment exists (NBRJOBS), when Banner Human
Resources is installed. It also checks if the position number is valid and active, when the
job assignment does not exist in Banner Human Resources. This will allow the new job
assignment to be created in Banner Human Resources. Prior invalid data in SIRASGN
displays a message based on the setting of the Position Validation on Faculty
Assignments checkbox on the Installation Rules Form (PTRINST). When the checkbox is
checked (
Y), an error is displayed. When the checkbox is unchecked (N), a warning
message is displayed.
When a position number is entered for a course assignment and the record is saved, the
following validation occurs:
1. The system checks that the position number exists in Position Control.
2. The system checks that the position has an active status.
3. If the position number does not exist, an error message is displayed.
4. If the position is not active, an error message is displayed.
5. If the position and suffix are selected, but the ID is for an employee, a warning
message is displayed.
Note: Use the Position Validation on Faculty Assignments checkbox
on the Installation Rules Form (PTRINST) to allow validation of Position
Control numbers to take place. This indicator must be checked (
Y) before
the validation can occur. If you wish to use the warning message for
invalid position numbers, leave the indicator unchecked (
N).

405
Banner Student User Guide | Faculty Load
Using Position Numbers with Faculty Compensation
Position numbering and suffix numbering assignments for instructional and non-
instructional items are used in the final compensation record that is passed to Banner
Human Resources. Compensation can be for full-time, salaried faculty members and for
part-time, course-based faculty members. Here are some recommended uses of position
numbers and suffixes.
Full-Time Salaried Faculty
Typically, a full-time faculty member has one job assignment and is compensated for a
number of assigned activities. Overload payments can occur when the faculty member is
assigned more than a full load. In this situation, a separate position number is assigned in
the Faculty Compensation module to designate the overload payment. If the same
position number and suffix are used for the overload payment, the overload compensation
is added to the regular assignment pay under one position, potentially making
identification of these payments difficult and also causing benefit costs to be incorrectly
calculated against these additional dollars. It is recommended that one position number
and one suffix be used for the regular contact, and a unique position number and suffix be
used for the overload.
Part-Time Course-Based Faculty
Conditions can exist for part-time faculty members that affect how position numbers and
suffixes are assigned and paid. A faculty member may have some or all of the following
payment conditions:
• a three week course,
• a course that runs for the entire length of the term,
• an online course that is associated with a two month time span,
• a non-instructional assignment that is to charged to another area, or
• a course that runs for a part-of-term.
If these payment conditions exist within Banner Student assignments for a faculty
member, each of these assignments must be associated with a unique position number/
suffix combination. This is because the Faculty Compensation module is creating job
assignments and calculating when they should be paid. In the above list of conditions,
each assignment is paid at a different time and has different start and end dates on the
faculty member’s job assignments.
If a faculty member's assignments are only operating for one condition, such as two
courses running for the entire length of the term that are charged to the same department,
the same position number/suffix combination can be used. This is because the payments
are added together and are paid and charged for the entire length of the term.
Warning! When the same position number and suffix combination is used
for each faculty assignment in Banner Student, it can result in
underpayment or overpayment in the Faculty Compensation module of
Banner Human Resources.

406
Banner Student User Guide | Faculty Load
Rolling Distribution Information
The Roll Labor Distribution parameter in the Term Roll Report (SSRROLL) is used to roll
the labor distribution FOAPAL information from SSACLBD/SSRCLBD for the section/CRN
to the new term. This FOAPAL is validated using the end date of the part-of-term for the
CRN. If no part-of-term exists, the FOAPAL is validated using the end date from
STVTERM, to ensure that the FOAPAL elements are valid until that date.
Note: Banner Finance requires a timestamp. A midnight timestamp will
be associated with the end date when the date is submitted for validation.
If all elements are successfully rolled, the process will display the Section Rolled message
in the output. If any element of the FOAPAL is invalid, an error message will be printed on
the output file, and the entire FOAPAL string will not be rolled. Other details associated
with the CRN, such as instructors, links, fees, attributes, and so on, will still be rolled. If an
error is encountered on a class with split distributions, none of the FOAPAL records will be
rolled, because this could cause an unbalanced labor distribution.
The following errors may be printed on the report output for invalid FOAPAL elements.
Message Cause Action
*ERROR* Chart of Accounts is
inactive. Schedule Job Labor
Distribution not rolled.
The Chart of Accounts Status
Indicator for this Chart of
Accounts code is not active.
Enter an active Chart of Accounts
code on the Schedule Labor
Distribution Form (SSACLBD).
*ERROR* Chart of Accounts code
is terminated. Schedule Job Labor
Distribution not rolled.
The Chart of Accounts is no longer
in effect in Banner Finance.
Enter an active Chart of Accounts
code that has not passed its
termination date on the Chart of
Accounts Code Maintenance Form
(FTMCOAS).
*ERROR* Account Index is
inactive. Schedule Job Labor
Distribution not rolled.
The Account Index Status
Indicator for this account index
code is not active.
Enter an active account index on
the Schedule Labor Distribution
Form (SSACLBD).
*ERROR* Account Index is
terminated. Schedule Job Labor
Distribution not rolled.
This account index is no longer in
effect in Banner Finance.
Enter an account index that has
not passed its termination date on
the Account Index Code
Maintenance Form (FTMACCI).
*ERROR* Fund is inactive.
Schedule Job Labor Distribution
not rolled.
The Fund Status Indicator for
this fund code is not active.
Enter an active fund code on the
Schedule Labor Distribution Form
(SSACLBD).
*ERROR* Fund is terminated.
Schedule Job Labor Distribution
not rolled.
This fund is no longer in effect in
Banner Finance.
Enter a fund that has not passed
its termination date on the Fund
Code Maintenance Form
(FTMFUND).
*ERROR* Fund is not defined as
data entry. Schedule Job Labor
Distribution not rolled.
This fund is not defined to be used
for data entry in Banner Finance.
Enter a fund defined for data entry
in Banner Finance.

407
Banner Student User Guide | Faculty Load
*ERROR* Organization is inactive.
Schedule Job Labor Distribution
not rolled.
The Organization Status
Indicator for this organization
code is not active.
Enter an active organization code
on the Schedule Labor Distribution
Form (SSACLBD).
*ERROR* Organization is
terminated. Schedule Job Labor
Distribution not rolled.
This organization is no longer in
effect in Banner Finance.
Enter an organization that has not
passed its termination date on the
Organization Code Maintenance
Form (FTMORGN).
*ERROR* Organization is not
defined as data entry. Schedule
Job Labor Distribution not rolled.
This organization is not defined to
be used for data entry in Banner
Finance.
Enter an organization defined for
data entry in Banner Finance.
*ERROR* Account is inactive.
Schedule Job Labor Distribution
not rolled.
The Account Status Indicator for
this account code is not active.
Enter an active account code on
the Schedule Labor Distribution
Form (SSACLBD).
*ERROR* Account XXXXXX is not
a labor account. Schedule Job
Labor Distribution not rolled.
The account type is not of a labor
account and/or the Internal
Account Type Code is not set to
60 in Banner Finance.
Enter an account type code with
an Internal Account Type Code
set to
60 in Banner Finance.
*ERROR* Account is terminated.
Schedule Job Labor Distribution
not rolled.
This account is no longer in effect
in Banner Finance.
Enter an account that has not
passed its termination date on the
Account Code Maintenance Form
(FTMACCT).
*ERROR* Account is not defined
as data entry. Schedule Job Labor
Distribution not rolled.
This account is not defined to be
used for data entry in Banner
Finance.
Enter an account defined for data
entry in Banner Finance.
*ERROR* Program is inactive.
Schedule Job Labor Distribution
not rolled.
The Program Status Indicator for
this account code is not active.
Enter an active program code on
the Schedule Labor Distribution
Form (SSACLBD).
*ERROR* Program is terminated.
Schedule Job Labor Distribution
not rolled.
This program is no longer in effect
in Banner Finance.
Enter a program that has not
passed its termination date on the
Program Code Maintenance Form
(FTMPROG).
*ERROR* Program is not defined
as data entry. Schedule Job Labor
Distribution not rolled.
This program is not defined to be
used for data entry in Banner
Finance.
Enter a program defined for data
entry in Banner Finance.
*ERROR* Activity is inactive.
Schedule Job Labor Distribution
not rolled.
The Activity Status Indicator for
this activity code is not active.
Enter an active activity code on the
Schedule Labor Distribution Form
(SSACLBD).
*ERROR* Activity is terminated.
Schedule Job Labor Distribution
not rolled.
This activity is no longer in effect in
Banner Finance.
Enter an activity that has not
passed its termination date of the
Activity Code Maintenance Form
(FTMACTV).
Message Cause Action
408
Banner Student User Guide | Faculty Load
Faculty Security Menu and Term Availability
Faculty members and advisors can be restricted by date/term from accessing information
through the Faculty and Advisor main menu in Self-Service. Date ranges can be set up to
control access to the menu based on the term. Faculty members and advisors who are
restricted from access to the main menu will see a message that access is not allowed.
The terms displayed to faculty members and advisors in the Select a Term pulldown list in
Self-Service can also be restricted by date/term. Date ranges can be set up to control
which terms are displayed in the list. Term information for a faculty member is compared to
the active records on SIAINST. However, the Status Date field on SIAINST is not used in
this processing.
Set Up SOATERM
Use the Faculty and Advisor Access Dates section of the Part of Term and Web
Registration Controls window on SOATERM to set up the date ranges in Self-Service for
main menu access and term display in the pulldown list. The term date rules use start and
end dates. When no faculty member or advisor access dates have been set up for a term,
the current functionality will be used. Rules can be created on a term-by-term basis or for
all terms on SOATERM.
Faculty members and advisors will have access to the Banner Faculty and Advisor Self-
Service main menu when one of two conditions exists: when the current date does not fall
within any date range for any term and the person has an active status for any term on the
Faculty/Advisor Information Form (SIAINST), and/or when the current date does fall within
a date range and the person has an active status for the term on SIAINST.
All terms are displayed in the Self-Service Select a Term pulldown list when no date
ranges have been defined on SOATERM, the person is active on SIAINST for the term,
and the Faculty and Advisor Controls have been set on SOATERM.
*ERROR* Location is inactive.
Schedule Job Labor Distribution
not rolled.
The Location Status Indicator for
this location code is not active.
Enter an active location code on
the Schedule Labor Distribution
Form (SSACLBD).
*ERROR* Location is terminated.
Schedule Job Labor Distribution
not rolled.
This location is no longer in effect
in Banner Finance.
Enter a location that has not
passed its termination date on the
Location Code Maintenance Form
(FTMLOCN).
*ERROR* Invalid Project code.
Schedule Job Labor Distribution
not rolled.
An invalid project code has been
entered in Banner Finance.
Enter a valid project code for this
Chart of Accounts in Banner
Finance.
*ERROR* Invalid Cost Type XX.
Schedule Job Labor Distribution
not rolled.
An invalid cost type code has been
entered in Banner Finance.
Enter a valid cost type code for this
Chart of Accounts in Banner
Finance.
Message Cause Action

409
Banner Student User Guide | Faculty Load
When a date range is set up, the Self-Service main menu for faculty members and
advisors will only be displayed for terms where the current date falls within the defined
date range. A term is displayed in the term selection list when no dates exist for a term,
and the faculty member has an active status. A term will not be displayed when the current
date does not fall into a date range set up for access or when the faculty member is
inactive for the term.
Unique term records can exist, such as:
But date ranges cannot overlap within the term for the menu access or for the term
selection list.
Processing Examples
Here are some examples of how menu access and term selection can be set up on
SOATERM. Faculty member FACMEMBER1 has SIAINST records for the terms shown
below.
Example 1:
SOATERM has dates for:
FACMEMBER1 logs into secure Self-Service on March 31, 2008.
• He has access to the menu, because he is active for term 200443, which is accessible
on that date for term display.
• He sees term 200443 in the term selection list, because the current date falls within the
range.
FACMEMBER1 logs into secure Self-Service on April 30, 2009.
• He does not have access to the menu, because April 30, 2009, falls within the date
range for term 200620, and he is not active in term 200620.
• He does not see term 200443 in the term selection list, because the current date does
not fall within the range for term display.
Terms that are defined as greater than 200443 but less than 200520 will be displayed in
the term selection list, because no dates have been defined for those terms.
Term Start End Menu Term Selection
200443 01-JAN-2008 30-JUN-2008 Checked Unchecked
200443 01-AUG-2008 31-AUG-2008 Unchecked Checked
Term SIAINST Start End Menu Term Selection
200443 Active 01-JAN-2008 30-JUN-2008 Checked Checked
200620 Inactive 01-JAN-2009 30-JUN-2009 Checked Checked

410
Banner Student User Guide | Faculty Load
Example 2:
SOATERM has dates for:
FACMEMBER1 logs into secure Self-Service on March 31, 2008.
• He has access to the menu, because he is active for term 200443, which is accessible
on that date.
• He sees term 200443 in the term selection list, because the current date falls within the
range for term display.
FACMEMBER1 logs into secure Self-Service on April 30, 2009.
• He has access to the menu, because April 30, 2009, does not fall within any date range
for which menu access is checked.
• He does not see term 200443 in the term selection list, because the current date does
not fall within the date range for term 200443.
Note: For a term, if a current date is not defined within any date range
with the Menu checkbox checked, the faculty member will have access to
the main menu, if he/she has an active SIAINST record. If the faculty
member does not have an active SIAINST record, no menu access is
allowed.
Example 3:
SOATERM has dates for:
FACMEMBER1 logs into secure Self-Service on March 31, 2008.
• He has access to the menu, because there are no dates defined for the current date.
• He sees term 200443 in the term selection list, because the current date falls within the
range for term display.
FACMEMBER1 logs into secure Self-Service on April 30, 2009.
• He does not see term 200443 in the term selection list, because the current date does
not fall within the range for term display.
Term SIAINST Start End Menu Term Selection
200443 Active 01-JAN-2008 30-JUN-2008 Checked Checked
200620 Inactive 01-JAN-2009 30-JUN-2009 Unchecked Checked
Term SIAINST Start End Menu Term Selection
200443 Active 01-JAN-2008 30-JUN-2008 Unchecked Checked
411
Banner Student User Guide | Faculty Load
• He has access to the menu, because there are no dates defined for the term.
Example 4:
SOATERM has no dates defined:
FACMEMBER1 logs into secure Self-Service.
• He has access to the menu, because there are no dates defined for the current date in
any term.
• He has access to all active terms in the term selection list, because no restricted dates
have been defined in any term.
Example 5:
SOATERM has dates for:
There is an overlap in the dates.
FACMEMBER1 logs into secure Self-Service on March 31, 2008.
• He has access to the menu, because he is active for term 200443, which is accessible
on that date.
• He sees term 200443 in the term selection list, because the current date falls within the
range for term display.
FACMEMBER1 logs into secure Self-Service on April 30, 2009.
• He has access to the menu, because April 30, 2009, falls within the date range for term
200443, and he is active in term 200443.
• He sees term 200443 and term 200620 in the term selection list, because the current
date falls within the range for term display.
Note: Faculty members who are inactive in term 200620 have access to
the menu, because the current date falls with the menu date ranges for
term 200443, when the faculty members were active. However, they do
not see term 200620 in the term selection list.
Faculty Security Scripts
Three scripts are used to create reports that assist with setup, testing, and
troubleshooting. The scripts are not run from job submission. They are executed from the
command line by developers or advanced functional users.
Term SIAINST Start End Menu Term Selection
200443 Active 01-JAN-2008 30-JUN-2009 Checked Checked
200620 Active 01-JAN-2009 30-JUN-2009 Checked Checked

412
Banner Student User Guide | Faculty Load
srsormenu.sql: Menu Report
This script creates a report for a specific date range and displays faculty members and
advisors who can access the main menu in Banner Faculty and Advisors Self-Service for
that date range.
The script uses two parameters. Enter the start and end dates for the period for which you
want to run the report.
• start_date_dd_mon_yyyy (in format DD-MON-YYYY)
• end_date_dd_mon_yyyy (in format DD-MON-YYYY)
For example:
On August 19 and 20, 2009, only faculty members active in terms 099211 and 100001 will
have access to the Faculty and Advisors menu in Banner Self-Service. (See lines 1 and 2
of the report.)
On August 21 and 22, 2009, any faculty members who are active in any term will have
access to the Faculty and Advisors menu in Banner Self-Service, as no rules have been
set up in SOATERM for these dates.
srsorterm.sql: Term Selection Report
This script creates a report for a specific date range and provides a list of terms that will be
displayed in the Banner Faculty and Advisors Self-Service term selection list for that date
range. If a term is not included in the report, that term will not be available for selection in
Self-Service for that date range.
The script uses two parameters. Enter the start and end dates for the period for which you
want to run the report.
• start_date_dd_mon_yyyy (in format DD-MON-YYYY)
• end_date_dd_mon_yyyy (in format DD-MON-YYYY)
srsorftrm.sql: Summary Report
This script creates a report of the records stored in SORFTRM. These records are ordered
by start date.
The script uses one parameter.
menu_or_term (
M for menu, T for term, B for Both)
Faculty and Advisor Security Dates - Menu Access(SORFTRM) Page 1
Enter value for start_date_dd_mon_yyyy: 19-AUG-2009
Enter value for end_date_dd_mon_yyyy: 31-AUG-2009
Start Date End Date Term
-------------------- -------------------- ----------------------------------------
19-AUG-09 20-AUG-09 099211
19-AUG-09 20-AUG-09 100001
21-AUG-09 22-AUG-09 No Menu Rule for Dates
23-AUG-09 29-AUG-09 200510
30-AUG-09 31-AUG-09 No Menu Rule for Dates

413
Banner Student User Guide | Faculty Load
Enter M to capture all menu records (SORFTRM_MENU_IND is Y). Enter T to capture
term records (
SORFTRM_TERM_IND is Y). Enter B to capture all SORFTRM records.
Faculty Security Process Rules
This section discusses faculty member and advisor process rules used in Banner Faculty
and Advisor Self-Service. Process rules are used to allow faculty member or advisor
access to student information by process or role in Self-Service. The process codes used
for the rules come from the Process Control Code Validation Form (STVPROC). The
Faculty/Advisor Process Rules Form (SOAFACS) is used to set up the process rules for
faculty members and advisors. The rules on STVPROC control access to the following
processes:
• accessing student schedules (DISPLAYSCHEDULE)
• accessing student test scores (DISPLAYTESTS)
• accessing student grades (DISPLAYGRADES)
• entering student grades (ENTERGRADES)
• accessing student holds (DISPLAYHOLDS)
• accessing student transcripts (TRANSCRIPT)
• accessing student compliance information (COMPLIANCE)
This section discusses the following topics:
• Obsolete GTVSDAX Rules
• Conversion from GTVSDAX to SOAFACS
• Modified GTVSDAX Rules and Corresponding Self-Service Pages
• Faculty Member and Advisor Access to Self-Service
• All Access to Self-Service
• Check Order Functionality
• Enforce Check Order Functionality
Obsolete GTVSDAX Rules
Rules on GTVSDAX used with security processing have been made obsolete. The
associated security functionality is maintained on SOAFACS. The affected rules have a
modified description of Obsolete, Use SOAFACS form, or for the
CHECKORDER rule,
Obsolete, Use STVPROC form. A script is delivered to inactivate these rules.
The following rules used with faculty and advisor access to processing in Self-Service are
obsolete. Their descriptions refer to the form used for security processing.

414
Banner Student User Guide | Faculty Load
Modified GTVSDAX Rules
The ALLADVR and ALLFAC rules are no longer used for faculty and advisor security
purposes. The associated security functionality has been moved to SOAFACS. However,
these two rules still drive Self-Service display capabilities, and as such they will not be
made obsolete. The rule descriptions have been updated in GTVSDAX to more accurately
describe their current functionality.
The security functionality associated with the
ADVRTYPE and FACFATT rules has been
moved to SOAFACS. However, the rules are still used on GTVSDAX to determine whether
to use the SOAFAPC rules for attribute/type checking with regard to the display of the
Summary Faculty Wait List, Detail Faculty Wait List, and Detail Class List pages in Self-
Service.
Note: Refer to the “Modified GTVSDAX Rules and Corresponding Self-
Service Pages” topic for current GTVSDAX functionality for the
ADVRTYPE and FACFATT rules with regard to these Self-Service ages.
The security functionality associated with the
PRIMINSTR rule has been moved to
SOAFACS. However, this GTVSDAX rule must exist in order to display the Summary
Faculty Wait List, Detail Faculty Wait List, and Detail Class list pages in Self-Service.
Note: Refer to the “Modified GTVSDAX Rules and Corresponding Self-
Service Pages” topic for current GTVSDAX functionality for the
PRIMINSTR rule with regard to these Self-Service pages.
External
Code Internal Code
Internal
Code Seq
Number
Internal Code
Group Description
Activity
Date
Y, N ADVRPIN N/A FACWEB Old - Is Advisor PIN
Control On?
Updated - Obsolete
8.3, Use SOAFACS
form
Sysdate
A, F CHECKORDER N/A FACWEB Old - Access Order?
Updated - Obsolete
8.3, Use STVPROC
form
Sysdate
Y, N FACPIN N/A FACWEB Old - Is Faculty PIN
Control On?
Updated - Obsolete
8.3, Use SOAFACS
form
Sysdate

415
Banner Student User Guide | Faculty Load
Conversion from GTVSDAX to SOAFACS
Faculty and advisor records that were processed using security rules on the Crosswalk
Validation Form (GTVSDAX) will be processed through the rules in the SOAFACS form
and SORFACS table. During the upgrade to this functionality, the values for these
GTVSDAX rules will be translated from GTVSDAX and populated in SORFACS using a
delivered conversion script.
The rules used on SOAFACS are delivered as system-required. With the exception of
ENTERGRADES, each system-required process code from STVPROC has two associated
rules on SOAFACS, one for faculty and one for advisor. The
ENTERGRADES process is
available for faculty only. The indicators (checkboxes) on the form will be updated based
on existing GTVSDAX rules at your site.
Note: It will be important to review your conversion, test these indicators
when your upgrade has been performed, and confirm that faculty
External
Code Internal Code
Internal
Code Seq
Number
Internal Code
Group Description
Activity
Date
Y, N ADVRTYPE N/A FACWEB Old - Advisor Type
Control On?
Updated - SOAFAPC
Attribute/Type Check
Sysdate
Y, N ALLADVR N/A FACWEB Old - All Access for
Advisors?
Updated - Display
‘All’ in Name Search
Sysdate
Y, N ALLFAC N/A FACWEB Old - All Access for
Faculty?
Updated - Display
‘All’ in Name Search
Sysdate
Y, N FACFATT N/A FACWEB Old - Faculty Attribute
Control On?
Updated - Updated -
SOAFAPC Attribute/
Type Check
Sysdate
Y, N PRIMINSTR N/A FACWEB Old - Primary
Instructor Check On
Updated - Primary
Instructor Checking
Sysdate

416
Banner Student User Guide | Faculty Load
members and/or advisors do not have too much or too little access to
student information.
Here is a list of the rules used on SOAFACS.
Rule/Indicator Description
Process Available on
Self-Service
Checkbox used to indicate whether the process rule is active
for the faculty member or advisor in Self-Service.
When this indicator is checked, and faculty members or
advisors meet the process rule, they have access to the
process.
When this indicator is unchecked, faculty members and
advisors cannot access the process, but they can see the link
to the process. A message is displayed indicating they do not
have access to the process.
All Access Checkbox used to indicate that no security is invoked for the
process, and faculty members and advisors are able to view
all available student information in Self-Service.
Once this indicator has been checked, you cannot activate
the settings for the other indicators except for the Process
Available on Self-Service indicator.
The All Access indicator must be unchecked in order to set
the other indicators to checked or unchecked and activate
those settings for the rule.
PIN Control Checkbox used to indicate whether the student’s PIN needs
to be entered to access the process rule in Self-Service.
When checked, the PIN is required.
The PIN Control checkbox is not available for the
DISPLAYGRADES or ENTERGRADES process rules.
Relationship - Faculty
- or -
Relationship - Advisor
Checkbox used to require that the faculty member or advisor
must have a teaching or advising relationship with the
student, in order to access the process rule in Self-Service.
For example, when a faculty member is teaching a section in
which the student is enrolled, and the Web page is displayed
based on the student’s ID, that faculty member can access
the process.
Or, when a faculty member is assigned to teach a section,
and the Web page is displayed based on the CRN, that
faculty member can access the process.

417
Banner Student User Guide | Faculty Load
Here is a comparison of the GTVSDAX rules and the indicators that perform the same
processing.
Your existing GTVSDAX rules will be converted using the delivered script, which will
evaluate your rule settings and convert them to SOAFACS. You can then set the values
and make them unique to faculty members or advisors for each process.
Here is a crosswalk that outlines each converted GTVSDAX rule, the SOAFACS process
associated with the GTVSDAX rule, and the indicator that will drive access to that
process. Seven unique process rules are available on SOAFACS. With the exception of
ENTERGRADES, which is available for faculty only, each rule can be assigned to faculty
members and/or advisors, which provides a total of 13 system-required rules that can be
used on SOAFACS.
Primary - Faculty
- or -
Primary - Advisor
Checkbox used to require that the faculty member or advisor
must be the primary instructor or primary advisor for the
student in order to access the process rule in Self-Service.
The faculty member must be the primary instructor on
SSASECT to access the process.
The advisor must be the primary advisor on SGAADVR to
access the process.
Attribute Type
Checking - Faculty
- or -
Attribute Type
Checking - Advisor
Checkbox used to require that the faculty attribute type or
advisor type must be checked in order to access the process
rule in Self-Service.
For faculty members, the system checks the attribute on
SIAINST and then cross-references SOAFAPC.
For advisors, the system checks the advisor type on
SGAADVR and then cross-references SOAFAPC.
SOAFACS Indicator GTVSDAX Rule GTVSDAX Rule Status
PIN Control ADVRPIN Obsolete
Attribute Type Checking ADVRTYPE Menu option dependent
Attribute Type Checking FACFATT Menu option dependent
PIN Control FACPIN Obsolete
Primary PRIMINSTR Menu option dependent
All Access ALLFAC Used for display
All Access ALLADVR Used for display
N/A CHECKORDER Moved to STVPROC,
Check Order field
Rule/Indicator Description

418
Banner Student User Guide | Faculty Load
The DISPLAYSCHEDULE rule is delivered with the All Access indicator checked (Y), as
this functionality was provided previously. It is important to test this functionality for faculty
members and advisors to be certain the appropriate access is allowed.
The
CHECKORDER rule on GTVSDAX has been replaced with functionality on STVPROC.
Since the GTVSDAX rule is generic, your setting for this rule at the time of the upgrade will
be converted to all seven system-required processes on STVPROC. Those STVPROC
settings can then be customized based on the process.
GTVSDAX Rule Process SOAFACS Indicator
ALLFAC all seven processes All Access - faculty record
ALLADVR
all except
ENTERGRADES
ENTERGRADES
not
available for advisors
All Access - advisor
record
ADVRPIN
all except
ENTERGRADES,
DISPLAYGRADES,
DISPLAYSCHEDULE
ENTERGRADES
not
available for advisors
PIN Control - advisor
record
FACPIN
all except
ENTERGRADES,
DISPLAYGRADES,
DISPLAYSCHEDULE
PIN Control - faculty
record
ADVRTYPE
all except
ENTERGRADES,
DISPLAYSCHEDULE
ENTERGRADES
not
available for advisors
Attribute Type Checking -
advisor record
FACFATT all except
DISPLAYSCHEDULE
Attribute Type Checking -
faculty record
PRIMINSTR all except
DISPLAYSCHEDULE for
faculty
all except
ENTERGRADES,
DISPLAYSCHEDULE for
advisors
Primary - both faculty and
advisor

419
Banner Student User Guide | Faculty Load
Modified GTVSDAX Rules and Corresponding Self-Service Pages
The ADVRTYPE, FACFATT, and PRIMINSTR rules control the display of Self-Service
menu options and access to the associated pages.
GTVSDAX Rule Process STVPROC
CHECKORDER all seven processes
CHECKORDER for the
ENTERGRADES process is
only available for faculty
No advisor rule is available
for
ENTERGRADES on
SOAFACS
Check Order field
GTVSDAX
Rule Menu Options Driven by Rule
GTVSDAX
Description Functionality
ADVRTYPE Faculty and Advisors Main Menu
Summary Wait List
(
bwlkfcwl.P_FacWaitList
Sum
)
Detail Wait List
(
bwlkfcwl.P_FacWaitList)
Detail Class List
(
bwlkfcwl.P_FacClaList)
These pages call the
F_CheckCRNAccess function
which then calls the
F_CheckCRNProcess function.
This second function checks the
FACFATT and ADVRTYPE rules
to determine whether to use the
SOAFAPC rules for attribute/type
checking.
SOAFAPC Attribute/
Type Check
Rule determines whether to
use SOAFAPC Attribute/
Type.

420
Banner Student User Guide | Faculty Load
Faculty Member and Advisor Access to Self-Service
The processes on STVPROC and their associated rules on SOAFACS determine which
links can be accessed in Banner Faculty and Advisor Self-Service by faculty members and
advisors.
Note: The setting of the PIN Control indicator on SOAFACS is
determined by the setting of the Pin Control Allowed indicator on
STVPROC.
FACFATT Faculty and Advisors Main Menu
Summary Wait List
(
bwlkfcwl.P_FacWaitList
Sum
)
Detail Wait List
(
bwlkfcwl.P_FacWaitList)
Detail Class List
(
bwlkfcwl.P_FacClaList)
These pages call the
F_CheckCRNAccess function
which then calls the
F_CheckCRNProcess function.
This second function checks the
FACFATT and ADVRTYPE rules
to determine whether to use the
SOAFAPC rules for attribute/type
checking.
SOAFAPC Attribute/
Type Check
Rule determines whether to
use SOAFAPC Attribute/
Type.
PRIMINSTR Faculty and Advisors Main Menu
Summary Wait List
(
bwlkfcwl.P_FacWaitList
Sum
)
Detail Wait List
(
bwlkfcwl.P_FacWaitList)
Detail Class List
(
bwlkfcwl.P_FacClaList)
These pages call the
bwlkilib.F_CheckCRNAcce
ss
function which checks the
PRIMINSTR rule.
Primary Instructor
Checking
Rule must exist to display
data on these pages.
GTVSDAX
Rule Menu Options Driven by Rule
GTVSDAX
Description Functionality

421
Banner Student User Guide | Faculty Load
When the Relationship, Primary, or Attribute Type Checking indicators are checked for
the advisor rule on SOAFACS for
DISPLAYGRADES, access to most CRN-based links
will not be permitted. Access to ID-based links will be permitted, including the Advisee
Grade Summary page in Self-Service.
With the exception of the CRN-based Summary Class List page, other
DISPLAYGRADES
CRN-based links will not permit access by advisors when any of these options are
checked, to prevent advisors from directly entering a CRN and thus bypassing security.
While the Summary Class List page may be accessed by CRN, grades will not be
displayed.
The All Access indicator allows advisors to select CRNs directly, because no security is
invoked when the All Access indicator is checked.
Here is a comparison of how the rules affect access to Self-Service.
Process
PIN Control
Allowed?
Associated Self-Service Menu
Options
COMPLIANCE Yes Faculty and Advisors Main Menu
Student Information Menu
Degree Evaluation
(
bwlkfcap.P_FacDispCurrent)
DISPLAYGRADES No Faculty and Advisors Main Menu
Midterm Grades
(
bwlkfmgd.P_FacMidGrd)
Final Grades
(
bwlkffgd.P_FacFinGrd)
Summary Class List
(
bwlkfcwl.P_FacClaListSum)
Faculty and Advisors Main Menu
Electronic Gradebook by Component
(
bwlkegrb.P_FacGrade
Components
)

422
Banner Student User Guide | Faculty Load
Student Information Menu
Electronic Gradebook for a Student
(
bwlkegrb.P_FacIDShrmrksProc)
Registration History
(
bwlkhreg.p_fac_reg_hist)
Faculty and Advisors Main Menu
Advisee Grade Summary
(
bwlkgrde.P_advfingrd)
Faculty Grade Summary
(
bwlkgrde.P_FacFinGrd)
Incomplete Grades Summary
(
bwlkincg.P_FacIncmpGrdSum)
When the Relationship, Primary, or Attribute Type Checking indicators are checked
for the advisor rule on SOAFACS for
DISPLAYGRADES, access to most CRN-based
links will not be permitted. Access to ID-based links will be permitted, including the
Advisee Grade Summary page in Self-Service.
With the exception of the CRN-based Summary Class List page, other
DISPLAYGRADES CRN-based links will not permit access by advisors when any of
these options are checked, to prevent advisors from directly entering a CRN and thus
bypassing security. While the Summary Class List page may be accessed by CRN,
grades will not be displayed.
The All Access indicator allows advisors to select CRNs directly, because no security
is invoked when the All Access indicator is checked.
DISPLAYHOLDS Yes Faculty and Advisors Main Menu
Student Information Menu
View Holds
(
bwlkgstu.P_ViewHold)
DISPLAYSCHEDULE Yes Faculty and Advisors Main Menu
Student Information Menu
View Student Schedule
(
bwlkfstu.P_FacStuSchd)
Student Week at a Glance
(
bwlkfshd.P_FacStuCrseSchd)
Concise Student Schedule
(
bwlkcrse.P_FacStuSchd)
Process
PIN Control
Allowed?
Associated Self-Service Menu
Options

423
Banner Student User Guide | Faculty Load
The DISPLAYSCHEDULE rule is delivered with the All Access indicator checked (Y),
as all access to these links was provided previously. Security can be invoked for these
links.
DISPLAYTESTS Yes Faculty and Advisors Main Menu
Student Information Menu
Test Scores
(
bwlktest.P_FacDispTest)
ENTERGRADES
This process is not
available for advisors.
No Faculty and Advisors Main Menu
Midterm Grades
(
bwlkfmgd.P_FacMidGrd)
Final Grades
(
bwlkffgd.P_FacFinGrd)
Faculty and Advisors Main Menu
Electronic Gradebook by Component
(
bwlkegrb.P_FacGrade
Components
)
Student Information Menu
Electronic Gradebook for a Student
(
bwlkegrb.P_FacIDShrmrks
Pro
c)
Faculty and Advisors Main Menu
Incomplete Grades Summary
(
bwlkincg.P_FacIncmpGrdSum)
Summary Class List
(
bwlkfcwl.P_FacClaListSum)
TRANSCRIPT Yes Faculty and Advisors Main Menu
Student Information Menu
Academic Transcript Options
(
bwlkftrn.P_FacDispTran)
Process
PIN Control
Allowed?
Associated Self-Service Menu
Options

424
Banner Student User Guide | Faculty Load
Notes for the Advisee Grade Summary page (bwlkgrde.P_advfingrd):
• The security options on SOAFACS for DISPLAYGRADES include access to the
Advisee Grade Summary page.
• When All Access is checked for DISPLAYGRADES on SOAFACS, the Advisee Grade
Summary page displays only advisees, not all students.
• While the DISPLAYGRADES process on SOAFACS does apply to the Advisee Grade
Summary page, there is no PIN control allowed for grades, and the advisor must have a
relationship with the student in order for the advisee records to be displayed.
• The setting of Relationship checkbox will not influence access to the Advisee Grade
Summary page, as an advisee/student relationship must always exist. Therefore, the
Primary and Attribute Type Checking indicators are the security options that are
applicable to Advisee Grade Summary page.
All Access to Self-Service
The All Access checkbox on SOAFACS is used to indicate that no security is invoked for
the process rule in Self-Service.
• When the All Access indicator is checked (set to Y), no other indicators may be
checked for the rule.
CHECKORDER
Check Order field on
STVPROC can be set
to
Faculty,
Advisor, or Both
N/A Access to Self-Service menu options
depends on how the rule is set up on
SOAFACS, but which rule is selected can
require the Check Order field.
• When Check Order is set to
Faculty,
the faculty rule on SOAFACS is used for
the process, if it is available.
• When Check Order is set to
Advisor,
the advisor rule on SOAFACS is used for
the process, if it is available.
• When Check Order is set to
Both, both
faculty and advisor rules are evaluated,
and the more permissive rule is used.
Faculty and Advisor
Security Information
(
bwlksecr.P_
FacAdvrSecurity
)
There is no STVPROC
process associated
with this Web page.
However, the page
reflects the use of the
SOAFACS rules.
N/A Faculty and Advisors Main Menu
Faculty and Advisor Security Information
(
bwlksecr.P_FacAdvrSecurity)
Reflects SOAFACS rules for review by
faculty member or advisor
Process
PIN Control
Allowed?
Associated Self-Service Menu
Options

425
Banner Student User Guide | Faculty Load
• Once the All Access indicator has been checked, you cannot change the settings of the
other indicators except for the Process Available on Self-Service indicator.
• With the exception of the Process Available on Self-Service indicator, the All Access
indicator must be unchecked in order to set the other indicators to checked and have
those settings invoked for the rule.
Check Order Functionality
The CHECKORDER rule used on GTVSDAX is obsolete. Check order processing is
controlled by the Check Order field on STVPROC. The indicator on STVPROC allows the
choice of
Faculty, Advisor, or Both.
An exception to this processing exists for the
ENTERGRADES rule. Since the
ENTERGRADES process is not allowed for advisors on SOAFACS, the only option used
with the Check Order field for the
ENTERGRADES rule is the Faculty option. While the
field displays the values for
Faculty, Advisor, or Both, only the value of Faculty
can be saved for the
ENTERGRADES rule.
When both the Faculty and Advisor checkboxes on SIAINST are checked for an ID, the
check order processing may need to determine which SOAFACS rule to use.
1. The faculty member or advisor has a relationship with the student. Check order
processing is not used.
When the faculty member or advisor advises the student but does not teach the
student, the advisor rule is selected.
When the faculty member or advisor teaches the student, the faculty rule is selected.
For example, when the ID is both a faculty member and advisor:
• The faculty member teaches Student A.
• The advisor advises Student B.
When the ID is requesting information for Student A, the faculty rule is selected.
Check order processing is not used.
When the ID is requesting information for Student/Advisee B, the advisor rule is
selected. Check order processing is not used.
2. The faculty member and advisor have relationships with the student. Check order
processing is used.
When the faculty member or advisor teaches and advises the same student, check
order processing is used.
For example, when the ID is both a faculty member and an advisor:
• The faculty member teaches Student A.
• The advisor advises Student A.
When the ID is requesting information for Student A, check order processing is used.
When the ID is requesting information for Student/Advisee A, check order processing
is used.

426
Banner Student User Guide | Faculty Load
3. The faculty member or advisor does not have a relationship with the student. Check
order processing is used.
For example, when the ID is both a faculty member and an advisor:
• The faculty member does not teach Student C.
• The advisor does not advise Student C.
When the ID is requesting information for Student C, check order processing is used.
When the ID is requesting information for Student/Advisee C, check order processing
is used.
Enforce Use of Check Order
Check order processing is used only when a relation between the faculty and advisor
record on SIAINST and a student and/or advisee cannot be established. However, in
some unique situations, it may be necessary to force the use of the check order process,
even when a relation is clear. You can force the use of check order processing based on
the setting of the Enforce Check Order checkbox on STVPROC. This option can be tied
to a specific process on STVPROC, such as transcripts or compliance.
You can also use the Override Process Rule Security checkbox on SIAINST to override
security for an individual ID. When this indicator is checked (
Y), any ID will have access to
student information on any Self-Service page that is available and is controlled by the
rules on SOAFACS. The exception is the
ENTERGRADES rule.
Process Order
1. Security processing takes place.
2. STVPROC establishes the rule to be activated from SOAFACS.
2.1. If the rule provides access, the process stops.
2.2. If the rule does not provide access, SIAINST is checked for the setting of the
Override Process Rule Security indicator.
– When the Override Process Rule Security indicator is checked, the process
provides all access for the SOAFACS rule that was executed for the
STVPROC process and the associated SOAFACS process Self-Service link
or links.
– When the Override Process Rule Security indicator is unchecked, the
process stops, and access is not allowed.
3. Since the process checks the setting of the Override Process Rule Security
indicator last, all faculty security processing is executed, and an SOAFACS rule is
established.
427
Banner Student User Guide | Faculty Load
Check Order on STVPROC
The setting of the Enforce Check Order indicator on STVPROC is checked (Y) when the
following is true:
• An ID is identified as both a faculty member and advisor on SIAINST, and both the
student and advisee are related to that ID. The Enforce Check Order indicator is not
needed, since the setting of the Check Order field would be used regardless.
or
• The setting of the Check Order field is checked by the process when an ID is identified
as both a faculty member and advisor on SIAINST, and both the student and advisee
are not related to that ID. The Enforce Check Order indicator is not needed, since the
setting of the Check Order field would be used regardless.
or
• The setting of the Check Order field may optionally be checked by the process when an
ID is identified as both a faculty member and advisor on SIAINST, and there is a relation
to the student, either as faculty member or advisor.
Regardless of that relation, when the Enforce Check Order indicator is checked, the
appropriate rule from SOAFACS is activated. This functionality accommodates schools
that use open advising or similar processes. Even when the faculty member (who is
flagged as both a faculty member and advisor on SIAINST) has a relation to the student,
you can force the advisor rule or faculty rule. This can be done using the Enforce
Check Order checkbox.
The setting of the Check Order field is not normally checked in this case, because there
is a clear relation to the student, and the process can tell which SOAFACS rule to
activate. However, the option to force the use of check order through the Enforce
Check Order indicator can be selected.
Note: The Check Order field cannot be used with the ENTERGRADES
rule, since that process is available for faculty only. The Enforce Check
Order indicator also cannot be used with the
ENTERGRADES rule.
.
Faculty or
Advisor
Is there a relation to
the student?
Relation check to select
SOAFACS rule
Will Check
Order be
used?
Can Enforce
Check Order be
used?
Faculty Yes Faculty rule No No
Faculty No Faculty rule No No
Advisor Yes Advisor rule No No
Advisor No Advisor rule No No
Faculty and
advisor
Teaching only Clear relation - faculty rule No Yes
428
Banner Student User Guide | Faculty Load
Note: In the table above and in the following examples, consider the
following:
“Teaching/teaches student” indicates the faculty member is
assigned to a course for a term on SSASECT, and the student is
registered for that course in that term.
“Advising/advises student” indicates the advisee is assigned
to the advisor using multiple advisors SGAADVR.
Usage Examples
The ID must be flagged as both a faculty member and advisor on SIAINST in order for the
consideration of the check order process, whether enforced or not. When an ID is flagged
as both a faculty member and advisor, the process needs to determine how the ID is
related to the student.
Example 1
Faculty or Advisor Relation - Relation is clear, so check order is not necessary. The option
to use the Enforce Check Order indicator is available.
• When the advisor has a relation to the student (SGVADVR), and the faculty member
does not have an assignment for that student (SSASECT), then the SOAFACS
Advisor rule for the process is selected.
• When the faculty member has a relation to the student (SSASECT), and the advisor
does not have an assignment for that student (SGAADVR), then the SOAFACS
Faculty rule for the process will be selected.
Such as:
• The ID is both a faculty member and an advisor.
• The faculty member teaches student A.
• The advisor advises student B.
When the SIAINST ID requests information for student A, the
Faculty rule is used.
The setting of the Check Order field is not used.
Faculty and
advisor
Advising only Clear relation - advisor rule No Yes
Faculty and
advisor
Not teaching
Not advising
No clear relation - requires
check order
Yes N/A
Faculty and
advisor
Teaching and advising No clear relation - requires
check order
Yes N/A
Faculty or
Advisor
Is there a relation to
the student?
Relation check to select
SOAFACS rule
Will Check
Order be
used?
Can Enforce
Check Order be
used?

429
Banner Student User Guide | Faculty Load
When the SIAINST ID requests information for student B, the Advisor rule is used.
The setting of the Check Order field is not used.
Example 2
Both Relations, Faculty and Advisor - The relation is not clear, so check order processing
is necessary. The use of the Enforce Check Order indicator is irrelevant, since the
process checks anyway.
When the SIAINST ID is both an advisor for the student (SGVADVR) and a faculty
member for the student (SSASECT), then the setting of the Check Order field on
STVPROC determines whether the
Faculty rule or the Advisor rule on
SOAFACS is used.
Such as:
• The ID is both a faculty member and an advisor.
• The faculty member teaches student A.
• The advisor advises student A.
When the SIAINST ID requests information for student A, the setting of the Check
Order field is used.
When the SIAINST ID requests information for advisee A, the setting of the Check
Order field is used.
Example 3
No Relation - Faculty or advisor relation is not clear, so the check order process is
necessary. The use of the Enforce Check Order indicator is irrelevant, since the process
checks anyway.
When the SIAINST ID is not related to the student in any way, then the setting of the
Check Order field on STVPROC determines whether the
Faculty rule or the
Advisor rule on SOAFACS is used.
Such as:
• The ID is both a faculty member and an advisor.
• The faculty member does not teach student C.
• The advisor does not advise student C.
When the SIAINST ID requests information for student C, the setting of the Check
Order field is used.
The Enforce Check Order option is available for Example 1. The SIAINST ID is flagged
as both a faculty member and an advisor, and the ID has a clear relation to the student.
The Check Order field is not needed, because a relation is clear. However, the option to
Enforce Check Order can be used under certain situations.
For instance, if the advisor has a relation to the student (SGVADVR), and faculty
member does not have an assignment for the student (SSASECT), the SOAFACS
Advisor rule for the process would be selected.

430
Banner Student User Guide | Faculty Load
When Enforce Check Order is checked, and the Check Order field is set to Faculty,
the SOAFACS
Faculty rule would be forced.
Also, if the faculty member has a relation to the student (SSASECT), and the student is
registered for the course, and the advisor does not have an assignment for that student
(SGAADVR), then the SOAFACS
Faculty rule for the process would be selected.
When Enforce Check Order is checked and the Check Order field is set to
Advisor, the SOAFACS Advisor rule would be forced.
Such as:
• The ID is both a faculty member and an advisor.
• The faculty member teaches student A.
• The advisor advises student B.
When the ID requests information for student A, the
Faculty rule is used. Check
order is not necessary. However, if the Enforce Check Order indicator is checked,
the process disregards the relation and uses the check order rule.
When the ID requests information for student B, the
Advisor rule is used. Check
order is not necessary. However, if the Enforce Check Order indicator is checked,
the process disregards the relation and uses the check order rule.
Note: The STVPROC Check Order field determines which SOAFACS
rule is activated for the Self-Service URL. Whether or not the ID actually
is presented with the student information is driven by the rules on
SOAFACS.
Use of the DISPLAYGRADES Rule
The DISPLAYGRADES rule links perform differently than other processes with regard to
the SOAFACS
Advisor or Faculty rules. When an ID is defined as both a faculty
member and an advisor on SIAINST, and the relation is not clear, the check order process
is used. However, the
DISPLAYGRADES rule contains a combination of ID and CRN-
based links. The CRN-based links cannot be accessed by the advisor rules. The selection
of the SOAFACS rule can depend on:
• whether or not the link is a CRN-based link (faculty) verses an ID-based link (faculty or
advisor).
• whether or not the faculty member is associated with the CRN, and/or if the advisor is
associated with the ID.
For the
DISPLAYGRADES rule, when an ID is both a faculty member and an advisor,
depending on whether the link is CRN or ID-based, and whether the ID has a course
assigned and has an advisee, the Enforce Check Order indicator can be used.
Override Process Rule Security for an ID
You can override process rule security for an ID on SIAINST. The Override Process Rule
Security indicator is optional and can only be checked when either the Faculty and/or
Advisor indicators are checked. When this security option is checked, the user can

431
Banner Student User Guide | Faculty Load
access student information on Banner Student Self-Service Web pages associated with
the process rules on SOAFACS. The security display rules on SOAFACS are overridden,
except for the
ENTERGRADES rule. When the Override Process Rule Security indicator
is unchecked, standard security processing is invoked.
Once the Override Process Rule Security indicator is checked, Override User ID and
Override Activity Date fields are populated. The Override User ID and Override
Activity Date values change as the Override Process Rule Security checkbox is
checked or unchecked. There is no audit process associated with the Override User ID or
Override Process Rule Security activity date information.
The Override User ID value, Override Activity Date value, and existing values for the
Override Process Rule Security indicator are added to the new term when a new record
is created using the Maintenance button. The value for the Override Process Rule
Security indicator can be changed in the new term.
When the Override Process Rule Security indicator is checked, but the faculty member
or advisor does not have access to the Self-Service link based on existing security
settings on SOAFACS, the SIAINST override allows the instructor to access the link,
regardless of the existing settings.
Warning! The Override Process Rule Security indicator always
provides Self-Service access for the ID when checked (Y), even when the
SOAFACS process is not available on Self-Service or when the
SOAFACS process has no access.
When the links are available in Self-Service and the indicator is checked
for the instructor, access to the link and associated student information is
allowed.
It is suggested that this option be used for a very limited population at
your institution and only be used when faculty security rules on
STVPROC and SOAFACS do not accommodate specific individual faculty
or advising responsibilities.
The Override Process Rule Security indicator is not valid for the
ENTERGRADES rule.
Access is not allowed for anyone other than the faculty members who are authorized to
enter grades. The override option can be used with the
DISPLAYGRADES rule. When the
Override Process Rule Security indicator is checked, the instructor may be able to view
grades by overriding the access for the
DISPLAYGRADES rule. However, the rule may
not allow the display of grades to IDs on SIAINST who are set up as faculty only and who
attempt to access ID-specific links. When there are no associated student assignments on
SGAADVR, the instructor does not have an advisee ID. The ID-specific link in this case
requires the student advisee ID.

432
Banner Student User Guide | Faculty Load
Purge Process
The following purge process may be used to purge information in the Faculty Load
Module.
Instructor Term Rule Purge (SIPASGN)
This process will purge, by user-defined parameters, the instructional assignments, the
non-instructional assignments, and the workload term rules for the term specified.
Banner Student Interface to Banner Human Resources
Please refer to the "Interfaces" chapter for information on the interface between Faculty
Load data and Banner Human Resources.
Faculty Load Reports
The following reports are run through the Faculty Load module:
Please refer to the Banner Student Reports and Processes Handbook for report
descriptions, instructions, parameter definitions, and output samples.
Instructor Schedule Report (SIRASGQ)
Faculty Load Contract Analysis Report (SIRCTAL)
Faculty Load Term Analysis Report (SIRTRAL)
Instructional Assignment Purge (SIPASGN)

433
Banner Student User Guide | Location Management
Location Management
This chapter discusses processing and procedure information for Location Management.
Location Management Procedures
Here are tasks you can perform in this module.
Housing Room Assignment Using Building and Room
Genders
This topic discusses gender specific buildings and non-gender specific buildings.
Gender Specific Buildings
If a building is specified as either a male building or a female building on the Building
Definition Form (SLABLDG), only persons matching that building's specific gender are
permitted to be assigned to the building.
If a gender is entered on (SLABLDG), it defaults to each room in the building on the Room
Definition Form (SLARDEF). The default value cannot be changed to the opposite sex;
however, the system does permit the removal of the original gender specification, which
was the default value from SLARDEF. Yet, even if the gender is removed (
Not
Available
) from the Gender field on the Room Definition Form (SLARDEF), the
system only permits the assignment of those persons matching the gender that was
specified to the room at the building level. There are no overrides provided to allow a
person of an unknown or opposite gender to be assigned to the rooms in a gender specific
building. These rules are used in batch and online processing of housing assignments.
Gender Non-Specific Buildings
If the gender of a building is not specified on the Building Definition Form (SLABLDG),
then the Gender field is
Null or Not Available, and persons of all genders, male,
female, and unknown, may be assigned to the building. Assignment will be made
according to the following, online, room specific gender rules:
• If the gender of the building is Not Available on the Building Definition Form
(SLABLDG), and the gender of the room is designated as
Male on the Room Definition
Form (SLARDEF), only persons of male gender may be assigned to this room.
• If the gender of the building is Not Available on the Building Definition Form
(SLABLDG), and the gender of the room is designated as
Female on the Room

434
Banner Student User Guide | Location Management
Definition Form (SLARDEF), only persons of female gender may be assigned to this
room.
• If the gender of the building is Not Available on the Building Definition Form
(SLABLDG), and the gender of the room is
Not Available on the Room Definition
Form (SLARDEF), male, female, and unknown genders may be assigned to this room.
This allows for married housing and co-ed rooms to be processed.
When performing the Batch Scheduling of Housing Assignments, the following rules are
used:
• If the gender of the building is Not Available on the Building Definition Form
(SLABLDG), and the gender of the room is designated as
Male on the Room Definition
Form (SLARDEF), only persons of male gender may be assigned to this room.
• If the gender of the building is Not Available on the Building Definition Form
(SLABLDG), and the gender of the room is designated as
Female on the Room
Definition Form (SLARDEF), only persons of female gender may be assigned to this
room.
• If the gender of the building is Not Available on the Building Definition Form
(SLABLDG), and the gender of the room is
Not Available on the Room Definition
Form (SLARDEF), male, female, and unknown genders may be assigned to this room.
However, the first applicant scheduled into the room defines the room gender for the
Batch Scheduling process. (Note: The Gender field remains
Not Available on
SLARDEF.) If the first applicant assigned to the room has not designated a gender on
the Dorm Room and Meal Application Form (SLARMAP), then no one else is scheduled
in batch into the room, because the gender of the room remains unknown.
Housing Module Deposits
The total amount of housing deposits which the applicant has paid for the term is
displayed in the Key Information of the Room Assignment Form (SLARASG). The total
amount of meal deposits for the term is displayed on the Meal Assignment Form
(SLAMASG), and the total amount of phone deposits for the term is displayed on the
Phone Assignment Form (SLAPASG).
These deposit amounts are summarized by a deposit type which exists on the Deposit
Detail Control Form (TGADEPC). These deposit types are validated against the Deposit
Type Validation Form (TTVDTYP). The deposit type for Housing Deposits must be
HOU,
MEA for meal deposits, and PHO for phone deposits.
Deposits maintained on the Student Payment Form (TSASPAY) or Billing Mass Date Entry
Form (TSAMASS) or Account Detail Form (TSADETL) for the term which have not expired
are summarized by deposit type, and the total amount for the term displays on the
appropriate assignment form.

435
Banner Student User Guide | Location Management
Housing Module Assessment
The assessment of dormitory rooms, meal plans, and phone charges is user-defined
based on the rules established on the Room/Meal/Phone Rate Code Rules Form
(SLALMFE). Assessment rules are established by term to allow for different assessment
rules for each term. The user can create assessment rules based on either a daily rate, a
monthly rate, or a term rate. This gives the institution the ability to charge a daily rate for
dormitory rooms, a term rate for meal plans, and a monthly charge for phone usage.
The Room/Meal/Phone Rate Code Rules Form has three sections for creating
assessment rules: one for housing rates, one for meal rates, and the other for phone
rates. Each section functions in the same manner. Prior to building these assessment
rules, the user must establish the valid rate codes on the Room Rate Code Validation
Form (STVRRCD), Meal Rate Code Validation Form (STVMRCD), and Phone Rate Code
Validation Form (STVPRCD). Detail codes must also be created for each different charge
that will be assessed. These are created on the Detail Code Control Form (TSADETC).
The detail code must be established with the following category codes:
The Refundable checkbox must be checked for these detail codes in order to process
refunds.
After the validation tables and the detail codes have been created, the assessment rules
can be built on Room/Meal/Phone Rate Code Rules Form (SLALMFE). Each rate code
and how it will be assessed (daily, monthly, or term) is entered.
A detail code is then entered for the rate code followed by the base rate to be assessed.
This base rate should be the daily rate if the assessment type is
D, the monthly rate if the
assessment type is
M, or the term rate if the assessment type is T. The base rate will be
multiplied by the calculated number of days, months, or terms, for the housing, meal or
phone assignment. The base rate and the minimum charge must be less than or equal to
the maximum charge. The days, months, and term associated with a dorm room, meal, or
phone assignment are calculated on the Room Assignment Form (SLARASG), Meal
Assignment Form (SLAMASG), or the Phone Assignment Form (SLAPASG) respectively.
The user can then specify a minimum and maximum assessment amount. If the calculated
assessment amount is less than the minimum, the minimum amount is assessed. If the
calculated assessment amount is greater than the maximum amount specified, the
maximum amount is assessed.
When the assignments are created on the Room Assignment Form (SLARASG), Meal
Assignment Form (SLAMASG), and the Phone Assignment Form (SLAPASG), the user
has the ability to review assessments by checking the Review Assessments checkbox in
the Assessment Information window of each form. This calculates the assessment based
on the rates on the Room/Meal/Phone Rate Code Rules Form (SLALMFE) and the
number of days, months, and terms associated with the assignment's beginning and
ending date, but does not update the student's account in the Accounts Receivable
module. For example, the beginning and ending dates used by the Housing Module for
term 199001 were established as 27-AUG-1990 and 16-DEC-1990 on the Term Code
HOU - Housing assessments
MEA - Meal plan assessments
PHO - Phone assessments

436
Banner Student User Guide | Location Management
Validation Form (STVTERM). This calculates out to 112 days, 3.64516 months, and 1
term. These values are multiplied by the base rate amount on SLALMFE to calculate the
assessment amount. If a daily base rate of $10.00 a day has been established then the
applicant is assessed $1120.00 (112 days * $10.00). If a monthly base rate of $25.00 has
also been established, then the applicant is assessed $91.13 (3.64516 months * $25.00).
The minimums and maximums are then applied.
To review an assessment, you may perform a Next Block to access the Assessment
Information window.
When monthly charges are to be created, they will be assessed in monthly increments for
as many months as specified or calculated on the assignment forms. This facilitates the
ability to charge apartment rentals on a monthly basis. In the previous example the
following monthly charges would be assessed:
There is a 12 month limit on monthly assessments.
Reviewing assessments does not update Accounts Receivable with the charges. The
Review Assessments checkbox is used to test the assessment process for a sampling of
students to insure that the assessment rules are established correctly.
There are two methods for assessing the housing, meal and phone assignments and
updating the person's account in the Accounts Receivable module.
• The first method is to individually assess each person online by checking the Process
Assessments box on the Dorm Room Assignment Form (SLARASG), Meal
Assignment Form (SLAMASG), and the Phone Assignment Form (SLAPASG).
• The second method is to run the Batch Fee Assessment Process (SLRFASM) to assess
all persons with housing, meal, and phone assignments for the term. The charges
assessed may then be viewed on the Student Payment Form (TSASPAY), the Account
Detail Form (TSADETL), or the Account Detail Review Form (TSAAREV). The source
types associated with these charges are: DORM = B, MEAL = V, PHONE = U.
The refunding of assessments may be processed in two methods.
• The first method is to apply a refund percentage to the appropriate assignment status
code. The status codes must be created on the Room Assignment Status Code
Validation Form (STVASCD), Meal Assignment Status Code Validation Form
(STVMSCD), and Phone Assignment Status Code Validation Form (STVPSCD). The
status code effective dates and refund percentages are established on the Room
Assignment Status Form (SLAASCD), Meal Assignment Status Form (SLAMSCD), and
Phone Assignment Status Form (SLAPSCD).
• The second method is to adjust the assignment dates and recalculate the day and/or
months on the Room Assignment Form (SLARASG), Meal Assignment Form
27 Aug 1991 25.00
27 Sept 1991 25.00
27 Oct 1991 25.00
27 Nov 1991 16.13 (.64512 x 25.00)

437
Banner Student User Guide | Location Management
(SLAMASG), and the Phone Assignment Form (SLAPASG). Method two is only
appropriate when using daily and monthly rates.
When the assessment is processed for the assignment, an adjustment will be written to
the student's account detail for the difference between the original assessment and the
new assessment.
Remember, the Refundable checkbox on TSADETC must be checked for the detail code
in order to process refunds.
Batch Scheduling of Housing Assignments
Batch scheduling of housing assignments is a process used to schedule housing
applicants into the available dormitory rooms for a user-requested term.
There are two steps in the batch scheduling process.
1. Run the Batch Housing Schedules Report (SLRSCHE)
This process can be run through job submission. This is a COBOL program which
extracts the building, room, and application data from the database, and creates a
temporary assignment file based on the applicant's preferences, priorities, and
attributes. The only parameter selection needed is the processing term. The Term
Code parameter, as well as username and password, must be updated in the exact
positions in
slrsche.prm.
2. Run the Batch Scheduler Report (SLRSCHD).
In update mode this step can update the database with the assignment information
from the previous step. If the assignment information is not in its final form, then the
step can be run in audit mode which will not update the database. A report is also
produced in this step. This report gives the complete scheduling information about
each applicant's preferences, priorities, gender, and attributes, and the room which is
assigned. Applicants who could not be scheduled are also listed on the report.
These steps can be run multiple times in audit mode until the best utilization of applicants
to available dorm rooms is achieved.
The user can select one of three sort options for the Batch Scheduler Report (SLRSCHD):
Applicant name, Applicant ID, or Applicant priority number. The report lists those
applicants who were scheduled, followed by the applicants who could not be scheduled.
When running in Update mode the following selection options must be specified:
Room Rate Code - This is the rate code which is used if no rate code exists on the Room
Definition Form (SLARDEF) for the room being assigned. This rate code must exist on the
Room Rate Code Validation Form (STVRRCD).
Room Assignment Status - This is the dorm room status code used for the assignment.
This updates the Status field on SLARASG. This status must exist on the Room
Assignment Status Code Validation Form (STVASCD).

438
Banner Student User Guide | Location Management
Room Assignment Status Date - This is the date associated with the room assignment
status. This date must fall within the range established on the Room Assignment Status
Form (SLAASCD).
The scheduling is done using a variety of institution and student specified elements. The
batch scheduler methodology is listed below:
Room Type - Only rooms designated as dormitory rooms as "Dormitory" in the Room
Type radio group on the Room Definition Form (SLARDEF) are loaded into the scheduler.
Room Priorities - Each room can be defined with a room priority. This is done on the Room
Definition Form (SLARDEF). This room priority is used when loading the available
dormitory rooms into the batch scheduler. The lower the number - the higher the priority.
For example, rooms with a priority of "1" are scheduled first. All rooms with the same
priority are then sorted by building code and ascending sequence room number. If an
institution wishes to use all of its single rooms first then these rooms should be given a
priority of
1.
If not entered, the room priority on SLADREF defaults to
99999999. The following is an
example of how rooms would be loaded into scheduler:
Room Capacity - Rooms where the capacity equals zero are not loaded into the scheduler.
Beds Remaining - The applicants which have already been assigned to the dormitory
room are checked prior to each room being loaded into the scheduler. For example, if a
group of applicants has already been manually assigned to dormitory rooms before the
scheduler is run, then these beds are not available to be scheduled via the batch
scheduler. Dorm room South 101 has a capacity of four. Two applicants have already
been assigned to the room. When South 101 is loaded into the scheduler it is loaded with
only two beds available. This prevents rooms from being over-allocated by the scheduler.
Inactive Rooms - Rooms which have been marked inactive are not loaded into scheduler.
There are two different methods used to inactivate a room.
1. The Status field on the Room Definition Form (SLARDEF), which is validated against
the Room Status Code Validation Form (STVRMST), can be used to flag the room as
inactive.
Priority Building Code Room Number
1 Adams 202
1 Burns 101
1 Burns 102
1 North 101
99999999 Adams 101
99999999 Adams 102
99999999 Adams 104
99999999 Burns 102

439
Banner Student User Guide | Location Management
2. The room can also be inactivated for a period of time via the Room Inactivation
information on the Room Definition Form. If the room is inactive for any day during the
term being scheduled, then the room is not available for scheduling.
Room Gender - Each room can be specified with a gender designation. Rooms
designated as
Male rooms can only be assigned to male applicants and Female gender
rooms to female applicants. If the room gender designation is
Not Available, then
the first applicant scheduled into the room defines the room gender for the scheduling
process. (Note: The gender designation remains
Not Available on SLARDEF.) If the
first applicant into the room has not designated a gender on the Housing and Meal
Application Form (SLARMAP), then no one else is scheduled into the room because the
gender of the room is unknown.
Housing Applicants - The batch scheduler loads those applicants for the user selected
term who have requested a room assignment. This selection is done using the
Application Type field on the Housing and Meal Application Form (SLARMAP) and the
Room and Meal Application Type Validation Form (STVARTP). The following applicants
are not processed by the batch scheduler:
1. Applicants who have requested only a meal assignment.
2. Applicants who have already received a dorm room assignment for the term.
3. Applicants whose application has been inactivated via the Application Status on
SLARMAP and the Housing Application Status Code Validation Form (STVHAPS).
Room Attributes - The user may define attributes associated with each building via the
Building Definition Form (SLABLDG). These attributes then default to the Room Definition
Form (SLARDEF) for each room in the building. The building attributes can be deleted on
SLARDEF or new room-specific attributes can be added. These attributes are then used
to locate the best fit of applicants to available dorm rooms. Attributes can also be
designated as "must match" attributes. These must match attributes are given special
processing considerations in the scheduler. An applicant must have the same attribute
specified on his Housing and Meal Application Form (SLARMAP) to be assigned to a
room with a must match attribute. The attribute does not have to be designated as a must
match attribute on the application; it must just exist.
The following example outlines this process:
Scores by Applicants
Room Capacity Attributes 1 2 3
North 101 2 Smok-checked 1 0 0
North 102 1 Coax 0 0 1
Nsmk
North 103 2 Coax 0 0 0
Smok-checked

440
Banner Student User Guide | Location Management
Note: None of the applicants has specified a preferred building, category,
or room number.
Applicant Number 1 has requested a smoking room, and the Must Match (Indicator) in
the Special Attributes window of SLARMAP is checked. This means that only rooms with a
smoking attribute are available for scheduling this applicant. This applicant also requested
a single room (Sngl) with a Coax cable (Coax). Neither of these attributes have been
designated as "must match" so the scheduler will look for an available room with these as
"best fit" attributes.
Hand-checked
North 104 1 Smok 3 N/A † N/A †
Coax
Sngl
Hand
North 105 1 Coax 0 2 0
Sngl-checked
Hand
†
N/A - Not Available - due to full capacity
Applicants Attributes
(1) 111-11-1111 Smok-checked
Sngl
Coax
(2) 222-22-2222 Sngl-checked
Hand-checked
(3) 333-33-3333 Nsmk-checked
Sngl
Scores by Applicants
Room Capacity Attributes 1 2 3

441
Banner Student User Guide | Location Management
Keeping the applicant's attributes in mind, each available room will be examined and
scored until the best fit of room attributes to applicant attributes can be accomplished.
North 101 is a smoking room, so it is available to the applicant, but it has no attributes for
single room and Coax, so it receives a score of 1. North 102 is not specified as a smoking
room, so it is not available for this applicant. It receives a score of zero. North 103 is a
smoking room, but it has a "must match" attribute of handicap (Hand-checked), which
means that only an applicant with a handicap attribute can be scheduled in the room.
Hence, the room is not available for this applicant; it receives a score of zero. North 104
has a smoking attribute. It also has single room and Coax attributes, hence it receives a
score of 3. North 105 has a no smoking attribute, so it receives a score of 0.
The room with the highest score is then used to schedule the applicant. Applicant number
1 is scheduled into North 104.
Under the same method of best fit scheduling, applicant Number 2 will be assigned to
North 105 because of its score of two - single and handicap attributes available, and
applicant number 3 will be scheduled into room North 102.
Assignment Priorities - Applicants are assigned to rooms in the user defined priority
sequence. These priorities can be entered online on the Housing and Meal Application
Form (SLARMAP), or they can be loaded via a user created SQL*Plus loader program. As
with the room priorities, the lowest priority is scheduled first. These priorities can be used
to assign all of your freshman first or all the athletes first, whatever your institutional policy
states. If no priority is entered it defaults to
99999999. The application add date and time
is also used to further sort the applicants with the same priority code. If an applicant has
no priority, they will be processed in application date order after the applicants with
priorities. The following example outlines the priority processing for the applicants listed:
Example:
Campus Request - If the applicant requests a room assignment on a specific campus,
then only the rooms on that campus are used. If no campus is specified on the Housing
and Meal Application Form (SLARMAP), then any room regardless of its campus
designation can be used for assignments.
Room Preference - The applicant may further specify building and category preference by
adding a specific room preference. The scheduler then tries to schedule the applicant into
the building and room requested. If the room is not available or the attributes cannot be
matched, then the applicant is scheduled into the next available room within the building
and category (if specified) if possible. A message is generated on the scheduler report
which informs the user that the room requested was not available.
Applicant Priority Date
111-11-1111 1 01-MAR-1990
222-22-2222 1 03-MAR-1990
333-33-3333 1 03-MAR-1990
112-22-3322 2 02-MAR-1990
223-00-9099 to 99999999 01-MAR-1990

442
Banner Student User Guide | Location Management
Category Preference - The applicant may further specify building preference by adding a
building category preference. Categories can be used to further define buildings, for
example, first floor, freshman floor, suites, wings. The scheduler then tries to schedule the
applicant into the building and category which was requested. If no room is available or
the attributes cannot be matched for the category requested, the applicant is scheduled
into the next available room within the building if possible. A message is generated on the
scheduler report which informs the user that a room in the requested category and
building could not be located. Categories are only used within the buildings specified; they
do not cross buildings. If the applicant specifies the first floor of North Hall building on the
application and no rooms are available in North Hall, then the first floor category code is
no longer used in scheduling.
Building Preference - The applicant may request a room in a specific building. The
scheduler then tries to schedule the applicant into a room in the building which was
requested. If no rooms exist in the building which meet the applicant's attributes, the
applicant is scheduled into the next available building and room. A message is generated
on the scheduler report which informs the user that a room in the preferred building could
not be located.
Roommate Preference - The applicant can also specify preferred roommates on the
Roommate Application Form (SLARMAT). An unlimited number of preferred roommates
may be specified.
Once a roommate application has been completed, all roommates whose Acceptance
checkbox is checked on SLARMAT are scheduled together as a group into the best fit
available room.
The highest priority of the group is used as the priority and the gender of highest priority
applicant is used to designate the room gender being requested.
Note: The gender and priorities of each roommate in the group do not
have to match for scheduling.
The Roommates Room Preference information and Roommate Room Attribute
information on SLARMAT are used to locate the best fit room for the group of roommates.
These preferences and attributes are used in the same manner as an individual applicant
preferences and attributes.
If no room with enough capacity or with the required attributes is available for the group of
roommates, then each applicant is scheduled as an individual using his/her own
preferences and attributes specified on their Dorm Room and Meal Application Form
(SLARMAP).
The Scheduler Report lists the roommates scheduled and the roommate preferences and
attributes used to perform the scheduling.
Note: The scheduler has a limit of 10,000 applicants and 5,000 rooms for
processing. There is also a limit of 10 attributes per applicant and per
room for batch scheduler processing.

443
Banner Student User Guide | Location Management
Assignment Roll Process
Room Assignment, as well as meal and phone assignments can be rolled forward from
one term to the next. The user, via parameter option, specifies the from and to term to be
used in the roll process. The assignments will not be rolled forward unless the from and to
terms are both within the same dorm room and meal application. For example, the
applicant's application term range on SLARMAP is from 199001 to 199002. The user
requests the assignment roll to be run to roll 199001 to 199002. The applicant will be
processed. If another applicant's application is for a single term of 199001, then the
assignment will not be created for the future term. This process does not roll a meal,
phone, or room assignment if one already exists for the term to which assignments are
being rolled. Only the time period associated with the rate code is calculated in the room
assignment process.
Note: The roll process checks room capacity based on the start and end
dates of the housing terms, so these dates should not overlap between
consecutive terms.
The user can also prevent an applicant from being rolled by checking the Prevent Roll
checkbox on the assignment forms (SLARASG, SLAMASG, SLAPASG). Both meal and
phone assignments may be prevented from being rolled by the status codes associated
with these assignments. The Meal Assignment Status Code Validation Form (STVMSCD),
the Phone Assignment Status Code Validation Form (STVPSCD), the Meal Assignment
Status Query Form (SLQMSCD), the Phone Assignment Status Query Form (SLQPSCD),
the Meal Assignment Status Form (SLAMSCD), and the Phone Assignment Status Form
(SLAPSCD) allow the user to specify if assignments with a certain status may be rolled.
The roll process can be run in either audit or update mode. The Assignment Roll Process
(SLRROLL) lists the assignments which will be rolled.
Housing Letter Generation and Population Selection
The following variables should be used for creating housing letters.
The variables listed below are specific to information that would be printed about a
roommate in a housing assignment letter.
Variable Description
*ROOMMATE
Roommate Name
*RM_PHONE
Roommate Phone Number
*RM_ADDRESS_STR1
Roommate Address Street Line 1
*RM_ADDRESS_STR2
Roommate Address Street Line 2
*RM_ADDRESS_STR3
Roommate Address Street Line 3
*RM_ADDRESS_CITY
Roommate Address City

444
Banner Student User Guide | Location Management
The variables listed below are specific to information that would be printed about the
person receiving a housing assignment letter.
The variables listed below are used to support logic in the Housing sample letter, but do
not print.
*RM_ADDRESS STATE
Roommate Address State
*RM_ADDRESS_CNTY
Roommate Address County Code
*RM_ADDRESS_NATN
Roommate Address Nation Code
*RM_ADDRESS_ZIPC
Roommate Address Zip Code
Variable Description
*FNAME
First Name
*LNAME
Last Name
*MNAME
Middle Name
*PHONE
Telephone Number
*STR1
Address Street Line 1
*STR2
Address Street Line 2
*STR3
Address Street Line 3
*CITY
Address City
*STATE
Address State Code
*NATN
Address Nation Description
*ZIPC
Address Zip Code
*TDATE
Today in Month dd, yyyy Format
*BUILDING_NAME
Housing Building Description
*ROOM_NUMBER
Housing Room Number
Variable Description
*ALWAYS_NULL
Always Null
*COUNT_OCCUPANCY
Count Room Occupancy of 1
*COUNT_ROOMMATES
Count Number of Roommates
*NO_ROOMMATES
No Roommates in Room
Variable Description

445
Banner Student User Guide | Location Management
The variables listed below are specific to information that would be printed about a
roommate in a housing assignment letter.
Dynamic Parameter
A dynamic parameter for term code (&Term_Code) must be entered when processing
many of the Housing variables. The prompt is spelled consistently as
&Term_Code so
that a valid term only needs to be entered once during processing, and all variables with
the same prompt will automatically use the same value for the term code.
Housing Population Selection
The Housing population selection consists of:
The population selection rules include a dynamic parameter for term code
(
&Term_Code). This population selection will return all persons with an active housing
assignment for the term code that is entered.
*ONE_ROOMMATE
One Roommate in Room
*TOTAL_IN_ROOM
Count Total Room Occupancy
Variable Description
*RM_FIRST_NAME
Roommate First Name
*RM_ADDRESS_CNTYDESC
Roommate Address County Desc
*RM_ADDRESS_NATNDESC
Roommate Address Nation Desc
*RM_ADDRESS_SUBZIPC
Roommate Address 5 Digit Zip
*RM_ADDRESS_FULL
Roommate Complete Address
*RM_ADDRESS_CSZ
Roommate Addr City, State, Zip
Parameter Value
Application: HOUSING
Selection ID: HOUSING_ASSIGNMENTS
Creator ID: SAISUSR
Variable Description

446
Banner Student User Guide | Location Management
Purge Process
The following purge process is part of the Location Management and Housing module.
Housing Purge (SLPHOUS)
This process will purge the housing applications, housing, meal plan, and phone
assignments for the user specified terms and activity dates. These assignment
assessments must have been processed and accepted in the Accounts Receivable
module.
Location Management Reports
The following reports are run through the Location Management and Housing module:
Please refer to the Banner Student Reports and Processes Handbook for report
descriptions, instructions, parameter definitions, and output samples.
Creating a Population Selection
To perform population selection, the application you will be working with must first be
defined on the Application Definition Rules Form (GLRAPPL).
The second step is to enter the Population Selection Definition Rules Form (GLRSLCT),
enter the Application (Code), and create a Selection ID (Identifier) with a description.
In the Selection Definition section, define the Select and From portions of the SQL
statement that the selection represents.
Dormitory Address Creation Report (SLRDADD)
Active Housing Assignments Report (SLRHLST)
Batch Room/Meal/Phone Assess Report (SLRFASM)
Assignment Roll Process (SLRROLL)
Batch Scheduler (SLRSCHD)
Housing Purge (SLPHOUS)
ACS Housing Interface (SLRBACS)

447
Banner Student User Guide | Location Management
Example:
Next, enter the Selection Rules for the population of records you would like to see.
Example:
Save your data and exit. Your population selection rules will be compiled. If any errors are
issued during the compilation process, resolve the errors before continuing. If you do not
resolve all errors given during the compile process, you will not be able to use the
population selection rules to extract a population.
You are now ready to extract the population of people. The Population Selection Extract
(GLBDATA) is run from the Process Submission Control Form (GJAPCTL). At minimum,
you will need to supply the parameters for Selection Identifier 1, Application, and Creator
ID, which are the values that were in the Key Information of the Population Selection
Definition Rules Form (GLRSLCT).
After extracting the population, you can use the Population Selection Extract Data Form
(GLAEXTR) to view and/or modify the people in the population. You can add or delete
people from the population using this form. The keys to the form are Application,
Selection ID, and Creator ID. (User ID is also displayed in the Key Information.) You will
be able to add or delete people only from populations that you selected.
After extracting the population, and modifying the people in it if necessary, you can use the
population for a variety of purposes. Letters can be produced using Letter Generation,
based upon a population, and many Banner® reports and processes also can accept a
population for processing.
For additional details on population selection, refer to the Banner General System User
Guide.
Select:
SARADAP_PIDM
From:
SARADAP
SARADAP_TERM_CODE_ENTRY
=
'200010'
AND
SARADAP_LEVL_CODE
=
'UG'

448
Banner Student User Guide | Recruiting
Recruiting
This chapter discusses processing and procedure information for Recruiting.
Recruiting Procedures
Here are tasks you can perform in this module.
Add/Maintain Prospects
To recruit a prospect, after a prospect's identification number and name have been
entered on the General Person Identification Form (SPAIDEN), the Recruit Prospect
Information Form (SRARECR) is used to enter and maintain the information necessary for
all recruitment related activities. This information includes the source of the prospect (high
school, mailings, alumni, etc.), intended degrees and majors, outside interests, contacts,
comments, attributes, and cohort information for student tracking.
The Quick Recruit Form (SRAQUIK) can also be used when entering information about a
recruit or a group of recruits which may have some of the same characteristics. The
Default Options window allows the user to enter default information such as address type,
contact type code, recruiter code, recruitment status code, source code, term code, high
school code, prior college code, level code, degree code, college code, department code,
and major code for all records being processed. This speeds the data entry process when
a batch of recruits from a local high school or all recruits from the same prior college are
being processed together. The default options are in effect only for the current SRAQUIK
session; once the user has exited the form, the options no longer apply.
If a prior college or high school record is entered on this form, the corresponding
admissions checklist request code is updated on the Prior College Form (SOAPCOL) and
High School Information Form (SOAHSCH), if it is defined on Source/Background
Institution Code Validation Form (STVSBGI). If multiple prior colleges or high schools are
added for a single recruit, only the first entered record will be assigned the admissions
checklist request code.
Add/Maintain Test Scores
Once a prospect has been established on the database, the various types of tests
required for recruiting a prospect are entered on the Test Score Information Form
(SOATEST). Test scores for SAT, ACT, GRE, GMAT, and AMCAS tests may also be
loaded onto the system from test score data loads and are recorded on this form.

449
Banner Student User Guide | Recruiting
Add/Maintain High School Data
The High School Information Form (SOAHSCH) is used to enter information about a
person's high school career. The information includes high school, transcript dates,
graduation date, GPA, and subjects taken in high school.
Add/Maintain Prior College Data
The Prior College Form (SOAPCOL) is used to enter and maintain information about a
person's prior college experience including degree information such as majors, minors,
and areas of concentration, number of hours, GPA, and transcript date.
Review Prospects
The Recruiter's Prospect Form (SRARINF) is used to display all the prospects for which a
recruiter has responsibility. The prospect's name, ID number, and status are displayed.
Assign/Review Recruiter's Appointments and Visits
The Recruiter Appointments/Visits Form (SRARAPT) is used to schedule and record daily
appointments with prospects and to record visits to recruiting sources such as a college
night. Appointments and visits may be viewed for a given day or range of days. If a
recruiter is absent, it provides a quick method to review their schedule.
Establish Source, High School, or College
The Source or Background Institution Base Form (SOASBGI) is used to capture general
information about a source, high school, or college. Information such as address,
contacts, comments, or directions may be used by the recruiter to aid in the recruitment
process.
Build Statistical Information for a Source or Background
Institution
Statistical information about a source, high school, or college may be maintained on a
yearly basis on the Source/Background Institution Year Form (SOABGIY). This
information may be used for statistical data on the institution's recruiting procedures.

450
Banner Student User Guide | Recruiting
Review Prospects and Visits by Source
The Source Visits/Prospects Form (SRASRCE) displays prospects by the source of the
prospect and also may be used to review and schedule visits to a particular source. This
form may be used by the recruiter to schedule a college night visit at a high school and to
view the prospects from that high school.
Produce System-Generated Letters
Letters (generated) and materials (published) are defined using a variety of validation and
control forms. Paragraph codes are defined on the Paragraph Code Validation Form
(GTVPARA), and their text is defined using the Paragraph Form (GUAPARA). Letter
codes are defined using the Letter Code Validation Form (GTVLETR), and the paragraphs
which make up a letter are defined on the Letter Process Form (GUALETR). Materials and
letters can be scheduled by the system based upon Communications Plans or can be
entered directly on the Student Mail Form (SUAMAIL).
Analyze Recruiting Enrollment
There are two reports you can use to analyze recruiting enrollment, the Recr/Enrl
Analysis-Source/Recr Report (SRRENRL) and the Recr/Enroll Analysis-How Learned
Report (SRRENRH).
The Recr/Enrl Analysis-Source/Recr Report (SRRENRL) analyzes by source, recruiter,
and contact type the number of people who have been recruited, applied, accepted, and
registered for a specified term. The report also collects data based on source and recruiter
codes and prints an optional section for source codes which have no corresponding
recruiting data associated with them. Data is populated from SRRRSRC.
The Recr/Enroll Analysis-How Learned Report (SRRENRH) provides recruiting
information sorted by recruiter code for a given range of term codes. The data collected for
the number of recruits, applications, and accepted and registered students is based first
on the How I Learned About code and then on term. An optional section may be printed for
How I Learned About codes which have no corresponding recruiting data associated with
them. The How I Learned About code is populated when any Web for Prospects user fills
in the appropriate field on the Web for Prospects page. That information is then pushed to
the user’s Banner® recruiting record. (The field can also be populated manually on
SRARECR/SRRLEND.)
This report will assist schools in determining their success rate with various types of
marketing and advertising methods. For instance, if a school is receiving little or no
feedback from an expensive newspaper campaign but is receiving many calls based on a
radio spot, the decision may be made to put more marketing dollars into radio and less
into print ads. This report will help give the school the necessary information to make
those types of decisions.

451
Banner Student User Guide | Recruiting
Print/Delete Recruits Who Did Not Apply
The Recruits Never Applied to Institution Report Process (SRRINQR) prints, by option, a
report of all prospects who never applied to the institution or deletes all records for those
prospects.
Appointment Scheduling
Appointments may be created and scheduled once a general person record exists. They
are person related, rather than specific to a recruiting record. A recruiting record is not
required to be built on the Recruit Prospect Information Form (SRARECR) in order to set
up an appointment. Appointments are entered and maintained on the Person
Appointments/Contacts Form (SOAAPPT). This form may be accessed from the Recruit
Prospect Information Form (SRARECR).
A person may be scheduled for an appointment with a recruiter via the Recruiter Code or
with an Interviewer. An interviewer is another person in the system and is defined via their
ID.
Multiple appointments, as well as multiple contacts, may be entered for a person on the
Person Appointment/Contacts Form (SOAAPPT). A person may have more than one
appointment at the institution in a single day. Perhaps an applicant would like to schedule
appointments with their Admissions counselor, a Financial Aid counselor, and their
Academic Advisor in a single day. As long as each of these members of your institution is
defined by an ID in your database, these appointments may be scheduled between the
applicant and these parties on the Person Appointments/Contacts Form (SOAAPPT).
Keep the following in mind for scheduling purposes.
• If a person for whom the appointment is being scheduled (the Key Information ID) has
conflicting appointments, the message *WARNING* Appointment already scheduled at
this time for the person is generated to inform the user of such a conflict.
• If the interviewer has conflicting appointments, the message *WARNING* Appointment
already scheduled at this time for the Interviewer is generated.
• And if a conflicting appointment and or visit is created for the recruiter, the message
*WARNING* Appointment/Visit already scheduled at this time for the Recruiter is
generated.
A contact is not a required element when creating an appointment for a person. However,
if a contact is entered, and a result code is entered that is to generate a contact, the
contact will be generated for the person, and may be viewed in the Contact section of the
Person Appointments/Contacts Form (SOAAPPT). Only one contact of the same contact
code may be entered in a day. Multiple contact codes may be entered for a person in a
single day, as long as the contact codes differ.
The Key Block of the Person Appointments/Contacts Form (SOAAPPT) requires an ID
and has an optional Appointment Range Start Date and End Date. If the Appointment
Range Start Date and End Date for appointments and contacts are left Null, then all
appointments and contacts will be queried. Otherwise, only those appointments and
contacts which fall between the Appointment Range Start Date and End Date the user
has specified will be queried.

452
Banner Student User Guide | Recruiting
The Appointment From Date and To Date fields in the Key Information of the Recruiter
Appointments/Visits Form (SRARAPT) allow the user to enter a range of dates, a single
date, or no dates for all records. The user may specifically query those days of interest for
a recruiter's schedule.
If an appointment is to be scheduled with a recruiter, the end user may also schedule that
appointment on the Recruiter/Appointments/Visits Form (SRARAPT) in the Appointments
section. All appointments entered on the Person Appointments/Contacts Form
(SOAAPPT) and scheduled with a recruiter will also display on this form and vice versa.
The Appointment Purge Process (SOPAPPT) will delete all person-related appointments
for a parameter entered range of dates. This process may first be run in audit mode to
verify the results before it is run in update mode; appointments are purged from the
database.
Communication Plan Processing
This section discusses using communication plans.
Communication Plan Processing Overview
Here is a detailed look at communication plan processing.
Introduction
Communication plan processing permits you to automatically assign a recruit, applicant,
or student (learner) to a communication plan online, according to their campus, level,
degree, college, field of study type, field of study code (major), curricula (primary,
secondary, any), and the rules defined for your institution. You can define rules that will
assign a communication plan based upon any field of study type (i.e., not just major) and/
or elements in the primary curriculum, secondary curricula, or all curriculum records.
Automatic mail generation helps the institution communicate quickly and efficiently with
prospects, applicants, and students. Based on the various “attributes” of a person and
their stage of processing (recruiting, admissions, general student), the system generates
different pieces of mail automatically. In the same manner, you can enter requests for
specific mailings to be produced. All mailings are dated and marked with a material code,
letter code, and communication plan where applicable, so you can keep a full audit trail of
correspondence sent to a person. You develop the actual letters online to send to a
person according to the specific needs of your institution.
How Processing is Called by Module
Communication plan processing is called in a variety of situations, depending on the
module for the curriculum record.
Processing is called from Recruiting when:
• new recruiting and curriculum records are added, and recruiting communication plan
matches are found on SOACOMM,

453
Banner Student User Guide | Recruiting
• a new curriculum or field of study is added to a recruiting record, and new recruiting
communication plan matches are found on SOACOMM (i.e., the communication plan
did not already exist for the recruit),
• the withdrawal code is added or changed, or a new source/background institution code
is added on SRARECR, and active communication plan records exist for the recruit,
• a curriculum record is deleted, and active communication plan records exist for the
recruit,
• a recruiting record is deleted or inactivated, and active communication plan records
exist for the recruit,
• a recruiting curriculum or field of study record is inactivated, and active communication
plan records exist for the recruit, and
• the recruiting curriculum is changed, and active communication plan records exist for
the recruit.
Processing is called from Admissions when:
• new application and curriculum records are added, and applicant communication plan
matches are found on SOACOMM,
• a new curriculum or field of study is added to an applicant record, and new applicant
communication plan matches are found on SOACOMM,
• the withdrawal code is added or changed, or a new source/background institution code
is added on SAAADMS, and active communication plan records exist for the applicant,
• a curriculum record is deleted, and active communication plan records exist for the
applicant,
• an admissions record is deleted or inactivated, and active communication plan records
exist for the recruit,
• an admissions curriculum or field of study record is inactivated, and active
communication plan records exist for the recruit, and
• the admissions curriculum is changed, and active communication plan records exist for
the recruit.
Processing is called from General Student when:
• a decision is confirmed for an applicant (SAAQUIK and SAADCRV) that results in the
creation of a new learner curriculum or a general student record, and new learner
communication plan matches are found on SOACOMM,
• a general student record is duplicated on SGASTDN, and new communication plan
matches are found on SOACOMM,
• a new curriculum or field of study is added to a general student record, and new learner
communication plan matches are found on SOACOMM,
• the student status on SGASTDN is changed to IS, and active communication plan
records exist for the learner,

454
Banner Student User Guide | Recruiting
• a curriculum record is deleted, and active communication plan records exist for the
learner,
• a general student record is deleted or inactivated, and active communication plan
records exist for the learner,
• a general student curriculum or field of study record is inactivated, and active
communication plan records exist for the learner, and
• the general student curriculum is changed, and active communication plan records exist
for the learner.
Determining Material Recipients
A communication plan defines standard materials and groups of materials to be sent to a
prospect/applicant/student at pre-defined time intervals. Once a person is assigned to a
communication plan, material is generated on the Student Mail Form (SUAMAIL). Please
note that the person must meet the material rule criteria for each specific material in order
to receive all materials in the plan. Otherwise, only those materials within the plan for
which the person is qualified are generated on the Student Mail Form (SUAMAIL).
In order to be qualified to receive a specific material, the person must meet all the required
criteria as defined on the Material Form (SOAMATL). On this form, the institution defines
the required attributes which a person must have in order to receive the material.
For instance, perhaps your institution has an Institutional Scholarship program called
"Presidential Scholarship for Freshman Minority Students". You would only like those
students that have: (1) received a score of 700 or better on either the Math SAT or the
Verbal SAT, (2) are members of a minority ethnic group, and (3) are new freshman at your
institution. The Material Form (SOAMATL) allows you to establish such requirements,
giving you strong controls over the materials that leave your institution.
If a specific material is part of a person's communication plan, and the individual meets all
the criteria for the material, the material is generated automatically to the Student Mail
Form (SUAMAIL). If a communication plan is added for a person, but the person does not
meet the required criteria to receive the material, no materials are generated. When the
individual does meet the criteria, and the plan is still active, the material is generated for
the person at that time.
For example, a prospect may be in the communication plan defined for undergraduate
students interested in the College of Business. A specific material, such as a College
Night Follow-Up Letter, may be associated with this communication plan. The material
rules for this letter may require that the prospect have a contact defined as "college night".
At the time the plan is assigned, the person did not have a contact of college night.
However, three weeks later, the college night contact is entered. At this time, the College
Night Follow-Up Letter is automatically generated on the Student Mail Form (SUAMAIL).
Defining Materials and Rules
When materials are defined on the Material Form (SOAMATL), the user must first define
specific information regarding the material in the Material information. These specifics
include indicating whether the material is a published work or is generated within the
system using Letter Generation. If the material is generated, a corresponding letter code
must be entered. Initials and the capability of overriding initials are defined here. This

455
Banner Student User Guide | Recruiting
section is also where the user determines whether a duplicate mailing of this material is
permitted.
There are a set of rules in the Material Rules section which may be used to designate who
receives certain materials. The following criteria may be used in combination to determine
which materials should be created for a person: Department, Major, Contacts, Interests,
Attributes, Gender, State or Province, Ethnicity, Legacy, Citizenship, Recruit Type,
Test Scores, Admission Type, Admission Decision, Student Type, Source,
Application Status, ESP Code, and Region or Division.
If a person meets the criteria defined for a specific material, and it is part of their
communication plan, the system sends the individual the corresponding material.
Automatic mailing of materials is based on a person's characteristics and the status of the
recruiting record, admissions application, or general student record.
Material rules have an OR condition within a rule type, and rules have an AND condition
among rule types. For example, in the Material Rules section, the codes which determine
the rules for each field, such as the Department field, follow the OR condition. The codes
which determine the rules for all the fields in the section, from Department through
Region Or Division, follow the AND condition in relation to each other.
Suppose your institution offers scholarships to new freshmen who have scored well on
either the SAT verbal or SAT mathematics tests. You should set up rules for this
scholarship material or letter that indicate these requirements. To accomplish this task,
you should enter in the test score rules that the person must have an SAT verbal score OR
an SAT math score of 700, AND a student type of B (new freshman) to receive this
material. Only these people with a student type of B, and either an SAT verbal or SAT
math score or 700 or better, will receive this material.
Materials are only generated for departments, majors, and general student admit codes
and student types when a communication plan is added. Materials
for non-majors,
departments, and general student admit codes and student types are generated from the
following forms:
• SAAACKL
• SAAADMS
• SAADCRV
• SAAQUIK
• SGASADD
• SGASTDN
• SLARMAP
• SOAAPPT
• SOACCOL
• SOAPLAN
• SOATEST
• SPACMNT

456
Banner Student User Guide | Recruiting
• SPAIDEN
• SPAPERS
• SRAQUIK
• SRARECR
Using Material Groups
Once all materials have been defined, and their corresponding rules have been
established, material groups may be used. Using group codes is a shorthand method of
assigning a group of materials to multiple communication plans, rather than assigning
each material individually to each communication plan.
Groups of materials are defined on the Communication Group Form (SOACGRP). Use
this form to specify the material codes which you would like to be part of the
communication group. An example of a group of materials may be Athletic Brochures.
Instead of adding each athletic brochure at your institution to each communication plan,
use group code processing to ease data entry. On the Communication Group Form
(SOACGRP), enter the group code for Athletic Brochures in the Key Block, and add the
material codes for such things as football brochures, baseball brochures, and field hockey
brochures. Adding the group code to your communication plans associates each of the
materials in the group with the plan. Please note that the rules for each material are
checked individually. If a person meets the rules for the football brochure, and no others in
this group, they will only receive the football brochure.
Associating Materials with Plans
After defining your institution's materials, material rules, and communication groups, you
must determine which materials and groups of materials will be part of each of your
institution's communication plans. Materials and communication groups are added to a
plan on the Communication Plan Form (SOACPLN). Use this form to define individual
materials for a plan and their associated wait days and to assign groups of materials to a
communication plan. If a specific material is added for a communication plan, and that
material is also part of a group of materials, the system does not generate the material
twice to the Student Mail Form (SUAMAIL). It checks your plan rules and only generates
one of the materials that is needed.
Using Communication Plans
Communication plans may be automatically generated online in the Recruiting,
Admissions, and General Student Modules and are controlled by the user. If a person
meets the requirements to be assigned to a communication plan as defined on the
Communication Rules Form (SOACOMM), the Communication Plan Change window
appears, and the user is given the option to assign a communication plan, or exit from the
window.
Note: To exit from the window, you must make some change to the record
(such as remove a plan and Save, change a plan and Save) or simply
save the existing/assigned plans. Use the Return button to return to the
main window of the form.

457
Banner Student User Guide | Recruiting
The following criteria, Campus, Level, College, Degree, Field of Study Type, Field of
Study Code (major), and Curricula (
Primary, Secondary, Any) as defined on the
Communication Rules Form (SOACOMM), and the person's stage of processing, either
recruit, applicant, or student (learner), determine the communication plan in which a
person is placed. You can define rules that will assign a communication plan based upon
any field of study type (i.e., not just major) and/or elements in the primary curriculum,
secondary curricula, or all curricula.
When creating your institution's communication plan rules, be aware that any fields which
are left blank are treated as wildcards. For example, if your institution has two
communication plans, one for undergraduate level and one for graduate level students,
you should create your rules with an undergraduate level code specified for the
undergraduate communication plan. Level would be the only rule defined for the plan, so
any person at that level and indicated processing stage (recruit, applicant, or student) is
placed in that communication plan. The same would be true for the graduate level
students.
Please note that communication plans may be set up at a broad level by using one rule,
such as by level only, or they may be specific for each campus, level, college, and degree
combination. This decision should be made prior to implementing this functionality at your
institution.
Using the Communication Plan Change Window
The Communication Plan Change Window is displayed in the forms listed below, if an
curriculum record is added or updated in the database and this causes a change of
communication plan.
The Communication Plan Change window for the student is automatically displayed on
SAAADMS, SAAQUIK, SRAQUIK, SRARECR, and SGASTDN under the following
conditions:
• A new host record (SRBRECR, SARADAP, SGBSTDN) is added along with its primary
curriculum, and a communication plan matches the curriculum.
• A new curriculum or field of study is added to a host record, and a communication plan
matches the curriculum and does not currently exist for the student's recruiting,
application, or general student record.
Recruit Prospect Information Form (SRARECR)
Quick Recruit Form (SRAQUIK)
Admissions Application/Checklist Summary Form (SAAACKL)
Admissions Application Form (SAAADMS)
Quick Entry Form (SAAQUIK)
Admissions Decision Form (SAADCRV)
General Student Form (SGASTDN)
Communication Plan Collector Form (SOACCOL)

458
Banner Student User Guide | Recruiting
• A host record is inactivated by a withdrawal or other source/background institution code
(SRBRECR, SARADAP), or the student status on the general student record
(SGBSTDN) is inactive.
• A host record is deleted, and communication plans exist for that record.
• A curriculum or field of study is deleted, and communication plans exist for the host
record.
• A curriculum or field of study is inactivated, and communication plans exist for the host
record.
The Communication Plan Change window is not displayed automatically from SOACCOL
and SAAACKL. The user must select the Communication Plan item from the Options
Menu.
The Communication Plan Change window is displayed automatically from SAADCRV if
the resulting decision is to create a new general student record, or when a new curriculum
is added for the student, and a new communication plan matches the curriculum.
When the Communication Plan Change Window appears in one of these forms, the user
is given the option to delete, inactivate, or ignore the initial communication plan and any
pending materials, and the option to add the new communication plan. This is all done by
setting the checkboxes to
Yes, No, Inactivate, or Delete (by checking or
unchecking them) and then saving the data and acknowledging the change. If no change
in plans is desired, use Save to exit from the window.
Note: To exit from the window, you must make some change to the record
(such as remove a plan and Save, change a plan and Save) or simply
save the existing/assigned plans. Use the Return button to return to the
main window of the form.
For example, when a recruiting record is first added to the database via the Recruit
Prospect Information Form (SRARECR), if the prospect's campus, level, college, and
degree match a communication rule on the Communication Rules Form (SOACOMM), the
Communication Plan Change Window appears. The user may save this communication
plan or exit from the window.
As the prospect becomes an applicant, similar steps must be taken to delete, inactivate, or
continue with recruiting communication plans and the addition of admissions or general
student plans. The Communication Plan Change Window will appear in the Admissions
Application Form (SAAADMS) when a record is added to the database. After the
admissions record is saved to the database, the system determines whether a
communication plan exists, needs to be changed, or should be added for the person.
At the time the Communication Plan Change Window appears in the Admissions
Application Form (SAAADMS), the user is given the option to:
1. Delete, inactivate, or ignore the initial communication plan.
2. Delete or ignore any pending materials from the existing communication plan.
3. Add the new communication plan in this window.
After each of these options are selected, the changes should be saved. When
communication plan changes are saved to the database, the message: Communication

459
Banner Student User Guide | Recruiting
Plan Update in Process... appears. You must acknowledge this message to continue
processing the communication plan. If no change in plans is desired, exit from the window.
Note: To exit from the window, you must make some change to the record
(such as remove a plan and Save, change a plan and Save) or simply
save the existing/assigned plans. Use the Return button to return to the
main window of the form.
The Communication Plan Change Window appears in three specific circumstances.
1. If a record for a person is added to SAAADMS, SAAQUIK, SRAQUIK, or SRARECR,
and this person fits the criteria combination of a communication plan designated on
the Communication Rules Form (SOACOMM), and the same active plan does not
already exist for that person on the Communication Plan Assignment Form
(SOAPLAN).
2. If the value for the campus, level, college, degree, field of study type, field of study
code (major), or curricula (primary, secondary, any) is changed for the person on one
of the above forms and that change alters the criteria for the communication plan
assigned to them based on the rules designated on the Communication Rules Form
(SOACOMM).
3. If a person's record is deleted and they have an active communication plan, the
communication plan window will open to ask you if you would like to inactivate their
communication plan.
Because of the complex curriculum validation and communication plan processing that
occurs when records are saved on SAAADMS, SAAQUIK, SRAQUIK, or SRARECR, the
creation of multiple records prompts you to save any changes. If you have made unsaved
changes to one record, then perform a Next Record function, the box Do you want to save
the changes you have made? You must save your changes in order to proceed to the next
record. Yes or No is displayed. If you choose
Yes, the changes for the record you are
working on will be saved, and the necessary validation and communication plan
processing will occur. If you answer
No, the above message displays until you either
choose to save or leave the form.
In other words, you will not be permitted to create a new record without saving changes to
the one you are currently working on. This eliminates confusion over the record for which
curriculum checking and communication plan processing are occurring.
Using the Collector File
Similar steps need to be taken when an applicant becomes a student. Please note that
after registration exists, changes in student information that may cause a plan change
(campus, level, college, degree) must be made on the Student Course Registration Form
(SFAREGS), and that the Communication Plan Change Window will not appear in this
form. Instead, a collector file which can be viewed online in the Communication Plan
Collector Form (SOACCOL) is updated with the changes made that cause the
communication plan to change or materials to be sent. Note that any batch process which
may affect a communication plan or materials to be sent to a plan member also updates
this collector file. Batch processes which may cause an update to the collector file include:

460
Banner Student User Guide | Recruiting
Records added to the Communication Plan Collector Form (SOACCOL) may be updated
individually online by performing a Count Query Hits function or by using the
Communication Plan item from the Options Menu. If a change is being made to a
communication plan, the Communication Plan Change Window appears. If the collector
record is to add materials only, no window appears after performing a Count Query Hits
function; however, the materials are generated. After processing a collector record on this
form, delete the record from the collector file.
The Communication Plan Processing Report (SORCPLN) allows you to process all
collector records in batch. You may clean up the collector file prior to running this batch
process by entering the Communication Plan Collector Form (SOACCOL) and deleting
those records which you do not wish to process.
Assigning Communication Plans
The Communication Plan Assignment Form (SOAPLAN) is used to assign or view
assigned communication plans for a person. The Module Indicator radio group value of
Recruiting, Admissions, or Student, indicates which module the plan is for. A
communication plan follows a person through these modules and may be turned off or on
as processing changes or as the plan changes according to the rules which have been
defined.
A person may have multiple active plans. Multiple plans may exist within a module or
across modules. For example, if your recruiting communication plan rules are set up as
different plans for different campuses, and a student is a prospect for both campuses, that
student may have active recruiting communication plans for both campuses.
Also, if a student is currently enrolled at your institution as an undergraduate student and
has a student communication plan and is also considered a prospect for the graduate
program, the student may also have an active recruiting module communication plan.
A person's communication plans are differentiated by term code and application or
sequence number on the Communication Plan Assignment Form (SOAPLAN). The term
code is associated with recruiting or admissions status, while the application or sequence
number identifies the specific recruiting or admissions application. When the Active
(Indicator) in the Assignment section is checked, the person will receive materials for the
plan code. When the Mail Exists (Indicator) in the Assignment section is checked, the
materials have been automatically posted to the Student Mail Form (SUAMAIL) and have
been sent via Letter Generation, based on the plan code that generated the materials.
Perform a Count Query Hits function from the Plan field in the Assignment section to
create materials for a new communication plan for the person whose ID is in the Key
Information.
Electronic Prospect Load Process (SRTLOAD)
Admissions Decision Calculation Report (SARBDSN)
Student Type Update (SHRTYPE)

461
Banner Student User Guide | Recruiting
Implementing Communication Plans
The following validation forms, application rule/control forms, and report are used in
Communications Plan Processing:
Validation Forms
Application Rule/Control Forms
Report/Process
Perform the following steps to set up processing.
1. Create a communication plan by defining the materials at your institution that will be
made available to each communication plan. Material codes may be up to four
characters in length and are defined on the Material Code Validation Form
(STVMATL).
2. After you have defined your material codes, define the base information for the
material itself. This includes indicating whether the material is published or generated.
If generated, you must enter the letter code.
In addition, you must define the rules which the recruit/applicant/student must meet to
receive this material. Both of these tasks are performed on the Material Form
(SOAMATL).
Please remember that material rules have an OR condition within a rule type, and
rules have an AND condition among rule types. For example, in the Material Rules
section, the codes which determine the rules for each field, such as the Department
Rules field, follow the OR condition. The codes which determine the rules for all fields
STVMATL Material Code Validation Form
STVCGRP Communication Group Code Validation Form
STVCPLN Communication Plan Code Validation Form
SOAMATL Material Form
SOACGRP Communication Group Form
SOACPLN Communication Plan Form
SOACOMM Communication Rules Form
SOACCOL Communication Plan Collector Form
SOAPLAN Communication Plan Assignment Form
SORCPLN Communication Plan Processing Report

462
Banner Student User Guide | Recruiting
in the section, from Department through Region or Division, follow the AND
condition in relation to each other.
3. Once all materials have been defined and their corresponding rules have been
established, you may use material groups. Using group codes is a shorthand method
of assigning the code to multiple communication plans, rather than assigning the code
individually to each communication plan. The first task in using material groups is to
define your group codes on the Communication Group Code Validation Form
(STVCGRP).
4. After defining your group codes, you can add standard materials such as an
Institutional Financial Aid Brochure, GSL Brochure, and Payment Options pamphlet to
groups of materials, such as Financial Aid Materials, for communication plans. This is
done using the Communication Group Form (SOACGRP).
Note: Wait days may be assigned to designate when materials should be
sent for a plan. By using this methodology, you need only associate the
group code with your communication plans, and if the members assigned
to the plan meet the criteria for any or each of the materials within the
group, they are automatically sent those materials for which they qualify.
This processing should ease the burden of data entry when
communication plans are created at your institution.
5. You must define the communication plan codes which will be used at your institution
on the Communication Plan Code Validation Form (STVCPLN). These codes define
the communication plans to which recruits/applicants/students may be assigned at
your institution.
6. Once you have defined your communication plan codes, materials, and
communication groups, you need to specify which materials and groups should be
part of each communication plan. This is accomplished on the Communication Plan
Form (SOACPLN). This form is used to assign materials and groups of materials to a
communication plan.
Groups of materials are set up, added to communication plans, and maintained at the
group level. Materials assigned to a plan, which are also included in groups of
materials assigned to a plan, are not duplicated when mailed. Wait days may be
assigned to designate when materials should be sent for a plan.
7. Now that you have fully defined the communication plans to be used at your
institution, you must specify the rules which a recruit/applicant/student must meet in
order to become assigned to a communication plan. You define rules by Campus,
Level, College, Degree, Field of Study Type, Field of Study Code (major), and
Curricula (
Primary, Secondary, Any), on the Communication Rules Form
(SOACOMM). These criteria, as well as the person's stage of processing in the
Recruiting, Admissions, or General Student modules determine which plan a person is
placed in. Any fields which are left blank are treated as wildcards. The form is also
used to calculate the communication plan to which a person is assigned when a
record is added or updated in the database.
Note: If a recruiting level is not defined during the Electronic Prospect
Load Process (SRTLOAD), the default value of level
00 will be assigned
to each of the added recruiting records. If you choose to use this default
level value and intend to use communication plan processing, you need

463
Banner Student User Guide | Recruiting
to create communication plan rules for the 00 level on the
Communication Plan Rules Form (SOACOMM). Otherwise, your newly
created recruits will not be assigned to a communication plan. It is also
important to note that the default level value of
00 is also used when
initially creating recruiting records on the Recruit Prospect Information
Form (SRARECR) and the Quick Recruit Form (SRAQUIK).
8. Normal processing should now be performed in all modules. Please note that the
Communication Plan Change Window appears during normal processing in the
following forms if a data element (Campus, Level, College, Degree, Field of Study
Type, Field of Study Code (major), and Curricula (
Primary, Secondary, Any))
is added or changed for a person:
For example, when a recruiting record is added online in the Recruit Prospect
Information Form (SRARECR) or the Quick Recruit Form (SRAQUIK), the system
automatically checks to determine if the prospect qualifies for placement in a
communication plan according to their campus, level, degree, college, field of study
type, field of study code (major), curricula (primary, secondary, any, and the rules your
institution has established on the Communication Rules Form (SOACOMM). If the
prospect does qualify for a communication plan, the Communication Plan Change
Window displays.
At this time you will be given the option to (1) delete, inactivate, or exit the initial
communication plan, (2) delete any pending materials from the existing
communication plan or leave them as they are, and (3) add the new communication
plan in this window. If the option selected causes changes in a plan, the changes need
to be saved. When communication plan changes are saved to the database, the
message: Communication Plan Update in Process... appears. You must acknowledge
this message in order to continue processing the communication plan. If no change in
plans is desired, you may exit from this window.
Note: To exit from the window, you must make some change to the record
(such as remove a plan and Save, change a plan and Save) or simply
save the existing/assigned plans. Use the Return button to return to the
main window of the form.
Recruit Prospect Information Form (SRARECR)
Quick Recruit Form (SRAQUIK)
Admissions Application/Checklist Summary Form (SAAACKL)
Admissions Application Form (SAAADMS)
Quick Entry Form (SAAQUIK)
Admissions Decision Form (SAADCRV)
General Student Form (SGASTDN)
Communication Plan Collector Form (SOACCOL)

464
Banner Student User Guide | Recruiting
As the prospect moves to applicant status, you must take similar steps to delete,
inactivate, or continue with recruiting communication plans, and to add the admissions
plans. The same is true when an applicant becomes a student.
If you perform a Save function from the Communication Plan Change Window, you
are given the message Communication Plan Update in Process... which you must
acknowledge, before the plan is added for the recruit. If you choose the Exit function,
the communication plan window disappears, and no communication plan is assigned.
9. After registration exists, 1) changes in student information that may cause a plan
change (campus, level, college, degree) must be made on the Student Course
Registration Form (SFAREGS), and 2) the Communication Plan Change Window will
not appear in this form. Instead, a collector file which can be viewed and processed
individually online in the Communication Plan Collector Form (SOACCOL) is updated
with the changes made that cause the communication plan change or materials to be
sent. In order to process these changes in batch, the Communication Plan Processing
Report (SORCPLN) must be run to update communication plans according to the
entered parameters.
Note: Any batch process which may affect a communication plan or
materials to be sent to a plan member updates this collector file on
SOACCOL. Those collector records may be updated individually online or
in batch via the Communication Plan Processing Report (SORCPLN).
Communication plan information updates the batch collector file when you run the
Electronic Prospect Load Process (SRTLOAD), the Student Type Update Report
(SHRTYPE), the Admission Decision Calculation Report (SARBDSN), or when you
make changes to the general student information after registration information exists.
Use the Communication Plan Collector Form (SOACCOL) to display the people which
have been added to the collector file for batch processing for communication plans.
The Communication Plan Processing Report (SORCPLN) updates these changes for
communication plans in the collector file. The changes may be updated online by the
performance of a Count Query Hits function from the record you want to update.
10. Use the Communication Plan Assignment Form (SOAPLAN) to assign or view
assigned communication plans for a person. The Module Indicator radio group value
of Recruiting, Admissions, or Student, indicates which module the plan is
associated with. A communication plan follows a person through these modules and
may be turned off or on online as processing changes or as the plan changes,
according to the rules which have been defined. A person may have multiple
communication plans assigned to them which are differentiated by term code and
application or sequence number. The term code is associated with recruiting or
admissions status, while the application or sequence number identifies the specific
recruiting or admissions application.
When the Active (Indicator) in the Assignment section is checked, the person will
receive materials for the plan code. When the Mail Exists (Indicator) in the
Assignment section is checked, the materials have been automatically posted to the
Student Mail Form (SUAMAIL) and have been sent via Letter Generation, based on
the plan code that generated the materials. Materials may be sent manually once a
plan is assigned to a person, materials are created, and the rules for the materials
meet the criteria for addition to SUAMAIL.

465
Banner Student User Guide | Recruiting
When a Count Query Hits function is performed from the Plan field in the Assignment
section, materials are created for a new communication plan for the person whose ID
is in the Key Information.
Electronic Prospects Processing
This section discusses electronic prospects.
Overview
Electronic Prospects processing provides a Web data entry point into the existing
electronic prospects search and test score data load functionality and allows for recruit
information to be available in the Banner Student Self-Service module called Web for
Prospects.
Please refer to the Banner Student Self-Service User Guide for more information on the
Web for Prospects module. Please refer to the “Search and Test Score Data Load” section
which follows “Electronic Prospects Processing” for more procedural information.
The following forms are used to support the electronic prospects functionality:
• Web Prospect How I Learned About Validation Form (STVLEND)
• Electronic Prospect Validation Form (STVPREL)
• Web Acknowledgment Validation Form (STVWACK)
• Web Prospect Information Selection Validation Form (STVWPIC)
• Electronic Prospects Default Options Form (SRAPRED)
• Electronic Prospect Detail Form (SRAPREL)
• Recruit Prospect Information Form (SRARECR)
• Web for Prospects Acknowledgment Letter Form (SRAWACK)
• Web for Prospects Display Rules Form (SRAWPDS)
• Web for Prospects Selection Rules Form (SRAWPRO)
Processing Steps
Use these steps to set up the Web for Prospects Web page entry:
1. Enter your Web prospect type code on the Electronic Prospect Validation Form
(STVPREL). (Required)
2. Identify the data entry sections to be displayed on the Web page on the Web for
Prospects Selection Rules Form (SRAWPRO). (Required)

466
Banner Student User Guide | Recruiting
Warning! Depending on your locale, it might be illegal to require users to
provide ethnicity and race information. Do not check the Response
Required on Web checkbox on SRAWPRO for the ETHNICITY
(Prospect Ethnicity/Race) Web prospect selection code if requiring users
to provide ethnicity and race information is prohibited.
If such a regulation applies to your institution, you must also review your
existing Web selection definitions and uncheck this checkbox for any
selections for which it is currently checked.
3. Enter default recruiting data on the Electronic Prospects Default Options Form
(SRAPRED). (Optional)
4. Select Banner validation items to appear in the Web lists on the Web for Prospects
Display Rules Form (SRAWPDS). (Optional)
5. Write your acknowledgment letter on the Web for Prospects Acknowledgment Letter
Form (SRAWACK). The letter is constructed dynamically and appears at the end of
the Web data entry. (Optional)
Web Prospect How I Learned About Validation Form (STVLEND)
This form is used to build Web for Prospects How I Learned About codes to designate how
the prospect learned about the school. These codes are entered by prospects on the Web
for Prospects Web entry forms. The data is migrated to the Banner production Recruiting
module and is available on the Recruit Prospect Information Form (SRARECR).
Electronic Prospect Validation Form (STVPREL)
This form is used to enter the electronic prospect type codes. The Enter on WEB and
WEB Page ID fields are used to support Web for Prospects.
The prospect codes that do not have the Enter on WEB checkbox checked cannot be
entered on the Web. The WEB Page ID field is used for grouping prospects on a Web
page. For example, if your institution has several undergraduate programs, you may have
different default values and require that different data be entered. Therefore, you would
create separate prospect codes. You can key the selection of your undergraduate
programs off one site by constructing a link using the WEB Page ID value.
Web Acknowledgment Validation Form (STVWACK)
This form is used to build Web for Prospects Acknowledgment codes for data elements
from the Electronic Prospect System. The values delivered with Web for Prospects are
system-required. These codes are used on the Web for Prospects Acknowledgment Letter
Form (SRAWACK) for placing Electronic Prospect data elements on the Web
acknowledgment letter. The acknowledgment letter appears on the Web after the prospect
presses the Submit button.

467
Banner Student User Guide | Recruiting
Web Prospect Information Selection Validation Form (STVWPIC)
This form is used to build Web for Prospects Information Selection codes for Web data
entry sections. The values delivered with Web for Prospects are system-required. These
codes are entered on the Web for Prospects Selection Rules Form (SRAWPRO) to control
order and data entry requirements for the Web for Prospects Web entry forms.
Warning! Depending on your locale, it might be illegal to require users to
provide ethnicity and race information. Do not check the Response
Required on Web checkbox on SRAWPRO for the ETHNICITY
(Prospect Ethnicity/Race) Web prospect selection code if requiring users
to provide ethnicity and race information is prohibited.
If such a regulation applies to your institution, you must also review your
existing Web selection definitions and uncheck this checkbox for any
selections for which it is currently checked.
Electronic Prospects Default Options Form (SRAPRED)
This form is used to enter the default recruit values for Web-entered data.
Enter a code from STVPREL in the Electronic Prospect Code field in the key, and use
Next Block to see the default values for the prospect code. The prospect codes on
STVPREL must have the Enter on WEB checkbox checked in order to be displayed in the
list of values for the Electronic Prospect Code field on SRAPRED.
The Clear Defaults button is used to remove the existing values so new ones can be
entered for the code in the key.
This form is optional for use in Web for Prospects processing. The Level, Recruiting
Term, Degree, and Major are required in the Recruiting module. If those values are not
entered here, and this data is not entered on the Web, the Banner system-required values
will default into the recruiting records.
If you do enter data on this form, the Level field is required.
Web for Prospects Acknowledgment Letter Form (SRAWACK)
This form allows you to customize the acknowledgment letter. The acknowledgment letter
will appear on the Web page after the student presses the Submit button.
Enter a code from STVPREL in the Web Electronic Prospect Code field in the key, and
use Next Block to see the sequence numbers and variables for the letter. The prospect
codes on STVPREL must have the Enter on WEB checkbox checked in order to be
displayed in the list of values for the Web Electronic Prospect Code field on SRAWACK.
The Sequence field determines the order of the rows in the letter. When you first type in
your letter, you can leave the sequence number blank, and the sequence will
automatically fill in when you save the letter. Or, you can type in a sequence number
incrementing each line by five, just in case you need to add new lines at a later time.

468
Banner Student User Guide | Recruiting
The Formatting field is a pulldown list where you can select an HTML command. The
values for the field are blank, New Paragraph, New Line, or Horizontal Rule. The only time
the formatting is ignored is when the Text and the Prospect Data fields are blank. This
prevents blank lines from appearing in the middle of your letter.
The Prospect Data field is used for data elements from the Electronic Prospect System.
These variables are stored on the Web Acknowledgment Validation Form (STVWACK).
The Text field is a free format field where you can include HTML commands in the text for
additional formatting. Use the Comments button to display the Editor window and enter
your text.
Web for Prospects Display Rules Form (SRAWPDS)
This form allows you to reduce the number of choices the student can select from or to
change the descriptions that will display on the Web.
This is accomplished by customizing the pulldown lists with specific values from Banner
validation tables. All list boxes in the Web for Prospects Web pages are populated from
Banner validation tables.
Enter a code from STVPREL in the Web Electronic Prospect Code field in the key, and
use Next Block to see the table names and rules used with the prospect code. The
prospect codes on STVPREL must have the Enter on WEB checkbox checked in order to
be displayed in the list of values for the Web Electronic Prospect Code field on
SRAWPDS.
You may enter the last four characters of a validation table name in the Validation Table
Name field in the key to see only the rules for that validation table and the prospect code,
or leave the Validation Table Name blank to view all the rules for the prospect code. For
example, enter
TERM for STVTERM, CITZ for STVCITZ, and RESD for STVRESD.
Enter the validation code value in the Code Value field. The description from the
validation table will default, but you can type over the description in order to customize it.
The student will never see codes on the Web for Prospects Web page. They will only see
descriptions. If you do not enter data on this form, all entries in the Banner 2000 validation
table will be listed.
High School and Prior College Lists
The Web for Prospects Web page allows you to search for a high school or prior college.
The search process will first prompt the student to select the state, province, or nation
from pulldown lists. The student is next prompted to select the name of the city where the
school is located. The last selection is for the school itself.
The requirement for this search is that address data be present for the schools included in
the search. School addresses are maintained on the Source or Background Institution
Base Form (SOASBGI).
The High School entry section has an alternative checkbox where the student can indicate
he or she was home schooled. The STVSBGI value for the Home School must be stored
on the SAAERUL rule for
HOMESCHOOL.

469
Banner Student User Guide | Recruiting
If the student cannot find his or her school in the selection, yet he or she enters the name
of the school, or any of the self reported data (including GPA, graduation date, rank, or
class size), the school code will default in the value on the SAAERUL rule for
UNKNOWNHSCH. If the student enters a school code that is not included in your STVSBGI
table, that value will still be stored in the SRTHSCH or SRTPCOL table in the
SBGI_CODE_INVALID
column.
Web for Prospects Selection Rules Form (SRAWPRO)
This form is used to identify the selections for display on the Web and the order in which
they display.
Enter a code from STVPREL in the Web Electronic Prospect Code field in the key, and
use Next Block to see the selection codes used with the prospect code. The prospect
codes on STVPREL must have the Enter on WEB checkbox checked in order to be
displayed in the list of values for the Web Electronic Prospect Code field on SRAWPRO.
The values in the Selection Code field are created on the Web Prospect Information
Selection Validation Form (STVWPIC) and are system-required. Each selection is equated
to data elements in the Web for Prospects module of the Banner Student Self-Service
product.
Use the Address Code and EMAIL (Code) fields to enter the values to be used. These
values are required for the selection codes
ADDRESS1, ADDRESS2, and EMAIL.
The Display Order on Web field is used to designate the order of the modules on the
Web page that fits your requirements.
The Response Required on Web checkbox, when checked, is used to force the prospect
to enter data on the Web page.
Warning! Depending on your locale, it might be illegal to require users to
provide ethnicity and race information. Do not check the Response
Required on Web checkbox on SRAWPRO for the ETHNICITY
(Prospect Ethnicity/Race) Web prospect selection code if requiring users
to provide ethnicity and race information is prohibited.
If such a regulation applies to your institution, you must also review your
existing Web selection definitions and uncheck this checkbox for any
selections for which it is currently checked.
When you first enter this form with a new prospect code from STVPREL, the selection
codes for
NAME and ADDRESS1 will automatically default.
If you have not entered any selection codes on this form for a prospect code from
STVPREL, the prospect code will not be available on any Web page in Web for Prospects.
Electronic Prospect Detail Form (SRAPREL)
This form is used to view biographical and search or test score data for a person that has
been loaded to the temporary tables. The form allows you to view all search data load

470
Banner Student User Guide | Recruiting
records for this ID which are present in the Search Tape View (SRVPREL). This form is
accessed independently or from the Electronic Prospect Inquiry Form (SRIPREL) using
the Detail item in the Options Menu.
Test Scores/Interests/Learned Window
Use this window to view test score and interest information for the record, as well as how
the person learned about the school. Use the Test Scores/Interests item in the Options
Menu of the main window to access this window.
The (Learned About Institution) Code in the (How I) Learned block is used by Web for
Prospects to capture how the person learned about the school. The data is initially stored
in Web for Prospects and is viewable from SRAPREL. After the prospect has been
migrated to Banner Production, the data is available on SRARECR.
The How I Learned data is migrated to the recruit record based on the rule value
CREATELEARNED, which is stored on SAAERUL under the group PREL. If the
CREATELEARNED rule is Y, the prospect How I Learned data is migrated to the recruit
How I Learned data.
The (Learned About Institution) Code is validated on the Web Prospect How I Learned
About Validation Form (STVLEND).
Requested Materials Window
The Requested Materials window is used to compliment the collection of that data for
prospects in the Web for Prospects module of Banner Student Self-Service. This window
is used to list the materials requested by the student. The SRTMATL table is used to store
the materials collected on the Web.
The SRKPREL package is used to migrate SRTMATL data to GURMAIL in Banner
production. The materials will not be migrated to GURMAIL if they fail the duplicate
checking rules. A material is a duplicate if an existing GURMAIL row exists for the same
material and has a blank print date, or the GURMAIL row exists for the same material with
a non-blank print date, but the Allow Duplicate Entry rule on SOAMATL is not checked.
Use the rule on the Electronic Admissions Application Rules Form (SAAERUL) where the
Group (Code) is
PREL and the Label is CREATEMATERIALS.
Recruit Prospect Information Form (SRARECR)
This form provides the information necessary for all recruitment-related activities, captures
and validates information on prospective applicants, and in the Comments/Learned
window contains information for electronic prospect processing on how the person learned
about the school.
Comments/Learned Window
Use this window to enter comments about the prospect and to view information on how
the person learned about the school. This window is accessed using the Comments,
Learned item in the Options Menu.

471
Banner Student User Guide | Recruiting
The (How I) Learned (About Institution Code) in the (How I) Learned block is used by
Web for Prospects to capture how the person learned about the school. The data is initially
stored in Web for Prospects and is viewable from SRAPREL. After the prospect has been
migrated to Banner Production, the data is available on SRARECR.
The How I Learned data is migrated to the recruit record based on the rule value
CREATELEARNED, which is stored on SAAERUL under the group PREL. If the
CREATELEARNED rule is Y, the prospect How I Learned data is migrated to the recruit
How I Learned data.
The (How I) Learned (About Institution Code) is validated on the Web Prospect How I
Learned About Validation Form (STVLEND).
Electronic Admissions Application Rules Form (SAAERUL)
This form is used to define the rules which are used when processing electronic
applications, electronic prospects, and data loads. Rows for this table are not intended to
be added locally. Rules which will be used in system processing will be delivered, and
users will only need to update the (Rule) Value to reflect local processing options if it
contains
UPDATE ME.
Rules fall into three major categories:
• Rules which control processing within Web admissions, Web prospects, or data load
processing.
For example, there is a rule which specifies the number of outside interest slots which
will display in Web applications.
• Rules which specify default values for various data elements. These kinds of rules can
apply to both Web and EDI applications.
• Rules which govern how data will be loaded into the permanent Banner tables.
For example, there is a set of rules which specifies whether application records will be
created if one already exists for the person, term, level, major, or overall curriculum
chosen.
Three general types of values may be required in the (Rule) Value field, and the Rule
Description field will usually indicate the type of value expected.
• Simple descriptive answers, like true, false, or a number to indicate the number of
values which will be available.
• A valid Banner validation table code, like an address type code.
• An EDI value which is valid within the TS189 transaction set. A complete, current listing
of all codes used in the TS189 transaction set is available online.
For a complete current set of EDI values, you can consult the Postsecondary Electronic
Standards Council (PESC) Website (
www.pesc.org) and use the link to the EDI
Implementation Guides.

472
Banner Student User Guide | Recruiting
(When a valid EDI value is expected, the EDI Indicator for the rule will be checked or
Y).
Use the Copy PREL Group button to copy existing electronic prospect rules to a new
group code. Once the values have been copied, the System Required Indicator defaults
to
N or unchecked, so you can customize the group settings. This allows users to
customize the electronic prospect rules based on each electronic prospect code used,
instead of the same set of values applying to all electronic prospect codes.
For example, if an electronic prospect code of
SAT exists and you want it to be processed
differently based on the rules for a group code of
PREL on SAAERUL, then do the
following.
1. Define a new group code on the EDI Rule Group Validation Form (STVEGRP) for
SAT. (The new group code must match the electronic prospect code).
2. Enter
SAT in the Group field on SAAERUL.
3. Select the Copy PREL Group button. All of the rules that exist for the
PREL group
code will be copied to your new
SAT group code.
4. You can customize those values, and they will be applied only when the electronic
prospect code used on SRTLOAD, SRRSRIN, or SRRPREL is
SAT.
Rules on SAAERUL
The rules on the Electronic Admissions Application Rules Form (SAAERUL) with the
Group (Code)
PREL allow you to set up default values for such things as an unknown
high school and to control the migration of the data.
New Recruit Data
Rules are used for determining under what circumstances recruiting records, addresses,
and phone numbers will be loaded. For the rule label
CREATENEWRECR (no recruit
exists, create new recruit), the possible values are
Y or N. When an incoming record is
being loaded and matched to an existing Banner person, the code will check if a recruiting
record already exists for the person. If none does, then the code will check the
CREATENEWRECR rule. If the rule value is Y, then the incoming data will be used to create
a recruiting record. If the rule value is
N, then no recruiting record will be created.
The two other rules used for creating a recruiting record are
MCREATENEWRECR
(matching recruit exists, create new recruit) and
NMCREATENEWRECR (non-matching
recruit exists, create new recruit).
• The possible values for MCREATENEWRECR are Y, N, or U (Update). If an incoming
record is being loaded, the program will determine if a matching recruiting record
already exists. An existing recruiting record matches if it has the same term, level, and
optionally campus.
• If the incoming record matches the existing recruiting record, and the
MCREATENEWRECR rule value is Y, then a new recruiting record will be created.
• If the
MCREATENEWRECR rule value is U, then no new recruiting record will be
created, and instead, the existing recruiting record will be updated. If a matching

473
Banner Student User Guide | Recruiting
recruiting record exists, and the incoming contact, source, and/or interests are
different, those values are updated.
• If the
MCREATENEWRECR rule value is N, then no recruiting record will be added,
and the existing recruit record will not be updated.
• The possible values for NMCREATENEWRECR are Y or N. If an incoming record is being
loaded, and it does not match to an existing recruiting record (based on term, level, and
optionally campus), then the code will check the
NMCREATENEWRECR rule to
determine whether or not to create a new recruiting record.
New Address Data
The rule label NEWADDRESS (no address exists, create one) is used when no address
currently exists for the person in Banner. The possible values are
Y or N. If the rule value
is set to
Y and no address currently exists for the person, the incoming address will be
loaded.
The two other rules used for creating an address record are
ADDRDIFFTYPE (address
exists with different address type, add address) and
ADDRSAMETYPE (address exists
with same address type, add address). The possible values for these rules are
Y or N.
• If an address already exists in Banner, and the incoming address record has the same
address type, the address record will be inserted if the
ADDRSAMETYPE rule value is Y.
• If the incoming address record has an address type that differs from the existing Banner
address record, and the
ADDRDIFFTYPE rule value is Y, then the incoming address
record will be loaded. If the
ADDRDIFFTYPE rule value is N, it will not be loaded.
New Phone Data
The rule label NEWPHONE (no phone exists, create one) is used when no phone number
currently exists for the person in Banner. The possible values are
Y or N, where Y creates
a new phone number, and
N does not create a new phone number.
The two other rules used for creating a phone record are
PHONDIFFTYPE (phone
number exists with different phone type, add phone) and
PHONSAMETYPE (phone
number exists with same phone type, add phone). The possible values for these rules are
Y or N.
• If a telephone record already exists in Banner, and the incoming telephone record has
the same phone type, the phone number will be inserted if the
PHONSAMETYPE rule
value is
Y.
• If the incoming phone record has a phone type that differs from the existing Banner
phone type, and the
PHONDIFFTYPE rule value is Y, then the incoming phone number
will be loaded. If the value is
N, it will not be loaded.
Web for Prospects Phone and Address Data
Web for Prospects allows users to enter extra phone numbers in Banner Student Self-
Service that are not associated with a specific address. If extra phone numbers are

474
Banner Student User Guide | Recruiting
entered by prospects on the Web, they will be processed in conjunction with address/
phone data as follows:
1. The primary address (Address 1) is loaded to Banner along with its associated phone
number using the electronic prospect rules identified above.
2. The secondary address (Address 2), if it exists, is loaded to Banner along with its
associated phone number using the electronic prospect rules identified above.
3. The extra phone numbers entered are processed one at a time, based on the
alphabetical order of the telephone type, using the electronic prospect rules identified
above.
For example:
• NEWPHONE = Y
• NEWADDRESS =Y
• PHONSAMETYPE = N
• PHONDIFFTYPE = Y
The person being loaded is new to Banner and has entered a mailing address and phone
number. In addition, they have entered a separate “mailing” phone number and a
“business” phone number. When the record is processed, the mailing address and phone
number will be loaded, because the
NEWADDRESS and NEWPHONE rules are both set to
Y.
Next, the business phone number will be processed, because it falls first alphabetically
based on the phone type. The business phone number will be loaded, because it is a
different type than the already processed mailing phone number, and the
PHONDIFFTYPE rule is set to Y. The mailing phone number will then be processed. It will
also be loaded to Banner, because it is a different type than one of the existing Banner
phone numbers (the business phone that was just processed), and the
PHONDIFFTYPE
rule is set to
Y.
SAAERUL Rules
The rules on the Electronic Admissions Application Rules Form (SAAERUL) with the
Group (Code) of
PREL allow you to control how the incoming data is processed. Please
see the table of rules that follows.
Note: Rows for this table are not intended to be added locally. Rules
which will be used in system processing will be delivered, and users will
only need to update the (Rule) Value on SAAERUL to reflect local
processing options.
Please refer to the “Loading Packages/Procedures from Temporary to Production Tables
(SRKPREL) Process Flows” section of the “Process Flows” chapter to review process
flows describing how recruiting data is loaded and updated.

475
Banner Student User Guide | Recruiting
Group Label Description EDI Instructions
DISP WEBPTESTDISP # of Prospects Test
Rows
N Determines the number of test score
rows that will display on the Web for
Prospects Web page.
PREL ACTADMR Default ADMR code for
ACT
N Identifies the checklist summary
request default ADMR code value to
be updated in the Application Detail
block of the Admissions Application
Form (SAAADMS), if it exists for the
record. This value will also be used to
populate the Admission Request
field on the Test Score Information
Form (SOATEST).
This default is only used for ACT data
loads and when the ADMR value is
not populated on the Test Code
Validation Form (STVTESC) for ACT
test code record types.
PREL ADDRDIFFTYPE Create address if
different type
N Determines if an address should be
created, if one with a different address
type already exists. If set to
Y, an
address record will be created. If set
to
N, no address record will be
created.
PREL ADDRSAMETYPE Create address if same
type
N Determines if an address should be
created, if one with the same address
type already exists. If set to
Y, a new
address record will be created. If set
to
N, no address record will be
created.
PREL COMMPLAN Create commplan
collector entry
N
If set to
Y, a record will be inserted
into the Communication Plan
Collector Table (SORCCOL) which is
visible on the Communication Plan
Collector Form (SOACCOL).

476
Banner Student User Guide | Recruiting
PREL CREATECONT Create new contact if
recruit or app.
N
If set to
Y, the contact code entered as
a parameter on the SRTLOAD
process for data load or the contact
code listed on the Electronic
Prospects Default Options Form
(SRAPRED) for electronic prospects
will be inserted into the SORCONT
table viewable on the Recruit
Prospect Information Form
(SRARECR) if a recruit record exists
and the Admissions Application Form
(SAAADMS) if an application record
exists.
If no contact code was loaded via
SRTLOAD, and this parameter is
Y,
the system will insert the contact code
for the appropriate interface code
from the Interface Code Validation
Form (STVINFC). The appropriate
contact code will be loaded each time
the recruit is loaded to Banner.
If set to
N, a contact code will not be
created for new recruit records.
PREL CREATELEARNED Create learned: Enter Y
or N
N
If
Y is entered, and if the prospect is
new to Banner, or if the prospect is
matched to a recruit, and the recruit
term, level, and campus are different,
then the How I Learned data is
created. The learned information will
always be created if the prospect is
matched to an applicant and the
UPDATEIIFAPP is Y, or if the
prospect is matched to a recruit with
same term, level, and campus. The
learned data is entered only on the
Web.
PREL CREATEMATERIALS Create Materials: Enter
Y or N
N
If
Y is entered, and if the prospect is
new to Banner, or if the prospect is
matched to a recruit, and the recruit
term, level, and campus are different,
then the materials data are created.
The materials will always be created if
the prospect is matched to an
applicant and the
UPDATEIIFAPP is
Y, or if the prospect is matched to a
recruit with same term, level, and
campus.
Group Label Description EDI Instructions

477
Banner Student User Guide | Recruiting
PREL CREATENEWAPPL Create New Application N Allows schools to indicate that they
want an application record created at
the same time a recruit record is
created by SRRPREL.
When this rule is
Y, a new application
will only be created when the term,
level, college, degree, department,
and/or major do not match an existing
application.
PREL CREATENEWRECR Create new recruit Y
If set to
Y and no recruit record exists,
a new recruit record will be created. If
set to
N and no recruit record already
exists, then a new recruit record will
not be created.
PREL CREATESRCE Create new source Y
If set to
Y, the source code entered as
a parameter on the SRTLOAD
process for data load or the source
ode listed on the Electronic Prospects
Default Options Form (SRAPRED) for
electronic prospects will be inserted
into the SRRRSRC table viewable on
the Recruit Prospect Information
Form (SRARECR). If no source code
was loaded via SRTLOAD, and this
parameter is
Y, the system will insert
the source code for this from the
Interface Code Validation Form
(STVINFC).
PREL GMATADMR Default ADMR code for
GMAT
N Identifies the checklist summary
request default ADMR code value to
be updated in the Application Detail
block of the Admissions Application
Form (SAAADMS), if it exists for the
record. This value will also be used to
populate the Admission Request
field on the Test Score Information
Form (SOATEST).
This default is only used for GMAT
data loads and when the ADMR value
is not populated on the Test Code
Validation Form (STVTESC) for
GMAT test code record types.
Group Label Description EDI Instructions

478
Banner Student User Guide | Recruiting
PREL GREADMR Default ADMR code for
GRE
N Identifies the checklist summary
request default ADMR code value to
be updated in the Application Detail
block of the Admissions Application
Form (SAAADMS), if it exists for the
record. This value will also be used to
populate the Admission Request
field on the Test Score Information
Form (SOATEST).
This default is only used for GRE data
loads and when the ADMR value is
not populated on the Test Code
Validation Form (STVTESC) for GRE
test code record types.
PREL HOMESCHOOL SBGI code, if the
prospect checks the
Home School checkbox
on Web for Prospects
Web page
N This applies only to the Web. The
value entered on SAAERUL for this
must be a valid high school on
STVSBGI.
PREL HSCHADMR Default High School
Checklist
N This value will be used to populate the
Admissions Request field on the
High School Information Form
(SOAHSCH). This default is only used
when the Admissions Request value
is not populated on the Source/
Background Institution Code
Validation Form (STVSBGI).
PREL HSCHSELFREPORT Update self-reported
items
N
If set to
Y, then the student self-
reported items, such as GPA, class
rank, etc., will be loaded to the
appropriate tables.
PREL INTERESTMAX Maximum interest to
load
1 Indicates the number of interests to
be loaded from a search data load to
the SORINTS table if the
LOADINTEREST group label is set to
Y.
PREL LOADALTID Load Same Alt ID Type/
Diff ID
N
If set to
N, do not load an incoming
additional ID for the same additional
ID type.
If set to
Y, load an incoming additional
ID for the same additional ID type, as
long as the additional ID is different.
Group Label Description EDI Instructions

479
Banner Student User Guide | Recruiting
PREL LOADINTEREST Load interests N
If set to
Y, interests provided will be
loaded to the SORINTS table. All
interest codes must have Banner
conversion values defined on the
Tape Code Conversion Form
(SOTCNVT) for the Validation Table
Name of
INTS.
PREL LOADMAJOR Use provided major N
If set to
Y, majors provided will be
loaded to a field of study row with a
Type of
MAJOR and a Priority of 1
(backfilled to the Major 1 field on
SRBRECR) and to a field of study row
with a Type of
MAJOR and a Priority
of
2 (backfilled to the Major 2 field on
SRBRECR). All major codes must
have Banner conversion values
defined on the Tape Code Conversion
Form (SOTCNVT) for the Validation
Table Name of
MAJR.
PREL LOADOLDTESTS Load older test scores N
If set to
Y, test score records with test
dates older than the current record’s
scores will also be loaded.
PREL MAJOR2INTEREST Load major to interests N
If set to
Y, and LOADINTEREST is
set to
Y, major codes provided will be
converted and loaded to the
SORINTS table. All major codes for
which interests are to be loaded must
have Banner conversion values set
appropriately on the Tape Code
Conversion Form (SOTCNVT) for the
Validation Table Name of
INTS.
Group Label Description EDI Instructions

480
Banner Student User Guide | Recruiting
PREL MCREATENEWRECR Matching create new
recruit
N
If set to
Y, and the incoming record
matches an existing recruiting record,
then a new recruiting record is
created.
If set to
U, and the incoming record
matches an existing recruiting record,
then no recruiting record is created,
and the existing record is updated. If a
matching recruiting record exists, and
the incoming contact, source, and/or
interests are different, those values
are updated.
If set to
N, and the incoming record
matches an existing recruiting record,
then no recruiting record is created,
and no records are updated.
A match exists if the incoming record
has the same term, level, and
optionally campus as the existing
recruiting record.
PREL NEWADDRESS Create address Y
If set to
Y, and no address record
exists for the person in Banner, an
address record will be created. If set
to
N, and no address record exists, no
record will be created.
PREL NEWPHONE Create phone Y
If set to
Y, and no phone record exists
for the person in Banner, a phone
record will be created. If set to
N, and
no phone record exists, no record will
be created.
PREL NMCREATENEWRECR Non-match create new
recruit
N
If set to
Y, and the incoming record
does not match an existing recruit
record, a new recruiting record is
created. If set to
N, no recruiting
record is created.
A match exists if the incoming record
has the same term, level, and
optionally campus as the existing
recruiting record.
Group Label Description EDI Instructions
481
Banner Student User Guide | Recruiting
PREL PCOLADMR Default Prior College
Checklist
N This value will be used to populate the
Admissions Request field on the
Prior College Form (SOAPCOL). This
default is only used when the
Admissions Request value is not
populated on the Source/Background
Institution Code Validation Form
(STVSBGI).
PREL PHONDIFFTYPE Create phone if different
type exists
N Determines if a phone record should
be created, if one with a different
phone type already exists. If set to
Y,
a phone record will be created. If set
to
N, no phone record will be created.
PREL PHONSAMETYPE Create phone if same
type exists
N Determines if a phone record should
be created, if one with the same
phone type already exists. If set to
Y,
a new phone record will be created. If
set to N, no phone record will be
created.
PREL PRIMESRCE Create source as
primary
N
If set to
Y, and CREATESRCE is set to
Y, then the source code loaded to the
SRRRSRC table will be set as the
primary source. Only one source will
be flagged as primary for each recruit
term and sequence number upon
loading to Banner.
Group Label Description EDI Instructions

482
Banner Student User Guide | Recruiting
PREL PSATMAJOR Obsolete Sept 2013
SSS_SEARCH
Formerly, Load the
PSAT Major First
This rule is obsolete as
of September 2013 and
is no longer used with
the SSS_SEARCH data
load.
N Loads the PSAT major if it exists. This
rule is only used for SSS_SEARCH
data load processing.
When
LOADMAJOR is set to Y and
PSATMAJOR is set to Y, and the
PSAT exists, the PSAT major will be
loaded to a field of study row with a
Type of
MAJOR and a Priority of 1
(backfilled to the Major 1 field on
SRBRECR). The first SAT major code
listed on the file will then be loaded to
a field of study row with a Type of
MAJOR and a Priority of 2 (backfilled
to the Major 2 field on SRBRECR) if it
exists.
When
LOADMAJOR is set to Y and
PSATMAJOR is set to N, the PSAT
major will not load at all, and the first
two SAT major codes on the file will
be loaded to a field of study row with a
Type of
MAJOR and a Priority of 1
(backfilled to the Major 1 field on
SRBRECR) and a field of study row
with a Type of
MAJOR and a Priority
of
2 (backfilled to the Major 2 field on
SRBRECR), if they exist.
Note: Whatever your settings are in
SAAERUL, if the second major to be
loaded translates to 0000
(undeclared), the second major will
not be loaded.
PREL SATHADMR Default ADMR code for
SAT
N Identifies the checklist summary
request default ADMR code value to
be updated in the Application Detail
block of the Admissions Application
Form (SAAADMS), if it exists for the
record. This value will also be used to
populate the Admission Request
field on the Test Score Information
Form (SOATEST).
This default is only used for SAT data
loads and when the ADMR value is
not populated on the Test Code
Validation Form (STVTESC) for SAT
test code record types.
Group Label Description EDI Instructions
483
Banner Student User Guide | Recruiting
PREL UNKNOWNHSCH SBGI code, if the student
enters an invalid SBGI
code on the Web
N This source/background institution
(SBGI) code will fill in the
SRTHSCH_SBGI_CODE, and the
code the student entered will fill into
SRTHSCH_SBGI_CODE_INVALID.
This code is also used if student
leaves the SBGI code blank but
enters a name of the institution or any
of the self-reported data. This rule is
for the Web only. The value entered
on SAAERUL for this must be a valid
high school on STVSBGI.
PREL UNKNOWNPCOL SBGI code, if the student
enters an invalid SBGI
code on the Web
N This source/background institution
(SBGI) code will fill in the
SRTPCOL_SBGI_CODE, and the
code the student entered will fill into
SRTPCOL_SBGI_CODE_INVALID.
This code is also used if student
leaves the SBGI code blank but
enters a name of the institution or any
of the self-reported data. This rule is
for the Web only. The value entered
on SAAERUL for this must be a valid
college on STVSBGI.
PREL UPDATEIFAPP Update recruit record if
application exists
N
If set to
Y, then the settings of the
previous rules will be followed, even if
a recruit record already exists for this
person for the same term, level, and
campus. If set to
N, and a matching
recruit record already exists, then
based on your SAAERUL settings,
the process will:
• Insert new test score records on the
Test Score Information Form
(SOATEST).
• Insert new high school records on
the High School Information Form
(SOAHSCH).
• Insert new college records on the
Prior College Form (SOAPCOL).
• Insert the contact code into the
SORCONT table.
• Insert the source code into the
SRRRSRC table if a matching
recruit record exists or insert the
source code into the SARRSRC
table if a matching application
record exists.
• Update Null values on the General
Person Form (SPAPERS).
Group Label Description EDI Instructions

484
Banner Student User Guide | Recruiting
Data Load and Match Processing
This section discuses data load and match processing for recruiting.
Overview of Banner Student External Load and Match Process
The following steps include technical details of the data load process for the student test
score data loads, search data loads, electronic prospects, and electronic applicants. This
discussion is intended to provide information on how the process works from a technical
perspective.
For additional information on Common Matching, please refer to the Banner General User
Guide and the “Common Matching Processing” procedures in the “General Person”
chapter of this user guide.
External Load Processes
External data is loaded into various sets of temporary tables depending on the source of
the external data. Test score data such as SATs, GREs, AMCAS, etc., is loaded into
temporary tables beginning with SRT, as is search file data and Banner Student Self-
Service prospect data. If you are using the Electronic Prospect Match Process
(SRRSRIN), the test score data is loaded into temporary tables beginning with SOR or
SRT, which can be viewed on the Electronic Prospect Inquiry Form (SRIPREL) and the
Electronic Prospect Detail Form (SRAPREL). Self-service admissions data is loaded into
temporary tables beginning with SARXXXX. Data loaded into the SARXXXX temporary
tables can be viewed on the Electronic Application Submitted Form (SAAETBL).
Once external data has been loaded into its respective temporary tables, it can be
matched manually (using SRIPREL or SAAEAPS) or in batch (using SRRSRIN or
SARETMT). The manual match process uses the Common Matching Entry Form
PREL VTYPADMR Default ADMR Code for
the Visa
Y Identifies the Checklist Summary
Request Code for the Visa Code
value to be inserted on the
Admissions Application Detail block of
the Admissions Application Form
(SAAADMS) when loading a record
from the Banner Student Self-Service
Prospects (Recruiting) or Admissions
modules. This rule is only used by the
Web interface.
PREL WEBGENID For Web only, use
generated ID, or use
entered SSN for ID
N
Enter
G to always use the generated
ID which uses SOBSEQN functions.
Enter
S to use the SSN entered on
the Web. If neither is entered, use a
generated ID.
Group Label Description EDI Instructions

485
Banner Student User Guide | Recruiting
(GOAMTCH) and the Common Matching algorithm to match incoming records to existing
Banner records.
Setting up Rule Restrictions on GORCMRL
The rules that define how the Common Matching algorithm searches for duplicates are
defined on the Common Matching Rules Form (GORCMRL). There are certain restrictions
on these rules:
• The algorithm requires that the last name or non-person name
(
SPRIDEN_SEARCH_LAST_NAME) be included in all your rules.
• For data elements where you can change the number of characters to use in matching
from what exists in the data dictionary, you cannot change the length to zero.
• If you enter a negative length for the number of characters to compare for the field, the
algorithm will start checking the specified number of characters with the last character in
the string.
Note: It is recommended that you not use a negative length for SSN/SIN/
TIN. It could create performance issues.
Different pieces of data are required depending on whether you are adding a person or
non-person record:
• For a person record, data in Last Name and First Name must exist. No other data is
required to initiate the Common Matching process. If data is entered in the Last Name
field, the
GOTCMME_ENTITY_IND must equal P for matching a person.
• For a non-person record, data in the Non-Person Name only must exist. No other data is
required to initiate the Common Matching process. If data is entered in the Non-person
Name field, the
GOTCMME_ENTITY_IND must equal C for matching a non-person.
Using the Common Matching Algorithm
The Common Matching algorithm uses the rules you create to evaluate new identification
records that are being added to the Banner database to see if they already exist. The
algorithm will return:
• New if no matching records or potential matches are found, based on the rules defined
for the matching source.
• Match if only one record is found that matches all the criteria of the rules. In this case,
the algorithm will return the PIDM.
• Potential Match (Suspense) if multiple records are found that match the
criteria, or if records are found that match only some of the criteria. In this case, the
algorithm returns the PIDMs of all possible matches. The data is stored in a temporary
table until the user finishes investigating them.

486
Banner Student User Guide | Recruiting
Note: When the algorithm is matching on non-code fields such as name,
the
gokcmpr.f_compress_name function will remove spaces,
special characters, and force the text to be upper case.
For a match or a potential match, the conditions met and unmet will also be returned, for
example:
Name Match, Date of Birth Year Match, Address No Match
How the Matching Process Works in Banner Student
When you enter an ID on SPAIDEN that does not exist in Banner and then execute the
matching process, you can receive a match status of “New”, “Match”, or “Potential Match”.
New Records
Records are matched with a status of “New” if no records match, based on the rules that
have been set up. When a record is identified as being new, the General Person APIs are
used to insert the data into SPRIDEN, SPRADDR, SPRTELE, SPBPERS, and/or
GOREMAL. Once the record is made new, you are returned to SPAIDEN.
Matched Records
Records are matched with a status of “Match” if one, and only one, record in Banner
matches the incoming person based on the rules that have been set up.
Data for the matched PIDM is displayed for review by the user. You can select the
matched record and return to the main window of SPAIDEN, or you can update the
matched person with data entered in the Data Entry block on GOAMTCH before returning
to SPAIDEN.
Potentially Matched Records
Records are matched with a status of “Potential Match” (or “Suspense”) if some, but not
all, fields match someone in Banner based on the rules that have been set up. For
example, the first and last names for the record match, but the date of birth does not
match.
You can create the person as “New”, or you can select one of the potentially matched
records as the “Match”.
Rule Examples
Here is one set of rules that can be used in Banner Student.

487
Banner Student User Guide | Recruiting
Matching Algorithm - Primary and Secondary Matches
The matching algorithm used with Common Matching processing is composed of two
matches - primary and secondary. The primary match selects a pool of Banner records
that may match based on first, middle, and last name, and/or SSN and ID. If a record is
selected as part of the primary match, then at a minimum it will be a potential match. The
secondary match then looks at all the records from the primary match pool and uses the
rest of the fields in the matching rule to see if only one record matches exactly. If only one
record matches exactly, that record is a match. If more than one record matches, then all
those records that match or partially match become the potential matches.
An exception to this process is if an incoming record has passed the primary match, but all
of the other non-name elements included in the matching rule do not match (and none of
the fields are Null), then the person is made new.
Priority Column Name Data Element Length
Required/
Exists
2
SPRIDEN_SEARCH_LAST_
NAME
LAST NAME/NON-PERSON NAME 10 Required
SPRIDEN_SEARCH_FIRST_
NAME
FIRST NAME 10 Required
SPBPERS_SSN
SSN/SIN/TIN 9 Required
SPBPERS_BIRTH_DAY
DATE OF BIRTH DAY 2 Exists
SPBPERS_BIRTH_MON
DATE OF BIRTH MONTH 2 Exists
SPBPERS_BIRTH_YEAR
DATE OF BIRTH YEAR 4 Exists
SPRADDR_CITY
CITY 10 Exists
SPRADDR_ZIP
ZIP/POSTAL CODE 5 Exists
3
SPRIDEN_SEARCH_LAST_
NAME
LAST NAME/NON-PERSON NAME 10 Required
SPRIDEN_SEARCH_FIRST_
NAME
FIRST NAME 10 Required
SPBPERS_BIRTH_DAY
DATE OF BIRTH DAY 2 Exists
SPBPERS_BIRTH_MON
DATE OF BIRTH MONTH 2 Exists
SPBPERS_BIRTH_YEAR
DATE OF BIRTH YEAR 4 Exists
SPRADDR_CITY
CITY 10 Exists
SPRADDR_ZIP
ZIP/POSTAL CODE 5 Exists

488
Banner Student User Guide | Recruiting
For example, a rule could be set up as follows:
Banner contains a SPRIDEN record for Joseph Smith in Tampa, FL, born on April 11,
1982. The incoming record is also for a Joseph Smith who lives in Boston, MA, and who
was born on August 18, 1981. Assuming there were no other Joseph Smiths in the Banner
database, the incoming record would be marked
New. It would normally have been
marked as
Suspended, because the first and last names matched, but as the rest of the
elements in the rule (City, ZIP, Date of Birth) specifically did not match, the person was
made new.
How the Algorithm Processes Rules
The Common Matching algorithm allows for the processing of multiple rules. Priority
numbers must be defined for each rule indicating the sequence in which they are to be
processed. The strictest rule should be assigned the first priority (i.e., #1). The algorithm
will process each rule in order, separately and completely.
• The first step performed by the algorithm is primary matching for the rule. This step
defines the population on which the rest of the processing (secondary match) will be
performed. If no match occurs during the primary match, then the external record is
considered to be new.
• The second step performed by the algorithm is secondary matching processing against
the results of the primary match. If the secondary match determines an exact match on
only one record, the external source record is considered to be a match.
If more than one record is matched to the criteria, the external source record is considered
to be in suspense. The external source record will be considered to be in suspense if data
matches part of the criteria of the rules but does not match all the criteria. If the results of
the rule are new or matched, the results are returned to the calling process. No other rules
are processed.
When all the rules have been processed, the algorithm will interrogate the results and
return the results to the calling process. The match status (new, matched, or suspense)
will be returned, as well as a results message providing the elements that were matched,
not matched, or missing as a result of processing the rule.
When processing online, if a record is determined to be a match using one rule but to be in
suspense using one or more additional rules, the record's match status will be set to
match, but the user will still be able to view the potentially matched records.
Element Required Length
Last Name Required 10
First Name Exists 8
City Exists 8
ZIP Exists 5
Date of Birth Exists

489
Banner Student User Guide | Recruiting
Rule Indicators
The Data Required field on GORCMRL can be set to Exists or Required.
• A value of Required indicates that the data field associated with the indicator is
required and must be present on the external source and in Banner. If the field on either
the external source or in Banner is Null for a data element with the Data Required field
set to
Required, then the data element is considered to be not matched. If all data
elements are required, but all of the data elements in the secondary match are Null
either in Banner or the external source, the record will be suspended for review.
• A value of Exists indicates that either the external source or the Banner value can be
Null. If either or both values are Null, the field is considered to be a match.
Rule Priorities
The algorithm processes each rule that has been defined for the data source separately
based on the priority given in the Rule Priorities block. If the priority rule determines that
the input record is either
New or Matched, that status is the overall status that is returned
for the record.
Note: For online processing, the potential matches that result from
processing the rules may be viewed online from the Potential Matches
block on the Common Matching Entry Form (GOAMTCH). Potential
matches are listed in order by rule priority.
Field Length Values
Whenever a length is specified for a rule on the Common Matching Rules Form
(GORCMRL), the comparison is made using the rule length of the fields. For example,
using the last name, the comparison would be between the rule lengths of the last name
on the external source to the rule length of the last name in Banner. If the rule length is
five, then the first five characters of the external source last name are compared to the first
five characters of the Banner last name.
A negative length may be entered for the ID and SSN/SIN/TFN to reverse the order from
last to first. For example, if
-5 is entered for the length of the SSN/SIN/TIN, the last five
characters of the external source SSN will be compared to the last five characters of the
Banner SSN/SIN/TIN.
For example, for the rule below:
Last Name length = 4
First Name length = 3
SSN/SIN/TFN length = -4
Patricia Longnecker, SSN/SIN/TFN #555116789

490
Banner Student User Guide | Recruiting
The results would be:
The first four characters of the last name would be used: LONG
The first three characters of the first name would be used: PAT
The last four characters of the SSN/SIN/TFN would be used: 6789
Suggested Rules
It is recommended that each external source type have at least two GORCMRL matching
rules defined in order to maximize the number of matches, and therefore minimize the
number of suspended records. The key difference between the two recommended rules is
in the use of the Social Security Number field.
Many institutions now use generated IDs when creating SPRIDEN records in Banner due
to the increased reluctance to ask for and to provide social security numbers. This
necessitates a matching rule that does not use the Social Security Number field, as it will
never match to the Generated ID. However, matching on an SSN in combination with a
first and last name is still superior to matching only on last and first name alone. So, a
second rule incorporating the Social Security Number field ensures that if the SSNs are
present, it will use them in the matching process.
Primary Matching Logic
The primary matching process uses Last Name/Non-Person name
(
SPRIDEN_SEARCH_LAST_NAME), which is a required data element for Common
Matching. If First Name (
SPRIDEN_SEARCH_FIRST_NAME) or Middle Name
(
SPRIDEN_SEARCH_MI) are specified data elements in a rule, these will also be used
as part of the primary match for the name. In addition, if ID (
SPRIDEN_ID) and/or SSN/
Rule 1: SSN = Y, 9
Lname = Y, 5
Fname = Y, 4
City = Y, 7
ZIP = Y, 5
Rule 2: Lname = Y, 5
Fname = Y, 4
City = Y, 7
ZIP = Y, 5
Rule 3: SSN = R, 9
Lname = Y, 5
Fname = Y, 4

491
Banner Student User Guide | Recruiting
SIN/TFN (SPBPERS_SSN) are specified data elements in a rule, they will be used as part
of the primary match.
The Common Matching process will use the Match Type (Indicator) setting that has been
established for the matching source on the Common Matching Source Code Rules Form
(GORCMSC) to determine which records are to be selected in Banner.
• When the Match Type (Indicator) is set to Person, person records will be selected.
When
GORCMSC_ENTITY_CDE is set to P, records will be selected from SPRIDEN
where
SPRIDEN_ENTITY_IND is set to P.
• When the Match Type (Indicator) is set to Non-Person, non-person records will be
selected. When
GORCMSC_ENTITY_CDE is set to C, records will be selected from
SPRIDEN where
SPRIDEN_ENTITY_IND is set to C.
• When the Match Type (Indicator) is set to Both, person and non-person records will
be selected. When
GORCMSC_ENTITY_CDE is set to B, records will be selected from
SPRIDEN where
SPRIDEN_ENTITY_IND is set to P or C.
The following steps are used in the primary matching process:
Either Step 1 or Step 2 below must be true for a record to pass the primary match. If the
external record fails the primary match, then the match status will be marked as new.
1. If the SSN/SIN/TFN is defined for the matching source and rule priority number,
retrieve all records from Banner with a matching SSN/SIN/TFN.
The SSN/SIN/TFN data element is defined as part of the rule, and the
SPBPERS_SSN is equal to the external source SSN/SIN/TFN.
2. If First Name and/or Middle Name are defined for the matching source and rule priority
number, combine them with the Last Name criteria, and retrieve all records from
Banner with a matching name.
Note: When matching non-person records, the First and Middle Names
should not be included as part of the rule.
2.1. The following must be true:
SPRIDEN_SEARCH_LAST_NAME must equal the last name on the external
source for the specified length.
Note: If the matching source is defined to match non-person records, and
SPRIDEN_SEARCH_LAST_NAME is not like the non-person name from
the external Source, the matching algorithm will check to see if a
matching record exists on the GORNPNM alias table.
2.2. One of the following must be true:
First Name data element is not defined.
or
First Name data element is defined for the rule, and
SPRIDEN_SEARCH_FIRST_NAME is equal to the external source first name
for the specified length.

492
Banner Student User Guide | Recruiting
Note: If the SPRIDEN_SEARCH_FIRST_NAME is not like the first name
from the external source, the matching algorithm will check to see if a
matching record exists on the GORNAME alias table (if the matching
source is defined to match person records).
2.3. One of the following must be true:
Middle Name data element is not defined.
or
Middle Name data element is defined for the rule, and
SPRIDEN_SEARCH_MI
is equal to the external source middle name for the specified length.
Note: If the SPRIDEN_SEARCH_MI is not like the middle name from the
external source, the matching algorithm will check to see if a matching
record exists on the GORNAME alias table (if the matching source is
defined to match person records).
3. If ID is defined for the matching source and rule priority number, retrieve all records
from Banner with a
SPRIDEN_ID that is equal to the external source ID.
Secondary Matching Logic
The secondary matching process compares the data elements defined for the matching
source and rule priority number for all records returned by the primary matching process.
The goal of the secondary match is to find an exact match between the external source
record and a Banner record.
When comparing a data field that has the Data Required (Indicator) set to
Exists, a
Null value may exist either in Banner or the external source. If a Null value exists either in
Banner or the external source for the data element, the data element is considered to be
matched.
When the Data Required (Indicator) is set to
Required, if a Null value exists either in
Banner or the external source for the data element, the data element is considered to be
not matched.
This step is repeated for each of the data elements for the rule, and one condition must be
true for each for an external source record to be considered to be a match.
• Data element is not defined.
• Data element Data Required (Indicator) is set to Exists or Required, and the
Banner value is equal to the external source value for the specified length.
or
• Data element Data Required (Indicator) is set to Exists, and the Banner value is
Null.
or

493
Banner Student User Guide | Recruiting
• Data element Data Required (Indicator) is set to Exists, and the external source
value is Null.
When the data being matched is part of a logical unit (such as an address), the logical unit
is matched separately and completely. For example, when matching on city and ZIP code,
the city and ZIP code must be associated with one address.
Note: There is an exception to be aware of. For an external source record
to be considered as new when the record has already passed the primary
match, all non-name data elements must be determined as not being a
match, and none of the non-name elements may be Null.
Examples of Matching Algorithm Process and Results
Here are some examples of how the matching algorithm works.
Example 1:
If all required data elements are missing, the record will be suspended.
Last Name = Required
First Name = Required
Date of Birth Day = Required
Date of Birth Month = Required
Date of Birth Year = Required
City = Required
Banner values: Mildred Jones, Date of Birth = 08/17/1957, City = Topeka
External values: Mildred Jones
The external record will pass the primary match, because the first and last names match.
However, since all other data elements are missing (i.e, Null) from the external source (not
matched but are Null), the record will be suspended.
Example 2:
The external record passes the primary match as the first and last name matches against
two Banner records. These two records are then used in the secondary match.
Rule 1 Rule 2
Last Name = R Last Name = R
First Name = Y First Name = Y
SSN = Y Date of Birth = Y
Date of Birth = Y City = Y

494
Banner Student User Guide | Recruiting
Banner values:
Record 1 - Alberta Rockville, 330229101, Largesse, 06259, 05/01/1985
Record 2 - Alberta Rockville, no SSN, Pomfret, 19355, no Date of Birth
External values: Alberta Rockville, 330229101, Largesse, 06259, no Date of Birth
The external record will pass the primary match, because the first and last names match
at least one Banner record with the same first and last names.
• Using Rule 1 and the matching algorithm, the external record will be matched against
Banner record 1. It will be suspended against Banner record 2.
• Using Rule 2, the external record would be matched against Banner record 1, since the
Date of Birth is missing and the City and ZIP match.
Example 3:
The external record passes the primary match, which usually means that the match status
will be Suspense at a minimum. However, in this case, because none of the non-name/
SSN fields match, the external record has a match status of
New.
Banner values: Tomasso Dalimonte, SSN = Null, Date of Birth = 06/02/78, City =
Marikesh, ZIP = 11233
External values: Tomasso Dalimonte, SSN = Null, Date of Birth = 09/07/59, City =
Woodstock, ZIP = 06281
The external record will pass the primary match, because the first and last names match.
Normally, this would mean that the record would be suspended at a minimum. However,
because the Date of Birth, City, and ZIP Code fields specifically do not match (i.e., none of
City = Y ZIP Code = Y
ZIP Code = Y
The value R stands for Required. The value Y stands for Exists.
Rule 1 Rule 2
Last Name = R Last Name = R
First Name = R First Name = R
SSN = Y Date of Birth = Y
Date of Birth = Y City = Y
City = Y ZIP Code = Y
ZIP Code = Y
The value R stands for Required. The value Y stands for Exists.
Rule 1 Rule 2

495
Banner Student User Guide | Recruiting
them are Null), then the record's match status is set to New. This is the only exception to
the basic matching algorithm.
Search and Test Score Data Load
This section discusses search and test score data loads.
Overview
The search and test score data load process allows data from the College Board’s Student
Search Service, Peterson, and ACT EOS and Private Colleges and Universities search
data files or the data from SAT, ACT, GRE, GMAT, and AMCAS test scores to be loaded
into the Banner Student System. In addition, delimited files (such as AMCAS) can be
loaded. The data is initially loaded into separate temporary tables due to its potentially
large volume of records.
You may choose to load records individually from the temporary tables into Banner
Production tables. Or, you may perform a mass load, taking into account records that may
match an existing Banner record. The data in the temporary tables is always accessible
using two Banner Student forms. The data may also be used to run reports, create labels,
and generate letters based on a combination of data in the temporary tables and the
Banner tables. The purge process is also available to purge temporary table records
created by the search or test score report data load process.
The tape types supported by the search and test score data load functionality are:
• SAT
• ACT
• GRE
• GMAT
• SSS Student Search Service
• Peterson
• ACT EOS Educational Opportunity Service
• PCU Private Colleges and University Search Tape
• AMCAS
Each tape is identified by the electronic prospect code (from STVPREL) and a tape code.
These codes will be referred to throughout this process. The codes are system-required
on the Electronic Prospect Validation Form (STVPREL) and the Electronic Data File and
Tape Validation Form (STVTAPE).

496
Banner Student User Guide | Recruiting
This data load process uses one program to load data from a file to Oracle. This process
can be run from job submission. Once loaded into Oracle, the data is initially loaded into
separate temporary tables due to its potential volume of records. You may choose to load
records individually from the temporary tables into Banner production tables. Or, you may
perform a mass load, taking into account records that may match an existing Banner
record. The data in the temporary tables is always accessible using two Banner Student
forms. The data may also be used to run reports, create labels, and generate letters based
on a combination of data in the temporary tables and the Banner tables. The purge
process is also available to purge temporary table records created by the search or test
score report data load process.
Note: For detailed information on processing AMCAS data loads, please
refer to the section “AMCAS (American Medical College Application
Service) Load Procedures Using SRTLOAD” in the procedures section for
this chapter.
Use of PIDM In Data File
Data (flat) files are often created and/or downloaded by institutions and sent to marketing
organizations. Various data in the file (name, address, etc.) can then be changed by the
marketing organization and returned to the institution. When the flat file is returned, the
PIDM (if included) can be used to match the incoming record to Banner. This reduces
creating suspended or duplicate records.
Use the tape/file field name of
PIDM (description is PIDM if person was prior
match
) on the Tape Field Name Validation Form (STVTPFD), and apply the rule on the
Tape Field Position Rule Form (SRATPFD) for the corresponding tape code to reduce the
risk of creating suspended or duplicate records during the matching process.
Tape Prospect Code from STVPREL Tape Code from STVTAPE
SAT SAT SAT
ACT ACT ACT
GRE GRE GRE
GMAT GMAT GMAT
SSS (psat) SSS-PSAT SSS_SEARCH
SSS (sat) SSS_SEARCH SSS_SEARCH
Peterson PETERSON PETERSON
ACT EOS EOS_ACT EOS_ACT
PCU PCU PCU
AMCAS AMCS AMCS
497
Banner Student User Guide | Recruiting
Handling of IDs in Temporary Table
SRTLOAD and electronic prospects only load generated prospect IDs to the temporary
table. This prevents wasting generated Banner IDs that are also loaded to the temporary
tables. If the prospect or Web prospect has an SSN, and SRTLOAD or SAAERUL is set to
use the SSN, the SSN will be loaded to the temporary table.
SRRPREL and SRIPREL generate a brand new Banner ID only when loading the
prospect to Banner for the first time. Prospect IDs that were created in the temporary table
SRTIDEN will never be loaded to Banner, unless the SSN was chosen as the temporary
ID. Then the SSN will load to Banner if it is found to be a
New record.
Note: When you are loading Web Prospects or data records using the
SSN as the temporary
SRTIDEN _ID (where the SAAERUL: group
PREL, label WEBGENID, is set to S for Generate ID if Web Prospect or
SRTLOAD: SSN or Generated ID parameter is set to
S), and during the
matching process (on SRIPREL or SRRSRIN) the record is determined to
be New (no match in Banner), but a Banner ID does exist that happens to
be identical to the SSN that was loaded into the temporary table, upon
loading this
New record to Banner (via SRIPREL or SRRPREL), an error
will appear:
Note: In this situation, the record must have a new prospect ID generated
on SRIPREL (using the Associate Person with ID window on SAAEAPS)
in order to be loaded to Banner and so avoid the possible creation of
duplicate IDs.
Overall Process
When a search file or a test score file is received from either College Board/SSS,
Peterson, EOS (from ACT), AMCAS, or Private Colleges and Universities, the data is
moved to your host machine. Using SRTLOAD, the data from the search file or test score
file is loaded into a set of temporary tables (SRTIDEN, SRTPERS, SRTTELE, SRTADDR,
SRTTEST, SRTPREL, SRTHSCH, SRTPCOL, SRTEMAL, SRTGPAT, SRTCRSS,
SRTSUPL, SRTDEGR, SRTMAJR, SRTTSPC, SRTPRAC). These tables are easily
accessible through the Search Tape View (SRVPREL). You can then use either the online
forms or the match and load processes to load search records or test score records into
the Banner production tables.
Add the interface codes to the Interface Code Validation Form (STVINFC) to identify the
different search and test score files. To associate each interface code with its matching
rules, assign a matching source code to each interface code on STVINFC. You may want
to verify that all test score types (SAT, ACT, ACT EOS, GRE, GMAT, and AMCAS) and
search types (PSAT, Peterson, PCU) are defined appropriately. Define similar codes on
the Electronic Data File and Tape Validation Form (STVTAPE) to associate a specific file
142228889 Boatwright,
Kwame
N 200010 UG 000 311420 Potential Dup ID on SPRIDEN

498
Banner Student User Guide | Recruiting
with its predefined field positions on the Tape Field Position Rule Form (SRATPFD). For
delimited files, use the Tape File Delimiter Type Rules Form (SORDLIM) to specify what
delimiter (and optionally what marker) is used with this file. Define prospect codes, very
similar to interface and electronic data file codes, on the Electronic Prospect Validation
Form (STVPREL). These codes are associated with the search and test score report data
loaded into the temporary tables and the Search Tape View (SRVPREL).
There are two options available for loading the search or test score data into Banner
production from the temporary tables.
Option 1: Batch Load
The Electronic Prospect Match (SRRSRIN) uses the Common Matching algorithm to
determine if a record already exists in Banner for persons in the temporary tables.
• If the record exists in Banner, then the match status on the temporary table for this
record is set to
M (Matched).
• If the record does not match, then the match status is set to N (New).
• If the record is considered a suspense, (that is, some elements are matched but not
enough to be considered a match), then the match status is set to
S (Suspense).
• If the record exists on the data load multiple times, or if it exists in the temporary tables
more than once for the same electronic prospect code and tape ID, the records are set
to
D (Duplicate).
All records in the temporary files can be viewed on the Electronic Prospect Inquiry Form
(SRIPREL). Those records with a status of suspense or duplicate can be viewed on this
form by running a query on a match status of
S or D. You may access the Common
Matching Entry Form (GOAMTCH) from this form, which runs the matching algorithm
using the data in the temporary tables to determine if a matching record exists. Based on
the results of the algorithm, you must decide if the record matches an existing Banner
record or whether it is a new record. For more information on using GOAMTCH, please
refer to the procedures in the “General Person” chapter.
Once all suspended or duplicated records have been updated to either
N (New) or M
(Matched), the Migrate Electronic Prospects Process (SRRPREL) is run. Depending on
the values set for the parameters, as well as the values set for the rules on SAAERUL, a
new recruit record may be created or an existing record may be updated at the time the
test scores are loaded. If an address with the same address type already exists in Banner,
then an additional address record may be created with the same address type and a one-
up sequence number. If an existing recruit record is to be updated, then a contact for this
specific data load will be added to the record.
If a match does not exist, then a recruit record is created at the time the test scores are
loaded for the person (using either the SSN or a generated ID) for the term and level (and
campus, if identified in the Electronic Prospect Load Process (SRTLOAD)) specified in the
parameters. In addition, records may be created for this person on the following forms,
depending on the rules settings on the Electronic Admissions Application Rules Form
(SAAERUL):
• SPAPERS – demographic information
• SPAIDEN – address information

499
Banner Student User Guide | Recruiting
• SPATELE – telephone information
• GOAINTL - international information
• SOAPCOL – prior college information
• SOAHSCH – high school information
• SRARECR – source, contact, and interests
• SOATEST – test scores (for test score data only, including percentiles for SAT and GRE
files)
• SAAADMS – application information
• SOASUPL – applicant supplemental information, for AMCAS only
If a match exists, then what happens will also depend on the values set on the Electronic
Admissions Application Rules Form (SAAERUL) where the Group (Code) is equal to
PREL. An existing recruit record may be updated with a new source and/or contact, or an
entirely new recruit record may be created at the time the test scores are loaded.
Regardless of the values set on SAAERUL, any Null fields on the General Person Form
(SPAPERS) will be filled in if the data for these fields exists on the search or test score file.
In either case, the load status on SRIPREL is set to
C, indicating that a Banner record was
created or updated for this person using the data in the temporary tables.
Option 2: Individual Record Loads
1. Use the Electronic Prospect Inquiry Form (SRIPREL) to query the Search Tape View
(SRVPREL) when a person has a stack of returned search cards or paper test score
reports, and they need to find the record that matches each. You can search on the
following fields: Prospect ID, Last Name, First Name, M(iddle) I(nitial), Prospect
Code, Tape ID, Match Status, Load Status, Street Line 1, ZIP, High School, Birth
Date, and Add Date.
Once a matching record or group of potential matches has been retrieved, you can
select a specific record and select the Detail item in the Options Menu.
2. This accesses the Electronic Prospect Detail Form (SRAPREL). This form displays
biographical information associated with the search or test score record selected on
SRIPREL, information about the search data load from which this record was created,
or test score information, interest information, and information about the test score
report data load from which this record was created.
Once you are convinced you have the correct person, use the Exit button to return to
the Electronic Prospect Inquiry Form (SRIPREL).
3. A load status code exists for each record in the Search Tape View (SRVPREL). The
load status is displayed on the Electronic Prospect Inquiry Form (SRIPREL) and, if it is
set to
C, indicates that a Banner record has been created or updated in Banner for this
person from a data load process. You can refer to the Prospect Code information to
determine what type of data load was used with this record. (If the field is blank, then
the record has not been created or updated in Banner.)
4. A match status also exists for each record in the Search Tape View (SRVPREL). This
status indicates that the record matched (
M) someone in Banner production (via the
SRRSRIN process or the Select ID or Update ID buttons on GOAMTCH), that the

500
Banner Student User Guide | Recruiting
record is new (N) and this person does not exist in Banner, that the record is
suspended (
S), that it is a duplicate (D) on the file, or that an error (E) occurred when
the SRRSRIN match process was run.
If the record’s Load Status and Match Status fields are blank (indicating that this
record has not been matched or loaded), then you need to see if the person already
exists in Banner.
Use the Match (GOAMTCH) item in the Options Menu on SRIPREL to go to the
Associate Person with ID window on SAAEAPS. Use the Associate Person with an
ID button or use a Save function to then access GOAMTCH.
5. Before accessing GOAMTCH, you will be asked to assign an ID to the new user,
either a generated ID or the person's SSN.
GENERATED is the default.
When you enter GOAMTCH, the ID field will contain either the word
GENERATED or
the selected record’s SSN. The Matching Source field will contain the matching
source code that has been assigned to the interface code, which is also assigned to
the electronic prospect code of the selected record on STVPREL.
If no matching source code has been assigned to the interface code, then the
Matching Source field will contain the default matching source code that has been
assigned to the user ID on GORCMUS. If no default source code has been assigned
on GORCMUS, then you will be able to select any matching source code from the List
of Values.
6. Perform a Next Block to populate the Data Entry block with all of the data for the
incoming prospect record that is present in the temporary tables.
7. You can update or adjust the data in the Data Entry block if it does not meet your
institution’s data standards. These updates will be copied back to the temporary tables
and used when the prospect's record is created.
8. Perform a Next Block to run the matching algorithm. The algorithm will determine if the
incoming record is new, matched, or a potential match.
9. Determine if the record is to be new or matched, and select the appropriate button.
10. The user will be automatically returned to SRIPREL. The match status will always be
Matched, as the person has now been created in Banner via GOAMTCH. Continue
with regular SRIPREL load processing.
11. The Match Status field will have been updated and will display an
M for this record
when a new query is run. Whether a match exists in Banner or not, you must select
the Create Recruit/Applicant item in the Options Menu to either create or update a
Banner recruit record and associated records. The Load Status will be set to
C,
indicating that a Banner record has been created and/or updated for this person.
Purging Records
Use the Electronic Prospect Purge Process (SRTPURG) to purge data from the temporary
tables based on the input parameters.
• Use the Electronic Prospect Code parameter to purge all records associated with a
specific search file (for example, Peterson) or specific data load type (for example,
SAT).

501
Banner Student User Guide | Recruiting
• Use the Tape ID parameter to:
• Purge all records associated with one data load of many received from the same
search company (for example, College Board Search files). For example, two
separate data loads may be requested from Student Search, one for students in a
specific region, and one for students with certain Advanced Placement exam
scores.
• Purge all records associated with a specific test score data load of many received
from the same source. For example, if you use different data load IDs for each data
load such as SAT1, SAT2, and so on, you will be able to purge only those SAT
records associated with the data load ID sat1 while leaving the other SAT records
on the temporary tables untouched.
Other Optional Processes Related to Data Load
Here is additional information about data loads.
SAT Recentering Process (SOPSATS)
Use the SAT Recentering Process (SOPSATS) to re-center SAT scores at your institution.
This step is completed only when SAT data is loaded.
The College Board has recentered the score scale for the SAT I as of the April 1995
national administration, which impacts the way scores and other data are reported to your
institution. While the 200-800 scale continues to be used, recentering the SAT I has the
effect of re-establishing the average score at 500, the mid-point of both the verbal and
math scores. This change in SAT I scores also results in changes to the scores for the
SAT II subject tests, which are aligned to the SAT I.
Running the SAT Recentering Process (SOPSATS) is the final step in the data load
process when loading SAT data. SOPSATS must be run each time an SAT file is loaded.
Once the SAT Recentering Process (SOPSATS) has been run, the original score for a
person is no longer displayed in the system; only the re-centered score appears on the
Test Score Information Form (SOATEST), where SAT scores are entered and maintained.
The Rcrv field (Revised/Recentered) on SOATEST flags whether the SAT score displayed
is one of the following values.
The SOPSATS process looks at this flag to determine which scores to recenter. SAT
scores that are marked with:
• a Null value will be recentered and the flag changed to an R
• an R will be not be recentered
Null indicates the score has not been changed and should be recentered
R indicates the score has already been recentered
X indicates the score has been revised but can be recentered
Z indicates the score has both been revised and recentered.
502
Banner Student User Guide | Recruiting
• an X will be recentered and the flag changed to a Z
• a Z will not be recentered
Note: SAT scores which are dated after April 1, 1995 will not be
recentered by this report. There is currently no date upon which all scores
in a file will be recentered.
For example, if Judy Smith has these scores,
the report will recenter her scores because they:
• are dated prior to April 1, 1995, and
• have a Null value, indicating they can be recentered.
After running the SOPSATS process on this information, her scores would look like this on
SOATEST:
Her original score is no longer displayed. Her recentered scores appear here, flagged with
an R in the Revised or Recentered field to show they have been recentered. If you are
using the company’s data load process, the SOPSATS process must be run after each
data load of SAT scores.
Note: The new scale for reporting SAT scores may affect your admissions
decision process and other processes at your institution. It needs to be
determined by your institution if the minimum requirements should be
modified.
The SAT I tables only deal in scores with increments of 10 (such as 630, 640, 650). The
SOPSATS process only converts scores that are originally reported in increments of 10,
as all others are invalid scores.
According to the College Board, all SAT scores are reported in increments of 10, so
SOPSATS only recenters scores that are reported in increments of 10 (630, 640, 650). If a
person has a recorded score of 642, this value is not recentered via the SOPSATS
process.
If your institution creates its own combined score of verbal and math, you should recenter
the verbal score, recenter the math score, and then add them for the composite. This
Test Code Description Score Date Taken Rcrv
S01 SAT Verbal 600 15-MAR-94 NULL
S02 SAT Math 500 15-MAR-94 NULL
Test Code Description Score Date Taken Rcrv
S01 SAT Verbal 670 15-MAR-94 R
S02 SAT Math 520 15-MAR-94 R

503
Banner Student User Guide | Recruiting
gives your institution the most accurate picture of what the new composite score is on the
recentered scale.
Please refer to the “Required System Values for Validation Forms” section of the
“Validation Forms” chapter for a listing of system-required codes as defined on the Test
Code Validation Form (STVTESC). Only tests with these codes are converted via the
delivered scripts. If you use different values at your institution, you will need to make the
appropriate changes to the scripts, for both the SAT I and SAT II codes.
Communication Plan Processing Report (SORCPLN)
This process is optional but highly recommended and assigns the communication plans
and generates the materials for persons processed by the data load. If you do not run
SORCPLN, communication plan assignments and material generation will not take place,
and the records inserted in the Communication Plan Collector Table (SORCCOL) will not
be processed. Note that SORCPLN processes all records in the Communication Plan
Collector Table regardless of source, so existing records will also be processed.
Steps for Individual Record Data Load Processing
1. Create the data file for loading.
2. Run SRTLOAD to load the data into the temporary tables.
Always run SRTLOAD in audit mode first to determine the values that are missing in
Banner. These values will need to be created in Banner or converted on SOTCNVT
(where appropriate) before running SRTLOAD in update mode.
3. Use the functionality on SRIPREL (Create Recruit/Applicant item in the Options Menu)
to:
• Query record(s) for the desired tape type.
• Resolve suspended or duplicate records using the Common Matching Entry Form
(GOAMTCH).
• Create new search or test score records or update existing search or test score
records.
• Create new recruiting records.
• Insert new source data into existing recruiting and admissions data.
4. (Optional) Run SRTPURG to remove records from the temporary tables based on the
report parameter values.
Steps for Batch Data Load Processing
1. Create the data file for loading.
2. Run SRTLOAD to load the data into the temporary tables.
Always run SRTLOAD in audit mode first to determine the values that are missing in
Banner. These values will need to be created in Banner or converted on SOTCNVT
(where appropriate) before running SRTLOAD in update mode.

504
Banner Student User Guide | Recruiting
3. Run SRRSRIN to match the data and update each record’s match status with a value
of
M (matched), N (new), D (duplicate), S (suspense), or E (error). This process uses
the matching rules on GORCMRL for the matching source code identified with the
prospect code on STVPREL.
4. Run SRRPREL to:
• Automatically load new and matched records to Banner.
• Create new search or test score records or update existing search or test score
records.
• Create new recruiting records.
• Create a corresponding application record.
• Insert new source data into existing recruiting and admissions data.
5. (Optional) Run SRTPURG to remove records from the temporary tables based on the
report parameter values.
API Errors on SRRPREL, SRRSRIN, and SRIPREL
API errors are all displayed or printed on the reports at the time of the load to Banner using
batch loading (SRRPREL, SRRSRIN with the Auto Load (Skip Dup Chk) parameter set to
Y) or manual loading on SRIPREL. The records revert to a status of S (Suspense) without
loading any permanent Banner data. The API data issues can be corrected and the batch
matching and load processes re-run, or the records can be manually matched and loaded
on SRIPREL.
Loading Records Using SRRPREL
After records have been assigned a match status using SRRSRIN, and SRRPREL is run
to load the records to Banner, if API errors are encountered for an individual prospect ID,
the prospect ID and the associated errors will be printed on the report, and the Match
Status will revert back to
S. No Banner data is loaded for these records, and the report
reflects that information. The API errors will also be printed in the
srrprel.log file.
The process will not abort when API errors are encountered, but records with API errors
will not be loaded to Banner until those errors are resolved.
Loading Records Using SRRSRIN
When matching and loading are performed using SRRSRIN with the Auto Load (Skip Dup
Chk) parameter set to
Y, if API errors are encountered, they will be printed on the report,
and the Match Status will revert back to
S. No Banner data is loaded for these records,
and the report reflects that information. Also, the API errors for each ID will be listed in the
srrsrin.log file.
Matching and Loading Records Manually Using SRIPREL
When the records are loaded manually using SRIPREL, if API errors are encountered,
those errors will be displayed in a window, and the Match Status will revert back to
S. No
Banner data is loaded for these records, and the report reflects that information. Also, the

505
Banner Student User Guide | Recruiting
API errors for each ID will be listed in the srrsrin.log file. The API errors need to be
resolved, and then record can be re-matched and loaded to Banner.
Major Code Errors
Major codes on STVMAJR that are not valid cannot be entered on SOTCNVT for use with
conversion codes. An error is displayed on SOTCNVT when you attempt to enter an
invalid major code.
However, if the Major (Indicator) is unchecked on STVMAJR for a major code that had
been previously entered as a valid major on SOTCNVT, you will receive the API error
messages in SRRPREL, SRRSRIN with the Auto Load (Skip Dup Chk) parameter set to
Y,
and SRIPREL.
To resolve this issue, you can return to STVMAJR and check the Major (Indicator) for the
major code, or you can remove the invalid major validation data on SOTCNVT. When you
access SOTCNVT and an invalid major is listed, the following error message will be
displayed: ERROR Invalid Major Code; Press LIST for valid codes. When you
acknowledge that error message, you will be able to view SOTCNVT and identify the
offending major code, since it will not have an associated STVMAJR value.
Data Load Processing for Nation Codes Using APIs
API processing requires that the nation code translate correctly and that the address be
complete in order to be loaded. A record will not be loaded to Banner if the state code and/
or ZIP code or nation code are missing. The nation name will never be loaded to the
Street Line 3 field.
SRTLOAD is used to determine whether the nation code translates correctly or not.
Institutions need to make sure the nation code in question exists on STVNATN, so the
record will be processed by SRRSRIN and SRRPREL. If the nation code does not exist on
STVNATN, when SRRSRIN is run with the Auto Load (Skip Dup Chk) parameter set to
Y,
or when SRRPREL is run, the record’s match status will be changed from
N or M back to S
(Suspense), and an associated error message will be printed on the report.
You will then need to use SRIPREL to correct the address and load the record manually.
Creation of New Records and Display of Associated Messages
SRRSRIN, SRRPREL, and SRIPREL display messages as to whether recruit/applicant
records or person records have been created. (The option to create or nor create a recruit
record is based on how the rules
MCREATENEWRECR and NMCREATENEWRECR are set
on SAAERUL. There is another rule,
CREATENEWRECR, under the PREL group that also
must have a value of
Y before a recruit record is created.)
A general person record will always be created, so there will always be a total. If a recruit
or applicant was not loaded for the term, but a previous applicant or recruit record existed
in the term for which SRTLOAD and/or SRRPREL were run, then a total of the records
Prospect ID: P00106279 Zip, state and nation cannot all be Null
P00106279 Statler, Karlene S 200222 UG BIOL UNKNHS Prospect not loaded.

506
Banner Student User Guide | Recruiting
that already had a record for the term will be counted in the total, even if they were not
loaded in that pass.
For instance, when a data load with eight records is loaded to Banner for a new term, and
no recruit or applicants exist, and no recruits or applicants are created by SRRPREL, then
you would see the following.
SAAERUL settings:
• CREATNEWRECR = N
• CREATENEWAPPL = N
• NMCREATENEWRECR = N
• MCREATENEWRECR = N
Run SRRPREL to load eight records to Banner, and the results would be as follows:
• Number of Prospects Read: 8
• Number of General Persons Migrated to Production Banner: 8 ***NOTE: Eight of these
records have general person records. Eight did not get loaded here. Create person
always occurs for general person data. So there will always be a value here to load
basic person information.
• Number of Recruits Migrated to Production Banner: ***NOTE: Zero recruits were loaded
for this term via SRRPREL. This is correct. But if recruit records already existed for this
term but were not loaded via SRRSRIN, that total number of recruits would be listed
here.
• Number of Applicants Migrated to Production Banner: ***NOTE: Zero applicants were
loaded for this term via SRRPREL. This is correct. But if recruit records already existed
for this term but were not loaded via SRRSRIN, that total number of recruits would be
listed here.
• Total Individuals Migrated to Production Banner: 8 ***NOTE: Eight existed in the
database, so they didn’t get loaded this time; they were previously loaded/manually
entered. Eight exist.
• Number of Persons NOT Migrated to Production Banner: ***NOTE: No records were
loaded via SRKPREL for this run.This is correct.
Processing Percentiles
Percentiles can be processed by SRTLOAD. The SRTLOAD process will load percentile
data for SAT and GRE tests into the SRTTSPC temporary table. The data is then loaded
to the Banner production tables using SRRPREL. The SORTSPC table stores the
percentiles, which can be viewed on the SOATEST form. You also have the capability on
SOATEST to load percentiles manually. Percentile types must first be created on
STVTSPT. Only one percentile of the same type may be associated with a test score.
You may choose whether you wish to load SAT or GRE percentiles to Banner using the
SAAERUL
LOADPERCENTILES rule for the group code of PREL. A value of Y will load
the percentiles to Banner. A value of
N will ignore percentiles.

507
Banner Student User Guide | Recruiting
The data load process will associate the percentiles with their corresponding test scores.
Currently, only SAT and GRE files provide percentiles. SAT and GRE percentile types
have been hardcoded for use by SRTLOAD. These codes are delivered for STVTSPT
(percentile types), STVTPFD (percentile fields - SRTLOAD will associate these fields with
their corresponding percentile types), and SRATPFD (percentile fields with begin and end
positions).
Note: If for any reason you want to change the percentile types that have
been delivered and associated with GRE and SAT test codes in Banner
Student, you can create new percentile types in STVTSPT and change
the type associated with the test score on SOTCNVT. The percentiles will
then be associated with the test codes on SORTSPC.
The following table contains the percentile types and the associated test scores for which
they are currently reported. SRTLOAD has been hardcoded to associate these percentile
types with the following test codes.
Search Tape View (SRVPREL)
The Search Tape View (SRVPREL) describes the contents of the following temporary
tables: SRTIDEN, SRTPERS, SRTTELE, SRTADDR, SRTTEST, SRTPREL, SRTHSCH,
SRTPCOL. This view is used by the SRIPREL and SRAPREL forms. The data used from
SRAPREL is found primarily in the Electronic Prospect Detail block.
Percentile Type Test Code
SVN S01
SVS S01
SMN S02
SMS S02
SWN S07
SWS S07
S2N WR, WH, SP, SL, PH, MH, 2C, 1C, M2, M1, LT, LR, JL, IT, HB,
GM, GL, FR, FL, ES, EN, EH, CL, CH, BY, AH, KL, EB, MB, EP,
UH
GRP GR01, GR02, GR03, G24, G241, G242, G243, G27,
G271,G272,G273, G29, G291, G292, G293, G31, G311, G312,
G313, G34, G341, G342, G343, G37, G371, G372, G373, G44,
G441, G442, G443, G46, G461, G462, G463, G47, G471,
G472, G473, G52, G521, G522, G523, G57, G571, G572,
G573, G64, G641, G642, G643, G67, G671, G672, G673, G71,
G711, G712, G713, G74, G741, G742, G743, G77, G771, G772,
G773, G79, G791, G792, G793, G81, G811, G812, G813, G87,
G871, G872, G873, G91, G911, G912, G913, G22, G221, G222,
G223, G78, G781, G782, G783, G72, G721, G722, G723, G68,
G681, G682, G683, G35, G351, G352, G353, GR05

508
Banner Student User Guide | Recruiting
Electronic Prospect Validation Form (STVPREL)
Use this form to define the various types of search or test score files that are to be loaded.
The Prospect Code is associated with the search tor test score data loaded into the
search data load temporary tables.
Use the Interface Code to define which interface code (and therefore matching source
code rules) should be used when loading this search or test score data load. The interface
code also determines which conversion rules to use as defined on the Tape Code
Conversion Rules Form (SOTCNVT).
The Tape Code field associates the tape field positions defined on the Tape Field Position
Rule Form (SRATPFD) with a specific prospect and interface code.
Example:
The Student Search data load can provide different data depending on whether it
contains PSAT or SAT1 data. The file layout is the same in either case, but the major
codes have different meanings.
So, the same tape code could be used with two different prospect and interface
codes. The two interface codes allow you to set up the appropriate data conversions
based on the two sets of input values for “Major”.
Please see the section on “Using the Student Search Service Data Load with
SRTLOAD” for information on how this will be changing in July of 2003 to a single data
load of combined data.
Electronic Data File and Tape Validation Form (STVTAPE)
Use this form to define the unique types of search or test score tapes that a school will
load. These codes are associated with the field positions of each tape on the Tape Field
Position Rule Form (SRATPFD).
Tape Field Names Validation Form (STVTPFD)
Use this form to define all the possible field names into which search or test score data
might be loaded. It may also be used to define all possible field names into which data
from other data sources might be loaded. The fields defined in this table are delivered.
Electronic Prospects Default Options Form (SRAPRED)
Use this form to designate default values that can be used to populate the recruiting
record (SRBRECR) or applicant record (SARADAP) when a record is created via the
Migrate Electronic Prospects Process (SRRPREL) or by using the Create Recruit/
Applicant item in the Options Menu on the Electronic Prospect Inquiry Form (SRIPREL).
This form is also used by the data load process.

509
Banner Student User Guide | Recruiting
This form is keyed by the prospect codes on the Electronic Prospect Validation Form
(STVPREL), which allows different sets of default options to be created for different
prospect codes. The Recruit Source and Level (Code) are required fields.
SRTLOAD uses the default values on SRAPRED if the corresponding parameter on
SRTLOAD is blank. If the corresponding parameter on SRTLOAD is blank, SRTLOAD will
use the data that exists on the incoming file for such fields as Term, Major, etc.
(incorporating the use of SOTCNVT or the validation table if it is a straight conversion). If
no value exists, then SRTLOAD will use the data in the parameter. If no value exists in the
parameter, SRTLOAD will use the value on SRAPRED. Certain fields (i.e., Tape Source,
SBGI Source Code, etc.) will be populated from STVINFC if no value exists on SRAPRED.
SRAPRED rules will create an application when no recruiting record is created, based on
the appropriate rule settings on SAAERUL. Fields that are required for applications (such
as student type for AMCAS or other files that do not include this value in any way) need to
be set up on SRAPRED for the level code for which SRTLOAD is run so that the
application student type and other necessary fields are updated. Providing defaults for the
application will create a value, as opposed to a
Null or 00000, for the program or
college, etc., on the application.
When data loaded to the temporary tables by SRTLOAD, the following checks are made:
a direct match to a validation table is checked, then SOTCNVT is checked for crosswalk/
conversion data, then the parameter values on SRTLOAD are checked, (as well as the
existence of a contact and/or source on STVINFC), and finally SRAPRED is checked.
SRAPRED is the only place that provides data for student type, program, or college code
for the applicant.
SRAPRED values for AMCAS must be used for loading various AMCAS application data,
since this information is not supplied on the incoming AMCAS file. Values such as student
type (which is required for an application), college code, and program will only be added to
an application when they have been added to SRAPRED for the level for which you are
running SRTLOAD. Recruiting records may be generated, but institutions may choose to
not load recruiting records and to only load applications (based on the appropriate
SAAERUL rules). A specific rule for the electronic prospect code
AMCS may be added to
SRAPRED with minimal values updated for the level type, student type, college code, and
program, if applicable.
Tape Field Position Rule Form (SRATPFD)
Use this form to define either the exact positions in which each field exists on a search or
test score file or the relative position of each field and then to assign the value in those
positions to the appropriate Banner fields.
This form, in combination with the Electronic Prospect Load (SRTLOAD), the Electronic
Prospect Match (SRRSRIN), and the Migrate Electronic Prospects Process (SRRPREL),
allows institutions to set up data loads that are not supported, such as AP (Advanced
Placement exams) or other search or test score data loads.
This form displays two sets of information. It displays fields for a default positional layout
(such as SAT or ACT) or for a sequential layout (such as AMCAS or a comma delimited
file). The layout displayed is determined by the tape code entered in the Key Block. If the
tape code has been defined on the Tape File Delimiter Type Rules Form (SORDLIM), then
the fields required to define a sequential delimited file will be displayed. If the tape code

510
Banner Student User Guide | Recruiting
has not been defined on SORDLIM, then the fields required to define a positional layout
will be displayed.
The Occurrence field is used to accommodate those values that may occur multiple times
such as test scores for different test dates. The fields defined in this form are delivered.
Tape File Delimiter Type Rules Form (SORDLIM)
Use this form to assign a delimiter or marker to a specific tape code. The delimiter or
marker should match those contained in the delimited input file to be used with this tape
code.
Tape File Test Score Controls Form (SRATPTS)
Use this form to map the test code which contains the “date taken” to all the other test
codes for which that date taken applies. For example, the date taken for one set of SAT I
scores is contained in only one place, even though that date applies to both the SAT
Verbal and Math scores.
Electronic Prospect Detail Form (SRAPREL)
Use this form to view biographic and search or test score data for a person that has been
loaded to the temporary tables. The form allows you to view all search records for this ID
which are present in the Search Tape View (SRVPREL).
This form is accessed independently or from the Electronic Prospect Inquiry Form
(SRIPREL) using the Detail item in the Options Menu.
Electronic Prospect Inquiry Form (SRIPREL)
This form is used to query and view records in the Search Tape View (SRVPREL). This
form is also used in conjunction with the Search Tape Matching Process (SRRSRIN) and
the Migrate Electronic Prospects Process (SRRPREL).
You can access the Common Matching Entry Form (GOAMTCH) using the Match
(GOAMTCH) item in the Options Menu to display information for a prospect ID and then
execute the matching process before a new PIDM is created in Banner. SRIPREL uses
GOAMTCH and the Common Matching algorithm for data load processing to determine if
the incoming record matches an existing Banner record.
Use the following steps to resolve suspended records or to match and load new records
from SRIPREL.
1. Query for prospect records (where the Match Status is
S for “suspended”), or by
other parameters.
2. If you want to view details about the selected record, choose the Details (SRAPREL)
item from the Options Menu. If you want to use the matching algorithm against the
selected record, then choose the Match (GOAMTCH) item from the Options Menu.

511
Banner Student User Guide | Recruiting
3. Before you can access GOAMTCH, you will be asked to assign an ID to the new user,
either a generated ID or the person's SSN. When the data is saved, you will be taken
to GOAMTCH.
4. When you enter GOAMTCH, the ID field will contain either the word
GENERATED or
the selected record’s SSN. The Matching Source field will contain the matching
source code that has been assigned to the interface code, which is also assigned to
the electronic prospect code of the selected record on STVPREL.
If no matching source code has been assigned to the interface code, then the
Matching Source field will contain the default matching source code that has been
assigned to the user ID on GORCMUS. If no default source code has been assigned
on GORCMUS, then you will be able to select any matching source code from the List
of Values.
5. Perform a Next Block to populate the Data Entry block with all of the data for the
incoming prospect record that is present in the temporary tables.
6. You can update or adjust the data in the Data Entry block if it does not meet your
institution’s data standards. These updates will be copied back to the temporary tables
and used when the prospect's record is created.
7. Perform a Next Block to run the matching algorithm. The algorithm will determine if the
incoming record is new, matched, or a potential match.
8. Determine if the record is to be new or matched, and select the appropriate button.
9. The user will be automatically returned to SRIPREL. The match status will always be
Matched, as the person has now been created in Banner via GOAMTCH. Continue
with regular SRIPREL load processing.
The new match status, *Matched*, is displayed under that person's record on
SRIPREL. When you exit the form or requery against the data in the SRVPREL view,
these highlighted values disappear, and the Match Status field is updated
appropriately.
10. The Migrate Electronic Prospects Process (SRRPREL) can then be used to load
those records with a match status
M (Match) to Banner production. Or, you can use
the Create Recruit/Applicant item in the Options Menu on SRIPREL to create Banner
records individually.
All fields on this form are searchable and can be used in combination to locate specific
data loads or populations.
The Load Status field indicates that the record for this person has already been created
or updated in Banner. A person may be present on multiple search or test score files, so
they may have multiple records in SRVPREL. This flag, if set to
C, indicates that this
record has been loaded into Banner.
The Match Status field displays the match status created by either the Search Tape
Matching Process (SRRSRIN) or the Common Matching Entry Form (GOAMTCH), based
on the rules on the Common Matching Rules Form (GORCMRL).
This form also allows you to perform the following three tasks:
1. For a selected record, use the Detail item in the Options Menu to access the
Electronic Prospect Detail Form (SRAPREL) to view the detailed search or test score
data for the person.

512
Banner Student User Guide | Recruiting
2. Use the Match item in the Options Menu to access the Common Matching Entry Form
(GOAMTCH) to determine if this person already exists in Banner, and then match the
person.
3. Use the Create Recruit/Applicant item in the Options Menu to create or update the
following Banner records for a person who is either new or has been matched to a
Banner record.
• SPAPERS - demographic information
• SPAIDEN - address information
• SPATELE - telephone information
• GOAINTL - international information
• SOAPCOL - prior college information
• SOAHSCH - high school information
• SRARECR - source and contact information
• SOATEST - test scores (for test score data loads only, including percentiles for SAT
and GRE files)
• SAAADMS - application information
• SOASUPL - applicant supplemental information, for AMCAS only
Common Matching Entry Form (GOAMTCH)
If Common Matching is turned on (on GUAINST), and the user is not excluded from
Common Matching on GORCMUS, GOAMTCH is called automatically from the Key Block
of SPAIDEN, SRAQUIK, SAAQUIK when an ID is generated or entered, and the ID does
not already exist in Banner. Whether or not Common Matching is turned on, the user will
access GOAMTCH from SRIPREL, SAAEAPS, and SHAEDIS as part of the matching
process for data loads.
You can enter information for name, address, telephone, date of birth, SSN, etc., in the
Data Entry block. The data entered can be used to assist with matching if the matching
rule contains the field being entered. Regardless, the data entered in the Data Entry block
will be stored in Banner if the person is found to be new.
The matching process is called when you perform a Next Block from the Data Entry block
or select the Duplicate Check button. Use the Duplicate Check button to execute the
matching process at any time during the entry of person information. Only those data
elements in this form can be used for online matching rules.
The Match block is automatically displayed after the matching process is completed if a
match is found. This block is accessed using Next Block or the Match tab. The data
entered remains in the Data Entry block. You can choose to clear the Match information
using the Clear button. You will then be returned to the Data Entry block. The address
information in the Match block displays the address type and address data, if the address
was matched as part of the matching algorithm.
The Potential Matches block displays the potential matches (formerly known as suspense
records) found during the search. The number of records found is displayed in
parentheses in the tab, i.e., “Potential Matches (42)”. You can scroll through the potential

513
Banner Student User Guide | Recruiting
match records to see the information in each that potentially matches the information in
the Data Entry block.
Logical sort order processing can be used to sort the matching results dynamically by ID
or name in ascending or descending order using the Sort up and down arrow buttons for
the ID and Name fields. The default sort order is by ID and priority (in descending order).
When you click on the Sort up arrow, the sort organizes the results in alpha order (A - Z).
When you click on the Sort down arrow, the sort organizes the results in reverse alpha
order (Z - A). Once you have clicked on an up or down arrow, you can mouse over the
arrow to see the tool switch hint message, click on the arrow again, reverse its direction,
and perform a new sort. For example, after you have sorted on ID or name in A - Z order
(using the Sort up arrow), you can then click on the arrow again to change it to a Sort
down arrow, and resort the data in Z - A order.
If any address fields are included in the matching rules being used, and a match exists on
the address of a potential match, then that address will be displayed for that record. To
see all address records for a selected potential match, select the All Addresses pulldown
list.
Note: If you use GOAMTCH by itself to match a person to an existing
person in Banner, and the existing person in Banner has an address of
the same address type (where the addresses themselves do not match),
the existing Banner address will be inactivated, and the address that was
entered on GOAMTCH will be inserted.
If you use SAAEAPS or SRIPREL to match a person via GOAMTCH and
the same scenario exists, SRIPREL and SAAEAPS will put an end date
on the existing Banner address and then insert the new address.
If the matching rule contains a row for telephone number and/or email address, and a
match exists on the telephone number or email address of a potential match, then the
phone number and/or email address will be displayed. The date of birth and gender will be
displayed for any potential match if they exist in Banner for the potentially matched record,
regardless of whether date of birth or gender are used in the matching rule.
The Matching Rule Sets field displays the result of the matching algorithm for each field
included in the matching rule. This allows a user to know what data elements the matching
rule was using, even if they do not have access to the Common Matching Rules Form
(GORCMRL).
Electronic Prospect Load (SRTLOAD)
This process uses a C program to load data from a search input file (for example, College
Guide/SSS, or Peterson) or a test score report file (for example, SAT, ACT, GRE, or
AMCAS), to the following temporary tables:
• SRTIDEN
• SRTPERS
• SRTTELE

514
Banner Student User Guide | Recruiting
• SRTADDR
• SRTTEST
• SRTPREL
• SRTHSCH
• SRTPCOL
• SRTEMAL
• SRTGPAT
• SRTCRSS
• SRTSUPL
• SRTDEGR
• SRTMAJR
• SRTTSPC
• SRTPRAC
The data in these tables is available using the Search Tape View (SRVPREL) or
SRAPREL. Detail is also available when accessing these loaded records on SRIPREL
using the Detail [SRAPREL] item in the Options Menu. The SRTLOAD process also
creates an audit report detailing the status of each record on the input file.
This process can be used to load positional files (SAT, GRE, etc.) and delimited files
(AMCAS). It reads delimited input files based on whether rules for file delimiters or
delimiters/markers exist in the SORDLIM table for a given tape code. The process will
either look for the fields by position or by sequence number as defined on SRATPFD in the
SRRTPFD_START_POS field. The process refers to the
STVTESC_TESC_CODE_DATE_ORIGIN field for test codes.
You should do the following in preparation for running SRTLOAD:
1. If the input file is delimited, set up the delimiter (and optionally the marker) on
SORDLIM for the tape code being used.
2. Set up the corresponding interface (INFC) code and tape code values on STVPREL.
3. Assign the appropriate matching source code to the interface code on STVINFC.
4. Set up rules on SOTCNVT for the conversion of the file values to the Banner
validation table values.
The codes listed below are compared to SOTCNVT for conversion to Banner values and
for default values.
If the code on the file is blank, an asterisk ( * ) value is matched against SOTCNVT. If the
file value is not blank, the incoming value is matched against SOTCNVT. If there is no
available conversion for the file value or the file value is not valid on the Banner validation
table, the literal
DEFAULT is matched against SOTCNVT. If this value is not available,
then an error message is printed on the report.

515
Banner Student User Guide | Recruiting
On SOTCNVT, the following tables are validated:
• NATN
• CITZ
• STAT
• INTS
• INTP (PSAT only)
• ETHN
• ETHR (AMCAS only)
• RACE (AMCAS only)
• DEGC
• DEGA (AMCAS only)
• MAJR
• MAJP (PSAT only)
• RELG
• CNTY
• TADM
• TERM
• DEPT
• VTYP
• EDLV
• EGOL
• ADMT (AMCAS only)
• TEAC (AMCAS only)
• TEFR (AMCAS only)
• SBGI (college code conversions)
• SBGH (high school code conversions)
• HGPA (SAT only)
• CAMP
• ESEL
• GNDR
• TESC

516
Banner Student User Guide | Recruiting
• TSPT
Note: The table value of GNDR should be used on SOTCNVT to convert
various gender formats on incoming data loads to the appropriate Banner
values.
GNDR works on SOTCNVT, even though it does not have a
corresponding validation table.
The exceptions for determining conversions and default values are for the major code,
interest code, term code, level code, campus code, contact type code, source code,
address type code, email type code, and telephone code. SRTLOAD will appropriately
analyze the high school or prior college graduation date on the incoming file against rules
on SOTCNVT to determine the term code, or it will use the term code entered in the
SRTLOAD Term Code parameter.
If there is no match, the value from the Term Code parameter is used. The level code,
address type code, telephone type code, and email code that is inserted will always be
from the input parameter value. If no source code or contact type code are entered in the
input parameters, the value from STVINFC for the interface will be used. In addition, the
test score source inserted on test scores will be the one created on STVINFC.
The fields INTS and MAJR can have multiple values in multiple fields for some types of
data loads. The asterisk ( * ) and
DEFAULT functionality will only work on the first match
attempt for the field MAJR(MAJR1). If there are values in fields MAJR2, MAJR3, or
MAJR4, the process will attempt to match the values against the SOTCNVT crosswalk
and the values in STVMAJR. If no match is found for these, the output report will display
an error indicating the field and the error. INTS will not use the asterisk ( * ) or the
DEFAULT functionality due to the possibility of many records existing on the incoming
data file.
High school codes can be converted using the
SBGH validation on SOTCNVT. If there is
no high school conversion on SOTCNVT, the STVSBGI code will be used if there is a
match. Non-high school codes cannot be entered using the
SBGH validation on
SOTCNVT. Colleges codes can be converted on SOTCNVT with
SBGI validation, and if a
code exists in STVSBGI, that code will be loaded.
The default values on SRAPRED are used when there are no SOTCNVT values and if the
corresponding parameter on SRTLOAD is blank. When there are no SOTCNVT values
and if the corresponding parameter on SRTLOAD is blank, SRTLOAD will first use the
data that exists on the incoming file for such fields as Term, Major, etc. If no value exists
on the file, and the value does not convert on SOTCNVT, then SRTLOAD will use the data
in the parameter. If no value exists in the parameter, SRTLOAD will use the value on
SRAPRED. The Test Source will default in from STVINFC. The Tape Source and Contact
Type fields will be populated from STVINFC if there are no corresponding SRTLOAD
parameter values. If no values exist on STVINFC, the values will default from SRAPRED
where appropriate.
Run the process in audit mode to determine which values are missing from Banner (i.e.,
high school codes, major codes, etc.). If these values are not created in Banner and
converted using SOTCNVT where appropriate, the value will not be loaded into Banner.

517
Banner Student User Guide | Recruiting
When data is loaded to Banner, the load hierarchy is as follows:
1. Values from SOTCNVT will be loaded first, if they exist.
2. Values from the SRTLOAD parameters will be loaded second, if they have been
entered.
3. Values from STVINFC (contact type and/or source code) will be loaded third, if they
exist, and if valid parameter values do not exist on SRTLOAD.
4. Values from SRAPRED will be loaded fourth, if they exist.
Note: For AMCAS, the student type will always need to be updated on
SRAPRED for the level for which you are running SRTLOAD, so the
required Student Type value is loaded for the applicant.
When matching nation codes, if no code exists on the file and a nation description is
provided, the nation description will be compared against the nation description in
STVNATN. If there is an exact match, the nation code will be updated in the SRTNATN
temporary table and can be loaded to Banner.
For example, when no SOTCNVT rules exist for STVNATN and the nation description is
provided on the file:
• Nation Singapore will be translated and update SRTADDR_NATN_CODE = 133
when STVNATN code
133 = Singapore.
• Nation Mexico will be translated and update SRTADDR_NATN_CODE = 99 when
STVNATN code
99 = Mexico.
• Nation Albania will be translated and update SRTADDR_NATN_CODE = 2 when
STVNATN code
2 = Albania.
• However, Bahamas would not be translated, as STVNATN code 10 = The Bahamas.
Note: The nation code will be loaded to Street Line 3, and there will be
associated API errors because of the nation and the state. The record
would need to be resolved manually on GOAMTCH prior to loading.
Also, SRTLOAD will provide the following messaging based on the above examples:
Data Item Nation Code Message
NATN 99 Nation found from description
NATN 2 Nation found from description
NATN 133 Nation found from description
NATN BAHAMAS Not In SOTCNVT, STVNATN
518
Banner Student User Guide | Recruiting
Loading User-Defined Activity Codes
The college interest information is delivered on the SAT file in positions 922-942. A single
activity determined by the College Board is represented in each of the 22 positions on the
file.
When the SRTLOAD process is run, it looks at each of the 22 positions to determine if
they are on or off. Each position represents a particular activity; for instance ART will
always be represented in position 922. SRTLOAD is hardcoded to interpret the activities in
each of these positions and convert the value to a corresponding activity code delivered
for use in STVINTS.
For instance, SRTLOAD interprets the interest code that represents ART in position 922
as
AH and loads AH to the Temporary Interests Table (SRTINTS). These are the activity
codes that will ultimately be loaded to Banner. These activity codes are maintained on
STVINTS.
You have the option to use your institution-defined activity codes in STVINTS and have
them loaded into Banner, rather than having the Banner baseline activity codes loaded by
SRTLOAD. This allows you to convert the delivered interests that SRTLOAD uses for
each activity to an institution-defined activity from STVINTS on the Tape Code Conversion
Form (SOTCNVT). Your institution’s validation values will then be loaded to Banner.
Note: Field names and positions will not change on SRATPFD for the
SAT file. The Banner baseline activity codes that SRTLOAD uses for the
SAT file must remain in STVINTS. The only change necessary to
accommodate this modification is to update SOTCNVT.
For example, on the SAT file, position 922 represents ART. In SRATPFD for the Tape
Code value
SAT, the Field Name value for position 922 is AH_INTS_CODE.
The
AH represents the activity code that is loaded to Banner if the student has marked
position 922. The field names for positions 922-942 incorporate the activity code used.
Note: Position 942 equals NONE OF THE ABOVE, and SRATPFD does
not look at this position.
If you prefer to use your own interest code for ART in STVINTS rather than
AH, then the
AH can be converted to a value of your choice on SOTCNVT. In this case, the Tape Value
on SOTCNVT is the Banner-delivered activity code that represents the activity on the file.
Below is an example of how to set up SOTCNVT to convert three of the activity codes:
AH
(ART),
AA (Intramural Sports), and AB (Varsity Sports) to the institution-defined interests
of
AR, IS, and VS respectively. The Interface Type is SAT, and the Validation Table
Name is
INTS.
Table Name Tape Value Conversion Code Description
INTS AH AR Art
INTS AA IS Intramural Sports

519
Banner Student User Guide | Recruiting
Codes that are not converted in this manner will still be loaded with the hard-coded values.
SRTLOAD Process Results with PIDM
The Electronic Prospect Load (SRTLOAD) checks the data file for the PIDM based on the
start and end positions that are defined on SRATPFD. If a PIDM exists in the file,
SRTLOAD compares the PIDM on the file to the value in the
SPRIDEN_PIDM field.
If SRTLOAD finds a matching PIDM in Banner, the
SRTIDEN_MATCH_STATUS field is
updated to a status of matched, and the
SRTIDEN_DATE_MATCHED field is also
updated accordingly. SRTLOAD only prints PIDM information on the report if there is a
PIDM found on the file. A total of matched PIDMs appears at the end of the report.
Data Load PIDM Matches Banner PIDM
When SRTLOAD determines that the PIDM on the file matches a PIDM in Banner,
SRTLOAD prints the corresponding matched/existing Banner ID on the report. The First
Name, Middle Name, and Last Name from the file print next to the actual Banner ID.
A message also prints indicating that the PIDM ON TAPE MATCHES
SPRIDEN_PIDM
AS
SPRIDEN_FIRST_NAME, SPRIDEN_LAST_NAME. (SPRIDEN First and Last
Name are the actual Banner First and Last Name associated with the matched PIDM.)
Data Load PIDM Does Not Match Banner PIDM
When SRTLOAD determines that the PIDM on the file does not match a PIDM in Banner,
a message prints on the report indicating that the PIDM ON TAPE DOES NOT MATCH
SPRIDEN_PIDM. Run the Electronic Prospect Match (SRRSRIN) to determine a match
status on the remainder of records with no matched status, or match them manually using
the Electronic Prospect Inquiry Form (SRIPREL) and the Common Matching Entry Form
(GOAMTCH).
When all matching is completed, run the Migrate Electronic Prospects Process
(SRRPREL) to load the records to Banner, or load them manually using SRIPREL and
GOAMTCH.
Matching on Middle Name
When a prospect is pushed to Banner (SRRPREL) that is a match and where the Banner
SPRIDEN record has a
NULL middle name, if the incoming prospect has a middle initial/
name, a new Banner SPRIDEN record is generated. The process keeps the existing ID,
inserts the new middle name information, creates an alternate SPRIDEN record with the
original name, and updates Name Change Indicator.
INTS AB VS Varsity Sports
Table Name Tape Value Conversion Code Description

520
Banner Student User Guide | Recruiting
Note: An alternate ID with the same name as the current SPRIDEN
record is allowed and will not cause API errors when a unique name type
is included as part of the alternate ID.
When data is loaded to Banner, several checks are made to accommodate the loading of
the middle name or middle initial. When the current SPRIDEN record matches an
alternate (including the name type), and the current SPRIDEN middle name is
Null, the
incoming record with the new middle name will not cause an API error, but it will not be
loaded.
Note: An alternate ID with the same name as the current SPRIDEN
record is allowed and will not cause API errors when a unique name type
is included as part of the alternate ID.
Middle name or middle initials will be loaded when:
• An incoming matching prospect has a middle name or middle initial, the current
SPRIDEN middle initial is
Null, and no alternate IDs exist with the same incoming
middle initial or middle name and/or the same first character of the incoming middle
initial or middle name.
• An incoming matching prospect has a middle name or middle initial, the current
SPRIDEN middle initial is
Null, and alternate IDs exist with a different middle initial or
middle name.
Student Search Service Data Load and SRTLOAD
The College Board Student Search Service (SSS) is combining the SAT majors and the
PSAT/NMSQT majors onto a single data load beginning in July 2003.
Note: The PSAT Major data element is obsolete with the September 2013
SSS_SEARCH data load regulatory updates. The description of the
PSATMAJOR rule on SAAERUL for the group code of PREL has been
changed to read
Obsolete Sept 2013 SSS_SEARCH.
SAT and PSAT/NMSQT Majors
The College Board Student Search Service (SSS) data load is delivered with between one
and five SAT majors. Since the delivered SAT and PSAT/NMSQT major codes are
converted differently, two sets of conversion codes on STVINFC and conversion rules for
majors on SOTCNVT are needed to process each SAT version or the PSAT/NMSQT
version of the file.
As of July 2003, the College Board Search Service (SSS) will deliver the SAT and PSAT/
NMSQT majors on a single data load. The five possible SAT major codes are listed in
positions 192-206. These positions had previously been blank.
While this processing is available in Banner, it will not impact your current processing of
the separate SAT or PSAT/NMSQT files. As of July 2003 when you begin to receive the

521
Banner Student User Guide | Recruiting
new format (or when you decide to begin your testing), you can change one of your
existing conversion rules on SOTCNVT to accommodate the single data load, or you can
create a completely new conversion rule.
Using Tape Code SSS_SEARCH
The description of the tape/file field name MAJR_PSAT for the PSAT/NMSQT major on
the Tape Field Names Validation Form (STVTPFD) indicates that this field name is
obsolete. The description reads
Obsolete Sept 2013 SSS_SEARCH.
The SAT majors (MAJR_CODE, MAJR_CODE2, MAJR_CODE3, MAJR_CODE4,
MAJR_CODE5) are in positions 446-460. The Temporary Electronic Prospects Table
(SRTPREL) can accommodate the five SAT major codes. The temporary tables are
populated when SRTLOAD is run.
The following information about PSAT Major only applies to SSS_SEARCH data loads
prior to September 2013.
Because the PSAT majors are converted differently than SAT majors and will be delivered
on a single data load, dummy validation table names are used on the Tape Code
Conversion Form (SOTCNVT) so the major codes are converted properly from PSAT
majors, and interest codes are converted properly from PSAT majors. These dummy
validation table names are:
MAJP (used to convert PSAT majors) and INTP (used to
convert PSAT majors to interests).
The
MAJP and INTP validation table names are not validated on SOTCNVT. The four
character table name is loaded to a variable used to execute the conversions. For data
entry purposes, validation (List of Values) against the dummy validation table names on
SOTCNVT will call the Banner validation tables STVMAJR and STVINTS, which contain
your institution’s major and interest values.
MAJP will validate on STVMAJR. INTP will
validate on STVINTS.
To translate the SAT majors and interests, you will need to create rules on SOTCNVT for
the
MAJR and INTS validation table names.
For example, a sample of data for SAT majors and conversions could appear as follows:
Interface Code Validation Table Name
SEARCH MAJR
Table Tape Data Banner Conversion Code Description
MAJR 108 DASC Dairy Science
MAJR 350 ACCT Accounting

522
Banner Student User Guide | Recruiting
A sample of data for SAT interests and conversions could appear as follows:
To translate the PSAT majors and interests, you will need to create rules on SOTCNVT for
the
MAJP and INTP validation table names.
For example, a sample of data for PSAT majors and conversions could appear as follows:
A sample of data for PSAT interests and conversions could appear as follows:
When the Electronic Prospect Load (SRTLOAD) is processing the SSS_SEARCH data
load and finds the table field name
PSAT_MAJOR on SRATPFD, it will use the MAJP
validation table and/or the
INTP validation table during the conversion of PSAT majors
and interests based on your institution‘s rules on SOTCNVT. SAT majors will be converted
from the
MAJR and INTS validation tables based on your institution‘s rules on SOTCNVT.
Interface Code Validation Table Name
SEARCH INTS
Table File Data Banner Conversion Code Description
INTS 108 AD Agriculture/Dairy
Science
INTS 350 FA Finance/Accounting
Interface Code Validation Table Name
SEARCH MAJP
Table File Data Banner Conversion Code Description
MAJP 130 AGRO Agronomy
MAJP 280 ENGR Engineering
Interface Code Validation Table Name
SEARCH INTP
Table File Data Banner Conversion Code Description
INTP 130 AY Agronomy
INTP 280 EN Engineering

523
Banner Student User Guide | Recruiting
The Electronic Admissions Application Rules Form (SAAERUL) contains a delivered rule
for use only with the SSS_SEARCH data load. The rule is for the
PREL group code and
the
PSATMAJOR label and has values of Y or N. Here is the SSAERUL rule.
Interests will be loaded and translated for all majors based on your institution’s rule
settings on SOTCNVT and your MAJOR2INTEREST and INTERESTMAX rule settings
on SAAERUL.
Note: If LOADMAJOR is set to Y, PSATMAJOR is set to N,
MAJOR2INTEREST is set to Y, and there is a PSAT major on the file that
meets your conversion rules, then the PSAT major will still be loaded to
the SRTPREL temporary table and will be converted to an interest.
However, SRRPREL will not load the PSAT major to the RECRUIT Major
1. If
MAJOR2INTEREST is set to N, no majors will be translated,
Group Label Description EDI Instructions
PREL PSATMAJOR Obsolete Sept 2013
SSS_SEARCH
Formerly, Load the PSAT
Major First
This rule is obsolete as of
September 2013 and is no
longer used with the
SSS_SEARCH data load.
N Loads the PSAT major if it exists. This
rule is only used for SSS_SEARCH
data load processing.
When
LOADMAJOR is set to Y and
PSATMAJOR is set to Y, and the
PSAT exists, the PSAT major will be
loaded to a field of study row with a
Type of
MAJOR and a Priority of 1
(backfilled to the Major 1 field on
SRBRECR). The first SAT major code
listed on the file will then be loaded to
a field of study row with a Type of
MAJOR and a Priority of 2 (backfilled
to the Major 2 field on SRBRECR) if it
exists.
When
LOADMAJOR is set to Y and
PSATMAJOR is set to N, the PSAT
major will not load at all, and the first
two SAT major codes on the file will
be loaded to a field of study row with a
Type of
MAJOR and a Priority of 1
(backfilled to the Major 1 field on
SRBRECR) and a field of study row
with a Type of
MAJOR and a Priority
of
2 (backfilled to the Major 2 field on
SRBRECR), if they exist.
Note: Whatever your settings are in
SAAERUL, if the second major to be
loaded translates to 0000
(undeclared), the second major will
not be loaded.

524
Banner Student User Guide | Recruiting
regardless of your rules. Also, INTERESTMAX will need to be set
accordingly.
2013 SSS_Search File Format
For the 2013 - 2014 reporting year, the ADDITIONAL_ID is reported in positions 14 - 45.
STREET_LINE2 is reported in positions 167 - 216. STREET_LINE3 is reported in
positions 217 - 266. Validation table names of MAJR and MAJP can be updated as
needed, and the conversion rules on SOTCNVT modified for the interface type code of
SSS_SEARCH.
Field Positions on SRATPFD
Here are the positions and field names used for 2013 - 2014 SSS_SEARCH files. The
SSN is no longer used. The PSAT Major is no longer used. The Additional ID, Street Line
2, and Street Line 3 are reported in the file.
From and To Positions Field Name
14 - 45 Student’s Additional ID
46 - 65 Student's Last Name
66 - 85 Student's First Name
86 - 86 Student's Middle Initial
87 - 166 Street Address Line 1
167 - 216 Street Address Line 2
217 - 266 Street Address Line 3
267 - 316 City
317 - 318 State/Province
319 - 333 Zip + 4 or Postal Code
334 - 362 Country Name
363 - 367 Country Code
371 - 420 Email Address
421 - 428 Date of Birth
429 - 429 Gender
430 - 431 Ethnic Indicator
432 - 433 Student’s High School Graduation Year
434 - 439 Student's High School Code
446 - 448 SAT I First-Choice Intended College Major

525
Banner Student User Guide | Recruiting
Here is a comparison of current and new field names and positions from SRATPFD.
449 - 451 SAT I Second Listed Major
452 - 454 SAT I Third Listed Major
455 - 457 SAT I Fourth Listed Major
458 - 460 SAT I Fifth Listed Major
Tape Code =
SSS_SEARCH
Record Number = 01
Current
From
Position
Current To
Position
New From
Position
New To
Position
ADDITIONAL_ID 14 45
NAME_LAST 15294665
NAME_FIRST 30 41 66 85
NAME_MI 42428686
STREET_LINE1 43 92 87 166
STREET_LINE2 167 216
STREET_LINE3 217 266
CITY 92 122 267 316
STAT_CODE 123 124 317 318
ZIP 125 134 319 333
NATION_NAME 135 163 334 362
CNTY_CODE 311 316 363 367
EMAIL_ADDR 234 283 371 420
BIRTH_MON 169 170 421 422
BIRTH_DAY 171 172 423 424
BIRTH_YEAR 173 176 425 428
GENDER 168 168 429 429
ETHN_CODE 232 233 430 431
HSCH_GRAD_YEAR 227 228 432 433
HSCH_SBGI_CODE 186 191 434 439
MAJR_CODE 192 194 446 448
MAJR_CODE2 195 197 449 451
From and To Positions Field Name

526
Banner Student User Guide | Recruiting
Using Additional ID with SSS_SEARCH
An SSS_SEARCH ID number (additional ID) that is unique to the student can be used with
the
ADDITONAL_ID field name that is provided on STVTPFD and SRATPFD. Also,
users can load additional IDs to the GORADID table. The
EPID additional ID type code is
provided on GTVADID. The
LOADALTID rule is provided on SAAREUL. The
ADDITIONAL_ID field name on SRATPFD for Tape Code of SSS_SEARCH is used for
the SSS_Search ID number.
The SRTLOAD process loads the additional ID with a default additional ID type code of
EPID. (The Additional ID Type Code value of EPID, with the description of
Electronic Prospect ID, is used on the GTVADID form.) The default value of
EPID is used for the additional ID type code, and the additional ID type code is required to
update the GORADID table in Banner General.
The additional ID and additional ID type code are loaded to the
SRTIDEN_ADDITIONAL_ID and SRTIDEN_ADDITIONAL_ID_CODE fields on the
SRTIDEN temporary table. Additional ID Type and Additional ID fields on SRAPREL are
used to display those values for the individual when they exist. The value for the
ADDITIONAL_ID is also loaded to SPAIDEN in the Additional Identification block. The
GORADID Banner General table stores the additional ID information.
Note: The ADDITIONAL_ID field name can be added to the file layouts
for other tape codes on SRATPFD. A unique additional ID will be loaded
with a default value of
EPID, unless your institution creates a new,
unique value for the Additional ID Type Code field on GTVADID and
chooses to convert that code on SOTCNVT for use with each new file
format.
In order to distinguish the origin of the or additional ID (or any
ADDITIONAL_ID rule
defined on SRATPFD), it is suggested that users create a new, unique value in the
Additional ID Type Code field on GTVADID for
SSS or any other electronic prospect
type. Your new GTVADID additional ID type code can then be converted from the default
value of
EPID on SOTCNVT, and you can associate or track the GTVADID additional ID
type code and additional ID with the prospect type, which in this case is
SSS_SEARCH.
It is important to remember that not all prospect organizations can guarantee that the ID
reported is unique during their relationship with an individual over time. This could lead to
a risk of having multiple additional IDs for an individual for a prospect type. Therefore, if
you do not create a new GTVADID additional ID type code to be converted from the value
of
EPID for each prospect type reported, the EPID value will be used across prospect
types. For this reason it is suggested you create and convert a GTVADID additional ID
MAJR_CODE3 198 200 452 454
MAJR_CODE4 201 203 455 457
MAJR_CODE5 204 206 458 460
Tape Code =
SSS_SEARCH
Record Number = 01
Current
From
Position
Current To
Position
New From
Position
New To
Position

527
Banner Student User Guide | Recruiting
type code for each prospect type that includes an ADDITIONAL_ID record on
SRATPFD.
Note: SPAIDEN and/or GORADID allow for the entry of the same
additional ID type, as long as the additional ID is unique. When the
additional ID type and additional ID are pushed to Banner, this
functionality stays consistent with the form. It is recommended
SSS_SEARCH files and/or any files that provide an additional ID be
loaded with a unique GTVADID additional ID type code.
Example Conversion Code Setup
1. Access GTVADID.
1.1. Enter an Additional ID Type Code value of
SSS with a description of, for
example,
SSS Search ID.
1.2. Save the changes.
2. Access SOTCNVT.
2.1. In the Key Block, select
SSS from the List of Values for the Interface Type field.
2.2. Enter
ADID in the Validation Table Name field.
3. Go to the next block.
3.1. Enter
ADID in the Table Name field.
3.2. Enter
EPID in the Tape Value field.
3.3. Select
SSS from the List of Values in the Conversion Code field.
The additional ID type selected from GTVADID for the conversion code will be converted
by SRTLOAD from the default value of
EPID and then be loaded to temporary fields in the
SRTIDEN table with the conversion value. The additional ID type and/or additional ID data
in SRTIDEN can then be viewed on SRAPREL. The converted additional ID type and/or
additional ID data can be pushed to production (GORADID table) and is then displayed in
the Additional Identification block of SPAIDEN. It is then clear that this SSS_SEARCH
additional ID type originated with a prospect file of type
SSS.
Note: If for any reason, your institution does not want an additional ID to
be loaded to Banner, the
ADDITIONAL_ID field name can be removed
from SRATPFD.
Also, should a unique identifier or additional ID be included on future files,
you can add the
ADDITIONAL_ID field name to SRATPDF at any time
for the appropriate tape code.
Run SRTLOAD with Additional ID
The SRTLOAD process loads the additional ID to the SRTIDEN_ADDITIONAL_ID
column and the default value of
EPID for the additional ID type code to the
SRTIDEN_ADDITIONAL_ID_CODE column.The process also checks for a conversion
528
Banner Student User Guide | Recruiting
of the default EPID value on SOTCNVT. (SOTCNVT allows the conversion of the
additional ID type code,
GTVADID_CODE, default value of EPID to a user-defined code
for the Interface Type Code, such as
PSAT.) The conversion value for the additional ID
type code will be loaded to the SRTIDEN temporary table.
The Additional ID Type and Additional ID fields on SRAPREL display the data after
SRTLOAD has been run, so it can be viewed before it is pushed to Banner from the
temporary tables.
The SRKPREL package loads the data from the
SRTIDEN_ADDITIONAL_ID and
SRTIDEN_ADDITIONAL_ID_CODE columns to the GORADID_ADDITIONAL_ID
and
GORADID_ADID_CODE columns when that data exists.
Electronic Admissions Application Rule for Loading an Alternate ID
The LOADALTID rule label on SAAERUL for the Group Code of PREL is used with this
processing. The
LOADALTID rule has a description of Load Same Alt ID Type/
Diff ID
and a value of UPDATE ME, which is equal to N. The EDI and System
Required indicators are unchecked (set to
N). Before this rule is used, you need to
change
UPDATE ME to Y or N.
Note: The load and push of the additional ID uses the same functionality
as SPAIDEN.
The
LOADALTID rule provides flexibility with loading the additional ID or any future
information. You can enter the same additional ID type on SPAIDEN (in the Additional
Identification block), as long as the additional ID is unique. This allows the update or
loading of other additional ID types with code
EPID, as long as the associated additional
ID is unique.
When the SSS_SEARCH file and another prospect file are loaded, and both use the
default additional ID type code of
EPID, you cannot distinguish the origin of the value for
the
ADDITIONAL_ID field name. If you need to track the origin, you can create a unique
additional ID type on GTVADID and then convert the
EPID code on SOTCNVT to your
selected GTVADID value for each electronic prospect type that uses an additional ID.
It is recommended that this practice be followed to prevent duplicate additional ID types
using
EPID from being loaded to your system and assist in verifying the origin of the
additional ID. Keep this in mind as you select the setting for the
LOADALTID rule.
When an additional ID is loaded to Banner, the process checks the
LOADALTID rule for a
setting of
Y or N. This rule provides the option to load or not load and incoming additional
ID when the same
GTVADID_CODE exists with a different associated additional ID.
The
LOADALTID rule processes data as follows:
• The additional ID type and additional ID are always loaded when the additional ID type
does not exist in the database, regardless of whether the rule is set to
Y or N.
• When the rule is set to Y, the additional ID type is loaded when the additional ID type is
the same, and the additional ID is different.

529
Banner Student User Guide | Recruiting
• When the rule is set to N, the additional ID type is loaded only if it does not exist for the
individual (even if the additional ID is different).
The SRKPREL package checks the setting of the
LOADALTID rule.
• When the rule is set to Y, SRKPREL loads the incoming additional ID for the same
additional ID type, as long as the additional ID is different.
• When the rule is set to N, SRKPREL does not load the incoming additional ID for the
same additional ID type.
Migrate Electronic Prospects with Additional ID
The SRRPREL process displays the additional ID on the report output in the detail for
each record. When the additional ID type and additional ID that are coming from the
prospect file are loaded and/or already exist in the database, the additional ID is displayed
for the individual on the report output, for example,
94998988.
When the additional ID type and additional ID that are coming from the prospect file are
not loaded and do not exist in the database, the additional ID is displayed for the individual
on the report output, followed by
-NL, for example, 34953099-NL.
Match Electronic Prospects with Additional ID
After the data is loaded, you can match on the additional ID as part of the electronic
prospect load and match process. The option to load an additional ID is important as the
use of the SSNs is discontinued by vendors and from outside source files, and unique
identifiers are provided for the records instead. The additional ID can now be included as
part of your matching process to assist with finding potential matches.
The SRAPREL and SRIPREL forms and the SSRSRIN process include fields for
Additional ID and Additional ID Type for matching. The SSRSRIN process passes the
data for the additional ID and additional ID type to the GOTCMME table during the
matching process, in order for those fields to be included as part of the matching rule
specified on the STVINFC form.
2015 SSS_Search File Format
This section discusses updates to Student Search Service (SSS_SEARCH) regulatory
reporting for September 2015 - August 2016. Contact your Student Search Service
representative or log in to your Search account for detailed information on the new data
file layout and to access sample files.
A layout has been created which allows users to process current and new SSS_SEARCH
files during the transition period. The layout code used with this layout is SSS15.
Updates include:
• Tape load code
• Electronic prospect code
• File layout

530
Banner Student User Guide | Recruiting
Reporting Changes
Reporting updates include:
• The fields for Student’s First Name and Student’s Last Name have been expanded to
from 25 to 35 characters.
• The Email Address field has been expanded from 50 to 128 characters.
• Province and state data has been separated into two fields for address information.
• The Province Name field has been added and allows for 40 characters.
• Canadian province data has been standardized and is reported by the College
Board as a description. For all other foreign countries, the Province field is a free
form data field.
• When data exists for both a state and a province, the province is loaded when a
matching value exists in STVSTAT. If the province value does not match, and the
state value does match on STVSTAT or is mapped on SOTCNVT, the state is
loaded.
• When neither the state nor the province values match, the message STAT State
Name Not In SOTCNVT, STVSTAT is displayed.
• All date fields use the YYYY-MM-DD format.
• The collection of race and ethnicity data has been updated to meet Federal guidelines.
The Ethnicity field has been separated into two fields, one for multiple races and one for
the aggregate race when two or more values exist for the student.
• Major codes have been updated to meet criteria for CIP codes provided by the NCES.
• Indicators for the National Hispanic Recognition Program (NHRP) and first generation
are included. However, these fields are not loaded by SRTLOAD.
Use of prospect codes on SRAPRED
SSS15
If default values have been set up on SRAPRED for the SSS_SEARCH electronic
prospect code, you need to define values for the
SSS15 electronic prospect code.
When SRTLOAD is run for the SSS_SEARCH 2015-2016 test score cycle and
SSS15 is
entered in the Electronic Prospect Code parameter, only default values defined on
SRAPRED for the
SSS15 electronic prospect code will be used by the process.
Any existing default values for the
SSS_SEARCH electronic prospect code will not be
used, and the process may load other default values from validation tables that you are
not expecting to be used.

531
Banner Student User Guide | Recruiting
SSS_SEARCH
If default values have been set up on SRAPRED for the SSS_SEARCH electronic
prospect code, and SRTLOAD is run for the SSS_SEARCH 2015-2016 test score cycle
with
SSS_SEARCH entered in the Electronic Prospect Code parameter, the existing
default values on SRAPRED will be used by the process.
Race and Ethnicity Fields
Race and ethnicity fields are used with the SSS_SEARCH file layout crosswalk. These are
used with the student answers to the two-part question and correspond to prior answers of
Y or Null. Answers can be for one, multiple, or none and are checked for Yes. "Other" is
used when the student responded with "other" to the prior version of the question.
When positions 550 or 551 or 552 or 553 are Y, the Hispanic ethnicity is loaded. When
position 554 is Y, the Non-Hispanic ethnicity is loaded. Multiple races are then loaded in
GORPRAC when those values are Y.
Set up Race Mapping on SOTCNVT
In order to load the race and ethnicity data, institutions must map their race values on the
Tape Code Conversion Form (SOTCNVT) as follows.
Position Race or Ethnicity
550 Cuban Ethnicity
551 Mexican Ethnicity
552 Puerto Rican Ethnicity
553 Other Hispanic or Latino
554 Non-Hispanic or Latino
555 American Indian or Alaska
Native
556 Asian
557 Black or African American
558 Native Hawaiian or Other
Pacific Islander
559 White
560 Other

532
Banner Student User Guide | Recruiting
When contradictory ethnicity data exists, the data is not loaded, and the following error
message is displayed: Cannot load ethnicity contradictory values. For example, when
SAT_CUBAN = Y, or SAT_MEXIC = Y, or SAT_PUERTOR = Y, or SAT_OTHHISP = Y, and
SAT_NOTHISP = Y, processing would present an error for contradictory ethnicity data.
Tape Load Code
A tape load code for SSS_SEARCH 2015 reporting is delivered for use on the Electronic
Data File and Tape Validation Form (STVTAPE).
Electronic Prospect Code
An electronic prospect code for SSS_SEARCH 2015 reporting is delivered for use on the
Electronic Prospect Validation Form (STVPREL).
The Interface Code value for the
SSS15 prospect code is delivered as Null. Make sure
to create an interface code for
PSAT on the Interface Validation Form (STVINFC) that can
be selected on STVPREL.
Table Name
(SOBCNVT_
TNAME)
Tape Value
(SOBCNVT_TAPE
_CODE)
Conversion Code
(SOBCNVT_
CONV_CODE) Description
RACE SAT_AMERIND <Institution specific
value>
American Indian or
Alaska Native
RACE SAT_ASIAN <Institution specific
value>
Asian
RACE SAT_AFRAMER <Institution specific
value>
Black or African
American
RACE SAT_HAWPACI <Institution specific
value>
Native Hawaiian or
Other Pacific Islander
RACE SAT_WHITE <Institution specific
value>
White
RACE SAT_OTHER <Institution specific
value>
Other
Tape Code Description
SSS15 SSS Search 2015

533
Banner Student User Guide | Recruiting
SSS_SEARCH file layout
The Tape Field Position Rule Form (SRATPFD) has been updated as fields in the
SSS_SEARCH file layout have changed in length and position.
Here is the updated layout information for SRATPFD.
Prospect
Code Description
Interface
Code
Tape
Code
Enter on
WEB
WEB
Page ID
SSS15 SSS15 Search
Tap e
Null SSS15 No Null
Field Name Start Position End Position Occurrence
ADDITIONAL_ID14451
NAME_LAST46801
NAME_FIRST 81 115 1
NAME_MI 116 116 1
STREET_LINE1 117 166 1
STREET_LINE2 167 216 1
STREET_LINE3 217 266 1
CITY 267 316 1
STAT_CODE 317 318 1
ZIP 319 333 1
NATION_NAME 334 362 1
PROVINCE 363 402 1
CNTY_CODE 403 407 1
EMAIL_ADDR 411 538 1
BIRTH_YEAR 539 542 1
BIRTH_MON 544 545 1
BIRTH_DAY 547 548 1
GENDER 549 549 1
SAT_CUBAN 550 550 1
SAT_MEXIC 551 551 1

534
Banner Student User Guide | Recruiting
2011 SAT File Format
The Test Date field in the file layout has changed from a month-year format (MMYY) to a
month-day-year format (MMDDYYYY). The new format will be available on October 17,
2011. This format allows for the SAT to be administered twice in the same month. The
layout of the SAT file has changed significantly with the addition of the new fields for SAT
Test Day and the associated positions. Installation of these changes is necessary to
properly read the new SAT file changes.
Note: Prior year SAT files will not process once this regulatory change
has been applied to the database. All prior year SAT test files should be
processed to completion before implementing these changes in your
production database.
Banner SAT electronic prospect processing accommodates these updates.
• SAT test scores and actual test days are initially loaded to SOATEST. Prior to this
change a date of
01 (DD = 01) was initially loaded as the test day.
• Test scores with actual test days will be loaded to SOATEST.
• The SAT test day field name has been added to STVTPFD.
• The test day field names for prospect code SAT have been added to SRATPFD for each
test type score date occurrence.
• SRTLOAD splits the year into year and century when the year length is four characters.
SAT_PUERTOR 552 552 1
SAT_OTHHISP 553 553 1
SAT_NOTHISP 554 554 1
SAT_AMERIND 555 555 1
SAT_ASIAN 556 556 1
SAT_AFRAMER 557 557 1
SAT_HAWPACI 558 558 1
SAT_WHITE 559 559 1
SAT_OTHER 560 560 1
HSCH_GRAD_YEAR 568 569 1
HSCH_SBGI_CODE 570 575 1
MAJR_CODE 582 588 1
MAJR_CODE2 589 595 1
MAJR_CODE3 596 602 1
Field Name Start Position End Position Occurrence

535
Banner Student User Guide | Recruiting
The SRKPRE1 package verifies that the test score record is valid and can be loaded. The
process checks whether a test score currently exists for the same test code on the same
test date. If this is true, the record is not loaded. When the incoming score is different, but
is for the same test code the same test date, the record is loaded. When the test score is
valid and can be loaded, the SRKTES1 package is invoked.
The SRKTES1 package does the following:
• Checks whether or not a test score record exists for the same test date. If the record
exists for the test date, the process finds the next available day and inserts the test
score with that date.
• Checks the oneup number of the date, when the incoming test score is different but is
for the same test code on the same test date. The oneup value of the test day is
determined by the setting of the
LOADOLDTESTS rule label (Y or N) on SAAERUL.
The following field names values have been added to STVTPFD.
The following field names have been added to SRATPFD.
2015 SAT File Format
The College Board has released a new SAT file layout for the 2015-2016 test cycle. The
new layout includes the old scores as well as 18 new test scores and other new data
fields. These changes require updates for test score and data files imported from third
parties. Details can be found at the following site:
https://collegereadiness.collegeboard.org/educators/
higher-ed
Updates include:
• SAT ID
• Race and ethnicity fields
• Tape load code
• Electronic prospect code
• Tape field names
Field Name Description System Required
OLDSAT1_TEST_DAY Old SAT Test Day Y
S01_TEST_DAY SAT S01 Test Day Y
Field Name Description
OLDSAT1_TEST_DAY Old SAT Test Day
S01_TEST_DAY SAT S01 Test Day

536
Banner Student User Guide | Recruiting
• Test score percentiles
• Test scores
• File layout
A file layout has been created which allows users to process current and new SAT files
during the transition period. The layout code used with the file is SAT15.
Values for some fields in the SAT layout have changed from alphabetic to numeric. Those
fields include: Race/Ethnicity, Major, Subject Test Codes, Activity Codes, High School
GPA, Citizenship and Religion. Please review the College Board layout documentation
and update SOTCNVT values to map to the new values.
Major codes are delivered as CIP codes. While the College Board will only use a subset of
the published codes, it is recommend that users allow for any CIP codes to be used, as
the values will be updated regularly.
For more information see the College Board layout documentation at the following site:
https://collegereadiness.collegeboard.org/pdf/data-
layout-sat-subject-tests-electronic-score-report-higher-
ed.pdf
Use of Layout Code versus Prospect Code
When the Electronic Prospect Load (SRTLOAD) is run for the current SAT layout, set the
Electronic Prospect Code parameter to
SAT. The value of SAT is inserted into the
Prospect Code field on the Electronic Prospect Inquiry Form (SRIPREL).
To run SRTLOAD for the updated SAT layout, set the Electronic Prospect Code parameter
to
SAT15. The value of SAT is inserted into the Prospect Code field on the Electronic
Prospect Inquiry Form (SRIPREL).
When running the Electronic Prospect Match (SRRSRIN), the Migrate Electronic
Prospects Process (SRRPREL), or the Electronic Prospect Purge (SRTPURG), set the
Electronic Prospect Code parameter to
SAT.
Use of prospect codes on SRAPRED
SAT15
If default values have been set up on SRAPRED for the SAT electronic prospect code,
you need to define values for the
SAT15 electronic prospect code.
When SRTLOAD is run for the SAT 2015-2016 test score cycle and
SAT15 is entered in
the Electronic Prospect Code parameter, only default values defined on SRAPRED for the
SAT15 electronic prospect code will be used by the process.
Any existing default values for the
SAT electronic prospect code will not be used, and the
process may load other default values from validation tables that you are not expecting to
be used.

537
Banner Student User Guide | Recruiting
SAT
If default values have been set up on SRAPRED for the SAT electronic prospect code,
and SRTLOAD is run for the SAT 2015-2016 test score cycle with
SAT entered in the
Electronic Prospect Code parameter, the existing default values on SRAPRED will be
used by the process.
Reporting Changes
Reporting updates include:
• The redesigned SAT scores and current SAT scores are reported in separate fields.
• Province and state data has been separated into two fields for address information.
• The Province Name field has been added and allows for 40 characters.
• Canadian province data has been standardized and is reported by the College
Board as a description. For all other foreign countries, the Province field is a free
form data field.
• When data exists for both a state and a province, the province is loaded when a
matching value exists in STVSTAT. If the province value does not match, and the
state value does match on STVSTAT or is mapped on SOTCNVT, the state is
loaded.
• When neither the state nor the province values match, the message STAT State
Name Not In SOTCNVT, STVSTAT is displayed.
• All date fields use the YYYY-MM-DD format.
• Some alphabetical codes have been revised to be numeric.
• Some logical regrouping of fields has occurred.
• High School codes are referred to as Attending Institution (AI) codes.
• The collection of race and ethnicity data has been updated to meet Federal guidelines.
The Ethnicity field has been separated into two fields, one for multiple races and one for
the aggregate race when two or more values exist for the student.
• 18 test scores and subscores have been added on STVTESC.
• Total Score (400-1600)
• Section Score: Evidenced Based Reading and Writing, Math (200-800)
• Test Score (10-40)
• Cross-test Score (10-40)
• Subscores (1-15)
• Three Essay subscores (2-8)
Note: Math is reported in increments of .5, such as, 10.0, 10.5, 11.0.

538
Banner Student User Guide | Recruiting
SAT ID
The College Board is delivering a College Board ID in the file layout.
The SRTLOAD process loads the additional ID with a default additional ID type code of
EPID. The Additional ID Type Code value of EPID, with the description of
Electronic Prospect ID, is used on the Additional Identification Type Validation
Form (GTVADID. The default value of
EPID is used for the additional ID type code, and
the additional ID type code is required to update the GORADID table in Banner General.
The ADDITIONAL_ID field name can be added to the file layouts for other tape codes on
SRATPFD. A unique additional ID will be loaded with a default value of
EPID, unless your
institution creates a new, unique value for the Additional ID Type Code field on GTVADID
and chooses to convert that code on SOTCNVT for use with each new file format.
Race and Ethnicity Fields
Race and ethnicity fields are used with the SAT file layout crosswalk. These are used with
the student answers to the two-part question and correspond to prior answers of Y or Null.
Answers can be for one, multiple, or none and are checked for Yes. "Other" is used when
the student responded with "other" to the prior version of the question.
When positions 80 or 81 or 82 or 83 are Y, the Hispanic ethnicity is loaded. When position
5 is Y, the Non-Hispanic ethnicity is loaded. Multiple races are then loaded in GORPRAC
when those values are Y.
Position Race or Ethnicity
80 Cuban Ethnicity
81 Mexican Ethnicity
82 Puerto Rican Ethnicity
83 Other Hispanic or Latino
84 Non-Hispanic or Latino
85 American Indian or Alaska
Native
86 Asian
87 Black or African American
88 Native Hawaiian or Other
Pacific Islander
89 White
90 Other

539
Banner Student User Guide | Recruiting
Set up Race Mapping on SOTCNVT
In order to load the race and ethnicity data, institutions must map their race values on the
Tape Code Conversion Form (SOTCNVT) as follows.
When contradictory ethnicity data exists, the data is not loaded, and the following error
message is displayed: Cannot load ethnicity contradictory values. For example, when
SAT_CUBAN = Y, or SAT_MEXIC = Y, or SAT_PUERTOR = Y, or SAT_OTHHISP = Y, and
SAT_NOTHISP = Y, processing would present an error for contradictory ethnicity data.
Tape Load Code
A tape load code for SAT 2015 reporting is delivered for use on the Electronic Data File
and Tape Validation Form (STVTAPE).
Electronic Prospect Code
An electronic prospect code for SAT 2015 reporting is delivered for use on the Electronic
Prospect Validation Form (STVPREL).
The Interface Code value for the
SAT15 prospect code is delivered as Null. Make sure
to create an interface code for
SAT on the Interface Validation Form (STVINFC) that can
be selected on STVPREL.
Table Name
(SOBCNVT_
TNAME)
Tape Value
(SOBCNVT_TAPE
_CODE)
Conversion Code
(SOBCNVT_
CONV_CODE) Description
RACE SAT_AMERIND <Institution specific
value>
American Indian or
Alaska Native
RACE SAT_ASIAN <Institution specific
value>
Asian
RACE SAT_AFRAMER <Institution specific
value>
Black or African
American
RACE SAT_HAWPACI <Institution specific
value>
Native Hawaiian or
Other Pacific Islander
RACE SAT_WHITE <Institution specific
value>
White
RACE SAT_OTHER <Institution specific
value>
Other
Tape Code Description
SAT15 SAT 2015 Test Score File

540
Banner Student User Guide | Recruiting
Tape Field Names
Tape field values have been added to the Tape Field Names Validation Form (STVTPFD)
for the test score codes and percentiles. They are delivered as seed data.
Prospect
Code Description
Interface
Code
Tape
Code
Enter on
WEB
WEB
Page ID
SAT15 SAT15 Test Tape Null SAT15 No Null
Field Name Description
S10_TEST_SCORE SAT S10 Test Score
S11_TEST_SCORE SAT S11 Test Score
S12_TEST_SCORE SAT S12 Test Score
S13_TEST_SCORE SAT S13 Test Score
S14_TEST_SCORE SAT S14 Test Score
S15_TEST_SCORE SAT S15 Test Score
S16_TEST_SCORE SAT S16 Test Score
S17_TEST_SCORE SAT S17 Test Score
S18_TEST_SCORE SAT S18 Test Score
S19_TEST_SCORE SAT S19 Test Score
S20_TEST_SCORE SAT S20 Test Score
S21_TEST_SCORE SAT S21 Test Score
S22_TEST_SCORE SAT S22 Test Score
S23_TEST_SCORE SAT S23 Test Score
S24_TEST_SCORE SAT S24 Test Score
S25_TEST_SCORE SAT S25 Test Score
S26_TEST_SCORE SAT S26 Test Score
S27_TEST_SCORE SAT S27 Test Score
S10_NATIONAL_PERCENTILE S10NR Percentile
S11_NATIONAL_PERCENTILE S11NR Percentile
S12_NATIONAL_PERCENTILE S12NR Percentile
S13_NATIONAL_PERCENTILE S13NR Percentile

541
Banner Student User Guide | Recruiting
New Test Score Percentile Codes
Test score percentiles are delivered that correspond to the provided test scores. These
values are delivered as seed data for the Test Score Percentile Type Validation Form
(STVTSPT).
S14_NATIONAL_PERCENTILE S14NR Percentile
S15_NATIONAL_PERCENTILE S15NR Percentile
S16_NATIONAL_PERCENTILE S16NR Percentile
S17_NATIONAL_PERCENTILE S17NR Percentile
S18_NATIONAL_PERCENTILE S18NR Percentile
S19_NATIONAL_PERCENTILE S19NR Percentile
S20_NATIONAL_PERCENTILE S20NR Percentile
S21_NATIONAL_PERCENTILE S21NR Percentile
S22_NATIONAL_PERCENTILE S22NR Percentile
S23_NATIONAL_PERCENTILE S23NR Percentile
S24_NATIONAL_PERCENTILE S24NR Percentile
S10_STATE_PERCENTILE S10US Percentile
S11_STATE_PERCENTILE S11US Percentile
S12_STATE_PERCENTILE S12US Percentile
S13_STATE_PERCENTILE S13US Percentile
S14_STATE_PERCENTILE S14US Percentile
S15_STATE_PERCENTILE S15US Percentile
S16_STATE_PERCENTILE S16US Percentile
S17_STATE_PERCENTILE S17US Percentile
S18_STATE_PERCENTILE S18US Percentile
S19_STATE_PERCENTILE S19US Percentile
S20_STATE_PERCENTILE S20US Percentile
S21_STATE_PERCENTILE S21US Percentile
S22_STATE_PERCENTILE S22US Percentile
S23_STATE_PERCENTILE S23US Percentile
S24_STATE_PERCENTILE S24US Percentile
PROVINCE
Field Name Description

542
Banner Student User Guide | Recruiting
Code Description
System
Required
S10NR NATIONAL REFERENCE TOTAL SCORE
PERCENTILE
Y
S11NR NATIONAL REF EVIDENCE BASED READ/WRITING
SECTION PERCENTILE
Y
S12NR NATIONAL REERENCE MATH SECTION
PERCENTILE
Y
S13NR NATIONAL REFERENCE READING TEST
PERCENTILE
Y
S14NR NATIONAL REFERENCE WRITING AND
LANGUAGE TEST PERCENTILE
Y
S15NR NATIONAL REFERENCE MATH TEST PERCENTILE Y
S16NR NATIONAL REFERENCE ANALYSIS IN SCIENCE
CROSS-TEST PERCENTIAL
Y
S17NR NATIONAL REF HISTORY/SOCIAL STUDIES
CROSS-TEST PERCENTILE
Y
S18NR NATIONAL REFERENCE RELEVANT WORDS IN
CONTEXT SUBSCORE PERCENTILE
Y
S19NR NATIONAL REFERENCE COMMAND OF EVIDENCE
SUBSCORE PERCENTILE
Y
S20NR NATIONAL REFERENCE EXPRESSION OF IDEAS
SUBSCORE PERCENTILE
Y
S21NR NATIONAL REF STANDARD ENGLISH
CONVENTIONS SUBSCORE PERCENTILE
Y
S22NR NATIONAL REFERENCE HEART OF ALGEBRA
SUBSCORE PERCENTILE
Y
S23NR NATIONAL REF ADVANCED MATHEMATICS
SUBSCORE PERCENTILE
Y
S24NR NATIONAL REF PROBLEM SOLV/DATA ANALYSIS
SUBSCORE PERCENTILE
Y
S10US US TEST TAKER TOTAL SCORE PERCENTILE Y
S11US US TEST TAKER EVIDENCE BASED READING AND
WRITING PERCENTILE
Y
S12US US TEST TAKER MATH PERCENTILE Y
S13US US TEST TAKER READING TEST PERCENTILE Y

543
Banner Student User Guide | Recruiting
The corresponding test scores are:
• Total Score (which is the sum of Evidence-Based Reading and Writing)
• Math
• Evidence-Based Reading and Writing
• Math
• Analysis in Science
• Analysis in History/Social Studies
• Reading
• Writing & Language
• Math
• Words in Context
• Command of Evidence
S14US US TEST TAKER WRITING AND LANGUAGE TEST
PERCENTILE
Y
S15US US TEST TAKER MATH TEST PERCENTILE Y
S16US US TEST TAKER ANALYSIS IN SCIENCE CROSS-
TEST PERCENTIAL
Y
S17US US TEST TAKER HISTORY/SOCIAL STUDIES
CROSS-TEST PERCENTILE
Y
S18US US TEST TAKER RELEVANT WORDS IN CONTEXT
SUBSCORE PERCENTILE
Y
S19US US TEST TAKER COMMAND OF EVIDENCE
SUBSCORE PERCENTILE
Y
S20US US TEST TAKER EXPRESSION OF IDEAS
SUBSCORE PERCENTILE
Y
S21US US TEST TAKER STD ENGLISH CONVENTIONS
SUBSCORE PERCENTILE
Y
S22US US TEST TAKER HEART OF ALGEBRA SUBSCORE
PERCENTILE
Y
S23US US TEST TAKER ADVANCED MATHEMATICS
SUBSCORE PERCENTILE
Y
S24US US TEST TAKER PROBLEM SOLV/DATA ANALYSIS
SUBSCORE PERCENTILE
Y
Code Description
System
Required

544
Banner Student User Guide | Recruiting
• Expression of Ideas
• Standard English Conventions
• Heart of Algebra
• Passport to Advance Mathematics
• Problem Solving & Data Analysis
Test Score to Percentile Crosswalk
Test scores are crosswalked to percentiles as follows:
Test Scores National Reference Percentiles US Test Take Percentiles
Code Description Code Description Code Description
S10 TOTAL SCORE S10NR NATIONAL REFERENCE TOTAL
SCORE PERCENTILE
S10US US TEST TAKER TOTAL SCORE
PERCENTILE
S11 EVIDENCE-BASED
READ/WRIT SCORE
S11NR NATIONAL REF EVIDENCE BASED
READ/WRITING SECTION
PERCENTILE
S11US US TEST TAKER EVIDENCE
BASED READING AND WRITING
PERCENTILE
S12 MATH SECTION SCORE S12NR NATIONAL REERENCE MATH
SECTION PERCENTILE
S12US US TEST TAKER MATH
PERCENTILE
S13 READING TEST SCORE S13NR NATIONAL REFERENCE READING
TEST PERCENTILE
S13US US TEST TAKER READING TEST
PERCENTILE
S14 WRIT/LANGUAGE TEST
SCORE
S14NR NATIONAL REFERENCE WRITING
AND LANGUAGE TEST
PERCENTILE
S14US US TEST TAKER WRITING AND
LANGUAGE TEST PERCENTILE
S15 MATH TEST SCORE S15NR NATIONAL REFERENCE MATH
TEST PERCENTILE
S15US US TEST TAKER MATH TEST
PERCENTILE
S16 SCIENCE CROSS-TEST
SCORE
S16NR NATIONAL REFERENCE ANALYSIS
IN SCIENCE CROSS-TEST
PERCENTIAL
S16US US TEST TAKER ANALYSIS IN
SCIENCE CROSS-TEST
PERCENTIAL
S17 HIS/SOC SCI CROSS-
TEST SCORE
S17NR NATIONAL REF HISTORY/SOCIAL
STUDIES CROSS-TEST
PERCENTILE
S17US US TEST TAKER HISTORY/SOCIAL
STUDIES CROSS-TEST
PERCENTILE
S18 WORDS IN CONTEXT
SUBSCORE
S18NR NATIONAL REFERENCE
RELEVANT WORDS IN CONTEXT
SUBSCORE PERCENTILE
S18US US TEST TAKER RELEVANT
WORDS IN CONTEXT SUBSCORE
PERCENTILE
S19 COMMAND OF
EVIDENCE SUBSCORE
S19NR NATIONAL REFERENCE
COMMAND OF EVIDENCE
SUBSCORE PERCENTILE
S19US US TEST TAKER COMMAND OF
EVIDENCE SUBSCORE
PERCENTILE
S20 EXPRESSION OF IDEAS
SUBSCORE
S20NR NATIONAL REFERENCE
EXPRESSION OF IDEAS
SUBSCORE PERCENTILE
S20US US TEST TAKER EXPRESSION OF
IDEAS SUBSCORE PERCENTILE
S21 STD ENG CONVENTIONS
SUBSCORE
S21NR NATIONAL REF STANDARD
ENGLISH CONVENTIONS
SUBSCORE PERCENTILE
S21US US TEST TAKER STD ENGLISH
CONVENTIONS SUBSCORE
PERCENTILE

545
Banner Student User Guide | Recruiting
Test scores
Test scores and subscores are delivered for use on the Test Code Validation Form
(STVTESC).
• Total Score (which is the sum of Evidence-Based Reading and Writing)
• Math
• Evidence-Based Reading and Writing
• Math
• Analysis in Science
• Analysis in History/Social Studies
• Reading
• Writing & Language
• Math
• Words in Context
• Command of Evidence
• Expression of Ideas
• Standard English Conventions
• Heart of Algebra
• Passport to Advance Mathematics
• Problem Solving & Data Analysis
• Essay Reading, Essay Analysis
• Essay Writing
Here is the breakdown of the test scores on STVTESC.
S22 HEART OF ALGEBRA
SUBSCORE
S22NR NATIONAL REFERENCE HEART
OF ALGEBRA SUBSCORE
PERCENTILE
S22US US TEST TAKER HEART OF
ALGEBRA SUBSCORE
PERCENTILE
S23 ADVANCED
MATHEMATICS
SUBSCORE
S23NR NATIONAL REF ADVANCED
MATHEMATICS SUBSCORE
PERCENTILE
S23US US TEST TAKER ADVANCED
MATHEMATICS SUBSCORE
PERCENTILE
S24 PROB SOLV/DATA
SUBSCORE
S24NR NATIONAL REF PROBLEM SOLV/
DATA ANALYSIS SUBSCORE
PERCENTILE
S24US US TEST TAKER PROBLEM SOLV/
DATA ANALYSIS SUBSCORE
PERCENTILE
Test Scores National Reference Percentiles US Test Take Percentiles
Code Description Code Description Code Description

546
Banner Student User Guide | Recruiting
Note: In the table below, the Data Type of Y indicates the checkbox is
selected, and a numeric value is used.
Test
Code Description
Number
of
Positions
Data
Type
Minimum
Score
Maximum
Score
S10 TOTAL SCORE 4 Y 0400 1600
S11 EVIDENCE-BASED READ/
WRIT SCORE
3Y200800
S12 MATH SECTION SCORE 3 Y 200 800
S13 READING TEST SCORE 2 Y 10 40
S14 WRIT/LANGUAGE TEST
SCORE
2 Y 10 40
S15 MATH TEST SCORE 4 Y 10.0 40.0
S16 SCIENCE CROSS-TEST
SCORE
2 Y 10 40
S17 HIS/SOC SCI CROSS-TEST
SCORE
2 Y 10 40
S18 WORDS IN CONTEXT
SUBSCORE
2 Y 01 15
S19 COMMAND OF EVIDENCE
SUBSCORE
2 Y 01 15
S20 EXPRESSION OF IDEAS
SUBSCORE
2 Y 01 15
S21 STD ENG CONVENTIONS
SUBSCORE
2 Y 01 15
S22 HEART OF ALGEBRA
SUBSCORE
2 Y 01 15
S23 ADVANCED MATHEMATICS
SUBSCORE
2 Y 01 15
S24 PROB SOLV/DATA
SUBSCORE
2 Y 01 15
S25 ESSAY READING
SUBSCORE
1Y08
S26 ESSAY ANALYSIS
SUBSCORE
1Y08

547
Banner Student User Guide | Recruiting
SAT File Layout
The Tape Field Position Rule Form (SRATPFD) has been updated as the majority of fields
in the SAT file layout have changed in length and position. Two fields are no longer used.
Also dates are now in format YYYY-MM-DD.
The following fields are no longer used and have been removed from SRATPFD.
Here is the updated layout information for SRATPFD.
Note: The HSCH_GPA, CITIZENSHIP, and RELG_CODE fields are now
numeric. You need to map new codes to your current codes.
S27 ESSAY WRITING
SUBSCORE
1Y08
Field Name Start Position End Position Occurrence
MAJR_CODE4 943 945 1
MAJR_CODE5 946 948 1
Field Name Start Position End Position Occurrence
NAME_LAST 7 41 1
NAME_FIRST 42 76 1
NAME_MI 77771
GENDER 78781
SAT_CUBAN 80 80 1
SAT_MEXIC 81 81 1
SAT_PUERTOR 82 82 1
SAT_OTHHISP 83831
SAT_NOTHISP 84841
SAT_AMERIND 85 85 1
SAT_ASIAN 86 86 1
SAT_AFRAMER 87 87 1
Test
Code Description
Number
of
Positions
Data
Type
Minimum
Score
Maximum
Score

548
Banner Student User Guide | Recruiting
SAT_HAWPACI 88 88 1
SAT_WHITE 89891
SAT_OTHER 90901
BIRTH_YEAR 98 101 1
BIRTH_MON 103 104 1
BIRTH_DAY 106 107 1
SSN 108 116 1
ADDITIONAL_ID 117 128 1
STREET_LINE1 159 208 1
STREET_LINE2 209 258 1
CITY 259 308 1
STAT_CODE 309 310 1
ZIP 311 327 1
CNTY_CODE 328 332 1
NATION_CODE 333 334 1
PROVINCE 335 374 1
PHONE_AREA 375 377 1
PHONE_NUMBER 378 398 1
EMAIL_ADDR 399 526 1
HSCH_GRAD_YEAR 527 530 1
HSCH_GRAD_MON 532 533 1
FOREIGN_INDICATOR 538 538 1
S01_TEST_YEAR 560 563 1
S01_TEST_MON 565 566 1
S01_TEST_DAY 568 569 1
S01_RCRV_IND 572 572 1
S10_TEST_SCORE 573 576 1
S11_TEST_SCORE 577 579 1
S12_TEST_SCORE 580 582 1
S13_TEST_SCORE 583 584 1
S14_TEST_SCORE 585 586 1
Field Name Start Position End Position Occurrence

549
Banner Student User Guide | Recruiting
S15_TEST_SCORE 587 590 1
S16_TEST_SCORE 591 592 1
S17_TEST_SCORE 593 594 1
S18_TEST_SCORE 595 596 1
S19_TEST_SCORE 597 598 1
S20_TEST_SCORE 599 600 1
S21_TEST_SCORE 601 602 1
S22_TEST_SCORE 603 604 1
S23_TEST_SCORE 605 606 1
S24_TEST_SCORE 607 608 1
S25_TEST_SCORE 609 609 1
S26_TEST_SCORE 610 610 1
S27_TEST_SCORE 611 611 1
S01_TEST_SCORE 614 616 1
S02_TEST_SCORE 617 619 1
S07_TEST_SCORE 620 622 1
S08_TEST_SCORE 623 624 1
S09_TEST_SCORE 625 626 1
SAT_ESSAY_ID 627 638 1
S01_TEST_YEAR 643 646 2
S01_TEST_MON 648 649 2
S01_TEST_DAY 651 652 2
S01_RCRV_IND 655 655 2
S10_TEST_SCORE 656 658 2
S11_TEST_SCORE 660 662 2
S12_TEST_SCORE 663 665 2
S13_TEST_SCORE 666 667 2
S14_TEST_SCORE 668 669 2
S15_TEST_SCORE 670 673 2
S16_TEST_SCORE 674 675 2
S17_TEST_SCORE 676 677 2
Field Name Start Position End Position Occurrence

550
Banner Student User Guide | Recruiting
S18_TEST_SCORE 678 679 2
S19_TEST_SCORE 680 681 2
S20_TEST_SCORE 682 683 2
S21_TEST_SCORE 684 685 2
S22_TEST_SCORE 686 687 2
S23_TEST_SCORE 688 689 2
S24_TEST_SCORE 690 691 2
S25_TEST_SCORE 692 692 2
S26_TEST_SCORE 693 693 2
S27_TEST_SCORE 694 694 2
S01_TEST_SCORE 697 699 2
S02_TEST_SCORE 700 702 2
S07_TEST_SCORE 703 705 2
S08_TEST_SCORE 706 707 2
S09_TEST_SCORE 708 709 2
SAT_ESSAY_ID 710 721 2
S01_TEST_YEAR 726 729 3
S01_TEST_MON 731 732 3
S01_TEST_DAY 734 735 3
S01_RCRV_IND 738 738 3
S10_TEST_SCORE 739 742 3
S11_TEST_SCORE 743 745 3
S12_TEST_SCORE 746 748 3
S13_TEST_SCORE 749 750 3
S14_TEST_SCORE 751 752 3
S15_TEST_SCORE 753 756 3
S16_TEST_SCORE 757 758 3
S17_TEST_SCORE 759 760 3
S18_TEST_SCORE 761 762 3
S19_TEST_SCORE 763 764 3
S20_TEST_SCORE 765 766 3
Field Name Start Position End Position Occurrence

551
Banner Student User Guide | Recruiting
S21_TEST_SCORE 767 768 3
S22_TEST_SCORE 769 770 3
S23_TEST_SCORE 771 772 3
S24_TEST_SCORE 773 774 3
S25_TEST_SCORE 775 775 3
S26_TEST_SCORE 776 776 3
S27_TEST_SCORE 777 777 3
S01_TEST_SCORE 780 782 3
S02_TEST_SCORE 783 785 3
S07_TEST_SCORE 786 788 3
S08_TEST_SCORE 789 790 3
S09_TEST_SCORE 791 792 3
SAT_ESSAY_ID 793 804 3
S01_TEST_YEAR 809 812 4
S01_TEST_MON 814 815 4
S01_TEST_DAY 817 818 4
S01_RCRV_IND 821 821 4
S10_TEST_SCORE 822 825 4
S11_TEST_SCORE 826 828 4
S12_TEST_SCORE 829 831 4
S13_TEST_SCORE 832 833 4
S14_TEST_SCORE 834 835 4
S15_TEST_SCORE 836 839 4
S16_TEST_SCORE 840 841 4
S17_TEST_SCORE 842 843 4
S18_TEST_SCORE 844 845 4
S19_TEST_SCORE 846 847 4
S20_TEST_SCORE 848 849 4
S21_TEST_SCORE 850 851 4
S22_TEST_SCORE 852 853 4
S23_TEST_SCORE 854 855 4
Field Name Start Position End Position Occurrence

552
Banner Student User Guide | Recruiting
S24_TEST_SCORE 856 857 4
S25_TEST_SCORE 858 858 4
S26_TEST_SCORE 859 859 4
S27_TEST_SCORE 860 860 4
S01_TEST_SCORE 863 865 4
S02_TEST_SCORE 866 868 4
S07_TEST_SCORE 869 871 4
S08_TEST_SCORE 872 873 4
S09_TEST_SCORE 874 875 4
SAT_ESSAY_ID 876 887 4
S01_TEST_YEAR 892 895 5
S01_TEST_MON 897 898 5
S01_TEST_DAY 900 901 5
S01_RCRV_IND 904 904 5
S10_TEST_SCORE 905 908 5
S11_TEST_SCORE 909 911 5
S12_TEST_SCORE 912 914 5
S13_TEST_SCORE 915 916 5
S14_TEST_SCORE 917 918 5
S15_TEST_SCORE 919 922 5
S16_TEST_SCORE 923 924 5
S17_TEST_SCORE 925 926 5
S18_TEST_SCORE 927 928 5
S19_TEST_SCORE 929 930 5
S20_TEST_SCORE 931 932 5
S21_TEST_SCORE 933 934 5
S22_TEST_SCORE 935 936 5
S23_TEST_SCORE 937 938 5
S24_TEST_SCORE 939 940 5
S25_TEST_SCORE 941 941 5
S26_TEST_SCORE 942 942 5
Field Name Start Position End Position Occurrence

553
Banner Student User Guide | Recruiting
S27_TEST_SCORE 943 943 5
S01_TEST_SCORE 946 948 5
S02_TEST_SCORE 949 951 5
S07_TEST_SCORE 952 954 5
S08_TEST_SCORE 955 956 5
S09_TEST_SCORE 957 958 5
SAT_ESSAY_ID 959 970 5
S01_TEST_YEAR 975 978 6
S01_TEST_MON 980 981 6
S01_TEST_DAY 983 984 6
S01_RCRV_IND 987 987 6
S10_TEST_SCORE 988 991 6
S11_TEST_SCORE 992 994 6
S12_TEST_SCORE 995 997 6
S13_TEST_SCORE 998 999 6
S14_TEST_SCORE 1000 1001 6
S15_TEST_SCORE 1002 1005 6
S16_TEST_SCORE 1006 1007 6
S17_TEST_SCORE 1008 1009 6
S18_TEST_SCORE 1010 1011 6
S19_TEST_SCORE 1012 1013 6
S20_TEST_SCORE 1014 1015 6
S21_TEST_SCORE 1016 1017 6
S22_TEST_SCORE 1018 1019 6
S23_TEST_SCORE 1020 1021 6
S24_TEST_SCORE 1022 1023 6
S25_TEST_SCORE 1024 1024 6
S26_TEST_SCORE 1025 1025 6
S27_TEST_SCORE 1026 1026 6
S01_TEST_SCORE 1029 1031 6
S02_TEST_SCORE 1032 1034 6
Field Name Start Position End Position Occurrence

554
Banner Student User Guide | Recruiting
S07_TEST_SCORE 1035 1037 6
S08_TEST_SCORE 1038 1039 6
S09_TEST_SCORE 1040 1041 6
SAT_ESSAY_ID 1042 1053 6
OLDSAT1_TEST_YEAR, 1058 1061 1
OLDSAT1_TEST_MON 1063 1064 1
OLDSAT1_TEST_DAY 1066 1067 1
OLDSAT1_RCRV_IND 1070 1070 1
OLDSAT1_TEST_CODE 1071 1072 1
OLDSAT1_TEST_SCORE 1073 1075 1
OLDSAT2_TEST_CODE 1082 1083 1
OLDSAT2_TEST_SCORE 1084 1086 1
OLDSAT3_TEST_CODE 1093 1094 1
OLDSAT3_TEST_SCORE 1095 1097 1
OLDSAT1_TEST_YEAR 1104 1107 2
OLDSAT1_TEST_MON 1109 1110 2
OLDSAT1_TEST_DAY 1112 1113 2
OLDSAT1_RCRV_IND 1116 1116 2
OLDSAT1_TEST_CODE 1117 1118 2
OLDSAT1_TEST_SCORE 1119 1121 2
OLDSAT2_TEST_CODE 1128 1129 2
OLDSAT2_TEST_SCORE 1130 1132 2
OLDSAT3_TEST_CODE 1139 1140 2
OLDSAT3_TEST_SCORE 1141 1143 2
OLDSAT1_TEST_YEAR 1150 1153 3
OLDSAT1_TEST_MON 1155 1156 3
OLDSAT1_TEST_DAY 1158 1159 3
OLDSAT1_RCRV_IND 1162 1162 3
OLDSAT1_TEST_CODE 1163 1164 3
OLDSAT1_TEST_SCORE 1165 1167 3
OLDSAT2_TEST_CODE 1174 1175 3
Field Name Start Position End Position Occurrence

555
Banner Student User Guide | Recruiting
OLDSAT2_TEST_SCORE 1176 1178 3
OLDSAT3_TEST_CODE 1185 1186 3
OLDSAT3_TEST_SCORE 1187 1189 3
OLDSAT1_TEST_YEAR 1196 1199 4
OLDSAT1_TEST_MON 1201 1202 4
OLDSAT1_TEST_DAY 1204 1205 4
OLDSAT1_RCRV_IND 1208 1208 4
OLDSAT1_TEST_CODE 1209 1210 4
OLDSAT1_TEST_SCORE 1211 1213 4
OLDSAT2_TEST_CODE 1220 1221 4
OLDSAT2_TEST_SCORE 1222 1224 4
OLDSAT3_TEST_CODE 1231 1232 4
OLDSAT3_TEST_SCORE 1233 1235 4
OLDSAT1_TEST_YEAR 1242 1245 5
OLDSAT1_TEST_MON 1247 1248 5
OLDSAT1_TEST_DAY 1250 1251 5
OLDSAT1_RCRV_IND 1254 1254 5
OLDSAT1_TEST_CODE 1255 1256 5
OLDSAT1_TEST_SCORE 1257 1259 5
OLDSAT2_TEST_CODE 1266 1267 5
OLDSAT2_TEST_SCORE 1268 1270 5
OLDSAT3_TEST_CODE 1277 1278 5
OLDSAT3_TEST_SCORE 1279 1281 5
OLDSAT1_TEST_YEAR 1288 1291 6
OLDSAT1_TEST_MON 1293 1294 6
OLDSAT1_TEST_DAY 1296 1297 6
OLDSAT1_RCRV_IND 1300 1300 6
OLDSAT1_TEST_CODE 1301 1302 6
OLDSAT1_TEST_SCORE 1303 1305 6
OLDSAT2_TEST_CODE 1312 1313 6
OLDSAT2_TEST_SCORE 1314 1316 6
Field Name Start Position End Position Occurrence

556
Banner Student User Guide | Recruiting
OLDSAT3_TEST_CODE 1323 1324 6
OLDSAT3_TEST_SCORE 1325 1327 6
S10_NATIONAL_PERCENTILE 1334 1335 1
S11_NATIONAL_PERCENTILE 1336 1337 1
S12_NATIONAL_PERCENTILE 1338 1339 1
S13_NATIONAL_PERCENTILE 1340 1341 1
S14_NATIONAL_PERCENTILE 1342 1343 1
S15_NATIONAL_PERCENTILE 1344 1345 1
S16_NATIONAL_PERCENTILE 1346 1347 1
S17_NATIONAL_PERCENTILE 1348 1349 1
S18_NATIONAL_PERCENTILE 1350 1351 1
S19_NATIONAL_PERCENTILE 1352 1353 1
S20_NATIONAL_PERCENTILE 1354 1355 1
S21_NATIONAL_PERCENTILE 1356 1357 1
S22_NATIONAL_PERCENTILE 1358 1359 1
S23_NATIONAL_PERCENTILE 1360 1361 1
S24_NATIONAL_PERCENTILE 1362 1363 1
S01_NATIONAL_PERCENTILE 1364 1365 1
S02_NATIONAL_PERCENTILE 1366 1367 1
S07_NATIONAL_PERCENTILE 1368 1369 1
S10_STATE_PERCENTILE 1376 1377 1
S11_STATE_PERCENTILE 1378 1379 1
S12_STATE_PERCENTILE 1380 1381 1
S13_STATE_PERCENTILE 1382 1383 1
S14_STATE_PERCENTILE 1384 1385 1
S15_STATE_PERCENTILE 1386 1387 1
S16_STATE_PERCENTILE 1388 1389 1
S17_STATE_PERCENTILE 1390 1391 1
S18_STATE_PERCENTILE 1392 1393 1
S19_STATE_PERCENTILE 1394 1395 1
S20_STATE_PERCENTILE 1396 1397 1
Field Name Start Position End Position Occurrence

557
Banner Student User Guide | Recruiting
S21_STATE_PERCENTILE 1398 1399 1
S22_STATE_PERCENTILE 1400 1401 1
S23_STATE_PERCENTILE 1402 1403 1
S24_STATE_PERCENTILE 1404 1405 1
S01_STATE_PERCENTILE 1406 1407 1
S02_STATE_PERCENTILE 1408 1409 1
S07_STATE_PERCENTILE 1410 1411 1
OLDSAT1_PERCENTILE 1418 1419 1
OLDSAT2_PERCENTILE 1426 1427 1
OLDSAT3_PERCENTILE 1434 1435 1
HSCH_GPA 1460 1461 1
CITIZENSHIP 1465 1465 1
RELG_CODE 1466 1468 1
DEGC_CODE 1783 1784 1
MAJR_CODE 1801 1807 1
MAJR_CODE2 1809 1815 1
MAJR_CODE3 1816 1822 1
AM_INTS_CODE 1841 1842 1
AH_INTS_CODE 1843 1844 1
AA_INTS_CODE 1845 1846 1
AB_INTS_CODE 1847 1848 1
AG_INTS_CODE 1849 1850 1
AJ_INTS_CODE 1851 1852 1
A5_INTS_CODE 1853 1854 1
A9_INTS_CODE 1855 1856 1
AL_INTS_CODE 1857 1858 1
A3_INTS_CODE 1859 1860 1
A4_INTS_CODE 1861 1862 1
AN_INTS_CODE 1863 1864 1
A1_INTS_CODE 1865 1866 1
A2_INTS_CODE 1867 1868 1
Field Name Start Position End Position Occurrence
558
Banner Student User Guide | Recruiting
2011 PSAT File Format
The County Code has been added to the file in positions 311-316. This replaces the data
that had previously existed in these positions in the 2010-2011 file.
Prior to this change, the data in positions 311-314 was unrelated to the County Code and
was not loaded to Banner. With the addition of the new positions (311-316), institutions will
need to process all 2010-2011 Search files to completion, before processing new Search
files that include the County Code.
Warning! Processing an old file with these changes may process invalid
data as county codes.
County Codes delivered by the College Board Student Search Service are unique. Users
will need to refer to the Student Search Service translation codes to convert incoming
County Codes to Banner County Code values on SOTCNVT. Supporting documents can
be found at this Website:
http://www.collegeboard.com/sss/help/appendix/
supportingdocuments/index.html
Because of the large number of county codes associated with each state, and because
institutions are unlikely to convert county codes beyond their home states, conversion
errors will not be displayed for the
CNTY_CODE value on the SRTLOAD output. County
Codes must be set up for conversion on SOTCNVT or exist in STVCNTY for a direct
conversion from the validation table.
If institutions process an old file with the new
CNTY_CODE added in positions 311-316 on
SRATPFD, the file will process to completion. Results may not present problems, since
SOTCNVT must be set up to convert new incoming County Codes. However, conversion
errors related to SOTCNVT County Codes may be reported on the SRTLOAD output file,
indicating that you could be processing an old file, and the process is trying to translate
the values in positions 311-314 into County Codes.
A8_INTS_CODE 1869 1870 1
AK_INTS_CODE 1871 1872 1
A7_INTS_CODE 1873 1874 1
AI_INTS_CODE 1875 1876 1
A6_INTS_CODE 1877 1878 1
AE_INTS_CODE 1879 1880 1
HSCH_SBGI_CODE 1899 1904 1
HSCH_NAME 1935 1984 1
Field Name Start Position End Position Occurrence

559
Banner Student User Guide | Recruiting
Note: Processing issues could occur when old values in positions 311-
314 have valid a STVCNTY code that is translated directly or converted
unexpectedly based on existing SOTCNVT rules.
If institutions process a new file with the County Code in positions 311-316 without having
the
CNTY_CODE value on SRATPFD, no errors will be presented in the SRTLOAD output
file. The data will not be read from the incoming file or loaded to Banner.
The following field name has been added to the SRATPFD for use with the Tape Code of
SSS_SEARCH. (This value exists on STVTPFD.)
Electronic Prospect Match (SRRSRIN)
Run this process to determine if a match exists between a record on the Search Tape
View (SRVPREL) and Banner production data when search, test score, or AMCAS
records are loaded in mass. Users should review how Common Matching works with
electronic prospect processing when using SRRSRIN and SRRPREL.
The process uses the interface code, its corresponding matching source code, and the
rules established on the Common Matching Rules Form (GORCMRL) to determine if a
record on SRVPREL has a match in Banner. The process runs against all records in
SRVPREL that have a match status of
Null and a load status of Null. This assumes
that if you change the matching rules on GORCMRL, you are not able to re-match
someone on SRVPREL who has already been matched, because the person’s match
status will no longer be
Null. This process sets the match status on SRVPREL to either
N (New), M (Matched) S (Suspense), D (Duplicate), or E (Error). The S and D records can
be viewed and updated on the Common Matching Entry Form (GOAMTCH) which is
accessed from the Electronic Prospect Inquiry Form (SRIPREL).
SRRSRIN will mark records as duplicates (
D) when it finds matching information for the
same tape ID. Duplicates can result from having multiple records delivered on a single
data load for a student. Students can submit more than one request to send a report to
your institution within the same reporting period. Students may also take a test more than
once and not provide consistent identifying information. Duplicates can also result if
SRTLOAD is run more than once with the same data load ID, and the matching process is
not executed between loads.
For example:
1. Records are loaded by SRTLOAD with electronic prospect code SAT and data load ID
of
sat1.
2. For some reason the matching process is not run, and the records not purged. They
remain unprocessed in the temporary tables.
Field Name Start Position End Position Occurrence
CNTY_CODE 311 316 1

560
Banner Student User Guide | Recruiting
3. SRTLOAD is run again for the same electronic prospect code SAT and data load ID of
sat1.
4. When the matching process is run, each of the IDs can be flagged as duplicate.
Using the Auto Load Parameter
The Auto Load (Skip Dup Chk) parameter allows you to choose whether to flag duplicates
on a data load or skip the duplicate checking process to reduce the number of duplicates
that would need to be handled manually on SRIPREL.
Duplicates are flagged by SRRSRIN when the temporary tables contain records having
the same name and date of birth for the prospect code and/or data load ID chosen as
parameter values when running SRRSRIN.
SRRSRIN may find duplicates in the following circumstances:
• Single data loads may report the same individual more than once for the prospect code/
data load ID.
• Individual data loads may be loaded to the temporary tables multiple times using the
same prospect code and/or data load ID.
• Multiple data loads for the same prospect code could be loaded to the temporary tables
with the same data load ID, and the same name could appear across multiple data
loads.
• Web prospects having the same prospect code, name, and date of birth could be loaded
to the temporary tables.
The Auto Load (Skip Dup Chk) parameter is used to bypass the flagging of duplicates by
SRRSRIN and to automatically load records to Banner. Auto load processing replaces the
manual processing of matching and loading those duplicates on SRIPREL.
When the Auto Load (Skip Dup Chk) parameter is set to
Y, the matching process is
invoked, and
NEW or MATCHED prospects are flagged. Those prospects are immediately
loaded to Banner. Duplicate checking does not occur.
When the records are loaded to Banner, each prospect that follows on the data load is
evaluated against any records loaded, facilitating more matches, and preventing records
from being flagged as duplicates. When the Auto Load (Skip Dup Chk) parameter is set to
Y, records that were previously flagged as LOADED manually on SRIPREL for the same
tape (data load) type and data load ID will not be processed by SRRSRIN.
When the Auto Load (Skip Dup Chk) parameter is set to
Y, the SRRSRIN output file will
resemble the SRRPREL output file with the information regarding the prospects that have
been loaded. If SRRPREL is run after SRRSRIN is run, with the Auto Load (Skip Dup Chk)
parameter set to
Y for the same prospect code and data load ID, there will be no records
processed. If all records are processed by SRRSRIN when the Auto Load (Skip Dup Chk)
parameter is set to
Y, there is no reason to run SRRPREL.
Note: Suspended records or records in error may still be found when the
Auto Load (Skip Dup Chk) parameter is set to
Y. These records will need
to be handled manually on SRIPREL.

561
Banner Student User Guide | Recruiting
The process works as follows:
If a data load ID selected by SRRSRIN contains multiple occurrences of John Smith with
the same date of birth or SSN, then when the Auto Load (Skip Dup Chk) parameter is set
to
Y, the first occurrence of John Smith will be flagged as NEW (or MATCHED), and the
record will immediately be loaded to Banner. If subsequent occurrences of the same John
Smith are evaluated on the same data load, each one will be found to be matched against
the prior record for John Smith that was already loaded as
NEW (or MATCHED) to Banner.
Note: When the Auto Load (Skip Dup Chk) parameter is set to Y, the
value for the Report Type parameter in SRRSRIN will be ignored.
If the Auto Load (Skip Dup Chk) parameter is set to
N, the Report Type
parameter value will be passed to SRRSRIN, and the check for duplicates
on a data load will occur.
Duplicate Processing and the Auto Load Parameter
If the Auto Load (Skip Dup Chk) parameter is set to N, then duplicate processing will be
run before match processing. In addition, duplicate processing performs the following
checks:
1. If two records have the same SSN, they will be marked as duplicates.
2. If two records have the same first and last names and the same dates of birth, they
will be marked as duplicates.
The first name match will also use any nick name data created on the Name
Translation Rules Form (GORNAME), if no first name matches are found. In addition,
if either of the incoming Date of Birth fields are Null, but the first and last names
match, a record will still be considered to be a duplicate.
Migrate Electronic Prospects Process (SRRPREL)
This process is used to create or update Banner recruiting and admissions records for the
records in the search data load temporary records, including AMCAS records, depending
on how the parameters are set. SRRPREL processes all search, test score, and AMCAS
records that have a match status of
N (New), M (Matched), or A (All) or rows with a match
status set to
M or N (depending on the parameter value selected). Once a record has been
loaded, its load status is set to
C.
The source and contact codes identified as parameters on the SRTLOAD process are
loaded to the new or updated recruiting or admissions records based on the values for
these rules on the Electronic Admissions Application Rules Form (SAAERUL). If no values
are entered for these parameters in the SRTLOAD process, the values entered on
STVINFC will be used. SRRPREL allows for the update of an existing recruiting or
admissions record instead of always creating a new recruiting record if you request that
additional information be loaded. Default values from SRAPRED will be used if they have
been set up.
Use the
CREATENEWAPPL rule on SAAERUL for the group equal to PREL to create an
application record at the same time a recruit record is created by SRRPREL. When this

562
Banner Student User Guide | Recruiting
rule is set to Y, the sakmods.p_create_application package is called to create
an application record. When this rule is set to
N, a corresponding application record is not
created.
Processing Incoming Data Load Information
The prospect codes on STVPREL need to be mapped to interface codes on the Interface
Code Validation Form (STVINFC), using the Interface Code field on STVPREL. If the
Interface Code field is blank, the SRTLOAD process will not know which tape code
conversion rules (defined on SOTCNVT) to use when processing the search data load
records and will not run to completion.
Regardless of the rules set on SAAERUL, Null fields on the General Person Form
(SPAPERS) will be filled in with the appropriate data from the search or test score data
load.
Electronic Admissions Application Rules Form (SAAERUL)
This form is used to define the rules which are used when processing electronic
applications, electronic prospects, and data loads. Rows for this table are not intended to
be added locally. Rules which will be used in system processing will be delivered, and
users will only need to update the (Rule) Value to reflect local processing options if it
contains
UPDATE ME.
Rules fall into three major categories:
• Rules which control processing within self-service admissions, self-service prospects, or
data load processing.
For example, there is a rule which specifies the number of outside interest slots which
will display in Web applications.
• Rules which specify default values for various data elements. These kinds of rules can
apply to both Web and EDI applications.
• Rules which govern how data will be loaded into the permanent Banner tables.
For example, there is a set of rules which specifies whether application records will be
created if one already exists for the person, term, level, major, or overall curriculum
chosen.
Three general types of values may be required in the (Rule) Value field, and the Rule
Description field will usually indicate the type of value expected.
• Simple descriptive answers, like true, false, or a number to indicate the number of
values which will be available.
• A valid Banner validation table code, like an address type code.
• An EDI value which is valid within the TS189 transaction set. A complete, current listing
of all codes used in the TS189 transaction set is available on the Web site
http://
adm5.byu.edu/ar/aacraoig/igtoc.html
.

563
Banner Student User Guide | Recruiting
(When a valid EDI value is expected, the EDI Indicator for the rule will be Y).
Use the Copy PREL Group button to copy existing electronic prospect rules to a new
group code. Once the values have been copied, the System Required Indicator defaults
to
N or unchecked, so you can customize the group settings. This allows users to
customize the electronic prospect code rules based on each electronic prospect code
used, instead of the same set of values applying to all electronic prospect codes.
For example, if an electronic prospect code of
SAT exists and you want it to be processed
differently based on the rules for a group code of
PREL on SAAERUL, then do the
following.
1. Define a new group code on the EDI Rule Group Validation Form (STVEGRP) for
SAT. (The new group code must match the electronic prospect code).
2. Enter
SAT in the Group field on SAAERUL.
3. Select the Copy PREL Group button. All of the rules that exist for the
PREL group
code will be copied to your new
SAT group code.
4. You can customize those values, and they will be applied only when the electronic
prospect code used on SRTLOAD, SRRSRIN, or SRRPREL is
SAT.
Rules on SAAERUL
The rules on the Electronic Admissions Application Rules Form (SAAERUL) with the
Group (Code)
PREL allow you to set up default values for such things as an unknown
high school and to control the migration of the data.
New Recruit Data
Rules are used for determining under what circumstances recruiting records, addresses,
and phone numbers will be loaded. For the rule label
CREATENEWRECR (no recruit
exists, create new recruit), the possible values are
Y or N. When an incoming record is
being loaded and matched to an existing Banner person, the code will check if a recruiting
record already exists for the person. If none does, then the code will check the
CREATENEWRECR rule. If the rule value is Y, then the incoming data will be used to create
a recruiting record. If the rule value is
N, then no recruiting record will be created.
The two other rules used for creating a recruiting record are
MCREATENEWRECR
(matching recruit exists, create new recruit) and
NMCREATENEWRECR (non-matching
recruit exists, create new recruit).
• The possible values for MCREATENEWRECR are Y, N, or U (Update). If an incoming
record is being loaded, the program will determine if a matching recruiting record
already exists. An existing recruiting record matches if it has the same term, level, and
optionally campus.
• If the incoming record matches the existing recruiting record, and the
MCREATENEWRECR rule value is Y, then a new recruiting record will be created.
• If the
MCREATENEWRECR rule value is U, then no new recruiting record will be
created, and instead, the existing recruiting record will be updated.

564
Banner Student User Guide | Recruiting
• If the MCREATENEWRECR rule value is N, then no recruiting record will be added,
and the existing recruit record will not be updated.
• The possible values for NMCREATENEWRECR are Y or N. If an incoming record is being
loaded, and it does not match to an existing recruiting record (based on term, level, and
optionally campus), then the code will check the
NMCREATENEWRECR rule to
determine whether or not to create a new recruiting record.
New Address Data
The rule label NEWADDRESS (no address exists, create one) is used when no address
currently exists for the person in Banner. The possible values are
Y or N. If the rule value
is set to
Y and no address currently exists for the person, the incoming address will be
loaded.
The two other rules used for creating an address record are
ADDRDIFFTYPE (address
exists with different address type, add address) and
ADDRSAMETYPE (address exists
with same address type, add address). The possible values for these rules are
Y or N.
• If an address already exists in Banner, and the incoming address record has the same
address type, the address record will be inserted if the
ADDRSAMETYPE rule value is Y.
• If the incoming address record has an address type that differs from the existing Banner
address record, and the
ADDRDIFFTYPE rule value is Y, then the incoming address
record will be loaded. If the
ADDRDIFFTYPE rule value is N, it will not be loaded.
New Phone Data
The rule label NEWPHONE (no phone exists, create one) is used when no phone number
currently exists for the person in Banner. The possible values are
Y or N, where Y creates
a new phone number, and
N does not create a new phone number.
The two other rules used for creating a phone record are
PHONDIFFTYPE (phone
number exists with different phone type, add phone) and
PHONSAMETYPE (phone
number exists with same phone type, add phone). The possible values for these rules are
Y or N.
• If a telephone record already exists in Banner, and the incoming telephone record has
the same phone type, the phone number will be inserted if the
PHONSAMETYPE rule
value is
Y.
• If the incoming phone record has a phone type that differs from the existing Banner
phone type, and the
PHONDIFFTYPE rule value is Y, then the incoming phone number
will be loaded. If the value is
N, it will not be loaded.
Web for Prospects Phone and Address Data
Web for Prospects allows users to enter extra phone numbers in Banner Student Self-
Service that are not associated with a specific address. If extra phone numbers are
entered by prospects on the Web, they will be processed in conjunction with address/
phone data as follows:

565
Banner Student User Guide | Recruiting
1. The primary address (Address 1) is loaded to Banner along with its associated phone
number using the electronic prospect rules identified above.
2. The secondary address (Address 2), if it exists, is loaded to Banner along with its
associated phone number using the electronic prospect rules identified above.
3. The extra phone numbers entered are processed one at a time, based on the
alphabetical order of the telephone type, using the electronic prospect rules identified
above.
For example:
• NEWPHONE = Y
• NEWADDRESS = Y
• PHONSAMETYPE = N
• PHONDIFFTYPE = Y
The person being loaded is new to Banner and has entered a mailing address and phone
number. In addition, they have entered a separate “mailing” phone number and a
“business” phone number. When the record is processed, the mailing address and phone
number will be loaded, because the
NEWADDRESS and NEWPHONE rules are both set to
Y.
Next, the business phone number will be processed, because it falls first alphabetically
based on the phone type. The business phone number will be loaded, because it is a
different type than the already processed mailing phone number, and the
PHONDIFFTYPE rule is set to Y. The mailing phone number will then be processed. It will
also be loaded to Banner, because it is a different type than one of the existing Banner
phone numbers (the business phone that was just processed), and the
PHONDIFFTYPE
rule is set to
Y.
SAAERUL Rules
The rules on the Electronic Admissions Application Rules Form (SAAERUL) with the
Group (Code) of
PREL allow you to control how the incoming data is processed. Please
see the table of rules that follows.
Note: Rows for this table are not intended to be added locally. Rules
which will be used in system processing will be delivered, and users will
only need to update the (Rule) Value on SAAERUL to reflect local
processing options.
Please refer to the “Loading Packages/Procedures from Temporary to Production Tables
(SRKPREL) Process Flows” section of the “Process Flows” chapter to review process
flows describing how recruiting data is loaded and updated.

566
Banner Student User Guide | Recruiting
Group Label Description EDI Instructions
DISP WEBPTESTDISP # of Prospects Test
Rows
N Determines the number of test score
rows that will display on the Web for
Prospects Web page.
PREL ACTADMR Default ADMR code for
ACT
N Identifies the checklist summary
request default ADMR code value to
be updated in the Application Detail
block of the Admissions Application
Form (SAAADMS), if it exists for the
record. This value will also be used to
populate the Admission Request
field on the Test Score Information
Form (SOATEST).
This default is only used for ACT data
loads and when the ADMR value is
not populated on the Test Code
Validation Form (STVTESC) for ACT
test code record types.
PREL ADDRDIFFTYPE Create address if
different type
N Determines if an address should be
created, if one with a different address
type already exists. If set to
Y, an
address record will be created. If set
to
N, no address record will be
created.
PREL ADDRSAMETYPE Create address if same
type
N Determines if an address should be
created, if one with the same address
type already exists. If set to
Y, a new
address record will be created. If set
to
N, no address record will be
created.
PREL COMMPLAN Create commplan
collector entry
N
If set to
Y, a record will be inserted
into the Communication Plan
Collector Table (SORCCOL) which is
visible on the Communication Plan
Collector Form (SOACCOL).

567
Banner Student User Guide | Recruiting
PREL CREATECONT Create new contact if
recruit or app.
N
If set to
Y, the contact code entered as
a parameter on the SRTLOAD
process for data load or the contact
code listed on the Electronic
Prospects Default Options Form
(SRAPRED) for electronic prospects
will be inserted into the SORCONT
table viewable on the Recruit
Prospect Information Form
(SRARECR) if a recruit record exists
and the Admissions Application Form
(SAAADMS) if an application record
exists.
If no contact code was loaded via
SRTLOAD, and this parameter is
Y,
the system will insert the contact code
for the appropriate interface code
from the Interface Code Validation
Form (STVINFC). The appropriate
contact code will be loaded each time
the recruit is loaded to Banner.
If set to
N, a contact code will not be
created for new recruit records.
PREL CREATELEARNED Create learned: Enter Y
or N
N
If
Y is entered, and if the prospect is
new to Banner, or if the prospect is
matched to a recruit, and the recruit
term, level, and campus are different,
then the How I Learned data is
created. The learned information will
always be created if the prospect is
matched to an applicant and the
UPDATEIIFAPP rule is Y, or if the
prospect is matched to a recruit with
same term, level, and campus. The
learned data is entered only on the
Web.
PREL CREATEMATERIALS Create Materials: Enter
Y or N
NIf rule is entered, and if the prospect is
new to Banner, or if the prospect is
matched to a recruit, and the recruit
term, level, and campus are different,
then the materials data are created.
The materials will always be created if
the prospect is matched to an
applicant and the
UPDATEIIFAPP
rule is
Y, or if the prospect is matched
to a recruit with same term, level, and
campus.
Group Label Description EDI Instructions
568
Banner Student User Guide | Recruiting
PREL CREATENEWAPPL Create New Application N Allows schools to indicate that they
want an application record created at
the same time a recruit record is
created by SRRPREL.
When this rule is
Y, a new application
will only be created when the term,
level, college, degree, department,
and/or major do not match an existing
application.
PREL CREATENEWRECR Create new recruit Y
If set to
Y and no recruit record exists,
a new recruit record will be created. If
set to
N and no recruit record already
exists, then a new recruit record will
not be created.
PREL CREATESRCE Create new source Y If set to Y, the source code entered as
a parameter on the SRTLOAD
process for data load or the source
ode listed on the Electronic Prospects
Default Options Form (SRAPRED) for
electronic prospects will be inserted
into the SRRRSRC table viewable on
the Recruit Prospect Information
Form (SRARECR). If no source code
was loaded via SRTLOAD, and this
parameter is
Y, the system will insert
the source code for this from the
Interface Code Validation Form
(STVINFC).
PREL GMATADMR Default ADMR code for
GMAT
N Identifies the checklist summary
request default ADMR code value to
be updated in the Application Detail
block of the Admissions Application
Form (SAAADMS), if it exists for the
record. This value will also be used to
populate the Admission Request
field on the Test Score Information
Form (SOATEST).
This default is only used for GMAT
data loads and when the ADMR value
is not populated on the Test Code
Validation Form (STVTESC) for
GMAT test code record types.
Group Label Description EDI Instructions

569
Banner Student User Guide | Recruiting
PREL GREADMR Default ADMR code for
GRE
N Identifies the checklist summary
request default ADMR code value to
be updated in the Application Detail
block of the Admissions Application
Form (SAAADMS), if it exists for the
record. This value will also be used to
populate the Admission Request
field on the Test Score Information
Form (SOATEST).
This default is only used for GRE data
loads and when the ADMR value is
not populated on the Test Code
Validation Form (STVTESC) for GRE
test code record types.
PREL HOMESCHOOL SBGI code, if the
prospect checks the
Home School checkbox
on Web for Prospects
Web page
N This applies only to the Web. The
value entered on SAAERUL for this
must be a valid high school on
STVSBGI.
PREL HSCHADMR Default High School
Checklist
N This value will be used to populate the
Admissions Request field on the
High School Information Form
(SOAHSCH). This default is only used
when the Admissions Request value
is not populated on the Source/
Background Institution Code
Validation Form (STVSBGI).
PREL HSCHSELFREPORT Update self-reported
items
N
If set to
Y, then the student self-
reported items, such as GPA, class
rank, etc., will be loaded to the
appropriate tables.
PREL INTERESTMAX Maximum interest to
load
1 Indicates the number of interests to
be loaded from a search data load to
the SORINTS table if the
LOADINTEREST group label is set to
Y.
PREL LOADALTID Load Same Alt ID Type/
Diff ID
N
If set to
N, do not load an incoming
additional ID for the same additional
ID type.
If set to
Y, load an incoming additional
ID for the same additional ID type, as
long as the additional ID is different.
Group Label Description EDI Instructions
570
Banner Student User Guide | Recruiting
PREL LOADINTEREST Load interests N
If set to
Y, interests provided on the
file will be loaded to the SORINTS
table. All interest codes must have
Banner conversion values defined on
the Tape Code Conversion Form
(SOTCNVT) for the Validation Table
Name of
INTS.
PREL LOADMAJOR Use provided major N
If set to
Y, majors provided on the file
will be loaded to a field of study row
with a Type of
MAJOR and a Priority
of
1 (backfilled to the Major 1 field on
SRBRECR) and to a field of study row
with a Type of
MAJOR and a Priority
of
2 (backfilled to the Major 2 field on
SRBRECR). All major codes must
have Banner conversion values
defined on the Tape Code Conversion
Form (SOTCNVT) for the Validation
Table Name of
MAJR.
PREL LOADOLDTESTS Load older test scores N
If set to
Y, test score records with test
dates older than the current record’s
scores will also be loaded.
PREL MAJOR2INTEREST Load major to interests N
If set to
Y, and LOADINTEREST is
set to
Y, major codes provided will be
converted and loaded to the
SORINTS table. All major codes for
which interests are to be loaded must
have Banner conversion values set
appropriately on the Tape Code
Conversion Form (SOTCNVT) for the
Validation Table Name of
INTS.
Group Label Description EDI Instructions

571
Banner Student User Guide | Recruiting
PREL MCREATENEWRECR Matching create new
recruit
N
If set to
Y, and the incoming record
matches an existing recruiting record,
then a new recruiting record is
created.
If set to
U, and the incoming record
matches an existing recruiting record,
then no recruiting record is created,
and the existing record is updated. If a
matching recruiting record exists, and
the incoming contact, source, and/or
interests are different, those values
are updated.
If set to
N, and the incoming record
matches an existing recruiting record,
then no recruiting record is created,
and no records are updated.
A match exists if the incoming record
has the same term, level, and
optionally campus as the existing
recruiting record.
PREL NEWADDRESS Create address Y
If set to
Y, and no address record
exists for the person in Banner, an
address record will be created. If set
to
N, and no address record exists, no
record will be created.
PREL NEWPHONE Create phone Y
If set to
Y, and no phone record exists
for the person in Banner, a phone
record will be created. If set to
N, and
no phone record exists, no record will
be created.
PREL NMCREATENEWRECR Non-match create new
recruit
N
If set to
Y, and the incoming record
does not match an existing recruit
record, a new recruiting record is
created. If set to
N, no recruiting
record is created.
A match exists if the incoming record
has the same term, level, and
optionally campus as the existing
recruiting record.
Group Label Description EDI Instructions

572
Banner Student User Guide | Recruiting
PREL PCOLADMR Default Prior College
Checklist
N This value will be used to populate the
Admissions Request field on the
Prior College Form (SOAPCOL). This
default is only used when the
Admissions Request value is not
populated on the Source/Background
Institution Code Validation Form
(STVSBGI).
PREL PHONDIFFTYPE Create phone if different
type exists
N Determines if a phone record should
be created, if one with a different
phone type already exists. If set to
Y,
a phone record will be created. If set
to
N, no phone record will be created.
PREL PHONSAMETYPE Create phone if same
type exists
N Determines if a phone record should
be created, if one with the same
phone type already exists. If set to
Y,
a new phone record will be created. If
set to
N, no phone record will be
created.
PREL PRIMESRCE Create source as
primary
N
If set to
Y, and CREATESRCE is set to
Y, then the source code loaded to the
SRRRSRC table will be set as the
primary source. Only one source will
be flagged as primary for each recruit
term and sequence number upon
loading to Banner.
Group Label Description EDI Instructions

573
Banner Student User Guide | Recruiting
PREL PSATMAJOR Obsolete Sept 2013
SSS_SEARCH
Formerly, Load the
PSAT Major First
This rule is obsolete as
of September 2013 and
is no longer used with
the SSS_SEARCH data
load.
N Loads the PSAT major if it exists. This
rule is only used for SSS_SEARCH
data load processing.
When
LOADMAJOR is set to Y and
PSATMAJOR is set to Y, and the
PSAT exists, the PSAT major will be
loaded to a field of study row with a
Type of
MAJOR and a Priority of 1
(backfilled to the Major 1 field on
SRBRECR). The first SAT major code
listed on the file will then be loaded to
a field of study row with a Type of
MAJOR and a Priority of 2 (backfilled
to the Major 2 field on SRBRECR) if it
exists.
When
LOADMAJOR is set to Y and
PSATMAJOR is set to N, the PSAT
major will not load at all, and the first
two SAT major codes on the file will
be loaded to a field of study row with a
Type of
MAJOR and a Priority of 1
(backfilled to the Major 1 field on
SRBRECR) and a field of study row
with a Type of
MAJOR and a Priority
of
2 (backfilled to the Major 2 field on
SRBRECR), if they exist.
Note: Whatever your settings are in
SAAERUL, if the second major to be
loaded translates to 0000
(undeclared), the second major will
not be loaded.
PREL SATHADMR Default ADMR code for
SAT
N Identifies the checklist summary
request default ADMR code value to
be updated in the Application Detail
block of the Admissions Application
Form (SAAADMS), if it exists for the
record. This value will also be used to
populate the Admission Request
field on the Test Score Information
Form (SOATEST).
This default is only used for SAT data
loads and when the ADMR value is
not populated on the Test Code
Validation Form (STVTESC) for SAT
test code record types.
Group Label Description EDI Instructions
574
Banner Student User Guide | Recruiting
PREL UNKNOWNHSCH SBGI code, if the student
enters an invalid SBGI
code on the Web
N This source/background institution
(SBGI) code will fill in the
SRTHSCH_SBGI_CODE, and the
code the student entered will fill into
SRTHSCH_SBGI_CODE_INVALID.
This code is also used if student
leaves the SBGI code blank but
enters a name of the institution or any
of the self-reported data. This rule is
for the Web only. The value entered
on SAAERUL for this must be a valid
high school on STVSBGI.
PREL UNKNOWNPCOL SBGI code, if the student
enters an invalid SBGI
code on the Web
N This source/background institution
(SBGI) code will fill in the
SRTPCOL_SBGI_CODE, and the
code the student entered will fill into
SRTPCOL_SBGI_CODE_INVALID.
This code is also used if student
leaves the SBGI code blank but
enters a name of the institution or any
of the self-reported data. This rule is
for the Web only. The value entered
on SAAERUL for this must be a valid
college on STVSBGI.
PREL UPDATEIFAPP Update recruit record if
application exists
N
If set to
Y, then the settings of the
previous rules will be followed, even if
a recruit record already exists for this
person for the same term, level, and
campus. If set to
N, and a matching
recruit record already exists, then
based on your SAAERUL settings,
the process will:
• Insert new test score records on the
Test Score Information Form
(SOATEST).
• Insert new high school records on
the High School Information Form
(SOAHSCH).
• Insert new college records on the
Prior College Form (SOAPCOL).
• Insert the contact code into the
SORCONT table.
• Insert the source code into the
SRRRSRC table if a matching
recruit record exists or insert the
source code into the SARRSRC
table if a matching application
record exists.
• Update Null values on the General
Person Form (SPAPERS).
Group Label Description EDI Instructions
575
Banner Student User Guide | Recruiting
Note: The College Board Student Search Service provides AP exam
codes indicating which exams the student took. However, no scores are
provided with these exams. A school indicates to the College Board
Student Search Service that they want any records for students with one
or more AP exams between some range of scores (2 –5, 3 – 5, etc.).
Given that the Test Score Information Form (SOATEST) requires a test
score, AP exam codes will not be loaded into Banner. They will be
accessible via the Search Tape View (SRVPREL).
Note: You still use the Tape Code Conversion Form (SOTCNVT) to
convert values from the various search data loads to Banner values.
Electronic Prospect Purge (SRTPURG)
This process is used to delete records from the search or test score data load temporary
tables based on the report parameter values. This process allows you to designate which
records to purge. All data associated with a search or test score record is deleted.
Note: Run the process in audit mode to determine which records will be
removed from the temporary tables.
Tape Code Conversion Form (SOTCNVT)
This form is used to convert codes on interface data loads to valid Banner values before
data is added to the system during the data load process. For example, if the SAT data
load has a major code of
ENGL for English and your institution's code for English is 100,
the table name would be
MAJR, the tape (file) value would be ENGL and the converted
value would be
100.
PREL VTYPADMR Default ADMR Code for
the Visa
Y Identifies the Checklist Summary
Request Code for the Visa Code
value to be inserted on the
Admissions Application Detail block of
the Admissions Application Form
(SAAADMS) when loading a record
from the Banner Student Self-Service
Prospects (Recruiting) or Admissions
modules. This rule is only used by the
Web interface.
PREL WEBGENID For Web only, use
generated ID, or use
entered SSN for ID
N
Enter
G to always use the generated
ID which uses SOBSEQN functions.
Enter
S to use the SSN entered on
the Web. If neither is entered, use a
generated ID.
Group Label Description EDI Instructions

576
Banner Student User Guide | Recruiting
If there is a field on the data load which is left blank, but which is required in Banner, then
an asterisk (*) needs to be entered in the Tape Value field with the appropriate conversion
value which will be assigned in Banner. For example, if the Major Code is blank on the file,
then a Major Tape Value of * with a Converted Code of
0000 should be maintained.
If an entry exists on the file but does not exist in SOTCNVT, a default entry needs to be
added that has
DEFAULT in the Tape Value column with the appropriate converted value
to be assigned in Banner. For example, if a major of Forestry comes from the file, and
forestry is not a valid major at your institution, then a
DEFAULT value of 0000
Undeclared Major or some other code of Unavailable Major should be maintained.
For example, the following two entries exist on SOTCNVT:
The student has not specified a major field of study, hence no value exists on the file.
Therefore, the tape value of * would be used, and the major code would be created with
000A - Unknown Major. If the student has specified a major of Geology, which does
not exist at the institution, and therefore does not exist on the SOTCNVT form, the
DEFAULT value of 0000 - Undeclared Major will be used.
Use the Copy Values button to copy values from one interface code to another. When you
select the button, the List of Values will display a row for each interface code which
contains conversion values for the validation table entered in the Key Block. If no
validation table name is entered, then the List of Values will display all interface codes that
contain conversion records.
For example, if you have an Interface Code of
PCU, and that code has conversions for
Validation Table Name
INTS (interests) defined on SOTCNVT, and you want to copy
that data to an Interface Code of SAT, do the following.
1. Enter
SAT in the Interface Code field and INTS in the Validation Table Name field.
2. Select the Copy Values button.
3. Select
PCU from the Interface Codes for the Table window that appears and select
OK. The rows from PCU with the table name equal to
INTS are copied back to
SOTCNVT for the Interface Code of
SAT and the Validation Table Name of INTS.
If you want all conversion values from one interface code (i.e,
PCU) copied to another
interface code (i.e,
SAT), do the following:
1. Enter
SAT in the Interface Code field, and leave the Validation Table Name field
blank.
2. Select the Copy Values button.
3. The Interface Codes with Conversion Rules window will appear, displaying all the
interface codes that contain any conversion records.
Table Name Tape Value Converted Code
MAJR * 000A
MAJR DEFAULT 0000

577
Banner Student User Guide | Recruiting
The form allows NATN to be validated against the Nation Code Validation Form
(STVNATN) for those files which have the Foreign Nation indicator field included. This
allows for incoming nation data to be converted to the values existing in Banner. This
validation is associated with an Interface Type to allow for different settings based on the
incoming values provided with each data load type (SAT, ACT, GRE, and GMAT).
SOTCNVT validates the following fields:
SOTCNVT
Table Banner Validation Form SRTLOAD Field
NATN STVNATN
SRTADDR_NATN_CODE
CITZ STVCITZ
SPTPERS_CITZ_CODE
STAT STVSTAT
SRTADDR_STAT_CODE
INTS STVINTS
SRTINTS_INTS_CODE
INTP STVINTS
SRTINTS_INTS_CODE
ETHN STVETHN
SRTPERS_ETHN_CODE
ETHR STVETHN
SRTPERS_ETHN_CODE
RACE GORRACE
GORPRAC_RACE_CDE
DEGC STVDEGC
SRTPREL_DEGC_CODE
DEGA STVDEGC
SRTSUPL_APPL_TYPE
MAJR STVMAJR
SRTPREL_MAJR_CODE
MAJP STVMAJR
SRTPREL_MAJR_CODE
RELG STVRELG
SRTPERS_RELG_CODE
CNTY STVCNTY
SRTADDR_CNTY_CODE
TADM STVTADM
SRTTEST_TADM_CODE
TERM STVTERM
SRTPREL_TERM_CODE
DEPT STVDEPT
SRTPREL_DEPT_CODE
VTYP STVVTYP
SRTINTL_VTYP_CODE_CURR_ENT
EDLV STVEDLV
SRTPREL_EDLV_CODE
EGOL STVEGOL
SRTPREL_GRAD_LEVEL
GNDR N/A
SRTPERS_SEX
SBGI STVSBGI
SRTPCOL_SBGI_CODE *
* Prior college codes are tied to the SRATPFD variable
PCOL_SBGI_CODE.
578
Banner Student User Guide | Recruiting
Note: The table value of GNDR should be used on SOTCNVT to convert
various gender formats on incoming data loads to the appropriate Banner
values.
GNDR works on SOTCNVT, even though it does not have a
corresponding validation table.
SRTLOAD will first try to convert the above fields using the INFC code defined for the
prospect code on STVPREL. If the field on the file is Null, then it will try the value *. The *
in the tape value on SOTCNVT signifies that this value is used in Banner if the value from
the file is Null. In addition, if the tape value does not exist on the SOTCNVT crosswalk and
is not valid in the Banner validation table, a message will print on the SRTLOAD report
with the error. In the case where the value is not a valid Banner value, a match on
SOTCNVT is attempted with the tape value of
DEFAULT. This is where the default value
is stored for the table.
The values used to convert the Term are the High School Graduation date or the Prior
College Graduation date. The valid formats to enter on SOTCNVT in the tape value are
YY, YYYY, 01-MON-YY, 01-MON-YYYY, 01MMYY, and 01MMYYYY. The YY and YYYY
are the graduation year, and the MON and MM are the graduation month. If the graduation
month is not on the file or a match is not found, the month of June is used in the
comparison.
The major and degree are required values on SRTPREL. If a default is not available on
SOTCNVT, the values
0000 and 000000 are used.
Race/Ethnicity Conversion
SOTCNVT uses the conversion value of ETHR to convert the incoming AMCAS RACE
CODE 1 to the
SRTPERS_ETHN_CODE value when the incoming AMCAS Hispanic
Indicator is set to
N.
SBGH STVSBGI
SRTHSCH_SBGI_CODE
ADMT STVADMT
SRTPREL_ADMT_CODE
CAMP STVCAMP
SRTPREL_CAMP_CODE
ESEL STVESEL
SRTSUPL_ESEL_CODE
TEAC STVTEAC
SRTTEST_TEAC_CODE
TESC STVTESC
SRTTEST_TESC_CODE
TEFR STVTESC
SRTTEST_TEFR_CODE
TSPT STVTSPT
SRTTSPC_PERCENTILE
HGPA N/A
SRTHSCH_GPA
ADID GTVADID
SRTIDEN_ADDITIONAL_ID_CODE
SOTCNVT
Table Banner Validation Form SRTLOAD Field

579
Banner Student User Guide | Recruiting
The conversion value of RACE uses the GORRACE table. The incoming race value is
converted based on the existing rules applied on GORRACE to load the incoming race
value and associated institutional race code (
GORRACE_RACE_CDE) to the
SRTPRAC_RACE_CDE field. The conversion code of “*” can be used for Null data. The
conversion code of
DEFAULT can be used when data does not convert.
Note: AMCAS has ten potential race codes that may be Null, but the rule
for “*” will only be loaded to SRTSUPL and SRTPRAC one time.
AMCAS files will convert the race values from GORRACE, and the data will be loaded to
SRTSUPL and to SRTPRAC. Non-AMCAS files will convert the race values from
GORRACE, and the data will be loaded only to SRTPRAC. (Currently, no baseline
electronic prospect files provide race information besides AMCAS.) Web prospects and
Web applicants can submit race information using Banner Student Self-Service.
When validation is not set up on SOTCNVT for GORRACE (and when no
DEFAULT or *
conversion values can be applied), validation may occur directly on GORRACE (if the
incoming AMCAS value happens to match a GORRACE value), and then the race codes
will be loaded to SRTPRAC.
A script is delivered to add the table values of
RACE based on previous rules that had
been established for the
ETHR rule prior to Release 7.3. A valid institution race code must
exist on STVETHN in order for the conversion of the race codes to apply and for
SOTCNVT/
RACE validation to be updated appropriately.
Using PCU Data Load
PCU (Private College Guide Search) data load can be used with electronic prospects
processing. Student type (freshman, transfer, other) and prior college information is
processed for transfer records, as well as intended enrollment dates, current college
name, and high school and prior college GPAs. SRRSRIN, SRRPREL, and SRTPURG
can be run by student types. SRTLOAD can be used to collect data for prior college
degree tracking.
Loading Records to Banner
Records are loaded to Banner as follows during PCU processing.
• The student type is loaded from the SRTPREL_STYP temporary table field to the
SRBRECR_STYP_CODE Banner field.
• The high school GPA is loaded from the SRTHSCH_GPA temporary table field to the
SORHSCH_GPA Banner field.
• The college code from the UNKNOWNCPOL rule on SAAERUL is loaded from the
SRTPCOL_SBGI_CODE temporary table field to the SOAPCOL_SBGI_CODE Banner
field. If no rule exists on SAAERUL for
UNKNOWNCPOL, no other college data will be
loaded.
• The PCU prior college degree from SRTLOAD is loaded from the
SRTDEGR_DEGC_CODE temporary table field to the SORDEGR_DEGC_CODE Banner
field, if a GPA exists.

580
Banner Student User Guide | Recruiting
• The prior college GPA is loaded from the SRTPCOL_GPA_TRANSFERRED temporary
table field to the
SORDEGR_GPA_TRANSFERRED Banner field.
Forms Used with PCU Data Load Processing
Here are the forms used with PCU processing.
Tape Field Names Validation Form (STVTPFD)
Use the values have on this form for student type, enrollment date, high school GPA, prior
college GPA, and prior college name.
Tape Field Position Rule (SRATPFD)
Use the values on this form for student type, enrollment date, high school GPA, prior
college GPA, and prior college name where the Tape Code value is
PCU.
Electronic Prospect Detail Form (SRAPREL)
Use the Student Type field in the Electronic Prospect block in the main window. While
most incoming non-PCU prospect records will not have a student type or will have a
student type that defaults from SRAPRED, this field is important for PCU processing, so
you can view/query PCU student types of
O (Other) based on the rule set up on
SOTCNVT.
Electronic Prospect Inquiry Form (SRIPREL)
Use the Student Type field for PCU processing. While most incoming non-PCU prospect
records will not have a student type or will have a student type that defaults from
SRAPRED, this field is important for PCU processing, so you can view/query PCU student
types of
O (Other) based on the rule set up on SOTCNVT.
Tape Code Conversion Form (SOTCNVT)
Use the crosswalk capability on SOTCNVT for student types (STVSTYP). SOTCNVT also
accommodates the intended enrollment date.
• The term converts the two character year (YY positions 58-59) for the year of high
school graduation to the recruiting term code.
• The same conversion rule for term will also be used to convert the four character
intended enrollment date (MMYY positions 197-200) to the recruiting term code when
the intended enrollment date exists and there is a valid conversion value.
Note: For term records on SOTCNVT, YY conversions for the high school
graduation year and MMYY conversions for the intended enrollment date
will exist for the same conversion rule.

581
Banner Student User Guide | Recruiting
PCU Term Code SOTCNVT Conversions
The high school graduation date and the intended enrollment date share the SOTCNVT
rule where the Interface Type is
PCU and the Validation Table Name is TERM. When an
intended enrollment date exists, that value will be checked first for conversion. If the
conversion takes place as a result of the
DEFAULT rule on SOTCNVT, the system will
check to see if a high school graduation date exists. If the high school graduation date
exists, the conversion will be attempted. If no conversion takes place, the
DEFAULT rule
will be used, if it exists. If no rule exists for either value (high school graduation date or
intended enrollment date) the * (Null) rule will be used, if it exists.
Note: Functionality currently exists for the conversion of the high school
GPA and the prior college GPA. You will need to set up rules to convert
the incoming PCU high school GPA (
HGPA) and the prior college GPA
(
CGPA).
Processing and Validation of Student Type
The incoming student type values from the PCU data load are:
• T (Transfer)
• F (Freshman)
• O (Other, Unknown)
For the PCU 2007 Regulatory File, it is recommended that the incoming student types are
converted appropriately so they can be loaded to Banner. Conversion values should be
set up for
T, F, and O, as well as the optional values for the * (NULL) and DEFAULT rules
on SOTCNVT. The PCU suggests that users do not process incoming records with
student types of
O (in positions 60 - 61) for loading into the Banner production tables
without first performing a manual review of the data.
These records, for example, may have been filled out by a parent, and the information
may contain parent data as opposed to student data, and therefore should not be loaded
into Banner. Unless the actual data file is carefully reviewed, there is no way to know what
the student types are until after they have been loaded into the temporary tables when
SRTLOAD is run, and the data is viewed on SRIPREL/SRAPREL.
Setup Steps on SOTCNVT
It is recommended that the following data be set up on SOTCNVT for the PCU student
type, in order to track and process (or not process) PCU student type records with a value
of
O.
1. Set up a unique conversion value for the student type of
O (Other).
Having a single, unique conversion value for the student type allows you to track,
review, and process these records efficiently. The conversion value for
O (Other)
should not be used for any other PCU student type conversions on SOTCNVT. The
PCU suggests manually reviewing records with a student type of
O, before they are
loaded into Banner.

582
Banner Student User Guide | Recruiting
2. Set up appropriate conversion values for the student types of F and T.
These values should be different than the value used to convert the student type of
O.
3. Set up a * (Null) rule for any PCU student type values that are Null.
This value should be different than the value used to convert the student type of
O.
4. Set up a
DEFAULT rule for any PCU student type that will not be translated correctly.
This value should be different than the value used to convert the student type of
O.
Note: If the Student Type field on SRAPRED has a default value for the
electronic prospect code
PCU, it is recommended that this default value
not be equal to the SOTCNVT rule that has been set up for the unique
conversion of the PCU student type value of
O.
If Null student types are delivered on the PCU file, and no rule exists on
SOTCNVT for * (Null) student types, the student type value on SRAPRED
will be defaulted. This default value from SRAPRED should not be
confused with the student type conversion on SOTCNVT for incoming
records with student types of
O. Setting up your SOTCNVT and
SRAPRED rules as suggested will allow you to tie a unique student type
to the incoming PCU student type of
O.
5. Once appropriate student types have been assigned via SRTLOAD based on the
rules on SOTCNVT, you can run SRRSRIN, SRRPREL, and SRTPURG, and process
records by specific student types.
Reports Used with PCU Data Load Processing
The following reports are used with PCU processing.
Electronic Prospect Load (SRTLOAD)
Prior College Degree Tracking
SRTLOAD will update the prior college for the
UNKNOWNPCOL rule on SAAERUL, when a
current college name exists on the incoming file. If the
UNKNOWNPCOL rule does not
exist, no prior college will be loaded to the temporary table. No attempt will be made to
convert the incoming PCU Current College Name field. (This field is a free format field
from the PCU.) The field value may be selected from a pick list provided by the PCU or
may be manually entered by recruit/prospect.
Due to the variety of data entry options (selecting a college name or manually entering the
data), the absence of an incoming college code to be used for conversion to Banner, the
PCU value length of 100 characters (in contrast to the 30 character description length on
STVSBGI), as well as potential misspellings, abbreviations, and formatting and data
inconsistencies related to manual entry, no attempt will be made to compare the incoming
PCU Current College Name value against the description in STVSGBI to avoid corrupt,
incorrect, or incomplete data.
Use the PCU Prior College Degree Code parameter for prior college degree tracking. You
can enter the degree code that will be applied to the prior college record, for PCU

583
Banner Student User Guide | Recruiting
processing. The parameter is validated against the Degree Code Validation Form
(STVDEGC).
The PCU file provides a prior college GPA, but it does not provide a degree code. If the
prior college GPA exists, it cannot be loaded without an associated degree and/or degree
sequence number. The degree GPA also requires the existence of the
UNKNOWNPCOL
rule on SAAERUL. The PCU Prior College Degree Code parameter will provide a degree
code that is loaded to the SRTDEGR/SORDEGR tables when a prior college GPA and an
incoming current college name exist. When the degree from the parameter and the GPA
are loaded, the degree will not be flagged as primary, since the PCU does not provide that
information in the file. The degree will not be loaded without an existing GPA.
Note: No college and/or degree information will be loaded without an
UNKNOWNPCOL rule in SAAERUL. If it is preferred no PCU college,
degree, and/or GPA data be loaded to Banner, this rule may be removed
from SAAERUL.
Processing and Output
SRTLOAD will perform the following during processing:
• It will load the student type value to the SRTPREL_STYP field in Banner.
• It will load the incoming high school GPA to the SRTHSCH_GPA field in Banner. A high
school code must exist for conversion or default, or the incoming high school GPA will
not be loaded.
• It will load the incoming prior college GPA to the SRTPCOL_GPA_TRANSFERRED field
in Banner. The prior college GPA will not be loaded unless the
UNKNOWNPCOL rule has
been set up on SAAERUL, and the PCU degree has been entered in the PCU Prior
College Degree Code parameter in SRTLOAD.
Prior to the optional Summary Report in the SRTLOAD output, a list of ID numbers is
printed from the incoming PCU file for records with the student type of
O. (Please note that
you may have chosen a different student type for these records on SOTCNVT.) This list of
IDs can be used to review the records on SRIPREL. The records with a student type of
O,
as well as any other records, can then be loaded manually or processed using SRRSRIN
and/or SRRPREL.
Electronic Prospect Match (SSRSRIN)
You can run this process by student types, using the Student Type parameter. This
parameter is optional, and multiple values may be entered. If left blank, all incoming
student types will be processed for the prospect code and data load ID. The parameter is
validated against the Student Type Code Validation Form (STVSTYP).
For each student type code that is entered in the parameter, only records on the incoming
file with matching student types will be processed. When specific student types are
excluded from the match and/or load processes, they can be manually reviewed and
matched and/or pushed on SRIPREL and/or purged using SRTPURG. This allows you to
selectively process or not process PCU student types.
If Null student types need to be processed, all applicable student types should be
processed first, so that only the Null types remain. Leave the Student Type parameter
584
Banner Student User Guide | Recruiting
blank, and the Null student types will be picked up, as they will be the last types that
remain during processing.
Note: The Student Type parameter is used mainly for PCU processing,
but it is valid for all electronic prospect codes. Only the PCU file currently
provides an incoming variable for the student type.
Student type values for other files (SAT, ACT, etc.) will be Null, or they will
use the default student type for the specific electronic prospect code that
was updated on SRAPRED.
If the Auto Load (Skip Dup Chk) parameter is set to
N (perform duplicate processing), and
the Student Type parameter is updated, a match status will be assigned for the student
types that have been entered. When the Student Type parameter is blank, a match status
will be assigned to all student types.
If the Auto Load (Skip Dup Chk) parameter is set to
Y (load new and matched IDs), and
the Student Type parameter is updated, a match status will be assigned for the student
types that have been entered, and the records will be loaded to Banner. When the Student
Type parameter is blank, a match status will be assigned to all student types, and the
records will be loaded to Banner.
Migrate Electronic Prospects Process (SRRPREL)
You can run this process by student types, using the Student Type parameter. This
parameter is optional, and multiple values may be entered. If left blank, all incoming
student types will be processed for the prospect code and data load ID. The parameter is
validated against the Student Type Code Validation Form (STVSTYP).
For each student type code that is entered in the parameter, only records on the incoming
file with matching student types will be processed. When specific student types are
excluded (not entered in this parameter), they can be manually reviewed and pushed (or
not) on SRIPREL and/or purged using SRTPURG. This allows you to selectively process
or not process PCU student types.
If Null student types need to be processed, all applicable student types should be
processed first, so that only the Null types remain. Leave the Student Type parameter
blank, and the Null student types will be picked up, as they will be the last types that
remain during processing.
Note: The Student Type parameter is used mainly for PCU processing,
but it is valid for all electronic prospect codes. Only the PCU file currently
provides an incoming variable for the student type.
Student type values for other files (SAT, ACT, etc.) will be Null, or they will
use the default student type for the specific electronic prospect code that
was updated on SRAPRED.
Electronic Prospect Purge (SRTPURG)
You can run this process by student types, using the Student Type parameter. This
parameter is optional, and multiple values may be entered. If left blank, all incoming

585
Banner Student User Guide | Recruiting
student types will be processed for the prospect code and data load ID. The parameter is
validated against the Student Type Code Validation Form (STVSTYP).
For each student type code that is entered in the parameter, only records on the incoming
file with matching student types will be processed. When specific student types are
excluded (not entered in this parameter), they can be manually reviewed and pushed (or
not) on SRIPREL and/or purged using SRTPURG. This allows you to selectively process
or not process PCU student types.
If Null student types need to be processed, all applicable student types should be
processed first, so that only the Null types remain. Leave the Student Type parameter
blank, and the Null student types will be picked up, as they will be the last types that
remain during processing.
Note: The Student Type parameter is used mainly for PCU processing,
but it is valid for all electronic prospect codes. Only the PCU file currently
provides an incoming variable for the student type.
Student type values for other files (SAT, ACT, etc.) will be Null, or they will
use the default student type for the specific electronic prospect code that
was updated on SRAPRED.
Using ACT Data Load
SRTLOAD can also be used to load ACT Electronic Student Record (Colleges and
Universities) data to Banner.
When loading Canadian province data, make sure the ACT-defined values that are
reported exist and have been updated appropriately in STVSTAT and/or SOTCNVT. The
Canadian province data is loaded to the
SRTADDR_STAT_CODE field and/or the
SPRADDR_STAT_CODE field in Banner.
SRTLOAD loads the Canadian province and Canadian postal code values to the
corresponding temporary tables in Banner. (Values exist on STVTPFD and SRATPFD for
CANADIAN_PROVINCE and CANADIAN_POSTAL_CODE.) The process also
accommodates the nation code for Canada (
CN) when that code is listed as the state code
value on the file.
When data exists for a Canadian province, the state code value will be the nation code on
the ACT file. This field could also be blank, but the ACT indicates the value should be
CN
when values exist for the Canadian province and Canadian postal code on the file.
Updating the Canadian Nation Code in STVNATN and/or SOTCNVT
For a nation code to be converted from the ACT file, the value of CN, with a description of
Canada, should be added to STVNATN, or the appropriate conversions should be set up
on SOTCNVT. When the state code on the file is
CN, a check will occur for Canadian
province code and Canadian postal code values. When no conversion takes place for the
CN nation code in STVNATN or SOTCNVT, and the Canadian province code and
Canadian postal code values exist, the nation, Canadian province, and Canadian postal
code values will not be loaded to Banner.

586
Banner Student User Guide | Recruiting
Reviewing the State Code List
The list of state codes used by the ACT includes Puerto Rico and the US Trust Territories.
You need to review the state code list from the ACT and update STVSTAT appropriately.
You also need to review and update SOTCNVT for an Interface Type of
ACT and a
Validation Table Name of
STAT.
Loading Multiple Records
Students may appear on an ACT file more than once if they have taken multiple tests in
different locations (such as national, state, etc.). These multiple occurrences of the tests
may have the same month and year dates. ACT does not provide a day to distinguish
between test dates. To accurately differentiate between these records, ACT recommends
that you always use the test location value, in addition to the test date (month and year)
value.
In Banner, SOATEST does not allow the entry of multiple test scores for the same test on
the same date. SOATEST requires a unique “day” in order to process the test score. In
this case, the day is loaded as the first day of the month and year that is reported as the
test date value on the file. When test scores are reported on the same test date (month
and year) with different test locations, the test “day” is defaulted as the next available one-
up day for the same month and year for the particular test code.
You need to review the ACT test location value and update STVTADM and/or SOTCNVT
appropriately. This ensures that test scores for multiple tests taken in the same month and
year will be loaded to Banner when the test location is changed. The test location updates
the Administration Type value on SOATEST.
Viewing Present Test Location on SRAPREL
The ACT test location can be viewed on SRAPREL in the Percentile block of the Test
Scores and Percentiles window. As you scroll through the test records in the Test Score
block, the test type, date taken, and test location/test score administration type code
(STVTADM) values are displayed in the (test type) taken on (date) with administrative
type field in the Percentile block.
2010 ACT File Format
The 2010 file format uses new codes, conversion values, and fields. Field positions have
been changed. Test codes have been removed. Data has been updated for race/ethnicity,
majors, and religious affiliation. A phone number data type is now used.
Note: Please review the ACT EXPLANATION OF 2010
IMPLEMENTATION OF CHANGES in REPORTING of RACE/
ETHNICITY INFORMATION on ACT STUDENT RECORDS to assist in
converting race and ethnicity codes for your institution. Conversions of
existing data related to ACT student records are not provided. You can
evaluate all new and changed ACT codes and make appropriate updates
on SOTCNVT.

587
Banner Student User Guide | Recruiting
Details regarding the changes to the ACT Electronic Student Record for 2010-2011 can be
found at the following link:
http://www.act.org/aap/infosys/
changes.html
.
File Updates
The following items have been updated in the ACT file.
The following items have been added to the ACT file.
The following additional changes have been made that are not related to the regulatory
updates.
Conversion of Codes
The following conversion values should be reviewed and changes made to SOTCNVT as
needed.
Updated Items Positions
New/Changed
ACT Values
SRATPFD Tape
Code
SOTCNVT
Validation
Race/Ethnicity 471 SOTCNVT ETHN_CODE ETHN
Major 411-413 SOTCNVT MAJR_CODE MAJR
Religious Affiliation 606-607 SOTCNVT RELG_CODE RELG
New Items Positions
New/Changed
ACT Values
SRATPFD Tape
Code
SOTCNVT
Validation
Type of Telephone 100 SOTCNVT TELE_TYPE_CODE TELE
Race/Ethnicity 608 SOTCNVT HISP_IND
1 = Y
2 = N
N/A
Race/Ethnicity 609-613 SOTCNVT RACE1 - RACE5 RACE
Changes Positions
New/Changed
ACT Values
SRATPFD Tape
Code
SOTCNVT
Validation
Percentiles added See
“Percentiles
associated
with test
scores” topic
N/A See “Percentiles
associated with test
scores” topic
N/A
Street Address Line
1 extended
45-84 N/A STREET_LINE1 N/A

588
Banner Student User Guide | Recruiting
• The ETHN_CODE value is now reported in position 471. You should review the
conversion values and update SOTCNVT as necessary for Interface Type of
ACT and
Validation Table Name of
ETHN.
• The MAJR_CODE value is now reported in position 411-413. You should review the
conversion values and update SOTCNVT as necessary for Interface Type of
ACT and
Validation Table Name of
MAJR.
• The RELG_CODE value is now reported in position 606-607. You should review the
conversion values and update SOTCNVT as necessary for Interface Type of
ACT and
Validation Table Name of
RELG.
• The TELE_TYPE_CODE value is reported in position 100. You should review the
conversion values and update SOTCNVT as necessary for Interface Type of
ACT and
Validation Table Name of
TELE.
• The TELE_TYPE_CODE value will be loaded with the telephone number using the
following hierarchy:
• SOTCNVT - Valid tape value conversion rule or
DEFAULT tape value rule (if one
exists)
• SRTLOAD - Value in the Telephone Type Code parameter
• STVATYP - Telephone Type value (if it exists) associated with the SRTLOAD
Address Type Code parameter value.
• Telephone type that matches the STVATYP Address Type value.
This is used when the STVATYP Telephone Type value is
Null, and a valid
STVTELE telephone type Code value exists (such as
MA) that matches the
STVATYP Address Type value (such as
MA).
• The HISP_IND value is reported in position 608. The value in the HISP_IND field will be
loaded to the temporary
SRTPERS_ETHN_CATEGORY field and the permanent
SPBPERS_ETHN_CDE field in Banner.
Note: There is no conversion available on SOTCNVT for the HISP_IND
field.
The ACT Hispanic or Latino Background values are:
•
1 - Yes
•
2 - No
•
3 - Prefer not to respond
When these values are loaded into Banner, the following occurs:
• When the incoming value is
1, the SRTPERS_ETHN_CATEGORY field or the
SPBPERS_ETHN_CDE field is set to HISP.
• When the incoming value is
2, the SRTPERS_ETHN_CATEGORY field or the
SPBPERS_ETHN_CDE field is set to NON-HISP.

589
Banner Student User Guide | Recruiting
• When the incoming value is another value or is Null, the
SRTPERS_ETHN_CATEGORY field or the SPBPERS_ETHN_CDE field is set to
Null or NONE.
Once the HISP_IND values have been loaded to the Banner production tables, they
are displayed in the New Ethnicity field on SPAPERS. The field values are
Hispanic or Latino, Not Hispanic or Latino, or None. The setting of
the Ethnicity and Race Confirmed indicator and Confirmed Date value will be
updated as appropriate.
• The RACE1 - RACE5 values are reported in positions 609-613. You should review the
conversion values and update SOTCNVT as necessary for Interface Type of
ACT and
Validation Table Name of
RACE. Refer to the following website: http://
www.act.org/aap/infosys/changes.html
ACT race values in positions 614-615 are not currently loaded to Banner. If you choose
to load these race values from the ACT file, you need to modify SRATPFD to include
values for RACE6 and RACE7. Be sure to account for these codes on SOTCNVT for
Interface Type of
ACT and Validation Table Name of RACE.
The following table shows the ACT Race fields that are not loaded to Banner and how
they can be added at your institution.
Percentiles Associated with Test Scores
ACT National Norm Percentiles associated with test scores are used in the file. Previously,
some percentiles had been loaded as test scores in SOATEST. Those test score field
name values have been removed from SRATPFD for the Tape Code of
ACT. New ACT
national norm percentiles are loaded as the true percentiles associated with the test
scores. Also, some test scores had no percentiles loaded as test scores or other data.
Those test scores now include the associated ACT national norm percentiles.
Note: The test score field names that are no longer used have not been
removed from STVTPFD. However, now percentiles are loaded instead of
test scores, based on the ACT fields that have been added to SRATPFD.
ACT Race Fields not
Loaded to Banner
Position on
Incoming File User Accommodation
Prefer Not to Respond Position 614
No data load to Banner
implies not reported or no
response.
Add RACE6 to SRATPFD
and create conversion value
for “No Response” if your
institution requires this
information.
Multiracial Position 615
ACT may report a single
value for Multiracial in
position 615 for converted
records only.
Add RACE7 to SRATPFD
and create conversion value
for “Multiracial” if your
institution requires this
information.
590
Banner Student User Guide | Recruiting
Conversion scripts are not provided to convert the old test scores (that
represented percentiles on SOATEST) to the new percentiles.
The following table shows the current ACT test score field names used on SRATPFD, the
obsolete test score field names that are no longer loaded to Banner, and the new ACT
National Norm Percentile field names on SRATPFD that are used instead.
The following table compares the overall values and the file positions. It shows the:
• current ACT test score field names on SRATPFD
• new ACT percentile field names on SRATPFD
• obsolete test score field names no longer loaded to Banner and replaced by the new
percentile field names
• percentile type
ACT Test Score
Field Name
Obsolete Test Score
Field Name
ACT Percentile
Field Name
A07_TEST_SCORE NEW_TEST_SCORE A07_NATIONAL_NORM
SWR_TEST_SCORE NWR_TEST_SCORE NWR_NATIONAL_NORM
SUM_TEST_SCORE NUM_TEST_SCORE NUM_NATIONAL_NORM
SRH_TEST_SCORE NRH_TEST_SCORE NRH_NATIONAL_NORM
SEA_TEST_SCORE NEA_TEST_SCORE NEA_NATIONAL_NORM
SAG_TEST_SCORE NAG_TEST_SCORE NAG_NATIONAL_NORM
SGT_TEST_SCORE NGT_TEST_SCORE NGT_NATIONAL_NORM
SSS_TEST_SCORE NSS_TEST_SCORE NSS_NATIONAL_NORM
SAL_TEST_SCORE NAL_TEST_SCORE NAL_NATIONAL_NORM
Current Test Scores From To New Percentiles From To
Obsolete Test
Scores
Percentile
Type
Not previously loaded No previous
percentile
representation
A01_TEST_SCORE 261 262 A01_NATIONAL_NORM 773 774 No score
previously
loaded
ANN
A02_TEST_SCORE 263 264 A02_NATIONAL_NORM 775 776 No score
previously
loaded
ANN
A03_TEST_SCORE 265 266 A03_NATIONAL_NORM 777 778 No score
previously
loaded
ANN

591
Banner Student User Guide | Recruiting
SRTLOAD loads these percentiles and the corresponding ACT National Norm Percentile
fields for the STVTPST code of
ANN.
A04_TEST_SCORE 267 268 A04_NATIONAL_NORM 779 780 No score
previously
loaded
ANN
A05_TEST_SCORE 269 270 A05_NATIONAL_NORM 781 782 No score
previously
loaded
ANN
A06_TEST_SCORE 272 274 N/A N/A N/A N/A N/A
New National Norm
Percentiles
Test score fields
no longer
loaded -
replaced by
New National
Norm
Percentiles
A07_TEST_SCORE 163 164 A07_NATIONAL_NORM 167 168 NEW_TEST_
SCORE
ANN
SWR_TEST_SCORE 165 166 NWR_NATIONAL_NORM 169 170 NWR_TEST_
SCORE
ANN
SUM_TEST_SCORE 320 321 NUM_NATIONAL_NORM 334 335 NUM_TEST_
SCORE
ANN
SRH_TEST_SCORE 322 323 NRH_NATIONAL_NORM 336 337 NRH_TEST_
SCORE
ANN
SEA_TEST_SCORE 324 325 NEA_NATIONAL_NORM 338 339 NEA_TEST_
SCORE
ANN
SAG_TEST_SCORE 326 327 NAG_NATIONAL_NORM 340 341 NAG_TEST_
SCORE
ANN
SGT_TEST_SCORE 328 329 NGT_NATIONAL_NORM 342 343 NGT_TEST_
SCORE
ANN
SSS_TEST_SCORE 330 331 NSS_NATIONAL_NORM 344 345 NSS_TEST_
SCORE
ANN
SAL_TEST_SCORE 332 333 NAL_NATIONAL_NORM 346 347 NAL_TEST_
SCORE
ANN
ACT SRATPFD National
Norm Percentile Codes
Corresponding ACT
SRATPFD Test Score Fields
Associated
STVTPST Code
A01_NATIONAL_NORM A01_TEST_SCORE ANN
A02_NATIONAL_NORM A02_TEST_SCORE ANN
A03_NATIONAL_NORM A03_TEST_SCORE ANN
Current Test Scores From To New Percentiles From To
Obsolete Test
Scores
Percentile
Type

592
Banner Student User Guide | Recruiting
Field name values have been added to the Tape Field Names Validation Form (STVTPFD)
for use with the ACT file.
A04_NATIONAL_NORM A04_TEST_SCORE ANN
A05_NATIONAL_NORM A05_TEST_SCORE ANN
A07_NATIONAL_NORM A07_TEST_SCORE ANN
NWR_NATIONAL_NORM SWR_TEST_SCORE ANN
NUM_NATIONAL_NORM SUM_TEST_SCORE ANN
NRH_NATIONAL_NORM SRH_TEST_SCORE ANN
NEA_NATIONAL_NORM SEA_TEST_SCORE ANN
NAG_NATIONAL_NORM SAG_TEST_SCORE ANN
NGT_NATIONAL_NORM SGT_TEST_SCORE ANN
NSS_NATIONAL_NORM SSS_TEST_SCORE ANN
NAL_NATIONAL_NORM SAL_TEST_SCORE ANN
Field Name Description System Required
TELE_TYPE_CODE Telephone Type Code Yes
A01_NATIONAL_NORM ACT English National Norm Yes
A02_NATIONAL_NORM ACT Math National Norm Yes
A03_NATIONAL_NORM ACT Reading National Norm Yes
A04_NATIONAL_NORM ACT Science National Norm Yes
A05_NATIONAL_NORM ACT Composite National Norm Yes
A07_NATIONAL_NORM ACT Combined English/Writing
National Norm
Yes
NWR_NATIONAL_NORM ACT Writing National Norm Yes
NUM_NATIONAL_NORM ACT Usage/Mech National Norm Yes
NRH_NATIONAL_NORM ACT Rhetorical Skills National Norm Yes
NEA_NATIONAL_NORM ACT Elem Algebra National Norm Yes
NAG_NATIONAL_NORM ACT Alg/Coord Geom National Norm Yes
NGT_NATIONAL_NORM ACT Plane Geom/Trig National Norm Yes
NSS_NATIONAL_NORM ACT Soc Stud/Sci National Norm Yes
NAL_NATIONAL_NORM ACT Arts/Lit National Norm Yes
ACT SRATPFD National
Norm Percentile Codes
Corresponding ACT
SRATPFD Test Score Fields
Associated
STVTPST Code

593
Banner Student User Guide | Recruiting
Field names have been updated on the Tape Field Position Rule Form (SRATPFD) for the
Tape Code value
ACT. The start and end positions have been changed.
The following field name value has been removed for the Tape Code value
ACT.
Note: The STREET_LINE1 field name has been expanded to use
positions 45-84 and can accommodate the entire street address on one
line. STREET_LINE2 is no longer used.
Percentile field names have been added that replace existing test score field names. The
values are loaded as percentiles.
Field name values have been added for the Tape Code value
ACT.
Field Name Old Start Old End New Start New End
RELG_CODE 468 468 606 607
STREET_LINE1 45 74 45 84
Field Name Start Position End Position Occurrence
STREET_LINE2 75 84 1
Old Field Name New Field Name
Start
Position End Position
NEW_TEST_SCORE A07_NATIONAL_NORM 167 168
NWR_TEST_SCORE NWR_NATIONAL_NORM 169 170
NUM_TEST_SCORE NUM_NATIONAL_NORM 334 335
NRH_TEST_SCORE NRH_NATIONAL_NORM 336 337
NEA_TEST_SCORE NEA_NATIONAL_NORM 338 339
NAG_TEST_SCORE NAG_NATIONAL_NORM 340 341
NGT_TEST_SCORE NGT_NATIONAL_NORM 342 343
NSS_TEST_SCORE NSS_NATIONAL_NORM 344 345
NAL_TEST_SCORE NAL_NATIONAL_NORM 346 347
Field Name Start Position End Position Occurrence
HISP_IND 608 608 1
TELE_TYPE_CODE 100 100 1

594
Banner Student User Guide | Recruiting
The ANN test score percentile code has been added to the Test Score Percentile Type
Validation Form (STVTSPT for use with the ACT file.
2011 ACT File Format
The ACT file defines positions 85–86 as Country Code. Response values can be found on
the Country Code List:
http://www.act.org/aap/infosys/pdf/
CountryCodeList.pdf
. Please refer to the ACT Website for the Country Code
crosswalk values used to update SOTCNVT for the Interface Type of
ACT.
Canadian records are denoted by
CA in the Country Code field (positions 85–86). The
two-character State Code field (positions 144–145) will no longer use a value for Canada
(formerly
CN).
A field name value has been added to the SRATPFD layout for the Tape Code value
ACT.
2015 ACT File Format
This section discusses updates to ACT Electronic Student Record test score regulatory
reporting for September 2015 - August 2016. Details can be found at the following site:
RACE1 609 609 1
RACE2 610 610 1
RACE3 611 611 1
RACE4 612 612 1
RACE5 613 613 1
A01_NATIONAL_NORM 773 774 1
A02_NATIONAL_NORM 775 776 1
A03_NATIONAL_NORM 777 778 1
A04_NATIONAL_NORM 779 780 1
A05_NATIONAL_NORM 781 782 1
Code Description System Required
ANN ACT National Norm
Cumulative Percent
Yes
Field Name Start Position End Position Occurrence
NATION_CODE85861
Field Name Start Position End Position Occurrence

595
Banner Student User Guide | Recruiting
http://www.act.org/aap/infosys/recordinfo.html
A layout has been created which allows users to process current and new ACT files during
the transition period. The layout code used with this is ACT15.
Updates include:
• ACT ID
• Test scores
• Tape load code
• Electronic prospect code
• Tape field names
• File layout
Use of Layout Code versus Prospect Code
When the Electronic Prospect Load (SRTLOAD) is run for the current ACT layout, set the
Electronic Prospect Code parameter to
ACT. The value of ACT is inserted into the
Prospect Code field on the Electronic Prospect Inquiry Form (SRIPREL).
To run SRTLOAD for the updated ACT layout, set the Electronic Prospect Code parameter
to
ACT15. The value of ACT is inserted into the Prospect Code field on the Electronic
Prospect Inquiry Form (SRIPREL).
When running the Electronic Prospect Match (SRRSRIN), the Migrate Electronic
Prospects Process (SRRPREL), or the Electronic Prospect Purge (SRTPURG), set the
Electronic Prospect Code parameter to
ACT.
Use of prospect codes on SRAPRED
ACT15
If default values have been set up on SRAPRED for the ACT electronic prospect code,
you need to define values for the
ACT15 electronic prospect code.
When SRTLOAD is run for the ACT 2015-2016 test score cycle and
ACT15 is entered in
the Electronic Prospect Code parameter, only default values defined on SRAPRED for the
ACT15 electronic prospect code will be used by the process.
Any existing default values for the
ACT electronic prospect code will not be used, and the
process may load other default values from validation tables that you are not expecting to
be used.
ACT
If default values have been set up on SRAPRED for the ACT electronic prospect code,
and SRTLOAD is run for the ACT 2015-2016 test score cycle with
ACT entered in the

596
Banner Student User Guide | Recruiting
Electronic Prospect Code parameter, the existing default values on SRAPRED will be
used by the process.
ACT ID
ACT is delivering an ACT ID in the file layout for use instead of the SSN.
The SRTLOAD process loads the additional ID with a default additional ID type code of
EPID. The Additional ID Type Code value of EPID, with the description of
Electronic Prospect ID, is used on the Additional Identification Type Validation
Form (GTVADID. The default value of
EPID is used for the additional ID type code, and
the additional ID type code is required to update the GORADID table in Banner General.
The ADDITIONAL_ID field name can be added to the file layouts for other tape codes on
SRATPFD. A unique additional ID will be loaded with a default value of
EPID, unless your
institution creates a new, unique value for the Additional ID Type Code field on GTVADID
and chooses to convert that code on SOTCNVT for use with each new file format.
Test Scores
Test scores and national norm values have been added to the ACT file layout and are
delivered as seed data on the Test Code Validation Form (STVTESC).
Writing Scores have been added for:
• Ideas and Analysis
• Development and Support
• Organization
• Language Use and Conventions
• Writing National Norms
• English Language Arts
• STEM Score
• STEM National Norms
Two indicators have been added for:
• Understanding Complex Text
• Progress Toward Career Readiness
Corresponding national norm values (percentiles) are still loaded as ANN for each test
type, unless your institution has entered a conversion value for the validation table name
TSPT on the Tape Code Conversion Form (SOTCNVT).
Note: In the table below, the Data Type of Y indicates the checkbox is
selected, and a numeric value is used.

597
Banner Student User Guide | Recruiting
Tape Load Code
A tape load code for ACT 2015 reporting is delivered for use on the Electronic Data File
and Tape Validation Form (STVTAPE).
Electronic Prospect Code
An electronic prospect code for ACT 2015 reporting is delivered for use on the Electronic
Prospect Validation Form (STVPREL).
The Interface Code value for the
ACT15 prospect code is delivered as Null. Make sure
to create an interface code for
ACT on the Interface Validation Form (STVINFC) that can
be selected on STVPREL.
Test
Code Description
Number
of
Positions
Data
Type
Minimum
Score
Maximum
Score
A08 Act Writing Subject Score 2 Y 01 36
A09 ACT Writing Ideas/Analysis 2 Y 02 12
A10 ACT Writing Dev/Support 2 Y 02 12
A11 ACT Writing Organization 2 Y 02 12
A12 ACT Writing Lang Use/Conv 2 Y 02 12
A13 English Language Arts Score 2 Y 01 36
A14 STEM Score 2 Y 01 36
UCT Understanding Complex Text
Ind
1Y02
PTC Progress Toward Career Ind 1 Y 0 3
Tape Code Description
ACT15 ACT 2015 Test Score File
Prospect
Code Description
Interface
Code
Tape
Code
Enter on
WEB
WEB
Page ID
ACT15 ACT15 Test Tape Null ACT15 No Null

598
Banner Student User Guide | Recruiting
Tape Field Names
Values have been added to the Tape Field Names Validation Form (STVTPFD) for use
with the delivered test score codes and national norms. These values are delivered as
seed data.
ACT File Layout
A set of test scores has been added to the end of the file in positions 791 - 821. An
updated file layout is delivered, as is a set of test scores. Seed data is delivered for the
Tape Field Position Rule Form (SRATPFD).
The SSN field in positions 91 - 99 has been changed to be ADDITIONAL_ID. SSNs are
no longer reported.
Field Name Description
A08_TEST_SCORE Act Writing Subject Score
A09_TEST_SCORE ACT Writing Ideas/Analysis
A10_TEST_SCORE ACT Writing Dev/Support
A11_TEST_SCORE ACT Writing Organization
A12_TEST_SCORE ACT Writing Lang Use/Conv
A13_TEST_SCORE English Language Arts Score
A14_TEST_SCORE STEM Score
A08_NATIONAL_NORM ACT Writing National Norms
A13_NATIONAL_NORM English Lang Arts Nat Norms
A14_NATIONAL_NORM STEM National Norms
UCT_TEST_SCORE Understanding Complex Text Ind
PTC_TEST_SCORE Progress Toward Career Ind
Field Name Start Position End Position Occurrence
A08_TEST_SCORE 791 792 1
A09_TEST_SCORE 796 797 1
A10_TEST_SCORE 798 799 1
A11_TEST_SCORE 800 801 1
A12_TEST_SCORE 802 803 1
A08_NATIONAL_NORM 804 805 1

599
Banner Student User Guide | Recruiting
2010 ACT EOS File Format
Electronic file characteristics for the ACT EOS Electronic Student Record 2010-2011 do
not include positional changes. However, the ACT is delivering the Race/Ethnicity value in
position 150 and the Intended College Major value in positions 181-183 with new and/or
different code values.
You will need to follow up with the ACT EOS for more information on code changes, new
codes, file layout, and delivery dates for the 2010-2011 reporting year. You can then
modify the rules on SOTCNVT appropriately for your ACT EOS interface type code for the
Validation Table Name of
ETHN and the Validation Table Name of MAJR. Changes to
your SOTCNVT rules will need to be coordinated with delivery and processing of the first
ACT EOS file of the 2010-2011 reporting year.
Details regarding the changes to the ACT EOS 2010-2011 for 2010-2011 can be found at
the following link:
[email protected] or through www.act.org/eos.
Note: Refer to FAQ #1-DJSK96 (ACT EOS Electronic Student Record
2010-2011) on the Customer Support Center for more information.
2011 ACT EOS File Format
The ACT EOS file includes a Country Code (NATION_CODE) and a Non-US Postal Code
(
NON_US_POSTAL_CODE).
The Canadian Postal Code has been removed from the layout for EOS_ACT, and a Non-
US Postal Code has been added in its place. The
CANADIAN_POSTAL_CODE value is
no longer used.
A field name value has been added to STVTPFD.
Field name values have been added to the SRATPFD layout for the Tape Code value
EOS_ACT.
A13_TEST_SCORE 806 807 1
A13_NATIONAL_NORM 808 809 1
A14_TEST_SCORE 813 814 1
A14_NATIONAL_NORM 815 816 1
UCT_TEST_SCORE 820 820 1
PTC_TEST_SCORE 821 821 1
Field Name Description System Required
NON_US_POSTAL_CODE Non U.S. Postal Code Yes
Field Name Start Position End Position Occurrence

600
Banner Student User Guide | Recruiting
Using Peterson Data Load
SRTLOAD can be used to load Peterson data, including home and mobile phone
numbers. When SRTLOAD is run for Peterson data load, the value in the Telephone Type
Code parameter should reflect the telephone type that is appropriate for a home phone.
However, SRTLOAD does allow for the use of multiple telephone type codes. SRATPFD
also allows for multiple occurrences of phone area code and phone number data.
Using SRTLOAD With Peterson Data Load
SRTLOAD accepts the entry of multiple telephone type codes and accommodates up to
nine telephone numbers on an incoming file. Multiple values can be entered in the
Telephone Type Code parameter.
• When SRTLOAD processes multiple phone codes, the telephone type code in the
Telephone Type Code parameter is specifically associated with the occurrence of the
telephone number on the incoming file.
• When a value is entered in the Telephone Type Code parameter, the value must be
preceded by the corresponding occurrence of the telephone number for the associated
tape code in SRATPFD.
SRTLOAD will not run to completion if the number of telephone type codes entered do not
match the occurrences of the phone number in SRATPFD. In this situation, the following
error will be displayed in the log file:
Parameter 16 Invalid Telephone Sequence Number
srtload terminated with error
0 lines written to /export/home/lparrish/jobsub/srtload_200590.lis
To load telephone numbers successfully, the Telephone Type Code parameter must
always be preceded by the occurrence number, even when a single telephone number
exists on the incoming file. In this case,
1 would be used. The number of occurrences of
the telephone type code must match the number of occurrences of the telephone numbers
in SRATPFD for the file being processed.
First and Second Occurrence of Phone Number
The primary phone number or the phone number associated with an address is
considered to be the first occurrence of the phone number when that phone number exists
and is loaded into Banner. For the Peterson file, that is the home phone value.
• Occurrence one is associated with the home phone value.
The telephone code preceded by a value of
1 for the Telephone Type Code parameter
will always only correspond to the home phone (such as
1MA).
Field Name Start Position End Position Occurrence
NATION_CODE 127 128 1
NON_US_POSTAL_CODE 132 149 1
601
Banner Student User Guide | Recruiting
• Occurrence two is associated with the mobile phone value.
The telephone code preceded by a value of
2 for the Telephone Type Code parameter
will always only correspond to the mobile phone (such as
2MO).
Note: The second phone number will not be visible on SRAPREL/
SRIPREL or GOAMTCH. It will not be used in common matching. It will
not be printed on the SRTLOAD output. However, the Control Page for
the report will show the second occurrence for the Telephone Type Code
parameter, if it is entered on GJAPTCL.
The order in which the codes are entered in the Telephone Type Code parameter is
associated with the occurrence of the telephone number in SRATPFD. The occurrences of
telephone type codes in the Telephone Type Code parameter must match the number of
occurrences of the
PHONE_AREA and PHONE_NUMBER Field Name values listed in
SRATPFD.
• When the Telephone Type Code parameter is set to 1PR, it will be associated with the
first occurrence of the home phone value that reflects occurrence one of
PHONE_AREA
and
PHONE_NUMBER in SRATPFD.
• When the Telephone Type Code parameter is set to 2MO, it will be associated with the
second occurrence of the mobile phone value that reflects occurrence two of
PHONE_AREA and PHONE_NUMBER in SRATPFD.
Note: If users prefer that one or both of the Peterson phone numbers not
be loaded to Banner for any reason, the associated fields and
occurrences can be removed from SRATPFD.
Saved Parameter Sets
All incoming files processed by SRTLOAD that include a telephone number will require the
value for the Telephone Type Code parameter to be preceded by an occurrence of the
telephone number on SRATPFD. (Currently, only Peterson provides more than a single
telephone code.) For all other files (except for Peterson) this will be 1. For example, when
a user attempts to enter only the code, such as MA, the following error message will be
displayed if the Telephone Type Code parameter value is not preceded by the occurrence:
ERROR: Parameter value failed STVTELE_EQUAL_2345 validation.
If saved rule settings exist for SRTLOAD and the Telephone Type Code parameter, the
delivered
suppdft1.sql script can be used to modify the existing telephone type code
to be preceded by 1. (As SRTLOAD previously only accommodated a single entry for the
telephone type code, that value will always be
1.) Saved rule settings can be found in the
GJRJPRM and GJBPRUN tables.
Job Submission Navigation Tips for Multiple Telephone Type Codes
When processing files with multiple occurrences for telephone numbers in SRATPFD, do
the following for SRTLOAD in job submission (GJAPCTL), to enter parameter values for
the multiple occurrences.

602
Banner Student User Guide | Recruiting
1. Navigate to the Telephone Type Code parameter (number 16) in the Parameter
Values block.
2. Enter the code for home phone,
1MA.
3. Perform an Insert Record function and then a Duplicate Record function.
This creates a second row for Parameter 16. The added parameter will still display the
1MA value.
4. Change the parameter value to the code for mobile phone,
2MO.
5. Save your changes.
2010 Peterson File Format
Significant positional changes have been made to the 2010 file. The file uses eight
additional interest codes (numbered 7 - 14) from SRATPFD and STVTPFD. The
NATION_CODE field name is also included in the file to Address: Country Code item.
You will need to update the Tape Code Conversion Form (SOTCNVT) appropriately.
Please contact Peterson directly for details regarding the Peterson Fixed File Data
Dictionary and/or Peterson Codes for translation on SOTCNVT.
2010 GRE File Format
The GRE record layout has been updated and a provision added for the future release of
the GRE revised General Test. A copy of the 2010-2011 GRE Optional Score Reporting
Record Layout is available at:
www.ets.org/gre/2010recordlayout.
The overall length of the GRE Optional Score Reporting Record Layout has been
increased from 500 to 600 characters. The location of each field after position 70 has been
modified. The Tape Field Position Rule Form (SRATPFD) has been updated to
accommodate these field position changes for field names with a Tape Code value of
GRE. A script is delivered to update the rows on SRATPFD.
Additional Fields
The following fields have been added to the record layout. Associated updates have been
made to SRATPFD as needed.
• Intended Graduate Major Field Code
This field name will not be added to SRATPFD at this time, since this value will be
Null
until Fall 2011. In Fall 2011, the
MAJR_CODE field name start and end positions (37-40)
can be changed to use the positions for the Intended Graduate Major Field Code field
(71-74). The
MAJR_CODE2 field name can also be added for positions 37-40, once
both majors are being reported.
• Intended Graduate Major Field Name
This field name is not used. Only the Major Field Code is used.

603
Banner Student User Guide | Recruiting
• Examinee's ISO Country Code
The
NATION_CODE field name (positions 329-331) has been added to SRATPFD. The
NATION_NAME field name is no longer used and has been removed from SRATPFD.
Note: You will need to build a crosswalk rule on the Tape Code
Conversion Form (SOTCNVT) for the specific ISO Country Code listing
used by the GRE. Refer to the ETS website for their ISO Country Code
list.
http://www.ets.org/Media/Tests/GRE/pdf/
gre_0910_online_bulletin.pdf
• Examinee's Telephone Number
This is a free-format field that is 20 characters in length. Field names for
PHONE_AREA
(positions 345-347) and
PHONE_NUMBER (positions 348-354) have been added to
SRATPFD.
• Examinee's E-mail Address
The
EMAIL_ADDR field name has been added to SRATPFD in positions 365-409.
Field name values have been added to SRATPFD for the Tape Code value
GRE.
Values have been added to STVTPFD for use with the GRE file.
Field Name Start Position End Position Occurrence
EMAIL_ADDR 365 409 1
NATION_CODE 329 331 1
PHONE_AREA 345 347 1
PHONE_NUMBER 348 354 1
PHONE_COMMENT 355 364 1
STREET_LINE3 226 257 1
Field Name Description System Required
PHONE_COMMENT Phone Comment for GRE Yes
STREET_LINE3 Street Address Line 3 Yes
604
Banner Student User Guide | Recruiting
Modified Fields
The following fields have been modified on the record layout. Associated changes have
been made to SRATPFD.
• Examinee's Street Address
Previously the Examinee's Street Address field used two 45-character fields. Now it
uses three 32-character fields. The field names on SRATPFD are
STREET_LINE1
(positions 162-193),
STREET_LINE2 (positions 194-225), STREET_LINE3
(positions 226-257).
STREET_LINE3 is loaded to SRTADDR and then pushed to SPRADDR by SRKPREL.
• The Social Security Number (SSN) field has been truncated to report only the last four
digits. The last four digits of the SSN are not loaded to Banner for the following reasons:
• This value is not unique to the individual.
• This value is of limited use for common matching.
• This value is not provided with international records.
• This value is not equal to the SSN and is not loaded to the
SPBPERS_SSN column
in the SPBPERS table. It would prevent the update of the actual SSN if it existed in
the
SPBPERS_SSN column. SRKPREL does not update existing fields. The
package only updates Null fields.
• The SSN field name is no longer used and has been removed from SRATPFD.
Revised General Test Codes
Test codes for 03 Revised General Quantitative, Revised General Verbal, and Revised
General Writing have been added to the Test Code Validation Form (STVTESC) in
preparation for the GRE revised General Test and the associated scores and percentiles.
New GRE tests will be administered in Fall 2011.
Intended Graduate Major Field Code
The Intended Graduate Major Field Code field is used for 2010-2011 reporting. It is
optional. This field is the same as the existing Department Code List field that was used
Test
Code Description
Number of
Positions
Data
Type
Min
Score
Max
Score
System
Required
G03Q GRE Revised
General
Quantitative
3 Numeric 130 170 Yes
G03V GRE Revised
General Verbal
3 Numeric 130 170 Yes
G03W GRE Revised
General Writing
3 Numeric 0.0 6.0 Yes

605
Banner Student User Guide | Recruiting
for 2009-2010 reporting. The Department Code List field is used to capture the
department at the score recipient's institution where the applicant wants their scores sent.
It is optional. The Department Code List field (
MAJR_CODE field name in positions 37-40
in Banner) should be used until the revised General Test is delivered. It can be used to
report a major if one exists.
When the revised General Test is introduced in Fall 2011, applicants will be required to
respond to a question regarding their Intended Graduate Major. The data in the Intended
Graduate Major Field Code and the Department Code List fields may not always match,
but the fields should match in most cases. As the Department Code List field is not a
required field, data for that field may not be received from every score recipient.
Remember that not all students will take the revised General Test, so the Intended
Graduate Major may not be reported.
To capture the Intended Graduate Major (once GRE reports this information in Fall 2011),
you may change the
MAJR_CODE field name on SRATPFD to use positions 71-74 and
then discontinue the use of
MAJR_CODE in positions 37-40 for the Department List Code.
The
MAJR_CODE2 field name may then be added for positions 37-40, once both majors
are being reported.
You will need to review GRE major codes in the following file:
http://www.ets.org/
Media/Tests/GRE/pdf/gre_0910_online_bulletin.pdf
. You can then
review and update codes for conversion on SOTCNVT for Interface Type
GRE and
Validation Table Name
MAJR, when these changes take effect.
Examinee's ISO Country Code
For the Examinee's ISO Country Code field, the NATION_CODE field name (positions
329-331) is used on SRATPFD. The
NATION_NAME field name is no longer used and
has been removed from SRATPFD.
Previously, the Nation Name field was translated and loaded to the
STREET_LINE3
columns in the Banner temporary tables. Street Line 3 data has been added to the GRE as
part of the Examinee's Street Address field, so the Banner
STREET_LINE3 column is
required for potential address information.
You will need to review GRE nation codes in the following file:
http://
www.ets.org/Media/Tests/GRE/pdf/
gre_0910_online_bulletin.pdf
. You can then review and update codes for
conversion on SOTCNVT for Interface Type
GRE and Validation Table Name NATN.
Examinee's Telephone Number
The Examinee’s Telephone Number field is twenty characters in length and uses positions
345-364 for the area code, phone number, and phone comment information. It is optional,
numeric, and free format. The data is captured for the GRE as numbers. The GRE does
not provide a telephone type.
The Phone Comment field in the Electronic Prospect Details block of SRAPREL is used
for the comment information. This field is populated by the
SRTTELE_COMMENT column.

606
Banner Student User Guide | Recruiting
The GRE does not require that an examinee (either national or international) provide a
telephone number. If a telephone number is provided, the GRE does not indicate whether
the number is national or international. The country code and city code that precede an
international telephone number are also optional. Codes of
1 or 011 can be used.
The Electronic Prospect Load (SRTLOAD) loads the first ten characters as the phone area
code and phone number. If more than ten digits exist, all characters are loaded to the
SRTTELE_COMMENT column in the SRTTELE temporary table. The Phone Comment
field in the Electronic Prospect Details block of the Electronic Prospect Detail Form
(SRAPREL) is populated by the
SRTTELE_COMMENT column.
When SRTLOAD is run, a hierarchy value of “1” must be entered in the Telephone Type
Code parameter as a prefix to the telephone type code, in order to load the GRE
telephone number and type to Banner. For example, with the telephone type of
MA, the
prefix of
1 creates a value of 1MA. You may choose to create a new telephone type to load
GRE phone numbers using this parameter.
Note: When duplicate Examinee Names appear in the file, GRE
telephone numbers should always be identical.
Tips for Loading GRE Phone Numbers
Here are some suggestions for loading phone numbers.
• Review the GRE reported phone comments on SRAPREL, after running SRTLOAD.
• Create a unique telephone type code for GRE phone numbers, and use the code in the
Telephone Type parameter when SRTLOAD is run. This may assist with reviewing the
GRE phone numbers.
• Use the SRRSRIN process for matching incoming records. Records set to N (New) do
not have phone number data inserted or updated. SRRPREL logic can be used to load
the phone number information. This ensures that existing phone comments are loaded
to Banner.
• Contact the GRE for assistance in defining telephone data in the future, so it can be
loaded to Banner as appropriate.
Load Telephone Information
The GRE delivers an unformatted set of numbers up to 20 characters as the GRE phone
number in positions 345-364.
SRTLOAD loads the first ten positions as the area code and phone number as defined on
SRATPFD for the
PHONE_AREA (positions 345-347) and PHONE_NUMBER (positions
348-354) field names. The data is loaded to the
SRTTELE_PHONE_AREA and
SRTTELE_PHONE_NUMBER columns in the SRTTELE temporary table.
SRTLOAD also evaluates if a digit exists in position 355 for the
PHONE_COMMENT field
name (positions 355-364) on SRATPFD. If a digit exists in position 355, the entire GRE
phone number from positions 345-364 is loaded to the
SRTTELE_COMMENT column in
the SRTTELE temporary table. The phone number is preceded by the text GRE Phone

607
Banner Student User Guide | Recruiting
Reported. This provides a reference to the origin of the phone number. This is displayed in
the Phone Comment field on SRAPREL.
Note: The Phone Comment field in the file may not always contain 20
digits. However any digits that exist beyond the first ten will be collected
entirely as comments.
The SRKPREL package uses the value in the
SRTTELE_COMMENT column to populate
the
SPATELE_COMMENT column when the PHONE_AREA and PHONE_NUMBER field
name logic is set up to load the information to SPATELE. The telephone number is also
loaded to SPATELE in this case.
The insert and update logic in SRTLOAD and SRKPREL used to load area code or phone
number data has not been modified. Phone information is loaded based on the settings for
the phone and address rules on SAAERUL.
Match and Push Phone Information
This section discusses matching the telephone data and pushing it into Banner.
Manual Match for New ID with Manual Push
When the match is performed manually and the Create New button on the Common
Matching Entry Form (GOAMTCH) is selected, a new person record is created for the ID
when phone number data exists. Records will not include telephone comments, even if
they exist. (A Banner General package creates the telephone data on GOAMTCH using
Banner General tables, and no
TELEPHONE_COMMENT column exists for the update.)
When the manual push to Banner occurs through SRKPREL, if a new telephone number
is created, the associated comment from the SRTTELE table will also be carried through
the process. A new telephone number is not always created. The Banner General
package applies the address type and sequence number, and sets the record to
Primary if appropriate. When the data is pushed to Banner, SRKPREL checks whether
the same telephone type, telephone number, and address type exist. If they do, the record
is considered to be a duplicate, and the telephone number may not be pushed to Banner a
second time.
Manual Match for Selected ID with Manual Push
When the match is performed manually and the Select ID button on the Common
Matching Entry Form (GOAMTCH) is used for an existing record that is a match,
telephone records are not created.
When the manual push to Banner occurs through SRKPREL, if a new telephone number
is created, the associated comment from the SRTTELE table will also be carried through
the process.
Manual Match to Update ID with Manual Push
When the match is performed manually and the Update ID button on the Common
Matching Entry Form (GOAMTCH) is selected, telephone records may be created.

608
Banner Student User Guide | Recruiting
Records will not include telephone comments, even if they exist. (A Banner General
package creates the telephone data on GOAMTCH using Banner General tables, and no
TELEPHONE_COMMENT column exists for the update.)
When the manual push to Banner occurs through SRKPREL, if a new telephone number
is created, the associated comment from the SRTTELE table will also be carried through
the process.
Batch Process Match with Batch Push
When the match is performed using the Electronic Prospect Match (SRRSRIN), telephone
records are not created. When the push to Banner is performed using the Migrate
Electronic Prospects Process (SRRPREL), SRKPREL processes the data the same way
as the manual push process.
When the manual push to Banner occurs through SRKPREL, if a new telephone number
is created, the associated comment from the SRTTELE table will also be carried through
the process.
Batch Process Match with Manual Push
When the match is performed using the Electronic Prospect Match (SRRSRIN), and the
new records are pushed into Banner, SRKPREL processes the data, and telephone
records are created. New records can be queried on the Electronic Prospect Inquiry Form
(SRIPREL).
When the manual push to Banner occurs through SRKPREL, if a new telephone number
is created, the associated comment from the SRTTELE table will also be carried through
the process.
2011 GRE File Format
ETS is providing an Estimated Current Score for General Test (02) taken before August
2011 and reported as of November 2011 or later. These changes do not effect the
processing of 2010 scores. These changes prepare the process to accommodate the
Estimated Scores when the scores are delivered.
ETS is introducing the GRE revised General Test. Minor changes are being made to
GRE® Optional Score. The reporting record layout will be changed. The 2011-2012 record
layout will become effective on July 1, 2011. The new fields in the layout will not be
populated until scores for the GRE revised General Test are reported beginning in
November 2011.
The changes to the record layout include two Estimated Current Score fields (453-455 and
467-469). These fields have been added in areas of the layout that were previously fields
used as placeholders.
The changes to the record layout enable ETS to provide estimated Verbal Reasoning and
Quantitative Reasoning scores on the GRE revised General Test for individuals who took
the GRE General Test prior to August 1, 2011.
For individuals who take the GRE General Test prior to August 1, 2011, and report their
scores in November 2011 or later, the Estimated Current Score fields will contain the

609
Banner Student User Guide | Recruiting
estimated Verbal or Quantitative scores on the new score scale, based on the 130-170
score range in 1-point increments. The Scaled Score fields for these individuals will
contain the Verbal or Quantitative scaled scores originally reported, based on the 200-800
score range, in 10-point increments.
For individuals who take the GRE revised General Test on August 1, 2011, or later, the
Estimated Current Score fields will be blank, and the Scaled Score fields will contain their
Verbal or Quantitative scores based on the 130-170 score range in 1(one) point
increments.
The GRE 2010 files will continue to process with no errors. 2011 processing has been
modified to accommodate new test scores associated with the General (02) Test and the
Major Code field has had position changes. Prior to this change, the layout for 2010 files
collected the Major Code from positions 37-40. In most cases, the values in (old) positions
37-40 match the new Major Code positions 71-74 and convert similarly in SOTCNVT.
While processing 2010 files with this changed layout will collect the appropriate major
code. It is suggested that you complete your 2010 file processing to avoid any
discrepancies.
Test Scores
The following test scores have been added the Test Code Validation Form (STVTESC).
The following field name values have been added to the Tape Field Names Validation
Form (STVTPRD).
The MAJR_CODE field positions have been changed on the Tape Field Position Rule
Form (SRATPFD) from 37-40 to 71-74.
Note: In the most cases, the Department Code is now located in positions
37 - 40 will present the same value and convert from the same SOTCNVT
rules as Intended Major now located in positions 71-74.
Two fields are used on SRATPFD with the associated positions.
Test
Code
Test
Type Description
Number
of
Positions
Data
Type
Min
Score
Max
Score
G2QE GRE GRE Quantitative
Estimated Cur
3 checked 130 170
G2VE GRE GRE Verbal
Estimated Current
3 checked 130 170
Field Name Description
GRE_EST_CURR0 GRE Estimated Current 0
GRE_EST_CURR1 GRE Estimated Current 1

610
Banner Student User Guide | Recruiting
.
The Electronic Prospect Load (SRTLOAD) links the G2VE and G2QE test scores in
positions 453-455 and 467-469 to the GRE_EST_CURR0 and GRE_EST_CURR1 field
names when based on the Test Code 2.
Test Day
The Test Day for the GRE test score can be processed in positions 419 - 420. A oneup
number for the test day is used. The test scores and test days are initially loaded to
SOATEST.
The following test day field name value has been added to STVTPFD.
The following test day field name value has been added to SRATPFD.
The SRKPRE1 package verifies that the test score record is valid and can be loaded. The
process checks whether a test score currently exists for the same test code on the same
test date. If this is true, the record is not loaded. When the incoming score is different, but
is for the same test code the same test date, the record is loaded. When the test score is
valid and can be loaded, the SRKTES1 package is invoked.
The SRKTES1 package does the following:
• Checks whether or not a test score record exists for the same test date. If the record
exists for the test date, the process finds the next available day and inserts the test
score with that date.
• Checks the oneup number of the date, when the incoming test score is different but is
for the same test code on the same test date. The oneup value of the test day is
determined by the setting of the
LOADOLDTESTS rule label (Y or N) on SAAERUL.
2012 GMAT File Format
Here are the GMAT file regulatory changes for processing and file layout for the 2012-
2013 reporting year. For additional information regarding these changes, please go to:
Field Name
Start
Position
End
Position Occurrence
GRE_EST_CURR0 453 455 1
GRE_EST_CURR1 467 469 1
Field Name Description System Required
GRE_TEST_DAY GRE Test Day Y
Field Name Description
GRE_TEST_DAY GRE Test Day

611
Banner Student User Guide | Recruiting
http://www.gmac.com/gmac/thegmat/
nextgenerationgmatinfocenter/scoring.htm
• The Social Security number has been removed from the GMAT layout, as it is no longer
provided by GMAT for the prospect.
The SSN field name has been removed from SRATPFD for the Tape Code of
GMAT.
• A GMAT ID number (additional ID) has been added that is unique to the student.
An associated
ADDITONAL_ID field name is provided on STVTPFD and SRATPFD.
• Also, users can load additional IDs to the GORADID table.
•The
EPID additional ID type code is provided on GTVADID.
•The
LOADALTID rule is provided on SAAREUL.
• Next Generation GMAT Integrated Reasoning Test Scores are provided on STVTESC
and SRATPTS.
• G09 for GMAT Integrated Reasoning Score
• G10 for GMAT Integrated Reasoning Conv
Associated test score field names are provided on STVTPFD and SRATPFD.
• G09_TEST_SCORE
• G10_TEST_SCORE
• The Middle Name field (field name NAME_MI) has been extended from one position to
30 positions for the Tape Code of
GMAT.
• The State/Province field (field name STAT_CODE) has been extended from two
positions to seven positions for the Tape Code of
GMAT.
• The Citizenship Code (field name CITIZENSHIP) has been added for the Tape Code
of
GMAT.
GMAT Load Unique ID Number and Additional ID
GMAT provides a GMAT ID number that is unique to the test taker. This number will follow
the individual throughout his/her relationship with GMAC/GMAT. The
ADDITIONAL_ID
field name on SRATPFD for Tape Code of
GMAT is used for the GMAT ID number.
The SRTLOAD process loads the GMAT ID or additional ID with a default additional ID
type code of
EPID. (The Additional ID Type Code value of EPID, with the description of
Electronic Prospect ID, is used on the GTVADID form.) The default value of
EPID is used for the additional ID type code, because GMAT provides the GMAT ID
number or additional ID, and the additional ID type code is required to update the
GORADID table in Banner General.
The additional ID and additional ID type code are loaded to the
SRTIDEN_ADDITIONAL_ID and SRTIDEN_ADDITIONAL_ID_CODE fields on the
SRTIDEN temporary table. Additional ID Type and Additional ID fields on SRAPREL are
used to display those values for the individual when they exist. The value for the

612
Banner Student User Guide | Recruiting
ADDITIONAL_ID is also loaded to SPAIDEN in the Additional Identification block. The
GORADID Banner General table stores the additional ID information.
Note: GMAT is the only prospect file to confirm that the GMAT ID number
they provide is unique to the test taker. Therefore, GMAT is the only
baseline process to include the
ADDITIONAL_ID field in its layout on
SRATPFD as of April, 2012.
However, as more organizations commit to using a unique ID, the
ADDITIONAL_ID field name can be added to the file layouts for other
tape codes on SRATPFD. (As of September 2013, the SSS_SEARCH file
can also include the ADDITIONAL_ID field.)
When this occurs, a unique additional ID will be loaded with a default
value of
EPID, unless your institution creates a new, unique value for the
Additional ID Type Code field on GTVADID and chooses to convert that
code on SOTCNVT for use with each new file format.
In order to distinguish the origin of the GMAT ID or additional ID (or any
ADDITIONAL_ID rule defined on SRATPFD), it is suggested that users create a new,
unique value in the Additional ID Type Code field on GTVADID for
GMAT or any other
electronic prospect type. Your new GTVADID additional ID type code can then be
converted from the default value of
EPID on SOTCNVT, and you can associate or track
the GTVADID additional ID type code and additional ID with the prospect type, which in
this case is
GMAT.
It is important to remember that not all prospect organizations can guarantee that the ID
reported is unique during their relationship with an individual over time. This could lead to
a risk of having multiple additional IDs for an individual for a prospect type. Therefore, if
you do not create a new GTVADID additional ID type code to be converted from the value
of
EPID for each prospect type reported, the EPID value will be used across prospect
types. For this reason it is suggested you create and convert a GTVADID additional ID
type code for each prospect type that includes an
ADDITIONAL_ID record on
SRATPFD.
Note: SPAIDEN and/or GORADID allow for the entry of the same
additional ID type, as long as the additional ID is unique. When the
additional ID type and additional ID are pushed to Banner, this
functionality stays consistent with the form. It is recommended GMAT files
and/or any files that provide an additional ID be loaded with a unique
GTVADID additional ID type code.
Example Conversion Code Setup
1. Access GTVADID.
1.1. Enter an Additional ID Type Code value of
GMAT with a description of, for
example,
GMAT ID.
1.2. Save the changes.
2. Access SOTCNVT.

613
Banner Student User Guide | Recruiting
2.1. In the Key Block, select GMAT from the List of Values for the Interface Type
field.
2.2. Enter
ADID in the Validation Table Name field.
3. Go to the next block.
3.1. Enter
ADID in the Table Name field.
3.2. Enter
EPID in the Tape Value field.
3.3. Select
GMAT from the List of Values in the Conversion Code field.
The additional ID type selected from GTVADID for the conversion code will be converted
by SRTLOAD from the default value of
EPID and then be loaded to temporary fields in the
SRTIDEN table with the conversion value. The additional ID type and/or additional ID data
in SRTIDEN can then be viewed on SRAPREL. The converted additional ID type and/or
additional ID data can be pushed to production (GORADID table) and is then displayed in
the Additional Identification block of SPAIDEN. It is then clear that this GMAT additional ID
type originated with a prospect file of type
GMAT.
Note: If for any reason, your institution does not want an additional ID to
be loaded to Banner, the
ADDITIONAL_ID field name can be removed
from SRATPFD.
Also, should a unique identifier or additional ID be included on future files,
you can add the
ADDITIONAL_ID field name to SRATPDF at any time
for the appropriate tape code.
Run SRTLOAD with Additional ID
The SRTLOAD process loads the additional ID to the SRTIDEN_ADDITIONAL_ID
column and the default value of
EPID for the additional ID type code to the
SRTIDEN_ADDITIONAL_ID_CODE column.The process also checks for a conversion
of the default
EPID value on SOTCNVT. (SOTCNVT allows the conversion of the
additional ID type code,
GTVADID_CODE, default value of EPID to a user-defined code
for the Interface Type Code, such as
GMAT.) The conversion value for the additional ID
type code will be loaded to the SRTIDEN temporary table.
The Additional ID Type and Additional ID fields on SRAPREL display the data after
SRTLOAD has been run, so it can be viewed before it is pushed to Banner from the
temporary tables.
The SRKPREL package loads the data from the
SRTIDEN_ADDITIONAL_ID and
SRTIDEN_ADDITIONAL_ID_CODE columns to the GORADID_ADDITIONAL_ID
and
GORADID_ADID_CODE columns when that data exists.
The process also reads the
G09_TEST_SCORE and G10_TEST_SCORE field names
and loads the data to the SRTTESC temporary table.

614
Banner Student User Guide | Recruiting
Electronic Admissions Application Rule for Loading an Alternate ID
The LOADALTID rule label on SAAERUL for the Group Code of PREL is used with this
processing. The
LOADALTID rule has a description of Load Same Alt ID Type/
Diff ID
and a value of UPDATE ME, which is equal to N. The EDI and System
Required indicators are unchecked (set to
N). Before this rule is used, you need to
change
UPDATE ME to Y or N.
Note: The load and push of the additional ID uses the same functionality
as SPAIDEN.
The
LOADALTID rule provides flexibility with loading the new GMAT additional ID or any
future additional ID information. You can enter the same additional ID type on SPAIDEN
(in the Additional Identification block), as long as the additional ID is unique. This allows
the update or loading of other additional ID types with code
EPID, as long as the
associated additional ID is unique.
When the GMAT file and another prospect file are loaded, and both use the default
additional ID type code of
EPID, you cannot distinguish the origin of the value for the
ADDITIONAL_ID field name. If you need to track the origin, you can create a unique
additional ID type on GTVADID and then convert the
EPID code on SOTCNVT to your
selected GTVADID value for each electronic prospect type that uses an additional ID.
It is recommended that this practice be followed, as the GMAT file provides a unique
additional ID. (As of September 2013, the SSS_SEARCH file also may contain an
additional ID.) This will also prevent duplicate additional ID types using
EPID from being
loaded to your system and assist in verifying the origin of the additional ID. Keep this in
mind as you select the setting for the
LOADALTID rule.
When an additional ID is loaded to Banner, the process checks the
LOADALTID rule for a
setting of
Y or N. This rule provides the option to load or not load and incoming additional
ID when the same
GTVADID_CODE exists with a different associated additional ID.
The
LOADALTID rule processes data as follows:
• The additional ID type and additional ID are always loaded when the additional ID type
does not exist in the database, regardless of whether the rule is set to
Y or N.
• When the rule is set to Y, the additional ID type is loaded when the additional ID type is
the same, and the additional ID is different.
• When the rule is set to N, the additional ID type is loaded only if it does not exist for the
individual (even if the additional ID is different).
The SRKPREL package checks the setting of the
LOADALTID rule.
• When the rule is set to Y, SRKPREL loads the incoming additional ID for the same
additional ID type, as long as the additional ID is different.
• When the rule is set to N, SRKPREL does not load the incoming additional ID for the
same additional ID type.

615
Banner Student User Guide | Recruiting
Migrate Electronic Prospects with Additional ID
The SRRPREL process displays the additional ID on the report output in the detail for
each record. When the additional ID type and additional ID that are coming from the
prospect file are loaded and/or already exist in the database, the additional ID is displayed
for the individual on the report output, for example,
94998988.
When the additional ID type and additional ID that are coming from the prospect file are
not loaded and do not exist in the database, the additional ID is displayed for the individual
on the report output, followed by
-NL, for example, 34953099-NL.
Match Electronic Prospects with Additional ID
After the data is loaded, you can match on the additional ID as part of the electronic
prospect load and match process. The option to load an additional ID is important as the
use of the SSNs is discontinued by vendors and from outside source files, and unique
identifiers are provided for the records instead. The additional ID can now be included as
part of your matching process to assist with finding potential matches.
The SRAPREL and SRIPREL forms and the SSRSRIN process include fields for
Additional ID and Additional ID Type for matching. The SSRSRIN process passes the
data for the additional ID and additional ID type to the GOTCMME table during the
matching process, in order for those fields to be included as part of the matching rule
specified on the STVINFC form.
Banner Recruiter Integration
This section describes how to set up and use the Banner Recruiter Integration. The
integration uses Ellucian Recruiter, Banner Student, Banner Recruiter Integration
Manager (BRIM), and Banner Event Publisher (BEP).
Please refer to the following documentation for more information on using Recruiter
processing with this interface.
• Recruiter Release Highlights
• Recruiter Installation Procedures
• Payment Gateway Installation Procedures
• Guide to Using Recruiter
• Integrating Recruiter with Banner
• Recruiter Configuration
• Styling the Recruiter Website
Current Recruiter documentation can be found in content packs in the Recruiter
documentation library on the Ellucian Support Center.

616
Banner Student User Guide | Recruiting
Processing Summary
This functionality joins two systems and provides you with two-way Web Service
integration. This integration generates the flow of information between Banner and
Recruiter. This allows you to send data from Recruiter to Banner and from Banner to
Recruiter.
• Data for prospects, admissions applications, proposed decisions, activities (interests),
test scores, transcripts, activities, and academic programs can be sent from Recruiter to
Banner.
• Data for application status dates (accepted and enrolled), application status history,
Financial Aid, and communication history (supplemental and checklist items) can be
sent from Banner to Recruiter.
You can perform the following tasks:
• Extract validation table data from Banner and import the values into Recruiter to
maintain consistency across both systems.
• Extract a set of prospects and associated data from Banner and import those prospects
into Recruiter for processing.
• Send prospect information from Recruiter to Banner to create or update information
about prospects.
• Send applications from Recruiter to Banner for admissions processing.
• Create workflows in Recruiter to automate the interface.
• Associate academic programs from Recruiter with curriculum fields in Banner.
Send Prospects and Applications from Recruiter to Banner
You can send prospects and completed applications from Recruiter to Banner. You can
select specific prospects to send, or you can send all prospects. You can send prospects
to Banner as often as you choose to. You can select specific applications to send, you can
send all applications, or you can set up Recruiter to automatically send applications.
However, you can only send an application to Banner one time.
The information is sent to a Web Service that validates and transforms the data, applying
translations you have set up on the Tape Code Conversion Form (SOTCNVT) and rules
you have set up on the Electronic Admissions Application Rules Form (SAAERUL). That
information is then loaded into temporary tables, matched, and pushed into Banner. The
information from Recruiter includes unique identifiers that are saved in Banner to link the
person and the application across both systems.
When data is loaded into the temporary tables, the process checks to see if the Recruiter
ID is already saved in Banner. If it is, the Banner common matching process is skipped,
and the data is pushed into the permanent Banner tables. If the Recruiter ID does not
already exist in Banner, then the common matching rules are applied to see if a match can
be found, or if a new person should be created. The data is then pushed into the
permanent Banner tables. If you choose to manually match and push these records, set

617
Banner Student User Guide | Recruiting
the R2BPUSH rule on SAAERUL to prevent the match and push from being executed
automatically.
Note: Please refer to the Banner Common Matching Handbook for more
information on using common matching processing
How information is loaded depends on how rules on SAAERUL are defined. Information
on these rules can be found in the “Electronic admissions application rules” topic.
When a prospect is sent from Recruiter, the following information may be loaded to
Banner and viewed on the associated forms, depending on the SAAERUL rules.
• person information on SPAIDEN
• addresses on SPAIDEN
• phone numbers on SPAIDEN
• email addresses on GOAEMAL
• parent/guardian information SOAFOLK
• recruiting information on SRARECR
• interests and sources on SRARECR
• high schools attended on SOAHSCH
• prior colleges attended on SOAPCOL
When a completed application is sent from Recruiter, the following information may be
loaded to Banner and viewed on the associated forms, depending on the SAAERUL rules.
• application details on SAAADMS
• application decisions on SAADCRV
• nationality, visa, and passport information on GOAINTL
• person information on SPAIDEN
• addresses on SPAIDEN
• phone numbers on SPAIDEN
• email addresses on GOAEMAL
• parent/guardian information SOAFOLK
• interests and sources on SAAADMS
• high schools attended on SOAHSCH
• prior colleges attended on SOAPCOL
• recruiting information on SRARECR

618
Banner Student User Guide | Recruiting
Provision Recruiter with Banner Data
Data can be provisioned initially from Banner to Recruiter, to be used in the Recruiter
system. Two processes are used to provision data during implementation.
• The Recruiter Validation Provisioning Process (SRRRVAL) process provides Banner
validation table values to Recruiter so the Recruiter codes will match the Banner codes.
• The Recruiter Prospect Provisioning Process (SRRRPRO) process provides Banner
prospect demographic data (SRARECR) and other associated prospect data for
Recruiter.
SRRRVAL and SRRRPRO produce various
.csv files that can be used to load data into
Recruiter using the standard CRM2011 import process. These processes can be run after
the initial startup has taken place, if additional data needs to be passed from Banner to
Recruiter. They can also be run as needed for import to Recruiter. (The Recruiter import
process provides an option to allow duplicates or not.)
SRRRVAL extracts Banner high school and college institution data into a
.csv file, which
can then be imported into the Recruiter system. The
.csv file may be edited before it is
imported.
Provision Other Validation Data
Data from validation tables is provisioned through RESTful APIs with existing inbound and
outbound messages. These APIs are part of the Banner Integration Manager (BRIM).
Here is a list of the types of validation data provisioned from Banner to Recruiter by the
APIs:
• admission request checklist code (STVADMR) and contact type code (STVCTYP)
combined
• admission type code (STVADMT)
• admission application decision code (STVAPDC)
• building code (STVBLDG)
• campus code (STVCAMP)
• citizen type code (STVCITZ)
• disability type code (STVDISA)
• education goal code (STVEGOL)
• outside interests code (STVINTS)
• language code (STVLANG)
• level code (STVLEVL)
• marital status code (STVMRTL)
• religion code (STVRELG)

619
Banner Student User Guide | Recruiting
• source/background institution code (STVSBGI)
• student type code (STVSTYP)
• term code (STVTERM)
• visa type code (STVVTYP)
In addition, data can be provisioned for prefixes, suffixes, academic programs, and full-
time/part-time academic loads.
Send Information from Banner to Recruiter
Data is sent from Banner to Recruiter when certain information is entered in Banner.
Banner Event Publisher (BEP) is used monitor specific tables and fields for changes and
to pass data from Banner to Recruiter through a Web Service. Rules have been created in
BEP to monitor certain fields in Banner, and when information is entered into these fields,
messages may be sent to Recruiter. Application status history, application status dates,
and ID information are sent from Banner to Recruiter when Recruiter data is loaded into
Banner.
Event Rules that Support Recruiter Funnel Processing
Funnels are used in Recruiter to track prospects as they progress through significant
states towards the goal of enrollment at the institution. A prospect's progress through the
funnel is tracked in a set of dates, one for each stage in the funnel. The dates for the last
three stages in the funnel (admit, confirmed, and enrolled) are set based on Web Services
transactions coming from Banner into Recruiter.
BEP event rules are used to send these dates to Recruiter. (These BEP event rules are
described in more detail in the next section.) Since there is some variation in how
institutions may define these states, the BEP event rules support several different
definitions. You should select one event rule for each of the funnel state types, and the
selected events should typically occur in the following order.
1. admit date event
2. confirmed date event
3. enrolled date event
In order to avoid duplicate transactions, BEP keeps track of which dates have been sent to
Recruiter in the Recruiter Date-Based Events History Table (SRREHST). BEP will not sent
an admit date for an application if one has already been sent, nor will it send a confirmed
or enrolled date for a prospect if one has already been sent.
BEP will automatically ensure that no stages in the funnel are skipped. For example, if a
confirmed date is triggered before an admit date has been sent, BEP will send a
transaction to set the admit date before it sets the confirmed date. The admit date will be
set equal to the confirmed date.

620
Banner Student User Guide | Recruiting
Note: Because a prospect can have multiple applications, and the admit
date is stored on an application record in Recruiter, it may not always be
possible to send a missing admit date message when a confirmed date or
enrolled date event occurs. The process may not be able to identify the
application to which the admit date should be applied.
Here are the event rules used with the integration:
• RECRUITER_ERP_ID
• RECRUITER_APPLICATION_STATUS
• RECRUITER_ADMIT_DATE_INSTACCEPT
• RECRUITER_ADMIT_DATE_APPLACCEPT
• RECRUITER_CONFIRMED_DATE_REGISTERED
• RECRUITER_CONFIRMED_DATE_DECISIONCODE
• RECRUITER_CONFIRMED_DATE_DEPOSITPAID
• RECRUITER_ENROLLED_DATE_APPLACCEPT
• RECRUITER_ENROLLED_DATE_REGISTERED
• RECRUITER_ENROLLED_DATE_DECISIONCODE
ERP ID and Application Status Events
These two events should always be enabled for use with this processing.
RECRUITER_ERP_ID
This rule can be used to send a prospect's Banner ID and Enterprise Identifier to Recruiter
when the prospect's unique ID from Recruiter is inserted into the Recruiter ID Table
(SRBRCID) in Banner. The Enterprise Identifier and the ERP ID are stored in Recruiter on
the prospect record. The unique ID is saved in SRBRCID the first time a prospect's profile
or application is sent from Recruiter.
Note: The application GUID from Recruiter is stored in the Recruiter
Application ID Table (SRBRAID). There is no synchronization back to
Recruiter for this insert. The record is only deleted when the application is
deleted. Otherwise, the record will remain in the table, even if the
Recruiter prospect GUID is deleted from the SRBRCID table.
Data from the following fields may be included in the XML message sent to Recruiter.
Banner Recruiter
SRBRCID_RECRUITER_ID
Recruiter ID (Contact (GUID)

621
Banner Student User Guide | Recruiting
RECRUITER_APPLICATION_STATUS
This rule can be used to apply an application status in Recruiter. It will send the full set of
admissions decisions applied to an application to Recruiter any time one of the decisions
in Banner is inserted, changed, or deleted in the SARAPPD table. The application must
have a Recruiter application ID recorded in the SRBRAID table, indicating that the
application originated from Recruiter.
The decisions are displayed as Applicant Status in Recruiter on the prospect profile and
Application Statuses on the application. Each time the message is received in Recruiter, it
replaces the existing set of application statuses with the new set.
Application status codes and decision codes should be consistent between Recruiter and
Banner. Admissions application decisions can be viewed in Banner in the Decision Data
block on the Admissions Decision Form (SAADCRV).
Data from the following fields may be included in the XML message sent to Recruiter.
Admit Date Events
Two admit date events are provided. You should enable one and disable the other.
RECRUITER_ADMIT_DATE_INSTACCEPT
This rule can be used to apply an admit date in Recruiter. It will send the decision date to
Recruiter as the admit date when a decision is applied to an application (the decision is
inserted into the SARAPPD table), and that decision code has the Institution
Acceptance indicator checked in the Decision Data block on the Admissions Decision
Form (SAADCRV). The decision can be updated manually or can be sent from Recruiter.
GOBUMAP_UDC_ID
Enterprise Identifier
SPRIDEN_ID
ERP ID
Banner Recruiter
GOBUMAP_UDC_ID
Enterprise Identifier
SRBRCID_RECRUITER_ID
Recruiter ID (Contact GUID)
SRBRAID_RECRUITER_APPL_ID
Application ID (GUID)
SPRIDEN_ID
ERP ID
SARAPPD_APDC_CODE
Status Type (Decision)
SARAPPD_APDC_DATE
Date
Banner Recruiter
622
Banner Student User Guide | Recruiting
The application must have a Recruiter application ID recorded in the SRBRAID table,
which indicates that it originated from Recruiter. The date sent will display as the Admit
Date on the prospect profile in Recruiter.
Before the admit date message is sent for the event, the process checks the SRREHST
table to see if the message has already been sent for the prospect, term, and application
ID. If one has not been sent, it is sent at this time. If it has already been sent, the new
message is not sent.
Note: If this rule is enabled, the RECRUITER_ADMIT_DATE_
APPLACCEPT rule should be disabled.
Data from the following fields may be included in the XML message sent to Recruiter.
RECRUITER_ADMIT_DATE_APPLACCEPT
This rule can be used to apply an admit date in Recruiter. It will send the decision date to
Recruiter as the admit date when a decision is applied to an application (the decision is
inserted into the SARAPPD table), and that decision code has the Applicant Acceptance
indicator checked in the Decision Data block on the Admissions Decision Form
(SAADCRV). The decision can be updated manually or can be sent from Recruiter.
The application must have a Recruiter application ID recorded in the SRBRAID table,
which indicates that it originated from Recruiter. The date sent will display as the Admit
Date on the prospect profile in Recruiter.
Before the admit date message is sent for the event, the process checks the SRREHST
table to see if the message has already been sent for the prospect, term, and application
ID. If one has not been sent, it is sent at this time. If it has already been sent, the new
message is not sent.
Note: If the RECRUITER_ADMIT_DATE_INSTACCEPT rule is enabled,
this rule should be disabled.
It is also recommended that the admit and enrolled date events be
coordinated. This rule should not be used if the
Banner Recruiter
GOBUMAP_UDC_ID
Enterprise Identifier
SRBRCID_RECRUITER_ID
Recruiter ID (Contact GUID)
SRBRAID_RECRUITER_APPL_ID
Application ID (GUID)
SPRIDEN_ID
ERP ID
Application Status message value is
Accepted
SARAPPD_APDC_DATE
Admit Date

623
Banner Student User Guide | Recruiting
RECRUITER_ENROLLED_DATE_APPLACCEPT rule is enabled to send
the admit date to Recruiter.
Data from the following fields may be included in the XML message sent to Recruiter.
Confirmed Date Events
Three confirmed date events are provided. You should enable one and disable the other
two.
Note: If you do not track confirmed events, you can disable all three event
rules. This should result in the confirmed date messages being sent
automatically when the enrolled date events occur. The confirmed dates
will match the enrolled dates in this situation.
RECRUITER_CONFIRMED_DATE_REGISTERED
This rule can be used to apply a confirmed date in Recruiter. It will send the registration
date to Recruiter as the confirmed date when a prospect first registers for a course (the
course registration record is inserted into the SFRSTCR table), in a term that matches the
term on an application that originated from Recruiter. While the confirmed date is not
associated with a specific application in Recruiter, the existence of an application from
Recruiter is important in determining if the registration event is relevant to Recruiter. The
rule also checks to see that the course counts in enrollment in Banner (STVRSTS).
Before the confirmed date message is sent for the event, an attempt is made to check the
SRREHST table for a previous admit date message. This can only be checked if the
prospect has one application from Recruiter for the term. If an admit message has not
been sent, and only one Recruiter application exists for the term, an admit message will
be constructed and sent using the registration date as the admit date. SRREHST is then
checked to determine if a confirmed date message has already been successfully sent for
the prospect. If one has not been sent, this new message is sent.
Note: If this rule is enabled, the other CONFIRMED_DATE rules should
be disabled.
Banner Recruiter
GOBUMAP_UDC_ID
Enterprise Identifier
SRBRCID_RECRUITER_ID
Recruiter ID (Contact GUID)
SRBRAID_RECRUITER_APPL_ID
Application ID (GUID)
SPRIDEN_ID
ERP ID
Application Status message value is
Accepted
SARAPPD_APDC_DATE
Admit Date

624
Banner Student User Guide | Recruiting
Data from the following fields may be included in the XML message sent to Recruiter.
RECRUITER_CONFIRMED_DATE_DECISIONCODE
This rule can be used to apply a confirmed date in Recruiter. It will send the decision date
to Recruiter as the confirmed date when a decision code is applied to an application. (The
record is inserted into the SARAPPD table.) The rule allows you to designate a specific
decision code that indicates a prospect has confirmed his/her interest in attending the
institution. You must identify that decision code in the BEP rule and the integration
configuration file. This rule verifies that the decision code entered is the one specified in
the BEP rule and the configuration file, and that the application originated from Recruiter.
Before the confirmed date message is sent for the event, the SRREHST table is checked
to determine if an admit date message was sent for this application for the prospect. If an
admit message has not already been sent, an admit message will be constructed and sent
using the decision date as the admit date. SRREHST is then checked to determine if a
confirmed date message has already been successfully sent for the prospect. If one has
not been sent, this new message is sent.
Note: If this rule is enabled, the other CONFIRMED_DATE rules should
be disabled.
Data from the following fields may be included in the XML message sent to Recruiter.
Banner Recruiter
GOBUMAP_UDC_ID
Enterprise Identifier
SPRIDEN_ID (where
SPRIDEN_CHANGE_IND is Null
)
ERP ID
SRBRCID_RECRUITER_ID
Recruiter ID (Contact GUID)
Application Status message value is
Confirmed
SFRSTCR_RSTS_DATE
Date
Banner Recruiter
GOBUMAP_UDC_ID
Enterprise Identifier
SPRIDEN_ID (where
SPRIDEN_CHANGE_IND is Null
)
ERP ID
SRBRCID_RECRUITER_ID
Recruiter ID (Contact GUID)
Application Status message value is
Confirmed
SARAPPD_APDC_DATE
Date

625
Banner Student User Guide | Recruiting
Configure the RECRUITER_CONFIRMED_DATE_DECISIONCODE Event
This rule must be configured in BEP before it is used. The Banner decision code value
must be specified in BEP for the event and also in the
r2b_configuration.groovy
file. It must be a valid code from STVAPDC.
Complete the following steps to configure this event. Refer to the Integrating Recruiter
with Banner manual for more information.
Use these steps to set up the decision code in BEP.
1. Access the Events page.
2. Select the RECRUITER_CONFIRMED_DATE_DECISIONCODE event.
3. Click Open.
4. On the Publish Rules page, select the SRBRAID_RECRUITER_APPL_ID row.
5. Click Open.
6. View the rule details.
7. Click on the Edit button to open the Edit Publish Rule window.
8. Enter the decision code in the User Defined Condition field.
Use single quotes, such as ‘XX’.
For example, if your decision code is
22, the entry would be:
SARAPPD_APDC_CODE IN (‘22’)
9. Click Save.
10. On the Events page, confirm the status of the CONFIRMED_DATE events.
• The RECRUITER_CONFIRMED_DATE_DECISIONCODE event should be
enabled. (Enabled is set to
true.)
• The RECRUITER_CONFIRMED_DATE_DEPOSITPAID and
RECRUITER_CONFIRMED_DATE_REGISTERED events should not be enabled.
(Enabled is set to
false.)
11. Access the Administration page.
12. Click Activate Changes.
Use these steps to edit the
r2b_configuration.groovy file.
1. Access the
r2b_configuration.groovy file on your WebLogic server.
2. Update the
confirmed.date.decision.code entry to match the decision
code value entered in step 8.
RECRUITER_CONFIRMED_DATE_DEPOSITPAID
This rule can be used to apply a confirmed date in Recruiter for the prospect. It will send
the deposit entry date to Recruiter as the confirmed date when a prospect pays a deposit
of a certain type (the deposit record is inserted into the Deposit Table (TBRDEPO) in
Banner Accounts Receivable), in a term that matches the term on an application that
originated from Recruiter. While the confirmed date is not associated with a specific

626
Banner Student User Guide | Recruiting
application in Recruiter, the existence of an application from Recruiter is important in
determining if the deposit event is relevant to Recruiter.
The rule allows you to designate a specific deposit detail code to indicate a prospect has
confirmed his/her interest in attending the institution. You must identify that code in the
BEP rule and the integration configuration file. You may also set a minimum deposit
amount in the configuration file.
The rule verifies that the deposit detail code entered is the one specified in the BEP rule
and the configuration file, that the deposit amount equals or exceeds the minimum
amount, and that the application originated from Recruiter.
Before the confirmed date message is sent for the event, an attempt is made to check the
SRREHST table for a previous admit date message. This can only be checked if the
prospect has one application from Recruiter for the term. If an admit message has not
been sent, and only one Recruiter application exists for the term, an admit message will
be constructed and sent using the registration date as the admit date. SRREHST is then
checked to determine if a confirmed date message has already been successfully sent for
the prospect. If one has not been sent, this new message is sent.
Note: If this rule is enabled, the other CONFIRMED_DATE rules should
be disabled.
Data from the following fields may be included in the XML message sent to Recruiter.
Configure the RECRUITER_CONFIRMED_DATE_DEPOSITPAID Event
This rule must be configured in BEP before it is used. The Banner deposit detail code
value must be specified in BEP for the event and also in the
r2b_configuration.groovy file. It must be a valid code from TGADEPC/
TBBDEPC.
Complete the following steps to configure this event. Refer to the Integrating Recruiter
with Banner manual for more information.
Use these steps to set up the deposit detail code in BEP.
1. Access the Events page.
2. Select the RECRUITER_CONFIRMED_DATE_DEPOSITPAID event.
Banner Recruiter
GOBUMAP_UDC_ID
Enterprise Identifier
SPRIDEN_ID
ERP ID
SRBRCID_RECRUITER_ID
Recruiter ID (Contact GUID)
Application Status message status is
Confirmed
TBRDEPO_ENTRY_DATE
Date

627
Banner Student User Guide | Recruiting
3. Click Open.
4. On the Publish Rules page, select the SRBRAID_RECRUITER_APPL_ID row.
5. Click Open.
6. View the rule details.
7. Click on the Edit button to open the Edit Publish Rule window.
8. Enter the deposit detail code in the User Defined Condition field.
Use single quotes, such as ‘XXXX’.
For example, if your deposit detail code is
TDEP, the entry would be:
TBRDEPO_DETAIL_CODE_DEPOSIT IN (‘TDEP’)
9. Click Save.
10. On the Events page, confirm the status of the CONFIRMED_DATE events.
• The RECRUITER_CONFIRMED_DATE_DEPOSITPAID event should be enabled.
(Enabled is set to
true.)
• The RECRUITER_CONFIRMED_DATE_DECISIONCODE and
RECRUITER_CONFIRMED_DATE_REGISTERED events should not be enabled.
(Enabled is set to
false.)
11. Access the Administration page.
12. Click Activate Changes.
Use these steps to edit the
r2b_configuration.groovy file.
1. Access the
r2b_configuration.groovy file on your WebLogic server.
2. Update the
deposit.detail.code entry to match the deposit detail code value
entered in step 8.
3. Update the
deposit.minimum.amount entry if the deposit must be for at least a
minimum amount. (It is set to
0.00 by default.)
Enrolled Date Events
Three enrolled date events are provided. You should enable one and disable the other
two.
RECRUITER_ENROLLED_DATE_APPLACCEPT
This rule can be used to apply an enrolled date for a prospect in Recruiter. It will send the
decision date to Recruiter as the enrolled date when a decision is applied to an application
(the decision is inserted into the SARAPPD table), and that decision code has the
Applicant Acceptance indicator checked in the Decision Data block on the Admissions
Decision Form (SAADCRV). The decision can be updated manually or can be sent from
Recruiter.

628
Banner Student User Guide | Recruiting
The application must have a Recruiter application ID recorded in the SRBRAID table,
which indicates it originated from Recruiter. The date sent will display as the Enrolled Date
on the prospect profile in Recruiter.
Before the enrolled date message is sent for the event, the SRREHST table is checked to
determine if an admit date message was sent for this application for the prospect. If an
admit message has not already been sent, an admit message will be constructed and sent
using the decision date as the admit date.
SRREHST is then checked to determine if a confirmed date message has already been
successfully sent for the prospect. If not, a confirmed date message will be constructed
and sent using the decision date as the confirmed date. Finally, SRREHST is checked to
determine if an enrolled date message has already been sent for the prospect. If one has
not been sent, this new enrolled date message is sent.
Note: If this rule is enabled, the other ENROLLED_DATE rules should be
disabled.
It is also recommended that the admit and enrolled date events be
coordinated. This rule should not be used if the
RECRUITER_ADMIT_DATE_APPLACCEPT rule is enabled to send the
admit date to Recruiter.
Data from the following fields may be included in the XML message sent to Recruiter.
RECRUITER_ENROLLED_DATE_REGISTERED
This rule can be used to apply an enrolled date for the prospect in Recruiter. It will send
the registration date to Recruiter as the enrolled date when a prospect first registers for a
course (the course registration record is inserted into the SFRSTCR table), in a term that
matches the term for which the application originated from Recruiter. While the enrolled
date is not associated with a specific application in Recruiter, the existence of an
application from Recruiter is important in determining if the registration event is relevant to
Recruiter. The rule also checks to see that the course counts in enrollment in Banner
(STVRSTS).
Before the enrolled date message is sent for the event, an attempt is made to check the
SRREHST table for a previous admit date message. This can only be checked if the
prospect has one application from Recruiter for the term. If an admit message has not
Banner Recruiter
GOBUMAP_UDC_ID
Enterprise Identifier
SRBRCID_RECRUITER_ID
Recruiter ID (Contact GUID)
SPRIDEN_ID
ERP ID
Application Status message value is
Enrolled
SARAPPD_APDC_DATE
or
SFRSTCR_RSTS_DATE
Enrolled Date

629
Banner Student User Guide | Recruiting
been sent and only one Recruiter application exists for the term, an admit message will be
constructed and sent using the registration date as the admit date.
SRREHST is then checked to determine if a confirmed date message has already been
successfully sent for the prospect. If one has not been sent, a confirmed date message
will be constructed and sent using the registration date as the confirmed date. Finally,
SRREHST is checked to determine if an enrolled date message has already been sent for
the prospect. If one has not been sent, this new enrolled date message is sent.
Note: If this rule is enabled, the other ENROLLED_DATE rules should be
disabled.
Data from the following fields may be included in the XML message sent to Recruiter.
RECRUITER_ENROLLED_DATE_DECISIONCODE
This rule can be used to apply an enrolled date in Recruiter. It will send the decision date
to Recruiter as the enrolled date when a specific decision code is applied to an
application. (The record is inserted into the SARAPPD table.) This rule allows you to
specify one decision code to indicate a prospect has enrolled at the institution. You must
identify that code in the BEP rule and the integration configuration file. The rule verifies
that the decision code entered is the one specified in the BEP rule and the configuration
file, and that the application originated from Recruiter.
Before the enrolled date message is sent for the event, the SRREHST table is checked to
determine if an admit date message was sent for this application for the prospect. If an
admit message has not already been sent, an admit message will be constructed and sent
using the decision date as the admit date.
SRREHST is then checked to determine if a confirmed date message has already been
successfully sent for the prospect. If one has not been sent, a confirmed date message
will be constructed and sent using the decision date as the confirmed date. Finally,
SRREHST is checked to determine if an enrolled date message has already been sent for
the prospect. If one has not been sent, this new enrolled date message is sent.
Note: If this rule is enabled, the other ENROLLED_DATE rules should be
disabled.
Banner Recruiter
GOBUMAP_UDC_ID
Enterprise Identifier
SRBRCID_RECRUITER_ID
Recruiter ID (Contact GUID)
SPRIDEN_ID
ERP ID
Application Status message value is
Enrolled
SARAPPD_APDC_DATE
or
SFRSTCR_RSTS_DATE
Enrolled Date

630
Banner Student User Guide | Recruiting
Data from the following fields may be included in the XML message sent to Recruiter.
Configure the RECRUITER_ENROLLED_DATE_DECISIONCODE Event
This rule must be configured in BEP before it is used. The Banner decision code value
must be specified in BEP for the event and also in the
r2b_configuration.groovy
file.
Complete the following steps in BEP to configure this event. Refer to the Integrating
Recruiter with Banner manual for more information.
Use these steps to set up the decision code in BEP.
1. Access the Events page.
2. Select the RECRUITER_ENROLLED_DATE_DECISIONCODE event.
3. Click Open.
4. On the Publish Rules page, select the SRBRAID_RECRUITER_APPL_ID row.
5. Click Open.
6. View the rule details.
7. Click on the Edit button to open the Edit Publish Rule window.
8. Enter the decision code in the User Defined Condition field.
Use single quotes, such as ‘XX’.
For example, if your decision code is
ER, the entry would be:
SARAPPD_APDC_CODE IN (‘ER’)
9. Click Save.
10. On the Events page, confirm the status of the ENROLLED_DATE events.
• The RECRUITER_ENROLLED_DATE_DECISIONCODE event should be enabled.
(Enabled is set to
true.)
• The RECRUITER_ENROLLED_DATE_APPLACCEPT and
RECRUITER_ENROLLED_DATE_REGISTERED events should not be enabled.
(Enabled is set to
false.)
Banner Recruiter
GOBUMAP_UDC_ID
Enterprise Identifier
SRBRCID_RECRUITER_ID
Recruiter ID (Contact GUID)
SPRIDEN_ID
ERP ID
Application Status message value is
Enrolled
SARAPPD_APDC_DATE
or
SFRSTCR_RSTS_DATE
Enrolled Date
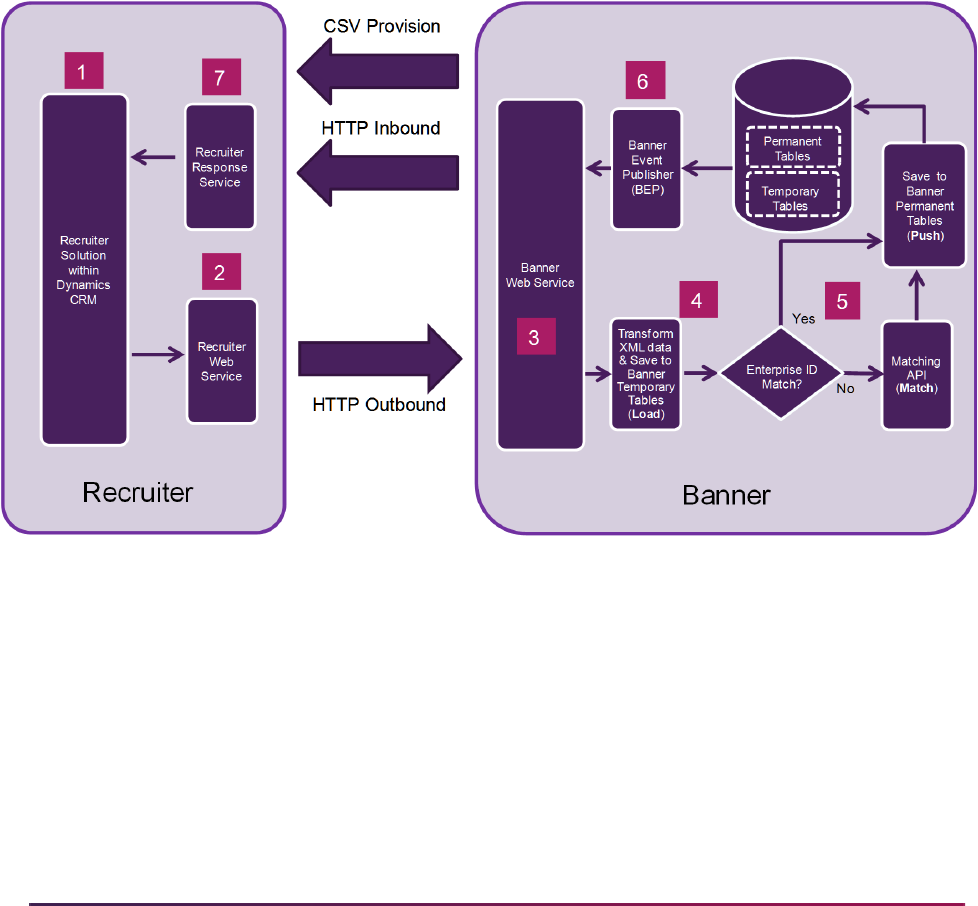
631
Banner Student User Guide | Recruiting
11. Access the Administration page.
12. Click Activate Changes.
Use these steps to edit the
r2b_configuration.groovy file.
1. Access the
r2b_configuration.groovy file on your WebLogic server.
2. Update the
enrolled.date.decision.code entry to match the decision code
value entered in step 8.
Banner Recruiter Integration Flow
This process flow shows how data is sent between Recruiter and Banner for the
integration.
Processing Details
This section describes setting up the interface, provisioning data, and handling specific
types of data.
Banner Setup Steps
Before using the integration, review the validation codes that were loaded during the
installation process, and enter the remaining required values as described below.

632
Banner Student User Guide | Recruiting
1. Enter an electronic prospect load code and an electronic prospect interface code
when prompted during the installation.
• The electronic prospect load validation code is loaded to the Electronic Prospect
Load Validation Form (STVPREL), and the electronic prospect interface validation
code is loaded to the Interface Validation Form (STVINFC) and STVPREL.
• The tape code value on STVPREL will be left blank, because it is not needed for
Banner Recruiter Integration processing.
• The electronic prospect load validation code is also loaded to the EDI Rule Group
Validation Form (STVEGRP), because the EDI rule group validation code must
always match the electronic prospect load validation code.
2. Update the source code, contact type, and common matching source for the interface
code on STVINFC.
3. Verify that rules were loaded on the Electronic Admissions Application Rules Form
(SAAERUL) for your EDI rule group validation code.
All values of
UPDATE ME must be changed to define how you want your data loaded
to Banner.
See the “Electronic admissions application rules” section for more information.
4. Update conversion code values on the Tape Code Conversion Form (SOTCNVT).
All values of
UPDATE ME must be changed to valid Banner conversion code values.
Any additional conversions required by your institution should be added.
See the “Crosswalk conversion values on SOTCNVT” section for more information.
Provision Data
Two processes are used to provision data from Banner to Recruiter:
• Recruiter Prospect Provisioning Process (SRRRPRO)
• Recruiter Validation Provisioning Process (SRRRVAL)
Note: System locale variables must be set to UTF-8 for Unicode
compatibility (e.g.,
LANG=en_US.UTF-8), because the .csv files that
are generated by the provisioning processes (SRRRVAL and SRRRPRO)
contain a Byte Order Mark at the beginning of the file.
If you FTP these
.csv files, it must be done in binary mode, as ASCII
mode will corrupt the Byte Order Mark. Please refer to FAQ 1-3YSCJ8 for
more information about Banner UTF-8 configuration.
Provision Prospect Data
The Recruiter Prospect Provisioning Process (SRRRPRO) is used to “provision” Recruiter
with Banner prospects, for further processing in Recruiter.
Prospects are selected for provisioning if they have Banner recruit records (SRBRECR)
for the specified term range, and they do not have any application records (SARADAP). If
633
Banner Student User Guide | Recruiting
they have multiple recruit records for the term range, the record with the highest term is
selected. The pool of prospects can be limited using a population selection, as long as the
prospects have existing recruit records for the specified term range and do not have
application records.
This process can be run during system implementation to capture the initial set of
prospects and then periodically thereafter to capture new prospects that have been added
in Banner (such as through financial aid data loads). Multiple
.csv files are created for a
prospect. Besides the main prospect file, files containing prospect high schools, prior
colleges, and interests are also generated.
This process extracts the Banner data into
.csv files which can then be imported into the
Recruiter system. The
.csv files may be edited before the data is imported the data into
Recruiter.
Note: You should be careful editing the .csv files in spreadsheet format,
as leading zeroes are sometimes removed.
The process allows for the provisioning of distinct prefix and suffix values that exist for
Banner prospects within the specified term range. Prefixes and suffixes are extracted into
their own
.csv files and should be imported into Recruiter before prospect data is
imported, so that prefix and suffix validation errors do not occur in Recruiter when
prospects are imported.
Here are the
.csv files created by this process, showing the Recruiter fields into which
the data will be imported and the Banner fields from which the data was extracted.
.csv file Recruiter Field Name Banner Data Field
ProvisionPrefix.csv
Prefix Name SPBPERS_NAME_PREFIX
ProvisionSuffix.csv
Suffix Name SPBPERS_NAME_SUFFIX

634
Banner Student User Guide | Recruiting
ProvisionProspect.csv
SSN
erpid
First Name
Middle
Last Name
Prospect 1 Suffix
Birth Date
Is this an International Address?
Address 1: Street 1
Address 1: Street 2
Address 1: Street 3
Address 1: City
Primary Address State/Province
Address 1: ZIP/Postal Code
Address 1: Country
Academic Program of Interest
Email Address
Address 1: Home Phone
SPBPERS_SSN
SPRIDEN_ID
SPRIDEN_FIRST_NAME
SPRIDEN_MI
SPRIDEN_LAST_NAME
SPBPERS_NAME_SUFFIX
SPBPERS_BIRTH_DATE
Value is Yes or Null, based on
SPRADDR_NATN_CODE
SPRADDR_STREET_LINE1
Concatenated
SPRADDR_STREET_LINE2,
SPRADDR_STREET_LINE3, and
SPRADDR_STREET_LINE4
Concatenated SPRADDR_ZIP and
SPRADDR_CITY for international
addresses only, otherwise Null
SPRADDR_CITY
SPRADDR_STAT_CODE
SPRADDR_ZIP
SPRADDR_NATN_CODE
SRBRICC_SURROGATE_ID
GOREMAL_EMAIL_ADDRESS
Concatenated
SPRTELE_CTRY_CODE_PHONE,
SPRTELE_PHONE_AREA,
SPRTELE_PHONE_NUMBER, and
SPRTELE_PHONE_EXT
.csv file Recruiter Field Name Banner Data Field

635
Banner Student User Guide | Recruiting
ProvisionProspect.csv
(cont)
Prospect Source
Anticipated Entry Term
Relationship Type
Admit Type
Prospect Prefix
Nickname
Prospect Gender
Ethnicity
Race Code 1
Race Code 2
Race Code 3
Race Code 4
Race Code 5
Address 1: County
Address 1: Cellphone
Marital Status
Citizenship Status
Religious Affiliation
Location
Enterprise System ID
SRRRSRC_SBGI_CODE
SRBRECR_TERM_CODE
Value is Prospective Student
SRBRECR_STYP_CODE
SPBPERS_NAME_PREFIX
SPBPERS_PREF_FIRST_NAME
Value is Male, Female, or Null,
based on SPBPERS_SEX
Value is Hispanic/Latino or Non-
Hispanic/Latino, based on
SPBPERS_ETHN_CDE
Value is Yes or No, based on
GORRACE_RRAC_CODE
Value is Yes or No, based on
GORRACE_RRAC_CODE
Value is Yes or No, based on
GORRACE_RRAC_CODE
Value is Yes or No, based on
GORRACE_RRAC_CODE
Value is Yes or No, based on
GORRACE_RRAC_CODE
STVCNTY_DESC for
SPRADDR_CNTY_CODE
Concatenated
SPRTELE_CTRY_CODE_PHONE,
SPRTELE_PHONE_AREA,
SPRTELE_PHONE_NUMBER, and
SPRTELE_PHONE_EXT
SPBPERS_MRTL_CODE
SPBPERS_CITZ_CODE
SPBPERS_RELG_CODE
SORLCUR_CAMP_CODE
GOBUMAP_UDC_ID
ProvisionProspectColl.csv
erpid
College
Graduated
Attended From Month
Attended From Year
Attended To Month
Attended To Year
Self-reported GPA
SPRIDEN_ID
SORDEGR_SBGI_CODE
Value is Yes or No, based on
SORDEGR_DEGC_DATE
Value is name of month, derived
from SORDEGR_ATTEND_FROM
Value is four-digit year, derived from
SORDEGR_ATTEND_FROM
Value is name of month, derived
from SORDEGR_ATTEND_TO
Value is four-digit year, derived from
SORDEGR_ATTEND_TO
SORDEGR_GPA_TRANSFERRED
.csv file Recruiter Field Name Banner Data Field
636
Banner Student User Guide | Recruiting
Provision Validation Data
The Recruiter Validation Provisioning Process (SRRRVAL) is used to “provision” Recruiter
with high school and college validation codes from Banner. This ensures that the same
high school and college validation codes are used in the Recruiter system as in Banner
when possible.
Note: System locale variables must be set to UTF-8 for Unicode
compatibility (e.g.,
LANG=en_US.UTF-8), because the .csv files that
are generated by the provisioning processes (SRRRVAL and SRRRPRO)
contain a Byte Order Mark at the beginning of the file.
If you FTP these
.csv files, it must be done in binary mode, as ASCII
mode will corrupt the Byte Order Mark. Please refer to FAQ 1-3YSCJ8 for
more information about Banner UTF-8 configuration.
This process can be run by a Banner institution that has newly installed the Recruiter
system. (It can also be run if new high school and validation codes are added to Banner.)
The process extracts Banner high school and college institution data into a
.csv file,
which can then be imported into the Recruiter system. The
.csv file may be edited before
it is imported.
Note: Data from other validation tables is provisioned through RESTful
APIs with existing inbound and outbound messages. These APIs are part
of the Banner Integration Manager (BRIM).
Below is the
.csv file created by this process, showing the Recruiter fields into which the
data will be imported and the Banner fields from which the data was extracted.
ProvisionProspectHS.csv
erpid
High School
Graduated
Attended To Month
Attended To Year
Self-reported GPA
Self-reported Class Rank
Self-reported Class Size
SPRIDEN_ID
SORHSCH_SBGI_CODE
Value is Yes or No, based on
SORHSCH_GRADUATION_DATE
Value is name of month, derived
from
SORHSCH_GRADUATION_DATE
Value is four-digit year, derived from
SORHSCH_GRADUATION_DATE
SORHSCH_GPA
SORHSCH_CLASS_RANK
SORHSCH_CLASS_SIZE
ProvisionProspectInts.csv erpid
Extracurricular Activity Type
SPRIDEN_ID
SORINTS_INTS_CODE
.csv file Recruiter Field Name Banner Data Field

637
Banner Student User Guide | Recruiting
Link Records Across the Systems
When a prospect is provisioned from Banner to Recruiter or a prospect is sent for the first
time from Recruiter to Banner, an Enterprise Identifier is generated in Banner and sent to
Recruiter along with the Banner ID. The first time Banner receives information from
Recruiter about a prospect or an application, the Recruiter GUID is saved in Banner. The
sharing of these unique identifiers ensures that when data is passed back and forth
between the two systems, the prospect is easily identified.
.csv file Recruiter Display Name Banner Data Field
ProvisionInstitution.csv
Contains only records where
STVSBGI_TYPE_IND is H or C
Account Name
Account Number
Feeder Organization
Available for Lookup
Organization Type
Institution Type
Address 1: Street 1
Address 1: Street 2
Address 1: Street 3
Address 1: City
State
Address 1: ZIP/Postal Code
Country
Is International
Organization Code
STVSBGI_DESC
SOBCNVT_CONV_CODE for
table SBGH, or STVSBGI_CODE,
or Null, based on setting of
parameter 23, Are CEEB codes
used on STVSBGI
Value is No
Value is Yes if
SOBSBGI_STAT_CODE is Not
Null, otherwise No
Value is High School or College
Value is Null
SOBSBGI_STREET_LINE1
Concatenated
SOBSBGI_STREET_LINE2,
SOBSBGI_STREET_LINE3, and
SOBSBGI_STREET_LINE4
Concatenated SOBSBGI_ZIP
and SOBSBGI_CITY for
international addresses only,
otherwise Null
SOBSBGI_CITY
SOBCNVT_CONV_CODE for
table STAT, or
SOBSBGI_STAT_CODE
SOBSBGI_ZIP
SOBCNVT_CONV_CODE for
table NATN, or
SOBSBGI_NATN_CODE
Value is Yes or Null, based on
SOBSBGI_NATN_CODE
STVSBGI_CODE
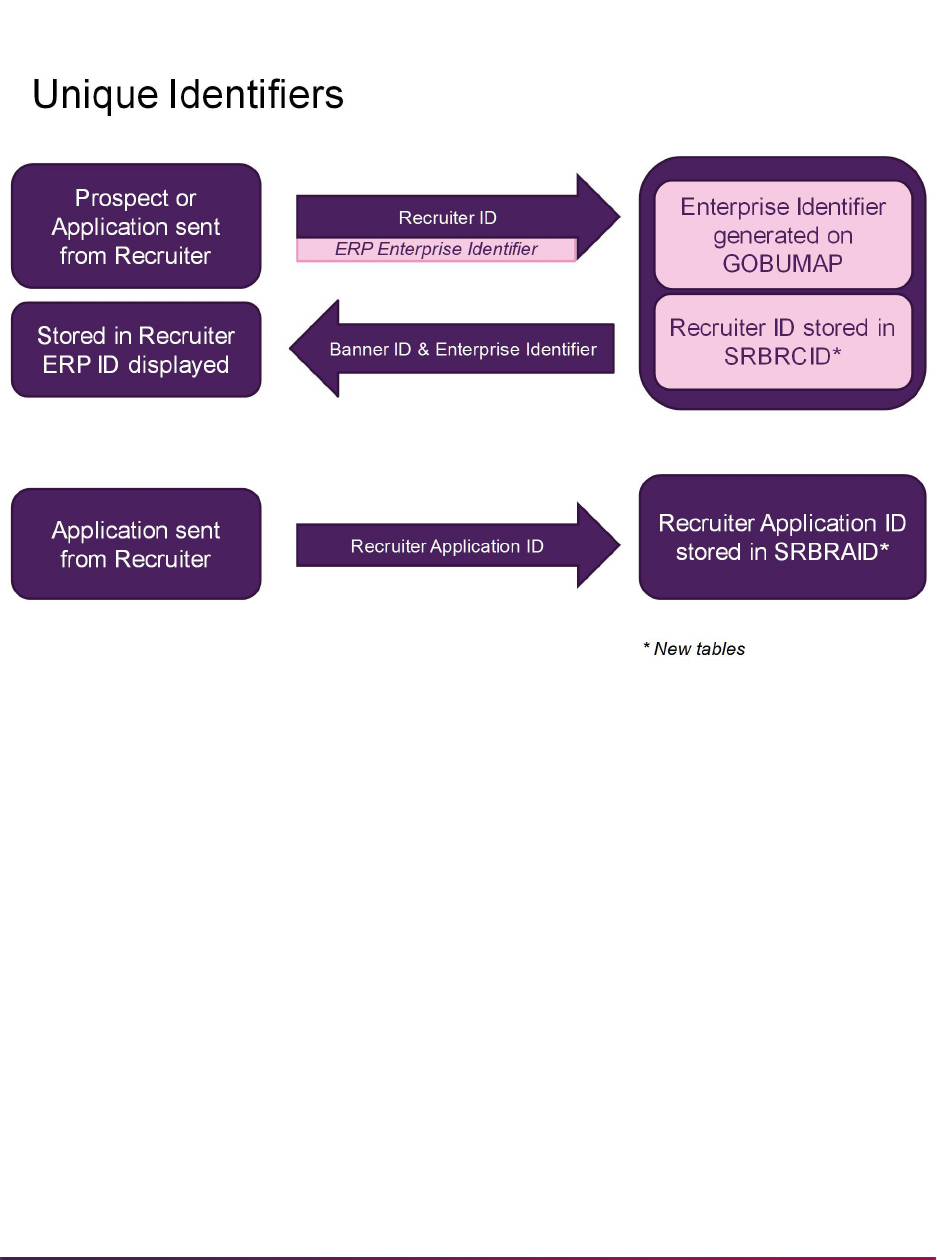
638
Banner Student User Guide | Recruiting
Here is a process flow that shows how unique identifiers are handled.
Break the Link Between the Systems
There may be times that you need to break the link between the Recruiter and Banner
prospect records, such as when duplicate records have been merged in Recruiter, or you
find that records have been linked incorrectly.
To break the link, you need to delete the ERP ID value from the prospect contact record in
Recruiter. Recruiter then sends a message to Banner, which causes Banner to remove the
Recruiter ID record that links the two systems. This does not delete the actual prospect
from Banner.
Application data that is integrated between Recruiter and Banner is more complex than
prospect data, and the application link may still be valid even after the prospect link has
been broken. You can only break the application link by deleting the application in Banner.
Use Financial Aid Data
Web Services are used to retrieve and display FAFSA information and award details from
Banner Financial Aid in Recruiter. The Financial Aid Integration Rules Form (RORINTR) is

639
Banner Student User Guide | Recruiting
used to maintain the financial aid rules for the Recruiter interface. These values are used
to load financial aid award and FAFSA data for prospects that exist in Recruiter.
Refer to the Banner Financial Aid User Guide for related processing information and the
Banner Financial Aid Online Help for more information on using this form.
The admissions office can use the Financial Aid information to do the following.
• Factor a prospect's ability to afford college into his/her likelihood of attending.
• Send timely and personalized communications about important financial aid deadlines.
• Know of other institutions to which a prospect sent his/her FAFSA.
• Use FAFSA submissions to identify prospective students which can then be better
guided throughout the admissions process.
The Banner Recruiter Integration has uses Web Services to perform the following tasks.
• Retrieve new and updated FAFSA information from Banner and display it for prospects
in Recruiter, including aid year, completion date, expected family contribution (EFC),
student adjusted gross income (AGI), parent adjusted gross income (AGI), and federal
college codes of selected schools.
• Retrieve new and updated award information about prospects in Recruiter from Banner
Financial Aid, including aid year, amount (offered, accepted, declined, and cancelled),
status (type, category), fund (name, description, type), and date.
• Retrieve FAFSA applicants when their ISIRs are received (and before they may be
pushed to permanent tables in Banner) to create new prospect records in Recruiter.
Additionally, institutions will have full control over the specific FAFSA and award
information that can be sent from Banner to Recruiter for each aid year.
Use Supplemental Items and Checklists
Institutions record information about supplemental items that are received throughout the
admissions process in Recruiter and Banner. Web Services are used to ensure that each
system is aware of items recorded as received in either system. A Web Service in
Recruiter is used to retrieve information from Banner for receipt of the items listed below.
Receipt of these items is recorded in the Communication History entity.
• high school transcripts
• college transcripts
• test scores
• visas
• immunization records
• application checklist items
When a supplemental information item is marked as received in Recruiter, the
corresponding checklist items that are not yet marked as received in Banner may be
updated with the received date.

640
Banner Student User Guide | Recruiting
Data Notes
Here are some specific considerations for how data is handled in the integration.
SSN/SIN Data
Recruiter stores the SSN and SIN in separate fields, and when either data item is sent to
Banner, it is stored in the SSN/SIN/TIN field on SPAIDEN. When prospects are
provisioned from Banner to Recruiter, the Banner SSN/SIN/TIN field is mapped to the
SSN field in Recruiter. If you would like to load the data into the SIN field instead, you can
change the import mapping in Recruiter.
Admissions Applications Processing
You can collect and process applications from prospects in Recruiter. At some point, you
will want to send those applications to Banner. You may also send a proposed admissions
decision. You will need to decide the best way to manage your applications processing.
Application Type of Withdrawn
Special consideration is needed for application status types of “withdrawn”.
Recruiter has an application status category of “withdrawn” and Banner does not. After the
STVAPDC codes have been provisioned from Banner to Recruiter,
(
ProvisionAdmissnDcsn.csv file), you should manually change the category in
Recruiter on any application statuses that designate “withdrawn”.
Send Admissions Decision from Recruiter
If you want to prevent the accidental creation of student records when certain decision
codes are sent from Recruiter to Banner, you can set up translations on SOTCNVT to
translate those codes to other codes that do not create student records.
Temporary Addresses on Application
Applications in Recruiter can include temporary addresses with from and to dates. If a
temporary address has expired by the time the application is sent to Banner, the address
will not be loaded to Banner.
Crosswalk Conversion Values
This section discusses setting up conversion codes, which are required on the Tape Code
Conversion Form (SOTCNVT) for specific data. Seed data is delivered as system required
values. The only values that should be changed on these system required records are the
conversion codes.
641
Banner Student User Guide | Recruiting
Conversion Translations
Incoming values are translated as follows.
• When an incoming code value exists, the process looks up the conversion code value.
The conversion code value is used when a match is found, and the value exists in the
validation table.
• If no conversion code value is found, the incoming value is used, if it exists in the
validation table.
The exception to this is the CEEB code translations for high schools and colleges. They
require explicit conversions or
DEFAULT table value rules.
• When the incoming code value is not found in the validation table, the tape value
DEFAULT rule is used.
If the
DEFAULT rule is not defined, an Invalid value for validation table error is returned.
• When an incoming code value is missing (Null), the process uses the Null rule indicated
by a tape value of “*”. If no Null rule exists, no value is loaded.
Hardcoded Values
System required records are delivered for the table names ATYP, EMAL, INTS, RACE,
RELT, and TELE. Each table name has a set of related tape values. It is important that
you do not change the tape values on any of these records. These tape values are
hardcoded in the integration logic, and the load will fail if any of these values is missing
from SOTCNVT. These records are delivered with conversion values of
UPDATE ME,
which you will need to change to the appropriate conversion codes.
Note: It is recommended that you use a different conversion code for
each of the required table name and tape value combinations. This can
prevent potential loader process errors.
A record is delivered as seed data with the BRIM upgrade. It is used to load a conversion
record for the Recruiter
College Board test score source value, because this value
exceeds the 11 character field limit on SOTCNVT. The tape value is truncated to
COLLEGE BOA and should not be changed. Any test scores sent from Recruiter with the
College Board test source will use the Banner COLLEGE BOA truncated value.
The system required records are listed below.
Table
Name Tape Value
Conversion
Code Description
ATYP GUARDIAN UPDATE ME Address type for Legal Guardian
ATYP PARENT1 UPDATE ME Address type for Parent 1

642
Banner Student User Guide | Recruiting
Mapping Values
Below is a partial list of the tables for which your institution can set up translations on
SOTCNVT to be used by the integration. Because you may have provisioned many
ATYP PARENT2 UPDATE ME Address type for Parent 2
ATYP PROSPECT UPDATE ME Address type for Prospect
ATYP TEMPORARY UPDATE ME Address type for Prospect Temporary
EMAL GUARDIAN UPDATE ME Email address type for Legal Guardian
EMAL PARENT1 UPDATE ME Email address type for Parent 1
EMAL PARENT2 UPDATE ME Email address type for Parent 2
EMAL PROSPECT UPDATE ME Email address type for Prospect
INTS HOUSING UPDATE ME Interest code for “Interested in campus
housing”
RACE RACE1 UPDATE ME Race code for American Indian or Alaskan
Native
RACE RACE2 UPDATE ME Race code for Asian
RACE RACE3 UPDATE ME Race code for Black
RACE RACE4 UPDATE ME Race code for Native Hawaiian or Other
Pacific Islander
RACE RACE5 UPDATE ME Race code for White
RELT FATHER UPDATE ME Relationship code for Father
RELT GUARDIAN UPDATE ME Relationship code for Legal Guardian
RELT MOTHER UPDATE ME Relationship code for Mother
RELT PARENT UPDATE ME Relationship code for Parent
TELE GUARDIAN UPDATE ME Telephone code for Legal Guardian
TELE PARENT1 UPDATE ME Telephone code for Parent 1
TELE PARENT2 UPDATE ME Telephone code for Parent 2
TELE MOBILE UPDATE ME Telephone code for Prospect Cellular
TELE PROSPECT UPDATE ME Telephone code for Prospect
TELE TEMPORARY UPDATE ME Telephone code for Prospect Temporary
TSRC COLLEGE BOA UDPATE ME Corresponds to the College Board test source
in Recruiter
Table
Name Tape Value
Conversion
Code Description

643
Banner Student User Guide | Recruiting
validation codes from Banner to Recruiter, you may only need to add conversions for
exceptions, default rules, and Null rules. For validation codes that were not provisioned,
such as state and nation, you should add conversions for values that are not consistent
between the two systems.
Note: When a prospect is sent without an academic program, values
should exist on SOTCNVT for
COLL, DEGC, LEVL, and MAJR.
Mapping from Recruiter SOTCNVT Table Name
Address Type ATYP
Admission Type ADMT
Application Decision APDC
Campus CAMP
Citizenship CITZ
College COLL
Degree DEGC
Education Goal EGOL
Email Type EMAL
High School SBGH
Institution SBGI
Interests INTS
Language LANG
Level LEVL
Major MAJR
Marital Status MRTL
Nation NATN
Race RACE
Relationship RELT
Religion RELG
Residence RESD
Source SBGS
State STAT
Student Type STYP
Telephone Type TELE

644
Banner Student User Guide | Recruiting
Source/Background Institution Code Conversion
In Recruiter, both CEEB codes and Banner STVSBGI codes are stored on high school
and college records. If your institution does not use CEEB codes on STVSBGI, you can
create conversions for them on SOTCNVT, so that when they are provisioned, Recruiter
will receive both the CEEB code and the STVSBGI code.
The conversions for the different types of STVSBGI codes are distinguished by using
different table names on SOTCNVT.
• SOTCNVT Validation Table Name field is SBGH
Used for converting high schools. The only conversion codes that are valid are those
where the STVSBGI Type field is
H (High School).
• SOTCNVT Validation Table Name field is SBGI
Used for converting colleges. The only conversion codes that are valid are those where
the STVSBGI Type field is
C (College or University).
• SOTCNVT Validation Table Name field is SBGS
Used for converting prospect sources. The only conversion codes that are valid are
those where the STVSBGI Source Indicator is checked. No CEEB code conversions
are needed for table name
SBGS.
Unlisted High Schools and Colleges
The following values are sent from Recruiter to Banner for unlisted schools:
• unlisted high school - 000000
• home school - 999999
• unlisted college - 9999
Conversions for these values need to be set up on SOTCNVT.
If Recruiter sends multiple unlisted high school or college records for a prospect, only one
unlisted high school and one unlisted college can be loaded into Banner, because they will
have the same STVSBGI codes.
Ter m TE RM
College Board test score source TSRC
Visa VTYP
Mapping from Recruiter SOTCNVT Table Name
645
Banner Student User Guide | Recruiting
Electronic Admissions Application Rules
This section discusses the delivered rules which are used to control the loading of
Recruiter records to the Banner temporary tables. This includes three rules developed
specifically for the integration. These rules can be maintained on the Electronic
Admissions Application Rules Form (SAAERUL). As part of the integration setup, you will
need to assign a value to each rule.
You will be prompted to enter an electronic prospect load code (STVPREL) when you
install the integration, and that value will also be your EDI rule group code (STVEGRP).
The value of NNN shown below is used only as an example group code. Your group code
will be the actual group code for the rules.
Here are the SAAERUL rules used with the integration.
Note: The default rules for the PREL group code are not checked for the
NNN group code (your group code). Processing does not default to the
rules for the
PREL group code as occurs in electronic prospect
processing in Banner.
The
R2BPUSH rule label is used to control the data that is submitted from Recruiter to
Banner. This rule has three options.
• PUSH - This option loads the data to the Banner temporary tables and then matches and
pushes the data to the Banner permanent tables.
• MATCHONLY - This option loads the data to the temporary tables and performs
matching, but it does not push the data to the permanent Banner tables.
• LOADONLY - This option loads data to the temporary tables only. Data is not matched or
pushed to the permanent Banner tables. This is the default option if the
R2BPUSH rule
is not found, or when the value is set to
UPDATE ME.
Note: Make sure the rule label and value are entered in all capital letters.
The
R2BSSNSIN rule checks the Web Service Loader process to determine which
identifier to load to Banner (SSN or SIN) if both exist in Recruiter and are submitted to
Banner. The options are
SSN or SIN. The default is SIN when the rule does not exist or
when the value is set to
UPDATE ME.
Group
Code Rule Label Rule Description Value EDI
Sys
Req
NNN R2BPUSH Load Only, Match Only, or Push UPDATE ME No No
NNN R2BSSNSIN Load SSN or SIN if Both Exist UPDATE ME No No
NNN LOADDECISIONS Load Recruiter proposed decision
codes to Banner
UPDATE ME No No
NNN UPDATEBIO Updates bio-demo info UDPATE ME No No

646
Banner Student User Guide | Recruiting
The LOADDECISIONS rule can be set to Y or N. This rule is used to turn the push of
decision codes on or off for data coming from Recruiter to Banner. Decision codes are
pushed to SAADCRV form and the SARAPPD table. The default is
Y when the rule does
not exist or when the value is set to
UPDATE ME.
The
UPDATEBIO rule can be set to Y or N. This rule is used to update the biographic and
demographic information for the prospect or applicant when the data is loaded to Banner.
When the rule is set to
Y, the following fields will be overwritten when a prospect or
application is sent from Recruiter, even if the values already exist in Banner.
• Preferred First Name
• Prefix
• Suffix
• Gender
• Birthdate
• Religion
• Citizenship
• Marital Status
SAAERUL Rules Used for the Integration
The following is extremely important:
• The rules on SAAERUL delivered for your group code should not be used with any other
STVEGRP group codes.
• No other rules should be added to SAAERUL for use with your group code.
• SRAPRED is not checked by the push process or the Web Service Loader process.
Because there is a custom Web Service Loader process for this integration, SRTLOAD is
not needed to load data from Recruiter. If you attempt to run SRTLOAD with your
electronic prospect code, an error will be generated, and the job will not run to completion.
Here is the complete set of rules delivered for use with the integration.
Note: The NNN group code used in this table is only an example code.
Your code will be the actual group code for the rules.
647
Banner Student User Guide | Recruiting
Group Label Description EDI Instructions
NNN ADDRDIFFTYPE Create address if
different type
N Determines if an address should be
created, if one with a different address
type already exists.
If set to
Y, an address record will be
created. If set to
N, no address record
will be created.
NNN ADDRSAMETYPE Create address if same
type
N Determines if an address should be
created, if one with the same address
type already exists.
If set to
Y, a new address record will
be created. If set to
N, no address
record will be created.
NNN CHKINACTIVEADDR Check Inactive Address N Used when incoming street address
fields are too long for the SPRADDR
table and when an address has been
inactivated (not end-dated), and re-
entered (Create Record/Duplicate
Record) with appropriate
abbreviations.
If the
CHKINACTIVEADDR rule is Y,
when the address is loaded the same
way as the original, it is compared to
the inactive address, so a new
address is not created.
NNN COMMPLAN Create commplan
collector entry
N
If set to
Y, a record will be inserted
into the Communication Plan
Collector Table (SORCCOL) which is
visible on the Communication Plan
Collector Form (SOACCOL).
When a new application is created
from Recruiter, the communication
plan record is always created,
regardless of the
COMMPLAN rule
setting.
NNN CREATECONT Create contact from
STVINFC
N
If set to
Y, the contact code will be
selected from the contact type on the
Interface Code Validation Form
(STVINFC).

648
Banner Student User Guide | Recruiting
NNN CREATEMATERIALS Create Materials N
If
Y is entered, and if the prospect is
new to Banner, or if the prospect is
matched to a recruit, and the recruit
term, level, and campus are different,
then the materials data are created.
The materials will always be created if
the prospect is matched to an
applicant and the
UPDATEIIFAPP is
Y, or if the prospect is matched to a
recruit with same term, level, and
campus.
NNN CREATENEWAPPL Create New Application N Allows schools to indicate that they
want an application record created at
the same time a recruit record is
created by SRRPREL.
When this rule is
Y, an application is
only created when the data includes
the Recruiter application ID. An
application cannot be created when
only prospect data is sent from
Recruiter.
NNN CREATENEWRECR Create new recruit N
If set to
Y and no recruit record exists,
a new recruit record will be created. If
set to
N and no recruit record already
exists, then a new recruit record will
not be created.
NNN CREATESRCE Create new source N
If set to
Y, the source code will be
loaded from the required Source
Code field in Recruiter. If no source
code is available from Recruiter, the
source code is defaulted from the
Interface Code Validation Form
(STVINFC).
If set to
N, no source code is loaded to
Banner.
Group Label Description EDI Instructions

649
Banner Student User Guide | Recruiting
NNN HSCHADMR Default High School
Checklist
N Used to populate the Admissions
Request field on the High School
Information Form (SOAHSCH).
Specifies the admissions request
checklist code from the Admission
Request Checklist Code Validation
Form (STVADMR) that should be
loaded when high school data is
pushed.
This default is only used when the
admissions request value is not
populated on the Source/Background
Institution Code Validation Form
(STVSBGI).
NNN INTERESTMAX Maximum interest to
load
N Indicates the number of interests to
be loaded from a search data load to
the SORINTS table if the
LOADINTEREST group label is set to
Y.
NNN LOADDECISIONS Load Recruiter proposed
decision codes to
Banner
N
If set to
Y, proposed decision codes
will be pushed to the Admissions
Decision Table (SARAPPD) and
populated on the Admissions
Decision Form (SAADCRV).
The default is
Y when the rule does
not exist or the value is set to
UPDATE ME.
NNN LOADINTEREST Load interests N
If set to
Y, interests provided will be
loaded to the SORINTS table.
NNN LOADMAJOR Use provided major N
If set to
Y, majors provided will be
loaded to a field of study row with a
Type of
MAJOR and a Priority of 1
(backfilled to the Major 1 field on the
SRBRECR table) and to a field of
study row with a Type of
MAJOR and
a Priority of
2 (backfilled to the Major
2 field on the SRBRECR table).
All major codes must have Banner
conversion values defined on the
Tape Code Conversion Form
(SOTCNVT) for the Validation Table
Name of
MAJR.
Group Label Description EDI Instructions

650
Banner Student User Guide | Recruiting
NNN MAJOR2INTEREST Load major to interests N
If set to
Y, and LOADINTEREST is
set to
Y, major codes provided will be
converted and loaded to the
SORINTS table.
All major codes for which interests are
to be loaded must have Banner
conversion values set appropriately
on the Tape Code Conversion Form
(SOTCNVT) for the Validation Table
Name of
INTS.
NNN MCREATENEWRECR Matching create new
recruit
N
If set to
Y, and the incoming record
matches an existing recruiting record,
then a new recruiting record is
created.
If set to
U, and the incoming record
matches an existing recruiting record,
then no recruiting record is created,
and the existing record is updated. If a
matching recruiting record exists, and
the incoming contact, source, and/or
interests are different, those values
are updated.
If set to
N, and the incoming record
matches an existing recruiting record,
then no recruiting record is created,
and no records are updated.
A match exists if the incoming record
has the same term, level, and
optionally campus as the existing
recruiting record.
NNN NEWADDRESS Create address N
If set to
Y, and no address record
exists for the person in Banner, an
address record will be created. If set
to
N, and no address record exists, no
record will be created.
NNN NEWPHONE Create phone N
If set to
Y, and no phone record exists
for the person in Banner, a phone
record will be created. If set to
N, and
no phone record exists, no record will
be created.
Group Label Description EDI Instructions
651
Banner Student User Guide | Recruiting
NNN NMCREATENEWRECR Non-match create new
recruit
N
If set to
Y, and the incoming record
does not match an existing recruit
record, a new recruiting record is
created. If set to
N, no recruiting
record is created.
A match exists if the incoming record
has the same term, level, and
optionally campus as the existing
recruiting record.
NNN PCOLADMR Default Prior College
Checklist
N Used to populate the Admissions
Request field on the Prior College
Form (SOAPCOL).
Specifies the admissions request
checklist code from the Admission
Request Checklist Code Validation
Form (STVADMR) that should be
loaded when college data is pushed.
This default is only used when the
Admissions Request value is not
populated on the Source/Background
Institution Code Validation Form
(STVSBGI).
NNN PHONDIFFTYPE Create phone if different
type exists
N Determines if a phone record should
be created, if one with a different
phone type already exists.
If set to
Y, a phone record will be
created. If set to
N, no phone record
will be created.
NNN PHONSAMETYPE Create phone if same
type exists
N Determines if a phone record should
be created, if one with the same
phone type already exists.
If set to
Y, a new phone record will be
created. If set to
N, no phone record
will be created.
NNN PRIMESRCE Create source as
primary
N
If set to
Y, and CREATESRCE is set to
Y, then the source code loaded to the
SRRRSRC table will be set as the
primary source.
Only one source will be flagged as
primary for each recruit term and
sequence number upon loading to
Banner.
Group Label Description EDI Instructions

652
Banner Student User Guide | Recruiting
NNN R2BPUSH Load Only, Match Only,
or Push
N Controls the data that is submitted
from Recruiter to Banner. This rule
has three options.
•
PUSH - Loads data to the Banner
temporary tables, matches and
pushes data to the Banner
permanent tables.
•
MATCHONLY - Matches the data
after the temporary tables have
been populated, but does not push
the data into the permanent Banner
tables.
•
LOADONLY - Loads data to the
temporary tables only.
LOADONLY is the default option if the
R2BPUSH rule is not found.
NNN R2BSSNSIN Load SSN or SIN if Both
Exist
N Checks the Web Service Loader
process to determine which identifier
to load to Banner (SSN or SIN) if both
exist in Recruiter and are submitted to
Banner.
The rule options are
SSN or SIN. The
default is
SIN when the rule does not
exist or the value is set to
UPDATE
ME
.
NNN UPDATEBIO Updates bio-demo info N Used to update biographic and
demographic information for the
prospect or applicant when the data is
loaded to Banner.
NNN UPDATEHSDATA Update HS data from
Recruiter
N Used to update high school data from
Recruiter.
When set to
Y, if the high school
record already exists in Banner,
incoming data will be used to update
the record. Incoming null values will
be ignored. (They will not null out data
that already exists in Banner.)
When set to
N, if the high school
record already exists in Banner, it will
not be updated with incoming data.
Group Label Description EDI Instructions

653
Banner Student User Guide | Recruiting
NNN UPDATEIFAPP Update recruit record if
application exists
N
If set to
Y, then the settings of the
previous rules will be followed, even if
a recruit record already exists for this
person for the same term, level, and
campus.
If set to
N, and a matching recruit
record already exists, then based on
your SAAERUL settings, the process
will do the following:
• Insert new test score records on the
Test Score Information Form
(SOATEST).
• Insert new high school records on
the High School Information Form
(SOAHSCH).
• Insert new college records on the
Prior College Form (SOAPCOL).
• Insert the contact code into the
SORCONT table.
• Insert the source code into the
SRRRSRC table if a matching
recruit record exists or insert the
source code into the SARRSRC
table if a matching application
record exists.
• Update Null values on the General
Person Form (SPAPERS).
NNN UPDATEPCOLDATA Update PCOL from
Recruiter
N Used to update prior college data
from Recruiter.
When set to
Y, if the prior college
record already exists in Banner,
incoming data will be used to update
the record. Incoming null values will
be ignored. (They will not null out data
that already exists in Banner.)
When set to
N, if the prior college
record already exists in Banner, it will
not be updated with incoming data.
NNN UPDATESSN Replace Banner SSN
with incoming
N
When set to
Y, if the incoming SSN
does not match the existing Banner
SSN, and the record has been
matched, upon being loaded to
Banner, the incoming SSN will
overwrite the existing
SPBPERS_SSN.
When set to
N, the SSN is not
updated if it has changed.
Group Label Description EDI Instructions

654
Banner Student User Guide | Recruiting
Data Loaded to Banner
This section discusses the types of data that can be sent from Recruiter to Banner.
Identification Data
Identification data from Recruiter can be loaded into Banner. It can be viewed in the
Current Identification block on the General Person Identification Form (SPAIDEN).
Data is handled as follows:
• Prefixes and suffixes are validated in Recruiter but not in Banner. All prefix and suffix
values are loaded to Banner.
• Alternate names are not loaded as prior names in Banner. However, the alternate last
name is used by common matching if a match cannot be found in Banner based on the
current last name. If a person is matched on the alternate last name, the first and last
names on the existing Banner record are changed to the alternate first and last names,
and a new SPRIDEN record is created with the current name. A message is logged in
Banner Recruiter Integration Manager (BRIM) when this occurs.
• Alternate first and last names are also used to identify prospect records in Banner when
no record is found that matches the primary name.
• When the Enterprise Identifier exists in Recruiter, it is sent to Banner and used to
identify the prospect.
NNN VTYPADMR Default ADMR Code for
the Visa
N Identifies the checklist summary
request code for the visa code value
to be inserted on the Admissions
Application Detail block of the
Admissions Application Form
(SAAADMS), when loading a record
from the Banner Student Self-Service
Prospects (Recruiting) or Admissions
modules.
Values come from the Admission
Request Checklist Code Validation
Form (STVADMR).
This rule is only used by the Web
interface.
Group Label Description EDI Instructions

655
Banner Student User Guide | Recruiting
Here is the field mapping for the identification fields.
Biographic and Demographic Data
Biographic and demographic data from Recruiter can be loaded into Banner. It can be
viewed in the Biographical block on the General Person Identification Form (SPAIDEN).
Nationality data can be viewed in the Nationality block on the International Information
Form (GOAINTL). Some biographical and nationality data can also be viewed on the
Application Supplemental Information Form (SOASUPL).
Use the
R2BSSNSIN and UPDATESSN rules on the Electronic Admissions Application
Rules Form (SAAERUL) to process SSN and SIN data.
State and nation values are pre-loaded in Recruiter. If the values in Banner do not match,
conversion values should be added on SOTCNVT.
The county code from GTVZIPC is loaded into Banner as part of an address for a prospect
or application sent from Recruiter.
Race Codes
Recruiter has five fields used to store racial group information. If a field is set to Y, the race
is loaded to Banner using the conversion code. Race code tape values must be set up on
SOTCNVT for conversion. Required values are delivered for table name
RACE with the
conversion code of
UPDATE ME.
When a Banner ID already has associated race codes, the push process does not update
or insert additional race codes sent from Recruiter. Only when no race codes exist in
Banner for an ID will race codes from Recruiter by loaded by the push process.
Recruiter Banner
Contact ID
SRBRCID_RECRUITER_ID
Prefix
SPBPERS_NAME_PREFIX
First Name
SPRIDEN_FIRST_NAME
Middle Name
SPRIDEN_MI
Last Name
SPRIDEN_LAST_NAME
Suffix
SPBPERS_NAME_SUFFIX
Nickname
SPBPERS_PREF_FIRST_NAME
Alternate First Name
SPRIDEN_FIRST_NAME, in case of name change
Alternate Last Name
SPRIDEN_LAST_NAME, in case of name change
Enterprise Identifier
GOBUMAP_UDC_ID, queried to identify prospect
656
Banner Student User Guide | Recruiting
Here is the field mapping for biographic and demographic fields.
Relationship Data
Relationship data from Recruiter can be loaded into Banner. It can be viewed on the
Guardian Information Form (SOAFOLK).
Recruiter Banner SOTCNVT Conversion
Social Security Number
Social Insurance Number
SPBPERS_SSN
N/A
Birth Date
SPBPERS_BIRTH_DATE
N/A
Gender
SPBPERS_SEX
N/A
Ethnicity
SPBPERS_ETHN_CDE
SPBPERS_CONFIRMED_RE_CDE
SPBPERS_CONFIRMED_RE_DATE
N/A
American Indian or
Alaskan Native
GORPRAC_RACE_CDE
Tape value RACE1 (RACE)
Asian
GORPRAC_RACE_CDE
Tape value RACE2 (RACE)
Black or African American
GORPRAC_RACE_CDE
Tape value RACE3 (RACE)
Native Hawaiian or Other
Pacific Islander
GORPRAC_RACE_CDE
Tape value RACE4 (RACE)
White
GORPRAC_RACE_CDE
Tape value RACE5 (RACE)
Marital Status
SPBPERS_MRTL_CODE
If values do not match (MRTL)
Religious Affiliation
SPBPERS_RELG_CODE
If values do not match (RELG)
Citizenship Status
SPBPERS_CITZ_CODE
If values do not match (CITZ)
Birth City
SABSUPL_CITY_BIRTH
N/A
Birth State/Province
SABSUPL_STAT_CODE_BIRTH
If values do not match (STAT)
Birth Country
GOBINTL_NATN_CODE_BIRTH
SOASUPL_NATN_CODE_BIRTH
If values do not match (NATN)
First Language
GOBINTL_LANG_CODE
If values do not match (LANG)
Primary Non-U.S.
Citizenship
GOBINTL_NATN_CODE_LEGAL
If values do not match (NATN)
Alien Registration Number
GOBINTL_REG_NUMBER
N/A
Visa Type
GORVISA_TYPE_CODE
If values do not match (VTYP)
657
Banner Student User Guide | Recruiting
Relationship code tape values must be set up on SOTCNVT for conversion. Required
values are delivered for table name
RELT with the conversion code of UPDATE ME. Any
other values used in Recruiter should also be set up on SOTCNVT.
Multiple records can exist for father, mother, and so on. The push process checks for an
exact record match for the data coming into Banner from Recruiter. When the first name,
last name, relationship, and address type coming from Recruiter are the same as the
record in Banner, no data is pushed into Banner. If any of the elements do not match the
record in Banner, then the data is pushed. The record is not sent from Recruiter to Banner
when the parent first name and last name are not provided, even if the address data
exists.
Here is the field mapping for the relationship fields.
Addresses
Address information from Recruiter can be loaded into Banner. It can be viewed in the
Address block on the General Person Identification Form (SPAIDEN). If a temporary
address has expired, it is not loaded to Banner. All addresses, even parent and guardian
addresses, are loaded to the prospect record.
Up to five address types can be sent from Recruiter to Banner. Address code tape values
must be set up on SOTCNVT for conversion. Required values are delivered for table
name
ATYP with the conversion code of UPDATE ME.
Use the
ADDRDIFFTYPE, ADDRSAMETYPE, CHKINACTIVEADDR, and NEWADDRESS
rules on the Electronic Admissions Application Rules Form (SAAERUL) to control how
address data is processed.
The county code from GTVZIPC is loaded into Banner as part of an address for a prospect
or application sent from Recruiter.
Recruiter Banner SOTCNVT Conversion
Relationship
SORFOLK_RELT_CODE
Tape value FATHER (RELT)
Tape value MOTHER (RELT)
Tape value PARENT (RELT)
Tape value GUARDIAN (RELT)
Prefix
SORFOLK_PARENT_NAME_PREFIX
N/A
First Name
SORFOLK_PARENT_FIRST
N/A
Middle Name
SORFOLK_PARENT_MI
N/A
Last Name
SORFOLK_PARENT_LAST
N/A
Suffix
SORFOLK_PARENT_NAME_SUFFIX
N/A
Is Parent/Guardian
Living?
SORFOLK_DECEASED_IND
N/A
658
Banner Student User Guide | Recruiting
International Addresses
In Recruiter, addresses in the United States and Canadian are considered to be domestic,
and all other addresses are considered to be international. International addresses are
stored differently. International addresses use the following fields in Recruiter: Street Line
1, Street Line 2, Foreign Address Line, and Country. The Foreign Address Line is stored in
the first available Street Line field in Banner.
When a prospect with an international address is provisioned from Banner to Recruiter,
the address sent to Recruiter is formatted to meet Recruiter's needs. If that same address
is later sent back to Banner, Banner may not recognize that the address already exists,
because the data is not formatted in the same way. This may cause the address to be
added to Banner again.
Here is the field mapping for the address fields.
Telephone Numbers
Telephone numbers from Recruiter can be loaded into Banner. This information can be
viewed in the Telephone block on the General Person Identification Form (SPAIDEN). All
phone numbers, even parent and guardian phone numbers, are loaded to the prospect
Recruiter Banner SOTCNVT Conversion
Address Type (hardcoded)
SPRADDR_ATYP_CODE
Tape value PROSPECT (ATYP)
Tape value TEMPORARY (ATYP)
Tape value PARENT1 (ATYP)
Tape value PARENT2 (ATYP)
Tape value GUARDIAN (ATYP)
Address Line 1
SPRADDR_STREET_LINE1
N/A
Address Line 2
SPRADDR_STREET_LINE2
N/A
Foreign Address Line
SPRADDR_STREET_LINE3
(or SPRADDR_STREET_LINE2, if
blank)
N/A
City
SPRADDR_CITY
N/A
State/Province
SPRADDR_STAT_CODE
If values do not match (STAT)
ZIP/Postal Code
SPRADDR_ZIP
N/A
Country
SPRADDR_NATN_CODE
If values do not match (NATN)
Temporary Address
Effective Date
SPRADDR_FROM_DATE
N/A
Temporary Address
Expiration Date
SPRADDR_TO_DATE
N/A
659
Banner Student User Guide | Recruiting
record. Phone numbers are loaded as active numbers and are associated with addresses,
except for mobile numbers.
Up to six phone number types can be sent from Recruiter to Banner. Phone number code
tape values must be set up on SOTCNVT for conversion. Required values are delivered
for table name
TELE with the conversion code of UPDATE ME.
Use the
NEWPHONE, PHONDIFFTYPE, and PHONSAMETYPE rules on the Electronic
Admissions Application Rules Form (SAAERUL) to process telephone data.
Telephone Number Fields
When telephone numbers are loaded from Recruiter, specific checks take place for data
and length to accommodate the population of the phone number fields in Banner. Banner
uses four phone number fields: Country Code, Area Code, Phone Number, and
Extension.
To convert phone numbers, phone number patterns in Google libraries are checked for
United States and international numbers. When patterns are found, phone numbers are
separated into the Banner fields and are loaded, with non-numeric characters removed. If
the number cannot be parsed or is too long, it is loaded into the telephone Comment field.
The Phone Number field will display the message: SEE COMMENT.
Here is the field mapping for the telephone fields.
Email Addresses
Email addresses from Recruiter can be loaded into Banner. This information can be
viewed in the E-mail block on the General Person Identification Form (SPAIDEN). All
Recruiter Banner SOTCNVT Conversion
Telephone
SPRTELE_PHONE_AREA
N/A
SPRTELE_PHONE_NUMBER
N/A
SPRTELE_PHONE_EXT
N/A
SPRTELE_COUNTRY_CODE
N/A
SPRTELE_COMMENT
N/A
SPRTELE_TELE_CODE
Tape value PROSPECT (TELE)
Tape value TEMPORARY (TELE)
Tape value PARENT1 (TELE)
Tape value PARENT2 (TELE)
Tape value GUARDIAN (TELE)
Tape value MOBILE (TELE)
660
Banner Student User Guide | Recruiting
email addresses are loaded to the prospect record, even parent and guardian email
addresses.
Up to four email address types can be sent from Recruiter to Banner. Email address code
tape values must be set up on SOTCNVT for conversion. Required values are delivered
for table name
EMAL with the conversion code of UPDATE ME.
Warning! Use a different conversion code for each of the required EMAL
tape values (PROSPECT, PARENT1, PARENT2, and GUARDIAN).
Otherwise, loader process errors can occur.
When email addresses are pushed to Banner, only one email address can be a preferred
email address. The Web Service Loader process uses the following hierarchy to
determine which email address is preferred. All other email addresses have the Preferred
Indicator set to
N.
• The PROSPECT email address (if sent) is the preferred address.
• If the PROSPECT email address is not sent, the PARENT1 email address is the
preferred address.
• If the PARENT1 email address is not sent, the PARENT2 email address is the preferred
address.
• If the PARENT2 email address is not sent, the GUARDIAN email address is the
preferred address.
Here is the field mapping for the email fields.
Extracurricular Activities and Interests
Extracurricular activities from Recruiter can be loaded into Banner as interests. This
information can be viewed in the Sources and Interests block on the Recruit Prospect
Information Form (SRARECR) when loading a prospect and in the Sources, Interests, and
Comments block on the Admissions Application Form (SAAADMS) when loading an
application.
If a prospect answers Yes to the Are you interested in campus housing? question in
Recruiter, the tape value of
HOUSING will be checked for a conversion code value on
SOTCNVT. The record is delivered for table name
INTS with the conversion code of
UPDATE ME.
Recruiter Banner SOTCNVT Conversion
Email Address
GOREMAL_EMAIL_ADDRESS
N/A
Email Address Type
GOREMAL_EMAL_TYPE
Tape value PROSPECT (EMAL)
Tape value PARENT1 (EMAL)
Tape value PARENT2 (EMAL)
Tape value GUARDIAN (EMAL)

661
Banner Student User Guide | Recruiting
Use the INTERESTMAX, LOADINTEREST, and MAJOR2INTEREST rules on the
Electronic Admissions Application Rules Form (SAAERUL) to process activities and
interest data.
Here is the field mapping for the extracurricular activities and interests fields.
Admissions Applications
Admissions applications from Recruiter can be loaded into Banner. This information can
be viewed in the Application block on the Admissions Application Form (SAAADMS). Each
Recruiter application should only be sent from Recruiter to Banner one time. When a new
application is created from Recruiter, a communication plan is also created in Banner.
The
CREATENEWAPPL rule on the Electronic Admissions Application Rules Form
(SAAERUL) must be set to
Y in order to create application records in Banner.
When the application has been sent from Recruiter, the Application Originated from
Recruiter indicator is checked on SAAADMS. The application ID number from Recruiter is
stored in the SRBRAID table.
Here is the field mapping for the application fields.
Recruiter Banner SOTCNVT Conversion
Are you interested in
campus housing?
SORINTS_INTS_CODE
Tape value HOUSING (INTS)
Extracurricular Activity
Type
SORINTS_INTS_CODE
If values do not match (INTS)
Recruiter Banner SOTCNVT Conversion
Academic Program Curriculum
Uses SRARICC crosswalk
N/A
Academic Level
SORLCUR_LEVL_CODE
N/A
Anticipated Entry Term
SARADAP_TERM_CODE_ENTRY
N/A
Decision Plan
SARADAP_ADMT_CODE
If values do not match (ADMT)
Course Load
SARADAP_FULL_PART_IND
N/A
Admit Type
SARADAP_STYP_CODE
If values do not match (STYP)
Prospect Source
SARRSRC_SBGI_CODE
If values do not match (SBGS)
Location
SORLCUR_CAMP_CODE
If values do not match (CAMP)
Graduate Degree Sought
SARADAP_EGOL_CODE
If values do not match (EGOL)
Mark Applied On
SARADAP_APPL_DATE
N/A
662
Banner Student User Guide | Recruiting
Curriculum and Academic Program Data
When applications and prospects are loaded into Banner from Recruiter, curriculum data
is included. Curriculum data is stored in the Academic Program field in Recruiter. You will
need to associate academic programs with Banner curriculum values (level, degree,
college, major, and program) before using the integration.
The Recruiter Integration Curriculum Crosswalk Form (SRARICC) is used to maintain this
association. You can use this form to enter the data manually, or you can run the Recruiter
Integration Curriculum Crosswalk Process (SRRRICC) to generate academic programs
and associate them with Banner curriculum fields. The academic programs and curriculum
field mappings must exist on SRARICC in order for curriculum data to be loaded from
Recruiter.
Here is the field mapping for the curriculum fields.
Generate Academic Programs
The Recruiter Integration Curriculum Crosswalk Process (SRRRICC) generates academic
programs names from existing curriculum data using a rule defined on the Business Rules
Form (GORRSQL).
Note: You can use your own custom process to populate the SRARICC
form if you prefer.
A sample SQL statement is delivered as seed data for use on GORRSQL for the Process
value (
nnn) and the Rule value nnn_CURR_CROSSWALK, where nnn is the value you
entered during installation. The SQL statement can be modified to fit your requirements.
The delivered statement uses existing curriculum data to derive academic program names
and populate the Recruiter Integration Curriculum Crosswalk Table (SRBRICC). Each
academic program name must be unique. If multiple curriculum records result in the same
academic program name, only one is written to SRBRICC, and the duplicates are listed on
the Control Report.
Application ID
SRBRAID_APPL_ID
N/A
Recruiter Banner SOTCNVT Conversion
Academic Program
SORLCUR_DEGC_CODE
SORLCUR_COLL_CODE
SORLCUR_PROGRAM
(optional)
SORLCUR_MAJR_CODE
SORLFOS_LFST_CODE
(set to
MAJOR)
N/A (Uses SRARICC crosswalk)
Recruiter Banner SOTCNVT Conversion

663
Banner Student User Guide | Recruiting
Note: Please refer to the “Alternate Sample SQL for Generating
Academic Programs” topic below for more information on using SQL to
generate academic programs from curriculum rules, rather than from
historical curriculum data.
After the initial run of SRRRICC, if a large number of duplicate academic program names
is reported, you may want to delete all records from SRBRICC, refine the GORRSQL
statement that is used to build the academic program name, and rerun the process to
generate the SRBRICC records. If only a small number of duplicates is reported, you may
choose to create academic program names for those few curriculum records by adding
them manually on the Recruiter Integration Curriculum Crosswalk Form (SRARICC). Once
the data has been populated, it can be reviewed and maintained on SRARICC.
SRRRICC can be rerun at any time to create academic program names for new
curriculum records that have been added to Banner since the initial run. After this process
is run, the Recruiter Validation Provisioning Process (SRRRVAL) should be run to
provision Recruiter with the academic programs.
Repopulating Banner
When SRRRICC is run additional times, only new records are inserted into SRARICC
when no existing match is found on level, college, degree, major, and program. Existing
records are not modified. If you delete all records from the SRBRICC table and then run
SRRRICC, the previously provisioned academic program records will be broken.
Validation errors will be returned for records being pushed, and the integration will not be
successful.
You can delete all the records in the SRBRICC table and re-run SRRRICC as often as
needed, until the academic programs have been provisioned. However, once the
academic programs have been provisioned to Recruiter, you should not delete any
existing records.
If you generate the SRARICC data in a Banner test database that has been cloned from
your Banner production database, provision the academic programs to your Recruiter
production database, perform testing, and then choose to populate the SRBRICC table in
the Banner production database, you need to do the following. Export the SRBRICC data
from the Banner test database, and insert the data into the Banner production database,
instead of running SRRRICC. After the insert is complete, reset the
SRBRICC_SURROGATE_ID_SEQUENCE column to the highest sequence number in
the SRBRICC table. This prevents new records from reusing a sequence number.
Alternate Sample SQL for Generating Academic Programs
Here is an alternate SQL example that will generate academic programs from curriculum
rules, rather than from historical curriculum data. Institutions who have not yet created
academic programs should evaluate both examples to determine which example is best
for their needs.
Note: If you modify either sample, do not delete the Start Date bind
variable, or the process will not run. If you do not want Start Date to be
used as part of your query, you can modify the logic involving the bind

664
Banner Student User Guide | Recruiting
variable as follows, so that the bind variable will have no effect. Note that
the value of NNN is used here only as an example.
:NNN_CURR_START_DATE = :NNN_CURR_START_DATE
The delivered statement uses existing curriculum data to derive academic program names
and populate the Recruiter Integration Curriculum Crosswalk Table (SRBRICC). If your
institution uses the rules on the Curriculum Rules Form (SOACURR), you may choose to
use those rules, instead of existing curriculum data, to derive academic program names.
Here is s an example of how GORRSQL could be rewritten to use curriculum rules.
SELECT sobcurr_levl_code,
NVL(sorcmjr_desc,stvmajr_desc||', '||stvdegc_desc)
AS acad_prog_name,
sobcurr_coll_code,
sobcurr_degc_code,
sorcmjr_majr_code,
sobcurr_program
FROM stvmajr, stvdegc, sorcmjr, sormcrl, sobcurr
WHERE sobcurr_curr_rule = sorcmjr_curr_rule
AND sobcurr_curr_rule = sormcrl_curr_rule
AND sobcurr_degc_code = stvdegc_code
AND sorcmjr_majr_code = stvmajr_code
AND sormcrl_rec_ind = 'Y'
AND sobcurr_prim_roll_ind = 'Y'
AND sobcurr_lock_ind = 'Y'
AND sorcmjr_disp_web_ind = 'Y'
AND sormcrl_rec_ind = 'Y'
AND sormcrl_adm_ind = 'Y'
AND :NNN_CURR_START_DATE = :NNN_CURR_START_DATE
ORDER BY sobcurr_program
Prospects
Prospect data from Recruiter can be loaded into Banner. This information can be viewed
in the Recruit Data block on the Recruit Prospect Information Form (SRARECR).
The following electronic processing rules can affect how prospect data is loaded into
Banner. You can access these rules on the Electronic Admissions Application Rules Form
(SAAERUL).
• CREATENEWRECR
• CREATESRCE
• PRIMESRCE
• CREATEMATERIALS
• COMMPLAN

665
Banner Student User Guide | Recruiting
• CREATECONT
• MCREATENEWRECR
• NMCREATENEWRECR
• UPDATEIFAPP
Here is the field mapping for the prospect fields.
High Schools
High school information from Recruiter can be loaded into Banner. This information can be
viewed in the High School Details block on the High School Information Form
(SOAHSCH).
Banner's graduation date is derived from the Recruiter Attended To Month and Attended
To Year values when the Recruiter Graduated field is
Y. The Day is set to 01.
Conversions should be set up on SOTCNVT for unlisted high schools and home
schooling. Only one unlisted high school can be loaded per prospect, as Banner only
allows each high school code to be used once per person.
• Unlisted high school records are sent from Recruiter with a code of 000000. These
should be converted to the correct unlisted high school code in Banner using table name
SBGH.
• Home schooling records are sent from Recruiter with a code of 999999. These should
be converted to the correct home schooling code in Banner using table name
SBGH.
Recruiter can store both the organization code (Banner's
STVSBGI_CODE) and CEEB
code. The integration loads high school data from Recruiter using either of these fields as
follows.
Recruiter Banner SOTCNVT Conversion
Academic Program Curriculum
Uses SRARICC crosswalk
N/A
Academic Level
SORLCUR_LEVL_CODE
N/A
Anticipated Entry Term
SRBRECR_TERM_CODE
N/A
Decision Plan
SRBRECR_ADMT_CODE
If values do not match (ADMT)
Course Load
SRBRECR_FULL_PART_IND
N/A
Admit Type
SRBRECR_STYP_CODE
If values do not match (STYP)
Prospect Source
SRRRSRC_SBGI_CODE
If values do not match (SBGS)
Location
SORLCUR_CAMP_CODE
If values do not match (CAMP)
666
Banner Student User Guide | Recruiting
• If the organization code is sent from Recruiter, the process checks to see if it exists on
the Source/Background Institution Code Validation Form (STVSBGI). If the organization
code exists, the record is loaded to Banner with that code. If the organization code does
not exist, an error is returned.
• If the organization code is not sent from Recruiter, the CEEB code is used instead. The
process checks SOTCNVT for the conversion code using table name
SBGH. If the
conversion code is found, the record is loaded to Banner with that code. If the
conversion code is not found, an error is returned.
Use the
HSCHADMR rule on the Electronic Admissions Application Rules Form
(SAAERUL) to specify the admissions request checklist code that should be loaded when
high school data is pushed.
Here is the field mapping for the high school fields.
Prior Colleges
Prior college information from Recruiter can be loaded into Banner. This information can
be viewed in the Prior College block on the Prior College Form (SOAPCOL).
The attended to and attended from dates in Banner are derived from the Attended To
Month, Attended From Month, Attended To Year, and Attended From Year values in
Recruiter. The Day is set to
01. The degree code is hardcoded as 000000 to retain
attendance and degree dates.
Conversions should be set up on SOTCNVT for unlisted colleges. Only one unlisted
college can be loaded per prospect, as Banner only allows each college code to be used
once per person.
Unlisted college records are sent from Recruiter with a code of
9999. These should be
converted to the correct unlisted college code in Banner using table name
SBGI.
Recruiter can store both the organization code (Banner's
STVSBGI_CODE) and CEEB
code. The integration loads college data from Recruiter using either of these fields as
follows.
Recruiter Banner SOTCNVT Conversion
Organization Code or
CEEB Code
SORHSCH_SBGI_CODE
CEEB, Home School, and Unlisted
High School (SBGH)
Graduated Y/N
Attended To Month
Attended To Year
SORHSCH_GRADUATION_DATE
N/A
Official Graduation Rank
SORHSCH_CLASS_RANK
N/A
Official Graduation Class
Size
SORHSCH_CLASS_SIZE
N/A
Official Graduation GPA
SORHSCH_GPA
N/A
667
Banner Student User Guide | Recruiting
• If the organization code is sent from Recruiter, the process checks to see if it exists on
the Source/Background Institution Code Validation Form (STVSBGI). If the organization
code exists, the record is loaded to Banner with that code. If the organization code does
not exist, an error is returned.
• If the organization code is not sent from Recruiter, the CEEB code is used instead. The
process checks SOTCNVT for the conversion code using table name
SBGI. If the
conversion code is found, the record is loaded to Banner with that code. If the
conversion code is not found, an error is returned.
Use the
PCOLADMR rule on the Electronic Admissions Application Rules Form
(SAAERUL) to specify the admissions request checklist code that should be loaded when
college data is pushed.
Here is the field mapping for the prior college fields.
Proposed Application Decisions
Proposed admissions application decisions from Recruiter can be loaded into Banner.
This information can be viewed in the Decision Data block on the Admissions Decision
Form (SAADCRV). Each time a proposed decision for an application is sent from
Recruiter, another decision is added in Banner.
Use the
LOADDECISIONS rule on the Electronic Admissions Application Rules Form
(SAAERUL) to process proposed admissions application decisions.
Here is the field mapping for the proposed decision fields.
Recruiter Banner SOTCNVT Conversion
Organization Code or
CEEB Code
SORPCOL_SBGI_CODE
CEEB and Unlisted College
(SBGI)
Attended From Month
Attended From Year
SORDEGR_ATTEND_FROM
N/A
Attended To Month
Attended To Year
SORDEGR_ATTEND_TO
N/A
Degree Type
SORDEGR_DEGC_CODE (000000)
N/A
Degree Date
SORDEGR_DEGC_DATE
N/A
Recruiter Banner SOTCNVT Conversion
Enterprise Identifier
GOBUMAP_UDC_ID
Used to identify applicant
N/A
668
Banner Student User Guide | Recruiting
Test scores
Official test scores loaded from test agencies into Recruiter can be sent to Banner for your
prospects using a Web Service. This allows you to do the following:
• Load Recruiter test/subtest type combinations into Banner and map them to
corresponding Banner test codes.
• Send official test score records with associated subtests, including test date, test score
source, test type, subtest, and test score.
• View and correct test score errors and resubmit transactions.
• Extend test score integration to include additional fields which can be loaded in Banner
using a custom PL-SQL package.
Before attempting to send test scores, you need to enter Banner test code values data in
the Recruiter Integration Test Code Crosswalk Form (SRARITC) to cross reference
Recruiter test and subtest names with Banner test codes.
SRARITC is used to maintain the test code crosswalk for the interface. These values are
used to load test data into Banner for prospects and applications that are sent from
Recruiter. A Banner test can be mapped to multiple combinations of Recruiter test types
and subtest types.
The Recruiter test and subtest names are loaded into the SRBRITC table as part of the
BRIM upgrade. You also need to enter conversion values for test score sources from
Recruiter on SOTCNVT using the
TSRC validation table code.
Note: The term will be set to 999999 in SORTEST for all test scores
loaded from Recruiter.
New test scores will be loaded when the test code and test date do not match an existing
record in Banner for the prospect.
• When the same test code and test date exist in Banner, but the score is different, the
record will not be pushed, and an error message is generated.
• When the same test code, test date, and score exist in Banner, the record is ignored and
not pushed.
• When the test score is out of range, as defined on STVTESC, the record will not be
pushed, and an error message is generated.
• When test scores cannot be loaded into the Banner temporary tables due to an invalid
test code or test source code, an error message is generated.
Application ID
SRBRAID_RECRUITER_APPL_ID
Use to identify application
N/A
Proposed Decision
SARAPPD_APDC_CODE
If values do not match (APDC)
Recruiter Banner SOTCNVT Conversion
669
Banner Student User Guide | Recruiting
The Tape ID field on the Electronic Prospect Inquiry Form (SRIPREL) displays a value of
TESTS when test scores are have been pushed from Recruiter.
Recruiter test data source values are delivered for each test type and cannot be changed.
You should compare these test data source values to Banner test source codes on
STVTSRC and add conversions on SOTCNVT for those that are different. When they are
added to SOTCNVT, the tape value should be entered in upper case only.
A record is delivered as seed data with the BRIM upgrade. It is used to load a conversion
record for the Recruiter
College Board test score source value, because this value
exceeds the 11 character field limit on SOTCNVT. The tape value is truncated to
COLLEGE BOA and should not be changed. Any test scores sent from Recruiter with the
College Board test source will use the Banner
COLLEGE BOA truncated value.
Here are the fields that are loaded into Banner.
Manage the Integration
You can use the Banner Recruiter Integration Manager (BRIM) to manage errors and
messages and to perform various tasks, such as:
• Test the integration connection using the Connection Test button on the Configuration
page.
• View and configure the Recruiter Response Service URL on the Configuration page.
• Specify the customer field package.
• View event errors and stop or start the consumer.
Use the Event Errors page in BRIM to review message-based validation errors for
events. Errors are logged based on the preset threshold. Event errors are listed by error
ID, event name, and message. You can also review event error message details and
associated XML.
Communication errors are retried until the retry threshold has been met. These errors
cannot be viewed.
The JMS Subscription will pause when the thresholds are met. You can then back up or
delete existing errors and restart the subscription using the Start Consuming button.
This will resume message processing.
Recruiter Banner Conversion
Test Date
SORTEST_TEST_DATE
Test Score Source
SORTEST_TSRC_CODE SOTCNVT - TSRC
Score
SORTEST_TEST_SCORE
Test and Subtest
SORTEST_TESC_CODE
SRARITC form

670
Banner Student User Guide | Recruiting
• View and resend loader errors.
The Loader process validates messages and attempts to load data to the Banner
temporary tables. Errors can occur when a value in the XML message does not pass a
validation check in Banner. If the connection test was successful, but data is not
appearing in Banner as expected, you should check for loader errors.
Use the Loader Errors page in BRIM to review records with errors by error ID, last name,
Recruiter ID, and message type. You can view event error message details, modify the
XML, and resend the message. The updated XML message will be resent, which
deletes the loader error. If the record still appears with an error, additional corrections
are needed.
• View match and push messages.
After data has been loaded to the Banner temporary tables, the common matching
process and the push process are used to match and move the data into the permanent
tables. If the data cannot be matched to an existing record or identified as a new record,
the record is put into suspense. If the data cannot be pushed to Banner because
business rules were not satisfied, the record is put into suspense.
Use the Match/Push Messages page in BRIM to review the match and push messages
by error ID, Banner ID, last name, Recruiter ID, process, and message. You can view
error message details and perform corrective actions.
You can also review errors and manually update records in Banner on the Electronic
Prospect Inquiry Form (SRIPREL).
For more information on using BRIM, please refer to the Integrating Recruiter with Banner
Manual. This guide includes a troubleshooting section for error handling.
Extend the Integration
You have the option to send customized information for prospects and admissions
applications from Recruiter to Banner. This applies to new custom fields and prospect
contact objects in Recruiter. It also includes existing fields you may want to export at a
later time or fields already included in the export that you may want to handle differently.
You can send custom data for the Contact Entity table in Recruiter and for application
entities. More than one application type can exist, and each application type has a specific
entity in Recruiter.
Customization is available for application entities. Some related prospect data in other
tables is available for the contact entity. You are permitted to select data that has already
been sent. You can also select data from the entity that was not sent in the default
delivered integration.
The additional fields can be added to the export map in Recruiter. They are then
appended to the XML data and loaded to the SRTCSTM temporary table, whether or not
values exist, when a prospect or admissions application is sent to Banner.

671
Banner Student User Guide | Recruiting
Note: Records in the SRTCSTM table are purged along with electronic
prospect records from other temporary tables when the Electronic
Prospect Purge Process (SRTPURG) is run.
A custom PL-SQL package can be used by the Banner push process to manage the new
data. Banner APIs can also be called to update the Banner database. If errors occur
during the push process for the custom fields, they are logged as push errors. These
errors can be viewed on the Match/Push Messages page in BRIM.
For more information on topics such as: selecting the template you wish to extend and
extra fields you wish to include, using XML content for custom fields, coding the PL-SQL
package in Recruiter, and setting up Oracle security and grants for the package, please
refer to the Integrating Recruiter with Banner Manual.
Technical Information
Here is a more technical description of the data processing, as well as a list of tables and
packages used with the integration.
Data is sent from Recruiter to Banner in XML format through a Web Service and is then
loaded to the Banner temporary tables. Recruiter receives an ERP Response XML
message from the Web Service that indicates whether the XML format is good or bad.
Good XML is accepted for processing by Banner. Bad XML produces an error message.
The Web Service does not use the SRTLOAD process but rather a Loader process
specifically created for this integration. After a successful load to the temporary tables has
occurred, Banner performs common matching which results in one of the following
outcomes:
• The person is found to match an existing person in Banner.
• The person is determined to be new.
• Multiple possible matches exist in Banner, and the person is put into suspense in the
temporary tables.
Once common matching has taken place for the person, the data is pushed to the
appropriate Banner permanent tables. If the push process fails, an error is produced, and
the data is not loaded to the Banner permanent tables.
Banner Tables
The following Banner Student and Banner Financial Aid tables are used specifically with
the integration.
• Financial Aid Integration Rules Table (RORINTR) - Banner Financial Aid
• Recruiter Application ID Table (SRBRAID)
• Recruiter Integration Configuration Table (SRBRCFG)

672
Banner Student User Guide | Recruiting
• Recruiter ID Table (SRBRCID)
• Recruiter Integration Curriculum Crosswalk Table (SRBRICC)
• Recruiter Integration Test Code Crosswalk Table (SRBRITC)
• Recruiter Date-Based Events History Table (SRREHST)
• Recruiter Custom Field Table (SRTCSTM)
• Parent/Guardian Temporary Table (SRTFOLK)
• Recruiter Loader Error Temporary Table (SRTLERR)
• Recruiter Match/Push Messages Temporary Table (SRTRCMP)
• Recruiter Outbound Events Error Temporary Table (SRTRERR)
Packages
The following packages are used specifically with the integration.
• Push for Banner Recruiter Integration Package (SRKPBRI/SRKPBRI1)
This package is used to push data from Recruiter to Banner. It is a clone of the of the
SRKPREL package, with changes made to support the integration enhancements.
• Recruiter Match/Push Package (SRKRCMP/SRKRCMP1)
This package is used to process Recruiter prospect records that have already been
loaded into the Banner temporary tables. The procedures in this package are called by
the middle tier using a Web Service to match and push records from the temporary
tables into Banner. Only one prospect is processed at a time by these procedures.
• Utilities Related to Recruiter Integration Web Services Package (SRKRCWS/
SRKRCWS1)
This package is used to process Recruiter Web Service utilities and validation for
prospect records passed to Banner.
• Recruiter Curriculum Crosswalk Package (SRKRICC/SRKRICC1)
This package is used to support the Recruiter to Banner interface. It is called by the
SRRRICC process to create the Recruiter integration curriculum crosswalk (SRBRICC)
records from existing curriculum records using a GORRSQL business rule.
Multi-Entity Processing
This functionality supports the ability to integrate between multiple Recruiter organizations
when Banner is MEP-enabled. The Banner Recruiter Integration Manager (BRIM) can
support multiple configurations, and the BRIM user interface recognizes your MEP
policies and permits you to switch contexts.

673
Banner Student User Guide | Recruiting
This allows the following to occur:
• Applications and prospects sent from a particular organization in Recruiter to Banner will
be associated with the correct entity. This allows Banner users who have permission to
view data associated with that entity to view the prospect information or applications in
Banner.
• Application and prospect status information sent from a specific entity in Banner will be
associated with the correct person in the corresponding organization in Recruiter.
Note: MEP policies can be applied to Banner error and message log
tables used by BRIM to control which errors users can see. See
Integrating Recruiter with Banner for details.
MEP and Banner Tables
When you have a single Recruiter organization and you have not MEP-enabled your
Banner Student tables, you will handle the organization as a non-MEP installation. When
you have multiple Recruiter organizations and you have MEP-enabled Banner Student,
you can MEP any of the tables mentioned below.
MEP-enabled institutions will have to decide which tables to configure for MEP. However,
the following three tables must be configured.
• SRBRCFG
• SRBRCID
• SRREHST
If you want to keep BRIM error messages separate for each institution, you should
configure the following three tables as well:
• SRTLERR
• SRTRERR
• SRTRCMP
You should also consider your existing MEP implementation and the use of the following
tables that support the integration, to determine if policies should be added to them.
• RORINTR
• SRBRAID
• SRBRICC
• SRBRITC
• SRTCSTM
• SRTFOLK

674
Banner Student User Guide | Recruiting
MEP and Provisioning
The SRRRPRO and SRRRVAL provisioning processes will append the user's VPDI
context onto the
.csv filename, such as AcademicProgramProvision
Prospect_NORTH.csv
. This ensures that the data is imported into the appropriate
Recruiter organization for institutions that are using MEP.
Banner Document Management (BDM)
Banner institutions that use Banner Document Management (BDM) can access
integration points in Recruiter. These integration points allow the following to take place.
• Enable admissions staff to view a list of all documents within the Recruiter console. The
documents are related to each prospective student and are stored in BDM.
• Allow admissions staff to use a link to access the BDM documents, respecting existing
security rules.
• Permit admissions documents received through Recruiter to be automatically pushed
into BDM for permanent storage.
Additional Seed Data
Additional seed data values are used for the following Banner forms and tables.
• Electronic Admissions Application Rules Form (SAAERUL)
• Tape Code Conversion Form (SOTCNVT)
• Electronic Prospect Load Validation Form (STVPREL)
• EDI Rule Group Validation Form (STVEGRP)
• Interface Validation Form (STVINFC)
• Recruiter Integration Configuration Table (SRBRCFG)
• Business Rule Process Code Validation Table (GTVSQPR)
• Business Rule Code Validation Table (GTVSQRU)
• Business Rule Parameter Code Validation Table (GTVSQPA)
• Business Rules Table (GORRSQL)
Please note that the seed data described below for STVPREL, STVINFC, GTVSQPR, and
SRBRCFG can be created during the Recruiter installation process using one of two
methods. It can be created automatically using a Windows installer or a Unix/Linux
installer, or it can be created manually using SQL scripts.
When the seed data is created manually, the code values are entered at prompts during
the installation process. This data is documented here for your information, since it applies
to Banner forms and tables.

675
Banner Student User Guide | Recruiting
Note: Code values of NNN shown below are used only as examples. Your
codes will be based on the values entered at prompts during the Recruiter
installation process.
Refer to the following topics in the Integrating Recruiter with Banner Manual for more
information, examples, and step-by-step instructions for creating seed data automatically
or manually.
• Create a Banner Recruiter Integration User
• Install the Banner Recruiter Integration Seed Data
• Banner Recruiter Integration Seed Data Windows Installer
• Banner Recruiter Integration Seed Data Unix Installer
• Manually Creating Seed Data Using SQL Scripts
Electronic Prospect Load Validation Form (STVPREL)
The electronic prospect code is entered at a prompt during the Recruiter installation
process. The value of
NNN is used here only as an example.
The Interface Code field will be populated with the value entered at the Interface Code
prompt during the Recruiter installation process. See the “Interface Validation Form
(STVINFC)” topic below.
EDI Rule Group Validation Form (STVEGRP)
The EDI rule group code is set to the same value as the electronic prospect code, that is,
the value that was entered at the prompt for the electronic prospect code during the
Recruiter installation process. See the “Electronic Prospect Load Validation Form
(STVPREL)” topic above.
Interface Validation Form (STVINFC)
The interface code is entered at a prompt during the installation process. The value of
NNN is used here only as an example.
Prospect
Code Description
Interface
Code
Tape
Code
Enter on
WEB
WEB Page
ID
NNN Banner
Recruiter
Integration
Populated at
installation
Null No N/A
EDI/Web Rule
Group Code Description System Required
NNN Banner Recruiter Integration Yes

676
Banner Student User Guide | Recruiting
The Common Matching Source field will be delivered as Null, but a value is required
for using the Recruiter interface. You must enter the desired value in this field.
Recruiter Integration Configuration Table (SRBRCFG)
The Electronic Prospect Code field is set to the value that was entered at the prompt
during the Recruiter installation process. See the “Electronic Prospect Load Validation
Form (STVPREL)” topic above. The value of
NNN is used here only as an example.
The Recruiter Response Service URL is entered at a prompt during the Banner Recruiter
Integration Manager (BRIM) installation process. The Recruiter Response Service URL
refers to the response service URL of the Recruiter product. If you do not know this value,
you can specify any syntactically correct URL. The URL
http://localhost:80/
brim
is an example value.
Business Rule Process Code Validation Table (GTVSQPR)
The rule process code is entered at a prompt during the Recruiter installation process. The
default value is the STVPREL value. The value of
NNN is used here only as an example.
Business Rule Code Validation Table (GTVSQRU)
The rule code is created during the Recruiter installation process. The rule code is
comprised of the process code plus “_CURR_CROSSWALK”. This code is used on
GORRSQL. The value of
NNN is used here only as an example.
Interface
Code Description
Test
Source
Source
Code
Contact
Type
Common
Matching
Source
Common
Matching
Description
NNN Banner
Recruiter
Integration
Null Null Null Null Null
Electronic Prospect Code Recruiter Service URL
NNN http://localhost:8080.brim
Rule Process Code Description System Required
NNN Banner Recruiter Integration No
Rule Code Description System Required
NNN_CURR_CROSSWALK Build curriculum crosswalk for
Recruiter integration
No
677
Banner Student User Guide | Recruiting
Business Rule Parameter Code Validation Table (GTVSQPA)
The parameter code is created during the Recruiter installation process. The parameter
code is comprised of the process code plus “_CURR_START_DATE”. This code is used
on GORRSQL. The value of
NNN is used here only as an example.
Business Rules Table (GORRSQL)
A sample curriculum crosswalk query is inserted during the Recruiter installation process
for your process code/rule code combination. The value of
NNN is used here only as an
example.
Note: The Recruiter Integration Curriculum Crosswalk Process
(SRRRICC) is used to generate academic program curriculum data using
a GORRSQL business rule.
A sample SQL statement is delivered as GORRSQL seed data. It should
be modified to suit your business needs. The statement extracts existing
curriculum data and uses it to construct the academic program names in
the Recruiter Integration Curriculum Crosswalk Table (SRBRICC).
After the SRRRICC has been run process to initially populate the
SRBRICC table, the curriculum crosswalk data can be reviewed and
maintained on the Recruiter Integration Curriculum Crosswalk Form
(SRARICC).
Parameter Code Description Data Type
NNN_CURR_START_DATE Start date for the curriculum
query
DATE
Process Code Rule Code Rule Data
NNN NNN_CURR_CROSSWALK See SQL Statement and
Parsed SQL Statement
data

678
Banner Student User Guide | Recruiting
Recruiting Reports
The following reports are run through the Recruiting module:
Please refer to the Banner Student Reports and Processes Handbook for report
descriptions, instructions, parameter definitions, and output samples.
Rec/Enroll Analysis - How Learned Report (SRRENRH)
Recr/Enrl Analysis - Source/Recr Report (SRRENRL)
Recruits Never Applied to Inst. Report (SRRINQR)
Communication Plan Processing Report (SORCPLN)
Electronic Prospect Load (SRTLOAD)
Electronic Prospect Purge (SRTPURG)
Search Tape Matching Process (SRRSRIN)
Migrate Electronic Prospects Process (SRRPREL)
Electronic Prospect Email Process (SRREMAL)
Recruiter Prospect Provisioning Process (SRRRPRO)
Recruiter Validation Provisioning Process (SRRRVAL)
Recruiter Integration Crosswalk Process (SRRRICC)

679
Banner Student User Guide | Admissions
Admissions
This chapter discusses processing and procedure information for Admissions.
Admissions Procedures
Here are tasks you can perform in this module.
Build Admission Credentials
The required admissions documents for categories of applicants are built on the
Admissions Checklist Rules Form (SAACHKB) based upon institution policies. If the data
built to define the rules matches the applicant's data when an application is entered on the
Admissions Application Form (SAAADMS), the system automatically identifies and
records items the applicant must submit to the institution to continue application
processing. These items can be viewed and updated in the Checklist window of the
Admissions Application Form (SAAADMS).
If you create a high school, prior college, test, or international record with a checklist item,
and then create an application for that person, but the checklist defined on SAACHKB for
that applicant’s program does not include the checklist entered on the source form
(SOAHSCH, SOAPCOL, SOATEST, or GOAINTL), then the checklist item will be created
on the application and marked as received.
For example:
1. Create an admissions request checklist code of HS90 on STVADMR.
2. Create a high school record for the person, and add HS90 as the checklist item.
3. Set up checklist rules for UG, BA - Major MATH as high school transcript HST1 and
test score TSTS on SAACHKB.
4. Create an application for the person with the checklist code of HS90. The checklists
created will be for HST1, TSTS, and HS90.
Checklist processing records the origin or source of a checklist item, specifically if the item
is from an external source, and tracks the status of the checklist item. The new source or
checklist origin will be populated with the value
BASELINE when a checklist item is
created. This value can be changed if the checklist item was not automatically generated
by system. The checklist origin code is displayed on SAAADMS and SAAACKL.
Checklist status codes can be used to communicate additional information to a student
about a requirement. The checklist status code is displayed on SAAADMS and SAAACKL.
For example, a high school transcript has been received by an institution, but an
updated transcript is needed that reflects additional semesters of coursework. A

680
Banner Student User Guide | Admissions
document status that indicates that an updated transcript is needed with the 7th
semester grades provides the necessary detail to the staff and applicant.
In another example, an unofficial transcript is received by an institution. The applicant
needs to be informed that the transcript was received, but an official transcript is
required. The document status can also be used to communicate this requirement to
the applicant.
Build Automated Decision Rules
The Admissions Decision Rules Form (SAADCSN) is used to enter the institution's
admission policies to be used by the system when calculating a decision on an applicant.
Application information, including residency, level, student type, college, degree, major,
program, and campus is entered on this form and is then compared to the admissions
application data. Rules are also defined to compare high school information, prior college
information, test scores, and ratings against data submitted by the applicant. You can
design automatic decision rules for applicants with the level of complexity you require.
A procedure in the SAKDCSN package is used to process the rules for all application
decisions. This procedure is called by all the processes that allow entry of a decision, such
as SAADCRV, SAADCBT, SARBDSN, and the Admissions module of Banner® Student
Self-Service. The Admissions Decision API is used with the Admissions Application
Repeating Table (SARADAP). This API is called by the procedure that is used to process
admissions application decisions.
sakdcsn.p_process_decsn
The Application Decision Procedure (sakdcsn.p_process_decsn) is used to house
the business logic for processing admissions application decisions. All processes that
allow you to insert a decision code call this procedure. The one exception to this is
SAAQUIK, which uses the API to insert the decision.
This procedure will perform the following activities for each new decision:
1. Validate that the last decision for the application does not have the same decision
code.
2. Verify the existence of a general student record and return a warning, if appropriate.
3. Check for the existence of registration records and return either a warning or an error
message, if appropriate.
4. Validate the curriculum.
5. Insert a decision, if appropriate.
6. Insert a general student record, if appropriate.
7. Copy the curriculum and field of study, if appropriate.
8. Push the application field of study to a new curriculum status, if appropriate.
Although an institution can define an unlimited number of admission decision codes, there
are essentially six different types of codes:
Significant, Not Significant,
Institutional Acceptance, Institutional Rejection, Applicant

681
Banner Student User Guide | Admissions
Acceptance, and Inactive Application. This piece of logic will define the
necessary validations to be performed, warning/error messages to be displayed, and
other actions to be taken when a decision code is to be inserted into the SARAPPD table.
Also, when the decision code being entered is an Applicant Acceptance type, the logic will
determine the priority value associated with the learner curriculum record(s) to be inserted
into the SORLCUR table.
Significant Decision Codes
The Significant Decision checkbox is checked on STVAPDC. The decision code should
be inserted into the SARAPPD table, and the Application Status field updated to
D.
Note: The Significant Decision checkbox on STVAPDC can be checked
(set to
Y) independently of each of the other checkboxes on the form. As
such, when it is checked in combination with any of the other checkboxes,
updating the Application Status field to
D should be part of that decision
code type's processing as well.
Not Significant Decision Codes
The Significant Decision checkbox is not checked on STVAPDC. The decision code
should be inserted into the SARAPPD table without performing additional validation or
updates.
Institutional Acceptance Decision Codes
The Institution Acceptance checkbox is checked on STVAPDC. The decision code
should be inserted into the SARAPPD table without performing additional validation or
updates.
Inactive Application Decision Codes
The Inactive Application checkbox is checked on STVAPDC. Before a new record is
inserted into the SARAPPD table, the system should perform the following checks.
1. If the applicant has registration records in the same term as the entry term on the
application, then:
1.1. Display a warning message that registration exists, but no general learner
record update is allowed.
1.2. Execute the package to push the appropriate curriculum status codes on the
application curriculum.
2. If the applicant does not have any registration records for the application term, but a
general learner record exists for the application entry term, then:
2.1. If all current and active learner curricula are the same as the current and active
curricula on the application, then:
– Update the student status on the general learner record to
IS.
– Display a warning message that learner records were inactivated.

682
Banner Student User Guide | Admissions
– Execute the package to push the appropriate curriculum status codes on the
application curriculum.
– Execute the package to push the appropriate curriculum status codes on the
learner curriculum.
2.2. If some, but not all of the current and active learner curricula match the current
and active curricula on the application, then:
– Display a warning message that learner records were not inactivated and
more than one current/active learner curriculum record exists.
– Execute the package to push the appropriate curriculum status codes on the
application curriculum.
2.3. If none of the current and active learner curricula match the current and active
curricula on the application, then:
– Display a warning message that other learner curricula exist and learner and
curriculum records were not inactivated.
– Execute the package to push the appropriate curriculum status codes on the
application curriculum.
3. If no registration records exist and no general learner record exists for the entry term
on the application, then:
3.1. Display a warning message that the decision was processed.
3.2. Execute the package to push the appropriate curriculum status codes on the
application curriculum.
Applicant Acceptance Decision Codes
The Applicant Acceptance checkbox is checked on STVAPDC. Before a new record is
inserted into the SARAPPD table, the system should perform the following checks.
1. Obtain the error severity values on SOACTRL from the Inactive current curriculum
in same term, Inactive Current curriculum in previous term, and Cause a
curriculum overload fields.
2. If the applicant has registration records in the same term as the entry term on the
application, compare the priorities on all current and active curricula on the application
to the learner's current and active primary curriculum.
At this point, the process will not allow a decision to be processed if the curriculum
from the application replaces the primary learner curriculum, as this would have an
impact on the assessment of fees.
2.1. If the priority on any current and active curriculum on the application is less than
the priority on learner's current and active primary curriculum, do not allow the
decision to be entered, and display a fatal error message.
2.2. If the priority on all current and active curricula on the application is greater than
the priority on the learner's current and active primary curriculum, allow the
decision to be entered and continue with the next check.
3. Check for the existence of a previous applicant acceptance decision for the
application.

683
Banner Student User Guide | Admissions
3.1. If the most recent significant decision is not an institutional rejection or inactive
application decision, do not allow the decision to be entered, and display a fatal
error message.
3.2. If the most recent significant decision is an institutional rejection or inactive
application decision, and the status on the general student record is inactive,
then:
– Update the status on the general student record to active.
– For each current and active curriculum on the application, if the Application
Preference value is populated, calculate the priority for the learner curriculum
records using the following formula.
– If the Application Preference value is
Null, copy the priority for the learner
curriculum records from the priority values on the application's curriculum
records.
– Validate the curricula and display the appropriate type of message based
upon the error severity settings obtained from SOACTRL and whether the
calling program requires processing of curriculum. (SARBDSN does not
require processing of curriculum.) If the error severity is
Fatal, exit the
procedure.
– Copy the curriculum records to the General Student module. If any of the
curriculum records will be copied with a curriculum activity code of
INACTIVE due to an overload situation, display the appropriate type of
message based upon the error severity setting obtained from SOACTRL.
– Execute the backfill process for the learner record after the curriculum records
have been inserted.
3.3. If there were no fatal or warning messages, display an informational message
that the general student and curriculum records have been updated.
4. If the applicant does not have any registration records but does have a general
student record with an effective term equal to the entry term on the application, then:
4.1. For each current and active curriculum on the application, if the Application
Preference value is populated, calculate the priority for the learner curriculum
records using the formula shown above.
4.2. If the Application Preference value is
Null, copy the priority for the learner
curriculum records from the priority values on the application's curriculum
records.
4.3. Compare the priority values on the new learner curriculum records to the priority
values of existing curriculum records. For the application entry term, if a current
and active learner curriculum record with a priority value that matches one of
the priority values of a new curriculum record, then the following checks occur.
(Application Preference Number X 10) + (Curriculum Priority Number)
SARADAP_APPL_PREFERENCE SORLCUR_PRIORITY_NO from the
application being processed

684
Banner Student User Guide | Admissions
– If the error severity setting is Fatal, display an appropriate message, and
exit the procedure.
– If the error severity setting is
Warning, display a message giving the user
the choice to cancel or continue.
– If the user chooses
Cancel, exit the procedure.
– If the user chooses
Continue, copy the existing learner curriculum record,
giving it an activity status of
INACTIVE and a curriculum status of
ADMITREPLACE.
– Validate the curriculum record, and display the appropriate type of message
based upon the error severity settings obtained from SOACTRL. If the error
severity is
Fatal, exit the procedure.
– Copy the curriculum record to the General Student module. If any of the
curriculum records will be copied with a curriculum activity code of
INACTIVE due to an overload situation, display the appropriate type of
message based upon the error severity setting obtained from SOACTRL.
– Execute the backfill process for the general student record after the
curriculum records have been inserted.
4.4. If there were no fatal or warning messages, display an informational message
that the general student and curriculum records have been updated.
5. If the applicant has a general student record with an effective term not equal to the
entry term on the application, create a new general student record with an effective
term equal to the entry term on the application, then:
5.1. For each current and active curriculum on the application, if the Application
Preference value is populated, calculate the priority for the learner curriculum
records using the formula shown above.
5.2. If the Application Preference value is
Null, copy the priority for the learner
curriculum records from the priority values on the application's curriculum
records.
5.3. Compare the priority values on the new learner curriculum records to the priority
values of existing curriculum records. For the application entry term, if a current
and active learner curriculum record with a priority value that matches one of
the priority value of a new curriculum record, then the following checks occur.
– If the error severity setting is
Fatal, display an appropriate message, and
exit the procedure.
– If the error severity setting is
Warning, display a message giving the user
the choice to cancel or continue.
– If the user chooses
Cancel, exit the procedure.
– If the user chooses
Continue, copy the existing learner curriculum record,
giving it an activity status of
INACTIVE and a curriculum status of
ADMITREPLACE.
– Validate the curriculum record and display the appropriate type of message
based upon the error severity settings obtained from SOACTRL. If the error
severity is
Fatal, exit the procedure.

685
Banner Student User Guide | Admissions
– Copy the curriculum record to the General Student module. If any of the
curriculum records will be copied with a curriculum activity code of
Inactive due to an overload situation, display the appropriate type of
message based upon the error severity setting obtained from SOACTRL.
– Execute the backfill process for the general student record after the
curriculum records have been inserted.
5.4. If there were no fatal or warning messages, display an informational message
that the general student and curriculum records have been updated.
Review Decision Rules
The Admissions Decision Criteria Report (SARDCSN) may be used to review the rules
built on the Admission Decision Rules Form (SAADCSN). The Admissions Decision
Calculation Process (SARBDSN) also uses the rules available on SAADCSN and defaults
the Level field value from the Admissions Information to the General Student Information.
Create Application
When a student applies to the institution, the Admissions Application Form (SAAADMS) is
used to establish an admissions record. Before entering the admissions application, the
applicant must first be entered into the system on the General Person Identification Form
(SPAIDEN). An unlimited number of applications per term may be entered for any
applicant. Any items the institution requires from the applicant may be entered and tracked
on this form. User-defined rules for required items built on the Admissions Checklist Rules
Form (SAACHKB) will automatically be entered on the application if the applicant matches
those rules. Missing credential letters may be requested from the Communication
information in the Application Fees window and generated using the Letter Generation
Process.
You also have the option of rolling a recruit record forward to the Admissions module. To
do this, select Prospect Information Summary (SRASUMI) from the Options Menu or
perform a Duplicate Item function from the Entry Term field on Admissions Application
Form (SAAADMS) to display the Prospect Summary Form (SRASUMI). You must decide
which recruiting record you wish to create an application for, and place your cursor on that
record. Next, you should perform a Select function to return the selected recruiting record
to admissions. You may now modify the defaulted information or simply save it. If the
defaulted recruiting record does not have a residency code and/or a student type code
assigned to it, the system-required value of
O (Undeclared) will default.
Application Preference Number
You can enter an application preference value for the applications that are submitted by an
individual, when multiple applications are created for a single entry term. This allows
applicants to designate a hierarchical preference (i.e., ranking) among the applications
they have submitted.

686
Banner Student User Guide | Admissions
The application preference number is stored on SARADAP and entered on SAAADMS
and in the Admissions module of Banner Student Self-Service. It is displayed on
SAADCRV, SAADCBT, SAAACKL, SAARRAT, SAAQUAN, SAAEAPS, SAAETBL, and on
the Web Application Summary in the Admissions module of Banner Student Self-Service.
SAASUMI also displays the application preference number, as well as curriculum
summary information.
SAAQUIK does not allow the entry of a value for the application preference number. This
form is only intended to support the quick creation of a learner record. (Recruiting and
admissions records can optionally be created as well.) It is not intended to be used as a
way to perform maintenance on existing general student and/or curriculum records.
Enter/Calculate Decision on Applicant
The Admissions Decision Form (SAADCRV) is used to enter decisions for an admissions
application. This form also provides a mechanism for a decision to be calculated
automatically by the system based on rules defined on the Admissions Decision Rules
Form (SAADCSN). Once a decision is entered or calculated to indicate that the student
has accepted and plans to attend, a general student record is automatically created using
the information entered on the application. This record allows the student to be eligible to
register. Decision letters may be requested from the Admission Decision Letter window
and generated using the Letter Generation Process. When a decision is entered on
SAADCRV which updates the student's application status, the status and decision codes
will be updated upon entry to the Admissions Application Form (SAAADMS). A decision
may also be calculated automatically using the Admissions Decision Calculation Report
(SARBDSN).
Multiple Applicant Acceptance Decisions
Learners can be accepted into an unlimited number of programs, even if they are currently
registered for courses or have already been accepted into another program. The system
updates the general student record when an applicant acceptance decision is rendered on
a pending application after another approved application has already generated that
record.
If application preference value for an application is Null and an applicant acceptance
decision is entered, the system copies the priority for the learner curriculum records from
the priority values on the application's curriculum records. If the application preference
value is populated, and an applicant acceptance decision is entered, the system
calculates the priority for the learner curriculum records using the following formula:
Example:
Joe Student has submitted two applications for a given term. His first preference
application has a primary curriculum of BA-ARTS. His second preference application
(Application Preference Number X 10) + (Curriculum Priority Number)
SARADAP_APPL_PREFERENCE SORLCUR_PRIORITY_NO from the
application being processed

687
Banner Student User Guide | Admissions
has a primary curriculum of BA-HISTORY. When his first preference application is
accepted, the curriculum (BA-ARTS) is copied to the learner curriculum with a priority
of 11. When his second preference application is accepted, the curriculum (BA-
HISTORY) should be copied to the learner curriculum with a priority of 21.
The preceding was a simple example. However, there is the potential for much more
complex situations to occur. As such, the system can assign the correct priorities to
curricula as they are processed, based on the application preference, without regard to
the order in which they are processed.
Example:
Joe Student submits a new application with a preference value of 2 and a primary
curriculum of CE-ARTS. Assuming this application is accepted, CE-ARTS would
become the new priority 2 learner curriculum, and BA-HISTORY would become
inactive. In order for CE-ARTS to be added as another curriculum, rather than replace
the BA-HISTORY curriculum, the application preference number or the priority on the
admissions curriculum would have to be changed.
Learners can apply to a new program for a term in which they are already registered.
Admissions applications are processed, even if the learner is registered for classes, as
long as the existing primary curriculum record will not be changed or replaced.
Example:
Lisa Learner applied and was admitted to BA-ENGLISH for Fall 2006. A few months
later, she attended orientation and pre-registered for classes. A month before the term
was scheduled to begin, Lisa decided to apply for an additional program, BA-
ANTHRO. Since Lisa's fees had not been assessed yet, her application for BA-
ANTHRO was able to be processed, and the new program was added as a secondary
curriculum.
When an applicant acceptance decision is made on a new application, the current and
active learner curriculum records are kept active, and the newly accepted application's
curriculum is added to the general student record (SGBSTDN) as another (secondary)
priority, or, depending on the circumstances, to replace the existing primary curriculum
with the new curriculum.
This is controlled by settings defined on the Curriculum Rules Control Form (SOACTRL).
Three radio group fields in the main window work with the controls in the Number of
Curricula Allowed window that define the number of curricula allowed per learner module.
For instance, if a learner applies to and is accepted into a third curriculum, but only two
current and active learner curricula are allowed, the new curriculum is copied to the
learner module and will be assigned an
INACTIVE/OVERLOAD status code.
The radio group fields on SOACTRL are in the Error Severity on Learner Curriculum
Updates section of the main window and are as follows.
• The Inactivate Current Curriculum in Same Term radio group determines which type
of error message, if any, to issue when an admissions decision will generate a learner
curriculum that would inactivate an existing one with the same effective term. Valid
values are
Fatal, Warning, or No Message.
• When the field is set to
Fatal, the system will issue a fatal error message
informing you that you cannot proceed without changing the application preference

688
Banner Student User Guide | Admissions
or curriculum priority on the application you are processing, because it will cause an
existing learner curriculum to become inactive/non-current.
• When the field is set to
Warning, the system will issue a warning message
informing you that the decision you are about to apply will cause an existing
curriculum to become inactive/non-current. You have the option to continue or
cancel.
– Clicking on
Continue will copy the existing curriculum record with a
curriculum status of
ADMITREPLACE and then insert the new curriculum
record as well as the application decision record.
– Clicking on
Cancel allows you to perform a Clear Record on the application
decision and adjust the application's preference value or the admissions
curriculum priority as needed to avoid making changes to existing learner
curricula.
• When the field is set to
No Message, the system will not issue any message at all
when you enter a decision that will cause an existing curriculum to become inactive/
non-current.
• The Inactivate Current Curriculum in Previous Term radio group determines which
type of error message, if any, to issue when an admissions decision will generate a
learner curriculum that would inactivate an existing one with an earlier effective term.
Valid values are
Fatal, Warning, or No Message.
• When the field is set to
Fatal, the system will issue a fatal error message
informing you that you cannot proceed without changing the application preference
or curriculum priority on the application you are processing, because it will cause an
existing learner curriculum with an earlier effective term to become inactive/non-
current.
• When the field is set to
Warning, the system will issue a warning message
informing you that the decision you are about to apply will cause an existing
curriculum with an earlier effective term to become inactive/non-current. You have
the option to continue or cancel.
– Clicking on
Continue will copy the existing curriculum record with a
curriculum status of
ADMITREPLACE and then insert the new curriculum
record as well as the application decision record.
– Clicking on
Cancel will allow you to perform a Clear Record on the
application decision and adjust the application's preference value or the
admissions curriculum priority as needed to avoid making changes to existing
learner curricula.
• When the field is set to
No Message, the system will not issue any message at all
when you enter a decision that will cause an existing curriculum with an earlier
effective term to become inactive/non-current.
• The Cause a Curriculum Overload radio group determines which type of error
message, if any, to issue when an admissions decision will generate a learner
curriculum with a curriculum status value of
OVERLOAD, because the number of
curricula or fields of study allowed has been exceeded.
• When the field is set to
Fatal, the system will issue a fatal error message
informing you that you cannot proceed, because it would cause a learner curriculum

689
Banner Student User Guide | Admissions
or field of study record to be created with an OVERLOAD status. In order to process
the application decision, you would need to inactivate the curriculum and/or field of
study on the admissions application that would cause the overload.
• When the field is set to
Warning, the system will issue a warning message
informing you that the decision you are about to apply will cause a learner
curriculum or field of study record to be created with an
OVERLOAD status. You
have the option to continue or cancel.
– Clicking on
Continue will copy the admissions curriculum and/or field of
study record(s) with a curriculum status of
OVERLOAD to the General Student
module and then insert the application decision record.
– Clicking on
Cancel will allow you to perform a Clear Record on the
application decision and inactivate the admissions curriculum and/or field of
study record(s) as needed to avoid causing a curriculum overload in the
General Student module.
• When the field is set to
No Message, the system will not issue any message at all
when you enter a decision that will cause a learner curriculum or field of study
record to be created with an
OVERLOAD status.
Add/Maintain Test Scores
The Test Score Information Form (SOATEST) is used to add and maintain the test scores
required for admission to the institution. Test scores for SAT, ACT, GMAT, GRE, and
AMCAS tests may also be loaded into the system from test score data loads and are
recorded on this form. This information may be used in the automated decision process.
The following optional fields may be used to further define test information:
Accommodation, Instrument, Form, and Purpose.
This form performs the test score equivalent lookup when data is saved. The Term and
the Source fields must both be entered in order for the equivalent lookup to take place.
When a record is found on SOATEQU that matches the test code, test source, and test
score entered on SOATEST, an equivalent record is created and entered in SOATEST.
The new equivalent test score will be displayed upon requerying the data.
Add/Maintain High School Data
The High School Information Form (SOAHSCH) is used to enter information about a
person's high school career. The information includes high school code and name,
transcript dates, graduation date, GPA, and subjects taken in high school. This information
may be used in the automated decision process.
Add/Maintain Prior College Data
The Prior College Form (SOAPCOL) is used to enter and maintain information about a
person's prior college experience including degree information such as majors, minors,
and areas of concentration, number of hours, GPA, and transcript date. The Prior College

690
Banner Student User Guide | Admissions
Summary Form (SOAPCOQ) may be used to view a summary of the prior college and
degree information for a specific ID.
Maintain Guardian Information
The Guardian Information Form (SOAFOLK) is used to enter address and employer
information for a person's parents or guardians.
Add Student Through Quick Entry
The Quick Entry Form (SAAQUIK) is an alternate method of entering a student as a
person and creating a general student record without going through the General Person
Identification Form (SPAIDEN), the Admissions Application Form (SAAADMS), and the
Admissions Decision Form (SAADCRV). This form allows the necessary biographic,
demographic, and admissions information to be entered all on one form. The option of
creating a recruiting and/or admissions record when a student is added is also permitted.
A person entered on this form automatically becomes a general student and is eligible to
register.
In order to facilitate data entry on the Quick Entry Form (SAAQUIK), the Quick Entry Rules
Form (SAAQKER) can be established with standard values that will default to the Quick
Entry Form (SAAQUIK). The values that automatically default may be overridden on the
SAAQUIK.
Review Application Data
The Admissions Application Report (SARADMS) is used to review application data for a
specified term.
The Admissions Count by College/Major Report (SARACTM) is used to produce a
statistical count on admission applications with totals by major and college.
Letter Generation—Letters, Paragraphs, and Variables
This section discusses using letter generation with recruiting and admissions.
Banner Student System Users
Two modules of the Banner Student System use the Letter Generation Process:
Admissions and Recruiting.
Recruiting Letters
Two Recruiting letters are supported; the application for both letters is Recruiting.

691
Banner Student User Guide | Admissions
Dynamic Parameters
For both of these letters, you must enter this dynamic parameter:
Note: For the INF_REQ letter, you also need to specify Date 1 and Date
2 when you run the Letter Generation Print Report (GLRLETR).
Paragraphs
You can use any of the following paragraphs in the Recruiting letters.
Variables
You can use any of the variables in the following list for the Recruiting letters.
Letter Description
INF_REQ
Information Request Letter
INQUIRY_THANKS
Thank You Letter for all inquiry types
Dynamic Parameter Description
&Recruiting_Term
Enter the recruiting term code for which this letter is being
run.
Paragraph Description
NEWPAGE
New Page for Letter
HEADDTE
Letter Date
GURPERS
Person Name/Address
INFOREQ
Information Request
CLOSING
Admissions/Recruiting Closing
Variable Description
*ADDRESS_COUNTY
Address County Description
*APTB
Appointment Begin Time (in format HH:MM AM)
*APTD
Appointment Date (in format Month, dd, yyyy)
*APTE
Appointment End Time (in format HH:MM AM)

692
Banner Student User Guide | Admissions
*APTI *
Appointment Interviewer Desc
*APTR
Appointment Recruiter Desc
*BDATE
Birthdate
*CITY
Address City
*CONT
Contact Description & Date
*CONTACT_DESCRIPTION *
Latest Contact Description
*CONTACT_MAX_SUBQUERY *
Subquery/Latest Contact Date
*DEPT +
Recruit Department Description
*FNAME
First Name
*GREETING_FIRST_NAME
Greeting with First Name
*GREETING_FORMAL
Formal Greeting
*HS_CITY
High School City
*HS_NAME
High School Name
*HS_NATN
High School Nation
*HS_STATE
High School State
*HS_STR1
High School Street 1
*HS_STR2
High School Street 2
*HS_STR3
High School Street 3
*HS_ZIP
High School ZIP Code
*ICITY
Institution City
*ID
Current ID
*INAME
Institution Name
*INATN
Institution Nation
*INTS
Recruit Outside Interest Desc
*IPHONE
Institution Telephone Number
*ISTAT
Institution State
*ISTR1
Institution Street Line 1
*ISTR2
Institution Street 2
*ISTR3
Institution Street 3
Variable Description

693
Banner Student User Guide | Admissions
*LATEST_CONT *
Latest Contact Description
*IZIPC
Institution ZIP Code
*LGNAME
Legal Name
*LNAME
Last Name
*MNAME
Middle Name
*NAME_PREFIX
Name Prefix
*NAME_SUFFIX
Name Suffix
*NATN
Nation Description
*PHONE
Telephone Number
*PNAME
Preferred Name
*RAPT
Appointment Contact Desc
*RCAMP +
Recruit Campus Description
*RCOLL +
Recruit College Description
*RDEGC +
Recruit Degree Description
*RECR +
Prospect Recruiter Description
*RLEVL +
Recruit Level Description
*RMAJR +
Recruit Major Description
*RSLT
Appointment Result
*RSTAT +
Recruit Status Description
*RSTUTYPE +
Recruit Student Type
*RTYPE +
Recruit Type Desc
*SBGI
Recruit Source Description
*SIGN
Letter Closing Signature
*SSN
SSN
*STATE
Address State Code
*STR1
Address Street Line 1
*STR2
Address Street Line 2
*STR3
Address Street Line 3
*TDATE
Today in Month dd, yyyy format
Variable Description

694
Banner Student User Guide | Admissions
Admissions Letters
Three Admissions letters are supported; the application for each letter is Admissions.
Dynamic Parameters
You must enter the appropriate dynamic parameters for each letter.
Note: You also need to specify Date 1 when you run the Letter
Generation Print Report (GLRLETR).
Paragraphs
You can use any of the following paragraphs in any of the Admissions letters.
*TERM +
Recruit Term Description
*ZIPC
Address ZIP Code
Letter Description
ADM_APPL_ACKN
Admissions Application Acknowledgment
ACCEPT
Admissions Acceptance Letter
CHKL
Checklist Letters
Letter Dynamic Parameter Description
ADM_APPL_ACKN &Application_Term
Enter the term code for which
this letter is being extracted.
ACCEPT &Application_Term
Enter the term code for which
this letter is being extracted.
ACCEPT &Signature_Initials
Enter the code associated with
the signature to be printed.
CHKL &Application_Term
Enter the term code for which
this letter is being extracted.
CHKL &Signature_Initials
Enter the code associated with
the signature to be printed.
Variable Description

695
Banner Student User Guide | Admissions
Variables
You can use any of the variables in the following list for the Admissions letters.
Paragraph Description
TB_RECR
Table for Recruiting Letter
NEWPAGE
New Page for Letter
HEADDTE
Letter Date
GURPERS
Person Name/Address
ACCEPT
Admissions Acceptance Paragraph
INADDRS
Institution Name and Address
FRMADDR
Formal Name, Address and Salutation
ADMACKL
Admissions Application Acknowledgment
CHKLBDY
Admissions Checklist
CHKLLST
List of Checklist Items
CLOSING
Admissions/Recruiting Closing
SIGN
Signature information
Variable Description
*ACOL1 +
Application College Desc
*ACAMP +
Application Campus Description
*ADEG1 +
Application Degree Desc
*ADEPT +
Application Dept Description
*ADMTYP +
Application Admit Type Desc
*ALEVL +
Application Level Description
*AMAJ1 +
Application Major 1 Desc
*AMAJ1_CONC +
Application Major 1 Conc Desc
*APPLNO +
Application Number
*APST +
Application Status Description
*APTB
Appointment Begin Time (in format HH:MM AM)
*APTD
Appointment Date (in format Month, dd, yyyy)

696
Banner Student User Guide | Admissions
*APTE
Appointment End Time (in format HH:MM AM)
*APTI *
Appointment Interviewer Desc
*APTR
Appointment Recruiter Code
*ARECTYP +
Application Rec Type Desc
*ARESD +
Application Residency Desc
*ASRCE
Application Source Description
*BDATE
Birthdate
*CAMP +
Application Campus Description
*CHKL
Admissions Checklist Items
*CITY
Address City
*CONT
Contact Description & Date
*CONTACT_DESCRIPTION *
Latest Contact Description
*CONTACT_MAX_SUBQUERY *
Subquery/Latest Contact Date
*DCSN
Application Decisions & Dates
*FNAME
First Name
*GREETING_FIRST_NAME
Greeting with First Name
*ICITY
Institution City
*ID
Current ID
*INAME
Institution Name
*INATN
Institution Nation
*INTS
Outside Interest Description
*IPHONE
Institution Telephone Number
*ISTAT
Institution State
*ISTR1
Institution Street Line 1
*ISTR2
Institution Street 2
*ISTR3
Institution Street 3
*IZIPC
Institution ZIP Code
*LGNAME
Legal Name
*LNAME
Last Name
Variable Description

697
Banner Student User Guide | Admissions
Notes on Variables for Recruiting and Admissions
Here is additional information on letter generation variables.
+ Multiple Returns Possible
Variables in Recruiting and Admissions use only the dynamic parameters
&Recruiting_Term and &Application_Term to select prospect or application
record information for a person. If your data maintenance and procedures allow multiple
records for the selected term (for example, multiple applications for the same term for the
same person), multiple variables will be returned.
Depending on the specific procedures at your institution, you will need to add additional
dynamic parameters (or other criteria embedded in each variable) in order to return a
single variable.
*MNAME
Middle Name
*NAME_PREFIX
Name Prefix (Mr., Mrs., etc.)
*NAME_SUFFIX
Name Suffix (Jr., Sr., etc.)
*NATN
Nation Description
*PHONE
Telephone Number
*PNAME
Preferred Name
*RAPT
Appt Contact Description
*RSLT
Appointment Result
*SIGN
Letter Closing Signature
*SSN
SSN
*STATE
Address State Code
*STR1
Address Street Line 1
*STR2
Address Street Line 2
*STR3
Address Street Line 3
*STUTYP +
Application Student Type Desc
*TDATE
Today in Month dd, yyyy format
*TERM +
Application Term Desc
*ZIPC
Address ZIP Code
Variable Description

698
Banner Student User Guide | Admissions
* Subquery Variables
Some variables require a subquery in order to return the desired result. For example, the
variable
*CONT in both the ADMISSIONS and RECRUITING applications will return the
contact description and contact date for all contacts with a person.
If you want to return the description of the most recent contact, you will need to use a
subquery. The subquery would retrieve the maximum contact date, and the variable
describing the contact description would use the subquery to return the correct (latest)
contact description.
The variables
*CONTACT_MAX_SUBQUERY and *CONTACT_DESCRIPTION are
examples of variables using subqueries.
*CONTACT_MAX_DESCRIPTION is the
subquery, and
*CONTACT_DESCRIPTION is the actual variable which will be used in a
letter. Please note that the subquery in the actual variable must be placed on the last line
of the variables rules.
Additional Dynamic Parameters for Delivered Variables
Appointment variables include a number of additional dynamic parameters. These
parameters are shown in the following list.
Build Curriculum Definition
Prior to creating the admissions application or entering data about a student curriculum,
rules and error checking should be set up on the Curriculum Rules Control Form
(SOACTRL), and rules should be built on the Curriculum Rules Form (SOACURR).
SOACURR allows the institution's valid curriculum records to be created based on the
program, level, campus, college, and degree combinations. For detailed information on
how to use curriculum rules, please refer to the curriculum procedure information in the
Banner Student CAPP Handbook.
Dynamic Variable Description
&From_Date
Enter the beginning date of the date range in which the
appointment may take place. Enter the date in DD-MON-
YYYY format.
&To_Date
Enter the ending date of the date range in which the
appointment may take place. Enter the date in DD-MON-
YYYY format.
&Appt_Contact_Type
Enter the code associated with the appointment contact
type to be printed.

699
Banner Student User Guide | Admissions
Concurrent Curricula Processing
Concurrent curricula processing allows an institution to record and use multiple curricula
for a person who is moved through the student cycle. This functionality is used by the
Recruiting, Admissions, General Student, Registration, and Academic History modules.
Please refer to the “Concurrent Curricula Processing” appendix for detailed information on
using concurrent curricula in Banner Student.
Mass Entry Processing
Mass entry processing is used with Admissions, General Student, Registration, Academic
History graduation, and athletic compliance processing. Mass entry forms are used to
search on data, perform updates, and then display the results. Search and update criteria
are user-defined and include student and curriculum elements where appropriate. The
selected students can be reviewed and their updates processed immediately, or the
updates can be held for later processing in job submission using a batch process. An audit
form is used to view processing results for the mass entry forms.
Please refer to the “Mass Entry Processing” appendix for detailed information on using
mass entry in Banner Student.
Study Path Processing
Study path processing is used with the Admissions, General Student, Registration, and
Academic History modules. Study paths provide a means by which a learner can
associate specific course registration records to learner curriculum records during
registration. The study path records allow the institution to track separate student status
codes and academic standings (along with various other data) based on the student's
curriculum. Likewise, a study path term enrollment record permits the tracking of
enrollment eligibility that is separate from a student's overall enrollment status. The grade
roll uses study paths to keep courses with an associated study path within the degree
sequence created for that study path.
Please refer to the “Study Path Processing” appendix for detailed information on using
study paths in Banner Student.
Duplicating An Admissions Application
In the case that it is necessary to duplicate an application for admissions, this task can be
accomplished by performing an Insert Record function and a Duplicate Record function on
the Admissions Application Form (SAAADMS). This will be helpful in those instances
where a student's term, level, student type, admission type, etc., are changed, but the
majority of the student's information remains the same.
A new checklist will be created to ensure that any requirements for the new (duplicated)
application are included. This occurs because the new application could be for a different
level, college, major, etc., and the requirements could be very different. However, any

700
Banner Student User Guide | Admissions
existing requirements that have been satisfied (i.e., they have a received date) by the
system (transcripts, test scores) for the original application will be included as satisfied in
the new checklist. Manually updated checklist entries where checklist items were entered
by the user are not carried forward to the new application.
Admissions Application Set-Up Procedures for Banner
Self-Service
This section provides the step-by-step setup procedures.
Warning! Due to data relationships and dependencies, these steps must
be performed in the order specified.
1. Review General Web controls.
Set up the global Web rules using Customize Web Rules in Web Tailor. Set up the
title, header, back URL and link, and help URL and link fields using Customize a Web
Menu or Procedure in Web Tailor. If these rules, links, and fields have not been
reviewed and customized for your institution, do this now.
The Address Role Privileges Form (GOAADRL) should contain entries with the Role
field pulldown set to the value of
STUDENT for all address types that are to be used
by self-service admissions processing. These address types are displayed in the List
of Values for the Address Type field in the Section Rules block of the Web Application
Section Rules Form (SAAWAPP).
2. Define values on validation forms used in self-service admissions application
processing.
2.1. Use the EDI Application Source Code Validation Form (STVAPLS) to define
codes and descriptions for the possible sources of electronic applications.
2.2. Use the Application Verification Steps Validation Form (STVASTA) to define the
manual steps that you want to perform for each electronic application. One
value is required: ID Verification (
IDVR).
For every electronic application received, you will need to determine whether
the application was submitted by a person already known to Banner (for
example, someone who is already being recruited) or whether the applicant
does not yet exist in Banner. The ID Verification Step prevents the loading of an
electronic application until you complete the verification and either match an
electronic applicant to an existing Banner person or create the person in
Banner.
You may also wish to define additional manual verification steps. The ID
Verification Step is automatically completed by the Elec. App. Verify/Load
Process (SARETMT) process. Any additional verification steps identified will not
be automatically processed by SARETMT.
2.3. Use the Web Application Section Validation Form (STVWSCT) to define the
sections of Banner Student Self-Service admissions applications. Data was
delivered for this form, but you may wish to review the values, become familiar
with the available sections, and/or update the descriptions of sections as these

701
Banner Student User Guide | Admissions
descriptions will display at the top of each section when the section is displayed
on the Web.
2.4. Use the Web Application Elements Validation Form (STVWSCF) to define the
data elements that can be used within a given section on the Web application.
The system-required values cannot be modified, with the exception of the
description of the element code and the
QUESTION element code.
STVWSCF works in conjunction with the Web Application Section Rules Form
(SAAWAPP). Initial element code descriptions from STVWSCF are defaulted
into SAAWAPP. The element code descriptions can be modified on STVWSCT,
or they can be modified on SAAWAPP, where they are called element rules
labels.
If an institution determines that a user-defined question can only be added to a
specific section, then that section should be identified in the Web Section field
for the
QUESTION element code. Otherwise, the Web Section field can be left
blank, allowing questions to be added to any Web section.
Warning! Depending on your locale, it might be illegal to require users to
provide ethnicity and race information. Do not check the Required
checkbox on SAAWAPP for the
PERSONAL (Personal Information) Web
application section code if requiring users to provide ethnicity and race
information is prohibited.
If such a regulation applies to your institution, you must also review your
existing Web application definitions and uncheck this checkbox for any
applications for which it is currently checked.
2.5. Use the Application Type Code Validation Form (STVWAPP) to define the types
of applications which can be received electronically and to define the values for
several required data elements for each application type. Your institution may
require different kinds of information from different types of applicants.
For example, you probably do not want to request prior college information from
first-time applicants but certainly want to ask for this information from transfer
applicants. You do want to ask for visa information from international applicants,
but not from domestic applicants.
The STVWAPP form lets you define the types of applications which will be
available to Web applicants. Think carefully about the kinds of information you
request from applicants, and define appropriate application types for each.
Make the descriptions of each type as clear as possible so that applicants are
able to choose the correct application to complete. Applicants will see the
descriptions from this form on the Web.
Several application types are delivered with the Banner Student Self-Service
system:
– Default Example - All Sections (00)
– Undergraduate Freshman (W1)
– Undergraduate Transfer (W2)
– International Undergraduate Freshman (W3)

702
Banner Student User Guide | Admissions
– International Undergraduate Transfer (W4)
– Graduate Studies (W5)
– International Graduate Studies (W6)
– Continuing Education, Non Degree (W7)
2.6. Use the EDI Rule Group Validation Form (STVEGRP) to display codes and
descriptions for groups of EDI application processing rules. Group codes are
provided so that rules which apply to similar types of data can be easily queried
on the Electronic Admissions Application Rules Form (SAAERUL). The
ADMS
and
DISP group codes are the two most used by self-service admissions
processing.
Note: Values in this table (STVEGRP) are not intended to be maintained
locally. All required values are delivered and inserted during the install
process and/or via update scripts. This form and its data are provided to
support other forms, and no changes of any kind should be made to the
data on this form.
2.7. Use the EDI Verification Label Validation Form (STVXLBL) to display codes and
descriptions for EDI data verification labels which are used when processing a
variety of incoming EDI data.
Note: Values in STVXLBL are not intended to be maintained locally. All
required values are delivered and inserted during the install process and/
or via update scripts. This form and its data are provided to support other
forms, and no changes of any kind should be made to the data on this
form.
3. Set Web Display Indicators on validation forms.
Several admissions-related validation forms include Web Display Indicators. These
indicators control whether a specific value in the validation form will display and/or be
available for selection via the Web. Scripts which added the Web Indicator
checkboxes set the values to unchecked (set to
N) for all values on these forms.
These checkboxes must be checked (set to
Y) for a value to be available on the Web.
When you Web-enable a value in one of these validation forms, you should also
review the description. The description of a value, not the code itself, displays on the
Web.
The following validation forms include Web Display Indicators which control
admissions application processing via the Web:
• STVADMR - Admission Request Checklist Code Validation Form. An applicant's
outstanding checklist items display in the Review Application Status section of the
Web when the checklist item is Web-enabled using the Web Indicator checkbox.
• STVAPST - Admission Application Status Code Validation Form. Values display
(when the Web Indicator checkbox is checked) when an applicant reviews their
applications via the Web. If the status of an existing application has not been Web-
enabled, the description Not Available is displayed.
• STVAPDC - Admission Application Decision Code Validation Form. If an application
is entered into Banner (either manually or via the Web), the calendar on SAAWAAD

703
Banner Student User Guide | Admissions
is set up, and the Display on Web checkbox is checked on STVAPDC, then the
most recent decision for that application will display on the Web Application
Summary Page. If the decision code has not been Web-enabled, then the message
Please Contact Admissions Office is displayed.
4. Define user-defined questions.
The Web User Defined Questions Form (SAAWUDQ) is used to define institution-
specific questions which request information not found elsewhere in any application
section. You can use the form to develop questions to collect any additional kind of
information your processing requires. Up to ten user-defined questions can be
displayed on any application section, while up to twenty user-defined questions can
be displayed in the Additional Information section. Each question can be up to 2,000
characters in length. The applicant will have 2,000 characters to answer the question.
This form also allows the user to associate an admission request checklist code with
each question. In addition, the user can specify that a question should have a Yes/No
radio button for its answer, instead of a text box.
In addition, essay questions can be defined on this form. Each essay question can be
up to 2,000 characters in length. The Web applicant has 32,700 characters to answer
the question.
5. Build Banner Student Self-Service applications by combining sections.
In earlier steps, you reviewed and/or created Electronic Application Types (using
STVWAPP) and reviewed delivered Web Application Sections (STVWSCT) and Web
Application Elements (STVWSCF). Now it is time to combine the sections and
elements to make an application. Sections include the actual questions that applicants
will be asked to answer, and each application is composed of a set of sections in a
specific order.
5.1. The Web Application Section Rules Form (SAAWAPP) is used to define the
sections and elements that make up each application type. It is also used to
specify the address type for each section of an application which collects
address information. This form allows the user to determine in what order the
sections will appear and in what order the data elements will appear within a
section. Users can designate an element as required on this form, as well as
indicate if the element should display on the Web. Users can also assign
specific questions which were previously defined on SAAWUDQ to a Web
section.
Warning! Depending on your locale, it might be illegal to require users to
provide ethnicity and race information. Do not check the Required
checkbox on SAAWAPP for the PERSONAL (Personal Information) Web
application section code if requiring users to provide ethnicity and race
information is prohibited.
If such a regulation applies to your institution, you must also review your
existing Web application definitions and uncheck this checkbox for any
applications for which it is currently checked.
5.2. Use the Web Application Section - Data Element Rules window to enter the data
elements that will display on a given section.

704
Banner Student User Guide | Admissions
The first time you enter this window when defining a new section, all the data
elements defined on STVWSCF for that Web section will populate the window.
The user can then reorder the elements, as well as delete any not automatically
marked as required. This window enforces the entry requirement of First and
Last Name, Street Line 1, City, and Choice of Study before an application can
be marked complete.
This window allows updates to the Order, Element Rules Label, Question
Sequence Number, Required (Indicator), and Display (Indicator) fields.
The Element Rules block is sorted by the Order field. When data elements
initially populate the Element Rules block, their order is automatically set in
increments of five (5). The user can update the Order field or delete an entire
data element record.
5.3. The user can copy the sections and elements set up for another application type
to a new application type by using the Copy Configuration button. If the
application type being copied from has questions defined for it on SAAWUDQ, a
copy of those questions will be made on SAAWUDQ for the new application
type. If questions have already been defined on SAAWUDQ for the new
application type, the copy process won't touch those questions but will add all
questions with non-matching sequence numbers from the existing application
type to the new application type.
For example:
– A new application type of X1 has questions defined with sequence numbers
1, 2, and 5 on SAAWUDQ.
– Questions with sequence numbers 1, 2, 3, 4, 5, 6, and 7 have already been
defined for existing application type of Y1.
– Use SAAWAPP to copy application type Y1 into X1. Questions 1, 2, and 5 for
application type X1 will remain unchanged.
– Questions 3, 4, 6, and 7 will be copied from application type Y1 to application
type X1.
– During the copy, any questions already assigned to application type X1 will
also be assigned to application type Y1.
6. Establish dates for the creation and receipt of Banner Student Self-Service
applications.
6.1. Define calendars for the application types that have different schedules on the
Web Application Term Calendar Rules Form (SAAWATR). Once this form is
used for an application type, it must always be used. This form allows the
institution to define the dates when applications of each type can be created
and subsequently viewed on the Web.
This form works in conjunction with the Web Application Term Display Control
Form (SOAATRM), where the calendar for all applications can be defined. If no
rules exist on SAAWATR for an application type, then the rules defined on
SOAATRM take effect.
6.2. Define the date ranges during which you will receive applications for a term. The
Web Application Term Display Control Form (SOAATRM) is used to specify
these time periods.

705
Banner Student User Guide | Admissions
6.3. Control the calendar of applications in the Banner production tables using the
Web Admissions Term Calendar Rules Form (SAAWAAD). This calendar
determines by term, level, campus, college, and admit type when an application
can be viewed (regardless of its source), when the status can be viewed, and
when the most recent decision can be viewed on the Web.
The Priority (Code) field is used to create a unique key for each calendar rule.
It may be necessary to have multiple records for one level and term that start
and end on the same date, in order to exclude specific admit types from ever
displaying on the Web. The Priority (Code) field can be used to make each
record unique.
7. Customize Web pulldowns.
7.1. Define codes, by application type, on the Web Application Customized Lists
Form (SAAWADP) which should display in the Web pulldowns for test codes,
requested materials, interests, and credit card waiver reasons. If no codes are
defined here, the pulldown values will be taken from the appropriate Web-
enabled rows on SOAXREF. If no codes are defined on SOAXREF, the values
will be taken from the appropriate validation table.
7.2. Identify curricula, by application type, on the Web Application Customized
Curriculum Form (SAAWCUR) that you want to appear in the Plan pulldown.
7.3. When you are first setting up self-service admissions, enter SAAWCUR with the
Restricted checkbox in the Key Block unchecked. All appropriate curriculum
rules will display. Check the Restrict to Type checkbox for those curriculum
items which you want to be available for this application type. Upon re-entering
the form, if you want to see only those curricula for this application type, check
the Restricted checkbox in the Key Block.
Note: With the exception of the Restrict to Type checkbox on
SAAWCUR, SAAWCUR and SOAXCUR are query only forms.
SOACURR is used to customize Web application data.
8. Determine use of medical information question.
Determine whether you want to collect medical information on applications received
via the Web. The data element, Medical, can be defined under the Personal
Information section rule on SAAWAPP. This data element will display the Web-
enabled values defined on SOAXREF (where the label is equal to STVMEDI). If no
values are defined on SOAXREF, then the pulldown list will display all values in the
Medical Code Validation Form (STVMEDI).
9. Customize Signature Page option.
9.1. A default Signature page is delivered with the Banner Student Self-Service
Admissions application, and its display is controlled using the
SIGPAGEDISP
label rule on the Electronic Admissions Application Rules Form (SAAERUL) for
the group of
DISP. The Signature page allows you to provide processing
instructions to applicants who submit applications via the Web.
9.2. The default Signature page is nothing more than Info Text for the page. Sample
Info Text for this page is delivered, but you can customize it to reflect your
institution's processing and desired instructions using Web Tailor. Use the
Format HTML Letter Rules Form (SOAELTR) to update the Info Text for the

706
Banner Student User Guide | Admissions
Display Signature package to reflect your institution's desired instructions, if you
decide to have the Signature page displayed.
9.3. You can customize the Signature page by application type using the Electronic
Applicant Web Default Rules Form (SAAWADF). The Web Signature Letters
window is used to assign customized letters to specific letter types. The letter
type of
STANDARD is used to assign a Signature page for Web applicants not
using Quick Start processing. The other letter types are used with Quick Start
processing to identify which letter should be displayed, depending on the
circumstances (i.e., a record is suspended during the automatic match).
The letters assigned to letter types must first be created on GTVLETR and then
associated with the appropriate module code on the HTML Letter Rules Form
(SOAELTL). Then the letter contents must be constructed on the Format HTML
Letter Rules Form (SOAELTR).
SOAELTR allows you to create a letter using electronic applicant variables,
some formatting, and free form text. This form also allows you to see how the
letter will look by using the Display Letter button.
10. Customize Web application data.
Users can customize Web application data by application type using the Electronic
Applicant Web Default Rules Form (SAAWADF). This form is used for entering default
data and rules for curriculum, email address, link text, and credit cards.
The keys to the record are the Web application type and an effective term. The
effective term code in the Default Curriculum block may be different than the effective
term in the key. In order for a curriculum to be used on this form, it must first be set up
on the Curriculum Rules Form (SOACURR).
If the term and curriculum are entered on this form, the curriculum data will
automatically populate the student’s application when the electronic application is
created. The Web data section for curriculum does not have to be displayed on the
Web application. If the section is displayed, the curriculum entered on SAAWADF will
automatically be filled in.
The form can be used to define the email address and the email link text that will
appear on the Application Checklist Menu on the Web. If no link text or email address
exists on this form, but the
EMAILSENDADDR and EMAILSENDLINK rules exist on
SAAERUL where the value in the Group field is equal to
ADMS, then that link text will
display on the Application Checklist Menu and that email address will become the To:
address.
The Application Credit Card Fee Rule block on SAAWADF is used to define the credit
card processing rules. The institution indicates if they will accept credit cards, and if
they do, the following decisions must be made. Are they required, will waivers be
allowed, what detail code should be associated with the payment, and what, if any,
checklist rule will be satisfied by the credit card payment. The Charge Detail and
Amount are required fields, and the Charge Detail must have a category code of
APF.
11. Build Quick Start processing.
Quick Start processing is turned on and off using the Automated Processing Rules
block (in the Matching and Processing Rule window) on the Electronic Applicant Web
Default Rules Form (SAAWADF). Check the Enable QuickStart Processing
checkbox if you want Quick Start to run for this application type.

707
Banner Student User Guide | Admissions
11.1. Once Quick Start processing is enabled, you can then customize how you want
it to operate using the remaining fields in the Automated Processing Rules
window. You can indicate that you want to:
– create a recruit record by checking the Automatically Create Recruit
Record checkbox,
– create an application record by checking the Automatically Create
Application Record checkbox, (if an application is created, you also have the
option of creating a decision record by checking the Process Decision
checkbox and entering the decision code in the Admission Decision field),
– access Banner Student Self-Service by checking the Provide Access to
Student Self-Service checkbox, which in turn causes an Access Web for
Students button to be displayed on the Signature page when the applicant
has a student record, and
– create one application (if the Create One Application checkbox is checked,
one application will be created with all curricula; if the field is not checked, a
separate application will be created for each curriculum).
You can select any individual item or a combination of items. There are two
restrictions to remember:
–the Enable QuickStart Processing checkbox must be checked in order to
check any of the other choices, and
–the Process Decision checkbox must be checked in order for a decision
code to be entered in the Admission Decision field. (In addition, the Auto
Student checkbox (in the EDI and Self-Service block of the Majors and
Departments window on SOACURR) must be checked.)
For example, an institution could use Quick Start processing to automatically
create a recruit record and an application record for a standard Web application,
eliminating the need to run the Elec App Verify/Load Process (SARETMT).
11.2. Quick Start processing attempts to automatically match a Web applicant to an
existing Banner person. Use the Web Matching Rules block on SAAWADF to
set up the rules to be used by the automated matching process.
12. Review and update or define the Procedures and Routines for each application type.
Before loading data from the holding tables into the permanent Banner tables, you
want to make sure that the information submitted by the applicant is as complete and
correct as it can possibly be. Application Procedures and Routines perform much of
this work.
A Procedure is a collection of Routines. Routines check data at the data element
level, and a number of Routines may be included within a Procedure. Procedures are
closely related to each table into which data will be loaded. All required Routines must
be satisfied before a Procedure can be satisfied. A set of Procedures and Routines
has been delivered and is attached to each of the delivered Application Types.
Procedures and Routines are attached to each Electronic Application Type using the
Electronic Admissions Procedure/Routine Control Form (SAAECRL). This form also
includes several flags which specify how each procedure and routine will be used in
electronic application processing.

708
Banner Student User Guide | Admissions
Both the Procedures section of the main window and the Routines section of the
Admissions Verification and Load Routines window include a Required flag and an
Override flag.
12.1. The Required flag is used to specify the Procedures and Routines which will be
attached to each electronic application when it is received. When a Procedure
or Routine is attached to an application, it needs to be fulfilled before the
application is considered verified and before the data is “pushed” to the
permanent Banner tables. More specifically, each Routine needs to be fulfilled
before the overall procedure can be satisfied.
The Procedures and Routines in effect control the types of data which will be
verified and eventually “pushed” into Banner. You can set Procedures and
Routines to “Not Required” if you do not wish certain data to be verified and/or
loaded into Banner.
For example, you might choose not to load Medical Conditions from electronic
applications. You would set the Required flag for Procedure P060 (Health
Conditions Verification) to unchecked (
N), and also set the Required flag for
Routine R0080 (Create Medical Conditions) in Procedure P900 (“PUSH”
Verification) to unchecked (
N). This would tell the system not to verify Medical
Conditions and not to push them into Banner.
12.2. The Override flags associated with Procedures and Routines allow you to
specify whether a Routine or Procedure can be overridden manually at the
individual application level on SAAEAPS or automatically using the Elec. App.
Verify/Load Process (SARETMT). If a Routine or Procedure is overrideable, it
will still be attached to an electronic application (based upon the Required flag),
but can be overridden if desired.
For example, you may normally collect required visa types from international
applicants, but not all applicants may understand the visa type they require.
You could require visa types from international applicants, but allow the “push”
of visa information to be overridden if an applicant does not provide the correct
information. In this case, you would set the Required flags for Procedure P032
(International Information Verification) and all of its Routines to checked (
Y), but
set the Override flag for Routine R0030 (Create International Record) in
Procedure P900 (“PUSH” Verification) to checked (
Y) so that you could override
the push of this information.
If a procedure has the Override flag checked, that procedure will be
automatically overridden, regardless of whether any of its routines fail.
If a routine has the Override flag checked, it will automatically be overridden if
the corresponding data field is blank. The only time it will not be over-ridden is if
the incoming data is in error.
The Elec. App. Verify/Load Process (SARETMT) will automatically override a
procedure or routine that fails the verification process due to blank data, if that
procedure or routine is marked as able to be overridden on SAAECRL, and the
AUTOOVERRIDE label for the group VCRL on SAAERUL is set to Y.
12.3. Duplicate processing is governed by rules set up in two places. First, overall
duplicate processing rules exist on the Electronic Admissions Application Rules
Form (SAAERUL) under group
ADMS. These rules are: DUPLAPPLCURR,
DUPLAPPLLEVL, DUPLAPPLMAJR, DUPLAPPLPERS, DUPLAPPLTERM.
These rules tell the self-service admissions push packages whether to check for

709
Banner Student User Guide | Admissions
duplicates in the given category. For example, if DUPLAPPLPERS is set to N,
then the corresponding Web package will not check for duplicate persons for
the Web application being pushed.
Note: The DUPLAPPLCURR rule is not currently used in self-service
admissions processing.
Duplicate processing rules also exist on the Electronic Admissions Procedure/
Routine Control Form (SAAECRL). These rules allow for duplicate processing
to be specified by application type instead of globally for all Web applications.
The rules exist within procedure P050 Application Verification (R0060 -
Duplicate Application for Person, R0070 - Duplicate Application for Term, and
R0080 - Duplicate Application for Level) and procedure P120 Entry Curriculum
Verification (R0010 - Duplicate Application for Major). These routines are
examined if the corresponding rule on SAAERUL is equal to
Y.
Whether a specific routine allows duplicates depends on the setting of the
Override flag. If the Override flag is unchecked, then duplicates are not
allowed. If the Override flag is checked, then duplicates are allowed. For
example, if
DUPLAPPLTERM is set to Y, routine R0070 is marked as required,
and the Override flag is checked, then multiple applications for the same term
are allowed. However, if
DUPLAPPLLEVL is set to Y, routine R0080 is marked
as required, and the Override flag is not checked, then the Web application will
not be pushed if one already exists in Banner for the same term and level.
For delivered Web Application Types, all appropriate procedures and routines have
already been attached to each application type. If you define additional application
types, you need to attach the appropriate procedures and routines to each new
application type. You can do so automatically by using the Copy Procedure button in
the Key Block of SAAECRL. The Copy Procedure button allows you to copy all the
procedures and routines defined for any existing application type to your new
application type.
13. Review and update rule values on the Electronic Admissions Application Rules Form
(SAAERUL).
The Electronic Admissions Application Rules Form (SAAERUL) includes a number of
rules which control how data is handled in self-service admissions application
processing. All rules which are used by system processing have been delivered and
should have been installed during the upgrade process.
For convenience purposes, Rules are categorized into Groups. Rule groups are used
to display rules with a similar purpose together, and Group Codes can be used to
specify that you want to display only a single group of rules at one time.
Each Rule is also identified by a Label and a Description. The script which installed
the Rule Groups and Rules also installed either the specific value expected for a rule
or the literal
UPDATE ME in the Value field. When an actual value was delivered, its
EDI Indicator was also checked (set to
Y) indicating that the rule expects an EDI
value, and the value for these rules should not be changed. When the literal
UPDATE
ME
was delivered, the value must be updated to reflect the local option for EDI
application processing to be used.

710
Banner Student User Guide | Admissions
When reviewing and updating rules, you may want to query on the Value field for the
value
UPDATE ME. After updating the appropriate rows, you may want to review all
rules so that you better understand how data will be processed.
14. Populate the EDI Cross-Reference Rules Form (SOAXREF).
If you will be processing both Web and EDI admissions applications, then you will
need to refer to the sections on “Processing Self-Service Admissions Applications”,
“EDI Set-up Procedures”, and “Processing EDI Applications” which follow. While much
of the setup on SOAXREF may not be required for your self-service admissions
applications, your EDI admissions application processing still relies heavily on the use
of the EDI Cross-Reference Rules Form (SOAXREF).
SOAXREF is used mainly by Web application processing to customize which values
the applicant will see in the various pulldowns available on the Web application. If an
institution wants all values within a validation table to display in the Web pulldown,
then no data from that validation table should be inserted into SOAXREF. For
example, since most institutions would want all state and province codes to display in
the state pulldown, no state or province codes need be inserted into SOAXREF. If,
however, an institution would like to customize which values from a validation table will
display in the Web pulldown, then they can either use the appropriate script to insert
all values from the validation table and then check the Web (Indicator) for those
values which should display, or they can manually insert only those values which
should display on the Web (remembering to check the Web (Indicator)).
Data pertaining to which majors a Web applicant can select must be entered on
SOAXREF as well as on SOACURR. The institution can also decide to default in a
curriculum for a given application type. In that case, the major information will come
from the Electronic Applicant Web Default Rules Form (SAAWADF). This form also
uses the curricula defined on SOAXREF and SOACURR.
Following are the instructions for running the various scripts to populate SOAXREF for
majors as well as for the other values which an institution may decide to load in order
to customize which values will appear in the Web pulldowns.
Not all rows in SOAXREF are used in self-service admissions application processing.
Many rows are used only to process incoming TS 189 transaction sets received
through EDI. Other rows may be used only to process incoming AMCAS records for
medical school applications. Regardless, only rows which are completely Web-
enabled will be available for display in the self-service admissions application
pulldown lists.
A Web-enabled row is one which:
• exists in SOAXREF.
• has an EDI Value, and perhaps, an EDI Qualifier (depending upon the type of data
reflected in the rule).
• has the Web (Indicator) checked (set to
Y).
•has a description.
•has a Banner Value.
In many cases, the only thing you need to do is ensure that all the values you want
displayed on the Web exist on SOAXREF and that the description clearly represents
the value you want the student to select. However, in some cases, you may need to
build additional rules.

711
Banner Student User Guide | Admissions
For example, the values delivered for the label STVDEGC (Degree Level - Degree
Codes) are generic EDI Degree Levels (Associate, Baccalaureate, Master's). Web-
enabled values for this label are displayed when a transfer applicant is asked about
the degree pursued or earned at a prior college, and you may want to collect
information about specific degrees (Associate of Technology, Bachelor of Arts, Master
of Sciences), and have values in the corresponding Banner validation table which
reflect these specific degrees.
In these cases, you need to make up a value for the Value field, and you should make
sure that the value does not already exist for the label. For these rules, you will also
set the EDI Indicator to unchecked (set to
N).
14.1. Define Web-enabled address and telephone types on SOAXREF.
Address and telephone types are assigned to each address section for a given
application type on the Web Application Section Rules Form (SAAWAPP). In
order for the Web to understand those values, they must be defined as Web-
enabled rows on SOAXREF. Define the appropriate address types on
SOAXREF using the label
STVATYP and telephone types using the label
STVTELE. Remember the Web-enabled rows must contain a Banner value.
14.2. Define EDI cross-reference values for majors on SOAXREF.
Review the values in the CIPC field on the Major, Minor, Concentration Code
Validation Form (STVMAJR).
For US institutions, values used should be actual CIP (Classification of
Instructional Program) codes. For institutions in other countries, a different code
set (like Stats Canada codes) might be used. Determine the EDI code set used
for this field; the valid choices are listed on SOAXREF for the label
FSTYIDQL.
Verify that the value for the rule label
DFLTMAJRQLFR on the Electronic
Admissions Application Rules Form (SAAERUL) for the group equal to CURR
contains the EDI qualifier for this code set. (If CIP codes are used in the CIPC
field on STVMAJR, the EDI value for this label should be
81.)
For a complete, current set of EDI values, consult the Postsecondary Electronic
Standards Council (PESC) website
www.pesc.org, where a link is provided
to EDI Implementation Guides.
Have your Information Services representative run the script
xrefmajr.sql
. This script creates a row in the table SORXREF for each row
in STVMAJR which has a value in the CIPC field.
Note: This script can be run whenever values are added to or changed on
STVMAJR. It will always delete all values from SOAXREF (table
SORXREF) and re-populate it with the current values from STVMAJR.
14.3. Define multiple major codes on SOAXREF
In some cases, an institution wants to assign the same CIP code to multiple
majors and then make multiple programs available for selection in the Planned
Course of Study pulldown list in the Banner Student Self-Service Admissions
Application.
To create SORXREF values for multiple major codes that use the same CIP
code, perform the following manual steps:

712
Banner Student User Guide | Admissions
– On SOAXREF, enter the label STVMAJR in the Key Block.
– Query for the first CIP code which may have multiple values.
Enter the CIP code in the EDI Value field and query on it.
– Review the values that exist, and/or add new values for the majors.
* Enter
81 in the EDI Qualifier field. 81 is the major code qualifier for CIP
codes.
* Enter a value which is different than any existing CIP code. For example, for
the first major code you define in a set, you might use the actual CIP code.
* Enter the corresponding Banner major code for one of the majors
represented by the CIP code.
* For every other major code which uses the same CIP code, create one line
on SOAXREF. On each line, you will need to enter a different EDI value in the
EDI Value field. For example, you might merely put a letter at the end of the
next CIP code. Specifically, Accounting (major code ACCT) might use an EDI
value of 060201, and Fund Accounting (major code ACTF) might use an EDI
value of 060201A.
For example:
– Review entries in the Curriculum Rules Form (SOACURR) to ensure that you
have an entry for each major. If you do not, create the entry, because cross-
reference rules are dependent on curriculum rules.
– Define the EDI curriculum cross-reference values for the newly created major
codes on SOACURR.
* Query for the first major code.
* Review the EDI cross-reference information for the record. You may need to
define cross-reference values.
* If you need to define cross-reference values, enter the appropriate EDI
degree level code in the EDI Degree field. The appropriate EDI Qualifier and
Identifier Code will display, or a List of Values will be available if more than
one matching record exists on SOAXREF.
* Check (set to
Y) the Display on Self-Service (Indicator).
EDI Label
EDI
Qualifier
EDI
Value Student Web
Banner
Value Description
STVMAJR 81 270101 X X MATH Mathematics
STVMAJR 81 270101A X X AMTH Applied
Mathematics
713
Banner Student User Guide | Admissions
* Enter a Web display description in the Self-Service Description field. This
is what will display in the Planned Course of Study pulldown menu on the
Web application.
* Save.
* Repeat this step until you have appropriate cross-reference values defined
for all major codes that you want to display on the Web application.
– Review your updates by accessing the Planned Course of Study page for a
self-service admissions application. The programs you have just defined
should display.
14.4. Define EDI cross-reference values for states/provinces
Update the EDI Equivalent on the State/Province Code Validation Form
(STVSTAT) with the appropriate EDI values.
For a complete, current set of EDI values, consult the Postsecondary Electronic
Standards Council (PESC) website
www.pesc.org, where a link is provided
to EDI Implementation Guides.
Have your Information Services representative run the script
xrefstat.sql.
This script creates a row in the table SORXREF for each row in STVSTAT which
has an EDI Equivalent value.
Note: This script can be run whenever states/provinces are added to or
are changed on STVSTAT. It will always delete all values from SOAXREF
(table SORXREF) and re-populate it with the current values from
STVSTAT.
14.5. Define EDI cross-reference values for nations
Update the EDI Equivalent on the Nation Code Validation Form (STVNATN)
with the appropriate EDI values.
For a complete, current set of EDI values, consult the Postsecondary Electronic
Standards Council (PESC) website
www.pesc.org, where a link is provided
to EDI Implementation Guides.
Have your Information Services representative run the script
xrefnatn.sql
. This script creates a row in the table SORXREF for each row
in STVNATN which has an EDI Equivalent value.
Note: This script can be run whenever nation codes are added to or are
changed on STVNATN. It will always delete all values from SOAXREF
(table SORXREF) and re-populate it with the current values from
STVNATN.
14.6. Define EDI cross-reference values for ethnicities
Update the EDI Equivalent on the Ethnic Code Validation Form (STVETHN)
with the appropriate EDI values.

714
Banner Student User Guide | Admissions
For a complete, current set of EDI values, consult the Postsecondary Electronic
Standards Council (PESC) website
www.pesc.org, where a link is provided
to EDI Implementation Guides.
Have your Information Services representative run the script
xrefethn.sql
. This script creates a row in the table SORXREF for each row
in STVETHN which has an EDI Equivalent value.
Note: This script can be run whenever ethnic values are added to or
changed on STVETHN. It will always delete all values from SOAXREF
(table SORXREF) and re-populate it with the current values from
STVETHN.
15. Review curriculum rules and define EDI cross-reference curriculum rules.
In Banner, a student's academic program is defined by a combination of the data
elements program, campus, college, level, degree, and major, and these data
elements must be valid alone and in combination. When an applicant completes an
application for admission, it is not likely that they would know all of the valid
combinations of these elements.
To make Web program choice selection clearer and easier, use the Curriculum Rules
Form (SOACURR). Before beginning Web application processing, you need to update
the curriculum cross-reference rules with appropriate EDI values.
The Curriculum Rules Form (SOACURR) displays information for each major
curriculum rule and the base rule to which it is attached. You need to update the EDI
Degree field value. The EDI Level (qualifier) and EDI Identification values are
retrieved by matching the major code from the curriculum rule to a row in SOAXREF.
In addition, you need to update the Web Display (Indicator) and Description values
for all curricula which are to be available for Web selection.
•The EDI Degree field must be updated to a valid value in the label
DEGRLEVL
(Degree Level Codes) from the EDI Cross-Reference Rules Form (SOAXREF). This
field defines the generic level of the degree program for which the applicant is
applying.
•The EDI Level (qualifier) field must be updated to a valid value in the label
FSTYIDQL (Field of Study Qualifier Codes) from the EDI Cross-Reference Rules
Form (SOAXREF). This field defines the EDI qualifier for the code set used for Field
of Study Codes, which will be entered in the next field.
•The EDI Identification field must be updated to a valid value in the label
STVMAJR
(Field of Study Identifier Codes) from the EDI Cross-Reference Curriculum Rules
Form (SOAXCUR) for a rule using the EDI Field of Study Qualifier entered in the
previous field. This field defines the subject matter of the intended field of study.
•The Display on Self-Service (Indicator) must be checked for all rules for which
applications can be received via Banner self-service admissions application
processing.
•The Auto Student (Indicator) must be checked if this curriculum is to be available
for Quick Start processing.
•The Self-Service Description data must be provided for all rules representing
curricula which will be displayed in self-service admissions applications. The
description maintained is exactly what will be displayed on the Web and also

715
Banner Student User Guide | Admissions
represents the total information from which the student will be able to select. For
example, if the curriculum rule represents a Bachelor of Arts degree with a major in
English which is only valid on the Main Campus, you would want the description to
be something like “BA - English (Main Campus only)”.
Some cautions are in order as you define your EDI Curriculum Cross-Reference
Rules:
• If possible, you should not use the same combination of EDI degree level, EDI field
of study qualifier, and EDI field of study identifier for more than one curriculum rule.
If you do, Web processing will not be able to map the combination back to a single
major curriculum rule. In this situation, the default values for the group code
CURR
(curriculum rules) maintained on the Electronic Admissions Application Rules Form
(SAAERUL) are used when the application is loaded into the permanent Banner
application tables.
• Web application types include a level in their definition on the Application Type Code
Validation Form (STVWAPP), and curriculum rules require a level in each base rule
on the Curriculum Rules Form (SOACURR). Only cross-referenced curriculum rules
for the level which matches the Web application type level will be displayed on the
Web. For example, if the level in a Web Application Type is
UG (undergraduate),
only cross-referenced curriculum rules for the level
UG will display for that
application type.
16. Customize curriculum rules by application type on the Web Application Customized
Curriculum Form (SAAWCUR).
The Web Application Customized Curriculum Form (SAAWCUR) allows institutions to
select only certain qualifying curricula to appear in the Plan pulldown for a particular
application type. This form is query only, except for the use of the Restrict to Type
checkbox.
When you enter the form with a valid application type in the Key Block, the form will
return all SORCMJR records whose level matches the level for the application type
and which have non-null values in
SORCMJR_DEGR_CODE, SORCMJR_EDI_QLFR,
and
SORCMJR_EDI_VALUE. Once all valid records are displayed, you can choose
which ones should be available for this application type by checking the Restrict to
Type checkbox. A record must have the Display on Self-Service (Indicator)
checked and the Self-Service Description field complete on SOACURR, in order for
the record to display on the Web.
Once all appropriate rules for this application type have had the Restrict to Type
checkbox checked, the user can re-enter the form with the application type and can
check the Restricted checkbox in the Key Block. After performing a Next Block, the
form will display only those curricula which have been restricted to this application
type.
Note: With the exception of the Restrict to Type checkbox on
SAAWCUR, SAAWCUR and SOAXCUR are query only forms.
SOACURR is used to customize Web application data.
Banner can be used to accept admissions applications via the Web using Banner Student
Self-Service Admissions Application processing.

716
Banner Student User Guide | Admissions
Procedures Used in Self-Service Admissions Processing
The following table is a list of the procedures on SAAECRL that are delivered for the Web
application type of
00.
Procedure Procedure Name Required Override Description
P010 ID Verification Y N The routines associated with this
procedure verify whether a valid ID exists.
P020 Name Verification Y N The routines associated with this
procedure verify whether a valid name
exists. A valid name in Banner must
include a first name and a last name.
P030 Biographic
Information
Y Y The routines associated with this
procedure verify whether valid biographic
information exists.
P032 International
Information
Y Y The routines associated with this
procedure verify whether valid international
information exists.
P035 Residency
Verification
Y Y The routines associated with this
procedure verify whether valid residency
information exists.
P040 Address Information Y N The routines associated with this
procedure verify whether a valid address
exists.
P045 Email Verification Y Y The routines associated with this
procedure verify whether a valid email
address exists.
P050 Application
Verification
Y N The routines associated with this
procedure verify whether a valid
application exists.
P060 Health Conditions
Verification
Y Y Not used unless Health Question section is
implemented.
P070 Phone Record
Verification
Y Y The routines associated with this
procedure verify whether a valid phone
record exists.
P080 Religion Verification Y Y The routines associated with this
procedure verify whether a valid religion
exists.
P090 Language Record
Verification
Y Y The routines associated with this
procedure verify whether a valid language
record exists.

717
Banner Student User Guide | Admissions
P100 Immunization Record Y Y Not used at this time.
P110 Applicant Activities Y Y The routines associated with this
procedure verify whether valid applicant
activities exists.
P120 Entry Curriculum
Verification
Y N The routines associated with this
procedure verify whether a valid entry
curriculum exists.
P130 High School
Verification
Y Y The routines associated with this
procedure verify whether a valid high
school exists.
P135 High School Subj.
Verification
Y Y The routines associated with this
procedure verify whether valid high school
subjects exist.
P140 Previous College
Verification
Y Y The routines associated with this
procedure verify whether a valid previous
college exists. This procedure is not
required if the application type will not
collect this information i.e., the person is a
freshman and has no prior college
information.
P142 Prv. Col. Degree
Verification
Y Y The routines associated with this
procedure verify whether a valid previous
college degree exists.
P145 Prv. Col. Major
Verification
Y Y The routines associated with this
procedure verify whether a valid previous
college major exists.
P150 Test Score
Verification
Y Y The routines associated with this
procedure verify whether valid test scores
exist.
P160 Relative Information
Verification
Y Y The routines associated with this
procedure verify whether valid parental
information exists.
P170 Question Answer
Verification
Y Y The routines associated with this
procedure verify whether valid questions
and answers exist.
P175 Requested Materials
Verification
Y Y The routines associated with this
procedure verify whether valid requested
materials exist.
P900 "PUSH" Verification Y N The routines associated with this
procedure verify whether a valid PUSH
exists.
Procedure Procedure Name Required Override Description

718
Banner Student User Guide | Admissions
Routines Used in Self-Service Admissions Processing
The following table is a list of the routines on SAAECRL, organized by procedure.
Procedure Routine Routine Name Required Override
P010 R0010 Valid ID Found Y N
P010 R0020 ID Length Check Y N
P010 R0200 ID New to Banner; Create PrevID Y N
P010 R9001 Edit Results Y N
P020 R0010 First Name Check Y N
P020 R0020 Last Name Check Y N
P020 R0030 Previous Last Name Check Y Y
P020 R9001 Edit Results Y N
P030 R0010 Date of Birth Established Y Y
P030 R0020 Ethnicity Established Y Y
P030 R0025 Race Established Y Y
P030 R0030 Ethnic Category Established Y Y
P030 R0031 Veteran Established Y Y
P030 R0040 Legacy Established Y Y
P030 R0050 SSN Established Y Y
P030 R0060 Marital Status Established Y Y
P030 R0080 Gender Established Y Y
P030 R0090 Citizenship Established Y Y
P030 R0091 Nation of Citizenship Est Y Y
P030 R0110 Native Language Established Y Y
P030 R0130 Home Language Established Y Y
P030 R0150 Corresponding Lang. Est Y Y
P030 R0200 Overwrite Existing Gender Y Y
P030 R0210 Overwrite Existing Birthdate Y Y
P030 R0220 Overwrite Existing Citizenship Y Y
P030 R0230 Overwrite Existing Confidential Y Y
P030 R0240 Overwrite Existing Religion Y Y

719
Banner Student User Guide | Admissions
P030 R0250 Overwrite Existing Marital St Y Y
P030 R0255 Overwrite Existing Race Y Y
P030 R0260 Overwrite Existing Ethnicity Y Y
P030 R0265 Overwrite Ethnic Category Y Y
P030 R0270 Overwrite Existing SSN N N
P030 R0280 Overwrite Existing Legacy Y Y
P030 R0290 Overwrite Existing Veteran Y Y
P030 R9001 Edit Results Y N
P032 R0010 VISA Type Established Y Y
P032 R0020 VISA Number Established Y Y
P032 R0030 VISA Issue Date Established Y Y
P032 R0040 VISA Expiration Date
Established
YY
P035 R0010 Residency Established Y Y
P035 R9001 Edit Results Y N
P040 R0010 Address Type Code Established Y N
P040 R0030 Street Line 1 Established Y N
P040 R0040 City Established Y N
P040 R0050 State Code Established Y N
P040 R0060 County Code Established Y Y
P040 R0070 ZIP Code Established Y N
P040 R0080 Nation Established Y Y
P040 R0090 Address Data Relationships Y N
P040 R9001 Edit Results Y N
P045 R0010 Email Type Established Y Y
P045 R0020 Email Address Established Y Y
P045 R9001 Email Record Existence Check Y N
P050 R0010 Application Type Established Y N
P050 R0020 Type Code Established Y N
P050 R0030 Source Established Y Y
P050 R0050 Application Term Established Y N
Procedure Routine Routine Name Required Override

720
Banner Student User Guide | Admissions
P050 R0060 Dupl Application for Person Y N
P050 R0070 Dupl Application for Term Y N
P050 R0080 Dupl Application for Level Y N
P050 R9001 Edit Results Y N
P060 R0010 Medical Condition Established Y Y
P060 R9001 Edit Results Y N
P070 R0010 Phone Number Type Established Y Y
P070 R0020 Phone Number Established Y Y
P070 R9001 Record Existence Check Y N
P080 R0010 Religion Established Y Y
P080 R9001 Edit Results Y N
P090 R0010 Language Established Y Y
P090 R0020 Language Use Established Y Y
P090 R0030 Language Proficiency Estb. Y Y
P090 R9001 Edit Results Y N
P100 R0010 Immunization Established Y Y
P100 R9001 Edit Results Y N
P110 R0010 Activity Established Y Y
P110 R9001 Edit Results Y N
P120 R0005 Degree Level Established Y N
P120 R0006 Fld of Stdy Level Established Y Y
P120 R0007 Fld of Stdy Qualifier Estb. Y N
P120 R0008 Fld of Stdy Ident. Code Estb. Y N
P120 R0009 Banner Equiv. Curriculum Est. Y N
P120 R0010 Duplicate Application; Major Y Y
P120 R9001 Record Edit Results Y N
P130 R0010 High School Established Y Y
P130 R0100 Graduation Date Established Y Y
P130 R0110 Class Rank Established Y Y
P130 R0120 Class Size Established Y Y
P130 R0130 Class Rank-Size Established Y Y
Procedure Routine Routine Name Required Override

721
Banner Student User Guide | Admissions
P130 R0140 Grade Point Average Est. Y Y
P130 R0200 Update Existing HS Data Y N
P130 R9001 Record Edit Results Y N
P135 R0010 Subject Established Y Y
P135 R9001 Record Verification Results Y N
P140 R0010 Previous College Established Y Y
P140 R9001 Edit Results Y N
P142 R0010 Degree Established Y Y
P142 R0030 Degree Date Established Y Y
P142 R0040 Earned Hours Established Y Y
P142 R0050 Bgn Attendance Date Est. Y Y
P142 R0060 End Attendance Date Est. Y Y
P142 R0070 Grade Point Average Est. Y Y
P142 R0200 Update Prior College Data N N
P142 R9001 Edit Results Y N
P145 R0010 Previous College Majors Y Y
P145 R0020 Previous College Minors Y Y
P145 R0030 Previous College Conc. Y Y
P145 R9001 Edit Results Y N
P150 R0010 Test Established Y Y
P150 R0020 Test Date Established Y Y
P150 R0030 Test Score Valid Y Y
P150 R9001 Edit Results Y N
P160 R0010 First Name Established Y Y
P160 R0020 Last Name Established Y Y
P160 R0030 Relationship Code Established Y Y
P160 R9001 Relative Record Check Y N
P170 R0010 Question Established Y Y
P170 R0020 Answer Established Y Y
P170 R9001 Question Answer Checked Y N
P175 R0010 Material Established Y Y
Procedure Routine Routine Name Required Override

722
Banner Student User Guide | Admissions
Rule Groups Used in Self-Service Admissions
Processing
The following table is a list of the rule groups and codes on SAAERUL that are used by
self-service admissions processing.
P175 R9001 Material Checked Y N
P900 L010 Create Application Required Y Y
P900 L020 Create Person Record Y Y
P900 L025 Create Race Record Y Y
P900 L030 Create International Record Y Y
P900 L040 Create Address Record Y Y
P900 L045 Create Email Record Y Y
P900 L050 Create Telephone Record Y Y
P900 L060 Create High School Record Y Y
P900 L070 Create High School Subjects Y Y
P900 L080 Create Medical Conditions Y Y
P900 L090 Create Prior College Record Y Y
P900 L100 Create Prior College Degree Y Y
P900 L110 Create Prior College Major Y Y
P900 L120 Create Prior College Minor Y Y
P900 L130 Create Prior College Conc. Y Y
P900 L140 Create Test Score Record Y Y
P900 L150 Create Outside Interest Record Y Y
P900 L160 Create Parent Information Y Y
P900 L170 Create Question/Answer Y Y
P900 L175 Create Materials Y Y
Group Code Group Name Description
ADDR Address Source Rules Rules in which you specify address source codes to be
used in electronic admissions application processing.
Procedure Routine Routine Name Required Override

723
Banner Student User Guide | Admissions
Delivered Rule Groups Used in Self-Service Admissions
Processing
The following table is a list of the rules delivered, the group with which they are
associated, a description of each rule, and instructions for updating each rule.
ADMS Admission Rules Rules which control the loading of duplicate applications
and residency information for applications.
ATYP Address Type Rules Rules used to specify the address types to be assigned to
addresses received in electronic applications.
CQLF Code Qualifiers Rules used to specify the EDI code qualifier for types of
data which require special processing.
CURR Curriculum Rules Rules used to translate received information into valid
Banner curricula.
DCSN Applicant Decision Rules used to allow admissions applicants to accept offers
of admission in self-service.
DISP Web Display Rules Rules which control the display of data sections in the
Banner self-service admissions application.
PATH System Path Rules Rules which describe the database path in which various
system components have been installed.
PCOL Prior College Rules Rules which are used to process prior college information.
PQLF Phone Qualifier Code Rules Rules which contain certain EDI telephone type qualifiers.
TEST Test Score Source Rules Rules which are used to identify the source of a test.
VCRL Verification Control Rules Rules which control several of the verification procedures
and routines.
Group Label Description EDI Instructions
ADDR DFLTADDRSRCE Default Address Source N Update the Default Address Source
to the value from the Address Source
Validation Form (STVASRC) that you
want assigned to addresses loaded
from Web applications. (You may
need to build the desired value on
STVASRC first.) (See Note 2 below.)
Group Code Group Name Description
724
Banner Student User Guide | Admissions
ADMS DFLTASRCWEB Web Default Application
Source
N Update the Web Default Application
Source to the value from the EDI
Application Source Code Validation
Form (STVAPLS) that you want
assigned to electronic applications
received via the Web.
ADMS DFLTSBGIWEB Web Default Application
SBGI Source
N Insert the source STVSBGI value
into the Application Source Table
(SARRSRC).
ADMS DUPLAPPLCURR
(Not currently used in Self-
Service admissions
processing.)
Allow Dup App for
Curriculum
N
Update the value to
Y (checked) to
specify that self-service admissions
should perform duplicate checking
using the duplicate rules set up on
SAAECRL for the given application
type for the same term and
curriculum. Update the value to
N
(unchecked) if no duplicate checking
should be done.
ADMS DUPLAPPLLEVL Allow Dup App for Level N
Update the value to
Y (checked) to
specify that self-service admissions
should perform duplicate checking
using the duplicate rules set up on
SAAECRL for the given application
type for the same term and level.
Update the value to
N (unchecked) if
no duplicate checking should be
done.
ADMS DUPLAPPLMAJR Allow Dup App for Major N
Update the value to
Y (checked) to
specify that self-service admissions
should perform duplicate checking
using the duplicate rules set up on
SAAECRL for the given application
type for the same term and major.
Update the value to
N (unchecked) if
no duplicate checking should be
done.
ADMS DUPLAPPLPERS Allow Dup App for Person N
Update the value to
Y (checked) to
specify that self-service admissions
should perform duplicate checking
using the duplicate rules set up on
SAAECRL for the given application
type for the same person, regardless
of the term, level, curriculum, or
major specified. Update the value to
N (unchecked) if no duplicate
checking should be done.
Group Label Description EDI Instructions

725
Banner Student User Guide | Admissions
ADMS DUPLAPPLTERM Allow Dup App for Term N
Update the value to
Y (checked) to
specify that self-service admissions
should perform duplicate checking
using the duplicate rules set up on
SAAECRL for the given application
type for the same term, regardless of
the level, curriculum, or major
specified. Update the value to
N
(unchecked) if no duplicate checking
should be done.
ADMS EMAILTYPE Store default e-mails type N Enter a valid value from the E-mail
Address Type Validation Form
(GTVEMAL). This value will be used
when storing email addresses from
Web applications on GOAEMAL.
ADMS EMAILSENDADDR Admissions Email
Address
N Update the value to be the email
address to which you want the Web
applicant’s email to be sent. For
example: [email protected].
ADMS EMAILSENDLINK Admissions Email Link
Tex t
N Update the value to contain the
hyperlink text the Web applicant will
select in order to bring up their
browser’s mail system. For example:
Have questions? Email us.
ADMS FORRESIDCODE Out of Country Residency
Code
N Update the Out of Country
Residency Code to the value from
the Residence Code Validation Form
(STVRESD) that you want assigned
to an application if the verification
procedures determine that the
person is an out-of-country resident.
(See Note 1 below.)
ADMS INRESIDCODE In State/Prov Residency
Code
N Update the In State/Province
Residency Code to the value from
the Residence Code Validation Form
(STVRESD) that you want assigned
to an application if the verification
procedures determine that the
person is an in-state/province
resident. (See Note 1 below.)
Group Label Description EDI Instructions

726
Banner Student User Guide | Admissions
ADMS ONEAPPORTWO Create One Application
or Two
N
Enter
ONE to create one application
with a primary and secondary
curriculum, or enter
TWO to create
one application for each area of
study. This value is checked when an
application is loaded into Banner
from the Web. If only one area of
study is indicated on the Web, then
only one application will be created,
regardless of the value of this rule.
ADMS OUTRESIDCODE Out of State/Prov
Residency Code
N Update the Out of State/Province
Residency Code to the value from
the Residence Code Validation Form
(STVRESD) that you want assigned
to an application if the verification
procedures determine that the
person is an out-of-state/province
resident. (See Note 1 below.)
Note 1: Residency determination is made based on answers to a variety of questions. If the system cannot
determine residency, or if no residency codes are specified in these three rules, the “Default” Residency Code,
identified by the value for the label
DFLTRESDCODE in the group RESD will be used.
ADMS PRIMSRCEWEB Web Default Application
SBGI as Primary Source
N Mark the value on the Application
Source Table (SARRSRC) from
DFLTSBGIWEB as the Primary
Source.
ATYP DFLTPARENTATYP Default Parent Address
Type
N Update the Default Parent Address
Type to the value from the Address
Type Code Validation Form
(STVATYP) that you want assigned
to addresses created from parent
address information. (See Note 2
below.)
ATYP DFLTSTUDENTATYP Default Student Address
Type
N Update the Default Student Address
Type to the value from the Address
Type Code Validation Form
(STVATYP) that you want assigned
to addresses created from applicant
address information. (See Note 2
below.)
Note 2:. For Web applications, each application section in which address data can be reported has its own
address type assigned to the application section using the Web Application Section Rules Form (SAAWAPP).
Default address types defined under Rule Group
ATYP are defaults which are used only when the address type to
be assigned cannot be determined based upon other information.
Group Label Description EDI Instructions

727
Banner Student User Guide | Admissions
CQLF ACTVCQLFCODE Default Activity Qlfr Code Y The Default Activity Qualifier Code is
an EDI value, and it is delivered as
SA. Specifically, it is used to
distinguish between activities and
awards which may be reported in the
same EDI data segment. This value
also has to be assigned to those
values which are “student activities”
in the EDI Cross-Reference Rules
Form (SOAXREF) for rules with a
label of
STVINTS.
CQLF AWRDCQLFCODE Default Award Qualifier
Code
Y The Default Award Qualifier Code is
an EDI value, and it is delivered as
SB. Specifically, it is used to
distinguish between activities and
awards which may be reported in the
same EDI data segment. This value
also has to be assigned to those
values which are “student awards” in
the EDI Cross-Reference Rules
Form (SOAXREF) for rules with a
label of
STVINTS.
CURR DFLTCAMPCODE Default Campus Code
Value
N Update the Default Campus Code
Value to the value from the Campus
Code Validation Form (STVCAMP)
that you want assigned to an
application if the application's
campus cannot be correctly derived
by data viewed in the EDI Cross-
Reference Curriculum Rules Form
(SOAXCUR) or maintained in the
Curriculum Rules Form (SOACURR).
CURR DFLTCOLLCODE Default College Code
Value
N Update the Default College Code
Value to the value from the College
Code Validation Form (STVCOLL)
that you want assigned to an
application if the application's college
cannot be correctly derived by data
viewed in the EDI Cross-Reference
Curriculum Rules Form (SOAXCUR)
or maintained in the Curriculum
Rules Form (SOACURR).
Group Label Description EDI Instructions

728
Banner Student User Guide | Admissions
CURR DFLTDEGCCODE Default Degree Code
Value
N Update the Default Degree Code
Value to the value from the Degree
Code Validation Form (STVDEGC)
that you want assigned to an
application if the application's degree
cannot be correctly derived by data
viewed in the EDI Cross-Reference
Curriculum Rules Form (SOAXCUR)
or maintained in the Curriculum
Rules Form (SOACURR).
CURR DFLTDEPTCODE Default Department Code
Value
N Update the Default Department Code
Value to the value from the
Department Code Validation Form
(STVDEPT) that you want assigned
to an application if the application's
department cannot be correctly
derived by data viewed in the EDI
Cross-Reference Curriculum Rules
Form (SOAXCUR) or maintained in
the Curriculum Rules Form
(SOACURR).
CURR DFLTMAJRCODE Default Major Code Value N Update the Default Major Code Value
to the value from the Major, Minor,
Concentration Code Validation Form
(STVMAJR) that you want assigned
to an application if the application's
major cannot be correctly derived by
data viewed in the EDI Cross-
Reference Curriculum Rules Form
(SOAXCUR) or maintained in the
Curriculum Rules Form (SOACURR).
Group Label Description EDI Instructions

729
Banner Student User Guide | Admissions
CURR DFLTMAJRQLFR Default Major Code
Qualifier
Y The Default Major Code Qualifier is
an EDI value, and it is delivered as
81, for CIP code. Specifically, the
Default Major Code Qualifier is used
by the script
xrefmajr.sql
delivered to assist in building major
code cross-reference values in the
EDI Cross-Reference Rules Form
(SOAXREF). This script copies each
value in the Major, Minor,
Concentration Code Validation Table
(STVMAJR) which has a value in the
CIPC Code field and creates a rule in
the EDI Cross-Reference Rules
Table using the major code, CIPC
code, and EDI qualifier specified
here.
If the values entered in the CIPC field
on STVMAJR are not Classification
of Instructional Program (CIP) codes,
the correct EDI value for the code set
used for this field should be entered
for this rule.
(See Note 3 below.)
Note 3: The value for this rule is used only by the script used to populate major code values in SOAXREF. If you
are not using the script and are instead building appropriate major code translation values by hand, this rule will
not be used.
CURR USEDEFAULTS Use Default Curriculum
Values
N Update the value to checked(set to
Y) or unchecked(set to N) to specify
whether the campus, college,
department, degree, and major
defaults should be used when an
application is created. (See Note 4
below.)
Note 4: Default values are used when the appropriate value cannot be determined using data viewed in the EDI
Cross-Reference Curriculum Rules Form (SOAXCUR) or maintained in the Curriculum Rules Form (SOACURR).
For example:
A single set of EDI cross-reference values can be associated with more than one curriculum rule. If the same EDI
cross-reference values are assigned to more than one curriculum rule, the defaults are used as “tie-breakers” and
assigned to all associated fields.
Regardless of the data elements used when the Banner application is created, curriculum rule checking takes
place according to normal rules when the application data is viewed on any Banner form. If the values loaded for
the application represent an invalid curriculum choice, as defined by existing curriculum rules, an error message
is displayed and corrective action may be required at that time.
Group Label Description EDI Instructions

730
Banner Student User Guide | Admissions
DCSN ALLOWDECISION Allow Applicant Decision N Update the Value column from
UPDATE ME to Y or N for the
applicant decision.
DCSN CONFIRMCODE Attendance Confirmation
Decision Code
N Update the Value column from
UPDATE ME to the value from the
Admission Application Decision
Code Validation Form (STVAPDC)
which should be used for the confirm
decision code.
DCSN CONFIRMLABEL Applicant Confirm Button
Label
N Update the Value column from
UPDATE ME to any value which
should be used for the Applicant
Confirm label.
DCSN WITHDRAWLABEL Applicant Withdraw
Button Label
N Update the Value column from
UPDATE ME to any value which
should be used for the Applicant
Withdraw label.
DCSN WITHDRAWCODE Withdraw Decision Code N Update the Value column from
UPDATE ME to the value from the
Admission Application Decision
Code Validation Form (STVAPDC)
which should be used for the
withdraw decision code.
DCSN CAPTUREWDINFO Capture Withdrawn
Information
N Update the Value column from
UPDATE ME to Y or N for the
additional withdrawn information.
DISP ACTVSDISP # of Activity Rows to
Display
N The Number of Activity Rows to
Display rule is used only in Banner
self-service admissions application
processing. It specifies the number of
free-form activity spaces to display in
the Activities Section of a Web
application. If you do not want to
display free-form activities, set this
value to zero (
0).
Group Label Description EDI Instructions
731
Banner Student User Guide | Admissions
DISP SIGPAGEDISP Display Sig Page (TRUE/
FALSE)
N The Display Signature page rule is
used only in Banner self-service
admissions application processing.
The Banner Web Application
includes the ability to display a
signature, certification, and an
instruction page at the time the
applicant marks the application as
complete. This rule specifies whether
the Signature page is displayed.
(See Note 5 below.) This is true
whether the page is created using
Info Text or the Format HTML Letter
Rules Form (SOAELTR).
Note 5: The “Signature page” is a separate page which can be displayed after marking a Web application as
“complete”. The page contains either Info Text if created using Web Tailor or an HTML letter if created using the
Format HTML Letter Rules Form (SOAELTR). A sample set of InfoText is delivered for this page, but the text can
be customized to suit local options using one of the Banner General Web Forms. For further information on
updating Info Text, see the Banner Web Tailor User Guide.
DISP TESTSDISP # of Test Rows to Display N The Number of Test Rows to Display
rule is used only in Banner self-
service admissions application
processing. It specifies the number of
test report slots to display in the
Tests Section of a Web application. If
you do not wish to collect test scores
via Web applications, do not
associate the Test Information
section with any Web application
type on the Web Application Section
Rules Form (SAAWAPP).
PATH CHECKMARKPATH Pathname for checkmark
gif
N The Checkmark gif pathname rule is
the database pathname for the
Checkmark gif. It is used only in self-
service admissions application
processing. This location should be
verified. Case is important.
PCOL PCOLDFLTDEGC Prior College Default
Degree
N Update the Prior College Default
Degree rule to the Banner degree
code from the Degree Code
Validation Form (STVDEGC) which
should be assigned as the prior
college degree attempted if an
applicant does not supply a value.
Group Label Description EDI Instructions
732
Banner Student User Guide | Admissions
PQLF EMAILPQLFCODE Phone Qualifier for E-mail Y The Phone Qualifier for E-mail rule
specifies the EDI standard telephone
qualifier which identifies an e-mail
address.
Note: The delivered value for this
rule is
EM; however, if the same
value has been defined for another
email address and/or telephone type
(such as
Emergency), then it is
recommended that this value be
changed.
RESD DFLTRESDCODE Default Residency Code N Update the Default Residency Code
rule to the code from the Residence
Code Validation Form (STVRESD)
which should be assigned to an
applicant if a specific residence
status cannot be determined based
upon other information.
RESD HOMECOUNTY Institution's Home County N Update the Institution's Home County
rule to the code from the County
Code Validation Form (STVCNTY)
which represents the institution's
home county. This value is used, in
conjunction with other information, to
attempt to determine the residency
status to assign to an applicant.
RESD HOMENATION Institution's Home
Country
N Update the Institution's Home Nation
rule to the code from the Nation
Code Validation Form (STVNATN)
which represents the institution's
home nation. This value is used, in
conjunction with other information, to
attempt to determine the residency
status to assign to an applicant.
RESD HOMESTATPROV Institution's Home State/
Prov
N Update the Institution's Home State/
Province rule to the code from the
State/Province Code Validation Form
(STVSTAT) which represents the
institution's home state. This value is
used, in conjunction with other
information, to attempt to determine
the residency status to assign to an
applicant.
Group Label Description EDI Instructions
733
Banner Student User Guide | Admissions
Cross-Reference Labels Used in Self-Service
Admissions Processing
EDI cross-reference rules are identified by a Label. The label describes the purpose of the
cross-reference rule. The following is a list of all the labels on SOAXREF that are used in
self-service admissions processing.
Note: You need to ensure that each label is set up on SOAXREF as
identified in the accompanying text. If one or more labels are not set up as
specified, self-service admissions processing will not work correctly.
TEST DFLTTSRCWEB Web Default Test Score
Source
N Update the Institution's Web Default
Test Score Source rule to the code
from the Admission Test Score
Source Code Validation Form
(STVTSRC) which represents the
institution's test score source.
VCRL AUTOOVERRIDE Automatic Override
Indicator
N The Automatic Override Indicator
rule is used to specify whether
verification procedures and routines
which allow overrides (as defined on
the Electronic Admissions
Procedure/Routine Control Form
(SAAECRL) will be automatically
overridden. Update this rule to
checked(set to
Y) or unchecked(set
to
N) depending upon your choice.
Overriding a procedure or routine will
not cause invalid data to be loaded; it
merely reduces the number of
manual overrides you may need to
perform during electronic application
verification.
Group Label Description EDI Instructions

734
Banner Student User Guide | Admissions
Label Description Processing Notes
DEGRLEVL Degree Level Codes Degree Level Codes are used to describe the generic
level of a degree, and the EDI values delivered roughly
correspond to the values in the Degree Award Category
Code Validation Form (STVACAT). These values are
used only when defining the EDI Curriculum Cross-
Reference Rules. Update the Banner value to the
corresponding value from STVACAT. (The Banner value
will normally be the EDI value without the period.) Do
not check (set to
Y) the Web (Indicator) on SOAXREF,
as these values are not used to control Web pulldown
lists, but only to define valid cross-reference values for
building curriculum cross-reference rules.
FSTYIDQL Field of Stdy Qualifier Codes Field of Study Qualifier Codes are used only to specify
the code set which is used to describe field of study
choices. No action is required on any of these rules for
Web processing. However, one of these values will be
associated with the rules for label
STVMAJR where it
will identify the code set used to define valid major code
choices.
GENDER Gender Codes Gender Codes are used to define the Banner equivalent
for EDI gender values. Three values are delivered. No
action is required on any of these rules for Web
processing.
STVCITZ Citizenship Type Codes Values in the Citizenship Type Code label are used to
customize the citizenship types which will be available
for Web selection. For each value which should be Web-
enabled, set its Web (Indicator) to checked (set to
Y)
and enter the appropriate Banner value from STVCITZ.
If all values from STVCITZ should be displayed, then
none need be entered here.
STVDEGC Degree Level-Degree Code For Web application processing, you can identify
specific degree codes to be available for Web selection.
In this case, you default values in the EDI value column
which do not represent EDI Degree Level Codes, set
the (EDI) Standard (Indicator) to unchecked (set to
N),
and enter the appropriate Banner value for the specific
degree codes to be made available. If all degree codes
from STVDEGC should be available for Web selection,
none need be entered here.
735
Banner Student User Guide | Admissions
STVETHN Ethnic Codes Values in the Ethnic Code label are used to specify the
ethnicities which will be available for Web selection. For
each value which should be Web-enabled, set its Web
(Indicator) to checked (set to
Y) and enter the
appropriate Banner value. If you have Banner ethnic
codes which do not correspond to EDI ethnic codes and
you want to make these additional codes available for
Web usage, create new rules, using an EDI value which
is not already in the EDI set and set the (EDI) Standard
(Indicator) to unchecked (set to
N) for these rules. (See
Note below.) If all ethnic codes from STVETHN should
be available for Web selection, none need be entered
here.
Note: The script
xrefethn.sql is used to populate the STVETHN label rows with values from the Ethnic
Code Validation Form (STVETHN).
STVINTS Award and Activity Codes Values in the Award and Activity Codes label are used
to specify the interests which will be available for Web
selection. For each value which should be Web-
enabled, specify the appropriate EDI qualifier which
represents “activities” (this value is
SA and is also
entered on SAAERUL to identify student activities), set
its Web (Indicator) to checked (set to
Y) and enter the
appropriate Banner value from STVINTS. If you have
Banner interest codes which do not correspond to EDI
codes, and you want to make these additional types
available for Web usage, create new rules, using an EDI
value which is not already in the EDI set and set the
(EDI) Standard (Indicator) to unchecked (set to
N) for
these rules. (See Note below.) If all award and activity
codes from STVINTS should be available for Web
selection, none need be entered here. If the awards and
activities should be specific to an application type, use
the Web Application Customized Lists Form
(SAAWADP).
Note: For rules which represent student awards, set the EDI Qualifier to
SB. Awards can also be reported
through the Web, but whether reported through a Web application or a TS 189 transaction set, these values
will not be loaded into the permanent Banner application tables.
Label Description Processing Notes
736
Banner Student User Guide | Admissions
STVLANGN Language Name Codes Values in the Language Name Codes label are used
specify the languages which will be available for Web
selection. For each value which should be Web-
enabled, set its Web (Indicator) to checked (set to
Y)
and enter the appropriate Banner value from STVLANG.
If you have Banner language codes which do not
correspond to EDI codes and you want to make these
additional types available for Web usage, create new
rules, using an EDI value which is not already in the EDI
set and set the (EDI) Standard (Indicator) to
unchecked (set to
N) for these rules. If all language
codes from STVLANG should be available for Web
selection, none need be entered here.
STVMAJR Major Codes Values in the Major Codes label are used to translate
EDI field of study data into Banner major codes. Field of
Study data reported in TS 189 transaction sets includes
a qualifier code and value. Qualifier codes represent
different standard code sets, like Classification of
Instructional Program (CIP) codes or Stats Canada
codes. You use a combination of a Degree Level code
(label
DEGRLEVL), Code Set Qualifier, and Banner
code to define the cross-reference from EDI values to
Banner values on the Curriculum Rules Form
(SOACURR). To create rules for the
STVMAJR label,
enter the Qualifier which represents a valid EDI field of
study code set, a value from the indicated set, and the
Banner equivalent for the EDI value. (See Note below.)
STVMATL Requested Materials Codes Values in the requested materials label are used to
specify the requested materials which will be available
for Web selection. For each value which should be Web-
enabled, set its Web (Indicator) to checked (set to
Y)
and enter the appropriate Banner value from STVMATL.
If all requested materials codes from STVMATL should
be available for Web selection, none need be entered
here. If the requested materials should be specific to an
application type, use the Web Application Customized
Lists Form (SAAWADP).
Note: The script
xrefmajr.sql is used to populate the STVMAJR label rows with values from the Major,
Minor, Concentration Code Validation Form.
Label Description Processing Notes

737
Banner Student User Guide | Admissions
STVMEDI Medical Condition Codes Values in the Medical Conditions Codes label are used
to specify the conditions which will be available for Web
selection. For each value which should be Web-
enabled, set its Web (Indicator) to checked (set to
Y)
and enter the appropriate Banner value from STVMEDI.
If you have Banner medical codes which do not
correspond to EDI codes and you want to make these
additional types available for Web usage, create new
rules, using an EDI value which is not already in the EDI
set and set the (EDI) Standard (Indicator) to
unchecked (set to
N) for these rules. (See Note below.)
If all medical condition codes from STVMEDI should be
available for Web selection, none need be entered here.
Note: Use the medical condition data element on the Web Application Section Rules Form (SAAWAPP) to
include this data in the Web application.
STVMRTL Marital Status Codes Values in the Marital Status Codes label are used to
specify the marital statuses which will be available for
Web selection. For each value which should be Web-
enabled, set its Web (Indicator) to checked (set to
Y)
and enter the appropriate Banner value from STVMRTL.
If you have Banner martial status codes which do not
correspond to EDI codes and you want to make these
additional types available for Web usage, create new
rules, using an EDI value which is not already in the EDI
set and set the (EDI) Standard (Indicator) to
unchecked (set to
N) for these rules. If all marital status
codes from STVMRTL should be available for Web
selection, none need be entered here.
STVNATN EDI Nation Codes Values in the Nation Codes label are used to specify the
nation codes which will be available for Web selection.
For each value which should be Web-enabled, set its
Web (Indicator) to checked (set to
Y) and enter the
appropriate Banner value from STVNATN. If you have
Banner nation codes which do not correspond to EDI
codes and you want to make these additional types
available for Web usage, create new rules, using an EDI
value which is not already in the EDI set and set the
(EDI) Standard (Indicator) to unchecked (set to
N) for
these rules. (See Note below.) If all nation codes from
STVNATN should be available for Web selection, none
need be entered here.
Note: The script
xrefnatn.sql is used to populate the STVNATN label rows with values from the Nation
Code Validation Form.
Label Description Processing Notes

738
Banner Student User Guide | Admissions
STVRELG Religion Codes Values in the Religion Codes label are used to specify
the religion codes which will be available for Web
selection. For each value which should be Web-
enabled, set its Web (Indicator) to checked (set to
Y)
and enter the appropriate Banner value from STVRELG.
If you have Banner religion codes which do not
correspond to EDI codes and you want to make these
additional types available for Web usage, create new
rules, using an EDI value which is not already in the EDI
set and set the (EDI) Standard (Indicator) to
unchecked (set to
N) for these rules. If all religion codes
from STVRELG should be available for Web selection,
none need be entered here.
STVRELT Relationship Codes Values in the Relationship Codes label are used to
specify the relationship codes which will be available for
Web selection. For each value which should be Web-
enabled, set its Web (Indicator) to checked (set to
Y)
and enter the appropriate Banner value from STVRELT.
If you have Banner relationship codes which do not
correspond to EDI codes and you want to make these
additional types available for Web usage, create new
rules, using an EDI value which is not already in the EDI
set and set the (EDI) Standard (Indicator) to
unchecked (set to
N) for these rules. If all relationship
codes from STVRELT should be available for Web
selection, none need be entered here.
STVSTAT EDI State Codes Values in the State Codes label are used to specify the
state/province codes which will be available for Web
selection. For each value which should be Web-
enabled, set its Web (Indicator) to checked (set to
Y)
and enter the appropriate Banner value from STVSTAT.
(See Note below.) If all state codes from STVSTAT
should be available for Web selection, none need be
entered here.
Note: The script
xrefstat.sql is used to populate the STVSTAT label rows with values from the State/
Province Code Validation Form (STVSTAT).
Label Description Processing Notes
739
Banner Student User Guide | Admissions
STVTESC Sub-Test Codes Values in the Sub-Test Codes label are used to specify
the sub-test codes which will be available for Web
selection. For each value which should be Web-
enabled, set its Web (Indicator) to checked (set to
Y)
and enter the appropriate Banner value from STVTESC.
If you have Banner test types codes which do not
correspond to EDI codes and you want to make these
additional types available for Web usage, create new
rules. Use an EDI value which is not already in the EDI
set, and set the (EDI) Standard (Indicator) to
unchecked (set to
N) for these rules. An EDI Qualifier,
EDI Value, Description, and Banner Value are all
required for
STVTESC rules. If all test codes from
STVTESC should be available for Web selection, none
need be entered here. If the test types should be
specific to an application type, use the Web Application
Customized Lists Form (SAAWADP).
STVVTYP VISA Type Codes Values in the Visa Type Codes label are used to specify
the visa codes which will be available for Web selection.
For each value which should be Web-enabled, set its
Web (Indicator) to checked (set to
Y) and enter the
appropriate Banner value from STVVTYP. If you have
Banner visa type codes which do not correspond to EDI
codes and you want to make these additional types
available for Web usage, create new rules. Use an EDI
value which is not already in the EDI set, and set the
(EDI) Standard (Indicator) to unchecked (set to
N) for
these rules. If all visa type codes from STVVTYP should
be available for Web selection, none need be entered
here.
STVWAIV Application Waiver Codes Values in the Application Waiver Codes label are used
to specify the application waiver codes which will be
available for Web selection. For each value which
should be Web-enabled, set its Web (Indicator) to
checked (set to
Y) and enter the appropriate Banner
value from STVWAIV. If you have Banner application
waiver codes which do not correspond to EDI codes and
you want to make these additional types available for
Web usage, create new rules. Use an EDI value which
is not already in the EDI set, and set the (EDI) Standard
(Indicator) to unchecked (set to
N) for these rules. An
EDI Qualifier, EDI Value, Description, and Banner Value
are all required for
STVWAIV rules. If all application
waiver codes from STVWAIV should be available for
Web selection, none need be entered here. If the
application waiver codes should be specific to an
application type, use the Web Application Customized
Lists Form (SAAWADP).
Label Description Processing Notes

740
Banner Student User Guide | Admissions
Address Hierarchy Rules for Credit Card Payment
Rules with an internal code of WEBCCADDR and an internal group code of ADDRESS are
used with miscellaneous transactions to set up the address hierarchy for Web payment
card payments and to populate the address in the GORCCAU table.
Miscellaneous transactions are used for admissions application fees. When an applicant
pays an application fee that creates a miscellaneous account transaction and uses a
payment card for payment, an address is needed to process the transaction. If no
SARADDR record exists, and no current SPRADDR record exists, the applicant is taken to
a page in Self-Service to enter the address information.
Miscellaneous transactions are also used for transcript request fees and enrollment
verification fees.When a student pays a fee that creates a miscellaneous account
transaction and uses a payment card for payment, an address is needed to process the
transaction. If no current SPRADDR record exists, the student is taken to a page in Self-
Service to enter the address information.
Miscellaneous transactions are not used for registration fees or graduation application
fees. A student does not need an address record to process payment for those fees.
Identify Payment Profile for Credit Card Payment
Payment profiles are configured on GOAMERC. You can query on GTVSDAX for the
WEBSTUCCID internal group code with an internal code of LEVEL, COLLEGE, or
CAMPUS to match the student’s level, college, or campus. The external code value for the
rule is the payment profile.
Include Cell Phone with Self-Service Admissions
Applications
You can capture an applicant’s cell phone information in Banner Student Self-Service as
part of the personal information on the admissions application. Collecting cell phone
information is optional. Cell phone information is not associated with an address type.
To use cell phone data with Self-Service applications, you need to set up rules in Banner
Student baseline, enter telephone information in Banner Student Self-Service, and push
the telephone number back into Banner Student baseline.
1. Access Banner Student baseline.
2. Review the cell phone element codes on the Admissions Web Page Element
Validation Form (STVWSCF).
• CELL_EXTENSION
• CELL_INTL_ACCESS
• CELL_PHONE
• CELL_PHONE_CTRY_CODE

741
Banner Student User Guide | Admissions
3. Add the cell phone element codes on the Web Application Section Rules Form
(SAAWAPP) for the Web Section of
PERSONAL.
4. Set the value of the
CELLPQLFCODE rule label on the Electronic Admissions
Application Rules Form (SAAERUL) for the Group Code of
PQLF.
The value used for the telephone type for the
CELLPQLFCODE rule label is not
validated. However, the value must exist on the Telephone Type Validation Form
(STVTELE) and should be only one or two characters in length.
Note: It is recommended that the telephone type value used for the
CELLPQLFCODE rule label be different than the value associated with
the address type used for the
ADDR1 or ADDR2 Web sections on
SAAWAPP.
It is also recommended that the telephone type value used for the
CELLPQLFCODE rule label be different than the value used for the
EMAILPQLFCODE rule label.
5. Access Banner Student Self-Service.
6. Begin or update an admissions application.
7. Enter cell phone information in the appropriate fields on the Personal Information
Page (
bwskaper.P_DispAppPersonal).
• Cellular Phone Number
• Cellular Phone Extension
• Cellular Phone Intl Access Code
• Cellular Phone Country Code
8. Return to Banner Student baseline.
9. Run the Elec App Verify/Load Process (SARETMT) to push the admissions
application information into Banner.
10. Access the Telephone block of the General Person Identification Form (SPAIDEN) to
review the populated cell phone information.
Cell phone information is captured on the Personal Information Page
(
bwskaper.P_DispAppPersonal) in Self-Service as part of the admissions
application. However, as the information is associated with the
PERSONAL Web section
on SAAWAPP, it is treated differently than the telephone information that is associated
with the
ADDR1 or ADDR2 Web sections. Cell phone information captured from the
Personal Information Page (
bwskaper.P_DispAppPersonal) is always loaded to
Banner as Non-Primary.
When the cell phone telephone type and phone number are pushed to Banner from the
Self-Service Personal Information page in the admissions application, a duplicate check is
performed against the telephone type and cell phone number in Banner baseline. Cell
phone data for the same telephone type and phone number is never loaded, even if the
existing cell phone number is set to Primary, Inactivate, or Unlisted on the General
Person Identification Form (SPAIDEN) or the General Person Telephone Form
(SPATELE). The cell phone type and number in Banner are never overwritten or changed.

742
Banner Student User Guide | Admissions
If the cell phone number needs to be modified, deleted, or set to Primary, Inactivate,
Unlisted, the changes must be made manually.
The load logic for the
CELLPQLFCODE rule label on SAAERUL is as follows:
• When the same telephone type and telephone number exist, the data is not loaded to
Banner, even if it exists as Primary, Inactivate, or Unlisted on SPAIDEN or SPATELE.
• When the same telephone type exists with a different phone number, the data is loaded
to Banner.
• When a new telephone type is found for an existing phone number, the data is loaded to
Banner.
• When a new telephone type is found for a different phone number, the data is loaded to
Banner.
Processing Self-Service Admissions Applications
Before you receive your first Web application, you need to establish appropriate policies
and procedures for processing Web applications. For example, you need to determine
whether to weed out frivolous applications, when and how you will collect application fees
(if required), whether you require and how you will collect application certifications and
signatures, and what impact Web applications will have on application and yield statistics.
The Elec. App. Verify/Load Process (SARETMT) is a batch process that is used to match,
verify, and load admissions applications received via the Web. This process allows users
to match, verify, and load large numbers of Web applications at one time. The process
uses the same matching algorithm as the Electronic Prospect Match Process (SRRSRIN)
and the Common Matching Entry Form (GOAMTCH). The Electronic Application Process
Form (SAAEAPS) is used to process Web applications that are placed in suspense or
error status by the SARETMT batch load process. In addition, SAAEAPS can be used to
review Web applications and delete those that are most likely frivolous (i.e., applications
from Mickey Mouse or Claude Monet).
Overall Process
The overall process for receiving self-service admissions applications is as follows.
1. The applicant creates and completes the Web application.
2. The institution reviews all Web applications (via SAAEAPS) added on a specific date
that are complete to check for frivolous applications. (Optional)
3. The institution runs the SARETMT process to match, verify, and load Web
applications.
4. The institution reviews Web applications on SAAEAPS that were put into Suspense or
Error status by the SARETMT process.
5. Suspended error records are resolved on SAAEAPS using GOAMTCH to determine if
the applicant is New or is a Match to an existing Banner record.

743
Banner Student User Guide | Admissions
6. The institution reruns SARETMT to verify and load those applications whose status
has just been resolved. Depending on the number of suspended and error records,
the institution can choose to manually verify and load these Web applications on
SAAEAPS.
Detailed Steps
The detailed steps for receiving self-service admissions applications are discussed in this
section.
1. Use the Electronic Application Process Form (SAAEAPS) to display received Web
applications.
To display the application(s) for a specific person, enter the electronic ID for that
person in the Key Block or use a List function to display the Electronic Applicant
Search Form (SOAEIDN), where you can search for an electronic applicant using
name and ID.
You can also select only those applications added on a certain date by entering the
Add Date in the Key Block field. Only applications matching the Web ID and/or Add
Date in the Key Block will be displayed.
You can also enter the main block and query on certain fields. Those fields are:
Application Number, Application Type, Completion Indicator, Term, Source (with
a value of WEB), Add Date, Accepted Indicator, Process, Process Date, Person
Status, and Application Status.
If you find applications that you believe are frivolous, they can be deleted using the
Delete Record function. Once an application is deleted on SAAEAPS, its associated
data is also deleted from the electronic application holding tables; therefore, the
application will no longer be viewable on SAAETBL.
2. Use the Elec. Appl. Verify/Load Process (SARETMT) to match, verify, and load the
Web applications that meet your processing guidelines.
Parameters for SARETMT allow processing based upon Application Type, Application
Source, Application Term, and the Date Range of when applications were added.
2.1. Run SARETMT in audit mode.
SARETMT can be run in audit mode providing the user with the opportunity to
review the match, verify, and load status of each application before it is actually
processed. The Status field will indicate whether the Web appli
cation is New,
Matched, Suspended, or in Error based on the matching rules specified by the
matching source code assigned to the interface code on STVINFC. If a Web
application type has previously been pushed for a given Web ID, the Status field
will indicate N/A, as a matching PIDM already existed for the Web ID. The
process will indicate if verification errors occurred or if the application was
pushed.
2.2. Run SARETMT in update mode.
The user can run the match, verify, and load process in update mode. All
electronic applications matching the input parameters will be processed by
SARETMT.
Three possible outcomes can exist for each record processed by SARETMT.

744
Banner Student User Guide | Admissions
– The record was matched, verified, and pushed successfully resulting in the
creation of a SAAADMS application record.
– The record was placed into suspense or error status during the match
process. Suspended and error records will not be processed further by
SARETMT until the match status has been resolved to either New or
Matched. The user can resolve the suspended status using the Electronic
Application Process Form (SAAEAPS) (See the “Resolve Suspended
Electronic Applications” section below for details.)
– The record failed the verification process. Numerous verification routines exist
to ensure the integrity of the data being loaded into Banner. If certain errors
occur during the verification process, the record will be marked with a
verification error.
3. Resolve suspended and error electronic applications using the Electronic Application
Process Form (SAAEAPS).
3.1. Access the Electronic Application Process Form (SAAEAPS).
3.2. Navigate to the main block and query for the appropriate records (i.e., term,
source equals Web etc.) having a Person Status of
S or E. These are the
records that will need to be resolved before they can be verified and pushed into
Banner.
4. Select the Verification Steps tab or the Manual Verification Steps option from the
Options Menu to access the Verification Steps window.
5. Mark any of the person or application steps complete, except for the ID Verification
(
IDVR) step, and then save the changes.
6. Select the ID Verification (
IDVR) step, and then choose the Associate Person with ID
item from the Options Menu.
7. This opens the Associate Person with ID window, where you can choose which type of
Banner ID to assign to the selected record from the Select an ID field.
• Electronic ID – This is the ID used to create the electronic application.
• Local ID – This is used for applications filed via EDI where the applicant provided a
Local ID.
• SSN – This is the SSN or other Federal ID number specified on the electronic
application.
• Banner ID – This is used if you wish to enter an explicit ID to be used by Banner.
• Generate ID – This indicates that Banner should generate an ID for this person.
8. After choosing the appropriate ID type, either save the changes or select the
Associate Person with an ID button. This will display GOAMTCH.
9. The ID displayed on GOAMTCH should match the option chosen in the Associate
Person with ID window. The Matching Source field should contain the source code
that has been assigned to the interface code on SAAWADF for the application type of
the selected Web application. This source code can be changed if desired.
If no interface code has been specified for the application type on SAAWADF, then the
Matching Source field will contain the default source code assigned to the user ID on
GORCMUS. If no default source code has been assigned on GORCMUS, you will be
able to select a source code from the List of Values.

745
Banner Student User Guide | Admissions
Perform a Next Block to populate the Data Entry block with all of the data for the
incoming electronic applicant record that is present in the temporary tables.
10. You can update or adjust the data in the Data Entry block if it does not meet your
institution’s data standards. These updates will be copied back to the temporary tables
and used when the applicant's record is created.
11. Once the data has been “cleaned up”, use a Next Block function to call the matching
algorithm, or select the Duplicate Check button.
12. The incoming electronic application can be a match, a potential match, or a new
record:
12.1. If the incoming electronic application is found to be a match to someone in
Banner, the Banner record will be displayed in the Match block.
12.2. If the incoming electronic application is found to be a potential match against
more than one existing Banner record, then all of the possible matches will be
displayed in the Potential Matches window.
12.3. If the electronic application is found to be a new record, an Alert Box will be
displayed with a message asking if you want to create the new person.
13. If the person is found to be an exact match, you can do one of three things:
13.1. Match the incoming record to the Banner record but not update any Null fields
that exist for the person in Banner by selecting the Select ID button.
13.2. Match the incoming record to the Banner record and choose to update any Null
fields that exist for the person in Banner with data on the incoming record by
selecting the Update ID button.
13.3. Choose to ignore the matched status, and create the person as new by
selecting the Create New button.
14. After selecting one of the options above, the user will be returned to the Verification
Steps window, and the ID Verification (
IDVR) step will be marked as complete.
Continue processing the electronic applicant as needed.
15. Resolve verification errors using the Electronic Application Process Form
(SAAEAPS).
If the
AUTOOVERRIDE label on the Electronic Admissions Application Rules Form
(SAAERUL) for the group
VCRL is set to Y, and the procedures and routines are
marked as overrideable on SAAECRL, then SARETMT will not stop the process if
verification errors occur (unless they are data errors). If the
AUTOOVERRIDE label is
set to
N, then any verification errors found while SARETMT is processing will be
identified on the report file. These errors can be viewed on SAAEAPS and must be
resolved before the affected applications can be re-processed by SARETMT.
Verification errors can only be resolved on SAAEAPS if the routine and/or procedure
causing the error have the Override (Indicator) checked on SAAECRL for the
appropriate application type.
15.1. Access the Electronic Application Process Form (SAAEAPS).
15.2. Navigate to the main block and query for the appropriate records (i.e., term,
source, etc.) having a Process field value of
E. These are the records that will
need their verification errors resolved before they can be pushed into Banner.

746
Banner Student User Guide | Admissions
15.3. Select Review Results from the Options Menu or use Next Block to access the
Verification/Load Results window.
In the System Verification Procedure block, each procedure is displayed, one
procedure at a time. At the same time, each routine associated with a procedure
is displayed in the System Verification Routines block.
15.4. Scroll through each procedure to find the procedures that have not been verified
(i.e., the Completion Indicator checkbox is not checked). To resolve a
procedure or routine, check the appropriate override (Override Indicator) box.
If you override an individual routine, only the verification associated with that
routine will be bypassed. If an entire procedure is overridden, none of the
individual routines will have verification performed.
15.5. Once all routines and/or procedures are overridden, return to the main block of
SAAEAPS. You can manually re-verify the application here by selecting Verify
Application from the Options Menu, or you can re-run SARETMT.
16. Re-run SARETMT in update mode.
SARETMT will try to verify all records that were previously suspended and will attempt
to re-verify all applications that originally failed verification. All applications that pass
the match and verification processing will be pushed to Banner. Once an application
has been pushed, the Process field will be set to
P(ushed).
Update Null SSN during Admissions Push Process
You can update Null SSN when performing the Admissions push process.
Use the R0050 routine (SSN Established) for the P030 procedure on SAAECRL for the
Web Application Type of
00. Routine R0050 is used to update the social security
number of an existing record with a
Null SSN when the Required indicator is checked
(
Y).
Routine R0270, Overwrite Existing SSN, will update a
Null value and overwrite an
existing value when the Required indicator is checked (
Y).
Using a combination of settings for the Required indicators determines how existing
Banner records are updated when a Self-Service application is processed. If there is no
SPBPERS record for an existing person, the SSN will always be updated, even if the
Required indicator for routine R0050 is unchecked (
N).
SAAECRL
P030/R0050
Required Ind
(Establish)
SAAECRL
P030/R0270
Required Ind
(Overwrite)
Existing
SPBPERS record
SSN entered in
Self-Service
Self-Service SSN
pushed
YNNo Yes Yes
Y N Yes, no SSN Yes Yes
Y N Yes, with SSN Yes No

747
Banner Student User Guide | Admissions
* It is possible to push the SSN from Self-Service when using SAAEAPS and the Update
ID button on GOAMTCH during the matching process, if the SSN field is
Null on the
existing person record.
Manually Matching, Verifying, and Pushing Electronic
Applications
The following steps how to manually match, verify, and push electronic applications into
Banner using SAAEAPS.
1. Use the Electronic Application Process Form (SAAEAPS) to display received Web
applications.
To display the application(s) for a specific person, enter the electronic ID for that
person in the Key Block or use a List function to display the Electronic Applicant
Search Form (SOAEIDN), where you can search for an electronic applicant using
name and ID.
You can also select only those applications added on a certain date by entering the
Add Date in the Key Block field. Only applications matching the Web ID and/or Add
Date in the Key Block will be displayed.
You can also enter the main block and query on certain fields. Those fields are:
Application Number, Application Type, Completion Indicator, Term, Source (with
a value of
WEB), Add Date, Accepted Indicator, Process, Process Date, Person
Status, and Application Status.
If you find applications that you believe are frivolous, they can be deleted using the
Delete Record function. Once an application is deleted on SAAEAPS, its associated
data is also deleted from the electronic application holding tables; therefore, the
application will no longer be viewable on SAAETBL.
YYNo Yes Yes
Y Y Yes, no SSN Yes Yes
Y Y Yes, with SSN Yes Yes
NYNo Yes Yes
N Y Yes, no SSN Yes Yes
N Y Yes, with SSN Yes Yes
NNNo Yes Yes
N N Yes, no SSN Yes No *
N N Yes, with SSN Yes No
SAAECRL
P030/R0050
Required Ind
(Establish)
SAAECRL
P030/R0270
Required Ind
(Overwrite)
Existing
SPBPERS record
SSN entered in
Self-Service
Self-Service SSN
pushed

748
Banner Student User Guide | Admissions
2. Flag applications for further processing.
If you will not process an application until a fee or certification is received, you might
also want to set the Accepted Indicator to
N until you receive the appropriate
additional information required by your policies and procedures.
For those applications which you will further process, set this indicator to
Y.
3. Perform any required manual verification steps.
Select the Verification Steps tab, use a Duplicate Item function, or select Manual
Verification Steps from the Options Menu to transfer to the Verification Steps window.
There may be two kinds of manual verification steps, those related to person data and
those related to an application. You defined the manual verification steps which would
be required on the Application Verification Steps Validation Form (STVASTA). One
person-related step - ID Verification (
IDVR) - is required by system processing and
will be present whether or not you defined additional verification steps.
If the application was received via the student (secured) side of the Web (Record
Type is
S), you do not need to complete the ID Verification (IDVR) step. It will be
completed for you when you verify the application's data. Go to Step 11.
If the application was received via the non-secured side of the Web, you must either
match the applicant to an existing Banner person or create the person in Banner.
Either of these functions also completes the ID Verification (
IDVR) step. Continue with
Step 3 through Step 10.
When you are positioned on the ID Verification (
IDVR) step record, use a function key
to perform special processing. The function can be performed if the ID Verification
(
IDVR) step has already been completed.
Use a Count Query Hits function or select Associate Person with ID from the Options
Menu to transfer to the Associate Person with ID window, where you can choose
which type of Banner ID to assign to the selected record in the Select an ID field.
• Electronic ID – This is the ID used to create the electronic application.
• Local ID – Used for applications filed via EDI where the applicant provided a Local
ID.
• SSN – This is the SSN or other Federal ID number specified on the electronic
application.
• Banner ID – Used if you wish to enter an explicit ID to be used by Banner.
• Generate ID – Indicates that Banner should generate an ID for this person.
4. After choosing the appropriate ID type, either save the changes or select the
Associate Person with an ID button. This will display GOAMTCH.
5. The ID displayed on GOAMTCH should match the option chosen in the Associate
Person with ID window. The Matching Source field should contain the source code
that has been assigned to the interface code on SAAWADF for the application type of
the selected Web application. This source code can be changed if desired.
If no interface code has been specified for the application type on SAAWADF, then the
Matching Source field will contain the default source code assigned to the user ID on
GORCMUS. If no default source code has been assigned on GORCMUS, you will be
able to select a source code from the List of Values.

749
Banner Student User Guide | Admissions
Perform a Next Block to populate the Data Entry block with all of the data for the
incoming electronic applicant record that is present in the temporary tables.
6. You can update or adjust the data in the Data Entry block if it does not meet your
institution’s data standards. These updates will be copied back to the temporary tables
and used when the applicant's record is created.
7. Once the data has been “cleaned up”, use a Next Block function to call the matching
algorithm, or select the Duplicate Check button.
8. The incoming electronic application can be a match, a potential match, or a new
record:
8.1. If the incoming electronic application is found to be a match to someone in
Banner, the Banner record will be displayed in the Match block.
8.2. If the incoming electronic application is found to be a potential match against
more than one existing Banner record, then all of the possible matches will be
displayed in the Potential Matches window.
8.3. If the electronic application is found to be a new record, an Alert Box will be
displayed with a message asking if you want to create the new person.
9. If the person is found to be an exact match, you can do one of three things:
9.1. Match the incoming record to the Banner record but not update any Null fields
that exist for the person in Banner by selecting the Select ID button.
9.2. Match the incoming record to the Banner record and choose to update any Null
fields that exist for the person in Banner with data on the incoming record by
selecting the Update ID button.
9.3. Choose to ignore the matched status, and create the person as new by
selecting the Create New button.
10. After selecting one of the options above, the user will be returned to the Verification
Steps window, and the ID Verification (
IDVR) step will be marked as complete.
Continue processing the electronic applicant as needed.
11. Verify the application data.
Select Verify Application from the Options Menu to verify the application data.
Verification performs all verification procedures and routines attached to the
application which have not been overridden.
After an application has been verified, its Accepted Indicator on the main window of
SAAEAPS is set either to
E, which indicates that errors were found during verification,
or
V for verification complete.
12. Review errors, override verification, or correct data.
If errors are encountered during verification, select Review Results from the Options
Menu or use a Next Block function to review the results. The Verification/Load Results
window is displayed.
In the System Verification Procedures section of this window, each procedure and its
associated routines are displayed, one procedure at a time. You scroll through the
procedures using the scroll bar or Next and Previous Record functions, and the
associated routines are displayed for each procedure. As you scroll through the
procedures, you can ignore any which have already been overridden or which have
passed verification. (The Completion (Indicator) checkbox is checked.)

750
Banner Student User Guide | Admissions
Verification errors must be resolved before the data can be loaded into the Banner
permanent tables from the holding tables. You resolve verification errors by overriding
the routine which failed or by overriding the entire procedure. If you override an
individual routine, only the verification associated with the individual routine will be by-
passed. If you override the procedure, none of the individual routines will be
performed. Only those procedures or routines for which override is allowed (defined
on SAAECRL) can be overridden. If you attempt to override a procedure or routine
when an override is not allowed, an error message displays, and the override is not
processed.
After overriding all routines or procedures that you wish to have ignored, use the
Return button to return to the main window of SAAEAPS, and select Verify Application
from the Options Menu to verify the information again. Only data which had not
previously been verified is processed. Procedures in which you overrode routines can
now be verified.
You should continue verifying data and overriding routines and procedures until
verification is complete (the Accepted Indicator displays
V for Verified). When you
push data into the permanent tables, data for procedures which have been verified is
loaded, regardless of the status of other data.
13. Load the verified information into the permanent tables.
Select Load Application from the Options Menu or use an Insert Record function to
push the data to the permanent tables. After you have pushed the data, you can view
the results by selecting Review Results from the Options Menu or by using a Next
Block function to access the System Verification Procedure section of the Verification/
Load Results window. Scroll until you reach procedure P900, the PUSH Verification
Procedure. The routines associated with this procedure push actual pieces of data.
Data has been pushed for routines which are complete, and the message associated
with each completed routine will tell you the number of records created or updated.
Changing PINs
There is one more option available on the Electronic Application Process Form
(SAAEAPS), the Change PIN option, and it is not part of actual application processing.
You use the Change PIN option when an applicant has forgotten the PIN used to submit
application information or when an applicant has been locked out of the non-student (non-
secured) application processing component of self-service admissions.
To use the Change PIN option, select Change PIN from the Options Menu or use a Help
function. The Non-Student PIN Change window is displayed. In this window, you can:
• view the existing PIN and report it to the applicant,
• change the applicant's PIN, or
• unlock a locked application.
Review Applicant Information
If at any point you want to review the application information, either to determine why there
are verification or load errors or to review application information which will not be loaded

751
Banner Student User Guide | Admissions
to the permanent Banner tables, use the Electronic Application Submitted Form
(SAAETBL).
You can now work on another electronic application or move into other Banner forms to
further process the applications you have pushed.
Pushing Test Score Information
SATI and SATII test scores entered via EDI and pushed into the SORTEST table should
have a value of
R placed in the SORTEST_RCRV_IND field if the
SORTEST_TEST_DATE is greater than or equal to April 1, 1995. This will ensure that the
SOPSATS program and/or client-written programs don’t try to further re-center these
scores, as they should already be re-centered.
(These programs use the value or lack of a value in the
SORTEST_RCRV_IND field in
their determination of whether to re-center the test scores.)
The following rules need to be added to the Electronic Admissions Application Rules Form
(SAAERUL) where the Group field is set to
TEST. The Value field will be populated for
you, as these are required values based on the Banner Test Code Validation Form
(STVTESC). Only those tests received via EDI that have a test code matching one of the
test codes below should have the
R added to the Revised or Recentered field on
SOATEST. This is because only SAT I and SAT II tests were affected by the re-centering
change. If additional SATII tests are added by ETS, additional records will be provided for
you on SAAERUL.
Group Label Description Value
TEST SATV SAT Verbal Test S01
TEST SATM SAT Math Test S02
TEST SATR SAT Reading Subscore Test S03
TEST SATV SAT Vocabulary Subscore Test S04
TEST SATAH SAT American History/Social Studies AH
TEST SATBE SAT Bio-Ecological Emphasis BE
TEST SATBM SAT Bio-Molecular Emphasis BM
TEST SATBY SAT Biology Emphasis BY
TEST SATCH SAT Chemistry CH
TEST SATCL SAT Chinese with Listening CL
TEST SATEH SAT European History/World Cultures EH
TEST SATEN SAT English Composition EN
TEST SATES SAT English Composition w/Essay ES
TEST SATFL SAT French with Listening FL

752
Banner Student User Guide | Admissions
Addresses in Banner and Entered on the Web
Addresses entered via the Web that have the same address type as existing Banner
addresses should be loaded as the next sequential address instead of not loading them at
all. The rules for determining From and To dates for existing addresses and new
addresses are detailed below.
When an address comes in via the Web and has the same address type as an existing
Banner address the push process will:
• Select the most current Banner address of that address type. This is either the address
with the correct address type that has a To Date equal to
Null or the address with the
correct address type that has a maximum To Date for that person. If two records are
returned, then the one with the
Null address is considered to be the most current (as
Null equals valid until the end of time). This will be the address used in all comparisons
below.
TEST SATFR SAT French FR
TEST SATGL SAT German with Listening GL
TEST SATGM SAT German GM
TEST SATHB SAT Hebrew HB
TEST SATIT SAT Italian IT
TEST SATJL SAT Japanese with Listening JL
TEST SATKR SAT Korean with Listening KR
TEST SATLR SAT Literature LR
TEST SATLT SAT Latin LT
TEST SATM1 SAT Mathematics Level I M1
TEST SATM2 SAT Mathematics Level II M2
TEST SAT1C SAT Mathematics Level IC 1C
TEST SAT2C SAT Mathematics Level IIC – Calculator 2C
TEST SATMH SAT Modern Hebrew MH
TEST SATPH SAT Physics PH
TEST SATSL SAT Spanish with Listening SL
TEST SATSP SAT Spanish SP
TEST SATWH SAT World History WH
TEST SATWR SAT Writing WR
Group Label Description Value

753
Banner Student User Guide | Admissions
• If the incoming Web address matches the most current Banner address of the same
address type, do nothing.
• Otherwise, determine how to update existing or Null To Dates and to insert new From
Dates:
• If the To Date (of the current Banner address) is
Null,
– Update the To Date of the current address with the greater of the From Date
(of the current address) or SYSDATE minus one.
– Insert the new address with the From Date with the greater of the From Date
plus one (of current address) or SYSDATE.
This code handles the problem of having someone submit multiple records on the
same day with multiple different addresses.
• If the To Date (of current Banner address) equals the SYSDATE, insert the new
address with a From Date of SYSDATE plus one.
• If the To Date (of current Banner address) is greater than SYSDATE, insert the new
address with the From Date of the current addressee’s To Date plus one.
• If the To Date is less than the SYSDATE, insert the new address with a From Date of
SYSDATE.
Quick Start Set-Up Procedures for Banner Student Self-
Service
This section discusses using Quick Start admissions processing.
Overview
Quick Start processing allows an institution to automatically process Web applications in a
number of ways. It can be set up to automatically create a student record, taking the Web
applicant directly to Banner Student Self-Service so they can register. It can also
automatically create a recruit and/or application record, thereby eliminating the need to
use SAAEAPS or run SARETMT. A decision record can be created too, as long as an
application record is being created.
You must follow the instructions in the “Admissions Application Set-Up Procedures for
Banner Student Self-Service” section before you can use Quick Start processing.
Processing Steps
The following describes the steps required to use Quick Start processing. It is followed by
a description of how Quick Start works behind the scenes.
1. Check the Enable QuickStart Processing checkbox in the Automated Processing
Rules block on the Electronic Applicant Web Default Rules Form (SAAWADF).
2. Choose the Quick Start features you would like to use by checking the appropriate
boxes.

754
Banner Student User Guide | Admissions
• Automatically Create Recruit Record - When checked, a recruit record will be
created for the Web applicant.
• Automatically Create Application Record - When checked, an application record
will be created for the Web applicant.
• Process Decision - When checked, an application decision code can be entered in
the Admission Decision field.
• Admission Decision - When a decision code is entered, an admissions decision
record will be created on SARAPPD.
• Provide Access to Student Self-Service - When checked and the Web applicant
has a student record, an Access Web for Students button will display on
whichever signature page is displayed.
• Create One Application - When checked, one recruit or application record will be
created for all associated curricula. When unchecked, a new record will be created
for each curriculum (major).
• Auto Student - When checked (in the EDI and Self-Service block of the Majors and
Departments window on SOACURR), a student record will be created on
SGBSTDN, as long as no matching record is found on SOAEQUI.
3. Select the interface code associated with the correct matching source code for the
matching rules to be used by Quick Start on the Web Matching Rules window of
SAAWADF.
4. Create letters to be used with Quick Start processing on SOAELTR.
5. Associate the letters with the appropriate letter types on the Web Signature Letters
window of SAAWADF.
Behind the Scenes
Quick Start processing begins automatically when:
• The Application Complete button is pressed on the Web Application Checklist page,
and credit card processing has been turned off for the application type on SAAWADF.
- OR -
• Credit card processing is enabled on SAAWADF and:
• The applicant selects the Pay Later button on the Application Fee Payment page.-
OR -
• The applicant is prompted for the Signature page after successfully processing their
credit card payment.
Then the following steps take place:
1. The match package is run to determine if the Web applicant matches an existing
Banner person.
2. If the match package, returns a status of
S (Suspended) or E (Error), then the
application status code is updated on SAAEAPS, and the Display Signature package
displays the letter code associated with the
SUSPENSE or MATCHERR letter types
respectively.

755
Banner Student User Guide | Admissions
3. Quick Start processing checks to see if the Automatically Create Application
Record box is checked. If it is checked, run the verification routines (the same
routines as run on SAAEAPS or with the SARETMT process).
If any errors are encountered during the verification process, the Application Status
field on SAAEAPS is updated appropriately, and the Signature Display package
displays the letter assigned to the
VERERR letter type on SAAWADF.
4. Now the
create_appl package is run. It first checks for the existence of an
application hold for the Web applicant (assuming they had matched someone in
Banner).
If an application hold exists, then the Application Status field on SAAEAPS is
updated appropriately, and the Display Signature package displays the letter assigned
to the
APPLHOLD letter type on SAAWADF. If no application hold exists, the
application is created.
5. If the Automatically Create Application Record checkbox is checked, then you can
optionally request that a decision record be created as well, by checking the Process
Decision checkbox and entering a decision code in the Admission Decision field.
Just as with SAAQUIK, no decision code with the Inactive Application (Indicator)
checked on STVAPDC can be created.
6. If the Automatically Create Recruit Record checkbox is checked, run the
create_recruit package to create a recruit record on SRBRECR.
7. If the Create One Application checkbox is checked, then one application will be
created for all associated curricula. If unchecked, then a separate application will be
created for each curriculum (major).
8. If the Auto Student checkbox is checked (in the EDI and Self-Service block of the
Majors and Departments window on SOACURR) for the applicant’s curriculum, Quick
Start processing is allowed for that curriculum.
8.1. If Quick Start processing is not allowed for the curriculum, then no student
record will be created, and the letter associated with the
STANDARD letter type
will be displayed. If you selected the option to create a recruit and/or application
record, these will still be created.
8.2. If Quick Start processing is allowed for the curriculum and the match status
returned earlier is
N (New), a student record is created for the Web applicant,
and the Signature Page is displayed with the letter assigned to the
QUIKADMIT letter type.
9. If the match status returned earlier is
M (Match), SOAEQUI is queried to see if the
Web applicant’s most recent Banner student record and Web application match any of
the exception processing rules on the form.
9.1. If one or more rules match, then the rule with the highest priority number is used
(1 = highest), and no student record is created. If that rule has a letter code
associated with it, then that letter is displayed as the Signature Page.
9.2. If no letter code exists on the matching SOAEQUI record, then the letter
associated with the
NOSTUREC letter type is displayed. If no letter code has
been assigned to the
NOSTUREC letter type, then the letter associated with the
DEFAULT letter type is displayed. If no letter has been assigned to the
DEFAULT letter type, the default Web Tailor letter is displayed.

756
Banner Student User Guide | Admissions
Application Status Errors and Resolutions
The following are the possible application status codes that can be generated by the Quick
Start process and how they may be resolved. They can be viewed on SAAEAPS.
Application
Status
Code Description Resolution
H Admissions Hold If an admissions hold exists for an applicant, their application
status will be updated to
H, and their record cannot be pushed on
SAAEAPS until the hold is removed on SOAHOLD. Even if the
hold is removed, only an application record will be created, not a
student or decision record.
Perform the following steps:
1. Remove the hold on SOAHOLD, if appropriate.
2. Run the Verification Process by selecting Verify Application from the Options Menu in the main window of
SAAEAPS. This process will run even though the Application Status field is set to
H.
3. Run the Load Application process by selecting Load Application from the Options Menu in the main
window of SAAEAPS. Assuming no other errors occur, the application should be pushed. It will not,
however, automatically create a student record if that was indicated for the application type on SAAWADF.
The institution will have to do that manually. It will create the recruit record though, if that was indicated on
the Automated Processing rules window of SAAWADF.
4. You can also run SARETMT to verify and push the application having an application status of
H, as long as
the hold has been removed.
I Can’t Insert Decision
Code
This error is received when you are trying to create a student
record, and the system knows that one or more of the rules
governing the creation of a student record would be broken in
doing so.
For example, if a student record already exists for the same term
as the newly created Quick Start application, the insert of a new
student record would fail, as you cannot insert a new student
record if one already exists for the same term.
However, all other items defined by the indicators in the Automated
Processing Rules window of SAAWADF, as well as items defined
by the SAAECRL rules, will still be processed.
So, the Quick Start applicant won't have a new student record
created, but they could have an application record created,
additional personal data updated on SPAPERS, test score data
added, an application and recruit record created, etc.

757
Banner Student User Guide | Admissions
P Push Error This error rarely occurs. It is usually caused by invalid data or data
that is not acceptable to the database because of indices. If a push
error occurs, the part of the process receiving the error will not be
pushed. All other pieces will be pushed though.
For example, if a question/answer receives a push error, the
recruit, application, and student record will still be created along
with person data.
R Match Error Perform the following steps:
1. Use the Person Search and/or Create Person items in the Options Menu from the Applicant and
Application Manual Verification window on SAAEAPS to mark the record with the match error as New or
Matched.
2. Mark any of the other manual verification steps as complete in the Manual Person Verification Steps block,
and save the changes.
3. Return to the main block, where the Person Status and Application Status fields should both be set to
Y.
4. Now you can either manually verify and push the application* on SAAEAPS or run the SARETMT process
to automatically re-verify and push the application.
* See the section called “Manually Matching, Verifying, and Pushing Electronic Applications” for more
information.
U Suspended Record Perform the following steps:
Application
Status
Code Description Resolution

758
Banner Student User Guide | Admissions
1. Select the Verification Steps tab or the Manual Verification Steps option from the Options Menu to access
the Verification Steps window.
2. Select the ID Verification (
IDVR) step, and then choose the Associate Person with ID item from the
Options Menu.
3. This opens the Associate Person with ID window, where you can choose which type of Banner ID to
assign to the selected record from the Select an ID field.
Electronic ID – This is the ID used by the applicant when the electronic application was submitted.
Local ID – This is the locally assigned ID reported by the applicant when the electronic application was
submitted. It is used for applications filed via EDI. For example, this may be a generated ID from another
institution or the person's high school.
SSN – This field displays the value reported by the applicant as a social security or other Federal ID
number when the electronic application was submitted.
Banner ID – This field is used to specify the ID which should be used when the SPRIDEN record is
created for the applicant in Banner.
Generate ID – This field indicates that Banner should generate an ID for this person.
4. After choosing the appropriate ID type, either save the changes or select the Associate Person with an
ID button. This will display the Common Matching Entry Form (GOAMTCH).
5. The ID displayed on GOAMTCH should match the option chosen in the Associate Person with ID window.
The Matching Source field should contain the source code that has been assigned to the interface code
on SAAWADF for the application type of the selected Web application. This source code can be changed
if desired.
If no interface code has been specified for the application type on SAAWADF, then the Matching Source
field will contain the default source code assigned to the user ID on GORCMUS. If no default source code
has been assigned on GORCMUS, you will be able to select a source code from the List of Values.
Perform a Next Block to populate the Data Entry block with all of the data for the incoming electronic
applicant record that is present in the temporary tables.
6. You can update or adjust the data in the Data Entry block if it does not meet your institution’s data
standards. These updates will be copied back to the temporary tables and used when the applicant's
record is created.
7. Once the data has been “cleaned up”, use a Next Block function to call the matching algorithm, or select
the Duplicate Check button.
8. The incoming electronic application can be a match, a potential match, or a new record:
8.1. If the incoming electronic application is found to be a match to someone in Banner, the Banner record
will be displayed in the Match block.
8.2. If the incoming electronic application is found to be a potential match against more than one existing
Banner record, then all of the possible matches will be displayed in the Potential Matches window.
8.3. If the electronic application is found to be a new record, an Alert Box will be displayed with a message
asking if you want to create the new person.
Application
Status
Code Description Resolution

759
Banner Student User Guide | Admissions
Using Accept Admissions Offer in Self-Service
You can use Banner Student Self-Service to allow an admissions applicant to view an offer
of admission (with conditions if appropriate) and then confirm/accept the offer or reject the
offer and withdraw the application from the institution.
Rules on SAAERUL for a group code of
DCSN are used with this processing. (The group
code of
DCSN (Applicant Decision) exists on STVEGRP.) These rules use UPDATE ME
values for which rule labels can be defined to allow students to accept the admissions
decision in self-service. The
ALLOWCONFIRM and ALLOWWITHDRAW rule labels can be
set up as
Yes or No values for specific levels, such as ALLOWCONFIRM00 and
ALLOWWITHDRAW00. You can customize these rule labels at your institution and replace
the
00 with a level type such as UG or another code suffix used to indicate that the student
acceptance or withdrawal is available for that specific level code.
Once the student has made a decision in self-service to accept the offer of admission, that
decision data is also updated on the Decision Data block of SAADCRV. If the student
rejects the offer and withdraws the application in self-service, the withdrawal data is
updated in the Withdrawal Data block on SAAADMS.
Please see the Banner Student Self-Service User Guide for more information.
9. If the person is found to be an exact match, you can do one of three things:
9.1. Match the incoming record to the Banner record but not update any null fields that exist for the person
in Banner by selecting the Select ID button.
9.2. Match the incoming record to the Banner record and choose to update any null fields that exist for the
person in Banner with data on the incoming record by selecting the Update ID button.
9.3. Choose to ignore the matched status, and create the person as new by selecting the Create New
button.
10.After selecting one of the options above, the user will be returned to the Verification Steps window, and the
ID Verification (
IDVR) step will be marked as complete. Continue processing the electronic applicant as
needed.
V Verification Error You can go to SAAEAPS to try and override the verification error if
the correct override indicators were set on SAAECRL.
Perform the following steps:
1. Select the Review Results item in the Options Menu in the main window of SAAEAPS to access the
Verification/Load Results window.
2. Scroll through the procedures in the System Verification Procedures block until you find the procedure(s)
where the Completion Indicator checkbox is blank.
3. Select the Override Indicator checkbox for this procedure. If an override is allowed for this procedure,
you can check the box and then save the change.
4. Return to the main block of SAAEAPS. You can either manually verify and push the application *, or you
can run SARETMT to automatically re-verify and push the application.
* See the section called” Manually Matching, Verifying, and Pushing Electronic Applications” for more
information.
Application
Status
Code Description Resolution

760
Banner Student User Guide | Admissions
Processing
Students who have been accepted for admission to an institution can confirm their
attendance or withdraw their applications in Banner Student Self-Service. The Confirm
Attendance and Withdraw Application buttons are displayed at the bottom of the
Application Summary page when the Web application section rule (SAAWAAP) allows the
application summary to be displayed, and the Display on Web indicator is checked on
STVAPDC for the admission application decision code.
The overall SAAERUL rule used is the
ALLOWDECISION rule. If this rule is not set to Y,
then regardless of how any other rule is set, the Confirm Attendance and Withdraw
Application buttons will not be displayed.
To only display the Confirm Attendance button, the application status on SAADCRV
must be set to
C (Complete ready for review) or D (Decision made), with the latest
decision processed being one of significant decision and institutional acceptance. The
ALLOWDECISION rule on SAAREUL must be set to Y. If this rule is set to N, the button
will not be used, and the student cannot accept the offer of admission online. Also, the
CONFIRMCODE rule must be set up with a valid STVAPDC code, such as 35 (Applicant
Accept), which will create the general student (learner) record.
The institution can be more specific regarding who can accept an offer by creating specific
level code record rules. For example, an institution can create the
ALLOWCONFIRMUG
rule, where
UG is a valid value on STVLEVL. All application types that have the UG level
code associated with them will then follow this rule. An
ALLOWCONFIRM rule can be
created for every level code at your institution. Note that if only the
ALLOWCONFIRM rule
exists, this rule affects all levels of applications. This processing will first look for the
“specific” level rule, and if that is not found, it will default back to the overall
ALLOWCONFIRM rule.
The Withdraw Application button is displayed at all times unless the last decision
processed was a rejection, (the Institution Rejection checkbox on STVAPDC is checked
or set to
Y), or if the application has already been withdrawn, (the Inactive Application
checkbox on STVAPDC is checked or set to
Y). The ALLOWWITHDRAW rule on
SAAERUL must also be set to
Y for this button to display. Also, the WITHDRAW rule must
be set up with a valid STVAPDC code, such as
40 (Applicant Rejected Offer), which will
inactivate the applicant record.
The institution can be more specific regarding who can withdraw from an offer by creating
specific level code record rules. For example, an institution can create the
ALLOWWITHDRAWUG rule, where UG is a valid value on STVLEVL. All application types
that have the
UG level code associated with them will then follow this rule. An
ALLOWWITHDRAW rule can be created for every level code at your institution. Note that if
only the
ALLOWWITHDRAW rule exists, this rule affects all levels of applications. This
processing will first look for the “specific” level rule, and if that is not found, it will default
back to the overall
ALLOWWITHDRAW rule.
The Confirm Attendance and Withdraw Application buttons can be customized using
the
CONFIRMLABEL and WITHDRAWLABEL rules on SAAERUL. Codes associated with
the
CONFIRMCODE or WITHDRAWCODE rules for the group code of DSCN (STVEGRP)
are inserted into SARAPPD to separate the rule requirements appropriately.
761
Banner Student User Guide | Admissions
The Withdraw Application button accesses the Applicant Withdrawal Information page
when the
CAPTUREWDINFO rule is set to Y on SAAERUL. This page allows the student
to enter a withdrawal reason code (STVWRSN) and a source/background institution code
(STVSBGI). The withdrawal reason comes from the SAAWADP entries associated with
the STVWRSN table. The Look-Up College code is pulled from the Previous College
page. If the
CAPTUREWDINFO rule is set to N, the Application Summary page is
redisplayed with the application decision for the decision code description associated with
the
WITHDRAWCODE rule on SAAERUL. The decision code associated with the rule must
have the Inactive Application and Display on Web checkboxes checked (set to
Y) on
STVAPDC.
Note: The STVWRSN table name on STVVTAB allows the institution to
determine which withdraw reason values are displayed on the Applicant
Withdrawal Information page.
Whether the
CAPTUREWDINFO rule is set to Y or N, the WITHDRAWCODE rule will be
inserted into SARDCSN with the system date, the
SARAPPD_MAINT_IND will be set to
U, and the user will be set to SAISUSER. When the Application Summary page is
redisplayed with an updated decision, (
CAPTUREWDINFO is set to N), then a message is
displayed at the top of the page indicating that the student’s decision has been saved.
Decision data is inserted into the SARAPPD table.
SAAERUL Rules
There are two types of rules used on SAAERUL for this processing, those that are
delivered and those that are created by your institution. The following rules are delivered
for the group code of
DCSN (from STVEGRP) with a value of UPDATE ME.
Group Label Description EDI Instructions
DCSN ALLOWDECISION Allow Applicant Decision N Update the Value column from
UPDATE ME to Y or N for the
applicant decision.
DCSN CONFIRMCODE Attendance Confirmation
Decision Code
N Update the Value column from
UPDATE ME to the value from the
Admission Application Decision
Code Validation Form (STVAPDC)
which should be used for the confirm
decision code.
DCSN CONFIRMLABEL Applicant Confirm Button
Label
N Update the Value column from
UPDATE ME to any value which
should be used for the Applicant
Confirm label.
762
Banner Student User Guide | Admissions
The following rules can be created at your institution.
The
ALLOWCONFIRM and ALLOWWITHDRAW rules can be created at your institution and
the suffix modified for use with specific application levels.They use a value of
Y or N.
When only the
ALLOWCONFIRM and ALLOWWITHDRAW labels exist, they will apply to all
application types that are Web-enabled. (The Web Indicator is checked on STVWAPP.)
When
ALLOWCONFIRM00 and ALLOWWITHDRAW00 labels exist, where 00 is the
student level code from STVLEVL, then only those application types will follow the rule.
You can have unlimited rules, so the suffix on the label determines the rule that is
displayed.
For example, you can set up the labels as specific decision codes for confirmation and
withdrawal based on student level, such as
ALLOWCONFIRMUG and
ALLOWWITHDRAWUG, using the UG suffix for the rule.
Set-Up Steps
The following step-by-step procedure explains how to set up the accept admissions offer
functionality in Student Self-Service.
1. Access the Electronic Admissions Applications Rules Form (SAAERUL).
DCSN WITHDRAWLABEL Applicant Withdraw
Button Label
N Update the Value column from
UPDATE ME to any value which
should be used for the Applicant
Withdraw label.
DCSN WITHDRAWCODE Withdraw Decision Code N Update the Value column from
UPDATE ME to the value from the
Admission Application Decision
Code Validation Form (STVAPDC)
which should be used for the
withdraw decision code.
DCSN CAPTUREWDINFO Capture Withdrawn
Information
N Update the Value column from
UPDATE ME to Y or N for the
additional withdrawn information.
Group Label Description EDI Instructions
DCSN ALLOWCONFIRM00 Rule to be entered by
user
N
Set to
Y or N to use as the
application confirmation rule.
00 is a
valid level code (STVLEVL).
DCSN ALLOWWITHDRAW00 Rule to be entered by
user
N
Set to
Y or N to use as the
application confirmation rule.
00 is a
valid level code (STVLEVL).
Group Label Description EDI Instructions

763
Banner Student User Guide | Admissions
2. Enter DCSN in the Group field in the Key block, then go to the next block.
3. Enter
Y in the Value field for the ALLOWDECISION rule.
This must be done to allow applicants to use the web for their decisions. You can
make more refinements, as explained in the following steps, but if the
ALLOWDECISION rule is not set to Y, the Confirm Attendance and Withdraw
Application buttons will not be displayed on the Application Summary page
(
bwskasta.P_Disp_StatusSaradap) regardless of the other details you put in
place.
4. Review the delivered codes, and take the action specified in the Instructions column
as needed to achieve the setup you desire.
5. If you do not want the Withdraw Application button to be displayed on the
Application Summary page under any circumstances, enter
N in the Value field for the
ALLOWWITHDRAW rule, and save your changes.
6. If you want to allow the Withdraw Application button to be displayed on the
Application Summary page based on the applicant’s student level, take the following
actions.
6.1. Create a new rule.
6.2. Enter the rule’s name in the Rule Label field, appending a valid student level
code (from the Level Code Validation Form [STVLEVL]) to the rule label.
For example, if
UG is your valid level code for Undergraduate, and you want
to allow applicants at the
UG level to withdraw, you could create a rule called
ALLOWWITHDRAWUG.
6.3. Enter the rule description in the Rule Description field.
6.4. Enter
Y in the Value field.
6.5. Save your changes.
6.6. Repeat steps 6.1 through 6.5 for each level for which you want to allow
Withdraw Application button to be displayed on the Application Summary
page.
7. If you want to allow withdrawing applicants to provide more information about their
decisions using the Web, take the following actions.
7.1. Enter
Y in the Value field for the CAPTUREWDINFO rule, and save your
changes.
If you set the
CAPTUREWDINFO rule to Y, when a user selects the Withdraw
Application on the Application Summary page, the system will display the
Applicant Withdrawal Information page
(
bwskadec.P_ApplicantWDInfo).
7.2. Access the Admission Application Decision Code Validation Form (STVAPDC).
7.3. Select the Display on Web check box for each decision code you want to be
available on the Web, and save your changes.
7.4. Access the Withdrawal Reason Code Validation Form (STVWRSN).
7.5. Review the existing codes and, if necessary, define any new codes you want to
be available, then save your changes.

764
Banner Student User Guide | Admissions
Admissions and Curriculum Processing in Banner Self-
Service
Self-service processing can select and push minors and/or concentrations into Banner.
The Planned Course of Study page in Banner Student Self-Service allows for the selection
of multiple majors, as well as multiple minors and/or concentrations within each major. In
baseline Banner, all entered majors, minors, and concentrations will be pushed to
whatever record(s) the user has requested be created. The curriculum data will be pushed
into the SORLCUR and SORLFOS curriculum tables. All controls in place for curriculum
will be adhered to when the data are pushed.
Banner Student Self-Service Admissions functionality ties into existing rules which allow
institutions to determine how many of each curriculum component can be entered. For
example, concurrent curricula processing provides rules to determine how many active
majors can be entered for each curriculum. You can also decide, by Web application type
and module, the maximum number of majors, minors, and concentrations that can be
entered using the Web. This number should usually be less than or equal to the
corresponding rules set on SOACTRL for each module code. However, if it is not, when
the record is pushed into Banner, all data entered by the person will be pushed to the
curriculum tables, but any data over the limits set on SOACTRL will be inactivated and
given a status of
OVERLOAD. For example, if a recruit is allowed to have three majors,
and has entered three majors, but Admissions only allows for two majors, then all three
majors are pushed to Admissions, but the third major is inactivated and given a status of
OVERLOAD.
The
ONEAPPORTWO rule on SAAERUL allows an institution to decide that when two
majors are entered by the applicant, whether one application record should be created
with two majors or whether two applications should be created with one major each. This
also applies to recruits. Instead of using one rule (
ONEAPPORTWO) on SAAERUL, an
indicator that can be set by Web application type is used for applicants on SAAWADF. If
the indicator is checked (
Y), then one recruiting and/or application record will be created,
and all curricula entered will be associated with that one record. If the indicator is
unchecked (
N), then a new record (recruiting or application) will be created for each major
entered by the Web user.
You can select multiple curricula (majors, minors, and/or concentrations) in Self-Service
based on baseline concurrent curricula functionality. You can also assign a curriculum
priority and application preference for multiple applications. The Planned Course of Study
page allows a user to first select a major, and then the user is given a choice of selecting
another major or selecting a multiple of minors and/or concentrations to be associated
with the first major. You can enter any number of majors, minors, and concentrations
based on maximums set for a specific Web application type. When concentrations are
displayed, all base concentrations for the given Web type/selected major will be displayed,
along with any concentrations attached to the major, when that major has been selected
by the user. This works in the same way as baseline processing but minimizes Web users
having to know anything about the concept of “attached majors”.
Pushing Curriculum Data
The SAKL010 package is used to push curriculum data to the SORLCUR and SORLFOS
tables. Before inserting rows into SORLCUR and SORLFOS, this package first

765
Banner Student User Guide | Admissions
determines if the curriculum conversion routine should be run. If a person is matched to an
existing Banner ID, the process determines if any rows exist in SORLCUR/SORLFOS for
that ID/PIDM. If none exist, then the curriculum conversion is run to ensure that all pre-7.0
curriculum data is now stored in SORLCUR and SORLFOS. If the person is new, then the
conversion does not need be run.
Curriculum data is moved or pushed from the temporary tables to Banner in a backward
process. When a major (or minor or concentration beginning with Release 7.3) is entered
in Banner Student Self-Service, a row is stored in SARETRY (for the curriculum), and
another row is stored in SAREFOS for the major, (minor or concentration). These rows
contain data for the degree and field of study from SOBCURR. A function is then called
which matches that data (the degree and field of study identifier) to the corresponding
curriculum row/major in SOBCURR/SORCMJR. This process also handles minors and
concentrations. As fields of study (majors, minors, and concentrations) are selected/
entered in Banner Student Self-Service, an entry will be made into the SARETRY table for
curriculum and the SAREFOS table for majors, minors and concentrations.
The logic for creating a single application record is as follows:
1. The process determines the SOBCURR rule to be used for the entered field of study
(i.e, major, minor, or concentration).
2. If the
SARWADF_ONE_REC_APPL_IND field is set to Y, then all majors, minors, and/
or concentrations entered will be stored on one application instead of on multiple
applications. If this indicator is set to
N, skip to step 5.
3. If the curriculum rule that is returned already exists for the application in SORLCUR
(and is active and current), it will not exist for the first field of study. However, the
process will loop, and if two majors from the same curriculum are entered, only one
row will exist on SORLCUR.
3.1. If no matching curriculum rule already exists for the record, the process inserts
an SORLFOS row for the field of study type (
SAREFOS_FLVL_CDE cross-
referenced against GTVLFST) and the field of study using the next value from a
counter as the priority for the SORLFOS row.
3.2. If a matching curriculum rule already exists for the record so there is no need to
insert one, the process inserts an SORLFOS row for the field of study type
(
SAREFOS_FLVL_CDE) and field of study using the incremented counter
value.
4. Steps 1 - 3 are repeated by the process by
SARETRY_SEQNO value, and within each
SARETRY_SEQNO value by SAREFOS_SEQNO value. At this point, the storage of all
curricula data for this application will be complete.
The logic for creating a multiple application records (i.e., one record per major entered
instead of one record containing all curricula data) is as follows:
1. The process selects the first major (
SARETRY_SEQNO is 1) and creates a new
record.
2. The process inserts an SORLFOS row for the field of study type
(
SAREFOS_FLVL_CDE cross- referenced against GTVLFST) and the field of study
using the next value from a counter as the priority for the SORLFOS row.
3. When all the SAREFOS records for a given SARETRY row have been entered, the
process determines if another SARETRY row exists. If one does exist, a new record is

766
Banner Student User Guide | Admissions
created, and step 2 above is repeated. If no additional SARETRY rows exist, the
process is finished.
Note: The SAREFOS_FLVL_CDE field value determines what type of
SORLFOS row should be inserted. This value must be cross-referenced
using SORXREF (with a cross-reference label of
GTVLFST) to determine
the correct row type (major, minor, or concentration).
The values for
MAJOR, MINOR, and CONCENTRATION are delivered as
seed data. If additional types are developed at your institution for Self-
Service, and/or you use EDI applications with other values, then those
values must also be cross-referenced using SOAXREF/
GTVLFST.
Setting Up Curriculum Processing for Self-Service
Applications
Use the following steps to set up curriculum processing when applications are completed
online.
1. Establish major codes on the Major, Minor, Concentration Code Validation Form
(STVMAJR).
2. Create programs on the Program Definition Rules Form (SMAPRLE).
3. Create curriculum rules on the Curriculum Rules Form (SOACURR).
4. Set up the EDI values on SOACURR, and make sure that the Display on Self-
Service checkbox is checked (set to
Y) so the item is displayed on the Web.
5. Assign majors to be displayed in Self-Service on SOACURR.
5.1. Use the Display on Self-Service checkbox to indicate that the major can be
displayed in the self-service pulldown lists.
5.2. The Auto Student checkbox is usually optional but is required if you are setting
up a Quick Start application with an applicant acceptance decision. When this
field is checked, the curriculum will be created on the learner curriculum record.
5.3. Use the EDI Degree, EDI Level (qualifier), and EDI Identification fields for
setting up EDI data.
Prior to this release, the self-service application required that EDI codes be set
up for each major that was available on the Web. All three EDI components
were required: the EDI Degree value, the EDI Level (qualifier) value, and the
Field Value Description
SAREFOS_FLVL_CDE
MMajor
SAREFOS_FLVL_CDE
NMinor
SAREFOS_FLVL_CDE
C Concentration

767
Banner Student User Guide | Admissions
EDI Identification value. All three fields had to contain valid values that had
been defined on SOAXREF using the following labels:
– EDI degree values and SOAXREF label
DEGRLEVL
– EDI level values (qualifier) and SOAXREF label FSTYIDQL
– EDI identification and SOAXREF label STVMAJR
The three codes make up the combination received from EDI that define the
degree, level, and field of study. The EDI degree and EDI level (qualifier) remain
constant. The EDI identification defines the field of study and the program of
which it is a part. There may be many EDI identification values.
As of Release 7.3, the only requirement for ensuring a curriculum is valid for the
self-service processing is to check Display on Self-Service checkbox on
SOACURR.
Here is more information about each of the three EDI components, starting with
the EDI level qualifiers.
The following is from the TS189 EDI application documentation and lists the
code values for valid EDI level codes, also referred to as the Identification Code
Qualifiers.
Identification Code Qualifier
Description: Field of Study Code Set Indicator
This relates back to SOAXREF and the
FSTYIFQL label.
The following is from the EDI TS189 documentation for degree level codes.
These codes have to be used if EDI processing is being used. It seems that EDI
does not have a list of valid major codes. You could use the web application
type value in this field.
Data Element 1126 - Academic Degree Code
Indicates the level of academic award being described. The decimal is part of
the code and is to be sent.
Code Description
81 Classification of Instructional Programs (CIP) coding structure
maintained by the U.S. Department of Education’s National Center
for Education Statistics
82 Higher Education General Information Survey (HEGIS) maintained
by the U.S. Department of Education’s National Center for
Education Statistics
CA Statistics Canada Canadian College Student Information System
Course Codes
CC Statistics Canada University Student Information System
Curriculum Codes
ZZ Mutually Defined

768
Banner Student User Guide | Admissions
This relates back to SOAXREF and the DEGRLEVL label.
The EDI identification defines the actual field of study. The new Generate
Identification button on SOACURR creates these values for you. The entries
will be found under the
STVMAJR label on SOAXREF. The button performs the
following tasks:
– generates a unique value for the curriculum and the field of study, and
– inserts degree and level qualifiers into SOAXREF under the
STVMAJR label.
6. Assign minors and concentrations to be displayed in Self-Service.
7. Set up the EDI values on SOACURR, and make sure that the Display on Self-
Service checkbox is checked (set to
Y) so the items are displayed on the Web. (The
EDI degree will be derived from the primary major.)
8. View the majors, minors, and concentrations by curriculum on the EDI Cross-
Reference Curriculum Rules Form (SOAXCUR).
With the exception of the Restrict to Type checkbox on SAAWCUR, SAAWCUR and
SOAXCUR are query only forms. SOACURR is used to customize Web application
data.
Code Description
2.1 Postsecondary Certificate or Diploma (less than one year)
2.2 Postsecondary Certificate or Diploma (one year or more but less
than four years)
2.3 Associate Degree
2.4 Baccalaureate Degree
2.5 Baccalaureate (Honors) Degree
2.6 Postsecondary Certificate or Diploma (one year or more but less
than two years)
2.7 Postsecondary Certificate or Diploma (two years or more but less
than four years)
3.1 First Professional Degree
3.2 Post Professional Degree
4.1 Graduate Certificate
4.2 Master’s Degree
4.3 Intermediate or Specialist Graduate Degree
4.4 Doctoral Degree
4.5 Post-Doctoral Award

769
Banner Student User Guide | Admissions
9. Set up restrictions on Web Application Customized Curriculum Form (SAAWCUR).
This step is not required, but it can be used to restrict the curriculum to a particular
Web application type.
With the exception of the Restrict to Type checkbox on SAAWCUR, SAAWCUR and
SOAXCUR are query only forms. SOACURR is used to customize Web application
data.
Keep in mind that all curricula that have a checked Web Display (Indicator) and have
the same level as the Web application type will appear in the list of valid programs,
unless some have a checked Restrict to Type (Indicator). A restriction on at least
one curriculum restricts the list of available curriculum to just the ones with a checked
Web Display (Indicator).
Note: Restrictions are available only on the major and apply only to the
primary major, otherwise known as the Planned Course of Study page in
Self-Service.
10. Restrict curricula from being pushed to a general student (learner) record.
Use the Auto Student checkbox (in the EDI and Self-Service block of the Majors and
Departments window on SOACURR) to prohibit a particular planned course of study
from creating a learner curriculum.
This means that if the Auto Student checkbox (in the EDI and Self-Service block of
the Majors and Departments window on SOACURR) is not checked for a particular
major, and it appears on a Quick Start application that has an applicant acceptance
decision, the learner curriculum will not be created if an applicant selects that
program.
You can also restrict which curriculum will result in the creation of a learner curriculum,
based on what the applicant has already been accepted into, by setting up equivalents
on the Existing or Incoming Student Data Mapping Form (SOAEQUI).
TS 189 Upload (SAR189U) of Electronic Applications
Your institution may upload electronic admissions applications in SPEEDE format (TS
189) received and processed by the EDI.Smart™ PC application, into the Banner Student
System. This processing is optional, and requires that EDI.Smart has been installed and
configured, and the appropriate Electronic Admissions Application set-ups have been
completed. This processing supports Peterson electronic admissions applications, as well
as other admissions applications transmitted via EDI (Electronic Data Interchange) which
conform to TS 189 standards.
The TS 189 Upload Process is used to receive an electronic admissions application in
SPEEDE (Standardization of Post-Secondary Education Electronic Data Exchange)
format and to automate the entry of the admissions application data into the Banner
Admissions module. It is assumed that the user is familiar with the procedures and
processing of the Admissions module.

770
Banner Student User Guide | Admissions
EDI.Smart Requirements
EDI.Smart release 2.0 must be installed, with the most recent patches applied for
processing TS 189 files. If you have any questions about your current release of
EDI.Smart, or if you need patch diskettes, please contact the EDI.Smart ActionLine at
either 1-800-522-4827 and follow the voice mail instructions, or send email directly to the
Customer Support Center.
Overall Data Requirements
The values transmitted in TS 189 admissions applications for various data elements
conform to the standards specified by the SPEEDE committee. For a complete, current
set of EDI values, consult the Postsecondary Electronic Standards Council (PESC)
website
www.pesc.org, where a link is provided to EDI Implementation Guides. These
EDI values are stored in the same Banner holding tables used to receive self-service
admissions applications.
Overview of Peterson Admissions Application Processing
The EDI.Smart PC application has received an admissions application and is ready for
printing on the local printer, and is also ready for upload to the host. The process on
EDI.Smart that accomplishes this upload is called
FLATUPLD. It produces a file known as
MAP_UPLD.TXT which can be found in the INTFCE subdirectory below the EDI.Smart
root directory (usually WEDISMT).
This file must be moved (copied) to a destination on the host where Banner resides which
the user specifies. This file is then parsed by the Pro*C program SAR189U (Admissions
Application TS 189 Upload). SAR189U can be run from job submission. The parsing
process scans the flat file and puts the data into the same Oracle holding tables that are
used for self-service admissions application processing. You may review the TS 189
applications from within Banner on the Electronic Application Process Form (SAAEAPS),
as well as on the Electronic Application Submitted Form (SAAETBL). The TS 189
applications can be distinguished from Web applications on both forms by the value
displayed in the Source field on the form. To search for EDI TS 189 applications on
SAAEAPS, enter query mode, then enter “EDI” in the Source field, then execute the
query.
Please refer to the Web information in the “Admissions Procedures” section of this chapter
and the Admissions forms online help for more detailed information about the SAAEAPS
and SAAETBL forms.
EDI Set-Up Procedures
This section discuses setting up EDI for admissions applications.
Warning! Due to data relationships and dependencies, these steps must
be performed in the order specified.

771
Banner Student User Guide | Admissions
1. Review General Web controls.
Set up the global Web rules using Customize Web Rules in Web Tailor. Set up the
title, header, back URL and link, and help URL and link fields using Customize a Web
Menu or Procedure in Web Tailor. If these rules, links, and fields have not been
reviewed and customized for your institution, do this now.
2. Define values on validation forms used in EDI admissions application processing.
2.1. Use the EDI Application Source Code Validation Form (STVAPLS) to define
codes and descriptions for the sources of electronic applications.
2.2. Use the Application Verification Steps Validation Form (STVASTA) to define the
manual steps that you want to perform for each electronic application. One
value is required: ID Verification (
IDVR). For every electronic application
received, you will need to determine whether the application was submitted by a
person already known to Banner (for example, someone who is already being
recruited) or whether the applicant does not yet exist in Banner. The ID
Verification Step prevents the loading of an electronic application until you
complete the verification and either match an electronic applicant to an existing
Banner person or create the person in Banner. You may also wish to define
additional manual verification steps.
2.3. Use the Application Type Code Validation Form (STVWAPP) to define the types
of applications which can be received electronically.
Several application types are delivered with the Banner Student Self-Service
system:
– Undergraduate Freshman
– Undergraduate Transfer
– International Undergraduate Freshman
– International Undergraduate Transfer
– Graduate Studies
– International Graduate Studies
– Continuing Education, Non Degree
2.4. Use the EDI Rule Group Validation Form (STVEGRP) to display codes and
descriptions for groups of EDI application processing rules. Group codes are
provided so that rules which apply to similar types of data can be easily queried
on the Electronic Admissions Application Rules Form (SAAERUL).
Note: Values in STVEGRP are not intended to be maintained locally. All
required values are delivered and inserted during the install process and/
or via update scripts. This form and its data are provided to support other
forms, and no changes of any kind should be made to the data on this
form.
2.5. Use the EDI Verification Label Validation Form (STVXLBL) to display codes and
descriptions for EDI data verification labels which are used when processing a
variety of incoming EDI data.

772
Banner Student User Guide | Admissions
Note: Values in STVXLBL are not intended to be maintained locally. All
required values are delivered and inserted during the install process and/
or via update scripts. This form and its data are provided to support other
forms, and no changes of any kind should be made to the data on this
form.
3. Review and update or define the Procedures and Routines for each application type.
Before loading data from the holding tables into the permanent Banner tables, you
want to make sure that the information submitted by the applicant is as complete and
correct as it can possibly be. Application Procedures and Routines perform much of
this work.
A Procedure is a collection of Routines. Routines check data at the data element
level, and a number of Routines may be included in a Procedure. Procedures are
closely related to each table into which data will be loaded. All required Routines must
be satisfied before a Procedure can be satisfied. A set of Procedures and Routines
has been delivered and is attached to each of the delivered Application Types.
Procedures and Routines are attached to each Electronic Application Type using the
Electronic Admissions Procedure/Routine Control Form (SAAECRL). This form also
includes several flags which specify how each procedure and routine will be used in
electronic application processing.
Both the Procedures section of the main window and the Routines section of the
Admissions Verification and Load Routines window include a Required flag and an
Override flag.
3.1. The Required flag is used to specify the Procedures and Routines which will be
attached to each electronic application when it is received. When a Procedure
or Routine is attached to an application, it needs to be fulfilled before the
application is considered verified and before the data is “pushed” to the
permanent Banner tables. More specifically, each Routine needs to be fulfilled
before the overall procedure can be satisfied.
The Procedures and Routines in effect control the types of data which will be
verified and eventually “pushed” into Banner. You can set Procedures and
Routines to “Not Required” if you do not wish certain data to be verified and/or
loaded into Banner.
For example, you might choose not to load Medical Conditions from electronic
applications. You would set the Required flag for Procedure P060 (Health
Conditions Verification) to unchecked (
N), and also set the Required flag for
Routine R0080 (Create Medical Conditions) in Procedure P900 (“PUSH”
Verification) to unchecked (
N). This would tell the system not to verify Medical
Conditions and not to push them into Banner.
3.2. The Override flags associated with Procedures and Routines allow you to
specify whether a Routine or Procedure can be overridden at the individual
application level. If a Routine or Procedure is overrideable, it will still be
attached to an electronic application (based upon the Required flag), but can
be overridden if desired.
For example, you may normally collect required visa types from international
applicants, but not all applicants may understand the visa type they require. You
could require visa types from international applicants, but allow the “push” of

773
Banner Student User Guide | Admissions
visa information to be overridden if an applicant does not provide the correct
information. In this case, you would set the Required flags for Procedure P032
(International Information Verification) and all of its Routines to checked (
Y), but
set the Override flag for Routine R0030 (Create International Record) in
Procedure P900 (“PUSH” Verification) to checked (
Y) so that you could override
the push of this information.
If a procedure has the Override flag checked, that procedure will be
automatically overridden, regardless of whether any of its routines fail.
If a routine has the Override flag checked, it will automatically be overridden if
the corresponding data field is blank. The only time it will not be over-ridden is if
the incoming data is in error.
Because you cannot control the amount or accuracy of data provided by applicants in
electronic applications, you may need to experiment before you arrive at the “best”
combination of Required and Override flags on the verification procedures and
routines. Remember, the more procedures and routines you require, the fewer
applications that will probably pass all edit checks and be eligible to load.
3.3. Duplicate processing is governed by rules set up in two places. First, overall
duplicate processing rules exist on the Electronic Admissions Application Rules
Form (SAAERUL) under group
ADMS. These rules are: DUPLAPPLCURR,
DUPLAPPLLEVL, DUPLAPPLMAJR, DUPLAPPLPERS, DUPLAPPLTERM.
These rules tell the self-service admissions push packages whether to check for
duplicates in the given category.
For example, if
DUPLAPPLPERS is set to N, then the corresponding Web
package will not check for duplicate persons for the Web application being
pushed.
Note: The DUPLAPPLCURR rule is not currently used in self-service
admissions processing.
Duplicate processing rules also exist on the Electronic Admissions Procedure/
Routine Control Form (SAAECRL). These rules allow for duplicate processing
to be specified by application type instead of globally for all Web applications.
The rules exist within procedure P050 Application Verification (R0060 -
Duplicate Application for Person, R0070 - Duplicate Application for Term, and
R0080 - Duplicate Application for Level) and procedure P120 Entry Curriculum
Verification (R0010 - Duplicate Application for Major). These routines are
examined if the corresponding rule on SAAERUL is equal to
Y.
Whether a specific routine allows duplicates depends on the setting of the
Override flag. If the Override flag is unchecked, then duplicates are not
allowed. If the Override flag is checked, then duplicates are allowed. For
example, if
DUPLAPPLTERM is set to Y, routine R0070 is marked as required,
and the Override flag is checked, then multiple applications for the same term
are allowed. However, if
DUPLAPPLLEVL is set to Y, routine R0080 is marked
as required, and the Override flag is not checked, then the Web application will
not be pushed if one already exists in Banner for the same term and level.
For delivered Web Application Types, all appropriate procedures and routines have
already been attached to each application type. If you define additional application
types, you need to attach the appropriate procedures and routines to each new

774
Banner Student User Guide | Admissions
application type. You can do so manually, using the delivered application type 00
(Default Example - All Sections) for example, or you can have your Information
Services representative copy the procedures and routines from Application Type
00
for you.
Note: Please see the end of the “EDI Set-Up Procedures” for a list of the
procedures on SAAECRL and their associated routines.
4. Review and update rule values on the Electronic Admissions Application Rules Form
(SAAERUL).
The Electronic Admissions Application Rules Form includes a number of rules which
control how data is handled in EDI admissions application processing. All rules which
are used by system processing are delivered and should have been installed during
the upgrade process.
For convenience purposes, Rules are categorized by Group. Rule groups are used to
display rules with a similar purpose together, and Group Codes can be used to specify
that you want to display only a single group of rules at one type.
Each Rule is also identified by a Label and a Description. The script which installed
the Rule Groups and Rules also installed either the specific value expected for a rule
or the literal
UPDATE ME in the Value field. When an actual value was delivered, its
EDI Indicator was also checked (set to
Y) indicating that the rule expects an EDI
value, and the value for these rules should not be changed. When the literal
UPDATE
ME
was delivered, the value must be updated to reflect the local option for Web and
EDI application processing to be used.
When reviewing and updating rules, you may want to query on the Value field for the
value
UPDATE ME, or query on the EDI Indicator for the value unchecked (N). Either
query will return the rows you need to review update. After updating the appropriate
rows, you may want to review all rules so that you better understand how data will be
processed.
Note: Please see the end of the “EDI Set-Up Procedures” for a list of the
rules delivered, the group with which they are associated, a description of
each rule, and instructions for updating each rule.
5. Review/Update EDI cross-reference values on existing validation forms and run
scripts to populate SOAXREF (optional), or add cross-reference values for the tables
to SOAXREF manually.
To translate the various EDI values to your institution-specific Banner values, the EDI
Cross-Reference Rules Form (SOAXREF) must be populated as required.
A number of existing validation forms (STVSTAT and STVNATN, for example) include
EDI values. These values are not used in EDI application processing. Rather, all
cross-reference information for processing of EDI applications is included in the EDI
Cross-Reference Rules Form (SOAXREF). However, cross-reference values in some
validation tables and those required in the EDI Cross-Reference Rules Form are the
same. Scripts have been delivered to help with the creation and maintenance of these
values. These scripts extract data from existing tables and populate SOAXREF. The
scripts are designed to be able to be run as often as necessary, so that if you make
775
Banner Student User Guide | Admissions
changes or add additional data to the validation forms, you can re-populate
SOAXREF with the entire set of new values.
Warning! You are not required to populate the EDI values in other
validation tables or to use the sample scripts, but appropriate values must
exist in SOAXREF before EDI application processing can begin. If you do
not use the scripts, you must populate SOAXREF using other means
(manual update or locally-developed scripts).
Warning! If you choose to add records to SOAXREF manually, you must
first add the appropriate label and description to the EDI Verification Label
Validation Form (STVXLBL). These labels are normally inserted by the
scripts described in the following sections. If you must add the labels
manually, use the label code from the Cross Reference Labels Used In
EDI Processing chart at the end of this section. Be careful to build the
label code exactly as listed in the chart.
In some cases, you may have more than one Banner value mapped to a single EDI
equivalent. This is allowable when you are creating files to transmit out via EDI, but is
not allowable when you receive EDI data. When running the scripts to populate the
EDI Cross-Reference Rules Form (SOAXREF), the script may encounter errors if an
EDI value is used more than once within a set of codes.
You may review and correct the EDI Cross-Reference Rules Form values later.
Remember, these scripts are provided as a data entry and time-saving convenience,
and may not populate all desired EDI Cross-Reference Rules.
5.1. Define EDI cross-reference values for states/provinces
Update the EDI Equivalent on the State/Province Code Validation Form
(STVSTAT) with the appropriate EDI values.
For a complete, current set of EDI values, consult the Postsecondary Electronic
Standards Council (PESC) website
www.pesc.org, where a link is provided
to EDI Implementation Guides.
Have your Information Services representative run the script
xrefstat.sql.
This script creates a row in the table SORXREF for each row in STVSTAT which
has an EDI Equivalent value.
Note: This script can be run whenever states/provinces are added to or
are changed on STVSTAT. It will always delete all values from SOAXREF
(table SORXREF) and re-populate it with the current values from
STVSTAT.
5.2. Define EDI cross-reference values for nations
Update the EDI Equivalent on the Nation Code Validation Form (STVNATN)
with the appropriate EDI values.
For a complete, current set of EDI values, consult the Postsecondary Electronic
Standards Council (PESC) website
www.pesc.org, where a link is provided
to EDI Implementation Guides.
776
Banner Student User Guide | Admissions
Have your Information Services representative run the script
xrefnatn.sql
. This script creates a row in the table SORXREF for each row
in STVNATN which has an EDI Equivalent value.
Note: This script can be run whenever nation codes are added to or are
changed on STVNATN. It will always delete all values from SOAXREF
(table SORXREF) and re-populate it with the current values from
STVNATN.
5.3. Define EDI cross-reference values for ethnicities
Update the EDI Equivalent on the Ethnic Code Validation Form (STVETHN)
with the appropriate EDI values.
For a complete, current set of EDI values, consult the Postsecondary Electronic
Standards Council (PESC) website
www.pesc.org, where a link is provided
to EDI Implementation Guides.
Have your Information Services representative run the script
xrefethn.sql
. This script creates a row in the table SORXREF for each row
in STVETHN which has an EDI Equivalent value.
Note: This script can be run whenever ethnic values are added to or
changed on STVETHN. It will always delete all values from SOAXREF
(table SORXREF) and re-populate it with the current values from
STVETHN.
5.4. Define EDI cross-reference values for majors on SOAXREF.
Review the values in the CIPC field on the Major, Minor, Concentration Code
Validation Form (STVMAJR).
For US institutions, values used should be actual CIP (Classification of
Instructional Program) codes. For institutions in other countries, a different code
set (like Stats Canada codes) might be used. Determine the EDI code set used
for this field; the valid choices are listed on SOAXREF for the label
FSTYIDQL.
Verify that the value for the rule label
DFLTMAJRQLFR on the Electronic
Admissions Application Rules Form (SAAERUL) for the group equal to CURR
contains the EDI qualifier for this code set. (If CIP codes are used in the CIPC
field on STVMAJR, the EDI value for this label should be
81.)
For a complete, current set of EDI values, consult the Postsecondary Electronic
Standards Council (PESC) website
www.pesc.org, where a link is provided
to EDI Implementation Guides.
Have your Information Services representative run the script
xrefmajr.sql
. This script creates a row in the table SORXREF for each row
in STVMAJR which has a value in the CIPC field.
Note: This script can be run whenever values are added to or changed on
STVMAJR. It will always delete all values from SOAXREF (table
SORXREF) and re-populate it with the current values from STVMAJR.

777
Banner Student User Guide | Admissions
5.5. Define EDI cross-reference values for high schools and colleges on SOAXREF.
– Four scripts are used to assist in building the cross-reference values for high
schools and colleges. The scripts
xrefhsch.sql and xrefcoll.sql
use the value in the FICE field of the Source/Background Institution Code
Validation Form (STVSBGI) as the EDI value in SOAXREF. The scripts
xrefhsc2.sql and xrefcol2.sql use the value in the Source or
Background Institution field of
STVSBGI as the EDI value in SOAXREF.
You can use one or the other set of scripts to populate high school and prior
college values in SOAXREF, depending upon the choices you wish to make
available to applicants.
– The page requests a “school type” code and “school code type”. The school
type code must be a valid value in SOAXREF for the label
SBGIQLFR, and
the values for this qualifier should be EDI-standard qualifiers for various code
sets (like FICE or ACT). The school code entered must be a valid value in
SOAXREF for the label
STVSBGIC or STVSBGIH which is valid for the
entered school code type.
– If your institution chooses to use the value in the FICE field of
STVSBGI as
the code which students should use to identify a high school or college, follow
the four bulleted steps below, and use the scripts
xrefhsch.sql and
xrefcoll.sql
to populate high school and college values in SOAXREF. If
your institution has used a standard code set (like ACT or ETS codes) for
school codes in STVSBGI, no additional set-up steps are required, and you
can use the scripts
xrefhsc2.sql and xrefcol2.sql to populate high
school and college values in SOAXREF.
Review the values in the FICE field on the Source/Background Institution Code
Validation Form (STVSBGI).
For US institutions, values used should be actual FICE codes. For institutions in
other countries, a different code set (like Stats Canada codes) might be used.
Determine the code set used for this field. Verify that value for the label
DFLTPCOLQLFR and group code PCOL on the Electronic Admissions
Application Rules Form (SAAERUL) contains the EDI qualifier for this code set.
(If FICE Codes are used in the FICE field on STVSBGI, the EDI value for this
Group and Label should be 73.)
For a complete, current set of EDI values, consult the Postsecondary Electronic
Standards Council (PESC) website
www.pesc.org, where a link is provided
to EDI Implementation Guides.
Note: If you use FICE codes for STVSBGI institution codes, you have not
previously been required to repeat this value in the FICE field. For the
purposes of this script, the FICE code must be in the FICE field.
If FICE codes (or the values from another appropriate code set) are not present
on STVSBGI, update the rows with the appropriate values.
Have your Information Services representative run the scripts
xrefcoll.sql
and
xrefhsch.sql, which are used to create a row in the table SORXREF
for each row in STVSBGI which has a value in the FICE field and either
H (High
School) or
C (College) in the Type field. These scripts can also use the school's
778
Banner Student User Guide | Admissions
city, state/province, and nation, which are maintained on the Source or
Background Institution Base Form (SOASBGI) in creating the SOAXREF
description which will display on the Web. Review the scripts and their options
with your Information Services representative before running them. Complete
instructions for customizing the scripts to reflect that your local choices are
included in the comments of the scripts, which your Information Services
representative can review with you. Review the results in SOAXREF for the
labels
STVSBGIC and STVSBGIH to see if the Descriptions appear in the way
you want them to display on the Web. If not, re-run the scripts, selecting a
different option for creating the Description, or update the descriptions manually.
Note: These scripts can be run whenever values are added to or changed
on STVSBGI. All values will always be deleted from SOAXREF (table
SORXREF), and the table/form is then re-populated with the current
values from STVSBGI.
6. Review/Update EDI or other cross-reference values on the EDI Cross-Reference
Rules Form (SOAXREF).
The EDI Cross-Reference Rules Form is used to translate incoming EDI data into
Banner values. A number of scripts are used to make building the SOAXREF table
easier. These scripts were provided for data entry and time-saving convenience and
will not be updated to reflect additional EDI values in the future. However, they give
you a large base of information to begin with.
Not all rows in SOAXREF are used to process incoming TS 189 transaction sets
received via EDI. Some are used in processing Banner self-service admissions
applications.
*
DEFAULT* and *NULL* rules can also be defined in SOAXREF, but they are
appropriate only to processing of TS 189 transaction sets received via EDI.
Note: The values DEFAULT and NULL (without the *) are also used for
EDI verification and loading. If the user wants to load the high school or
prior college, even if the student enters only the name of an institution, the
value on the
NULL record is used on the SORPCOL and SORHSCH
tables. If the source/background institution code entered by the student is
not in the SOAXREF
STVSBGIC/STVSBGIH crosswalk, the Banner
value with
DEFAULT is used.
Note: Please see the end of the “EDI Set-Up Procedures” for a list of the
labels used on SOAXREF.
7. Review curriculum rules and define EDI cross-reference curriculum rules.
In Banner, a student's academic program is defined by a combination of the data
elements program, campus, college, level, degree, and major, and these data
elements must be valid alone and in combination. When an applicant completes an
application for admission, it is not likely that the applicant would know all of the valid
combinations of these elements. In EDI applications, many of these data elements will
need to be derived.

779
Banner Student User Guide | Admissions
To map EDI values to Banner, use the Curriculum Rules Form (SOACURR). A script
has been provided to create rules from all current existing data, and a new curriculum
cross-reference rule is created whenever a new curriculum rule is added on
SOACURR. Before beginning EDI application processing, you need to update the
curriculum cross-reference rules with appropriate EDI values.
The Curriculum Rules Form (SOACURR) displays information for each major
curriculum rule and the base rule to which it is attached. You need to update the EDI
Degree field value. The values for the EDI Level (qualifier) and EDI Identification
fields are retrieved by matching the major code from the curriculum rule to a row in
SOAXREF.
•The EDI Degree field must be updated to a valid value in the label
DEGRLEVL
(Degree Level Codes) from the EDI Cross-Reference Rules Form (SOAXREF). This
field defines the generic level of the degree program for which the applicant is
applying.
•The EDI Level (qualifier) field must be updated to a valid value in the label
FSTYIDQL (Field of Study Qualifier Codes) from the EDI Cross-Reference Rules
Form (SOAXREF). This field defines the EDI qualifier for the code set used for Field
of Study Codes, which will be entered in the next field.
•The EDI Identification field must be updated to a valid value in the label
STVMAJR
(Field of Study Identifier Codes) from the EDI Cross-Reference Curriculum Rules
Form (SOAXCUR) for a rule using the EDI Field of Study Qualifier entered in the
previous field. This field defines the subject matter of the intended field of study.
Warning! If possible, you should not use the same combination of EDI
degree level, EDI field of study qualifier, and EDI field of study identifier
for more than one curriculum rule when defining your EDI curriculum
cross-reference rules. If you do, EDI processing will be unable to map the
combination back to a single major curriculum rule. In this situation, the
default values for the group code CURR (curriculum rules) maintained on
the Electronic Admissions Application Rules Form (SAAERUL) are used
when the application is loaded into the permanent Banner application
tables.
8. Establish dates for receipt of EDI applications.
The TS 189 transaction set does not include a data element to identify or specify an
entry term for the admissions application. The EDI Cross-Reference Term Code Rules
Form (SAAECTM) is used to derive an entry term for the application, based on the
entry date. When a TS 189 application is received via EDI, the requested entry date is
compared to the date ranges defined in this form, and the term code associated with
the date range which includes the supplied date is used as the application term.
If no date range includes the supplied date, the date range with the earliest start date
which is greater than the supplied date will be used. If there is no date range which
either includes the supplied date or one with a start date greater than the supplied
date, the application will not be loaded for processing.
When date ranges and terms are entered, the form edits to ensure that no date ranges
overlap any other date ranges. Multiple date ranges can be associated with the same
term, but date ranges can not overlap.
780
Banner Student User Guide | Admissions
The query section of the form is used to assist in determining the term which will be
assigned for any given date. Entering a date in the Search Date field displays the
term code derived from the date, if any is available. If not, the message “No Term
Found For Date” displays in the Term Description field to indicate that no term can be
derived from the supplied date.
Banner is now ready for you to accept EDI admissions applications.
Procedures Used in EDI Processing
The following table is a list of the procedures on SAAECRL that are delivered for the Web
application type of
00.
Procedure Procedure Name Required Override Description
P010 ID Verification Y N The routines associated with this
procedure verify whether a valid ID exists.
P020 Name Verification Y N The routines associated with this
procedure verify whether a valid name
exists. A valid name in Banner must
include a first name and a last name.
P030 Biographic
Information
Y Y The routines associated with this
procedure verify whether valid biographic
information exists.
P032 International
Information
Y Y The routines associated with this
procedure verify whether valid international
information exists.
P035 Residency
Verification
Y Y The routines associated with this
procedure verify whether valid residency
information exists.
P040 Address Information Y N The routines associated with this
procedure verify whether a valid address
exists.
P045 Email Verification Y Y The routines associated with this
procedure verify whether a valid email
address exists.
P050 Application
Verification
Y N The routines associated with this
procedure verify whether a valid
application exists.
P060 Health Conditions
Verification
Y Y Not used unless Health Question section is
implemented.
P070 Phone Record
Verification
Y Y The routines associated with this
procedure verify whether a valid phone
record exists.

781
Banner Student User Guide | Admissions
P080 Religion Verification Y Y The routines associated with this
procedure verify whether a valid religion
exists.
P090 Language Record
Verification
Y Y The routines associated with this
procedure verify whether a valid language
record exists.
P100 Immunization Record Y Y Not used at this time.
P110 Applicant Activities Y Y The routines associated with this
procedure verify whether valid applicant
activities exists.
P120 Entry Curriculum
Verification
Y N The routines associated with this
procedure verify whether a valid entry
curriculum exists.
P130 High School
Verification
Y Y The routines associated with this
procedure verify whether a valid high
school exists.
P135 High School Subj.
Verification
Y Y The routines associated with this
procedure verify whether valid high school
subjects exist.
P140 Previous College
Verification
Y Y The routines associated with this
procedure verify whether a valid previous
college exists. This procedure is not
required if the application type will not
collect this information i.e., the person is a
freshman and has no prior college
information.
P142 Prv. Col. Degree
Verification
Y Y The routines associated with this
procedure verify whether a valid previous
college degree exists.
P145 Prv. Col. Major
Verification
Y Y The routines associated with this
procedure verify whether a valid previous
college major exists.
P150 Test Score
Verification
Y Y The routines associated with this
procedure verify whether valid test scores
exist.
P160 Relative Information
Verification
Y Y The routines associated with this
procedure verify whether valid parental
information exists.
P170 Question Answer
Verification
Y Y The routines associated with this
procedure verify whether valid questions
and answers exist.
Procedure Procedure Name Required Override Description

782
Banner Student User Guide | Admissions
Routines Used in EDI Processing
The following table is a list of the routines on SAAECRL, organized by procedure.
P175 Requested Materials
Verification
Y Y The routines associated with this
procedure verify whether valid requested
materials exist.
P900 "PUSH" Verification Y N The routines associated with this
procedure verify whether a valid PUSH
exists.
Procedure Routine Routine Name Required Override
P010 R0010 Valid ID Found Y N
P010 R0020 ID Length Check Y N
P010 R0200 ID New to Banner; Create PrevID Y N
P010 R9001 Edit Results Y N
P020 R0010 First Name Check Y N
P020 R0020 Last Name Check Y N
P020 R0030 Previous Last Name Check Y Y
P020 R9001 Edit Results Y N
P030 R0010 Date of Birth Established Y Y
P030 R0020 Ethnicity Established Y Y
P030 R0025 Race Established Y Y
P030 R0030 Ethnic Category Established Y Y
P030 R0031 Veteran Established Y Y
P030 R0040 Legacy Established Y Y
P030 R0050 SSN Established Y Y
P030 R0060 Marital Status Established Y Y
P030 R0080 Gender Established Y Y
P030 R0090 Citizenship Established Y Y
P030 R0091 Nation of Citizenship Est Y Y
P030 R0110 Native Language Established Y Y
P030 R0130 Home Language Established Y Y
Procedure Procedure Name Required Override Description

783
Banner Student User Guide | Admissions
P030 R0150 Corresponding Lang. Est Y Y
P030 R0200 Overwrite Existing Gender Y Y
P030 R0210 Overwrite Existing Birthdate Y Y
P030 R0220 Overwrite Existing Citizenship Y Y
P030 R0230 Overwrite Existing Confidential Y Y
P030 R0240 Overwrite Existing Religion Y Y
P030 R0250 Overwrite Existing Marital St Y Y
P030 R0255 Overwrite Existing Race Y Y
P030 R0260 Overwrite Existing Ethnicity Y Y
P030 R0265 Overwrite Ethnic Category Y Y
P030 R0270 Overwrite Existing SSN N N
P030 R0280 Overwrite Existing Legacy Y Y
P030 R0290 Overwrite Existing Veteran Y Y
P030 R9001 Edit Results Y N
P032 R0010 VISA Type Established Y Y
P032 R0020 VISA Number Established Y Y
P032 R0030 VISA Issue Date Established Y Y
P032 R0040 VISA Expiration Date
Established
YY
P035 R0010 Residency Established Y Y
P035 R9001 Edit Results Y N
P040 R0010 Address Type Code Established Y N
P040 R0030 Street Line 1 Established Y N
P040 R0040 City Established Y N
P040 R0050 State Code Established Y N
P040 R0060 County Code Established Y Y
P040 R0070 ZIP Code Established Y N
P040 R0080 Nation Established Y Y
P040 R0090 Address Data Relationships Y N
P040 R9001 Edit Results Y N
P045 R0010 Email Type Established Y Y
Procedure Routine Routine Name Required Override

784
Banner Student User Guide | Admissions
P045 R0020 Email Address Established Y Y
P045 R9001 Email Record Existence Check Y N
P050 R0010 Application Type Established Y N
P050 R0020 Type Code Established Y N
P050 R0030 Source Established Y Y
P050 R0050 Application Term Established Y N
P050 R0060 Dupl Application for Person Y N
P050 R0070 Dupl Application for Term Y N
P050 R0080 Dupl Application for Level Y N
P050 R9001 Edit Results Y N
P060 R0010 Medical Condition Established Y Y
P060 R9001 Edit Results Y N
P070 R0010 Phone Number Type Established Y Y
P070 R0020 Phone Number Established Y Y
P070 R9001 Record Existence Check Y N
P080 R0010 Religion Established Y Y
P080 R9001 Edit Results Y N
P090 R0010 Language Established Y Y
P090 R0020 Language Use Established Y Y
P090 R0030 Language Proficiency Estb. Y Y
P090 R9001 Edit Results Y N
P100 R0010 Immunization Established Y Y
P100 R9001 Edit Results Y N
P110 R0010 Activity Established Y Y
P110 R9001 Edit Results Y N
P120 R0005 Degree Level Established Y N
P120 R0006 Fld of Stdy Level Established Y Y
P120 R0007 Fld of Stdy Qualifier Estb. Y N
P120 R0008 Fld of Stdy Ident. Code Estb. Y N
P120 R0009 Banner Equiv. Curriculum Est. Y N
P120 R0010 Duplicate Application; Major Y Y
Procedure Routine Routine Name Required Override

785
Banner Student User Guide | Admissions
P120 R9001 Record Edit Results Y N
P130 R0010 High School Established Y Y
P130 R0100 Graduation Date Established Y Y
P130 R0110 Class Rank Established Y Y
P130 R0120 Class Size Established Y Y
P130 R0130 Class Rank-Size Established Y Y
P130 R0140 Grade Point Average Est. Y Y
P130 R0200 Update Existing HS Data Y N
P130 R9001 Record Edit Results Y N
P135 R0010 Subject Established Y Y
P135 R9001 Record Verification Results Y N
P140 R0010 Previous College Established Y Y
P140 R9001 Edit Results Y N
P142 R0010 Degree Established Y Y
P142 R0030 Degree Date Established Y Y
P142 R0040 Earned Hours Established Y Y
P142 R0050 Bgn Attendance Date Est. Y Y
P142 R0060 End Attendance Date Est. Y Y
P142 R0070 Grade Point Average Est. Y Y
P142 R0200 Update Prior College Data N N
P142 R9001 Edit Results Y N
P145 R0010 Previous College Majors Y Y
P145 R0020 Previous College Minors Y Y
P145 R0030 Previous College Conc. Y Y
P145 R9001 Edit Results Y N
P150 R0010 Test Established Y Y
P150 R0020 Test Date Established Y Y
P150 R0030 Test Score Valid Y Y
P150 R9001 Edit Results Y N
P160 R0010 First Name Established Y Y
P160 R0020 Last Name Established Y Y
Procedure Routine Routine Name Required Override

786
Banner Student User Guide | Admissions
P160 R0030 Relationship Code Established Y Y
P160 R9001 Relative Record Check Y N
P170 R0010 Question Established Y Y
P170 R0020 Answer Established Y Y
P170 R9001 Question Answer Checked Y N
P175 R0010 Material Established Y Y
P175 R9001 Material Checked Y N
P900 L010 Create Application Required Y Y
P900 L020 Create Person Record Y Y
P900 L025 Create Race Record Y Y
P900 L030 Create International Record Y Y
P900 L040 Create Address Record Y Y
P900 L045 Create Email Record Y Y
P900 L050 Create Telephone Record Y Y
P900 L060 Create High School Record Y Y
P900 L070 Create High School Subjects Y Y
P900 L080 Create Medical Conditions Y Y
P900 L090 Create Prior College Record Y Y
P900 L100 Create Prior College Degree Y Y
P900 L110 Create Prior College Major Y Y
P900 L120 Create Prior College Minor Y Y
P900 L130 Create Prior College Conc. Y Y
P900 L140 Create Test Score Record Y Y
P900 L150 Create Outside Interest Record Y Y
P900 L160 Create Parent Information Y Y
P900 L170 Create Question/Answer Y Y
P900 L175 Create Materials Y Y
Procedure Routine Routine Name Required Override

787
Banner Student User Guide | Admissions
Rule Groups Used in EDI Processing
The following table is a list of the rule groups and codes on SAAERUL that are used by
EDI processing.
Group Code Group Name Description
ADDR Address Source Rules Rules in which you specify address source codes to be
used in electronic admissions application processing.
ADMS Admission Rules Rules which control the loading of duplicate applications
and residency information for applications.
ATYP Address Type Rules Rules used to specify the address types to be assigned to
addresses received in electronic applications.
CQLF Code Qualifiers Rules used to specify the EDI code qualifier for types of
data which require special processing.
CURR Curriculum Rules Rules used to translate received information into valid
Banner curricula.
DTQL Date/Time Qualifier Rules Rules which specify the EDI qualifier that describes
specific kinds of dates.
ENTY Entity Rules Rules which specify EDI entity types.
FLVL Field of Study Level Rules Rules which specify the EDI qualifiers that describe majors
and minors.
LGCY Legacy Rules Rules which define the Banner legacy type code to assign
to specify relationship types.
PATH System Path Rules Rules which describe the database path in which various
system components have been installed.
PCOL Prior College Rules Rules which are used to process prior college information.
PQLF Phone Qualifier Code Rules Rules which contain certain EDI telephone type qualifiers.
QSTN Question Code Rules Rules which specify the EDI question number where
certain types of desired information may be reported.
RESD Residency Rules Rules used to assist in residency determinations.
RFQL Reference Qualifier Rules Rules which supply EDI reference qualifiers for specific
kinds of information.
RLTN Relationship Qualifier Rules Rules which supply EDI qualifiers for relationship types.
TELE Telephone Pattern Rules Rules which define the standard format for telephone
numbers which are reported by your applicants.
VCRL Verification Control Rules Rules which control several of the verification procedures
and routines.
788
Banner Student User Guide | Admissions
Delivered Rule Groups Used in EDI Processing
The following table is a list of the rules delivered, the group with which they are
associated, a description of each rule, and instructions for updating each rule.
Group Label Description EDI Instructions
ADDR DFLTADDRSRCE Default Address Source N Update the Default Address Source
to the value from the Address Source
Validation Form (STVASRC) that you
want assigned to addresses loaded
from EDI applications. (You may
need to build the desired value on
STVASRC first.)
ADMS DFLTASRCEDI EDI Default Application
Source
Y Update the EDI Default Application
Source to the value from the EDI
Application Source Code Validation
Form (STVAPLS) that you want
assigned to electronic applications
received via EDI.
ADMS DFLTSBGIEDI EDI Default Application
SBGI Source
Y Insert the source STVSBGI value
into the Application Source Table
(SARRSRC).
ADMS DUPLAPPLCURR
(Not currently used in
Banner Student Self-
Service Admissions
processing.)
Allow Dup App for
Curriculum
N
Update the value to
Y (checked) to
specify that self-service admissions
should perform duplicate checking
using the duplicate rules set up on
SAAECRL for the given application
type for the same term and
curriculum. Update the value to
N
(unchecked) if no duplicate checking
should be done.
ADMS DUPLAPPLLEVL Allow Dup App for Level N
Update the value to
Y (checked) to
specify that self-service admissions
should perform duplicate checking
using the duplicate rules set up on
SAAECRL for the given application
type for the same term and level.
Update the value to
N (unchecked) if
no duplicate checking should be
done.
789
Banner Student User Guide | Admissions
ADMS DUPLAPPLMAJR Allow Dup App for Major N
Update the value to
Y (checked) to
specify that self-service admissions
should perform duplicate checking
using the duplicate rules set up on
SAAECRL for the given application
type for the same term and major.
Update the value to
N (unchecked) if
no duplicate checking should be
done.
ADMS DUPLAPPLPERS Allow Dup App for Person N
Update the value to
Y (checked) to
specify that self-service admissions
should perform duplicate checking
using the duplicate rules set up on
SAAECRL for the given application
type for the same person, regardless
of the term, level, curriculum, or
major specified. Update the value to
N (unchecked) if no duplicate
checking should be done.
ADMS DUPLAPPLTERM Allow Dup App for Term N
Update the value to
Y (checked) to
specify that self-service admissions
should perform duplicate checking
using the duplicate rules set up on
SAAECRL for the given application
type for the same term, regardless of
the level, curriculum, or major
specified. Update the value to
N
(unchecked) if no duplicate checking
should be done.
ADMS EDIIDPREFIX Generated ID Prefix for
Upload
Y Enter the letter for the first character
of the ID that TS 189 processing
generates for use on the Electronic
Application Process Form
(SAAEAPS).
ADMS EDIWAPPCODE WAPP Code for TS 189
Upload Pgm
Y Specify the code of the electronic
application type to be used when
loading EDI applications, so the
procedures and routines (rules) will
be attached. Must be validated on
the Application Type Code Validation
Form (STVWAPP).
ADMS EMAILTYPE Store default e-mails N Enter a value from the E-mail
Address Type Validation Form
(GTVEMAL).
Group Label Description EDI Instructions
790
Banner Student User Guide | Admissions
ADMS FORRESIDCODE Out of Country Residency
Code
N Update the Out of Country
Residency Code to the value from
the Residence Code Validation Form
(STVRESD) that you want assigned
to an application if the verification
procedures determine that the
person is an out-of-country resident.
(See Note 1 below.)
ADMS INRESIDCODE In State/Prov Residency
Code
N Update the In State/Province
Residency Code to the value from
the Residence Code Validation Form
(STVRESD) that you want assigned
to an application if the verification
procedures determine that the
person is an in-state/province
resident. (See Note 1 below.)
ADMS OUTRESIDCODE Out of State/Prov
Residency Code
N Update the Out of State/Province
Residency Code to the value from
the Residence Code Validation Form
(STVRESD) that you want assigned
to an application if the verification
procedures determine that the
person is an out-of-state/province
resident. (See Note 1 below.)
1. Residency determination is made based on answers to a variety of questions. If the system cannot determine
residency, or if no residency codes are specified in these three rules, the default Residency Code, identified by the
value for the label
DFLTRESDCODE in the group RESD will be used.
ATYP DFLTPARENTATYP Default Parent Address
Type
N Update the Default Parent Address
Type to the value from the Address
Type Code Validation Form
(STVATYP) that you want assigned
to addresses created from parent
address information. (See Note 2
below.)
ATYP DFLTSTUDENTATYP Default Student Address
Type
N Update the Default Student Address
Type to the value from the Address
Type Code Validation Form
(STVATYP) that you want assigned
to addresses created from applicant
address information. (See Note 2
below.)
2. Addresses submitted via EDI may have a location qualifier which identifies the type of address. Default address
types defined under group
ATYP are defaults which are used only when the address type to be assigned cannot
be determined based upon other information.
Group Label Description EDI Instructions

791
Banner Student User Guide | Admissions
CQLF ACTVCQLFCODE Default Activity Qlfr Code Y The Default Activity Qualifier Code is
an EDI value, and it is delivered as
SA. Specifically, it is used to
distinguish between activities and
awards which may be reported in the
same EDI data segment. This value
also has to be assigned to those
values which are “student activities”
in the EDI Cross-Reference Rules
Form (SOAXREF) for rules with a
label of
STVINTS.
CQLF AWRDCQLFCODE Default Award Qualifier
Code
Y The Default Award Qualifier Code is
an EDI value, and it is delivered as
SB. Specifically, it is used to
distinguish between activities and
awards which may be reported in the
same EDI data segment. This value
also has to be assigned to those
values which are “student awards” in
the EDI Cross-Reference Rules
Form (SOAXREF) for rules with a
label of
STVINTS.
CURR DFLTCAMPCODE Default Campus Code
Value
N Update the Default Campus Code
Value to the value from the Campus
Code Validation Form (STVCAMP)
that you want assigned to an
application if the application's
campus cannot be correctly derived
by data viewed in the EDI Cross-
Reference Curriculum Rules Form
(SOAXCUR) or maintained in the
Curriculum Rules Form (SOACURR).
CURR DFLTCOLLCODE Default College Code
Value
N Update the Default College Code
Value to the value from the College
Code Validation Form (STVCOLL)
that you want assigned to an
application if the application's college
cannot be correctly derived by data
viewed in the EDI Cross-Reference
Curriculum Rules Form (SOAXCUR)
or maintained in the Curriculum
Rules Form (SOACURR).
Group Label Description EDI Instructions
792
Banner Student User Guide | Admissions
CURR DFLTDEGCCODE Default Degree Code
Value
N Update the Default Degree Code
Value to the value from the Degree
Code Validation Form (STVDEGC)
that you want assigned to an
application if the application's degree
cannot be correctly derived by data
viewed in the EDI Cross-Reference
Curriculum Rules Form (SOAXCUR)
or maintained in the Curriculum
Rules Form (SOACURR).
CURR DFLTDEPTCODE Default Department Code
Value
N Update the Default Department Code
Value to the value from the
Department Code Validation Form
(STVDEPT) that you want assigned
to an application if the application's
department cannot be correctly
derived by data viewed in the EDI
Cross-Reference Curriculum Rules
Form (SOAXCUR) or maintained in
the Curriculum Rules Form
(SOACURR).
CURR DFLTMAJRCODE Default Major Code Value N Update the Default Major Code Value
to the value from the Major, Minor,
Concentration Code Validation Form
(STVMAJR) that you want assigned
to an application if the application's
major cannot be correctly derived by
data viewed in the EDI Cross-
Reference Curriculum Rules Form
(SOAXCUR) or maintained in the
Curriculum Rules Form (SOACURR).
Group Label Description EDI Instructions

793
Banner Student User Guide | Admissions
CURR DFLTMAJRQLFR Default Major Code
Qualifier
Y The Default Major Code Qualifier is
an EDI value, and it is delivered as
81, for CIP code. Specifically, the
Default Major Code Qualifier is used
by the script
xrefmajr.sql
delivered to assist in building major
code cross-reference values in the
EDI Cross-Reference Rules Form
(SOAXREF). This script copies each
value in the Major, Minor,
Concentration Code Validation Table
(STVMAJR) which has a value in the
CIPC field and creates a rule in the
EDI Cross-Reference Rules Table
using the major code, CIPC code,
and EDI qualifier specified here.
If the values entered in the CIPC field
on STVMAJR are not Classification
of Instructional Program (CIP) codes,
the correct EDI value for the code set
used for this field should be entered
for this rule.
(See Note 3 below.)
3. The value for this rule is used only by the script used to populate major code values in SOAXREF. If you are not
using the script and are instead building appropriate major code translation values by hand, this rule will not be
used.
CURR USEDEFAULTS Use Default Curriculum
Values
N Update the value to checked(set to
Y) or unchecked(set to N) to specify
whether the campus, college,
department, degree, and major
defaults should be used when an
application is created. (See Note 4
below.)
4. Default values are used when the appropriate value cannot be determined using data viewed in the EDI Cross-
Reference Curriculum Rules Form (SOAXCUR) or maintained in the Curriculum Rules Form (SOACURR). For
example:
A single set of EDI cross-reference values can be associated with more than one curriculum rule. If the same EDI
cross-reference values are assigned to more than one curriculum rule, the defaults are used as “tie-breakers” and
assigned to all associated fields.
Regardless of the data elements used when the Banner application is created, curriculum rule checking takes
place according to normal rules when the application data is viewed on any Banner form. If the values loaded for
the application represent an invalid curriculum choice, as defined by existing curriculum rules, an error message is
displayed and corrective action may be required at that time.
Group Label Description EDI Instructions
794
Banner Student User Guide | Admissions
DTQL AWRDDTQLCODE Award Date Y The Award Date Qualifier rule
specifies the Date/Time Qualifier
used to specify an award date. It is
an EDI standard value which should
not be changed or unpredictable
results will occur.
DTQL EFFCDTQLCODE Effective Date Y The Effective Date Qualifier rule
specifies the Date/Time Qualifier
used to specify an effective date. It is
an EDI standard value which should
not be changed or unpredictable
results will occur.
DTQL ENDDTQLCODE End Date Y The End Date Qualifier rule specifies
the Date/Time Qualifier used to
specify an end date. It is an EDI
standard value which should not be
changed or unpredictable results will
occur.
DTQL EXPRDTQLCODE Expire Date Qualifier Y The Expire Date Qualifier rule
specifies the Date/Time Qualifier
used to specify an expiration date. It
is an EDI standard value which
should not be changed or
unpredictable results will occur.
DTQL ISSUDTQLCODE Issue Date Qualifier Y The Issue Date Qualifier rule
specifies the Date/Time Qualifier
used to specify an issue date. It is an
EDI standard value which should not
be changed or unpredictable results
will occur.
DTQL STRTDTQLCODE Start Date Y The Start Date Qualifier rule specifies
the Date/Time Qualifier used to
specify a start date. It is an EDI
standard value which should not be
changed or unpredictable results will
occur.
ENTY HSCHENTYCODE Default High School
Entity
Y The Default High School Entity rule
specifies the EDI qualifier which
represents a high school. It is an EDI
standard value which should not be
changed or unpredictable results will
occur.
Group Label Description EDI Instructions
795
Banner Student User Guide | Admissions
FLVL MJRFLVLCODE Major Field of Study Level Y The Major Field of Study rule
specifies the EDI field of study
qualifier used to represent majors. It
is an EDI standard value which
should not be changed or
unpredictable results will occur.
FLVL MNRFLVLCODE Minor Field of Study Level Y The Minor Field of Study rule
specifies the EDI field of study
qualifier used to represent minors. It
is an EDI standard value which
should not be changed or
unpredictable results will occur.
LGCY FATHERLGCYCODE Father Legacy Code N Update the Father Legacy Code to
the value from the Legacy Code
Validation Form (STVLGCY) that
describes an applicant's father
(alone) as a legacy relationship.
LGCY MOTHERLGCYCODE Mother Legacy Code N Update the Mother Legacy Code to
the value from the Legacy Code
Validation Form (STVLGCY) that
describes an applicant's mother
(alone) as a legacy relationship.
LGCY PARENTLGCYCODE Parents Legacy Code N Update the Parents Legacy Code to
the value from the Legacy Code
Validation Form (STVLGCY) that
describes an applicant's parents
(both mother and father) as legacy
relationships.
PCOL DFLTPCOLQLFR Prior College Qualifier
Dflt
Y Update the Prior College Qualifier
Default to the EDI qualifier for the
code set which represents values
entered in the FICE field of the
Source/Background Institution Code
Validation Form (STVSBGI). It is
used only by the scripts
xrefsbgih.sql
and
xrefsbgic.sql
, delivered to
assist in building high school and
college cross-reference values in the
EDI Cross-Reference Rules Form
(SOAXREF). (See Note 5 below.)
5. This script copies all values from the Source/Background Institution Code Validation Table (STVSBGI) which
have a type of
C (college) or H (high school) and have a value in the FICE field. When these conditions are met,
the scripts create rules in the EDI Cross-Reference Rules Table using the SBGI Code, FICE field value, EDI
qualifier specified here, and a description which may include school name, city, state/province, and nation,
depending upon options selected when the script is run.
Group Label Description EDI Instructions
796
Banner Student User Guide | Admissions
PCOL PCOLDFLTDEGC Prior College Default
Degree
N Update the Prior College Default
Degree rule to the Banner degree
code from the Degree Code
Validation Form (STVDEGC) which
should be assigned as the prior
college degree attempted if an
applicant does not supply a value.
PQLF CELLPQLFCODE Cell Phone Qualifier Y The Cell Phone Qualifier rule
specifies the EDI standard cell phone
qualifier which identifies a cell phone.
Update the Value column to the value
from the Telephone Type Validation
Form (STVTELE) which should be
used for cell phone type. This value
is not validated.
It is recommended that this value be
different than the value used for the
EMAILPQLFCODE rule and the
value associated with the
ADDR1 or
ADDR2 Web sections on SAAWAPP.
PQLF EMAILPQLFCODE Phone Qualifier for E-mail Y The Phone Qualifier for E-mail rule
specifies the EDI standard telephone
qualifier which identifies an e-mail
address.
The delivered value for this rule is
EM; however, if the same value has
been defined for another email
address and/or telephone type (such
as
Emergency), then it is
recommended that this value be
changed.
QSTN CONFQSTNCODE Restrict Access Indicator Y The Restrict Access Indicator rule
specifies the EDI question code
which reports whether the applicant
requests that information be
restricted or kept confidential. It is an
EDI standard value which should not
be changed.
QSTN FALMQSTNCODE Legacy Information
Response
Y The Legacy Information Response
rule specifies the EDI question code
which reports whether the applicant's
relative is an alumnus of the applied-
to institution. It is an EDI standard
value which should not be changed.
Group Label Description EDI Instructions

797
Banner Student User Guide | Admissions
QSTN FDCSDQSTNCODE Father Deceased
Request Code
Y The Father is Deceased Request
Code rule specifies the EDI question
code which reports whether the
applicant's father is deceased. It is
an EDI standard value which should
not be changed.
QSTN MALMQSTNCODE Mother is Alumni Request
Code
Y The Mother is Alumni Request Code
rule specifies the EDI question code
which reports whether the applicant's
mother is an alumnus of the applied-
to institution. It is an EDI standard
value which should not be changed.
QSTN MDCSDQSTNCODE Mother Deceased
Request Code
Y The Mother is Deceased Request
Code rule specifies the EDI question
code which reports whether the
applicant's mother is deceased. It is
an EDI standard value which should
not be changed.
QSTN RESDQSTNCODE Resident of State/Prov
Request
Y The Resident of State/Province
Request rule specifies the EDI
question code which reports whether
the applicant claims to be a resident
of the applied-to institution's state or
province. It is an EDI standard value
which should not be changed.
RESD DFLTRESDCODE Default Residency Code N Update the Default Residency Code
rule to the code from the Residence
Code Validation Form (STVRESD)
which should be assigned to an
applicant if a specific residence
status cannot be determined based
upon other information.
RESD HOMECOUNTY Institution's Home County N Update the Institution's Home County
rule to the code from the County
Code Validation Form (STVCNTY)
which represents the institution's
home county. This value is used, in
conjunction with other information, to
attempt to determine the residency
status to assign to an applicant.
Group Label Description EDI Instructions

798
Banner Student User Guide | Admissions
RESD HOMENATION Institution's Home
Country
N Update the Institution's Home Nation
rule to the code from the Nation
Code Validation Form (STVNATN)
which represents the institution's
home nation. This value is used, in
conjunction with other information, to
attempt to determine the residency
status to assign to an applicant.
RESD HOMESTATPROV Institution's Home State/
Prov
N Update the Institution's Home State/
Province rule to the code from the
State/Province Code Validation Form
(STVSTAT) which represents the
institution's home state. This value is
used, in conjunction with other
information, to attempt to determine
the residency status to assign to an
applicant.
RFQL SSNRFQLCODE SSN Qualifier Y The SSN Qualifier rule reports the
EDI Reference Qualifier Code used
to describe Social Security/Social
Insurance number. It is an EDI
standard value which should not be
changed or unpredictable results will
occur.
RFQL VISARFQLCODE VISA Reference Qualifier Y The Visa Reference Qualifier rule
reports the EDI Reference Qualifier
Code used to describe visa type. It is
an EDI standard value which should
not be changed or unpredictable
results will occur.
RFQL VNUMRFQLCODE VISA Number Reference
Qlfr
Y The Visa Number Reference
Qualifier rule reports the EDI
Reference Qualifier Code used to
describe visa number. It is an EDI
standard value which should not be
changed or unpredictable results will
occur.
RLTN FATHERRLTNCODE Relationship Qualifier;
Father
Y The Father Relationship Qualifier
rule specifies the EDI qualifier code
which represents the father of the
applicant. It is an EDI standard value
which should not be changed or
unpredictable results will occur.
Group Label Description EDI Instructions
799
Banner Student User Guide | Admissions
RLTN MOTHERRLTNCODE Relationship Qualifier;
Mother
Y The Mother Relationship Qualifier
rule specifies the EDI qualifier code
which represents the mother of the
applicant. It is an EDI standard value
which should not be changed or
unpredictable results will occur.
TELE AREALENGTH Area Code Length Y The Area Code Length rule is used to
specify the expected standard length
of area codes reported as part of
telephone information. It should be
set to the standard length for area
codes normally reported to your
institution.
TELE PHONELENGTH Phone Number Length Y The Phone Number Length rule is
used to specify the expected
standard length of phone numbers
reported as part of telephone
information. It should be set to the
standard length for telephone
numbers normally reported to your
institution.
VCRL AUTOOVERRIDE Automatic Override
Indicator
N The Automatic Override Indicator
rule is used to specify whether
verification procedures and routines
which allow overrides (as defined on
the Electronic Admissions
Procedure/Routine Control Form
(SAAECRL) will be automatically
overridden. Update this rule to
checked(set to
Y) or unchecked(set
to
N) depending upon your choice.
Overriding a procedure or routine will
not cause invalid data to be loaded; it
merely reduces the number of
manual overrides you may need to
perform during electronic application
verification.
Group Label Description EDI Instructions

800
Banner Student User Guide | Admissions
Cross-Reference Labels Used in EDI Processing
EDI cross-reference rules are identified by a label. The label describes the purpose of the
cross-reference rule. The following is a list of all the labels on SOAXREF that are used in
EDI processing.
Label Description Processing Notes
AGEVERFY Age Verification Codes Age Verification Codes are used to report the source of
age verification data. They are used only in TS 189
processing.
CRDBASIS Credit Basis Codes Credit Basis Codes are used only to process TS 189
data.
DEGRLEVL Degree Level Codes Degree Level Codes are used to describe the generic
level of a degree, and the EDI values delivered roughly
correspond to the values in the Degree Award Category
Code Validation Form (STVACAT). These values are
used only when defining the EDI Curriculum Cross-
Reference Rules. Update the Banner value to the
corresponding value from STVACAT. (The Banner value
will normally be the EDI value without the period.) Do
not check (set to
Y) the Web (Indicator) on SOAXREF,
as these values are not used to control Web pulldown
lists, but only to define valid cross-reference values for
building curriculum cross-reference rules.
DFMTCODE Date Format Codes Date Format Codes are used only to process TS 189
data.
EIDNCODE Entity Identifier Codes Entity Identifier Codes are used only to process TS 189
data.
FSTYIDQL Field of Stdy Qualifier Codes Field of Study Qualifier Codes are used only to specify
the code set which is used to describe field of study
choices.
FSTYLEVL Field of Study Level Codes Field of Study Level Codes are used only to process TS
189 data.
GENDER Gender Codes Gender Codes are used to define the Banner equivalent
for EDI gender values. Three values are delivered.
GRCRLEVL Grade or Course Level Codes Grade or Course Level Codes are used only to process
TS 189 data.
HONRLEVL Honor Level Codes Honor Level Codes are used only to process TS 189
data.
HSCHRSON High School Graduation
Codes
High School Graduation Codes are used only to process
TS 189 data.
IMMZRTYP Immunization Report Type
Codes
Immunization Report Type Codes are used only to
process TS 189 data.

801
Banner Student User Guide | Admissions
IMMZSTAT Immunization Status Codes Immunization Status Codes are used only to process TS
189 data.
IMMZTYPE Immunization Type Codes Immunization Type Codes are used only to process TS
189 data.
ITCCLEVL Individual Level Codes Individual Level Codes are used only to process TS 189
data.
LANGPROF Language Proficiency Codes Language Proficiency Codes are used only to process
TS 189 data.
LANGUSE Language Use Codes Language Use Codes are used only to process TS 189
data.
NTYPCODE Name Type Codes Name Type Codes are used only to process TS 189
data.
QSTNCODE EDI Question Codes EDI Question Codes are used to process TS 189 data.
The question code used corresponds to the answer
being provided on the TS 189 RSQ segment.
RESDCRIT Residency Criteria Codes Residency Criteria Codes are used only to process TS
189 data.
RFNOQLFR Reference Qualifier Code Reference Qualifier Codes identify a variety of reference
number qualifiers used in the TS 189 transaction set.
Delivered values are valid and should not be changed
unless additional reference number qualifiers are added
for use with the TS 189 code set. Several reference
number qualifiers are used in the Electronic Admissions
Application Rules Form (SAAERUL).
SBGIQLFR Educational Inst Qualifier Values in the Educational Institution Qualifier label are
used as the qualifier in cross-reference rules for the
labels
STVSBGIH and STVSBGIC (high schools and
colleges) to identify the code set for the values placed in
the EDI Value field. These values are used to translate
school code types and school codes into appropriate
Banner values.
STVATYP Address Type Codes Values in the Address Type Codes label are used to
translate address data received in TS 189 code sets into
valid Banner address types from STVATYP.
STVCITZ Citizenship Type Codes Values in the Citizenship Type Code label are used to
translate EDI citizenship types into appropriate Banner
values.
Label Description Processing Notes

802
Banner Student User Guide | Admissions
STVDEGC Degree Level-Degree Code Values in the Degree Level-Degree Codes label are
used to translate EDI degree level codes into valid
Banner degree codes found in the Degree Code
Validation Form (STVDEGC). These values are used
only in translating prior college degrees to Banner
degrees. In TS 189 processing, only EDI Degree Level
Codes will be transmitted. EDI Degree Level codes
represent generic degree levels, (for example,
Baccalaureate Degree instead of Bachelor of Arts and
Bachelor of Science). To translate EDI values to Banner
values, you will need generic degree codes in
STVDEGC.
STVETHN EDI Ethnic Codes Values in the EDI Ethnic Code label are used to
translate EDI ethnic codes into appropriate Banner
values. (See Notes below.)
You may translate a number of valid Banner codes to a single EDI code (for example; “Hopi”, “Navaho”, and
“Cherokee” are all valid ethnic codes for your institution, and you map them all to the single EDI value
American Indian or Alaskan Native).
The script
xrefethn.sql is used to populate the STVETHN label rows with values from the Ethnic Code
Validation Form.
STVINTS Award and Activity Codes Values in the Award and Activity Codes label are used
to translate EDI award and activity codes into
appropriate Banner interest codes. (See Note below.)
For rules which represent student awards, set the EDI Qualifier to
SB. Awards can also be reported through
the Web, but whether reported through a Web application or a TS 189 transaction set, these values will not be
loaded into the permanent Banner application tables.
STVLANGN Language Name Codes Values in the Language Name Codes label are used to
translate EDI language codes into appropriate Banner
language codes.
STVLANGW Written Language Codes Values in the Written Language Codes label are used to
translate EDI written language codes into appropriate
Banner language codes.
Label Description Processing Notes

803
Banner Student User Guide | Admissions
STVMAJR Major Codes Values in the Major Codes label are used to translate
EDI field of study data into Banner major codes. Field of
Study data reported in TS 189 transaction sets includes
a qualifier code and value. Qualifier codes represent
different standard code sets, like Classification of
Instructional Program (CIP) codes or Stats Canada
codes. You use a combination of a Degree Level code
(label DEGRLEVL), Code Set Qualifier, and Banner
code to define the cross-reference from EDI values to
Banner values on the Curriculum Rules Form
(SOACURR). To create rules for the STVMAJR label,
enter the Qualifier which represents a valid EDI field of
study code set, a value from the indicated set, and the
Banner equivalent for the EDI value. (See Note below.)
The script
xrefmajr.sql is used to populate the STVMAJR label rows with values from the Major, Minor,
Concentration Code Validation Form (STVMAJR).
STVMEDI Medical Condition Codes Values in the Medical Conditions Codes label are used
to translate EDI medical condition codes into
appropriate Banner medical codes.
STVMRTL Marital Status Codes Values in the Marital Status Codes label are used to
translate EDI marital status codes into appropriate
Banner codes.
STVNATN EDI Nation Codes Values in the Nation Codes label are used to translate
EDI nation codes into appropriate Banner codes. (See
Note below.)
The script
xrefnatn.sql is used to populate the STVNATN label rows with values from the Nation Code
Validation Form.
STVRELG Religion Codes Values in the Religion Codes label are used to translate
EDI religion codes into appropriate Banner codes. (See
Note below.)
There may be a number of EDI religion codes which map to the same Banner value. (For example, you may
have different religion codes for each of the Lutheran Synods for which there are EDI religion codes.)
STVRELT Relationship Codes Values in the Relationship Codes label are used to
translate EDI relationship codes into appropriate Banner
codes. (See Note below.)
There may be a number of EDI relationship codes which map to the same Banner value. (For example, you
may have different relationship codes for son, daughter, adopted child, foster child, etc., for which there are
EDI relationship codes.)
STVSBGIC EDI College Codes Values in the EDI College Codes label are used to
translate EDI college codes into appropriate Banner
codes. (See Note below.)
The scripts
xrefcoll.sql and xrefcol2.sql are used to populate the STVSBGIC label rows with
values from the Source/Background Institution Code Validation Form.
Label Description Processing Notes
804
Banner Student User Guide | Admissions
Receiving EDI Applications (to Temporary Tables)
The EDI.Smart PC application has received an admissions application and is ready for
upload to the host. The process on EDI.Smart that accomplishes this upload is called
FLATUPLD. It produces a file known as
MAP_UPLD.TXT which can be found in the
INTFCE subdirectory below the EDI.Smart root directory (usually WEDISMT). This file
must be moved (copied) to a destination on the host where Banner resides which the user
specifies. It may be necessary to consult with the technical staff at your institution to
specify the location and name of the data file with the syntax that is appropriate for your
operating system.
The file is then parsed by the PRO*C program SAR189U (TS 189 Upload to Banner). The
SAR189U process can be run from job submission.
The parameters are as follows:
• Input File (Required) - Enter the directory path where MAP_UPLD.TXT file is located.
• Test Flag (Optional) - Enter Y to produce more extensive messages in the log file. Enter
N to not print the debug messages.
STVSBGIH EDI High School Codes Values in the EDI High School Codes label are used to
translate EDI high school codes into appropriate Banner
codes. (See Note below.)
The scripts
xrefhsch.sql and xrefhsc2.sql are used to populate the STVSBGIC label rows with
values from the Source/Background Institution Code Validation Form.
STVSTAT EDI State Codes Values in the State Codes label are used to translate
EDI state/province codes into appropriate Banner
codes. (See Note below.)
The script
xrefstat.sql is used to populate the STVSTAT label rows with values from the State/Province
Code Validation Form.
STVTELE Telephone Qualifier Codes Values in the Telephone Qualifier Codes label are used
to specify the EDI telephone code which corresponds to
each Banner telephone type code.
STVTESC Sub-Test Codes Values in the Sub-Test Codes label are used to translate
EDI sub-test codes into appropriate Banner codes.
STVVTYP VISA Type Codes Values in the Visa Type Codes label are used to
translate EDI visa type codes into appropriate Banner
codes.
TESTCODE EDI Test Qualifier Codes Values in the EDI Test Qualifier Codes label are used to
define valid EDI Test Qualifier Codes. Only codes
defined as valid in this label should be used as EDI
qualifiers in the STVTESC label.
Label Description Processing Notes

805
Banner Student User Guide | Admissions
• Application Type (Optional) - Enter the application type code to be associated with EDI
applications. Valid values come from the Application Type Code Validation Form
(STVWAPP).
• Term Code (Optional) - Enter the term code to be used as entry term for EDI
applications. Valid values come from the Term Code Validation Form (STVTERM).
The SAR189U process scans the flat file (
map_upld.txt) and puts the data into the
same Oracle holding tables that are used for self-service admissions application
processing. You can review the TS 189 application from within Banner on the Electronic
Application Process Form (SAAEAPS), as well as on the Electronic Application Submitted
Form (SAAETBL).
Processing EDI Applications
If you have completed all of the steps outlined in the Admissions Application Set-Up
Procedures for EDI applications, Banner is now ready to receive admissions applications
via EDI.
Before you receive your first EDI application, you need to establish appropriate policies
and procedures for processing EDI applications. For example, you need to determine
whether to weed out frivolous applications, when and how you will collect application fees
(if required), whether you require and how you will collect application certifications and
signatures, and what impact EDI applications will have on application and yield statistics.
The Elec. App. Verify/Load Process (SARETMT) is a batch process that is used to match,
verify, and load admissions applications received via EDI. This process allows users to
match, verify, and load large numbers of EDI applications at one time. The process uses
the same matching algorithm as the Electronic Prospect Match Process (SRRSRIN) and
the Common Matching Entry Form (GOAMTCH). The Electronic Application Process
Form (SAAEAPS) is used to process EDI applications that are placed in suspense or error
status by the SARETMT batch load process. In addition, SAAEAPS can be used to review
EDI applications and delete those that are most likely frivolous (i.e., applications from
Mickey Mouse or Claude Monet).
Overall Process
The overall process for receiving EDI admissions applications is as follows.
1. The application is received and loaded to the temporary tables using EDI.Smart and
SAR189U.
2. The institution reviews all EDI applications (via SAAEAPS) added on a specific date
that are complete to check for frivolous applications. (Optional)
3. The institution runs the SARETMT process to match, verify, and load Web
applications.
4. The institution reviews EDI applications on SAAEAPS that were put into Suspense or
Error status by the SARETMT process.
5. Suspended records are resolved on SAAEAPS using GOAMTCH to determine if the
applicant is New or is a Match to an existing Banner record.

806
Banner Student User Guide | Admissions
6. The institution reruns SARETMT to verify and load those applications whose
suspense status has just been resolved. Depending on the number of suspended
records, the institution can choose to manually verify and load these EDI applications
on SAAEAPS.
Detailed Steps
The detailed steps for receiving EDI admissions applications are discussed in this section.
1. Use the Electronic Application Process Form (SAAEAPS) to display received EDI
applications.
To display the application(s) for a specific person, enter the electronic ID for that
person in the Key Block or use a List function to display the Electronic Applicant
Search Form (SOAEIDN), where you can search for an electronic applicant using
name and ID. You can also select only those applications added on a certain date by
entering the Add Date in the Key Block field. Only applications matching the Web ID
and/or Add Date in the Key Block will be displayed.
You can also enter the main block and query on certain fields. Those fields are:
Application Number, Application Type, Completion Indicator, Term, Source (with
a value of
EDI), Add Date, Accepted Indicator, Process, Process Date, Person
Status, and Application Status.
If you find applications that you believe are frivolous, they can be deleted using the
Delete Record function. Once an application is deleted on SAAEAPS, its associated
data is also deleted from the electronic application holding tables; therefore, the
application will no longer be viewable on SAAETBL.
2. Use the Elec. Appl. Verify/Load Process (SARETMT) to match, verify, and load the
EDI applications that meet your processing guidelines.
Parameters for SARETMT allow processing based upon Application Type, Application
Source, Application Term, and the Date Range of when applications were added.
2.1. Run SARETMT in audit mode.
SARETMT can be run in audit mode providing the user with the opportunity to
review the match, verify, and load status of each application before it is actually
processed. The Status field will indicate whether the Web application is New,
Matched, Suspended, or in Error based on the matching rules specified by the
matching source code assigned to the interface code on STVINFC. The process
will indicate if verification errors occurred or if the application was pushed.
2.2. Run SARETMT in update mode.
The user can run the match, verify, and load process in update mode. All
electronic applications matching the input parameters will be processed by
SARETMT.
Three possible outcomes can exist for each record processed by SARETMT.
– The record was matched, verified, and pushed successfully resulting in the
creation of a SAAADMS application record.
– The record was placed into suspense or error status during the match
process. Suspended records will not be processed further by SARETMT until
the match status has been resolved to either New or Matched. The user can

807
Banner Student User Guide | Admissions
resolve the suspended status using the Electronic Application Process Form
(SAAEAPS) (See the “Resolve Suspended Electronic Applications” section
below for details.)
– The record failed the verification process. Numerous verification routines exist
to ensure the integrity of the data being loaded into Banner. If certain errors
occur during the verification process, the record will be marked with a
verification error.
3. Resolve suspended electronic applications using the Electronic Application Process
Form (SAAEAPS).
3.1. Access the Electronic Application Process Form (SAAEAPS).
3.2. Navigate to the main block and query for the appropriate records (i.e., term,
source equals EDI etc.) having a Person Status of
S. These are the records that
will need to be resolved before they can be verified and pushed into Banner.
4. Select the Verification Steps tab or the Manual Verification Steps option from the
Options Menu to access the Verification Steps window.
5. Mark any of the person or application steps complete, except for the ID Verification
(
IDVR) step, and then save the changes.
6. Select the ID Verification (
IDVR) step, and then choose the Associate Person with ID
item from the Options Menu.
7. This opens the Associate Person with ID window, where you can choose which type of
Banner ID to assign to the selected record from the Select an ID field.
• Electronic ID – This is the ID used to create the electronic application.
• Local ID – This is used for applications filed via EDI where the applicant provided a
Local ID.
• SSN – This is the SSN or other Federal ID number specified on the electronic
application.
• Banner ID – This is used if you wish to enter an explicit ID to be used by Banner.
• Generate ID – This indicates that Banner should generate an ID for this person.
8. After choosing the appropriate ID type, either save the changes or select the
Associate Person with an ID button. This will display GOAMTCH.
9. The ID displayed on GOAMTCH should match the option chosen in the Associate
Person with ID window. The Matching Source field should contain the source code
that has been assigned to the interface code on SAAWADF for the application type of
the selected Web application. This source code can be changed if desired.
If no interface code has been specified for the application type on SAAWADF, then the
Matching Source field will contain the default source code assigned to the user ID on
GORCMUS. If no default source code has been assigned on GORCMUS, you will be
able to select a source code from the List of Values.
Perform a Next Block to populate the Data Entry block with all of the data for the
incoming electronic applicant record that is present in the temporary tables.
10. You can update or adjust the data in the Data Entry block if it does not meet your
institution’s data standards. These updates will be copied back to the temporary tables
and used when the applicant's record is created.

808
Banner Student User Guide | Admissions
11. Once the data has been “cleaned up”, use a Next Block function to call the matching
algorithm, or select the Duplicate Check button.
12. The incoming electronic application can be a match, a potential match, or a new
record:
12.1. If the incoming electronic application is found to be a match to someone in
Banner, the Banner record will be displayed in the Match block.
12.2. If the incoming electronic application is found to be a potential match against
more than one existing Banner record, then all of the possible matches will be
displayed in the Potential Matches window.
12.3. If the electronic application is found to be a new record, an Alert Box will be
displayed with a message asking if you want to create the new person.
13. If the person is found to be an exact match, you can do one of three things:
13.1. Match the incoming record to the Banner record but not update any Null fields
that exist for the person in Banner by selecting the Select ID button.
13.2. Match the incoming record to the Banner record and choose to update any Null
fields that exist for the person in Banner with data on the incoming record by
selecting the Update ID button.
13.3. Choose to ignore the matched status, and create the person as new by
selecting the Create New button.
14. After selecting one of the options above, the user will be returned to the Verification
Steps window, and the ID Verification (
IDVR) step will be marked as complete.
Continue processing the electronic applicant as needed.
15. Resolve verification errors using the Electronic Application Process Form
(SAAEAPS).
If the
AUTOOVERRIDE label on the Electronic Admissions Application Rules Form
(SAAERUL) for the group
VCRL is set to Y, and the procedures and routines are
marked as overrideable on SAAECRL, then SARETMT will not stop the process if
verification errors occur (unless they are data errors). If the
AUTOOVERRIDE label is
set to
N, then any verification errors found while SARETMT is processing will be
identified, and the process will halt. These errors can be viewed on SAAEAPS and
must be resolved before the affected applications can be re-processed by SARETMT.
Verification errors can only be resolved on SAAEAPS if the routine and/or procedure
causing the error have the Override (Indicator) checked on SAAECRL for the
appropriate application type.
15.1. Access the Electronic Application Process Form (SAAEAPS).
15.2. Navigate to the main block and query for the appropriate records (i.e., term,
source, etc.) having a Process field value of
E. These are the records that will
need their verification errors resolved before they can be pushed into Banner.
15.3. Select Review Results from the Options Menu or use Next Block to access the
Verification/Load Results window.
In the System Verification Procedure block, each procedure is displayed, one
procedure at a time. At the same time, each routine associated with a procedure
is displayed in the System Verification Routines block.

809
Banner Student User Guide | Admissions
15.4. Scroll through each procedure to find the procedures that have not been verified
(i.e., the Completion Indicator checkbox is not checked). To resolve a
procedure or routine, check the appropriate override (Override Indicator) box.
If you override an individual routine, only the verification associated with that
routine will be bypassed. If an entire procedure is overridden, none of the
individual routines will have verification performed.
15.5. Once all routines and/or procedures are overridden, return to the main block of
SAAEAPS. You can manually re-verify the application here by selecting Verify
Application from the Options Menu, or you can re-run SARETMT.
16. Re-run SARETMT in update mode.
SARETMT will try to verify all records that were previously suspended and will attempt
to re-verify all applications that originally failed verification. All applications that pass
the match and verification processing will be pushed to Banner. Once an application
has been pushed, the Process field will be set to
P(ushed).
Manually Matching, Verifying, and Pushing Electronic
Applications
The following steps how to manually match, verify, and push electronic applications into
Banner using SAAEAPS.
1. Use the Electronic Application Process Form (SAAEAPS) to display received EDI
applications.
To display the application(s) for a specific person, enter the electronic ID for that
person in the Key Block or use a List function to display the Electronic Applicant
Search Form (SOAEIDN), where you can search for an electronic applicant using
name and ID.
You can also select only those applications added on a certain date by entering the
Add Date in the Key Block field. Only applications matching the Web ID and/or Add
Date in the Key Block will be displayed.
You can also enter the main block and query on certain fields. Those fields are:
Application Number, Application Type, Completion Indicator, Term, Source (with
a value of
EDI), Add Date, Accepted Indicator, Process, Process Date, Person
Status, and Application Status.
If you find applications that you believe are frivolous, they can be deleted using the
Delete Record function. Once an application is deleted on SAAEAPS, its associated
data is also deleted from the electronic application holding tables; therefore, the
application will no longer be viewable on SAAETBL.
2. Flag applications for further processing.
If you will not process an application until a fee or certification is received, you might
also want to set the Accepted Indicator to N until you receive the appropriate
additional information required by your policies and procedures.
For those applications which you will further process, set this indicator to Y.

810
Banner Student User Guide | Admissions
3. Perform any required manual verification steps.
Select the Verification Steps tab, use a Duplicate Item function, or select Manual
Verification Steps from the Options Menu to transfer to the Verification Steps window.
There may be two kinds of manual verification steps, those related to person data and
those related to an application. You defined the manual verification steps which would
be required on the Application Verification Steps Validation Form (STVASTA). One
person-related step - ID Verification (
IDVR) - is required by system processing and
will be present whether or not you defined additional verification steps.
You must now either match the EDI applicant to an existing Banner person or create
the person in Banner. Either of these functions also completes the ID Verification
(
IDVR) step. Continue with Step 3 through Step 10.
When you are positioned on the ID Verification (
IDVR) step record, use a function key
to perform special processing. The function can be performed if the ID Verification
(
IDVR) step has already been completed.
Use a Count Query Hits function or select Associate Person with ID from the Options
Menu to transfer to the Associate Person with ID window, where you can choose
which type of Banner ID to assign to the selected record in the Select an ID field.
• Electronic ID – This is the ID used to create the electronic application.
• Local ID – Used for applications filed via EDI where the applicant provided a Local
ID.
• SSN – This is the SSN or other Federal ID number specified on the electronic
application.
• Banner ID – Used if you wish to enter an explicit ID to be used by Banner.
• Generate ID – Indicates that Banner should generate an ID for this person.
4. After choosing the appropriate ID type, either save the changes or select the
Associate Person with an ID button. This will display GOAMTCH.
5. The ID displayed on GOAMTCH should match the option chosen in the Associate
Person with ID window. The Matching Source field should contain the source code
that has been assigned to the interface code on SAAWADF for the application type of
the selected Web application. This source code can be changed if desired.
If no interface code has been specified for the application type on SAAWADF, then the
Matching Source field will contain the default source code assigned to the user ID on
GORCMUS. If no default source code has been assigned on GORCMUS, you will be
able to select a source code from the List of Values.
Perform a Next Block to populate the Data Entry block with all of the data for the
incoming electronic applicant record that is present in the temporary tables.
6. You can update or adjust the data in the Data Entry block if it does not meet your
institution’s data standards. These updates will be copied back to the temporary tables
and used when the applicant's record is created.
7. Once the data has been “cleaned up”, use a Next Block function to call the matching
algorithm, or select the Duplicate Check button.
8. The incoming electronic application can be a match, a potential match, or a new
record:

811
Banner Student User Guide | Admissions
8.1. If the incoming electronic application is found to be a match to someone in
Banner, the Banner record will be displayed in the Match block.
8.2. If the incoming electronic application is found to be a potential match against
more than one existing Banner record, then all of the possible matches will be
displayed in the Potential Matches window.
8.3. If the electronic application is found to be a new record, an Alert Box will be
displayed with a message asking if you want to create the new person.
9. If the person is found to be an exact match, you can do one of three things:
9.1. Match the incoming record to the Banner record but not update any Null fields
that exist for the person in Banner by selecting the Select ID button.
9.2. Match the incoming record to the Banner record and choose to update any Null
fields that exist for the person in Banner with data on the incoming record by
selecting the Update ID button.
9.3. Choose to ignore the matched status, and create the person as new by
selecting the Create New button.
10. After selecting one of the options above, the user will be returned to the Verification
Steps window, and the ID Verification (
IDVR) step will be marked as complete.
Continue processing the electronic applicant as needed.
11. Verify the application data.
Select Verify Application from the Options Menu to verify the application data.
Verification performs all verification procedures and routines attached to the
application which have not been overridden.
After an application has been verified, its Accepted Indicator on the main window of
SAAEAPS is set either to
E, which indicates that errors were found during verification,
or
V for verification complete.
12. Review error, override verification, or correct data.
If errors are encountered during verification, select Review Results from the Options
Menu or use a Next Block function to review the results. The Verification/Load Results
window is displayed.
In the System Verification Procedures section of this window, each procedure and its
associated routines are displayed, one procedure at a time. You scroll through the
procedures using the scroll bar or Next and Previous Record functions, and the
associated routines are displayed for each procedure. As you scroll through the
procedures, you can ignore any which have already been overridden or which have
passed verification. (The Completion Indicator checkbox is checked.)
Verification errors must be resolved before the data can be loaded into the Banner
permanent tables from the holding tables. You resolve verification errors by overriding
the routine which failed or by overriding the entire procedure. If you override an
individual routine, only the verification associated with the individual routine will be by-
passed. If you override the procedure, none of the individual routines will be
performed. Only those procedures or routines for which override is allowed (defined
on SAAECRL) can be overridden. If you attempt to override a procedure or routine
when an override is not allowed, an error message displays, and the override is not
processed.

812
Banner Student User Guide | Admissions
After overriding all routines or procedures that you wish to have ignored, use the
Return button to return to the main window of SAAEAPS, and select Verify Application
from the Options Menu to verify the information again. Only data which had not
previously been verified is processed. Procedures in which you overrode routines can
now be verified.
You should continue verifying data and overriding routines and procedures until
verification is complete (the Accepted Indicator displays V for Verified). When you
push data into the permanent tables, data for procedures which have been verified is
loaded, regardless of the status of other data.
13. Load the verified information into the permanent tables.
Select Load Application from the Options Menu or use an Insert Record function to
push the data to the permanent tables. After you have pushed the data, you can view
the results by selecting Review Results from the Options Menu or by using a Next
Block function to access the System Verification Procedure section of the Verification/
Load Results window. Scroll until you reach procedure P900, the PUSH Verification
Procedure. The routines associated with this procedure push actual pieces of data.
Data has been pushed for routines which are complete, and the message associated
with each completed routine will tell you the number of records created or updated.
Race/Ethnicity Processing
Ethnicity category and race data can be captured in Recruiting and Admissions in Banner
Student. This processing ties into Banner Human Resources and Banner General. Banner
Human Resources collects and reports on ethnicity, ethnic category (Hispanic or Latino
and Not Hispanic or Latino), and race separately, as well as on multiple races for an
individual. Banner General collects and displays the value of
RACE.
Prerequisites
Do the following setup before installation.
Warning! Before release 7.3 is installed, mappings for race, institutional
race, and ethnic category must be set up in Ethnic Code Validation Form
(STVEHTN), and race codes must be updated on the Race Rules Form
(GORRACE).
In addition, if you load AMCAS files using SRTLOAD and currently have
conversion rules for validation table ETHR, please be sure that those
rules are correct.
The upgrade process will check STVETHN for institutional race values that are associated
with ethnic codes on SOTCNVT for
ETHR and then build new SOTCNVT rules for RACE
using GORRACE. Incoming race values will be converted using
RACE (GORRACE)
versus using
ETHR. The ETHR rules will still be valid and will be used with AMCAS
processing but should be reviewed. The use of the conversion rule
ETHR is discussed in
further detail in the “Race/Ethnicity Functionality for AMCAS” topic.
813
Banner Student User Guide | Admissions
When release 7.3 is installed, the SRTSUPL temporary table and the SABSUPL
permanent table will be modified to accommodate three position race fields that are
validated on GORRACE. If the release is installed without having these STVETHN and
GORRACE rules set up, you may lose existing SOASUPL race codes in production and
SRTSUPL temporary table race codes, if values that existed prior to the upgrade cannot
be converted to the equivalent three digit race codes during the installation. The scripts for
the conversions are run during the upgrade process when the tables and fields are
changed from two digits to three digits.
Note: Please refer to the following checklist for processing and
conversion steps.
Processing Checklist
The following steps should be performed before installing this functionality:
1. Run the
srstvethn.sql script, found in the Plus directory.
This script checks STVETHN to determine which ethnic codes have no equivalent
race codes and are not able to be converted.
This script also checks GORRACE to determine which race codes are mapped to
more than one ethnic code and are not able to be converted.
2. Update your data in STVETHN and/or GORRACE based on the results of the script.
3. If you process AMCAS files using SRTLOAD, review the SOTCNVT/
ETHR rules to
make sure they are correct.
The following steps should be performed after installing this functionality:
1. Review any new SOTCNVT/
RACE rules for AMCAS processing.
2. Review SOTCNVT/
ETHR rules for AMCAS processing.
3. Review all seed data, table changes, and database changes as needed to test the
setup at your institution.
4. Run the
supsprac1.sql and supsprac2.sql scripts.
The
supsprac1.sql script copies race data in the SRTSUPL temporary table to
the SRTPRAC temporary table.
The
supsprac2.sql script copies race data in the SABSUPL permanent table to
the GORPRAC permanent table.
Warning! These two scripts are optional and are not executed during the
upgrade process. You must run them after the upgrade is performed.

814
Banner Student User Guide | Admissions
Processing
Race/ethnicity processing can be tracked and is processed using the following forms and/
or reports:
• SPAPERS
• SPAIDEN
• SRAQUIK
• SAAQUIK
• SRAPREL
• SRIPREL
• SOTCNVT
• SRRPREL
• SRTLOAD
• SRTPURG
SRTLOAD accommodates the incoming race fields and loads the values to the new
SRTPRAC temporary repeating table. SRTLOAD still processes race for AMCAS in the
current manner with regard to SRTSUPL.
The incoming race data will be converted via SOTCNVT based on
RACE (GORRACE)
prior to being loaded to SRTPRAC/GORPRAC. AMCAS race will also continue to be
loaded to the SRTSUPL/SOASUPL/SABSUPL Race1 through Race 10 fields. Values will
be loaded to the permanent tables for use with SPAIDEN, SPAPERS, SRAQUIK, and
SAAQUIK. SRRPREL will load race and ethnicity (Hispanic or Latino and Not Hispanic or
Latino) to the appropriate Banner tables. SRRPREL will also update the
SPBPERS_CONFIRMED_RE_CD and SPBPERS_CONFIRMED_RE_DATE fields, when
the
SPBPERS_ETHN_CODE and GORPRAC_RACE_CDE values are inserted.
Note: The push process that loads data does not change or overwrite
data if that data already exists in Banner. Only a single value can exist for
ethnicity. While multiple race values may exist, if new race values are
submitted, only those values that are unique are added to GORPRAC.
The Prospects module in Banner Student Self-Service captures the ethnicity /ethnic
category (Hispanic or Latino and Not Hispanic or Latino) and race values that are
submitted online by prospects. A single ethnic category may be submitted. Multiple race
codes can be submitted. After the data is submitted, it is loaded to the same temporary
tables/fields (SRTPERS for ethnicity/ethnic category and SRTPRAC for race) that are
updated using SRTLOAD for incoming test score/search data. Once ethnic and race
values have been loaded to the temporary tables, all the electronic prospect processing
that follows mirrors data load processing.
The Admissions module in Banner Student Self-Service captures the ethnicity/ethnic
category (Hispanic or Latino and Not Hispanic or Latino) and race values that are
submitted online by applicants. A single ethnic category may be submitted. Multiple race

815
Banner Student User Guide | Admissions
codes can be submitted. After the data is submitted, it is loaded to the temporary tables/
fields (SARPERS for ethnicity and SARPRAC for race).
SAAETBL reflects the use of the ethnic category and race data in the temporary tables.
The push process will validate the data and allow for overwrite/push of the ethnic and race
data from the temporary tables to SPBPERS and GORPRAC, respectively. Also, the push
process will update the
SPBPERS_CONFIRMED_RE_CD and the
SPBPERS_CONFIRMED_RE_DATE fields when both the ethnic category and race codes
are loaded to Banner, to indicate the data has been reported and confirmed directly from
the applicant.
The push process will also allow an overwrite of the ethnic category and race data that
exists in Banner when the routine to overwrite existing ethnic category or existing race has
been added to SAAECRL by the institution for the chosen application type.
In the case of the overwrite existing ethnic category, the single existing ethnic category in
SPBPERS will be overwritten by the SRAPERS ethnic category. If the overwrite is not
added by the institution, when the data is loaded, it will be inserted if the value is
Null. If
the overwrite is not added by the institution, when the data is loaded, it will not be inserted
if the value is populated.
Two fields on SPAPERS are updated to indicate that the incoming race and ethnic data
and the date have been confirmed. When any race or ethnicity data in the temporary table
that has been reported by the individual using test scores or self-service is loaded to
production through SPBPERS, then the
SPBPERS_CONFIRMED_RE_CD column is
updated to Y to indicate that the data has been confirmed, and the
SPBPERS_CONFIRMED_RE_DATE column is updated to the date the data is pushed to
Banner from SPBPERS. These two fields do not have associated temporary table fields,
so these fields are updated directly in SPBPERS.
Note: Historical ethnicity and race data will not be saved.Existing ethnicity
data in SPBPERS will be overwritten by SRKPREL. Existing “new
ethnicity” data in SPBPERS will be overwritten unless the value is
NULL/
None.
In the case of the overwrite existing race, all existing race codes on
GORPRAC will be deleted and the SRAPRAC race codes will be inserted
into GORPRAC. If the overwrite is not added by the institution, when the
data is loaded, it will insert race codes if the value is
Null. If the
overwrite is not added by the institution, when the data is loaded, it will not
add or update race codes if race codes exist.
Race/Ethnicity Functionality for AMCAS
AMCAS processing as of Release 7.2 used ETHR on SOTCNVT for the conversion of
ethnicity values to race values on SABSUPL. Incoming AMCAS race values were
converted to a race value from STVETHN using the conversion table value
ETHR, since
there was no existing Banner RACE code.
AMCAS processing as of Release 7.3 will continue to use
ETHR on SOTCNVT, but for a
different reason. When the AMCAS Hispanic Indicator is set to
N, the value for AMCAS
RACE CODE 1 is loaded to the
SRTPERS_ETHN_CODE field. In order for RACE CODE 1

816
Banner Student User Guide | Admissions
to be converted to an appropriate ethnic code, the conversion rule to convert RACE
CODE 1 to an ethnicity must be valid.
ETHR is used on SOTCNVT to change the incoming
RACE CODE 1 to the
SPBPERS_ETHN_CODE value.
AMCAS loads up to ten ethnic codes and ten race codes to SABSUPL/SOASUPL.
Incoming ethnic and race codes are now different values. The value from STVETHN is
used to convert ethnicity (SOTCNVT rule
ETHN) and RACE CODE 1, (SOTCNVT rule
ETHR), when the AMCAS Hispanic Indicator is set to N for the validation and conversion
on SOTCNVT.
• On SOTCNVT, the incoming ethnic codes are converted and loaded to SRTSUPL and
SRTPERS using the
ETHN value from STVETHN.
• On SOTCNVT (when the AMCAS Hispanic Indicator is set to N), the incoming RACE
CODE 1 is converted and loaded to SRTPERS using the
ETHR value from STVETHN.
The Hispanic Indicator is loaded to SABSUPL/SOASUPL and also to SRTPERS/
SPBPERS.
• The incoming Hispanic Indicator is loaded to temporary tables/fields
SRTSUPL_HISP_IND and SRTPERS_ETHN_CATEGORY.
• The incoming Hispanic Indicator is loaded to permanent tables/fields
SABSUPL_HISP_IND and SPBPERS_ETHN_CDE.
In summary:
• On SOTCNVT, the incoming ethnic codes are converted and loaded to SABSUPL/
SOASUPL using the
ETHN value from STVETHN. These are two character codes.
• On SOTCNVT, incoming race codes are converted and loaded to SRTSUPL/SABSUPL
and SRTPRAC/GORPRAC using the
RACE value from GORRACE. These are three
character codes.
• If the incoming Hispanic Indicator is set to Y, ETHN CODE 1 is loaded to the
SRTSUPL_ETHNIC_CODE_SELF field and the SRTPERS_ETHN_CODE field.
• If the incoming Hispanic Indicator is set to N, RACE CODE 1 is loaded to the
SRTSUPL_ ETHNIC_CODE_SELF field and the SRTPERS_ETHN_CODE field.
The RACE 1 value is three characters in length and is converted from GORRACE
(SOTCNVT/
RACE).
• When the Hispanic Indicator is set to N, it will look at the incoming RACE CODE 1 value
and convert it to ethnicity for the
SRTPERS_ETHN_CODE field using the ETHR rule on
SOTCNVT.
ETHR is used to convert the incoming race values to a valid ethnic code that
will be loaded to the
SRTPERS_ETHN_CODE field.
Using the Electronic Prospect Load (SRTLOAD)
SRTLOAD validates incoming race values against the conversion process using
SOTCNVT/GORRACE. SRTLOAD will continue to convert ethnic codes based on
STVETHN.

817
Banner Student User Guide | Admissions
SRTLOAD also converts AMCAS RACE CODE 1 to the SRTPERS_ETHN_CODE value
when the incoming AMCAS Hispanic Indicator is set to
N and based on the SOTCNVT
rule
ETHR.
AMCAS race values are loaded to both SRTSUPL and SRTPRAC. The race values for
AMCAS will be always be the same in both tables and can be viewed on SRIPREL/
SRAPREL. Non-AMCAS race values are only loaded to SRTPRAC.
SRTLOAD updates the following fields on SRTPRAC:
SRTLOAD updates the
SRTPERS_ETHN_CDE with the AMCAS HISP_IND value.
• If the AMCAS HISP_IND value is set to Y, the SRTPERS_ETHN_CDE is set to 1.
• If the AMCAS HISP_IND value is set to N, the SRTPERS_ETHN_CDE is set to 2.
The
AMCAS_HISP_IND value will also continue to be loaded to the
SRTSUPL_HISP_IND field.
Purging Data
The Electronic Prospect Purge (SRTPURG) will purge data from the SRTPRAC temporary
table and the
SRTPERS_ETHN_CATEGORY column. The Electronic App Purge Process
(SARETPG) will purge data from the SARPRAC table and the
SARPERS_ETHN_CATEGORY column.
Self-Service Race and Ethnicity Survey
You can present an optional survey to Banner Student Self-Service users to obtain
ethnicity and race information for prospects and applicants. If the survey parameters have
been established in Banner Web General, when a user successfully logs on to Self-
Service, the survey will be presented and the user will have the option to complete the
survey at that time or to complete it later. Once the user has completed the survey, it will
no longer be presented to that user.
The prospect push process updates the biographical fields on SPAIDEN. The New
Ethnicity field is updated with the ethnic category data, and the Race field is updated with
race information. Historical data for ethnicity and race is not retained when new data is
supplied. On SPAPERS, the Ethnicity and Race Confirmed checkbox is checked and
the Confirmed Date field is populated when either ethnic category or race information is
supplied.
Field Data
SRTPRAC_RIDM
Temporary recruiting record RIDM
SRTPRAC_RACE_CDE Converted race code based on SOTCNVT/RACE
SRTPRAC_USER_ID
User ID that ran SRTLOAD when table was loaded
SRTPRAC_ACTIVITY_DATE
Date/timestamp loaded to temporary table

818
Banner Student User Guide | Admissions
Note the following warning when setting up the Web for Prospects Selection Rules Form
(SRAWPRO) and determining which Web prospect selection codes are required for use
with the race and ethnicity survey. This warning also applies to setting up the Web
Application Section Rules Form (SAAWAPP) and determining which Web application
section codes are required for use with the race and ethnicity survey.
Warning! Depending on your locale, it might be illegal to require users to
provide ethnicity and race information. Do not check the Required
checkbox on SAAWAPP for the PERSONAL (Personal Information) Web
application section code or the Response Required on Web checkbox
on SRAWPRO for the ETHNICITY (Prospect Ethnicity/Race) Web
prospect selection code if requiring users to provide ethnicity and race
information is prohibited.
If such a regulation applies to your institution, you must also review your
existing Web application and prospect selection definitions, and uncheck
these checkboxes for any application and prospect codes for which they
are currently checked.
Survey Questions Presentation
The presentation of the survey questions “What is your ethnicity?” and “Select one or
more races to indicate what you consider yourself to be.” follows specific guidelines from
the NCES. The answer choices are presented as checkboxes, instead of pulldown lists.
This was done on purpose, as it was decided that these questions and answers should be
the same for all users. The questions and answers should not be stored at the application
type level where they could be customized based on the Web application types for
graduates, undergraduates, and so on, on SAAWAPP. Storing the questions as
information text (instead of as Web section labels from SAAWAPP) provides a unified look
across Banner Self-Service between the Main Race Survey in Banner Web for General
and the Web Admissions Survey in Banner Student Self-Service. The focus group for
these updates reviewed the form layout and the question storage and agreed to the
design. The same layout format was applied in both Banner Web for General and Banner
Student Self-Service.
AMCAS (American Medical College Application Service)
Load Procedures Using SRTLOAD
This section discusses AMCAS data load processing.
Introduction
The Electronic Prospect Load (SRTLOAD) can be used to load application data provided
by the American Medical College Application Service (AMCAS) to the Banner database.
This section reviews the set-up steps and procedures for loading AMCAS applications.
AMCAS application data is submitted to institutions using code values determined and
published by AMCAS. These values often must be translated to appropriate, valid Banner
819
Banner Student User Guide | Admissions
values. Valid Banner values can be maintained as conversion rules on the Tape Code
Conversion Form (SOTCNVT) or on Banner validation tables.
In addition, the AMCAS data load process requires a number of values to construct data in
appropriate Banner format. Appropriate processing rules values are maintained on the
Electronic Admissions Application Rules Form (SAAERUL) for the group codes
PREL,
AGPA, and ACRH.
Note: It is suggested for AMCAS processing that PREL group code rules
that are specific to AMCAS be copied to a new group code. For example,
all
PREL rules can be copied to a new group code of AMCS (AMCAS
Rules). All rules and settings specific to AMCAS can be modified and
maintained for this group code so that SAAERUL settings do not have to
be changed or monitored closely when processing various data loads.
The same procedure can be followed for other file processing. For
example, SRKPREL will check SAAERUL to see if the Electronic
Prospect Group (STVEGRP) rule equals the Electronic Prospect Load
Validation (STVPREL) rule for
AMCS for the SAAERUL values, and if
there is no
AMCS value, it will use the SVTEGRP rule that is equal to
PREL.
Both application and conversion rules (SOTCNVT) may require values established in a
number of other Banner validation tables, and a number of new validation values may be
required by the AMCAS load process. One-to-one matches use the validation tables.
Matches that are not one-to-one use the rules on SOTCNVT.
Note: AMCAS uses specific sets of nation codes and major codes which
may be updated from time to time. AMCAS nation and major codes are
listed in a variety of AMCAS publications and are also available on the file
from AMCAS.
The following values are converted from the value on the incoming data load to the
appropriate Banner value and loaded to the appropriate temporary tables. Not all
SOTCNVT values are used by AMCAS.
Value Description
ADMT Used to load admissions type on SAAADMS
CAMP Not used by AMCAS
CITZ Not used by AMCAS
CNTY Used to load county code
DEGC Used for prior college degree (STVDEGC)
DEGA
Converts the value for
APPL_TYPE on the incoming AMCAS file to an
application degree on SAAADMS and overrides the degree loaded by
SRTLOAD for the AMCAS Degree Code parameter (STVDEGC)
DEPT Not used by AMCAS

820
Banner Student User Guide | Admissions
Two sections follow. The first section, (“AMCAS Application Load Processing Set-up”),
deals with set-up steps which are required before processing the first AMCAS application
file. The second section, (“AMCAS Application Load Processing and Reporting
EDLV Not used by AMCAS
EGOL Used for prior college education goals
ESEL Used to load special consideration based on the Disadvantaged flag on
the incoming AMCAS file
ETHN Used to load ethnicity (STVETHN) to SPBPERS and SABSUPL
ETHR Used to convert and load RACE 1 value to SABSUPL based on
STVETHN when the AMCAS
HISP_IND is set to N.
GNDR Used to load gender if a conversion is necessary, but not used by
AMCAS
HGPA Not used by AMCAS
INTS Not used by AMCAS
INTP Not used by AMCAS
MAJR Not used by AMCAS
MAJP Not used by AMCAS
NATN Used to load nation information
RACE Used to load race (GORRACE) to GORPRAC
RELG Not used by AMCAS
SBGI Used to load college information
SBGH Not used by AMCAS
STAT Used by to load state codes
TADM Not used by AMCAS
TEAC Used to load setting of MCAT non-standard indicator from AMCAS to the
test score accommodation on SOATEST/
SORTEST_TEAC_CODE
when test scores are loaded
TEFR Used to load MCAT series code when test scores are loaded to the test
form number on SOATEST/
SORTEST_TEFR_CODE
TERM Not used by AMCAS
TESC Can be used by AMCAS if you do not want to load the hard-coded
values
TSPT Not used by AMCAS (Used to load test percentile for SAT, GRE)
VTYP Used to load visa type
Value Description
821
Banner Student User Guide | Admissions
Procedures”), deals with the actual AMCAS application data load process and related
steps.
AMCAS Application Load Processing Set-up
Note: Scripts have been delivered with the following: codes for baseline
data load AMCAS processing, values used for the conversion from
SOAXREF to SOTCNVT, and SAAERUL rules for the group code
PREL,
so that very little preparation/set-up is required. It is recommended that
you review the SOTCNVT conversion values and establish the necessary
rules on SAAERUL. In addition, it is suggested that you review all data
load processing validation and rules forms prior to processing your first
AMCAS file using baseline data load processing procedures.
1. Review validation forms and build new values if required.
1.1. Verify that values exist in the Degree Code Validation Form (STVDEGC) for the
necessary degree types, or build new entries as needed.
If values for the degree types do not exist in STVDEGC, you will not be able to
convert the AMCAS values to appropriate Banner values on the Tape Code
Conversion Form (SOTCNVT).
If the values are not converted to valid Banner degree codes on SOTCNVT or
exist as a one-to-one relationship in the STVDEGC validation table, the degree
data reported by AMCAS will not be loaded.
1.2. Verify that values exist in the Degree Code Validation Form (STVDEGC) for the
necessary degree types that will be used to convert the
APPL_TYPE on the
AMCAS file to the appropriate degree code for your applicant.
If values for the application degree types do not exist in STVDEGC, you will not
be able to convert the AMCAS values for
APPL_TYPE to appropriate Banner
values on the Tape Code Conversion Form (SOTCNVT).
If the values for
APPL_TYPE are not converted to valid Banner degree codes
on SOTCNVT, the value for
APPL_TYPE reported by AMCAS will not be
converted or loaded as the application degree.
Note: On SOTCNVT for the interface tape AMCS (AMCAS), you must use
the validation table name
DEGA in order to convert the AMCAS value for
APPL_TYPE to Banner as the application degree. Both prior college
degree codes and application degree codes exist STVDEGC, but in order
for the data load process to know which codes to convert to the prior
college degree versus the application degree, it is important to use DEGA
on SOTCNVT for the application degree.
This conversion of the AMCAS
APPL_TYPE allows for a different degree
code to be loaded for the applicant besides the one from the SRTLOAD
parameter. If there is a converted value on SOTCNVT for
DEGA for the
AMCAS
APPL_TYPE, the converted value will load first as the
application degree. If there is no converted value on SOTCNVT for
DEGA,

822
Banner Student User Guide | Admissions
then the required degree code listed as the SRTLOAD parameter value
will be loaded as the application degree.
1.3. Verify that values exist in the Eligibility Factor Validation Form (STVESEL) for
the necessary special consideration types, or build new entries as needed.
If values for these consideration types do not exist in STVESEL, you will not be
able to convert the AMCAS values to appropriate Banner values on SOTCNVT.
If the values are not converted to valid Banner codes on SOTCNVT or exist as a
one-to-one relationship in the STVESEL validation table, the special
consideration request data reported by AMCAS will not be loaded.
1.4. Verify that values exist in the Educational Goal Validation Form (STVEGOL) for
the necessary program types (referred to as educational goals in Banner), or
build new entries as needed.
If values for these program types do not exist in STVEGOL, you will not be able
to convert the AMCAS values to appropriate Banner values on SOTCNVT.
If the values are not converted to valid Banner codes on SOTCNVT or exist as a
one-to-one relationship in the STVEGOL validation table, the program type data
reported by AMCAS will not be loaded.
1.5. Verify that values exist in the Ethnic Code Validation Form (STVETHN) for the
necessary ethnic categories, or build new entries as needed.
If values for these ethnic categories do not exist in STVETHN, you will not be
able to convert the AMCAS values to appropriate Banner values on SOTCNVT.
If the values are not converted to valid Banner codes on SOTCNVT or exist as a
one-to-one relationship in the STVETHN validation table, ethnicity data reported
by AMCAS will not be loaded.
1.6. Verify that ethnic values also exist in the Ethnic Code Validation Form
(STVETHN) for the appropriate conversion of the incoming AMCAS race
categories, or build new entries as needed. When the AMCAS Hispanic
Indicator is set to
N, the AMCAS RACE CODE 1 value is loaded as the
SPBPERS_ETHN_CODE. Please see the Note below.
If values for these race categories do not exist in STVETHN, you will not be able
to convert the AMCAS values to appropriate Banner values on SOTCNVT.
If the values are not converted to valid Banner codes on SOTCNVT or exist as a
one-to-one relationship in the STVETHN validation table, race data reported by
AMCAS will not be loaded.
1.7. Verify that values exist in the Race Rules Form (GORRACE) and that
associated race values have been entered, if necessary, on the Ethnic Code
Validation Form (STVETHN) for the race codes, or build new entries as needed.
If values for these race codes do not exist in GORRACE, you will not be able to
convert the AMCAS values to appropriate Banner values on SOTCNVT.
If the values are not converted to valid Banner codes on SOTCNVT or exist as a
one-to-one relationship in the STVETHN validation table, race data reported by
AMCAS will not be loaded.

823
Banner Student User Guide | Admissions
Note: On SOTCNVT, for the interface tape AMCS (AMCAS), you must
use the validation table name
ETHR in order to convert the AMCAS
RACE CODE 1 to an ethnic code that will be loaded to SPBPERS when
the AMCAS Hispanic Indicator is set to
N.
When the AMCAS Hispanic Indicator is set to
N, the RACE CODE 1 value
is loaded to
SPBPERS_ETHN_CODE and to SABSUPL. The race code is
a three character value, so a corresponding ethnic code must be used to
translate the incoming RACE CODE 1 to the appropriate Banner ethnic
code.
Since ethnicity codes are converted based on values in STVETHN, in
order for the data load process to know when to convert an incoming
AMCAS ethnic code to
SPBPERS_ETHN_CODE versus converting an
incoming AMCAS RACE CODE 1 to
SPBPERS_ETHN_CODE, it is
important to use
ETHR on SOTCNVT for the RACE CODE 1 for AMCAS.
When the AMCAS Hispanic Indicator is set to
Y, the ETHNIC CODE 1 will
be loaded to
SPBPERS_ETHN_CODE, based on the appropriate ETHN
conversion. Values for SOTCNVT/
ETHN will be loaded to the
SPBPERS_ETHN_CODE and SABSUPL_ETHNIC fields based on
incoming AMCAS ethnic codes.
SOTCNVT/
ETHR will load the incoming RACE CODE 1 to the
SPBPERS_ETHN_CODE and SABSUPL_ETHNIC fields when the
AMCAS Hispanic Indicator is set to
N.
All validation for ethnicity and incoming race 1 values to ethnicity, exists in
the same Banner validation table (STVETHN), but the use of validation of
either
ETHN or ETHR on SOTCNVT determines how these values are
converted.
1.8. Verify that values exist in the Visa Type Code Validation Form (STVVTYP) for
the necessary visa types, or build new entries as needed.
If values for these visa types do not exist in STVVTYP, you will not be able to
convert the AMCAS values to appropriate Banner values on SOTCNVT.
If the values are not converted to valid Banner codes on SOTCNVT or exist as a
one-to-one relationship in the STVVTYP validation table, the visa data reported
by AMCAS will not be loaded.
1.9. Verify that a value exists in the Test Accommodation Validation Form
(STVTEAC) for the necessary accommodation type, or build a new entry if
needed.
If a value for this test accommodation type does not exist in STVTEAC, you will
not be able to convert the AMCAS value to an appropriate Banner value on
SOTCNVT.
If the values are not converted to valid Banner codes on SOTCNVT or exist as a
one-to-one relationship in the STVTEAC validation table, test data will be

824
Banner Student User Guide | Admissions
loaded, but no indication of a non-standard test administration will be populated
when non-standard administration is reported by AMCAS.
1.10. AMCAS reports majors pursued at other institutions using specific AMCAS code
values. Some majors pursued at other institutions may already be in your
version of the Major, Minor, Concentration Code Validation Form (STVMAJR).
Verify that values exist in the Major, Minor, Concentration Code Validation Form
(STVMAJR) for the necessary major types, or build new entries as needed
If values for AMCAS majors do not exist in STVMAJR, you will not be able to
convert the AMCAS values to appropriate Banner values on SOTCNVT.
If the AMCAS major codes are not converted to valid Banner codes on
SOTCNVT or exist as a one-to-one relationship in the STVMAJR validation
table, the prior college major data reported by AMCAS will not be loaded.
1.11. AMCAS reports nations using specific AMCAS codes. Verify that values exist in
the Nation Code Validation Form (STVNATN) for the necessary nation codes, or
build new entries as needed.
If values for AMCAS nation codes do not exist in STVNATN, you will not be able
to convert the AMCAS values to appropriate Banner values on SOTCNVT.
If AMCAS nation codes are not converted to valid Banner codes on SOTCNVT
or exist as a one-to-one relationship in the STVNATN validation table, the nation
data reported by AMCAS will not be loaded.
1.12. AMCAS reports county information using a combination of county and state
code. The AMCAS load process will load both legal county and county of birth, if
appropriate conversion values are defined. Your institution may chose to load
some, all, or no county information.
Verify that values exist in the County Code Validation Form (STVCNTY) for the
necessary county codes, or build new entries as needed.
If values for AMCAS counties do not exist in STVCNTY, you will not be able to
convert the AMCAS values to appropriate Banner values on SOTCNVT.
If AMCAS county codes are not converted to valid Banner codes on SOTCNVT
or exist as a one-to-one relationship in the STVCNTY validation table, the
county data reported by AMCAS will not be loaded.
Note: You can build values on SOTCNVT for AMCAS state/county codes,
if you want to load county of birth and county of residence data. AMCAS
reports both county of birth and county of residence. If you choose not to
load county data, skip this step.
To report this county data, AMCAS uses a combination of state and
county codes. (The same county code may be used with multiple states.)
In order to load this AMCAS information, you will need to do the following:
– Determine the counties which you want to load. In most cases, only state-
supported schools will need to load county data, and then only for counties in
their home state.
– Develop codes on the County Code Validation Form (STVCNTY) for the
counties for which data should be loaded. Note that, unlike AMCAS,

825
Banner Student User Guide | Admissions
STVCNTY does not use state to distinguish among counties in different
states, and that each county code must be unique.
1.13. Verify that values exist in the State/Province Code Validation Form (STVSTAT)
for the necessary state/province codes, or build new entries as needed.
If values for AMCAS states/provinces do not exist in STVSTAT, you will not be
able to convert the AMCAS values to appropriate Banner values on SOTCNVT.
If AMCAS state codes and/or provinces are not converted to valid Banner codes
on SOTCNVT or exist as a one-to-one relationship in the STVSTAT validation
table, the state/province data reported by AMCAS will not be loaded.
1.14. Verify that values exist in the Admission Type Code Validation Form
(STVADMT) for the necessary early decision or standard application types or
build new entries as needed.
If a value for AMCAS early decision does not exist in STVADMT, you will not be
able to convert the AMCAS values to appropriate Banner values on SOTCNVT.
If AMCAS early decision values are not converted to valid Banner codes on
SOTCNVT or exist as a one-to-one relationship in the STVADMT validation
table, an early decision value reported by AMCAS will not be loaded.
1.15. Verify that values exist in the Source/Background Institution Code Validation
Form (STVSBGI) for the necessary prior colleges or build new entries as
needed.
If values for prior colleges do not exist on STVSBGI, you will not be able to
convert the AMCAS values to appropriate Banner values on SOTCNVT.
If AMCAS prior college values are not converted to valid Banner codes on
SOTCNVT or exist as a one-to-one relationship in the STVSBGI validation
table, college codes reported by AMCAS will not be loaded.
Note: You may not want to have all prior college codes set up in
STVSBGI. AMCAS files will report up to six different college codes. If you
do not want or need all possible six prior college codes to be loaded, you
can use the AMCAS SAAERUL rules for
UNKNOWNPCOL2,
UNKNOWNPCOL3, UNKNOWNPCOL4, UNKNOWNPCOL5, and
UNKNOWNPCOL6. You will still need to update the value for each of these
rules on SAAERUL to provide a default value that can be used when each
prior college does not convert.
1.16. Verify that values exist in the Applicant GPA Type Validation Form (STVGPAT)
for the necessary grade point average types, or build new entries as needed.
If values for these GPA types do not exist in STVGPAT, you will not be able to
define an appropriate conversion value on the Electronic Admissions
Application Rules Form (SAAERUL) for the group code
AGPA.
If appropriate values are not defined on SAAERUL for group
AGPA, the grade
point average data reported by AMCAS will not be loaded.

826
Banner Student User Guide | Admissions
Here are the values.
Note: There are no specific AMCAS values which must be translated for
these GPA types. You must define appropriate codes so that you can
enter the appropriate rule value on SAAERUL.
1.17. Verify that values exist in the Applicant Course Summary Type Validation Form
(STVCRSS) for the necessary course summary types, or build new entries as
needed.
If values for these course summary types do not exist in STVCRSS, you will not
be able to define an appropriate conversion value on SAAERUL.
If appropriate values are not defined on SAAERUL for the group
ACHR, course
summary data reported by AMCAS will not be loaded.
Freshman BCPM GPA
Freshman AO GPA
Freshman Total GPA
Sophomore BCPM GPA
Sophomore AO GPA
Sophomore Total GPA
Junior BCPM GPA
Junior AO GPA
Junior Total GPA
Senior BCPM GPA
Senior AO GPA
Senior Total GPA
PBUG BCPM GPA
PBUG AO GPA
PBUG Total GPA
Cumulative UG BCPM GPA
Cumulative UG AO GPA
Cumulative UG Total GPA
Graduate BCPM GPA
Graduate AO GPA
Graduate Total GPA

827
Banner Student User Guide | Admissions
Here are the values.
Note: There are no specific AMCAS values which must be translated for
these course summary types. You must define appropriate codes so that
you can enter the appropriate rule values on SAAERUL.
1.18. Verify that values exist in the Test Code Validation Form (STVTESC) for the
necessary test types, or build new entries as needed.
If values for these test types do not exist in STVTESC, you will not be able to
convert the AMCAS values (or in this case the delivered AMCAS test codes) to
appropriate Banner values on SOTCNVT.
Freshman BCPM Hours
Freshman AO Hours
Sophomore BCPM Hours
Sophomore AO Hours
Junior BCPM Hours
Junior AO Hours
Senior BCPM Hours
Senior AO Hours
PBUG BCPM Hours
PBUG AO Hours
Cumulative UG BCPM Hours
Cumulative UG AO Hours
Graduate BCPM Hours
Graduate AO Hours
Pass/Fail Hours Failed Hours
Pass/Fail Hours Passed
Hours
AP Hours
CLEP Hours
High School BCPM GPA
High School AO GPA
High School Total GPA
828
Banner Student User Guide | Admissions
If the values are not converted to valid Banner codes on SOTCNVT or exist as a
one-to-one relationship in the STVTESC validation table, the test type data
reported by AMCAS will not be loaded.
Note: All MCAT test score codes have been delivered for STVTESC.
These MCAT test scores are hardcoded for use by SRTLOAD. If your
institution used different MCAT test scores prior to using this baseline
version of AMCAS processing or does not choose to use the delivered
test scores, the test scores can be converted using SOTCNVT. The tape
value would equal the delivered test code, and the conversion code would
equal the MCAT test score you prefer to use.
1.19. Verify that a value exists in the Admission Test Score Source Code Validation
Form (STVTSRC) for
Reported by AMCAS, or build a new entry if needed.
If an appropriate value does not exist in STVTSRC, you will not be able to
define a test source value on the Interface Validation Form (STVINFC).
If no appropriate test score source is defined on STVINFC, MCAT test data will
still be loaded, but will be missing a test score source.
1.20. AMCAS reports an MCAT Series Code which indicates the test series number
used by the application when the MCAT tests were taken. This value will be
loaded into each MCAT test record inserted by SRTLOAD (stored in the column
SRTTEST_TEFR_CODE). The MCAT series code is a numeric value between
00 and 99. Load these 100 values into the Test Form Validation Form
(STVTEFR) so that the MCAT Series Code can be loaded.
Note: If you do not wish to load all 100 values during set-up, you can use
the results from SRTLOAD to determine those values which are in the
current AMCAS file which do not already exist in STVTEFR. After running
SRTLOAD in Audit Mode, review the validation errors to determine the
TEFR codes that did not convert. Then create any missing values before
continuing to process the current AMCAS file. You may set up an
SOTCNVT conversion for
TEFR, but if the valid STVTEFR code matches
the tape value, the
TEFR code will be loaded.
1.21. Verify that values exist in the Application Fee Waiver Reason Validation Form
(STVWAIV) for AMCAS Fee Waiver and for MCAT Scores.
If appropriate values do not exist in STVWAIV, you will not be able to define
conversion values on SAAERUL for the
AMCASFWAV rule label.
2. Verify that the following values exist in the Electronic Admissions Application Rules
Form (SAAERUL) and that the Value column has been updated to an appropriate
institutional value.
If these values do not exist, enter them manually on SAAERUL. Set the Value column
to the appropriate institutional value as you enter the appropriate rule.
Note: Please be aware that all SAAERUL rules need to be evaluated and
updated accordingly, in addition to the rules listed below which are used
specifically for AMCAS processing. SAAERUL rules other than those

829
Banner Student User Guide | Admissions
listed below are used for other types of data loads, and those rules could
also be applicable to AMCAS.
Group
Code Rule Label Rule Description Delivered Value
ACHR AOCUH Cumulative UG AO Hours
UPDATE ME - Update the Value column
to the value from the Applicant Course
Summary Type Validation Form
(STVCRSS) which should be used for
Cumulative Undergraduate AO hours.
ACHR AOFH Freshman AO Hours
UPDATE ME - Update the Value column
to the value from the Applicant Course
Summary Type Validation Form
(STVCRSS) which should be used for
Freshman AO hours.
ACHR AOGH Graduate AO Hours
UPDATE ME - Update the Value column
to the value from the Applicant Course
Summary Type Validation Form
(STVCRSS) which should be used for
Graduate AO hours.
ACHR AOJH Junior AO Hours
UPDATE ME - Update the Value column
to the value from the Applicant Course
Summary Type Validation Form
(STVCRSS) which should be used for
Junior AO hours.
ACHR AOPUH PBUG AO Hours
UPDATE ME - Update the Value column
to the value from the Applicant Course
Summary Type Validation Form
(STVCRSS) which should be used for
Undergraduate Postbaccalaureate AO
hours.
ACHR AOSHS High School AO Hours
UPDATE ME - Update the Value column
to the value from the Applicant Course
Summary Type Validation Form
(STVCRSS) which should be used for
High School AO hours.
ACHR HSTOT High School Total Hours
UPDATE ME - Update the Value column
to the value from the Applicant Course
Summary Type Validation Form
(STVCRSS) which should be used for
High School Total Hours.
ACHR AOSOH Sophomore AO Hours
UPDATE ME - Update the Value column
to the value from the Applicant Course
Summary Type Validation Form
(STVCRSS) which should be used for
Sophomore AO hours.

830
Banner Student User Guide | Admissions
ACHR AOSRH Senior AO Hours
UPDATE ME - Update the Value column
to the value from the Applicant Course
Summary Type Validation Form
(STVCRSS) which should be used for
Senior AO hours.
ACHR APH AP Hours
UPDATE ME - Update the Value column
to the value from the Applicant Course
Summary Type Validation Form
(STVCRSS) which should be used for
Advanced Placement hours.
ACHR BCPMCUH Cumulative UG BCPM
Hour
UPDATE ME - Update the Value column
to the value from the Applicant Course
Summary Type Validation Form
(STVCRSS) which should be used for
Cumulative Undergraduate BCPM hours.
ACHR BCPMFH Freshman BCPM Hours
UPDATE ME - Update the Value column
to the value from the Applicant Course
Summary Type Validation Form
(STVCRSS) which should be used for
Freshman BCPM hours.
ACHR BCPMGH Graduate BCPM Hours
UPDATE ME - Update the Value column
to the value from the Applicant Course
Summary Type Validation Form
(STVCRSS) which should be used for
Graduate BCPM hours.
ACHR BCPMHSH High School BCPM
Hours
UPDATE ME - Update the Value column
to the value from the Applicant Course
Summary Type Validation Form
(STVCRSS) which should be used for
High School BCPM hours.
ACHR BCPMJH Junior BCPM Hours
UPDATE ME - Update the Value column
to the value from the Applicant Course
Summary Type Validation Form
(STVCRSS) which should be used for
Junior BCPM hours.
ACHR BCPMPUH PBUG BCPM Hours
UPDATE ME - Update the Value column
to the value from the Applicant Course
Summary Type Validation Form
(STVCRSS) which should be used for
Undergraduate Post-baccalaureate
BCPM hours.
Group
Code Rule Label Rule Description Delivered Value

831
Banner Student User Guide | Admissions
ACHR BCPMSOH Sophomore BCPM Hours
UPDATE ME - Update the Value column
to the value from the Applicant Course
Summary Type Validation Form
(STVCRSS) which should be used for
Sophomore BCPM hours.
ACHR BCPMSRH Senior BPCM Hours
UPDATE ME - Update the Value column
to the value from the Applicant Course
Summary Type Validation Form
(STVCRSS) which should be used for
Senior BCPM hours.
ACHR CLEPH CLEP Hours
UPDATE ME - Update the Value column
to the value from the Applicant Course
Summary Type Validation Form
(STVCRSS) which should be used for
CLEP hours.
ACHR PFFH Pass/Fail Hours Failed
Hours
UPDATE ME - Update the Value column
to the value from the Applicant Course
Summary Type Validation Form
(STVCRSS) which should be used for
Pass/Fail Failed hours.
ACHR PFPH Pass/Fail Hours Passed
Hours
UPDATE ME - Update the Value column
to the value from the Applicant Course
Summary Type Validation Form
(STVCRSS) which should be used for
Pass/Fail Passed hours.
AGPA AOCG Graduate AO GPA
UPDATE ME - Update the Value column
to the value from the Applicant GPA Type
Validation Form (STVGPAT) which should
be used for Graduate AO grade point
averages.
AGPA AOCUG Cumulative UG AO GPA
UPDATE ME - Update the Value column
to the value from the Applicant GPA Type
Validation Form (STVGPAT) which should
be used for Cumulative Undergraduate
AO grade point averages.
AGPA AOF Freshman AO GPA
UPDATE ME - Update the Value column
to the value from the Applicant GPA Type
Validation Form (STVGPAT) which should
be used for Freshman AO grade point
averages.
Group
Code Rule Label Rule Description Delivered Value

832
Banner Student User Guide | Admissions
AGPA AOHS High School AO GPA
UPDATE ME - Update the Value column
to the value from the Applicant GPA Type
Validation Form (STVGPAT) which should
be used for High School AO grade point
averages.
AGPA AOJ Junior AO GPA
UPDATE ME - Update the Value column
to the value from the Applicant GPA Type
Validation Form (STVGPAT) which should
be used for Junior AO grade point
averages.
AGPA AOPBUG PBUG AO GPA
UPDATE ME - Update the Value column
to the value from the Applicant GPA Type
Validation Form (STVGPAT) which should
be used for Undergraduate
Postbaccalaureate AO averages.
AGPA AOS Sophomore AO GPA
UPDATE ME - Update the Value column
to the value from the Applicant GPA Type
Validation Form (STVGPAT) which should
be used for Sophomore AO grade point
averages.
AGPA AOSR Senior AO GPA
UPDATE ME - Update the Value column
to the value from the Applicant GPA Type
Validation Form (STVGPAT) which should
be used for Senior AO grade point
averages.
AGPA BCPMCUG Cumulative UG BCPM
GPA
UPDATE ME - Update the Value column
to the value from the Applicant GPA Type
Validation Form (STVGPAT) which should
be used for Cumulative Undergraduate
BCPM grade point averages.
AGPA BCPMF Freshman BCPM GPA
UPDATE ME - Update the Value column
to the value from the Applicant GPA Type
Validation Form (STVGPAT) which should
be used for Freshman BCPM grade point
averages.
AGPA BCPMG Graduate BCPM GPA
UPDATE ME - Update the Value column
to the value from the Applicant GPA Type
Validation Form (STVGPAT) which should
be used for Graduate BCPM grade point
averages.
Group
Code Rule Label Rule Description Delivered Value
833
Banner Student User Guide | Admissions
AGPA BCPMHS High School BCPM GPA
UPDATE ME - Update the Value column
to the value from the Applicant GPA Type
Validation Form (STVGPAT) which should
be used for High School BCPM grade
point averages.
AGPA BCPMJ Junior BPCM GPA
UPDATE ME - Update the Value column
to the value from the Applicant GPA Type
Validation Form (STVGPAT) which should
be used for Junior BCPM grade point
averages.
AGPA BCPMPBUG PBUG BCPM GPA
UPDATE ME - Update the Value column
to the value from the Applicant GPA Type
Validation Form (STVGPAT) which should
be used for Undergraduate
Postbaccalaureate BCPM grade point
averages.
AGPA BCPMS Sophomore BCPM GPA
UPDATE ME - Update the Value column
to the value from the Applicant GPA Type
Validation Form (STVGPAT) which should
be used for Sophomore BCPM grade
point averages.
AGPA BCPMSR Senior BPCM GPA
UPDATE ME - Update the Value column
to the value from the Applicant GPA Type
Validation Form (STVGPAT) which should
be used for Senior BCPM grade point
averages.
AGPA TOTCG Graduate Total GPA
UPDATE ME - Update the Value column
to the value from the Applicant GPA Type
Validation Form (STVGPAT) which should
be used for Total Graduate grade point
averages.
AGPA TOTCUG Cumulative UG Total GPA
UPDATE ME - Update the Value column
to the value from the Applicant GPA Type
Validation Form (STVGPAT) which should
be used for Total Cumulative
Undergraduate grade point averages.
AGPA TOTF Freshman Total GPA
UPDATE ME - Update the Value column
to the value from the Applicant GPA Type
Validation Form (STVGPAT) which should
be used for Total Freshman grade point
averages.
Group
Code Rule Label Rule Description Delivered Value
834
Banner Student User Guide | Admissions
AGPA TOTHS High School Total GPA
UPDATE ME - Update the Value column
to the value from the Applicant GPA Type
Validation Form (STVGPAT) which should
be used for Total High School grade point
averages.
AGPA TOTJ Junior Total GPA
UPDATE ME - Update the Value column
to the value from the Applicant GPA Type
Validation Form (STVGPAT) which should
be used for Total Junior grade point
averages.
AGPA TOTPBUG PBUG Total GPA
UPDATE ME - Update the Value column
to the value from the Applicant GPA Type
Validation Form (STVGPAT) which should
be used for Total Undergraduate
Postbaccalaureate grade point averages.
AGPA TOTS Sophomore Total GPA
UPDATE ME - Update the Value column
to the value from the Applicant GPA Type
Validation Form (STVGPAT) which should
be used for Total Sophomore grade point
averages.
AGPA TOTSR Senior Total GPA
UPDATE ME - Update the Value column
to the value from the Applicant GPA Type
Validation Form (STVGPAT) which should
be used for Total Senior grade point
averages.
PREL AMCASCHKLSTONLY Load items only on
SAACHKB
UPDATE ME - Update the Value column
to
Y or N to indicate if all checklist items
should be created (
N) or only those
specific to AMCAS (
Y).
If no designation is made, schools where
the person was also an undergraduate
(with test score records, prior college
records, and high school records, each
with an ADMR code) would have checklist
items created for those records, because
they are generated automatically.
Medical schools generally will only want to
consider those checklist items that pertain
specifically to their requirements.
Group
Code Rule Label Rule Description Delivered Value

835
Banner Student User Guide | Admissions
PREL AMCASCREATALTID Load Alternate ID to
SPRIDEN
UPDATE ME - Update the Value column
to
Y or N to indicate if the AMCAS ID
should be created as an alternate ID on
SPRIDEN.
This rule determines whether the AMCAS
ID should be loaded to SRTIDEN/
SPRIDEN as an alternate ID. The
SRTIDEN_NTYP_CODE is set to the
AMCASNTYP rule for the group ADMS.
This allows the AMCAS ID to be used as
part of search on the “IDEN” forms. If the
rule is
N, then the AMCAS ID will only be
stored on SABSUPL.
PREL AMCASFWAV AMCAS Fee Waiver
UPDATE ME - Update the Value column
to the value from the Application Fee
Waiver Reason Validation Form
(STVWAIV) which will update the
application fee waiver when the AMCAS
FEE_WAIVER
column is Y.
PREL AMCASHSGPACRSS Load High School GPA
Crse Hrs
UPDATE ME - Update the Value column
to
Y or N to load high school GPA and
course hour data to SOAGPAT/
SOACRSS for application number and
term.
If the
CREATEAPPL rule is N, the term
will be set to
999999 and the application
number to
0.
PREL AMCASNTYP AMCAS ID Type Code
UPDATE ME - Update the Value column
to the value from the Name Type
Validation Form (GTVNTYP) which will be
used as the name type when an alternate
ID is loaded based on the
AMCASCREATALTID rule being set to Y.
When the
AMCASCREATALTID rule is
set to
Y and an AMCAS ID is loaded to
SPRIDEN, the
AMCASNTYP will be
loaded with the ID.
Group
Code Rule Label Rule Description Delivered Value

836
Banner Student User Guide | Admissions
PREL CHKINACTIVEADDR Check Inactive Address
UPDATE ME - Update the Value column
to
Y or N to check inactive addresses for
matched records. When left as
UPDATE
ME
, the value of Y is used.
Used when incoming street address fields
are too long for SPRADDR and when an
address has been inactivated (not end
dated), and re-entered (Create Record/
Duplicate Record) with appropriate
abbreviations.
If the
CHKINACTIVEADDR rule is Y,
when the address is loaded the same way
as original, it is compared to the inactive
address, so a new address is not created.
For example: On an incoming file, street lines 1 and/or 2 are 40 characters long. The SPRADDR
street lines 1, 2, and 3 are 75 characters long. The 40 character lines are not truncated when loaded
to SPRADDR.
Access the Address window on SPAIDEN (SPRADDR), and view the address. Use a Duplicate
Record and create a new sequence number of the address for street line 1 and/ or 2 with appropriate
abbreviations. Return to the address that was loaded from the incoming file. Do not modify that
address, but set it as inactive. Save the changes.
When the
CHKINACTIVEADDR rule is Y, if the exact 40 character street lines come in again on the
data load, the process will look at the inactive address for comparison and not insert the address a
second time.
This functionality works in conjunction with the
NEWADDRESS, ADDSAMETYPE, and
ADDDIFFTYPE rules.
PREL DFLTRESDCODE Default Residency Code
UPDATE ME - Update the Value column
to the value from the Residence Code
Validation Form (STVRESD) which should
be used as the default residence code for
the applicant.
When the residence code is unclear on
the incoming file, this value will be used
for the applicant residency.
Group
Code Rule Label Rule Description Delivered Value

837
Banner Student User Guide | Admissions
PREL FORRESIDCODE Out of Country
Residence Code
UPDATE ME - Update the Value column
to the value from the Residence Code
Validation Form (STVRESD) which should
be assigned to applications determined to
be foreign residents. Residency will be
derived from the value supplied by the
applicant for state of legal residency.
When the AMCAS
LEGAL_STATE_
CODE
on the data load is Null, then this
value is loaded for the applicant.
If you do not want the AMCAS load process to attempt to derive an applicant's residency, you may set this
value to a valid value from STVRESD which indicates “residency needs to be determined”. If residency is not
an issue for your institution, the three residency rules may all be set to use the same value.
PREL HOMESTATPROV Institution’s Home State/
Prov
UPDATE ME - Update the Value column
to the value from the State/Province Code
Validation Form (STVSTAT) which
represents the Institution's Home State or
Province to determine the state of
residency for the applicant.
PREL INRESDICODE In State/Prov Residency
Code
UPDATE ME - Update the Value column
to the value from the Residence Code
Validation Form (STVRESD) which should
be assigned to applicants determined to
be in-state residents.
When the AMCAS LEGAL STATE CODE
is populated, and the
STAT_CODE
matches the
HOMESTATPROV value,
then this value is loaded for the applicant.
If you do not want the AMCAS load process to attempt to derive an applicant's residency, you may set this
value to a valid value from STVRESD which indicates “residency needs to be determined”. If residency is not
an issue for your institution, the three residency rules may all be set to use the same value.
PREL LOADPERCENTILES Load Percentiles on Test
Score
UPDATE ME - Update the Value column
to
Y or N to load SAT or GRE test score
percentiles to the SORTSPC table and
view them on the SOATEST form.
PREL MCATPREVAPPYR Update AMCAS App Yr
Fields
UPDATE ME - Update the Value column
to
Y or N to update previous AMCAS
application year fields on SOASUPL for
the term and application.
Group
Code Rule Label Rule Description Delivered Value

838
Banner Student User Guide | Admissions
PREL MCATUPDMATCHES Update Matched AMCAS
Records
UPDATE ME - Update the Value column
to
Y or N to update/insert data on matched
AMCAS records. The tables that can be
updated/inserted by this rule include
SABSUPL, SORCRSS, and SORGPAT.
When
MCATUPDMATCHES is Y, an
incoming AMCAS record matches the
Banner record, and a matched application
also exists for term, level, degree, college,
major, and department, missing data on
SABSUPL, SORCRSS, and SORGPAT
will be updated. Also, previously existing
Banner data on SABSUPL that is different
than incoming data (AMCAS ID, City of
Birth, Race, Admit Nation, etc.) will be
overwritten to retain the latest
supplemental information for that
applicant/matched application.
PREL OUTRESIDCODE Out of State/Prov Resid
Code
UPDATE ME - Update the Value column
to the value from the Residence Code
Validation Form (STVRESD) which should
be assigned to applications determined to
be from out-of-state residents.
When the AMCAS LEGAL STATE CODE
is populated, and the
STAT_CODE does
not match the
HOMESTATPROV value,
then this value is loaded for the applicant.
If you do not want the AMCAS load process to attempt to derive an applicant's residency, you may set this
value to a valid value from STVRESD which indicates “residency needs to be determined”. If residency is not
an issue for your institution, the three residency rules may all be set to use the same value.
Group
Code Rule Label Rule Description Delivered Value

839
Banner Student User Guide | Admissions
3. Five values reported by AMCAS will be loaded into user-defined flags displayed on
the Application Supplemental Information Form (SOASUPL). In order to reflect the
information which will be reported by AMCAS, update the descriptions for the five
flags on the Application User Defined Flags/Fields Form (SAAAUDF).
3.1. Disadvantaged data will be loaded to Flag 1, if supplied by AMCAS.
3.2. Military Service data will be loaded to Flag 2, if supplied by AMCAS.
3.3. Previous Matriculation in another medical school will be loaded to Flag 3, if
supplied by AMCAS.
PREL UNKNOWNPCOL2,
UNKNOWNPCOL3,
UNKNOWNPCOL4,
UNKNOWNPCOL5,
UNKNOWNPCOL6
Default Prior College
SBGI Code
UPDATE ME - Update the Value column
to the value from the Source/Background
Institution Code Validation Form
(STVSBGI) to load unknown colleges.
AMCAS files may report up to six different
prior colleges per applicant. When the
prior college value on the AMCAS file has
an SBGI code that does not convert on
SOTCNVT or validate directly from
STVSBGI, and the description does not
translate, then the colleges are
"unknown", and the codes assigned to
these
UNKNOWNCOL2 - 6 rules will be
loaded.
(The
UNKNOWNPCOL rule will apply to
AMCAS Prior College #1.
UNKNOWNPCOL% rules 2 through 6 are
used when the remainder of the SBGI
codes do not translate.)
PREL UNKNOWNPCOL7 Default Prior College
SBGI Code
UPDATE ME - This rule is currently not
used in Banner. Values must exist on
Source/Background Institution Code
Validation Form (STVSBGI).
PREL UPDATESSN Replace Banner SSN
with incoming
UPDATE ME - Update the Value column
to
Y or N to replace a populated Banner
SSN.
When set to
Y, if the incoming SSN does
not match the existing Banner SSN, and
the record has been matched, upon being
loaded to Banner, the incoming SSN will
overwrite the existing
SPBPERS_SSN.
When set to
N, the SSN is not updated if it
has changed.
Group
Code Rule Label Rule Description Delivered Value
840
Banner Student User Guide | Admissions
3.4. Institutional action (dismissal, suspension, etc.) by another institution will be
loaded to Flag 4, if supplied by AMCAS.
3.5. Felony data supplied will be loaded to Flag 5, if reported by AMCAS.
Note: For institutions using the AMCAS load process, these five flags
must be set to reflect the AMCAS values, and are in effect reserved for
these values. Institutions can make whatever use is appropriate of the
other five user-defined flags. Institutions that do not use the AMCAS load
process can use all ten user-defined flags as desired.
You have now completed all required set-up procedures and are ready to process your
first AMCAS application file.
AMCAS Application Load Processing and Reporting Procedures
After completing your set-up procedures, you are ready to begin processing AMCAS
admissions application files. AMCAS application processing uses the Banner baseline
data load processing to:
1. load application data to a set of temporary tables via SRTLOAD, and then view the
data using SRIPREL/SRAPREL,
2. match the data through SRRSRIN batch processing or manually on GOAMTCH,
3. load the data to the Banner permanent tables through SRRPREL batch processing or
manually on SRIPREL, and
4. allow the deletion of the temporary data using SRTPURG.
Banner Programs
The following is the list of programs used for the AMCAS application load process:
Program Description
srtload.pc
PRO*C program that loads data from a search file (PSAT or
PCU) or a test score report file (SAT, AMCAS) to temporary
tables.
srrsrin.pc
PRO*C program that determines a record’s match status and
will potentially loads records to Banner when comparing
temporary data in the Search Tape View (SRVPREL) to
Banner production data.
srrprel.pc
PRO*C program that creates or updates Banner data including
recruiting and/or admissions records based on information in
the temporary tables and rule settings on SOTCNVT and
SAAERUL.
srtpurg.pc
PRO*C program that delete records from the temporary tables.
841
Banner Student User Guide | Admissions
Banner Forms and Tables
The following temporary tables store data that can be viewed on SRIPREL/SRAPREL:
SRTIDEN, SRTPERS, SRTTELE, SRTADDR, SRTTEST, SRTPREL, SRTHSCH (not
applicable to AMCAS), SRTPCOL, SRTEMAL, SRTGPAT, SRTCRSS, SRTSUPL,
SRTPRAC, SRTDEGR, SRTMAJR, SRTTSPC (percentiles - not applicable to AMCAS).
The following is a list of the Banner tables that will be updated by the Electronic Load
Process (SRTLOAD) and the Banner forms on which the data can be viewed:
Table Description Processing Notes
SPRIDEN Identification Table Names and IDs will be loaded into SPRIDEN. SPRIDEN
records will be inserted whenever new and/or changed names
or IDs are reported. In the case of name or ID changes, the
current SPRIDEN record will be made inactive and a new,
current one inserted. SPRIDEN records are viewed on the
General Person Identification Form (SPAIDEN).
SPRADDR Address Repeating Table Address information will be loaded into SPRADDR, based
upon an address type supplied in the parameter for the
SRTLOAD process and rule values on SAAERUL. As new
addresses are received on subsequent data loads, the current
address of the same address type will be end-dated, and the
new address will be inserted. This will allow schools to keep a
record of addresses. It is still recommended that an “AMCAS
Address Type” be used for all AMCAS processing. Addresses
are viewed on the General Person Identification Form
(SPAIDEN).
SPRTELE Telephone Table Telephone numbers will be loaded into SPRADDR, based
upon a telephone type supplied in the parameter for the
SRTLOAD process and rule values on SAAERUL. Telephone
numbers will be loaded into SPRTELE. It is recommended that
an "AMCAS Telephone Type" be used for all AMCAS
processing. The telephone associated with an address can be
viewed on the General Person Identification Form (SPAIDEN),
and all telephone numbers can be viewed on the General
Person Telephone Form (SPATELE).
SPBPERS Basic Person Base Table Person biographic and demographic data will be loaded into
SPBPERS. Biographic/demographic data includes gender,
ethnicity, ethnic category, date of birth, and SSN. SPBPERS
records will be inserted when one does not already exist for a
person being processed. Where a record already exists, data
will be updated when the Banner value is currently Null, but
existing values will not be changed. Person data is viewed on
the General Person Form (SPAPERS).
842
Banner Student User Guide | Admissions
GORPRAC Race Table Race will be loaded to GORPRAC. Only unique race values for
a PIDM will be loaded. GORRACE records will be inserted
when one does not already exist for a person being processed.
When a record already exists, only unique incoming race
codes will be inserted, and existing values will not be changed.
Race data is viewed on the General Person Identification Form
(SPAIDEN).
GOBINTL Person International
Information Table
Visa information will be loaded into GOBINTL. When a visa
type is present in the information, the nation of birth, nation of
citizenship, and number of dependents (if present in the
AMCAS data) will also be loaded to GOBINTL. GOBINTL
records will be inserted when one does not already exist for a
person being processed. When a record does already exist,
data will be updated when the Banner value is currently Null,
but existing values will not be changed. International student
data is viewed on the International Information Form
(GOAINTL).
GOREMAL E-mail Address Table Email addresses will be loaded into GOREMAL, based upon
an email type code specified in the parameter for the
SRTLOAD process. Email addresses will always be
completely overwritten by the AMCAS load process.
Therefore, it is recommended that an "AMCAS E-mail Address
Type" be used for all AMCAS processing. Email addresses are
viewed on the E-mail Address Form (GOAEMAL).
SORCRSS Applicant Course Summary
Tab le
Course summary data will be loaded into SORCRSS, based
upon course summary types specified in the Electronic
Admissions Application Rules Form (SAAERUL) in the group
code
ACHR. Course summary records may be completely
overwritten by the AMCAS load process. Course summary
data are viewed on the Applicant Course Summaries Form
(SOACRSS).
SORGPAT Applicant GPA Types Table Grade point average data will be loaded into SORGPAT, based
upon grade point average types specified in the Electronic
Admissions Application Rules Form (SAAERUL) in the group
code
AGPA. Grade Point Average Type records may be
completely overwritten by the AMCAS load process. Grade
Point Average types are viewed on the Applicant GPA Types
Form (SOAGPAT).
SORTEST Student Test Score Repeating
Tab le
MCAT test data will be loaded into SORTEST, based upon the
hardcoded values MBS, MPS, MVR, and MWS. If these
hardcoded test scores need to be changed to different codes
for any reason, they can be converted on SOTCNVT. Test
records will never be overwritten or updated. Test data is
viewed on the Test Score Information Form (SOATEST).
Table Description Processing Notes

843
Banner Student User Guide | Admissions
SORPCOL Prior College Table Prior college data will be loaded into SORPCOL, based upon
school code conversions on SOTCNVT and rules on
SAAERUL. A prior college record will be inserted for a school if
one does not already exist, but prior college records will never
be updated. Prior college data is viewed on the Prior College
Form (SOAPCOL).
SORDEGR Prior College Degree Table Prior college attendance and degree data reported by AMCAS
will be loaded into SORDEGR, based upon degree code
conversion rules specified on SOTCNVT. Prior college
attendance and degree data may include degree pursued,
dates of attendance, date of degree, and prior college program
type. SORDEGR records will be inserted when one does not
already exist for a prior college and degree being processed.
Where a record does already exist, data will be updated when
the Banner value is currently Null, but existing values will not
be changed. Prior college data is viewed on the Prior College
Form (SOAPCOL).
SORMAJR Prior College Major
Repeating Table
Prior college majors will be loaded into SORMAJR, based
upon major code conversion rules specified on SOTCNVT. A
prior college major record will be inserted for a school/degree
combination if one does not already exist, but prior college
major records will never be updated. Prior college data is
viewed on the Prior College Form (SOAPCOL).
Table Description Processing Notes

844
Banner Student User Guide | Admissions
SARADAP Admissions Application
Repeating Table
Admissions applications will be loaded into SARADAP using a
variety of rules (SRTLOAD parameters, SOTCNVT rules,
SAAAERUL rules and/or SRAPRED defaults) for the values to
be inserted.
• Term code, level code, campus code, AMCAS degree code,
AMCAS major code, and department code are handled by
parameters for the SRTLOAD process.
• Residency will be derived from the AMCAS-reported state of
legal residence and rules in the labels
DFLTRESDCODE,
FORRESIDCODE, INRESIDCODE, and OUTRESIDCODE
for the group code PREL and the value for home state/
province in the label
HOMESTATPROV for the group code
PREL in the Electronic Admissions Application Rules Form
(SAAERUL).
• Admission type will be derived from the AMCAS-reported
early decision consideration field and values for admission
type on SOTCNVT for a conversion value of
ADMT.
• The AMCAS admission degree may also be converted on
SOTCNVT using the validation table name
DEGA for the
AMCAS value
APPL_TYPE. This conversion will override
the SRTLOAD value for AMCAS Degree Code parameter.
• Student type, which is a required field for all applications, will
need to be established on SRAPRED for the level code for
which you are running SRTLOAD. This will be the only option
for inserting the student type for AMCAS applications. Other
optional fields on SRAPRED may also be established, but
please note that these values are loaded last when no other
value has been established during processing.
Admissions applications will be inserted by SRTLOAD for new
records. Admissions applications will never be updated by
subsequent change processing. Admissions Applications are
viewed on the Admissions Application Form (SAAADMS).
SARCHKL Admissions Checklist
Repeating Table
Admissions checklist items will be loaded into SARCHKL,
using a variety of rules for the values to be inserted:
• An MCAT checklist item will be inserted based upon the
value on STVTESC. If scores are received, the “Received
Date” will be set to the date when the AMCAS data is loaded
into Banner, and the date the test was taken will be
populated in the Comment field. If a “Next MCAT Test Date”
is supplied, the next test date will be populated in the
Comment field.
• Checklist items can be viewed for the applicant on
SAAADMS.
Table Description Processing Notes

845
Banner Student User Guide | Admissions
Steps to be Followed in AMCAS Load Processing
Please refer to the “Data Load and Match Processing” and “Search and Test Score Data
Load” procedure sections in the "Recruiting" and "Admissions" chapters for more
information on data load processing using SRTLOAD and matching.
1. Retrieve the AMCAS application data file to be processed and place it in the
appropriate working directory using any name, but remembering the maximum length
of the path/filename is 30 characters.
2. Run the Electronic Prospect Load (SRTLOAD), which loads data from the AMCAS file
to the temporary tables.
SRTLOAD produces the report file
srtload.lis which indicates how many
records were loaded or potentially loaded if run in Audit Mode. Once SRTLOAD has
been run, carefully review the results for validation errors, conversion errors, etc., and
make necessary corrections in validation tables, on SOTCNVT, etc.
Note: Always run SRTLOAD in Audit Mode first to determine the values
that are missing in Banner. These values will need to be created in
Banner or converted on SOTCNVT (where appropriate) before running
SRTLOAD in update mode.
SABSUPL Application Supplemental
Information Base Table
A number of data elements will be inserted into SABSUPL
based upon a variety of translation and rules values, including
cross-reference values for nation codes, county codes, ethnic
codes, race codes, special consideration codes, and college
codes. In addition, five AMCAS values will be used for user-
defined flags 1 - 5:
• Disadvantaged data will be loaded to Flag 1, if supplied by
AMCAS.
• Military Service data will be loaded to Flag 2, if supplied by
AMCAS.
• Previous Matriculation in another medical school will be
loaded to Flag 3, if supplied by AMCAS.
• Institutional action (dismissal, suspension, etc.) by another
institution will be loaded to Flag 4, if supplied by AMCAS.
• Felony data supplied will be loaded to Flag 5, if reported by
AMCAS.
SABSUPL data can be viewed on SOASUPL.
SORCCOL Communication Plan
Collector Table
Two communication plan collector records will be inserted into
SORCCOL when a new application is inserted. SORCCOL
records allow an institution to assign a communication plan
and generate materials for applications created by the load
process. Communication plan collector records are viewed
and processed on the Communication Plan Collector Form
(SOACCOL). In order to process the records in SORCCOL,
you will need to run the Communication Plan Processing
Report (SORCPLN).
Table Description Processing Notes

846
Banner Student User Guide | Admissions
3. Run the Electronic Prospect Match (SRRSRIN) to match the incoming data and
update each record’s match status with a value of
M (matched), N (new), D (duplicate),
S (suspense), or E (error). This process uses the matching rules on GORCMRL for
the matching source code identified with the prospect code on STVPREL.
Note: You may also choose to run SRRSRIN with the Auto Load (Skip
Dup Chk) parameter set to
Y. In this mode, as records are flagged as
matched (
M) or new (N), they will also immediately be loaded to the
Banner production tables. Suspended (
S) records will still need to be
reviewed and resolved manually using SRIPREL/GOAMTCH.
Setting this parameter to
Y will prevent the flagging of duplicates (D)
(which means that there are multiple/duplicate records for the same
person on the incoming file). A SRRSRIN status of
D (duplicate) does not
indicate that the record is a duplicate in Banner. When the Auto Load
(Skip Dup Chk) parameter is set to
Y, the SRRPREL process does not
have to be run for the same electronic prospect code/tape ID.
4. Run the Migrate Electronic Prospects Process (SRRPREL). Based on rule settings,
this report will:
• automatically load new and matched records to Banner,
• create new search or test score records or update existing search or test score
records,
• create new recruiting records,
• create new application records,
• insert new source data into existing recruiting and admissions data,
• insert college, degree, and major data,
• insert various supplemental data,
• insert international data where applicable,
• insert email addresses, and
• insert GPA and course hour data.
5. Run the Electronic Prospect Purge (SRTPURG) to remove records from the
temporary tables based on the report parameter values, once you are finished with the
temporary data records.
6. Run the Communication Plan Process (SORCPLN) to assign communication plans
and generate materials for persons processed by the AMCAS load.
This step is optional but highly recommended.
If you do not run SORCPLN, communication plan assignment and material generation
will not take place, and the records inserted in the Communication Plan Collector
Table (SORCCOL) will not be processed. Note that SORCPLN processes all records
in the Communication Plan Collector Table, regardless of source, so existing records
other than those inserted by SRRPREL will also be processed.

847
Banner Student User Guide | Admissions
Common Matching for AMCAS Processing
SRRSRIN uses common matching for AMCAS processing, including matching on
variables for SSN, last name, AMCAS ID, and old last name. Matching will occur against
SRTSUPL_AMCAS_ID (if it is part of the GORCMRL rule) and
SRTIDEN_LAST_NAME_OLD (if it exists on the data load).
The insert to GOTCMME includes the ID. ID will be populated with the AMCAS ID and will
be used in the secondary match against the Banner ID, if it is part of the GORCMRL rule.
If SRRSRIN is not processing an AMCAS data load, the ID will be Null.
The insert to SOTCMME includes the
AMCAS_ID. The AMCAS_ID will be populated with
the AMCAS ID and will be used in secondary match if the
sakmtch.p_match_amcas_id procedure is called to match against the
SABSUPL_AMCAS_ID column for the matching rule. If SRRSRIN is not processing an
AMCAS data load, the ID will be Null.
When using the matching procedure for the AMCAS ID, SRRSRIN will most likely put a
record into suspense if an incoming AMCAS ID is different from the current Banner
AMCAS ID. This seldom happens but can occur. It is highly recommended that all
suspended records be reviewed very carefully, and especially when matching manually, to
resolve the suspension on GOAMTCH. You may consider matching records manually on
GOAMTCH with a matching rule that does not consist of the AMCAS ID but has an SSN
(or not since AMCAS does not require the AMCAS ID), the City/ZIP, Date of Birth, etc., to
prevent creating new records that are not truly new.
SRRSRIN will most likely put a record into suspense when an old last name exists that is
different from the current name. It is highly recommended that suspended records with an
old last name be viewed carefully on SRIPREL, and especially when matching, to resolve
the suspension on GOAMTCH. Records with an old last name will also appear on the
SRRSRIN report as “Former Last Name”. It is recommended that the SSN be used as part
of the matching rule on GOAMTCH to prevent the possible creation of duplicate IDs.
All data from the incoming file may be matched and loaded in a single step by SRRSRIN
when the Auto Load (Skip Dup Chk) parameter is set to
Y. Rules on SAAERUL are
checked, and rules on SRAPRED are applied appropriately. Running SRRSRIN with the
Auto Load (Skip Dup Chk) parameter set to
Y allows you to omit using SRRPREL in the
processing. This cuts down on the flagging of duplicate records on the incoming file.
As records are assigned a match status (
N, M), they are immediately loaded to Banner so
that if another record is found on the incoming data load that is a duplicate, it will be found
to be a match and will be loaded immediately. Otherwise, duplicate records on the
incoming file are marked
D and will need to be resolved manually on SRIPREL and/or
GOAMTCH.
When the Auto Load (Skip Dup Chk) parameter is set to
N, SRRSRIN will simply assign
the match status, the output file and records can be reviewed if necessary prior to being
loaded to Banner, and then SRRPREL can be run to move the records to Banner.
When data is loaded to Banner, the load hierarchy is as follows:
1. Values from SOTCNVT will be loaded first, if they exist.
2. Values from the SRTLOAD parameters will be loaded second, if they have been
entered.

848
Banner Student User Guide | Admissions
3. Values from STVINFC (contact type and/or source code) will be loaded third, if they
exist, and if valid parameter values do not exist on SRTLOAD.
4. Values from SRAPRED will be loaded fourth, if they exist.
Note: For AMCAS, the student type will always need to be updated on
SRAPRED for the level for which you are running SRTLOAD, in order for
the required student type value to be loaded for the applicant. If you load
AMCAS files without having a default student type on SRAPRED and
then access an application that was created without the required student
type, you may experience errors on the form and will need to insert the
student type at that time.
When records are matched through batch processing, SRTLOAD loads the address
source from the temporary tables to the SPRADDR table. SRRSRIN then calls SRKPREL
to push the address data, and therefore loads the
SRTADDR_ASRC_CODE value to the
SPRADDR_ASRC_CODE field.
When matching is performed manually using SRIPREL and GOAMTCH, SRIPREL saves
the prospect’s address to the GOTCMME table. GOAMTCH then creates the address for
the new person record from the GOTCMME table, including the
ASCR_CODE data.
AMCAS Report Detail
SRRSRIN provides matching data in its output, as well as a report of name changes.
When matches are found, columns are printed providing the current last name on the
incoming file, as well as the former last name that may be a match to the Banner last
name. This name information is helpful when resolving possible suspended records where
an old last name from a file matches the existing/current Banner last name.
For example, if you had an AMCAS applicant that was previously been loaded to Banner
with the name “Smith”, and the applicant exists on a new incoming file with a married
name of “Jordan”. “Smith” would be the old last name that may be matched to the
SPRIDEN_LAST_NAME, but “Jordan” is the current last name. Depending on how your
matching rules are set up, you may receive suspended records in this situation. It will be
important to review the SRRSRIN report output for records with former last names and
carefully match them on GOAMTCH.
Information for “bad” address data, such as foreign addresses, that does not meet Banner
requirements, can be identified on SRRPREL and SRIPREL using API processing. After
records are matched and receive a status of
M or N, if address data that is to be loaded is
found to be incomplete, the API errors will be trapped and presented to the user either
directly on SRIPREL (if they are performing a manual load), on SRRSRIN with the Auto
Load (Skip Dup Chk) parameter set to
Y (if they are bypassing SRRPREL), and finally on
SRRPREL. These records will not be loaded, and the match status will revert to
S.
Messages will be supplied to indicate the data issue that must be resolved, and then the
temporary data issues can be resolved, and records can be re-matched and re-loaded.
Information for applications added is produced by SRRSRIN. The report information is
provided when the Auto Load (Skip Dup Chk) parameter is set to
Y, (since the SRRPREL
process will be omitted when running SRRSRIN with the Auto Load (Skip Dup Chk)
parameter set to
Y). There is no option to not print this information on the reports. When

849
Banner Student User Guide | Admissions
the Auto Load (Skip Dup Chk) parameter is set to Y, if an application has been created for
the ID, then the ID, term, and application number will be printed on the report. In the
Record Count section at the bottom of the report, summary information is also printed for
all records that are loaded to Banner. This includes number of persons loaded, number of
prospects, loaded, and number of applicants loaded. This is helpful information for all data
load types.
Information for applications added is produced by SRRPREL. There is no option to not
print this information on the reports. If an application has been created for the ID, then the
ID, term, and application number will be printed on the report. The application number
data will indicate that an application has been created. In the Summary Section of the
report, summary information is also printed for all records that are loaded to Banner. This
includes number of persons loaded, number of prospects loaded, and number of
applicants loaded. This is helpful information for all data load types.
Data records on the report show that multiple types of records can be loaded from:
• SPAPERS - if no recruiting or applicant data is loaded,
• SPAPERS and SRBRECR - if person and recruiting data are loaded,
• SPAPERS and SARADAP - if no recruiting records are loaded,
• SPAPERS, SRBRECR, and SARADAP - if both recruiting and application records are
loaded.
When data has not changed in SPBPERS, GOBINTL, SORDEGR, etc., and data exists in
Banner, and the incoming AMCAS values are different, those differences are not reported.
All incoming data to Banner in these tables and all other production tables is not updated
when data in the file is different. However, the data is available for institutions to report
against as they choose. The incoming data remains stored in the temporary tables until it
is deleted by running SRTPURG. Once the matching process (SRRSRIN) has been run
against the incoming data and has been updated with a match status, and a Banner PIDM
assigned in the temporary table, any reporting requirements can be run against the
temporary tables and associated production data for processing assistance prior to data
loading.
2008 AMCAS File Format
A different file format is used for the 2007-2008 application year. As it may be necessary to
process 2007 application files well into the 2008 application year, Banner provides the
capability to process both 2007 and 2008 file formats.
The 2007 AMCAS file has 322 positions, and the 2008 AMCAS file has 328 positions. The
AMCS08 (AMCAS 2008 Test Score File) tape type is used on STVTAPE to handle the
number of fields in the 2008 AMCAS file. SRTLOAD will not run to completion when the
number of positions on SRATPFD does not match the incoming AMCAS file. An error is
displayed in the
.log file.
Here is a sample of the error received in the
.log file when SRTLOAD is run with the
2006-2007 AMCAS file (
AMCS tape type) versus the 2007-2008 AMCAS file (AMCS08
tape type).

850
Banner Student User Guide | Admissions
*ERROR* Check number of delimiters in file (row 1) or delimiter type
against SORDLIM.
srtload terminated with error
5 lines written to /export/home/lparrish/jobsub/srtload_181942.lis
Connected.
Connected.
Using the 2008 Tape Code
The AMCS08 tape code on STVTAPE is used for 2008 AMCAS reporting. Do the following
to use this code.
• Change the Tape Code value on STVPREL depending on which year is being
processed.
• Use the existing
AMCS code to process files from 2007 and earlier.
• Use the
AMCS08 code to process files from 2008.
• Verify that the interface code on STVPREL is appropriate for both the AMCS and
AMCS08 data load types.
The interface code on STVINFC incorporates the rules, test source, contact code,
source, and matching rules from SOTCNVT. If different rules are needed for the
AMCS08 code, the STVINFC rules can be changed accordingly at your institution for the
AMCS prospect code.
When the correct value is entered in the Electronic Prospect Code parameter when
SRTLOAD is run, and the correct value is entered in the Tape Code field on STVPREL,
the incoming AMCAS file (whether for 2007 and prior years or for 2008) should be
processed appropriately.
Additional Field Name Values, Flag Descriptions, and Fields
System-required Field Name values on STVTPFD for ADDL_MCAT_INTENT_IND,
MCAT_INTENT_DATE, MILITARY_DISCHARGE_IND,
MILITARY_HON_DISCHARGE_IND, and MISDEMEANOR_IND are used with 2008
reporting. These values are also used on SRATPFD.
Description values for Flag 6 (
Misdemeanor), Flag 7 (Military Discharge), and
Flag 8 (
Military Honorable Discharge) are used on SAAAUDF. These
descriptions can be added manually and should be reviewed, since the form is term
driven. SRTLOAD uses these flags to load the AMCAS 2007-2008 flags to the temporary
tables in Banner.
The system-required
AMCS08 Tape Code value on SORDLIM, with a delimiter ( | ), is also
used with this processing.
Note: No conversion changes are needed for 2008 for SOTCNVT. Users
should confirm that their STVINFC rules (that include SOTCNVT) will
function as needed when application year files for 2007 are processed
versus files for 2008.

851
Banner Student User Guide | Admissions
SRAPREL displays fields for Misdemeanor, Military Discharge, and Military Honorable
Discharge in the Supplemental Data window. These indicators are
Y/N fields which are
populated from the SRTSUPL temporary table.
AMCAS Field Notes
Here is additional information on specific fields.
• ADDL_MCAT_INTENT_IND
This field is a placeholder only and does not have any functionality associated with it.
• ADDL_MCAT_INTENT_DATE
AMCAS processing will read the date, load the value to the
SRTSUPL_NEXT_MCAT_DATE field, and push the data to SOASUPL.
For 2008, the
NEXT_MCAT_DATE will be Null. However, if there is no intent date value,
and there is a date, the process will attempt to load the next MCAT date.
• CBC_FELONY_IND
AMCAS processing will read this indicator, load the value to the SRTSUPL_FLAG_5
field, and push the data to SOASUPL.
• CBC_MISDEMEANOR_IND
SRTLOAD will read this indicator, load the value to the SRTSUPL_FLAG_6 field, and
push the data to SOASUPL.
• CBC_MILITARY_DISCHARGE_IND
SRTLOAD will read this indicator, load the value to the SRTSUPL_FLAG_7 field, and
push the data to SOASUPL.
• CBC_MILITARY_HON_DISCHARGE_IND
SRTLOAD will read this indicator, load the value to the SRTSUPL_FLAG_8 field, and
push the data to SOASUPL.
Setup Checklist
When the 2007-2008 regulatory changes are installed you should do the following:
1. Review all object changes.
2. Test the new processing in your environment.
3. Change the Tape Code value on STVPREL to either
AMCS or AMCS08, depending
on which application year is being processed.
4. Verify that the interface code on STVPREL is appropriate for both the
AMCS and
AMCS08 data load types.

852
Banner Student User Guide | Admissions
5. Verify that the rules on SAAAUDF are appropriate for your institution's environment,
since these values are term driven.
6. Review SAAAUDF to be sure the three new flag descriptions for
Misdemeanor,
Military Discharge, and Military Honorable Discharge have been
updated appropriately for your institution, since the form is term driven.
These flags will not be migrated to SOASUPL/SABSUPL if not they have not been
updated in SAAAUDF.
7. Confirm that STVINFC rules that include SOTCNVT will function as needed for 2007
application year files and 2008 application year files.
2010 AMCAS File Format
The FEE_WAIVER item uses valid values of NULL, 0, 1, or 2, instead of Y or N.
SRTLOAD processes a value of
Y or 1 in the same manner, so that FEE_WAIVER is set
to
Y/ON. Any other FEE_WAIVER value is processed as N/OFF.
2011 AMCAS File Format
AMCAS uses alpha scores, for test type codes MBS, MPS, MVR, and MWS. These scores
are delivered as alphanumeric and are reported against the same test codes as numeric
scores, as well as the same test date. The alpha score test date corresponds to the
numeric score that has been placed on hold, cancelled, or deleted. These alphanumeric
scores can be reported in advance of valid AMCAS numeric scores or following the valid
AMCAS numeric scores. Data is displayed on the report for incoming test scores that are
out or range or may have changed for the same test code taken on the same test date.
This data is informational only. You can decide how to use AMCAS alpha test scores at
your institution.
Please refer to the following:
• The test score range for numeric test scores for MBS, MPS, and MVR is 00 - 99.
• When an AMCAS alpha score of CD, DD, or HD is reported against MBS, MPS, or MVR,
the scores are considered invalid or out of range and are not loaded into the Banner
database.
Value Description
NULL No FAP application has been submitted.
0 An FAP application was submitted but was not approved.
1 An FAP application was submitted, was approved, and the approval was
applied to the submission of the AMCAS application.
2 An FAP application was submitted, was approved, but was not applied to
the submission of the AMCAS application.

853
Banner Student User Guide | Admissions
• The test score range for alpha numeric test scores for MWS is J-T, which describes the
valid range of scores.
• When an AMCAS alpha score of C, D, or H is reported against MWS, it is considered out
of range and is not loaded into the Banner database.
• SRRPREL does not load AMCAS test scores that are out of range. SRRPREL provides
summary information at the end of the file to include test scores reported by AMCAS
that are invalid and/or out of range. This allows institutions to review any incoming alpha
scores or other inconsistencies that have been reported, and they can be handled on a
case-by-case basis.
• SRRPREL also provides summary information at the end of the file regarding incoming
test scores reported for the same test code on the same date as scores that exist in
Banner, if the incoming test scores are different than the existing scores. These scores
are potentially loaded in to Banner based on the SAAERUL rule for
LOADOLDTESTS.
The incoming test score dates have date loaded into Banner that is one date later than
that of the existing test score, and the original test score and date remain unchanged.
You can use this information to review potentially changed scores.
The following situations can occur with regards to the new AMCAS alpha scores.
Scenario 1: The alpha scores may precede numeric scores of the same test code and test
type.
In this case, the alpha scores are considered to be out of range and are reported by
SRRPREL. Out of range scores are not loaded to Banner. You can review the output
from SRRPREL and choose how to manage this information on an individual basis.
You could create new, corresponding (different) test codes for these new alpha scores
on STVTESC and enter the alpha scores for reference. You could update admissions
comments or indicate in some other manner on the student's application that the
scores have been revoked by AMCAS. You can also reference the AMCAS Change
Report for test score changes. This scenario should be referenced on the report.
Scenario 2: The alpha scores may follow numeric scores of the same test code and test
type.
The alpha scores are not loaded into Banner, since they are considered to be out of
range and are reported by SRRPREL. Existing numeric test scores may have been
rendered invalid as of the reporting of the alpha scores for the same test code and test
date. You can refer to SRRPREL and can choose how to manage this information on
an individual basis. You could remove the invalid numeric test scores on SOATEST
(for the same test type and date as incoming alpha score), create new corresponding
test codes for the alpha scores on STVTESC, and enter the alpha scores on
SOATEST for reference. You could also update admissions comments or indicate in
some other manner on the student's application that the scores have been revoked.
You can reference the AMCAS Change Report for test score changes. This scenario
should be referenced on the report.
Scenario 3: Valid, in-range, numeric scores may follow alpha scores of the same test code
and test type.
In this case and under the above circumstances, numeric scores are probably loaded
into Banner with no errors, since there is no prior existing score for the incoming test
code and test date (depending on how or if institutions have chosen to update the new
alpha scores on SOATEST). If the numeric scores follow the alpha scores and your

854
Banner Student User Guide | Admissions
data loads are kept up sequentially by date, these scores take precedence over the
alpha scores previously reported that rendered the numeric test scores invalid. If you
had entered an alpha score on SOATEST with a different test code and the same test
date, when you look at the test scores remember that the numeric scores now
override the alpha scores. Upon review of SRRPREL, you may decide to remove the
alpha scores for the same test date. You can reference the AMCAS Change Report
for test score changes. This scenario should be referenced on the report.
SRRPREL does not overwrite existing scores on SOATEST. SRRPREL also does not load
scores that are out of range. AMCAS is reporting alpha scores for tests that may have
been previously received as valid numeric scores. Since Banner does not overwrite
existing scores, these incoming out of range scores should be reviewed and handled on
an individual basis. You can also refer to the AMCAS Change Report for additional
assistance.
Note: Alpha scores are rarely reported. Also, when records are matched
or manually loaded on SRIPREL, this score information will be bypassed.
Test information needs to be manually reviewed on SRAPREL for a visual
confirmation of invalid or out of range scores. Invalid or out of range
scores are loaded to the temporary tables but are not loaded or pushed
into Banner. You should consult the AMCAS Change Report for additional
information.
2015 AMCAS File Format
This section discusses updates to AMCAS MCAT test score regulatory reporting for
September 2015 - August 2016. Contact your AMCAS representative for detailed
information on reporting requirements.
Updates include:
• Test scores
• Tape load code
• Electronic prospect code
• Tape field names
• Test score percentile codes
• Test score controls
• File layout
• SAAERUL rule
Use of Layout Code versus Prospect Code
When the Electronic Prospect Load (SRTLOAD) is run for the current AMCAS layout, set
the Electronic Prospect Code parameter to
AMCS08. The value of AMCS08 is inserted
into the Prospect Code field on the Electronic Prospect Inquiry Form (SRIPREL).

855
Banner Student User Guide | Admissions
To run SRTLOAD for the updated AMCAS layout, set the Electronic Prospect Code
parameter to
AMCS15. The value of AMCS is inserted into the Prospect Code field on the
Electronic Prospect Inquiry Form (SRIPREL).
When running the Electronic Prospect Match (SRRSRIN), the Migrate Electronic
Prospects Process (SRRPREL), or the Electronic Prospect Purge (SRTPURG), set the
Electronic Prospect Code parameter to
AMCS.
Use of prospect codes on SRAPRED
AMCS15
If default values have been set up on SRAPRED for the AMCS electronic prospect code,
you need to define values for the
AMCS15 electronic prospect code.
When SRTLOAD is run for the AMCAS 2015-2016 test score cycle and
AMCS15 is
entered in the Electronic Prospect Code parameter, only default values defined on
SRAPRED for the
AMCS15 electronic prospect code will be used by the process.
Any existing default values for the
AMCS electronic prospect code will not be used, and
the process may load other default values from validation tables that you are not expecting
to be used.
AMCS
If default values have been set up on SRAPRED for the AMCS electronic prospect code,
and SRTLOAD is run for the AMCAS 2015-2016 test score cycle with
AMCS entered in the
Electronic Prospect Code parameter, the existing default values on SRAPRED will be
used by the process.
Use of 100th Percentile
The Test Score Information Form (SOATEST) allows the entry of values from 0 to 100 in
the Percentile field.
Test Scores
MCAT test scores and their corresponding high and low confidence bands have been
added to the AMCAS file layout and are delivered as seed data on the Test Code
Validation Form (STVTESC).
The codes include the following values:
• Chemical and Physical Foundations of Biological Systems
• Critical Analysis and Reasoning Skills
• Biological and Biochemical Foundations of Living Systems
• Psychological, Social, and Biological Foundations of Behavior
• Tota l Sc or e

856
Banner Student User Guide | Admissions
Note: In the table below, the Data Type of Y indicates the checkbox is
selected, and a numeric value is used.
Test
Code Description
Number
of
Positions
Data
Type
Minimum
Score
Maximum
Score
MCPB MCAT Chem Phys Found Biol
Sys
3N118132
MCAR MCAT Crit Analys Reas Skills 3 N 118 132
MBBF MCAT Biol Biochem
Foundations
3N118132
MPSB MCAT Psych Soc Bio
Foundations
3N118132
MTOT MCAT Total 3 N 472 528
MCPL MCAT CPFB Conf Band Low 3 N 118 132
MCPH MCAT CPFB Conf Band High 3 N 118 132
MCAH MCAT CARS Conf Band High 3 N 118 132
MCAL MCAT CARS Conf Band Low 3 N 118 132
MBBH MCAT BBFL Conf Band High 3 N 118 132
MBBL MCAT BBFL Conf Band Low 3 N 118 132
MPBL MCAT PSBB Conf Band High 3 N 118 132
MPBH MCAT PSBB Conf Band Low 3 N 118 132
MTOL MCAT Total Conf Band Low 3 N 472 528
MTOH MCAT Total Conf Band High 3 N 472 528
MPSH MCAT Phys Sci Conf Band
High
2 N 00 99
MPSL MCAT Phys Sci Conf Band
Low
2 N 00 99
MVRH MCAT Verbal Conf Band High 2 N 00 99
MVRL MCAT Verbal Conf Band Low 2 N 00 99
MBSH MCAT Biol Sci Conf Band
High
2 N 00 99
MBSL MCAT Biol Sci Conf Band
Low
2 N 00 99

857
Banner Student User Guide | Admissions
Tape Load Code
A tape load code for AMCAS 2015 reporting is delivered for use on the Electronic Data
File and Tape Validation Form (STVTAPE).
Electronic Prospect Code
An electronic prospect code for AMCAS 2015 reporting is delivered for use on the
Electronic Prospect Validation Form (STVPREL).
The Interface Code value for the
AMCS15 prospect code is delivered as Null. Make
sure to create an interface code for
AMCS on the Interface Validation Form (STVINFC)
that can be selected on STVPREL.
Data File Code
A data file/tape code for AMCAS 2015 reporting is delivered for use on the Tape File
Delimiter Type Rules Form (SORDLIM).
M91H MCAT Tot Pre-Jan2015 CB
High
2 N 00 45
M91L MCAT Tot Pre-Jan2015 CB
Low
2 N 00 45
Tape Code Description
AMCS15 AMCAS 2015 Test Score File
Prospect
Code Description
Interface
Code
Tape
Code
Enter on
WEB
WEB
Page ID
AMCS15 AMCAS15 Code =
No SUPL Data
Null AMCS15 No Null
Tape Code Description Delimiter Marker
System
Required
AMCS15 AMCAS 2015 Test
Score File
|N/AYes
Test
Code Description
Number
of
Positions
Data
Type
Minimum
Score
Maximum
Score

858
Banner Student User Guide | Admissions
Test Score Percentile Codes
Test score percentile codes are delivered for use with AMCAS MCAT reporting on the Test
Score Percentile Type Validation Form (STVTSPT).
Percentiles are reported in the AMCAS data file. SRTLOAD checks for percentile fields
containing the suffix _TPST for processing. For example, the test score code for the
MCAT test Biological and Biochemical Foundations of Living Systems is MBBF. The
corresponding test score field is MBBF_TEST_SCORE. The corresponding percentile
field is MBBF_TSPT. You can convert the test score codes and percentile codes to values
of your choice by mapping them on the Tape Code Conversion Form (SOTCNVT).
In addition, the high and low scores should be mapped to the corresponding test
percentile code. For example, on SOTCNVT the setup for high and low scores and
percentile values would be as follows for the Interface Type of
AMCAS and the Validation
Table Name of
TPST.
Code Description
System
Required
MBBF MCAT Per Rank BBFL Y
MBS MCAT Per Rank BS Y
MCAR MCAT Per Rank CARS Y
MCPB MCAT Per Rank CPBS Y
M91 MCAT Per Rank M91 Pre-Jan2015 Y
M91L MCAT Per Rank Pre-Jan2015 Y
MPS MCAT Per Rank PS Y
MPSB MCAT Per Rank PSBB Y
MTOT MCAT Per Rank TS Y
MVR MCAT Per Rank MVR Y
MWS MCAT Per Rank MWS Y
Table Name Tape Value
Conversion
Code Description
TSPT MBBH MBBF MCAT Per Rank BBFL
TSPT MBBL MBBF MCAT Per Rank BBFL

859
Banner Student User Guide | Admissions
Tape Field Names
Tape field names have been added to the Tape Field Names Validation Form (STVTPFD)
for the updated test score codes and percentiles. They are delivered as seed data.
Field Name Description
System
Required
NUM_MCATS_2015 Num MCAT Placehld Y
MVRH_TEST_SCORE MCAT1 Lo Conf Band VR Y
MVRL_TEST_SCORE MCAT1 Hi Conf Band VR Y
MVR_TSPT MCAT1 Percent Rank VR Y
MPSL_TEST_SCORE MCAT1 Lo Conf Band PS Y
MPSH_TEST_SCORE MCAT1 Hi Conf Band PS Y
MPS_TSPT MCAT1 Percent Rank PS Y
MBSL_TEST_SCORE MCAT1 Lo Conf Band BS Y
MBSH_TEST_SCORE MCAT1 Hi Conf Band BS Y
MBS_TSPT MCAT1 Percent Rank BS Y
MWS_TSPT MCAT1 Percent Rank W Y
MCPB_TEST_SCORE MCAT1 Chem Phy Bio Sys Score Y
MCPL_TEST_SCORE MCAT1 Lo Conf Band CPBS Y
MCPH_TEST_SCORE MCAT1 Hi Conf Band CPBS Y
MCPB_TSPT MCAT1 Per Rank CPBS Y
MCAR_TEST_SCORE MCAT1 Crit Analy Reason Skills Y
MCAL_TEST_SCORE MCAT1 Lo Conf Band CARS Y
MCAH_TEST_SCORE MCAT1 Hi Conf Band CARS Y
MCAR_TSPT MCAT1 Per Rank CARS Y
MBBF_TEST_SCORE MCAT1 Bio Biochem Found Score Y
MBBL_TEST_SCORE MCAT1 Lo Conf Band BBFL Y
MBBH_TEST_SCORE MCAT1 Hi Conf Band BBFL Y
MBBF_TSPT MCAT1 Per Rank BBFL Y
MPSB_TEST_SCORE MCAT1 Psy Soc Bio Found Score Y
MPBL_TEST_SCORE MCAT1 Lo Conf Band PSBB Y
MPBLH_TEST_SCORE MCAT1 Hi Conf Band PSBB Y

860
Banner Student User Guide | Admissions
Tape File Test Score Controls
Tape file test codes have been added to the Tape File Test Score Controls Form
(SRATPTS) for use with AMCAS MCAT reporting. They are delivered as seed data.
MPSR_TSPT MCAT1 Per Rank PSBB Y
MTOT_TEST_SCORE MCAT1 Total Score Y
MTOL_TEST_SCORE MCAT1 Lo Conf Band Total Y
MTOH_TEST_SCORE MCAT1 Hi Conf Band Total Y
MTOT_TSPT MCAT1 Per Rank TS Y
M91L_TEST_SCORE MCAT Tot Pre-Jan2015 CB Low Y
M91H_TEST_SCORE MCAT Tot Pre-Jan2015 CB High Y
M91_TSPT MCAT Per Rank Pre-Jan2015 Y
MCPB_TEST_DATE MCAT2 Test Date Y
MCAT1_MCAT_SCORE_2015_ID MCAT1 Score ID Placehld Y
MCAT2_MCAT_SCORE_2015_ID MCAT2 Score ID Placehld Y
Test Code Description
Test Code
Date Origin
System
Required
MCPB MCAT Chem Phys Found Biol Sys MCPB Y
MCAR MCAT Crit Analys Reas Skills MCPB Y
MBBF MCAT Biol Biochem Foundations MCPB Y
MPSB MCAT Psych Soc Bio Foundations MCPB Y
MTOT MCAT Total MCPB Y
M91H MCAT Tot Pre-Jan2015 CB High MBS Y
M91L MCAT Tot Pre-Jan2015 CB Low MBS Y
MCPL MCAT CPFB Conf Band Low MCPB Y
MCPH MCAT CPFB Conf Band High MCPB Y
MBBL MCAT BBFL Conf Band Low MCPB Y
MBBH MCAT BBFL Conf Band High MCPB Y
MPSH MCAT Phys Sci Conf Band High MBS Y
Field Name Description
System
Required

861
Banner Student User Guide | Admissions
AMCAS File Layout
Fields have been added to the file for use with AMCAS and MCAT in positions 329 to 399.
Not all the fields will be loaded for reporting, but they are accounted for in the seed data
delivered for the Tape Field Position Rule Form (SRATPFD). The majority of the fields in
the AMCAS file layout have changed position.
MPSL MCAT Phys Sci Conf Band Low MBS Y
Field Name
Sequence
Number Occurrence
SSN 1 1
SSN_OLD 2 1
AMCAS_ID 3 1
CYCLE_ADD 4 1
CHANGE_FLAG 5 1
CHANGE_NBR 6 1
APP_YEAR 7 1
CYCLE_CHANGE 8 1
EVALUATION 9 1
EARLY_DECISION 10 1
FEE_WAIVER 11 1
NAME_LAST 12 1
NAME_FIRST 13 1
NAME_MI 14 1
SUFFIX 15 1
NAME_LAST_OLD 16 1
PREF_ADDRESS 17 1
PREF_CITY 18 1
STAT_CODE 19 1
ZIP 20 1
PHONE_PREF 21 1
Test Code Description
Test Code
Date Origin
System
Required

862
Banner Student User Guide | Admissions
LEGAL_STATE 22 1
LEGAL_COUNTY_CODE 23 1
LEGAL_COUNTY_NAME 24 1
LEGAL_COUNTY_RURAL_IND 25 1
CITIZEN_NATN_CODE 26 1
CITIZEN_NATN_NAME 27 1
VISA 28 1
GENDER 29 1
BIRTH_DATE 30 1
BIRTH_STATE 31 1
BIRTH_CITY 32 1
BIRTH_COUNTY_COUNTRY_CODE 33 1
BIRTH_COUNTY_COUNTRY_NAME 34 1
BIRTH_COUNTY_RURAL_IND 35 1
AGE 36 1
NUMBER_OF_DEPENDENTS 37 1
RACE1 38 1
DISADVANTAGED_IND 39 1
MILITARY_SERVICE_IND 40 1
PREV_MATRIC 41 1
INSTITUTIONAL_ACTION 42 1
FELONY_PLACE_HOLDER 43 1
PCOL_SBGI_CODE 44 1
PCOL_NAME 45 1
PCOL_STAT_CODE 46 1
PCOL_PROGRAM 47 1
PCOL_YEARS_ATTEND 48 1
Note that the PCOL_YEARS_ATTEND field name is delivered in the seed
data script as PCOL_YEARS_ATTENDED. This can be manually corrected
at your institution.
PCOL_MAJR_CODE 49 1
Field Name
Sequence
Number Occurrence

863
Banner Student User Guide | Admissions
PCOL_MAJR_NAME 50 1
PCOL_DEGR_CODE 51 1
PCOL_GRAD_DATE 52 1
PCOL_SBGI_CODE 53 2
PCOL_NAME 54 2
PCOL_STAT_CODE 55 2
PCOL_PROGRAM 56 2
PCOL_YEARS_ATTENDED 57 2
PCOL_MAJR_CODE 58 2
PCOL_MAJR_NAME 59 2
PCOL_DEGR_CODE 60 2
PCOL_GRAD_DATE 61 2
PCOL_SBGI_CODE 62 3
PCOL_NAME 63 3
PCOL_STAT_CODE 64 3
PCOL_PROGRAM 65 3
PCOL_YEARS_ATTENDED 66 3
PCOL_MAJR_CODE 67 3
PCOL_MAJR_NAME 68 3
PCOL_DEGR_CODE 69 3
PCOL_GRAD_DATE 70 3
PCOL_SBGI_CODE 71 4
PCOL_NAME 72 4
PCOL_STAT_CODE 73 4
PCOL_PROGRAM 74 4
PCOL_YEARS_ATTENDED 75 4
PCOL_MAJR_CODE 76 4
PCOL_MAJR_NAME 77 4
PCOL_DEGR_CODE 78 4
PCOL_GRAD_DATE 79 4
Field Name
Sequence
Number Occurrence

864
Banner Student User Guide | Admissions
PCOL_SBGI_CODE 80 5
PCOL_NAME 81 5
PCOL_STAT_CODE 82 5
PCOL_PROGRAM 83 5
PCOL_YEARS_ATTENDED 84 5
PCOL_MAJR_CODE 85 5
PCOL_MAJR_NAME 86 5
PCOL_DEGR_CODE 87 5
PCOL_GRAD_DATE 88 5
PCOL_SBGI_CODE 89 6
PCOL_NAME 90 6
PCOL_STAT_CODE 91 6
PCOL_PROGRAM 92 6
PCOL_YEARS_ATTENDED 93 6
PCOL_MAJR_CODE 94 6
PCOL_MAJR_NAME 95 6
PCOL_DEGR_CODE 96 6
PCOL_GRAD_DATE 97 6
FR_BPCM_GPA 98 1
FR_AO_GPA 99 1
FR_TOTAL_GPA 100 1
SO_BCPM_GPA 101 1
SO_AO_GPA 102 1
SO_TOTAL_GPA 103 1
JR_BPCM_GPA 104 1
JR_AO_GPA 105 1
JR_TOTAL_GPA 106 1
SR_BPCM_GPA 107 1
SR_AO_GPA 108 1
SR_TOTAL_GPA 109 1
Field Name
Sequence
Number Occurrence

865
Banner Student User Guide | Admissions
PBUG_BPCM_GPA 110 1
PBUG_AO_GPA 111 1
PBUG_TOTAL_GPA 112 1
CUM_BPCM_GPA 113 1
CUM_AO_GPA 114 1
CUM_TOTAL_GPA 115 1
GRAD_BPCM_GPA 116 1
GRAD_AO_GPA 117 1
GRAD_TOTAL_GPA 118 1
FR_BCPM_HOURS 119 1
FR_AO_HOURS 120 1
SO_BCPM_HOURS 121 1
SO_AO_HOURS 122 1
JR_BCPM_HOURS 123 1
JR_AO_HOURS 124 1
SR_BCPM_HOURS 125 1
SR_AO_HOURS 126 1
PBUG_BCPM_HOURS 127 1
PBUG_AO_HOURS 128 1
CUM_BCPM_HOURS 129 1
CUM_AO_HOURS 130 1
GRAD_BCPM_HOURS 131 1
GRAD_AO_HOURS 132 1
PF_FAIL_HOURS 133 1
PF_PASS_HOURS 134 1
AP_HOURS 135 1
CLEP_HOURS 136 1
PLUS_MINUS_GRADES 137 1
NUM_MCATS 138 1
NEXT_MCAT_DATE 139 1
Field Name
Sequence
Number Occurrence

866
Banner Student User Guide | Admissions
MBS_TEST_DATE 140 1
MBS_TEFR_CODE 141 1
MVR_TEST_SCORE 142 1
MPS_TEST_SCORE 143 1
MWS_TEST_SCORE 144 1
MBS_UNUSED1 145 1
MBS_TEST_SCORE 146 1
MBS_WS_FORM_NUM 147 1
MBS_UNUSED2 148 1
MBS_MED_MAR_IND 149 1
MBS_TEAC_CODE 150 1
MBS_LITHOCODE 151 1
MBS_UNUSED3 152 1
MBS_TEST_DATE 153 2
MBS_TEFR_CODE 154 2
MVR_TEST_SCORE 155 2
MPS_TEST_SCORE 156 2
MWS_TEST_SCORE 157 2
MBS_UNUSED1 158 2
MBS_TEST_SCORE 159 2
MBS_WS_FORM_NUM 160 2
MBS_UNUSED2 161 2
MBS_MED_MAR_IND 162 2
MBS_TEAC_CODE 163 2
MBS_LITHOCODE 164 2
MBS_UNUSED3 165 2
ADVISOR_INFO_RELEASE 166 1
SCHOOL_STATE 167 1
SCHOOL_NUM 168 1
DATE_APPLIED 169 1
Field Name
Sequence
Number Occurrence

867
Banner Student User Guide | Admissions
PREV_APP1 170 1
PREV_APP2 171 1
PREV_APP3 172 1
PREV_APP4 173 1
ADM_ACTION_CODE 174 1
ADM_ACTION_DATE 175 1
MATRIC_DATE 176 1
EXP_GRAD_DATE 177 1
RACE2 178 1
RACE3 179 1
RACE4 180 1
RACE5 181 1
RACE6 182 1
RACE7 183 1
RACE8 184 1
RACE9 185 1
EMAIL_ADDR 186 1
SCHOOL_UNUSED 187 1
RACE10 188 1
ETHN_CODE 189 1
ETHN_CODE2 190 1
ETHN_CODE3 191 1
ETHN_CODE4 192 1
ETHN_CODE5 193 1
ETHN_CODE6 194 1
ETHN_CODE7 195 1
ETHN_CODE8 196 1
ETHN_CODE9 197 1
ETHN_CODE10 198 1
PCOL_MAJR_CODE2 199 1
Field Name
Sequence
Number Occurrence

868
Banner Student User Guide | Admissions
PCOL_MAJR_NAME2 200 1
PCOL_DEGR_CODE2 201 1
PCOL_GRAD_DATE2 202 1
PCOL_MAJR_CODE3 203 1
PCOL_MAJR_NAME3 204 1
PCOL_DEGR_CODE3 205 1
PCOL_GRAD_DATE3 206 1
PCOL_MAJR_CODE4 207 1
PCOL_MAJR_NAME4 208 1
PCOL_DEGR_CODE4 209 1
PCOL_GRAD_DATE4 210 1
PCOL_MAJR_CODE5 211 1
PCOL_MAJR_NAME5 212 1
PCOL_DEGR_CODE5 213 1
PCOL_GRAD_DATE5 214 1
PCOL_MAJR_CODE2 215 2
PCOL_MAJR_NAME2 216 2
PCOL_DEGR_CODE2 217 2
PCOL_GRAD_DATE2 218 2
PCOL_MAJR_CODE3 219 2
PCOL_MAJR_NAME3 220 2
PCOL_DEGR_CODE3 221 2
PCOL_GRAD_DATE3 222 2
PCOL_MAJR_CODE4 223 2
PCOL_MAJR_NAME4 224 2
PCOL_DEGR_CODE4 225 2
PCOL_GRAD_DATE4 226 2
PCOL_MAJR_CODE5 227 2
PCOL_MAJR_NAME5 228 2
PCOL_DEGR_CODE5 229 2
Field Name
Sequence
Number Occurrence

869
Banner Student User Guide | Admissions
PCOL_GRAD_DATE5 230 2
PCOL_MAJR_CODE2 231 3
PCOL_MAJR_NAME2 232 3
PCOL_DEGR_CODE2 233 3
PCOL_GRAD_DATE2 234 3
PCOL_MAJR_CODE3 235 3
PCOL_MAJR_NAME3 236 3
PCOL_DEGR_CODE3 237 3
PCOL_GRAD_DATE3 238 3
PCOL_MAJR_CODE4 239 3
PCOL_MAJR_NAME4 240 3
PCOL_DEGR_CODE4 241 3
PCOL_GRAD_DATE4 242 3
PCOL_MAJR_CODE5 243 3
PCOL_MAJR_NAME5 244 3
PCOL_DEGR_CODE5 245 3
PCOL_GRAD_DATE5 246 3
PCOL_MAJR_CODE2 247 4
PCOL_MAJR_NAME2 248 4
PCOL_DEGR_CODE2 249 4
PCOL_GRAD_DATE2 250 4
PCOL_MAJR_CODE3 251 4
PCOL_MAJR_NAME3 252 4
PCOL_DEGR_CODE3 253 4
PCOL_GRAD_DATE3 254 4
PCOL_MAJR_CODE4 255 4
PCOL_MAJR_NAME4 256 4
PCOL_DEGR_CODE4 257 4
PCOL_GRAD_DATE4 258 4
PCOL_MAJR_CODE5 259 4
Field Name
Sequence
Number Occurrence

870
Banner Student User Guide | Admissions
PCOL_MAJR_NAME5 260 4
PCOL_DEGR_CODE5 261 4
PCOL_GRAD_DATE5 262 4
PCOL_MAJR_CODE2 263 5
PCOL_MAJR_NAME2 264 5
PCOL_DEGR_CODE2 265 5
PCOL_GRAD_DATE2 266 5
PCOL_MAJR_CODE3 267 5
PCOL_MAJR_NAME3 268 5
PCOL_DEGR_CODE3 269 5
PCOL_GRAD_DATE3 270 5
PCOL_MAJR_CODE4 271 5
PCOL_MAJR_NAME4 272 5
PCOL_DEGR_CODE4 273 5
PCOL_GRAD_DATE4 274 5
PCOL_MAJR_CODE5 275 5
PCOL_MAJR_NAME5 276 5
PCOL_DEGR_CODE5 277 5
PCOL_GRAD_DATE5 278 5
PCOL_MAJR_CODE2 279 6
PCOL_MAJR_NAME2 280 6
PCOL_DEGR_CODE2 281 6
PCOL_GRAD_DATE2 282 6
PCOL_MAJR_CODE3 283 6
PCOL_MAJR_NAME3 284 6
PCOL_DEGR_CODE3 285 6
PCOL_GRAD_DATE3 286 6
PCOL_MAJR_CODE4 287 6
PCOL_MAJR_NAME4 288 6
PCOL_DEGR_CODE4 289 6
Field Name
Sequence
Number Occurrence

871
Banner Student User Guide | Admissions
PCOL_GRAD_DATE4 290 6
PCOL_MAJR_CODE5 291 6
PCOL_MAJR_NAME5 292 6
PCOL_DEGR_CODE5 293 6
PCOL_GRAD_DATE5 294 6
VERIFY_IND 295 1
EFFECTIVE_DATE 296 1
APPL_TYPE 297 1
BIO_NUMBER 298 1
HISP_IND 299 1
PCOL_SHORT_DESC 300 1
PCOL_SHORT_DESC 301 2
PCOL_SHORT_DESC 302 3
PCOL_SHORT_DESC 303 4
PCOL_SHORT_DESC 304 5
PCOL_SHORT_DESC 305 6
NATION_CODE 306 1
URM_IND 307 1
HSCH_BCMP_GPA 308 1
HSCH_AO_GPA 309 1
HSCH_GPA 310 1
HSCH_BCPM_HOURS 311 1
HSCH_AO_HOURS 312 1
HSCH_TOTAL_HOURS 313 1
STREET_LINE1 314 1
STREET_LINE2 315 1
CITY 316 1
PCOL_LONG_DESC 317 1
PCOL_LONG_DESC 318 2
PCOL_LONG_DESC 319 3
Field Name
Sequence
Number Occurrence

872
Banner Student User Guide | Admissions
PCOL_LONG_DESC 320 4
PCOL_LONG_DESC 321 5
PCOL_LONG_DESC 322 6
ADDL_MCAT_INTENT_IND 323 1
MCAT_INTENT_DATE 324 1
FELONY 325 1
MISDEMEANOR_IND 326 1
MILITARY_DISCHARGE_IND 327 1
MILITARY_HON_DISCHARGE_IND 328 1
NUM_MCATS_2015 329 1
MVRH_TEST_SCORE 330 1
MVRL_TEST_SCORE 331 1
MVR_TSPT 332 1
MPSL_TEST_SCORE 333 1
MPSH_TEST_SCORE 334 1
MPS_TSPT 335 1
MBSL_TEST_SCORE 336 1
MBSH_TEST_SCORE 337 1
MBS_TSPT 338 1
MWS_TSPT 339 1
M91L_TEST_SCORE 340 1
M91H_TEST_SCORE 341 1
M91L_TSPT 342 1
MCPB_TEST_SCORE 343 1
MCPL_TEST_SCORE 344 1
MCPH_TEST_SCORE 345 1
MCPB_TSPT 346 1
MCAR_TEST_SCORE 347 1
MCAL_TEST_SCORE 348 1
MCAH_TEST_SCORE 349 1
Field Name
Sequence
Number Occurrence

873
Banner Student User Guide | Admissions
MCAR_TSPT 350 1
MBBF_TEST_SCORE 351 1
MBBL_TEST_SCORE 352 1
MBBH_TEST_SCORE 353 1
MBBF_TSPT 354 1
MPSB_TEST_SCORE 355 1
MPBL_TEST_SCORE 356 1
MPBLH_TEST_SCORE 357 1
MPSB_TSPT 358 1
MTOT_TEST_SCORE 359 1
MTOL_TEST_SCORE 360 1
MTOH_TEST_SCORE 361 1
MTOT_TSPT 362 1
MVRH_TEST_SCORE 363 2
MVRL_TEST_SCORE 364 2
MVR_TSPT 365 2
MPSL_TEST_SCORE 366 2
MPSH_TEST_SCORE 367 2
MPS_TSPT 368 2
MBSL_TEST_SCORE 369 2
MBSH_TEST_SCORE 370 2
MBS_TSPT 371 2
MWS_TSPT 372 2
M91L_TEST_SCORE 373 2
M91H_TEST_SCORE 374 2
M91L_TSPT 375 2
MCPB_TEST_SCORE 376 2
MCPL_TEST_SCORE 377 2
MCPH_TEST_SCORE 378 2
MCPB_TSPT 379 2
Field Name
Sequence
Number Occurrence

874
Banner Student User Guide | Admissions
AMCAS Admissions Action File Creation
This sections discusses AMCAS file creation.
Overview
The AMCAS Extract File (SARAMXF) process allows medical schools to create a flat file
containing the data required by AMCAS as part of the AMCAS Admissions Action File.
This file can then be submitted electronically (via FTP) to AMCAS. The SAVAMC2 view is
used to create this flat file.
MCAR_TEST_SCORE 380 2
MCAL_TEST_SCORE 381 2
MCAH_TEST_SCORE 382 2
MCAR_TSPT 383 2
MBBF_TEST_SCORE 384 2
MBBL_TEST_SCORE 385 2
MBBH_TEST_SCORE 386 2
MBBF_TSPT 387 2
MPSB_TEST_SCORE 388 2
MPBL_TEST_SCORE 389 2
MPBLH_TEST_SCORE 390 2
MPSR_TSPT 391 2
MTOT_TEST_SCORE 392 2
MTOL_TEST_SCORE 393 2
MTOH_TEST_SCORE 394 2
MTOT_TSPT 395 2
MCPB_TEST_DATE 396 1
MCPB_TEST_DATE 397 2
MCAT1_MCAT_SCORE_2015_ID 398 1
MCAT2_MCAT_SCORE_2015_ID 399 1
Field Name
Sequence
Number Occurrence

875
Banner Student User Guide | Admissions
Three Banner Student Object:Access views (SAVAMCD, SAVAMCT, and SAVAMC2) are
used in AMCAS processing to allow medical schools access to the data they need to meet
their reporting requirements.
Flat File Process
The flat file is created in the required AMCAS format that contains the AMCAS admissions
actions for applicants. Additional information on the file format and guidelines appears
below in the section "Submitting Actions via FTP". Two parameters must be included as
entries on the Electronic Admissions Application Rules Form (SAAERUL), where the
group code is
ADMS for the rule label of AMCASSCHCODE (your school’s AAMC school
code) and the rule label of
AMCASSCHSTAT (your school’s state code).
Note: When processing an ID, the extract first checks the SPRIDEN_ID
field for the AMCAS ID, to ensure that the name type matches the
AMCASNTYP rule label on SAAERUL for group code of ADMS. If no value
is found, it then pulls the AMCAS ID from the
SABSUPL_AMCAS_ID
field on SABSUPL and stores it in the appropriate place in the outgoing
flat file.
In order for each medical school’s unique decision codes to be translated into acceptable
AMCAS codes, the EDI Cross-Reference Rules Form (SOAXREF) uses the Admission
Application Decision Code Validation Form (STVAPDC) codes as
XLBL_code.
The process reads all application records having the same level and term entered as input
parameters (i.e., not just the most recent application for that level/term). In addition, you
must indicate if you want to run the process in Audit or Update mode. If you choose Audit,
the process will create an extract report which details what records would be included in
the extract file if the process were run in Update mode. If the parameter is set to Update,
the extract report will be created as well as the extract file to be sent to AMCAS. In
addition, the
SABSUPL_AGENCY_REPORT_DATE field on the Application Supplemental
Information Form (SOASUPL) is updated with the system date to indicate that the record
has been processed. A separate purge process deletes the date entered into the
SABSUPL_AGENCY_REPORT_DATE field if the flat file needs to be recreated.
SARAMXF retrieves the most recent decision row for an applicant using the SAVAMC2
view. The date of this decision code record is verified as greater than or equal to the value
in the
SABSUPL_AGENCY_REPORT_DATE field on the Application Supplemental
Information Form (SOASUPL). If this is the case, the process continues. Otherwise, the
process goes to the next applicant/application. If the decision code
(
SAVAMC2_ADMIT_ACTION_CODE) equals the decision code on SOAXREF which has
a corresponding EDI value that matches the value in the
AMCASDELCODE rule on
SAAERUL (i.e.,
D), then the process finds the next most recent decision row for the
applicant where the decision code equals a decision code cross-referenced on SOAXREF,
where the value in the EDI Label field is
STVAPDC, and the value in the EDI Qualifier
field is
AN%.
This decision code is used to create the record to be sent in the AMCAS flat file. A value of
D is inserted into the DELROW field on the flat file to indicate that a prior row (which is
identical) should be removed. (The DELROW field is used to indicate that the prior action
sent for an applicant needs to either be corrected or deleted.) The value of the

876
Banner Student User Guide | Admissions
SABSUPL_AGENCY_REPORT_DATE field is updated with the system date. Additional
pipe delimiters are used as needed to handle the final four fields, which are
Null.
Be certain that a value exists on the EDI Verification Label Validation Form (STVXLBL) for
STVAPDC with a description of Application Decision Codes. If an institution has more than
one decision code that maps to one AMCAS code, the codes must be entered on
SOAXREF with an EDI qualifier code of
AN, AN1, AN2, etc., because SOAXREF will not
allow more than one mapping between EDI Value and Banner Value.
The process then creates a record in the flat file for each applicant that passes the above
tests. The guidelines for creating the flat file and the layout of each record are described
below.
Submitting Actions via FTP
Note: The following text and bullet points come from the AMCAS
Admissions Action File documentation.
Schools may submit admission actions via a text file posted to the school folder on the
AAMC FTP site. To ensure timely information on reports and adherence to traffic rules,
AMCAS recommends this be done daily; however, this may represent a hardship for some
schools, so weekly is acceptable. There will be a three to five business day turnaround for
actions submitted in this manner to be validated, loaded to the AMCAS database, and
available for reports. Please e-mail Client Services at schoolr[email protected]g when a new
file is available on the FTP site, as you do now. Client Services staff will contact medical
schools to resolve issues with invalid format or data for a submitted file. The guidelines
listed below should be followed:
• Submit new admission actions only. Files should include only those actions which have
occurred since the last reporting date.
• The file should be labeled with the code AA for admission action, the State Code,
Medical School Code, and date (YYYYMMDD) Example: AA-AK850-20020131.
• No blank lines should be included.
• Actions for only one entering class year should be included in a file.
• Files should be broken into three segments:
• One header segment (HDR) designating the number of admission action records
that are enclosed in the file.
• One or more admission action segments (ADM) designating the admission action.
• One trailer segment (END) verifying the number of action records enclosed in the
file.
• Each field within a segment must be separated by a pipe ( | ) delimiter, regardless of
whether the field is populated.

877
Banner Student User Guide | Admissions
HDR Segment
This table lists the layout of the HDR segment.
ADM Segment
This table lists the layout of the HDR segment.
Field Name Datatype Definition
HDR
CHAR(3)
REQUIRED
Record Count
NUMERIC
(7,0)
REQUIRED; count of all ADM segments in the file
Field Name Datatype Definition
ADM
CHAR(3)
REQUIRED
AAMD ID Number
NUMERIC(10)
REQUIRED; AAMC Identification Number
of the applicant; no leading zeros
Application Year
DATE
REQUIRED; YYYY; entering class year
School Code
CHAR(3
REQUIRED; three digit medical school
code
Social Security
Number
CHAR(9)
OPTIONAL; used for matching/quality
control purposes; no hyphens or spaces
Last Name
VARCHAR(55)
REQUIRED; legal last name
First Name
VARCHAR(55)
REQUIRED; legal first name
Middle Name
VARCHAR(55)
OPTIONAL; legal middle name
Action Code
CHAR(2)
REQUIRED; valid admission action code
Action Application
Type Code
CHAR(1)
REQUIRED for MA (matriculated),
OPTIONAL for AC (accepted), not
expected for all other actions; program
code to which applicant has been accepted
or will matriculate provided by the medical
school, based on
REF_APPL_TYPE and
REF_MED_APPL_TYPE
Campus Code
CHAR(2)
REQUIRED for MA (matriculated),
OPTIONAL for AC (accepted), not
expected for all other actions; campus to
which applicant has been accepted or will
matriculate provided by the medical school,
based on
REF_MED_CAMPUS

878
Banner Student User Guide | Admissions
END Segment
This table lists the layout of the END segment.
Log File
A log file (extract report) is created when the electronic submission process is run (in
either Audit or Update mode). One record will exist for each record that is written to the flat
file. The data to be displayed in the log file for each record is as follows:
In addition, a Report Control section exists at the end of the log file. The report control
section contains the following information:
• Process name
• Process release number
Matriculation Date
DATE
REQUIRED for MA (matriculated),
OPTIONAL for AC (accepted), not
expected for all other actions; MM/YYYY;
matriculation date provided by the medical
school
Projected Graduation
Date
DATE
REQUIRED for MA (matriculated),
OPTIONAL for AC (accepted), not
expected for all other actions; MM/YYYY;
projected or expected graduation date
provided by the medical school, default in
AWS client is
MATRICULATION_DATE
plus 4 years; must be greater than the
current calendar year
Timestamp
DATE
REQUIRED; MMDDYYYY HHMMSS; 24
hour clock (no AM/PM); the action effective
date
User ID
VARCHAR(14)
REQUIRED; the user name/ID associated
with the action; can be a default value
established by the medical school
Field Name Datatype Definition
END
CHAR(3)
REQUIRED
Record Count
NUMERIC
(7,0)
REQUIRED; count of all ADM segments in
the file
ID Name Application #
School’s
Decision Code
Decision
Description
Decision
Date
Field Name Datatype Definition

879
Banner Student User Guide | Admissions
• Date of log file
• Term parameter
• Level parameter
• Audit/Update parameter
• Matriculation Date parameter
• Expected Graduation Date parameter
• Number of records matching the term and level
• Number of records created on the AAMCTRAN file
AMCAS Extract File Process (SARAMXF)
Use this process to create a flat file of data to be electronically submitted to AMCAS. The
AMCAS ID is placed in the flat file when the extract is run. When processing an ID, the
extract first checks the
SPRIDEN_ID field for the AMCAS ID, to ensure that the name
type matches the
AMCASNTYP rule label on SAAERUL for group code of ADMS. If no
value is found, it then pulls the AMCAS ID from the
SABSUPL_AMCAS_ID field on
SABSUPL for the most recent application and stores it in the appropriate place in the
outgoing flat file.
The AMCAS ID is placed in the flat file when the extract is run. The process will first look at
the
SPRIDEN_ID field for the AMCAS ID, ensuring that the name type code matches the
AMCASNTYP value on SAAERUL. If no value is found in SPRIDEN, the process will then
select the AMCAS ID from the
SABSUPL_AMCAS_ID field on SABSUPL for the most
recent application and store it in the appropriate place in the outgoing flat file.
The School Code that has been assigned to your institution by AMCAS needs be entered
on the Electronic Admissions Application Rules Form (SAAERUL), with a group code of
ADMS and a rule label of AMCASSCHCODE, before you run this process.
The State Code that has been assigned to your institution by AMCAS needs be entered on
the Electronic Admissions Application Rules Form (SAAERUL), with a group code of
ADMS and a rule label of AMCASSCHSTAT, before you run this process.
When processing an ID, the extract first checks the
SPRIDEN_ID field for the AMCAS
ID, to ensure that the name type matches the
AMCASNTYP rule label on SAAERUL for
group code of
ADMS. If no value is found, it then pulls the AMCAS ID from the
SABSUPL_AMCAS_ID field on SABSUPL and stores it in the appropriate place in the
outgoing flat file.
AMCAS Date Purge (SARAMDP)
This process is used if the institution has run the electronic submission process for a
group of applicants (and created the flat file) but then realizes that one or more of the
decision codes must be changed. In order to recreate the flat file with all the same
applicants as for the previous run, you must run the purge process to delete the

880
Banner Student User Guide | Admissions
SABSUPL_AGENCY_REPORT_DATE from all SABSUPL records (date in the Last
Agency Report Date field on the Application Supplemental Information Form
(SOASUPL)) matching the IDs entered on the first run. This process may be run from
either job submission or the host.
This process deletes the
SABSUPL_AGENCY_REPORT_DATE from all records having a
term and level equal to the input parameter and an existing
SABSUPL_AGENCY_REPORT_DATE equal to the Last Electronic Submission Date
parameter.
The audit report itemizes the following fields for all applications that have had their
SABSUPL_AGENCY_REPORT_DATE deleted:
• ID
• Name
• Ter m
• Level
• Application #
• The date that was deleted (i.e., the value in SABSUPL_AGENCY_REPORT_DATE)
AMCAS Views
Three Banner views are used in this process: SAVAMCD, SAVAMCT, and SAVAMC2.
They require that a value exist on the Crosswalk Validation Form (GTVSDAX) for the
internal code of
AMCASADDR. This value is used to determine the priority of address type
and phone type. File
safamcs.sql contains some of the functions used to create the
AMCAS views.
Note: There are also some additional data elements (next MCAT test
date and waiver information, which are also captured on SABSUPL) that
are sent by AMCAS and stored in SARCHKL that are not part of the
following views.
SAVAMCD View
This view represents all of the demographic and prior college data submitted in an
AMCAS file to an institution and loaded into Banner.
The following tables and individual data elements are accessed by this view:
SPRIDEN Identification Table
SPRIDEN_ID
Previous ID – uses function f_get_spriden_prev
SPRIDEN_LAST_NAME
SPRIDEN_FIRST_NAME

881
Banner Student User Guide | Admissions
SPRIDEN_MI
Previous Last Name – uses function f_get_spriden_prev
SPRADDR Address Repeating Table
Uses function f_get_address_rowid
Must have GTVSDAX set up with code ‘AMCASADDR’
SPRADDR_STREET_LINE_1
SPRADDR_CITY
SPRADDR_STAT_CODE
SPRADDR_ZIP
SPRTELE Telephone Repeating Table
Use f_get_address_telephone_rowid (uses GTVSDAX)
Uses function f_get_address_telephone_rowid
Must have GTVSDAX set up with code ‘AMCASADDR’
SPRTELE_PHONE_AREA
SPRTELE_PHONE_NUMBER
SPBPERS Basic Person Base Table
SPBPERS_SSN
SPBPERS_NAME_SUFFIX
SPBPERS_SEX
SPBPERS_BIRTH_DATE
Age – uses function f_calculate_age
GORVISA Visa Information Table
GORVISA_VTYP_CODE
Description of Visa Type
GOREMAL E-mail Address Table
Checks GOREMAL_STATUS_IND = ‘A’ and GOREMAL_PREFERRED_IND =’Y’
GOREMAL_EMAIL_ADDRESS
GOREMAL_DISP_WEB_IND
SORDEGR Prior College Degree Table
AMCAS provides data for 6 prior colleges (PRIM, OTH1, OTH2, OTH3, OTH4,
OTH5)
Uses function f_get_sordegr_rowid
SORDEGR_SBGI_CODE
Prior college state code – uses function f_get_sobsbgi_stat
SORDEGR_EGOL_CODE
SORDEGR_ATTEND_FROM
SORDEGR_ATTEND_TO
SORDEGR_DEGC_CODE

882
Banner Student User Guide | Admissions
SORDEGR_DEGC_DATE
SORDEGR_PRIMARY_IND
SORMAJR Prior College Major Repeating Table
Uses function f_get_sormajr_majr
SORMAJR_MAJR_CODE_MAJOR
Major Description
SARADAP Admissions Application Repeating Table
SARADAP_PIDM
SARADAP_TERM_CODE_ENTRY
SARADAP_STYP_CODE
SARADAP_CAMP_CODE
SARADAP_PROGRAM_1
SARADAP_COLL_CODE_1
SARADAP_LEVL_CODE
SARADAP_DEGC_CODE_1
SARADAP_MAJR_CODE_1
SARADAP_ADMT_CODE (for Early Decision)
SARADAP_APPL_DATE
SABSUPL Application Supplemental Information Base Table
SABSUPL_AGENCY_FILE_NO
SABSUPL_CYCLE_ADDED
SABSUPL_APP_YEAR_AGENCY
SABSUPL_CYCLE_CHANGED
SABSUPL_FLAG5 (Eval)
SABSUPL_AGENCY_FEE_WAIVED
SABSUPL_STAT_CODE_ADMIT
SABSUPL_CNTY_CODE_ADMIT
County description – uses function f_get_desc_fnc
SABSUPL_CNTY_ADMIT_RURAL
SABSUPL_NATN_CODE_ADMIT
Nation description – uses function f_get_desc_fnc
SABSUPL_STAT_CODE_BIRTH
SABSUPL_CITY_BIRTH
SABSUPL_CNTY_CODE_BIRTH
County description – uses function f_get_desc_fnc
SABSUPL_CNTY_BIRTH_RURAL
SABSUPL_NATN_CODE_BIRTH
Nation description – uses function f_get_desc_fnc
SABSUPL_NUMBER_DEPS
SABSUPL_ETHN_CODE_SELF
Ethnic code description – uses f_get_desc_fnc
SABSUPL_ESEL_CODE (minority app)

883
Banner Student User Guide | Admissions
SABSUPL_FLAG1 (military service)
SABSUPL_FLAG2 (prev med student)
SABSUPL_FLAG3 (disciplinary action)
SABSUPL_FLAG4 (adv_info_release)
SABSUPL_PREV_APP_1
SABSUPL_PREV_APP_2
SABSUPL_PREV_APP_3
SABSUPL_PREV_APP_4
SAVAMCT View
This view represents all of the MCAT test score, course hours, and GPA data submitted in
an AMCAS file to an institution and loaded into Banner. There are multiple rows for each
person for each application - one row for each test score, course hour, or GPA.
The following tables and data elements are accessed by this view.
SPRIDEN Identification Table
SPRIDEN_ID
Previous ID – uses function f_get_spriden_prev
SPRIDEN_LAST_NAME
SPRIDEN_FIRST_NAME
SPRIDEN_MI
Previous Last Name – uses function f_get_spriden_prev
SARADAP Admissions Application Table
SARADAP_PIDM
SARADAP_TERM_CODE_ENTRY
SARADAP_STYP_CODE
SARADAP_CAMP_CODE
SARADAP_PROGRAM_1
SARADAP_COLL_CODE_1
SARADAP_LEVL_CODE
SARADAP_DEGC_CODE_1
SARADAP_MAJR_CODE_1
SARADAP_ADMT_CODE (for Early Decision)
SARADAP_APPL_DATE
SARERUL Electronic Admissions Application Rules Table
SARERUL_EGRP_CODE
SARERUL_DESC
SARERUL_VALUE

884
Banner Student User Guide | Admissions
STVEGRP EDI Rule Group Validation Table
STVEGRP_CODE
STVEGRP_DESC
SORTEST Test Score Table
Uses SARERUL_EGRP_CODE = ‘ATST’
Group code and description
SORTEST_TESC_CODE
Test code description
SORTEST_TEST_SCORE
SORTEST_TEST_DATE
SORTEST_TEFR_CODE
SORTEST_TEIN_CODE
SORTEST_RELEASE_IND
SORTEST_TEAC_CODE
SORTEST_INSTR_ID
SORCRSS Person Course Summary Types Table
Uses SARERUL_EGRP_CODE = ‘ACHR’
Group code and description
SORCRSS_CRSS_CODE
Course code description
SORCRSS_HOURS
SORCRSS_SBGI_CODE = ‘999999’
SORGPAT Person GPA Types Table
Uses SARERUL_EGRP_CODE = ‘AGPA’
Group code and description
SORGPAT_GPAT_CODE
GPA code description
SORGPAT_GPA
SORGPAT_PLUS_MINUS_IND
SORGPAT_SBGI_CODE = ‘999999’
SAVAMC2 View
This view contains all the data that must be returned to AMCAS as past of the Admissions
Action File and is used by the AMCAS Extract File Process (SARAMXF).
The following tables and fields are accessed by this view.
SPRIDEN Identification Table
SPRIDEN_PIDM
SPRIDEN_ID

885
Banner Student User Guide | Admissions
SPRIDEN_LAST_NAME
SPRIDEN_FIRST_NAME
SPRIDEN_MI
Name code for AMCAS file - uses function f_get_name_code
SARADAP Admissions Application Table
SARADAP_TERM_CODE_ENTRY
SARADAP_LEVL_CODE
SARADAP_APPL_NO
SARAPPD Application Decision Table
SARAPPD_APDC_DATE
SARAPPD_APDC_CODE – translated via SORXREF
SARAPPD_SEQ_NO
SABSUPL Admissions Supplemental Data Table
SABSUPL_AGENCY_REPORT_DATE
SABSUPL_AMCAS_ID
SORXREF Cross-reference Rules Table
SORXREF_EDI_VALUE
SORXREF_EDI_QLFR (like ‘AMCAS%’)
SORXREF_XLBL_XODE (= ‘STVAPDC’)
Selective Admissions - Communication Load and
Removal
This section discusses selective admissions and communication load.
Overview
The Communication Load Process (SURLOAD) is used to insert records into GURMAIL
using a flat file of PIDMS as input. The process inserts a record with a minimum of PIDM,
System Indicator, and Activity Date.
The process also provides you with the option of inserting additional data elements into
the GURMAIL record via the input parameters (i.e., Letter Code, Material Code, Initials,
etc.). In addition, the Communication Removal Process (SURDELT) is used to purge
records from GURMAIL based on certain input parameters.
SURLOAD allows schools to track any mailings to students that take place outside the
realm of communication plan processing and/or letter generation, using the Student Mail
Form (SUAMAIL).

886
Banner Student User Guide | Admissions
Communication Load Process (SURLOAD)
This process takes a flat file of PIDMS as input, from which it inserts new records into the
GURMAIL table. This process can be run from either job submission (GJAPCTL) or the
host.
The process first determines whether any of the PIDMS in the input file are invalid Banner
PIDMS (i.e., they don’t exist in SPRIDEN). If a PIDM does not currently exist in Banner,
that record is bypassed and noted in the audit log file. The PIDM, System Indicator (i.e.,
S
= Banner Student,
H = Banner Human Resources, R = Banner Financial Aid, etc.), and
Activity Date (the date the file of PIDMs is loaded into GURMAIL) are all required. In
addition, the process sets the User field on GURMAIL to
SURLOAD for all records loaded
via this process.
The
GURMAIL_DATE_INIT is automatically set to the GURMAIL_ACTIVITY_DATE,
indicating the day the record is inserted into GURMAIL. The
GURMAIL_INIT_DATE will
not change from this point forward, while the
GURMAIL_ACTIVITY_DATE may change
if the record is updated.
Use Parameter Definition Form (GJAPDEF) to change any of the optional SURLOAD
parameters to required parameters at your institution. The SURLOAD process also
checks to ensure that duplicate rule processing is followed if a record with the same
material and/or letter code is already found in GURMAIL for the same PIDM.
Log File
A log file is created that identifies each record loaded into GURMAIL, as well as indicating
those records which were not loaded and why (no PIDM exists in Banner, duplicate letter,
etc.). The log file also includes a count of how many records were actually loaded into
GURMAIL. In addition, the log file displays all of the input parameters to the SURLOAD
process as well as the system date. The following fields will be displayed for each record
in the log file:
• ID
• Name
• System Indicator
• Comment (indicating why a record hasn’t been loaded into GURMAIL)
Communication Removal Process (SURDELT)
This process allows for the mass delete of SUAMAIL records. This process may be run
from either job submission (GJAPCTL) or from the host.
The input parameters for the delete process are similar to those used by the SURLOAD
process, except that the purge process also allows for the deletion of SUAMAIL records
that were not created by the SURLOAD process (i.e., user is not equal to SURLOAD).

887
Banner Student User Guide | Admissions
Log File
A log file is created which identifies all records deleted by the purge process. The log file
contains the following fields:
• ID
• Name
• System Indicator
• Value of all parameters entered
Selective Admissions - Secondary School Tracking
This section discusses selective admissions and secondary schools.
Overview
Secondary school tracking allows institutions to summarize data by high school or prior
college for the following groups of people:
• Prospect – must have an SRBRECR record.
• Applicant – must have a SARADAP record.
• Accepted Applicant – must have a SARAPPD record with a decision code having the
Significant Decision and Institution Acceptance flags checked.
• Confirmed – must have a SARAPPD record with a decision code having the Significant
Decision and Applicant Acceptance flags checked.
Secondary school tracking allows institutions to quickly assess their success rate over
time at various high schools and colleges from which they receive prospects and
applicants. They can then use this information for a variety of purposes, including setting
travel schedules for the following years, planning special visits to certain high schools or
colleges to increase yield, etc.
• The Source/Background Institution Summary View (SOVSBGI) is used to calculate the
summary data for each high school as a person moves from prospect, applicant, and
accepted applicant to confirmed applicant. This process includes any person loaded via
any data load or Web load process.
• The Prior College Summary View (SOVPSCM) is used to calculate the summary data
for each college as a person moves from prospect, applicant, and accepted applicant to
confirmed applicant. This process includes any person loaded via any data load or Web
load process.
• The Source/Background Institution Summary Form (SOASBSM) is used to display the
high school summary information calculated by the view for a specific source/
background institution (STVSBGI) code, term, level, campus, college, program, major,
and student type for as many years of data as exist in Banner.

888
Banner Student User Guide | Admissions
• The Prior College Enrollment Summary Form (SOAPCSM) is used to display the prior
college summary information calculated by the view for a specific source/background
institution (STVSBGI) code, term, level, campus, college, program, major, and student
type for as many years of data as exist in Banner.
• The Source/Background Summary Report (SORSBSM) is used to collect high school
summary information like what is displayed on SOASBSM.
• The Prior College Summary Report (SORPCSM) is used to collect prior college
summary information like what is displayed on SOAPCSM.
Source/Background Institution Summary Form (SOASBSM)
This form is used to call a view that generates the high school data to be displayed. The
view calculates the percentages for the appropriate fields. The form is entered in query
mode.
The Key Block contains a source/background institution code, which is required.
The Source/Background Institution Summary Block contains the summary information for
the institution in the key, such as a term code, a level code, a campus code, a college
code, a program code, a major code, and a student type code, which are optional. The
fields in this block are queryable.
If the term code is left blank, then the form displays all pertinent data for the source/
background institution code in the key for all available terms beginning with the most
current term. If the term code is entered, the form displays all pertinent information for that
term only.
At the bottom of the window, the totals for the query are listed by number of prospects,
number of applicants, number of applicants accepted, and number of student
confirmations.
Prior College Enrollment Summary Form (SOAPCSM)
This form calls a view that generates the prior college data to be displayed. The view
calculates the percentages for the appropriate fields. The form is entered in query mode.
The Key Block contains a source/background institution code, which is required.
The Source/Background Institution Summary Block contains the summary information for
the institution in the key, such as a term code, a level code, a campus code, a college
code, a program code, a major code, and a student type code, which are optional. The
fields in this block are queryable.
If the term code is left blank, then the form displays all pertinent data for the source/
background institution code in the key for all available terms beginning with the most
current term. If the term code is entered, the form displays all pertinent information for that
term only.
At the bottom of the window, the totals for the query are listed by number of prospects,
number of applicants, number of applicants accepted, and number of student
confirmations.

889
Banner Student User Guide | Admissions
Source/Background Summary Report (SORSBSM)
Use this report to collect high school information similar to what is found on the Source/
Background Institution Summary Form (SOASBSM).
Prior College Summary Report (SORPCSM)
Use this report to collect prior college summary information similar to what is found on the
Prior College Enrollment Summary Form (SOAPCSM).
Source/Background Institution Summary View (SOVSBGI)
This view is run every time the Source/Background Institution Summary Form
(SOASBSM) is accessed. The view uses the source/background institution code value in
the Key Block of SOASBSM to select its high school records. The Source or Background
Institution field is required.
The view collects the following values for either all terms (if the Term field is blank) or for
the term indicated and all prior terms:
• Class Size
The number of seniors, obtained from
SORBDMO_NO_OF_SENIORS on SOABGIY if
available for the correct year.
Note: If no value exists in this field for the correct year, the program will
try to use the Class Size field (
SORHSCH_CLASS_SIZE) on SOAHSCH
for any ID selected in the query. Regardless of which class size field is
used, the Graduation Date field (
SORHSCH_GRADUATION_DATE)
must be filled in.
• Number of Prospects
The number of SRBRECR records that have an associated SOAHSCH record whose
source/background institution code matches the one in the key or match the entered
criteria.
• Number of Applications
The number of SARADAP records that have an associated SOAHSCH record whose
source/background institution code matches the one in the key or match the entered
criteria.
• Application Rate (Number of Applications/Class Size)
Take the number of applications and divide by the class size.
• Number Accepted
The number of SARAPPD records that have the significant decision code and the
institutional accept code checked and that have an associated SOAHSCH record whose

890
Banner Student User Guide | Admissions
source/background institution code matches the one in the key or match the entered
criteria.
• Acceptance Rate (Number Accepted/Number of Applications)
Take the number of accepted applicants and divide by the number of applications.
• Number Confirmed
The number of SARAPPD records that have the significant decision code and the
applicant accept code checked and that have an associated SOAHSCH record whose
source/background institution code matches the one in the key or match the entered
criteria.
• Confirmation rate (Number confirmed/Number Accepted)
Take the number of confirmed applicants and divide by the number of accepted
applicants.
Prior College Summary View (SOVPSCM)
This view is run every time the Prior College Enrollment Summary Form (SOAPCSM) is
accessed. The view uses the source/background institution code value in the Key Block of
SOASBSM to select its prior college records. The Source or Background Institution
field is required.
The view collects the following values for either all terms (if the Term field is blank) or for
the term indicated and all prior terms:
• Number of Prospects
The number of SRBRECR records that have an associated SOAPCOL record whose
source/background institution code matches the one in the key or match the entered
criteria.
• Number of Applications
The number of SARADAP records that have an associated SOAPCOL record whose
source/background institution code matches the one in the key or match the entered
criteria.
• Application Rate (Number of Applications/Class Size)
Take the number of applications and divide by the class size.
• Number Accepted
The number of SARAPPD records that have the significant decision code and the
institutional accept code checked and that have an associated SOAPCOL record whose
source/background institution code matches the one in the key or match the entered
criteria.
• Acceptance Rate (Number Accepted/Number of Applications)
Take the number of accepted applicants and divide by the number of applications.

891
Banner Student User Guide | Admissions
• Number Confirmed
The number of SARAPPD records that have the significant decision code and the
applicant accept code checked and that have an associated SOAPCOL record whose
source/background institution code matches the one in the key or match the entered
criteria.
Students are added to this counter if they have the decision code that is entered in the
External Code field of the GTVSDAX record with an Internal Code of
DEPOPAID and
a Group (Code) of
DEPOSIT.
• Confirmation Rate (Number Confirmed/Number Accepted)
Take the number of confirmed applicants and divide by the number of accepted
applicants.
Selective Admissions - Admissions Rating/Batch Entry
This section discusses selective admissions and admissions rating processing.
Overview
The Admissions Rating Form (SAARRAT) allows for the input of multiple ratings (of
multiple types), as well as producing total and average ratings by ID. The form also
displays basic application information for the applicant being rated.
The Admissions Rating Type Rules Form (SAARRCT) allows each institution to define
minimum and maximum values for each rating type. The rules form also allows institutions
to "assign" rating types to administrators. This can reduce batch entry as well as data
entry on the SAARRAT, as the assigned rating types will default in, if that administrative ID
and role are entered in the key.
The Admissions Decision and Rating Batch Entry Form (SAADCBT) allows you to enter
an admission decision code for multiple students at one time. In addition, the form allows
for the input of multiple ratings for multiple students at one time.
Use the Admission Purge Process (SAPADMS) to purge the new applicant admissions
rating data in the SARRRAT table as part of the application record purge.
Admissions Rating Type Validation Form (STVRATP)
Use this form to define codes that identify all the types of ratings an institution might use.
Possible examples include ratings for different application forms, personal ratings,
academic ratings, athletic ratings, art or music ratings, etc. The rating type "0000 -
Admissions Rating" is system-required.
892
Banner Student User Guide | Admissions
Admissions Rating Type Rules Form (SAARRCT)
Institutions should use this form to define and tailor each type of rating to meet their
individual needs. The data contained in this form is stored in the Admissions Rating Table
(SARRRCT). All rating types to be used must be defined in the Term Rating Type Rules
block. Use of the Administrator Rating Type Rules block is optional.
Admissions Rating Form (SAARRAT)
Use the Admissions Rating Form (SAARRAT) to enter multiple rating types and
associated ratings per individual ID.
Admissions Decision and Rating Batch Entry Form (SAADCBT)
Institutions should use this form to group their applications in multiple ways and then enter
decisions for those groups all at once. In addition, the form allows institutions to enter
ratings for the applications receiving a decision code or to enter only ratings for multiple
IDs. All fields in the Key Block are optional.
Note: For more information on SAARRCT, SAARAT, and SAADCBT,
please see the online help for these forms.
Admissions Decision Form (SAADCRV)
Use the Rating Review window on this form to review rating types and ratings for the ID
and admissions application in the main window. This window is accessed from the
Decision Calculator window, using the Rating Review item in the Options Menu.
Admissions Decision Rules Form (SAADCSN)
Use the Ratings window on this form to track and consider the new ratings entered on
either SAARRAT or SAADCBT as additional criteria in the automated decision process.
Use the Admission Rating Type Rules item in the Options Menu in the main window to
access the Ratings window.
Rating Audit Report (SARDCBT)
Use this report to view all applications updated by the Admissions Decision and Rating
Batch Entry Form (SAADCBT) for a specific date. The report displays the following fields
for each ID that matches the input parameters:
• ID/SSN
• Name
• High School
• Ter m Co de

893
Banner Student User Guide | Admissions
• Application number
• Application Type
• Level
• Campus
• Degree
• Major
• Program
• Subtotal of # of decisions for that particular decision code.
In addition, the control section at the end of the report details the parameters that were
entered. The control section also indicates the total number of decisions (matching the
input parameters) entered on that date.
Admission Decision Criteria Report (SARDCSN)
This report details the various decision rules entered on SAADCSN for various terms
depending on the parameters entered. Use this report to consider rating data entered on
SAADCSN in the Ratings window.
Admit Decision Calculation Report (SARBDSN)
Use this report to consider the data entered in the Ratings window on SAADCSN when
calculating an automatic decision.
Admissions Purge Process (SAPADMS)
Use the Admission Purge Process (SAPADMS) to purge the new applicant admissions
rating data in the SARRRAT table as part of the application record purge.
Data Load and Match Processing
Please see the “Data Load and Match Processing” section in the “Recruiting” chapter
procedures for this information.
Selective Admissions - Search and Test Score Data Load
Please see the “Search and Test Score Data Load” section in the “Recruiting” chapter
procedures for this information.

894
Banner Student User Guide | Admissions
Selective Admissions - Regionalization
This section discusses selective admissions and regionalization.
Overview
Regionalization processing allows you to do the following:
• Assign a district/region/EPS market code to a person, based on rules using the person’s
address, high school address, or high school source/background institution code
(STVSBGI), even if the person is created via the data load process.
• Assign a district/region/EPS market code to a high school based on the high school’s
address, even if the person is created via the data load process.
• Store and override the system-assigned geographic region/division codes.
• Build rules on the Material Form (SOAMATL) to use the district/region/EPS market code
in the determination of communication plan materials.
• Assign a specific administrator by term to a person or institution, based on the district/
region/EPS market code.
Overall Process Flow
This processing is used to assign people and institutions to various geographic regions.
Multiple geographic regions can be assigned to an individual or to an institution. Multiple
administrative roles such as recruiter, reader, etc. can be assigned to the same person or
to an institution. Geographic region codes assigned to people and/or institutions can be
manually updated or overridden. The geographic regions of individuals and institutions
and institutional EPS Market Codes can be used when creating the rules for material
creation. Historical data on which region(s) a person or institution has belonged to is
maintained.
1. Use the Geographic Region Rule Form (SOAGEOR) to define all region and division
combinations and rules.
2. If you have purchased Enrollment Planning Service (EPS) codes, load them into the
Enrollment Planning Service Code Validation Form (STVEPSC) for use on the
Enrollment Planning Service Rules Form (SOAEPSC).
3. Determine what your administrative roles are (recruiter, reader, traveler, alumni rep,
etc.) on the Administrative Role Code Validation Form (STVRADM).
4. Set up the rules you want to use to assign your administrators on the Administrator
Role Rules Form (SOAADAS).
5. As addresses for recruits and applicants are entered on the General Person
Identification Form (SPAIDEN), a database trigger creates a record for that address in
the GORCGEO collector table. A record is only created in the collector table if a
record exists on the Crosswalk Validation Form (GTVSDAX) having an Internal Code
of "Region" with the same address type. The collector table record is used by the
Person Geo Region/Divisions Report (GORPGEO) to create region records for that
address in the GORPGEO table. These records can be viewed on the Geographic

895
Banner Student User Guide | Admissions
Regions/Divisions by ID Form (GOAPGEO). In addition, as high school addresses are
entered in Banner, the SBGI Geo Region/Divisions Report (GORSGEO) is used to
create region records for high schools on the new Source/Background Institution
Geographic Form (GOASGEO).
6. Use the Assigned Administrators window in the Recruit Prospect Information Form
(SRARECR), the Quick Recruit Form (SRAQUIK), and the Admissions Application
Form (SAAADMS) to view and update the administrator assignments using the region
data in GORPGEO and GORSGEO and the rules on the Administrative Roles Rules
Form (SOAADAS). This window is accessed through the Options Menu.
Or, you can run the SORAINF process to assign administrators using the region data
in the GORPGEO and GORSGEO tables and the rules on the Administrator Role
Rules Form (SOAADAS).
7. Use the SAVSGEO and SAVADAS1 views to see which institutions are assigned to
administrators. These views use the data in the GORPGEO, GORSGEO, and
SORAROL tables and allow you to run various queries to determine which
administrators have been assigned to individual institutions, as well as to all
institutions within a region.
Administrative Role Code Validation Form (STVRADM)
This validation form allows institutions to define various types of administrator roles to be
used with regionalization processing. Examples of such roles are: Recruiter, Reader,
Alumni Recruiter, etc. These codes are used by the Administrator Role Rules Form
(SOAADAS) and the Administrator’s Assignments Form (SOAAINF).
The Rater Indicator checkbox is used to designate that a role can assign ratings on the
Admissions Rating Form (SAARRAT) and the Admissions Decision and Rating Batch
Entry Form (SAADCBT) when checked.
Enrollment Planning Service Code Validation Form (STVEPSC)
This validation form can contain all 304 EPS Market codes created by the College Board
along with their corresponding market names. This validation form must be populated by
the institution with all the EPS codes and descriptions available from the College Board.
Administrator Assignment Data Element Validation Form (STVADDA)
This validation form is used to define the various data elements that may be used to
assign administrators on the Administrator Role Rules Form (SOAADAS). The data for
this table is provided. Programming logic is built into each of the delivered data elements.
Note: If new data elements are needed, they will be inserted into this
table, and the stored procedure to calculate the assignments will be
modified to include the new data elements.
The Sys(tem) Req(uired) checkbox is used to determine which values are required by the
system. If the Sys(tem) Req(uired) checkbox is checked, the validation table record
cannot be deleted.

896
Banner Student User Guide | Admissions
Administrator Role Rules Form (SOAADAS)
This form allows you to define a combination of rules to be used in assigning different
administrators (recruiter, reader, alumni recruiter, etc.) to high school and person records.
The form also allows institutions to use many fields available within Banner to determine
how a specific administrative role should be assigned. Examples of fields which are
included are: college code, campus, level, home address state, EPS market code,
geographic region code, high school code, degree, program, ethnicity, gender, etc.
The form can be entered in query mode, allowing you to see which rules have been
defined for the administrator ID in the key. If the Role is entered in the key, only rules
matching this field are displayed. If an Effective Term is entered in the key, all rules for
that effective term and earlier are displayed. If the Active Only checkbox is checked, only
active rules for this administrator ID are displayed.
To create a new rule for the administrator ID in the key, enter the appropriate effective term
and role for the new rule in the Rule Definitions block. The system automatically creates
the rule number once the new rule assignments have been saved.
Access the Assignment Rules block, and define the specific elements that govern the new
rule. The fields that are available have been predefined in the Administrator Assignment
Data Element Validation Form (STVADDA). The logic is an OR condition within like data
elements and an AND condition between different data elements. If more than one rule ID
exists for an administrator/role combination, OR logic is used between the rules.
Rules can be inactivated by unchecking the Active checkbox in the Rule Definitions block.
Only rules that are active can be modified in the Assignment Rules block.
Use List from the Data Element field to see the Administrator Assignment Data Element
Codes List of Values.
The Operator field can be set to either "=" equal or "<>" not equal.
Use List from the From Value field to assign the appropriate value for the corresponding
data element. You may designate a range of values for a data element using List from the
To Value field, for example a ZIP Code range of 06000 to 06599.
Enrollment Planning Service Rules Form (SOAEPSC)
This form allows you to set up rules for each EPS code by state, ZIP/Postal Code, county,
or city. Only the State/Province field is required. These rules are for specific region criteria
and apply only to high school addresses.
Administrator Assignment Search Form (SOIAROL)
Use this form to query on roles and IDs from the Administrator Role Rules Form
(SOAADAS).
This form is accessed by using Count Query Hits from the ID or Role fields in the Key
Information of SOAADAS or SOAAINF, or you may display the Option List from the ID or
Role fields and then select Admin Assign Search Form (SOIAROL).

897
Banner Student User Guide | Admissions
Administrator’s Assignments Form (SOAAINF)
This form displays the IDs and names of everyone assigned to the administrator/role
combination identified in the Key Information.
For example, if Russell Jones is a recruiter for Banner University, and using the
Administrator Role Rules Form (SOAADAS) he was assigned as the recruiter for all high
schools in Michigan, then SOAAINF would display all IDs having recruiting records which
had been entered into Banner for a specific term, that had associated high schools with an
address in Michigan. The form obtains this information by querying the SORAROL table
for the administrator ID, role, and term in the key.
Use the Remember ID item in the Options Menu to carry one of the IDs to another form.
Assign Administrator Window
Use the Assign Student item in the Options Menu to access the Assign Administrator
window. This window is used to view and assign an administrator to the person in this
window’s ID field. The administrator who is assigned is the ID in the key of the main
window.
Administrator Role Form (SOAAROL)
This form is used to display all the administrative roles assigned to the ID in the Key
Information. Since individuals can hold more than one type of administrative role, this form
allows you to see all the roles that have been assigned to different individuals. This form is
populated with data from the SORAROL table.
Source/Background Institution Geographic Form (GOASGEO)
This form is used to display the geographic regions assigned to a source/background
institution based on its address. You can also access this form from the Source or
Background Institution Base Form (SOASBGI), the High School Information Form
(SOAHSCH), and the Prior College Form (SOAPCOL). This form is populated with data
from the GORSGEO table.
A record with the System Indicator checkbox checked can be made inactive, but no other
fields can be altered. If a record is entered by the user, the System Indicator checkbox
remains unchecked.
Geographic Regions/Divisions by ID Form (GOAPGEO)
This form is used to display the geographic regions assigned to an ID based on its
addresses. Regions can be active or inactive. GOAPGEO is populated with data from the
GORPGEO table.
A record with the System (Indicator) checkbox checked can be made inactive, but no
other fields can be altered. If a record is entered by the user, the System (Indicator)
checkbox remains unchecked.

898
Banner Student User Guide | Admissions
Administrator Assignments Process (SORAINF)
This process allows institutions to use the rules defined on the Administrator Role Rules
Form (SOAADAS) to assign administrators to recruit and applicant records. The process
populates the SORAINF table. This process also runs when the Assign Administrators
item in the Options Menu is selected on the Assigned Administrators window on the
Recruit Prospect Information Form (SRARECR), the Quick Recruit Form (SRAQUIK), the
Admissions Application Form (SAAADMS), and the Administrator’s Assignments Form
(SOAAINF).
Person Geo Region/Divisions Report (GORPGEO)
This process is used to assign regions to individuals using the data in the GORCGEO
collector table in combination with the rules defined on the Geographic Region Rules
Form (SOAGEOR). These regions are then stored in the GORPGEO table.
SBGI Geo Region/Divisions Report (GORSGEO)
This process is used to assign regions to high schools or colleges using the institution
addresses in combination with the region rules set up on SOAGEOR. The high school and
college regions are then stored in the GORSGEO table.
High School/College Administrator Assignments View (SAVADAS1)
This view is used to show the source/background institutions assigned to administrators.
Selective Admissions - Process Geographic Regions,
Administrators, and Ratings
This section discusses selective admissions processing for geographic regions,
administrators, and ratings.
Setup steps
The following steps are used to set up geographic regions, assign administrators, and
define ratings calculations.
1. Create geographical region definitions.
Create geographic regions on the Geographic Region Rules Form (SOAGEOR).
Regions are defined using a combination of division and region.
For example, to create a region associated with the recruits Donna Harrison will be
working with, create a region called
DHARISSON and a division called Recruits. Or, if
a school defines their regions geographically, create a region for
NEWENGLAND and a
division of Recruiting.

899
Banner Student User Guide | Admissions
The use of the Region and Division fields is arbitrary. The fields can be defined for
whatever you need to use them for.
2. Set up GTVSDAX address type records.
Use the entries on the Crosswalk Validation Form (GTVSDAX) to determine which
address types will cause the trigger on SPRADDR to create entries in the Geo-Region
Collector Table (GORCGEO). The records in this collector table will also be used in a
later step to assign geographic regions to persons, based on the regions set up
previously on SOAGEOR.
Create entries on GTVSDAX for the Internal Code of
REGION. When the Internal
Code field has a value of
REGION, the Group Code field must use a value of
REGION ADDRESS in order for region processing to work. Use the External Code
field for those entries to define which address types should cause the trigger to run.
This allows institutions to only have the trigger run when certain address types are
entered on SPAIDEN, thus allowing other offices (i.e., Alumni) that enter addresses to
use a different address type without having the trigger run. The trigger causes a
record to be created in the Geo-Region Collector Table (GORCGEO) for each address
entered on SPAIDEN with an address type matching one set up on GTVSDAX.
3. Define administrator roles.
Create role codes on the Administrative Role Code Validation Form (STVRADM) that
define the different roles your administrators might play (i.e., reader, Alumni
interviewer, rater, etc.). If a role is allowed to assign ratings, check the Rater Indicator
checkbox for that role.
Consider creating a
GENERIC role code for use in conjunction with the Admissions
Rating Calculation Process (SARRATE). This process assigns ratings in batch to
records meeting the specified criteria. This role must have the Rater Indicator box
checked if it is to be used to automatically assign ratings.
4. Create administrator(s).
Create Banner records on the Identification Form (SPAIDEN) for each person who will
be functioning as an administrator. Consider creating a
GENERIC administrator ID to
use in conjunction with the Admissions Rating Calculation Process (SARRATE).
5. Assign roles to administrators.
Assign all appropriate role(s) to each administrator on the Administrator Role Form
(SOAAROL). If you are using a generic administrator and role with the Admissions
Rating Calculation Process (SARRATE), the role must be assigned to the
administrator ID on this form.
6. Set up rules to assign administrators.
Set up rules to assign an administrator to a group of recruits or applicants using the
Administrator Role Rules Form (SOAADAS). Multiple rules can be set up for each
administrator, thereby increasing the complexity of the assignment. If the same data
element is listed multiple times for a rule, then an OR condition exists between each
record. An AND condition exists between non-like data element rows.

900
Banner Student User Guide | Admissions
For example:
SARADAP_TERM_CODE_ENTRY = 200310
SARADAP_MAJR_CODE_1 = ART
SARADAP_MAJR_CODE_1 = MATH
This indicates you want to assign this administrator to all applicants who have an entry
term code of 200310 AND who have applied to be an Art major OR a Math major.
If you are planning to use the Admissions Rating Calculation Process (SARRATE) in
conjunction with a
GENERIC administrator ID, ensure that one of the rules set up on
SOAADAS assigns that administrator/role combination to all persons who might be
affected by the SARRATE process.
7. Create rating types.
Create rating type codes on the Admissions Rating Type Validation Form (STVRATP).
Examples of rating types could be: Academic 1, Personal Interview, Art Portfolio, etc.
8. Define ratings types, and optionally assign them to administrators.
Define rating types for given effective terms using the Admissions Rating Type Rules
Form (SAARRCT). In addition, define the minimum and maximum values allowed for
each rating type.
Optionally, you can also assign rating types to administrators using SAARRCT. This
reduces the amount of data entry for the administrator when they enter ratings on
SAARRAT, but it does not restrict administrators to only entering ratings for these
rating types.
9. Define test score equivalencies.
Define any test score equivalencies that may be used in the rating process on the Test
Score Equivalency Form (SOATEQU). In order to use test score equivalencies, a test
source must be identified on SOATEQU and must accompany the incoming test
score. This allows institutions to limit the creation of equivalencies to official test
scores versus self-reported test scores.
10. Define factor codes.
Define factor codes (to be used in setting up rating formulas) on the Admissions
Factor Code Validation Form (STVAFCT). Each factor code acts as a variable in the
user-defined rating formula. Factor codes are only needed if you are planning to
calculate ratings with a user-defined formula.
11. Define selection criteria for factor codes.
Associate factor codes with selection criteria, and assign them to Banner fields using
the Admissions Rating Factor Rules Form (SAARRFT). The selection criteria define
the characteristics the applicant must have in order for the rating formula to use this
factor code. For example, a factor code could be defined as valid for all applicants with
a major code equal to Math who are in-state residents.
The factor codes are then assigned either a static value such as
10, or they are
assigned to a Banner column. For example, if the rating formula requires the SAT
Verbal score, then a factor code could be associated with a Table Name value of
SORTEST, a Select Column value of SORTEST_TEST_SCORE, and a Where

901
Banner Student User Guide | Admissions
Column value of SORTEST_TESC_CODE = S01 (the test code for the SAT Verbal
score).
Selection criteria for factor codes are only needed if you are planning to calculate
ratings with a user-defined formula.
12. Define the rating calculation formula.
Define the rating calculation formula on the Admissions Rating Formula Definition
Form (SAARRDF). This form uses the factor codes created on SAARRFT in
conjunction with parentheses and numeric operators to create a user-defined formula.
Each user-defined formula is defined for a rating type and effective term. The rating
calculation formula is only needed if you want to create and assign ratings based on a
user-defined formula.
The set up for using geographic regions, administrators, and ratings is complete. You
can now create your recruit and/or applicant records in Banner, including their address
records, which will cause the Geo-Region Collector Table (GORCGEO) to be
populated. Additional information required by the user-defined formula (such as test
scores, etc.) should be entered where appropriate in your process.
13. Assign regions to records.
Run the Person Geo Regions/Divisions Process (GORPGEO) to assign regions to all
records in the Geo-Region Collector Table (GORCGEO). This process can also be run
for a single ID within the Geo-Region Collector Table (GORCGEO).
14. View assigned region(s)/division(s).
Use the Geographic Regions/Divisions by ID Form (GOAPGEO) to view the
geographic regions assigned to each person. Each record also includes information
about the address that caused the creation of the geographic region.
15. Assign administrators.
Run the Administrator Assignments Process (SORAINF) to assign administrators to
recruits and applicants based on the rules set up on SOAADAS. Use the
Administrator’s Assignments Form (SOAAINF) to view all recruits or applicants
assigned to an administrator manually or via the SORAINF process.
Use the Administrator Assignments item in the Options Menu from SAAADMS or
SRARECR for a specific recruit or applicant to view the administrator(s) assigned to
the specific recruit or applicant.
16. Assign ratings.
Now that administrators have been assigned to recruits and applicants, they can
assign rating(s) to your applicants on the Admissions Rating Form (SAARRAT).
Rating types that were pre-defined for each administrator will default into SAARRAT
as long as the administrator/role information is entered in the Key Block. The
administrator then needs to only enter the rating itself.
17. Run batch rating process.
If your institution has created a user-defined formula on the Admissions Rating
Formula Definition Form (SAARRDF) to assign ratings, run the Admissions Rating
Calculation Process (SARRATE) to calculate the ratings based on the formula and to
insert the rating into SARRRAT for each applicant that met the criteria.

902
Banner Student User Guide | Admissions
Other options:
1. Enter ratings on the Admissions Decision and Rating Batch Entry Form (SAADCBT).
This form allows you to enter decisions and/or ratings in batch. As on SAARRAT,
rating types defined for an administrator on SAARRCT will default into the form if the
administrator and role information is entered in the Key Block.
2. Ratings can also be used with the auto-decision process. Enter rating minimum and
maximum values on the Admissions Decision Rules Form (SAADCSN) as part of
auto-decision processing.
Purge Process
The following purge is part of the Admissions module.
Admissions Purge (SAPADMS)
This process will purge all admissions information for a student based on the user
specified parameter of term. The term entered represents the terms up to and including
the term for which you would like to purge admissions data. The user may optionally
choose to delete High School, Prior College, and Test Score information by parameter
selection. The Transfer Articulation information for the applicant will also be deleted if no
General Student information exists, or it may bypass those students with registration and/
or academic history. The process will only delete the mail records which are tied to the
Admissions module. This process will also delete person-related information such as
interests and contacts, if no recruiting or student record exists for the applicant.
Admissions Reports
The following reports are run through the Admissions module:
Admissions Count by College/Major Report (SARACTM)
Admissions Application Report (SARADMS)
Admit Decision Calculation Report (SARBDSN)
Admission Decision Criteria Report (SARDCSN)
Admissions High School Report (SORHSRP)
Admission Purge (SAPADMS)
Appointment Purge Process (SOPAPPT)
SAT Recentering Process (SOPSATS)
AMCAS Extract File Process (SARAMXF)

903
Banner Student User Guide | Admissions
Please refer to the Banner Student Reports and Processes Handbook for report
descriptions, instructions, parameter definitions, and output samples.
Creating a Population Selection
To perform population selection, the application you will be working with must first be
defined on the Application Definition Rules Form (GLRAPPL).
The second step is to enter the Population Selection Definition Rules Form (GLRSLCT),
enter the Application (Code), and create a Selection ID (Identifier) with a description.
In the Selection Definition section, define the Select and From portions of the SQL
statement that the selection represents.
Example:
AMCAS Date Purge (SARAMDP)
Communication Load Process (SURLOAD)
Communication Removal Process (SURDELT)
Source/Background Summary Report (SORSBSM)
Rating Audit Report (SARDCBT)
Administrator Assignments Process (SORAINF)
Electronic App Purge Process (SARETPG)
Elec App Verify/Load Process (SARETMT)
TS 189 Upload to Banner (SAR189U)
Student Email Process (SOREMAL)
Batch Email for Elec. Apps. Process (SAREMAL)
Admissions Rating Calculation Report (SARRATE)
Electronic Application Report (SARETBL)
Learner Curriculum Conversion Process (SOPLCCV)
Learner Curriculum Purge Process (SOPLCPG)
Non-Destructive Curric Update Report (SOPLCHG)
Process Mass Entry Report (SORMEBP)
Purge Mass Entry Audit Process (SOPMAUD)
Select:
SARADAP_PIDM
From:
SARADAP

904
Banner Student User Guide | Admissions
Next, enter the Selection Rules for the population of records you would like to see.
Example:
Save your data and exit. Your population selection rules will be compiled. If any errors are
issued during the compilation process, resolve the errors before continuing. If you do not
resolve all errors given during the compile process, you will not be able to use the
population selection rules to extract a population.
You are now ready to extract the population of people. The Population Selection Extract
(GLBDATA) is run from the Process Submission Control Form (GJAPCTL). At minimum,
you will need to supply the parameters for Selection Identifier 1, Application, and Creator
ID, which are the values that were in the Key Information of the Population Selection
Definition Rules Form (GLRSLCT).
After extracting the population, you can use the Population Selection Extract Data Form
(GLAEXTR) to view and/or modify the people in the population. You can add or delete
people from the population using this form. The keys to the form are Application,
Selection ID, and Creator ID. (User ID is also displayed in the Key Information.) You will
be able to add or delete people only from populations that you selected.
After extracting the population, and modifying the people in it if necessary, you can use the
population for a variety of purposes. Letters can be produced using Letter Generation,
based upon a population, and many Banner reports and processes also can accept a
population for processing.
For additional details on population selection, refer to the Banner General User Guide.
SARADAP_TERM_CODE_ENTRY
=
'200010'
AND
SARADAP_LEVL_CODE
=
'UG'

905
Banner Student User Guide | General Student
General Student
This chapter discusses processing and procedure information for General Student.
General Student Procedures
Here are tasks you can perform in this module.
Review/Change Current Student Information
The General Student Form (SGASTDN) is used to modify a student's current academic
information, such as changes to major, residency, student type, etc. It is also used to enter
information about a student's career, activities, comments, and veteran information. The
information on the General Student Form (SGASTDN) is initially created when an
applicant accepts the institution's offer of admission on the Admissions Decision Form
(SAADCRV), in the batch Admissions Decision Calculation Report (SARBDSN), or when
an applicant is processed on the Quick Entry Form (SAAQUIK). Information may be
maintained on this form to provide a historical record of all changes.
The Miscellaneous Student Information window of SGASTDN contains optional fields
which include: Apprenticeship Code, Transfer Center, Employment and Training
Code, Employment Expectation, Vocational Education Status, Education Level and
Educational Goal. The values for the Education Level and Educational Goal fields
default from the Admissions Module if the information is entered there. The values for the
other fields need to be entered in this window.
The Citizenship, which defaults from the Person Form (SPAPERS), displays in the main
window. There is a Block Code field in the main window which supports the Block
Scheduling processing. There are Graduation Term and Year fields in the main window
which support the Graduation Group processing.
When attempting to delete a general student record, the system will check academic
history for the effective term and will search for data greater than or equal to the Start Term
and less than the End Term.
The General Student Summary Form (SGASTDQ) may be used to give a historical picture
of the changes to the student's academic information over time. Information includes:
student status and type, residency code, level, academic standing information, and
curriculum data. The ID field is required, and the Term Code field is optional. If no term
code is entered, all existing general student records will be queried for the student. If a
term is entered, only those student records with a from term that is earlier than or equal to
the Key Information term will be queried.
The Additional Student Information Form (SGASADD) maintains information about
student cohort codes, as well as student attributes. The cohort codes will default from
admissions when the general student record is created. These codes may be used for

906
Banner Student User Guide | General Student
grouping and tracking specific categories of students. The student attributes are also
effective term oriented, but are maintained only in the General Student module. These
attributes may be used in the student classification rules to further define the class
calculation. These codes may also be used to store any additional student data.
Concurrent Curricula Processing
Concurrent curricula processing allows an institution to record and use multiple curricula
for a person who is moved through the student cycle. This functionality is used by the
Recruiting, Admissions, General Student, Registration, and Academic History modules.
Please refer to the “Concurrent Curricula Processing” appendix for detailed information on
using concurrent curricula in Banner® Student.
Mass Entry Processing
Mass entry processing is used with Admissions, General Student, Registration, Academic
History graduation, and athletic compliance processing. Mass entry forms are used to
search on data, perform updates, and then display the results. Search and update criteria
are user-defined and include student and curriculum elements where appropriate. The
selected students can be reviewed and their updates processed immediately, or the
updates can be held for later processing in job submission using a batch process. An audit
form is used to view processing results for the mass entry forms.
Please refer to the “Mass Entry Processing” appendix for detailed information on using
mass entry in Banner Student.
Study Path Processing
Study path processing is used with the Admissions, General Student, Registration, and
Academic History modules. Study paths provide a means by which a learner can
associate specific course registration records to learner curriculum records during
registration. The study path records allow the institution to track separate student status
codes and academic standings (along with various other data) based on the student's
curriculum. Likewise, a study path term enrollment record permits the tracking of
enrollment eligibility that is separate from a student's overall enrollment status. The grade
roll uses study paths to keep courses with an associated study path within the degree
sequence created for that study path.
Please refer to the “Study Path Processing” appendix for detailed information on using
study paths in Banner Student.
Athletic Compliance Processing
Athletic compliance processing allows institutions to track athletic status and academic
eligibility in support of the National Collegiate Athletic Association (NCAA) Athletic
Compliance (ATHL) requirements.

907
Banner Student User Guide | General Student
Processing Overview
Athletes who satisfy initial academic eligibility requirements become qualified to compete
in NCAA sanctioned competition. Eligibility is based on years of eligibility, seasons of
competition available, and seasons of competition used as defined by NCAA
requirements. Time lapses are allowed for time periods when an athlete is not enrolled.
Eligibility can be adjusted for time lapses. Transfer eligibility, academic residency,
residency exceptions, and transfer status can also be considered for eligibility
requirements. Additionally, institutions can effectively track changes in athlete eligibility
over time. Compliance (sport) records for an athlete can be copied to future terms along
with associated current competition information and, optionally, attribute information. This
aids institutions in reviewing changes in eligibility. The Athletic Compliance Form
(SGASPRT) is used to enter and update athletic compliance information.
Institutions also have the ability to copy compliance and current athletic competition to a
future term for a group of athletes using mass entry processing. This provides consistent
information to the athletic certification staff as an athlete's progress is followed from term
to term. The Mass Entry Athletic Compliance Form (SGAMSPT) is used to search for
compliance records and then copy, insert, or update athletic information for specific
athletes based on the search criteria results or a population selection. Results can be
reviewed, audited, and submitted for batch update.
Please refer to the “Mass Entry Processing” appendix for detailed information on using
mass entry processing, performing updates, and auditing results.
Institutions can track the academic progress of an athlete using the Athletic Academic
Progress Form (SGAAPRG). Progress is determined by credit hours per term and
academic year, to see if the athlete is in compliance and is allowed to compete in a sport.
This form provides curriculum and field of study summary information, as well as degree
completion information.
Institutions can query athletic compliance and competition information on the Athletic
Compliance Inquiry Form (SGISPRT). Athletic compliance records can be displayed in
different views based on the ID, the sport, or both.
Set Up Values Used with Athletic Compliance Processing
To use athletic compliance, set up your values on the following validation forms.
• Student Activity Code Validation Form (STVACTC)
Make sure the activity codes have the Type field set to
SPRTS.
• Comment Type Code Validation Form (STVCMTT)
• Degree Completion Change Reason Validation Form (STVDCPR)
• Eligibility Code Validation Form (STVELIG)
• Originator Validation Form (STVORIG)
• Athletic Attribute Validation Form (STVSAAT)
• Athletic Academic Eligibility Validation Form (STVSAEL)

908
Banner Student User Guide | General Student
• Athletic Qualifier Status Validation Form (STVSAQS)
• Athletic Competition Reason Validation Form (STVSARE)
• Athletic Residency Exception Validation Form (STVSARX)
• Athlete Transfer Status Validation Form (STVSATR)
• Sport Status Code Validation Form (STVSPST)
• Term Code Validation Form (STVTERM)
Enter and Update Compliance (Sport) Records
Use the Athletic Compliance Form (SGASPRT) to assign sport codes, status, athletic
eligibility, academic eligibility, and athletic aid information by term to an athlete. An athlete
needs at least a general person record (SPRIDEN) in order to be processed on this form.
If your institution requires that an athlete with a compliance (sport) record must have an
associated general student record (SGBSTDN), you can do so. A student status is
displayed for the record for the term, for an ID with a general student record.
Note: You can use the Options Menu to access SGISPRT for athletic
summary queries, SGAMSPT for mass update processing, and
SGAAPRG for academic progress review.
Compliance records can be created and modified for any term and are not required to
have associated competition data. Compliance records can be modified in any term,
regardless of the existence of competition data. They can also be modified if the athlete is
deceased. Compliance records without competition data can be copied to a future term.
Compliance records with a history of competition can be copied to a future term using the
copy functionality, but only the compliance information will be copied. Compliance records
with current competition data can be copied to a future term, and the associated current
competition data is also copied. If you try to copy the current competition record to a future
term and the compliance record already exists, the current competition record will be
copied. The compliance record will not be modified in the future term.
At a term and sport level, the associated competition data (including total number of
seasons of competition available and number of seasons of competition used), athletic
attributes, and athletic comment information can be entered. Sport records, the current
competition for the sport, and optionally, athletic attributes for the sport, can be copied to a
future term.
At the athletic level, athletic eligibility, general comments, athletic compliance admissions
information, and compliance agency transfer information can be maintained, once an
athlete has been assigned to a sport/compliance record. While multiple sport records can
exist for the athlete per term or terms, only a single eligibility, admission, or transfer record
can exist for an athlete. Multiple general comments can be recorded for an athlete. The
use of athletic eligibility, general comments, admissions, and transfer information is
optional and can be deleted at any time.
In addition to the manually entered athletic compliance admissions data, admissions
summary information is presented that includes any applications the athlete has
submitted, curriculum and field of study information, high school attendance information,

909
Banner Student User Guide | General Student
and test score data. Admissions summary information is display only. In addition to the
manually entered compliance agency transfer data, transfer summary information is
presented that includes transfer institutions, transfer courses, and transfer attendance
period GPA data. Transfer summary information is display only.
Compliance records in a term can be deleted as long as no associated competition data
(history or current), athletic attributes, or athletic comments exist for the sport. If athletic
eligibility, general comments, admissions, or transfer data exists, the last (most recent)
compliance record cannot be deleted. To delete the last compliance record, the athletic
eligibility, general comments, admissions, and/or transfer data must be deleted, as well as
any attributes and comments associated with the sport. A compliance record can never be
deleted if any associated competition data (history or current) exists.
Steps to Enter Compliance Records Without Competition Data
You can enter compliance (sport) records without athletic competition data, athletic
attributes, or athletic comments.
1. Access the Athletic Compliance Form (SGASPRT).
2. Enter the ID for the athlete in the ID field in the Key Block.
3. Perform a Next Block to the Athletic Compliance Term block.
4. Enter the term for the athletic compliance record in the Term field.
5. Review if the person has a prospect, applicant, or general student record for the term.
If a general student record exists, review the student status.
6. Perform a Next block to the Athletic Compliance Sport block.
7. Enter the sport code in the Sport field for the sport in which the athlete is participating.
8. Enter the status code for the athlete in the Status field.
9. Enter the eligibility code for the athlete in the Eligible field.
10. Set the Athletic Aid checkbox to checked or
Y if the athlete is receiving athletic aid.
11. Enter the academic eligibility code for the athlete in the Academic Eligibility field.
12. Save the record.
You can stop here. If you wish to add additional information for the athlete, then
continue with the following steps.
13. Use the Eligibility and General Comments tab to access the Eligibility and General
Comments window.
14. Enter athletic eligibility term and attendance information if you choose.
15. Save your changes.
16. Use Next Block to access the General Comments block.
17. Enter general comments that are associated with the athlete.
18. Save your changes.
You can stop here. If you wish to view additional admissions information for the sport
record, then continue with the following steps.

910
Banner Student User Guide | General Student
19. Use the Admissions tab to access the Admissions window.
20. Review summary data for admissions applications, curriculum and field of study
records, and high school and test score information, if it is displayed.
21. Enter athletic compliance admissions information for the athlete if you choose.
22. Save your changes.
You can stop here. If you wish to view additional transfer information for the sport
record, then continue with the following steps.
23. Use the Transfer tab to access the Transfer window.
24. Review summary data for transfer institutions, transfer courses, and transfer
attendance period GPAs, if it is displayed.
25. Enter compliance agency transfer information for the athlete, if you choose.
26. Save your changes.
Enter and Update Competition Records
Use the Athletic Competition block on SGASPRT to enter and maintain information related
to athletic eligibility in the sport, such as the number of seasons of competition available,
and to indicate if the athlete has used a season of competition for the sport in the term. A
reason code for a time lapse in the athlete's availability can also be entered at any time
and is required whenever the number of seasons of competition available is changed. The
number of seasons of competition used and the number of seasons of competition
remaining are calculated and are display only. Competition records can never be deleted.
They are retained for historic reference following an athlete's participation in a sport
throughout that athlete’s career at the institution.
When a competition record has been saved for a sport in a term, it becomes the current
competition record for the sport. Only the current competition record for a sport can be
modified, regardless of the term. Once a current competition record exists for a sport, it
must be copied to a future term to carry that information forward. Once the current
competition data has been copied, the prior term competition record becomes history and
can no longer be modified. The future term current competition record can then be
modified.
Competition records for a sport in a term are displayed from most recent to least recent.
When a new competition record is saved, it becomes the current competition record, and it
is given a oneup sequence number. Only a single current competition record can exist,
and it cannot be deleted. Previous competition records are noted as having a status of
history and can be reviewed but cannot be updated or deleted. An asterisk (*) is displayed
next to the sport record in the Athletic Compliance Sport block which references the data
displayed in the Athletic Competition block.
An athlete can have multiple competition records for a sport within a term but can only
have one competition record that is current for the sport, regardless of the term. The
sport's current competition record is designated as the most recent competition record
entered for the sport in the greatest term. Only the current competition record can be
updated and/or copied to a future term. The only way to carry competition data forward to
a future term is to use the Copy button. When a current competition record is updated, a
new current competition record is created, and the original competition record is

911
Banner Student User Guide | General Student
preserved as history. The Record Status field displays the status of the competition
record as
Current or History (Display Only).
When a competition record has been assigned to a sport, that competition record is
associated with the sport throughout the athlete's career. Once competition data exists for
a sport, the competition record and the associated compliance record cannot be deleted.
Updates must occur on current competition record. Updates cannot be performed on
competition records that are in history. Competition records can only be copied to a future
term.
Once competition data exists for a sport in a term, that competition data cannot be entered
in a prior term for the same sport. A sport can be created in a prior term, but no
competition data can be entered. Once competition data has been entered for a sport, a
current competition record will always exist. Institutions can establish procedures to
update a sport record with associated status, attribute, or reason code information to
indicate the sport is no longer active or current.
The number of seasons of competition available and the setting of the Season of
Competition Used (Indicator) are considered for a sport across all terms when the
number of seasons of competition used and the number of seasons of competition
remaining are calculated. While the default number of seasons of competition available is
4, it can be changed to any value from 0-99, but a reason code is required to explain the
change. No reason is required if the default of
4 is accepted. Each time the current
competition record is saved, the number of seasons of competition used and the number
of seasons of competition remaining will be recalculated. History competition records
cannot be updated. Only current competition records can be updated.
Steps to Enter Compliance Records With Competition Data
You can enter compliance (sport) records with associated athletic competition data,
athletic attributes, and athletic comments. Once athletic competition data exists for a sport
in a term, the compliance and competition records in that term cannot be deleted.
1. Access the Athletic Compliance Form (SGASPRT).
2. Enter the ID for the athlete in the ID field in the Key Block.
3. Perform a Next Block to the Athletic Compliance Term block.
4. Enter the term for the athletic compliance record in the Term field.
5. Review if the person has a prospect, applicant, or general student record for the term.
If a general student record exists, review the student status.
6. Perform a Next block to the Athletic Compliance Sport block.
7. Enter the sport code in the Sport field for the sport in which the athlete is participating.
8. Enter the status code for the athlete in the Status field.
9. Enter the eligibility code for the athlete in the Eligible field.
10. Set the Athletic Aid checkbox to checked or
Y if the athlete is receiving athletic aid.
11. Enter the academic eligibility code for the athlete in the Academic Eligibility field.
12. Save the record.

912
Banner Student User Guide | General Student
13. Use Next Block to access the Athletic Competition block.
14. Enter the beginning term of eligibility in the Begin Term of Eligibility field. (Optional)
15. Enter the ending term of eligibility in the End Term of Eligibility field. (Optional)
16. Review the default number of seasons of competition available in the Seasons of
Competition Available field and change it if desired.
17. If you changed the number of seasons of competition available, you must enter a
reason code in the Reason field.
18. Check the Season of Competition Used checkbox to indicate that the athlete has
used a season of competition in the sport. (Optional)
19. Save the changes.
20. Review the calculated values in the Seasons of Competition Used and Seasons of
Competition Remaining fields.
21. Review the status of the competition record in the Record Status field to see if it is
current or in history.
22. Use the Attributes tab to access the Attributes block.
23. Enter attribute codes for athletic attributes for the sport record. (Optional)
24. Save the changes.
25. Use the Comments tab to access the Athletic Comments block.
26. Enter athletic comments for the sport record. (Optional)
27. Save the changes.
You can stop here. If you wish to add additional information to the sport record, then
continue with the steps listed under “Entering Sport Records Without Competition
Data” for entering or reviewing eligibility, general comments, admissions, and transfer
information.
Enter and Update Athletic Attributes
Use the Athletic Attributes block on SGASPRT to enter and maintain attributes for the
athletic compliance sport record. An athlete can have multiple attributes for a sport within
a term. Attributes are associated with the athletic compliance sport record. They are not
associated with the general student record. Attributes are unique to the sport, are
associated with the term for the sport, and can be copied to a future term. An asterisk (*) is
displayed next to the sport record in the Athletic Compliance Sport block which references
the data displayed in the Athletic Attributes block.
Enter and Update Athletic Comments
Use the Athletic Comments block on SGASPRT to enter comments for the athletic
compliance sport record. An athlete can have multiple comments for a sport within a term.
These comments are associated with the athletic compliance sport record. If you wish to
enter comments associated with the athlete, regardless of the term or sport, use the
General Comments block. Athletic comments are free form, are associated with the ID,

913
Banner Student User Guide | General Student
sport, and term, and are not copied to a future term. An asterisk (*) is displayed next to the
sport record in the Athletic Compliance Sport block which references the data displayed in
the Athletic Comments block.
Enter and Update Athletic Eligibility Information
Use the Athletic Eligibility block on SGASPRT to enter and maintain eligibility data for an
athlete, such as attendance dates, enrollment dates, and number of attended terms. An
athlete can have one athletic eligibility record regardless of sport and term.
Enter and Update General Comments
Use the General Comments block on SGASPRT to enter and maintain general comments
for an athlete. An athlete can have multiple general comments records. These records are
created independently from the sport and term. The comment text is free form.
Enter and Update Admissions Information
Use the Admissions window on SGASPRT to enter admissions compliance information
and review admissions summary data for an athlete. You can view admission applications,
curricula and field of study information, and high school and test score information. You
can enter admissions compliance information for the athlete including qualification, SAT
scores, high school core coursework, and high school GPA. An athlete can have one
athletic admissions record, regardless of sport and term.
Enter and Update Transfer Information
Use the Agency Transfer window on SGASPRT to enter compliance agency transfer
information and review transfer data for an summary data athlete. You can view transfer
institution, transfer course summary, and transfer attendance period GPA information. You
can enter compliance agency transfer information for the athlete including quality points,
transfer GPA, terms attended, hours and attempted hours, and residency information. An
athlete can have one compliance agency transfer record, regardless of sport and term.
Perform Mass Entry for Compliance (Sport) Records
Use the Mass Entry Athletic Compliance Form (SGAMSPT) to perform mass entry athletic
compliance processing for athletes with compliance (sport) records. Compliance records
must exist on SGASPRT to be updated on this form. Updates can be made even when
holds exist. You can search on specific criteria, perform copy, insert, or update processing,
and then view the results. When the copy functionality is used, existing sport values will be
copied by default, or you can overwrite existing values, insert a new attribute, and
optionally copy the attributes from the current term to a future term. Current competition
data can be copied to the future term.
If no search criteria is entered, the Results window will not display any records. If search
criteria is entered that does not include the athletic compliance term, results will only be
displayed for queries. A search criteria athletic compliance term code is always required to

914
Banner Student User Guide | General Student
perform the copy, insert, or update process. When copy, insert, or update criteria is
entered, you can manually enter IDs for students with athletic compliance records and
then perform updates and process those records from the Results window.
Population selection can be also used to search for athletic compliance records and
PIDMs that meet the search criteria of the form. Compliance records are selected first,
and then an “intersect” is performed. PIDMs that exist in the population selection that meet
the search criteria are selected and displayed with the results.
Copy Compliance (Sport) Records to Future Terms
Compliance records can be copied individually on SGAPSRT or copied in mass on
SGAMSPT. A record is always copied to a future term. Compliance data can also be
inserted or updated in mass on SGAMSPT. You cannot perform the copy, insert, or
updates processes at the same time.
Note: Messages that are displayed on SGASPRT and SGAMSPT during
insert, update, and copy processing are not exactly the same, but they
are similar. Messages in the Results window on SGAMSPT may provide
more information than the autohint text or pop-ups that are displayed on
SGASPRT.
Search on SGAMSPT
Before you can copy, insert, or update compliance data on SGAMSPT using mass entry
processing, you need to enter the search criteria or provide a population selection. You
must enter an athletic compliance term in the search criteria to use the copy, insert, or
update processes. You can leave the athletic compliance term in the search criteria null
when SGAMSPT is used in query mode.
The search criteria sport is not required. When the copy process is used and the search
criteria sport is null, all sports in the search criteria with the athletic compliance term are
copied to the future term. When the insert process is used and the search criteria sport is
null, the sport will only be inserted one time, but it will be inserted for any athlete with any
sport in that term. When the update process is used and the search criteria sport is null, all
sports will be updated in that term. It is suggested that a search sport be used for the copy,
insert, or update processes. Only the current competition record is considered, regardless
of the setting of the Season of Competition Used in this Term radio group (
Yes or No)
in the search criteria.
Copy on SGAMSPT
The Copy window on SGAMSPT is used to copy athletic compliance and current
competition information (if it exists) from the current term to a future term. The copy, insert,
or update processes cannot be performed at the same time.
Compliance data is copied as follows:
• Existing compliance values are copied by default, but those values can be modified
before the copy process is performed.

915
Banner Student User Guide | General Student
• The sport code, sport status, athletic eligibility, and academic eligibility values are copied
to the future term.
• When status, athletic eligibility, or academic eligibility values are not entered for the copy
process, existing data is used and is copied to the future term.
• When status, athletic eligibility, or academic eligibility values are entered for the copy
process, those values will supersede the existing values when the copy is performed.
• Attributes are copied to the future term when requested during the copy process.
• Beginning and ending terms of eligibility and the number seasons of competition
available are copied to the future term if current competition data exists for the sport.
• The reason code for the current competition record is not copied to the future term.
• Athletic comments are not copied to the future term.
• The setting of the Athletic Aid (Indicator) is copied to the future term as unchecked or
N. This setting can be changed to Yes in the Insert or Update window for update
processing using the Athletic Aid radio group.
• The setting of the Season of Competition Used (Indicator) is copied to the future term
as unchecked or
N, regardless of the setting on the current competition record in the
current term. This setting can be changed to checked or
Yes in the Insert or Update
window for update processing using the Season of Competition Used in this Term
radio group.
Insert or Update on SGAMSPT
The Insert or Update window on SGAMSPT is used to insert or update athletic compliance
data. The copy, insert, or update processes cannot be performed at the same time.
Use the Athletic Compliance Insert or Update Values section of the window to insert a new
compliance record or update existing compliance values for athletic compliance records
based on the search criteria entered in the Search window. You must enter an athletic
compliance term in the search criteria in order to continue with an insert or update
function, and then go on to process the results.
• For inserts and updates, the athletic compliance term for the search criteria is required.
This prevents a different sport than the one on the current term compliance record from
being copied or updated and then compromising the data and audited competition
records. You can use a mass insert or update for compliance records for a selected
group of athletes that are not associated with a particular sport.
• For updates, the search sport and athletic compliance term are required and cannot be
changed in the Insert or Update window, once they have been entered in the Search
window. To make a change, you would need to return to the Search window and re-enter
a different sport or term. You also cannot change the number of seasons available or the
number of seasons of competition used. This will cause those future term values to be
incorrect.
Inserts and updates are performed as follows:
• The athletic compliance term in the insert or update criteria reflects the value for the
athletic compliance term in the search criteria and cannot be modified.

916
Banner Student User Guide | General Student
• The value in the Sport field is defaulted from the search criteria for the selected term.
This value cannot be changed. (The Athletic Compliance Term value is also defaulted
from the search criteria.)
• When the Sport field in the search criteria is null, the Sport field in the update criteria
will also be null. In this circumstance, all sports in the search criteria athletic compliance
term will be updated. It is suggested that a search criteria sport be provided so that
specific sport updates take place.
• When the Sport field in the search criteria is null, the Insert New Sport value will only
be inserted one time. Duplicate sport records cannot exist for a term.
• The insert process does not insert competition data. Current competition data must be
copied to a future term.
• The insert process does not insert the number of seasons of competition used in the
term.
• When Athletic Aid radio group set to No in the search criteria, the Athletic Aid radio
group must be set to
Yes for the update process.
• When Athletic Aid radio group set to Yes in the search criteria, the Athletic Aid radio
group must be set to
No for the update process.
• When the Season of Competition Used in this Term radio group is set to No in the
search criteria, the Season of Competition Used in this Term radio group must set to
Yes for the update process.
• When the Season of Competition Used in this Term radio group is set to Yes in the
search criteria, the Season of Competition Used in this Term radio group must set to
No for the update process.
Copy on SGASPRT
Compliance records displayed for the term in the Athletic Compliance Sport block on
SGASPRT can be copied to a future term to create new compliance records in that future
term. The Copy button is used to access the Copy Sport to Future Term window where
you can specify the term to copy the compliance record to and then perform the copy. The
Process Copy button is used to perform the copy. The Return button is used to return to
the main window and not perform the copy. A compliance record can only be copied to a
future term (the to term). The from term data is automatically populated with the current
term and cannot be changed. The sport code cannot be changed. If the compliance record
already exists in the specified future term, the compliance data will not be overwritten. If
the compliance record does not exist in the future term, the record will be copied.
Compliance records can exist in any term, with or without competition data. When a
compliance record has associated current competition data, the current competition data
is copied. When competition data is copied, the from term competition record becomes the
history record and cannot be modified. The to term competition record becomes the
current competition record and can be modified. If current competition data exists in a
future term, the copy process will not copy that competition data. Copying attributes is
optional. Attributes can be copied regardless of the existence of competition data.

917
Banner Student User Guide | General Student
Note: You can use Count Query Hits from the Sport field on SGAPSRT to
see the current competition term for the sport when you are on a record in
a prior term, or see a message that no current competition term exists for
the sport.
Compliance data is copied as follows:
• The setting of the Athletic Aid (Indicator) is copied to the future term as unchecked or
N. This setting can be changed to checked or Y on the new record.
• If the compliance record for the future term already exists, then the existing record will
not be modified.
• If the compliance record for the future term does not already exist, a new compliance
record will be created using the from term values.
Competition data is copied as follows:
• If the compliance record for the future term already exists, the current competition data
is copied to the future term.
• Beginning and ending terms of eligibility and the number of seasons of competition
available are copied to the future term.
• The setting of the Season of Competition Used (Indicator) is copied to the future term
as unchecked or
N. This setting can be changed to checked or Y on the new record.
• The reason code is not copied to the future term.
• Seasons of competition used and seasons of competition remaining are recalculated.
• Attribute data will be copied to the future term when the Copy Attributes checkbox is
checked in the Copy Sport to Future Term window.
Compliance records with competition history can be copied a future term, but only the
compliance data is copied. Competition data is not copied, as it is not current. Attributes
are copied if selected. Current competition data can be copied to any future term. For
example:
• The compliance record for golf exists in term 200111 with competition history.
• The compliance record for golf exists in term 200122 without competition data.
• The compliance record for golf exists in term 200133 with current competition data.
• The compliance record for golf exists in term 200144 without competition data.
• The compliance record for golf exists in term 200155 without competition data.
You choose to copy the compliance record for golf in term 200133 with current competition
data to term 200166. The compliance and competition records are copied successfully.
The results are:
• The compliance record for golf exists in term 200133 with competition history.
• The compliance record for golf exists in term 200166 with current competition data.

918
Banner Student User Guide | General Student
You can view the new compliance record in the Athletic Compliance Term and Athletic
Compliance Sport blocks to see the data that was copied forward. The detail for the new
record is displayed in the Athletic Compliance Sport block, and any competition
information that was copied is displayed in the Athletic Competition block. When attributes
are copied, that data is displayed in the Athletic Attributes block.
Sample Rules for Insert, Update, and Copy
Here are some example rules for how the insert, update, and copy functionality works on
SGASPRT and SGAMSPT. Compliance records can be created in any term. Remember
that current competition records must be copied to future terms.
The example rules that follow use these three terms:
• Term 200111 = current or prior term
• Term 200222 = future term 1
• Term 200333 = future term 2
Insert and Update Compliance (Sport) Records
These rules refer to creating and inserting compliance records for an athlete.
• Compliance records can be created for Term 200111 when the sport does not already
exist in Term 200111.
• Compliance records can be created for Term 200111 if the sport record exists in Term
200222.
• Competition records cannot be created for Term 200111 if competition data exists in
Term 200222. An error is displayed that competition data cannot be created in the term.
• Competition records can be created in Term 200111 when no competition records exist
for the sport in Term 200222.
• Compliance records can be created for Term 200222 when compliance records exist in
Term 200111, even when competition data exists in Term 200111.
When current competition data exists in Term 200111 and compliance data (only) exists
in Term 200222, competition data cannot be manually entered in Term 200222. You will
need to copy the current competition data in Term 200111 to Term 200222. If you
attempt to manually enter competition data in Term 200222, an error is displayed that
competition data exists for this sport in a prior term, and the current competition data
needs to be copied to a future term.
Copy Records Individually
These rules refer to copying compliance records on SGASPRT.
• Compliance records with no competition data in Term 200111 can be copied to any
future term.

919
Banner Student User Guide | General Student
• Compliance records with current competition data in Term 200111 can be copied to Term
200222. When compliance data only exists in Term 200222, the current competition
data will be copied to Term 200222.
• Compliance records cannot be copied from a future term to a previous term, such as
copying from Term 200222 to Term 200111.
• Compliance records can be copied from Term 200111 to Term 200222 when no
competition data exists in Term 200111, and when no compliance record exists in Term
200222.
• Compliance records with current competition data can be copied from Term 200111 to
Term 200333 when current competition data exists in Term 200111 and compliance data
exists in Term 200222.
Insert and Update Records Through Mass Entry Processing
These rules refer to inserting sport records using mass entry processing on SGAMSPT.
For inserts and updates, the athletic compliance term for the search criteria is required.
When the athletic compliance term and sport are entered in the search criteria, they will be
displayed in the Insert or Update Window and cannot be changed. To make a change, you
need to return to the Search window and re-enter a different sport or athletic compliance
term.
• Compliance records can be updated for Term 200111 or Term 200222 at any time.
• Current competition data can be updated in Term 200111.
• Current competition data can be updated in Term 200222 when competition history
exists or when no competition data exists in Term 200111.
• Current competition data can be updated in Term 200111 when compliance data exists
in Term 200222.
• Only current competition data can be updated, regardless of term.
You must complete all updates to current competition data for Term 200111 before the
competition record is copied to Term 200222. For example, you cannot go back to the
competition history record and change the setting of the Season of Competition Used
indicator.
Delete Compliance (Sport) Records
These rules refer to deleting compliance (sport) records from SGASPRT.
• Compliance records can only be deleted from SGASPRT. They are not associated with
general student records and are not deleted when the General Student Purge Process
(SGPSTDN) is run.
• Compliance records cannot be deleted when athletic competition data (history or
current) exists.
• Compliance records can be deleted when no competition data (history or current) exists
for the sport, and no related data (such as athletic comments or athletic attributes)
exists.

920
Banner Student User Guide | General Student
• Non-term data (such as athletic eligibility, general comments, transfer information, or
admissions information) needs to be removed and the changes saved prior to the
deletion of the last (most recent) sport record.
• Each compliance record must be deleted separately. A prompt is displayed to ensure
that you wish to delete the record and save the changes.
• You cannot delete all sport records by deleting the term.
Query on Athletic Competition Information
The Athletic Compliance Inquiry Form (SGISPRT) is used to query on and view athletic
compliance record and athletic competition record summary information for an athlete.
You can access SGISPRT using the Options Menu from SGASPRT and SGAMSPT.
You have the ability to select how the data is displayed and organized on the form. In the
Key Block, you can enter either the ID for the athlete and view the associated sport
records by term, or you can enter a sport and view the associated IDs by term for the
sport. You can only enter the ID or the sport, not both.
Once you have entered the ID or the sport and used Next Block to access the Athletic
Compliance Inquiry block, you can change the summary data display by selecting a
different view from the Choose View field. The list of available views is specific to the Key
Block selection of ID or sport. You can also perform subqueries on the summary data in
the Athletic Compliance Inquiry block.
Note: The current record is always the most recent sport record with
competition data.
You can view the following types of records using the Choose View field.
View Description ID, Sport, Both
All Records Displays all records for a sport or ID
(depending on the value entered in the
Key Block), with or without associated
competition records.
Both
All Competition Records Displays all competition records for a
sport or ID (depending on the value
entered in the Key Block), those
current and those in history.
Both
Most Recent
Competition Records
per Term
Displays most recent history record for
each term when multiple competition
history records exist.
Both

921
Banner Student User Guide | General Student
Current Competition
Records
Displays current competition records
only:
• for each sport when an ID is entered
in the Key Block, and
• for each ID when a sport is entered in
the Key Block.
Both
Sports without
Competition Records
Displays sport records that do not have
associated competition data.
ID
Current and Most
Recent Records (default
for ID inquiry)
Displays current sport record with
competition, as well as the sport record
with the highest term that does not
have an associated competition
record, if one exists.
If a sport record has a competition
record, and another sport record exists
that has a higher term but does not
have a competition record, both
records will be displayed.
If a sport record exists for a term that is
less than the highest term for the
competition record, it will not be
displayed.
ID
Athletes without
Competition Records
Displays sport records for athletes,
where those records do not have
associated competition data.
Sport
Current and Most
Recent Records per
Athlete per Sport
(default for sport
inquiry)
Displays current sport record with
competition, as well as the sport record
with the highest term that does not
have an associated competition
record, if one exists.
If a sport record has a competition
record, and another sport record exists
that has a higher term but does not
have a competition record, both
records will be displayed.
If a sport record exists for a term that is
less than the highest term for the
competition record, it will not be
displayed.
Sport
View Description ID, Sport, Both

922
Banner Student User Guide | General Student
Track Athletic Academic Progress
The Athletic Academic Progress Form (SGAAPRG) is used to track the academic
progress of an athlete for a degree. Progress is determined by credit hours per term and
academic year, to see if the athlete is in compliance and has met the academic
requirements to compete in a sport. This form provides curriculum and field of study
summary information. Degree completion information can be entered as well.
Records in the Academic Requirements block cannot be modified or deleted. Only the
setting of the Active (Indicator) can be changed. If you want change a record, create a
new record for the term, enter the hours, make it the active record (set the Active
checkbox to checked or
Y), and inactivate the existing record (set the Active checkbox to
unchecked or
N). This creates an audit history for the athlete.
Banner Views Used with Athletic Compliance Processing
Two Banner views are used with athletic compliance processing.
Athletic Compliance Sport Records by Term and ID View (SGVATPT)
This view is used to collect data for PIDMS for unique terms for which athletic compliance
records (SGRSPRT) exist.
The following rows are in this view:
SGVATPT_PIDM
SGVATPT_TERM_CODE
Athletic Compliance Sport Records View (SGVISPT)
This view is used to collect all sports data for PIDMS for which athletic compliance records
(SGRSPRT) and athletic competition records (SGRATHC) exist. For example, you could
perform a select of ID and full name, by term and sport code, and create a roster for that
sport.
The following rows are in this view:
SGVISPT_PIDM
SGVISPT_ID
SGVISPT_FULL_NAME
SGVISPT_TERM_CODE
SGVISPT_ACTC_CODE
SGVISPT_SAEL_CODE
SGVISPT_ELIG_CODE
SGVISPT_SPST_CODE
SGVISPT_ATHL_AID_IND
SGVISPT_STST_CODE
SGVISPT_ASTD_CODE
SGVISPT_SEASON_USED_IND
SGVISPT_CURRENT_IND
SGVISPT_COMP_SEQ_NO

923
Banner Student User Guide | General Student
SGVISPT_COMP_USER_ID
SGVISPT_COMP_ACTIVITY_DATE
SGVISPT_SARE_CODE
SGVISPT_SEASONS_AVAILABLE
SGVISPT_ELIG_BEGIN_TERM_CODE
SGVISPT_ELIG_END_TERM_CODE
Student Right to Know Reporting
The Student Right to Know act proposes regulations that require an institution of higher
education to disclose information about its student body's completion or graduation rates.
This act expands the types of "consumer" information that institutions are required to
disclose to both current and prospective students through appropriate publications and
mailings.
Institutions are required to report a completion or graduation rate for full-time certificate-
seeking or degree-seeking undergraduate students. Also, institutions that award
athletically related student aid are required to report completion or graduation rates of
various student populations at the institution, including student athletes. If an institution
cannot calculate the graduation rate of the most recent cohort of students that has had an
opportunity to graduate, the institution would report a persistence rate until it can disclose
an actual graduation rate of an entering cohort of students. This statute requires an
institution to make these disclosures to current and prospective students by July 1, 1993,
and annually thereafter.
Note: References to the "Legislation" in this procedure, refer to the Notice
of Proposed Rule Making which was published in the July 10, 1992
Federal Register. It is recommended that you read either this information,
or the Dear Colleague Letter from the US Department of Education dated
August 21, 1991 before this processing is implemented.
The following are the procedural steps which may be followed to implement the Student
Right to Know reporting:
1. Update the following validation forms with your institution's defined codes:
Degree Level Code Validation Form (STVDLEV)
This form needs to be updated with numeric values, indicating a hierarchy of your
institution's degree levels.
For example, an associates level degree may be assigned a numeric value of 5, a
baccalaureate level degree may be assigned a numeric value of 10, and a masters
level degree may be assigned a numeric value of 15. This will indicate that a
baccalaureate level degree is higher than an associates level degree, and that a
masters level degree is a higher degree level than a baccalaureate level degree.
Cohort Code Validation Form (STVCHRT)
An institution will define their Student Right to Know Cohort Codes on this form.
For Student Right to Know cohorts, a Cohort Code, Description, Start Term, End
Term, Degree Level, and a checked Print Indicator must be designated for each
code.

924
Banner Student User Guide | General Student
Note: You must check the Print Indicator for those cohort codes which
are to be included in the Student Right to Know Report (SGRKNOW).
Cohort codes may be used for both Student Right to Know reporting or for
tracking of other types of populations or groups.
When defining your institution's Student Right to Know cohorts, it is very important that
the start term reflects the fall term in which the cohort of students entered the
institution, and that the end term reflects the very last term in which the students could
have completed or graduated from their respective programs in order to meet the
regulatory requirements.
According to the legislation, a student is considered to have completed or graduated
from their respective programs if they completed or graduated from the programs they
entered within 150 percent of the normal time to completion or graduation.
Example:
If your institution offers an associates level degree, whose normal time to completion
is 2 years, students enrolled in this program will be given 3 years to graduate or
complete from this program in order to be considered a graduate under the Student
Right to Know reporting.
If your institution offers a baccalaureate level degree, whose normal time to
completion is 4 years, students enrolled in this program will be given 6 years to
graduate or complete from this program in order to be considered a graduate under
the Student Right to Know reporting.
According to the legislation, if an institution offers programs of different length, the
institution must disclose its completion or graduation rate when 150 percent of the
normal time for completion or graduation for its longest program has elapsed. If your
institution offers both associate and baccalaureate level degrees, each must be
defined as separate cohort codes for Student Right to Know reporting in the Banner
Student System. Please note that according to the legislation, an institution must
disclose an institution-wide rate. That is, the graduation rate for an entering class of
associate level students and the graduation rate for the entering class of
baccalaureate level students, whose start terms must match, must be combined and
reported after students in both programs have been given the allowed time to
graduate or complete their programs under the requirements of the Student Right to
Know Act.
Examples:
The following is a list of the term codes and time frames that will be used in all
examples within this document.
Academic
Fall
Term Code
Spring
Term Code
Summer
Term Code
86-87 198601 198602 198603
87-88 198701 198702 198703
88-89 198801 198802 198803
89-90 198901 198902 198903

925
Banner Student User Guide | General Student
Example 1:
For an institution that offers a two-year associate and a four-year baccalaureate
program, and does not have historical data to report, the cohort codes for the entering
Fall class in 1991 might be defined as follows:
Therefore, students entering the Associate cohort in the Fall of 1991 will be given until
the end of the summer for the academic year 1993-1994 to complete their degree
level program, and students entering the Bachelor cohort in the Fall of 1991 will be
given until the end of the summer of the academic year 1996-1997 to complete their
degree level program.
For the July 1, 1993 reporting deadline, this institution will be reporting the persistence
rate of the entering class of 1991. The persistence rate is the percentage of students
that completed their degree level program, moved to a higher level program, or re-
enrolled in the institution in the Fall of 1992.
Example 2:
For an institution that offers a two-year associate and a four-year baccalaureate
program, and has historical data for the entering class of 1986 to report, their cohort
codes might be defined as follows:
90-91 199001 199002 199003
91-92 199101 199102 199103
92-93 199201 199202 199203
93-94 199301 199302 199303
94-95 199401 199402 199403
95-96 199501 199502 199503
96-97 199601 199602 199603
97-98 199701 199702 199703
Cohort Code Description
Start
Term
End
Term
Degree
Level
Prnt
Incl
91ASSOCIATE Fall 1991 Associates Candidates 199101 199303 01 Y
91BACHELOR Fall 1991 Bachelors Candidates 199101 199603 02 Y
Cohort Code Description
Start
Term
End
Term
Degree
Level
Prnt
Incl
86ASSOCIATE Fall 1986 Associates Candidates 198601 198803 01 Y
86BACHELOR Fall 1986 Bachelors Candidates 198601 199103 02 Y
Academic
Fall
Term Code
Spring
Term Code
Summer
Term Code

926
Banner Student User Guide | General Student
Therefore, students that entered the associate cohort in the Fall of 1986 were given
until the end of the summer for the academic year 1988-1989 to complete their degree
level program, and students entering the bachelor cohort in the Fall of 1986 will be
given until the end of the summer of the academic year 1991-1992 to complete their
degree level program.
For the July 1, 1993 reporting deadline, this institution will be reporting the completion/
graduation rate of the entering class of 1986. That is, they will report the percentage of
students that have completed their degree level program or moved to a higher degree
level program prior to the specified end term as defined on the Cohort Code Validation
Form (STVCHRT).
Cohort Reason Code Validation Form (STVCREA)
This validation form allows you to define reasons for inactivating a student's cohort
code. For the purpose of calculating Student Right to Know graduation rates, an
institution may inactivate a student's cohort code, and therefore remove the student
from the cohort, if they leave the institution for one of the four following reasons:
• To serve in the Armed Services,
• To serve on Official church mission assignments,
• To serve with a foreign aid service of the Federal Government, such as the Peace
Corps,
• If they have died.
Cohort reason codes should be created for each of these instances to support the
Student Right to Know reporting.
Banner Student Activity Code Validation Form (STVACTC)
If your institution awards athletically related financial aid, your institution is required to
report the graduation rates of certain groups of student athletes in addition to the
required institution-wide graduation rate.
The sports in which the graduation rates of student athletes must be tracked are:
• Basketball
• Baseball
• Football
• Cross Country/Track
• All other sports combined
Sport codes should be created for each of these instances, as well as for other sports
for which your institution awards athletically related aid, to support the Student Right
to Know reporting.
Note: Do not use "UNASSIGN" as an activity code. This value has
already been defined as a default for use in processing for the Student
Right to Know Report (SGRKNOW).
This functionality was not designed to satisfy the NCAA Reporting Requirements; it
was designed to comply with the requirements outlined in the Student Right to Know
Legislation.

927
Banner Student User Guide | General Student
2. Once all validation tables have been updated or created, you must associate students
with cohort codes for an effective term on the Additional Student Information Form
(SGASADD). This task may be accomplished two ways:
The first method of associating students with cohort codes is online association, which
is performed on a student-by-student basis in the Additional Student Information Form
(SGASADD). The keys to this form are student ID and effective term.
An alternate method of associating students with cohort codes is via the batch Cohort
Load Process (SGRCHRT). This load process utilizes population selection, and
should be run to update the student's general student cohort codes for the specified
effective term. (Cohort codes may be loaded in batch into a person's existing
recruiting, admissions, general student, or academic history record.)
A student should be placed in your institution Student Right to Know cohorts if they are
full time, undergraduate, certificate-seeking, or degree-seeking students that have
entered a program of higher education for the first time at your institution during the
fall term. The cohort should also include students who enter an institution for the first
time during the summer and then re-enroll at the same institution for the fall
enrollment. However, an institution should exclude from the cohort students who enter
the institution during the summer but fail to re-enroll at the same institution for the fall
enrollment. For the purpose of establishing a cohort of students, an institution never
includes students who transfer into the institution.
3. Once you have associated students with their respective Student Right to Know
cohort code, if your institution awards athletically based financial aid, student athletes
must also be associated with sport codes on the Student Sport Form (SGASPRT).
Students must be associated with a sport for which they have received athletically
related financial aid, for the start term of their Student Right to Know cohort. The
Athletic Aid (Indicator) for each sport code for which the student has received
financial aid to participate in must be checked.
Example:
John Miller is a member of the entering cohort of baccalaureate candidates at your
institution in the fall of 1991 (Term 199101). At this time, John is awarded athletic aid
to play baseball. John would be assigned the baseball sport code with a checked
Athletic Aid (Indicator) in the Student Sport Form (SGASPRT) for 199101. In the Fall
of 1993, John decides he will no longer play baseball. This information may be
updated and tracked for your institution's use; however, John will remain a member of
the baseball sport code and baccalaureate level cohort for Student Right to Know
reporting.
The keys to the Student Sport Form are ID and Term. Once again, it is important that
the student's sport code is entered with a checked Athletic Aid (Indicator)
for the
start term of their cohort to be accurately processed in the Student Right to Know
Report (SGRKNOW).
4. Run the Student Right to Know Report (SGRKNOW).
Note: For institutions outside of the United States, the Student Right to
Know Report (SGRKNOW) uses IPEDS Ethnic Codes as defined on the
IPEDS Ethnic Code Validation Form (STVETCT). These values must be
entered for your institution's Ethnic Code Validation Form (STVETHN).

928
Banner Student User Guide | General Student
The parameters used by the report are as follows:
Report Term - (single, required) Defines the start term of the cohort codes to be
processed and is validated against the Term Code Validation Form (STVTERM).
Cohort Start Term - (multiple, required) Limits the code(s) processed to those
specified with a matching start term. A wildcard (%) will process all cohort codes with
a matching start term and a checked Print Indicator. Cohort codes are validated
against the Cohort Code Validation Form (STVCHRT).
Enrollment Term - (single, optional) Defines the term in which students must have
enrollment to be counted as a persister. Term codes are validated against the Term
Code Validation Form (STVTERM).
Cohort Code - (multiple, required) Defines the cohort codes to be processed and is
validated against the Cohort Code Validation Form (STVCHRT). A wildcard (%) will
process all cohort codes.
Note: Only cohorts with start terms matching the Cohort Start Term
parameter selection will be processed. If a wildcard (%) is entered, only
those cohorts with start terms matching the Cohort Start Term parameter
or having a Print Indicator that is checked (set to
Y) on the Cohort Code
Validation Form (STVCHRT) will be processed.
Sport Activity Code - (multiple, optional) Specifies the sport activity code(s) to be
processed for each cohort code and is validated against the Banner Student Activity
Code Validation Form (STVACTC). Enter a wildcard (%) to process all sport activity
codes.
Degree Level - (multiple, required) Limits cohort code(s) to be processed to match the
degree level as specified on the Cohort Code Validation Form (STVCHRT), or a
wildcard (%) may be entered to process all degree levels.
Athletic Aid Indicator - (Y/N) Enter
Y to select only those students with the sport
code(s) to be processed where the Athletic Aid (Indicator) for the sport code is
checked.
Print Detail Report Indicator - (Y/N) Enter
Y to print a detailed listing of students in
each category.
Process by Student Period - (Y/N) Enter
Y to process a student centric period in the
report.
The following are an examples of how report parameters may be set.
Example 1:
For an institution that offers a two-year associate and a four-year baccalaureate
program, and does not have historical data to report, the report parameters would be
set as follows:

929
Banner Student User Guide | General Student
Example 2:
For an institution that offers a two-year associate and a four-year baccalaureate
program and has historical data for the entering class of 1986 to report, the report
parameters would be set as follows:
Parameter Value
Report Term: 199101
Enrollment Term: 199201 (For the July 1, 1993 reporting, a
persistence rate of the class of 1991 in the fall term
of 1992 must be reported.)
Cohort Code: % (Process all cohort codes with start term of
199101 and a checked Print Indicator.)
Sport Activity Code: % (All sport activity codes will be processed.)
Degree Level: % (Process cohort codes at all degree levels with a
start term of 199101.)
Athletic Aid Indicator Y (Select only those students with athletic aid for
the sport code(s).)
Print Detail Report Indicator: Y (Print a list of students placed into each
category.)
Parameter Value
Report Term: 198601
Enrollment Term: Leave Null (For the July 1, 1993 reporting, the
actual completion/graduation rate will be
determined; therefore, an enrollment term does not
need to be entered.)
Cohort Code: % (Process all cohort codes with a start term of
198601 and a checked Print Indicator.)
Sport Activity Code: % (All sport activity codes will be processed.)
Degree Level: % (Process cohort codes all degree levels with a
start term of 198601.)
Athletic Aid Indicator Y (Select only those students with Athletic Aid for
the sport code(s).)
Print Detail Report Indicator: Y (Print a list of students placed into each
category.)

930
Banner Student User Guide | General Student
If these report parameters are entered, the output would contain:
• a summary sheet for the associates level cohort followed by a detailed listing of
students within each Student Right to Know category,
• a summary sheet for each sport code that is related to the students in the
associates level cohort followed by a detailed listing of students within each Student
Right to Know category,
• a summary sheet for the baccalaureate level cohort followed by a detailed listing of
students within each Student Right to Know category,
• a summary sheet for each sport code that is related to the students in the
baccalaureate level cohort followed by a detailed listing of students within each
Student Right to Know Category.
The categories* a student may fall into for Student Right to Know reporting are as
follows. They appear on the Student Right to Know Report (SGRKNOW) output.
* These categories match those defined in the US Department of Education's National
Center for Educational Statistics.
Please review the process flow after this section which shows the relationship of the
categories.
(01) Initial cohort of students - This is the number of students with a specified general
student cohort, regardless of their active/inactive status. This number represents
everyone who was placed in the cohort.
(02) Adjustment to cohort - This is the number of students in the initial cohort that have
had their general student cohort code inactivated for an effective term that falls within
the time period of the start term through the end term or the report parameter
enrollment term, whichever is earlier.
(03) Adjusted cohort - This is the number of students in the cohort whose general
student cohort code is still active. This is calculated by subtracting the adjustment to
the cohort from the initial cohort figure.
(07) Total Graduates - This is the number of students from the adjusted cohort who
have a degree record on the Degrees and Other Formal Awards Form (SHADEGR)
with an Awarded Indicator of
A (on the Degree Status Code Validation Form
(STVDEGS)) at the degree level of the cohort as defined on the Cohort Code
Validation Form (STVCHRT). The degree must have been awarded prior to the ending
date of the end term of the cohort as defined on the Cohort Code Validation Form
(STVCHRT), or prior to the ending date of the user-specified enrollment term,
whichever is earlier.
Note: The Graduation Date or the End Date of the graduation term
associated with the degree will be used in the comparison. One of these
fields must be populated in order for a student to be counted as a member
of the Total Graduates Category.
(08) Persisters - This is the number of students from the adjusted cohort that are not
counted in the Total Graduates category but do have registration records for the
specified enrollment term.

931
Banner Student User Guide | General Student
Note: Students will only be placed in this category if the enrollment term
is earlier than the end term of the cohort as defined on the Cohort Code
Validation Form (STVCHRT).
(13) Total Transfer Out (Up) - This is the number of students from the adjusted cohort
that are not counted in the total graduates category, do not count in the persisters
category, but do have a degree record on the Degrees and Other Formal Awards
Form (SHADEGR) for a higher degree level program than the degree level of the
cohort as specified on the Cohort Code Validation Form (STVCHRT). These students
must have entered this program prior to the ending date of the end term of the cohort
as defined on the Cohort Code Validation Form (STVCHRT), or prior to the ending
date of the user-specified enrollment term, whichever is earlier.
Note: The Graduation Application Date for the degree record will be
used in this comparison.
(14) Attrition/Unknown - This is the number of students from the adjusted cohort that
are not counted in the total graduates, total transfer out (up), or persister categories.
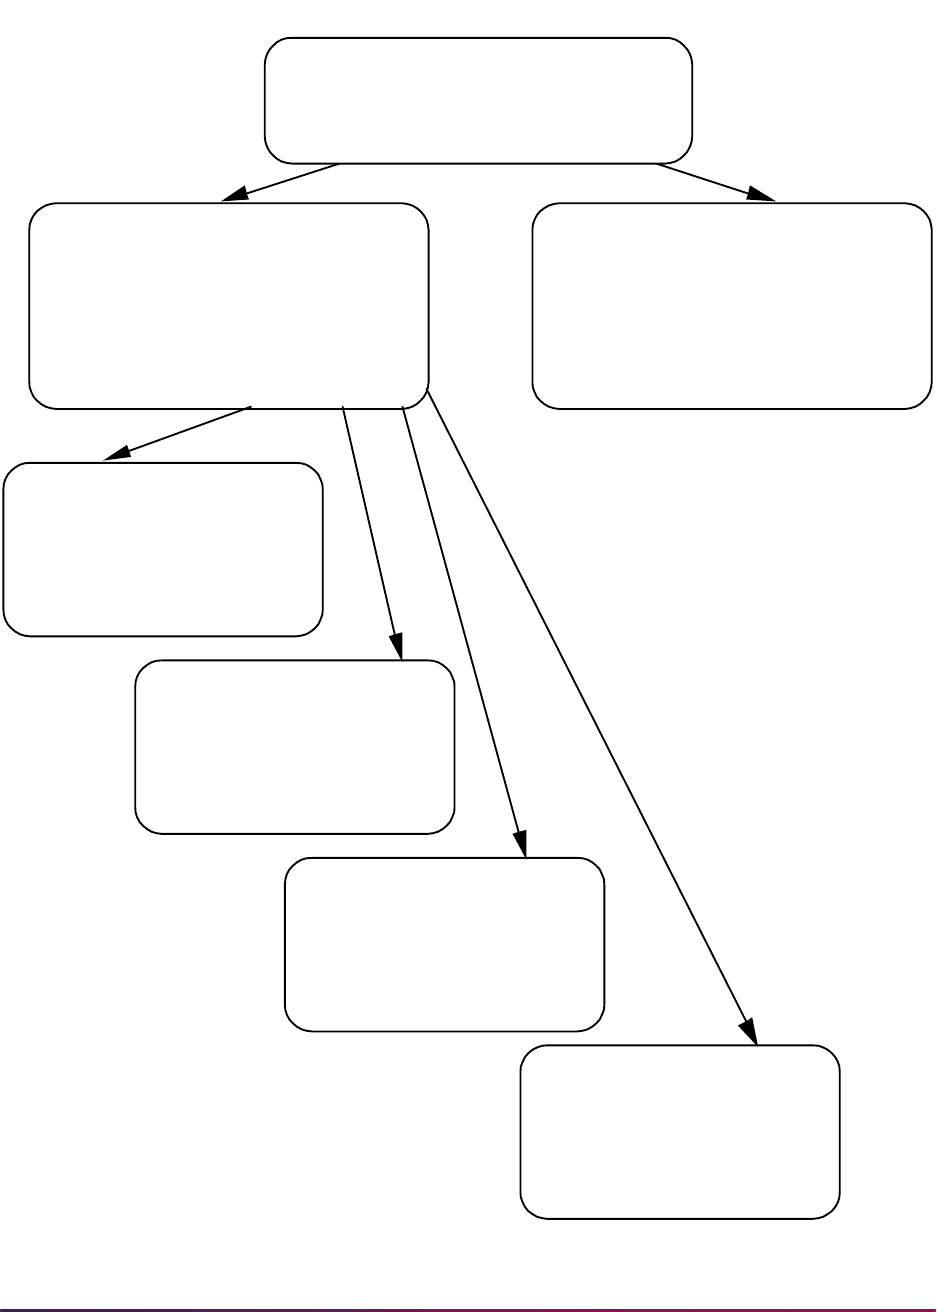
932
Banner Student User Guide | General Student
Note: A student from the Adjusted Cohort will
only fall into one of the following categories;
Total Graduates, Total Transfer Out (Up),
Persisters, or Attrition/Unknown.
S
tu
d
e
n
t
R
i
g
h
tt
o
K
n
o
w
R
e
p
o
rti
n
g
C
a
te
g
o
rie
s
Total Graduates
The number of students from the
Adjusted Cohort wi th an
awarded degree at the degree
l evel of the Cohort Code.
07
Total Transfer Out (Up)
The number of students from the
Adjusted Cohort wi th a degree
record at a higher degree level
than the Cohort Code.
13
Persi sters
The number of students from the
Adjusted Cohort with enrollment
for the Enrollment Term.
08
Attrition/ Unknown
The number of students from the
Adjusted Cohort that do not fal l
into the Graduates, Transfer Up,
or Persisters Categories.
14
Adjusted Cohort
03
Student Record has the Cohort Code
for the specified Start Term, and the
Cohort Code i s active from the Start
Term through the End Term or the
Enrollment Term, whichever isearlier.
02
Adjustment to Cohort
02
Student Record has the Cohort Code for
theStartTerm,yettheCohortCodeis
inactive some time during the Start Term
through the End Term or the Enrollment
Term, w hichever is earlier.
Initial Cohort of Students
Student Record has the Cohort Code for
the speci fied Start Term.
01

933
Banner Student User Guide | General Student
Assign Cooperative Education Program
Cooperative education data for an admitted student is entered and maintained on the
Cooperative Education Form (SGACOOP).
Assign Education Opportunity Programs and Services
The Education Opportunity Programs and Services Form (SGAEOPS) is an optional form
allowing an institution to record and maintain information such as EOPS status eligibility
factors, acceptance date, and student financial aid eligibility. Information is maintained on
this form by effective term, as on the General Student Form. The person must be a student
before EOPS information can be entered.
Establish Student Classification
The Student Classification Rules Form (SGACLSR) is used to establish the academic
classification rules to determine class calculation of freshman, sophomore, etc., based on
the range of hours entered and any user-defined student attributes. A student's
classification is determined by comparing his hours earned in academic history against the
institution established rules. The student's attributes are maintained on the Additional
Student Information Form (SGASADD).
The Student Classification Rules Form (SGACLSR) allows for the addition of attributes to
be included in the rules processing. You can specify additional requirements along with
the credit hour range for determining a student's classification. For example, if a student
must complete a sophomore language test prior to becoming a junior, this requirement
can be included in the rules. These attributes are maintained on the Student Attribute
Validation Form (STVATTS). An unlimited number of attributes may be associated with a
rule. If multiple attributes are specified on a rule, then these attributes must all be satisfied
for the student to be given the classification. Using the above example, a student who has
between 60 to 89.99 earned hours, who has the attribute of SOPR - Sophomore
Language Test, will be classified as a junior. A student who has 60 to 89.99 hours who
does not have the attribute will remain a sophomore.
These attributes are associated with the student on the Additional Student Information
Form (SGASADD). These attributes are effective term oriented and are unlimited. By each
attribute being effective term oriented, it will allow the user to "time stamp" the information.
Class Standing
Class standing uses the levels on the Student Classification Rules Form (SGACLSR). A
rule must exist for the level of courses in academic history in order to determine a
student's class standing. Only course levels that match the student level are used.

934
Banner Student User Guide | General Student
Example:
Undeclared Student Level
Class Standing Undeclared
Class standing is calculated and displayed on the general student record, the Student
Course Registration Form (SFAREGS), and the Term Course Maintenance Form
(SHAINST). The standing which displays on all Banner Student forms prior to being rolled
to academic history is calculated by using the institution term GPAs which are less than
the term in the Key Information, or the transfer term GPAs which are less than or equal to
the term in the Key Information.
Add/Maintain Test Scores
Once a prospect has been established on the database, the various types of tests
required for recruiting a prospect are entered on the Test Score Information Form
(SOATEST). Test scores for SAT, ACT, GRE, GMAT, and AMCAS tests can also be loaded
using test score data loads and are recorded on this form.
Add/Maintain High School Data
The High School Information Form (SOAHSCH) is used to enter information about a
person's high school career. The information includes high school, transcript dates,
graduation date, GPA, and subjects taken in high school.
Add/Maintain Prior College Data
The Prior College Form (SOAPCOL) is used to enter and maintain information about a
person's prior college experience including degree information such as majors, minors,
UD 0 - 999.99 UD - Undeclared
UG 0 - 25.99 01 - Freshman
UG 26 - 57.99 02 - Sophomore
UG 8 - 89.99 03 - Junior
UG 90 - 999.99 04 - Senior
GR 0 - 99.99 GR - Graduate
1 Undeclared Level Course 3 credits
1 Undergraduate Level Course 3 credits
1 Graduate Level Course 4 credits

935
Banner Student User Guide | General Student
and areas of concentration, number of hours, GPA, and transcript date. A summary of the
prior college information may be obtained from the Prior College Summary Form
(SOAPCOQ).
Review Student Data
The Student Report (SGRSTDN) is produced to provide, by term, an informational listing
of students. Information displayed includes campus, level, student type, residency, block
code, degree, major, and graduation information. It will provide historical information of
changes made during a student's career. It also includes veteran information, comments,
and activities.
Review Veterans Data
The Veteran Report (SGRVETN) is used to list students with veteran information by term.
It includes not only the student's veteran type and number, but also the certification hours
and current schedule of classes. Schedule and veteran number data are required.
In order to produce this report, three components must exist in Banner.
• Information must be entered in the Veteran Information window of SGASTDN for the
Veteran Type, Term, Certification Credit Hours, and Certification Date fields. Valid
values for the veteran type code come from STVVETC. The term code is the term of
veteran certification. The veteran certification credit hours for the term are entered in
format 99.99. The veteran certification date is entered in format MON-DD-YYYY.
• The veteran file number must exist on the General Person Form (SPAPERS) in the
Veteran File Number field.
• The student must be registered for courses on the Student Course Registration Form
(SFAREGS).
Also, the term code entered in the Veteran Information window of SGASTDN and on
SFAREGS must match the term code entered in the Term parameter for the report.
Cooperative Education (Co-op) Tracking
This section discusses using cooperative education tracking.
Overview
Co-op tracking allows institutions to track dates, purposes, and sponsorships for activities
related to courses or other educational tasks that need to be linked to enrollments or
recorded in academic history.
You can create multiple co-op records, attach them to CRNs (sections), and roll them to
academic history. When you have attached a co-op to a course section, you can track the

936
Banner Student User Guide | General Student
activity’s sponsor for tasks such as residencies, internships, and clerkships and check
potential schedule conflicts and data overlaps.
Note: You may have multiple co-ops for a student for a term, but the CRN
assigned to each co-op must be unique.
Tracking Co-ops
Here is information on setup and use of co-op tracking.
Validation Form Set-up
Use the Cooperative Education Code Validation Form (STVCOPC) to create cooperative
education codes.
Check the Co-op Assignment Allowed checkbox on the Schedule Type Code Validation
Form (STVSCHD) to indicate that the schedule type for the section is allowed to be
assigned to a co-op on SGACOOP.
Using SGACOOP for Co-ops
Use the Cooperative Education Form (SGACOOP) to enter or validate CRNs that are
associated with co-ops.
The CRN field on SGACOOP allows the entry of a CRN associated with a co-op. This field
also validates entries so that only sections which exist and that allow co-op attachment
(based on the schedule type) can be assigned as a co-op activity. Also, the CRN must
exist for the person in registration for the term or in academic history for the term.
You may navigate to three other forms from the CRN field. Use function keys or the Option
List to access the information. You may query sections, registration, or history.
• Use a List function or select Schedule Section Query from the Option List to access the
Schedule Section Query Form (SSASECQ).
The Schedule Section Query Form (SSASEGQ) will display from SGACOOP if a
schedule exists for the effective term in the Key.
If you enter a term in the Key for which no sections exist on SSASECQ, you will see the
following error, *ERROR* No Schedule for the selected term.
• Use a Count Query Hits function or select Registration Query from the Option List to
access the Registration Query Form (SFAREGQ).
The Registration Query Form (SFAREGQ) will display from SGACOOP if a valid CRN
exists for the ID number, effective term, and level, so you may query the student’s
schedule. This allows you to view active registration information for the term so you can
select the CRN to be associated with the co-op.
If you enter an ID for a student who has no registration information on SFAREGQ for the
term in the Key, you will see the following error, *ERROR* No registration exists for the
selected term.

937
Banner Student User Guide | General Student
• Use a Duplicate Item function or select Course Summary from the Option List to access
the Course Summary Form (SHACRSE).
The Course Summary Form (SHACRSE) will display from SGACOOP if a valid CRN
exists for the ID number, effective term, and level, so you may query the student’s
courses for the term. This allows you to view courses in history for the term so you can
select the CRN to be associated with the co-op.
If you enter an ID for a student who has no academic history information on SHACRSE
for the term in the Key, you will see the following error, *ERROR* No Academic History
for selected term.
The following situations will cause errors to be displayed in the autohelp on SGACOOP:
• If you enter a CRN that is not valid for the term, you will receive the message *ERROR*
CRN does not exist and will not be able to advance into the form. If you have already
removed the information for the student using the Cooperative Education Purge
(SGPCOOP), you should delete the co-op record, or you will receive this error.
• If you enter a CRN where the schedule type is not checked as a co-op assignment on
STVSCHD (does not allow assignment to a co-op activity), you will receive the message
*ERROR* Schedule type does not allow co-op and will not be able to advance into the
form.
• If the co-op record exists, and the student’s information has been changed in
registration or academic history, (i.e., the student is dropped from a course, the CRN is
no longer valid as it is counted in enrollment on STVRSTS), you will receive the
message *WARNING* CRN is no longer valid for the term and level. However, you will
be able to advance in the form. The CRN must represent a section for which the student
has registered or has in history for the term and level of the co-op activity. If you run
purges for registration and scheduling, but the student has already been rolled to
history, the error will not occur.
The Course Title field (untitled) on SGACOOP displays the title of the course entered in
the CRN field. This title will come from the schedule, if the CRN is assigned to the co-op
and the enrollment is in registration, or it will come from history, if the CRN is assigned to
the co-op and the enrollment has already been rolled to history.
The Begin Date and End Date fields on SGACOOP are optional fields used to check for
overlapping dates on the co-op records for the term, regardless of level or schedule type.
When a conflict exists, an alert box will display with the message *WARNING* Activities
overlap in term, check to override. Check the Override box and then save the record to
continue to add data for the co-op. This data overlap checking will take place whenever a
new activity is added or when the start or end dates are changed.
The Evaluation Prepared and Evaluation Received date fields on SGACOOP are
optional fields which may be used to track when a student’s evaluation was prepared and
sent to the co-op provider and then received from and recorded by the co-op provider.
The Employer Code field on SGACOOP is optional, so you are not required to enter
employer or provider information for a co-op, if the co-op is being used to designate a
vacation or other activity not associated with an employer.
Use the Cooperative Education Activities option in the Navigation Frame on SGACOOP to
access the Cooperative Education Activities for Term window. This window is used to

938
Banner Student User Guide | General Student
display the co-ops available for the student for the effective term and to see what conflicts
exist or have been previously overridden. Use the Return button to return to the main
window.
Using SFAREGQ for Co-ops
Use the Co-op Education button on the Registration Query Form (SFAREGQ) to
navigate to SGACOOP when the cursor is on a CRN which allows co-op assignment (the
schedule type for the section is flagged on STVSCHD to allow co-op). Button activation is
determined by the CRN your cursor is on.
The button has three modes:
• Data - A valid co-op is assigned for that student, term, and CRN. The button is enabled,
and the message bubble says Data.
• No Data - A valid co-op record exists for the CRN. The button is enabled, and the
message bubble says No Data.
• Disabled - There is no co-op record attached to the CRN. The button is not enabled.
Using SHATCKN for Co-ops
Use the Co-op Education button on the Course Maintenance Form (SHATCKN) to
access SGACOOP and view the co-op associated with the CRN in academic history for
the student. Button activation is determined by the CRN your cursor is on.
Using the Grade Roll Process for Co-ops
When information is rolled to academic history either online using the Class Roster Form
(SFASLST) or the Class Attendance Roster Form (SFAALST) or in batch using the Grade
Roll to Academic History (SHRROLL), the section start and end dates are rolled. If the
schedule type of the section permits assignment of a CRN to a co-op activity, and the CRN
is assigned to a co-op for the term, the start and end dates for the co-op are rolled. If no
co-op exists or the section’s type does not permit the assignment of a CRN to a co-op
activity, then the section dates are rolled.
The shared package
SHKROLS is used to perform all grade roll functionality. It works in
conjunction with the Grade Roll to Academic History (SHRROLL) batch program and the
online roll process performed on the Class Roster Form (SFASLST) and the Class
Attendance Roster Form (SFAALST).
Automatic PIN Creation
PINS can be added to Banner manually for an individual, by batch process using a
population selection, or automatically by database trigger.
You have the option to automatically create PINs when a general student record or faculty
record is inserted. Triggers on the SGBSTDN and SIBINST tables will create PINs when a
student or faculty record is inserted into either table, if the triggers are set up to do so. This
automatic creation allows the PIN to be available for use as soon as the person becomes

939
Banner Student User Guide | General Student
eligible to access the self-service processing. The triggers will fire when the record is
inserted, based upon the institution’s PIN preferences and table selections on the PIN
Preference Form (GUAPPRF).
Please note that performance issues may arise when the PIN triggers are used. You may
need to turn this functionality off if batch processing is involved. Student and faculty
records are generally processed individually and should not be affected. However, if you
assign decisions which create student records using the using the Admit Decision Calc
Report (SARBDSN), you may want to disable automatic PIN creation during batch
decision runs.
Please refer to the Banner General User Guide for more information on PIN functionality
and the PIN Preference Form (GUAPPRF).
Purge Processes
The following purge processes are part of the General Student module.
General Student Purge (SGPSTDN)
This process purges the general student information for a student who never registered
based on the user-specified effective term and activity date. You can choose to leave the
High School, Prior College, Guardian, Test Score, and Hold information on the database
also by parameter selection. General Student information will not be purged if:
1. The student has any active holds.
2. The student has academic history information, i.e., a term course maintenance record
exists in the SHRTTRM table.
However, if the general student record is purged, the associated communication plan
record, along with the person's contacts and outside interests will also be purged.
Cooperative Education Purge (SGPCOOP)
This process will purge all the cooperative education information based on the user
specified parameters of term and activity date.
Hold Purge (SGPHOLD)
This process purges all expired holds based on the user specified parameters of
expiration date, activity date, and hold type. You can choose one of two options:
• Option 1: Hold expiration date
• Option 2: Hold activity date

940
Banner Student User Guide | General Student
General Student Reports
The following reports are run through the General Student module:
Please refer to the Banner Student Reports and Processes Handbook for report
descriptions, instructions, parameter definitions, and output samples.
Creating a Population Selection
To perform population selection, the application you will be working with must first be
defined on the Application Definition Rules Form (GLRAPPL).
The second step is to enter the Population Selection Definition Rules Form (GLRSLCT),
enter the Application (Code), and create a Selection ID (Identifier) with a description.
In the Selection Definition section, define the Select and From portions of the SQL
statement that the selection represents.
Example:
Next, enter the Selection Rules for the population of records you would like to see.
Example:
Student Report (SGRSTDN)
Veteran Report (SGRVETN)
Hold Purge (SGPHOLD)
General Student Purge (SGPSTDN)
Cooperative Education Purge (SGPCOOP)
Student Block Load Process (SGPBLCK)
Cohort Load Process (SGRCHRT)
Student Right to Know Report (SGRKNOW)
Select:
SARADAP_PIDM
From:
SARADAP
SARADAP_TERM_CODE_ENTRY
=
'200010'
AND
SARADAP_LEVL_CODE
=
'UG'

941
Banner Student User Guide | General Student
Save your data and exit. Your population selection rules will be compiled. If any errors are
issued during the compilation process, resolve the errors before continuing. If you do not
resolve all errors given during the compile process, you will not be able to use the
population selection rules to extract a population.
You are now ready to extract the population of people. The Population Selection Extract
(GLBDATA) is run from the Process Submission Control Form (GJAPCTL). At minimum,
you will need to supply the parameters for Selection Identifier 1, Application, and Creator
ID, which are the values that were in the Key Information of the Population Selection
Definition Rules Form (GLRSLCT).
After extracting the population, you can use the Population Selection Extract Data Form
(GLAEXTR) to view and/or modify the people in the population. You can add or delete
people from the population using this form. The keys to the form are Application,
Selection ID, and Creator ID. (User ID is also displayed in the Key Information.) You will
be able to add or delete people only from populations that you selected.
After extracting the population, and modifying the people in it if necessary, you can use the
population for a variety of purposes. Letters can be produced using Letter Generation,
based upon a population, and many Banner reports and processes also can accept a
population for processing.
For additional details on population selection, refer to the Banner General User Guide.

942
Banner Student User Guide | Registration
Registration
This chapter discusses processing and procedure information for Registration.
Registration Procedures
Here are tasks you can perform in this module.
Registration Tables to be Updated Each Semester
The following list is of validation and control forms that need to be updated each semester
before registration can occur.
Validation Table/
Control/Rules Form Information Required for Update
STVTERM Need start and end dates for the semester. Also helpful to
have housing and financial aid dates.
SSAEXCL Determine holidays and vacation periods.
SOATERM • Determine starting course reference number.
• Set the Permit (Registration) flag to checked.
• Enter the registration readmit term—the last semester a
student must have attended in order to register.
• Need start and end dates, number of weeks, and census
dates for each part of term.
• Set registration errors.
SFAMHRS For each student level, enter the minimum and maximum
hours for which a student can register.
SFAESTS For each enrollment status (as determined on STVESTS),
enter the status start and end dates.
EL (Eligible to Register) must refer to the start of advance
registration, not the first day of classes.
SFARSTS For each part of term (as determined on SOATERM), enter
the course status (as determined on STVRSTS), the
effected by student enrollment status, and the start and end
dates.
Any code that can be used during advance registration
needs advance registration start dates.

943
Banner Student User Guide | Registration
Concurrent Curricula Processing
Concurrent curricula processing allows an institution to record and use multiple curricula
for a person who is moved through the student cycle. This functionality is used by the
Recruiting, Admissions, General Student, Registration, and Academic History modules.
Please refer to the “Concurrent Curricula Processing” appendix for detailed information on
using concurrent curricula in Banner® Student.
Mass Entry Processing
Mass entry processing is used with Admissions, General Student, Registration, Academic
History graduation, and athletic compliance processing. Mass entry forms are used to
search on data, perform updates, and then display the results. Search and update criteria
are user-defined and include student and curriculum elements where appropriate. The
selected students can be reviewed and their updates processed immediately, or the
updates can be held for later processing in job submission using a batch process. An audit
form is used to view processing results for the mass entry forms.
Please refer to the “Mass Entry Processing” appendix for detailed information on using
mass entry in Banner Student.
Study Path Processing
Study path processing is used with the Admissions, General Student, Registration, and
Academic History modules. Study paths provide a means by which a learner can
associate specific course registration records to learner curriculum records during
registration. The study path records allow the institution to track separate student status
codes and academic standings (along with various other data) based on the student's
curriculum. Likewise, a study path term enrollment record permits the tracking of
enrollment eligibility that is separate from a student's overall enrollment status. The grade
roll uses study paths to keep courses with an associated study path within the degree
sequence created for that study path.
Please refer to the “Study Path Processing” appendix for detailed information on using
study paths in Banner Student.
SOACTRM For each student type (as determined on STVSTYP), enter
terms which constitute consecutive enrollment.
Validation Table/
Control/Rules Form Information Required for Update

944
Banner Student User Guide | Registration
Mainline Edit Registration
This section discusses using mainline edit for registration.
Overview
The following registration functionality works consistently: processing multiple registration
records for a person for the same term, processing enrollment counts, and using common
program procedures for registration processing in Banner baseline, Banner self-service,
and Banner Voice Response.
When you begin registration processing, you are logged into the Registration Access
Control Table (SFRRACL). If another current entry exists in that table for ID and term, you
will be denied access.
Registration records are recorded in the Registration Temporary Table (SFTREGS), and
when all errors are corrected, the registration is saved to the Student Course Registration
Repeating Table (SFRSTCR). Enrollment counts are updated only when the registration is
finalized and saved to SFRSTCR. If you shut down registration before the final save
process, the registration record will not be recorded, and the enrollment counts will not be
updated.
All edits on registration are located in or called from common procedures in SFKEDIT.
Warning! It is necessary to truncate and reorganize the SFRRACL and
SFTREGS tables as part of regular database maintenance performed
when registration is not available.
Registration Access Control Table (SFRRACL)
This table is used to control simultaneous access to registration records for the same
person. Please see the "Registration" Processing section for more information.
Registration Temporary Table (SFTREGS)
The SFTREGS table is used as a workpad for registration processing. Once all issues/
errors have been addressed and the registration record has been finalized, the temporary
table entries are moved to SFRSTCR, and all enrollment counts are updated. If the
registration record is never finalized, the counts are not updated, and the person is not
enrolled in the requested courses.
Note: Records are not automatically deleted from SFTREGS. It is
expected that they will be deleted during normal database maintenance
such as when the table is truncated and reorganized.
Entries are created in SFRSTCA that reflect the changes to the registration record on the
workpad.

945
Banner Student User Guide | Registration
Registration Processing
This section discusses using registration.
Starting Registration
When you begin processing a student’s registration, a function is called to check
registration access activity. If another active registration session is found for the ID and
term, a value of
FALSE is returned, and you will receive the message Another registration
session is in progress for this ID and TERM. Please try again later. If an expired access
record exists, it is updated by the function with the current user’s information, and
registration is allowed to continue.
The length of time that a registration session remains active is determined by the number
of minutes entered in the External Code field in the GTVSDAX rule for Internal Code
value of
REGACCTIME.
Saving Registration
When you save the registration record, a function is called to determine whether the
current user is still in control of the registration session. The function checks the access
table to determine whether another registration session has been initiated against the
same ID and term, which may happen if the first user’s registration session remains idle
for a period longer than the time out limit. If the registration access is no longer valid for
the first user, you will receive the message Another registration session intervened for this
ID and TERM while your session was idle. Please try again later. when you try to perform
any registration-related activity. The registration session will be rolled back, and any
changes not previously saved will be lost.
Ending Registration
When you are finished with the registration process, a function is executed to inactivate
the access record.
GTVSDAX Rule
The rule for the Internal Code of REGACCTIME and the Group (Code) of
REGISTRATION is used to control the length of time left to enter registration data for a
student after the last activity has occurred. The rule on GTVSDAX is delivered in a script.
The GTVSDAX entry for Registration Access Time Out must contain a numeric value that
represents the number of minutes a session may remain idle before the session is
External
Code Internal Code
Internal
Code
Sequence
Number
Internal Code
Group Description
Activity
Date
UPDATEME REGACCTIME 1 REGISTRATION Reg Access
Time Out
Sysdate

946
Banner Student User Guide | Registration
considered to be timed out. The delivered value is UPDATEME, which must be modified at
your institution. Change this value to a numeric value, for example,
15 for 15 minutes. If
no value is entered, the default time of 60 minutes will be used.
When the session times out, it is not terminated. Another user is now permitted to initiate a
registration session for the same ID and term. In this instance, the second user is then in
control of the student’s registration records. The message Another registration session
intervened for this ID and TERM while your session was idle. Please try again later. will be
displayed when the original user resumes work on the student’s registration records, and
a Rollback will take place.
If a registration session is idle and then is timed out, and no other registration sessions are
initiated for the same ID and term, the user’s time limit will be reset to the GTVSDAX limit
when they next perform a task against the registration records.
It is necessary to use registration access control in this way, due to the use of the workpad
and the fact that no changes are saved to SFRSTCR until all errors have been resolved.
An example of how access control works would be:
A student begins telephone registration using Banner Voice Response. An
administrator attempts to initiate a separate baseline registration for the same ID and
term on SFAREGS. The administrator will be locked out of the student’s record until
the student has concluded their telephone registration.
Common Procedures
Common procedures are used for registration edits for Banner baseline, Banner self-
service, and Banner Voice Response telephone processing.
sfkedit.sql, Packaged Procedures for Registration Edits and Base-Table
Updates/Insert
All edit processing is performed from the sfkedit.sql package and uses the
p_pre_edit and p_group_edits procedures.
The
p_pre_edit procedure is executed before the registration records are saved.
When an error is found, the course is flagged with a fatal error and is not included in the
final processing when the record is saved. Edits are performed on a single course, in the
order shown below. The following elements are checked:
• approval code restrictions
• level restrictions
• college restrictions
• degree restrictions
• program restrictions
• major restrictions
• campus restrictions

947
Banner Student User Guide | Registration
• class restrictions
• repeat restriction
• capacity
The
p_group_edits procedure checks all courses in SFTREGS in the order shown
below.
• duplicate courses
• time conflicts
• prerequisites
• corequisites
• links
• max hours
Note: A duplicate course is one that has the same subject, course
number, and schedule type.
All errors are written to the
SFTREGS_MESSAGE and SFTREGS_ERROR_FLAG fields.
When all the errors are resolved, registration records are processed by the
p_update_regs procedure as follows:
1. Capacity is rechecked.
2. Section hours are updated.
3. Changes are transferred from SFTREGS to SFTSTCR, where records are inserted or
updated.
4. Time status records are inserted.
5. SFBETRM is updated.
The following procedures are also used with
sfkedit.sql:
• sfkfunc.sql, Registration Functions and Procedures
• sfkmods.sql, Registration Insert, Update, and Delete Procedures
• sskfunc.sql, Registration Section Functions and Procedures
• sskmods.sql, Registration Section Insert, Update, and Delete
• ssksels.sql, Registration Section Query Procedures
Registration Error Messages
Registration error messages reside in a rules table that can be modified at your institution.
Messages are identified by type, based on a message codes that correspond to each
message text value.
948
Banner Student User Guide | Registration
Registration error message processing allows you to:
• Identify the message type code, and therefore determine the kind of processing error.
• Derive the message text from the SFRRMSG table using the
sb_registration_msg API.
• Insert/update a new message type code and text to the relevant registration table.
• Allow for the extra length of the new message text for any related variables.
The Registration Error Messages Form (SFARMSG) is used to maintain registration error
messages by type. Messages can be customized by your institution. Messages that are
system required cannot be changed, except to modify the customized (local) message
text.
The Student Course Registration Audit Form (SFASTCA) and the Student Course
Registration Form (SFAREGS) display the message code and text from SFARMSG. The
Registration Admin Messages Report (SFRRGAM) also displays the message code and
text from SFARMSG.
The Registration Error Message Rules Table (SFRRMSG) is used to store the message
code, sequence number, message text, and locally created message text. It ties the
message type to the error message and allows for predefined variables to be moved
around within or removed from the message. You can create your own version of the
actual message text for an existing message type on a system-required row. The
message text will default to the baseline version, but can be changed by creating a
corresponding user version. The user version text must contain the associated variables
(%X%). System-required rows cannot be deleted.
The delivered seed data for SFRRMSG ties the code and sequence number to the
message.
Code Seq No Message Value Req Date
CLOS 1 Closed Section %1% NULL Y Banner Sys Date
WAIT 1 Closed - %1% Waitlisted %2% NULL Y Banner Sys Date
WAIT 2 Open - %1% Waitlisted NULL Y Banner Sys Date
WAIT 3 Open - %1% Crosslist Waitlisted NULL Y Banner Sys Date
WAIF 1 Closed - Waitlist Full %1% NULL Y Banner Sys Date
WAIF 2 Open - Waitlist Filled NULL Y Banner Sys Date
WLNE 1 Waitlist Notification Expired %1% NULL Y Banner Sys Date
WLRS 1 Open - Reserved for Waitlist NULL Y Banner Sys Date
RESC 1 Reserve Closed %1% NULL Y Banner Sys Date
RESV 1 Reserve Closed - %1% on Waitlist %2% NULL Y Banner Sys Date
RESV 2 Reserve Open - %1% on Waitlist NULL Y Banner Sys Date
RESF 1 Reserve Closed - Waitlist Full %1% NULL Y Banner Sys Date

949
Banner Student User Guide | Registration
RESF 2 Reserve Open - Waitlist Filled NULL Y Banner Sys Date
REPT 1 Repeat count exceeds %1% NULL Y Banner Sys Date
REPH 1 Repeat hours exceed %1% NULL Y Banner Sys Date
MAXI 1 Maximum hours exceeded NULL Y Banner Sys Date
DUPL 1 Duplicate Course with Section %1% NULL Y Banner Sys Date
DUPL 2 Duplicate Equivalent with Section %1% NULL Y Banner Sys Date
DUPL 3 Duplicate Crosslist with Section %1% NULL Y Banner Sys Date
DUPS 1 Duplicate Section - Press Clear Record NULL Y Banner Sys Date
PREQ 1 Prerequisite and Test Score error NULL Y Banner Sys Date
PREQ 2 Prerequisite In Progress NULL Y Banner Sys Date
PREQ 3 Prerequisite communication error NULL Y Banner Sys Date
CORQ 1 Corequisite %1% %2% %3% required NULL Y Banner Sys Date
LINK 1 Linked course required (%1%) NULL Y Banner Sys Date
CAMP 1 Campus Restriction NULL Y Banner Sys Date
CLAS 1 Class Restriction NULL Y Banner Sys Date
COLL 1 College Restriction NULL Y Banner Sys Date
LEVL 1 Level Restriction NULL Y Banner Sys Date
MAJR 1 Field of Study Restriction - %1% NULL Y Banner Sys Date
PROG 1 Program Restriction NULL Y Banner Sys Date
DEGR 1 Degree Restriction NULL Y Banner Sys Date
DEPT 1 Department Restriction NULL Y Banner Sys Date
ATTS 1 Student Attribute Restriction NULL Y Banner Sys Date
CHRT 1 Cohort Restriction NULL Y Banner Sys Date
STAT 1 Section status prohibits registration NULL Y Banner Sys Date
TIME 1 Time conflict with CRN %1% NULL Y Banner Sys Date
SYST 1 BP - System Error NULL Y Banner Sys Date
MIDG 1 Midterm grade updated to %1% NULL Y Banner Sys Date
FING 1 Final grade updated to %1% NULL Y Banner Sys Date
DELT 1 Record deleted on %1% NULL Y Banner Sys Date
SAPR 1 See Note below ** NULL Y Banner Sys Date
CAPP 1 CAPP NULL Y Banner Sys Date
Code Seq No Message Value Req Date

950
Banner Student User Guide | Registration
Note: ** SAPR code errors are handled differently than all other
messages on SFARMSG. A special approval error will always result in the
display of the special approval description from the
STVSAPR_DESC
column. While a custom message can be created on SFARMSG, it will
never be used.
The following placeholders have been enabled for the baseline seed data messages.
PIPE 1 PIPE NULL Y Banner Sys Date
VARH 1 Range - %1% %2% %3% NULL Y Banner Sys Date
MEXC 1 Mutual Exclusion with %1% %2% NULL Y Banner Sys Date
Code Seq No Message Column
CLOS 1 %1%
SSBXLST_XLST_GROUP
WAIT 1 %1%
SSBSECT_WAIT_COUNT
%2%
SSBXLST_XLST_GROUP
WAIT 2 %1%
SSBSECT_WAIT_COUNT
WAIT 3 %1%
SSBSECT_WAIT_COUNT
(Crosslist total)
WAIF 1 %1%
SSBXLST_XLST_GROUP
RESC 1 %1%
SSBXLST_XLST_GROUP
RESV 1 %1%
SSRRESV_WAIT_COUNT
%2%
SSBXLST_XLST_GROUP
RESV 2 %1%
SSRRESV_WAIT_COUNT
RESF 1 %1%
SSBXLST_XLST_GROUP
REPT 1 %1%
SCBCRSE_NUMBER_OF_UNITS
REPH 2 %1%
SCBCRSE_MAX_RPT_UNITS
DUPL 1 %1%
SSBSECT_CRN
DUPL 2 %1%
SSBSECT_CRN
DUPL 3 %1%
SSBSECT_CRN
CORQ 1 %1%
SSBSECT_SUBJ_CODE
%2%
SSBSECT_CRSE_NUMB
Code Seq No Message Value Req Date

951
Banner Student User Guide | Registration
Note: The primary key includes the _RMSG_CDE and _RMSG_SEQNO
columns. A conversion script converts any Not Null SFRSTCR/
SFRSTCA/SFTRGAM message rows, populating the corresponding
_RMSG_CDE columns as appropriate.
The following message records are used with Banner Flexible Registration.
%3%
SSRCORQ_CRN_CORQ
LINK 1 %1%
SSBSECT_SCHD_CODE
TIME 1 %1%
SSBSECT_CRN
MIDG 1 %1%
SFRSTCR_GRDE_CODE_MID
FING 1 %1%
SFRSTCR_GRDE_CODE
DELT 1 %1%
SYSDATE
MEXC 1 %1%
SCRMEXC_SUBJ_CODE
SCRMEXC_SUBJ_CODE_MEXC
%2%
SCRMEXC_CRSE_NUMB
SCRMEXC_CRSE_NUMB_MEXC
WLNE 1 %1%
SFRWLNT_END_DATE
VARH 1 %1%
SCBBCRSE_CREDIT_HR_LOW
%2%
SCBBCRSE_CREDIT_HR_IND
%3%
SCBBCRSE_CREDIT_HR_HIGH
Code Seq No Message Value Req Date
HOLD 1 You have Holds which will prevent
registration.
NULL Y Banner Sys Date
HOLD 2 You have no Holds which will prevent
registration.
NULL Y Banner Sys Date
TICT 1 You have no Registration Time Ticket. Please
contact the registration administrator.
NULL Y Banner Sys Date
TICT 2 You may register during the following times. NULL Y Banner Sys Date
TICT 3 You may register at any time. NULL Y Banner Sys Date
TICT 4 You may not register at this time. NULL Y Banner Sys Date
SSTS 1 Student Status is Undetermined. NULL Y Banner Sys Date
Code Seq No Message Column

952
Banner Student User Guide | Registration
The following placeholders have been enabled for the Banner Flexible Registration seed
data messages.
SSTS 2 Your Student Status permits registration. NULL Y Banner Sys Date
SSTS 3 Your Student Status prevents registration. NULL Y Banner Sys Date
RADM 1 You require re-admission prior to registration. NULL Y Banner Sys Date
RADM 2 You do not require re-admission prior to
registration.
NULL Y Banner Sys Date
ACST 1 Your Academic Standing permits registration. NULL Y Banner Sys Date
ACST 2 Your Academic Standing is %01% which
prevents registration.
NULL Y Banner Sys Date
ACST 3 Your Academic Standing is %01% which
permits registration.
NULL Y Banner Sys Date
ACST 4 Your Academic Standing is %01%. NULL Y Banner Sys Date
ACST 5 Your Progress Evaluation Standing is %01%. NULL Y Banner Sys Date
ACST 6 Your Combined Academic Standing is %01%
which prevents registration.
NULL Y Banner Sys Date
ACST 7 Your Combined Academic Standing is %01%
which permits registration.
NULL Y Banner Sys Date
DROP 1 Class cannot be dropped! Discounts exist. NULL Y Banner Sys Date
FLEX 1 An exception has occurred. NULL Y Banner Sys Date
Code Seq No Message Column
ACST 2 %01%
STVASTD_DESC
ACST 3 %01%
STVASTD_DESC
ACST 4 %01%
STVASTD_DESC
ACST 5 %01%
STVPREV_DESC
ACST 6 %01%
STVCAST_DESC
ACST 7 %01%
STVCAST_DESC
Code Seq No Message Value Req Date

953
Banner Student User Guide | Registration
Enrollment Count Scripts
The following scripts can be used to report and correct enrollment counts that may be out
of balance.
Note: It is recommended that SFRSTCA records be purged whenever
possible, to improve performance of the Census Count scripts. SFRSTCA
records may be purged after all processing has been closed out for a term
and there is absolutely no chance that registration adjustments will have
to be made or that fee assessment will have to be run against that term.
Warning! If fee assessment is run after SFRSTCA records have been
purged for that term, results are unpredictable.
These scripts are run in the order shown below. Each update script (sup%) can be run as
needed, based on the results of the search script (srch%) that identifies the counts. For
example, when the
srchkresvcount.sql script is run, the
supresvcount.sqlscript can be run if needed. When the srchkenrlcount.sql
script is run, the
supenrlcount.sql script can be run if needed, and so on.
Script Description
srchkresvcount.sql
Identifies sections with incorrect reserved counts by
comparing SSRRESV counts with SFRSTCR
counts. It also reports reserved records where the
values for seats available or waitlisted seats
available are incorrect.
supresvcount.sql
Updates incorrect reserved counts in SSRRESV
based on counts from SFRSTCR for the reserved
key.
srchkenrlcount.sql
Identifies sections with incorrect enrollment counts.
The first query compares SFRSTCR counts to
SSBSECT counts. The second query checks
SSBSECT for rows where the number of seats
available is incorrect.
supenrlcount.sql
Corrects enrollment counts in SSBSECT based on
counts from SFRSTCR.
srchkxlstcount.sql
Identifies cross-listed groups with incorrect
enrollment counts by comparing SSBXLST counts
with SSBSECT counts.
supxlstcount.sql
Corrects cross-listed counts in SSBXLST based on
enrollment counts in SSBSECT.
srchkwaitcount.sql
Identifies sections with incorrect waitlist counts by
comparing SFRSTCR counts with SSBSECT
counts.

954
Banner Student User Guide | Registration
The census count scripts are not dependent on any other scripts and can be run at any
time you wish to check the census counts, such as when census dates are realized. For
example, as soon as your Census One date has passed, you can run the
srchkcensuscount1.sql script. As soon as your Census Two date has passed, you
can run the
srchkcensuscount2.sql script.
Enrollment Count Audit Trail
Audit trail information can be collected for enrollment counts. The information can be used
to monitor enrollment count updates for records in the SSBSECT, SFRSTCA, and
SFRSTCR tables.
During the registration process, the
sb_section API inserts a new audit record into the
Section Enrollment Count Audit Trail Table (SSRSECA) each time a section is updated in
the SSBSECT table for the number of available seats or number of seats enrolled. No
audit record is inserted when a new course section is created. Use of the SSRSECA table
is optional.
The SSRSECA record contains the CRN, term, Oracle session ID, timestamp, student
PIDM, course registration status (STVRSTS), and the old and new values for the available
seats and enrollment. The Oracle session ID and timestamp are also captured in the
Student Course Registration Archive Table Voice Response (SFRSTCA) and the Student
Course Registration Repeating Table (SFRSTCR). This allows the association of a
student and Oracle session to determine the exact time an enrollment count discrepancy
occurred.
supwaitcount.sql
Corrects waitlist counts in SSBSECT based on
counts from SFRSTCR.
srchktotalcrhrs.sql
Identifies sections with incorrect total credit hours by
comparing the sum of SFRSTCR values with
SSBSECT values.
suptotalcrhrs.sql
Corrects total credit hours in SSBSECT based on
the sum of the credit hours in SFRSTCR.
srchkcountover.sql
Identifies sections where enrollment counts, waitlist
counts, and cross-list counts exceed maximum
limits.
srchkcensuscount1.sql
Identifies sections where Report Census One counts
are out of balance.
supcensuscount1.sql
Corrects Census One counts in SSBSECT.
srchkcensuscount2.sql
Identifies sections where Report Census Two counts
are out of balance.
supcensuscount2.sql
Corrects Census Two counts in SSBSECT.
Script Description

955
Banner Student User Guide | Registration
Note: The audit record is not inserted into the table when the enrollment
counts are updated outside of a normal registration session, such as the
using the existing enrollment count scripts to report and correct
enrollment counts.
Additional processing occurs as follows:
• The SFKEDIT1 package retrieves the PIDM and course registration status code values
from the Oracle context values and inserts them into the SSRSECA table.
• The SFKMOD1 package inserts the timestamp and Oracle session ID values into the
SFRSTCR and SFRSTCA tables.
• The Registered, Not Paid Process (SFRRNOP) retrieves the PIDM and course
registration status code values from the Oracle context values and inserts them into the
SSRSECA table.
Audit Process
The enrollment count audit trail allows users to trace a failure in the enrollment count
process to a specific student. The process works as follows.
1. The student selects a class for which he/she wishes to register.
2. The SFRSTCA record is inserted for the request with the Oracle session ID, time
stamp, current enrollment count, and number of available seats.
3. The registration process passes all restriction checks and is accepted for the student.
4. The enrollment counts are updated.
5. Optionally, a record is inserted into the SSRSECA table with the Oracle session ID,
timestamp, and the old and new enrollment counts.
6. The student's PIDM and the course registration status code (STVRSTS) are recorded
on the audit record.
7. The registration record is finalized, and the SFRSTCR record is created with the
Oracle session ID and timestamp.
8. A new SFRSTCA record with the source of BASE is created with the Oracle session
ID, timestamp, enrollment count, and number of seats available.
For example:
SFRSTCR_SESSIONID 1521077095
SFRSTCR_CURRENT_TIME 08-SEP-15 06.43.11.104966000 AM
SFRSTCA_SOURCE_CDE BASE
SFRSTCA_ENRL 48
SFRSTCA_SEATS_AVAIL 2
SFRSTCA_SESSIONID 1521077095
SFRSTCA_CURRENT_TIME 08-SEP-15 06.43.11.112690000 AM
956
Banner Student User Guide | Registration
SSRSECA_SESSIONID 1521077095
SSRSECA_CURRENT_TIME 08-SEP-15 06.43.11.082453000 AM
SSRSECA_ENRL_NEW 2
SSRSECA_ENRL_OLD 1
SSRSECA_SEATS_AVAIL_NEW 48
SSRSECA_SEATS_AVAIL_OLD 49
GTVSDAX Rule
Use the ENRLAUDIT rule to activate the section enrollment audit process and insert
records into the SSRSECA table during registration enrollment count updates.
• Set the rule to Y to activate the sb_section API to insert a record into the SSRSECT
table when the enrollment or seats available counts are updated.
• Set the rule to N to not activate the API or insert a record into the table.
Implement Optional Section Audit
Use the following steps to activate the section audit process.
1. Run the
sgtvsdaxi_080900.sql script to create the GTVSDAX entry for the
ENRLAUDIT rule.
Sqlplus <userid>/<password>
Start sgtvsdaxi_080900.sql
Commit;
2. Set the ENRLAUDIT rule to Y.
All registration records initiated after the rule is set to
Y are inserted into the
SSRSECA table.
Find Count Discrepancies
When the enrollment count scripts have been run and enrollment count issues exist,
analysis should be performed to determine the student and Oracle session with the
discrepancy.
The scripts listed below that are used to find enrollment count issues cannot be run until
the issue is resolved.
External
Code
Internal
Code
Internal Code
Group Description
Sys
Req
Activity
Date
Y/N ENRLAUDIT REGISTRATION Enrollment Count Audit Y Sysdate

957
Banner Student User Guide | Registration
• srchkresvcount.sql
• srchkenrlcount.sql
• srchkxlstcount.sql
• srchkwaitcount.sql
• srchktotalcrhrs.sql
• srchkcountover.sql
Note: These scripts do not consider if a student has an override to be in
the class.
The associated
sup%.sql scripts used to update the enrollment counts
do not insert records into the SSRSECA table.
Enrollment Count Audit Script
Run the srchkenrlaudit.sql script to list all the audit records for a term and the
classes where the enrollment count discrepancy exists.
For example:
TERM 333336
CRN 14
SUBJ CHEM
CRSE 101
MAX 50
AVAIL 47
BANNERID MAHSSCA1
SEQNO 1
SCA_SESSION 1521077095
SCA_TIMESTAMP 08-SEP-15 06.43.11.082453000 AM
RSTS RE
STCA 1
STCA_TIMESTAMP 08-SEP-15 09.30.25.843302000 AM
STCA_ERROR
STCA_USER MHANLAN
The srchkenrlaudit.sql script is used to report SSBSECT enrollment count issues
with enrollment audit detail and student detail. The script looks at SSBSECT section
records for a term where the
SSBSECT_ENRL and SSBSECT_SEATS_AVAIL values
do not match. SFRSTCR counts are compared to SSBSECT counts. Where a difference is
found, the sections, enrollment audit records, and registration audit records for the
session are listed. Data is inserted into the SSRSECA table and displayed in the order in
which the CRN was updated.

958
Banner Student User Guide | Registration
Create Term Controls
The first step in the registration process is to create the attributes specific to a registration
term. These attributes include the registration error radio group switches on the Term
Control Form (SOATERM) which determine the type of error checking to be done at
registration (time conflict, prerequisites, repeat limit, repeat hours, test score, campus,
etc.) for student and section options. This form is also used to control online fee
assessment during registration, whether refund by total is to be used in fee assessment,
and whether courses are to be tracked by CRN. Grade book controls and Web process
controls can be set up as needed.
Set Up Registration Hours
The Registration Minimum Maximum Hours Form (SFAMHRS) is used to set up the rules
for the minimum and maximum hour checking performed for registration. Minimum and
maximum registration hours can be restricted by the following curriculum and student data
elements: campus, college, degree, program, field of study type, field of study code,
department, curricula, admission type, minimum hours, student type, student attribute,
cohort, residence, sport, visa, and class. This allows you to build flexible registration hours
rules and track academic requirements for colleges and programs that use different
registration hour restrictions.
Maximum hours can be increased on SFAREGS, and minimum hours can be decreased
on SFAREGS. The source of the hours rule is also displayed on SFAREGS. The source
determines if the minimum or maximum hours value can be updated using the Update
‘USER’ Source New Value parameter on SHRASTD. This parameter can be set to
override minimum and maximum hours or not override minimum and maximum hours,
when the existing source for the hours from SFAMHRS is
USER.
SOATERM uses minimum and maximum hours error checking in the Student Options
items. Minimum and maximum hours can also be added for academic standing codes
(STVASTD) and combined academic standing codes (STVCAST). When the Active
Indicator checkbox on STVSPST is checked for a sports status code, that code will be
considered by the rules for minimum and maximum hours checking.
Minimum hours functionality prevents students from dropping below their institutionally
defined minimum number of registration hours, once that minimum limit has been
reached. For example, this prevents a student from dropping below full-time status.
Students can make changes to their schedules until they reach the minimum hours limit.
Once that limit has been reached, they can still make changes, as long as they stay within
the minimum to maximum hours range.
Minimum and maximum hours rules for students are calculated based on the rules met
from SFAMHRS, as well as rules for academic standing and combined academic
standing. If no rule is met, minimum hours will be set to
0.000, and maximum hours will
be set to
999999.999. If multiple SFAMHRS rules are met by a student, Banner will
compare all rules and select the highest number of minimum hours and the lowest number
of maximum hours.

959
Banner Student User Guide | Registration
Example:
A student meets two rules. Rule one has a minimum of 3 hours and a maximum of 12
hours. Rule two has a minimum of 6 hours and a maximum of 99 hours. The values
returned for the student will be a minimum of 6 hours and a maximum of 12 hours,
because this will be the most restrictive rule.
Where multiple rules are met and the minimum hours on the most restrictive minimum rule
are greater than the maximum hours on the most restrictive maximum rule, the student's
minimum and maximum hours will be populated with the same value that is equal to the
maximum hours.
Example:
Rule one has a minimum of 12 hours and a maximum of 18 hours. Rule two has a
minimum of 3 hours and a maximum of 10 hours. The values returned for the student
would be a minimum of 12 hours and a maximum of 10 hours. In this case, the
student’s minimum and maximum hours are set to the same value as the maximum of
10.
Minimum and maximum hours rules from academic standing and progress evaluation take
precedence over minimum and maximum hours rules on SFAMHRS.
Example:
A student pre-registers and meets a SFAMHRS rule for a minimum of 6 hours and a
maximum of 99 hours. Later on, that student is put on academic probation where the
minimum hours rule is 9 hours and the maximum hours rule met is 15 hours, due to
the probation status. Since changes in academic standing and progress evaluation
supersede the rules on SFAMHRS, the minimum and maximum hours will be replaced
with a minimum of 9 hours and a maximum of 15 hours, if the user requests this when
the Calculate Academic Standing Report (SHRASTD) is run.
The Source field on SFAREGS displays the source of the minimum and maximum hours.
Sources are:
USER, ASTD, CAST, and MHRS. The only way a source of USER can be
overridden is to use the Update ‘USER’ Source New Value parameter on SHRASTD. This
parameter can be set to
Y to override minimum and maximum hours, or N to not override
minimum and maximum hours when the existing source for the hours from SFAMHRS is
USER. During registration, minimum hours checking does not allow any updates to
registration, if all updates cannot be performed.
Example:
A student has 12.000 minimum hours on SFAREGS and on the Add/Drop page in
Banner Student Self-Service. The student pre-registers for 12 hours. The student later
elects to drop two, three credit courses and add a new three credit course. This results
in the total credit hours dropping to 9, which is below the student’s minimum.
Registration will not process any of the add/drop requests and produces a message
that the request will result in less than the minimum number of hours. The student can
then decide if he/she really wants to add one course and drop another, or leave the
schedule as it is.

960
Banner Student User Guide | Registration
Minimum hours checking will occur only after a student has successfully completed
registration for courses that meet the minimum hours restriction. (That is, minimum hours
checking will not occur during the student's initial registration session or during any
subsequent registration sessions, until the minimum number of hours has been attained
and saved to SFRSTCR table.)
Note: Registration maximum hours rules and registration processing will
continue to work as they did prior to Release 8.0. After the upgrade to
Banner Student 8.0, all the curriculum fields will be set to
Null, with the
exception of the Curricula pulldown field. This field will be set to
Primary on existing rules to accommodate prior registration maximum
hours rules that only checked the primary curriculum.
Define Registration Statuses for Student and Course
The Student Registration Status Form (SFAESTS) provides the rules associated with user
defined Student Statuses for the registration term. This form allows the user to control, by
date ranges, the actions that may be taken on a student at registration and the refund
percentages associated with the action. For example: student eligible to register, or
student withdrawn.
The Course Registration Status Form (SFARSTS) provides the rules associated with the
user defined Course Statuses for the registration term. This form allows the user to
control, by date ranges, the actions that may be taken on the courses a student is
registering for and the refund percentages associated with the actions. For example: an
add course, a drop course at 100% refund, a withdraw course at 80% refund with a "W"
grade.
Student Registration Status and Course Registration
Status
This section discusses statuses used with student and course registration.
Define Codes
STVESTS - Enrollment Status Code
Validation Form
STVRSTS - Course Registration
Status Code Validation Form
Student In A Term May Be: Student In A Course May Be:
• eligible to register
• withdrawn
•canceled
•dismissed
• registered
• dropped/added
• withdrawn
• canceled
Should This Status: Should This Status:

961
Banner Student User Guide | Registration
* In the case where a student status should affect/override a course status, the following
must apply:
• Affect Course is checked on STVESTS.
• Same status must appear on STVRSTS.
• Allowed To Enter is unchecked on STVRSTS.
• Affected By Student Status for the system-required value of RE is checked on
SFARSTS.
Define Rules
Flags on STVRSTS
You should not change the settings of the flags on STVRSTS after registration records
have been completed. These flags are critical to many Banner Student processes, and
they must be set correctly before registration begins. However, if a data entry error occurs,
and the flags are discovered to be set incorrectly, the following must be done in order for
enrollment counts to remain accurate:
1. When you discover an incorrect setting on STVRSTS, do not change the flags. Leave
all the flags set as they were when registration commenced.
• affect headcount for term
• override (affect) course status *
• prevent registration
• be keyed by a user
• affect enrollment figures
• be assessed charges
• be graded in academic history
• be assigned as automatic grade
SFAESTS - Student Registration
Status Form
SFARSTS - Course Registration
Status Form
Define valid student registration statuses
which are valid during a term, the dates
and refunds associated with each status.
Define valid course registration statuses
which are valid during a term (and within
parts of a term), the dates and refunds
associated with each status.
EL - Eligible to register, Required Value RE - Registered, Required Value
• status start and end dates
• status/refunds with start /end dates
• part of term
• status/start and end dates
• effect by student status
• status/refunds with start/end dates
DD - Drop/Delete, Required Value
STVESTS - Enrollment Status Code
Validation Form
STVRSTS - Course Registration
Status Code Validation Form

962
Banner Student User Guide | Registration
2. Run an SQL script to report all students and/or CRNs that have the "bad" RSTS
(registration status) code for the term.
3. Access SFAREGS, and set all those courses that were found to
DD. (This must be
done via SFAREGS, so that enrollment counts are processed correctly. Do not use an
SQL script to make these changes.)
4. After all the affected courses have been changed to
DD, reset the flags on STVRSTS.
5. Reapply the changed RSTS code on SFAREGS for all the affected courses. (This
must be done via SFAREGS, not using an SQL script.)
6. You must access SFAREGS, and change the
DD back to the original code that was
just fixed on STVRSTS. (This must be done using SFAREGS, not using an SQL
script).
Student Levels Versus Course Levels in Registration
The student level is stored in the general student record on the General Student Form
(SGASTDN). Course levels are stored on the course catalog which is entered on the Basic
Course Information Form (SCACRSE). When a student registers for a class, the
registration process looks at the course catalog for the class to find all associated levels.
If multiple levels are valid for the course, the student level defaults to the course. If the
student level is not included in the list of valid values, the message ERROR Invalid Code,
Press LIST key for valid codes will be displayed. You should then override the defaulting
level with a valid level from the list. If only one level is valid for the course, and it is different
from the student level, the valid course level will be defaulted, no error message will
display, and no message will indicate that the course level does not match the student
level.
Registration Course Error Flags
The following values may be displayed in the (Course Registration) Error field of the
Registration Section Query Form (SFQSECM). These values are automatically generated
by the system if the student's course meets the criteria as specified by each value.
Note: These values may not be entered in SFQSECM by the user.
Value Description
L Course status is designated as a waitlist status.
D Course has been dropped.
O Override was used in registration of this course.

963
Banner Student User Guide | Registration
Build Tuition and Fees
The institution's tuition and fee policy is built for a registration term using the Registration
Fee Assessment Rules Form (SFARGFE). This form allows your institution to define the
rules to be used in the registration fee assessment algorithm.
• The rules provide you with the ability to assess fees based on student criteria of
campus, residency, level, college, major, class, rate, department, student attribute,
student type, degree code, admit term, residency, program, and/or course criteria of part
of term, grade mode, schedule type, and instructional method.
• Rules can be further limited by range of billing hours for the minimum and maximum
charges for the rule, original registration dates, and flat hour ranges.
• In addition, the rules or charging can be grouped by course level, course campus,
course attribute, study path, or study path with course attribute using all of the above
criteria.
Special Part-of-Term Processing
If part-of-term is entered on the Course Registration Status Form (SFARSTS) for either
student, course, or campus processing, special logic is used. When a student is registered
in courses that exist in more than one part-of-term, the registration fee assessment
process looks for a registration fee assessment rule on the Registration Fee Assessment
Rules Form (SFARGFE) that has a part of term code of
C (combined). The registration fee
assessment process will combine the billing hours from courses in all parts of term and will
use that total with the
C part of term rule. If no C rule exists, no part-of-term rules will be
assessed, but non-part-of-term rules will still be assessed.
If the student is registered in courses in only one part-of-term, the rule for that part-of-term
is used for the registration fee assessment.
W Warning error. (This value never remains in the database permanently; it is
used as a part of temporary processing when warning errors are detected
that require online user intervention. Once the warning error is fixed, the
W
goes away.)
F Fatal error. (This value never remains in the database permanently; it is
used as a part of temporary processing when fatal errors are detected that
require online user intervention. Once the fatal error is fixed, the
F goes
away.)
Value Description

964
Banner Student User Guide | Registration
Example:
If a student is registered for:
3 billing hours in part of term 1
Assessment = 3 hours x $15 = $45 (Rule #1 is used)
If a student is registered for:
3 billing hours for part of term 2
Assessment = 3 hours x $15 = $45 (Rule #2 is used)
If a student is registered for:
3 billing hours for part of term 1
and
3 billing hours for part of term 2
Assessment = 6 hours x $25 = $150 (Rule #3 is used)
The Registration Additional Fees Control Form (SFAAFEE) is used to establish the fee
codes and amounts for which a student may be accessed, on an individual basis.
The Registration Fees Min/Max Charge Control Form (SFAFMAX) is used to set up
minimum and maximum amounts that can be assessed by detail code for the registration
fee assessment process.
Please refer to the information on assess by course processing in the “Fee Assessment
Using the Assess by Course Indicator” section of the “Registration Fee Assessment
Processing” procedures for an explanation of and examples for additional use of part-of-
term.
Assess Additional Fees
The Registration Additional Fees Form (SFAEFEE) is used to enter additional charges for
a student to be calculated in the registration fee assessment process. The only fees that
may be assessed here are fees that are set up on the Registration Additional Fees Control
Form (SFAAFEE).
Additional fees can be assessed online only by accessing the Registration Additional Fees
Form (SFAEFEE) from the Student Course Registration Form (SFAREGS). (Select the
Change Optional Registration Fees item from the Options Menu on SFAREGS.) The
Detail Code Per Credit Part-of-Term
Billing
Hours Rule
SSF-Student Svc. Fee 15.00 1 1—99 Rule #1
SSF-Student Svc. Fee 15.00 2 1—99 Rule #2
SSF-Student Svc. Fee 25.00 C 1—99 Rule #3

965
Banner Student User Guide | Registration
Registration Fee Assessment On-line box on the Term Control Form (SOATERM) must
be checked. When the user returns to the Student Course Registration Form (SFAREGS)
after processing additional fees, processing fees online in SFAREGS will include the
assessment of additional fees.
Additional charges entered on the Registration Additional Fees Form (SFAEFEE) are
assessed by the fee assessment process, which is launched from Registration or from the
batch registration fee assessment process. Additional fees for a student are not assessed
from SFAEFEE.
Assess Tuition and Fees
If your institution chooses not to assess fees online for each individual student, your
institution may run the Registration Fee Assessment Process (SFRFASC). This may be
done after pre-registration time when the fee structure for the new term is set. This
process has the options of assessing all students for a term or assessing only those who
did not have an assessment done online. All charges assessed are immediately posted to
the student's account in the Accounts Receivable module.
When any change is made to the Student Information window of SFAREGS that affects
registration fee assessment, a batch registration fee assessment record is written. This
will be used by the Registration Fee Assessment Process (SFRFASC) to correctly assess
the student.
Registration Fee Assessment Processing
This section discusses using fee assessment for registration.
Overview
The Registration Fee Assessment process is used to assess fees for traditional or open
learning registration records. It can also be used for registration records with study paths.
An audit history is available so you can see how charges have been derived. You can
copy registration fee assessment rules to new terms, and you can assess fees using per
credit hour (using course liable billing hours), flat fee, and flat plus overload rules. When
using fee assessment at the section level, you can use per billing hour, per credit hour, flat
fee, and per duration unit rules.
Note: The registration fee assessment rules currently in use at your
institution will continue to work for fee assessment processing. However,
your rules can be updated as new terms are opened at your institution.
Fee assessment rules can be used to assess a student based on all curriculum elements
and any curriculum type including primary and secondary curriculum, as well as student
information such as residency, student attribute, student rate, student type, cohort, class,
and visa type. Fee assessment rules that existed prior to Banner Student Release 8.0 can
still be used and do not need to be re-evaluated. Those rules only consider the primary

966
Banner Student User Guide | Registration
curriculum in processing assessments. The Curricula field will be set to Primary to
accommodate these rules.
The additional curriculum fields are set to
Null with the following exception. If the Major
field (now the Field of Study Code field) was populated prior to the upgrade to Release
8.0, the following will occur with regard to those rules:
• The Field of Study Type will be set to MAJOR.
• The Field of Study Code will be set to the code from STVMAJR that was used for the
fee assessment rule.
• The Curricula field will be set to Primary.
The fee assessment process accommodates section level rules defined for open learning
courses. User-defined codes are applied in the Registration Fee Assessment Rules Form
(SFARGFE) to assess fees for open learning courses based on the schedule type and
instructional method.
The following conditions apply when using fee assessment with open learning registration:
• Open learning sections are identified by the following characteristics: no part-of-term, an
instructional method, registration from/to dates, student start from/to dates, duration
units, and number of units.
Section level status codes, extension rules (if registration extensions are permitted), and
refunding rules must be defined to process the registration of students into open
learning courses. This data defaults from the information established in the Open
Learning Rules Form (SOAORUL) when a new section is created.
The registration from and to dates will reflect the most appropriate registration dates as
per SOAORUL, based on course and/or section characteristics. These rules are
accessible via the Schedule Processing Rules Form (SSARULE).
• When registration takes place, charges are placed on the student's account based on
section fees defined in the Section Detail Information Form (SSADETL) and/or fee rules
established in the Registration Fee Assessment Rules Form (SFARGFE).
The Track by CRN indicator on in the Term Control Form (SOATERM) is used to add
the CRN number to all fee assessment transactions on the student’s accounts
receivable records. The Assess by Course indicator on SFARGFE does the same in
the refunding process (if the Track by CRN and Assess by Course indicators have
been checked at the section level). This capability facilitates the tracking of fees to an
individual registration record.
A study path sequence number will only be associated with a section fee charge when
the Section Fees by Study Path indicator is checked on SOATERM.
• As an alternative to defaulting fees from the course level, registration fees can be
defined in the Section Fee Assessment Control Form (SSADFEE) and will populate the
section fees (SSRFEES table) based on course and/or section characteristics. This is a
set-up process only and will not physically write the new records to the table until a new
section has been created.
When new sections are created, the fee rules defined here will default automatically. If
the updating of existing sections with no existing fee rules is required, a batch process

967
Banner Student User Guide | Registration
(SSPMFEE) is available to examine the set-up information and apply the fee rules to the
appropriate sections.
• If fee assessment rules are required in addition to section level fees, they should be
constructed in the Registration Fee Assessment Rules Form (SFARGFE) as in
traditional fee assessment.
Note: These charges will be assessed using the billing hours from
SFAREGS as in the traditional registration fee assessment calculations.
• If your institution does not wish to use the section fees method for assessment, rules
that incorporate open learning courses must be added to the Registration Fee
Assessment Rules Form (SFARGFE). The data elements in the registration fee
assessment rules provide the ability to assess by instructional method and schedule
type.
Define Charges Based on Course Registration Records
Charges can be defined in three ways:
• Section Fees
You can establish and apply rules assigned to individual courses using the course fees
information (in the Fee Code window of SCADETL) or the sections fees information (in
the Section Fees window of SSADETL).
• Registration Fee Assessment Rules
You can establish and apply rules on SFARGFE based on curriculum elements, student
characteristics, course campus, course level, course attributes, study path, or study
path with course attribute for pre-billing or regular billing rules.
• Registration Additional Fees
You can manually add optional fees using SFAEFEE. This form can be accessed from
the *REGISTRATION menu or from SFAREGS during registration using the Charge
Optional Registration Fees item in the Options Menu.
Assessment Methods
Once you have built your rules and students have been enrolled, the charges can be
applied immediately to a student’s account using online assessment or through job
submission.
You can run assessment five ways:
1. Online through SFAREGS Banner Student baseline registration.
2. Online through Banner Student Self-Service registration.
3. Online through Banner Voice Response telephone registration.
4. Online through TSASPAY in the Accounts Receivable module in Banner Student.

968
Banner Student User Guide | Registration
5. Online through job submission for a term using SFRFASC:
• for a single ID
• for a population selection
• for batch collector records created in registration
• for batch enrollment status
Reporting, Viewing, Auditing, Trouble Shooting, and Purging Fee
Assessment
You can review charges that have been placed on a student’s account in a variety of ways.
1. Use the Student Course/Fee Assessment Query Form (SFAREGF).
Review the data that is displayed in the Term Registration Summary block and the
Mock Fee Assessment window for the student for the term.
2. View student account detail on the Account Detail Review Form (TSAAREV).
You can access this form from the *TSTUDENT menu or using the Review Account
Detail item in the Options Menu on SFAREGS or on SFAFAUD.
3. View student account detail on the Student Account Detail Form (TSADETL).
You can access this form from the *TSTUDENT menu or using the Student Account
Detail item in the Options Menu on SFAFAUD.
4. Use the Registration Fee Assessment Audit History Form (SFAFAUD).
The main window displays all the items that have been entered into the audit table to
calculate the student’s charges. Items that have been used to create a TBRACCD
record display the associated transaction number from that table. The Audit Detail
Information window displays the details for the audit record.
5. Run the Registration Fee Assessment Process (SFRFASC).
Run this process to: print accounting records, print audit information, print both
accounting records and audit information, view audit records before updating student
accounts, and sort in name or ID order.
6. Run the Fee Assessment Report (SFRFEES).
Run this report to assist in trouble shooting and debugging fee assessment
processing. The report is used by the ActionLine to obtain contact data, (along with
additional delivered SQL*Plus scripts, which are discussed in the “Fee Assessment
Script” section).
7. Run the Purge Fee Assessment Audit Process (SFPFAUD).
Run this process to purge audit history records from the database or range of dates
for transactions, for a specific term, or for an ID. You can retain only the last
assessment records, print summary or detail information, and run the process in audit
or update mode.

969
Banner Student User Guide | Registration
Course Catalog
To assure that fee assessment processing will access all the rules and information needed
to calculate charges correctly, set-up is required in the Catalog module.
The following information from the Basic Course Information Form (SCACRSE) and the
Course Detail Information Form (SCADETL) is pulled into the Schedule module and is
used in fee assessment:
• billing hours
• credit hours (for section fees only)
• tuition waiver
• course levels
• grade mode
• schedule type
• instructional method
• course degree attributes
• fee codes
• duration type (for section fees only)
• duration units (for section fees only)
Class Schedule
To assure that fee assessment processing will access all the rules and information needed
to calculate charges correctly, set-up is required in the Class Schedule module.
The following information from the Schedule Form (SSASECT) and the Schedule Detail
Form (SSADETL) is pulled into the Registration module and is used in fee assessment:
• course campus
• schedule type
• instructional method
• part-of-term (These dates default from SOATERM.)
• tuition/fee waiver
• billing hours (These default from the course but may be changed as sections are
created.)
• sections fees
• degree program attributes
• duration type

970
Banner Student User Guide | Registration
• duration units
Term Control
To assure that fee assessment processing will access all the rules and information needed
to calculate charges correctly, set-up is required in the Registration module.
The following fields in the Registration Fee Assessment section of the Term Control Form
(SOATERM) are used in fee assessment:
• On-line Fee Assessment - When this box is checked, fee assessment will run in
baseline when registration records are saved and in self-service when students use the
View Fee Assessment link.
• Track by CRN - When this box is checked, courses with assigned section fees and
tuition and fee waiver flags set will have the CRN for that section recorded in accounting
records when assessment takes place.
• Refund by Total - Check this box to use refund calculations that are processed by
special refund by total calculations and registration refunding by total rules in SFARFND.
• Allow Swapping - Check this box to turn on hours swapping on a term-by-term basis in
registration fee assessment.
• Reverse Non-Tuition/Fee Charges - Check this box to allow registration fee
assessment to reverse non-tuition or non-fee charges for detail codes with a category
code other than
TUI or FEE.
• Effective Date - Enter the date you want charges to become effective in accounts
receivable, when using post-dated fees for a future date.
• Original Charge Cutoff Date - This is the last date on which charges can be
considered as original for purposes of Banner Financial Aid.
• Section Fees by Study Path - Check this box to control whether the study path
sequence number for the CRN (for the section fees) will be posted to the charge on
TBRACCD.
Registration and Enrollment Status
This section discusses setting up and using enrollment status information.
Course Registration Status Code Validation Form (STVRSTS)
The Count in Assessment and Withdrawal Indicator fields on STVRSTS need to be set
up for use in fee assessment.
The Count in Assessment indicator is used for any course with a registration status
which should have an impact on fee assessment. When this indicator is checked, the
billing hours for the course with this registration status code will be considered in fee
assessment. Uncheck this indicator if the billing hours for the course with this registration
status code are not to be considered in fee assessment.

971
Banner Student User Guide | Registration
The Withdrawal Indicator is used for any course with a registration status that should be
considered as a dropped course and for which a refund or penalty should be calculated.
When this indicator is checked, the billing hours for the course with this registration status
code will be considered in fee assessment, and the refund rules will be applied that are in
effect for the date the code was assigned to the course. This is the only way a course can
be considered as a dropped course and be processed by refund calculations in fee
assessment.
The billing hours are adjusted based on the defined refund information (from either
SFARSTS or SFARFND), if applicable, to calculate the student’s liable hours for the
course that has been dropped. If no refund period is defined, and no refund information is
found for the dropped course, the student is 100% liable for the course. The course is
considered an enrolled or registered course when the Withdrawal Indicator is
unchecked. When the Withdrawal Indicator is unchecked and the Count in
Assessment checkbox is checked, the student is automatically considered 100% liable
for the charge for the course.
Course Registration Status Form (SFARSTS)
The information in the Course Registration Status Refund Rules block on SFARSTS is
considered when the Refund by Total checkbox is unchecked on SOATERM. If the
student has dropped a course, fee assessment checks the registration status code, the
part-of-term code on the course, and the date it was applied to the student's course on the
SFRRFCR record. If that date falls within a range that has a refund period associated with
a detail code that has a category of
TUI or FEE, the liability for the student’s assessment
will be processed according to the refund percentages associated with that code on
SFARSTS. The Count in Assessment checkbox must be checked for the registration
status code.
Enrollment Status Code Validation Form (STVESTS)
The Withdrawal Indicator on STVESTS needs to be set up for use in fee assessment.
This indicator is used to define an enrollment status code as a drop for refund calculation.
Check this indicator so fee assessment will use the enrollment status code as a refund
status code. The refund percentages and date ranges in the rules on SFAESTS are used
for refunding. Uncheck this indicator so the student is seen as enrolled for this enrollment
status code.
Enrollment Status Controls Form (SFAESTS)
When the Withdrawal Indicator is checked for an enrollment status code on STVESTS,
fee assessment checks the enrollment status code and the date it was applied to the
student’s enrollment against the SFBRFST record for refund information. If the student's
enrollment change date falls within a range that has a refund percent associated with a
detail code that has a category of
TUI or FEE, assessment will calculate the percentage
of the refund according to the refund percentages associated with that code.
If the enrollment code and the course enrollment status code are changed to a withdrawal
type, the enrollment refund will always take precedence, and refunding will be based on
the enrollment withdrawal rules. If no enrollment withdrawal percentages exist for the
enrollment status code or the enrollment date, the course withdrawal refund rules will be
used from SFARSTS or SFARFND.

972
Banner Student User Guide | Registration
Assessments that occur after the student's enrollment has been changed to a withdrawal
type will not reflect any course liability, and tuition will not be assessed. The student's
assessment will remain the same as it was for the previous assessment. Any mock
assessment that is performed will not include course liability and tuition assessment,
because none will be available.
Manually Updating Existing Registration Status Codes
You can overwrite/update an existing registration status code (a non-dropped code) with
the same value. If an existing course has the same registration status code (a non-
dropped code) retyped over the existing code, no change in assessment should occur. If a
course is changed from a lesser registration status to full registration status, any refund
penalties or liability assessed need to be reversed. The
SFRSTCR_ASSESS_ACTIVITY_DATE column on the SFRSTCR table is used to
monitor this.
The SFRSTCR table captures a fee assessment activity date to determine if a course
needs to be processed in the next assessment. If flat charge refunding is in effect for the
assessment, as it is the only method of refunding that determines and processes
registration changes that have occurred since the last assessment, and a user types over
an existing code, reassessment should not occur for the section. The date in the
SFRSTCR_ASSESS_ACTIVITY_DATE column is used to determine which registration
records need to be selected for assessment.
As part of the registration processing, if the registration record is newly added or has had
a change in its registration status, the
SFRSTCR_ASSESS_ACTIVITY_DATE field will
be updated with the current date and time, so the fee assessment process will know that
this record needs to be processed. The SFRSTCR record only will be selected for flat
charge refund processing, if the
SFRSTCR_ASSESS_ACTIVITY_DATE is greater than
the
SFBETRM_ASSESSMENT_DATE, which is the date when the student was last
assessed. On those records that do not need to be processed, the
SFRSTCR_ASSESS_ACTIVITY_DATE field will not be updated.
Note: Institutions not using assessment flat charge rule definitions and
flat charge refunding will not be impacted by this processing.
• If both the original course registration status code (STVRSTS) and the new course
registration status code are for a non-dropped course (i.e., the course is being added),
and the original add was already assessed, then the
SFRSTCR_ACTIVITY_DATE
field is always updated, but the
SFRSTCR_ASSESS_ACTIVITY_DATE field is not
updated, since the course is not newly added and does not need to be assessed.
• If either the original course registration status code (STVRSTS) or the new course
registration status code are for a dropped course, which is defined as the
STVRSTS_WITHDRAW_IND is set to Y, then the following criteria checking is
performed.
• If the new course registration status code and the original course registration status
code are equal (the
SFTREGS_RSTS_CODE field value equals the original
SFRSTCR_RSTS_CODE field value), registration processing checks to see if the
date on the new course registration status code (
SFTREGS_RSTS_DATE) is
different from the date on the original record (
SFRSTCR_RSTS_DATE). If they are

973
Banner Student User Guide | Registration
different, then the student has made a change and may qualify for a different refund.
This record needs to be re-evaluated, and therefore the
SFRSTCR_ACTIVITY_DATE and the SFRSTCR_ASSESS_ACTIVITY_DATE
must be updated, so next assessment picks up the change.
• If the new course registration status code is for a dropped course and the original
course registration status code is for an added course, the
SFRSTCR_ACTIVITY_DATE and the SFRSTCR_ASSESS_ACTIVITY_DATE
must be updated, so that the next assessment processes the drop.
Storing Related Values and Options
Fee assessment options and controls for a term are stored in the Fee Assessment section
of the main window on SOATERM.
• Use the On-Line Fee Assessment (Indicator) to turn on online registration fee
assessment for the term.
• Use the Track by CRN (Indicator) to turn on tracking of charges by CRN for registration
fee assessment.
• Use the Refund by Total (Indicator) to turn on refund by total processing in registration
fee assessment.
• Use the Allow Swapping (Indicator) to turn on hours swapping in registration fee
assessment.
• Use the Reverse Non-Tuition/Fee Charges (Indicator) to allow registration fee
assessment to reverse non-tuition or non-fee charges for detail codes with a category
code other than
TUI or FEE.
• Use the Effective Date field to designate the date you want charges to become
effective in accounts receivable, when using post-dated fees for a future date.
• Use the Original Charge Cutoff Date field to designate the date through which all
assessments are considered original charges on all student accounting transactions.
• Use the Section Fees by Study Path (Indicator) to control whether study path data is
stored with a charge, when the charge is generated from section fees.
Setting Up Non-Refundable Fees
When a student no longer qualified for a charge to a detail code having a category code
other than
TUI or FEE, the non-refundable charges were traditionally reversed. Some
institutions prefer that only
TUI and FEE charges qualify for the reversal. There is an
option to reverse or not reverse charges to detail codes having a category code other than
TUI or FEE.
Use the Reverse Non-Tuition/Fee Charges (Indicator) on SOATERM to allow
registration fee assessment to reverse non-tuition or non-fee charges for detail codes with
a category code other than
TUI or FEE.

974
Banner Student User Guide | Registration
When the indicator is not checked (set to N), charges to detail codes having a category
code other than
TUI or FEE will not be reversed during fee assessment. For institutions
that wish to use the reversal, the indicator should be checked (set to
Y).
Note: When the checkbox is not checked, assessment will default to not
reversing charges to detail codes with a category code other than
TUI
and
FEE.
Maximum Limits
Use the Registration Fees Min/Max Charge Control Form (SFAFMAX) to set upper limits
for the amount a student can be charged overall for a specific detail code for a term. This
does not include processing using Track by CRN. A course that has the Tuition Waiver
(Indicator) set on SCACRSE in a term that is using Track by CRN will not count toward
the maximum allowed for a detail code for the term. Please refer to the topic "Definition
and Use of Registration in SFAFMAX" later in this section for more information.
Registration Fee Assessment Rules
Use the Registration Fee Assessment Rules Form (SFARGFE) to build your rules for fee
assessment processing. Please refer to the online help for more information on
SFARGFE.
On SFARGFE you can do the following in the Key Block:
• Use the pulldown list in the Rule Type field to select valid rule type values such as
ATTR, CAMPUS, LEVEL, STUDENT, STUDYPATH, or STUDYPATH_ATTR.
• Use the Entry Type field to build rules for pre-billing and regular billing. Use the
pulldown list to select
PREBILL or REGULAR as the value.
• Use the Copy Rules to New Term button to copy existing rules to a new term. This
button opens a window where you can enter the rule information and then select the
Process Rule Copy button to insert the copied rules into a new term and save the
changes.
• Use the Set Copy Indicator checkbox to set the Copy (Indicator) for each rule on
SFARGFE to checked (copy) or unchecked (do not copy).
• Use the Process Copy Indicator Setting button to default each Copy (Indicator) in
the form for that rule type to the setting chosen (checked or unchecked) by the Set
Copy Indicator checkbox.
On SFARGFE you can do the following in the Registration Charges and Fees block.
• Use the Sequence Number field to view the one-up number that is automatically
assigned to each rule within the term code and rule type when the rule is created and
saved. In the Registration Fee Assessment Audit History Form (SFAFAUD), you can
identify exactly which rule was used to process that assessment by referring to the
sequence number and then viewing the registration fee assessment rules for that term
and rule type.

975
Banner Student User Guide | Registration
• Use the Course Campus, Course Level, and Course Attribute fields only when you
are working with the applicable rules (
CAMPUS, LEVEL, ATTR), as they have
associated data entry restrictions. The Course Attribute field must be used with the
STUDYPATH_ATTR rule.
• Use the other fields in the block to build rules to your specifications.
Use the Student Curriculum Rules block, the Registration Criteria block, and the Student/
Course Rules block to maintain information used in fee assessment processing. The data
displayed in these blocks is dependent on the rule selected in the Registration Charges
and Fees block.
Use the Assess by Course checkbox in the Student/Course Rules block to apply charges
to a specific CRN when rules exist based upon part-of-term, grade mode, instructional
method, and schedule type.
The following occurs in the Student Curriculum block when either the
STUDYPATH or
STUDYPATH_ATTR rule type is selected in the Key Block.
• The Residence and Session fields are displayed.
• The Curricula field is hidden. You cannot enter the curriculum priority.
• The Student Curriculum tab label changes to read Study Path.
• The Student Curriculum Rules block label changes to read Study Path Rules.
When the rule types for
STUDENT, CAMPUS, ATTR, or LEVEL are selected, the
Curricula field is displayed, and the Residence and Session fields are hidden. The tab
label reads Student Curriculum, and the block label reads Student Curriculum Rules.
When the
STUDYPATH rule type is used, you must enter at least one curriculum value in
the Study Path Rules block before a rule can be saved.
When the
STUDYPATH_ATTR rule type is used, you must enter at least one curriculum
value in the Study Path Rules block, as well as a course attribute in the Registration
Charges and Fees block before a rule can be saved.
Copying Rules to New Term
Use the Copy Fee Assessment Rules To A New Term window on SFARGFE to copy rules
by term and the associated data to a new term. This window is accessed from the Key
Block using the Copy Rules to New Term button.
You may also select rules to copy by using the rule data elements. For example, you may
copy one department's rules at a time or copy only those rules for non-resident students
before copying rules for resident students. Use the data elements to restrict the rules to be
copied. Only rules with the Set Copy Indicator checked will be copied to the new term.
(When entering data elements to restrict rule copying, the rule uses an AND condition
between the data elements you select.) Rules may be copied back to previous terms or
forward to future terms. Detail codes that are inactive in TSADETC will not be copied in
this process.

976
Banner Student User Guide | Registration
Audit History
Use the Registration Fee Assessment Audit History Form (SFAFAUD) to assist in fee
assessment processing and to view the history of assessments by ID and term. Use the
data on the form to understand how the charge was calculated by the fee assessment
process.
The Detail block displays the term code, activity date, time of the assessment, the
SFARGFE rule sequence number, detail code, detail category code, TBRACCD
transaction number, and the amount of the charge. You can view expanded detail on the
audit record using Next Block or the Options Menu.
The Detail Audit Information window displays the pertinent information from SFARGFE
and the fee assessment process to explain how the charge was derived. The window
separates assessments into per credit, flat, and overload and allows you to see the billing
hours used, as well as the overload starting hours, overload hours, and the per credit
charges applied. The audit history also stores the CRN for both Track by CRN processing
and for assess by course processing. When you are assessing by course or tracking by
CRN, the audit detail record displays the source of the refunding information, as well as
the registration status code or the enrollment status code used to calculate the refund.
Charges applied as a result of assessments from the section fees portion of the Section
Detail Form (SSADETL) and from additional fees are displayed in the Note field in the
window. If minimum or maximum restrictions from the registration fee assessment rules or
from SFAFMAX have affected the assessment, this is also displayed as notes information.
Fee Assessment Audit History Records from Batch
The fee assessment process run from job submission (SFRFASC) provides output options
to print either the entries that are made to the audit history table, the student accounting
record (TBRACCD) update only, or both audit and student accounting record information.
Output is distinguished between fee assessment audit history records under the
subheading of Audit and student accounting records (TBRACCD) under the subheading of
Accounting.
Here is a sample of the output for a student in which charges have been back-dated in the
Student Course Registration Form (SFAREGS). The audit information records the actual
date of assessment, and the student accounting records display the effective date the
charges were posted to TBRACCD. This represents the option to print both audit and
student accounting information for the current assessment.
550000030 Student, Sample
Audit:
3 T101 Tuition Charge 400.00 20-NOV-2002
1 TA Tuition Rules by Level 40.00 20-NOV-2002
2 TF Non-Resident Tuition 240.00 20-NOV-2002
Net Assessment: 680.00
Accounting:
3 T101 Tuition Charge 400.00 20-NOV-2002
1 TA Tuition Rules by Level 40.00 01-OCT-2002
2 TF Non-Resident Tuition 240.00 01-OCT-2002
Net Change: 680.00

977
Banner Student User Guide | Registration
Per Credit, Flat, and Flat Plus Per Credit (Overload) Processing
Rules for fee assessment processing are defined in one of three ways:
• Per credit charging rules (uses billing hours)
• Flat charging rules
• Overload charging rules
Rules that have already been defined for previous terms will calculate the appropriate
fees. When the audit history detail records are created for a previous term, fee
assessment will place all charges in the Per Hour Charge field, since this was the only
method used to create charges in the previous versions of registration fee assessment.
Flat charging rules must be developed for institutions using plateau refunding. The flat and
overload charging elements can be used to set up new rules for a term. Understanding
this processing allows you to build rules that will provide more useful information from the
registration fee assessment audit history records. Users can more readily see how a
charge was derived in fee assessment.
The best way to demonstrate the differences in set-up and when it is necessary to update
an institution’s rules to use these new data elements is to provide several examples.
Per Credit
Per credit processing functions as follows. You enter the per credit amount and use the
minimum and maximum ranges to control the limits. The fee assessment audit history
shows the per credit amount for the rule and the billing hours used to calculate the charge.
If the minimum or maximum was invoked to limit the charge, that information is displayed
in the notes. An example of the use of per credit charges and the results in the audit
history is provided in the scenarios that follow.
Flat and Flat Plus Per Credit (Overload) Processing
Flat plus per credit charges will be referred to as overload charges from here on.
For overload processing, the Liable Billing Hours From and (Liable Billing Hours) To
fields are used to define how a student qualifies for or enters the rule. Other fields are also
additionally used to define flat rules and overload rules.
The Flat Charge Hours Range From field is used to define the minimum credits for the
flat charge. The (Flat Charge Hours Range) To field defines the point at which the flat
rule charge is no longer in effect, and the Flat Charge Amount field defines the actual
amount to be applied to the student's assessment.
The Course Overload Start Hours field determines the liable billing hours the student
must have to begin assessing a per credit calculation over the flat charge. Therefore, a
single rule can be used to set up the flat and overload charges. Conversely, single rules
for per credit and flat processing can be broken out into two rules to allow for easier
identification of how charges were derived using the audit history detail.
Note: These fields must be used when plateau refunding is needed at
your institution.
978
Banner Student User Guide | Registration
Flat fee processing uses a flat hours range and a defined flat fee amount to generate flat
fee charges. This works with the assessment process to identify the starting point for the
flat rule. The from flat hours is referred to during the plateau refund process.
Expanded decimal places are not required to calculate correct refunds when dropping into
and out of flat charge ranges. The course overload start hours is referred to when
overload rules are in effect. Any credits over a particular range are charged a per credit
rate plus the flat charge. For example, you may have a rule that says: Charge $1000.00 to
any student with 12 or more credits and an additional $100.00 per credit to students who
have more than 15 credits. You do not need to use a negative rule to back out the
difference between the flat and per credit over flat amounts. A detailed example is
provided in the scenarios that follow.
Per Credit Charging
Previously, per credit charging was the only way fee assessment was able to calculate
charges. Per credit charging was used to create both flat and flat plus per credit charges
by manipulating the use of the minimum and maximum charge values in SFARGFE. This
method will continue to calculate the correct results. Please review the following example.
Scenario 1: Flat Charges versus Per Credit with a Maximum Charge
Old Rule Set-Up Charges
1. Any undergraduate student who is registered in 1-11.99 credits (billing hours) is
charged $80.00 per credit.
2. Any undergraduate student who registers in more than 12 credits is charged a flat fee
of $1000.00.
12 X 80.00 per credit = $960.00
Therefore, these charging rules mean that full-time students pay a $40.00 premium for
going to full-time status, which allows them a higher range of hours for the same flat
charge.
A single rule such as the following can be created:
This rule creates the correct charges and refunds for students in fee assessment
processing. The results in SFAFAUD will show what fee assessment has done to calculate
the charge. All charges are recorded as per credit charges in the audit table.
As a result, the audit history records for every student who is charged using a rule such as
the one above will display the per credit calculation in the Per Hour Charge field in the
Detail Audit Information window of SFAFAUD. The total per credit calculation and the
Seq Detl
Per
Credit Min Max Lvl
From
Liable
Billing
Hrs
To
Liable
Billing
Hrs
From
Flat
Hrs
To
Flat
Hrs
Flat
Chrg
Course
Overload
Start Hrs
1 T101 $80.00 $80.00 $1000.00 UG 1.00 99.00 New Data Elements on SFARGFE
979
Banner Student User Guide | Registration
number of liable hours used to derive the charge are displayed in those data fields. If the
student exceeds the $1,000.00 limit, the total calculation is displayed, but the Note field
explains that the per credit calculation exceeded the rule maximum. Fee Assessment
actually calculates the per credit charge and then invokes the maximum charge defined
for the rule.
A student who registered for 21 credits in a term in which the above rule is defined, would
have the information in the Note field in the Detail Audit Information window of SFAFAUD
explaining that the per credit calculation of:
21 liable billing hours X 80.00 per hour = $1680.00, which exceeds the rule maximum
of $1,000.00
(by displaying in the Note field)
1680 > rule max of 1000, reset to max
Fee assessment rules and processing allow the user to move the $1,000.00 flat rate into
the Flat Fee Charge field, indicating that the charge was not derived just as a maximum
that was invoked on a per credit rule, but that it was in fact a flat charge. Please see the
next example.
Alternative Rule Set-Up for Flat Charging
Using the same example as above, a new rule can be established.
As an alternative to fee assessment performing the work to calculate per credit charges,
when in fact the user really is creating a flat charge, use the set of flat charging elements
in SFARGFE. The charge posted to the accounting records in TBRACCD will be the same
using this set-up, however what is displayed to the user in the Audit Detail Information
window will differ.
To accomplish this you can break the above rule into two separate rules using the fields on
SFARGFE for flat and overload charging.
A student who is registered in 21.00 credits receives a $1,000.00 charge. This time, the
flat charge of $1,000 displays in the Flat Fee Charge field in the Audit Detail Information
window. The range of credits that apply to the flat rule are also displayed in the Rule Flat
Hour Range fields as 12.00 - 99.00. Fee assessment does not multiply the student’s
billing hours by the per credit charge and then invoke the maximum limit. There is no
information in the Note field in this case.
The new rules on SFARGFE in the Registration Charges and Fees block will be displayed
as follows:
Seq Detl
Per
Credit Min Max Lvl
From
Liable
Billing
Hrs
To
Liable
Billing
Hrs
From
Flat
Hrs
To
Flat
Hrs
Flat
Chrg
Course
Overload
Start Hrs
1 T101 80.00 80.00 959.20 UG 1.00 11.99
2 T101 0.00 0.00 9999.99 UG 12.00 99.00 12.00 99.00 1000.00

980
Banner Student User Guide | Registration
• The value for the Flat Charge Hours Range From is 12.00.
• The value for the (Flat Charge Hours Range) To is 99.00.
• The value for the Flat Charge Amount is $1000.00.
Fee assessment will calculate refunds when a student drops below the from flat hours
range. Please refer to the topic “Refunding Using Combined Flat and Overload Rules
(Plateau Refunds)” later in this section.
Scenario 2: Overload Charging
An “overload” situation may exist when:
• The institution decides that the flat charge applies to a specific range of credits (billing
hours), and there is a maximum number of hours allowed for that flat charge.
• If a student exceeds the maximum hours allowed for the flat charge, the institution
charges per credit for the difference between the maximum allowed for the flat range
and the actual number of credits for which the student is registered.
SFARGFE uses a Course Overload Start Hours field to determine when that overload
charge should begin. Please review the following example.
Any undergraduate student who is registered in 1-11.99 credits is charged $100.00 per
credit.
When an undergraduate student reaches 12.00 credits, a flat fee of $1000.00 is applied.
(In this case, the institution provides an incentive to register as a full-time student.) The flat
fee applies to all students registered in 12 or more credits, but if the student registers in
more than 15 credits, the institution begins charging an additional $100.00 for each credit
in excess of that 15 credit maximum.
Non-Refund by Total and Multiple Flat Rules
Fee assessment processing can assess a student for multiple flat rates, as well as non-flat
or per credit type rates concurrently.
Example Rules:
The student qualifies for the following rules on SFARGFE.
Step 1: The student initially registers for 13 credit hours and is assessed.
Rule Detail Code Rule Type Flat From Flat To Amount
1 T100 STUDENT 12 99 1200 flat
2 T200 STUDENT 7 10 1000 flat
3 C100 STUDENT 0.01
(Credit From)
50
(Credit To)
100 per
credit hour

981
Banner Student User Guide | Registration
Step 2: The student drops 6 credit hours in a 60% refund period and is assessed.
The following rules are used for processing multiple flat rules with per credit hours rules.
1. When the student qualifies for multiple rules that exist across multiple rule types (such
as
STUDENT and ATTR, or STUDENT and CAMPUS, or CAMPUS and LEVEL), the
student liable rule hours on all non-student rules will be based on a per-credit and
non-flat calculation.
2. The student drops out of a flat rule, and no other rule exists to pick up where the flat
rule ends. (The student is assessed a flat fee with a range of 12 - 99 hours, drops
hours in a range from 0 - 11.99, and no other rules exist below 12 hours). When the
student adds credit hours back into their rule, the previous flat liability will be lost, and
the new liability will include only new credit hours.
Example Rule:
The student qualifies for the following rule on SFARGFE.
Step 1: The student initially registers for 13 credit hours and is assessed.
Step 2: The student drops 3 credit hours in a 60% refund period and is assessed.
Detail Code Amount Liability Hours Student Liability Hours
T100 1200 13 13
C100 1300 13 13
Detail Code Amount Liability Hours Student Liability Hours
T100 1200 The flat liability is calculated at 9 hours, which is
below the flat range.
T200 1000 9.4 9.4
C100 360 9.4 9.4
Rule Detail Code Rule Type Flat From Flat To Amount
1 T100 STUDENT 12 99 1200 flat
Detail Code Amount Liability Hours Student Liability Hours
T100 1200 13 13

982
Banner Student User Guide | Registration
Step 3: The student adds another 6 credit hours and is assessed.
3. The rules that will reuse the liability hours calculated for a flat fee are flat rules with the
same from and to flat hours within the same rule type and value. This is any non-flat
rule in which the flat “from hours” minus the non-flat rule credit “to hours” is greater
than zero but less than one.
For example, the flat rule has a flat range of 12 - 99. The rule that is not for a flat fee
and with a credit hour range of 0 - 11.99, will use the liability hours calculated for the
flat fee. If the non-flat rule has a credit hour range of 0 - 10.99, the flat liability will not
be used, but the liability calculated as a per credit hour will be used.
Example Rules:
The student qualifies for the following rules on SFARGFE.
Step 1: The student initially registers for 13 credit hours and is charged.
Step 2: The student drops 6 credit hours in a 60% refund period and is charged.
Detail Code Amount Liability Hours Student Liability Hours
T100 1200 The flat liability is calculated at 10.8 hours, which
is out of the flat range.
Detail Code Amount Liability Hours Student Liability Hours
T100 1200 16 16
The previous flat liability of 8 hours is lost, and the starting liability for the flat fee
will start over.
Rule Detail Code Rule Type Flat From Flat To Amount
1 T100 STUDENT 12 99 1200 flat
2 T200 STUDENT 7 10 1000 flat
3 C100 STUDENT 0.01
(Credit From)
11.99
(Credit To)
100 per
credit hour
Detail Code Amount Liability Hours Student Liability Hours
T100 1200 13 13
Detail Code Amount Liability Hours Student Liability Hours
T100 1200 The flat liability is calculated at 9 hours.

983
Banner Student User Guide | Registration
4. If a non-flat rule falls in the 1 credit hour range for multiple flat rules, it will always be
treated as a per credit hour, and none of the flat liabilities will be used for the rule.
Example Rules:
The student qualifies for the following rules on SFARGFE.
Step 1: The student initially registers for 13 credit hours and is charged.
Step 2: The student drops 6 credit hours in a 60% refund period and is charged.
Multiple Flat Rules GTVSDAX Rule
Warning! If you have multiple flat rules with the same from (start) dates
but with different to (end) dates, you need to read the following, or your
results may be different than expected.
T200 1000 9.4 9.4
C100 900 9 9
C100 picks up the liability calculated for the T100 flat fee, because it is within
one credit hour range.
Rule Detail Code Rule Type Flat From Flat To Amount
1 T100 STUDENT 12 99 1200 flat
2 T200 STUDENT 12 15 1000 flat
3 C100 STUDENT 0.01 (Credit
From)
11.99
(Credit To)
100 per credit
hour
Detail Code Amount Liability Hours Student Liability Hours
T100 1200 13 13
T200 1000 13 13
Detail Code Amount Liability Hours Student Liability Hours
T100 1200 The flat liability is calculated at 9 hours.
T200 1000 The flat liability is calculated at 9 hours.
C100 940 9.4 9.4
Detail Code Amount Liability Hours Student Liability Hours

984
Banner Student User Guide | Registration
A GTVSDAX rule is used to define the minimum flat to hours for conversion to a value of
9999 for processing consistency. Script sinsgtvsdax1.sql is used to insert this
record into GTVSDAX.
The GTVSDAX rule for the (Internal) Code of
FLATTOMAX and the Group (Code) of
FEERULES is used to define the minimum flat to hours that will be converted to 9999.
For example, if your rules are 12-99, 12-99.99, and 12-999, set the External Code to
99
so that all rules greater than or equal to
99 will be converted to 9999.
The
FLATTOMAX rule is delivered with the External Code set to 99. If your institution
assesses a greater number of credit hours than 99 for a flat range, you must reset the rule
value.
Example:
• For a flat hour range of up to 99, leave the rule set at 99.
• For a flat hour range of up to 999, set the rule to 999.
• For a flat hour range of up to 9999, set the rule to 9999.
The
supsfrflat.sql script is used to correct all flat to hours values for a term in
SFRRGFE and SFRFAUD. This script is run from SQL*Plus. Its finds all flat hour ranges
for a term, prompts the user for new flat to hour values, and then updates the values. The
SFKFEES and SFKFEE1 packages replace the
SFRRGFE_TO_FLAT_HRS value and
the
SFRFAUD_RGFE_TO_FLAT_HRS value with 9999 for a term, when that value is
greater than or equal to the GTVSDAX value for the
FLATTOMAX rule.
Old Rule Set-Up for Overload Charges
The former rule set-up required four lines of rules. One line of rules was set up using a
negative charge to compensate for the per credit limitations of old fee assessment
processing. These rules will continue to calculate the correct assessment.
The * indicates fields that have been added to SFARGFE.
The ** indicates fields that have been removed from SFARGFE.
External
Code
Internal
Code
Internal
Code
Sequenc
e Number
Internal Code
Group Description
Activity
Date
99 FLATTOMAX 1 FEERULES Max RGFE flat
to hours
Sysdate
985
Banner Student User Guide | Registration
The work done by fee assessment when a student with 19 credits registers and is
assessed for these rules is:
Determine the student's liable hours = 19, and therefore rules 2, 3 and 4 apply.
Rule 2 charge = 19 X 100.00 per credit = $1900.00, but the maximum allowed for the
rule is $1,000.00; therefore the Rule 2 charge = $1,000.00.
Rule 3 charge = 19 X 100.00 per credit = $1900.00.
Rule 4 charge = 19 X 0 per credit = 0, and the minimum charge = - $1500.00.
The total of Rules 2, 3, and 4 = ($1,000.00 + $1900.00) - $1500.00 = $1,400.00.
Alternative Rule Set-Up for Overload Charges
Here is an alternative rule example.
The $100.00 per credit charge will be used when the student reaches the course overload
start hours (in this case 15.00 hours).
Only students who are liable for 12.00 or more billing hours use this rule (sequence
number 2). Once it is determined that the student has more than 12.00 liable billing hours,
fee assessment then looks to see if the liable billing hours are also greater than or equal to
15.00, the value of the course overload start hours. If that is the case, as with a student
who has 19 credits, fee assessment performs this calculation:
Seq Detl
Per
Credit Min Max Plat
Plat
Hrs Lvl
From
Liable
Bill
Hrs
To
Liable
Bill
Hrs
Frm
Flat
Hrs
To
Flat
Hrs
Flat
Chrg
Crse
Ovrld
Start
Hrs
*********
1 T101 100.00 100.00 1199.00 Y 12 UG 1.00 11.99
2 T101 100.00 1000.00 1000.00 Y 12 UG 12.00 99.00
3 T101 100.00 0.00 9999.00 Y 12 UG 15.00 99.00
4 T101 0.00 - 1500.00 - 1500.00 Y 12 UG 15.00 99.00
Seq Detl
Per
Credit Min Max Lvl
From
Liable
Billing
Hrs
To
Liable
Billing
Hrs
From
Flat
Hrs
To
Flat
Hrs
Flat
Chrg
Crse
Ovrld
Start
Hrs
1 T101 100.00 100.00 1199.00 UG 1.00 11.99
2 T101 100.00 0.00 9999.99 UG 12.00 99.00 12.00 99.00 1000.00 15.00

986
Banner Student User Guide | Registration
Flat Charge + (Billing Liable hours – Course Overload Start Hours) X Per Credit
Charge
A student with 19 credits will be charged:
1000.00 + (19 Liable Billing Hours -15 Course Overload Start Hours for the rule) X
100.00 = 1000 + (4 Overload Hours X 100.00) = $1400.00
The Detail Audit Information window on SFAFAUD displays the flat charge amount and the
overload charge amount based on the rule above for a student who registers in 19.00
hours. Based on the overload start hours of 15.00, the flat fee charge of $1000.000 is still
in effect and is displayed in the Flat Fee Charge field. The hours used for the overload
calculation (4.00) are displayed in the Overload Hours field, and the $100.00 per credit
charge that applies to the overload hours displays in the At field with the calculated charge
displayed to the right.
Fee Assessment Using the Assess by Course Indicator
Fee assessment processing can assess a course with certain course-specific data
elements. These data elements that apply to assess by course are part-of-term, grade
mode, instructional method, and schedule type. The Assess by Course (Indicator)
allows fee assessment to return to the grouped courses (whether by student, level,
campus, or course attribute) and check for CRNs that satisfy a rule with a specified part-
of-term, grade mode, instructional method, and schedule type. Rules can also be
assessed using
C (combined parts-of-term).
Using Assess By Course With Part-of-Term Processing
When a rule is specified as being assessed by course, fee assessment processes the
student's registered courses in two steps for the available rule groupings in SFARGFE
(student characteristics, course level, course campus, and course attribute).
1. The order of processing within groups is determined.
1.1. Course hours for that rule grouping are summed.
1.2. While the total hours are being summed, part-of-term is tracked for that group. If
more than one part-of-term is found,
C (combined) becomes the part-of-term for
the group. If the part-of-term for the group is not greater than one, the code
remains set to that unique part-of-term.
2. The group hours are totaled.
2.1. The rule evaluation is called.
2.2. The part-of-term code determined in step 1 during the totalling process is used.
If found to be
C, fee assessment will use the rule that is specified as C for the
part-of-term.
2.3. Only rules not marked assess by course will be considered in this step.
3. Assess by course processing begins.
3.1. Each course is processed within the course grouping.
3.2. The rule evaluation is called for each course within the grouping.

987
Banner Student User Guide | Registration
3.3. Only courses marked assess by course will be considered.
3.4. The part-of-term code used in the rule will be the part-of-term code (or grade
mode) attached to the course being processed.
3.5. The hours used for the rule for that specific part-of-term will be the hours for the
course.
Examples of Part-of-Term Processing
Here are some examples of part-of-term processing.
Example 1 - Ken Jones
For this example, assess by course is turned off in all rules. The rule type is Charge By
Student Characteristics
. SFARGFE is set up as follows:
Ken Jones is registered in two courses:
The total credits for grouping by student are six (6). The SFARGFE rules for both
C and
Blank apply to this student’s registration.
The calculation would be:
(6 X 10.00) for Part-of-Term C =
T102
+ (6 X 125.00) for Part-of-Term = Null
= 810.00
The rule for Part-of-Term 2 does not use
T103 for processing, because assess by course
is turned off.
The student’s accounting entries (TBRACCD) would be:
Part-of-Term C T102 @ 10.00 pc
Part-of-Term 2 T103 @ 100.00 pc
Part-of-Term blank T101 @ 125.00 pc
CRN 1 4 credits defined as Part-of-Term 1
CRN 2 2 credits defined as Part-of-Term 2
1 T101 Tuition Charge 750.00
2 T102 Undergraduate Tuition 60.00
Net Change 810.00

988
Banner Student User Guide | Registration
Example 2 - Ken Samuels
For this example, assess by course is turned on in one rule. The rule type is Charge By
Student Characteristics
. SFARGFE is set up as follows:
Ken Samuels is registered in two courses:
The total credits for the grouping by student are six (6). Assess by Course is checked for
the rule with the detail code of
T103. Therefore the SFARGFE rules for both C and
Blank apply, and Part-of-Term 2 will apply to this student for the hours within Part-of-
Term 2. The credits to assess by course equal two (2).
The calculation would be:
(6 X 10.00) for Part-of-Term C =
T102
+ (6 X 125.00) for Part-of-Term Blank = T101
+ (2 X 100.00) for Part-of-Term 2, assess by course = T103
= 1010.00
The student’s accounting entries (TBRACCD) would be:
If the above students were to drop courses during a 100% refund period or using a drop
code that is not counted in assessment, and the remaining CRN(s) exist in a single part-
of-term, fee assessment assesses the student as though they are in a single part-of-term.
Fee assessment sees the change from multiple parts-of-term to a single part-of-term and
use the correct rules for the student.
Track by CRN
Track by CRN processing works as follows. The CRN is stored in the audit history record
(SFAFAUD), and section fee information is retained in the notes of the audit history record.
Part-of-Term C T102 @ 10.00 pc Assess by Course is N
Part-of-Term 2 T103 @ 100.00 pc Assess by Course is Y
Part-of-Term blank T101 @ 125.00 pc Assess by Course is N
CRN 1 4 credits defined as Part-of-Term 1
CRN 2 2 credits defined as Part-of-Term 2
1 T101 Tuition Charge 750.00
2 T102 Undergraduate Tuition 60.00
3 T103 Tuition Charge 200.00
Net Change 1010.00

989
Banner Student User Guide | Registration
The CRN can be viewed on TSADETL. You can navigate to TSADETL from SFAFAUD to
see the CRN in Accounts Receivable. This is enabled in SOATERM using the Track by
CRN checkbox. Track by CRN also allows institutions to realize or total the revenue
generated from students registering for specific CRNs.
Note: The view SFVTFAN and the report produced by the script
sfrtfan.sql are also part of this fee assessment processing.
The Student Course/Fee Assessment Query Form (SFAREGF) provides fee assessment
detail in the Mock Fee Assessment window and also displays the CRN for any courses
with section fees when the Track by CRN checkbox is checked in SOATERM. The mock
assessment takes place for the current saved registration record when you view these
charges with the SFAFMAX minimum/maximum applied or without the SFAFMAX
minimum/maximum applied using the Options Menu.
Definition and Use of Registration in SFAFMAX
The Registration Fees Min/Max Charge Control Form (SFAFMAX) allows institutions to
define minimum and maximum charges for a given detail code for a given term. When a
minimum/maximum range is established for a detail code for a term, fee assessment
refers to the rules built for the term in this form and imposes the minimum or maximum as
defined for the grouped detail code charges.
When tracking by CRN is not used, and study path charging is not used, the assessment
charges determined for the student for the term are grouped by detail code. Prior to the
creation of the accounting record, the SFRFMAX table is checked to see if a defined
minimum/maximum exists for the detail code and term. If an SFRFMAX record is defined
for the detail code and term being processed, the total generated charge (the aggregate
charge) for the detail code is evaluated to see if it falls within the minimum/maximum
charge range that is defined for that detail code in SFAFMAX. If the aggregate charge is
outside of the minimum/maximum charge range, the aggregate charge is adjusted, and
the adjustment amount is recorded in the Registration Fee Assessment Audit History
Form (SFAFAUD).
The audit history record that is created brings the determined liability for the student into
agreement with the amount the student was charged in accounting. The audit history and
the student's account charges will agree. This processing can be seen in the Note field in
the Detail Audit Information window on SFAFAUD.
In registration fee assessment, the SFRFMAX table is consistently checked prior to the
creation of accounting records in TBRACCD. This is true regardless of whether the
Tracking by CRN checkbox is turned on (checked) or off (unchecked) in Term Control
Form (SOATERM).
When tracking by CRN is used for a term, the scope of the registration minimum/
maximum rules changes.
1. Each course-specific charge will be evaluated against the defined minimum/maximum
charge range for the term and detail code as defined in SFAFMAX.
2. As part of registration fee assessment processing when using tracking by CRN, the
determined charges are grouped by detail code and CRN. The generated charges will
include recording the CRN in the student’s accounting record if the charge is for a

990
Banner Student User Guide | Registration
particular course, i.e., a section fee or a charge determined by a registration fee
assessment rule (from SFARGFE) where the Assess by Course (Indicator) is
checked (
SFRRGFE_ASSESS_BY_COURSE_IND is Y).
3. Prior to creating the accounting record in TBRACCD for the course-specific charge,
the SFRFMAX table is checked to determine if a defined minimum/maximum charge
range exists for the term and detail code. If the generated course-specific charge is
outside of the minimum/maximum range as defined in SFRFMAX, the generated
charge is adjusted, and the adjustment amount is recorded in registration fee
assessment audit history (SFRFAUD).
When study path assessment is used for a term, the scope of the registration minimum/
maximum rules changes.
1. Each detail code and study path charge will be evaluated against the defined
minimum/maximum charge range for the term and detail code as defined in
SFAFMAX.
2. As part of registration fee assessment processing when using the
STUDYPATH or
STUDYPATH_ATTR rules, the charges are grouped by detail code and study path.
The generated charges include recording the study path in the student's accounting
record.
3. Prior to creating the accounting record in TBRACCD for the study path charge, the
SFRFMAX table is checked to determine if a defined minimum/maximum charge
range exists for the term and detail code. If the generated study path charge is outside
of the minimum/maximum range as defined in SFRFMAX, the generated charge is
adjusted, and the adjustment amount is recorded in registration fee assessment audit
history (SFRFAUD).
Minimum/maximum rules are not used if all courses have been dropped at 100%. In
addition, if all the rules (created on SFARGFE or SSADETL) are deleted for a detail code
and a corresponding minimum/maximum charge range, the minimum/maximum rules are
not used in the reassessment.
Use of View Students Classes and Charges on SFAREGF
The Student Course/Fee Assessment Query Form (SFAREGF) performs a mock fee
assessment when the you select Fee Assessment Without Min/Max Applied or Fee
Assessment With Min/Max Applied from the Options Menu.
Fee assessment detail in the Mock Fee Assessment window displays the CRN for any
courses with section fees when the Track by CRN checkbox is checked in SOATERM,
along with the detail code and charge calculated based on the student's current saved
registration record. You may view these charges with the SFAFMAX minimum/maximum
applied or without the SFAFMAX minimum/maximum applied.
Fee Assessment Processing Steps - Refunding by Course
The fee assessment process always works with the student’s liability at the specific time
that the process is run. Comparisons to previous assessments for accurate charging,
refunding, and reversals are aided in certain processing by the use of the audit history
table. It is critical to create the first set of audit history records.

991
Banner Student User Guide | Registration
Fee assessment does the following during processing:
1. Determines the liable amount by detail code.
Fee assessment looks at registration status information for the course and determines
what the student is liable for in terms of billing hours, using the Liable Billing Hours
From and To fields on SFARGFE.
For example, a student is registered in 12 hours.
The fee assessment rule the student qualifies for is:
• The registration status code used is
RE (Registered).
• On STVRSTS the following settings are used. The Count in Enrollment
(Indicator) is checked. The Count in Assessment (Indicator) is checked. The
Withdrawal Indicator is not checked.
• In SFARSTS, there are no refund periods associated with the
RE status.
• Fee assessment uses the per credit charge and the
RE status, because it does not
mean a drop (Withdrawal Indicator is not checked), and no refund percentages
apply. Therefore liability for each CRN is interpreted as 100%. (For the calculation,
the liability multiplier is 1.0.)
The calculation used is (liable hours X liability multiplier) X charge per the rule
qualification.
CRN Hours Status
CRN 001 4 RE
CRN 002 2 RE
CRN 003 3 RE
CRN 004 3 RE
Detail Code Amount Field Value
T101 10.00 per credit Minimum 0.00
Maximum 1,000.00
From Liable Hours 1.00
To Liable Hours 99.00
CRN Calculation
CRN 001 (4.00 X 1.0) X 10.00
CRN 002 (2.00 X 1.0) X 10.00
CRN 003 (3.00 X 1.0) X 10.00

992
Banner Student User Guide | Registration
The total charge will be $120.00 for the detail code (T101) associated with this rule.
If this scenario is modified by performing a drop of one CRN, there is a different result.
• The registration status code for CRN 001 is changed to
DC (Drop Course).
• On STVRSTS the following settings are used. The Count in Assessment
(Indicator) is checked. The Withdrawal Indicator is checked.
• When setting up registration status controls on SFARSTS,
DC is defined with a
refund percentage of 90% for category codes of
TUI.
• A 90% refund means 10% liability to fee assessment, thus the multiplier changes
from 1.00 to .0.
This is how fee assessment calculates the new assessment:
The total new assessment will be $84.00 for the detail code (
T101) associated with
this rule.
Step 2 explains what is done in the student’s accounting record as a result of this
registration change from the first assessment.
2. Compares the current assessment to the current student accounting records using
currency amounts and the last set of charges for the student.
2.1. Compares the liable amount to what is in the student accounting records for the
detail code and term. (In the example above, this is
T101 for $120.00.)
2.2. Posts the difference (the charge or refund) if the current assessment liable
amount is different than what is in the student accounting records (for non-
refund by total processing).
In the above instance, $120.00 (which exists in TBRACCD for detail code
T101
for the term) is compared to $84.00 for the same detail code for the current
assessment. The difference is $36.00. A charge of - $36.00 is posted to detail
code
T101 for the student for the term in the TBRACCD (student accounting)
record.
3. Reverses any detail codes or amounts that are no longer applicable.
Consults the previous student accounting records for detail codes and amounts that
are not applicable in the current assessment and reverses these amounts.
CRN 004 (3.00 X 1.0) X 10.00
CRN Calculation
CRN 001 (4.00 X .10) X 10.00 = 4.00
CRN 002 (2.00 X 1.0) X 10.00 = 20.00
CRN 003 (3.00 X 1.0) X 10.00 = 30.00
CRN 004 (3.00 X 1.0) X 10.00 = 30.00
CRN Calculation

993
Banner Student User Guide | Registration
If a student no longer qualifies for a rule because of a change either to the student's
general student data or to the student's course registration records, fee assessment
reverses the amount charged to that detail code. For instance, if a detail code and rule
are used to charge a $75.00 parking fee to a non-resident student, and the student
changes from non-resident status to resident status, when fee assessment is run
again, the parking fee is reversed.
Refunding by course is used when the Refund by Total checkbox is unchecked for the
term in the Term Control Form (SOATERM). For refunding by course processing, the
above explanation of processing is a basic description of what is done when a per credit
rule has been used. Since there are options to process rules in three ways (per credit, flat,
and overload), the following steps describe in more detail what occurs:
1. The student’s previous accounting record is always consulted.
2. The method used to create the charge is determined. If there was a flat charge or an
overload charge, refunding will account for that (without the use of plateau hours and
plateau indicators), because flat hours are stored in the audit history record and are
itemized there.
The audit trail itemizes the currency amounts for per credit, flat fee, and plus per
credit, checking for overload charges.
Please refer to the topic "Refunding Using Combined Flat and Overload Rules
(Plateau Refunds)" later in this section for further information about plateau refunds.
3. Refunding then looks at the charge for that course and processes the refund
according to the rules established on SFARSTS or SFAESTS. Refunding using
enrollment status is discussed in the “Refunding By Registration Enrollment Status”
section.
Using Optional Swapping Processing with Refunding by Course
Users have the ability to use optional swapping processing with refund by course refund
processing. Swapping can be defined as the exchange (dropping and adding) of billing
hours within the same day with no additional liability. Swapping occurs across billing hours
and not by the individual course. An institution can choose to invoke this functionally or
use the established processing with liability for dropped hours. Use the Allow Swapping
(Indicator) on the Term Control Form (SOATERM) to turn on swapping on a term-by-term
basis if desired.
Note: Open learning courses are not considered in the swapping
algorithm, as they carry their own refund method.
Section fees are not considered in the swapping algorithm as they are
assessed for each course individually and do not consider the total billing
hour liability.
Refund by Course Processing and Examples
If a student drops and adds course billing hours on the same day during a refund by
course refund period, assessment will only determine liability on the difference of the

994
Banner Student User Guide | Registration
excess of dropped billing hours. This will allow an implicit 100% refund on the liable billing
hours calculated for the offsetting drop. This may occur with any combination of hours.
For example, the Total Billing Hours Dropped - Total Billing Hours Added = Net Billing
Hours Dropped.
If an intermediate assessment has occurred between the drop and add activity, fee
assessment will post an adjusting entry for the difference for the appropriate detail codes
to the student’s account.
Here are eight examples that illustrate this.
Example 1:
A student drops a three hour course and adds a three hour course in the same day.
A student drops three hours and adds three hours on the same day. The resulting
hours are the same; therefore, no liability is associated with the dropped hours.
(Drops - Adds = Net) (3-3=0)
Considered swapping for three hours. The student has no liability for the dropped
billing hours.
Example 2:
A student drops a three hour course and adds a two hour course and a one hour course in
the same day.
A student drops three hours and adds a two hour course and a one hour course on the
same day. The resulting hours are the same; therefore, no liability is associated with
the dropped hours.
(Drops - Adds = Net) (3-(2+1)=0)
Considered swapping for three hours. The student has no liability for the dropped
billing hours.
Example 3:
A student drops two, two hour courses and adds a four hour course on the same day.
A student drops two, two hour courses and adds a four-hour course on the same day.
The resulting hours are the same; therefore, no liability is associated with the dropped
hours.
(Drops - Adds = Net) ((2+2)-4=0)
Considered swapping for four hours.The student has no liability for the dropped billing
hours.
Example 4:
A student drops a three hour course and adds a three hour course and a two hour course
on the same day.

995
Banner Student User Guide | Registration
A student drops a three hour course and adds a three hour course and a two hour
course on the same day. The resulting hours for the drop can be offset with a portion
of the added hours; therefore, no liability is associated with the dropped hours.
(Drops - Adds = Net) (3-(3+2)=-2)
Considered swapping for three hours. The student has no liability for the dropped
billing hours.
Example 5:
A student drops a three hour course and adds two, two hour courses on the same day.
A student drops three hours and adds two, two hour courses on the same day. The
resulting hours for the drop can be offset with a portion of the added hours; therefore,
no liability is associated with the dropped hours.
(Drops - Adds = Net) (3-(2+2)=-1)
Considered swapping for three hours.The student has no liability for the dropped
billing hours.
Example 6:
A student drops a three hour course and adds a four hour course on the same day.
A student drops three hours and adds a four hour course on the same day. The
resulting hours for the drop can be offset with a portion of the added hours; therefore,
no liability is associated with the dropped hours.
(Drops - Adds = Net) (3-4=-1)
Considered swapping for three hours.The student has no liability for the dropped
billing hours.
Example 7:
A student drops a four hour course and adds a two hour course in the same day.
A student drops four hours and adds a two hour course on the same day. A portion of
the resulting hours for the drop can be offset with the added hours; therefore, a
penalty is assessed for only the hour dropped in excess of the added hours for the
day.
(Drops - Adds = Net) (4-2=2)
Considered swapping for two hours. The student has liability for two of the four
dropped billing hours.
Example 8:
A student adds two, three hour courses and later drops one of the courses on the same
day.
A student adds two, three hour courses and later drops one of the courses on the
same day. The resulting hours for the drop can be offset with a portion of the added
hours; therefore, no liability is associated with the dropped hours. A 100% implicit

996
Banner Student User Guide | Registration
refund exists for three hours. The end result is that the student will be charged for only
three of the hours added that day.
(Drops - Adds = Net) (3-6=-3)
Considered swapping for three hours.The student has no liability for the dropped
billing hours.
Swapping and Section Fees Examples
Section fees are not considered as part of swapping processing. If section fees are
attached to a course that later is used for swapping, the section fee liability remains.
Example 1:
A student drops a three hour course that has a flat section fee attached during a 60%
refund period and adds a three hour course in the same day.
A student drops a three hour course that has a flat section fee attached during a 60%
refund period and adds a three hour course in the same day. The resulting hours are
the same; therefore, no liability is associated with the dropped hours for the fee rules,
but the section fee has a 40% liability.
Example 2:
A student drops a three hour course that has a per billing hour section fee attached during
a 60% refund period and adds a three hour course in the same day.
A student drops a three hour course that has a per billing hour section fee attached
during a 60% refund period and adds a three hour course in the same day. The
resulting hours are the same; therefore, no liability is associated with the dropped
hours for the fee rules, but the section fee has a 40% liability.
Swapping and Non-Refundable Fees Example
Non-refundable fees are not considered during swapping processing. If non-refundable
fees are charged based on a student’s liable hours, these fees are not reversed when
subsequent swapping occurs.
Example:
A student registers for a course during a 60% refund period and a non-refundable fee
rule is assessed. The student later drops a course on the same day. The resulting
hours are the same; therefore, no liability is associated with the dropped hours for the
fee rules, but the student is still liable for the non-refundable fee.
Refunding By Registration Enrollment Status
Your institution may use enrollment status codes to determine refunds by establishing the
refund periods in the Enrollment Status Control Form (SFAESTS). To be sure that

997
Banner Student User Guide | Registration
refunding by enrollment status will calculate a percentage refund when the enrollment
status code is used, check the Withdrawal Indicator on the Enrollment Status Code
Validation Form (STVESTS) to designate that the enrollment status code is to be
processed as a drop by fee assessment.
Please be aware that if valid refund periods and percentages exist on both SFAESTS and
SFARSTS, and the institution changes the registration status codes to match the
enrollment status codes (either manually or using the effect by enrollment status process),
the fee assessment process will apply the refunds twice, once for the enrollment status
and then again for the registration status.
The fee assessment code process is consistent with refunding using registration status
codes, therefore the Refundable (Indicator) on TSADETC is not used when refunding is
being processed. (Institutions have used detail codes with detail categories other than
TUI or FEE in SFARGFE rules to prevent refunding of charges.) This functionality is
consistent in the two methods of refunding.
Note: The Refundable (Indicator) is used in the Location Management/
Housing fee assessment process, where you cannot add detail codes
other than
HOU, MEA, and PHO.
The Enrollment Status Control Form (SFAESTS) allows you to determine a refund based
upon the total flat charge assessed and with the total current liable hours based on the
enrollment status code entered in the student's registration record on SFAREGS for the
term.
Minimum/Maximum Rules
Minimum/maximum rules function consistently with previous releases of fee assessment
processing when refunding by enrollment status is used.
1. Minimum and maximum charges defined in the Registration Fees Min/Max Charge
Control Form (SFAFMAX) are not honored when refunding is processed using refund
by enrollment status.
2. Registration fee assessment rules minimum/maximum definitions for a rule are not
honored when refunding is processed using refund by enrollment status.
3. The minimum/maximum functions control refunding when refunding uses registration
status codes.
How Fee Assessment Processes Refunds by Enrollment Status
Any registration status codes that the institution wishes to be updated by a changed
enrollment status code must be set up accordingly using the controls available in the
Enrollment Status Code Validation Form (STVESTS) and the Course Registration Status
Form (SFARSTS).
Prior to the registration fee assessment processing of the CRNs, the student's enrollment
status will be evaluated to see if the student is withdrawing from enrollment. This is
determined by whether the enrollment status code (
SFBETRM_ESTS_CODE) for the
student has the Withdrawal Indicator checked (
STVESTS_WD_IND is Y) on STVESTS.

998
Banner Student User Guide | Registration
If the enrollment status code used has the Withdrawal Indicator checked, the process
will check for a valid date range and refund rule in the Enrollment Status Control Form
(SFAESTS). The SFBRSTS table houses the code, date range, and refund percent. The
process uses the values in the
SFBETRM_ESTS_CODE and SFBETRM_ESTS_DATE
fields for the student.
If no refund rule is found in SFAESTS, assessment will continue by processing the
registration records using conventional course refunding based on registration status
codes. Refunds are calculated by applying the refund percentage to what is currently
owed by the student for detail codes in their account that have a category of either
TUI or
FEE.
Note: As discussed above, you must be careful when establishing the
refund date ranges in both SFAESTS and SFARSTS. Any registration
record processed in one of these forms has the potential to have a course
refund applied, as well as an enrollment status refund. You must establish
your date ranges carefully to be sure that the rules on the two forms do
not overlap.
Refunding by Total
Refunding by total works as follows:
• The Refund by Total checkbox must be checked on the Term Control Form
(SOATERM).
• The Registration Fee Assessment Refund by Total Rules Form (SFARFND) must have
rules entered for the term.
• When a detail code is specified in SFARFND, the penalty will always go to that detail
code. An institution that wants to define the clearing account to be used for the penalty
posting may wish to set up separate detail codes using special general ledger entries for
the penalty charges. If a detail code is not specified, the penalty will post to the detail
code of the original charge.
• It is strongly recommended that institutions using refunding by total plan to migrate to
this fee assessment process at the start of a new term of assessments rather than in the
middle of a term. Please see the examples that follow.
• Set-up for registration rules in SFARSTS is not required for refunding by total processing
to work properly. Refund by total consults the SFARFND table for refund periods. It is
not necessary to define a refund status code as being 100% or 0% refundable in
SFARSTS to make the refund by total process function correctly.
Special Migration Considerations For Institutions Using Refunding By Total
Institutions using refunding by total must perform the migration processing using
SFRFASC after installing the fee assessment code. All assessments must be current prior
to performing the migration processing.
When performing the migration processing, your institution must specify the correct refund
by total refund date that would apply for the term being processed. This is accomplished
using the Refund by Total Refund Date parameter in SFRFASC. Migration to the fee

999
Banner Student User Guide | Registration
assessment code should occur only after it has been determined that there are no
outstanding refunds to be processed.
Calculation Differences For Refunding by Total Refunds
Refunding by total is different from refunding by course in that fee assessment assumes
the student is either 100% liable or 0% liable for the hours in the registration record,
(depending upon whether the registration status code is defined in STVRSTS as able to
be used for a course withdrawal or not). If the registration status code is defined in
STVRSTS with the Count in Assessment (Indicator) and the Withdrawal Indicator
checked, the student is not liable for those hours at all when refunding by total is applied.
Instead, SFARFND calculates a penalty charge based upon the refund status code and
date and adds that charge to the student's accounting record.
Fee assessment differences using the example provided above would appear as follows
with two prerequisites:
1. The Refund by Total (Indicator) must be checked on SOATERM.
2. The Registration Fee Assessment Refund by Total Rules Form (SFARFND) must
have refund periods and percentages established.
For this example, the scenario is as follows:
• SFARFND has a 90% refund period established.
• The registration status code of DC (Drop Course) has the Withdrawal Indicator and the
Count in Assessment (Indicator) checked on STVRSTS.
The student is registered in 12 hours.
The fee assessment rule the student qualifies for is based on a per credit rule:
• The registration status code used is RE (Registered).
• On STVRSTS the following settings are used. The Count in Enrollment (Indicator) is
checked. The Count in Assessment (Indicator) is checked. The Withdrawal
Indicator is not checked.
CRN Hours Status
CRN 001 4 RE
CRN 002 2 RE
CRN 003 3 RE
CRN 004 3 RE
Detail Code Amount
T101 10.00 per credit

1000
Banner Student User Guide | Registration
• Fee assessment uses the per credit charge and the RE status, because it does not
mean a drop (Withdrawal Indicator is not checked), and no refund percentages apply.
Therefore, liability for each CRN is interpreted as 100%. (For the calculation, the liability
multiplier is 1.0.)
The student’s charge equals (liable hours X liability multiplier) X charge per the rule
qualification.
The total charge will be $120.00 for the detail code (
T101) associated with this rule.
If this scenario is modified by performing a drop of one CRN, there is a different result.
• The registration status code for CRN 001 is changed to DC (Drop Course).
• On STVRSTS, the following settings are used. The Count in Assessment (Indicator)
is checked. The Withdrawal Indicator is checked.
• On SFARFND there is a 90% refund using the detail code TRFD for category codes of
TUI that are in effect for the date of the drop.
Notice that since refunding by total is being used, the refund multiplier becomes 0 for the
dropped course. The total new assessment would be $80.00 for the detail code (
T101)
associated with this rule.
Fee assessment then performs the following checks and calculations for refunding by
total:
• The previous assessment charge for detail code T101 is $120.00.
• The new assessment charge for detail code T101 is $80.00.
• The difference between the two assessments is $40.00.
• The refund percentage period is 90%.
CRN Calculation
CRN 001 (4.00 X 1.0) X 10.00
CRN 002 (2.00 X 1.0) X 10.00
CRN 003 (3.00 X 1.0) X 10.00
CRN 004 (3.00 X 1.0) X 10.00
CRN Calculation
CRN 001 (4.00 X 0.0) X 10.00 = 0.00
CRN 002 (2.00 X 1.0) X 10.00 = 20.00
CRN 003 (3.00 X 1.0) X 10.00 = 30.0
CRN 004 (3.00 X 1.0) X 10.00 = 30.00

1001
Banner Student User Guide | Registration
• This translates to a penalty charge of 10% (or a multiplier of .1) for the penalty
calculation.
• The 10% penalty is applied to the difference between the first assessment and the new
assessment, which equals $40.00 X .1 = $4.00 penalty.
The accounting transactions in the student’s accounting record (TBRACCD) would be as
follows:
The student's total charges after the drop are $84.00. If the student had paid in full for the
original assessment of $120.00, they would be eligible for a credit of $36.00.
The important thing to note in refunding by total processing is that a penalty charge is
assessed on the student’s account, rather that assessing a new charge based upon
liability hours for the registration status codes on the student's record and posting a
difference. That penalty is based upon the difference between the currency amount
charged to the student in the new assessment and the currency amount in the previous
student accounting record for the detail code and term. In refunding by total, fee
assessment interprets all liability on the student's hours as either 100% liable or 0% liable
to determine the new assessment. It then calculates the new charges after the dropped
courses, finds the difference from the last recorded student accounting for that detail code
and term, and assesses the penalty based upon the rules defined in SFARFND.
Using Optional Swapping Processing with Refund by Total
You can use optional swapping processing with refund by total refund processing.
Swapping can be defined as the exchange of billing hours within a defined penalty period
with no incurred penalty. Swapping occurs across billing hours and not by the individual
course. The swapped hours liability is stored in SFRFAUD to determine the difference in
the refund based on the swapped penalty hours, so as to correctly adjust the penalty. An
institution can choose to invoke this functionally or use the established processing with
liability for dropped hours. Use the Allow Swapping (Indicator) on the Term Control Form
(SOATERM) to turn on swapping on a term-by-term basis if desired.
Note: Open learning courses are not considered in the swapping
algorithm, as they carry their own refund method.
Section fees are not considered in the swapping algorithm as they are
assessed for each course individually and do not consider the total billing
hour liability.
Detail Code Amount Assessment Date
T101 120.00 First assessment date
T101 - 40.00 New assessment date
TRFD (penalty) 4.00 New assessment date

1002
Banner Student User Guide | Registration
Refund by Total Processing and Examples
When entering additional registration records, drops and adds which take place during the
same penalty period are considered to offset each other. The system looks at the
assessments from the beginning of the penalty period and compares them to the
assessments from the end of the penalty period, to determine the difference in order to
assess the percentage penalty. The student is only assessed a penalty if the hours
dropped are greater then the hours added during that period. Otherwise, no penalty is
assessed. If any assessment occurs in the interim, and a penalty was assessed, that
penalty should be reversed. (Drops less adds is equal to net hours for penalty.)
If an intermediate assessment has occurred between the drop and add activity, fee
assessment will post an adjusting entry for the difference for the appropriate detail codes
to the students account.
Examples
Here are four examples that illustrate this.
Example 1: A student drops and adds equal hours in the same penalty period.
If a student adds three hours on day two of the penalty period, and three hours are
dropped on day six of the penalty period, then the resulting hours are the same as at
the beginning of the penalty period. Therefore, no penalty is assessed.
(Drops - Adds = Net) (3-3=0)
Example 2: A student drops more hours than are added in the same penalty period.
If a student adds three hours on day two of the penalty period, and four hours are
dropped on day six of the penalty period, then the resulting dropped hours are greater
than the added hours, and the student will be assessed a penalty on the net greater of
one hour.
(Drops - Adds = Net) (4-3=1)
Example 3: A student drops less hours than are added in the same penalty period.
If a student adds four hours on day two of the penalty period, and three hours are
dropped on day six of the penalty period, then the resulting dropped hours are less
than the added hours, and the student will be assessed no penalty, as the net is
negative.
(Drops - Adds = Net) (3-4=-1)
Example 4: A student drops more hours than are added in the same penalty period
with an assessment between drops and adds.
A student drops three hours on day two of the penalty period, assessment occurs, and
the student is penalized for the dropped hours. Fee assessment posts a credit and
penalty for the drop to the student’s account. Then on day six of the same penalty
period, the student adds two hours. The resulting dropped hours are greater than the
added hours, and the student will be assessed a penalty on the net greater of only one
hour.
(Drops - Adds = Net) (3-2=1)
Fee assessment will make the adjustment, reverse the penalty, and post the new
penalty for the appropriate detail codes to the student’s account.

1003
Banner Student User Guide | Registration
Refunding Using Combined Flat and Overload Rules
The process corrects errors in the rules used when students drop registration hours into
and out of per credit, flat rate ranges, and overload rules.
Fee assessment determines which rules to use when a student changes their liable hours
into or out of a flat range, per credit range, or overload rules by using the Flat Charge
Hours Range From field and the Course Overload Start Hours field. The Flat Charge
Hours Range From field functions as the starting point to determine the change in liable
hours for the student when dropping from a flat range into a per credit range.
Note: If you currently use plateau hours to manage your refunds, you
must migrate the correct starting point for your flat hours range into the
Flat Charge Hours Range From field.
A script is provided to determine the “from flat hours” using the rules you
have established for plateau charging at your institution. You do not need
an extended decimal range to create an accurate refund in these
situations, so the use of plateau hours is not required.
A base number of liable hours must be used to use to determine the dropped hours that
will then determine the new qualifying rule in SFARGFE, instead of using plateau hours.
When converting to this version of fee assessment, rules for previous terms should be
adjusted by moving the plateau hours to the Flat Charge Hours Range From field. The
extended decimal places that were required in the Plateau Hours field are not required in
the Flat Charge Hours Range From field. If the flat range began with 12.00 hours, then
12.00 hours should be entered into the Flat Charge Hours Range From field for the flat
rule.
For example, if you adjusted your plateau hours to 12.0574 to correct for calculation
errors in the old processing, but your from credit hours for the rule were 12.00, you
would enter 12.00 in the Flat Charge Hours Range From field.
The hours in the Flat Charge Hours Range From field will also be the same as the hours
in the Liable Billing Hours From field on any rule where a flat charge has been defined.
Since the plateau information no longer exists, these rules must be identified, and the Flat
Charge Hours Range From field must be populated to be sure refunding will work
correctly.
Fee Assessment must subtract the current liable hours from the Flat Charge Hours
Range From field to yield the resulting dropped hours, then the refund percentage is
applied. Once the refund percentage is applied to the dropped hours, and the adjusted
dropped hours are added to the current hours, fee assessment determines the correct rule
to be used to set the student’s new financial liability.
When processing the course registration records for a student, fee assessment must
determine whether the student has dropped the course and whether the drop occurred
during a defined refund period on Registration Status Control Form (SFARSTS). When a
drop is processed for a student's registration, the previous as
sessment is consulted by
referring to the registration audit history records to see if rule qualification occurred based
on flat hour requirements having been met for that last assessment.

1004
Banner Student User Guide | Registration
If a flat hour rule was met in the previous assessment, the starting point for the flat hours
(or the from flat hours) for the previous qualified rule is stored for use in the current
assessment process. These from flat hours become the benchmark hours to be used in
determining whether the dropped course causes the student to fall below the flat hour
range qualified for in the previous assessment. The checking of the previous assessment
for flat hour rule qualification is done for each rule type that is used as part of fee
assessment i.e., charge by student characteristics, course level, course campus, and
course attribute.
If the drop does not cause the student to fall below the flat hour range met in the previous
assessment, no change in assessment will be realized. The student's liable course hours
will still be within the flat hour range, and therefore the student is considered unchanged in
terms of their registration fee assessment. If the drop does cause the student to fall below
the flat hour range met in the previous assessment, fee assessment moves on to the next
phase of processing.
The approach for determining the student's liability is slightly different here than in a
conventional assessment. Rather than determine the liability by factoring in the percent
refund for the registration status code(s) up front, the processing first refers back to the
last assessment and determines the total number of non-dropped hours. Since this
information is needed for further processing, a record is written to the audit history table
that holds this information. That row is displayed with a 0.00 charge in SFAFAUD and is
informational only.
For each registration record processed for the student that involves a drop or withdrawal,
the number of dropped hours are deducted from the total non-dropped hours determined
from the last assessment. For this processing, fee assessment refers to the dropped
hours, rather than the liable hours used in other fee assessment processes.
The dropped hours are deducted from the total non-dropped hours from the last
assessment, because the process needs to identify whether the student has fallen below
the starting point for flat hour range from the last assessment. After determining what will
now be referred to as the student's enrollment liable hours, these hours are compared to
the starting point for the flat hour range from the last assessment. If the enrollment liable
hours are not less than the starting hours for the flat hour range, there is no change in
assessment. If the enrollment liable hours are less, the rule evaluation is called using the
enrollment liable hours to determine what rule the student now qualifies for. Please refer to
examples of these calculations which follow.
Here is a sample of registration activity for a student who reg
istered for courses and
performed a series of drops across multiple refund periods. In this example, assessment
was not run until all the dropping activity had been completed for the term.
The student registered in 22 hours of courses on the first day of registration. Based on the
rules shown below, the student was assessed the flat charge of $5,000.00, and this was
posted to the student's account records with the detail code of
FLAT. The from flat hours
for the first assessment for this rule is 12.00. This information is stored in the fee
assessment audit history record for this student for the term. The student then elected to
drop several courses at different points in the registration period on the dates shown
below.

1005
Banner Student User Guide | Registration
The following refund periods and % refunds are in effect for the registration status of DC
(Drop Course):
The following registration fee assessment rules are used for this example:
Fee assessment then processes the student’s record to determine the charges.
1. The from flat hours from last assessment are determined to be 12.
2. The total non-dropped hours from previous assessment are determined to be 22.
(These total non-dropped hours will be referred to as starting hours as the discussion
of processing continues.)
3. Registration records are processed in order of status date.
• If the Withdrawal Indicator for the registration status code in STVRSTS is not
checked, the student is 100% liable for all the registration hours.
CRN
Registration
Status Code Hours
Refund %
defined for
RSTS code/date
Liability %
based on
refund rule
Date of
activity
1001 RE 4 0 100 15-DEC-02
1002 DC 4 75 25 18-JAN-03
1003 DC 4 75 25 18-JAN-03
1005 DC 3 10 90 23-JAN-03
1006 DC 4 10 90 23-JAN-03
1004 DC 3 0 100 15-FEB-03
From Date To Date Refund %
Liability
% Multiplication Factor
01-JAN-03 15-JAN-03 90 10 .10
16-JAN-03 22-JAN-03 25 75 .25
23-JAN-03 29-JAN-03 10 90 .90
From
Liable
Hrs
To
Liable
Hrs
Detail
Code
Per
Credit
Charge
From
Flat
Hrs
To
Flat
Hrs
Flat Charge
Amount
1.00 6.99 T1 450.00
7.00 11.99 T2 420.00
12.00 99.99 FLAT 0.00 12.00 30.00 5,000.00

1006
Banner Student User Guide | Registration
• If the Withdrawal Indicator for the registration status code in STVRSTS is
checked, the dropped hours are deducted from the starting hours to determine a
new total hours. (These total hours will be referred to as enrolled hours for the
remainder of the processing.)
This is done to determine when the student's enrolled hours fall below the from flat
hours from the previous assessment. When the enrolled hours fall below the from flat
hours for the rule, the student no longer qualifies for the flat hour rule.
4. Liability processing takes place. Fee assessment systematically processes the
courses and determines the liability % for the hours to be processed.
Each CRN is listed below in the order that fee assessment performs the processing,
which is in ascending order by date of the transactions.
4.1. CRN 1001 is processed.
The Withdrawal Indicator for the registration status code in STVRSTS is not
checked, so all 4 hours have 100% liability.
4 hours * 1 = 4 liable hours. (Liability is expressed in decimal form, so 1 equals
100%.)
Add 4 to the total liable hours.
The total liable hours equal 4. (This is stored for later use.)
The next registration/refund interim period and corresponding CRNs are
processed.
4.2. CRN 1002 is processed.
The Withdrawal Indicator for the registration status code in STVRSTS is
checked, so dropped hour processing is performed.
Dropped Hour Processing
Starting hours - registration hours for the drop = new starting hours.
CRN
Registration
Status Code Hours
Refund %
defined for
RSTS
code/date
Liability %
based on
refund rule
Date of
activity
1001 RE 4 0 100 15-DEC-02
CRN
Registration
Status Code Hours
Refund %
defined for
RSTS
code/date
Liability %
based on
refund rule
Date of
activity
1002 DC 4 75 25 18-JAN-03
1003 DC 4 75 25 18-JAN-03

1007
Banner Student User Guide | Registration
22 - 4 hours dropped = new starting hours of 18 (new starting hours are saved
for next CRN processing).
Determine Enrolled Hours
New starting hours - previous from flat hours = enrolled hours.
18 - 12 = enrolled hours of 6.
Fee assessment checks to see if the student is still enrolled in more hours than
the previous from flat hours for the rule. If they are, this indicates that the
student still qualifies for the previous flat hour rule. Since 6 hours are greater
than zero, there is no change in the flat hour qualification.
4.3. CRN 1003 is processed.
The Withdrawal Indicator for the registration status code in STVRSTS is
checked, so dropped hour processing is performed.
Dropped Hour Processing
Starting hours (saved from previous CRN processing) - registration hours for the
drop = new starting hours.
18 - 4 hours dropped = new starting hours of 14 (new starting hours are saved
for next CRN processing).
Determine Enrolled Hours
New starting hours - previous from flat hours = enrolled hours.
14 - 12 = enrolled hours of 2.
Fee assessment checks to see if the student is still enrolled in more hours than
the previous from flat hours for the rule. If they are, this indicates that the
student still qualifies for the previous flat hour rule. Since 2 hours are greater
than zero, there is no change in the flat hour qualification.
The next registration/refund interim period and corresponding CRNs are
processed.
4.4. CRN 1005 is processed.
The Withdrawal Indicator for the registration status code in STVRSTS is
checked, so dropped hour processing is performed.
Dropped Hour Processing
Starting hours - registration hours for the drop = new starting hours.
CRN
Registration
Status Code Hours
Refund %
defined for
RSTS
code/date
Liability %
based on
refund rule
Date of
activity
1005 DC 3 10 90 23-JAN-03
1006 DC 4 10 90 23-JAN-03

1008
Banner Student User Guide | Registration
14 - 3 hours dropped = new starting hours of 11 (new starting hours are saved
for next CRN processing).
Determine Enrolled Hours
New starting hours - previous from flat hours = enrolled hours.
11 - 12 = enrolled hours of - 1.
Fee assessment checks to see if the student is still enrolled in more hours than
the previous from flat hours for the rule. If they are, this indicates that the
student still qualifies for the previous flat hour rule. Since - 1 hours are not
greater than zero, there is a change in the flat hour qualification.
New Formula
Registration hours + enrolled hours = dropped hours.
3 registered hours + -1 enrolled hour = 2 dropped hours. (The student has
dropped 3 hours, but only 1 of those hours brings the student below the from flat
hours point.)
The dropped hours are not less than 0.
Deduct the dropped hours from the registered hours.
3 registered hours - 2 dropped hours = 1 liable hour.
Multiply the liable hours by the liability percent expressed as a decimal.
1 hour *.9 = .9 liable hours.
Add .9 to the total liable hours.
The liable hours saved from first CRN processed equal 4.0.
The total liable hours now equal 4.9.
4.5. CRN 1006 is processed.
The Withdrawal Indicator for the registration status code in STVRSTS is
checked, so dropped hour processing is performed.
Dropped Hour Processing
Starting hours - registration hours for the drop = new starting hours.
11 - 4 hours dropped = new starting hours of 7 (new starting hours are saved for
next CRN processing).
Determine Enrolled Hours
New starting hours - previous from flat hours = enrolled hours.
7 - 12 = enrolled hours of - 5.
Fee assessment checks to see if the student is still enrolled in more hours than
the previous from flat hours for the rule. If they are, this indicates that the
student still qualifies for the previous flat hour rule. Since - 5 hours are not
greater than zero, there is a change in the flat hour qualification.
New Formula
Registration hours + enrolled hours = dropped hours.

1009
Banner Student User Guide | Registration
4 registered hours + - 5 enrolled hour = - 1 dropped hours.
The dropped hours are less than 0. Therefore all 4 registered hours are 90%
liable.
Multiply the liable hours by the liability percent expressed as a decimal.
4 hours * .9 = 3.6 liable hours.
Add 3.6 to the total liable hours.
The liable hours saved from first CRN processed equal 4.9.
The total liable hours now equal 8.5.
The next registration/refund interim period and corresponding CRN are
processed.
4.6. CRN 1004 is processed.
The Withdrawal Indicator for the registration status code in STVRSTS is
checked, so dropped hour processing is performed.
Dropped Hour Processing
Starting hours - registration hours for the drop = new starting hours.
7 - 3 hours dropped = new starting hours of 4 (new starting hours are saved for
next CRN processing).
Determine Enrolled Hours
New starting hours - previous from flat hours = enrolled hours.
4 - 12 = enrolled hours of - 8.
Fee assessment checks to see if the student is still enrolled in more hours than
the previous from flat hours for the rule. If they are, this indicates that the
student still qualifies for the previous flat hour rule. Since - 8 hours are not
greater than zero, there is a change in the flat hour qualification.
New Formula
Registration hours + enrolled hours = dropped hours.
3 registered hours + - 8 enrolled hour = - 5 dropped hours.
The dropped hours are not greater than 0. Therefore, all 3 registered hours are
liable.
Multiply the liable hours by the liability percent expressed as a decimal.
3 hours * 1.00 = 3 liable hours.
CRN
Registration
Status Code Hours
Refund %
defined for
RSTS
code/date
Liability %
based on
refund rule
Date of
activity
1004 DC 3 0 100 15-FEB-03

1010
Banner Student User Guide | Registration
Add 3 to the total liable hours.
The liable hours saved from first CRN processed equal 8.5.
The total liable hours now equal 11.5.
Processing is complete for all courses.
5. Rule evaluation is performed using the determined total new liable hours.
• New liable hours = 11.5.
• The rule qualification for 11.5 liable hours is detail code
T2.
•
T2 is a per credit charge of $420.00 per hour.
• 420 X 11.5 liable hours = $4830.00.
• The new charge in TBRACCD will be
T2 4830.00.
• The charge in TBRACCD for last assessment is
FLAT 5000.00.
The student’s accounting record will show a reversal of the detail code
FLAT for
$5,000.00, since the student no longer qualifies for that rule. A charge will be posted
for $4830.00 with the Detail Code of
T2.
If a single detail code of
T2 were used for all three rules, there would be a transaction
of - 170.00 (the difference between $5,000.00 and $4,830.00) posted to detail code
T2 for the date the fee assessment was run.
Refunding When Overload Rules Are Used
When refunding is performed using overload hour rules, fee assessment will use the
straight liability hours processing (for refunding by course) for the hours up to the point
when the student's liable hours drop below the start hours for overload charge. When the
student's liable hours drop into the flat charge range based upon the flat hour charge
range that is defined for the rule, the refunding process described above for flat hour
refunding will be used.
Refunding and Variable Credit Hours
When a variable credit hour course is adjusted and the student had a flat assessment,
assessment will always go back and re-evaluate all courses to determine if a penalty
should be charged. The adjusted credit hours are treated in the same way as the original
credit hours, and a reassessment occurs. This is essential, as the system has no way to
determine if the adjustment is a drop, an add, or a correction to the credit hours.
Here are examples using variable billing hours with the following rules.
For SFARGFE:

1011
Banner Student User Guide | Registration
For SOATERM:
• The Reverse Non Tuition/Fee checkbox is checked (set to Y).
• The Refund by Total checkbox is unchecked (set to N).
• The Allow Swapping checkbox is unchecked (set to N).
For SFARSTS: using a 50% refund:
Example 1: Variable hours are not changed
1. Student registers for 12.00 hours (01-MAR-09)
CRN 90001 - student registers for 3 hours
CRN 90002 - student registers for 3 hours
CRN 90003 - student registers for 3 hours
CRN 90004 - student registers for 3 hours
Detail code
T102: assessed at $1200.00
2. Student drops 6.00 hours during a 50% refund period on SFARSTS (15-MAR-09)
CRN 90001 - student drops class for 3 hours
CRN 90002 - student drops class for 3 hours
Detail code
T101: assessed at $900.00, 6 non-dropped hours plus 6 dropped hours
at .5, (6 ND + ([email protected])=9.0)
Calculation: 6.00 hours dropped x .50 = 3.00 + 6.00, hours registered = 9.00
3. Student changes billing hours from 0.00 to 2.00 hours (16-MAR-09)
CRN 90005 - student changes registration from 0 to 2 hours
Detail code
T101: assessed at $1100.00
Calculation: 6.00 hours dropped x .50 = 3.00 + 8.00, hours registered =11.00
Detail Code Per Credit
Liable
From and
To Hours
Charge
Type Flat Rate Overload
T101 100.00 0 - 11.99
T102 125.00 12 - 99.99 FLAT 1200.00 21
Registration Status
Refund Rule Start Date End Date
Percentage Fees
Refund
DC 01-JAN-2009 31-JAN-2009 100%
DC 01-FEB-2009 31-MAR-2009 50%

1012
Banner Student User Guide | Registration
Result: Credit hours were not adjusted. Therefore, straight assessment occurs.
Example 2: Variable hours are changed
1. Student registers for 12.00 hours (01-MAR-09)
CRN 90001 - student registers for 3 hours
CRN 90002 - student registers for 3 hours
CRN 90003 - student registers for 3 hours
CRN 90004 - student registers for 3 hours
Detail code
T102: assessed at $1200.00
2. Student drops 6.00 hours during 50% refund period on SFARSTS (15-MAR-09)
CRN 90001 - student drops class for 3 hours
CRN 90002 - student drops class for 3 hours
Detail code
T101: assessed at $900.00, (6 ND + ([email protected])=9.0)
Calculation: 6.00 hours dropped x .50 = 3.00 + 6.00, hours registered = 9.00
3. Student registers for 0.00 hour course (16-MAR-09)
CRN 90005 - student registers for 0 hours
Detail code
T101: assessed at $900.00
Calculation: 6.00 hours dropped x .50 = 3.00 + 6.00, hours registered = 9.00
4. Student changes billing hours from 0.00 to 2.00 hours (16-MAR-09)
CRN 90005 - student changes registration from 0 to 2 hours
5. Charges are assessed at 10.00 liable hours, which is correct.
Assessment is doing the following: Started at 12 hours, then dropped 6 hours and
added 2 hours
Calculation: 4.00 hours dropped x .50 = 2.00 + 8.00, hours registered = 10.00
Result: Dropped class is treated as going from 12.00 to 8.00, 12 hours to 8 hours
Since credit hours on an existing course were changed, assessment is treated as if
that is how it started.
Example 3: Variable hours are changed within a flat charge period
1. Student registers for 15.00 hours (01-MAR-09)
CRN 90001 - student registers for 3 hours
CRN 90002 - student registers for 6 hours
CRN 90003 - student registers for 3 hours
CRN 90004 - student registers for 3 hours
Detail code
T102: assessed at $1200.00

1013
Banner Student User Guide | Registration
2. Student drops 9.00 hours during 50% refund period on SFARSTS (15-MAR-09)
CRN 90001 - student drops class for 6 hours
CRN 90002 - student drops class for 3 hours
Detail code
T101: assessed at $900.00, (6 ND + ([email protected])=9.0)
Calculation: 6.00 hours dropped x .50 = 3.00 + 6.00, hours registered = 9.00
Result: Dropped class is treated as going from 12 hours to 6 hours
3. Student registers for 0.00 hour course (16-MAR-09)
CRN 90005 - student registers for 0 hours
Detail code
T101: assessed at $900.00
Calculation: 6.00 hours dropped x .50 = 3.00 + 6.00, hours registered = 9.00
4. Student changes billing hours from 0.00 to 2.00 hours (16-MAR-09)
CRN 90005 - student changes registration from 0 to 2 hours
5. Charges are assessed at 10.00 liable hours
Assessment is doing the following: Started at 15 hours, then dropped to 6 hours and
added 2 hours
Calculation:4.00 hours dropped x .50 = 2.00 + 8.00, hours registered = 10.00
Result: Dropped class is treated as 15.00 to 12.00, which is within the flat range and is
then liable for the drop from 12 hours to 8 hours.
Since credit hours on an existing course were changed, assessment is treated as if
that is how it started.
Registration Activity Processing Order
Fee Assessment processes registration transactions in sequential order based on the
registration status date. Since the processing is performed chronologically, the order in
which adds and drops are entered may impact the determined student liable billing hours.
Examples of Registration Activity Processing Order
This set of examples uses a student rule that is set up for refund by course/flat charge
refund processing.
Detail
Code
Per
Credit Min Max
Liable
Hrs
From
Liable
Hrs To
Flat
Charg
e From
Flat
Charge
To
Flat
Charge
Amount Overload
CRED 100.00 0 9999.99 01 11.99
FLAT 100.00 0 9999.99 12.00 99.99 12.00 99.99 1200 18

1014
Banner Student User Guide | Registration
Example 1:
A student registers for 19 hours and qualifies for flat charging. The student's fee
assessment audit is as follows:
The student drops two hours during a 90% refund period and adds an additional four
hours immediately following the drop. Both registration changes are performed in the
same session. Fee assessment is then run.
The student's new fee assessment audit is as follows:
Calculation:
Example 2:
The student registers for 19 hours. The student's fee assessment audit is as follows:
Detail Code FLAT 1200.00
Rule Student Hours 19.0
Rule Liable Hours 19.0
Rule Flat Hour Range 12.0 - 99.99
Overload Hours 1.0
Detail Code FLAT 1200.00
Rule Student Hours 21.1
Rule Liable Hours 21.1
Rule Flat Hour Range 12.0 - 99.99
Overload Hours 3.1
Current Non-Dropped
(ND) Hours
17.0
Drop Two Hours at a
90% Refund
0.1
Penalty on one overload hour. No penalty on second hour
because student remains in the flat charge hour range.
19 previous liable hours - 18 overload start = 1 liable
Overload hour: 1 * .1 = .1
Add Four Hours 4.0
Total Liable Hours 21.1

1015
Banner Student User Guide | Registration
The student adds an additional four hours and drops two hours during a 90% refund
period immediately following the add. Both registration changes are performed in the
same session. Fee assessment is then run.
The student’s new fee assessment audit is as follows:
Calculation:
Example 3:
The student registers for 14 hours and qualifies for flat charging. The student's fee
assessment audit is as follows:
Detail Code FLAT 1200.00
Rule Student Hours 19.0
Rule Liable Hours 19.0
Rule Flat Hour Range 12.0 - 99.99
Overload Hours 1.0
Detail Code FLAT 1200.00
Rule Student Hours 21.2
Rule Liable Hours 21.2
Rule Flat Hour Range 12.0 - 99.99
Overload Hours 3.2
Current Non-Dropped
(ND) Hours
17.0
Add Four Hours 4.0
17 ND hours + 4 new hours = 21 ND hours
Drop Two Hours at a
90% Refund
0.2
Penalty on two overload hours since student is registered in
21 hours.
21 NDs > overload start 18 hours
All dropped hours have overload liability.
2 dropped hours * .1 = .2
Total Liable Hours 21.2

1016
Banner Student User Guide | Registration
The student drops four hours during a 90% refund period and adds an additional two
hours immediately following the drop. Both registration changes are performed in the
same session. Fee assessment is then run.
The student's new fee assessment audit is as follows:
Calculation:
Detail Code FLAT 1200.00
Rule Student Hours 14.0
Rule Liable Hours 14.0
Rule Flat Hour Range 12.0 - 99.99
Overload Hours 0.0
Detail Code FLAT 1200.00
Rule Student Hours 12.2
Rule Liable Hours 12.2
Rule Flat Hour Range 12.0 - 99.99
Overload Hours 0.0
Current Non-Dropped
(ND) Hours
10.0
Drop Four Hours at a
90% Refund
0.2
10% penalty on two of the four hours. No penalty on two of
the hours, because two of the four hours were in the flat
charge range.
14 previous liable hours - 4 dropped hours = 10
Start for flat is 12 hours.
2 of the 4 dropped hours are in the flat range.
2 remaining dropped hours have liability.
2* .1 = .2
Add 2 Hours 2.0
Total Liable Hours 12.2

1017
Banner Student User Guide | Registration
Example 4:
The student registers for 14 hours and qualifies for flat charging. The student's fee
assessment audit is as follows:
The student adds an additional two hours and drops four hours during a 90% refund
period immediately following the add. Both registration changes are performed in the
same session. Fee assessment is then run.
The student's new fee assessment audit is as follows:
Calculation:
Drop/Delete Processing
Processing dropped/deleted (DD) courses in fee assessment treats the assessment as if
registration for the course that is being dropped/deleted never occurred. When students
Detail Code FLAT 1200.00
Rule Student Hours 14.0
Rule Liable Hours 14.0
Rule Flat Hour Range 12.0 - 99.99
Overload Hours 0.0
Detail Code FLAT 1200.00
Rule Student Hours 12.0
Rule Liable Hours 12.0
Rule Flat Hour Range 12.0 - 99.99
Overload Hours 0.0
Current Non-Dropped
(ND) Hours
4.0
Add 2 Hours 2.0
14 + 2 = 16
Drop Four Hours at a
90% Refund
0.0
No penalty on any of the dropped hours, as student is back in
the flat hour range after the add.
16 ND hours - 4 dropped hours = 12
Total Liable Hours 12.0

1018
Banner Student User Guide | Registration
have qualified for a flat charge rule in the past and a drop/delete has occurred since the
last assessment, the assessment process needs to re-assess the student from the top
down, and in essence start over with the assessment. Fee assessment will go back and
recalculate the student's assessment and make the appropriate adjustments to fee
assessment and the student's account.
This top down assessment methodology is used for flat charge refunding and refund by
course processing. Reassessment will need to be re-run for each refund interim to
determine the correct assessment. Fee assessment processing on all registration status
codes that do not count in assessment will be treated in the same manner as with the
drop/delete processing.
Fee assessment will create intermediate assessment audit rows in SFRFAUD without
posting any changes to accounting. The following will take place:
1. Assessment processing will check to see if the student has ever met a flat charge rule
and has had a drop/delete issued since the last assessment was run.
2. Assessment processing will then select all registration records with a status code
where
STVRSTS_INCL_ASSESS is set to Y as RE. The liability for each course will
be stored in SFTFEES as the full billing hours with 100% liability.
3. The SFTFEES rows will be processed, and assessment rule evaluation performed.
4. The assessment liability will be stored in SFRFAUD using a
SFRFAUD_ASSESS_RFND_PENLTY_CDE value of D.
5. The SFTFEES rows will be deleted.
6. Assessment will then proceed to perform regular assessment processing.
Examples of Drop/Delete Processing
The following examples illustrate drop/delete processing.
Example 1:
Drop/delete a course that has a status of RE, and the student remains in the per hour
range. The flat hour range is 12 hours with no overload fee.
1. The student’s initial registration is for 15 hours and is assessed.
The student is liable for 15 hours.
2. The student drops 3 hours during a 90% refund interim and is assessed.
The student remains in the flat hour range and has no change in assessment. The
student is currently liable for 12 hours.
3. The student drops an additional 3 hours during a 50% refund interim and is assessed.
The student drops out of the flat hour range and into the per hour assessment. The flat
fee assessed will be reversed, and the per hour fee will be assessed. The student is
liable for 10.5 hours (9 non-dropped hours, plus 50% of the 3 dropped hours (1.5)).
4. The student drops/deletes an additional 3 hours and is assessed.
This is the point where the error occurred. However, the following should now occur at
this point in the process.

1019
Banner Student User Guide | Registration
When the student drops/deletes the course, the assessment will go back and reassess the
student as if they were never registered for the last 3 hours that were dropped/deleted.
The assessment process will calculate the student's assessment as if the following had
occurred:
1. The student's initial registration would be considered for 12 hours.
The student is in the flat hour range and is liable for 12 hours.
2. The student drops 3 hours during a 90% refund interim.
The student drops out of the flat hour range and into the per hour range. The flat fee
assessed will be reversed, and the per hour fee will be assessed. The student is liable
for 9.3 hours (9 non-dropped hours, plus 10% of the 3 dropped hours (.3)).
3. The student drops an additional 3 hours during a 50% refund interim.
The student stays in the per hour range. A credit will be applied to the student's
account for a percentage of the course that was dropped. The student is liable for 7.8
hours (6 non-dropped hours plus .3 liable hours from the previous drop, plus 50% of
the current 3 dropped hours (1.5)).
4. The end result is that the student is liable for 7.8 hours and is assessed at a per hour
rate.
Example 2:
Drop/delete a course that was previously dropped, and student stays in per hour range.
The flat hour range is 12 hours.
1. The student’s initial registration is for 12 hours and is assessed.
The student is liable for 12 hours.
2. The student drops 3 hours during a 90% refund interim and is assessed.
The student drops out of the flat hour range and into the per hour range. The flat fee
assessed will be reversed, and the per hour fee will be assessed. The student is liable
for 9.3 hours (9 non-dropped hours, plus 10% of the 3 dropped hours (.3)).
3. The student drops/deletes the same 3 hour course they withdrew from at 90% and is
assessed.
This is the point where the error occurred. However, the following should now occur at
this point in the process.
When the student drops/deletes the course, the assessment will go back and reassess the
student as if they were never registered for the last 3 hours that were dropped/deleted.
The assessment process will calculate the student's assessment as if the following had
occurred:
1. The student's initial registration would be considered for 9 hours.
The student is liable for 9 hours, and a per hour charge should occur.
2. The end result is that the student is liable for 9 hours and is assessed at a per hour
rate.

1020
Banner Student User Guide | Registration
Example 3:
Drop/delete a course, and add another course at the same time that will cause the student
to go back into the flat hour range and out of per hour range. The flat hour range is 12
hours.
1. The student’s initial registration is for 15 hours and is assessed.
The student is liable for 15 hours.
2. The student drops 6 hours during a 90% refund interim and is assessed.
The student drops out of the flat hour range and into the per hour range. The flat fee
assessed will be reversed, and the per hour fee will be assessed. The student is liable
for 9.3 hours (9 non-dropped hours, plus 10% for 3 of the dropped hours (.3). (3 have
no penalty because of flat rate.)
3. The student drops/deletes another 3 hour course, adds 6 hours at the same time, and
is assessed.
This is the point where the error occurred. However, the following should now occur at
this point in the process.
When the student drops/deletes the course, the assessment will go back and reassess the
student as if they were never registered for the 3 hours that were dropped/deleted. The
assessment process will calculate the student's assessment as if the following had
occurred:
1. The student's initial registration would be considered for 12 hours.
The student is in the flat hour range and is liable for 12 hours.
2. The student drops 6 hours during a 90% refund interim.
The student drops out of the flat hour range and into the per hour range. The student
is liable for 6.6 hours (6 non-dropped hours, plus 10% for the 6 of the dropped hours
(.6)).
3. The student adds 6 hours, is again in the flat hour range, and is now liable for 12.6
hours (12 non-dropped and .6 (6 *.10 of liability for dropped course)).
4. The end result is that the student is liable for 12.6 hours and is assessed at a flat rate.
Batch Fee Assessment - Creating the First Audit History Records
The Registration Fee Assessment Process (SFRFASC) is used to process batch fee
assessment. The processing prevents the printing of IDs if no updates took place,
eliminating long output files. SFRFASC allows you to:
• Process assessments using a single ID which is very useful for testing of rules.
• Process assessment in audit mode.
• Process assessments using a population selection.
• Use a separate date parameter for refunding by total processing.
• Choose your output format (audit and/or accounting records).

1021
Banner Student User Guide | Registration
• Create the last audit records for migration purposes.
• Process in collector mode and with an enrollment status.
• Create student accounting records in TBRACCD to assist in migration steps.
Banner Views Used in Fee Assessment
The following views are used with registration fee assessment processing.
SFVFAUD View
This view is used to select the registration fee assessment audit data on SFRFAUD.
The following rows are in this view.
SFVFAUD_PIDM
SFVFAUD_TERM_CODE
SFVFAUD_SESSIONID
SFVFAUD_SEQNO
SFVFAUD_ASSESS_RFND_PENLTY_CDE
SFVFAUD_DCAT_CODE
SFVFAUD_DETL_CODE
SFVFAUD_CHARGE
SFVFAUD_ASSESS_BY_COURSE_IND
SFVFAUD_ASSESSMENT_SOURCE
SFVFAUD_USER_ID
SFVFAUD_ACTIVITY_DATE
SFVFAUD_ACTIVITY_DAY
SFVFAUD_ACTIVITY_TIME
SFVFAUD_RGFE_SEQNO
SFVFAUD_RGFE_TYPE
SFVFAUD_CRN
SFVFAUD_RSTS_CODE
SFVFAUD_RSTS_DATE
SFVFAUD_ESTS_CODE
SFVFAUD_ESTS_DATE
SFVFAUD_REFUND_SOURCE_TABLE
SFVFAUD_REG_BILL_HR
SFVFAUD_RULE_LIABLE_BILL_HRS
SFVFAUD_RULE_LIABLE_STUD_HRS
SFVFAUD_TOT_PER_CRED_CHARGE
SFVFAUD_FLAT_FEE_AMOUNT
SFVFAUD_CRSE_OVERLOAD_HRS
SFVFAUD_CRSE_OVERLOAD_CHARGE
SFVFAUD_ACCD_TRAN_NUMBER
SFVFAUD_NOTE
SFVFAUD_RGFE_PER_CRED_CHARGE

1022
Banner Student User Guide | Registration
SFVFAUD_RGFE_FLAT_FEE_AMOUNT
SFVFAUD_RGFE_FROM_FLAT_HRS
SFVFAUD_RGFE_TO_FLAT_HRS
SFVFAUD_RGFE_CRSE_OL_START_HR
SFVFAUD_LCUR_SEQNO
SFVFAUD_RGFE_RULE_VALUE_2
SFVREGD View
This view joins the SFRSTCR and SFRREGD tables to cumulatively list all registration
records for a student, including those that have been dropped/deleted and removed. The
view is used in fee assessment processing to determine if courses have been dropped/
deleted for a student since their last assessment was produced. It is also used in the
SFRFEES report, to cumulatively list all registration records for a student, including those
that have been dropped/deleted and removed and not yet assessed.
The following rows are in this view.
SFVREGD_TERM_CODE
SFVREGD_PIDM
SFVREGD_CRN
SFVREGD_LEVL_CODE
SFVREGD_CAMP_CODE
SFVREGD_PTRM_CODE
SFVREGD_RSTS_CODE
SFVREGD_RSTS_DATE
SFVREGD_CREDIT_HR
SFVREGD_BILL_HR
SFVREGD_WAIV_HR
SFVREGD_GMOD_CODE
SFVREGD_INSM_CODE
SFVREGD_SCHD_CODE
SFVREGD_WITHDRAW_IND
SFVREGD_INCL_ASSESS
SFVREGD_ACTIVITY_DATE
Fee Assessment Report (SFRFEES)
This report is used to assist in trouble shooting and debugging fee assessment
processing. It is intended to be an efficient way to gather needed information when a
question on arises on fee assessment. The report will be the primary method for the
ActionLine to obtain contact data, (along with additional delivered SQL*Plus scripts).
These scripts are discussed in the next section.
This report lists various data values stored for a student that have the potential to meet
registration assessment rule criteria. The values displayed are for enrollment data, student
data, curriculum data, course registration data, optional mock fee assessment data,
previous and current fee assessment, and accounts receivable records. The report
processes a single ID or a population selection for a term. This report may be used for
assessment verification and can be helpful when troubleshooting assessment results. The

1023
Banner Student User Guide | Registration
supported parameters will be expanded in later releases to assist with reviewing
assessment information.
This report can also be used as a tool for institutions to evaluate their processing rules or
check on a specific group of students. For example, an institution may want to update a
rule. They could take a sample population selection, and then compare the current
assessment with a mock assessment to determine if this change would be appropriate.
Another potential use would be if a user wanted to review assessment results for students
who have a specific drop registration status (i.e.,
DD). They would create a population
selection containing these students, and run the report. This allows them to easily
compare the current assessment to the previous one, and determine if the refund was
performed correctly.
Fee Assessment Script Set
A set of SQL reporting scripts is delivered to assist with evaluating and reviewing
registration fee assessment data.
Overview
This fee assessment script set is used to assist with evaluating and reviewing registration
fee assessment data. These scripts provide an institution with the ability to easily gather
term-based rule and fee assessment-related data for a term, as well as registration
information for a specific student. The scripts are designed to provide a standardized
method for institutions to list and examine rule and assessment data for a specific student
ID and term so as to assist them in troubleshooting assessment issues independently.
The generated report files from these scripts can also be used as a standardized method
for providing the ActionLine with institution test case data when reporting assessment-
related issues and creating assessment-related contacts.
These scripts are delivered as part of the PLUS directory, and they can be run from the
SQL*Plus command prompt. Some script output is in a
.csv (comma separated value)
file format.
A total of 27 scripts are delivered. One of the scripts is a driver script, which calls the
remaining 26 scripts. (You must run the
srdriver.sql script first.) A total of four output
files are generated: one
.lis file and three .csv files.
All four files follow a standard naming convention using the specific student ID and term.
• The .lis file name follows the naming convention <term>_<id>.lis. For
example, if the scripts were run for term 200409 and student ID 123456789, the
generated file would be named
200409_123456789.lis.
• The .csv files (data from SSBSECT, SFRRGFE, and SFRFAUD) follow the same
naming convention. These files would be named:
<term>_<id>_ssbsect.csv,
<term>_<id>_sfrrgfe.csv, and <term>_<id>_sfrfaud.csv.
Description of Scripts
The following scripts and the tables they report on are listed below:

1024
Banner Student User Guide | Registration
Script Name
Table
Reported On Description
srdriver.sql
N/A Driver script for the series of assessment data reporting scripts
used to create fee assessment contacts with ActionLine.
Input Parameters:
• Term - Required, no wildcards
• ID - Required, no wildcards
srgtvsdax.sql
GTVSDAX Script used to identify crosswalk/conversion information for the
rules with an Internal Group (Code) of
FEE ASSESSMENT.
srsfbests.sql
SFBESTS Script used to identify refund by enrollment status/student
registration status information which defines when the
enrollment status code can be used during the specified term.
srsfbetrm.sql
SFBETRM Script used to identify student registration/enrollment
information for a specific student ID and term.
srsfbrfst.sql
SFBRFST Script used to identify refund by enrollment status/student
refund percentage information which defines the refund period
and percentage for the enrollment status code during the
specified term.
srsfrafee.sql
SFRAFEE,
SFREFEE
Script used to identify student registration additional fees
information for a specific student ID and term.
srsfrareg.sql
SFRAREG Script used to identify open learning course registration
extension information for a specific student ID and term.
srsfrfaud.sql
SFRFAUD Script used to identify registration fee assessment audit
information for a specific student ID and term. Output is a
.csv file.
srsfrfmax.sql
SFRFMAX Script used to identify minimum and maximum registration fee
information. Defines minimum and maximum charges needed
for a detail code for a specific term.
srsfrrfcr.sql
SFRRFCR Script used to identify course refund percentage information
for a specific term.
srsfrrfnd.sql
SFRRFND Script used to identify refund by total refund/penalty periods for
a specific term.
srsfrrgfe.sql
SFRRGFE Script used to identify registration fee assessment rules
information for a specific student ID and term. Output is a
.csv file.
srsfrrsts.sql
SFRRSTS Script used to identify refund by course/registration status by
term information. Defines when student course registration
codes can be used during the specified term.
srsfrstcr.sql
SFRSTCR Script used to identify student course registration information
for a specific student ID and term.

1025
Banner Student User Guide | Registration
How to Run the Scripts
Use these steps to run the scripts, generate the data output files, and send the files to the
ActionLine.
1. Verify that the above scripts exist under
$BANNER_HOME/student/plus and
$BANNER_LINKS.
2. Navigate to the directory to which the output files can be written.
3. Run the script set from the SQL*Plus prompt by typing the name of the driving script,
srdriver
, preceded by the @ command or the start command: SQLPLUS>
@$BANNER_LINKS/srdriver
.
4. Enter values for the two input parameters at the prompt:
• ID - Required, the ID for the student
srsobterm.sql
SOBTERM Script used to identify base term information for a specified
term.
srssbsect.sql
SSBSECT Script used to identify general base section information for a
specified term. Output is a
.csv file.
srssrattr.sql
SSRATTR Script used to identify degree program attribute information for
a specified term.
srssrextn.sql
SSREXTN Script used to identify open learning registration extension rule
information for a specified term.
srssrfees.sql
SSRFEES Script used to identify section fee information for a specified
term.
srssrrfnd.sql
SSRRFND Script used to identify open learning registration/section
refunding information for a specified term.
srssrrsts.sql
SSRRSTS Script used to identify open learning registration/section
registration status code information for a specified term.
srstvests.sql
STVESTS Script used to identify student enrollment/registration status
information which defines enrollment status codes.
srstvftyp.sql
STVFTYP Script used to identify fee type validation information.
srstvrsts.sql
STVRSTS Script used to identify course registration status validation
information.
srtbbctrl.sql
TBBCTRL Script used to identify accounts receivable billing control
information.
srtbbdetc.sql
TBBDETC Script used to identify detail charge/payment code definition
information.
srtbraccd.sql
TBRACCD Script used to identify account charge/payment detail
information for a specific student ID and term.
Script Name
Table
Reported On Description

1026
Banner Student User Guide | Registration
• Term - Required, the term for the student
5. Review the following files that are created by the series of SQL scripts:
•
<term>_<id>.lis
• <term>_<id>_ssbsect.csv
• <term>_<id>_sfrrgfe.csv
• <term>_<id>_sfrfaud.csv
6. Transfer the output files to your PC in ASCII using File Transfer Protocol (FTP)
software.
7. Submit the script output files when you contact the Customer Support Center. If you
are sending output files to the ActionLine as part of creating a contact, attach the four
output files to an email message.
Files Produced by the Scripts
Here is a breakdown of what is reported in each of the four files produced by the scripts.
<term>_<id>.lis File
The <term>_<id>.lis file is comprised of the following data:
1. Term and Control Data
• GTVSDAX - crosswalk/conversion information.
• SOBTERM - term-based information for a specified term.
• TBBCTRL - accounts receivable billing control information.
• SFRFMAX - registration fees maximum information that defines minimum and
maximum charges needed for a detail code for a specific term.
• STVRSTS - course registration validation status information.
• STVESTS - student registration status validation information that defines enrollment
status codes.
• SSRATTR - degree program attribute information for a specified term.
• STVFTYP - fee type validation information.
2. Refund Data
• Refund By Course
– SFRRSTS - refund by course/registration status by term information. defines
when a student course registration code can be used during the specified
term.
– SFRRFCR - refund by course refund percentage information for specific term.
• Refund By Total
– SFRRFND - refund by total/refund control information which defines penalty
periods for refund by total for a specific term.

1027
Banner Student User Guide | Registration
• Refund By Enrollment Status
– SFBESTS - refund by enrollment status/student registration status information
which defines when enrollment status code can be used during the specified
term.
– SFBRFST - refund by enrollment status/student refund percentage
information which defines the refund period and percentage for the enrollment
code during the specified term.
• Open Learning Registration Refunding
– SSRRSTS - open learning registration/section open learning registration
status code information for a specified term.
– SSREXTN - open learning registration/section open learning registration
extension rules information for a specified term.
– SSRRFND - open learning registration/section open learning registration
refunding information for a specified term.
3. Student and Student Registration Data
• SFBETRM - student registration table information for a specific ID/term.
• SFRSTCR - student course registration information for specific ID/term.
• SSRFEES - section fees repeating information for a specified term.
• SFRAFEE - registration additional fees, student registration additional fees, and
detail charge/payment code definition information for a specific student ID and term.
• SFRAREG - open learning additional and student course registration information for
a specific student ID/term.
• TBRACCD - account charge/payment detail information for specific ID/term.
Note: SSBSECT data is spooled to a separate .csv file named
<term>_<id>_ssbsect.csv.
SFRFAUD data is spooled to a separate
.csv file named
<term>_<id>_sfrfaud.csv.
SFRRGFE data is spooled to a separate
.csv file named
<term>_<id>_sfrrgfe.csv.
4. Detail Code Definitions
• TBBDETC - detail charge/payment code definition information.
.csv Files
The remaining data is written to three comma separated value (.csv) files in delimited
format, and the files may be viewed as spreadsheets with Microsoft Excel.
• <term>_<id>_ssbsect.csv - section information for a specific term.

1028
Banner Student User Guide | Registration
• <term>_<id>_sfrfaud.csv - registration fee assessment audit information for a
specific student ID and term.
• <term>_<id>_sfrrgfe.csv - registration fee assessment rules information.
Using the Purge Process
Use the Purge Fee Assessment Audit Process (SFPFAUD) to purge audit history records
from the database. You can delete unnecessary records and use a reporting option to
review individual accounts when researching possible accounting or assessment errors.
You can run the purge process for range of dates for transactions, for a specific term, or
for an ID. You can choose to keep only the last assessment records. The last assessment
should be kept when the current term is active and additional assessments are going to
occur for that term. If all records are purged for a given term and section fees or other
additional fees exist, fee assessment may need to be run twice to ensure accurate
assessment.You can print summary or detail information, and you can run the purge in
audit or update mode.
This process prevents the intermediate assessment audit that is created to handle records
with a status of
DD from being purged. These interim records will not be purged until a flat
charge rule qualification has re-occurred. This will ensure that future assessments will
have accurate previous assessment records available for fee assessment processing.
The process deletes SFRFAUD rows for qualified students by assessment rule type
(
STUDENT, LEVEL, CAMPUS, ATTR). The processes considers if a student has had prior
flat rule qualification but has been reassessed due to having a drop/delete issued. Since
the student's assessment in essence starts over when the drop/delete is realized by
assessment, any prior assessment audit records that record prior flat charge rule
qualification can be safely purged.
SFPFAUD first determines if a drop/delete scenario has been handled by assessment. If it
has, any assessment audit prior to the drop/delete being handled can be purged. The
process checks to see if a date is found for when a drop/delete was handled, and then
goes on to delete all assessment audit prior to the drop/delete, making sure to retain the
last assessment audit.
Updating Records with Incorrect Assessments
The following steps should be used to update any incorrect assessment records:
1. Identify students with inaccurate assessments due to flat charge refunding issues.
2. Record the course drop history for the students (the CRN, the course registration
status code, and the date for each dropped course).
3. Purge the SFRFAUD audit data for the students.
4. Re-register the students, and assess them.
5. Drop the appropriate courses using the course registration status codes and dates
noted in Step 2 above.

1029
Banner Student User Guide | Registration
6. Run SFRFASC in audit mode, if you want to preview the results prior to posting the
assessment.
7. Review and verify the assessment results.
8. Run the assessment in update mode, if the assessment was previewed in audit mode.
Registration Fee Assessment and Open Learning
Courses
This section discusses using fee assessment with open learning registration.
Refunding Rule Setup
Before setting up refunding rules for use with open learning courses and fee assessment,
create the term in the Term Control Form (SOATERM), and define the required registration
dates, census dates, and status codes on SOAORUL.
Then consider the following recommendations:
• To default the appropriate registration, extension, and refunding rules to the section, the
CRNs must be created either through the Term Roll Report (SSRROLL) or directly
through the Schedule Form (SSASECT).
All new open learning sections (those sections defined with no part-of-term, with an
instructional method, registration from/to dates, student start from/to dates, duration
units, and number of units) will be given section level registration dates, registration
status codes, and extension rule and refunding rule records, based on the information
established in the Open Learning Rules Form (SOAORUL) for the course and/or section
characteristics.
The registration from and to dates will reflect the most appropriate registration dates as
per SOAORUL, based on course and/or section characteristics. These rules are
accessible via the Schedule Processing Rules Form (SSARULE).
• Modifications to the registration dates, registration status codes, extension rules, and
refunding rules are permitted if the original open learning rule has been denoted as
overrideable.
• It is strongly suggested that fee assessment be established in the Schedule Detail Form
(SSADETL). Once established at the section level, the Track by CRN indicator on in the
Term Control Form (SOATERM) is used to add the CRN number to all fee assessment
transactions on the student’s accounts receivable records. The Assess by Course
indicator on SFARGFE does the same in the refunding process. This will facilitate the
tracking of fees to an individual registration.
• As an alternative to defaulting fees from the course level, registration fees can be
defined in the Section Fee Assessment Control Form (SSADFEE) and will populate the
section fees (SSRMEET table) based on course and/or section characteristics. This is a
set-up process only and will not physically write the new records to the table until a new
section has been created.

1030
Banner Student User Guide | Registration
When new sections are created, the fee rules defined here will default automatically. If
the updating of existing sections with no existing fee rules is required, use the batch
process (SSPMFEE) to examine the set-up information and apply the fee rules to the
appropriate sections.
• If fee assessment rules are required in addition to section level fees, they should be
constructed in the Registration Fee Assessment Rules Form (SFARGFE).
Note: These charges will be assessed per credit hour only, and the
section will not be appended to the TBRACCD record.
Examples of Simple Section Level Fee Assessment
Here are fee assessment examples for simple section processing.
Section Setup
CRN 10001 characteristics:
• Open Learning Course
• 10 week duration
• 3 billing hours
• 4 credit hours
CRN 10002 characteristics:
• Traditional section defined with part-of-term
• 3 billing hours
• 4 credit hours
The following represents the TBRACCD entries that would be placed on the learner’s
account:
Detail Code Amount Fee Type Duration
1 T100 900.00 FLAT
2 T100 300.00 CRED
3 T100 90.00 DURN Week
4T200
COMP
100.00
25.00
DURN
FLAT
Week
5T200
TECH
100.00
50.00
BILL
FLAT

1031
Banner Student User Guide | Registration
CRN 10001:
CRN 10002:
Examples of Simple Section Level Refunding
Here are fee assessment examples for simple section refund processing.
Section Setup
CRN 10001 characteristics:
• Open Learning Course
• 10 week duration
Scenario 1 T100 900.00
Scenario 2 T100 900.00 300.00 X 4
Scenario 3 T100 900.00 90.00 X 10
Scenario 4 T200
COMP
1000.00
25.00
100.00 X 10
Scenario 5 T200
TECH
300.00
0.00
100.00 X 3
Scenario 1 T100 900.00
Scenario 2 T100 900.00 300.00 X 4
Scenario 3 Fee assessment would not be accomplished on a duration basis (entry
of this scenario would be prohibited in SSADETL).
Scenario 4 Fee assessment would not be accomplished on a duration basis (entry
of this scenario would be prohibited in SSADETL).
Scenario 5 T200
TECH
300.00
50.00
100.00 X 3
Reg
Code %Complete
Duration
Complete Duration
Tuition
Refund
Fee
Refund
Extn
Refund
1 DC 10 100% 100%
DC 20 90 90
DC 30 70 70

1032
Banner Student User Guide | Registration
The following represents the TBRACCD entries that would be placed on the learner’s
account.
Refunding by Percent Complete (Rule Set 1)
Scenario 1:
Learner A started course on April 1 paying $100.00 tuition (no fees) and drops on April
5. The learner was active in the course for 5 days which constitutes 7.1429%
complete - between 0 and 10% complete [5 days / (10 weeks * 7 days) * 100].
Scenario 2:
Learner B started course on April 1 paying $100.00 tuition (no fees) and drops on April
15. The learner was active in the course for 15 days which constitutes 21% complete
– between 20 and 30% [15 days / (10 weeks * 7 days) * 100].
Scenario 3:
Learner B started course on April 1 paying $100.00 tuition (no fees) and drops on May
15. The learner was active in the course for 45 days which constitutes 64% complete -
more than 50% complete [31 days / (10 weeks * 7 days) * 100].
No refund processed.
Refunding by Duration Complete (Rule Set 2)
Scenario 4:
Learner A started course on April 1 paying $100.00 tuition (no fees) and drops on April
5. The learner is in the first week of the course - between 0 and 1 week complete.
DC 40 50 0
2 DC 1 WEEK 100 100
DC 3 WEEK 75 75
DC 5 WEEK 50 0
T100 - 100.00
T100 - 70.00
T100 - 100.00
Reg
Code %Complete
Duration
Complete Duration
Tuition
Refund
Fee
Refund
Extn
Refund

1033
Banner Student User Guide | Registration
Scenario 5:
Learner B started course on April 1 paying $100.00 tuition (no fees) and drops on April
22. The learner is in the fourth week of the course - between 3 and 5 weeks complete.
Scenario 6:
Learner B started course on April 1 paying $100.00 tuition (no fees) and drops on May
6. The learner is in the sixth week of the course – more than 5 weeks complete.
No refund processed.
Examples of Section Level Refunding for Traditional Type Courses
The following is an example of how a traditional course, defined as an open learning
course, can be structured to use open learning refunding rules.
A continuing education course meets every Tuesday between August 21 and October 16
– 9 classroom meetings.
• The refund deadline date is August 23.
• The withdrawal deadline date is October 2.
The Banner setup would be:
• Registration from and to dates could be structured to allow students to register in any
timeframe that is convenient prior to first classroom meeting date of August 21.
• Start from and to dates could be defined as the same date of August 21, thereby
ensuring that all students have the same start date.
• Refunding rules could be established for the section defining a duration complete or
percent complete as follows.
T100 - 50.00
Reg
Code
%
Complete
Duration
Complete Duration
Tuition
Refund
Fee
Refund
Extn
Refund
Refunding Rules by % Complete
DC 10 100% 100%
DC 75 50 50
DC 100 0 0
Refunding Rules by Duration
Complete
DC 1 WEEK 100 100
DC 7 WEEK 50 50

1034
Banner Student User Guide | Registration
Refunding by Percent Complete
Scenario 1:
Student drops the class on August 23 after the first class.
If determined by duration, they would receive a full refund as they fall within the range
of 0 to 1 week.
By percentage, they would also get a 100% refund ((3 days completed / 56 days in
total period) * 100 = 5.35714 or 5% which is between 0% and 10%).
Refunding by Duration Complete
Scenario 2:
Student drops the class on September 25.
If determined by duration, they would receive a 50% refund as they fall within the
range of 2 to 7 weeks.
By percentage, they would also get a 100% refund ((35 days completed / 56 days in
total period) * 100 = 62.5 or 62% which is between 10% and 75%).
Scenario 3:
Student drops the class on October 9.
If determined by duration, they would not receive a refund as they fall within the range
of 8 to 9 weeks.
By percentage, they would also get no refund ((49 days completed / 56 days in total
period) * 100 = 87.5 or 87% which is between 75% and 100%).
Extension Fee Processing
For open learning courses, you may require the assessment of fees if the student’s
expected completion has been extended. In effect, the student will be able to “buy”
additional time in the course. Rules are established at the section level (SSARULE) to
allow the definition of how those rules should be assessed.
To apply the extension to an individual learner, access SFARHST, where the extension
rules established for the section are defaulted and may be altered (based on whether
overrides are permitted). Therefore, fees will need to be assessed to the student’s account
reflecting this transaction.
DC 9 WEEK 0 0
Reg
Code
%
Complete
Duration
Complete Duration
Tuition
Refund
Fee
Refund
Extn
Refund

1035
Banner Student User Guide | Registration
Extension fees are processed similarly to registration fees:
• Extension fees are processed from common extension fee assessment procedures.
• Extension fees are processed from the form if the Registration Fee Assessment On-
line checkbox is checked on SOATERM.
• Extension fees are processed from batch if the Registration Fee Assessment On-line
checkbox is not checked on SOATERM.
• The CRN should be appended to the TBRACCD record if the Track by CRN checkbox
is checked on SOATERM.
The differences from registration fee assessment are as follows:
• Fees are pre-calculated based on the extension rule defined in SSARULE and
SFARHST (by duration) and will therefore be treated as flat fees in the fee assessment
process.
• The date assessed is captured in the Additional Registration Information Table
(SFRAREG) after the student’s account record (TBRACCD) has been generated either
online or through the batch fee assessment process.
Note: It is possible for the extension fees to be waived. In that case, the
extension fee amount will be zero. In the case where there are zero fees,
no record is inserted in the TBRACCD table.
Extension Refunding Processing
The processing for extension refunding is similar to that accomplished for open learning
registration. Rules are attached to the status code and subsequently assigned to the
extension that has been deemed as a withdrawal (
STVRSTS_WITHDRAW_IND) and has
been allocated to extension processing (
STVRSTS_EXTENSION_IND).
The drop or withdrawal of an individual extension is processed through the Registration
Extensions block of the Student Registration History and Extension Form (SFARHST). If
the course is withdrawn from or dropped via the Student Course Registration Form
(SFAREGS), all extensions for that course will also be withdrawn from or dropped. This
form permits the user to define the process date in the Key Block, and it should be this
date that is used to determine the current date.
If a student drops an open learning course with an extension prior to the beginning of that
extension, the refund given is determined by the registration date that is assigned to the
registration status code for the extension. This date is displayed in the Course Status Date
field in the Student Registration Extension Information window on SFARHST. It is stored in
the SFRAREG table, in the SFRAREG_RSTS_DATE field. The field will store the date
when a course registration status code (STVRSTS) is created or updated for an extension
record. This allows an extension record to have its own registration status date that is
separate from the course registration status date.

1036
Banner Student User Guide | Registration
Processing Algorithms
Example:
The student was granted a 5-week extension, and on January 28, 2002, wants to drop
the extension. The extension start date is January 15, 2002, with an expected
completion date of February 19, 2002. A week is defined as having 7 days.
Percent Complete Calculation
Number of days elapsed in the registration:
Calculate the number of days between the current extension start date
(
SFRAREG_START_DATE) and the current date (or the process date in the event that
the total course is dropped).
Example:
Difference between January 15, 2002 and January 28, 2002 = 13 days
Number of days available in the registration:
Calculate the number of days between the current extension start date
(
SFRAREG_START_DATE) and the current expected completion date
(
SFRAREG_END_DATE).
Example:
Difference between January 15, 2002 and February 19, 2002 = 35 days
Calculate the percent complete:
(Number of days elapsed in registration / number of days available in the registration) *
100
Example:
(13 / 35) * 100 = 37.14285%
This percentage would be compared to the percent complete rule defined for the
registration code (rules defined in the SSRRFND table) to ascertain the refund percentage
to use in the calculation of the refund amount.
Duration Complete Calculation
Number of duration units elapsed in the registration:
Calculate the number of days between the current extension start date
(
SFRAREG_START_DATE) and the current date (or the process date in the event that
the total course is dropped), and divide by the number of days defined for the duration
code (
SFRAREG_DUNT_CODE) assigned to the section
(
GTVDUNT_NUMBER_OF_DAYS).
Example:
Difference between January 15, 2002 and January 28, 2002 = 13 days
Translate to duration unit of week = 13 days / 7 days = 1.8571428 weeks

1037
Banner Student User Guide | Registration
The elapsed duration units would be compared to the duration complete rule defined for
the registration code (rules defined in the SSRRFND table) to ascertain the refund
percentage to use in the calculation of the refund amount.
Examples of Individual Extension Refunding
Extensions are granted for an open learning course as follows:
• Original Duration: 10 weeks
• Extension: 5 weeks
• Extension Fee: $150.00
Refunding by Percent Complete
Scenario 1:
Student has been granted a 5 week extension, and on January 28, 2002, wants to
withdraw from the extension. The extension start date is January 15, 2002, with an
expected completion date of February 18, 2002.
They would receive a 50% refund (13 days completed / 35 days in total period) * 100
= 37.1429 or 37% which is between 0% and 50%).
Refunding by Duration Complete
Scenario 2:
Student has been granted a 5 week extension, and on February 2, 2002, wants to
withdraw. The original extension date is January 15, 2002, and their expected
completion date is February 18, 2002.
They would receive no refund, as they fall within the range of 2 to 5 weeks.
Reg
Code
%
Complete
Duration
Complete Duration
Tuition
Refund
Fee
Refund
Extn
Refund
Refunding Rules by % Complete
WX 50 50%
WX 100 0
Refunding Rules by Duration
Complete
WX 2 WEEK 50%
WX 5 WEEK 0

1038
Banner Student User Guide | Registration
Examples of Extension Refunding for Dropped/Withdrawn Course
Here are examples for extension refunding.
Section Setup
CRN 10001 characteristics:
• Open Learning Course
• 10 week duration
Refunding by Percent Complete with Extensions (Rule Set 1)
Scenario 1:
Learner B started course on April 1 paying $100.00 tuition (no fees), and drops the
course (by default all extensions) on May 15. A registration extension was granted for
a 5 week period commencing on June 10 at a cost of $50.00 (charged to the same
detail code as the original registration). The learner was active in the course for 45
days which constitutes 64% complete - more than 50% complete [31 days / (10 weeks
* 7 days) * 100].
No refund processed.
The extension refund is processed. As the extension was not in effect yet, 0%
completed, the learner would receive a full refund of the cost of the extension.
Reg
Code
%
Complete
Duration
Complete Duration
Tuition
Refund
Fee
Refund
Extn
Refund
1 DC 10 100% 100% 100%
DC 20 90 90 50
DC 30 70 70 0
DC 40 50 0 0
2 DC 1 WEEK 100 100 0
DC 3 WEEK 75 75 0
DC 5 WEEK 50 0 0
T100 - 50.00

1039
Banner Student User Guide | Registration
Refunding by Duration Complete with Extensions (Rule Set 2)
Scenario 2:
Learner B started the course on April 1 paying $100.00 tuition (no fees), and drops the
course (by default all extensions) on May 6. A registration extension was granted for a
5 week period commencing on June 10 at a cost of $50.00 (charged to the same
detail code as the original registration). The learner is in the sixth week of the course -
more than 5 weeks complete.
No refund processed.
The extension refund is processed. Although the extension was not in effect yet - 0
weeks complete, the learner, based on the rules that were set up, would receive no
refund of the cost of the extension.
No refund processed.
Registration Fee Assessment and Study Paths
This section discusses using fee assessment with study paths.
Set up Study Paths with Fee Assessment
Use the following steps to set up study path processing with fee assessment and Banner
Accounts Receivable.
1. Set up study paths in Banner Student baseline and Banner Student Self-Service.
Refer to the "Study Path Processing” appendix.
2. Create fee assessment rules on SFARGFE by
STUDYPATH or STUDYPATH_ATTR
rule type.
3. Use the Student Curriculum Rules block on SFARGFE to set up curriculum rules for
registration.
4. Check the Section Fees by Study Path checkbox on SOATERM to control whether
study path data is stored with a charge, when the charge is generated from section
fees.
5. Check the Display Study Paths checkbox the TSACTRL to display study path
information on TSAAREV, TSADETL, and TSIQACT.

1040
Banner Student User Guide | Registration
Registration Fee Assessment Combined Fee
Assessment Process
This section discusses using the combined fee assessment process.
Fee Assessment Functionality
Processing supports the use of the section schedule type and section instructional method
on SFARGFE. For example, you may have the requirement to assess technology fees to
only those sections that have an instructional method of
WEB. This fee would be
inappropriate for students registered in a traditional classroom setting.
• These rules are not considered in the situation where Tuition and Fee Waiver flag on
SSASECT and Override (Indicator) on SFARGFE are checked.
• If rules are defined in SFARGFE with part-of-term information, they will not be applicable
to open learning courses, as these sections will not have a part-of-term attributed to
them.
• If rules are defined with registration from/to dates, they will not be applicable to open
learning courses due to the fact that these dates are static, and potentially, each open
learning section may be defined with different registration periods.
For those fees calculated from the section level fee rules defined in SSADETL, the
accounting records (TBRACCD) incorporate the CRN if Track by CRN is checked on
SOATERM.
Processing Algorithms
The following applies to processing algorithms:
• If SSRFEES_FEE_IND = FLAT, calculation is necessary.
• If SSRFEES_FEE_IND = CRED, SSRFEES_AMOUNT * SFRSTCR_CREDIT_HR.
• If SSRFEES_FEE_IND = BILL, SSRFEES_AMOUNT * SFRSTCR_BILL_HR.
• If SSRFEES_FEE_IND = DURN, SSRFEES_AMOUNT *
SFRAREG_NUMBER_OF_UNITS.
Extreme care should be taken when creating section level (SSADETL) and term level
(SFARGFE) fee rules, as term level rules will not have the same flexibility of fee type as
the section level rules. Also, term level rules can be developed for part-of-term and/or
registration from/to dates which will not be applicable to open learning courses.
Tuition and Fee Refunding Functionality
This refunding should only be invoked for open learning section registration records (no
part-of-term is defined for the section), if no extensions have been processed for this
registration record (
SFRAREG_EXTENSION_NUMBER = 0 of the most current
(maximum) SFRAREG records), and the Extension Indicator

1041
Banner Student User Guide | Registration
(STVRSTS_EXTENSION_IND) of the registration status code used for the drop contains
a value of
N. Otherwise, the extension refund processing should be invoked.
At the section level, criteria for refunding fees is defined in the section level rule
processing. Refunds are based on the elapsed time. Open learning courses can be
identified as those courses where no part of term information is contained on the
SSBSECT record.
You need to determine how to calculate the amount of time elapsed since the individual
student started the course. Students registered in the same section will have
individualized start dates. Therefore the traditional means of refunding based on static
dates is not possible. The registration start and end dates reside in the SFRAREG table.
This functionality should not be dependent upon how the original fees were assessed.
Therefore, if section level fees or fees assessed through SFARGFE were used in the
calculation of the original charge, there should be no change in refunding protocol.
Note: Refunding rules are tied to a registration status and would be
invoked whenever that status was applied to a registration record.
Note: SFARFND, SFARSTS, and SFAESTS refund processing is not
applicable for open learning courses.
Percent complete is based on the amount of time given to the student to complete the
course, and monies would be refunded on the percentage of used or elapsed time. This
elapsed time is calculated specifically for the individual student’s start date and represents
a percentage of the total course duration.
Duration complete is based on the duration units and duration period assigned to the
section in SSASECT. Refunding rules can be developed to assess the number of duration
periods that have passed with the student’s start date and refund monies based on rules
established in SSARULE for that section.
Processing Algorithms
Example:
The student started a 15-week course and on April 22, 2002 wants to drop. The
registration start date is April 1, 2002 with an expected completion date of July 15, 2002. A
week is defined as having 7 days.
Percent Complete Calculation
Number of days elapsed in the registration:
Calculate the number of days between the registration start date
(
SFRAREG_START_DATE) and the current date.
Example:
Difference between April 1, 2002 and April 22, 2002 = 21 days

1042
Banner Student User Guide | Registration
Number of days available in the registration:
Calculate the number of days between the current extension start date
(
SFRAREG_START_DATE) and the current expected completion date
(
SFRAREG_END_DATE).
Example:
Difference between April 1, 2002 and July 15, 2002 = 105 days
Calculate the percent complete:
(Number of days elapsed in registration / number of days available in the registration) *
100
Example:
(21 / 105) * 100 = 20.00%
This percentage would be compared to the percent complete rule defined for the
registration code (rules defined in the SSRRFND table) to ascertain the refund percentage
to use in the calculation of the refund amount.
Duration Complete Calculation
Number of duration units elapsed in the registration:
Calculate the number of days between the current extension start date
(
SFRAREG_START_DATE) and the current date, and divide by the number of days
defined for the duration code (
SFRAREG_DUNT_CODE) assigned to the section
(
GTVDUNT_NUMBER_OF_DAYS).
Example:
Difference between April 1, 2002 and April 22, 2002 = 21 days
Translate to duration unit of week = 21 days / 7 days = 3.00 weeks
The elapsed duration units would be compared to the duration complete rule defined for
the registration code (rules defined in the SSRRFND table) to ascertain the refund
percentage to use in the calculation of the refund amount. Ensure that the CRN is
captured on the student’s account record (TBRACCD) when the Track by CRN flag is
checked on SOATERM.
Register Students
The Student Course Registration Form (SFAREGS) provides an automated mechanism
for registering students into sections created in the Class Schedule module. This form also
assesses the tuition and fee charges related to the registration and passes them to the
Accounts Receivable module. This form further allows for student maintenance, performs
the functions necessary for add/drop activity, and provides the ability to print a student's
schedule and bill.
The form contains the logic to check the repeat limit or repeat maximum hours, which is
controlled by the flags set on the Term Control Form (SOATERM). The repeat checking

1043
Banner Student User Guide | Registration
process examines the courses which are in progress and exist in academic history to
determine if the repeat rules are violated.
Equivalent courses that are specified at the Catalog module are also examined when
determining repeats.
SFAREGS contains the logic to check the prerequisite and test score restrictions; this
logic is controlled by the registration error flag on SOATERM. The form also contains the
logic to check the campus restrictions; this logic is also controlled by the registration error
flag on SOATERM.
All changes made in the Registration information must be saved before the user is
permitted to exit the form. Users are not permitted to exit the registration form if fatal errors
exist.
This form supports block scheduling via the use the Delete all CRNS checkbox, and
Process Block checkbox, and the Block Schedule field. Select Update Student’s Term
Information from the Options Menu to open the Student Term window where the Block
Schedule field is located.
SFAREGS displays the following messages in the circumstances described below:
1. When the course status is not defined for part of term, the message will display
Course registration status rules not defined for part of term.
2. When the course status is defined, but is out of the date range, the message will
display Course status dates not within range for part of term.
3. If enrollment statuses have not been created for the term on the Enrollment Status
Control Form (SFAESTS), the message will display Status undefined or date range
invalid; press KEY-CLRBLK OR KEY-CLRFRM to exit.
4. A warning message is generated if the user attempts to change a student's major or
college, if that student's degree record has been updated to pending graduation
status.
5. Test score and prerequisite checking are combined, and generate the message Preq
& Test Score - Error. if the student does not meet the prerequisite requirements for a
course. The message PREQ in progress will display if the student is currently
registered for a prerequisite in a prior term, and it has not been graded, and the In
Progress (Indicator) for that term has been unchecked (set to
N) on SOATERM.
6. The Maximum Hours check only updates those records which bring the student over
the Maximum Hours Allowed with a Maximum hours exceeded message. Maximum
Hours errors cannot be overridden, but the Maximum Hours may be increased in the
Registration information section of the form.
7. If the user attempts to perform an Exit or Rollback function from the Registration
section when changes have been made to this section which may affect registration
fee assessment, the message *ERROR* Invalid Key. Must SAVE registration changes
before exiting. will be generated.
8. If the user attempts to perform an Exit or Rollback function from the Student
Information window when changes have been made to this window, the message
*ERROR* Invalid Key. Must SAVE student AND registration changes before exiting.
will be generated.

1044
Banner Student User Guide | Registration
9. If the user attempts to perform an Exit or Rollback function from the Registration
section when changes have been made to this section, the message *ERROR* Invalid
Key. Must SAVE student AND registration changes before exiting. will be generated.
The Registration Section Query Form (SFQSECM) is used to assist the registration user
in resolving registration problems if they occur. The user may request specific queries
against the section data and compare the results to the student's current schedule.
Also used in the registration process is the Registration Course Query Form (SFQSECT),
which displays information pertaining to the registration of a course, as well as override
fields for repeat checking, campus restrictions, and test score restrictions.
Open Learning Registration
Open learning registration provides learners with the ability to register for a class based on
start/end dates rather than a term. This open learning approach is optional and works with
Banner Student’s registration processing for enrollment and administrative purposes.
Please refer to the Banner Student Open Learning Registration Handbook for more
information on using this processing.
Open learning allows you to do the following in the Registration module:
• Run reports (such as student schedules, schedule/bills, transcripts, and enrollment
verifications) using date ranges in place of term.
• Permit students to select, as part of the registration process, either the date they wish to
start their course or the date they wish to finish the course.
• Calculate either the start and/or expected completion dates of the class based on the
duration of the section in conjunction with the date the student selected at the time of
registration.
• Permit the student to buy more time in a class, thereby extending their expected
completion date.
• Use the section level rules defined through the section creation process.
• View all registration activity for a student, irrespective of term.
• Process withdrawals or drops based on the individual student's progress in the course
versus static date ranges for the term or part-of-term.
• Create rules for registration and fee assessment processing that will provide the
appropriate level of flexibility for open learning courses. These rules are defined outside
the traditional part-of-term and static date registration processing.
• Specify dates when registration will be accepted (outside of the usual term definitions on
SOATERM) to lay the foundation for non-term based registration.

1045
Banner Student User Guide | Registration
Set Up Open Learning Rules
Before setting up open learning rules, make sure all section-related rules and validation
codes have been defined in Banner.
1. Access the Open Learning Section Default Rules Form (SOAORUL), and enter the
term in the Key Block.
2. Use Next Block to access the Registration Date Defaults block, and enter the course/
section criteria for the rule (college, department, campus, schedule type, instructional
method).
This criteria will be used to associate the registration default information to the section
or group of sections. For example, if all Web-based nursing sections will be available
for registration between a particular range of dates, the department should be set to
the nursing department code, and the instructional method should be set to the code
that represents Web-based delivery.
3. Enter the registration start and end dates for the period of time that the students are
allowed to register for a section.
These dates will default to all new section records created, matching the identifying
criteria defined here. These dates will also default to the start from and to dates on the
section record. Both of these date ranges are updatable in SSASECT, if the Override
(Indicator) is checked.
4. Enter the census dates to be defaulted to the corresponding fields in the Enrollment
Data block of the Schedule Form (SSASECT).
5. Save the records.
6. Define the registration status codes that will be allowable for the rule.
6.1. To do this, position the cursor on the record with the appropriate criteria, and
use the Detail button or the Registration Status Codes item in the Options Menu
to access the Default Registration Status Code Definitions block.
6.2. Enter all the registration status codes and usage cutoff percentages that apply
for this set of course characteristics. The description and indicator settings from
STVRSTS are displayed.
7. Save the records.
8. Define extension rules for the term using extension registration status codes with the
Extension Indicator checkbox checked on STVRSTS.
8.1. To do this, position the cursor on the extension status code, and select the
Extension Rules item in the Options Menu. You will see an error message if the
code you chose is not defined as an extension code.
This rule defines the default information that will be displayed when granting
extensions in SFARHST.
9. Enter the percentage of the original duration period for the various sections that meet
the identifying criteria to be used to extend the learner’s expected completion date.
10. Define the rate per duration unit.
11. Check the Override (Indicator) if the defined values can be overridden after the
information has been defaulted to the section (SSARULE).

1046
Banner Student User Guide | Registration
12. Define refunding rules. Refunding rule definitions are required for each registration
code that will be used to drop, withdraw, or cancel a registration record.
Unlike the refunding rules defined for registration codes in SFARSTS, refunding is
accomplished based on the elapsed time from the student’s individual start date
based on the duration of the section. This elapsed time is defined as a completion
percentage. At the section level, rules may be defined based on the duration
complete. This functionality was not provided here due to the fact that these are
general default rules, and the duration is set at the section level.
For example, the original duration of the section is ten weeks, and institutional policy
states that a 100% tuition refund will be granted in the first week of the student’s
registration. A rule should be defined with a completion percentage of 10% and a
tuition refund rate of 100%. Multiple refunding rules can be defined for an individual
registration status. After all refunding rules have been defined, save the records.
The process of defining registration status codes, refunding rules, and extension rules
must be completed for all required department, college, campus, schedule type, and
instructional method combinations prior to the creation of section records. If this task has
not been completed before CRNs are generated, a batch process (SSPRDEF) may be
used to default these rules to all open learning sections (in the term) that do not have
processing rules.
Register for an Open Learning Course
Before processing registration records for an open learning course, make sure all open
learning rules and course sections have been defined in Banner.
1. Access the Student Course Registration Form (SFAREGS).
2. Enter the ID of the student who is registering for the course.
3. Use Next Block to access the Registration Information block, and enter the CRN
number in the CRN field, (or search for appropriate sections using the Search feature
for the CRN field). You may also enter the subject, course number, and section directly
if the CRN is unknown.
4. Save the record, and fix any errors.
5. The Start/End Date Entry window will be displayed for open learning courses. Enter
the start or end date selected by the student in the window.
• If the start date is entered, the expected completion date of the course will be
calculated based on the duration defined for the section.
• If the student has chosen the date they wish to finish the course, the start date will
be calculated. The start date, regardless of how derived, will be checked against the
start from and to dates on the section record.
6. Save the date information. You will be returned to the Registration Information block
where you must save again to trigger the checking for registration restrictions (i.e.,
prerequisites, time conflicts, etc.).
7. Save the record so that fee assessment processing can take place.
8. An entry is created in the Additional Registration Information Table (SFRAREG) for
the start and end dates and the information for the instructor or tutor assigned to the
1047
Banner Student User Guide | Registration
student for the section. The number of extensions field will be populated with a zero to
signify the original registration record.
Note: Entries are created in this table or traditional and open learning
course registration records. This information is then available for
Financial Aid processing.
Create an Extension for an Open Learning Course
Before creating an extension for an open learning course, make sure all open learning
rules and course sections have been defined in Banner.
1. Access the Student Registration History and Extension Information Form (SFARHST),
and enter the ID of the student for whom you wish to process the extension.
2. Use Next Block to access the Registration History block, and select the record for the
course to be extended.
3. Position the cursor on the desired course and use Next Block, or select the Course
Extension item from the Options Menu to access the Registration Extensions Block.
Note: You will not be allowed to proceed if: a final grade has already been
processed for the course, the selected course has not been defined as
open learning (evidenced by lack of part-of-term and start/end date
information), the class has been dropped or withdrawn, or the section has
not been set up to allow extensions.
4. Insert a record in the Registration Extension block. The contents of the extension rule
defined for the section in SSARULE will be interpreted and used to populate the fields
in this record. The transaction amount will be calculated and represents the charge
that will be applied to the student's account.
Note: Extension processing will not be possible if: the student has passed
their expected completion date, the student will exceed the maximum
number of extensions allowed for the section, or the student has
registration holds.
5. If the section requires pre-approval, use the Approval Override checkbox to signify
that special approval requirement has been granted.
6. If, in the case of an administrative extension, the charge amount should be waived,
check the Waived checkbox, and the Amount field will be set to zero (
0).
7. Save the record when you are satisfied that the correct information exists. A new entry
will be entered in the Additional Registration Information Table (SFRAREG).
8. If online fee assessment is turned on in SOATERM, the fee assessment processing
can take place for the extension fees (evidenced by the assess date). If online fee
assessment has not been turned on, you will need to run the Batch Fee Assessment
Process (SFRFASC) to update the student's account.

1048
Banner Student User Guide | Registration
Drop or Withdraw from an Open Learning Course
Before dropping out of or withdrawing from an open learning course, make sure all open
learning rules and course sections have been defined in Banner.
1. Access the Student Course Registration Form (SFAREGS).
2. Enter the required term and student ID.
3. Use Next Block to access the Registration Information block, and enter the
appropriate drop or withdrawal code in the Status field. (The status code must be
defined in STVRSTS with the Withdrawal Indicator checkbox checked and have a
Status Type of
W for withdrawals or D for drops.)
Note: If extensions have been processed for the registration, they will
also be dropped.
4. Save your changes. This updates the existing registration record and the most current
and future records in the Additional Registration Information Table (SFRAREG). The
status code of withdrawn extensions will not be affected.
5. Save again. (Your cursor will now be in the Fees field.) This generates the appropriate
refunds based on the open learning refunding rules, if online fee assessment has
been turned on in SOATERM. Otherwise, you will need to run the Batch Fee
Assessment Process (SFRFASC) to update the student's account.
Drop or Withdraw from an Extension
Before dropping out of or withdrawing from an extension, make sure all open learning
rules and course sections have been defined in Banner.
1. Access the Student Registration History and Extension Information Form (SFARHST),
and enter the ID for the required student.
2. Use Next Block to access the Registration History block, and select the course to be
dropped or withdrawn from.
3. Position the cursor on the required course, then use Next Block or select the Course
Extension item in the Options Menu.
4. Use Next Record to locate the extension to be dropped or withdrawn from.
5. Enter an appropriate registration status code.(The status code must be defined in
STVRSTS with both the Withdrawal Indicator and Extension Indicator checkboxes
checked and have a Status Type of
W for withdrawals or D for drops.)
Note: Only active, future-dated extensions may be dropped or withdrawn
from. This process does not drop or withdraw the student entirely from the
course. Extension records may not be removed.
6. Save your changes. Only the dropped or withdrawn from entry in the Additional
Registration Information Table (SFRAREG) will be affected. If online fee assessment
is turned on in SOATERM, fee assessment processing will perform the necessary
calculations to determine the student's indebtedness to your institution. If online fee

1049
Banner Student User Guide | Registration
assessment has not been turned on, you will need to run the Batch Fee Assessment
Process (SFRFASC) to update the student's account.
Using Usage Cutoffs
Open learning processing in scheduling (SSARULE) and registration (SOAORUL) allows
usage cutoffs on the
DD course registration status code. This affords open learning
courses the same functionality that exists for traditional courses when usage cutoff rules
are used. (In open learning, usage cutoff rules are based on each learner's chosen start
date for the course.) Only the
RE course registration status code is restricted from usage
cutoff. The
DD course registration status code is processed like any other STVRSTS code.
Open learning processing in scheduling (SSARULE) and registration (SOAORUL also
allows negative usage cutoffs on course registration status codes, so that registration
status codes can be limited to a period of time before the learner has actually started
class. Negative numbers can be entered in the various usage cutoff fields. The usage
cutoff percentage range is -100 to 100. The usage cutoff duration range allows positive
and negative values for the length of the course. (For example, for a 16-week course, the
range will be -16 to 16. For a two-month course, the range will be -2 to 2.) Completion
calculations convert all durations to days, as defined on GTVDUNT.
One thing to keep in mind when working with negative percentages or durations, is that a
calculated completion rate may be meaningless.
Example:
A learner registers on January 1 for a one-week course, which he elects to start on
June 1. On January 5, he drops the course. The duration complete is -21 units, and
the percentage complete is -2100%. Assume the same scenario exists with a one-day
course. On January 5, the duration complete would be -147 units, and the percentage
complete would be -14700%.
These large negative numbers are not useful and can vary greatly from one section to
another, based on registration dates and learner start dates. Therefore, if an institution
wants a course registration status code to be available “from the day the student registers
until...”, the “from” part of the usage cutoff range must be set to
Null. The system will
then allow any completion rate to satisfy the “from” part of the range, as long as the
completion rate is less than or equal to the specified “to” value.
Processing Examples
Here are some examples that show how to set up registration status usage cutoff ranges.
Each code is valid if the learner's completion rate for the course falls within the usage
cutoff range specified for the course registration status code. If the usage cutoff “from” and
“to” values are both left
Null, the course registration status code is available for use at
any time.

1050
Banner Student User Guide | Registration
Calculating the Learner’s Completion Rate
In order to calculate the learner's completion rate, you need to determine how many days
of class have been completed. This is done by subtracting the learner's start date from the
registration status date.
• If the learner's start date has not yet been realized, it is not counted in the number of
days completed. (See Examples 1 and 2 below.)
• If the learner's start date has been realized, one day is added to the number of days
completed, making the completion rate inclusive of both the learner's start date and the
registration status date. (See Examples 3 and 4 below.).
Example 1:
The learner is registered for Course A and has elected to start the course on 15-NOV-
2006. On 01-NOV-2006, he decides to drop the course.
Number of days complete = (registration status date - learner start date)
Number of days complete = (01-NOV-2006 - 15-NOV-2006)
Number of days complete = -14
Example 2:
The learner is registered for Course A and has elected to start the course on 15-NOV-
2006. The day before his start date, he decides to drop the course.
Number of days complete = (registration status date - learner start date)
Number of days complete = (14-NOV-2006 - 15-NOV-2006)
Number of days complete = -1
Example 3:
The learner is registered for Course A and has elected to start the course on 15-NOV-
2006. On 18-NOV-2006, he decides to drop the course. (Because the start date has been
realized, it is included in the number of days completed.)
Number of days complete = (registration status date - learner start date) + 1
Number of days complete = (18-NOV-2006 - 15-NOV-2006) + 1
Number of days complete = (3) + 1
Number of days complete = 4
Example 4:
The learner is registered for Course A and has elected to start the course on 15-NOV-
2006. On the first day of class, he decides to drop the course. (Because the start date has
been realized, it is included in the number of days completed.)
Number of days complete = (registration status date - learner start date) + 1

1051
Banner Student User Guide | Registration
Number of days complete = (15-NOV-2006 - 15-NOV-2006) + 1
Number of days complete = (0) + 1
Number of days complete = 1
From the above examples, it is clear that number of days completed can never equal zero
(
0). Therefore, the student's percentage complete or duration complete will never equal
zero (
0). However, this does not restrict zero (0) from being used on SSARULE or
SOAORUL.
• Using zero (0) for the usage cutoff “from” value specifies “from the day the learner starts
class until...”, and can only be followed by a positive number for the usage cutoff “to”
value.
• Using zero (0) for the usage cutoff “to” value specifies “until the day before the learner
starts class” and can only be preceded by a
Null value or a negative number for the
usage cutoff “from” value.
Calculating the Usage Cutoff Percentage
Here are examples of course registration status code usage cutoffs for a 10-week course.
Example 1:
DD is available from the day the learner registers until the day before he starts class.
Example 2:
DD is available from the day the learner registers until one week before he starts
class.
DW is available only for the six days prior to the learner starting class.
DC is available from the day the learner starts class through the first week of class.
Status Code From To
DD Null 0
Status Code From To
DD Null -10
DW -9 0
DC 0 10

1052
Banner Student User Guide | Registration
Example 3:
DD is available from the day the learner registers until one week before he starts
class.
DW is available for the entire week before the learner starts class.
Calculating the Usage Cutoff Duration
Example 4:
DD is available from the day the learner registers until the day before he starts class.
Example 5:
DD is available from the day the learner registers until one week before he starts
class.
DW is available only for the six days prior to the learner starting class.
DC is available from the day the learner starts class through the first week of class.
Example 6:
Status Code From To
DD Null -10
DW -10 0
Status Code From To
DD Null 0
Status Code From To
DD Null -1
DW -99 0
DC 0 1
Status Code From To
DD Null -1
DW -1 0

1053
Banner Student User Guide | Registration
DD is available from the day the learner registers until one week before he starts
class.
DW is available for the entire week before the learner starts class.
Note: In Examples 3 and 6 above, both registration status codes (DD and
DW) are available on the same day, exactly one week before the learner
starts class. To avoid having multiple codes available on the same day,
usage cutoff values in the “from” and “to” fields cannot overlap. The only
exception to this is zero (
0), as explained above.
Report and Update Scripts
Optional scripts are provided to be run by institutions who have used usage cutoff values
of zero (
0) to indicate that a registration status code was to be available prior to the
learner starting class. As discussed above, if a status code is to be available “from the day
the learner registers until...”, the usage cutoff “from” field must be set to
Null.
• The report scripts identify records in SSRRSTS and SORRSTS that have zeroes (0) in
the usage cutoff “from” fields.
• The update scripts update these zeros (0) to Null values.
Enrollment Verification Processing
The Enrollment Verification Request Form (SFARQST) allows the user to request retrieval
of the most commonly requested data such as registration information, academic
standing, GPA, etc., for enrolled students. The student must have at least one general
student record created via the Admissions process. Curriculum summary information can
also be viewed. This form will not process verifications for students with verification holds
on their records unless password-authorized overrides are entered by the requester.
Select Term Summary (SHQTERM) from the Option List or perform a Duplicate Record
Table Script Result
SSRRSTS
srssrrsts1.sql
Reports all SSRRSTS rows where usage cutoff from
is
0 (either percentage or duration)
SORRSTS
srsorrsts.sql
Reports all SORRSTS rows where usage cutoff from
is
0
SSRRSTS
supsrrsts.sql
Updates all SSRRSTS rows identified by the report
script, changing usage cutoff from values from
0 to
Null (either percentage or duration)
SORRSTS
suporrsts.sql
Updates all SORRSTS rows identified by the report
script, changing usage cutoff from values from
0 to
Null

1054
Banner Student User Guide | Registration
function from the Term field in the Key Information to return the Term Summary Form
(SHQTERM). This query form displays the valid history terms associated with the student.
The Enrollment Verification Request Rules Form (SFAEPRT) allows the user to generate
the types of information to be printed on the Enrollment Verification Document. Print
options include self-service options, service types, and payment options. An unlimited
number of enrollment verification document types may be created and maintained by the
user. SFAEPRT has a Messages checkbox which controls the printing of messages on
enrollment verification documents.
The Enrollment Verification Message Form (SFAMESG) is used to enter specific
enrollment verification type codes, term codes, or student identification numbers and the
messages related to them.
The Enrollment Verification Report (SFRENRL) produces the enrollment verification
reports which were processed using the Enrollment Verification Request Form
(SFARQST) or selected using the population selection parameters. You can specify the
number of copies of the enrollment verification that are to be printed on SFARQST. Term,
registration date, or academic year information from SFARQST is used to determine the
term information that is included in the report. The report also processes information
based on terms that are part of student centric periods. Enrollment dates, attendance
information, enrollment history, and course summary information are printed as student
centric period data.
Specify the Enrollment Verification Distribution printer parameter on the Banner Student
System Distribution Initialization Form (SOADEST) in the Enrollments field when
requesting enrollment verification. This same printer parameter should be specified when
running the Enrollment Verification Report (SFRENRL), so that the output is routed to the
correct printer. The Student Distribution Initialization Form (SOADEST) will be returned
prior to the Enrollment Verification Request Form (SFARQST) being displayed, if it has not
been processed prior to SFARQST being accessed. Once SOADEST has been
processed by a user during a session, any printer changes or additions will need to be
made by accessing the form through a menu Go To... (Direct Access) field.
You can perform enrollment verification requests from the baseline or in self-service at any
time and for any term. You can also prevent requests from being printed by using a
specific cutoff term. If registration drops and/or adds are still in progress, those enrollment
verification requests will not be processed, thereby preventing the printing of verifications
for IDs whose statuses may be altered as a result of ongoing registration changes.
Selection of Concurrent Curricula Enrollment Verification Data
You can select the curriculum data to be printed on the Enrollment Verification Report
(SFRENRL) and the Self-Service View Term Data Page
(
BWSKRSTA.P_RegsStatusDisp, and BWSKGSTU.P_StuInfo). SFRENRL will
print all parts of the primary and secondary curriculum, and the self-service pages and the
Enrollment Verification Request Form (SFARQST) will display a summary of all current
and active curriculum and field of study records.
The maximum number of fields of study that can be printed on the enrollment verification
is based on the allowable current maximum established for the module and type. This
includes field of study types that are outside of the major, minor, or concentration.

1055
Banner Student User Guide | Registration
Concentrations for enrollment verification are printed as follows:
• Concentrations attached to the major are printed under the major with a label of “Maj/
Concentration”.
• Concentrations attached to the base curriculum are printed after the minors and have a
label of “Concentration”.
The following items from the base curriculum are included in the enrollment verification
output:
• program
• level
• degree
• campus
• college
The fields of study will always print in the priority order within the field of study grouping:
• majors/departments
• concentrations attached to majors will follow the major
• minors
• concentrations attached to the base curriculum
• other field of study types
Execution of Curriculum Conversions
Curriculum conversions can be executed from enrollment verification requests (SFARQST
and SFRENRL) and self-service view pages where curriculum data can be printed before
any processing occurs, so that all curriculum data appears on the hardcopy output or
online. All objects in which concurrent curriculum processing is implemented will attempt
to convert the learner and outcome curriculum data from the original host tables to the
concurrent curricula tables. The concurrent curricula conversion will automatically be
executed when SFRENRL begins to process enrollment verification for a student. If the
curriculum data has already been converted, the conversion process will end without
completing any activity.
Time Status and Enrollment Verification
Use the Time Status Rules Form (SFATMST) to print the enrollment summary information
on the enrollment verification document and list the student's actual time status based on
their course work for the term. This form allows the user to specify the rules associated
with the calculation of the time status information. These rules include effective term,
student level, campus, college, degree, major, and student type. A course level is also
used to determine which courses should be used in calculating the time status.

1056
Banner Student User Guide | Registration
Using these rules criteria, the user may specify the minimum and maximum credit hours
which the student must have for a term to obtain the time code specified in the rule.
The following are some examples of time status rules:
For effective term 199301, level 01 students (undergraduates), the minimum credits to
be classified as a full time student are 12.00, and the maximum credits are 17.99. (No
campus, college, degree, major, or student type are specified in the rule.) Only
undergraduate credits are to be included in the calculation. If an undergraduate
student has 9.00 credits of graduate work (level 02) and 6.00 credits of undergraduate
work, then they do not meet the rule specified, and another rule must be found. If no
rule can be found for the student, then the user-entered time status that exists on the
student's record will display on the report, and an asterisk "*" will display to indicate
that the time status does not reflect the student's actual course work.
The Enrollment Verification Report (SFRENRL) uses population selection parameters to
produce the enrollment verification requests which were processed on the Enrollment
Verification Request Form (SFARQST). Students must have had an enrollment verification
request processed on the Enrollment Verification Request Form (SFARQST), or they will
not be processed. There is a message area on the report where messages which are user
defined by person, term, and/or enrollment request type on the Enrollment Verification
Message Form (SFAMESG) will appear. The enrollment history portion of the report
includes the student's calculated full-time/part-time status information on a term-by-term
basis. Graduation term and year are also shown on the report.
The enrollment verification process first checks to determine if a manual override time
status history record exists for the appropriate term on SFAREGS. If it does exist, the
manual override time status will be reported. If no manual time status exists, then the
existing time status calculation within SFRENRL will be used to calculate and report the
student's time status, based on the value entered for the Time Status Calc Credit Type
parameter (either
E for Earned Hours or A for Attempted Hours as recorded in Academic
History).
SSN/SIN/TIN, ID, and Birth Date Format Masks
You have the option to select the birth date, SSN/SIN/TIN, Banner ID, or none of those to
be printed on the enrollment verification requests. Use the checkboxes in the Print Options
block on SFAEPRT to choose the data you wish to include. You can change how the SSN/
SIN/TIN or Banner ID appear on the enrollment verification. You can also change the birth
date format for the paper or self-service enrollment verification to any valid date format
using the pulldown list.
SSN/SIN/TIN and ID
The rules for adding in a character mask to the SSN/ID values are as follows:
• Use the character X to display data and the character * to conceal data.
• This can be used only for display-only columns.
• This cannot be used when there is data entry involved on the column.
The following describes valid format masks for character strings such as the SSN or ID
number:

1057
Banner Student User Guide | Registration
Two examples of format masks and the SSN would be:
• Value 123456789 and mask ******XXX will print as ******789.
• Value 123456789 and mask ***XXX*** will print as ***456***.
Dates/Birth Dates and Times
The following describes valid format masks for dates, such as the birth date, and times,
and can be used to change how the date appears on the enrollment verification:
Element Example Description
* **** Characters are displayed as asterisks.
X XXXXXX Characters are displayed as normal value.
Element Example Description
YYYY
YYY
YY
Y
2003
003
03
3
four-digit year
three-digit year
two-digit year
one-digit year
SYYYY -2003 S adds a prefix of a - to a BC date.
Y,YYY 2,003 Year with comma in this position
BC or AD 2003AD BC/AD indicator
B.C. or A.D. 2003A.D. BC/AD indicator with periods
RR Defaults to correct century. Calculates the century
from a date entered by comparing the two -digit
year entered with the year and century to which the
computer's internal clock is set. Years 00 - 49 will
be given the 21st century (the year 2000), and
years from 50 - 99 will be given the 20th century
(the year 1900).
MM January = 01 two-digit month
MONTH JANUARY Name of month, padded with blanks to a length of
nine characters
MON JAN Name of month, three letter abbreviation
DDD Day of year (1 - 366)
DD Day of month (1 - 31)
D Day of week (1 - 7; Sunday = 1)
DAY SUNDAY Name of day, padded with blanks to a length of
nine characters

1058
Banner Student User Guide | Registration
Two examples of format masks and for dates and times would be:
• Birth date value 01-JAN-1980 and mask 'DD-MON' will display as 01-JAN.
• Birth date value 01-JAN-1980 and mask 'Month DD' will display as January 01.
Self-Service Request and Payment Options
Records are inserted into Accounts Receivable when charge amounts exist that are
greater than $0.00. When an available payment option has been set up in STVWPYO that
requires a self-service credit card charge and/or payment, both the charge and the credit
will be inserted into the appropriate Accounts Receivable table when the self-service
request has been completed. That insert can occur whether the charge type is
M (record is
inserted into TBRMISD) or
S (record is inserted into TBRACCD).
• If the charge type is M, then the payment option must be a credit card type, because that
is the only way to ensure that payment has been collected. By definition, TBRMISD
requires a payment at the same time it posts a charge.
• If the charge type is S, and the payment option is not a credit card type, then any
charges set up for the services are not inserted into the student's account from self-
service. An example of this could be "Bill My Account."
DY SUN Name of day, three letter abbreviation
J Julian day, the number of days since January 1,
4712 BC
AM or PM Meridian indicator
A.M. or P.M. Meridian indicator with periods
HH or HH12 1100 Hour of the day (1 - 12)
HH24 2300 Hour of the day (0 - 23)
MI Minute (0 - 59)
SS Second (0 - 59)
SSSSS Seconds past midnight (0 - 86399)
/. Punctuation is produced in the result.
“...” Quoted string is produced in the result.
FM Fill mode: assumes implied characters such as O
or space, displays significant characters left
justified. Allows end user's input to be shorter than
the format mask. (Use in conjunction with FX to
require specific delimiters.)
FX All date literals must match the format mask
exactly, including delimiters.
Element Example Description
1059
Banner Student User Guide | Registration
• Charges of type S (that are not credit card charges) are inserted into TBRACCD when
you run SFRENRL for enrollment verification requests.
The following four conditions affect the information that is displayed on self-service
request pages, based on the settings in the Print Options window for SFAEPRT.
Enrollment Verifications Submissions in Banner Self-Service
A self-service Web page is available for enrollment verification submissions processing
that allows a student to request a copy of their enrollment verification for a term. This page
resides in the secure login off the Student Record menu so a learner can request an
enrollment verification report at any time. The page populates the same table that is
behind SFARQST.
The data the learner enters includes:
• term and/or academic year
• type of request
• number of copies
• issue to name and address or fax number (A pulldown list is used to select the learner's
address.)
• confirmation page for student to view their request
Conditions in Self-Service Print
Options Window
Data/Message Displayed to the Student
in Banner Self-Service Request Pages
1
• Service level type is
M
• Charge is greater than $0.00
• Payment options exist, both credit card
and non-credit card types
Display only those payment options where the
Credit Card Indicator is
Y in STVWPYO.
2
• Service level type is
M
• Charge is greater than $0.00
• Payment options exist, but none is a
credit card type
Display Info Text error message:
There is no credit card payment option
available, so we cannot complete your
request. Please contact the Bursar or
Registrar for assistance.
3
• Service level type is
S
• Charge is greater than $0.00
• Payment options exist that are credit
card and/or non-credit card types
Display all payment options.
4
• Service level type is
S or M
• Charge is greater than $0.00
• No payment options exist
Display Info Text error message:
There are no payment options available, so
we cannot complete your request. Please
contact the Bursar or Registrar for assistance.
1060
Banner Student User Guide | Registration
Controls in the Self-Service Print Options window on SFAEPRT are used to indicate the
types and special handling/payment options that are available for self-service requests.
Use the
MAXEVREQNO rule on the Crosswalk Validation Form (GTVSDAX) to limit the
number of self-service enrollment verification requests the student is allowed to make per
term. The default is
999 (essentially, unlimited). You must change this value if you want to
restrict the number of requests allowed per term.
Use the
WEBCCEPRTREQ process name on the Process Name Validation Form
(GTVPROC) for credit card processing for self-service enrollment verification requests. If
your institution charges for self-service enrollment verification requests and wants to allow
students to make credit card payments, you must create a corresponding record in
GORMERC (using the GOAMERC form).
Schedule/Invoice/Statement Options
On the Student Course Registration Form (SFAREGS) there are options to request an
individual student's bill and/or schedule. The bill refers to the printing of a student bill in
"INVOICING" mode via the Student Invoice/Billing Statement (TSRCBIL), and the
schedule refers to the printing of a Student Schedule Report (SFRSCHD).
The printing of either or both of these documents can occur in any of the following ways:
• Requested online and printed by the Sleep/Wake process.
• Requested online and printed when the batch process is run.
• Requested when the batch process is run using the parameters which include
population selection.
To request either or both documents to print online via TSRCBIL and SFRSCHD, the
Sleep/Wake process must have been defined. The request may be entered online and the
batch process(es) run without defining the Sleep/Wake process.
The first set of options which follows describes the choices regarding the printing of bills,
and the second set describes the choices for the printing of schedules. Any combination
External
Code Internal Code
Internal
Code
Sequence
Number
Internal Code
Group Description
Activity
Date
999 MAXEVREQNO STUWEB Max Enrl Ver
Requests per
Ter m
Sysdate
Process Name Code Description System Required
WEBCCEPRTREQ Web Credit Card Enrollment
Verification Charge Process
Y

1061
Banner Student User Guide | Registration
may be used to print one or both documents. For example, the Student Schedule Report
(SFRSCHD) can be defined to the Sleep/Wake process and requested online and printed,
while the Student Invoice/Billing Statement (TSRCBIL) can be requested online without
the Sleep/Wake process defined and then be printed later through the batch process.
Printing of Bills
The Print Bill box on the Student Course Registration Form (SFAREGS) automatically
defaults to checked when the Registration Fee Assessment On-line box is checked on
the Term Control Form (SOATERM) and defaults to unchecked when the Registration
Fee Assessment On-line box is unchecked on SOATERM. Whichever value defaults, the
opposite value may be entered and saved.
Option 1:
If a Save function is performed when this field is checked, a record is written to the
Invoice/Statement Collector Table (TBRCBRQ). If the Sleep/Wake process is set up to
process these requests, the student invoice is printed, and the system automatically clears
out the Invoice/Statement Collector Table (TBRCBRQ).
The report process that needs to be set up with the Sleep/Wake process is the Student
Invoice/Billing Statement (TSRCBIL). This report should have the Run Mode parameter
set to
INVOICING.
Reference Name Description
Collector Tables Used SFRCBRQ
TBRCBRQ
Registration Student Schedule Collector
Table
Invoice/Statement Collector Table
Form Used SFAREGS Student Course Registration Form
Reports Used SFRSCHD
TSRCBIL
Student Schedule Report
Student Invoice/Billing Statement
Process Used Sleep/Wake N/A
Form/Process Field/Parameter Value
SFAREGS Print Bill box Checked
Sleep/Wake Set up and executed Yes for TSRCBIL
TSRCBIL ID
Printer
Run Mode
COLLECTOR
% or value from SOADEST
INVOICING

1062
Banner Student User Guide | Registration
Option 2:
If a Save function is performed when this field is checked, a record is written to the
Invoice/Statement Collector Table (TBRCBRQ). If the Sleep/Wake process is not set up to
process these requests, the student invoice can be printed when the Student Invoice/
Billing Statement (TSRCBIL) is run from the host or through job submission. This report
should have the Run Mode parameter set to
INVOICING. When the process is run, the
system automatically clears out the Invoice/Statement Collector Table (TBRCBRQ).
Option 3:
If the operator unchecks this field, or the Registration Fee Assessment On-line box is
unchecked on the Term Control Form (SOATERM), nothing happens when a Save
function is performed. No record is written to the Invoice/Statement Collector Table
(TBRCBRQ).
The student invoice or bill statement can be printed when the Student Invoice/Billing
Statement (TSRCBIL) is run from the host or through job submission.
Note: TSRCBIL can also be run in “STATEMENT” mode. When the Run
Mode parameter is set to
STATEMENT, the TSRCBIL process generates
a
.lis file of statements for students who owe a balance to the school.
Users can parse the output and store the individual statements, or use
third-party software to perform the parse, enhance and brand the
statement, convert each file into PDF format, and store the PDF file.
Form/Process Field/Parameter Value
SFAREGS Print Bill box Checked
Sleep/Wake Set up and executed No for TSRCBIL
TSRCBIL ID
Printer
Run Mode
COLLECTOR
% or value from SOADEST
INVOICING
Form/Process Field/Parameter Value
SFAREGS Print Bill box Unchecked
Sleep/Wake Set up and executed Yes or No for TSRCBIL
TSRCBIL ID
Printer
Run Mode
N/A*
N/A
INVOICING or STATEMENT
* COLLECTOR would not be
used for this scenario)

1063
Banner Student User Guide | Registration
These files can be displayed in Banner or Self-Service. For more
information, please refer to the Banner Accounts Receivable User Guide.
Printing of Student Schedule
The Print Schedule box on the Student Course Registration Form (SFAREGS)
automatically defaults to checked It may be manually unchecked.
Option 1:
If a Save function is performed when this field is checked, a record is written to the
Registration Student Schedule Collector Table (SFRCBRQ). If the Sleep/Wake process is
set up to process these requests, the student schedule is printed, and the system
automatically clears out the Registration Student Schedule Collector Table (SFRCBRQ).
The Student Schedule Report (SFRSCHD) needs to be set up with the Sleep/Wake
process.
Option 2:
If a Save function is performed when this field is checked, a record is written to the
Registration Student Schedule Collector Table (SFRCBRQ). If the Sleep/Wake process is
not set up to process these requests, the Student Schedule Report (SFRSCHD) can be
run from the host or through job submission. This report can have the Printer parameter
designated for the collector printer set in the Sleep/Wake process. When the process is
run, the system automatically clears out the Registration Student Schedule Collector Table
(SFRCBRQ).
Form/Process Field/Parameter Value
SFAREGS Print Schedule box Checked (default)
Sleep/Wake Set up and executed Yes for SFRSCHD
SFRSCHD ID
Printer
COLLECTOR
% or value from SOADEST
Form/Process Field/Parameter Value
SFAREGS Print Schedule box Checked (default)
Sleep/Wake Set up and executed No for SFRSCHD
SFRSCHD ID
Printer
COLLECTOR
% or value from SOADEST
1064
Banner Student User Guide | Registration
Option 3:
The Print Schedule field on the Student Course Registration Form (SFAREGS) is
manually unchecked. If a Save function is performed when this field is unchecked, nothing
happens. No record is written to the Registration Student Schedule Collector Table
(SFRCBRQ).
The Student Schedule Report (SFRSCHD) can be printed when the Student Schedule
Report (SFRSCHD) is run from the host or through job submission.
Note: Requests to print bills or schedules always add records to the
collector tables. These tables should be monitored, and SQL scripts can
be used to delete records that are no longer needed.
Produce Student's Schedule
A student's schedule of classes listing meeting times, places, instructors, and campuses
may be produced immediately from the Student Course Registration Form (SFAREGS). It
may also be produced through a batch process, SFRSCHD, for all students.
Unsatisfied Links
The Unsatisfied Links Report (SFRLINK) lists students and CRNs for which they have
registered, which have unsatisfied links for the term. The only parameter for this report is a
single term. The report will produce unsatisfied link results regardless of whether link
section security is a fatal registration error on the Term Control Form (SOATERM).
When No Check is selected for the Links radio group in the Registration Error Checking
window of the Term Control Form (SOATERM), the Unsatisfied Links Report (SRFLINK)
can be run after registration is completed to produce a list of students who have
unsatisfied or missing section links for the term. The report is a post-registration batch
alternative to an online fatal check for unsatisfied or missing links during registration
processing.
Form/Process Field/Parameter Value
SFAREGS Print Bill box Unchecked
Sleep/Wake Set up and executed Yes or No for SFRSCHD
SFRSCHD ID
Printer
N/A *
N/A
* COLLECTOR would not be
used for this scenario)

1065
Banner Student User Guide | Registration
Produce Student's Bill
Student bills listing all their charges for the term, any past due amount, any future charges,
and any current payment may be produced immediately from the Student Course
Registration Form (SFAREGS) if fees are assessed. It may also be produced for all
students through a batch process (TSRCBIL).
View Student's Registration
The Registration Query Form (SFAREGQ) is used to view a student's registration. It lists
all the classes for which a student is registered, the meeting times, the building and room
of each class, and the course campus code. If the student is not registered for the term,
the user will not be able to leave the Key Information of SFAREGQ.
Produce Course Request Edit
The Course Request Edit Report (SFPCREQ) lists all course request transactions that
contain an error along with an appropriate error message. This process updates the valid
transactions so they can be used in course request. Please see the Course Request and
Scheduling Handbook for more information on using this report.
Produce Course Request Update
The Course Request Update (SFPFREQ) is used to list all course request transactions
that contain errors (i.e., ID not on database, invalid CRN, etc.) along with an appropriate
error message. This process updates the database to ready the transactions for
processing. Time status history records may also be inserted, if requested.
The billing hours associated with a course when Course Request and Scheduling is run
will default when the Course Request Update (SFPFREQ) is run. These hours will be
defaulted from the section information or from overrides entered on the student's Course
Request Form (SFACREQ).
Please see the “Time Status Calculations” section of the “National Student Clearinghouse
(NSC) Reporting Procedures” later in this chapter for more information on using this
report.
Produce Class Roster
The Class Roster Report (SFRSLST) produces an alphabetical list of all students within a
section and may be requested for all sections or one particular section.

1066
Banner Student User Guide | Registration
Produce Headcount
The Unduplicated Headcount Report (SFRHCNT) is used to produce an actual headcount
for a term.
View Class Roster/Enter Grades
The Class Roster Form (SFASLST) displays the section information and the students
enrolled for a particular section. It may be used during registration to monitor a section.
This form is also used to enter both mid-term and final grades. The section override
values, specified on the Schedule Override Form (SSAOVRR), are used when rolling the
courses to academic history. The Class Attendance Roster Form (SFAALST), the Class
Roster Form (SFASLST), and the Grade Roll to Academic History (SHRROLL) support
this functionality.
The SFAALST and SFASLST forms have an optional Degree Award Status in their Key
Information sections. The system will look at the Outcome Status for the student's degree
status on the Degrees and Other Formal Awards Form (SHADEGR). The Awarded
Indicator is validated on the Degree Status Code Validation Form (STVDEGS).
Setting the Awarded Indicator to
P (Pending) in the Key Information will display only
those students in the class with an Awarded Indicator of "Pending". Setting the Awarded
Indicator to
A (Awarded) in the Key Information will display only those students in the
class with an Awarded Indicator of "Awarded". If this indicator is
Null, all students are
returned.
By using these fields, the user may query and grade only those students which are
selected. This will allow instructors to grade only those students in the class who are
eligible to graduate.
Last Date of Attendance
This section discusses the required entry of the last date of attendance in for specified
grade codes. You can specify which grades and student levels require the entry of the last
date of attendance. Users will be prohibited from entering a grade for a student without
also entering the student’s last date of attendance.
You can set up rules on SHAGRDE for specific grades where the entry of the last date of
attendance is required for students who are receiving those grades using the Last
Attendance Date Ind(icator). When the specified final grades are entered in the Class
Attendance Roster Form (SFAALST), the Class Roster Form (SFASLST), or in Faculty
and Advisor Self-Service (Final Grades page), those rules will require instructors to use
the appropriate form and enter the last date of attendance for students.
• When an administrator enters a grade in SFASLST that requires a last date of
attendance based on the rule on SHAGRDE, an error message is displayed that the
student’s last date of attendance must be entered for the grade, and that the grade and
date must be entered using SFAALST.

1067
Banner Student User Guide | Registration
• When an administrator enters a grade in SFAALST that requires a last date of
attendance based on the rule on SHAGRDE, and does not enter the student’s last date
of attendance, a message is displayed that a last date of attendance must be entered for
the grade.
The last date of attendance can also be viewed or entered for a CRN in the Course Detail
window of SFAWDRL for use with the withdrawal information for the student ID in the Key
Block.
Handle Student's Registered, Not Paid
The Registered, Not Paid Process (SFRRNOP) is executed in batch to produce a report of
all students who have registered but who have not had their charges accepted in the
Accounts Receivable module. This process also has an option to delete the registration of
the students selected. This process also maintains census two enrollment based on the
user-supplied parameter date.
The Registered, Not Paid Process (SFRRNOP) supports Third Party Processing. The T/P
Exempt Indicator parameter is used to indicate whether or not a student may be exempt
from deletion when a potential third party payment exists. If the parameter is set to
Y, and
third party contract memos exist for the student, the student would be bypassed in the
registration deletion process.
Process Canceled Classes
The Registration Mass Entry Form (SFAMREG) can be used to delete registration records
for students registered in a canceled section.
Faculty Feedback
Faculty feedback processing is used to help faculty members identify and monitor
students in their classes who may be at risk academically. Faculty members can use Web
pages to:
• define issues and recommendations
• select issues and make recommendations to address the issues
• enter free form comments regarding the issues
• enter estimated grades
Information is collected during a specific period of time or session. The feedback can then
be used to help with problems and initiate proactive action to assist students in academic
recovery. First time, full-time freshman who are first generation college students or
minority students are examples of students that can be monitored.
Any faculty member who is defined as an instructor can enter feedback in Faculty and
Advisor Self-Service. When an instructor is assigned to a course, the instructor can view

1068
Banner Student User Guide | Registration
the information. When multiple instructors are assigned to a course, they can all view the
information. Instructors can update and change existing comments entered by other
instructors.
Note: Estimated grades used for faculty feedback do not relate to actual
grades received by the students. Estimated grades are used only for
monitoring the progress of the students.
Faculty feedback functionality works with Banner Relationship Management (BRM) early
alerts processing. The feedback data is extracted from Self-Service and used as source
data in BRM. Then early alerts processing uses defined rules and student events that
occur to intervene on behalf of the students. Early alerts can be triggered by a pattern,
such as a GPA that falls over multiple semesters, students who miss class repeatedly, or
students who do not complete assignments. The students are flagged for an alert based
on the pattern and are monitored for intervention. Once a student has been selected for
monitoring, the faculty member can enter recommendations, such as seeking a tutor,
meeting with an advisor, or taking a seminar in an appropriate topic like time management.
Use the following Web pages for faculty feedback processing.
• Faculty Feedback Sessions (bwlkfdbk.P_FacultyFeedback)
Used to view a list of the faculty members’ courses for the term(s) that are available for
feedback and the time period in which feedback is to be provided. The page also shows
the number of registered students, the number of monitored students, and the number
of monitored students that require feedback in a specific period.
• Faculty Feedback Roster (bwlkfdbk.P_FacultyFeedback)
Displays data from the Student Course Registration Repeating Table (SFRSTCR) and
the Additional Registration Information Table (SFRAREG) for course information and
created students. Data is displayed in sets of records by feedback status. The faculty
member can select issues that apply, add the estimated grade, provide comments, and
offer recommendations.
• Feedback Session Control (bwlkfdad.p_session_control)
Used to define and maintain feedback session information, including session start and
end dates, for session periods.
• Faculty Feedback - Add Session (bwlkfdad.p_session_control_post)
Used to add feedback session records for use on the Feedback Session Control page.
• Faculty Issues (bwlkfdad.p_define_issues)
Used to define and maintain issue codes and descriptions for validation on the Faculty
Feedback Roster page.
• Faculty Issues - Add Issue (bwlkfdad.p_define_issues)
Used to add a new issue code and description for validation on the Faculty Feedback
Roster page.

1069
Banner Student User Guide | Registration
• Faculty Recommendations (bwlkfdad.p_define_recommendations)
Used to define and maintain recommendation codes and descriptions for validation on
the Faculty Feedback Roster page.
• Faculty Recommendations - Add Recommendation
(
bwlkfdad.p_define_recommendations)
Used to add a new recommendation code and description for validation on the Faculty
Feedback Roster page.
Please see the “Faculty Feedback” chapter in the Banner Faculty and Advisor Self-
Service User Guide for more information on using these Web pages.
This chapter also includes instructors for how to:
• set up a faculty member
• set up a faculty feedback administrator
• set up faculty feedback control sessions
• set up faculty issues
• set up faculty recommendations
• leave feedback for a student
Faculty Feedback Processes
You can monitor students for feedback and purge the records. Use the following
processes to do this.
Feedback Monitor Students Process (SFRFFMN)
This process uses a population selection to find students registered for a course in a
specific term that are required to be monitored by faculty members. Students are
designated as monitored, and a feedback record for each monitored student is loaded to
the Faculty Feedback Student Estimated Grade Table (SFRFFST). Students not
designated as monitored are optional and are not considered by the process.
When a faculty member views the Faculty Feedback Roster
(
bwlkfdbk.P_FacultyFeedback) in Banner Faculty and Advisor Self-Service, the
students that require feedback are displayed, and the student marked as
Monitored
have the status of
Monitored. When a issue or recommendation has been entered for a
monitored student, the
Monitored status changes to Complete. Students with an
Optional status remain as optional.
If desired, the process can be executed multiple times for the same session with different
populations. Subsequent executions add new students not marked as
Monitored.
This process calls the
sb_feedback_session API and the
sb_estimated_grades API.

1070
Banner Student User Guide | Registration
Faculty Feedback Purge Process (SFRFFPG)
This process is used to purge records for a term and session description for the start and
end dates of the session control record. The feedback session end date must be in the
past. Data purged includes: feedback session definition, estimated grades and comments,
and issues and recommendations. The feedback session definition can be deleted from
the user interface as long as no feedback exists. When feedback exists, the SFRFFPG
process must be used to delete it.
Faculty Feedback View (SFVFDBK)
This Banner view is used to select faculty feedback information. It joins the faculty
feedback tables to simplify reporting on faculty feedback activity. The following columns
are in this view:
SFVFDBK_SESSION_TERM
SFVFDBK_TERM_DESCRIPTION
SFVFDBK_SESSION_DESC
SFVFDBK_STUDENT_ID
SFVFDBK_STUDENT_FIRST_NAME
SFVFDBK_STUDENT_LAST_NAME
SFVFDBK_CRN
SFVFDBK_FACULTY_ID
SFVFDBK_FACULTY_FIRST_NAME
SFVFDBK_FACULTY_LAST_NAME
SFVFDBK_STATUS_CDE
SFVFDBK_COMMENT_DATE
SFVFDBK_FEEDBACK_DATE
SFVFDBK_FEEDBACK_CODE
SFVFDBK_FEEDBACK_DESC
SFVFDBK_FEEDBACK_TYPE
SFVFDBK_ESTIMATED_GRADE
SFVFDBK_FEEDBACK_COMMENTS
SFVFDBK_STUDENT_PIDM
SFVFDBK_FACULTY_PIDM
SFVFDBK_SESSION_ID
SFVFDBK_GRADE_ID
Faculty Feedback APIs
The following APIs are used with faculty feedback processing. These APIs use the
BWLKFDAD and BWLKFDBK Self-Service packages.
• sb_feedback_codes
• sb_feedback_session
• sb_faculty_feedback
• sb_estimated_grades

1071
Banner Student User Guide | Registration
Faculty Feedback Tables
The following tables are used with faculty feedback processing.
These tables follow a different pattern for Banner tables. Every table, including validation
tables, has a
SURROGATE_ID column, which is a single unique identifier for each record.
Other columns in the tables can be comprised of a single or alone unique key, but the
SURROGATE_ID column is the only column used in referential integrity constraints. The
SURROGATE_ID column is maintained by the corresponding API and is generated from
an Oracle sequence generator.
Faculty Issues and Recommendations Validation Table (STVFFVA)
This table is used to store and maintain faculty issue and recommendation feedback
codes used in Banner Faculty and Advisor Self-Service. There is no corresponding
validation form in Banner Student baseline.
Faculty Feedback Session Control Table (SRBFFSC)
This table contains the data that defines faculty feedback sessions and controls various
aspects of a session.
Faculty Feedback Student Estimated Grade and Comments Table
(SFRFFST)
This table contains a list of students monitored for faculty feedback with the associated
estimated grades and comments, as well as records for students for whom feedback has
been manually entered. Students that are not monitored have an optional status (O).
There are two types of records in this table, records for monitored students and optional
records that contain information on students that do not require monitoring.
Records for monitored students only exist for students that were targeted by the Feedback
Monitor Students Process (SFRFFMN). Students that are to be monitored have a status of
Monitored displayed on the Faculty Feedback Roster page. The number of monitored
students in a class is dependent on how the institution defined the student population and
for what courses those students are registered. There is no requirement that monitored
students be defined or a limit as to how many students can be monitored. Once the
monitored students have feedback entered for them, the status is changed to
Complete
or is changed back to
Monitored if all feedback is deleted.
Optional records contain information about students that are not required to be monitored.
These records do not exist at first. The records are created by the faculty member as they
enter their data. These students have the status of
Optional displayed in Faculty
Feedback Roster page even if there is no corresponding record in the table. The record is
created in the database when a grade, comment, issue, or recommendation is added, and
the user saves the information.
The parent of the Faculty Feedback Student Estimated Grade and Comments Table
(SFRFFST) is the Session Control Table (SFBFFSC), which is identified by the
SFRFFST_SFBFFSC_ID column. The Faculty Feedback Table (SFRFFBK) is the child
table of the Session Control Table (SFBFFSC).

1072
Banner Student User Guide | Registration
Faculty Feedback About Students Table (SFRFFBK)
This table contains issues and recommendations for a student in a course, which are
provided by assigned faculty for the course. The records in this table are dependent on the
estimated grades record (SFRFFST).
Waitlisting
Prior to adding a student to a waitlist, the waitlist seating information must be specified on
the Schedule Form (SSASECT). The waitlist maximum number of seats must be entered
or a waitlist cannot be created.
A student can be placed on the waitlist by using a waitlist registration status code which is
created on the Course Registration Status Code Validation Form (STVRSTS).
Note: Caution should be used when setting the Count in Enrollment and
Count in Assessment flags for the Waitlist status. If checked, they will
update the section enrollment counts as well as the waitlist counts and
assess the student for any waitlisted sections. It is recommended that
these values are set to unchecked.
You must specify, on the Course Registration Status Control Form (SFARSTS), the period
in which the waitlist status code may be used.
Students are placed on the waitlist via the Student Course Registration Form (SFAREGS)
by entering the waitlist course status specified on STVRSTS in the Status Type field for
the course for which the student is being waitlisted. Students can be placed on the waitlist
prior to or after the section capacity is filled. However, if a student is to be waitlisted for a
course prior to it being filled, it may be necessary to first register the student (
RE), and
then change the course status to waitlist after saving the changes on the Student Course
Registration Form (SFAREGS). Once the number of students enrolled plus the number on
the waitlist exceeds the capacity, error messages will inform the user that a waitlist exists.
Consider the following waitlisting example steps:
1. Section 10010, Senior Thesis in Economics, has a section maximum of 7 and a
waitlist maximum of 3. There are six students registered. John has asked for special
permission to take the section. The professor will only let John into the section if no
other eligible student wants the seat. So John is placed on the waitlist. The section
now shows 6 actually enrolled and 1 on the waitlist.
2. When the next student enrolls for the section, the message OPEN - n WAITLISTED
(where n equals the number of students waitlisted) will be displayed to indicate that a
waitlist exists and to show the number of students on the waitlist. The section is now
filled, and there are two available seats on the waitlist. An override must be used to
place the student into the "closed" section. The section is closed, because the number
of students already enrolled plus the number on the waitlist is greater than the
capacity.
3. The next student to register for the section will get the message CLOSED - n
WAITLIST (where n equals the number of students waitlisted). This indicates that the
number of available seats is zero and that one person already exists on the waitlist.
The entry operator can choose to override the section capacity by entering a
Y in the

1073
Banner Student User Guide | Registration
Override field. Or, the Course Registration Status can be changed to a waitlist status.
Using the waitlist status will increase the waitlist enrollment to two.
4. If a student enrolled in the section drops, then the user can go to the Class Roster
Form (SFASLST) to see who is on the waitlist and determine which student is to be
registered. Then, using the Student Course Registration Form (SFAREGS), the
student's course status can be changed from waitlist to registered. However, a new
student attempting to register may do so.
Note: No automatic movement of students from the waitlist to a registered
status occurs in the Student Course Registration Form (SFAREGS) when
seats become available.
5. Once the maximum number of seats and the waitlist maximum have been reached,
any student attempting to register will be prohibited from registering or being placed
on the waitlist.
So, using the same course outlined above, if the number of students registered is 7
and the number of students on the waitlist is 3, the next student attempting to register
will receive the following message: Closed—Waitlist Full.
6. If a seat becomes available in a section which has a waitlist, then the OPEN -
WAITLIST message will be displayed when a student tries to register for the section.
This indicates to the operator that a waitlisted student may be eligible for the seat
before the student trying to register.
The waitlist enrollment can also be overridden if the user enters a waitlist status code
in the Status Type field and a
Y in the Override field.
7. To process a Remove function on a waitlisted course on the Student Course
Registration Form (SFAREGS), the system requires that a Drop/Delete (DD) function
from the Course Registration Status Code Validation Form (STVRSTS) be performed
on a waitlisted course, which will remove the student from the waitlist enrollment
count. A Remove function may be performed after the Drop/Delete function.
Waitlisted courses are checked for time conflicts with registered courses using the Include
Waitlisted Courses in Student Options Error Checking section on SOAWLTC. When the
Time radio group is set to
No, you need to specify when a course can be waitlisted if a
registered course already exists in that time slot.
• If this radio group is set to No, a course can be waitlisted, even if a registered class
already exists for that time slot.
• If this radio group is set to Yes, a course may not be waitlisted if a registered class
already exists for that time slot.
The Registration Course Query Form (SFQSECT) and the Registration Section Query
Form (SFQSECM) allow the user to query all sections which have students on the waitlist
where seats are currently available.
• Access SFQSECM from SFAREGS using a List function from the CRN, Subject,
Course, or Section fields.
• Access SFQSECT from SFAREGS using one of the following methods.
• Use the Search feature and select View Section Information, or use a Help function
from the CRN field, after a CRN has been entered.

1074
Banner Student User Guide | Registration
• Use the Search feature, or use a List function from the Credit Hours field, after a
CRN has been entered.
• Use the Search feature, or use a List function from the Bill Hrs field, after a CRN
has been entered.
The Registered, Not Paid Process (SFRRNOP) removes all students on the waitlist and
modifies the waitlist counters.
The Waitlist Enrollment Purge (SFPWAIT) removes all waitlist enrollment information for
those students who could not be placed in a specific class section.
Reserved Seating & Waitlist Processing
Waitlisting can also be used with reserved seating. Waitlist maximums can be established
on the Enrollment Data window on SSASECT. If waitlist maximums are established for
reserved seats during registration, then the error messages will indicate that reserved
seating is being used for the section.
For example, the message RESERVE CLOSED - WL FILLED indicates that the reserved
seating is filled, and the reserved seating waitlist is filled for the section. An override of the
registration status will over-enroll the reserved seating and leave the waitlist alone.
Entering a waitlist status and a
Y in the Override field of SFAREGS will over-enroll the
waitlist.
The reserved seating check for a student's major examines only the Major 1 (highest
priority major) of the student's primary curriculum (highest priority curriculum). The
reserved seating check for a student's level examines only the level of the student's
primary curriculum (highest priority curriculum).
Automated Waitlisting
Waitlisting assists in maximizing enrollment numbers in individual course sections. It
allows institutions to track excess demand for seats in courses where enrollment limits
have been met and then create priority queues to assign seats as they become available
due to drops and withdrawals. Students use waitlists to get in line for courses they need to
fulfill their requirements. Automated waitlist processing assists in managing the movement
of students from waitlists to active registration statuses through rule and control forms and
job submission processes. This processing is also used in self-service registration.
Processing
Waitlist and registration functionality are used to help students move from waitlisted status
to registered status, to help institutions configure rules to control waitlist priorities, and to
support self-service waitlist functions. Waitlist notification is term-based and can be turned
on and off by term as needed on the Automated Waitlist Term Control Form (SOAWLTC).
This form provides verification checking and severity warnings for waitlist processing,
similar to the registration error checking on SOATERM. Additionally, SOAWLTC includes
rules to prioritize student waitlists beyond the first-come, first-served ordering that is
needed for certain situations. Waitlist processing can also be controlled for an individual
1075
Banner Student User Guide | Registration
CRN using the Waitlist Automation Section Control Form (SSAWLSC). Additional waitlist
review forms and processes allow you to review waitlisted students, manually adjust a
student's waitlist priority, and resort the priority order.
Note: Automated waitlist processing is not used with open learning
courses.
When a seat becomes available for registration, an email notification is sent to designated
individuals. These can include the student, primary instructor, primary advisor, and
registrar. The notification email content is configured on SOAELTR for the letter code
defined on GTVLETR and uses the module code of
F (Registration) from STVELMT.
Notification emails are sent when available seats exist. The time period in which the
student must register before the next student is notified is defined on SOAWLTC. This
automatic notification is performed either online as seats become available or through the
Batch Waitlist Notification Process (SFRBWLP).
When the time period has expired and the student has not registered for the course, the
student is removed from the waitlist. Before the student is removed, the student's
registration status is checked to see if it has changed from “waitlisted” to “registered”. If it
has not, the SFRBWLP batch process will update the student's registration status to
DD
(dropped/deleted), remove the registration record, and then notify the next student on the
waitlist. If no more waitlisted students exist, the notification processing stops. The dropped
student is not notified of the status change.
Note: The SFRBWLP batch process must be used to update the expired
waitlist notices, even if the On-line Waitlist Notification checkbox is
checked on SOAWLTC. SFRBWLP should be set up and run in sleep/
wake mode.
Seats become available for notification when the following occurs:
• Another registered student is dropped, and the resulting number of remaining available
seats recorded on SSASECT minus the number of unexpired notifications is greater
than zero.
• The maximum enrollment is increased on SSASECT, and the resulting number of
remaining available seats recorded minus the number of unexpired notifications is
greater than zero.
• The SFRBWLP process finds a notification that has expired, the entry is removed from
the student's list of registered courses, and the resulting number of remaining available
seats on SSASECT minus the number of unexpired notifications is greater than zero.
When automated waitlist processing is no longer valid for a term, the Waitlist Enrollment
Purge Process (SFPWAIT) is used to clear the waitlists and purge term, CRN, and PIDM
information for available seats (SFRCOLW table) and waitlist notification (SFRWLNT
table).
The Available Seats to Zero Process (SSRASTZ) can also be used to change the
remaining available seats for all CRNs to zero.

1076
Banner Student User Guide | Registration
Configure Waitlist Processing
You can define how automated waitlist processing will work at your institution. Use the
Automated Waitlist Term Control Form (SOAWLTC) to configure general waitlisting by
term for general controls, error checking, course selection, priority reordering rules, and
exclusion reordering rules.
SOAWLTC allows you to:
• activate the automatic waitlist notification process as needed
• specify whether waitlist notification is performed online or in batch
• specify the time period in which students must register before the notification expires
• specify whether students are allowed to see their positions in the waitlist queue in self-
service
• define who will be notified regarding available seats (student, instructor, advisor,
registrar)
• define the host email address for automatic notification
• define letter codes for the various recipients of the notification emails
• define waitlist priority rules and waitlist reordering
• specify section options error checking levels for waitlisting
• specify whether waitlisted coursework should be included when performing student
options error checking
• define priority rules which give student populations preferential treatment when
waitlisted
• specify course characteristics (college, subject, course number, CRN, section attributes)
which must be met before priority rules are applied
• specify student populations that are not allowed to use the waitlist function
• define waitlist priority rules and waitlist reordering
• copy waitlist configuration controls for an existing term to a new term
Waitlist registration error checking is set up by term for student and section options.
Student Options can be set to
Yes or No. Student Options that are set to Yes indicate
that waitlisted courses should be included in error checking along with enrolled courses.
Section Options can be set to
Fatal, Warning, or No Check. When a new record is
created, the severity settings for the Section Options are determined by the severity
settings on SOATERM for the term. The settings for the Student Options are defaulted in.
If no waitlist control records have been defined for the term on SOAWLTC, the error
checking process will use the settings on SOATERM.
Note: Corequisites, prerequisites, and links for waitlisted coursework can
be met by enrolled coursework, but waitlisted coursework cannot meet
enrolled coursework requirements.

1077
Banner Student User Guide | Registration
If a CRN has special requirements for automated waitlist processing, the waitlist setup
defined at the institutional level can be changed at the CRN level for that course. Use the
Waitlist Automation Section Control Form (SSAWLSC) to configure waitlisting by CRN and
term.
SSAWLSC allows you to:
• activate registration error checking as defined on SOAWLTC
• activate the automatic student waitlist notification process as needed
• specify whether students are allowed to see their positions in the waitlist queue in self-
service
• specify the deadline time period for students to move from waitlisted status to registered
status when seats become available
• copy the waitlist control settings to a new term
Records must exist on SOAWLTC in order for section term controls to be defined on
SSAWLSC. If no records exist in the SSBWLSC table, values from the SOBWLTC table
will be defaulted in.
When the Automatic Waitlist Notification checkbox is unchecked, automated waitlist
notification processing will not be used for the CRN. When the Use Waitlist Registration
Error Checking checkbox is unchecked, waitlist registration checking from SOAWLTC
will not be used, and no checking will take place for the CRN.
Note: CRNs that are defined as open learning courses cannot be used
with SSAWLSC.
Letters formats can be configured for specific information types depending on the
recipients. You can:
• configure letter codes on GTVLETR
• associate the letter module code of F (Registration) on STVELMT to the letter codes
from GTVLETR
• build letters on SOAELTR using the information available from the
AS_STUDENT_REGISTRATION_DETAIL Object:Access view
Note: If automated waitlist processing is not defined for a term, previous
waitlist rules will be used, and the system will assume that waitlist
notification is turned off (inactivated).
Processing Order
Banner Student automated waitlisting controls the queue of students (with waitlist
registration statuses) that are registered for the CRN and allows a waitlisted student to
enroll in the course as soon as a seat becomes available. When a student attempts to
register as waitlisted for a CRN, automated waitlist processing performs as follows:

1078
Banner Student User Guide | Registration
1. The process considers the setting of the Automatic Waitlist Notification checkbox
on SOAWLTC and SSAWLSC to see if automated waitlisting is active. When the
Automatic Waitlist Notification indicator is checked (set to
Y) on SSAWLSC, this
takes precedence over the setting of the indicator on SOAWLTC.
When no record exists on SOAWLTC, automatic waitlist processing is not performed.
Error checking performed for courses with waitlisted students is controlled by the
settings on SOATERM, including time conflict checking.
When a record exists on SSAWLSC or SOAWLTC and the Automatic Waitlist
Notification checkbox is unchecked (set to
N), automatic waitlist processing is not
performed. Error checking performed for courses with waitlisted students is controlled
by the settings on SOAWLTC.
Assuming that the Automatic Waitlist Notification indicator is checked (set to
Y), the
processing continues as follows:
2. When waitlist exclusion rules have been defined on SOAWLTC, the student’s
characteristics are compared to the characteristics defined in the rules. If all of the
student’s characteristics match all the characteristics defined for any of the rules, then
the student is not allowed to waitlist the course.
3. The Student Options and Section Options error checking is performed based on the
settings defined on the Waitlist Error Checking window of SOAWLTC. If an entry exists
on SSAWLSC for the CRN and the Use Waitlist Registration Error Checking
checkbox is unchecked (set to
N), no error checking is performed.
4. When no fatal errors are found, an evaluation is performed to match the
characteristics of the waitlisted CRN against the characteristics of the entries in the
Waitlist Course Selection window on SOAWLTC.
When a match is found or when no entries exist, the student's characteristics are
compared to the characteristics defined in the Waitlist Priority Rules window on
SOAWLTC. The student's waitlist priority is assigned based on the results of this
evaluation.
When no match is found, the student is assigned a priority on a first-come, first-served
basis.
5. When seat becomes available, two options exist for notification:
When the On-line Waitlist Notification checkbox on SOAWLTC is checked, a
notification email is sent to the designated individuals.
When the On-line Waitlist Notification checkbox is not checked, the notification is
sent the next time the SFRBWLP process is run.
Note: At the time the notification is sent, the expiration date and time are
calculated based on the value of the Waitlist Notification Deadline field.
6. Prior to the expiration date and time, the student is eligible to enroll in the CRN for
which the notification was sent. The Student Options and Section Options registration
error checking (as defined on SOAWLTC) are enforced at the time that the student
tries to register.
If the student does not use the available seat, and the notification deadline expires,
that student is removed from the waitlist queue by the SFRBWLP process, and the
next student in the waitlist is notified to use the available seat.

1079
Banner Student User Guide | Registration
Unless there are more seats available than there are students on the waitlist, no
students, other than those who have been notified, are allowed to enroll in the course.
Other students are only allowed to register as waitlisted if remaining waitlist seats
exist.
Note: When the Show Waitlist Position on Student Self-Service
indicator is checked on SSAWLSC or SOAWLTC, the Automatic Waitlist
Notification indicator must also be checked for the waitlist information to
be displayed in Self-Service.
When the Show Waitlist Position on Student Self-Service indicator is
not checked, traditional waitlist processing is used, and the waitlist
position is not displayed in Self-Service.
Waitlist Registration Verification Checking
Normal registration eligibility checking occurs before a student can be added to a waitlist.
When a fatal error is received, the student cannot register as “waitlisted” for the course. If
SOAWLTC is not used for a term rule, registration error checking is controlled by the
settings on SOATERM. Optional controls can be used as well.
SOAWLTC is used for waitlist registration verification checking and error severity
warnings. Section options for severity checking on waitlisted courses include: approvals,
capacity, field of study, department, college, level, class, campus, degree, program,
student attributes, and cohort. Student options for verification on waitlisted courses
include: time conflicts, prerequisites, corequisites, duplicates, and links. The student
options functionality on SOAWLTC differs from that on SOATERM. For the student
options, SOATERM controls the severity level of the error, and SOAWLTC controls
whether or not to include waitlisted CRNs in error checking.
• When the Duplicates radio group is set to Fatal on SOATERM, a student can be
enrolled in a course and also be waitlisted for a more desirable section of the same
course. In addition, a student can be waitlisted for multiple sections of the same course.
• When the Duplicates radio group is set to No Check on SOATERM, waitlisted
courses are not included in the duplicate error checking, and the student can waitlist
multiple sections of the same course. In addition, the student can also be enrolled in a
section of the same course but cannot be enrolled in two sections of the same course.
• When the Duplicates radio group is set to Yes (in the Include Waitlisted Courses in
Student Options Error Checking section) on SOAWLTC, a student can only be waitlisted
for one section of a course.
Note: A duplicate course is one that has the same subject, course
number, and schedule type.

1080
Banner Student User Guide | Registration
Here is a summary of the settings used with duplicate registration verification
checking.
Waitlisted courses are included with registered courses in time conflict error checking
based on the setting of the Time radio group (in the Include Waitlisted Courses in Student
Options Error Checking section) on SOAWLTC. Assuming that the Time radio group on
SOATERM is set to
Fatal, the following occurs.
• If this radio group is set to No, a course can be waitlisted, even if a registered class
already exists for that time slot.
• If this radio group is set to Yes, a course may not be waitlisted if a registered class
already exists for that time slot.
Note: Time Conflict checking is controlled at the term level. If rules are
not set up on SOAWLTC, error checking for time conflicts is based on the
setting on SOATERM.
The Links, Corequisites, and Prerequisites radio groups (in the Include Waitlisted
Courses in Student Options Error Checking section) on SOAWLTC perform error checking
as follows.
• When these options are set to No, verification is not performed.
• When these options are set to Yes, verification that all related coursework requirements
are met is performed according to the setting on SOATERM. Requirements that apply to
waitlisted coursework can be met by either another waitlisted course or a by a registered
course. Requirements that apply to registered coursework must be met by other
registered coursework.
The
Fatal, Warning, and No Check settings for the Section Options radio groups
perform independently of the respective settings on SOATERM. Courses will allow
waitlisting if it is appropriate, based on the SOAWLTC settings and the relevant data that is
validated for the settings.
The Use Waitlist Registration Error Checking checkbox on SSAWLSC is used to turn
the Student Options and Section Options error checking criteria on and off for individual
CRNs.
SOATERM -
Duplicates
SOAWLTC -
Duplicates Results
No Check No Student is able to register for the course and
waitlist the course, with multiples of both.
No Check Yes Student is able to register for the course and
waitlist the course, with multiples of both.
Fatal No Student is allowed one registration record and
multiple waitlisted courses.
Fatal Yes Student can only register for the course or
waitlist the course, but not both.
1081
Banner Student User Guide | Registration
• When the field is checked, error checking is performed for the CRN based on the
settings on SOAWLTC.
• When the field is unchecked, error checking is not performed.
Note: For Banner Student Self-Service registration, when the SOATERM
setting for an option is
Fatal, setting the respective section option to a
lessor error checking level on SOAWLTC does not apply.
For example, if the Department option on SOATERM is
Fatal and the
same option on SOAWLTC is
No Check, the error checking will only
apply to registration records processed on SFAREGS. Since the default
processing in self-service is to check the registration status before
checking the waitlist status, the fatal registration error from SOATERM will
be displayed and will prevent waitlisting.
Registration Verification Checking
When a student is registered as waitlisted, a position on the waitlist is assigned using the
waitlist priority rules in first-come, first-served order unless priorities are customized using
priority rules or manual adjustments. If the waitlisted student receives an available seat
notification, that student can register for the course until the notification deadline has
expired. In order to register for the course, the registration status (STVRSTS) must be
changed from “waitlisted” to “registered”. This can be processed on SFAREGS or in
Banner Student Self-Service. If the waitlisted student tries to register for the course during
the notification deadline, and a registration error occurs (such as time conflict,
prerequisite, corequisite, and so on, as defined on SOATERM), the student's priority on
the waitlist is maintained until the defined deadline. This gives students the opportunity to
rearrange their schedules or resolve erroneous errors in order to enroll for the waitlisted
course.
Note: If a waitlisted student who has not been notified tries to register for
the course, an error is displayed, and registration is not allowed. This will
also be true for any student who is not yet registered and is not already on
the waitlist.
Manage Waitlist Priorities
You can configure waitlist priorities and exclusions based on rules by term using
SOAWLTC. If no rules have been defined, the default priority for the waitlist queue is first-
come, first-served. The timestamp of the registration status code on the SFRSTCR table
determines the order of the queue.
Waitlist priority rules apply to all sections that meet the institution section selection criteria.
These selection criteria include: college, subject, course number, CRN, and section
attributes. If no section selection criteria have been defined in the Waitlist Course
Selection window on SOAWLTC, the waitlist priority rules apply to all sections.
You can define waitlist priority rules in the Waitlist Priority Rules window on SOAWLTC to
alter how priorities are controlled and define groups of students that comply with selection

1082
Banner Student User Guide | Registration
criteria. Rule priorities control which group of students takes precedence, and students
within a group are ordered on a first-come, first-served basis. The selection criteria for
waitlist priority rules within groups include: class, campus, level, college, program, field of
study, department, primary/secondary curriculum, student attributes, student GPA range
(minimum/maximum), academic standing, and cohort.
You can also exclude groups of students from waitlist processing in the Waitlist Exclusion
Rules window on SOAWLTC. The selection criteria for waitlist exclusion rules within
groups include: class, campus, level, college, program, field of study, department, primary/
secondary curriculum, student attributes, student GPA range (minimum/maximum),
academic standing, and cohort.
Reorder Waitlist Priorities
When a student is registered as waitlisted, the registration process assigns a waitlist
priority to the student for the CRN. Waitlists can be reordered based on priority.
Processing events can necessitate a change to the order of an existing waitlist, such as
the need to reposition an individual on a waitlist, adjust the priority rules as defined on
SOAWLTC, or add/remove CRNs from a cross-listed group. Waitlist priority can be
recalculated as described below using forms and a batch process.
Three forms allow you to manually manage the waitlist priority of the students for a CRN or
apply the waitlist priority rules to automatically reorder the list.
• The Waitlist Priority Management Form (SFAWLPR) is used to view and manage the
priorities of waitlisted students by term and CRN who have not yet been notified of
available seats in individual courses.
• The Cross List Waitlist Priority Management Form (SFAXWLP) is used to process CRNs
that are part of a cross-listed group.
• The Reserved Seats Waitlist Priority Management Form (SFARWLP) is used to process
CRNs with reserved seats.
The Waitlist Priority Reorder Process (SFPWLRO) is used to reorder waitlists in batch for
all sections that meet institutionally configured selection criteria and specified rules that
have been defined on SOAWLTC. You can use the Automatic Reorder item in the Options
Menu from SFAWLPR, SFARWLP, and SFAXWLP to launch SFPWLRO for the CRN.
Manual changes must be recorded so that SFPWLRO does not reassign a new priority.
The SFPWLRO process applies the priority rules, reorders the waitlist for the term and
CRN or for the term and cross-listed group, and assigns a new waitlist priority number to
each student registered on the waitlist. Waitlists are sorted by waitlist priority order and the
timestamp for the course registration status code (STVRSTS). By default, manually
modified waitlist priorities are left unprocessed. But optionally, when run in batch, this
process can override the manual assignments.
Reordering is only applied to sections that fit the selection criteria and is done on a first-
come, first-served basis within each rule. Waitlists for cross-listed courses are
consolidated and reordered as a single waitlist for the group. Waitlists for courses with
reserved seats and overflow allowances are consolidated and reordered as a single
waitlist. Waitlists for courses with reserved seats but without overflow allowances are
treated as a single waitlist

1083
Banner Student User Guide | Registration
Banner Student Self-Service and Banner Faculty and Advisor Self-Service display the
student’s current position on the waitlist for all waitlisted sections. You can choose which
waitlists are displayed in self-service.
Review Student Waitlist Status and Priority
Students can view their current waitlist positions and notification deadlines on the Student
Detail Schedule page in self-service when the settings on SOAWLTC or SSAWLCS allow
this for specific CRNs. The waitlist position and notification deadline information is printed
on the Class Roster Report (SFRSLST) and is listed for the instructor in self-service.
Instructors can also view the student’s waitlist position on the Summary Waitlist page and
the Detail Waitlist page in self-service. SFAWLPR, SFARWLP and SFAXWLP are used to
view student waitlist rosters for those students who have not been notified.
The Class Roster Report (SFRSLST) displays waitlist priority position and expiration date
information for students who are waitlisted, based on the course registration status code
(STVRSTS). Waitlisted students are displayed separately for each CRN. The expiration
date will only be displayed if the student has been notified that a seat is available, and the
student has not registered for the course. The printed order of the waitlist is determined by
the student's position, which is based on the waitlist priority. A position of zero (0) appears
for waitlisted students who have been notified of an available seat.
The Waitlist Notification Query Form (SFIWLNT) is used to query waitlisted students by
term and CRN to check on notification of an available seat, assignment of registration
deadline, registration date and time, waitlist status, and waitlist priority.
Reserved Seats Overflow
The (Reserved Seats) Overflow checkbox in the Reserved Seats window on SSASECT
is used for each reserved seats rule, to allow a specific rule to overflow reserved seating to
unreserved, available seats. This indicator allows students who meet the reserved rule to
successfully register when the reserved rule is full, and available seats exist in the non-
reserved rule. The (Reserved Seats) Overflow checkbox is not used to waitlist students
in the non-reserved rule. Its sole purpose is to find an available seat for immediate
registration.
If the student's reserved rule is full, whether or not it has available seats on the waitlist, if
the (Reserved Seats) Overflow checkbox is checked (set to
Y), the non-reserved rule will
be checked for seat availability. The non-reserved rule will only be used for overflow
seating if available seats exist, and there are no students on the non-reserved rule waitlist.
Otherwise, registration processing will use the reserved rule and issue capacity
messages, as usual.
Capacity Verification
When the number of available seats does not exceed the number of students on the
waitlist for the course, no other students can enroll in the course. When a seat becomes
available and a waitlisted student is notified, this position is reserved for the notified
student, and no other students can register for this seat. When a waitlisted student has
received notification, the seat remains reserved for the student until the expiration date
1084
Banner Student User Guide | Registration
and time have passed. Prior to the deadline being reached, the student can change the
registration status from “waitlisted” to “enrolled” or from “waitlisted” to “dropped” to
“enrolled”.
For cross-listed CRNs, capacity verification for enrollment considers the actual enrollment
for all the CRNs and the waitlists for the CRNs. The waitlists are consolidated into a single
queue. In order for a student to enroll in a cross-listed CRN, there must be at least one
available seat for the CRN and the cross-listed group.
• When no available seats exist in the cross-listed group, the student is not allowed to
enroll in a cross-listed CRN, even though the CRN may still have available seats. If the
CRN allows waitlisting, the student may register for the waitlist.
• When there are available seats in the cross-listed group, but no available seats exist for
the cross-listed CRN, the student is not allowed to enroll in the CRN. If the CRN allows
waitlisting, the student may register for the waitlist.
• Enrollment in cross-listed CRNs with available seats can take place, even though other
CRNs in the cross-listed group are closed and have waitlists.
For reserved seats, capacity verification for enrollment considers the waitlist capacity for
each reserved seat rule. If at least one student is registered as waitlisted for the course for
a specific reserved seat rule, no other students can enroll in the course using the same
rule. The exception to this is where at least one student is registered as waitlisted for an
unreserved seats rule or any other rule where the Overflow (Indicator) is checked on the
SFARWLP form. In this case, no student is allowed to enroll for the course using the
unreserved seats rule. Only waitlisted registration is allowed.
A student who is waitlisted and has been notified of an available seat can enroll in the
course before the notification deadline expires. This applies to a student with a dropped
status or one who has been dropped due to an error such as a time conflict or a
prerequisite and who wishes to resolve the situation.
The following error messages are displayed when a student attempts to register for a
course that has waitlisted students.
Error Description Result
CLOSED - ### WAITLISTED No regular seats available,
### student waitlisted
Student registers as waitlisted
OPEN - ### WAITLISTED Regular seats available, but
### students waitlisted
Student registers as waitlisted
CLOSED - WAITLIST FULL No seats available neither
regular nor in waitlist
Not allowed to register
OPEN - WAITLIST FULL Regular seats available but
no seats on waitlist
Not allowed to register
OPEN - RESERVED FOR
WAITLIST
Regular seats available but
notified students exist
Not allowed to register

1085
Banner Student User Guide | Registration
Notify Students of Available Seats
A seat can become available for a waitlisted student when: a student drops the course, the
maximum seat capacity for a CRN is modified on SSASECT, or the maximum seat
capacity is modified for a cross-listed CRN on SSAXLST. When any of these events
occurs, the automated waitlist process is triggered. The process identifies whether the
notification should be performed online or through the batch process. When the batch
process is used, a record is inserted into a collector table for later processing. When
online notification is used, the waitlist notification process is triggered. This process
notifies the next student in the waitlist queue that a seat is available and assigns the
student a deadline by which registration must occur. This notification takes place using
email. If the student does not enroll in the course by the time the waitlist notification
expires, the next student in the queue is notified.
The SFRBWLP batch process is used to notify waitlisted students of new, available seats
in CRNs by term. The process also removes students from the waitlist when notifications
have expired (SFRWLNT), processes all CRNs in the SFRCOLW collector table with a
pending status, and calls the waitlist notification procedure. The waitlist enrollment count
will then be updated for the CRN. When SFRBWLP removes registration entries which
have expired, no notification email is sent, but a registration audit record is generated with
the message Waitlist Notification Expired On (date).
A notification is considered to be expired when a seat becomes available for a CRN, the
list of notified students is examined, and any notifications which have reached the
deadline are marked as expired. Then the next student notification is sent. SFRBWLP is
used to identify notifications which have expired but have not yet been evaluated, because
no new seats have become available for that CRN. SFRBWLP can be run in sleep/wake
mode or run on a regular basis to assist in promptly identifying expired notifications.
Note: Even though some students may remain on the waitlist, a
notification does not remain active after it has expired. The student must
re-enter the waitlist and receive a new notification.
When the waitlist record is removed by the Waitlist Enrollment Purge Process (SFPWAIT)
or using mass drop functionality from the Registration Mass Entry Form (SFAMREG), no
automatic notification will be sent to the student regarding the removal from the waitlist.
To use email notification to contact waitlisted students about available seats, the
appropriate email letter needs to be defined on SOAELTR. The letter module code of
F
(Registration) must be defined on STVELMT as a system-required value. This code is
associated with the
AS_STUDENT_REGISTRATION_DETAIL Object:Access view,
which contains the necessary data related to waitlist notification. The letter module code
can then be associated with the appropriate letter code rules on SOAELTL.
Modify Available Seats
The Available Seats to Zero Process (SSRASTZ) sets the available seats for a CRN to
zero as of a specific date, to force all additional registration records to be processed
through the waitlist. This process can be run in Audit or Update Mode for a term or part-of-
term and can specify CRNs by campus, subject, and course number. Audit Mode can be
used to check which course would be affected without actually changing the available seat
count. When run in Update Mode, the maximum enrollment for a section (SSBSECT) will

1086
Banner Student User Guide | Registration
be changed to the same value as the number of students that are registered in the section.
If reserved seats exist (SSRRESV), that capacity is also reduced for each rule.
Courses with Reserved Seats
Reserved seats waitlists are viewed and managed on the Reserved Seats Waitlist Priority
Management Form (SFARWLP) for students that have not yet been notified of available
seats for CRNs with reserved seats. Waitlisted students are displayed based on the
reserved seats rules.
Waitlists for courses with reserved seats are treated as independent waitlists based on the
reserved seat rules that have been set up. If a student drops a course, which creates an
available seat for the reserved rule that corresponds to this student, and this rule allows
for waitlisting, then the next student is selected from the list of waitlisted students on that
specific rule. An exception exists in the case of a Null rule. If a seat becomes available for
the Null rule, all waitlisted students with rules where the Overflow (Indicator) is checked
on SFARWLP are treated as a single waitlist, along with students that are specifically
waitlisted for the default rule. This allows all eligible students to be considered, and the
student with higher priority is notified of the available seat.
Priorities can be manually changed, or you can use the Automatic Reorder item in the
Options Menu to launch the Waitlist Priority Reorder Process (SFPWLRO) for the CRN.
Cross-listed Courses
The Cross List Waitlist Priority Management Form (SFAXWLP) is used to review and
manage priorities of waitlisted students who have not yet been notified of available seats
in cross-listed courses. Waitlists for cross-listed courses are treated as a single waitlist.
When a seat becomes available for a cross-listed course, the processing looks for the
next waitlisted student, considering all waitlisted students for the cross-listed CRNs. A
seat becomes available when a student drops a cross-listed CRN or when the maximum
enrollment of the cross-listed courses has been modified using SSAXLST.
In order to determine which student is next on the waitlist, all waitlists (from all cross-listed
CRNs with waitlisted students where remaining seats are greater than zero) must be
checked. The student with the highest priority is chosen first. If a waitlist exists for the
CRN, but remaining seats are available, it is likely that the maximum enrollment for the
cross-listed courses was reached before the maximum enrollment for the CRN was
reached. In this case, the next student in the waitlist might not necessarily be the first in
line. A student waitlisted for another CRN in the cross-listed group could have a higher
priority.
Use the Automatic Reorder item in the Options Menu to launch the Waitlist Priority
Reorder Process (SFPWLRO) for the cross-listed group of CRNs.

1087
Banner Student User Guide | Registration
Drop Processing
Two GTVSDAX rules are used with automated waitlist processing.
• The ADMINDROP rule uses verification checking for connected courses that are
waitlisted.
• The AUTODROP rule considers a waitlist status to be an active registration status for
verification checking.
Waitlist Students in Self-Service
Waitlist queue positions for students are displayed in Banner Student Self-Service and
Banner Faculty and Advisor Self-Service. Students can check their positions on the waitlist
on the Student Detail Schedule page. Faculty can also view see the position of the
students on the waitlist. Waitlist notification expiration dates can be viewed in self-service.
The following Web pages in Banner Student Self-Service are used with automated
waitlisting:
• Student Detail Schedule page
• Registration History page
The following Web pages in Faculty and Advisor Self-Service are used with automated
waitlisting:
• View Student Schedule page
• Detail Wait List page
• Summary Wait List page
• Add or Drop Classes page
Waitlist Examples
These examples assume that the Automatic Waitlist Notification and the On-line
Waitlist Notification checkboxes are both checked (set to
Y).
Example for Standard Course
For the following course:
CRN Subject Course Sequence Title
10010 BIO 101 01 Biology I

1088
Banner Student User Guide | Registration
Capacity Verification and Waitlist Notification
When a student tries to enroll for this course, the following message is displayed:
CLOSED - 004 WAITLISTED. The student can select a waitlist registration status. If no
verification error occurs, the student is waitlisted, the waitlist count is updated to 5, and the
number of remaining waitlist positions becomes 0.
The next student who attempts to enroll in this course receives the following message:
CLOSED - WAITLIST FULL, and that student is not allowed to register for the course.
If two students drop the course, the enrollment count is updated, showing 2 new available
seats and 5 waitlisted students.
As each of the two students drops the course, the waitlist automation process is triggered.
For each student who drops the course, this process identifies that a seat has become
available and notifies the next student in the waitlist queue that an available seat exists.
The waitlist queue is ordered by a waitlist priority. This waitlist priority reflects the position
of the student in the waitlist. By default, students are ordered in a first-come first-served
basis, unless other waitlist priority rules have been defined.
When a new student or a waitlisted student who has not yet been notified attempts to
enroll in this course, the following message is displayed, OPEN - WAITLIST FULL, and
that student is not allowed to enroll because waitlisted students exist.
Enrollment Waitlist
Maximum Actual Remaining Maximum Actual Remaining
20200 541
Enrollment Waitlist
Maximum Actual Remaining Maximum Actual Remaining
20200 550
Enrollment Waitlist
Maximum Actual Remaining Maximum Actual Remaining
20182 540

1089
Banner Student User Guide | Registration
Waitlist Queue for CRN 1001, Term 200810
In this case, email notifications of available seats are sent out to the first two students in
the waitlist queue. This waitlist notification includes a deadline (expiration date and time).
The students are allowed to register as enrolled for the course until the notification
expires.
Examples for Cross-Listed Courses
For the courses in the following cross-list group 01:
Cross-list Enrollment:
CRN ID
Registration
Status
Registration
Timestamp
Waitlist
Priority
10010 210009300 WL Sept. 30, 2007 09:10 1
10010 210009401 WL Sept. 30, 2007 09:27 2
10010 210009430 WL Sept. 30, 2007 11:32 3
10010 210009301 WL Sept. 30, 2007 11:32 4
10010 210009000 WL Oct. 2, 2007 20:10 5
CRN Subject Course Sequence Title
10011 BIO 101 01 Biology I
10012 BIO 001 01 Nature I
10013 SCI 010 01 Intro to Natural Sciences
10014 MED 001 01 Intro to Medicine
Maximum Actual Remaining
37 37 0
Enrollment Waitlist
CRN Maximum Actual Remaining Maximum Actual Remaining
10011 10 10 0 4 4 0
10012 10 10 0 4 2 2
10013 10 8 2 4 3 1
10014 10 9 1 0 0 0

1090
Banner Student User Guide | Registration
All of the available seats in the cross-listed group are taken. No seats are available, and
students are already waitlisted for the first three CRNs.
Example 1 - Capacity Verification
When the Capacity error checking is set to Fatal on SOAWLTC, and a student attempts to
enroll in a CRN in the cross-listed group, the following error messages will be displayed,
depending on the chosen CRN.
The student can choose a waitlisted registration status for CRNs 10012 and 10013. The
last two CRNs (10013 and 10014) have remaining seats. However, the cross-listed group
is full; therefore, no student is allowed to enroll for those courses.
Example 2 - Capacity Verification and Waitlist Notification
Using the same cross-list group as in Example 1, one student drops CRN 10012, and one
student drops CRN 10014.
Cross-list Enrollment:
Two seats are now available at the cross-listed level. One seat is available for CRN
10012. Another seat is now available for CRN 10014.
Enrollment Waitlist Error Message
CRN Max Actual Remaining Max Actual Remaining
10011 10 10 0 4 4 0 CLOSED - WAITLIST FULL
10012 10 10 0 4 2 2 CLOSED - 002 WAITLISTED
10013 10 8 2 4 3 1 CLOSED - 003 WAITLISTED
10014 10 9 1 0 0 0 CLOSED
Maximum Actual Remaining
37 35 2
Enrollment Waitlist
CRN Maximum Actual Remaining Maximum Actual Remaining
10011 10 10 0 4 4 0
10012 10 9 1 4 2 2
10013 10 8 2 4 3 1
10014 10 8 2 0 0 0

1091
Banner Student User Guide | Registration
Capacity Verification
When a student attempts to enroll in a CRN in the cross-listed group, the following error
messages will be displayed, depending on the chosen CRN.
Even when available seats exist at the cross-listed level, no student is allowed to enroll for
any course, because of the cross-listed capacity verification condition. (When one CRN in
a cross-listed group has waitlisted students and available seats, no other student may
enroll for the course.)
Waitlist Notification
When the On-line Waitlist Notification checkbox is checked (set to Y), as each of the
two students drops the course, the waitlist automation process is triggered. This process
identifies that an available seat exists and notifies each of the two students in the waitlist
queue. In this case, the waitlist queue includes all waitlisted students for any courses in
the cross-list group that are eligible for waitlist notification. Available seats must exist for
the cross-listed courses, as well as the CRN, in order for notification to take place.
Using the same scenario, the waitlist notification process identifies CRNs with eligible
waitlisted students.
Cross-list Enrollment:
Enrollment Waitlist Error Message
CRN Max Actual Remaining Max Actual Remaining
10011 10 10 0 4 4 0 CLOSED - WAITLIST FULL
10012 10 9 1 4 2 2 OPEN - 002 WAITLISTED
10013 10 8 2 4 3 1 OPEN - 003 WAITLISTED
10014 10 8 2 0 0 0 CLOSED
Maximum Actual Remaining
37 35 2
Enrollment Waitlist Eligibility
CRN Max Actual Remaining Max Actual Remaining
10011 10 10 0 4 4 0 Not eligible, no
seats available
for enrollment
10012 10 9 1 4 2 2 Eligible
10013 10 8 2 4 3 1 Eligible

1092
Banner Student User Guide | Registration
Only students waitlisted for CRNs 10012 and 10013 are eligible, because there are
waitlisted students and remaining enrollment seats for the CRN. Students waitlisted for
CRN 1011 are not eligible, because even if available seats exist at the cross-listed level,
no available seats exist at the CRN level.
The waitlist queue includes waitlisted students for these two CRNs and is ordered by
waitlist priority rules. (The waitlist priority determines the position of the student in the
waitlist.) By default, students are ordered in a first-come, first-served basis, unless other
waitlist priority rules have been defined or the priority has been manually adjusted.
Waitlist Queue for Cross-List Group 01, Term 200810
In this case, the first two eligible students in the waitlist queue are notified of the available
seats. This notification includes a deadline with an expiration date and time. The students
can register for the CRN as enrolled in the course until the notification expires.
• The student with ID #210009300 can enroll in CRN 1012.
• The student with ID #210009401 can enroll in CRN 1013
• All other students in the waitlist queue remain waitlisted.
• A new student who attempts to enroll in a course in the cross-listed group is not allowed
to do so. However, that student can register as waitlisted if remaining seats exist for the
waitlist for that CRN. Similarly, a student on the waitlist who has not been notified will not
be allowed to enroll in the course.
10014 10 8 2 0 0 0 N/A
CRN ID
Registration
Status
Registration
Timestamp
Waitlist
Priority Eligibility
1012 210009300 WL Sept. 30, 2007 09:10 1 Eligible
1011 210012304 WL Sept. 30, 2007 09:12 2 Not eligible
1013 210009401 WL Sept. 30, 2007 09:27 3 Eligible
1011 210010034 WL Sept. 30, 2007 09:34 4 Not eligible
1012 210009430 WL Sept. 30, 2007 11:32 5 Eligible
1011 200000213 WL Sept. 30, 2007 12:15 6 Not eligible
1011 230459731 WL Oct. 1, 2007 09:10 7 Not eligible
1013 210009301 WL Oct. 1, 2007 09:15 8 Eligible
1013 210009000 WL Oct. 2, 2007 20:10 9 Eligible
Enrollment Waitlist Eligibility
CRN Max Actual Remaining Max Actual Remaining

1093
Banner Student User Guide | Registration
Examples for Reserved Seats
For the following course with reserved seats, CRN 1010:
• Rules have been numbered for this example.
• Rules do not show all possible elements, just level, program, major, and class.
• Rule 0 is the system-generated rule for unreserved seats.
• Rule 0 is used when a student can enroll in a course where remaining unreserved seats
exist, if the rule that matches the student is full, but the Overflow (Indicator) is checked
(set to
Y).
Rule 1 has four waitlisted students (A, B, C, and D). Students 1 through 6 are also
considered. When three students attempt to enroll in the course, rules 2, 3, and 4 are
matches.
Student 1 matches rule 2.
Rule 2 is full and has no remaining seats. Because the Overflow (Indicator) is
checked (set to
Y), the student is allowed to enroll using an available seat from the
unreserved seats rule (rule 0).
Student 2 matches rule 3.
Rule 3 is full and has no remaining seats. Because the Overflow (Indicator) is
checked (set to
Y), the student is allowed to enroll using an available seat from the
unreserved seats rule (rule 0).
Student 3 matches rule 4.
Rule 4 is full and has no remaining seats. The Overflow (Indicator) is unchecked (set
to
N). The student receives the CLOSED - 000 WAITLISTED message and is only
allowed to register as waitlisted, using reserved seats rule 4.
After these changes have taken place, the reserved seats scenario looks like this:
Rule
No Reserved Seats Rule Enrolled Waitlisted
Ovr
Ind
Lvl Prgm Major Class Max Act Rem Max Act Rem
0## ########### 743505
1 BIO 10100541
2 FR550000Yes
3UG 550505Yes
4GR ANTH 220505
5GR ARCHSP550505
CRN Total 34 31 3 25 4 21
1094
Banner Student User Guide | Registration
Three additional students (4, 5, and 6) that match rule 3 attempt to enroll in the course.
Student 4 and rule 3.
Rule 3 is full and has no remaining seats. Because the Overflow (Indicator) is
checked (set to
Y), the student is allowed to enroll using the last available seat from
the unreserved seats rule (rule 0).
Students 5 and 6 and rule 3.
Rule 3 is full and has no remaining seats. The Overflow (Indicator) is checked (set to
Y) for rule 3. This allows the student to enroll using rule 0. However, rule 0 is full, as
the last remaining seat was used by student 4, and no more available seats can be
used.
Students 5 and 6 receive the CLOSED - 000 WAITLISTED message and are allowed
to register as waitlisted on rule 3.
After these changes have taken place, the reserved seats scenario looks like this:
Rule
No Reserved Seats Rule Enrolled Waitlisted
Ovr
Ind
Lvl Prgm Major Class Max Act Rem Max Act Rem
0## ########### 761505
1 BIO 10100541
2 FR550000Yes
3UG 550505Yes
4GR ANTH 220514
5GR ARCHSP550505
CRN Total 34 33 1 25 5 20
Rule
No Reserved Seats Rule Enrolled Waitlisted
Ovr
Ind
Lvl Prgm Major Class Max Act Rem Max Act Rem
0## ########### 770505
1 BIO 10100541
2 FR550000Yes
3UG 550523Yes
4GR ANTH 220514
5GR ARCHSP550505

1095
Banner Student User Guide | Registration
Two additional students (7 and 8), that match the unreserved seats rule (rule 0), attempt to
register for the course. The rule is full, so they are registered as waitlisted using rule 0. But
this rule is also full, so they are registered as waitlisted on rule 0.
A student who matches rule 2 attempts to enroll and is not allowed because the rule is full.
Even thought the Overflow (Indicator) is checked and waitlist positions are available for
rule 0, this student is not allowed to waitlist the CRN. The Overflow (Indicator) is strictly
for enrollment use and does not apply to students attempting to use a waitlist.
After these changes have taken place, the reserved seats scenario looks like this:
Waitlist Notification
Three students drop the course in the above scenario.
• One student was enrolled using rule 2.
• One student was enrolled using rule 3.
• One student was enrolled using the unreserved seat rule (rule 0).
CRN Total 34 34 0 25 7 18
Rule
No Reserved Seats Rule Enrolled Waitlisted
Ovr
Ind
Lvl Prgm Major Class Max Act Rem Max Act Rem
0## ########### 770523
1 BIO 10100541
2 FR550000Yes
3UG 550523Yes
4GR ANTH 220514
5GR ARCHSP550505
CRN Total 34 34 0 25 9 16
Rule
No Reserved Seats Rule Enrolled Waitlisted
Ovr
Ind
Lvl Prgm Major Class Max Act Rem Max Act Rem

1096
Banner Student User Guide | Registration
The waitlist notification process works as follows:
• A new seat is available for reserved rule 2. There are no waitlisted students for that rule,
and no action is required.
• A new seat is available for reserved rule 3. There are two waitlisted students using this
rule.
• The next waitlisted student, who is using rule 3, would be notified that a seat is
available.
• Only students waitlisted for rule 3 are eligible.
• The first eligible waitlisted student for rule 3 is student 5.
Waitlist Queue for CRN 1010, Term 200810, use reserved seats
Rule
No Reserved Seats Rule Enrolled Waitlisted
Ovr
Ind
Lvl Prgm Major Class Max Act Rem Max Act Rem
0## ########### 761523
1 BIO 10100541
2 FR541000Yes
3UG 541523Yes
4GR ANTH 220514
5GR ARCHSP550505
CRN Total 34 31 3 25 9 16
Reserved Seats Rule Enrolled
CRN ID Rule Lvl Prgm Majr Cl
Ovr
Ind
Reg
Stat
Registration
Timestamp
Waitlist
Priority Eligibility
1010 Student A 1 BIO WL Oct. 1, 2007 09:10 1 Not eligible
1010 Student B 1 BIO WL Oct. 1, 2007 09:20 2 Not eligible
1010 Student C 1 BIO WL Oct. 1, 2007 10:30 3 Not eligible
1010 Student D 1 BIO WL Oct. 1, 2007 11:15 4 Not eligible
1010 Student 3 4 GR ANTH WL Oct. 2, 2007 09:00 5 Not eligible
1010 Student 5 3 UG Yes WL Oct. 3, 2007 08:00 6 Eligible
1010 Student 6 3 UG Yes WL Oct. 3, 2007 08:10 7 Eligible
1010 Student 7 0 ## #### ##### ## WL Oct. 4, 2007 10:00 8 Not eligible

1097
Banner Student User Guide | Registration
A new seat is available for unreserved rule 0. The unreserved seats rule (rule 0) is treated
as an exception. The process will look for the next waitlisted student using rule 0, or any
other rule where the Overflow (Indicator) is checked (set to
Y). The next waitlisted
student is notified that a seat is available. Only students waitlisted in rule 0 or in rules
where the Overflow (Indicator) is checked (set to
Y) are eligible.
The first eligible (next available) waitlisted student is number 6. Student 5 has already
been notified.
Waitlist Queue for CRN 1010, Term 200810, use reserved seats
When seats become available for the course, rule 0 is the last rule that is evaluated by the
process.
Examples for Connected Courses
Two types of dependencies exist for connected courses that are waitlisted.
• Course A requires that the student is enrolled in course B.
Course B does not require that the student is enrolled in course A.
1010 Student 8 0 ## #### ##### ## WL Oct. 2, 2007 10:01 9 Not eligible
Reserved Seats Rule Enrolled
CRN ID Rule Lvl Prgm Majr Cl
Ovr
Ind
Reg
Stat
Registration
Timestamp
Waitlist
Priority Eligibility
1010 Student A 1 BIO WL Oct. 1, 2007 09:10 1 Not eligible
1010 Student B 1 BIO WL Oct. 1, 2007 09:20 2 Not eligible
1010 Student C 1 BIO WL Oct. 1, 2007 10:30 3 Not eligible
1010 Student D 1 BIO WL Oct. 1, 2007 11:15 4 Not eligible
1010 Student 3 4 GR ANTH WL Oct. 2, 2007 09:00 5 Not eligible
1010 Student 5 3 UG Yes WL Oct. 3, 2007 08:00 0 Eligible, but
notified
1010 Student 6 3 UG Yes WL Oct. 3, 2007 08:10 7 Eligible
1010 Student 7 0 ## #### ##### ## WL Oct. 4, 2007 10:00 8 Eligible
1010 Student 8 0 ## #### ##### ## WL Oct. 2, 2007 10:01 9 Eligible
Reserved Seats Rule Enrolled
CRN ID Rule Lvl Prgm Majr Cl
Ovr
Ind
Reg
Stat
Registration
Timestamp
Waitlist
Priority Eligibility
1098
Banner Student User Guide | Registration
• Course A requires that the student is enrolled in course B.
Course B requires that the student is enrolled in course A.
Linked courses also have the same relationships at CRN level.
Banner Student does not allow a student to be enrolled in a course that does not comply
with a dependency restriction for a waitlisted course, because the waitlisted course may
eventually be dropped.
When the Student Options for Links, Corequisites, and Prerequisites are set to
Yes on
SOAWLTC, and the same options are set to
Fatal on SOATERM, the results are shown
in the example below with the allowed combinations for each case.
Example 1 - Course A requires course B, but course B does not require
course A
Example 2 - Course A requires course B, and course B requires course A
A student wants to register for the lecture course BIO 101, which requires the lab course
BIO 102.
• If the lab is full, the student is not allowed to enroll for the lecture course BIO 101, even
if the student has already registered as waitlisted for the lab course BIO 102.
• If the lecture is full, the student is allowed to register as waitlisted for the lecture course
BIO 101 and as enrolled for the lab course BIO 102.
• If both the lab and lecture are full, the student is allowed to register for both courses as
waitlisted.
However, for the last two options, if the student drops the waitlisted lab course (BIO
102), an invalid combination is generated, and the autodrop functionality will drop both
courses or ask for confirmation based on the
AUTODROP rule on GTVSDAX.
Course ----------------------------------Allowed--------------------------- --------------Not Allowed----------
Course A Enrolled Waitlisted Waitlisted Dropped Dropped Enrolled Enrolled Waitlisted
Course B Enrolled Waitlisted Enrolled Enrolled Waitlisted Waitlisted Dropped Dropped
Course ---------Allowed------ ---------------------------------------Not Allowed---------------------------------
Course A Enrolled Waitlisted Waitlisted Enrolled Enrolled Waitlisted Dropped Dropped
Course B Enrolled Waitlisted Enrolled Waitlisted Dropped Dropped Enrolled Waitlisted

1099
Banner Student User Guide | Registration
Waitlist Notification Errors
The waitlist notification process used with automated waitlisting allows you to view
notification errors and establish a time period for resending failed email notifications. The
resend functionality is based on the maximum resend hours deadline as defined on the
Waitlist Automation Section Control Form (SSAWLSC) or the Automated Waitlist Term
Control Form (SOAWLTC).
The Waitlist Notification Error Query Form (SFIWLNE) is used to review all notification
errors by term and date. The notification status can be viewed on the Waitlist Notification
Query Form (SFIWLNT). The Batch Waitlist Notification Process (SFRBWLP) selects all
records from the SFRWLNT table for re-notification where transient errors exist, and the
waitlist status is
Pending.
Resend hours are used in addition to notification hours. The SFRBWLP process will
attempt to resend failed notifications based on the resend hours defined on SOAWLTC or
SSAWLSC. When a notification is successful during the resend hours period, the
notification hours will begin to count down, and resend hours will no longer be considered.
Only notifications with transient errors (Notification Status of
T) will be considered for
resending. If the start date of the email is still within the resend period, the notification end
date is extended to restart the countdown and attempt to resend the email.
The notification status displayed on SFIWLNT and SFIWLNE is only for the most recent
status. If a notification is successfully resent after an error occurred on a previous
notification attempt, the Notification Status field will be set to
S (Successful).
Notifications that are successful on the first attempt are not logged on SFIWLNE. The
notification status for these records will be
Null on SFIWLNT. The last notification error
message will remain on SFIWLNE after a successful resend has occurred, as it may
provide useful information about why prior notification attempts were unsuccessful.
Only internal errors that result from a “send” failure are logged. External errors, such as
delayed or failed delivery, are not logged. The notification status on SFIWLNT will be
Null for these records. If the Registrar indicator for notification is checked on
SOAWLTC, the registrar will receive an email as per existing processing.
Setup
To use the notification resend processing, enter the hours for the resend deadline on
SOAWLTC or SSAWLSC. Using SSAWLSC is optional. Then monitor notification errors
on SFIWLNE after the email processes and the waitlist process have been run.
On SOAWLTC, it is recommended that you not set the Resend Deadline Hours value to
a number that is greater than the Waitlist Notification Deadline value. If you do not wish
to use the resend functionality with automated waitlisting, leave the Resend Deadline
Hours value as
Null or 0. You can still query the notification status on SFIWLNT and
SFIWLNE, even if the resend functionality is not in use.
Example
For a Waitlist Notification Deadline Hours of 24, and a Resend Deadline Hours of 4,
where SFRBWLP is run every hour, the following occurs.
• 9:00 AM – Notification sent, notification error (status T) received and logged.

1100
Banner Student User Guide | Registration
• 10:00 AM – Notification resent.
Notification deadline twenty four hours from this time.
• 11:00 AM – Notification resent.
Notification deadline twenty four hours from this time.
• 12:00 PM – Notification resent.
Notification deadline twenty four hours from this time.
• 1:00 PM – Last notification resent.
Notification deadline twenty four hours from this time.
If a successful notification is not achieved before the resend hours have expired, the
waitlist notification deadline hours are calculated from the time of the last notification (1:00
PM). The student has until 1:00 PM the following day to register for the course.
If the notification at 10:00 AM is successful, the student has until 10:00 AM the following
day to register for the course. The waitlist notification deadline hours period begins with a
successful notification, and the resend deadline hours are no longer considered.
If the notification error is a permanent error (status of
P or O), the notification will not be
resent. The student will have 24 hours from the time the 9:00 AM notification was sent to
register for the course.
Error Types
Here are some error types you may encounter.
Permanent event
Permanent events include SMTP status codes in the 500s, such as an invalid email
address, a bad sequence of commands from the email server, or a rejected recipient
address. No attempts are made to resend notifications with permanent errors.
You can search online for additional SMTP server status codes and SMTP error codes. A
suggested site for 2012 codes is www.answersthatwork.com
. Go to the Download Area,
then ATW Library, then Networking, and see the
Network__3-
SMTP_Server_Status_Codes_and_SMTP_Error_Codes.pdf
file.
Transient event
Transient events include SMTP status codes in the 400s, such as a mail server that is not
available, a connection that is dropped during transmission, or an outgoing message that
has timed out. These events are considered temporary, and attempts will be made to
resend notifications using the resend deadline hours on SOAWLTC or SSAWLSC.
You can search online for additional SMTP server status codes and SMTP error codes. A
suggested site for 2012 codes is www.answersthatwork.com
. Go to the Download Area,

1101
Banner Student User Guide | Registration
then ATW Library, then Networking, and see the Network__3-
SMTP_Server_Status_Codes_and_SMTP_Error_Codes.pdf
file.
Other errors
Other errors include an email host that is not defined on SOAWLTC, an email address that
is not found for the student, an email from address that is not found, or Oracle errors.
Drop Last Class
Students can be dropped from the last class for which they registered or from all classes.
If a student is registered for a single class, use one of the drop codes defined on the
Course Registration Status Code Validation Form (STVRSTS) or on the Course
Registration Status Form (SFARSTS) (for traditional courses) or the Schedule Processing
Rules Form (SSARULE) (for open learning courses) to drop the last class. If there are no
registration errors, the last class should be dropped.
If the student is registered for multiple classes, use one or more of the drop codes defined
on STVRSTS or SFARSTS and/or SSARULE to drop all classes. If there are no
registration errors, all classes (which would include the last class) should be dropped.
Please review the information that follows for "Drop/Withdrawal Processing for Connected
Courses" for specific details regarding dropping or withdrawing from associated courses.
Drop/Withdrawal Processing for Connected Courses
When a student is registered in two associated or “connected” courses (corequisites,
prerequisites, or linked courses), and you request that one of the courses be dropped, the
course is allowed to be dropped under certain conditions.
Courses cannot be dropped and refunded at 100% unless the drop meets criteria
specified in two rules on the Crosswalk Validation Form (GTVSDAX) and has been
assigned the appropriate setup code (allowing a course to be dropped and refunded at
100%) on the Course Registration Status Form (SFARSTS) (for traditional courses) or the
Schedule Processing Rules Form (SSARULE) (for open learning courses). Connected
courses are included in this processing.
Errors are tracked as the following:
• Registration add (displayed on the Add or Drop Classes page in Self-Service when a
class is added), which reports errors that are encountered when a student is trying
unsuccessfully to register for a class, for example a time conflict.
• Registration update (displayed on the Add or Drop Classes page in Self-Service), which
appears when a connected course is dropped or withdrawn from and either has no drop
code assigned or has multiple drop codes assigned, and can also appear when a
student tries to change the status of a course that has a connection.
• Administrative (not displayed to the student), which can be reviewed on the Registration
Admin Messages Report (SFRRGAM).

1102
Banner Student User Guide | Registration
Status Types
The Status Type field on STVRSTS is used to assign a status type to describe the course
registration status code for baseline, self-service, and telephone applications. Valid values
are
R (Registered), D (Dropped), L (Waitlisted), or W (Withdrawn).
Web registration uses the Status Type field on the Course Registration Status Code
Validation Form (STVRSTS) to determine the type of code that can be placed on the
course and the processing that is affected based on this code. This type code determines
what is displayed in the Action pulldown list on the Add or Drop Classes page.
Note: The Status Type field must be filled in for every status code that is
in use. If the Status Type field is left blank, unexpected results can occur.
The following conditions apply when using status type codes:
• If the course status is marked as an R (Registered) type code, then all other type codes
can be displayed (depending on their availability).
• If the course status is marked as a D (Drop) or W (Withdrawal) type code, then only R
type actions will be displayed.
• The RE (Registered) type code or other R type codes (with the exception of the
WEBRSTSREG code) will be included in the pulldown list if the Web Indicator checkbox
is selected on STVRSTS.
• The registration code designated on GTVSDAX for internal code WEBRSTSREG is not
displayed in the pulldown list, because it is used only for initial registration via the Web.
The system does not allow a student to drop a course that has already been dropped or
withdrawn from.
Automatic Drops
An automatic drop is one that occurs if certain conditions are met when a user attempts to
drop a connected course. When a connected course is dropped, the appropriate drop
code and refund (if any) are applied to the student.
A single, active drop code must be available for a successful connected or automatic drop
to occur.
• If no drop codes exist for any part of a connection, no courses in the connection are
allowed to be dropped.
• If multiple drop codes exist for any part of a connection, no courses in the connection
are allowed to be dropped automatically. This is because the system does not choose
which drop code to use for the automatic drop. In this case, the user can initiate the drop
by selecting one of the multiple drop codes where necessary. The drop is processed
with the selected drop code, and the refund (if any) associated with the code is applied.

1103
Banner Student User Guide | Registration
Example:
Let’s say a student is registered for History 308, English 310, and Mathematics 125.
History 308 and English 310 are corequisites. History 308 has a single drop code of
DC, but English 310 has two drop codes available: DC and DW.
Now let’s say that the user chooses to drop History 308 with the
DC code. The system
determines that it is connected to English 310, which has two drop codes. In this case,
the drop is rejected because the system does not know which of the two drop codes to
assign to English 310.
On the other hand, if the user chooses to drop English 310 with either of the drop
codes, the system drops History 308 automatically with the
DC drop code, because it
is the only one available.
Finally, if the user chooses to drop both courses simultaneously and specifies a drop
code for each, the drops are allowed.
When a student is dropped or withdraws from a connected course without dropping the
entire connection, the system determines which of the following conditions applies and
takes the associated action shown in the table that follows.
Note: In Banner Voice Response, error checking is performed on each
CRN as it is entered. Because of this, if you enter
N for the AUTODROP
rule, it will not be possible for connected courses to be dropped.
Therefore, it is recommended that you use either
C or Y for the
AUTODROP rule.
Condition Action Taken GTVSDAX Setting
Connected drops are processed
only with approval of the student.
The Connected Course Drop Confirmation page
is displayed asking the user whether all
connected courses should be dropped.
• If the user chooses to drop all connected
courses, they are all dropped simultaneously.
• If the user chooses not to drop all connected
courses, the initial request is ignored, and the
student continues to be registered in all
connected courses.
The drops occur only if all courses that are
connected have a single, active drop code.
AUTODROP set to C
Connected drops are processed
automatically. (All connected
courses are dropped when one
is.)
The drop is processed, and the student is
dropped from all courses with no notification.
The drops occur only if all courses that are
connected have a single, active drop code.
AUTODROP set to Y
Connected drops are not
allowed.
The drop is cancelled, and a message is
displayed saying that all connected courses must
be dropped simultaneously. The user can initiate
the drop for all connected courses at the same
time, and the drop will be successful.
AUTODROP set to N

1104
Banner Student User Guide | Registration
The connected course(s) that can be dropped are dropped with the appropriate drop code
based on the settings on the following forms:
• Crosswalk Validation Form (GTVSDAX)
• Course Registration Status Form (SFARSTS) (for traditional courses)
• Schedule Processing Rules Form (SSARULE) (for open learning courses)
The code designated in
WEBRSTSDRP does not work as a “clean up” code for registration
errors related to automatic drops and administrative drops. The
WEBRSTSDRP code
works like a regular drop/withdrawal.
For example, if a user tries to register a student for Psychology 200 and the
registration results in a
PREQ or TEST SCORE error, the DW code is used to remove
the course from the schedule and reverse any charges that were associated with it.
If your institution does not allow a student’s last class to be dropped via the Web (that is,
the external code for
WEBDROPLST is N), then the system will not drop a connection if the
student is not registered in any other classes.
The rest of this section provides a variety of scenarios to help illustrate how the system
processes requests based on your system setup. These scenarios are not meant to be all-
inclusive but rather to show several examples.
Connected Drops Allowed with User Approval
You want the system to notify the user if one course is dropped, but a course to which it is
associated is not, thereby allowing the user to choose to drop both or to drop neither. To
accomplish this, you have set the external code to
C for the AUTODROP rule.
Let’s say a student has registered in the following courses:
• History 320 (corequisite with Sociology 320)
• Sociology 320 (corequisite with History 320)
• Religious Studies 225
• Mathematics 162
If a user attempts to drop the history course but not the sociology one, the system displays
the Connected Course Drop Confirmation page letting the user know that the two courses
must be dropped simultaneously and asking whether the user wants to drop or not drop
the entire connection. If the user chooses to drop, both courses are dropped. If the user
chooses not to drop, neither course is dropped.
If a user attempts to drop the history course and the mathematics class, but not the
sociology course, the system displays the Connected Course Drop Confirmation page
letting the user know that the history and sociology courses must be dropped
simultaneously and asking whether the user wants to drop or not drop them. Regardless
of the user’s choice regarding dropping the connection, the mathematics course is
dropped per the student’s original request.

1105
Banner Student User Guide | Registration
Now let’s say a student has registered in the following courses:
• Biology 405 lecture (linked to Biology 405 lab)
• Biology 405 lab (linked to Biology 405 lecture)
• Anthropology 307 (corequisite with Archeology 305)
• Archeology 305 (corequisite with Anthropology 307)
• Latin 150
If a user tries to drop the Biology lecture course and the Anthropology course, the system
displays the Connected Course Drop Confirmation page showing both connections and
asking whether the user wants to drop or not drop them. The decision the user makes on
this page applies to both connections: if the user chooses to drop the courses, all four are
dropped; if the user chooses not to drop the courses, none of the four are dropped.
Connected Drops Processed Automatically
You want the system to automatically drop a linked course if the course to which it is linked
is dropped. To accomplish this, you have set the external code to
Y for the AUTODROP
rule.
Let’s say a student has registered in the following courses:
• Zoology 505 lecture (linked to Zoology 505 lab)
• Zoology 505 lab (linked to Zoology 505 lecture)
• Psychology 410
• Mathematics 380
• German 202
If a user attempts to drop the lecture course but not the lab, the system automatically
drops both. The system does not notify the user that the lab was also dropped.
Note: The system drops both courses in the connection as long as the
connected course has a single, active drop code; otherwise both classes
are returned to their original registration status.
Connected Drops Not Allowed
You do not want students to be able to drop a connected course unless all the courses in
the connection are dropped simultaneously by the user. To accomplish this, you have set
the external code to
N for the AUTODROP rule.
Let’s say a student has registered in the following courses:
• Biology 101 lecture (linked to Biology 101 lab)
• Biology 101 lab (linked to Biology 101 lecture)
• English 105

1106
Banner Student User Guide | Registration
• History 102
If a user attempts to drop the lecture course but not the lab, the system displays a
message that the course cannot be dropped unless the course to which it is linked (in this
case, the lab) is dropped at the same time. The student remains registered in both
courses.
To drop both classes, the user must select both in the same transaction.
Note: In Banner Voice Response, error checking is performed on each
CRN as it is entered. Because of this, if you enter
N for the AUTODROP
rule, it will not be possible for connected courses to be dropped.
Therefore, it is recommended that you use either
C or Y for the
AUTODROP rule.
Drop Last Class Not Allowed
You do not want a student to be able to drop his or her last class via the Web. To
accomplish this, you have set the external code to
N for the WEBDROPLST rule.
Let’s say a student has registered in the following courses:
• English 260 (corequisite with English 260W)
• English 260W (corequisite with English 260)
If a user attempts to drop one course but not the other (or if the student attempts to drop
both simultaneously), the system does not drop either course because of the setting on
the
WEBDROPLST rule, regardless of the setting for the AUTODROP rule.
Administrative Drops
An administrative drop is one that occurs automatically when a user accesses a student’s
registration record after certain changes that affect registration records occur within the
system, after registration has opened and enrollment for a course exists. These changes
can include:
• A CRN’s prerequisites are changed.
• A CRN’s corequisites are changed.
• A CRN is linked to another CRN.
• An approval requirement is added to a CRN.
• The meeting day or time of a CRN is changed (which can cause a time conflict in a
student’s schedule).
• An equivalent course is added (which can cause a duplicate course error on the
student's schedule).
Note: A duplicate course is one that has the same subject, course
number, and schedule type.

1107
Banner Student User Guide | Registration
When a student has registered and later their registration record is accessed via Banner
self-service or Banner Voice Response, the system determines whether any of the above
kinds of changes occurred. If so, the system determines which of the following conditions
applies and takes the associated action shown in the table below.
Note: The system does not perform an administrative drop if a student
fails an in-progress prerequisite after registering for a CRN, although the
Registration Admin Messages Report (SFRRGAM) captures the error.
Also, if registration is accessed via the Student Course Registration Form
(SFAREGS), the
ADMINDROP rule is not invoked, because the types of
errors that the
ADMINDROP rule addresses would be encountered and
dealt with by the administrator.
If the student’s record is accessed and changed in the Student Course Registration Form
(SFAREGS), any administrative errors encountered must be resolved. You can run the
Registration Admin Messages Report (SFRRGAM) to review administrative drop errors
that need to be resolved.
The rest of this section provides a variety of scenarios to help illustrate how the system
processes requests based on your system setup. These scenarios are not meant to be all-
inclusive, but rather to show several examples.
Administrative Drop if an Approval is Added to a CRN
You want the system to perform administrative drops. To accomplish this, you have to set
the external code to
Y for the ADMINDROP rule. You have also included a single, active
drop code (
DC for Drop Course) for Linguistics 318 on these forms:
• Schedule Processing Rules Form (SSARULE) (for open learning courses)
• Course Registration Status Form (SFARSTS) (for traditional courses)
Let’s say a student has registered in the following courses:
• Linguistics 318
Condition Action Taken GTVSDAX Setting
Administrative drops are allowed. The drop is automatically processed, and a
message is written to the SFTRGAM table, but
the user is not notified of the action.
The drop occurs only if all courses with
administrative errors or classes that are
connected to them have a single, active drop
code.
ADMINDROP set to Y
Administrative drops are not
allowed.
A message is written to the Student Course
Registration Audit Form (SFASTCA), but the drop
is not processed, and the student continues to be
registered in the course.
ADMINDROP set to N

1108
Banner Student User Guide | Registration
• English 350
• Comparative Lit 302
• Geology 220
After the student has registered in the course, an instructor approval code is added to
Linguistics 318.
If a user accesses the student’s registration record via Banner self-service or Banner
Voice Response, the system checks for administrative errors and finds one for this
student: in this case, that the student no longer meets the requirements of Linguistics 318.
That is, that the student does not have the required instructor approval. The system then
checks SSARULE or SFARSTS (as applicable) and finds the
DC drop code, so it changes
the student’s registration status to
DC. This occurs before the Add or Drop Classes page is
displayed on the Web, and the change is reflected when the page is displayed. No
additional information is provided to the student.
Only those students whose records are accessed will have this drop performed. For
example, if 30 students were registered in this class and only three of these students’
records were accessed, they would be the only ones dropped from the course.
The Registration Admin Messages Report (SFRRGAM) identifies the students who might
have had classes dropped after a change has been made. You can use this report to
identify and resolve the errors in Banner (for example, enter an override) before the
students’ records are accessed.
Administrative Drop if a Corequisite is Added to a CRN
You want the system to perform administrative drops. To accomplish this, you have set the
external code to
Y for the ADMINDROP rule. You have included a single, active drop code
(
DC for Drop Course) on the Schedule Processing Rules Form (SSARULE) for Astronomy
105 and for Astronomy 106.
Let’s say a student has registered in the following courses:
• Astronomy 105 (corequisite with Astronomy 106)
• Astronomy 106 (corequisite with Astronomy 105)
• Mathematics 130
• Physical Education 154
• Computer Science 205
After the student has registered in the course, an Astronomy 107 seminar is added as a
corequisite of Astronomy 105.
If a user accesses the student’s registration record via Banner self-service or Banner
Voice Response, the system checks for administrative errors and finds one for this
student: in this case, that the student has not registered in a corequisite. The system then
checks SSARULE and finds the
DC drop code for both courses, so it drops the courses
and changes the registration status for both courses to
DC. This occurs before the Add or

1109
Banner Student User Guide | Registration
Drop Classes page is displayed on the Web, and the change is reflected when the page is
displayed.
Administrative Drops if Active Drop Codes are Not Defined
You want the system to perform administrative drops. To accomplish this, you have set the
external code to
Y for the ADMINDROP rule. You have included a single, active drop code
(
DC for Drop Course) for Anthropology 215 on the Schedule Processing Rules Form
(SSARULE), but you have not defined an active drop code for Sociology 215 on
SSARULE (for open learning courses) or the Course Registration Status Form
(SFARSTS) (for traditional courses).
Let’s say a student has registered in the following courses:
• Anthropology 215 (corequisite with Sociology 215)
• Sociology 215 (corequisite with Anthropology 215)
• Economics 105
• French 201
After the student has registered in the course, a seminar is added as a corequisite of
Anthropology 215.
If a user accesses the student’s registration record via Banner self-service or Banner
Voice Response, the system checks for administrative errors and finds one for this
student: in this case, that the student has not registered in a corequisite. Processing
continues, and the system finds that Sociology 215 is a corequisite of Anthropology 215,
and therefore must also be dropped. There is no active drop code, however, for Sociology
215. Because both courses cannot be dropped appropriately, neither are dropped, and
both are returned to their previous registration statuses. This occurs before the Add or
Drop Classes page is displayed on the Web.
Administrative Drops if Other Errors are Found during Processing
You want the system to perform administrative drops. To accomplish this, you have set the
external code to
Y for the ADMINDROP rule. You have also included a single, active drop
code (
DC for Drop Course) on the Schedule Processing Rules Form (SSARULE) and the
Course Registration Status Form (SFARSTS) for Music 118 and Music 250, but you have
not defined an active drop code for Physics 105.
Let’s say a student has registered in the following courses:
• Music 118 (corequisite with Music 250)
• Music 250 (corequisite with Music 118)
• Political Science 101
• Physics 105
After the student has registered in the course, a seminar is added as a corequisite of
Music 118.

1110
Banner Student User Guide | Registration
If a user accesses the student’s registration record via Banner self-service or Banner
Voice Response, the system checks for administrative errors and finds one for this
student: in this case, that the student has not registered in a corequisite. Processing
continues, and the system finds that Music 250 is a corequisite of Music 118, and
therefore must also be dropped. There is an active drop code for both music courses.
Processing continues further, and the system finds that the meeting day of Physics 105
has been changed and now conflicts with Political Science 101. There is no active drop
code, however, for Physics 105. Because Physics 105 cannot be dropped appropriately,
none of the courses are dropped, and all are returned to their previous registration
statuses. This occurs before the Add or Drop Classes page is displayed on the Web.
Rules on GTVSDAX
Two rules are used on the Crosswalk Validation Form (GTVSDAX) with the improved
drop/withdrawal processing. These rules are delivered via scripts.
AUTODROP Rule
The AUTODROP rule is used to determine whether connected courses that are in error
can be dropped using Banner self-service or Banner Voice Response.
This rule can be set to process the dropping of connected courses in three ways:
• C (Confirm) - Automatic drops are allowed for connected courses, after input is received
from the user. This is the default value.
• Y (Yes) - Automatic drops are allowed for connected courses. A single, active drop code
must exist for all connected courses that would be dropped. No input is needed from the
user.
• N (No) - No automatic drops are allowed for connected courses. The user must initiate
dropping the connected courses. All connected courses must be dropped at the same
time.
Note: In Banner Voice Response, error checking is performed on each
CRN as it is entered. Because of this, if you enter
N for the AUTODROP
rule, it will not be possible for connected courses to be dropped.
Therefore, it is recommended that you use either
C or Y for the
AUTODROP rule.
External
Code
Internal
Code
Internal
Code
Sequence
Number
Internal Code
Group Description
Activity
Date
C AUTODROP N/A REGISTRATION Drop
connected
courses
Sysdate

1111
Banner Student User Guide | Registration
If multiple drop codes exist or no drop codes exist, no connected course drops are allowed
to occur.
ADMINDROP Rule
The ADMINDROP rule is used to drop courses where schedule or restriction changes
have occurred after enrollment exists.
This rule can be set to process the dropping of courses in two ways:
• Y (Yes) - Courses with administrative errors are allowed to be dropped if a single, active
drop code is available for the section or the part-of-term. This is the default value.
• N (No) - Courses that have administrative errors are not dropped. Run the Registration
Admin Messages Report (SFRRGAM) to see errors in the student’s schedule.
Registration leaves the courses with administrative errors in their registered status on
the schedule.
You can run the Registration Admin Messages Report (SFRRGAM) report to review any
errors in the student’s schedule regardless of how the
ADMINDROP rule is set up.
The Registration Administrative Message Temporary Table (SFTRGAM) stores the error
messages that result from the use of the
ADMINDROP rule to drop courses during the
registration session.
Rules and Use of the Term Control Form (SOATERM) in
Repeat Processing
Repeat processing in registration uses the schedule type, level, title, and transfer courses
when checking for a repeat condition. Registration repeat checking functions in the same
way as academic history repeat checking and considers all academic history (courses
graded and rolled to history), as well as in-progress courses that are either graded or
unrolled and ungraded.
Please review the settings of the Key Block fields on SHARPTR in the “Academic History”
chapter for more information on how to set up registration repeat checking limits by
schedule type, level, title, and transfer courses.
External
Code
Internal
Code
Internal
Code
Sequence
Number
Internal Code
Group Description
Activity
Date
Y ADMINDROP N/A REGISTRATION Drop courses
in admin error
Sysdate
1112
Banner Student User Guide | Registration
When a student's record is assessed for registration repeat instances, the process will
specifically count the following:
• The total number of times the course has been taken (in rolled and unrolled registration
records).
• The total credits taken by the student (in rolled and unrolled registration records).
• Both transfer and history records, including the current registration attempt.
Repeat Limit
The (Repeat) Limit and (Repeat) Maximum Hours fields referred to in this section are
set up on the Basic Course Information Form (SCACRSE) for use on SOATERM in repeat
processing.
Using Repeat Limit only as a fatal error on SOATERM
Note: Use these rules if your institution checks Repeat Limit but not
Repeat Maximum Hours.
When the user designates via the Repeat Limit flag on SOATERM that the Repeat Limit
is to be checked as a fatal error, the following rules apply:
• If the (Repeat) Limit is Null or 0, regardless of the value in the (Repeat) Maximum
Hours field, the course may not be repeated.
• If the (Repeat) Limit has a value, regardless of the value in the (Repeat) Maximum
Hours field, then the course may be repeated as follows:
Repeat Limit =
2
Repeat Maximum Hours = any value
The course may be taken three times for an unlimited number of credits; that is, after the
course has been taken the first time, it may be repeated twice.
Using Repeat Maximum Hours only as a fatal error on SOATERM
Note: Use these rules if your institution checks Repeat Maximum Hours
but not Repeat Limit.
When the user designates via the Repeat Hours flag on SOATERM that the Repeat
Hours are to be checked as a fatal error, the following rules apply:
• Regardless of the value in the (Repeat) Limit, if the (Repeat) Maximum Hours is
Null, the course can be repeated for an unlimited number of credits.
• Regardless of the value in the (Repeat) Limit, if the (Repeat) Maximum Hours is 0, the
course cannot be taken at all.

1113
Banner Student User Guide | Registration
• Regardless of the value in the (Repeat) Limit, if the (Repeat) Maximum Hours has a
value, the course may be taken as many times as desired, as long as the credit hours do
not exceed those specified in the (Repeat) Maximum Hours field.
Repeat Limit = any value
Repeat Maximum Hours =
10
If a three credit course is attempted to be taken four times, the fourth will not be allowed,
because it exceeds the Repeat Maximum Hours.
Using both Repeat Limit and Repeat Maximum Hours as fatal errors on
SOATERM
Note: Use these rules if your institution checks both Repeat Maximum
Hours and Repeat Limit.
• If both the (Repeat) Limit and (Repeat) Maximum Hours are Null, the course cannot
be repeated.
• If the (Repeat) Limit is 0 and the (Repeat) Maximum Hours is 0, the course cannot be
repeated because of the Repeat Maximum Hours rules.
• If the (Repeat) Limit has a value and (Repeat) Maximum Hours is 0, the course
cannot be repeated because of the Repeat Maximum Hours rules.
• If the (Repeat) Limit is 0 and (Repeat) Maximum Hours has a value, the course
cannot be repeated because of the Repeat Limit rules.
• If the (Repeat) Limit is Null and (Repeat) Maximum Hours has a value, the rules for
Repeat Maximum Hours are used:
Repeat Limit =
Null
Repeat Maximum Hours = 7
• If a three credit course is taken more than two times, it will exceed the Repeat Maximum
Hours rule and may not be repeated.
• If the (Repeat) Limit has a value and (Repeat) Maximum Hours is null, the Repeat
Limit rules are used:
Repeat Limit =
1
Repeat Maximum Hours = Null
A course can only be repeated once here, regardless of credits.
• If the (Repeat) Limit and (Repeat) Maximum Hours each have values, and if either
rule fails the test, repeat checking will prevent registration.
Repeat Limit =
3
Repeat Maximum Hours = 10
• Taking a three credit course for the fourth time, as allowed by the Repeat Limit, would
exceed the Repeat Maximum Hours of ten, and therefore this repeat would not be
allowed.

1114
Banner Student User Guide | Registration
• Taking a two credit course for the fifth time, as allowed by the Repeat Maximum Hours,
would exceed the Repeat Limit of three, and therefore this repeat would not be allowed.
All errors received in registration because of Repeat Limit or Repeat Maximum Hour
constraints can be overridden, and students are then able to register for those courses.
Selection Rules
Repeat/equivalent course processing is controlled by the (Repeat) Limit and the (Repeat
Maximum Hours) fields on the Basic Course Information Form (SCACRSE). These fields
are used in the Registration Module according to the status of the registration error flags
on SOATERM and are calculated in Academic History according to the rules on the
Repeat/Multiple Course Rules Form (SHARPTR).
Note: The Repeat Status (Code) field on SCACRSE is informational only
and is not used in Repeat Processing.
Repeat Policies
The Repeat/Multiple Course Rules Form (SHARPTR) is used to establish the institution's
repeat policy. It allows for repeated courses to be treated in two different ways (repeat limit
rule or repeat hours rule) with three different course selections (last, highest, or first
passing).
The Repeat Limit Selection Rule field is used when the number of times a may student
take a course is limited. Repetition of the course will invoke the specified repeat rules. This
is defined on the Basic Course Information Form (SCACRSE) in the (Repeat) Limit field.
The Repeat Hours Selection Rule field is used when there is a maximum number of
hours that may be earned before the course is considered to be a repeat.
Each rule has an associated evaluation grade that determines the minimum grade a
course must have to be considered for repeat processing evaluation. Registration repeat
checking uses the evaluation grade to determine if a course should be considered in
repeat checking, based upon whether repeat hours or repeat limit rules are to be used.
The value in the Repeat Hours Evaluation Grade field is the minimum grade that will be
used for repeat checking, for the term, level, and selection rule. Once this grade is set,
courses with a numeric value less than the evaluation grade will not be considered in
repeat checking.

1115
Banner Student User Guide | Registration
National Student Clearinghouse (NSC) Reporting
Procedures
This section discusses regulatory reporting to the NSC.
Overview of Processing for Clearinghouse Reporting
Your institution has the option to report student enrollment information to the National
Student Clearinghouse (NSC), which then tracks and reports that information to lenders
and guarantors of student loans at no cost to the reporting institution. The following
sections outline the processing requirements and procedures for submitting information
extracted from the Banner Student System to the Clearinghouse.
Reporting of student enrollment information is based on calculating and storing a student's
time status, where the time status is associated with any online or batch processing, when
the processing results in the creation or modification of registration records and the credit
hours (non-CEU hours) associated with those records. By design, a student is considered
for reporting during a given term only if a registration term header record exists for the
student.
The calculation of a student's enrollment time status is based on rules established in the
existing Time Status Rules Form (SFATMST). Each time status code defined by an
institution in the Time Status Code Validation Form (STVTMST) must include an NSC
equivalent for Clearinghouse reporting purposes.
Specific data elements are required in the extract file that is transmitted to the
Clearinghouse. To assist end users in identifying any missing or invalid data prior to
processing the file that will be transmitted to the Clearinghouse, an option is provided in
the Clearinghouse Extract Report (SFRNSLC) that will produce a listing of invalid or
missing data. In addition, the Time Status Calculation Update Process (SFRTMST)
includes comments in the output which will assist in identifying potentially invalid data. No
invalid or missing data should exist prior to processing and producing the extract output
file, or some of the data that is transmitted to the Clearinghouse will be inaccurate or
misrepresented.
Sources of Data for Clearinghouse Reporting
The validity of the data reported by the Clearinghouse Extract Report (SFRNSLC)
depends on specific data entry requirements and procedural consistencies. A registration
term header record must exist for a student to be included in the reporting for a term.
Note: The record is represented by the enrollment status data in the
Enrollment Information block of the Student Course Registration Form
(SFAREGS). This record is created when a Save function is performed for
the first time in the form, even if no registration for CRNs exists.
Students who are considered to be “enrolled” by an institution, but who
have not been officially registered in courses in the Student Course
Registration Form (SFAREGS), are still included in the group of students
reported to the Clearinghouse. A student can have an SFBETRM record

1116
Banner Student User Guide | Registration
and an SFRSTCR record and be included in the report, but all that is
needed is the SFBETRM record.
Students who are enrolled in courses, but for institutionally specific
reasons should not be reported to the Clearinghouse, should be assigned
a student attribute which will be input as a value to the Student Attributes
to Exclude parameter when processing the report.
For all students enrolled for the term, an enrollment status is determined. For all
enrollment statuses, with the exception of a withdrawn student, the Third Party
Withdrawal Indicator on the Enrollment Status Code Validation Form (STVESTS) must
have a value of
N or unchecked for the enrollment status code that exists in the Enrollment
Information block of the Student Course Registration Form (SFAREGS). In some specific
cases, start dates for enrollment statuses must be reported. The statuses are checked for
in the order listed below, and the data requirements (form field, source of status date, if
required) for each status are indicated:
1.
D - Deceased (requires status date)
A value of
Y or checked must exist in the General Person Form (SPAPERS)
Deceased (Indicator). The status date is selected from the Deceased Date field on
the same form.
2.
G - Graduated (requires status date)
A degree with a status code that has an Awarded Indicator of
A on the Degree Status
Code Validation Form (STVDEGS) must exist in the Degrees and Other Formal
Awards Form (SHADEGR). In addition, the level of the degree code must match the
level of the current general student record (the maximum term that is less than or
equal to the reporting term). The level check is included so that a student who is
currently enrolled in a graduate program, but previously has been awarded an
undergraduate degree from the same institution, will not be erroneously reported as
graduated. The status date is selected from the Graduation Date field on the same
form.
Note: To report a student as graduated or EB4, the student’s current
learner record needs to match the program/major of the SHRDGMR
awarded degree.
3.
A - Approved Leave of Absence (status date not required)
A leave code exists in the General Student Form (SGASTDN) for the current effective
term (the maximum term that is less than or equal to the reporting term) which
includes the reporting date between the leave from and to dates on the same form.
For example, a student is on a medical leave of absence from February 1 through
March 15, 1995. The Clearinghouse Extract report date of March 1, 1995 will identify
this student as on an approved leave of absence.
4.
W - Withdrawn (requires status date)
A student enrollment status code exists for the term where the Third Party
Withdrawal Indicator is
Y or checked on the Enrollment Status Code Validation Form
(STVESTS). The status date is selected from the (Enrollment) Status Date on the
Student Course Registration Form (SFAREGS).

1117
Banner Student User Guide | Registration
Note: SFRNSLC uses the Third Party Withdrawal Indicator on
STVESTS to determine whether a student is counted as withdrawn when
reporting to the Clearinghouse. When the Third Party Withdrawal
Indicator is checked for an enrollment status code, and that enrollment
status code is assigned to a student on SFAREGS, the student will be
reported as withdrawn.
When the Effective Withdrawal Date parameter is set to
Y, the date used
for the effective withdrawal date is selected from the student's withdrawal
record (
SFRWDRL_EFF_WDRL_DATE). When no SFRWDRL record
exists or when the Effective Withdrawal Date parameter is set to
N, the
date used for the effective withdrawal date is selected from the student's
enrollment record (
SFBETRM_ESTS_DATE).
5.
F - Full-time; H - Half-time; or L - Less than Half-time (conditionally requires status
date)
A student who has a registration term header record, but is not deceased, graduated,
on an approved leave of absence, or withdrawn, is considered to be actively enrolled,
and their maximum time status history record that is less than or equal to the reporting
date will be examined to determine the enrollment status. A status date is reported
when a student drops from a "higher" status to a "lower" status in a subsequent report
to the Clearinghouse during the same term.
A drop from a higher to a lower status would include: from full-time to half-time; from
full-time to less than half-time; and from half-time to less than half-time. When a drop
in enrollment is determined, the status date is selected from the (Time Status) Date in
the Time Status History window in SFAREGS for the maximum time status history
record that is less than or equal to the date of the report currently being submitted to
the Clearinghouse. A status date is not reported if a student increases from a lower
status to a higher status in a subsequent report to the Clearinghouse during the same
term.
Overall Data Requirements
The following are set-up requirements which only need to be completed once.
Establish Time Status Codes
Codes and descriptions for institutionally defined student time statuses should be
established on the Time Status Code Validation Form (STVTMST). For each code, a
National Student Clearinghouse (NSC) equivalent value must be designated.
Note: An exception to this is a code and a rule which must be built for
0.00 minimum and 0.00 maximum credit hours applicable to each student
level and a system-required code of
99 - Error Calculating Time Status -
refer to the section on establishing Time Status Rules below for more
detailed information.

1118
Banner Student User Guide | Registration
The NSC equivalents are limited to three specific values: F for full-time, H for half-time,
and
L for less than half-time. It is possible that an institution may have multiple time status
codes that would equate to the same NSC equivalent. For example, an institution may
wish to distinguish between three-quarters and half-time enrollment with separate codes.
For purposes of reporting to the Clearinghouse, both of these codes would be equivalent
to
H - half-time.
Establish Time Status Rules
Institutionally specific student enrollment time status rules should be defined on the Time
Status Rules Form (SFATMST). When establishing rules, the following guidelines are
recommended.
1. Include rules for all valid student levels for time status calculations.
Note: (Student) Level is not a required field on the form. If a rule does
not include a specific student level, it will apply to all student levels that
may exist.
2. For each rule, at least one course level is required in the Time Status Level section.
Enter the course level(s) that should be included in calculating time status for each
individual rule.
3. Build rules so no gaps exist between hour ranges.
For example, if half-time enrollment is at least 6 but not more than 12 credit hours, and
full-time enrollment is 12 credit hours or more, do not specify the half-time rule
minimum and maximum credits as 6 and 11, and the full-time rule minimum and
maximum credits as 12 and 99. If a student can take a combination of courses that will
total to a fractional amount between 11 and 12 (such as 11.5 credits), then the student
will not match a rule. To avoid such a problem, designate the half-time rule minimum
and maximum credits as 6 and 11.99. Equate each rule to an NSC equivalent of either
F - full-time, H - half-time, or L - less than half-time, with the exception noted in item 4)
below.
4. Build a rule that designates both the minimum and maximum credits as 0.00 for every
student level. Do not equate the time status code for this rule to an NSC equivalent.
This rule is needed to accurately reflect a withdrawal from all courses in the Time
Status History window in SFAREGS. A system-required value is not dictated so that a
meaningful institution specific code and description can be built. If such a rule does
not exist, and a student withdraws from all courses, the first record in the display in the
Time Status History window will be the system-required code
99 - Error Calculating
Time Status. (Suggestion: Build one rule, and do not specify a student level, so that
the rule will be selected for all students, regardless of their level, if credit hours drop to
zero (0).)
5. Do not build a rule for the system-required 99 (Error Calculating Time Status) time
status code.
This code is reserved for the purpose of updating and inserting time status records
with the value of
99 when the system is unable to calculate time status. A current time
status code of
99 will alert the user that a problem was encountered when the system
attempted to calculate time status. Please refer to error messages in the Time Status
Calculations section below.

1119
Banner Student User Guide | Registration
6. If necessary, time status rules may be updated in subsequent terms if student
enrollment rules change, by adding rules with a new effective term code.
For example, in term 199301, a student is considered to be half-time if enrolled for at
least 6 but less than 9 credits hours. In term 199601, new rules take effect so that to
be considered half-time, a student must be enrolled in less than 12 credit hours. To
accommodate the change effective in 199601, a new rule should be added with an
effective term of 199601 with the new minimum and maximum credits.
Establish Institution FICE Code for Reporting
Enter the correct FICE code for your institution in the Institution FICE Code field on the
Academic History Control Form (SHACTRL). The FICE code entered is reported in the
extract file that is sent to the Clearinghouse. This field is not currently used for any other
purpose in the Banner Student System.
Establish Term Control for Time Status Calculation
The following is a set-up requirement which needs to be completed on a term-by-term
basis.
For each term that student enrollment information should be reported to the
Clearinghouse, set the Calculate Time Status (Indicator) on the Term Control Form
(SOATERM) to
Y or checked if dynamic time status calculations should be performed in
online forms that add or update credit hour (non-CEU hour) enrollment. As an alternative
to performing time status calculations dynamically, time status records can be created in
batch with the Time Status Calculation Update Process (SFRTMST). (See additional
information about the SFRTMST process in the “Time Status Calculations” section below.)
This indicator defaults to
N or unchecked when controls are initially created for a new
term.
Establish Time Status Hours
You can retain previous hours on a course before a dropped/withdrawn status is recorded
for use in the time status calculations as defined in the time status rules. The Count in
Time Status (Indicator) on STVRSTS is used to provide control of the hours to be used in
time status calculations. When the Count in Time Status (Indicator) is checked, the time
status hours are set to the last credit hour value that was counted in enrollment for the
course. When the indicator is unchecked, the time status hours are set to zero for the
course. This allows an institution to set the Count in Enrollment (Indicator) to
unchecked for institutional processing without impacting the time status calculation. The
time status calculation process will produce a sum of the time status hours values that is
displayed on SFAREGS.
Establish Attempted Hours
You can retain hours that existed on a course before a dropped or withdrawn status was
recorded so they are counted in the attempted hours for GPA data in academic history.
The Count in Attempted (Hours Indicator) on STVRSTS is to control attempted hours
that will be rolled to academic history. When the Count in Attempted (Hours Indicator) is
checked, attempted hours are set to the last credit hour value that was counted in

1120
Banner Student User Guide | Registration
enrollment for the course. When the indicator is unchecked, the attempted hours are set to
zero for the course.
Note: Attempted hours are displayed on SFAREGS and SFASTCA.
SHATCKN also displays the institutional course attempted hours that
have been rolled after grading.
The Count in Enrollment (Indicator) on STVRSTS can be unchecked, and credit hours
will be
0.000, but the Financial Aid Satisfactory Academic Progress processing will
report the hours in academic history. that existed prior to the withdrawal or drop. This
allows an institution to set the Count in Enrollment (Indicator) to unchecked for other
institutional processing without impacting the attempted hours that are rolled to history.
Establish Withdrawn Enrollment Status
The Third Party Withdrawal Indicator on STVESTS is used to determine the withdrawn
status of a student for NSC/NSLDS reporting. It also provides reporting that will not affect
the return of financial aid funds, due to a mismatch in reporting based on a student’s
withdrawal from a course.
If the Third Party Withdrawal Indicator is checked for the student’s enrollment status
code, the student will be reported as withdrawn to the NSLDS or NSC through the
Clearinghouse Extract Report (SFRNSLC) and the NSLDS SSCR Process (SFRSSCR). If
the Third Party Withdrawal Indicator is unchecked for an enrollment status code that is
assigned to a student on SFAREGS, even if the Affect Headcount (Indicator) is also
unchecked, the report processes will not consider the student as withdrawn and will report
the last time status for the student.
The Third Party Withdrawal Indicator allows institutions to report a student as withdrawn
for NSC/SSCR reporting purposes, even though the student may still be enrolled at the
institution. For example, a student may drop all regular credit courses but may still be
enrolled in CEU (Continuing Education Unit) courses. This permits the Affect Headcount
(Indicator) to be set as needed for other processing and reporting, such as unduplicated
headcounts.
Establish Leave of Absence for Reporting
The Third Party Report Indicator on STVLEAV indicates whether a leave of absence is
to be selected from the general student record and reported as a leave by the
Clearinghouse Extract Report (SFRNSLC) and the NSLDS SSCR Process (SFRSSCR).
This allows institutions to define leave of absence codes that should not be reported to the
Clearinghouse or NSLDS by setting the Third Party Report Indicator to
N or unchecked.

1121
Banner Student User Guide | Registration
Time Status Calculations
This section discusses using time status with registration.
Update and Insert Time Status Records
As mentioned above, the value of Y or checked for the Calculate Time Status (Indicator)
on the Term Control Form (SOATERM) results in dynamic time status calculations and
update and insert of time status records on the Student Course Registration Form
(SFAREGS), the Registration Mass Entry Form (SFAMREG), and in the Telephone
Registration processing. These time status calculations write a time status history record
when a time status is calculated for the first time in the term, and also when a change in
time status has been calculated. The history of status changes is stored in the time status
history table.
In addition, the most recently calculated time status is updated and stored on the
registration term header record. User overrides to calculated time statuses are permitted
in the Student Course Registration Form (SFAREGS). Detailed time status processing
information on the individual forms is described below.
Dynamic Calculation of Time Status and Update/Insert of Records
Note: Time status calculations occur in SFAREGS, SFAMREG, telephone
registration, and Web registration only when the Calculate Time Status
(Indicator) on SOATERM has been set to
Y or checked. No messages
are included in those forms to inform the user that the indicator is set
either to
Y (checked) or N (unchecked) on SOATERM.
In SFAREGS, SFAMREG, telephone registration, and Web registration, where processing
can affect a student's total credit hours enrollment (CEU credit hours are not included in
Clearinghouse processing and reporting), the existing time status code is “remembered” in
the form prior to the occurrence of any processing. After processing has been completed
in each form and you perform either an Exit or Rollback function, the total credit hours as a
result of processing are read from the database, and the current/new time status is
retrieved from the database.
Within each form, the previously existing ("remembered") and the current/new time status
codes are compared, and if they are different, a time status history record is inserted, and
the registration term header record is updated. The calculation uses the time status rules
on the Time Status Rules Form (SFATMST) and determines the time status code that
matches the qualifying credit hours enrollment.
SFAREGS - System Time Status Calculations, Functionality, and Error
Messages
During student course registration processing, a student's enrollment time status is
calculated after additions and/or changes have been completed and saved in the form,
and you perform an Exit or Rollback function. Changes in student information, such as
college, campus, degree, major, or student type, may or may not result in a change to a
previously calculated time status, depending on whether institution-specific rules exist for

1122
Banner Student User Guide | Registration
differences in any one or more of those characteristics. Changes in course registration
and/or student information may or may not cause a new time status to be calculated,
depending on the rules that have been established.
The autohelp message *WARNING* Unable to calculate time status. Check rules on
SFATMST displays if time status calculations have been enabled on the Term Control
Form (SFATMST), but no time status rule can be found which matches the range of hours,
student characteristics, and course levels that exist in the student's registration record.
When this message displays, the system inserts a time status history record with the
system-required code of
99 - Error Calculating Time Status, and also updates the
registration term header record with the code of
99. The error should be investigated by
examining the rules on SFATMST.
After the problem has been found and corrected, the student registration where the error
occurred should be accessed again on SFAREGS. Performing two Next Block functions
(cursor will be in the Course Registration section), Save, then a Rollback or Exit function
will update the time status calculation, if appropriate. Correcting the problem will not delete
the time status history record of
99. That record remains as an historical record, and the
new record will be inserted.
Note: Refer to the Time Status Calculation Update Process (SFRTMST)
in the Banner Student Reports Handbook for an alternative to online
reprocessing when problems with the time status rules have been found
and corrected.
To view the history of student enrollment time statuses that have been calculated, select
View Time Status Information from the Options Menu or perform a Duplicate Item function
from the ID or Date fields when you are in the Key Information of the form. This displays
the Time Status History window. The time status records are displayed in reverse
chronological order (most recent changes first). An Edit function can be performed on the
(Time Status) Date field in the window to display the full date and time that the time status
calculation was performed, in the format DD-MON-YYYY HH24:MI:SS. No fields in the
display are updateable, and existing records cannot be deleted.
The Time Status History window cannot be accessed unless registration exists for the
term (at minimum a registration term header record). If you attempt to access the Time
Status History window when no registration exists, the message *ERROR* Registration
MUST exist for term before updating time status history displays. The source of the
calculation, either SYSTEM or USER will display. The Banner user ID (Oracle ID) of the
user associated with both SYSTEM and USER calculations is stored in the time status
history table, but is not currently displayed online. For auditing purposes, access to that
information is available by authorized personnel through SQL*Plus.
When a time status history record is added, the registration term header record is also
updated with the new/current time status code, time status date, time status maintenance
indicator (either “S” -SYSTEM or “U” - USER), and the Banner user ID (Oracle ID)
responsible for the update to the record. The Banner user ID field from the time status
history record, as well as from the registration term header record, is not displayed from
any existing form in the Student System, but for auditing purposes, access to that
information is available by authorized personnel through SQL*Plus. The other fields are
displayed in the Time Status History window on SFAREGS. (The values actually displayed
are from the time status history table, and not from the registration term header table, but
they would be the same.)

1123
Banner Student User Guide | Registration
Overriding System Time Status Calculations
Time statuses that have been calculated by the SYSTEM can be overridden by the USER.
To override a previously calculated time status, first access the Time Status History
window in the Key Information of SFAREGS. Next, perform an Insert Record function, and
add the override time status code that is appropriate. If desired, the List function can be
performed from the Time Status (Code) field to display the valid time status codes from
the Time Status Code Validation Form (STVTMST). The time status date on the added
record will default to the current date, but may be overridden. The Source will default to
USER.
After the USER record has been added and saved, it cannot be modified or deleted. If an
incorrect time status was entered, either a new record should immediately be added with
the correct time status, or the existing record should be updated in the time status history
table by authorized personnel through SQL*Plus.
Note: Once a USER override time status history record exists,
subsequent SYSTEM time status calculations will not occur for the
student for that particular term.
If registration changes after a USER time status history record exists, the message
*WARNING* Time status information MUST be updated manually is displayed on autohelp
line of the Student Course Registration Form (SFAREGS).
Users who have access to add and/or update registration information on SFAREGS also
have access to add manual (USER) time status history records in the Time Status History
window. There is no separate form level security access for the window. Users can
selectively be prevented from being able to add manual (USER) time status history
records by controlling grants to the time status history table.
Back Dating Registration
If you back date the date in the Key Information of SFAREGS, be aware that the time
status history record that may be calculated and inserted will be date stamped with the
current date (Time Status Date). If desired, a user-added time status record may be added
with the back-date. Also note that if a user time status record is added with a time status
date that is chronologically earlier than the system calculated record, no future system
calculations will occur, because an indicator has been set on the registration term header
record.
SFAMREG - System Time Status Calculations, Functionality, and Error
Messages
A time status calculation is performed for each student added or dropped from a section,
and a new time status history record is created if appropriate. If an appropriate rule cannot
be found to calculate a new time status for a student the message *WARNING* Unable to
calculate time status for ID <student ID>. Check SFATMST rules is displayed in the
Message field in the Results window.
When this message displays, the system inserts a time status history record with the
system-required code of
99 - Error Calculating Time Status, and also updates the
registration term header record with the code of
99. Each problem should be investigated
1124
Banner Student User Guide | Registration
and resolved by examining the rules on the Time Status Rules Form (SFATMST). After
each problem has been corrected, the student(s) with the error(s) should have their time
statuses updated properly. Correcting the problem and recalculating time status will not
delete the time status history record of
99. The 99 record remains as an historical record,
and the new record will be inserted. How this is done depends on whether the course that
was dropped was also deleted, and also on the user's preference for updating dynamically
online or in batch at a later date. If desired, updates in batch can be performed by the
Time Status Calculation Process (SFRTMST) at an appropriate time.
Note: Refer to the Time Status Calculation Update Process (SFRTMST)
in the Banner Student Reports Handbook for detailed information about
batch time status processing.
If a manual (USER) time status history record exists for a student being processed on
SFAMREG, the message *WARNING* Time status history for ID <student ID> MUST be
updated manually is displayed in the Message field in the Results window. When this
warning message displays, institutional policies and procedures will determine if the user
should update the time status history manually in the Time Status History window in the
Student Course Registration Form (SFAREGS).
Note: The warnings that are detected by the Student Course Registration
Form (SFAREGS) and the Registration Mass Entry Form (SFAMREG)
are not considered to be fatal errors, and do not stop or interfere with
processing of course registrations.
Telephone Registration Processing - System Time Status Calculations,
Functionality, and Error Messages
Please refer to the Banner Voice Response user documentation for more information on
telephone registration processing.
Because of technical and procedural issues, checks for the warning conditions in
SFAREGS and SFAMREG are performed in telephone registration processing for either a
rule that cannot be found, or a time status that must be updated manually, but the display
of the warning messages has been inactivated. These messages are not displayed in the
form processing, because the calculations and error checking cannot be performed until
the user either Exits or performs a Rollback after Saving. You may hang up the phone after
receiving confirmation of registration and are not technically required to perform an Exit or
a Rollback. Therefore, there is no guarantee that a warning message would be
consistently conveyed and appropriate follow-up would occur.
As with SFAREGS and SFAMREG, if an error is encountered in attempting to calculate
time status, a time status history record with the system-required value of
99 - Error
Calculating Time Status is inserted into the time status history table, and the registration
term header is updated with the
99 code. These errors will be identified later by either the
Time Status Calculation Update Process (SFRTMST) and/or the Clearinghouse Extract
Report (SFRNSLC). As is the same case with SFAREGS and SFAMREG, the warnings
are not considered to be fatal errors, and do not stop or interfere with the processing of
course registrations.

1125
Banner Student User Guide | Registration
SFPFREQ - System Time Status Calculations, Functionality, and Error
Messages
The Course Request Update Process (SFPFREQ) inserts course registration records via
a parameter which optionally calculates and adds a time status history record for the
processing term. If this process was run without calculating and adding time status history
records initially, the Time Status Calculation Update Process (SFRTMST) could be run at
a later time to create and update the time status records.
Batch Calculation and Update/Insert of Time Status Records
The Time Status Calculation Update Process (SFRTMST) calculates time status and
updates/inserts time status records if appropriate in a batch mode. If dynamic time status
calculations have not been enabled for the term by setting the Calculate Time Status
(Indicator) on SOATERM to
Y or checked, or if the indicator has been turned on and off
one or more times during the term, this process must be executed to calculate students'
time statuses and update/insert time status records that are needed for the Clearinghouse
Extract Report (SFRNSLC).
This process uses the Count in Time Status (Indicator) on STVRSTS for each course
registration status code on each CRN to determine which sections are included in the time
status calculation. The time status calculation will use the sum of the credit hour hold
values (
SFRSTCR_CREDIT_HR_HOLD) where the Count in Time Status (Indicator) is
set to Y. Therefore, if the Count in Time Status (Indicator) is checked for a course
registration status code on STVRSTS, the
SFRSTCR_CREDIT_HR_HOLD value will be
used. Otherwise, time status hours will default to zero for the course. This allows an
institution to set the Count in Enrollment (Indicator) to any value needed for institutional
processing and without creating any processing issues for the time status calculation.
The SFRTMST process should be run in audit mode first to review any error conditions
that may need to be resolved before making permanent changes to the database in
update mode. The process can be run in audit mode as many times as desired without
any adverse effects on the data. For example, the process can be run multiple times in
audit mode for different combinations of campus and/or level so that individual outputs can
be directed to appropriate offices, departments, or individuals for review. After necessary
corrections have been made, it is recommended that update mode be processed for all
levels and campuses, so that all students are updated simultaneously.
The process selects all students registered for the term, and determines if the existing
time status in the database is the same as the time status that is calculated when the
process is run. If the calculated time status would be different, the student is selected for
printing on the report. For each selected student, the existing time status code (if one
exists), the revised time status code (what the current calculated time status would be),
and an appropriate comment are printed on the report. The following is a list of all of the
possible comments which could be included in the output, and a description of what each
indicates. The comments fall in two groups: 1) comments indicating that the status of a
student is different from one of the “enrolled” statuses (either
F - full-time, H - half-time, or
L - less than half-time) and that they do not have a time status reported; and 2) comments
pertinent to enrolled students who require a time status to be reported.
The process also calculates the student centric period time status in addition to the
existing term time status when the student has a cycle designator in effect for the
registration term and CRNs being processed. A new student centric period time status

1126
Banner Student User Guide | Registration
history record is inserted in SFRSTSH if the time status for the student centric period has
changed since the last update. If the time status has not changed, no additional record is
created. When a student has a manually inserted time status record, no additional time
status record is inserted.
Comments for students with statuses that do not have a time status reported:
Comments for enrolled students who require a time status to be reported:
1. MUST be updated manually
This indicates that the most recent time status history record for the student is a
USER-entered override time status. These students should be reviewed to determine
if the USER time status code is still appropriate. If any student with a USER time
status should be updated, the update could be performed by adding another USER
(manual) time status in the Time Status window in SFAREGS, or the existing
registration term header record could be updated in SQL*Plus by authorized
personnel. If the registration term header record is updated to allow SYSTEM time
status calculations to resume, the existing USER time status history record remains as
a historical record, but subsequent changes, if any, to the student's enrollment may
result in additional (future) SYSTEM time status records.
2. ERROR - Must be resolved
This message appears when an error is encountered when the process attempts to
calculate the student's current time status. The system-required
99 (Error Calculating
Time Status) displays as the revised code on the printed output. You must diagnose
and resolve the problem. It is likely that a problem exists in the Time Status rules. You
should investigate the student's current registration, and compare the student's
characteristics and levels of the registered courses against the existing Time Status
Rules to determine the problem. After correcting any problems with the Time Status
Rules, the SFRTMST process can be run again. If the changes have successfully
resolved the problems that caused the
99 codes to display on the report, the 99
codes should now be replaced by other “real” calculated time status codes.
3. **
A legend centered at the beginning of the report output indicates that the students will
have their time status updated if the process is run in update mode. The number of
students in this group may be significantly large if dynamic time status calculations
have not been enabled for all or part of the term. When the Calculate Time Status
(Indicator) on SOATERM has been set to
N prior to running this process, there will be
no value in the column displaying the existing time status on the report output.
If all enrolled students for the term have time status records that are current, and there are
no students who are deceased, graduated, withdrawn, or on leave of absence, and if there
are no enrolled students with USER (manual) time status records, the output of SFRTMST
will print the statement No Time Status Records to be Updated.
1. Deceased - Student is deceased
2. Withdrawn - Student has withdrawn
3. Graduated - Student has graduated
4. Leave of Absence - Student is on a leave of absence

1127
Banner Student User Guide | Registration
The process can be used to serve several purposes. First, it can be used to update/insert
time status records after certain errors, such as gaps or other types of errors in Time
Status Rules, have been corrected. If the process does update/insert time status records,
the value of “SFRTMST” will be inserted in the USER field in both the registration term
header record and the time status history record. Second, it can be used to verify that
students with USER (manual) time statuses are valid. Third, it can be used to detect
procedural inconsistencies. An example of a procedural inconsistency would be when a
student has a time status that equates to the institution rule where minimum and maximum
credit hours are zero (0), and has actually withdrawn from the institution, but displays on
the output. This would be an indication that the student's enrollment status had not been
changed to a status (SFAESTS for the registration term) where the Third Party
Withdrawal Indicator was set to
Y or checked (STVESTS).
Warning! The timing of the execution of this batch process is critical.
Time statuses are calculated and time status history records updated/inserted with an
activity date that is equal to the day the process is executed. If, for example, your
institution determines time statuses will always be processed in batch, careful
consideration must be given to the dates when the batch process should be executed so
that the information that is reported to the Clearinghouse is accurate as of the intended
reporting dates. It is not possible to calculate time status and insert time status history
records as of a point in time in the past, because a complete historical audit of course
registration changes is not available in the database. If a report needs to be submitted to
the Clearinghouse on September 10, the batch process would need to be executed prior
to September 10.
The batch process allows you to control the frequency of the calculation of time status and
update/insert of time status history records. Depending on the frequency of execution,
some historical changes may not be reflected when reviewing a student's time status
history online in SFAREGS. For example, consider the following registration history for a
student, and assume that the Calculate Time Status (Indicator) on SOATERM has been
set to
N or unchecked:
Example registration changes:
Example batch processing and update of time status history:
If the batch process was run for the first time on September 2nd, this student would have a
time status history record indicating full-time status inserted for that date. If the next batch
process was run on September 10th, this student would now have a new time status
history record inserted, because their current time status is half-time. The batch process
September 1 13 credit hours Full-time status
September 6 8 credit hours Half-time status
September 15 12 credit hours Full-time status
September 2 Full-time status
September 10 Half-time status

1128
Banner Student User Guide | Registration
provides point-in-time updates to time status history, but would not reflect changes that
may have occurred between the distinct points in time of batch updates.
If the date of the first report to the Clearinghouse was September 20, the student would be
reported as half-time. This would not be correct, because the student had actually added
additional courses on the 15th of September which returned them to full-time status.
Because the batch time status update was not run after September 15th, the time status
was not updated/inserted properly.
Warning! Time status cannot be calculated for a point in time in the past,
because a complete history of all registration changes is not available in
the database. The Clearinghouse report depends on timely and accurate
information in the time status history table. It is critical that batch time
status calculations are planned, so that time status history data is current
and accurate for Clearinghouse reporting.
Reporting to the Clearinghouse (SFRNSLC)
Your institution should contact the Clearinghouse directly to arrange for transmission of
EDI or EDI.Smart™ extract files. The Clearinghouse can accept files that are sent using
FTP, as well as files sent on diskette. The Clearinghouse can be contacted as follows:
Report Processing Overview
The Clearinghouse Extract Report (SFRNSLC) includes three run mode options:
1. report of missing or invalid data,
2. EDI output, and
3. EDI.Smart output.
Prior to extracting and submitting the extract file to the Clearinghouse, the report should
be run in the missing or invalid data mode as many times as needed to detect and then
correct certain types of errors, as described in the next section. In addition, if the
Calculate Time Status (Indicator) on SOATERM has been set to
Y or checked, the Time
Status Calculation Update Process (SFRTMST) should be run to update/insert time
history records prior to creating the extract file so that students' time statuses are current.
Either the EDI or EDI.Smart output run mode options will produce the extract file of
student enrollment information which is submitted to the Clearinghouse.
National Student Clearinghouse
13100 Worldgate Drive, Suite 245
Herndon, VA 22070
Phone number: (703) 742-7791
Fax number: (703) 742-7792

1129
Banner Student User Guide | Registration
Identifying and Correcting Missing or Invalid Data
The report of missing or invalid data detects the following problems with data, which must
be fixed by users or authorized technical personnel either online or through updating the
database through SQL*Plus, or other programmatic means.
The following are the error messages that may print on the report, the source of the error,
and what is required to fix the error:
• No Institution FICE code on SHACTRL
This message indicates that the Institution FICE Code field on the Academic History
Control Form (SHACTRL) is blank. The correct institution FICE code should be entered
online in the form.
• No SSN Number on SPAPERS
This message indicates that the SSN/SIN/TIN (Social Security Number, Social
Insurance Number, Tax Identification Number) field on the General Person Form
(SPAPERS) is blank. The social security number is required for all students that are
reported to the Clearinghouse. A social security number must be entered in this field,
even if it is used as the student’s ID number.
• No Date of Birth on SPAPERS
This message indicates that the Birth Date field on the General Person Form
(SPAPERS) is blank. The date of birth is not required for all students that are reported to
the Clearinghouse, but it is recommended. When a record is submitted with a blank birth
date, zeroes are inserted in place of the birthdate.
A DMG segment exists in the records after the IN2 segment with 7 segments, where
only the second segment needs to be populated with the date of birth from SPAPERS
(
SPBPERS_BIRTH_DATE).
For example, for Daniel Earp ( ID is @00000976), with birthdate of Feb. 27, 1934, with
format CCYYMMDD:
ST|190|000000126
BGN|11|000000126|000228|1350|ES
ENR|EB4|UN||||||||Y|Y|D8|20000228
DTP|382|RD8|19970901-19971215
DTP|007|D8|19981219
ENT|01|S2|34|
IN2|02|Daniel
IN2|05|Earp
DMG||19340227||||||<--------------------here
N3|123 Easy Street
N4|Malvern||193554209
ENT|02|M8|DS|999900||||U2|Fall 1997
SE|12|000000126

1130
Banner Student User Guide | Registration
• No Address on SPAIDEN
This message indicates that address information could not be found for the address
hierarchy that was entered. For example, if 1MA and 2 PR were the address types
selected for the report, this message would indicate that neither an MA or PR address
type could be found for the student. If it appears that the student does have an address
that matches the hierarchy that was entered, the error message is probably caused by
the effective date of the address not being valid for the report date. (The effective date of
the address needs to be prior to the report date; addresses effective the same date as
the report date are not selected.)
Address information is required for all students that are reported to the Clearinghouse.
An address with an effective date prior to the report date must be entered that will match
the address hierarchy that is used for the report.
• No Expected Grad Date on SGASTDN
Students who have been identified as full-time, half-time, or on a leave of absence
require the expected graduation date to be reported. This message indicates that the
Expected Graduation Date on the General Student Form (SGASTDN) is blank. An
expected graduation date must be entered in this field. This field is located in the
Graduation Data window, which is accessed by selecting Graduation Status from the
Options Menu.
Note: The expected graduation date on the general student record will
roll to the (Anticipated) Graduation Date on the Degrees and Other
Formal Awards Form (SHADEGR) during the first grade roll to academic
history, (either performed online with the Class Roster Form (SFASLST)
or in batch with the Grade Roll to Academic History (SHRROLL)).
• No Graduation Date on SHADEGR
Students who have been awarded a degree (have a status of graduated) require the
(anticipated) graduation date to be reported. This message indicates that the
(Anticipated) Graduation Date on the Degrees and Other Formal Awards Form
(SHADEGR) for a degree with an Awarded Indicator of
A (from the Degree Status
Code Validation Form (STVDEGS)), where the level of the degree matches the level of
the current general student record, is blank. An (anticipated) graduation date must be
entered in this form.
• No Time Status on SFAREGS
Students who are enrolled for the term must have a time status history record that has
been created before the reporting date so the time status can be reported. This
message indicates that no time status history record exists for the student, because an
error described previously in SFAREGS or SFAMREG processing was not resolved, or
because an error prevented time status from being calculated in telephone or Web
registration, or because the Calculate Time Status (Indicator) was not set to
Y or
checked on SOATERM when registration processing occurred. The Time Status
Calculation Update Process (SFRTMST) should be executed to calculate time status
and update/insert time status records that are missing. If any errors prevent the batch
calculation of time status and/or the update/insert of a time status history record, the

1131
Banner Student User Guide | Registration
specific error will be described on the report output of the SFRTMST. Depending on the
error, corrections (such as changes to the Time Status Rules) may be required online.
• No NSC Equiv for <time status code> on STVTMST
If this message displays with your institution time status code for 0.00 minimum and
0.00 maximum credit hours, it means that the enrollment status for the student's
registration record has a Third Party Withdrawal Indicator of
N or unchecked on the
Student Enrollment Status Validation Code Form (STVESTS). Students who withdraw
completely from classes must be updated on SFAREGS with a student status that has
the Third Party Withdrawal Indicator set to
Y or checked on STVESTS. If a student
drops all courses (credit hour total would be zero (0) for the term), but the student
enrollment status does affect the headcount, the Clearinghouse Extract Report will
select the student as enrolled for the term.
• Time Status Calc Error on SFAREGS
This messages indicates that either an error exists which prevents the student's time
status from being calculated successfully, or the student's time status was not
recalculated either online or in batch after appropriate corrections were made following
a diagnosis of the cause of the problem. Viewing the time status history record on
SFAREGS displays the system-required code of
99 (Error Calculating Time Status) as
the most recent time status. The error should be diagnosed and the problem corrected.
It is likely that there is a problem with the time status rules. After the problem is
corrected, the time status can be recalculated online in SFAREGS or in batch with
SFRTMST.
The process should be run in the report of missing or invalid data mode as many times as
necessary, and all errors resolved until the message No invalid or missing data for the
<term code> term prints on the output. When that message displays, it indicates that all
the preceding error conditions have been resolved.
The process does not check for the following types of conditions or errors:
1. Use of fields for purposes other than that designated for baseline processing.
For example, a different type of number other than social security number is stored in
the SSN/SIN/TIN (Social Security Number, Social Insurance Number, Tax
Identification Number) field on the General Person Form (SPAPERS). Institution-
specific use of the leave of absence fields and the student enrollment status fields
should be examined for possible problems in reporting to the Clearinghouse (see
previous section on Identifying and Correcting Missing Data discussed in the
Reporting to the Clearinghouse section).
2. User updates to time status codes and rules during a term.
Changes made to Time Status codes and rules will not cause prior existing time status
history records to be recalculated and updated. Rules should be tested thoroughly
prior to implementing in production to avoid changes after time status history records
exist for a term. If rules are modified, the Time Status Batch Calculation process
(SFRTMST) could be run to update students' time status records, if applicable, based
on changes to the Time Status Rules. This situation should be avoided, because time
status cannot be recalculated for a point in time in the past.

1132
Banner Student User Guide | Registration
Creating the Extract File for Submitting to the Clearinghouse
After all errors have been resolved, the Clearinghouse Extract Report (SFRNSLC) can be
run in either the EDI or EDI.Smart mode to produce the flat file that can be submitted to
the Clearinghouse. Only institutions that have licensed EDI.Smart and have contacted the
Clearinghouse and made appropriate arrangements for the transmission of an EDI.Smart
file should select that run mode.
You can use population selection when creating the extract file, to create the population
that is reported based in institutionally defined needs. This also allows you to report time
status for students each time the process is run, regardless of the amount of credits they
are registered for. The SFRNSLC process will select students in the population selection,
and any students that do not have an SFBETRM record will be listed on the output, when
the Run Mode parameter is set to
1.
SFRNSLC is run by term using the Process Term parameter. When SFRNSLC is run with
the Process by Student Period parameter set to
Y, the process checks the rules on
SOASCPT to determine which student centric period includes the value entered in the
Process Term parameter as the last term. The data comes from the SFASTSR and
SFASCPR forms. All term codes that are part of the student centric period are considered,
as is the order in which the terms fall within the student centric period. When SFRNSLC is
run for a single term, the data comes from the SFATMST form.
The possibility exists, when using population selection, that a student may have multiple
time status records, and a change in the status record be reported to the NSC even if the
student was never previously reported. In this case, if a student is submitted to the NSC
with a change of status, and that student was not previously submitted, the NSC will
continue their current practice of automatically removing the change of status record from
the file and will then submit the students' current status when providing the submission to
the lending institutions.
For example:
On July 1, Student A and Student B both register as full-time students.
On July 15, the institution runs a population selection report for SFRNSLC that
includes only Student A, and the report is submitted to the NSC.
On July 30, Student B drops from full-time to half-time status.
On August 1, the institution runs a population selection report for SFRNSLC that
includes Student B, and the report is submitted to the NSC.
Student B is reported as having a “drop in status”, because he went from full-time to
half-time between the dates of the first and second runs of SFRNSLC, even though he
was not transmitted in the first run. The NSC is receiving a status change record for
Student B, even though they have no prior status for him. The NSC has always, and
will continue to, remove the change of status row for a student who was not previously
reported, prior to submitting the data to the lender.
The report uses the Third Party Withdrawal Indicator on STVESTS to determine
students who have withdrawn. When the Third Party Withdrawal Indicator is checked
for the student’s enrollment status code, the student will be reported as a withdrawn
student to the NSLDS or NSC through the SFRNSLC report. When the indicator is
unchecked, the SFRNSLC report will not consider the student as withdrawn and will report
the last time status for the student that was calculated by the time status rules.

1133
Banner Student User Guide | Registration
The report uses the Third Party Report Indicator on STVLEAV to select the leave of
absence codes for the student. When the indicator is checked, the report will only select
leave of absence codes from the general student record to report the leaves to third
parties.
The Create Summary parameter is used to produce a summary report/overview of the
data to be transmitted to the NCS. This summary can be used to easily view student
information such as: names, Banner IDs, SSNs, dates of birth, enrollment statues, term
start and end dates, and graduation dates. This file is created in addition to the pipe-
delimited files and the missing/invalid data report that are produced by SFRNSLC.
The flat file produced by the SFRNSLC process can be transmitted using an institutionally
defined branch code in the Branch Code parameter. Enter the two digit branch number
code to be associated with the header record and individual records when transmitted in
the file to third party agencies. If left blank,
00 is defaulted in.
• If your institution maintains student records under multiple OE (FICE) numbers or
branch codes, you can run a separate report for each OE number or branch code
combination. For example, you could run one report for the medical school and one
report for all other students.
• If your institution maintains student records under one OE number, but has academic
programs with different terms or mandatory attendance periods, you should consult the
Clearinghouse as to your reporting expectations. (For example, medical schools often
have different attendance periods than undergraduate schools.) You may want to
generate separate data for the different academic programs and differentiate between
them by using an “alternate” branch code or the official branch code.
The files created by SFRNSLC are handled as follows:
• When SFRNSLC is run through job submission (GJAPCTL), three files are created and
stored in the job submission directory:
• sfrnslc_oneup#.log
• sfrnslc_oneup#.lis
• sfrnslc_oneup#.txt
• The sfrnslc_oneup#.log and sfrnslc_oneup#.lis files are viewable on
the GJIREVO form.
• The sfrnslc_oneup#.txt file can be found in the job submission directory.
When the Run Mode parameter is set to
1 (Report of Missing/Invalid Data), no output is
created for the pipe-delimited data file (
.txt). Only the error report (.lis) is created
with a control page and a
.log file.
When the Run Mode parameter is set to
2 (EDI TS190) or 3 (EDI.Smart TS190), and the
Create Summary Report parameter is set to
Y, (create a summary report for Run Modes 2
(EDI TS190) and
3 (EDI.Smart TS190)), the summary report is created (.lis) with a
control page. The pipe-delimited file is created (
.txt), and a .log file is created.
When the Run Mode parameter is set to
2 (EDI TS190) or 3 (EDI.Smart TS190), and the
Create Summary Report parameter is set to
N, (do not create a summary report for Run
Modes
2 (EDI TS190) and 3 (EDI.Smart TS190)), the summary report is created (.lis)

1134
Banner Student User Guide | Registration
with the message: Summary Report Not Requested, and a control page is printed. The
pipe-delimited file is created (
.txt), and a .log file is created.
Initial Reporting Versus Subsequent Reporting for the Same Term
The Clearinghouse Extract Report inserts a row in the SFRTCTL control table each time
run mode
2 (EDI) or run mode 3 (EDI.Smart) is selected. The first report for the term is
identified by the process by determining that the combination of term code and report flag
from the process parameters entered does not currently exist in the control table. As part
of the processing, the row is inserted with the term code, report date, report flag, and
activity date.
A subsequent report for the same term is identified by determining that the combination of
term code and report flag from the process parameters entered does exist in the control
table. If more than one row exists, the most recent row historically is used in the process to
find the report date of the previous run, which is then used to determine if changes have
occurred in student enrollment since the previous report.
Using Multiple Branch and FICE Codes
The SFRNSLC report and the SFRTCTL table process Branch and FICE codes. This
allows institutions to run SFRNSLC for multiple branch campuses and ensures
appropriate time status results.
Four optional scripts are delivered for use by institutions that have already run SFRNSLC
for multiple Branch codes. These scripts allow institutions to alter the control file for terms
that are still being submitted by creating control records for all Branch and FICE codes
that were previously submitted for these terms.
National Student Loan Clearinghouse Data Extract Process Control Table
(SFRTCTL)
The SFRTCTL_BRANCH_CDE (Branch code) and SFRTCTL_INST_FICE (Institution
FICE code) columns on SFRTCTL are used with the Term Code and Report Flag
parameters in SFRNSLC, when the process searches the control table for the record from
the previous submission.
The SFRTCTL_BRANCH_CDE column defaults to 00. The SFRTCTL_INST_FICE
column defaults from the value that exists on SHACTRL. If no Institutional FICE Code
value exists on SHACTRL, it will default to
000000.
Using the Institution FICE Code On SHACTRL
It is strongly recommended that the Institution FICE Code value be entered on
SHACTRL before the Release 8.2 upgrade scripts are run. For institutions that run
SFRNSLC for multiple FICE codes, this would be the FICE code that was last processed
for SFRNSLC. If no Institution FICE Code value exists on SHACTRL, and the column in
the SFRTCTL table is defaulted to
000000, an optional update script
(
susfrtctl.sql, which is described below) can be used to set the column to the
appropriate value.

1135
Banner Student User Guide | Registration
Institutions that do not run SFRNSLC for multiple branches or multiple FICE codes can
ignore the optional scripts. The only exception is, if the Institution FICE Code field on
SHACTRL is
Null when the upgrade is performed, the optional update script must be run
to set the Institutional FICE Code in the SFRTCTL table to the correct value.
Using the FICE Code Parameter on SFRNSLC
The FICE Code parameter on SFRNSLC is optional and supports institutions that use
different FICE codes for different branch campuses. Enter the FICE code to be reported. If
no code is entered, the Institution FICE Code value from SHACTRL will be used. If no
code exists on SHACTRL,
000000 will default.
The FICE code must exist on SHACTRL, or it must be entered in the FICE Code
parameter when the Run Mode parameter is set to
2 (EDI TS190 output) or 3 (EDI.Smart
TS190 output). Submittal
.txt files are no longer produced with the FICE code set to
000000. If no FICE code is provided for Run Modes 2 or 3, the value will default to
000000, and the process will terminate with an error.
Using the Optional Scripts
Four optional scripts are delivered that allow users to view, update, insert, and delete
records from the SFRTCTL table, after the new columns have been added by the upgrade
to Release 8.2.
These scripts only need to be run after the upgrade to Release 8.2. They will not be used
on a continuing basis. Those institutions that have already run the SFRNSLC process for
multiple Branch or FICE codes in terms that are still active will use these scripts to bring
the control table up to date, so that records exist for all the Branch and FICE codes that
have already been submitted. After that, SFRNSLC will insert the control records for the
correct Branch and FICE codes, whenever the process is run in modes
2 or 3.
Institutions that do not run SFRNSLC for multiple Branch codes or multiple FICE codes do
not need to run any of the optional scripts, unless the Institution FICE Code value on
SHACTRL was
Null at the time of the upgrade.
No wildcard values (%) may be entered for these scripts. A specific value must be entered
for each prompt that is displayed. When a date and/or time is requested, enter the date
and time in the format presented, with a single space separating the date and time
components.
No commits are performed by the scripts. After running the update, insert, or delete script,
you can review the changes by re-running the report script (
srsfrtctl.sql), to see
the effect of the update, insert, or delete process. At that point, you can decide whether
you want to save the changes or roll them back.
Report Script - srsfrtctl.sql
The
srsfrtctl.sql script is run for the Term and will display SFRTCTL records that
exist for the entered term. The
sfrtctl.lis file is produced, so you can review the
output.

1136
Banner Student User Guide | Registration
Note: If the report script is run multiple times, the output file will be
overwritten each time. If you want to preserve any particular output from
the report script, rename the existing
sfrtctl.lis file before re-
running the script.
Update script - susfrtctl.sql
The
susfrtctl.sql script can be run to update the Branch code and FICE code to
the appropriate values on existing SFRTCTL records. (For example, if the institution last
submitted a report for the Branch code of
03, they can use this script to update the Branch
code on the existing record to
03). Prompts are explanatory as the script is executed.
Insert script - sisfrtctl.sql
The
sisfrtctl.sql script can be run to insert records for other Branch codes and
FICE codes that were previously run for the term. If an institution last ran SFRNSLC for
the Branch code of
03, they can now insert SFRTCTL records that reflect their previous
submissions of Branch codes
01 and 02.
Delete script - sdsfrtctl.sql
The
sdsfrtctl.sql script can be run to delete records from the SFRTCTL table,
should there be a need to do so. It contains prompts for Term, Report Date/Time, Standard
Indicator, Branch Code, and FICE Code. Only the records that match all entered values
will be deleted.
Processing Recommendations for Creating the Extract Files
Time delays should be avoided between obtaining the message of No invalid or missing
data for the <term code> term when running the Clearinghouse Extract Report in the
report of missing or invalid data mode and producing the extract file to send to the
Clearinghouse.
Data entry changes even in a short period of time could result in errors being introduced
before the data is extracted. Optimally, the processing should be run during off hours to
minimize possible additions or updates to data which could introduce new errors.
Subsequent reports to the Clearinghouse for the same term rely on comparing the
students' statuses from the previous report to determine any changes in enrollment and
reporting of status start dates, if required. A control table is used to store the term, report
date, report flag, and activity date each time the EDI or EDI.Smart TS190 output is created
by the Clearinghouse Extract Report. For consistency, the user responsible for processing
the extract file that is submitted to the Clearinghouse must use the same parameter values
for each submission during the same term. It is recommended that the Job Parameter Set
Default feature in job submission, which allows a user ID to store more than one set of
parameter defaults for the same job, be used to save the parameters that are used each
time to process the Clearinghouse Extract file. With this information available online, you
can recall the previous set of parameters submitted, update them by changing only the
report date, and then save the change to a new job parameter set name.
If an error occurred and was detected in the process of creating the extract file, and the file
needed to be created again (either problems with data or incorrect parameters, entered,

1137
Banner Student User Guide | Registration
etc.), it is necessary for authorized personnel to delete the appropriate row or rows from
this table in SQL*Plus. This must be done, because subsequent reports for the same
combination of term and report flag compare the control table report date from the
previous processing date to the time status history table to determine if changes in student
enrollment status have occurred.
Job Stream Processing Alternatives and Recommendations
There are three basic alternatives to job stream processing for reporting to the
Clearinghouse. The processing flow is dictated by when, and if, the Calculate Time
Status (Indicator) on the Term Control Form (SOATERM) is set to
Y. The options, on a
term-by-term basis, for this indicator are:
1. always set to
Y or checked,
2. always set to
N or unchecked, or
3. sometimes set to
Y (checked) and sometimes set to N (unchecked).
If processing demands are heavy during peak periods of registration activity, it may be
advisable to set the Calculate Time Status (Indicator) to
N or unchecked. If the indicator
is set to
N or unchecked, you should determine, in conjunction with technical personnel,
when the Time Status Calculation Update Process (SFRTMST) should be executed. It
may be desirable to run this process nightly, possibly in conjunction with registration fee
assessment. If it is important to your institution to track all enrollment status changes and
the precise dates on which they occur for institutional reporting purposes, it is advisable to
run this process daily if the SOATERM indicator is set to
N or unchecked.
If the Calculate Time Status (Indicator) on SOATERM is set to
N or unchecked during
any period of activity that affects registration (online in SFAREGS, SFAMREG, telephone
registration, and Web registration), it will be critical to run the Time Status Calculation
Batch Process (SFRTMST) at a minimum of the day before it is necessary to submit an
extract file to the Clearinghouse. It would be advisable to run the batch process to double
check for errors that may not have been resolved, even if the indicator had been set to
Y
(checked) and not changed to
N (unchecked) at any time during processing.
Additional Information About Clearinghouse Reporting
As the Clearinghouse Extract Report only selects currently registered students, the
termination date for previously enrolled students who do not return in a subsequent term
reported is handled as follows:
The Clearinghouse maintains the complete history of data that is reported from your
institution. Their programs compare current reports with previous reports, and their
processing determines that a student has terminated their enrollment if they are not
included in the next term reported by your institution. The Clearinghouse will report
the termination date as the end date of the previous term. The term start and end
dates are data elements that are reported as part of the extract processing.
Students who are enrolled in special programs are considered to be full-time students, and
should be reported to the Clearinghouse, but are not registered in any courses, should not
be enrolled in "dummy" courses for the purpose of reporting to the Clearinghouse. This
should be handled as follows:

1138
Banner Student User Guide | Registration
There are two options, given the current design of Clearinghouse processing.
• First, a registration term header record can be created without actually registering the
students in courses (Save in SFAREGS without adding courses). Once this registration
term header record exists, a manual (USER) time status record can be entered by
accessing the Time Status History window from the Key Information of SFAREGS.
Maintaining the information becomes a manual process. Be aware, however, that
adding a registration term header record can have many processing consequences in
the Banner Student System, including adding to the headcount, causing registration fee
assessment to occur if there are “generic” registration fee assessment rules built,
affecting IPEDS reporting, etc.
• The second option is to manually edit the extract file.
The process performs an additional check to ensure that the ZIP code length transmitted
in the extract file does not exceed the nine positions permitted by the NSC. If a ZIP code
longer than nine positions is found, the following message will be printed when the
process is run selecting the Report of Missing/Invalid Data run mode option: Zipcode
length exceeds 9 characters
If this error is found on the report, you should review the ZIP/Postal code for the address
record that would have been processed, based on the address hierarchy parameter
values. Please note that hyphens (-) are excluded by the process so that a ZIP/Postal
code of 12345-1111 will be reported in the extract file correctly as 123451111. Also, any
blank spaces that may exist at either the beginning or end of the data are also excluded.
Blank spaces contained within the ZIP/Postal code, however, are not automatically
removed, because the syntax requirements for the ZIP/Postal code in some cases
correctly includes blank spaces (for example, Canada).
Foreign Addresses
In the N4 segment of the Transaction Set 190 for SFRNSLC, the reference designator
N402, data element 156, accommodates foreign addresses. If the student’s selected
address does not have a state code, the state code in this data element needs to be
populated with a value equal to
FO. If the value of FO is in the State field, then the country
code as defined on the SPRADDR record, in reference designator N404, data element 26,
needs to be updated with the EDI equivalent country code found in
STVNATN_EDI_EQUIV
.
Reporting Graduates and Summer Term Enrollment
This section discusses specific reporting for graduates and summer term students.
Reporting Spring Graduates
The Clearinghouse would like to receive a separate, graduates-only report and will accept
a report that includes graduates as well as other students enrolled in the term of
graduation. The Clearinghouse has also specified that they prefer the Academic Term
data element be in the Header Record of the file reference Spring Graduates, but this is
not an absolute requirement. The SFRNSLC process will print the Term Code Validation
Form (STVTERM) description in the Academic Term data element, and this is acceptable.

1139
Banner Student User Guide | Registration
The most critical part of processing your Clearinghouse file to report Spring Graduates is
having the correct response to the SFRNSLC process Report Flag parameter. The
Clearinghouse has requested that this report be submitted as a non-standard report. To
create a non-standard report for the purpose of identifying Spring Graduates, the
response to the Report Flag parameter must be
N. This identifies that the report is for non-
standard term data, and places the proper value in report flag position of the file. For
normal term processing, the Report Flag parameter must be set to
Y.
It is critical that a non-standard report of Spring Graduates be completed and submitted to
the Clearinghouse prior to any scheduled file submittal for the next regular term. If your
Spring Graduates report is delayed beyond the first submittal for the next regular term (fall,
not summer), students who graduated will be assumed by the Clearinghouse to have
withdrawn from the institution, because they no longer appear in the file. The
Clearinghouse will report these individuals to lenders and guarantors as withdrawn, with
the effective date being the last day of the previous term. One consequence is the
possibility of having already passed the grace period, leaving little time for lenders to notify
the students of repayment obligations and deadlines. This usually is a problem with Fall
Graduates, rather than Spring Graduates, because of the limited time between the end of
the fall term and the beginning of the winter or spring academic term.
Please be aware that the graduation date that is reported should reasonably reflect the
date that the student terminated with the institution. The SFRNSLC process reports the
(Anticipated) Graduation Date on the Degrees and Other Formal Awards Form
(SHADEGR) as the graduation date. This may be an issue if the ceremonial graduation
date is recorded in this date, and the actual ceremony is several weeks or months beyond
the final day of the semester. Please review your current policy for recording this date, to
determine if your procedures are in compliance with this requirement.
Note: To report a student as graduated or EB4, the student’s current
learner record needs to match the program/major of the SHRDGMR
awarded degree.
Reporting Summer Enrollment
The Clearinghouse would prefer to the receive a report only for summer term students
who are enrolled full-time or half-time, but they will accept a submission where other
students cannot be excluded. Please be aware that the SFRNSLC process will include all
enrolled students for your summer term(s).
As with the Spring Graduates file, the Clearinghouse would like to have the Academic
Term data element in the Header Record of the file reference Summer Term. Again, this is
not an absolute requirement, and the description for your summer term(s) from the Term
Code Validation Form (STVTERM) prints in this data element and is acceptable.
Your Time Status Rules Form (SFATMST) may need to be updated to reflect the correct
values for calculating the different enrollment classifications (full-time, half-time, less than
half-time) for summer enrollment. Because Banner time status rules are effective-term
driven, it may be necessary to add a rule for your summer term(s), and then add another
rule for the upcoming fall term, so that enrollment classifications are calculated correctly.
As with the Spring Graduates report, it is critical that your summer enrollment reports to
the Clearinghouse are specified as non-standard reports. To identify the summer report as
non-standard, you must set the Report Flag parameter to
N.

1140
Banner Student User Guide | Registration
FERPA and Clearinghouse
The National Student Clearinghouse uses a Data Block Indicator in the Clearing House
Extract Report (SFRNSLC) so that schools who participate in the Clearinghouse will
remain compliant with The Family Educational Rights and Privacy Act - FERPA. The only
items that the block relates to are the name of and dates for the student.
The output of the ENR10 segment record is affected by the Data Block Indicator. The
value of the record can be
Y (Yes, the student requests their name and date information
be confidential), or
N (No, the student does not request their name and date information
be confidential).
The Confidential (Indicator) on the General Person Form (SPAPERS) must also be set
correctly.
• The ENR10 element will be set to Y when the Confidential (Indicator) on SPAPERS is
checked (
SPBPERS_CONFID_IND = Y).
• The ENR10 element will be set to N when the Confidential (Indicator) on SPAPERS is
unchecked (
SPBPERS_CONFID_IND = N).
For example:
Reporting Class/Credential Levels
The optional reporting field for Class is controlled by the Class Level parameter in the
Clearinghouse Extract Report (SFRNSLC). This parameter provides the ability to report a
traditional class calculation based on credits (Freshman, Sophomore, Junior, Senior). You
can also report on the overall levels of Associate’s or Bachelor’s using the following class
values:
• A (Associate’s)
• T (Post baccalaureate certificate)
• B (Bachelor’s)
Here is the complete list of values from the NSC Class Level Translation field on
STVCLAS:
ST|190|000000001
BGN|11|000000001|981214|1232|ES
ENR|EB6|UN|D8|20000513||||||N|Y|D8|19981214
^-here the ENR10 element = N
DTP|382|RD8|19970901-19971215
ENT|01|S2|34|5 2443935
IN2|02|Michael
IN2|05|Gates
N3|1640 Yates Avenue
N4|Bronx|NY|10461
ENT|02|M8|DS|999900||||U2|Fall 1997
SE|11|000000001

1141
Banner Student User Guide | Registration
• Freshman
• Sophomore
• Junior
• Senior
• Certificate
• Under Unspecified
•Masters
•Doctoral
• Postdoctorate
• First Professional
• Grad Unspecified
• Post baccalaureate certificate - saved to the database as
T
• Associate’s - saved to the database as A
• Bachelor’s - saved to the database as B
•None
The Class Level parameter in SFRNSLC also permits the use of STVACAT values to
determine the credential level when a student is reported as graduated. (You can also use
the parameter to report class values for enrolled students who have not graduated if
needed.)
When the Class Level parameter is set to
Y, the following processing occurs.
• You can use the STVCLAS rules to populate the Class/Credential field in the file for all
students.
• If the student is a graduate (reporting as EB4 status), the process determines the NSC
value to be reported based on credential level rules in STVACAT, instead of using
STVCLAS.
The following fields on STVACAT allow the NSC codes to be different from the codes
being used by the SSCR file. (It is possible that the NSC could make changes that vary
from those required by the NSLDS. Therefore, using these fields can prevent issues in the
future.)
• The NSC Credential Level Translation field is a pulldown list used to determine which
code is to be reported to the NSC using the required EDI TS190 codes. The values
displayed are in accordance with the credential levels required by the NSLDS and are
mapped to the values used by the Clearinghouse. The Clearinghouse translates the
reported values reported to the permitted NSLDS credential level values. Values are:
• Associate’s - saved to the database as
A
• Bachelor’s - saved to the database as B
• Certificate (Undergraduate) - saved to the database as C

1142
Banner Student User Guide | Registration
• Master’s - saved to the database as M
• Doctoral - saved to the database as D
• First Professional - saved to the database as P
• Post baccalaureate certificate - saved to the database as T
• None - saved to the database as N
• The NSLDS Credential Level Translation field is a pulldown list used to determine the
value needed to support institutions using the NSLDS SSCR Process (SFRSSCR) for
reporting. Values are:
• Certificate (Undergraduate) - saved to the database as
01
• Associate’s - saved to the database as 02
• Bachelor’s - saved to the database as 03
• Post baccalaureate certificate - saved to the database as 04
• Master’s - saved to the database as 05
• Doctoral - saved to the database as 06
• First Professional - saved to the database as 07
• None - saved to the database as N
If STVACAT is not set up, but the Class Level parameter in SFRNSLC is set to Y, the
translation of values from STVCLAS will occur, and the Clearinghouse report will be
produced based on the class values for students who are enrolled, but who are not
reported as graduated. To report a credential level for graduated students, institutions
need to map the degree award category code to a credential level using the additional
STVACAT values.
An error is produced when a student who is reported as less than half-time enrollment
does not have an expected graduation date. An error is reported when a student reported
as graduated does not have a credential level.
Reporting Degree Levels
The Degree Verification Process (SHRDEGV) uses codes from the Degree Award
Category Code Validation Form (STVACAT) to process degree levels. These codes are
defined within the process and are not related to the field on STVACAT.
The degree level of
T (Post Baccalaureate Certificate) is used with the types of degrees
earned by students. The value of
T translates to an STVACAT value of 41, the EDI TS190
value.
Deletion of Time Status Records
The following processes may be used to delete time status history records.
• The Registered, Not Paid Process (SFRRNOP) can be used to delete any time status
history records that may exist for the processing term.

1143
Banner Student User Guide | Registration
• The Registration Purge (SFPREGS) can also be used to optionally delete any time
status history records that may exist for the processing term.
Troubleshooting - Error Messages
This section reviews error messages for time status processing.
SFAREGS Error Messages and Resolutions
• *ERROR* Registration MUST exist for term before updating time status history
This message indicates that the ID for the term in the Key Information is not registered
for the term. Time status records cannot be calculated and then viewed and/or updated
until registration exists (at a minimum the registration term header record must exist).
• *WARNING* Time status information MUST be updated manually
This message indicates that a USER (manual) time status currently exists for the ID for
the term in the Key Information. This message is not a fatal error. It is an alert to the user
that changes in registration will not automatically override a USER (manual) update to
time status.
• *WARNING* Unable to calculate time status. Check rules on SFATMST
This message indicates that a problem was encountered in attempting to calculate a
time status for the ID and term in the Key Information. A problem may exist in the
construction of the Time Status Rules (SFATMST). Check to make sure there are no
gaps in the rules, and that a rule exists for 0.00 minimum and 0.00 maximum credit
hours. This message is not a fatal error, but the problem should be investigated and
resolved.
• *WARNING* Unable to update SFBETRM
This message indicates an Oracle grants problem. Contact the DBA for assistance.
• *WARNING* Unable to insert into SFRTHST
This message indicates an Oracle grants problem. Contact the DBA for assistance.
SFAMREG Error Messages and Resolutions
• *WARNING* Unable to calculate time status for ID <ID number>. Check rules on
SFATMST
This message indicates that a problem was encountered in attempting to calculate a
time status for the student associated with the message in the Results window. A
problem may exist in the construction of the Time Status Rules (SFATMST). Check to
make sure there are no gaps in the rules, and that a rule exists for 0.00 minimum and
0.00 maximum credit hours. This message is not a fatal error, but the problem should be
investigated and resolved.
• *WARNING* Time status for ID <ID number> MUST be updated manually

1144
Banner Student User Guide | Registration
This message indicates that a USER (manual) time status currently exists for the ID
number displayed in the error message. This message is not a fatal error. It alerts you
that changes in registration will not automatically override a USER (manual) update to
time status.
• *WARNING* Unable to update SFBETRM
This message indicates an Oracle grants problem. Contact the DBA for assistance.
• *WARNING* Unable to insert into SFRTHST
This message indicates an Oracle grants problem. Contact the DBA for assistance.
Other Errors and Problems
• No time status displays in the Time Status History window in SFAREGS after registering
a student.
The Calculate Time Status (Indicator) on SOATERM must be set to
Y (checked), or if
it is set to
N (unchecked), the Time Status Calculation Update Process (SFRTMST)
needs to be run.
• The time status that was calculated seems to be incorrect.
The time status calculation is based on the rules that have been established on the Time
Status Rules Form (SFATMST). Those rules should be examined closely. First,
determine that there are no gaps in the rules and that a rule exists for 0.00 minimum and
0.00 maximum credit hours for all applicable student levels. Depending on the
complexity of the rules, check carefully for the rule that matches all of the characteristics
of the student in question -- are there rules for student campus, college, degree, major,
etc. Remember that if one of the elements in a rule is blank, it is treated like a wildcard,
and all students will match that element, regardless of the value.
For example, if there are two rules for the main campus, and one of those rules is
specific to engineering majors, all other majors will be considered by the rule that does
not specify engineering majors. Also, examine the course levels included in the rule that
you expect the student to meet, and the actual level of the courses on SFAREGS.
• A SYSTEM ("S") calculated time status record was added after a USER ("U") time
status record already existed. USER records are not supposed to be treated as
overrides, and prevent SYSTEM calculations from adding additional time status history
records.
This happened because SYSTEM calculations can be forced to resume if needed for a
particular student term if a USER time status history record exists. Either the update to
the registration term header record was made by authorized personnel in SQL*Plus, or
the complete time status history record (SFRTHST) was added in SQL*Plus.
Achieve the Dream Reporting
Achieve the Dream reporting is used to improve student achievement at community
colleges with a focus on coursework completion and earning of certificates or degrees.

1145
Banner Student User Guide | Registration
The data collected provides incentive for institutional changes that promote student
success.
Reporting uses fields for Pell Grant Recipient Flag and Remedial Flag on the
Clearinghouse Extract Report (SFRNSLC) to report the data to the Clearinghouse. These
fields are considered in run modes
2 (EDI TS190 output) and 3 (EDI.Smart TS190
output).
The associated SFRNSLC parameters are also used with reporting.
• Remedial Course - Optional. Enter the remedial course attribute code. Valid values
come from the Attribute Validation Form (STVATTR).
• Pell Grant - Optional. Enter the Pell Grant detail code. Valid values come from the Detail
Code Control Form (TSADETC).
The setting of the Pell Grant Recipient Flag field is based on the detail code value entered
in the Pell Grant parameter. The SFRNSLC report compares the parameter value with the
detail codes on the student account for the report term. The results are as follows.
• When a matching detail code is found and the Pell amount is greater than zero, the
student is reported with a value of
Y.
• When no matching detail code is found or the Pell amount is less than or equal to zero,
the student is reported with a value of
N.
• When no detail code is entered in the parameter, the process does not report anything
for the Pell Grant Recipient Flag field.
The setting of the Remedial Flag field is based on the attribute entered in the Remedial
Course parameter. The SFRNSLC process compares the parameter value with the
attributes on the sections for which the student is registered during the report term.
• When a registered section has the matching attribute, the student is reported with a
value of
R for Remedial.
• When no attribute is entered in the parameter, the process does not report anything for
the Remedial Flag field.
National Student Loan Data System (NSLDS) Student
Status Confirmation Report (SSCR) Roster File
Procedures
This section discusses regulatory reports to the NSLDS.
Overview of Processing for NSLDS SSCR Reporting
This report is provided for direct lending institutions to process and update, as appropriate,
data received for Title IV aid recipients on the Student Status Confirmation Report (SSCR)
from the National Student Loan Data System (NSLDS). Any questions about the SSCR
process should be directed to the NSLDS Customer Service Center at 1-800-999-8219.

1146
Banner Student User Guide | Registration
The following sections outline the processing requirements and procedures for processing
the SSCR file and creating the updated School Submittal file, and processing the Error
Notification File.
NSLDS places each institution's SSCR File on the Title IV WAN. Your institution must
review, update, and return the file within 30 days of receipt. Once your institution has
transferred the Roster File from the Title IV WAN to their Banner system, the SFRSSCR
process will read that file, match records in the file to Banner, perform updates as
appropriate, and write out the updated School Submission flat file which is then submitted
to NSLDS. Any issues directly related to obtaining and accessing the SSCR File, and
returning the updated file should be reported directly to the Customer Service Center at
NSLDS.
Sources of Data for SSCR Roster File Update
The validity of the updates to student enrollment information depends on the use of the
Banner functionality to perform time status calculations (based on student enrollment) for
the purpose of reporting to the National Student Clearinghouse (NSC). Please refer to the
“National Student Clearinghouse (NSC) Reporting Procedures” section of this chapter for
overall data requirements, term specific data requirements, and a detailed description of
how a student's status (enrollment status, or other status such as deceased, on an
approved leave of absence, etc.) is calculated and reported.
Note: The same logic from the Clearinghouse Extract Report (SFRNSLC)
is used to determine each student's enrollment status when processing
the SSCR Roster File. For efficiency, time status information is retrieved
from the registration term header record, rather than from the time status
history table, because the most current time status is always reported to
NSLDS. The actual values reported and used to update the file, however,
are different from the values reported in the SFRNSLC program. In the
SFRNSLC process, each enrollment status is translated to the equivalent
EDI TS 190 required code for that status. This translation does not occur
in the SFRSSCR process.
The following list summarizes both the SSCR and EDI TS 190 codes that
are reported with a brief description, to assist users familiar with the
SFRNLSC process:
Description NSLDS Code
EDI TS 190
Code
Approved Leave of Absence A EB9
Deceased D EB1
Full-time F EB6
Graduated G EB4
Three-Quarter time Q EBO

1147
Banner Student User Guide | Registration
Note: * A status of “Never attended” indicates that an individual on whose
behalf a loan was certified or awarded, who was admitted, and may have
enrolled (registered), never attended classes at the institution (institution
has a record of the person, but no record that they actually attended
classes). This status is not used when reporting to the NSC. Although the
Class Attendance Roster Form (SFAALST) includes an informational field
for entering the total hours that a student attended the class, this does not
serve the purpose of identifying registration without attendance.
For SSCR file processing, an individual is reported with a status code of
X
if they exist in Banner (a match is found), but no registration term header
record exists for the term associated with the SSCR file. It is assumed
that if a student pre-registered for a term, but never attended, either one
of two actions would be taken procedurally. One action would be to run
the Registered, Not Paid Process (SFRNNOP), which would result in the
registration records being deleted. The other action would be to update
the student enrollment status on the registration record to a code that
would indicate that the student was not actively enrolled. The enrollment
status code should have the Third Party Withdrawal Indicator set to
Y
on STVESTS. In the first situation, the student is reported as Never
Attended (
X), whereas in the second situation the student is reported as
Withdrawn (
W).
Note: ** A status of “No record found” is reported when no matching
person record is found in Banner.
Process Flow for SSCR File Processing
Complete the following procedural steps in the sequence outlined to ensure that up-to-
date, valid, and complete data is available for processing the SSCR File. These steps
should be verified and/or completed just prior to each scheduled SSCR update.
Initial receipt of SSCR Roster File
Registrar's/Enrollment Office
Half-time or more, but less than Full-
time
H EB7
Less than Half-time L EB8
Withdrawn W EB3
Never attended * X N/A
No record found ** Z N/A
Description NSLDS Code
EDI TS 190
Code

1148
Banner Student User Guide | Registration
1. Verify that registration add/drops are current.
2. Run the Time Status Calculation Update Process (SFRTMST) in Audit mode.
2.1. Review output for messages.
2.2. Review data and complete updates as required to resolve missing or invalid
data issues; re-run in Audit mode until all data issues are resolved.
3. Run SFRTMST in Update mode.
3.1. Review output for messages - confirm that no new errors have been introduced
between Audit and Update mode runs.
If new errors exist, return to Audit mode and repeat process.
4. Run SFRSSCR for Roster File in Audit mode.
4.1. Review output for messages.
4.2. Review data and complete updates as required to resolve missing or invalid
data issues; re-run in Audit mode until all data issues are resolved.
5. Run SFRSSCR for Roster File in Create flat file mode to produce Submittal File.
5.1. Review output for messages - confirm that no new errors have been introduced
between Audit and Create flat file mode runs.
If new errors exist, return to Audit mode and repeat process.
Subsequent receipt of Error Notification File
Registrar's/Enrollment Office
1. Run SFRSSCR for Error Notification File in Error listing mode.
1.1. Review output for messages indicating success or errors in previously
submitted file.
1.2. No Errors exist - no further action required.
- or -
1.3. Errors exist
– Review data and complete updates as required to resolve NSLDS errors
reported in Error listing mode output.
– Run SFRSSCR for Error Notification File in Audit mode.
– Review output for messages.
– Review data and complete updates as required to resolve missing or invalid
data issues; re-run in Audit mode until all data issues are resolved.
– Run SFRSSCR for Error Notification File in Create flat file mode to produce
Error Correction File.
– Review output for messages - confirm that no new errors have been
introduced between Audit and Create flat file mode runs. If new errors exist,
return to Audit mode and repeat process.

1149
Banner Student User Guide | Registration
Note: If an Error Correction File is submitted, NSLDS will return an Error
Notification File in response to the Error Correction File. The new Error
Notification File must also be processed using the same steps described
above. The cycle of Error Notification and Error Correction Files will
continue until NSLDS reports that no errors found.
NSLDS SSCR Roster File Update Process (SFRSSCR)
Initially, your institution will upload the SSCR Roster File from NSLDS. That file is to be
updated appropriately, and returned to NSLDS as the SSCR School Submittal File.
NSLDS analyzes the returned Submittal File, and subsequently returns an SSCR Error
Notification File to your institution. The Error Notification File may indicate that all records
in the Submittal File were accepted and processed without errors, or it may indicate that
errors were encountered in the processing of the Submittal File. If errors were found, the
records in error are returned in the Error Notification File, along with specific error codes
that identify the problem(s) found. Those errors must be investigated, and an Error
Notification Correction File must be returned to NSLDS with changes to resolve the errors
that were reported. The SFRSSCR process is designed to accommodate the processing
of both the Roster File and the Error Notification File.
The following output files are created when the Roster file or Error Notification file is
processed in Create flat file mode.
• report output and control information listing, which includes appropriate messages about
the data and/or processing of the file
• log file
• flat data file with updates that would be transmitted back to NSLDS
The SFRSSCR process allows students to be selected based on the level, campus, or
college associated with the current general student record. Multiple values may be
entered for each parameter, or % may be designated for all values. Level, campus, and
college values entered as parameter selections are compared only to the student's
primary curriculum information. This allows institutions with different schools to identify the
appropriate groups of students if they receive multiple files from NSLDS to process.
Because of great variance in the data supplied by the various lenders and guarantee
agencies to NSLDS, the process allows the option to Match on ID/SSN only, rather than
on ID/SSN and Last Name. For processing, it is recommended that the Roster File should
initially be processed in Audit mode matching on both ID/SSN and Last Name (the
default). Depending on the consistency and/or integrity of the data in the SSCR File, it
may be desirable to process the Roster File again in Audit mode, but selecting the Match
on ID/SSN only option. The two outputs should be compared to determine which option is
best for evaluating matched records. If the Match on ID/SSN only option is selected, you
should be aware that the possibility could exist that an incorrect SSN in the Roster File
could become associated with the wrong person in Banner.
This process uses the Third Party Withdrawal Indicator on STVESTS to report students
as withdrawn to the NSLDS. When the indicator is not checked, the process will not
consider the student as withdrawn and will report the last time status for the student that
was calculated by the time status rules.

1150
Banner Student User Guide | Registration
The process also uses the Third Party Report Indicator on STVLEAV to select leave of
absence codes for the student. The process will only select leave of absence codes from
the general student record to be reported as valid leaves when the indicator is checked.
SFRSSCR processes files using the eight digit OPEID number that is reported in the file
from the NSLDS. SFRSSCR does not process data using branch codes or population
selection.
Class/Credential Levels
Users can report a credential level for all graduated students and an anticipated
graduation date for all students, including those registered as less than half-time.
SFRSSCR reports the credential level from rules on SFACPLR for all students reported as
graduated and maps the credential level code to an NSLDS credential level.
An error is produced when a student who is reported as less than half-time does not have
an expected graduation date. An error is reported when a student reported as graduated
does not have a credential level.
Roster File Processing
The Roster File can be processed in either Audit mode or Create Flat File mode. In Audit
mode, any records that cannot be identified as a match to an existing Banner record will
be reported, and any missing and/or invalid data that would be required for creating the
updated flat file will be reported. The Audit mode report should be reviewed, and
corrections and/or adjustments should be made to resolve all data problems. Audit mode
can be executed as many times as needed to identify and resolve errors.
Note: If the Create Flat File mode is selected, the potential exists for
missing or invalid data to be written to the Submittal File, depending on
the amount of time that has elapsed since processing in Audit mode. The
report information from Create Flat File processing should also be
reviewed for errors. The process can be run in Create Flat File mode
multiple times because no database updates in Banner occur. Running
the process again in Create Flat File mode creates a new version of the
Submittal File.
Resolving Data Errors in the Roster File
The Audit mode report for the Roster File will detect problems with data, which must be
fixed by authorized users. The following are the error messages that may print on the
report, the source of the error, and what is required to fix the problem:
• No Address on SPAIDEN
This message indicates that address information could not be found for the address
hierarchy that was entered. For example, if 1MA and 2PR were the address types
selected for the report, this message would indicate that neither an MA or PR address
type could be found for the student. If it appears that the student does have an address
that matches the hierarchy that was entered, the error message is probably caused by
the effective date of the address not being valid as of the date of processing. Address
information is required for all students that are reported to NSLDS. An address with an

1151
Banner Student User Guide | Registration
effective date prior to the processing date must be entered that will match the address
hierarchy that is used for the process. Please note that this processing occurs only for
records that have no address in the file.
Note: As of March 1, 1999, the NSLDS no longer requires address
information in SSCR files. The NSLDS will obtain this information from
other sources. Institutions will not be sent error messages if this
information is provided.
• No Expected Grad Date on SGASTDN
Students who have been identified as full-time, half-time, or on a leave of absence
require the expected graduation date to be reported. This message indicates that the
Expected Graduation Date field on the General Student Form (SGASTDN) is blank. An
expected graduation date must be entered. (Note: The expected graduation date on the
general student record will roll to the (Anticipated) Graduation Date on the Degrees
and Other Formal Award Form (SHADEGR) during the first grade roll to academic
history (either performed online with the Class Roster Form (SFASLST) or in batch with
the Grade Roll to Academic History (SHRROLL).
• SSN must be entered on SPAPERS
This message will occur only when students are added to the file and indicates that the
SSN/SIN/TIN field on the General Person Form (SPAPERS) is blank. The social security
number is required for all new students added to the file, and must be entered.
• No Deceased Date on SPAPERS
This message will occur only when a student is identified as deceased and the
Deceased Date field on the General Person Form (SPAPERS) is blank. This date, if
available, is reported as the status effective date for a deceased student; otherwise the
date is reported as "00000000".
• Time Status on SFAREGS is missing or invalid
Students who are enrolled in classes for the term must have a time status record that
has been created before the reporting date, so the time status can be reported. This
message indicates that either no time status record exists for the student because
online or batch calculation of a time status has not occurred previously for the report
term, or an error was encountered when the time status was calculated previously. To
resolve this problem, run the batch Time Status Calculation Update Process
(SFRTMST) in Audit mode to review more detailed messages about the errors. After
resolving any problems that may exist with time status rules, etc., SFRTMST may be run
in Update mode to calculate and store time status records, or the time status can be re-
calculated and stored online on the Student Course Registration Form (SFAREGS).
• Expected Grad Date on SGASTDN precedes current date
This message indicates that the Expected Graduation Date on the General Student
Form (SGASTDN) is a past date, rather than a future date. If this message occurs, the
date in this field should be reviewed and updated as appropriate to a future date.
• SGASTDN grad date precedes term end

1152
Banner Student User Guide | Registration
This message indicates that the Expected Graduation Date on the General Student
Form (SGASTDN) is not greater than or equal to the end of the processing term. If this
message occurs, the date in this field should be reviewed and updated as appropriate to
a future date.
• No Graduation Term on SHADEGR
Students who have been awarded a degree during the current term (have a status of
graduated) require the date of completion of course requirements to be reported. The
most recent part of term end date for graded courses for the term is reported for the
completion date. If no graded courses exist for the term, the (Anticipated) Graduation
Date on the Degrees and Other Formal Awards Form (SHADEGR) is reported as the
completion date. This date must be entered on this form.
Matching Students in the SSCR File to Banner Records
Each student record in the SSCR Roster File includes a social security number and last
name. These elements are used as the basis for searching for a matching record within
Banner. The SFRSSCR process examines the social security number data element in the
General Person Form (SPAPERS), as well as all IDs in the General Person Identification
Form (SPAIDEN), both current and previous, to determine a match to the SSN reported in
the Roster File. The process also examines all last names, previous and current, to
determine a last name match. If a match for any SSN/last name combination cannot be
found, a record is written to the control report with the information from the SSCR file -
SSN, Last Name, First Name, Middle Name, Date of Birth, Street Address 1, City, State,
County, and ZIP/Postal Code.
If in fact the student in the Roster File is unknown to your institution, the SFRSSCR
process will report that individual as a status of "Z", indicating no record exists at your
institution for that person, without any further user intervention. If, however, you can
identify an individual at your institution who should "match" the Roster File record, but was
not matched because the SSN and last name reported in the Roster File did not match an
existing combination of ID/SSN and any current or previous last name in Banner, it is
necessary to add either an Identification record (SPAIDEN) and/or a social security
number in Banner to "force" a match so that the individual can be associated with the
Roster File record and then be processed, updated, and reported properly.
If the Roster File last name is different from any existing Banner last name, a name
change record can be added using SPAIDEN. If the Roster File SSN is different from any
existing Banner ID or the SSN on SPAPERS, an ID change record can be added using
SPAIDEN, or the SSN can be entered, if this is preferable and appropriate. Please note
that the SFRSSCR process will not under any circumstances update SSNs that are
transmitted by NSLDS. The SSN reported on the SSCR file will always be the SSN that is
returned in the Submittal File and the Error Correction File.
If a match is found on SSN/Last Name combination, the record is updated with the
appropriate enrollment status code and effective date for that status, if needed. If any of
the name fields (Last Name, First Name, or Middle Name) do not match the
corresponding current name fields, then all of the fields provided for reporting a name
change in the SSCR file (these fields are referred to as New Student's Last Name, New
Student's First Name, and New Student's Middle Name) are updated with the data in the
current name record as null. Please note that if a middle name is reported in the Roster
file, but no middle name exists in Banner, the middle name is not updated to blank (null) in
the returned Submittal File.

1153
Banner Student User Guide | Registration
Source of Effective Dates for Statuses
For each student enrollment status, an effective date for that status is reported. The
following lists the source of data for each enrollment status reported:
Updating Existing Records With New/Changed Information
Fields exist to report changes in date of birth and address information. The SFRSSCR
process compares the birth date supplied in the Roster File to the birth date on the
General Person Form (SPAPERS). If no birth date is reported in the Roster File, or if the
birth date is different from the birth date in Banner, the Banner birth date is written to the
Submittal File. Address information, if supplied in the Roster File, is not compared to
Banner address information, and no updates will be proposed for address information in
the Submittal File.
Date of Anticipated Completion is reported in the SSCR file, if applicable. The Banner
process will compare the reported anticipated completion date to the current Banner
expected graduation date in the General Student Form (SGASTDN). If the dates are
different, the SSCR file is updated with the Banner date. A check is performed to ensure
that the expected graduation date is greater than the certification date for the file. If this
date is earlier than the certification date, the error message Expected Grad Date on
SGASTDN precedes current date is written to the report information.
Enrollment Status
Source of Data -
Form Source of Data - Field
Approved Leave of Absence SGASTDN Leave of Absence From Date
Deceased SPAPERS Deceased Date, if available;
otherwise reported as "00000000"
Graduated SSASECT Most recent Part of Term (End Date)
for graded courses for the term
Full-time SFAREGS Most recent (Time Status) Date
Three-Quarter time SFAREGS Most recent (Time Status) Date
Half-time or more, but less than Full-
time
SFAREGS Most recent (Time Status) Date
Less than Half-time SFAREGS Most recent (Time Status) Date
Withdrawn SFAREGS (Enrollment) Status Date
Never attended * N/A Certification Date **
No record found * N/A Certification Date **
* See explanation under Sources of Data for SSCR Roster File Update.
** Certification Date is the date/time the Roster File is processed and updated to create the Submittal
File.

1154
Banner Student User Guide | Registration
Identifying New Students and Adding Them to the SSCR File
The NSLDS SSCR Process (SFRSSCR) is used by direct lending institutions to process
and update data received for Title IV aid recipients on the Student Status Confirmation
Report (SSCR) from the National Student Loan Data System (NSLDS). Institutions can
process the SSCR File, create the updated School Submittal File, and process the Error
Notification File.
Enrollment status information is dependent on information calculated and stored in the
Banner Student System as a result of the reports used for National Student Clearinghouse
(NSC) Reporting.
As records in the SSCR File are matched to Banner records, the PIDM for each matched
Banner record is saved internally in the program. In a subsequent processing step, the
program will determine if there are additional individuals who were not included on the
SSCR file. If an individual found in this selection has not already been processed, the
record is added to the end of the SSCR file output, populating the fields in the Detail
Record using the same structure as the matched records. Data for new students is not
placed in separate areas of the output file.
Error Notification File Processing
The Error Notification File can be processed in Error Listing mode, Audit mode, or Create
Flat File mode. The file should be processed initially in Error Listing mode. This produces
a report listing the records flagged by NSLDS as errors, and the error conditions that were
encountered. The messages about the error conditions are taken from the SSCR User's
Guide as follows:
Error Message/Description
11 No Detail Record matches the record identifiers, Student's SSN, Student's
First Name, Date of Student's Birth in NSLDS
13 Invalid Date of Student's Birth
15 Invalid Date of Anticipated Completion
16 Anticipated Completion Date cannot be greater than 10 years after the
Certification Date
19 Missing Code for Enrollment Status
20 Invalid Code for Enrollment Status
21 Invalid Date Enrollment Status Effective
22 Enrollment status of ‘X’ or ‘Z’ cannot be reported if enrollment history at the
school exists
23 Missing Date of Enrollment Status Effective; mandatory when Code for
Enrollment Status is not equal to D for Deceased
26 Anticipated Completion Date must be greater than Certification Date when
Enrollment Status Code = A, F, H, or L

1155
Banner Student User Guide | Registration
The Error Listing report can be reviewed. When data has been reported as invalid, the
messages associated with the error codes contained in the Error Notification File are
printed in the report information to assist you in identifying and resolving these types of
errors. The process should also be run in Audit mode to identify any areas where missing
or invalid Banner data may need to be corrected for these records.
30 Certification Date must be greater than or equal to Enrollment Status
Effective Date
32 Student status could not be applied as current due to a reporting/history
violation
33 Anticipated Completion Date must be greater than or equal to Enrollment
Status Effective Date
34 Enrollment Status Effective Date cannot equal Certification Date if Status
has not changed for F, H, or A
35 Certification Date cannot be more than 180 days after Enrollment Status
Effective Date for Status of 'A'
36 Ten percent error on enrollment status
37 Invalid Certification Date
38 Certification Date is too old
39 Certification Date is in the future
41 Address information must be left justified
42 Invalid state code
43 Invalid term date format
44 Invalid good address flag
45 Address effective date is missing
46 Invalid address effective date
47 Address effective date cannot be a future date
48 Invalid country code
49 Term begin date must precede term end date
50 Invalid school code
51 Invalid move to location
52 Not authorized to process input based on the Batch TG# or the Web user
ID
53 Invalid credential level
54 Address effective date supplied with no address data
Error Message/Description

1156
Banner Student User Guide | Registration
After all data issues have been resolved, process the Error Notification File in Create Flat
File mode to create the updated Error Correction File, then re-submit the file to NSLDS.
Resolving Data Errors in the Error Notification File
Processing the Error Notification File in Audit mode performs the same data checking and
validity that is performed for the Roster File in Audit mode. Please refer to the previous
section on Roster File Processing which describes the Audit mode processing and error
messages that apply.
Job Stream Processing Recommendations
Because accuracy is vital in processing, updating, and returning the School Submittal File
to NSLDS, time status enrollment calculations should be performed in batch prior to SSCR
File processing. This will ensure the time status (Full-time, Three-Quarter time, Half-time,
and Less than Half-time) enrollment information is up to date. Please refer to the Banner
Student Reports Handbook for information on running the Time Status Calculation Update
process (SFRTMST). It is strongly recommended that the SFRTMST process be executed
in both Audit and Update modes prior to processing an SSCR Roster File.
Roster File and Error Notification File Processing Errors and
Troubleshooting
The following outlines errors that may occur in both Roster and Error File processing and
resolutions to those errors. Although it is unlikely that these errors will be encountered,
appropriate checks were included in the program to detect these unlikely events.
• Header Record is missing or has invalid seqno, aborting job.
This message indicates that the first record read and processed did not have the
expected sequence number of 000. Please contact the Customer Service Center at
NSLDS when this error occurs.
• *ERROR* Certification Date precedes SSCR Create Date, aborting job.
This message indicates that the processing date (current date and time) is earlier than
the NSLDS create date and timestamp transmitted on the file being processed. Please
contact the Customer Service Center at NSLDS when this error occurs.
• *ERROR* SSCR File Type does not match designated type of file, aborting job.
This message indicates that the user's response to the SSCR File Type parameter did
not match the file that was specified for the SSCR File to Process parameter. The user
either entered an E instead of R to process a Roster File, or an R instead of E to process
an Error Notification File. Re-submit the job request with the correct parameters.
• *ERROR* Trailer record found before end of file, aborting job.
This message indicates that additional data was found beyond the record with a
sequence number of 999, which should be the last record in the file. Please contact the
Customer Service Center at NSLDS when this error occurs.

1157
Banner Student User Guide | Registration
• *ERROR* Trailer record is missing or has invalid sequence number, aborting job.
This message indicates that a valid trailer record with a sequence number of 999 could
not be found. Please contact the Customer Service Center at NSLDS when this error
occurs.
• *ERROR* Incorrect number of detail records processed, aborting job.
This message indicates that the total count of records indicated by NSLDS in the Trailer
Record does not match the actual number of records that the SFRSSCR process read.
Please contact the Customer Service Center at NSLDS when this error occurs.
• Dynamic Memory Error, aborting job.
This message indicates that not enough memory was available for processing. This
problem should be brought to the attention of technical support staff, who will need to
identify appropriate actions to make sufficient memory available for the execution of the
program. This message would be related to the amount of memory required for linked
list processing in the program. NSLDS provided an estimate that a "typical" SSCR
Roster File could contain a record count that is 60% of an institution's enrollment.
Error Notification File Only Processing Errors and Troubleshooting
The following outlines general errors that may occur and solutions to those errors.
• *ERROR* Error Notification File contains no records, aborting job.
This message indicates that a request was submitted to process the Error Notification
File in Create Flat File mode, but no errors exist that require an update.
To confirm that no errors exist, process the file in the Error Listing mode. No errors are
confirmed by the message * * * Submittal File accepted and processed without errors
* * * printed in the report output.
• Certification Date must be greater than or equal to date enrollment status effective date
• Attempted to add an ad hoc student but the student was not found in the database
• Student status could not be applied as current due to a reporting/history violation
• Anticipated Completion Date must be greater than or equal to Date Enrollment Status
Effective
Please refer to the most recent updates for the SSCR User's Guide, or contact NSLDS if
you have any questions about the above error messages.
General File Execution Processing Errors and Troubleshooting
The following outlines general errors that may occur, and resolutions to those errors.
• *ERROR* Parameters entered on the command line are invalid, aborting job.
This message indicates that the syntax for the execution of the program submitted from

1158
Banner Student User Guide | Registration
the command line is invalid. Re-submit the job request with the correct command line
parameters.
• *ERROR* Cannot open file: <filename>, aborting job.
This message indicates that either the Roster File or Error Notification File specified to
be processed cannot be found, or that file permissions do not allow the input file to be
opened for processing. Check the spelling of the path and filename, as well as the
permissions for the file. Correct as needed and re-submit the job request, or contact
technical support staff, if needed, for assistance. The message could also indicate that
an error was encountered attempting to open the output file(s), which could also be
related to permissions problems. The filename specified will indicate which file cannot
be opened.
150 Percent Subsidized Stafford Usage Limit Reporting
A provision in the Moving Ahead for Progress in the 21st Century Act (MAP-21) (Public
Law 112-141) limits the Subsidized Stafford Borrowing to 150 percent of a published
program’s length. The changes apply to a first time Stafford loan borrower who borrows on
or after July 1, 2013, and need to be in place prior to institutions being able to send
origination or disbursement records (Direct Loans, TEACH, PELL) to COD for 2014-2015.
This also impacts NSLDS and NSC enrollment reporting. Information collected in Banner
Student is passed to Banner Financial Aid for regulatory reporting.
The NSC and the NSLDS recommend that institutions report enrollment information every
term, including summer terms or any other short terms. If enrollment data is not reported
for these terms, there could be compliance implications. Please contact the NSC and/or
the NSLDS with any compliance questions.
For more information, refer to the following website:
http://www.ifap.ed.gov/150PercentDirectSubsidizedLoanLimitInfo/index.html
Please refer to the Banner Financial Aid Release Guide 8.20 for more information on the
using this reporting with Banner Financial Aid.
Overview
The Federal Subsidized Student Loan process sets the following borrowing limitations for
150 percent reporting:
• A first-time Federal Subsidized Student Loan borrower is not eligible for the Direct
Subsidized Student Loan program if he or she exceeds 150 percent of the published
length necessary to graduate within an undergraduate degree program.
• A borrower reaching the 150 percent limit becomes ineligible for the interest subsidy
benefits on all Federal Subsidized Loans disbursed to the borrower on or after July 1,
2013.
Enrollment reporting in Banner is used to determine if borrowers have graduated before
exceeding the 150 percent limit or have exceeded the 150 percent limit while enrolled. All

1159
Banner Student User Guide | Registration
program and enrollment changes since July 1, 2014 must be reported. All students and all
loans must be reported.
Banner Student provides two methods of enrollment reporting to the National Student
Clearinghouse (NSC) and the National Student Loan Data System (NSLDS):
• Clearinghouse Extract Report (SFRNSLC)
This report extracts student enrollment information for reporting to the NSC.
• NSLDS SSCR Process (SFRSSCR)
This process reads and processes NSLDS Student Status Confirmation Report (SSCR)
roster and error notification files for reporting to the NSLDS.
SFRNSLC and SFRSSCR are used to capture campus level and program level enrollment
for 150 percent reporting. The following information is reported:
• active current programs and active non-current programs
• program duration
• program start dates and program effective dates
The OPEID and Nation Code parameters for SFRNSLC and SFRSSCR are used with 150
percent reporting.
The SFKCPLR package selects the correct program data from Banner for reporting.
Processing
Rules are used to define the required information for program length reporting, credential
levels, and special program status. The Program Duration Rules Form (SFACPLR) and
the Program Duration Rules Table (SFRCPLR) are used to create and maintain the rules
for the following:
• published program length in years, weeks, or months
• number of weeks in the academic year for the program, when the program length is
reported in months or weeks
• program required hours for the number of credit hours needed to complete the program
• program credential level, such as Undergraduate certificate, Associate’s degree, and so
on
• special program code, such as preparatory coursework and non-credential teacher
certification
Rules are based on curriculum and student data.
• The following curriculum values are considered: level, college, campus, degree,
program, catalog start term, catalog end term, field of study type, and field of study
code.
The rules provide for an institution to use multiple field of study types and field of study

1160
Banner Student User Guide | Registration
codes to allow for variations in program lengths, based on specific major/minor/
concentration combinations.
• The following general student values are considered: classification (class), student type,
cohort, and attribute.
• The Student Rules section of the Program Duration Rules Form (SFACPLR) will only be
compared against the current learner record when SFRNSLC and SFRSSCR are run.
The Student Program Information Process (RPPSPGM) is used for reporting in Banner
Financial Aid. Not all Banner Student records are passed to Banner Financial Aid. All
current and active curriculum records are examined, and the STVMAJR code for a
curriculum must be defined as aid eligible to be considered for reporting, but only one
curriculum record, which is determined by logic in the package, will be passed to Banner
Financial Aid.
For each student who is identified to be reported, the Program Duration Calculation
Package (SFKCPLR) is called that creates outbound parameter values. This package
analyzes the student's current and active curriculum for the term identified by the calling
process against the rules on the Program Duration Rules Form (SFACPLR). The matching
logic locates the most restrictive program duration rule that matches on all curriculum, field
of study, and student elements for the student when determining program length. If a
student has three active programs, all three will be examined. General student data
(student type, class, student attribute, and cohort) may also be assigned to a rule and the
data is analyzed against the general student data for the student and effective term.
The SFKCPLR package treats each major as a separate record. For example, when a
student is pursing one degree with one curriculum record with two majors, each major is
reported separately. The field of study statement uses an indicator of
P for program,
instead of
M for major. The major description is also reported. (Characters that are not
alphanumeric are removed from the major descriptions, as well as from street lines 1 and
2.)
The active non-current curriculum records are only reported if they have become inactive
since July 1, 2014. Withdrawn programs prior to this date will not be reported. The date
the program was withdrawn from is compared to the dates in the log file. The logic looks at
the start date of the term in which the program was withdrawn to calculate the value for the
program status start date for withdrawn programs, instead of the activity date on the
curriculum record. When a student withdraws from a program, that program should be
reported two times and then dropped from future SFRNSLC reports.
When a student withdraws from a program, the process looks at SFAWDRL for a record
for the term that can be used for the withdrawn date. If no record is found, then the
SFBETRM_ESTS_DATE value is used.
The Enrollment Reporting Results Temporary Table (SFTCPLR) is used to store program
duration rule matching data produced by the SFKCPLR package. The
ssfrcplrq.sql
script in the plus directory is used to test the SFKCPLR package.
Matching logic example:
• Rule 1 has a level of UG, and the program length, credential level, and type are
populated.

1161
Banner Student User Guide | Registration
• Rule 2 has a level of UG, a field of study type of MAJOR, and a field of study code of
ECON. The program length, credential level, and type are populated.
• Students with a current and active curriculum record at the UG level with a major code of
ECON will be matched against Rule 2 for program length.
• Students that have a current and active curriculum record at the UG level and have any
other field of study major will be matched against Rule 1 for program length.
Each current and active curriculum that is found is compared to the rules that have been
defined. The rules that apply to the student determine the program length for each
curriculum that is examined. Curriculum records are checked against rule elements,
including fields of study. Field of study major codes are checked against STVMAJR. The
Financial Aid Eligibility indicator must be checked to include the curriculum major when
finding the appropriate rule. The process also matches the general student data items
against the rules for the student and term.
Note: Continuing education programs for degree-seeking students are
excluded from SFRNSLC and SFRSSCR processing. When a curriculum
record has a level assigned to the program with the
STVLEVL_CEU_IND set to Y, the record is not counted as active. Time
status codes for continuing education are not considered when all
courses for a term are found to be CEU level courses.
The Department of Education considers a unique program to be the combination of
Classification of Instructional Program (CIP) code and Program Credential Level. While
the Department of Education does not break credential levels down into groups, Banner
Student has categorized the credential levels into two groups, undergraduate and
graduate, based on how financial aid can be awarded.This is meant to assist users with
understanding what program should be reported when multiple programs exist at different
academic levels. The groups are also used to identify the different types of curriculum
records the student might have. This qualification is internal to the matching process in the
SFKCPLR database package and helps identify the correct program and program length
to be reported.
Here are the two credential level groups.
Group 1 - Undergraduate Credential Levels
• 01 (Undergraduate Certificate)
• 02 (Associate’s degree)
• 03 (Bachelor’s degree)
• 04 (Post Baccalaureate Certificate)
• 99 (Non-Credential programs)
Group 2 - Graduate Credential Levels
•
05 (Master’s degree)
• 06 (Doctoral degree)
1162
Banner Student User Guide | Registration
• 07 (First Professional degree)
• 08 (Graduate/Professional Certificate)
Note: Data for all credential level fields is retrieved from the SFACPLR
rules, not from STVACAT.
However, the STVACAT code is considered when the process needs to
distinguish one program from another program with similar elements. The
program start date for the specific learner being processed can then be
determined based on the earliest learner record with that STVACAT code
and other matching learner data.
Once all of the student's current and active curriculum records and associated general
student data have been analyzed and stored in the SFTCPLR table, the data is reviewed
to determine the curriculum and program length to be reported. Since students can be
enrolled in programs with the same credential level or different credential levels, after all
aid-eligible curriculum records have been evaluated, the following logic is used in
SFKCPLR:
• If the curriculum records have the same credential level group, the longest program will
be sent.
• If the curriculum records have the same credential level group and the lengths are the
same, the primary curriculum will be sent if that has the same credential level group.
• If the credential level groups are not the same, the credential level group of the primary
curriculum is determined, and the longest program of that level that is current and active
is sent.
• Only the longest program with a valid credential level is passed to RPPSPGM, and a
program with a credential level of
00 is never passed.
Note: Program level enrollment information for non-degree programs is
not reported when the credential level is
00 and the Special Program
indicator is set to
N. This applies to Banner Financial Aid only. Rules on
the SFACPLR form where the credential level is
00 are used to identify
non-degree programs to SFRNSLC and SFRSSCR.
• When all the student's curricula are examined and a program and major combination
exists that does not match any rule, that student is reported with a message of No
Records Found.
• If a general student record is not found for the student and term, that student is reported
with a message of No Student Rec (SGBSTDN) found.
• If the package was called by Banner Financial Aid, the enrollment reporting results
records for the student and term are deleted, and one program is reported.
• The data in the SFTCPLR table will be retained when called by processes for NSLDS
reporting so that all programs are reported to that organization, and the rows will be
deleted by that process, once the student reporting is complete.

1163
Banner Student User Guide | Registration
The rules use the following curriculum, student, and field of study data elements in the
following order for matching:
Curriculum elements:
• level
• campus
• college
• degree
• program
• catalog start term
• catalog end term
Student elements:
• student type
• student attribute
• class
• cohort
• class
Field of study elements:
• learner field of study type *
• learner field of study
• learner field of study type *
• learner field of study
• learner field of study type *
• learner field of study
Note: * Any combination of majors, minors, and/or concentrations can be
used for the learner field of study types when defining the rule.
Students are matched on the rule with the heaviest weight where the student curriculum,
student data elements, and field of study elements match the elements on the rule. Weight
is determined by the order of the element groups and the data contained in those groups.
Specifically, all fields in the Curriculum Rules section take precedence over the fields in
the Student Rules sections, which take precedence over the fields in the Field of Study
Rules section. Within each section of data, the order considered is from left to right, and
from top to bottom.
For example:

1164
Banner Student User Guide | Registration
Rule A has a level of UG and a major of ENGL in the Field of Study Rules with a
program length of two years.
Rule B has a level of
UG and a major of COMP in the Field of Study Rules with a
program length of four years.
Student 1 has a priority one major of
COMP and a priority two major of ENGL. The
match is made on Rule A and is reported as two years, because the major fields for
the two different rules have equal weight, and Rule A is considered first.
This result can be adjusted by including both majors in one rule or by creating a
heavier rule using one of the Student Rules criteria such as attribute or cohort.
These data elements from the matching rule are then provided to the calling process:
• length
• years, months, weeks,
• weeks in academic year
• program required hours
• credential level - determined by the Department of Education
• special program - determined by the Department of Education
The following data is sent to Banner Financial Aid:
• program length type
• program length
• calculated program length
• program required hours
• academic year length
• credential level
• CIPC code for the primary field of study attached to the curriculum being reported
Note: The publication year for the CIPC codes is set to 2010 on the
CIPC Code Validation Form (STVCIPC).
• special program
• setting of STVMAJR Financial Aid Eligibility indicator
• general student data effective term
• curriculum elements analyzed:
• level
• college
•campus

1165
Banner Student User Guide | Registration
• degrees
• program code
• catalog term
• rule number of the rule used to measure the student’s program length
• message variable for No Records Found or No Student Rec (SGBSTDN) found
The program length is determined by reviewing all current and active curriculum records
and determining the best fit.
• If the curriculum records have the same credential level group, the longest program will
be sent.
• If the curriculum records have the same credential level group and the lengths are the
same, the primary curriculum will be sent, if that has the same credential level group.
• If the credential level groups are not the same, the credential level group of the primary
curriculum is determined, and the longest program of that level that is current and active
is sent.
• When all the student's curriculum records are examined and a program and major
combination exists that does not match any rule, that student is reported with a
message of No Records Found.
The program length sent to Banner Financial Aid is calculated based on the formula
provided by Department of Education. When multiple majors exist, the CIP code from the
highest priority field of study code of the curriculum will be forwarded to Banner Financial
Aid. Here is the calculation used to determine the program length that is sent to the calling
process:
Note: For the rules on SFACPLR, the Weeks in Year value defaults to
000000 for the program’s Title IV academic year when the Measured In
program length type is
Years (Y).
Here are the values provided by the Department of Education.
(Months in Length of Program x 30)
Length of Program = ------------------------------------------------------------
(Weeks in Program's Title IV Academic Year x 7)
Credential Level Values
01: Undergraduate certificate or diploma program
02: Associate’s degree
03: Bachelor’s degree
04: Post Baccalaureate certificate

1166
Banner Student User Guide | Registration
Here is a crosswalk of data elements for:
• the program credential level from the rule that the student and program match on
SFACPLR
• the matching NSLDS student level codes
05: Master’s degree
06: Doctoral degree
07: First Professional degree
08: Graduate/professional certificate
99: Non-credential programs (preparatory coursework/teacher certification
Special Program Values
A: Special Admission Associate Degree Program
B: Bachelor’s Degree Completion Program
N: Not Applicable
P: Preparatory Coursework Graduate Professional Program
T: Non-Credential Teacher Certification Program
U: Preparatory Coursework Undergraduate Program
Credential Level
on SFACPLR NSLDS Code Description
01 UG Undergraduate
02 AS Associate Degree
03 BD Baccalaureate (Bachelor's) Degree
04 25 Postsecondary Post-Baccalaureate
Student
05 MD Master's Degree
06 DD Doctoral Degree
07 FP First Professional
08 GR Graduate
99 PC Postsecondary Certificate or Diploma
Credential Level Values

1167
Banner Student User Guide | Registration
Recommended Preparation for Banner Student Institutions
Institutions using Banner Student should consider the following when building the rule
used for reporting:
1. Identify majors and programs that have special program status.
2. Find common elements that identify programs or majors by program length and
credential levels.
3. Determine if you need a rule for each major that you have.
4. Decide how to define rules by level and program that allow any major associated with
the program or level to use a single rule.
5. Determine how to define dual degree five year programs, such as BA/MA, using the
curriculum and student data in the new rules form.
6. Decide how far back you should define the program by catalog year.
7. Check if a major or program began with one length and then changed within a period
of time in which data is still being reported to the NSLDS.
8. Determine if you need a rule for students who do not match any other rule.
Banner Setup and Processing Steps
Use the following steps to set up and use the regulatory reporting.
1. Check that the seed data for credential levels, special programs, and program length
types has been loaded into the Enrollment Reporting Types Table (SFRFDRV).
2. Build reporting rules on the Program Duration Rules Form (SFACPLR).
3. Add a value of
Q to the Time Status Code Validation Form (STVTMST) for the NSLC
Equivalent value of
3/4 time status.
This is used as a National Student Clearinghouse equivalent value for your
institutionally defined time status code.
4. Run the Student Program Information Process (RPPSPGM).
This is the Banner Financial Aid reporting process.
5. Review the results.
Test rule matching
The ssfrcplrq.sql script is used to test program duration rule matching on the
SFACPLR form and in the SFKCPLR package. The script can be run multiple times for the
same ID and term combination. It can also be run in debug mode.
The parameters are:
• Enter Banner ID
• Enter term code

1168
Banner Student User Guide | Registration
In the p_set_context command, the gb_common.p_set_context
('SFKCPLR','PRINT', 'Y','N')
parameter is used to run the script in debug
mode when set to
Y. Debug messages are suppressed when this parameter is set to N.
Running the script in debug mode provides all of the data used in selecting the program
duration rule to be used.
The script output provides the program duration rule that determines the required
elements reported to Banner Financial Aid and used for NSLDS reporting. Here is an
output sample.
=========== Report Begins ===========
Banner ID: A00194236 Last Name: Joens First Name: Johnson
Report Term: 201410
SFACPLR Rule Number selected for program length: 50
Program Length Type: Y
Program Length assigned to the rule 2
Calculated Program Length: 2
Program Required Hours:
Credential Level assigned to the rule: 03
Special Program assigned to the rule:
CIPC code of the major reported: 500101
Financial Aid Major Eligibility Indicator: Y
Message:
Student Curricula selected for reporting
Level: UG College AS
Degree: BA Campus M
Program: BA-ARTS Catalog Term 201410
=========== Report Ends ===========
Rule Examples
Here are examples of basic rules.
Rule criteria is based on:
• curriculum level rules
• field of study rules
• student level rules
• program length, level, and type
Example 1
All BA-HIST programs are reported as four year programs. Any major in the Bachelor of
Arts - History program is considered to be four years in length.
Note: Credential level is required.
1169
Banner Student User Guide | Registration
When the learner field of study type code and the learner field of study code values are
Null, all majors assigned to a student with the curriculum of BA-HIST/UG/College of Arts &
Sciences, BA degree, with a catalog term that is greater than 199510 are considered to be
four year programs.
Example 2
Associate level programs with a major in Accounting prior to 200010 are considered to be
two and a half (2.5) years in length.
Students that have a catalog term of 200010 to 999999 with an Associate level program
and a major in Accounting are considered to be two year programs.
Here are more examples that have specific use case scenarios.
Example 3
All undergraduate level (UG) programs are four years, except for a special major in
Accounting that is preparation for the CPA exam, but without a Master’s degree.
Curriculum rules allow for two majors, as well as minors and concentration.
Prog Level Coll Degr Camp Class
Stud
Type Chrt Attr
Catalog
Start
Catalog
End Length
Years
Months
Weeks
Weeks
Acad
Year
Cred
Level
BA-
HIST
UG AS BA 199510 999999 4 Years
LFOS Type LFOS Code LFOS Type LFOS Code LFOS Type LFOS Code
Prog Level Coll Degr Camp Class
Stud
Type Chrt Attr
Catalog
Start
Catalog
End Length
Years
Months
Weeks
Weeks
Acad
Year
Cred
Level
AS 198519 199920 2.5 Assoc
LFOS Type
MAJOR
LFOS Code LFOS Type LFOS Code LFOS Type LFOS Code
Accounting
Prog Level Coll Degr Camp Class
Stud
Type Chrt Attr
Catalog
Start
Catalog
End Length
Years
Months
Weeks
Weeks
Acad
Year
Cred
Level
AS 200010 999999 2 Assoc
LFOS Type
MAJOR
LFOS Code LFOS Type LFOS Code LFOS Type LFOS Code
Accounting

1170
Banner Student User Guide | Registration
Rule 1:
Rule 2:
Student A has the following data.
Student B has the following data.
Prog Level Coll Degr Camp Class
Stud
Type Chrt Attr
Catalog
Start
Catalog
End Length
Years
Months
Weeks
Weeks
Acad
Year
Cred
Level
UG 4 Years Bach
LFOS Type LFOS Code LFOS Type LFOS Code LFOS Type LFOS Code
Prog Level Coll Degr Camp Class
Stud
Type Chrt Attr
Catalog
Start
Catalog
End Length
Years
Months
Weeks
Weeks
Acad
Year
Cred
Level
UG 5 Years Bach
LFOS Type
MAJOR
LFOS Code LFOS Type LFOS Code LFOS Type LFOS Code
ACCT-CPA
Curriculum: Level: UG Major 1: Math
Major 2: Chemistry
Major 3: Computer Systems
Two programs are reported:
• Math - Length of four years
• Chemistry - Length of four years
A single program is reported to Financial Aid. NSLDS reporting will produce multiple
program results.
Curriculum: Level: UG Major 1: Accounting/CPA
One programs is reported:

1171
Banner Student User Guide | Registration
Student C has the following data.
Example 4
Some undergraduate level (UG) programs are four years in length, and some are five
years in length, depending on the major, major/minor/concentration combination, or the
student’s cohort code.
Rule 1:
Rule 2:
Accounting/CPA - Length of five years
Curriculum: Level: UG Major 1: Accounting/CPA
Major 2: Math
Major 3: Computer Systems
Two programs are reported:
• Accounting/CPA - Length of five years
• Math - Length of four years
A single program is reported to Financial Aid. NSLDS reporting will produce multiple
program results.
Prog Level Coll Degr Camp Class
Stud
Type Chrt Attr
Catalog
Start
Catalog
End Length
Years
Months
Weeks
Weeks
Acad
Year
Cred
Level
BS-BIO UG 4 Years
LFOS Type
MAJOR
LFOS Code LFOS Type LFOS Code LFOS Type LFOS Code
BIO
Prog Level Coll Degr Camp Class
Stud
Type Chrt Attr
Catalog
Start
Catalog
End Length
Years
Months
Weeks
Weeks
Acad
Year
Cred
Level
BS-BIO UG 4 Years
LFOS Type
MAJOR
LFOS Code LFOS Type
CONCENTRA-
TION
LFOS Code
GEN-COUN
LFOS Type LFOS Code
GENETICS

1172
Banner Student User Guide | Registration
Rule 3:
Rule 4:
Student A has the following data. The program length is five years from rule 2.
Student B has the following data. The program length is four years from rule 1.
Student C has the following data. The program length is four years from rule 4.
Prog Level Coll Degr Camp Class
Stud
Type Chrt Attr
Catalog
Start
Catalog
End Length
Years
Months
Weeks
Weeks
Acad
Year
Cred
Level
BS-
ENG
UG 2013-
5YR-
MS
5 Years
LFOS Type
MAJOR
LFOS Code LFOS Type LFOS Code LFOS Type LFOS Code
EENG
Prog Level Coll Degr Camp Class
Stud
Type Chrt Attr
Catalog
Start
Catalog
End Length
Years
Months
Weeks
Weeks
Acad
Year
Cred
Level
BS-
ENG
UG 4 Years
LFOS Type LFOS Code LFOS Type LFOS Code LFOS Type LFOS Code
Curriculum: Program: BS-BIO Level: UG Major: Biology
Minor: Genetics
Conc: Genetic Counseling
Curriculum: Program: BS-BIO Level: UG Major: Biology
Minor: Genetics
Curriculum: Program: BS-
Engineering
Level: UG Major: Electrical
Engineering
Minor: Computer Science

1173
Banner Student User Guide | Registration
Student D has the following data. The program length is five years from rule 5.
Examples 5 and 6 use multiple curriculum records.
Example 5
This example uses two curriculum records with a five year dual degree program. Both
curricula can be assigned lengths, but the undergraduate record with the longer length will
be used by the Department of Education.
The student has the following data for two curriculum records.
For four years Program A is the primary curriculum. Coursework for the graduate level
(GR) program may begin in the fourth year, but not until the fifth year does the GR
program become the primary curriculum. Program A remains current and active in the fifth
year, but is still the secondary curriculum.
The rules can be set up as follows.
Note: The GR level program does not become the primary program
automatically. The institution must define it as the primary program.
The student's curriculum for five years is reported with both curricula: Program A for four
years, at the UG level, and Program B for one year at the GR level. The Department of
Education considers the longer of the two programs to be at the UG level. In this case, the
student would have four years plus two, six years of subsidized Stafford eligibility.
Curriculum: Program: BS/MS -
Engineering
Level: UG Major: Electrical Engineering
Minor: Computer Science
Cohort: 2013-5YR-MS
Curriculum: Program A: Primary Level: UG Length is four years
Curriculum: Program B: Secondary Level: GR Length is one year
Curriculum: Program: 5YR-MBA Level: UG Major: Accounting (five years)
Program: 5YR-MBA Level: GR Major: Finance (one year)

1174
Banner Student User Guide | Registration
Rule 1:
Rule 2:
Example 6
The student has the following data for two curriculum records.
For three years, Program A is primary curriculum. Coursework for the graduate level (GR)
program may begin in the fourth year. In year four, the GR program becomes the primary
curriculum. Program A remains current and active in the fourth year, but is still secondary
curriculum. The program length that is reported is determined by the longest program.
The rule can be set up as follows.
The student's curriculum for five years is reported with both curricula: Program A for four
years at the UG level, and Program B for two years at the GR level. The Department of
Education considers the longer of the two programs to be at the UG level. In this case, the
Prog Level Coll Degr Camp Class
Stud
Type Chrt Attr
Catalog
Start
Catalog
End Length
Years
Months
Weeks
Weeks
Acad
Year
Cred
Level
5YR-
MBA
UG 4 Years Bach
LFOS Type
MAJOR
LFOS Code LFOS Type LFOS Code LFOS Type LFOS Code
Accounting
Prog Level Coll Degr Camp Class
Stud
Type Chrt Attr
Catalog
Start
Catalog
End Length
Years
Months
Weeks
Weeks
Acad
Year
Cred
Level
5YR-
MBA
GR 1 Years Mast
LFOS Type
MAJOR
LFOS Code LFOS Type LFOS Code LFOS Type LFOS Code
Finance
Curriculum: Program A: Primary Level: UG Length is three
years
Curriculum: Program B: Secondary Level: GR Length is two years
Curriculum: Program: 5YR-MBA Level: UG Major: Accounting (three years)
Program: 5YR-MBA Level: GR Major: Finance (two years)

1175
Banner Student User Guide | Registration
student would have three years plus one and one half (1.5), four and one half (4.5) years
of subsidized Stafford eligibility.
Rule 1:
Rule 2:
The curriculum records can be assigned lengths, but another piece of student data, such
as classification, defines when the student progresses beyond the undergraduate
coursework portion of the degree. Therefore, for three years, the student needs to be
reported as part of the undergraduate portion of the program. In this case, the student
would never be reported as having a program length of five years. Even though the
program is technically five years in length, it is only three years in length as an
undergraduate, plus two years at the graduate level.
Example 7
Here is an example using one curriculum record with a five year dual degree program.
The student has one curriculum record of PHARM5 with a major of Pharmacy.
For three years the student is considered to be at the undergraduate level. For two years,
the student is considered to be at the graduate level, but only one program code/major
combination is used.
The curriculum level code used may be the special level code that the institution defines,
such as 5Y (Five Year combined degree), instead of switching programs in the fourth year
from an undergraduate (UG) program code to a graduate (GR) program code.
For three years, the student’s class calculation is defined with class codes for Bachelor’s
levels, such as P1, P2, and P3. These are used to assessment, financial aid, and
Prog Level Coll Degr Camp Class
Stud
Type Chrt Attr
Catalog
Start
Catalog
End Length
Years
Months
Weeks
Weeks
Acad
Year
Cred
Level
5YR-
MBA
UG 3 Years Bach
LFOS Type
MAJOR
LFOS Code LFOS Type LFOS Code LFOS Type LFOS Code
Accounting
Prog Level Coll Degr Camp Class
Stud
Type Chrt Attr
Catalog
Start
Catalog
End Length
Years
Months
Weeks
Weeks
Acad
Year
Cred
Level
5YR-
MBA
GR 2 Years Mast
LFOS Type
MAJOR
LFOS Code LFOS Type LFOS Code LFOS Type LFOS Code
Finance
1176
Banner Student User Guide | Registration
credential level. In the fourth year, the class calculation changes to P4. In the fifth year, the
class calculation changes to P5, which designates graduate level to the institution.
In the rules below, only one program is reported. For the first three years, it is reported as
UG level with a length of three years. Then for the next two years, the class code is used
to indicate that student is working at the graduate/Master’s level for the length of two
years.
The student has three plus one and one half (1.5) years of subsidized eligibility. If the
student does not finish the required work to proceed to the Master's credential level
standing in three years, the class code would remain at the lower class level.
Here are the specific rules for this example.
Rule 1:
Rule 2:
Curriculum: Program: PHARM5 Class: P1 Major: Pharmacy (three years)
Program: PHARM5 Class: P2 Major: Pharmacy (three years)
Program: PHARM5 Class: P3 Major: Pharmacy (three years)
Program: PHARM5 Class: P4 Major: Pharmacy (two years)
Program: PHARM5 Class: P5 Major: Pharmacy (two years)
Prog Level Coll Degr Camp Class
Stud
Type Chrt Attr
Catalog
Start
Catalog
End Length
Years
Months
Weeks
Weeks
Acad
Year
Cred
Level
PHARM
5
5YR P1 3 Years Bach
LFOS Type
MAJOR
LFOS Code LFOS Type LFOS Code LFOS Type LFOS Code
Pharmacy
Prog Level Coll Degr Camp Class
Stud
Type Chrt Attr
Catalog
Start
Catalog
End Length
Years
Months
Weeks
Weeks
Acad
Year
Cred
Level
PHARM
5
5YR P2 3 Years Bach
LFOS Type
MAJOR
LFOS Code LFOS Type LFOS Code LFOS Type LFOS Code
Pharmacy
1177
Banner Student User Guide | Registration
Rule 3:
Rule 4:
Rule 5:
Example 8
Here is an example with a six year pharmacy program using student type. You can use
student type, attribute, or cohort as standalone parameters or in combination with other
parameters.
The student has one curriculum record of PHARM5 with a major of Pharmacy.
Prog Level Coll Degr Camp Class
Stud
Type Chrt Attr
Catalog
Start
Catalog
End Length
Years
Months
Weeks
Weeks
Acad
Year
Cred
Level
PHARM
5
5YR P3 3 Years Bach
LFOS Type
MAJOR
LFOS Code LFOS Type LFOS Code LFOS Type LFOS Code
Pharmacy
Prog Level Coll Degr Camp Class
Stud
Type Chrt Attr
Catalog
Start
Catalog
End Length
Years
Months
Weeks
Weeks
Acad
Year
Cred
Level
PHARM
5
5YR P4 2 Years Mast
LFOS Type
MAJOR
LFOS Code LFOS Type LFOS Code LFOS Type LFOS Code
Pharmacy
Prog Level Coll Degr Camp Class
Stud
Type Chrt Attr
Catalog
Start
Catalog
End Length
Years
Months
Weeks
Weeks
Acad
Year
Cred
Level
PHARM
5
5YR P5 2 Years Mast
LFOS Type
MAJOR
LFOS Code LFOS Type LFOS Code LFOS Type LFOS Code
Pharmacy
Curriculum: Program: PHARM6 Class: P1 Major: Pharmacy (first year)
Program: PHARM6 Class: P2 Major: Pharmacy (second year)
1178
Banner Student User Guide | Registration
Here are the specific rules for this example.
Rule 1:
Rule 2:
Rule 3:
Program: PHARM6 Class: P3 Major: Pharmacy (third year)
Program: PHARM6 Class: P4 Major: Pharmacy (fourth year)
Program: PHARM6 Class: P5 Major: Pharmacy (fifth year,
becomes graduate level)
Program: PHARM6 Class: P6 Major: Pharmacy (sixth year)
Prog Level Coll Degr Camp Class
Stud
Type Chrt Attr
Catalog
Start
Catalog
End Length
Years
Months
Weeks
Weeks
Acad
Year
Cred
Level
PHARM
6
P1 4 Years Bach
LFOS Type
MAJOR
LFOS Code LFOS Type LFOS Code LFOS Type LFOS Code
Pharmacy
Prog Level Coll Degr Camp Class
Stud
Type Chrt Attr
Catalog
Start
Catalog
End Length
Years
Months
Weeks
Weeks
Acad
Year
Cred
Level
PHARM
6
P2 4 Years Bach
LFOS Type
MAJOR
LFOS Code LFOS Type LFOS Code LFOS Type LFOS Code
Pharmacy
Prog Level Coll Degr Camp Class
Stud
Type Chrt Attr
Catalog
Start
Catalog
End Length
Years
Months
Weeks
Weeks
Acad
Year
Cred
Level
PHARM
6
P3 4 Years Bach
LFOS Type
MAJOR
LFOS Code LFOS Type LFOS Code LFOS Type LFOS Code
Pharmacy

1179
Banner Student User Guide | Registration
Rule 4:
Rule 5:
Rule 6:
Example 9
Here is an example where programs are changed from years to weeks within a catalog
year.
For a program of BS-Biology and a major in Genetics, with an option to take a special
concentration in Genetic Counseling, the program length is four and one half (4.5) years.
The program of BS-Biology without the concentration has a program length of four years.
• A student with a program of BS-Biology and major of Genetics, who does not have the
concentration of Genetic Counseling, will be reported as having a program length of four
years.
Prog Level Coll Degr Camp Class
Stud
Type Chrt Attr
Catalog
Start
Catalog
End Length
Years
Months
Weeks
Weeks
Acad
Year
Cred
Level
PHARM
6
P4 4 Years Bach
LFOS Type
MAJOR
LFOS Code LFOS Type LFOS Code LFOS Type LFOS Code
Pharmacy
Prog Level Coll Degr Camp Class
Stud
Type Chrt Attr
Catalog
Start
Catalog
End Length
Years
Months
Weeks
Weeks
Acad
Year
Cred
Level
PHARM
6
P5 2 Years Mast
LFOS Type
MAJOR
LFOS Code LFOS Type LFOS Code LFOS Type LFOS Code
Pharmacy
Prog Level Coll Degr Camp Class
Stud
Type Chrt Attr
Catalog
Start
Catalog
End Length
Years
Months
Weeks
Weeks
Acad
Year
Cred
Level
PHARM
6
P6 2 Years Mast
LFOS Type
MAJOR
LFOS Code LFOS Type LFOS Code LFOS Type LFOS Code
Pharmacy

1180
Banner Student User Guide | Registration
• Any student with a program of BS-Biology and any other major is also reported as
having a program length of four years.
The program length for a Certificate program in Technology Studies has been changed
from “years” to “weeks”.
• Prior to 2013, the program length was one year (two 16 week terms).
• As of 2013, it can now be completed in 28 weeks. (An academic year is 32 weeks.)
Here are the specific rules for this example.
Rule 1:
Rule 2:
Rule 3:
Prog Level Coll Degr Camp Class
Stud
Type Chrt Attr
Catalog
Start
Catalog
End Length
Years
Months
Weeks
Weeks
Acad
Year
Cred
Level
BS-BIO UG 4.5 Years Bach
LFOS Type
MAJOR
LFOS Code LFOS Type
CONCENTRA-
TION
LFOS Code
GEN-COUN
LFOS Type LFOS Code
Genetics
Prog Level Coll Degr Camp Class
Stud
Type Chrt Attr
Catalog
Start
Catalog
End Length
Years
Months
Weeks
Weeks
Acad
Year
Cred
Level
BS-BIO UG 4 Years Bach
LFOS Type LFOS Code LFOS Type LFOS Code LFOS Type LFOS Code
Prog Level Coll Degr Camp Class
Stud
Type Chrt Attr
Catalog
Start
Catalog
End Length
Years
Months
Weeks
Weeks
Acad
Year
Cred
Level
CERT-
TS
CT CERT 199910 201220 1 Years Cert
LFOS Type
MAJOR
LFOS Code LFOS Type LFOS Code LFOS Type LFOS Code
TECH

1181
Banner Student User Guide | Registration
Rule 4:
Seed Data
Seed data is delivered for credential levels, special programs, and program length types.
Enrollment Reporting Types Table (SFRFDRV)
Here is the seed data for credential levels.
Note: The credential level of 00 is a valid code for NSLDS reporting, but it
is not passed to RPPSPGM for Financial Aid reporting.
Here is the seed data for special programs.
Prog Level Coll Degr Camp Class
Stud
Type Chrt Attr
Catalog
Start
Catalog
End Length
Years
Months
Weeks
Weeks
Acad
Year
Cred
Level
CERT-
TS
CT CERT 201310 999999 28 Weeks 32 Cert
LFOS Type
MAJOR
LFOS Code LFOS Type LFOS Code LFOS Type LFOS Code
TECH
Report Type
Credential
Level Code Description
PC 01 Undergraduate certificate or diploma program
PC 02 Associate’s degree
PC 03 Bachelor’s degree
PC 04 Post Baccalaureate certificate
PC 05 Master’s degree
PC 06 Doctoral degree
PC 07 First Professional degree
PC 08 Graduate/professional certificate
PC 99 Non-credential programs (preparatory
coursework/teacher certification

1182
Banner Student User Guide | Registration
Here is the seed data for program length types.
Reporting to the NSC and the NSLDS
You can upload files to the National Student Clearinghouse (NSC) and the National
Student Loan Data System (NSLDS) for enrollment reporting related to the 150 percent
reporting. The Clearinghouse Extract Report (SFRNSLC) is used to report on each
program in a student’s curriculum record. If a student has multiple programs, multiple
records (such as FOS, ENR) will be included in the student record that is reported.
SFRNSLC and SFRSSCR reporting includes the current and active curriculum, as well as
curriculum records that are active but no longer current. (Those records are reported two
times.) If the end term is populated, withdrawn programs are reported in the term with
which they are associated.
• When the end term exists, it must be less than or equal to the report term. It also has to
be greater than or equal to the last enrollment term.
• When an end term exists, the process checks to see if the status is graduated, and if so,
the end date of the graduation term is used as the program status effective date.
• When an end term exists, and the status is not graduated, the start date of the end term
is used as the program status effective date.
• When no end term exists, and the learner record is current but not active, the process
looks at the SORLFOS term. It checks to see that this term is greater than the last
enrollment term and that the status effective date is the start date of the report term.
Report Type
Special
Program Code Description
SP A Special Admission Associate Degree Program
SP B Bachelor’s Degree Completion Program
SP N Not Applicable
SP P Preparatory Coursework Graduate Professional
Program
SP T Non-Credential Teacher Certification Program
SP U Preparatory Coursework Undergraduate
Program
Report Type
Program
Length Code Description
PL W Weeks
PL M Months
PL Y Years

1183
Banner Student User Guide | Registration
Existing logic is used to determine whether a time status change has occurred for the
SFRNLSC process. SFRSSCR reports a snapshot of the status at the time the report is
run, so it does not look for changes.
A calculation is used to determine enrollment status. As enrollment status at the campus
level cannot be derived from a single program's enrollment status, each program status is
evaluated and combined with the enrollment status to determine the overall enrollment
status. When different statuses exist for the curriculum records, statues are selected in
descending order of importance, such as
D, F, Q, H, L, G, A, W,. Records with time statuses
are considered before records with withdrawn statuses and then so on in the order listed.
However, when program one status is
F, and program two status is G, the campus level
enrollment status would be
F. When program status one is W, and program two status is Q,
the enrollment status would be
Q.
Note: A time status of Q (3/4 time) can be used on the Time Status Code
Validation Form (STVTMST).
The overall campus level status is assigned based on the program level status. If a
D is
found among the program level status codes, that would be the campus level status. If a
G is found, that status would be next in the order, unless an enrolled status (F, Q, H, L) is
also found for the term.
When a student is deceased, that status takes precedence. Then processing looks at the
overall status of the student for the greatest time status and so on in descending order,
such as
F, Q, H, L, then G - Graduated, A - Approved leave of absence, or W - Withdrawn.
• If the student has withdrawn with a valid reason, the status is A. (The A status is
calculated based on the leave of absence code. It is different than being withdrawn.)
• If the reason is not valid, the status is W.
• A status of X indicates the student record was found, but the student never attended
classes.
• A status of Z indicates the student was not found.
The program level status is
W when one of two conditions exists.
• The curriculum record is active but not current. (The end term is populated on the
record.)
• The student has withdrawn from the institution, and the enrollment status on SFAREGS
has been changed to a withdrawn status.
SFRSSCR looks for institutional work on SHRLGPA and sets the enrollment status to
X for
students that are not registered in the current term. When academic history exists, the
status is set to
W for withdrawn.
The NSC requires that changes in enrollment and program status be reported. In order to
provide this data, the SFRNSLC report looks in the .log file to determine the last date it
was run. All status change dates are compared to this date. If a change occurred before
the last file was produced, the change is not included in the report. If the change occurred
after the last file was produced, then the change is included in the report.

1184
Banner Student User Guide | Registration
If the SFRNSLC version is current, the date for that record in the .log file will be used. If
the version is not current, the report looks at the previous record. If a previous record with
the current version is not found, the date of July 1, 2014 is used to determine which
changes to report. Changes that have occurred since July 1 are included in the file for
reporting, even if they were included in a file provided for reporting in the old format. Text
from processing section: A column on the National Student Loan Clearinghouse Data
Extract Process Control Table (SFRTCTL) is used to store the version of SFRNSLC that
was run.
A log file is produced by the NSLDS SSCR Process (SFRSSCR) to provide the version of
the process that was run. The SFRSSCR Process Control Table (SFRSCTL) is also used
to store the date of the last submission of the SFRSSCR process.
The SFRNSLC report processes information for the report term selected in the Term Code
parameter, or it may be run to process information based on terms that are a part of a
student centric period. When the report is run for a single report term, the time status data
comes from the SFATMST form. When the report is run with the Process by Student
Period parameter set to
Y, the output is based on terms that are a part of the student
centric period, and data comes from the SFASTSR and SFASCPR forms.
The SFRNSLC report uses an OPEID parameter to report school code and location code
where the enrollment is certified. However, the Major 1 and CIP Code and Major 2 and
CIP Code parameters are not used with this reporting. Additional parameters used for
reporting include Nation Code and Citizenship.
Additional notes on SFRNSLC processing:
• When a program does not have the Special Program indicator on SFACPLR set to a
certificate or degree value, a default value of
N is attached to the student’s record.
• When the enrollment status is Null, the student’s ID is still reported by SFRNSLC.
• When the SSN is Null for a student, the SSN is not displayed on the report.
• When the reported program graduation date is past the term end date, the graduation
date is reset to the report term date by SFRNSLC. The program level graduation date
uses the last date of classes for the student (the maximum
SSBSECT_PTRM_END_DATE value).
• The process looks for awarded degrees based on the matching campus, major CIP
code, and award category level, instead of using the rolled sequence number.
The SFRSSCR process uses parameters for Telephone Hierarchy, Email Hierarchy,
Nation Code, and OPEDID to report information for the student. The Aid Year Code(s)
parameter is not used. Students who are missing SSNs on SFBPERS are not included in
the process output.
The process uses the program begin date value from the
SORLCUR_TERM_CODE field
and the program withdrawn date value from the
SORLCUR_TERM_CODE_END_DATE
field. The program enrollment status date is made equal to the program start date when
the status date is prior to the begin date.

1185
Banner Student User Guide | Registration
File Record Types
The fixed-width Enrollment Reporting file consists of header and trailer records and
multiple detail record types. These record types are:
• Record Type 000 - Header (existing record)
• Record Type 001 - Campus-Level (existing record with updates)
• Record Type 002 - Program-Level (new record)
• Record Type 003 - Email Address (new record)
• Record Type 999 - Trailer (existing record with updates)
The 001 Campus-Level record type reports additional data for:
• Student Phone Type
• Preferred Phone Number flag
• Student Phone Country Code
• Student Phone Number
• Bundle Rejected Flag
• Program Indicator
Note: The phone fields are optional, but if the phone number is provided,
all phone number-related fields become mandatory.
The student phone country code uses leading zeroes, such as 095
instead of 95.
The 002 Program-Level record type reports additional data for:
• Classification of Instructional Programs (CIP) code
• Program Credential Level
• Published Program Length
• Published Program Length Measurement (Weeks, Months, Years)
• Weeks in Title IV Academic Year
• Program Begin Date
• Special Program Indicator
• Program Enrollment Status
• Program Enrollment Effective Date
• Bundle Rejected Flag
The 03 Email Address record type reports additional data for:

1186
Banner Student User Guide | Registration
• Email Address
This field is optional, but if an email address is provided, all email address fields become
mandatory (Email Effective Date, Good Email Address Flag)
• Email Effective Date
• Bundle Rejected Flag
• The 999 Trailer record type reports the Valid Detail Record Count and the Detail
Records in the Error Count.
Bundled Records
The first record of the file will be the header record, the last record is the footer record, and
the student records are bundled in between.
• Each student will have one record type of 001 that contains all of his/her student and
campus-level information.
• Record type 002 is the program-level. This is required unless the student does not have
a program.
• Record type 003 is optional and contains the student email address information.
Because each student's update will consist of multiple detail records, a valid detail record
of one type may be rejected by NSLDS because of an error in another detail record in the
student's bundle. Each detail record type in the file layout includes a field named Bundle
Rejected Flag. That flag is set to
Y for all the detail records in a bundle that contain an
error, although the actual error code will only be displayed on the detail record that
contains the error.
The OPEID in the bundled format is the combination of the six-digit school code and the
two-digit school location code. If a school has more than 99 locations, the first digit of the
OPEID is incremented to 1. If the school has more than 199 locations, the first digit is
incremented to 2, and so forth. For example, location 00 = 06789900, location 101 =
16789901, location 202 = 26789902.
SFRNSLC EDI Output
The Header Record file layout in fixed-width format reports additional information for
SFRNSLC in Run Mode
2, EDI TS190 output.

1187
Banner Student User Guide | Registration
Field Name Length
Start
Position
End
Position Required Additional Information
Enrollment Status 1 87 87 Yes F - Full Time
Q - Three Quarter Time
H - Half Time
L - Less Than Half Time
W - Withdrawn
G - Graduated
A - Approved Leave of
Absence
D - Deceased
In an advanced registration
file, the valid values are: F, Q,
H, or L.
Status Start Date 8 88 95 Conditional Report for all non-enrolled
statuses (deceased,
graduated, withdrawn, or
leaves of absence) using
SFBETRM_ESTS_DATE.
Do not report for full-time
students.
Report students with
decreasing time using the
SFRTHST_TMST_DATE.
Program Indicator 1 674 674 Yes Y - Student is enrolled in at
least one program.
N - Student is not enrolled in
a program.
Comes from the SORLCUR
program for the active and
current curriculum record.
A space defaults to N.
Program 1 CIP Code 6 675 680 Conditional STVMAJR six digit
Classification of Instructional
Program code that identifies a
program's academic content.
No decimals can be used.

1188
Banner Student User Guide | Registration
CIP Year 4 681 684 Conditional Year in which the CIP used by
NSLDS was published. The
CIP year for the codes
currently used by NSLDS is
2010 in format CCYY.
The CIP published year used
from STVCIPC is the one
where the CIPC code is equal
to the STVMAJR CIPC code.
Program 1 Credential
Level
2 685 686 Conditional 01 - Undergraduate
Certificate or Diploma
Program
02 - Associate's Degree
03 - Bachelor's Degree
04 - Post Baccalaureate
Certificate
05 - Master's Degree
06 - Doctoral Degree
07 - First Professional Degree
08 - Graduate/Professional
Certificate
99 - Non Credential Program
(Preparatory Coursework/
Teacher Certification)
Comes from the SFRCPLR
credential level data for the
rule that matched the
student’s record.
Published Program 1
Length
6 687 692 Conditional Program length in years,
months, or weeks as defined
at your institution, in format
nnnnnn.
Comes from the SFRCPLR
program length data for the
rule that matched the
student’s record.
Field Name Length
Start
Position
End
Position Required Additional Information
1189
Banner Student User Guide | Registration
Published Program 1
Length Measurement
1 693 693 Conditional Y - Year
M - Month
W - Week
Comes from the SFRCPLR
program length type data for
the rule that matched the
student’s record.
Weeks Program 1
Title IV Academic
Year
6 694 699 Conditional Total number of weeks of
instruction in the program's
academic year, in format
nnnnnn.
Only reported when the
published program length
measurement is equal to W or
M.
Comes from the SFRCPLR
weeks and year data for the
rule that matched the
student’s record.
Program 1 Begin
Date
8 700 707 Conditional Date on which the student
began attending the program,
in format CCYYMMDD, using
the term code on the
curriculum record (not the
catalog term), the begin date
is retrieved from STVTERM.
Special Program
Indicator
1 708 708 Conditional A - Special Admission
Associate Degree Program
B - Bachelor's Degree
Completion Program
N - Not Applicable
P - Preparatory Coursework
Graduate/Professional
T - Non Credential Teacher
Certification
U - Preparatory Coursework
Undergraduate
Comes from the SFRCPLR
special program data for the
rule that matched the
student’s record.
Field Name Length
Start
Position
End
Position Required Additional Information

1190
Banner Student User Guide | Registration
Program 1
Enrollment Status
1 709 709 Conditional F - Full Time
Q - Three Quarter Time
H - Half Time
L - Less than Half Time
A - Leave of Absence
G - Graduated
W - Withdrawn
D - Deceased
Comes from the SFRTHST
time status date and term for
the STVTMST NSLC
equivalency value.
For student centric periods,
comes from SFRTHST or
SFRSTSH.
Program 1
Enrollment Status
Effective Date
8 710 717 Conditional Effective date for the program
enrollment status currently
being reported in format
CCYYMMDD.
Comes from the SFRTHST
time status date and term.
For student centric periods,
comes from SFRTHST or
SFRSTSH.
Also can be related to change
of program or gap in
enrollment.
Program 2 CIP Code 6 718 723 No STVMAJR six digit
Classification of Instructional
Program code that identifies a
program's academic content.
No decimals can be used.
Field Name Length
Start
Position
End
Position Required Additional Information
1191
Banner Student User Guide | Registration
CIP Year 4 724 727 Conditional Year in which the CIP used by
NSLDS was published. The
CIP year for the codes
currently used by NSLDS is
2010 in format CCYY.
The CIP published year used
from STVCIPC is the one
where the CIPC code is equal
to the STVMAJR CIPC code.
Program 2 Credential
Level
2 728 729 Conditional 01 - Undergraduate
Certificate or Diploma
Program
02 - Associate's Degree
03 - Bachelor's Degree
04 - Post Baccalaureate
Certificate
05 - Master's Degree
06 - Doctoral Degree
07 - First Professional Degree
08 - Graduate/Professional
Certificate
99 - Non Credential Program
(Preparatory Coursework/
Teacher Certification)
Comes from the SFRCPLR
credential level data for the
rule that matched the
student’s record.
Published Program 2
Length
6 730 735 Conditional Program length in years,
months, or weeks as defined
at your institution, in format
nnnnnn.
Comes from the SFRCPLR
program length data for the
rule that matched the
student’s record.
Field Name Length
Start
Position
End
Position Required Additional Information

1192
Banner Student User Guide | Registration
Published Program 2
Length Measurement
1 736 736 Conditional Y - Year
M - Month
W - Week
Comes from the SFRCPLR
program length type data for
the rule that matched the
student’s record.
Weeks Program 2
Title IV Academic
Year
6 737 742 Conditional Total number of weeks of
instruction in the program's
academic year, in format
nnnnnn.
Only reported when the
published program length
measurement is equal to W or
M.
Comes from the SFRCPLR
weeks and year data for the
rule that matched the
student’s record.
Program 2 Begin
Date
8 743 750 Conditional Date on which the student
began attending the program,
in format CCYYMMDD, using
the term code on the
curriculum record (not the
catalog term), the begin date
is retrieved from STVTERM.
Special Program
Indicator
1 751 751 Conditional A - Special Admission
Associate Degree Program
B - Bachelor's Degree
Completion Program
N - Not Applicable
P - Preparatory Coursework
Graduate/Professional
T - Non Credential Teacher
Certification
U - Preparatory Coursework
Undergraduate
Comes from the SFRCPLR
special program data for the
rule that matched the
student’s record.
Field Name Length
Start
Position
End
Position Required Additional Information

1193
Banner Student User Guide | Registration
Program 2
Enrollment Status
1 752 752 Conditional F - Full Time
Q - Three Quarter Time
H - Half Time
L - Less than Half Time
A - Leave of Absence
G - Graduated
W - Withdrawn
D - Deceased
Comes from the SFRTHST
time status date and term for
the STVTMST NSLC
equivalency value.
Program 2
Enrollment Status
Effective Date
8 753 760 Conditional Effective date for the program
enrollment status currently
being reported in format
CCYYMMDD.
Comes from the SFRTHST
time status date and term.
Program 3 CIP Code 6 761 766 No STVMAJR six digit
Classification of Instructional
Program code that identifies a
program's academic content.
No decimals can be used.
CIP Year 4 767 770 Conditional Year in which the CIP used by
NSLDS was published. The
CIP year for the codes
currently used by NSLDS is
2010 in format CCYY.
The CIP published year used
from STVCIPC is the one
where the CIPC code is equal
to the STVMAJR CIPC code.
Field Name Length
Start
Position
End
Position Required Additional Information

1194
Banner Student User Guide | Registration
Program 3 Credential
Level
2 771 772 Conditional 01 - Undergraduate
Certificate or Diploma
Program
02 - Associate's Degree
03 - Bachelor's Degree
04 - Post Baccalaureate
Certificate
05 - Master's Degree
06 - Doctoral Degree
07 - First Professional Degree
08 - Graduate/Professional
Certificate
99 - Non Credential Program
(Preparatory Coursework/
Teacher Certification)
Comes from the SFRCPLR
credential level data for the
rule that matched the
student’s record.
Published Program 3
Length
6 773 778 Conditional Program length in years,
months, or weeks as defined
at your institution, in format
nnnnnn.
Comes from the SFRCPLR
program length data for the
rule that matched the
student’s record.
Published Program 3
Length Measurement
1 779 779 Conditional Y - Year
M - Month
W - Week
Comes from the SFRCPLR
program length type data for
the rule that matched the
student’s record.
Field Name Length
Start
Position
End
Position Required Additional Information

1195
Banner Student User Guide | Registration
Weeks Program 3
Title IV Academic
Year
6 780 785 Conditional Total number of weeks of
instruction in the program's
academic year, in format
nnnnnn.
Only reported when the
published program length
measurement is equal to W or
M.
Comes from the SFRCPLR
weeks and year data for the
rule that matched the
student’s record.
Program 3 Begin
Date
8 786 793 Conditional Date on which the student
began attending the program,
in format CCYYMMDD, using
the term code on the
curriculum record (not the
catalog term), the begin date
is retrieved from STVTERM.
Special Program
Indicator
1 794 794 Conditional A - Special Admission
Associate Degree Program
B - Bachelor's Degree
Completion Program
N - Not Applicable
P - Preparatory Coursework
Graduate/Professional
T - Non Credential Teacher
Certification
U - Preparatory Coursework
Undergraduate
Comes from the SFRCPLR
special program data for the
rule that matched the
student’s record.
Field Name Length
Start
Position
End
Position Required Additional Information

1196
Banner Student User Guide | Registration
Program 3
Enrollment Status
1 795 795 Conditional F - Full Time
Q - Three Quarter Time
H - Half Time
L - Less than Half Time
A - Leave of Absence
G - Graduated
W - Withdrawn
D - Deceased
Comes from the SFRTHST
time status date and term for
the STVTMST NSLC
equivalency value.
Program 3
Enrollment Status
Effective Date
8 796 803 Conditional Effective date for the program
enrollment status currently
being reported in format
CCYYMMDD.
Comes from the SFRTHST
time status date and term.
Program 4 CIP Code 6 804 809 No STVMAJR six digit
Classification of Instructional
Program code that identifies a
program's academic content.
No decimals can be used.
CIP Year 4 810 813 Conditional Year in which the CIP used by
NSLDS was published. The
CIP year for the codes
currently used by NSLDS is
2010 in format CCYY.
The CIP published year used
from STVCIPC is the one
where the CIPC code is equal
to the STVMAJR CIPC code.
Field Name Length
Start
Position
End
Position Required Additional Information

1197
Banner Student User Guide | Registration
Program 4 Credential
Level
2 814 815 Conditional 01 - Undergraduate
Certificate or Diploma
Program
02 - Associate's Degree
03 - Bachelor's Degree
04 - Post Baccalaureate
Certificate
05 - Master's Degree
06 - Doctoral Degree
07 - First Professional Degree
08 - Graduate/Professional
Certificate
99 - Non Credential Program
(Preparatory Coursework/
Teacher Certification)
Comes from the SFRCPLR
credential level data for the
rule that matched the
student’s record.
Published Program 4
Length
6 816 821 Conditional Program length in years,
months, or weeks as defined
at your institution, in format
nnnnnn.
Comes from the SFRCPLR
program length data for the
rule that matched the
student’s record.
Published Program 4
Length Measurement
1 822 822 Conditional Y - Year
M - Month
W - Week
Comes from the SFRCPLR
program length type data for
the rule that matched the
student’s record.
Field Name Length
Start
Position
End
Position Required Additional Information

1198
Banner Student User Guide | Registration
Weeks Program 4
Title IV Academic
Year
6 823 828 Conditional Total number of weeks of
instruction in the program's
academic year, in format
nnnnnn.
Only reported when the
published program length
measurement is equal to W or
M.
Comes from the SFRCPLR
weeks and year data for the
rule that matched the
student’s record.
Program 4 Begin
Date
8 829 836 Conditional Date on which the student
began attending the program,
in format CCYYMMDD, from
CRN part of term or open
learning start date.
Special Program
Indicator
1 837 837 Conditional A - Special Admission
Associate Degree Program
B - Bachelor's Degree
Completion Program
N - Not Applicable
P - Preparatory Coursework
Graduate/Professional
T - Non Credential Teacher
Certification
U - Preparatory Coursework
Undergraduate
Comes from the SFRCPLR
special program data for the
rule that matched the
student’s record.
Field Name Length
Start
Position
End
Position Required Additional Information

1199
Banner Student User Guide | Registration
Program 4
Enrollment Status
1 838 838 Conditional F - Full Time
Q - Three Quarter Time
H - Half Time
L - Less than Half Time
A - Leave of Absence
G - Graduated
W - Withdrawn
D - Deceased
Comes from the SFRTHST
time status date and term for
the STVTMST NSLC
equivalency value.
Program 4
Enrollment Status
Effective Date
8 839 846 Conditional Effective date for the program
enrollment status currently
being reported in format
CCYYMMDD.
Comes from the SFRTHST
time status date and term.
Program 5 CIP Code 6 847 852 Conditional STVMAJR six digit
Classification of Instructional
Program code that identifies a
program's academic content.
No decimals can be used.
CIP Year 4 853 856 Conditional Year in which the CIP used by
NSLDS was published. The
CIP year for the codes
currently used by NSLDS is
2010 in format CCYY.
The CIP published year used
from STVCIPC is the one
where the CIPC code is equal
to the STVMAJR CIPC code.
Field Name Length
Start
Position
End
Position Required Additional Information

1200
Banner Student User Guide | Registration
Program 5 Credential
Level
2 857 858 Conditional 01 - Undergraduate
Certificate or Diploma
Program
02 - Associate's Degree
03 - Bachelor's Degree
04 - Post Baccalaureate
Certificate
05 - Master's Degree
06 - Doctoral Degree
07 - First Professional Degree
08 - Graduate/Professional
Certificate
99 - Non Credential Program
(Preparatory Coursework/
Teacher Certification)
Comes from the SFRCPLR
credential level data for the
rule that matched the
student’s record.
Published Program 5
Length
6 859 864 Conditional Program length in years,
months, or weeks as defined
at your institution, in format
nnnnnn.
Comes from the SFRCPLR
program length data for the
rule that matched the
student’s record.
Published Program 5
Length Measurement
1 865 865 Conditional Y - Year
M - Month
W - Week
Comes from the SFRCPLR
program length type data for
the rule that matched the
student’s record.
Field Name Length
Start
Position
End
Position Required Additional Information

1201
Banner Student User Guide | Registration
Weeks Program 5
Title IV Academic
Year
6 866 871 Conditional Total number of weeks of
instruction in the program's
academic year, in format
nnnnnn.
Only reported when the
published program length
measurement is equal to W or
M.
Comes from the SFRCPLR
weeks and year data for the
rule that matched the
student’s record.
Program 5 Begin
Date
8 872 879 Conditional Date on which the student
began attending the program,
in format CCYYMMDD, from
CRN part of term or open
learning start date.
Special Program
Indicator
1 880 880 Conditional A - Special Admission
Associate Degree Program
B - Bachelor's Degree
Completion Program
N - Not Applicable
P - Preparatory Coursework
Graduate/Professional
T - Non Credential Teacher
Certification
U - Preparatory Coursework
Undergraduate
Comes from the SFRCPLR
special program data for the
rule that matched the
student’s record.
Field Name Length
Start
Position
End
Position Required Additional Information

1202
Banner Student User Guide | Registration
Program 5
Enrollment Status
1 881 881 Conditional F - Full Time
Q - Three Quarter Time
H - Half Time
L - Less than Half Time
A - Leave of Absence
G - Graduated
W - Withdrawn
D - Deceased
Comes from the SFRTHST
time status date and term for
the STVTMST NSLC
equivalency value.
Program 5
Enrollment Status
Effective Date
8 882 889 Conditional Effective date for the program
enrollment status currently
being reported in format
CCYYMMDD.
Comes from the SFRTHST
time status date and term.
Program 6 CIP Code 6 890 895 No STVMAJR six digit
Classification of Instructional
Program code that identifies a
program's academic content.
No decimals can be used.
CIP Year 4 896 899 Conditional Year in which the CIP used by
NSLDS was published. The
CIP year for the codes
currently used by NSLDS is
2010 in format CCYY.
The CIP published year used
from STVCIPC is the one
where the CIPC code is equal
to the STVMAJR CIPC code.
Field Name Length
Start
Position
End
Position Required Additional Information

1203
Banner Student User Guide | Registration
Program 6 Credential
Level
2 900 901 Conditional 01 - Undergraduate
Certificate or Diploma
Program
02 - Associate's Degree
03 - Bachelor's Degree
04 - Post Baccalaureate
Certificate
05 - Master's Degree
06 - Doctoral Degree
07 - First Professional Degree
08 - Graduate/Professional
Certificate
99 - Non Credential Program
(Preparatory Coursework/
Teacher Certification)
Comes from the SFRCPLR
credential level data for the
rule that matched the
student’s record.
Published Program 6
Length
6 902 907 Conditional Program length in years,
months, or weeks as defined
at your institution, in format
nnnnnn.
Comes from the SFRCPLR
program length data for the
rule that matched the
student’s record.
Published Program 6
Length Measurement
1 908 908 Conditional Y - Year
M - Month
W - Week
Comes from the SFRCPLR
program length type data for
the rule that matched the
student’s record.
Field Name Length
Start
Position
End
Position Required Additional Information

1204
Banner Student User Guide | Registration
Weeks Program 6
Title IV Academic
Year
6 909 914 Conditional Total number of weeks of
instruction in the program's
academic year, in format
nnnnnn.
Only reported when the
published program length
measurement is W or M.
Comes from the SFRCPLR
weeks and year data for the
rule that matched the
student’s record.
Program 6 Begin
Date
8 915 922 Conditional Date on which the student
began attending the program,
in format CCYYMMDD, from
CRN part of term or open
learning start date.
Special Program
Indicator
1 923 923 Conditional A - Special Admission
Associate Degree Program
B - Bachelor's Degree
Completion Program
N - Not Applicable
P - Preparatory Coursework
Graduate/Professional
T - Non Credential Teacher
Certification
U - Preparatory Coursework
Undergraduate
Comes from the SFRCPLR
special program data for the
rule that matched the
student’s record.
Field Name Length
Start
Position
End
Position Required Additional Information
1205
Banner Student User Guide | Registration
The following field is used in the Trailer Record file layout with this reporting.
The Header Record file layout in fixed-width format reports additional information for
SFRNSLC in Run Mode
3, EDI.Smart TS190 output.
Program 6
Enrollment Status
1 924 924 Conditional F - Full Time
Q - Three Quarter Time
H - Half Time
L - Less than Half Time
A - Leave of Absence
G - Graduated
W - Withdrawn
D - Deceased
Comes from the SFRTHST
time status date and term for
the STVTMST NSLC
equivalency value.
Program 6
Enrollment Status
Effective Date
6 925 932 Conditional Effective date for the program
enrollment status currently
being reported in format
CCYYMMDD.
Comes from the SFRTHST
time status date and term.
Filler 318 933 1250 Yes Space fill
Field Name Length
Start
Position
End
Position Required Additional Information
Number of “Q” 6 9 14 Yes Number of records where
enrollment status is Q.
Field Name Length
Start
Position
End
Position Required Additional Information
1206
Banner Student User Guide | Registration
Reference
Designator
Data
Element Name Additional Information
SUM 03 1073 Yes/No Condition or Response Code Indicates student is enrolled in at least
one program.
Y - Yes
N - No
N101 98 Entity Identifier Code ZZ
N102 93 Name SB
SES10 1131 Academic Session Loop 1 - Class Level/Grade Level
Loop 2 - Program 1 Credential Level
Loop 3 - Program 2 Credential Level
Loop 4 - Program 3 Credential Level
Loop 5 - Program 4 Credential Level
Loop 6 - Program 5 Credential Level
Loop 7 - Program 6 Credential Level

1207
Banner Student User Guide | Registration
SES10 1131 Level of Student (Grade/Class) 20 - Non-Degree or Temporary
Undergraduate
21 - Post-Secondary First Year
Student
22 - Post-Secondary Sophomore
23 - Post-Secondary Junior
24 - Post-Secondary Senior
25 - Post-Secondary Post
Baccalaureate Student
26 - Post-Secondary Non-Degree
Graduate Student
27 - Post-Secondary Professional
Student
28 - Post-Secondary Master's Degree
Student
29 - Post-Secondary Doctoral Student
30 - Post-Doctorate Student
UN - Ungraded
AS - Associate Degree
BD - Baccalaureate (Bachelors)
Degree
SES10 1131 Level of Student (Program Credential) UG - Undergraduate
AS - Associate Degree
BD - Baccalaureate (Bachelor's)
Degree
25 - Postsecondary Post-
Baccalaureate Student
MD - Master's Degree
DD - Doctoral Degree
FP - First Professional
GR - Graduate
PC - Postsecondary Certificate or
Diploma
Reference
Designator
Data
Element Name Additional Information

1208
Banner Student User Guide | Registration
ENR01 641 Status Reason Code (Program
Enrollment Status)
EBO - Three-Quarter Time Enrollment
(Clearinghouse code Q)
The Status Reason Code (data
element 641) for the program
enrollment status is calculated to use
three quarter time enrollment (Q).
ENR03 1250 Date Time Period Format Qualifier Format for program begin date -
CCYYMMDD.
ENR04 1251 Date Time Period (Program Begin
Date)
Date student began attendance in
program in format CCYYMMDD.
ENR12 1250 Date Time Period Format Qualifier Format for status effective date -
CCYYMMDD.
ENR13 1251 Date Time Period (Program
Enrollment Status Effective Date)
Date program status was effective in
format CCYYMMDD.
FOS01 1153 Academic Field of Study Level or
Type Code
Field of study (major) used for the
program.
FOS02 66 Identifier Code Qualifier Code structure used for Identification
Code, such as CIP Code.
FOS03 67 Identifier Code (CIP Code) Code identifying the CIP Code (CIPC
Code from STVMAJR).
Loop 1 - Student Level CIP Code
Loop 2 - Program 1 CIP Code
Loop 3 - Program 2 CIP Code
Loop 4 - Program 3 CIP Code
Loop 5 - Program 4 CIP Code
Loop 6 - Program 5 CIP Code
Loop 7 - Program 6 CIP Code
Reference
Designator
Data
Element Name Additional Information

1209
Banner Student User Guide | Registration
FOS05 352 Published Program Length
Measurement
Length of instructional program in
years, months, or weeks as published
by the school, in format nnnnnn with
implied decimal between the third and
fourth digits.
000100 - one tenth (1/10)
001000 - one (1)
010000 - ten (10)
100000 - one hundred (100)
Loop 1 - not used
Loop 2 - Program 1 Length
Measurement
Loop 3 - Program 2 Length
Measurement
Loop 4 - Program 3 Length
Measurement
Loop 5 - Program 4 Length
Measurement
Loop 6 - Program 5 Length
Measurement
Loop 7 - Program 6 Length
Measurement
FOS06 380 Published Program Length Method of measurement used for the
program length measurement.
Y - Year
M - Month
W - Week
Loop 1 - not used
Loop 2 - Program 1 Length
Loop 3 - Program 2 Length
Loop 4 - Program 3 Length
Loop 5 - Program 4 Length
Loop 6 - Program 5 Length
Loop 7 - Program 6 Length
Reference
Designator
Data
Element Name Additional Information

1210
Banner Student User Guide | Registration
FOS06 380 Weeks Program Title IV Academic
Year
Total number of weeks of instruction
in the program's academic year, in
format nnnnnn with implied decimal
between the third and fourth digits.
Only reported when Published
Program Length Measurement is W
or M.
000100 - one tenth (1/10)
001000 - one (1)
010000 - ten (10)
100000 - one hundred (100)
Loop 1 - not used
Loop 2 - Program 1 Title IV Academic
Year
Loop 3 - Program 2 Title IV Academic
Year
Loop 4 - Program 3 Title IV Academic
Year
Loop 5 - Program 4 Title IV Academic
Year
Loop 6 - Program 5 Title IV Academic
Year
Loop 7 - Program 6 Title IV Academic
Year
NTE02 352 Flag used to indicate the group to
which the program belongs
A - Special Admission Associate
Degree Program
B - Bachelor's Degree Completion
Program
N - Not applicable
P - Preparatory Coursework
Graduate/Professional
T - Non Credential Teacher
Certification
U - Preparatory Coursework
Undergraduate
Reference
Designator
Data
Element Name Additional Information

1211
Banner Student User Guide | Registration
SFRNSLC Error Reporting
For SFRNSLC Run Mode 1, Report of Missing/Invalid Data, the report will check for the
following conditions:
• The process checks majors attached to all active curriculum records to ensure that a
CIP code exists in STVMAJR (STVMAJR_CIPC_CODE is populated).
• When the Program Indicator is Y, the process provides all program-level information.
The report prints
Y in the SUM03 element when at least one current and active
curriculum record is found.
• When the Program Indicator is N, the report does not print any program level
information. The report prints
N in the SUM03 element.
• When the curriculum does not find a program length match, it is included in the report
with the message No Matching Rule Found on SFACPLR.
Use Required Terms
Reporting includes processing required terms based on the student’s curriculum record.
Required terms are used to determine gaps in enrollment when running the Clearinghouse
Extract Report (SFRNSLC) and the NSLDS SSCR Process (SFRSSCR).
Institutions can require different sets of terms based on the student’s program of study. In
order to determine the program status effective date when multiple terms are used, a list
of terms in which students are required to attend is compared to the student’s SFBETRM
record to determine if the student was enrolled for that term. If the student is not enrolled,
it is considered a gap in enrollment. The program status effective date is then re-set to the
start of the term following the gap in enrollment.
The Required Terms Rule Form (SFACPLT) and the Required Terms Rule Table
(SFRCPLT) and the Required Terms Table (SFRCPTT) are used to define rules for
required terms. Rules are based on the curriculum elements the student is pursuing, and
optionally, the student attribute. Curriculum elements come from the SORLCUR table
(level, college, campus, degree, program) and the SORLFOS table (major). The student
attribute is defined in the SGRSATT table. Rule data for required terms can be copied to a
new rule when the required terms are Null, and the curriculum, major, or attribute elements
are populated. You cannot create duplicate rules.
The student’s primary current and active curriculum record is used for processing. The
process looks for the weightiest matching rule on SFACPLT. The student’s program status
effective date is based on the required terms of attendance found on the rule that matches
the student’s primary current and active curriculum record. The program status effective
date equals the program begin date if the effective date is prior to the begin date.
The NSC Reported Major Audit Table (SFRMNSC) and the NSLDS Reported Major Audit
Table (SFRMSSR) are used to store reported data from previously reported terms.

1212
Banner Student User Guide | Registration
Curriculum Views
Banner views are used to select the required terms data to be used by SFRNSLC and
SFRSSCR and pass the data for processing.
• The Curricula by Term View (SOVCLTR) is used to simplify the selection of curriculum
data by term. The view is created by SOVCLTR0 and SOVCLTR1.
• The Current and Active Primary Curriculum by Term View (SOVCLTP) is used to
simplify the selection of current and active primary curriculum data by term.
SOVCLTR and SOVCLTP create the SOVCLTM view that is used by SFRNSLC and
SFRSSCR. For more information on these views, refer to the "Concurrent Curricula
Processing Appendix" in the Banner Student User Guide.
The Current and Active Curriculum Plus Major by Term View (SOVCLTM) is used by the
enrollment reporting process to forward the required terms to SFRNSLC and SFRSSCR
based on the curriculum elements that match the student’s record. The view calls the
SOVLFOS view and lists primary current and active curriculum record for a student and
includes whether the curriculum is the most current for the priority. It also lists the primary
major for the term.
Processing works as follows.
1. The SOVCLTM view selects the primary current and active curriculum record,
including the major, for each student for the term being processed.
2. The enrollment process then compares the selected curriculum record to the required
term rules.
3. If the rule returned specifies a student attribute, SFRNSLC and SFRSSCR then check
the Student Attribute Repeating Table (SGRSATT) for a match on PIDM, effective
term, and attribute code.
4. The rule with the most weight that applies to the student is used to determine the
required terms for that student, and in turn is used to determine any gaps in
enrollment for that student.
Each element in the rule has a value of 1. If one component is entered, that rule has a
weight of 1. If two components are entered, the weight is 2, and so on.
5. The data for the required term codes that matches the curriculum record data
elements and the student attribute is sent for reporting for the student being
evaluated.
Here are sample SFACPLT rules and outcomes.
Example 1
For this example, all BA-HIST programs require fall and spring term enrollment.
Not every undergraduate student who is pursuing a BA-HIST program with a BA degree in
the College of Arts & Sciences is expected to attend the summer term.
When the field of study type code and field of study code are Null, the process reviews all
majors assigned to a student with a curriculum of BA-HIST, a level of UG in the College of

1213
Banner Student User Guide | Registration
Arts & Sciences, and a BA degree, and considers the fall and spring terms to be regular
terms of enrollment.
Example 2
For this example, associate level programs with a major in Accounting require summer
attendance.
Every student in an associate level (AS) with an ACCT major would be expected to attend
the fall, spring, and summer terms.
Data Reported With SFRNSLC and SFRSSCR
SFRNSLC and SFRSSCR process the required terms, based on the curriculum data
elements on the rule form that match the student’s primary current and active curriculum.
Here are some example rule sets with rule weights to show which rule is used.
Example 1
This scenario would be allowed, regardless of what terms are required.
Curriculum and
LFOS Data
Elements Level Campus College Degree Program
Field of Study/
Major Code
UG AS BA BA-HIST
Unlimited
number of
terms required Term Term Term Term Term And so on
201210 201220 201310 201320 201410
Curriculum and
LFOS Data
Elements Level Campus College Degree Program
Field of Study/
Major Code
AS ACCT
Unlimited
number of
terms required Term Term Term Term Term Term
201210 201220 201230 201310 201320 201330

1214
Banner Student User Guide | Registration
Example 2
This scenario would be allowed, regardless of what terms are required. A student could
match all three rules. Rule 3 would be used because it is the weightiest.
Example 3
In this scenario, Rule 4 would not be allowed, even though the required terms might be
different for the rules, because the curriculum elements are the same for Rule 2 and Rule
4.
Here are more examples of how required terms on SFACPLT are used with SFRNSLC
and SFRSSCR reporting. Terms used and reporting results are detailed for enrollment
gaps, the program effective status date, withdrawn majors, and the program start date.
Rule Level Program
Rule
Weight
1UG 1
2 UG AS-ACCT 2
Rule Level Program Major
Rule
Weight
1UG 1
2 UG AS-ACCT 2
3 UG AS-ACCT FIN 3
Rule Level Program Major
Rule
Weight
1UG 1
2 UG AS-ACCT 2
3 UG AS-ACCT Finance 4
4 UG AS-ACCT rule not
permitted

1215
Banner Student User Guide | Registration
Basic Term Setup Example
When SFRNSLC or SFRSSCR is being run for 201403 Fall 2014, returning students
should have been included in the following terms depending on when they were admitted.
The following terms should be entered on SFACPLT.
• 201103 Fall 2011
• 201201 Spring 2012
• 201203 Fall 2012
• 201301 Spring 2013
• 201303 Fall 2013
• 201401 Spring 2014
These terms are referenced in the topics that follow.
Finding Gaps
The required terms on SFACPLT are used to find gaps in a student's enrollment. The
terms entered on the form are matched to the student's enrollment records starting with
the student's first enrollment term. If any enrollment terms are missing, the term is
considered to be an enrollment gap for reporting. The gap terms are used when the report
reads the time status for the student in order to find the program effective status date.
• When a gap exists, the program status effective date will be a date that falls after the
gap ends and is the oldest time status date for the current time status value.
• When no gap exists, the program status effective date is the time status date for the first
term where the student has the current time status code value.
Example
For example, a student enrolls in the following terms.
• 201203 Fall 2012, student is full-time
• 201301 Spring 2013, student is full-time
• 201303 Fall 2013, student is on leave
• 201401 Spring 2014, student returns as full-time
• 201403 Fall 2014, student is full-time
201303 is found to be a gap term, and the program status effective date will be the date on
the 201401 time status.
For reports generated for terms 201203 through 201301, the program status effective date
will be the time status date for Fall 2012.

1216
Banner Student User Guide | Registration
Effective Date
The program effective status date is the first date of the current time status since the
status was changed. Here are some examples for SFRNSLC and SFRSSCR.
Example 1
A student enrolls in the following terms.
• 201203 Fall 2012, student is 3/4 time
• 201301 Spring 2013, student is 3/4 time
• 201302 Summer 2013, student is full-time
• 201303 Fall 2013, student is full-time
The report is run for Fall 2013. The student's current status as of the report is full-time. The
program status effective date selected will be Summer 2013.
Example 2
A student enrolls in the following terms
• 201203 Fall 2012, on 9/1/2012 student is full-time
• 201203 Fall 2012, on 9/5/12 student drops to half-time
• 201203 Fall 2012, on 9/8/12 student goes back to full-time
The report is run on 9/2/12 and shows the student as full-time with an effective date 9/1.
The report is run again on 10/2/12 and shows the student again as full-time with an
effective date 9/1.
The report will select the time status based on the report dates for a term.
Example 3
A student enrolls in the following terms.
• 201203 Fall 2012, on 9/1/2012 student is full-time
• 201203 Fall 2012, on 9/5/12 student drops to half-time
• 201203 Fall 2012, on 9/8/12 student goes back to full-time
• 201301 Spring 2013, on 11/10/12 student is full-time
• 201301 Spring 2013, on 1/15/13 student is half-time
• 201301 Spring 2013, on 1/16/13 student is half-time
• 201301 Spring 2013, on 2/15/13 student is full-time
• 201302 Summer 2013, on 6/1/13 student is full-time

1217
Banner Student User Guide | Registration
• 201302 Summer 2013, on 6/20 student is half-time
• 201301 Fall 2013, on 9/1/13 student is half-time
Report output will show the following data for the term, report date, and the student's
status and effective date.
• 201203 Fall 2012, on 9/1/12 student is full-time effective 9/1/12
• 201203 Fall 2012, on10/1/12 student is full-time effective 9/1/12
• 201203 Fall 2012, on 11/1/12 student is full-time effective 9/1/12
• 201301 Spring 2013, on 1/10/13 student is full-time effective 9/1/12
• 201301 Spring 2013, on 1/30/13 student is half-time effective 1/16/13
• 201301 Spring 2013, on 2/28/13 student is full-time effective 2/15/13
• 201302 Summer 2013, on 6/10/13 student is full-time effective 2/15/13
• 201302 Summer 2013, on 7/10/13 student is half-time effective 6/20/13
• 201302 Summer 2013, on 8/10/13 student is half-time effective 6/20/13
• 201301 Spring 2013, on 9/2/13 student is half-time effective 6/20/13
Example 4
A student enrolls in the following terms.
• 201203 Fall 2012, on 9/1/2012 student is full-time
• 201302 Summer 2013, on 6/20 student is half-time
• 201301 Fall 2013, on 9/1/13 student is half-time
Report output will show the following for the term, report date, and the student's status and
effective date.
• 201203 Fall 2012, on 9/1/12 student is full-time effective 9/1/12
• No report run for summer 2013 term
• 201301 Fall 2013, on 9/2/13 student is half-time effective 6/1/13, which is the first day of
the summer term
If no reporting records exist in SFRTCTL for a term, the last time status calculated and the
first day of the term are used as the program status effective date.
Example 5
A student enrolls in the following terms.
• 201203 Fall 2012, on 9/1/2012 student is full-time
• 201301 Spring 2013, on 1/10/2013 student is full-time

1218
Banner Student User Guide | Registration
• 201301 Spring 2013, on 2/15/2013 student withdraws and time status drops to less than
full-time
• 201302 Summer 2013, on 6/10/2013 student is full-time
Report output will show the following for the term, report date, student's status, and
effective date.
• 201203 Fall 2012, on 9/1/12 student is full-time effective 9/1/12
• 201301 Spring 2013, on 1/10/13 student is full-time effective 9/1/12
• 201302 Summer 2013, student is full-time effective 9/1/12
The issue with the above scenario is that the report was not run again for Spring 2013 to
capture the withdrawal and change in time status.
A different status effective date is produced if the report is run for Spring 2013 after
February 15.
• 201301 Spring 2013, on 1/10/13 student is full-time effective 9/1/12
• 201301 Spring 2013, on 2/20/13 student is withdrawn effective 2/15/2013
• 201302 Summer 2013, student is full-time effective 6/10/2013
The report should be run at the end of each term to pick up all end of term changes.
Withdrawn Majors
Withdrawn majors are reported with the EB3 status when SFRNSLC or SFRSSCR is run.
The withdrawal is only reported for the first term for which the withdrawal is known. Majors
withdrawn as of the student’s last enrollment are reported. The program start date will
always be the original term in which the major is added. Here are some examples for
SFRNSLC and SFRSSCR.
Example 1
A student is enrolled in the Fall and Spring 2015 terms, with a major of MATH.
• The student is on leave for the Summer 2015 term.
• The Registrar changes the student's major effective Summer 2015 to AMTH.
• The student is enrolled in the Fall 2016 term.
• The report output will show the EB3 for MATH and the new major AMTH.
• The program start date will be the first day of the Summer 2015 term.
• The program status effective date will be the first day of the Summer 2015 term.

1219
Banner Student User Guide | Registration
Example 2
A student is admitted in the Fall 2014 term with a major of MATH.
• Before enrolling in the term, the student changes the major to AMTH.
• The student then withdraws from the Fall 2014 term.
• The Registrar removes the student’s SFBETRM record.
• The student returns and registers in the Spring 2015 term.
• The withdrawn major will not be reported as an EB3 status, because the student does
not have a first enrollment term before the reporting term.
Example 3
A student is enrolled in the Fall 2014 term with a major of MATH.
• Either SFRNSLC or SFRSSCR is run, and the student is reported to the NSC or the
NSLDS.
• The student changes the major to AMTH, late in the Fall 2014 term, after all reports
have been completed.
• The Spring 2015 term does not include the EB3 for MATH.
• The last reports for a term should be run after all changes have been made.
• Withdrawn majors are selected after the last term in which the student was enrolled,
which is the Fall 2014 term.
Program Start Date
The program start date is always the first day of the term in which the major was added.
Here is an example for SFRNSLC and SFRSSCR.
Example
A student is admitted in the Fall 2013 term for a major of ART.
• The program start date for the ART major will be the first day of the Fall 2013 term.
• The student changes from an ART major to a PHOT major in the Spring 2014 term.
• The program start date for the PHOT major will be the first day of the Spring 2014 term.
• The student changes the PHOT major to a CERM major in March 2014 for the Spring
2014 term.
• The program start date for the CERM major will be the first day of the Spring 2014 term.
• The student is not enrolled during the Summer 2014 term but changes from a CERM
major to a CERB major.

1220
Banner Student User Guide | Registration
• When the student returns in the Fall 2014 term, the CERB major will be reported with a
program start date of the first day of the Summer 2014 term, and the CERM major will
have an EB3 record to show the withdrawal.
Select Time Status
The following Banner views are used to select time status data for required terms.
SFVTMSS
This view is used to select the time status for the student for SFRSSCR reporting. This
view lists the time status and the highest date for the time status within the SFRSSCR
reporting time periods.
The following columns are in this view:
SFVTMSS_PIDM
SFVTMSS_TERM_CODE
SFVTMSS_TMST_CODE
SFVTMSS_TMST_DATE
SFVTMSS_TERM_START_DATE
SFVTMSS_SUBMITTAL_DATE
SFVTMSS_PROCESS_NAME
SFVTMST
This view is used to select the current time status for each term and reporting period. If no
reporting records exist in SFRTCTL, the first day of the term is used, and the student's last
calculated time status is used in determining the program status effective date.
The program status effective date equals the program begin date if the effective date is
prior to the begin date.
The following columns are in this view:
SFVTMST_PIDM
SFVTMST_TERM_CODE
SFVTMST_TMST_CODE
SFVTMST_TMST_DATE
SFVTMST_TERM_START_DATE
SFVTMST_RPRT_DATE
SFVTMST_BRANCH_CDE
SFVTMST_RPRT_STANDARD_IND
SFVTMST_INST_FICE

1221
Banner Student User Guide | Registration
Registration Set-Up Procedures for Banner Student Self-
Service
The following steps are required to implement basic Registration in Banner Student Self-
Service. If you are implementing Registration Priority Time-Ticketing, Third-Party Controls,
Alternative PIN Processing, and Registration Permit-Overrides, you will need to complete
additional optional steps. Instructions for these topics follow the Web setup instructions.
Note: Before you begin, make sure you have activated any appropriate
Web display indicators on Banner validation forms.
Supporting Validation Forms
A number of validation forms include Web display indicators. These indicators control
whether a specific value in the validation form will display and be available for selection via
the Web. In most cases, the Web Indicator must be checked (set to
Y) for a value to be
available on the Web.
In addition to setting the Web indicators correctly, you should also review the description
of each value flagged for Web display. The description of a value will display on the Web
when an item is Web-enabled.
The following validation forms include Web display indicators which control Registration
processing via the Web.
• Subject Code Validation Form (STVSUBJ)
• Course Registration Status Code Validation Form (STVRSTS)
Subject Code Validation Form (STVSUBJ)
Indicated values will display in the list of subjects available to search when the Look Up
Classes page is selected. The output of the Catalog and Schedule reports for display on
the corresponding Web pages also is restricted to the Web-enabled subject codes. Please
note that a student will not be prevented from registering for a specific section by entering
the CRN directly, even if the subject code for that section is not Web-enabled.
Course Registration Status Code Validation Form (STVRSTS)
Values which are Web-enabled will be used either in the Add/Drop process or as
additional options which a student can select, such as audit or waitlist.
At least two values, one which will be used when courses are added via the Web and one
which will be used when courses are dropped via the Web, must be Web-enabled. The
specific values you use for these two actions will be controlled by entries in the Crosswalk
Validation Form (GTVSDAX). You can use the traditional
RE (Registered) and DD (Drop/
Delete) values for these entries, or you can define additional values for Web Registered
and Web Dropped. If you define additional values for the codes used for these purposes,
you must set all the indicators for each value to correspond with the indicators set for
RE
and
DD.

1222
Banner Student User Guide | Registration
Warning! Careful consideration should be given to which codes are Web-
enabled. For example, if students should only be permitted to add
courses on the Web, no drop status codes should be Web-enabled. Also,
a waitlist course status should be Web-enabled only if students should be
permitted to select a waitlist status for a course if a section is closed and a
waitlist is available. An institution may also want to consider whether
course statuses with refunding rules should be Web-enabled.
Registration Setup Overview
1. Set up the global Web rules using Customize Web Rules in Web Tailor.
2. Establish Web processing and Web display controls on the Term Control Form
(SOATERM) for a specific term. This step is required for every registration term.
3. Establish and Web-enable Web-related enrollment and course status codes on the
Course Registration Status Code Validation Form (STVRSTS). This step is required
for the initial set-up of Web registration.
4. Establish term-specific date ranges for course statuses on the Course Registration
Status Form (SFARSTS) or the Schedule Processing Rules Form (SSARULE). This
step is required for every registration term.
5. Update rules for registering or dropping via the Web on the Crosswalk Validation Form
(GTVSDAX) as necessary. This step is required for the initial set-up of Web
registration.
6. Review the Subject Code Validation Form (STVSUBJ) for those codes that should be
Web-enabled. This step is only required for the initial set-up of Web registration.
7. If your institution is using WebCT and you want class titles to be displayed as
hyperlinks to the WebCT login page, set the appropriate Web Tailor parameters. This
step is required for the initial set-up of Web registration.
8. Establish the appropriate display settings for midterm and final grades. This step is
required for every registration term.
Registration Setup Steps
1. Set up the global Web rules using Customize Web Rules in Web Tailor. Set up the
title, header, back URL and link, and help URL and link fields using Customize a Web
Menu or Procedure in Web Tailor. If these rules, links, and fields have not been
reviewed and customized for your institution, do this now.
2. Establish term-specific Web controls on the Term Control Form (SOATERM) for the
following sets of information.
• Web Processing Controls
• Web Display Controls
• Web Registration Dates
This is required for each registration term.

1223
Banner Student User Guide | Registration
2.1. Review and/or establish term-specific Web Processing and Web Display
Controls.
On the Term Control Form (SOATERM), enter a term in the Key Information and
use Next Block to access the fields in the main window. Select the Process
Web Controls button to display the Web Processing Controls window.
The fields in this window are used for two main functions:
– to restrict or enable selected registration related actions in self-service for
Class Change Options, Grade Display, Faculty and Advisor, and WebCAPP,
and
– to restrict or enable selected searching capabilities for Catalog and Schedule
(including open learning courses) when a student performs a search for
available sections on the Look Up Classes page.
For more information on the fields in this window, see SOATERM in the Banner
Student online help.
2.2. Review and/or establish Web registration date range periods to restrict Web
registration.
On the Term Control Form (SOATERM), enter a term in the Key Information,
use a Next Block function to navigate through the main window, and use a
second Next Block function to access the Part of Term and Web Registration
Controls window.
The Web Registration Dates section of the Part of Term and Web Registration
Controls window is used to specify the date ranges during which registration via
the Web is available for the term in the Key Information. Web registration dates
are established as follows:
– Enter one or more start and end dates for Web Registration periods. Note that
the ability to enter more than one Web Registration period allows the
institution to turn Web Registration access on and off during the term.
– The start and end dates entered should not fall outside (either before or after)
the date ranges that are established for both student enrollment statuses
(SFAESTS) and course registration statuses (SFARSTS) for the term, or
errors will prevent a student from registering via the Web.
3. Establish and Web-enable Web-related course status codes on the Course
Registration Status Code Validation Form (STVRSTS).
This is an initial set-up requirement only.
Status codes that are Web-enabled are used either in the Add/Drop process or as
additional options that a student can select, such as Audit or Waitlist.
To use registration on the Web, you must have at least one course status code
enabled. If you want to allow students to drop classes from their schedules using the
Web, you also need to define a drop status code and Web-enable
it. You can use the
traditional
RE (Registered) and DD (Drop/Delete) codes, or you can create new codes.
If you create new codes, you must set all indicators for each value to correspond with
the settings for
RE and DD. (The codes RW and DW are delivered, which you can use if
you choose, or you can create new codes.)
1224
Banner Student User Guide | Registration
Note: You can give any names to these status codes; the documentation
uses the generic terms “Web registered” and “Web drop”. When naming
your course status codes, remember that the descriptions are what will be
displayed on the Web and should therefore be clear enough to be
understood by your users.
The Web registered status is required to initially add a class on the Web. An institution
can disable the Web-dropped status if students should not be allowed to drop classes
on the Web. Optionally, other course statuses may be Web-enabled, such as Audit,
Waitlist, etc., if institutional policies determine that these actions should be available
for selection on the Web.
The Web Registered (
RW) and Web Drop (DW) course status codes are controlled by
entries in the Crosswalk Validation Form (GTVSDAX), which is covered in the next
step.
Note: A student may be able to waitlist a course if a waitlist course status
is Web-enabled on STVRSTS, a valid date range is defined for the status
on SFARSTS, and a waitlist is available. Careful consideration should be
given as to whether institutional policy should allow waitlist registrations
via the Web.
Warning! Set the indicators on STVRSTS as specified in the following
table. These indicators must not be changed, or Web registrations will not
be processed properly:
In order for the system to determine which status code(s) to be displayed, in the
Status Type field, enter the status code type:
•
R - Registered (enrolled)
•
D - Dropped
Processing Indicator Add Drop
Allowed to Enter
checked/
Y checked/Y
Count in Enrollment
checked/
Y unchecked/N
Count in Assessment
checked/
Y unchecked/N
Withdrawal Indicator
unchecked/
N unchecked/N
Waitlist Indicator
unchecked/
N unchecked/N
Gradable Indicator
checked/
Y unchecked/N
Print on Schedule (Indicator)
checked/
Y unchecked/N
Web (Registration) Indicator
checked/
Y checked/Y
1225
Banner Student User Guide | Registration
• L - Waitlisted
•
W - Withdrawn
Note: If the Status Type field is left blank, unexpected results can occur.
4. Establish term-specific date ranges for enrollment and course statuses.
This is required for each registration term.
4.1. Review and/or establish enrollment status codes, their associated start and end
dates, and refunds as applicable for the registration term on the Enrollment
Status Control Form (SFAESTS).
4.2. Review and/or establish course registration status codes, their associated start
and end dates, and refunds as applicable for the registration term and parts-of-
term within the registration term on the Course Registration Status Form
(SFARSTS).
4.3. For open learning courses, define usage/cutoff rules for course registration
status codes on the Schedule Processing Rules Form (SSARULE).
5. Update the Crosswalk Validation Form (GTVSDAX) as necessary.
5.1. If you created new course status codes for Web processing, take the following
actions.
– If you created a new course status code for “Web registered”, for the internal
code
WEBRSTSREG, enter your “Web registered” code in the External Code
field.
– If you created a new course status code for “Web drop”, for the internal code
WEBRSTSDRP, enter your “Web drop” course registration status code in the
External Code field.
– If you are using the
RE and DD course status codes for Web registrations and
drops, you do not need to make any changes to the entries for the
WEBRSTSREG or WEBRSTSDRP internal codes for the WEBREG internal
code group on GTVSDAX, because as delivered, these codes are set up for
use on the Web.
Note: You may define only one code for “Web registered” and one for
“Web drop” on GTVSDAX. If you wish to change the code later, change
the external code on GTVSDAX.
Note: The drop code that is crosswalked to the WEBRSTSDRP internal
code drops the course and removes it from the student’s schedule.
5.2. For the internal code
MAXREGNO with internal code group WEBREG, in the
External Code field, enter the maximum number of enrollment attempts your
institution wants to allow on the Web.
5.3. To display the Dynamic Schedule by Date Range field values on the select
term or date range, enter
Y in the External Code field for the SCHBYDATE
internal code.

1226
Banner Student User Guide | Registration
5.4. If your institution is using WebCT and you want to identify schedule types for
WebCT content and/or delivery, create a row for each applicable schedule type
as follows.
– In the Internal Code field, enter
WEBCONTENT.
– In the (Internal) Group (Code) field, enter
INTCOMP.
– In the External Code field, enter the schedule type.
– In the Translation Code field, enter
WEBCT.
5.5. For the internal code
AUTODROP, enter the appropriate value in the External
Code field.
– If you want users to be allowed to choose whether to drop all or no connected
courses if not all were selected to be dropped, enter
C.
– If you want an entire connection to be automatically dropped if not all were
selected to be dropped, enter
Y.
– If you want no connected courses to be dropped unless all were selected,
enter
N.
Note: In Banner Voice Response, error checking is performed on each
CRN as it is entered. Because of this, if you enter
N for AUTODROP, it will
not be possible for connected courses to be dropped via Banner Voice
Response. Therefore, if your institution uses both Banner Voice
Response and Banner Student Self-Service, it is recommended that you
use either
C or Y for AUTODROP.
5.6. For the internal code
ADMINDROP, enter the appropriate value in the External
Code field.
– If you want administrative errors that have been encountered when a
registration record is accessed to be ignored, enter
N.
– If you want the system to automatically drop a course if an administrative error
is encountered when a registration record is accessed, enter
Y.
6. Review subjects for Web display on the Subject Code Validation Form (STVSUBJ).
This is an initial set-up requirement only.
Web-enable those subjects that should display when a student searches for available
sections on the Web. Remember that the Web-enabled subject codes will also control
the Catalog and Schedule display as well.
The Web (Display) Ind(icator) checkbox on the Subject Code Validation Form
(STVSUBJ) specifies which subjects are allowed to be displayed in the Web Course
Catalog, Class Schedule, and Look Up Classes pages. The installation process
automatically defaults checked or
Y for the Web (Display) Ind(icator) for all of your
subject codes. Without any changes, all subject code descriptions will display on the
Web. You should review subject code descriptions for clarity, as well as update the
Web (Display) Ind(icator) to
N only for the subject code descriptions that should not
be displayed on the Web.

1227
Banner Student User Guide | Registration
7. Establish the appropriate display settings for midterm and final grades.
This step is required for every registration term.
On the Term Control Form (SOATERM), enter a term in the Key Information and use
Next Block to access the fields in the main window. Select the Process Web
Controls button to display the Web Processing Controls window.
Use the grade display checkboxes on SOATERM to control the display for the whole
term. You can, however, then use the Section Web Controls From (SSAWSEC) to
override the SOATERM setting for specific classes.
For example, if you choose to display midterm grades for the whole term on
SOATERM, but a particular professor does not want to display their midterm grades,
you can uncheck the Display Midterm Grades checkbox on SSAWSEC.
7.1. Set the Grade Display checkboxes in the Web Processing Controls window of
SOATERM to specify whether you want midterm and/or final grades and/or
grade detail for the whole term to be available on the Web. For more information
on the fields in this window, refer to the online help.
7.2. If you want to override the settings on SOATERM for a specific class, set the
Grade Display checkboxes on SSAWSEC in the Banner Student Self-Service
Display Controls block.
7.3. On the Grade Component Definition Form (SHAGCOM), define grade detail for
the class if your institution wants grade detail to be available via the Active
Registrations page.
Display Term Date Ranges in Self-Service
System-required rules are delivered on the Crosswalk Validation Form (GTVSDAX) for
use with term selection in Self-Service. Use these rules to display term date ranges in the
Term field pulldown lists on Web pages in Banner Student Self-Service and Banner
Faculty and Advisor Self-Service. This helps the user determine which term to use for
registration without being dependent on term descriptions. The date display format is
controlled by the setting in Banner General.
Set the rules as follows:
• Set the WEBTRMDTE rule for group STUWEB to Y to display date ranges for terms on all
Banner Student Self-Service pages where the term is selected.
• Set the WEBTRMDTE rule for group FACWEB to Y to display date ranges for terms on all
Banner Faculty and Advisor Self-Service pages where the term is selected.

1228
Banner Student User Guide | Registration
Registration Time-Ticketing in Banner Student Self-
Service and Banner Voice Response
Registration Time-Ticketing allows institutions to optionally establish priority driven
registration period time slots for registration via Banner Student Self-Service registration
and Banner Voice Response telephone registration.
Time-Ticketing slots for Web and telephone registration processing are established using
the following forms:
• Registration Priority Control Form (SFARCTT)
• Registration Group Control Form (SFARCTL)
• Student Registration Group Query Form (SFIRGRP)
There are two primary methods of registration eligibility control checking:
• Registration Time-Ticketing
If time tickets are used to control registration eligibility, there are two variations available,
unrestricted time ticketing and restricted to time ticketing.
• Unrestricted time tickets refers to students with assigned time tickets who are only
eligible for registration (for the term) as applicable for their time ticket. If a student
does not have a time ticket, that student may register (for the term) at any time
(subject to other restrictions, as applicable).
• Restricted time tickets refers to students with assigned time tickets who are subject
to the same eligibility restrictions as with unrestricted time tickets. The difference
with this method is that all students must have a time ticket to register. If they do not
have an assigned time ticket, the student will not be eligible for registration (for the
term) under any circumstances.
• Registration Time Controls
The Third Party Registration Time Controls Form (SFARGTC) provides an alternative to
individually assigned time-ticketing, by offering the ability to create term-specific
registration eligibility profiles whereby only those students who match the criteria for a
valid time control may register at any given time.
External
Code
Internal
Code
Internal
Code
Sequence
Number
Internal
Code Group Description
Activity
Date
N WEBTRMDTE N/A FACWEB Web Term
Displays Dates
Sysdate
N WEBTRMDTE N/A STUWEB Web Term
Displays Dates
Sysdate

1229
Banner Student User Guide | Registration
These methods are controlled by rules on GTVSDAX (and GORFLAG for Banner Voice
Response) and provide a registration indicator of eligible or ineligible for the student based
on the selected method of registration control and checking against the rules on
SFARGTC (for registration time controls) or the records on SFARGRP (for restricted and
unrestricted time tickets). The student is permitted to continue with registration once the
checks have taken place.
The rule on the Crosswalk Validation Form (GTVSDAX) must be created as follows:
• The Internal Code is WEBRESTTKT.
• The Sequence (Number) is blank (Null).
• The (Internal) Group (Code) value is WEBREG.
• The External Code can be set to Y, to restrict registration to time tickets, or N, to not
restrict registration to time tickets.
N is the delivered default.
• The Description is WebVR Restrict Reg to Time Tkt.
• The Translation Code and Reporting Date can be left blank (Null).
• The System Requirements (Indicator) must be checked.
Students with time tickets (for a specified term) can only register within the timeframes
established for that ticket (or tickets). All students must have a time ticket to register. If a
student does not have a time ticket established, they are not eligible for registration under
any circumstances.
Registration Priority Time-Ticketing Setup Overview
The following steps are required to implement Registration Priority Time-Ticketing:
1. Build registration group codes in the Registration Group Control Form (SFARCTL).
2. Build registration time slots in the Registration Priority Control Form (SFARCTT).
3. Link the time slots with their priorities to the Registration Groups.
4. Assign term specific registration groups to individual students on the Student
Registration Group Form (SFARGRP).
Steps 1 through 4 are required for each registration term. However, Steps 1 and 2 may be
completed in reverse order. If the time slots are built first on the Registration Priority
Control Form (SFARCTT) as indicated in Step 2, then steps 1 and 3 can be combined as
the next step.
In addition, a model script is available to partially automate the building of registration
group codes and assign those codes to students who are eligible to register. See
additional detailed notes about this script (
sfrgrup.sql) following the implementation
steps below.

1230
Banner Student User Guide | Registration
Registration Priority Time-Ticketing Setup Steps
1. Build registration group codes in the Registration Group Control Form (SFARCTL).
Note: At this time, build the codes only; do not try to associate a priority
with a group until the next step has been completed.
The Registration Group Control Form (SFARCTL) is used to define registration group
codes and the assigned registration priorities for those group codes for Banner
Student Self-Service Web registration and Banner Voice Response telephone
registration. There is no validation for the group code. A group code may be initially
defined without a priority, and the priority may be associated with the code after time
slots and priorities are established on the Registration Priority Control Form
(SFARCTT).
Students assigned to registration groups will be permitted access to Web and
telephone registration only during the time slot(s) specified by their assigned
registration group code and assigned priority on the Student Registration Group Form
(SFARGRP). Codes must be established on the Registration Group Control Form
(SFARCTL) before they can be assigned to students on the Student Registration
Group Form (SFARGRP).
Procedurally, registration group codes can be defined on SFARCTL without priorities
at the same time that registration time slots are defined on SFARCTT. Priorities can
then be assigned to the group codes on SFARCTL after the time slots exist with their
assigned priorities on SFARCTT.
2. Build registration time slots in the Registration Priority Control Form (SFARCTT).
The Registration Priority Control Form (SFARCTT) is used to define rules that assign
the begin and end dates and times and priority assignment for each registration time
slot for Banner Student Self-Service Web registration and Banner Voice Response
telephone registration. Time slots are required to have a begin date and time, end
date and time, and a priority.
More than one registration time slot can be assigned the same priority. If more than
one time slot has the same priority, any group assigned that priority on the
Registration Group Control Form (SFARCTL) will have all of those time slots assigned
and available for Web and telephone registration. Students who are assigned to the
group in the Student Registration Group Form (SFARGRP) will be permitted to
register via the Web or telephone during any of the time slots assigned to the priority
of the group.
3. Link the time slots with their priorities to the registration groups.
Link the time slots with their priorities to the registration groups by updating the Group
Priority field on the Registration Group Control Form (SFARCTL).
4. Assign term-specific registration groups to individual students on the Student
Registration Group Form (SFARGRP).
The Student Registration Group Form (SFARGRP) is used to assign a registration
group to individual students on a term-by term-basis. A registration group that has
been defined, but not associated with a priority, cannot be assigned to a student on
this form. Only one registration group can be assigned to a student for a specific term.
Use a List function from the (Registration) Group (Code) field to display the

1231
Banner Student User Guide | Registration
Registration Group Control Form (SFARCTL), which in turn displays the valid codes
and allows for an Exit with Value.
The user ID that assigned the registration group code is stored and displayed on the
form, as well as the activity date associated with the most recent change.
Registration group assignments cannot be made when the student status for the
selected term does not allow registration (i.e., the Allow Registration flag on the
Student Status Code Validation Form (STVSTST) is unchecked or
N). You cannot
create group assignments for a term for which the student record has an inactive
status.
You may query the registration time slots and the students who have been assigned to
those time slots for specific registration group codes using the Student Registration
Group Query Form (SFIRGRP).
When more than one time slot is assigned the same priority, and that priority has been
assigned to a registration group, all of the time slots are displayed in the Student
Registration Group Control section of the form. The cursor cannot be positioned to
any fields in the form, but in query mode, (Registration) Group Code, Group
Priority, Begin Date, End Date, Begin Time, and End Time can be accessed and
used to specify query criteria.
Students assigned to the registration group code display in the Student Information
section of the form. When the cursor is scrolled through multiple time slot records, it
they exist, the list of student names that displays will be the same for each record.
Group is an optional Key Information field. If no group code is entered in the Key
Information, all existing registration groups and their assigned students, if any exist,
are retrieved for display.
See the "Model Script for Populating Registration Groups" topic below for more
information.
5. Set up the following rule for restricted time tickets on GTVSDAX.
Model Script for Populating Registration Groups
The SQL script sfrgrup.sql may be used as a model for creating registration groups
from your existing student population. This script should be analyzed and modified as
appropriate by technical support staff prior to execution. The model script does the
following:
• Prompts for a term code.
External
Code
Internal
Code
Internal
Code
Sequence
Number
Internal
Code Group Description
Activity
Date
Y/N WEBRESTTKT WEBREG WebVR
Restrict Reg to
Time Tkt
Sysdate

1232
Banner Student User Guide | Registration
• Creates student registration group records (SFBRGRP) for every general student in the
database whose student status (
SGBSTDN_STST_CODE) allows registration
(
STVSTST_REG_IND = Y). (These students represent the IDs that will be entered in
the Key Information of SFARGRP).
• Creates registration group code records (SFBWCTL) and assigns the appropriate code
to each of the students (SFBRGRP) above by examining academic history as follows:
• Sums the earned hours in academic history for all of the Term GPA records
(
SHRTGPA_HOURS_EARNED) that have the same level as the level of the general
student record that is effective for the term specified in the prompt.
• Subtracts the sum of hours from the previous step from 1000. This result is the
group code that is assigned to the student.
Here are some examples:
Once the script is executed, the group codes are associated with the students. The group
codes are displayed on SFARCTL. The order of the display of the codes is by earned
hours seniority, if no modifications are made to the script. In other words, the group codes
are character values and are ordered in ascending order.
The students who have completed the most hours will have codes that are at the top of the
list of codes displayed on SFARCTL, and the students who have completed the fewest
hours will have codes that are at the bottom of the list of codes displayed on SFARCTL.
The codes in the example above would be displayed in the following order on SFARCTL:
• 0896
• 0954
• 0982
• 1000
When the group codes have been associated with students, you must build the time slots
and their priorities on SFARCTT (if not built previously), then associate the time slots
(priorities) with the groups on SFARCTL by populating the Group Priority field. Once
those tasks have been completed, the SFARGRP form can be used to display the time
slots for individual students for the term, and the Student Registration Group Query Form
Student
Sum of Hours
Earned Calculation
Group Code
Assigned
One 46 1000 - 46 0954
Two 104 1000 - 104 0896
Three 18 1000 - 18 0982
Four * 0 1000 - 0 1000
* Freshmen with no earned hours in academic history will be assigned to group
1000 based on the logic in the model script.

1233
Banner Student User Guide | Registration
(SFIRGRP) can be used to query registration groups, their associated time slots, and the
students assigned to those groups.
Scenarios for Using the GTVSDAX Rules for Restricted Time Tickets
and Time Controls
1. Time Controls
•
WEBMANCONT = Y
• WEBRESTTKT = N (This record setting is not applicable if you are using third-party
controls.)
• No valid SFARGTC record profile match exists for the student/term at this time.
Because no SFARGTC record exists, when the user tries to access the Add or Drop
Class and Change Class Options pages, the following MCERR message is displayed:
The student is not permitted to register at this time.
The Look Up Classes page will display, the search can be performed, and the results
are displayed without a Registration checkbox.
2. Time Controls
•
WEBMANCONT = Y
• WEBRESTTKT = N (This record setting is not applicable if you are using third-party
controls.)
•
SFARGTC = Last Name same as student
The Add or Drop Class, Change Class Options, and Look Up Classes pages can be
accessed.
3. Time Controls
•
WEBMANCONT = Y
• WEBRESTTKT = Y (This record setting is not applicable to Third Party Controls.)
• No valid SFARGTC record profile match exists for the student/term at this time.
Because no SFARGTC record exists, when the user tries to access the Add or Drop
Class and Change Class Options pages, the following MCERR message is displayed:
The student is not permitted to register at this time.
The Look Up Classes page is displayed, the search can be performed, and the results
are displayed without a Registration checkbox.
4. Time Tickets
•
WEBMANCONT = N
• WEBRESTTKT = N
• No SFARGRP record
The Add or Drop Class, Change Class Options, and Look Up Classes pages can be
accessed. The Registration Status page displays the time ticket appropriately.

1234
Banner Student User Guide | Registration
5. Time Tickets
•
WEBMANCONT = N
• WEBRESTTKT = Y
• No SFARGRP record exists for the student.
If Web registration is attempted, then because
WEBRESTTKT is set to Y, the user will
receive the following TTERR message:
You have no Registration Time Ticket. Please contact the registration administrator for
your time ticket.
The Look Up Classes page is displayed, the search can be performed, and the results
are displayed without a Registration checkbox. The Registration Status page can be
accessed.
6. Time Tickets
•
WEBMANCONT = N
• WEBRESTTKT = N
• A valid SFARGRP record exists for the student.
The Add or Drop Class, Change Class Options, and Look Up Classes pages can be
accessed. The Registration Status page displays the time ticket appropriately.
7. Time Tickets
•
WEBMANCONT = N
• WEBRESTTKT = N
• An invalid SFARGRP record exists for the student.
Because the student does not have an active SFARGRP record, the following
TTTIMES error message is displayed on the Add or Drop Class and Change Class
Options pages:
You may register during the following times.
The Look Up Classes page is displayed, the search can be performed, and the results
are displayed without a Registration checkbox. The Registration Status page
displays the time ticket appropriately.
8. Time Tickets
•
WEBMANCONT = N
• WEBRESTTKT = Y
• A valid SFARGRP record exists for the student.
The Add or Drop Class, Change Class Options, and Look Up Classes pages can be
accessed. The Registration Status page displays the time ticket appropriately.
9. Time Tickets
•
WEBMANCONT = N
• WEBRESTTKT = Y

1235
Banner Student User Guide | Registration
• An invalid SFARGRP record exists for the student.
Because the student does not have an active SFARGRP record, the following
TTTIMES error message is displayed on the Add or Drop Class and Change Class
Options pages:
You may register during the following times.
The Look Up Classes page is displayed, the search can be performed, and the results
are displayed without a Registration checkbox. The Registration Status page
displays the time ticket appropriately.
Setting up Third-Party Controls
Your institution can choose to use third-party controls instead of time-ticketing. Third-party
controls allow you to define rules that control timed access to add/drop functions. Time
control records can use any combination of the following to define assigned time slots for
registration activity:
• PIN
• Last name
• Student type
• Earned hours
• College
• Degree
• Department
• Campus
• Class
• Major
Management control time ticketing is dynamic. When a student attempts to register, his or
her current data is compared to defined management control records to determine
whether the action can be performed.
Management controls are maintained and displayed in the Third Party Registration Time
Controls Form (SFARGTC).
Use the Crosswalk Validation Form (GTVSDAX) to indicate that you are using third-party
controls. The rule on GTVSDAX should be set up as follows:
• The Internal Code is WEBMANCONT.
• The Sequence (Number) is blank (Null).
• The (Internal) Group (Code) value is WEBREG.
• The External Code should be Y. (The delivered value is N, which should be changed if
you want to use third-party controls instead of registration group time ticketing controls.)

1236
Banner Student User Guide | Registration
• The Description is Web Use Management Controls.
• The Translation Code and Reporting Date can be left blank (Null).
• The System Requirements checkbox must be checked.
When third-party controls are being used to enforce Web registration availability, a
student’s characteristics are matched against management control records maintained in
the SFRCTRL table and displayed on SFARGTC. Multiple records can be defined for each
term.
Management control records are checked against the student’s data to determine at the
time of login whether any permit the student to perform add/drop activity. If no
management control records that allow access at the current date and time are matched,
the message Please contact the registration administrator for your time ticket is displayed,
and add/drop activity will not be allowed.
One of the items that can be used in management control time-ticket rules is PIN. Different
registration periods can be defined for different PIN ranges. Because two PINs can exist
for a student (the login PIN and the term-specific alternative PIN), you can select which
PIN is to be used in management control checking. The PIN selection is done using
another GTVSDAX rule, which should be set up as follows:
• The Internal Code is WEBALTPINU.
• The Sequence (Number) is blank (Null).
• The (Internal) Group (Code) value is WEBREG.
• The External Code should be Y if you want the alternative PIN (from the SPRAPIN
table) for the term to be used when matching management control time ticket records to
student characteristics, or External Code should be
N if you want the login PIN (from
the GOBTPAC table) to be used.
• The Description is Web Alt PIN Use.
• The Translation Code and Reporting Date can be left blank (Null).
• The System Requirements checkbox must be checked.
Setting up Alternative PIN Processing
Alternative PIN processing allows you to require a student to enter an additional PIN
before he or she can perform initial add/drop activity for a term. Institutions typically use
this functionality to “force” a student to contact an advisor, who will provide the PIN, before
initially registering for the term. When a student tries to register for the first time (via either
the Add or Drop Classes page or the Look Up Classes results page), if alternative PIN
processing is turned on and an alternative PIN has been entered for the student on the
Alternate Personal Identification Number Form (SPAAPIN), then the system displays the

1237
Banner Student User Guide | Registration
Alternate PIN Verification page. (If no alternative PIN has been entered on SPAAPIN, the
system displays the requested page without displaying this page first.)
Alternative PIN processing works together with third-party controls. The following table
shows the different ways you can set up alternative PIN processing in the Crosswalk
Validation Form (GTVSDAX). The internal codes in the table are described as follows.
• WEBMANCONT - Uses third-party controls to determine when students are eligible to
register.
• WEBALTPINA - Indicates that the alternative PIN is required if it has been set on
SPAAPIN.
• WEBALTPINU - Indicates when Y that the alternative PIN from the SPRAPIN table is
used for the term, or indicates when
N that the login PIN from the GOBTPAC table is
used.
Internal Code External Code System Action
Here is rule combination number one.
WEBMANCONT N Use registration time-ticketing as set up on
SFARCTT.
WEBALTPINA Y Requires entry of the alternative PIN
designated for the student and term on
SPAAPIN, if one exists.
WEBALTPINU N This value is not relevant, as third party
controls on SFARGTC are not used when the
WEBMANCONT rule is set to N.
Here is rule combination number two.
WEBMANCONT Y Requires that registration appointment
requirements defined on SFARGTC be met.
WEBALTPINA Y Requires entry of the alternative PIN
designated on SPAAPIN for the student and
term, if one exists, for process name
TREG.
WEBALTPINU N Requires that the GOATPAD PIN for the
student is in the range set up on SFARGTC.
Here is rule combination number three.
WEBMANCONT Y Requires that registration appointment
requirements defined on SFARGTC be met.
WEBALTPINA N Student will not be required to enter an
alternate PIN, even if one has been assigned
on SPAAPIN.

1238
Banner Student User Guide | Registration
1. On the Crosswalk Validation Form (GTVSDAX), enter the appropriate value, as
described in the table above, in the External Code field for the following internal
codes:
•
WEBMANCONT
• WEBALTPINA
• WEBALTPINU
2. For each term code for which you want to use alternative PIN processing, on the
Alternate Personal Identification Number Form (SPAAPIN), define the alternative
PIN(s) as follows.
• In the Term Code field, enter the term code.
• In the Process Name field, enter
TREG.
• In the Alternate PIN field, enter the PIN.
• Save your changes.
WEBALTPINU Y Alternate PIN from SPAAPIN for process
name
TREG will be used by the SFARGTC
PIN range settings.
Here is rule combination number four.
WEBMANCONT N Use registration time-ticketing as set up on
SFARCTT.
WEBALTPINA N Student will not be required to enter an
alternate PIN, even if one has been assigned
on SPAAPIN.
WEBALTPINU Y This value is not relevant, as third party
controls on SFARGTC are not used when the
WEBMANCONT rule is set to N.
Here is rule combination number five.
WEBMANCONT Y Requires that registration appointment
requirements defined on SFARGTC be met.
WEBALTPINA Y Requires entry of the alternative PIN
designated for the student and term on
SPAAPIN, if one exists.
WEBALTPINU Y Requires entry of the alternative PIN
designated on SPAAPIN for the student and
term, if one exists, for process name
TREG.
Internal Code External Code System Action

1239
Banner Student User Guide | Registration
Student Registration Permit-Override Procedure
This section applies to Banner Student System baseline registration, Telephone
Registration processing, and Banner Student Self-Service registration.
Registration Permit-Override processing allows institutions to optionally establish
combinations of allowable automatic overrides for registration processing that can be
assigned to individual students. These permit-overrides are available by term on a course
or section basis. These overrides will bypass the error checking that is performed in the
baseline Student Course Registration Form (SFAREGS), Telephone Registration
processing, and Banner Student Self-Service Registration, when the corresponding term
controls on the Term Control Form (SOATERM) are flagged as either
Warning or
Fatal, where applicable.
The following registration errors can be designated for permit-overrides on the
Registration Permit-Overrides Control Form (SFAROVR):
• prerequisite and test score override
• corequisite override
• course link override
• special approval override
• department override
• duplicate course override
• repeat hours override
• repeat limit override
• time conflict override
• student attribute override
• college override
• campus override
• class override
• capacity permit override
• cohort override
• level override
• program override
• degree override
• field of study override
• mutual exclusion override

1240
Banner Student User Guide | Registration
Note: A duplicate course is one that has the same subject, course
number, and schedule type.
For more detailed information about the above registration error checking categories,
please refer to the “Course Catalog” and “Class Schedule” chapters.
Permit-Overrides Set-Up Summary
Permit codes from STVROVR are used to set up override criteria on SFAROVR. If these
items cause registration errors to occur based on the severity set on SOATERM, the items
checked for each permit code rule allow overrides of these errors so that registration can
continue.
1. Initial Set-up
1.1. Review and/or establish permit-overrides on the Registration Permit-Override
Code Validation Form (STVROVR).
1.2. Enter permit-override codes and their descriptions on the form.
2. Term-Specific Processing
2.1. Review and/or establish term specific permit-override processing rules on the
Registration Permit-Overrides Control Form (SFAROVR).
2.2. Review and/or establish the automatically allowed registration error checking
override flags for permit-override codes available for the registration term.
3. Permit-Override Processing
3.1. Assign specific permit-overrides to students for courses and/or sections on the
Student Registration Permit-Override Form (SFASRPO).
3.2. Review and/or assign registration permit-override codes to individual students
for specific courses and/or sections.
Student Registration Permit-Override Steps
Permit-overrides are established in the following order:
1. Define permit-override codes on the Registration Permit-Override Code Validation
Form (STVROVR).
The Registration Permit-Override Code Validation Form (STVROVR) is used to define
and maintain the codes and descriptions for assigning registration permit-override
groups to individual students in the Student Registration Permit-Override Form
(SFASRPO) for registration processing. The rules for each registration permit-override
group are defined on the Registration Permit-Overrides Control Form (SFAROVR) on
a term-by-term basis, and must exist before they can be assigned to students.
2. Establish, on a term-by-term basis, the permit-override codes and the specific
registration error checking overrides that are allowed using the Registration Permit-
Overrides Control Form (SFAROVR).

1241
Banner Student User Guide | Registration
The Registration Permit-Overrides Control Form (SFAROVR) is used to establish the
registration permit-override codes and their associated allowable registration error
overrides on a term-by-term basis. When a new permit-override code is added, all
overrides initially default to unchecked or
N (no automatic override), but may be
updated to checked or
Y (registration error checking override automatically allowed).
These override codes are then assigned to individual students on a specific term and
course or section basis.
You cannot make a permit-override entry until a Permit-Override code (defined on the
Registration Permit-Override Code Validation Form (STVROVR)) has rules defined for
the term in the Key Information of SFAROVR. Entry of a code which is defined only on
STVROVR which does not have rules defined on SFAROVR for the Key term is not
allowed.
3. Assign student-specific permit-override codes on a term and course or section basis
using the Student Registration Permit-Override Form (SFASRPO).
The Student Registration Permit-Override Form (SFASRPO) is used to assign specific
permit-override codes to individual students on a term and course or section basis.
When a code is assigned to a student for a specific term, the CRN, Subject, Course
Number, and Section fields are available to specify when assigning the specific
permit-override code. At a minimum, a subject and course number must be
designated when assigning a code. If a subject and course number are specified, the
permit-override registration error checking will apply to any section of that subject and
course number when the student registers. If a specific CRN is entered, the subject,
course number, and section number will default. If a subject, course number, and
section number are entered, the CRN will default. Multiple permit-override codes can
be assigned to the same subject and course number combination, or the same CRN.
Warning! Caution should be exercised when assigning permit-override
codes. If a permit-override code is assigned to a subject and course
number combination that is not associated with a CRN, and a different
permit-override code (with a different set of registration error overrides
allowed) is assigned to a specific CRN that has the same subject and
course number, the logic in the permit-override checking “combines” the
rules in the sense that all of the
Y (Yes) overrides for registration error
checking are combined from both rules.
This is not a problem if the
Y overrides permitted for the specific CRN are
the same, or include more
Y overrides than the rule associated with the
same subject and course number combination.
This is a problem if the
Y overrides permitted for the specific CRN are
fewer and/or different from the overrides permitted for the same subject
and course number combination.
The effects of combining overrides when the same subject and course
number are specified in more than one permit-override rule are illustrated
in the following examples.

1242
Banner Student User Guide | Registration
Example of Permit-Override Rules
In the examples below, the "student" is an undergraduate sophomore biology major, and
Section 02 of PSYC 300 (CRN 10050) and Section 03 of PSYC 300 (CRN 10051) are
restricted to junior and senior psychology majors at the undergraduate level.
Example 1 of specific overrides assigned to the student:
In Example 1, the student has been granted an automatic override for the specific section
02 of PSYC 300 (CRN 10050) only if the class's maximum enrollment has been reached
or exceeded (capacity permit = Yes). However, because the
ALLOWALL rule grants
automatic overrides for all registration error checking categories, the student will
automatically be enrolled in the either section 02 or 03 of PSYC 300, if selected at the time
of registration, even though the student does not meet the requirements for the class and
major for enrollment in the sections.
Permit
Code Capacity Duplicates Links
Co-
Reqs
Pre-
Reqs Time
ALLOWALL Y Y YYY Y
Spc-
Appr Major College Level Class Camp
Rpt
Hrs
Rpt
Lmt Deg Prgm
YY Y YYY YYYY
Permit
Code Capacity Duplicates Links
Co-
Reqs
Pre-
Reqs Time
CAPACITY Y N N N N N
Spc-
Appr Major College Level Class Camp
Rpt
Hrs
Rpt
Lmt Deg Prgm
YN N NNN NNNN
Permit Code CRN Subj Course Section
ALLOWALL PSYC 300
CAPACITY 10050 PSYC 300 02

1243
Banner Student User Guide | Registration
Example 2 of specific overrides assigned to the student:
In Example 2, the student has been granted an automatic override for all registration error
checking categories for the specific section 02 of PSYC 300 (CRN 10050). If the student
attempts to register for section 02 of PSYC 300 only, the
ALLOWALL rule will grant
automatic overrides for all registration error checking categories, including the capacity
error, and the student will be successfully registered in the section. If the student attempts
to register for section 03 of PSYC 300 (CRN 10051), registration errors will occur on both
Class restriction and Major restriction, but not capacity.
Permit-override codes are assigned in the Student Registration Permit-Overrides section
of SFASRPO. Permit-override types can be assigned only when they have been
authorized for the term in the Key Information using the Registration Permit-Overrides
Control Form (SFAROVR). Several functions are available in this section as follows:
• A List function from the Permit (-Override Code) field displays the Registration Permit-
Override Codes list of values, which is derived from the Registration Permit-Overrides
Control Form (SFAROVR). You may select a value from this window or select Define
Permit/Override Rules from the Options Menu to access SFAROVR, which displays the
valid codes and allows Exit with Value.
• A Help function from the CRN field displays the Registration Course Query Form
(SFQSECT) when a valid CRN is present. You may also use the Search feature and
select View Section Information (SFQSECT) to access SFQSECT.
• A List function from the Subject field displays a list of valid subject codes.
• A Count Query Hits function from the CRN, Subject, Course Number, and Section
fields displays the Registration Section Query Form (SFQSECM). You may also use the
Search feature and select Search for Sections (SFQSECM) to access SFQSECM from
the CRN field.
• A Duplicate Record function from the Subject and Course Number fields displays the
Existing Courses list of values, which is derived from the Subject/Course Query Form
(SCQSUBJ).
The user ID that assigned the override-permit code is stored and displayed on the form, as
well as the activity date associated with the most recent change.
Student Schedule information is also displayed on the form. The information displayed is
the same as that displayed in the Student Schedule section of the Registration Section
Query Form (SFQSECM).
Permit Code CRN Subj Course Section
CAPACITY PSYC 300
ALLOWALL 10050 PSYC 300 02

1244
Banner Student User Guide | Registration
Registration Restrictions and Prerequisites
This section discusses registration restrictions and prerequisites.
Overview
Registration restrictions can be defined by: department, field of study (major), class, level,
degree, program, campus, college, student attribute, and cohort, as well as test score and
prerequisites. Registration restrictions can be used to check equivalent courses, use of
course ranges, use of groups of courses, use of course attributes, to require a minimum
grade point average in a group of prerequisite courses, and to handle in progress courses
for prerequisite checking.
These prerequisite definition elements exist in the rules and requirements structure used
for the definition of areas within the CAPP module and CAPP compliance processing.
Because current prerequisite restrictions may satisfy many institutions, and because the
prerequisites for many courses can be defined using the current structure, current
prerequisite restriction processing is maintained in Banner, and an institution may choose,
on a section-by-section basis, which type of prerequisite rule definition and analysis will be
used.
Registration restrictions are defined, controlled, and used by a number of system modules
and processes:
• Registration restrictions can be defined at the Catalog level on the Course Registration
Restrictions Form (SCARRES). Prerequisite requirements at the Catalog level can be
defined on the Catalog Prerequisite and Test Score Restrictions Form (SCAPREQ).
• When a section is created online, catalog information defaults into the Schedule module,
where it can be modified if needed to reflect the restrictions and prerequisites which
apply to the specific section. Section-level restrictions are maintained using the
Schedule Restrictions Form (SSARRES), and section-level prerequisites are maintained
using the Schedule Prerequisite and Test Score Restrictions Form (SSAPREQ). When
sections are rolled from one term to another, restrictions and prerequisites are copied
exactly from the existing section, based upon parameter options selected for the
Schedule Roll Process (SSRROLL).
• Enforcement of restrictions by the Registration module is controlled by error-checking
switches on the Term Control Form (SOATERM). Whether in progress courses will be
allowed to fulfill prerequisite requirements is also controlled by a switch on SOATERM.
• Codes for types of registration overrides and special permissions are defined on the
Registration Permit-Override Validation Form (STVROVR).
• The types of permits and overrides which can be performed for a term, and the specific
conditions a permit or override governs, are defined for each term using the Registration
Permit-Override Control Form (SFAROVR).
• Permits and overrides authorized for a person/term combination are maintained on the
Student Registration Permit-Overrides Form (SFASPRO).

1245
Banner Student User Guide | Registration
• Restrictions, prerequisite requirements, and permits and overrides are checked by the
Student Course Registration Form (SFAREGS), telephone registration processing, and
the Banner Student Self-Service registration procedures.
• If a restriction is overridden, or if a special permit or override is used, each course in
which an override was performed or a permit was used is flagged with the override.
These override flags are stored in the student course registration record (SFRSTCR)
and displayed on the Registration Course Query Form (SFQSECT).
For clarity, terminology and other assumptions about prerequisite processing are included
as follows.
Terminology
It is important to understand the following terms.
Corequisite
A corequisite is a course which must be taken in the same term as the course to which it is
a corequisite. If two (or more) courses must absolutely be taken in the same term,
corequisites should be used. No changes to corequisite processing have been made, but
they are discussed in this introduction to clarify the difference between a concurrent
prerequisite and a corequisite.
Prerequisite
A prerequisite is a course which must usually be completed in a term earlier than the
course for which registration is attempted and prerequisites are being checked, but it may
be taken in the same term, based upon the value of the Concurrency Indicator.
Use of the Concurrency Indicator
The Concurrency Indicator can be used to modify a prerequisite requirement and
indicate that the prerequisite course can be taken either in an earlier term or in the same
term as the course in which registration is attempted.
When not set, the prerequisite course must be taken in a term earlier than the one in
which registration is attempted. When set, the prerequisite course can be taken in an
earlier term or can be taken in the same term as the one in which registration is attempted.
Use of Minimum Grade
It is assumed that the minimum grade value will be used in all prerequisite requirements
unless the requirement can be fulfilled based upon a test score alone. If minimum grade is
not used, evaluation of prerequisite requirements will cause results other than those
desired and expected. When evaluating prerequisite requirements, failed courses and
withdrawn courses will fulfill requirements unless a minimum grade (with a numeric value
higher than those for failure and withdrawal grades) is specified in the rule.

1246
Banner Student User Guide | Registration
Graded courses will be considered completed, and a prerequisite will either be fulfilled or
failed, regardless whether they are transfer, courses in academic history, or courses which
have not yet been rolled to academic history.
• If a grade exists for a course, the grade will be used, whether the course is a transfer
course, an institutional course in academic history, or an institutional course in
registration.
• If the prerequisite course is an institutional course in academic history, only the most
recent grade will be used.
• If the prerequisite course has been graded but has not yet been rolled to academic
history, the grade in registration will be used. (A course which only has a mid-term grade
will not be considered graded for prerequisite checking purposes.)
Use of In Progress Courses
Use the In Progress checkbox on the Term Control Form (SOATERM) to specify, on a
term-by-term basis, whether in progress courses can be used to fulfill prerequisite
requirements. When this checkbox is checked, prerequisite requirements will be able to be
fulfilled by in progress courses, and no warning or error message will be issued and need
to be acknowledged. When this checkbox is unchecked, in progress courses will not be
able to be used to fulfill prerequisite requirements. In progress courses are defined as
active ungraded courses for earlier terms than the one in which registration is attempted.
Enrollments in which a person is waitlisted, from which a person has withdrawn, or which
has already been graded will never be considered in progress courses. Future-term
enrollments, while in progress for transcript purposes, will never be considered by
prerequisite checking.
Prerequisite Processing
Prerequisite processing performs as follows:
• If a potential prerequisite exists in transfer work in academic history for any term (past,
present or future), it will be used, based upon the minimum grade specified. If using
CAPP areas for prerequisite rules, the Use Transfer flag will control whether or not
transfer work can fulfill the requirement. The result will either be a successful registration
or a Pre-Req or Test Score Error, depending on the minimum grade. Transfer work still
in transfer articulation will not be considered for prerequisite checking purposes.
If a potential prerequisite exists in history for a term less than or equal to the term of the
enrollment being processed, it will be used. The result will either be a successful
registration or a Pre-Req or Test Score Error, depending on the minimum grade
requirement.
• If a required prerequisite does not exist in either transfer work or academic history,
enrollments in registration for terms equal to or less than that of the enrollment being
processed will be checked.
Enrollments in sections which are not gradable will not be considered.
• The course registration status of all considered, ungraded courses will be checked
in all cases.

1247
Banner Student User Guide | Registration
– If the registration status does not count in enrollment (STVRSTS Count in
Enrollment (Indicator) is not checked), the course will bypassed. (This will
prevent DD status from satisfying a prerequisite.)
– If the registration status is a withdrawn status (STVRSTS Withdrawal
Indicator is checked), the course will be bypassed.
– If the registration status is a waitlist status (STVRSTS Waitlist Indicator) is
checked), the course will be bypassed.
• If a considered enrollment for a term less than or equal to the registration term has
already been graded but not yet rolled to history, the minimum grade will be
checked. The result will either be a successful registration or a Pre-Req or Test
Score Error, depending on the minimum grade.
• Ungraded enrollments for all terms less than the term of the enrollment being
checked will always be considered only if the In Progress checkbox on SOATERM
is checked for the term for which registration is attempted.
• Ungraded enrollments for the same term as the enrollment being checked will be
considered only when the concurrent option has been chosen for the prerequisite
being checked. The result will be a successful registration if all other requirements
have also been met. If an ungraded, qualifying course exists within the same term
and concurrent enrollment is not allowed, the result will be a Pre-Req or Test Score
Error.
Equivalent courses will also be used in prerequisite checking when CAPP areas are
used to define prerequisite requirements.
At the time of registration, if a course has a corequisite requirement at either the Catalog
or Schedule level, enrollments in registration for the same term as the attempted
enrollment will be checked. The course registration status of all considered courses will be
checked in all cases.
• If the registration status does not count in enrollment (STVRSTS Count in Enrollment
(Indicator) is not checked), the course will bypassed. (This will prevent
DD status from
satisfying a corequisite.)
• If the registration status is a withdrawn status (STVRSTS Withdrawal Indicator is
checked), the course will be bypassed.
• If the registration status is a waitlist status (STVRSTS Waitlist Indicator) is checked),
the course will be bypassed.
Registration attempts for a course with a corequisite will result in either a successful
registration or a corequisite error.
Here are a few examples of correct and incorrect ways of defining prerequisite
requirements.
Example of Incorrect Prerequisite Definition:
In this scenario, prerequisite checking was perceived to be performed incorrectly.
Here is a sample of the incorrect prerequisite rules which were used:

1248
Banner Student User Guide | Registration
The actual requirement, stated in simple terms, is “have taken ENGL 110 and earned
a grade of A or be concurrently enrolled in ENGL 110”. With the rules established in
this fashion on SSARRES, a student who had taken ENGL 110 in a previous term and
failed it, passed prerequisite checking.
However, this is how the above requirement was interpreted: “(have taken ENGL 110
and earned a grade of A) or (have taken ENGL 110 and earned any grade or be
enrolled in ENGL 110 concurrently)”. Because the second line said that any previous
or concurrent enrollment in ENGL 110 was acceptable, regardless of the grade, a
failure still satisfied the prerequisite requirement.
Example of Correct Prerequisite Definition:
The correct way to write the requirement so that it is interpreted as desired would be
as follows. Note that the concurrency indicator is set on the same line as the rest of
the requirement.
The use of CAPP areas as prerequisite requirements provides additional flexibility and
data elements to be used in prerequisite checking. When defining prerequisite
requirements using CAPP areas, area general requirements and detail attachments (and
rules) can be used. If the prerequisite requirements are more complex than can be stated
using areas alone, groups can also be used. Here are some simple examples of some of
the conditions you can define:
Example:
Requirement: “Have taken ENGL 110 and earned a grade of A or be concurrently
enrolled in ENGL 110.”
Area General Requirements:
1 course
Detail Attachments:
A/O Subj Crse Lvl Grd Con
ENGL 110 01 A N
OR ENGL 110 Y
A/O Subj Crse Lvl Grd Con
ENGL 110 01 A N
Subj
Crse
Low
Crse
High
Req
Crd Connect
Req
Crs
Min
Grd Concurrent
ENGL 110 None 1 A Y

1249
Banner Student User Guide | Registration
Example:
Requirement: “Have taken 15 credits or 5 courses in lower-level English with a GPA of
2.5 and no single grade lower than a C in the used courses.”
Area General Requirements:
15 credits or 5 courses
2.5 Area GPA
Detail Attachments:
Example:
Requirement: “Have taken ENGL 110 and earned at least a C or scored at least 500
on the SAT Verbal Test.”
Area General Requirements:
None
Detail Attachments:
Example:
Requirement: “Have an overall GPA of 3.00.”
Area General Requirements:
3.00 Area GPA
Detail Attachments:
Subj
Crse
Low
Crse
High
Req
Crd Connect
Req
Crs
Min
Grd Concurrent
ENGL 1000 2999 15 OR 5 C
Set
Sub
Set Subj
Crse
Low
Crse
High
Req
Crd Connect
Req
Crs
Min
Grd Test Min Max
A10 010 ENGL 110 None 1 C
A10 015 S01 500 700
Subj
Crse
Low
Crse
High
Req
Crd Connect
Req
Crs
Max
Crd Connect
Max
Crs
1000 9999 0 None 999

1250
Banner Student User Guide | Registration
Note: The detail requirements in this case must be written in a fashion to
select all courses that the student has taken. The course number range
must be all-inclusive, and both a required number of credits (or courses)
and a maximum number must be specified.
Setting up Catalog Restrictions and Prerequisites
Use the Catalog Prerequisite and Test Score Restrictions Form (SCAPREQ) to set up and
maintain information about prerequisite requirements for a course.
• Use the Course Title field and the Prerequisite Check Method radio group in the
Course Information section of the main window to set up a course prerequisite. The
radio group can be updated in this section of the form, but the title must be maintained
on the Basic Course Information Form (SCACRSE). Use the Maintenance button in this
window to copy an existing course. Change the checkbox value when the type of
prerequisite to be used changes over time.
This information is also displayed on SCACRSE.
• Use the Course Test Score and Prerequisite Restrictions section in the Course
Prerequisite Restrictions window to display and maintain catalog-level test score and
prerequisite restrictions.
• Use the Course Area Prerequisite Restrictions section in the Course Prerequisite
Restrictions window to display and maintain the CAPP area(s) which include
prerequisite requirements for the course.
• Use the Course Registration Restriction Form (SCARRES) set up all other restrictions at
the Catalog level.
Both test score and prerequisite restrictions and area prerequisites can be maintained for
a course for the same effective term range, but only one type will be used for the course,
depending on the setting of the Prerequisite Check Method radio group. Choices are
Basic or None, CAPP, and DegreeWorks. Remember that the actual prerequisite
requirements imposed on a student are those found in the Schedule module for each
section of a course. Restrictions maintained at the Catalog level are merely used as
defaults when sections of a course are created online using the Schedule Form
(SSASECT).
Note: The Prerequisite Check Method radio group is found in the
Course Information section of the main window of the Basic Course
Information Form (SCACRSE). This radio group is used to determine the
type of prerequisite requirements which will be listed in the Bulletin Report
(SCRBULT) or the Web Catalog and will also default to sections created
online using the Schedule Form (SSASECT). Prerequisite requirements
can be defined using the existing test score and prerequisite restrictions
structure, using CAPP areas, or using DegreeWorks.

1251
Banner Student User Guide | Registration
Setting up Schedule Restrictions and Prerequisites
Use the Schedule Prerequisite and Test Score Restrictions Form (SSAPREQ) to set up
and maintain information about prerequisite requirements for a section.
• Use the Subject, Course Number, and Section Title fields and the Prerequisite
Check Method radio group in the Section Information in the main window to set up a
section prerequisite. The radio group can be updated in this section of the form, but the
other values are display only and must be maintained on the Schedule Form
(SSASECT).
This information is also displayed on SSASECT.
• Use the Section Test Score and Prerequisite Restriction section in the Section Test
Score and Prerequisite Restrictions window to display and maintain section-level test
score and prerequisite restrictions.
• Use the Section Area Prerequisite Restriction section of the form in the Section Test
Score and Prerequisite Restrictions window to display and maintain the CAPP area(s)
which include prerequisite requirements for the section.
• Use the Schedule Restrictions Form (SSARRES) to set up all other restrictions at the
Schedule level.
Both test score and prerequisite restrictions and area prerequisites can be maintained for
a section, but only one type will be used by registration prerequisite checking, depending
on the setting of the Prerequisite Check Method radio group. Choices are
Basic or
None
, CAPP, and DegreeWorks. This allows users who already have prerequisite
requirements defined but who wish to move to the use of CAPP area prerequisite
requirements to be able to view both types of requirements at once and also to easily test
the prerequisite rules.
Note: The Prerequisite Check Method radio group is found in the
Section Information in the main window of the Schedule Form
(SSASECT). This radio group is used to determine the type of
prerequisite requirements that will be enforced for a person attempting to
enroll in the section. The setting will be defaulted from the value
maintained for the course on the Basic Course Information Form
(SCACRSE) but may be changed on a section-by-section basis.
Prerequisite requirements can be defined using the existing test score
and prerequisite restrictions structure, using CAPP areas, or using
DegreeWorks.
All restrictions will be copied from the Catalog module when a section is created using the
Schedule Form (SSASECT) and can also be rolled from a previous term using the
Schedule Roll process (SSRROLL). Only restrictions defined for a section will be enforced
by registration restriction checking.
More Information on Catalog and Schedule Prerequisites
Here are some specific scenarios on setting the Prerequisite Check Method radio group
on SCAPREQ, SSAPREQ, SCACRSE, and SSASECT. Error and warning messages are
displayed to guide the user.

1252
Banner Student User Guide | Registration
Catalog Prerequisite and Test Score Restrictions Form (SCAPREQ)
1. When the Prerequisite Check Method is set to Basic or None and CAPP area
prerequisites exist, a warning is displayed when the user saves, performs a Rollback,
or exits from the form. The warning appears even if no changes have been made to
the record.
The warning message is: WARNING: CAPP area prerequisites exist, but the CAPP
prerequisite check method is not selected. The user must acknowledge this message
to continue.
2. When the Prerequisite Check Method is set to
CAPP and no CAPP area
prerequisites exist, an error message is displayed when the user saves, performs a
Rollback, or exits from the form.
The error message is: No CAPP area is associated with this course. Either add a
CAPP Area prerequisite or select ‘Basic or None’. The user cannot leave the form until
the prerequisite is added or the radio group setting is changed.
Schedule Prerequisite and Test Score Restrictions Form (SSAPREQ)
1. When the Prerequisite Check Method is set to Basic or None and CAPP area
prerequisites exist, a warning is displayed when the user saves, performs a Rollback,
or exits from the form. The warning appears even if no changes have been made to
the record.
The warning message is: WARNING: CAPP area prerequisites exist, but the CAPP
prerequisite check method is not selected. The user must acknowledge this message
to continue.
2. When the Prerequisite Check Method is set to
CAPP and no CAPP area
prerequisites exist, an error message is displayed when the user saves, performs a
Rollback, or exits from the form.
The error message is: No CAPP area is associated with this course. Either add a
CAPP Area prerequisite or select ‘Basic or None’. The user cannot leave the form until
the prerequisite is added or the radio group setting is changed.
Basic Course Information Form (SCACRSE)
1. Users cannot modify the setting of the Prerequisite Check Method radio group on
this form, because they cannot view or modify the prerequisites on this form.
2. When the Prerequisite Check Method is set to
CAPP for a course and no CAPP
area prerequisites exist for the term range, and the user makes a change to the record
and saves the record, the Prerequisite Check Method setting is automatically
changed from CAPP to
Basic or None.
A message is displayed: NOTE: Prerequisite Check Method has been changed from
CAPP to ‘Basic or None’, because no CAPP Area prerequisites exist for this term
range. The user must acknowledge the message to continue.
3. When the Prerequisite Check Method is set to
CAPP for a course and no CAPP
area prerequisites exist for the term range, and the Copy button is used to copy the
course to a new term, and no CAPP area prerequisites exist in the term range for the

1253
Banner Student User Guide | Registration
new course record, the Prerequisite Check Method is set to Basic or None for
the course for the new effective term.
A message is displayed: NOTE: Prerequisite Check Method has been changed from
CAPP to ‘Basic or None’, because no CAPP Area prerequisites exist for this term
range. The user must acknowledge the message to continue.
4. When the Prerequisite Check Method is set to
CAPP for a course and the Copy
button is used to copy the course to a new term, and CAPP area prerequisites exist
for some but not all terms in the term range for the new course record, a warning
message is displayed.
The warning message is: WARNING: Prerequisite Check Method is set to CAPP, but
CAPP Area prerequisites are not active for some terms within this term range. Review
on SCAPREQ. The user must acknowledge the warning to continue.
5. When the Prerequisite Check Method is set to
CAPP for a course and CAPP area
prerequisites exist for some but not all terms in the term range on the course record,
and the user makes a change to the record and then saves the record, a warning
message is displayed.
The warning message is: WARNING: Prerequisite Check Method is set to CAPP, but
CAPP Area prerequisites are not active for some terms within this term range. Review
on SCAPREQ. The user must acknowledge the warning to continue.
Schedule Form (SSASECT)
1. Users cannot modify the setting of the Prerequisite Check Method radio group on
this form, because they cannot view or modify the prerequisites on this form.
2. When the Prerequisite Check Method is set to
CAPP for a section and no CAPP
area prerequisites exist, and the user makes a change to the record and saves the
record, the Prerequisite Check Method setting is automatically changed from
CAPP
to
Basic or None.
A message is displayed: NOTE: Prerequisite Check Method has been changed from
CAPP to ‘Basic or None’, because no CAPP Area prerequisites exist for this section.
The user must acknowledge the message to continue.
3. When the Prerequisite Check Method is set to
CAPP for a section and no CAPP
area prerequisites exist, and the Copy button is used to copy data to a new section,
the Prerequisite Check Method is set to
Basic or None for the new section.
A message is displayed: NOTE: Prerequisite Check Method has been changed from
CAPP to ‘Basic or None’, because no CAPP Area prerequisites exist for this section.
The user must acknowledge the message to continue.
4. When the term in the Key Block is the same term from which the section is being
copied, the associated prerequisites and the setting of the Prerequisite Check
Method radio group are copied from the section records on SSASECT and
SSAPREQ.
However, when the term in the Key Block is different than the term from which the
section is being copied, the associated prerequisites and the setting of the
Prerequisite Check Method radio group are copied from course records on
SCACRSE and SCAPREQ that are active for the term in the Key Block.

1254
Banner Student User Guide | Registration
Setting Up Registration Restrictions and Prerequisites
Use the checkboxes on the Registration Permit-Overrides Control Form (SFAROVR) to
allow definition of permit-overrides for a number of registration restrictions.
The Student Course Registration Form (SFAREGS) handles the following restriction and
prerequisite processing:
• The form checks restrictions, using the data in both the primary and secondary
curriculum of the effective student record. If a type of restriction fails, a restriction error
will be issued. Restriction errors will not be issued if an appropriate permit/override
exists for the student. Restriction errors can be overridden by the operator using normal
override processing.
• If a prerequisite is fulfilled by an in progress course, and in progress courses are
permitted to fulfill prerequisite requirements based upon the In Progress checkbox on
the Term Control Form, a PRE-REQ IN PROGRESS message will not be issued.
• If a section fails a prerequisite requirement, a PRE_REQ OR TEST SCORE
RESTRICTION error message will be issued.
• If standard prerequisite and test score restrictions are used to define the
prerequisite requirements for the section, no further information will be available.
The prerequisite error can be overridden by the operator using normal override
processing.
• If the prerequisite requirement is defined using CAPP areas, you can access the
Detailed Restriction Results Form (SFQPREQ) from the Student Course
Registration Form (SFAREGS), where the details of the prerequisite conditions
which were not met will be displayed. After reviewing the conditions which were
failed, additional enrollments can be added to allow the student to fulfill
requirements (for example, if additional courses would fulfill requirements for
concurrent-enrollment prerequisites), the error can be overridden using standard
override processing, or the enrollment can be dropped.
Use the checkboxes on the Registration Course Query Form (SFQSECT) to display
overrides which have been authorized for the listed restrictions.
Use the radio group options in the Registration Error Checking window of the Term Control
Form (SOATERM) to establish appropriate error checking criteria for restrictions. These
restrictions will allow either Fatal, Warning, or No Check error checking, or Fatal or No
Check error checking.
Setting up CAPP Restrictions and Prerequisites
Use the Compliance (use area in compliance when performing a compliance evaluation),
Prerequisite (use area as a registration prerequisite for a course or section), and
Dynamic (use of area as a qualifier for non-captive programs) checkboxes on the Area
Library Form (SMAALIB) to set up CAPP restrictions and prerequisites. These flags are
used as follows:
• Only areas flagged for compliance usage (Compliance checkbox checked) will be able
to be attached to a program in the Program Area Attachment and Management window
of the Program Requirements Form (SMAPROG), and only areas flagged for

1255
Banner Student User Guide | Registration
compliance usage will be considered during dynamic area selection. Only compliance in
a non-captive program can select the program.
• Only areas flagged as prerequisite areas (Prerequisite checkbox checked) will be able
to be assigned as course area prerequisites on the Catalog Prerequisite and Test Score
Restrictions Form (SCAPREQ) or as section area prerequisites on the Schedule
Prerequisite and Test Score Restrictions Form (SSAPREQ).
• Only areas flagged as dynamic (Dynamic checkbox checked) can be processed based
on qualifiers for non-captive programs. If an area is attached to a captive program, the
setting of the Dynamic (Indicator) is ignored.
Use the following fields in the Course/Attribute Attachment Results window of the Area
Output Inquiry Form (SMIAOUT) to set up CAPP restrictions and prerequisites:
• The Concurrent Enrollment checkbox will be used only when an area is used for
prerequisite checking. It specifies that the prerequisite requirement can be a concurrent
enrollment, in other words, an enrollment in the same term as the course to which it is a
prerequisite. When not checked, the prerequisite requirement must be fulfilled by
enrollment in the prerequisite course in a term earlier than the one for which registration
is attempted.
• The Test Code, Score Minimum, and Score Maximum fields can be used to define
test type and score range which will fulfill the detail requirement. Test scores can be
used in compliance areas, prerequisite areas, and (in the future) areas used as
registration prescriptions. In order to define a test requirement, no other data elements
(except set and subset) can be entered on the detail line. In other words, a line of detail
requirements can include a rule, other criteria, or test scores but not any other
combination.
Implementing Area Prerequisite Processing
Area prerequisite processing is an optional feature of Banner Student. Prerequisite and
test score restriction processing can be still performed using existing rules. Area
prerequisite processing provides added flexibility in definition of prerequisite requirements
and expanded display of the results of a failure to meet prerequisite requirements. Area
prerequisite processing can be selected on a section-by-section basis.
Processing Steps
1. (Required) Area prerequisite processing uses the CAPP Program Compliance Report
(SMRCMPL) to evaluate prerequisite requirements and their fulfillment. Compliance
processing requires that areas be evaluated within the context of a program, and
compliance results are attached to a program.
Determine a single code to use as the prerequisite program code. Define this
“program rule” on the Program Definition Rules Form (SMAPRLE), and then enter an
appropriate row using this code in the Crosswalk Validation Form (GTVSDAX).

1256
Banner Student User Guide | Registration
The GTVSDAX record must be created as follows:
•The Internal Code must be
PREREQPROG.
•The Sequence (Number) must be blank (
Null).
•The Internal Group (Code) value must be
PREREQUISITES.
•The External Code must be the prerequisite program code defined on SMAPRLE.
•The Description can be any desired description of the crosswalk rule.
•The Translation Code and Reporting Date can be left blank (
Null).
•The System Requirements indicator must be checked.
The program code defined for prerequisite processing on GTVSDAX will be used to
provide a logical link within compliance to process areas as registration prerequisites.
This code is loaded to the temporary request record (SMRRQCM) built for the
duration of the Registration Prerequisite process.
2. (Optional) You can set up CAPP area prerequisites to work with multiple levels when
you define the
PREREQPROG rule settings. Here is an example.
2.1. Define the
PREREQPROG rule with the Internal Group (Code) of
PREREQUISITES, and the External Code of PREREQ.
2.2. On SMARPLE, define
PREREQ as a valid program with default levels, such as
course level of
UG and student level of UG.
2.3. On SMAPROG, define
PREREQ as a program and make it active.
2.4. In the Program Include/Exclude Course Levels window, add all levels at your
institution that you wish to work with prerequisite checking, such as
GR, 01, CE,
and so on.
3. Determine a coding structure to use for Area Prerequisite requirements. Area (Code)
is a ten character field. Using a coding structure like "PENGL1005", where "P"
indicates a prerequisite requirement, and "ENGL1005" is the course for which
prerequisites are defined, will provide for easy queries of prerequisite areas, and
simplify data entry and reporting.
4. (Required) Use the Area Requirements Form (SMAAREA) to define the requirements
for a prerequisite area. If you have not already defined an area to the Area Library,
you will be able to do so at this time.
5. (Optional) Use the Catalog Prerequisite and Test Score Restrictions Form
(SCAPREQ) to attach area(s) containing prerequisite requirements to a course.
6. (Optional) Use the Prerequisite Check Method radio button group on either
SCAPREQ or the Basic Course Information Form (SCACRSE) to specify which type
of prerequisite requirements will be in effect for the course. Values are
Basic or
None
, CAPP, and DegreeWorks.
• When the CAPP radio button is selected, prerequisite requirements defined in the
attached CAPP area will be listed for the course in the Bulletin Report (SCRBULT)
and in the self-service catalog package.
• When the Basic or None radio button is selected, prerequisite requirements
defined in the Course Test Scores and Prerequisite Restrictions block of SCAPREQ

1257
Banner Student User Guide | Registration
will be listed for the course in the SCRBULT Report and in the self-service catalog
package.
•The DegreeWorks radio button is only used when DegreeWorks prerequisite
checking is in use, in place of CAPP area prerequisite checking.
7. (Required) Use the Schedule Prerequisite and Test Score Restrictions Form
(SSAPREQ) to attach area(s) containing prerequisite requirements to a section.
8. (Required) Use the Prerequisite Check Method radio group on either SSAPREQ or
the Schedule Form (SSASECT) to specify which type of prerequisite requirements will
be in effect for each section. Values are
Basic or None, CAPP, and
DegreeWorks.
• When the CAPP radio button is selected, prerequisite requirements defined in the
attached CAPP area will be applied to attempts to register for the section. When
area requirements are used as prerequisites, registration processes use the
Program Compliance Report (SMRCMPL) to evaluate fulfillment of the
requirements.
• When the Basic or None radio button is selected, prerequisite requirements
defined in the Section Test Score and Prerequisite Restrictions block of SSAPREQ
will be applied to attempts to register for the section, and current prerequisite
restriction selection will occur. If you choose to not implement area prerequisites,
you will see no changes in prerequisite processing.
•The DegreeWorks radio button is only used when DegreeWorks prerequisite
checking is in use, in place of CAPP area prerequisite checking.
9. (Required) Use the Term Control Form (SOATERM) to control prerequisite checking
parameters.
•Use the In Progress checkbox (in the main window) to specify whether in progress
courses should be used to fulfill prerequisite requirements when using area
prerequisites. When checked, an in progress course will automatically fulfill a
prerequisite requirement, and no acknowledgment of this usage is required. When
unchecked, in progress courses will not be allowed to fulfill a prerequisite
requirement, and a Pre-req or test score restriction error will be given.
• In progress courses are "active" ungraded qualifying courses for an earlier term, or
a course attempted in the same term if the Concurrent Enrollment Allowed
(Indicator) is checked in the Course/Attribute Attachment window of SMAAREA or
SMAGROP. Enrollments in which a person is waitlisted, from which a person has
withdrawn, or which have already been graded, will never be considered an "in
progress " course. Future-term enrollments, while "in progress " for transcript
purposes, will never be considered by prerequisite checking.
•Use the Prerequisites radio group (in the Registration Error Checking window) to
specify whether prerequisite checking should be performed or not. The No Check
option specifies that prerequisite restrictions will not be checked. The Fatal
option
indicates that failure of a prerequisite restriction will raise a fatal error.
10. (Required) Determine if pipe processes or advanced queuing will be used to submit
compliance requests for prerequisite checking.
Use the
AQ4PIPES GTVSDAX rule to toggle between pipes and advance queues.
1258
Banner Student User Guide | Registration
Note: Advanced queuing is used for session communication with Oracle
RAC technology where the database runs across multiple instances.
Pipes and queues can co-exist, and you can switch between the two
options. However, you must choose to run one or the other. They cannot
be run together.
Refer to the “Student Records” chapter of the Banner Student Self-Service User
Guide or the “Student Information” chapter of the Banner Faculty and Advisor Self-
Service User Guide for more information on using pipes and advanced queues.
10.1. For pipe processes, determine how the processes which will submit compliance
requests will be managed.
When using area prerequisite requirements, Oracle pipes can be used to submit
compliance requests from the various registration processes. Two pipe
programs are involved:
– The Compliance Listener Start Up Process (SFRPINI) initializes the
Compliance Pipe Process (SFRPIPE) for each pipe listed in the SFBPIPE
table.
– The Compliance Pipe Process (SFRPIPE) is used as a listening agent for
Oracle pipes to initiate the compliance process to perform prerequisite
processing for registration.
Use the
PIPETIME GTVSDAX rule with pipes to manage the timeout period
for a response from compliance processing.
Note: Pipes used by area prerequisite processing are similar to those
used by Job Submission (GURJOBS), and their management is usually a
database administrator or systems-type responsibility.
Appropriate pipes must be initialized in order for area-prerequisite
processing to occur, and they may be best initialized during normal
system start-up routines. Ten rows have been delivered in the SFBPIPE
table, and ten pipes will be initialized by SFRPINI. Determining the
required number of pipes to use is each institution's responsibility. If
processes are waiting for pipe responses, it may be best to initialize
additional pipes.
10.2. For advanced queuing, determine how the processes which will submit
compliance requests will be managed.
When using area prerequisite requirements, Oracle advanced queuing can be
used to submit compliance requests from the various registration processes.
Two advance queuing programs are involved:
– The Queue Initialization Process (SFRQINI) initializes the SFRADVQ listener
process to be run in the background, where it listens for Oracle advanced
queue calls to execute the compliance process.
– The Compliance Advanced Queue Process (SFRADVQ) is used as a
listening agent for Oracle advanced queue processing. It tells advanced
queuing to initiate the compliance process to perform prerequisite processing
for registration.

1259
Banner Student User Guide | Registration
Use the QUEUETIME GTVSDAX rule with advanced queues to manage the
timeout period for a response from compliance processing.
11. Perform registration as usual. There will be different results, depending upon the
method of registration used.
11.1. Online registration using the Student Course Registration Form (SFAREGS):
When area prerequisites are not in effect for a section, prerequisite checking will
be performed as it has been in the past. There are three possible results: a
successful registration, an In progress message, or a Pre-Req and Test Score
Restriction error. The operator must respond either by dropping the request or
overriding the error.
When area prerequisites are in effect for a section, prerequisite processing will
be performed by a piped call for a compliance evaluation. There are two
possible results: a successful registration or a Pre-Req and Test Score
Restriction error. If a Pre-Req and Test Score Restriction error occurs, the
operator may respond in one of several ways:
– Override the error immediately.
– Drop the request.
– Request additional information on why the prerequisite requirement was not
met. Additional prerequisite failure information is presented in the Detailed
Restriction Results Form (SFQPREQ). This form is available as an option
from SFAREGS using the CRN field Search feature and the Option List
(select View Detailed Results) or a Duplicate Item function when positioned
on a course for which an area prerequisite was not met. After reviewing the
requirements which have not been met, the operator is returned to
SFAREGS, where additional enrollments can be requested, the error can be
overridden, or the section can be dropped.
Note: Please note that SFQPREQ is available for display only for
enrollment attempts in sections which use area prerequisites. If you
request display of SFQPREQ for all enrollment attempts where test score
and prerequisite restrictions are used, the error message *ERROR*
CAPP Area Prerequisite error not encountered will be given.
11.2. Web Registration (either Banner Student Self-Service or Banner Faculty and
Advisors Self-Service):
When area prerequisites are not in effect for a section, prerequisite checking will
be performed as it has been in the past. There are two possible results: a
successful registration or a Pre-Req and Test Score Restriction error. Following
an error, the request to enroll in the section is automatically deleted.
When area prerequisites are in effect for a section, prerequisite processing will
be performed by a piped call for a compliance evaluation. There are two
possible results: a successful registration or a Pre-Req and Test Score
Restriction error.
If a Pre-Req and Test Score Error is returned for an enrollment attempt which
uses an area prerequisite, a link will be available from the CRN for the
enrollment, and you will see a line below the CRN. The student can select the
link, and a new Web page, the CRN Prerequisite Area Results will be displayed.

1260
Banner Student User Guide | Registration
This page will display all prerequisite areas for the CRN which have not been
met. It will not display required prerequisite areas which have already been met.
The display is in table format, and includes the following sections:
• For each CRN for which an area prerequisite has not been met, the CRN, Subject,
Course Number, and Course Title will display.
– Each area which has not been met will be listed, and Area Code and Area
Description will display.
– The Required Credits, Courses, and Minimum GPA from the area’s general
requirements will display, if the area includes any of these items in its general
requirements.
– Detailed requirements for the area will display, if the Print Indicator checkbox
for the area is checked on the Area Library Form (SMAALIB). If the Print
Indicator checkbox is not checked for the area, no detail requirements will
display. For example, you may have an area in which a minimum GPA is
required, and the only thing you want to communicate to the student is
whether the GPA requirement has been met or not. Setting the Print
Indicator checkbox to unchecked for the area will suppress the display of the
detail requirements for the area.
After viewing the results of the prerequisite evaluation, the student has several
options:
– Use the Menu button to return to the Registration Menu.
– Use the Exit button to exit from Banner Student Self-Service.
– Use the Return to Add/Drop link to return to the Add/Drop Classes page.
Registration Prerequisite Checking using DegreeWorks
This section discusses using DegreeWorks software with Banner prerequisite checking in
the Catalog, Schedule, and Registration modules. This is optional functionality that can be
turned on as needed using a rule on GTVSDAX. DegreeWorks version DW4.0.7 supports
this functionality.
Warning! Once you have turned on DegreeWorks prerequisite checking
and converted the records, attempting to revert back to CAPP
prerequisite checking is not recommended. You can continue to use
Banner basic prerequisite checking.
You cannot turn on DegreeWorks prerequisite checking for prior terms
that have registration records. Prior terms will still use CAPP and/or
Banner basic prerequisite checking.
Communication between DegreeWorks and Banner is handled by Oracle advanced queue
processing. GTVSDAX rules are also used to set up this processing. Please refer to the
DegreeWorks documentation regarding listener services used to communicate with
Banner Student.

1261
Banner Student User Guide | Registration
Processing Overview
This section contains information on:
• setting up Banner
• running the update and conversion scripts
• turning on the prerequisite GTVSDAX rule
• turning on prerequisite checking for courses and sections
• viewing errors in registration
• integrating the processing with DegreeWorks
• using the DegreeWorks Scribe tool
• using the DegreeWorks Scribe Requisite blocks
• using the DegreeWorks listener services
• setting up Oracle advanced queuing
• turning on the advanced queue GTVSDAX rule
• using the “degreeworks” user role
• using the Prerequisite Service
• using the Description Service
• using Oracle object types
Banner Setup
Banner General 8.3 must be installed before Banner Student 8.4.1 is installed, in order to
use this processing. After Banner Student 8.4.1 has been installed, the
PREREQCHK
GTVSDAX rule can be configured. You can then run the optional update and conversion
scripts to update the prerequisite checking method on the SCBCRSE and SSBSECT
tables. The mandatory update and conversion scripts were automatically run as part of the
Student 8.4 upgrade.
Update and Conversion Scripts
Four update and conversion scripts are delivered for use with DegreeWorks prerequisite
checking.
• sscbcrseu_080400.sql
Run automatically as part of Banner Student 8.4 upgrade
• sssbsectu_080400.sql
Run automatically as part of Banner Student 8.4 upgrade
• sscbcrseu_dw_08040100.sql

1262
Banner Student User Guide | Registration
Optional, run manually after Banner Student 8.4.1 upgrade for DegreeWorks
prerequisite checking
• sssbsectu_dw_08040100.sql
Optional, run manually after Banner Student 8.4.1 upgrade for DegreeWorks
prerequisite checking
sscbcrseu_080400.sql
The sscbcrseu_080400.sql update script is used to populate the
SCBCRSE_PREREQ_CHK_METHOD_CDE column in SCBCRSE for all terms.
Note: The SCBCRSE_PREREQ_CHK_METHOD_CDE column replaces
the
SCBCRSE_CAPP_PREREQ_TEST_IND column.
This script was run automatically during the Banner Student 8.4 upgrade process.
The script sets the
SCBCRSE_PREREQ_CHK_METHOD_CDE column to the appropriate
value for the prerequisite.
• If the obsolete SCBCRSE_CAPP_PREREQ_TEST_IND column was set to Y, the
SCBCRSE_PREREQ_CHK_METHOD_CDE column is set to C.
• If the obsolete SCBCRSE_CAPP_PREREQ_TEST_IND column was set to N or Null,
the
SCBCRSE_PREREQ_CHK_METHOD_CDE column is set to B.
sssbsectu_080400.sql
The sssbsectu_080400.sql update script is used to populate the
SSBSECT_PREREQ_CHK_METHOD_CDE column in SSBSECT for all terms.
Note: The SSBSECT_PREREQ_CHK_METHOD_CDE column replaces
the
SSBSECT_CAPP_PREREQ_TEST_IND column.
This script was run automatically during the Banner Student 8.4 upgrade process.
The script sets the
SSBSECT_PREREQ_CHK_METHOD_CDE column to the appropriate
value for the prerequisite.
• If the obsolete SSBSECT_CAPP_PREREQ_TEST_IND column was set to Y, the
SSBSECT_PREREQ_CHK_METHOD_CDE column is set to C.
• If the obsolete SSBSECT_CAPP_PREREQ_TEST_IND column was set to N or Null,
the
SSBSECT_PREREQ_CHK_METHOD_CDE column is set to B.
sscbcrseu_dw_08040100.sql
The sscbcrseu_dw_08040100.sql conversion script is used to change CAPP
prerequisite checking to DegreeWorks prerequisite checking for courses by term by

1263
Banner Student User Guide | Registration
updating SCBCRSE. When the SCBCRSE_PREREQ_CHK_METHOD_CDE is set to C, the
script updates the setting to
D.
This script is optional and is run after the 8.4.1 upgrade is complete, and only needs to be
run if you are implementing DegreeWorks prerequisite checking.
Before this script is run, update the delivered
PREREQCHK rule on GTVSDAX to the valid
beginning term code. This is the term when you wish to start using DegreeWorks for
prerequisite checking.
This script verifies that registration is not in progress, and that no courses have
registration records for the term code entered for the
PREREQCHK rule or for any active or
future term codes that are greater than the beginning term code. If registration records
exist, an error is displayed, and a different future term must be selected.
The script also creates a new course detail record on the Course General Information
Base Table (SCBCRSE) using the beginning term from the
PREREQCHK rule as the new
effective term. It then updates the value for the prerequisite checking method
(
SCBCRSE_PREREQ_CHK_METHOD_CDE) for CRNs that have active terms equal to or
greater than the beginning term for the rule.
sssbsectu_dw_08040100.sql
The sssbsectu_dw_08040100.sql conversion script is used to change CAPP
prerequisite checking to DegreeWorks prerequisite checking for sections by term by
updating SSBSECT. When the
SSBSECT_PREREQ_CHK_METHOD_CDE is set to C, the
script updates the setting to
D.
This script is optional and is run after the 8.4.1 upgrade is complete, and only needs to be
run if you are implementing DegreeWorks prerequisite checking.
Before this script is run, update the delivered
PREREQCHK rule on GTVSDAX to the valid
beginning term code. This is the term when you wish to start using DegreeWorks for
prerequisite checking.
This script verifies that registration is not in progress, and that no sections have
registration records for the term code entered for the
PREREQCHK rule or for any active or
future term codes that are greater than the beginning term code. If registration records
exist, an error is displayed, and a different future term must be selected.
The script updates the value for the prerequisite checking method
(
SSBSECT_PREREQ_CHK_METHOD_CDE) for CRNs/sections that have active terms
equal to or greater than the beginning term for the rule. This script does not create any
new records on the Section General Information Base Table (SBBSECT).
Prerequisite Checking GTVSDAX Rule
The PREREQCHK rule is used with DegreeWorks prerequisite checking. When this rule is
in use and DegreeWorks is installed at your institution, registration prerequisite checking
can take place through DegreeWorks.

1264
Banner Student User Guide | Registration
The PREREQCHK rule is delivered with the external code set to 999999. You need to set
the rule to the term code for the beginning term for which you wish to use DegreeWorks
prerequisite checking.
The following conditions apply on SCACRSE and SSASECT:
• When the External Code field is set to a begin term of 999999 or an invalid term code,
the
DegreeWorks option in the Prerequisite Check Method radio group is disabled.
• When the External Code field is set to a begin term that is equal to or less than the
current term, the
CAPP option in the Prerequisite Check Method radio group is
disabled.
• At least one course area prerequisite restriction must exist on SCAPREQ or SSAPREQ,
in order to set the Prerequisite Check Method radio group to
CAPP and save the
record on SCACRSE or SSASECT.
The following conditions apply on SCAPREQ and SSAPREQ:
• When the External Code field is set to a begin term of 999999 or an invalid term code,
the
DegreeWorks option in the Prerequisite Check Method radio group is disabled.
• When the External Code field is set to a begin term that is equal to or less than the
current term, the
CAPP option in the Prerequisite Check Method radio group is
disabled.
• When the External Code field is set to a begin term that is equal to or less than the
current term, and the Prerequisite Check Method radio group is set to
DegreeWorks, the tab for the Course Prerequisite Restrictions or the Section Test
Score and Prerequisite Restrictions window is disabled.
• When the External Code field is set to a begin term of 999999 or an invalid term code,
a CAPP area prerequisite must exist in the Course Prerequisite Restrictions or the
Section Test Score and Prerequisite Restrictions window in order to set the
Prerequisite Check Method radio group to
CAPP and save the record.
• When the External Code field is set to a begin term that is equal to or less than the
current term, and the Prerequisite Check Method radio group setting is changed from
DegreeWorks to Basic or None, the tab for the Course Prerequisite Restrictions
window or the Section Test Score and Prerequisite Restrictions is enabled.
• When the External Code field is set to a begin term that is prior to the availability of
DegreeWorks prerequisite checking, the View DegreeWorks Prerequisite Description
button is not displayed on SCAPREQ or SSAPREQ.
External
Code
Internal
Code
Internal
Code
Sequence
Number
Internal Code
Group Description
Activity
Date
Begin term
code,
default
999999
PREREQCHK 1 DEGREEWORKS DegreeWorks
Prereqs
Specified
Sysdate

1265
Banner Student User Guide | Registration
Catalog and Schedule
DegreeWorks prerequisite checking can be set up at the course level on SCACRSE and
SCAPREQ and at the section level on SSASECT and SSAPREQ using the Prerequisite
Check Method radio group. Set the radio group to
DegreeWorks, instead of Basic
or None
or CAPP.
The DegreeWorks description for the course or section can be viewed using the View
DegreeWorks Prerequisite Description button on SCAPREQ and SSAPREQ. This
opens the Prerequisite Information window. When no information exists for the
prerequisite description, the message No prerequisite was defined for this course. Please
contact the Registrar's Office is delivered is displayed in the window. This message text is
delivered and can be customized in DegreeWorks version DW4.1.0.
Note: As of DegreeWorks version DW4.0.7, if no course description is
entered in DegreeWorks, the Prerequisite Information window will be
displayed but will be blank.
The prerequisite descriptions from DegreeWorks and associated prerequisite error
messages can also be viewed in the Catalog and Schedule modules in Banner Student
Self-Service and Banner Faculty and Advisor Self-Service to assist students and faculty
members to determine the order in which courses need to be taken.
Prerequisite information from DegreeWorks is displayed on the following pages in Self-
Service:
• Detailed Course Information (bwckctlg.p_disp_course_detail)
• Detailed Class Information (bwckschd.p_disp_detail_sched)
• Add or Drop Classes (bwskfreg.P_AddDrpCrse) (Student Self-Service)
• Add or Drop Classes (bwlkfrad.P_FacAddDropCrse) (Faculty and Advisor Self-
Service)
The Bulletin Report (SCRBULT) displays DegreeWorks course prerequisites in the output.
The report calls the DegreeWorks Description Service to obtain the prerequisite
descriptions scribed in the remarks in the Requisite blocks associated with the course.
The Term Roll Report (SSRROLL) rolls the prerequisite checking method and or converts
prerequisite checking from a CAPP method to a DegreeWorks method according to the
begin term in
PREREQCHK rule on GTVSDAX. This allows you to create the schedule of
class sections for terms where DegreeWorks will be used. SSRROLL will not allow the
new sections to have a CAPP prerequisite checking method, unless a CAPP area is
associated with the section per the Roll CAPP Area or DW Pre-reqs parameter.
Set the
PREREQCHK rule to the beginning term code for which you use to use
DegreeWorks. When SSRROLL is run and the Roll CAPP Area or DW Pre-reqs
parameter, the process converts the prerequisite checking method for the sections from
CAPP to DegreeWorks, based on the parameter setting. You can roll and convert the
prerequisite checking method from Catalog, from Schedule, or you can choose to not roll
the data. Not rolling the data resets the Prerequisite Check Method radio group to
Basic or None (SCBCRSE_PREREQ_CHK_METHOD_CDE and
SSBSECT_PREREQ_CHK_METHOD_CDE set to B).

1266
Banner Student User Guide | Registration
You can review the settings on GTVSDAX for the PREREQCHK rule after running
SSRROLL. When a valid term code is stored in the External Code field that is less than or
equal to the term code the data was rolled to, the settings should be as follows:
• For CRNs where the SSBSECT_PREREQ_CHK_METHOD_CDE is set to C, the setting
is changed to
D.
• For CRNs where the SSBSECT_PREREQ_CHK_METHOD_CDE is set to B, the setting
remains as it is.
Registration
DegreeWorks prerequisite registration errors can be viewed on SFAREGS for a student
and term. They can also be viewed in Self-Service.
The Student Temporary DegreeWorks Error Messages Table (SFTDWER) is used to store
the DegreeWorks prerequisite checking errors that are displayed on SFAREGS and in
Self-Service. SFTDWER is a child table of the Registration Temporary Table (SFTREGS).
Records in SFTDWER must be deleted before associated records can be deleted from
SFTREGS.
DegreeWorks prerequisite checking is called by SFAMREG for mass registration, but
individual DegreeWorks errors must be viewed from SFAREGS. A Message window on
SFAREGS is used to display the prerequisite error messages by CRN. This window also
displays course descriptions when errors do not exist.
The Registration Admin Messages Report (SFRRGAM) uses prerequisite checking with
DegreeWorks and displays pre-registration DegreeWorks prerequisite error messages for
students.
DegreeWorks Integration Setup
Reports can be run from DegreeWorks using Transit to view prerequisite setup in Banner
and DegreeWorks. You can use the reports to identify prerequisite setup issues in
DegreeWorks, such as courses and sections where the DegreeWorks prerequisite
indicator has been set but no rules exist. You can also identify courses and sections that
have the indicator set for existing rules. This will assist you in setting up processing for
registration errors and preventing students from receiving unnecessary prerequisite error
messages. The section prerequisite checking method determines the use of DegreeWorks
in Banner registration processing when DegreeWorks has been installed.
Please refer to the DegreeWorks documentation suite (version DW4.0.7) for more
information.
Scribe Tool
The DegreeWorks Scribe tool is used to encode degree requirements. It contains
templates that can be used to enter Requisite blocks (rules) for courses and sections. It is
used to create a prerequisite rule for a course, as well as add a description. The courses
in the descriptions can have hyperlinks in the Web display as long as they are used in the
rule. The descriptions are extracted from the Scribe Remarks (notes on the requirements)
and are available to Banner Student Self-Service and Banner Faculty and Advisor Self-
1267
Banner Student User Guide | Registration
Service on the Detail Course Information pages and the Detailed Class Information pages.
They are available to Banner baseline in the Bulletin Report (SCRBULT) and on the
SCAPREQ and SSAPREQ forms. The error messages seen by the student or registrar
when a prerequisite is not met are contained in the Scribe ProxyAdvice. These messages
are displayed to the students and faculty members in Self-Service and to the registrar in
the error details in SFAREGS.
Please refer to the DegreeWorks documentation suite (version DW4.0.7) for more
information.
Scribe Requisite Blocks
Scribe Requisite blocks are made up of remarks (prerequisite description), the class
(course) prerequisite rules, and ProxyAdvice. Rules are defined by course and term
range, or by term and CRN. They are linked to Banner when the
SCBCRSE_PREREQ_CHK_METHOD_CDE column or the
SSBSECT_PREREQ_CHK_METHOD_CDE column is set to D.
The Requisite block also prevents in-progress courses from being used to meet
prerequisites on a rule-by-rule basis or on a course-within-a-rule basis. The setting of the
In Progress checkbox on SOATERM is not used in DegreeWorks. The DegreeWorks
standard is that in-progress courses will meet prerequisites.
Note: Courses that have been waitlisted, withdrawn from, or already
graded do not qualify as in-progress for prerequisite checking.
Please refer to the DegreeWorks documentation suite (version DW4.0.7) for more
information.
Oracle Advanced Queue Processing
Advanced queue processing is used to connect Banner and DegreeWorks for prerequisite
checking. This is similar to the pipes processing used with CAPP prerequisite checking.
The
squeqtabc_08040100_02.sql and squeqtabc_08040100_03.sql
scripts are run during the 8.4.1 upgrade to establish the administrative queues and queue
tables for advanced queuing.
Please see the Banner General 8.3 Release Guide for more information on Oracle
Advanced Queue Processing.
Advanced Queue Processing GTVSDAX Rule
The QUEUETIME rule is used with advanced queue processing for DegreeWorks queues.
Internal Code Internal Code Group External Code Description
QUEUETIME QUEUETIMEOUT 300 SFRADVQ
timeout in seconds

1268
Banner Student User Guide | Registration
The QUEUETIME rule allows you to change the timeout period for the advanced queue
process. The delivered default timeout period is
300 seconds (five minutes). You need to
set the rule to the timeout value you choose for the queue to work with the advanced
queuing.
Please refer to the DegreeWorks documentation for information on starting listener
services.
DegreeWorks User Role
A “degreeworks” Oracle user is used with this processing. The USR_DEGREE_WORKS
role is the default role given to this user. This role will only be granted to execute specific
objects as defined by the
gurtgrdw.sql script. (This grant script is also part of the
8.4.1 upgrade.) This allows the DegreeWorks listener processes (DAP61 for the
Prerequisite Service and DAP62 for the Description Service) to be executed as the
DegreeWorks user, only allowing access to the specific objects required for DegreeWorks
prerequisite checking.
Prerequisite Service
The Prerequisite Service sends the prerequisite courses that are used for SCRBULT,
SCAPREQ, and SSAPREQ in baseline and the Detailed Course Information page
(
bwckctlg.p_disp_course_detail) and the Detailed Class Information page
(
bwckschd.p_disp_detail_sched) in Banner Student Self-Service and Banner
Faculty and Advisor Self-Service. When a student has not met the requirements, a
message is displayed.
The Add or Drop Classes page (
bwskfreg.P_AddDrpCrse) in Banner Student Self-
Service and the Add or Drop Classes page (
bwlkfrad.P_FacAddDropCrse) in
Banner Faculty and Advisor Self-Service also display prerequisite messages.
A registration request to the Prerequisite Service contains the term code, PIDM, SPRIDEN
ID, level, degree, CRN, subject code, course number, section number, and credit hours.
The response returns the course prerequisite information, including in-progress and error
information.
The Registration DegreeWorks Advanced Queuing Package (SFKDWAQ) package is
used by the Banner registration process when DegreeWorks prerequisite checking is
implemented. It facilitates communication across the Oracle queues for the DegreeWorks
listener process - DAP61 for the Prerequisite Service.
Description Service
The Description Service sends the course prerequisite descriptions that are used for
SCRBULT, SCAPREQ, and SSAPREQ in baseline and the Detailed Course Information
page (
bwckctlg.p_disp_course_detail) and the Detailed Class Information
page (
bwckschd.p_disp_detail_sched) in Banner Student Self-Service and
Banner Faculty and Advisor Self-Service.
A catalog request is initiated in Self-Service when the course details hyperlink is selected.
The request must contain required data for term code, subject code, and course number.
The request can contain optional data for section number, student ID, degree, and level.

1269
Banner Student User Guide | Registration
A class schedule request is initiated in Self-Service when the class section hyperlink is
selected. The request must contain required data for CRN, term code, subject code,
course number, and section number. The request can contain optional data for student ID,
degree, and level.
The Description Service response to a catalog request or a class schedule request is
displayed to the user as course or section prerequisite description information when the
description is found or as an error message if the service is not available, the description
is not found, or the Scribe Requisite block is not found.
The Registration DegreeWorks Advanced Queuing Package (SFKDWAQ) package is
used by the Banner registration process when DegreeWorks prerequisite checking is
implemented. It facilitates communication across the Oracle queues for the DegreeWorks
listener process - DAP62 for the Description Service.
Oracle Object Types
Four high-level, complex, Oracle object types are used that rely on dependent, lower-level
object types for their creation. The object types are:
so_dw_preq_request,
so_dw_preq_response, so_dw_desc_request, and
so_dw_desc_response. These objects represent the communication payload that is
sent across one of the four, unique, Oracle queues also used with this processing. The
four Oracle queues are:
DW_PREQ_REQUEST_Q, DW_PREQ_RESPONSE_Q,
DW_DESC_REQUEST_Q, and DW_DESC_RESPONSE_Q.
so_dw_preq_request
The so_dw_preq_request object is populated by the Banner SFKPREQ package. It
represents information used by DegreeWorks to perform a prerequisite evaluation. This
informational payload is sent from Banner across the
DW_PREQ_REQUEST_Q queue so
that the DegreeWorks DAP61 listener process can submit the prerequisite evaluation.
so_dw_preq_response
The so_dw_preq_response object is populated by DegreeWorks. It represents
information for the results of the prerequisite evaluation. DegreeWorks process DAP61
posts this payload on the
DW_PREQ_RESPONSE_Q so that Banner (SFKPREQ) can
listen for this response. Once the response is received, Banner decodes the object and
proceeds with the registration prerequisite evaluation, based upon the results received.
Variable Name Underlying Oracle Object Type
CORRELATIONID BANINST1.SO_DW_PREQ_CORRELATION_ID
TERMCODE BANINST1.SO_DW_PREQ_TERM
STUDENT BANINST1.SO_DW_PREQ_STUDENT
COURSESECTION BANINST1.SO_DW_PREQ_CRSE_REQUEST_V

1270
Banner Student User Guide | Registration
so_dw_desc_request
The so_dw_desc_request object is populated by the Banner SFKPREQ package. It
represents information used by DegreeWorks to query course description information.
This informational payload is sent from Banner across the
DW_DESC_REQUEST_Q
queue so that the DegreeWorks DAP62 listener process can submit the query information
on the DegreeWorks platform.
so_dw_desc_response
The so_dw_desc_response object is populated by DegreeWorks. It represents
information for the course description. DegreeWorks process DAP62 posts this payload
on the
DW_DESC_RESPONSE_Q queue so that Banner (SFKPREQ) can listen for the
response. Once the response is received, Banner decodes the object and proceeds with
returning the course description results to the calling processes (i.e., baseline Banner or
Self-Service Banner).
Variable Name Underlying Oracle Object Type
CORRELATIONID BANINST1.SO_DW_PREQ_CORRELATION_ID
TERMCODE BANINST1.SO_DW_PREQ_TERM
STUDENT BANINST1.SO_DW_PREQ_STUDENT
COURSESECTION BANINST1.SO_DW_PREQ_CRSE_RESPONSE_V
Variable Name Underlying Oracle Object Type
CORRELATIONID BANINST1.SO_DW_PREQ_CORRELATION_ID
TERMCODE BANINST1.SO_DW_PREQ_TERM
STUDENT BANINST1.SO_DW_PREQ_STUDENT
COURSESECTION BANINST1.SO_DW_PREQ_CRSE_REQUEST
Variable Name Underlying Oracle Object Type
CORRELATIONID BANINST1.SO_DW_PREQ_CORRELATION_ID
COURSESECTION BANINST1.SO_DW_PREQ_CRSE_REQUEST
DESCRIPTION BANINST1.SO_DW_DESC_DESCRIPTION_V
REFERENCE BANINST1.SO_DW_DESC_REFERENCE_V
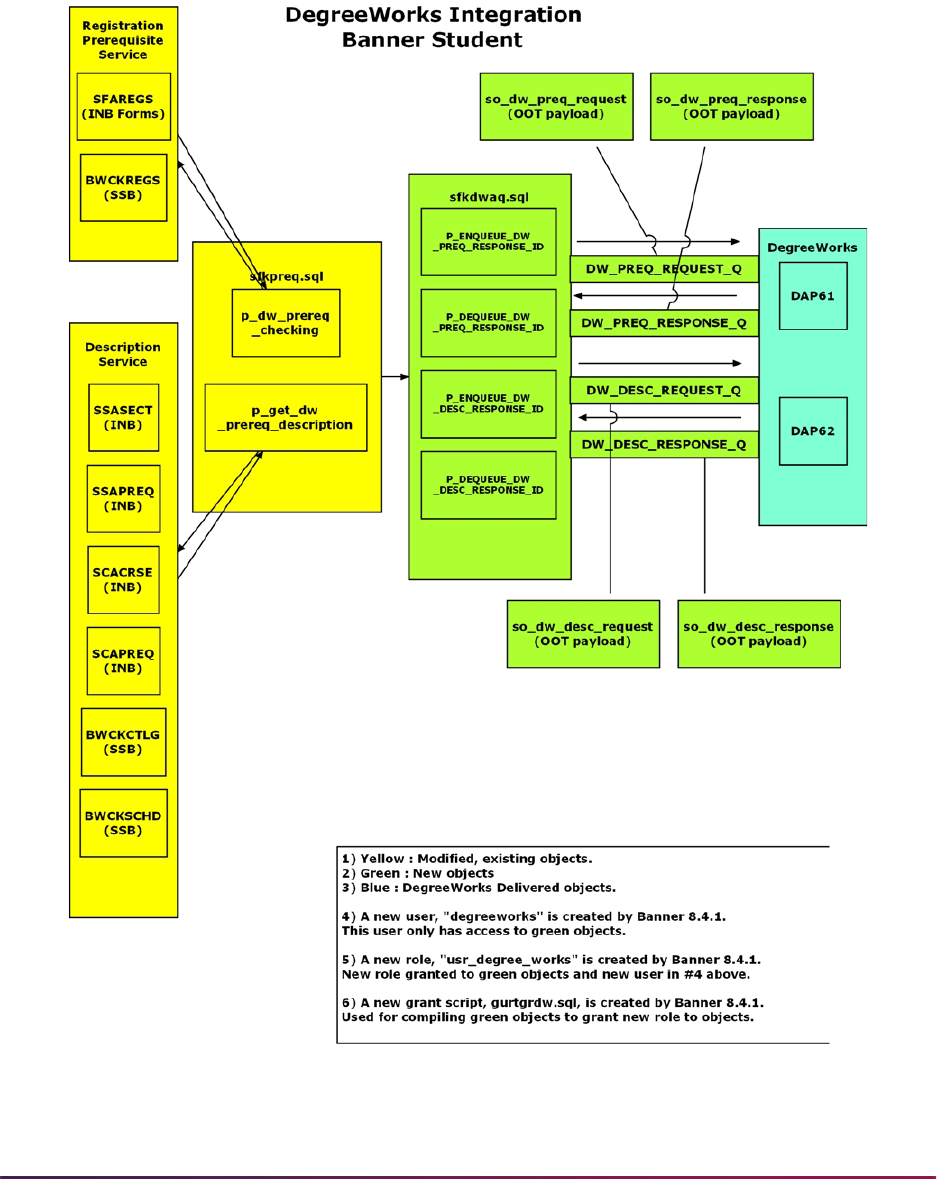
1271
Banner Student User Guide | Registration
Process Flow
Here is a process flow that shows how pipes and queues are used with prerequisite
checking.

1272
Banner Student User Guide | Registration
Return of Title IV Funds Processing
Return of Title IV Funds processing provides one simplified Return of Title IV Funds policy
for all students, when a student who is receiving Title IV, HEA program funds ceases
attendance at the institution. This policy determines the amount of institutional charges
that an institution has earned when a student withdraws, and the amount that was
unearned and has to be returned.
The Return of Title IV Funds policy limits the student’s responsibility for repayments of
Federal grants to 50% of the total amount of Federal grants above institutional charges.
The policy excludes Federal Work-Study from the calculation.
Return of Title IV processing is cross-enterprise functionality involving the Banner
Financial Aid, Banner Student, and Banner Student Self-Service products, and the
Accounts Receivable module.
Return of Title IV Funds and Authorizations Handbook
For more information on Title IV Refunding, please refer to the Return of Title IV Funds
and Title IV Authorizations Handbook, which contains information for the Banner Financial
Aid and Banner Student products and the Accounts Receivable module.
Terminology
The following terms are used to discuss Title IV processing.
Term Description
Title IV Aid Loans and grants funded by the Federal Government under
regulations initially established by the Higher Education Act
of 1965 and as amended.
Reauthorization Periodic review, modification, continuation of a federal
program. Title IV was last reauthorized in 1998 with
significant changes to the required handling of aid if a
student withdraws from all classes.
Break Period A period of consecutive days during which no academic
activity occurs, which may include weekends, holidays,
vacations, etc.
Enrollment Period The period of time (measured in days for Credit Hour
programs and hours for Clock Hour programs) for which
students who complete an academic program are enrolled.
Excludes break periods of five or more consecutive days.
Leave of Absence Periods in which a student is excused from attendance with
prior approval. Regulations define criteria for approving a
leave of absence.

1273
Banner Student User Guide | Registration
Calculations
Here is a summary of the steps involved in calculating the Return of Title IV Funds.
1. Determine the student’s withdrawal date.
The student’s withdrawal date can be determined by one of the following
specifications:
1.1. The withdrawal date as determined by the institution’s attendance records.
An institution that is required by an outside entity to take attendance for only
some of its students must use those attendance records for those students that
withdraw to determine the withdrawal date.
1.2. The date, as determined by the institution, that the student began the
withdrawal process prescribed by the institution.
1.3. The date, as determined by the institution, that the student provided official
notification to the institution of his or her intent to withdraw.
A student has provided official notification to the institution of his or her intent to
withdraw if the student indicates an intent orally or in writing.
1.4. The period mid-point (50%) for institutions who do not take attendance and for
which a student leaves the institution without reporting his or her withdrawal and
for which the institution is unable to identify the actual date of withdrawal.
This step is accomplished by the Banner Student System. The Return of Title IV
Funds process is dependent upon the entry of a withdrawal date. The following steps
cannot occur until the withdrawal date is entered.
Note: The Title IV Funds Return Calc Process (RPRTIVC) allows for the
determination of the Return Title IV Funds in Audit Mode (Calculate and
View) or Update Mode (Calculate and Save). The Audit Mode allows you
to inform the student of the consequences of a withdrawal before the
withdrawal process is completed without updating the Banner Financial
Aid awards or the Accounts Receivable information. You also have the
Period of Attendance The period of time a student actually attends prior to
withdrawal, excluding approved leave of absence and break
periods of five or more consecutive days.
Percent Completed Period of Attendance/Enrollment Period as a percentage
rounded to one decimal.
Institutional Charges Assessments which are made to students as a requirement
for attendance in an academic program (for example, Tuition,
Fees, Room, Board).
Other Institutional
Costs
Additional amounts not billed through Accounts Receivable
which are considered as required for attendance (for
example, required lab equipment which all students must
purchase off campus).
Term Description

1274
Banner Student User Guide | Registration
ability to print a summary of the Return of Title IV Funds calculation in
Audit Mode or Update Mode.
Institutions are not required to use the Return of Title IV Funds calculation
withdrawal date for their own institutional refund policies or for other
purposes. Institutions may have a separate withdrawal date for their own
purposes. The institutions’ withdrawal date for registration fee
assessment may differ from the Title IV withdrawal date.
2. Identify students who have had a withdrawal status code and date entered on their
records.
The Return of Title IV Funds Recipient Withdrawn Status Report (RPRTIVR) allows
you to print a listing of the students who have had a withdrawal status code entered on
their accounts.
3. Identify students who are Title IV recipients.
The Title IV Recipient Withdrawn Report (RPRTIVR) identifies those students who are
eligible Title IV recipients during the payment period of the withdrawal.
Title IV recipients are those students who have had Title IV funds disbursed to their
accounts or who could have had Title IV funds disbursed to their accounts during the
payment period in which the withdrawal occurred.
4. Calculate the Return of Title IV Funds.
The Title IV Funds Return Calc Process (RPRTIVC) will process the Return of Title IV
Funds calculation in batch in two modes:
• Audit Mode (Calculate and View)
• Update Mode (Calculate and Save)
The Return of Title IV Fund Calculation Form (RPATIVC) also processes the Return of
Title IV Funds calculation online in two modes:
• Audit Mode (Calculate and View)
• Update Mode (Calculate and Save)
5. Determine the percentage earned.
The percentage earned is calculated by taking the number of calendar days or clock
hours completed in the period or period of enrollment divided by the total number of
calendar days or clock hours in the payment period or period of enrollment. Scheduled
breaks of at least five consecutive days, as well as approved leave of absences, are
not included in the calculation of days in the payment period or period of enrollment.
This calculation is performed when RPATIVC is accessed or the Title IV Funds Return
Calc Process (RPRTIVC) is run.
Leaves of Absence
• A leave of absence is not an approved leave of absence for the purposes of the Title
IV program unless the institution explains at or prior to granting the leave of absence
the effects that the student’s failure to return from an approved leave of absence
may have on the student loan repayment terms. This includes the exhaustion of
some or all of the student’s grace period.

1275
Banner Student User Guide | Registration
• In accordance with the statute, the total number of days of all leaves of absence
cannot exceed 180 days in any 12 month period.
• A Title IV program loan borrower who has been granted an approved leave of
absence is considered to be enrolled in the institution for purposes of reporting the
student’s in-school status for Title IV program loans.
Processing Notes
The "period of enrollment" is defined as the academic period established by the institution
for which institutional charges are generally assessed (for example, terms in Banner).
The percentage earned is defaulted to 100% whenever the calculated percentage of the
period of enrollment completed is greater than 60 %. No Return of Title IV Funds
calculation is required to be completed when the calculated percentage of the period of
enrollment completed is greater than 60%. The percentage unearned is calculated by
subtracting the percentage earned from 100%.
The percentages earned and unearned are calculated based on the Return of Title IV
rounding rules. Use three decimal places, rounding the third decimal place up one if the
fourth decimal place is five or above (for example, 4486 would be rounded to .449 or
44.9%).
Institutions with term-based educational programs must determine the treatment of the
student’s Title IV, HEA program assistance on a payment period basis.
Institutions with non-term-based educational programs must choose either a payment
period or period of enrollment and use that period consistently for all students in the
program. Banner Financial Aid currently has a term-based structure.
Institutions are permitted to make a separate selection of payment period or period of
enrollment for the return of unearned aid calculations for students who: transfer to the
institution, re-enter the institution, or attend a non-term-based or a non-standard term-
based educational program.
Student Term Break Form (SOATBRK)
This form is used to provide a method for institutions to define break periods within the
period of enrollment or term. A break period less than five calendar days is considered
part of the period of enrollment. A break period that is equal to or more than five calendar
days is not counted as part of the period of enrollment. Banner uses the break periods
defined for the term to determine the percent attended when a student withdraws from the
institution.
Break days will be determined as entered on SOATBRK and the SORTBRK table on a
term basis. All consecutive calendar days (including weekends) must be entered within
any vacation period for this feature to function correctly. (Example: Classes do not meet
on weekends. Thanksgiving vacation days include Thursday, Friday, and the following
Monday. A total of five calendar days – Thursday, Friday, Saturday, Sunday, and Monday
– must be entered on SOATBRK.)

1276
Banner Student User Guide | Registration
The form will not:
• permit an overlap in dates for break periods, (that is, the start date cannot be between
start and end of another period),
• allow consecutive break periods (records) to be entered, (that is, the start date cannot
be end date plus one of another period),
or
• permit break days to be entered as start and end dates of term.
The Student Withdrawal Form (SFAWDRL), where the Title IV withdrawal date is entered,
will display the appropriate break days (greater than or equal to five consecutive days),
and this value will be used to calculate the attend percentage.
Student Withdrawal Form (SFAWDRL)
Use this form to withdraw a student from enrollment for the term. When you withdraw a
student from the term using this form, Banner begins the processing of the student’s Title
IV refund information.
You can also use this form to update information that Banner will use later to calculate the
student’s Title IV refund, such as:
• Record a Title IV effective withdrawal date and status, and a start date and end date of
enrollment.
• Record any additional amount for allowable institutional costs not assessed via
Accounts Receivable.
• Record any days for approved leave of absence. The percent of period attended will be
calculated based on this data, the start and end of term as recorded in STVTERM or by
part-of -term as indicated on SOATERM, and break periods of five or more days as
recorded in the Student Term Break Form (SOATBRK) and the SORTBRK table.
• Be warned if the student still has active enrollment status when a withdrawal code is
entered.
• Calculate the amount of original institutional charges for the term from the TBRACCD
records for the term, which have the
TBRACCD_ORIG_CHARGE_IND set to Y on
records with detail codes where the
TBBDETC_INST_CHARGE_IND is set to Y. This
form also displays all TBRACCD records for the term with detail codes where the
TBBDETC_INST_CHARGE_IND is set to Y with an updatable checkbox for the
TBRACCD_ORIG_CHARGE_IND and totals for the sum of original institutional charges
and of other institutional charges. If changes are made to the Original Charge Indicators,
the new total will be taken back as the amount of original charges on the Title IV
withdrawal record. All processing of the enrollment status, course status, and
registration fee assessment must be completed before accessing SFAWDRL.
• View current course information (from SFRSTCR) similar to SFAREGQ, including:
• CRN
• Part-of term

1277
Banner Student User Guide | Registration
•Subject
• Course number
• Section
• Enrollment status
• Enrollment status date
• Last date of attendance
• Maintain additional withdrawal information such as:
• Enrollment start and end dates
• Days in enrollment period as well as the days attended
• The total institutional charges
• Free form user withdrawal comments
SFAWDRL and Status Changes
If status code, date, or original charges have changed, when accessing the Withdrawal
Status Information block from the key, a pop-up window indicates that changes have
occurred and displays the old/new values for all three.
1. If the status code/date have changed, the user has three options:
1.1. Create a new record.
1.2. Update the existing status code/date.
1.3. Exit.
If the user chooses to update an existing record, the new status code and date are
defaulted into the SFRWDRL block. The user may update other fields only if the
SFRWDRL_PROCESSED_IND = N.
2. If the original charges amount has changed, and if the
SFRWDRL_PROCESSED_IND
=
N, the user has three options:
2.1. Create a new record.
2.2. Update the original charges amount.
2.3. Exit.
If a user chooses to update an existing record, the new amount will default in for the
original charges. Other fields may be updated by the user, including the Institutional
Charges Detail Information window, should the user choose to update the Original
Charge Indicators.
3. If the
SFRWDRL_PROCESSED_IND = Y, and if post-withdrawal disbursement is to
occur, the user has three options:
3.1. Update the institutional charges amount.
3.2. Update the Original Charge Indicators to match institutional charges previously
used in the calculation.
3.3. Exit.

1278
Banner Student User Guide | Registration
4. If the SFRWDRL_PROCESSED_IND = Y, and if the return of funds is to occur, the
user has three options:
4.1. Create a new record.
4.2. Update the Original Charge Indicators to match institutional charges.
4.3. Exit.
If the user chooses to update the institutional charges amount, the new amount will
default in, and no other fields will be updatable.
If the user chooses to update the Original Charge Indicators, the form will go to the
Institutional Charges Detail Information window where the user can update the
Original Charge checkbox. Two totals will display:
• Locked original charges
• Current original charges
As the checkbox is changed, the Original Charges field will be updated. The user will
be able to save changes only when the two amounts are equal. The user may exit
without making changes.
5. After going from the key to the SFRWDRL block, the following are checked:
5.1. If the student’s status code has changed (
KEY_BLOCK.ESTS_CODE is
different than the
SFRWDRL_ESTS_CODE).
5.2. If the student’s status date has changed (
KEY_BLOCK.ESTS_DATE is
different than the
SFRWDRL_ESTS_DATE).
5.3. If the student’s original charges amount has changed
(
KEY_BLOCK.TOTAL_ORIG_CHGS is different than the
SFRWDRL_ORIGINAL_CHARGES).
If any of these three values has changed, a dialogue box stating which fields have
changed appears and displays the new values of those fields. A user can compare
current values on the form to the new values, to decide on a course of action. After the
user responds to the dialogue box by selecting
OK, the following happens:
For scenarios #1 and #2 above, an option window appears with the following options.
• Create new record
• Update status code and/or date
• Exit without changes
If the user chooses to update, the status code/date from the key default in.
For scenario #3 above, there are three different situations to check for, each having
different options:
5.1. If
SFRWDRL_PROCESSED_IND = N:
– Create a new record.
– Update the original charges amount.
– Exit without changes.

1279
Banner Student User Guide | Registration
If the user chooses to update the original charges, the total original charges
amount from the key will default in.
5.2. If
SFRWDRL_PROCESSED_IND = Y and there is a post-withdrawal
disbursement (check Banner Financial Aid tables for amount-earned > amount-
disbursed):
– Update the original charges amount.
– Adjust the Original Charge Indicators to match institutional charges previously
used in the calculation.
– Exit without changes.
If the user chooses to update the original charges, the total original charges
amount from the key will default in.
If the user chooses to adjust the indicators, access the Institutional Charges
Detail Information window.
5.3. If
SFRWDRL_PROCESSED_IND = Y and there is a return of funds (check
Banner Financial Aid tables for amount-disbursed > amount-earned):
– Create a new record.
– Adjust the Original Charge Indicators to match institutional charges previously
used in the calculation.
– Exit without changes.
If the user chooses to adjust the indicators, access the Institutional Charges
Detail Information window.
In any of the previous scenarios, if the user opts to “Create a new record”, the cursor is
placed on Withdrawal Code field if
Null (and it will be Null if the
STVESTS_WDRL_CODE_DEF is Null). If the Withdrawal Code is populated (meaning
STVESTS_WDRL_CODE_DEF gave it a value), then the cursor is in the Effective
Withdrawal Date field. If the user chooses to “Exit without changes”, a Rollback occurs.
(This is the end of the discussion of the three scenarios listed above.)
• If the SFRWDRL_PROCESSED_IND = Y, the user may not update any other fields on
the form.
• If the SFRWDRL_PROCESSED_IND = N, the user may update all updatable fields.
Student Withdrawal Query Form (SFIWDRL)
Use this form to view and query withdrawal information about a student from SFAWDRL.
You can view information for either a single term or all terms. Withdrawal records appear
in descending order by term, and within each term, descending order by record sequence.
This form is for query purposes only; you cannot make changes to any of the values on
this form. You can access this form from SFAREGS using the Options Menu.

1280
Banner Student User Guide | Registration
Student Withdrawal Status Code Validation Form (STVWDRL)
This form is used to define Title IV withdrawal status codes. Use the indicators on the form
to control whether Banner Financial Aid records are updated and whether refunds will be
processed at 50%.
Term Control Form (SOATERM)
Use the Original Charge Cutoff Date field in the Registration Fee Assessment section to
reflect the date through which all assessments are considered original charges. This is not
a null field and is defaulted to the
STVTERM_START_DATE when creating a new record.
The user can update the field.
The TIV Date Source section uses a radio group for Term Date or Part of Term Dates.
The default is Term Date. Based on how the institution sets this, either the
STVTERM_START_DATE
and STVTERM_END_DATE will be used on SFAWDRL as
the "Enrollment Start" and "Enrollment End" dates, or the
min (part-of-term)
START_DATE
and maximum (part-of-term) END_DATE that go with the student's course
registrations for the term will be used for "Enrollment Start" and "Enrollment End" dates.
Housing Term Control Form (SLATERM)
Use the Original Charge Cutoff Date field to reflect the date through which all
assessments are considered original charges. The housing fee assessment process will
check this date to determine if the Original Charge Indicator should be set. This is a null
field and is defaulted to the
STVTERM_HOUSING_START_DATE when creating a new
record. The user can update the field.
Enrollment Status Code Validation Form (STVESTS)
The Withdrawal Code field is used as an optional crosswalk column, referencing
STVWDRL codes if desired. Valid values may be selected from the List for Values derived
from the Student Withdrawal Status Code Validation Form (STVWDRL).
The Withdrawal Indicator is used as a withdrawal indicator by the enrollment status
code. An enrollment status code with this indicator checked will denote a withdrawal code
and will then be able to be selected by the batch Withdrawn Student Report (SFRWDRL).
This field is validated against the Student Withdrawal Status Code Validation Form
(STVWDRL).
Student Course Registration Form (SFAREGS)
SFAREGS is used in the Return of Title IV Funds processing:
• A non-fatal pop-up warning message is displayed whenever an attempt is made to
reinstate a student’s enrollment status on SFAREGS in a term for which a Title IV
withdrawal record has been created.

1281
Banner Student User Guide | Registration
• If the SFBETRM_ESTS_CODE is changed, and Title IV withdrawal records exist for the
student, the following message is displayed: Student has Title IV withdrawal record for
this term.
• The Student Withdrawal Information item in the Options Menu allows access to
SFIWDRL.
• The form recalculates the student’s tuition and fees to reflect the reduced charges
resulting from the shortened period of attendance. This is handled by registration fee
assessment processing to accommodate the correct calculation of the Banner Financial
Aid refund by adding the update of the TBRACCD Original Charge Indicator or an
original assessment.
• The online registration fee assessment process sets the TBRACCD_ORIG_CHG_IND
in assessment if applicable.
Room Assignment Form (SLARASG)
The TBRACCD Original Charge Indicator for room charges and the online housing fee
assessment process set the
TBRACCD_ORIG_CHG_IND in assessment if applicable.
Source code
B will be passed to Accounts Receivable.
Meal Assignment Form (SLAMASG)
The TBRACCD Original Charge Indicator for meal charges and the online housing fee
assessment process set the
TBRACCD_ORIG_CHG_IND in assessment if applicable.
Source code
V will be passed to Accounts Receivable.
Phone Assignment Form (SLAPASG)
The TBRACCD Original Charge Indicator for phone charges and the online housing fee
assessment process set the
TBRACCD_ORIG_CHG_IND in assessment if applicable.
Source code
U will be passed to Accounts Receivable.
Class Attendance Roster Form (SFAALST)
The Date Last Attended field allows updates and queries on the last date of attendance
in a particular class for a student. This can help institutions determine the last date of
attendance for unofficial withdrawals
Withdraw Pending Status Change Report (SFRNOWD)
This report is used to show which students have zero enrollment hours but have not
officially withdrawn from the institution. This refers to students who have been enrolled in a
term and whose status indicates they are eligible to enroll, but no longer have any active
registration for a term, because there are no SFRSTCR records with a Status Code
checked as Count in Enrollment on the Course Registration Status Code Validation
Form (STVRSTS).

1282
Banner Student User Guide | Registration
Note: The Withdrawal Code on STVESTS is used to show that the
enrollment status code is also a withdrawn indicator for this reporting
process.
You can display several different groups of students in the report output:
• those who have received or could have received Title IV financial aid
• those who received only non-Title IV aid
• those with no financial aid
The report also allows you to include those students who have enrollment for the term but
no credit hours in academic history (all F’s, for example).
Date parameters are included in this report so as not to include students previously
identified as withdrawn if desired. Dates are based on activity date on SFRSTCA.
Withdrawn Student Report (SFRWDRL)
This report is used to identify students who have withdrawn from the term and need to
have a Title IV refund calculated (in other words, those students who have had a
withdrawal status code with the TIV Update Ind(icator) checked on the Student
Withdrawal Status Code Validation Form (STVWDRL) and entered on their student
record). This report can also be used to record the student’s withdrawal date for Title IV
purposes, and to create a withdrawal record for those students who received Title IV
funds.
The report allows you to:
• Select only those students who have been awarded Title IV funds or all students.
• Select only the withdrawal enrollment status codes requested. The default for the
parameter is all withdrawal enrollment status codes. You have the option of selecting all
withdrawal status codes, one withdrawal status code, or multiple withdrawal status
codes.
• Review the student status date and Accounts Receivable institutional charge detail to
determine if changes are required.
• Use population selection.
• Sort by activity date, ID, name, withdrawal status code, or level.
Note: Address type codes need to be set up on GTVSDAX to map to the
home address type and campus address type if you want addresses to
print on the report. The value in the Internal Code field is used to identify
the GTVSDAX address hierarchy.

1283
Banner Student User Guide | Registration
Registration Fee Assessment Process (SFRFASC)
The process automatically populates the Original Indicator to Y, for the first time
assessment occurs, for a specific detail code, for the student, for the term, and for all
assessments prior to the cutoff dates established on SOATERM.
Batch Room/Meal/Phone Assess Report (SLRFASM)
The process automatically populates the Original Indicator to Y, for the first time
assessment occurs, for a specific detail code, for the student, for the term, and for all
assessments prior to the cutoff dates established on SLATERM.
Class Roster Report (SFRSLST)
The Last Date Attended column on SFRSTCR corresponds to the Date Last Attended
field on SFAALST.
Registered, Not Paid Process (SFRRNOP)
The process passes the value of TBRACCD_ORIG_CHG_IND from the existing record
into the new TBRACCD record being created for assessment reversals.
Student Centric Period Processing
This section discusses using student centric periods with registration and academic
history processing. Student centric periods are made up of multiple terms or groups of
terms. A student centric period is assigned to a student using a cycle designator. When a
cycle designator is associated with the student, that indicates the student is included in the
student centric period.
Student centric cycles are inserted into the general student record during the admissions
process. They can also be dynamically assigned during the registration process. The
cycle code and term are used to determine the student centric period. Student centric
periods use processing rules to determine time status, academic standing, and student
type. Student centric periods are carried into academic history and are used for GPA
calculations along with terms and student levels.
Set Up and Use Student Centric Periods
Use these steps to set up and use student centric periods. This section assumes you have
already set up your terms, as well as admissions, general student, registration, and
academic history processing.
1. Create student centric period cycle codes on the Student Centric Period Cycle
Validation Form (STVSCPC).

1284
Banner Student User Guide | Registration
2. Create student centric period rules on the Student Centric Period Term Control Form
(SOASCPT).
3. Associate the student centric period rules with term codes on SOASCPT.
4. Create continuant student centric period rules by term or by term and student type on
the Continuant Student Centric Period Rule Form (SOACSCP).
5. Review continuant student centric periods by student type on the Continuant SCP
Query Form (SOQCSCP).
6. Create time status rules for student centric periods on the Student Centric Time Status
Rules Form (SFASTSR).
7. Associate time status levels with the time status rules on SFASTSR.
8. Admit students into student centric periods using the Admissions Form (SAAADMS)
or the Quick Admit Form (SAAQUIK).
9. View cycle designator on the general student record on the General Student Form
(SGASTDN).
10. Register students in courses in terms on the Student Course Registration Form
(SFAREGS).
11. View the cycle designator on the student term record on SFAREGS.
12. Review registration history for student centric periods and for time status codes on the
Student Centric Registration History Form (SFASCPR).
13. Set up student centric academic standing rules and GPA information on the Academic
Standing Rules Form (SHAACST).
14. Assign a student centric period code to the term header record on the Term Course
Maintenance Form (SHAINST).
15. Review student centric period hours and GPA information, as well as institutional and
transfer course detail on the Term Sequence Course History Form (SHATERM).
16. Use the Student Centric Period Statistics checkbox on the Transcript Type Rules
Form (SHATPRT) to include student centric period GPA totals on the transcript.
Processing
This section discusses in detail how student centric period processing is used in
registration and academic history. Processing is based on settings for rules on GTVSDAX.
Data must also be built for validation, term rules, cycle designators, continuant rules, and
time status rules.
Terminology
Here are definitions of student centric period and cycle designator and an example of how
student centric periods can be set up.

1285
Banner Student User Guide | Registration
Student Centric Period
A student centric period is a way of grouping multiple Banner terms into one period. It is a
standard academic term that can begin at any point at which a student can enter courses
and ends when the requirements for a standard term have been fulfilled. Courses that are
offered in modules, mini-sessions, parts-of-term, with alternate start dates, and so on, can
be grouped into a semester, quarter, or trimester on a student centric basis. A student
centric period code has associated terms and a cycle designator.
Cycle Designator
A cycle designator is an indicator assigned to a student and to a student centric period
that is used to relate the one to the other. It is used to:
• calculate and maintain totals by student centric period
• display registration records and academic history courses associated with the student’s
student centric period
• facilitate evaluation, reporting, and extracts of enrollment or academic history data by
student centric period
Mapping Example
Here is an example of mapping student centric periods. There are two cycle codes, each
with a group of terms and associated student centric periods.
Enrollment Examples
Some students may be enrolled in a student centric period throughout their college
careers.
Cycle - T1
Terms: Sept - Oct
200810
Nov - Dec
200820
Jan - Feb
200830
Mar - Apr
200840
May - Jun
200850
Jul - Aug
200860
SCPs: 2008A 2008A 2008C 2008C 2009E 2009E
Cycle - T2
Terms: Jul - Aug
200760
Sept - Oct
200810
Nov - Dec
200820
Jan - Feb
200830
Mar - Apr
200840
May - Jun
200850
Jul - Aug
200860
Sept - Oct
200910
SCPs: 2007F 2007F 2008B 2008B 2008D 2008D 2008F 2008F

1286
Banner Student User Guide | Registration
Some students may never be enrolled in a student centric period.
Some students may have a combination of enrollment in a student centric period and
enrollment in standard terms.
For example, a student is enrolled in terms 200710-200760 with no student centric period.
In term 200810, the institution offers enrollment using student centric periods, so from
terms 200810-200860, the student is enrolled in student centric periods.
Term
Associated Student
Centric Period
Cycle on
SGASTDN Report on Transcript
200810 2008A T1 Student centric period data
200820 2008A T1 Student centric period data
200830 2008C T1 Student centric period data
200840 2008C T1 Student centric period data
200850 2008E T1 Student centric period data
200860 2008E T1 Student centric period data
Term
Associated Student
Centric Period
Cycle on
SGASTDN Report on Transcript
200810 2008A None Term data
200820 2008A None Term data
200830 2008C None Term data
200840 2008C None Term data
200850 2008E None Term data
200860 2008E None Term data
Term
Associated Student
Centric Period
Cycle on
SGASTDN Report on Transcript
200710 -
200760
None None Term data
200810 2008A T1 Student centric period data
200820 2008A T1 Student centric period data
200830 2008C T1 Student centric period data
200840 2008C T1 Student centric period data
200850 2008E T1 Student centric period data

1287
Banner Student User Guide | Registration
Set Up GTVSDAX Rules
Three rules are delivered for the Crosswalk Validation Form (GTVSDAX) as controls for
student centric period processing. Each has an internal code group of
CENTRICPERIODS. These rules are delivered set to N.
• The PROCESSSCP rule turns on student centric period processing.
• The AUTOASSIGN rule automatically assigns a cycle designator code from SOASCPT
during the admissions process.
• The AUTOUPDATE rule updates the cycle designator code on the general student
record at registration for the first enrollment term.
When the
PROCESSSCP rule is set to Y, you can use student centric processing. You can
also choose to use or not use the
AUTOASSIGN rule or the AUTOUPDATE rule with the
PROCESSSCP rule. When the PROCESSSCP rule is set to N, student centric processing
is not invoked, and baseline processing will take place as usual.
When the
AUTOASSIGN rule is Y, the cycle designator will be automatically assigned
based on the data on SOASCPT, when a student is admitted and the initial general learner
record is created. When this rule is
N, the cycle designator is not assigned during
admissions.
When the
AUTOUPDATE rule is Y, the cycle designator is validated for the student’s first
enrollment record at registration. When the first enrollment term has a different cycle
designator than the one assigned during admissions, a new general student record is
created, and the student's new cycle code is assigned. When this rule is
N, the cycle
designator is not automatically updated when a student enrolls for the first term.
Here is a summary of the rule settings on GTVSDAX.
200860 2008E T1 Student centric period data
External
Code
Internal
Code
Internal
Code
Sequence
Number
Internal Code
Group Description
Activity
Date
Y PROCESSSCP N/A CENTRICPERIODS Use Student
Centric Periods
Sysdate
Y AUTOASSIGN N/A CENTRICPERIODS Automate cycle
desig at adm
Sysdate
Y AUTOUPDATE N/A CENTRICPERIODS Update cycle
desig for 1st enr
Sysdate
Term
Associated Student
Centric Period
Cycle on
SGASTDN Report on Transcript

1288
Banner Student User Guide | Registration
PROCESSSCP Rule
When the PROCESSSCP rule is set to N, institutions that are not using student centric
periods can bypass all student centric period processing. The following conditions apply:
• No cycle designator is created on the general student record during admissions.
• When a general student record is copied forward, any cycle designator that existed in
the previous record is copied forward to the new record. The cycle designator can be
deleted from or updated in the new record.
• When the grade roll is performed, the student centric period code in the student's
academic history term header record (SHRTTRM) is not populated, even if the student
has a cycle designator in effect for the term.
• When time status is calculated, the student centric period time status history records
(SFRSTSH) is not calculated, even if the student has a cycle designator in effect for the
term.
If you enter
Y in the Calculate SCP Time Status parameter in SFRTMST, the message
Calculate SCP Time Status must be N when GTVSDAX PROCESSSCP does not = Y is
displayed.
• When GPAs are calculated, the student centric period GPA records (SHRSGPA) are not
calculated, even if the student has a student centric period code the SHRTTRM term
header record.
• When academic standing is calculated, student centric period rules and processing are
not used.
If you enter
Y in the Process by Student Period parameter in SHRASTD, the message
Process by Student Period must be N when GTVSDAX PROCESSSCP does not = Y is
displayed.
• When student type updates are calculated using SHRTYPE, the continuant student
centric period rules are not used.
The following conditions apply to reports and processes in general:
• All reports and processes with a Process by Student Period parameter generate an error
message in the
.log file when the PROCESSSCP rule is set to N, and the Process by
Student Period parameter is set to
Y. The message Process by Student Period must be
N when GTVSDAX PROCESSSCP does not = Y is displayed in the
.log file.
• Reports such as the baseline transcript and the Student Self-Service transcript ignore
the setting of the Student Centric Period Statistics indicator on SHATPRT when the
PROCESSSCP rule is set to N.
When student centric period processing rules are created at your institution, and student
centric period processing is activated by setting
PROCESSSCP rule to Y, reports and
processes populate special values and/or create table records as follows:
• The cycle designator is populated in the general learner record (SGBSTDN).
• The student centric period code is populated in the academic history term header record
(SHRTTRM) when the grade roll process is performed.
1289
Banner Student User Guide | Registration
• Student centric period time status history records are created in the SFRSTSH table.
• Student centric period GPA records are created in the SHRSGPA table.
Warning! If your institution later decides to turn off student centric period
processing by changing the setting of the PROCESSSCP rule from Y to
N, the data created by student centric period processing will already exist
in the tables listed above and will not be automatically updated or deleted.
This could cause inaccurate records to exist for the terms or period of
time that student centric period processing was in effect.
Once the PROCESSSCP rule has been set to
Y, it should not be changed to N, unless
your institution first makes the following changes to student data.
• Set the SGBSTDN_SCPC_CODE value to Null in all general student records.
• Set the SHRTTRM_SCPS_CODE value to Null in all academic history term header
records.
• Delete all student centric period time status history records from the SFRSTSH table.
• Delete all student centric period GPA records from the SHRSGPA table.
Note: The student centric period time status history cannot be calculated
retroactively for a term, since it is dependent on evaluation and
calculation being performed as registration occurs.
Build Validation
The Student Centric Period Cycle Validation Form (STVSCPC) is used to create student
centric period cycle codes. Each cycle code designates a reporting period that is a
collection of terms. This form uses the Student Centric Period Cycle Validation Table
(STVSCPC).
Define Terms Associated With Student Centric Periods
The Student Centric Period Term Control Form (SOASCPT) is used to define terms that
are associated with student centric periods for a cycle. This form uses the Student Centric
Periods Table (SOBSCPS) and the Student Centric Period Term Control Table
(SORSCPT).
You can also query on existing rules by student centric period code or student centric
period cycle code. Existing student centric period codes are displayed in the Data block in
descending order. Each period is associated with a cycle code. The cycle codes come
from the Student Centric Period Cycle Validation Form (STVSCPC).
A unique combination of student centric period code, cycle designator code, and term
code must exist. You cannot associate a specific term to the same cycle in two different
student centric periods.
The Associated Term Codes block displays the term codes associated with each record in
ascending order. Multiple terms can be associated with a student centric period. You must

1290
Banner Student User Guide | Registration
save any changes in the Data block before navigating to the Associated Term Codes
block. Each student centric period must have a unique earliest term code.
When students are associated with the cycle and term in general student (SGBSTDN) or
academic history (SHRTTRM), and you attempt to change the cycle code in the Data
block or delete a record from the Associated Term Codes block, an error will be displayed.
The record cannot be changed or deleted.
Note: Term codes should be numeric, in the format YYYYTT, and the
codes must be constructed so that they maintain the appropriate
sequence of terms. Term codes are displayed in descending order, with
the highest term first.
The first four characters of student centric period codes should be
numeric, in the format YYYYTT, and the codes must be constructed to
maintain the appropriate sequence of periods. Student centric period
codes are displayed in descending order, with the highest period shown
first.
Use Cycle Designators
Cycle designators are codes that reflect the cycle in which a student participates. These
cycles, along with groups of terms, are used to determine the student centric periods
associated with the student.
General Student Record
The Student Centric Cycle field in the General Learner block on the General Student
Form (SGASTDN) displays the cycle designator for the general student record. This value
cannot be updated if registration records exist for the term. It must be updated through the
Student Term window on SFAREGS. Other updates are allowed, but the user may receive
warning messages that the associated data already exists in academic history.
This field is populated with the student centric period cycle designator when the general
student record is created for a term for the primary curriculum during the admissions
process or when the baseline quick admit process is completed and the decision is
selected. The cycle designator identifies the student centric cycle by term in which the
student is included. The value used is based on the rules set up for the term on the
Student Centric Period Term Control Form (SOASCPT). When a cycle designator exists
for the general student record that is created, that current cycle designator is used, and a
new cycle designator is not calculated for the record.
The SGVCCUR, SGVSTDN, and SGVTEND Banner views use the student centric period
cycle data.
Registration Record
The Student Centric Cycle field in the Student Term window on the Student Course
Registration Form (SFAREGS) displays the cycle designator for the registration record.
This value can be updated, but the user may receive warning messages that the
associated data already exists in academic history.

1291
Banner Student User Guide | Registration
The cycle designator on the general student record can be updated automatically for the
start term when the first registration enrollment occurs, where registration counts in
enrollment. The process checks whether the current cycle designator is different than the
one assigned at admissions. When it is different, a new general student record is created
with a new cycle designator. When it is the same, the process does not create a new
general student record or update the cycle designator. The cycle designator remains
unchanged for the effective general student record. This includes when the student has
existing registration enrollment records for any prior, current, or future term.
When a student has no other registration enrollment records for any term and is not
registering for courses for the admissions term from the primary curriculum of the effective
general student record, the cycle designator is updated to the one associated with the
enrollment term, and a new general student record is created for the effective term.
Cycle designators can be maintained over terms so you can review a history of prior
terms.
• When a cycle is changed for a current term, the cycle on the existing SBGSTDN record
is updated, such as a
Null cycle is changed to a cycle code value, or CYCLE1 is
changed to
CYCLE2.
• When a cycle is changed for a future term, a new effective term record is created on
SGASTDN.
• When a new general student record is created, the current cycle designator is copied
forward whether the record is created manually or by a batch process. The cycle
designator can be maintained on the new record.
• When the effective term is changed for the cycle designator, and the term does not
match any existing general student records, a new record is created for the term. The
data is copied forward, and the cycle designator can be maintained on the new record.
• When the student does not have a registration record for the term being updated, you
can change the cycle designator on SGASTDN or SFAREGS.
• When registration records exist, but no academic history records exist, you can only
change the cycle designator on SFAREGS.
• When an academic history term header record exists for the processing term or a future
term, or when transfer term GPA records exist for the processing term or a future term, a
warning message is displayed when you try to change the cycle designator on
SGASTDN or SFAREGS. This warning notifies the user that existing academic history
exists, and if the cycle designator is changed, the user may have additional updates to
perform in academic history.
Build Continuant Rules
The Continuant Student Centric Period Rule Form (SOACSCP) is used to view and
maintain continuant student centric period rules by term and student type. The keys to the
form are rule term and student type. This form uses the Continuant Student Centric
Periods Repeating Table (SORCSCP).
These rules are used to process student type updates for student centric periods. When a
cycle has been assigned to a student centric period, and that period is then assigned to a
term on SOACSCP, the cycle cannot be changed on the Student Centric Period Term

1292
Banner Student User Guide | Registration
Control Form (SOASCPT). When a term has been assigned to a student centric period,
and that period is then assigned to a student for the term header record, the term cannot
be removed from SOACSCP.
Continuant student centric period rules should be defined for all student types that are
updated by the Student Type Update Process (SHRTYPE). This includes student type
codes that have a different value in the Next Student Type field than in the Code field on
STVSTYP. Academic history must exist for a registered student in the period, in order for
the student type updates to occur when SHRTYPE is run.
The Continuant SCP Query Form (SOQCSCP) is used to query on continuant student
centric periods by student type. This form is accessed using a Count Query Hits function
from the Student Type field in the Key Block of SOACSCP or by using the Continuant
Student Centric Period Query (SOQCSCP) item on the Options Menu.
Build Time Status Rules
The Student Centric Time Status Rules Form (SFASTSR) is used to view and maintain
student centric period time status rules and time status levels associated with the rules.
This form uses the Student Centric Time Status Levels Table (SFRSTSL) and the Student
Centric Time Status Table (SFRSTST).
Rules are based on student centric periods rather than on terms. You can also query on
data elements within the rule. When a rule is created, you must associate a time status
level in order to save the record. Multiple levels can be associated with each rule and can
be changed as needed. The time status levels associated with each rule are displayed in
the Time Status Levels block as you scroll through the rules in the Student Centric Period
Time Status Rules block.
View Time Status History
The Student Centric Registration History Form (SFASCPR) is used to view a student’s
registration history and time status by student centric period. This form uses the Student
Centric Time Status History Table (SFRSTSH).
Records can be displayed by terms or student centric periods based on the data entered
in the Key Block, or you can enter the ID only and see all the records for the student.
Records are displayed in descending order by student centric period and term. You can
query on the fields in the Student Centric Registration block, such as performing a query
by CRN. The totals for credit hours, billing hours, and continuing education hours are
updated for each query. The totals are used to verify that the student has been enrolled for
sufficient credits within the student centric period to qualify for financial aid or defer
repayment of student loans.
Calculate Time Status
The Time Status Calculation Update Process (SFRTMST) calculates the student centric
period time status in addition to the existing term time status when the student has a cycle
designator in effect for the registration term and CRNs being processed. A new student
centric period time status history record is inserted in SFRSTSH if the time status for the
student centric period has changed since the last update. If the time status has not
changed, no additional record is created. When a student has a manually inserted time
status record, no additional time status record is inserted.

1293
Banner Student User Guide | Registration
The Calculate SCP Time Status parameter is used with student centric period processing.
This parameter is required. Enter
Y to calculate the student centric period time status for
students assigned to a cycle designator for the term being processed or
N to not calculate
the student centric period time status. The default is
N.
If the new student centric period time status is different from the previous one, and the
Run Mode parameter is set to
U, the new student centric period time status history record
will be inserted into the database.
You can enter a student centric time status record manually on the Student Centric
Registration History Form (SFASCPR). Time status can also be updated online using
SFAREGS and in Banner Student Self-Service registration. This is automatically activated
when the Calculate Time Status indicator is checked on SOATERM for the term in the
Key Block.
Track Student Centric Periods in Registration
The Student Centric Period Registration View (SFVSCPR) is used to track student centric
periods in student registration records. This Banner view processes data that includes
PIDM, student centric period, term, CRN, part-of-term, subject, course number, level,
course registration status, credit hours, billing hours, hours attended, time status hours,
grade, grade rolled indicator, and study path sequence number, and continuing education
hours. The view uses the PIDM and term to determine whether the student has a cycle
designator for the term on the general student record (SGBSTDN). If one exists, the
process checks SOASCPT to find the student centric period for the term and cycle.
The following columns are in this view:
SFVSCPR_PIDM
SFVSCPR_SCP
SFVSCPR_TERM_CODE
SFVSCPR_CRN
SFVSCPR_PTRM_CODE
SFVSCPR_SUBJ_CODE
SFVSCPR_CRSE_NUMB
SFVSCPR_LEVL_CODE
SFVSCPR_RSTS_CODE
SFVSCPR_CREDIT_HR
SFVSCPR_BILL_HR
SFVSCPR_ATTENDED_HR
SFVSCPR_TIME_STATUS_HR
SFVSCPR_GRDE_CODE
SFVSCPR_GRDE_ROLLED_IND
SFVSCPR_STSP_KEY_SEQUENCE
SFVSCPR_CEU_HR
SFVSCPR_NON_CEU_HR
Calculate Academic Standing
Academic standing calculates academic standing by student centric period for students
with an active student centric period for the term. The student is considered to have an

1294
Banner Student User Guide | Registration
active student centric period for the term when the Student Centric Period field on
SHAINST (or the column in the SHRTTRM table) has a valid value. The Academic
Difficulty Rules by Student Centric Period window on the Academic Standing Rules Form
(SHAACST) is used to maintain academic standing hours and GPA rules by student
centric period. This window uses the Student Centric Period Academic Standing Rules
Table (SHRASSR).
When academic standing is evaluated for the student for the final term of the student
centric period, the new standing is based on the institutional hours and GPA from all the
terms associated with the student centric period. When academic standing is evaluated for
the student for an earlier term in the student centric period, the most recent, previous
academic standing calculated before the student centric period will be assigned as the
new standing.
For a student, for all terms prior to the final term in a student centric period, the academic
standing is rolled forward from the student’s most recent term that is prior to the start of the
current student centric period. This permits registration restrictions and maximum hours
calculations to remain in effect throughout the student centric period.
When a student who has an active student centric period does not enroll in the final term
of the student centric period, and academic standing is calculated for the final term, the
student’s standing is evaluated based on the student centric period GPA totals, but the
academic standing is stored in the highest or maximum existing term header record for the
student centric period.
When a student does not have an active student centric period assigned, the existing
term-based rules from SHAACST are used for the evaluation of academic standing.
Two parameters on the Calculate Academic Standing Report (SHRASTD) are used with
student centric period processing.
• The Process by Student Period parameter is required. Enter Y to calculate the academic
standing for student centric periods or
N to not calculate the academic standing. The
default is
N.
• When this parameter is set to
Y, the process considers students who are assigned
to a cycle designator and student centric period using the rules for student centric
period academic standing processing.
• When this parameter is set to
Y, any students who are not assigned to a cycle
designator for the term are processed using baseline term academic standing
processing.
• When this parameter is set to
N, only baseline term academic standing processing
is performed.
• The SCPs to be Processed parameter is optional. Multiple values can be entered. Enter
the student centric periods to be processed. Values should be valid for the term entered
in the Term parameter. Valid values come from the Student Centric Period Term Control
Form (SOASCPT). When the Process by Student Period parameter is set to
Y, this
parameter must be entered.

1295
Banner Student User Guide | Registration
Calculate GPA
GPA processing can calculate a student’s GPA by student centric period for terms that are
part of a student centric period. When a student changes his cycle (either retroactively or
for the current, in-progress term), a warning is displayed that existing student centric
period records will be deleted, and the GPA needs to be recalculated.
When the cycle designator is changed on SGASTDN or SFAREGS after the student has
existing academic history records, the Cycle Designator does not agree with existing
Academic History message is displayed. When the student centric period value is entered,
altered, or deleted on SHAINST, the GPA and totals for the student centric period will be
automatically recalculated, and the GPA recalculation completed message is displayed.
A student centric GPA is stored by level and type. The types include Institutional (
I),
Transfer Credit (
T), and Overall (O). The transfer credit GPA is a combined GPA for all
transfer work within the student centric period. Even though transfer work has been
accepted for an effective term within the student centric period, it will only be included in
the GPA by student centric period if the student has an institutional academic history term
header record for that effective term.
The Calculate GPA Report (SHRCGPA) and the GPA Recalculation Report (SHRGPAC)
consider student centric periods when calculating the GPA for the student. When GPA
calculation is called by SHATRNS or SHATCKN, or when recalculation is performed on
SHAINST, the student's GPA will be calculated by student centric period, if the student
centric period data element in the academic history term header record has a student
centric period value.
Track Student Centric Periods in History
The term header record on SHRTTRM includes the student centric period for the student’s
academic history term. The grade roll process (SHKROLL) populates the term header
record (SHRTTRM) with the student centric period when the record is created during the
roll process. When a student has a cycle designator in effect for the term, the student
centric period associated with the process term and student's cycle designator will be
inserted into the SHRTTRM table. This take places when grades are rolled from the Class
Attendance Roster Form (SFAALST) or the Class Roster Form (SFASLST), or using the
Grade Roll Process (SHRROLL).
The student centric period can be viewed for the term header record on Term Course
Maintenance Form (SHAINST). The student centric period code can only be entered or
updated using a code that is valid for the term or is
Null. Validation takes place against
the rules on SOASCPT. If the student centric period is manually changed on SHAINST,
the GPA will be automatically recalculated so that all totals and GPAs for student centric
periods are adjusted to reflect the change.
The Term Sequence Course History Form (SHATERM) displays academic history by
student centric period. The Student Centric Term GPA and Course Detail Information
window is used to display student centric period hours and GPA totals, as well as
institutional and transfer course detail, for courses associated with a student centric
period. This window uses the Student Centric Period GPA Table (SHRSGPA). Academic
history information for the student is displayed for the term in the Key Block and other
terms in ascending order. If no term is entered, all academic history records with
associated student centric periods are displayed for the student.

1296
Banner Student User Guide | Registration
When you scroll through the student centric period records in the Student Centric Period
GPA block, the data in the bottom block of the window switches between the Transfer
Courses information and the Institutional Courses information. This window can be
accessed when the term header record (SHRTTRM) for the student has a student centric
period or cycle designator for the term in the Key Block.
Reporting
Reports and processes include student centric periods in the information that is processed
and the calculations that are performed.
Clearinghouse Extract
The Clearinghouse Extract Report (SFRNSLC) processes information based on terms
that are part of a student centric period. Data comes from the SFASTSR and SFASCPR
forms.
The Process by Student Period parameter is used with student centric period processing.
This parameter is required. Enter
Y to process student centric periods or N to not process
student centric periods. The default is
N.
Student Right to Know
The Student Right to Know Report (SGRKNOW) processes information based on terms
that are part of a student centric period.
The Process by Student Period parameter is used with student centric period processing.
This parameter is required. Enter
Y to process student centric periods for right to know
reporting or
N to not process student centric periods. The default is N.
Enrollment Verification
The Enrollment Verification Request (SFRENRL) processes information based on terms
that are part of student centric periods. Enrollment dates, attendance information,
enrollment history, and course summary information are printed as student centric period
data.
The Process by Student Period parameter is used with student centric period processing.
This parameter is required. Enter
Y to process enrollment by student centric periods or N
to not process enrollment by student centric periods. The default is
N.
IPEDS
IPEDS processing uses student centric periods. The Web upload files for the IPEDS
reports can process information based on terms that are part of a student centric period.
IPEDS Data Table (SHRIPDS)
The SHRIPDS table collects data for multiple terms when the Process by Student Period
parameter for the SHRIPDS process is set to
Y, and the PROCESSSCP rule on GTVSDAX

1297
Banner Student User Guide | Registration
is set to Y. The process reports any students registered in a term that is included in the
student centric period.
IPEDS File Generation Process (SHRIPDS)
The IPEDS File Generation Process (SHRIPDS) processes information based on terms
that are part of student centric periods.
The Process by Student Period parameter is used with student centric period processing.
This parameter is required. Enter
Y to include a student centric period in the process or N
to not include a student centric period. When the parameter is set to
N, existing term
processing is used. The default is
N.
SHRIPDS is run by term using the Process Term parameter. When the Process by Student
Period parameter is also used, the process checks the rules on SOASCPT to determine
which student centric period includes the value entered in the Process Term parameter as
the last term. All term codes that are part of the student centric period are considered, as
is the order in which the terms fall within the student centric period.
After the student centric period and the associated terms have been identified, each
student record that shows enrollment in any term in the student centric period is read for
reporting.
• If the student is registered in all terms of the student centric period, the following occurs:
• Enrollment hours are summed from all terms in the student centric period in which
the student is enrolled, using the existing rules in base SHRIPDS processing.
• Student centric period rules for time status are used and combine the enrollment
hours for all the terms in the student centric period.
• The general student record is used for the lowest term in the student centric period
in which the student has registration. The process reports the student’s class, type,
level, and category.
• Registration records for all terms in the student centric period are used to determine
remedial courses, foreign campus courses, off-campus courses, audit grade mode
courses, and audit registration status courses.
• Academic standing status rules are used. If the student is new, the system assumes
a standing of
00. For continuing students, the system pulls the standing from the
previous term's academic standing in the End of Term Academic Standing field in
the Term Header block on SHAINST. (If there is no standing, the system assumes
00.) If an override standing has been entered for the term on SGASTDN, the system
will use the override standing.
• If the student is not registered in all terms of the student centric period, the student's
registration records are reported for terms included in the student centric period using
these rules:
• The general student record is used for the lowest term in the student centric period
in which the student has a registration record. This determines time status, student
class, type, level, and category.
• Student registration records are used for all terms of the student centric period. This
determines remedial courses, foreign campus courses, off-campus courses, audit

1298
Banner Student User Guide | Registration
grade mode courses, and audit registration status courses. See the following
example.
A student is registered in a term that falls within a student centric period.
• Student centric period 2009A is composed of terms 200910 and 200920.
• The student is not included in the student centric period, but is registered in two
terms (terms 200910 and 200930), and term 200910 is included in student centric
period 2009A.
• Registration is reported for term 200910, because term 200910 is included in
student centric period 2009A.
• Registration in term 200930 is not reported, because term 200930 is not included in
student centric period 2009A.
IPEDS Total Activity Report (SHRIACT)
You can enter multiple values in the Effective Terms of Fall Cohort parameter and the
Retention Terms of Fall Cohort parameter. This allows your institution to process multiple
effective terms and multiple retention terms by student centric period.
Graduation Rate Survey Report (SHRIGRS)
The term parameters on this report can be used with student centric periods.
• Start Term parameter
Enter the minimum start term of the student centric period to be processed.
• End Term parameter
Enter the maximum end term of the student centric period to be processed.
• Enrollment Terms parameter
The maximum enrollment term is used to select students to be reported for the student
centric period. Students enrolled in any terms up to the maximum enrollment term will be
reported.
Printed Transcripts
The Academic Transcript (SHRTRTC) displays course history information and GPA totals
by term within student centric periods. All terms with a specific student centric period on
the term header record (SHRTTRM) are grouped between a student centric header line
and student centric GPA statistics section on the report output. This allows an institution to
provide totals for both the student centric period and terms within the student centric
period.
The Student Centric Period Statistics checkbox on the Transcript Type Rules Form
(SHATPRT) is used to include student centric period GPA information on the transcript for
the last term in the student centric period. This information appears on the paper transcript
and the Banner Student Self-Service transcript.

1299
Banner Student User Guide | Registration
Self-Service Transcripts
The Academic Transcript (bwskotrn.P_ViewTran) in Banner Student Self-Service
displays course history information and GPA totals by student centric period for students
included in student centric periods when the Student Centric Period Statistics checkbox
is checked on SHATPRT.
XML Transcripts
The PESC/XML Transcript Export Process (SHRPESE) can display courses and GPAs by
student centric period without term details in the
.xml output.
The student centric period is displayed as one continuous enrollment period that is not
broken up by the terms contained in the student centric period. The term header is not
displayed on the XML transcript for student centric periods. Terms are grouped within the
student centric period for the student. After the last term with a student centric period has
been printed, intervening terms without student centric periods are printed.
A term that is not associated with a student centric period is displayed chronologically in
the
.xml file after the end of the student centric period (which starts before that term
begins) and the start of the next student centric period. For example, an intersession
which is not part of a student centric period, which falls between the two terms that make
up the student centric period, will be printed after that student centric period.
The student centric period data is substituted for the term data when the Student Centric
Period Statistics checkbox is checked (set to
Y) on SHATPRT. When the Student
Centric Period Statistics checkbox is unchecked (set to
N), data is processed using
standard term functionality.
The XML transcript reports data in three scenarios when the Student Centric Period
Statistics checkbox is checked.
• When all of a student's coursework belongs to a student centric period, data is reported
by student centric period for all of the student’s enrollment and/or academic history
records.
• When some of a student's coursework belongs to a student centric period and some
coursework does not belong to a student centric period, data is reported by student
centric period and by standard terms (presented as if the term is a student centric
period) for the student’s enrollment and/or academic history records.
• When none of a student's coursework belongs to a student centric period and no
student centric period exists, data is reported by standard terms (presented as if the
term is a student centric period) for the student’s enrollment and/or academic history
records.
Note: When the Student Centric Period Statistics checkbox is checked
(set to
Y) on SHATPRT, all information is presented as if it belongs to a
student centric period header. Data is displayed as being in a “period”.
However, the data may actually reflect term data when student centric
periods are not in use or when the term does not have an associated
student centric period.

1300
Banner Student User Guide | Registration
The process checks the term header record (SHRTTRM) for each term in the student’s
academic history. When the
SHRTTRM_SCPS_CODE is Null for a term, the student
does not have a student centric period associated with that term. In this case, the standard
term information is displayed on the transcript for the academic history information.
When a student has a registration record for a term but no term header record exists, the
student centric period to which that term is associated is determined by:
• finding the general student record (SGBSTDN) that is active for the registration term
• using the student centric period cycle code (SGBSTDN_SCPC_CODE) from that record
• finding the record for that registration term in the SORSCPT table where:
• that registration term matches the
SORSCPT_TERM_CODE
• the cycle code (SGBSTDN_SCPC_CODE) from the SGBSTDN table matches the
cycle code (
SOBSCPS_SCPC_CODE) in the SOBSCPS table
• the student centric period code from the SOBSCPS table matches the student
centric period code from the SORSCPT table
When the
SHRTTRM_SCPS_CODE has a student centric period value for the term, that
code is used to group the terms that belong to each student centric period. It also
populates the Academic Session data on the transcript. The GPA totals and GPA
information for the student centric period are used to populate the Academic Summary
data on the transcript. Data for standard term information for the Academic Session and
Academic Summary comes from SHRTGPA.
When the student centric period is in effect for the term and student:
• Term comments for all terms are grouped together.
• The major that is effective for the first term of the student centric period is used.
• Term statistics data comes from SHRSGPA.
• Academic standing by term data comes from the highest term header record in the
student centric period.
• In-progress courses are listed at the end with the associated student centric period.
• Coursework from academic history is displayed for the associated student centric
period.
Transfer coursework is not associated with a student centric period. Transfer credit is
displayed at the beginning of the transcript based on the transfer attendance period
entered on SHATRNS.
Student Type Updates
The Student Type Update Process (SHRTYPE) includes student centric periods in the
update processing. This allows you to update student type based on a student’s
enrollment in a student centric period, instead of enrollment by term. The student type in
effect on the student general record (SBGSTDN) for the first term in the student centric
period will be used for reporting for the duration of the student centric period.

1301
Banner Student User Guide | Registration
The Process by Student Period parameter is used with student centric period processing.
This parameter is optional. Enter Y to use student centric period rules when determining
the student type or
N to not use student centric period rules. The default is N.
• When this parameter is set to Y and the student has a cycle designator (general student
record) or student centric period (academic history record) in effect for the update term,
the SOACSCP rules are used to evaluate whether the student type should be updated
to the next student type defined on STVSTYP.
• When this parameter is set to Y and the student does not have a cycle designator or
student centric period in effect for the update term, the SOACTRM rules are used to
evaluate whether the student type should be updated to the next student type defined
on STVSTYP.
• When this parameter is set to N, the current SOACTRM rules are used, even if the
student has a cycle designator or student centric period in effect for the update term.
Gainful Employment Reporting
Gainful employment reporting is used with Banner Student and Banner Accounts
Receivable. You do not need to have Banner Financial Aid installed to use gainful
employment processing.
Federal regulations require that all institutions publicize data about gainful employment
repayment rates and debt-to-earnings ratios for students who have completed certain
types of educational programs deemed to be “gainful employment” courses of study. In
addition, every school must submit a data file annually to the National Student Loan Data
System (NSLDS) that reports the students who were enrolled in a program deemed to be
a “gainful employment” program. The report must contain information about the students’
indebtedness and enrollment status in the gainful employment program.
For more information about this reporting requirement, please refer to the following
website:
http://ifap.ed.gov/GainfulEmploymentInfo/indexV2.html
A report is used to submit this data to the National Student Loan Data System (NSLDS)
and the National Student Clearinghouse (NSC). Rules forms are used to: allow institutions
to determine what defines a gainful employment program at their own institution based on
Banner curriculum elements, define the detail codes for the financial data required for
students who have completed or withdrawn from the gainful employment program, track
books, supplies, and equipment allowances, and define the OPEID rules used for each
student record that is reported. The reporting process provides the data required in the
formats specified and permits institutions to acknowledge and respond to the NSLDS with
the corrected data based upon the errors that NSLDS reports back to the institution.
Warning! Gainful employment reporting is by Federal mandate.
Institutions who do not report this data may jeopardize their Title IV
eligibility.
The NSLDS will return a file with error messages after the initial submittal of the gainful
employment report. This file can be uploaded to Banner and matched on Banner records
so that errors can be found and corrections made. The corrected file can then be

1302
Banner Student User Guide | Registration
resubmitted to the NSLDS. Parameters have been added to process the error report,
match records in Banner, and then resubmit the corrected records.
Banner Forms
The following forms are used with gainful employment processing:
• Gainful Employment Program Rules Form (SFAGECR)
• Gainful Employment File Maintenance Form (SFAGEFM)
See the Banner Student Online Help for form details and field descriptions.
Gainful Employment Program Rules Form (SFAGECR)
The form is used to build rules for use with gainful employment reporting.
• Curriculum rules can be created and maintained for gainful employment programs.
Students enrolled in an aid year who have qualifying curriculum elements are reported.
You do not need to use all four curriculum elements with a rule.
• Detail code rules are used with gainful employment reporting and can be set up for Title
IV aid, private loans, institutional debt, tuition and fees, and books, supplies, and
equipment.
• Aid year budget component codes and period budget component codes from Banner
Financial Aid are used for books, supplies, and equipment with detail code rules.
• Office of Postsecondary Education Identifier (OPEID) rules are used with gainful
employment reporting and apply to campus codes.
Matching rules
When rules are matched to students, the highest rule weight is applied first, and then the
highest program length is applied within that group of rules.
The curriculum elements (major, degree, level, and program) are totaled and matched to a
student curriculum. Each element is worth one point. The from and to terms are also
considered and are worth one point each. The rule with the most number of matching
elements (highest rule weight) is selected. When multiple rules exist that match equally,
the rule with the highest program length is selected.
For example, a student has the following data for a gainful employment program.
There are two rules on SFAGECR that the student could potentially match.
Program Major Degree Level
CERT - ART ART CERT UG

1303
Banner Student User Guide | Registration
Rule 1
Rule 2
Because the first rule only has one matching element, and the second rule has three
matching elements, the second rule has the highest weight and is selected as the
matching rule.
Curricula Block
Use the Curricula block to enter and maintain the curriculum rules for the gainful
employment program. Students enrolled in an aid year who have qualifying curriculum
elements are reported. You do not need to use all four curriculum elements with a rule.
Data in this block comes from the SFRGECR table.
Rules include major, CIP code, degree, level, program, from term, to term, program
length, program length measurement, and credential level. A student with a curriculum
record that matches the major/level/degree/program combination in the rule will be
selected by the report process.
Rules must be established beginning with the first term the gainful employment program
was offered at your institution, not just from the term of the first aid year to be reported.
This allows the correct checking to occur for the details needed in the report records.
When rules are matched to students, the highest rule weight is applied first, and then the
highest program length is applied within that group of rules. The curriculum elements
(major, degree, level, and program) are totaled and matched to a student curriculum. Each
element is worth one point. The from and to terms are also considered and are worth one
point each. The rule with the most number of matching elements (highest rule weight) is
selected. When multiple rules exist that match equally, the rule with the highest program
length is selected.
Detail Codes Window
This window is used to build detail codes rules for use with gainful employment reporting
that apply to Title IV aid, private loans, institutional debt, tuition and fees, and books,
supplies, and equipment. You can insert any detail code or combination of detail codes
that correspond to these categories. You can define a detail code with a different term
range, as long as the terms do not overlap.
Program Major Degree Level
Null ART Null Null
Program Major Degree Level
CERT - ART ART CERT Null

1304
Banner Student User Guide | Registration
When entering rules for what is to be considered institutional debt, include all detail codes
that designate an outstanding obligation to the institution, such as institutional financing
plans, institutional loans, payment plans, parking tickets, library fees, and so on, if those
amounts need to be processed by the report. The report calculates what is owed by the
student at the time of completion of or withdrawal from the gainful employment program.
For each detail code record, the institution can state that the detail code should be used in
any one or more of these categories for the summation process in the SFRGEED report.
Do not include detail codes that designate Title IV student aid that is owed.
When a detail code record is inserted, the Charge or Payment field displays the current
detail code type from TSADETC. When the detail code type is updated (payment to
charge or charge to payment) after the record has been saved, the existing records are
not automatically updated. Any new record entered uses the current detail code type from
TSADETC.
Note: For institutions using the Automated Return to Lender Process, the
detail codes used for
Student Charge or Payment on the Loan
Options Form (RPRLOPT) in Banner Financial Aid must be used on
SFAGECR.
Detail codes for
Return Payment or Return Refund should
not be used on SFAGECR.
Detail codes should be defined for books, supplies, and equipment charges, so the total
for the student enrollment in the gainful employment program is compared to the sum of
the budget component amounts. The higher amount of the two totals is reported as the
allowance for books, supplies, and equipment.
Books/Supplies/Equipment Allowance Window
This window contains two blocks for component codes used with books, supplies, and
equipment. Component codes come from Banner Financial Aid. This window is not
enabled when Banner Financial Aid is not in use.
• The Aid Year Budget block is used to enter aid year budget component codes from the
Budget Component Validation Form (RTVCOMP).
• The Period Budget block is used to enter period budget component codes from the
Period Budget Component Validation Form (RTVPBCP).
OPEID Window
This window is used to build Office of Postsecondary Education Identifier (OPEID) rules
for use with gainful employment reporting. You can enter your applicable OPEIDs and
OPEID branches as they apply to each campus code (STVCAMP). All institutions must
use this window for the gainful employment reporting process, as the process points to the
SFRGEOR table. It does not point to the ROBINST table in Banner Financial Aid.
If an institutional default OPEID rule is not defined for a term on this form, the eight-digit
OPEID/branch code from the OPEID or Third Party Code parameter (SFRGEED) will be
used for the OPEID/branch code in the students applicable detail record(s). If the OPEID
or Third Party Code parameter is not used when SFRGEED is run, then the detail records

1305
Banner Student User Guide | Registration
which do not have an OPEID number will be returned with an error when submitted.
Therefore, you need to make sure that all terms for gainful employment programs have an
OPEID defined.
You can create an institutional default OPEID rule for a term range when no campus code
exists. You can use the same OPEID number and branch code for multiple campuses
within the same term range.
If you have entered an OPEID number and an OPEID branch code with a range that has
expired, you need to ensure that another valid range is defined for the next term going
forward. Here are two examples.
• Example 1:
• 123456-01, 200610 – 200710 as institutional default
• 234567-01, 200730 – 999999 as institutional default
If reporting for term 200730, this would cause a student who does not have a campus
code on SGASTDN to fail for the report, since no institutional default was defined for
the 200710 to 200730 range.
• Example 2:
• 001001-01, 100, 200610 – 200710
• 001001-01, 100, 200730 – 999999
• If reporting for term 200720, this would cause a student who has campus code 100
to fail, since no OPEID was defined for the 200710 to 2000730 range.
Gainful Employment File Maintenance Form (SFAGEFM)
This form is used to review SFRGEED output and modify the data before the gainful
employment file is submitted for reporting. Records can be added, updated, or deleted.
System and manual indicators are used to designate how the data was generated. When
Banner Financial Aid is not in use, values should be inserted for books, supplies, and
equipment.
Use the Key Block to enter the aid year, batch ID, or student ID for which you wish to
review SFRGEED data. You must enter at least one of these data items, but you can enter
any combination of these values to retrieve matching records. Use the Data block to
review the student information, program details, and loan amounts.
When a record is created or updated, the following fields in the Data block cannot be left
Null.
• Aid Year
• Batch ID
• SSN
• First Name
• Last Name
• Birthdate

1306
Banner Student User Guide | Registration
• OPEID
• Program Name
• CIPC
• Program Length
• Program Measurement
• Credential Level
• Medical/Dental
• Attendance Begin Date
• Attendance Begin Date Award Year
• Attendance Status Award Year
• Attendance Status Date
• Enrollment Status
Banner Reports
The following reports are used with gainful employment processing.
See the "Registration Reports" chapter in the Banner Student Reports Handbook for more
information on report parameters and output samples.
Gainful Employment Submittal Report (SFRGEED)
This report is used to retrieve data for gainful employment reporting based on processing
rules. All current and active, and non-current and active gainful employment programs are
reported for students for the aid year being processed. Data is selected for students
enrolled in terms where the aid year for that term (
STVTERM_FA_PROC_YR) matches
the aid year in the report parameter. The process reports one aid year at a time and
determines which terms are included in the aid year being reported. The report retrieves
only students who have received Title IV financial aid as defined on SFAGECR in the
Detail Codes window. Institutional debt that is greater than $0 (zero) is reported.
Population selection is used to retrieve a list of students from SFBETRM for the aid year.
The OPEID number and branch code are used in the header and trailer records on the
report for the NSC.
Students must have current and active curriculum records where the gainful employment
settings for level, degree, and/or major codes indicate they are in a gainful employment
program. The credential level is selected from SFRGECR using the gainful employment
program that is being reported. The gainful employment program length and program
length type from SFAGECR are reported.
The student’s enrollment status as of the first day of enrollment in a gainful employment
program is reported as: Full-Time, Three-Quarter Time, Half-Time, or Less Than Half-
Time. The report can also process the first time enrollment status by student centric

1307
Banner Student User Guide | Registration
period. The attendance status value of G is used for students that have completed the
gainful employment program and/or graduated during the award year.
The total cost for books, supplies, and equipment is reported. The actual charges
assessed for the student enrollment in the gainful employment program are compared to
the sum of the budget component amounts from the Cost of Attendance (COA). The
higher amount of the two totals is reported as the allowance for books, supplies, and
equipment.
The process produces a report that can be submitted to the NSLDS and the NSC. The
submittal report uses two file layouts, fixed width (
.dat) and comma separated values
(
.csv). The process also populates the Gainful Employment File Maintenance Table
(SFRGEFM) with data or creates the submittal file using the data from the table. The
Gainful Employment File Maintenance Form (SFAGEFM) is used to review original
calculations for the SFRGEED output, before changes are made for file submission.
When SFRGEED is run with the File Export Type parameter set to
T, the output data is
sent to the Gainful Employment File Maintenance Table (SFRGEFM). You can use the
SFAGEFM form to adjust the data prior to submitting the official report. Once the report
has been run with the File Export Type parameter set to
T, it can then be run using the
batch ID in the Batch ID parameter and with the File Export Type parameter set to
F (fixed
width format) or
C (comma separated format).
SFRGEED can also read an error acknowledgment file in fixed width (
.dat) or comma
separated values (
.csv) format and display data in a readable format in the .lis output
file. You can generate a resubmittal file from the error acknowledgment file, so the
submittal is only for those students with errors. File codes, error codes, and messages
provided by the NSLDS are used with the error acknowledgment file. Processing can
perform matches on SSN or SSN and last name. Records that do not have a match in
Banner are printed separately on the output file.
Gainful Employment Purge Process (SFPGEED)
This purge process is used to remove the records from the Gainful Employment File
Maintenance Table (SFRGEFM) for an aid year and/or a batch ID. Run the process in
Audit mode to check the data to be purged and Update mode to update the database.
Setup Steps
Use the following steps to implement gainful employment processing.
1. Check that the following data exists in Banner.
1.1. All students to be processed for reporting must have SSNs on SPBPERS.
If SSNs do not exist, the students will not be reported.
1.2. Curriculum rules should be set up for curriculum records.
1.3. All majors to be processed for reporting must have CIP codes on STVMAJR,
even if you are not using a major code as part of the gainful employment criteria
on the SFAGECR form.

1308
Banner Student User Guide | Registration
If CIP codes do not exist for the major, the records will be returned as errors by
the NSLDS.
1.4. To report a student as “graduated”, the graduation term and a status that
indicates the degree has been awarded must be populated in a degree record,
where the current and active curriculum has the same major as the curriculum
for the gainful employment program being reported.
1.5. If the student has completed the gainful employment program within the aid
year being processed, the term code for the graduation term on SHADEGR
must have the correct financial aid processing year
(
STVTERM_FA_PROC_YR).
1.6. To report a student as enrolled, the term in which the gainful employment
curriculum is current and active must have an enrollment status that is counted
in headcount (Affect Headcount is checked on STVESTS), and the student
must have at least one registration record where the registration status is
counted in enrollment (Count in Enrollment is checked on STVRSTS).
1.7. To report a student as withdrawn, the term in which the gainful employment
curriculum is current and active must have an enrollment status with the Third
Party Withdrawal Indicator checked on STVESTS.
2. Build curriculum rules for gainful employment in the Curricula block of the Gainful
Employment Program Rules Form (SFAGECR).
3. Build detail code rules for gainful employment in the Detail Codes window of
SFAGECR.
4. Enter component codes in the Books/Supplies/Equipment Allowance window on
SFAGECR when Banner Financial Aid is used.
4.1. Enter aid year component codes in the Aid Year Budget block.
4.2. Enter period budget component codes in the Period Budget block.
5. Build OPEID rules for gainful employment in the OPEID window on SFAGECR.
6. (Optional) Set up student attribute codes on STVATTS.
Create student attribute codes for medical or dental internships or residency
programs.
7. Run the Gainful Employment Submittal Report (SFRGEED).
7.1. Enter values in the Aid Year Code, GE File Type, and File Export Type
parameters.
7.2. Enter the STVATTS code(s) in the Medical Residency Attribute parameter to
designate that a student is in a medical or dental internship or a residency
program.
7.3. If you are submitting a file to the NSC, enter a value in the OPEID or Third Party
Code parameter.
7.4. Use the population selection parameters if you are running the report against a
segment of your student population.
8. Review the output in the Gainful Employment File Maintenance Table (SFRGEFM)
and make adjustments on the Gainful Employment File Maintenance Form
(SFAGEFM) before the file is submitted.

1309
Banner Student User Guide | Registration
This can be done when the File Export Type parameter is set to T.
9. Complete the proper setup with the NSLDS before the report is submitted.
9.1. Check that a designated person at the institution has online access to the
NSLDS.
9.2. Log into the NSLDSFAP website.
9.3. Access the GE Enrollment Reporting List page under the Enroll tab.
9.4. Identify the proper TG mailbox the submission will be sent from.
The TG mailbox listed can be:
– one that is attached to an individual at the institution
– one that your school currently uses for NSLDS batch processes
– for a servicer that will be providing the data for your institution
The servicer is required when the NSC is used for submittals on behalf of your
institution.
Check with your IT department and/or Data Point Administrator (DPA) if you are
not sure which TG mailbox to use.
10. (Optional) Run the Gainful Employment Purge Process (SFPGEED) for an aid year
and/or a batch ID to remove the records from the Gainful Employment File
Maintenance Table (SFRGEFM).
Processing
The Gainful Employment Submittal Report (SFRGEED) is used to retrieve data for gainful
employment reporting based on processing rules. The report looks at all gainful
employment programs and not just the program for the primary curriculum. Data is
selected for students enrolled in terms where the aid year for that term matches the aid
year in the report parameter. The process reports one aid year at a time and determines
which terms are included in the aid year being reported. Data is collected based on the
SFAGECR curriculum rules and the student’s enrollment status. The report processes
records using SFAGECR detail code rules and OPEID rules, as well as the values entered
in the SFRGEED parameters.
The attendance status is reported as
G when the student has completed the gainful
employment program and has met all the academic requirements, whether the student
has graduated or not. The process looks at the awarded degree for the student.
The program attendance begin date is the start date of the term from the earliest learner
record with a corresponding major (SOVLFOS) that matches the SORLFOS record being
processed. Additionally the STVACAT code of the earliest learner record must match the
STVACAT code of the parent learner record for the SORLFOS record being processed.
Note: The earliest learner record for the gainful employment program will
be used for processing even if the student was not enrolled. The General
Student Purge (SGPSTDN) can be used to remove these older learner
records when the student was not enrolled.

1310
Banner Student User Guide | Registration
The program attendance begin date for the award year is reported using the STVTERM
start date for the earliest term in which the student was enrolled in the gainful employment
program within the specified award year.
Office of Postsecondary Education Identifier (OPEID) Number
The Office of Postsecondary Education Identifier (OPEID) number must be all numeric
and a valid OPE institution code from the NSLDS. This is an eight-digit number that is a
combination of two separate codes. The first six digits of the number identify the
institution. The last two digits identify the specific location or branch where the student
attended the education program being reported.
You can define the OPEID rules used with gainful employment reporting on SFAGECR).
Rules can be set as institutional defaults. One institutional default rule can be created for
students whose curriculum records do not have associated campus codes.
If no rule exists for a term range and there is no default value, the report uses the value in
the OPEID or Third Party Code parameter for SFRGEED, if one is entered.
Official Institution Name
The official name of the institution (from the Department of Education's ECAR) where the
student attends the program is reported. This is derived from the Installation Controls
Form (GUAINST).
Aid Year
The NSLDS requires that “Institutions must report information on an Award Year basis.”
For the purposes of this document and gainful employment processing, the term “aid year”
is used in place of “award year.”
The report processes records for any terms that comprise the aid year to be reported.
Since an aid year can be made up of multiple terms, a student may be reported several
times. The NSLDS award year is determined by the value entered in the Aid Year Code
parameter for SFRGEED. It is matched against term codes that have the same value in
the
STVTERM_FA_PROC_YR field. Completions are reported only for the aid year being
processed.
Aid year start and end dates are calculated based on the aid year code for which the
report is run. For example, when the value entered in the Aid Year parameter is 1415, the
start date is calculated by the process as 01-July-2014, and the end date is calculated as
30-June-2015. Or if the value entered in the Aid Year parameter is 1516, the start date is
calculated by the process as 01-July-2015, and the end date is calculated as 30-June-
2016.
Title IV Aid
Institutions must only report data for students in gainful employment programs who have
received Title IV aid while in those programs. Here are some specific scenarios.
• Students are reported beginning with the award year in which they first received Title IV
aid for the gainful employment program.

1311
Banner Student User Guide | Registration
• When a student is enrolled in a gainful employment program that crosses from one aid
year into another, the student is reported in both of the aid year gainful employment files.
• When a student receives Title IV aid in his/her first term of the gainful employment
program, that student will continue to be reported until he/she withdraws or graduates
from that program.
• When a student receives Title IV aid while in a non-gainful employment program during
his/her first term, and then changes to a gainful employment program in his/her second
term but does not receive Title IV aid, the student is not reported, as he/she did not
receive aid while in the gainful employment program.
• When a student receives Title IV aid while in a non-gainful employment program during
his/her first aid year, and then changes to a gainful employment program during the
second aid year but does not receive Title IV aid, the student is not reported, as he/she
did not receive aid while in the gainful employment program.
• When a student graduates from a gainful employment program, but he /she was not
enrolled in the program during that aid year, the student is still reported as graduated.
Students who have received Federal Work Study (FWS) only, Supplemental Educational
Opportunity Grant (SEOG) only, or who have received only FWS and SEOG should not be
reported. Detail codes for these options should not be set up on SFAGECR.
Processing does the following:
1. Students are retrieved for the financial aid year.
2. Programs for those students are retrieved, and checks are made for gainful
employment programs.
3. When a gainful employment program is found, the start term is selected.
The end term is also selected based on the maximum term for the aid year for which
the report is being run.
4. The student’s TBRACCD record is checked for a detail code that qualifies as Title IV
aid. (The
SFRGEDR_DETAIL_TITLEIV_AID_IND is Y.)
5. When a record for Title IV aid is found, and the student's total disbursement is greater
than $0, the student is reported.
Or, the student’s next program is checked.
6. When all the programs for a student have been checked, the process moves on to the
next student and repeats the checks.
Here are examples of how the Title IV aid is considered during processing.
Example 1
A student is in a gainful employment program for the 2014-2015 award year and
receives Title IV aid. The student would be included on the report for that award year.
The same student is in the same gainful employment program in the 2015-2016
award year and does not receive Title IV aid. The student would be included on the
report for that award year because they had previously received Title IV aid for the
gainful employment program.

1312
Banner Student User Guide | Registration
Example 2
A student is in a gainful employment program for the 2014-2015 award year and does
not receive Title IV aid. The student would not be included on the report for that award
year.
The same student is in the same gainful employment program for the 2015-2016
award year and does receive Title IV aid. The student would be included on the report
for that award year.
Programs Reported
Programs that are active as of July 1, 2015 should be included in reporting. Active and
inactive programs are reported based on settings on SFAGECR.
• When a program has been discontinued, and a student is still actively enrolled but has
not completed the program as of July 1, 2015, that student needs to be reported back to
reporting year 2008-2009, or back to reporting year or 2007- 2008 for students in a
medical or dental residency or internship.
• When a program has been discontinued, and no students are active in that program
between July 1, 2012 and July 1, 2015, the program is still reported.
Note: A student who received Title IV aid only in the 07-08 award year or
a prior award year and did not receive Title IV aid in any subsequent year
is not included in the gainful employment report. If a student was in a
summer term that crossed aid years, and he/she was enrolled as of July
1, 2008 and did receive Title IV aid, that student is included in the report.
The length and length type of the gainful employment program in which the student is
enrolled for the award year are reported in weeks, months, or years.
When two programs are taken concurrently, they are reported based on comparing the
OPEID, CIP code, credential level and program length. If any of those items is different
between the two programs, the programs are considered as separate programs. For
example, a student is in two gainful employment programs, both with the same OPEID,
CIP code, and credential level. The first program is one year in length, and the second
program is two years in length. Each program is reported separately because the program
lengths are different.
All gainful employment programs are reported, including current and active, and non-
current and active. Therefore, a student could be listed multiple times in the report.
(Previously, only the primary curriculum was reported.) Programs with the same OPEID,
CIP code, credential level, and program length are treated as one gainful employment
program to avoid reporting duplicate records.
Medical or Dental Internship or Residency Program
Medical or dental internship/residency training programs require specific degrees or
certificates of post-graduate training and must be completed for the student to be licensed
by the state and board certified. Banner does not track medical or dental internship/
residency training programs on curriculum records. Therefore, the student must be
defined as a participant in one of these programs, in order to be associated with a gainful
employment curriculum in this specialized set of programs.

1313
Banner Student User Guide | Registration
A student attribute can be used to indicate the student should be considered to be enrolled
in a program that is a medical or dental internship/residency or is post-doctoral. If this
attribute is entered for the student, any gainful employment program reported for that
student will be flagged as medical or dental internship or residency for the term ranges
that the attribute is in effect.
Enter attributes for medical or dental internship/residency on STVATTS for use with
SFRGEED. The attribute code must exist for the student in the Attribute block of
SGASADD and must be effective for the term or terms in which the student is enrolled in a
gainful employment program.
For a student to have the Medical/Dental indicator checked on SFAGEFM, two conditions
must be true:
• The student must be enrolled in a program that has a credential level of 06, 07, or 08.
• The student must have an attribute for the period in question that matches one of the
attributes supplied to SFRGEED in the Medical Dental Attribute parameter.
The report uses the Medical Dental Attribute parameter to define a student attribute for
medical or dental internship or residency program. Multiple values can be entered. The
process indicates whether or not the student being reported in any gainful employment
program is a medical or dental internship/residency student in the Medical or Dental
Internship or Residency Program field (
Y or N).
Population Selection
Population selection parameters are used with the report and provide the following
reporting abilities:
• Segments of the university that use different OPEIDs can be reported individually.
• Reporting schedules may vary based on when degrees are completed. This can be
accommodated by allowing reporting to occur after degree records have been updated
in different parts of the institution.
• Foreign institutions can select only the students who are eligible to be reported.
Student Selection
Students must have current and active curriculum records where the gainful employment
settings for program, level, degree, and/or major codes indicate they are in a gainful
employment program. CIP codes must exist for the majors to be reported, or the record
will be returned by NSLDS with errors. Curriculum rules for gainful employment are
defined on the Gainful Employment Program Rules Form (SFAGECR).
Other data associated with the student such as biographical information, enrollment status
and dates, credential level, and financial information is collected for each unique student
and curriculum combination.
Gainful employment enrollment and financial aid data is reported based on the student’s
curriculum. A student may be enrolled in more than one gainful employment curriculum
that is current and active in a given aid year. A student in this situation will be reported for
each gainful employment curriculum within the aid year. A change in a gainful employment
program is determined by a change in the major code.

1314
Banner Student User Guide | Registration
Note: Enrollment at other institutions is not reported.
SSN, Name, and Birth Date Information
The report provides the SSN (SPBPERS_SSN for the PIDM) of the student enrolled in a
gainful employment program, as well as the first name, middle name, last name, and date
of birth. The date of birth is displayed in CCYYMMDD format (century, year, month, day). If
a student’s birth date is not known, the field contains
19000101. If no SSN exists for the
student, that student is not included in the report.
CIP Code
The process displays the classification of instructional program (CIP) code for the program
(major) in which the student was enrolled during the aid year. This is a six-digit code
assigned by the academic offices at the institution. The process reports on the curriculum
data (SORLCUR table) and major data (SORLFOS table).
Credential Levels
Credential levels are selected from SFRGECR using the gainful employment program that
is being reported. Credential levels are no longer mapped to the degree level of the
degree code for the curriculum being reported.
Enrollment Status
The enrollment status for the student is reported as of the first day of enrollment in the
gainful employment program. The earliest calculated time status from the Student
Enrollment Time Status History Table
(SFRTHST) that is active on the first day of the term
during which the student was enrolled in the gainful employment program is used. When
student centric periods are in use and the Process by Student Period parameter on
SFRGEED is set to
Y, the time status from SFRSTSH is used. When a student does not
have a time status, the report displays a Null enrollment status.
Example
The student is enrolled in a gainful employment program for term 201482, fall 2014,
beginning September 1, 2014.
The student registers for courses on July 1, 2014, at half time status.
The student changes the registration on September 1, 2014, to full time status.
SFRTHST has two time status records for the student:
• FT 01-SEP-14
• HT 01-JUL-14
The full time status would be reported, as that is earliest calculated status as of the
first day in the gainful employment program.

1315
Banner Student User Guide | Registration
Attendance Status
The program displays the attendance status of the student in the program. Statuses are E,
W, or G. The process finds all terms with the same Financial Aid Process Year value on
STVTERM that matches the aid year entered in the Aid Year Code parameter. In the terms
to be included, the process finds students with current and active curriculum records for
gainful employment programs, based on the rules on SFAGECR.
• E - An SFBETRM record exists for the terms in the aid year.
• For the term in the aid year, the
SFBETRM_ESTS_CODE for the student has the
Affect Headcount indicator checked on STVESTS.
• For the term in the aid year, the
SFBETRM_ESTS_CODE for the student has the
Third Party Withdrawal indicator unchecked on STVESTS.
• For the student to be considered as enrolled, at least one record must exist on
SFRSTCR where the Count in Enrollment indicator is checked for the registration
status code on STVRSTS.
• W - An SFBETRM record exists for the terms in the aid year.
• For the term in the aid year, the
SFBETRM_ESTS_CODE for the student has the
Third Party Withdrawal indicator checked on STVESTS.
• When the Third Party Withdrawal indicator is checked on STVESTS, the process
does not check SFRSCTR for records where the registration status code on
STVRSTS has the Withdrawal Indicator checked or the Count In Enrollment
indicator checked.
• G - An SHRDGMR record exists where:
• The curriculum on the degree record in academic history matches the gainful
employment program being checked.
• The outcome status code has the Awarded Indicator set to Awarded on
STVDEGS.
• The graduation term is a term within the aid year being reported.
The graduation date is reported but the process does not calculate completion based
on graduation dates. It uses the term code to determine that the curriculum was
completed within the aid year being processed.
Attendance Status Dates
The process displays two attendance status dates, “Date student began enrollment in the
educational program” and “Date in this award year student began enrollment in the
educational program.” The dates are reported in format CCYYMMDD. The date the
student began enrollment in the educational program is reported even when it is before
the beginning of the aid year/term being reported. The process selects the earliest term in
which an SFBETRM exists for the student, where the curriculum is the one being reported
for the student’s record, and the student is considered as enrolled or withdrawn for the
term. This is based on the start date of the term of the earliest learner record for the
matching gainful employment program.

1316
Banner Student User Guide | Registration
The process also displays the date during the aid year that the student started enrollment
in the program. This is the enrollment start date (from STVTERM) of the first term in the
aid year where the gainful employment program is for the current and active curriculum,
and the student is considered as enrolled or withdrawn.
Graduation or Withdrawal
The process looks at the student’s enrollment status for the terms being reported in the aid
year for the gainful employment program to determine whether the student graduated or
withdrew from the program. The report displays the date of the student’s completion of the
gainful employment program using the graduation date (
SHRDGMR_GRAD_DATE)
entered on SHADEGR for the awarded degree sequence associated with that gainful
employment program. Graduations are only reported if the graduation term
(
SHRDGMR_TERM_CODE_GRAD) is a term code that is associated with the aid year
being reported. The withdrawal date in the aid year is reported as the SFBETRM date or
the SFRWDRL date when the withdrawn status is recorded for the gainful employment
program. If a student changes his/her curriculum, the start date of the term in which the
curriculum change occurs is used as the withdrawal date.
Students that withdrew from a gainful employment program and then re-enrolled in the
same gainful employment program in an award year must be reported separately for each
enrollment. The student is reported twice for the award year, once for the withdrawal and
once for the re-enrollment.
Two records are reported for the student in this situation. The first record reports the
student's first enrollment, with a withdrawn program attendance status for the award year
and the withdrawal date as the program attendance status date. The second record uses
the date the student began the second enrollment in the program as the attendance begin
date for the award year.
Example
The student began a gainful employment program on September 1, 2014.
The student withdrew from the program on October 30, 2014.
The
SFBETRM_ESTS_DATE is set to October 30, 2014.
The student starts the same gainful employment program on January 10, 2015.
The program attendance status begin date during the award year is updated to
January 10, 2015.
Financial Data
Financial data is reported based on the attendance status for students that withdrew or
graduated from the gainful employment program. The reported data is cumulative for the
entire period of attendance at the institution.
The total amount of the allowance for books, supplies, and equipment that is in the
Financial Aid Cost of Attendance (COA) is reported, or the amount of charges assessed
for the student for obtaining or purchasing these items from the institution is reported,
whichever amount is the higher of the two. The total amount is cumulative for the time the
student was enrolled in the gainful employment program, not just for a specific aid year.
Banner Financial Aid component codes are used in the summation of the total allowance.

1317
Banner Student User Guide | Registration
Budget components in Banner Financial Aid are used to track component codes and
amounts for books, supplies, and equipment for the entire time the student was enrolled in
the gainful employment program. Aid year budget component codes are created and
maintained on the Budget Component Validation Form (RTVCOMP). Period budget
component codes are created and maintained on the Period Budget Component
Validation Form (RTVPBCP).
If an institution is not using Banner Financial Aid, SFRGEED will report the actual amount
of charges assessed for books, supplies, and equipment. Institutions not using Banner
Financial Aid will need to manually adjust these numbers if the allowance for books,
supplies and equipment from the COA is higher than the actual charges. This data can be
entered on the Gainful Employment File Maintenance Form (SFAGEFM).
Detail codes used for tuition and fee charges are now identified for reporting the total
charges for the entire time the student was enrolled in a gainful employment program.
This applies to students who have graduated or withdrawn from the program during the
award year.
The private loans amount, the tuition and fees amount, and the allowance for books,
supplies, and equipment are summed from the start term in the gainful employment
program to the date of graduation or withdrawal. The withdrawal date comes from
SFRWDRL or the enrollment status date on the SFBETRM record. Institutional debt is
totaled for the time period when the student was in any gainful employment program, from
the start term to the date of graduation or withdrawal. Institutional debt is now reported for
amounts that are greater than $0. Previously, it was only reported for amounts over $200.
Note: A student is reported for gainful employment when the net amount
of his/her Title IV aid (excluding SEOG and Federal Work Study) is
greater than $0. However, when the student's total disbursement is $0
due to cancellation of the aid, that student is not reported even if he/she
was enrolled in a gainful employment program.
Example 1
The student began a gainful employment program on September 1, 2014.
The student withdrew from the program on October 30, 2014.
The
SFBETRM_ESTS_DATE value is October 30, 2014.
The total amount reported is from the start date of this program to October 30, 2014.
Example 2
The student began a gainful employment program on September 1, 2014.
The student graduated from the program on December 30, 2014.
The total amount reported is from the start date of this program to December 30,
2014.
The student started a new gainful employment program on January 10, 2015.
The student withdrew from the program on April 30, 2015.
The total amount reported is from the start date of this program to April 30, 2015.

1318
Banner Student User Guide | Registration
When a student is in multiple gainful employment programs, the amounts for private loans,
institutional debt, tuition and fees, and books, supplies, and equipment are distributed
equally among the programs for reporting. When a student is in one gainful employment
program and one non-gainful employment program, the full amounts are attributed to the
gainful employment program.
For example, if a student takes out $10,000 in private loans for enrollment in two gainful
employment programs, $5,000 is attributed to each of the two programs. However, if one
of the educational programs is not a gainful employment program, the full $10,000 is
attributed to the gainful employment program.
Institutional Debt
The gainful employment regulations at 34 CFR 668.404(d) define the term institutional
debt as, "The amount outstanding, as of the date the student completes the program, on
any other credit, (including any unpaid charges) extended by or on behalf of the institution
for enrollment in any gainful employment program attended at the institution that the
student is obligated to repay after completing the gainful employment program . . . ".
Banner does not store the balance of a particular debt (charge) for a student on a specific
date, so the balance must be calculated by the SFRGEED process.
• Charge detail codes
All detail codes that indicate a debt incurred by the student should be marked as
institutional debt. This includes items such as tuition, fees, etc., that the school believes
fit the above definition.
• Payment detail codes
SFRGEED must calculate the balance of the debt. Therefore, the institution should also
mark all possible payment detail codes that would be applied to the charge detail codes
listed. This includes any Title IV, State, Institutional, or other aid that would be applied
against the institutional debt (charges) incurred. It also should include cash and credit
card payment detail codes that could be applied against the institutional debt.
Institutions are required to report the total amount owed by a student from institutional
financing and payment plans for attendance in a gainful employment program. Totals are
derived from all terms of attendance in the program, not just in the aid year being reported.
Unlike Title IV loan debt or private loan debt where institutions report the total amount the
student received for attendance in the gainful employment program, the amount reported
for institutional financing plans is the amount owed by the student as of the day the
student completed or withdrew from the gainful employment program. This difference in
treatment also applies to the calculation of loan debt for gainful employment program
disclosure purposes.
Any loan, extension of credit, payment plan, or other financing mechanism that was
provided by the institution or a related party for attendance in the gainful employment
program, and that otherwise is not reported as a private education loan, that results in a
debt a student must repay to the institution or the related party, after withdrawing from or
completing the gainful employment program, is considered part of an institutional
financing plan. Also, any charge that is attributable to the student’s attendance in the
gainful employment program that a student owes to the institution after withdrawing from
or completing the gainful employment program should also be included in the amounts

1319
Banner Student User Guide | Registration
reported and disclosed under an institutional financing plan. This may include unpaid
library fees, parking tickets, or other outstanding obligations due to the institution after a
student withdraws from or completes a gainful employment program.
Over awards and other Title IV student aid owed to the institution by the student, including
as a result of a Return of Title IV (R2T4) calculation, are not amounts owed under an
institutional financing plan and should not be reported or disclosed. Nor should amounts
owed by students to the institution under the Federal Perkins Loan Program be reported or
disclosed.
To define the detail codes to be summed to determine the institutional debt amounts:
1. Access SFAGECR.
2. Enter the detail code.
3. Select the Institutional Debt indicator for that detail code.
This is reported when the enrollment status is
W or G. The process skips the data in
records with an enrollment status of
E.
Private Loans
The process displays the amount of private loans received by the student for attendance
in the gainful employment program. Totals are derived from all terms of attendance in the
program, not just in the aid year being reported. This is reported when the enrollment
status is
W or G. The process skips the data in records with an enrollment status of E.
To define the detail codes to be summed to determine the private loan amounts:
1. Access SFAGECR.
2. Enter the detail code.
3. Select the Private Loan indicator for that detail code.
The detail code for Private Loan is associated with the reporting category of
P.
Books, Supplies, and Equipment Allowances
The total cost of attendance allowance for books, supplies, and equipment for the student
for the entire period of enrollment in the gainful employment program is reported when the
student's attendance status is
Graduated or Withdrawn.
Allowance data is provided on a yearly basis. Therefore, the budget components provided
to Banner Student for books, supplies and equipment are used with the requested
Financial Aid Process Year value on STVTERM. Specific budget components are
defined on the Gainful Employment Program Rules Form (SFAGECR). They are retrieved
from the allowance for the student’s federal budget.
• When period budgeting is enabled (the ROBINST_PERIOD_BUDGET_ENABLED
value is
Y), the RBRAPBC_AMT value is summed only for periods in the student’s aid
year in which the student was in a gainful employment program, based on the term and
the budget components defined on the SFAGECR form and the SFAGEPB table.
• The budget type must be
F (Federal).

1320
Banner Student User Guide | Registration
• The run name must be ACTUAL.
When period budgeting is enabled, the hierarchy is as follows:
• Period based budget
• Federal budget that is non-Pell
• Federal budget that is Pell
• Aid year based budget
• Non-Federal based budget
The actual amount from TBRACCD is then compared to the budgeted amount, and
the greater amount is reported until the date of withdrawal or graduation.
• When period budgeting is not enabled (the ROBINST_PERIOD_BUDGET_ENABLED
value is
N), the components are summed based on the budget components defined on
the SFAGECR form and the SFAGEAB table.
The hierarchy is as follows:
• Federal budget that is not Pell
• Pell budget
• Any budget
The total sum of the component amounts is compared to the total sum of the actual
charges for books, supplies, and equipment, based on the associated detail codes. The
higher amount is reported. Detail codes are defined in the Detail Codes window of the
Gainful Employment Rules Form (SFAGECR) where the Books/Supplies/Equipment
indicator is checked. The term must fall within the range of terms defined for the detail
code. When a student has a curriculum change, the start date of the term in which the
change was made is used for the amount calculations.
When Banner Financial Aid is not installed, the amounts for books, supplies, and
equipment are populated with actual figures based on amounts from the TBRACCD
record for all SFRGEDR codes where the Books/Supplies/Equipment indicator is
checked. The actual values and budgeted values can be compared and a decision made
to update or not update the SFAGEFM record.
Banner Accounts Receivable
It is possible that institutions may have students enrolled in two or more gainful
employment programs in a single term. Banner Accounts Receivable does not have a
process that easily identifies one set of detail codes or charges with a specific curriculum.
Therefore, SFRGEED will split the tuition/fees, institutional debt, private loans, and books/
supplies/equipment amounts between the gainful employment programs.
File Export Type Parameter
When the Gainful Employment Submittal Report (SFRGEED) is run with the File Export
Type parameter set to
T, the output data is sent to the Gainful Employment File
Maintenance Table (SFRGEFM). You can use the Gainful Employment File Maintenance
Form (SFAGEFM) to adjust the data prior to submitting the official report. Indicators in the

1321
Banner Student User Guide | Registration
table are used to show if the data was system generated or manually created and/or
updated. This allows users without Banner Financial Aid to add the allowances for books,
supplies, and equipment.
Once the report has been run with the File Export Type parameter set to
T, it can then be
run using the batch ID (which can be found in the
.lis output file) in the Batch ID
parameter and with the File Export Type parameter set to
F (fixed width format) or C
(comma separated format).
Processing order
The process order is as follows when the Gainful Employment Submittal Report
(SFRGEED) is run.
1. Student PIDMs are collected for students enrolled a gainful employment program as
defined on SFAGECR.
• The student must have an SSN in the SPBPERS table.
• The student must have a curriculum record that is current and active for the term
where the curricula are defined as gainful employment programs using the rules on
SFAGECR.
• The records are held for further examination by the process.
2. Terms are checked for the student’s enrollment history where the student also has the
same gainful employment curriculum based only on the rule from SFAGECR.
All the terms of enrollment in the gainful employment program are gathered first. A
term where the student was enrolled or has withdrawn from enrollment is considered.
3. The process determines which records are in the aid year to be processed.
4. The process checks for an enrollment status of
G or W.
A new record is created when student’s status in the program is changed.
5. The detail codes on the TBRACCD table are checked for terms where the student is
enrolled in the gainful employment program, and the detail code type on SFAGECR is
associated with the institutional debt code, private loan code, tuition and fees code,
and books, supplies and equipment code from the SFRGEDR table.
The process checks detail codes for any term in which the student was enrolled in a
gainful employment program, not just the aid year being reported.
• When the sum of the detail codes for the private loan code is equal to 0, all zeroes
are reported.
• When the sum of the detail codes for the private loan code is greater than 0, the
sum of all payments for all detail codes found is reported.
• When the sum of the detail codes for the institutional debt code is less than 0, all
zeroes are reported.
• When the sum of the detail codes for the institutional debt code is greater than 0, the
total as of the date of graduation or withdrawal is reported.

1322
Banner Student User Guide | Registration
The sum of the balances is based not only on the aid year but on all terms for the
history of the student where the gainful employment program being reported is for the
current and active curriculum record.
6. The amount of institutional debt is determined based on student attendance in the
gainful employment program and the Institutional Debt detail code type on SFAGECR.
7. The process checks for an attribute code from STVATTS in the SGRATTS table that is
effective for the term in which the student is being reported and indicates the program
is a medical or dental internship/residency.
Create Submittal File
Use these steps to create the gainful employment submittal file.
1. Run the Gainful Employment Submittal Report (SFRGEED).
1.1. Set the GE File Type parameter to
S (Submittal Report).
1.2. Set the File Export Type parameter to
T (output to SFRGEFM table).
A batch ID will be assigned, and data will be written to the Gainful Employment File
Maintenance Table (SFRGEFM). The batch ID can be found in the
.lis output file.
2. Access the Gainful Employment File Maintenance Form (SFAGEFM) to review the
data for the batch.
3. Correct the data as appropriate.
3.1. Correct data (such as name and Social Security Number) that must be updated
on other Banner forms.
3.2. If you have made a lot of corrections, run the Gainful Employment Purge
Process (SFPGEED) to purge this batch from the SFRGEFM table before
returning to the first step.
3.3. Regenerate the gainful employment data.
3.4. If you are not using Banner Financial Aid, update the Books, Supplies, and
Equipment amount.
4. When the data in the table is acceptable for reporting, run SFRGEED again.
4.1. Set the GE File Type parameter to
S (Submittal Report).
4.2. Set the File Export Type parameter to
F (fixed width format.dat file) or C
(comma separated values
.csv file).
The Aid Year Code parameter is required.
You can use the Batch ID parameter to submit a subset of students for that aid year.
5. A file will be generated.
6. Submit the file.
The returned error file can be formatted by running SFRGEED with the GE File Type
parameter set to
E (Error Report), the File Export Type parameter set to C (comma
separated values
.csv) or F (fixed width format .dat), and the Error File Type

1323
Banner Student User Guide | Registration
parameter set to C (comma separated values .csv) or F (fixed width format .dat)
respectively.
Values also need to be entered in the File Path, File Name, and Match on ID
parameters.
At this point, any corrections to the submitted data must be made on the NSLDS
website.
Review and Modify SFRGEED Output
The Gainful Employment File Maintenance Form (SFAGEFM) is used to review
SFRGEED output and modify the data before the gainful employment file is submitted for
reporting. The Gainful Employment File Maintenance Table (SFRGEFM) is used with this
form.
Curriculum Examples for Multiple Records
As curriculum changes will cause multiple gainful employment records to be produced,
here are some sample processing scenarios.
Example 1
The student is enrolled in one gainful employment program in the Fall term, changes to
another gainful employment program within the Fall term, and then changes to another
gainful employment program in the next Spring term.
The student starts in the Fall 2014 term in Accounting and has a concurrent curricula
change to Business Administration during the Fall term. Before the Spring 2015 term
begins, the student switches to Economics.
Three records will be produced:
• W record for Accounting
• W record for Business Administration
• E record for Economics
Example 2
The student is enrolled in one gainful employment program in the Fall term, changes to
another gainful employment program within the Fall term, and then changes back to the
first gainful employment program in the Spring term.
The student starts in the Fall 2014 term in Accounting and has a concurrent curricula
change to Business Administration during the Fall term. Before the Spring 2015 term
begins, the student switches back to Accounting.
Three records will be produced:
• W record for Accounting
• W record for Business Administration
• E record for Accounting

1324
Banner Student User Guide | Registration
Example 3
The student is enrolled in a gainful employment program in the Fall term. The student
withdraws from the institution in the middle of the Fall term. The student re-enrolls in the
same gainful employment program in the Spring term.
The student starts in the Fall 2014 term in Accounting and withdraws during the Fall term.
Before the Spring 2015 term begins, the student returns to Accounting.
Two records will be produced:
• W record for Accounting
• E record for Accounting
Example 4
The student graduates from one gainful employment program in the Fall term, then enrolls
in another gainful employment program for the Spring term but withdraws from the
program.
The student starts in the Fall 2014 term in Accounting and graduates at the end of the
semester. The student begins an Economics program in the Spring 2015 term but
withdraws from the program.
Two records will be produced:
• G record for Accounting
• W record for Economics
Example 5
The student is enrolled in one gainful employment program in one award year, then
changes to a different gainful employment program in the next award year.
The student starts in the Fall 2014 term in Accounting and has a concurrent curricula
change to Business Administration for the Fall 2015 term.
One record will be produced for the 2014/2015 award year:
• E record in Accounting
Two records will be produced for the 2015/2016 award year:
• W record for Accounting
• E record for Business Administration
Example 6
The student changes majors multiple times during the year. Changes are at the program
level (SORLCUR).
The student begins in the Fall 2014 term with an Accounting major. During the semester,
the program is changed to Statistics. Later in the semester, the program is changed back
to Accounting, and a second major of Business Administration is added. In the Spring
2015 term, the student graduates with a double major.

1325
Banner Student User Guide | Registration
Four records will be produced:
• W record for Accounting
• W record for Statistics
• G record for Accounting
• G record for Business Administration
Error Reporting
This section discusses how to use error reporting with SFRGEED.
GE Error/Acknowledgement File
The GE Error/Acknowledgement File can be produced and returned in either fixed width
(
.dat) or comma separated values (.csv) format, depending on how the original
submittal file was sent. Banner will process the GE Error/Acknowledgement File in both
formats. The file formats are described in the third party NSLDS User Manual.
The GE Error/Acknowledgement File has the following characteristics
• Header, Detail, and Trailer Records - Each GE Error/Acknowledgement File contains a
single Header record, multiple Detail records with the error codes at the end of each
record, and a single Trailer record.
• The Header record identifies the source of the file and the file’s preparation/creation
date, as well as other identifying information.
• The Detail records, one for each record submitted that has at least one error,
contain information provided in the GE Submittal File with up to five errors identified.
Records without errors and accepted by NSLDS will not be in this file.
• The Trailer record shows the number of Detail records contained in the file.
• Format Data - All Detail records are formatted according to the record layout and field
definition specifications provided by the NSLDS in the third party user manual. Solutions
for error codes are also provided by the NSLDS.
GE Error Submittal File
You can produce a GE Error Submittal File to submit the corrected records from the GE
Error/Acknowledgement File that was previously uploaded. This file reported the errors on
the student records that needed to be corrected. Once the errors have been corrected and
you choose to resubmit the data, you can produce the GE Error Submittal File. The file
can only be produced in fixed width format. The file layout follows that of the GE Error/
Acknowledgement File.
The GE Error Submittal File has the following characteristics:
• Header, Detail, and Trailer Records - Each GE Error Submittal File contains a single
Header record, multiple Detail records, and a single Trailer record.
1326
Banner Student User Guide | Registration
• The Header record identifies the source of the file and the file’s preparation/creation
date, as well as other identifying information.
• The Detail records, one for each record located in the Error/Acknowledgement File,
contain information specific to that student’s program for that award year, with all
previously identified errors corrected.
• The Trailer record shows the number of Detail records contained in the file.
• Format Data - All Detail records are formatted according to the record layout and field
definition specifications provided by the NSLDS. Solutions for error codes are also
provided by the NSLDS. You should verify changes and check for formatting errors
before returning the GE Error Submittal File to the NSLDS.
Message Classes
The following message classes are used with gainful employment reporting.
Process and Resubmit the Error Report
Use the following steps to process and resubmit the NSLDS Error/Acknowledgement
Report.
1. Submit a GE Submittal File to the NSLDS.
2. Import the GE Error/Acknowledgement File sent back by the NSLDS.
This file includes codes for any errors in the data received.
3. Correct any records that require changes.
4. Rerun SFRGEED for the updated records.
See the instructions that follow.
5. Send a GE Error Submittal File to the NSLDS with the corrected data.
Note: Unlike the NSLDS Enrollment Roster process, all data originates
from the institution without using an NSLDS file to prompt a response.
Run SFRGEED in Error Mode
SFRGEED can be run in error mode and in resubmittal mode. When run in error mode, a
new output file is produced that contains student information and error messages.
Message Class Description (44 character limit)
GESFLEIN Gainful Employment Submittal - fixed width
GERFLEOP Gainful Employment Response - fixed width
GESCDEIN Gainful Employment Submittal - comma delimited
GERCDEOP Gainful Employment Response - comma delimited

1327
Banner Student User Guide | Registration
Use the following steps to run SFRGEED in error reporting mode.
1. Run SFRGEED with these settings.
1.1. Set the GE File Type parameter to
E (Error Report).
1.2. Set the File Export Type parameter to
F (fixed width format .dat) or C (comma
separated values
.csv).
1.3. Set the File Path parameter to a valid path for the error report received from the
NSLDS.
1.4. Set the File Name parameter to a valid file name for the error report received
from the NSLDS.
1.5. Set the Match on ID parameter to
N to have the matching process look for Last
Name, First Name, and a matching Banner Student record.
1.6. Set the Error File Type parameter to
F (fixed width format .dat) or C (comma
separated values
.csv).
This parameter is required when the GE File Type parameter is set to
E, or
when the GE File Type parameter is set to
R, and the File Export Type
parameter is set to
T.
2. Review the output for the report.
The error report produced displays the Banner ID, SSN, name, and date of birth
information with the major and status for the student’s record.
Each student processed is displayed with the field where the error occurred and the
corresponding error message.
Unmatched records are listed in a separate section.
The control file lists the parameters used to process the file.
3. Make corrections to the data in Banner for each reported error.
Run SFRGEED in Resubmittal Mode
When the process is run in resubmittal mode, the output file contains the corrected
records matched from the file produced in error mode.
Use the following steps to run SFRGEED in resubmittal mode and create the updated file
for reporting.
1. Rerun SFRGEED in resubmittal mode after running the process in error mode.
1.1. Set the GE File Type parameter to
R (Resubmittal Report).
1.2. Set the File Export Type parameter to
T (output to SFRGEFM table).
1.3. Set the File Path parameter to a valid path for the error report received from the
NSLDS.
1.4. Set the File Name parameter to a valid file name for the error report received
from the NSLDS.

1328
Banner Student User Guide | Registration
1.5. Set the Error File Type parameter to F (fixed width format .dat) or C (comma
separated values
.csv).
This parameter is required when the GE File Type parameter is set to
E, or
when the GE File Type parameter is set to
R, and the File Export Type
parameter is set to
T.
1.6. A batch ID will be assigned, and data will be written to the SFRGEFM table.
Access the
.lis output file to locate the batch ID.
2. Access the Gainful Employment File Maintenance Form (SFAGEFM) to review the
data for the batch and make corrections as appropriate.
3. When the data in the table is considered to be acceptable for reporting, run SFRGEED
again.
3.1. Set the GE File Type parameter to
R (Resubmittal Report).
3.2. Set the File Export Type parameter to
F (fixed width format .dat) or C (comma
separated values
.csv).
3.3. Enter a value in the Aid Year Code parameter.
This parameter is required.
3.4. Use the Batch ID parameter to submit the subset of students from the error
report.
4. Submit the generated file.
The output contains records that were matched in error mode and will be reported
back to the NSLDS.
If no matching records are found, this indicates the SSN or name for the student has
changed. In this case, the data needs to be corrected with the NSLDS so the records
will match.
Purge Data
The Gainful Employment Purge Process (SFPGEED) is used to remove records from the
SFRGEFM table. The purge can be run in Audit or Update mode.
Course Program of Study Processing
This processing is used to track student enrollment in courses that are counted in a
program of study. Banner Financial Aid Release 8.24.2 provides the ability to evaluate a
student's courses when enrollment is determined, and financial aid is processed and
disbursed.
Please refer to the Banner Financial Aid Release Guide 8.24.2 for more information.

1329
Banner Student User Guide | Registration
Note: If you wish to use the integration to Degree Works with this
enhancement, you will need to wait for the Degree Works 4.1.5 release,
scheduled for November 20, 2015. CAPP processing is available for use
with the Banner Student 8.9 and Banner Financial Aid 8.24.2 releases.
Processing
Course program of study processing identifies and tracks courses in which a student is
registered that apply to the sought degree or certificate. Remedial courses and number of
attempted remedial hours are included in the enrollment counts, as are repeated courses
and number of repeat attempts. Repeated courses from which the student has withdrawn
can be included in or excluded from the counts. A course which is legitimately repeated
(such as a thesis) may be defined and excluded from consideration in the counts as a
repeat of a previously passed course. Eligibility is also determined by whether a course is
an English as a Second Language (ESL) course.
The evaluation of a course is stored as an audit record that can be updated and so kept
current. This information may be used to determine the number eligible course hours to be
used for enrollment calculations in Banner Financial Aid.
Course program of study processing evaluates the student's registration record for the
following.
• The considered course is in the student’s program (CAPP or Degree Works).
• The considered course is remedial.
• The student has attempted a number of remedial course hours.
• The repeat coursework has been evaluated.
The results of the course in program processing are used with additional enrollment
criteria in Banner Financial Aid. The results of the enrollment calculations used for
financial aid processing and disbursement are displayed in Banner Financial Aid.
The Course Program of Study Control Form (SFACPSC) is used to set up process
controls, override rules, and repeat exclusion rules. The Student Course Evaluation Audit
Form (SFASCRE) is used to view the student evaluation data. The Course Program of
Study Process (SFPCPOS) is a Java process used to identify courses in which a student
is registered that count toward the student’s program. Students are tracked by the process
whether or not they are entitled to financial aid.
The following tables are used with course program of study processing:
• Student Course Program of Study Control Table (SFBCPSC)
• Student Course Program of Study Term Control Table (SFRCPST)
• Student Course Override Table (SFRCRSO)
• Student Course Evaluation Audit History Table (SFRHCRE)
• Student Repeat Course Exclusion Table (SFRRPCX)

1330
Banner Student User Guide | Registration
• Student Course Evaluation Audit Table (SFRSCRE)
The following packages are used with course program of study processing:
• SFKSCRE/SFKSCRE1 - used to process student course evaluations and evaluation
audits
• SFKCMPL/SFKCMPL1 - used with CAPP degree audit processing
Banner setup steps
Use the following steps to set up and use course program of study processing in Banner.
1. Modify the delivered sample SQL on the Business Rules Form (GORRSQL) for the
CPOS process and the CPOS_REMEDIAL_RULE value to define the SQL statement
that allows SFPCPOS to identify remedial courses.
2. Modify the delivered sample SQL on the Business Rules Form (GORRSQL) for the
CPOS process and the CPOS_ESL_RULE value to define the SQL statement that
allows SFPCPOS to identify ESL courses.
3. Create or update the control rules on the Course Program of Study Control Form
(SFACPSC).
3.1. Define the process rules by setting the appropriate indicators.
– Set up the degree audit evaluation to use CAPP.
Set Perform In Program Processing to
Yes.
Set Audit System to
CAPP.
Set CAPP Default Code to your selected value.
Set CAPP Origin Code to your selected value.
– Activate ESL processing by setting Perform ESL Processing to
Yes.
– Activate remedial processing by setting Perform Remedial Processing to
Yes.
– Activate repeat processing by setting Perform Repeat Processing to
Yes.
3.2. Define the registration terms that will use the process rule.
3.3. Define the in program override rules for the course and term range.
3.4. Define the repeat exclusion rules for the course and term range.
4. Run the Course Program of Study Process (SFPCPOS) to capture student
registration changes in the Student Course Evaluation Audit Table (SFRSCRE).
5. Review the course evaluation results on the Student Course Evaluation Audit Form
(SFASCRE).
6. Update or override the In Program value for a record if needed.

1331
Banner Student User Guide | Registration
Degree Works setup steps
Use the following steps to set up Degree Works with course program of study processing.
Step one is completed in Banner. The rest of the steps are completed in Degree Works.
1. In Banner, set up the What-if external API used to retrieve registration data from
Degree Works.
Refer to the Banner Student Registration Handbook 9.3 and the Banner Student
Registration Online Help 9.3 for information on using STVREST and SOAREST.
See the "Use external API" sections in the "Structured Registration" and "Projected
Registration" chapters for setup instructions for external APIs.
2. In Degree Works, set up Degree Works Web Services.
Refer to the Degree Works Installation Guide for more information. Additional
information can be found in the "POST a What-if Audit request" section in the Ellucian
Degree Works API documentation.
3. In Shepentry, select the Users function to modify the default password for the
WHATIFAPI user.
The user and password supplied are used as the
SOBREST_USERNAME and
SOBREST_PASSWORD values.
4. Ensure that the UCX-CFG020 DAP14 Calculate Elective Credits flag is set to
Y.
5. Execute a webrestart.
6. Ensure that all blocks have a Credits header qualifier.
If a block does not have a strict credit limit, using the Pseudo reserved word allows the
credits qualifier to always be satisfied. However, the auditor knows how many credits
this block is worth when the elective credits allowed amount is calculated.
See the Degree Works Scribe User Guide for more information.
7. Use Shepentry to set the
core.audit.programAsDegree value to your UCX-
CFG020 BANNER Program As Degree value.
For example, when the UCX-CFG020 BANNER Program As Degree flag is set to
N,
then the
core.audit.programAsDegree value is set to false.
8. Restart the Degree Works Web Services application.
Sample process flow
Here is a sample process flow.
1. Access the Student Course Registration Form (SFAREGS).
2. Enter a student ID and term.
3. Use Next Block functions to pass through the Enrollment Information block and the
Enrollment Study Path block and access the Course Information block.
4. Add a course, and save the changes.
5. Run the Course Program of Study Process (SFPCPOS) for the student’s ID.

1332
Banner Student User Guide | Registration
6. Access the Student Course Evaluation Audit Form (SFASCRE).
7. Review the added courses and settings (remedial hours, repeat counts, and count in
program information).
8. Manually update the Count in Program indicator for records as needed.
9. Select the Preserve Override indicator for the records to maintain the changes when
the SFPCPOS is next run.
10. Enter a comment to explain the changes.
11. Save the changes.
Count in program
This section discusses use of the count in program options.
Enable count in program
Count in program processing is enabled by on the Course Program of Study Control Form
(SFACPSC).
1. Set the Perform In Program Processing radio group to
Yes.
2. Set the Audit System radio group to either
CAPP or Degree Works to reflect the
system that will perform the degree audit evaluation.
Each audit system is associated with additional parameters that must be entered to
perform the evaluation.
Disable count in program
Count in program processing is disabled by on the Course Program of Study Control Form
(SFACPSC).
1. Set the Perform In Program Processing radio group to
No.
2. Audit records are assigned a default value of
Yes, No, or None, based on the setting
of the In Program Default Value radio group.
Manual override
The degree audit evaluation count in program results can be viewed on the Student
Course Evaluation Audit Form (SFASCRE). Use the Preserve Override indicator on
SFASCRE to select a manual override for a record and preserve the override during future
runs of the SFPCPOS process. The captured registration changes are updated with the
value entered as a preserved override.
Override rules
You can define count in program override rules on the Course Program of Study Control
Form (SFACPSC) that can be used to override subject and course combinations.

1333
Banner Student User Guide | Registration
Overrides are captured during processing, and updates to the registration data are stored
with the values entered for the subject and course rule.
Remedial courses
Remedial course processing is enabled on the Course Program of Study Control Form
(SFACPSC).
1. Set the Perform Remedial Processing radio group to
Yes.
2. Enter a process code from the Business Rule Process Code Validation Form
(GTVSQPR).
3. Enter a remedial rule code from the Business Rule Code Validation (GTVSQRU).
Remedial processing uses the business rule to identify a remedial course by
executing the SQL statement defined on the Business Rules Form (GORRSQL).
ESL courses
English As a Second Language (ESL) course processing is enabled on the Course
Program of Study Control Form (SFACPSC).
1. Set the Perform ESL Processing radio group to
Yes.
2. Enter a process code from the Business Rule Process Code Validation Form
(GTVSQPR).
3. Enter an ESL rule code from the Business Rule Code Validation (GTVSQRU).
ESL processing uses the business rule to identify an ESL course by executing the
SQL statement defined in the Business Rules Form (GORRSQL).
Repeated courses
Repeat course processing is enabled on the Course Program of Study Control Form
(SFACPSC).
1. Set the Perform Repeat Processing radio group to
Yes.
2. Define repeat exclusion details for subjects and courses in the Repeat Exclusion
Rules window.
Registration
The course program of study process captures the student registration changes in the
Student Course Evaluation Audit Table (SFRSCRE). The changes are tracked when they
occur during terms that are defined as registration terms and have start and end dates
defined on the Course Program of Study Control Form (SFACPSC). Registration changes
related to academic history and curriculum data are also stored in the SFRSCRE table.

1334
Banner Student User Guide | Registration
Academic History
Here are some notes for academic history records and course program of study
processing.
• When course records are deleted from the academic history tables, those changes are
not captured.
• When a record is saved on SHATCKN and/or SHATRNS, the timestamp in the activity
date is not saved. Therefore, changes on these forms are not captured until the next
day.
CAPP
Use of course program of study processing assumes that CAPP processing has already
been set up. Please refer to the Banner Student CAPP Handbook for information on
setting up and using CAPP.
Degree Works
Use of course program of study processing assumes that Degree Works has already been
set up and the What-if API has been installed. See the Degree Works documentation
referenced earlier for more information.
Seed Data
Seed data is used with the following forms.
• Business Rules Form (GORRSQL)
• Business Rule Process Parameters Form (GORSQPA)
• Printer Validation Table (GTVPRNT)
• Business Rule Parameter Code Validation Form (GTVSQPA)
• Business Rule Process Code Validation Form (GTVSQPR)
• Business Rule Code Validation Form (GTVSQRU)
Business Rules Form (GORRSQL)
These new business rules are used with course program of study processing. The
delivered SQL is sample code that can be updated at your institution for ESL and remedial
processing. The business rule query should return a value of
Y for a course that needs to
be identified as Remedial or ESL.

1335
Banner Student User Guide | Registration
Business Rule Process Parameters Form (GORSQPA)
These process codes and parameters are used with GORRSQL for course program of
study processing.
Process Rule Record SQL Statement Excerpt
Sys
Req
CPOS CPOS_ESL_RULE 1
'SELECT ''Y''
FROM SCBSUPP a
WHERE a.SCBSUPP_SUBJ_CODE = :SUBJ_CODE
AND a.SCBSUPP_CRSE_NUMB = :CRSE_NUMB
AND a.SCBSUPP_EFF_TERM=
(SELECT MAX (b.SCBSUPP_EFF_TERM)
FROM SCBSUPP b
WHERE b.SCBSUPP_SUBJ_CODE =
a.SCBSUPP_SUBJ_CODE
AND b.SCBSUPP_CRSE_NUMB =
a.SCBSUPP_CRSE_NUMB
AND b.SCBSUPP_EFF_TERM <= :TERM_CODE)
Yes
CPOS CPOS_REMEDIAL_
RULE
1
'SELECT ''Y''
FROM SCBSUPP a
WHERE a.SCBSUPP_SUBJ_CODE = :SUBJ_CODE
AND a.SCBSUPP_CRSE_NUMB = :CRSE_NUMB
AND a.SCBSUPP_EFF_TERM=
(SELECT MAX (b.SCBSUPP_EFF_TERM)
FROM SCBSUPP b
WHERE b.SCBSUPP_SUBJ_CODE =
a.SCBSUPP_SUBJ_CODE
AND b.SCBSUPP_CRSE_NUMB =
a.SCBSUPP_CRSE_NUMB
AND b.SCBSUPP_EFF_TERM <= :TERM_CODE)
Yes
Process Code Parameter Code Description Sys Req
CPOS CRSE_NUMB Course Number Yes
CPOS SUBJ_CODE Subject Code Yes
CPOS TERM_CODE Term Code Yes

1336
Banner Student User Guide | Registration
Printer Validation Form (GTVPRNT)
This printer code is used with GTVPRNT for course program of study sleep/wake
processing.
Business Rule Parameter Code Validation Form (GTVSQPA)
These parameter codes are used with GORSQPA for course program of study processing.
These new parameter codes are used with GORSQPA for course program of study
processing. They are optional.
These parameters need to be defined on GTVSQPA to be used for rule queries on
GORRSQL. Only these three parameters are supported. When other parameters are used
for rule queries, the following SQL error is presented in the log file: Not all variables
bound.
Business Rule Process Code Validation Form (GTVSQPR)
This process code is used with GORRSQL for course program of study processing.
Business Rule Code Validation Form (GTVSQRU)
These rule codes are used with GORRSQL for course program of study processing.
Code Description Command
SFPCPOS_PRNT Printer setup for SFPCPOS Not used but required for sleep/wake
Code Description Data Type Start Date Activity Date
CRSE_NUMB Course Number CHARACTER System Date System Date
SUBJ_CODE Subject Code CHARACTER System Date System Date
TERM_CODE Term Code CHARACTER System Date System Date
Code Description System Required
CPOS CPOS Process Rules No
Code Description System Required
CPOS_ESL_RULE Standard rule for ESL
process
No
CPOS_REMEDIAL_RULE Standard rule for
Remedial process
No

1337
Banner Student User Guide | Registration
Control and audit forms
The following forms are used with course program of study processing:
• Course Program of Study Control Form (SFACPSC)
• Student Course Evaluation Audit Form (SFASCRE)
See the Banner Student Online Help for form and field details.
Course Program of Study Control Form (SFACPSC)
This form is used to set up controls for course program of study processing. You can
define process rules, in program override rules, and repeat exclusion rules.
Main Window
The main window contains the Process Rules block and the Registration Terms block. Use
the Process Rules tab to access these blocks.
Use the Process Rules block to define process rules for course evaluation. You can
include ESL processing, remedial processing, repeat processing, and in program
processing. When in program processing is not used, you can use a default value instead.
You can also select the degree audit system you wish to use. When CAPP is used, you
can define the default compliance request code and the compliance request origin code.
When Degree Works or another third party system is used, you can define the integration
code for the RestFul API connection.
Use the Registration Terms block to define active registration terms used with the rules in
the Process Rules block. This data includes start and end dates, as well as editable
comments.
In Program Override Window
The In Program Override window is used to set up rules for course in program overrides.
These rules are used override institution process rules for the courses defined in this
window. The courses can be counted in or excluded from the from and to term range and
can be counted toward the student program from the degree audit result. Use the Override
Rules tab to access this window.
Overrides can be used for a program or a subject and course combination.
• For program overrides, the In Program Processing indicator is set to Yes, and the In
Program Default Value field is set to
No. The Audit System field can be set to any
choice.
• For subject and course overrides, the In Program Processing indicator is set to No,
and the In Program Default Value field can be set to
Yes or No.
Repeat Exclusion Rules Window
The Repeat Exclusion Rules window to define repeat exclusion rules used to exclude
courses from the repeat counts. You can set up courses to be excluded during the from

1338
Banner Student User Guide | Registration
and to term range. Rules can be created for a subject and course combination. Use the
Exclusion Rules tab to access this window.
Student Course Evaluation Audit Form (SFASCRE)
This form is used to view student course evaluation audit date for course program of study
processing.
Main Window
The main window contains the Key Block and the Data block.
Use the Key Block to enter the student ID and registration term for which you wish to view
or update student course evaluation records. You can choose to display the most recent
records first.
Use the Data block to query on and update student course evaluation audit information.
Records are displayed by sequence number for the CRN, subject, and course. Courses
can be designated as remedial and display the associated remedial hours. Courses can
be designated as ESL, as well as repeated, with associated repeat counts. Courses can
be counted in the student’s program for degree audit results, and override of the count in
program value can be preserved. Comments can be entered for the block. Source
information is displayed for the record and the source and audit request number of the
degree audit system.
Course Program of Study Process (SFPCPOS)
The Course Program of Study Process (SFPCPOS) is a Java process used to identify
courses in which a student is registered that count toward the student’s program. The
packaged files that launch and execute the process include the
sfpcpos.jar file and
the
sfpcpos.shl file.
The process captures whether a registration record is counted toward a student's program
or degree and uses GORRSQL rules to identify remedial and ESL classes. It can also be
used to run financial aid repeat processing. Processing is based on defined rules and
controls.
The process uses the registration term information on the Course Program of Study
Control Form (SFACPSC) to determine the terms to be processed. It sends a request to
CAPP or Degree Works for a degree evaluation or audit and reviews the data returned. It
analyzes changes in registration, curriculum, or academic history records. It captures
remedial courses and hours, English as a Second Language (ESL) courses, repeat
coursework, and repeat hours calculations and stores/updates the data in the Student
Course Evaluation Audit Table (SFRSCRE).
The process can be run through job submission, or it can be scheduled to run
automatically. It can also be executed as a sleep/wake process. The process can be run
for a single student, a population selection, or for all students in batch.
Student records are updated and inserted into the SFRSCRE table. Records in CAPP are
updated for use with the Degree Evaluation process in Banner Student Self-Service.
Records in Degree Works are updated for use with the Degree Audit Evaluation. The

1339
Banner Student User Guide | Registration
process logs the audit ID for the evaluation, and this can be used to check the results if
needed.
See the Banner Student Reports and Processes Handbook for parameter details and
output samples.
Purge Processes
The following purge processes are part of the Registration module:
Registration Purge (SFPREGS)
This process purges the registration information for all students based on the user
specified parameter of term. Courses which have not been graded or rolled to history will
have a warning generated on the report.
Note: Please be aware that all results of the student's course work will be
deleted during the purge, and if no paper copy of this information is kept,
this information will be lost.
Waitlist Enrollment Purge (SFPWAIT)
This process removes the waitlist enrollment information for those students who could not
be placed in the class section. It should be run after the end of the drop/add period after all
enrollment data has been processed for the term. Multiple parts-of-term may be purged.
Expired notifications can also be purged for the term or part-of-term and registration
status.
The process uses the course statuses defined on the Course Status Code Validation Form
(STVRSTS). Only these course statuses which have a checked Waitlist Indicator and
unchecked Count in Enrollment and Count in Assessment boxes will be acceptable for
processing. A report, sorted by student name, lists the waitlist enrollments which are
purged. A total number of students processed and a total number of enrollments deleted is
also provided on the report. Multiple parts of term may be purged. This process also
adjusts the waitlist counts on the Schedule Form (SSASECT).
Enrollment Verification Request Purge (SFPENRL)
This process purges the enrollment verification requests which were previously requested.
Requests are purged by date and type. Request types are defined on the Enrollment
Verification Type Code Validation Form (STVEPRT).

1340
Banner Student User Guide | Registration
Gainful Employment Purge Process (SFPGEED)
This purge process is used to remove the records from the Gainful Employment File
Maintenance Table (SFRGEFM) for an aid year and/or a batch ID. Run the process in
Audit mode to check the data to be purged and Update mode to update the database.
Setting Up Sleep/Wake Processes
Note: The following Banner systems and processes are valid for the
sleep/wake processing described in this section:
Banner Student
Accounts Receivable Module
Setting up Sleep/Wake Processing
1. Define printer and print command on the Printer Validation Form (GTVPRNT). In the
(Printer) Code field, enter a name to reference each specific printer that may be used
for printing output from sleep/wake processing. In the Comment (Printer Command)
field, enter the correct operating system print command as it would normally be
entered from the command line prompt, substituting an @ (at sign) as the place holder
for the filename to be printed.
Report/Process Description
SFRSCHD Student Schedules
SHRTRTC Academic Transcript
Report/Process Description
TGRRCPT Account Receipt
TSRCBIL Student Billing Statement (Invoices)
TGRMISC Miscellaneous Receipt
Operating System Print Command
UNIX example:
lp -d talaris1 @
VMS example:
print/queue=ln01 @

1341
Banner Student User Guide | Registration
2. On the appropriate System Distribution Initialization Information Form (SOADEST for
Banner Student or TOADEST for Accounts Receivable), enter the printer code from
GTVPRNT that should be identified with the collector table rows that will be inserted to
the appropriate tables when online application forms create a request for output that
can be generated by sleep/wake processing.
Note: The collector tables are as follows:
3. On the Process Submission Control Form (GJAPCTL), for the valid sleep/wake jobs
listed previously, enter the correct response for the parameter that specifies that the
job should be processed for collector table entries. Refer to the documentation for
each specific process to determine the appropriate response in each case (correct
responses may be
COLLECTOR, Y, %, etc.). In addition, each sleep/wake job has a
printer code parameter. You must specify exactly the same code for this parameter
answer that was entered on either SOADEST or TOADEST. A value of
Y should be
entered for the run in sleep/wake mode parameter, and a number of seconds should
be specified for the sleep/wake interval (cycle) for each process.
Note: Do not enter the printer code in the top section of GJAPCTL; only
enter it in the parameter section of the form.
Using SFRSCHD with Sleep/Wake Method One
You can run SFRSCHD using Sleep/Wake Method One. Please note that while the
execution of processes from the command line is no longer supported, processes that run
in sleep/wake, including SFRSCHD, are supported.
Please refer to the Banner General Technical Reference Manual for information about the
various components of sleep/wake processing. Sleep/Wake Method One requires that the
.dat response file must be constructed in the order in which the parameters are
prompted for when running SFRSCHD from the command line. This order is different than
the order of the parameters displayed in job submission (GJAPCTL).
Below is a sample
.dat file for SFRSCHD using Sleep/Wake Method One:
Process Collector Table
SFRSCHD SFRCBRQ
SHRTRTC SHTTRAN
TGRMISC TBRCMIS
TGRRCPT TBRCRCP
TSRCBIL TBRCBRQ

1342
Banner Student User Guide | Registration
The specific responses above will vary depending on your institution's codes and set-up.
Note: Please note that it is strongly recommended that institutions use
the online forms (such as GJASWPT) for initiating and maintaining sleep/
wake processes. Please refer to the Banner General Technical Reference
Manual for more information.
.dat File Value
Parameter Prompt (in order displayed using
command line execution)
<blank line> Parameter Sequence Number
<blank line> Selection Identifier (population selection is not valid for sleep/
wake processing)
COLLECTOR ID
% Process Term (% for all terms, or a single term value such as
200510)
<blank line> Address Selection Date (blank assumes today's date or enter
a specific date)
1MA Address Hierarchy 1
2PR Address Hierarchy 2 (add more lines if additional address
hierarchies are desired)
<blank line> Include blank line to indicate end of Address Hierarchies
HPLAS1 Printer (printer schedules will print to; enter same value on
SOADEST, and set up the printer with the correct print
command string on GTVPRNT)
N Process by Campus?
Y Run in Sleep/Wake
300 Sleep/Wake Interval (value is number of seconds between
sleep/wake cycles)
<blank line> Start Range From Date
<blank line> Start Range To Date
% Schedule Type
% Instructional Method
N Print Long Section Title
N Print Schedule Type
N Print Instructional Method
N Print Registration Start/End Dates
<blank line> Number of Lines Printed Per Page (55)

1343
Banner Student User Guide | Registration
Registration Reports
The following reports are run through the Registration module:
Registration Fee Assessment Process (SFRFASC)
Purge Fee Assessment Audit Process (SFPFAUD)
Unduplicated Headcount Report (SFRHCNT)
Registered, Not Paid Process (SFRRNOP)
Student Schedule Report (SFRSCHD)
Class Roster Report (SFRSLST)
Enrollment Verification Report (SFRENRL)
Enrollment Verification Request Purge (SFPENRL)
Registration Purge (SFPREGS)
Waitlist Enrollment Purge (SFPWAIT)
Course Request Load Process (SFPBLCK)
Unsatisfied Links Report (SFRLINK)
Clearinghouse Extract Report (SFRNSLC)
Time Status Calculation Update Process (SFRTMST)
NSLDS SSCR Process (SFRSSCR)
Compliance Listener Start Up Process (SFRPINI)
Compliance Pipe Process (SFRPIPE)
Withdraw Pending Status Change Report (SFRNOWD)
Withdrawn Student Report (SFRWDRL)
Auto Grade Assignment Process (SFPAGRD)
Registration Admin Messages Report (SFRRGAM)
Fee Assessment Report (SFRFEES)
Batch Waitlist Notification Process (SFRBWLP)
Waitlist Priority Reorder Process (SFPWLRO)
Feedback Monitor Students Process (SFRFFMN)
Faculty Feedback Purge Process (SFRFFPG)
Gainful Employment Submittal Report (SFRGEED)
Student Block Pre-Assignment Process (SFPSBPA)

1344
Banner Student User Guide | Registration
Please refer to the Banner Student Reports and Processes Handbook for report
descriptions, instructions, parameter definitions, and output samples.
Creating a Population Selection
To perform population selection, the application you will be working with must first be
defined on the Application Definition Rules Form (GLRAPPL).
The second step is to enter the Population Selection Definition Rules Form (GLRSLCT),
enter the Application (Code), and create a Selection ID (Identifier) with a description.
In the Selection Definition section, define the Select and From portions of the SQL
statement that the selection represents.
Example:
Next, enter the Selection Rules for the population of records you would like to see.
Example:
Save your data and exit. Your population selection rules will be compiled. If any errors are
issued during the compilation process, resolve the errors before continuing. If you do not
resolve all errors given during the compile process, you will not be able to use the
population selection rules to extract a population.
You are now ready to extract the population of people. The Population Selection Extract
(GLBDATA) is run from the Process Submission Control Form (GJAPCTL). At minimum,
you will need to supply the parameters for Selection Identifier 1, Application, and Creator
ID, which are the values that were in the Key Information of the Population Selection
Definition Rules Form (GLRSLCT).
After extracting the population, you can use the Population Selection Extract Data Form
(GLAEXTR) to view and/or modify the people in the population. You can add or delete
people from the population using this form. The keys to the form are Application,
Incomplete Block Registration Report (SFRIBLR)
Student Projection Process (SFPPROJ)
Schedule Planning Report (SFRPRES)
Select:
SARADAP_PIDM
From:
SARADAP
SARADAP_TERM_CODE_ENTRY
=
'200010'
AND
SARADAP_LEVL_CODE
=
'UG'

1345
Banner Student User Guide | Registration
Selection ID, and Creator ID. (User ID is also displayed in the Key Information.) You will
be able to add or delete people only from populations that you selected.
After extracting the population, and modifying the people in it if necessary, you can use the
population for a variety of purposes. Letters can be produced using Letter Generation,
based upon a population, and many Banner reports and processes also can accept a
population for processing.
For additional details on population selection, refer to the Banner General User Guide.

1346
Banner Student User Guide | Academic History
Academic History
This chapter discusses processing and procedure information for Academic History.
Academic History Procedures
Here are tasks you can perform in this module.
Enter Pre-Banner Data
Any academic history records that are not currently computerized may be entered into
Banner® as bulk hours if the institution is not doing a detail conversion. The hours are
entered on the Pre-Banner Summary Hours and GPA Form (SHAPCMP) by student level.
The (GPA) Type field is used to indicate Institutional (
I) or Transfer (T) pre-Banner
information. The GPA is recalculated when information is deleted from this form. The
Campus field is used when calculating a Campus GPA. Campus may only be entered on
institutional information.
Concurrent Curricula Processing
Concurrent curricula processing allows an institution to record and use multiple curricula
for a person who is moved through the student cycle. This functionality is used by the
Recruiting, Admissions, General Student, Registration, and Academic History modules.
Please refer to the “Concurrent Curricula Processing” appendix for detailed information on
using concurrent curricula in Banner Student.
Mass Entry Processing
Mass entry processing is used with Admissions, General Student, Registration, Academic
History graduation, and athletic compliance processing. Mass entry forms are used to
search on data, perform updates, and then display the results. Search and update criteria
are user-defined and include student and curriculum elements where appropriate. The
selected students can be reviewed and their updates processed immediately, or the
updates can be held for later processing in job submission using a batch process. An audit
form is used to view processing results for the mass entry forms.
Please refer to the “Mass Entry Processing” appendix for detailed information on using
mass entry in Banner Student.

1347
Banner Student User Guide | Academic History
Study Path Processing
Study path processing is used with the Admissions, General Student, Registration, and
Academic History modules. Study paths provide a means by which a learner can
associate specific course registration records to learner curriculum records during
registration. The study path records allow the institution to track separate student status
codes and academic standings (along with various other data) based on the student's
curriculum. Likewise, a study path term enrollment record permits the tracking of
enrollment eligibility that is separate from a student's overall enrollment status. The grade
roll uses study paths to keep courses with an associated study path within the degree
sequence created for that study path.
Please refer to the “Study Path Processing” appendix for detailed information on using
study paths in Banner Student.
Manual Curriculum Roll Processing
Manual curriculum roll processing allows an institution to select a single student’s
curriculum and create a degree record and an outcome curriculum record without rolling
grades. The outcome curriculum record is referenced on transcripts when a degree is
awarded. Outcome refers to a completion of a course of study, which could be a degree.
However, not all courses of study result in a degree. Some can result in a certificate or
license, for example.
A separate process is used to control the creation of the outcome records. The use of the
manual roll does not exactly duplicate the processing performed in the grade roll (See the
process flow that follows.) This streamlines processing and assists users by not requiring
the creation of degree and curriculum records until a degree is ready to be processed. It
assists by removing the need to make manual corrections on previously created degree
records, if they were created in error.
This process can be initiated at any point, in baseline and self-service, without running a
batch process or rolling grades for an entire class. The use of the manual roll avoids the
creation of unnecessary records in the SHRDGMR table, as the degree sequence number
is only created for the final curriculum and the intended degree. Specific checking of
curricula data is not executed by this roll, because an assumption is made that the
curriculum selected is the one the user wants to use to create the degree. A job
submission process can be used to select groups of learners and create degree records
when your institution decides to do so.
Self-service graduation application processing can also be used to create degree records
for outcome curricula and to update current outcome records with learner curriculum
changes.
Roll to Outcome Process Flow
Here is a process flow for the roll to outcome process. This process rolls the learner
curriculum record to the outcome. It assumes that the incoming learner curriculum record
has been selected to be rolled. The parameters include the entire learner curriculum
record that will be rolled, so the record does not have to be re-read. The process validates
setting of the Rolled to Outcome (Indicator).

1348
Banner Student User Guide | Academic History
1. The process determines whether a degree with a sought or pending status exists that
has the same college, degree, level, and program that are on the learner curriculum
record.
2. The process validates that the learner curriculum record is current and active, that the
learner curriculum term is greater than or equal to the processing term, whether the
learner curriculum record was previously rolled but the outcome curriculum no longer
exists (it was deleted), and that the learner curriculum term is less then the processing
term.
The system only processes learner curriculum records that have been selected for
processing. If the outcome records have been deleted, the process then inserts the
outcome curriculum records and updates/inserts the degree records based on the
following:
2.1. whether the rolled sequence number for the learner curriculum record is Null or
whether the degree was deleted, and
2.2. if the learner curriculum record is current and active for the processing term. If
the record is current and active, the process then checks:
– whether a matching degree record exists with the same learner curriculum
level, program, degree, and college. If no match is found, the degree record is
inserted.
– whether a degree exists for the same learner curriculum level, program,
degree, and college, and if that degree has been awarded. If so, a new
degree record is inserted.
2.3. If the curriculum is not current or active, the process then checks for a
previously rolled curriculum record with the same priority.
– If no record exists, the curriculum record is not rolled.
– If a record exists, the process looks for the degree record for the previously
rolled curriculum with the same priority. If that degree was awarded, the
curriculum record is not rolled. If it was awarded, the next validation check
takes place.
2.4. If the curriculum is not current and a degree exists, the process checks for
another current, active outcome curriculum record for the degree that has a
different priority. If one is found, the non-current curriculum record can be rolled,
as it will not leave the outcome record without a current and active curriculum.
2.5. If the previous check does not result in the roll of the curriculum record, the
process checks for another learner curriculum record that can be rolled that has
a different priority, but has the same college, degree, level, and program. This
results in the curriculum record being rolled to the same degree, and the degree
record will then have at least one current, active curriculum.
3. A final check is made before the curriculum record is rolled to verify that one current,
active curriculum will exist on the outcome record.
3.1. Previous checks are performed again, to ascertain that one active outcome
curriculum with the same priority exists for the degree, or that other learner
curriculum records are ready to be rolled with the same level, degree, college,
and program.

1349
Banner Student User Guide | Academic History
3.1. If the learner curriculum has already been rolled, and the degree exists and has
not been awarded, the process updates the degree and updates any field of
study changes.
4. The backfill process is executed.
Roll Curriculum Records from Job Submission
You can roll learner curriculum records to outcome manually or from job submission. The
Roll Learner to Outcome Report (SHRROUT) allows you to roll one or more Banner IDs or
a population selection using Audit and Update Mode. This process is independent of the
end of term grade roll (SHRROLL). It allows you to define which student's learner records
are selected and inserted or updated in the SHRDGMR table and to create outcome
curriculum records. Record selection can be based on graduation application elements. If
the graduation application data includes a diploma name and address that have been
submitted using the self-service graduation application process, the report will update the
appropriate diploma record with that data.
When the report is run in Update Mode, it uses functionality that is similar to SHRROLL. It
checks for an existing degree record where the current, active, outcome curriculum
associated with the record matches the level, college, degree, or program of the current,
active, learner curriculum for the ID that has been selected for update. If no matching
current, active curriculum record is found, the process creates a new degree record in the
SHRDGMR table, copies the selected learner curriculum data, and creates a curriculum
record with the module of
OUTCOME. The previous outcome curriculum record is
inactivated when the new degree and the outcome curriculum record are inserted. If the
curriculum record matches an existing active outcome curriculum, other data elements
submitted from the graduation application will be inserted, unless that outcome curriculum
record has an active graduation application associated with it. In this case, a new degree
sequence is created. The existence of different majors, minors, and concentrations does
not constitute the need for a new degree record and the inactivation of the previously
existing curriculum record, unless an active graduation application exists. Learner field of
study records will be inactivated, and new active records will be inserted.
The curriculum record that is selected based on the parameters entered in job submission
is read using the term that is associated with that curriculum. The SORLCUR table is read,
and the highest sequence number row for each priority is selected, beginning with the
lowest priority number row first. All rows are selected where the term code on SORLCUR
is less than the to term of the selected SGBSTDN record.
A new record is created on SHADEGR when the learner record on SORLCUR is active,
and no outcome SORLCUR row exists with the same college, degree, level, and program.
A new record is also created when an outcome record on SORLCUR exists with the same
college, degree, level, and program and a degree status of
AW (Awarded).
An existing record on SHADEGR is updated when an outcome record on SORLCUR
exists with the same college, degree, level, and program and a degree status that is not
equal to AW (awarded). When the learner record on SORLCUR is active, the
SHRDGMR_KEY_SEQNO field on the matched outcome record is used to determine which
outcome record can be updated. (This applies when a curriculum record was created,
inactivated, then reactivated.)

1350
Banner Student User Guide | Academic History
When the learner record on SORLCUR is inactive, the process checks for the last rolled
learner record that has the same priority. (The
SORLCUR_ROLLED_SEQNO field is Not
Null.) The
SHRDGMR_LCUR_SEQNO value is selected from the ROLLED_SEQNO field of
the last rolled learner record to determine which outcome record should be updated. If no
rolled learner SORLCUR record exists for that priority, the SORLCUR record is not
processed. (Only inactive records need to be rolled, if records were previously rolled to
history while they were active.)
Diploma data collected in the Graduation Application Form (SHAGAPP) is inserted if the
data has been submitted through self-service, or if you have manually entered or edited
the data in the form. When diploma data exists in SHAGAPP and is rolled manually or
through job submission, the data is moved to SHADIPL.
When the manual roll is processed, the setting of the
SORLCUR_ROLL_IND is ignored.
This occurs in the following conditions:
• when SHRROUT is run
• when the Roll to Outcome button is used in the Curriculum window on SGASTDN or
SFAREGS
• when the Create/Update Degree Record button is used on SHAGAPP
• when the Submit Request button is used on the Graduation Application Summary page
(
bwskgrad.p_disp_confirm) in Self-Service (and the Create/Update Degree
checkbox is checked on SHAGADR)
Consider the following conditions when manual roll processing is used with graduation
application functionality.
• If a graduation application exists for a learner curriculum record, that curriculum will not
be displayed for selection on the Graduation Application page in Banner Student Self-
Service.
• If a learner curriculum record has been rolled:
• you cannot create a graduation application from that learner curriculum record in the
Curriculum window;
• you can create an application from the degree record on SHADEGR;
• the learner curriculum record will not be displayed for selection in self-service.
• If a learner curriculum record is rolled that has an associated graduation application, the
outcome curriculum record is associated with the graduation application.
• If a learner curriculum record has been rolled and an associated graduation application
exists, neither the learner curriculum record nor the outcome curriculum record will be
displayed for selection in self-service.
• If a graduation application does not exist on a learner curriculum record, when the
curriculum is rolled and matched to a degree with an existing graduation application, the
graduation application from that degree is added to the newly rolled learner curriculum
record. (The curriculum matches the level, college, program, and degree.)
• If a graduation application does exist on an unrolled learner curriculum record, when the
record is rolled, a new degree will always be created, even if it is matched to an existing
degree by level, college, degree, and program. This prevents the process from charging

1351
Banner Student User Guide | Academic History
a student twice for the same degree sequence, when graduation charges are in use for
self-service graduation applications.
• If a current and active outcome curriculum has an active graduation application derived
from a rolled learner curriculum record, that curriculum record cannot be deleted without
acknowledging a warning message.
• If a learner curriculum record is copied, you have the option to associate the graduation
application to the new curriculum record that is created.
• If the graduation application is created from an outcome curriculum record, the
graduation application is not attached to the original learner curriculum record. Since
that learner curriculum record was already rolled, you cannot use that record to create a
graduation application.
• If an outcome curriculum record is copied, the graduation application is always
associated to the new curriculum record that is created.
Manually Roll Records from Forms
You can manually roll and update learner curriculum records using the Roll to Outcome
button in the Curriculum windows on SFAREGS and SGASTDN. The Roll to Outcome
button creates and updates Academic History records and outcome curriculum records for
changes made to curriculum records. This button can be masked if you do not wish to use
it. It is masked in the Curriculum window on SOILCUR.
The SHKROLS procedure behind the button works independently of SHRROLL. The
courses in the curriculum record can be rolled when the rolled sequence number is Null
and the curriculum record is active and current. The button is disabled when a new
curriculum record is inserted, but it is enabled when the record has been saved. The
setting of the Roll Learner radio group is not considered when the roll is initiated using the
Roll to Outcome button. The curriculum record will be rolled, even when the Roll
Learner radio group is set to
No.
This functionality allows users to make changes to curriculum records from the General
Student and Registration modules, for students who are preparing to graduate or complete
outcome requirements. The degree record is populated immediately without waiting for
SHRROUT or SHRROLL to be run through job submission.
The Create/Update Degree Record button on the Graduation Application Status Form
(SHAGAPP) is used to create a degree record and an outcome curriculum record when
the graduation application has been submitted from self-service. You can activate the
manual roll, collect graduation applications, review the data on SHAGAPP, and then
immediately update degree sequence records with the graduation and diploma
information. The current, active curriculum record is checked for an active graduation
application and an unawarded degree, based on the module code (
LEARNER or
OUTCOME).
This button triggers the graduation application roll process. It inserts the degree and
diploma records when the curriculum attached to the graduation application is from the
LEARNER module and has not been rolled. This in turn creates the degree record and
rolls the learner curriculum record to the outcome. Then the diploma information is
inserted from the graduation application information.

1352
Banner Student User Guide | Academic History
The degree is updated and the diploma information is inserted when the curriculum record
is from the
OUTCOME module, when the curriculum record is from the LEARNER module
and has not been rolled, or when the diploma exists on the graduation application but
does not exist for the degree on SHADIPL.
An error is displayed in the following conditions: when the form is running in query-only
mode, when the Graduation Application Information block has been modified, when the
graduation status is inactive, and when the data returned from the graduation application
roll process has an error.
Roll to Outcome from SGASTDN and SFAREGS
The Roll to Outcome button on SGASTDN and SFAREGS is active when the
Graduation Sequence field (rolled sequence number) is
Null, the curriculum is current
and active, and no graduation application exists. The button is not active when a new
curriculum record is inserted, but it is enabled with the record is saved.
This button triggers the roll to outcome process, sends the curriculum sequence number,
and refreshes the data that is rolled to the outcome. When the button is used to initiate the
roll, the setting of the Roll Learner radio group is not considered. The curriculum record
will be rolled, even when the Roll Learner radio group is set to
N.
The values for the Graduation Date, Graduation Term, Graduation Year fields and the
Fee radio group are pulled from the graduation application. If no application exists, the
graduation date, term, and year information is taken from SGASTDN and from the next
learner curriculum record. If a graduation status code exists in the graduation application
for the curriculum, that is also copied into the degree sequence.
Courses are applied to the new degree based on the setting of the Apply Graded
Courses to New Degrees checkbox on SHACTRL. When the checkbox is checked (set
to
Y), all courses that have not been previously applied to an awarded degree will be
applied to the new degree.
Apply Courses to Degrees
The Apply Graded Courses to New Degrees checkbox on SHACTRL is used to
determine if previously graded courses (from the learner curriculum) with the same level
should be applied to the new degrees created during the manual roll process, when the
roll is initiated from SGASTDN or SFAREGS and not from job submission. This checkbox
is used in place of the Apply Courses parameter in SHRROUT.
• When this field is checked (set to Y), the SHRROUT roll process will award all
previously graded courses in which the course has the same level as the degree to the
new outcome record. Previously rolled courses which have not been applied to an
awarded degree will also be applied.
• If unchecked (set to N), previously graded courses will not be awarded to the new
degree.
The process to award courses to the new degree will not occur if the degree is created
during the SHRROLL grade roll process. That process will apply only the course being
rolled to the new degree.

1353
Banner Student User Guide | Academic History
When changes are made to a learner curriculum record before SHRROLL is run, that
record may not be available for selection using the graduation application process, as it
only exists for the
LEARNER module, and the last SHRTTRM record would be for the prior
term. In this case, the changes need to be rolled to the outcome.
Courses are applied or not applied to a degree as follows:
• Courses previously applied to an awarded degree will not be applied to the new degree.
• Courses previously applied to a pending or sought degree will be applied to the new
degree.
• Courses not applied to any other degree will be applied to the new degree.
Delete Learner Curriculum Records
The Delete Learner Curriculum checkbox in the Error Severity controls of the Curriculum
Rules window on SOACTRL is used to automatically delete the learner curriculum record
with the same term as the general student record (SGBSTDN) effective term, when the
SGBSTDN record with that effective term is deleted. When this checkbox is checked (set
to Y), the error severity message level is set to
Fatal, and the user can only delete or
view the current, active learner curriculum record. The user cannot delete the general
student record when a curriculum record exists with the same term and effective term, that
is also current for a future general student effective term.
Example:
You cannot delete the SGBSTDN record for term 200443, because the curriculum record
is also current for term 200520.
An alert is shown if the SGBSTDN record being deleted is not the last general student
record. This allows the user to delete the curriculum record as well as the learner
curriculum record, or not. The message Warning: Curriculum data may exist for term.
Review curricula and delete if necessary displays three buttons: Delete Learner and
Curricula, Delete Learner, and Show Curricula and Cancel.
When the Delete Learner Curriculum checkbox is checked, the Delete Learner button is
not displayed in the warning message. The user must select either Delete Learner and
Curricula or Show Curricula and Cancel. When the Delete Learner and Curricula
button is selected, and one of the existing curriculum records is current for a future
SGBSTDN effective term, a warning will be displayed, and the user can cancel the delete
action.
Effective Term
SORLCUR
Term
SORLCUR
Sequence and
Curriculum Current Active
200443 200443 1 BA-HISTORY Y Y
200520 none exists

1354
Banner Student User Guide | Academic History
You cannot delete a general student record (SGBSTDN) if a current, unrolled, curriculum
record exists for the term, and it has an associated graduation application that is active.
You must delete the graduation application, and then delete the general student record. If
the SGBSTDN record is the last record being deleted, it cannot be deleted if it has any
associated curriculum records with unrolled graduation applications (existing graduation
application sequence numbers).
Manually Create Graduation Applications
The Apply to Graduate button is used to create graduation applications from learner and
outcome curriculum records on SGASTDN, SFAREGS, and SHADEGR. This button is
masked on SOILCUR. This button is active on learner curriculum records in SGASTDN
and SFAREGS when the graduation application sequence number is Null for the
curriculum record. When a previous graduation application exists for a curriculum record
(whether the record is active or inactive), that application must be deleted before the
button can be enabled. Just inactivating the application will not allow you to create a new
application.
Only one active graduation application can exist for a curriculum record, but multiple
curriculum records may have the same graduation application. This can only occur on the
outcome curriculum record, which groups primary and secondary curricula together when
an application is created for a degree sequence where more than one outcome curriculum
record has been associated with it.
The process behind the button used to create the graduation application executes the
Graduation Application API (
sb_gradapp) and updates the graduation sequence
number on SORLCUR. The user can then update the graduation application information
on SHAGAPP. The graduation application can be created using the graduation application
selection display rule code from self-service. However, not all graduation applications are
created using self-service. The process that creates applications from baseline does not
check any selection rules. Only self-service graduation applications use the selection
display rule codes. When a baseline application is created, the user needs to fill in all the
graduation application data manually on SHAGAPP.
Note: You can navigate to the Graduation Application Display Rule
Selection Form (SHAGADS) and the Self-Service Graduation Application
Display Rules Form (SHAGADR) from SHAGAPP to review existing rule
information.
Outcome curriculum records are created as follows when all significant curriculum
elements match the graduation application. When multiple, current, active learner
curriculum records exist with same level, college, degree, and program, and the Apply to
Graduate button is selected, or the application is submitted through self-service, all the
curriculum records with the same level, college, degree, and program are grouped
together with that single application and graduation application sequence number. This
takes place because only one degree is ever created with the same level, college, degree,
and program when the learner curriculum records are rolled to the outcome record.
The exception to this scenario is when a graduation application already exists for the
matching degree sequence, and then a new degree record is created. It is possible that an
institution has already applied a graduation fee to a degree sequence. In order to prevent
adding another graduation fee for the same degree sequence, a new degree sequence

1355
Banner Student User Guide | Academic History
will be created, even when the college, level, program, and degree match. Users are
cautioned about creating graduation charges from self-service when learner curriculum
elements may change for the student, such as when only the major is changed (college,
level, degree, and program are not changed), after graduation fees have already been
applied to the degree sequence.
In the case where a student has applied to graduate and a degree sequence with that
graduation application is created, that outcome curriculum record (and learner curriculum
record if it was rolled) will not be available for selection from the self-service graduation
pages, since the application exists and is active.
If the student changes majors for the same degree (college, level, degree, and program
are unchanged), when the user attempts to duplicate or update the learner curriculum
record to add the new major, the system asks if the graduation application should be
copied to the new curriculum. (See the “Archiving, Duplicating, and Deleting Curriculum
Records with Graduation Application Sequence Numbers”
section below.) If no, then the
new graduation application needs to be created using the Apply to Graduate button. The
new curriculum record will not be eligible for application through self-service until the
student registers, is graded, and grades are rolled to history. Therefore, it is recommended
that graduation applications are copied and updated if necessary at the time the major
change is processed. This may occur if a student changes a major in the term that is
closest to the intended graduation term, but after the degree sequence and graduation
application already exist.
When it is necessary to remove one of the curriculum records from the application, the
user needs to delete the existing graduation application with the two matching curriculum
records, and inactivate the learner curriculum record on SGASTDN or SFAREGS. Another
option is to modify one of the significant elements on the curriculum record (level, college,
degree, program), so the two curriculum records are no longer a match. Then the
application can be created. The user can delete the degree record and the associated
outcome curriculum record where the two matching curricula existed and can use the
manual roll process to create the correct degree record with only one rolled curriculum
record per degree.
Apply to Graduate on SGASTDN and SFAREGS
The Apply to Graduate button in the Curriculum window of SGASTDN and SFAREGS is
used as follows. This button triggers the Graduation Application API (
sb_gradapp),
updates the graduation application sequence number on SORLCUR, and opens
SHAGAPP so additional data can be entered. Curriculum data is copied from the
curriculum record (including Admission Term, Matriculation Term, Graduation Date,
Graduation Term, Graduation Year values). If that data does not exist, data from
SGBSTDN is used.
The button does not insert diploma information into the graduation application. This button
is only enabled if the learner curriculum record is current and active. The button is not
enabled when the learner curriculum record has been rolled to history, when the
graduation application is attached to an awarded degree, or when the graduation
application is inactive. When a graduation application exists, the button opens SHAGAPP
in update mode for that graduation application.

1356
Banner Student User Guide | Academic History
Apply to Graduate on SHADEGR
The Apply to Graduate button is used on SHADEGR to create a graduation application
from an outcome record with an Outcome Status of
SO (Sought). All current and active
curriculum records for the outcome will be included in the graduation application, when
that application is created. When outcome curriculum is copied, the graduation application
sequence is copied to the new record.
This button triggers the Graduation Application API (
sb_gradapp) to create the
application, updates the graduation application sequence number on the outcome
curriculum records, and opens SHAGAPP so additional data can be entered. The values
for the Graduation Date, Graduation Term, Graduation Year, Graduation Status fields
and the Fee radio group are inserted into the new graduation application from SHADEGR.
The current date is always used as the graduation application date when the new
graduation application is created using the Apply to Graduate button on SHADEGR. This
date can be modified in SHAGAPP. If the graduation application already exists, and the
outcome degree status is still
SO (Sought) and the button is enabled, but the user is taken
to the existing graduation application.
The button does not insert diploma information into the graduation application. This button
is only enabled if the learner curriculum record is current and active. The button is not
enabled when the graduation application is attached to an awarded degree or when the
graduation application is inactive. When a graduation application exists, the button opens
SHAGAPP in update mode for that graduation application.
Use Graduation Application Sequence Numbers
The Graduation Sequence field on SGASTDN, SFAREGS, SHADEGR, and SOIHCUR
and the Graduation Application Sequence field on SHAGAPP are used to display the
graduation application sequence number on the curriculum record for the learner
(SGASTDN, SFAREGS) and outcome (SHADEGR) curriculum records.
Graduation application sequence numbering works with the Banner Student Self-Service
graduation application processing. It tracks the graduation application sequence number
for the learner and outcome curriculum records. When a graduation application is
submitted, the application number is generated as a one-up number and is stored with the
curriculum record (SORLCUR) that was used to generate the application.
Only one active graduation application can exist for a curriculum. However, multiple
curriculum records may be associated with the same graduation application. This situation
occurs because a degree has multiple curriculum records associated with it, but that
degree record was generated by the same application where the learner curriculum
records have matching elements such as level, college, degree, and program.
Inactivate, Reactivate, and Delete Graduation Applications
Graduation applications can be inactivated and deleted but cannot be reactivated.

1357
Banner Student User Guide | Academic History
Inactivate
An existing graduation application is inactivated when an inactive graduation application
status code is assigned to it. (The Active Indicator is unchecked on the Graduation
Application Status Validation Form (STVGAST) for that status code.) No further updates to
that application are permitted, and that application is not viewable from the View
Graduation Applications link on the self-service menu. The graduation application
sequence number may be populated, but will appear Null when it is displayed, because
the graduation application is marked as inactive.
Reactivate
An inactivated graduation application cannot be reactivated. Once the application is
inactive, the user needs to create a new application, either from SGASTDN, SFAREGS, or
SHADEGR, or by using the Apply to Graduate option on the Student Records menu in
self-service.
Delete
When a graduation application is deleted, the application number is removed from the
curriculum record. The sequence number is deleted, and the history of that application no
longer exists. If the application number was
1, and no other application numbers higher
than
1 exist, creating a new application will begin again with the sequence number 1.
Archive, Duplicate, and Delete Curriculum Records with Graduation
Application Sequence Numbers
Archiving, duplicating, and deleting curriculum records with graduation application
sequence numbers can be performed for manual curriculum roll processing.
Archive
When a curriculum record has been archived, no updates can be made to the graduation
application. Curriculum records cannot be archived if a graduation application exists.
Duplicate
When a curriculum record is created using the Duplicate Record function or any of the
non-destructive update functions, the graduation application sequence number will be
reset to Null. If a user inserts or duplicates records while in the Curriculum window of
SGASTDN, SFAREGS, or SHADEGR, a message is displayed with the options to copy
the graduation application from the previous curriculum record, inactivate the graduation
application from the previous curriculum record, or assign a new priority to the new
curriculum record. Assigning a new priority means the graduation application is not copied
with the new curriculum record.

1358
Banner Student User Guide | Academic History
Delete
When a degree record is deleted and a graduation application exists, that graduation
application is also deleted. If the curriculum records associated with the graduation
application are from the
LEARNER module, the graduation application sequence number
is removed from the learner curriculum record. Otherwise, the outcome curriculum record
is deleted along with the associated degree. Curriculum records cannot be deleted if a
graduation application exists.
The graduation application sequence number is removed from the learner or outcome
curriculum records if the graduation application is deleted. The graduation application
sequence number can be reused after it has been deleted, if it was the maximum
application number for the student.
Use Graduation Application Sequencing Rules
Graduation application sequence numbering functions with curriculum processing as
follows. The SHAGAPP record must always have at least one associated curriculum
record that is active and current. If all the curriculum records associated with that
graduation application are not current, the graduation application status must be inactive,
unless the curriculum record was already rolled to the outcome or is already an outcome
curriculum, and the degree has been awarded.
• Using the Replace button in the Curriculum window will automatically inactivate the
STVGAST code for the graduation application, unless the learner curriculum record has
been rolled and the degree awarded for that curriculum.
A warning message is displayed that the function will cause the graduation application
to be made inactive. You can choose to continue or not continue.
• Using the Update and Duplicate buttons in the Curriculum window will display a
message with the option to copy the graduation application sequence number to the
new learner curriculum record, inactivate the existing graduation application, or create a
new priority and then inactive the graduation application. If the graduation application is
not to be copied, that graduation application status code is inactivated on STVGAST, as
a curriculum record cannot be deleted when a graduation application exists.
• Using the Replace, Duplicate, and Update buttons on SHADEGR will automatically
copy the graduation application sequence number to the new curriculum record. If the
curriculum record has been rolled to the outcome, and the degree it is associated with
has been awarded, the graduation application sequence number is not copied to the
new curriculum record, and the prompt is not displayed.
Replace Functionality on SGASTDN
When the graduation application sequence number is populated for an unrolled learner
curriculum record, a message is displayed that the graduation application will be
inactivated. The user can then choose to continue or cancel the replacement process. If
you continue, the new curriculum record is created with the graduation sequence number
set to Null, and the previous graduation application is made inactive. If you do not
continue, the replacement process is cancelled.

1359
Banner Student User Guide | Academic History
The delete process for SGBSTDN uses the SOBCTRL processing that determines if the
learner curriculum record with the same term must be deleted. An alert is shown if the
SGBSTDN record being deleted is not the last general person record. This allows the user
to delete the curriculum record as well as the learner curriculum record, or not. The
message Warning: Curriculum data may exist for term. Review curricula and delete if
necessary displays three buttons: Delete Learner and Curricula, Delete Learner, and
Show Curricula and Cancel.
When the Delete Learner Curriculum checkbox is checked in the Curriculum Rules
window on SOACTRL, the Delete Learner button is not displayed in the warning
message. The user must select either Delete Learner and Curricula or Show Curricula
and Cancel. When the Delete Learner and Curricula button is selected, and one of the
existing curriculum records is current for a future SGBSTDN effective term, a warning will
be displayed, and the user can cancel the delete action.
You cannot delete an SGBSTDN record if a current curriculum record exists for the term,
and it has an unrolled graduation application. If the SGBSTDN record is the last record
being deleted, it cannot be deleted if it has any associated curriculum records with
unrolled graduation applications (existing graduation application sequence numbers).
Replace Functionality on SHADEGR
The Replace button works differently on SHADEGR than on SGASTDN. When the
Replace button is used for an outcome curriculum record that has a graduation
application associated with the degree sequence, the new curriculum record will
automatically replace the old curriculum record for the graduation application. The
outcome delete process will delete the graduation application. If a learner curriculum
record exists for a graduation application, the outcome delete process will not delete the
graduation application. When an outcome curriculum record is copied, the graduation
application sequence number is copied to the new record. This includes processing for the
Update and Duplicate buttons in the Curriculum window.
Delete and Purge General Student Records
You cannot delete the general student record (SGBSTDN) if the current curriculum record
has a graduation application sequence number, and the curriculum record is also being
deleted. When an outcome record is deleted, the graduation application is also deleted.
The General Student Purge Process (SGPSTDN) checks whether the SGBSTDN record
is the last record for the PIDM and has a curriculum record with an associated graduation
application that has not been rolled. In this case, the record will not be deleted. If the
SGBSTDN record is not the last record for the PIDM, it still cannot be deleted if it has a
current curriculum record with a graduation application that has not been rolled.
Update and Inactivate Curriculum Records
When the Student Type Update Report (SHRTYPE) is run, the graduation application
sequence number is copied to the new learner curriculum record when the student type is
changed, unless that curriculum record has already been rolled, and the associated
degree has been awarded.
The admissions decision process (SAKDCSN package) inactivates the existing
graduation application, when the curriculum record is inactivated as a result of the admit

1360
Banner Student User Guide | Academic History
replace process, unless that curriculum has been rolled to history, and the associated
degree has been awarded.
When the student status (STVSTST) is changed on SGASTDN or SHADEGR, the process
copies the graduation application sequence number to the new curriculum record with the
status change, unless that curriculum has been rolled to history, and the associated
degree has been awarded.
Purge Curriculum Records
You cannot purge curriculum records using SOPLCPG when a graduation application
sequence number exists, and the SHAGAPP record exists. The Curriculum API
(
sb_curriculum) cannot be purged when a graduation application sequence number
exists, and the SHAGAPP record exists. SHAGAPP will display the only current
curriculum record in the Curricula Summary block when the graduation application status
code is active. It will display all curriculum records when the graduation application status
code is inactive.
The Learner Curriculum Purge Process (SOPLCPG) checks whether the curriculum
record has an associated graduation application. The curriculum record will not be deleted
if the graduation application exists, the module code for the record is
LEARNER, and the
record is not the only curriculum record that is attached to the graduation application.
Open Learning Registration and Academic History
Open learning allows you to do the following in the Academic History module:
• Run reports (such as student transcripts and grade rolls) using date ranges in place of
term.
• Roll open learning registration data to academic history.
• Run transcripts by start date in addition to traditional terms.
For more information on how to set up and use open learning registration, please refer the
“Procedures” sections of the “Course Catalog”, “Class Schedule”, and “Registration”
chapters.
Build Grades
The institution's grading policy is identified to the system on the Grade Code Maintenance
Form (SHAGRDE). The grade is defined on this form with information to determine what
hours that grade counts in: hours earned, attempted, passed, and whether it is used in a
GPA calculation. A grade is also identified with valid grading modes. Any grade that will be
entered on a student's record must first be defined on this form. If the Repeat/Equivalent
Course Repeat Process (SHRRPTS) will be used, all grades must be assigned a numeric
value on this form.
A substitute grading policy may also be built using the Grade Code Substitution Form
(SHAGRDS). This form is used to set up rules to allow one grade to be substituted for
another based on the grading mode of the class. For example, if a student gets a 'B' grade

1361
Banner Student User Guide | Academic History
in a class being taken as pass/fail, that B may be substituted by a P. The substitution rules
are used when grades are rolled to academic history in either online or batch methods.
Enter Grades
Grades for course sections submitted by the faculty are entered on the Class Roster Form
(SFASLST). This form allows the grades to be entered for each student in the section. The
grades are not validated against the grading mode at the time of entry on SFASLST or on
the Web. Validation against grade mode occurs during the roll process, at which time
grade substitution rules are also checked. After grades have been rolled to Academic
History, they may no longer be changed on the Class Roster Form (SFASLST). Any
modification to a student's grade must be done through the Course Maintenance Form
(SHATCKN).
Roll Grades
All grades entered on the Class Roster Form (SFASLST) or the Class Attendance Roster
Form (SFAALST) may be rolled online to Academic History by checking the Roll
(Indicator) box in the Key Information, and then saving the grades. This process creates
a record on the Term Course Maintenance Form (SHAINST) for each student with the
grade in the course section. The grade roll process also flags the system that a grade
mailer needs to be produced. A batch process may also be run to roll all grades on
SFASLST to Academic History.
When information is rolled to academic history either online using the Class Roster Form
(SFASLST) or the Class Attendance Roster Form (SFAALST) or in batch using the Grade
Roll Process (SHRROLL), the section start and end dates are rolled. If the schedule type
of the section permits assignment of a CRN to a co-op activity, and the CRN is assigned to
a co-op for the term, the start and end dates for the co-op are rolled. If no co-op exists or
the section’s type does not permit the assignment of a CRN to a co-op activity, then the
section dates are rolled.
The shared SHKROLS package is used to perform all grade roll functionality. It works in
conjunction with the Grade Roll Process (SHRROLL) batch program and the online roll
process performed on the Class Roster Form (SFASLST) and the Class Attendance
Roster Form (SFAALST). SHKROLS package can roll attempted hours for individual
courses into Academic History with grade roll processing.
SHKROLS will also populate the term header record with the student centric period when
the record is created during the roll process. When a student has a cycle designator in
effect for the term, the student centric period associated with the process term and
student's cycle designator will be inserted into the SHRTTRM table. This will take place
when grades are rolled from the Class Attendance Roster Form (SFAALST), the Class
Roster Form (SFASLST), or the Grade Roll Process (SHRROLL).
You can drop or withdraw a student from a course but retain the original hours for that
course for use in Academic History using the Count in Attempted (Hours Indicator) on
STVRSTS. When this indicator is checked for a course registration status code, the
attempted hours rolled will be the hours that existed on the course prior to the dropped or
withdrawn status being recorded.

1362
Banner Student User Guide | Academic History
When the Count in Attempted (Hours Indicator) is checked on STVRSTS for the course
registration status code, the attempted hours displayed on SFAREGS for that CRN will be
rolled to the
SHRTCKG_HOURS_ATTEMPTED column and will be displayed on
SHATCKN in the Attempted Hours field in the Grades block. If the Count in Attempted
(Hours Indicator) is unchecked, zero attempted hours will be rolled for the course.
The process will only roll components and sub-components when there is no value for the
grade date. The grade update restrictions also apply to components and sub-components.
When a final grade is entered against an individual registration record, the grade date
(
SFRSTCR_GRDE_DATE) is not, as yet, updated. When SHRROLL is run in batch mode,
those registration records containing a value in the Final Grade field
(
SFRSTCR_GRDE_CODE) and no value in the (Grade) Date are rolled to academic
history. The existence of a date in this field prevents the batch grade roll process from
performing any subsequent rolls to academic history. The presence of this date also
prevents the final grade from being updated in either SFASLST or SFAALST.
The same grade update restriction is required for component and sub-component marks.
Therefore, when the registration is rolled, the same date that is entered in the registration
date field is also used to populate the roll date in the SHRMRKS, SHRCMRK, and
SHRSMRK tables for the applicable student.
Process Flow
Here is a process flow for the logic used by the grade roll process. This process manages
the insert of all parts of the course in Academic History, and then inserts or updates the
degree and the outcome curriculum record. Finally, it applies the course to the degree.
1. The learner curriculum is selected for the PIDM in which the term code is less than the
end term for the student's current learner record.
For example, the student has a general student record for terms Fall2007 and
Spring2008. The end term of the Fall2007 record is the term of the next general
student record, which is Spring2008. The end term for the Spring2008 term is the end
of time.
2. The system checks the setting of the Rolled to Outcome (Indicator) for the
curriculum record. If it is
Y, the record is not processed.
2.1. For each record that is selected, the setting of the Current checkbox is
retrieved.
2.2. The roll to outcome process is called for the curriculum.
2.3. If the degree that is returned from the curriculum record has not been awarded,
the course being rolled to history is applied to the degree.
Unroll Grades
When a graded and rolled course is deleted from the Course Maintenance Form
(SHATCKN) using the Remove Record function, the following occurs. The course is
removed from the academic history tables, and the grade and grade date are removed
from the registration table. The course is therefore “unrolled” from history, rather than just
deleted from the academic history tables.

1363
Banner Student User Guide | Academic History
When a student registers in a course and receives a grade, that grade is then rolled to
history. The grade date is populated, which in turn sets the Rolled indicator to checked (
Y)
on the Class Roster Form (SFAALST) and the Class Attendance Roster Form
(SFAALST). This also changes the value displayed in the Rolled column for final grades
in Banner Faculty and Advisor Self-Service to
Y on the Final Grades page
(
bwlkffgd.P_FacFinGrd), the Incomplete Grades Summary page
(
bwlkincg.P_FacIncmpGrdSum), and the Incomplete Final Grades
(
bwlkffgd.P_FacCommitFinGrd).
When the Remove Record function is used to delete the course from SHATCKN, the
Grade and Grade Date field values are removed from the SFRSTCR table and are no
longer displayed on the SFAALST and SFASLST forms.
In Banner Faculty and Advisor Self-Service,
N is displayed in the Rolled column for the
student in the course on the Final Grades page (
bwlkffgd.P_FacFinGrd), the
Incomplete Grades Summary page (
bwlkincg.P_FacIncmpGrdSum), and the
Incomplete Final Grades (
bwlkffgd.P_FacCommitFinGrd).
The grade that was rolled to history prior to the removal of the record in SHATCKN can
still be viewed using the Registration Audit Form (SFASTCA), should the user need to see
the original grade.
How Degree Attributes Are Rolled from Catalog to Academic History
1. Degree attributes are entered in the Catalog module (SCADETL).
2. A new schedule record is created in the Class Schedule module, and the catalog
attributes populate the schedule attributes (SSADETL).
Note: This is the reason that degree attributes exist on the catalog record,
so they can be defaulted into the schedule record.
3. A student registers for the section, and the section is graded and rolled to history.
4. For the first student that is rolled in the section, the schedule degree attributes are
used to populate the history degree attributes (SHRATTC).
5. The History Course Section Attribute Table (SHRATTR), which is used in CAPP, is
populated from SHRATTC.
6. Other students register for the section and have grades rolled. The contents of
SHRATTC are used to populate the student's degree attributes.
7. You can view the rolled section degree attributes (SHRATTC) on SHADEGR and
SHATCKN, although they are not updateable.
8. To customize the degree attributes on a student's record (SHRATTR), you can insert
and/or delete data from the SHRATTR block.
Grade Roll and Concurrent Curricula Processing
The following processing is used to roll learner (General Student) information from
SBGSTDN to the learner outcome (Academic History) and update records on SHADEGR
via the Grade Roll Process (SHRROLL).

1364
Banner Student User Guide | Academic History
1. The most current SGBSTDN record for the person is read. This is determined by
checking for the maximum learner effective term record that is less than or equal to
the term on the course.
2. The SORLCUR table is read beginning with the lowest priority number row first. All
rows are selected where the term code on SORLCUR is less than the To Term of the
selected SGBSTDN record. All previous term records are read to capture any non-
destructive updates on the learner record and to re-roll missing outcome curriculum
records.
3. If the
SORLCUR_ROLL_IND is set to N, processing will end. Otherwise, continue to
the next step.
4. If the
SORLCUR_ROLL_SEQNO is Y, the following may occur.
4.1. A new SHADEGR record is created if the learner SORLCUR row is active and,
No outcome SORLCUR row exists with the same college, degree, level, and
program.
or
An outcome SORLCUR row exists with the same college, degree, level, and
program with status of
AW (Awarded).
or
A graduation record already exists for a degree sequence with the same
college, level, degree, and program.
4.2. An existing SHADEGR record is updated if:
An outcome SORLCUR row exists with the same college, degree, level and
program with status that is not equal to
AW (Awarded).
– If the learner SORLCUR row is active, use the
SHRDGMR_KEY_SEQNO field
on the matched outcome row to determine which outcome row can be
updated. (This is used if a curriculum was started, inactivated, and then re-
started).
The learner SORLCUR row is not rolled during the grade roll process when
the term for the row is earlier than the term on the existing degree record
(SHADEGR) for the current and active SORLCUR record.
– If the learner SORLCUR row is inactive, check for the last rolled learner
SORLCUR row for the same priority (i.e., the
SORLCUR_ROLLED_SEQNO
field will not be Null). Select the SHRDGMR_LCUR_SEQNO value from the
ROLLED_SEQNO field of the last rolled learner record to determine which
outcome row is to be updated. If no rolled learner SORLCUR row exists for
that priority, do not process the SORLCUR record. (You only need to roll an
inactive record, if the record was previously rolled to academic history while it
was active).
4.3. The copy process for a new or updated SHRDGMR record is as follows.
The learner SORLCUR row is copied, and the module is changed to
OUTCOME.

1365
Banner Student User Guide | Academic History
The SORLCUR_ROLLED_SEQNO field on the learner SORLCUR row is
updated to that of the SORLCUR sequence number of the new SORLCUR row
for the
OUTCOME module.
All the active SORLFOS rows attached to the rolled learner SORLCUR row (the
highest sequence number for each priority) are read and copied to the new
outcome curriculum.
The SORLFOS rolled sequence number (
SORLFOS_ROLLED_SEQNO) is
updated with the new outcome SORLFOS sequence number.
The curriculum status on the newly created SORLFOS outcome rows is
defaulted from STVDEGS. If none exists there, the delivered defaults are used.
5. If the
SORLCUR_ROLLED_SEQNO is not blank (i.e., it was previously rolled), the
following may occur.
5.1. The SORLCUR rows’ corresponding SORLFOS rows are read to find rows with
blank rolled sequence numbers, and the highest sequence number per priority
is selected.
5.2. If the selected SORLFOS row is inactive, then it is not rolled if the same field of
study type and priority were not previously rolled. (You can determine if the row
was previously rolled by selecting the last rolled learner SORLFOS row for the
same SORLCUR priority. If none exists, it was not previously rolled.)
5.3. Copy all other SORLFOS rows to the outcome SORLFOS rows for the
outcomes curriculum previously rolled, (using the
SORLCUR_ROLLED_SEQNO
value of the learner SORLCUR row to which this
SORLFOR row is attached). Update the
SORLFOS_ROLLED_SEQNO field with
the new outcome
SORLFOS_SEQNO value. The curriculum status on the newly
created SORLFOS outcome rows is defaulted from STVDEGS. If none exists
there, the delivered defaults are used.
Example:
Here is an example for this step of how the
SORLCUR_ROLLED_SEQNO and
SORLFOS_ROLLED_SEQNO fields are used when grade roll processing is run.
A student has an English major in the BA_UG program:
Grades are rolled at end of first semester.
For the student:
Table Curriculum Record
SORLCUR
200510, BA_UG, ACTIVE,
ROLLED_SEQNO field is Null
SORLFOS
200510, ENGL, ACTIVE, INPROGRESS,
ROLLED_SEQNO field is
Null
Table Curriculum Record
SORLCUR
200510, BA_UG, ACTIVE,
ROLLED_SEQNO field is 1

1366
Banner Student User Guide | Academic History
For academic history:
The student changes their major to Art:
For the student:
The next time SHRROLL is run, the process will take into account the newly
duplicated SORLFOS row for English (activity status is
INACTIVE) with a
ROLLED_SEQNO field that is Null.
It will check the corresponding SORLCUR row (to find its rolled sequence number
value - 1), and it will use that value to insert an SORLFOS row with a learner module
of
OUTCOME and an activity status of INACTIVE, and in so doing will inactivate the
existing active ENGL row in Academic History for sequence number
1.
It will then take into account the next LEARNER row in SORLFOS for ART, which also
has a
ROLLED_SEQNO field that is Null. It will check that this SORLFOS row also
has an associated SORLCUR row with a
ROLLED_SEQNO field that is 1, and it will
now insert a new SORLFOS row with a learner module of
OUTCOME for a major of
ART with a status of
ACTIVE.
The activity status on the newly created
OUTCOME rows will be set to ACTIVE or
INACTIVE depending on the curriculum status of the corresponding General Student
row which had the
ROLLED_SEQNO field set to Null.
SORLFOS
200510, ENGL, ACTIVE, INPROGRESS,
ROLLED_SEQNO field is
1
Table Curriculum Record
SORLCUR
200510, BA_UG, ACTIVE,
LCUR_SEQ field is 1
SORLFOS
200510, ENGL, ACTIVE, SOUGHT,
LFOS_SEQ field is 1
Table Curriculum Record
SORLCUR
200510, BA_UG, ACTIVE,
ROLLED_SEQNO field is 1
SORLFOS
200510, ENGL, ACTIVE, INPROGRESS,
ROLLED_SEQNO field is
1
SORLFOS
200510, ENGL, INACTIVE, CHANGED,
ROLLED_SEQNO field is
Null
SORLFOS
200510, ART, ACTIVE, INPROGRESS,
ROLLED_SEQNO field is
Null
Table Curriculum Record

1367
Banner Student User Guide | Academic History
For academic history:
For the student:
Grade Roll Package (SHKROLS) Processing
The Grade Roll Package (SHKROLS) is used to pull the graduation values from the
curriculum table. The graduation information entered on the curriculum, if present, will
populate the SHRDGMR record.
Example:
The following table describes how the roll process works if the learner has two active and
current learner curriculum records with the same level, college, degree, and program, and
both are set to roll to academic history.
Table Curriculum Record
SORLCUR
200510, BA_UG, ACTIVE,
LCUR_SEQ field is 1
SORLFOS
200510, ENGL, ACTIVE, SOUGHT,
LFOS_SEQ field is 1
SORLFOS
200510, ENGL, INACTIVE, CHANGED,
LFOS_SEQ field is 2
SORLFOS
200510, ART, ACTIVE, SOUGHT,
LFOS_SEQ field is 3
Table Curriculum Record
SORLCUR
200510, BA_UG, ACTIVE,
ROLLED_SEQNO field is 1
SORLFOS
200510, ENGL, ACTIVE, SOUGHT,
ROLLED_SEQNO field is 1
SORLFOS
200510, ENGL, INACTIVE, CHANGED,
ROLLED_SEQNO field is 2
SORLFOS
200510, ART, ACTIVE, SOUGHT,
ROLLED_SEQNO field is 3
Graduation data
exists on SGBSTDN
Graduation data
exists on SORLCUR What is rolled to SHRDGMR
Y Y Graduation data on SORLCUR
N Y Graduation data on SORLCUR
Y N Graduation data on SGBSTDN
N N No graduation data will be rolled

1368
Banner Student User Guide | Academic History
The insert degree procedure in SHKROLS is called before the first curriculum record is
created. It uses the curriculum values or the SGBSTDN record if the curriculum is Null.
The generate API procedure is used to insert API-reported errors into the SOTPRNT
table, so that SHRROLL will list all API errors on the report and continue processing the
remaining grades. The
SOTPRNT_ERR_MSG column stores the API error message.
Build/Change Term Header
Term header information needs to be created for each term of the student's career at the
institution. This header information is created using the Term Course Maintenance Form
(SHAINST). This form provides information on when grade mailers were sent and is where
Graduation data
exists on
SGBSTDN
Graduation data
exists on
SORLCUR 1
Graduation data
exists on
SORLCUR 2 What is rolled to SHRDGMR
Y Y N Graduation data on SORLCUR 1
Y N Y Graduation data on SORLCUR 2
Y N N Graduation data on SGBSTDN
YYYIf the graduation data associated with
the two SORLCUR records are
identical, one SHRDGMR record will be
created with the SORLCUR graduation
data and both curricula attached to it.
If the graduation data associated with
the SORLCUR records are different,
two separate SHRDGMR records will
be created, each populated with the
graduation data from one of the
SORLCUR records.
N Y Y If the graduation data associated with
the two SORLCUR records are
identical, one SHRDGMR record will be
created with the SORLCUR graduation
data and both curricula attached to it.
If the graduation data associated with
the SORLCUR records are different,
two separate SHRDGMR records will
be created, each populated with the
graduation data from one of the
SORLCUR records.
N Y N Graduation data on SORLCUR 1
N N Y Graduation data on SORLCUR 2
NNNIt will be blank on the degree record.

1369
Banner Student User Guide | Academic History
term GPA information is maintained. The header information is automatically created
during the grade roll process using the Class Roster Form (SFASLST), the Class
Attendance Roster Form (SFAALST), or during the batch Grade Roll (SHRROLL).
Change/Maintain Grades
After the term header information has been created, each course that has been rolled from
the Class Roster Form (SFASLST) may be accessed through the Term Course
Maintenance Form (SHAINST). This form maintains access to all of a student's rolled
courses and grades for a specific term. Any grade changes are made here. This course
and grade information will print on the student's transcript.
A grade change may also be made by accessing the Term Course Summary Form
(SHACRSE). When the course that needs to be changed is flagged, the Term Course
Maintenance Form (SHAINST) is used to make the change.
Automated Incomplete Grade Processing
This processing allows an institution to automatically assign an incomplete grade code for
a course when a student has not completed the coursework in the designated timeframe.
This processing assumes a course has been extended to help the student finish the
assignments. Extensions can be varied in length due to level (undergraduate or graduate),
circumstances (illness or family emergency), research opportunities, or institution policy.
Regardless of the nature of the extension, grades that are incomplete require closure.
When an incomplete grade has been assigned, it indicates that the course has not been
finished. However, a final grade may need to be assigned as a default final grade. The
default final grade is a replacement grade for the incomplete grade that is assigned if no
manual intervention occurs by the time the extension end date is reached. This processing
recognizes incomplete grade code values and automates the conversion of the final
grades.
This processing contains three main components: the grade collection process and the
corresponding rules, the automated processing of unreconciled, incomplete grades, and
the display of the incomplete grades.
Processing Overview
To use this processing, your institution should review any existing policies regarding the
automation of incomplete grades or plan to define such policies. The Incomplete Grade
Rules Form (SHAINCG) is used to create incomplete grade rules, and other forms are
used to track default (replacement) grade and extension date information. Those forms
are: SFAALST, SFASLST, SOATERM, SHAGRDE, and SHATCKN.
The Incomplete Grade Process (SHRCINC) is used to automatically change the grade
from incomplete to the default, final grade on the assigned date. This process examines
the date on which the incomplete grade is set to expire, and if that date has been reached
or exceeded makes the appropriate grade change. If the incomplete work has been made
up and the incomplete grade has been changed through normal Banner grade change

1370
Banner Student User Guide | Academic History
processes, the default final grade would have been deactivated as part of the grade
change, and no further action is taken.
The Grade Roll Process (SHRROLL) rolls the incomplete final grade and the extension
date from the class roster to history. The process also validates that the incomplete grade
is an active grade code for the same level as the final grade for which it is being
substituted as an incomplete grade.
The self-service grade lookup displays the default, incomplete, final (replacement) grade,
the expiration date, and potentially an associated comment when the student has an
incomplete grade in any course. The comment, if one exists, identifies whether the
extension date is constrained to be less than or equal to, or greater than or equal to the
system default extension date.
When an incomplete grade is assigned as the grade for a student in any course, the
system will:
• Default and require a replacement grade that the incomplete grade will be converted to
on a specified future date, if the incomplete is not changed, and a new grade has not
been assigned through normal grade change processes.
• Default and require the date on which the incomplete grade will expire and the default,
replacement, final grade will be assigned. (A default expiration date is needed if a date
has not been entered for the default replacement grade. Default grades and dates are
populated automatically by the new process and can be changed by instructors, if the
grade rule values are set to grant that permission.)
The Incomplete Final Grade and Extension Date fields on SFASLST and SFAALST are
also used in automated incomplete grade processing, as are the Incomplete Grade Ind
and Incomplete Grade Default fields on SHAGRDE, and the Incomplete Final Grade
field on SHATCKN. The Incomplete Final Grade field is enabled for input based on the
setting of the Override Grade field on SHAINCG. The value displayed is the default from
the SHRGRDE table. It can be overridden by the instructor, if that permission has been
granted on the incomplete grade rule. A value is required for the Incomplete Final Grade
field when an incomplete grade is entered for a student.
The Extension Date field determines the expiration date, after which the replacement
grade is eligible to become the final grade. This field always displays a value, based on
the part-of-term data for the term on SOATERM. An extension date can be defined for a
part-of-term, the full term, or neither. If no extension date has been defined for the part-of-
term that matches the course, the process checks for an extension date for the full term,
and if that is not found, then the end date for the full term is used. The extension date for a
student can only be changed or overridden when the Override Grade Date radio group is
set to allow that on the incomplete grade rule. The Override Grade Date radio group can
be set to: allow any date, not allow any date override, restrict the date to on or before the
default extension date, or restrict the date to on or after the default extension date.
Processing for incomplete grade entries requires that:
• A grade code value has been entered which passes the checks for being a legitimate
grade and grade mode for the course.
• The entered grade code cannot be another incomplete grade type.
• The date is valid and complies with the value set for the incomplete grade rule.

1371
Banner Student User Guide | Academic History
Grade Collection
Grade code values that are identified as incomplete grade types are maintained within the
Grade Code Maintenance Table (SHRGRDE). Multiple grade code values may be defined
as incomplete, such as “incomplete-passing” and “incomplete-failing”. Grades are entered
in SFASLST, SFAALST, or in Banner Faculty and Advisor Self-Service. When final grades
have been entered, the incomplete grade rules need to be checked, as well as the grade
code values. The automated process checks the effective term records to see if
incomplete grade processing is active for the term.
The process first searches for the most current rule on or before the grading term with a
matching level. If none is found, then it searches for the most current rule on or before the
grading term where no level is specified. That rule will be the determining processing rule.
If the Incomplete Grade Processing checkbox is not checked (
N), then incomplete grade
processing is inactive (turned off), and all grades function as non-incomplete grades.
A default term rule can be set up for automated incomplete grade processing. You can
also define multiple default rules within the effective term that differ by level. When
incomplete grade processing is active (turned on) and incomplete grades have been
assigned and rolled to history, the default final grade will be substituted as the final grade
during the automated process, in the case that the coursework has not been completed
and the grade has not been manually updated by the instructor. The instructor can
override the default final grade when it has been assigned and before it is rolled, if
override permission has been granted.
Even if grade codes have been defined on SHAGRDE as incomplete grades, along with
default, incomplete, final grades, those default, incomplete, final grades and extension
dates will not be implemented on student grade records when incomplete grade
processing is inactive (turned off) for the effective rule. Only final grade codes will be
recorded. Automated incomplete grade processing checks to see if an incomplete grade
has been entered on a student’s record (an incomplete grade is in the Final Grade field on
SFAALST). The grade is determined to be incomplete when the Incomplete Grade Ind on
SHAGRDE is checked (set to
Y) for the grade code attribute. The processing checks the
term and level of the student for the course to see if they match the rule on SHAINCG for
the effective term.
When incomplete grade processing is active for a rule for one or more levels in a term, it
may not necessarily be active for all levels. Therefore, the process checks the student’s
level for the course. When incomplete grade processing is inactive for a rule that governs
the term and course level for the student, then the fields for incomplete grade processing
are skipped. When the rule record is found to be active, the additional fields for incomplete
grade processing are processed along with the grade code, if it is has a type of incomplete
in SHRGRDE.
If the grade code is incomplete, the process checks the part-of-term dates for the term in
which the work is to be completed by the student. Extension expiration dates can be
selected on SOATERM for a part-of-term. If the extension date is not set for the matching
part-of-term, then processing will search for an extension date for the full term (where part-
of-term is 01). If an extension date is not set for the full term, the end date for the full term
will be used. Instructors can override the default date extension and shorten or lengthen it
as needed, if override permission has been granted.

1372
Banner Student User Guide | Academic History
Identify Incomplete Grades
Incomplete grades are identified on SHAGRDE using two fields. The Incomplete Grade
Ind checkbox is used to specify that the grade code is an incomplete grade. The
Incomplete Grade Default field displays the default, replacement, final grade for the
incomplete grade. The Incomplete Grade Ind checkbox should always be checked (set
to
Y) when a default final grade exists. If the Incomplete Grade Ind checkbox is set
without the entry of a default final grade, faculty members need to have override
capabilities to enter the incomplete final grades. The Incomplete Grade Default field can
be Null, so an instructor can enter those values.
When a grade record is removed or inactivated, the system checks that the grade is not in
use as a default, incomplete, final grade on another active grade record. When a user
attempts to delete, remove, or inactivate any grade record on SHAGRDE, a verification
check takes place. The check ensures that:
• the grade code is not used as a default final grade on any other active grade code
record within SHAGRDE (SHRGRDE) for the same level, and
• the grade code is not used as an incomplete final grade on any Academic History record
for its greatest sequence number for current, active grades.
If the check finds that one of these conditions exists, an error message is displayed.
When the user attempts to populate the incomplete final grade code, it validates that:
• the grade code already exists in the SHRGRDE table,
• it is active for the level of the incomplete grade for which it is being defined,
• it is not the same grade code for which it is being defined, and
• it is not another incomplete grade code.
This criteria controls the pulldown list for the Incomplete Grade Default field. The grade
code must be:
• active as of the most recent effective term relative to the grade code entry,
• for the same level as defined on the existing record,
• it cannot be the same grade code value as the grade code value for this record, and
• it cannot be an incomplete grade. (The Incomplete Grade Ind must be unchecked or
set to
N.)
If these conditions are not met, errors will be displayed:
• If you enter a grade code value for the incomplete grade default that is not defined within
SHAGRDE as an active grade code for the same level as the final grade code, an error
is displayed.
• If you enter the a grade code value for the incomplete grade default that is the same as
the final grade code, an error is displayed.

1373
Banner Student User Guide | Academic History
Assign Incomplete Grades
Default final grades can be entered or defaulted at the time an incomplete grade code is
assigned. If the outstanding coursework is not completed, then the default or replacement
final grade will be applied at a point after the expiration date. The defaulted grade does not
take into account the effort to date made by the student for the course. The instructor can
override the default final grade, if institution policy allows.This capability is maintained in
the new SHAINCG rules form and the SHRINCG rules table.
For example, if the coursework has not been completed, then a default grade of “failing”
can be assigned. This is an institutional default from the SHRGRDE table. However, at the
time grades are entered, the instructor can acknowledge that an individual's efforts to date
already meet the criteria for a passing grade, such as a “C”, but that this student has not
successfully completed all the required work. Consequently, the instructor can override
the default, incomplete, final grade from “failing” to a different valid grade code, such as
“C”, and allow for the completion of the remaining work. Alternatively, institutional
preference can be to assign different defaults for different incomplete grade codes within a
level, such as incomplete-passing and incomplete-failing.
Assign Extension Dates
A date is needed at the time an incomplete grade is assigned, at which point the default
final grade is eligible to become the final grade, as the remaining work has not been
completed by the extension date expiration. The default extension date is stored with the
term setup date for terms and parts-of-term on SOATERM. (Extensions dates can be set
at the part-of-term level.)
If there is no extension date for the matching part-of-term, the process checks for a full
term value designated as part-of-term 1. If part-of-term 1 has no specified extension date,
the process uses the end date for the full term. The rules on SHAINCG determine if the
instructor can change the extension date for the incomplete grade.
The Incomplete Extension Date field in the Base Part of Term block on SOATERM works
as follows:
• When the process determines that the student is to be included, it checks the extension
date using the part-of-term for the CRN. The course part-of-term
(
SSBSECT_PTRM_CODE) needs to match the part-of-term for the rule
(
SOBPTRM_PTRM_CODE). The corresponding term (SSASECT_TERM_CODE) needs
to match the term for the rule (
SOBPTRM_TERM_CODE).
• If an extension date (SOBPTRM_INC_EXTENSION DATE) exists for the part-of-term
that matches the CRN, the process uses it as the default extension date. If no extension
date exists for the matching part-of-term, then the process checks for an extension date
on the full term. If no extension date exists, the end date (
SOBPTRM_END_DATE) of
the full term is used as the expiration date. If the part-of-term for the CRN is Null, as for
open learning courses, a value of
1 is substituted which reverts to the full term value.
Assign Comments for Incomplete Grades
Grade comment codes can be entered on SFASLST and SFAALST for any grade code
using the list of valid values from STVGCMT. Comments can also be entered for
incomplete grades with associated comment codes on STVGCMT to justify the incomplete

1374
Banner Student User Guide | Academic History
status. The grade comment code on STVGCMT can be up to seven characters, and the
accompanying description can be up to 200 characters. Generic situations can be defined
here for things such as family leave, illness, or other events.
Build Processing Rules
Rules for grade collection are determined by term and level. If your institution has not used
incomplete grade automation, a delivered effective term value of
000000 can be used.
Multiple rules can be established for a term, using different levels for each rule. If your
rules have always been the same for all levels, then only one rule is needed for each
effective term. When rules vary by level, a separate rule is needed to distinguish that rule
from the default setting for all unspecified levels. The level is Null when the rule pertains to
all unspecified levels.
Example:
• The initial overall (default) rule for the institution has a term value of 000000 and a level
value of Null. Automated incomplete grade processing has been inactive.
• A single processing rule exists for term 200810.
• Term 200910 has a rule for GR (graduate level), and no other new rules.
• Term 200930 has a rule for DOC (doctorate level), and no other rules. Other rules will
revert to the rule for the most recent effective date that includes the associated level.
Example 1
All processing for term 200720 reverts to record 1, as no entry exists for 200720, and no
entries have been added since the seed data rule for 000000. No distinct rules by level
exist. Incomplete grade processing remains inactivated.
Example 2
All processing for term 200810 reverts to record 2, as a rule exists that takes effect in
200810. No distinct rules by level exist. Therefore, all levels in 200810 are governed by
record 2.
Rule
Effective Term
(required)
Level
(required) Active/Inactive
Override
Grade
1 000000 Null Inactive
2 200810 Null
3 200910 GR
4 200930 DOC
5 201010 Null

1375
Banner Student User Guide | Academic History
Example 3
All processing for term 200820 reverts to record 2, as no entry exists for 200820. No
distinct rules by level exist, so all levels revert to the rule for 200810, which is the last
effective rule.
Example 4
All processing for the graduate level of GR, starting in term 200910, reverts to record 3.
However, all processing for non-graduates in term 200910 reverts to record 2, as no prior
rules by level exist, so all levels revert to the rule for 200810, which is the last effective
rule.
Example 5
All processing for the doctoral level of DOC, starting in Term 200930, reverts to record 4.
All processing for graduate level GR continues to revert to record 3, and all other levels in
term 200930 revert to record 2.
Example 6
All processing for all levels except DOC and GR, starting in Term 201010, reverts to
record 5. DOC continues to revert to record 4, which is the most recent record for that
level, and GR continues to revert to record 3, which is the most recent record for that level.
Note: If a rule entry is set so that incomplete grade processing is Inactive,
then the Override Grade and Override Grade Date fields will have no
effect, as incomplete grades within SHAGRDE will be treated as non-
incompletes. However, the Web Display field on SHAINCG may still
pertain to coursework that could have been completed for a different level
or in a different time period during which incomplete grade processing
may have been active.
Automate Grade Changes
An automated process is used to update grade changes in Academic History, once
extension dates for the completion of coursework have expired. The Incomplete Grade
Process (SHRCINC) works with grade roll processing. Grades are posted to the class
roster or the attendance roster and are then rolled to history, including any incomplete
grade codes. The roll process can be performed manually on SFASLST or SFAALST or
automatically by running SHRROLL. When the grades are rolled to history, the grade code
values cannot be modified, as they could on SFASLST (class attendance roster) and
SFAALST (class roster) before they were rolled. The Incomplete Final Grade and
Extension Date fields are rolled to history with incomplete grades.
Grades are entered in baseline or in self-service, and grade changes may be made until
the grades are rolled. After grades are rolled, grade changes can only be recorded in
Academic History on SHATCKN. Incomplete grades are captured along with default final
grades and extension dates on the class roster (SFAALST) and are then rolled to history
with the courses. The incomplete final grade and extension date can then be maintained

1376
Banner Student User Guide | Academic History
on SHATCKN, and those changes are not restricted by the override permissions on the
grade rule, (as SHATCKN is for restricted administrative override users).
SHRCINC can be run as needed to update default replacement grades for incomplete
courses with expired extensions to final grades for those courses. It is run by term, and/or
level, and/or CRN. Multiple terms can be used. Reason codes (STVGCHG) can be
entered to show why the grade was changed, and the reason is added to each grade
entry. Grade comment codes (STVGCMT) can also be added to each grade entry. The
process checks for incomplete grades (default, incomplete, final grades) and compares
the system date to the grade extension date to find the expired records. You have the
option of running this process in Audit Mode and then Update Mode. You can also use a
future date option in Audit Mode to check the extension dates that are on file.
When a grade change is needed (SHRCINC is run in Update Mode), a new grade entry is
made for the course in Academic History for the final grade. A second grade entry is
automatically created after the first new entry, if grade substitution is necessary. For
example, an instructor assigns a student a final grade of “Incomplete” and a default,
replacement, final grade of “C”. However, the student is taking the course as “Pass/Fail”.
The process checks the grade and the extension expiration date, and then creates a new
grade change entry with a final grade of “C”. It checks whether a grade substitution needs
to take place. If so, then a second grade change entry is created with the final grade of “P”
and a reason code of “SG”. The reason code of “SG” must be used for the grade
substitution, as it is hardcoded. No grade comment code is attached for the grade
substitution entry.
When SHRCINC is run in Update Mode, you can recalculate the GPA. (You can also defer
recalculating the GPA and perform that task as needed after checking grades on
SHATCKN and then running the Calculate GPA Report (SHRCGPA) in Collector Mode.)
When the GPA is recalculated, you may need to send out revised grade mailers
(SHRGRDE). Check that a grade mailer entry exists in the collector table with a request
type of
R (revised) and a print status of Null for each student with grade changes.
When the GPA is recalculated using SHRCINC, only students that have been selected for
an automated grade change resulting from an incomplete grade will be processed. The
students that are processed will have their entire GPAs updated, not just the grades that
are changing due to default grades. If any uncalculated grades exist for those students,
those graded will be updated during the process.
SHRCINC also populates the SHRCGPA collector table used by SHRCGPA report. When
SHRCGPA is run in Collector Mode, it selects records that have been defined for
processing whether table entries have been populated by SHRRPTS or SHRCINC.
Display Grades in Self-Service
Grades are displayed in Banner Student Self-Service in the Final Grades page. When the
Web Display (Indicator) on SHAINCG is checked (set to
Y) for the rule, incomplete
grades are displayed in self-service within a separate data block with the associated
extension dates and the default, replacement, final grades. In Banner Faculty and Advisor
Self-Service, instructors can also enter and override the incomplete final grade for the
incomplete grade, as well as override the default date, if permission has been granted on
the governing incomplete grade processing rule.

1377
Banner Student User Guide | Academic History
Processing Results
Grades posted to the class roster (SFAALST) are stored in the SFRSTCR table prior to
being rolled to history. This table handles the incomplete final (replacement) grade and the
incomplete grade extension date. The existing grade comment code (STVGCMT) can be
used for grade comments for incomplete grades. If a final grade is changed and posted on
the class roster (SFAALST), and the prior grade was an incomplete grade, the incomplete
final grade (
SFRSTCR_GRDE_CODE_INCMP_FINAL) and extension date
(
SFRSTCR_INCOMPLETE_EXT_DATE) values will be removed. These fields can be
repopulated with the entry of a new incomplete grade code. The incomplete final grade
can be changed before the roll takes place, if the rule allows for this (the
SHRINCG_INCMP_GRDE_OVER_IND is set to Y).
Once the grades have been rolled to history, no changes can be made outside of
Academic History, except for updating the grade code comment. If a grade is rolled as an
incomplete grade, the associated fields cannot be maintained in Banner Faculty and
Advisor Self-Service or on SFASLST (class attendance roster) and SFAALST (class
roster).
The SHRTCKG table also includes the incomplete final (replacement) grade. The existing
extension date will be used for incomplete grade date extensions, as well as the existing
grade comment code (STVGCMT) for grade comments for incomplete grades.Comments
can also be entered on SFASLST (class attendance roster) and SFAALST (class roster)
and are rolled to history.
When an incomplete grade is rolled to and stored in Academic History, the associated
incomplete final grade and extension date values will remain intact on SFRSTCR, and are
transferred to history along with other data. SHATCKN also includes a field for the
incomplete final grade.
The incomplete final grade and the extension date (as well as grade comment code) can
be maintained on the Academic History record for the most current grade entry. However,
the incomplete final grades and extension dates are protected or disabled for all records
that are not the most current. Since the extension date triggers the automated processing,
this preserves an audit history. Changes to incomplete final grades can be tracked by
adding a change reason (STVGCHG) and entering a new replacement grade code. The
final grade entry cannot be changed, unless a new grade change entry is created.
Steps to Implement Incomplete Grades
Use the following steps to implement automated incomplete grade processing.
1. Set up rules by effective term or effective term and level on the Incomplete Grade
Rules Form (SHAINCG).
2. Set up incomplete grading extension expiration dates on SOATERM for parts-of-term.
If you only define an extension date for the full term, the other parts-of-term will revert
to that date.
3. Define incomplete grades on SHAGRDE.
3.1. Set the Incomplete Grade Ind(icator) to checked (
Y) for existing grade code
values to be used with the automated process.

1378
Banner Student User Guide | Academic History
or
Insert new grade code entries for the effective term in which they will be active
as automated incomplete grades.
or
Define new grade code values.
3.2. Define default final grades for the incomplete grades, unless instructors are
required to enter the replacement final grades and override privileges have
been set up on SHAINCG.
4. Assign incomplete grades on SFASLST or SFAALST in baseline or using Banner
Faculty and Advisor Self-Service (Final Grades page and Incomplete Final Grades
page) before grades are rolled.
5. Review and revise grades before they are rolled, using SFASLST or SFAALST in
baseline or Banner Faculty and Advisor Self-Service (Final Grades page and
Incomplete Grades Summary page).
6. Roll the grades, including incomplete grades, using SHRROLL, SFASLST, or
SFAALST.
7. Review and update incomplete final grades and extension dates on SHATCKN for any
grade changes.
Grade changes are limited to only the most recent grade sequence numbers.
Changes to the final grade require the insertion of a new grade sequence entry, which
will supersede prior entries.
8. Run the Incomplete Grade Process (SHRCINC) to automate the grade changes.
8.1. Run the process in Audit Mode.
8.2. Review the results for grade changes.
8.3. Run the process in Update Mode to commit the changes to the database.
Note: If the GPAs are not calculated when SHRCINC is in Update Mode,
then SHRCGPA should be run in a timely manner to reflect the grade
change updates and any other updates that may be pending a
recalculation.
Forms Used with Processing
The following forms are used with automated incomplete grade processing.
Incomplete Grade Rules Form (SHAINCG)
This form is used to set up the rules used for automated incomplete grade processing.
Unique rules can be created by effective term and level. The system-required term value
of
000000 is delivered to reflect that incomplete grade processing is inactive (turned off)
as of any prior time period. This record with this term value should exist to indicate that
incomplete grading is turned off for all levels.
1379
Banner Student User Guide | Academic History
You can query on the following fields: Effective Term, Level, Incomplete Grade
Processing, Override Grade, Override Grade Date, and Web Display. If a level is not
specified, all records for the term will be retrieved. When the form is entered in query
mode, you need to reset the checkbox fields, even if that means resetting them back to
their original display states, or the query will not consider those fields. Setting the
checkbox fields indicates that the fields are intended to restrict the query selection. The
fields can be used in combination for a query.
For example, if all the checkbox fields are checked (set to
Y) when query mode is entered,
and you do not want to use those fields in the query, you can leave the settings as they
are. If you want to restrict the query selection to all records for which incomplete grade
processing is active (turned on), uncheck (set to
N) the Incomplete Grade Processing
checkbox, then recheck (set to
Y) the field, leave the other field settings as they are, and
execute the query.
Overrides can be set up on this form. Use the Override Grade checkbox to allow faculty
members to override the default, incomplete, final grade for a student. Instructors can also
override the default extension date based on the setting of the Override Grade Date field
for the rule. Dates can be shortened, extended, both (all), or no date override can be
allowed.
The system-required term value is delivered for use with SHAINCG.
Term Control Form (SOATERM)
This form is used with automated incomplete grade processing. The Incomplete
Extension Date field in the Base Part of Term block is the extension/expiration date when
incomplete final grades become eligible to replace final grades during automated
processing. The date you use can vary by part-of-term. It is optional and can remain Null.
The date will be Null for old term records and can be left Null for all terms when automated
incomplete grade processing is not in use.
When the rules on SHAINCG indicate that automated incomplete grade processing is
active for a term, with default grades for incomplete grades on SHAGRDE that can be
entered or overridden by faculty members, the extension date is also defaulted.
Code Description
System
Required
000000 Term for incomplete grade processing not yet activated Yes
Effective
Term Level
Incomplete
Grade
Processing
Override
Grade
Override
Grade
Date
Web
Display User
Activity
Date
System
Required
000000 Null N Y A (All) Y Not
Null
Not Null Y

1380
Banner Student User Guide | Academic History
Class Roster Form (SFASLST)
This form is used with automated incomplete grade processing. The Incomplete Final
Grade field is used to replace a final grade after the extension date to complete
coursework has expired. The Extension Date field displays the date when the incomplete
final grade is eligible to replace the final grade. This date must be less than or equal to the
default date when the Override Grade Date radio group on SHAINCG is set to
Shorten
for the rule. This date must be greater than or equal to the default date when the Override
Grade Date radio group on SHAINCG is set to
Lengthen for the rule. The extension
date must meet the date restrictions for the rule when restrictions apply. These restrictions
are relative to the default date.
These fields are activated when a grade code value for an incomplete grade is entered in
the Final Grade field. Overrides are also permitted if the rule on SHAINCG allows
overrides. The Incomplete Final Grade field is populated with the system value for the
incomplete grade. You can enter a value in this field when the Incomplete Grade
Processing field on SHAINCG is checked (
Y). The Extension Date field is also
populated and can be entered when the Override Grade field on SHAINCG is checked
(
Y). When the value in the Final Grade field is one that is other than incomplete, the
Incomplete Final Grade and Extension Date fields are not active. All incomplete grades
must have an associated incomplete final grade and extension date. Once the grade has
been rolled to history, the incomplete final grade and the extension date cannot be
changed using these fields.
The Grade Comment field (STVGCMT) can be used to add comments that pertain to
incomplete grades.
Class Attendance Roster Form (SFAALST)
This form is used with automated incomplete grade processing. The Incomplete Final
Grade field is used to replace a final grade after the extension date to complete
coursework has expired. The Extension Date field displays the date when the incomplete
final grade is eligible to replace the final grade. This date must be less than or equal to the
default date when the Override Grade Date radio group on SHAINCG is set to
Shorten
for the rule. This date must be greater than or equal to the default date when the Override
Grade Date radio group on SHAINCG is set to
Lengthen for the rule. The extension
date must meet the date restrictions for the rule when restrictions apply. These restrictions
are relative to the default date.
These fields are activated when a grade code value for an incomplete grade is entered in
the Final Grade field. Overrides are also permitted if the rule on SHAINCG allows
overrides. The Incomplete Final Grade field is populated with the system value for the
incomplete grade. You can enter a value in this field when the Incomplete Grade
Processing field on SHAINCG is checked (
Y). The Extension Date field is also
populated and can be entered when the Override Grade field on SHAINCG is checked
(
Y). When the value in the Final Grade field is one that is other than incomplete, the
Incomplete Final Grade and Extension Date fields are not active. All incomplete grades
must have an associated incomplete final grade and extension date. Once the grade has
been rolled to history, the incomplete final grade and the extension date cannot be
changed using these fields.
The Grade Comment field (STVGCMT) can be used to add comments that pertain to
incomplete grades.

1381
Banner Student User Guide | Academic History
Grade Code Maintenance Form (SHAGRDE)
This form is used with automated incomplete grade processing and accommodates
incomplete grades and default, replacement, final grades. The Incomplete Grade Ind
checkbox is used to specify when checked (set to
Y) that the grade code is for an
incomplete grade. The Incomplete Grade Default field displays the default, replacement,
final grade for the incomplete grade. The Incomplete Grade Ind field will always be
checked (set to
Y) when a default final grade exists. When a grade record is removed or
inactivated, the system checks that the grade is not in use as a default, incomplete, final
grade on another active grade record.
If the Incomplete Grade Ind checkbox is set for the grade code when the incomplete
grade is entered, and a default final grade is not entered at that time, faculty members can
use override capabilities to change the final grades. Prior entries for grade values on
SHAGRDE will automatically have the Incomplete Grade Ind unchecked (set to
N),
indicating there are no default final grades, as those entries would not have been
processed as incompletes. Default, incomplete, final grades can be Null for grade codes
where the Incomplete Grade Ind is checked, and an instructor can enter a replacement
final grade when the incomplete grade is assigned.
Course Maintenance Form (SHATCKN)
This form is used with automated incomplete grade processing. The Incomplete Final
Grade field is used to replace a final grade after the extension date by which the
coursework should be completed has expired. The Extension Date field displays the date
when the incomplete final grade is eligible to replace the final grade. (SHATCKN is an
administrative override form, expected to have limited user access, and consequently it is
not limited by the override restrictions set on the incomplete grade rule.)
The Incomplete Final Grade field is activated when an incomplete grade code is entered
in the Final Grade field and incomplete grade processing is active (turned on). The
Extension Date field is updatable for a new entry or for the most current existing entry.
When a new grade sequence record is entered, the Incomplete Final Grade field is
populated with the system default value for the incomplete grade. All incomplete, default,
final grades must have associated extension dates. When the value in the Final Grade
field is not an incomplete grade, the Incomplete Final Grade field is not active.
Incomplete final grades and extension dates can be changed on SHATCKN, regardless of
the override setting on SHAINCG. However, after grade changes have been made, the
Extension Date and Incomplete Final Grade fields will be protected for all entries except
the most current entry (the entry with the highest sequence number), as these entries
reflect the student’s prior history. If you do not use automated incomplete grade
processing, you can continue to use the Extension Date field.
When a final grade is entered, the system checks to see whether the grade is an
incomplete grade and whether incomplete grade processing is active (turned on). The
following occurs:
• When an incomplete grade is found, the Incomplete Final Grade field is activated,
populated by default, or if populated already, that value is displayed. Also, the
Extension Date field is populated by default if the value has not been entered.
• When the grade is not an incomplete grade, the Incomplete Final Grade field remains
inactive.

1382
Banner Student User Guide | Academic History
The Grade Comment field (STVGCMT) can be used to add comments that pertain to
incomplete grades.
Incomplete Grade Process (SHRCINC)
This process is used to automatically update incomplete grades to final grades. If an
incomplete grade is found in Academic History for any course within the specified terms,
and its grade extension date is less than or equal to the current system date, it is selected
for processing.
Note: The process scans only Academic History records. All grades on
the class roster that have not yet been rolled are still considered to be in-
process.
The grade code values that are displayed on SFAALST, SFASLST, and in
Banner Faculty and Advisor Self-Service are only those grade codes that
were last entered on the class roster. Any grades that have been
subsequently updated in history are not reflected in the roster.
This process can be run by term in either Audit or Update Mode and includes reason
codes for the grade changes, as well as grade comments for the grade entries. You can
restrict the process selection by level and/or CRN. You can include student IDs on the
output and calculate GPAs in Update Mode if you wish to do so. The incomplete grade
code value that is selected and the final replacement grade are also printed in the output.
If grade substitution is needed, you can choose to have the grade substitution grade code
printed on the report.
The grade extension date for incomplete grades is compared against the system date to
determine whether a grade change needs to occur. If a grade change is needed, a new
grade entry is created for the course in the student’s academic history. If the system date
is greater than the incomplete extension date, then a new grade entry is inserted, but with
the final grade code changed from the incomplete grade entry to the replacement final
grade. The process also performs checking for grade substitution. Grade substitution can
replace the updated grade with a substitute grade, based upon the grade mode
associated with the student that was taking the course. A GPA recalculation is then
performed when the Calculate GPA parameter is set to Y, and the process is run in Update
Mode.
The process can be run in Audit Mode to forecast automated grade change results for
upcoming grade conversions. The Future Date parameter can be used to forecast future
results. No GPA calculation is performed in Audit Mode.
Note: This process does not use sleep wake processing.
Grade Conversion and Substitution
The process creates a new grade revision entry in the SHRTCKG table. The existing,
current, incomplete entry is maintained in Academic History. This update is processed as
a non-destructive grade change. The new entry is added as the next sequence number,
and the final grade code is extracted from the incomplete final grade of the prior entry. The
extension date is cleared for the new entry. The reason code comes from the Reasons

1383
Banner Student User Guide | Academic History
Code parameter, and the current system date is used as the grade date. If a grade code
comment is specified, it will be added to the new grade entry.
The default, incomplete, final grade is the assigned final grade of the new grade change
entry. That may cause a second grade change entry to be posted for the grade
substitution. The processing for the grade substitution is automatically invoked at the time
the first grade change is posted. The reason code on the grade substitution entry (if one is
needed) uses
SG (substitute grade) as the reason code, and no grade comment code will
appear on that entry.
SG is a system-defined reason code used for substituted grade
change entries. A second entry will be printed on the report output for the substitute grade
change (by default) unless the Print Grade Substitutions parameter is set to
N.
If grade substitution is needed for the incomplete final grade, then the substitution grade
value must be reconciled to exist before the first grade change entry is posted. A final
grade cannot be changed to a grade value that is inconsistent with the grade mode for
which the student is taking the course, except when the grade is immediately replaced
with a substitute grade value. If grade substitution is required and a substitute grade is not
on file, then neither grade change will be posted, and an error message will be displayed
in the output. Once the grade substitution is complete, the GPA recalculation can take
place, if the Calculate GPA parameter is set to
Y.
Build Academic Standing Rules
The institution's policies regarding probation and Dean's List are set up as a series of rules
on the Academic Standing Rules Form (SHAACST). Rules may be set up to place
students on probation, to take them off probation, to continue probation, or to indicate
suspension or dismissal. Rules are set up using minimum hour and GPA requirements.
Dean's List rules are also set up using minimum hour and GPA requirements for the term.
Use the Grades field in the Excluded Grades block to enter any grade which causes a
student to be ineligible for an end-of-term honor, even if the student otherwise qualifies
under a rule defined in the Dean's List Rule block. Multiple rows of excluded grades are
allowed. Entries are validated against SHAGRDE for grades defined for the level entered
in the Key Block. When a valid grade is entered, the abbreviation for the grade will be
displayed.
Calculate Academic Standing
The calculation of academic standing and dean's list eligibility are performed using the
Calculate Academic Standing Process (SHRASTD). The rules are defined using the
Academic Standing Rules Form (SHAACST). The process permits calculation of
academic standing and Dean's List eligibility independently (each has its own Y/N
parameter). The process uses the highest hours that apply to a student when calculating
dean's list status, thus allowing an institution to calculate various honors for full-time and
part-time students. The process also checks a student's course information for excluded
grades only at the level for which the dean's list rule is created. The process can be run in
either update or audit mode. First time students are retrieved, and pre-Banner hours are
included. Results are displayed for a person in the Term Header information of the Term
Course Maintenance Form (SHAINST) or can be viewed for selected groups of students
within a term on the Academic Standing Query Form (SHASTAT).

1384
Banner Student User Guide | Academic History
Note: The academic standing process uses a student's displayed GPA
rather than the stored GPA when determining their academic standing.
For example, if a student's GPA is calculated to be 1.987821, that is the
value that will be stored. However, if the institution's GPA display rules are
set up to round the GPA to three digits, the displayed GPA would be
2.000, and that is the value the SHRASTD process will use to evaluate
the student's academic standing.
Academic standing on SHAACST is based on the level of the student and the GPA of
those courses where the level matches that of the student when determining which rule to
use.
Example: Rules for Undergraduate Students
The Calculate Academic Standing Process (SHRASTD) differentiates between a zero
(0.00) GPA attained as a result of receiving grades which do not count in GPA and a zero
(0.00) GPA received as a result of receiving grades which do count in GPA.
Example: Academic Standing Rule (SHAACST)
Current Standing Next Standing
G1 0-999.99 E 0-999.99 0.00 1.00 G1
G1 0-999.99 E 0-999.99 1.01 2.99 G2
G1 0-999.99 E 0-999.99 3.00 3.50 G3
G1 0-999.99 E 0-999.99 3.51 4.00 G4
Level Grade
1 Undergraduate Level Course A
1 Undergraduate Level Course D
1 Graduate Level Course B
Term GPA GPA 2.39
Academic Standing Calculated = G2
Current Standing Next Standing
00 (Good) Term GPA 0.00 - 1.99 P1 (Probation)

1385
Banner Student User Guide | Academic History
Student A:
Student B:
• When academic standing is calculated, Student A will be placed on 00 (Good), and
Student B will be placed on P1 (Probation).
• In summary, the process looks for at least one course with a grade which counts in GPA
when processing students with 0.00 GPAs.
The Calculate Academic Standing Process (SHRASTD) calculates term honors based
upon the Dean's List rules defined on the Academic Standing Rules Form (SHAACST).
The process compares the student (using the student's term hours and term GPA) against
all rules for which the student has exceeded or met both the minimum hours and minimum
GPA set for the rule. If multiple rules are selected, the process chooses the rule which is a
best fit (closest to but not less than) the term hours and term GPA of the student.
Example:
* All use institutional GPA and earned hours.
Cumulative
GPA
0.00 - 1.99
Course Credits Grade
ENGL 100 3 P (Pass) Count in GPA = N
HIST 100 3 AU (Audit) Count in GPA = N
Attempted Passed Earned GPA Hrs GPA
Term 3.00 3.00 3.00 0.00 0.00
Cum 3.00 3.00 3.00 0.00 0.00
Course Credits Grade
ENGL 100 3 P (Pass) Count in GPA = N
HIST 100 3 F (Failure) Count in GPA = Y
Attempted Passed Earned GPA Hrs GPA
Term 6.00 3.00 3.00 3.00 0.00
Cum 6.00 3.00 3.00 3.00 0.00
Current Standing Next Standing

1386
Banner Student User Guide | Academic History
• Student A will be compared against rules #3 and #5. He qualifies for rule #3 based upon
his term GPA of 3.29 being greater than or equal to the minimum of 3.00 set for the rule,
and his term hours being closest to but not less than the minimum of 12 on rule #3.
• Student B will be compared against rules #1, #2, #3, #4, and #5. She qualifies for rule #1
based upon her term GPA of 3.75 being greater than or equal to the minimum of 3.75
set for the rule, and her term hours being closest to but not less than the minimum of 12
on rule #1.
• Student C will only be compared against rule #5, since his earned hours for the term (11)
are closest to but not less than the minimum hours (6) set for the rule, and his term GPA
of 3.35 being greater than or equal to the minimum of 3.25 set for the rule.
When a student matches the criteria for an academic standing rule, but has no hours
which count in GPA calculation for the term (for example, the student has withdrawn from
all hours or audited all hours), the academic standing from the most recent past term will
be carried forward into the new term. Note that this processing requires that an existing
academic standing rule be found which matches the student's information at that point in
time. If no academic standing rule would otherwise apply to the student, the student's
standing for the term is updated to the detail “00” standing code. The pass-through of the
academic standing from the previous term occurs only when a rule applies to a student,
but the student has no hours for the term which count in the GPA.
The maximum hours in the SFBETRM record, as displayed on the Student Course
Registration Form (SFAREGS), are not updated at all if the maximum hours value on the
Academic Standing Code Validation Form (STVASTD) is Null (blank) for the calculated
academic standing and the Calculate Maximum Registration Hours parameter option in
Rules *
Minimum
Term Hours
Minimum
Term GPA Status
#1 12 3.75 DL (Dean's List)
#2 12 3.50 HL (Honor's List)
#3 12 3.00 ML (Merit List)
#4 9 3.50 DL (Dean's List)
#5 6 3.25 HL (Honor's List)
Student Hours/GPA Status
Student A 15 earned hours for the term ML
3.29 term GPA
Student B 12 earned hours for the term DL
3.75 term GPA
Student C 11 earned hours for the term HL
3.35 term GPA

1387
Banner Student User Guide | Academic History
the Calculate Academic Standing Process (SHRASTD) is used. The SFBETRM record for
the student must also exist in the pre-registration future term entered in the Pre-
registration Future Term parameter. No graded registration may exist for this term.
If this option is used and the calculated academic standing has a value in the Max(imum)
Hours field on STVASTD, the value from STVASTD will overlay any value already
contained in the SFBETRM record. If there is no maximum hours value for the academic
standing code on STVASTD, no update will be made to the data in the SFBETRM record.
Specifically, if no value is present in the Max(imum) Hours field on STVASTD for a new
academic standing, the SFBETRM maximum hours will not be updated to “0.00”.
If no value is present in the Min(imum) Hours field on STVASTD for a new academic
standing, the SFBETRM minimum hours will be updated to zero if all other selection
criteria have been met. If the value is for the pre-registration future term, and the
SFBETRM minimum and maximum hours are equal to the value in STVASTD for the
academic standing, the SFBETRM record will not be updated. The report will display new
minimum and maximum hours values only when the SFBETRM record is updated. The
academic standing code may be updated, regardless of the whether the SFBETRM record
minimum and maximum hours are updated.
Calculate Academic Standing by Student Centric Period
SHRASTD also calculates academic standing by student centric period for students with
an active student centric period for the term. The student is considered to have an active
student centric period for the term when the Student Centric Period field on SHAINST (or
the column in the SHRTTRM table) has a valid value. The Academic Difficulty Rules by
Student Centric Period window on SHAACST is used to maintain academic standing
hours and GPA rules by student centric period.
When academic standing is evaluated for the student for the final term of the student
centric period, the new standing is based on the institutional hours and GPA from all the
terms associated with the student centric period. When academic standing is evaluated for
the student for an earlier term in the student centric period, the most recent, previous
academic standing calculated before the student centric period will be assigned as the
new standing.
For a student, for all terms prior to the final term in a student centric period, the academic
standing is rolled forward from the student’s most recent term that is prior to the start of the
current student centric period. This permits registration restrictions and maximum hours
calculations to remain in effect throughout the student centric period. When a student who
has an active student centric period does not enroll in the final term of the student centric
period, and academic standing is calculated for the final term, the student’s standing is
evaluated based on the student centric period GPA totals, but the academic standing is
stored in the highest or maximum existing term header record for the student centric
period.
Note: When a student does not have an active student centric period
assigned, the existing term-based rules from SHAACST are used for the
evaluation of academic standing.

1388
Banner Student User Guide | Academic History
Use the Process by Student Period parameter to calculate the academic standing for
student centric periods.
• When this parameter is set to Y, the process considers students who are assigned to a
cycle designator and student centric period using the rules for student centric period
academic standing processing.
• When this parameter is set to Y, any students who are not assigned to a cycle
designator for the term are processed using baseline term academic standing
processing.
• When this parameter is set to N, only baseline term academic standing processing is
performed.
Use the SCPs to be Processed parameter to process specific student centric periods.
Values should be valid for the term entered in the Term parameter. Valid values come from
the Student Centric Period Term Control Form (SOASCPT). When the Process by Student
Period parameter is set to
Y, this parameter must be entered.
Produce Grade Mailers
Grade mailers are produced by course level using the Grade Mailer Report (SHRGRDE)
for students who have had grades rolled to academic history. Revised grade mailers may
also be produced when grade changes are made on the Course Summary Form
(SHACRSE). Duplicate grade mailers are produced, when requested, on the Term Course
Maintenance Form (SHAINST). The grade mailer lists the courses taken, credits, quality
points, and grades received, as well as transfer GPAs and term descriptions for each
student.
Courses which are flagged as non-gradable (Gradable Indicator is unchecked) on the
Course Registration Status Code Validation Form (STVRSTS) will not be given the user-
supplied default grade when running the Grade Mailer. Courses flagged as non-gradable
(Gradable Indicator is unchecked) which have no grades entered and exist in registration
will not appear on the Grade Mailer.
The grade mailer may be created for only those courses associated with a selected
campus. This is done when the campus GPA is being calculated via the Academic History
Control Form (SHACTRL). The Grade Mailer Status/Error Correction Form (SHAGCOL) is
used to view the status of grade mailers and to allow mailers to be re-run if there is a
printer problem or other reason to re-run the job.
The hold logic for the process is such that if a person had a hold which prevented a grade
mailer from being produced, and the hold has been removed, or is no longer active, the
subsequent run of the grade mailer will remove the grade mailer hold information for the
previous request and produce the grade mailer.
The selection of registration records for grade mailers prints those rows where the section
is gradable according to the Schedule Form (SSASECT) and a combination of the
following is true:
• The SFRSTCR_ERROR_FLAG must either be Null or a setting other than D, which
means the record counts in enrollment.
or

1389
Banner Student User Guide | Academic History
• The SFRSTCR_ERROR_FLAG is D (does not count in enrollment), but the record has
already been graded (via auto grade on the stvrsts record matching the
sfrstcr_rsts_code).
or
• The SFRSTCR_ERROR_FLAG is D (does not count in enrollment), but the
STVRSTS_GRADEABLE_IND on the STVRSTS record matching the
SFRSTCR_RSTS_CODE is set to Y.
The report will check for grade mailer type holds that are effective for a date greater than
the system date and then suppress the associated grade mailer. If the hold is effective for
a date less than or equal to the system date, the grade mailer may be printed. The Grade
(Hold Indicator) is located on the Hold Type Code Validation Form (STVHLDD).
Add/Change Degrees
Information concerning each student's degree and certificate history is entered on the
Degrees and Other Formal Awards Form (SHADEGR). This form allows you to enter the
degree, college, majors, minors, status, honors, and dual degrees associated with the
degree for a student. The degree information, specified as part of the student's record on
the General Student Form (SGASTDN), defaults to this form. Any institutional and transfer
course work taken by the student may be indicated as applying to the degree. Any
courses that apply to the degree may be used to calculate degree hour and GPA data.
Degree information is automatically created for each student during the initial grade roll
process. Subsequent grade rolls may create or modify degree information in academic
history depending upon changes made to that information on the General Student Form
(SGASTDN).
On the Degrees and Other Formal Awards Form (SHADEGR), the Institutional Course
Attributes information and the Transfer Course Attributes information, may be used to view
any attribute information associated with the student's course work. An indicator (*) exists
as an addition to the Institutional Course information and Transfer Course information to
indicate the course for which the attributes are being displayed.
Note: A subsequent degree record is created when there is a change in
the college, degree, level, or program code. If there is a change on
SGASTDN in any other curriculum data (i.e., Major 1), the current degree
record is updated.
National Student Clearinghouse (NSC) Degree
Verification Reporting
The National Student Clearinghouse (NSC) uses reporting to collect degree information
for use in a national repository to aid in the verification of student educational
achievement.

1390
Banner Student User Guide | Academic History
This reporting provides the following benefits:
• Reduces the administrative workload and constant interruptions that verifications cause
in the registrar’s office.
• Makes it easy and inexpensive for employers to verify educational achievements so that
misrepresentation of college credentials is virtually eliminated.
• Allows all schools, even those that may need to process only a small number of
verification requests during the year, to obtain the benefits of out-sourced degree
verifications.
• Allows schools to share in revenues that may be generated without having to enter into
long-term, exclusive contracts.
• Helps institutions more accurately measure their performance in preparing their
students to obtain degrees and certificates from other institutions.
Use the Degree Verification Process (SHRDEGV) to collect data relating to the degrees a
student has completed at an institution and supply the information to the clearinghouse.
Enter/Maintain Transfer Course Work
Information related to a student's transfer work may be entered on the Transfer Course
Form (SHATRNS). This form allows for the recording of all previously attended institutions,
the level of course work, and the term in which it applies. Detail course work is entered as
your institutional course equivalent and may be tied to the student's original transcript
work. Transfer Hour and GPA data may be calculated on this form. The Title field defaults
from the Catalog information if the subject and course number exist on the Catalog for the
effective term entered.
The Transfer Articulation Module may also be used to enter transfer work. See the
Transfer Articulation Procedures for more information.
Add/Change Transcript Events and Comments
Significant events and narrative comments unique to a particular student are entered on
the Transcript Event and Comment Form (SHATCMT). Events will print on the student's
transcript if they are so designated. Comments will print on the transcript. The comments
may be specific to the level of the student or may be term specific. If term specific, they will
print next to that term on the transcript.
Enter Qualifying Papers
All original research papers or projects authorized for students as part of their degree
requirements are entered using the Qualifying Paper Form (SHAQPNO). The title of the
paper and any comments or text are maintained. The paper will print on the transcript only
if the paper type is so designated on the Qualifying Paper Type Code Validation Form
(STVQPTP).

1391
Banner Student User Guide | Academic History
Several conditions must be true in order for qualifying paper titles and/or comments to
print:
• The Transcript Print checkbox for the qualifying paper type must be checked on the
Qualifying Paper Type Code Validation Form (STVQPTP).
• A value must be present in the Acceptance Date field on the Qualifying Paper Form
(SHAQPNO) for the paper.
• The paper must be applied to an awarded degree on the Academic Non-Course Form
(SHANCRS).
• The Qualifying Papers checkbox must be checked on the Transcript Type Rules Form
(SHATPRT) for the transcript type being produced. If paper comments should also print
for the transcript type, the Qualifying Papers Text checkbox must also be checked.
Review Academic History Online
The Term Sequence Course History Form (SHATERM) displays summary information for
a student for each term with cumulative hour and GPA totals. Both institutional and
transfer work are displayed.
The Subject Sequence History Form (SHASUBJ) displays summary information for a
student for each subject area with hour and GPA totals by subject. Both institutional and
transfer work display.
Print Transcript
A request to print a transcript is made on the Transcript Request Form (SHARQTC). This
form allows you to specify the level of the transcript, who it will be sent to, and whether to
print it immediately, to defer printing, or to send it electronically via EDI or XML.
The Academic Transcript Process (SHRTRTC) allows you to print various transcript types,
each of which may include different sections of information. Future term information will
print on this transcript, even if no institution data is present. The Transcript Population
Process (SHRTPOP) allows production of the academic transcript for an entire population
of students, without entering individual requests. The academic transcript may also be
produced to allow those institutions requiring only the courses associated with a particular
campus to be printed. This is done when the campus GPA is being calculated via the
Academic History Control Form (SHACTRL).
Codes and descriptions of transcript types are defined on the Transcript Type Code
Validation Form (STVTPRT). The specific sections of information to be printed for each
transcript are defined on the Transcript Type Rules Form (SHATPRT). For example,
Internal Transcripts may include all possible information, but External Transcripts may not
include academic standing, term comments, and qualifying paper information. Examples
of sections of information which print depending on transcript type include: transfer course
detail, academic events, level comments, qualifying paper information, committee
information, and college, major, and student type by term.

1392
Banner Student User Guide | Academic History
Note: SHRTRTC checks the value in the SHTTRAN_TYPE field. A Null
value indicates the paper transcript should be printed. Values of
E (EDI),
P (XML), or D (PDF) are ignored, and a transcript is not printed if those
electronic values exist.
The transcript also displays course history information and GPA totals by term within
student centric periods. All terms with a specific student centric period on the term header
record (SHRTTRM) are grouped between a student centric header line and student centric
GPA statistics section on the report output. This allows an institution to provide totals for
both the student centric period and terms within the student centric period. This
information is displayed when the Student Centric Period Statistics checkbox is
selected on the Transcript Type Rules Form (SHATPRT).
You can select continuous pagination or pagination by course level when printing
transcripts for students with multiple levels of coursework. Page numbering can be reset
for each course level, which is printed on a new Page 1. When the transcript type rule on
SHATPRT is set to
Y, regular continuous page numbering is used for the transcript. When
the rule is set to
N, pagination by course level is used.
Selection of Concurrent Curricula Transcript Data
Concurrent curricula data can be selected from the concurrent curricula tables and printed
on the Academic Transcript (SHRTRTC), the Electronic Data Interchange Extract
(SHREDIY) or EDI transcript, and the Self-Service Transcript Page
(
BWSKOTRN.P_ViewTran). Parameters are used to allow the printing of all or parts of
the primary and secondary curriculum records.
The transcript displays detailed information for curriculum records, based on the options
selected on SHATPRT. The SOVLCUR and SOVLFOS views are referenced by
SHRTRTC. Curriculum records can be printed by term, learner primary and secondary
curriculum records can be printed, degrees awarded for primary and secondary curriculum
records can be printed, and data can be sorted by department, college, and major.
Primary and secondary curriculum records are printed based on the number of current
and active records allowed for the module. You can use options on SHATPRT to include
and exclude the printing of parts of the primary and/or secondary curriculum as needed.
Curriculum labels can be customized using SHATPRT. If no labels are specified in those
options, the default labels used will be “Current Program” and “Secondary”. An option also
exists to print the program on the transcript. You can also print the campus for the primary
curriculum.
The maximum number of fields of study that can be printed on the transcript is based on
the allowable current maximum established for the module. This includes field of study
types that are outside of the major, minor, or concentration. Options on SHATPRT (Major
and Major Concentration) are used to control the printing of concentrations, both base
and those attached to majors. Concentrations attached to the major are printed under the
major with a label of “Maj/Concentration”. Those concentrations attached to the base
curriculum are printed after the minors and have a label of “Concentration”.

1393
Banner Student User Guide | Academic History
Print Options
You can print the transcript type description without the transcript type code. You can still
select the option to print the transcript type code value if you choose.
Four sets of curriculum print options exist on SHATPRT:
• Primary Learner Curriculum
• Secondary Learner Curriculum
• Primary Outcome Curriculum
• Secondary Outcome Curriculum
The print options for all four sections are the same and include the following data:
• title or label that appears above the curriculum section
• program
• degree (only available for the Learner module and does not display for the outcome)
• college
• campus
• major
• major concentrations
• minor
• concentration
• other fields of study
Please note that the primary curriculum degree for an outcome is printed with the awarded
label. If the learner has multiple curriculum records on a single outcome, only the degree
from the primary curriculum will be displayed.
Other print options that pertain to curriculum data, specifically the learner's primary
curriculum, are the options to print the admissions term and the matriculation term.
The fields of study will always be printed in priority order within the field of study grouping.
Please note that the placement of the concentrations differs from the display of fields of
study on the forms that have Curriculum windows. On those forms, the concentrations
attached to a major show the major but are displayed after the minors. In this setting, the
“Attached to Major” label is not visible.
The following order facilitates identifying concentrations that are attached to majors:
• majors
• concentrations attached to majors will follow each major
• minors
• concentrations attached to the base curriculum

1394
Banner Student User Guide | Academic History
• other field of study types
Example:
Learner's Primary Curriculum
Program: BA-HISTORY BA History
Level: UG Undergraduate
Degree: BA Bachelor of Arts
Campus: MAI Main
College: AS Arts and Sciences
Major 1: HIST History
Concentration Attached to HIST: AMER American History
Major 2: ECON Economics
Minor 1: ACCT Accounting
Concentration Attached to Base: MEDI Medieval History
Other Field of Study INTERN: USGV US Federal Government Internship (The
description of
INTERN on GTVLFST is Internship.)
If all print options are selected, the following data will be displayed on the transcript:
Current Program:
Bachelor of Arts
Program: BA History
College: Arts and Sciences
Campus: Main
Major: History
Maj/Concentration: American History
Major: Economics
Minor: Accounting
Concentration: Medieval History
Internship: US Federal Government Internship
The paper transcript (SHRTRTC) will print the primary curriculum and awarded degree
curriculum if the level matches the course level that is being reported. The college and
major that are printed by term come from the primary current and active curriculum. If the
level does not match the course level being printed, college and “Major by Term" will not
be printed.
The difference between the self-service and paper transcripts when the level of
AL is
selected is apparent in how the curriculum is printed. For the self-service transcript, all
curriculum records are printed at the beginning of the document, but for the paper
1395
Banner Student User Guide | Academic History
transcript, the current, active, primary curriculum record is printed at the beginning of the
output pages that are reporting the courses for that level. If the degree is awarded, and the
primary and secondary outcome curriculum records are at two different levels (both in the
same degree sequence number), both the primary and secondary outcome curriculum
records will be printed on the page with the level that matches the primary outcome
curriculum. The self-service transcript reports all courses together, but the paper transcript
produces separate output pages for each level.
Using SORLMFS for Maximum Field of Study Counts
Maximum counts for all types of fields of study are recorded, not just the fields of study for
the major, minor, and concentration. The maximum current and active fields of study
allowed are coded for each module on SOACTRL for any field of study type.
The SORLMFS table is used to store the maximum counts per field of study type and
module. The keys to the table are the module code (
LMOD_CODE) and the field of study
type (
LFST_CODE). The types for MAJOR, MINOR, and CONCENTRATION are required.
The table allows a count of zero, which means none are allowed for that field of study
type. A value of one (
1) is required for the major type, because the curriculum currently
requires at least one major.
Note: An SOBLMOD record which defines the learner module and
number of curriculum allowed must exist prior to defining fields of study
counts on SORLMFS.
Execution of Curriculum Conversions
Curriculum conversions can be executed from transcript requests (SHRTRTC) and self-
service view pages where curriculum data can be printed before any processing occurs,
so that all curriculum data appears on the hardcopy output or online. All objects in which
concurrent curriculum processing is implemented will attempt to convert the learner and
outcome curriculum data from the original host tables to the concurrent curricula tables.
The concurrent curricula conversion will automatically be executed when SHRTRTC
begins to process a transcript for a student. If the curriculum data has already been
converted, the conversion process will end without completing any activity.
Using Levels with Self-Service and Paper Transcripts
The paper transcript prints the current, active, primary learner curriculum records and/or
the current, active, outcome primary or secondary curriculum (if it is awarded), if the level
for the curriculum matches the course level that is being reported on the transcripts.
The self service transcript displays the primary and secondary learner curriculum records
and the outcome primary or secondary curriculum, if the level for the curriculum matches
the course level that is being reported on the transcripts. When all levels are selected in
self-service, all current, active, primary and secondary curriculum records for all levels are
displayed at the top of the transcript pages, before the coursework for all levels is
reported.

1396
Banner Student User Guide | Academic History
Example:
The transcript pages that print the Undergraduate Courses report just the learner primary
curriculum. The pages that print the Continuing Education courses print the learner
secondary curriculum.
The undergraduate curriculum for the awarded degree is printed on the pages that report
the Undergraduate Courses course level. All curriculum records for an awarded degree
are printed together. In the above example, the Continuing Education curriculum is listed
as a secondary curriculum to the undergraduate outcome curriculum, and it will be
reported with the undergraduate outcome curriculum.
College and Major by Term
The college that is printed for each term is taken from the curriculum that is active and
current for that term, has the lowest priority, and has a level code that matches the course
level reported. The major printed is the one that is primary, active, and current for that
curriculum.
Transcript Requests
Transcript requests are entered or displayed by ID on SHARQTC, and transcript requests
may not be entered without an override for a person who has holds in effect which prevent
transcript production. The Holds Exist field displays whether transcript holds exist, allows
use of a List function to display holds on the Holds Query-Only Form (SOQHOLD) and is
Learner Primary Curriculum
Program: BA History
Level: Undergraduate
Degree: Bachelor of Arts
College: Arts and Sciences
Campus: Main
Major: History
Learner Secondary Curriculum
Program: CE Arts
Level: Continuing Education
Degree: Art Certificate
College: Continuing Education
Campus: Main
Major: Drawing

1397
Banner Student User Guide | Academic History
where an override can be entered. Academic standing, enrollment terms, accumulated
credits, and cumulative GPA data displays by level in the Current Student Status window.
Transcript requests are displayed and can be entered in the Transcript Request section.
When the section of the form is accessed, existing transcript requests will be displayed in
reverse date order. Unprinted requests will display first, followed by printed requests. A
transcript may be produced for a student with no graded coursework in academic history.
Please note that a student still must have history to be selected by the Transcript
Population Process (SHRTPOP). Transcripts can be printed using Sleep-Wake
processing or through user-initiated runs of the Academic Transcript Process (SHRTRTC).
When processing an electronic transcript, enter a valid level, a request date, the transcript
type, and the number of copies. You may check the Official (Indicator), or if an EDI or
XML capable institution code is used, you will receive a warning when you save the
record, and this indicator will be updated for you.
Electronic transcripts require the entry of a valid outside institution code for an institution
that is capable of receiving electronic transcripts. Institutions are noted as being EDI or
XML capable using the setting of the Electronic field on STVSBGI. This field determines
the mode in which the transcript is to be sent. When the institution code is entered in the
Transcript Destination block of the Issue Information window, the system will check to see
if that institution is EDI or capable and then default in the appropriate Output Type value
(
E, P, Null).
The Output Type field will always be blank unless an external institution code has been
entered and that institution is capable of receiving transcripts electronically using the EDI
or XML file formats. When this field is
Null, the transcript will be printed on paper. If the
institution is EDI capable, the system will set the Output Type to
E in the Transcript
Destination block of the Issue Information window. If the institution is XML capable, the
system will set the Output Type to
P in the Transcript Destination block of the Issue
Information window.
The Output Type value can then be overridden by the user in the following situations:
• If the Electronic field on STVSBGI is Not Null for the corresponding External
Institution Code value, then the user can change the Output Type value to
Null. The
override is only valid for that transcript request.
• The value of
E can only be entered for those institution codes that are marked as
EDI capable on STVSBGI.
• The value of
P can only be entered for those institution codes that are marked as
XML capable on STVSBGI.
• If the Electronic field on STVSBGI is Null for the corresponding External Institution
Code value, then the Output Type value cannot be overridden.
The student's academic transcript is associated with committee information and academic
events for graduate student tracking. First, committee information may be printed on the
transcript if the Print On Transcript (Indicator) on the Committee/Service Form
(SHACOMI) is checked for a specific committee and the Transcript Type Rules Form
(SHATPRT), for the type of transcript being requested, also has the Committees
(Indicator) checked. Second, decision and/or event grade may be printed along with the
event on the transcript if the Transcript Print (Indicator) on the Academic History Event
Code Validation Form (STVEVEN) is checked and the Transcript Type Rules Form

1398
Banner Student User Guide | Academic History
(SHATPRT), for the type of transcript being requested, also has checked print indicators
for Academic Events, Academic Event Decision, and Academic Event Grade.
All majors and concentrations within a student's degree record print in the degree
awarded section, based upon the value for the Degree Major field on the Transcript Type
Rules Form (SHATPRT). When Degree Major is checked (set to
Y), all majors and
concentrations in the degree record will be printed. Printing of minors is controlled by the
Degree Minor field. When Degree Minor is checked (set to
Y), all minors in the degree
record will print. The order and format of majors, minors and concentrations is as follows:
Name Type Hierarchy on Transcript Request
You have the option to use a name type hierarchy on a transcript request. You can print a
name on a transcript that is not the current name found on the identification record
Order Format
Major Description of Major 1, Primary Curriculum
Concentration(s) Description of Concentration 1, Major 1, Primary Curriculum
Description of Concentration 2, Major 1, Primary Curriculum
Description of Concentration 3, Major 1, Primary Curriculum
Major Description of Major 2, Primary Curriculum
Concentration(s) Description of Concentration 1, Major 2, Primary Curriculum
Description of Concentration 2, Major 2, Primary Curriculum
Description of Concentration 3, Major 2, Primary Curriculum
Minor(s) Description of Minor 1, Primary Curriculum
Description of Minor 2, Primary Curriculum
Major Description of Major 1, Secondary Curriculum
Concentration(s) Description of Concentration 1, Major 1, Secondary Curriculum
Description of Concentration 2, Major 1, Secondary Curriculum
Description of Concentration 3, Major 1, Secondary Curriculum
Major Description of Major 2, Secondary Curriculum
Concentration(s) Description of Concentration 1, Major 2, Secondary Curriculum
Description of Concentration 2, Major 2, Secondary Curriculum
Description of Concentration 3, Major 2, Secondary Curriculum
Minor(s) Description of Minor 1, Secondary Curriculum
Description of Minor 2, Secondary Curriculum

1399
Banner Student User Guide | Academic History
(SPRIDEN). You can identify a hierarchy of names in Banner that can be used to populate
the “record of” name on the paper transcript. The Banner names that can be considered
include:
• any name in the Person Identification/Name Repeating Table (SPRIDEN) that is
identified by a name type
• general person legal name
• student diploma name
Two levels can be defined for the transcript name hierarchy. The top level is for the
transcript type. The second level is for a person's request. If no matches are found in
either of these data sources, the current identification name will be used.
Special rules processing is required for EDI transcripts (SHREDIY). That process requires
that a first and last name exist. The diploma name and legal name cannot be used for the
EDI transcript, since those records do not split the first and last names.
Note: Name hierarchy selection can only be used for EDI transcripts if the
transcript type selected allows an EDI transcript to be produced.
The STVTRNS validation table is used to identify the name sources, and required values
are delivered with the supported name sources. SHATPRT (transcript type) stores the
name hierarchy. SHARQTC (transcript request) also stores a name hierarchy specific to
the individual.
When completing a transcript request, the Options Menu provides access to SHADEGR
where the degree sequences can be queried (SHADGMQ), and the diploma name can be
viewed, allowing the user to select the correct degree sequence number for the diploma
name in the hierarchy rules.
SSN/SIN/TIN, ID, and Birth Date Format Masks
You have the option to select the birth date, SSN/SIN/TIN, Banner ID, or none of those to
be printed on the paper and/or EDI transcripts. (EDI does not transmit the SSN/SIN/TIN. It
always uses the Banner ID.) (The birth date can be masked on the self-service transcript,
but the SSN does not display on the self-service transcript.) Use the checkboxes in the
Personalization Print Options block on SHATRPT to choose the data you wish to include.
You can change how the SSN/SIN/TIN or Banner ID appear on the transcript using format
masks. You can also change the birth date format for the paper or self-service transcript to
any valid date format using the pulldown list of format masks.
SSN/SIN/TIN and ID
The rules for adding in a character mask to the SSN/ID values are as follows:
• Use the character X to display data and the character * to conceal data.
• This can be used only for display-only columns.
• This cannot be used when there is data entry involved on the column.

1400
Banner Student User Guide | Academic History
The following describes valid format masks for character strings such as the SSN or ID
number:
Two examples of format masks and the SSN would be:
• Value 123456789 and mask ******XXX will print as ******789.
• Value 123456789 and mask ***XXX*** will print as ***456***.
Dates/Birth Dates and Times
The following describes valid format masks for dates, such as the birth date, and times,
and can be used to change how the date appears on the transcript:
Element Example Description
* **** Characters are displayed as asterisks.
X XXXXXX Characters are displayed as normal value.
Element Example Description
YYYY
YYY
YY
Y
2003
003
03
3
four-digit year
three-digit year
two-digit year
one-digit year
SYYYY -2003 S adds a prefix of a - to a BC date.
Y,YYY 2,003 Year with comma in this position
BC or AD 2003AD BC/AD indicator
B.C. or A.D. 2003A.D. BC/AD indicator with periods
RR Defaults to correct century. Calculates the
century from a date entered by comparing
the two -digit year entered with the year and
century to which the computer's internal
clock is set. Years 00 - 49 will be given the
21st century (the year 2000), and years from
50 - 99 will be given the 20th century (the
year 1900).
MM January = 01 two-digit month
MONTH JANUARY Name of month, padded with blanks to a
length of nine characters
MON JAN Name of month, three letter abbreviation
DDD Day of year (1 - 366)
DD Day of month (1 - 31)

1401
Banner Student User Guide | Academic History
Two examples of format masks and for dates and times would be:
• Birth date value 01-JAN-1980 and mask 'DD-MON' will display as 01-JAN.
• Birth date value 01-JAN-1980 and mask 'Month DD' will display as January 01.
Self-Service Request and Payment Options
Records are inserted into Accounts Receivable when charge amounts exist that are
greater than $0.00. When an available payment option has been set up in STVWPYO that
requires a self-service credit card charge and/or payment, both the charge and the credit
will be inserted into the appropriate Accounts Receivable table when the self-service
request has been completed. That insert can occur whether the charge type is
M (record is
inserted into TBRMISD) or
S (record is inserted into TBRACCD).
D Day of week (1 - 7; Sunday = 1)
DAY SUNDAY Name of day, padded with blanks to a length
of nine characters
DY SUN Name of day, three letter abbreviation
J Julian day, the number of days since
January 1, 4712 BC
AM or PM Meridian indicator
A.M. or P.M. Meridian indicator with periods
HH or HH12 1100 Hour of the day (1 - 12)
HH24 2300 Hour of the day (0 - 23)
MI Minute (0 - 59)
SS Second (0 - 59)
SSSSS Seconds past midnight (0 - 86399)
/. Punctuation is produced in the result.
“...” Quoted string is produced in the result.
FM Fill mode: assumes implied characters such
as O or space, displays significant
characters left justified. Allows end user's
input to be shorter than the format mask.
(Use in conjunction with FX to require
specific delimiters.)
FX All date literals must match the format mask
exactly, including delimiters.
Element Example Description
1402
Banner Student User Guide | Academic History
• If the charge type is M, then the payment option must be a credit card type, because that
is the only way to ensure that payment has been collected. By definition, TBRMISD
requires a payment at the same time it posts a charge.
• If the charge type is S, and the payment option is not a credit card type, then any
charges set up for the services are not inserted into the student's account from self-
service. An example of this could be "Bill My Account."
• Charges of type S (that are not credit card charges) are inserted into TBRACCD when
you run SHRTRTC for transcript requests.
The following four conditions affect the information that is displayed on self-service
request pages, based on the settings in the Self-Service Print Options window for
SHATPRT.
Transcript Population Process
The Transcript Population Process (SHRTPOP), which produces transcript requests for a
selected population, may be used for the Academic Transcript, Electronic EDI Transcript,
and XML Transcript, based upon user-specified parameters.
Selection parameters include Term, ID, Level, Advisor, Degree, Degree Status, Degree
Graduation Date, College and Major. These parameters, with the exception of Term, allow
multiple values. In order to have a transcript request produced, a student must have
courses in academic history for some term and must have courses either in academic
history or registration for the specified term.
Conditions in Self-Service Print
Options Window
Data/Message Displayed to the Student
in Banner Self-Service Request Pages
1
• Service level type is
M
• Charge is greater than $0.00
• Payment options exist, both credit
card and non-credit card types
Display only those payment options where the
Credit Card Indicator is
Y in STVWPYO
2
• Service level type is
M
• Charge is greater than $0.00
• Payment options exist, but none is a
credit card type
Display Info Text error message:
There is no credit card payment option
available, so we cannot complete your request.
Please contact the Bursar or Registrar for
assistance.
3
• Service level type is
S
• Charge is greater than $0.00
• Payment options exist that are credit
card and/or non-credit card types
Display all payment options
4
• Service level type is
S or M
• Charge is greater than $0.00
• No payment options exist
Display Info Text error message:
There are no payment options available, so we
cannot complete your request. Please contact
the Bursar or Registrar for assistance.

1403
Banner Student User Guide | Academic History
Other parameters function differently depending upon the use of the Degree parameter.
When this parameter is used, requests will be produced for only those persons who have
a degree record (displayed on the Degrees and Other Formal Awards Form (SHADEGR))
and who meet other criteria. For example, when a degree code is specified and college
and/or major are also specified, the process selects only students who have a degree
record which matches on degree, college and/or major. When no degree code is specified,
all selection is performed based upon the information contained in the person's general
student record. For example, when no degree is specified, but a college or major is
specified, college and major are compared with the curriculum information maintained for
the student, rather than degree information which may exist.
In addition to the selection parameters, other parameters are provided to specify the type
of transcript to be produced and the issued-to information to be used on the transcripts. A
single transcript type must be specified for each run of the Transcript Population Process.
Charges may be posted to the Accounts Receivable Module by specifying Billing Term,
Billing Detail Code and Billing Amount. A final parameter allows specification of the latest
term for which In-progress Courses will be printed, if the transcript type selected includes
printing of in-progress work.
The Transcript Population Process populates data in a temporary table, SHTTRTC. The
Academic Transcript (SHRTRTC) must be run to produce the actual transcripts and
update the transcript requests, or the EDI Transcript Extract must be run to generate the
transcripts for electronic transfer. Only one set of results from a run of the Transcript
Population can be stored in the temporary table. If existing entries already exist in the
temporary table, they must be purged before a new population can be extracted. Purges
are performed by a parameter option in the process.
Transcript Request Purge
The Academic Transcript Request Purge Process (SHPTRTC) will only purge the
requests generated out of the Transcript Request Form (SHARQTC). The only requests
which will be processed are those requests whose date printed or EDI or XML send date is
Not Null. This request process contains the following parameter selections which can
further qualify the requests to be purged.
Parameter Description
Request Date All requests equal to or less than date entered.
Level All requests for a particular level or all levels.
Official/Unofficial Purge just official or unofficial or all request.
Type Purge just a specific transcript request type or purge all types.
EDI Complete Purge EDI transcript requests only if the EDI status is complete.

1404
Banner Student User Guide | Academic History
EDI Transcript Download Processing
EDI transcript processing with EDI.Smart allows requests to be processed for all levels
(AL) on the Transcript Request Form (SHARQTC). Multiple future in-progress terms and
corresponding coursework are retrieved for transcripts being downloaded out of Banner.
Electronic Data Interchange Extract (SHREDIY)
There are a number of Banner Student validation tables that use an EDI Equivalent
column when a downloaded EDI transcript is created in the Banner system through the
SHREDIY process. SPEEDE/ExPRESS standards require specific values to be
transmitted for these elements. EDI equivalent columns are used on the corresponding
forms. As part of the implementation process for preparing to send electronic transcripts
from Banner, the EDI Equivalent column in these forms should be populated with EDI
values as indicated in the third party manual A Guide to the Implementation of the
SPEEDE/ExPRESS Electronic Transcript. This manual is referred to throughout this
section as the "third party manual".
If no EDI equivalent value is specified for any institution specific entries in the forms listed
in the table that follows (in the "Using the Transcript Download" section), then no value will
be transmitted for that element in the transcript. Please note that no validation or case
sensitivity checking is performed for entries that are made in the EDI equivalent columns.
This is because EDI standards may change at times that do not correspond with software
releases.
For an up-to-date listing of all valid EDI values in the TS 130 Transaction Set (Electronic
Academic Transcript), you may also consult the POSTSECONDARY Electronic Standards
Council (PESC) website
www.pesc.org, where a link is provided to EDI
Implementation Guides.
Note: Not all of the expanded grade codes, credit hours, and GPA data
used in Banner can be transmitted through EDI.Smart. Please refer to the
third party manual for acceptable field lengths.
In particular, only a three position grade code can be transmitted from
Banner to EDI.Smart. Any grade code that is larger than three positions
will not be transmitted.
The SHREDIY program converts Banner values for gender and Banner values for the
Repeat field for courses to the required EDI values.
Banner values for gender are converted as follows (refer to Data Element 1068):
Banner Gender EDI
FfemaleF
Mmale M
Blank or Null unknown U

1405
Banner Student User Guide | Academic History
Banner values for the Repeat field for courses are converted as follows (refer to Data
Element 66):
On the online transcript, a duplicate indicator is used to identify duplicate courses (same
subject and course number) in the same transcript. The first occurrence of the course will
not be flagged, however, any additional occurrences of the same subject and course
number will display a "D" for duplicate.
Note: If the transcript is uploaded to the Transfer Articulation Evaluation
Form (SHATAEQ), the processing of duplicate courses will be handled as
required by SHATAEQ; that is, a numeric value (0 - 9) will be inserted into
the Duplicate field in the Transfer information for all duplicates.
The Repeat field is used to identify repeated courses. The field may have the following
values for institutional-based work:
The following shows the mapping between the ANSI and Banner defined values:
Note: A value of zero (0) is inserted for credit hours earned for in-
progresses courses which would later be uploaded to SHATAEQ. This
Banner Repeat Indicator EDI
IIncludeR
E Exclude N
AInclude GPAR
Value Description
Include
Include in GPA, saved to the database as
I
Exclude Exclude from GPA, but include only in attempted hours, saved to the
database as
E
Include GPA Include in attempted hours and GPA, but exclude from earned hours,
saved to the database as
A
(None)
Not processed, saved to the database as
Null
Mapping based upon ANSI and Banner definitions
ANSI Banner
NE
RI
XE

1406
Banner Student User Guide | Academic History
occurs because the field in the database is Not Null
(
SHRTRTK_CRED_HOURS).
Using the Transcript Download
The following are the procedural steps needed to use EDI Transcript Download
Processing:
1. Update the following existing validation forms with the appropriate EDI equivalent
values. These values can be found in the third party manual under the data element
numbers which are listed below.
2. Create the values in the Term Type Validation Form (STVTRMT) which are
appropriate for your institution. This field uses the third party manual for data element
#1139.
3. Review the Transcript Type Code Validation Form (STVTPRT) to determine if a new
code for EDI Transactions should be created or whether an existing code will be used.
4. Review the Transcript Type Rules From (SHATPRT) for the Transcript Type which will
be designated as the EDI Transcript type.
Note: The following information is not sent on an EDI transcript even if
the boxes are checked. The EDI file layout does not support these
elements:
Validation Form Code
Data
Element
Number
Academic Standing Code Validation Form (STVASTD) academic standing
codes
#641
Citizen Type Code Validation Form (STVCITZ) citizen type codes #1066
Class Code Validation Form (STVCLAS) class codes #1131
Diploma Type Code Validation Form (STVDPLM) diploma type codes #641
Ethnic Code Validation Form (STVETHN) ethnic codes #1109
Institutional Honors Code Validation Form
(STVHONR)
institutional honors
codes
#641
Level Code Validation Form (STVLEVL) level codes #1142
Marital Status Code Validation Form (STVMRTL) marital status codes #1067
Nation Code Validation Form (STVNATN) nation codes #26
Residence Code Validation Form (STVRESD) residency codes #1073
State/Province Code Validation Form (STVSTAT) state/province codes #156
Term Type Validation Form (STVTRMT) term codes #1139
1407
Banner Student User Guide | Academic History
• Issued Address
• CEU Dates
• Contact Hours
•Campus
• Term Admitted
• Term Matriculated
• Deans List
• Current College
• Current Minor
• Current Major
• Current Student Type
• Student Type By Term
• College By Term
• Transcript Type
• Student Centric Period Statistics
Note: Major by term is always sent. The major code value is converted to
the CIPC code value maintained on the Major, Minor, Concentration Code
Validation Form (STVMAJR).
5. Set the Electronic (Indicator) field to
Y on the Source/Background Institution Code
Validation Form (STVSBGI) for those institutions which are able to receive transcripts
electronically.
If your institution is not using the FICE code as your source/background institution
code on STVSBGI, then you will also need to load the FICE code into the FICE
(Code) field on STVSBGI. If the source background code is the FICE code, then no
value needs to be maintained in the FICE (Code) field.
6. Using the Academic History Control Form (SHACTRL), create a default term type and
a default EDI transcript request type. These fields are both required for the production
of EDI transcripts.
7. Using the values in the Term Type Validation Form (STVTRMT), update the Term
Type field on the Term Code Validation Form (STVTERM).
Only those terms whose term type values are different than the default value on
SHACTRL need to be updated. For example, if a code of "1- Full Semester" is created
on SHACTRL, then only those terms which are not Full Semester need to be updated
on STVTERM.
Note: Your institution may want to write a script to update these values.
8. Using the EDI Academic Grade Qualifier Form (SHAGEDI) and the third party manual,
translate your institution's grading scheme into the required EDI format.
1408
Banner Student User Guide | Academic History
Prior to creating an EDI transcript for a student, you may want to review the student's
honors information on the Degrees and Other Formal Awards Form (SHADEGR). If no
EDI default has been specified, then the first institutional honor that appears will be
sent for the degree.
9. Review the changes made to the Transcript Request Form (SHARQTC), and create
transcript requests for institutions which have been designated as EDI institutions, and
then create requests for non-EDI institutions.
10. Run the Academic Transcript (SHRTRTC) for all of the requests which have been
entered.
Note: No printed transcript should be generated for the EDI institutions.
11. Create transcript populations using the Transcript Population Creation Process
(SHRTPOP) for non-EDI transcripts, and then generate transcripts using the
Academic Transcript (SHRTRTC).
12. Run the Electronic Data Interchange Extract (SHREDIY), which is used to convert the
transcript information into the flat file to be read by EDI.
13. Using EDI.Smart, process the electronic transcript. Refer to the EDI.Smart
documentation for further information.
14. Create transcript populations using the Transcript Population Creation Process
(SHRTPOP) for EDI transcripts, then generate transcripts using the Academic
Transcript (SHRTRTC).
Note: No printed transcript should be generated for EDI requests.
15. Run the Electronic Data Interchange Extract (SHREDIY) for the transcript population
created in step #14.
16. Using EDI.Smart, process the electronic transcript.
17. An upload file will be generated from EDI.Smart, which will be used in the
Reconciliation of Electronic Transcripts (SHREDIR) in the next step.
18. Run the Reconciliation of Electronic Transcripts (SHREDIR). This process will update
the Status field in the EDI Request Details section of the Transcript Request Form
(SHARQTC) with the EDI transmission status.
19. Create additional EDI transcript requests and non-EDI requests.
20. Purge transcript requests using the Transcript Request Purge Process (SHPTRTC).
Note: The EDI transcript requests which have not been generated should
remain on the database.

1409
Banner Student User Guide | Academic History
EDI Transcript Upload Processing
EDI (Electronic Data Interchange) is used to upload post-secondary transcripts into the
Banner Student System for transfer articulation, in the SPEEDE/ExPRESS
(Standardization of Post-Secondary Education Electronic Data Exchange) format which is
received and processed by the EDI.Smart PC application. You need to have EDI.Smart
installed and configured and the appropriate Transfer Articulation definitions completed to
use this processing.
Note: If you are licensed for the EDI.Smart product, you should install the
most current release, prior to implementing EDI Transcript Upload
Processing.
Processing Transcripts
When the EDI.Smart PC application has received a transcript from the sending institution
that is ready for printing on the local printer, it is also ready for upload to the host. The
process on EDI.Smart that accomplishes this upload is called FLATUPLD. It produces a
file known as FLAT130. This file must be moved (copied) to a destination on the host
where Banner resides which you specify. This file is then parsed by the Pro*C program
SHREDIP (Upload of EDI Transcript). The parsing process scans the flat file and puts the
data into interim Oracle tables in Banner.
You may review the electronic transcript activity (EDI and XML) from within Banner on the
Online Transcripts Activity List Form (SHAEDIS). From this form, the ID of the student
must be either matched to an existing Banner ID, or a new ID must be created to
associate with the transcript. Once the ID has been verified, you may establish internal
tasks and/or processes which apply to that transcript. In addition, you may optionally send
a message to another Banner user indicating actions are required in regard to that
transcript. It is also possible to view the transcript as received online. The view of the
transcript contains the original EDI codes transmitted for such values as student level, and
dates in the format in which they were received, along with the corresponding SPEEDE/
ExPRESS date qualifier.
After completing required institution-specific procedures for transcript review, and if
appropriate, you may flag the transcript as ready for transfer articulation processing. You
will be alerted if an EDI or XML transcript exists for a student in the Transfer Articulation
Form (SHATAEQ). If an electronic transcript exists for the ID and transfer institution in the
Key Information, you will be presented with the option to load the transcript. If transfer
work already exists in academic history for the student, you must unroll (delete) the work
from academic history before proceeding. You may elect to load the transcript into one
attendance period or multiple attendance periods for that transfer institution. If multiple
attendance periods are selected, the process will create the appropriate terms and
attendance periods based on either the existing Term Code Validation Form (STVTERM)
or transfer institution-specific term information created in the Transfer Effective Term Code
Maintenance Form (SHADRTM). If a single attendance period is selected, you must build
the transfer institution header record with an attendance period of one (1) on the Transfer
Course Form (SHATRNS) prior to loading. After loading the transcript data, existing
procedures should be used for transfer articulation evaluation and the roll to academic
history.

1410
Banner Student User Guide | Academic History
Concurrent Curricula and EDI Processing
The conversion of the MAJOR, MINOR, CONCENTRATION, and other field of study type
codes to the EDI field of study identifier requires an external reference code on
SOAXREF. The
GTVLFST code and the values for MAJOR, MINOR, and
CONCENTRATION are delivered as seed data.
Note: You must add non-major, minor, and concentration field of study
types at your institution and associate them with one of the EDI codes.
The concurrent curricula conversion will automatically be executed when SHREDIY
begins to process a transcript for a student. If the curriculum data has already been
converted, the conversion process will end without completing any activity.
The EDI transcript does not include all items that are part of the learner's current
curriculum. The OPS loop includes only the primary major from the primary curriculum.
The DEG loop includes the degree and fields of study from the outcome record and allows
multiples be included in the output file.
Name Type Hierarchy on Transcript Request
You have the option to use a name type hierarchy on a transcript request. You can print a
name on a transcript that is not the current name found on the identification record
(SPRIDEN). You can identify a hierarchy of names in Banner that can be used to populate
the “record of” name on the paper transcript. The Banner names that can be considered
include:
• any name in the Person Identification/Name Repeating Table (SPRIDEN) that is
identified by a name type
• general person legal name
• student diploma name
Two levels can be defined for the transcript name hierarchy. The top level is for the
transcript type. The second level is for a person's request. If no matches are found in
either of these data sources, the current identification name will be used.
Special rules processing is required for EDI transcripts (SHREDIY). That process requires
that a first and last name exist. The diploma name and legal name cannot be used for the
EDI transcript, since those records do not split the first and last names.
Note: Name hierarchy selection can only be used for EDI transcripts if the
transcript type selected allows an EDI transcript to be produced.
The STVTRNS validation table is used to identify the name sources, and required values
are delivered with the supported name sources. SHATPRT (transcript type) stores the
name hierarchy. SHARQTC (transcript request) also stores a name hierarchy specific to
the individual.
When completing a transcript request, the Options Menu provides access to SHADEGR
where the degree sequences can be queried (SHADGMQ), and the diploma name can be

1411
Banner Student User Guide | Academic History
viewed, allowing the user to select the correct degree sequence number for the diploma
name in the hierarchy rules.
Overall Data Requirements
The following are setup requirements which must be completed before processing the
upload of EDI transcripts. Maintenance may be needed in some of these forms,
particularly as an institution develops EDI trading partnerships with additional institutions.
Term Type Validation Form (STVTRMT)
The Term Type Validation Form (STVTRMT) must contain the full set of valid EDI term
types as defined in the third party manual (Data Element 1139 - Session Code). These
required codes and descriptions are listed below:
Level Code Validation Form (STVLEVL)
Use the EDI Equiv(alent) field on STVLEVL to allow institution specific level codes to be
mapped to the values that may be transmitted on a transcript for the level of the
coursework which is reflected in the GPA and hours. The valid levels as defined in the
third party manual (Data Element 1142 - Academic Grade of Course Level Code) that
would be appropriate for post-secondary transcripts are:
Code Description
1 Full Year
2 Semester
3Trimester
4 Quarter
5 Quinmester
6 Mini--term
7Summer
8 Intersession
9 Long Session
Code Description
G Graduate
P Professional
U Undergraduate

1412
Banner Student User Guide | Academic History
Each of the above levels, if appropriate at your institution, should be mapped to only one
STVLEVL code. Additional values exist for Data Element 1142 in the third party manual,
but they are not relevant to this processing.
Note: The EDI Equivalent column used for transcript upload processing,
may also be used to translate institution level codes to the appropriate
EDI value(s) for level code for the transcript download. A list of the valid
values can be found in the third party manual.
Loading SPEEDE Transcripts into Banner
After the FLAT130 file produced by EDI.Smart has been uploaded to the host where
Banner resides, the Upload of EDI Transcript (SHREDIP) must be executed to load the
transcript data into interim Oracle tables in Banner. The SHREDIP process can be
executed through job submission or the host. To execute SHREDIP from the host, follow
the instructions below.
Execute SHREDIP from the host command line using the following four parameters (which
must be passed for successful execution).
The general form of the command line syntax is as follows:
The location and name of the data file to process will depend on where the EDI.Smart
FLAT130 file was uploaded to the host system and the filename that was specified. It may
be necessary to consult with technical staff at your institution to specify the location and
name of the data file with the syntax that is appropriate for your operating system. The log
flag may have a value of
Y or N. A value of Y or N will result in some informational
messages being displayed to your screen during SHREDIP processing. A value of
Y will
produce more extensive messages in the log file that is created during processing.
The student RAP and course RAP parameters, like the log file parameter, are specified as
Y/N (Yes/No) flags on the command line. A value of
Y in the Student RAP flag will process
RAP segments associated with the student. A value of
Y for the Course RAP flag will
upload the RAP segments associated with the courses. A value of
N for the Student or
Course RAP flag will not process/upload the respective RAP segments.
Host Command Line
UNIX
shredip <file to process> <log flag>
<student RAP flag> <course RAP flag>
<userid/password>
VAX
runproc shredip <file to process> <log flag>
<student RAP flag> <course RAP flag>
<userid/password>

1413
Banner Student User Guide | Academic History
A specific example is:
The SHREDIP process will produce a log file named
EDI01.LOG. Note that the name is
uppercase. This log file contains processing messages which can be reviewed,
particularly for errors. Errors which may be encountered include:
• *ERROR* Cannot open log file
• *ERROR* Cannot open input file
• *ERROR* Unknown type
• *ERROR* Internal ID has changed from <xxx> to <yyy> without a HEAD record
• *ERROR* Line processing error
• *ERROR* ??Bad parms?? Too many or too few parms
• *ERROR* Unprocessable line: <nnnn>
• *ERROR* Error occurred in processing
You may receive multiple ASUM and SSUM segments created by EDI.Smart's Banner
FLAT130 processing within the same transcript document.
You can process transcripts without an ASUM record, or transcripts without an SSUM
record. The level associated with the course work in the transcript is derived from the
ASUM record. If no ASUM record is present, the level is then derived from the SSUM
record. If neither an ASUM or SSUM record is present, the records will be rolled back, and
no transcript data will be inserted to the tables. An informational message will be written to
the log file if the level cannot be derived.
For example:
()**LEVEL ERROR: No ASUM or SSUM record exists to obtain level
()Student SSN: EDI000001 Student Name: Editest, Sarah M
()**** Transcript NOT processed ****
Note: The long data type display of the transcript document image
displays the value of the cum/sum indicator associated with the SSUM
record, to accommodate the possible receipt of multiple SSUM records.
Host Command Line
UNIX
shredip flat130.dat Y Y Y saisusr/
u_pick_it
VAX
runproc shredip flat130.dat Y Y Y
saisusr/u_pick_it

1414
Banner Student User Guide | Academic History
Use the following tables and indexes:
SHRSUMA table
• Column SHRSUMA_GPA_SEQNO is used to handle multiple ASUM records from
EDI.Smart's Banner FLAT130 processing.
• Primary key index is on the SHRSUMA_DCMT_SEQNO and SHRSUMA_GPA_SEQNO
columns.
SHRSUMS table
• Columns SHRSUMS_GPA_SEQNO and SHRSUMS_CUM_SUM are used to handle
multiple SSUM records from EDI.Smart's Banner FLAT130 processing.
• Primary key index is on the SHRSUMS_DCMT_SEQNO, SHRSUMS_ASES_SEQNO,
and
SHRSUMS_GPA_SEQNO columns.
Processing prevents a partial save of records processed in an individual transcript if fatal
errors are encountered. If a fatal error is encountered, informational messages will be
written to the log file to assist in identifying the document. No parts of the transcript
processed will be saved, and processing will continue to the next transcript in the file. All
records associated with a single transcript are committed only when they have all been
successfully processed.
The size of the
ACKKEY_T variable is 10 characters. This accommodates the maximum
length that may be received for the corresponding EDI segment and element BGN02. This
is a reference number which must have a minimum length of 4 (four) and a maximum
length of 9 (nine).
The size of the
HOME_CNTRY variable is 3 (three) characters. This accommodates the
maximum length that may be received for the corresponding EDI segment and element -
DMG07. This is the country of citizenship which must have a minimum length of 2 (two)
and a maximum length of 3 (three).
Note: In the database, the columns in the SHBHEAD table accommodate
the maximum values that may be transmitted as follows:
Error checking handling displays informational messages to the screen device as well as
writes them to the log file. Additional information to assist in problem identification and
resolution is provided particularly when a record cannot be inserted into the database. A
message is also included indicating that the transcript was not processed. Although a fatal
error may be encountered prior to the complete processing of the transcript, the SHREDIP
Column Value
SHBHEAD_ID_EDI_KEY
9
SHBHEAD_ACKKEY_T
9
SHBHEAD_HOME_CNTRY
3

1415
Banner Student User Guide | Academic History
program will continue to read and process all the remaining records, and will report any
additional errors detected, both fatal and non-fatal.
Error checking is used to validate incoming dates. Dates are examined to ensure that they
can be successfully inserted into tables, where required. All invalid dates (invalid by
Oracle date format requirements) will cause an error/informational message to be written
to the log file.
Non-critical dates will be replaced by Nulls when inserted into the tables. Invalid critical
dates, on which Banner processing of the transcripts depends, will result in the transcript
data being rolled back, and an appropriate informational message written to the log file.
Non-critical date error informational messages (transcript processed):
Invalid HEAD dob date
Invalid SSUM rank date
Invalid ASUM rank date
Invalid ASES start date
Critical date error informational messages (transcript not processed):
**** Transcript NOT processed **** Invalid date qualifier or ASES begin date format
**** Transcript NOT processed **** Invalid date qualifier or ASES end date format
In each case, these messages would be followed by additional detail to assist in
identifying the transcript with the problem:
Example of non-critical (non-fatal) error:
()**DATE ERROR #-1839: Invalid HEAD dob date
()Student SSN: EDI000001 Student Name: ,
()ORA-01839: date not valid for month specified
Note: In the above example, SHREDIP processing has not yet reached
the record which identifies the student's name, and that is why no name is
displayed in this particular error message. For other date error messages
that occur after the name is processed, the name will be included in the
message.
Logic is used to accommodate the receipt and processing of additional Banner FLAT130
record codes created from the EDI transcript segments. Processing is successful when
the following record codes may be transmitted:
Banner FLAT130 record Corresponding TS 130 Segments
ACAD ** SST, N1, N3, N4
SNTE NTE
DFOS FOS
HDR3 NTE

1416
Banner Student User Guide | Academic History
Note: ** The above records, with the exception of the ACAD record, are
written to the log file only. Selected information from the ACAD record is
written to the long data type display. Data for all of the above tables is not
currently stored in Banner Oracle tables.
Although the transcript record will no longer be displayed, the data is not deleted from the
database tables. It may be desirable to periodically purge transcript data from the tables
populated by SHREDIP after the transcripts have been successfully uploaded to transfer
articulation, and the status code for archiving the transcript has been updated to a status
of complete. You may use the Electronic Transcript Upload Purge Process (SHRETRP) to
delete this information.
Note and RAP Segments
The EDI Transcript Upload Parser is used to upload Note segments and optionally, RAP
segments. Note segments identify transfer institution student information with regard to
General Education Certification, repeated course work policies, credit through
examination, credit for prior experiential learning, and advanced placement, as well as
additional data needed to accurately evaluate a student's transcript and determine student
standing, class level, and eligibility. RAP segments identify requirements, attributes, and
proficiencies of students and/or individual courses.
Both the Note and RAP segments are included in the long data type view of the transcript
available in SHAEDIS. To make these segments easily identifiable visually, each will be
preceded by a single asterisk (*) followed by the segment name as in the following
examples:
HDR2 PCL
ANTE NTE
IMMS IMM
HCND HC
SPED SP
OPRG OP
CREF REF
CCSU CSU
CNTE NTE
COIN N1
DEGR DEG
DSUM SUM
DNTE NTE
Banner FLAT130 record Corresponding TS 130 Segments

1417
Banner Student User Guide | Academic History
The process allows you to specify whether student-specific RAP segments and/or course-
specific RAP segments should be uploaded with the transcript data. Although RAP
segments include free format alphanumeric fields for transmitting this information,
academic agencies or consortiums may establish defined and approved specific field
coding structures and schemes to transmit specific meanings as they relate to the student
or courses. The usefulness and interpretation of RAP segment data will depend on
agreements that have been established with your trading partners.
The transcript document image includes the display of all Note segments, if transmitted,
and RAP segments, if selected for upload.
The command line structure for submitting SHREDIP for processing is:
shredip <file to process> <log flag> <student RAP flag> <course RAP
flag> <userid/password>
The student RAP and course RAP parameters, like the log file parameter, are specified as
Y/N (Yes/No) flags on the command line. A specific example is:
shredip flat130.dat Y Y Y saisusr/u_pick_it
Note: The values of the flags passed on the command line for the log file,
upload student RAP segments, and upload course RAP segments are
interpreted on specific platforms as uppercase or lowercase. Entry of
either lower or uppercase values for the flags is forced to uppercase for
purposes of program processing.
SHREDIP processing extracts prior college information from the transcript and includes
the display of that information in the view of the transcript document image. (These are
HDR2 and HDR3 records in the Banner130 file created by EDI.Smart.)
The data displayed in the long data type view of the transcript available in the Online
Transcripts Activity List Form (SHAEDIS) displays "attempted hours" as opposed to credit
hours or earned hours. The Transfer Articulation Evaluation Form (SHATAEQ) shows the
uploaded attempted hours in the Transfer Courses scroll box for articulation according to
the rules established on the Transfer Grade Code Maintenance Form (SHATGRD) and
calculation of Transfer GPA.
* Notes: Course Note One
Course Note Two
Course Note Three (etc.)
* RAP: General Educ Certification

1418
Banner Student User Guide | Academic History
Establishing Crosswalks to Banner Values for Incoming
EDI Transcript Data (TS130)
SHREDIP processing allows several TS130 coded data elements to be translated into the
appropriate Banner Student values for each institution. A description of this logic, and the
set-up required to build the crosswalk translations are described in the following sections.
Here is the strategy for processing and uploading electronic data from multiple sources
(Web and EDI) into the Banner Student System. The EDI Cross-Reference Rules Form
(SOAXREF) supports Web and electronic admissions application processing (TS189).
One of the purposes of SOAXREF is to define how incoming EDI data will be translated
into Banner values. A number of scripts are used to make building the SOAXREF
underlying table easier, including a script which populates EDI code sets for every current
valid EDI value for any field which can be used in Web admissions application processing
or received in an EDI TS 189 transaction set. Further information about these scripts is
included below.
Although several EDI standard data elements are transmitted in an electronic transcript,
only a selected number of these elements require a translation or a crosswalk to a Banner
value. The elements that require a crosswalk translation to be established on SOAXREF
for transcript upload processing are:
• high school code *
• high school graduation type
• prior college code *, including the trading partner sending a transcript and other
postsecondary work identified within a transcript
• degree code
• degree honors
• academic summary, degree, and course levels
• field of study types *
* Both the high school, prior college, and field of study type codes will require a
qualifier to be specified in the rule on SOAXREF.
The above values are used in EDI application processing. A number of existing validation
forms include EDI values, such as STVLEVL, and some of the values listed above are
also used in Web and EDI admissions application processing. To assist you in creating
and maintaining some of these values, scripts have been provided. These scripts extract
data from existing tables and populate SOAXREF. They are designed to be able to be run
as often as necessary, so that if you make changes or add additional data in validation
forms, you can re-populate SOAXREF with the entire set of new values.
Note: You are not required to populate the EDI values in other validation
tables or to use the sample scripts, but appropriate values must exist in
SOAXREF before EDI transcript upload processing can begin. If you do
not use the scripts, you must populate SOAXREF using other means
(manual update or locally developed scripts).

1419
Banner Student User Guide | Academic History
If you choose to add records to SOAXREF manually, you must first add the appropriate
label and description to the EDI Verification Label Validation Form (STVXLBL). These
labels are normally inserted by the scripts described in the following sections. If you must
add labels manually, use the label codes provided. Be careful to build the label codes
exactly as listed in the chart which appears in the next section, after the instructions for
Defining EDI Cross-reference Values for High Schools and College.
Define EDI Cross-reference Values for High Schools and College
Four scripts are used to assist in building the cross-reference values for high schools and
colleges. The scripts
xrefhsch.sql and xrefcoll.sql use the value in the FICE
(Code) field of the Source/Background Institution Code Validation Form (STVSBGI) as the
EDI value in SOAXREF. The scripts
xrefhsc2.sql and xrefcol2.sql use the
value in the Source or Background Institution (Code) field of STVSBGI as the EDI
value in SOAXREF. You can use one or the other set of scripts to populate high school
and prior college values in SOAXREF, depending upon the choices you wish to make
available to applicants.
For Web use, the web page requests a “school type” code and “school code type”. The
school type code must be a valid value in SOAXREF for the label
SBGIQLFR, and the
values for this qualifier should be EDI-standard qualifiers for various code sets (like FICE
or ACT). The school code entered must be a valid value in SOAXREF for the label
STVSBGIC or STVSBGIH which is valid for the entered school code type.
If your institution chooses to use the value in the FICE (Code) field of STVSBGI as the
code which students should use to identify a high school or college, follow the four
bulleted steps below (and use the scripts
xrefhsch.sql and xrefcoll.sql to
populate high school and college values in SOAXREF). If your institution has used a
standard code set (like ACT or ETS codes) for school codes in STVSBGI, no additional
set-up steps are required, and you can use the scripts
xrefhsc2.sql and
xrefcol2.sql to populate high school and college values in SOAXREF.
• Review the values in the FICE (Code) field on the Source/Background Institution Code
Validation Form (STVSBGI).
• For US institutions, values used should be actual FICE codes. For institutions in other
countries, a different code set (like Stats Canada codes) might be used. Determine the
code set used for this field. Verify that value for the Label
DFLTPCOLQLFR in Group
Code
PCOL on the Electronic Admissions Application Rules Form (SAAERUL) contains
the EDI qualifier for this code set. (If FICE Codes are used in the FICE (Code) field on
STVSBGI, the EDI value for this group and label should be
73.)
For a complete, current set of EDI values, consult the POSTSECONDARY Electronic
Standards Council (PESC) website
www.pesc.org, where a link is provided to EDI
Implementation Guides.
Note: If you use FICE codes for STVSBGI institution codes, you have not
previously been required to repeat this value in the FICE (Code) field. For
the purposes of this script, the FICE code must be in the FICE (Code)
field.

1420
Banner Student User Guide | Academic History
• If FICE codes (or the values from another appropriate code set) are not present on
STVSBGI, update the rows with appropriate values.
• Have your Information Services representative run the scripts xrefcoll.sql and
xrefhsch.sql
, which are used to create a row in the table SORXREF for each row
in STVSBGI which has a value in the FICE (Code) field and either
H (High School) or C
(College) in the Type field. These scripts can also use the school's city, state/province,
and nation, which are maintained on the Source or Background Institution Base Form
(SOASBGI) in creating the SOAXREF description which will display on the Web. Review
the scripts and their options with your Information Services representative before
running them. Complete instructions for customizing the scripts to reflect that your local
choices are included in the comments of the scripts, which your Information Services
representative can review with you. Review the results in SOAXREF for the labels
STVSBGIC and STVSBGIH to see if the Descriptions appear in the way you want them
to display on the Web. If not, re-run the scripts, selecting a different option for creating
the Description, or update the descriptions manually.
Note: These scripts can be run whenever values are added to or changed
on STVSBGI. All values will always be deleted from SOAXREF (table
SORXREF), and the table/form is then re-populated with the current
values from STVSBGI.
Several scripts were automatically executed as part of the installation process to insert
rows into SOAXREF for degree level-degree codes (
STVDEGC), high school graduation
types (
HSCHRSON), honor level codes (HONRLEVL), and grade or course level codes
(
GRCRLEVL). ** The entries that were created represented the listing of known EDI
values for those data elements at that time. To update the Banner code translations for
these data elements, enter the appropriate label in the key of SOAXREF, and perform a
Next Block function. For each individual value, enter the appropriate Banner code in the
Banner Value field on the form. Please keep in mind that additional values may be added
for any of these elements, and manual updates to reflect these additions would be
required on SOAXREF.
For a complete, current set of EDI values, consult the POSTSECONDARY Electronic
Standards Council (PESC) website
www.pesc.org, where a link is provided to EDI
Implementation Guides.
** The actual scripts executed are as follows:
Label Script
STVDEGC
ixref18.sql
GRCRLEVL
ixref31.sql
HONRLEVL
ixref32.sql
HSCHRSON
ixref33.sql

1421
Banner Student User Guide | Academic History
Using Field of Study Types
The conversion of the MAJOR, MINOR, CONCENTRATION, and other field of study type
codes to the EDI field of study identifier requires an external reference code on
SOAXREF. The
GTVLFST code and the values for MAJOR, MINOR, and
CONCENTRATION are delivered as seed data.
Note: You must add non-major, minor, and concentration field of study
types at your institution and associate them with one of the EDI codes.
All other field of study types need to be included on SOAXREF and identified by one of the
following EDI values:
The following labels are used on SOAXREF for EDI processing.
EDI Label
EDI
Qualifier
EDI
Value Standard Web Banner Value
GTVLFST MAJOR M Y N MAJOR
GTVLFST MINOR N Y N MINOR
GTVLFST CONCENTR C Y N CONCENTRATION
Value Description
C Concentration
E Endorsement
G Graduate Non-degree
LLicensing
MMajor
NMinor
S Concentration
TTeaching
V Visiting Scholar
Label Description Processing Notes
GTVLFST Field of Study Types Values in the Field of Study Types label are used to translate
EDI field of study codes into appropriate Banner codes. Both
the field of study types and their qualifiers must be specified.

1422
Banner Student User Guide | Academic History
STVSBGIC EDI College Codes Values in the EDI College Codes label are used to translate
EDI college codes for postsecondary work completed at other
institutions into appropriate Banner codes and to specify the
college codes and their qualifier that you expect to receive
from your trading partner. You must have an entry for each
trading partner, and the Source/Background Institution record
(SOASBGI) must exist. Both the college codes and their
qualifier must be specific.
STVSBGIH EDI High School Codes Values in the EDI High School Codes label are used to
translate EDI high school codes into appropriate Banner
codes. Both the high school codes and their qualifier must be
specified.
STVDEGC Degree Level-Degree
Code
Values in the Degree Level-Degree Codes label are used to
translate EDI degree level codes into valid Banner codes
found in the Degree Code Validation Form (STVDEGC). These
values will be used only in translating prior college degrees to
Banner degrees in TS130 processing. EDI Degree Level
codes represent generic degree levels, (for example,
Baccalaureate Degree instead of Bachelor of Arts and
Bachelor of Science). To translate EDI values to Banner
values, you will need generic degrees codes in STVDEGC.
HSCHRSON High School Graduation
Type Codes
Values in the High School Graduation Type Codes label are
used to translate the EDI type of high school diploma or
certificate the student was awarded into valid Banner codes
found in the Diploma Type Code Validation Form (STVDPLM).
These values will be used only in translating high school
graduation type to Banner diploma types in TS130 processing.
HONRLEVL Honor Level Codes Values in the Honor Level Codes label are used to translate
Honors Level of the degree into valid Banner codes found in
the Institutional Honors Code Validation Form (STVHONR).
These values will be used only in translating prior college
degree honors to Banner honors in TS130 processing.
GRCRLEVL Grade or Course Level
Codes
Values in the Grade or Course Level Codes label are used to
translate academic grade or course level codes into valid
Banner level codes found in the Level Code Validation Form
(STVLEVL). These values will be used only in translating level
of work for the overall academic summary, each individual
academic session summary, each individual course taken, and
awarded degrees.
Label Description Processing Notes
1423
Banner Student User Guide | Academic History
Both the EDI College Codes and High School Codes require qualifiers to be specified in
the rules established on SOAXREF. An EDI qualifier is used to identify the content of an
associated data element. For example, college codes can be transmitted using a variety of
coding structures, such as FICE codes, IPEDS codes, or ETS codes, etc. When a qualifier
is associated with an incoming code, it identifies the type of code being transmitted. High
school and college codes transmitted via EDI always require a qualifier to be able to
identify the institution. As an example, your trading partner may indicate that their FICE
code will be transmitted for their institution identification. However, in your Banner Student
database, you may have built Source/Background Institution Codes using the IPEDS
coding structure. To upload the FICE code for your trading partner, and have it
crosswalked or translated to the IPEDS code used in your Banner database, you would
manually build the SOAXREF rule with the following format:
Note: 73 is the qualifier code that indicates a FICE code is being
transmitted.
Before processing EDI transcripts, you must enter or update SOAXREF rules for the
Labels specified in the chart above. To assist in building these rules, the following chart
identifies the TS 130 segments and elements that will be translated by the SOAXREF rule,
some of the expected EDI values, and the previous source in Banner used to perform the
translation.
For a complete, current set of EDI values, consult the POSTSECONDARY Electronic
Standards Council (PESC) website
www.pesc.org, where a link is provided to EDI
Implementation Guides.
Label Qualifier Code
Disp
Std
Disp
Web Description
Banner
Value
STVSBGIC 73 123456 Y N Central Univ 654321
TS 130
Segment
Data
Element
EDI Qualifiers
(not inclusive)
SOAXREF
Label EDI Values
Previous
Banner Source
N1 N103 -
Institutional
Code
Qualifier
See Data Element 66
71 - IPEDS
72 - ETS
73 - FICE
CS - Stats Canada
(Canadian University)
ZZ - Mutually Defined
STVSBGIC Example - Georgia State
University ETS code is
2851; FICE code is
001574
STVSBGI_CODE

1424
Banner Student User Guide | Academic History
N1 N104 -
Institution
Code
See Data Element 66
71 - IPEDS
72 - ETS
73 - FICE
CS - Stats Canada
(Canadian University)
ZZ - Mutually Defined
STVSBGIC Example - Georgia State
University ETS code is
2851; FICE code is
001574
STVSBGI_CODE
N1 N103 -
Institutional
Code
Qualifier
See N1 above STVSBGIH Similar to above
N1 N104 -
Institution
Code
See N1 above STVSBGIH Similar to above
SST SST01 -
Status
Reason
Code
N/A HSCHRSON See data element 641
B18 - Standard High
School Diploma
B24 - General Education
Development Diploma
(GED)
B25 - Other High School
Equivalency
PCL PCL01 -
Institutional
Code
Qualifier
See N1 above STVSBGIC See N1 above
PCL PCL02 -
Institution
Code
See N1 above STVSBGIC See N1 above
PCL PCL05 -
Academic
Degree
Code
(Highest
Degree
Received)
N/A STVDEGC See data element 1126
2.3 Associate Degree
2.4 Baccalaureate
Degree
4.2 Master's Degree
TS 130
Segment
Data
Element
EDI Qualifiers
(not inclusive)
SOAXREF
Label EDI Values
Previous
Banner Source
1425
Banner Student User Guide | Academic History
If an SOAXREF crosswalk rule has not been established for one of the elements identified
above, an error message will display and will be written to the log file similar to this
example:
Missing record of value on SOAXREF:
Label: STVSBGIC
Institution: 001118
Qualifier: 73
No translation for LEVEL exists on SOAXREF
Missing record or value on SOAXREF
Scripts were provided in the installation process to assist in populating the SOAXREF
form. These scripts are also provided in support of Banner Student Self-Service. The
same scripts can also assist in populating the SOAXREF form for EDI transcript
processing.
XML Transcript Processing
This section describes XML transcript processing.
Overview
You can transfer transcript data electronically from one institution to another, using XML
formatted files with Postsecondary Electronic Standards Council (PESC) XML Transcript
standards. XML transcripts can be sent, as well as received. This functionality gives users
a choice to print paper transcripts, use electronic transcript exchange through EDI.Smart,
use self-service transcripts online, or use the electronic XML transcript. For more
information about the PESC/XML transcript, please visit this Website:
www.pesc.org
and use the link for Standards.
DEG DEG05 -
Status
Reason
Code
(Honors
Level of
Degree)
N/A HONRLEVL See data element 641
B35 - Highest Honors
B36 - Second Highest
Honors
B37 - Third Highest
Honors
SUM SUM02 -
Academic
Grade or
Course
Level Code
N/A GRCRLEVL See data element 1142
U-Undergraduate
G - Graduate
P - Professional
STVLEVL EDI
Equiv column
TS 130
Segment
Data
Element
EDI Qualifiers
(not inclusive)
SOAXREF
Label EDI Values
Previous
Banner Source

1426
Banner Student User Guide | Academic History
XML transcript processing is similar to EDI transcript processing. You need to set up
supporting validation and rules, set up translation values on SOAXREF, and then you can
either send a transcript by creating a transcript request or receive a transcript using sleep/
wake or batch processing. The Electronic (Indicator) on the Source/Background
Institution Validation Form (STVSBGI) can be set for each record to specify whether the
institution can receive electronic transcripts, and if so, whether they should be sent via EDI
or as XML formatted transcripts.
Transcript files can be produced in XML format according to the PESC/XML transcript
schema. Two processes are used to import (SHRPESI) and export (SHRPESE) transcript
data files between institutions in XML format. Cross-reference values to support these
processes are available on SOAXREF. User-Defined Extensions (UDE) indicators on
STVDSTS are used to further define the information that is to be included on the
transcript. A UDE is an institutionally defined piece of the XML transcript.
Note: A shell is delivered for user-defined extensions, but the contents of
the shell are determined and developed by your institution.
The XML document can be encrypted and authenticated. SHACTRL is used to store
default FTP location information for where the XML transcript should be sent, as well as
transmission information for host name, remote directory, username, and password. The
password information will be encrypted upon entry and will not be accessible unless it is
unencrypted. The Source/Background Access Form (SOASBGA) is used to create
institution-specific information that includes host name, remote directory, username, and
password information for transcript transmission. The form also includes the Use Default
Location indicator that is used to determine whether the specific information on
SOASBGA or the default information on SHACTRL should be used.
Your institution can execute a process from within Banner to create an XML transcript,
rather than use a separate application. The following can be performed in Banner.
• The PESC/XML Transcript Export Process (SHRPESE) is used to read the XML
transcript requests from the collector file and generate the XML file for the transcripts,
along with control and log file entries.
• SHARQTC is used to request XML transcripts for those institutions that are XML
capable.
• SHRTPOP is used to process XML transcripts for a population selection.
• SHRETRP is used to purge XML transcript data from the appropriate tables, along with
EDI transcript data.
• The PESC/XML Transcript Import Process (SHRPESI) is used to bring into an institution
XML transcript files that have been received from another institution.
XML transcript processing contains the functionality to notify users of the encryption and
file transfer status. The success or failure of the file encryption can be tracked. The PESC/
XML Export Document Status Form (SHIEPTD) is used to track the status of XML
transcripts sent by the institution. The PESC/XML Import Document Status Form
(SHIIPTD) is used to track the status of XML transcripts received by the institution. You
can use SHARQTC to verify whether a transcript has been generated. You can view (via
SHAEDIS) and print XML transcripts to preview the data.

1427
Banner Student User Guide | Academic History
Process Test Scores and GPA Information
Test score data can be included in the XML transcript. The Test Scores (Indicator) on
SHATPRT allows you to specify whether a transcript type is to have test scores included in
its output. You can only include test score data when using an XML transcript.
GPA information can also be included in the XML transcript in rounded or truncated
format. You can request an XML transcript for a specific level or for all levels per student
via SHARQTC and SHRTPOP.
Process Immunization Records
Immunization data can be included in the XML transcript. The Immunization Data
(Indicator) on SHATPRT allows you to specify whether a transcript type is to have
immunization records included in its output. You can only include immunization data when
using an XML transcript.
Use the following forms in Banner General to set up immunization information.
• The Immunization Code Validation Form (GTVIMMU) is used to store immunization
codes, such as
90701, DTP Immunization.
• The Immunization Status Code Validation Form (GTVIMST) is used to store
immunization status codes, such as
1, First Inoculation.
• The Immunization Information Form (GOAIMMU) is used to maintain immunization
status information for an ID, such as the immunization code and description,
immunization status, immunization date, and any comments that are needed.
XML transcript processing uses the Banner Student EDI label codes from STVXLBL and
the cross-reference labels and rules from SOAXREF that are also used with EDI
immunization processing.
Data for immunization records can be added manually on GTVIMMU and cross-
referenced on SOAXREF. Please refer to the “Export Crosswalk Values on SOAXREF”
section for a list of values that can be used on GTVIMMU.
XML Transcripts in Banner Student Self-Service
Banner Student Self-Service can also process XML transcripts. The Transcript Request
Summary page checks the transcript request. If a student selects an institution that has
been identified on STVSBGI as being able to process electronic transcripts via XML or
EDI, the student has the option to request that the transcript be sent electronically or by
paper. If the student chooses the electronic transcript option, and the institution is set up
for XML transcripts, a type value of
P is inserted into the Transcript Request Table
(SHTTRAN).
STVXLBL EDI Label
Code Description
System
Required
IMMZSTAT Immunization Status Codes Y
IMMZTYPE Immunization Type Codes Y

1428
Banner Student User Guide | Academic History
Security for XML Transcripts
Pretty Good Privacy (PGP) software can be used for security with XML transcripts. To use
PGP, there are tasks you need to complete.
• Download the freeware for PGP at www.pgpi.org/products/pgp/versions/
freeware/
. (Version 6.5.8 of PGP supports RSA keys.)
• If your version includes encryption steps, update the pgp.properties file in both
the export (SHRPESE) and import (SHRPESI) processes to use PGP encryption.
• If your version includes encryption steps, exchange the key for your institution with the
key for the institution where the server is located. You need to exchange (register) keys
with any institution to which you are directly transmitting files.
XML Transcript Data Selection Using SHATPRT
The following fields on SHATPRT can be used to select data for inclusion on the XML
transcript.
Under the Print Options in the main window:
• Student Address
• High School
• Academic Events
• Degree GPA
• Qualifying Papers
• Qualifying Papers Text
• Level Comments
• Term Comments
• Course Comments
• Major by Term
• Transfer Detail
• GPA Statistics
• Academic Standing by Term
• Institution Totals
• Transfer Totals
• Overall Totals
• Test Scores *
• Immunization Data *

1429
Banner Student User Guide | Academic History
• College Transcript (User-Defined Extensions) *
• Student (User-Defined Extensions) *
• Academic Record (User-Defined Extensions) *
• Course (User-Defined Extensions) *
• Birth Date
* These fields are used only with XML transcripts. They are not available for paper,
EDI, or self-service transcripts.
Under the Primary Outcome Curriculum in the Curriculum Print Options window:
• Major
• Major Concentration
• Minor
• Concentration
• Other Fields Of Study
Use the Export and Import Processes
This section describes the import and export processes used in Banner.
PESC/XML Transcript Export Process (SHRPESE)
This Java process is used to create electronic transcripts in XML format by producing a
.xml file that can be read by the receiving institution. It also produces .lis and .log
file entries. It uses the file transfer protocol information on SOASBGA to send the
transcript to an institution. The process reads XML transcript requests from the collector
records and extracts those with a transcript type of
P (PESC/XML) from the Electronic
field on STVSBGI and a transcript type of
XML on SHATPRT.
To use this process, a transcript must have been requested through SHARQTC or
SHRTPOP (using population selection), or online using self-service. SHRPESE reads the
requests from the collector file and generates the XML for the transcripts along with
control and log file entries. Only official transcript requests with a send type of
P will be
processed. Transcripts may be produced for an individual with a pending request or for all
requests which have been sent to the collector file. When each transcript is generated,
SHRPESE will update the Status and Status Date fields in the Electronic Transcript
Status information on SHARQTC. If no errors have occurred, the Run Date value will also
be populated.

1430
Banner Student User Guide | Academic History
The electronic transcript status codes from STVEDIS are listed below.
The process allows for the use of multiple commands for SFTP and FTP when XML files
are exchanged. The
shrpese.jar file contains the option to break out and issue an
operating system command. Institutions will maintain their own shell scripts to perform the
SFTP or alternate transmission protocol.
This process also provides a baseline view of transmitted data that is printable in the
PESC standard template format. You can view the output on the Saved Output Review
Form (GJIVERO). While imported XML transcripts can be viewed on SHAEDIS, this view
truncates files to 31880 characters, which does not provide readable, formatted versions
of the XML file (input or output). The SHRPESE process produces an HTML readable
version of the XML file contents.
PESC/XML Transcript Import Process (SHRPESI)
This Java process is used to import XML transcript files into an institution from other
institutions. It reads files from a server, loads them to a temporary table, renames the files
(
.old), and then loads the data to Banner using rules set up on STVDSTS.
The process checks for duplicate records in Banner. The duplicate records will be noted in
the
.lis file by file name, document ID, Banner document sequence number, and the
message: Document has already been processed. New records will be loaded with the
same information as above, but the message will read: Transcript Document Imported.
New records can be viewed and routed on SHAEDIS before they are imported. Matched
records can be processed and verified using GOAMTCH and then articulated using
SHATAEQ. The decision to load transcripts can also be made on SHATAEQ.
Note: Data is imported into existing Banner EDI tables. Additional UDE
data is imported into new tables based on code written by the institution.
Set Up XML Transcripts
Use the following steps to set up processing (sending and receiving) for XML transcripts.
1. Set up crosswalk values on SOAXREF with the XML (Indicator) checked (set to
Y).
Please see the delivered seed data for crosswalk values.
Electronic Status Code Description
P0 XML Request Received
P1 XML Transcript Exported
P2 XML Export had errors
P4 XML Export held for final grades
P5 XML Export held for awarded degree

1431
Banner Student User Guide | Academic History
2. Make sure an appropriate transcript type for electronic submission exists on
STVTPRT.
3. Make sure the source/background code for your institution also has an FICE or
CEEBACT code on STVSBGI.
4. Make sure the institution codes for PESC/XML capable colleges or high schools have
an Electronic value of
PESC/XML on STVSBGI.
Note: PESC/XML transcript processing does not currently support high
school transcripts.
5. Create codes on STVHLWK to indicate the highest level of work to be accepted from
PESC/XML capable institutions.
6. Create codes on STVTLVL to indicate the highest level of transfer work to be
accepted from PESC/XML capable institutions.
7. Make sure term codes on STVTERM have assigned term type codes for any terms
that are different than the default term type code in SHACTRL.
8. Set up electronic document status codes on STVDSTS.
• Verification of ID - Create a status code with a priority of
1. All other indicators must
be set to
N.
• Transfer Articulation - Create a status code with a priority that is higher than
1.
Ensure that the Transfer Articulation Indicator is set to
Y.
• Test Scores - Create a status code with a priority that is higher than
1. Ensure that
the Tests (Indicator) is set to
Y.
• Immunizations - Create a status code with a priority that is higher than
1. Ensure
that the Immunizations (Indicator) is set to
Y.
• User-Defined Extensions - Create a status code (or codes) with a priority that is
higher than
1. Ensure that the appropriate user-defined extension indicators are set
to
Y.
• User-defined extensions on STVDSTS are: Main, Student, Academic Record, and
Course.
• Archive Status - Create a status code with the highest priority. Ensure that the
Archive Status Indicator is set to
Y. All other indicators must be set to N.
9. Define attendance periods for sending institutions on SHADRTM.
Each start and end date must be equated to a valid term code from STVTERM.
Note: Data should only be entered on SHADRTM if you want to limit the
terms to be accepted from the transfer institution. If records are built on
SHADRTM, only the imported student coursework that falls within those
transfer session date ranges will be loaded into SHATRNS. Any terms
that do not fall within the transfer session date ranges defined for the
institution on SHADRTM will not be loaded. If you want to load all terms
from a transcript that are defined in the STVTERM table, do not define
rules for the institution in SHADRTM.

1432
Banner Student User Guide | Academic History
10. Select the transcript type, and set up the desired print options on SHATPRT.
SHATPRT also contains the following options for user-defined extensions. They are:
College Transcript, Student, Academic Record, and Course.
11. Enter the default term type code and the FICE code for your institution on SHACTRL.
Also enter the FTP information, if your institution will be using a common XML
exchange system, that may be used for XML transcript exchanges. An example is the
University of Texas - Austin server in Austin, TX.
The default term type code causes the session type to be created in the XML
document for any term codes that do not have a term type (STVTRMT).
12. Enter the characteristics for transfer institutions on SOABGTA.
13. Define grades to be accepted from transfer institutions on SHATGRD.
14. Enter source/background and FTP information for XML transcript eligible schools on
SOASBGA.
If you want to use the default server that was set up on SHACTRL, check the Use
Default Location checkbox on SOASBGA.
15. Make sure address information for your institution and any schools to which you are
sending transcripts is defined in SOASBGI.
16. If you are using test score data, define test codes on STVTESC.
17. If you are using immunization data, define immunization codes on GTVIMMU.
18. If you are using immunization data, define immunization status codes on GTVIMST.
Send (Export) XML Transcripts
Use the following steps to create XML transcripts for export to a receiving institution.
1. Create an official transcript request on SHARQTC, or use SHRTPOP to create a
transcript population selection to process multiple requests. SHRPESE will only
process official requests, even if the request type is
P.
1.1. In the main window of SHARQTC, select a transcript type, number of copies,
and check the Official box. You may also enter other appropriate information for
the request.
1.2. In the Issue Information window, enter an external institution code. The output
type will default from STVSBGI.
or
1.3. Run SHRTPOP with appropriate values in the population selection, issued to
institution, and student-related transcript value parameters.
2. Run the SHRPESE export process to create an XML file for the receiving institution.
You can run this process in batch or in sleep/wake mode.
The process polls the transcript request table, reads the collector file, and selects
records with an output type of
P to be extracted as XML files and mapped to the
PESC/XML standard.

1433
Banner Student User Guide | Academic History
The process then checks SOASBGA for the FTP information. The XML formatted files
are stored on a central server.
Receive (Import) XML Transcripts
Use the following steps to import XML transcripts from sending institutions.
1. Run the SHRPESI import process to read the XML file from the sending server.
You can run this process in batch or in sleep/wake mode.
This process will read each file in the designated location, load the data to a
temporary table, rename the file to preserve it, and then load the data to Banner using
the rules set up on STVDSTS.
Once the system has checked the incoming record for a match in Banner, it will be
loaded. If a matching record is found, use SHAEDIS to process the file.
2. Use SHAEDIS to match the record or create a new record.
To match the record:
2.1. Enter the document status code associated with the ID verification for XML
transcript types (STVDSTS) in the Key Block.
2.2. Enter
P in the Pending or Complete Indicator field to select all pending
requests.
2.3. Use Next Block to view the electronic transcript records.
2.4. To match a record, select the record and use Next Block to access GOAMTCH.
To create a new record:
2.1. Use the Options Menu and select View Transcript to view the XML file data
before it is imported into Banner.
New records have an asterisk ( * ) in the untitled field to the left of the Last
Name field.
2.2. Once the ID has been verified as matched or new, use the Route Transcript
item in the Options Menu to access the Route Transcript window.
2.3. Enter
C in the Pending or Complete Indicator for the document routing status
code that is associated with the ID verification.
2.4. Enter a new record and the document routing status code for your next task,
such as routing the transcript for transfer articulation.
The code must exist on STVDSTS with the Transfer Articulation Indicator set
to
Y.
3. Load the transcript into the Banner tables using the Electronic Transcript Load
Decision Window on SHATAEQ.
3.1. Select the Transfer Articulation Detail (SHATAEQ) item from the Options Menu
on SHAEDIS.
3.2. Once you have accessed SHATAEQ, use Next Block to access the Electronic
Transcript Load Decision window.
1434
Banner Student User Guide | Academic History
3.3. Check the Electronic Version checkbox to upload the electronic transcript, and
check the Create Multiple Attendance Periods checkbox to load transfer work
for multiple attendance periods.
3.4. Select one of all of the Override Edit, Successful, No Equivalent, and
Manual status indicators to retain articulation statuses (whether set manually or
by the system) when transcripts are loaded, for records where the Articulate
Ind(icator) is set to
Override Edit, Successful, No Equivalent,
and
Manual.
3.5. Select Load Transcript Detail from the Options Menu, or use the Load
Transcript button to initiate the upload of transcript data.
4. Once the transcript has been loaded, perform transfer articulation on SHATAEQ.
5. Once articulation has been completed, return to SHAEDIS.
6. Go to the Route Transcript window and create your next transcript status code to load
user-defined extensions, test scores, etc., or to archive that status code information
based on the setting of the Archive Status Indicator on STVDSTS.
Note: Please refer to this guide for more information on loading
transcripts and transfer articulation. Please refer to the online help for
more information on STVDSTS, SHATEAQ, and SHAEDIS.
Export Crosswalk Values on SOAXREF
Labels are used during the XML transcript export process to determine values used within
the document to be sent to the receiving institution. The values to be included must be
cross-referenced on SOAXREF with the XML field checked. Some of these cross-
references are also used for the import process.
Note: Values that are delivered and automatically loaded are not
associated with a validation table for the crosswalk.
The Banner Value field on SOAXREF will only display a List of Values when the value in
the Label field is a validation table. The other non-validation table labels equate to values
in existing Banner validation tables and must be populated on SOAXREF. The Banner
values must be valid values on the associated validation table or translation will not take
place.
If a value has been crosswalked to multiple Banner values, then the Banner code with the
lowest sequence number will be used on the imported file. For example, if multiple level
codes are crosswalked to" UnderGraduate", the lowest sequence number will be used for
the imported data to translate an "UnderGraduate" level to a Banner level. The Banner
value is used first, then the electronic value is used. There is no actual sequence number
on SOAXREF.
Because PESC does not use qualifier codes (like EDI processing or Banner Student Self-
Service Admissions processing), a one-to-one relationship will work best for XML
transcript processing. However, if a one-to-many or many-to-one relationship is set up on
SOAXREF, then the process will select the translated value for the export process by

1435
Banner Student User Guide | Academic History
Banner value and then by electronic value. The import process does not have the same
issue, as the PESC or electronic values would not be duplicated.
For example, on SOAXREF, the Banner value
UG is crosswalked to the electronic values
of "LowerDivision" and "Undergraduate".
For the export process, the Banner value would be translated to the electronic value. If
the student had a course with a level of
UG, it would be translated to the
"LowerDivision" value.
For the import process, the electronic value would be translated to the Banner value. If
the student had a translated level of "LowerDivision", it would be imported into Banner
as
UG. If the student had courses that also had the UG value associated with them,
they would be translated into Banner as
UG as well.
See the PESC website for a list of transcript elements used with the XML transcript export
process and associated comments and details. The elements are used to determine
values within the transcript to be sent to the receiving institution. EDI label codes must
exist on STVXLBL.
Import Crosswalk Values on SOAXREF
Labels are used during the XML transcript import process to determine values to be
imported into the system from the transcript that was received. The values to be included
must be crosswalked on SOAXREF with the XML field checked. Some of these
crosswalks are used for the export process.
Note: Values that are delivered and automatically loaded are not
associated with a validation table for the crosswalk.
The Banner Value field on SOAXREF will only display a List of Values when the value in
the Label field is a validation table. The other non-validation table labels equate to values
in existing Banner validation tables and must be populated on SOAXREF. The Banner
values must be valid values on the associated validation table or translation will not take
place.
If a value has been crosswalked to multiple Banner values, then the Banner code with the
lowest sequence number will be used on the imported file. For example, if multiple level
codes are crosswalked to "UnderGraduate", the lowest sequence number will be used for
the imported data to translate an "UnderGraduate" level to a Banner level. The Banner
value is used first, then the electronic value is used. There is no actual sequence number
on SOAXREF.
Because PESC does not use qualifier codes (like EDI processing or Banner Student Self-
Service Admissions processing), a one-to-one relationship will work best for XML
transcript processing. However, if a one-to-many or many-to-one relationship is set up on
SOAXREF, then the process will select the translated value for the export process by
Banner value and then by electronic value. The import process does not have the same
issue, as the PESC or electronic values would not be duplicated.
For example, on SOAXREF, the Banner value
UG is crosswalked to the electronic values
of "LowerDivision" and "Undergraduate".

1436
Banner Student User Guide | Academic History
For the export process, the Banner value would be translated to the electronic value. If
the student had a course with a level of
UG, it would be translated to the
"LowerDivision" value.
For the import process, the electronic value would be translated to the Banner value. If
the student had a translated level of "LowerDivision", it would be imported into Banner
as
UG. If the student had courses that also had the UG value associated with them,
they would be translated into Banner as
UG as well.
See the PESC website for a list of transcript elements used with the XML transcript import
process and associated comments and details. The elements are used to determine
values to be imported into the system from the transcript that was received. EDI label
codes must exist on STVXLBL.
Use an Alternate Transmission Protocol
SHRPESE can be run using SFTP or an alternate transmission protocol. Users are not
limited to only FTP processing.
Note: If you choose to use the scripting method of FTP processing, you
will need to create and support your own shell file for the SFTP
processing of XML transcript files.
Use the following steps to set up an alternate transmission protocol.
1. Extract the
send.properties files from the shrpese.jar file using the
following command:
jar -xvf shrpese.jar send.properties
2. Set the following two control settings in this file:
send.UseAlternate=N
send.Command=sh /export/home/xmluser/sftp.shl
The send.UseAlternate variable is the switch that will determine whether to use
the embedded, regular FTP transmission protocol within the
shrpese.jar process
(
general/transporter.jar) or to use an alternate method of transmission
protocol.
This flag is delivered with a default value of
N (No), meaning the extract process will
use the embedded, standard FTP process.
When the
send.UseAlternate variable is set to Y (Yes), this indicates that your
institution wants to use a transmission protocol other than the delivered FTP
methodology.
The process will then use the second variable,
send.Command, to run the
transmission protocol of your choice. The
send.Command variable represents the
operating system path and file that will be used execute the transmission protocol of
your choice.
3. Once the
send.properties file is updated with the desired settings, save the file.

1437
Banner Student User Guide | Academic History
4. Update the shrpese.jar process with the newly updated file and settings using
the following command:
Jar -uvf shrpese.jar send.properties
When the shrpese.jar export process is run and reaches the point of transferring
a file, it reads the
send.properties file to determine which course of action to
take. If the
send.UseAlternate variable is set to Y, the process will break out
from the
shrpese.jar process and issue the following operating system
command.
sendCommand + " " + pgpFileName + " "
+ ThisJobNumber + " "
+ fileOutPath + " "
+ hostName + " "
+ userName + " "
+ passWord + " "
+ RemoteDirectory;
The sendCommand value is equal to the send.Command value in the
send.properties file that was updated.
In this example, the exact values would be:
sh /export/home/xmluser/sftp.shl + pgpFileName + " "
+ ThisJobNumber + " "
+ fileOutPath + " "
+ hostName + " "
+ userName + " "
+ passWord + " "
+ RemoteDirectory;
The parameter descriptions are as follows:
Parameter Description
sendCommand
Value in
send.properties file send.Command
variable
pgpFileName XML/PGP file being sent via (S)FTP
ThisJobNumber Job submission oneup number
fileOutPath
Path that maps where the
*.lis files are written; the shell
file can write the
ftp_oneup.log file to same output
directory as the
shrpese.lis/log, pescxml*.xml
files, etc.
hostname Hostname from SOASBGA/SHACTRL
username Username from SOASBGA/SHACTRL
password Password from SOASBGA/SHACTRL
RemoteDirectory Remote Directory from SOASBGA/SHACTRL

1438
Banner Student User Guide | Academic History
Create Readable Output From the *.xml File
XML files produced by SHRPESE and SHRPESI can be transformed into alternate forms
of output using an XSLT engine. This provides readable, formatted versions of the input or
output files, such as HTML.
Note: If you choose to use the scripting method of XSLT processing, you
will need to create and support your own shell file for the XSLT processing
of XML transcript files.
Use the following steps to create readable output from the XML file.
Perform XSLT Transformation
1. Extract the following xslt.properties files from the shrpese.jar and
shrpesi.jar files using the following commands:
jar -xvf shrpese.jar xslt.properties
jar -xvf shrpesi.jar xslt.properties
2. Set the following four control settings in this file:
xslt.Transform=Y
xslt.UseInternalXSLT=Y
xslt.XSLFileName=bwcktran.xsl
xslt.Command=sh /export/home/xmluser/input/xalan.shl
•The xslt.Transform variable is the overall indicator that determines if XSLT
transformation is performed, so the XML data file is transformed into an alternate,
readable form.
If the
xslt.Transform variable is set to N, no transformation will take place.
If the
xslt.Transform variable is set to Y, then the transformation will take
place, but the method of transformation is determined by the second variable,
xslt.UseInternalXSLT.
•The
xslt.UseInternalXSLT variable determines if the internal transformation
process,
PESCXMLTransform.java, or an external transformation process is
used to perform the transformation of the XML data file into another readable form
of output.
If
xslt.UseInternalXSLT variable is set to Y, then the shrpese.jar and
shrpesi.jar files will use the internal XSLT engine,
PESCXMLTransformer.java, to transform the XML data file into an HTML
formatted output file. This method is only available to produce HTML formatted
output.
If
xslt.UseInternalXSLT variable is set to N, then the shrpese.jar and
shrpesi.jar files will issue an operating system command (i.e., a shell file) that

1439
Banner Student User Guide | Academic History
is used to perform the XSLT transformation using the XSLT engine and stylesheet of
your choice.
Note: The xslt.Transform variable must be set to Y for any of the
remaining variables to be used.
•The
xslt.XSLFileName variable is optional. It will only be used if the
xslt.UseInternalXSLT variable is set to N, (using an external XSLT process
to perform the transformation instead of the internal method).
If the
xslt.UseInternalXSLT variable is set to N, then the
xslt.XSLFileName variable is passed to the shell file that is responsible for
performing the transformation. The variable must have a value if the
xslt.UseInternalXSLT variable is set to N, but whether the shell file
responsible for performing the transformation uses this value is up to the logic within
the shell file itself.
The locally created shell file used to perform the XSLT transformation might have a
hardcoded stylesheet value that performs the transformation, instead of using this
passed parameter as the stylesheet. This value is passed to provide flexibility in the
creation of locally owned XSLT shell file.
If the internal transformation process is used (
xslt.UseInternalXSLT is set
to
Y), then the transformation process will always use the file name
bwcktran.xsl for the stylesheet used to perform the transformation.
•The
xslt.command variable is only used if the xslt.UseInternalXSLT
variable is set to
N. When the shrpese.jar and shrpesi.jar files reach the
point in process where the transformation is to be performed, the process first reads
the
xslt.Transform variable.
If this value is
N, then no other processing takes place with regard to XSLT. If this
value is
Y, the process then reads the xslt.UseInternalXSLT variable to
determine if the internal XSLT engine or an external XSLT engine is used to perform
the transformation.
If
xslt.UseInternalXSLT variable is set to N, then the xslt.command
variable is used. The
shrpese.jar and shrpesi.jar processes will “break
out” from processing and issue the following operating system command:
xsltcommand + " " + xmlFileName + " " +
XSLTJobNumber + " " + xsltFileName;
The xsltcommand value is equal to the xslt.command value in the
xslt.properties file that was updated.
In this example, the exact values would be:
sh /export/home/xmluser/input/xalan.shl + " " + xmlFileName
+ " " + XSLTJobNumber
+ " " + xsltFileName;

1440
Banner Student User Guide | Academic History
The parameter descriptions are as follows:
Two methods can be used to accomplish the XSLT transformation, the internal method
and the external method. The internal method will only produce an HTML formatted
version of the XML data file. The external method allows you to produce alternate output
file formats. If you want to create a
.pdf, .doc, .txt, or .xls file format for the XML
transcript as opposed to a
.html version, you can use the external XSLT process,
accompanied by your
XSL:FO stylesheet, to produce the desired output.
Modify the bwcktran.xsl File
The delivered bwcktran.xsl stylesheet is an example or starter stylesheet used to
produce a readable version of the XML transcript. Stylesheets are meant to be altered and
adjusted to render the chosen output format.
Use the following steps to modify the
bwcktran.xsl stylesheet file.
1. Extract the
bwcktran.xsl file from the shrpese.jar and the shrpesi.jar
files using the following commands:
jar -xvf shrpese.jar bwcktran.xsl
jar -xvf shrpesi.jar bwcktran.xsl
The bwcktran.xsl stylesheet contains an embedded *.css file within the
stylesheet, as denoted in the comments section of the
bwcktran.xsl file. The
bwcktran.xsl stylesheet contains the web_defaultapp.css file that is found
in the
$BANNER_HOME/wtlweb/htm directory.
The stylesheet is embedded, as opposed to being linked, to provide portability. For
example, the final HTML file can be mailed to the user running the process. Therefore,
any linking that is done to a
*.css file, as opposed to embedding the file, causes any
styles associated with the final HTML document to be lost.
2. Cut the existing stylesheet out of the
bwcktran.xsl file, located between the
<STYLE> tags, and replace it with the contents of your customized
web_defaultapp.css code.
This will produce a final HTML document that is consistent with the self-service
products running at your institution.
Note: For more information on specific modifications or customizations of
the stylesheet to render adjusted HTML output and about using the XSL
Parameter Description
xmlFileName XML file you are transforming
XSLTJobNumber Job submission oneup number
xsltFileName
Filename that maps to the
xslt.XSLTFileName
variable in the
xslt.properties file

1441
Banner Student User Guide | Academic History
programming language, please refer to the following resource:
www.w3.org/Style/XSL/.
3. Load the new or altered
bwcktran.xsl file back into the import and export
processes so that when the processes are run, the stylesheet will transform the output
to your new format.
Use the following commands to upload the new
bwcktran.xsl stylesheet into the
processes:
jar -uvf shrpese.jar bwcktran.xsl
jar -uvf shrpesi.jar bwcktran.xsl
View Formatted Output
The XML transcript process can produce a readable version of the XML data file. If the
XSLT process is used to produce the formatted output file, the SHRPESE and SHRPESI
batch files used to launch the programs, as well as any
*.lis and *.log files
produced by those processes, are then converted to HTML files.
The HTML formatted files can be viewed on the Saved Output Review Form (GJIREVO)
by selecting the HTML file for the process and opening that output in a separate browser.
To ensure the process produces output that can be reviewed on GJIREVO, keep the
following in mind when entering job submission data on the Process Submission Control
Form (GJAPCTL):
• The job or report that creates the output must be a Pro*C program.
• It must be run under your user ID with DATABASE entered in the Printer field on
GJAPCTL.
Use the following steps to view the XML transcript output on GJIREVO:
1. Enter the name of the process that created the output in the Process field.
2. Enter the sequence number that identifies the specific job or report in the Number
field.
3. Enter the file name of the output file in the File Name field.
Use the format
jobname_jobnumber.extension.
Use a
.html extension for HTML formatted output.
4. Use Next Block to view the output in the Saved Output block.
- or -
5. Select the Show Document item from the Options Menu to display the output in HTML
format in a browser.
6. Click
Yes to continue when prompted to show the file in a browser.
1442
Banner Student User Guide | Academic History
Use Student Centric Periods on the XML Transcript
The PESC/XML Transcript Export Process (SHRPESE) can display courses and GPAs by
student centric period without term details in the
.xml output.
Note: For more information on setting up and using student centric period
processing, please see the “Student Centric Period Processing”
procedure topic in the “Registration” chapters.
The student centric period is displayed as one continuous enrollment period that is not
broken up by the terms contained in the student centric period. The term header is not
displayed on the XML transcript for student centric periods. Terms are grouped within the
student centric period for the student. After the last term with a student centric period has
been printed, intervening terms without student centric periods are printed.
A term that is not associated with a student centric period is displayed chronologically in
the
.xml file after the end of the student centric period (which starts before that term
begins) and the start of the next student centric period. For example, an intersession
which is not part of a student centric period, which falls between the two terms that make
up the student centric period, will be printed after that student centric period.
The student centric period data is substituted for the term data when the Student Centric
Period Statistics checkbox is checked (set to
Y) on SHATPRT. When the Student
Centric Period Statistics checkbox is unchecked (set to
N), data is processed using
standard term functionality.
The XML transcript reports data in three scenarios when the Student Centric Period
Statistics checkbox is checked.
• When all of a student's coursework belongs to a student centric period, data is reported
by student centric period for all of the student’s enrollment and/or academic history
records.
• When some of a student's coursework belongs to a student centric period and some
coursework does not belong to a student centric period, data is reported by student
centric period and by standard terms (presented as if the term is a student centric
period) for the student’s enrollment and/or academic history records.
• When none of a student's coursework belongs to a student centric period and no
student centric period exists, data is reported by standard terms (presented as if the
term is a student centric period) for the student’s enrollment and/or academic history
records.
Note: When the Student Centric Period Statistics checkbox is checked
(set to
Y) on SHATPRT, all information is presented as if it belongs to a
student centric period header. Data is displayed as being in a “period”.
However, the data may actually reflect term data when student centric
periods are not in use or when the term does not have an associated
student centric period.
The process checks the term header record (SHRTTRM) for each term in the student’s
academic history. When the
SHRTTRM_SCPS_CODE is Null for a term, the student

1443
Banner Student User Guide | Academic History
does not have a student centric period associated with that term. In this case, the standard
term information is displayed on the transcript for the academic history information.
When a student has a registration record for a term but no term header record exists, the
student centric period to which that term is associated is determined by:
• finding the general student record (SGBSTDN) that is active for the registration term
• using the student centric period cycle code (SGBSTDN_SCPC_CODE) from that record
• finding the record for that registration term in the SORSCPT table where:
• that registration term matches the
SORSCPT_TERM_CODE
• the cycle code (SGBSTDN_SCPC_CODE) from the SGBSTDN table matches the
cycle code (
SOBSCPS_SCPC_CODE) in the SOBSCPS table
• the student centric period code from the SOBSCPS table matches the student
centric period code from the SORSCPT table
When the
SHRTTRM_SCPS_CODE has a student centric period value for the term, that
code is used to group the terms that belong to each student centric period. It also
populates the Academic Session data on the transcript. The GPA totals and GPA
information for the student centric period are used to populate the Academic Summary
data on the transcript. Data for standard term information for the Academic Session and
Academic Summary comes from SHRTGPA.
When the student centric period is in effect for the term and student:
• Term comments for all terms are grouped together.
• The major that is effective for the first term of the student centric period is used.
• Term statistics data comes from SHRSGPA.
• Academic standing by term data comes from the highest term header record in the
student centric period.
• In-progress courses are listed at the end with the associated student centric period.
• Coursework from academic history is displayed for the associated student centric
period.
Transfer coursework is not associated with a student centric period. Transfer credit is
displayed at the beginning of the transcript based on the transfer attendance period
entered on SHATRNS.
Web Transcript Request Processing Set-Up
Web Transcript Request processing allows students to request official and/or any type of
printed transcripts via the Web using Banner Student Self-Service. The Web Transcript
Request changes a manual process into a self-service function and that benefits your
institution’s Student Records office. The Student Records office can service exceptions
and the processing of the transcripts.

1444
Banner Student User Guide | Academic History
Transcript requests are not created if the learner has a hold defined on SOAHOLD with a
hold type that prevents transcript processing. Learners who have these types of holds will
receive a message indicating as such and what action needs to be taken to clear the hold.
Please refer to the Banner Student Self-Service User Guide for more detailed information
describing the Web processing used with this functionality.
Instructions
Use the following steps to set up Web Transcript Request processing.
1. Transcript Type Codes – On STVTPRT, check the Web Request Indicator checkbox
for the transcript type code(s) your institution wishes to make available to students to
create requests via the self-service applications.
2. Electronic Letter Codes – On GTVLETR, create the letter code(s) that will be used to
confirm that the Web-generated transcript request was successfully entered. You may
define a separate letter code for each transcript type with the Web Request Indicator
checkbox checked, or you may use the same letter code for all transcript types.
3. HTML Letter Assignment – On SOAELTL, add the letter code(s) created in the
previous step, and associate the module value
T with each.
4. Email Letter – On SOAELTR, create the confirmation message that will be displayed
upon the successful creation of a transcript request. A customized message, which
may include data from the transcript request itself, should be created for each
electronic letter code entered in GTVLETR.
5. Web Self-Service Options – On STVWSSO, create the code(s) and associated
description(s) for each type of service level a student may request via the Web. For
example, you may want to set up a code for standard turn-around/standard delivery
and a different code for expedited turn-around using an express delivery service. Also,
you may optionally associate a charge, an issued to comment, and/or a printer code
with each self-service option code.
5.1. Charges entered on this validation form will default into the appropriate field
when the self-service option code is associated with a transcript type; however,
it can be updated if necessary.
5.2. Any text entered into the Issued To comment field will display in the Issued To
line on the printed transcript. Your institution can use this feature to provide
instructions to the persons who handle the transcript after it has been printed.
5.3. A printer code associated with a self-service option code will enable the persons
responsible for generating transcripts to direct all transcript requests created
with that self-service option code to print on a specific printer when running
SHRTRTC in sleep/wake mode.
6. Web Payment Request Options – On STVWPYO, create the code(s) and associated
description(s) for each type of payment method your institution wishes to make
available to students using this functionality.
6.1. Check the Credit Card Indicator check box to indicate that this payment
option, when selected, should invoke the Web credit card payment process.

1445
Banner Student User Guide | Academic History
6.2. Enter the detail code(s) that should be associated with this type of transaction
when records are written to the appropriate type of account (student or
miscellaneous).
7. Web Transcript Request Rules – On SHAWTRR, adjust the default values on the
fields to meet your institution’s transcript request policies. On this form, you may place
limits on:
• the number of requests a student may make per day,
• the number of transcripts (copies) that a student can ask for per request,
• the number of transcripts (copies) a student can request per day, and
• the number of free transcripts (copies) the student may request before incurring any
charges.
Finally, your institution can ensure that all transcript requests will include all course
levels for each student by checking the Default course level to ALL on transcript
checkbox.
8. Transcript Type Rules – On SHATPRT, for each transcript type that you checked the
Web Request Indicator checkbox on STVTPRT, turn on or off certain options, and
associate the appropriate Web self-service option and Web payment option codes. In
the Self-Service Print Options window, there are three blocks that control Web request
options.
8.1. The Web Transcript Controls block has the following options:
– Allow Hold for End of Term Processing – Check the checkbox if you want
to allow students to indicate that they would like their transcript request(s) to
be processed after final grades have been processed.
– Allow Electronic Transcripts on the Web – Check the checkbox if you want
to allow students to generate electronic transcript requests on the Web.
Check this checkbox only if your institution is set up to send transcripts
electronically. When this checkbox is checked, and the student wishes to
send a transcript to another institution that is set up to receive electronic
transcripts, then an option will display to generate that sort of request.
– Allow Hold for Degree Processing – Check the checkbox if you want to
allow students to indicate that they would like their transcript request(s) to be
processed after a pending degree has been awarded.
– Electronic Letter Code – Enter the electronic letter code created in Step 2
that you want to display on the Web upon successful creation of a transcript
request.
8.2. The Service Level block has the following options:
Use this block to associate Web self-service options with specific transcript
types. When you enter a Web self-service option code in the Code
field, the
description and charge will default from STVWSSO. The description is display
only, but the charge amount may be updated if desired. The other items that can
be adjusted for each code are:
– Type – Use this field to determine where charges will be written in the Banner
Finance system. A value of
M results in records being written to a
miscellaneous type of account. A value of
S results in records being written to
the student accounts.

1446
Banner Student User Guide | Academic History
–The Delivery Method is required in Self-Service. A service level record must
be defined on SHATPRT for each transcript type that is available for Self-
Service transcript processing
– If your institution does not charge for transcript requests, you need to create a
service level record with a Charge of
$0.00. This is displayed as a value of
No Charge in the Delivery Method drop down in Self-Service.
– Per – Use this field to determine whether charges will be incurred per request
(
R) or per copy (C). Per request charges will always be incurred and should
be associated with those service options that the institution would never waive
(e.g., express delivery services). Per copy charges will only be incurred once
the student has reached the limit of free copies allowed before charging
begins, as defined on the Web Transcript Request Rules Form (SHAWTRR).
8.3. The Payment Options block is where you associate Web payment options with
specific transcript types. Enter as many Web payment options per transcript
type as needed.
SHVTRE1 Banner View
This Banner view allows you to develop customized reports of transcript request data to
track usage of Web transcript processing.
The key attributes of this view are:
• Personal ID Master: PIDM_KEY
• Request Sequence Number: SEQ_NO
Since the PIDM is an internal ID number unique to each student, the view returns one row
of information for each student per request sequence number.
The following rows are in this view.
SHVTRE1_ACTIVITY_DATE
SHVTRE1_ADDR_NAME
SHVTRE1_CITY
SHVTRE1_COLL_CODE
SHVTRE1_CTRY_CDE_PHONE
SHVTRE1_DETC_AMOUNT
SHVTRE1_DETC_DESC
SHVTRE1_DETC_DETAIL_CODE
SHVTRE1_EDI_REQUEST_NUM
SHVTRE1_EDI_SENT_DATE
SHVTRE1_EDI_STATUS_DATE
SHVTRE1_EDIS_CODE
SHVTRE1_ERROR_IND
SHVTRE1_FIRST_NAME
SHVTRE1_HOLD_DEGR_IND
SHVTRE1_HOLD_GRDE_IND
SHVTRE1_HOUSE_NUMBER

1447
Banner Student User Guide | Academic History
SHVTRE1_ID
SHVTRE1_INTL_ACCESS
SHVTRE1_LAST_NAME
SHVTRE1_LEVL_CODE
SHVTRE1_MI
SHVTRE1_NATN_CODE
SHVTRE1_NO_COPIES
SHVTRE1_OFFICIAL_IND
SHVTRE1_PHONE_AREA
SHVTRE1_PHONE_EXT
SHVTRE1_PHONE_NUMBER
SHVTRE1_PIDM
SHVTRE1_PRINT_DATE
SHVTRE1_PRINTER
SHVTRE1_REQUEST_DATE
SHVTRE1_SBGI_CODE
SHVTRE1_SENT_DATE
SHVTRE1_SEQ_NO
SHVTRE1_SESSIONID
SHVTRE1_STAT_CODE
SHVTRE1_STREET1
SHVTRE1_STREET2
SHVTRE1_STREET3
SHVTRE1_STREET4
SHVTRE1_SURNAME_PREFIX
SHVTRE1_TERM
SHVTRE1_TERM_CODE_DETC
SHVTRE1_TERM_CODE_IN_PRG
SHVTRE1_TPRT_CODE
SHVTRE1_TYPE
SHVTRE1_USER
SHVTRE1_WPYO_CODE
SHVTRE1_WPYO_DESC
SHVTRE1_WPYO_RECEIPT_NUMBER
SHVTRE1_WSSO_DESC
SHVTRE1_WSSO_CODE
SHVTRE1_ZIP
eTranscripts Processing
eTranscripts processing allows you to use Banner Student, the Ellucian Cloud, and third
party vendors to accept secure transcript orders and automate the process of fulfilling
those orders. The transcript orders are sent from the vendor to Banner Student using the
eTranscripts Ellucian Cloud interface. The student orders a transcript through the vendor
user interface, and the Ellucian Cloud serves as the communication broker between the
1448
Banner Student User Guide | Academic History
vendor and the Banner ERP. The vendor handles FERPA consent, credit card payments,
and institution branding for electronic transcript PDF files.
This hands free approach reduces the workload in the Registrar’s Office and improves the
quality and timeliness of transcript services to students and alumni, as the processing and
delivery of transcripts will not necessitate human intervention for the vast majority of
transcript orders.
Order status logic and transcript order status codes are used to drive the automation and
transcript processing. Processing can be paused as needed, such as when a future
processing request is associated with the transcript order to wait for grades to be
conferred and rolled to academic history or for pending degrees to be awarded. Manual
processing intervention can also take place when needed.
eTranscripts processing uses existing PESC XML schema standards. Schemas include
mutually agreed upon user-defined elements. Specific standards are required for the XML
College Transcript Request and XML College Transcript Response processing for
CollegeTranscript, CoreMain, AcademicRecord, and TranscriptResponse. The request
places the order. The response is used to send back the initial response of Order
Received and is then used for all subsequent order status updates.
Warning! eTranscripts processing uses Banner Student 8.X functionality
combined with Banner 9.X eTranscripts API functionality. You must apply
the upgrade for 9.x along with Banner Student 8.x in order to use
eTranscripts functionality.
Also, your institution must be active with the vendor Transcript Ordering Service, and the
Ellucian Cloud setup must be completed.
For more information, please refer to the following documents located in the Ellucian
eTranscripts documentation library in salesforce.
• eTranscripts Readiness
• eTranscripts Cloud Enablement Form
• Cloud Configuration User Guide
• Banner eTranscripts Go Live Checklist
• Banner eTranscripts SFTP Setup (third party vendor only)
Forms Used With eTranscripts Processing
The following forms are used to manage and monitor eTranscripts orders.
• eTranscript Delivery Method Validation Form (STVETME)
• eTranscript PESC Transcript Purpose Validation Form (STVETPU)
• eTranscript Electronic Transcript Status Validation Form (STVETST)
• eTranscript PESC Transcript Type Validation Form (STVETTP)
• eTranscript Administrator Configuration Form (SHAETAD)

1449
Banner Student User Guide | Academic History
• eTranscript Transcript Request Summary Form (SHAETOR)
• eTranscript SFTP Transmission Resend Form (SHASFTP)
• eTranscript Status Summary Inquiry Form (SHIETSS)
• eTranscript PDF Printer Rule Form (SHRPDFT)
• eTranscript Rule Form (SHRTETC)
Tables Used With eTranscripts Processing
The following tables are used to store data for eTranscripts orders.
• eTranscript Transcript Order Summary Table (SHBTEOT)
• eTranscript Transcript Rules Table (SHBTETC)
• eTranscript Order Request XML Table (SHRORRE)
• eTranscript PDF Printer Rule Table (SHRPDFT)
• eTranscript SFTP Transmission Resend Table (SHRSFTP)
• eTranscript Transcript Delivery Methods Table (SHRTDEL)
• eTranscript Enrollment Degree Information Table (SHRTEDI)
• eTranscript Enrollment History Programs Table (SHRTEHP)
• eTranscript Transcript Order Detail Table (SHRTEOD)
• eTranscript Summary Status Table (SHRTEOS)
• eTranscript Transcript Hold for Degree or Grades Table (SHRTHLD)
• eTranscript Transcript Level Table (SHRTLVL)
• eTranscript Transcript Types Table (SHRTTYP)
• eTranscript Transcript Order Hold Table (SHRTXHL)
• eTranscript Delivery Method Validation Table (STVETME)
• eTranscript PESC Transcript Purpose Validation Table (STVETPU)
• eTranscript Order Status Validation Table (STVETST)
• eTranscript PESC Transcript Type Validation Table (STVETTP)
Processes Used With eTranscripts Processing
This following processes are used with eTranscripts processing.
• eTranscript Export Process (SHRETRN)
• eTranscript Listener Start Up Process (SHRQINI)

1450
Banner Student User Guide | Academic History
• eTranscript Advanced Queue Process (SHRADVQ)
• eTranscript Cloud Post Process (SHRPOST)
Packages Used With eTranscripts Processing
The following packages are used with eTranscripts processing.
• eTranscript Transcript Processing Package (SHKEBLD/SHKEBL1)
• eTranscript Common Matching Package (SHKECMN/SHKECMN1)
• eTranscript Order Status Package (SHKEORS/SHKEORS1)
• eTranscript PDF Processing Package (SHKETRN/SHKETRN1)
• eTranscript XML Transcript Order Request Package (SHKEXML/SHKEXML1)
APIs Used With eTranscripts Processing
The following RESTful APIs are used with eTranscripts processing.
• Find a Student API
• Find Student Transcript Restrictions API
• Get Student Ungraded Terms API
• Get Student Programs API
• Place Transcript Order API
• Update Order Cloud Status API
• System Details API
Seed Data
The following seed data is used with eTranscripts processing.
eTranscript Delivery Method Validation Table (STVETME)
Seed data is delivered for transcript delivery methods.
Code Description
ELECTRN Electronic
EXPCANMEX ExpressCanadaMexico
EXPINTL ExpressInternational

1451
Banner Student User Guide | Academic History
eTranscript PESC Transcript Purpose Validation Table (STVETPU)
Seed data is delivered for transcript purpose codes.
EXPRESS Express
EXPRESSUS ExpressUnitedStates
FAX FAX
FAXEXP FAXExpress
FAXMAIL FAXMail
FAXOVERNT FAXOvernight
HOLDFPICK Hold for PickUp
MAIL Mail
OVERNIGHT Overnight
Code Description
ADM Admission
ADMREG AdmissionRegistrar
ADMSERV AdmissionService
CERTLIC CertificationLicensure
EMPLOY Employment
GRADADM GraduateAdmissions
LAWSCHADM LawSchoolAdmissions
MEDSCHADM MedicalSchoolAdmissions
OTHER Other
REG Registrar
SCHOGRFELL ScholarshipGrantFellowship
SCHOLAR Scholarship
SELF Self
SELFMPACK SelfManagedPackage
TRANSFER Transfer
UNDERGADM UndergraduateAdmissions
Code Description

1452
Banner Student User Guide | Academic History
eTranscript Order Status Validation Table (STVETST)
Seed data is delivered for transcript order status codes.
Note: Codes for EX, GC, GF, and TC are used internally by Banner.
These codes are never sent to the Ellucian Cloud or the third party
transcript vendor.
eTranscript PESC Transcript Type Validation Table (STVETTP)
Seed data is delivered for PESC transcript type codes.
Code Description Translation
Send to
Vendor
Send to
Cloud
OR Order Received TranscriptRequestReceived Y Y
NR Needs Research N Y
NF Student Not Found NoRecord Y Y
AR Attachment Needs Review N Y
HR Hold for Restrictions Hold Y Y
AG Awaiting Grades N Y
AD Awaiting Degree N Y
RG Ready to Generate N Y
GC Generation Complete N N
TF Transmission Failed N Y
TC Transmission Complete N N
FF Order Fulfilled TranscriptSent Y Y
FO Offline Record Sent OfflineRecordSent Y Y
CA Order Canceled Canceled Y Y
EX Order Expired N N
GF Generation Failed N N
Code Description
COMPLETE Complete
DENTAL Dental
GRADUATE Graduate
HEALTH Health

1453
Banner Student User Guide | Academic History
Banner Setup Steps
Use the following steps to set up eTranscripts processing in Banner.
1. Check that delivered seed data is available on the validation forms used with
eTranscripts processing.
1.1. Verify that delivery method codes exist on the eTranscript Delivery Method
Validation Form (STVETME).
1.2. Verify that PESC transcript purpose codes exist on the eTranscript PESC
Transcript Purpose Validation Form (STVETPU).
1.3. Verify that electronic order status codes exist on the eTranscript Electronic
Transcript Status Validation Form (STVETST).
1.4. Verify that PESC transcript type codes exist on the eTranscript PESC Transcript
Type Validation Form (STVETTP).
2. Define transcript types on the Transcript Type Code Validation Form (STVTPRT).
• Existing transcript type codes can be used with eTranscripts processing. Different
transcript types are only needed if different information is included in the transcript.
•The Web Indicator is not used with eTranscripts processing.
• These Banner transcript types on STVTPRT will be mapped with third party
transcript types in step 9.2 - Set up transcript type rules.
3. Use the print options on the Transcript Type Rules Form (SHATPRT) to create rules
for each transcript type.
• The print options for User-Defined Extensions must be checked for PDF transcripts.
(College Transcript, Student, Academic Record, Course)
• The print option for Student Centric Period Statistics is not available for use with
PDF transcripts at this time.
• The print options for Test Scores and Immunization Data are only used with the
PESC/XML transcripts. They are not used with baseline paper or PDF transcripts.
While test scores and immunizations are not included in PDF transcripts, you can
add these options by creating a custom PDF template. The information exists in the
XML that is used to create the PDF. However the delivered PDF template does not
display the information.
LAW Law
MANAGEMT Management
MEDICAL Medical
PHARMACY Pharmacy
UNDERGRAD Undergraduate
Code Description

1454
Banner Student User Guide | Academic History
• The curriculum, personalization, and name hierarchy print options are used for PDF
transcripts.
4. Define rules for display of GPAs and quality points on the GPA Display Rules Form
(SHAGPAR).
• Rules determine whether GPAs and quality points are rounded off or truncated and
define the number of positions displayed to the right of the decimal.
• The delivered default PDF transcript displays two places after the decimal for the
GPA and quality points, and the values are rounded off.
• When rules are the same for all levels and campuses, go to the Overall Term
Selection block to enter data.
• When multiple effective term records exist, the Overall Term Selection block is used
to select the rule for applied for processing.
Note: If you copy the delivered shretrn_template.xsl file and
customize it at your institution, be aware that if the formatting used for
GPA and quality points is added to the template, this will override the
controls from SHAGPAR.
5. Define printer codes and commands for printed transcripts on the Printer Validation
Form (GTVPRNT).
6. Define a common matching source code for use with eTranscripts on the Common
Matching Source Code Validation Form (GTVCMSC).
7. Set up common matching rule sets on the Common Matching Rules Form
(GORCMRL).
• The last name, first name, and date of birth are required when students complete
the vendor transcript request.
• The student may also provide an unverified Banner ID, and a Social Security
Number, but these are optional. When you are configuring your school profile with
the vendor, you can require the Banner ID or SSN.
The vendor profile can require the entry of the unverified Banner ID or the SSN, so
that one or the other must be filled out along with the first name, last name, and date
of birth.
• Your settings on the vendor school profile will determine your settings for the Match
on Null Data field for the SSN and Banner ID on GORCMRL.
– If you allow the student to enter either the SSN or the Banner ID during the
ordering process, then Match on Null Data will be set to
Yes for both
elements.
– If you require the student to enter both the SSN and the Banner ID during the
ordering process, then Match on Null Data will be set to
No for both
elements.
– If you require the student to enter only the SSN during the ordering process,
then Match on Null Data would be set to
No for the element.

1455
Banner Student User Guide | Academic History
– If you require the student to enter only the Banner ID during the ordering
process, then Match on Null Data would be set to
No for the element.
• Matching rules must be set up so that if any data element does not match, even if it
is optional, there is no match for the student. For example, if the student has the
option to submit either the SSN or the Banner ID during the order process, and the
student includes both items, they must both be correct for a match to occur. This will
help ensure that the student is the actual person placing the transcript order.
• The eTranscripts matching process uses the data on the Name Translation Rules
Form (GORNAME).
8. Define common matching source rules and rule options on the Common Matching
Source Rules Form (GORCMSC).
• The Data Entry/Update Defaults, Hierarchy of Display, and Detail List blocks do not
apply to eTranscripts processing.
• A sample rule could be Matching Source of
ETRANSCRIPT, with a description of
eTranscript Common Matching Source.
The Options section can be set to Match Type of
Person, with the Transpose Date
Month/Day and Transpose First Name/Last Name indicators checked.
It is not recommended that the Allow Alias Wildcard Use and Allow Length
Override indicators be checked.
9. Define your rules on the eTranscript Rule Form (SHRTETC).
9.1. Set up processing rules.
– Enter your institution's eight-digit OPEID number.
If you have a six-digit OPEID number and you are not at a branch campus,
enter the last two digits as
00.
– Enter the default transcript type and default level that will be used if a value
has not been mapped to the third party transcript type in the Transcript Types
block.
AL for “All” levels is a valid value.
–Check the Include In-Progress Courses indicator if you wish to include in-
progress courses on the transcripts.
This is a global setting for all eTranscript orders.
– Enter the number of auto cancel days,
0 - 30, after which an order is
automatically canceled.
If the current order status is
HR - Hold for Restrictions or NF -
Student Not Found
, and the number of auto cancel days is exceeded,
the order will become expired and will be automatically canceled.
– Enter the common matching source rule that will be used for the matching
process.

1456
Banner Student User Guide | Academic History
9.2. Set up transcript type rules.
– Enter all combinations of third party transcript type, third party transcript
purpose, and Banner transcript type from STVTPRT that you want to use.
Your combinations should match the vendor school profile options.
– The transcript requester selects the transcript type and purpose as part of the
vendor order. This mapping equates the selections to a Banner transcript type
that can be produced.
– If one Banner transcript type and level will be used for all students, this setup
is optional. The default transcript type and level from the Processing Rules
block are used if no mapping is entered.
AL for “All” levels is a valid value.
9.3. Set up delivery type rules.
– Enter all combinations of PESC delivery method, PESC format, and Banner
send type that you want to allow students to be able to request.
– The Banner output type is the same as the output type on the Transcript
Request Form (SHARQTC). The value of
PDF can be selected. This value is
saved to the database as
D. (This is a new value on SHARQTC.)
9.4. Set up level rules.
– Match each third party transcript type with a Banner course level.
– This optional mapping determines the level that is used on SHARQTC.
– If transcript types and levels are not entered here, the default level from the
Processing Rules block is used.
– If one Banner transcript type and level will be used for all students, this setup
is optional. The default transcript type and level from the Processing Rules
block can be used.
–
AL for “All” levels is a valid value.
9.5. Set up future processing holds for degrees and grades.
– Enter a term code to hold the transcript for a degree or for grades. Only one
term can be entered per future processing record.
– Enter a release date. After this date, the eTranscripts process will check daily
to determine if the degree has been awarded or if grades have been rolled to
academic history for the student.
Once all grades for a student are in academic history or the degree has been
awarded, transcript processing will continue.
10. Define transcript PDF rules on the eTranscript PDF Printer Rule Form (SHRPDFT).
10.1. Enter a PDF template for each Banner transcript type that produces PDF
output.
10.2. Enter the printer name for each Banner transcript type that can be produced as
a hardcopy (paper) output.
A transcript type can be associated with both a PDF template and a printer by
entering the template and the printer name on one record.

1457
Banner Student User Guide | Academic History
If a PDF template is not entered or cannot be found during processing, the
default template will be used.
11. Set up the file transfer and Ellucian Cloud configuration information on the eTranscript
Administrator Configuration Form (SHAETAD).
11.1. Enter the SFTP information for file transmission.
11.2. Enter the information for the Ellucian Cloud connection.
12. Set up crosswalk values on the EDI Cross-Reference Rules Form (SOAXREF).
Order values from the SHRTEOD table need to be set up as crosswalks to the Banner
values that are needed on SHARQTC. Crosswalks for state and nation values can be
defined on SOAXREF for the STVSTAT and STVNATN cross-reference labels.
Verify that the XML indicator is checked on SOAXREF for each rule so the PESC
value is translated.
13. Verify that the
create_etranscript_user.sql script was run during the
installation process to create the
ETRANSCRIPT user value.
Warning! The create_etranscript_user.sql script should only be run for
new installations of eTranscripts. If you are performing an upgrade, do not
run this script.
•The
create_etranscript_user.sql script should be run by a user with
either a
BANSECR or SYSTEM user account. This type of user has the necessary
permissions to create other users. The script prompts the user for a password that
can be entered during the process.
•The
ETRANSCRIPT user value is required. It is used to ensure proper results when
the eTranscript Export Process (SHRETRN) and the Academic Transcript
(SHRTRTC) are run.
•The
ETRANSCRIPT user value is assigned privileges for BAN_DEFAULT_M and
BAN_DEFAULT_Q security. This allows you to log in to Banner and change the
address type and priority defaults for the eTranscript Export Process (SHRETRN)
and the Academic Transcript Process (SHRTRTC), so those values are valid for
your institution.
•The
ETRANSCRIPT value is hardcoded in the SHKEBLD package.
14. Set up user default job submission parameters on the Default Parameter Value
Validations Form (GJAPDFT) for the
ETRANSCRIPT user.
• When the
shkebld.p_call_process is called, it inserts job submission
parameters in GJBPDFT with the
ETRANSCRIPT value. This value is used to find
the default values for the eTranscript Export Process (SHRETRN) and the
Academic Transcript Process (SHRTRTC).
• Defaults values cannot be overridden by a user when processes are run using
queues.
• Do not change the defaults directly in the database, or the automated output
generation processes could fail.

1458
Banner Student User Guide | Academic History
• Do not create a parameter set on GJAPDFT. The eTranscripts process does not use
the parameter set value.
Note: It is recommended that the Print Expanded Address parameter for
SHRTRTC be set to a value of
40 or greater. The vendor order page
allows students to enter 40 characters in each address line.
15. Set the date to
SYSDATE for use with the Address Selection Date parameters in
SHRETRN and SHRTRTC.
This ensures that the system date is always used as the GLBLSEL address selection
date.
15.1. On the Parameter Definitions Form (GJAPDEF), set the Default field to
SYSDATE for the parameter as a global level default value.
15.2. On the Default Parameter Value Validations Form (GJAPDFT), set the System
Default field to
SYSDATE for the parameter as a user level default value.
Do not used the Process Submission Controls Form (GJACPTL) to set the date.
When
SYSDATE is entered in the Values field for a parameter, it is translated to a
date value.
16. Set up advanced queuing by defining the payload, queues, and queue tables. These
are found in the definition scripts included in the upgrade.
Advanced queuing is used to process orders and create the transcripts from either
SHRETRN or SHRTRTC.
After an order is processed by SHRETRN or SHRTRTC, the order is saved to a queue to
be picked up by the SHRPOST process. This sends the order statuses of
FF, FO, and TF
to the Ellucian Cloud and
FF and FO to the vendor.
Setup Needed for XML Output
XML transcripts can be sent using the eTranscripts process if both the sender and receiver
are defined as XML-capable by the vendor. Refer to the “XML Transcript Processing”
section in this chapter for further information on using XML transcripts.
1. Set up crosswalk values on SOAXREF with the XML Indicator checked (set to
Y).
See the “Export Crosswalk Values on SOAXREF” topic in the “XML Transcript
Processing” section in this chapter.
2. Refer to the list of SHATPRT fields that can be used to select data for inclusion on an
XML transcript.
This can be found in the “XML Transcript Data Selection Using SHATPRT” topic in the
“XML Transcript Processing” section in this chapter.
3. Verify that the source/background code for your institution also has an FICE code on
STVSBGI.
4. Enter the default term type code and FICE code for your institution on SHACTRL.
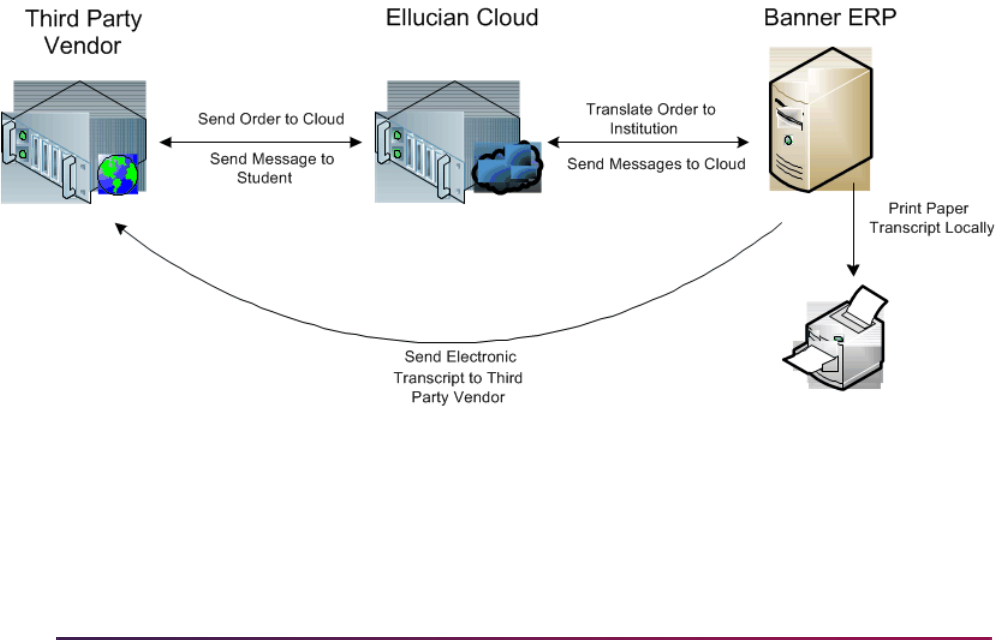
1459
Banner Student User Guide | Academic History
eTranscripts Components and Process Flow
eTranscripts processing includes three components:
• Vendor Interface - This is the transcript vendor interface students or alumni use to place
transcript orders.
• Ellucian Cloud - The Ellucian Cloud acts as the broker for the order. It is responsible for
receiving the transcript order from the vendor, sending the order to the appropriate
Banner system, requesting transcript order status updates from Banner, and sending
updates (when appropriate) back to the vendor. APIs are executed during the order
process and are also used to transmit the orders and provide status updates for the
orders.
• Banner ERP - The Banner system receives, automates the processing of, and fulfills the
transcript orders.
The communications associated with transcript order processing are always performed
through the Ellucian Cloud with two exceptions. The exceptions occur when the transcript
order is generated and fulfilled.
• When an electronic PDF transcript is generated, Banner sends the order directly to the
vendor and bypasses the Ellucian Cloud.
• When a paper transcript is generated, the eTranscripts process directs the output to the
printer defined on the eTranscript PDF Printer Rule Form (SHRPDFT).
Here is the high level flow of how a transcript order is processed.
The vendor will work with the Registrar’s office at your institution to configure and
customize components as needed. The Ellucian Cloud uses the specific institution
configuration to enable API calls between the Ellucian Cloud and the vendor, and the
Ellucian Cloud and Banner. Banner contains the setup and rules used to support the
receipt and processing of eTranscript orders.
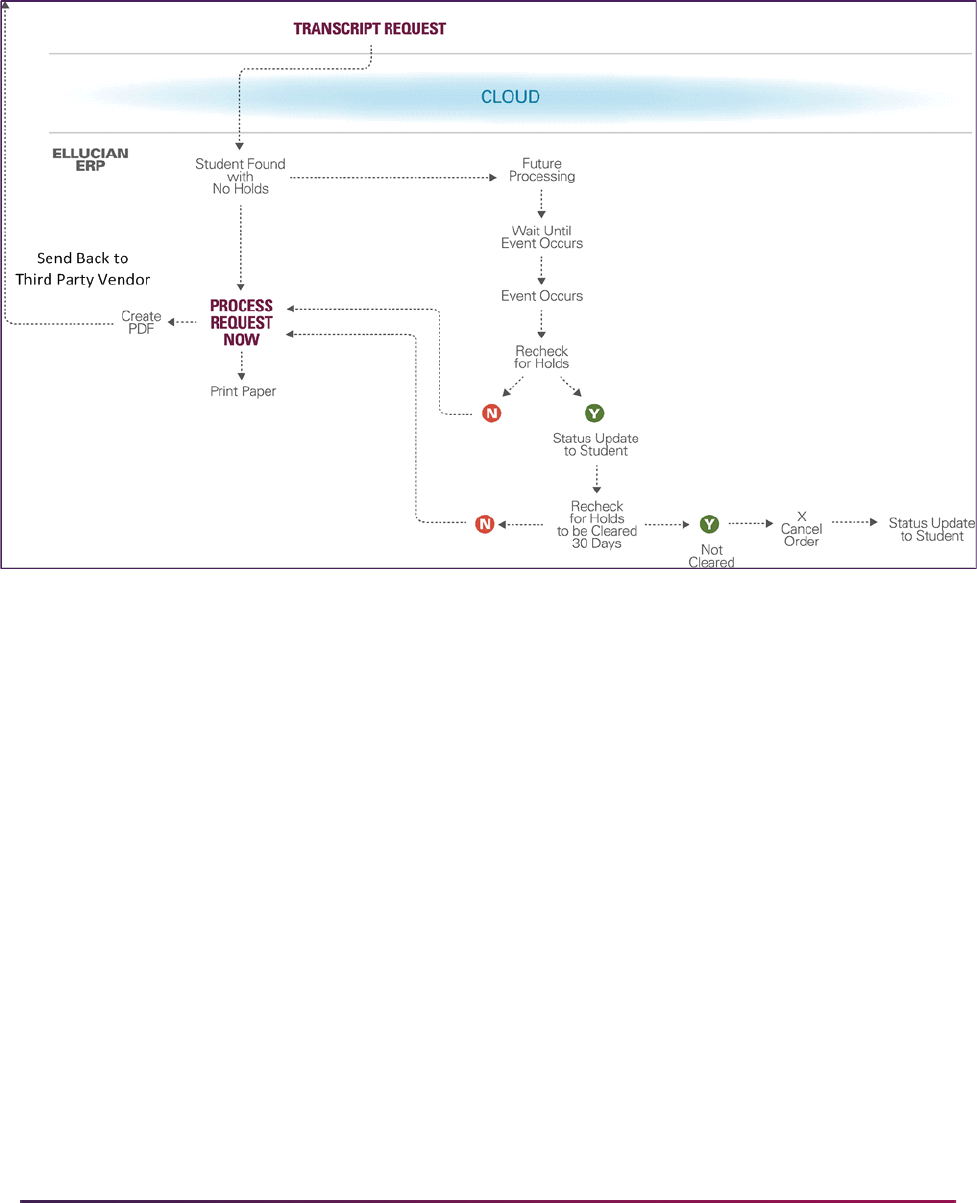
1460
Banner Student User Guide | Academic History
eTranscripts Request Fulfilled
Here is a high level look at how a transcript order is fulfilled.
Setup Needed for the Vendor
Your institution will need to complete a school profile for the vendor. Specific values in the
profile need to have corresponding rules in Banner to process transcript order. Profiles
include but are not limited to the following types of information.
• if orders are accepted if the student has a transcript hold
• the date when records are not available for access in Banner
• which transcript hold codes in Banner are student actionable and which are school
actionable
• the maximum number of attachments a student can upload
• the specific data elements the student can enter on the order form
• the data elements that are required on the order form
• what transcript purpose options can be selected on the order form
• what transcript type options can be selected on the order form
• what delivery method options can be selected on the order form

1461
Banner Student User Guide | Academic History
• what processing options can be selected on the order form
• configuration of informational messages displayed or sent to the student as email or text
message
You should work directly with your vendor representative to ensure that all components
are in place, and that you are active with the Transcript Ordering Service.
Setup Needed for the Ellucian Cloud
You need to perform technical configuration and institution registration to use the Ellucian
Cloud. This set up is not within your Banner system, but requires completion directly in the
Ellucian Cloud interface. Please note that there is both an Ellucian Cloud test server, and
an Ellucian Cloud production server.In each case, you will need to validate that the APIs
that are essential for eTranscripts processing are successfully communicating between
the vendor and your Banner system.
Ellucian Cloud Configuration
Your institution must complete the following tasks to configure the Ellucian Cloud.
1. Deploy the WAR file to a server that allows network access between the Ellucian
Cloud server and the Banner eTranscripts API server.
2. Make the APIs accessible through a range of pre-defined transmission ports.
Available ports are 80, 443, and 8100-8199.
3. If your server is behind a firewall, ensure that you modify your firewall rules to allow
transactions from the following public IPs for the Ellucian Cloud:
• 149.24.139.255
• 54.164.111.202
• 54.164.84.184
4. Request a login to the Ellucian Cloud by submitting an eTranscripts Cloud
Enablement Form to
Ellucian will issue a login and password to the administrator.
5. Complete the registration setup in the Ellucian Cloud.
6. Use the two available Ellucian Cloud servers, production or test.
Ellucian Cloud Registration
Your institution must be registered with the Ellucian Cloud. This requires completion of the
following tasks.
1. Fill out a form to request a login. The following user and institution information is
needed.
• administrator first name
• administrator last name

1462
Banner Student User Guide | Academic History
• administrator email
• administrator office phone
• institution name
• institution OPEID Number
• ERP type (Banner)
• ERP username (username used to authenticate the Ellucian Cloud against the API)
• ERP password (password used to authenticate the Ellucian Cloud against the API)
• URL for the API
2. Receive the login and change the password.
3. Enter the following information for the Ellucian Cloud Connection:
•username
• institution name
• first name
• last name
• email address
• phone number
• institution name
•OPEID number
The OPEID number is used by the Ellucian Cloud to direct API requests from the
vendor to Banner.
• ERP URL
• ERP type
• ERP authentication name
• ERP authentication secret (password)
• poll time
This is the daily time when the Ellucian Cloud will send a request for order status
updates, such as
17:30.
• vendor (preferred)
ERP Authentication Name
Use the following guidelines to create the ERP Authentication Name.
• Create this user and add it in GSASECR with appropriate privileges.
• The username must have all capital letters.
• The password cannot contain special characters such as $, #, @, and so on.

1463
Banner Student User Guide | Academic History
• This requires the CREATE SESSION privilege.
• This currently requires adding GUAGMNU to object security for the user.
• This is the username that the Ellucian Cloud uses to authenticate against the Banner
APIs that are called by the Ellucian Cloud.
Place an eTranscripts Order
Here are the options available for a student to order a transcript.
• The student clicks on a link in Banner Student Self-Service.
The link is added in Web Tailor as a new menu item. Please refer to the Banner Web
Tailor User Guide for more information.
Note: No Single Sign-On (SSO) exists from Banner Self-Service to the
vendor login.
• The student clicks on a public link on the institution’s website that goes directly to the
vendor transcript ordering page.
• The student logs into the institution’s vendor student self-service application.
• The student directly accesses the public vendor transcript ordering website or the
institution-specific ordering page.
The high level steps in the order process using a vendor site are as follows. Required
fields are in red with an asterisk (*).
1. Enter the student’s personal information.
2. Select the transcript recipient.
3. Enter the details for the transcript recipient.
4. Review the transcript order.
5. Enter credit card information for payment.
6. Sign the consent form for the order.
Student Identification
Here is a process flow showing how the vendor verifies the student identification of the
student requesting the transcript whether the order is placed through Self-Service or
through a public portal.
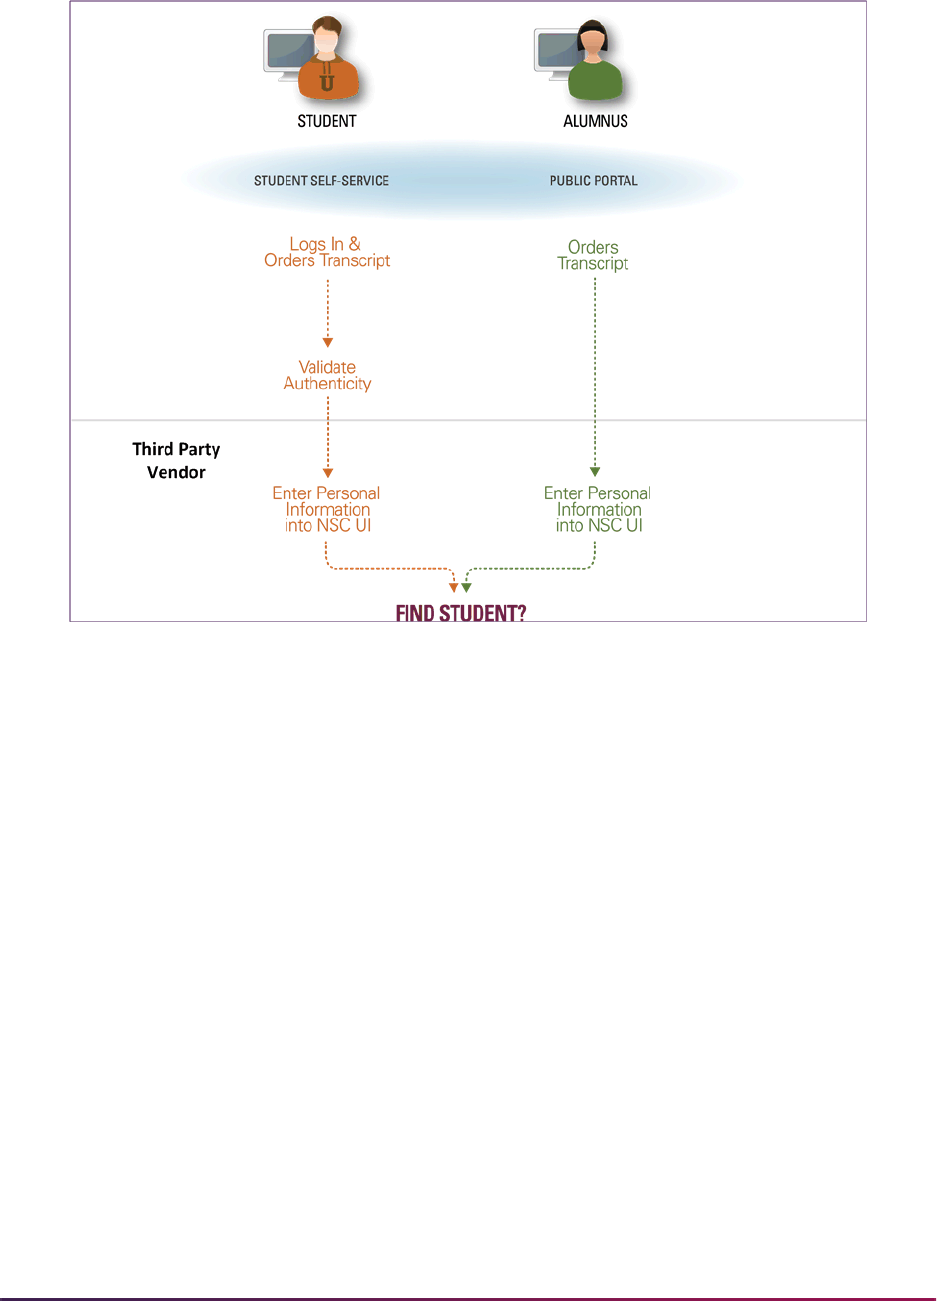
1464
Banner Student User Guide | Academic History
Here is a process flow showing how the vendor verifies the student identification when
holds exist.
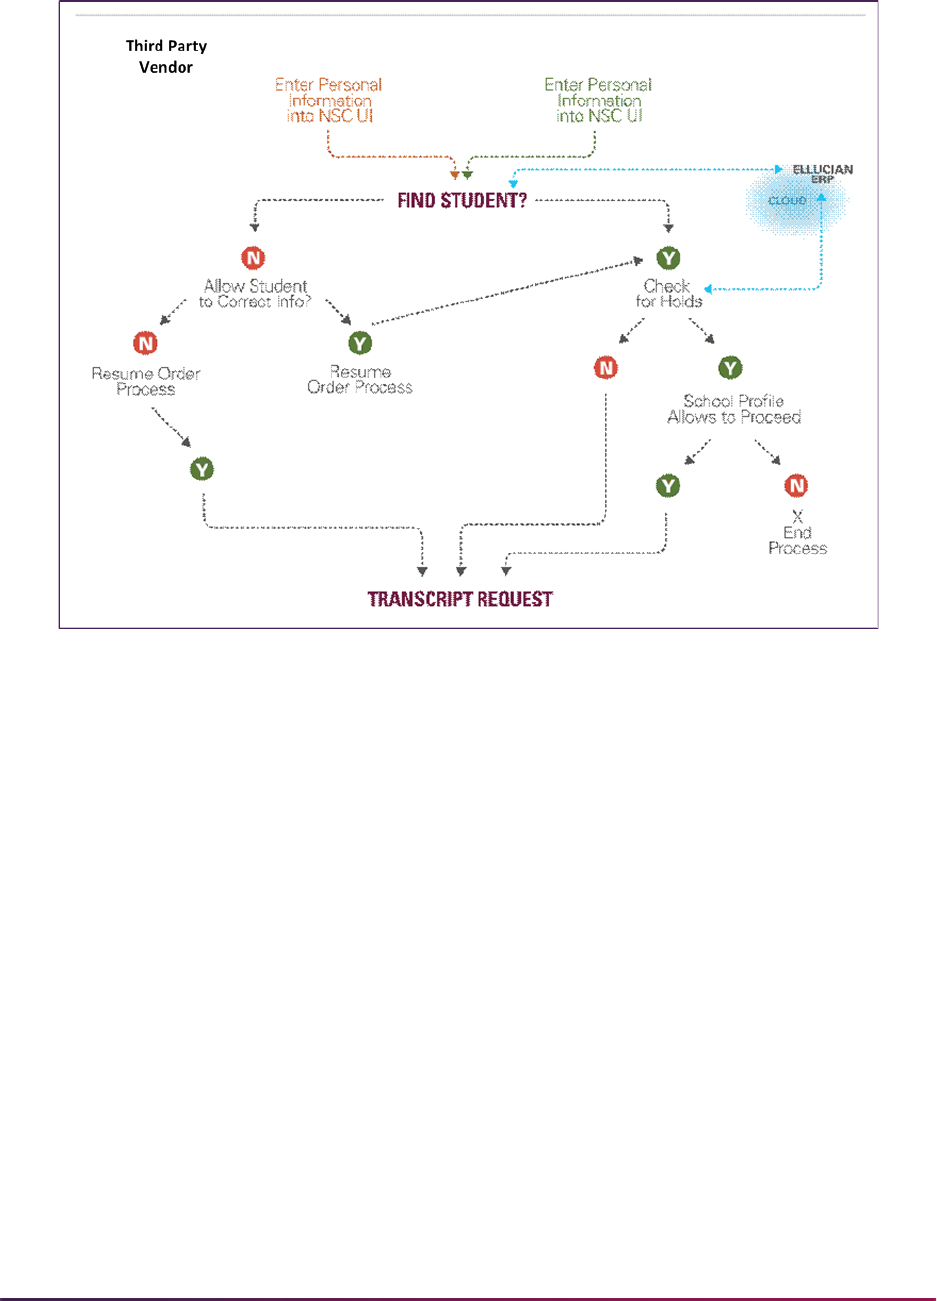
1465
Banner Student User Guide | Academic History
Student Data Collected for the Order
The following information is provided by the student for the order. This information can be
useful if an exact match is not found in Banner for the student.
• Demographic data such as a minimum of first name, last name, and date of birth is
required for every order.
Student ID and/or SSN can be optional, but the vendor can recommend that at least one
be required.
It is also recommended that a common matching rule is created in Banner based on the
required fields.
• Enrollment data such as currently enrolled or not enrolled
If not enrolled, the student may be asked to enter the years of overall attendance or
years of attendance at specific institutions, as well as degrees and/or certificates earned
and the year in which a degree was earned.
The student can select order details for transcript purpose, processing, and delivery.
• Transcript orders can have different purposes, such as transfer, admission,
employment, or scholarship.

1466
Banner Student User Guide | Academic History
• Processing options can be selected such as, now, after grades are posted, or after a
degree is awarded.
• Delivery methods choices include hold for pickup, electronic PDF file, or mail.
Order Processing APIs
Once the student has filled out the order information and clicks on the appropriate button,
such as Next, processing begins. The process initiates calls to one or more Ellucian Cloud
APIs. The Ellucian Cloud then calls the appropriate Banner APIs.
• The Find a Student API is always called, unless the ERP is down and exception
processing is needed.
When the ERP is down, the vendor sweeper job is run every 10 minutes in production
checking for orders that need to be sent to the Ellucian Cloud. If the Ellucian Cloud does
not respond, the process continues to attempt to send the waiting transcript orders
every 10 minutes for a period of one day. Once the Ellucian Cloud is back up and
running, these records will be processed the next time the vendor sweeper job is run.
• The Find Student Transcript Restrictions API is only called when the Find a Student API
has found an exact match in Banner and active holds exist.
• The Get Ungraded Terms API (for terms with courses that have not been graded and
rolled to academic history) and the Get Student Programs API (for degrees that have not
yet been awarded) are only called when a student is found in Banner, and if values are
returned, allows the student to choose a future processing option for the order, if that
feature is enabled at your institution.
The following APIs support real-time and automated processing of orders between the
vendor, the Ellucian Cloud, and Banner.
Find a Student API
This API is always called and looks for the last name and first name from SPRIDEN and
the date of birth from SPBPERS. It also checks for additional required or optional data
which includes the unverified student ID from SPRIDEN and the optional government
issued ID (SSN) from SPBPERS.
The API calls the institution-specific common matching rule on the eTranscript Rules Form
(SHRTETC) by calling the SHKECMN package. Common matching results are not
displayed to the student. If a former last name was entered on the vendor order form, it will
be used in the matching process if an exact match is not found using the current last
name.
If an exact match is found, the Banner ID is returned internally, and the student continues
with the order. The process then executes three additional APIs.
• The Find Student Transcript Restrictions API checks for any active transcript holds, such
as a library fine or a balance due in Accounts Receivable. For vendor-specific
processing, the vendor school profile determines whether your institution will allow the
order to continue when restrictions or active holds exist. If the student may not proceed
with the order, he/she must exit from the order process.

1467
Banner Student User Guide | Academic History
Your institution-specific vendor profile also allows you to distinguish between student
actionable holds which are displayed to the student and school actionable holds which
are not displayed to the student. For more information about these types of holds please
contact your vendor representative.
• At this point, the Get Ungraded Terms API and the Find Student Programs API could
return values for future processing options for the order that can be displayed to the
student if they are available.
If no match is found, or multiple possible matches are found, a
Null value is returned
internally, and the student sees a message to try again, if your institution accepts orders
without a matching Banner ID. If you try again and click Next, you will be taken the next
page to continue processing your order, and the status of your order once in Banner will
be
NR - Needs Review.
Note: When a match on any data element fails, there is no match for the
student. Even when the incoming last name, first name, and date of birth
are matched in Banner, if the incoming optional SSN or Banner ID are not
matched in Banner, the match fails.
Active transcript holds are not checked until the order is received in Banner. No future
processing options for the order are displayed to the student when no match has been
found.
Find Student Transcript Restrictions API
This API is called when an exact match is returned by the Find a Student API. The API
checks for active transcript holds and returns the hold codes and descriptions for holds
found. The student receives a message if actionable holds exist.
The
gb_hold API finds active, current holds based on the setting of the Transcript
indicator for the hold code on the Hold Type Code Validation Form (STVHLDD). Student
holds can be viewed on the Hold Information Form (SOAHOLD) and in the Order History
block of the eTranscript Transcript Request Summary Form (SHAETOR).
Get Student Ungraded Terms API
This API checks for registration terms with one or more gradable courses that remain
ungraded and have not been rolled to academic history. The term code and description
are returned. The list of terms is displayed on the vendor ordering page, and the student
can select only one term for the transcript order.
Get Student Programs API
This API returns one or more unawarded degrees and/or programs in a 60 position
concatenation of level description, plus degree description, plus program description. The
degrees are selected from current and active curricula where that term's start and end
date range on STVTERM includes the current date. For example, Undergraduate
Bachelor of Arts BA-HISTORY. Multiple concatenations can be returned. The list is
displayed on the third party transcript vendor ordering page, and the student can select
only one pending degree.

1468
Banner Student User Guide | Academic History
If Banner degree records do not exist for the student (no SHRDGMR records exist), then
existing active curriculum information (SORLCUR) associated with the student's learner
record (SGBSTDN) will be used to obtain degree and/or program information that will be
returned by the API. Because a term needs to be associated with a degree or program to
find the appropriate SHRTETC release date, the term used is derived from the pending or
sought SORLCUR outcome record on the Degree and Other Formal Rewards Form
(SHADEGR). When the SORLCUR record is not available, the term used is derived from
the academic status and graduation status information on the General Student Form
(SGASTDN). The Graduation Term field on SGASTDN must be populated in either case.
Determine Student Effective Term
The svq_sovlcur_term view is used in this API to build a set of terms where today's
date is between the start and end dates for the term, beginning with the minimum term
where that is true. For example, if today is November 15:
• Term 201410 has a start date of 15-AUG-2013 and an end date of 15-DEC-2013.
• Term 201412 has a start date of 01-NOV-2013 and an end date of 15-JAN-2014.
• If today's date is 01-DEC-2013, the data will be built starting with term 201410.
The view finds the student's current and active curricula beginning with term 201410.
The view can also find the minimum student effective term (SGBSTDN) that includes the
term selected. For example, when a student has these effective terms:
• 200910 - 201110
• 201110 - 999999
The effective term selected for the student is 201110 - 999999.
The view can retrieve the following data from the selected student effective term record:
• the graduation term associated with the student effective term
• the curriculum sequence number associated with the curriculum used to retrieve the
SORLCUR record(s)
If the student has more than one curriculum record, all curriculum records will be
returned, but any curriculum where the degree has been awarded will not be returned to
the list on the transcript vendor ordering page.
The graduation term on SHADEGR for the pending or sought outcome record is used to
find the hold for degree rule for the term and to obtain the planned release date from
SHRTETC. If no rule can be found for the term, the corresponding STVTERM end date is
used.
When the graduation term on SHADEGR is not populated, the maximum SGBSTDN
graduation term is selected to determine the release date. When the Graduation Term
field on SGASTDN is not populated, the release date is set as the next day from the day of
order submission (current date +1).

1469
Banner Student User Guide | Academic History
The XML response is returned with the AD order status and the planned release date. This
date is used by the Ellucian Cloud to determine when the order will be checked to see if it
can be fulfilled.
Place Transcript Order API
This API is used to accept the transcript order for a student with a PESC transcript request
(XML) from the Ellucian Cloud.
Update Order Ellucian Cloud Status API
This API is used to check the current status of a particular transcript order. It accepts input
of the order ID.
System Details API
This API is used to check system availability, i.e., whether the Banner Student 8.6.2
release is installed. If it is installed, the API returns a value of
True to the Ellucian Cloud.
Otherwise, a value of
False will be returned. It allows orders to be held until the system
is next available.
API Access
The following privileges should be defined in the Banner Administrative account for
eTranscripts API access:
1. Define the Oracle Create Session privilege or the
USR_DEFAULT_CONNECT Oracle
role as the default role for the user.
2. Define the
BAN_DEFAULT_M Oracle role as granted to the user. It does not need to
be a default role, as it is password protected.
3. Define the
BANPROXY access set in the Oracle/Banner Security Maintenance Form
(GSASECR) or the
ALTER USER username GRANT CONNECT THROUGH
BANPROXY
.
4. Define access to the General Menu (GUAGMNU) Banner security object using the
Oracle/Banner Security Maintenance Form (GSASECR).
This is the minimum privilege access model for the account that can be used to execute
the eTranscripts APIs.
Complete the eTranscripts Order
Once the processing has returned the information, the student can continue to finish the
order. The next steps are:
1. Select a delivery option.
2. View the order prior to payment.
3. Check the transcript request, and add, edit, or delete recipients.

1470
Banner Student User Guide | Academic History
4. Supply credit card information for payment.
Only an authorization against the student's credit card is performed at the time an
order is placed. Charges are not applied until the order has been fulfilled.
5. Place the order.
The student receives an email indicating that the order has been filled, along with the
unique order ID which can be used to track the order on the vendor transcript ordering
website. The order ID becomes the key to processing the order in Banner. The student
can log in to the vendor website with his/her email address and order number and view the
status of the order.
You can do the following in Banner for transcript orders:
• Review transcript order requests on the eTranscript Transcript Request Summary Form
(SHAETOR).
• Review transcript order statuses on the eTranscript Status Summary Inquiry Form
(SHIETSS).
• Review transcript order errors on the eTranscript SFTP Transmission Resend Form
(SHASFTP).
Order Transmission
The vendor sends the PESC XML transcript request to the Ellucian Cloud, and the
Ellucian Cloud passes the request to the correct Banner institution, based on the OPEID
number. The transcript request contains additional XML user-defined fields that have been
agreed upon by the vendor and Ellucian.
The XML is parsed and loaded into the SHRORRE temporary table. It is then further
parsed and transformed before being loaded into the production tables behind the
SHAETOR form. These tables are: SHBTEOT, SHRTEOD, SHRTEOS, SHRTEHP, and
SHRTEDI.
Some data translations can occur during the load, such as when PESC Boolean values of
True or False are loaded as Y or N. When a Banner ID is included in the order, the
PIDM is retrieved and loaded to the production tables.
When the load is successful, Banner sends the full XML Transcript Response to the
Ellucian Cloud, and the Ellucian Cloud sends the XML to the vendor. The response status
code expected by the vendor is the order status translation “TranscriptRequestReceived”.
Here is a process flow for the initial receipt of the transcript order. In this example the
Ellucian ERP is the Banner System, the ERP DB is the Banner DB, and the ERP initial
order API is the Banner initial order API.
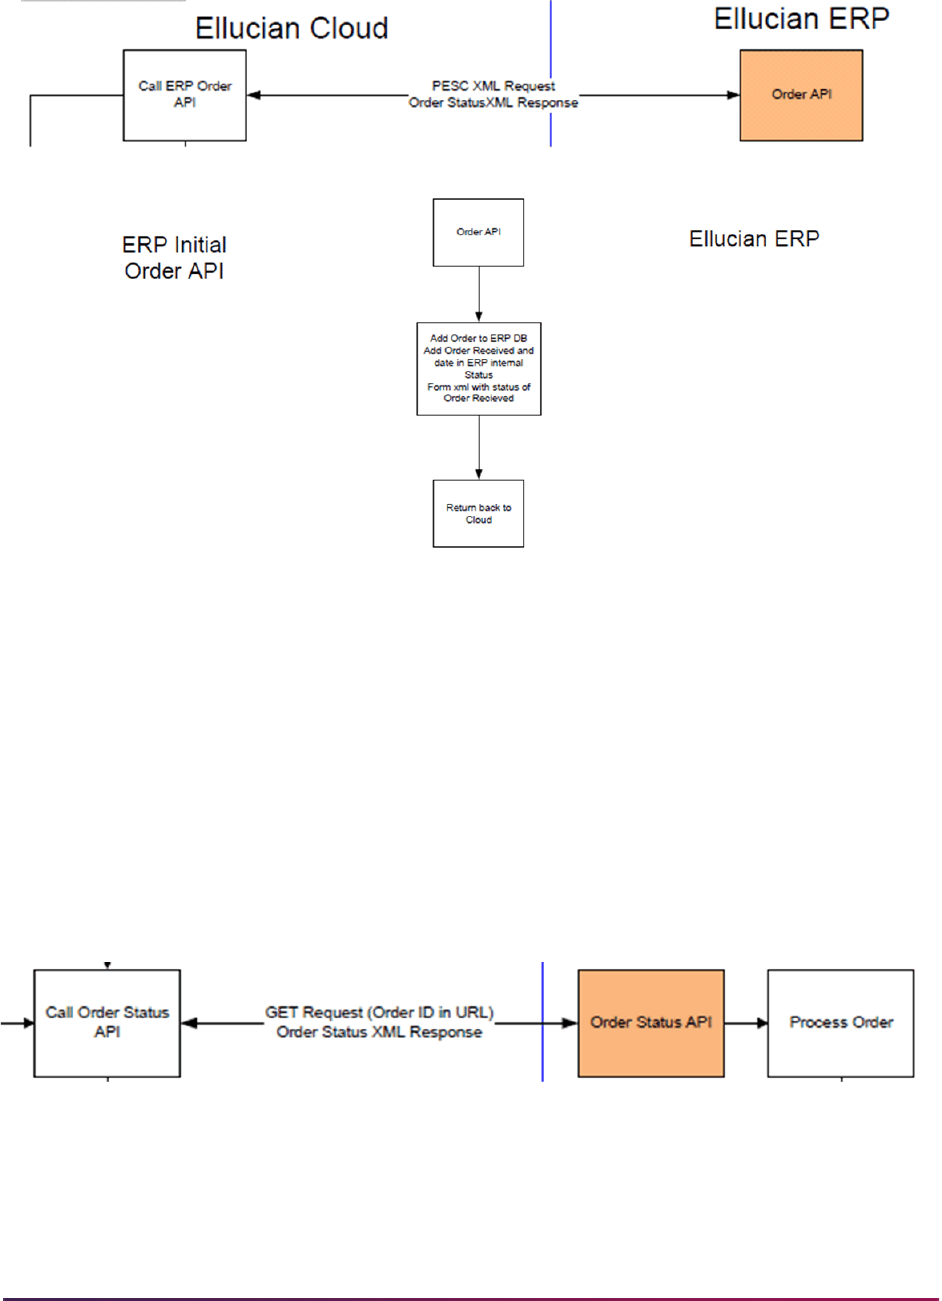
1471
Banner Student User Guide | Academic History
Banner XML Processing
After Banner sends the XML with a status of “TranscriptRequestReceived”, the Ellucian
Cloud sends a request to retrieve the status of the order as below.
GET /api/transcript-orders/{order-ID} (HTTP/1.1)
Banner executes the SHKEORS package that evaluates transcript order statuses and
returns the full Transcript Order Status XML with appropriate status updates and additional
information as needed. The Transcript Order Status XML is modeled on the Transcript
Request Response XML.
Here is a diagram of the XML process flow.
Order Status Processing
Order status codes are used to identify the processing stages through which an order
passes. Not all orders will pass through the same statuses. Some statuses will require

1472
Banner Student User Guide | Academic History
manual intervention to continue the process. The complete status history for an order is
captured on the eTranscript Order Request Form (SHATEOR) and the eTranscript Status
Summary Inquiry Form (SHIETSS). A set of order status codes is delivered and stored on
the eTranscript Order Status Validation Table (STVETST). They should not be changed.
eTranscripts order processing is driven by order status logic (SHKEORS package) that
facilitates automated order processing. The logic checks on the current order status each
time the Ellucian Cloud requests an order status update. This logic does not contain any
checking for the
OR - Order Received status. The logic is used to detect each
status condition is included in the package. The package also adds the new order statuses
to an order’s status history.
Note: In “test”, the Ellucian Cloud will request status updates from Banner
every hour. In “production”, the Ellucian Cloud will request status updates
from Banner once a day.
When a status change has occurred, the new order status is added to the SHRTEOS
table. Internal status codes are delivered for internal Banner processing and are not sent
to the vendor. Some statuses are sent to the Ellucian Cloud using the two-digit internal
code and are not sent to the vendor. Some statuses are sent to the Ellucian Cloud with the
internal code and are then sent to the vendor using the PESC third party translation value.
In this case, the vendor sends an email or text message to the student to alert them to the
current status of their transcript order. The full Transcript Order Status XML is sent with
each status update to the Ellucian Cloud (and to the vendor where appropriate). The
Ellucian Cloud will request a daily status update from Banner, and exceptions will be
noted. If a status is not sent back to the vendor, the order is considered to be “in process”.
Statuses are checked in the following sequence by the process: expired, needs research,
attachment needs review, hold for restrictions, awaiting grades, awaiting degrees, offline
(manual) record sent, canceled, ready to generate with holds, ready to generate without
holds.
The SHKEORS order status package is called by the Order Status API request from the
Ellucian Cloud. The order status package is also called by the eTranscript Order Request
Transcript Request Summary Form (SHATEOR) under the following conditions and is
used to determine the next status of the order.
• The Banner ID is added to an order or changed for an order.
• The Holds Override checkbox is checked.
• The Attachments Reviewed checkbox is checked.
• The Student Not Found, Cancel Order, or Manual indicators are checked.
Order Status Sequence Exceptions
Exceptions to XML order status updates exist for the following conditions when the order
is returned to being in process with the institution.
• The status is changed from HR to AG.
• The status is changed from HR to AD.
• The status is changed from NF to AR.

1473
Banner Student User Guide | Academic History
The first status in each pair alerted the student to a problem with the transcript order.
However, the second status did not indicate that the order is back in process. The
description will be changed to "TranscriptRequestReceived" for the statues in all cases,
and the values for
<UpdateThirdParty> and <UpdateCloudStatus> will be
updated to
True.
Ellucian Cloud Order Status Update
When an order arrives, the Ellucian Cloud immediately requests a status update after
Banner sends back the
OR - Order Received status. The Ellucian Cloud will then
send a poll once a day for an order status update at the polling time specified in the
Ellucian Cloud setup.
Daily polling occurs except under these conditions:
• For AD - Awaiting Degree and AG - Awaiting Grades, the request for an
update will not be sent again until the day after the defined planned release date.
• For RG - Ready to Generate, the Ellucian Cloud waits for Banner to send back
the status that comes after
RG.
• For the following statuses: FO - Offline Record Sent (paper), FF - Order
Fulfilled
(electronic PDF), or TF - Transmission Failed (electronic PDF).
Daily Ellucian Cloud Status Update Requests
Banner checks the current order status against the most current status in the SHRTEOS
table. If no change in status is found from the previous day, the XML response sends back
False for the
<UpdateCloudStatus> value.
For example:
• On December 2, the status is AR.
• The <UpdateCloudStatus> value is True.
• On December 3, the status is AR.
• The <UpdateCloudStatus> value is False.
The XML user-defined extension includes the elements for updating the vendor and the
Ellucian Cloud.
Order Status Codes
The following order statuses are used with eTranscripts processing and are explained in
this section:
• OR - Order Received
• NR - Needs Research
• NF - Student Not Found

1474
Banner Student User Guide | Academic History
• AR - Attachment Needs Review
• HR - Hold for Restrictions
• AG - Awaiting Grades
• AD - Awaiting Degrees
• RG - Ready to Generate
• GF - Generation Failed
• GC - Generation Complete
• TF - Transmission Failed
• TC - Transmission Complete
• FF - Order Fulfilled
• FO - Offline Record Sent
• EX - Order Expired
• CA - Canceled
OR - Order Received
The OR - Order Received status indicates that the order data has been
successfully loaded to Banner after the order information has been sent to Banner using
PESC XML College Transcript Request schema. The order XML is loaded and parsed into
the Banner order tables.
Banner sends the order status translation “TranscriptRequestReceived” in the Transcript
Request Response XML to the Ellucian Cloud, and the Ellucian Cloud sends the XML to
the vendor. Banner adds OR as the first record in the order status history for the order.
Once the
OR status has been communicated back to the Ellucian Cloud, the Ellucian
Cloud requests an order status update, and the order status logic package (SHKEORS)
determine the next status to be used. The Ellucian Cloud will request a status update once
a day (with some exceptions).
All statuses other than
OR (translation of “TranscriptRequestReceived”) are created and
communicated using the Transcript Order Status XML. These statuses are discussed
below. A user-defined section has been created in the Transcript Order Status XML to
accommodate internal statuses.
Example XML Data Sent to the Vendor for OR Status Updates
Response for POST api/transcript-orders: institutionId=99989900,
parsedResponse=5109454-12013-11-28T08:50:00.000-
05:00RequestOriginal99989900Ellucian Banner
School827034414VendorPRODUCTION2013-11-28T08:50:00.000-05:005109454-
1TranscriptRequestReceivedJANEDOEEllucian Banner
School99989900FalseTrueElectronicTrueTrue2013-11-28T08:50:01.000-05:00OR

1475
Banner Student User Guide | Academic History
NR - Needs Research
The NR - Needs Research status indicates that the order has arrived without a
Banner ID, and no match was found during the order process by the Find a Student API.
The order status logic adds the
NR status to the order history.
Banner sends the XML with the
NR status to the Ellucian Cloud, but the Ellucian Cloud
does not send the status to the vendor. You must research the order to determine whether
a match can be found based on any additional demographic or enrollment information
submitted by the student. When an exact match is found, you can update the Banner
Identification fields in the Transcript Order Summary block of the Transcript Request
Summary Form (SHAETOR). When the Banner ID is updated, the order PIDM is also set.
When Banner ID is updated, order status logic is called to advance the order.
The SHAETOR form immediately determines what the next status should be and adds it to
the order status history. Since the form determined that status, no updates were sent to
the Ellucian Cloud or the vendor (if applicable). The next time the Ellucian Cloud polls for a
status update, the last status that was sent to the Ellucian Cloud is compared to the
current status. If the status has changed, Banner sends the XML with the new status to the
Ellucian Cloud. If the new status is one that should be sent to the vendor, the Ellucian
Cloud sends the XML with the applicable status translation to the vendor. The Ellucian
Cloud then sends the XML to the vendor. The vendor informs the student of the current
status. If the new status is one that is not sent to the vendor, Banner sends the XML with
the new status to the Ellucian Cloud, but the Ellucian Cloud does not send the status to
the vendor.
Here is an example where a new status is sent to the vendor:
When the Banner ID is populated, if the status moves from
NR - Needs
Research
to HR - Hold for Restrictions, Banner sends the XML with the
HR status to the Ellucian Cloud and the translation of “Hold” and the hold descriptions
to the vendor. The Ellucian Cloud then sends the XML to the vendor. The vendor will
inform the student of the holds that exist on his/her account and provide information to
contact the institution to resolve the issue.
Here is an example where a new status is not sent to the vendor:
When the Banner ID is populated, if the status moves from
NR - Needs
Research
to AR - Attachment Needs Review, Banner sends the XML with
the
AR status to the Ellucian Cloud, but the AR status is not one that is sent to the
vendor.
Example XML Data Sent to the Vendor for NR Status Updates
<UserDefinedExtensions><ErpStatusInfo><UpdateThirdParty>False</
UpdateThirdParty><UpdateCloudStatus>True</
UpdateCloudStatus><StatusDateTime>2013-11-28T07:05:02.000-05:00</
StatusDateTime><StatusCode>NR</StatusCode><PlannedReleaseDate></
PlannedReleaseDate></ErpStatusInfo></UserDefinedExtensions>
NF - Student Not Found
The NF - Student Not Found status indicates that the order arrived without a
Banner ID, and after further research, no matching student can be found. You must check
the Student Not Found checkbox in the Transcript Order Summary block of the

1476
Banner Student User Guide | Academic History
eTranscript Transcript Request Summary Form (SHAETOR). The order status logic adds
the NF status to the order history.
The next time the Ellucian Cloud polls for an update, Banner sends the XML with the
NF
status to the Ellucian Cloud and the translation of “NoRecord” to the vendor. The Ellucian
Cloud then sends the XML to the vendor. The vendor informs the student that the record
cannot be found and provides information to contact the institution to resolve the issue.
The auto cancel number of days countdown is activated. The student has a specific
number of days to contact the school in an effort to resolve the issue. If the number of auto
cancel days elapses without a resolution, the status is updated to
EX - Expired and
then to
CA - Canceled. The vendor will inform the student of the canceled order.
The next time the Ellucian Cloud polls for an update, Banner sends the XML with the CA
status to the Ellucian Cloud and the translation of “Canceled” to the vendor. The Ellucian
Cloud then sends the XML to the vendor. The vendor informs the student that the order is
canceled.
If the student contacts the institution with additional information that enables the institution
to determine the Banner ID, you can update the Banner Identification fields in the
Transcript Order Summary block of the Transcript Request Summary Form (SHAETOR).
When the Banner ID is updated, the order PIDM is also set.The SHAETOR form
immediately determines what the next status should be and adds it to the order status
history. Since the form determined that status, no updates were sent to the Cloud or the
vendor.
The next time the Ellucian Cloud polls for a status update, the last status sent to the
Ellucian Cloud is compared to the current status. If the status has changed, Banner sends
the XML with the new status to the Ellucian Cloud. If the new status is one that should be
sent to the vendor, the Ellucian Cloud sends the applicable status translation to the
vendor. The vendor informs the student of the current status. If the new status is one that
is not sent to the vendor, Banner sends the XML with the new status to the Ellucian Cloud,
but the Ellucian Cloud does not send the status to the vendor.
AR - Attachment Needs Review
The AR - Attachment Needs Review status indicates that the student has
submitted attachments with the order that require your review, and the Attachments
indicator is checked in the Transcript Order Summary block of SHAETOR. The order
status logic adds the
AR status to the order history.
The
AR status is added when it is the next applicable status when the order status update
is processed. When the Attachments indicator is checked, the logic also checks if the
Attachments Reviewed indicator is unchecked. If the indicator is unchecked, the
AR
status is inserted into the order history.
When the status that immediately precedes the
AR status is NF - Student Not
Found
, Banner sends the XML with the AR status to the Ellucian Cloud, and the
translation of “TranscriptRequestReceived” to the vendor. The Ellucian Cloud then sends
the XML to the vendor. The vendor informs the student that the order is in process.
When the status that immediately precedes the
AR status is not NF, Banner sends the
XML with the
AR status to the Ellucian Cloud, but the Ellucian Cloud does not send the
status to the vendor. The attachments are not brought into Banner with the order. You

1477
Banner Student User Guide | Academic History
need to log into the vendor using the attachment URL provided in the Attachments
Information block of SHAETOR. Once the attachments have been reviewed, you can
check the Attachments Reviewed checkbox in the Attachments Information block of
SHAETOR to indicate that processing can continue.
Note: Some transactions may take longer than expected to process to
completion, depending on the order status and the behind the scenes
updates that take place.
For example, when the order status is updated to
AR, (the Attachments
Reviewed indicator is checked on SHAETOR), and the changes are
saved, the SHKEORS order status package is called and processing
continues.
SHKEORS determines whether the order is ready to be generated. If so,
the SHRETRN process is run, and the PDF file is produced. Then the
SHRTEOS table is updated with statuses of
RG, GC, TC, and FF.
Example XML Data Sent to the Vendor for AR Status Updates
<UserDefinedExtensions><ErpStatusInfo><UpdateThirdParty>True</
UpdateThirdParty><UpdateCloudStatus>True</
UpdateCloudStatus><StatusDateTime>2013-12-10T11:50:04.000-05:00</
StatusDateTime><StatusCode>HR</StatusCode><PlannedReleaseDate></
PlannedReleaseDate></ErpStatusInfo></UserDefinedExtensions>
HR - Hold for Restrictions
The HR - Hold for Restrictions status indicates that active transcripts holds
have been found. The order status logic adds the
HR status to the order history. Banner
sends the XML with the
HR status, the translation of “Hold”, and the holds to the vendor
and sends the specific hold code descriptions to the Ellucian Cloud. The Ellucian Cloud
then sends the XML to the vendor. The vendor will inform the student of the holds that
exist on their account and provide information to contact the institution to resolve the
holds.
The auto cancel number of days countdown is activated. The student has a specific
number of days to contact the school in an effort to resolve the holds. If the number of auto
cancel days elapses without a resolution, the status is updated to
EX - Expired and
then to
CA - Canceled.
The next time the Ellucian Cloud polls for a status update, Banner sends the XML with the
CA status to the Ellucian Cloud and the translation of “Canceled” to the vendor. The
Ellucian Cloud then sends the XML to the vendor. The vendor informs the student that the
order is canceled.
If new holds have been added since the last holds status update occurred, the new holds
and descriptions must be sent in a status update to the Ellucian Cloud and to the vendor in
the order status XML. This could occur if holds existed but were cleared before waiting for
grades or if a new transcript hold exists when the release date for grades is reached. The
SHRXHLD table stores information about holds previously sent in XML updates for an
order ID.

1478
Banner Student User Guide | Academic History
Current holds are compared to holds previously sent to determine if the hold information
has changed or not, since the previous XML update about the HR status occurred. If new
holds are found, the auto cancel number of days countdown is reset to the value on
SHRTETC. The vendor informs the student that holds exist and provides information to
contact the institution resolve the holds.
Holds can be designated school actionable or student actionable.
• School actionable holds pause processing and need to be addressed by administrative
staff, but do not result in a message being sent to the student. A school actionable hold
could be an academic issue that needs internal review, or when complete academic
records may not be in Banner.
• Student actionable holds pause processing and need to be addressed by the student,
such as fines that need to be paid.
If the student contacts the institution and resolves the holds, you have some options for
how to proceed.
• You may manually check the Holds Override indicator in the Transcript Order Summary
block of the Transcript Request Summary Form (SHAETOR). When the Holds Override
indicator is checked, the SHAETOR form immediately determines what the next status
should be and adds it to the order status history. Since the form determined that status,
no updates were sent to the Ellucian Cloud or the vendor.
The next time the Ellucian Cloud polls for a status update, the last status sent to the
Ellucian Cloud is compared to the current status. If the status has changed, Banner
sends the XML with the new status to the Ellucian Cloud. If the new status is one that
should be sent to the vendor, the Ellucian Cloud sends the applicable status translation
to the vendor. The vendor informs the student of the current status. If the new status is
one that is not sent to the vendor, Banner sends the XML with the new status to the
Ellucian Cloud, but the Ellucian Cloud does not send the status to the vendor.
• You may update the To Date of the applicable holds on SOAHOLD to the current date. If
you choose to do this, the order status will remain as
HR until the next time the Ellucian
Cloud polls for a status update.
When this poll occurs, the last status sent to the Ellucian Cloud is compared to the
current status. If the status has changed, Banner sends the XML with the new status to
the Ellucian Cloud. If the new status is one that should be sent to the vendor, the
Ellucian Cloud sends the applicable status translation to the vendor. The vendor informs
the student of the current status. If the new status is one that is not sent to the vendor,
Banner sends the XML with the new status to the Ellucian Cloud, but the Ellucian Cloud
does not send the status to the vendor.
Example XML Data Sent to the Vendor for HR Status Updates
<UserDefinedExtensions><ErpStatusInfo><UpdateThirdParty>True</
UpdateThirdParty><UpdateCloudStatus>True</
UpdateCloudStatus><StatusDateTime>2013-12-10T11:50:04.000-05:00</
StatusDateTime><StatusCode>HR</StatusCode><PlannedReleaseDate></
PlannedReleaseDate></ErpStatusInfo></UserDefinedExtensions>

1479
Banner Student User Guide | Academic History
AG - Awaiting Grades
The AG - Awaiting Grades status indicates that the student placing the order has
requested the hold for grades future processing option. The order status logic adds the
AG
status to the order history.
When the status that immediately precedes the
AG status is HR - Hold for
Restrictions
, Banner sends the XML with the AG status and a planned release date
to the Ellucian Cloud, and sends the translation of “TranscriptRequestReceived” to the
vendor. The Ellucian Cloud then sends the XML to the vendor. The vendor informs the
student that the order is in process.
When the status that immediately precedes the
AG status is not HR, Banner sends the
XML with the
AG status and a release date to the Ellucian Cloud. The Ellucian Cloud does
not send the XML to the vendor. The release date comes from the term submitted for the
hold for grades request on the eTranscript Rule Form (SHRTETC). When the term code is
missing on SHRTETC, the logic uses the term end date from STVTERM as the planned
release date. The Ellucian Cloud will wait until the day after the release date before
requesting daily status updates on the order. Banner logic ensures that all grades have
been rolled to academic history before the order is filled.
When the transcript order is submitted with a hold for grades term, the release date is
retrieved from the Hold for Grades data element on SHRTETC for the matching term.
The Hold for Grades data element and the
AG - Awaiting Grades order status
include the term in the order that is sent to Banner. Both require a planned release date to
be included in the XML order status that is sent back to the Ellucian Cloud. The hold for
grades rule that matches the term on SHRTETC is used to send back the planned release
date. The XML response is returned with the
AG order status and the planned release
date.
AD - Awaiting Degrees
The AD - Awaiting Degrees status indicates that the student placing the order has
requested the hold for degree future processing option. The order status logic adds the
AD
status to the order history.
When the status that immediately precedes the
AD status is HR - Hold for
Restrictions
, Banner sends the XML with the AD status and a planned release date
to the Ellucian Cloud, and sends the translation of “TranscriptRequestReceived” to the
vendor. The Ellucian Cloud then sends the XML to the vendor. The vendor informs the
student that the order is in process.
When the status that immediately precedes the
AD status is not HR - Hold for
Restrictions
, Banner sends the XML with the AD status and a release date to the
Ellucian Cloud. The Ellucian Cloud does not send the XML to the vendor.
The release date comes from the term submitted for the hold for degree request on the
eTranscript Rule Form (SHRTETC). When the term code is missing on SHRTETC, the
logic uses the term end date from STVTERM as the planned release date. The Ellucian
Cloud will wait until the date after the release date before requesting daily status updates
on the order. Banner logic ensures that degree has been awarded before the order is
fulfilled.

1480
Banner Student User Guide | Academic History
When the transcript order is submitted with a hold for degree term, the release date is
retrieved from the Hold for Degree data element on SHRTECT for the matching term.
The Hold for Degree data element and the
AD - Awaiting Degrees order status
both require a planned release date to be included in the XML order status that is sent
back to the Ellucian Cloud. A student may request a transcript on April 25 but will not be
awarded the degree until May 14. The Ellucian Cloud does not want to ask for a daily
update on the order status from April 25 until student is awarded the degree.
The planned release date reflects the date on which degrees are expected to be awarded
and is associated with the maximum graduation term on SHADEGR. When the graduation
term on SHADEGR is not populated, the maximum SGBSTDN graduation term is selected
to determine the release date. When the Graduation Term field on SGASTDN is not
populated, the release date is set as the next day from the day of order submission
(current date +1). The Ellucian Cloud will not ask for an update on the order status until the
day after the defined planned release date.
For example:
1. The student submits an order with a hold for degree term on April 25.
2. The XML response sends back an order status of
AD and a
<PlannedReleaseDate> of May 14.
3. The next request from the Ellucian Cloud for an order status will take place on May 15.
4. The Ellucian Cloud will continue to request the order status on a daily basis until the
degree is awarded and the order is moved to the next status.
RG - Ready to Generate
The RG - Ready to Generate status indicates that no issues exist with the order,
and the process to fill the order can be initiated asynchronously, that is, not occurring at
predetermined or regular intervals during data communication. The order status logic adds
the
RG status to the order history.
Banner sends the XML with the
RG status to the Ellucian Cloud. The Ellucian Cloud does
not send the XML to the vendor. The Ellucian Cloud does not send a daily request for an
update once the RG status has been received. Rather the Ellucian Cloud waits to receive
the next status from Banner, and the next status will be either
TF - Transmission
Failed
, FF - Order Fulfilled, or FO - Offline Record Sent.
The
RG status triggers the creation of the transcript request record (SHTTRAN) from the
Transcript Request Form (SHARQTC) and in the SHKELBD package. The record can be
viewed on SHARQTC. However, the order ID is not displayed. It is stored in the SHTTRAN
table for internal use. The transcript request record provides the data used to produce the
output based on the output type (hardcopy or electronic PDF). The order status logic then
calls the
shkebld.p_call_process package to process the order ID.
Note: A GPA recalculation will be performed before the transcript is
produced when at least one institutional course level exists or transfer
courses exist that have not yet been calculated.
Order values from the SHRTEOD table need to be set up as crosswalks to Banner values
needed on SHARQTC. This cross walk for state and nation values can be done on the EDI

1481
Banner Student User Guide | Academic History
Cross-Reference Rules Form (SOAXREF) for the STVSTAT and STVNATN cross-
reference labels. Verify that the XML checkbox is checked for each rule on SOAXREF so
the PESC value is translated.
Once the order status is
RG, a request is sent to the queue (advanced queuing). The
queue listener looks for requests and then runs either the eTranscript Export Process
(SHRETRN) and the Academic Transcript (SHRTRTC), based on the transcript type, to
produce the output. (SHRETRN uses the options on SHATPRT to produce electronic PDF
output. SHRTRTC produces paper output.) The SHRADVQ listener process needs to be
started by submitting the eTranscript Listener Start Up Process (SHRQINI) to enable
processing of these requests.
Create user defaults for the
ETRANSCRIPT user on the Default Parameter Value
Validations Form (GJAPDFT) for use with eTranscripts output for SHRETRN and
SHRTRTC. When the
shkebld.p_call_process is called, it inserts job submission
parameters in GJBPDFT with the user value of
ETRANSCRIPT. This allows the
appropriate transcript process to be run automatically. Do not create a parameter set on
GJAPDFT. The eTranscripts process does not use the parameter set value. The value of
ETRANSCRIPT is created as seed data by a script and is hardcoded in the SHKEBLD
package. You can change the default values for this user, but you cannot set up a different
user.
Note: When the ETRANSCRIPT parameter set is used with SHRTRTC,
the Transcript Printer parameter defaults to
%, so paper transcripts can be
printed from the queue.
GF - Generation Failed
The GF - Generation Failed status is a Banner internal only status that indicates
that an error occurred during the generation of the electronic PDF transcript output prior to
initiating the SFTP transfer of an electronic file to the vendor. The order status logic adds
the
GF status to the order history. No XML is sent to the Ellucian Cloud or the vendor with
a status update.
When the PDF generation fails, the SHTTRAN is updated, and the
.log file displays the
message PDF Transcript not created. You must manually create the electronic PDF file.
Go to SHAETOR and query on the status of
GF in the Key block. If failed records are
returned on SHAETOR, go to SHARQTC, duplicate the specific record, and run
SHRETRN from job submission to process the order manually. This will automatically
place the output in the directory path specified on SHAETAD, and SFTP process will occur
as part of the SHRETRN process. The SHRETRN process adds the
GF status to the order
history.
GC - Generation Complete
The GC- Generation Complete status is a Banner internal only status that
provides confirmation that the output has been generated prior to initiating the SFTP
transfer of an electronic file to the vendor. The order status logic adds the
GC status to the
order history. No XML is sent to the Ellucian Cloud or the vendor with a status update.

1482
Banner Student User Guide | Academic History
TF - Transmission Failed
The TF - Transmission Failed status is a Banner internal only status that
indicates that the electronic transmission of the file to the vendor drop box has been
unsuccessful, and an error code has been returned. Errors can be returned for bad syntax,
incorrect authorization header, forbidden request, URL not found, internal server error.
The SHRETRN process adds the
TF status to the order history. Banner sends the XML
with the
TF status to the Ellucian Cloud after the SHRETRN process is run by submitting
another request to the queue to run SHRPOST. The Ellucian Cloud does not send the
XML to the vendor. You can manually resend the order using the SHASFTP form. You can
manually resend individual orders or all orders.
If the SFTP process fails, the
TF status is added to the order status history. A record is
written to the SHRSFTP table, and the generated PDF is stored in a BLOB column
associated with order ID. You can manually resend the order using the SHASFTP form.
TC - Transmission Complete
The TC - Transmission Complete status indicates that the electronic
transmission of the file to the vendor drop box has been successful, and a success code
has been returned. The SHRETRN process adds the
TC status to the order history.
The
TC status is a Banner internal only status that provides confirmation that the output for
the electronic file has been successfully received by the vendor drop box before the
Ellucian Cloud is updated that the order has been fulfilled. No XML is sent to the Ellucian
Cloud or the vendor with a status update.
FF - Order Fulfilled
The FF - Order Fulfilled status indicates that the order data has been
successfully fulfilled, and the electronic file has been sent to the vendor drop box. The
SHRETRN process adds the
FF status to the order history.
Banner sends the XML with the
FF status to the Ellucian Cloud after the SHRETRN
process is run by submitting another request to the queue to run SHRPOST. The
translation of “Transcript Sent” to the vendor. The Ellucian Cloud then sends the XML to
the vendor. The vendor informs the student that the request has been fulfilled
electronically.
Example XML Data Sent to the Vendor for FF Status Updates
<UserDefinedExtensions><ErpStatusInfo><UpdateThirdParty>False</
UpdateThirdParty><UpdateCloudStatus>False</
UpdateCloudStatus><StatusDateTime>2013-12-10T11:47:21.000-05:00</
StatusDateTime><StatusCode>FF</StatusCode><PlannedReleaseDate></
PlannedReleaseDate></ErpStatusInfo></UserDefinedExtensions>
FO - Offline Record Sent
The FO - Offline Record Sent status indicates that exceptions can be made to
electronic orders to fill them manually. In this case, a hardcopy transcript is produced.
(Paper transcripts are considered as fulfilled “offline”.) Either the SHRETRN process or

1483
Banner Student User Guide | Academic History
the SHRTRTC process adds the FO status to the order history. When an order is filled
manually, you must check the Manual Processing checkbox in the Transcript Order
Summary block on SHAETOR. The SHAETOR form adds the
FO status to the order status
history.
When SHRTRTC is run manually, the format XXXXXXXXX/000 must be used for the
transcript request, such as 12345/09, 123456789/01, or N00014401/11.
• Positions one through nine (XXXXXXXXX) are available for the ID number. The ID
number may not use the entire nine digits. It can be shorter than nine digits.
• The next position (/) is a separator. This position will float, depending on the ID length.
• The next positions (000) are available for the sequence number or transcript request
number. The transcript request number may not use all three positions. It can be shorter
than three digits. These positions will also float based on the length of the ID and the
position of the separator.
Banner sends the XML with the
FO status to the Ellucian Cloud after SHRETRN or
SHRTRTC is run by submitting another request to the queue to run SHRPOST. The
translation of “OfflineRecordSent” to the vendor. The Ellucian Cloud then sends the XML
to the vendor. The vendor informs the student that the request has been fulfilled manually
(not electronically).
Example XML Data Sent to the Vendor for FO Status Updates
<UserDefinedExtensions><ErpStatusInfo><UpdateThirdParty>False</
UpdateThirdParty><UpdateCloudStatus>False</
UpdateCloudStatus><StatusDateTime>2013-12-10T11:48:55.000-05:00</
StatusDateTime><StatusCode>FO</StatusCode><PlannedReleaseDate></
PlannedReleaseDate></ErpStatusInfo></UserDefinedExtensions>
EX - Order Expired
The EX - Order Expired status is a Banner internal only status that indicates that
the order has expired. The order status logic adds the
EX status to the order history. No
XML is sent to the Ellucian Cloud or the vendor with a status update. Immediately after the
EX status is added to the order history table, Banner adds a CA - Canceled status to
the order history. Banner then sends the XML with the
CA status to the Ellucian Cloud and
the translation of “Canceled” to the vendor. Finally, the Ellucian Cloud sends the XML to
the vendor.
CA - Canceled
The CA - Canceled status indicates that the order has been canceled due to
expiration or was manually canceled by a user. You can manually cancel an order by
checking the Cancel Order checkbox in the Transcript Order Summary block on
SHAETOR. The SHAETOR form adds the
CA status to the order status history.
Banner sends the XML with the
CA status to the Ellucian Cloud and the translation of
“Canceled” to the vendor. The Ellucian Cloud then sends the XML to the vendor. The
vendor informs the student that the order has been canceled.

1484
Banner Student User Guide | Academic History
Example XML Data Sent to the Vendor for CA Status Updates
<UserDefinedExtensions><ErpStatusInfo><UpdateThirdParty>True</
UpdateThirdParty><UpdateCloudStatus>True</
UpdateCloudStatus><StatusDateTime>2013-12-07T13:56:44.000-05:00</
StatusDateTime><StatusCode>CA</StatusCode><PlannedReleaseDate></
PlannedReleaseDate></ErpStatusInfo></UserDefinedExtensions>
eTranscript Transcript Summary Status View (SHVTEOS)
This view is used to combine order status data from the SHRTEOS table and person data
from the SPRIDEN table for display on the SHIETSS form. Order status summary and
detail information is displayed on SHIETSS, as well as the student’s name and ID. Order
data is sorted at the form level by student last name and order ID.
The following columns are in this view.
SHVTEOS_ORDER_ID
SHVTEOS_ETST_CODE
SHVTEOS_ETST_DATE
SHVTEOS_USER_ID
SHVTEOS_ACTIVITY_DATE
SHVTEOS_SURROGATE_ID
SHVTEOS_PIDM
SHVTEOS_ROWID
SHVTEOS_ID
SHVTEOS_FIRST_NAME
SHVTEOS_MIDDLE_NAME
SHVTEOS_LAST_NAME
Generate Order Output
The eTranscript Export Process (SHRETRN) is used to produce the transcript order
output in PDF format. This is a Java process that can be run from job submission (for
exception processing only) by ID and sequence number, transcript type, address selection
date, address priority and type, and Order ID. It is also run when a request is sent to the
queue by the SHKEORS order status package to process the transcript request.
SHRETRN produces XML and PDF output. The XML output is not PESC compliant and is
used for the PDF generation only. It contains Banner values instead of the PESC values
produced by the SHRPESE process. A set of 50 user-defined elements is provided to
accommodate the data elements from the SHATPRT print option rules.
Note: The SHATPRT print option for Student Centric Period Statistics
is not available for use with PDF transcripts at this time.
A baseline PDF template file (
shretrn_template.xls) is delivered for use with
SHRETRN. An Adobe Formatting Objects Processor (FOP) tool is used to create a
stylesheet. The stylesheet can be used once the data has been transformed to XML. The
XML is then transformed to a PDF file. The output is not PESC XML. The actual Banner
values are generated in the output for the SHATPRT data elements (print options) with the

1485
Banner Student User Guide | Academic History
exception of student centric periods. You can create your own templates/stylesheets and
link them to Banner transcript types.
eTranscripts supports the use of multiple stylesheets, but the number of different PDF
output types you use depends on how your institution configures the transcript ordering
page with the vendor and how the PESC transcript types and purposes are mapped to
Banner transcript types.
The eTranscript PDF Printer Rule Form (SHRPDFT) is used to map the Banner transcript
type to specific PDF templates for electronic PDF transmission and to specific printers for
paper (hardcopy) transcripts. You can create customized templates for your institution
using the baseline template as a model, and then link the templates to Banner transcript
types on SHRPDFT.
SHRETRN uses SFTP transfer to automatically send the electronic PDF output to the
vendor drop box. If the SFTP process fails, an automatic number of retries is built in.
Three retries are attempted, each 60 seconds apart. When the retries fail, the eTranscript
SFTP Transmission Resend Form (SHASFTP) displays the errors and allows you to
attempt a manual resend of the files individually or in a group. A record is written to the
SHRSFTP table, and the generated PDF is stored in a BLOB column.
Once the electronic PDF is received by the vendor, institution branding can be added for
the school’s logo and an electronic signature can be displayed.
• When a PDF transcript is generated, the Status field in the Electronic Transcript Status
section of SHARQTC is updated with existing baseline codes such as
P1 - XML
Transcript Exported
or P2 - XML Export had Errors.
• The Transcript Sent Date and Transcript Print Date fields in the Transcript Request
information are also updated.
When the PDF generation fails during the SHRETRN process, updates occur as follows:
• The Run Date, Status, and Status Date fields (in the Electronic Transcript Status
information) are updated on the SHARQTC form and in the SHTTRAN table. The Status
field displays XML Transcript Exported when the XML is generated but PDF generation
fails. The Status field displays XML Export had errors when the XML generation fails.
• The statuses in the SHRTEOS table are updated to GF and TF.
• The log file contains the error message PDF Transcript not created.
You will need to manually process the record after the reason for the PDF generation
failure has been corrected.
1. Access SHARQTC and duplicate the record. The
SHTTRAN_TYPE field must be D.
2. Run SHRETRN from job submissions with the appropriate parameters.
Transform XML to PDF
When XML content is converted to PDF output, a series of changes takes place. At a high
level, the XML document is first converted to Extensible Stylesheet Language Formatting
Objects (XSL-FO) markup language using an Extensible Stylesheet Language
Transformations (XSLT) stylesheet. The XSL-FO object is entered into a Formatting
Objects Processor (FOP) engine, where it is converted to a PDF file.

1486
Banner Student User Guide | Academic History
For example, here is a sample XML file that will go through the process of XML to XSL-FO
with XSLT to FOP to PDF.
<name>Frank</name>
An XSLT stylesheet is needed to convert the XML to XSL-FO, in order to produce the PDF
file. Next, the FOP reads the generated XSL-FO document and formats it to be a PDF
document.
Here is the minimal XSLT stylesheet that is needed to take the name (Frank) and produce
a document that reads Hello Frank! The document is saved as
name2fo.xsl.
<?xml version="1.0" encoding="utf-8"?>
<xsl:stylesheet version="1.0"
xmlns:xsl="http://www.w3.org/1999/XSL/Transform"
xmlns:fo="http://www.w3.org/1999/XSL/Format">
<xsl:output method="xml" indent="yes"/>
<xsl:template match="/">
<fo:root>
<fo:layout-master-set>
<fo:simple-page-master master-name="A4-portrait"
page-height="29.7cm" page-width="21.0cm"
margin="2cm">
<fo:region-body/>
</fo:simple-page-master>
</fo:layout-master-set>
<fo:page-sequence master-reference="A4-portrait">
<fo:flow flow-name="xsl-region-body">
<fo:block>
Hello, <xsl:value-of select="name"/>!
</fo:block>
</fo:flow>
</fo:page-sequence>
</fo:root>
</xsl:template>
</xsl:stylesheet>
The SHRETRN process uses this same functionality to produce the eTranscripts PDF
output. XML is produced, then the
PESCXMLPdfHelper.java file is used to transform
the XML through the XSLT and XSL-FO, input the data into the FOP engine, and produce
the PDF file. A default template XSLT stylesheet is delivered to format the PDF.
Modify the PDF Template
The shretrn_template.xsl file is the default template for eTranscripts PDF output.
You can modify the
shretrn_template.xsl file to change the format of the PDF
output. To do this, rename the file with a version number such as,
shretrn_template_1_0.xsl, make your changes, and store the file in the
$DATA_HOME/student directory. You also need to associate the modified, renamed

1487
Banner Student User Guide | Academic History
template with the transcript type on SHRPDFT by entering the filename in the PDF
Template field for the transcript type.
When SHRETRN is run, the process checks SHRPDFT for the transcript type and
associated
.xsl template file. If the .xsl file does not exist, the default, delivered
shretrn_template.xsl file is used to format the PDF output. If a .xsl file is found,
the process then checks
$DATA_HOME/student directory for a .xsl file to use. If no
file is found in the directory, the
shretrn_template.xsl file is used.
You can add new fields to the PDF output by selecting the User-Defined Extensions (UDE)
fields on SHATPRT (College, Student, Academic Record, Course). Use SQL to modify
the following UDE procedures in the SHKETRN package.
• p_main_ude_element
• p_student_ude_element
• p_acrec_ude_element
• p_acadsess_course_ude_element
Additional code can be added to display more fields on the PDF transcript. As already
discussed, you can copy the default template, rename the file, and make your changes.
Refer to the third party manual PESC XML College Transcript Implementation Guide for
more information about user-defined elements.
Existing Custom Output
If your institution already has custom transcript output, you need to examine the code that
calls the processes to generate paper or PDF output and make local modifications to call
your custom or third party processes.
For electronic PDF, you will need to ensure that custom or third party code generates the
required PDF filename convention and places the file in the required directory.
PDF Filename
The PDF file that is generated has a required naming convention:
Ellucian_Transcript_OPEID#_ordertracking#_timestamp
• The OPEID number uses an eight digit format.
• The order tracking number uses the format Order#-suborder (123456-1).
• The timestamp uses the format yyyymmddhhmmss.
For example:
Ellucian__Transcript_00123456_1234-1_ 20120419124512.pdf

1488
Banner Student User Guide | Academic History
SFTP Setup
To set up SFTP for automated and manual transcript processing, enter the following
information on the eTranscript Administrator Configuration Form (SHAETAD) for use with
the vendor.
1. Host Name
Enter the name of the vendor’s host computer or server that will accept the
eTranscripts file.
2. Username
Enter the username or ID used to log into the vendor’s host computer.
3. SSH Directory
Enter the location of the institution server that stores the
id_rsa and id_rsa.pub
identity files. The
id_rsa file is used to dynamically generate the password for
logging into the vendor’s host computer.
4. Passphrase
Enter the passphrase used to access the identity (
id_rsa) file.
If the SFTP process fails, review the
.log file for error messages, such as the
shretrn_xxxxxx.log file in the JOBSUB directory. This directory is used for sending
and resending transcript PDF files.
Oracle Advanced Queue Processing
Advanced queue processing can be used to connect transcript printing in Banner to the
vendor request for eTranscripts. The
soo_etran_payload.sql,
squeqtabe_080602_01.sql, and squeqtabe_080602_02.sql scripts are run
during the Banner Student 8.6.2 upgrade to establish the administrative queues, queue
tables, and roles for eTranscripts advanced queuing.
Queues are started with the eTranscript Listener Start Up Process. This can be run
through job submission. It calls multiple occurrences of the eTranscript Advanced Queue
Process (SHRADVQ) as the listener process. Queues must be restarted any time the
Banner system is down.
Refer to the “Oracle Advanced Queue Processing” topic in the “Registration” chapter for
more information on using advanced queues.
GTVSDAX Rule
The QUEUETIME GTVSDAX rule can be used with advanced queue processing for
eTranscripts to set the queue time out.
Internal Code Internal Code Group External Code Description
QUEUETIME QUEUETIMEOUT 300 SFRADVQ/SHRADVQ
timeout in seconds

1489
Banner Student User Guide | Academic History
The QUEUETIME rule is used to change the timeout period for the advanced queue
process. The delivered default timeout period is
300 seconds (five minutes). You need to
set the rule to the timeout value you choose for the queue to work with the advanced
queuing. The SOKADVQ package uses the
QUEUETIME rule.
The
QUEUETIME rule is equivalent to the PIPETIME GTVSDAX rule. The QUEUETIME
rule states the amount of time the user is willing to wait for a response for eTranscripts
processing while using the advanced queuing option, while the
PIPETIME rule denotes
the amount of time the user is willing to wait for a response for the compliance processing
while using pipes processing. (Pipes processing is not supported for eTranscripts
processing.)
Advanced queuing is a requirement of eTranscripts processing. The GTVSDAX rule is not
delivered with the Banner Student 8.6.2 release and must be verified during the upgrade
process.
Oracle Object Types for eTranscripts
One new high-level, complex, Oracle object type is used that relies on dependent, lower-
level object types for their creation. The object type is
so_etranscript_payload.
This object represents the communication payload that is sent across the unique, Oracle
queues also used with this processing. The two Oracle queues are:
ETRANSCRIPT_REQUEST_Q and ETRANSCRIPT_RESPONSE_Q.
ETRANSCRIPT_REQUEST_Q
The ETRANSCRIPT_REQUEST_Q object is populated when the Banner SHKEBLD
package calls the SOKADVQ package to run either the SHRETRN or SHRTRTC process
and produce a transcript. This informational payload is sent from Banner across the
ETRANSCRIPT_REQUEST_Q queue so that the “listener process”, the eTranscript
Advanced Queue Process (SHRADVQ), can submit the transcript request.
Once the transcript request has been processed and the order status is updated
FF or FO,
the queue is also used to send a message to SHRADVQ to call the eTranscript Post Cloud
Process (SHRPOST) to send the response to the Ellucian Cloud.
Variable Name Underlying Oracle Object Type
COMMAND_TYPE BANINST1. SO_ETRANSCRIPT_PAYLOAD.SF_
COMMAND_TYPE
CORRELATIONID BANINST1.SO_ETRANSCRIPT_PAYLOAD.SF_
CORRELATION_ID
ONE_UP_NO BANINST1. SO_ETRANSCRIPT_PAYLOAD.SF_
ONE_UP_NO
STATUS BANINST1.SO_ SO_ETRANSCRIPT_PAYLOAD.SF_
STATUS

1490
Banner Student User Guide | Academic History
ETRANSCRIPT_RESPONSE_Q
The ETRANSCRIPT_RESPONSE_Q object is populated by the Banner eTranscript
Advanced Queue Process (SHRADVQ), the “listener process”, once the call to either
SHRETRN or SHRTRTC has been executed. It can be used in the future to perform error
handling routines if desired.
ETRANSCRIPT_REQUEST_QTAB
The ETRANSCRIPT_REQUEST_QTAB object is the queue table that holds the request
messages written to the queue.
ETRANSCRIPT_RESPONSE_QTAB
The ETRANSCRIPT_RESPONSE_QTAB object is the queue table that holds the
response messages written to the queue.
Manual Transmission
The SHRETRN process generates a PDF transcript when the order status is set to RG -
Ready to Generate
for the first time. SHRETRN also performs the SFTP to the
vendor server location that has been defined on SHAETAD. If the transmission fails, the
error message is logged in the
.log file in JOBSUB folder, and a record is created in the
SHRSFTP table for the order. The generated PDF file is stored in a BLOB column.
You can use the SHASFTP form to initiate the manual transmission of the PDF file. The
PDF object is retrieved from the SHRSFTP table and sent to the JOBSUB location from
where it is transmitted to the vendor server location.
Ellucian Cloud Maintenance
When you are using the Ellucian Cloud in production, there will be a maintenance
schedule for the Cloud services.
EDI Format
eTranscripts processing supports the EDI TS130 format. EDI output is generated by taking
the PESC standard XML output and translating the XML to EDI. The translation of this
data follows the PESC XML to TS130 EDI standards. More information about the
translation and standards can be found on the PESC website.
Note: Check with your vendor on the availability of this option.
To use eTranscripts EDI functionality, you will need to map the XML values in the EDI
Cross-Reference Rules Form (SOAXREF). As the XML source is translated to EDI by the
eTranscripts process, be sure to map the XML values and not the EDI values.

1491
Banner Student User Guide | Academic History
See the "XML Transcript Processing" section this chapter for more information on using
SOAXREF values with XML and EDI transcripts.
Credits and Notations on Permanent Record
The following is a list of credits and notations, other than regular coursework, that need to
be posted to a student's transcript record and suggestions as to the best place to record
this information in the Academic History module.
• Removal of incompletes and changes of grade notations to an F.
Suggestion: Any grade change made via the Term Course Maintenance Form
(SHAINST) may be done using the Course Maintenance item in the Options Menu, a
Duplicate Record function, or Next Block functions until the Course Maintenance Form
(SHATCKN) is accessed. A grade change will always be added as a new grade with a
grade change reason code, with the original grade maintained as an audit trail. An
incomplete or I grade would be maintained as the original grade, the actual grade would
then be added with a grade change reason code. The most recent grade is the grade
that will be used for all GPA and hour calculations, print on the transcript, and be used to
determine academic standing and dean's list eligibility. You may choose to reflect the
original I grade in the actual grade by creating a new grade on the Grade Code
Maintenance Form (SHAGRDE), for example:
I/A. The I/A grade would then show on
the transcript to reflect that the grade had originally been incomplete.
Incompletes or other grades may be changed to
F using the same procedure described
above. An automated procedure may also be written using the Oracle tools to change
Is to Fs based on certain date parameters.
• Study abroad or other outside program where the course numbers match the
institution's course catalog.
Suggestion: Courses may be input onto a student's record directly in Academic History
on the Term Course Maintenance Form (SHAINST). When entering courses for a term
where there is an existing class schedule in Banner, a Course Reference Number
(CRN) must exist in the Schedule Module for each course being entered on the
student's record. If no class schedule exists, but the catalog exists in Banner for the term
courses are being recorded for, a valid subject and course number from the Catalog
Module must be entered.
• Study abroad or other outside program where the course numbers do not match
institution's course catalog.
Suggestion: Courses may be entered directly in Academic History on the Term Course
Maintenance Form (SHAINST) if they can be converted to actual courses at the
institution. This may be done using the Course Maintenance item in the Options Menu, a
Duplicate Record function, or Next Block functions until the Course Maintenance Form
(SHATCKN) is accessed. If they cannot be converted to actual courses at the institution,
it would be best to enter the courses as transfer credit on the Transfer Course Form
(SHATRNS), because transfer work does not validate against the course catalog. The
subject code, however, has to be a valid subject on the Subject Code Validation Form
(STVSUBJ).

1492
Banner Student User Guide | Academic History
• Prior Learning Experience - no grades, earned hours only.
Suggestion: Prior learning experience could be entered as either course specific work at
the institution or as transfer credit. If it is entered as course specific work on the Term
Course Maintenance Form (SHAINST), it would have to be converted to an existing
course, or a dummy course and section may be set up in the Class Schedule Module. A
grade must be entered, but the grade could be set up on the Grade Code Maintenance
Form (SHAGRDE) as a special grade that only counts in earned hours and not in GPA
hours. If the prior learning experience is entered as transfer work a valid subject would
have to exist on the Subject Code Validation Form (STVSUBJ), but the course number
and title would be free format. As in institutional course work a grade must be entered,
but the same procedure could be followed.
• Academic Bankruptcy - GPA adjusted but course work stays on the record.
Suggestion: This process could be accommodated by doing a grade change on the
courses that are being excused, so that the new grade does not count toward GPA
hours but the course will stay on the student's record.
Course specific comments may be entered associated with each course and will print on
the transcript with the course. This comment may be entered on the Course
Maintenance Form (SHATCKN). This form can be accessed from the Term Course
Maintenance Form (SHAINST) or the Academic History Course Summary Form
(SHACRSE).
• Notations to a student's academic record - Readmitted on Academic Probation, Denied
Readmission, etc.
Suggestion: Any notations or comments to a student's academic record may be made
on the Transcript Event and Comments Form (SHATCMT). Free form comments or
notations may be entered as level specific comments that will print on the student's
transcript before any course work, or as term specific comments that will print with the
associated term after the term header information and before the detail coursework.
Coded comments may be entered as events. Events are first established on the
Academic History Event Code Validation Form (STVEVEN) and may be coded, Yes
(checked) or No (unchecked), to print on the transcript. If the event is set to print on the
transcript, it will print before the level specific comments.
• Degrees posted with honors (cum laude, etc.), and departmental honors (certified by
American Chemical Society, etc.).
Suggestion: Honors for a degree are entered on the Degrees and Other Formal Awards
Form (SHADEGR) in the Institution Honors section and/or the Departmental Honors
section. Institutional honors, such as cum laude, are first set up on the Institutional
Honors Code Validation Form (STVHONR). Departmental honors are established on the
Departmental Honors Code Validation Form (STVHOND). Honors may only be entered
for a degree that has a degree status in the Degree Information, with a type of awarded
(
A) or pending (P) on the Degree Status Code Validation Form (STVDEGS).
• Education certification sticker or papers (with degrees).
Suggestion: The Qualifying Paper Form (SHAQPNO) may be used to enter the type of
paper or certification which is set up on the Qualifying Paper Code Type Validation Form
(STVQPTP). A title of up to four lines must be entered and unlimited text may also be

1493
Banner Student User Guide | Academic History
associated with the paper or certification. This text may then optionally print on the
student's transcript when a degree has been awarded.
• Complete withdrawal date.
Suggestion: This information and date may be entered as a term specific comment on
the Transcript Event and Comments Form (SHATCMT).
• Exemption from writing or speech requirements.
Suggestion: Any type of exemption or waiver from specific degree requirements may be
done in the Degree Audit Module. If degree audit is not in production, a level specific
comment on the Transcript Event and Comments Form (SHATCMT) would be the best
method to record this notation.
• Advanced Placement and CLEP.
Suggestion: Advanced Placement and CLEP credit may be entered on the Transfer
Course Form (SHATRNS). A transfer institution code may be set up on the Source/
Background Institution Code Validation Form (STVSBGI) for advanced placement and
CLEP, or a code of
999999 with a free form description may be entered directly on the
Transfer Course Form (SHATRNS). The course equivalents may be entered associated
with the advanced placement or CLEP, or special subjects may be set up on the Subject
Code Validation Form (STVSUBJ) and the courses may be entered for those special
subjects. Grade and hour information must also be entered. Special grades or regular
pass grades may be set up on the Grade Code Maintenance Form (SHAGRDE) to
indicate how the advance placement and CLEP credit should be counted.
• Credit by examination.
Suggestion: The course for which the student is receiving credit should be entered on
the Term Course Maintenance Form (SHAINST) or the Course Maintenance Form
(SHATCKN), along with the grade and level applied information.
SHATCKN may be accessed from the Term Course Maintenance Form (SHAINST) or
the Academic History Course Summary Form (SHACRSE). A course specific comment
may then be entered to indicate that the credit for the course was received by
examination.
Repeat/Equivalent Course Rules
Repeat/equivalent course processing is controlled by the (Repeat) Limit and the (Repeat)
Maximum Hours fields on the Basic Course Information Form (SCACRSE). These fields
are invoked in the Registration Module according to the status of the Registration Error
Checking flags on the Term Control Form (SOATERM) and are calculated in Academic
History according to the Repeat/Multiple Course Rules Form (SHARPTR).
Note: The Repeat Status Code field on SCACRSE does not control any
processing. It is informational only.

1494
Banner Student User Guide | Academic History
Repeat Policies
The Repeat/Multiple Course Rules Form (SHARPTR) is used to establish the institution's
repeat policy. It allows for repeated courses to be treated in two different ways (repeat limit
rule or repeat hours rule) with three different course selections (last, highest, or first
passing). Repeat policies may be established for repeated courses where the number of
times a student may repeat is limited and repeated courses where the number of hours a
student may earn in a course is limited.
• The Repeat Limit Selection Rule field on SHARPTR handles the situation where the
number of times a student takes a course is limited. Repetition of the course will invoke
the repeat rules specified in this column. This is specified on the Basic Course
Information Form (SCACRSE) by the (Repeat) Limit field.
• The Repeat Hours Selection Rule field on SHARPTR handles the situation where the
institution establishes a maximum number of hours that may be earned before the
selection rule is used. Each rule has an associated evaluation grade that determines the
minimum grade a course must have to be considered for repeat processing evaluation.
• The values in the Repeat Limit Evaluation Grade field and the Repeat Hours
Evaluation Grade field on SHARPTR are the minimum grades that will be used for
repeat checking, for the term, level, and selection rule. Once these grades are set,
courses with a numeric value less than the evaluation grade for the selection rule being
used will not be considered in repeat checking.
• The more restrictive selection rule on SCACRSE for the (Repeat) Limit or (Repeat)
Maximum Hours values is the rule that will be used.
Use of Equivalent Courses in Repeat Processing
In order for equivalent courses to be evaluated, they must be established on the Course
Detail Information Form (SCADETL), in the Equivalent Course block in the main window.
Equivalent courses are evaluated based upon the target course being evaluated in the
repeat process for the term. If course equivalents exist on SCADETL for the term you are
processing, the rules for the target course are used in repeat evaluation.
For example, in the Key Information of SCADETL, the Subject is ENGL, the Course
(Number) is 101, and the Term is 199810. In the Course Equivalency window, ENGL
100 is defined as an equivalent from term 199410 to term 199760. A student has
completed institutional work in academic history for ENGL 101 for 199810 and has
also completed institutional work in academic history for ENGL 100 in 199510. When
running the repeat process for 199810, ENGL 100 and ENGL 101 will be evaluated,
since the student completed ENGL 100 within the course equivalency start and end
term associated with ENGL 101 on SCADETL.
Course Selection Rules
The Repeat Limit Selection Rule and Repeat Hours Selection Rule fields on
SHARPTR are used to define which course(s) will be included in the student's earned and
passed hours when a repeat limit or repeat hours condition exists.
In establishing the rules, the following selections must be specified:

1495
Banner Student User Guide | Academic History
Evaluation Grade
The Repeat Limit Evaluation Grade field on SHARPTR is used to define the minimum
evaluation grade for the effective term and level. A grade is entered from the Grade Code
Maintenance Form (SHAGRDE). The Repeat/Equivalent Course Check Report
(SHRRPTS) translates the grade to its numeric value, which is specified on SHAGRDE, to
determine where a grade ranks.
The evaluation grade, established with a rule on SHARPTR, is the minimum value based
on its numeric value in SHAGRDE that can be considered in the repeat process. All
courses that do not meet the evaluation grade minimum can appear on the output for
SHRRPTS, because the evaluation grade established on the repeat rule on SHARPTR
determines the courses displayed on the output.
For example, when the Repeat Limit Selection Rule is set to Latest, the Repeat
Limit Evaluation Grade defined with the rule is
D, and the student has taken the
course twice, the first time they received a
D, and the second time received a W.
According to the rule, the D grade would be included, and the W grade record would
have a comment: *Not Updated – Check Grade. This is due to the W grade having a
numeric value less than the D grade as defined on the Grade Code Maintenance
Form (SHAGRDE), and therefore, it will not be considered in repeat evaluation.
The passing grade is the grade code to be considered in evaluation when the Rule "F"
(First Passing) is selected. This is established by entering a grade value in the Passing
Grade field in the Repeat/Equivalent Course Conditions and Passing Grade Rules block
of SHARPTR. An example of how this will work is found under the topic “Example Output
from SHRRPTS” which appears later in this section.
Sample Rules
It is important to remember when using repeat limits, that a course is not seen as violating
a repeat limit rule until the student actually has one more occurrence than the repeat value
for that course in his/her history. For instance, if repeat limit is one, the first and second
instances of the course will count, because the course is allowed to be repeated once.
The next time the course is taken, repeat processing must choose which course of the
three to count. So, two will always be counted.
It is also important to remember that if the (Repeat) Maximum Hours field on SCACRSE
is set to zero, no occurrences of the course will be included by SHRRPTS. If the student
has multiple occurrences of the course, all occurrences that meet the evaluation grade (or
the passing grade, when the First Passing rule is used) will be excluded.
Rule G = Greatest or latest occurrence of the course will count
Rule L = Latest occurrence of the course will count
Rule F = First occurrence of the course with a passing grade will count
Rule H = Course with the highest grade will count

1496
Banner Student User Guide | Academic History
Using the following Course Information, an example follows which uses each of the
Repeat Limits, Repeat Maximum Hours, Selection rules, and Passing Grade rules. The
example course is a three credit hour course, and the evaluation grades are all set to
D.
This example uses Greatest and Latest.
Course Repeat 1 F
Course Repeat 2 D
Course Repeat 3 A *
Course Repeat 4 A *
Course Repeat 5 C
Course Repeat 6 B
* When the Repeat Hours Selection Rule is set to
Highest, and two course
selections have equally high grades, the earlier attempted course is selected.
When the Repeat Hours Selection Rule is set to
Greatest or Latest, and two
course selections have equally high grades, the latest attempted course is selected.
Repeat Limit - Null Using Repeat Limit Selection Rule Greatest or
Latest
Repeat Maximum Hours - Null
Course 4 would be included.
Repeat Limit - 0 Using Repeat Limit Selection Rule Greatest or
Latest
Repeat Maximum Hours - Null
Course 4 would be included.
Repeat Limit - Null Using Repeat Limit Selection Rule Greatest or
Latest
Repeat Maximum Hours - 7
Courses 3 and 4 would be included.
Repeat Limit - 0 Using Repeat Limit Selection Rule Greatest or
Latest
Repeat Maximum Hours - 7
Course 4 would be included.

1497
Banner Student User Guide | Academic History
This example uses Highest and Latest.
Repeat Limit - Null Using Repeat Limit Selection Rule Greatest or
Latest
Repeat Maximum Hours - 0
No courses would be included.
Repeat Limit - 0 Using Repeat Limit Selection Rule Greatest or
Latest
Repeat Maximum Hours - 0
No courses would be included.
Repeat Limit - 2 Using Repeat Limit Selection Rule Greatest or
Latest
Repeat Maximum Hours - Null
Courses 3, 4, and 6 would be
included.
Repeat Limit - 2 Using Repeat Limit Selection Rule Greatest or
Latest
Repeat Maximum Hours - 0
No courses would be included.
Repeat Limit - 2 Using Repeat Limit Selection Rule Greatest or
Latest
Repeat Maximum Hours - 12
Courses 3, 4, and 6 would be
included.
Repeat Limit - 2 Using Repeat Limit Selection Rule Greatest or
Latest
Repeat Maximum Hours - 6
Courses 3 and 4 would be included.
Repeat Limit - Null Using Repeat Limit Selection Rule Latest

1498
Banner Student User Guide | Academic History
Repeat Maximum Hours - Null
Course 6 would be included.
Repeat Limit - 0 Using Repeat Limit Selection Rule Latest
Repeat Maximum Hours - Null
Course 6 would be included.
Repeat Limit - Null Using Repeat Hours Selection Rule Latest
Repeat Maximum Hours - 7
Courses 5 and 6 would be included.
Repeat Limit - 0 Using Repeat Limit Selection Rule Latest
Repeat Maximum Hours - 7
Course 6 would be included.
Repeat Limit - Null Using Repeat Hours Selection Rule Latest
Repeat Maximum Hours - 0
No courses would be included.
Repeat Limit - 0 Using Repeat Hours Selection Rule Latest
Repeat Maximum Hours - 0
No courses would be included.
Repeat Limit - 2 Using Repeat Limit Selection Rule Latest
Repeat Maximum Hours - Null
Courses 4, 5, and 6 would be
included.
Repeat Limit - 2 Using Repeat Hours Selection Rule Latest
Repeat Maximum Hours - 0
No courses would be included.

1499
Banner Student User Guide | Academic History
Repeat Limit - 2 Using Repeat Limit Selection Rule Latest
Repeat Maximum Hours - 12
Courses 4, 5, and 6 would be
included.
Repeat Limit - 2 Using Repeat Hours Selection Rule Latest
Repeat Maximum Hours - 6
Courses 5 and 6 would be included.
Repeat Limit - Null Using Repeat Limit Selection Rule Highest
Repeat Maximum Hours - Null
Courses 3 or 4 would be included. *
Repeat Limit - 0 Using Repeat Limit Selection Rule Highest
Repeat Maximum Hours - Null
Courses 3 or 4 would be included. *
Repeat Limit - Null Using Repeat Hours Selection Rule Highest
Repeat Maximum Hours - 7
Course 3 and 4 would be included.
Repeat Limit - 0 Using Repeat Limit Selection Rule Highest
Repeat Maximum Hours - 7
Courses 3 or 4 would be included. *
Repeat Limit - Null Using Repeat Hours Selection Rule Highest
Repeat Maximum Hours - 0
No courses would be included.
Repeat Limit - 0 Using Repeat Hours Selection Rule Highest
Repeat Maximum Hours - 0
No courses would be included.

1500
Banner Student User Guide | Academic History
This example uses First Passing.
Repeat Limit - 2 Using Repeat Limit Selection Rule Highest
Repeat Maximum Hours - Null
Courses 3, 4, and 6 would be
included.
Repeat Limit - 2 Using Repeat Hours Selection Rule Highest
Repeat Maximum Hours - 0
No courses would be included.
Repeat Limit - 2 Using Repeat Limit Selection Rule Highest
Repeat Maximum Hours - 12
Courses 3, 4, and 6 would be
included.
Repeat Limit - 2 Using Repeat Hours Selection Rule Highest
Repeat Maximum Hours - 6
Courses 3 and 4 would be included.
Repeat Limit - Null Using Repeat Limit Selection Rule First Passing
Repeat Maximum Hours - Null
Passing Grade - C
Course 3 would be included.
Repeat Limit - 0 Using Repeat Limit Selection Rule First Passing
Repeat Maximum Hours - Null
Passing Grade - C
Course 3 would be included.
Repeat Limit - Null Using Repeat Hours Selection Rule First Passing
Repeat Maximum Hours - 7

1501
Banner Student User Guide | Academic History
Passing Grade - C
Courses 3 and 4 would be included.
Repeat Limit - 0 Using Repeat Limit Selection Rule First Passing
Repeat Maximum Hours - 7
Passing Grade - C
Course 3 would be included.
Repeat Limit - Null Using Repeat Hours Selection Rule First Passing
Repeat Maximum Hours - 0
Passing Grade - C
No courses would be included.
Repeat Limit - 0 Using Repeat Hours Selection Rule First Passing
Repeat Maximum Hours - 0
Passing Grade - C
No courses would be included.
Repeat Limit - 2 Using Repeat Limit Selection Rule First Passing
Repeat Maximum Hours - Null
Passing Grade - C
Courses 3, 4, and 5 would be
included.
Repeat Limit - 2 Using Repeat Hours Selection Rule First Passing
Repeat Maximum Hours - 0
Passing Grade - C
No courses would be included.
Repeat Limit - 2 Using Repeat Limit Selection Rule First Passing
Repeat Maximum Hours - 12
Passing Grade - C

1502
Banner Student User Guide | Academic History
Courses 3, 4, and 5 would be
included.
Repeat Limit - 2 Using Repeat Hours Selection Rule First Passing
Repeat Maximum Hours - 6
Passing Grade - C
Courses 3 and 4 would be included.

1503
Banner Student User Guide | Academic History
GPA Calculation Indicator
The Repeat Limit GPA Calculation (Indicator) field on SHARPTR determines how the
repeated course will be treated in the hours and GPA calculation.
S specifies that only
courses selected based upon the selection rule will be included.
A specifies that all
courses will be included.
S - Selected Course
The course(s) selected to be excluded based on the rule specified above will be marked
with the Repeat Limit GPA Calculation (Indicator) field set to
E (Excluded), and the
hours associated with the course will be deducted from the Term and Overall Hours
Passed, Hours Earned, GPA Hours, Quality Points, and GPA calculations. The credit
hours will be left in the Hours Attempted calculation.
A - All Courses Count in GPA
The course(s) selected to be excluded based on the rule specified above will be marked
with the Repeat Limit GPA Calculation (Indicator) field set to
A, and the hours
associated with the course will be deducted from the Term and Overall Hours Passed and
Hours Earned. The credit hours will be left in Hours Attempted, GPA Hours, Quality Points,
and GPA.
Notes
• For either selection rule, the courses that are not excluded will be marked with the
Repeat Limit GPA Calculation (Indicator) field set to
I (Included), and all hours will be
counted in the Term and Overall Hours Passed, as well as the GPA calculations.
• Those courses having a grade with the Count in GPA box checked on the Grade Code
Maintenance Form (SHAGRDE) will be excluded in the repeat process and marked with
an
E on the Repeat/Equivalent Course Check Report (SHRRPTS).
• Be sure to run the Calculate GPA Report (SHRCGPA) for both the collector file and for
all students at the end of the term when utilizing repeat processing.
Implementation of the Repeat/Equivalent Course Check Process
To use repeat/equivalent course checking, you must set the indicators on SHARPTR.
1. Level Indicator – Check this box to use course level in repeat processing.
If the Level Indicator is unchecked, then course levels will not be compared.
This indicator allows institutions to select the courses used for matching on the course
levels. If the Level Indicator is checked, then course levels are compared and must
match in order to be selected for the repeat process.
2. Title Indicator – Check this box when the title on a course must match to be
considered a repeat.

1504
Banner Student User Guide | Academic History
If the Title Indicator is unchecked, all course work with the same subject and course
number will be considered in the evaluation based upon the additional repeat/course
equivalent rules established, even if the titles are different.
This indicator is used by institutions who re-use course numbers, e.g., a previous
course completed (MATH 101 Calculus) with the same subject and course number
was an entirely different course with a different course title (MATH 101 Trigonometry).
In this situation, institutions would not want to consider these courses in the repeat
process evaluation.
The title check will be based upon the course title established in the Course
Maintenance Form (SHATCKN). (This is the course title that is stored in the
SHRTCKN table.) When checking the title using registration repeat checking,
additional tables are referenced when looking at courses that are in progress or
graded but not rolled to history.
If the Title Indicator is checked, the repeat process will evaluate the courses
completed by the student. If the course title which appears on SHATCKN for the
previous course work being evaluated is different than the course title on the target
course being evaluated, the previous course work will not be used in repeat
evaluation. This record will display on the output for SHRRPTS with the following
comment: *Not Considered – Diff Title. Review of these types of records will only
occur if there are at least two records that have the same course title.
3. Schedule Type Indicator – Check this box to if the course schedule type must match
to be considered a repeat.
If the Schedule Type Indicator is unchecked, all courses with a schedule type or Null
schedule type will be considered in repeat evaluation.
Institutions have the option to consider courses to be evaluated to match on the
schedule type of each course. If this indicator is checked, then courses to be
considered in evaluation will only be those course records with matching schedule
types. For those courses that do not have a matching schedule type or a Null
schedule type, the record will display on the output for SHRRPTS with the following
comment: *Not Considered – Diff Schd Type, meaning they are not used in the
evaluation of the repeat process.
If you choose to use this option and have converted some academic history detail
from your legacy system, you may need to re-evaluate the value of the schedule type
on these records on the Course Maintenance Form (SHATCKN).
Remember that a Null schedule type will not be considered in ev
aluation if you choose
this option.
4. Transfer Course Indicator – Check this box to consider transfer courses in repeat
processing.
If the Transfer Course Indicator is unchecked, repeat processing will not consider
any transfer work in processing.
For institutions that leave the Transfer Course Indicator unchecked, but need to
know the entire academic history record, use the Print Transcript Work parameter on
the Repeat/Equivalent Course Check Report (SHRRPTS) to print transfer work of the
same subject and course number. Valid values for the Print Transfer Work parameter
are
Y or N. If this parameter is set to Y, transfer work will display at the end of the
institutional course work for the student for the same subject and course number.
Each transfer record printed will have the comment: *TRANSFER – Not Evaluated.

1505
Banner Student User Guide | Academic History
This transfer work data is strictly informational and is not used in processing or
evaluation. If the parameter is set to
N, transfer work will not print on the output of
SHRRPTS.
The output for SHRRPTS prints the results in one sort order, alphabetically by last
name. The sort of the records associated with each student will be as follows: if the
course work is considered, (that is, the course is included or excluded from repeat
processing), unless the course fails the minimum grade value, this information will
appear first in term order. Institutional courses with Repeat Messages such as *Not
Considered – Diff Schd Type or * Not Considered –Diff Title will appear next, and then
transfer work is displayed.
5. Passing Grade – Select a grade from SHAGRDE.
This rule establishes the minimum passing grade that must exist in order to consider
the record for evaluation in the repeat process used when the Rule "F’ (First Passing)
is selected. If the Passing Grade field is used, you must enter a grade code
established on the Grade Code Maintenance Form (SHAGRDE). Only one passing
grade can be defined for the Repeat/Equivalent Course Check Report (SHRRPTS).
Any grade code with a numeric value equal to or greater than the minimum passing
grade will be used in evaluation of the repeat processing rules in academic history
when using the first passing rule. The course will be included first, then the process
will choose no passing grades in ascending order, starting with the earliest rows.
Example Output From SHRRPTS
Here are examples from SHRRPTS
Greatest or Latest
The course ACCT 2333 on SCACRSE is defined with a start term equal to 199510 and an
end term equal to 999999. The repeat limit is 3 on the SCACRSE record.
For the term being evaluated, 200010, SHARPTR has the Using Repeat Limit Selection
Rule and the Using Repeat Hours Selection Rule set up.
A student, Ed Hyde, completed ACCT 2333 with a grade of F in term 199510 and earned
a grade of A in terms 199810 and 200010. The results of processing SHRRPTS are as
follows:
Selection Rule G
Evaluation Grade D
GPA Calc S
Schedule Type Ind unchecked
Title Ind checked

1506
Banner Student User Guide | Academic History
Ed Hyde
ACCT 2333, taken in term 199510, was not considered in the repeat process due to the
grade of F not being equal to the evaluation grade of D as defined in the rules on
SHARPTR. Since the evaluation grade is set to D and the repeat limit is 3, CRN 10023
and CRN 20023 were included in the repeat evaluation process.
First Passing Grade
Example A:
The course ACCT 2333 on SCACRSE is defined with a start term equal to 199510 and an
end term equal to 999999. The repeat limit is Null on the SCACRSE record.
For the term being evaluated, 199810, SHARPTR has the Using Repeat Limit Selection
Rule and the Using Repeat Hours Selection Rule set up.
A student, Ed Hyde, completed ACCT 2333 with a grade of F in term 199510 and earned
a grade of A in term 199810. The results of processing SHRRPTS are as follows:
Ed Hyde
ACCT 2333, taken in term 199510, was considered in the repeat process due to the grade
of F being equal to the minimum grade defined on the rules on SHARPTR. Since the
Term CRN Subject Course Section
Sched
Type Grade Level Hours
Repeat
Message
200010 20023 ACCT 2333 1 L A UG 3.00 I SYSTEM
199810 10023 ACCT 2333 1 L A UG 3.00 I SYSTEM
199510 10157 ACCT 2333 1 L F UG 3.00 E SYSTEM
Selection Rule F
Evaluation Grade F
GPA Calc S
Schedule Type Ind unchecked
Passing Grade D
Title Ind checked
Term CRN Subject Course Section
Sched
Type Grade Level Hours
Repeat
Message
199810 10023 ACCT 2333 1 L A UG 3.00 I SYSTEM
199510 10157 ACCT 2333 1 L F UG 3.00 E SYSTEM

1507
Banner Student User Guide | Academic History
minimum passing grade is set to D, CRN 10157 was excluded in the repeat evaluation
process.
Example B:
Example B is the same as Example A above, except the evaluation grade on the rules on
SHARPTR is set to D.
The course ACCT 2333 on SCACRSE is defined with a start term equal to 199510 and an
end term equal to 999999. The repeat limit is Null on the SCACRSE record.
For the term being evaluated, 199810, SHARPTR has the Using Repeat Limit Selection
Rule and the Using Repeat Hours Selection Rules set up.
A student, Ed Hyde, completed ACCT 2333 with a grade of F in term 199510 and earned
a grade of A in term 199810. The results of processing SHRRPTS are as follows:
Ed Hyde
ACCT 2333, taken in term 199510, was not considered in the repeat process due the
grade of F not being equal to the evaluation grade defined on the rules on SHARPTR.
Therefore, CRN 10157 was not considered in the repeat evaluation.
No repeat message is displayed for the course taken in term 199810, since no updates
would take place in Academic History based on the evaluation grade for term 199510.
Use the Print Repeated Courses Only parameter in the Repeat/Equivalent Course Check
Report (SHRRPTS). When this parameter is set to
Y, the report will not print the course
information in this example, since the courses are not considered and will not be updated
by repeat processing. When this parameter is set to
N, the report will continue to print the
information as shown in the example above.
Selection Rule F
Evaluation Grade D
GPA Calc S
Schedule Type Ind unchecked
Passing Grade D
Title Ind checked
Term CRN Subject Course Section
Sched
Type Grade Level Hours
Repeat
Message
199810 10023 ACCT 2333 1 L A UG 3.00
199510 10157 ACCT 2333 1 L F UG 3.00 *Not
Updated –
Check Grade

1508
Banner Student User Guide | Academic History
Example C:
For the term being evaluated, 199810, SHARPTR has:
SHRRPTS is run for Term 199810, Level UG, in Report Mode, with List Transfer Work set
to
Y.
Corey Charles - Repeat Limit Null
If a grade with a numeric value below a C is earned for 199810, the student has not
received a passing grade at any time for that course. The course is included in the repeat
process. All grades will still count toward the GPA calculation.
Example D:
For the term being evaluated, 199810, SHARPTR has:
Level UG
Selection Rule F
Evaluation Grade F
GPA Calc S
Repeat Limit Null on SCACRSE records
Passing Grade C
Title Ind unchecked
Level Ind unchecked
Term CRN Subject Course Section
Sched
Type Grade Level Hours
Repeat
Message
199810 10017 ENGL 1201 1 L F UG 3.00 I SYSTEM
199410 SG016 ENGL 1201 6 L F UG 3.00 I SYSTEM
Level UG
Selection Rule F
Evaluation Grade F
GPA Calc S
Repeat Limit 3 on SCACRSE records
Passing Grade C
Title Ind unchecked

1509
Banner Student User Guide | Academic History
SHRRPTS is run for Term 199810, Level UG, in Report Mode, with List Transfer Work set
to
Y.
Stuart Anderson - Repeat Limit 3
The repeat limit for PHED 101 on SCACRSE is set to three. Therefore, all records are
included in the repeat process. CRN 10187 for term 199810 is included in the repeat
process, because the grade of F is below the minimum grade for first passing being equal
to C. Therefore, according to the process rules, all grades below the minimum value of the
first passing grade are still included in the GPA calculation.
Example E:
For the term being evaluated, 199810, SHARPTR has:
SHRRPTS is run for Term 199810, Level UG, in Report Mode, with List Transfer Work set
to
Y.
Level Ind unchecked
Term CRN Subject Course Section
Sched
Type Grade Level Hours
Repeat
Message
199810 10187 PHED 101 1 L F UG 2.00 I SYSTEM
199410 110 PHED 101 2 I A UG 2.00 I SYSTEM
199410 111 PHED 101 3 L A G 2.00 I SYSTEM
199410 112 PHED 101 1 L B UG 2.00 I SYSTEM
Level UG
Selection Rule F
Evaluation Grade F
GPA Calc S
Repeat Limit 3 on SCACRSE records
Passing Grade C
Title Ind unchecked
Level Ind unchecked

1510
Banner Student User Guide | Academic History
Karen Black - Repeat Limit 3
The Repeat process will evaluate the records by first looking for passing grades, then the
system will include those grades where no passing grades exist. In this case, CRN 10196
for 199810 was used first, then CRN 10172 for 199510, and then CRN 10169 and CRN
10171 for 199510. Since these grades are still below the evaluation value of the C grade
defined on the first passing rule, they are included in the GPA calculation. CRN 10197 and
10198 were excluded due to the repeat limit being set to three.
Example F:
For the term being evaluated, 199810, SHARPTR has:
SHRRPTS is run for Term 199810, Level UG, in Report Mode, with List Transfer Work set
to
Y.
Term CRN Subject Course Section
Sched
Type Grade Level Hours
Repeat
Message
199810 10196 PHED 101 3 L A UG 2.00 I SYSTEM
199810 10197 PHED 101 2 L F UG 2.00 E SYSTEM
199810 10198 PHED 101 1 L F UG 2.00 E SYSTEM
199510 10169 PHED 101 4 L D UG 2.00 I SYSTEM
199510 10172 PHED 101 1 L D UG 2.00 I SYSTEM
199510 10171 PHED 101 2 L F UG 2.00 I SYSTEM
Transfer Work:
199410 PHED 101 A UG 2.00 *
TRANSFER:
Not
Evaluated
Level UG
Selection Rule F
Evaluation Grade F
GPA Calc S
Repeat Limit 3 on SCACRSE records
Passing Grade C
Title Ind unchecked
Level Ind unchecked

1511
Banner Student User Guide | Academic History
Heather Jones - Repeat Limit 3
For this example, the first passing grade which was included was CRN 10196 for 199810.
Then the process will now choose the no passing grades in ascending order starting with
the earliest rows. Next, if additional records exist for the same term, the selection is
random as to which are included. On this example, CRNs 10171, 10169, and 10172 were
used.
Schedule Type Processing
Example A:
The course PHYS 101 on SCACRSE is defined with a start term equal to 199510 and an
end term equal to 999999. The repeat limit is Null on the SCACRSE record.
For the term being evaluated, 199810, SHARPTR has the Using Repeat Limit Selection
Rule and the Using Repeat Hours Selection Rules set up.
Term CRN Subject Course Section
Sched
Type Grade Level Hours
Repeat
Message
199810 10196 PHED 101 3 L A UG 2.00 I SYSTEM
199810 10197 PHED 101 2 L F UG 2.00 E SYSTEM
199810 10198 PHED 101 1 L F UG 2.00 E SYSTEM
199610 10124 PHED 101 1 L D UG 2.00 E SYSTEM
199610 10122 PHED 101 3 L F UG 2.00 E SYSTEM
199610 10123 PHED 101 2 L F UG 2.00 E SYSTEM
199510 10169 PHED 101 4 L D UG 2.00 I SYSTEM
199510 10172 PHED 101 1 L D UG 2.00 I SYSTEM
199510 10170 PHED 101 3 I F UG 2.00 E SYSTEM
199510 10171 PHED 101 2 L F UG 2.00 I SYSTEM
Transfer Work:
199410 PHED 101 A UG 2.00 *
TRANSFER:
Not
Evaluated
Selection Rule F
Evaluation Grade D
GPA Calc S
Schedule Type Ind unchecked

1512
Banner Student User Guide | Academic History
A student, Elizabeth Johnson, completed PHYS 101 with an grade of D in term 199510
and a grade of C in term 199810. The results of processing SHRRPTS are as follows:
Elizabeth Johnson
CRN 10204 of PHYS 101 is set equal to E (Excluded) in the repeat process, because the
first grade completed is equal to the passing grade (the D grade) on SHARPTR. In
addition, the Schedule Type Indicator is unchecked. Therefore, both sections of the
courses were used in evaluation.
Example B:
The course MATH 101 on SCACRSE is defined with a start term equal to 199510 and an
end term equal to 999999. The repeat limit is Null on the SCACRSE record.
For the term being evaluated, 199810, SHARPTR has the Using Repeat Limit Selection
Rule and the Using Repeat Hours Selection Rules set up.
Andrew Wright
Passing Grade D
Title Ind checked
Term CRN Subject Course Section
Sched
Type Grade Level Hours
Repeat
Message
199810 10204 PHYS 101 1 I C UG 4.00 E SYSTEM
199510 10173 PHYS 101 1 C D UG 4.00 I SYSTEM
Selection Rule F
Evaluation Grade D
GPA Calc S
Schedule Type Ind checked
Passing Grade D
Title Ind unchecked
Term CRN Subject Course Section
Sched
Type Grade Level Hours
Repeat
Message
199810 10204 MATH 101 1 I C UG 4.00

1513
Banner Student User Guide | Academic History
MATH 101, completed in term 199510, was not considered in evaluation due to the course
having a Null schedule type.
No repeat message is displayed for the course taken in term 199810, since no updates
would take place in Academic History based on the different schedule type.
Use the Print Repeated Courses Only parameter in the Repeat/Equivalent Course Check
Report (SHRRPTS). When this parameter is set to
Y, the report will not print the course
information in this example, since the courses are not considered and will not be updated
by repeat processing. When this parameter is set to
N, the report will continue to print the
information as shown in the example above.
Optional Printing of Transfer Work
Respond to the parameters of SHRRPTS as follows to have transfer work print on the
output:
Example:
Edward Benjamin
199510 10173 MATH 101 1 D UG 4.00 * Not
Considered -
Diff Schd
Type
Parameter Value
Term Code 199810
Level Code UG
Report or Update R
Print Transfer Work Y
Term CRN Subject Course Section
Sched
Type Grade Level Hours
Repeat
Message
199810 10195 ACCT 1102 1 L A UG 3.00 I SYSTEM
199510 10168 ACCT 1102 1 L F UG 3.00 E SYSTEM
Transfer Work:
Term CRN Subject Course Section
Sched
Type Grade Level Hours
Repeat
Message

1514
Banner Student User Guide | Academic History
A student, Edward Benjamin, completed ACCT 1102 in term 199610 as transfer work.
This course will appear on the output as information only. Transfer work is not used in the
evaluation of repeat processing.
If the Transfer Course Indicator on SHARPTR is unchecked, his course will appear on
the output as information only. Transfer work is only used in the evaluation of repeat
processing when the Transfer Course Indicator is checked.
If transfer work was set to be used, the output would appear as with other repeat
processing output, and the SHATRNS and SHATAEQ records will be updated to show the
Included, Excluded, or Averaged result of the processing and the source of the update
(System, Manual, or Null).
Handling of Courses With Different Titles
Example A:
The course BIOL 1205 on SCACRSE is defined with a start term equal to 199410 and an
end term equal to 999999. In 199410, the course title was Biology 1. Effective for term
199710, the course title was changed to Microbiology. This was changed in the course
catalog on SCACRSE effective for term 199710. The repeat limit is Null on the SCACRSE
record.
For the term being evaluated, 199810, SHARPTR has the Using Repeat Limit Selection
Rule and the Using Repeat Hours Selection Rules set up.
199610 ACCT 1102 D UG 3.00 *
TRANSFER:
Not
Evaluated
Selection Rule F
Evaluation Grade D
GPA Calc S
Schedule Type Ind unchecked
Passing Grade D
Title Ind checked
Term CRN Subject Course Section
Sched
Type Grade Level Hours
Repeat
Message

1515
Banner Student User Guide | Academic History
Walter Washington
Since the course title was changed in 199710, the course BIOL 1205 completed in 199410
was not considered in the repeat evaluation due to the different course title and the
indicator on SHARPTR. The Title Indicator is checked, so that repeat processing will
check for this course title change.
Example B:
Using the same example as above but changing the Title Indicator to unchecked, results
in the course for term 199410 being used in the evaluation of the repeat process.
Walter Washington
Course Equivalency
Example A:
For the following example, HIST 135 and POL 135 are equivalents of each other as
defined on SCADETL with a from term equal to 199510 and a to term equal to 999999.
The courses on SCACRSE are defined with an effective start term equal to 199510 and an
end term equal to 999999. The repeat limit is Null on the SCACRSE records.
For the term being evaluated, 199810, SHARPTR has the Using Repeat Limit Selection
Rule and the Using Repeat Hours Selection Rules set up.
Term CRN Subject Course Section
Sched
Type Grade Level Hours
Repeat
Message
199810 10013 BIOL 1205 1 L A UG 4.00 E SYSTEM
199710 10010 BIOL 1205 2 B C UG 4.00 I SYSTEM
199410 10034 BIOL 1205 1 C C UG 4.00 * Not
Considered -
Diff Title
Term CRN Subject Course Section
Sched
Type Grade Level Hours
Repeat
Message
199810 10013 BIOL 1205 1 L A UG 4.00 E SYSTEM
199710 10010 BIOL 1205 2 B C UG 4.00 E SYSTEM
199410 10034 BIOL 1205 1 C C UG 4.00 I SYSTEM
Selection Rule F
Evaluation Grade D

1516
Banner Student User Guide | Academic History
MaryBeth Anderson
Both POL 135 and HIST 135 are used in the repeat process evaluation, because the
target course being evaluated in 199810 is POL 135. POL 135 has HIST 135 defined as a
course equivalent on SCADETL within the start and end term range associated with this
equivalency.
Example B:
For this example, MA 135 Calculus which had been offered since 199410, was changed to
course number MA 150 Calculus, effective for term 199810. The course MA 135 on
SCACRSE is defined with an effective start term equal to 199410 and an end term equal
to 199720. The course MA 150 on SCACRSE is defined with an effective start term equal
to 199810 and an end term equal to 999999.
For this example, MA 150 has MA 135 defined as an equivalent effective for the 199810
term. On SCADETL, for MA 150 for term 199810 in the Course Equivalency window, MA
135 is an equivalent course with a from term equal to 199410 and a to term equal to term
199720. The repeat limit is Null on the SCACRSE records.
For the term being evaluated, 199810, SHARPTR has the Using Repeat Limit Selection
Rule and the Using Repeat Hours Selection Rules set up.
GPA Calc S
Schedule Type Ind unchecked
Passing Grade D
Title Ind unchecked
Term CRN Subject Course Section
Sched
Type Grade Level Hours
Repeat
Message
199810 10191 POL 135 1 B A UG 3.00 E SYSTEM
199510 10163 HIST 135 1 L B UG 3.00 I SYSTEM
Selection Rule L
Evaluation Grade D
GPA Calc S
Schedule Type Ind unchecked
Passing Grade D
Title Ind checked

1517
Banner Student User Guide | Academic History
Julie Farley
Both MA 135 and MA 150 are used in the repeat process evaluation, because the target
course being evaluated in term 199810 is MA 150. MA 150 has MA 135 defined as a
course equivalent on SCADETL within the start and end term range associated with this
equivalency.
Courses With Multiple Repeat Messages
There may be occurrences where a course has more than one repeat message
associated with it. The output will display the first message that occurs, based on the order
of processing.
Handling of Courses With Different Courses Levels
Example:
BIOL 111 at course level UG has been offered since the term 199806. This was changed
to course number BIOL 101 at course level GR in 199809. On SCADETL for course BIOL
101 effective for 199809, BIOL 111 was defined as an equivalent for start term 199806 to
end term 999999.
For the term being evaluated, 199810, SHARPTR has the Using Repeat Limit Selection
Rule and the Using Repeat Hours Selection Rules set up.
Term CRN Subject Course Section
Sched
Type Grade Level Hours
Repeat
Message
199810 10123 MA 150 1 B A UG 3.00 I SYSTEM
199510 10145 MA 135 1 L D UG 3.00 E SYSTEM
Selection Rule F
Evaluation Grade D
GPA Calc S
Schedule Type Ind unchecked
Passing Grade D
Title Ind checked
Level Ind unchecked

1518
Banner Student User Guide | Academic History
Aleena Smith
Both BIOL 111 and BIOL 101 are used in the repeat process evaluation, because the
target course being evaluated in 199809 is BIOL 111. BIOL 111 has BIOL 101 defined as a
course equivalent on SCADETL within the start and end term range associated within this
equivalency, and since the Level Indicator on SHARPTR is unchecked, the course levels
do not need to match in order to be considered for repeat evaluation.
Expanded Credit Hours and GPA Fields
Your institution can expand credit hour values assigned to individual courses and control
how GPA values are displayed in the system, on the Web, and on printed reports.
Specifically, you can make the following decisions:
• You can use 100- point grading scales and define 10,000-point requirements for
programs and courses.
• When determining how GPA values should be displayed for your students, you can also
decide whether the values should be truncated or rounded off, as well as how many
decimal places should be displayed.
• If you want to continue to use values that are truncated to two decimal places, your
values will display as per usual.
• You can set up your GPA and quality point display rules by level and/or campus.
The expanded fields are defined as follows:
• Credit hours fields use the format 9,999.999.
• Grade codes fields use up to six positions or XXXXXX.
• Quality point fields for grade codes use the format 999.999.
• Numeric values fields for grade codes use the format 999.
• GPA fields store and display values up to the format 99,999,999,999,999.999999999.
• Quality point fields store and display values up to the format 99,999,999,999.999999.
Field Sizes
Field sizes are based on the field usage. Fields are categorized as having data for an
individual course, a term summary, or a cumulative summary.
Term CRN Subject Course Section
Sched
Type Grade Level Hours
Repeat
Message
199809 98102 BIOL 111 1 L A UG 3.00 I SYSTEM
199806 6001 BIOL 101 1 L F GR 3.00 E SYSTEM

1519
Banner Student User Guide | Academic History
For SHAGRDE, for example, the field expansion is as follows:
For individual courses, the field expansion is as follows:
* This is based on 9999.999 X 999.999.
For term summary records, the field expansion is as follows:
** This is based on 9,999,999.999999 from an individual course X 50 courses per term.
For full summary records, the field expansion is as follows:
***This is based on the largest credits possible for 20 terms X the largest points possible
per course.
Column Traditional Size Expanded Size
Grade Code XXX XXXXXX
Quality Points 99.99 999.999
Numeric Value 99 999
Column Traditional Size Expanded Size
Credit Hours 99.99 9999.999
Quality Points 99.99 9999999.999999 *
Grade Code XXX XXXXXX
Numeric Value 99 999
Column Traditional Size Expanded Size
Credit Hours 999.99 999999.999
Quality Points 9999.99 999999999.999999 **
GPA 9999.999999 999999999999.999999999
Column Traditional Size Expanded Size
Credit Hours 999.99 99999999.999
Quality Points 99999999.99 99999999999.999999 ***
GPA 9999.999999 99999999999999.999999999

1520
Banner Student User Guide | Academic History
Set up Rules on SHAGPAR
Use the GPA Display Rules Form (SHAGPAR) to set up rules for your institution that will
determine how grade point averages (GPAs) and quality points will be displayed for the
various segments of your student population.
You can create overall GPA display rules and/or display rules for level and campus GPAs.
You can query on the GPA display rules based on the effective term, and/or course level,
and/or course campus combination(s) entered in the Key Block.
Processing
The GPA display rule selection process works as follows:
1. Get the term selection code for the level code:
F (First) or L (Last) term of coursework
or
M (Most recent rule) from the Level Term Selection block.
If no record exists, get the term selection code from the Overall Term Selection block.
2. Get the student's GPA rule term.
If the term selection code is
F, get the term code from the student's first term GPA
record for that level in academic history.
If the term selection code is
L, get the term code from the student's last term GPA
record for that level in academic history.
If the term selection code is
M, set the student's GPA rule term code to 999999.
3. Get the appropriate GPA rule.
3.1. If a campus GPA is to be displayed, use the GPA display rule from the Campus
GPA Rules block where the student's course campus and level codes match
those of the rule with the highest effective term code that is less than or equal to
the student's GPA rule term.
If no rule exists in the Campus GPA Rules block, use the GPA display rule from
Level GPA Rules block where the student's course level code matches that of
the rule with the highest effective term code that is less than or equal to the
student's GPA rule term.
If no rule exists in the Level GPA Rules block, use the GPA display rule from the
Overall GPA Rules block with the highest effective term code that is less than or
equal to the student's GPA rule term.
3.2. If a level GPA is to be displayed, use the GPA display rule from the Level GPA
Rules block where the student's course level code matches that of the rule with
the highest effective term code that is less than or equal to the student's GPA
rule term.
If no rule exists, use the display rule from the Overall GPA Rules block with the
highest effective term code that is less than or equal to the student's GPA rule
term.

1521
Banner Student User Guide | Academic History
For example:
An institution's GPA display rules are set up as follows:
Overall Term Selection Use student’s first term is selected.
Overall GPA Rules GPA Values Quality Point Values
Term 000000 Display Code = Round Display Code = Truncate
Display (2) spaces after
decimal
Display (2) spaces after
decimal
Level Term Selection
Level GR Use student’s last term is selected.
Level LW Use most recent display rule is selected.
Level UG Use student's first term is selected.
Level GPA Rules GPA Values Quality Point Values
Level GR - Term 200010 Display Code = Round Display Code = Round
Display (4) spaces after
decimal
Display (2) spaces after
decimal
Level GR - Term 199610 Display Code = Truncate Display Code = Truncate
Display (2) spaces after
decimal
Display (2) spaces after
decimal
Level LW - Term 200210 Display Code = Truncate Display Code = Truncate
Display (9) spaces after
decimal
Display (2) spaces after
decimal
Level LW - Term 199510 Display Code = Truncate Display Code = Truncate
Display (2) spaces after
decimal
Display (2) spaces after
decimal
Level UG - Term 200110 Display Code = Round Display Code = Round

1522
Banner Student User Guide | Academic History
Display (3) spaces after
decimal
Display (3) spaces after
decimal
Level UG - Term 199710 Display Code = Round Display Code = Round
Display (4) spaces after
decimal
Display (4) spaces after
decimal
Level UG - Term 199410 Display Code = Round Display Code = Round
Display (2) spaces after
decimal
Display (2) spaces after
decimal
Campus GPA Rules GPA Values Quality Point Values
Campus -Level - Term Display Code = Round Display Code = Truncate
CEN - UG - 199410 Display (4) spaces after
decimal
Display (2) spaces after
decimal
Campus -Level - Term Display Code = Round Display Code = Round
EST - UG - 199410 Display (4) spaces after
decimal
Display (3) spaces after
decimal
Campus -Level - Term Display Code = Round Display Code = Round
NOR - UG - 199410 Display (6) spaces after
decimal
Display (4) spaces after
decimal
Student A All courses: Level UG
First Term 199610 BIOL, CHEM = Campus CEN
Last Term 200220 ENGL, FREN, POLS = Campus EST
Subject and
Course
Credit
Hours Campus Grade
Quality
Points
Credit Hours *
Quality Points
BIOL 100 3.5 CEN B- 2.667 9.3345
CHEM 120 4.0 CEN A 4.000 16.0000
ENGL 105 3.5 EST A- 3.667 12.8345
Level GPA Rules GPA Values Quality Point Values

1523
Banner Student User Guide | Academic History
Note: The campus GPA and quality points are in the same format as the
level since there are no rules specified for the campus code.
FREN 201 4.0 EST B+ 3.333 13.3320
POLS 121 3.0 EST B 3.000 9.0000
18.0 60.5010
Level: UG Campus: CEN Campus: EST
GPA
Quality
Pts GPA
Quality
Pts GPA
Quality
Pts
Stored: 3.361166666 60.501 3.377933333 25.3345 3.349190476 35.1665
Displayed: 3.36 60.50 3.3779 25.33 3.3492 35.167
Student B All courses: Level LW and Campus WST
First Term 199710
Last Term 199920
Subject and
Course
Credit
Hours Campus Grade
Quality
Points
Credit Hours *
Quality Points
LAW 611 125.000 WST P 100.000 12500.000000
LAW 632 175.000 WST HP 120.000 21000.000000
LAW 643 125.000 WST LP 80.000 10000.000000
425.000 43500.000000
Level: LW Campus: WST
GPA Quality Pts GPA Quality Pts
Stored: 102.352941176 43500.000 102.352941176 43500.000
Displayed: 102.352941176 43500.00 102.352941176 43500.00
Subject and
Course
Credit
Hours Campus Grade
Quality
Points
Credit Hours *
Quality Points
1524
Banner Student User Guide | Academic History
Note: In the absence of display rules for the campus and level codes, the
overall rule applies.
Forms and Reports/Processes That Select SHAGPAR Rules
The following list of objects (forms, reports, and processes) impacted by the GPA Display
Rules Form (SHAGPAR) includes logic describing how the objects will select the correct
rule from the form.
Note: Only those objects that display system-generated GPA and quality
point (as opposed to manually entered) data require logic to select the
correct display rule.
Student C All courses: Level CE and Campus SOU
First Term 200010
Last Term 200220
Subject and
Course
Credit
Hours Campus Grade
Quality
Points
Credit Hours *
Quality Points
PSYC 100 7500.000 SOU B- / C+ 375.125 2813437.500000
MATH 121 7500.000 SOU C / C- 245.175 1838812.500000
ENGL 110 7500.000 SOU A- / B+ 475.175 3563812.500000
22500.000 8216062.500000
Level: CE Campus: SOU
GPA Quality Pts GPA Quality Pts
Stored: 365.158333333 8216062.5 365.158333333 8216062.5
Displayed: 365.16 8216062.50 365.16 8216062.50
1525
Banner Student User Guide | Academic History
Objects
GPA/Quality Point Data
Displayed Rule Selection Logic
SHAINST
SHAPCMP
SHARQTC
SHASUBJ
SHATERM
SHATRMC
SHATRNS
The following data are displayed for
these objects:
• Grade code quality points
• Level GPA /quality points
• Campus GPA/quality points
Rule processing is as follows:
First:
Get the term selection code for the level code from the
Level Term Selection block -
F (First) or L (Last) term
of course work or
M (Most recent).
If no record exists for the level code, get the term
selection code from the Overall Term Selection block.
SHAINST
SHAPCMP
SHARQTC
SHASUBJ
SHATERM
SHATRMC
SHATRNS
The following data are displayed for
these objects:
• Grade code quality points
• Level GPA /quality points
• Campus GPA/quality points
Second:
Get the student's GPA rule term.
• If the term selection code is
F, get the term code
from the student's first term GPA record for that level
in academic history.
• If the term selection code is
L, get the term code
from the student's last term GPA record for that level
in academic history.
• If the term selection code is
M, set the student's
GPA rule term code to
999999.
SHAINST
SHAPCMP
SHARQTC
SHASUBJ
SHATERM
SHATRMC
SHATRNS
The following data are displayed for
these objects:
• Grade code quality points
• Level GPA /quality points
• Campus GPA/quality points
Third:
Get the appropriate GPA rule.
• If a campus GPA is to be displayed, use the GPA
display rule from the Campus GPA Rules block
where the student's course campus and level codes
match those of the rule with the highest effective
term code that is less than or equal to the student's
GPA rule term.
• If no rule exists in the Campus GPA Rules block, use
the GPA display rule from the Level GPA Rules block
where the student's course level code matches that
of the rule with the highest effective term code that is
less than or equal to the student's GPA rule term.
• If no rule exists in Level GPA Rules block, use the
GPA display rule from the Overall GPA Rules block
with the highest effective term code that is less than
or equal to the student's GPA rule term.
• If a level GPA is to be displayed, use the GPA display
rule from the Level GPA Rules block where the
student's course level code matches that of the rule
with the highest effective term code that is less than
or equal to the student's GPA rule term.
• If no rule exists, use the display rule from the Overall
GPA Rules block with the highest effective term code
that is less than or equal to the student's GPA rule
term.

1526
Banner Student User Guide | Academic History
SHATAEQ Term GPA/quality points The logic will be the same as for the forms listed
above except when the student being processed does
not have any term GPA records in academic history.
When this is the case, the effective term(s) on the
attendance period(s) will be processed as if they
already existed in the Term GPA Table (SHRTGPA).
SFRENRL
SHRTAEQ
The following data are displayed for
these objects:
• Level GPA /quality points
•Term GPA
The logic will be the same as for the forms listed
above (SHAINST, etc.) with the exception that
displaying a campus GPA is not an option.
SHRGPAC The following data are displayed for
this object:
• Level GPA /quality points
• Term GPA/quality points
• Campus GPA/quality points
The logic will be the same as for the forms listed
above (SHAINST, etc.).
SHRGRDE The following data are displayed for
this object:
• Grade code quality points
• Level GPA /quality points
• Term GPA/quality points
• Campus GPA/quality points
The logic will be the same as for the forms listed
above (SHAINST, etc.). However, the values in the
Campus Process Request and Campus to be
Processed parameters will control whether or not
grade mailers will be produced for specific course
campuses.
• If the value in the Campus Process Request
parameter is
Y, the process should attempt to find
GPA display rules in the Campus GPA Rules block
first.
• If the value in the Campus Process Request is
N, the
process should attempt to find GPA display rules in
the Level GPA Rules block first.
SHRTRTC The following data are displayed for
this object:
• Grade code quality points
• Level GPA /quality points
• Term GPA/quality points
• Campus GPA/quality points
The logic will be the same as for the forms listed
above (SHAINST, etc.). However, the values in the
Campus Selection Indicator and Campus Selected
parameters will control whether or not transcripts will
be produced for specific course campuses.
• If the value in the Campus Selection Indicator
parameter is
Y, the process should attempt to find
GPA display rules in the Campus GPA Rules block
first.
• If the value in the Campus Selection Indicator
parameter is
N, the process should attempt to find
GPA display rules in Level GPA Rules block first.
Objects
GPA/Quality Point Data
Displayed Rule Selection Logic

1527
Banner Student User Guide | Academic History
GPA Calculation Process
The calculation process is used by forms that initiate the GPA calculation and/or display
system-related GPA data. Forms and processes that display system-related GPA data
must be able to select the correct rule from the GPA Display Rules Form (SHAGPAR).
The calculation process does the following:
• Handles pre-Banner hours
• Calculates GPA by subject
• Calculates an overall term GPA
• Calculates a degree GPA
• Calculates an institutional GPA for a given level and term
• Calculates a campus GPA for a given level, term, and campus
• Calculates a transfer GPA where the transfer term equals any valid term code
Note: Only those objects that display system-generated GPA and quality
point (as opposed to manually entered) data require logic to select the
correct display rule.
The calculation process does not involve any rounding or truncating.
The GPA calculation is processed as follows:
1. The credit hour values of courses with grade codes where the GPA divisor hours
indicator is checked are multiplied by the quality points value associated that grade
code.
For example:
2. The products of these calculations are summed.
For example:
Subject and
Course
Credit
Hours Grade
Quality
Points
Credit Hours *
Quality Points
BIOL 101 1000.00 AAAAAA 400.00 400000.000000
ENGL 103 1500.00 BBBBBB 300.00 450000.000000
SPAN 201 2000.00 AAABBB 350.00 700000.000000
Subject and
Course
Credit
Hours Grade
Quality
Points
Credit Hours *
Quality Points
BIOL 101 1000.00 AAAAAA 400.00 400000.000000

1528
Banner Student User Guide | Academic History
3. This sum is divided by the total number of credit hours from those courses included in
step 1.
For example,
4. The entire value from the preceding calculation is stored.
For example:
The GPA 344.444444444 is stored in the SHRTGPA table.
Calculate GPA Using SHRCGPA
Calculation of grade point averages is performed using the stand-alone GPA Calculation
Process (SHRCGPA). SHRCGPA calculates (or re-calculates) both term and cumulative
grade point averages for the selected term and group of students. You can use population
selection or you can select all students for the term, students whose histories have been
rolled, or students whose information has been fed to a collector file. The process also
calculates a student’s GPA by student centric period, level, and type (institutional, transfer
credit, and overall) for terms that are part of a student centric period.
SHRCGPA is controlled by two parameters, term and selection. There are three options
for selection:
ENGL 103 1500.00 BBBBBB 300.00 450000.000000
SPAN 201 2000.00 AAABBB 350.00 700000.000000
Total GPA Hours 4500.00 Total
Quality
Points
1550000.000000
Subject and
Course
Credit
Hours Grade
Quality
Points
Credit Hours *
Quality Points
BIOL 101 1000.00 AAAAAA 400.00 400000.000000
ENGL 103 1500.00 BBBBBB 300.00 450000.000000
SPAN 201 2000.00 AAABBB 350.00 700000.000000
Total GPA Hours 4500.00 Total
Quality
Points
1550000.000000
150000.000000 / 4500.00 = 344.444444444 (GPA)
Subject and
Course
Credit
Hours Grade
Quality
Points
Credit Hours *
Quality Points

1529
Banner Student User Guide | Academic History
All three selection options will calculate or recalculate appropriate term and level GPAs.
Calculate GPA by Student Centric Period
GPA processing can calculate a student’s GPA by student centric period for terms that are
part of a student centric period. When a student changes his cycle (either retroactively or
for the current, in-progress term), a warning is displayed that existing student centric
period records will be deleted, and the GPA needs to be recalculated.
When the cycle designator is changed on SGASTDN or SFAREGS after the student has
existing academic history records, the Cycle Designator does not agree with existing
Academic History message is displayed. When the student centric period value is entered,
altered, or deleted on SHAINST, the GPA and totals for the student centric period will be
automatically recalculated, and the GPA recalculation completed message is displayed.
A student centric GPA is stored by level and type. The types include Institutional (
I),
Transfer Credit (
T), and Overall (O). The transfer credit GPA is a combined GPA for all
transfer work within the student centric period. Even though transfer work has been
accepted for an effective term within the student centric period, it will only be included in
the GPA by student centric period if the student has an institutional academic history term
header record for that effective term.
When GPA calculation is called by SHATRNS or SHATCKN, or when recalculation is
performed on SHAINST, the student's GPA will be calculated by student centric period, if
the student centric period data element in the academic history term header record has a
student centric period value.
Calculate Campus GPA
It is possible for the institution to calculate a campus GPA based on the course level and
course campus using SHRCGPA. This is an optional process which is controlled via the
Process Campus GPA checkbox on the Academic History Control Form (SHACTRL). If
the institution decides to calculate the campus GPA, the Calculate Campus GPA Process
(SHRCONV) must be run after checking the box on SHACTRL.
A
All. The term GPA will be calculated or recalculated for all students who have
rolled enrollments for the specified term.
R
Rolled. The term GPA will be calculated or recalculated for students who have
had sections rolled to Academic History or enrollment/grade changes made in
Academic History for the specified term.
C
Collector. All students who have had courses excluded by the Repeat/
Equivalent Course Check Process (SHRRPTS) will have term GPAs
calculated or recalculated for all terms with excluded courses, regardless of
the specified term.

1530
Banner Student User Guide | Academic History
This conversion process creates a campus GPA record for each student that has a term
GPA record. This process will create a number of records on the database and may take
some time to complete.
Warning! No users may be on the system while the calculation is in
process.
The Campus GPA Process may also be disabled by unchecking the Process Campus
GPA checkbox on the Academic History Control Form (SHACTRL). When unchecked, all
of the existing campus GPA records on the database are deleted, and no forms or reports
which use the campus GPA will display the information.
Warning! Again, no users should be on the system while the campus
GPA records are being deleted.
The Course History by Term and Campus Form (SHATRMC) is available when the
campus GPA has been calculated. This form displays the campus GPA information for the
level selected. The main window of the form displays the cumulative campus GPA and
hours information. The Term GPA and Course Detail Information window details the GPA
information on a term-by-term basis.
The following is an example of a campus GPA calculation:
The student has courses for term 199101 in the following course levels and course
campuses:
Hence, the student will have the following Campus GPA information (using a 4.0 GPA
scale):
Level Campus Hours Grade Points
01 1 3.00 B 9.00
01 1 4.00 A 12.00
01 2 3.00 C 6.00
02 1 3.00 A 12.00
02 2 1.00 B 3.00
Level Campus Hours GPA
01 1 7.00 3.00
01 2 3.00 2.00
02 1 3.00 4.00
02 2 1.00 3.00

1531
Banner Student User Guide | Academic History
Recalculate GPA
Use the GPA Recalculation Report (SHRGPAC) to recalculate the GPA for all terms for
each student. When GPA calculation is called by SHATRNS or SHATCKN, or when
recalculation is performed on SHAINST, the student's GPA will be recalculated. When
terms have been recalculated, then all levels for each student are recalculated. Students
may be selected for GPA recalculation using one of three methods:
• The user has previously created a population selection file.
• The user enters a term, and if no population selection file exists, and the user does not
select individual students, all students enrolled in the term will be processed.
• The user will be prompted for individual student IDs.
The process also recalculates a student’s GPA by student centric period, level, and type
(institutional, transfer credit, and overall) for terms that are part of a student centric period.
End of Term
The following steps should be performed at end-of-term.
1. Build grades using the Grade Code Maintenance Form (SHAGRDE). The grade,
including the information to determine which hours it counts in: earned, attempted, or
passed, and whether it counts in the GPA, is defined on this form. Valid grading modes
are also identified.
Note: Grades only need to be created once.
2. Build substitute grades using the Grade Code Substitution Form (SHAGRDS). For
example, if a student taking a course with a pass/fail grading mode is given a B grade,
that B may be substituted with a P grade.
Note: Substitute grades only need to be created once.
3. Enter grades in the Class Roster Form (SFASLST) or the Class Attendance Roster
Form (SFAALST).
4. Roll grades to Academic History using the Grade Roll Process (SHRROLL), or by
checking the Roll box on the Class Roster Form (SFASLST) or the Class Attendance
Roster Form (SFAALST), and saving.
5. Use the Repeat/Multiple Course Rules Form (SHARPTR) to set up rules to determine
what courses are considered repeats and how they will be used in the GPA
calculation.
6. Run the Repeat/Equivalent Course Check Process (SHRRPTS) to flag courses that
are repeated based on the rules set up on SHARPTR.
7. Run the Calculate GPA Process (SHRCGPA) to re-calculate GPAs for students who
took courses.

1532
Banner Student User Guide | Academic History
8. Run the Calculate GPA Process (SHRCGPA) to calculate GPAs based on the term
and the selected group of students. Groups of students can include those whose
information has been fed into a collector file, only those whose academic histories
have been rolled, or all the students for the term.
9. Set up academic standing rules relating to the institution's policies in probation and
Dean's List on the Academic Standing Rules Form (SHAACST).
10. Run the Calculate Academic Standing Process (SHRASTD) to calculate the academic
standing for the selected term and group of students.
11. Produce grade mailers in batch mode by using the Grade Mailer Process
(SHRGRDE). Student's grades must have either been entered manually or through
the Grade Roll Process (SHRROLL).
12. Build continuant term rules on the Continuant Terms Rule Form (SOACTRM). These
rules allow you to determine which terms constitute consecutive enrollment.
13. Run the Student Type Update Process (SHRTYPE) to automatically update the
student type on the General Student record based on the rules created on the
Continuant Terms Rule Form.
IPEDS Report Procedures
The following Integrated Postsecondary Education Data System (IPEDS) reports are
supported in Banner.
Ethnicity Use Definition for IPEDS
The following information should be used for the building and maintenance of the tables
used to prepare ethnicity data entry within the Banner Human Resources System for EEO
reporting, and within the Banner Student System for IPEDS reporting.
The forms used are the Race Rules Form (GORRACE), the Ethnic Code Rules Form
(PTRETHN), and the Ethnic Code Validation Form (STVETHN). The Ethnic Code Rules
Form (PTRETHN) and the Race Rules Form (GORRACE) are used to report counts of
individuals to the federal government based on ethnic background.
SHRIRES IPEDS First Time Residency Report
SHRIACT IPEDS Total Activity Report
SHRICIP IPEDS Completions Report
SHRIPDS IPEDS File Generation Process
SHRIAGE IPEDS Summary by Age Report
SHRIETH IPEDS Race/Ethnic Status Report - (Fall Enrollment Report)
SHRIGRS Graduation Rate Survey Report
SHRIOMS Outcome Measures Report

1533
Banner Student User Guide | Academic History
The Ethnic Code Validation Form (STVETHN) is used to identify individuals at a low level
ethnic value, i.e., breakdowns of ethnicity. Examples of this would be Apache, Blackfoot,
and Sioux as ethnic values in the Ethnic Code Validation Form (STVETHN). The codes
associated with these values are then cross-referenced into the Banner Human
Resources and Banner Student Systems against the Ethnic Code Rules Form
(PTRETHN) and Race Rules Form (GORRACE) respectively, for proper federal ethnic
values. Therefore, each of the codes mentioned above would cross-reference to a code
that indicates “Native American”.
With this methodology, it is then permissible to use low level university-specific
descriptions on the Ethnic Code Validation Form (STVETHN), while maintaining the
proper federal values on the Ethnic Code Rules Form (PTRETHN) and the Race Rules
Form (GORRACE).
When dealing with individuals who are “internationals”, it is important to note that the
Banner Student System IPEDS First Time Residency Report (SHRIRES) will not even
consider the individual's ethnic code if a row exists in the Person International Information
Table (GOBINTL), and a code exists in the Visa Type field on GOAINTL that relates to a
visa type code on STVVTYP where the Non-Resident field is checked (set to
Y), and the
visa Start Date and End Date values from GOAINTL are current as of the creation of the
IPEDS data. This indicates that the individual is a non-resident alien, and the IPEDS
report processes them as such and does not look at ethnicity.
Race/Ethnicity Logic
All Banner IPEDS processes and reports use the following logic to produce the IPEDS
values for the web upload files.
Banner Value Description IPEDS Value
GOAINTL - Visa Type relates to a
visa type code on STVVTYP where
Non-Resident field is checked (set to
Y) and the visa Start Date and End
Date are current as of the creation of
the IPEDS Data
Nonresident Alien 1
New Ethnicity value = Hispanic or
Latino on SPAPERS for Student
Hispanic/Latino 2
GORRACE, GTVRRAC 1 American Indian or
Alaska Native
3
GORRACE, GTVRRAC 2 Asian 4
GORRACE, GTVRRAC 3 Black or African
American
5
GORRACE, GTVRRAC 4 Native Hawaiian or
Other Pacific
Islander
6
GORRACE, GTVRRAC 5 White 7

1534
Banner Student User Guide | Academic History
Warning! The process of maintaining the Ethnic Code Validation Form
(STVETHN) between two areas such as the Banner Human Resources
System and the Banner Student System needs to be coordinated so that
agreed upon values are used where appropriate, but under no
circumstances should values, once entered, be changed on a regular
basis to coincide with reports.
Multi-Race and Ethnicity Reporting
The SHRIACT, SHRICIP, SHRIETH, and SHRIGRS IPEDS reports use the new ethnicity
code, and students are reported based on their responses to two questions on the multiple
race and ethnicity online survey. Reports display two or more races for students who
report multiple races on the online multiple race and ethnicity survey. The multiple races
are displayed when the ethnicity reported is not Hispanic, and two or more races from
multiple race categories (such as Asian and White) are selected. The multiple races are
converted to a value of “two or more races”.
Reports display “Unknown” for students who did not complete the online multiple race and
ethnicity survey. A non-response is equivalent to the race and ethnicity being unknown.
When a student selects an ethnicity of Non-Hispanic and does not select a race, that
student will be reported as unknown.
Non-resident aliens are reported as “NRA”, and the race and ethnicity data is not
considered.
SHRIPDS Processing
SHRIPDS uses an ethnicity code to collect ethnicity data for students. Ethnicity is
recorded as Hispanic, Non-Hispanic, or Non-Resident Alien. When a student selects
Hispanic for the ethnicity, that ethnicity is reported, but no race selection is reported. When
a student selects Non-Hispanic for the ethnicity, and a race selection is indicated, the race
selections are reported. When a student selects Non-Hispanic for the ethnicity, and does
not select a race selection, the ethnicity and race are reported as unknown.
SHRIPDS also collects multiple race information for students. GORRACE entries for each
student are checked for an ethnicity of Non-Hispanic and two or more races. The multiple
race selections are converted to a value for “two or more races”.
The process will also display a value of “unknown” for a student who did not respond to
the multiple race and ethnicity survey or who selected an ethnicity of Non-Hispanic but did
not select a race. When a student selects an ethnicity of Hispanic, the race is not reported.
When a student selects an ethnicity of Non-Hispanic, the selected race is reported.
Two or More races assigned to
Student on GORRACE
Two or More Races 8
No ethnicity and race found in
Banner.
Race and Ethnicity
Unknown
9
Banner Value Description IPEDS Value

1535
Banner Student User Guide | Academic History
Reporting Categories
The IPEDS reporting categories used by the Web upload files are:
Data Conversion for Uploads
A common procedure is used to convert the multiple race and ethnicity data for a single
person after the biographical information for existing ethnicity has been updated to the
new ethnicity through the various upload processes in Student, such as SRTLOAD and
SARETMT. The old ethnicity codes are loaded to Banner and converted to the new
ethnicity and race code fields. The load and conversion process takes place in one step.
The conversion of multiple race and ethnicity data is run from within the upload process if
the old ethnicity code exists and the new race and ethnicity do not exist. Some processes,
like the data load, only use the ethnicity and do not load the race information. Those
processes have not been modified in Banner or by the vendor to include the new multiple
race and ethnicity data.
IPEDS First Time Residency Report (SHRIRES)
In the IPEDS First Time Residency Report (SHRIRES), the students are categorized
based on the award category of their degree in their student record. First-time students
(where student type matches requested type) who are registered in the requested term
and whose general student level matches the requested level, will be reported by state,
which is determined by the student's address type.
A population of students is selected using the following criteria:
1. Student validly registered for the term being processed.
Reporting Categories Web Upload Values
Nonresident alien 1
Hispanic/Latino 2
American Indian or Alaska Native 3
Asian 4
Black or African American 5
Native Hawaiian or Other Pacific Islander 6
White 7
Two or more races 8
Race and ethnicity unknown 9
Grand total
The grand total is generated in the export file.
Do not include it in the import file.
10

1536
Banner Student User Guide | Academic History
2. Student has a general student record with an effective term that is less than or equal
to the term being processed and which has a degree code that is valid on the Degree
Code Validation Form (STVDEGC), and the category code on the STVDEGC matches
the category code(s) you requested. The general student level must match your
requested level code(s). Student must have a student type which matches your
requested first-time freshman code(s) and cumulative credit hours which do not
exceed the parameter limit you have set.
The Degree Award Category Code Validation Table (STVACAT) is used to classify degree
codes (i.e., B.A. = Bachelor of Arts) into award categories. Required codes for the
STVACAT Table are included in the table definitions and should be used. Use the
parameter selection to specify which Degree Award Categories are to be used for the
report.
The Degree Code Validation Form (STVDEGC) uses the Degree Award Category Code
Validation Form (STVACAT) to identify the category that the degree code belongs to, such
as Bachelor’s, Master's, Doctoral.
Example:
Students are counted in the HS Grad/Year column if they have a high school graduation
date on the High School Information Form (SOAHSCH) that falls within the user-specified
parameter dates.
Transfer hours are used in the calculation of student classification. For example, if a
student has 60 transfer credits and 20 institutional credits, then 80 credits will be used to
determine their class standing.
SHRIRES Web Upload
Use the Report Format parameter to create hardcopy output only, a comma-delimited file
only, or both formats during the same run. This comma-delimited file format conforms to
the NCES requirements for the creation of the Key Pair Value file. The Report Format
parameter is required. Enter
1 to produce hardcopy output. Enter 2 to produce output in a
Web upload file format. Enter
3 to produce both formats. 3 is the default.
Note: When running this report from job submission, the Web upload file
name will be in the format
shrires_wu_######.txt, where
###### is the run sequence number.
Prior to uploading this file to the website, you must convert it to a text
(
.txt file).
For any additional information on the IPEDS Web-Based Data collection process refer to
the following website:
www.nces.ed.gov/ipeds/, or contact the IPEDS helpdesk at
1-877-225-2568.
Degree Code Degree Category
BS Bachelor of Science 24

1537
Banner Student User Guide | Academic History
Key Pair Value File Format
The key pair value file format is the standard from the National Center for Educational
Statistics (NCES) which is used for the creation of the Web upload in the IPEDS reports.
The import/export file layout specification, including accepted values for the fields, can be
found on the NCES website.
The NCES Unit ID value should be the one entered on SHACTRL.
IPEDS Total Activity Report (SHRIACT)
In the IPEDS Total Institutional Activity Report (SHRIACT), both credit hours attempted in
a 12-month period and unduplicated headcount of students are generated in the grand
totals for the report. All students with at least one course recorded for credit will be
counted for the period specified by the parameters.
This report looks at the information maintained in Academic History, not in Registration.
Therefore, if a course has not yet been rolled to history, it will not be reported. For each
course that falls within the period specified by the parameters, total credit hours and
contact hours will be reported in the grand totals. If there is no enrollment in a course, the
course will not be reported in the grand totals
Contact hours are calculated by adding the term contact hours together (lecture, lab and
other), as defined in the Basic Course Maintenance Form (SCACRSE), and multiplying
that number by the number of students enrolled in the course.
Contact Hours = (Lecture hours + Lab hours + Other Hours) x # of students enrolled in
course
The unduplicated headcount is calculated by taking those students that have at least one
degree credit course in their academic history record on the Course Summary Form
(SHACRSE). Students are reported according to their student level. If students have more
than one level during a year, the students are counted by the level they are in the last term
of the report, based on the user-defined parameters.

1538
Banner Student User Guide | Academic History
Example:
SHRIACT reflects course information that has been rolled to Academic History and
applied to the level in the Institutional Course block of SHADEGR used for this report.
Active registrations do not impact the figures represented in the file.
Total activity reporting (SHRIACT) includes Part E - Retention Data of First Time
Undergraduates from Fall to Fall, which requires that schools report the percentage
number of full-time, first-time undergraduates who are retained from one fall term to the
next. (Part-time percentage is determined separately.) Retention is counted as fall to fall
only. This data is reported with the spring submission and is no longer included with the
12-month enrollment data submitted in the fall (see below).
A person in the full-time cohort does not have to remain full-time to be counted as
retained. For example, if Cohort A is enrolled in fall 2003 as full-time but is part-time in fall
2004, that student is counted as retained. Institutions are required to report the percent of
students who are in a fall, full-time, first-time undergraduate cohort who have
subsequently enrolled in the next fall term. Institutions must report the same data for the
fall, part-time, first-time undergraduate cohort. Part E is also included in the Web Upload
File, to report first-time fall cohorts who returned the following fall.
The NCES does not collect the First Year Retention data with the same submission as the
12-Month Enrollment Report or the Unduplicated Count and Instructional Activity Report,
both of which are produced using SHRIACT. Since SHRIACT generates the required data
for both reports, it is necessary to run SHRIACT in the fall and spring to produce the
different data that is required.
Beginning with the Fall 2007 submissions, the Unduplicated Count and Instructional
Activity data is collected in the Fall. To generate the report for the Fall, run SHRIACT with
the parameters used for first-year retention data set to Null, thus producing no retention
data. These parameters are: Effective Term of Fall Cohort, Retention Term of Fall Cohort,
Full-time Fall Cohort Code, and Part-time Fall Cohort Code.
The First Year Retention Rate will be collected in the Winter (optional) and Spring
submissions beginning in 2008. The actual cohort values and number of exclusions will be
reported, and the retention percentages will be calculated by the NCES system. To
Report Start Date July 1, 2003
Report End Date June 30, 2004
200301 Fall Term
Student's Level 01 Undergraduate
200302 Spring Term
Student's Level 02 Graduate
Student will be counted as a graduate student.
1539
Banner Student User Guide | Academic History
generate the report for the Winter and Spring, run SHRIACT with the first-year retention
parameters populated with your institution’s values to produce the first year retention data.
These parameters are: Effective Term of Fall Cohort, Retention Term of Fall Cohort, Full-
time Fall Cohort Code, and Part-time Fall Cohort Code.
Note: You need to include any level codes that were formerly used for
First-Professional in the list of level codes for Graduate.
Multiple values can be entered in the Effective Terms of Fall Cohort parameter and the
Retention Terms of Fall Cohort parameter. This allows your institution to process multiple
effective terms and multiple retention terms by student centric period.
For 2012-2013 enrollment reporting, graduate level credit activity, Doctor Degree
Professional credit hours, and FTEs are reported in the July 1 to June 30 period using Part
B - Instructional Activity. The race/ethnicity categories that have been optional since Fall
2008 are required for reporting.
Note: If your institution reports data for students whose degree level
qualifies as Doctor’s Degree Professional, the FTE data must be handled
manually.
The Doctor’s Professional Practice hours are reported separately from the graduate level
activity total. In Banner, the STVACAT code for Doctor’s Degree - Professional is
45.
Since the NCES collects the FTE for the Doctor’s Degree Professional practice separately,
and each institution has a different method for calculating an FTE, and Banner does not
calculate FTEs while producing the total activity data, users need to manually calculate
the FTE on the form for this piece of data. To assist users in reporting the FTE for the
Doctor Degree - Professional Practice, the SHRIACT report calculates and uploads the
total credit hour activity. Once the date is uploaded, the user needs to make the FTE
calculation, or alternatively, revise the Web upload value prior to performing the upload.
Please refer to the “FTE Calculations” topic under the “SHRIACT Web Upload” section for
more information on using FTEs with the Web upload file.
SHRIACT Web Upload
The report produces a control page with the parameter values and the number of records
processed, as well as a comma-delimited file for the Web upload. This comma-delimited
file format conforms to the NCES requirements for the creation of the Key Pair Value file.
Note: When running this report from job submission, the Web upload file
name will be in the format
shriact_wu_######.txt, where
###### is the run sequence number.
Prior to uploading this file to the website, you must convert it to a text
(
.txt file).
The SHRIACT Temporary Table (SHRTACT) is used internally within SHRIACT to
accumulate data for the Web upload file creation. When the process is completed, the
contents of this table are deleted.

1540
Banner Student User Guide | Academic History
For any additional information on the IPEDS Web-Based Data collection process refer to
the following website:
www.nces.ed.gov/ipeds/, or contact the IPEDS helpdesk at
1-877-225-2568.
Key Pair Value File Format - Fall Data Collection, 12 - Month Enrollment
Section
The key pair value file format is the standard from the National Center for Educational
Statistics (NCES) which is used for the creation of the Web upload in the IPEDS reports.
The import/export file layout specification, including accepted values for the fields, can be
found on the NCES website.
• The NCES Unit ID value should be the one entered on SHACTRL.
• The Student Level code comes from the applicable SHRDGMR record and is matched
against the code(s) entered in the run parameters.
• The Race value comes from the race defined on SPAPERS in the GORPRAC table.
• The Undergraduate Credit Hours is stored on SHRTCKG.
• The Contact Hours is the sum of the lecture, lab, and other hours from SCBCRSE.
• The Graduate Credit Hours is stored on SHRTCKG.
• The Representative Year selection is based on a comparison between term dates as
defined on STVTERM and dates entered in the run parameters.
Key Pair Value File Format - Winter/Spring Data Collection, Enrollment
Section
The key pair value file format is the standard from the National Center for Educational
Statistics (NCES) which is used for the creation of the Web upload in the IPEDS reports.
The import/export file layout specification, including accepted values for the fields, can be
found on the NCES website.
• The NCES Unit ID value should be the one entered on SHACTRL.
• The CIP Code is CIP code defined on STVCIPC.
• The Student Level code comes from the applicable SHRDGMR record and is matched
against the code(s) entered in the run parameters.
• The Race value comes from the race defined on SPAPERS in the GORPRAC table.
• The Sex comes from the gender defined on SPAPERS in the SPBPERS table.
• The Full-Time Fall Cohort is the sum of the students in the cohort in SGASADD.
• The Full-Time Exclusions is the sum of the cohort exemptions in SGASADD.
• The Full-Time Students Retained Through Fall is the difference between the number of
students in the cohort minus the number of cohort exemptions in SGASADD.
• The Part-Time Fall Cohort is the sum of students in the cohort in SGASADD.
• The Part-Time Exclusions is the sum of the cohort exemptions in SGASADD
1541
Banner Student User Guide | Academic History
• The Part-Time Students Retained Through Fall is the difference between the number of
students in the cohort minus the number of cohort exemptions in SGASADD.
Note: If for any combination of CIP code, award level, race, and sex, the
count is zero, the line will not be included in the import file. However, if
there were no awards granted in a specific CIP code and award level and
the program is still offered at the institution, submit the record as
suggested by the NCES.
Note: If there is zero enrollment for any category (student level, age,
state) the line does not have to be included in the import file. For Part C,
HS=1 and 2 are not mutually exclusive categories. If first-time students
who graduated from high school in the past 12 months are reported
(HS=2) for any state, then also report those students as all first-time
students (HS=1). Sort Order: UNITID,SURVSECT,PART.
Race/Ethnicity Values
The Web upload values used for the race/ethnicity types can be found on the NCES site:
https://surveys.nces.ed.gov/ipeds/. These values are associated with
values in Banner on the Race Rules Form (GORRACE).
Note: If a student is a non-resident alien, then only the alien status is
counted, and race is disregarded. The non-resident alien status is
determined by the current visa type established on the International
Information Form (GOAINTL), where the current visa type code on the
Visa Type Code Validation Form (STVVTYP) has the Non-Resident
(Indicator) checked (set to
Y), and where the visa Start Date and End
Date values from GOAINTL are current as of the creation of the IPEDS
data.
FTE Calculations
SHRIACT separates out the credit hour activity for students at the graduate level whose
degrees use the STVACAT code of
45 (Doctor Degree-Professional). The raw total value
of all the credit hour activity is reported in the Web upload file for the purpose of manually
calculating the FTE for these courses.
The calculation used is: Credit Hour Activity of a Course = Course Credit Hour Value *
Number of Students Enrolled for Credit.
This value is not an FTE value. It is reported only for this segment of the graduate level
hours.
When SHRIACT is run, the
RDOCFTE field is passed in the Web upload file. It contains a
number that represents the total of the credit hour activity for STVACAT level
45 students.

1542
Banner Student User Guide | Academic History
This is not the FTE calculation. You will still need to convert this raw credit hour value to an
FTE value, based on how FTEs are calculated at your institution.
For example:
UNITID=123456,SURVSECT=E1D,PART=B,CREDHRSU=23100.,CONTHRS
=3700.,CREDHRSG=1200.,
RDOCFTE=160
You can either perform the calculation and then edit the Web upload file or upload the
value and manually convert it on the form. Do not leave the
RDOCFTE value as passed in
the Web upload file.
Here is an example of this scenario.
• You have ten students working at the Doctor’s Degree - Professional level.
• Ten students, with each student in four, four credit hour courses, equals 160 total credit
hour activity.
• The FTE calculation is based on a semester, 4-1-4 plan, or other calendar type.
• The FTE calculation is: Graduate total credit hour activity divided by 24.
(FTE calculations for different institutional practices are available on the NCES/IPEDS
reporting website.)
• You must convert the 160 credit hour total activity to 160/24 = 6.667.
IPEDS Completions Report (SHRICIP)
The IPEDS Completions Report (SHRICIP) provides degree and award information on
degrees conferred by the institution within the user-specified timeframe. These degrees
are broken down by degree level. Only degrees with a degree status on the Degree Status
Code Validation Form (STVDEGS) with an Awarded Indicator of
A (for awarded) are
included in the Web upload file.
The following degree award categories are included:
• 21 - Less than one year certificate
• 22, 25 - At least one but less than four year certificate
• 23 - Associate’s Degree
• 24 - Bachelor’s Degree
• 41, 43- Post-Baccalaureate Certificate and Post Master’s Certificate
• 42 - Master’s Degree
• 44, 45, 46 - Doctor’s Degree
Note: All designated CIP Codes are included in the file.

1543
Banner Student User Guide | Academic History
The following age categories are used:
• Under 18
• 18-24
• 25-39
• 40 and above
• Age unknown
The following degrees are excluded from SHRICIP:
• degrees and awards conferred by branches of your institution located in foreign
countries
• honorary degrees and awards
The report collects the total number of students who have earned degrees or certificates
by race/ethnicity, gender, and age. These three types of data are reported separately. The
report also indicates whether the program is available to be completed entirely through
distance education. This information is collected by the CIP code and award level.
The SHRICIP Web Upload File contains four parts.
• Part A: Completions - CIP Data
• Part B: Completions - Distance Education
• Part C: All Completers
• Part D: Completers by Level
Part A: Completions - CIP Data
This section produces the specified CIP data for the degree award categories.
Part B: Completions - Distance Education
This section is used to report whether the CIP code and award level are being reported for
a distance education program. On the Completions form, the This program is offered as
a distance education program checkbox with values of
Yes or No is used for this
determination. SHRICIP can produce the Web upload file with this field set to
No.
However, you can remove this value from the Web upload file if having it set to
No is not
useful. SHRICIP passes a value that always sets this field to
No for all CIP data being
reported. You can manually change those records that qualify as distance education.
This determination of what constitutes distance education will vary from institution to
institution. Banner does not contain a specific field for this data or a rule for degree
completion that specifies if a degree with a CIP code and level qualifies as distance
education. Please refer to the NCES definitions of distance education for more information
at this site:
https://surveys.nces.ed.gov/ipeds/

1544
Banner Student User Guide | Academic History
When setting the checkbox, consider the following information from the NCES:
• If the program for the award level is offered for completion exclusively through distance
education, respond
Yes.
• If more than one program is reported under a CIP code by award level, and any of those
programs are offered as distance education, respond
Yes.
• If the option exists for students to complete the program exclusively through distance
education by CIP code and award level, but no students used the option, respond
Yes.
Part C: All Completers
This section reports totals for all completers by race and gender.
Part D: Completers by Level
This section reports all completers by level, race/ethnicity, and gender. It includes a field
for the number of students who are completers, based on their age at the time the degree/
certificate was awarded.
• If the student’s race/ethnicity is unknown, the student is counted in the race/ethnicity
unknown grouping.
• If the student does not have the gender populated, the student’s degree is not counted.
• If the student does not have an age calculated, the student is counted in the age
unknown grouping.
The age at time of completion is calculated as the difference between the graduation date
in the degree record on SHADEGR (degree sequence number for the curriculum with the
major for the degree) and the student’s date of birth.
If completions have been reported in a prior reporting year, and no completions exist for
that CIP code in the current year, and the program is still offered at the same award level,
the record must be submitted using zeros.
Note: The file produced by SHRICIP will not produce any data for CIP
codes when no completions exist for the date range in which the report is
run. These records will need to be manually updated.
SHRICIP Web Upload
The report produces a control page with the parameter values and the number of records
processed, as well as a comma-delimited file for the Web upload. This comma-delimited
file format conforms to the NCES requirements for the creation of the Key Pair Value file.
The Web upload is processed as follows.
• For the first major (MAJORNUM1), the report reflects those students who have
completed their studies toward a particular certificate or degree and have been denoted
as awarded (
SHRDGMR_DEGS_CODE = AW) in Academic History. (These translate to
NCES Award Levels 1, 2, 3, 4, 5, 6, 7, 8, 9, 17, 18, 19.)

1545
Banner Student User Guide | Academic History
• For the second major (MAJORNUM2), file entries are created for students who have
been awarded an Associate Degree, Bachelors Degree (or equivalent), Masters
Degree, or Doctoral Degree. (These translate to NCES Award Levels 3, 5, 7, 17, 18,
19.) The second degree can be recognized by the secondary major in the curriculum
record.
Note: When running this report from job submission, the Web upload file
name will be in the format
shricip_wu_######.lis, where
###### is the run sequence number.
Prior to uploading this file to the website, you must convert it to a text
(
.txt file).
For any additional information on the IPEDS Web-Based Data collection process refer to
the following website:
www.nces.ed.gov/ipeds/, or contact the IPEDS helpdesk at
1-877-225-2568.
Key Pair Value File Format, Completions Section
The key pair value file format is the standard from the National Center for Educational
Statistics (NCES) which is used for the creation of the Web upload in the IPEDS reports.
The import/export file layout specification, including accepted values for the fields, can be
found on the NCES website.
• The NCES Unit ID value should be the one entered on SHACTRL.
• The First or Second Major comes from the SHRDGMR record for the student.
• The CIP code is the code (as defined on STVMAJR) that is associated with the major in
the secondary curriculum or the second major in the primary curriculum. The CIP codes
are defined on STVCIPC.
• The Award Level comes from the STVACAT code assigned the applicable curriculum
record. The degree code is defined on STVDEGC.
• The Race value comes from the race defined on SPAPERS in the GORPRAC table.
• The Sex comes from the gender defined on SPAPERS in the SPBPERS table.
Note: If for any combination of CIP code, award level, race, and sex, the
count is zero, the line will not be included in the import file. However, if
there were no awards granted in a specific CIP code and award level and
the program is still offered at the institution, submit the record as
suggested by the NCES.
The following criteria apply:
• The selection comes first from the Base Curriculum Rules Table (SOBCURR) where the
degree code corresponds to a degree code (STVDEGC) that is assigned to a
corresponding degree category code (STVACAT). Please see the Award Values section
which follows for degree category equivalent information.

1546
Banner Student User Guide | Academic History
• When entering a value for the Report Term parameter in SHRICIP, consider that the
process will use the latest set of curriculum records (SOBCURR) that are locked and
effective up to and including the term entered in the Report Term parameter. For
example, when the Report Term parameter is set to
200010, it will not select
curriculum records that are effective for term 200020.
• After the base rules are selected, the Curriculum Rules Major Table (SORCMJR) is
analyzed. The process will select the appropriate effective term major code which is
“linked” to the curriculum base rule. In addition, the major code is only selected if it has a
valid corresponding STVCIPC code associated with it in STVMAJR, where in STVMAJR
the column
STVMAJR_VALID_MAJOR is equal to Y.
• For example, the Report Term parameter is equal to 200010; if a curriculum base rule is
effective for term 200010, this curriculum base rule will be selected. If one of the
associated majors linked to this base rule is effective for term 200020, and has a valid
corresponding STVCIPC code associated with it in STVMAJR where in STVMAJR the
column
STVMAJR_VALID_MAJOR is equal to Y, this major code will not be used in
this report.
CIP Code Table
Valid CIP codes are listed in Classification of Instructional Programs (CIP) 1990 Version
which is available at this web site:
http://nces.ed.gov/ipeds/.
Award Values
The following values are used for the award levels.
Race/Ethnicity Values
The Web upload values used for the race/ethnicity types can be found on the NCES site:
https://surveys.nces.ed.gov/ipeds/. These values are associated with
values in Banner on the Race Rules Form (GORRACE).
Web Upload
Value IPEDS Category Description
Banner Value on
STVACAT
1 Less than one year certificate 21
2 At least one but less than four year certificate 22, 25
3 Associate’s Degree 23
4 Bachelor’s Degree 24
5 Post Baccalaureate and Post Master’s
Certificate
41, 43
6 Master’s Degree 42
7 Doctor’s Degree 44, 45, 46

1547
Banner Student User Guide | Academic History
Note: If a student is a non-resident alien, then only the alien status is
counted, and race is disregarded. The non-resident alien status is
determined by the current visa type established on the International
Information Form (GOAINTL), where the current visa type code on the
Visa Type Code Validation Form (STVVTYP) has the Non-Resident
(Indicator) checked (set to
Y), and where the visa Start Date and End
Date values from GOAINTL are current as of the creation of the IPEDS
data.
IPEDS File Generation Process (SHRIPDS)
The IPEDS File Generation Process (SHRIPDS) is an extract process that is used to
produce the Enrollment Summary of Students by Age (SHRIAGE), the Enrollment
Summary by Racial/Ethnic Status (SHRIETH), and the Enrollment Summary by First Time
Residency (SHRIRES). This process, which creates a table, must be run prior to running
any of these reports. A control report, which lists the parameters used, is also produced
from this process.
SHRIPDS is the IPEDS report extract process. This process must be run prior to
producing the three dependent reports. A file of individual and communal statistics is
created which is used by SHRIAGE, SHRIETH, and SHRIRES.
These following three reports retrieve data needed for the Fall Enrollment Report:
A population of students is selected by SHRIPDS using the following criteria:
• Student is validly registered for the term being processed.
• Student has a general student record with an effective term that is less than or equal to
the term being processed and which has a degree code that is valid on the Degree
Code Validation Form (STVDEGC).
For each student retrieved, a record is created and inserted into the SHRIPDS file for later
use by the reports.
IPEDS rules dictate that a student may only be counted once in the ethnicity section if he/
she is a non-resident alien. A check is made to determine if this is the case, and if it is, the
ethnicity is set to reflect this condition.
Report Part Description
SHRIETH Parts A and D
Part G
Enrollment Summary by Racial/Ethnic Status
Enrollment Summary by Distance Education
SHRIAGE Part B Enrollment Summary of Students by Age
SHRIRES Part C Enrollment Summary by First-Time Residency
(Freshman)

1548
Banner Student User Guide | Academic History
The student's sex indicator is captured. The student's age is calculated using his/her
birthday and user-entered date (default today's date), and the appropriate age column is
determined.
The process gathers first year, second year, third year, and fourth year statistics based
either upon credit ranges or calculated student classification. Parameters allow entry of
one or more student classification codes which, when using online job submission, are
validated against the Class Code Validation Form (STVCLAS). When class code values
are entered in these parameters, the specified class codes determine which row a student
will be reported in, in the IPEDS Web upload file. The credit hour parameters which have
been used to control the first year, second year, etc., determination are still required.
However, if values are entered in any class code parameters for a given year, the class
code instead of the credit hour value is used to determine the row in which a student is
reported.
A calculation is done to determine whether or not the student is full-time or part-time
based on the following criteria:
• Valid undergraduate registered hours for the process term are equal to or greater than
the credit hours designated as full-time undergraduate (parameter for Full-Time
Undergraduate Hours).
• Graduate full-time or part-time hours are calculated the same way. Use the Graduate
level parameters to count all student levels and categories that were formerly counted in
First-Professional. First-Time First-Professionals must now use the student type code
for First-Time Graduate.
Additionally, data is gathered and indicators set if the student is enrolled in all remedial
courses, all foreign campuses, all off-campuses, and/or all audit courses. All of a student's
registered courses are examined for remedial attributes (those supplied via parameter).
Reporting counts are broken down by undergraduate, non-degree/certificate seeking
undergraduate, and graduate levels, and are then further subdivided by whether the
students are enrolled exclusively in distance eduction or only in some courses that are
considered to be distance education. They are also separated into groups by location,
such as in-state, out-of-state, and outside the United States.
The IPEDS reports work the same as other Banner reports. If run through job submission,
editing of data with system table ties is done. If run interactively, no system table editing
done.
Note: The other IPEDS reports (SHRIACT, SHRICIP, SHRIGRS) are
stand alone reports that can be run without running SHRIPDS first.
Campus Codes
The process looks at the student's individual registered courses when considering the
parameters for Foreign Campus Code and Off-Campus Code. Schools won't necessarily
build courses that are offered at a foreign campus, but the student might be assigned to a
foreign campus.
Each user is allowed to decide for themselves which (if any) of their campus(es) meet the
criteria, and enter them via this parameter. If all the courses in which a student is

1549
Banner Student User Guide | Academic History
registered match the parameter supplied data, then an appropriate switch is set. This
works the same way for the off-campus codes.
Student Centric Periods
SHRIPDS processes information based on terms that are part of student centric periods.
SHRIPDS is run by term using the Process Term parameter. When the Process by Student
Period parameter is also used, the process checks the rules on SOASCPT to determine
which student centric period includes the value entered in the Process Term parameter as
the last term. All term codes that are part of the student centric period are considered, as
is the order in which the terms fall within the student centric period.
After the student centric period and the associated terms have been identified, each
student record that shows enrollment in any term in the student centric period is read for
reporting.
• If the student is registered in all terms of the student centric period, the following occurs:
• Enrollment hours are summed from all terms in the student centric period in which
the student is enrolled, using the existing rules in base SHRIPDS processing.
• Student centric period rules for time status are used and combine the enrollment
hours for all the terms in the student centric period.
• The general student record is used for the lowest term in the student centric period
in which the student has registration. The process reports the student’s class, type,
level, and category.
• Registration records for all terms in the student centric period are used to determine
remedial courses, foreign campus courses, off-campus courses, audit grade mode
courses, and audit registration status courses.
• Academic standing status rules are used. If the student is new, the system assumes
a standing of
00. For continuing students, the system pulls the standing from the
previous term's academic standing in the End of Term Academic Standing field in
the Term Header block on SHAINST. (If there is no standing, the system assumes
00.) If an override standing has been entered for the term on SGASTDN, the
system will use the override standing.
• If the student is not registered in all terms of the student centric period, the student's
registration records are reported for terms included in the student centric period using
these rules:
• The general student record is used for the lowest term in the student centric period
in which the student has a registration record. This determines time status, student
class, type, level, and category.
• Student registration records are used for all terms of the student centric period. This
determines remedial courses, foreign campus courses, off-campus courses, audit
grade mode courses, and audit registration status courses.
See the following example.
A student is registered in a term that falls within a student centric period.
• Student centric period 2009A is composed of terms 200910 and 200920.
1550
Banner Student User Guide | Academic History
• The student is not included in the student centric period, but is registered in two
terms (terms 200910 and 200930), and term 200910 is included in student centric
period 2009A.
• Registration is reported for term 200910, because term 200910 is included in
student centric period 2009A.
• Registration in term 200930 is not reported, because term 200930 is not included in
student centric period 2009A.
Distance Education
When either the Campus Code, Schedule Type, and/or Instructional Method parameters
are used, distance education is processed for reporting. SHRIPDS looks at the enrolled
students by level for existing courses in the SFRSTCR and SSBSECT tables where the
courses contain one of the report parameter values for schedule type, instructional
method, or campus. Also, when at least one of those parameters is used, the Address
Type, State or Province, and Nation Code parameters are required.
If the Campus Code, Schedule Type, and/or Instructional Method parameters are not
used, the Address Type, State or Province, and Nation Code parameters are skipped, and
an error is recorded in the log file for the report.
TO PROCESS DISTANCE EDUCATION, ADDRESS TYPE, STATE AND NATION
ARE REQUIRED.
lp: Error - no default destination available.
Here is a processing example with the following settings:
• Campus Code parameter set to D, Distance
• Schedule Type parameter set to W, Web
• Instructional Method parameter set to ONL, Online
Courses in the SFRSCTR table are used to determine whether they are counted or not
counted as distance education by SHRIPDS. These are OR conditions. If more than one
parameter is used for defining the distance education courses, there are multiple ways a
course can be considered as a distance education course.
Course Number Description Campus
Schedule
Type
Instructional
Method
Count as
Distance
Education
ARTH 200 Art History D L Null Yes
MATH 200 Math I M L ONL Yes
ECON 200 Micro
Economics
M W Null Yes
PSYC 200 Psychology I D W ONL Yes
HIST 200 History M L Null No

1551
Banner Student User Guide | Academic History
When enrolled students are found through SHRIPDS, the process then determines if the
students are enrolled exclusively in distance education, enrolled in some distance
education courses, or not enrolled in any distance education courses. The Web upload file
created using SHRIETH displays these conditions as ENROLL_EXCLUSIVE,
ENROLL_SOME, or NOTENROLL. The course must have an STVRSTS code that is set
to count in enrollment for the PIDM and term. The CRN must have a value from SSBSECT
defined in the Campus Code, Schedule Type, or Instructional Method parameters qualifies
as a distance education course.
Counts are defined by level for undergraduate degree seeking students, undergraduate
non-degree seeking students, and graduate students. Information for enrollment for
distance education courses appears in Part G of the Web upload file for SHRIETH.
Student Location
When a student has been defined as having exclusive enrollment in distance education
courses, processing then determines the student’s location based on an address
hierarchy and address date. Students can be in-state, out-of-state but within the U.S.,
have an unknown state within the U.S., or be outside of the U.S. The Web upload file
displays these conditions as INUS, INUS_NOTPPS, INUS_UNKNOWN_STATE, or
OUTSIDEUS. The Address Selection Date, Address Type, State or Province, and Nation
Code parameters are used for this data.
The Address Selection Date parameter allows for reporting for a date within an enrollment
period. Therefore the address for the student should be current as of the date specified in
the parameter.
The Address Type parameter allows for a hierarchy of address types the process can
search for. If a student does not have any of the address types entered, or the student
does not have any addresses in the SPRADDR table, the record is populated into the
location unknown row on the IPEDS form/Website so the enrollment counts for distance
education will still be accurate. When the state for the student is unknown but the nation
code is known, the student is reported as state unknown, located in the United States.
When a student has an address type but the nation code is Null, the address is assumed
to be in the United States. When the nation for the address type is equal to the value in the
Nation Code parameter, the address is considered to be in the United States. When the
nation for the address type is not equal to the value in the Nation Code parameter, the
address is considered to not be in the United States.
A student can have an address record with a state/province value, and still be in a non-
United States location such as Canada. Therefore, when the nation code is populated in
student address data, it is best to define the nation code or codes that would be
considered to be in the United States, and so avoid errors in processing this information
for the report.
IPEDS Summary of Students by Age (SHRIAGE)
The IPEDS Summary by Age Report provides a breakdown of registered students by CIP
Code within the Department of Education age categories. The CIP Code associated with
the student is derived from the student's major code (STVMAJR) from SORLCUR and
SORLFOS. The information on this report coincides with the data on the Enrollment
Summary by Racial/Ethnic Status (SHRIETH). The information is broken down as follows:

1552
Banner Student User Guide | Academic History
This report generates student counts by age, gender, and full-time/part-time status
according to CIP Code. It also creates Part B of the EF Survey Section.
SHRIAGE Web Upload
Use the Report Format parameter to create hardcopy output only, a comma-delimited file
only, or both formats during the same run. This comma-delimited file format conforms to
the NCES requirements for the creation of the Key Pair Value file. The Report Format
parameter is required. Enter
1 to produce hardcopy output. Enter 2 to produce output in a
Web upload file format. Enter
3 to produce both formats. 3 is the default.
Note: When running this report from job submission, the Web upload file
name will be in the format
shriage_wu_######.txt, where
###### is the run sequence number.
Prior to uploading this file to the website, you must convert it to a text
(
.txt file).
For any additional information on the IPEDS Web-Based Data collection process refer to
the following website:
www.nces.ed.gov/ipeds/, or contact the IPEDS helpdesk at
1-877-225-2568.
Key Pair Value File Format - Winter/Spring Data Collection, Fall Enrollment
Section
The key pair value file format is the standard from the National Center for Educational
Statistics (NCES) which is used for the creation of the Web upload in the IPEDS reports.
The import/export file layout specification, including accepted values for the fields, can be
found on the NCES website.
• The NCES Unit ID value should be the one entered on SHACTRL.
• The Age Category is the date calculated by SHRIPDS, based on the student’s birth date
and the value in the Birth Date parameter. If no student birth date is recorded, the value
unknown is displayed.
• The Student Level is the level of the appropriate general student record compared to the
values entered in the parameters for SHRIPDS, which must be run prior to running
SHRIAGE.
• The Sex comes from the gender defined on SPAPERS in the SPBPERS table.
Undergraduate Degree
Seeking
Rows 01–06 of SHRIETH for full-time students
All Other Credit
Undergraduates
Row 07 of SHRIETH for full-time students
Graduate Students Rows 11–13 of SHRIETH for full-time students

1553
Banner Student User Guide | Academic History
Note: If for any combination of CIP code, award level, race, and sex, the
count is zero, the line will not be included in the import file. However, if
there were no awards granted in a specific CIP code and award level and
the program is still offered at the institution, submit the record as
suggested by the NCES.
IPEDS Race/Ethnic Status Report (SHRIETH) - Fall Enrollment
The Race/Ethnic Status Report generates the racial/ethnic breakdown of the selected
students and may be used to complete Part A of the Enrollment Summary Report.
Statistical information is generated on the race/ethnic background of students by CIP
code. The text file reports statistics only on the CIP codes specified and provides data for
Part A of the EF Survey Section and Part D, for the total number of students enrolled.
Undergraduate students are classified by student type, degree category, and level. For
example, if a first time undergraduate freshman has a degree category of Masters of
Business then he will be counted in the Undergraduates Enrolled for Credit because his
degree category does not meet the parameter specified undergraduate degree categories.
For the Ethnic Status Report (SHRIETH), students must be registered in the requested
term. Subject areas for the students are determined by the CIPC code on the CIPC Code
Validation Form (STVCIPC) for each student's major, which is in the student’s learner
curriculum record. These major codes are defined on the Major, Minor, Concentration
Code Validation Form (STVMAJR).
The ethnic category for a student is determined by the New Ethnicity Code value
maintained on the General Person Form (SPAPERS). The
SPBPERS_ETHN_CDE value
is used to track ethnicity for Hispanic, non-Hispanic, or non-resident alien ethnicities. Race
categories are defined on the Race Rules Form (GORRACE) using the Regulatory Race
(Code) value that is associated with the Institution Race (Code) value. The
GORRACE_RRAC_CODE value is used to report race categories.
If a student is a non-resident alien, then only the alien status is counted; race is
disregarded. The non-resident alien status is determined by the current visa type
established on the International Information Form (GOAINTL), where the current visa type
code on the Visa Type Code Validation Form (STVVTYP) has the Non-Resident
(Indicator) checked (set to
Y), and where the visa Start Date and End Date values from
GOAINTL are current as of the creation of the IPEDS data.
The Degree Award Category Code Validation Table (STVACAT) is used to classify degree
codes (i.e., B.A. = Bachelor of Arts) into award categories. Required codes for the
STVACAT Table are included in the table definitions and should be used.
Students are categorized in this report using user-specified parameter selections.

1554
Banner Student User Guide | Academic History
Example:
• Full-time versus part-time hours for undergraduates and graduates is a parameter
selection.
• Undergraduate and graduate degree categories are user selected.
Unlimited categories are available.
Graduate categories should include those categories formerly used for First-
Professional, as well as all Doctoral categories.
• First-Time students are determined by user-selected student types for undergraduates
and graduates.
Unlimited student types are available.
• Level codes for undergraduates and graduates are user specific.
Unlimited level codes are available.
• The credit hour range for a first year student is user-defined.
• You may specify the student types used for unclassified students.
The Degree Code Validation Form (STVDEGC) uses the Degree Award Category Code
Validation Form (STVACAT) to identify the category that the degree code belongs to, i.e.,
Bachelor’s, Master's, Doctoral.
Example:
First-Time Freshmen are students classified as freshman by the Student Type Validation
Form (STVSTYP) when their category matches the user-entered category, and their level
matches a freshman, user-entered, undergraduate level.
Other First Year students are classified as transfer-in, degree or certificate-seeking
undergraduates.
Sophomores are classified as students who have more than the maximum number of
freshman hours and less than the maximum number of hours designated for a sophomore
via the parameter selection of second year credit hours.
The students whose earned credit hours are greater than or equal to the user-specified
freshman credit hours and less than the user-specified sophomore credit hours are
counted as sophomores.
Degree Code Degree Category
BS - Bachelor of Science 24

1555
Banner Student User Guide | Academic History
Example:
Juniors are classified as students who have more than the maximum number of
sophomore hours and less than the maximum number of hours designated for a junior via
the parameter selection of third year credit hours.
Seniors are classified as students who have more than the maximum number of hours
designated for a third year student.
Unclassified students are students that have a student type equal to the parameter
selected as unclassified student type.
Transfer hours are used in the calculation of student classification. For example, if a
student has 60 transfer credits and 20 institutional credits, then 80 credits will be used to
determine their class standing.
Those students who have dropped or withdrawn from all of their classes will not be
included in the file. The process examines the Count in Enrollment box on the Course
Registration Status Code Validation Form (STVRSTS). If all of the course statuses are
flagged as "Do not count in enrollment" or unchecked, then the student is not included in
the file.
The totals for full-time degree/certificate-seeking undergraduate students, part-time
degree/certificate-seeking undergraduate students, and first-time non-degree/certificate-
seeking undergraduate students are reflected in the counts.
Part D is used to generate a new record for the number of students enrolled. Only one
record is required.
Part G is used to report the number of students enrolled in distance education courses.
SHRIETH Web Upload
The report produces a control page with the parameter values and the number of records
processed, as well as a comma-delimited file for the Web upload. This comma-delimited
file format conforms to the NCES requirements for the creation of the Key Pair Value file.
Note: When running this report from job submission, the Web upload file
name will be in the format
shrieth_wu_######.txt, where
###### is the run sequence number.
Prior to uploading this file to the website, you must convert it to a text
(
.txt file).
Freshman Credit Hours
Sophomore Credit Hours
Junior Credit Hours
=
=
=
30
60
90
Student A has 30 hours
Student B has 29 hours
Student C has 60 hours
=
=
=
Sophomore
Freshman
Junior
1556
Banner Student User Guide | Academic History
For any additional information on the IPEDS Web-Based Data collection process refer to
the following website:
www.nces.ed.gov/ipeds/, or contact the IPEDS helpdesk at
1-877-225-2568.
Key Pair Value File Format - Winter/Spring Data Collection, Fall Enrollment
Section (Part A)
The key pair value file format is the standard from the National Center for Educational
Statistics (NCES) which is used for the creation of the Web upload in the IPEDS reports.
The import/export file layout specification, including accepted values for the fields, can be
found on the NCES website.
• The NCES Unit ID value should be the one entered on SHACTRL.
• The CIP Code is the sum of all the STVMAJR CIP codes.
• The Student Level is the level of the appropriate general student record compared to the
values entered in the parameters for SHRIPDS, which must be run prior to running
SHRIETH.
• The Race value comes from the race defined on SPAPERS in the GORPRAC table.
• The Sex comes from the gender defined on SPAPERS in the SPBPERS table.
Note: If for any combination of CIP code, award level, race, and sex, the
count is zero, the line will not be included in the import file. However, if
there were no awards granted in a specific CIP code and award level and
the program is still offered at the institution, submit the record as
suggested by the NCES.
Key Pair Value File Format - Winter/Spring Data Collection, Fall Enrollment
Section (Part D)
The key pair value file format is the standard from the National Center for Educational
Statistics (NCES) which is used for the creation of the Web upload in the IPEDS reports.
The import/export file layout specification, including accepted values for the fields, can be
found on the NCES website.
The NCES Unit ID value should be the one entered on SHACTRL.
Note: If for any combination of CIP code, award level, race, and sex, the
count is zero, the line will not be included in the import file. However, if
there were no awards granted in a specific CIP code and award level and
the program is still offered at the institution, submit the record as
suggested by the NCES.
Graduation Rate Survey Report (SHRIGRS)
The Graduation Rate Survey (GRS) Report collects data on the numbers of
undergraduate students entering an institution as full-time, first-time, degree/certificate
seeking students. The GRS requires institutions to collect and generate data on a

1557
Banner Student User Guide | Academic History
particular cohort code. The GRS applies only to those institutions that are eligible for
Federal student financial assistance and enroll full-time, first-time, degree/certificate
seeking undergraduate students.
Reporting is by race/ethnicity and gender, length of time to completion, number still
persisting, and number transferred to other institutions. The report requires an institution
to take a snapshot of these students for a particular year (cohort) and then again after
150% of normal time has elapsed.
Beginning with the Spring 2008 submissions, the NCES has eliminated Sections V and VI
that collected data on students who received athletically related student aid. (The related
parameters are no longer used and should not be populated.) Institutions are no longer
required to report this data to IPEDS, but are still required to disclose this data, as
specified in the Student Assistance General Provision Regulations (34 CFR 668) which
implemented the Student Right-to-Know Act. An item has been added for the URL which
can be used to report this disclosure.
Note: Although the GRS is part of the IPEDS reports, you do not have to
run the IPEDS File Generation Process (SHRIPDS) prior to running the
Graduation Rate Survey Report (SHRIGRS).
The GRS is published in four versions:
Setting Up the Report
Use the following steps to implement the Graduation Rate Survey report.
1. Update the following validation forms with your institution’s codes:
1.1. Cohort Code Validation Form (STVCHRT)
Define your institution’s cohort codes for the Graduation Rate Survey Report
(SHRIGRS) on this form. Populate the following fields for each cohort code:
Cohort Code, Description, Start Term, End Term, Degree Level, and check
(set to Y) the Print Indicator.
When defining your cohorts, it is important that the start term represents the fall
term for the fall cohort or the beginning term for the full year cohort of the year in
which the students entered the institution. The end term represents the last term
in which the students could have completed or graduated from their respective
programs.
The degree level code on STVCHRT is associated with the award category
code on the Degree Code Validation Form (STVDEGC) to ensure that the
Version Institution
GRS1 4-year institutions
GRS2 2-year public institutions
GRS2A 2-year private institutions
GRS3 less than 2-year institutions

1558
Banner Student User Guide | Academic History
degree level is valid. If the award category code is not indicated, the bachelors
degree code is the default.
The Print Indicator must be checked for those cohort codes that are to be
included in the Graduation Rate Survey report (SHRIGRS). Cohort codes may
be used for both the Graduation Rate Survey report and for tracking other types
of populations of groups.
Note: Separate cohorts should be created for each program that is not part of
your normal program timeframe. For example, if you are a four year institution
and offer mainly four year programs, but have five year programs, then a
separate cohort should be created for each program. If you are a two year
institution and offer mainly two year programs, but have three year programs,
then a separate cohort should be created for each program.
Students are considered to be completers if they have received their degree,
diploma, or certificate, and the degree or award is actually conferred within
150% of normal time.
For example, if your institution offers an associate degree which normally is two
years in completion length, students will have three years to complete the
requirements for the degree. If your institution offers a baccalaureate degree
which is normally four years in length, students will have six years to complete
the requirements. If your institution offers a baccalaureate degree which is five
years in length, students will have seven and one half years to complete the
requirements. If a student is admitted with the intention of pursuing an
associates degree and is part of an associate cohort, but decides to pursue a
bachelors degree, the student will remain in the associate cohort in which they
were admitted.
The following is a list of the term codes and timeframes that are used in the
examples provided.
Example 1:
For an institution which offers a two year associate degree and four year
baccalaureate programs, the cohort codes for the entering Fall class for 2001
might be defined as follows:
Academic
Year
Fall Term
Code
Spring Term
Code
Summer Term
Code
01-02 200210 200220 200240
02-03 200310 200320 200340
03-04 200410 200420 200440
04-05 200510 200520 200540
05-06 200610 200620 200640
06-07 200710 200720 200740

1559
Banner Student User Guide | Academic History
Therefore, students entering the associate cohort in the fall of 2001 will be given
until the end of the summer for the academic year 2003-2004 to complete their
degree level program. Students entering the bachelor cohort in the fall of 2001
will be given until the end of the summer of the academic year 2006-2007 to
complete their degree level program.
Example 2:
For an institution which offers only a two year degree, the cohort code for the
entering fall class for 2001 might be defined as follows:
1.2. Cohort Reason Code Validation Form (STVCREA)
Use this validation form to define reasons for excluding a student from a cohort
code. For the purpose of calculating the Graduation Rate Survey graduation
rates, an institution may inactivate a student’s cohort code, and therefore,
remove the student from the cohort, if they leave the institution for one of four
reasons:
– Are deceased or totally and permanently disabled,
– To serve in the armed forces,
– To serve with a foreign aid service of the Federal Government, such as the
Peace Corps,
– To serve on official church missions.
1.3. Withdrawal Reason Code Validation Form (STVWRSN)
Use this validation form to define the codes that your institution uses to record
the withdrawal reason for those students who transfer out. A transfer-out is a
non-completer who has transferred to and enrolled in another eligible institution
within 150% of normal time for their program. Tracking also needs to occur for
those students who attend a less than two year institution and left for a job in a
related field. Since the GRS requires institutions to determine the type of
institution that a student has transferred to, less than 2- year, 2-year, 4-year or
higher, your codes should refer to these categories.
Cohort Code Description
Start
Term
End
Term
Degree
Level
Print
Incl.
01ASSOCIATE Fall 2001
Associate
200210 200440 AS Y
01BACHELOR Fall 2001
Bachelor
200210 200740 BA Y
Cohort Code Description
Start
Term
End
Term
Degree
Level
Print
Incl.
01ASSOCIATE Fall 2001
Associate
200110 200440 AS Y

1560
Banner Student User Guide | Academic History
The withdrawal reason codes are assigned to the student on the Term Course
Maintenance Form (SHAINST). If the withdrawal reason or transfer institution
codes are added or changed for the student on SHAINST, the corresponding
withdrawal information (SARADAP table) is not automatically updated. To make
the corresponding adjustment, access the student’s admissions record on the
Admissions Application Form (SAAADMS), if a SAAADMS record exists for the
term.
The transfer institution codes are assigned on the Term Course Maintenance
Form (SHAINST) and are based on the term code that is less than or equal to
the term in the Enrollment Term parameter.
Example:
The following codes could be used to designate the withdrawal reason.
2. Associate students with a cohort code for an effective term on the Additional Student
Information Form (SGASADD). There are two ways to do this.
The first is to add an individual student to a cohort online, using the Additional Student
Information Form (SGASADD). A student must have a student ID for an effective term
to be associated with a cohort code.
The second is to add multiple students to a cohort using the batch Cohort Load
Process (SGRCHRT). This process uses population selection, and should be run to
update the student’s general student cohort codes for the specified effective term.
(Cohort codes may be loaded by a batch process into a person’s existing recruiting,
admissions, general student, or academic history record.)
A student should be included in the cohort if they enter an institution as a full-time,
first-time, degree/certificate seeking, undergraduate student during either the fall term
of a given year or between September 1 and August 31 of the same academic year.
Students who enroll during the summer, but fail to enroll in the fall should not be
included. Transfer students should not be included in your cohort.
3. Track students who have withdrawn due to transfer or study related job.
The Graduation Rate Survey reporting requires institutions to track students who
either transfer out to an eligible institution or leave the institution for a job related to
their field of study, within 150% of normal time for their program. To count a student as
a transfer out, you must verify that the student has enrolled at an eligible institution.
“Enrollment” is defined under 34 CFR 668.2 of the Student Assistance General
Provisions as the “Status of a student who has completed the registration
requirements (except for the payment of tuition and fees) at the institution he/she is
attending.” “Eligible institution” refers to an institution that is eligible for Title IV funds.
You must also determine the type of institution that the student has transferred to: less
than 2-year, 2-year, 4-year, or higher.
Code Institution/Reason
T1 Less than a 2-year institution
T2 2-year institution
T4 4-year institution or higher
J1 Left for a job related to the student’s study
1561
Banner Student User Guide | Academic History
Withdrawal codes for transfer to an eligible institution or leaving for a job related to the
student’s field of study (GRS3 version only) are entered in the Withdrawal Reason
field on the Term Course Maintenance Form (SHAINST). The Withdrawal Reason
field is validated against the Withdrawal Reason Code Validation Form (STVWRSN),
where codes are updated and maintained. The transfer institution codes for the
institution to which the student has transferred are entered on the Term Course
Maintenance Form (SHAINST). Codes for the Transfer Institution field are queried
and selected from the Source/Background Institution Query-Only Form (SOISBGI).
Codes are updated and maintained on the Source/Background Institution Code
Validation Form (STVSBGI).
Note: The data in these fields will be used for the Graduation Rate Survey
reporting and will not control any system processing. These fields may be
used to support other local processing needs as appropriate.
4. Track students who leave in good academic standing.
Students who did not transfer out, but left the institution in good academic standing
within 150% of normal time, must be reported. Good academic standing is defined as
“the minimum quality point average or grade point average your institution requires for
graduation”. This is required for the two year institutions that must complete the GRS2
and GRS2A versions of the report. The academic standing code is taken from the
SHRTTRM record, which records the end of term academic standing. Academic
standing codes are created and maintained on the Academic Standing Code
Validation Form (STVASTD).
Note: If the End of Term Academic Standing field is Null on SHAINST,
information will not be reported for this requirement.
Student Centric Periods
The following parameters can be used with student centric periods.
• Start Term parameter - Enter the minimum start term of the student centric period to be
processed.
• End Term parameter - Enter the maximum end term of the student centric period to be
processed.
• Enrollment Terms parameter - The maximum enrollment term is used to select students
to be reported for the student centric period. Students enrolled in any terms up to the
maximum enrollment term will be reported.
SHRIGRS Web Upload
The report produces a control page with the parameter values and the number of records
processed, as well as a comma-delimited file for the Web upload. This comma-delimited
file format conforms to the NCES requirements for the creation of the Key Pair Value file.
Note: When running this report from job submission, the Web upload file
name will be in the format
shrigrs_wu_######.txt, where
###### is the run sequence number.

1562
Banner Student User Guide | Academic History
Prior to uploading this file to the website, you must convert it to a text
(
.txt file).
For any additional information on the IPEDS Web-Based Data collection process refer to
the following website:
www.nces.ed.gov/ipeds/, or contact the IPEDS helpdesk at
1-877-225-2568.
Key Pair Value File Format
The key pair value file format is the standard from the National Center for Educational
Statistics (NCES) which is used for the creation of the Web upload in the IPEDS reports.
The import/export file layout specification, including accepted values for the fields, can be
found on the NCES website.
This report uses key pair value file formats for four year institutions, two year institutions,
and less than two year institutions.
• The NCES Unit ID value should be the one entered on SHACTRL.
• The Race value comes from the race defined on SPAPERS in the GORPRAC table.
• The Sex comes from the gender defined on SPAPERS in the SPBPERS table.
Outcome Measures Report (SHRIOMS)
The Outcome Measures Report (SHRIOMS) is used to collect data about award
completion and enrollment status from degree granting institutions. Data is required for
four undergraduate cohorts at two points in time, at six years and eight years after the
students entered the reporting institution.
The first submission of this report is for the entering cohort year of 2007. The six year
status date for the 2007 cohort year is August 31, 2013. The eight year status date for the
2007 cohort year is August 31, 2015.
The four cohorts of degree/certificate seeking undergraduates are:
• Full-time, first-time
• Part-time, first-time
• Full-time, non-first-time
• Part-time, non-first-time
The report includes parameters for each of the four cohort categories. You do not need to
use all four parameters to run the report.
Multiple enrollment terms can be entered, and the start and end term date information is
used to determine who is included in the cohort population. You can also create a detailed
file that contains the ID, student name, cohort code, exclusion code, transfer out code,
status (such as Awarded, Still Enrolled, and so on), and award date (if a degree has been
awarded).
1563
Banner Student User Guide | Academic History
Each record found in the cohort is counted in revisions. Students are to be counted only
one time, regardless of whether the student has data that would put him/her into other
categories. The processing order is: exclusions, awarded, still enrolled, and enrolled
another. If a student has an exclusion on his/her record, that student will not be counted as
awarded. If a student is counted as awarded, that student will not be counted as still
enrolled. If the student is still enrolled, that student will not be counted as enrolled another.
Note: This IPEDS report is standalone. Although SHRIOMS is part of the
IPEDS reports, you do not have to run the IPEDS File Generation
Process (SHRIPDS) prior to running SHRIOMS.
Setting Up the Report
Use the following steps to implement the Outcome Measures Report (SHRIOMS).
1. Update the Cohort Code Validation Form (STVCHRT) with your institution’s codes.
Define your institution’s cohort codes. Populate the Cohort Code, Description, and
Start Term fields for each cohort code.
When defining your cohorts, it is important that the start term represents the fall term
for the fall cohort or the beginning term for the full year cohort of the year in which the
students entered the institution.
Note: The end term represents the last term in which the students could
have completed or graduated from their respective programs. However,
for outcome measures reporting, the end term is not used to process any
data related to graduation.
2. Update the Cohort Reason Code Validation Form (STVCREA) with your institution’s
codes.
Define reasons for excluding a student from a cohort code. For the purpose of
calculating the number of students in the exclusion count, an institution may inactivate
a student’s cohort code, which removes the student from the cohort, if he/she leaves
the institution for one of four reasons:
• Student is deceased or totally and permanently disabled.
• Student is serving in the armed forces.
• Student is serving with a foreign aid service of the Federal Government, such as the
Peace Corps.
• Student is serving on an official church mission.
3. Update the Withdrawal Reason Code Validation Form (STVWRSN) with your
institution’s codes.
Define the codes that your institution uses to record the withdrawal reason for those
students who transfer out. A transfer-out is a non-completer who has transferred to
and enrolled in another eligible institution. The withdrawal reason codes are assigned
to the student on the Term Course Maintenance Form (SHAINST).

1564
Banner Student User Guide | Academic History
Note: Per NCES IPEDS requirements for outcome measures, institutions
should only use reason codes which indicate that a student has
transferred to a separate institution, and that institution has confirmed the
student’s subsequent enrollment.
4. Associate students with a cohort code for an effective term on the Additional Student
Information Form (SGASADD). There are two ways this can be accomplished.
• Add an individual student to a cohort on SGASADD.
A student must have a student ID for an effective term to be associated with a
cohort code.
or
• Add multiple students to a cohort using the batch Cohort Load Process
(SGRCHRT).
This process uses population selection and should be run to update the student’s
general student cohort codes for the specified effective term. (Cohort codes may be
loaded by a batch process into a person’s existing recruiting, admissions, general
student, or academic history record.)
Reporting Details
This section reviews how students are included in the reported counts.
Cohort count
The cohort count (Part A, six year lines) will have a value of -2 (COHORT=-2). Per IPEDS
outcome measures survey requirements, this indicates that the IPEDS system is to use
the preloaded cohort value. The preloaded cohort value will be the value your institution
previously reported to IPEDS for the corresponding cohort.
Revision count
Prerequisite - The student must be associated with a cohort code on the Additional
Student Information Form (SGASADD).
For fall cohorts, students are included in the revision count when they have the following:
• one of the cohort codes entered in the cohort parameters that matches the SGRCHRT
record
• SFBETRM enrollment record or SHRTGPA institutional academic history record for the
term entered in the Start Term parameter
For full year cohorts, students are included in the revision count when they have the
following:
• one of the cohort codes entered in the cohort parameters that matches the SGRCHRT
record

1565
Banner Student User Guide | Academic History
• SFBETRM enrollment record or SHRTGPA institutional academic history record for
terms between the term entered in the Start Term parameter and the term entered in the
End Term parameter
The cohort parameters are:
• Full-Time First-Time Cohort
• Part-Time First-Time Cohort
• Full-Time Non-First-Time Chrt
• Part-Time Non-First-Time Chrt
Exclusion count
Prerequisite - The student must be associated with a reason code on the Additional
Student Information Form (SGASADD).
For fall cohorts, students are included in the exclusion count when they have the following:
• one of the cohort codes entered in the cohort parameters that matches the SGRCHRT
record
• SFBETRM enrollment record or SHRTGPA institutional academic history record for the
term entered in the Start Term parameter
• one or more of the exclusion codes entered in exclusion code parameters
For full year cohorts, students are included in the exclusion count when they have the
following:
• one of the cohort codes entered in the cohort parameters that matches the SGRCHRT
record
• SFBETRM enrollment record or SHRTGPA institutional academic history record for
terms between the term entered in the Start Term parameter and the term entered in the
End Term parameter
• one or more of the exclusion codes entered in exclusion code parameters that matches
the SGRCHRT record for terms between the term entered in the Start Term parameter
and the term entered in the End Term parameter
The exclusion parameters are:
• Excl Code -- Disabled/Deceased
• Excl Code -- Armed Forces
• Excl Code -- Foreign Service
• Excl Code -- Church Mission

1566
Banner Student User Guide | Academic History
Awarded count
Prerequisite - The student must have a degree status on the Degrees and Other Formal
Awards Form (SHADEGR) with the Awarded indicator checked for the degree status
code on the Degree Status Code Validation Form (STVDEGS).
For fall cohorts, students are included in the awarded count when they have the following:
• one of the cohort codes entered in the cohort parameters that matches the SGRCHRT
record
• SFBETRM enrollment record or SHRTGPA institutional academic history record for the
term entered in the Start Term parameter
• SHRDGMR awarded degree record for a term between the term entered in the Start
Term parameter and the date entered in the Six Year Status Date parameter.
Per IPEDS Outcome Measures Survey requirements, the minimum award date (first
awarded degree) is counted.
The Web Upload file has two sections, one that counts awarded students up to the six
year status date and one that counts awarded students up to the eight year status date.
For full year cohorts, students are included in the awarded count when they have the
following:
• one of the cohort codes entered in the cohort parameters that matches the SGRCHRT
record
• SFBETRM enrollment record or SHRTGPA institutional academic history record for
terms between the term entered in the Start Term parameter and the term entered in the
End Term parameter
• SHRDGMR awarded degree record for a term that is greater than or equal to the cohort
effective term and less than the date entered in the Six Year Status Date parameter.
Per IPEDS Outcome Measures Survey requirements, the minimum award date (first
awarded degree) is counted.
The Web Upload file has two sections, one that counts awarded students up to the six
year status date and one that counts awarded students up to the eight year status date.
Awarded counts are cumulative. For example:
• Student A and Student B are both in Cohort 1 for term 200782.
• Student A receives an award on 15-MAY-2011 (which is before or equal to the six year
status date).
• Student B receives an award on 15-MAY-2014 (which is before or equal to the eight year
status date).
• The Awarded count for Cohort 1 in the six year lines (Part A) of the Web Upload file will
be 1.
UNITID=123456,SURVSECT=OM1,PART=A,LINE=1,COHORT=,REVISION=
2,EXCLUSION=0,AWARDED=1

1567
Banner Student User Guide | Academic History
• The Awarded count for Cohort 1 in the eight year lines (Part B) of the Wed Upload file
will be 2.
UNITID=123456,SURVSECT=OM1,PART=B,LINE=1,REVISION=2,EXCLUS
ION=0,AWARDED=2,STILL_ENROLLED=0,ENROLLED_ANOTHER=0
Still enrolled count
For fall cohorts, students are included in the still enrolled count when they have the
following:
• one of the cohort codes entered in the cohort parameters that matches the SGRCHRT
record
• SFBETRM enrollment record or SHRTGPA institutional academic history record for the
term entered in the Start Term parameter
• SFBETRM enrollment record for any terms entered in the Enrollment Terms parameter
For full year cohorts, students are included in the still enrolled count when they have the
following:
• one of the cohort codes entered in the cohort parameters that matches the SGRCHRT
record
• SFBETRM enrollment record or SHRTGPA institutional academic history record for
terms between the term entered in the Start Term parameter and the term entered in the
End Term parameter
• SFBETRM enrollment record for any terms entered in the Enrollment Terms parameter
The still enrolled count is only included in the eight year lines of the Web Upload file, per
IPEDS Outcome Measures Survey requirements.
Enrolled another count
Prerequisite - The student must be associated with a withdrawal reason code on the Term
Course Maintenance Form (SHAINST).
Note: Per NCES IPEDS requirements for outcome measures, institutions
should only use reason codes which indicate that a student has
transferred to a separate institution, and that institution has confirmed the
student’s subsequent enrollment.
For fall cohorts, students are included in the enrolled another count when they have the
following:
• one of the cohort codes entered in the cohort parameters that matches the SGRCHRT
record
• SFBETRM enrollment record or SHRTGPA institutional academic history record for the
term entered in the Start Term parameter

1568
Banner Student User Guide | Academic History
• one or more of the values entered in the Transfer Out Reason Code parameter that
matches the SHRTTRM record and are on or before the maximum enrollment term
entered in the Enrollment Terms parameter
For full year cohorts, students are included in the enrolled another count when they have
the following:
• one of the cohort codes entered in the cohort parameters that matches the SGRCHRT
record
• SFBETRM enrollment record or SHRTGPA institutional academic history record for
terms between the term entered in the Start Term parameter and the term entered in the
End Term parameter
• one or more of the values entered in the Transfer Out Reason Code parameter that
matches the SHRTTRM record and are on or before the maximum enrollment term
entered in the Enrollment Terms parameter
The enrolled another count is only included in the eight year lines of the Web Upload file,
per IPEDS Outcome Measures Survey requirements.
Student Centric Periods
The following parameters can be used with student centric periods.
• Start Term parameter - Enter the minimum start term of the student centric period to be
processed.
• End Term parameter - Enter the maximum end term of the student centric period to be
processed.
• Enrollment Terms parameter - The maximum enrollment term is used to select students
to be reported for the student centric period. Students enrolled in any terms up to the
maximum enrollment term will be reported.
Note: A student will be reported when he/she has a cohort code that
matches the parameter values entered, and an SFBETRM enrollment
record or SHRTGPA institutional academic history record for terms
between the term entered in the Start Term parameter and the term
entered in the End Term parameter.
Web Upload
The report produces a control page with the parameter values, as well as a comma-
delimited file for the Web upload. This comma-delimited file format conforms to the NCES
requirements for the creation of the Key Pair Value file. You have the option to produce a
file of detailed records for the students contained in the web upload file. This can be used
to review the data prior to uploading the file.
Note: When running this report from job submission, the Web upload file
name will be in the format
shrioms_wu_######.txt, where
###### is the run sequence number.

1569
Banner Student User Guide | Academic History
The detail file name will be in the format shrioms_######.csv,
where
###### is the run sequence number.
Academic Standing Rules Processing
Academic Standing Rules are built by level and college on the Academic Standing Rules
Form (SHAACST). This allows the institution to create different academic standing rules
for undergraduate liberal arts students vs. graduates and different rules for the Music
College vs. the Business School. If college is not used by your institution for determining
academic standing then a wild card college of
99 can be used. If this wild card is used
then no other specific college rules can be created.
An Academic Standing Rules Query Form (SHQASTR) can be accessed from the Key
Information after entering a level, to see the rules which have been created.
There are three sections on the Academic Standing Rules Form (SHAACST).
• The first section is the Academic Difficulty Rules information. This section is used to
create the rules the institution uses when determining probation and dismissal. Rules for
updating the student's status to good standing after being on probation are also created
in this section.
• The second section is the Dean's List information. This section is used to determine if
the student is eligible for the dean's list based on the rules established.
• The third section is the Excluded Grades information. This section defines, for the
dean's list rules selected, what grades will disqualify a student from meeting a rule.
Use the Grades field in the Excluded Grades block to enter any grade which causes a
student to be ineligible for an end-of-term honor, even if the student otherwise qualifies
under a rule defined in the Dean's List Rule block. Multiple rows of excluded grades are
allowed. Entries are validated against SHAGRDE for grades defined for the level
entered in the Key Block. When a valid grade is entered, the abbreviation for the grade
will be displayed.
The following outlines the fields used by the Academic Difficulty Rules.
• Term - Term during which rules take effect
• Status - Student's current academic standing
If the student is new, the system assumes a standing of
00. For continuing students, the
system pulls the standing from the previous term's academic standing in the End of
Term Academic Standing field in the Term Header information of the Term Course
Maintenance Form (SHAINST). (If there is no standing, the system assumes
00). If an
override standing has been entered for the term on the General Student Form
(SGASTDN), the system will use the override standing.
• Sequence Number - Academic standing rule sequence number
Used to distinguish different rules for the same selection criteria. Will be used in priority
order. If a student matches the first rule (sequence 1), then the system will use that
standing. For example, if there are two different rules for determining probation, one

1570
Banner Student User Guide | Academic History
based on term GPA and the other on cumulative GPA, then you can create the first rule
using term GPA, and the second using cumulative GPA.
• Probation Indicator - Indicator for preventing registration if checked
Probation indicator defaulted from the Academic Standing Code Validation Form
(STVASTD) when retrieving current status.
• Term Hours Low/Term Hours High - Minimum and maximum attempted term hours
Low and high term hours the student is registered for from the Registration Form
(SFAREGS). Used to create different rules for part-time and full-time students.
• Cumulative Hours Low/ Cumulative Hours High - Minimum and maximum
cumulative hours based on type
Includes transfer hours earned.
• Type - Type of cumulative hours
Type of cumulative hours used to determine if student is eligible for rule.
Type is only limited within term and status.
• Term Institutional GPA From/To - Minimum and maximum GPA for the rule if
institutional term GPA is used to determine academic standing
If term GPA is not used, fields are left blank.
• Cumulative Institutional GPA From/To - Minimum and maximum GPA for the rule if
institutional cumulative GPA is used to determine academic standing
If institutional cumulative GPA is not used, fields are left blank. If used in conjunction
with term GPA, student's GPA for term and cumulative consideration must fall within
appropriate ranges.
• Cumulative Overall GPA From/To - Minimum and maximum GPA for the rule if
institutional plus transfer (overall) GPA is used to determine academic standing
May be useful for students admitted on probation. If institution and transfer cumulative
GPA is not used, fields are left blank. If used in conjunction with either or both of the
other GPA ranges, student must comply with all rules to attain next standing.
• Status - Next academic standing code
This is the academic standing the student attains if he/she meets all the requirements
for the specified rule.
Valid values are:
A - Attempted
E - Earned
P - Passed
G - GPA Hours

1571
Banner Student User Guide | Academic History
There are no restrictions on using varying hour types on different GPA selections for
different rules, except within term and status.
There are three parameter options which control the update to maximum hours on the
Calculate Academic Standing Report (SHRASTD).
• Calculate Maximum Hours? Y/N
• Pre-registration Future Term? (This is the term to which you want the new maximum
hours to apply.
• Maximum Hours Update/Audit? U/A (The process may be run in Audit mode to
determine who would be updated with new maximum hours.)
In order for an update to maximum hours to occur, the following items must also be
considered:
• The Calculate Academic Standing Process (SHRASTD) must be requested and run in
Update mode.
• An E-term record must exist for the designated pre-registration future term.
• There may be no graded sections as part of the student's registration for the future term
designated.
The report lists all students selected for academic standing updates. Two columns on the
report display the maximum hours information.
The Max Prev column (Previous Maximum Hours) reflects the current (prior to update)
value in the Maximum Hours field on the Student Course Registration Form (SFAREGS)
of the future term designated.
The Hrs New column (New Maximum Hours) reflects the value associated with the newly
calculated academic standing (as defined on the Academic Standing Code Validation
Form (STVASTD)), which will be used to update the Maximum Hours field on the Student
Course Registration Form (SFAREGS) for the future term.
If Previous Max Hours and New Max Hours are equal, neither value will print. Also, if there
is no pre-registration for the future term designated, the report will present the Max Hours
that will be assigned if/when the student registers for the future term designated.
Progress Evaluation Processing and Combined
Academic Standing
You can track students’ progress (and regression) in addition to their academic standing
using progress evaluation processing. You can define progress evaluation codes and
rules by which those codes will be assigned to students, as well as combined academic
standing codes and rules that are based on the existing academic standing codes and the
progress evaluation codes. As such, the combined academic standing code is a single
value that reflects a student’s academic standing and progress evaluation.
Forms in the General Student, Registration, and Academic History modules are used to
capture and display the progress evaluation data.

1572
Banner Student User Guide | Academic History
Combined Academic Standing Code Validation Form (STVCAST)
This form allows you to create and define valid combined academic standing codes. The
combined academic standing code is defined by a combination of an academic standing
code and a progress evaluation code.
Progress Evaluation Code Validation Form (STVPREV)
This form allows you to create and define valid progress evaluation codes.
Student Course Registration Form (SFAREGS)
This form displays the progress evaluation (PREV) code, the combined academic
standing (CAST) code, and the associated descriptions for the student, as well as the
academic standing. Override codes and terms will display if available, and you may
update (override) an existing code using these fields. The fields have been added to the
Student window of SFAREGS, which is accessed using the Update Student’s Term
Information item from the Options Menu, when you are in the Registration Information
block.
When you are registering a student in a course, the form checks the combined academic
standing code first to see if this code can cause registration to be prohibited or if maximum
hours are attached to that code. It then looks at the academic standing for prohibitions or
maximum hour restrictions.
The logic within baseline registration, telephone registration, and Web registration
considers whether or not a student’s combined academic standing (CAST) code has any
registration restrictions or limitations associated with it. If it does not, or if the student does
not have a combined academic standing (CAST) code, the registration process will also
consider whether or not the academic standing (ASTD) code has any registration
restrictions or limitations associated with it. As such, your institution should carefully
consider whether or not to place registration restrictions and/or limitations on both sets of
codes (CAST and ASTD). It is recommended that you associate registration restrictions
and/or limitations with one set of codes or the other, not necessarily both.
General Student Form (SGASTDN)
This form displays the progress evaluation (PREV) code and the combined academic
standing (CAST) code for the student, as well as the activity dates and descriptions for
these fields in the Academic Status window. Override codes, descriptions, and override
terms for the PREV and CAST codes are also in this window. These fields provide
override capability for possible restrictions placed on students based on their combined
academic standing and progress evaluation status.
General Student Summary Form (SGASTDQ)
This form displays the progress evaluation (PREV) code and the combined academic
standing (CAST) code for the student. Override codes for the PREV and CAST codes are
display only fields.

1573
Banner Student User Guide | Academic History
Academic Standing Rules Form (SHAACST)
This form includes the rules for progress evaluation (PREV), the progress evaluation
grade exclusions, and the combined academic standing (CAST) rules. Three windows
allow the creation and definition of the rules used by the Progress Evaluation Process
(SHRPREV). The rules are used to assign progress evaluation codes and combined
academic standing codes to student records.
The windows are:
• Progress Evaluation Rules window
• Progress Evaluation Grade Exclusion window
• Combined Academic Standing Rules window
Progress Evaluation Rules Window
The Progress Evaluation Rules block is used to create rules that will determine which
progress evaluation code to assign to the students being processed. Fields within the
rules allow for defining the population to which they apply. These fields include program,
campus, degree, major, and student type.
This window is accessed using Next Block or the Progress Evaluation Rules item in the
Options Menu.
Progress Evaluation Grade Exclusion Window
The Progress Evaluation Grade Exclusion window is used to create a list of grade codes
that will cause a course bearing one of these grades to be excluded from those that count
towards positive progress.
This window is accessed using Next Block or the Progress Evaluation Grade Exclusions
item in the Options Menu.
Combined Academic Standing Rules Window
The Combined Academic Standing window is used to create and define rules using
academic standing codes assigned to the student(s) by the Academic Standing Process
(SHRASTD) and progress evaluation codes assigned to the student(s) by the Progress
Evaluation Process (SHRPREV). A rule should be created for each possible combination
of academic standing code and progress evaluation code.
This window is accessed using Next Block or the Combined Academic Standing Rules
item in the Options Menu.
Term Course Maintenance Form (SHAINST)
This form displays the progress evaluation code and the combined academic standing
code of the student, as well as the activity dates and descriptions for these fields.

1574
Banner Student User Guide | Academic History
Subject Sequence History Form (SHASUBJ)
This form displays the progress evaluation (PREV) code and the combined academic
standing (CAST) code of the student in the Current Standing block. Override codes and
descriptions for the PREV and CAST codes are display only fields.
Term Sequence Course History Form (SHATERM)
This form displays the progress evaluation (PREV) code and the combined academic
standing (CAST) code of the student in the Current Standing block. Override codes and
descriptions for the PREV and CAST codes are display only fields.
Progress Evaluation Process (SHRPREV)
This process is used to calculate progress evaluation and combined academic standing
codes and print a report of the results. The process can be run in update or audit mode.
Prior to running this process, make sure valid codes have been set up on STVPREV and
STVCAST, and that valid rules have been set up on SHAACST (for the SHRCAST,
SHRPREV, and SHRPRGE blocks).
The Calculate Academic Standing Report (SHRASTD) should be run at least once in
update mode for the term code being processed before SHRPREV is run. This is to make
certain that student academic standing codes have been assigned.
When SHRPREV is run, the
PREV_CODE value is first derived from the override progress
evaluation code displayed on the General Student Form (SGASTDN) for the most recent
term prior to the term processed, if one exists. Next, it is derived from the end of term
progress evaluation code displayed on the Term Course Maintenance Form (SHAINST)
for the most recent term prior to the one being processed, if one exists. If there is no end
of term progress evaluation code displayed on SHAINST for the most recent term prior to
the one being processed, a value of “00” (Good Standing) will be assumed.
The following error messages may be displayed on the output, if the process is unable to
calculate progress evaluation and combined academic standing codes for the student:
• No Student record
• No Term Course Header Record
• No CAST Rule for Student
• No PREV Rule for Student
The Progress Evaluation Process (SHRPREV) takes grade changes into account when
determining the percentage of courses the student has completed and then assigning
progress evaluation status codes for the term. The process also considers transfer hours
as included in cumulative hours, when cumulative hours are checked for progress
evaluation rule qualification as defined in the academic standing rules. Future term hours
are included when progress evaluation rules are assigned, so that the student's hours are
considered up to and including the term for which the process is run, instead of just the
overall cumulative hours for that student.

1575
Banner Student User Guide | Academic History
Satisfactory Academic Progress
Federal regulations require that institutions monitor the academic progress of each
student who applies for federal financial assistance. Institutions must certify that students
are making satisfactory academic progress towards earning their degrees. The
determination of satisfactory academic progress (SAP) must be made at least once a year
and before the financial aid office disburses any federal aid funds for the subsequent
semester.
More information on Federal requirements can be found at the following Website:
http://www.ifap.ed.gov/
SAP determination uses CAPP compliance to check whether a student is successfully
completing coursework for a degree. This in turn allows the student to remain eligible for
federal financial aid, including Title IV funding. Students must maintain a specific
cumulative GPA and complete a specific percentage of all attempted courses (earned
credits) to be considered to have made satisfactory academic progress. The SHISAPP
form and SHRSAPP and SHRSARJ tables are used with batch CAPP compliance
processing to capture the data used for checking satisfactory academic progress.
Satisfactory academic data can be purged using the SMPCSAP process.
To use SAP functionality, you must have CAPP set up so you can run batch compliance.
Please refer to the Banner Student CAPP Handbook for information on using CAPP
compliance.
Process Flow
Here is an overview of the process flow for satisfactory academic progress. This assumes
CAPP has been set up and is in use for compliance processing.
1. Access the Compliance Default Parameters Form (SMADFLT).
1.1. Set the Default Code to
BATCH.
1.2. Check the following indicators under Additional Compliance Data:
• Create Unused Courses and Attributes
• Create Rejection Records
2. Run the Batch Compliance Process (SMRBCMP).
2.1. Set the Create SAP Data Y/N parameter set to
Y.
This value is inserted into the Person Collector Table (SPRCOLR) for use with
SMRJOBS.
2.2. Use a population selection.
Population selection must be set up on SMRBCMP and used for satisfactory
academic progress. When only a few records are needed, you can create a
manual population selection.
3. Compliance records are created with data for satisfactory academic progress.

1576
Banner Student User Guide | Academic History
4. The Satisfactory Academic Progress Course Data Table (SHRSAPP) and the
Satisfactory Academic Progress Course Rejection Reason Table (SHRSARJ) are
populated with data for satisfactory academic progress.
• The SHKCSAP package and SHKCSA1 package body are used to retrieve data
from CAPP and insert it into the tables. This package is called when SMRBCMP is
run.
• The SMRJOBS process is called when SMRBCMP is run. When the Create SAP
Data Y/N parameter is set to
Y, SMRJOBS calls processing which calculates the
GPA and inserts the data into the SHRSAPP table.
5. Review satisfactory academic progress data for the selected students on the
Satisfactory Academic Progress Review Form (SHISAPP).
You can view information for curriculum and used course GPA summary data, used
course details, unused course details, and rejection reasons for unused courses.
6. Run the SAP Purge Process (SMPCSAP) when appropriate to remove the
compliance data for satisfactory academic progress from the SHRSAPP and
SHRSARJ tables.
You can run this process for a date range, for IDs, in Audit Mode or Update Mode, and
choose to produce summary or detail information.
The Compliance Purge Process (SMPCPRG) does not purge compliance data
created for satisfactory academic progress.
Rejection Reasons
Rejection reasons for unused courses are stored in the SHRSARJ table. This table is a
child table of the SHRSAPP table. It is populated when the
SHRSAPP_REJECTION_IND column is set to Y. Rejection reasons can be viewed in the
Rejection Reason window on the SHISAPP form.
If a course is marked as used, and the same course (CRN) also has rejection reasons for
other areas/groups, the course is not populated a second time in the table as not used
with rejection reasons. The course will not appear twice in the table when the CRN or the
transfer identity is the same. (Transfer identity includes the transfer institution sequence
number, the transfer institution attendance period sequence number, and the transfer
equivalent course sequence number.)
A repeated course that is not used will only be populated once in the table as unused, with
the reason of “repeated course”, provided your institution uses Banner Student repeat
processing that populates data using the include/exclude/all repeat indicators. Duplicate
instances of the same subject and number that are not coded as repeats by Banner repeat
processing are not identified in any specific way in this table.

1577
Banner Student User Guide | Academic History
When the Batch Compliance Process (SMRBCMP) is run, courses can be rejected for
various reasons. Here is a list of rejection reasons and descriptions used with SMRCMPL
and SMRBCMP that can affect satisfactory academic progress.
Error Message Description
Invalid Campus/Coll/Dept The course does not meet the campus, college, or
department requirement in the Course/Attribute
Attachment block or the Course/Attribute Exclusions
block of the Area Requirements Form (SMAAREA) or
the Group Requirements Form (SMAGROP).
Outside Term Range The course was taken outside of the must take in or
after term and must take before term range in the
Course/Attribute Attachment block or the Course/
Attribute Exclusions block of the Area Requirements
Form (SMAAREA) or the Group Requirements Form
(SMAGROP).
Exceeded Year Rule Limit The year limit (also called year rule) requirement in the
General Requirements or the Course/Attribute
Attachment blocks of the Area Requirements Form
(SMAAREA) or the Group Requirements Form
(SMAGROP) or the General Requirements block of
the Program Requirements Form (SMAPROG) has
been exceeded.
Outside Credits Per Crse
Range
The course credits are outside the minimum credits
per course and the maximum credits per course range
in the Course/Attribute Attachment block of the Area
Requirements Form (SMAAREA) or the Group
Requirements Form (SMAGROP).
Detail Min Grade Not Met The minimum grade requirement in the Course/
Attribute Attachment block of the Area Requirements
Form (SMAAREA) or the Group Requirements Form
(SMAGROP) has not been met.
Group Min Grade Not Met The minimum course grade in the General
Requirements block of the Group Requirements Form
(SMAGROP) has not been met.
Area Min Grade Not Met The minimum course grade in the General
Requirements block of the Area Requirements Form
(SMAAREA) has not been met.
Program Min Grade Not Met The minimum course grade in the General
Requirements block of the Program Requirements
Form (SMAPROG) has not been met.
Detail Addl. Level Not Met The include level requirement in the Include/Exclude
Course/Attribute Levels in Requirement block of the
Area Requirements Form (SMAAREA) or the Group
Requirements Form (SMAGROP) has not been met.

1578
Banner Student User Guide | Academic History
Group Addl. Level Not Met The include level requirement in the Include/Exclude
Course Levels block of the Group Requirements Form
(SMAGROP) has not been met.
Area Addl. Level Not Met The include level requirement in the Include/Exclude
Course Levels block of the Area Requirements Form
(SMAAREA) has not been met.
Program Addl. Level Not Met The include level requirement in the Include/Exclude
Course Levels block of the Program Requirements
Form (SMAPROG) has not been met.
Intentionally Excluded The course is excluded in the Course/Attribute
Exclusions block of the Area Requirements Form
(SMAAREA) or the Group Requirements Form
(SMAGROP).
Invalid Course Level The course level is excluded in the Include/Exclude
Levels block of the Area Requirements Form
(SMAAREA), the Group Requirements Form
(SMAGROP), or the Program Requirements Form
(SMAPROG).
Group Restricted Subj/Attr The course or course attribute is restricted in the
Restricted Subjects/Attributes block of the Group
Requirements Form (SMAGROP).
Area Restricted Subj/Attr The course or course attribute is restricted in the
Restricted Subjects/Attributes block of the Area
Requirements Form (SMAAREA).
Program Restricted Subj/Attr The course or course attribute is restricted in the
Restricted Subjects/Attributes block of the Program
Requirements Form (SMAPROG).
Group Restricted Grade The course grade is restricted in the Group Restricted
Grades block of the Group Requirements Form
(SMAGROP).
Area Restricted Grade The course grade is restricted in the Area Restricted
Grades block of the Area Requirements Form
(SMAAREA).
Program Restricted Grade The course grade is restricted in the Program
Restricted Grades block of the Program Requirements
Form (SMAPROG).
Transfer Course Not Allowed The use of transfer courses is not allowed in the
Course/Attribute Attachment block of the Area
Requirements Form (SMAAREA) or the Group
Requirements Form (SMAGROP).
Error Message Description

1579
Banner Student User Guide | Academic History
Student Type Update Procedures
The Continuant Terms Rule Form (SOACTRM) is used to establish the rules for how the
existing student type, maintained on the General Student Form (SGASTDN), will be
updated to the Next Student Type, which is maintained on the Student Type Validation
Form (STVSTYP). The form is used to establish the rules for consecutive enrollment.
These rules may change over time and may be different for different student types, so the
keys to the table are term and student type. Terms which are continuant to the key term by
student type are built on the table. An unlimited number of terms may be specified as
continuant. For example, a new freshman may become a continuing student after two
terms, but a transfer student becomes a continuing student after one term.
The Student Type Update Process (SHRTYPE) automatically updates the student type
based on the rules established on SOACTRM. This process should be run after the
courses have been rolled to history at the end of the term using SHRROLL. If the Next
Exceed Max Transfer Cred/
Crse
The transfer credits or courses exceed the maximum
allowed in the General Requirements block of the
Program Requirements Form (SMAPROG), the Area
Requirements Form (SMAAREA), or the Group
Requirements Form (SMAGROP).
Exceed Max Non-Trad Cred/
Crse
The credits or courses with non-traditional grades
exceed the maximum allowed in the General
Requirements block of the Program Requirements
Form (SMAPROG), the Area Requirements Form
(SMAAREA), or the Group Requirements Form
(SMAGROP).
Targeted to Diff Area/Group The course is targeted to a different area or group on
the Student Targets, Waivers, and Substitutions Form
(SMASADJ).
Test Score Not Met
(SMRCMPL only)
The test score requirement in the Course/Attribute
Attachment block of the Area Requirements Form
(SMAAREA) or the Group Requirements Form
(SMAGROP) has not been met.
Concurrency Not Met
(SMRCMPL only)
The concurrency requirement has not been met.
Repeated Course
(SMRCMPL only)
The course has been repeated.
Repeat Limit Exceeded
(SMRCMPL only)
The course repeat limit has been exceeded.
Prerequisite Not Met
(SMRCMPL only)
The course prerequisite has not been met.
Error Message Description

1580
Banner Student User Guide | Academic History
Student Type field is Null on the Student Type Validation Form (STVSTYP) then no
update of the student type occurs.
The student must have an enrollment status on the Student Course Registration Form
(SFAREGS) that permits registration for the update process to occur. The enrollment
status on SFAREGS must have the Prevent Registration box on the Enrollment Status
Validation Form (STVESTS) unchecked.
SHRTYPE can be run for a rules term, an update term, in audit or update mode, can
process student type for a learner curriculum, and process student type by student centric
period rules.
The option to use student centric period rules to determine student type allows you to
update student type based on a student’s enrollment in a student centric period, instead of
enrollment by term. The student type in effect on the general student record (SBGSTDN)
for the first term in the student centric period will be used for reporting for the duration of
the student centric period.
The Process by Student Period parameter is used to consider student centric period rules
when determining the student type.
• When this parameter is set to Y and the student has a cycle designator (general student
record) or student centric period (academic history record) in effect for the update term,
the SOACSCP rules are used to evaluate whether the student type should be updated
to the next student type defined on STVSTYP.
• When this parameter is set to Y and the student does not have a cycle designator or
student centric period in effect for the update term, the SOACTRM rules are used to
evaluate whether the student type should be updated to the next student type defined
on STVSTYP.
• When this parameter is set to N, the current SOACTRM rules are used, even if the
student has a cycle designator or student centric period in effect for the update term.
Examples
The following are examples of how the student type update process will function.
Continuant Terms Rules
Key
Student
Type Continuant Terms
199101 B 199004 199003 199002
199101 A 199004 199003 199002
199101 D 199101
199101 - Fall 1991 B - New Freshman

1581
Banner Student User Guide | Academic History
If you run the Student Type Update Process (SHRTYPE), then each student's academic
history will be examined. SHRTYPE looks for either an enrollment record or academic
history in the rules term and academic history for any of the terms listed in the Continuant
Term information of the Continuant Terms Rule Form (SOACTRM). If the process is being
run for Rules Term 199101 with an Update Term of 199102 and the new freshman
students are registered for courses (have an enrollment record) and have at least one
course on their Term Course Maintenance Form (SHAINST) for either term 199004,
199003, or 199002, then the students will have their student statuses updated. The
transfer students who took courses in 199101 will have their student types updated
automatically, because the courses have been rolled to history for term 199101.
The following are the entries in the Student Type Table for the examples below:
Example 1:
John Smith has a student type of B on his general student record for term 199101.
Term 199101 is the first term John has ever registered. He has no academic history
information for the continuant terms. John's student type will not change.
Example 2:
Ann Jones has a student type of B for term 199101 on her general student record.
Ann took two courses in term 199003 which exist on SHAINST and has registered for
a course in term 199101. Following the rules on SOACTRM, a new general student
record will be created for Ann with an effective term of 199102 and a student type of
C.
Example 3:
Hope Lance has a student type of C for term 199101 on her general student record.
Since no new student type value is maintained on the Student Type Validation Form
(STVSTYP) for the student type of C, then no update is performed. Note: No rules
need to be built on SOACTRM for student types which will not be updated via the
Student Type Update Process (SHRTYPE).
199004 - Summer 2 1990 D - Transfer Student
199003 - Summer 1 1990
199002 - Spring 1990
Student Type New Student Type
A Returning Freshman C
B New Freshman C
CContinuing
DTransferC
E Adult/Continuing Ed

1582
Banner Student User Guide | Academic History
Example 4:
Joe Stein has a student type of A for term 199101 on his general student record. Joe
took courses in term 199004 which exist on SHAINST and has registered for courses
in term 199101. Following the rules on SOACTRM, his student type should be
updated to a C for term 199102. Joe already has a general student record for term
199102, so it will be updated with the new student type of C.
Example 5:
Mike King has a student type of D for term 199101 on his general student record. Mike
took courses in term 199101 which exist on SHAINST and has registered for courses
in term 199101. Following the rules on SOACTRM, his student type should be
updated to a C for term 199102.
More Example Process Steps
Here is another example of the student type update process.
The scenario is:
• Grades have been rolled to history for the Fall 1995 term (e.g., 199510).
• You want to update the student type of these students to the appropriate code (as
defined on STVSTYP) for the Spring 1996 term (e.g., 199520).
Perform the following steps:
1. Access SOACTRM.
2. In the Key Block, enter the term code in the Term field for which you have just
completed end-of-term processing. (In this example, you would enter
199510.)
3. Enter the valid student type code(s) to be updated in the Student Type field.
This data so far should select those students who have registration records and at
least one institutional academic history record for the term 199510.
4. Use Next Block to access the Continuant Term block.
5. Use the Continuant Term field to further narrow your selection of the population by
entering those term(s) for which the student(s) must have at least one institutional
record in academic history.
In this example, you only want to select those students for update who have academic
history records for the Fall 1995 term, so you would enter
199510 again here.
Note: Based upon your institutional policy, if you need to add more than
one term code here, this would be an OR condition.
6. Save your changes, and exit SOACTRM.
7. Access job submission, and run SHRTYPE.
7.1. Enter the term you entered in the Key Block of SOACTRM in the Rules Term
parameter. (For this example, you would enter
199510.)

1583
Banner Student User Guide | Academic History
7.2. Enter the term code to be used to update the student type on SGASTDN for the
general student record in the Update Term parameter. (For this example, you
would enter
199520.)
7.3. Enter
A (Audit) in the Mode parameter to verify that the report is selecting the
correct population. Once you have verified the output, you can run the process
in Update Mode.
Electronic Gradebook - Define Sub-Components
Electronic gradebook functionality is used to define, enter, and view sub-components, This
section discusses the definition of sub-components and components defined for CRN
(section) and how they are used to calculate the grade.
Please refer to the Banner Student Self-Service User Guide and the Banner Faculty and
Advisor Self-Service User Guide for more detailed information describing the Web
processing used with this baseline functionality.
Overview
You can create and maintain the definition of the gradable components for a CRN of a
course (section), as well as the grade scale to be used for grade calculations for the CRN.
You can also define additional rules for the component definition and define components
at a layer lower than the gradable component, that is the sub-component level. The sub-
component marks must be defined in relation to a component so that they may be used by
the system to calculate the component mark.
• Components may have AND/OR logic or rule-based logic to allow for sub-set selections
(e.g., three of five, etc.) and best of logic (e.g., best two out of four, etc.) to be used for
the calculation of a section mark. Sub-components may also use the same facilities for
the calculation of component marks. Each sub-component and/or component has a
minimum passing mark. Component and sub-component data entry is sequenced to
allow the AND/OR and the best of logic to function properly.
• The specific grade scale to be used can be identified at the sub-component and
component levels and factored into the overall final grade calculation for the CRN
(section) for the student. This includes both the numeric and alphabetic marking
processes.
• Each sub-component and/or component may have deadline dates for submission of
work, as well as a definition of maximum time (number of days) work can be late.
Calculation of a sub-component or component mark can degrade the percentage mark
by a number of days, to a minimum mark, specifically no higher than the cap mark
identified for the sub-component or component itself.
• Weighting at the sub-component and component levels is formatted to 999.99.
• A maximum (cap) on the resit mark at the sub-component or component levels can be
set, and a maximum number of resits allowed on a sub-component and on a component
can also be defined. (Manual administration is required to ensure that a student has not
reached the maximum number of resits before they are allowed to actually take a resit.)

1584
Banner Student User Guide | Academic History
• When CRNs (sections) are rolled from one term to another using SSRROLL, a sub-
component will not be rolled unless the component to which it is attached is set to be
rolled.
Forms and Process Used
• SHAGRUL - Used to define the rules to be associated with the grade book calculations.
• SHARTYP - Used to define rule types to be associated with grade book rules.
• SHARPAR - Used to define parameters to be associated with the rule type functions.
• SHAGSCH - Used to define a grade scale for use in the grade calculation procedure
and to draw a relationship between a percentage and a letter grade.
• SOATERM - Used to store default late rules and resit rules for components and sub-
components and to define midterm and final deadline date entry capabilities.
• SHAGCOM - Used to assign grade scales and define components and sub-
components.
• SSRROLL - Used to roll gradable components and sub-components.
Sample Data
The Gradebook Rule Type Definition Table (SHBRTYP) and grade rule are delivered with
two pre-defined rules types, rule type parameters, and the associated procedures. Please
see the sample data which follows.
Late Rule
Rule Type Data
Rule Type Name LATE
Description Late mark degradation
System-required Y
Parameter Data
First day percentage degradation per day
First day actual percentage degradation per day
Late cap mark in percent
Max number of late days
Percentage degradation per day
Actual mark degradation per day

1585
Banner Student User Guide | Academic History
Late Rule Function
The late rule function is used in the calculation of component and sub-component grades.
The procedure uses the due date from
SHRSCOM_DUE_DATE or SHRGCOM_DUE_DATE
and the submission dates from
SHRSMRK_COMPLETION_DATE or
SHRMRKS_COMPLETION_DATE to identify students who have submitted work that is
considered late. If an extension date exists on SHRSMRK or SHRMRKS for a student,
then this is used instead of the due date. If there is a value in the parameter for first day
degradation by percentage or first day actual mark degradation (if both are entered,
percentage will take precedence), these values are used. They are then accumulated with
the parameter values for actual mark or percentage (if both are entered, percentage will
take precedence) for each additional day the work is late up to the maximum number of
days the work is late.
If no first day values are present, then each day the work is late accumulates using the
second set of parameters only. The mark is then degraded by the total amount, either by
percentage or actual mark, down to the minimum late mark. If an alpha grade has been
entered on the Web, the default score defined on SHRGRSC is used to calculate the
degraded value, and it is then mapped back to the appropriate alpha grade. The resulting
score is stored in
SHRSMRK_PERCENTAGE or SHRMRKS_PERCENTAGE with a grade
change code of
DL. The parameter values are always stored as percentage values in the
rule definitions. Therefore if the mark entered is an alpha grade, then the numeric median
value is selected from the relevant grade scale. If a numeric mark is entered, the
percentage value is calculated using the Out of value to give a percentage.
Here are two examples of the Late Rule Function.
Example 1:
First day percentage degradation of 10%.
Percentage degradation of 5% per day.
Late cap = 40%
Resit Cap Rule
Rule Type Data
Rule Type Name RESIT
Description Resit cap mark calculation
System-required Y
Parameter Data
Resit cap in percent
Max number of resits allowed

1586
Banner Student User Guide | Academic History
Max Late days = 5
Student has mark of 60% and is 5 days late.
Mark will be degraded by 30%, (60% - 18%).
Final mark = 42%
Example 2:
Percentage degradation of 5% per day.
Late cap = 40%
Max Late days = 5
Student has mark of 60% and is 10 days late.
Mark will be degraded by 50%, which will then require capping to the late cap value
(60% - 30%).
Final mark = 40% capped to late cap value.
Resit Rule Function
The procedure uses the grade change codes with the Resit Indicator set to Y to identify
students with resits. It then applies the resit rule from either SHRSCOM or SHRGCOM,
which in turn looks at SHAGRUL for the necessary parameter values. It selects a count of
existing resits for the sub-component/component and checks this against the parameter
value for maximum number of resits. If this check is passed, the procedure goes on to
check the mark entered against the parameter value for the resit cap. If the entered mark
is greater than the resit cap value, then the mark is degraded back to the resit cap value
with a grade change code of
CR. If the mark is not capped, the mark is stored with a grade
change code that is chosen by the user. The resulting score is stored in
SHRSMRK_PERCENTAGE or SHRMRKS_PERCENTAGE. The parameter values are
always stored as percentage values in the rule definitions. Therefore, if the mark entered
is an alpha grade, the numeric median value is selected from the relevant grade scale. If a
numeric mark is entered, the percentage value is calculated using the Out Of value to give
a percentage.
Here are two examples of the Resit Rule Function.
Example 1:
Max no of resits = 2
Resit cap mark = 40%
Students first resit attempt is marked with 60 out of 120 = 50%.
This is capped to the max resit mark of 40% and mapped back to a mark of 48.
Example 2:
Max no of resits = 2

1587
Banner Student User Guide | Academic History
Resit cap mark = 40%
Students third resit attempt is marked with 60 out of 120 = 50%.
Process recognizes that too many attempts to resit have been made, and this is
reported using an error message.
Best of Processing
Here is an example of Best of processing.
Best of ... Example:
A section is made up of seven components.
All weightings are assumed as equal in this example.
The best…of value for the section is 3.
The component definition table looks as follows:
Please remember that this sub-set and best of logic requires the component definitions to
be entered in the correct sequence order.
The above example would translate as follows:
Comp 6 and 7 will be included in the overall section calculation, as the components
directly above (Comp 5 and 6 respectively) have no sub-set logic implied and
therefore default to AND logic. This allows a combination of Best of and Must Include.
Then the best (highest) three components from Comps 1, 2, 3, 4, and 5 will be used,
as each component directly above has OR logic applied.
Therefore the over all section mark would be:
(the best three from Comps 1, 2, 3, 4, and 5) + Comp 6 + Comp 7.
For this example, the marks from Comps 1, 2, and 4 (highest three from Comps 1- 5) plus
Comp 6 and 7 would match this criteria giving the following final mark:
Name
Sub-Set
Logic Mark Weight Out of
Comp 1 OR 45 1 100
Comp 2 OR 40 1 100
Comp 3 OR 70 1 100
Comp 4 OR 55 1 100
Comp 5 40 1 100
Comp 6 50 1 100
Comp 7 85 1 100

1588
Banner Student User Guide | Academic History
Subset Processing
Here is an example of Subset processing.
Subset Example:
A section is made up of seven components.
All weightings are assumed as equal in this example.
The best…of value for the parent section is blank.
The component definition table looks as follows:
Please remember that this sub-set and best of logic requires the component definitions to
be entered in the correct sequence order.
The above example would translate as follows:
The best…of value for the parent section is blank. Therefore, all OR logic will default
to best 1 of.
(Take the best 1 of Comps 1, 2, and 3) AND (the best 1 of Comps 4 and 5) AND (the
best 1 of Comps 6 and 7.)
For this example, Comp 2 (highest from Comps 1- 3) plus Comp 4 (highest from Comps 4
and 5) plus Comp 7 (highest from Comps 6 and 7) would match this criteria giving the
following final mark:
(45 + 70 + 55) + 50 + 85
= 61
5
Name
Sub-Set
Logic Mark Weight Out of
Comp 1 OR 45 1 100
Comp 2 OR 40 1 100
Comp 3 AND 70 1 100
Comp 4 OR 55 1 100
Comp 5 40 1 100
Comp 6 OR 50 1 100
Comp 7 85 1 100
(70) + (55) + (85)
= 7
3

1589
Banner Student User Guide | Academic History
Electronic Gradebook - Enter Sub-Components
Electronic gradebook functionality is used to define, enter, and view sub-components, This
section discusses the entry of sub-components and how they are used to calculate the
grade.
Please refer to the Banner Student Self-Service User Guide and the Banner Faculty and
Advisor Self-Service User Guide for more detailed information describing the Web
processing used with this baseline functionality.
Overview
You can define security via several methods and use the Web for the entry of the
component marks for a student. You can also define additional rules to apply security to
those who may have permission to enter marks. Marks may be entered at the sub-
component level. Entry and changes to marks are maintained by the system using an
audit trail.
• Marks may be entered for the student for the sub-components defined for the CRN
(section). Where there are no sub-components, the marks may be entered for the
components defined for the CRN (section).
• Entry of sub-component, and where applicable, component marks is performed via the
Web in Banner Faculty and Advisors Self-Service.
• No mark will be calculated for a component if required sub-component marks are
missing, and no final grade will be calculated for a CRN (section) if a required
component mark is missing, except where exemptions have been entered, and except
where a subset of value has been entered for the parent section or component.
• Degraded late marks are calculated like simple interest. Percentage or actual
deductions are made from the original mark and are not compounded each day.
Forms and Processes Used
• STVROLE - Used to define roles inherent to the institution.
• SOAROLE - Used to assign one or multiple roles to an individual.
• STVGCMT - Used to define institutional comments that can be associated with a
student’s final mark.
• SFAALST - Used to enter grade codes and comments.
• SFASLST - Used to enter grade codes and comments.
• SHATCKN - Used to enter grade codes and comments.
• SOAFAPC - Used to attach a process code (and thereby grant Web access if attribute or
advisor type checking is turned on) to a faculty attribute or advisor type.
• STVGHCG - Used to indicate if grade change codes have resit or exemption status for
the mark entered.

1590
Banner Student User Guide | Academic History
• SHRROLL - Used to roll components and sub-components when there is no value for
the grade date.
• SFPREGS - Used to purge components and sub-components from registration records
before coursework is purged.
• SSPSCHD - Used to purge components and sub-components records for a section
before the section is purged.
Sample Data
Two system-required codes are delivered for the Grade Change Validation form
(STVGCHG). The codes are
CR (Capped Resit) and DL (Degraded Late Mark).
Two roles are delivered for the Role Definition Validation Form (STVROLE). The roles of
F
(Faculty Member) and
A (Advisor) provide all users who are set up in SIAINST as faculty
members and advisors with a role description on SOAFAPC.
Electronic Gradebook - View Sub-Components
Electronic gradebook functionality is used to define, enter, and view sub-components. This
section discusses the viewing of sub-components and components and the associated
grades.
Please refer to the Banner Student Self-Service User Guide and the Banner Faculty and
Advisor Self-Service User Guide for more detailed information describing the Web
processing used with this baseline functionality.
Overview
You can view the component marks for a student using Banner Student Self-Service and
Banner Faculty and Advisors Self-Service. You can also review the system-maintained
audit trail of changes to the sub-component and component marks.
• You have the ability to historically view marks for the student for the sub-components
defined for CRN (section).
• Students and appropriate staff can view only the current mark for the sub-component or
component via the Web.
• Appropriate staff members are given permission to view the history of sub-component
and component marks in Banner.
• The Class Roster Report (SFRSLST) is used to identify students who are missing final
grades and therefore, the sub-component and component marks that are related to that
final grade.

1591
Banner Student User Guide | Academic History
Forms Used
• SHATCKN - Used to view component grades and their history, as well as sub-
component grades and their history.
• SFAREGS - Used to create a set of records associated with the student for all courses
where gradable components have been defined, as well as records for all sub-
component definitions associated with the component records for the section.
Setting Up Sleep/Wake Processes
Note: The following Banner systems and processes are valid for the
Sleep/Wake processing described in this section:
Banner Student
Accounts Receivable Module
1. Define printer and print command on the Printer Validation Form (GTVPRNT). In the
(Printer) Code field, enter a name to reference each specific printer that may be used
for printing output from sleep/wake processing. In the Comment (Printer Command)
field, enter the correct operating system print command as it would normally be
entered from the command line prompt, substituting an @ (at sign) as the place holder
for the filename to be printed.
Report/Process Description
SFRSCHD Student Schedules
SHRTRTC Academic Transcript
Report/Process Description
TGRRCPT Account Receipt
TSRCBIL Student Billing Statement (Invoices)
TGRMISC Miscellaneous Receipt
Operating System Print Command
UNIX example:
lp -d talaris1 @
VMS example:
print/queue=ln01 @

1592
Banner Student User Guide | Academic History
2. On the appropriate System Distribution Initialization Information Form (SOADEST for
Student or TOADEST for Accounts Receivable), enter the printer code from
GTVPRNT that should be identified with the collector table rows that will be inserted to
the appropriate tables when online application forms create a request for output that
can be generated by sleep/wake processing.
Note: The collector tables are as follows:
3. On the Process Submission Control Form (GJAPCTL), for the valid sleep/wake jobs
listed previously, enter the correct response for the parameter that specifies that the
job should be processed for collector table entries. Refer to the documentation for
each specific process to determine the appropriate response in each case (correct
responses may be
COLLECTOR, Y, %, etc.).
In addition, each sleep/wake job has a printer code parameter. You must specify
exactly the same code for this parameter answer that was entered on either
SOADEST or TOADEST. A value of
Y should be entered for the run in sleep/wake
mode parameter, and a number of seconds should be specified for the sleep/wake
interval (cycle) for each process.
Note: Do not enter the printer code in the top section of GJAPCTL; only
enter it in the parameter section of the form.
Creating a Population Selection
To perform population selection, the application you will be working with must first be
defined on the Application Definition Rules Form (GLRAPPL).
The second step is to enter the Population Selection Definition Rules Form (GLRSLCT),
enter the Application (Code), and create a Selection ID (Identifier) with a description.
In the Selection Definition section, define the Select and From portions of the SQL
statement that the selection represents.
Example:
Process Collector Table
SFRSCHD SFRCBRQ
SHRTRTC SHTTRAN
TGRMISC TBRCMIS
TGRRCPT TBRCRCP
TSRCBIL TBRCBRQ
Select:
SARADAP_PIDM

1593
Banner Student User Guide | Academic History
Next, enter the Selection Rules for the population of records you would like to see.
Example:
Save your data and exit. Your population selection rules will be compiled. If any errors are
issued during the compilation process, resolve the errors before continuing. If you do not
resolve all errors given during the compile process, you will not be able to use the
population selection rules to extract a population.
You are now ready to extract the population of people. The Population Selection Extract
(GLBDATA) is run from the Process Submission Control Form (GJAPCTL). At minimum,
you will need to supply the parameters for Selection Identifier 1, Application, and Creator
ID, which are the values that were in the Key Information of the Population Selection
Definition Rules Form (GLRSLCT).
After extracting the population, you can use the Population Selection Extract Data Form
(GLAEXTR) to view and/or modify the people in the population. You can add or delete
people from the population using this form. The keys to the form are Application,
Selection ID, and Creator ID. (User ID is also displayed in the Key Information.) You will
be able to add or delete people only from populations that you selected.
After extracting the population, and modifying the people in it if necessary, you can use the
population for a variety of purposes. Letters can be produced using Letter Generation,
based upon a population, and many Banner reports and processes also can accept a
population for processing.
For additional details on population selection, refer to the Banner General User Guide.
Purge Process
The following purge process is part of the Academic History module:
Transcript Request Purge (SHPTRTC)
This process must be run in order to purge the Banner transcript requests from the
system. Transcript requests are defined as “official”, “unofficial”, or “both”. Within this
criteria, several purge options are available: 1) Purge by request date, 2) Purge by level,
and 3) Purge by TPRT type. A transcript must have been requested through the use of the
Transcript Request Form (SHARQTC) in order to be purged through this process. Purging
of electronic transcripts by EDI transcript status is optional.
From:
SARADAP
SARADAP_TERM_CODE_ENTRY
=
'200010'
AND
SARADAP_LEVL_CODE
=
'UG'

1594
Banner Student User Guide | Academic History
Transfer Articulation Procedures
This section discusses using transfer articulation.
Transfer Articulation Validation Tables
Two transfer articulation validation forms are used to control processing. The first is the
Calendar Type Code Validation Form (STVCALD). This form enables you to build the
multiplier which will be used when it is necessary to convert from one type of calendar to
another. An example of this would be a semester hour school which takes courses in from
quarter hour schools. In this case, the quarter hour school gave 4.5 credits for the course
where the semester hour school only gives 3 credit hours. To accomplish this, the sending
school would have to have a calendar type code which has a multiplier of.667 (4.5 quarter
credits x 667 = 3.00 semester credits).
The second validation table is the Transfer Articulation Course Status Validation Form
(STVTAST). This form indicates whether the transfer course is active or inactive. Multiple
active and inactive course statuses may be used. For example, an inactive course status
may be PN - Pending Department Authorization.
Transfer Articulation Institution Creation
The Transfer Articulation Institution Form (SOABGTA) maintains all the information about
the transfer institution based on effective term. From and to terms are provided on all
sections of the form so that the data is maintained as it changes over time. This is handled
in the same manner as the effective terms in the Catalog module.
For example, if the calendar type of an institution changes from semester to quarter in
1991, then a record for 1990 indicating a semester calendar type and a record for 1991
indicating a quarter calendar type can be created. This allows all courses being presented
for transfer in 1990 to be articulated under a semester calendar and all courses being
presented for transfer in 1991 to be articulated under a quarter calendar.
The transfer level information is very important to the transfer articulation process. This
section maintains the valid levels of work which will be presented for transfer from the
sending institution. This level is used in establishing the valid grades and the way which
the grades should be handled in transfer GPA calculations. Again, this section contains a
from and to term to maintain changes over time.
Transfer Articulation Grading Schemes
A grading scheme must be created for each transfer institution. The grading scheme is the
valid set of grades which the sending school uses when grading its courses. To ease the
data entry process, user the Default Institution field in the Key Information of the
Transfer Grade Code Maintenance Form (SHATGRD). This allows the grades from one
school to be copied to another school via the transfer institution code. For example, the
University of XYZ uses a plus/minus grading scheme (A, A-, B-, B, etc.) which has been

1595
Banner Student User Guide | Academic History
created on SHATGRD. Now the University of ABC is being created, and they have the
same grading scheme as University of XYZ. The transfer institution code from the Source
Background Institution Validation Form (STVSBGI) for XYZ would be entered as the
default institution when creating the grades for University of ABC. Then any adjustments,
deletions, or additions which may need to be made can be done on the form.
The default grading logic on the Transfer Grade Code Maintenance Form (SHATGRD)
works such that when grades are defaulted from the default institution, the effective term
of the grade will be the effective term from the Transfer Articulation Institution Form
(SOABGTA). Only the grades for the levels established on SOABGTA will be copied. For
example, a new institution (University of ABC) is being created for effective term 199301,
and only level 02 has been set up as a valid transfer level code on SOABGTA. The default
institution (University of XYZ) has both level 01 and 02 grades which became effective in
199201. When the default copy occurs, only the level 02 grades will be copied, and all the
effective terms will be 199301.
The Count in Attempted, Passed, Earned, and GPA fields on SHATGRD are used to
calculate the GPA for the transfer institution. The Institution Grade and (Grading) Mode
are used for performing an automatic grade code conversion when articulating the transfer
work. For example, some schools convert all grades during the articulation process to a
standard transfer grade such as
T, regardless of what grade the student received at the
sending school. The Num(eric) Value field is used to determine and calculate the
minimum grade criteria when articulating courses.
Creating the Transfer Institution Courses
The sending institution's courses may be entered on either the Transfer Institution Catalog
Entry Form (SHATATC) or the Transfer Course Articulation Form (SHATATR). SHATATC
allows for the display and maintenance of the sending institution's course catalog which
will be used when articulating courses. Since some courses articulate differently for
different degree programs, a program code has been provided in the Key Information.
Transfer course work may be articulated under a specific program or without a program
code. If a program code is used, then the specific course equivalencies associated with
the program code will be used in articulation. This allows a course to be articulated
differently under different programs. A Null (blank) Program Code indicates this is the
default or standard program code which should be used. The following outlines how these
program codes can be used.
A student being articulated under program code X00001 who takes ANTH 405, BIOL 001,
and ENGL 001 will use the transfer course equivalencies under program code X00001 for
ANTH 405 and BIOL 001. Since no course equivalencies have been established for ENGL
Null (blank) Program Code X00001 Program Code
ARTS 001 ANTH 405
BIOL 001 BIOL 001
ENGL 001
HIST 001

1596
Banner Student User Guide | Academic History
001 under program X00001, the Null Program Code (the default) will be examined to
determine if a course equivalency exists for ENGL 001.
Since ENGL 001 exists in the Null Program Code, then the course will be articulated as
specified under the Null Program Code. Using this example you see that only the
exceptions under a degree program should be built as separate transfer course
equivalencies. There would be no reason to build ENGL 001 under program code X00001
if it articulates the same way under the Null Program Code.
Note: Program codes are an optional processing feature. If your
institution does not articulate courses differently under different programs,
then all course equivalencies are built under the Null Program Code.
The effective term associated with the transfer course is used when creating or changing
the equivalent courses over time. For example, ACCT 101 from the sending institution is
created with an effective term of 199001. In 199101, ACCT 101 becomes ACCT 51 at the
sending institution. SHATATC would look as follows:
The same type of process would occur if ACCT 101 from the sending institution for term
199001 was equivalent with ACCT 51 at the receiving institution but as of 199101 the
course equivalency would change to ACCT 1001.
Multiple transfer courses may be grouped together when creating course equivalencies.
This is done through the use of the group connector and a primary indicator.
For example, remedial English 001, 002, and 003 must all be taken to get credit for
English 010 at the receiving institution. The SHATATC form would look as follows to
perform this function.
Eff term Subj Course St
199001 ACCT 101 AC
199101 ACCT 101 IN
199101 ACCT 51 AC
Eff term Subj Course St
Course equivalency
(on SHATATR)
199001 ACCT 101 AC ACCT 51
199101 ACCT 101 AC ACCT 1001
Group Subject Course
CD P
01 Y ENGL 001
01 ENGL 002

1597
Banner Student User Guide | Academic History
A user-defined group code (01 in this example) is used to join these three courses
together. These courses will then be treated as a unit when the articulation occurs. If the
student does not take all courses within the group, then no course equivalency is given.
The Primary (Group Indicator) is used to indicate the primary course within the group. A
primary indicator must be specified on all groups. The primary indicator is used when
performing the grade code conversion during the articulation process.
You may have the same course appear in multiple groups which may have different
equivalencies. The following is an example of this method of grouping:
Transfer Course
Equivalent Course
Transfer Course
Equivalent Course
01 ENGL 003
Group P
Effective
Term Level Subject Course Credits
01 Y 199101 01 BIOL 300 3.00
01 199101 01 BIOL 300L 0.00
01 199101 01 BIOL 300G 1.00
Subject Course Credits
BIOL 3000 4.00
Group P Effective Term Level Subject Course Credits
02 Y 199101 01 BIOL 300 3.00
02 199101 01 BIOL 300L 0.00
Subject Course Credits
BIOL 3000 3.00
Group Subject Course

1598
Banner Student User Guide | Academic History
In this example, BIOL 300 is both in Group 01 and 02, giving different credit hour
equivalencies based on the group of transfer courses.
Transfer course comments may be added and maintained via a Next Block function from
any transfer course on SHATATC.
Creating the Transfer Institution Equivalency
Equivalent courses are added and maintained on the Transfer Course Articulation Form
(SHATATR). Equivalent courses may be singular, such as ACCT 101 is equivalent to
ACCT 51, or multiple, such as ENGL 050 and ENGL 051 are equivalent to ENGL 100. An
OR condition is also available so that PSYC 101 or BIOL 101 may be equivalent to PSYC
110. In an OR condition, the first course will be used as the default when performing the
articulation process.
Parenthesis may also be used when creating course equivalencies to group together the
appropriate course equivalencies. An example of multiple course equivalencies follows:
This course equivalency states that STAT 101 is equivalent with:
STAT 101 or ACCT 101 or (MATH 050 and MATH 051)
As stated before, STAT 101 will be used as the default when articulating STAT 101.
Equivalent course comments may be added and maintained for each course in the
Institution Course Comments window for any equivalent course on SHATATR.
Use a List function from the Subject field in the Equivalent Course section of SHATATR to
see the valid subjects and a Count Query Hits function to see existing courses which are
in the catalog for the effective term.
When a transfer course has a range of possible credit values defined in the transfer
catalog, the system determines the number of credits assigned to the equivalent course
as follows:
Transfer Course
STAT 101
Equivalent Course
A/O Subj Crse
STAT 101
OACCT101
O(MATH050
AMATH051

1599
Banner Student User Guide | Academic History
• If the Credits Used field in Equivalent Course block of SHATATR is Not Null, that value is
assigned to the equivalent course.
• If the Calendar Type and Multiplier field for the institution defined in SOABGTA is Not
Null, the equivalent course credits are calculated by multiplying the transfer course's
credits (as entered in SHATAEQ) by the value in the Calendar Type and Multiplier
field.
• If the value in the Calendar Type and Multiplier field on SOABGTA for the institution is
Null, the value entered for the transfer course (as entered in SHATAEQ) is assigned to
the equivalent course.
Transfer Course Attributes
Transfer Articulation Course Attributes may be associated with institutional courses in the
Transfer Articulation module. The Transfer Course Articulation Form (SHATATR) contains
an Institution Course Attribute window. This window stores the attribute information
associated with the transfer and equivalent course. When an equivalent course which
exists on the course catalog is entered on the Transfer Course Articulation Form
(SHATATR), the course attributes from the Catalog module will default to the institution
course. If the institutional course does not exist on the catalog, then you have the option of
adding the course attributes on the Institution Course Attribute window of SHATATR.
Attribute information entered on SHATATR will default to the Transfer Articulation
Evaluation Form (SHATAEQ) when the transfer course information is entered.
Institutional attributes may also be added or modified on an individual student basis on the
Transfer Articulation Evaluation Form (SHATAEQ). These institutional course attributes
are also included on the roll to academic history and will display on the Transfer Course
Form (SHATRNS) for the institutional course work via the Institutional Equivalent Course
Attributes section. This section is used to record the attribute information associated with
the equivalent course. There is an indicator (*) on the Institutional Equivalent Course
Detail section to designate the course for which attributes are being displayed.
The Transfer Articulation Attributes Form (SHATRTA) allows the attributes to be entered
for courses in the transfer articulation process. All of the key data must be entered prior to
entering course attributes. The Key Information includes: ID, Institution, Attendance
Period, Term, Level, Subject and Course (Transfer Course Details), as well as Subject
and Course (Institutional Equivalent Details).
This form may also be accessed via the Transfer Articulation Attribute item in the Options
Menu or a Duplicate Record function from the Transfer Articulation Evaluation Form
(SHATAEQ). This is a much easier method for entering course attributes than accessing
SHATRTA directly.
These attributes may be updated by the Transfer Articulation Module on SHATAEQ during
the Grade Roll Process (SHRROLL). Attributes maintained on SHATRTA will automatically
roll to academic history and will display on the Transfer Course Form (SHATRNS).

1600
Banner Student User Guide | Academic History
Transfer Course Title
A function exists on the Transfer Articulation Evaluation Form (SHATAEQ) to add the
course title associated with the Transfer Course and the Institution Equivalent Course
information. Once entered, this title will roll with the transfer course information to the
Transfer Course Form (SHATRNS).
The Duplicate field on the Transfer Articulation Evaluation Form (SHATAEQ) indicates
that the same subject and course for the same term are being transferred. This field will
allow for each duplicate course to be articulated to its equivalent instead of performing a
one to many articulation.
Performing Transfer Articulation for Students
Now that all the course equivalencies have been created, the transfer students can be
loaded, and their course work may be articulated. This is done on the Transfer Articulation
Evaluation Form (SHATAEQ). Transfer course work may be articulated under a specific
program or without a program code. If a program code is used then the specific course
equivalencies associated with the program code will be used in articulation.
The transfer courses which the student is presenting are entered in the Transfer Scroll
Box. If the transfer courses being entered do not exist on the Transfer Institution Catalog
Entry Form (SHATATC), a message is generated and you may, using the Subject field
Search feature (Option List - Define New Course) or performing a Count Query Hits
function, transfer to the Transfer Course Articulation Form (SHATATR) to enter the transfer
and equivalent course information. Use the Subject field Search feature (Option List -
View Transfer Catalog) or perform a List function to view the existing transfer courses
which have been created.
Once all the transfer courses have been created, you may perform the articulation by
selecting the Perform Articulation item in the Options Menu or performing a Duplicate Item
function. (Note: This will articulate all the courses in the window.) Once complete, the
Equivalent Scroll box will display the equivalent courses, and the Articulate Ind(icator)
will be automatically set to
Successful on the courses for which articulation occurred.
A setting of
No Equivalent indicates that no articulation occurred, either because no
equivalency was created, the minimum grade has not been met, or not all courses in a
group exist.
Courses can be articulated individually by selecting
Articulate in the Articulate
Ind(icator) and performing a Next Item function. An articulation may be overridden by
selecting
Override Edit in the Articulate Ind(icator) and then entering the
equivalency information on the course. Courses can be articulated manually by selecting
Manual in the Articulate Ind(icator) and performing a Next Item function.
To create a one-to-many articulation directly on SHATAEQ, enter the Transfer Course
information scroll box. Select
Manual in the Articulate Ind(icator) field, then proceed to
the Course Equivalent information.
To enter the next course equivalence, use Next Record. This automatically copies the
transfer information on the previous record into this current record. Your cursor will be on
the Subject field in the equivalence side of the record, and you may now enter the course
equivalence.

1601
Banner Student User Guide | Academic History
If you have finished entering a many-to-one entry and want to enter additional
articulations, use Next Record or select the next record, then use Clear Record. This will
clear all transfer data except for the attendance period, term, and level data. Your cursor
will be in the Group field, and you can may enter your data.
When courses are grouped, and articulation is performed manually by selecting
Articulate in the Articulate Ind(icator), the primary grouped courses will have this
field automatically updated with a setting of
Successful, and all other courses in the
group will be updated with a setting of
No Equivalent.
Once transfer courses have been entered, the Equivalent Course GPA section of
SHATAEQ will display the hours and GPA information. The institution hours and GPA
information will display after the articulation occurs.
This transfer articulation information may be moved to academic history whenever the
evaluation is complete. This move is processed by selecting
Roll to History in the
History Indicator field in the Equivalent Course GPA/Roll to History window on
SHATAEQ.
To enter or adjust this transfer course work, you must manually adjust it on SHATRNS or
delete the courses from academic history and roll them back to transfer articulation. This
is done by selecting
Delete from History in the History Indicator field on in the
Equivalent Course GPA/Roll to History window of SHATAEQ. This window is accessed
from the Options Menu or via a Previous Block function.
The courses may then be unarticulated, by selecting the Perform Unarticulation item in the
Options Menu or performing a Next Primary Key function in the Transfer Institution
Equivalent information, and re-articulated either with the additional courses or under a
different program code. The roll to history is then performed again to move the courses
back to academic history.
Note: When the courses are in transfer articulation then no adjustments
or entries may be performed on SHATRNS. When the courses are in
academic history, no adjustments or entries may be performed on
SHATAEQ. Also, equivalent courses on SHATAEQ do not print on the
transcript until they are rolled to history.
Performing Unarticulation
To perform unarticulation, select the Perform Unarticulation item in the Options Menu or
perform a Next Primary Key function in the Transfer Institution Equivalent information.
Records with a value of
Successful will be set to (None) when they are
unarticulated. Records with a value of
Override Edit cannot have unarticulation
performed. If you wish to unarticulate a record with a setting of
Override Edit, you
must first change the value to
Unarticulate, and then perform unarticulation. Once
you set the value to
Unarticulate, and then perform unarticulation, the value of
Unarticulate is automatically set to (None), and the record is unarticulated. All
records with a value of
(None) are not considered for unarticulation, since no articulation
was performed.

1602
Banner Student User Guide | Academic History
To unarticulate one course at a time on SHATAEQ, select Unarticulate in the
Articulate Ind(icator) field, and then use Next Item. Once you perform a Next Item
function, there is an automatic save of the unarticulation. If you attempt to perform
unarticulation on a record that is a one-to-many entry or a many-to-one entry,
unarticulation will be performed on all records associated with that entry.
Graduation Procedures
This section discusses graduation processing.
Graduation Processing
Graduation processing is used to monitor the graduation and diploma information
associated with the degree being awarded to the student, as well as the creation of
ceremonies being held and tracking those individuals who are attending the ceremonies.
This is done through the use of application and query forms, as well as mass entry and
update forms which provide an efficient way to enter and update degree, diploma, and
ceremony attendance data.
All graduation forms review the student's hold information and inform you if the student
has a graduation hold on their record. The Holds Query-Only Form (SOQHOLD) is
accessed from most of the graduation forms. These holds may be overridden to continue
processing when necessary.
Mass entry forms are used to search on data, perform updates, and then display the
results. Search and update criteria are user-defined and include student and curriculum
elements where appropriate. Population selection can be used. The selected students can
be reviewed and their updates processed immediately, or the updates can be held for later
processing in job submission using a batch process. An audit form is used to view
processing results for the mass entry forms.
The mass entry forms allow you to enter search and query criteria to select IDs for update.
Depending on the mass entry form used, the parent records of selected IDs can have
specific values updated, as well as a pending letter inserted in SUAMAIL. Search and
update validation is performed using mass entry column codes from the Mass Entry
Column Validation Form (STVMECL). Updates can be submitted immediately on the mass
entry form or held for batch processing using the Process Mass Entry Report
(SORMEBP). Immediate and pending updates can then be viewed on the Mass Entry
Audit Form (SOAMAUD). Result messages are captured when updates occur and can be
reviewed directly on the mass entry form at the time of the update and/or on the mass
entry audit form after the updates are submitted in batch. Reviewing update result
messages allows for failed inserts and updates to be resolved. The Purge Mass Entry
Audit Process (SOPMAUD) is used to delete mass entry audit records.
When updates occur or when updates are held for batch submission, mass entry forms
retain the user ID, date and timestamp, search and update criteria, and IDs, which are
selected for audit purposes. When the forms are used for query only, no updates are
processed, and audit information is not collected.

1603
Banner Student User Guide | Academic History
Please refer to the “Mass Entry Processing” appendix for detailed information on using
mass entry processing, performing updates, and auditing results.
Set Up Graduation Information
Graduation information for a student is entered using the Degrees and Other Formal
Awards Form (SHADEGR) or the Mass Entry Graduation Form (SHAMDEG). SHAMDEG
allows the entry of graduation information which can then be viewed using SHADEGR.
The Degrees and Other Formal Awards Form (SHADEGR) supports the entry and
maintenance of graduation data in the Graduation Information. When data is entered in
the Graduation Term field, the Graduation Year field is populated. The section also
contains graduation date, status, and fee information. The section is accessed for entry or
update of graduation information using a Duplicate Item function from the Degree
Information or by tabbing through the fields.
The Departmental Honors and Institutional Honors sections of SHADEGR each have the
Print on Transcript and Print on Commencement Report fields. When either of these
fields is checked, the appropriate honors will print on the student's transcript or
commencement report.
The Degree Summary Form (SHADGMQ) displays summary information about all the
degrees which a student is seeking or which have been awarded. Graduation term and
status are part of the information that is displayed.
Mass Enter Graduation Information
You can search for and update degree records on Mass Entry Graduation Form
(SHAMDEG) when a degree record exists for the student on SHADEGR. The search uses
criteria associated with SHADEGR, except for the graduation application status code,
which is associated with the degree record on SHAGAPP.
Degree records returned by the search can update SHADEGR graduation information.
Updates will take place, regardless of any holds the students may have. Updates will also
take place whether or not data previously existed on SHADEGR for the degree sequence
number in the Results window that is selected for update.
The Authorize field on SHADEGR is updated when changes are made on SHAMDEG.
This field displays the user ID of the person who updated the graduation status for the
student.
Fees can be added on SHAMDEG and viewed on TSAAREV when no previous charges
have been applied on SHADEGR. When a fee is added on SHAMDEG and a fee already
exists on SHADEGR, the new fee will not be charged, and no new TSAAREV record is
created during the mass update. A message is displayed that the fee has already been
applied. You must select
Charge Fee or Waive Fee from the Fee radio group in order
to access the other fee fields.
When a student has a degree outcome status of awarded, (the Awarded Indicator on
STVDEGS is set to
Awarded for the degree status code), graduation criteria (term,
status, year, date) and fees selected for the mass update will not be applied. A message is

1604
Banner Student User Guide | Academic History
displayed that the degree has been awarded, and updates are not allowed. Mail
submission updates will also not be processed.
When the outcome status is changed, the existing curriculum status code for the field of
study is updated to the new curriculum status code based on the rules on STVDEGS and
SORCSTS. When the graduation status is changed, and the Update Next Degree Status
checkbox is checked (set to
Y) for the graduation status rule on STVGRST, the outcome
status on SHADEGR is updated based on the STVGRST rule.
The search results are displayed by ID and name based on the data required by the mass
entry form, the search criteria, and the population selection, if used. All records returned in
the Results window can be selected for update, all deselected, or not selected. Individual
records can be selected for update. Records can be added or deleted manually. Fields for
records returned by the search can be queried prior to the manual entry of records.
Graduation Status Validation
The Graduation Status Validation Form (STVGRST) is used to create and update
graduation statuses. These statuses are used to update the student's degree record with
any statuses related to graduation, such as needed approval or monies owed. The
Update Next Degree Status checkbox is used to indicate whether the student's degree
status is to be automatically updated when the graduation status is entered or modified.
This field works in conjunction with the Next Degree Status field, which is maintained on
the Degree Status Code Validation Form (STVDEGS). If the graduation status indicates an
update to degree status, and a next degree status code is present on STVDEGS, it will be
substituted and the record updated.
Set Up Diploma Information
Diploma information for a student can be entered using the Diploma Form (SHADIPL) or
the Mass Entry Diploma Form (SHAMDIP). Mass updates of diploma information can be
accomplished using the Mass Update Diploma Form (SHAMUDI).
The Diploma Form (SHADIPL) is used to create and maintain diploma-related information.
The student must have a degree record on the Degrees and Other Formal Awards Form
(SHADEGR) before a diploma record can be created. Diploma-related information
includes:
• Order date, mailed date, and pickup date for the diploma.
• Diploma fee information which allows the institution to charge a fee for the diploma.
• Diploma name and address information. The diploma name defaults from the legal
name, and if none is specified, from the current name, and may be updated on this form.
This information is stored as the diploma name and does not change unless you modify
the field. Changes to the student's name on the General Person Identification Form
(SPAIDEN) have no effect on this field.
• Awarding institution information is used if the institution awards degrees under multiple
names. A default value can be set up on the Graduation Default Control Form
(SHAGRDD).
The Awarding Institution Validation Form (STVINNM) is used to create and update

1605
Banner Student User Guide | Academic History
awarding institution codes. These codes represent the school, college, or institution
awarding the diploma.
• The ceremony where the student is planning to receive their diploma can be attached to
a diploma and will allow for the automatic update of the pickup date when the cap and/or
gown are returned. The student must be registered in the ceremony for the date to be
updated on the diploma record.
• Diploma comments can also be maintained.
Mass Enter Diploma Information
The Mass Entry Diploma Form (SHAMDIP) will present search results for use with mass
entry when a degree record exists for the student on SHADEGR and no diploma record
exists on SHADIPL. Updates will insert diploma records in SHADIPL and optionally insert
ceremony records on SHACATT. Updates will take place, regardless of any holds the
students may have. Once a SHADIPL record exists based on the search criteria entered,
those records will not be presented by a search and cannot be updated using SHAMDIP.
In order for the update criteria ceremony and ceremony term entered on the SHAMDIP to
be processed successfully on SHADIPL, a ceremony attendance record (SHACATT) must
exist, or the update of the ceremony and ceremony term will fail. SHADIPL also requires
that the SHACATT record exist. SHAMDIP provides the option to create the ceremony/
ceremony term record on SHACATT in order to update SHADIPL.
When the Create Ceremony Attendance checkbox is checked (set to
Y), a ceremony
attendance record is inserted in SHACATT for the term and ceremony on SHAMDIP. The
record on SHACATT will have the ceremony, ceremony term, and activity date. Additional
ceremony information may be added to the record when mass ceremony attendance
updates are performed on SHAMUCA. The ceremony and term are also updated on
SHADIPL when the Create Ceremony Attendance checkbox is checked. The ceremony
attendance information may be viewed on the Ceremonies By Attendee Query Form
(SHACPRQ).
Fees updated on SHAMDIP are always new fees. You must select
Charge Fee or
Waive Fee from the Fee radio group in order to access the other fee fields. Fee
information can be viewed on TSAAREV.
Note: When a diploma address type is included in the update criteria, the
active mailing address from SPAIDEN (SPRADDR) is updated, but the
address type is not updated or displayed on SHADIPL.
The search results are displayed by ID and name based on the data required by the mass
entry form, the search criteria, and the population selection, if used. All records returned in
the Results window can be selected for update, all deselected, or not selected. Individual
records can be selected for update. Records can be added or deleted manually. Fields for
records returned by the search can be queried prior to the manual entry of records.

1606
Banner Student User Guide | Academic History
Mass Update Diploma Information
You can search for and update diploma records on the Mass Update Diploma Form
(SHAMUDI) when a diploma record exists for the student on SHADIPL. Records returned
by the search can have the diploma record (SHADIPL) updated. Updates will take place,
regardless of any holds the students may have. Updates will also take place whether or
not data previously existed.
In order for the update criteria ceremony and ceremony term entered on the SHAMUDI to
be processed successfully on SHADIPL, a ceremony attendance record (SHACATT) must
exist, or the update of the ceremony and ceremony term will fail. SHADIPL also requires
that the SHACATT record exist. SHAMUDI provides the option to create the ceremony/
ceremony term record on SHACATT in order to update SHADIPL.
When the Create Ceremony Attendance checkbox is checked (set to
Y), a ceremony
attendance record is inserted in SHACATT and SHADIPL for the term and ceremony on
SHAMUDI. The record on SHACATT will have the ceremony, term, and activity date.
Additional ceremony information can be added to the record when mass ceremony
attendance updates are performed on SHAMUCA.
The search results are displayed by ID and name based on the data required by the mass
entry form, the search criteria, and the population selection, if used. All records returned in
the Results window can be selected for update, all deselected, or not selected. Individual
records can be selected for update. Records can be added or deleted manually. Fields for
records returned by the search can be queried prior to the manual entry of records.
Set Up Ceremony Information
The Ceremony Form (SHACRMY) is used to create and maintain ceremony information.
There are no restrictions as to what constitutes a ceremony. Ceremony types are defined
on the Ceremony Validation Form (STVCERT). Examples of ceremonies might be: Spring
Graduation, College of Business Diploma Ceremony, or Awards Dinner.
The ceremony information can be associated with the event information in the Location
Management module. This is done by entering a valid event in the Event field. Events
cannot be created using this form. If an existing event from the Event Form (SLAEVNT) is
entered, the site, building, room, date, and time data will default in and cannot be changed
on SHACRMY. If the Event field is left blank, you are able to enter or change the event
information. The site code must exist on the Site Code Validation Form (STVSITE) to be
entered. Buildings and rooms are not validated. First and second choice locations are
available for events.
Other information available on this form includes:
• Maximum student tickets and maximum non-student tickets information is used to
indicate how many tickets may be given to an individual.
• The maximum capacity is the maximum capacity of the ceremony.
• The required dress code specifies the type of attire to be worn, based on values from
the Ceremony Dress Validation Form (STVDRES).
• Unlimited accommodation attributes may be entered for a ceremony, and these special
accommodations are shared with the Location Management module.

1607
Banner Student User Guide | Academic History
• Unlimited ceremony comments can also be maintained.
The Ceremony Query Form (SHACRMQ) is a stand alone query form which is used to
display all existing ceremonies for an institution. Select the View Ceremony [SHACRMY]
item in the Options Menu to access the Ceremony Form (SHACRMY) to view and/or
update specific information for a particular ceremony. Select the Ceremony Attendance
Detail [SHACATQ] item to access the Ceremony Attendance Query Form (SHACATQ) to
query information on attendees for a ceremony.
Set Up Ceremony Attendance Information
Once the ceremony has been created, the attendees for the ceremony are entered using
either the Ceremony Attendance Form (SHACATT) or the Mass Entry Ceremony
Attendance Form (SHAMCAT). The Mass Entry Diploma Form (SHAMDIP) and the Mass
Update Diploma Form (SHAMUDI) may also be used to add ceremony information.
The Ceremony Attendance Form (SHACATT) is used to create and maintain ceremony
attendance records for an individual. The person does not need to be a student to attend a
ceremony. A record will exist for each unique ceremony that the attendee will attend.
Information maintained on this form includes cap, gown, and hood types and sizes, as well
as order, pickup and return dates.
Ceremony attendance can be for a student or a non-student. If the non-student is a faculty
member, then the Faculty Degree Information Form (SIAFDEG) may be accessed to
examine the faculty member's institution and degree information. This may be useful in
determining which hood type should be ordered for the ceremony.
The Attendee Size Classification Rules Form (SHASIZE) is an optional rules form which
defines sizes and ranges that are utilized by SHACATT.
Ceremony Attendance Validation
Three validation forms support setting up ceremony attendance information.
• The Measurement Validation Form (STVMEAS) is used to indicate the valid units of
measurement for height, weight, and head size.
• The Academic Dress Type Validation Form (STVTYPE) is used to indicate the valid
types for cap, gown, and hood orders.
• The Academic Dress Size Validation Form (STVSIZE) is used to indicate the valid sizes
for caps and gowns.
Mass Enter Ceremony Attendance Information
The Mass Entry Ceremony Attendance Form (SHAMCAT) will present search results for
use with mass entry when a degree record exists for the student on SHADEGR, and no
ceremony record exists on SHACATT for the ceremony and term entered in the update
criteria. An update ceremony and term are required for any updates to occur. The
ceremony and ceremony term will be inserted on SHACATT. Updates will take place,
regardless of any holds the students may have.

1608
Banner Student User Guide | Academic History
The search can be refined by requesting that a graduation application exist on SHAGAPP
and that the response for ceremony attendance be considered. When the Select
Graduation Application checkbox is checked (set to
Y), the records returned by
SHAMCAT must also have an associated SHAGAPP record. The graduation application
record must in turn have a ceremony attendance value that matches the setting of the
Attend Ceremony radio group on SHAMCAT. When the Select Graduation Application
checkbox is unchecked (set to
N), the value of the Attend Ceremony radio group is not
considered by the search.
When a student has a degree record with an assigned ceremony and term on SHACATT,
a second record cannot added for the same ceremony and term. The record will not be
inserted, and a message will be displayed that the ceremony already exists and updates
will not take place.
Fees cannot be applied a second time for the ceremony and ceremony term on SHACATT.
Fees cannot be updated or changed. You must select
Charge Fee or Waive Fee
from the Fee radio group in order to access the other fee fields. Fee information can be
viewed on TSAAREV.
The search results are displayed by ID and name based on the data required by the mass
entry form, the search criteria, and the population selection, if used. All records returned in
the Results window can be selected for update, all deselected, or not selected. Individual
records can be selected for update. Records can be added or deleted manually. Fields for
records returned by the search can be queried prior to the manual entry of records.
The Ceremony Attendance Query Form (SHACATQ) is a stand alone query form that is
used to display detail information for a ceremony and its attendees. The Attending field in
the Key Information of SHACATQ calculates and displays the number of persons
attending the ceremony. If the Diploma box is checked, it indicates that this ceremony is
the one where the attendee will receive their diploma. The checkbox may be unchecked
by accessing the Diploma Form (SHADIPL) and removing data from the Ceremony and
Term fields. Only one diploma can be awarded per degree.
From SHACATQ, select the Ceremony Attendance [SHACATT] item in the Options Menu
to access the Ceremony Attendance Form (SHACATT), or select the View/Update
Diploma [SHADIPL] item in the Options Menu to access the Diploma Form (SHADIPL), if
more attendee detail is desired. When information is changed or updated on SHACATT or
SHADIPL, the modifications will be reflected on SHACATQ.
The Ceremonies By Attendee Query Form (SHACPRQ) is a stand alone query form which
displays all ceremonies for which an attendee is registered. Select the Update Ceremony
Detail [SHACATT] item in the Options Menu or perform a Count Query Hits function to
access the Ceremony Attendance Form (SHACATT), or select the Update Diploma Detail
[SHADIPL] item in the Options Menu to access the Diploma Form (SHADIPL), to view
and/or modify attendance or diploma information. When information is updated on
SHACATT or SHADIPL, the modifications will be reflected on SHACPRQ.
Mass Update Ceremony Attendance Information
You can search for and update ceremony attendance records on the Mass Update
Ceremony Attendance Form (SHAMUCA) when a ceremony attendance record exists for
the student on SHACATT. Update criteria on SHAMUCA updates ceremony attendance
records on SHACATT and diploma information on SHADIPL. The Diploma Pickup Date

1609
Banner Student User Guide | Academic History
is updated on SHADIPL when the ceremony and term in the search criteria match the
student, and the Diploma Pickup Date is entered in the update criteria. Updates will take
place, regardless of any holds the students may have.
Updates for cap and gown sizes are based on the rules on SHASIZE. If measurements
exist on SHACATT that meet SHASIZE rules, cap and gown size values will default when
they are updated on SHAMUCA. When SHASIZE rules exist that meet the student's
measurements for cap or gown, the cap or gown cannot be updated without calculating
the sizes.
The cap, gown, and hood information can be applied to the order, pickup, and return dates
as needed. A type for cap, gown, or hood must already exist on the Ceremony Attendance
Form (SHACATT) or be indicated in the appropriate type field to cause an update when a
date is changed. If an order date is entered for a cap, and the participant's cap type is
blank, then the participant's cap order date would not be changed.
If a record was created for a participant and only reflects the fact they have been
registered to attend a ceremony but lacks detail information such as cap or gown type, this
information can be added or updated as needed. Tickets can be updated and added to
existing cap, gown, and hood information. Number of tickets and diploma pickup dates
can also be updated.
The search results are displayed by ID and name based on the data required by the mass
entry form, the search criteria, and the population selection, if used. All records returned in
the Results window can be selected for update, all deselected, or not selected. Individual
records can be selected for update. Records can be added or deleted manually. Fields for
records returned by the search can be queried prior to the manual entry of records.
Create Graduation Rules
The Graduation Default Control Form (SHAGRDD) is used to set up height, weight, and
head size information, which can be used on the Ceremony Attendance Form
(SHACATT), and the awarding institution default value, which is used on the Diploma
Form (SHADIPL).
The Attendee Size Classification Rules Form (SHASIZE) creates a table of sizes and
ranges which is used by the Ceremony Attendance Form (SHACATT) to determine
ceremony attendee cap or gown size, based on the attendee's height, weight, and head
size. When these rules are established, they default the appropriate cap or gown size into
the Attendee Information section of SHACATT when cap and/or gown type is present. You
can override the rules.
Update Degree Status
The Degree Status Update Report (SHRDEGS) updates the degree status and/or the
student status based on user defined criteria. This report may be run in either Audit or
Update Mode. The report allows an institution to quickly update all those students whose
degree status is pending to awarded. It also allows the institution to set a student status
which may prohibit future registration from occurring.
The update of degree status is controlled by the selected parameter values. For example,
you supply the current degree status as well as the new degree status. Only those

1610
Banner Student User Guide | Academic History
students with the current degree status will be selected for processing. Other optional
selection parameters include: Graduation Term, Graduation Year, Graduation Status,
Degree Code, Campus, and Level. The student status to be used for the update may be
specified along with the effective term to update the general student record.
Produce Commencement Report
The Commencement Report (SHRCOMM) produces a list of students by degree award
status code, their degrees, majors, and any institutional or departmental honors
associated with the degree. Students are printed in last name alpha order within a certain
date range as specified in the parameters. A graduation date must exist in the Graduation
Date field on the Degrees and Other Formal Awards Form (SHADEGR) in order to be
included in the report. The report also includes graduation information. The parameter
selections which support this include: Graduation Term Selection, Graduation Year
Selection, and Graduation Status Selection.
Produce Commencement Attendance Report
The Commencement Attendance Report (SHRCATT) displays the ceremony information
and lists those persons who are attending the ceremony. You may request that the report
also display the information on caps, gowns, and hoods, which may be used by the
institution to place their orders.
The parameter selection options which may be specified include: Print only students, non-
students, or all; Print the cap, gown, and hood detail; Print the cap, gown, and hood order
totals; List only those persons who have no cap, gown, or hood information; List only
those persons who have not picked up their order; List only those persons who have not
returned their order.
Self-Service Graduation Application Processing
Eligible students who expect to complete a course of study can apply to graduate on
institution-specified dates through Banner Student Self-Service. Eligibility is determined
based on existing learner and/or outcome curriculum records. Graduation application
processing reviews the student's curricula and other eligibility criteria and matches them
against user-defined rules to determine which students can apply through self-service.
Submitted applications can be controlled to create outcome and degree records using the
curriculum selected for graduation. The ability to create degree and outcome curriculum
records from self-service graduation applications works in conjunction with manual
curriculum roll processing.
Set Up Processing in Baseline
Do the following to set up baseline forms for use with graduation application processing in
self-service.
1. Set up graduation application status codes on STVGAST.
1.1. Check the Active Indicator for active status codes.

1611
Banner Student User Guide | Academic History
1.2. Check the Web Indicator for status codes to be used in self-service.
2. Set up graduation application display rule codes on STVGADR.
3. Build graduation application display rule selection rules on SHAGADS in process
order.
These rules determine which graduation application display rule is used.
4. Build graduation application display rules on SHAGADR.
These rules tell self-service which graduation application pages to display, what date
to request from the student, and whether degree and diploma records are created or
updated.
4.1. Add overall self-service controls for the rule.
4.2. Add graduation date availability information for the rule.
4.3. Add diploma name and address information for the rule.
4.4. Add payment options for the rule.
5. Build graduation application eligibility rules on SHAGELR.
These rules determine whether the student has the required curriculum, general
student, or academic history and GPA data required by the institution in order to apply
to graduate. These rules also determine if the curriculum for self-service graduation
applications must be from the
LEARNER module or the OUTCOME module or can be
from either module.
5.1. Set up curriculum information for the rule.
5.2. Set up general student information for the rule.
5.3. Set up academic history information for the rule.
5.4. Set up a level to use for GPA and earned hours for the rule.
5.5. Set up the institutional and overall minimum GPA and/or hours for the rule.
6. Set the Self-Service Graduation Term Control field on SHACTRL to define which
curriculum terms are displayed in Self-Service for the graduation application.
7. Review the graduation application that was submitted through self-service on
SHAGAPP.
7.1. Update, delete, or inactivate the application as needed.
7.2. Use the Create/Update Degree Record button to update the degree and
diploma records for an active application.
or
8. Enter the graduation application, curriculum, and diploma information for a new
application when SHAGAPP is accessed from SGASTDN, SFAREGS, or SHADEGR.
9. Use the Create/Update Degree Record button to create the degree and diploma
records for the new, active application.

1612
Banner Student User Guide | Academic History
Use Apply to Graduate in Self-Service
Banner Student Self-Service pages are used for eligible learners to apply to graduate or
complete a course of study. Links in the Student Records Menu are used with graduation
application processing. The Apply to Graduate link initiates the process. The View
Application to Graduate link allows students, faculty, and advisors to view submitted
applications.
You must define who is eligible to submit an application and complete a degree based on
existing outcome or learner curriculum records. You must also specify when applications
can be submitted. You must determine what information to display to the student and
define which degree and/or diploma data you want to collect from the self-service
graduation application.
Using a self-service process to initiate the application to complete a degree provides
graduation processing for deans, registrars, advisors, and other administrators. A
separate process is used to control creation of the outcome records which streamlines
and assists with manual corrections of final degree records. The student can also view any
active graduation applications.
Curriculum Selection Page
This page is used to choose the curriculum and degree for the graduation application. If
the learner does not have graduation holds and meets at least one self-service graduation
eligibility rule, and the current and active curriculum for the learner has a minimum of one
institutional academic history record (SHRTTRM) or registration record (SFRSTCR), and
no existing graduation applications or awarded degrees are associated with the record,
and display rules exist for that curriculum, the graduation application process will continue.
The curriculum information comes from the SORLCUR/SORLFOS curriculum tables.
Graduation Date Selection Page
This page displays the curriculum information selected by the student, as well as the
graduation term, date (day/month/year), and/or graduation year information that can be
selected for the graduation application. The graduation date information comes from the
Graduation Date Availability window on SHAGADR.
Graduation Ceremony Selection Page
This page allows the user to verify the learner's attendance at any graduation ceremony
that is associated with the completion of the degree or course of study. If the graduation
date/term/year selected has the Ceremony checkbox checked (in the Graduation Date
Availability window on SHAGADR) to request this information, this data will be displayed.
If indicator is not checked, the student will continue either to the Diploma Information
pages or to the Graduation Charge and Payment page if graduation fee charging has
been established. If diploma information or charging information is not requested, the
student will proceed to the Graduation Application Summary page.
Diploma Name Selection Page
This page is displayed when the Display Page checkbox is checked (set to Y) for the
graduation application display rule in the Diploma Name block (in the Diploma Name/

1613
Banner Student User Guide | Academic History
Address Options window) on SHAGADR. The user can determine which name is to be
displayed (current or alternate name and diploma name), which part of the middle name is
to be displayed, and which parts of the name are to be displayed, such as a suffix.
If you allow the learner to select and/or edit the diploma name, all names on file will be
displayed in a pulldown list on this Web page. Once one name is selected and the learner
continues, you can also allow editing of any portion of the name. The information can be
updated if the Edit checkbox is checked (set to
Y) in the Diploma Name block on
SHAGADR. When the learner uses the Continue button on this Web page, a new page
will be displayed where the fields that are enabled for editing can be updated. This name
will populate the diploma data in the Graduation Application Table (SHBGAPP).
Note: The Full Legal Name field value on SPAIDEN is never used for
self-service diploma name information. This field is a single-name field
that has been concatenated, and therefore, cannot be broken into first,
middle, last, and suffix columns for display or editing in self-service.
Diploma Mailing Address Selection Page
This page is displayed when the Display Page checkbox is checked (set to Y) for the
graduation application display rule in the Diploma Mailing Address block (in the Diploma
Name/Address Options window) on SHAGADR.
You can also display existing diploma mailing address information for the curriculum
selected, by checking the Display checkbox in the Diploma Mailing Address block. If the
Edit checkbox is checked (set to
Y) in the Diploma Mailing Address block, the available
addresses selected may also be edited. The system displays the current address by
default, but the student can change it for diploma mailing.
Graduation Charge and Payment Page
This page is displayed when the Charge Graduation Fee checkbox is checked (set to Y)
in the Processing Controls block (in the Payment Options window) and the Create/Update
Degree checkbox is checked (set to
Y) in the Overall Self-Service Graduation Application
Controls block (in the main window) for the graduation application display rule on
SHAGADR. Payment options information comes from the Payment Options block on
SHAGADR.
Graduation Application Summary Page
This page displays the curriculum, graduation term, graduation date, diploma name,
address information, and any charges and payments for the graduation application. The
student can verify the information and then submit the graduation application.
Confirmation Letter Page
This page displays the graduation confirmation letter for the graduation application rule
that was entered in the Confirmation Letter field in the main window on SHAGADR.
If the confirmation letter uses a Banner Student Object:Access view (such as
AS_STUDENT_DATA), for a confirmation letter with the Module value of S (on

1614
Banner Student User Guide | Academic History
STVELMT), GTVSDAX entries needed by that view should be changed from UPDATE ME
to an actual value. If this is not done, the confirmation letter will cause an error to be
displayed in Banner Self-Service such as:
ORA-06502: PL/SQL: numeric or value error: character string buffer too
small
ORA-06512: at "BANINST1.F_CONCAT_SGRSPRT", line 40
This occurs because no sport code was defined for the STDNSPRT rule on GTVSDAX for
the view.
Please refer to the Banner Student Object:Access Reporting Guide for more information
on views used with Banner Student.
Build Graduation Application Status Codes
Graduation application status codes are maintained on the Graduation Application Status
Validation Form (STVGAST). These status codes are used by the Graduation Application
Form (SHAGAPP) and indicate the status of the graduation application that is submitted
through the graduation application self-service pages.
Build Graduation Application Display Rule Codes
Graduation application display rule codes are maintained on the Graduation Application
Display Rule Code Validation Form (STVGADR). These display rule codes are used on
the Self-Service Graduation Application Display Rules Form (SHAGADR) to define how
the graduation application Web pages are displayed to the learner in self-service.
Some sample rule codes might be:
• UGASMSP - Undergraduate Arts Science Main Spring
• GRBUDFA - Graduate Business Downtown Fall
• UGBACHS - Undergraduate Bachelors Spring
• DEFAULT - Default Rule
Build Graduation Application Display Rules
Graduation application display rules are maintained on the Self-Service Graduation
Application Display Rules Form (SHAGADR). These display rules are used to specify the
settings used for display and update of graduation application information in self-service.
Controls can be set up for overall self-service display, graduation date availability, diploma
name and mailing address display and edit, and payment options for application fees. Use
the Copy button in the Key Block to copy the settings from one rule to another.
Payment Options
The billing term is determined by checking the last SHRTTRM record, the last SFRSTCR
record, or the most recent SGBSTDN record. If you check the Charge Graduation Fee

1615
Banner Student User Guide | Academic History
checkbox, and you do not enter a detail code or an amount, a warning message is
displayed. You can proceed and enter that data at a later time. However, the student
cannot proceed with the graduation application in self-service, because the charge
information is missing. An error is displayed in self-service to contact the administrator/
registrar.
Charges for Application Fees
When a degree sequence is created manually and a graduation fee is assessed using
SHADEGR, if a graduation application is created at a later time using the Apply to
Graduate button in the Curriculum window for an unrolled learner curriculum record, the
user will not be prevented from entering a graduation fee for that new graduation
application. This fee can be entered, because the process does not check that a degree
record with an outcome curriculum that could match the learner curriculum (matches on
college, level, degree, and program) already had a graduation fee applied.
It is recommended that when degree records are created, the graduation fees are
assessed after the learner curriculum record has been rolled. It is also recommended that
degree sequences are not created manually before the learner curriculum records are
rolled. Since the Roll to Outcome button allows degree creation without requiring that the
grade roll take place, learner and outcome records can be kept current and consistent.
For more information on using the Roll to Outcome button, refer to the “Manual
Curriculum Roll Processing” section in this chapter.
Warning! Users are cautioned that changes made to curriculum records
close to graduation may not be available to students for selection from
self-service, if those curriculum records have not been rolled to outcome
through the grade roll process (SHRROLL).
Processing looks for a curriculum record with the highest associated
academic history record (SHRTTRM). Therefore, curriculum changes
(such as changes to fields of study) made after the last grade roll, but
before the next grade roll when graduation applications can become
available through self-service, are only displayed for those curriculum
records for the term of the last grade roll to history.
Major changes should be updated through the grade roll procedures or
maintained on the most current and active outcome curriculum record, if
records are not rolled to academic history prior to allowing students to
access self-service graduation.
A graduation fee cannot be created from Banner Student Self-Service unless the Create/
Update Degree checkbox is checked (set to
Y) on SHAGADR. Once the graduation
application is submitted, fee information on that record cannot be updated on SHAGAPP,
and the display only Fee (Status) radio group for the degree sequence in SHADEGR is
set to
Fee Charged.

1616
Banner Student User Guide | Academic History
Use Graduation Application Display Rule Selection
Graduation application display rule selection criteria are maintained on the Graduation
Application Display Rule Selection Form (SHAGADS). These selection rules are used to
determine how the application process will assign a self-service graduation display code
to a student's curriculum record. When the self-service graduation application process
does not find a SHAGADS rule that matches any current, active curriculum for a student,
no curriculum records will be available for selection on the Graduation Application
Summary page.
You can define or query prioritized selection rules for use with the graduation application
display rules. At least one graduation application display selection rule must be associated
with at least one graduation application display rule code for that rule to be used in the
self-service processing. Multiple graduation application selection rules can be created for
the same graduation application display rule code.
You must specify a unique process order for each selection rule that is defined. The
process order is the order in which the selection rules will be considered. You can then
specify the graduation application display rule code and any combination of optional
curriculum elements for the rule. This allows you to control the display and update of self-
service data when a curriculum rule is found that matches a select rule code for a
graduation application.
When a student uses the self-service graduation application process, the information
displayed in self-service is based on the graduation application display rule on
SHAGADR. This means that one specific rule will be used for that student’s curriculum.
The graduation application process checks the display rule selection data on SHAGADS
for process order from lowest to highest, to determine if the student curriculum record
contains data that matches the rule data. When a matching record is found, the graduation
application display rule code on that record is the rule used for displaying curriculum
information in self-service.
If the student qualifies for at least one eligibility rule, then processing will continue to
determine how the curriculum and graduation application information is to be displayed.
When eligibility is considered, student holds, outcome status for the degree sequence
(cannot be “awarded”), and term code selection for the curriculum (based upon the
highest academic history (SHRTTRM) or registration (SFRSTCR) record for the
curriculum) are also considered before the curriculum is displayed.
The following criteria apply to the selection rule processing:
• Only one selection rule will be matched for the learner and the degree combination of
curricula.
Either a learner curriculum record or outcome curriculum records will be processed. A
matching select rule must be found in order for the curriculum to be displayed.
Select rules are searched in process number order to find a match to the student's
current and active curriculum records.
• All the defined fields must match the selection. Blank fields will be ignored.
• The selection data is considered as included. There are no exclude capabilities.
• The selection data is not active or inactive. Records can be deleted as needed.

1617
Banner Student User Guide | Academic History
• The selection data does not have begin or end dates.
• For a curriculum record with a module code of LEARNER, only one record is
considered. A select rule is found for this one curriculum.
• For a curriculum record with a module code of OUTCOME, a set of curriculum records
can exist. The select rule is found that matches one of the records in the set.
The primary curriculum is examined to see if a matching select rule exists. If a match is
found, that select rule is used. If no match is found, the first secondary curriculum is
checked against each select rule until a match is found. When a match is found, the
process stops. If no match is found, the next secondary curriculum is checked.
Here is a summary of the selection rule processing:
1. The student's record is checked for holds. Graduation holds will prevent the student
from using the self-service graduation application process.
2. The student’s current and active curriculum records are gathered, and each is
compared to the SHAGADS rules using the processing order that has been
determined for the rules.
3. When a matching select rule is found, the process stops, and the display rule that is
found is used for that curriculum.
4. Eligibility checking takes place to see if a single eligibility rule exists that passes for
the student. Eligibility checking can define whether the curriculum module must be
LEARNER or OUTCOME or can be from either module in the eligibility rules.
5. The learner curriculum record is examined to see if any curriculum records exist that
are available for graduation application selection. Learner curriculum records are
restricted by term.
6. When an SHRTTRM record exists in academic history, the maximum SHRTTRM term
associated with that curriculum is used as the learner term.
or
• If no academic history term exists, and an SFRSTCR record exists in registration,
the maximum SFRSCTR term associated with that curriculum is used as the learner
term.
or
• If neither an academic history nor registration term record exists, the learner
curriculum is not available for graduation application selection.
7. When no current, active, curriculum data matches any selection rule criteria, an error
message is displayed, and the student will not be able to submit a graduation
application in self-service.
Restrictions are as follows:
• The learner module curriculum cannot be used if it has been rolled.
• The curriculum cannot have an active graduation application associated with it.
• An eligibility rule must match the curriculum.

1618
Banner Student User Guide | Academic History
• Graduation dates must be available on the date the student attempts to apply for
graduation.
When the student's outcome curriculum records are examined:
• Processing determines the most recent outcome term.
• The degree sequence for that curriculum cannot have an outcome status of “awarded”.
• The curriculum cannot have an active graduation application associated with it.
• Each curriculum record in the degree sequence must also be eligible for graduation.
• Graduation dates must be available on the date the student attempts to apply for
graduation.
The processing order for the rules is important, as selection rules can be created that use
common criteria. For example, you could have two selection rules such as:
• Rule A defines a level and campus code.
• Rule B contains the same level code in the definition, but instead of using a campus
code, it selects the rule using a college code.
You may want the process matching to stop as soon as a curriculum is found with the
matching campus code. If the student’s curriculum record does not have a matching
campus code, then the rule with the college code rule can be used. To do this, you can
assign the process order of 10 on the rule with campus code, which is rule A, and you can
assign the process order of 15 on the rule with college code, which is rule B. In this case,
if a student has a curriculum record that matches the level, college, and campus for both
rules A and B, the display of graduation dates, diploma options, and so on, is based on
rule A, for the lowest numeric processing order or the first selection rule found.
Example of display rule selection data order:
In this example, the display rule selection data is checked in priority, ascending order:
10, 20, 999.
Selection rule 10 with display rule UG-BS-ART is the selected rule when the learner
has a curriculum record with a level code of UG, a degree code of BS, and major/field
of study code of ART.
If the learner data matches this selection rule criteria, no additional analysis is needed,
and the graduation application display rule settings specified for UG-BS-ART are used
for the graduation application process for the learner/curriculum. If the learner data
Processing
Order
Display
Rule Level Campus College Degree Program Major
Depart
ment
10 UG-BS-ART UG BS ART
20 UG-BS UG BS
999 DEFAULT

1619
Banner Student User Guide | Academic History
does not match the selection rule criteria, the next priority selection rule (20) will be
checked.
Selection rule 20 with display rule UG-BS-ART is the selected rule when the learner
has a curriculum record with a level code of UG, a degree code of BS, and as multiple
curriculum records are considered at the same time as a set, all current and active
outcome records in the set must be matched.
If the learner data matches this selection rule criteria, no additional analysis is needed,
and the graduation application display rule settings specified for UG-BS are used for
the graduation application process for the learner/curriculum. If the learner data does
not match the selection rule criteria, the next priority selection rule (999) will be
checked.
Selection rule 999 with display rule DEFAULT is the selected rule when the learner
has an active, current curriculum record.
If no learner data matches any selection rule criteria, an error message is displayed,
and the learner cannot submit the graduation application in self-service.
Use Graduation Application Eligibility Rules
Graduation application eligibility rules are maintained on the Graduation Application
Eligibility Rules Form (SHAGELR). These rules determine who is eligible to apply for
graduation using Banner Student Self-Service graduation application pages. Students
whose general student, curriculum, and academic history records match the restrictions
created in an eligibility rule can apply to graduate in self-service. At least one eligibility rule
must be met for each current/active SORLCUR record in the curricula set in order for the
learner to be allowed to submit a graduation application via self-service. Rules can be
queried and are ordered by rule number.
Eligibility rules allow users to decide if the curriculum used for graduation must be from the
LEARNER module, the OUTCOME module, or can be from either. You can determine if the
eligibility rules that are created apply to students with specific curriculum data and then set
any general student criteria, academic history criteria, required level-specific GPA and
earned hours criteria, and institutional and/or overall level GPA and hours data
restrictions.
Note: The term used to evaluate the general student data is the
maximum SFRSTCR term for the student. If this does not exist, the
maximum SGBSTDN term is used. The term used to evaluate the
academic history data is the most recent SHRTTRM term.
When a student selects the Apply to Graduate menu option in Banner Student Self-
Service, all current and active curriculum records are examined. If an existing learner
curriculum has not been rolled to history or an outcome curriculum has not already been
awarded, and no active graduation application exists for the curriculum, the process
checks for eligibility. One eligibility rule needs to be met so the student can apply for
graduation.

1620
Banner Student User Guide | Academic History
The following criteria apply to the eligibility rule processing:
• One and only one eligibility rule must be matched for the curriculum record or curriculum
record set. For outcome curriculum records, the set that includes primary and secondary
curriculum data does not have to use the same eligibility rule for all records in the set.
• All the defined fields on the eligibility rule must match the curriculum record. Blank fields
will be ignored.
• The eligibility data is considered as included. There are no exclude capabilities.
• The eligibility data is not active or inactive. Records can be deleted as needed.
• The eligibility data does not have begin or end dates.
• Eligibility rules are assigned one-up numbers.
• It is not necessary to have a graduation application select rule that matches the eligibility
rule The eligibility rule can be defined at a more specific level than the select rule.
Use Graduation Application Sequence Numbers
The Graduation Sequence field on SGASTDN, SFAREGS, SHADEGR, and SOIHCUR
and the Graduation Application Sequence field on SHAGAPP are used to display the
graduation application sequence number on the curriculum record for the learner
(SGASTDN, SFAREGS) and outcome (SHADEGR) curriculum records.
Graduation application sequence numbering tracks the graduation application sequence
number for the learner and outcome curriculum records. When a graduation application is
submitted, the application number is generated as a one-up number and is stored with the
curriculum record (SORLCUR) that was used to generate the application.
Only one active graduation application can exist for a curriculum. However, multiple
curriculum records may be associated with the same graduation application. This situation
occurs because a degree has multiple curriculum records associated with it, but that
degree record was generated by the same application where the learner curriculum
records have matching elements such as level, college, degree, and program.
Restrict Curriculum Term Selection
You can use the Self-Service Graduation Term Control field on the Academic History
Control Form (SHACTRL) to define/restrict which terms are displayed for selection in
Banner Self-Service for the graduation application. The student can select from terms for
the graduation application based on the rule selected in the Self-Service Graduation
Term Control field. The rule can be set to: all terms, the latest academic history term, the
latest registration term, or the latest academic history term and the latest registration term.
This term restriction prevents any/all terms in which the student had registration records or
academic history from being displayed for selection. Therefore, a student cannot select a
term and curriculum record from an earlier registration period or term of academic history
after a curriculum change had been made. In some institutions, this earlier curriculum
record may no longer be valid for use with a graduation application.

1621
Banner Student User Guide | Academic History
Note: Eligibility processing on SHAGELR works as usual with the term
control.
All terms
A student can select any term in which registration or academic history records exist, even
if the curriculum has changed and is no longer current in the latest term of attendance.
The curriculum that is displayed is still dependent on the setting of the SHAGELR module
control (
Learner, Outcome, or Either).
When the Apply to Graduate option is selected in Banner Student Self-Service, the Select
a Term field on the Curriculum Term Selection page
(
bwskgrad.p_disp_grad_term) displays a list of any term with any curriculum that
is current and active for that term.
Latest academic history term
A student can select only the last term in which grades were rolled to academic history
(the term on SHRTTRM). The curriculum that is displayed is still dependent on the setting
of the SHAGELR module control (
Learner, Outcome, or Either).
When the Apply to Graduate option is selected in Banner Student Self-Service, the Select
a Term field on the Curriculum Term Selection page
(
bwskgrad.p_disp_grad_term) displays only the latest term for which the student
has an SHRTTRM record with the curriculum that is current and active for that term.
Latest registration term
A student can only select a term using the latest term in which the student is registered for
classes. This prevents a student from graduating based on a curriculum that is associated
with earlier terms and consequently for a curriculum that may have been changed since
the prior term of registration. The curriculum that is displayed is still dependent on the
setting of the SHAGELR module control (
Learner, Outcome, or Either).
When the Apply to Graduate option is selected in Banner Student Self-Service, the Select
a Term field on the Curriculum Term Selection page
(
bwskgrad.p_disp_grad_term) displays only the latest term for which the student
has an SFBETRM record with the curriculum that is current and active for that term.
Latest academic history and registration term
A student can select from two terms, the latest registration term and the latest academic
history term. The curriculum that is displayed is still dependent on the setting of the
SHAGELR module control (
Learner, Outcome, or Either).
When the Apply to Graduate option is selected in Banner Student Self-Service, the Select
a Term field on the Curriculum Term Selection page
(
bwskgrad.p_disp_grad_term) displays the latest term for which the student has
an SFBETRM record and the latest term for which the student has an SHRTTRM record,
with the curriculum that is current and active for that term.

1622
Banner Student User Guide | Academic History
Maintain Graduation Applications
Graduation application information that is submitted in self-service is maintained on the
Graduation Application Form (SHAGAPP). This form is used to review and update the
information while the graduation application is active. You can also delete an application,
change the status of an application, or view an inactive application. New graduation
applications can be submitted from this form when it is called from SGASTDN, SFAREGS,
and SHADEGR, as these forms will pass the selected curriculum and field of study
information. The curriculum information cannot be changed.
Fee information for the application is interdependent. The detail code, fee amount, billing
term, and fee date need to entered for the fee to be applied to the application. However,
fee information cannot be entered if an outcome curriculum record exists.
Diploma name and address mailing information can be viewed and updated for an active
graduation application. This information is used to create or update the diploma record
when the Create/Update Degree Record button is selected. This information will not be
displayed, if it has not been entered in self-service.
Use the Create/Update Degree Record button to create a degree record and an outcome
curriculum record when the graduation application has been submitted from self-service. If
the curriculum associated with the application has not been rolled, this button will perform
the roll to outcome (academic history). When no degree record exists for the matching
curriculum data that is attached to the active graduation application, a new degree record
is created. If a degree record exists, it is updated using the values from the application.
The application can be reviewed and then manually updated on SHAGAPP when it has
been approved. This button is inactive when the graduation application is inactive.
Graduation applications for the learner are queried by graduation application number in
descending order. The graduation application number is assigned when the application
number is submitted. This sequence number is stored on the curriculum record. A
curriculum will have only one active associated graduation application at a time.
New graduation applications can be created using the Apply to Graduate button from
SGASTDN, SFAREGS, and SHADEGR. Once a graduation application is created from
SGASTDN and SFAREGS, if the curriculum has not yet been rolled to outcome (academic
history), the Apply to Graduate button remains enabled. (The Apply to Graduate button
also remains enabled in SHADEGR.) These forms allow you to toggle between the
Curriculum window and the associated graduation application sequence. If an existing
graduation application is called from SGASTDN, SFAREGS, or SHADEGR, only the
specifically associated graduation application will be queried. Curriculum information
cannot be changed from SHAGAPP.
If an existing graduation application is called from SGASTDN, SFAREGS, or SHADEGR,
only the specifically associated graduation application will be queried. When SHAGAPP is
called from SGASTDN, SFAREGS, or SHADEGR, a new graduation application can be
created, but the curriculum information cannot be changed. You cannot create a
graduation application from SFAREGS or SGASTDN when the learner curriculum record
has already been rolled to outcome (academic history).
If a student wishes to withdraw or cancel an application (such as application 1), it can be
inactivated using the status code on STVGAST. Once an application has been inactivated,
it cannot be modified. The curriculum record associated with the application is not
inactivated or updated in the curriculum tables (SORLCUR and SORLFOS). The student
is now eligible to submit a new application for the same curriculum. When the new

1623
Banner Student User Guide | Academic History
application is submitted, and the application number in the SORLCUR record is replaced
with new application number (application 2). Application 2 is now associated with the
curriculum record that previously was associated with application 1. When application 1 is
viewed on SHAGAPP, the curriculum associated with it is no longer displayed, the Active
Indicator is unchecked, and the Create/Update Degree Record button is inactive.
Example:
A learner submits graduation application 1 for the curriculum record of BA/UG/ARTS.
The application status is submitted/active. The SORLCUR record is updated to set the
graduation application sequence number to 1. (This update to SORLCUR is not a
non-destructive update.)
The learner then withdraws the application, so the application status on SHAGAPP is
changed to withdrawn/inactive. No SORLCUR update is performed. The associated
SORLCUR record still has the graduation application sequence number set to 1.
The learner submits graduation application 2 for the same curriculum record of BA/
UG/ARTS. The application status is submitted/active. The SORLCUR record is
updated to set the graduation application sequence number to 2.
SORLCUR information associated with graduation application 1 is overwritten. The
curriculum information for graduation application 1 is no longer used in processing,
although graduation application 1 still exists in the SHBGAPP table.
Use Apply to Graduate
The Apply to Graduate button is used to create graduation applications from learner and
outcome curriculum records on SGASTDN, SFAREGS, and SHADEGR. This button is
masked on SOILCUR. This button is active on learner curriculum records in SGASTDN
and SFAREGS when the graduation application sequence number is Null for the
curriculum record. When a previous graduation application exists for a curriculum record
(whether the record is active or inactive), that application must be deleted before the
button can be enabled. Just inactivating the application will not allow you to create a new
application.
Only one active graduation application can exist for a curriculum record, but multiple
curriculum records may have the same graduation application. This can only occur on the
outcome curriculum record, which groups primary and secondary curricula together when
an application is created for a degree sequence where more than one outcome curriculum
record has been associated with it.
The process behind the button used to create the graduation application executes the
Graduation Application API (
sb_gradapp) and updates the graduation sequence
number on SORLCUR. The user can then update the graduation application information
on SHAGAPP. The graduation application can be created using the graduation application
selection display rule code from self-service. However, not all graduation applications are
created using self-service. The process that creates applications from baseline does not
check any selection rules. Only self-service graduation applications use the selection
display rule codes. When a baseline application is created, the user needs to fill in all the
graduation application data manually on SHAGAPP.
Outcome curriculum records are created as follows when all significant curriculum
elements match the graduation application. When multiple, current, active learner

1624
Banner Student User Guide | Academic History
curriculum records exist with same level, college, degree, and program, and the Apply to
Graduate button is selected, or the application is submitted through self-service, all the
curriculum records with the same level, college, degree, and program are grouped
together with that single application and graduation application sequence number. This
takes place because only one degree is ever created with the same level, college, degree,
and program when the learner curriculum records are rolled to the outcome record.
The exception to this scenario is when a graduation application already exists for the
matching degree sequence, and then a new degree record is created. It is possible that an
institution has already applied a graduation fee to a degree sequence. In order to prevent
adding another graduation fee for the same degree sequence, a new degree sequence
will be created, even when the college, level, program, and degree match. Users are
cautioned about creating graduation charges from self-service when learner curriculum
elements may change for the student, such as when only the major is changed (college,
level, degree, and program are not changed), after graduation fees have already been
applied to the degree sequence.
In the case where a student has applied to graduate and a degree sequence with that
graduation application is created, that outcome curriculum record (and learner curriculum
record if it was rolled) will not be available for selection from the self-service graduation
pages, since the application exists and is active.
If the student changes majors for the same degree (college, level, degree, and program
are unchanged), when the user attempts to duplicate or update the learner curriculum
record to add the new major, the system asks if the graduation application should be
copied to the new curriculum. If no, then the new graduation application needs to be
created using the Apply to Graduate button. The new curriculum record will not be
eligible for application through self-service until the student registers, is graded, and
grades are rolled to history. Therefore, it is recommended that graduation applications are
copied and updated if necessary at the time the major change is processed. This may
occur if a student changes a major in the term that is closest to the intended graduation
term, but after the degree sequence and graduation application already exist.
When it is necessary to remove one of the curriculum records from the application, the
user needs to delete the existing graduation application with the two matching curriculum
records, and inactivate the learner curriculum record on SGASTDN or SFAREGS. Another
option is to modify one of the significant elements on the curriculum record (level, college,
degree, program), so the two curriculum records are no longer a match. Then the
application can be created. The user can delete the degree record and the associated
outcome curriculum record where the two matching curricula existed and can use the
manual roll process to create the correct degree record with only one rolled curriculum
record per degree.
Apply to Graduate on SGASTDN and SFAREGS
The Apply to Graduate button in the Curriculum window of SGASTDN and SFAREGS is
used as follows. This button triggers the Graduation Application API (
sb_gradapp),
updates the graduation application sequence number on SORLCUR, and opens
SHAGAPP so additional data can be entered. Curriculum data is copied from the
curriculum record (including Admission Term, Matriculation Term, Graduation Date,
Graduation Term, Graduation Year values). If that data does not exist, data from
SGBSTDN is used.

1625
Banner Student User Guide | Academic History
The button does not insert diploma information into the graduation application. This button
is only enabled if the learner curriculum record is current and active. The button is not
enabled when the learner curriculum record has been rolled to history, when the
graduation application is attached to an awarded degree, or when the graduation
application is inactive. When a graduation application exists, the button opens SHAGAPP
in update mode for that graduation application.
Apply to Graduate on SHADEGR
The Apply to Graduate button is used on SHADEGR to create a graduation application
from an outcome record with an Outcome Status of
SO (Sought). All current and active
curriculum records for the outcome will be included in the graduation application, when
that application is created. When outcome curriculum is copied, the graduation application
sequence is copied to the new record.
This button triggers the Graduation Application API (
sb_gradapp) to create the
application, updates the graduation application sequence number on the outcome
curriculum records, and opens SHAGAPP so additional data can be entered. The values
for the Graduation Date, Graduation Term, Graduation Year, Graduation Status fields
and the Fee radio group are inserted into the new graduation application from SHADEGR.
The current date is always used as the graduation application date when the new
graduation application is created using the Apply to Graduate button on SHADEGR. This
date can be modified in SHAGAPP. If the graduation application already exists, and the
outcome degree status is still SO (sought) and the button is enabled, but the user is taken
to the existing graduation application.
The button does not insert diploma information into the graduation application. This button
is only enabled if the learner curriculum record is current and active. The button is not
enabled when the graduation application is attached to an awarded degree or when the
graduation application is inactive. When a graduation application exists, the button opens
SHAGAPP in update mode for that graduation application.
Use Application Sequencing with Curriculum
Graduation application sequencing works with curriculum records as follows:
• The graduation application must always have an associated curriculum.
• That curriculum must be current and active.
• If none of the student’s curriculum records are current, the status of the graduation
application must be inactive unless the curriculum has been rolled to outcome
(academic history), or the curriculum is an outcome curriculum and the degree has been
awarded.
Using the Replace button in the Curriculum window automatically changes the graduation
application status code to inactive, unless the curriculum was rolled and the associated
degree awarded. The Duplicate and Update buttons prompt the user to copy the
graduation application sequence number to the new current application. If the sequence
number is not copied, then the application is made inactive. If the curriculum record has
been rolled to outcome (academic history) and the associated degree has an awarded
status, the sequence number will not be copied to the new curriculum record. You cannot
delete a curriculum record if a graduation application exists.

1626
Banner Student User Guide | Academic History
Replace on SGASTDN
When the graduation application sequence number is populated for an unrolled learner
curriculum record, a message is displayed that the graduation application will be
inactivated. The user can then choose to continue or cancel the replacement process. If
you continue, the new curriculum record is created with the graduation sequence number
set to Null, and the previous graduation application is made inactive. If you do not
continue, the replacement process is cancelled.
The delete process for SGBSTDN uses the SOBCTRL processing that determines if the
learner curriculum record with the same term must be deleted. An alert is shown if the
SGBSTDN record being deleted is not the last general person record. This allows the user
to delete the curriculum record as well as the learner curriculum record, or not. The
message Warning: Curriculum data may exist for term. Review curricula and delete if
necessary displays three buttons: Delete Learner and Curricula, Delete Learner, and
Show Curricula and Cancel.
When the Delete Learner Curriculum checkbox is checked in the Curriculum Rules
window on SOACTRL, the Delete Learner button is not displayed in the warning
message. The user must select either Delete Learner and Curricula or Show Curricula
and Cancel. When the Delete Learner and Curricula button is selected, and one of the
existing curriculum records is current for a future SGBSTDN effective term, a warning will
be displayed, and the user can cancel the delete action.
You cannot delete an SGBSTDN record if a current curriculum record exists for the term,
and it has an unrolled graduation application. If the SGBSTDN record is the last record
being deleted, it cannot be deleted if it has any associated curriculum records with
unrolled graduation applications (existing graduation application sequence numbers).
Duplicate and Update on SGASTDN and SFAREGS
When a graduation application sequence of 1 has been created for a learner curriculum in
SGASTDN or SFAREGS, using the Duplicate button or the Update button displays a
Copy Graduation Sequence alert window with buttons used to Copy the graduation
application sequence number to the new current application, Inactivate it, or create a
New Priority. The alert only appears when the graduation application is active, the
curriculum has not been rolled, and the curriculum is current and active.
When the Copy button is used, the curriculum priority remains the same. The user can
change curriculum values (including the priority) and save the changes. The graduation
sequence number of 1 can be viewed on the new curriculum record, and the new
curriculum data is associated with graduation application sequence of 1. The Roll to
Outcome button is disabled, but the Apply to Graduate button remains enabled, as it can
be used to toggle between the Curriculum window and the graduation application data.
The Roll to Outcome and Apply to Graduate buttons are disabled for the previous
curriculum record.
When the Inactivate button is used, the original graduation sequence 1 for the original
curriculum is inactivated (the status in SHAGAPP is set to the system-required, inactive,
application status code), and the Roll to Outcome and Apply to Graduate buttons are
not enabled on that curriculum record. The user may edit the curriculum data, but when
the changes are saved, no graduation application will be associated with that new record.
A new curriculum record can be rolled to outcome (history), or a graduation application
can be created manually.

1627
Banner Student User Guide | Academic History
When the New Priority button is used, the curriculum priority is increased to the next
sequence number based on the SOACTRL rules, and the original graduation application
sequence 1 remains active and associated with the original priority 1 curriculum. The user
can either roll the curriculum record or submit a new graduation application for the new
curriculum priority that has been created.
Replace, Duplicate, and Update on SHADEGR
The Replace, Duplicate, and Update buttons work differently on SHADEGR than on
SGASTDN.
When the Replace button is used for an outcome curriculum record that has a graduation
application associated with the degree sequence, the new curriculum record will
automatically replace the old curriculum record for the graduation application. The
outcome delete process will delete the graduation application. If a learner curriculum
record exists for a graduation application, the outcome delete process will not delete the
graduation application. When an outcome curriculum record is copied, the graduation
application sequence number is copied to the new record. This includes processing for the
Update and Duplicate buttons in the Curriculum window.
Deleting General Student and Degree Records
You can delete a general student record (SGBSTDN) when a graduation application exists
for the curriculum, but you cannot delete the curriculum record. You cannot delete a
general student record when a current curriculum record has an associated graduation
application sequence number and the curriculum record is being deleted.
When a degree or outcome record (SHRDGMR) is deleted, the associated graduation
application is also deleted.
Student Type and Sequence Number
When SHRTYPE is run, the process copies the graduation application sequence number
to the new learner curriculum record when the student type is changed. This will not
happen if the curriculum record has been rolled to history and the associated degree has
been awarded.
Admissions Decision and Sequence Number
During the admissions decision process, if a graduation application exists, the graduation
application is inactivated, unless the curriculum record has been rolled to history and the
associated degree has been awarded.
Student Status and Sequence Number
When the student status is changed on SGASTDN or SHADEGR, the graduation
application sequence number is copied to the new curriculum record, unless the
curriculum record has been rolled to history and the associated degree has been
awarded.

1628
Banner Student User Guide | Academic History
Purging Curriculum Records with Sequence Numbers
When SOPLCPG is run, curriculum records are not purged if a graduation application
sequence number exists and the graduation application record exists. The same is true for
the Curriculum API (
sb_curriculum) processing.
Create a Graduation Application Record
When the learner completes the graduation application and submits it, the data entered is
written to the Graduation Application Table (SHBGAPP) and the Graduation Application
API (
sb_gradapp). The following data is used to create the record.
Column Value When Initially Submitted
SHBGAPP_PIDM
PIDM associated with the learner who
submitted the graduation application
SHBGAPP_SEQNO
One-up number for the number of graduation
applications submitted by the learner
SHBGAPP_ACTIVE_IND
Y (checked)
SHBGAPP_REQUEST_DATE
Date the graduation application was submitted
SHBGAPP_GAST_CODE
Status of the graduation application determined
by the graduation application display rule
application and the status when submitted
SHBGAPP_GAST_DATE
Date of the application status
SHBGAPP_USER_ID
ID of the user who last updated the record
SHBGAPP_ACTIVITY_DATE
System date
SHBGAPP_GADR_CODE
Display rule used when run from self-service
SHBGAPP_GRAD_DATE
Selected graduation date
SHBGAPP_GRAD_TERM_CODE
Selected graduation term code
SHBGAPP_GRAD_ACYR_CODE
Selected graduation year
SHBGAPP_GRAD_ATTEND_CDE
Code used to indicate if the learner plans to
attend the graduation ceremony
SHBGAPP_LAST_NAME
Last name to use for the diploma name
SHBGAPP_FIRST_NAME
First name to use for the diploma name
SHBGAPP_MI
Middle name to use for the diploma name
SHBGAPP_NAME_SUFFIX
Suffix to use for the diploma name
SHBGAPP_STREET1
Street line one for the diploma address
SHBGAPP_STREET2
Street line two for the diploma address

1629
Banner Student User Guide | Academic History
Create and Update Academic History Records
Degree and diploma records can be created and/or updated during the graduation
application process. The process also checks the status codes of graduation applications
for curriculum records that are to be archived.
Degree Records
A degree record (SHRDGMR) can be created automatically when a self-service
graduation application is submitted (based on the graduation application display rule) or
on demand from SHAGAPP, SGASTDN, or SFAREGS. A degree record can be updated
from SHAGAPP using the Create/Update Degree Record button. A new degree record is
only created when one does not already exist that matches on college, level, degree, and
program, or if those curriculum elements match, but a graduation application already
exists.
Diploma Records
A diploma record (SHBDIPL) can be created or updated when the graduation application
is submitted (based on the graduation application display rule) or automatically from
SHAGAPP. A new diploma record is only created when one does not already exist for the
degree sequence.
SHBGAPP_STREET3
Street line three for the diploma address
SHBGAPP_CITY
City for the diploma address
SHBGAPP_STAT_CODE
State code for the diploma address
SHBGAPP_ZIP
ZIP code for the diploma address
SHBGAPP_NATN_CODE
Nation code for the diploma address
SHBGAPP_TERM_CODE_DETC VARCHAR2(6)
SHBGAPP_DETC_DETAIL_CODE VARCHAR2(4)
SHBGAPP_DETC_AMOUNT NUMBER(12,2)
SHBGAPP_DETC_DESC VARCHAR2(30)
SHBGAPP_FEE_DATE DATE
SHBGAPP_TRAN_NUMBER NUMBER(4)
SHBGAPP_WPYO_RECEIPT_
NUMBER
NUMBER(8)
SHBGAPP_DATA_ORIGIN VUMBER(8)
Column Value When Initially Submitted

1630
Banner Student User Guide | Academic History
Curriculum Archive Records
When an SORLCUR record is moved into the curriculum archives (SORHCUR), if the
process detects an active graduation application, the application status will be set to
inactive.

1631
Banner Student User Guide | Academic History
Graduate Student Tracking Procedures
This section discusses using graduate student tracking.
Graduate Student Tracking Overview
The main components used in the tracking of graduate student information are
assistantship, fellowship, and internship information, dual degree data, multiple advisors,
committee information, non-course processing, and the academic transcript. Please note
that the majority of the forms and processing may be used for all student populations and
can accommodate other institutional needs besides tracking the graduate student
population. All of the forms related to this processing are found in either the General
Student module or Academic History module menu options.
Processing Assistantship, Fellowship, and Internship Information
This processing component of graduate student tracking allows you to record a range of
data related to assistantships, fellowships, and internships. The data includes (but is not
limited to) such things as effective term range, type, source of funds, stipend, supervisor,
tasks, task coordinator, comments, and more. Multiple assistantships, fellowships, and
internships may be set up for a person or a student.
The primary form in this component is the Assistantship/Fellowship/Internship Form
(SGAASST). The keys to this form include the ID (dependent upon an identification record
only, which allows information to be recorded for non-students as well as students),
Effective Term, Category, and Type fields, all of which are required in the Key
Information before entering data in the other sections of the form.
The Category field has the hard coded options
A (Assistantship), F (Fellowship), or I
(Internship). The Type field is validated against the Assistantship/Fellowship/Internship
Type Validation Form (STVGTYP). Examples of types may include teaching assistantship,
arts fellowship, nursing internship, lab assistantship, etc.
The Assistantship/Fellowship/Internship Form (SGAASST) includes two windows of data
(Information section of the main window and the Tasks and Comments window). All of the
data on the form is from and to term driven; this allows you to capture and track changes
over time. In order to make changes to data, the from term in the section of the form must
be equal to the effective term in the Key Information (similar to the way changes are made
to courses in the Catalog module). In order to track changes and create a new effective
term record for any of the information, you must enter the new effective term in the Key
Information and then press the Maintenance button or perform a Duplicate Record
function in the section of the form where the change is to be made. You may query for all
existing records related to a specific assistantship, fellowship, or internship by using the
Assistantship/Fellowship/Internship Query Form (SGAASTQ), which is accessed from the
Key Information using the ID field Search feature, and selecting View Existing A/F/I Info
(SGASSTQ) from the Option List.
The Comment section of the form allows you to create free format comments related to
the assistantship, fellowship, or internship. In addition, there is an Origin (Code)
(validated against the Originator Code Validation Form (STVORIG)) and an Origin Date.

1632
Banner Student User Guide | Academic History
The second form related to assistantship, fellowship, and internship information is the
Assistantship/Fellowship/Internship Query Form (SGAASTQ), a stand alone query form
that may be accessed from the Key Information of the Assistantship/Fellowship/Internship
Information Form (SGAASST) or via the A/F/I Summary item on the Options Menu from
anywhere on SGAASST. SGAASTQ allows you to query for existing assistantship,
fellowship, or internship information based upon one or more of the following pieces of
data: Recipient ID, Recipient Name, Term, Category, Type, Status, Program, Catalog
Term, Level, Degree, College, Major, and Department.
In addition, you may view or update the Assistantship/Fellowship/Internship Form
(SGAASST) for a specific record by selecting the A/F/I Information item in the Options
Menu or performing a Count Query Hits function from the Recipient ID field on the
Assistantship/Fellowship/Internship Query Form (SGAASTQ).
Creating Multiple Advisors
This processing component allows you to assign an unlimited number of advisors to a
student. The advisor information is effective term driven, allowing you to track and
maintain changes to the information over time.
The primary form in this component is the Multiple Advisors Form (SGAADVR). The keys
to this form are the ID and Term fields. ID, Name (untitled), and Advisor Type (optional)
are also entered, as well as the ability to designate an advisor as primary using the
Primary Indicator. The advisor ID must be set up as a valid advisor on the Faculty/
Advisor Information Form (SIAINST). The Advisor Type field is validated against the
Advisor Type Validation Form (STVADVR), which may include such values as program
advisor, peer advisor, athletic advisor, dissertation advisor, etc. The primary advisor is
displayed on the Student Course Registration Form (SFAREGS). Therefore, one advisor
should always be designated by you as the primary advisor.
The Multiple Advisors Form (SGAADVR) may also be accessed from the General Student
Form (SGASTDN). Perform a Duplicate Item function from the New Term field of the main
window of SGASTDN to view SGAADVR.
Tracking Dual Degree Information
Dual Degree information (such as JD/MBA) is tracked in the system via the General
Student Form (SGASTDN) and the Degrees and Other Formal Awards Form
(SHADEGR). The dual degree information may be entered or viewed on either form by
selecting the appropriate tab to display the Dual Degree data. The data which may be
created for the dual degree includes the Degree, Level, College, Department, and Major
fields. You may enter any combination of degree and level, as well as college, department,
and major. The system does not allow you to enter a level, college, department, or major
without a degree. After entering the dual degree information, you may perform an Exit
function from the Dual Degree data to return to the General Student Form (SGASTDN) or
the Degrees and Other Formal Awards Form (SHADEGR).
Dual Degree information which is created on the General Student Form (SGASTDN)
creates dual degree information for that degree record on the Degrees and Other Formal
Awards Form (SHADEGR) during the grade roll process, in both the online grade roll or
the batch grade roll. Dual degree information is a part of the processing which the system
performs when creating degree records on SHADEGR. If any of the dual degree

1633
Banner Student User Guide | Academic History
information is changed through the General Student Form (SGASTDN), the next time the
Grade Roll (SHRROLL) is run, the system updates the existing degree record with the
new dual degree data on the Degrees and Other Formal Awards Form (SHADEGR). This
is similar to the way the system updates (does not create) the existing degree record if
primary curriculum major or any secondary curriculum information is changed on the
General Student Form (SGASTDN). The system creates a new degree record during the
Grade Roll (SHRROLL) on the Degrees and Other Formal Awards Form (SHADEGR),
only if the level, primary curriculum degree, or primary curriculum college on SGASTDN
does not match an existing degree record in academic history.
Note: As a result of the processing described above, schools that use
dual degree information for students with existing degree records need to
create the dual degree information only on the General Student Form
(SGASTDN). The system automatically attaches that information to the
existing degree record on the Degrees and Other Formal Awards Form
(SHADEGR) for those students during the next grade roll process.
If the student has no remaining grades to be rolled (i.e., the student has
already graduated or withdrawn from your institution), or if you want the
information to be available immediately, you need to create the dual
degree information on both the General Student Form (SGASTDN) and
the Degrees and Other Formal Awards Form (SHADEGR).
Setting Up Committee/Service Information
This processing allows you to set up committee or service information which is affiliated
with a person (such as a dissertation committee) or that is stand alone, with no person
affiliation (such as a long-range planning committee). Committee member information may
be tracked. Various query options exist for committee information. In addition, committee
information may be printed on a student's transcript at your request.
Note: The Banner Human Resources System makes use of the service
aspect of the committee forms. An example of a committee/service type
they might use could be a community recycling project.
The primary form in this component is the Committee/Service Form (SHACOMI). The key
to this form is Committee/Service Type field and optionally, the Associated ID field. A
committee type may be set up without an ID, but an ID may not be set up without a
committee type. The Committee/Service Type field is validated against the Committee/
Service Type Validation Form (STVCOMT) and may include such values as dissertation
committee, academic appeals committee, thesis review committee, long range planning
committee, or curriculum review committee. The Transcript Print Switch may be
checked for each committee type created on STVCOMT that you want to print on student
transcripts. You may view all existing committees on the Committee/Service Inquiry Form
(SHICOMQ) by selecting the Committee/Service Inquiry item from the Options Menu,
selecting List Existing Comm/Serv (SHICOMQ) from the Option List for the Committee/
Service Type field, or by performing a Count Query Hits function from the Key Information
of SHACOMI. The Associated ID field is dependent upon an identification record only;
therefore, committees may be affiliated with persons outside of the general student
population. The Committee/Service Form consists of two windows: the Committee/Service
Information window (or main window) and the Committee/Service Comment window.

1634
Banner Student User Guide | Academic History
The Committee/Service Information window allows you to record general information
about the committee, to record information about an unlimited number of committee
members. The Committee/Service Comments window allows you to record an unlimited
number of free format text comments related to the committee.
If the committee is affiliated with a valid student ID on the Committee/Service Form
(SHACOMI), it may be set up as a non-course (or part of a non-course) and applied to a
degree for a student on the Academic Non-Course Form (SHANCRS). Use the Non-
Course Information item in the Options Menu to display the Academic Non-Course Form
(SHANCRS). This allows you to record the committee as a non-course (or part of a non-
course). You may also give the committee a degree audit non-course requirement code
(NCRC) and apply it to a degree for the student.
Committee information may be queried in a variety of ways through the use of three stand-
alone query forms: the Committee/Service Inquiry Form (SHICOMQ), the Committee/
Service By Person Inquiry Form (SHICMID), and the Committee/Service Member Inquiry
Form (SHICMBQ).
• The Committee/Service Inquiry Form (SHICOMQ) allows you to search for existing
committees based upon the committee type, person ID or name affiliated with the
committee, home college, home department, committee status, date initiated, and
dissolved date. Committee member information for all of the committees found in a
given query displays on the form in the Committee/Service Members section. As you
scroll through the committees displayed after a search is executed, member data
changes to correspond with the selected committee. If you perform a Next Block
function to the Committee Members section, a greater than sign (>) is placed next to the
committee to which the members belong.
• The Committee/Service By Person Inquiry Form (SHICMID) allows you to search for
existing committees by the ID of the person or student affiliated with the committee. The
form displays information about the committee in the Committee/Service Identification
Data section and about the committee members in the Committee/Service Member
Data section for the committees retrieved during a given search. As you scroll through
the committees displayed after a search is executed, member data changes to
correspond with the selected committee. If you perform a Next Block function to the
Committee/Service Member Data section, a greater than sign (>) is placed next to the
committee to which the members belong.
• The Committee/Service Member Inquiry Form (SHICMBQ) allows you to search for
committee members based upon the member ID, member name, role, member status,
member college, member department, participation from and to dates, and committee
type.
Use the Event Form (SLAEVNT) to create and schedule meetings for the committee(s) on
SHACOMI. Select the Schedule Meetings item from the Options Menu to access
SLAEVNT. The one-up event number is automatically generated. The Event Description
appears with the name of the committee. The Committee or Service Indicator is
populated (checked) by the system, because this event was established through the
SHACOMI. This data cannot be updated.
Once on SLAEVNT, use the Schedule item in the Options Menu or a Next Block function
from the Event Information to access the Meeting Times window to set up the start and
end dates, day of the week, beginning and ending times, building, and room for the
committee meeting. Use the Committee/Service Information item in the Options Menu to
return to SHACOMI.

1635
Banner Student User Guide | Academic History
Using Non-Course Processing
Non-Course processing may be set up in conjunction with a student's academic history,
while also being connected to degree audit processing. Non-courses may be set up in
academic history for any combination of qualifying paper, committee, and academic event.
Non-courses may also be applied toward a student's degree record and are displayed in
the same manner as courses.
The primary form in this component is the Academic Non-Course Form (SHANCRS). The
key to this form is a valid student ID. The form is comprised of the Academic Non-Courses
information and the Degree Applied information.
The Academic Non-Courses information allows you to create an unlimited number of non-
course records. In addition, every academic non-course which is created here also
displays (as an exact match of that information) on the Academic Non-Courses window of
the Degrees and Other Formal Awards Form (SHADEGR) for each degree record the
student may have. An academic non-course record may be comprised of a combination of
data such as paper, committee, and event.
The Degrees Applied information allows you to apply an academic non-course created in
the Academic Non-Courses section of the form with an unlimited number of degree
records which may exist for the student. If you perform a Next Block function from the
Academic Non-Courses information, the system places an asterisk (*) next to the
academic non-course to indicate the record to which the Degree Applied section is
connected. You may access the Degree Summary Form (SHADGMQ) using the (Applied
Degree) Number field Search feature or by performing a List function. In addition, once
you apply an academic non-course to a degree, the system places a check in the Apply
Non-Course Work to Learner Outcome checkbox for that record in the Non-Course
window of the Degrees and Other Formal Awards Form (SHADEGR) for the degree to
which it was applied.
This processing functions in a manner similar to the way the system sets the Applied to
Learner Outcome flag for courses on the Degrees and Other Formal Awards Form
(SHADEGR) during the Grade Roll (SHRROLL). You may change the Apply Non-Course
Work to Learner Outcome to unchecked. If you delete the "degree applied to"
information on the Academic Non-Course Form (SHANCRS), the setting of the Apply
Non-Course Work to Learner Outcome flag is also removed for that non-course record
in the Non-Course window of the Degrees and Other Formal Awards Form (SHADEGR).
However, if you change the Apply Non-Course Work to Learner Outcome flag from
checked to unchecked on a record in the Non-Course window of SHADEGR, the record
remains on the form, but the Degree Applied section of SHANCRS no longer contains that
information.
In addition to creating non-courses directly on the Academic Non-Course Form
(SHANCRS), the same information may be created through accessing the Academic Non-
Courses window on either the Committee/Service Form (SHACOMI), the Qualifying Paper
Form (SHAQPNO), or the Transcript Events and Comments Form (SHATCMT). Select the
Non-Course Information item from the Options Menu or perform a Duplicate Item function
from SHAQPNO or SHATCMT to access the Academic Non-Course Form (SHANCRS).
Select the Non-Course Information item from the Options Menu to access SHACOMI.

1636
Banner Student User Guide | Academic History
Associating Academic Transcript With Committees and Events
The student's academic transcript is associated with committee information and academic
events for graduate student tracking. Committee information may be printed on the
transcript if the Print on Transcript (Indicator) on the Committee/Service Form
(SHACOMI) is checked for a specific committee and the Transcript Type Rules Form
(SHATPRT), for the type of transcript being requested, also has the print indicator checked
for Committees.
Decision and event grade may be printed along with the event on the transcript if the
Transcript Print (Indicator) on the Academic History Event Code Validation Form
(STVEVEN) is checked and the Transcript Type Rules Form (SHATPRT), for the type of
transcript being requested, also has the print indicators checked for Academic Events,
Academic Event Decision and Academic Event Grade.
Graduate Student Tracking Implementation Instructions
Use these instructions to set up and use graduate student tracking.
Create Assistantships, Fellowships, and Internships
Use the following steps to create assistantship, fellowship, and internship information.
1. Create assistantships, fellowships, and internships values on the following validation
forms:
2. Create an assistantship for a student on the Assistantship/Fellowship/ Internship Form
(SGAASST) by entering the following information.
2.1. Enter data in the ID, Effective Term, Category, and Type fields in the Key
Information.
2.2. Enter data in the Status, Supervisor, Source of Funds, FTE, Minimum
Course Load, Maximum Course Load, and Required Hours fields in the A/F/
I Information section of the form.
2.3. Populate the Degree, Level, College, Major, and Department fields by
selecting the Degree Summary item in the Options Menu or performing a Count
Query Hits function to view the student's degree record or records, and perform
a Select function on any of the degree records.
2.4. Enter several tasks related to the assistantship in the Task and Comments
window. Assign a coordinator who is a faculty member to one of the tasks and a
STVTASK Assistantship/Fellowship/Internship Task Validation Form
STVSOFF Assistantship/Fellowship/Internship Source of Fund Validation Form
STVGSTA Assistantship/Fellowship/Internship Status Validation Form
STVGTYP Assistantship/Fellowship/Internship Type Validation Form

1637
Banner Student User Guide | Academic History
coordinator who is not a faculty member to another task. Leave at least one task
with no coordinator assigned to it.
2.5. Enter a multiple line comment with an originator code in the Comment section.
2.6. Save the data you have entered and then perform a Rollback function.
2.7. Enter a new effective term in the Key Information.
2.8. Create a new effective term record in the Information section by pressing the
Maintenance button and selecting Copy Information from the Option List or by
performing a Duplicate Record function.
2.9. Change one or more pieces of data in the Information section, and then perform
a Save function.
3. Perform a query on the Assistantship/Fellowship/Internship Query Form (SGAASTQ)
for the assistantship you created.
Note: The two records are displayed, one for each effective term record
that you created.
4. Select the Assistantship/Fellowship/Internship Information item in the Options Menu
or perform a Count Query Hits function on either record to view the assistantship on
the Assistantship/Fellowship/Internship Form (SGAASST).
Create Multiple Advisors
Use the following steps to create multiple advisor information.
1. Create advisor type values on the Advisor Type Validation Form (STVADVR).
2. Create an advisor and an advisor type for a student by either:
2.1. accessing the Multiple Advisors Form (SGAADVR) and entering the appropriate
data, or
2.2. from the General Student Form (SGASTDN), performing a Duplicate Item
function from the New Term field to access SGAADVR. Enter an advisor and an
advisor type, and designate a primary advisor.
3. Add a second advisor and advisor type on SGAADVR.
4. Perform a Rollback function on SGAADVR, and enter a different term in the Key
Information than the term used on the General Student Form (SGASDTN).
5. Press the Maintenance button and select Copy Advisor Information from the Option
List or perform a Duplicate Record function in the Advisors information, and delete the
primary advisor.
6. Perform a Save function, and note the message the system displays regarding the
primary advisor.
1638
Banner Student User Guide | Academic History
Create Dual Degree Data
Use the following steps to create dual degree information.
1. Select the Academic and Graduation Status, Dual Degree tab to display the Dual
Degree information to create, view, or update dual degree data.
2. Enter a dual degree and any combination of level, college, department, or major.
3. Exit from the window and perform a Save function.
4. Register the student for a course, grade the course, and roll the grade to academic
history.
5. Access the Degrees and Other Formal Awards Form (SHADEGR) for that student,
and use the Degree Sequence field Search feature or perform a List function to
access the Degree Summary Form (SHADGMQ).
Note: The Dual Degree field is checked for the degree that was included
in the Grade Roll (SHRROLL). Perform a Select function with that degree
to return to SHADEGR.
6. On SHADEGR, select the Dual Degree tab to display the Dual Degree window to
create, view, or edit the dual degree information.
Note: Any changes made to the information here will not affect the dual
degree information which may exist on the General Student Form
(SGASTDN).
Create Committee/Service Information
Use the following steps to create committee/service information.
Note: The Banner Human Resources System makes use of the service
aspect of the committee forms. An example of a committee/service type
they might use could be a community recycling project.
1. Create committee/service status, type, and member values on the following validation
forms:
2. Create a committee/service on the Committee/Service Form (SHACOMI) which is
affiliated with a student.
STVCOMS Committee/Service Status Validation Form
STVCOMT Committee/Service Type Validation Form
Also set the Transcript Print switch for each type created on
STVCOMT.
STVCOMF Committee Member Role/Function Validation Form
1639
Banner Student User Guide | Academic History
Note: Committees may also be affiliated with non-students or may be
created as stand alone.
3. Enter a committee/service type and student ID in the Key Information.
4. Enter the following committee/service information.
4.1. Assign a status to the committee in the Committee/Service Information section.
4.2. Populate the Home College and Home Department fields on SHACOMI by
selecting the General Student Summary item from the Options Menu. When you
have accessed the General Student Summary Form (SGASTDQ), perform a
Select function on any one of the records queried.
Note: The college and department are not required to match those on the
general student record.
4.3. Create two or more committee members in the Committee/Service Members
section, and assign a role and status to each.
4.4. Create at least one member through use of the Available Faculty By Term
Query Form (SOAFAVQ) by selecting the Available Faculty By Term item from
the Options Menu and then performing a Select function on any of the faculty
members queried who has either a college or department or both displayed.
Note: The system will also bring back the college and department for the
committee member.
4.5. Create a multiple line comment in the Committee/Service Comments window for
the committee.
5. Create a stand alone committee in the Key Information that does not have an ID
affiliated with it.
6. Access the Committee/Service Inquiry Form (SHICOMQ) by selecting List Existing
Comm/Serv (SHACOMI) from the Option List or by performing a Count Query Hits
function from either the Committee/Service Type field or the Associated ID field in
the Key Information of the Committee/Service Form (SHACOMI).
7. Access the Committee/Service By Person Inquiry Form (SHICMID) from the menu or
by selecting the Committee/Service By Person Inquiry item from the Options Menu on
SHACOMI.
8. Access the Committee/Service Member Inquiry Form (SHICMBQ) by selecting the
Committee/Service Member Inquiry item from the Options Menu on SHACOMI.
Note: All of the query forms for committees are stand alone query forms.
9. Access the Committee/Service Form (SHACOMI) for the committee and ID you
created. Select the Non-Course Information item in the Options Menu to display the
Academic Non-Course Form (SHANCRS) to create, view, or edit academic non-
course information related to the committee.
10. Schedule a meeting for your committee using SLAEVNT.

1640
Banner Student User Guide | Academic History
10.1. Access SLAEVNT by selecting the Schedule Meetings item in the Options
Menu, to create and schedule meetings for the committee.
The one-up event number is automatically generated. The (Event) Description
appears with the name of the committee. The Committee/Service Indicator is
populated by the system because this event was established through the
SHACOMI. This data cannot be updated.
10.2. Use the Schedule item in the Options Menu or a Next Block function from the
Event Information to access the Meeting Times window to set up the start and
end dates, day of the week, beginning and ending times, building, and room for
the committee meeting.
Create Non-Course Information
Use the following steps to create non-course information.
1. Set up a student with at least one degree record on the Degrees and Other Formal
Awards Form (SHADEGR).
2. Access the Committee/Service Form (SHACOMI) to enter the committee/service type
and associated ID for the student created in Step 1.
3. From within the Committee/Service Information section, select the Non-Course
Information item from the Options Menu to display the Academic Non-Course Form
(SHANCRS) to create, view, or edit academic non-courses.
Note: The committee type from the Committee/Service Form displays.
4. An academic non-course may be comprised of any combination of the fields displayed
in SHANCRS. Along with the committee, enter a complete-by date and a status code.
Save the data, and exit back to the Committee/Service Form (SHACOMI).
5. Access the Qualifying Papers Form (SHAQPNO), and enter the same student ID as
was used for the committee information. Create a qualifying paper for the student.
Save the data, and select the Non-Course Information item from the Options Menu or
perform a Duplicate Item function to display SHANCRS for entering non-course data.
Note: The paper number you just created is displayed.
6. Enter a CAPP non-course requirement code along with the paper. Also, enter a status
(choose a status which signifies "satisfied"), and perform a Save function.
7. Perform a Next Block function to the Degree Applied section of SHANCRS. Use the
Number field Search feature or perform a List function to access the student's
Degree Summary Form (SHADGMQ). Perform a Select function on the student's
degree record queried. Save your data.
8. Access the Academic Non-Course Form (SHANCRS), and enter the student's ID.
Perform a Next Block function.
Note: The information which you created through using SHANCRS from
the Committee/Service Form (SHACOMI) and the Qualifying Paper Form

1641
Banner Student User Guide | Academic History
(SHAQPNO) is recorded here. You may also add, change, or delete
academic non-course information using this form.
9. Access the Degrees and Other Formal Awards Form (SHADEGR) for the student you
have been using. Enter the degree number to which you applied the qualifying paper
non-course. Use the Non Course Work tab to access the Non-Course window.
Note: Both the academic non-course records you created (the paper and
the committee) display here, and the paper has the Apply Non-Course
Work to Learner Outcome box checked.
10. Access the Transcript Events and Comments Form (SHATCMT), and enter the
student's ID and level. Create an event in the Academic Events section. Enter a
decision and a grade for the event, and save your data.
Note: Academic non-course processing may also be accomplished from
this form as well, by selecting the Academic Non-Course Information item
in the Options Menu or by performing a Duplicate Item function.
Academic History Reports
The following reports are run through the Academic History module:
Grade Roll Process (SHRROLL)
Calculate GPA Conversion Process (SHRCONV)
Calculate GPA Report (SHRCGPA)
GPA Recalculation Report (SHRGPAC)
Calculate Academic Standing Report (SHRASTD)
Repeat/Equivalent Course Check Report (SHRRPTS)
Grade Mailer Report (SHRGRDE)
Student Type Update Report (SHRTYPE)
Transcript Population Creation Process (SHRTPOP)
Academic Transcript (SHRTRTC)
Academic Transcript Request Purge (SHPTRTC)
Degree Status Update Report (SHRDEGS)
Commencement Report (SHRCOMM)
Commencement Attendance Report (SHRCATT)
Transfer Equivalency Catalog (SHRTECA)
Transfer Equivalency Worksheet (SHRTAEQ)

1642
Banner Student User Guide | Academic History
Please refer to the Banner Student Reports and Processes Handbook for report
descriptions, instructions, parameter definitions, and output samples.
Transfer Articulation Purge (SHPTAEQ)
IPEDS First Time Residency Report (SHRIRES)
IPEDS Total Activity Report (SHRIACT)
IPEDS Completion Report (SHRICIP)
IPEDS File Generation Process (SHRIPDS)
IPEDS Enrollment Summary Age Analysis (SHRIAGE)
IPEDS Enrollment Summary Racial/Ethnic Status (SHRIETH)
Graduation Rate Survey Report (SHRIGRS)
Outcome Measures Report (SHRIOMS)
Electronic Data Interchange Reconciliation (SHREDIR)
Electronic Data Interchange
Institutions (SHREDII)
Electronic Transcript Upload Purge Process (SHRETRP)
Upload of EDI Transcript (SHREDIP)
Electronic Data Interchange Extract (SHREDIY)
Degree Verification Process (SHRDEGV)
Progress Evaluation Process (SHRPREV)
PESC/XML Transcript Export Process (SHRPESE)
PESC/XML Transcript Import Process (SHRPESI)
Transfer Catalog Data Import Process (SHRTCIM)
Incomplete Grade Process (SHRCINC)
Roll Learner to Outcome Process (SHRROUT)
eTranscript Export Process (SHRETRN)
eTranscript Listener Start Up Process (SHRQINI)
eTranscript Advanced Queue Process (SHRADVQ)
eTranscript Cloud Post Process (SHRPOST)

1642
Banner Student User Guide | Banner Student System Management
Banner Student System Management
This chapter discusses procedures and processing used to manage the Student System.
Banner Student System Management Procedures
These procedures discuss using Value-Based Security and Personally Identifiable
Information with Fine-Grained Access Control.
Value-Based Security and Personally Identifiable
Information Security Using Fine-Grained Access Control
This section details Banner Student VBS domains with business cases, impacted objects,
and restrictions, as well as FGAC seed data.
Processing Overview
Value-Based Security (VBS) using Fine-Grained Access Control (FGAC) provides
functionality that uses existing columns to secure data, which is appropriate for sets of
tables that contain security data and for securing small sets of data. (FGAC can be used to
secure an updated version of VBS processing if you wish to use it in that capacity.) Seed
data is used to define product domains and domain tables.
While Banner® provides role security and object level security, Fine-Grained Access
Control is used for controlling row level security. You can restrict which rows are displayed
to a user. Security checking takes place when the rows are accessed. FGAC dynamically
modifies an SQL statement in a transparent way to users by adding a condition (WHERE
clause) which restricts the rows shown to the user.
FGAC security can be defined on a table column in a primary table for predefined domains
in Banner Student. These domains are in the Catalog, Schedule, Recruiting, Admissions,
and General Student modules. Test score and transfer GPA domain information is also
controlled within these modules. FGAC can also be used to secure Personally Identifiable
Information (PII).
Please refer to the Banner Data Security Handbook for more information on setting up and
using FGAC with VBS and PII.
Banner Student VBS Domains
A Banner FGAC domain is an area in Banner that has a common driving table. An
example of a domain is Banner Student Admissions, where the driver table is SARADAP.

1643
Banner Student User Guide | Banner Student System Management
All lesser tables in Admissions are part of the domain and will follow the restrictions that
are set based on the rules defined for the Admissions domain.
Seed data is used to define the following Banner Student VBS domains:
• SB_CATALOG_VBS
• SB_SCHEDULE_VBS
• SB_CURRICULUM_VBS
• SB_FIELDOFSTUDY_VBS
• SB_RECRUIT_VBS
• SB_ADMISSIONS_VBS
• SB_LEARNER_VBS
• SB_TESTSCORES_VBS
• SB_TESTSCORES_STUDENT_VBS
• SB_TESTCODES_VBS
• SB_OTHERGPA_VBS
• SB_OTHERGPA_STUDENT_VBS
• SB_OTHERGPACODES_VBS
The following domains are used with Banner General using Banner Student tables.
• GB_ADDRESS_VBS (SPRADDR)
• GB_MEDICAL_VBS (SPRMEDI)
• GB_TELEPHONE_VBS (SPRTELE)
The following table lists the domains with descriptions and the associated driver tables.
Domain Description Driver Table
SB_CATALOG_VBS Catalog SCBCRSE
SB_SCHEDULE_VBS Schedule SSBSECT
SB_CURRICULUM_VBS Recruiting, Admissions,
Learner, Outcome Base
Curriculum
SORLCUR
SB_FIELDOFSTUDY_VBS Recruiting, Admissions,
Learner, Outcome Base Fields
of Study
SORLFOS
SB_RECRUIT_VBS Recruiting SRBRECR
SB_ADMISSIONS_VBS Admissions SARADAP

1644
Banner Student User Guide | Banner Student System Management
Banner Student Institutional Example Using VBS
This example is an overview of the kinds of security that can be employed when using
Banner FGAC. For more examples, please refer to the section in this chapter titled “How
to Use Banner Student VBS Domains”.
An institution has two colleges, the College of Arts and Sciences and the College of
Education. Each college has its own Admissions Office and Registrar’s Office.
The Admissions Office can insert, update, delete, and select all recruiting and applications
in their own college. They can also admit their applicants into their college, but they cannot
change the General Student record. In addition, they can only query the recruiting,
application, and student records in the other college.
The Registrar’s Office in both colleges can update, delete, insert, and query General
Student records. They can view all recruiting and application records.
1. Create a business profile group for the College of Arts and Sciences for the
Registrar’s Office and another one for the Admissions Office on the FGAC Business
Profile Assignments Form (GOAFBPR).
2. Create a third and fourth business profile group for the College of Education
Registrar’s Office and another one for the Admissions Office on GOAFBPR.
3. Insert the assigned business profile code for each user on GOAFBPR.
4. Create and activate the FGAC codes for the College of Arts and Sciences and for the
College of Education on the FGAC Group Rules Form (GOAFGAC).
5. For each group, enter the domains (Admissions - SB_ADMISSIONS_VBS and
Student - SB_LEARNER_VBS) and the predicate SQL statement that will match the
table’s college to the access list using GOAFGAC.
6. Enter the business profile groups for each domain, and check the appropriate Select,
Insert, Update, and Delete access checkboxes found in the Business Profile Access
to Predicate block in the Access to Predicate window on GOAFGAC.
The result of setting up the restrictions using VBS with FGAC procedures is that the
Admissions Office in the College of Arts and Sciences will be able to insert, update, and
SB_LEARNER_VBS General Student SGBSTDN
SB_TESTSCORES_VBS Test Scores SORTEST
SB_TESTSCORES_STUDENT_
VBS
Test scores for learners, user
has access
SORTEST
SB_TESTCODES_VBS Test Codes STVTESC
SB_OTHERGPA_VBS Other GPA SORGPAT
SB_OTHERGPA_STUDENT_VBS Other GPAs for learners, user
has access
SORGPAT
SB_OTHERGPACODES_VBS Other GPA Codes STVGPAT
Domain Description Driver Table

1645
Banner Student User Guide | Banner Student System Management
delete only applications that have their college code in the College field in the Curricula
Summary - Primary block on SAAADMS. They can view all other applications, but Oracle
FGAC will prevent them from making changes to other applications. The College of
Education Admissions Office will have similar restrictions placed upon them. They can
view applications in the College of Arts and Sciences, but Oracle FGAC will prevent them
from modifying those applications.
Banner Student PII Domains
Two types of domains are used for Banner FGAC, one for VBS and another for PII. You
can implement PII and/or VBS. They are not dependent on one another. PII is executed
for all system users, although certain users and program objects can be exempt. They are
system-required only on the SPRIDEN table and are used for the selection of General
Person data.
PII domains are used to define a processing area, which is tied to a driver table. To access
a SPRIDEN row, the PIDM must have a row in one of the PII domains to which the user is
assigned. Users will be able to access PII only for records in their processing area. For
example, if you work in the Admissions office, you will only be able to view PII for student
applicants. Masking rules can be used on forms to prevent the display of sensitive data,
such as a date or SSN.
PII processing does not require the definition of a predicate. The use of the predicate is
dictated by the PII domain driver tables and the PII column. The
GOKFGAC package is
used to construct the predicates for PII functions for selecting information.
Note: The SPRIDEN_CREATE_FDMN_CODE column on SPRIDEN has
a value of
ctx_fg_fdmn_code_home and is used as the context
variable that houses the PII domain of the user’s home domain from
GOAFPUD. This column is populated by APIs.
The following seed data is used to define Banner Student PII domains:
Domain Code Driver Table PII Column Name
SB_FACULTY_PII SIBINST
SIBINST_PIDM
SB_HOUSING_PII SLBRMAP
SLBRMAP_PIDM
SB_RECRUIT_PII SARADAP
SRBRECR_PIDM
SB_ADMISSIONS_PII SARADAP
SARADAP_PIDM
SB_GENSTUDENT_PII SGBSTDN
SGBSTDN_PIDM
SB_REGISTRATION_PII SFBETRM
SFBETRM_PIDM
SB_TRANSFER_PII SHRTTRM
SHRTTRM_PIDM

1646
Banner Student User Guide | Banner Student System Management
Banner Student Institutional Example for PII
This example is an overview of the kinds of security that can be employed when using
Banner FGAC.
The goal of this example is to restrict access to ID and name information based on the
work location of the user and the functional location of data for the ID.
• Staff members in the Admissions, Registration, Student Billing, and Student Dean's
offices are assigned to the functional locations of Admissions, Enrollment, and General
Student.
• Staff members in the Payroll area are assigned to the functional locations of Applicant,
Benefits, and Beneficiary.
• When the staff members in the Admissions office open a Banner form and enter an ID
that does not have a record in Admissions, Enrollment, or General Student, it will appear
as if the ID does not exist in the system.
• When staff members in the Payroll area open a Banner form and enter an ID that does
not have a record in any of the Banner Human Resources areas, it will again appear as
if the ID does not exist for the system.
Typically, the Banner Student System administrative offices do not have access to Payroll
type forms, and the Payroll area may not have access to Banner Student System
administrative forms. That alone prevents access to the data in those products. PII goes
one step farther and prevents these offices from viewing the lists of people that exist for
the other products.
How to Use Banner Student VBS Domains
The following section provides information about Banner Student domains and how they
can be implemented.
Catalog Domain
Domain Description Driver Tables
SB_CATALOG_VBS Course Catalog SCBCRSE SCRSYLO, SCRSYRM,
SCRSYTR, SCRTEXT,
SCRSYLN, SCRFEES,
SCRGMOD, SCRLEVL,
SCRRARE, SCRRCAM,
SCRRCLS, SCRRCMP,
SCRRCOL. SCRRDEG,
SCRRLVL, SCRRMAJR,
SCRRPRG, SCRRTRM,
SCRRTST, SCRSBGI,
SCBCDTL, SCBCRSE,
SCBDESC, SCBSUPP

1647
Banner Student User Guide | Banner Student System Management
The Catalog domain predicates should be used to control the insertion, updating, and
deletion of data. The impact of having predicates to control selection of the catalog is far
reaching in Banner Student and may cause corrupt data. For example, the course title is
derived from the catalog if not it is not available from the schedule. The course title
appears on many pages and reports.
Restrictions
Business Cases
Restriction
Mode
Columns Used in
Restrictions Column Description
Insert, Update,
Delete
SCBCRSE_SUBJ_CODE
Subject area of the course
Insert, Update,
Delete
SCBCRSE_CRSE_NUMB
Course number associated with the
subject for the course
Insert, Update,
Delete
SCBCRSE_EFF_TERM
Term this version of the course
becomes effective
Insert, Update,
Delete
SCBCRSE_COLL_CODE
College which offers the course
Insert, Update,
Delete
SCBCRSE_DIVS_CODE
Division which offers the course
Insert, Update,
Delete
SCBCRSE_DEPT_CODE
Department which offers the course
Insert, Update,
Delete
SCBCRSE_CSTA_CODE
Status code for the course
Insert, Update,
Delete
SCBCRSE_CIPC_CODE
CIP code (primary subject matter)
for the course
Business Cases Using
SB_CATALOG_VBS Business Case Issues
Restrict by subject or department or
college (using Insert, Update, Delete)
SCBCRSE_SUBJ_CODE IN
('1','2') AND
SCBCRSE_DEPT_CODE IN
('1','2') AND
SCBCRSE_COLL_CODE IN
('1','2')
Restrict maintenance by college, department,
or subject

1648
Banner Student User Guide | Banner Student System Management
Other Business Cases
Impacted Objects
Schedule Domain
Other Business Case Examples Using SB_CATALOG_VBS
N/A
Objects that may be
impacted by restrictions Possible Impacts
SCACRSE Maintenance of course catalog information
SCADETL Maintenance of course catalog information
SCARRES Maintenance of course catalog information
SCAPREQ Maintenance of course catalog information
SCASRES Maintenance of course catalog information
SCABASE Maintenance of base catalog information
SCASYLB Maintenance of course catalog syllabus
Faculty Self-Service Maintenance of course catalog information
Domain Description Driver Tables
SB_SCHEDULE_VBS Class Schedule SSBSECT SSBDESC, SSBFSEC,
SSBOVRR, SSBSECT,
SSRATTR, SSRBLCK,
SSRCORQ, SSREVAL,
SSREXTN, SSRFEES,
SSRLINK, SSRMEET,
SSRMPRT, SSRMRDF,
SSRRARE, SSRRCLS,
SSRRCMP, SSRRDEG,
SCRRLVL, SSRRMAJ,
SSRRPRG, SSRRSTS,
SSRRTST, SSRSCCD,
SSRSPRT, SSRSRDF,
SSRSYLN, SSRSYLO,
SSRSYRM, SSRSYTR,
SSRTEXT, SSRXLST,
SSRRESV, SSRRFND,
SSRRLVL, SSRRMAJ,
SSRRPRG

1649
Banner Student User Guide | Banner Student System Management
The Schedule domain predicates should be used to control the insertion, updating, and
deletion of data. It is recommended that the selection restrictions not be applied to the
Schedule tables. This could impact viewing student course data on transcripts and other
online course reports.
Note: Special processing is used by the learner registration validation and
update package SFKEDIT to turn FGAC off so that enrollment counts will
not be compromised by VBS restrictions.
Restrictions
Restriction
Mode
Columns Used in
Restrictions Column Description
Insert, Update,
Delete
SSBSECT_INSM_CODE
Instructional method code assigned
to the section
Insert, Update,
Delete
SSBSECT_TERM_CODE
Term code for the course section
information
Insert, Update,
Delete
SSBSECT_PTRM_CODE
Part-of-term in which the section is
offered
Insert, Update,
Delete
SSBSECT_SUBJ_CODE
Subject code for the section
Insert, Update,
Delete
SSBSECT_SSTS_CODE
Status of the section
Insert, Update,
Delete
SSBSECT_SCHD_CODE
Instructional type of the section
being scheduled
Insert, Update,
Delete
SSBSECT_CAMP_CODE
Campus on which the section is
scheduled
Insert, Update,
Delete
SSBSECT_GMOD_CODE
Grading mode for the section
Insert, Update,
Delete
SSBSECT_SESS_CODE
Session in which the section is
scheduled

1650
Banner Student User Guide | Banner Student System Management
Business Cases
Other Business Cases
Impacted Objects
Business Cases Using
SB_SCHEDULE_VBS Business Case Issues
Restrict by subject or campus or
session or schedule type (using
Insert, Update, Delete)
SSBSECT_SUBJ_CODE IN
('1','2') AND
SSBSECT_CAMP_CODE IN
('1','2') AND
SSBSECT_GMOD_CODE IN
('1','2')
Restrict maintenance of the schedule to
subject, campus, or grade mode types
Other Business Case Examples Using SB_SCHEDULE_VBS
N/A
Objects that may be
impacted by restrictions Possible Impacts
SSASECT Maintenance of schedule information
SSADETL Maintenance of schedule information
SSATEXT Maintenance of schedule information
SSAPREQ Maintenance of schedule information
SSASYLB Maintenance of schedule information
SSARULE Maintenance of schedule information
SSAACCL Maintenance of schedule information
SSAASEC Maintenance of schedule information
SSAEVAL Maintenance of schedule information
SSAOVRR Maintenance of schedule information
SSASECQ Maintenance of schedule information
Faculty Self-Service Maintenance of schedule information

1651
Banner Student User Guide | Banner Student System Management
Curriculum Domain
All curriculum data is maintained in the base curriculum and field of study tables
SORLCUR and SORLFOS. Restrictions on the insertion and deletion of curriculum data
should be written against these tables. Also, curriculum data cannot be updated. The
process used to change data includes copying the curriculum record using the key insert/
key duplicate and making changes to the new record.
If the user wishes to restrict selection against SRBRECR, SARADAP, and SGASTDN
based on the primary or secondary curriculum, they can use those tables’ curriculum
columns in building selection, updating, and deletion rules against those tables. The
primary and secondary curriculum data are backfilled from SORLCUR and SORLFOS to
SARADAP, SRBRECR, and SGASTDN after all inserts have occurred.
If selection restrictions are built using the SRBRECR, SARADAP, and SGASTDN
curriculum data columns, an alternative check needs to be added for the data to be null.
The Curriculum API validates the existence of the host record before allowing an insert.
For example, you cannot insert an application module curriculum if the application does
not exist. The application will appear to not exist if the rule is only for non-null values.
Restrictions
Domain Description Driver Tables
SB_CURRICULUM_VBS Recruiting,
Admissions,
Learner,
Outcome,
Base
Curriculum
SORLCUR SORLCUR
Restriction
Mode
Columns Used in
Restrictions Column Description
Insert, Delete
SORLCUR_LMOD_CODE
Learner module code for the
curriculum
Insert, Delete
SORLCUR_TERM_CODE
Term code for the curriculum
Insert, Delete
SORLCUR_LEVL_CODE
Level code for the curriculum
Insert, Delete
SORLCUR_COLL_CODE
College code for the curriculum
Insert, Delete
SORLCUR_DEGC_CODE
Degree code for the curriculum
Insert, Delete
SORLCUR_TERM_CODE_CTLG
Catalog term code for the learner
curriculum
Insert, Delete
SORLCUR_ADMT_CODE
Admit code for the learner’s
admission to the curriculum
Insert, Delete
SORLCUR_CAMP_CODE
Campus code for the curriculum

1652
Banner Student User Guide | Banner Student System Management
Business Cases
Other Business Cases
Insert, Delete
SORLCUR_PROGRAM
Program code for the curriculum
Business Cases Using
SB_CURRICULUM_VBS Business Case Issues
Restrict recruits by curriculum
SORLCUR_LMOD_CODE =
sb_curriculum.f_recruit
AND SORLCUR_LEVL_CODE =
'X' AND SORLCUR_COLL_CODE
= 'XX'
Need to restrict various campus offices that
recruit different populations for different
programs
Other Business Case Examples Using SB_CURRICULUM_VBS
Applicants by curriculum
SORLCUR_LMOD_CODE = sb_curriculum.f_admissions AND
SORLCUR_LEVL_CODE = 'X' AND
SORLCUR_COLL_CODE = 'XX'
Learners by curriculum
SORLCUR_LMOD_CODE = sb_curriculum.f_learner AND
SORLCUR_LEVL_CODE = 'X' AND
SORLCUR_COLL_CODE = 'XX'
Outcome by curriculum
SORLCUR_LMOD_CODE = sb_curriculum.f_outcome AND
SORLCUR_LEVL_CODE = 'X' AND
SORLCUR_COLL_CODE = 'XX'
Restriction
Mode
Columns Used in
Restrictions Column Description

1653
Banner Student User Guide | Banner Student System Management
Impacted Objects
* Impacted objects do not include Banner batch objects. All job type objects are listed in
the Banner General FGAC GORFEOB object. Banner security turns VBS using FGAC off
when an object exists in the GORFEOB table.
** This list may not include all possible impacts. This needs to be reviewed by each
institution based on the type of restrictive rule coded on GOAFGAC.
Field of Study Domain
Objects that may be
impacted by restrictions * Possible Impacts **
SRAQUIK Cannot save the recruit, application, or learner record
if primary curriculum cannot be saved
SAAADMS Cannot save the application if primary curriculum
cannot be saved
SGASTDN Maintenance of the learner's curriculum
SAAQUIK Cannot create the learner record, application, or
recruit record since the curriculum cannot be saved
SRARECR Cannot save the recruit record if primary curriculum
cannot be saved
SFAREGS Maintenance of the learner's curriculum
SHADEGR Maintenance of the learner's outcome curriculum
SRIPREL Cannot create the recruit or application for prospect
SAADCRV Cannot add a decision to applicant that will result in a
learner record being created
SAADCBT Cannot add a decision to applicant that will result in a
learner record being created
SAAEAPS Cannot push the application for an electronic
applicant
Online Grade Roll Cannot create the outcome record or add unrolled
curriculum during the online grade rolls
SOVLCUR Selection of curriculum information
Domain Description Driver Tables
SB_FIELDOFSTUDY_VBS Recruiting, Admissions,
Learner, Outcome, Base
Fields of Study
SORLFOS SORLFOS

1654
Banner Student User Guide | Banner Student System Management
Restrictions
Business Cases
Other Business Cases
Restriction
Mode Columns Used in Restrictions Column Description
Insert, Delete
SORLFOS_MAJR_CODE_ATTACH
Major code to which the
concentration is attached
Insert, Delete
SORLFOS_MAJR_CODE
Major code for the field of
study
Insert, Delete
SORLFOS_DEPT_CODE
Department code associated
with the major field of study
Insert, Delete
SORLFOS_TMST_CODE
Time status code used to
indicate the intent of the
student’s pursuit of the field of
study
Business Cases Using
SB_FIELDOFSTUDY_VBS Business Case Issues
Restrict any learner module by major
SORLFOS_DEPT_CODE = 'XXX'
AND SORLFOS_MAJR_CODE =
'XXX' AND
SORLFOS_LFST_CODE =
sb_fieldofstudy_str.f_
major
Need to restrict major changes to certain
departments by department
Other Business Case Examples Using SB_FIELDOFSTUDY_VBS
Recruits by department or major
SORLFOS_DEPT_CODE = 'XXX' AND
SORLFOS_MAJR_CODE = 'XXX' AND
EXISTS (SELECT 'X' FROM SORLCUR WHERE
SORLCUR_PIDM = SORLFOS_PIDM AND SORLCUR_SEQNO =
SORLFOS_LCUR_SEQNO AND
SORLCUR_LMOD_CODE = sb_curriculum_str.f_recruit)

1655
Banner Student User Guide | Banner Student System Management
Impacted Objects
Applicants by department or major
SORLFOS_DEPT_CODE = 'XXX' AND
SORLFOS_MAJR_CODE = 'XXX' AND
EXISTS (SELECT 'X' FROM SORLCUR WHERE SORLCUR_PIDM =
SORLFOS_PIDM AND
SORLCUR_SEQNO = SORLFOS_LCUR_SEQNO AND SORLCUR_LMOD_CODE =
sb_curriculum_str.f_admissions)
Learners by department or major
SORLFOS_DEPT_CODE = 'XXX' AND
SORLFOS_MAJR_CODE = 'XXX' AND
EXISTS (SELECT 'X' FROM SORLCUR WHERE SORLCUR_PIDM =
SORLFOS_PIDM AND
SORLCUR_SEQNO = SORLFOS_LCUR_SEQNO AND SORLCUR_LMOD_CODE =
sb_curriculum_str.f_learner)
Outcome by department or major
SORLFOS_DEPT_CODE = 'XXX' AND
SORLFOS_MAJR_CODE = 'XXX' AND
EXISTS (SELECT 'X' FROM SORLCUR WHERE SORLCUR_PIDM =
SORLFOS_PIDM AND
SORLCUR_SEQNO = SORLFOS_LCUR_SEQNO AND SORLCUR_LMOD_CODE =
sb_curriculum_str.f_outcome)
Objects that may be
impacted by restrictions Possible Impacts
SRAQUIK Cannot save recruit, application, or learner record if
primary curriculum cannot be saved
SAAADMS Cannot save application if primary curriculum cannot
be saved
SGASTDN Maintenance of learner's curriculum
SAAQUIK Cannot create the recruit, application, or learner
record since the curriculum cannot be saved
SRARECR Cannot save recruit record if primary curriculum
cannot be saved
Other Business Case Examples Using SB_FIELDOFSTUDY_VBS

1656
Banner Student User Guide | Banner Student System Management
Recruit Domain
The Recruit domain predicates built on non-curriculum items are meant to control the
selection, insertion, updating, and deletion of the recruit data. Predicates that include the
primary or secondary curriculum items on SRBRECR can only be used to control selection
of the recruit data.
Restrictions
SFAREGS Maintenance of learner's curriculum
SHADEGR Maintenance of learner's outcome curriculum
SRIPREL Cannot create the recruit or application for prospect
SAADCRV Cannot add a decision to an applicant that will result in
a learner record being created
SAADCBT Cannot add a decision to an applicant that will result in
a learner record being created
SAAEAPS Cannot push the application for an electronic applicant
Online Grade Roll Cannot create the outcome record or add unrolled
curriculum during the online grade roll
SOVLFOS Selection of field of study information
Domain Description Driver Tables
SB_RECRUIT_VBS Recruiting SRBRECR SRBRECR, SRRLEND,
SRRRATT, SRRRSRC,
SRRCHRT
Restriction
Mode Columns Used in Restrictions Column Description
Select, Insert,
Update, Delete
SRBRECR_TERM_CODE
Effective term where
recruiting records will be
viewed or created.
Select, Insert,
Update, Delete
SRBRECR_RECR_CODE
Recruiter assigned to the
prospect recruiting record
Select, Insert,
Update, Delete
SRBRECR_RSTA_CODE
Status of the prospect
associated with the recruiting
record
Objects that may be
impacted by restrictions Possible Impacts

1657
Banner Student User Guide | Banner Student System Management
Select, Insert,
Update, Delete
SRBRECR_ADMT_CODE
Admission type code for the
prospect recruiting record
Select, Insert,
Update, Delete
SRBRECR_FULL_PART_IND
Indicates if prospect will be
full-time or part-time student
Select, Insert,
Update, Delete
SRBRECR_RTYP_CODE
Recruit type code for the
prospect recruiting record
Select, Insert,
Update, Delete
SRBRECR_RESD_CODE
Residency code for the
prospect recruiting record
Select, Insert,
Update, Delete
SRBRECR_SESS_CODE
Session code for the prospect
recruiting record
Select, Insert,
Update, Delete
SRBRECR_SITE_CODE
Site code for the prospect
recruiting record
Select, Insert,
Update, Delete
SRBRECR_STYP_CODE
Student type code for the
prospect recruiting record
Select,
Update, Delete
SRBRECR_TERM_CODE
Effective term where
recruiting records will be
viewed or created
Select,
Update, Delete
SRBRECR_DEPT_CODE
Department associated with
the prospect recruiting record
Select,
Update, Delete
SRBRECR_LEVL_CODE
Level code associated with
the prospect recruiting record
Select,
Update, Delete
SRBRECR_DEGC_CODE
Degree code associated with
the prospect recruiting record
Select,
Update, Delete
SRBRECR_MAJR_CODE
Major code associated with
the prospect recruiting record
Select,
Update, Delete
SRBRECR_CAMP_CODE
Campus code associated with
the prospect recruiting record
Select,
Update, Delete
SRBRECR_COLL_CODE
College code associated with
the prospect recruiting record
Select,
Update, Delete
SRBRECR_PROGRAM_1
Curriculum 1 program code
associated with the prospect
recruiting record
Select,
Update, Delete
SRBRECR_TERM_CODE_CTLG_1
Curriculum 1 catalog term
code associated with the
prospect recruiting record
Restriction
Mode Columns Used in Restrictions Column Description

1658
Banner Student User Guide | Banner Student System Management
Business Cases
Other Business Cases
Impacted Objects
Business Cases Using
SB_RECRUIT_VBS Business Case Issues
Restrict by instate recruits (using
Select, Insert, Update, Delete)
SRBRECR_RESD_CODE = 'R'
Need to restrict creation of the recruit based
on if applicant is instate or out of state
Restrict selection of recruit records
based on the primary curriculum
(using Select, Update, Delete)
(SRBRECR_LEVL_CODE = 'X'
AND
SRBRECR_MAJR_CODE =
'XXXX') OR
(SRBRECR_LEVL_CODE IS
NULL AND
SRBRECR_MAJR_CODE IS
NULL)
Need to restrict selection, updating, and
deletion of the recruit record based on the
primary curriculum level and major
Other Business Case Examples Using SB_RECRUIT_VBS
By recruiter type
SRBRECR_RTYP_CODE = 'GR'
By full-time recruits
SRBRECR_FULL_PART_TIME = 'F'
By recruiter
SRBRECR_RECR_CODE IN ('1','2')
Objects that may be
impacted by restrictions Possible Impacts
SRARECR Recruit record maintenance
SRAQUIK Recruit record quick entry
SRIPREL Create recruit record during create process for an
electronic prospect

1659
Banner Student User Guide | Banner Student System Management
Admissions Domain
The Admissions domain predicates built on non-curriculum items are meant to control the
selection, insertion, updating, and deletion of the application data. Predicates that include
the primary or secondary curriculum items should only be used to control selection,
updating, or deletion of the application.
In addition, the curriculum data is null until the backfill has been run, and any predicate
that checks the application curriculum should also check alternatively if the curriculum
fields are null. This is required for the curriculum APIs to complete, because one of the
checks in the curriculum insert is that the host record must exist.
Restrictions
SAAQUIK Create recruit record during quick admissions process
SRARINF View recruiting information
SRASRCE View recruiting information
SOILCUR View recruiting information
SRASUMI View recruiting information
SOASBSM View recruiting information
SOAPCSM View recruiting information
Banner Student and Banner
Financial Aid product views
with policy tables for
SB_RECRUIT_VBS
View recruiting information
Domain Description Driver Tables
SB_ADMISSIONS_VBS Admissions
Application
SARADAP SARADAP, SARAPPD,
SARCHKL, SARCHRT,
SARDSCL, SARQUAN,
SARRRAT, SARRSRC
Restriction
Mode Columns Used in Restrictions Column Description
Select, Insert,
Update, Delete
SARADAP_TERM_CODE_ENTRY
Term associated with the
information on applicant
record
Select, Insert,
Update, Delete
SARADAP_APST_CODE
Status of the application
Objects that may be
impacted by restrictions Possible Impacts

1660
Banner Student User Guide | Banner Student System Management
Select, Insert,
Update, Delete
SARADAP_ADMT_CODE
Admission type of the
applicant
Select, Insert,
Update, Delete
SARADAP_STYP_CODE
Type of student the applicant
will become if admitted
Select, Insert,
Update, Delete
SARADAP_SITE_CODE
Site to which applicant is
applying
Select, Insert,
Update, Delete
SARADAP_RESD_CODE
Residency classification of
the applicant
Select, Insert,
Update, Delete
SARADAP_FULL_PART_IND
Identifies if applicant intention
is for full or part time
enrollment
Select, Insert,
Update, Delete
SARADAP_SESS_CODE
Session applicant is applying
for
Select, Insert,
Update, Delete
SARADAP_RATE_CODE
Specific assessment rate
assigned to the student
Select, Insert,
Update, Delete
SARADAP_RECR_CODE
Recruiter code for the
applicant
Select, Insert,
Update, Delete
SARADAP_RTYP_CODE
Recruit type code for the
applicant
Select,
Update, Delete
SARADAP_LEVL_CODE
Level for which the applicant
is applying
Select,
Update, Delete
SARADAP_CAMP_CODE
Campus to which applicant is
applying
Select,
Update, Delete
SARADAP_COLL_CODE_1
Primary college to which
applicant is applying
Select,
Update, Delete
SARADAP_DEGC_CODE_1
Primary degree for which
applicant is applying
Select,
Update, Delete
SARADAP_MAJR_CODE_1
Primary major for which
applicant is applying
Select,
Update, Delete
SARADAP_DEPT_CODE
Department to which
applicant is applying
Select,
Update, Delete
SARADAP_PROGRAM_1
Curriculum 1 program code
for which applicant is applying
Select,
Update, Delete
SARADAP_TERM_CODE_CTLG_1
Curriculum 1 catalog term
code for which applicant is
applying
Restriction
Mode Columns Used in Restrictions Column Description

1661
Banner Student User Guide | Banner Student System Management
Business Cases
Other Business Cases
Impacted Objects
Business Cases Using
SB_ADMISSIONS_VBS Business Case Issues
Restrict by instate applicants (using
Select, Insert, Update, Delete)
SARADAP_RESD_CODE =
'<value for instate>'
Need to restrict creation of the application
based on if applicant is instate or out of state
Restrict applications by primary level
and college (using Select, Update,
Delete)
(SARADAP_LEVL_CODE = 'UG'
AND SARADAP_COLL_CODE_1 =
'AS') OR
(SARADAP_LEVL_CODE IS
NULL AND SARADAP_COLL_
CODE_1 IS NULL)
Need to restrict selection, updating, and
deletion of the application based on the
primary curriculum level and college
Other Business Case Examples Using SB_ADMISSIONS_VBS
By instate applicants
SARADAP_RESD_CODE = 'R'
By full-time applicants
SARADAP_FULL_PART_TIME = 'F'
By admit type
SARADAP_ADMT_CODE IN ('1','2')
Objects that may be
impacted by restrictions Possible Impacts
SAAACKL Maintenance of checklist items
SAAQUAN Maintenance of application questions and answers
SAAADMS Maintenance of applications
SAAQUIK Create application function on the quick admissions
process

1662
Banner Student User Guide | Banner Student System Management
Learner (General Student) Domain
The Learner domain predicates built on non-curriculum items are meant to control the
insertion, updating, and deletion of the learner data. Predicates that include the primary or
secondary curriculum items on SGBSTDN can only be used to control selection of the
learner data.
SAARRAT Maintenance of admissions ratings
SAADCRV Maintenance of decisions
SAADCBT Maintenance of decisions and admissions ratings
SRIPREL Create application in the create recruit function for the
electronic prospects
SOASUPL Maintenance of supplemental application information
SOAGPAT Maintenance of other GPAs for applicant
SOILCUR View application information
SAASUMI View application information
SOASBSM View application information
SOAPCSM View application information
Banner Student and Banner
Financial Aid product views
with policy tables for
SB_ADMISSIONS_VBS
View application information
Domain Description Driver Tables
SB_LEARNER_VBS General Student SGBSTDN SGBEOPS, SGBOEDU,
SGBSTDN, SGRACMT,
SGBUSER, SGRADVR,
SGRASSI, SGRASST,
SGRCHRT, SGRCMNT,
SGRCOOP, SGRDSER,
SGRDISA, SGRDUTY,
SGRESEL, SGRSACT,
SGRSATT, SGRSCMT,
SGRSPRT, SGRVETN
Objects that may be
impacted by restrictions Possible Impacts

1663
Banner Student User Guide | Banner Student System Management
Restrictions
Restriction
Mode Columns Used in Restrictions Column Description
Insert, Update,
Delete
SGBSTDN_TERM_CODE_GRAD
Term student intends to
graduate
Insert, Update,
Delete
SGBSTDN_ACYR_CODE
Year student intends to
graduate
Insert, Update,
Delete
SGBSTDN_SITE_CODE
Site code for the student
record
Insert, Update,
Delete
SGBSTDN_TERM_CODE_EFF
Effective term associated with
student record
Insert, Update,
Delete
SGBSTDN_STST_CODE
Student status for the
effective term
Insert, Update,
Delete
SGBSTDN_STYP_CODE
Student type for the effective
term
Insert, Update,
Delete
SGBSTDN_FULL_PART_IND
Indicates whether the student
is full-time or part-time
Insert, Update,
Delete
SGBSTDN_SESS_CODE
Session student is attending
for the effective term
Insert, Update,
Delete
SGBSTDN_RESD_CODE
Residency status of the
student for the effective term
Select,
Update, Delete
SGBSTDN_ADMT_CODE
Admissions type from the
admissions application
Select,
Update, Delete
SGBSTDN_DEPT_CODE
Department code for the
effective term
Select,
Update, Delete
SGBSTDN_PROGRAM_1
Curriculum 1 program code
for the effective term
Select,
Update, Delete
SGBSTDN_TERM_CODE_CTLG_1
Curriculum 1 catalog term
code for the effective term
Select,
Update, Delete
SGBSTDN_LEVL_CODE
Level of the student for the
effective term
Select,
Update, Delete
SGBSTDN_TERM_CODE_ADMIT
Term student was first
admitted to institution
Select,
Update, Delete
SGBSTDN_CAMP_CODE
Campus location associated
with the student for the
effective term
Select,
Update, Delete
SGBSTDN_COLL_CODE_1
College associated with the
primary curriculum for the
effective term

1664
Banner Student User Guide | Banner Student System Management
Business Cases
Other Business Cases
Select,
Update, Delete
SGBSTDN_DEGC_CODE_1
Degree within the primary
curriculum for the effective
term
Select,
Update, Delete
SGBSTDN_MAJR_CODE_1
Primary major within the
primary curriculum for the
effective term
Business Cases Using
SB_LEARNER_VBS Business Case Issues
Restrict by instate students (using
Insert, Update, Delete)
SGBSTDN_RESD_CODE = 'R'
Need to restrict creation of the learner based
on if person is instate or out of state
Restrict selection of learner records
based on the primary curriculum
(using Select, Update, Delete)
(SRBRECR_LEVL_CODE = 'X'
AND
SRBRECR_MAJR_CODE =
'XXXX') OR
(SGBSTDN_LEVL_CODE IS
NULL AND
SGBSTDN_MAJR_CODE IS
NULL)
Other Business Case Examples Using SB_LEARNER_VBS
By full-time learners
SGBSTDN _FULL_PART_TIME = 'F'
By student type
SGBSTDN_STYP_CODE IN ('AS','NS')
Restriction
Mode Columns Used in Restrictions Column Description

1665
Banner Student User Guide | Banner Student System Management
Impacted Objects
Test Scores Domain
Selection by primary curriculum
SGBSTDN_LEVL_CODE = 'XX' AND
SGBSTDN_COLL_CODE = 'XX' OR
(SGBSTDN_LEVL_CODE IS NULL AND
SGBSTGDN_COLL_CODE_1 IS NULL)
Selection by admissions code
SGBSTDN_ADMT_CODE = 'XX'
Objects that may be
impacted by restrictions Possible Impacts
SGASTDN Maintain general learner information
SFAREGS Maintain general learner information
SAADCRV Admit application and create learner
SAADCBT Admit application and create learner
SOILCUR View general learner information
SGASTDQ View general learner information
SGACOOP Maintain general learner information
SGAEOPS Maintain general learner information
SGASPRT Maintain general learner information
SGAADVR Maintain general learner information
SGADISA Maintain general learner information
SGAUSDF Maintain general learner information
Banner Student and Banner
Financial Aid product views
with policy tables for
SB_LEARNER_VBS
View application information
Domain Description Driver Tables
SB_TESTSCORES_VBS Test Scores SORTEST SORTEST
Other Business Case Examples Using SB_LEARNER_VBS

1666
Banner Student User Guide | Banner Student System Management
Restrictions
Business Cases
Other Business Cases
Impacted Objects
Restriction
Mode
Columns Used in
Restrictions Column Description
Select, Insert,
Update, Delete
SORTEST_TESC_CODE
Test score code associated with
various tests, i.e., SAT, ACT
Select, Insert,
Update, Delete
SORTEST_TSRC_CODE
Test source or how the test score
was entered, i.e., data load or self-
reported
Select, Insert,
Update, Delete
SORTEST_TADM_CODE
Administrative type of a particular
test, i.e., locally or nationally
administered
Select, Insert,
Update, Delete
SORTEST_ADMR_CODE
Admissions checklist item code
which is cross-referenced
Business Cases Using
SB_TESTSCORES_VBS Business Case Issues
Restrict by test code (using Insert,
Update, Delete)
SORTEST_TESC_CODE in
('1','2','3')
Restrict maintenance to specific test codes
Other Business Case Examples Using SB_TESTSCORES_VBS
By admission request checklist code
SORTEST_ADMR_CODE in ('1','2','3')
Objects that may be
impacted by restrictions Possible Impacts
SOATEST Selection of test scores
SAADCRV Decision calculator

1667
Banner Student User Guide | Banner Student System Management
Student Test Scores Domain
This domain comes with a built-in function that limits access to test scores based on the
existence of recruit, applicant, or learner records. If the learner has one of these module
records and the user has access to one of them, then they will have access to the
associated test scores for the student. If the learner does not have one of these module
records, then the user has access to the test scores.
Restrictions
SRIPREL Insertion of test scores during creation or updating of
recruit and application from electronic prospect
SAAEAPS Insertion of test scores during creation or updating of
application from electronic applicant
Banner Student and Banner
Financial Aid views with
queries against SORTEST
Selection of records
Domain Description Driver Tables
SB_TESTSCORES_
STUDENT_VBS
Test Scores for
Learner for Which
User has Access
SORTEST SORTEST
Restriction
Mode
Columns Used in
Restrictions Column Description
Select, Insert,
Update, Delete
SORTEST_TESC_CODE
Test score code associated with
various tests, i.e., SAT, ACT
Select, Insert,
Update, Delete
SORTEST_TSRC_CODE
Test source or how the test score
was entered, i.e., data load or self-
reported
Select, Insert,
Update, Delete
SORTEST_TADM_CODE
Administrative type of a particular
test, i.e., locally or nationally
administered
Select, Insert,
Update, Delete
SORTEST_ADMR_CODE
Admissions checklist item code
which is cross-referenced
Objects that may be
impacted by restrictions Possible Impacts

1668
Banner Student User Guide | Banner Student System Management
Business Cases
Other Business Cases
Impacted Objects
Business Cases Using
SB_TESTSCORES_STUDENT_VBS Business Case Issues
Restrict access to test scores (using Insert,
Update, Delete)
Limit user access to test scores if the
learner has a record in their processing
area (recruiting, application, or general
student), and they have access to that
record. If the learner does not have one of
these records, the user then has access to
all test scores.
No restrictive predicate is required for the
above.
Other Business Case Examples Using SB_TESTSCORES_STUDENT_VBS
By admission request checklist code
SORTEST_ADMR_CODE in ('1','2','3')
Objects that may be
impacted by restrictions Possible Impacts
SOATEST Selection of test scores
SAADCRV Decision calculator
SRIPREL Insertion of test scores during creation or updating of
recruit and application from electronic prospect
SAAEAPS Insertion of test scores during creation or updating of
application from electronic applicant
Banner Student and Banner
Financial Aid views with
queries against SORTEST
Selection of records

1669
Banner Student User Guide | Banner Student System Management
Test Codes Domain
Test code predicates can be used to limit the List of Values to only the test codes the user
is restricted to for insertion. If a Select restriction is placed on the Test Code Validation
Table (STVTESC), the same restriction needs to be added using the
SB_TESTSCORES_VBS or SB_TESTSCORES_STUDENT_VBS domains. If this is not
done, you may have to deal with missing descriptions and form error messages during the
query process on SOATEST and all other forms that display test scores.
Restrictions
Business Cases
Other Business Cases
Domain Description Driver Tables
SB_TESTCODES_VBS Test Codes STVTESC STVTESC
Restriction
Mode
Columns Used in
Restrictions Column Description
Select, Insert,
Update, Delete
STVTESC_CODE
Test code for the test
Select, Insert,
Update, Delete
STVTESC_ADMR_CODE
Admissions materials required with
the associated test
Business Cases Using
SB_TESTCODES_VBS Business Case Issues
Restrict by test code (using Insert,
Update, Delete)
STVTESC_CODE in
('1','2','3')
Restrict to specific test codes
Other Business Case Examples Using SB_TESTCODES_VBS
N/A

1670
Banner Student User Guide | Banner Student System Management
Impacted Objects
Other GPAs Domain
Restrictions
Objects that may be
impacted by restrictions Possible Impacts
STVTESC Selection and maintenance of test codes
SOATEST Selection of test scores
SAADCRV Decision calculator
SRIPREL Insertion of test scores during creation or updating of
recruit and application from electronic prospect
SAAEAPS Insertion of test scores during creation or updating of
application from electronic applicant
SOABGIY Selection and maintenance of test types for institution
SAADCSN Decision calculator rules
Banner Student and Banner
Financial Aid views with
queries against STVTESC
Selection of records
Domain Description Driver Tables
SB_OTHERGPA_VBS Other GPAs SORGPAT SORGPAT
Restriction
Mode
Columns Used in
Restrictions Column Description
Select, Insert,
Update, Delete
SORGPAT_GPAT_CODE
Other GPA type code
Select, Insert,
Update, Delete
SORGPAT_SBGI_CODE
Source from which the other GPA
originated

1671
Banner Student User Guide | Banner Student System Management
Business Cases
Other Business Cases
Impacted Objects
Student Other GPAs Domain
This domain comes with a built-in function that limits access to other student GPAs based
on the existence of recruiting, applicant, or learner records. If the learner has one of these
module records, and the user has access to one of them, then they will have access to the
other student GPAs.
Business Cases Using
SB_OTHERGPA_VBS Business Case Issues
Restrict by GPA type (using Insert,
Update, Delete)
SORGPAT_GPAT_CODE IN
('1','2')
Other Business Case Examples Using SB_OTHERGPA_VBS
By source or background institution code, limiting access based on source
SORGPAT_GPAT_CODE IN ('1','2')
Objects that may be
impacted by restrictions Possible Impacts
SOAGPAT Selection and maintenance of other GPA scores for
learner
Banner Student views with
queries against SORGPAT
Selection of records
Domain Description Driver Tables
SB_OTHERGPA_STUDENT_VBS Other GPAs for
learners, for which
user has access
SORGPAT SORGPAT

1672
Banner Student User Guide | Banner Student System Management
Restrictions
Business Cases
Other Business Cases
Impacted Objects
Restriction
Mode
Columns Used in
Restrictions Column Description
Select, Insert,
Update, Delete
SORGPAT_GPAT_CODE
Other GPA type code
Select, Insert,
Update, Delete
SORGPAT_SBGI_CODE
Source from which the other GPA
originated
Business Cases Using
SB_OTHERGPA_STUDENT_VBS Business Case Issues
Restrict access to GPAs (using Insert,
Update, Delete)
Limit user access to GPAs if the learner has
a record in their processing area (recruiting,
application, or general student), and they
have access to that record. If the learner
does not have one of these records, the user
then has access to all GPAs.
No restrictive predicate is required for the
above.
Other Business Case Examples Using SB_OTHERGPA_STUDENT_VBS
By source or background institution code, limiting access based on GPA type
SORGPAT_GPAT_CODE IN ('1','2')
Objects that may be
impacted by restrictions Possible Impacts
SOAGPAT Selection and maintenance of other GPA scores for
learner
Banner Student views with
queries against SORGPAT
Selection of records

1673
Banner Student User Guide | Banner Student System Management
Other GPA Type Codes Domain
GPA type code predicates can be used to limit the List Of Values to only the GPA codes
applicable to data in their area. If a Select restriction is placed on the GPA Type Code
Validation Table (STVGPAT), the same restriction needs to be added using the
SB_OTHERGPA_VBS or SB_OTHERGPA_STUDENT_VBS domains. If this is not done,
you may have to deal with missing descriptions and form error messages during the query
process on SOAGPAT and all other forms that display other GPAs.
Restrictions
Business Cases
Other Business Cases
Impacted Objects
Domain Description Driver Tables
SB_OTHERGPACODES_VBS Other GPA Codes STVGPAT STVGPAT
Restriction
Mode
Columns Used in
Restrictions Column Description
Insert, Update,
Delete
STVGPAT_CODE
GPA code for the student
Business Cases Using
SB_OTHERGPACODES_VBS Business Case Issues
Restrict by GPA code (using Insert,
Update, Delete)
STVGPAT_CODE in
('1','2','3')
Other Business Case Examples Using SB_OTHERGPACODES_VBS
N/A
Objects that may be
impacted by restrictions Possible Impacts
STVGPAT Selection and maintenance of other GPA type codes

1674
Banner Student User Guide | Banner Student System Management
How to Use Banner General VBS Domains with Banner Student
The following section provides information about Banner General domains that use
Banner Student drivers and tables and how they can be implemented.
Addresses Domain
Restrictions
Business Cases
SOAGPAT Selection and maintenance of other GPA scores for
learner
Domain Description Driver Tables
GB_SPRADDR_VBS Person Addresses SPRADDR SPRADDR
Restriction
Mode
Columns Used in
Restrictions Column Description
Select, Insert,
Update, Delete
SPRADDR_ASRC_CODE
Address source code associated
with the person
Select, Insert,
Update, Delete
SPRADDR_ATYP_CODE
Type of address associated with the
person
Select, Insert,
Update, Delete
SPRADDR_STAT_CODE
State/province associated with the
person’s address
Select, Insert,
Update, Delete
SPRADDR_ZIP
ZIP code associated with the
person’s address
Select, Insert,
Update, Delete
SPRADDR_NATN_CODE
Nation/country associated with the
person’s address
Business Cases Using
GB_SPRADDR_VBS Business Case Issues
Restrict by address type (using
Select, Insert, Update, Delete)
SPRADDR_ATYP_CODE IN
('MA','W2')
Objects that may be
impacted by restrictions Possible Impacts

1675
Banner Student User Guide | Banner Student System Management
Other Business Cases
Impacted Objects - Banner Student
Other Impacted Objects
Other Business Case Examples Using GB_SPRADDR_VBS
By address maintenance by the address source
SPRADDR_ASRC_CODE IN ('SELF','POST')
By maintenance of addresses by state, ZIP, or nation
SPRADDR_STAT_CODE IN ('MA','VT','NH','ME','NY','RI')
Banner Student objects
that may be impacted by
restrictions Possible Impacts
SPAIDEN Maintenance of addresses
SAAQUIK Maintenance of addresses
SRAQUIK Maintenance of addresses
Other product objects
that may be impacted by
restrictions Possible Impacts
APAIDEN Maintenance of addresses
FOAIDEN Maintenance of addresses
FTMAGCY Maintenance of addresses
FTMCUST Maintenance of addresses
FTMFMGR Maintenance of addresses
FTMVEND Maintenance of addresses
GOAADDR Maintenance of addresses
PEA1PAY Maintenance of addresses
PPAIDEN Maintenance of addresses

1676
Banner Student User Guide | Banner Student System Management
Telephones Domain
Restrictions
Business Cases
Other Business Cases
Impacted Objects
Domain Description Driver Tables
GB_SPRTELE_VBS Person Telephone Numbers SPRTELE SPRTELE
Restriction
Mode
Columns Used in
Restrictions Column Description
Select, Insert,
Update, Delete
SPRTELE_TELE_CODE
Telephone type code for the
person’s telephone number
Select, Insert,
Update, Delete
SPRTELE_ATYP_CODE
Optional address type code
associated with telephone number
Business Cases Using
GB_SPRTELE_VBS Business Case Issues
Restrict by telephone type (using
Select, Insert, Update, Delete)
SPRTELE_TELE_CODE IN
('HOME','FAX')
Other Business Case Examples Using GB_SPRTELE_VBS
N/A
Objects that may be
impacted by restrictions Possible Impacts
SPAIDEN Maintenance of telephone number
SAAQUIK Maintenance of telephone number
SRAQUIK Maintenance of telephone number
SPATELE Maintenance of telephone number

1677
Banner Student User Guide | Banner Student System Management
Medical Domain
Restrictions
Business Cases
Other Business Cases
Impacted Objects - Banner Student
Domain Description Driver Tables
GB_SPRMEDI_VBS Person Medical Information SPRMEDI SPRMEDI
Restriction
Mode
Columns Used in
Restrictions Column Description
Select, Insert,
Update, Delete
SPRMEDI_MEDI_CODE
Medical code associated with the
person
Select, Insert,
Update, Delete
SPRMEDI_MDEQ_CODE
Medical equipment code associated
with the person
Select, Insert,
Update, Delete
SPRMEDI_DISA_CODE
Disability type code associated with
the person
Select, Insert,
Update, Delete
SPRMEDI_SPSR_CODE
Disability service code available to
the person
Business Cases Using
GB_SPRMEDI_VBS Business Case Issues
Restrict by medical code (using
Select, Insert, Update, Delete)
SPRMEDI_MEDI_CODE = 'DE'
Different health professionals are used for
different medical issues
Other Business Case Examples Using GB_SPRMEDI_VBS
N/A
Objects that may be
impacted by restrictions Possible Impacts
SAAEAPS Push application with medical information

1678
Banner Student User Guide | Banner Student System Management
Other Impacted Objects
Seed Data
The following seed data is used with Banner FGAC.
Domain Driver Table Seed Data for GORFDMN
The following domain driver table seed data for each domain on the FGAC Domain
Validation Form (GTVFDMN) is used with FGAC for Banner Student.
Banner Student views Selection of medical information
Other product objects
that may be impacted by
restrictions Possible Impacts
GOAMEDI Maintenance of medical information
PEAEACC Maintenance of employee accommodations
Banner Human Resources
Payroll views
Selection of medical information
Domain Description Driver Table
SB_CATALOG_VBS Catalog SCBCRSE
SB_SCHEDULE_VBS Schedule SSBSECT
SB_CURRICULUM_VBS Recruiting, Admissions,
Learner, Outcome Base
Curriculum
SORLCUR
SB_FIELDOFSTUDY_VBS Recruiting, Admissions,
Learner, Outcome Base
Fields of Study
SORLFOS
SB_RECRUIT_VBS Recruiting SRBRECR
SB_ADMISSIONS_VBS Admissions SARADAP
SB_LEARNER_VBS General Student SGBSTDN
SB_TESTSCORES_VBS Test Scores SORTEST
SB_TESTSCORES_STUDENT_VBS Test scores for learners,
user has access
SORTEST
Objects that may be
impacted by restrictions Possible Impacts

1679
Banner Student User Guide | Banner Student System Management
VBS Policy Table Seed Data (GORFDPL)
The following domain policy table seed data is used with FGAC for Banner Student.
Domains are listed by driver table and with the tables where predicate functions are built.
This data is found on the FGAC VBS Table Rules Form (GORFDPL). Entries on this form
are required for Oracle policy creation. The driver SQL joins the policy table to the domain
driver table. VBS restrictions are written for the domain driver table.
SB_TESTCODES_VBS Test Codes STVTESC
SB_OTHERGPA_VBS Other GPA SORGPAT
SB_OTHERGPA_STUDENT_VBS Other GPAs for learners,
user has access
SORGPAT
SB_OTHERGPACODES_VBS Other GPA Codes STVGPAT
SB_FACULTY_PII Faculty SIBINST
SB_HOUSING_PII Housing SLBRMAP
SB_RECRUIT_PII Recruiting SARADAP
SB_ADMISSIONS_PII Admissions SARADAP
SB_GENSTUDENT_PII General Student SGBSTDN
SB_REGISTRATION_PII Registration Enrollment SFBETRM
SB_TRANSFER_PII Transfer Course
Maintenance
SHRTTRM
Domain Policy Table Driver SQL
SB_CATALOG_VBS SCBCRSE
N/A
SB_CATALOG_VBS SCBDESC
EXISTS (SELECT 'X' FROM SCBCRSE
WHERE SCBCRSE_CRSE_NUMB =
SCBDESC_CRSE_NUMB AND
SCBCRSE_SUBJ_CODE =
SCBDESC_SUBJ_CODE AND
SCBCRSE_EFF_TERM =
(SELECT MAX(A.SCBCRSE_EFF_TERM)
FROM SCBCRSE A WHERE
A.SCBCRSE_SUBJ_CODE =
SCBDESC_SUBJ_CODE AND
A.SCBCRSE_CRSE_NUMB =
SCBDESC_CRSE_NUMB AND
A.SCBCRSE_EFF_TERM <=
SCBDESC_TERM_CODE_EFF)
Domain Description Driver Table

1680
Banner Student User Guide | Banner Student System Management
SB_CATALOG_VBS SCBSUPP
EXISTS (SELECT 'X' FROM SCBCRSE
WHERE SCBCRSE_CRSE_NUMB =
SCBSUPP_CRSE_NUMB AND
SCBCRSE_SUBJ_CODE =
SCBSUPP_SUBJ_CODE AND
SCBCRSE_EFF_TERM =
(SELECT MAX(A.SCBCRSE_EFF_TERM)
FROM SCBCRSE A WHERE
A.SCBCRSE_SUBJ_CODE =
SCBSUPP_SUBJ_CODE AND
A.SCBCRSE_CRSE_NUMB =
SCBSUPP_CRSE_NUMB AND
A.SCBCRSE_EFF_TERM <=
SCBSUPP_EFF_TERM)
SB_CATALOG_VBS SCRATTR
EXISTS (SELECT 'X' FROM SCBCRSE
WHERE SCBCRSE_CRSE_NUMB =
SCRATTR_CRSE_NUMB AND
SCBCRSE_SUBJ_CODE =
SCRATTR_SUBJ_CODE AND
SCBCRSE_EFF_TERM =
(SELECT MAX(A.SCBCRSE_EFF_TERM)
FROM SCBCRSE A WHERE
A.SCBCRSE_SUBJ_CODE =
SCRATTR_SUBJ_CODE AND
A.SCBCRSE_CRSE_NUMB =
SCRATTR_CRSE_NUMB AND
A.SCBCRSE_EFF_TERM <=
SCRATTR_EFF_TERM)
SB_CATALOG_VBS SCRCORQ
EXISTS (SELECT 'X' FROM SCBCRSE
WHERE SCBCRSE_CRSE_NUMB =
SCRCORQ_CRSE_NUMB AND
SCBCRSE_SUBJ_CODE =
SCRCORQ_SUBJ_CODE AND
SCBCRSE_EFF_TERM =
(SELECT MAX(A.SCBCRSE_EFF_TERM)
FROM SCBCRSE A WHERE
A.SCBCRSE_SUBJ_CODE =
SCRCORQ_SUBJ_CODE AND
A.SCBCRSE_CRSE_NUMB =
SCRCORQ_CRSE_NUMB AND
A.SCBCRSE_EFF_TERM <=
SCRCORQ_EFF_TERM
Domain Policy Table Driver SQL

1681
Banner Student User Guide | Banner Student System Management
SB_CATALOG_VBS SCRCPRT
EXISTS (SELECT 'X' FROM SCBCRSE
WHERE SCBCRSE_CRSE_NUMB =
SCRCPRT_CRSE_NUMB AND
SCBCRSE_SUBJ_CODE =
SCRCPRT_SUBJ_CODE AND
SCBCRSE_EFF_TERM =
(SELECT MAX(A.SCBCRSE_EFF_TERM)
FROM SCBCRSE A WHERE
A.SCBCRSE_SUBJ_CODE =
SCRCPRT_SUBJ_CODE AND
A.SCBCRSE_CRSE_NUMB =
SCRCPRT_CRSE_NUMB AND
A.SCBCRSE_EFF_TERM <=
SCRCPRT_TERM_CODE_EFF)
SB_CATALOG_VBS SCRCRDF
EXISTS (SELECT 'X' FROM SCBCRSE
WHERE SCBCRSE_CRSE_NUMB =
SCRCRDF_CRSE_NUMB AND
SCBCRSE_SUBJ_CODE =
SCRCRDF_SUBJ_CODE AND
SCBCRSE_EFF_TERM =
(SELECT MAX(A.SCBCRSE_EFF_TERM)
FROM SCBCRSE A WHERE
A.SCBCRSE_SUBJ_CODE =
SCRCRDF_SUBJ_CODE AND
A.SCBCRSE_CRSE_NUMB =
SCRCRDF_CRSE_NUMB AND
A.SCBCRSE_EFF_TERM <=
SCRCRDF_TERM_CODE_EFF)
SB_CATALOG_VBS SCREQIV
EXISTS (SELECT 'X' FROM SCBCRSE
WHERE SCBCRSE_CRSE_NUMB =
SCREQIV_CRSE_NUMB AND
SCBCRSE_SUBJ_CODE =
SCREQIV_SUBJ_CODE AND
SCBCRSE_EFF_TERM =
(SELECT MAX(A.SCBCRSE_EFF_TERM)
FROM SCBCRSE A WHERE
A.SCBCRSE_SUBJ_CODE =
SCREQIV_SUBJ_CODE AND
A.SCBCRSE_CRSE_NUMB =
SCREQIV_CRSE_NUMB AND
A.SCBCRSE_EFF_TERM <=
SCREQIV_EFF_TERM)
Domain Policy Table Driver SQL

1682
Banner Student User Guide | Banner Student System Management
SB_CATALOG_VBS SCRFEES
EXISTS (SELECT 'X' FROM SCBCRSE
WHERE SCBCRSE_CRSE_NUMB =
SCRFEES_CRSE_NUMB AND
SCBCRSE_SUBJ_CODE =
SCRFEES_SUBJ_CODE AND
SCBCRSE_EFF_TERM =
(SELECT MAX(A.SCBCRSE_EFF_TERM)
FROM SCBCRSE A WHERE
A.SCBCRSE_SUBJ_CODE =
SCRFEES_SUBJ_CODE AND
A.SCBCRSE_CRSE_NUMB =
SCRFEES_CRSE_NUMB AND
A.SCBCRSE_EFF_TERM <=
SCRFEES_EFF_TERM)
SB_CATALOG_VBS SCRGMOD
EXISTS (SELECT 'X' FROM SCBCRSE
WHERE SCBCRSE_CRSE_NUMB =
SCRGMOD_CRSE_NUMB AND
SCBCRSE_SUBJ_CODE =
SCRGMOD_SUBJ_CODE AND
SCBCRSE_EFF_TERM =
(SELECT MAX(A.SCBCRSE_EFF_TERM)
FROM SCBCRSE A WHERE
A.SCBCRSE_SUBJ_CODE =
SCRGMOD_SUBJ_CODE AND
A.SCBCRSE_CRSE_NUMB =
SCRGMOD_CRSE_NUMB AND
A.SCBCRSE_EFF_TERM <=
SCRGMOD_EFF_TERM)
SB_CATALOG_VBS SCRINTG
EXISTS (SELECT ''X'' FROM SCBCRSE
WHERE
SCBCRSE_CRSE_NUMB =
SCRINTG_CRSE_NUMB AND
SCBCRSE_SUBJ_CODE =
SCRINTG_SUBJ_CODE AND
SCBCRSE_EFF_TERM =
(SELECT MAX(A.SCBCRSE_EFF_TERM)
FROM SCBCRSE A WHERE
A.SCBCRSE_SUBJ_CODE =
SCRINTG_SUBJ_CODE AND
A.SCBCRSE_CRSE_NUMB =
SCRINTG_CRSE_NUMB AND
A.SCBCRSE_EFF_TERM <=
SCRINTG_TERM_CODE_EFF)
Domain Policy Table Driver SQL

1683
Banner Student User Guide | Banner Student System Management
SB_CATALOG_VBS SCRLEVL
EXISTS (SELECT 'X' FROM SCBCRSE
WHERE SCBCRSE_CRSE_NUMB =
SCRLEVL_CRSE_NUMB AND
SCBCRSE_SUBJ_CODE =
SCRLEVL_SUBJ_CODE AND
SCBCRSE_EFF_TERM =
(SELECT MAX(A.SCBCRSE_EFF_TERM)
FROM SCBCRSE A WHERE
A.SCBCRSE_SUBJ_CODE =
SCRLEVL_SUBJ_CODE AND
A.SCBCRSE_CRSE_NUMB =
SCRLEVL_CRSE_NUMB AND
A.SCBCRSE_EFF_TERM <=
SCRLEVL_EFF_TERM)
SB_CATALOG_VBS SCRRARE
EXISTS (SELECT 'X' FROM SCBCRSE
WHERE SCBCRSE_CRSE_NUMB =
SCRRARE_CRSE_NUMB AND
SCBCRSE_SUBJ_CODE =
SCRRARE_SUBJ_CODE AND
SCBCRSE_EFF_TERM =
(SELECT MAX(A.SCBCRSE_EFF_TERM)
FROM SCBCRSE A WHERE
A.SCBCRSE_SUBJ_CODE =
SCRRARE_SUBJ_CODE AND
A.SCBCRSE_CRSE_NUMB =
SCRRARE_CRSE_NUMB AND
A.SCBCRSE_EFF_TERM <=
SCRRARE_TERM_CODE_EFFECTIVE)
SB_CATALOG_VBS SCRRCAM
EXISTS (SELECT 'X' FROM SCBCRSE
WHERE SCBCRSE_CRSE_NUMB =
SCRRCAM_CRSE_NUMB AND
SCBCRSE_SUBJ_CODE =
SCRRCAM_SUBJ_CODE AND
SCBCRSE_EFF_TERM =
(SELECT MAX(A.SCBCRSE_EFF_TERM)
FROM SCBCRSE A WHERE
A.SCBCRSE_SUBJ_CODE =
SCRRCAM_SUBJ_CODE AND
A.SCBCRSE_CRSE_NUMB =
SCRRCAM_CRSE_NUMB AND
A.SCBCRSE_EFF_TERM <=
SCRRCAM_EFF_TERM)
Domain Policy Table Driver SQL

1684
Banner Student User Guide | Banner Student System Management
SB_CATALOG_VBS SCRRCLS
EXISTS (SELECT 'X' FROM SCBCRSE
WHERE SCBCRSE_CRSE_NUMB =
SCRRCLS_CRSE_NUMB AND
SCBCRSE_SUBJ_CODE =
SCRRCLS_SUBJ_CODE AND
SCBCRSE_EFF_TERM =
(SELECT MAX(A.SCBCRSE_EFF_TERM)
FROM SCBCRSE A WHERE
A.SCBCRSE_SUBJ_CODE =
SCRRCLS_SUBJ_CODE AND
A.SCBCRSE_CRSE_NUMB =
SCRRCLS_CRSE_NUMB AND
A.SCBCRSE_EFF_TERM <=
SCRRCLS_EFF_TERM)
SB_CATALOG_VBS SCRRCMP
EXISTS (SELECT 'X' FROM SCBCRSE
WHERE SCBCRSE_CRSE_NUMB =
SCRRCMP_CRSE_NUMB AND
SCBCRSE_SUBJ_CODE =
SCRRCMP_SUBJ_CODE AND
SCBCRSE_EFF_TERM =
(SELECT MAX(A.SCBCRSE_EFF_TERM)
FROM SCBCRSE A WHERE
A.SCBCRSE_SUBJ_CODE =
SCRRCMP_SUBJ_CODE AND
A.SCBCRSE_CRSE_NUMB =
SCRRCMP_CRSE_NUMB AND
A.SCBCRSE_EFF_TERM <=
SCRRCMP_EFF_TERM)
SB_CATALOG_VBS SCRRCOL
EXISTS (SELECT 'X' FROM SCBCRSE
WHERE SCBCRSE_CRSE_NUMB =
SCRRCOL_CRSE_NUMB AND
SCBCRSE_SUBJ_CODE =
SCRRCOL_SUBJ_CODE AND
SCBCRSE_EFF_TERM =
(SELECT MAX(A.SCBCRSE_EFF_TERM)
FROM SCBCRSE A WHERE
A.SCBCRSE_SUBJ_CODE =
SCRRCOL_SUBJ_CODE AND
A.SCBCRSE_CRSE_NUMB =
SCRRCOL_CRSE_NUMB AND
A.SCBCRSE_EFF_TERM <=
SCRRCOL_EFF_TERM)
Domain Policy Table Driver SQL

1685
Banner Student User Guide | Banner Student System Management
SB_CATALOG_VBS SCRRDEG
EXISTS (SELECT 'X' FROM SCBCRSE
WHERE SCBCRSE_CRSE_NUMB =
SCRRDEG_CRSE_NUMB AND
SCBCRSE_SUBJ_CODE =
SCRRDEG_SUBJ_CODE AND
SCBCRSE_EFF_TERM =
(SELECT MAX(A.SCBCRSE_EFF_TERM)
FROM SCBCRSE A WHERE
A.SCBCRSE_SUBJ_CODE =
SCRRDEG_SUBJ_CODE AND
A.SCBCRSE_CRSE_NUMB =
SCRRDEG_CRSE_NUMB AND
A.SCBCRSE_EFF_TERM <=
SCRRDEG_TERM_CODE_EFFECTIVE)
SB_CATALOG_VBS SCRRLVL
EXISTS (SELECT 'X' FROM SCBCRSE
WHERE SCBCRSE_CRSE_NUMB =
SCRRLVL_CRSE_NUMB AND
SCBCRSE_SUBJ_CODE =
SCRRLVL_SUBJ_CODE AND
SCBCRSE_EFF_TERM =
(SELECT MAX(A.SCBCRSE_EFF_TERM)
FROM SCBCRSE A WHERE
A.SCBCRSE_SUBJ_CODE =
SCRRLVL_SUBJ_CODE AND
A.SCBCRSE_CRSE_NUMB =
SCRRLVL_CRSE_NUMB AND
A.SCBCRSE_EFF_TERM <=
SCRRLVL_EFF_TERM)
SB_CATALOG_VBS SCRRMAJ
EXISTS (SELECT 'X' FROM SCBCRSE
WHERE SCBCRSE_CRSE_NUMB =
SCRRMAJ_CRSE_NUMB AND
SCBCRSE_SUBJ_CODE =
SCRRMAJ_SUBJ_CODE AND
SCBCRSE_EFF_TERM =
(SELECT MAX(A.SCBCRSE_EFF_TERM)
FROM SCBCRSE A WHERE
A.SCBCRSE_SUBJ_CODE =
SCRRMAJ_SUBJ_CODE AND
A.SCBCRSE_CRSE_NUMB =
SCRRMAJ_CRSE_NUMB AND
A.SCBCRSE_EFF_TERM <=
SCRRMAJ_EFF_TERM)
Domain Policy Table Driver SQL

1686
Banner Student User Guide | Banner Student System Management
SB_CATALOG_VBS SCRRPRG
EXISTS (SELECT 'X' FROM SCBCRSE
WHERE SCBCRSE_CRSE_NUMB =
SCRRPRG_CRSE_NUMB AND
SCBCRSE_SUBJ_CODE =
SCRRPRG_SUBJ_CODE AND
SCBCRSE_EFF_TERM =
(SELECT MAX(A.SCBCRSE_EFF_TERM)
FROM SCBCRSE A WHERE
A.SCBCRSE_SUBJ_CODE =
SCRRPRG_SUBJ_CODE AND
A.SCBCRSE_CRSE_NUMB =
SCRRPRG_CRSE_NUMB AND
A.SCBCRSE_EFF_TERM <=
SCRRPRG_TERM_CODE_EFFECTIVE)
SB_CATALOG_VBS SCRRTRM
EXISTS (SELECT 'X' FROM SCBCRSE
WHERE SCBCRSE_CRSE_NUMB =
SCRRTRM_CRSE_NUMB AND
SCBCRSE_SUBJ_CODE =
SCRRTRM_SUBJ_CODE AND
SCBCRSE_EFF_TERM =
(SELECT MAX(A.SCBCRSE_EFF_TERM)
FROM SCBCRSE A WHERE
A.SCBCRSE_SUBJ_CODE =
SCRRTRM_SUBJ_CODE AND
A.SCBCRSE_CRSE_NUMB =
SCRRTRM_CRSE_NUMB AND
A.SCBCRSE_EFF_TERM <=
SCRRTRM_EFF_TERM)
SB_CATALOG_VBS SCRRTST
EXISTS (SELECT 'X' FROM SCBCRSE
WHERE SCBCRSE_CRSE_NUMB =
SCRRTST_CRSE_NUMB AND
SCBCRSE_SUBJ_CODE =
SCRRTST_SUBJ_CODE AND
SCBCRSE_EFF_TERM =
(SELECT MAX(A.SCBCRSE_EFF_TERM)
FROM SCBCRSE A WHERE
A.SCBCRSE_SUBJ_CODE =
SCRRTST_SUBJ_CODE AND
A.SCBCRSE_CRSE_NUMB =
SCRRTST_CRSE_NUMB AND
A.SCBCRSE_EFF_TERM <=
SCRRTST_TERM_CODE_EFF)
Domain Policy Table Driver SQL

1687
Banner Student User Guide | Banner Student System Management
SB_CATALOG_VBS SCRSBGI
EXISTS (SELECT 'X' FROM SCBCRSE
WHERE SCBCRSE_CRSE_NUMB =
SCRSBGI_CRSE_NUMB AND
SCBCRSE_SUBJ_CODE =
SCRSBGI_SUBJ_CODE AND
SCBCRSE_EFF_TERM =
(SELECT MAX(A.SCBCRSE_EFF_TERM)
FROM SCBCRSE A WHERE
A.SCBCRSE_SUBJ_CODE =
SCRSBGI_SUBJ_CODE AND
A.SCBCRSE_CRSE_NUMB =
SCRSBGI_CRSE_NUMB AND
A.SCBCRSE_EFF_TERM <=
SCRSBGI_EFF_TERM)
SB_CATALOG_VBS SCRSCHD
EXISTS (SELECT 'X' FROM SCBCRSE
WHERE SCBCRSE_CRSE_NUMB =
SCRSCHD_CRSE_NUMB AND
SCBCRSE_SUBJ_CODE =
SCRSCHD_SUBJ_CODE AND
SCBCRSE_EFF_TERM =
(SELECT MAX(A.SCBCRSE_EFF_TERM)
FROM SCBCRSE A WHERE
A.SCBCRSE_SUBJ_CODE =
SCRSCHD_SUBJ_CODE AND
A.SCBCRSE_CRSE_NUMB =
SCRSCHD_CRSE_NUMB AND
A.SCBCRSE_EFF_TERM <=
SCRSCHD_EFF_TERM)
SB_CATALOG_VBS SCRSYLN
EXISTS (SELECT 'X' FROM SCBCRSE
WHERE SCBCRSE_CRSE_NUMB =
SCRSYLN_CRSE_NUMB AND
SCBCRSE_SUBJ_CODE =
SCRSYLN_SUBJ_CODE AND
SCBCRSE_EFF_TERM =
(SELECT MAX(A.SCBCRSE_EFF_TERM)
FROM SCBCRSE A WHERE
A.SCBCRSE_SUBJ_CODE =
SCRSYLN_SUBJ_CODE AND
A.SCBCRSE_CRSE_NUMB =
SCRSYLN_CRSE_NUMB AND
A.SCBCRSE_EFF_TERM <=
SCRSYLN_TERM_CODE_EFF)
Domain Policy Table Driver SQL

1688
Banner Student User Guide | Banner Student System Management
SB_CATALOG_VBS SCRSYLO
EXISTS (SELECT 'X' FROM SCBCRSE
WHERE SCBCRSE_CRSE_NUMB =
SCRSYLO_CRSE_NUMB AND
SCBCRSE_SUBJ_CODE =
SCRSYLO_SUBJ_CODE AND
SCBCRSE_EFF_TERM =
(SELECT MAX(A.SCBCRSE_EFF_TERM)
FROM SCBCRSE A WHERE
A.SCBCRSE_SUBJ_CODE =
SCRSYLO_SUBJ_CODE AND
A.SCBCRSE_CRSE_NUMB =
SCRSYLO_CRSE_NUMB AND
A.SCBCRSE_EFF_TERM <=
SCRSYLO_TERM_CODE_EFF)
SB_CATALOG_VBS SCRSYRM
EXISTS (SELECT 'X' FROM SCBCRSE
WHERE SCBCRSE_CRSE_NUMB =
SCRSYRM_CRSE_NUMB AND
SCBCRSE_SUBJ_CODE =
SCRSYRM_SUBJ_CODE AND
SCBCRSE_EFF_TERM =
(SELECT MAX(A.SCBCRSE_EFF_TERM)
FROM SCBCRSE A WHERE
A.SCBCRSE_SUBJ_CODE =
SCRSYRM_SUBJ_CODE AND
A.SCBCRSE_CRSE_NUMB =
SCRSYRM_CRSE_NUMB AND
A.SCBCRSE_EFF_TERM <=
SCRSYRM_TERM_CODE_EFF)
SB_CATALOG_VBS SCRSYTR
EXISTS (SELECT 'X' FROM SCBCRSE
WHERE SCBCRSE_CRSE_NUMB =
SCRSYTR_CRSE_NUMB AND
SCBCRSE_SUBJ_CODE =
SCRSYTR_SUBJ_CODE AND
SCBCRSE_EFF_TERM =
(SELECT MAX(A.SCBCRSE_EFF_TERM)
FROM SCBCRSE A WHERE
A.SCBCRSE_SUBJ_CODE =
SCRSYTR_SUBJ_CODE AND
A.SCBCRSE_CRSE_NUMB =
SCRSYTR_CRSE_NUMB AND
A.SCBCRSE_EFF_TERM <=
SCRSYTR_TERM_CODE_EFF)
Domain Policy Table Driver SQL

1689
Banner Student User Guide | Banner Student System Management
SB_CATALOG_VBS SCRTEXT
EXISTS (SELECT 'X' FROM SCBCRSE
WHERE SCBCRSE_CRSE_NUMB =
SCRTEXT_CRSE_NUMB AND
SCBCRSE_SUBJ_CODE =
SCRTEXT_SUBJ_CODE AND
SCBCRSE_EFF_TERM =
(SELECT MAX(A.SCBCRSE_EFF_TERM)
FROM SCBCRSE A WHERE
A.SCBCRSE_SUBJ_CODE =
SCRTEXT_SUBJ_CODE AND
A.SCBCRSE_CRSE_NUMB =
SCRTEXT_CRSE_NUMB AND
A.SCBCRSE_EFF_TERM <=
SCRTEXT_EFF_TERM)
SB_SCHEDULE_VBS SSBDESC
EXISTS (SELECT 'X' FROM SSBSECT
WHERE SSBSECT_CRN =
SSBDESC_CRN AND
SSBSECT_TERM_CODE =
SSBDESC_TERM_CODE_EFF
SB_SCHEDULE_VBS SSBFSEC
EXISTS (SELECT 'X' FROM SSBSECT
WHERE SSBSECT_CRN =
SSBFSEC_CRN AND
SSBSECT_TERM_CODE =
SSBFSEC_TERM_CODE
SB_SCHEDULE_VBS SSBOVRR
EXISTS (SELECT 'X' FROM SSBSECT
WHERE SSBSECT_CRN =
SSBOVRR_CRN AND
SSBSECT_TERM_CODE =
SSBOVRR_TERM_CODE
SB_SCHEDULE_VBS SSBSECT
N/A
SB_SCHEDULE_VBS SSBSSEC
EXISTS (SELECT 'X' FROM SSBSECT
WHERE SSBSECT_CRN =
SSBSSEC_CRN AND
SSBSECT_TERM_CODE =
SSBSSEC_TERM_CODE
SB_SCHEDULE_VBS SSRATTR
EXISTS (SELECT 'X' FROM SSBSECT
WHERE SSBSECT_CRN =
SSRATTR_CRN AND
SSBSECT_TERM_CODE =
SSRATTR_TERM_CODE
Domain Policy Table Driver SQL

1690
Banner Student User Guide | Banner Student System Management
SB_SCHEDULE_VBS SSRBLCK
EXISTS (SELECT 'X' FROM SSBSECT
WHERE SSBSECT_CRN =
SSRBLCK_CRN AND
SSBSECT_TERM_CODE =
SSRBLCK_TERM_CODE
SB_SCHEDULE_VBS SSRCORQ
EXISTS (SELECT 'X' FROM SSBSECT
WHERE SSBSECT_CRN =
SSRCORQ_CRN AND
SSBSECT_TERM_CODE =
SSRCORQ_TERM_CODE
SB_SCHEDULE_VBS SSREVAL
EXISTS (SELECT 'X' FROM SSBSECT
WHERE SSBSECT_CRN =
SSREVAL_CRN AND
SSBSECT_TERM_CODE =
SSREVAL_TERM_CODE
SB_SCHEDULE_VBS SSREXTN
EXISTS (SELECT 'X' FROM SSBSECT
WHERE SSBSECT_CRN =
SSREXTN_CRN AND
SSBSECT_TERM_CODE =
SSREXTN_TERM_CODE
SB_SCHEDULE_VBS SSRFEES
EXISTS (SELECT 'X' FROM SSBSECT
WHERE SSBSECT_CRN =
SSRFEES_CRN AND
SSBSECT_TERM_CODE =
SSRFEES_TERM_CODE
SB_SCHEDULE_VBS SSRLINK
EXISTS (SELECT 'X' FROM SSBSECT
WHERE SSBSECT_CRN =
SSRLINK_CRN AND
SSBSECT_TERM_CODE =
SSRLINK_TERM_CODE
SB_SCHEDULE_VBS SSRMEET
EXISTS (SELECT 'X' FROM SSBSECT
WHERE SSBSECT_CRN =
SSRMEET_CRN AND
SSBSECT_TERM_CODE =
SSRMEET_TERM_CODE
SB_SCHEDULE_VBS SSRMPRT
EXISTS (SELECT 'X' FROM SSBSECT
WHERE SSBSECT_CRN =
SSRMPRT_CRN AND
SSBSECT_TERM_CODE =
SSRMPRT_TERM_CODE
Domain Policy Table Driver SQL
1691
Banner Student User Guide | Banner Student System Management
SB_SCHEDULE_VBS SSRMRDF
EXISTS (SELECT 'X' FROM SSBSECT
WHERE SSBSECT_CRN =
SSRMRDF_CRN AND S
SBSECT_TERM_CODE =
SSRMRDF_TERM_CODE
SB_SCHEDULE_VBS SSRRARE
EXISTS (SELECT 'X' FROM SSBSECT
WHERE SSBSECT_CRN =
SSRRARE_CRN AND
SSBSECT_TERM_CODE =
SSRRARE_TERM_CODE
SB_SCHEDULE_VBS SSRRCLS
EXISTS (SELECT 'X' FROM SSBSECT
WHERE SSBSECT_CRN =
SSRRCLS_CRN AND
SSBSECT_TERM_CODE =
SSRRCLS_TERM_CODE
SB_SCHEDULE_VBS SSRRCMP
EXISTS (SELECT 'X' FROM SSBSECT
WHERE SSBSECT_CRN =
SSRRCMP_CRN AND
SSBSECT_TERM_CODE =
SSRRCMP_TERM_CODE
SB_SCHEDULE_VBS SSRRCOL
EXISTS (SELECT 'X' FROM SSBSECT
WHERE SSBSECT_CRN =
SSRRCOL_CRN AND
SSBSECT_TERM_CODE =
SSRRCOL_TERM_CODE
SB_SCHEDULE_VBS SSRRDEG
EXISTS (SELECT 'X' FROM SSBSECT
WHERE SSBSECT_CRN =
SSRRDEG_CRN AND
SSBSECT_TERM_CODE =
SSRRDEG_TERM_CODE
SB_SCHEDULE_VBS SSRRESV
EXISTS (SELECT 'X' FROM SSBSECT
WHERE SSBSECT_CRN =
SSRRESV_CRN AND
SSBSECT_TERM_CODE =
SSRRESV_TERM_CODE
SB_SCHEDULE_VBS SSRRFND
EXISTS (SELECT 'X' FROM SSBSECT
WHERE SSBSECT_CRN =
SSRRFND_CRN AND
SSBSECT_TERM_CODE =
SSRRFND_TERM_CODE
Domain Policy Table Driver SQL

1692
Banner Student User Guide | Banner Student System Management
SB_SCHEDULE_VBS SSRRLVL
EXISTS (SELECT 'X' FROM SSBSECT
WHERE SSBSECT_CRN =
SSRRLVL_CRN AND
SSBSECT_TERM_CODE =
SSRRLVL_TERM_CODE
SB_SCHEDULE_VBS SSRRMAJ
EXISTS (SELECT 'X' FROM SSBSECT
WHERE SSBSECT_CRN =
SSRRMAJ_CRN AND
SSBSECT_TERM_CODE =
SSRRMAJ_TERM_CODE
SB_SCHEDULE_VBS SSRRPRG
EXISTS (SELECT 'X' FROM SSBSECT
WHERE SSBSECT_CRN =
SSRRPRG_CRN AND
SSBSECT_TERM_CODE =
SSRRPRG_TERM_CODE
SB_SCHEDULE_VBS SSRRSTS
EXISTS (SELECT 'X' FROM SSBSECT
WHERE SSBSECT_CRN =
SSRRSTS_CRN AND
SSBSECT_TERM_CODE =
SSRRSTS_TERM_CODE
SB_SCHEDULE_VBS SSRRTST
EXISTS (SELECT 'X' FROM SSBSECT
WHERE SSBSECT_CRN =
SSRRTST_CRN AND
SSBSECT_TERM_CODE =
SSRRTST_TERM_CODE
SB_SCHEDULE_VBS SSRSCCD
EXISTS (SELECT 'X' FROM SSBSECT
WHERE SSBSECT_CRN =
SSRSCCD_CRN AND
SSBSECT_TERM_CODE =
SSRSCCD_TERM_CODE
SB_SCHEDULE_VBS SSRSPRT
EXISTS (SELECT 'X' FROM SSBSECT
WHERE SSBSECT_CRN =
SSRSPRT_CRN AND
SSBSECT_TERM_CODE =
SSRSPRT_TERM_CODE
SB_SCHEDULE_VBS SSRSRDF
EXISTS (SELECT 'X' FROM SSBSECT
WHERE SSBSECT_CRN =
SSRSRDF_CRN AND
SSBSECT_TERM_CODE =
SSRSRDF_TERM_CODE
Domain Policy Table Driver SQL

1693
Banner Student User Guide | Banner Student System Management
SB_SCHEDULE_VBS SSRSYLN
EXISTS (SELECT 'X' FROM SSBSECT
WHERE SSBSECT_CRN =
SSRSYLN_CRN AND
SSBSECT_TERM_CODE =
SSRSYLN_TERM_CODE
SB_SCHEDULE_VBS SSRSYLO
EXISTS (SELECT 'X' FROM SSBSECT
WHERE SSBSECT_CRN =
SSRSYLO_CRN AND
SSBSECT_TERM_CODE =
SSRSYLO_TERM_CODE
SB_SCHEDULE_VBS SSRSYRM
EXISTS (SELECT 'X' FROM SSBSECT
WHERE SSBSECT_CRN =
SSRSYRM_CRN AND
SSBSECT_TERM_CODE =
SSRSYRM_TERM_CODE
SB_SCHEDULE_VBS SSRSYTR
EXISTS (SELECT 'X' FROM SSBSECT
WHERE SSBSECT_CRN =
SSRSYTR_CRN AND
SSBSECT_TERM_CODE =
SSRSYTR_TERM_CODE
SB_SCHEDULE_VBS SSRTEXT
EXISTS (SELECT 'X' FROM SSBSECT
WHERE SSBSECT_CRN =
SSRTEXT_CRN AND
SSBSECT_TERM_CODE =
SSRTEXT_TERM_CODE
SB_SCHEDULE_VBS SSRXLST
EXISTS (SELECT 'X' FROM SSBSECT
WHERE SSBSECT_CRN =
SSRXLST_CRN AND
SSBSECT_TERM_CODE =
SSRXLST_TERM_CODE
SB_CURRICULUM_VBS SORLCUR
N/A
SB_FIELDOFSTUDY_VBS SORLFOS
N/A
SB_RECRUIT_VBS SRBRECR
N/A
SB_RECRUIT_VBS SRRCHRT
EXISTS (SELECT 'X' FROM SRBRECR
WHERE SRBRECR_PIDM =
SRRCHRT_PIDM AND
SRBRECR_TERM_CODE =
SRRCHRT_TERM_CODE AND
SRBRECR_ADMIN_SEQNO =
SRRCHRT_ADMIN_SEQNO
Domain Policy Table Driver SQL

1694
Banner Student User Guide | Banner Student System Management
SB_RECRUIT_VBS SRRLEND
EXISTS (SELECT 'X' FROM SRBRECR
WHERE SRBRECR_PIDM =
SRRLEND_PIDM AND
SRBRECR_TERM_CODE =
SRRLEND_TERM_CODE AND
SRBRECR_ADMIN_SEQNO =
SRRLEND_ADMIN_SEQNO
SB_RECRUIT_VBS SRRRATT
EXISTS (SELECT 'X' FROM SRBRECR
WHERE SRBRECR_PIDM =
SRRRATT_PIDM AND
SRBRECR_TERM_CODE =
SRRRATT_TERM_CODE AND
SRBRECR_ADMIN_SEQNO =
SRRRATT_ADMIN_SEQNO
SB_RECRUIT_VBS SRRRSRC
EXISTS (SELECT 'X' FROM SRBRECR
WHERE SRBRECR_PIDM =
SRRRSRC_PIDM AND
SRBRECR_TERM_CODE =
SRRRSRC_TERM_CODE AND
SRBRECR_ADMIN_SEQNO =
SRRRSRC_ADMIN_SEQNO
SB_ADMISSIONS_VBS SARACMT
EXISTS (SELECT 'X' FROM SARADAP
WHERE SARADAP_PIDM = SARACMT_PIDM
AND SARADAP_TERM_CODE_ENTRY =
SARACMT_TERM_CODE AND
SARADAP_APPL_NO =
SARACMT_APPL_NO
SB_ADMISSIONS_VBS SARADAP
N/A
SB_ADMISSIONS_VBS SARAPPD
EXISTS (SELECT 'X' FROM SARADAP
WHERE SARADAP_PIDM = SARAPPD_PIDM
AND SARADAP_TERM_CODE_ENTRY =
SARAPPD_TERM_CODE_ENTRY AND
SARADAP_APPL_NO =
SARAPPD_APPL_NO
SB_ADMISSIONS_VBS SARCHKL
EXISTS (SELECT 'X' FROM SARADAP
WHERE SARADAP_PIDM = SARCHKL_PIDM
AND SARADAP_TERM_CODE_ENTRY =
SARCHKL_TERM_CODE_ENTRY AND
SARADAP_APPL_NO =
SARCHKL_APPL_NO
Domain Policy Table Driver SQL

1695
Banner Student User Guide | Banner Student System Management
SB_ADMISSIONS_VBS SARCHRT
EXISTS (SELECT 'X' FROM SARADAP
WHERE SARADAP_PIDM = SARCHRT_PIDM
AND SARADAP_TERM_CODE_ENTRY =
SARCHRT_TERM_CODE_ENTRY AND
SARADAP_APPL_NO =
SARCHRT_APPL_NO
SB_ADMISSIONS_VBS SARDSCL
EXISTS (SELECT 'X' FROM SARADAP
WHERE SARADAP_PIDM = SARDSCL_PIDM
AND SARADAP_TERM_CODE_ENTRY =
SARDSCL_TERM_CODE AND
SARADAP_APPL_NO =
SARDSCL_APPL_NO
SB_ADMISSIONS_VBS SARQUAN
EXISTS (SELECT 'X' FROM SARADAP
WHERE SARADAP_PIDM = SARQUAN_PIDM
AND SARADAP_TERM_CODE_ENTRY =
SARQUAN_TERM_CODE_ENTRY AND
SARADAP_APPL_NO =
SARQUAN_APPL_NO
SB_ADMISSIONS_VBS SARRRAT
EXISTS (SELECT 'X' FROM SARADAP
WHERE SARADAP_PIDM = SARRRAT_PIDM
AND SARADAP_TERM_CODE_ENTRY =
SARRRAT_TERM_CODE AND
SARADAP_APPL_NO =
SARRRAT_APPL_NO
SB_ADMISSIONS_VBS SARRSRC
EXISTS (SELECT 'X' FROM SARADAP
WHERE SARADAP_PIDM = SARRSRC_PIDM
AND
SARADAP_TERM_CODE_ENTRY =
SARRSRC_TERM_CODE_ENTRY AND
SARADAP_APPL_NO =
SARRSRC_APPL_NO
SB_ADMISSIONS_VBS SARAATT
EXISTS (SELECT 'X' FROM SARADAP
WHERE SARADAP_PIDM = SARAATT_PIDM
AND SARADAP_TERM_CODE_ENTRY =
SARAATT_TERM_CODE_ENTRY AND
SARADAP_APPL_NO = SARAATT_APPL_NO
SB_ADMISSIONS_VBS SABSUPL
EXISTS (SELECT 'X' FROM SARADAP
WHERE SARADAP_PIDM = SABSUPL_PIDM
AND SARADAP_TERM_CODE_ENTRY =
SABSUPL_TERM_CODE_ENTRY AND
SARADAP_APPL_NO = SABSUPL_APPL_NO
SB_LEARNER_VBS SGBEOPS
EXISTS (SELECT 'X' FROM SGBSTDN
WHERE SGBSTDN_PIDM = SGBEOPS_PIDM
Domain Policy Table Driver SQL

1696
Banner Student User Guide | Banner Student System Management
SB_LEARNER_VBS SGBOEDU
EXISTS (SELECT 'X' FROM SGBSTDN
WHERE SGBSTDN_PIDM = SGBOEDU_PIDM
SB_LEARNER_VBS SGBSTDN
N/A
SB_LEARNER_VBS SGBUSER
EXISTS (SELECT 'X' FROM SGBSTDN
WHERE SGBSTDN_PIDM = SGBUSER_PIDM
SB_LEARNER_VBS SGRACMT
EXISTS (SELECT 'X' FROM SGBSTDN
WHERE SGBSTDN_PIDM = SGRACMT_PIDM
AND SGBSTDN_TERM_CODE_EFF =
SGRACMT_TERM_CODE_EFF
SB_LEARNER_VBS SGRADVR
EXISTS (SELECT 'X' FROM SGBSTDN
WHERE SGBSTDN_PIDM = SGRADVR_PIDM
AND SGBSTDN_TERM_CODE_EFF =
SGRADVR_TERM_CODE_EFF
SB_LEARNER_VBS SGRASSI
EXISTS (SELECT 'X' FROM SGBSTDN
WHERE SGBSTDN_PIDM = SGRASSI_PIDM
AND SGBSTDN_TERM_CODE_EFF =
SGRASSI_TERM_CODE_EFF
SB_LEARNER_VBS SGRASST
EXISTS (SELECT 'X' FROM SGBSTDN
WHERE SGBSTDN_PIDM = SGRASST_PIDM
AND SGBSTDN_TERM_CODE_EFF =
SGRASST_TERM_CODE_EFF
SB_LEARNER_VBS SGRCHRT
EXISTS (SELECT 'X' FROM SGBSTDN
WHERE SGBSTDN_PIDM = SGRCHRT_PIDM
AND SGBSTDN_TERM_CODE_EFF =
SGRCHRT_TERM_CODE_EFF
SB_LEARNER_VBS SGRCMNT
EXISTS (SELECT 'X' FROM SGBSTDN
WHERE SGBSTDN_PIDM = SGRCMNT_PIDM
AND SGBSTDN_TERM_CODE_EFF =
SGRCMNT_TERM_CODE
SB_LEARNER_VBS SGRCOOP
EXISTS (SELECT 'X' FROM SGBSTDN
WHERE SGBSTDN_PIDM = SGRCOOP_PIDM
AND SGBSTDN_TERM_CODE_EFF =
SGRCOOP_TERM_CODE
SB_LEARNER_VBS SGRDISA
EXISTS (SELECT 'X' FROM SGBSTDN
WHERE SGBSTDN_PIDM = SGRDISA_PIDM
AND SGBSTDN_TERM_CODE_EFF =
SGRDISA_TERM_CODE
Domain Policy Table Driver SQL

1697
Banner Student User Guide | Banner Student System Management
SB_LEARNER_VBS SGRDSER
EXISTS (SELECT 'X' FROM SGBSTDN
WHERE SGBSTDN_PIDM = SGRDSER_PIDM
AND SGBSTDN_TERM_CODE_EFF =
SGRDSER_TERM_CODE
SB_LEARNER_VBS SGRDUTY
EXISTS (SELECT 'X' FROM SGBSTDN
WHERE SGBSTDN_PIDM = SGRDUTY_PIDM
AND SGBSTDN_TERM_CODE_EFF =
SGRDUTY_TERM_CODE
SB_LEARNER_VBS SGRESEL
EXISTS (SELECT 'X' FROM SGBSTDN
WHERE SGBSTDN_PIDM = SGRESEL_PIDM
AND SGBSTDN_TERM_CODE_EFF =
SGRESEL_TERM_CODE_EFF
SB_LEARNER_VBS SGRSACT
EXISTS (SELECT 'X' FROM SGBSTDN
WHERE SGBSTDN_PIDM = SGRSACT_PIDM
AND SGBSTDN_TERM_CODE_EFF =
SGRSACT_TERM_CODE
SB_LEARNER_VBS SGRSATT
EXISTS (SELECT 'X' FROM SGBSTDN
WHERE SGBSTDN_PIDM = SGRSATT_PIDM
AND SGBSTDN_TERM_CODE_EFF =
SGRSATT_TERM_CODE_EFF
SB_LEARNER_VBS SGRSCMT
EXISTS (SELECT 'X' FROM SGBSTDN
WHERE SGBSTDN_PIDM = SGRSCMT_PIDM
AND SGBSTDN_TERM_CODE_EFF =
SGRSCMT_TERM_CODE
SB_LEARNER_VBS SGRSPRT
EXISTS (SELECT 'X' FROM SGBSTDN
WHERE SGBSTDN_PIDM = SGRSPRT_PIDM
AND SGBSTDN_TERM_CODE_EFF =
SGRSPRT_TERM_CODE
SB_LEARNER_VBS SGRVETN
EXISTS (SELECT 'X' FROM SGBSTDN
WHERE SGBSTDN_PIDM = SGRVETN_PIDM
AND SGBSTDN_TERM_CODE_EFF =
SGRVETN_TERM_CODE_VA
SB_TESTSCORES_VBS SORTEST
N/A
SB_TESTSCORES_
STUDENT_VBS
SORTEST
SOKFGAC.F_FIND_IF_STUDENT(SORTEST_
PIDM) = 'Y'
SB_TESTCODES_VBS STVTESC
N/A
SB_OTHERGPA_VBS SORGPAT
N/A
SB_OTHERGPA_
STUDENT_VBS
SORGPAT
SOKFGAC.F_FIND_IF_STUDENT(SORGPAT_
PIDM) = 'Y'
Domain Policy Table Driver SQL

1698
Banner Student User Guide | Banner Student System Management
PII Policy Table (GORFDPI)
The following row is used by the GORFDPI table, for use with the SPRIDEN table, which
is owned by the STUDENT table owner.
Banner Student Elevate Support
This is an optional enhancement. It can be applied at any time after the 8.7 upgrade has
been performed by running the sgorfbpri_0080700.sql script to populate the business
profile with user records in the GORFBPR table.
If you did not want to use elevate processing and the 8.7 upgrade was applied before the
sgorfbpri_0080700.sql script was available, and the GORFBPR table was automatically
populated with user records, run the sgorfbprd_080700.sql script to delete the records
from the table.
Elevate provides a Student Information System (SIS) for use by an institution’s Continuing
Education office. It assists registrars, continuing education counselors, and workforce
development counselors with course management and facilitates registration for
continuing education courses. It also aids with the management of continuing education
data. Elevate can be integrated with Banner Student.
In Banner Student, Course Catalog and Class Schedule forms are restricted to prevent
modifications to Elevate courses or sections. Also, Elevate sections are prevented from
being copied (SSASECT) or rolled (SSRROLL) to a new term, so new sections cannot be
created.
Fine-Grained Access Control (FGAC) and Value-Based Security (VBS) are used to restrict
access to Elevate data to read only. Scripts and seed data are delivered for FGAC and
VBS.
• A course is considered to be an Elevate course when the integration partner value in the
SCRINTG_INTG_CDE field is ELEV8, or when the value in
SCBCRSE_DATA_ORIGIN field is Elevate.
For example, SCADETL could have an Integration Partner value of
ELEV8, but it may
contain another value. The user should always check the Data Origin column in the
table to be certain that a course is an Elevate course.
SB_OTHERGPA_CODES_
VBS
STVGPAT
N/A
Table Name
Code that Links Table Predicate to Domain Driver
Table (GOBFDMN)
SPRIDEN
gokfgac.f_find_pii_domain
Domain Policy Table Driver SQL

1699
Banner Student User Guide | Banner Student System Management
• A section is considered to be an Elevate course when the integration partner value in
the
SSBSECT_INTG_CDE field is ELEV8.
When a user attempts to change an Elevate course or section, the following Oracle error
is displayed Record changed or deleted by another user. The system may also display a
security error, such as Security violation, transaction not complete.
Forms Restricted Using FGAC
On the following forms, you can view Elevate courses. You cannot perform any inserts,
updates, or deletions for Elevate courses.
• Basic Course Information Form (SCACRSE)
• Course Detail Information Form (SCADETL)
• Course Registration Restrictions Form (SCARRES)
• Catalog Prerequisite and Test Score Restrictions Form (SCAPREQ)
• Catalog Schedule Restrictions Form (SCASRES)
• Course Syllabus Form (SCASYLB)
• Mutual Course Exclusion Form (SCAMEXC)
On the following forms, you can view Elevate sections. You cannot perform any inserts,
updates, or deletions for Elevate sections.
• Schedule Form (SSASECT)
• Schedule Detail Form (SSADETL)
• Schedule Restrictions Form (SSARRES)
• Schedule Prerequisite and Test Score Restrictions Form (SSAPREQ)
• Section Comment Form (SSATEXT)
• Section Web Controls Form (SSAWSEC)
• Schedule Evaluation Form (SSAEVAL)
• Schedule Override Form (SSAOVRR)
• Schedule Calendar Form (SSAACCL)
• Schedule Processing Rules Form (SSARULE)
• Section Syllabus Form (SSASYLB)
Monitor Section Roll
The Term Roll Report (SSRROLL) report will skip Elevate sections and not roll them to a
new term. The
rollsec_ptrmcode_null and rollsect procedures use Fine-

1700
Banner Student User Guide | Banner Student System Management
Grained Access Control (FGAC) security settings to determine when the section is an
Elevate section.
Using Elevate and Banner with FGAC and VBS
Banner users are prevented from modifying Course Catalog and Class Schedule data that
originates from the Elevate system.The Oracle ID that executes the API to post catalog
course and schedule section entries from Elevate must still be able to insert, update, and
delete data. Therefore, FGAC with VBS is used to control access to the data. Seed data
and scripts are delivered to run the required processes, including defining the FGAC rule
and predicates and enabling policies.
For more information on using FGAC with VBS, refer to the Banner General Data Security
Handbook.
Guidelines for Oracle User that Submits API
The Oracle user that is created and used in the authorization header of the API that posts
catalog and schedule entries to Banner must have the following:
1. Default proxy access to
BAN_PROXY
2. Default connect and ban_default_m access
3. Access to security class for the
API_ELEVATE_CLASS Elevate API. This API
includes objects for each API that has an object name such as
API_ELEVATE%.
The Oracle user should be able to log in to SQL*Plus but does not have any Banner table
access.
Delivered Scripts
Implementation scripts and seed data scripts are delivered to control access to Course
Catalog and Class Schedule. Scripts are used to set up and populate the Business Profile
and the FGAC and VBS rules, predicates, and restrictions. Users are listed in a Banner
business profile, and the business profile is restricted on the FGAC predicate.
8.7 Scripts
Here is the list of 8.7 scripts, which are run as part of the upgrade process. A description of
each script follows. The two implementation scripts are noted. The other scripts are seed
data scripts.
1. sgtvintpi_080700.sql
2. sgorintgi_080700.sql
3. sgtvfdmni_080700.sql
4. sgobfdmni_080700.sql
5. sgorfdpli_080700.sql

1701
Banner Student User Guide | Banner Student System Management
6. sgtvfgaci_080700.sql
7. sgtvfbpri_080700.sql
8. sgobfgaci_080700.sql
9. sgorfbpri_080700.sql**
10.sgorfprdi_080700.sql
11.sgorfgbpi_080700.sql
12.sgorfdplu_080700.sql
13.sgorfbpri_sync_job.sql**
** These scripts are implementation scripts.
8.8 Scripts
Banner Student 8.8 is dependent on Banner Student 8.7. These scripts are run as part of
the upgrade process.
1. sgtvfdmni_080800.sql
2. sgobfdmni_080800.sql
3. sgorfprdi_080800.sql
4. sgorfgbpi_080800.sql
5. sgorfdpli_080800.sql
6. sgorfgbpd_080800.sql
7. sgorfprdd_080800.sql
GTVINTP table
sgtvintpi_080700.sql
This script is used to create a record in the GTVINTP table for the integration partner
code. The data is displayed on the Integration Partner System Code Validation Form
(GTVINTP).
Integration Partner System Description
ELEV8 Elevate Partner

1702
Banner Student User Guide | Banner Student System Management
GORINTG table
sgorintgi_080700.sql
This script is used to create a record in the GORINTG table for the integration partner
code. The data is displayed on the Integration System Partner Rules Form (GORINTG).
GTVFDMN table
sgtvfdmni_080700.sql
This script is used to insert VBS domains for the Course Catalog module in the GTVFDMN
table. This data is displayed on the FGAC Domain Validation Form (GTVFDMN).
sgtvfdmni_080800.sql
This script is used to insert a VBS domain for the Class Schedule module in the
GTVFDMN table. This data is displayed on the FGAC Domain Validation Form
(GTVFDMN).
Integration Partner
Value Description
Cross Referenced
Partner System Description
ELEV8 Elevate ELEV8 Elevate Partner
VBS Domain Code Description Additional Information
SB_CATALOG_ELEVATE_VBS Student Catalog
Elevate VBS Security
Used for policy driven by
the SCBCRKY table on all
Catalog tables except
SCRINTG
SB_SCRINTG_ELEVATE_VBS Student Catalog
Elevate VBS Security
Used for policy driven by
the SCBCRKY table only
on the SCRINTG table
VBS Domain Code Description Additional Information
SB_SCHEDULE_ELEVATE_VBS Student Schedule VBS
Elevate Security
Used for policy driven by
the SSBSECT table on all
Schedule tables

1703
Banner Student User Guide | Banner Student System Management
GOBFDMN table
sgobfdmni_080700.sql
This script is used to insert the SCBCRKY driver table for the two Course Catalog VBS
domains into the GOBFDMN table.
sgobfdmni_080800.sql
This script is used to insert the SSBSECT driver table for the Class Schedule domain into
the GOBFDMN table.
GORFDPL table
sgorfdpli_080700.sql
This script is used to insert table definitions into the GORFDPL table for the Course
Catalog tables defined for the SB_SCRINTG_ELEVATE_VBS and
SB_CATALOG_ELEVATE_VBS domains and the Class Schedule tables defined for the
SB_SCHEULDE_VBS domain.
Domain Code
Table
Name
Domain Type
Predicate
Code
Sys
Req
Enable
PII
SB_CATALOG_ELEVATE_VBS SCBCRKY VBS Y N
SB_SCRINTG_ELEVATE_VBS SCBCRKY VBS Y N
Domain Code
Table
Name
Domain Type
Predicate
Code
Sys
Req
Enable
PII
SB_SCHEDULE_ELEVATE_VBS SSBSECT VBS Y N

1704
Banner Student User Guide | Banner Student System Management
Domain Code
Table
Name
Sys
Req
Active
Ind Driver SQL
SB_SCRINTG_ELEVATE_VBS SCRINTG Y N
' EXISTS (SELECT ''X'' FROM
SCBCRKY WHERE SCBCRKY_CRSE_NUMB =
SCRINTG_CRSE_NUMB
AND SCBCRKY_SUBJ_CODE =
SCRINTG_SUBJ_CODE '
from dual where not exists (
select 1 from gorfdpl where
gorfdpl_fdmn_code =
'SB_SCRINTG_ELEVATE_VBS' and
gorfdpl_table_name = 'SCRINTG');
SB_SCRINTG_ELEVATE_VBS SCBCRKY Y N
from dual where not exists (
select 1 from gorfdpl where
gorfdpl_fdmn_code =
'SB_SCRINTG_ELEVATE_VBS' and
gorfdpl_table_name = 'SCBCRKY');
SB_CATALOG_ELEVATE_VBS SCRINTG Y N
' EXISTS (SELECT ''X'' FROM
SCBCRKY WHERE SCBCRKY_CRSE_NUMB =
SCRINTG_CRSE_NUMB
AND SCBCRKY_SUBJ_CODE =
SCRINTG_SUBJ_CODE '
from dual where not exists (
select 1 from gorfdpl where
gorfdpl_fdmn_code =
'SB_CATALOG_ELEVATE_VBS' and
gorfdpl_table_name = 'SCRINTG');
SB_CATALOG_ELEVATE_VBS SCBCRKY Y N
from dual where not exists (
select 1 from gorfdpl where
gorfdpl_fdmn_code =
'SB_CATALOG_ELEVATE_VBS' and
gorfdpl_table_name = 'SCBCRKY');

1705
Banner Student User Guide | Banner Student System Management
SB_CATALOG_ELEVATE_VBS SCBCRSE Y N
' EXISTS (SELECT ''X'' FROM
SCBCRKY WHERE SCBCRKY_CRSE_NUMB =
SCBCRSE_CRSE_NUMB
AND SCBCRKY_SUBJ_CODE =
SCBCRSE_SUBJ_CODE '
from dual where not exists (
select 1 from gorfdpl where
gorfdpl_fdmn_code =
'SB_CATALOG_ELEVATE_VBS' and
gorfdpl_table_name = 'SCBCRSE');
SB_CATALOG_ELEVATE_VBS SCBDESC Y N
' EXISTS (SELECT ''X'' FROM
SCBCRKY WHERE SCBCRKY_CRSE_NUMB =
SCBDESC_CRSE_NUMB
AND SCBCRKY_SUBJ_CODE =
SCBDESC_SUBJ_CODE '
from dual where not exists (
select 1 from gorfdpl where
gorfdpl_fdmn_code =
'SB_CATALOG_ELEVATE_VBS' and
gorfdpl_table_name = 'SCBDESC');
SB_CATALOG_ELEVATE_VBS SCBSUPP Y N
' EXISTS (SELECT ''X'' FROM
SCBCRKY WHERE SCBCRKY_CRSE_NUMB =
SCBSUPP_CRSE_NUMB
AND SCBCRKY_SUBJ_CODE =
SCBSUPP_SUBJ_CODE '
from dual where not exists (
select 1 from gorfdpl where
gorfdpl_fdmn_code =
'SB_CATALOG_ELEVATE_VBS' and
gorfdpl_table_name = 'SCBSUPP');
SB_CATALOG_ELEVATE_VBS SCRATTR Y N
' EXISTS (SELECT ''X'' FROM
SCBCRKY WHERE SCBCRKY_CRSE_NUMB =
SCRATTR_CRSE_NUMB AND
SCBCRKY_SUBJ_CODE =
SCRATTR_SUBJ_CODE '
from dual where not exists (
select 1 from gorfdpl where
gorfdpl_fdmn_code =
'SB_CATALOG_ELEVATE_VBS' and
gorfdpl_table_name = 'SCRATTR');
Domain Code
Table
Name
Sys
Req
Active
Ind Driver SQL

1706
Banner Student User Guide | Banner Student System Management
SB_CATALOG_ELEVATE_VBS SCRCLBD Y N
' EXISTS (SELECT ''X'' FROM
SCBCRKY WHERE SCBCRKY_CRSE_NUMB =
SCRCLBD_CRSE_NUMB
AND SCBCRKY_SUBJ_CODE =
SCRCLBD_SUBJ_CODE '
from dual where not exists (
select 1 from gorfdpl where
gorfdpl_fdmn_code =
'SB_CATALOG_ELEVATE_VBS' and
gorfdpl_table_name = 'SCRCLBD');
SB_CATALOG_ELEVATE_VBS SCRCORQ Y N
' EXISTS (SELECT ''X'' FROM
SCBCRKY WHERE SCBCRKY_CRSE_NUMB =
SCRCORQ_CRSE_NUMB
AND SCBCRKY_SUBJ_CODE =
SCRCORQ_SUBJ_CODE '
from dual where not exists (
select 1 from gorfdpl where
gorfdpl_fdmn_code =
'SB_CATALOG_ELEVATE_VBS' and
gorfdpl_table_name = 'SCRCORQ');
SB_CATALOG_ELEVATE_VBS SCRCPRT Y N
' EXISTS (SELECT ''X'' FROM
SCBCRKY WHERE SCBCRKY_CRSE_NUMB =
SCRCPRT_CRSE_NUMB
AND SCBCRKY_SUBJ_CODE =
SCRCPRT_SUBJ_CODE '
from dual where not exists (
select 1 from gorfdpl where
gorfdpl_fdmn_code =
'SB_CATALOG_ELEVATE_VBS' and
gorfdpl_table_name = 'SCRCPRT');
SB_CATALOG_ELEVATE_VBS SCRCRDF Y N
' EXISTS (SELECT ''X'' FROM
SCBCRKY WHERE SCBCRKY_CRSE_NUMB =
SCRCRDF_CRSE_NUMB AND
SCBCRKY_SUBJ_CODE =
SCRCRDF_SUBJ_CODE '
from dual where not exists (
select 1 from gorfdpl where
gorfdpl_fdmn_code =
'SB_CATALOG_ELEVATE_VBS' and
gorfdpl_table_name = 'SCRCRDF');
Domain Code
Table
Name
Sys
Req
Active
Ind Driver SQL

1707
Banner Student User Guide | Banner Student System Management
SB_CATALOG_ELEVATE_VBS SCREQIV Y N
' EXISTS (SELECT ''X'' FROM
SCBCRKY WHERE SCBCRKY_CRSE_NUMB =
SCREQIV_CRSE_NUMB AND
SCBCRKY_SUBJ_CODE =
SCREQIV_SUBJ_CODE '
from dual where not exists (
select 1 from gorfdpl where
gorfdpl_fdmn_code =
'SB_CATALOG_ELEVATE_VBS' and
gorfdpl_table_name = 'SCREQIV');
SB_CATALOG_ELEVATE_VBS SCRFEES Y N
' EXISTS (SELECT ''X'' FROM
SCBCRKY WHERE SCBCRKY_CRSE_NUMB =
SCRFEES_CRSE_NUMB AND
SCBCRKY_SUBJ_CODE =
SCRFEES_SUBJ_CODE '
from dual where not exists (
select 1 from gorfdpl where
gorfdpl_fdmn_code =
'SB_CATALOG_ELEVATE_VBS' and
gorfdpl_table_name = 'SCRFEES');
SB_CATALOG_ELEVATE_VBS SCRGMOD Y N
' EXISTS (SELECT ''X'' FROM
SCBCRKY WHERE SCBCRKY_CRSE_NUMB =
SCRGMOD_CRSE_NUMB AND
SCBCRKY_SUBJ_CODE =
SCRGMOD_SUBJ_CODE '
from dual where not exists (
select 1 from gorfdpl where
gorfdpl_fdmn_code =
'SB_CATALOG_ELEVATE_VBS' and
gorfdpl_table_name = 'SCRGMOD');
SB_CATALOG_ELEVATE_VBS SCRLEVL Y N
' EXISTS (SELECT ''X'' FROM
SCBCRKY WHERE SCBCRKY_CRSE_NUMB =
SCRLEVL_CRSE_NUMB AND
SCBCRKY_SUBJ_CODE =
SCRLEVL_SUBJ_CODE '
from dual where not exists (
select 1 from gorfdpl where
gorfdpl_fdmn_code =
'SB_CATALOG_ELEVATE_VBS' and
gorfdpl_table_name = 'SCRLEVL');
Domain Code
Table
Name
Sys
Req
Active
Ind Driver SQL

1708
Banner Student User Guide | Banner Student System Management
SB_CATALOG_ELEVATE_VBS SCRMEXC Y N
' EXISTS (SELECT ''X'' FROM
SCBCRKY WHERE SCBCRKY_CRSE_NUMB =
SCRMEXC_CRSE_NUMB AND
SCBCRKY_SUBJ_CODE =
SCRMEXC_SUBJ_CODE '
from dual where not exists (
select 1 from gorfdpl where
gorfdpl_fdmn_code =
'SB_CATALOG_ELEVATE_VBS' and
gorfdpl_table_name = 'SCRMEXC');
SB_CATALOG_ELEVATE_VBS SCRRARE Y N
' EXISTS (SELECT ''X'' FROM
SCBCRKY WHERE SCBCRKY_CRSE_NUMB =
SCRRARE_CRSE_NUMB AND
SCBCRKY_SUBJ_CODE =
SCRRARE_SUBJ_CODE '
from dual where not exists (
select 1 from gorfdpl where
gorfdpl_fdmn_code =
'SB_CATALOG_ELEVATE_VBS' and
gorfdpl_table_name = 'SCRRARE');
SB_CATALOG_ELEVATE_VBS SCRRATT Y N
' EXISTS (SELECT ''X'' FROM
SCBCRKY WHERE SCBCRKY_CRSE_NUMB =
SCRRATT_CRSE_NUMB
AND SCBCRKY_SUBJ_CODE =
SCRRATT_SUBJ_CODE '
from dual where not exists (
select 1 from gorfdpl where
gorfdpl_fdmn_code =
'SB_CATALOG_ELEVATE_VBS' and
gorfdpl_table_name = 'SCRRATT');
SB_CATALOG_ELEVATE_VBS SCRRCAM Y N
' EXISTS (SELECT ''X'' FROM
SCBCRKY WHERE SCBCRKY_CRSE_NUMB =
SCRRCAM_CRSE_NUMB AND
SCBCRKY_SUBJ_CODE =
SCRRCAM_SUBJ_CODE '
from dual where not exists (
select 1 from gorfdpl where
gorfdpl_fdmn_code =
'SB_CATALOG_ELEVATE_VBS' and
gorfdpl_table_name = 'SCRRCAM');
Domain Code
Table
Name
Sys
Req
Active
Ind Driver SQL

1709
Banner Student User Guide | Banner Student System Management
SB_CATALOG_ELEVATE_VBS SCRRCHR Y N
' EXISTS (SELECT ''X'' FROM
SCBCRKY WHERE SCBCRKY_CRSE_NUMB =
SCRRCHR_CRSE_NUMB AND
SCBCRKY_SUBJ_CODE =
SCRRCHR_SUBJ_CODE '
from dual where not exists (
select 1 from gorfdpl where
gorfdpl_fdmn_code =
'SB_CATALOG_ELEVATE_VBS' and
gorfdpl_table_name = 'SCRRCHR');
SB_CATALOG_ELEVATE_VBS SCRRCLS Y N
' EXISTS (SELECT ''X'' FROM
SCBCRKY WHERE SCBCRKY_CRSE_NUMB =
SCRRCLS_CRSE_NUMB AND
SCBCRKY_SUBJ_CODE =
SCRRCLS_SUBJ_CODE '
from dual where not exists (
select 1 from gorfdpl where
gorfdpl_fdmn_code =
'SB_CATALOG_ELEVATE_VBS' and
gorfdpl_table_name = 'SCRRCLS');
SB_CATALOG_ELEVATE_VBS SCRRCMP Y N
' EXISTS (SELECT ''X'' FROM
SCBCRKY WHERE SCBCRKY_CRSE_NUMB =
SCRRCMP_CRSE_NUMB AND
SCBCRKY_SUBJ_CODE =
SCRRCMP_SUBJ_CODE '
from dual where not exists (
select 1 from gorfdpl where
gorfdpl_fdmn_code =
'SB_CATALOG_ELEVATE_VBS' and
gorfdpl_table_name = 'SCRRCMP');
SB_CATALOG_ELEVATE_VBS SCRRCOL Y N
' EXISTS (SELECT ''X'' FROM
SCBCRKY WHERE SCBCRKY_CRSE_NUMB =
SCRRCOL_CRSE_NUMB AND
SCBCRKY_SUBJ_CODE =
SCRRCOL_SUBJ_CODE '
from dual where not exists (
select 1 from gorfdpl where
gorfdpl_fdmn_code =
'SB_CATALOG_ELEVATE_VBS' and
gorfdpl_table_name = 'SCRRCOL');
Domain Code
Table
Name
Sys
Req
Active
Ind Driver SQL

1710
Banner Student User Guide | Banner Student System Management
SB_CATALOG_ELEVATE_VBS SCRRDEG Y N
' EXISTS (SELECT ''X'' FROM
SCBCRKY WHERE SCBCRKY_CRSE_NUMB =
SCRRDEG_CRSE_NUMB AND
SCBCRKY_SUBJ_CODE =
SCRRDEG_SUBJ_CODE '
from dual where not exists (
select 1 from gorfdpl where
gorfdpl_fdmn_code =
'SB_CATALOG_ELEVATE_VBS' and
gorfdpl_table_name = 'SCRRDEG');
SB_CATALOG_ELEVATE_VBS SCRRDEP Y N
' EXISTS (SELECT ''X'' FROM
SCBCRKY WHERE SCBCRKY_CRSE_NUMB =
SCRRDEP_CRSE_NUMB AND
SCBCRKY_SUBJ_CODE =
SCRRDEP_SUBJ_CODE '
from dual where not exists (
select 1 from gorfdpl where
gorfdpl_fdmn_code =
'SB_CATALOG_ELEVATE_VBS' and
gorfdpl_table_name = 'SCRRDEP');
SB_CATALOG_ELEVATE_VBS SCRRLVL Y N
' EXISTS (SELECT ''X'' FROM
SCBCRKY WHERE SCBCRKY_CRSE_NUMB =
SCRRLVL_CRSE_NUMB AND
SCBCRKY_SUBJ_CODE =
SCRRLVL_SUBJ_CODE '
from dual where not exists (
select 1 from gorfdpl where
gorfdpl_fdmn_code =
'SB_CATALOG_ELEVATE_VBS' and
gorfdpl_table_name = 'SCRRLVL');
SB_CATALOG_ELEVATE_VBS SCRRMAJ Y N
' EXISTS (SELECT ''X'' FROM
SCBCRKY WHERE SCBCRKY_CRSE_NUMB =
SCRRMAJ_CRSE_NUMB AND
SCBCRKY_SUBJ_CODE =
SCRRMAJ_SUBJ_CODE '
from dual where not exists (
select 1 from gorfdpl where
gorfdpl_fdmn_code =
'SB_CATALOG_ELEVATE_VBS' and
gorfdpl_table_name = 'SCRRMAJ');
Domain Code
Table
Name
Sys
Req
Active
Ind Driver SQL

1711
Banner Student User Guide | Banner Student System Management
SB_CATALOG_ELEVATE_VBS SCRRPRG Y N
' EXISTS (SELECT ''X'' FROM
SCBCRKY WHERE SCBCRKY_CRSE_NUMB =
SCRRPRG_CRSE_NUMB AND
SCBCRKY_SUBJ_CODE =
SCRRPRG_SUBJ_CODE '
from dual where not exists (
select 1 from gorfdpl where
gorfdpl_fdmn_code =
'SB_CATALOG_ELEVATE_VBS' and
gorfdpl_table_name = 'SCRRPRG');
SB_CATALOG_ELEVATE_VBS SCRRTRM Y N
' EXISTS (SELECT ''X'' FROM
SCBCRKY WHERE SCBCRKY_CRSE_NUMB =
SCRRTRM_CRSE_NUMB AND
SCBCRKY_SUBJ_CODE =
SCRRTRM_SUBJ_CODE '
from dual where not exists (
select 1 from gorfdpl where
gorfdpl_fdmn_code =
'SB_CATALOG_ELEVATE_VBS' and
gorfdpl_table_name = 'SCRRTRM');
SB_CATALOG_ELEVATE_VBS SCRRTST Y N
' EXISTS (SELECT ''X'' FROM
SCBCRKY WHERE SCBCRKY_CRSE_NUMB =
SCRRTST_CRSE_NUMB AND
SCBCRKY_SUBJ_CODE =
SCRRTST_SUBJ_CODE '
from dual where not exists (
select 1 from gorfdpl where
gorfdpl_fdmn_code =
'SB_CATALOG_ELEVATE_VBS' and
gorfdpl_table_name = 'SCRRTST');
SB_CATALOG_ELEVATE_VBS SCRSBGI Y N
' EXISTS (SELECT ''X'' FROM
SCBCRKY WHERE SCBCRKY_CRSE_NUMB =
SCRSBGI_CRSE_NUMB AND
SCBCRKY_SUBJ_CODE =
SCRSBGI_SUBJ_CODE '
from dual where not exists (
select 1 from gorfdpl where
gorfdpl_fdmn_code =
'SB_CATALOG_ELEVATE_VBS' and
gorfdpl_table_name = 'SCRSBGI');
Domain Code
Table
Name
Sys
Req
Active
Ind Driver SQL

1712
Banner Student User Guide | Banner Student System Management
SB_CATALOG_ELEVATE_VBS SCRSCHD Y N
' EXISTS (SELECT ''X'' FROM
SCBCRKY WHERE SCBCRKY_CRSE_NUMB =
SCRSCHD_CRSE_NUMB AND
SCBCRKY_SUBJ_CODE =
SCRSCHD_SUBJ_CODE '
from dual where not exists (
select 1 from gorfdpl where
gorfdpl_fdmn_code =
'SB_CATALOG_ELEVATE_VBS' and
gorfdpl_table_name = 'SCRSCHD');
SB_CATALOG_ELEVATE_VBS SCRSYLN Y N
' EXISTS (SELECT ''X'' FROM
SCBCRKY WHERE SCBCRKY_CRSE_NUMB =
SCRSYLN_CRSE_NUMB AND
SCBCRKY_SUBJ_CODE =
SCRSYLN_SUBJ_CODE '
from dual where not exists (
select 1 from gorfdpl where
gorfdpl_fdmn_code =
'SB_CATALOG_ELEVATE_VBS' and
gorfdpl_table_name = 'SCRSYLN');
SB_CATALOG_ELEVATE_VBS SCRSYLO Y N
' EXISTS (SELECT ''X'' FROM
SCBCRKY WHERE SCBCRKY_CRSE_NUMB =
SCRSYLO_CRSE_NUMB AND
SCBCRKY_SUBJ_CODE =
SCRSYLO_SUBJ_CODE '
from dual where not exists (
select 1 from gorfdpl where
gorfdpl_fdmn_code =
'SB_CATALOG_ELEVATE_VBS' and
gorfdpl_table_name = 'SCRSYLO');
SB_CATALOG_ELEVATE_VBS SCRSYRM Y N
' EXISTS (SELECT ''X'' FROM
SCBCRKY WHERE SCBCRKY_CRSE_NUMB =
SCRSYRM_CRSE_NUMB AND
SCBCRKY_SUBJ_CODE =
SCRSYRM_SUBJ_CODE '
from dual where not exists (
select 1 from gorfdpl where
gorfdpl_fdmn_code =
'SB_CATALOG_ELEVATE_VBS' and
gorfdpl_table_name = 'SCRSYRM');
Domain Code
Table
Name
Sys
Req
Active
Ind Driver SQL

1713
Banner Student User Guide | Banner Student System Management
SB_CATALOG_ELEVATE_VBS SCRSYTR Y N
' EXISTS (SELECT ''X'' FROM
SCBCRKY WHERE SCBCRKY_CRSE_NUMB =
SCRSYTR_CRSE_NUMB AND
SCBCRKY_SUBJ_CODE =
SCRSYTR_SUBJ_CODE '
from dual where not exists (
select 1 from gorfdpl where
gorfdpl_fdmn_code =
'SB_CATALOG_ELEVATE_VBS' and
gorfdpl_table_name = 'SCRSYTR');
SB_CATALOG_ELEVATE_VBS SCRTEXT Y N
' EXISTS (SELECT ''X'' FROM
SCBCRKY WHERE SCBCRKY_CRSE_NUMB =
SCRTEXT_CRSE_NUMB AND
SCBCRKY_SUBJ_CODE =
SCRTEXT_SUBJ_CODE '
from dual where not exists (
select 1 from gorfdpl where
gorfdpl_fdmn_code =
'SB_CATALOG_ELEVATE_VBS' and
gorfdpl_table_name = 'SCRTEXT');
SB_SCHEDULE_VBS SIRASGN Y Y
' EXISTS (SELECT ''X'' FROM
SSBSECT WHERE SSBSECT_CRN =
SIRASGN_CRN AND SSBSECT_TERM_CODE
= SIRASGN_TERM_CODE'
FROM dual WHERE NOT EXISTS (SELECT
1 FROM gorfdpl WHERE
GORFDPL_FDMN_CODE
='SB_SCHEDULE_VBS' AND
GORFDPL_TABLE_NAME='SIRASGN');
SB_SCHEDULE_VBS SSRRATT Y Y
' EXISTS (SELECT ''X'' FROM
SSBSECT WHERE SSBSECT_CRN =
SSRRATT_CRN AND SSBSECT_TERM_CODE
= SSRRATT_TERM_CODE'
FROM dual WHERE NOT EXISTS (SELECT
1 FROM gorfdpl WHERE
GORFDPL_FDMN_CODE
='SB_SCHEDULE_VBS' AND
GORFDPL_TABLE_NAME='SSRRATT');
Domain Code
Table
Name
Sys
Req
Active
Ind Driver SQL

1714
Banner Student User Guide | Banner Student System Management
sgorfdpli_080800.sql
This script is used to insert table definitions into the GORFDPL table for the Class
Schedule tables defined for the SB_SCHEDULE_ELEVATE_VBS domain.
SB_SCHEDULE_VBS SSBWLSC Y Y
' EXISTS (SELECT ''X'' FROM
SSBSECT WHERE SSBSECT_CRN =
SSBWLSC_CRN AND SSBSECT_TERM_CODE
= SSBWLSC_TERM_CODE'
FROM dual WHERE NOT EXISTS (SELECT
1 FROM gorfdpl WHERE
GORFDPL_FDMN_CODE
='SB_SCHEDULE_VBS' AND
GORFDPL_TABLE_NAME='SSBWLSC');
SB_SCHEDULE_VBS SSRCLBD Y Y
' EXISTS (SELECT ''X'' FROM
SSBSECT WHERE SSBSECT_CRN =
SSRCLBD_CRN AND SSBSECT_TERM_CODE
= SSRCLBD_TERM_CODE'
FROM dual WHERE NOT EXISTS (SELECT
1 FROM gorfdpl WHERE
GORFDPL_FDMN_CODE
='SB_SCHEDULE_VBS' AND
GORFDPL_TABLE_NAME='SSRCLBD');
SB_SCHEDULE_VBS SSRRCHR Y Y
' EXISTS (SELECT ''X'' FROM
SSBSECT WHERE SSBSECT_CRN =
SSRRCHR_CRN AND SSBSECT_TERM_CODE
= SSRRCHR_TERM_CODE'
FROM dual WHERE NOT EXISTS (SELECT
1 FROM gorfdpl WHERE
GORFDPL_FDMN_CODE
='SB_SCHEDULE_VBS' AND
GORFDPL_TABLE_NAME='SSRRCHR');
SB_SCHEDULE_VBS SSRRDEP Y Y
' EXISTS (SELECT ''X'' FROM
SSBSECT WHERE SSBSECT_CRN =
SSRRDEP_CRN AND SSBSECT_TERM_CODE
= SSRRDEP_TERM_CODE'
FROM dual WHERE NOT EXISTS (SELECT
1 FROM gorfdpl WHERE
GORFDPL_FDMN_CODE
='SB_SCHEDULE_VBS' AND
GORFDPL_TABLE_NAME='SSRRDEP');
Domain Code
Table
Name
Sys
Req
Active
Ind Driver SQL
1715
Banner Student User Guide | Banner Student System Management
Domain Code
Table
Name
Sys
Req
Active
Ind Driver SQL
SB_SCHEDULE_ELEVATE_VBS SSBSECT Y Y
FROM dual WHERE NOT EXISTS (SELECT
1 FROM gorfdpl WHERE
GORFDPL_FDMN_CODE
='SB_SCHEDULE_ELEVATE_VBS' AND
GORFDPL_TABLE_NAME='SSBSECT');
SB_SCHEDULE_ELEVATE_VBS SSRMEET Y Y
' EXISTS (SELECT ''X'' FROM
SSBSECT WHERE SSBSECT_CRN =
SSRMEET_CRN AND SSBSECT_TERM_CODE
= SSRMEET_TERM_CODE '
FROM dual WHERE NOT EXISTS (SELECT
1 FROM gorfdpl WHERE
GORFDPL_FDMN_CODE
='SB_SCHEDULE_ELEVATE_VBS' AND
GORFDPL_TABLE_NAME='SSRMEET');
SB_SCHEDULE_ELEVATE_VBS SSRRATT Y Y
' EXISTS (SELECT ''X'' FROM
SSBSECT WHERE SSBSECT_CRN =
SSRRATT_CRN AND SSBSECT_TERM_CODE
= SSRRATT_TERM_CODE'
FROM dual WHERE NOT EXISTS(SELECT
1 FROM gorfdpl WHERE
GORFDPL_FDMN_CODE
='SB_SCHEDULE_ELEVATE_VBS' AND
GORFDPL_TABLE_NAME='SSRRATT');
SB_SCHEDULE_ELEVATE_VBS SSBWLSC Y Y
' EXISTS (SELECT ''X'' FROM
SSBSECT WHERE SSBSECT_CRN =
SSBWLSC_CRN AND SSBSECT_TERM_CODE
= SSBWLSC_TERM_CODE'
FROM dual WHERE NOT EXISTS (SELECT
1 FROM gorfdpl WHERE
GORFDPL_FDMN_CODE
='SB_SCHEDULE_ELEVATE_VBS' AND
GORFDPL_TABLE_NAME='SSBWLSC');

1716
Banner Student User Guide | Banner Student System Management
SB_SCHEDULE_ELEVATE_VBS SSRCLBD Y Y
' EXISTS (SELECT ''X'' FROM
SSBSECT WHERE SSBSECT_CRN =
SSRCLBD_CRN AND SSBSECT_TERM_CODE
= SSRCLBD_TERM_CODE'
FROM dual WHERE NOT EXISTS (SELECT
1 FROM gorfdpl WHERE
GORFDPL_FDMN_CODE
='SB_SCHEDULE_ELEVATE_VBS' AND
GORFDPL_TABLE_NAME='SSRCLBD');
SB_SCHEDULE_ELEVATE_VBS SSRRCHR Y Y
' EXISTS (SELECT ''X'' FROM
SSBSECT WHERE SSBSECT_CRN =
SSRRCHR_CRN AND SSBSECT_TERM_CODE
= SSRRCHR_TERM_CODE'
FROM dual WHERE NOT EXISTS (SELECT
1 FROM gorfdpl WHERE
GORFDPL_FDMN_CODE
='SB_SCHEDULE_ELEVATE_VBS' AND
GORFDPL_TABLE_NAME='SSRRCHR');
SB_SCHEDULE_ELEVATE_VBS SSRRDEP Y Y
' EXISTS (SELECT ''X'' FROM
SSBSECT WHERE SSBSECT_CRN =
SSRRDEP_CRN AND SSBSECT_TERM_CODE
= SSRRDEP_TERM_CODE'
FROM dual WHERE NOT EXISTS (SELECT
1 FROM gorfdpl WHERE
GORFDPL_FDMN_CODE
='SB_SCHEDULE_ELEVATE_VBS'AND
GORFDPL_TABLE_NAME='SSRRDEP');
SB_SCHEDULE_ELEVATE_VBS SIRASGN Y Y
' EXISTS (SELECT ''X'' FROM
SSBSECT WHERE SSBSECT_CRN =
SIRASGN_CRN AND SSBSECT_TERM_CODE
= SIRASGN_TERM_CODE'
FROM dual WHERE NOT EXISTS (SELECT
1 FROM gorfdpl WHERE
GORFDPL_FDMN_CODE
='SB_SCHEDULE_ELEVATE_VBS' AND
GORFDPL_TABLE_NAME='SIRASGN');
Domain Code
Table
Name
Sys
Req
Active
Ind Driver SQL

1717
Banner Student User Guide | Banner Student System Management
SB_SCHEDULE_ELEVATE_VBS SHRGCOM Y Y
' EXISTS (SELECT ''X'' FROM
SSBSECT WHERE SSBSECT_CRN =
SHRGCOM_CRN AND SSBSECT_TERM_CODE
= SHRGCOM_TERM_CODE'
FROM dual WHERE NOT EXISTS (SELECT
1 FROM gorfdpl WHERE
GORFDPL_FDMN_CODE
='SB_SCHEDULE_ELEVATE_VBS' AND
GORFDPL_TABLE_NAME='SHRGCOM');
SB_SCHEDULE_ELEVATE_VBS SHRSCOM Y Y
' EXISTS (SELECT ''X'' FROM
SSBSECT WHERE SSBSECT_CRN =
SHRSCOM_CRN AND SSBSECT_TERM_CODE
= SHRSCOM_TERM_CODE'
FROM dual WHERE NOT EXISTS (SELECT
1 FROM gorfdpl WHERE
GORFDPL_FDMN_CODE
='SB_SCHEDULE_ELEVATE_VBS' AND
GORFDPL_TABLE_NAME='SHRSCOM');
SB_SCHEDULE_ELEVATE_VBS SSBDECS Y Y
' EXISTS (SELECT ''X'' FROM
SSBSECT WHERE SSBSECT_CRN =
SSBDESC_CRN AND SSBSECT_TERM_CODE
= SSBDESC_TERM_CODE'
FROM dual WHERE NOT EXISTS (SELECT
1 FROM gorfdpl WHERE
GORFDPL_FDMN_CODE
='SB_SCHEDULE_ELEVATE_VBS' AND
GORFDPL_TABLE_NAME='SSBDESC');
SB_SCHEDULE_ELEVATE_VBS SSBOVRR Y Y
' EXISTS (SELECT ''X'' FROM
SSBSECT WHERE SSBSECT_CRN =
SSBOVRR_CRN AND SSBSECT_TERM_CODE
= SSBOVRR_TERM_CODE '
FROM dual WHERE NOT EXISTS (SELECT
1 FROM gorfdpl WHERE
GORFDPL_FDMN_CODE
='SB_SCHEDULE_ELEVATE_VBS' AND
GORFDPL_TABLE_NAME='SSBOVRR');
Domain Code
Table
Name
Sys
Req
Active
Ind Driver SQL

1718
Banner Student User Guide | Banner Student System Management
SB_SCHEDULE_ELEVATE_VBS SSBSSEC Y Y
' EXISTS (SELECT ''X'' FROM
SSBSECT WHERE SSBSECT_CRN =
SSBSSEC_CRN AND SSBSECT_TERM_CODE
= SSBSSEC_TERM_CODE '
FROM dual WHERE NOT EXISTS (SELECT
1 FROM gorfdpl WHERE
GORFDPL_FDMN_CODE
='SB_SCHEDULE_ELEVATE_VBS' AND
GORFDPL_TABLE_NAME='SSBSSEC');
SB_SCHEDULE_ELEVATE_VBS SSRATTR Y Y
' EXISTS (SELECT ''X'' FROM
SSBSECT WHERE SSBSECT_CRN =
SSRATTR_CRN AND SSBSECT_TERM_CODE
= SSRATTR_TERM_CODE '
FROM dual WHERE NOT EXISTS (SELECT
1 FROM gorfdpl WHERE
GORFDPL_FDMN_CODE
='SB_SCHEDULE_ELEVATE_VBS' AND
GORFDPL_TABLE_NAME='SSRATTR');
SB_SCHEDULE_ELEVATE_VBS SSRBLCK Y Y
' EXISTS (SELECT ''X'' FROM
SSBSECT WHERE SSBSECT_CRN =
SSRBLCK_CRN AND SSBSECT_TERM_CODE
= SSRBLCK_TERM_CODE '
FROM dual WHERE NOT EXISTS (SELECT
1 FROM gorfdpl WHERE
GORFDPL_FDMN_CODE
='SB_SCHEDULE_ELEVATE_VBS' AND
GORFDPL_TABLE_NAME='SSRBLCK');
SB_SCHEDULE_ELEVATE_VBS SSRCORQ Y Y
' EXISTS (SELECT ''X'' FROM
SSBSECT WHERE SSBSECT_CRN =
SSRCORQ_CRN AND SSBSECT_TERM_CODE
= SSRCORQ_TERM_CODE '
FROM dual WHERE NOT EXISTS (SELECT
1 FROM gorfdpl WHERE
GORFDPL_FDMN_CODE
='SB_SCHEDULE_ELEVATE_VBS' AND
GORFDPL_TABLE_NAME='SSRCORQ');
Domain Code
Table
Name
Sys
Req
Active
Ind Driver SQL

1719
Banner Student User Guide | Banner Student System Management
SB_SCHEDULE_ELEVATE_VBS SSREVAL Y Y
' EXISTS (SELECT ''X'' FROM
SSBSECT WHERE SSBSECT_CRN =
SSREVAL_CRN AND SSBSECT_TERM_CODE
= SSREVAL_TERM_CODE '
FROM dual WHERE NOT EXISTS (SELECT
1 FROM gorfdpl WHERE
GORFDPL_FDMN_CODE
='SB_SCHEDULE_ELEVATE_VBS' AND
GORFDPL_TABLE_NAME='SSREVAL');
SB_SCHEDULE_ELEVATE_VBS SSREXTN Y Y
' EXISTS (SELECT ''X'' FROM
SSBSECT WHERE SSBSECT_CRN =
SSREXTN_CRN AND SSBSECT_TERM_CODE
= SSREXTN_TERM_CODE '
FROM dual WHERE NOT EXISTS (SELECT
1 FROM gorfdpl WHERE
GORFDPL_FDMN_CODE
='SB_SCHEDULE_ELEVATE_VBS' AND
GORFDPL_TABLE_NAME='SSREXTN');
SB_SCHEDULE_ELEVATE_VBS SSRFEES Y Y
' EXISTS (SELECT ''X'' FROM
SSBSECT WHERE SSBSECT_CRN =
SSRFEES_CRN AND SSBSECT_TERM_CODE
= SSRFEES_TERM_CODE '
FROM dual WHERE NOT EXISTS (SELECT
1 FROM gorfdpl WHERE
GORFDPL_FDMN_CODE
='SB_SCHEDULE_ELEVATE_VBS' AND
GORFDPL_TABLE_NAME='SSRFEES');
SB_SCHEDULE_ELEVATE_VBS SSRLINK Y Y
' EXISTS (SELECT ''X'' FROM
SSBSECT WHERE SSBSECT_CRN =
SSRLINK_CRN AND SSBSECT_TERM_CODE
= SSRLINK_TERM_CODE '
FROM dual WHERE NOT EXISTS (SELECT
1 FROM gorfdpl WHERE
GORFDPL_FDMN_CODE
='SB_SCHEDULE_ELEVATE_VBS' AND
GORFDPL_TABLE_NAME='SSRLINK');
Domain Code
Table
Name
Sys
Req
Active
Ind Driver SQL

1720
Banner Student User Guide | Banner Student System Management
SB_SCHEDULE_ELEVATE_VBS SSRMPRT Y Y
' EXISTS (SELECT ''X'' FROM
SSBSECT WHERE SSBSECT_CRN =
SSRMPRT_CRN AND SSBSECT_TERM_CODE
= SSRMPRT_TERM_CODE '
FROM dual WHERE NOT EXISTS (SELECT
1 FROM gorfdpl WHERE
GORFDPL_FDMN_CODE
='SB_SCHEDULE_ELEVATE_VBS' AND
GORFDPL_TABLE_NAME='SSRMPRT');
SB_SCHEDULE_ELEVATE_VBS SSRMRDF Y Y
' EXISTS (SELECT ''X'' FROM
SSBSECT WHERE SSBSECT_CRN =
SSRMRDF_CRN AND SSBSECT_TERM_CODE
= SSRMRDF_TERM_CODE '
FROM dual WHERE NOT EXISTS (SELECT
1 FROM gorfdpl WHERE
GORFDPL_FDMN_CODE
='SB_SCHEDULE_ELEVATE_VBS' AND
GORFDPL_TABLE_NAME='SSRMRDF');
SB_SCHEDULE_ELEVATE_VBS SSRRARE Y Y
' EXISTS (SELECT ''X'' FROM
SSBSECT WHERE SSBSECT_CRN =
SSRRARE_CRN AND SSBSECT_TERM_CODE
= SSRRARE_TERM_CODE '
FROM dual WHERE NOT EXISTS (SELECT
1 FROM gorfdpl WHERE
GORFDPL_FDMN_CODE
='SB_SCHEDULE_ELEVATE_VBS' AND
GORFDPL_TABLE_NAME='SSRRARE');
SB_SCHEDULE_ELEVATE_VBS SSRRCLS Y Y
' EXISTS (SELECT ''X'' FROM
SSBSECT WHERE SSBSECT_CRN =
SSRRCLS_CRN AND SSBSECT_TERM_CODE
= SSRRCLS_TERM_CODE '
FROM dual WHERE NOT EXISTS (SELECT
1 FROM gorfdpl WHERE
GORFDPL_FDMN_CODE
='SB_SCHEDULE_ELEVATE_VBS' AND
GORFDPL_TABLE_NAME='SSRRCLS');
Domain Code
Table
Name
Sys
Req
Active
Ind Driver SQL

1721
Banner Student User Guide | Banner Student System Management
SB_SCHEDULE_ELEVATE_VBS SSRRCMP Y Y
' EXISTS (SELECT ''X'' FROM
SSBSECT WHERE SSBSECT_CRN =
SSRRCMP_CRN AND SSBSECT_TERM_CODE
= SSRRCMP_TERM_CODE '
FROM dual WHERE NOT EXISTS (SELECT
1 FROM gorfdpl WHERE
GORFDPL_FDMN_CODE
='SB_SCHEDULE_ELEVATE_VBS' AND
GORFDPL_TABLE_NAME='SSRRCMP');
SB_SCHEDULE_ELEVATE_VBS SSRRCOL Y Y
' EXISTS (SELECT ''X'' FROM
SSBSECT WHERE SSBSECT_CRN =
SSRRCOL_CRN AND SSBSECT_TERM_CODE
= SSRRCOL_TERM_CODE '
FROM dual WHERE NOT EXISTS (SELECT
1 FROM gorfdpl WHERE
GORFDPL_FDMN_CODE
='SB_SCHEDULE_ELEVATE_VBS' AND
GORFDPL_TABLE_NAME='SSRRCOL');
SB_SCHEDULE_ELEVATE_VBS SSRRDEG Y Y
' EXISTS (SELECT ''X'' FROM
SSBSECT WHERE SSBSECT_CRN =
SSRRDEG_CRN AND SSBSECT_TERM_CODE
= SSRRDEG_TERM_CODE '
FROM dual WHERE NOT EXISTS (SELECT
1 FROM gorfdpl WHERE
GORFDPL_FDMN_CODE
='SB_SCHEDULE_ELEVATE_VBS' AND
GORFDPL_TABLE_NAME='SSRRDEG');
SB_SCHEDULE_ELEVATE_VBS SSRRESV Y Y
' EXISTS (SELECT ''X'' FROM
SSBSECT WHERE SSBSECT_CRN =
SSRRESV_CRN AND SSBSECT_TERM_CODE
= SSRRESV_TERM_CODE '
FROM dual WHERE NOT EXISTS (SELECT
1 FROM gorfdpl WHERE
GORFDPL_FDMN_CODE
='SB_SCHEDULE_ELEVATE_VBS' AND
GORFDPL_TABLE_NAME='SSRRESV');
Domain Code
Table
Name
Sys
Req
Active
Ind Driver SQL

1722
Banner Student User Guide | Banner Student System Management
SB_SCHEDULE_ELEVATE_VBS SSRRFND Y Y
' EXISTS (SELECT ''X'' FROM
SSBSECT WHERE SSBSECT_CRN =
SSRRFND_CRN AND SSBSECT_TERM_CODE
= SSRRFND_TERM_CODE '
FROM dual WHERE NOT EXISTS (SELECT
1 FROM gorfdpl WHERE
GORFDPL_FDMN_CODE
='SB_SCHEDULE_ELEVATE_VBS' AND
GORFDPL_TABLE_NAME='SSRRFND');
SB_SCHEDULE_ELEVATE_VBS SSRRLVL Y Y
' EXISTS (SELECT ''X'' FROM
SSBSECT WHERE SSBSECT_CRN =
SSRRLVL_CRN AND SSBSECT_TERM_CODE
= SSRRLVL_TERM_CODE '
FROM dual WHERE NOT EXISTS (SELECT
1 FROM gorfdpl WHERE
GORFDPL_FDMN_CODE
='SB_SCHEDULE_ELEVATE_VBS' AND
GORFDPL_TABLE_NAME='SSRRLVL');
SB_SCHEDULE_ELEVATE_VBS SSRRMAJ Y Y
' EXISTS (SELECT ''X'' FROM
SSBSECT WHERE SSBSECT_CRN =
SSRRMAJ_CRN AND SSBSECT_TERM_CODE
= SSRRMAJ_TERM_CODE '
FROM dual WHERE NOT EXISTS (SELECT
1 FROM gorfdpl WHERE
GORFDPL_FDMN_CODE
='SB_SCHEDULE_ELEVATE_VBS' AND
GORFDPL_TABLE_NAME='SSRRMAJ');
SB_SCHEDULE_ELEVATE_VBS SSRRPRG Y Y
' EXISTS (SELECT ''X'' FROM
SSBSECT WHERE SSBSECT_CRN =
SSRRPRG_CRN AND SSBSECT_TERM_CODE
= SSRRPRG_TERM_CODE '
FROM dual WHERE NOT EXISTS (SELECT
1 FROM gorfdpl WHERE
GORFDPL_FDMN_CODE
='SB_SCHEDULE_ELEVATE_VBS' AND
GORFDPL_TABLE_NAME='SSRRPRG');
Domain Code
Table
Name
Sys
Req
Active
Ind Driver SQL

1723
Banner Student User Guide | Banner Student System Management
SB_SCHEDULE_ELEVATE_VBS SSRRSTS Y Y
' EXISTS (SELECT ''X'' FROM
SSBSECT WHERE SSBSECT_CRN =
SSRRSTS_CRN AND SSBSECT_TERM_CODE
= SSRRSTS_TERM_CODE '
FROM dual WHERE NOT EXISTS (SELECT
1 FROM gorfdpl WHERE
GORFDPL_FDMN_CODE
='SB_SCHEDULE_ELEVATE_VBS' AND
GORFDPL_TABLE_NAME='SSRRSTS');
SB_SCHEDULE_ELEVATE_VBS SSRRTST Y Y
' EXISTS (SELECT ''X'' FROM
SSBSECT WHERE SSBSECT_CRN =
SSRRTST_CRN AND SSBSECT_TERM_CODE
= SSRRTST_TERM_CODE'
FROM dual WHERE NOT EXISTS (SELECT
1 FROM gorfdpl WHERE
GORFDPL_FDMN_CODE
='SB_SCHEDULE_ELEVATE_VBS' AND
GORFDPL_TABLE_NAME='SSRRTST');
SB_SCHEDULE_ELEVATE_VBS SSRSCCD Y Y
' EXISTS (SELECT ''X'' FROM
SSBSECT WHERE SSBSECT_CRN =
SSRSCCD_CRN AND SSBSECT_TERM_CODE
= SSRSCCD_TERM_CODE '
FROM dual WHERE NOT EXISTS (SELECT
1 FROM gorfdpl WHERE
GORFDPL_FDMN_CODE
='SB_SCHEDULE_ELEVATE_VBS' AND
GORFDPL_TABLE_NAME='SSRSCCD');
SB_SCHEDULE_ELEVATE_VBS SSRSPRT Y Y
' EXISTS (SELECT ''X'' FROM
SSBSECT WHERE SSBSECT_CRN =
SSRSPRT_CRN AND SSBSECT_TERM_CODE
= SSRSPRT_TERM_CODE '
FROM dual WHERE NOT EXISTS (SELECT
1 FROM gorfdpl WHERE
GORFDPL_FDMN_CODE
='SB_SCHEDULE_ELEVATE_VBS' AND
GORFDPL_TABLE_NAME='SSRSPRT');
Domain Code
Table
Name
Sys
Req
Active
Ind Driver SQL

1724
Banner Student User Guide | Banner Student System Management
SB_SCHEDULE_ELEVATE_VBS SSRSRDF Y Y
' EXISTS (SELECT ''X'' FROM
SSBSECT WHERE SSBSECT_CRN =
SSRSRDF_CRN AND SSBSECT_TERM_CODE
= SSRSRDF_TERM_CODE '
FROM dual WHERE NOT EXISTS (SELECT
1 FROM gorfdpl WHERE
GORFDPL_FDMN_CODE
='SB_SCHEDULE_ELEVATE_VBS' AND
GORFDPL_TABLE_NAME='SSRSRDF');
SB_SCHEDULE_ELEVATE_VBS SSRSYLN Y Y
' EXISTS (SELECT ''X'' FROM
SSBSECT WHERE SSBSECT_CRN =
SSRSYLN_CRN AND SSBSECT_TERM_CODE
= SSRSYLN_TERM_CODE '
FROM dual WHERE NOT EXISTS (SELECT
1 FROM gorfdpl WHERE
GORFDPL_FDMN_CODE
='SB_SCHEDULE_ELEVATE_VBS' AND
GORFDPL_TABLE_NAME='SSRSYLN');
SB_SCHEDULE_ELEVATE_VBS SSRSYLO Y Y
' EXISTS (SELECT ''X'' FROM
SSBSECT WHERE SSBSECT_CRN =
SSRSYLO_CRN AND SSBSECT_TERM_CODE
= SSRSYLO_TERM_CODE '
FROM dual WHERE NOT EXISTS (SELECT
1 FROM gorfdpl WHERE
GORFDPL_FDMN_CODE
='SB_SCHEDULE_ELEVATE_VBS' AND
GORFDPL_TABLE_NAME='SSRSYLO');
SB_SCHEDULE_ELEVATE_VBS SSRSYRM Y Y
' EXISTS (SELECT ''X'' FROM
SSBSECT WHERE SSBSECT_CRN =
SSRSYRM_CRN AND SSBSECT_TERM_CODE
= SSRSYRM_TERM_CODE '
FROM dual WHERE NOT EXISTS (SELECT
1 FROM gorfdpl WHERE
GORFDPL_FDMN_CODE
='SB_SCHEDULE_ELEVATE_VBS' AND
GORFDPL_TABLE_NAME='SSRSYRM');
Domain Code
Table
Name
Sys
Req
Active
Ind Driver SQL

1725
Banner Student User Guide | Banner Student System Management
SB_SCHEDULE_ELEVATE_VBS SSRSYTR Y Y
' EXISTS (SELECT ''X'' FROM
SSBSECT WHERE SSBSECT_CRN =
SSRSYTR_CRN AND SSBSECT_TERM_CODE
= SSRSYTR_TERM_CODE '
FROM dual WHERE NOT EXISTS (SELECT
1 FROM gorfdpl WHERE
GORFDPL_FDMN_CODE
='SB_SCHEDULE_ELEVATE_VBS' AND
GORFDPL_TABLE_NAME='SSRSYTR');
SB_SCHEDULE_ELEVATE_VBS SSRTEXT Y Y
' EXISTS (SELECT ''X'' FROM
SSBSECT WHERE SSBSECT_CRN =
SSRTEXT_CRN AND SSBSECT_TERM_CODE
= SSRTEXT_TERM_CODE '
FROM dual WHERE NOT EXISTS (SELECT
1 FROM gorfdpl WHERE
GORFDPL_FDMN_CODE
='SB_SCHEDULE_ELEVATE_VBS' AND
GORFDPL_TABLE_NAME='SSRTEXT');
SB_SCHEDULE_ELEVATE_VBS SSRXLST Y Y
' EXISTS (SELECT ''X'' FROM
SSBSECT WHERE SSBSECT_CRN =
SSRXLST_CRN AND SSBSECT_TERM_CODE
= SSRXLST_TERM_CODE '
FROM dual WHERE NOT EXISTS (SELECT
1 FROM gorfdpl WHERE
GORFDPL_FDMN_CODE
='SB_SCHEDULE_ELEVATE_VBS' AND
GORFDPL_TABLE_NAME='SSRXLST');
SB_SCHEDULE_ELEVATE_VBS SSTSCHW Y Y
' EXISTS (SELECT ''X'' FROM
SSBSECT WHERE SSBSECT_CRN =
SSTSCHW_CRN AND SSBSECT_TERM_CODE
= SSTSCHW_TERM_CODE'
FROM dual WHERE NOT EXISTS (SELECT
1 FROM gorfdpl WHERE
GORFDPL_FDMN_CODE
='SB_SCHEDULE_ELEVATE_VBS' AND
GORFDPL_TABLE_NAME='SSTSCHW');
Domain Code
Table
Name
Sys
Req
Active
Ind Driver SQL

1726
Banner Student User Guide | Banner Student System Management
GTVFGAC table
sgtvfgaci_080700.sql
This script is used to insert the VBS rule code used to identity the Elevate rules into the
GTVFGAC table. This data is displayed on the FGAC Group Validation Form (GTVFGAC).
GTVFBPR table
sgtvfbpri_080700.sql
This script is used to create the business profile code in the GTVFBPR table. The data is
displayed on the FGAC Business Profile Validation Form (GTVFBPR).
GOBFGAC table
sgobfgaci_080700.sql
This script is used to insert the header record into the GOBFGAC table. The header
record stores the Active indicator setting and the Effective Date value. The data is
displayed on the FGAC Group Rules Form (GOAFGAC) for the Group value in the Key
Block.
FGAC Code Description
ELEVATE Elevate Restrictions
FGAC Business Profile Code Description
ELEVATE Restrict Users from Elevate Data
FGAC Code Active Ind Effective Date
ELEVATE Y SYSDATE

1727
Banner Student User Guide | Banner Student System Management
GORFBPR table
sgorfbpri_0080700.sql
This script is used to populate the business profile with users in the GORFBPR table. The
data is displayed on the FGAC Business Profile Assignments Form (GOAFBPR) for the
FGAC Business Profile Code value and the associated Fine-Grained Access User ID
values.
Note: Run this script to populate the business profile with users in the
GORFBPR table and activate elevate processing.
sgorfbprd_080700.sql
If the 8.7 upgrade was applied before the sgorfbpri_0080700.sql script was
available, and the GORFBPR table was automatically populated with user records, run the
sgorfbprd_080700.sql script to delete the records from the table.
GORFPRD table
sgorfprdi_080700.sql
This script is used to create the predicates. The predicates state that the user assigned to
the rule can insert, update, delete data, when the selects are true.
Entries are created for catalog (
SB_CATALOG_ELEVATE_VBS),
(
SB_SCRINTG_ELEVATE_VBS), and schedule (SB_SCHEDULE_VBS) in the
GORFPRD table where the
GORFPRD_FGAC_CODE is ELEVATE. (Entries use the VBS
domains that are part of the existing baseline seed data.) The data is displayed on the
FGAC Group Rules Form (GOAFGAC).
FGAC User ID Business Profile Code
a.username ELEVATE

1728
Banner Student User Guide | Banner Student System Management
FGAC
Code Domain Code
Seq
Num Predicate
ELEVATE SB_SCHEDULE_VBS 1
select 'ELEVATE',
'SB_SCHEDULE_VBS',
1,
sysdate,
user,
'nvl(SSBSECT_INTG_CDE,''x'') !=
''ELEV8'''
from dual where not exists ( select 1
from gorfprd where gorfprd_fgac_code =
'ELEVATE' and gorfprd_fdmn_code =
'SB_SCHEDULE_VBS');
ELEVATE SB_CATALOG_VBS 2
select 'ELEVATE',
'SB_CATALOG_ELEVATE_VBS',
2,
sysdate,
user,
' not exists ( select 1 from scrintg vbs
where vbs.scrintg_subj_code =
scbcrky_subj_code
and vbs.scrintg_crse_numb =
scbcrky_crse_numb
and vbs.scrintg_intg_cde = ''ELEV8'' )'
from dual where not exists ( select 1
from gorfprd where gorfprd_fgac_code =
'ELEVATE' and gorfprd_fdmn_code =
'SB_CATALOG_ELEVATE_VBS');

1729
Banner Student User Guide | Banner Student System Management
sgorfprdd_080800.sql
This script is used to delete the row delivered in 8.7 for the SB_SCHEDULE_VBS domain
in the GORFPRD table.
ELEVATE SB_SCRINTG_VBS 3
select 'ELEVATE',
'SB_SCRINTG_ELEVATE_VBS',
3,
sysdate,
user,
' not exists ( select 1 from scbcrse vbs
where vbs.scbcrse_subj_code =
scbcrky_subj_code
and vbs.scbcrse_crse_numb =
scbcrky_crse_numb
and
upper(nvl(vbs.scbcrse_data_origin,''X'')
) = ''ELEVATE'' )'
from dual where not exists ( select 1
from gorfprd where gorfprd_fgac_code =
'ELEVATE' and gorfprd_fdmn_code =
'SB_SCRINTG_ELEVATE_VBS');
FGAC
Code Domain Code
Seq
Num Predicate

1730
Banner Student User Guide | Banner Student System Management
sgorfprdi_080800.sql
This script is used to create the predicates. The predicates state that the user assigned to
the rule can insert, update, delete data, when the selects are true.
An entry is created for schedule (
SB_SCHEDULE_ELEVATE_VBS) in the GORFPRD
table where the
GORFPRD_FGAC_CODE is ELEVATE. (Entries use the VBS domains
that are part of the existing baseline seed data.) The data is displayed on the FGAC
Group Rules Form (GOAFGAC).
FGAC
Code Domain Code
Seq
Num Predicate
ELEVATE SB_SCHEDULE_VBS 1
select 'ELEVATE',
'SB_SCHEDULE_VBS',
1,
sysdate,
user,
'nvl(SSBSECT_INTG_CDE,''x'') !=
''ELEV8'''
from dual where not exists ( select 1
from gorfprd where gorfprd_fgac_code =
'ELEVATE' and gorfprd_fdmn_code =
'SB_SCHEDULE_VBS');

1731
Banner Student User Guide | Banner Student System Management
GORFGBP table
sgorfgbpi_080700.sql
This script is used to insert access definition/restrictions for three domains on the Elevate
VBS rule into the GORFGBP table. Access is through the business profile. The ability to
select, insert, update, and delete data is determined by the predicate. The settings for the
GORFGBP_SELECT_IND, GORFGBP_INSERT_IND, GORFGBP_UPDATE_IND, and
GORFGBP_DELETE_IND are displayed on the FGAC Group Rules Form (GOAFGAC).
sgorfgbpd_080800.sql
This script is used to delete the row delivered in 8.7 for the SB_SCHEDULE_VBS domain
in the GORFGBP table.
FGAC
Code Domain Code
Seq
Num Predicate
ELEVATE SB_SCHEDULE_
ELEVATE_VBS
1
select 'ELEVATE',
'SB_SCHEDULE_VBS',
1,
sysdate,
user,
'nvl(SSBSECT_INTG_CDE,''x'') !=
''ELEV8'''
from dual where not exists ( select 1
from gorfprd where gorfprd_fgac_code =
'ELEVATE' and gorfprd_fdmn_code =
'SB_SCHEDULE_ELEVATE_VBS');
FGAC
Code Domain Code
Predicate
Seq Num
FBPR
Code
Select
Ind
Insert
Ind
Update
Ind
Delete
Ind
ELEVATE SB_SCHEDULE_VBS 1 ELEVATE N Y Y Y
ELEVATE SB_CATALOG_ELEVATE_VBS 2 ELEVATE N Y Y Y
ELEVATE SB_SCRINTG_ELEVATE_VBS 3 ELEVATE N Y Y Y

1732
Banner Student User Guide | Banner Student System Management
sgorfgbpi_080800.sql
This script is used to insert access definition/restrictions for the schedule domain on the
Elevate VBS rule into the GORFGBP table. Access is through the business profile. The
ability to select, insert, update, and delete data is determined by the predicate. The
settings for the
GORFGBP_SELECT_IND, GORFGBP_INSERT_IND,
GORFGBP_UPDATE_IND, and GORFGBP_DELETE_IND are displayed on the FGAC
Group Rules Form (GOAFGAC).
GORFDPL table
sgorfdplu_080700.sql
This script is used to update the status on the domain policy tables to "active" in the
GORFDPL table.
FGAC
Code Domain Code
Predicate
Seq Num
FBPR
Code
Select
Ind
Insert
Ind
Update
Ind
Delete
Ind
ELEVATE SB_SCHEDULE_VBS 1 ELEVATE N Y Y Y
FGAC
Code Domain Code
Predicate
Seq Num
FBPR
Code
Select
Ind
Insert
Ind
Update
Ind
Delete
Ind
ELEVATE SB_SCHEDULE_ELEVATE_VBS 1 ELEVATE N Y Y Y
Domain Code Table Name
Active
Ind
SB_CATALOG_ELEVATE_VBS All tables in GORFDPL with domain
SB_CATALOG_ELEVATE_VBS except
SCRINTG
Y
SB_SCRINTG_ELEVATE_VBS SCRINTG Y
SB_SCHEDULE_VBS All tables in GORFDPL with domain
SB_SCHEDULE_VBS
Y
SB_SCHEDULE_ELEVATE_VBS ** All tables in GORFDPL with domain
SB_SCHEDULE_ELEVATE_VBS
Y
** The SB_SCHEDULE_ELEVATE_VBS row is added in Release 8.8 due to the updates
delivered for the GORFDPL table in the
sgorfdpli_080800.sql script.

1733
Banner Student User Guide | Banner Student System Management
GORFBPR table
sgorfbpri_sync_job.sql
This script is used to schedule a daily job (at 3:00 AM) to populate the business profile
with new Oracle users in the GORFBPR table. This script is optional and must be run
manually to use elevate processing.
FGAC Tips
When using FGAC, remember the following.
• Variables for FGAC in Banner are managed within the Oracle session. If the predicate or
restrictions are changed, the user must log out of Banner and re-enter a new session to
pick up any changes.
• The scripts used to enable the policies should be run after regular business hours.
Create/Activate FGAC Policies
After running the Elevate FGAC seed data scripts, the gfvbsaddpol.sql script must
be run to create policies for Banner tables. The
gfvbsaddpol.sql script is located in
the Banner General PLUS directory.
Use BANINST1 to Run gfvbsaddpol.sql
You must use the BANINST1 User ID when you run the script to create the policies. The
predicate package owner must equal the policy owner. In this case, GOKFGAC is owned
by BANINST1.
1. From SQL*Plus, run the
gfvbsaddpol.sql script while logged in with the
BANINST1 User ID.
2. You are prompted for a table name. You can use wildcards (SS for Schedule tables,
SC for Catalog tables).
3. Provide the owner name for the table owner when prompted, for example SSBSECT
is owned by SATURN.
This task is performed once per module with the to create policies for SC% and SS%
tables as identified in the GORFDPL table. The script will create a policy for each table.
This task does not need to be repeated if the
gorfdpl_driver.sql script changes,
the table is added to another domain, or there is any change to the domain and table.
Note: The gfvbsaddpol.sql script is can be rerun and restarted.
The process will not try to recreate a policy. If the policy exists, the task to
add the policy is skipped.

1734
Banner Student User Guide | Banner Student System Management
Run gfvbsaddpol.sql.for the following tables.
•SCBCRKY
•SCBCRSE
• SCBDESC
• SCBSUPP
• SCRATTR
• SCRCLBD
• SCRCORQ
• SCRCPRT
• SCRCRDF
•SCREQIV
•SCRFEES
• SCRGMOD
•SCRINTG
• SCRLEVL
• SCRMEXC
• SCRRARE
• SCRRATT
• SCRRCAM
• SCRRCHR
• SCRRCLS
• SCRRCMP
• SCRRCOL
• SCRRDEG
• SCRRDEP
• SCRRLVL
• SCRRMAJ
• SCRRPRG
• SCRRTRM
•SCRRTST
• SCRSBGI
• SCRSCHD
• SCRSYLN
• SCRSYLO

1735
Banner Student User Guide | Banner Student System Management
• SCRSYRM
• SCRSYTR
•SCRTEXT
• SIRASGN
• SSBWLSC
• SSRCLBD
• SSRRATT
• SSRRCHR
• SSRRDEP
View Policy Data from SQL*Plus
GORFDPL creates four policies per table, one each for the insert, update, delete and
select items. All have the package defined as GOKFGAC and must be owned by
BANINST1.
Policy Names
The gokfgac.f_get_policy_name function ensures that the policy name created
is less than 30 characters in length.
• If the table name length is less than 19 characters, the policy name will use the following
pattern:
GOKFGAC_tablename_INS (INS, UPD, DEL, SEL)
• If the table name length is 19 or greater characters, the policy name will use the
following pattern:
tablename_I (I, U, D, S)
Drop a Policy
To drop a policy, run the gfgacdroppol.sql script from Banner General PLUS
directory using the BANINST1 ID. This script accepts wildcards for the table name prompt.
Schedule a Daily Job to Populate the Business Profile
A sgorfbpri_sync_job.sql script can be found in the PLUS directory. It is run
using the SATURN ID. It is used to schedule the synchronization process for the user IDs
that adds new Oracle users that Elevate group business profile.
Automation of the synchronization process ensures that newly created users are not able
to modify any data related to Elevate courses and sections. The default synchronization is
performed each day at 3:00 AM. The default value can be changed according to your site-
specific synchronization interval requirements.

1736
Banner Student User Guide | Interfaces
Interfaces
This chapter discusses interfaces to other Banner products using Banner Student.
Interfaces Used With Banner Student
Here are the interfaces available to other Banner products with Banner Student.
Banner Accounts Receivable Interface to Banner
Finance
This documentation is contained in the Banner® Accounts Receivable User Guide. Please
refer to this guide for the interface information.
Banner Accounts Receivable Interface to Banner
Financial Aid
This documentation is contained in the Banner Accounts Receivable User Guide. Please
refer to this guide for the interface information.
Banner Student Interface to Banner Advancement
This documentation is contained in the Banner Advancement User Guide. Please refer to
this guide for the interface information. Here is an introduction to this interface.
The Student-Advancement Interface Process (APPSTDI) loads information for selected
individuals from Banner Student to Banner Advancement. Students can be selected for
processing based on current, non-current, or degree awarded categories. They can then
have data loaded to Banner Advancement based on the APPSTDI selection parameters
for their respective category. The report output details the information that is loaded from
Banner Student to Banner Advancement, including the number of records processed or
not processed due to missing data and the number of new and updated database records.
A person is identified in Banner Advancement when information for that person exists on
the Advancement Individual Information Form (APACONS). This information constitutes
an advancement individual record. When the data for a selected student is loaded to
Banner Advancement, the process determines whether the student is created as a new
advancement individual or is updated as an existing advancement individual. If an
advancement individual record already exists for a person selected by the interface, new
academic and employment information is added to the record. Depending on the setting of

1737
Banner Student User Guide | Interfaces
an APPSTDI parameter, the preferred college code and preferred class year can be
updated in Banner Advancement. Otherwise, existing information in the record is not
overwritten.
All Banner systems share identification, person, and address information. The interface
does not affect this shared information. Student academic information is retrieved from the
Admissions, Academic History, and Registration modules. Depending on the process
parameters used, cooperative employment information and student activity information
can also be retrieved from Banner Student.
Please note that before APPSTDI is run, the Banner Student grade roll process must be
run to create academic history records for students. The grade roll process can be run
either online from the Class Roster Form (SFASLST) or the Class Attendance Roster
Form (SFAALST), or in batch using the Grade Roll to Academic History (SHRROLL).
APPSTDI uses information created by the grade roll process, such as term header
records, degree records, and hours earned by the students. If no term header record
exists for a student, then APPSTDI does not select that student for processing.
The timing of when the grade roll and APPSTDI are run needs to be coordinated and
depends on your institution’s needs. For example, if your institution wants students to
become advancement individuals after their first semester, then APPSTDI must be run
after the grade roll for the semester to ensure that the term header records exist.
Your institution name must be entered in the Institution field on the Institution window of
the Advancement Control Form (AGACTRL).
Note: APPSTDI uses two GTVSDAX rules for processing, ALUMPRAD
for address types and
ALUMPUNC for prefixes and suffixes.
Banner Student Interface to Banner Human Resources
The Banner Human Resources and Banner Student Systems interface includes the
sharing of data entered through General Person Module forms in both systems. There are
also a number of Faculty Load Module forms in the Banner Student System, as well as a
reporting process in the Banner Human Resources System which compares and pulls
data from both systems. This process identifies where the data entered does not match,
and when it does match there is a calculation and recording of Total Contact Hours and
FTE on the Human Resource side from the data entered on the Banner Student side.
General Person Data
The General Person Identification Form (SPAIDEN) shares data pertaining to ID, name,
address, and telephone information with the Identification Form (PPAIDEN) in the Banner
Human Resources System. The Banner Human Resources Identification Form data is
displayed on three forms in the Banner Student System: the General Person Identification
Form (SPAIDEN), the General Person Form (SPAPERS), and the Emergency Contact
Form (SPAEMRG).
The General Person Form (SPAPERS) shares personnel data with the Banner Human
Resources Identification Form (PPAIDEN) with the exception of veteran disability, and

1738
Banner Student User Guide | Interfaces
driver's license number information. These items are not available on forms within the
Banner Student System.
The Emergency Contact Form (SPAEMRG) shares all of its data with the Banner Human
Resources Identification Form (PPAIDEN).
The following chart details the shared data for the interface.
Banner Student General Person to Banner Human Resources Data
Banner Student Form Data Shared
Banner Human
Resources Form
SPAIDEN - General Person
Identification Form
Current ID and Name
Previous ID(s) and Name(s)
Address data
Telephone data
Prefix
Suffix
Preferred Name
Legal Name
PPAIDEN - Identification Form
SPAPERS - General Person
Form
Gender
Date of Birth
SS Number
Ethnic Code
Marital Status
Religion
Legacy
Vet File Number
Veteran Category
Special Disability Veteran *
Deceased
Date
Age *
Driver’s License Number *
PPAIDEN - Identification Form
SPAEMRG - Emergency
Contact Form
All data PPAIDEN - Identification Form

1739
Banner Student User Guide | Interfaces
Faculty Load Data
There is an integration point between the Banner Student Faculty Load Module and the
Banner Human Resources System which begins on the optional Faculty Personnel Form
(SIAFPER). Reports verifying the connection point exist in Banner Human Resources.
The Faculty Personnel Form (SIAFPER) shares faculty history and personnel information
with the Employee Form (PEAEMPL) in the Banner Human Resources System, with the
exception of discipline and home organization information. These items are not available
on forms within the Banner Student System. The data for home organization, displayed on
PEAEMPL, is validated against the Organization Code List (FTVORGN), a Banner
Finance System validation form. If Banner Finance is not installed, the home organization
is validated against the Organization Code List (PTVORGN).
The Faculty/Advisor Information Form (SIAINST) displays the home college and
department information, which is not available on forms within the Banner Human
Resources System. This is where you may enter the ID of the faculty member (which was
created on the General Person Identification Form (SPAIDEN) in the General Person
module) and set up the details which change over time, i.e., contract and workload rule
information.
Note: Degree information for a faculty member may be entered on both
the Prior College Form (SOAPCOL) and Faculty Degree Information
Form (SIAFDEG). If your institution has the Banner Human Resources
System installed, you will need to decide if the information contained in
SOAPCOL and SIAFDEG will be maintained in both systems or only in
the Banner Human Resources System.
The Faculty Degree Information Form (SIAFDEG) shares faculty academic history
information with the General Information Form (PPAGENL), with the exception of
publications and examinations information, which is not available on forms within the
Banner Student System.
The Instructor Schedule Report (SIRASGQ) can display the faculty member's salary via
an optional parameter. The salary information originates in the Banner Human Resources
data. The process displays the total salary recorded for all positions stored within the
Banner Human Resources System.
The Faculty Assignment Form (SIAASGN) permits the recording of a position and a suffix,
information which should exist in the Banner Human Resources System; however, no
validation is done online.
The Faculty Load Process (PEPFACL) updates the Faculty Load Form (PEAFACL) with
the contact hours and FTE from Student Faculty Assignment Form (SIAASGN).
After the Faculty Load Process (PEPFACL) is run, the Faculty Load Comparison Report
(PERFACL) should be generated. This report displays comparative data in four different
formats.
* = Not available in the Banner Student System
1740
Banner Student User Guide | Interfaces
• Identifies faculty members whose position and suffix match on the Faculty Assignment
Form (SIAASGN) and the Employee Job Form (NBAJOBS).
• Identifies faculty members whose position and suffix are missing on the Faculty
Assignment Form (SIAASGN).
• Identifies faculty members whose have a position and suffix on the Faculty Assignment
Form (SIAASGN) but do not have a position and suffix on the Employee Job Form
(NBAJOBS).
• Identifies faculty members whose position and suffix do not match on the Faculty
Assignment Form (SIAASGN) and the Employee Job Form (NBAJOBS).
The following chart details the shared data for the interface.
Faculty Load to Human Resources Data
Banner Student Form/
Report Shared Data
Banner Human
Resources Form/Report
SIAFPER - Faculty Personnel
Form
Tenure Code
Tenure Date
Review Date
AAUP Membership
Years Experience
Sabbatical Dates
Title
Discipline *
Home Organization *
Faculty Action Tracking Form
(PEAFACT)
PEAEMPL - Employee Form
- validates against -
FTVORGN - Organization
Code List (Banner Finance)
SIAINST - Faculty/Advisor
Information Form
Home College **
Department **
1741
Banner Student User Guide | Interfaces
SIAFDEG - Faculty Degree
Information Form
Institution Code
Transcript Dates
Degree
Year
GPA
Hours
Major
Minor
Area of Concentration
Publications *
Examinations *
PPAGENL - General
Information Form
SIRASGQ - Instructor
Schedule Report
Show salary option from Banner Human
Resources
SIAASGN - Faculty
Assignment Form
Position ***
Suffix ***
FTE
Contact Hours
NBAJOBS - Employee Job
Form
PEPFACL - Faculty Load
Update Process (updates
PEAFACL below, with data
from Banner Student System)
PEAFACL - Faculty Load
Form
PERFACL - Faculty Load
Comparison Report
(compares information
between SIAASGN and
NBAJOBS, - Position, Suffix,
Contact Hours, and FTE)
* = Not available in the Banner Student System
** = Not available in the Banner Human Resources System
*** = No validation is performed between the systems online
Banner Student Form/
Report Shared Data
Banner Human
Resources Form/Report
