AMERICAN COUCIL ON EXERCISE © All Rights Reserved
ACE Group FitnEss instruCtor FitnEss AssEssmEnt protoCols
1
THE FITNESS ASSESSMENTS PRESENTED HERE ARE NOT INTENDED TO SERVE AS
comprehensive coverage of the topic, but rather as an introduction to various assessments
that fall within the scope of practice of an ACE Certified Group Fitness Instructor (GFI).
For full coverage of the appropriate use of fitness assessment protocols and sequencing
guidelines, refer to the ACE Personal Trainer Manual.
CARDIORESPIRATORY-FITNESS TESTING
Maximal and submaximal exercise tests using the treadmill or bicycle ergometer are not
well-suited for measuring the cardiorespiratory fitness of groups. In the group fitness setting,
field tests for measuring cardiorespiratory endurance, such as the YMCA submaximal step
test, are more appropriate because they are easy to administer, practical, inexpensive,
and less time-consuming than the treadmill and bicycle ergometer tests. One important
consideration for administering a cardiorespiratory field test with a group of individuals is
that participants must be taught how to accurately measure their heart rates.
YMCA Submaximal Step Test
The YMCA submaximal step test is one of the most popular step tests used to measure
cardiorespiratory endurance and is considered suitable for low-risk, apparently healthy,
nonathletic individuals between the ages of 20 and 59. This particular test uses any 12-inch
(30.5 cm) step, with the Reebok
®
step being utilized most frequently in fitness settings (four
risers plus the platform).
CONTRAINDICATIONS
Due to the nature of step testing, this assessment may not be appropriate for:
•Individuals who are extremely overweight
•Individuals with balance concerns
•Individuals with orthopedic problems (e.g., knee or low-back)
•Individuals who are extremely deconditioned, as the intensity of the test may
require near-maximal effort
•Individuals who are short in stature, as they may have trouble with the step
height
ACE GROUP FITNESS INSTRUCTOR
FITNESS ASSESSMENT PROTOCOLS
CONTENTS
Cardiorespiratory-fitness
Testing
YMCA Submaximal Step Test
Muscular Strength and
Endurance Testing
Push-up Test
Curl-up Test
Static Postural Assessment
Plumb Line Instructions
Plumb Line Positions
Deviation 1: Ankle Pronation/
Supination and the Effect on
Tibial and Femoral Rotation
Deviation 2: Hip Adduction
Deviation 3: Pelvic Tilting
(Anterior or Posterior)
Deviation 4: Shoulder Position
and the Thoracic Spine
Deviation 5: Head Position
Postural Assessment
Checklist and Worksheets
Movement Screens
Bend and Lift Screen
Hurdle Step Screen
Shoulder Push Stabilization
Screen
Thoracic Spine Mobility Screen
Balance and the Core
Sharpened Romberg Test
Stork-stand Balance Test
Flexibility and Muscle-length
Testing
Sit-and-Reach Test
Thomas Test for Hip Flexion/
Quadriceps Length
Passive Straight-leg (PSL)
Raise
Shoulder Mobility
AMERICAN COUCIL ON EXERCISE © All Rights Reserved
ACE Group FitnEss instruCtor FitnEss AssEssmEnt protoCols
2
Equipment:
•12-inch (30.5 cm) step
•Stopwatch
•Metronome
•Stethoscope (optional)
Pre-test procedure:
•After explaining the purpose of the YMCA submaximal step test, set the
metronome to a cadence of 96 “clicks” per minute, which represents 24 steps
cycles/minute (or 96 foot placements).
üDescribe and demonstrate the four-part stepping motion (“up,” “up,”
“down,” “down”).
üEither foot can lead the step sequence.
üPermit a short practice to allow participants to familiarize themselves with
the cadence.
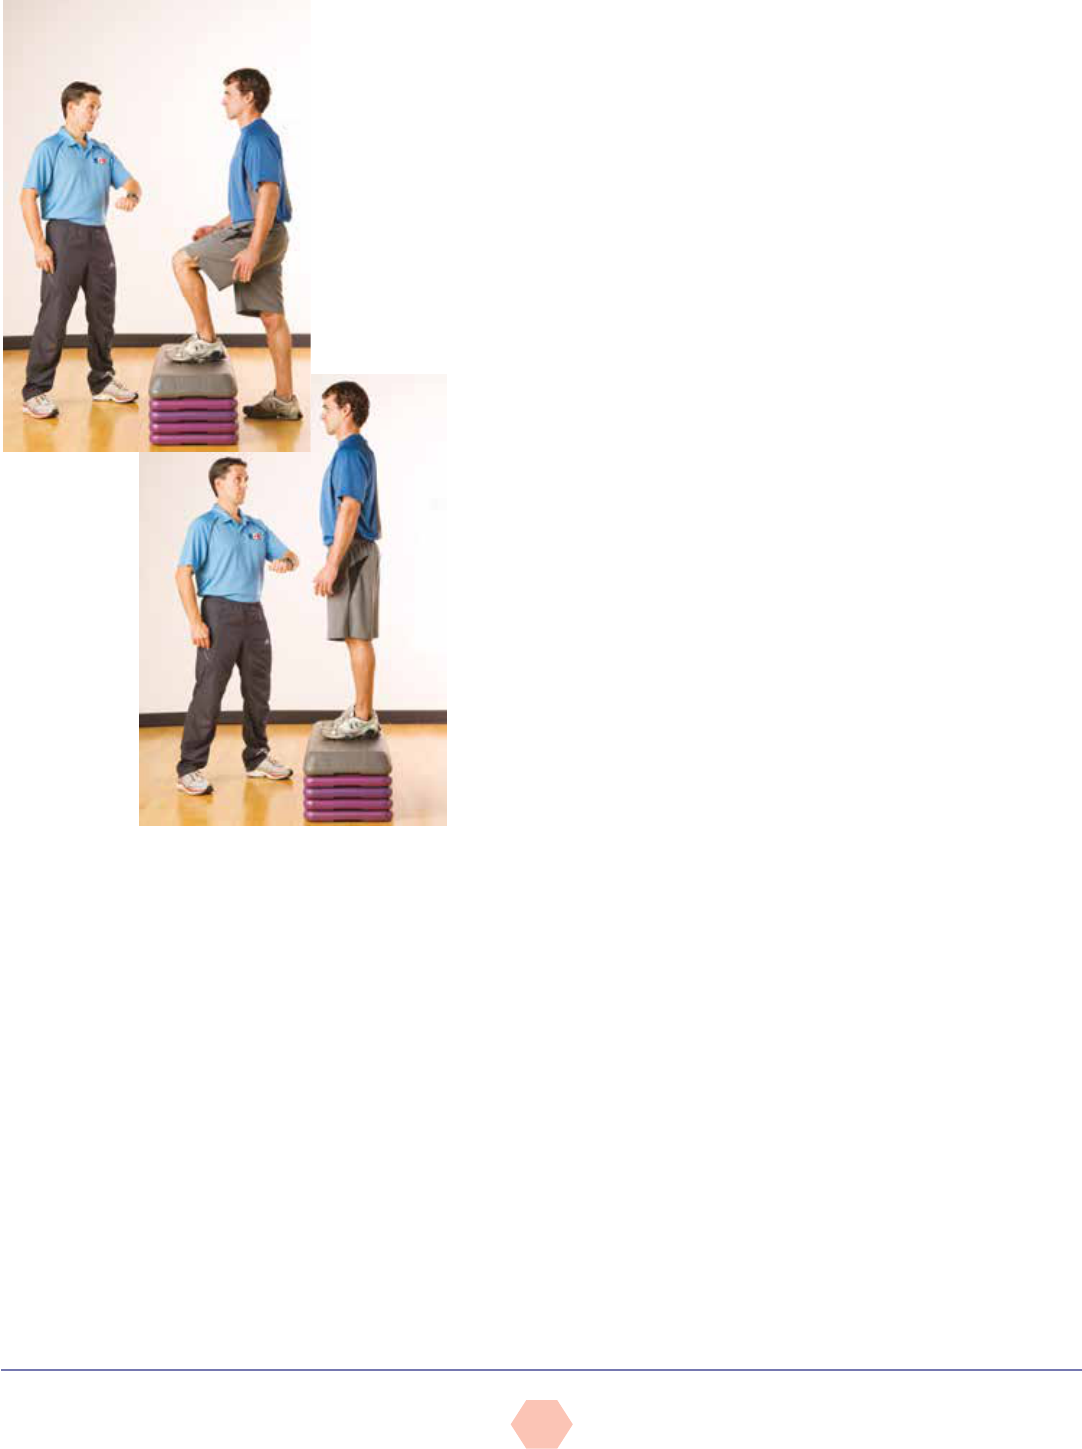
• The goal of the test is to step up and down on a 12-inch riser for three minutes
(Figure 1).
• Explain to the participant that heart rate will be measured through
palpation (or auscultation) for one full minute upon completion of
the test, counting the number of beats during that first minute of
recovery. It is important for the participant to sit down immediately
following the test and remain quiet to allow the instructor to
accurately assess heart rate.
Test protocol and administration:
• On the instructor’s cue, the participant begins stepping and the
stopwatch is started.
• The instructor can coach the initial steps to make sure the
participant is keeping pace with the metronome. Cue the time
remaining to allow the participant to stay on task.
• Atthethree-minutemark,thetestisstoppedandtheparticipant
immediately sits down. Count the participant’s heart rate (HR) for
one entire minute.
ü The test score is based on the fact that the immediate post-
exercise HR will decrease throughout the minute cycle.
ü It is important that the HR check begin within five
seconds of test completion. (Placing a stethoscope to the
participant’s chest enhances the tester’s ability to count the
actual heartbeats. In some cases, the participant may be
uncomfortable with this procedure, in which case a radial pulse
check will also suffice.)
•The participant’s one-minute post-exercise HR is recorded.
•Encourage a three- to five-minute cool-down followed by stretching of the
lower extremities. The participant may experience post-exercise dizziness or
other signs of distress if no cool-down is performed (i.e., blood pooling in the
extremities and accelerated HR).
•Classify the participant’s score using Table 1 or 2 and record the values.
•Continue to observe the participant, as negative symptoms can arise
post-exercise.
For those who score “below average” to “very poor,” it will be necessary to be
conservative in the initial exercise program. Keeping exercise duration and intensity
to a minimum will be important. For those who score “above average” to “excellent,”
it would be appropriate to focus on exercise duration as well as intensity.
Figure 1
Three-minute step test—stepping cycle
AMERICAN COUCIL ON EXERCISE © All Rights Reserved
ACE Group FitnEss instruCtor FitnEss AssEssmEnt protoCols
3
Table 2
Post-exercise Heart Rate Norms for YMCA Submaximal Step Test (Women)
Age (years)
Rating % Rating 18–25 26–35 36–45 46–55 56–65 66+
Excellent 100 52 58 51 63 60 70
95 75 74 77 85 83 85
90 81 80 84 91 92 92
Good 85 85 85 89 95 97 96
80 89 89 92 98 100 98
75 93 92 96 101 103 101
Above average 70 96 95 100 104 106 104
65 98 98 102 107 109 108
60 102 101 104 110 111 111
Average 55 104 104 107 113 113 116
50 108 107 109 115 116 120
45 110 110 112 118 118 121
Below average 40 113 113 115 120 119 123
35 116 116 118 121 123 125
30 120 119 120 124 127 126
Poor 25 122 122 124 126 129 128
20 126 126 128 128 131 129
15 131 129 132 132 135 133
Very poor 10 135 134 137 137 141 135
5 143 141 142 143 147 145
0 169 171 169 171 174 155
Reprinted with permission from YMCA Fitness Testing and Assessment Manual, 4th ed. © 2000 by YMCA of the USA. All rights reserved
Table 1
Post-exercise Heart Rate Norms for YMCA Submaximal Step Test (Men)
Age
Rating % Rating 18–25 26–35 36–45 46–55 56–65 66+
Excellent 100 50 51 49 56 60 59
95 71 70 70 77 71 74
90 76 76 76 82 77 81
Good 85 79 79 80 87 86 87
80 82 83 84 89 91 91
75 84 85 88 93 94 92
Above average 70 88 88 92 95 97 94
65 90 91 95 99 99 97
60 93 94 98 101 100 102
Average 55 95 96 100 103 103 104
50 97 100 101 107 105 106
45 100 102 105 111 109 110
Below average 40 102 104 108 113 111 114
35 105 108 111 117 115 116
30 107 110 113 119 117 118
Poor 25 111 114 116 121 119 121
20 114 118 119 124 123 123
15 119 121 124 126 128 126
Very poor 10 124 126 130 131 131 130
5 132 134 138 139 136 136
0 157 161 163 159 154 151
Reprinted with permission from YMCA Fitness Testing and Assessment Manual, 4th ed. © 2000 by YMCA of the USA. All rights reserved

AMERICAN COUCIL ON EXERCISE © All Rights Reserved
ACE Group FitnEss instruCtor FitnEss AssEssmEnt protoCols
4
MUSCULAR STRENGTH AND ENDURANCE TESTING
GFIs can measure participants’ dynamic muscular fitness using calisthenic-type strength and
endurance tests. These tests are based on specific exercises, such as the push-up and curl-
up, and require the participant to perform a maximum number of repetitions for each exercise
during the assessment.
Push-up Test
The push-up test measures upper-body endurance, specifically of the pectoralis muscles,
triceps, and anterior deltoids. Due to common variations in upper-body strength between men
and women, women should be assessed while performing a modified push-up. The push-up is
not only useful as an evaluation tool for measuring upper-body strength and endurance, but is
also a prime activity for developing and maintaining upper-body muscular fitness.
CONTRAINDICATIONS AND CONSIDERATIONS
This test may not be appropriate for participants with shoulder, elbow, or wrist
problems. Alternate muscular-endurance tests or the Cooper 90-degree push-up test
(where the elbows do not exceed a 90-degree angle) may be more appropriate. A major
problem associated with tests that require performance to fatigue is that the point
of “exhaustion” or fatigue is highly influenced by an individual’s level of motivation.
Novice exercisers may not push themselves to the maximal point of exertion.
Equipment:
•Mat (optional)
•Towel or foam block
Pre-test procedure:
•After explaining the purpose of the push-up test, explain and demonstrate the correct
push-up version (standard or modified) (Figure 2).
•The hands should point forward and be positioned shoulder-width apart, directly under
the shoulders. The hips and shoulders should be aligned (i.e., rigid trunk) and the
head should remain in a neutral to slightly extended position.
•The goal of the test is to perform as many consecutive and complete push-ups as
possible before reaching a point of fatigue. The push-ups must be steady, without any
rest between repetitions. Explain that only correctly performed push-ups are counted.
•Encourage the participant to perform a few practice trials before the test begins.
Modified bent-knee position Standard push-up position
Figure 2
Push-up test
Test protocol and administration:
•The test starts in the “down” position and the participant can begin the test whenever
he or she is ready.
•Count each complete push-up until the participant reaches fatigue. A complete
push-up requires:
üFull elbow extension with a straight back and rigid torso in the “up” position

AMERICAN COUCIL ON EXERCISE © All Rights Reserved
ACE Group FitnEss instruCtor FitnEss AssEssmEnt protoCols
5
üThe chest touching the instructor’s fist, a rolled towel, or a foam block, without resting
the stomach or body on the mat in the “down” position
•The test is terminated when the participant is unable to complete a repetition or fails
to maintain proper technique for two consecutive repetitions.
•Record the score.
•Classify the participant’s score using Table 3. For example, if a 46-year-old female
participant completed a total of 23 modified push-ups, she would be classified as
“very good,” which signifies that her upper-body muscular endurance scored very well.
Table 3
Fitness Categories for the Push-up by Age and Sex
Age (years)
Category 20–29 30–39 40–49 50–59 60–69
Sex M W M W M W M W M W
Excellent 36 30 30 27 25 24 21 21 18 14
Very good 29–35 21–29 22–29 20–26 17–24 15–23 13–20 11–20 11–17 12–16
Good 22–28 15–20 17–21 13–19 13–16 11–14 10–12 7–10 8–10 5–11
Fair 17–21 10–14 12–16 8–12 10–12 5–10 7–9 2–6 5–7 2–4
Needs improvement 16 9 11 7 9 4 6 1 4 1
Note: M = Men; W = Women
Reprinted with permission from Canadian Society for Exercise Physiology (2003). The Candian Physical Activity, Fitness, & Lifestyle Approach (CPAFLA): CSEP—Health &
Fitness Program’s Health-Related Appraisal and Counseling Strategy (3rd ed.). Ottawa: Canadian Society for Exercise Physiology.
Participants who are sedentary or unaccustomed to working the upper body are likely lacking
in upper-body strength and endurance. If the muscles of the upper body are weak, this can
lead to poor posture and a variety of musculoskeletal problems.
There are a variety of strength-training activities that can be incorporated into group fitness
classes that would help increase muscular fitness in the pectoralis, triceps, and deltoid
muscle groups, individually or collectively. The push-up itself is a great exercise for developing
muscular strength, endurance, and overall tone in the upper body. Push-ups do not require
any equipment and can be performed virtually anywhere.
Curl-up Test
The curl-up test is used to measure abdominal strength and endurance. Like the push-up
test, this test requires the participant to perform to fatigue. The curl-up is preferred over the
full sit-up because it is a more reliable indicator of abdominal strength and endurance and is
much safer for the exerciser. The full sit-up requires additional recruitment of the hip flexors,
which places increased loads across the lumbar spine. Many participants are also inclined to
pull on the neck in an effort to generate momentum during a full sit-up, potentially increasing
the risk for injury in the cervical region. Most participants will be able to perform the curl-up
test unless they suffer from low-back problems. The curl-up test is an easy and inexpensive
method of evaluating abdominal strength and endurance.
CONTRAINDICATIONS
The following issues should be considered prior to the performance of abdominal
strength assessments:
•Participants with low-back concerns should check with their physicians prior to
attempting this test.
•Participants with cervical neck issues may find that this exercise exacerbates their
pain. All participants should be encouraged to relax the neck and rely on their
abdominal muscles to do the work.
AMERICAN COUCIL ON EXERCISE © All Rights Reserved
ACE Group FitnEss instruCtor FitnEss AssEssmEnt protoCols
6
Equipment:
•Mat
Pre-test procedure:
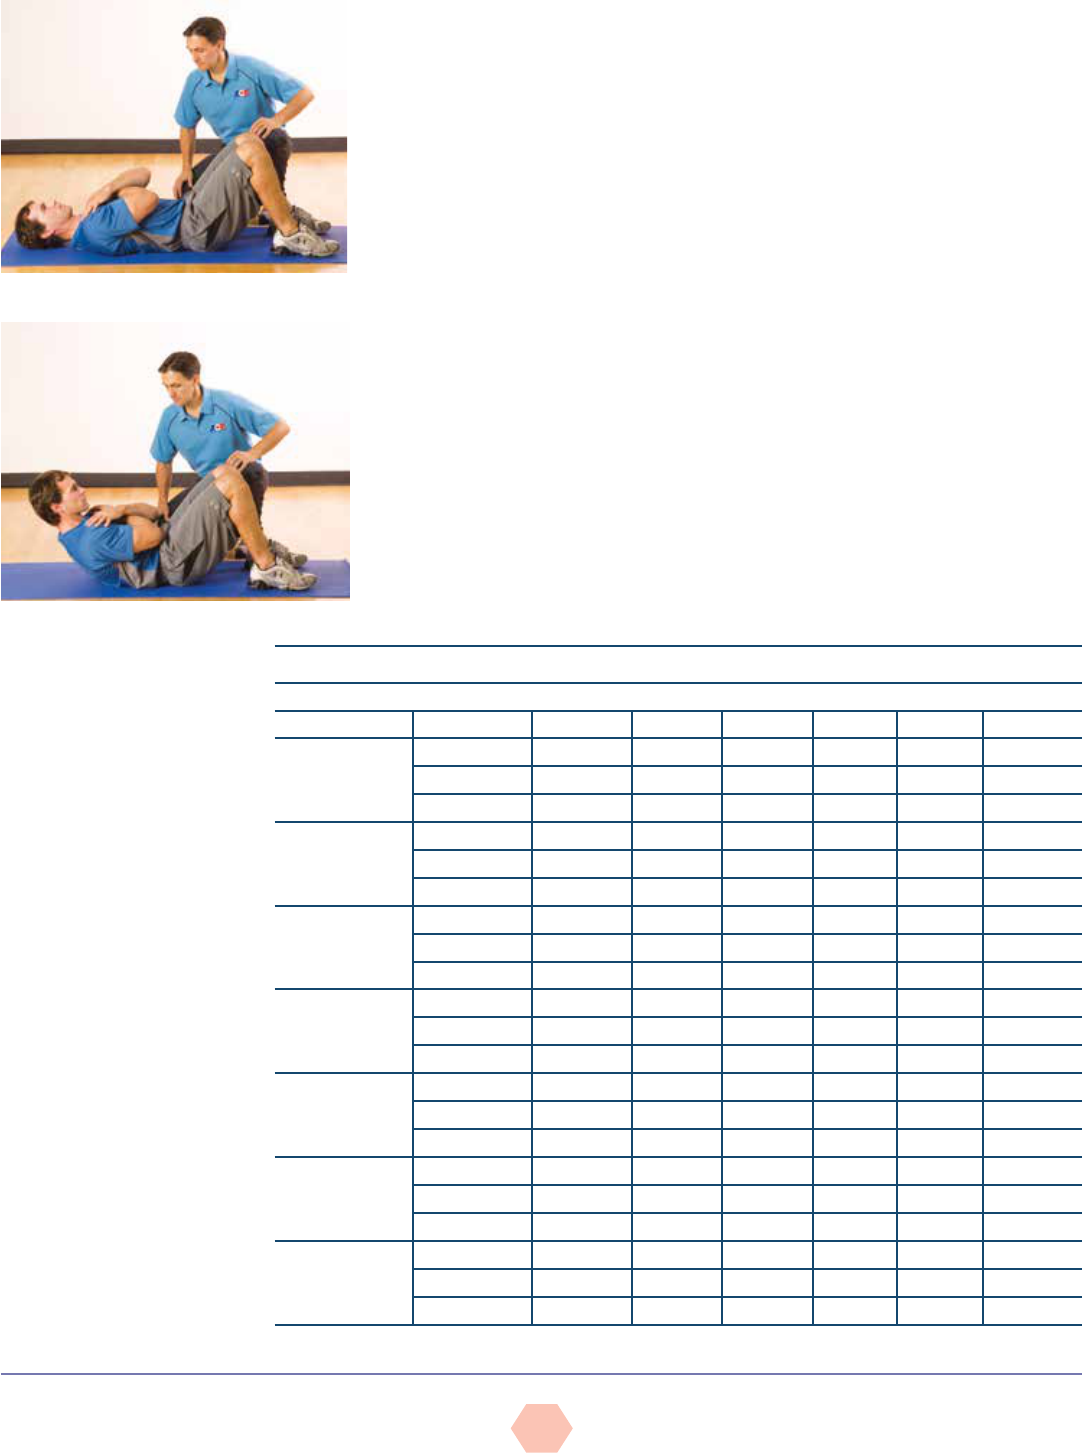
• After explaining the purpose of the curl-up test, explain and demonstrate
proper body position and movement technique. The starting position requires
the participant to be supine, with feet flat on the floor, both knees bent to a
90-degree angle, and arms crossed at the chest (Figure 3).
• Cue the participant to perform a controlled curl-up to lift the shoulder blades
off the mat (approximately 30 degrees of trunk flexion), and then to lower
the torso back down to momentarily rest the shoulders completely on the mat
(the head does not need to touch the mat).
• Instruct the participant to exhale on the way up and inhale on the way down.
• Encourage the participant to perform a few practice or warm-up repetitions
prior to the test.
Test protocol and administration:
•The participant starts in the “down” position and begins on the
instructor’s cue.
• Count each complete curl-up until the participant reaches fatigue.
• Make sure the participant is not holding his or her breath during the test.
• The participant must not flex the cervical spine by curling the neck.
• Record the participant score as the maximum number of curl-ups completed.
• Classify the participant’s score using Table 4 or 5. For example, if a 27-year-
old male participant completes a total of 36 curl-ups, he would be classified
in the upper range of “below average,” signifying that his abdominal
endurance needs improvement.
Curl-up test: Up position
Curl-up test: Down position. Head support is
optional.
Figure 3
Curl-up test
Table 4
Norms for Curl-up Test (Men)
Age (years)
Rating % Rating 18 –25 26–35 36 –45 46–55 56–65 66+
Excellent 100 99 80 79 78 77 66
95 83 68 65 68 63 55
90 77 62 60 61 56 50
Good 85 72 58 57 57 53 44
80 66 56 52 53 49 40
75 61 53 48 52 48 38
Above average 70 57 52 45 51 46 35
65 54 46 44 47 43 32
60 52 44 43 44 41 31
Average 55 49 41 39 41 39 30
50 46 38 36 39 36 27
45 43 37 33 36 33 26
Below average 40 41 36 32 33 32 24
35 40 34 31 32 31 23
30 37 33 29 29 28 22
Poor 25 35 32 28 25 25 21
20 33 30 25 24 24 19
15 29 26 24 21 21 15
Very poor 10 27 21 21 16 20 12
5 23 17 13 11 17 10
0 14 7 6 6 5 5
Reprinted with permission from YMCA Fitness Testing and Assessment Manual, (4th ed.) © 2000 by YMCA of the USA. All rights reserved
AMERICAN COUCIL ON EXERCISE © All Rights Reserved
ACE Group FitnEss instruCtor FitnEss AssEssmEnt protoCols
7
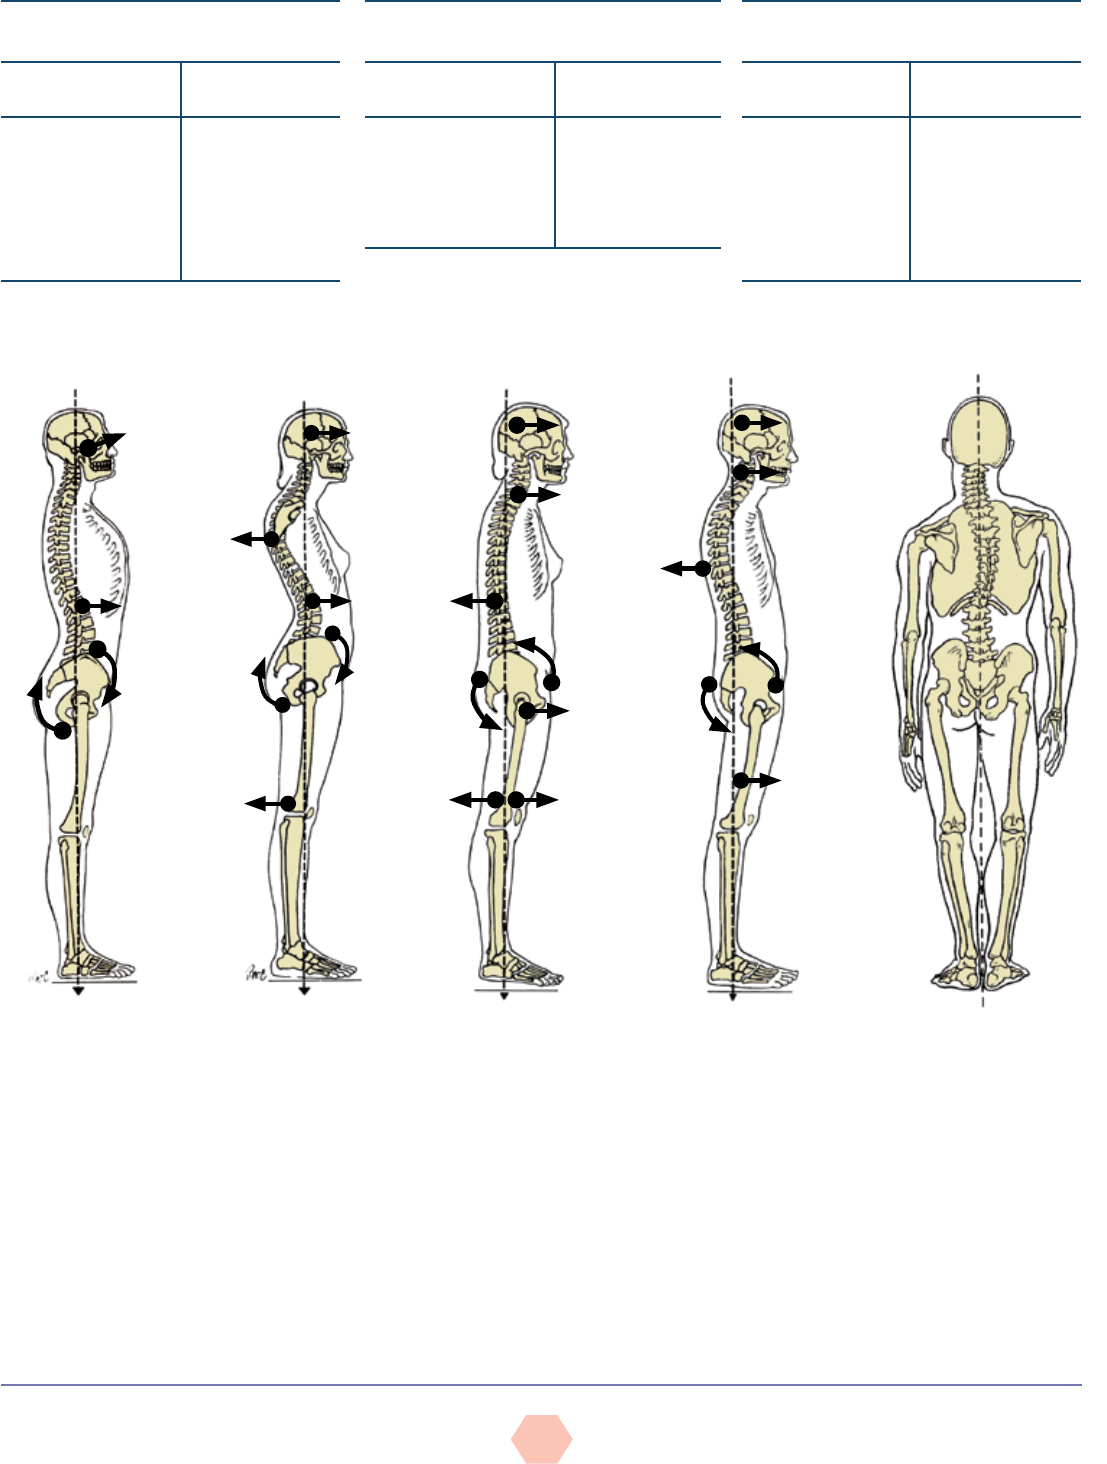
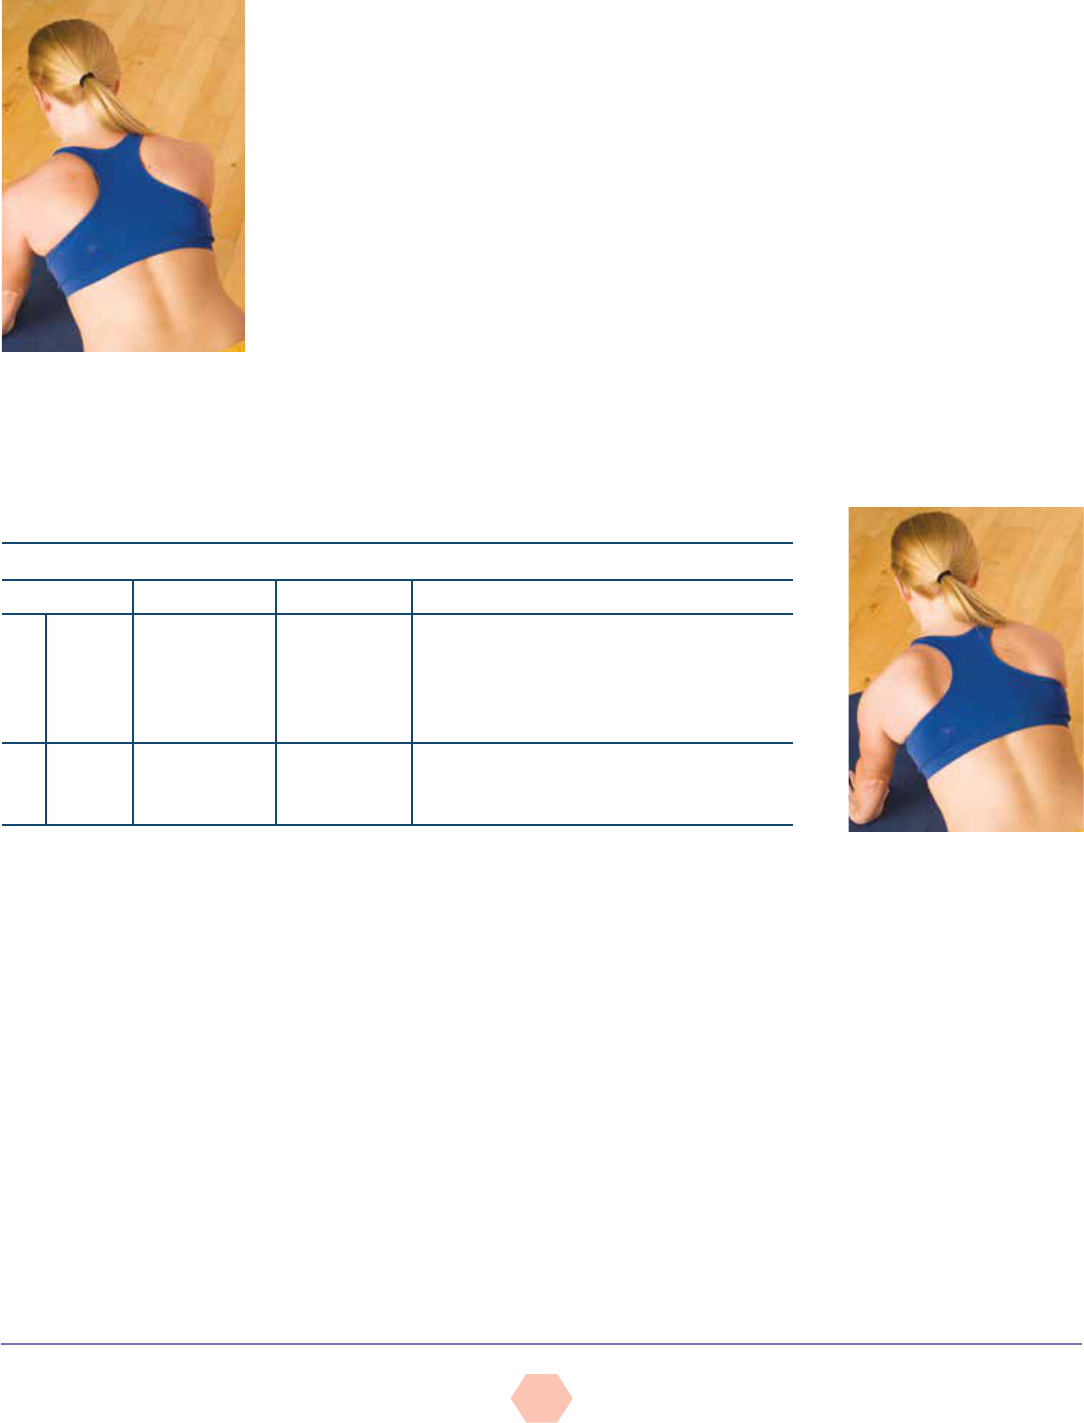
STATIC POSTURAL ASSESSMENT
Static posture represents the alignment of the body’s segments, or how the person holds
him- or herself “statically” or “isometrically” in space (Figure 4). Holding a proper postural
position involves the actions of multiple postural muscles, which are generally the deeper
muscles that contain greater concentrations of type I muscle fibers and function to hold
static positions or low-grade isometric contractions for extended periods. Good posture or
structural integrity is defined as that state of musculoskeletal alignment and balance that
allows muscles, joints, and nerves to function efficiently (Kendall et al., 2005). However,
if a participant exhibits deviations in his or her static position from good posture, this may
reflect muscle-endurance issues in the postural muscles and/or potential imbalance at
the joints (Tables 6 through 8 and Figure 5). Movement begins from a position of static
posture. Therefore, the presence of poor posture is a good indicator that movement may be
dysfunctional. Although movement screens offer valuable information related to neuromuscular
efficiency, a static postural assessment is considered very useful and serves as a starting point
from which a GFI can identify muscle imbalances and potential movement compensations
associated with poor posture (Kendall et al., 2005; Sahrmann, 2002). A static posture
assessment may offer valuable insight into:
• Muscle imbalance at a joint and the working relationships of muscles around a joint
üMuscle imbalance often contributes to dysfunctional movement.
• Altered neural action of the muscles moving and controlling the joint
üFor example, tight or shortened muscles are often overactive and dominate movement at
the joint, potentially disrupting healthy joint mechanics.
Table 5
Norms for Curl-up Test (Women)
Age (years)
Rating % Rating 18–25 26–35 36–45 46–55 56 –65 66+
Excellent 100 91 70 74 73 63 54
95 76 60 60 57 55 41
90 68 54 54 48 44 34
Good 85 64 50 48 44 42 33
80 61 46 44 40 38 32
75 58 44 42 37 35 31
Above average 70 57 41 38 36 32 29
65 54 40 36 35 30 28
60 51 37 35 33 27 26
Average 55 48 36 32 32 25 25
50 44 34 31 31 24 22
45 41 33 30 30 23 21
Below average 40 38 32 28 28 22 20
35 37 30 24 27 20 18
30 34 28 23 25 18 16
Poor 25 33 26 22 23 15 13
20 32 24 20 21 12 11
15 28 22 19 19 11 10
Very poor 10 25 20 16 13 8 9
5 24 17 14 9 7 8
0 11 7 4 2 1 0
Reprinted with permission from YMCA Fitness Testing and Assessment Manual, 4th ed. © 2000 by YMCA of the USA. All rights reserved
Figure 4
Neutral spine alignment with
slight anterior (lordotic) curves
at the neck and low back and a
posterior (kyphotic) curve in the
thoracic region
AMERICAN COUCIL ON EXERCISE © All Rights Reserved
ACE Group FitnEss instruCtor FitnEss AssEssmEnt protoCols
8
Table 6
Muscle Imbalances Associated
With Kyphosis-lordosis Posture
Facilitated/Hypertonic
(Shortened)
Inhibited
(Lengthened)
Hip flexors
Lumbar extensors
Anterior chest/shoulders
Latissimus dorsi
Neck extensors
Hip extensors
External obliques
Upper-back extensors
Scapular stabilizers
Neck flexors
Table 7
Muscle Imbalances Associated
With Flat-back Posture
Facilitated/Hypertonic
(Shortened)
Inhibited
(Lengthened)
Rectus abdominis
Upper-back extensors
Neck extensors
Ankle plantarflexors
Iliacus/psoas major
Internal oblique
Lumbar extensors
Neck flexors
Table 8
Muscle Imbalances Associated
With Sway-back Posture
Facilitated/Hypertonic
(Shortened)
Inhibited
(Lengthened)
Hamstrings
Upper fibers of
posterior obliques
Lumbar extensors
Neck extensors
Iliacus/psoas major
Rectus femoris
External oblique
Upper-back extensors
Neck flexors
a. Lordosis: increased
anterior lumbar curve
from neutral
b. Kyphosis: increased
posterior thoracic
curve from neutral
e. Scoliosis: lateral
spinal curvature often
accompanied by verte-
bral rotation
c. Flat back:
decreased anterior
lumbar curve
d. Sway back: decreased
anterior lumbar curve and
increased posterior tho-
racic curve from neutral
Figure 5
Postural deviations
Muscle imbalance and postural deviations can be attributed to many factors that are both
correctible and non-correctible, including the following:
• Correctible factors:
üRepetitive movements (muscular pattern overload)
üAwkward positions and movements (habitually poor posture)
üSide dominance
üLack of joint stability
üLack of joint mobility
üImbalanced strength-training programs
AMERICAN COUCIL ON EXERCISE © All Rights Reserved
ACE Group FitnEss instruCtor FitnEss AssEssmEnt protoCols
9
• Non-correctible factors:
üCongenital conditions (e.g., scoliosis)
üSome pathologies (e.g., rheumatoid arthritis)
üStructural deviations (e.g., tibial or femoral torsion, or femoral anteversion)
üCertain types of trauma (e.g., surgery, injury, or amputation)
Proper postural alignment promotes optimal neural activity of the muscles controlling and
moving the joint. When joints are correctly aligned, the length-tension relationships and force-
coupling relationships function efficiently. This facilitates proper joint mechanics, allowing the
body to generate and accept forces throughout the kinetic chain, and promotes joint stability and
mobility and movement efficiency. Figure 6 illustrates the importance of muscle balance and its
contribution to movement efficiency. Given how an individual’s static posture reflects potential
muscle imbalance, it stands to reason that instructors should consider conducting a static
postural assessment on their participants as an initial assessment.
Figure 6
Movement efficiency pattern
MUSCLE BALANCE
NORMAL FORCE-COUPLING RELATIONSHIPS
PROPER JOINT MECHANICS
(ARTHROKINEMATICS)
MOVEMENT EFFICIENCY
EFFICIENT FORCE ACCEPTANCE
AND GENERATION
PROMOTES JOINT STABILITY
AND MOBILITY
NORMAL LENGTH-TENSION RELATIONSHIPS
Given the propensity many individuals have toward poor posture, an initial focus of GFIs
should be to restore stability and mobility within the body and attempt to “straighten the
body before strengthening it.” The instructor can therefore start by looking at a participant’s
static posture following the right-angle rule of the body (Kendall et al., 2005). This model
demonstrates how the human body represents itself in vertical alignment across the major
joints—the ankle (and subtalar joint), knee, hip, and shoulder, as well as the head. This
model allows the observer to look at the individual in all three planes to note specific “static”
asymmetries at the joints (e.g., front to back and left to right). As illustrated in Figure 7,
the right-angle model implies a state in the frontal plane wherein the two hemispheres are
equally divided, and in the sagittal plane wherein the anterior and posterior surfaces appear
in balance. The body is in good postural position when the body parts are symmetrically
balanced around the body’s line of gravity, which is the intersection of the mid-frontal and
mid-sagittal planes and is represented by a plumb line hanging from a fixed point overhead.
While this model helps GFIs identify postural compensations and potential muscle
imbalances, it is important to recognize that limitations exist in using this model.
Plumb Line Instructions
Using a length of string and an inexpensive weight (e.g., a washer), GFIs can create a
plumb line that suspends from a ceiling or fixed point to a height 0.5 to 1 inch (1.3 to 2.5
cm) above the floor. It is important to select a location that offers a solid, plain backdrop or
a grid pattern with vertical and horizontal lines that offer contrast against the participant.
When conducting these assessments, the GFI should instruct the participant to wear form-
fitting athletic-style clothing to expose as many joints and bony landmarks as possible,
and have the participant remove his or her shoes and socks. The use of adhesive dots
placed upon the bony landmarks may assist instructors in identifying postural deviations.

AMERICAN COUCIL ON EXERCISE © All Rights Reserved
ACE Group FitnEss instruCtor FitnEss AssEssmEnt protoCols
10
The objective of this assessment is to observe the participant’s symmetry against the plumb
line and the right angles that the weightbearing joints make relative to the line of gravity.
Individuals will consciously or subconsciously attempt to correct posture when they are aware
they are being observed. GFIs should encourage participants to assume a normal, relaxed
posture, and utilize distractions such as casual conversation to encourage this relaxed posture.
It is important to remember that while postural assessments provide valuable information, they
are only one piece to the movement efficiency puzzle, and thus should not be overemphasized.
GFIs should focus on the obvious, gross imbalances and avoid getting caught up in minor
postural asymmetries. Instructors should bear in mind that the body is rarely perfectly
symmetrical and that overanalyzing asymmetries is time-consuming, potentially intimidating
to participants, and may induce muscle fatigue in the participant that can alter his or her
posture even further. Therefore, when looking for gross deviations, the instructor should select
an acceptable margin of asymmetry that he or she will allow and focus on larger, more obvious
discrepancies. For example, start by focusing on gross deviations that differ by a quarter-inch
(0.6 cm) or more between the compartments of the body.
Plumb Line Positions
Anterior and Posterior Views
Source: Kendall et al., 2005
• For the anterior view, position the participant between the plumb line and a wall, facing
the plumb line with the feet equidistant from the suspended line (using the inside of the
heels or medial malleoli as a reference) (see Figure 7a).
• With good posture, the plumb line will pass equidistant between the feet and ankles, and
intersect the pubis, umbilicus, sternum, mandible (chin), maxilla (face), and frontal bone
(forehead).
• For the posterior view, position the individual between the plumb line and a wall, facing
away from the plumb line with the insides of the heels equidistant from the suspended
line (see Figure 7b).
Figure 7
The right-angle rule
(frontal and sagittal
views)
a. Frontal view (anterior) b. Frontal view (posterior) c. Sagittal view
Medial
malleolus
Lateral
malleolus

AMERICAN COUCIL ON EXERCISE © All Rights Reserved
ACE Group FitnEss instruCtor FitnEss AssEssmEnt protoCols
11
• With good posture, the plumb line should ideally bisect the sacrum and overlap the
spinous processes of the spine.
Sagittal View
Source: Kendall et al., 2005
• Position the individual between the plumb line and the wall, facing sideways with the plumb
line aligned immediately anterior to the lateral malleolus (anklebone) (see Figure 7c).
• With good posture, the plumb line should ideally pass through the anterior third of the
knee, the greater trochanter of the femur, and the acromioclavicular (A-C) joint, and
slightly anterior to the mastoid process of the temporal bone of the skull (in line with, or
just behind, the ear lobe) (see Figure 4).
Transverse View
Source: Kendall et al., 2005
• All transverse views of the limbs and torso are performed from frontal- and sagittal-plane
positions.
GFIs must respect scope of practice when performing a postural assessment on
participants, particularly in the presence of pain or injury. They must understand the need
for referral to more qualified healthcare professionals when pain or underlying pathologies
are present (e.g., scoliosis).
When conducting assessments of posture and movement, the following key components
should be included (Figure 8).
• Participant history—written and verbal
üCollect information on musculoskeletal issues, congenital issues (e.g., scoliosis),
trauma, injuries, pain and discomfort, the site of pain or discomfort, and what
aggravates and relieves pain or discomfort (e.g., with discomfort in the upper back, the
participant may feel temporary relief by hunching forward and rounding the shoulders).
üCollect lifestyle information, including occupation, side-dominance, and habitual
patterns (information regarding these patterns may take time to gather).
• Visual and manual observation
üIdentify observable postural deviations.
üVerify muscle imbalance as determined by muscle-length testing.
üDetermine the impact on movement ability or efficiency by performing movement
screens.
üDistinguish correctible from non-correctible compensations
While postural assessments can be performed in great detail, the following sections
address five key postural deviations that occur frequently in individuals.
Figure 8
A chronological plan
for conducting postural
assessments and
movement screens
*if necessary
HEALTH HISTORY AND
LIFESTYLE INFORMATION
STATIC POSTURAL ANALYSIS
MUSCLE LENGTH TESTING
ACTIVE AND PASSIVE RANGE OF MOTION*
PHASE 1: STABILITY AND MOBILITY
TRAINING (RESTORATIVE EXERCISE)
PHASE 2: MOVEMENT
TRAINING (MOVEMENT PATTERNS)
PHASES 3 & 4: PROGRESSION: LOAD
AND PERFORMANCE TRAINING
Documentation and
determination of
need for referral
to medical
professional
IDENTIFICATION OF CORRECTIBLE
POSTURAL COMPENSATIONS
ADMINISTRATION OF APPROPRIATE
MOVEMENT SCREENS
AMERICAN COUCIL ON EXERCISE © All Rights Reserved
ACE Group FitnEss instruCtor FitnEss AssEssmEnt protoCols
12
Deviation 1: Ankle Pronation/Supination and the Effect on Tibial and Femoral
Rotation
Both feet should face forward in parallel or with slight (8 to 10 degrees) external rotation
(toes pointing outward from the midline, as the ankle joint lies in an oblique plane with the
medial malleolus slightly anterior to the lateral malleolus) (see Figure 7). The toes should
be aligned in the same direction as the feet and any excessive pronation (arch flattening) or
supination (high arches) at the subtalar joint should be noted.
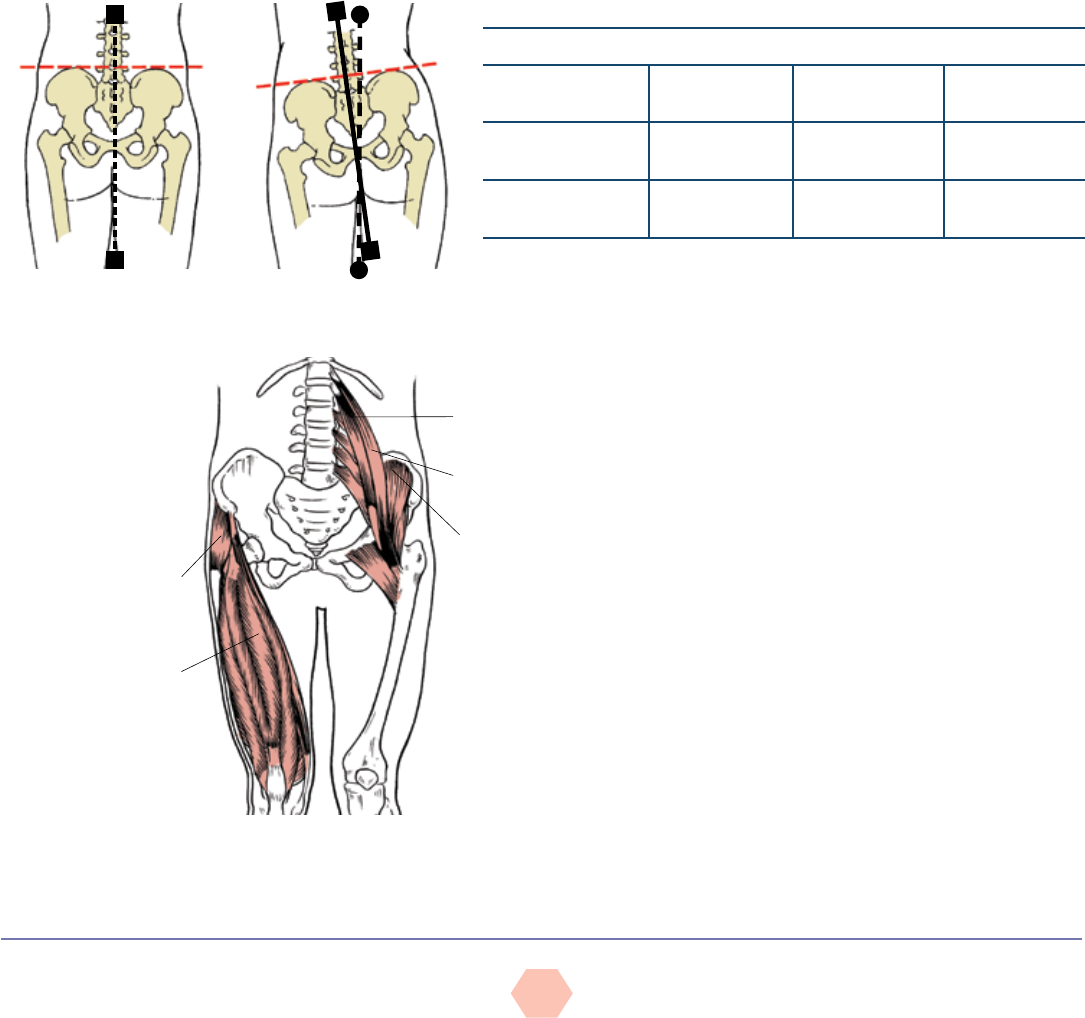
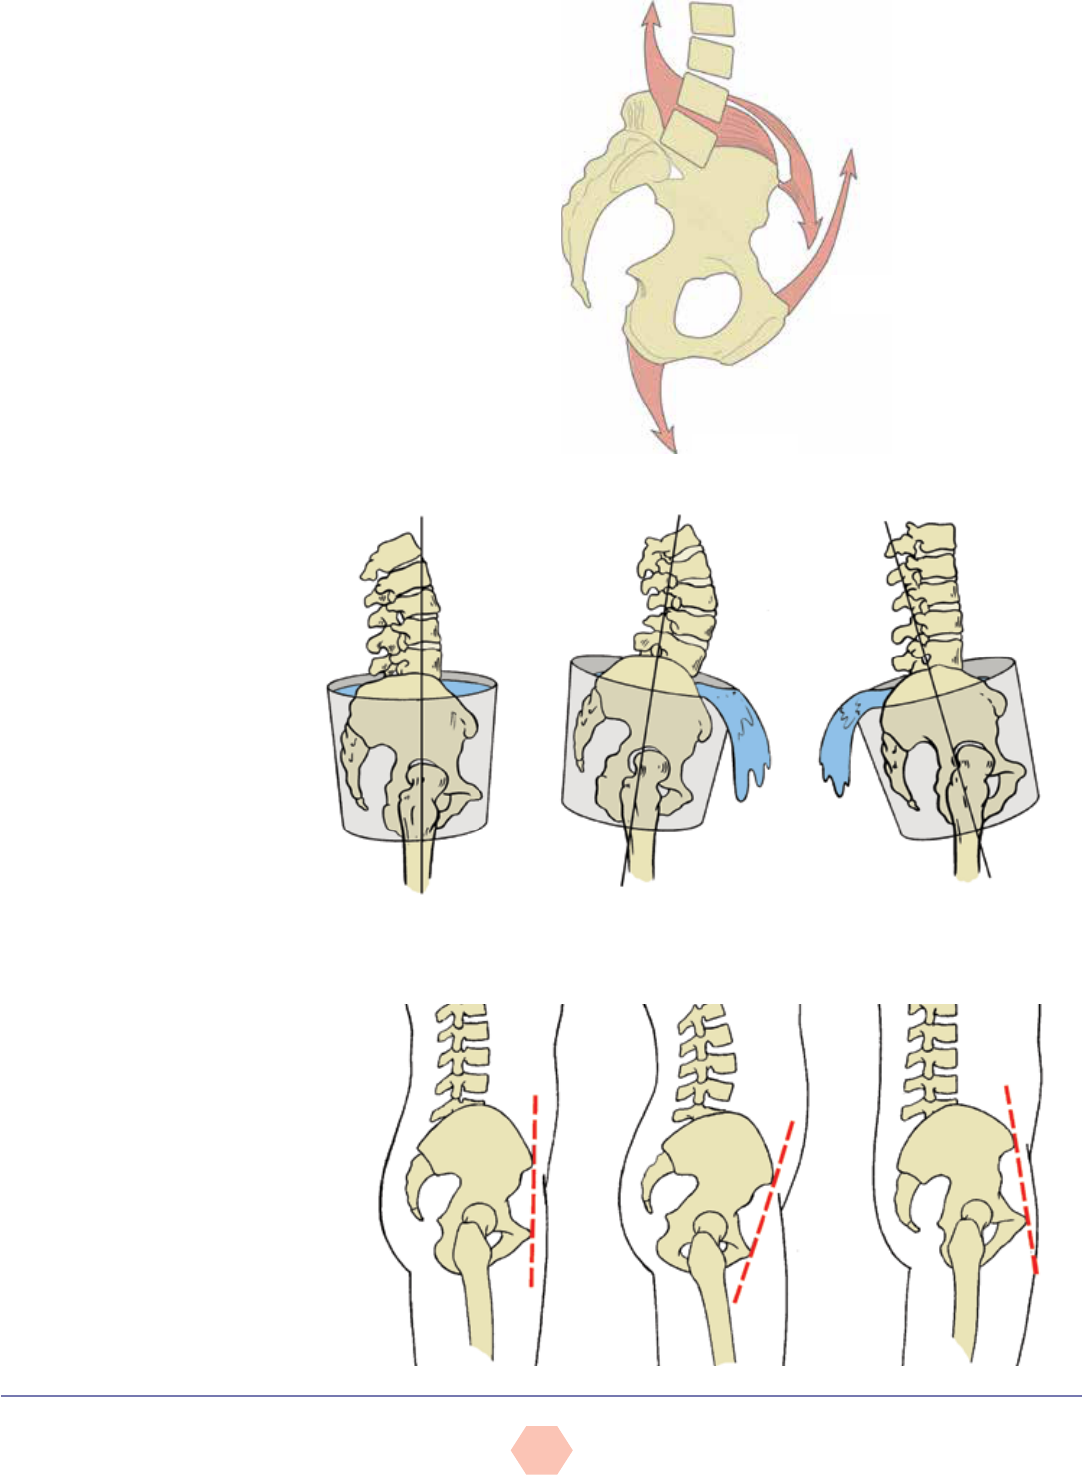
Deviation 2: Hip Adduction
In standing and in gait, hip adduction is a lateral tilt of the pelvic that elevates one
hip higher than the other (also called “hip hiking”), which may be evident in individuals
who have a limb-length discrepancy (Sahrmann, 2002). If a person raises the right hip
as illustrated in Figure 9, the line of gravity following the spine tilts over toward the left,
moving the right thigh closer to this line of gravity. Consequently, the right hip is identified
as moving into adduction. This position progressively lengthens and weakens the right hip
abductors, which are unable to hold the hip level (Table 9). Sleeping on one’s side can
produce a similar effect, as the hip abductors of the upper hip fail to hold the hip level.
Figure 9
Normal hip position
versus right hip
adduction (posterior view)
Source: LifeART image
copyright 2008 Wolters
Kluwer Health, Inc.,
Lippincott Williams
& Wilkins. All rights
reserved.
Table 9
Hip Adduction
Observation Position
Plumb Line
Alignment
Plane of View
Right hip adduction
Elevated
(vs. left side)
Hips usually
shifted right
View from front
Left hip adduction
Elevated
(vs. right side)
Hips usually
shifted left
View from front
Deviation 3: Pelvic Tilting (Anterior or Posterior)
Anterior tilting of the pelvis frequently occurs in
individuals with tight hip flexors, which is generally
associated with sedentary lifestyles where individuals
spend countless hours in seated (i.e., shortened hip
flexor) positions (Kendall et al., 2005) (Figure 10). With
standing, this shortened hip flexor pulls the pelvis into
an anterior tilt (i.e., the superior, anterior portion of the
pelvis rotates downward and forward) (Figure 11). As
illustrated in Figure 12, an anterior pelvic tilt rotates
the superior, anterior portion of the pelvis forward and
downward, spilling water out of the front of the bucket,
whereas a posterior tilt rotates the superior, posterior
portion of the pelvis backward and downward, spilling
water out of the back of the bucket. Figure 13 illustrates
the alignment of the anterior superior iliac spine and
posterior superior iliac spine in neutral alignment, as
well in anterior and posterior pelvic tilts.
Psoas minor
Psoas major
Iliacus
Figure 10
Anterior musculature
of the hip and knee,
prime movers for
hip flexion (iliacus,
psoas major and
minor) and knee
extension
Tensor
fasciae
latae
Rectus
femoris
AMERICAN COUCIL ON EXERCISE © All Rights Reserved
ACE Group FitnEss instruCtor FitnEss AssEssmEnt protoCols
13
Figure 11
Muscular control of the pelvis
by the abdominals and hip
flexors (iliopsoas and rectus
femoris) anteriorly and the spinal
extensors (erector spinae) and
hamstrings posteriorly
Rectus
abdominis
Hip
flexors
Hamstrings
Erector spinae
Anterior
surface of
the pelvis
Posterior
surface of
the pelvis
Figure 12
Anterior and posterior
tilting of the pelvis—
sagittal (side) view
Back Front Back Front Back Front
Neutral pelvic position
Posterior pelvic tilt
Anterior pelvic tilt
Figure 13
Alignment of the
ASIS and pubic bone
Source: LifeART
image copyright
2008 Wolters
Kluwer Health, Inc.,
Lippincott Williams
& Wilkins. All rights
reserved.
AMERICAN COUCIL ON EXERCISE © All Rights Reserved
ACE Group FitnEss instruCtor FitnEss AssEssmEnt protoCols
14
Tight or overdominant hip flexors are generally coupled with tight erector spinae muscles
(Figure 14), producing an anterior pelvic tilt, while tight or overdominant rectus abdominis
muscles are generally coupled with tight hamstrings, producing a posterior pelvic tilt (Table
10). This coupling relationship between tight hip flexors and erector spinae is defined by
Vladimir Janda as lower-cross syndrome (Morris et al., 2006). With foot pronation and
accompanying internal femoral rotation, the pelvis may tilt anteriorly to better accommodate
the head of the femur, demonstrating the point of an integrated kinetic chain whereby foot
pronation can increase lumbar lordosis due to an anterior pelvic tilt (Sahrmann, 2002).
Figure 14
The erector spinae muscles and
hamstrings (posterior view)
Longissimus
Spinalis
Iliocostalis
Biceps
Femoris
Semitendinosus
Semimembranosus
Table 10
Pelvic Tilt
Observation Rotation Muscles Suspected
to Be Tight
Muscles Suspected
to Be Lengthened
Plane of View
Anterior tilt ASIS tilts
downward and
forward
Hip flexors, erector
spinae
Hamstrings, rectus
abdominis
Sagittal
Posterior tilt ASIS tilts
upward and
backward
Rectus abdominis,
hamstrings
Hip flexors, erector
spinae
Sagittal
Note: ASIS = Anterior superior iliac spine
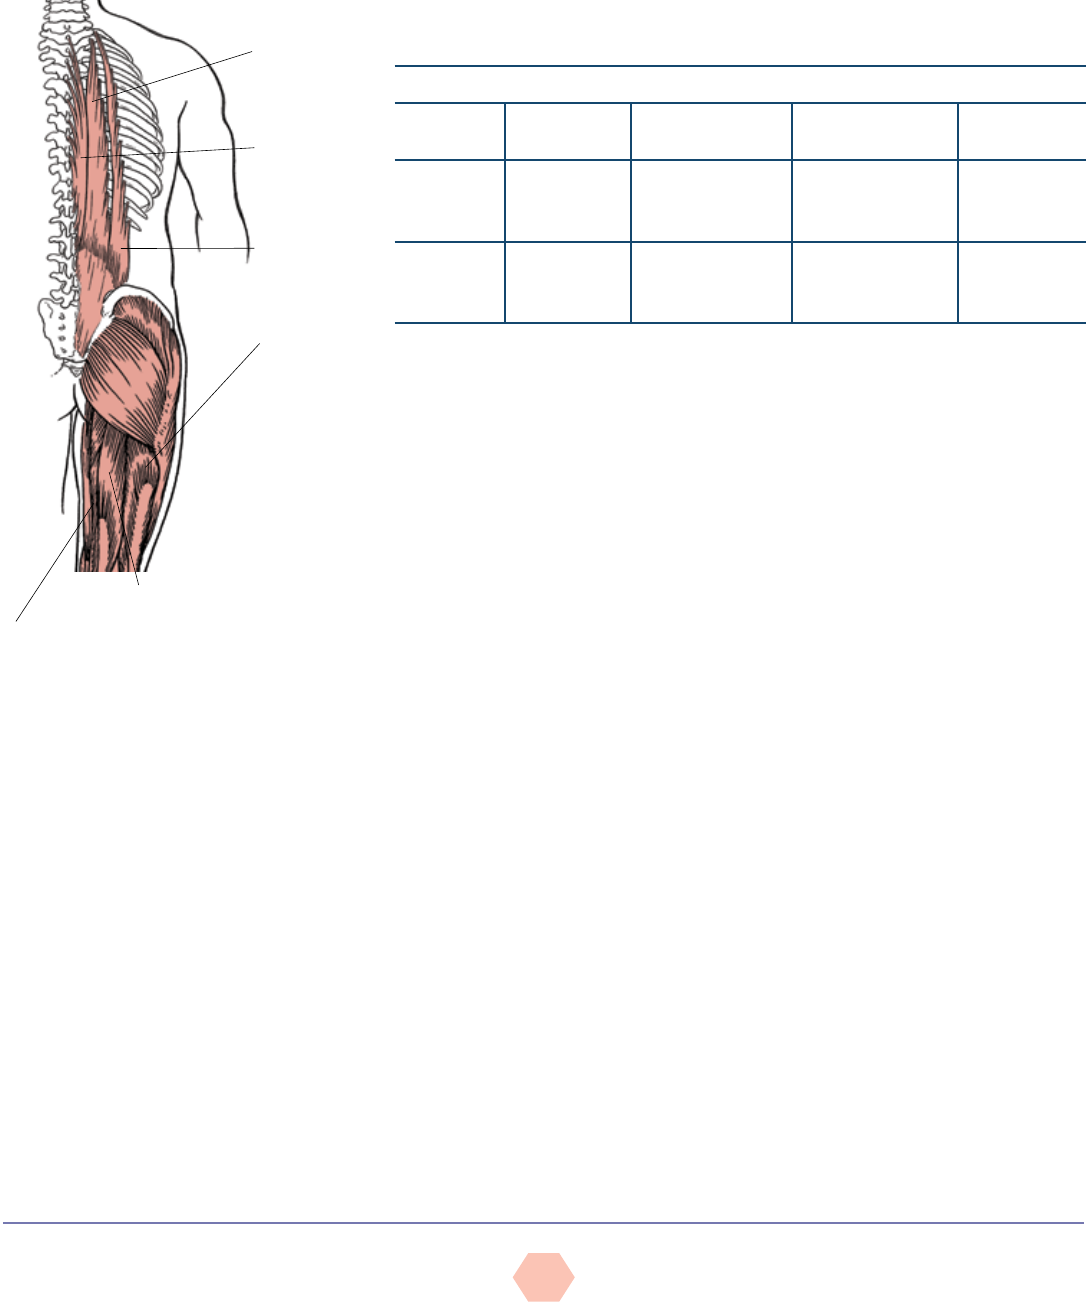
Deviation 4: Shoulder Position and the Thoracic Spine
Limitations and compensations to movement at the shoulder occur frequently due to the
complex nature of the shoulder girdle design and the varied movements performed at the
shoulder. While the glenohumeral joint is highly mobile and perhaps a less stable joint,
the scapulothoracic joint is designed to offer greater stability with less mobility. However,
it is important to remember that it still contributes approximately 60 degrees of movement
in raising the arms overhead, with the glenohumeral joint contributing the remaining 120
degrees. The scapulothoracic joint also promotes many important movements of the scapulae
(Figure 15). Collectively, however, they allow for a diverse range of movements in the shoulder
complex. Observation of the position of the scapulae in all three planes provides good insight
into a participant’s quality of movement at the shoulders.
Figure 16 illustrates the “resting” position of the scapulae, which can vary considerably from
person to person. The vertebral (medial) border of the scapula is typically positioned between
the second and seventh ribs and vertically about 3 inches (7.6 cm) from the spinous processes
(Houglum, 2010; Kendall et al., 2005). While the glenoid fossa is tilted upward 5 degrees and
anteriorly 30 degrees to optimally articulate with the head of the humerus, the scapulae usually
lie flat against the rib cage (Kendall et al., 2005). While the scapulae should appear flat against
the rib cage, their orientation depends on the size and shape of the person and the rib cage.
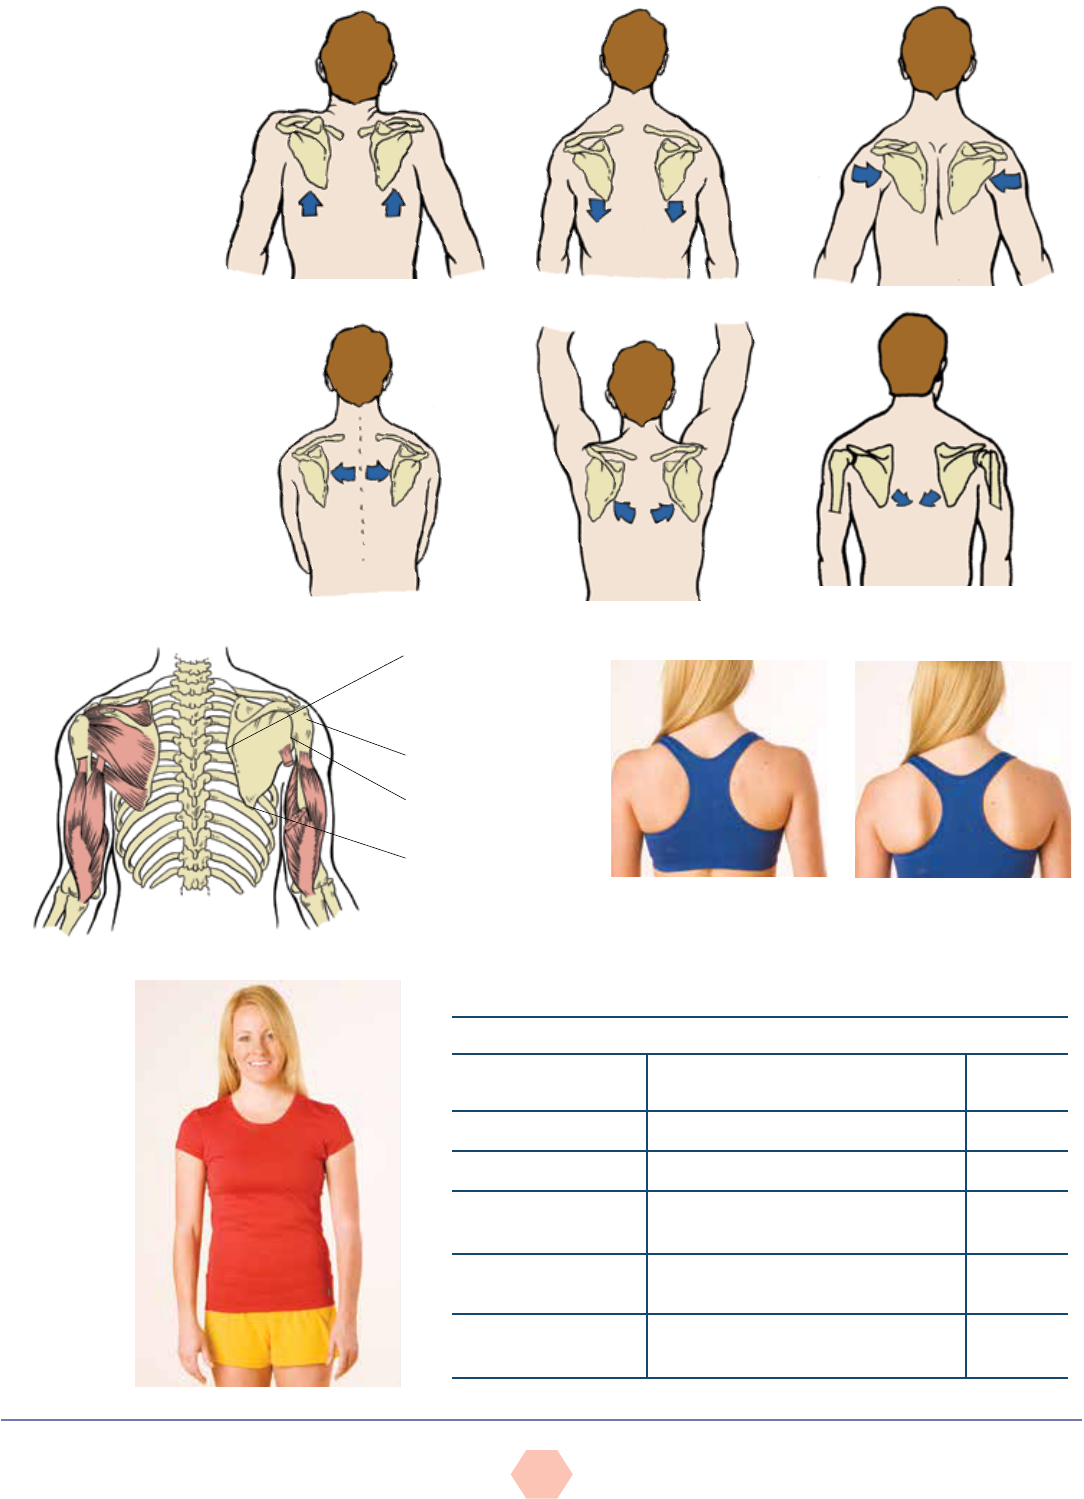
Scapular Winging and Scapular Protraction
GFIs can perform a quick observational assessment to identify scapular winging and
scapular protraction. While looking at the participant from the posterior view, if the vertebral
(medial) and/or inferior angle of the scapulae protrude outward, this indicates an inability of
the scapular stabilizers (primarily the rhomboids and serratus anterior) to hold the scapulae
in place. Noticeable protrusion of the vertebral (medial) border outward is termed “scapular
protraction” (Figure 17a), while protrusion of the inferior angle and vertebral (medial) border
outward is termed “winged scapulae” (Figure 17b).
Scapular protraction can also be identified from the anterior view. If the palms face backward
instead of to the sides, this generally indicates internal (medial) rotation of the humerus and/
or scapular protraction (Figure 18). Table 11 lists key deviations of the thoracic spine and
shoulders in various planes of view.
AMERICAN COUCIL ON EXERCISE © All Rights Reserved
ACE Group FitnEss instruCtor FitnEss AssEssmEnt protoCols
15
Elevation
Depression
Adduction (retraction)
Downward rotation (return to
anatomical position)
Upward rotationAbduction (protraction)
Figure 15
Scapular
movements
Figure 16
The normal
position of the
scapulae
Medial border of the
scapula
Head of the humerus
Glenoid fossa
Inferior angle of the
scapula
Figure 17
Scapular protraction and winging: Posterior view
Figure 18
Scapular
protraction:
Anterior view
Table 11
Shoulder Position
Observation Muscles Suspected to Be Tight
Plane of
View
Shoulders not level Upper trapezius, levator scapula, rhomboids Frontal
Asymmetry to midline Lateral trunk flexors (flexed side) Frontal
Protracted
(forward, rounded)
Serratus anterior*, anterior scapulo-
humeral muscles, upper trapezius
Sagittal
Medially rotated
humerus
Pectoralis major, latissimus dorsi,
subscapularis
Frontal
Kyphosis and depressed
chest
Shoulder adductors, pectoralis minor,
rectus abdominis, internal oblique
Sagittal
*Serratus anterior is usually tight with scapular protraction and is usually lengthened with scapular winging.
a. Scapular protraction b. Scapular winging
AMERICAN COUCIL ON EXERCISE © All Rights Reserved
ACE Group FitnEss instruCtor FitnEss AssEssmEnt protoCols
16
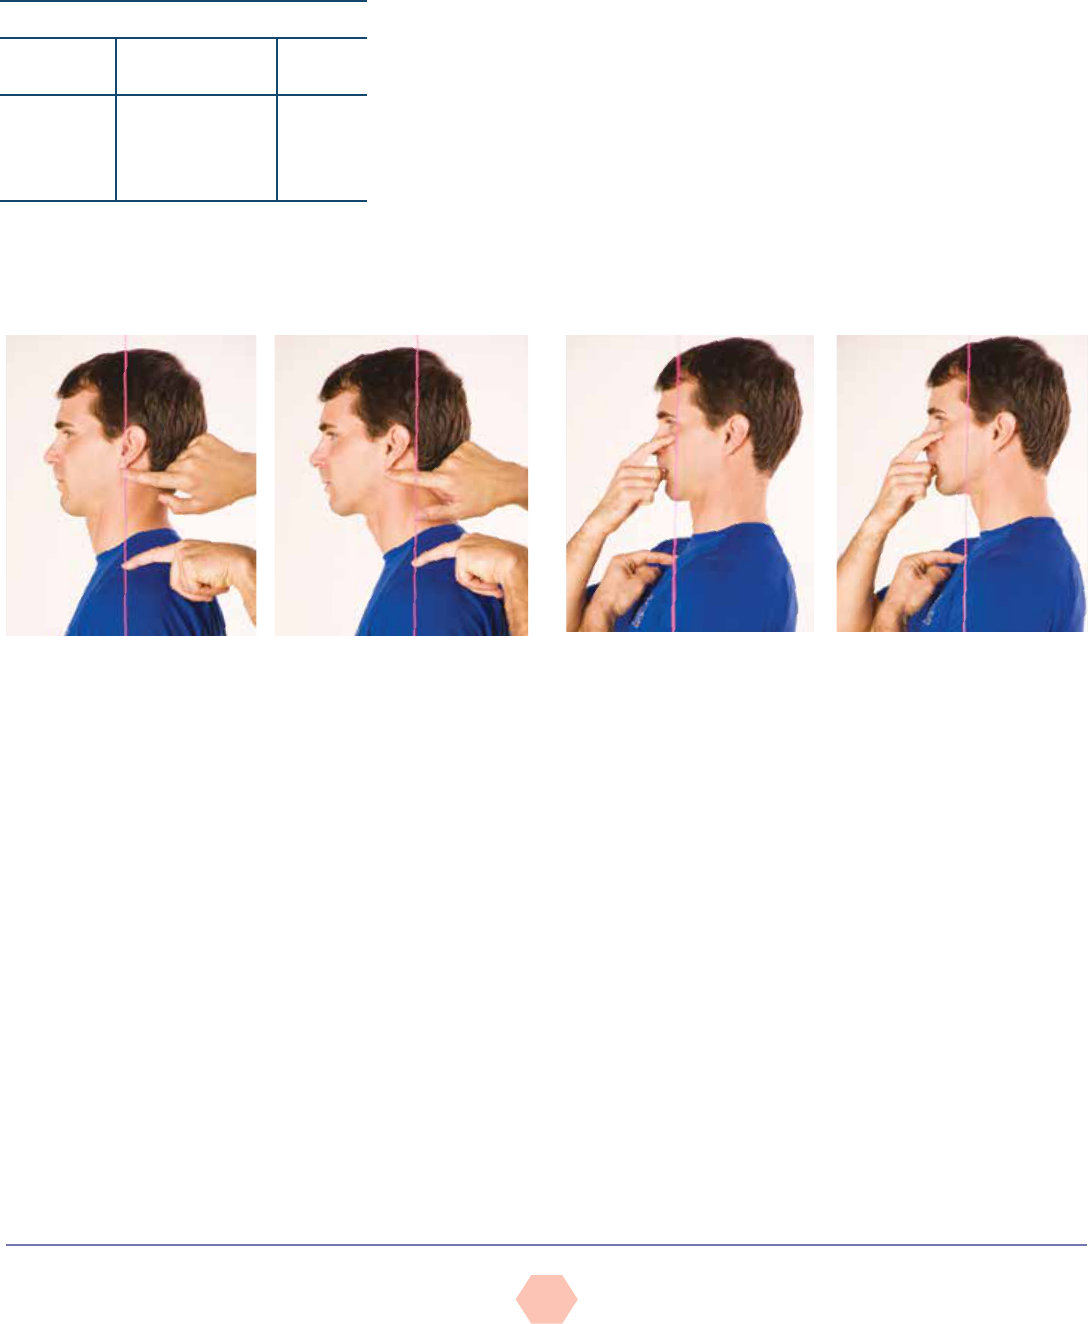
DEVIATION 5: HEAD POSITION
With good posture, the earlobe should align approximately over the acromion process,
but given the many awkward postures and repetitive motions of daily life, a forward-head
position is very common (Table 12) (Kendall et al., 2005). This altered position does not
tilt the head downward, but simply shifts it forward so that the earlobe appears significantly
forward of the acromioclavicular (AC) joint. To observe the presence of this
imbalance, use the sagittal view, aligning the plumb line with the AC joint, and
observe its position relative to the ear (Figure 19) (Price, 2010). A forward-head
position represents tightness in the cervical extensors and lengthening of the
cervical flexors. To demonstrate this point, an instructor can place one thumb on
his or her manubrium (top of the sternum) and the index finger of the same hand
on the chin. Slowly slide the head forward and observe how the spacing between
the fingers increases, representing the change in muscle length. An alternative
option for observing forward-head position is via the alignment of the cheek
bone and the collarbone. With good posture, they should almost be in vertical
alignment with each other. To demonstrate this point, have a participant place one finger on
his or her collar bone (aligned under the cheek) and place another finger on the cheek bone
(aligned under the eye) as illustrated in Figure 20 (Price, 2010). From the sagittal plane,
the instructor can observe the vertical alignment of the two fingers.
Table 12
Head Position
Observation
Muscles Suspected
to Be Tight
Plane
of View
Forward-
head position
Cervical spine
extensors, upper
trapezius, levator
scapulae
Sagittal
Figure 19
Alignment of the acromioclavicular joint with the ear
Good posture Forward-head position
Figure 20
Alignment of the collar bone and cheek bone
Good posture Forward-head position
Postural Assessment Checklist and Worksheets
When performing basic postural assessments, GFIs can use the checklist provided in Figure
21 to guide themselves through their observations, and complete the worksheets provided in
Figures 22 and 23 to mark any postural compensations they identify.
MOVEMENT SCREENS
Observing active movement is an effective method to determine the contribution that muscle
imbalances and poor posture have on neural control, and also helps identify movement
compensations (Whiting & Rugg, 2012; Sahrmann, 2002). When compensations occur during
movement, it is usually indicative of some form of altered neural action, commonly referred to
as “faulty neural control,” which normally manifests due to muscle tightness or an imbalance
between muscles acting at the joint.
Movement can essentially be broken down and described by five primary movements that
people perform during many daily activities (Cook, 2010):
• Bending/raising and lifting/lowering movements (e.g., squatting)
• Single-leg movements
• Pushing movements (in vertical/horizontal planes) and resultant movement
• Pulling movements (in vertical/horizontal planes) and resultant movement
• Rotational movements

AMERICAN COUCIL ON EXERCISE © All Rights Reserved
ACE Group FitnEss instruCtor FitnEss AssEssmEnt protoCols
17
Figure 21
Postural assessment checklist
FRONTAL VIEW
¨
¨
¨
¨
¨
¨
¨
¨
¨
¨
¨
Overall body symmetry: symmetrical alignment of the left and right hemispheres
Ankle position: observe for pronation and supination
Foot position: observe for inversion and eversion
Knees: rotation and height discrepancies
Hip adduction and shifting: observe for shifting to a side as witnessed by the position of the pubis in relation to the
plumb line
Alignment of the iliac crests
Alignment of the torso: position of the umbilicus and sternum in relation to the plumb line
Alignment of the shoulders
Arm spacing: observe the space to the sides of the torso
Hand position: observe the position relative to the torso
Head position: alignment of the ears, nose, eyes, and chin
POSTERIOR VIEW
¨
¨
¨
¨
¨
Overall body symmetry: symmetrical alignment of the left and right hemispheres
Alignment of the spine: vertical alignment of the spinous processes (may require forward bending)
Alignment of the scapulae: inferior angle of scapulae and presence of winged scapulae
Alignment of the shoulders
Head: alignment of the ears
SAGITTAL VIEW
¨
¨
¨
¨
¨
¨
Overall body symmetry: symmetrical alignment of load-bearing joint landmarks with the plumb line
Knees: flexion or extension
Pelvic alignment for tilting: relationship of ASIS to PSIS
Spinal curves: observe for thoracic kyphosis, lumbar lordosis, or flat-back position
Shoulder position: forward rounding (protraction) of the scapulae
Head position: neutral cervical curvature (versus forward position) and level (position above the clavicle)
Note: ASIS = Anterior superior iliac spine; PSIS = Posterior superior iliac spine
AMERICAN COUCIL ON EXERCISE © All Rights Reserved
ACE Group FitnEss instruCtor FitnEss AssEssmEnt protoCols
18
Figure 22
Anterior/posterior worksheet
ANTERIOR VIEW: POSTERIOR VIEW:
L R
DEVIATION
L R
DEVIATION
¨ ¨
1.
¨ ¨
1.
¨ ¨
2.
¨ ¨
2.
¨ ¨
3.
¨ ¨
3.
¨ ¨
4.
¨ ¨
4.
¨ ¨
5.
¨ ¨
5.
¨ ¨
6.
¨ ¨
6.
¨ ¨
7.
¨ ¨
7.
CIRCLE OR MARK OBSERVED DEVIATIONS CIRCLE OR MARK OBSERVED DEVIATIONS
AMERICAN COUCIL ON EXERCISE © All Rights Reserved
ACE Group FitnEss instruCtor FitnEss AssEssmEnt protoCols
19
Figure 23
Sagittal worksheet
SAGITTAL: LEFT SIDE SAGITTAL: RIGHT SIDE
L
DEVIATION
R
DEVIATION
¨
1.
¨
1.
¨
2.
¨
2.
¨
3.
¨
3.
¨
4.
¨
4.
¨
5.
¨
5.
¨
6.
¨
6.
¨
7.
¨
7.
CIRCLE OR MARK OBSERVED DEVIATIONS CIRCLE OR MARK OBSERVED DEVIATIONS

AMERICAN COUCIL ON EXERCISE © All Rights Reserved
ACE Group FitnEss instruCtor FitnEss AssEssmEnt protoCols
20
Activities of daily living (ADL) are essentially the integration of one or more of these primary
movements. For example, the action of picking up a child and turning to place the child
in a car seat involves a squatting movement, a rotational movement, a possible single-leg
movement if stepping is involved, a pushing movement, and finally a pulling movement to
resist the effects of gravity as the child is lowered into the seat.
Movement screens help GFIs observe the ability and efficiency with which a participant
performs many ADL. The movement screens, however, must be skill- and conditioning-level
appropriate, and be specific to the participant’s needs. It is important to remember that almost
any screen can evaluate functional capacity, as long as it is relevant to participant needs and
challenges, and provides useful feedback on movement efficiency (Sahrmann, 2002). Screens
generally challenge participants with no recognized pathologies to perform basic movements
and evaluate their ability to demonstrate appropriate levels of stability and mobility throughout
the entire kinetic chain—namely, at the feet, knees, lumbo-pelvic-hip complex, shoulders,
and head. If the participant experiences pain during a movement screen, the test should be
stopped and the participant should be referred to his or her healthcare provider to have the
painful area evaluated before performing that type of movement in a future exercise session.
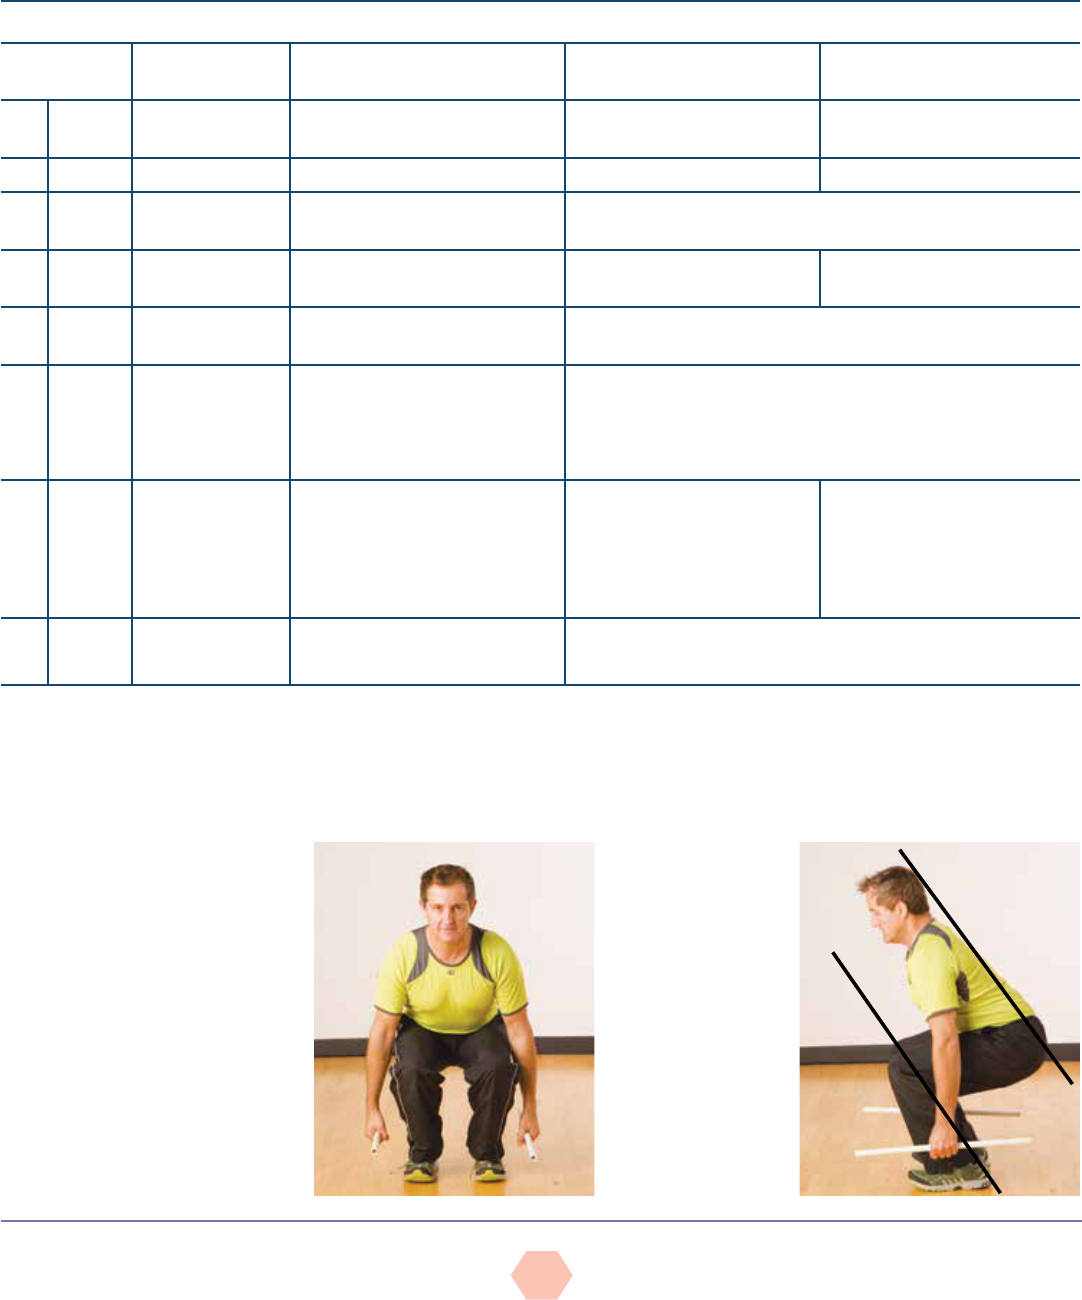
Bend and Lift Screen
Objective: To examine symmetrical lower-extremity mobility and stability, and upper-
extremity stability during a bend-and-lift movement
Equipment:
• Two 2- to 4-foot (0.6- to 1.2-m) dowels or broomsticks
Instructions:
• Briefly discuss the protocol so the participant understands what is required.
• Ask the participant to stand with the feet shoulder-width apart with the arms hanging
freely to the sides.
• Place the two dowels on the floor adjacent to the outside of each foot.
• Ask the participant to perform a series of basic bend-and-lift movements (i.e., a squatting
movement) to grasp the dowels and lift them off the floor, holding the lowered position
for one to two seconds to allow the instructor to make some brief observations before
returning to the starting position. The number of repetitions performed is determined by
the number needed to make the necessary evaluations.
üAsk the participant to pretend the dowels are 25-pound weights.
üIt is important to remember not to cue the participant to use good technique, but
instead observe his or her natural movement.
Observations (Table 13):
• Frontal view (Figure 24):
üFirst repetition: Observe the stability of the foot (i.e., evidence of pronation, supination,
eversion, or inversion).
üSecond repetition: Observe the alignment of the knees over the second toe.
üThird repetition: Observe the overall symmetry of the entire body over the base of
support (i.e., evidence of a lateral shift or rotation).
• Sagittal view (Figure 25):
üFirst repetition: Observe whether the heel remains in contact with the floor throughout
the movement.
üSecond repetition: Determine whether the participant exhibits “glute” or “quadriceps”
dominance (i.e., does he or she initiate the downward phase by driving the knees
forward or pushing the hips backward?).
üThird repetition: Observe whether the participant achieves a parallel position between
the tibia and torso in the lowered position (sometimes referred to as the “figure-4”
position), while also observing whether he or she controls the descent to avoid resting
the hamstrings against the calves.
üFourth repetition: Observe the degree of lordosis in the lumbar/thoracic spine during
the lowering movement and while the participant is in the lowered position (i.e., flat-to-
AMERICAN COUCIL ON EXERCISE © All Rights Reserved
ACE Group FitnEss instruCtor FitnEss AssEssmEnt protoCols
21
neutral or demonstrated increased lordosis) and watch for excessive thoracic extension
in the lowered position.
üFifth repetition: Observe any changes in head position during the lowering phase.
General interpretations:
• Identify origin(s) of movement limitation or compensation.
• Evaluate the impact on the entire kinetic chain.
Figure 24
Bend and lift screen:
Frontal view
Figure 25
Bend and lift screen:
Sagittal view
Table 13
Bend and Lift Screen
View Joint Location Compensation Key Suspected Compensations:
Overactive (Tight)
Key Suspected Compensations:
Underactive (Weak)
¨
Anterior Feet Lack of foot stability: Ankles
collapse inward/feet turn outward
Soleus, lateral gastrocnemius,
peroneals
Medial gastrocnemius, gracilis,
sartorius, tibialis group
¨
Anterior Knees Move inward Hip adductors, tensor fascia latae Gluteus medius and maximus
¨
Anterior Torso Lateral shift to a side Side dominance and muscle imbalance due to potential lack of
stability in the lower extremity during joint loading
¨
Sagittal Feet Unable to keep heels in contact
with the floor
Plantarflexors None
¨
Sagittal Hip and knee Initiation of movement Movement initiated at knees may indicate quadriceps and hip flexor
dominance, as well as insufficient activation of the gluteus group
¨
Sagittal Tibia and torso
relationship
Contact behind
knee
Unable to achieve parallel between
tibia and torso
Hamstrings contact back of calves
Poor mechanics, lack of dorsiflexion due to tight plantarflexors (which
normally allow the tibia to move forward)
Muscle weakness and poor mechanics, resulting in an inability to
stabilize and control the lowering phase
¨
Sagittal Lumbar and
thoracic spine
Back excessively arches
Back rounds forward
Hip flexors, back extensors,
latissimus dorsi
Latissimus dorsi, teres major,
pectoralis major and minor
Core, rectus abdominis, gluteal
group, hamstrings
Upper back extensors
¨
Sagittal Head Downward
Upward
Increased hip and trunk flexion
Compression and tightness in the cervical extensor region
Data from: Abelbeck, K.G. (2002). Biomechanical model and evaluation of a linear motion squat type exercise. Journal of Strength and Conditioning Research, 16, 516–524; Cook, G.
(2003). Athletic Body in Balance. Champaign, Ill.: Human Kinetics; Donnelly, D.V. et al. (2006). The effect of directional gaze on kinematics during the squat exercise. Journal of Strength
and Conditioning Research, 20, 145–150; Fry, A.C., Smith J.C., & Schilling, B.K. (2003). Effect of knee position on hip and knees torques during the barbell squat. Journal of Strength and
Conditioning Research, 17, 629–633; Kendall, F.P. et al. (2005). Muscles Testing and Function with Posture and Pain (5th ed.). Baltimore, Md.: Lippincott Williams & Wilkins; Sahrmann, S.A.
(2002). Diagnosis and Treatment of Movement Impairment Syndromes. St. Louis, Mo.: Mosby.

AMERICAN COUCIL ON EXERCISE © All Rights Reserved
ACE Group FitnEss instruCtor FitnEss AssEssmEnt protoCols
22
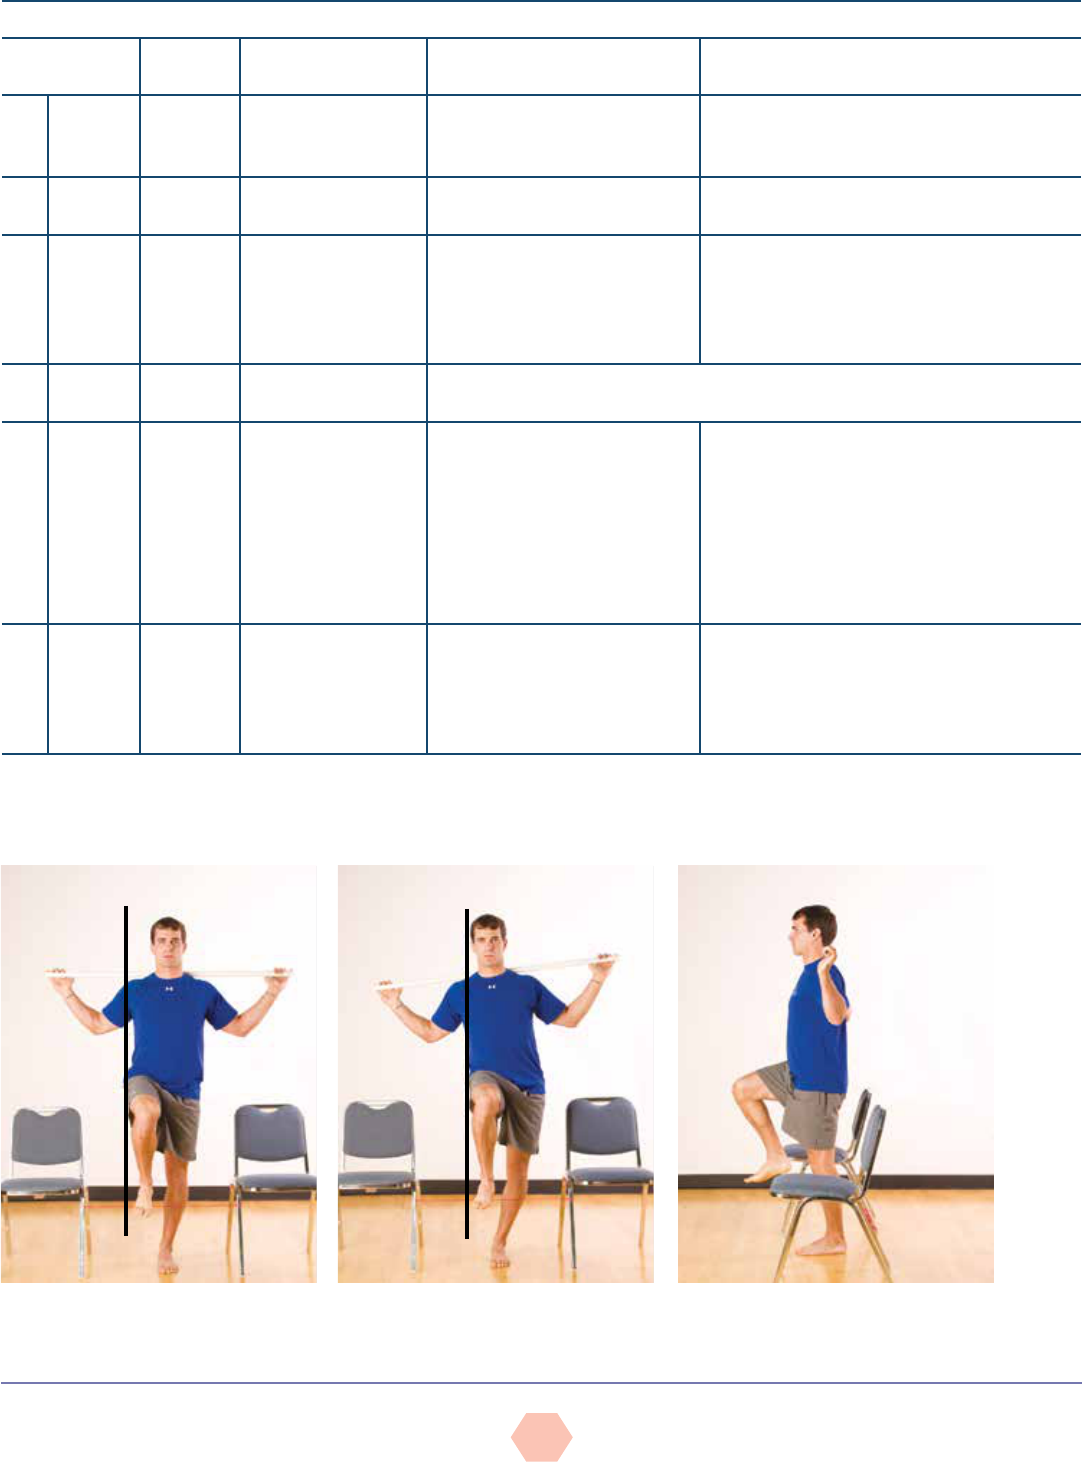
Hurdle Step Screen
Objective: To examine simultaneous mobility of one limb and stability of the contralateral
limb while maintaining both hip and torso stabilization during a balance challenge of
standing on one leg
Equipment:
•Two uprights to anchor string (chair or table legs)
•36-inch (0.9-m) piece of string
•48-inch (1.2-m) wooden or plastic dowel
Instructions:
•Briefly discuss the protocol so the participant understands what is required.
•Fasten a piece of string spanning two points at a height even with the underside of the
foot positioned parallel with the floor, when it is raised to a height that flexes the hip
to 70 degrees (approximately just above halfway up the tibia).
•Have the participant stand with both feet together and the front edge of the toes
aligned directly beneath the string.
üUltimately, this test should be performed with the feet positioned at gait-width apart
[i.e., 2.8 to 3.5 inches (7 to 9 cm)] to simulate single-leg support during walking.
•Place the dowel across the participant’s shoulders, holding it parallel to the floor
(similar to the placement of the bar during the traditional barbell squat).
•Instruct the participant to load onto one leg and slowly lift the opposite leg over the
string, flexing the hip to clear the string and then gently touching the heel of the
raised leg to the floor in front of the string before returning to the starting position.
üThe foot only needs to clear the string and does not need to be lifted as high as
possible.
üIt is important to remember not to cue the participant to use good technique,
instead observing the natural movement.
üRepetitions need to be performed slowly and with control.
•Have the participant repeat the movement with the opposite leg, completing a series of
repetitions with each leg so that the instructor can make the necessary evaluations.
•Allow sufficient practice trials to accommodate learning before administrating the test
screens.
Observations (Table 14):
•Frontal view (Figure 26):
üFirst repetition: Observe the stability of the foot (i.e., evidence of pronation,
supination, eversion, or inversion).
üSecond repetition: Observe the alignment of the stance-leg knee over the foot (i.e.,
evidence of knee movement in any plane).
üThird repetition: Watch for excessive hip adduction greater than 2 inches (5.1 cm)
as measured by excessive stance-leg adduction or downward hip-tilting toward the
opposite side (Figure 27).
üFourth repetition: Observe the stability of the torso (i.e., evidence of torso movement
in any plane as demonstrated by movement of the dowel) (see Figure 27).
üFifth repetition: Observe the alignment of the moving leg (i.e., lack of dorsiflexion
at the ankle, deviation from the sagittal plane at the knee or ankle, or hiking of the
moving hip) (see Figure 27).
•Sagittal view (Figure 28):
üFirst repetition: Observe the stability of the torso and stance leg.
üSecond repetition: Observe the mobility of the hip (i.e., allowing 70 degrees of hip
flexion without compensation—anterior tilting).
General interpretations:
•Identify the origin(s) of movement limitation or compensation.
•Evaluate the impact on the entire kinetic chain.
AMERICAN COUCIL ON EXERCISE © All Rights Reserved
ACE Group FitnEss instruCtor FitnEss AssEssmEnt protoCols
23
Figure 26
Hurdle step screen: Anterior view
Figure 27
Hurdle step screen: Anterior view with
compensations
Figure 28
Hurdle step screen: Sagittal view
Table 14
Hurdle Step Screen
View
Joint
Location
Compensation
Key Suspected Compensations:
Overactive (Tight)
Key Suspected Compensations:
Underactive (Weak)
¨
Anterior Feet Lack of foot stability:
Ankles collapse inward/
feet turn outward
Soleus, lateral gastrocnemius,
peroneals
Medial gastrocnemius, gracilis, sartorius, tibialis
group, gluteus medius and maximus—inability to
control internal rotation
¨
Anterior Knees Move inward Hip adductors, tensor fascia latae Gluteus medius and maximus
¨
Anterior Hips Hip adduction
>2 inches (5.1 cm)
Stance-leg hip rotation
(inward)
Hip adductors, tensor fascia latae
Stance-leg or raised-leg internal
rotators
Gluteus medius and maximus
Stance-leg or raised-leg external rotators
¨
Anterior Torso Lateral tilt, forward
lean, rotation
Lack of core stability
¨
Anterior Raised-leg Lack of ankle
dorsiflexion
Limb deviates from
sagittal plane
Hiking the raised hip
Ankle plantarflexors
Raised-leg hip extensors
Stance-leg hip flexors—limiting
posterior hip rotation during raise
Ankle dorsiflexors
Raised-leg hip flexors
¨
Sagittal Pelvis and
low back
Anterior tilt with
forward torso lean
Posterior tilt with
hunched-over torso
Stance-leg hip flexors
Rectus abdominis and hip
extensors
Rectus abdominis and hip extensors
Stance-leg hip flexors
*Hip adduction involves weight transference over the stance leg while preserving hip, knee, and foot alignment. This weight transference requires a 1- to 2-inch (2.5- to 5-cm) lateral shift
over the stance-leg, with a small hike in the stance-hip of 4 to 5 degrees or less.
Data from: Cook, G. (2003). Athletic Body in Balance. Champaign, Ill.: Human Kinetics; Kendall, F.P. et al. (2005). Muscles Testing and Function with Posture and Pain (5th ed.). Baltimore,
Md.: Lippincott Williams & Wilkins; Sahrmann, S.A. (2002). Diagnosis and Treatment of Movement Impairment Syndromes. St. Louis, Mo.: Mosby.
AMERICAN COUCIL ON EXERCISE © All Rights Reserved
ACE Group FitnEss instruCtor FitnEss AssEssmEnt protoCols
24
Shoulder Push Stabilization Screen
Objective: To examine stabilization of the scapulothoracic joint and core control during
closed-kinetic-chain pushing movements
Instructions:
• Briefly discuss the protocol so the participant understands what is required.
üThe participant presses his or her body off the ground as the instructor evaluates
the ability to stabilize the scapulae against the thorax (rib cage) during pushing-type
movements (Figure 29).
• Instruct the participant to lie prone on the floor with arms abducted in the push-up
position or bent-knee push-up position.
• Ask the participant to perform several push-ups to full arm extension.
üSubjects should perform full push-ups; modify to bent-knee push-ups if necessary.
üIt is important to remember not to cue the participant to use good technique, but
instead observe his or her natural movement.
üRepetitions need to be performed slowly and with control.
Observations (Table 15):
• Observe any notable changes in the position of the scapulae relative to the rib cage at
both end-ranges of motion (i.e., the appearance of scapular “winging”) (Figure 30).
• Observe for lumbar hyperextension in the press position.
General interpretations:
• Identify the origin(s) of movement limitation or compensation.
• Evaluate the impact on the entire kinetic chain.
Figure 29
Shoulder push stabilization screen
Figure 30
Shoulder push stabilization
screen with scapular winging
Table 15
Shoulder Push Stabilization Screen
View Joint Location Compensation Key Suspected Compensations
¨
Sagittal Scapulothoracic Exhibits
“winging”
during the
push-up
movement
Inability of the parascapular muscles (i.e., serratus
anterior, trapezius, levator scapula, rhomboids) to
stabilize the scapulae against the rib cage. Can also
be due to a flat thoracic spine.
¨
Sagittal Trunk Hyperextension
or “collapsing”
of the low back
Lack of core, abdominal, and low-back strength,
resulting in instability
Data from: Sahrmann, S.A. (2002). Diagnosis and Treatment of Movement Impairment Syndromes. St. Louis, Mo.: Mosby; Kendall, F.P. et al. (2005).
Muscles Testing and Function with Posture and Pain (5th ed.). Baltimore, Md.: Lippincott Williams & Wilkins.
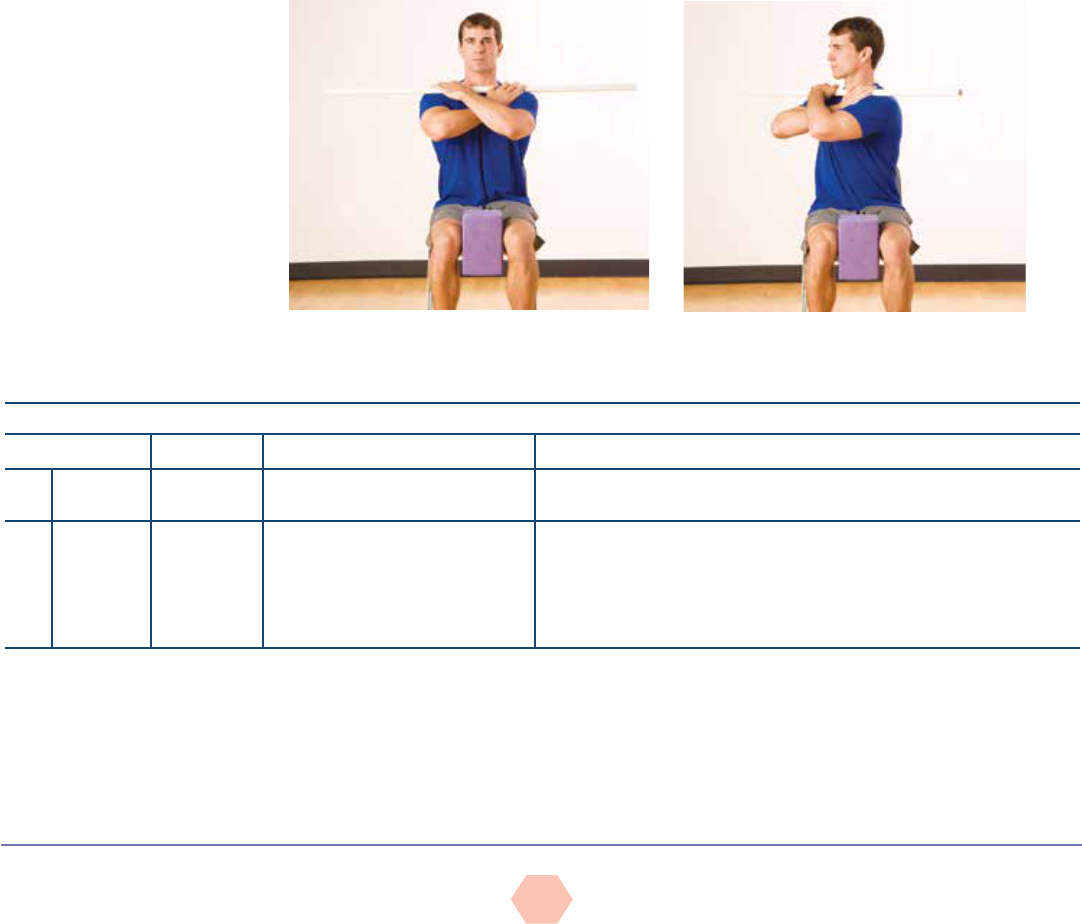
Thoracic Spine Mobility Screen
Objective: To examine bilateral mobility of the thoracic spine. Lumbar spine rotation is
considered insignificant, as it only offers approximately 15 degrees of rotation.
Equipment:
• Chair
• Squeezable ball or block
• 48-inch (1.2-m) dowel
Instructions:
• Briefly discuss the protocol so the participant understands what is required.
•Instruct the participant to sit upright toward the front edge of the seat with the feet
together and firmly placed on the floor. The participant’s back should not touch the
backrest.
•Place a squeezable ball or block between the knees and a dowel across the front
of the shoulders, instructing the participant to hold the bar in the hands (i.e., front
barbell squat grip) (Figure 31).
AMERICAN COUCIL ON EXERCISE © All Rights Reserved
ACE Group FitnEss instruCtor FitnEss AssEssmEnt protoCols
25
• While maintaining an upright and straight posture, the participant squeezes the block to
immobilize the hips and gently rotates left and right to an end-range of motion without any
bouncing (Figure 32).
üIt is important to remember not to cue the participant to use good technique, but
instead observe his or her natural movement.
üAsk the participant to perform a few repetitions in each direction, slowly and with
control.
Observation (Table 16):
• Observe any bilateral discrepancies between the rotations in each direction.
General interpretations:
• Identify the origin(s) of movement limitation or compensation. As an individual rotates,
the facet joints of each vertebra experience shearing forces against each other. One way
to reduce this force and promote greater movement is to laterally flex the trunk during the
movement or at the end-range of movement. This screen evaluates trunk rotation in the
transverse plane. Therefore, any lateral flexion of the trunk (dowel tilting up or down) must
be avoided.
• Evaluate the impact on the entire kinetic chain. Remember that the lumbar spine
generally exhibits limited rotation of approximately 15 degrees (Sahrmann, 2002), with
the balance of trunk rotation occurring through the thoracic spine. If thoracic spine
mobility is limited, the body strives to gain movement in alternative planes within the
lumbar spine (e.g., increase in lordosis to promote greater rotation).
Figure 32
Thoracic spine mobility screen: End position
Figure 31
Thoracic spine mobility screen: Starting position
Table 16
Thoracic Spine Mobility Screen
View Joint Location Compensation Possible Biomechanical Problems
¨
Transverse Trunk None if trunk rotation achieves
45 degrees in each direction
¨
Transverse Trunk Bilateral discrepancy (Assuming
no existing congenital issues in
the spine)
Side-dominance
Differences in paraspinal development
Torso rotation, perhaps associated with some hip rotation
Note: Lack of thoracic mobility will negatively impact glenohumeral mobility
Data from: Sahrmann, S.A. (2002). Diagnosis and Treatment of Movement Impairment Syndromes. St. Louis, Mo.: Mosby.

AMERICAN COUCIL ON EXERCISE © All Rights Reserved
ACE Group FitnEss instruCtor FitnEss AssEssmEnt protoCols
26
BALANCE AND THE CORE
Given the importance of balance and the condition of the core musculature to fitness
and overall quality of life, these baseline assessments should be collected to evaluate the
need for comprehensive balance training and core conditioning during the early stages of
a conditioning program. While dynamic balance correlates more closely with people’s daily
activities, these tests are generally movement-specific and quite complex. Consequently, GFIs
should aim to first evaluate the basic level of static balance that a participant exhibits by
using the sharpened Romberg test or the stork-stand test. Figure 33 can be used to record the
participant’s performance on the balance and core assessments presented here.
Figure 34
Sharpened Romberg test
Balance Worksheet
Balance Right Leg Left Leg Difference
Sharpened Romberg test ______ seconds ______ seconds ______ seconds
Stork-stand balance test
______ seconds ______ seconds ______ seconds
Sharpened Romberg Test
Sources: Black et al., 1982; Newton, 1989
Objective: To assess static balance by standing with a reduced base of support while
removing visual sensory information
Equipment:
• Flat, non-slip surface
• Stopwatch
Instructions:
• Explain the purpose of the test.
• Instruct the participant to remove his or her shoes and stand with one foot directly in front
of the other (tandem or heel-to-toe position), with the eyes open.
• Ask the participant to fold his or her arms across the chest, touching each hand to the
opposite shoulder (Figure 34).
• Allow sufficient practice trials. Once the participant feels stable, instruct him or her to
close his or her eyes. Start the stopwatch to begin the test.
• Always stand in close proximity as a precaution to prevent falling.
• Continue the test for 60 seconds or until the participant exhibits any test-termination cue,
as listed in the Observations section.
• Allow up to two trials per leg position and record the best performance on each side.
Observations:
• Continue to time the participant’s performance until one of the following occurs:
üThe participant loses postural control and balance.
üThe participant’s feet move on the floor.
üThe participant’s eyes open.
üThe participant’s arms move from the folded position.
üThe participant exceeds 60 seconds with good postural control.
General interpretations:
• The participant needs to maintain his or her balance with good postural control (without
excessive swaying) and not exhibit any of the test-termination criteria for 30 or more
seconds.
• The inability to reach 30 seconds is indicative of inadequate static balance and postural
control.
Figure 33
Balance worksheet
AMERICAN COUCIL ON EXERCISE © All Rights Reserved
ACE Group FitnEss instruCtor FitnEss AssEssmEnt protoCols
27
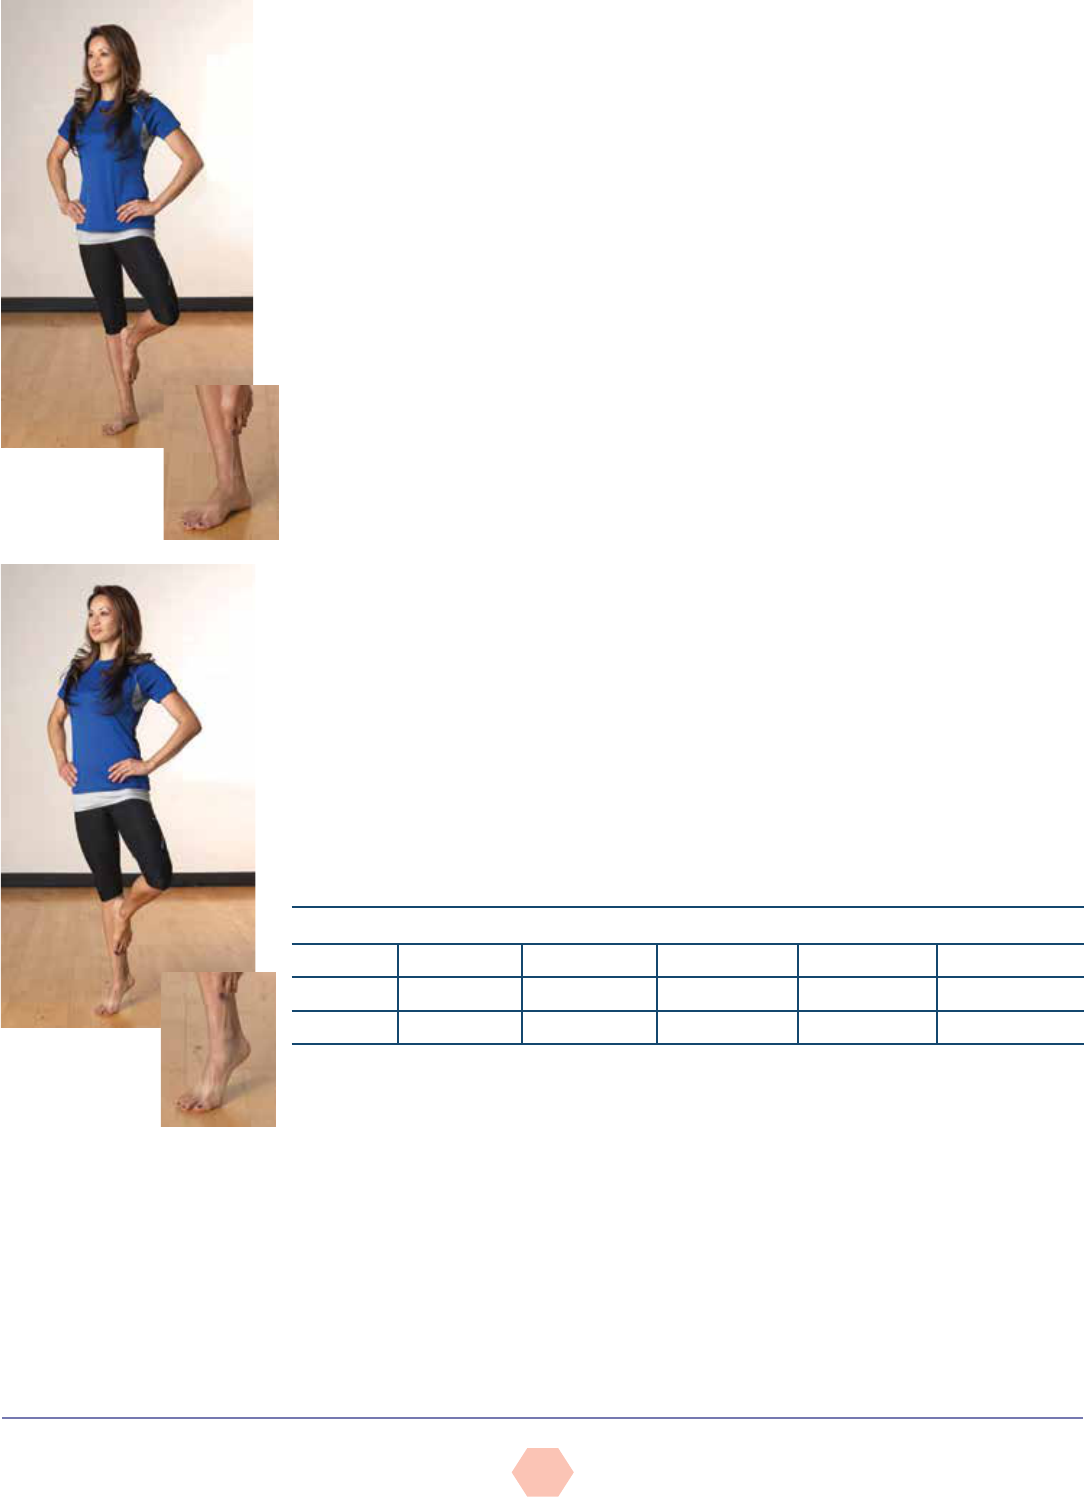
Stork-stand Balance Test
Source: Johnson & Nelson, 1986
Objective: To assess static balance by standing on one foot in a modified stork-stand
position. This is a more challenging variation of the blind stork-stand test, where the stance
foot remains flat on the floor, but the test is conducted with the eyes closed.
Equipment:
• Flat, non-slip surface
• Stopwatch
Instructions:
• Explain the purpose of the test.
•Ask the participant to remove his or her shoes and stand with feet together, hands on
the hips.
• Instruct the participant to raise one foot off the ground and bring that foot to lightly touch
the inside of the stance leg, just below the knee (Figure 35).
üThe participant must raise the heel of the stance foot off the floor and balance on the
ball of the foot (Figure 36).
üStand behind the participant for support if needed.
üAllow 1 minute of practice trials.
üAfter the practice trial, perform the test, starting the stopwatch as the heel lifts off the
floor.
üThe test is performed with the eyes open.
• Repeat with the opposite leg.
• Allow up to three trials per leg position and record the best performance on each side.
Observations:
• Timing stops when any of the following occurs:
üThe hand(s) come off the hips.
üThe stance or supporting foot inverts, everts, or moves in any direction.
üAny part of the elevated foot loses contact with the stance leg.
üThe heel of the stance leg touches the floor.
üThe participant loses balance.
General interpretation:
• Use the information provided in Table 17 to categorize the participant’s performance
Figure 35
Stork-stand
balance test:
Starting position
Figure 36
Stork-stand
balance test:
Test position
Table 17
The Stork-stand Balance Test
Rating Excellent Good Average Fair Poor
Males >50 seconds 41–50 seconds 31–40 seconds 20–30 seconds <20 seconds
Females >30 seconds 25–30 seconds 16–24 seconds 10–15 seconds <10 seconds
Data from: Johnson B.L. & Nelson, J.K. (1986). Practical Measurements for Evaluation in Physical Education (4th ed.). Minneapolis, Minn.:
Burgess.

AMERICAN COUCIL ON EXERCISE © All Rights Reserved
ACE Group FitnEss instruCtor FitnEss AssEssmEnt protoCols
28
Figure 37
Worksheet for
conducting
flexibility
assessments
SIT-AND-REACH TEST
Distance reached:___________________________________ Additional notes:__________________________________
THOMAS TEST
Left hip: Normal q Tight q Right hip: Normal q Tight q
Additional notes:___________________________________ Additional notes:__________________________________
PASSIVE STRAIGHT-LEG RAISE
Left Hamstrings: Normal q Tight q Right Hamstrings: Normal q Tight q
Additional notes:___________________________________ Additional notes:__________________________________
SHOULDER FLEXION
Left shoulder: Normal q Tight q Right shoulder: Normal q Tight q
Additional notes:___________________________________ Additional notes:__________________________________
SHOULDER EXTENSION
Left shoulder: Normal q Tight q Right shoulder: Normal q Tight q
Additional notes:___________________________________ Additional notes:__________________________________
INTERNAL ROTATION
Left shoulder: Normal q Tight q Right shoulder: Normal q Tight q
Additional notes:___________________________________ Additional notes:__________________________________
EXTERNAL ROTATION
Left shoulder: Normal q Tight q Right shoulder: Normal q Tight q
Additional notes:___________________________________ Additional notes:__________________________________
APLEY’S SCRATCH TEST
Left reach-under: Normal q Tight q Right reach-under: Normal q Tight q
Additional notes:___________________________________ Additional notes:__________________________________
Left reach-over: Normal q Tight q Right reach-over: Normal q Tight q
Additional notes:___________________________________ Additional notes:__________________________________
FLEXIBILITY AND MUSCLE-LENGTH TESTING
Evaluating participants’ ranges of motion using flexibility tests is a great way to determine
areas of the body that may need an emphasis on stretching. Stiff, inflexible muscles and
joints pose a risk for injury and may adversely affect the performance of the simplest
tasks. During the initial assessments of posture and movement, a GFI may opt to assess
the flexibility of specific muscle groups that he or she suspects demonstrate tightness
or limitations to movement. Figure 37 can be used to keep records when conducting the
flexibility assessments presented in this section.

AMERICAN COUCIL ON EXERCISE © All Rights Reserved
ACE Group FitnEss instruCtor FitnEss AssEssmEnt protoCols
29
MEN
Ages 18–25 26–35 36–45 46–55 56–65 >65
% Rating
90 22 21 21 19 17 17
80 20 19 19 17 15 15
70 19 17 17 15 13 13
60 18 17 16 14 13 12
50 17 15 15 13 11 10
40 15 14 13 11 9 9
30 14 13 13 10 9 8
20 13 11 11 9 7 7
10 11 9 7 6 5 4
Figure 38
Sit-and-reach
flexibility test
WOMEN
Ages 18–25 26–35 36–45 46–55 56–65 >65
% Rating
90 24 23 22 21 20 20
80 22 21 21 20 19 18
70 21 20 19 18 17 17
60 20 20 18 17 16 17
50 19 19 17 16 15 15
40 18 17 16 14 14 14
30 17 16 15 14 13 13
20 16 15 14 12 11 11
10 14 13 12 10 9 9
Table 18
Norms for Trunk-Flexibility Test Fitness Categories (inches)
The following may be used as descriptors for the percentile rankings: Well above average (90), above average (70), average (50), below average (30), and well below average (10).
Sit-and-Reach Test
The sit-and-reach test is used to assess low-back and hip-joint flexibility. Due to the
possibility of injury to the low back and hamstrings, participants should refrain from fast,
jerky movements during this assessment. Instead, they should perform the test trials slowly
and with control. Participants with a history of low-back dysfunction and/or pain should avoid
performing this test.
Equipment:
• Exercise mat
• Tape
• Yardstick
Procedure:
• Participants should perform a light warm-up prior to testing. However, if this test follows
a cardiorespiratory-fitness test, participants may proceed without a warm-up. Additional
light stretching of the low back and hamstrings (e.g., modified hurdler stretch) is
recommended before test administration.
• Place a yardstick on the floor and put a piece of tape at least 12 inches long on the
15-inch mark on the yardstick.
• Review and demonstrate the proper execution of the test. With the shoes off, sit on the
floor with the yardstick parallel between extended legs. The zero mark of the yardstick
should be toward the body.
• The feet should be placed approximately 12 inches apart with the heels aligned with the
tape at the 15-inch mark.
•Extendthearmsinfrontofthechestandplaceonehandontopoftheother,with
fingertips aligned. Inhale in the upright position and exhale while leaning forward,
dropping the head toward or between the arms. The fingers should maintain contact with
the yardstick and knees should remain in full extension (Figure 38).
•Instructparticipantstobeginthetestbyslowlyreaching
forward with both hands as far as possible, holding this
position for approximately two seconds. Remind them to
keep their hands parallel and not to lead with one hand.
The score is the farthest point on the yardstick reached after
three trials (Table 18).
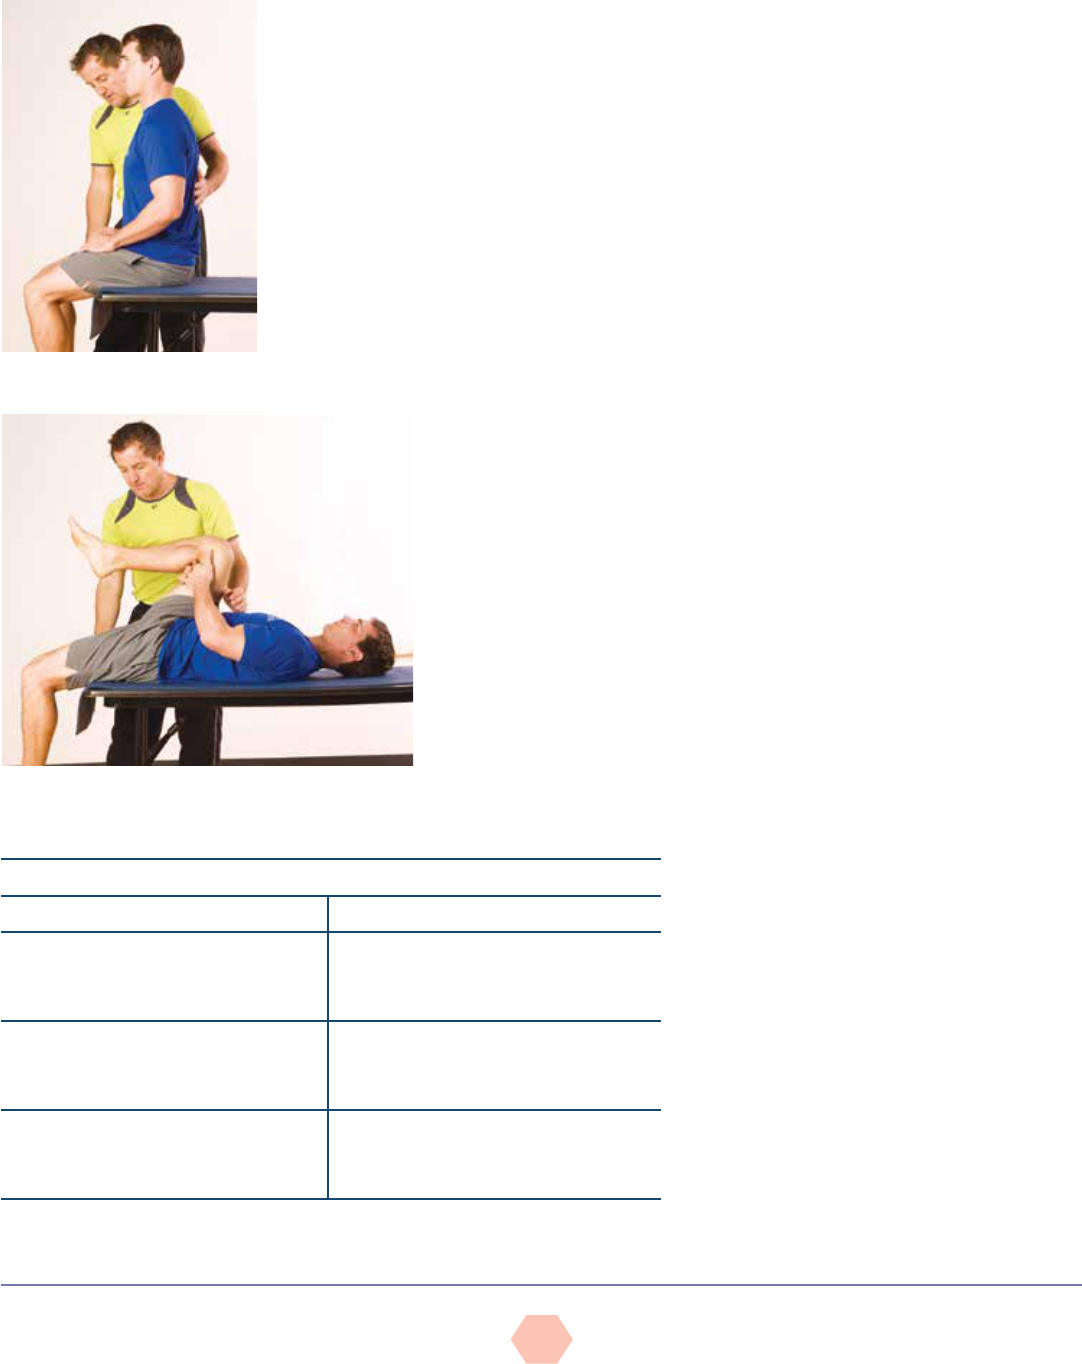
AMERICAN COUCIL ON EXERCISE © All Rights Reserved
ACE Group FitnEss instruCtor FitnEss AssEssmEnt protoCols
30
Group fitness instructors should be aware of the limitations associated with the sit-and-
reach test. First, variations in arm, leg, and trunk length can make comparisons between
individuals—such as when comparing participants’ scores to those listed in the norm tables—
misleading. That is, participants with long arms and/or short legs will get a better result, while
those with short arms and/or long legs will be at a disadvantage. Second, as noted earlier,
individuals with a history of low-back pain should avoid this test due to the end ranges of
motion required in hip and spine flexion to perform it. An option for assessing the length of
the hamstrings while sparing the back is the passive straight-leg (PSL) raise test.
Thomas Test for Hip Flexion/Quadriceps Length
Objective: To assess the length of the muscles involved in hip flexion. This test can actually
assess the length of the primary hip flexors.
• Hip flexors or iliopsoas
• Rectus femoris (one of the four quadriceps muscles)
This test should not be conducted on participants suffering from low-back pain, unless
cleared by their physician.
Equipment:
• Stable table
Instructions:
• Given the nature of the movement associated with this test, the instructor may want to
consider draping a towel over the participant’s groin area.
Figure 40
Thomas test: Test position
Figure 39
Thomas test: Starting position
Table 19
Interpretation of the Thomas Test
Movement/Limitation Suspected Muscle Tightness
With the back and sacrum flat, the back of
the lowered thigh does not touch the table
and the knee does not flex to 80 degrees.
Primary hip flexor muscles
With the back and sacrum flat, the back of
the lowered thigh does not touch the table,
but the knee does flex to 80 degrees.
The iliopsoas, which is preventing the hip
from rotating posteriorly and inhibiting the
thigh from being able to touch the table
With the back and sacrum flat, the back of
the lowered thigh does touch the table, but
the knee does not flex to 80 degrees.
The rectus femoris, which does not allow the
knee to bend
Data from: Kendall, F.P. et al. (2005). Muscles Testing and Function with Posture and Pain (5th ed.). Baltimore, Md.:
Lippincott Williams & Wilkins.
• Explain the objective of the test and allow a warm-up.
• Instruct the participant to sit at the end of a table with the mid-thigh
aligned with the table edge (Figure 39). Place one hand behind the
participant’s back and the other under his or her thighs.
• While supporting the participant, instruct him or her to gently flex both
thighs toward the chest, and gradually assist as the participant rolls back
onto the table to touch the back and shoulders to the table top.
üInstruct the participant to slowly pull one thigh (hip) toward the
chest, reaching with both hands to grasp the thigh or the area
behind the knee without raising or moving the torso.
üAsk the participant to slowly relax the opposite leg, allowing the knee to
slowly fall toward the table and the lower leg to hang freely off the table
edge [a 1-inch (2.5 cm) spacing between the back of the knee and the
table edge is adequate] (Figure 40).
Observations:
• Observe whether the back of the lowered
thigh touches the table (hips positioned in
10 degrees of extension).
• Observe whether the knee of the lowered
leg achieves 80 degrees of flexion.
• Observe whether the knee remains
aligned straight or falls into internal or
external rotation.
General interpretations:
• Use the information provided in Table 19
to determine the location and identity of
the tight or limiting muscles.
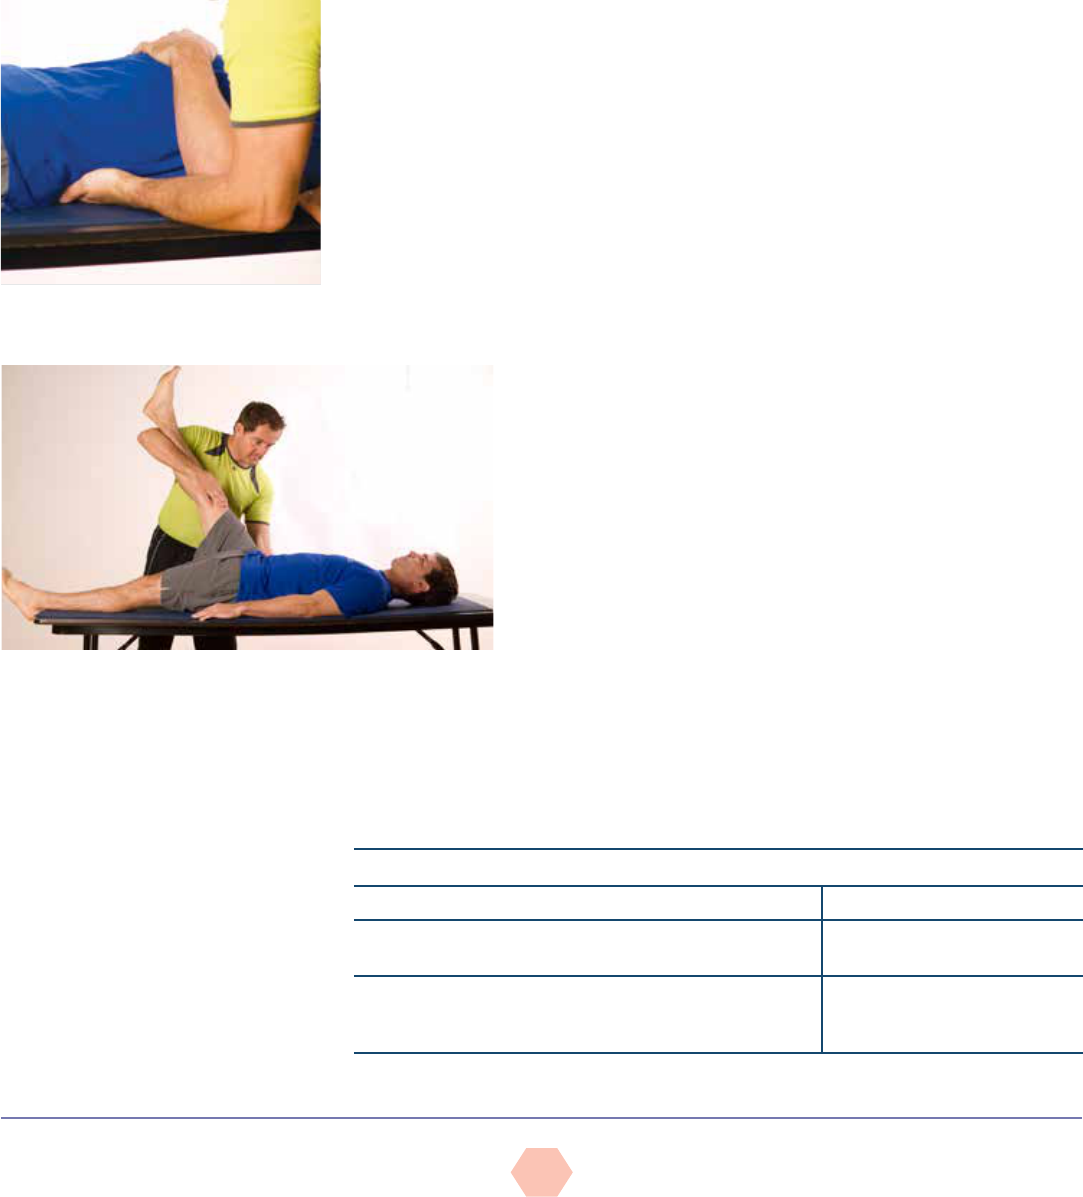
AMERICAN COUCIL ON EXERCISE © All Rights Reserved
ACE Group FitnEss instruCtor FitnEss AssEssmEnt protoCols
31
Passive Straight-leg (PSL) Raise
Objective: To assess the length of the hamstrings
Equipment:
• Stable table or exercise mat
Instructions:
• Explain the objective of the test and allow a warm-up.
• Instruct the participant to lie supine on a mat or table with the legs extended and the low
back and sacrum flat against the surface.
• Place one hand under the calf of the leg that will be raised while instructing the
participant to keep the opposite leg extended on the mat or table. Restrain that leg from
moving or rising during the test.
Figure 42
PSL raise: Test position
Figure 41
PSL raise: Trainer’s hand position
Table 20
Interpretation of the Passive Straight-leg Raise
Movement/Limitation Hamstrings Length
The raised leg achieves ≥80 degrees of movement before the
pelvis rotates posteriorly.
Normal hamstrings length
The raised leg achieves <80 degrees of movement before the
pelvis rotates posteriorly or there are any visible signs in the
opposite leg lifting off the mat or table.
Tight hamstrings
Data from: Kendall, F.P. et al. (2005). Muscles Testing and Function with Posture and Pain (5th ed.). Baltimore, Md.: Lippincott
Williams & Wilkins.
• Slide the other hand under the lumbar spine into the space between the participant’s
back and the mat or table (Figure 41).
• Advise the participant to gently plantarflex his or her ankles to point the toes away
from the body. This position avoids a test limitation due to a tight gastrocnemius
muscle (which would limit knee extension with the ankle in dorsiflexion).
Additionally, a straight-leg raise with dorsiflexion may increase tension within the
sciatic nerve and create some discomfort.
• Slowly raise the one leg, asking the participant to keep that knee loosely extended
throughout the movement.
• Continue to raise the leg until firm pressure can be felt from the low back pressing
down against the hand (Figure 42).
• This indicates an end-range of motion of the hamstrings with
movement now occurring as the pelvis rotates posteriorly.
• Throughout the movement, the participant needs to maintain
extension in the opposite leg and keep the sacrum and low back
flat against the mat or table.
üIf the test is performed with the opposite hip in slight flexion,
this allows the pelvis more freedom to move into a posterior
tilt, allowing a greater range of motion and falsely increasing
the length of the hamstrings.
Observation:
• Note the degree of movement attained from the table or mat
that is achieved before the spine compresses the hand under
the low back or the opposite leg begins to show visible signs of
lifting off the table or mat.
üThe mat or table represents 0 degrees.
üThe leg perpendicular to the mat or table represents
90 degrees.
General interpretation:
• Use the information provided in Table 20 to determine the
limitation(s).
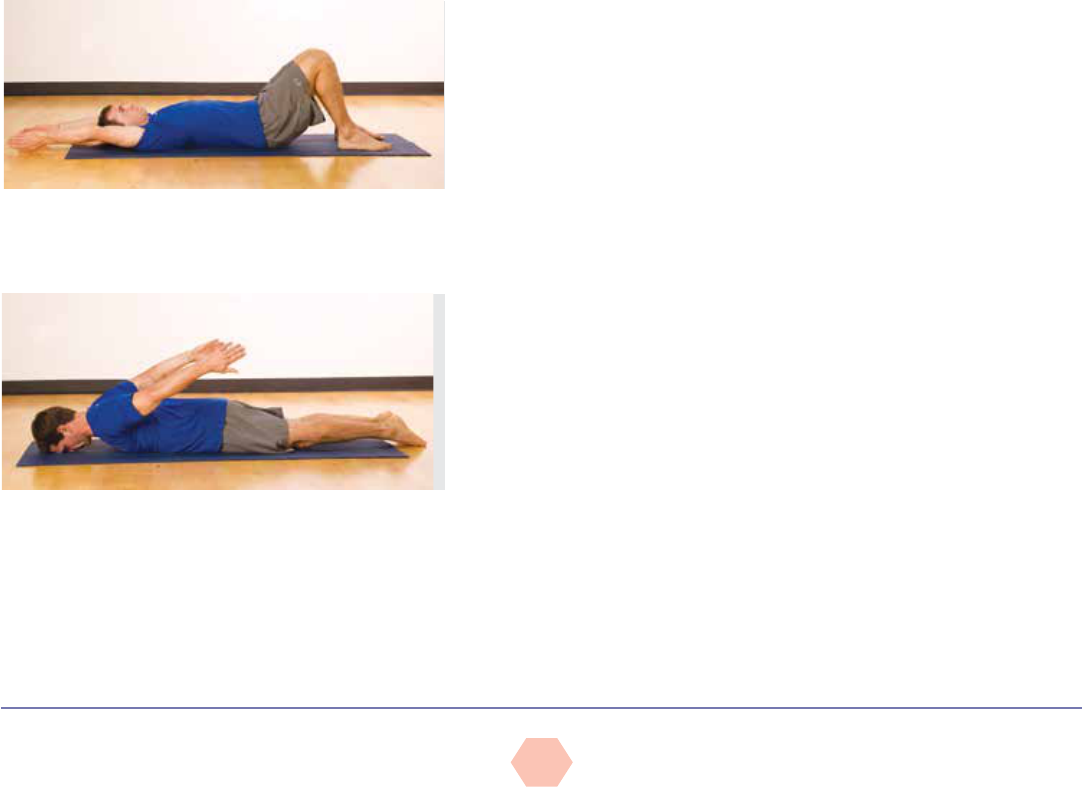
AMERICAN COUCIL ON EXERCISE © All Rights Reserved
ACE Group FitnEss instruCtor FitnEss AssEssmEnt protoCols
32
Shoulder Mobility
Apley’s scratch test involves multiple and simultaneous movements of the scapulothoracic
and glenohumeral joints in all three planes. This represents a challenge in evaluating
shoulder movement and identifying movement limitations. To identify the source of the
limitation, GFIs can first have participants perform various isolated movements in single
planes to locate potentially problematic movements. Consequently, the scratch test is
completed in conjunction with:
• The shoulder flexion-extension test
• An internal-external rotation test of the humerus
Shoulder Flexion and Extension
Objective: To assess the degree of shoulder flexion and extension. This test should be
performed in conjunction with Apley’s scratch test to determine if the limitation occurs with
shoulder flexion or extension.
Equipment:
• Exercise mat
• Pillow (optional)
Instructions:
• Explain the purpose of the test.
• Shoulder flexion:
üInstruct the participant to lie supine on a mat, with the back flat and a bent-knee
position [knees and second toe aligned with the anterior superior iliac spine (ASIS)],
and with the arms at the sides.
üHave the participant engage the abdominal muscles to hold a neutral spine without
raising the hips from the mat.
üInstruct the participant to raise both arms simultaneously into shoulder flexion, moving
them overhead, keeping them close to the sides of the head, and bringing them down to
touch the floor or as close to the floor as possible (Figure 43).
Figure 44
Shoulder extension test
Figure 43
Shoulder flexion test
o The participant must maintain extended elbows and neutral
wrist position (the arms will naturally rotate internally during this
movement).
o Have the participant avoid any arching in the low back during the
movement.
o Have the participant avoid any depression of the rib cage, which
may pull the shoulders off the mat.
• Shoulder extension:
üInstruct the participant to lie prone, extending both legs, with arms at
the sides, and resting the forehead gently on a pillow or the mat.
üAsk the participant to slowly raise both arms simultaneously into
extension, lifting them off the mat while keeping the arms close to
the sides (Figure 44) (the arms will naturally rotate internally during
this movement).
o A small amount of extension in the thoracic spine is acceptable
during the movement.
o The participant should avoid any arching in the low back or any
rotation of the torso during the movement.
o The participant should avoid any attempts to lift the chest or head
off the mat during the movement.
Observations:
• Measure the degree of movement in each direction.
• Note any bilateral differences between the left and right arms in
performing both movements.
General interpretations:
• Use the information provided in Table 21 to determine the limitation(s)
in these shoulder flexibility tests.

AMERICAN COUCIL ON EXERCISE © All Rights Reserved
ACE Group FitnEss instruCtor FitnEss AssEssmEnt protoCols
33
Internal and External Rotation of the Humerus at the Shoulder
Objective: To assess internal (medial) and external (lateral) rotation of the humerus at the
shoulder joint. This test should be performed in conjunction with Apley’s scratch test to
determine if the limitation occurs with internal or external rotation of the humerus.
Equipment:
• Mat
Instructions:
• Explain the purpose of the test.
• Instruct the participant to lie supine, with his or her back flat on a mat in a bent-knee
position (knees and second toe aligned with the ASIS).
• Ask the participant to abduct the arms to 90 degrees, with a 90-degree bend at the
elbows and the forearms perpendicular to the mat (i.e., pointing up toward the ceiling).
üThe upper arms must remain aligned with the shoulders throughout the test.
üThe backs of the upper arms should rest against the mat throughout the test.
• External (lateral) rotation to evaluate medial rotators
üAsk the participant to slowly rotate his or her forearms backward toward the mat, aiming
to rest the forearms and the backs of the hands on the mat adjacent to the head, while
maintaining the 90-degree bend at the elbows (Figure 45).
o The participant should engage the abdominals to avoid arching the low back, and
avoid flexing the spine forward.
o The participant should maintain a neutral wrist position throughout the movement.
• Internal (medial) rotation to evaluate lateral rotators
üHave the participant return to the starting position (forearms perpendicular to the mat).
üAsk the participant to slowly rotate the forearms forward toward the mat, turning the
palms downward while maintaining the 90-degree bend at the elbows (Figure 46).
o The participant should avoid raising the shoulders off the table or flexing the spine
forward.
o The participant must maintain a neutral wrist position throughout the movement.
Table 21
Interpretation of the Shoulder Flexion and Extension Test
Movement/Limitation—Flexion Shoulder Mobility
Ability to flex the shoulders to 170–180 degrees
(hands touching/nearly touching floor)
Good shoulder mobility
Inability to flex the shoulders to 170 degrees or
discrepancies between the limbs
Potential tightness in the pectoralis major and minor, latissimus dorsi, teres major, rhomboids, and
subscapularis
• Tightness in the latissimus dorsi will force the low back to arch.
• Tightness of the pectoralis minor may tilt the scapulae forward (anterior tilt) and prevent the
arms from touching the floor.
• Tight abdominals may depress the rib cage, tilting the scapulae forward (anterior tilt), and
prevent the arms from touching the floor.
• Thoracic kyphosis may round the thoracic spine and prevent the arms from touching the floor.
Ability to extend the shoulders to
50–60 degrees off the floor
Good shoulder mobility
Inability to extend the shoulders to 50 degrees
or discrepancies between the limbs
Potential tightness in pectoralis major, abdominals, subscapularis, certain shoulder flexors (anterior
deltoid), coracobrachialis, and biceps brachii
• Tightness in the abdominals may prevent normal extension of the thoracic spine and rib cage.
• Tightness in the biceps brachii may prevent adequate shoulder extension with an extended elbow (but
may permit extension with a bent elbow).
Data from: Kendall, F.P. et al. (2005). Muscles Testing and Function with Posture and Pain (5th ed.). Baltimore, Md.: Lippincott Williams & Wilkins; Houglum, P.A. (2010). Therapeutic Exercise
for Musculoskeletal Injuries (3rd ed). Champaign, Ill.: Human Kinetics.
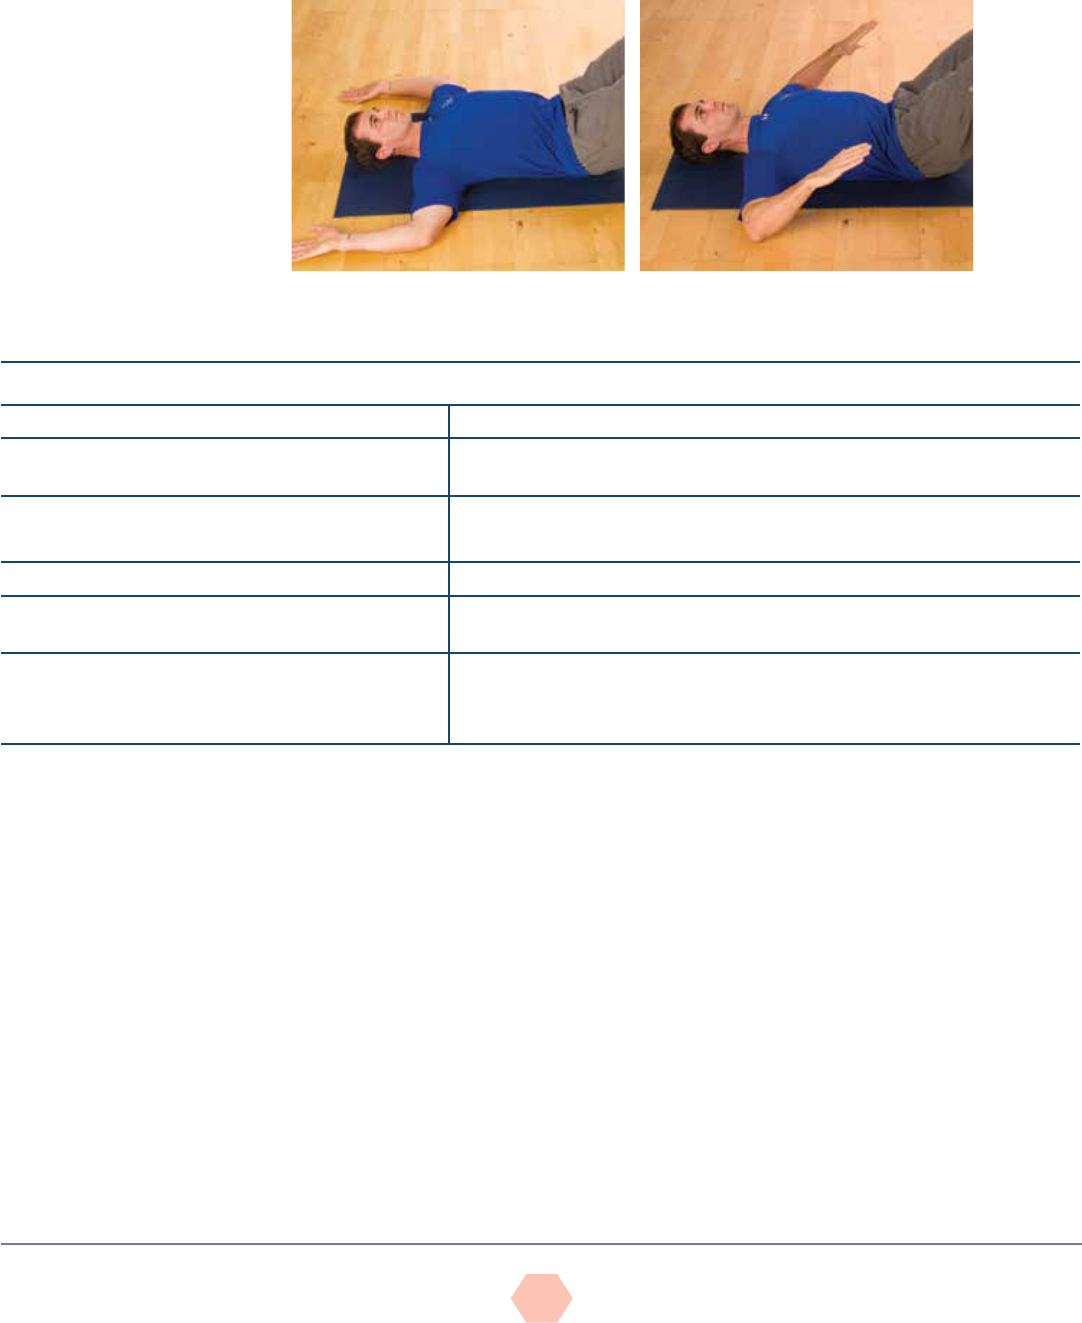
AMERICAN COUCIL ON EXERCISE © All Rights Reserved
ACE Group FitnEss instruCtor FitnEss AssEssmEnt protoCols
34
Observations:
• Measure the degree of movement in each direction.
• Note any bilateral differences between the left and right arms in performing both
movements.
General interpretation:
• Use the information provided in Table 22 to determine the limitation(s) in this flexibility test.
Table 22
Interpretation of the External and Internal Rotation Test
Movement/Limitation—External/Lateral Rotation Shoulder Mobility
Ability to externally rotate the forearms 90 degrees to
touch the mat
Good mobility in the internal (medial) rotators, allowing the joint to move through the
full range
Inability to reach the floor or discrepancies between
the limbs
Potential tightness in the medial rotators of the arm (i.e., subscapularis)
The joint capsule and ligaments may also be tight and limit rotation.
Movement/Limitation—Internal/Medial Rotation Shoulder Mobility
Ability to internally rotate the forearms 70 degrees toward the
mat (i.e., forearms are 20 degrees off the mat)
Good mobility in the external (lateral) rotators, allowing the joint to move through the
full range
Inability to internally rotate the forearm 70 degrees, or
discrepancies between the limbs
Potential tightness in the lateral rotators of the arm (i.e., infraspinatus and teres
minor)
The joint capsule and ligaments may also be tight and limit rotation.
Data from: Kendall, F.P. et al. (2005). Muscles Testing and Function with Posture and Pain (5th ed.). Baltimore, Md.: Lippincott Williams & Wilkins; Houglum, P.A. (2010). Therapeutic Exercise
for Musculoskeletal Injuries (3rd ed). Champaign, Ill.: Human Kinetics.
Figure 46
Internal (medial) shoulder rotation
Figure 45
External (lateral) shoulder rotation
Apley’s Scratch Test for Shoulder Mobility
Objective: To assess simultaneous movements of the shoulder girdle (primarily the
scapulothoracic and glenohumeral joints)
Movements include:
• Shoulder extension and flexion
• Internal and external rotation of the humerus at the shoulder
• Scapular abduction and adduction
Instructions:
• Explain the purpose of the test and allow a warm-up (e.g., forward and rearward
arm circles).
• Shoulder flexion, external rotation, and scapular abduction
üFrom a sitting or standing position, the participant raises one arm overhead,
bending the elbow and rotating the arm outward while reaching behind the head
with the palm facing inward to touch the medial border of the contralateral scapula
or to reach down the spine (touching vertebrae) as far as possible (Figure 47).
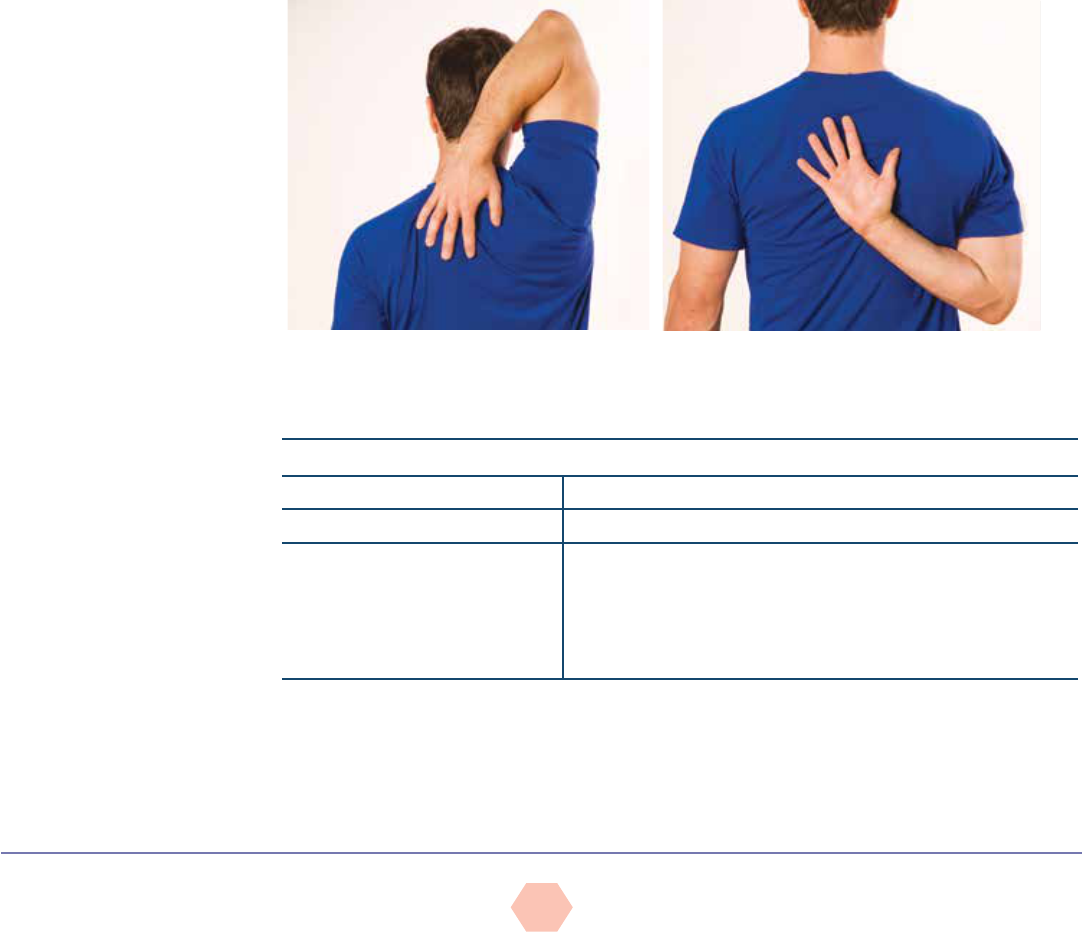
AMERICAN COUCIL ON EXERCISE © All Rights Reserved
ACE Group FitnEss instruCtor FitnEss AssEssmEnt protoCols
35
üThe participant should avoid any excessive arching in the low back or rotation of the
torso during the movement.
üHave the participant repeat the test with the opposite arm.
• Shoulder extension, internal rotation, and scapular adduction
üFrom a sitting or standing position, the participant reaches one arm behind the back,
bending the elbow and rotating the arm inward with the palm facing outward to touch
the inferior angle of the contralateral scapula or to reach up the spine (touching
vertebrae) as far as possible (Figure 48).
üThe participant should avoid any excessive arching in the low back or rotation of the
torso during the movement.
üHave the participant repeat the test with the opposite arm.
Observations:
• Note the participant’s ability to touch the medial border of the contralateral scapula or
how far down the spine he or she can reach with shoulder flexion and external rotation.
• Note the participant’s ability to touch the opposite inferior angle of the scapula or how far
up the spine he or she can reach with shoulder extension and internal rotation.
• Observe any bilateral differences between the left and right arms in performing both
movements.
General interpretations:
• Use the information provided in Table 23 to determine the limitation(s) in this flexibility test.
Figure 47
Apley’s scratch test: Shoulder flexion,
external rotation, and scapular abduction
Figure 48
Apley’s scratch test: Shoulder extension, internal
rotation, and scapular adduction
Table 23
Interpretation of Apley’s Scratch Test
Movement/Limitation Shoulder Mobility*
Ability to touch specific landmarks Good shoulder mobility
Inability to reach or touch the specific
landmarks or discrepancies
between the limbs
Requires further evaluation to determine the source of the limitation (i.e.,
which of the movements is problematic)
• Shoulder flexion and extension
• Internal and external rotation of the humerus
• Scapular abduction and adduction
*Tightness of the joint capsules and ligaments may also contribute to limitations. It is common to see greater restriction on the
dominant side due to increased muscle mass.
Data from: Kendall, F.P. et al. (2005). Muscles Testing and Function with Posture and Pain (5th ed.). Baltimore, Md.: Lippincott Williams & Wilkins.

AMERICAN COUCIL ON EXERCISE © All Rights Reserved
ACE Group FitnEss instruCtor FitnEss AssEssmEnt protoCols
36
REFERENCES
Abelbeck, K.G. (2002). Biomechanical model and evaluation of a linear motion squat type exercise.
Journal of Strength and Conditioning Research, 16, 516–524.
Black, F.O. et al. (1982). Normal subject postural sway during the Romberg test. American Journal of
Otolaryngology, 3, 309–318
Canadian Society for Exercise Physiology (2003). The Candian Physical Activity, Fitness, & Lifestyle
Approach (CPAFLA): CSEP—Health & Fitness Program’s Health-Related Appraisal and Counseling
Strategy (3rd ed.). Ottawa: Canadian Society for Exercise Physiology.
Cook, G. (2010). Movement. Aptos, Calif.: On Target Publications.
Cook, G. (2003). Athletic Body in Balance. Champaign, Ill.: Human Kinetics.
Donnelly, D.V. et al. (2006). The effect of directional gaze on kinematics during the squat exercise.
Journal of Strength and Conditioning Research, 20, 145–150.
Fry, A.C., Smith J.C., & Schilling, B.K. (2003). Effect of knee position on hip and knees torques during
the barbell squat. Journal of Strength and Conditioning Research, 17, 629–633.
Houglum, P.A. (2010). Therapeutic Exercise for Musculoskeletal Injuries (3rd ed). Champaign, Ill.:
Human Kinetics.
Johnson B.L. & Nelson, J.K. (1986). Practical Measurements for Evaluation in Physical Education (4th
ed.). Minneapolis, Minn.: Burgess.
Kendall, F.P. et al. (2005). Muscles Testing and Function with Posture and Pain (5th ed.). Baltimore,
Md.: Lippincott Williams & Wilkins.
Morris, C.E. et al. (2006). Vladimir Janda: Tribute to a master of rehabilitation. Spine, 31, 9, 1060–1064.
Newton, R. (1989). Review of tests of standing balance abilities. Brain Injury, 3, 4, 335–343.
Price, J. (2010). The fundamentals of structural assessment. In: The BioMechanics Method Corrective
Exercise Program. San Diego, Calif.: The BioMechanics.
Sahrmann, S.A. (2002). Diagnosis and Treatment of Movement Impairment Syndromes. St. Louis, Mo.:
Mosby.
Whiting W.C. & Rugg, S. (2012). Dynatomy: Dynamic Human Anatomy. Champaign, Ill.: Human Kinetics.
