
Agilent Technologies
Best Practices for Using an Agilent
LC System
Technical Note
Best Practices - Technical Note
This technical note describes best practices for using an Agilent LC system.
Contents
Housekeeping 2
How to deal with solvents 2
How to prepare samples 3
Daily / Weekly tasks 4
Power up / Shut-down the system 5
Power-up the system 5
Shut-down the system 6
Recommendations for degassers 7
Recommendations for pumps 8
Recommendations for Pumps with MCGV 8
Seal Wash (usage mandatory when installed) 9
Recommendations for samplers 13
Recommendations for pumps and samplers with optional inline filter 14
Recommendations for columns 15
Recommendations for detectors 16
Additional Information for 1290 Infinity and 1290 Infinity II Pumps 17

2
Housekeeping
How to deal with solvents
Housekeeping
How to deal with solvents
• Use clean bottles only.
• Use borosilicate glass bottle only.
• Rinse bottle with desired solvent before refilling it.
• Bottles can ge
t contaminated with detergents form the dishwasher.
• Exchange water-based solvents daily.
• Algae growth may block the degasser or filters.
• Precipitation of insoluble salts may block filters or capillaries.
• Select solv
ent volume to be used up within 1 – 2 days.
• Use only HPLC-grade solvents and water filtered through 0.2 µm
filters.
• Residues or contaminations may block filters or capillaries.
• Label bottles correctly with bottle content,
and filling date / expiry date.
• Use solvent inlet filters to protect the system from incoming particles.
• Reduce ri
sk of algae growth: use brown bottles for aqueous solvents, avoid direct
sunlight or wrap the bottles in aluminium foil.
Contaminated seal wash solvent
➔
Do not recycle seal wash solvent to avoid contamination
➔
Weekly exchange seal wash solvent
➔
Use of Seal Wash Bottle Head Kit (5067-6131) is strongly recommended
Extra measures with Acetonitrile (ACN)
• Filter ACN using a 0.45 µm nylon filter.
• Fill ACN in brown bottles and keep amount to minimum to prevent photochemical
reaction
s and oxidation.
• Flush t
he system monthly with warm water (60 – 70 °C (1
40 – 158 °F)) - 1 L at
2 mL/min to dissolve traces of ACN reaction products.
CAUTION
NOTE
Filtering through nylon filters is not recommended for High Sensitivity LCMS.
NOTE
Add 5 – 10 % water to ACN, especially for LCMS applications when 0.1 % formic acid is present (if
possible).

Possible sample precipitation
➔
Take care that the sample is complete soluble in both, the used sample solvent and the
mobile phase at starting conditions.
➔
Match the sample solvent matches and the proposed mobile phase as closely as possible to
prevent precipitation.
3
Housekeeping
How to prepare samples
How to prepare samples
• Filter, decant, or centrifuge sample to separate from insoluble solid.
• Take care that the sample solvent is free of particles.
CAUTION
4
Daily / Weekly tasks
How to prepare samples
Daily / Weekly tasks
Daily tasks
• Replace solvents and solvent bottles for mobile phases based on water/buffer.
• Replace sol
vents and solvent bottles for organic mobile phase latest every second
day.
• Check presence o
f seal wash solvent.
• Purg
e each channel with fresh solvent at 2.5 – 3 mL/min for 5 min.
• Equilibrat
e your system with composition of your application for 15 min. Use
conditioning for 1290 systems.
Weekly tasks
• Change seal wash solvent (10 % / 90 % isopropanol/water) and bottle.
• Flush al
l channels with water at 2.5 – 3 mL/min for 5 min to remove salt deposits if
buffer applications were used.
• Inspect s
olvent filters for dirt or blockages. Clean or exchange if no flow is coming
out of the solvent line when removed from the degasser inlet.
5
Power up / Shut-down the system
Power-up the system
Power up / Shut-down the system
Power-up the system
Power up the pump
• Use new or different mobile phase (as required).
• Purge each channel wit
h 2.5 – 3 mL/min for 5 min. Open the purge valve (1260) or
use the purge command (1290).
• Equilibrat
e your system with composition of your application for 15 min. Use
conditioning for 1290 systems.
Power up the sampler
• Purge the autosampler daily, and before and after sample analysis, especially if you
are using buffers.
• Set f
low to required value of your application and close the purge valve.
• Pum
p for approximately 10 min.
• Use fresh need
le wash and/or needle seat backflush solvents like methanol or
acetonitrile and water mixtures without buffer.
• Ensure t
hat the vials contain enough sample solution for all injections.
Power up the detector
• Warmup the lamp for at least 1 h.
• F
or RI detectors only: flush the reference and sample side with fresh solvent used
for the current application.

6
Power up / Shut-down the system
Shut-down the system
Shut-down the system
Long-term storage of the column
• Flush the column with appropriate solvent found in the column manual.
• Re
move and seal column, and store according to good laboratory practice if needed.
Long-term shut-down of the system
• Flush system with water to remove buffer.
• Remo
ve all samples from the sampler and store according to good laboratory
practice.
• Use re
commended solvents to store the system.
• P
ower off the system.
NOTE
Use 50\50 Methanol\Water or 2-propanol\Water without additions to store system.
Condensation of vapor inside the degasser
If an internal or high performance degasser is used with low boiling solvents, the solvent vapors
can condensate inside the degasser chamber when the vacuum pump is turned off.
➔
Purge all solvent channels with 2-propanol and let the degasser pump for two more hours.
7
Recommendations for degassers
Shut-down the system
Recommendations for degassers
• Check compatibility of solvent with degasser and application
• Use internal or high performance degasser
s for standard applications
• Use the standard degasser (G1322A or G7122A) for RI applications
• Use the standard degasser for high volatile sol
vents with vapor pressure below
100 mbar at room temperatur.
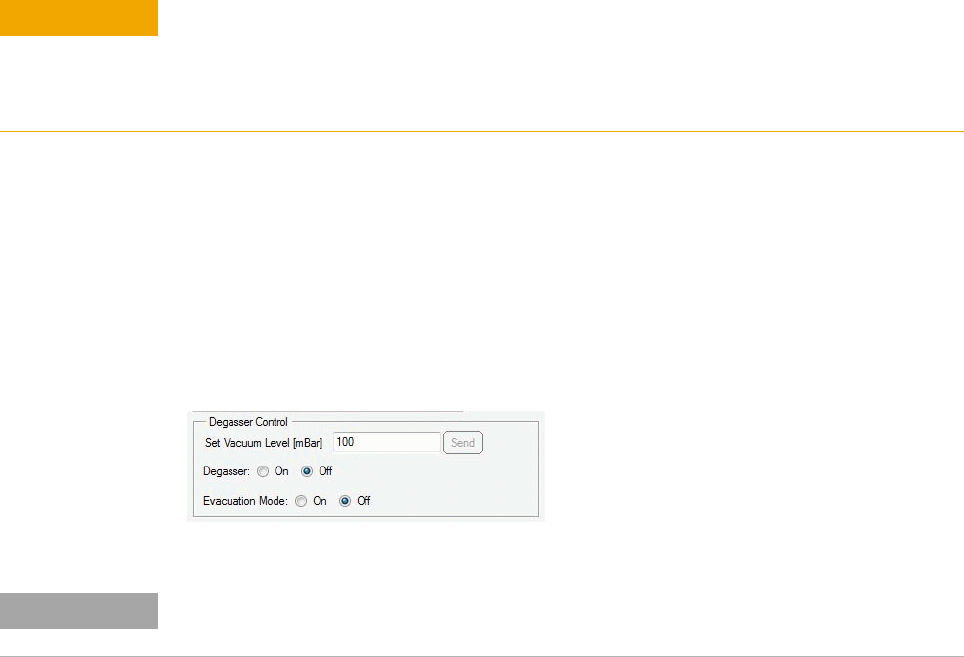
• Use the Ev
acuation Mode if degassing performance of internal degassers is not
optimal. Access it in the degasser control from the instrument control screen in the
Agilent LabAdvisor.
Figure 1 Degasser Control for internal degassers in Agilent LabAdvisor
CAUTION
NOTE
Follow the instructions prompted on the screen when starting the Evacuation Mode.

8
Recommendations for pumps
Recommendations for Pumps with MCGV
Recommendations for pumps
• Check pumps performance on regular basis.
• P
erform preventive maintenance in the recommended usage interval.
• Prep
are the pump as recommended like described in the power up section to ensure
optimal performance and best life time.
• Use t
he seal wash function as recommended to ensure optimal performance and
best life time, see below.
Recommendations for Pumps with MCGV
Select channels for Multi-Channel Gradient Valve (MCGV)
• Use lower channels (A and/or D) for buffer solutions.
• Regul
arly flush all MCGV channels with 200 mL of warm water to remove possible
salt deposits.
• C
heck compatibility of buffers and organic solvents to avoid precipitation in the
MCGVs mixing chamber.
NOTE
When mixing incompatible solvents, salts can precipitate at the point of mixing blocking the
downstream flow path and damaging parts.

Contaminated seal wash solvent
➔
Do not recycle seal wash solvent to avoid contamination
➔
Weekly exchange seal wash solvent
➔
Use of Seal Wash Bottle Head Kit (5067-6131) is strongly recommended
9
Recommendations for pumps
Seal Wash (usage mandatory when installed)
Seal Wash (usage mandatory when installed)
Seal Wash (G4204A, G4220A, all 1260 Pumps)
Using the seal wash function is strrongly recommended when using water or water
based solvents like buffer, other non-volatile solvents or additives that could deposit
on pistons and seals. The seal wash function regularly cleans these parts
automatically.
Benefits of Seal Wash Operation:
• Removal of particles, salt crystals and other non-volatile residues from the pistons
and seals, which have the potential to damage the piston and piston seals
• Lubrication of seal/piston interface
• Cooling of pistons
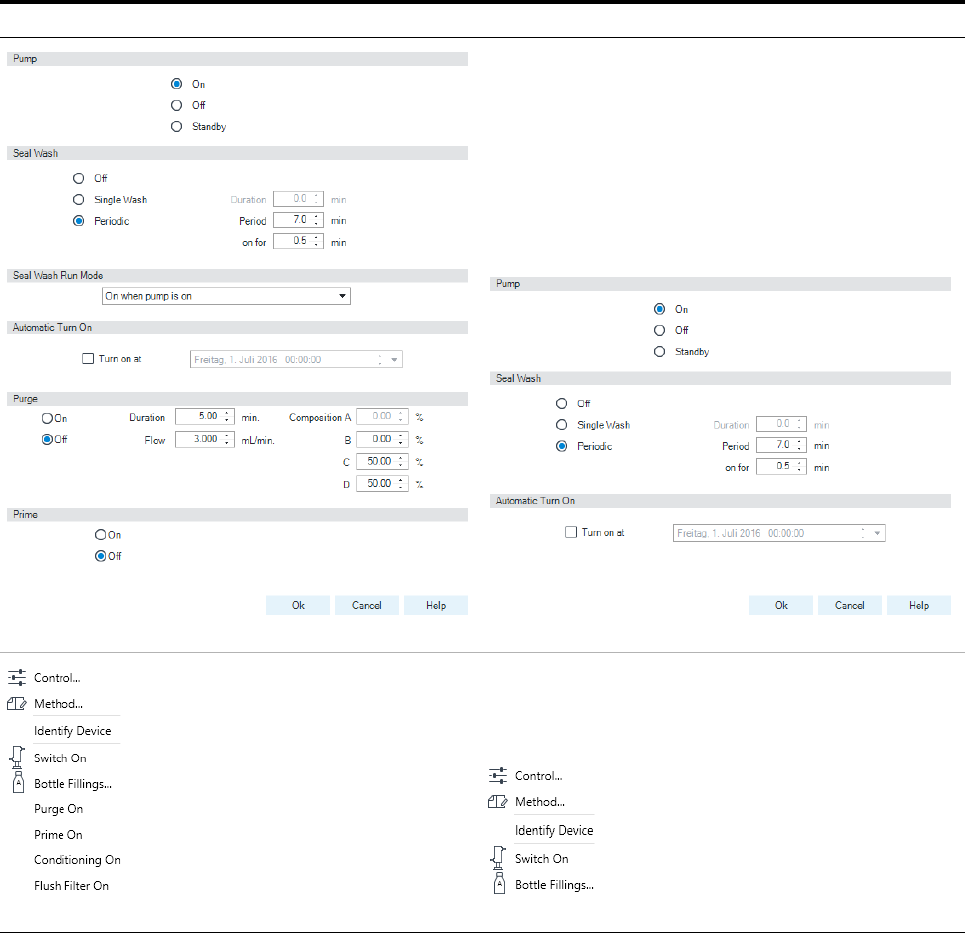
Seal Wash Dialog in your CDS
The dialog can be found under the control screen, it is recommended to use the
settings displayed in Figure 2 on page 10
.
Be aware that:
• The seal was
h
settings are NOT method parameters
• The seal wash has to be turned on again manually after:
• An ERROR has been cleared
• Power on
Seal Wash Operation:
• PERIODIC operation, for example 0.5 min every 7 min
• Setting can be changed in the Control screen, see Fi
gure 2 on page 10.
The settings are available via the context menu, see Fig
ure 4 on page 10.
• Typical solvent flow is 0.7 mL/min what cor
responds to an approximate
consumption of 3 mL/h of or 0.5 L/week at constant operation
• Use 10 % 2- Propanol in water
• 100 % 2- Propanol for normal phase applications
• P
osition wash solvent bottle above and waste bottle below instrument
• DO NOT recycle the seal wash solvent
• Usage of th
e Seal Wash Bottle Head Kit is recommended (Agilent Part Number:
5067-6131)
CAUTION
10
Recommendations for pumps
Seal Wash (usage mandatory when installed)
• Exchange solvent weekly
• Do not ref
ill seal wash solvent, always use properly cleaned, fresh bottles
• Test Peristaltic Pump
• Touch the peristaltic pump with you finger to check that the pump is working, or
co
nfirm seal wash solvent flow by looking seal wash solvent dropping out of the
tubing
Tabl e 1 Seal wash dialog and operation
G4204A, G4220A all 1260 Pumps
Figure 2 Seal wash settings (1290 Infinity Pumps) Figure 3 Seal wash settings (all 1260 pumps)
Figure 4 Context Menu (1290 Infinity Pumps) Figure 5 Context Menu (all 1260 pumps)

Contaminated seal wash solvent
➔
Do not recycle seal wash solvent to avoid contamination
➔
Weekly exchange seal wash solvent
➔
Use of Seal Wash Bottle Head Kit (5067-6131) is strongly recommended
11
Recommendations for pumps
Seal Wash (usage mandatory when installed)
Seal Wash (G7104A, G7120A)
The seal wash pump is turned on when the analytic pump is moving solvent to remove
deposits from pistons and seals. The seal wash function regularly cleans these parts
automatically.
The seal wash sensor will constantly check the performance of the seal wash system
and war
n t
he user in case an anomaly has been detected.
Seal Wash Operation:
• The seal wash interval is set to 30 s on every 7 min.
• The flow is set to 500 µL/
min.
• The integrity of the seal wash system
is checked at regular intervals
• Typical solvent usage is about 1 L per w
eek
• Use 10 % isopropanol in water
• 100 % isopropanol for normal phase applications
• P
osition wash solvent bottle above and waste bottle below instrument
• DO NOT refill the seal wash solvent, always use properly cleaned, fresh bottles
• Usage of th
e Seal Wash Bottle Head Kit is recommended (Agilent Part Number:
5067-6131)
• Exchange solvent weekly
• DO NOT recycle seal wash solvent bottles
CAUTION
12
Recommendations for pumps
Seal Wash (usage mandatory when installed)
• The EMF s
ymbol will turn yellow once the pumps seal wash sensor detects an
irregularity
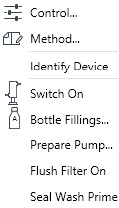
• Change th
e seal wash solvent and trigger the Seal Wash Prime function from the
context menu (see Figure 6 on page 12)
Figure 6 Context Menu
• Check seal wash tubing and fi
lter for kinks, leaks or blockages
• Check for blockages of the waste tubings, m
ake sure that the solvent waste can
drain off freely:
If solvent waste is building up in the tube, the sensor can’t perform correctly
• C
heck the peristaltic pump for function
• Touch the peristaltic pump with you finger to check that the pump is working,
or
• Confirm seal wash solvent flow by looking seal wash so
lvent dropping out of
the tubing

13
Recommendations for samplers
Seal Wash (usage mandatory when installed)
Recommendations for samplers
• Purge the autosampler after sample analysis.
• Remo
ve buffer with HPLC grade water.
• Re
move contaminating substances with a strong solvent, for example pure
acetonitrile.
• T
oggle the injection valve between Mainpass and Bypass while purging.
• Alwa
ys use fresh wash solvent for the needle or seat wash function.
• Remo
ve buffer with HPLC grade water.
• Re
move contaminating substances with a strong solvent, for example pure
acetonitrile.
• Place t
he wash solvent reservoir for needle wash (optional: needle seat flush) into
the solvent cabinet.
• Use an appr
opriate solvent based on the sample and mobile phase properties.
• C
heck the drainage routing of the washport outlet into a waste container.
• F
ill each vial with enough sample solution for all injections.
• Use A
gilent recommended vials only.
• Do n
ot overfill the vials, that is to say fill each vial up to 90 % only.
• Use pre
-slitted septa when drawing large volumes or multiple times from the
same vial.
• F
ilter, decant, or centrifuge sample to separate from insoluble solid.
• Tak
e care that the sample solvents match the proposed mobile phase as closely as
possible.
NOTE
The composition of the needle-wash solvent should be the most solubilizing compatible solvent
(your strongest diluent). Selecting it is part of the method development. A mixture of 50 % up to
100 % organic solvent in distilled water is a good choice for many applications.
NOTE
Sample solvent should be free of particles.

14
Recommendations for pumps and samplers with optional inline filter
Seal Wash (usage mandatory when installed)
Recommendations for pumps and samplers with optional
inline filter
Optional inline filter for pumps and samplers (1290 Infinity and 1290 Infinity II)
In most cases, the lifetime limiting factor for UHPLC columns is high backpressure.
Particulate matter in the sample is collecting on the inlet frit of the column which
causes an increase in the backpressure until the pressure limit of the system is
reached. Using the inline filter is recommended to prevent blockages of the column
frit, t
hat is when sample preparation does not allow for filtering or the sample may
form precipitate.
The following modules can be equipped with an additional inline filter:
• Pum
ps (G7104A, G4204A):
Inline Filter Assembly (5067-5407)
• All A
gilent Technologies autosamaplers:
1290 Infinity II Inline Filter Kit (5067-6189)
This inline filter with a nominal filter pore size of 0.3 µm protects the UHPLC column
ef
fectively from clogging by particulate matter from samples or from the UHPLC
system.
Advantages of the inline filter:
• V
ery small internal volume
• Dela
y volume with rigid capillary 1.3 µL
• Del
ay volume with flexible capillary 1.6 µL
• Specif
ied for working at high pressures (max. operating pressure 1300 bar)
Installing the inline filter into the G4204A or G7104A is recommended t
o protect the
downstream system from blockages in the following cases:
• Whe
n solvent combinations are used that can form precipitation after mixing,
• When r
unning applications with buffers or additives when columns with small
particle sizes are used
General hints for effective usage of the inline filter:
• F
ilter solvents before usage
• F
ollow best practices
• Back
-flush the filter in the pump weekly (start Flush Filter from the context menu)
• Ex
change the filter frit ( Frit 0.3 µm for inline filter, 5/pk (5023-0271)) every 1000
injections or when the back-pressure rises by 15 %
NOTE
See Technote G7167-90130 for further reference.

15
Recommendations for columns
Seal Wash (usage mandatory when installed)
Recommendations for columns
• Use columns only in the marked direction.
• Alwa
ys use suitable fittings for your specific column.
• Dif
ferent vendor columns require different fitting dimensions.
• Using an un
appropriate fitting may result in peak dispersion or even terminal
damage to the column.
• A
gilent recommends using A-Line fittings to overcome fitting incompatibilities
when using different vendor columns.
• Alwa
ys adhere to operating and application limits, as put forth in the column user
guide.
• E
quilibrate the column with 10 – 20 column volumes before use.
• It
is advisable to do an intermediate flush with a mobile phase of the correct
composition without additives before equilibrating to the final solvent with
additives.
• The
use of a guard column is recommended to protect your column and increase its
lifetime.
NOTE
Long-term storage of columns should always be in the appropriate storing solvent, for more details
on the column in use, see the User Guide inserted in the column package.

Frequent lamp on/off
Reduced lifetime of the lamp
➔
Avoid unnecessarily switching on/off the lamp.
16
Recommendations for detectors
Seal Wash (usage mandatory when installed)
Recommendations for detectors
• Warm-up the lamp at least 1 h.
• Keep environment and ambient temperature stable.
• Do not expose the detector to direct sun light.
• Do not expose the detector to too much air current from the HVAC.
• Install pressure relieve valve when connecting a second detector after the Max-light
car
tridge cell.
• Use the recommended waste lines for each detector type. Avoid pinching the waste
tube af
ter the cell outlet.
• Ensure th
at the detector flow cell is bubble free.
• For RI detectors only: flush the reference and sample side with fresh solvent used
f
or the current application.
• Flush the flow cell after use.
• Use HPLC grade water to remove salts.
• Use isopro
panol to remove organic solvents.
• Before removing an unused flowcell for storage fill it with isopropanol to prevent
algae g
rowth.
CAUTION
NOTE
There is a safety period/wait time before a lamp can be re-ignited after it has been turned off.
17
Additional Information for 1290 Infinity and 1290 Infinity II Pumps
Seal Wash (usage mandatory when installed)
Additional Information for 1290 Infinity and 1290 Infinity II Pumps
The Agilent 1290 Infinity and 1290 Infinity II Pumps are equipped with automatic
purge valves. This enables a variety of additional functions not available in Agilent
Pumps with manual purge valve. It is possible to prepare the pump (set paramaters
and start the functions Purge, Condition, or Prime) with the software.
Purge
Use the Purge function to:
• F
ill the system with fresh or different solvent.
• Ensure t
hat the new solvent is miscible with the previous solvent.
• Pre
vent damage to the degasser or pump by using an intermediate step with a
co-miscible solvent, if necessary.
• Rem
ove air bubbles in tubes and pump heads.
• Af
ter the pump in use for the first time.
• Af
ter the pump has been idle for a few hours or more (air may have diffused into
the solvent lines).
As soon as the duration time of the purge ends t
he module automatically switches to
analytical conditions again.
Condition
If micro air bubbles persist in the pump head the overall pump performance may look
correct but the pump will perform extra work and accuracy/precision are negatively
affected. To remove the air efficiently the Condition function can be used. During
Conditioning, the pump is delivering flow into the system (column) and the last used
method settings, like flow, composition and max pressure are used.
Use a reasonable flow rate (for example 1.5 mL/min), composition setting (for example
A:
50 % B: 50 %) and back pressure (>200 bar) to ensure efficien
t air bubble removal
from all heads.
If applicable generate an extra conditioning method at the beginning of the sequence.
Condition the pump if you see:
• Ex
cessive pressure ripple.
• Ex
cessive composition ripple (baseline noise/mixing noise – noise level changes
with the composition), when you are sure that the solvent type is correctly set, and
there is no evidence of out of specification leakage in the pump.
Conditioning may be necessary:
• Dail
y when starting the pump
• Af
ter a long period of standby
• Af
ter running out of solvent
• Af
ter service or repair

Filling empty solvent lines
Damage to the seal
➔
Use a syringe to fill empty solvent lines.
➔
Do not use the Prime procedure to fill empty solvent lines.
18
Additional Information for 1290 Infinity and 1290 Infinity II Pumps
Seal Wash (usage mandatory when installed)
Prime
The Prime function is helpful if air has entered the pump heads. The module draws
solvent at high speed with all pump drives simultaneously and dispenses it into the
waste position of the automatic purge valve. This is done 20 times before the process
comes to an end.
Use the Prime function to:
• Fill pump heads when completely dry.
• Free a potentially blocked valve.
CAUTION

19
Additional Information for 1290 Infinity and 1290 Infinity II Pumps
Seal Wash (usage mandatory when installed)
The described functions can be triggered from the driver interface:
• 1290 Infinity
1.
2.
Figure 7 Prepare the pump (1290 Infinity).
1. Right click on the module dashboard
2. Select the appropriate function to start the procedure
NOTE
For parameter settings, see Figure 2 on page 10.

Additional Information for 1290 Infinity and 1290 Infinity II Pumps
Seal Wash (usage mandatory when installed)
*01200-90090*
*01200-90090*
01200-90090
Part Number: 01200-90090
Edition: 07/2016
Printed in Germany
©
Agilent Technologies, Inc 2016
Agilent Technologies, Inc
Hewlett-Packard-Strasse 8
76337 Waldbronn
Germany
The user-optimized Prepare Pump context menu replaces the classical menu:
• 1290 In
finity II Pumps
1.
2.
3.
4.
Figure 8 Prepare the pump (1290 Infinity II pumps)
1. Right click on the module dashboard
2. Select Prepare Pump...
3. Select the procedure and fill in adequate parameters
4. Click Start to run the selected procedure
