
ELECTRONIC CASE REPORT FORM
COMPLETION GUIDELINES
2011 AAOMS Anesthesia and Third Molar Benchmark Study
Version 1.2; 14-July-2011

eCRF COMPLETION
GUIDELINES
Version 1.2; 14-July-2011 Confidential Page 2 of 55
Revision History:
Document
Version
Date
Author
Description of Changes
0.1
02-Apr-2011
Matt Frano
Initial draft
0.2
05-Apr-2011
Matt Frano
Updated per client comments
1.0
11-Apr-2011
Stephan Rubin
Corrected typo in client name; updated
Anesthesia End Time
1.1
18-May-2011
Stephan Rubin
Updated sections based on client
feedback
1,2
14-July-2011
Janet Marie Wilson
Corrected instructions for Date of Birth
and Weight
eCRF COMPLETION
GUIDELINES
Version 1.2; 14-July-2011 Confidential Page 3 of 55
Signatures / Approvals
Document Prepared by
Name and Function
Signature
Date
Matt Frano
Clinical Data Manager
Outcome Approval
Name and Function
Signature
Date
Anastasia Derzko
Associate Director, Data Management
Stephan Rubin
Clinical Project Manager
Sponsor Approval
Name and Function
Signature
Date
Thomas Dodson
Chair, AAOMS Special Committee to
Outcomes

eCRF COMPLETION
GUIDELINES
Version 1.2; 14-July-2011 Confidential Page 4 of 55
TABLE OF CONTENTS
1. GENERAL GUIDELINES .................................................................................................................... 5
1.1 USERNAME AND PASSWORD .......................................................................................................... 5
1.2 PRINTING BLANK FORMS ............................................................................................................... 5
1.3 DATA COLLECTION ........................................................................................................................ 5
1.4 PATIENT DATA .............................................................................................................................. 6
1.5 PATIENT IDENTIFIERS AND HEADER INFORMATION ........................................................................... 6
1.6 REPORTING DATES ....................................................................................................................... 7
2. ECRF COMPLETION GUIDELINES ................................................................................................... 8
2.1 ANESTHESIA FORM ....................................................................................................................... 8
2.1.1 Demographics Tab ............................................................................................................ 8
2.1.2 Patient History Tab .......................................................................................................... 10
2.1.3 Procedure Info Tab .......................................................................................................... 15
2.1.4 Recovery Info / Complications Tab .................................................................................. 33
2.2 3
RD
MOLAR EXTRACTION FORM .................................................................................................... 37
2.2.1 3
rd
Molar Extraction Tab................................................................................................... 37
2.2.2 3
rd
Molar Meds Tab .......................................................................................................... 43
2.2.3 3
rd
Molar Follow-Up Tab .................................................................................................. 49
2.3 SATISFACTION QUESTIONNAIRE FORM ......................................................................................... 54

eCRF COMPLETION
GUIDELINES
Version 1.2; 14-July-2011 Confidential Page 5 of 55
1. General Guidelines
Electronic Case Report Form (eCRF) Completion Guidelines (eCCGs) provide assistance in
completing the eCRF pages. For additional questions regarding how to complete the forms
or how to use the EDC system, please refer to the EDC User Manual or contact the Help
Desk at:
Outcome: support@outcome.com
US & Canada: 888.526.6700
1.1 Username and Password
Your Username and Password are needed to log into the system. Signature Users
will also need their Username and Password to provide their electronic signature at
the end of form in order to confirm data entered is accurate. Your Username and
Password were assigned to you by the Outcome Help Desk. If you forget either of
these, please contact the Help Desk using the information above.
1.2 Printing Blank Forms
The most up-to-date blank forms are available in this section of the Home tab.
Included are forms to document: Anesthesia, 3
rd
Molar Extraction, and Satisfaction
Questionnaire. The blank forms should be used as a reference only, as not all forms
will represent the true functionality of the EDC system. Data can only be submitted
via the EDC system and not via paper.
1.3 Data Collection
Investigators and/or designated qualified staff will enter the data into the eCRFs.
Investigators or designees will review and approve each patient‟s complete eCRF
record.
Sites are responsible for entering patient data and completed forms into a secure
internet-based EDC registry database via an eCRF. All sites will be fully trained on
the EDC by Outcome Site Management via webinar on how to utilize the EDC system
and the guidance documents available as resources, including eCRF completion
guidelines and User Manuals.
The following instructions apply to general entry of the data. If you experience any
technical issues, select „Contact Us‟ in the top right hand corner of the registry
webpage. You will then receive the toll-free numbers, listed above, and will be
provided with the option to create an email about the issue.
All data should be entered verbatim, do not abbreviate CRF entries.
No punctuation should be used.
Do not use subscript or superscript when entering data on the eCRF.
Text exceeding field length will be flagged automatically by the EDC system.
Symbols should not be entered in the EDC system.
Ranges should not be entered into eCRF text fields (i.e. 1-3 HR).
Quotes should not be used when entering data on the eCRF.
All text entries MUST be made in English.
To add an additional comment to any field, click on the icon (this icon will

eCRF COMPLETION
GUIDELINES
Version 1.2; 14-July-2011 Confidential Page 6 of 55
appear after saving the form). A new window will open for additional comments
to be entered. To save the comment, click the „Save Annotation‟ button.
The types of edits that may appear in the Errors and Warnings window are
„CRITICAL‟, „ERROR‟, and „WARNING‟. These messages are color-coded to indicate
their severity and the action that is required:
1. „CRITICAL‟ messages are Red and must be addressed in order to save the
form at all.
2. „ERROR‟ messages are Dark Red and must be addressed in order to save the
form with a status of „Complete‟.
3. „WARNING‟ messages are Grey and are informational. These do not affect
the saving the form.
These Errors and Warnings provide guidance to the site on entering logical, valid,
range appropriate information as specified in the protocol.
At the end of each form you have the option of saving the form as „Complete‟ or
„Incomplete‟. You may only save the form as „Complete‟ if all „CRITICAL‟ and
„ERROR‟ edits in the Errors and Warnings window have been resolved, the data is
accurate, and the form is ready for an electronic signature. You may save a form as
„Incomplete‟ as long as all „CRITICAL‟ edits have been resolved. If the form is saved
as „Incomplete‟ the EDC system will save the most recently entered responses and
the form can be updated at a later time.
NOTE: Once the form is signed electronically, only authorized Signature Users will
have permission to modify it. All forms must be signed at the end of the survey.
1.4 Patient Data
To enroll a new patient into the registry, click the „New Patient‟ link on the main portal
page after login. You can also enroll a new patient by clicking the „Enter New Patient‟
link on the Patients tab. After you have entered the information and ensured data
accuracy, select the „Complete‟ form option. If you wish to save the data you have
entered but want to return to the form to complete it at another time, select the
„Incomplete‟ option. You will then have the option to „Save and Exit‟ the form or you
can click „Save and Continue Data Entry‟ to move to the next form. The system will
alert you to any missing patient information prior to moving to the next form. The
completed form will be saved as a „Date Link‟ on the Patient Grid. The Patient Grid is
where you will see all saved patient forms. Within the Patient Grid, you will also have
the ability to enter new forms for the patient. Refer to the „User Manual‟ link located
within the top right corner of the EDC system for further information on the Patient
Grid.
1.5 Patient Identifiers and Header Information
The patient ID will be obtained at the time of enrollment. As soon as the Anesthesia
form is saved, the patient will automatically be assigned a unique Patient ID in the
following format: #### - ####. The first part of the ID (####) represents the Site ID.
The second part of the ID (####) represents the unique patient number. The Clinic ID
and patient ID will not need to be entered at each visit and will populate automatically
at the top of the screen after initial entry at the Baseline visit.

eCRF COMPLETION
GUIDELINES
Version 1.2; 14-July-2011 Confidential Page 7 of 55
1.6 Reporting Dates
Many date fields for this registry require Month, Day, and Year in order to save the
eCRF as „Complete‟.
Each visit/contact requires a Date to be entered at the top of the eCRF. Next to each
date field there is a calendar window in which dates can be selected to ease data
entry.
All Dates are in MM-DD-YYYY format (e.g., April 02, 2011, would be entered 04-02-
2011).

eCRF COMPLETION
GUIDELINES
Version 1.2; 14-July-2011 Confidential Page 8 of 55
2. eCRF COMPLETION GUIDELINES
2.1 Anesthesia Form
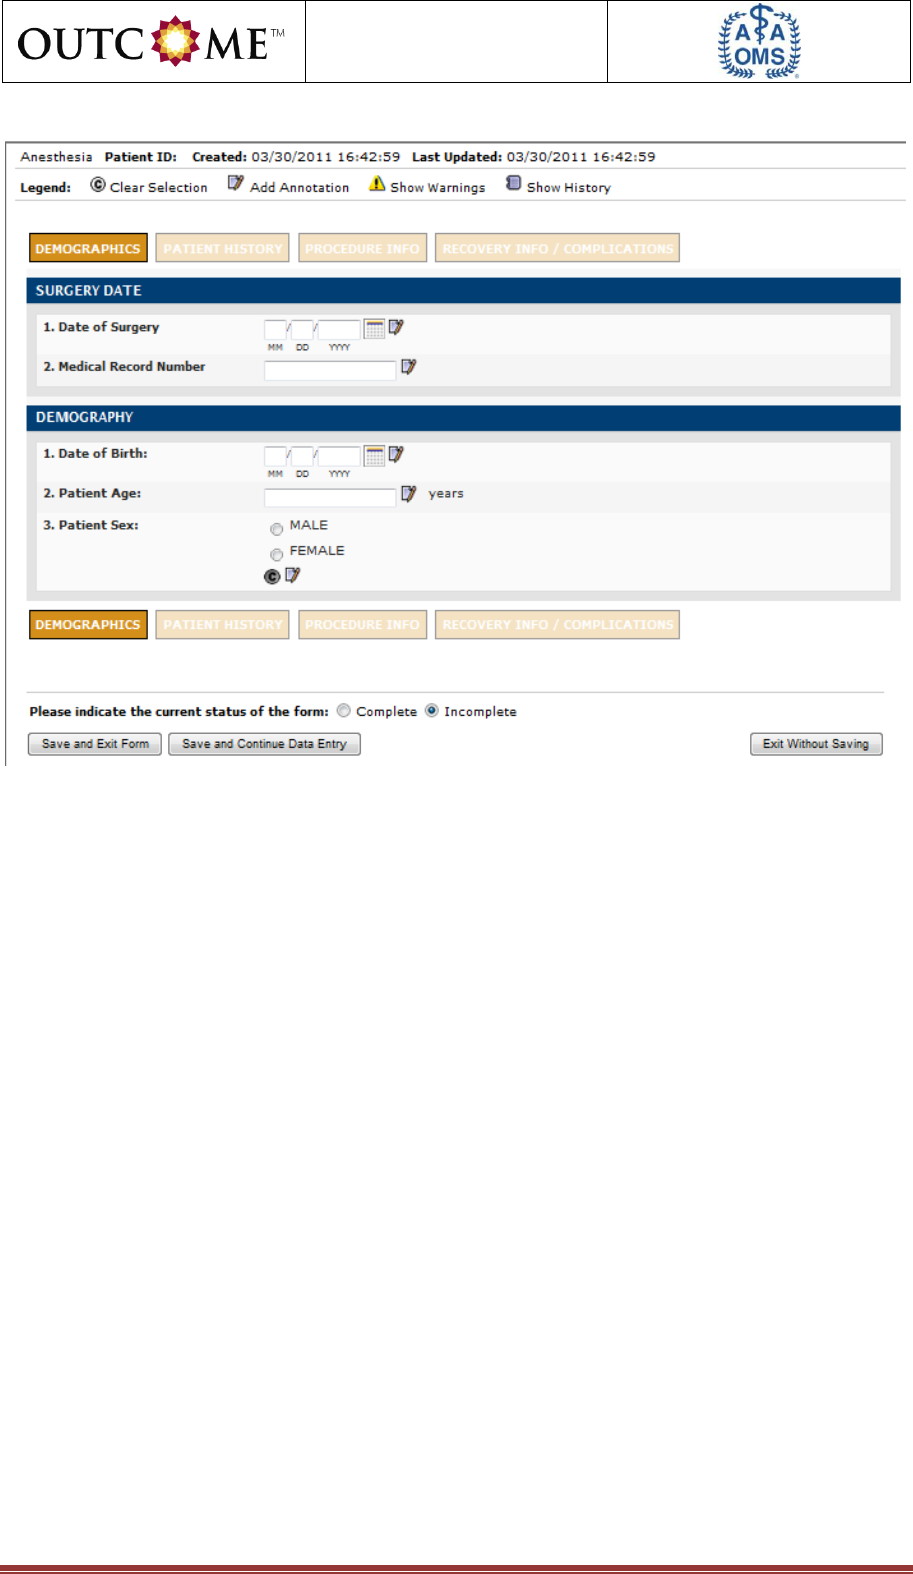
2.1.1 Demographics Tab
Field / Question
Instructions
SURGERY DATE
1. Date of Surgery
Enter the date of the surgery using an 8-digit format
with the month, day and 4-digit year. Use leading zeros
before single digit months and days. For example: April
2
nd
, 2011, is entered as 04/02/2011.
„Date of Surgery‟ is a required field and must be
entered to save the Anesthesia form.
2. Medical Record Number
Enter the medical record number assigned to the
patient.
„Medical Record Number‟ is a required field and must
be entered to save the Baseline form.
DEMOGRAPHY
1. Date of Birth:
Enter the date of the birth using an 8-digit format with
the month, day and 4-digit year. Use leading zeros
before single digit months and days. For example: April
2
nd
, 2011, is entered as 04/02/2011.
„Date of Birth‟ is a required field and must be entered to
save the Anesthesia form as „Complete‟.
2. Patient Age:
Field will be automatically calculated by the EDC
system and is based on the date of surgery and the
date of birth.
3. Patient Sex:
Select whether the patient is „Male‟ or „Female‟.
„Patient Sex‟ is a required field and must be entered to
save the Anesthesia form as „Complete‟.
eCRF COMPLETION
GUIDELINES
Version 1.2; 14-July-2011 Confidential Page 9 of 55

eCRF COMPLETION
GUIDELINES
Version 1.2; 14-July-2011 Confidential Page 10 of 55
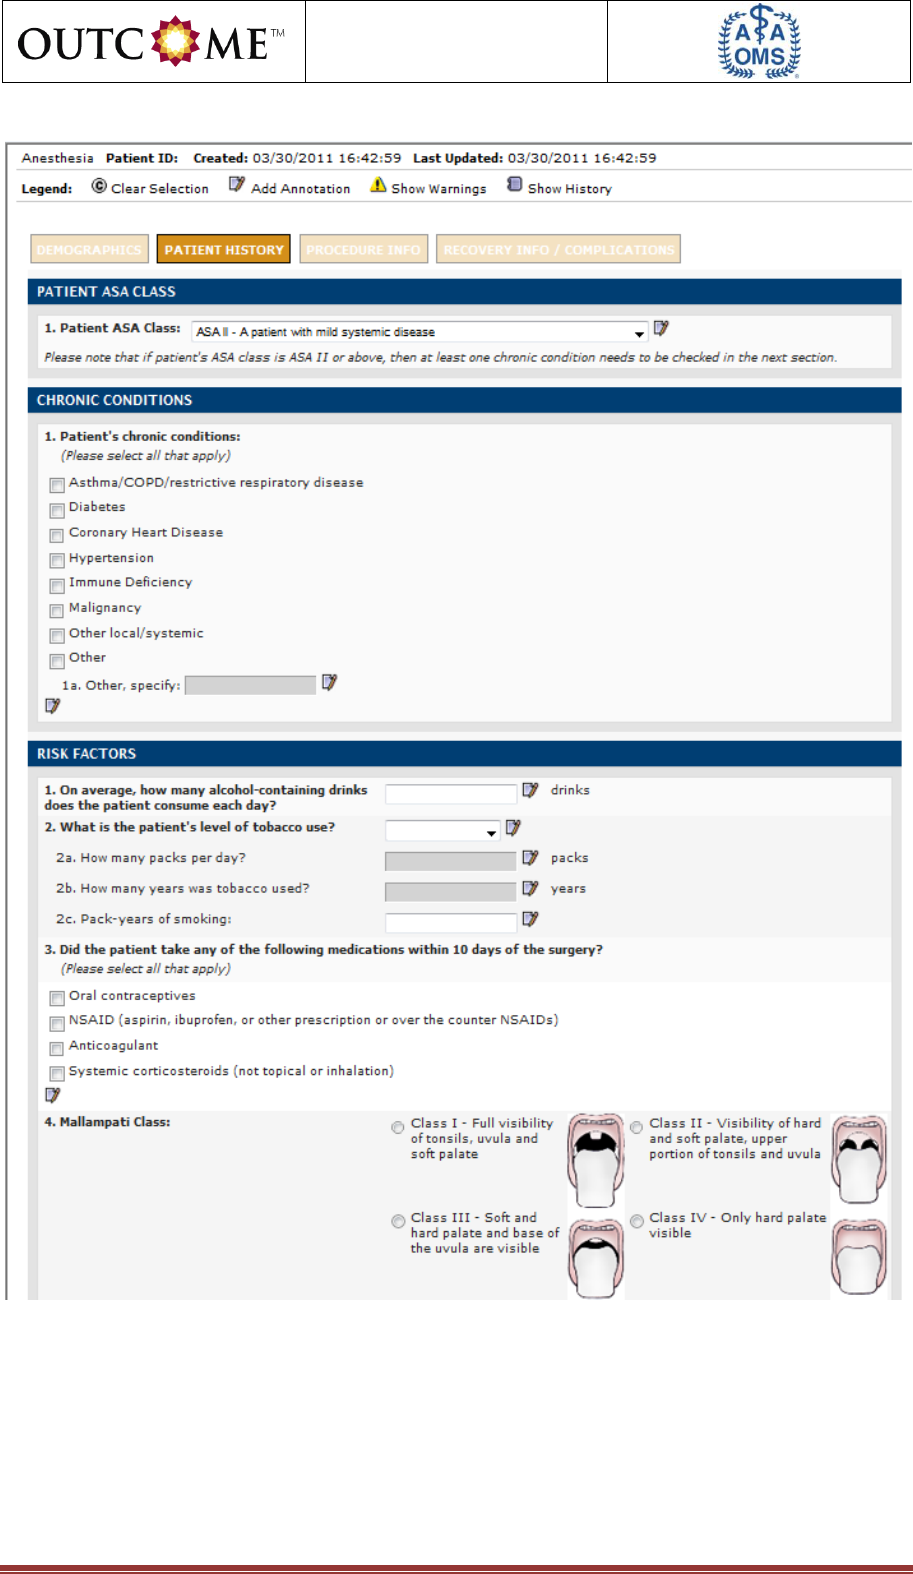
2.1.2 Patient History Tab
Field / Question
Instructions
PATIENT ASA CLASS
1. Patient ASA Class:
Select the American Society of Anesthesiologists (ASA)
physical status classification that best describes the
patient‟s clinical status at the time of surgery from the
drop-down list.
Please note that if patient's ASA class is ASA II or
above, then at least one chronic condition needs to be
checked in the next section.
„Patient ASA Class‟ is a required field and must be
entered to save the Anesthesia form as „Complete‟.
CHRONIC CONDITIONS
1. Patient's chronic conditions:
„Patient's chronic conditions‟ field will be enabled if ASA
II or above is selected for „Patient ASA Class‟.
Indicate any chronic medical conditions the patient has
at the time of surgery. Check all that apply. If the
patient has a condition(s) not included among the
options listed, check “Other”.
If ASA II or above is selected for „Patient ASA Class‟,
then at least one chronic medical condition must be
selected to save the Anesthesia form as „Complete‟.
1a. Other, specify:
„Other, specify‟ field will be enabled if “Other” is
selected for „Patient's chronic conditions‟.
If “Other” is checked for „Patient's chronic conditions‟,
you must specify the chronic medical condition(s) to
save the Anesthesia form as „Complete‟.
RISK FACTORS
1. On average, how many alcohol-
containing drinks does the patient
consume each day?
Enter the number of alcohol-containing drinks the
patient consumes each day in ##.## format. Please
enter a number greater than or equal to zero.
One drink = one oz of liquor or 1 glass of wine, or one
12 oz beer
„On average, how many alcohol-containing drinks does
the patient consume each day?‟ is a required field and
must be entered to save the Anesthesia form as
„Complete‟.
2. What is the patient's level of
tobacco use?
Select the patient's level of tobacco use at the time of
surgery from the drop-down list.
„What is the patient's level of tobacco use?‟ is a
required field and must be entered to save the
Anesthesia form as „Complete‟.

eCRF COMPLETION
GUIDELINES
Version 1.2; 14-July-2011 Confidential Page 11 of 55
Field / Question
Instructions
2a. How many packs per day?
„How many packs per day?‟ field will be enabled if “Past
Smoker” or “Current Smoker” is selected for „What is
the patient's level of tobacco use?‟.
It is acceptable to enter fractional packs. For example,
if a patient reports smoking 5 cigarettes a day, that
would be 0.25 packs per day.
If “Past Smoker” or “Current Smoker” is selected for
„What is the patient's level of tobacco use?‟, you must
enter the number of packs smoked each day in ##.##
to save the Anesthesia form as „Complete‟.
2b. How many years was tobacco
used?
„How many years was tobacco used?‟ field will be
enabled if “Past Smoker” or “Current Smoker” is
selected for „What is the patient's level of tobacco
use?‟.
It is acceptable to enter fractional years. For example,
if a patient reports smoking for two and a half years,
that would be 2.5 years.
If “Past Smoker” or “Current Smoker” is selected for
„What is the patient's level of tobacco use?‟, you must
enter the number of years tobacco was used in ##.##
to save the Anesthesia form as „Complete‟.
2c. Pack-years of smoking:
Field will be automatically calculated by the EDC
system and is based on packs smoked per day and
total years tobacco was used.
3. Did the patient take any of the
following medications within 10 days
of the surgery?
Select any medications the patient has taken within 10
days of surgery. Check all that apply. If the patient has
not taken oral contraceptives, aspirin, ibuprofen or
other non-steroidal anti-inflammatory drugs,
anticoagulants such as Coumadin, or corticosteroids,
then leave this field blank.
4. Mallampati Class:
Select the Mallampati Class that best characterizes the
patient. Refer to the diagrams provided.
„Mallampati Class‟ is a required field and must be
entered to save the Anesthesia form as „Complete‟.

eCRF COMPLETION
GUIDELINES
Version 1.2; 14-July-2011 Confidential Page 12 of 55
Field / Question
Instructions
5. Height:
Enter patient‟s height in inches or centimeters in ###.#
format. Provide units by selecting „in‟ or „cm‟. The
expected range is 39-87 in or 100-220 cm.
If the height value is outside the expected range for a
given unit, then you must validate the entry to save the
Anesthesia form as „Complete‟. This can be done by
clicking the blue „Validate‟ link that is present below the
error text in the Errors and Warnings window and
providing the validation reason in the „Validate Query‟
window.
„Height‟ is a required field and must be entered to save
the Anesthesia form as „Complete‟.
6. Weight:
Enter patient‟s weight in pounds or kilograms in ###.#
format. Provide units by selecting „lbs‟ or „kg‟. The
expected range is 66.1-330.7 lbs or 30-150 kg.
If the weight value is outside the expected range for a
given unit, then you must validate the entry to save the
Anesthesia form as „Complete‟. This can be done by
clicking the blue „Validate‟ link that is present below the
error text in the Errors and Warnings window and
providing the validation reason in the „Validate Query‟
window.
„Weight‟ is a required field and must be entered to save
the Anesthesia form as „Complete‟.
7. BMI:
Field will be automatically calculated by the EDC
system and is based on the height and weight data
entered regardless of whether it is entered in terms of
the English or metric measures.
eCRF COMPLETION
GUIDELINES
Version 1.2; 14-July-2011 Confidential Page 13 of 55

eCRF COMPLETION
GUIDELINES
Version 1.2; 14-July-2011 Confidential Page 14 of 55

eCRF COMPLETION
GUIDELINES
Version 1.2; 14-July-2011 Confidential Page 15 of 55
2.1.3 Procedure Info Tab
Field / Question
Instructions
PREOPERATIVE LEVEL OF ANXIETY
1. Patient's self-reported
preoperative level of anxiety
regarding anesthesia:
Indicate the level of the patient‟s anxiety regarding the
anesthesia before the anesthesia is administered by
selecting from the drop-down list. Obtain this
information by reading the question and response
options to the patient, and asking the patient to choose
the single best response option. Do not use your own
impression of the patient‟s level of anxiety to answer
this question.
„Patient's self-reported preoperative level of anxiety
regarding anesthesia‟ is a required field and must be
entered to save the Anesthesia form as „Complete‟.
PROCEDURES PERFORMED ON PATIENT
1. Procedures performed on patient:
Check all types of intraoral procedures that were
performed during this operative visit. Check all that
apply.
Check “None” if no procedures were
performed.
Check “3
rd
Molar Extraction” if the procedure
performed involved the third molar extraction.
Do not include extraction of retained third
molar root tips, planned coronectomy, or
supernumerary teeth.
Check “Dentoalveolar” if the procedure
performed involved teeth and supporting
structures associated with the oral cavity, other
than those associated with a third molar or
involved a coronectomy of the third molar or
removal of third molar root tips.
Check “Implant” if the procedure involved the
use of implants to rehabilitate and restore form
and function to the edentulous or partially
edentulous jaws and the craniomaxillofacial
skeleton of patients utilizing fixed or removable
prostheses, or to assist stabilization of
prostheses, which replace missing maxillofacial
parts, such as the nose, eyes, and ears.
Check “Trauma” if the procedure performed
related to treatment of injuries to teeth and/or
supporting structures or to maxillofacial
structures that occurred as a result of trauma.
Check “Pathology” if the procedure was
performed to treat diseases of the oral and
maxillofacial region, including diseases of
bone, soft tissue, or salivary glands. Such
pathologic conditions may include, for
example, cysts, benign and malignant tumors,
infections, and diseases of metabolism or
function.

eCRF COMPLETION
GUIDELINES
Version 1.2; 14-July-2011 Confidential Page 16 of 55
Field / Question
Instructions
Check “Orthognathic” if the procedure involves
surgical correction of maxillofacial skeletal
deformities, including reconstructive
procedures that correct deformities of the jaws,
facial skeleton, and associated soft tissues.
These abnormalities may be caused by
genetic, environmental, developmental,
functional, and/or pathological aberrations
apparent at birth or manifested in subsequent
growth and development, or acquired through
trauma, neoplastic processes, and
degenerative diseases.
Check “Cosmetic (non-orthognathic)” if the
procedure involved enhancing and improving
form and appearance of the maxillofacial
region.
Check “Reconstructive” if the procedure
involved surgical correction of soft and/or hard
tissue defects of the jaws, face, and contiguous
structures, including reduction, revision,
augmentation, grafting, and implantation for the
correction or replacement of defective
structures to assist in restoring functions to the
compromised patient.
Check “Diagnostic block” if the procedure
involved injection of nerve or soft tissue with
local anesthetic or other pharmaceutical in
order to determine the source of pain.
Check “TMJ” if the procedure involved
treatment of pathologic conditions involving the
temporomandibular joint.
Check “Other” if the intraoral procedure type is
not included among the options listed.
If 3
rd
molar is checked, you should complete the 3
rd
Molar Extraction eCRF upon completion of the
Anesthesia eCRF. You may complete the 3
rd
Molar
Extraction eCRF even if you have not yet completed
the Satisfaction Questionnaire eCRF.
„Procedures performed on patient‟ is a required field
and must be entered to save the Anesthesia form as
„Complete‟.

eCRF COMPLETION
GUIDELINES
Version 1.2; 14-July-2011 Confidential Page 17 of 55
Field / Question
Instructions
1a. Explain "None":
„Explain "None"‟ field will be enabled if “None” is
selected for „Procedures performed on patient‟.
There may be some circumstance where no procedure
is completed. If so, check “None” for „Procedures
performed on patient‟ and explain why the patient was
anesthetized and no procedure was completed.
If “None” is selected for „Procedures performed on
patient‟, you must enter an explanation for why no
procedures were performed to save the Anesthesia
form as „Complete‟.
1b. Other, specify:
„Other, specify‟ field will be enabled if “Other” is
selected for „Procedures performed on patient‟.
If “Other” is selected for „Procedures performed on
patient‟, you must specify the other procedure(s)
performed to save the Anesthesia form as „Complete‟.
ANESTHESIA LEVEL INDUCED
1. Deepest anesthesia level induced
in patient:
Indicate the deepest level of anesthesia obtained, even
if that level of anesthesia was obtained only transiently
or was unintended by selecting from the drop-down list.
Select only one.
Select “Local anesthesia alone” if it is the only
agent used.
Select “Minimal” if the patient responds
normally to verbal commands; cognitive
function and coordination may be impaired, but
ventilatory and cardiovascular functions are
unaffected. Per the AAOMS position paper on
enteral sedation and the use of a combination
of enteral and inhalation sedation, minimal
sedation would be “either (1) less than 50%
nitrous oxide in oxygen with no other sedative
or analgesic medications by any route with or
without local anesthesia or 2) a single, oral
sedative or analgesic medication in doses
appropriate for the unsupervised treatment of
insomnia, anxiety, or pain.“ Or “if oral agents
are used incrementally or supplemented to a
total dosage of 1.5 of the initial dose and/or
combined with nitrous oxide/oxygen” then the
level of anesthesia is beyond minimal.
Select “Moderate Sedation” if there is
depressed consciousness, but the patient
responds purposely (not simply reflex
withdrawal to painful stimuli) to verbal
commands, either alone or accompanied by
light tactile stimulation; no interventions are
required to maintain a patent airway and
spontaneous ventilation is adequate;
cardiovascular function is usually maintained.
“The administration of incremental and
supplemental doses of oral agents and the use

eCRF COMPLETION
GUIDELINES
Version 1.2; 14-July-2011 Confidential Page 18 of 55
Field / Question
Instructions
of inhalational-enteral sedation” qualifies as at
least moderate sedation.
Select “Deep Sedation” if there is depressed
consciousness, and the patient is not easily
aroused but responds purposely to repeated or
painful stimuli; ability to independently maintain
ventilatory function may be impaired; the
patient may require assistance in maintaining a
patent airway and spontaneous ventilation may
be inadequate; cardiovascular function is
usually maintained.
Select “General anesthesia” if there is a loss of
consciousness and patient is not aroused even
by painful stimuli; ability to independently
maintain ventilatory function is often impaired;
patients often require assistance in maintaining
a patent airway and positive pressure
ventilation may be required; cardiovascular
function may be impaired.
„Deepest anesthesia level induced in patient‟ is a
required field and must be entered to save the
Anesthesia form as „Complete‟.
2. Was an advanced airway
employed?
Indicate whether an advanced airway was employed by
selecting “Yes” or “No”.
„Was an advanced airway employed?‟ is a required
field and must be entered to save the Anesthesia form
as „Complete‟.
2a. If YES, type of airway device:
„If YES, type of airway device‟ field will be enabled if
“Yes” is selected for „Was an advanced airway
employed?‟.
If “Yes” is selected for „Was an advanced airway
employed?‟, you must select the type of airway device
from the drop-down list to save the Anesthesia form as
„Complete‟.
2a-1. If Other, specify:
„If Other, specify‟ field will be enabled if “Other” is
selected for „If YES, type of airway device‟.
If “Other” is selected for „If YES, type of airway device‟,
you must specify the other airway device to save the
Anesthesia form as „Complete‟.

eCRF COMPLETION
GUIDELINES
Version 1.2; 14-July-2011 Confidential Page 19 of 55
Field / Question
Instructions
2b. Was use of the airway device:
„Was use of the airway device‟ field will be enabled if
“Yes” is selected for „Was an advanced airway
employed?‟.
If “Yes” is selected for „Was an advanced airway
employed?‟, you must select whether use of an
advanced airway device was one of the following to
save the Anesthesia form as „Complete‟:
“Elective” - planned prior to the first
administration of anesthetic
“Emergent” - performed after the first
administration of anesthesia on an emergency
basis
2b-1. Describe emergent
circumstances:
„Describe emergent circumstances‟ field will be enabled
if “Emergent” is selected for „Was use of the airway
device:‟.
If “Emergent” is selected for „Was use of the airway
device:‟, you must describe emergent circumstances to
save the Anesthesia form as „Complete‟.
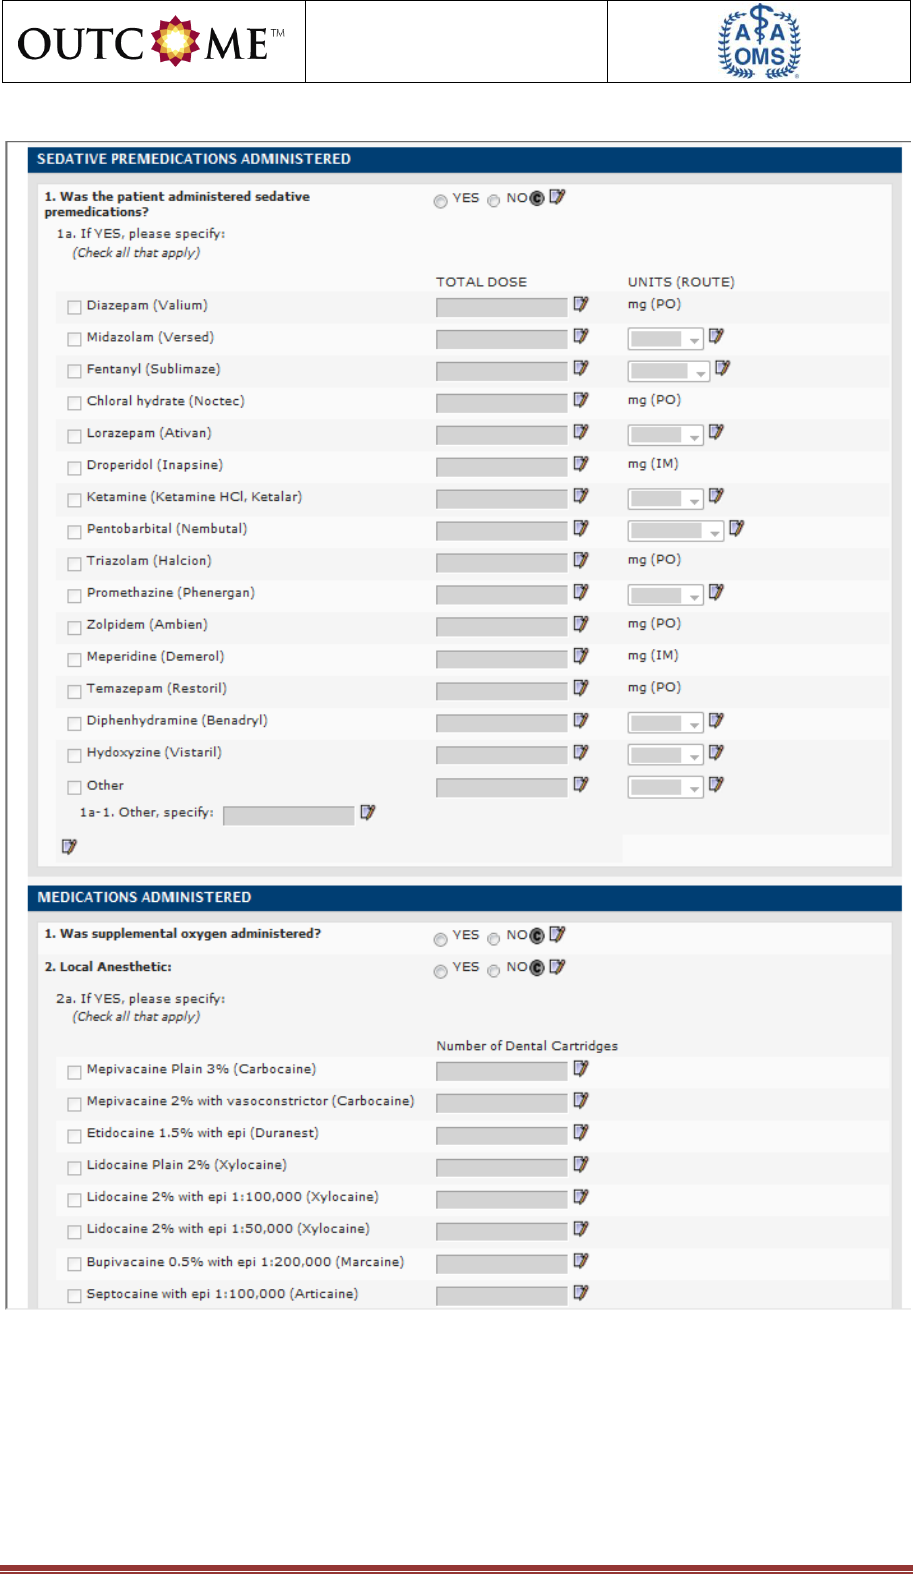
SEDATIVE PREMEDICATIONS ADMINISTERED
1. Was the patient administered
sedative premedications?
Indicate if patient was administered sedative
premedications by selecting “Yes” or “No”.
„Was the patient administered sedative
premedications?‟ is a required field and must be
entered to save the Anesthesia form as „Complete‟.

eCRF COMPLETION
GUIDELINES
Version 1.2; 14-July-2011 Confidential Page 20 of 55
Field / Question
Instructions
1a. If YES, please specify:
TOTAL DOSE
UNITS (ROUTE)
„If YES, please specify‟ field will be enabled if “Yes” is
selected for „Was the patient administered sedative
premedications?‟.
Select each drug administered as a sedative
premedication for the surgical procedure. Check all
that apply. If an agent other than those listed was
given, check “Other”.
If “Yes” is selected for „Was the patient administered
sedative premedications?‟, you must select at least one
agent to save the Anesthesia form as „Complete‟.
Individual „TOTAL DOSE‟ fields will be enabled if
corresponding agent is selected.
If corresponding agent is selected, you must specify
total dose to save the Anesthesia form as „Complete‟.
Individual „UNITS (ROUTE)‟ fields will be enabled (if
applicable) if corresponding agent is selected.
If corresponding agent is selected, you must specify
units and route to save the Anesthesia form as
„Complete‟.
If the total dose value is outside the expected range for
a given unit, then you must validate the entry to save
the Anesthesia form as „Complete‟. This can be done
by clicking the blue „Validate‟ link that is present below
the error text in the Errors and Warnings window and
providing the validation reason in the „Validate Query‟
window.
1a-1. Other, specify:
„Other, specify‟ field will be enabled if “Other” is
selected for „If YES, please specify‟.
If “Other” is checked for „If YES, please specify‟, you
must specify the sedative premedication to save the
Anesthesia form as „Complete‟.
MEDICATIONS ADMINISTERED
1. Was supplemental oxygen
administered?
Indicate if patient was administered supplemental
oxygen by selecting “Yes” or “No”.
„Was supplemental oxygen administered?‟ is a required
field and must be entered to save the Anesthesia form
as „Complete‟.

eCRF COMPLETION
GUIDELINES
Version 1.2; 14-July-2011 Confidential Page 21 of 55
Field / Question
Instructions
2. Local Anesthetic:
Indicate if patient was administered local anesthetic by
selecting “Yes” or “No”.
„Local Anesthetic‟ is a required field and must be
entered to save the Anesthesia form as „Complete‟.
2a. If YES, please specify:
Number of Dental Cartridges
„If YES, please specify‟ field will be enabled if “Yes” is
selected for „Local Anesthetic‟.
Select each drug administered as a local anesthetic for
the surgical procedure. Check all that apply. If an
agent other than those listed was given, check “Other”.
If “Yes” is selected for „Local Anesthetic‟, you must
select at least one agent to save the Anesthesia form
as „Complete‟.
Individual „Number of Dental Cartridges‟ fields will be
enabled if corresponding agent is selected.
If corresponding agent is selected, you must specify
number of dental cartridges to save the Anesthesia
form as „Complete‟.
If the number of dental cartridges value is outside the
expected range, then you must validate the entry to
save the Anesthesia form as „Complete‟. This can be
done by clicking the blue „Validate‟ link that is present
below the error text in the Errors and Warnings window
and providing the validation reason in the „Validate
Query‟ window.
2a-1. Other, specify:
„Other, specify‟ field will be enabled if “Other” is
selected for „If YES, please specify‟.
If “Other” is checked for „If YES, please specify‟, you
must specify the local anesthetic to save the
Anesthesia form as „Complete‟.
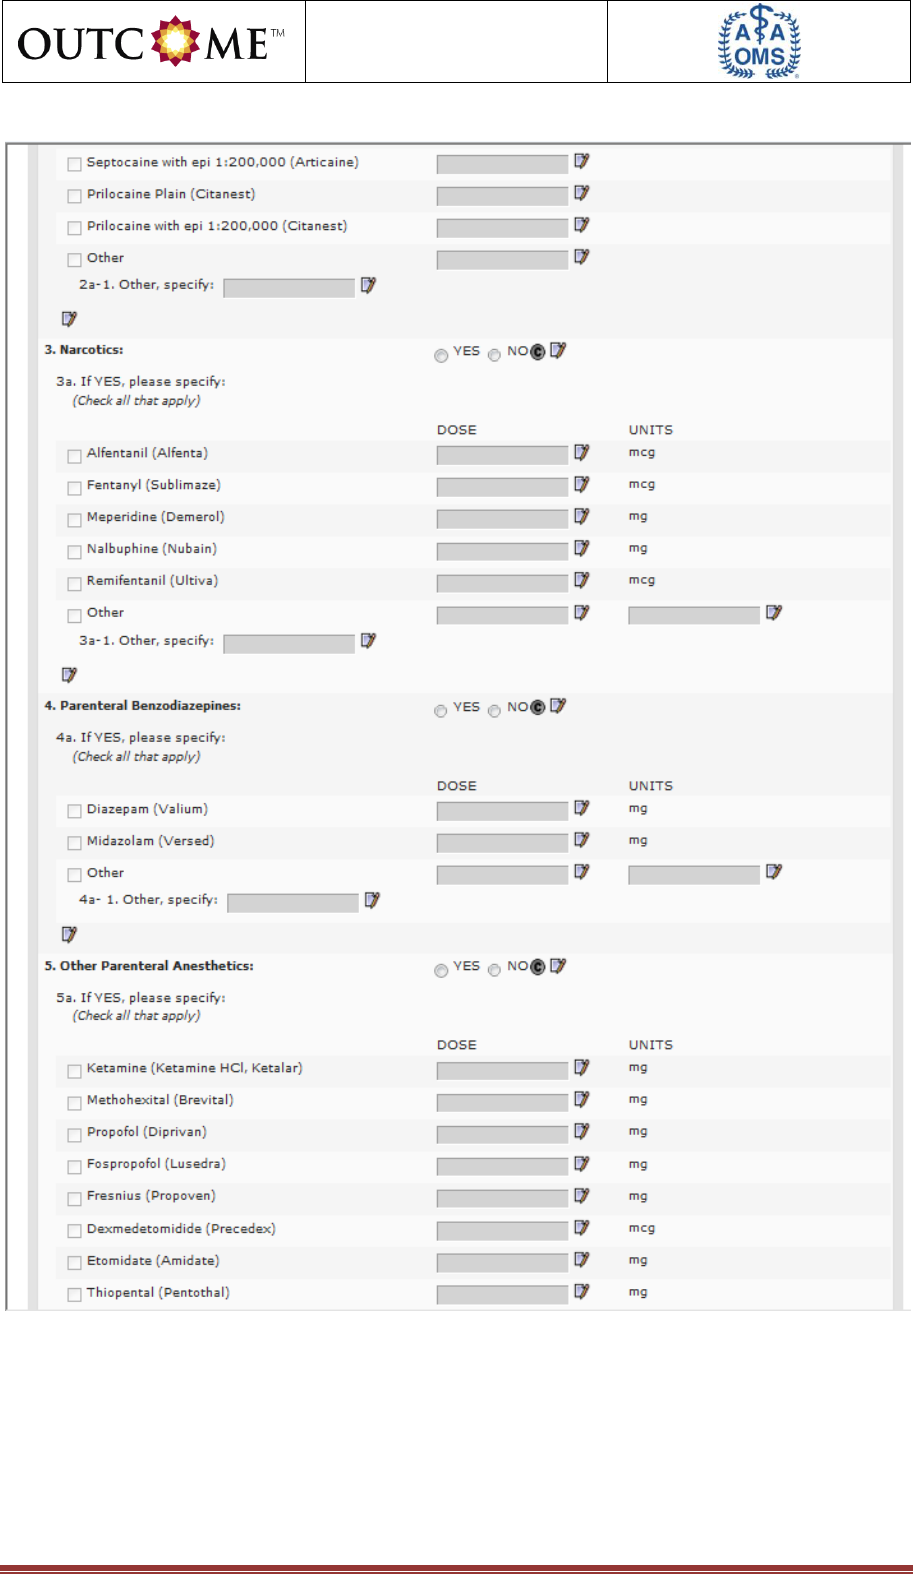
3. Narcotics:
Indicate if patient was administered narcotics by
selecting “Yes” or “No”.
„Narcotics‟ is a required field and must be entered to
save the Anesthesia form as „Complete‟.

eCRF COMPLETION
GUIDELINES
Version 1.2; 14-July-2011 Confidential Page 22 of 55
Field / Question
Instructions
3a. If YES, please specify:
DOSE
UNITS
„If YES, please specify‟ field will be enabled if “Yes” is
selected for „Narcotics‟.
Select each drug administered as a narcotic for the
surgical procedure. Check all that apply. If an agent
other than those listed was given, check “Other”.
If “Yes” is selected for „Narcotics‟, you must select at
least one agent to save the Anesthesia form as
„Complete‟.
Individual „DOSE‟ fields will be enabled if
corresponding agent is selected.
If corresponding agent is selected, you must specify
dose to save the Anesthesia form as „Complete‟.
Individual „UNITS‟ fields will be enabled (if applicable) if
corresponding agent is selected.
If corresponding agent is selected, you must specify
units to save the Anesthesia form as „Complete‟.
If the dose value is outside the expected range for a
given unit, then you must validate the entry to save the
Anesthesia form as „Complete‟. This can be done by
clicking the blue „Validate‟ link that is present below the
error text in the Errors and Warnings window and
providing the validation reason in the „Validate Query‟
window.
3a-1. Other, specify:
„Other, specify‟ field will be enabled if “Other” is
selected for „If YES, please specify‟.
If “Other” is checked for „If YES, please specify‟, you
must specify the narcotic to save the Anesthesia form
as „Complete‟.
4. Parenteral Benzodiazepines:
Indicate if patient was administered parenteral
benzodiazepines by selecting “Yes” or “No”.
„Parenteral Benzodiazepines‟ is a required field and
must be entered to save the Anesthesia form as
„Complete‟.

eCRF COMPLETION
GUIDELINES
Version 1.2; 14-July-2011 Confidential Page 23 of 55
Field / Question
Instructions
4a. If YES, please specify:
DOSE
UNITS
„If YES, please specify‟ field will be enabled if “Yes” is
selected for „Parenteral Benzodiazepines‟.
Select each drug administered as a parenteral
benzodiazepine for the surgical procedure. Check all
that apply. If an agent other than those listed was
given, check “Other”.
If “Yes” is selected for „Parenteral Benzodiazepines‟,
you must select at least one agent to save the
Anesthesia form as „Complete‟.
Individual „DOSE‟ fields will be enabled if
corresponding agent is selected.
If corresponding agent is selected, you must specify
dose to save the Anesthesia form as „Complete‟.
Individual „UNITS‟ fields will be enabled (if applicable) if
corresponding agent is selected.
If corresponding agent is selected, you must specify
units to save the Anesthesia form as „Complete‟.
If the dose value is outside the expected range for a
given unit, then you must validate the entry to save the
Anesthesia form as „Complete‟. This can be done by
clicking the blue „Validate‟ link that is present below the
error text in the Errors and Warnings window and
providing the validation reason in the „Validate Query‟
window.
4a- 1. Other, specify:
„Other, specify‟ field will be enabled if “Other” is
selected for „If YES, please specify‟.
If “Other” is checked for „If YES, please specify‟, you
must specify the parenteral benzodiazepine to save the
Anesthesia form as „Complete‟.
5. Other Parenteral Anesthetics:
Indicate if patient was administered other parenteral
anesthetics by selecting “Yes” or “No”.
„Other Parenteral Anesthetics‟ is a required field and
must be entered to save the Anesthesia form as
„Complete‟.

eCRF COMPLETION
GUIDELINES
Version 1.2; 14-July-2011 Confidential Page 24 of 55
Field / Question
Instructions
5a. If YES, please specify:
DOSE
UNITS
„If YES, please specify‟ field will be enabled if “Yes” is
selected for „Other Parenteral Anesthetics‟.
Select each drug administered as an other parenteral
anesthetic for the surgical procedure. Check all that
apply. If an agent other than those listed was given,
check “Other”.
If “Yes” is selected for „Other Parenteral Anesthetics‟,
you must select at least one agent to save the
Anesthesia form as „Complete‟.
Individual „DOSE‟ fields will be enabled if
corresponding agent is selected.
If corresponding agent is selected, you must specify
dose to save the Anesthesia form as „Complete‟.
Individual „UNITS‟ fields will be enabled (if applicable) if
corresponding agent is selected.
If corresponding agent is selected, you must specify
units to save the Anesthesia form as „Complete‟.
If the dose value is outside the expected range for a
given unit, then you must validate the entry to save the
Anesthesia form as „Complete‟. This can be done by
clicking the blue „Validate‟ link that is present below the
error text in the Errors and Warnings window and
providing the validation reason in the „Validate Query‟
window.
5a-1. Other, specify:
„Other, specify‟ field will be enabled if “Other” is
selected for „If YES, please specify‟.
If “Other” is checked for „If YES, please specify‟, you
must specify the other parenteral anesthetic to save the
Anesthesia form as „Complete‟.
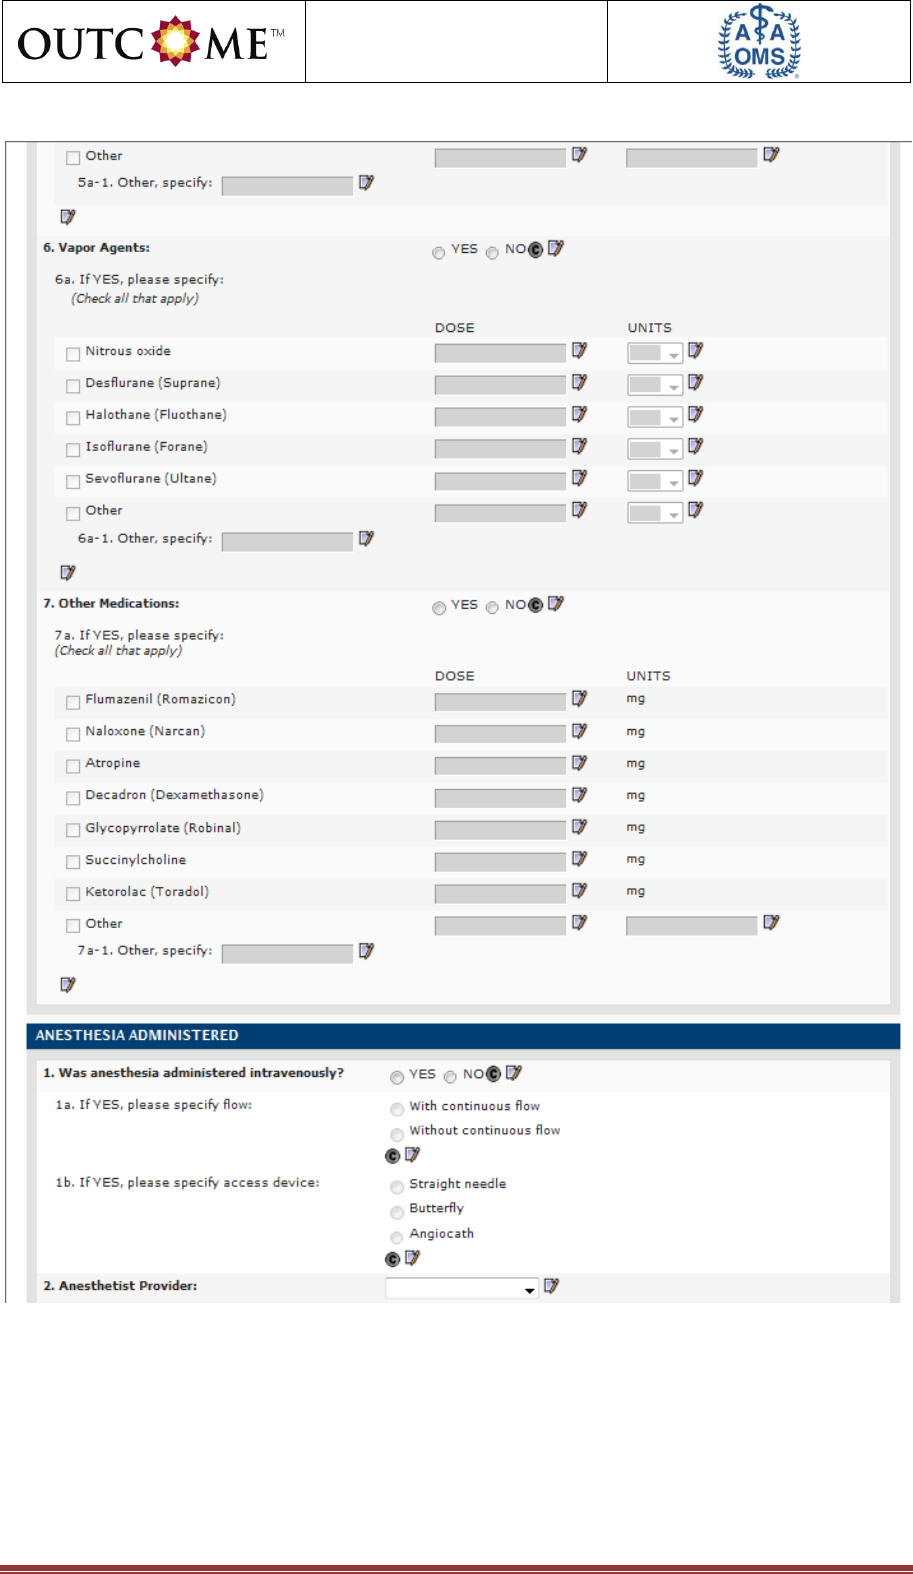
6. Vapor Agents:
Indicate if patient was administered vapor agents by
selecting “Yes” or “No”.
„Vapor Agents‟ is a required field and must be entered
to save the Anesthesia form as „Complete‟.

eCRF COMPLETION
GUIDELINES
Version 1.2; 14-July-2011 Confidential Page 25 of 55
Field / Question
Instructions
6a. If YES, please specify:
DOSE
UNITS
„If YES, please specify‟ field will be enabled if “Yes” is
selected for „Vapor Agents‟.
Select each drug administered as a vapor agent for the
surgical procedure. Check all that apply. If an agent
other than those listed was given, check “Other”.
If “Yes” is selected for „Vapor Agents‟, you must select
at least one agent to save the Anesthesia form as
„Complete‟.
Individual „DOSE‟ fields will be enabled if
corresponding agent is selected.
Enter the maximum dose of a vapor anesthetic agent
used even if the maximum dose is used only briefly.
If corresponding agent is selected, you must specify
dose to save the Anesthesia form as „Complete‟.
Individual „UNITS‟ fields will be enabled if
corresponding agent is selected.
If corresponding agent is selected, you must specify
units to save the Anesthesia form as „Complete‟.
If the dose value is outside the expected range for a
given unit, then you must validate the entry to save the
Anesthesia form as „Complete‟. This can be done by
clicking the blue „Validate‟ link that is present below the
error text in the Errors and Warnings window and
providing the validation reason in the „Validate Query‟
window.
6a-1. Other, specify:
„Other, specify‟ field will be enabled if “Other” is
selected for „If YES, please specify‟.
If “Other” is checked for „If YES, please specify‟, you
must specify the vapor agent to save the Anesthesia
form as „Complete‟.
7. Other Medications:
Indicate if patient was administered other medications
by selecting “Yes” or “No”.
„Other Medications‟ is a required field and must be
entered to save the Anesthesia form as „Complete‟.

eCRF COMPLETION
GUIDELINES
Version 1.2; 14-July-2011 Confidential Page 26 of 55
Field / Question
Instructions
7a. If YES, please specify:
DOSE
UNITS
„If YES, please specify‟ field will be enabled if “Yes” is
selected for „Other Medications‟.
Select each drug administered as an other medication
for the surgical procedure. Check all that apply. If an
agent other than those listed was given, check “Other”.
If “Yes” is selected for „Other Medications‟, you must
select at least one agent to save the Anesthesia form
as „Complete‟.
Individual „DOSE‟ fields will be enabled if
corresponding agent is selected.
If corresponding agent is selected, you must specify
dose to save the Anesthesia form as „Complete‟.
Individual „UNITS‟ fields will be enabled (if applicable) if
corresponding agent is selected.
If corresponding agent is selected, you must specify
units to save the Anesthesia form as „Complete‟.
If the dose value is outside the expected range for a
given unit, then you must validate the entry to save the
Anesthesia form as „Complete‟. This can be done by
clicking the blue „Validate‟ link that is present below the
error text in the Errors and Warnings window and
providing the validation reason in the „Validate Query‟
window.
7a-1. Other, specify:
„Other, specify‟ field will be enabled if “Other” is
selected for „If YES, please specify‟.
If “Other” is checked for „If YES, please specify‟, you
must specify the other medication to save the
Anesthesia form as „Complete‟.
ANESTHESIA ADMINISTERED
1. Was anesthesia administered
intravenously?
Indicate whether anesthesia was administered
intravenously by selecting “Yes” or “No”.
„Was anesthesia administered intravenously?‟ is a
required field and must be entered to save the
Anesthesia form as „Complete‟.
1a. If YES, please specify flow:
„If YES, please specify flow‟ field will be enabled if
“Yes” is selected for „Was anesthesia administered
intravenously?‟.
If “Yes” is selected for „Was anesthesia administered
intravenously?‟, you must specify the flow by selecting
from the drop-down list to save the Anesthesia form as
„Complete‟.

eCRF COMPLETION
GUIDELINES
Version 1.2; 14-July-2011 Confidential Page 27 of 55
Field / Question
Instructions
1b. If YES, please specify access
device:
„If YES, please specify access device‟ field will be
enabled if “Yes” is selected for „Was anesthesia
administered intravenously?‟.
If “Yes” is selected for „Was anesthesia administered
intravenously?‟, you must select the access device type
to save the Anesthesia form as „Complete‟.
2. Anesthetist Provider:
Indicate the anesthetist provider by selecting from the
drop-down list.
„Anesthetist Provider‟ is a required field and must be
entered to save the Anesthesia form as „Complete‟.
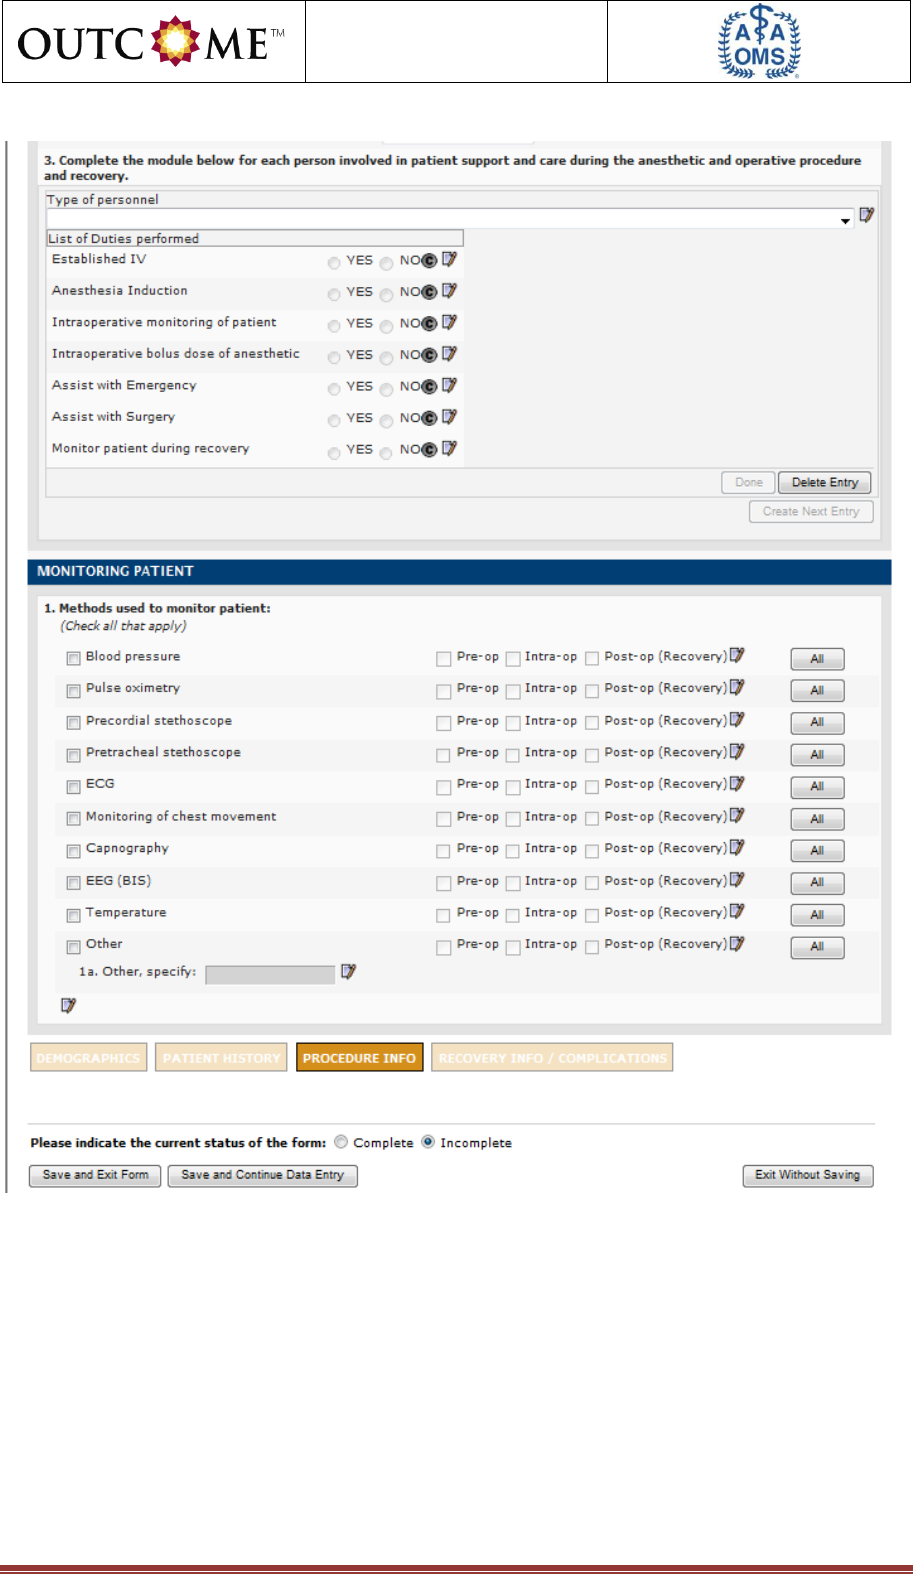
3. Complete the module below for
each person involved in patient
support and care during the
anesthetic and operative procedure
and recovery.
Question 3 is a repeat group. Each created entry
group is meant to capture the details for an individual
involved in patient support and care during the
anesthetic and operative procedure and recovery.
To add more people involved in patient support and
care during the anesthetic and operative procedure and
recovery, click „Done‟ after the first entry is completed
and then click the „Create Next Entry‟ button to open a
new blank record.
Type of personnel
Indicate the type of personnel by selecting from the
drop-down list.
List of Duties performed
„List of Duties performed‟ fields will be enabled if „Type
of personnel‟ is selected.
If „Type of personnel‟ is selected, you must select either
“Yes” or “No” for each potential duty to save the
Anesthesia form as „Complete‟.
MONITORING PATIENT
1. Methods used to monitor patient:
Select any methods used to monitor the patient. Check
all that apply.
Individual monitoring timing fields will be enabled if
corresponding method used to monitor the patient is
selected. Check all that apply. If a method was used
during pre-op, intra-op, and post-op, clicking the “All”
button will automatically check each individual option.
If corresponding method used to monitor the patient is
selected, you must specify monitoring timing(s) to save
the Anesthesia form as „Complete‟.
1a. Other, specify:
„Other, specify‟ field will be enabled if “Other” is
selected for „Methods used to monitor patient‟.
If “Other” is checked for „Methods used to monitor
patient‟, you must specify the other method used to
monitor the patient to save the Anesthesia form as
„Complete‟.

eCRF COMPLETION
GUIDELINES
Version 1.2; 14-July-2011 Confidential Page 28 of 55
eCRF COMPLETION
GUIDELINES
Version 1.2; 14-July-2011 Confidential Page 29 of 55
eCRF COMPLETION
GUIDELINES
Version 1.2; 14-July-2011 Confidential Page 30 of 55
eCRF COMPLETION
GUIDELINES
Version 1.2; 14-July-2011 Confidential Page 31 of 55
eCRF COMPLETION
GUIDELINES
Version 1.2; 14-July-2011 Confidential Page 32 of 55

eCRF COMPLETION
GUIDELINES
Version 1.2; 14-July-2011 Confidential Page 33 of 55
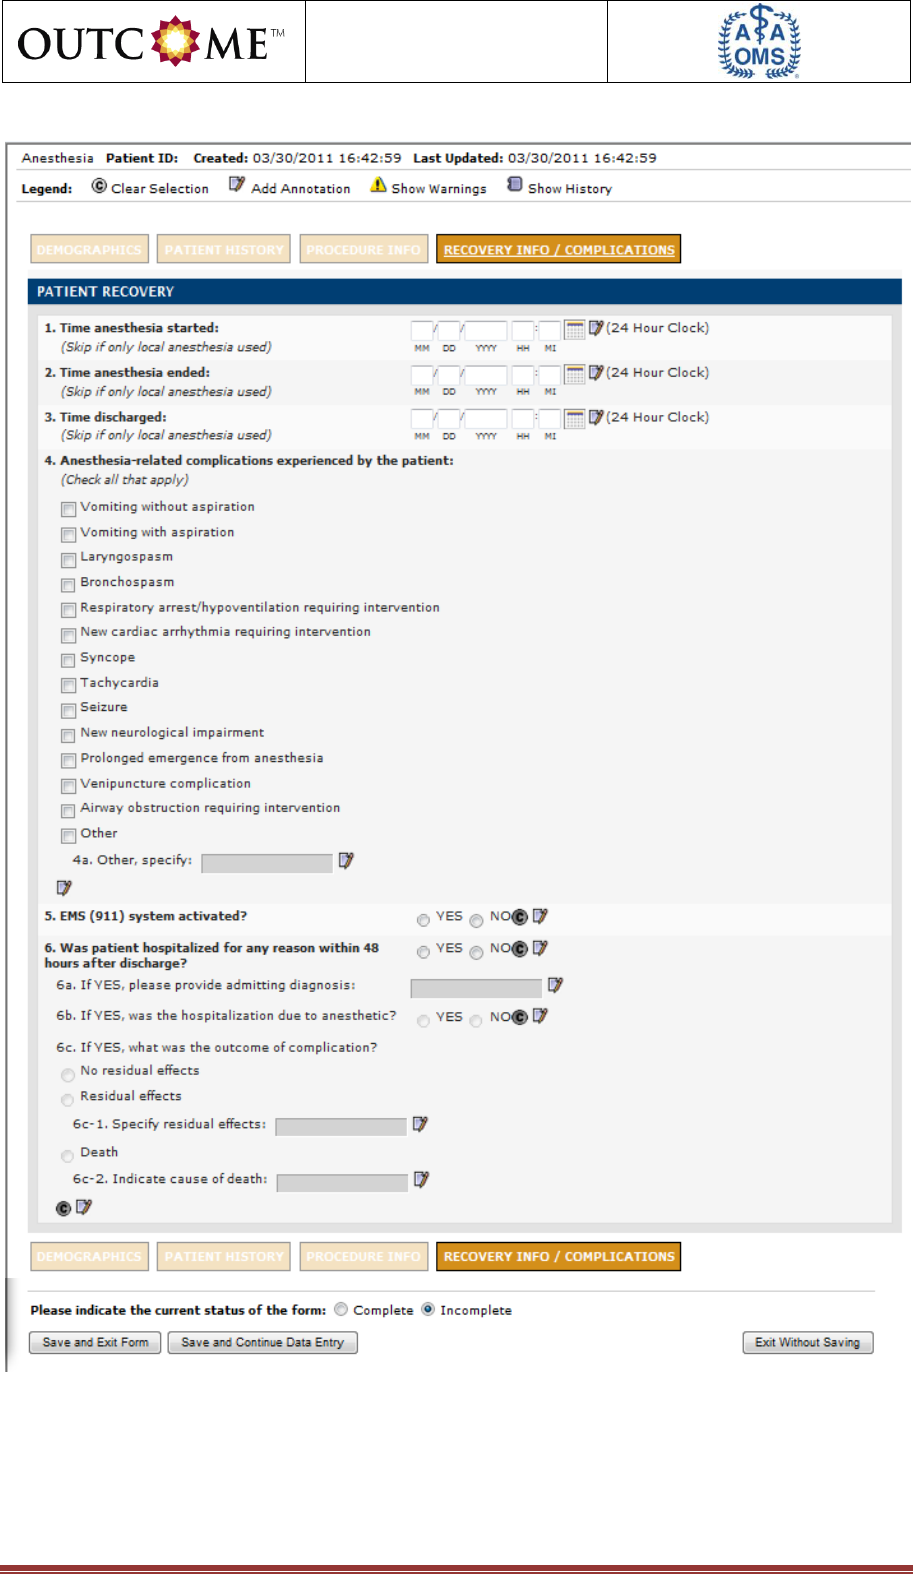
2.1.4 Recovery Info / Complications Tab
Field / Question
Instructions
PATIENT RECOVERY
1. Time anesthesia started:
„Time anesthesia started‟ field will be enabled if anything
other than “Local anesthesia alone” is selected for
„Deepest anesthesia level induced in patient‟ on the
Procedure Info tab.
If anything other than “Local anesthesia alone” is selected
for „Deepest anesthesia level induced in patient‟ on the
Procedure Info tab, please specify the time anesthesia
started (time at which an enteral, inhalation, or
intravenous medication is initially administered with
the intent to begin inducing the planned anesthetic) in
HH:MM format (24 Hour Clock) to save the Anesthesia
form as „Complete‟.
2. Time anesthesia ended:
„Time anesthesia ended‟ field will be enabled if anything
other than “Local anesthesia alone” is selected for
„Deepest anesthesia level induced in patient‟ on the
Procedure Info tab.
If anything other than “Local anesthesia alone” is selected
for „Deepest anesthesia level induced in patient‟ on the
Procedure Info tab, you must specify the time anesthesia
ended (The time at which the surgeon (or anesthetist)
transfers care to the recovery room personnel as
evidenced by his/her leaving the treatment
room/operative suite) in HH:MM format (24 Hour Clock)
to save the Anesthesia form as „Complete‟.
3. Time discharged:
„Time discharged‟ field will be enabled if anything other
than “Local anesthesia alone” is selected for „Deepest
anesthesia level induced in patient‟ on the Procedure Info
tab.
Time discharged is the time the patient is medically
cleared for discharge and should not include any
additional time that a patient may wait for the
designated responsible person to bring the patient
home.
If anything other than “Local anesthesia alone” is selected
for „Deepest anesthesia level induced in patient‟ on the
Procedure Info tab, you must specify the time discharged
in HH:MM format (24 Hour Clock) to save the Anesthesia
form as „Complete‟.

eCRF COMPLETION
GUIDELINES
Version 1.2; 14-July-2011 Confidential Page 34 of 55
4. Anesthesia-related complications
experienced by the patient:
Select any anesthesia-related complications experienced
by the patient, whether the complications were transient
or were associated with residual adverse effects. Check
all that apply. Check “Prolonged emergence from
anesthesia”, if emergence occurred beyond the time you
deemed appropriate for the particular patient and
procedure under consideration. Check “Other” if a
complication occurred that is not included in the list
provided. If none, leave this field blank.
4a. Other, specify:
„Other, specify‟ field will be enabled if “Other” is selected
for „Anesthesia-related complications experienced by the
patient‟.
If “Other” is checked for „Anesthesia-related complications
experienced by the patient‟, you must specify the
anesthesia-related complications experienced by the
patient to save the Anesthesia form as „Complete‟.
5. EMS (911) system activated?
Indicate whether EMS (911) system activated by
selecting “Yes” or “No”.
„EMS (911) system activated?‟ is a required field and
must be entered to save the Anesthesia form as
„Complete‟.
6. Was patient hospitalized for any
reason within 48 hours after
discharge?
Indicate whether patient hospitalized for any reason
within 48 hours after discharge by selecting “Yes” or “No”.
„Was patient hospitalized for any reason within 48 hours
after discharge?‟ is a required field and must be entered
to save the Anesthesia form as „Complete‟.
6a. If YES, please provide admitting
diagnosis:
„If YES, please provide admitting diagnosis‟ field will be
enabled if “Yes” is selected for „Was patient hospitalized
for any reason within 48 hours after discharge?‟.
If “Yes” is selected for „Was patient hospitalized for any
reason within 48 hours after discharge?‟, you must
provide admitting diagnosis to save the Anesthesia form
as „Complete‟.
6b. If YES, was the hospitalization
due to anesthetic?
„If YES, was the hospitalization due to anesthetic?‟ field
will be enabled if “Yes” is selected for „Was patient
hospitalized for any reason within 48 hours after
discharge?‟.
If “Yes” is selected for „Was patient hospitalized for any
reason within 48 hours after discharge?‟, you must
specify if the hospitalization was due to the anesthetic by
selecting “Yes” or “No” to save the Anesthesia form as
„Complete‟.

eCRF COMPLETION
GUIDELINES
Version 1.2; 14-July-2011 Confidential Page 35 of 55
6c. If YES, what was the outcome of
complication?
„If YES, what was the outcome of complication?‟ field will
be enabled if “Yes” is selected for „Was patient
hospitalized for any reason within 48 hours after
discharge?‟.
If the patient fully recovered, mark “No residual effects”. If
the patient recovered but suffered residual adverse
effects as a result of the complication, mark “Residual
Effects”. If the patient died, mark “Death”
If “Yes” is selected for „Was patient hospitalized for any
reason within 48 hours after discharge?‟, you must
specify if the outcome of complication to save the
Anesthesia form as „Complete‟.
6c-1. Specify residual effects:
„Specify residual effects‟ field will be enabled if “Residual
effects” is selected for „If YES, what was the outcome of
complication?‟.
If “Residual effects” is selected for „If YES, what was the
outcome of complication?‟, you must specify the residual
effects to save the Anesthesia form as „Complete‟.
6c-2. Indicate cause of death:
„Indicate cause of death‟ field will be enabled if “Death” is
selected for „If YES, what was the outcome of
complication?‟.
The cause you enter may or may not be the immediate
cause of death listed on the death certificate. For
example, if a patient arrests and dies following severe
hemorrhage, the primary cause of death listed on the
death certificate may be cardiorespiratory arrest, but the
underlying reason the patient went into arrest was
exsanguination. In this case, you would record
exsanguination as the cause of death. Similarly, for a
patient who arrested and died as a result of fulminant
sepsis, you should record sepsis as the cause of death.
If “Death” is selected for „If YES, what was the outcome of
complication?‟, you must specify the cause of death to
save the Anesthesia form as „Complete‟.
eCRF COMPLETION
GUIDELINES
Version 1.2; 14-July-2011 Confidential Page 36 of 55

eCRF COMPLETION
GUIDELINES
Version 1.2; 14-July-2011 Confidential Page 37 of 55
2.2 3
rd
Molar Extraction Form
2.2.1 3
rd
Molar Extraction Tab
Field / Question
Instructions
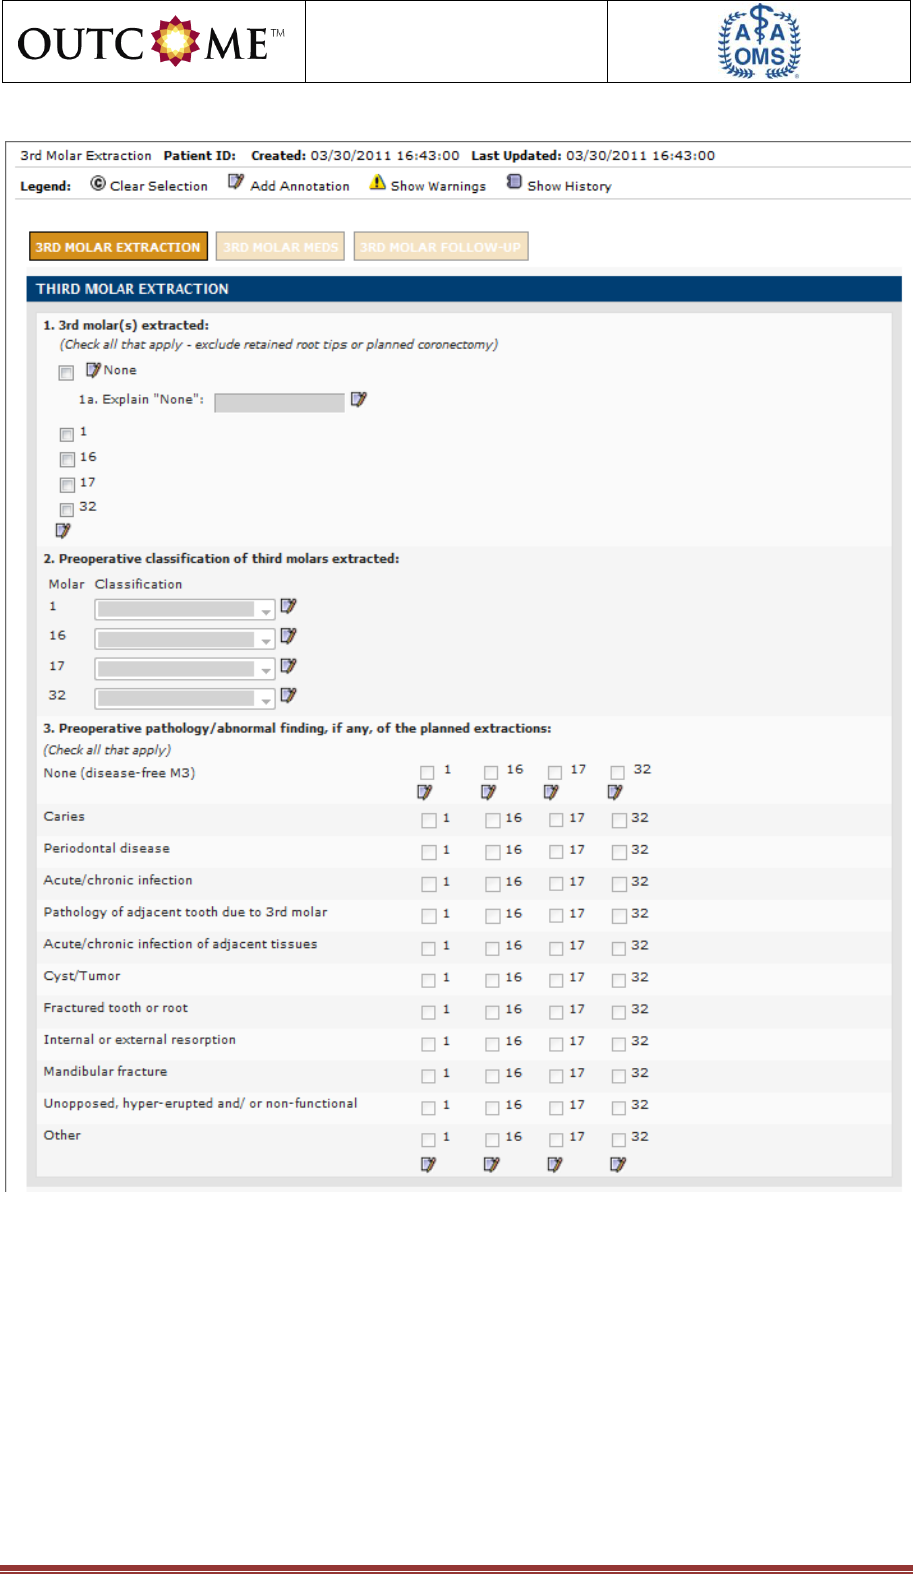
THIRD MOLAR EXTRACTION
1. 3rd molar(s) extracted:
Indicate the 3rd molar(s) extracted by selecting from
the available options. Check all that apply, excluding
retained root tips, planned coronectomy, or
supernumerary teeth. If 3
rd
molar extraction was
planned, however, no 3
rd
molars are extracted, then
check “None”.
„3rd molar(s) extracted‟ is a required field and must be
entered to save the 3
rd
Molar Extraction form as
„Complete‟.
1a. Explain "None":
„Explain "None"‟ field will be enabled if “None” is
selected for „3rd molar(s) extracted‟.
There may be some circumstance where no 3
rd
molars
are extracted, e.g. procedure aborted after inducing or
administering anesthesia. In this circumstance, check
“None” for „3rd molar(s) extracted‟ and explain briefly
why no 3
rd
molars were removed.
If “None” is selected for „3rd molar(s) extracted‟, you
must enter an explanation for why no 3rd molar(s) were
extracted to save the 3
rd
Molar Extraction form as
„Complete‟.
2. Preoperative ADA billing code
classification of third molars
extracted:
Individual „Preoperative classification of third molars
extracted‟ fields will be enabled if corresponding molar
is selected for „3rd molar(s) extracted‟.
Indicate the preoperative classification of the 3
rd
molars
extracted using the ADA codes based on clinical and
radiologic findings. The third molar is considered
erupted if it is so positioned that the entire clinical
crown is visible, all five surfaces of the tooth can be
examined for caries, and there is attached gingival all
around the tooth. If the tooth does not meet the
definition of an erupted tooth, it is considered an
impacted tooth. There is no definition of a “partially
impacted tooth”.
Select “Erupted - surgical D7210” if a
mucoperiosteal flap is elevated or the tooth
sectioned or bone removed.
Select “Erupted - nonsurgical D7140” if the
tooth is removed without making a soft tissue
incision or sectioning the tooth or removing
bone.
Select “Soft tissue - D7220” if the occlusal
surface of tooth partially or completely covered
by soft tissues; requires mucoperiosteal flap

eCRF COMPLETION
GUIDELINES
Version 1.2; 14-July-2011 Confidential Page 38 of 55
Field / Question
Instructions
elevation.
Select “Partial bony - D7230” if part of the
crown is covered by bone; requires
mucoperiosteal flap elevation and bone
removal.
Select “Full bony - D7240” if most or all of
crown covered by bone; requires
mucoperiosteal flap elevation and bone
removal.
Select “Full bony - difficult - D7241” if most or
all of the crown is covered by bone, requires
mucoperiosteal flap, bone removal, and is
difficult.
If corresponding molar is selected for „3rd molar(s)
extracted‟, you must specify the preoperative
classification of the molar by selecting from the drop-
down list to save the 3
rd
Molar Extraction form as
„Complete‟.
3. Preoperative pathology/abnormal
finding, if any, of the planned
extractions:
Individual „Preoperative pathology/abnormal finding, if
any, of the planned extractions‟ fields will be enabled if
corresponding molar is selected for „3rd molar(s)
extracted‟. Check all that apply. Check the molar
number in the “None (disease-free M3)” row if the
planned extractor is disease free. Check the molar
number in the “Caries” row if decay is present that
involves more than one surface of the planned
extractor with or without pulpal involvement. Check the
molar number in the “Periodontal disease” row if the
planned extractor is associated with periodontitis with
advanced destruction, defined as presence of
periodontal probing depths greater than 4 mm or
radiologic evidence of bone loss. Check the molar
number in the “Pathology of adjacent tooth due to 3rd
molar” row if preoperative pathology/abnormal finding is
found in tooth adjacent and due to planned extractor.
Examples include caries, root resorption, and periapical
infection. Check the molar number in the “Other” row if
planned extractor is associated with preoperative
pathology/abnormal finding(s) that are not included
among the options listed.
If corresponding molar is selected for „3rd molar(s)
extracted‟, you must specify the preoperative
pathology/abnormal finding, if any, of the planned
extractions to save the 3
rd
Molar Extraction form as
„Complete‟.

eCRF COMPLETION
GUIDELINES
Version 1.2; 14-July-2011 Confidential Page 39 of 55
Field / Question
Instructions
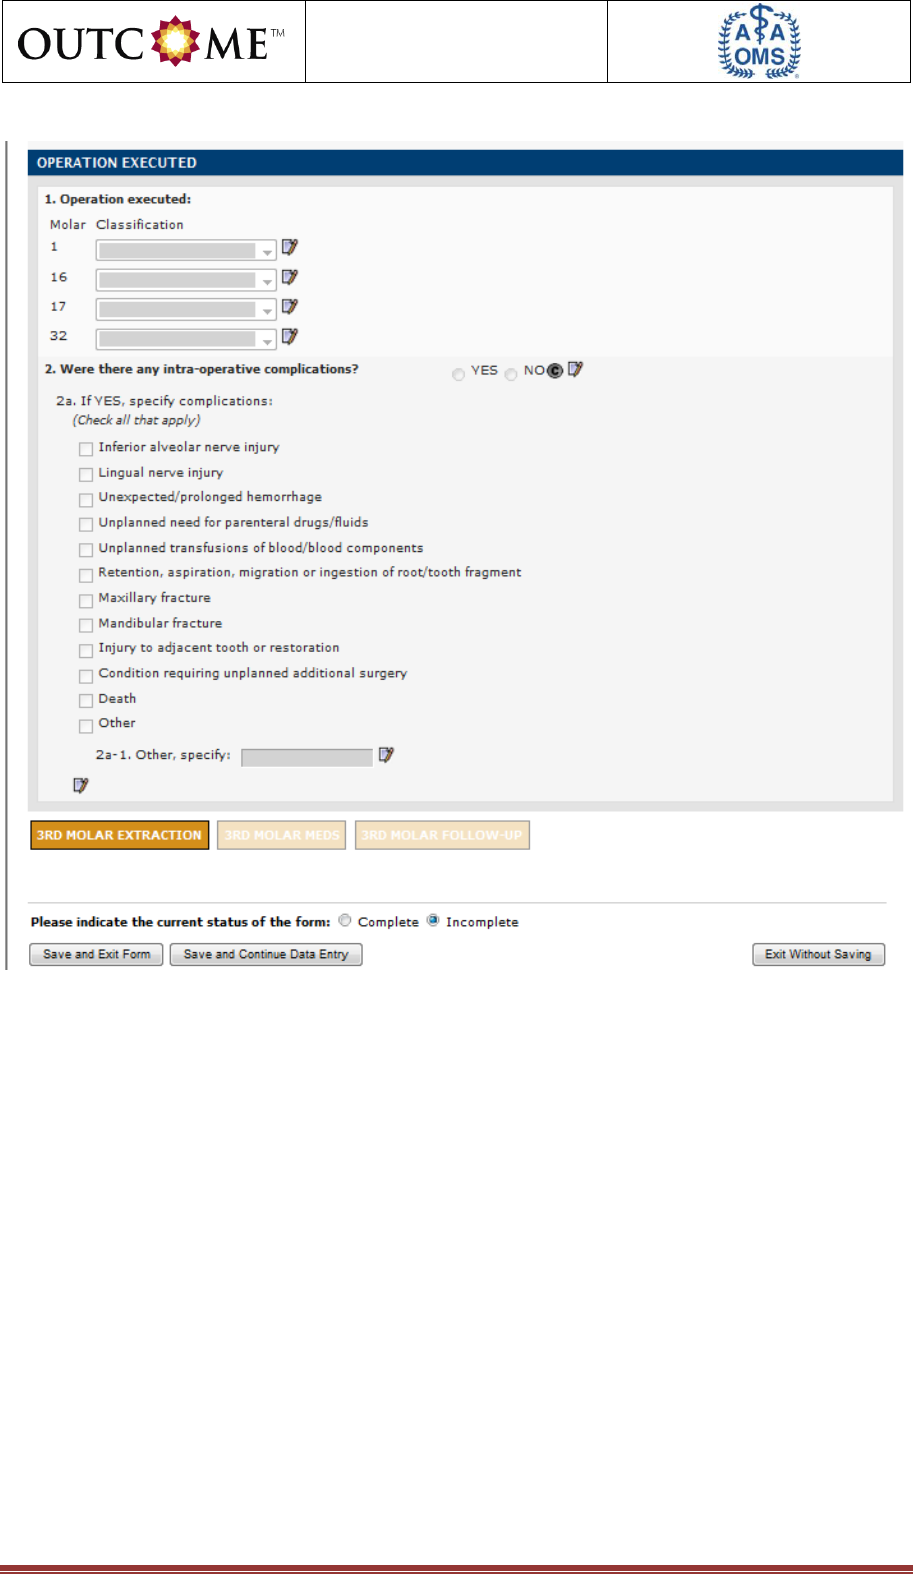
OPERATION EXECUTED
1. Operation executed:
Individual „Operation executed‟ fields will be enabled if
corresponding molar is selected for „3rd molar(s)
extracted‟.
For each 3
rd
molar extracted select the operation that
was executed by selecting from the drop-down list.
Please note that the definitions for the operation
executed are different than the options for
„Preoperative classification of third molars extracted‟
using the ADA codes. The third molar is considered
erupted if it is so positioned that the entire clinical
crown is visible, all five surfaces of the tooth can be
examined for caries, and there is attached gingival all
around the tooth. If the tooth does not meet the
definition of an erupted tooth, it is considered an
impacted tooth.There is no definition of a “partially
impacted tooth”.
Select “Full bony impacted” if molar was an
impacted tooth that required an incision, bone
removal, and sectioning of the tooth to remove
it.
Select “Full bony impacted - difficult” if molar
was an impacted tooth that required an
incision, bone removal, sectioning of the tooth
to remove it, and it was more difficult than
usual.
Select “Partial bony impacted” if molar was an
impacted tooth that required an incision and
bone removal to remove the tooth
Select “Soft tissue impacted” if molar was an
impacted tooth that was removed and required
an incision to access the tooth.
Select “Erupted simple” if molar was an
erupted tooth removed without the use of a flap
or sectioning or bone removal
Select “Erupted surgical” if molar was an
erupted tooth that required sectioning, a flap, or
bone removal, or any combination of the three
techniques.
If corresponding molar is selected for „3rd molar(s)
extracted‟, you must specify the operation executed on
the molar to save the 3
rd
Molar Extraction form as
„Complete‟.
2. Were there any intra-operative
complications?
„Were there any intra-operative complications?‟ field will
be enabled if any molar is selected for „3rd molar(s)
extracted‟.
If any molar is selected for „3rd molar(s) extracted‟, you
must specify whether there were any intra-operative
complications by selecting “Yes” or “No” to save the 3
rd

eCRF COMPLETION
GUIDELINES
Version 1.2; 14-July-2011 Confidential Page 40 of 55
Field / Question
Instructions
Molar Extraction form as „Complete‟.
2a. If YES, specify complications:
„If YES, specify complications‟ field will be enabled if
“Yes” is selected for „Were there any intra-operative
complications?‟. Check all that apply. Check
“Unplanned need for parenteral drugs/fluids” if the need
was for other than blood or blood components.
If “Yes” is selected for „Were there any intra-operative
complications?‟, you must select at least one
complication to save the 3
rd
Molar Extraction form as
„Complete‟.
2a-1. Other, specify:
„If Other, specify‟ field will be enabled if “Other” is
selected for „If YES, specify complications‟.
If “Other” is selected for „If YES, specify complications‟,
you must specify the other complications to save the 3
rd
Molar Extraction form as „Complete‟.
eCRF COMPLETION
GUIDELINES
Version 1.2; 14-July-2011 Confidential Page 41 of 55
eCRF COMPLETION
GUIDELINES
Version 1.2; 14-July-2011 Confidential Page 42 of 55

eCRF COMPLETION
GUIDELINES
Version 1.2; 14-July-2011 Confidential Page 43 of 55
2.2.2 3
rd
Molar Meds Tab
Field / Question
Instructions
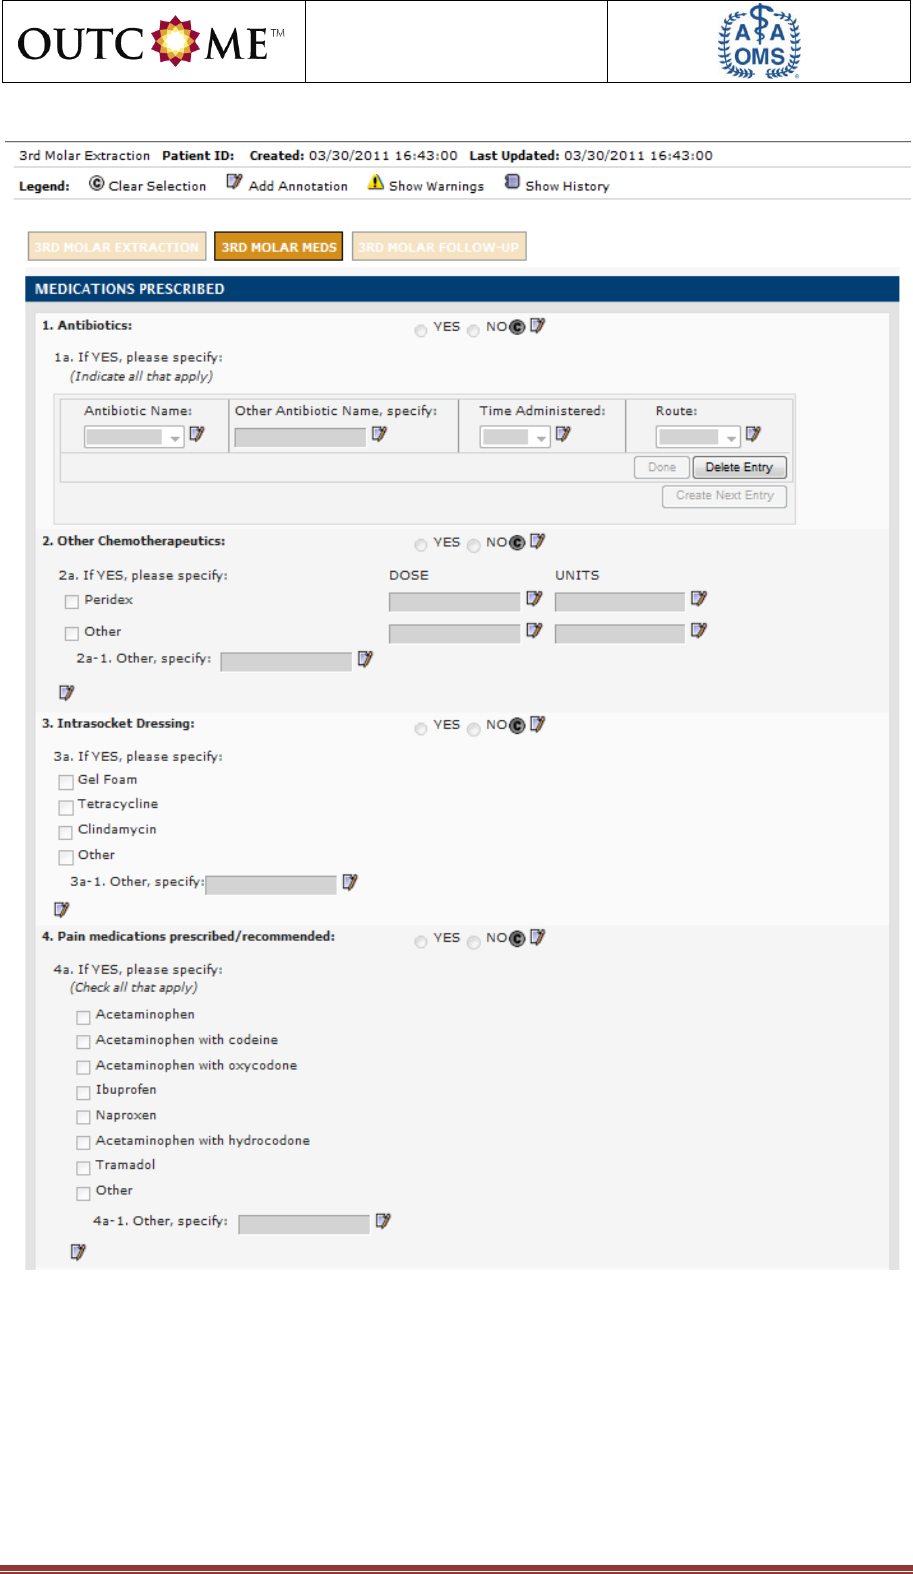
MEDICATIONS PRESCRIBED
General Instructions:
Only record medications that were prescribed for outpatient use.
Indicate the medications that were prescribed for outpatient use from the time of
detection of preoperative pathology/abnormal finding(s), or
intraoperative/postoperative complication(s), to final resolution of the third molar
problem(s) or complication(s).
1. Antibiotics:
„Antibiotics‟ field will be enabled if any molar is selected
for „3rd molar(s) extracted‟.
If any molar is selected for „3rd molar(s) extracted‟, you
must specify whether antibiotics were administered by
selecting “Yes” or “No” to save the 3
rd
Molar Extraction
form as „Complete‟.
1a. If YES, please specify:
„If YES, please specify‟ field will be enabled if “Yes” is
selected for „Antibiotics‟.
Question 1a is a repeat group. Each created entry
group is meant to capture the details for an individual
antibiotic administered.
To add more antibiotics, click „Done‟ after the first entry
is completed and then click the „Create Next Entry‟
button to open a new blank record.
If “Yes” is selected for „Antibiotics‟, you must provide at
least one agent to save the 3
rd
Molar Extraction form as
„Complete‟.
Antibiotic Name:
Indicate the antibiotic name by selecting from the drop-
down list. Select “Other” is antibiotic is not listed.
Other Antibiotic Name, specify:
„Other Antibiotic Name, specify‟ field will be enabled if
“Other” is selected for „Antibiotic Name‟.
If “Other” is selected for „Antibiotic Name‟, you must
specify the other antibiotic to save the 3
rd
Molar
Extraction form as „Complete‟.
Time Administered:
„Time Administered‟ field will be enabled if „Antibiotic
Name‟ is provided.
If „Antibiotic Name‟ is provided, you must specify the
time the antibiotic was administered by selecting from
the drop-down list to save the 3
rd
Molar Extraction form
as „Complete‟.

eCRF COMPLETION
GUIDELINES
Version 1.2; 14-July-2011 Confidential Page 44 of 55
Field / Question
Instructions
Route:
„Route‟ field will be enabled if „Antibiotic Name‟ is
provided.
If „Antibiotic Name‟ is provided, you must specify the
route the antibiotic was administered by selecting from
the drop-down list to save the 3
rd
Molar Extraction form
as „Complete‟.
2. Other Chemotherapeutics:
„Other Chemotherapeutics‟ field will be enabled if any
molar is selected for „3rd molar(s) extracted‟.
If any molar is selected for „3rd molar(s) extracted‟, you
must specify whether other chemotherapeutics were
administered by selecting “Yes” or “No” to save the 3
rd
Molar Extraction form as „Complete‟.
2a. If YES, please specify:
DOSE
UNITS
„If YES, please specify‟ field will be enabled if “Yes” is
selected for „Other Chemotherapeutics‟.
Select each drug administered as an other
chemotherapeutic. Check all that apply. If an agent
other than those listed was given, check “Other”.
If “Yes” is selected for „Other Chemotherapeutics‟, you
must select at least one agent to save the 3
rd
Molar
Extraction form as „Complete‟.
Individual „DOSE‟ fields will be enabled if
corresponding agent is selected.
If corresponding agent is selected, you must specify
dose to save the 3
rd
Molar Extraction form as
„Complete‟.
Individual „UNITS‟ fields will be enabled if
corresponding agent is selected.
If corresponding agent is selected, you must specify
units to save the 3
rd
Molar Extraction form as
„Complete‟.
2a-1. Other, specify:
„If Other, specify‟ field will be enabled if “Other” is
selected for „If YES, please specify‟.
If “Other” is selected for „If YES, please specify‟, you
must specify the other chemotherapeutic to save the 3
rd
Molar Extraction form as „Complete‟.
3. Intrasocket Dressing:
„Intrasocket Dressing‟ field will be enabled if any molar
is selected for „3rd molar(s) extracted‟.
If any molar is selected for „3rd molar(s) extracted‟, you
must specify whether intrasocket dressings were
administered by selecting “Yes” or “No” to save the 3
rd
Molar Extraction form as „Complete‟.

eCRF COMPLETION
GUIDELINES
Version 1.2; 14-July-2011 Confidential Page 45 of 55
Field / Question
Instructions
3a. If YES, please specify:
„If YES, please specify‟ field will be enabled if “Yes” is
selected for „Intrasocket Dressing‟.
Select each drug administered as an intrasocket
dressing. Check all that apply. If an agent other than
those listed was given, check “Other”.
If “Yes” is selected for „Intrasocket Dressing‟, you must
select at least one agent to save the 3
rd
Molar
Extraction form as „Complete‟.
3a-1. Other, specify:
„If Other, specify‟ field will be enabled if “Other” is
selected for „If YES, please specify‟.
If “Other” is selected for „If YES, please specify‟, you
must specify the other intrasocket dressing to save the
3
rd
Molar Extraction form as „Complete‟.
4. Pain medications
prescribed/recommended:
„Pain medications prescribed/recommended‟ field will
be enabled if any molar is selected for „3rd molar(s)
extracted‟.
If any molar is selected for „3rd molar(s) extracted‟, you
must specify whether pain medications were
prescribed/recommended by selecting “Yes” or “No” to
save the 3
rd
Molar Extraction form as „Complete‟.
4a. If YES, please specify:
„If YES, please specify‟ field will be enabled if “Yes” is
selected for „Pain medications
prescribed/recommended‟.
Select each drug prescribed/recommended pain
medication. Check all that apply. If an agent other
than those listed was given, check “Other”.
If “Yes” is selected for „Pain medications
prescribed/recommended‟, you must select at least one
agent to save the 3
rd
Molar Extraction form as
„Complete‟.
4a-1. Other, specify:
„If Other, specify‟ field will be enabled if “Other” is
selected for „If YES, please specify‟.
If “Other” is selected for „If YES, please specify‟, you
must specify the other pain medications
prescribed/recommended to save the 3
rd
Molar
Extraction form as „Complete‟.
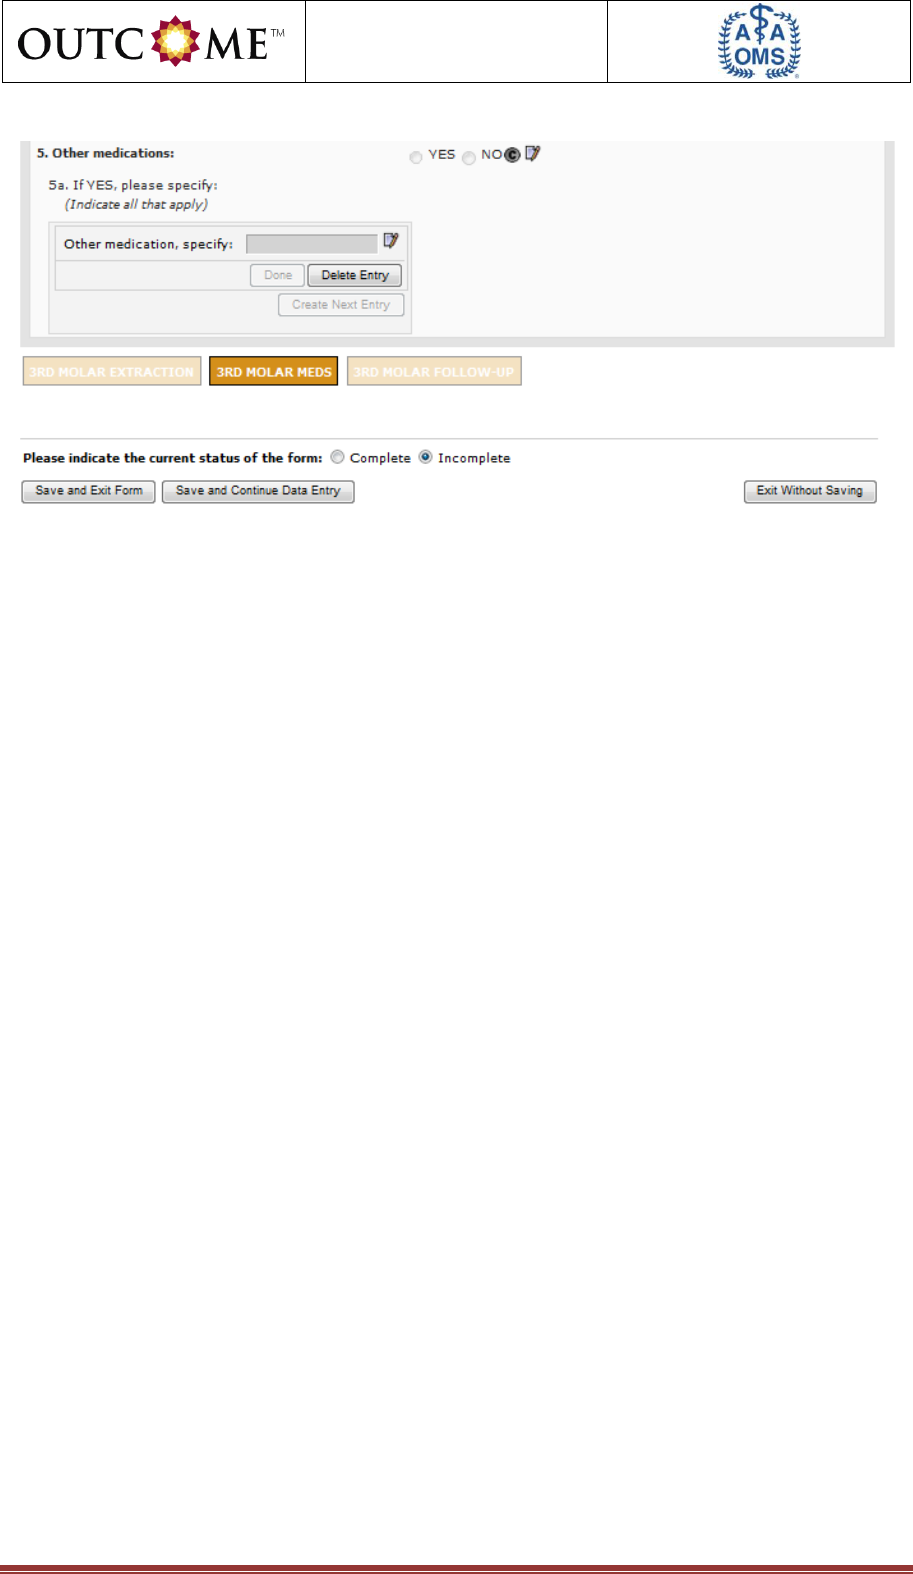
5. Other medications:
„Other medications‟ field will be enabled if any molar is
selected for „3rd molar(s) extracted‟.
If any molar is selected for „3rd molar(s) extracted‟, you
must specify whether other medications were
administered by selecting “Yes” or “No” to save the 3
rd
Molar Extraction form as „Complete‟.

eCRF COMPLETION
GUIDELINES
Version 1.2; 14-July-2011 Confidential Page 46 of 55
Field / Question
Instructions
5a. If YES, please specify:
„If YES, please specify‟ field will be enabled if “Yes” is
selected for „Other medications‟.
Question 5a is a repeat group. Each created entry
group is meant to capture the details for an individual
other medication administered.
To add more other medications, click „Done‟ after the
first entry is completed and then click the „Create Next
Entry‟ button to open a new blank record.
If “Yes” is selected for „Other medications‟, you must
provide at least one agent to save the 3
rd
Molar
Extraction form as „Complete‟.
Other medication, specify:
Enter the other medication name.
eCRF COMPLETION
GUIDELINES
Version 1.2; 14-July-2011 Confidential Page 47 of 55
eCRF COMPLETION
GUIDELINES
Version 1.2; 14-July-2011 Confidential Page 48 of 55
eCRF COMPLETION
GUIDELINES
Version 1.2; 14-July-2011 Confidential Page 49 of 55
2.2.3 3
rd
Molar Follow-Up Tab
Field / Question
Instructions
1. Was at least one follow-up visit
conducted?
„Was at least one follow-up visit conducted?‟ field will
be enabled if any molar is selected for „3rd molar(s)
extracted‟.
If any molar is selected for „3rd molar(s) extracted‟, you
must specify whether at least one follow-up visit was
conducted by selecting “Yes” or “No” to save the 3
rd
Molar Extraction form as „Complete‟.
General Instructions:
FOLLOW-UP VISIT DATE and POST-OPERATIVE COMPLICATIONS sections will be
enabled if “Yes” is selected for „Was at least one follow-up visit conducted?‟.
FOLLOW-UP VISIT DATE and POST-OPERATIVE COMPLICATIONS sections are a
repeat group. Each created entry group is meant to capture the details for an
individual follow-up visit.
To add more follow-up visits, click „Done‟ after the first entry is completed and then
click the „Create Next Entry‟ button to open a new blank record.
If “Yes” is selected for „Was at least one follow-up visit conducted?‟, you must
provide at least one follow-up visit record to save the 3
rd
Molar Extraction form as
„Complete‟.
FOLLOW-UP VISIT DATE
1. Date of Follow-up:
Enter the date of the follow-up visit using an 8-digit
format with the month, day and 4-digit year. Use
leading zeros before single digit months and days. For
example: April 2
nd
, 2011, is entered as 04/02/2011.

eCRF COMPLETION
GUIDELINES
Version 1.2; 14-July-2011 Confidential Page 50 of 55
Field / Question
Instructions
1. Post-operative complications:
Indicate if any post-operative complications occurred by
selecting “Yes” or “No”.
If “Yes” is selected for „Post-operative complications‟,
you must select at least one complication to save the
3
rd
Molar Extraction form as „Complete‟. Check all
complications that apply.
A diagnosis of “Alveolar osteitis” is made if the following
elements were present:
By history, there was a new onset or increasing
pain more than 36 hours after the operation
By examination, there was a loss of the blood
clot in the extraction site as evidenced by
exposed bone, gentle probing or irrigation of
the wound duplicated the pain, and there was
significant pain relief after application of an
anodyne dressing.
All elements needed to be present to make the
diagnosis of “Alveolar osteitis”. If the elements are not
present, then consider persistent postoperative pain or
surgical site infection as alternative diagnostic options.
Persistent postoperative pain is defined as that
requiring an additional prescription or other
interventions, e.g. placement of a dressing, for
management more than 7 days after the operation.
Surgical site infection is made if there is visual
evidence of frank purulence in the extraction sites at
any time postoperatively or unexpected pain and
swelling warranting operative intervention or
prescribing antibiotics.
Delayed healing was defined as an extraction site with
incomplete coverage by soft tissue within 21 days of
the operation with or without additional treatment
1a – 1f. Molars:
Individual „Molars‟ fields will be enabled if
corresponding post-operative complication is checked.
Check all molars that were affected by the post-
operative complication.
If corresponding post-operative complication is
checked, you must select at least one molar that was
affected to save the 3
rd
Molar Extraction form as
„Complete‟.

eCRF COMPLETION
GUIDELINES
Version 1.2; 14-July-2011 Confidential Page 51 of 55
Field / Question
Instructions
1g. Report details of condition
requiring unplanned additional
surgery:
„Report details of condition requiring unplanned
additional surgery‟ field will be enabled if “Condition
requiring unplanned additional surgery” is selected as a
post-operative complication.
If “Condition requiring unplanned additional surgery” is
selected as a post-operative complication, you must
enter the details of condition requiring unplanned
surgery to save the 3
rd
Molar Extraction form as
„Complete‟.
1h. Report details of "Other" post-
operative complication:
„Report details of "Other" post-operative complication‟
field will be enabled if “Other” is selected as a post-
operative complication.
If “Other” is selected as a post-operative complication,
you must enter the details of the other post-operative
complication to save the 3
rd
Molar Extraction form as
„Complete‟.
1i. Report details of unplanned
hospitalization admission related to
the procedure:
„Report details of unplanned hospitalization admission
related to the procedure‟ field will be enabled if
“Unplanned hospital admission related to the
procedure” is selected as a post-operative
complication.
If “Unplanned hospital admission related to the
procedure” is selected as a post-operative
complication, you must enter the details of the
unplanned hospitalization admission related to the
procedure to save the 3
rd
Molar Extraction form as
„Complete‟.
2. Days of usual activity missed due
to the procedure:
„Days of usual activity missed due to the procedure‟ is
outside of the repeat group and can only be answered
once.
„Days of usual activity missed due to the procedure‟
field will be enabled if any molar is selected for „3rd
molar(s) extracted‟.
If any molar is selected for „3rd molar(s) extracted‟, you
must specify the number of days of usual activity
missed due to the procedure in ### format to save the
3
rd
Molar Extraction form as „Complete‟.
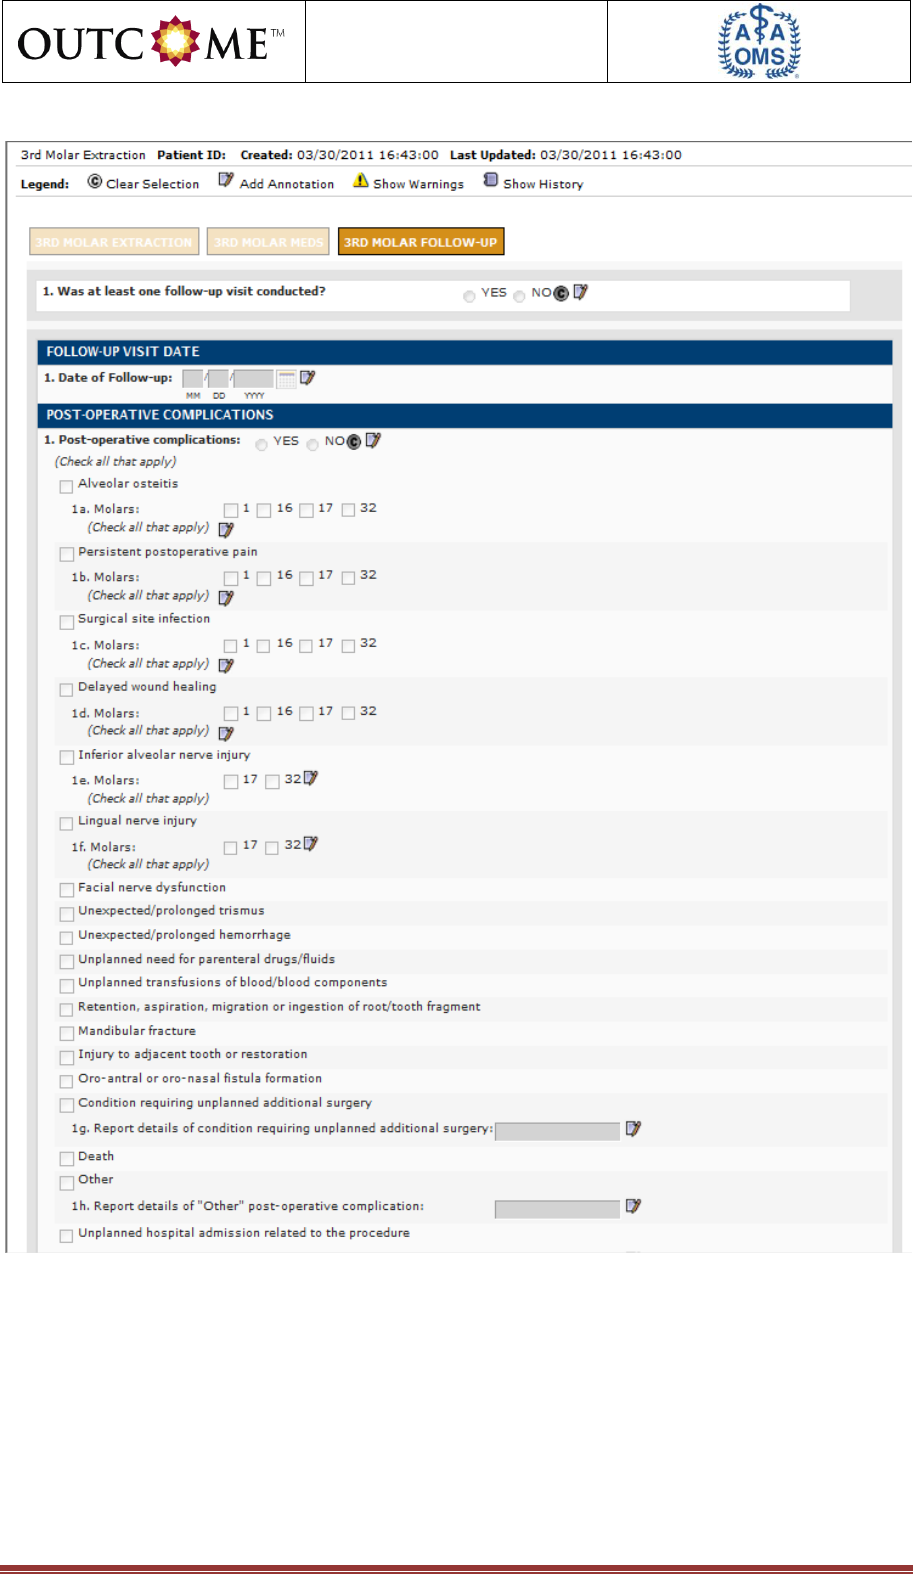
eCRF COMPLETION
GUIDELINES
Version 1.2; 14-July-2011 Confidential Page 52 of 55
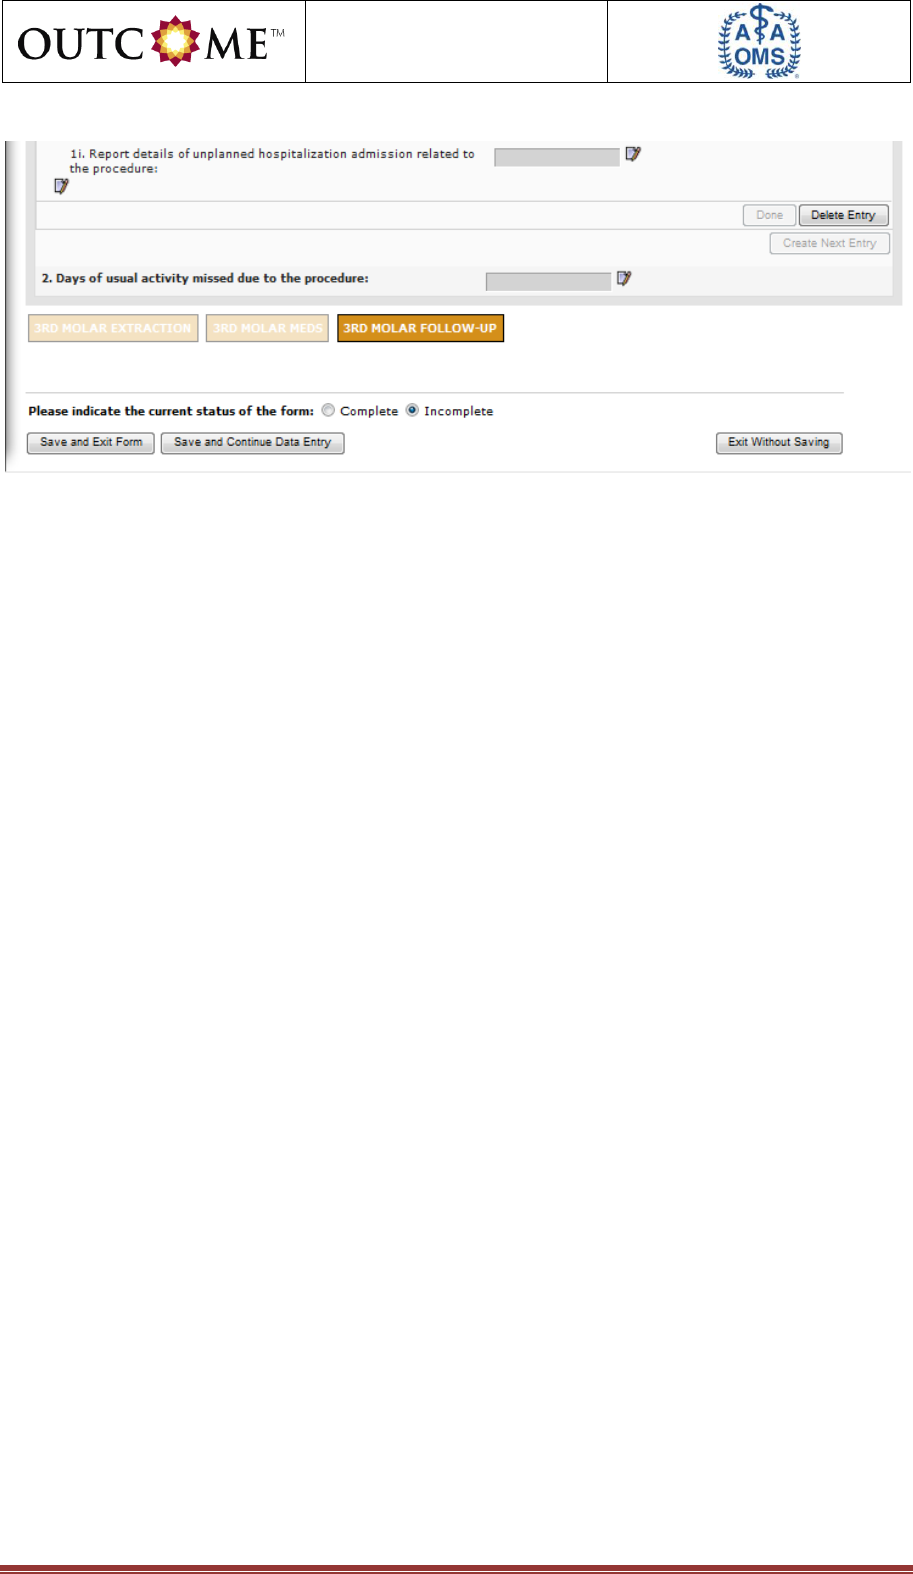
eCRF COMPLETION
GUIDELINES
Version 1.2; 14-July-2011 Confidential Page 53 of 55

eCRF COMPLETION
GUIDELINES
Version 1.2; 14-July-2011 Confidential Page 54 of 55
2.3 Satisfaction Questionnaire Form
Field / Question
Instructions
PATIENT ANESTHESIA SATISFACTION FORM
General Instructions:
The patient will be asked to complete the satisfaction form, either just after their
procedure involving anesthesia or at a follow-up visit
1. Date of Satisfaction Form
Completed:
Enter the date the satisfaction form was completed
using an 8-digit format with the month, day and 4-digit
year. Use leading zeros before single digit months and
days. For example: April 2
nd
, 2011, is entered as
04/02/2011.
„Date of Satisfaction Form Completed‟ is a required
field and must be entered to save the Satisfaction
Questionnaire form as „Complete‟.
2. Which of the following did the
patient remember about their
anesthetic experience?
Enter what the patient remembered about their
anesthetic experience. Check all that apply. If none,
check “None of the above”.
„Which of the following did the patient remember about
their anesthetic experience?‟ is a required field and
must be entered to save the Satisfaction Questionnaire
form as „Complete‟.
3. If patient received deep or general
anesthesia, was put to sleep or
received other medications to relax
them during the procedure, which of
the following did they remember
about their anesthetic experience?
If patient received deep or general anesthesia, was put
to sleep or received other medications to relax them
during the procedure, select what the patient
remembered about their anesthetic experience from the
drop-down list. You can select only one response. If
not applicable, select “N/A; Local anesthetic alone or
minimum sedation used”.
„If patient received deep or general anesthesia, was put
to sleep or received other medications to relax them
during the procedure, which of the following did they
remember about their anesthetic experience?‟ is a
required field and must be entered to save the
Satisfaction Questionnaire form as „Complete‟.
4. How satisfied was the patient with
their anesthetic experience.
Select how satisfied the patient was with their
anesthetic experience from the drop-down list. You
can select only one response.
„How satisfied was the patient with their anesthetic
experience‟ is a required field and must be entered to
save the Satisfaction Questionnaire form as „Complete‟.
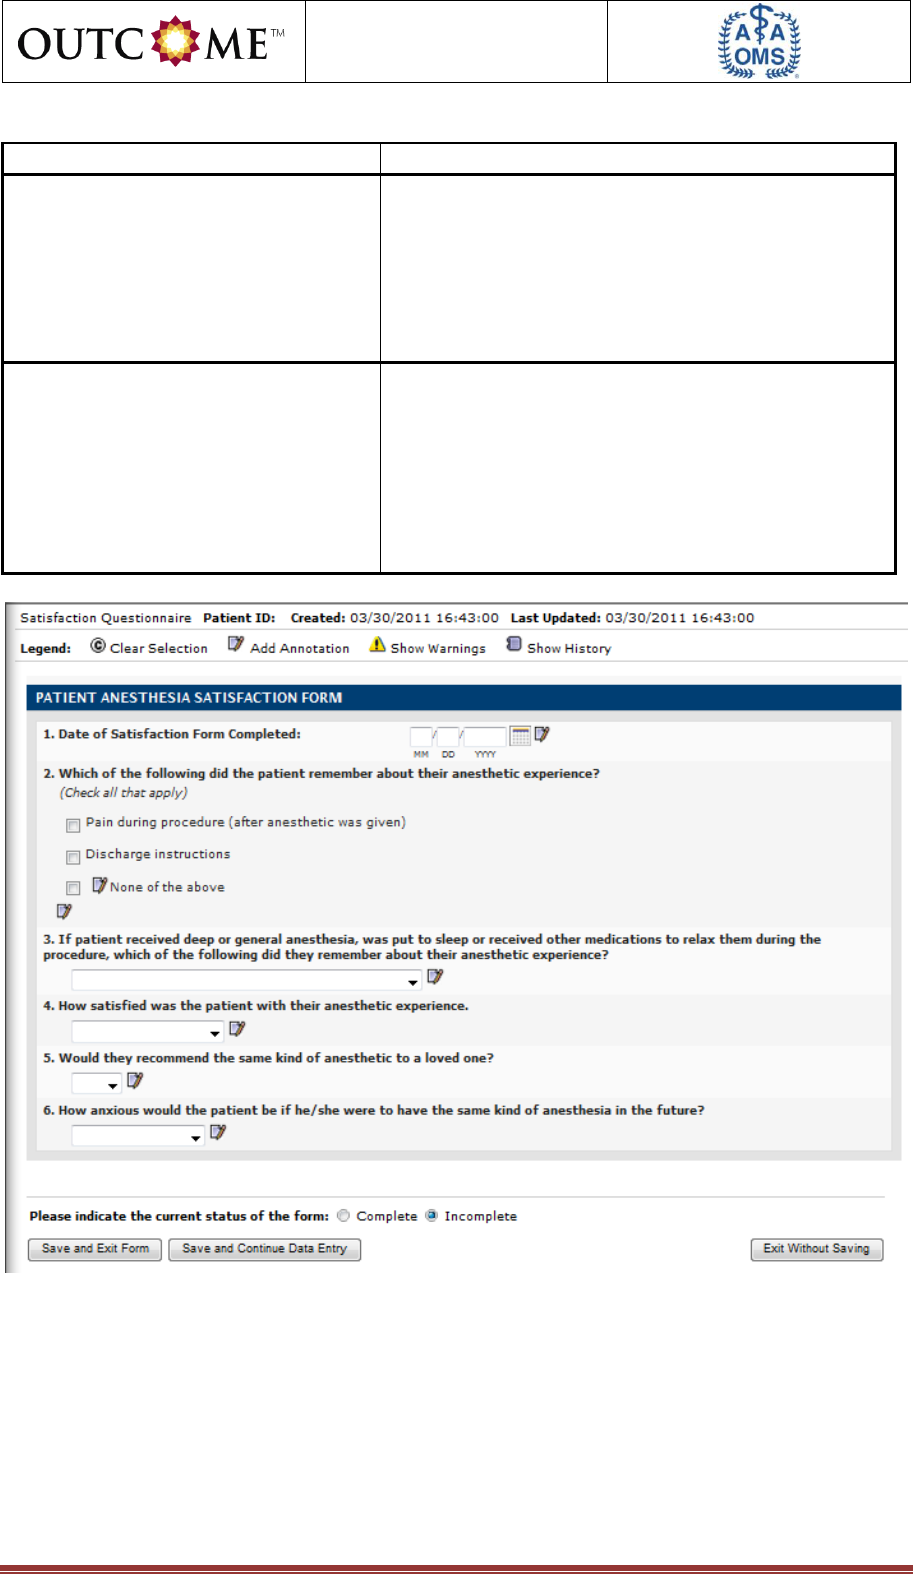
eCRF COMPLETION
GUIDELINES
Version 1.2; 14-July-2011 Confidential Page 55 of 55
Field / Question
Instructions
5. Would they recommend the same
kind of anesthetic to a loved one?
Indicate whether the patient would recommend the
same kind of anesthetic to a loved one by selecting
“Yes” or “No” from the drop-down list.
„Would they recommend the same kind of anesthetic to
a loved one?‟ is a required field and must be entered to
save the Satisfaction Questionnaire form as „Complete‟.
6. How anxious would the patient be
if he/she were to have the same kind
of anesthesia in the future?
Select how anxious the patient would be if he/she were
to have the same kind of anesthesia in the future from
the drop-down list. You can select only one response.
„How anxious would the patient be if he/she were to
have the same kind of anesthesia in the future?‟ is a
required field and must be entered to save the
Satisfaction Questionnaire form as „Complete‟.
