
®
AJA Adobe Plugins
For Mac & PC
Installation & Operation Guide
Version 12.4
Published: June 6, 2016

AJA Adobe Plugins v12.4 www.aja.com
2
Table of Contents
Notices . . . . . . . . . . . . . . . . . . . . . . . . . . . . . . . . . . . . . . . . . . . . . . . . . . . . . . . . 3
Trademarks . . . . . . . . . . . . . . . . . . . . . . . . . . . . . . . . . . . . . . . . . . . . . . . . . . . . . . . . . . . . . . . . . . . . . . . 3
Copyright . . . . . . . . . . . . . . . . . . . . . . . . . . . . . . . . . . . . . . . . . . . . . . . . . . . . . . . . . . . . . . . . . . . . . . . . . 3
Contacting Support . . . . . . . . . . . . . . . . . . . . . . . . . . . . . . . . . . . . . . . . . . . . . . . . . . . . . . . . . . . . . . . 3
Chapter 1: Adobe Plugins Installation . . . . . . . . . . . . . . . . . . . . . . . . . . . 4
Installation . . . . . . . . . . . . . . . . . . . . . . . . . . . . . . . . . . . . . . . . . . . . . . . . . . . . . . . . . . . . . . . . . . . . . . . . 4
Chapter 2: Using Adobe Applications. . . . . . . . . . . . . . . . . . . . . . . . . . . . 5
Overview. . . . . . . . . . . . . . . . . . . . . . . . . . . . . . . . . . . . . . . . . . . . . . . . . . . . . . . . . . . . . . . . . . . . . . . . . . 5
Using Adobe Premier Pro . . . . . . . . . . . . . . . . . . . . . . . . . . . . . . . . . . . . . . . . . . . . . . . . . . . . . . . . . . 5
Beginning a Project with Adobe Presets . . . . . . . . . . . . . . . . . . . . . . . . . . . . . . . . . . . . . . . 5
Options Set in Premiere Pro Preferences . . . . . . . . . . . . . . . . . . . . . . . . . . . . . . . . . . . . . . . 7
Premiere Pro Capture Settings. . . . . . . . . . . . . . . . . . . . . . . . . . . . . . . . . . . . . . . . . . . . . . . . . 9
Premiere Pro Playback Preferences . . . . . . . . . . . . . . . . . . . . . . . . . . . . . . . . . . . . . . . . . . . 12
Playback Resolution . . . . . . . . . . . . . . . . . . . . . . . . . . . . . . . . . . . . . . . . . . . . . . . . . . . . . . . . . . 14
Closed Caption Support . . . . . . . . . . . . . . . . . . . . . . . . . . . . . . . . . . . . . . . . . . . . . . . . . . . . . . 14
Audio Setup . . . . . . . . . . . . . . . . . . . . . . . . . . . . . . . . . . . . . . . . . . . . . . . . . . . . . . . . . . . . . . . . . 15
Audio Voice-over Setup . . . . . . . . . . . . . . . . . . . . . . . . . . . . . . . . . . . . . . . . . . . . . . . . . . . . . . 16
Export to Tape . . . . . . . . . . . . . . . . . . . . . . . . . . . . . . . . . . . . . . . . . . . . . . . . . . . . . . . . . . . . . . . 16
Using Adobe Photoshop. . . . . . . . . . . . . . . . . . . . . . . . . . . . . . . . . . . . . . . . . . . . . . . . . . . . . . . . . . 17
AJA Capture . . . . . . . . . . . . . . . . . . . . . . . . . . . . . . . . . . . . . . . . . . . . . . . . . . . . . . . . . . . . . . . . . 17
AJA Export . . . . . . . . . . . . . . . . . . . . . . . . . . . . . . . . . . . . . . . . . . . . . . . . . . . . . . . . . . . . . . . . . . . 19
Using Adobe After Effects. . . . . . . . . . . . . . . . . . . . . . . . . . . . . . . . . . . . . . . . . . . . . . . . . . . . . . . . . 20
AJA Transmit Plugin. . . . . . . . . . . . . . . . . . . . . . . . . . . . . . . . . . . . . . . . . . . . . . . . . . . . . . . . . . 20
Legacy AJA Preview Plugin . . . . . . . . . . . . . . . . . . . . . . . . . . . . . . . . . . . . . . . . . . . . . . . . . . . 21
Using Adobe SpeedGrade . . . . . . . . . . . . . . . . . . . . . . . . . . . . . . . . . . . . . . . . . . . . . . . . . . . . . . . . 24
AJA Display Setup. . . . . . . . . . . . . . . . . . . . . . . . . . . . . . . . . . . . . . . . . . . . . . . . . . . . . . . . . . . . 24
Using AJA Codecs for File Generation . . . . . . . . . . . . . . . . . . . . . . . . . . . . . . . . . . . . . . . . . 25
Index. . . . . . . . . . . . . . . . . . . . . . . . . . . . . . . . . . . . . . . . . . . . . . . . . . . . . . . . .27

AJA Adobe Plugins v12.4 www.aja.com
3
Notices
Trademarks
AJA® and Because it matters.® are registered trademarks of AJA Video Systems, Inc. for use with
most AJA products. AJA™ is a trademark of AJA Video Systems, Inc. for use with recorder, router,
software and camera products. Because it matters.™ is a trademark of AJA Video Systems, Inc. for
use with camera products.
CION®, Corvid Ultra®, lo®, Ki Pro®, KONA®, KUMO®, ROI® and T-Tap® are registered trademarks of AJA
Video Systems, Inc.
AJA Control Room™, FiDO™, KiStor™, Science of the Beautiful™, TruScale™, TruZoom™, V2Analog™
and V2Digital™ are trademarks of AJA Video Systems, Inc.
AirPort, Apple, Apple logo, AppleShare, AppleTalk, FireWire, iPod, iPod touch, Mac, Macintosh and
ProRes, are registered trademarks of Apple Inc. Final Cut Pro, QuickTime and QuickTime logo are
trademarks of Apple Inc.
Avid, Avid DNxHD and Media Composer are registered trademarks of Avid Technology, Inc.
Adobe is a registered trademark of Adobe Systems Incorporated in the United States and/or other
countries.
HDMI, the HDMI logo and High-Definition Multimedia Interface are trademarks or registered
trademarks of HDMI Licensing, LLC.
DVI is a registered trademark of DDWG.
TASCAM is a registered trademark of TEAC Corporation.
Dolby and the double-D Dolby logo are registered trademarks of Dolby Laboratories Licensing
Corporation.
All other trademarks are the property of their respective holders.
Copyright
Copyright © 2016 AJA Video Systems, Inc. All rights reserved. All information in this
manual is subject to change without notice. No part of the document may be
reproduced or transmitted in any form, or by any means, electronic or mechanical,
including photocopying or recording, without the express written permission of AJA
Video Systems, Inc.
Contacting Support
When calling for support, have all information at hand prior to calling. To contact AJA for
sales or support, use any of the following methods:
Telephone: +1.530.271.3190
FAX: +1.530.271.3140
Web: http://www.aja.com
Support Email: suppor[email protected]
Sales Email: [email protected]
www.aja.com
4
AJA Adobe Plugins v12.4
Chapter 1: Adobe Plugins Installation
Installation
IMPORTANT: Please read the brief Release Notes PDF file that accompanies your AJA Software. The Release
Notes describe important Features and Fixes. Also, always go to your AJA Utilities (on the Mac)
or Windows Control Panel to uninstall existing AJA software before installing a new version.
This will prevent hardware/software conflicts.
NOTE: Before proceeding, ensure that your Adobe software is installed as detailed in its user
documentation. These applications should be installed prior to installing AJA software. The
AJA software package adds required files to your Adobe application directories.
Download the latest KONA software from the AJA website to install necessary software
drivers, plugins, and AJA’s Control Panel. from our website at:
http://www.aja.com/en/support/software/
You cannot use AJA hardware with third-party applications until the AJA plugins
software has been installed on the host computer.
If you add KONA supported applications at a later date and have not previously installed
the appropriate plugins, you must run the install program again selecting the
appropriate application support software to be installed.

www.aja.com
5
AJA Adobe Plugins v12.4
Chapter 2: Using Adobe Applications
Overview
AJA provides plugins for both Mac and Windows versions of the Adobe Applications and
their functions are mostly the same. This chapter will describe the Windows menus and
note exceptions for the Mac.
AJA hardware is tightly integrated with Adobe Premiere Pro, Photoshop, and After
Effects. This allows a user to capture supported Premiere Pro compressed formats and
provides plug-ins and drivers that add functionality to the Premiere Pro application.
The manual you are reading does not provide operational information for Adobe except
as related to AJA hardware operations. Please read the Adobe user documentation for
Premiere Pro, Photoshop, After Effects configuration and operation.
The chapter you are reading addresses configuration and setups supported by KONA.
Topics covered include:
• Adobe Premiere Pro
• Beginning a Project with Adobe Presets
• KONA/Io Capture Options
• KONA/Io Playback Options
• Using Adobe Photoshop
• Using After Effects
Using Adobe Premier Pro
Beginning a Project
with Adobe Presets
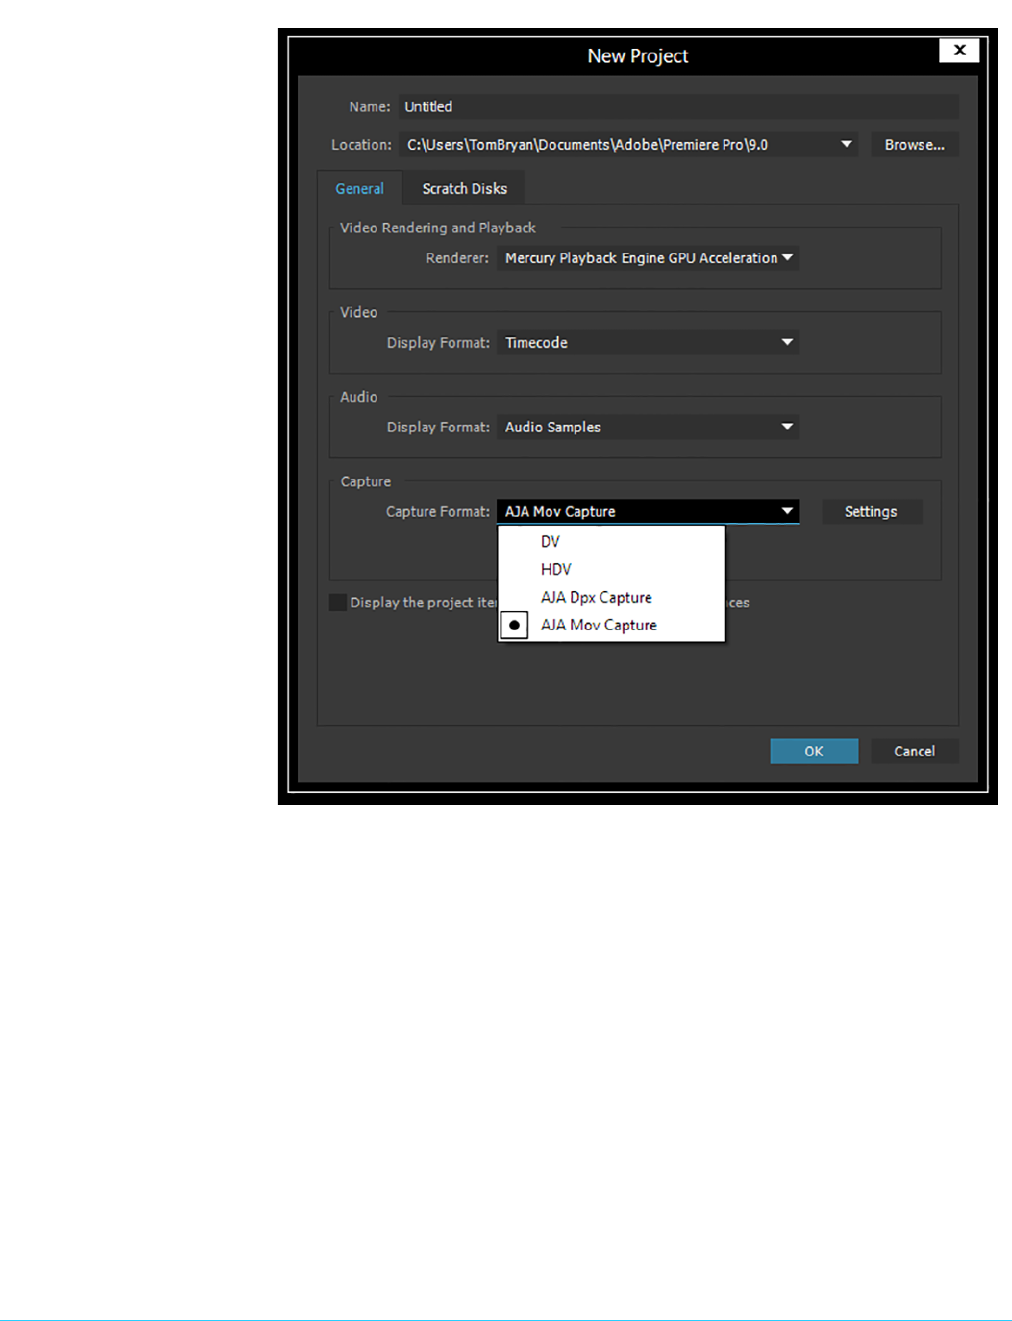
Opening Adobe Premiere Pro, you will select New Project from the File Menu and choose
an AJA Capture Format from the pulldown menu, name the project, and click OK. When
the Premiere Pro project has launched, refer to Adobe documentation to open the New
Sequence setup panel with presets. Or in the Capture window, click the AJA Settings
button to customize your workflow Capture Options panel
" Premiere Pro Capture Settings
on page 9".
www.aja.com
6
AJA Adobe Plugins v12.4
Figure 1. Adobe Premiere Pro New Project panel
www.aja.com
7
AJA Adobe Plugins v12.4
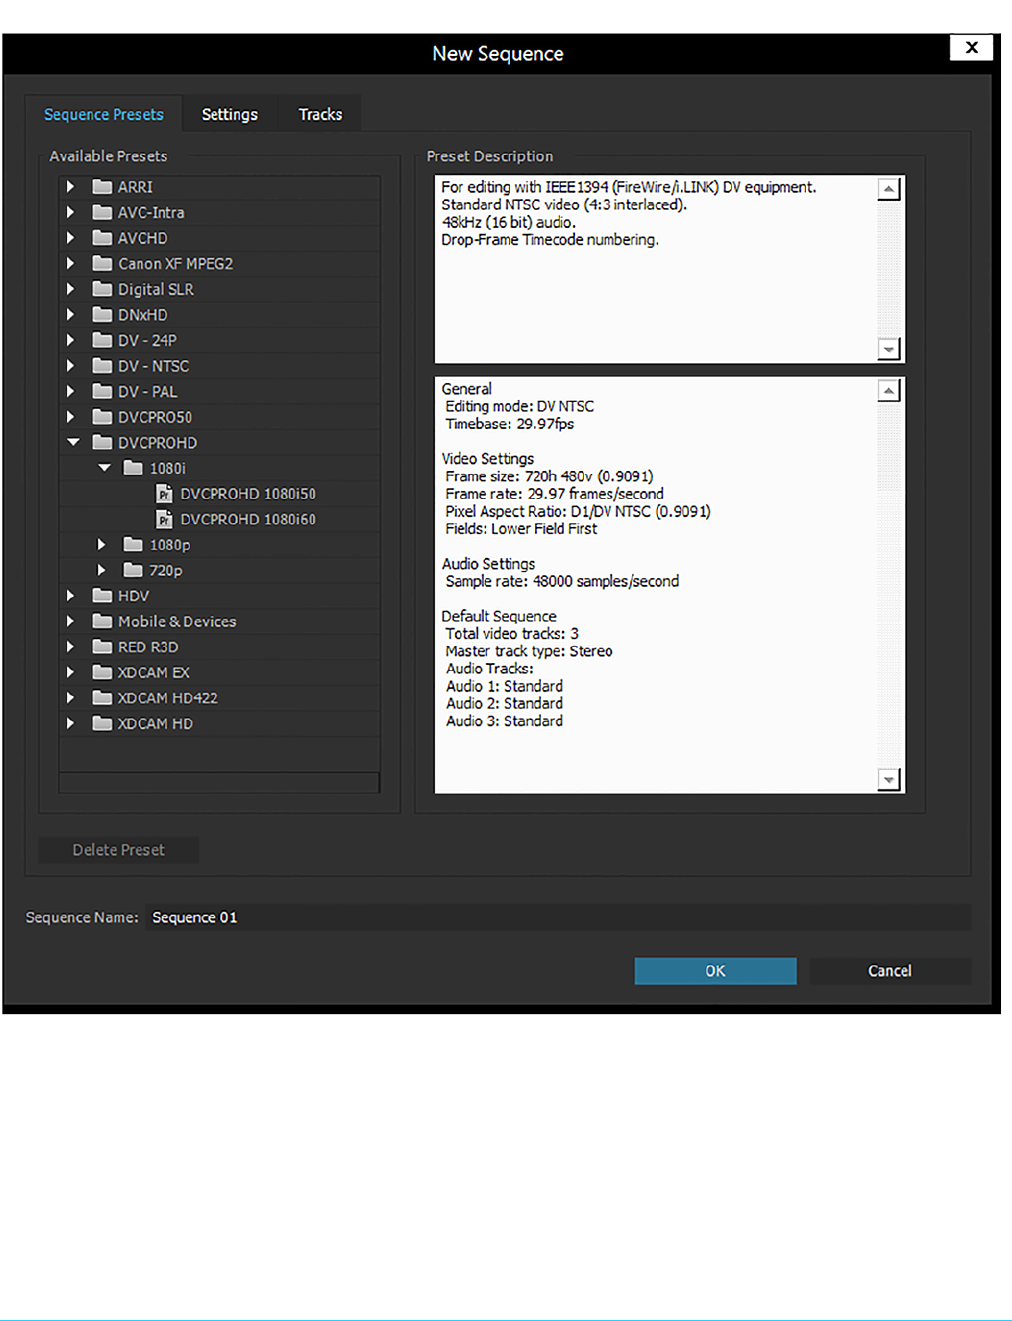
Figure 2. New Sequence Setup Panel
Using the New Sequence Setup panel, you can select from any Adobe Presets. The
Presets offer typical project settings. This differs from some earlier versions of AJA
plugins for Premiere, which required AJA specific sequence presets.
Options Set in
Premiere Pro
Preferences
Some settings that determine both capture and playback characteristics for AJA
hardware are accessed through Premiere Pro Preferences.
In Adobe Premiere Pro Preferences (under Premiere Pro>Preferences for Mac, and under
Edit>Preferences for Windows,) you can set up global (default) settings for:
• Audio Hardware
www.aja.com
8
AJA Adobe Plugins v12.4
• Audio Output mapping
• Device Control
• Playback Settings (see " Premiere Pro Playback Preferences on page 12").
NOTE: There are two important audio configurations you must consider for Playback performance:
• Standard audio setup with optimum A/V sync output
• Voice-over audio setup that uses the AJA hardware as an audio input for the Premiere
Pro voice-over tool (does not guarantee precise frame-accurate sync)
Reference the Playback Settings section for Standard and Voice-over audio setup instructions.
Device Control Device Control Options are settings for Export to Tape and Capture functions using the
RS-422 machine control interface on AJA KONA/Io hardware (not applicable to T-Tap).
Always use the AJA Serial Control setting and the KONA/Io RS-422 port for capture. There
are two ways to access Device Control in Premiere Pro—in Preferences (shown below)
and in the Capture window Settings tab.
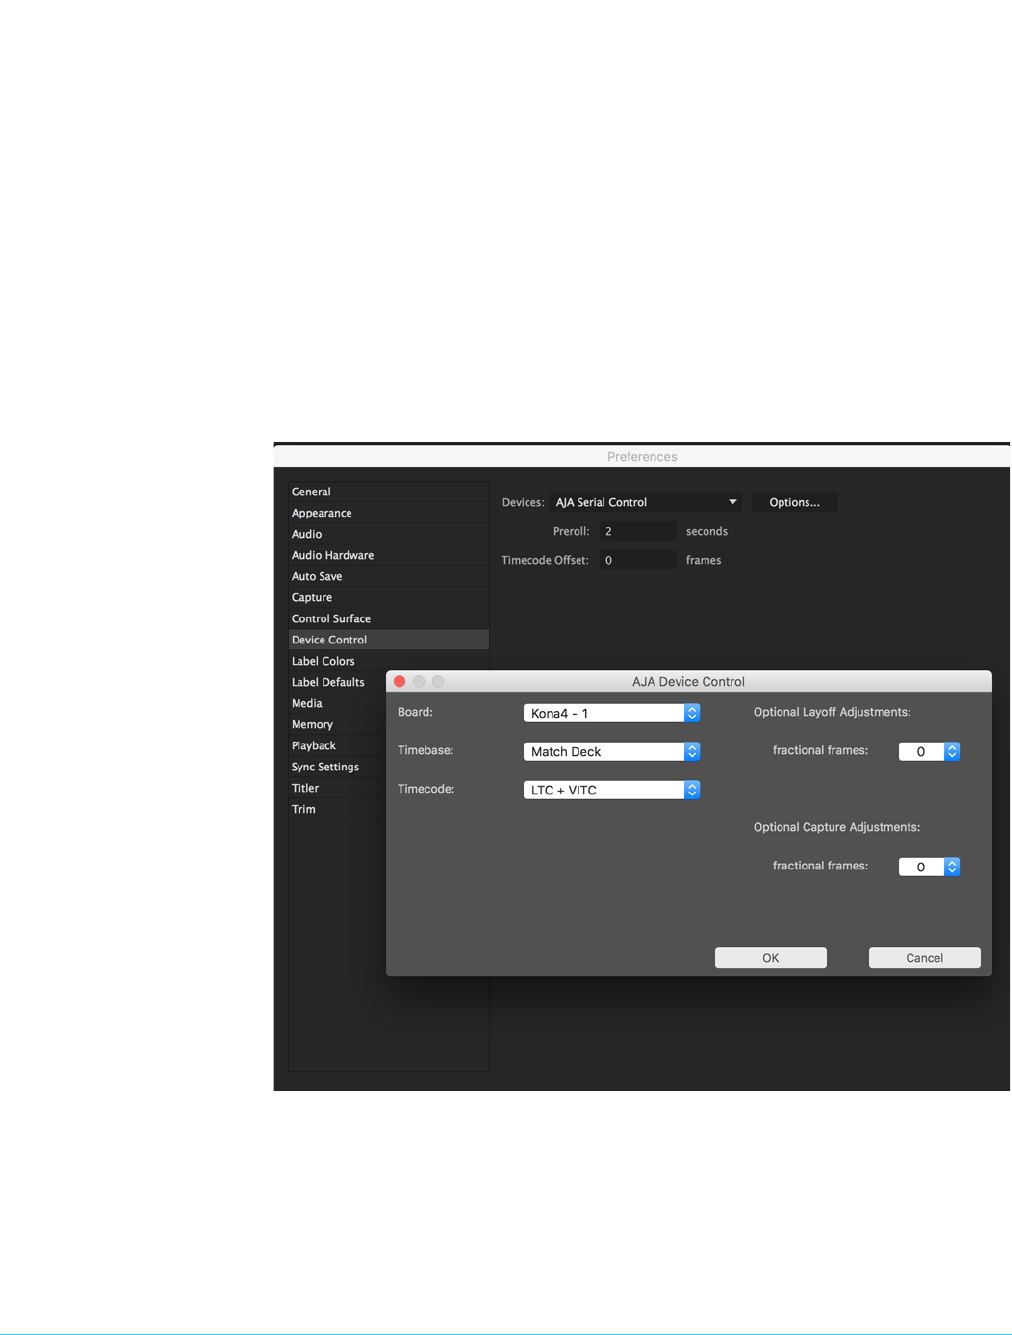
Figure 3. Preferences>Device Control>Options
Enter the desired value for:
Preroll: 0 to 15; the number of seconds required to start the source machine before capture. AJA
recommends 4 seconds of preroll for device control.
Timecode Offset: -30 to +30; timecode adjustment (in seconds) forward or back to compensate for
discrepancies between the source’s burned-in timecode and that of the captured
sequence.

www.aja.com
9
AJA Adobe Plugins v12.4
Always verify Premiere Pro and AJA offset settings for Capture and Export are in
agreement. Device Control settings made in the Capture window or Export window
menus may override Preference settings.
AJA Device Control
Options
Click on the Options button to pull up the AJA Device Control window.
Board: This menu allows you to select from multiple KONA/Io devices if you have them installed
in your system.
Timebase : Use this pull-down to select the timecode base supported by your VTR.
• Match Deck–this is the AJA default setting. It accesses the connected VTR deck to get
the current framerate of the tape.
•Base 24
•Base 25
• Base 29.97 NDF (no drop frame)
• Base 29.97 DF (drop frame)
•Base 30
The timecode format is used for both monitoring the RP-188 timecode embedded in the
digital data stream and for selecting a timecode offset (if required) for the attached VTR
(connected to KONA’s RS-422 port).
IMPORTANT: Not all decks support the default Match Deck function. If you are using a Panasonic deck
(especially a D5) you should set the frame rate match manually.
Timecode Source: Choose between a separate-channel Longitudinal Timecode (LTC) or Vertical Interval
Timecode (VITC) transported in the video signal’s vertical interval or include both (LTC +
VITC).
Optional Layoff Adjustments: The fractional frames settings (1/10 frame increments) are available as optional offset
adjustments that can be applied in situations where layoffs are intermittently off by a
frame. For example, if a Layoff deck is missing its edit in point 1 out of 10 times, try
adjusting the layoff by .1 frames and see if it locks in the accuracy.
NOTE: If you find an adjustment that works consistently with your deck, reporting that information
to AJA support can allow AJA to hard code that adjustment for that specific deck into future
versions of the plugin.
Optional Capture Adjustments: Same as above, but applies to adjusting fractional frames for capture
Premiere Pro
Capture Settings
In Premiere Pro you can access Capture settings in a number of ways. For initial project
settings, go to File> Project Settings> General and set AJA Capture Format and settings.
To access the Adobe Capture Settings panel, do one of the following:
• Go to Window>Capture (or F5 function key) to launch the Capture Window and click on
the Settings tab>Edit
• Use the Flydown menu >Capture Settings
• Right-click in the Capture window for context-sensitive menu.
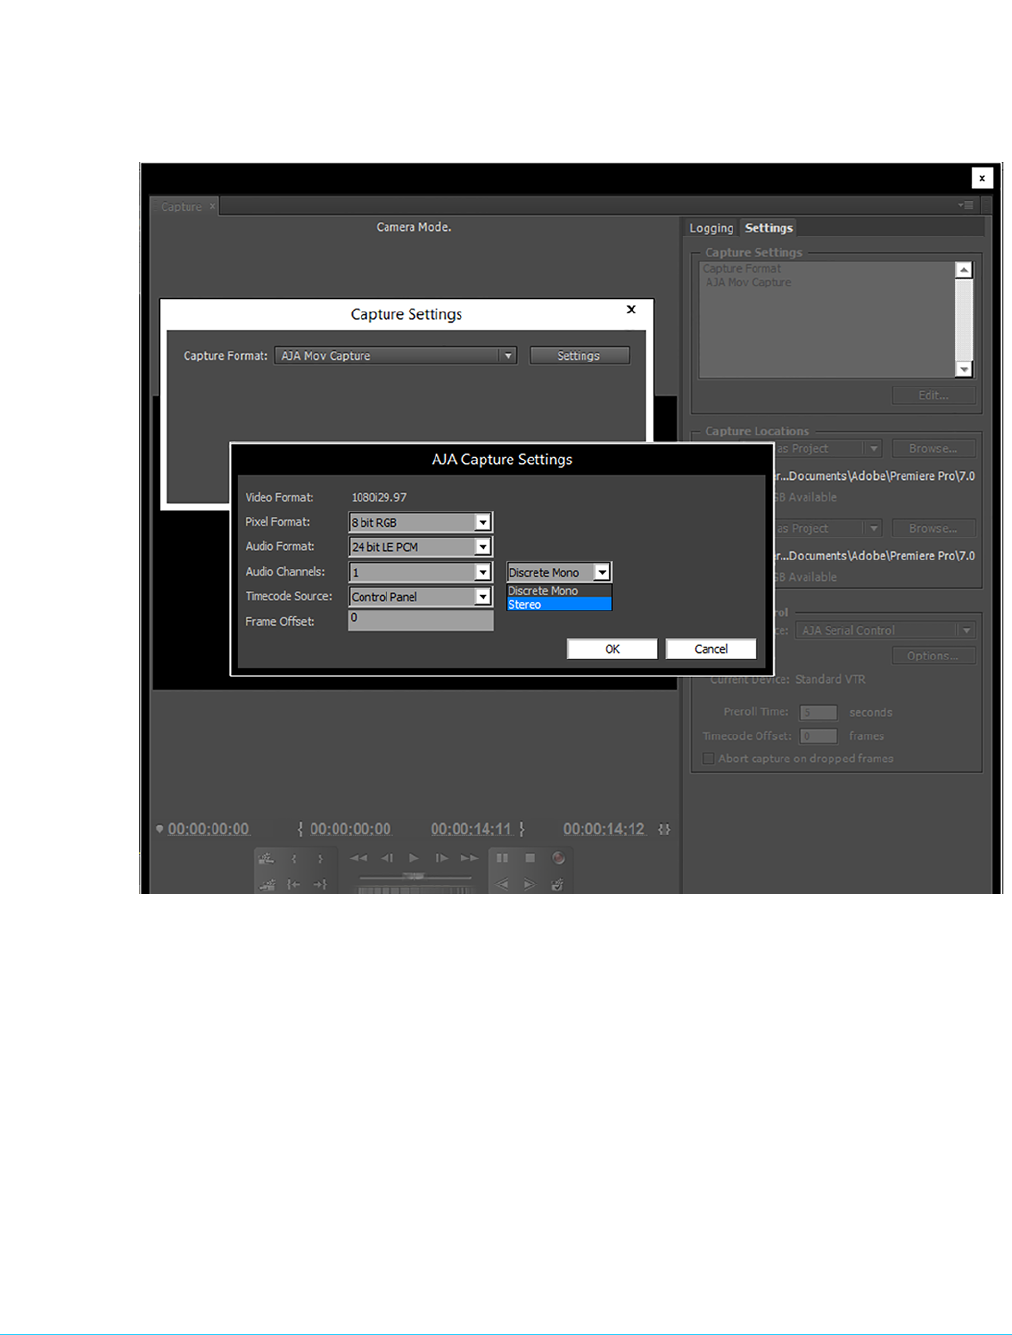
In the Capture settings, you can select either AJA Dpx or AJA Mov file format for the
capture. Click on Settings to see that Premiere Pro detects the current video input Format
and then allows you to set:
•Pixel Format
www.aja.com
10
AJA Adobe Plugins v12.4
•Audio Format
• Audio Channels (mono or stereo)
• Timecode Source
•Frame Offset
Figure 4. AJA Capture Settings panel
Pixel Format Choices Supported pixel formats are shown in the following table.

www.aja.com
11
AJA Adobe Plugins v12.4
NOTE: Available Pixel Format will vary according to the video input resolution. For example, if the
AJA device has an HD input, the DV/DVCPro formats won’t be displayed but the DVCProHD
formats will.
Audio Formats Use the Audio Formats pull-down menu to select the appropriate signal type for your
input.
• 16-bit LE (little-endian) PCM (audio compression)
•24-bit LE PCM
•32-bit LE PCM
• 32-bit LE float PCM
Audio Channels Select the number of audio channels to be captured, KONA and Io devices vary in the
number of audio channels they support. Audio channels can be captured as discrete
mono channels or stereo pairs.
Timecode Source This setting tells the Capture plugin where to get the timecode information for insertion
into the file.
• Control Panel–(default setting) uses the user-defined setting in the AJA Control Panel
• Device Control–uses the timecode from the RS-422 port
• Time of Day–use the computer time of day information
• Premiere–asks Premiere for timecode information
Table 1. Available Pixel Formats
DPX format
10-Bit BE (big endian) RGB
MOV formats
8-Bit RGB
8-Bit RGBA
10-Bit BE RGB
8-Bit Uncompressed
10-Bit Uncompressed
MC DV25
MC DVCPRO50
MC DVCPRO HD
Apple ProRes 4444
Apple ProRes 422 (HQ)
Apple ProRes 422
Apple ProRes 422LT
Apple ProRes 422 (Proxy)
Avid DNxHD HQX
Avid DNxHD HQX
Avid DNxHD HQ
Avid DNxHD SQ
Avid DNxHD LB
Avid DNxHD 444
Avid DNxHR HQX
Avid DNxHR HQ
Avid DNxHR SQ
Avid DNxHR LB
Avid DNxHR 444
Note: Apple ProRes capture available
on Mac OS only

www.aja.com
12
AJA Adobe Plugins v12.4
Premiere Pro
Playback
Preferences
To access AJA Playback settings, in Premiere Pro, go to PremierePro>Preferences>
Playback (Mac) or Edit>Preferences>Playback (Windows) to access the screen below.
Figure 5. Player Settings Panel in Premiere Pro Preferences
Video Device Setup For Video Device, select the AJA device you are using and click Setup.
www.aja.com
13
AJA Adobe Plugins v12.4
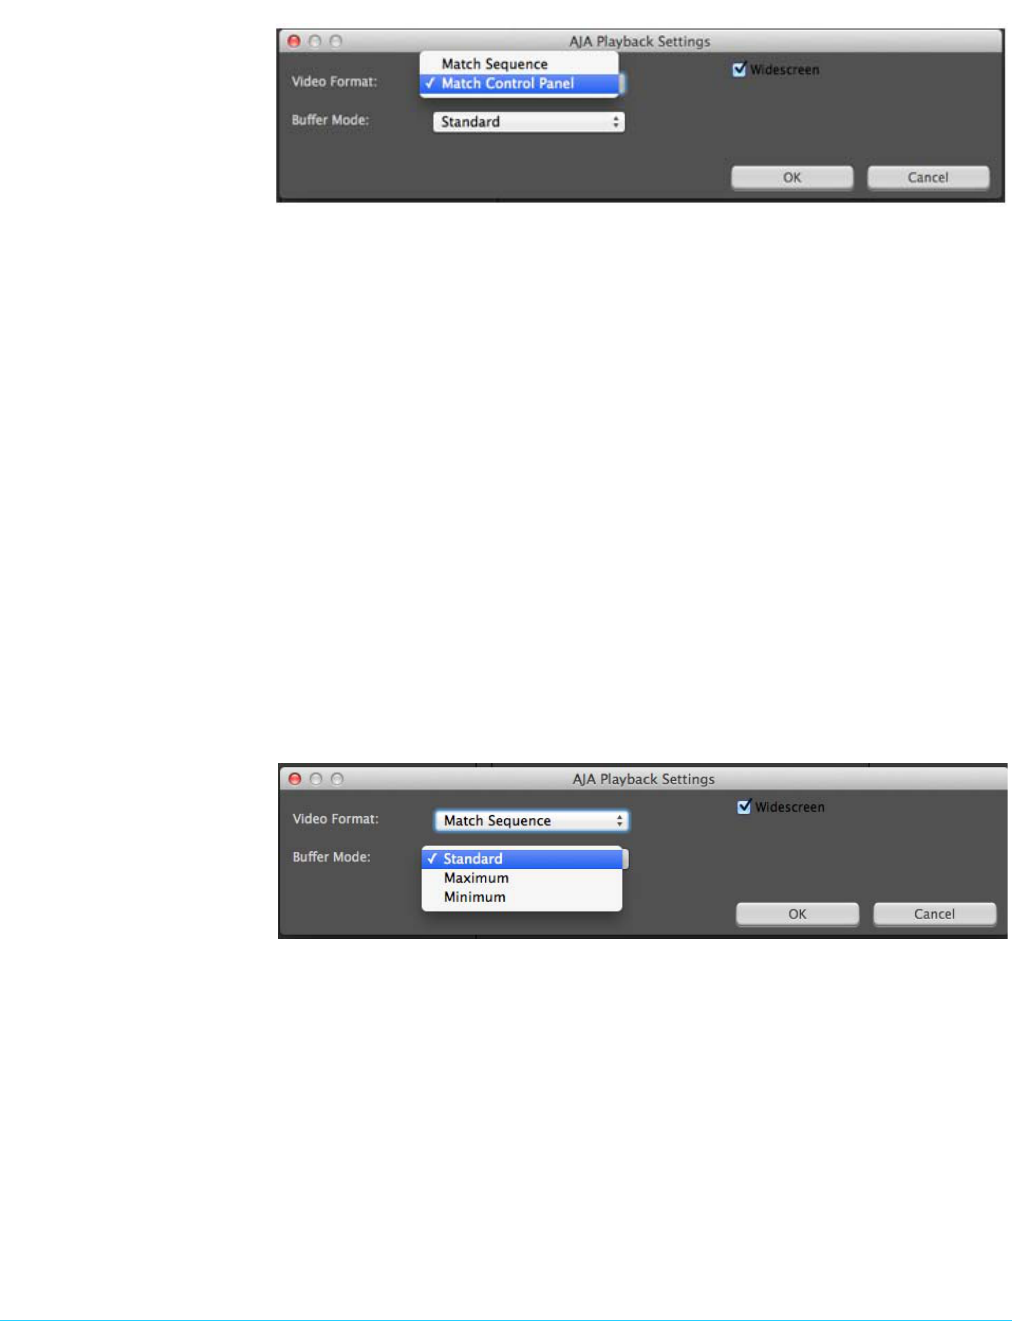
Figure 6. Premiere Pro Preferences Playback Format Settings
Video Format The default setting (expected to be what most users will want and use) is Match
Sequence. When Match Sequence is selected, the transmit plugin will try to put the card in
a mode that matches the resolution and frame rate of the timeline you're working with.
Alternatively, you can use Match Control Panel and then select a “hard-wired” video
format from the AJA Control Panel menu of available formats.
NOTE: Even with Match Sequence selected you can make other parameter adjustments (such as
color space or up/down/cross conversions) using the AJA Control Panel.
Offset Settings: The AJA Transmit plugin always works to perfectly sync audio and video output from the
AJA hardware. In doing this, a buffer is created which may cause a slight delay (generally
around 1-2 frames) compared to the Program Monitor or Source Monitor on your
desktop. These Offset settings have been provided by Adobe to tweak that delay, and
match up the video on the desktop to the video and audio coming out of the AJA
hardware.
IMPORTANT: A video offset set here can cause a missed frame when laying off to tape. Be sure to set
this offset to zero before layoff (refer to your AJA Mac or Windows release notes for the latest
information).
Buffer Mode Use the Buffer Mode menu to choose Standard, Minimum, or Maximum frame buffering.
Figure 7. Premiere Pro Preferences Playback Buffer Modes
This mode determines how many frames of buffering are to be used in the AJA hardware:
• Standard, will store 8 frames
• Maximum will store either the maximum number of frames allowed by the hardware or
14, whichever is smallest.
• Minimum will store 3 frames
Minimum vs. Standard Mode: The Minimum setting will provide the best scrubbing and JKL keyboard control
performance on the timeline. The Standard setting insures that frame drops are less
likely by providing more frame buffering.
For editing, KONA and Io users should use Minimum mode most of the time. Then, when
mastering a tape or playing out live (to air or theater) where no scrubbing will occur, you
can switch to the Standard mode to avoid frame drops.
www.aja.com
14
AJA Adobe Plugins v12.4
For T-Tap users, Standard mode is preferred in both cases.
Use Standard mode for any projects in which the sequence framerate does NOT match
the framebuffer framerate. The most common examples of this are using 720p23.98, 25,
and 30. These formats don’t exist on SDI so the card will switch to 720p50 or 60
automatically. Users, in these cases, should use the Standard buffer mode.
Widescreen Checkbox Check the Widescreen box if the project is widescreen standard definition NTSC or PAL
format.
Playback Resolution For best output resolution from KONA, use Full as your Playback Resolution setting. Use
the fly-down menu in the Premiere Pro Program Sequence to set Playback Resolution.
4K Output in
Premiere Pro
If you are using KONA 4K/3G in 4K Mode, true 4K will be output on the SDI outputs. If the
KONA device you are using does not support 4K, KONA in Premiere Pro Match Sequence
mode will automatically output the best resolution available.
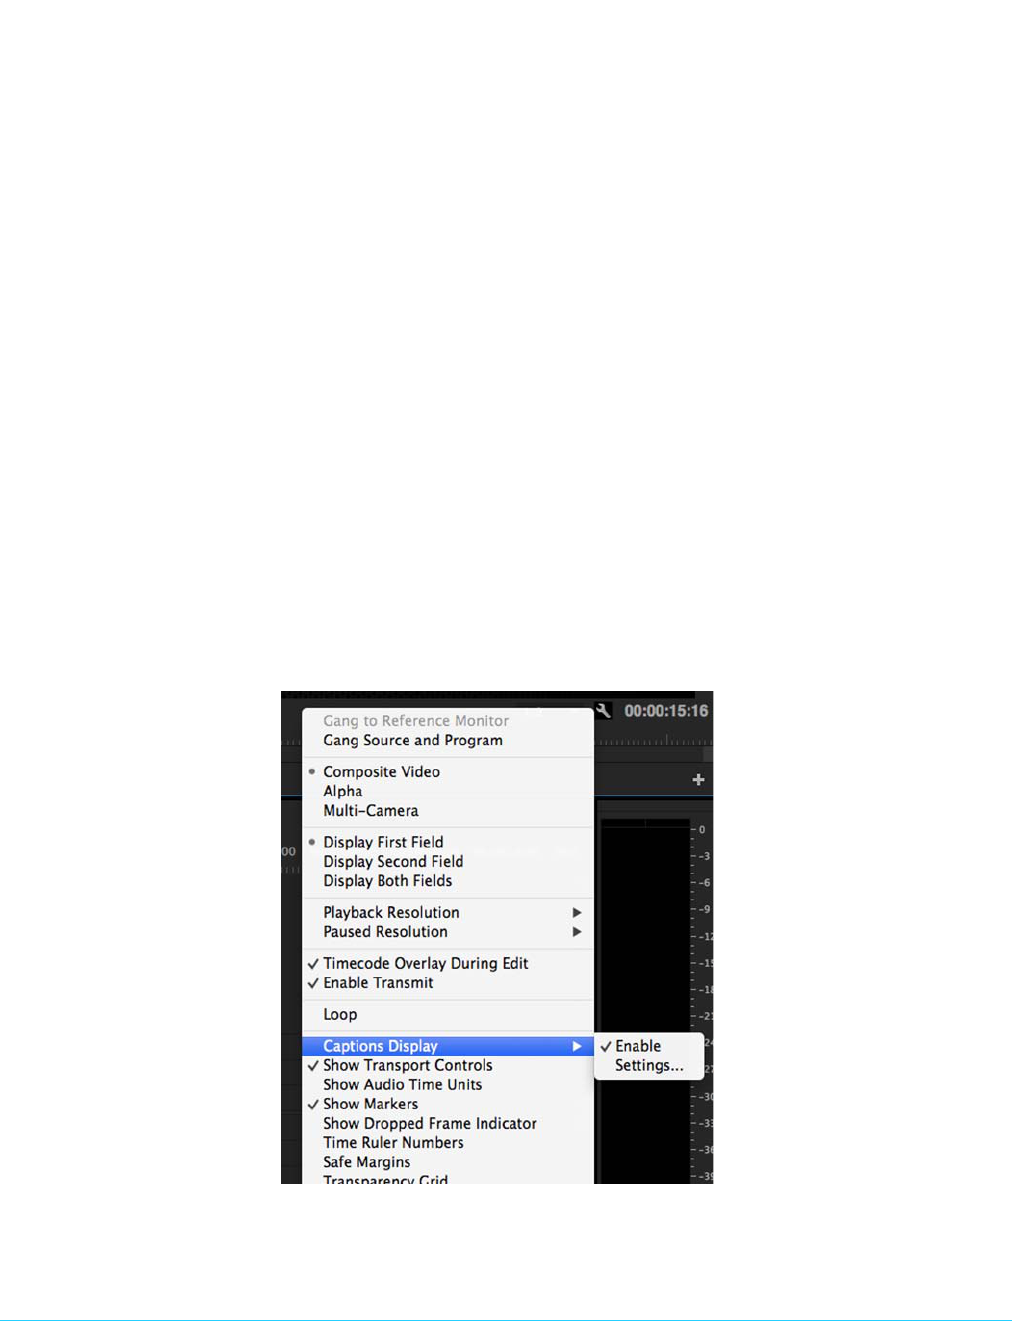
Closed Caption
Support
To capture and output Closed Captions, use the fly-down menu in the Premiere Pro
Program Sequence to select Captions Display>Enable. This will enable closed captioning
output from any file type that Premiere Pro can read.
For Closed Captioning Capture, Io4K or KONA 4 is required. If closed captions are present
in the Ancillary Data, the AJA capture plugin in Premiere Pro will detect them, and write
them into a file. For Quicktime capture, the captions will be written into the QuickTime
track of the file, and an .scc and .mcc file will be created as well. For DPX capture, only
.mcc and .scc files will be created.
Figure 8. Enable Captions
NOTE: If your AJA device is a KONA 4 or Io 4K, Closed Captions will always be active for capture
and playback. If, however, you are using earlier KONA or Io models, you must enable
vertical ancillary data (VANC) using the AJA Control Panel (see KONA/Io documentation).
www.aja.com
15
AJA Adobe Plugins v12.4
Audio Setup This section describes the two important audio configurations you must consider in
setting up the AJA transmit plugin for Premiere Pro playback. Standard audio setup with
optimum A/V sync at the output and Voice-over output that does not guarantee precise
frame-accurate sync at the output. For Voice-over, see
" Audio Voice-over Setup on page
16".
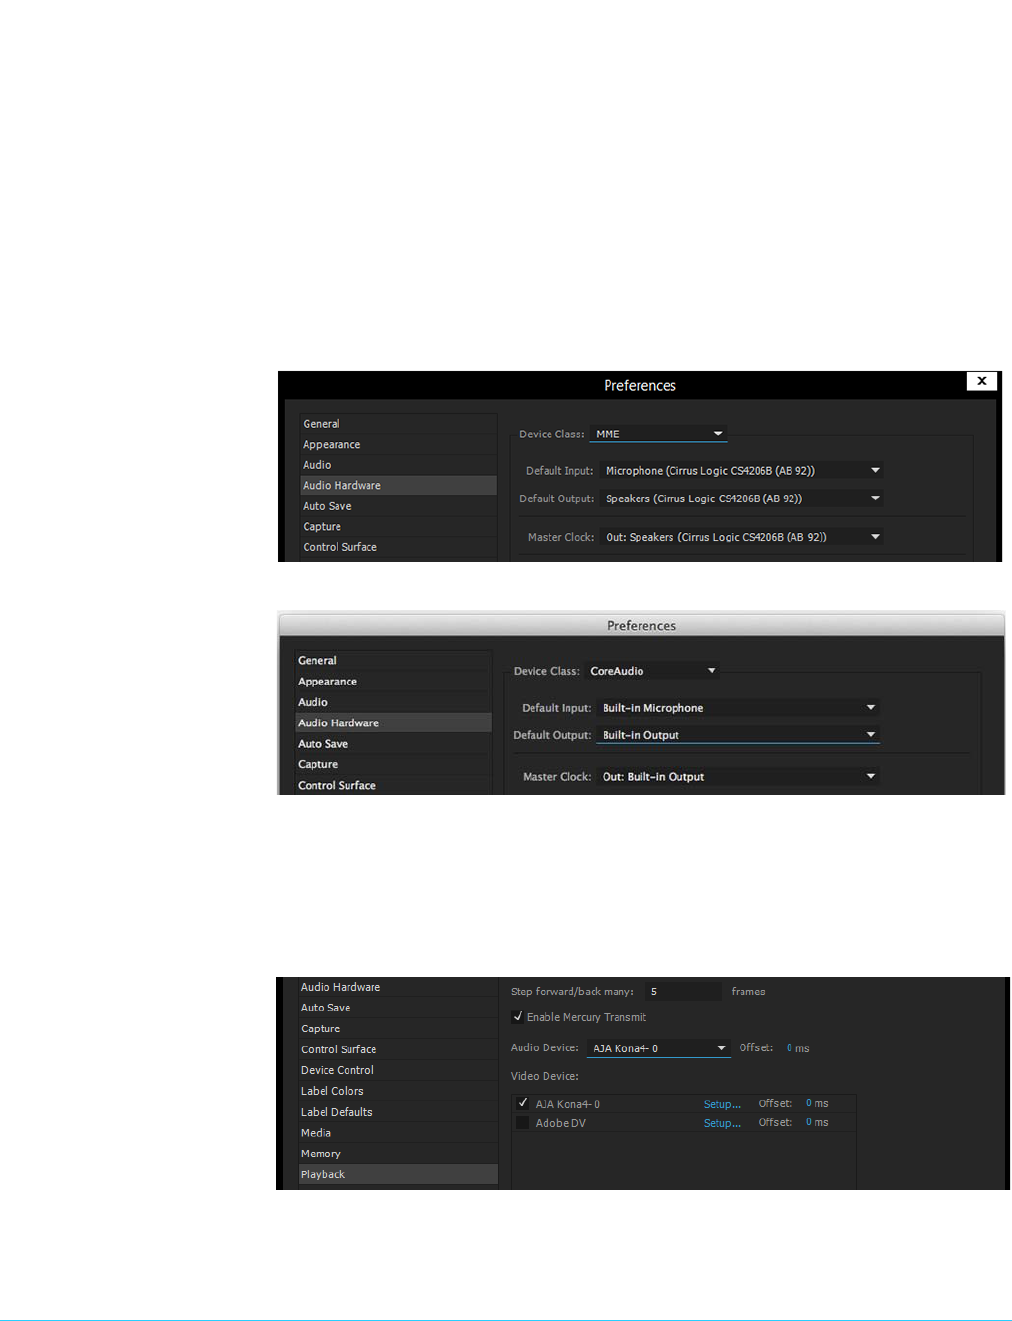
Standard Audio
Hardware Setup
The following setup is most often used and guarantees accurate AV output sync.
In Audio Hardware, Adobe Desktop Audio menu for Windows, select the Premiere Pro
default for Device Class. Do not select “ASIO” for use with KONA/Io.
NOTE: If you hear static on the KONA/Io output, adjust the audio buffer size in the Audio Hardware
Preferences. The optimal size may vary for different systems or different setups based on CPU,
RAM, and running applications.
Figure 9. Audio Hardware Preferences, Windows
Figure 10. Audio Hardware Preferences, Mac
Audio Output Mapping: In this Preferences window you can also map Stereo or 5.1 audio out channels. With your
AJA device selected in the Map Output menu, simply drag and drop the right/left or 5.1
channel icons to the desired KONA/Io channel 1–16.
Standard Playback
Audio Device
In Playback Preferences you will select your KONA/Io device in the Audio Device menu.
Figure 11. Playback Preferences, Windows or Mac

www.aja.com
16
AJA Adobe Plugins v12.4
Audio Voice-over
Setup
You can use one of the KONA/Io audio inputs (selected on the AJA Control Panel) to add a
voice-over track to your project timeline. For example, if your KONA/Io device supports
analog audio input your source could be a microphone input to your KONA breakout
panel.
NOTE: Voice-over mode should not be used when precise A/V sync is required on the output. A slight,
measurable, delay may be induced.
Windows Voice-over Setup: In Premiere Pro Preferences (Edit menu>Preferences), go to:
1. Audio Hardware and choose AJA Device from the Default Input and Default Output
menus
2. Playback and choose Adobe Desktop Audio from the Audio Device menu
Mac Voice-over Setup: For Mac Voice-over, go to Playback in the Premiere Pro Preferences (Premiere Pro
menu>Preferences> and then:
1. In Playback preferences, choose Adobe Desktop Audio from the Audio Device menu
2. In Audio Hardware preferences, choose AJA Device from the Default Input and
Default Output menus
Export to Tape To setup and Export to Tape, select (make active) the desired sequence in Premiere Pro
and then go to File>Export>Tape (Serial Device). This will bring up the following
Premiere Pro Serial Device panel which allows you to interface with the target tape
machine through AJA serial control. Export to Tape using AJA Serial Device
Figure 12. Edit to Tape Screen
In this window you will set up the following:
Export Type: • Insert–add new material from the timeline to tape with existing content, Video and
Audio tracks are selectable and no timecode is written.

www.aja.com
17
AJA Adobe Plugins v12.4
• Assemble–requires deck in regeneration mode, uses existing timecode from the tape
to begin lay down, and generates new timecode from that point on using the deck's
timecode clock.
• Print to Tape–outputs directly to tape without regard to existing timecode.
You also have access to these AJA device settings:
• Device Control Settings–AJA Device Control (see" Device Control on page 8").
• Recorder Setting– AJA Capture Settings (see " Premiere Pro Capture Settings on page 9").
Premiere Pro uses the AJA Capture plugin to display video from the tape deck.
NOTE: For precise A/V sync accuracy your audio setup should be in Standard configuration (" Video
Device Setup on page 12").
IMPORTANT: Do two or three test insert edits to establish a frame offset BEFORE doing a real insert. The
frame offset may differ for different decks and even for different resolutions and frame rates
on the same deck. You should test this before setting the offset. Also, note that the capture
frame offset may not be identical to the layoff frame offset (refer to your AJA Mac or Windows
release notes for the latest information).
• In Point, Out Point, and Duration when in applicable print mode
• Standard tape machine function controls
As noted above, you should use Preview mode to test your deck offset to verify accuracy
and avoid latency problems. Also, the more performance resources (processor and
storage speed) the better for “realtime editing.”
Using Adobe Photoshop
Adobe Photoshop (not included with KONA) accepts KONA plugins and drivers to closely
integrate the KONA/Io Export function into the application.
NOTE: Setup of Input and Output formats for KONA/Io are now performed using the AJA Control
Panel rather than menus within the Adobe Plugins.
The manual you are reading does not provide operational information for Adobe
Photoshop. Please read the Photoshop user documentation provided with the
application for information on configuration and operation. The chapter you are reading
addresses configuration and setup unique to use of KONA with Adobe Photoshop.
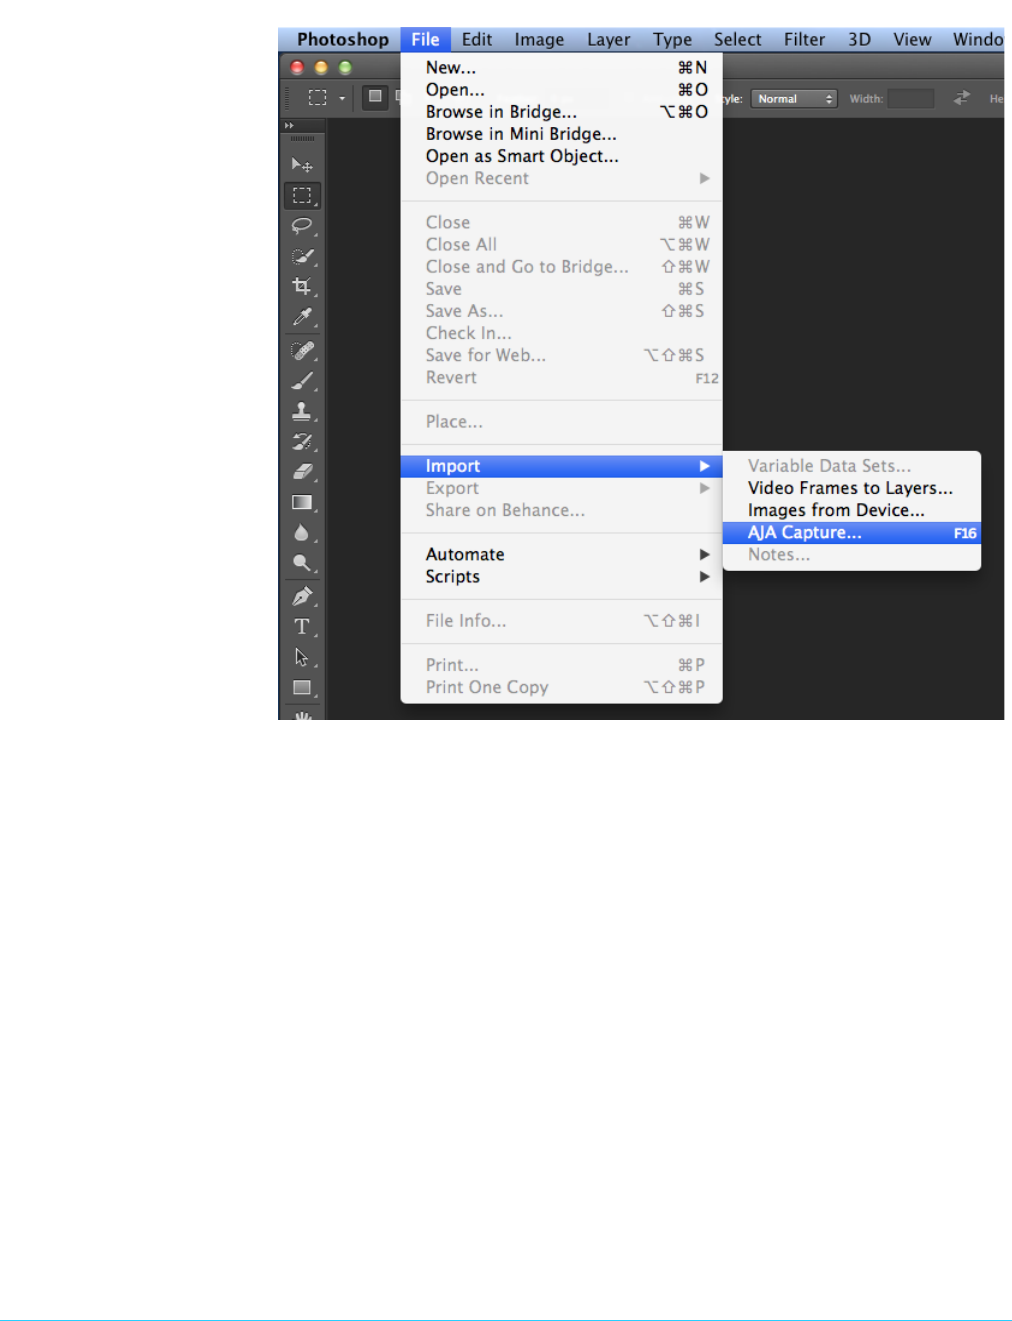
AJA Capture With Photoshop open, go to the File pull-down menu and select Import>AJA Capture.
Selecting AJA Capture performs an immediate capture of the current frame in the KONA/
Io frame buffer.
www.aja.com
18
AJA Adobe Plugins v12.4
Figure 13. AJA Image Capture in Photoshop, File>Import Menu
If you use the capture function regularly, we recommend that you set up a Keyboard
Shortcut to trigger the capture (see Photoshop documentation).
www.aja.com
19
AJA Adobe Plugins v12.4
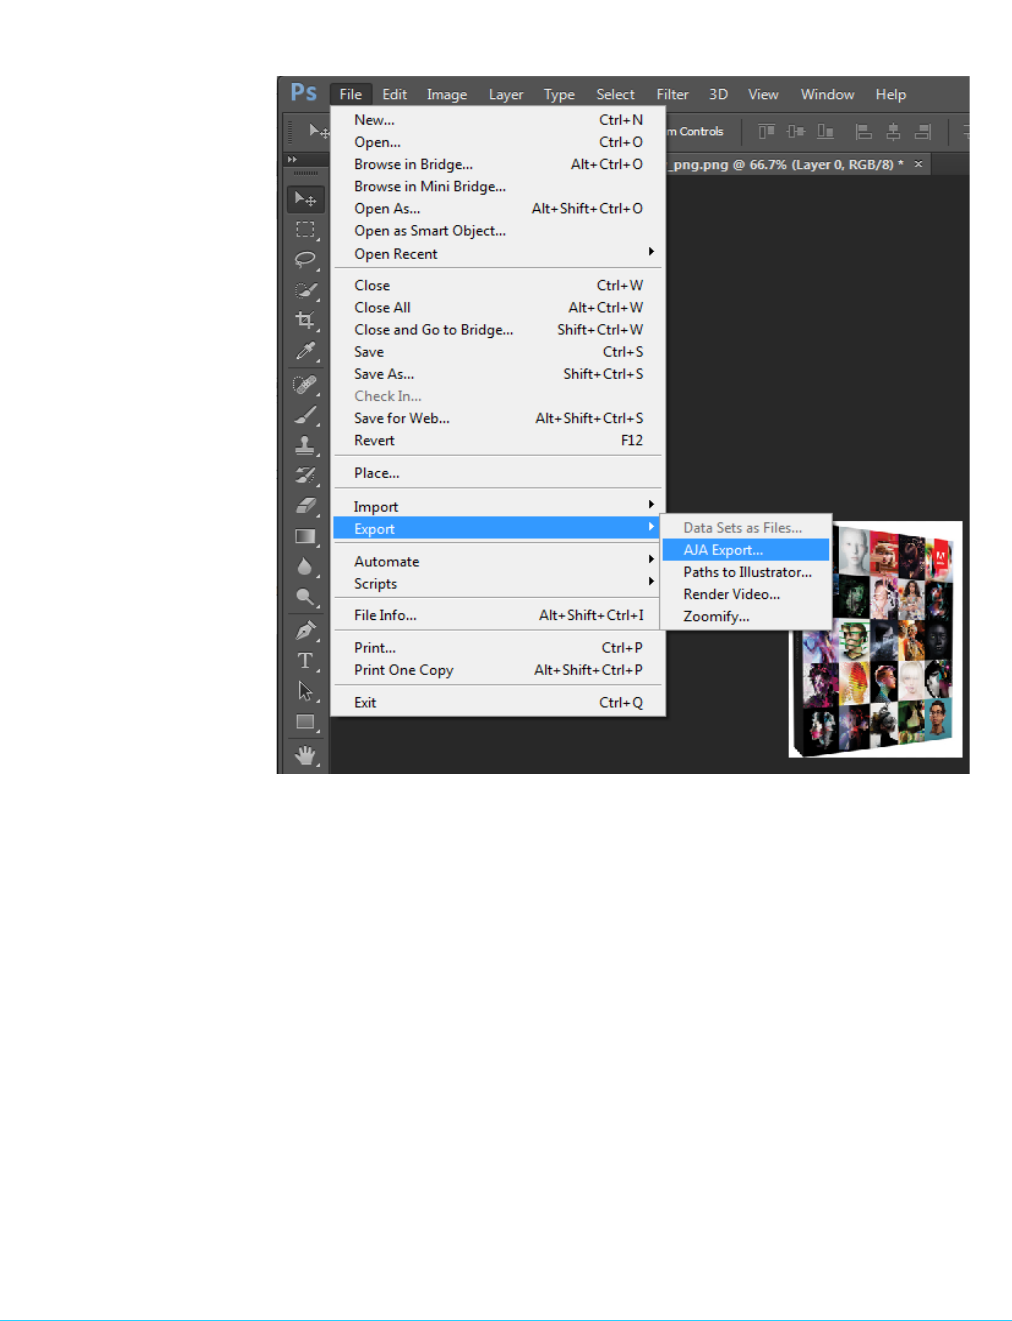
AJA Export To use the AJA Preview function, go to Export and choose AJA Export.
Figure 14. AJA Image Export in Photoshop, File>Export Menu
The specific options available to you are determined by the AJA KONA/Io device that is
installed in your workstation and you are currently controlling. This section will describe
all options for the Photoshop plugin when used with KONA/Io.
Use the AJA Control Panel to set Video Format and Pixel Format for your desired output.
Source Frame Setting: To setup Preview options, go to the Window menu and select AJA Preview. Select a
Source Frame mode to define the video interlace for your image. Progressive is the
default.
NOTE: If your source video is interlaced, you may select the appropriate (lower or upper) initial field
to maximize KONA/Io output performance. This setting tells the KONA/Io which type of frame
format it is receiving.
www.aja.com
20
AJA Adobe Plugins v12.4
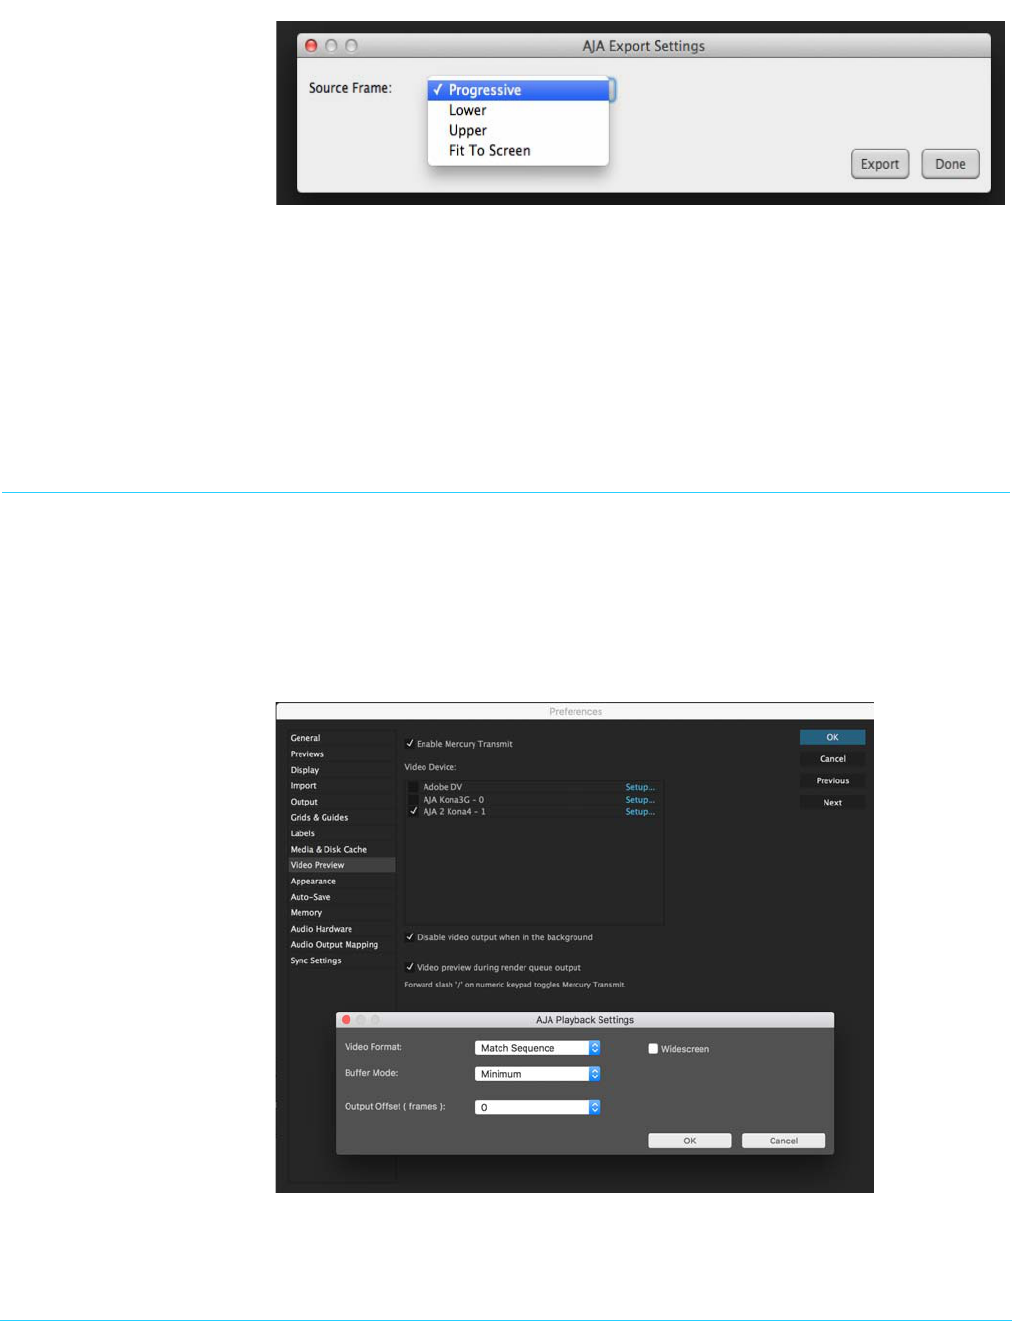
Figure 15. AJA Photoshop Export Setting Menu
In Fit To Screen mode, KONA/Io automatically scales the image geometry until one of its
borders fills the monitor screen. No cropping or distortion occurs.
When your Export Settings are selected, click on the Export button to output your image
through KONA/Io.
NOTE: When you output in Video + Key mode (set in AJA Control Panel), Video is output via SDI 1 and
the Key channel is output on SDI 2. (This does not apply to KONA 4K Mode operation, see the
KONA manual.)
Using Adobe After Effects
NOTE: In AJA’s v12.4 Retail Software package, support for Adobe After Effects has changed.
Previoiusly two different plugins were being installed. The 'Blithook' plugin is the legacy
plugin and is no longer installed by default. It must be deliberately chosen as an option in
both the Mac and Windows installer. The Transmit plugin is installed with the default
installation options.
AJA Transmit Plugin Figure 16. AJA After Effects Preview Settings Menu, Transmit Plugin

www.aja.com
21
AJA Adobe Plugins v12.4
Video Format The default setting (expected to be what most users will want and use) is Match
Sequence. When Match Sequence is selected, the transmit plugin will try to put the card in
a mode that matches the resolution and frame rate of the timeline you're working with.
Alternatively, you can use Match Control Panel and then select a “hard-wired” video
format from the AJA Control Panel menu of available formats.
NOTE: Even with Match Sequence selected you can make other parameter adjustments (such as
color space or up/down/cross conversions) using the AJA Control Panel.
Offset Settings: The AJA Transmit plugin always works to perfectly sync audio and video output from the
AJA hardware. In doing this, a buffer is created which may cause a slight delay (generally
around 1-2 frames) compared to the Program Monitor or Source Monitor on your
desktop. These Offset settings have been provided by Adobe to tweak that delay, and
match up the video on the desktop to the video and audio coming out of the AJA
hardware.
IMPORTANT: A video offset set here can cause a missed frame when laying off to tape. Be sure to set
this offset to zero before layoff (refer to your AJA Mac or Windows release notes for the latest
information).
Buffer Mode Use the Buffer Mode menu to choose Standard, Minimum, or Maximum frame buffering.
This mode determines how many frames of buffering are to be used in the AJA hardware:
• Standard, will store 8 frames
• Maximum will store the maximum number of frames allowed by the given hardware
• Minimum will store 3 frames
Minimum vs. Standard Mode: The Minimum setting will provide the best scrubbing and JKL keyboard control
performance on the timeline. The Standard setting insures that frame drops are less
likely by providing more frame buffering.
For editing, KONA and Io users should use Minimum mode most of the time. Then, when
mastering a tape or playing out live (to air or theater) where no scrubbing will occur, you
can switch to the Standard mode to avoid frame drops.
For T-Tap users, Standard mode is preferred in both cases.
Use Standard mode for any projects in which the sequence framerate does NOT match
the framebuffer framerate. The most common examples of this are using 720p23.98, 25,
and 30. These formats don’t exist on SDI so the card will switch to 720p50 or 60
automatically. Users, in these cases, should use the Standard buffer mode.
Widescreen Checkbox Check the Widescreen box if the project is widescreen standard definition NTSC or PAL
format.
Legacy AJA Preview
Plugin
The Legacy Preview plugin allows you to view the current frame of your working timeline
in various formats on a monitor connected to a KONA/Io output.
Video & Pixel Format: Use the AJA Control Panel to set Video Format and Pixel Format for your desired output.
After Effects does not set these parameters within the application.
Source Frame Setting: To set up Preview options for After Effects, go to the Window menu and select AJA
Preview.
www.aja.com
22
AJA Adobe Plugins v12.4
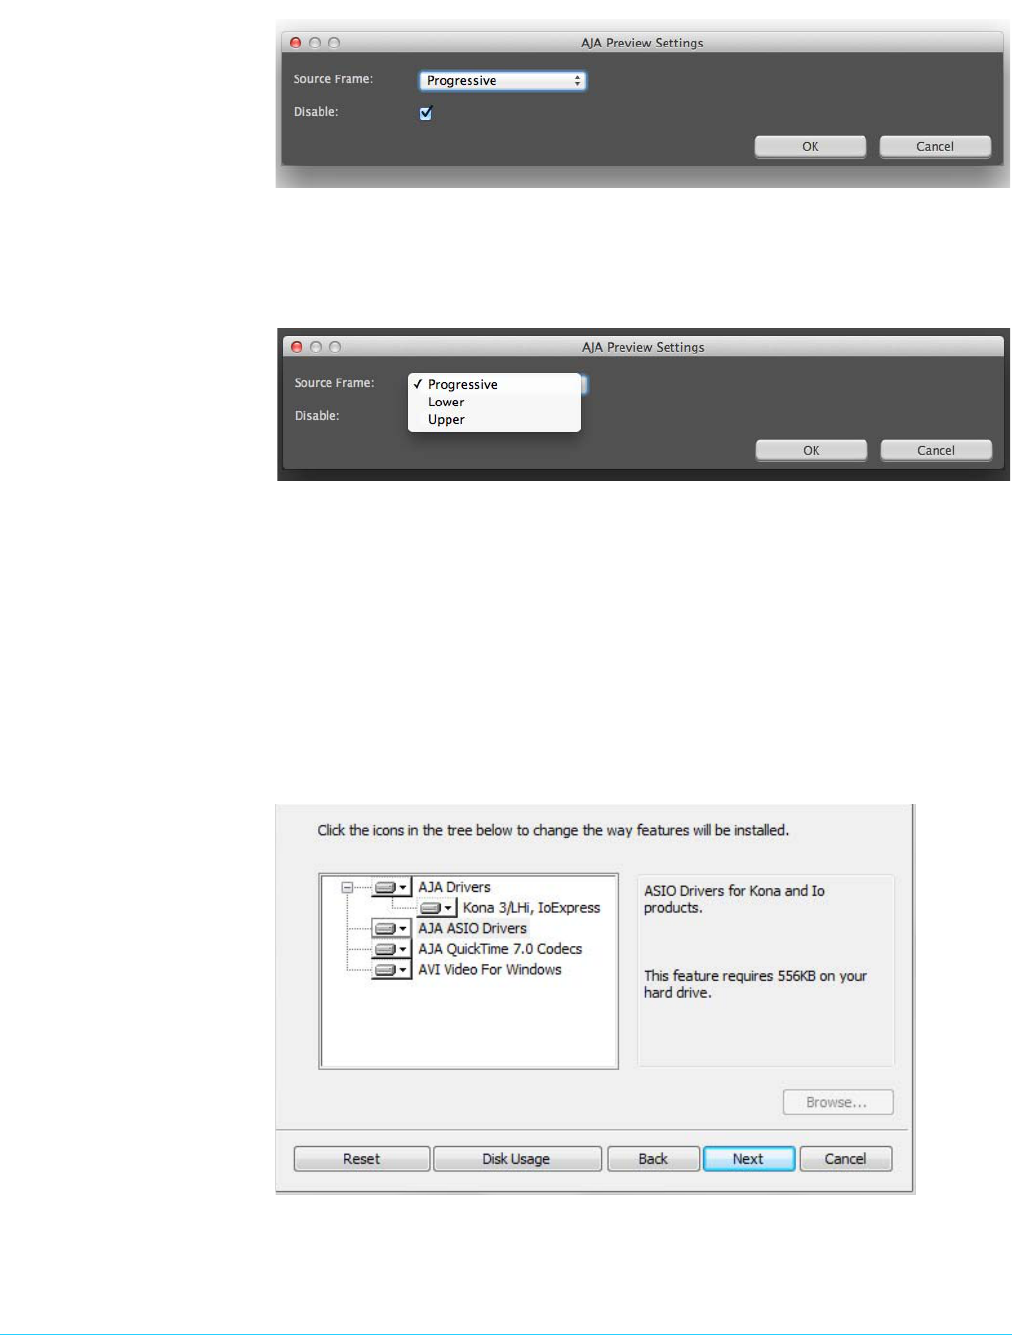
Figure 17. AJA After Effects Preview Settings Menu, Legacy Plugin
Here you can choose to disable the AJA Plugin by checking the Disable box or select a
Source Frame mode to define the video interlace for your video input. Progressive is the
default.
Figure 18. AJA After Effects Source Frame Setting Menu, Legacy Plugin
NOTE: If your source video is interlaced, you may choose to select the appropriate field dominance
(lower or upper) to maximize KONA/Io output performance. This setting tells the KONA/Io
which type of frame format it is receiving.
Audio Hardware
Selection
In the After Effects Preferences you can also select the AJA KONA/Io audio hardware for
output.
Windows Audio Output: To setup After Effects audio in Windows, you must have installed the ASIO drivers during
AJA KONA/Io driver installation. ASIO is not part of the default installation. Refer to the
KONA/Io installation manual for details. The ASIO Drivers installation selection is shown
below.
Figure 19. Windows ASIO Installation in KONA/Io Drivers Package
Go to Audio Hardware Preferences to select KONA ASIO for audio output.
www.aja.com
23
AJA Adobe Plugins v12.4
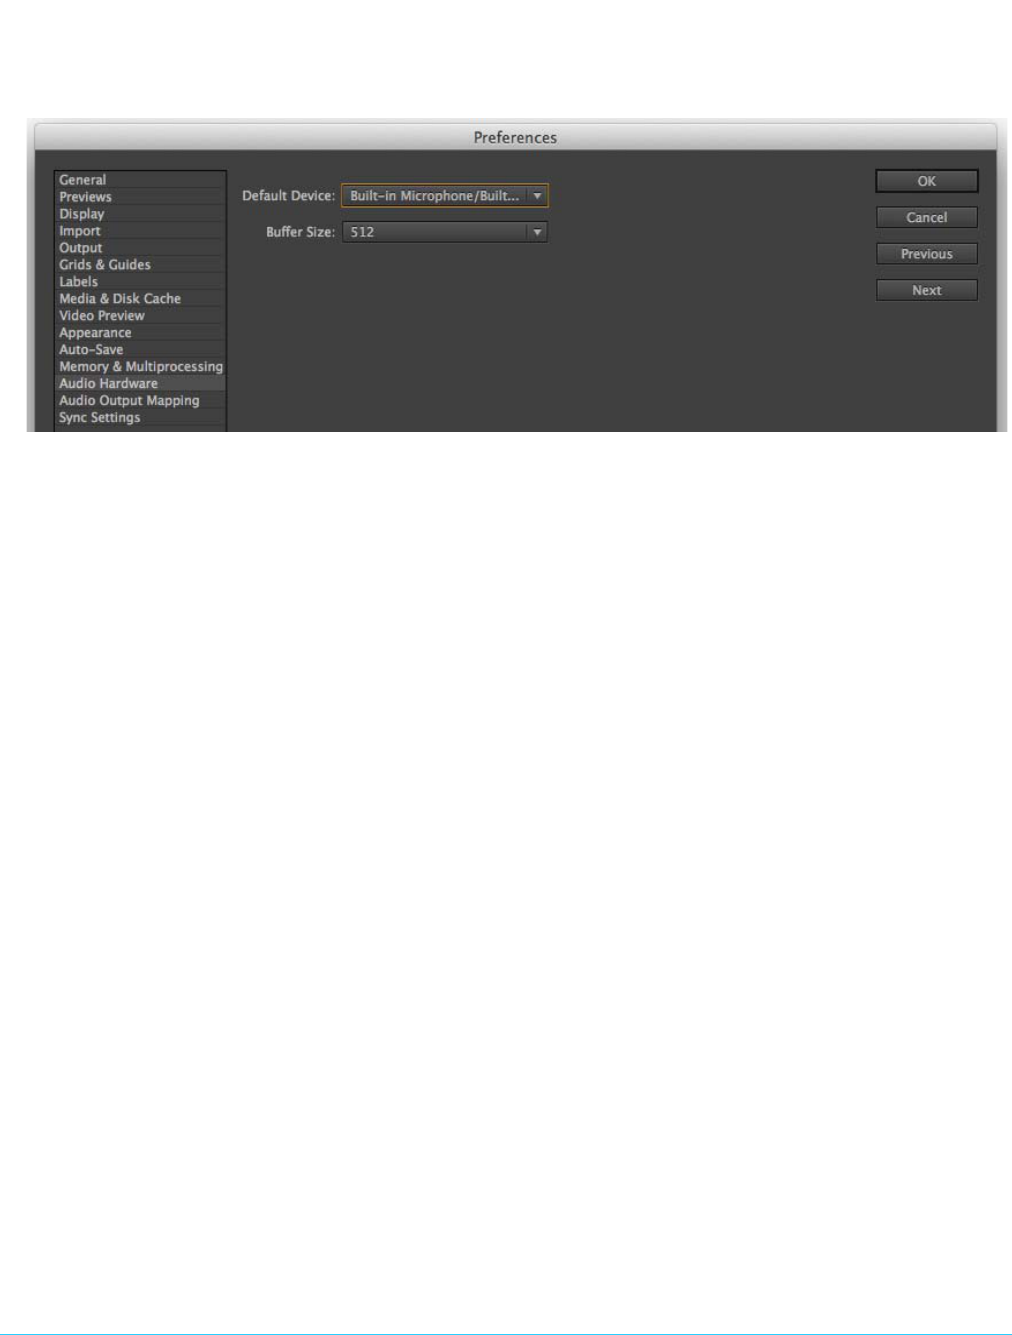
Mac Audio Output: : For Mac Audio go to the After Effects Preferences>Audio Hardware and select System
Default Input/Output and then set the Mac OS System Preferences>Sound Input and
Output to the AJA KONA/Io device.
Figure 20. AJA After Effects Mac Audio Hardware Preference
NOTE: For both Windows and Mac, you should set the Audio Buffer size to 512. If you hear static on
the KONA/Io output, adjust the audio buffer size from this setting. The optimal size may vary
for different systems or different setups based on CPU, RAM, and running applications.
After Effects Real-time
Performance
RAM Preview should be real-time for HD in After Effects. 4K RAM preview may even be
possible with a high performance workstation. Please ensure you have the following
settings for proper RT RAM preview.
1. Make sure that the frame buffer format of the AJA Control Panel matches the
resolution and frame rate of your After Effects Composition. This can be set by
launching AJA Control Panel, clicking on 'Format' in the left hand column, and
selecting the correct resolution and framerate in the 'format' drop down menu.
2. Next, please ensure that the “Resolution” setting for “Time Controls” is set to “Full” in
After Effects. If not set to “Full”, the image that the AJA Preview Panel receives and
sends to the KONA board during RAM Preview will not be sent at “Full Resolution”
and thus will either be software resized to Full Resolution before sending to the
KONA Board for display, or will be center cropped before sending.
3. If RAM Preview is still not real-time, you can try some of the following – setting your
Zoom to “100%” in your AE Composition, making sure the “Frame Rate” of the AE
Time Controls” matches the frame rate of the “Primary Format” in the AJA Preview
Panel, and muting audio in the AE Time Controls.
NOTE: In some cases the available bandwidth of the motherboard limits the cards ability to output
realtime video. AJA tech support can show you how to use AJA System Test to test the
bandwidth you are getting between the card and motherboard.
www.aja.com
24
AJA Adobe Plugins v12.4
Using Adobe SpeedGrade
AJA Display Setup AJA Adobe Plugins are closely integrated into Adobe’s SpeedGrade color correction and
color grading software. You can use your AJA device for Display output in SpeedGrade by
going to the AJA Control Panel and SpeedGrade Preferences and performing the
following:
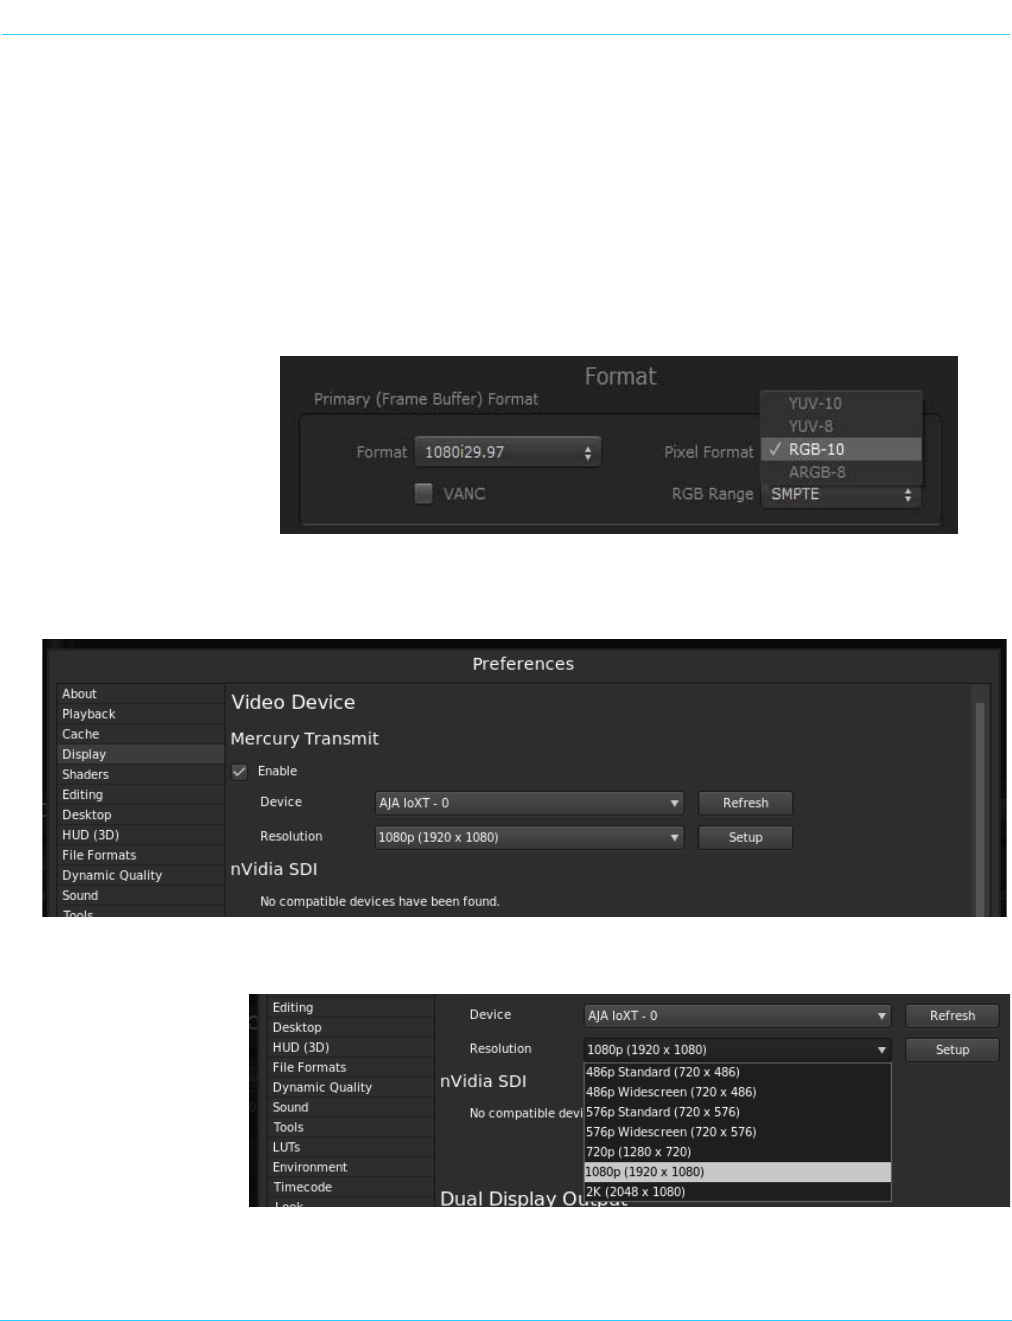
1. Go to your AJA Control Panel and select the Format screen. Here you will choose the
Pixel Format you wish to display.
NOTE: RGB-10 or ARGB-10 are the best options if they are available through your AJA device and
appear in the menu.
Figure 21. AJA Control Panel Pixel Format Setting
2. Go to the SpeedGrade Preferences screen>Display tab, and choose your AJA unit in
the Device pulldown menu and check the Enable checkbox to the left.
Figure 22. SpeedGrade Preferences, Display
3. Select the resolution that you want the AJA transmit engine to use.
Figure 23. Resolution Pulldown Menu
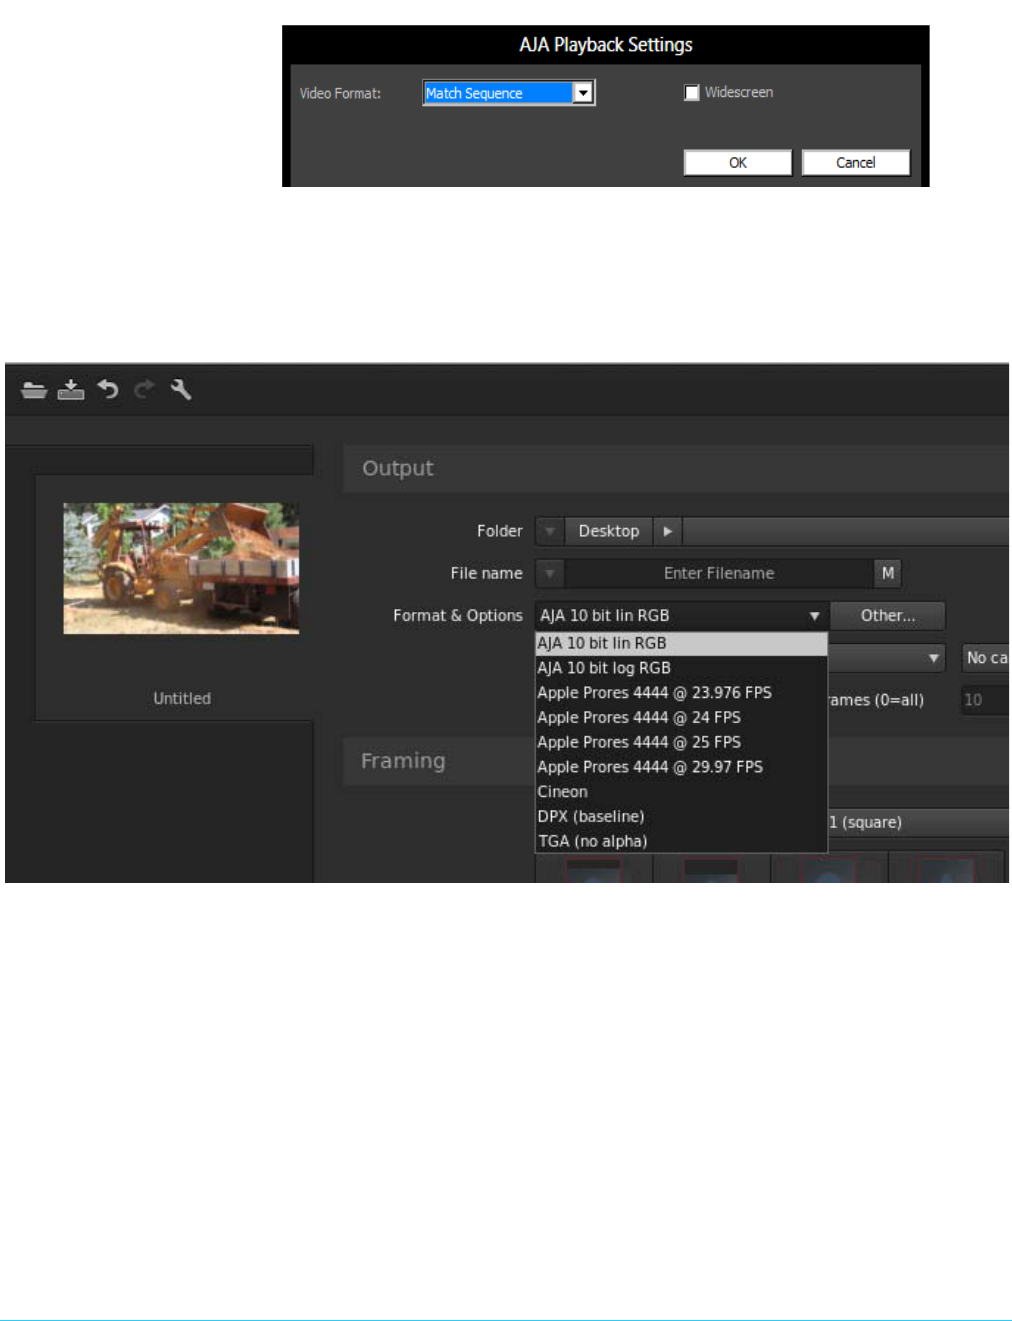
4. Click the Setup button to verify that Match Sequence is selected (default).
www.aja.com
25
AJA Adobe Plugins v12.4
Figure 24. Match Sequence Setting Verification
Using AJA Codecs
for File Generation
In SpeedGrade, under the Render tab you can choose to use the AJA Quicktime codecs
for file generation. Access the Format & Options pulldown menu to select the desired AJA
Format.
Figure 25. AJA Output Format & Options Menu
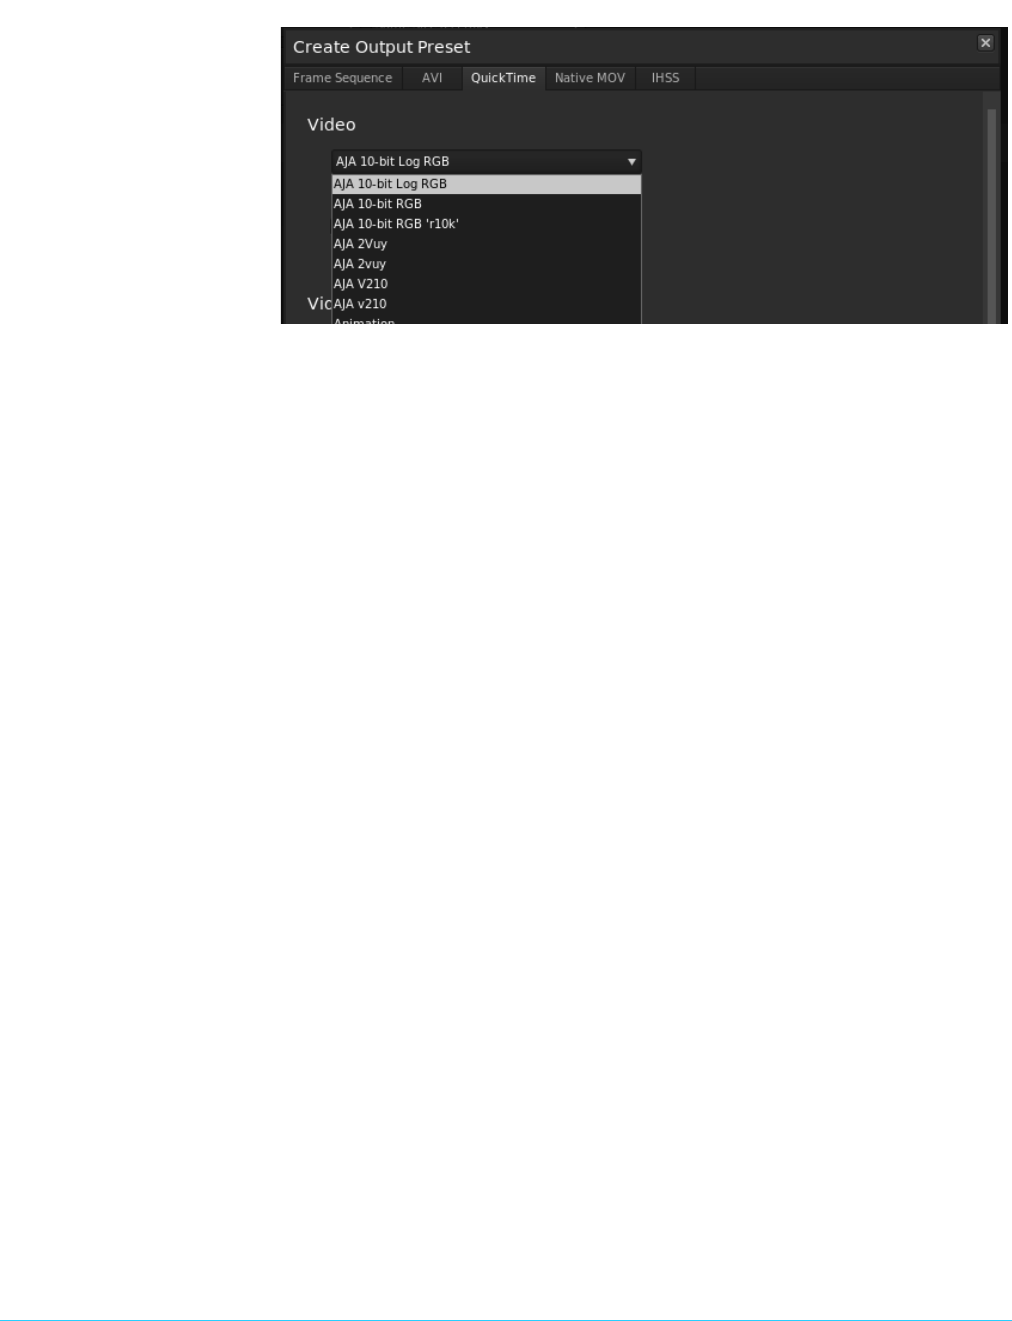
If you click on the Other button to the right of Format and Options, you will see the
following screen where you can select an AJA video format, give it a Preset name, and
save it to recall for any subsequent project.
www.aja.com
26
AJA Adobe Plugins v12.4
Figure 26. Create a SpeedGrade Output Preset

www.aja.com
27
AJA Adobe Plugins v12.4
Index
Numerics
4K output 14
A
A/V sync accuracy 17
Adobe application directories 4
Adobe applications 5
After Effects preferences 23
After Effects preview 21
AJA plugins 4
AJA Quicktime codecs 25
AJA serial control 8, 16
AJA settings button 5
AJA website 4
assemble edit 17
audio
After Effects 22
audio channels 10
audio configurations 8, 15
audio output mapping 15
AV output sync 15
B
buffer mode 13, 21
standard 14, 21
C
capture settings 9
closed captions 14
color correction 24
D
deck offset 17
discrete mono or stereo 10, 11
display
SpeedGrade 24
display captions 14
download 4
F
fractional frames 9
I
important audio configurations 15
Installation Overview 4
L
LTC 9
M
mapping audio output 15
match deck 9
N
new sequence 5
O
Optional Capture Adjustments 9
Optional Layoff Adjustments 9
output resolution 14
P
Photoshop capture 17
Photoshop export 19
Premiere Pro preferences 7
preroll 8
presets 5
R
realtime editing 17
release notes 4
required files 4
RS-422 machine control 8
S
screen format 14, 21
SpeedGrade output preset 26
SpeedGrade pixel format 24
standard buffer mode 14, 21
T
target tape machine 16
test insert edits 17
third-party applications 4
timecode 8
timecode information 11
timeline to tape 16
V
vertical ancillary data (VANC) 14
video offset 13, 21
VITC 9
voice-over audio 8
voice-over output 15
voice-over track setup 16
