ADINKRA: Exploring
Printmaking
thRough African
Symbols and
Textiles
by Alana Adams

Description:
In this lesson, students will learn about how people from all different continents have used
symbols to communicate stories and meanings dating back to Cave Art. Next, they will
observe the use of Adinkra symbols in traditional African and Gullah textiles. Finally, students
will learn how to use a modified printmaking or “stamping” process to create a collaborative
class “Adinkra cloth” on paper.
Audience: Duration:
Grades 3 and up 2 (45 minute) sessions
Resources:
Understanding how Symbols Communicate Stories and Meanings Presentation
Adinkra designs Handout (in Appendix of this lesson)
Self Adhesive fun foam sheets - 2 each (2.5” x
2.5”)
Corrugated cardboard (or foam core) square
– 2 each (2.5” x 2.5”)
Pointed tip Scissors
Teacher only: craft knife with fine tip such as
X-ACTO
Pencils
Water based markers (darker colors such as
black, blue, brown work best)
9x9 square of white art paper for Adinkra
Cloth
12x12 square of construction paper or brown
butcher paper (colors from nature are
recommended)
Glue stick
White square of practice paper for sketching
design (it can be smaller than 12x12 if needed,
such as 8.5x8.5”)
Materials:

SESSION 1
Part 1: The Hook
Using the accompanying Presentation, explore how symbols have been used throughout the
world dating back to Cave Art. Have students recall what kinds of symbols they see every
day and discuss how much meaning a simple image can convey.
Part 2: Background
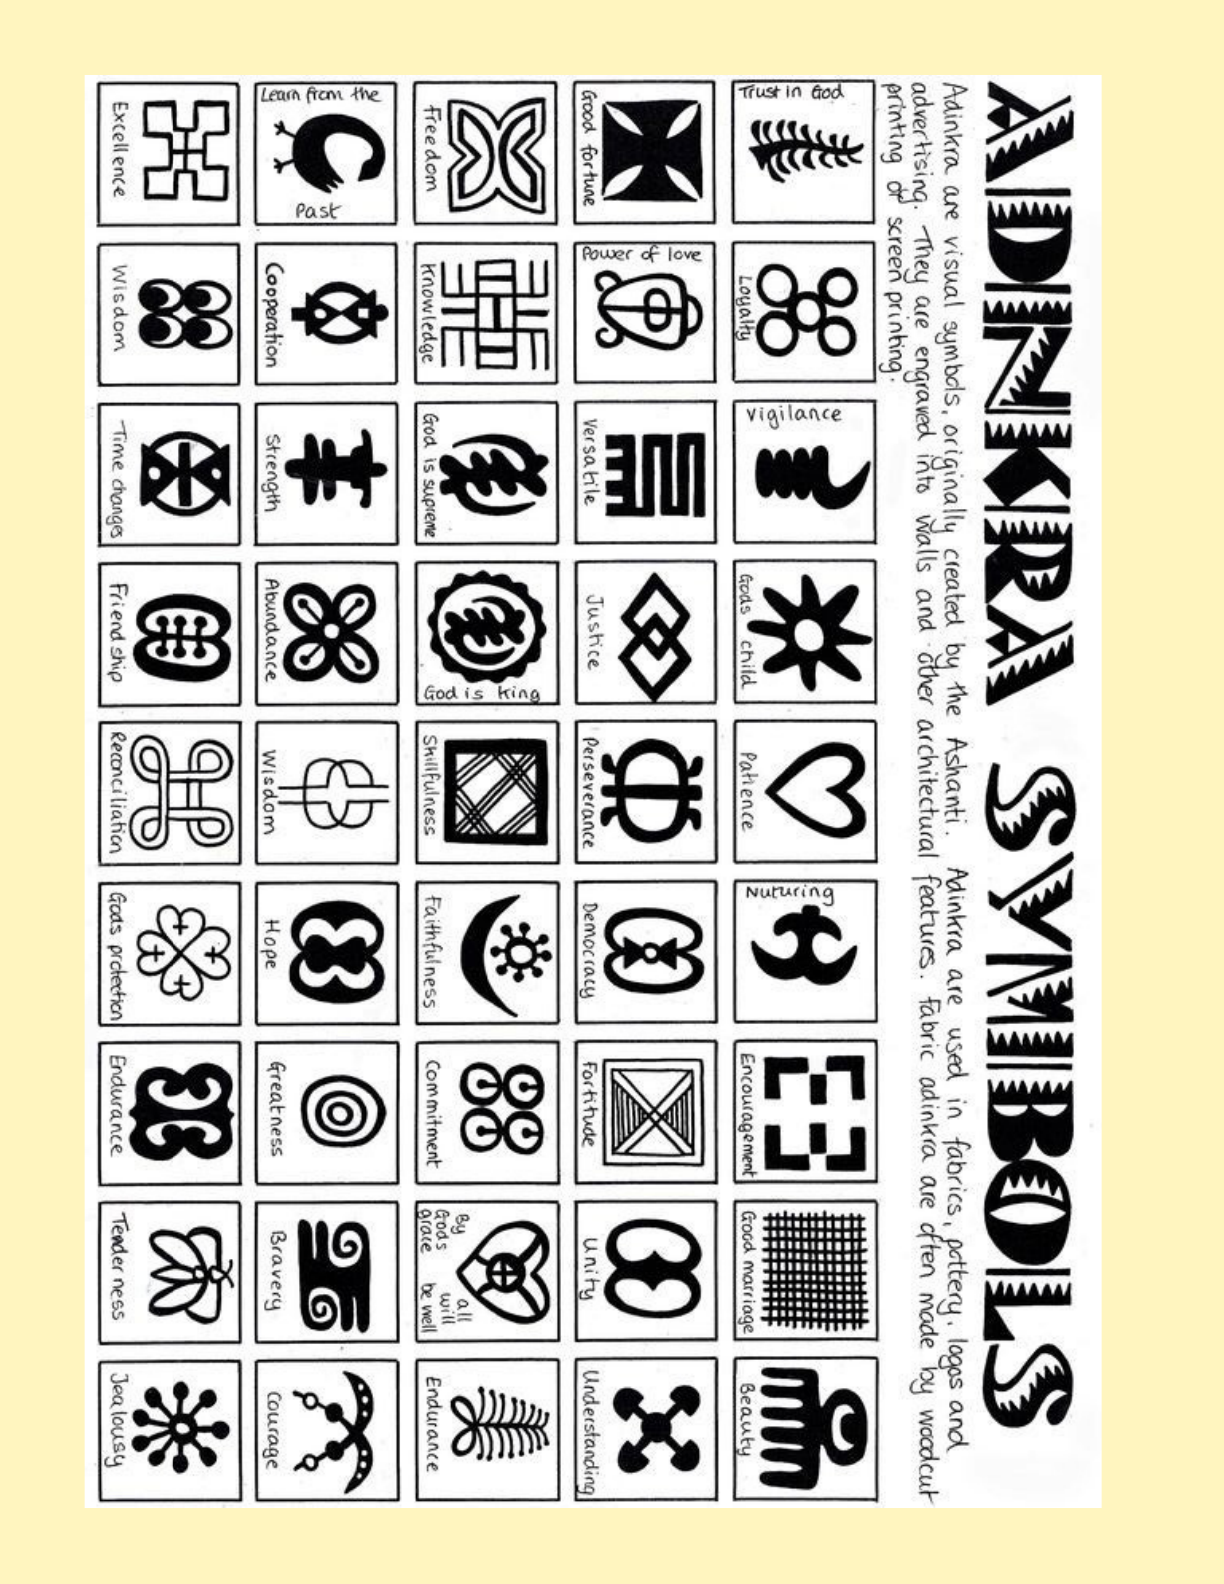
Next, draw student focus on the Adinkra Symbols from West Africa.
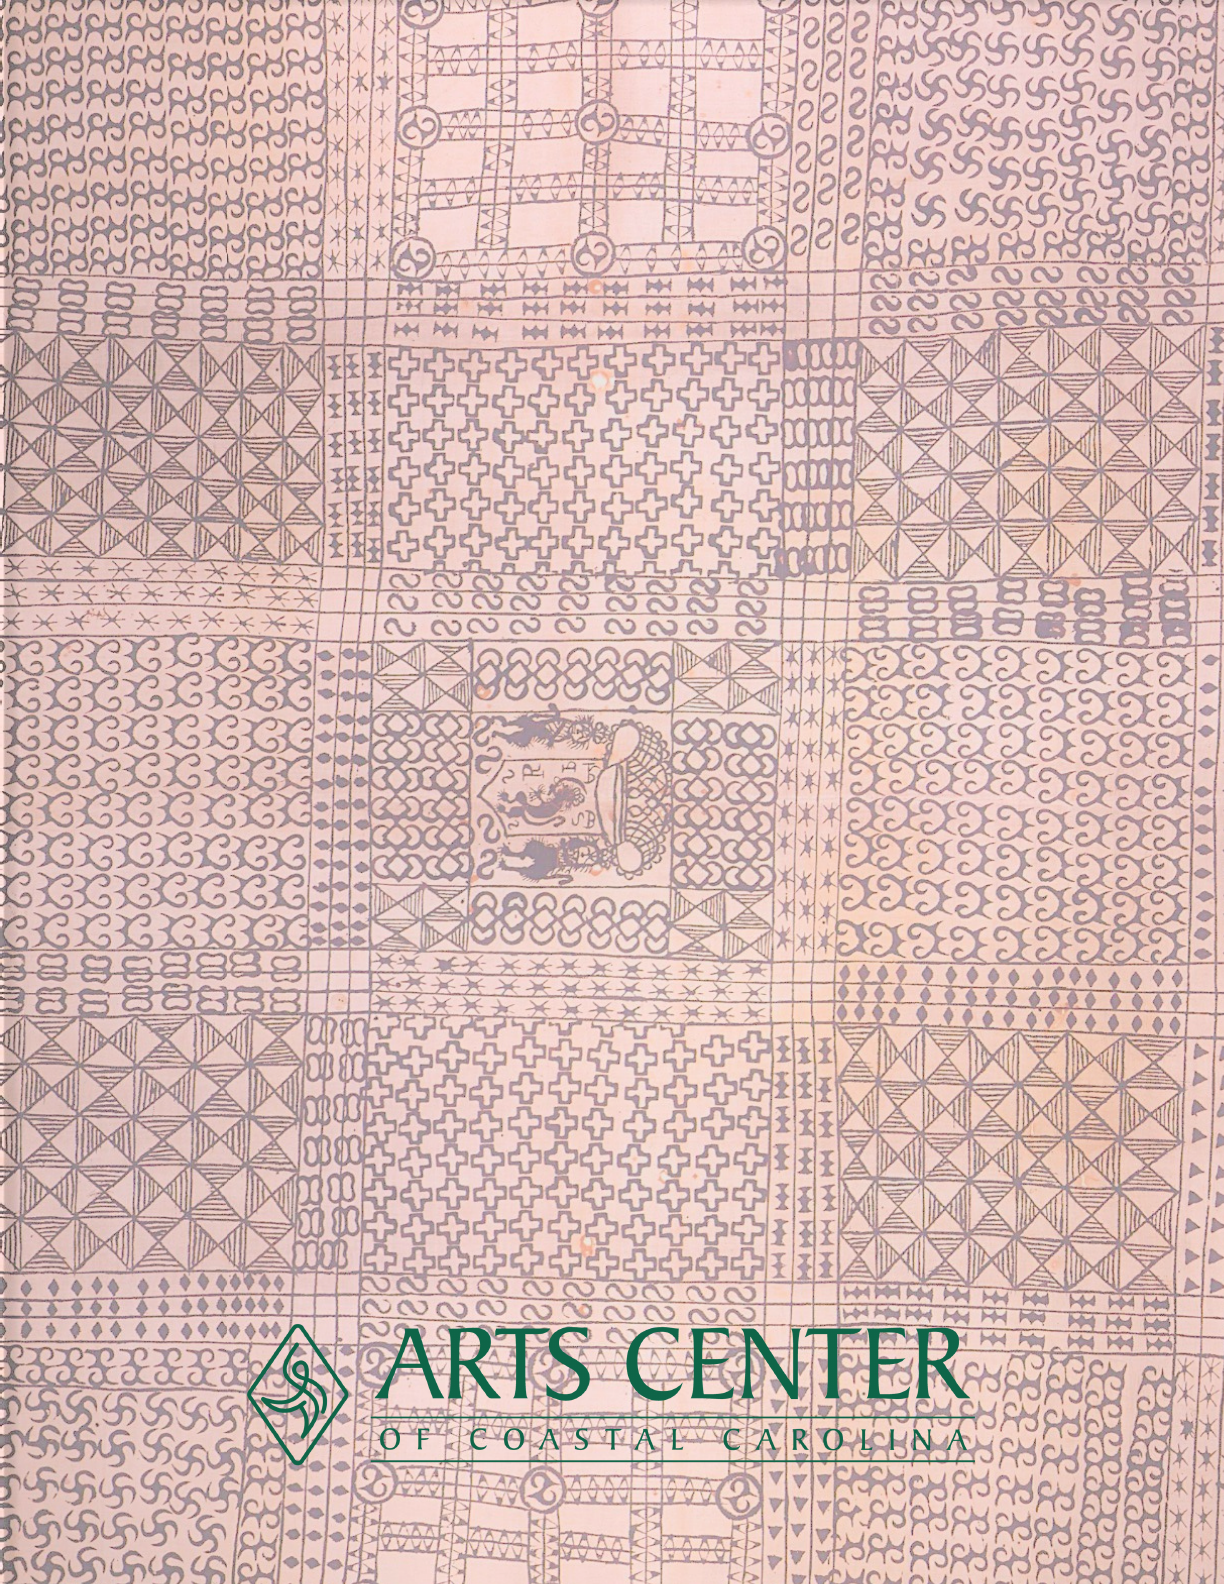
Adinkra are symbols from a country in West Africa called Ghana that represent concepts or
ideas. These symbols have been used in textiles, pottery, wall decorations and even in ritual
ceremonies in Africa for hundreds of years. The symbols have a decorative function but also
represent ideas that convey traditional wisdom, aspects of life, or the environment. There
are many symbols with distinct meanings, often linked with proverbs.
When enslaved Africans were brought to America, they brought many of their rich traditions
from Africa with them. Today, many Gullah people still use Adinkra symbols inn their textiles
as a means to preserve their rich African heritage. Adinkra symbols would have historically
been carved or printed on textiles using calabash stamp and a vegetable-based dye to
create “Adinkra Cloth”.
The oldest surviving adinkra cloth was made in 1817. Today Adinkra cloth is widely available
and commercially printed on fabric, t-shirts and jewelry for everyone to wear and enjoy.
Sometimes these symbols can even be found in fine art.
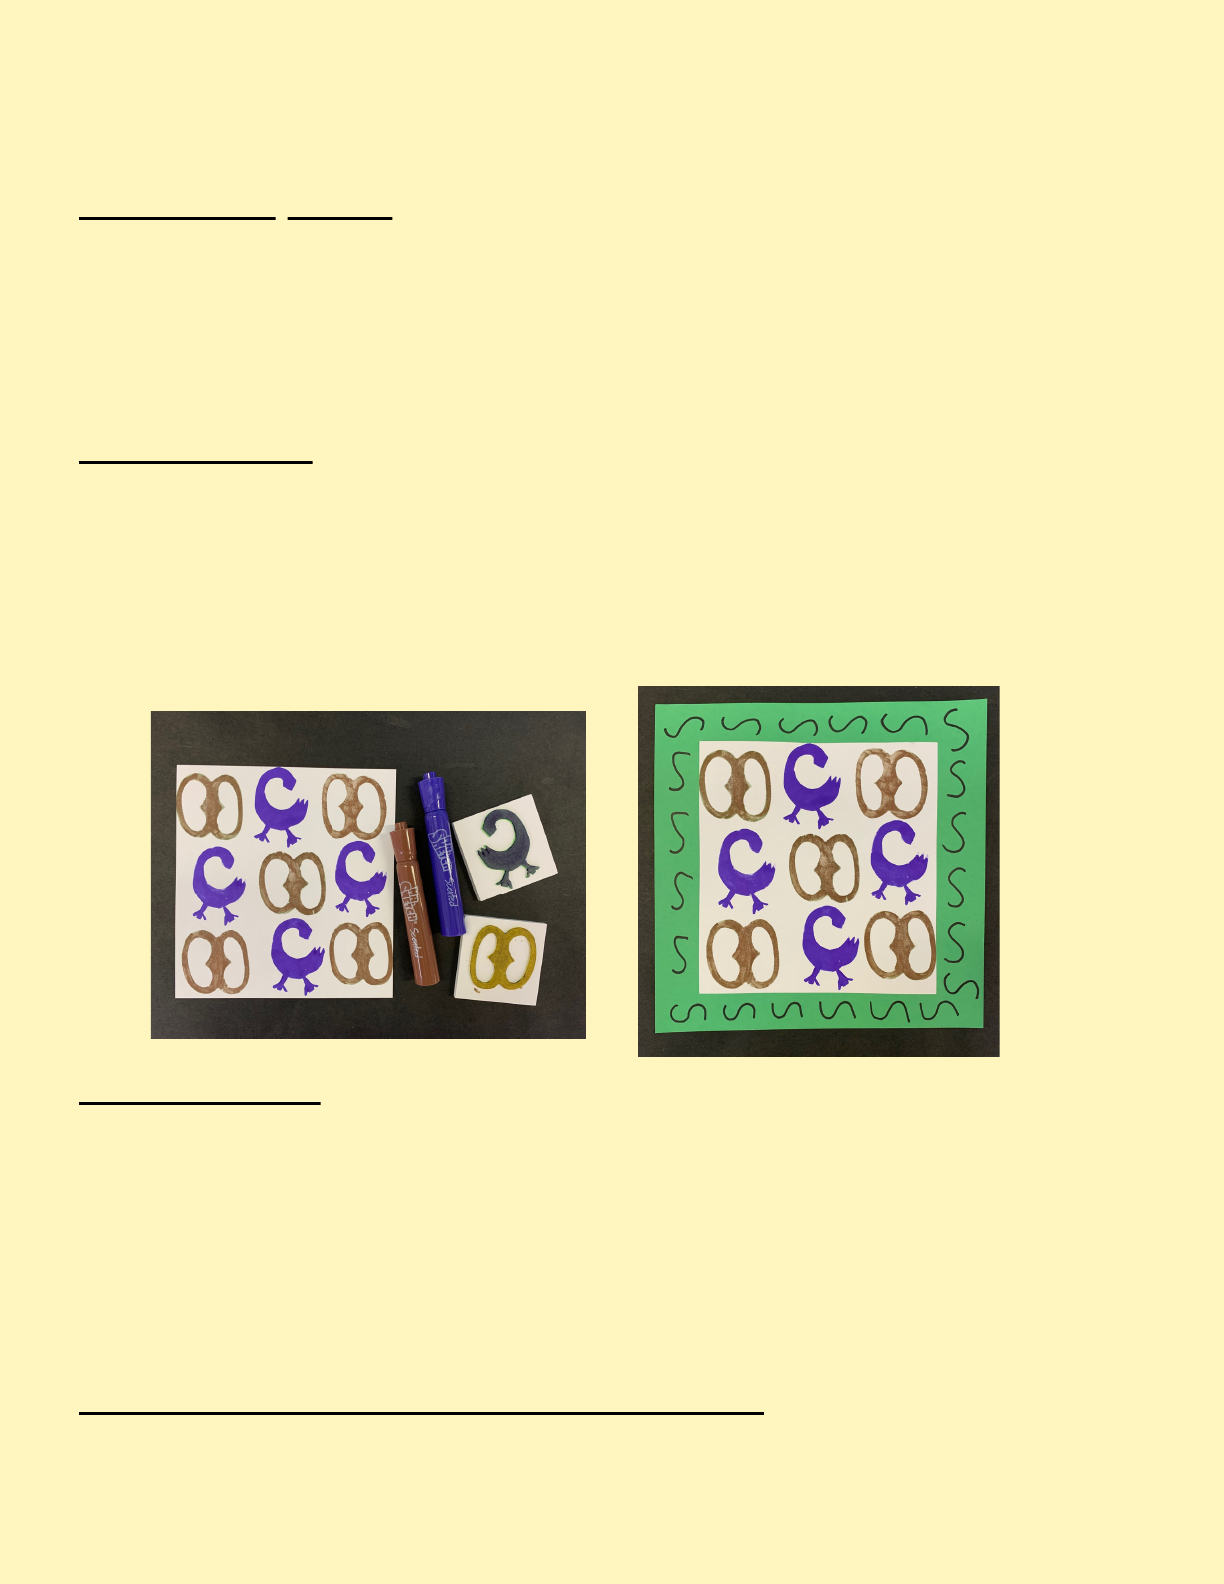
Part 3: Create Stamps
1. Pass out the Adinkra design worksheets and have
students look over the 45 different symbols that are
represented. Have students choose the 2 images that
they feel best represent their own character traits.
2. Using a pencil, students draw each of their symbols
on the white paper side of one square of the adhesive
foam.
3. Cut out the fun foam Adinkra shapes, peel off
paper back, then stick to the cardboard square to
create a stamp. (HINT: If students have small negative
spaces they can’t get to with their scissors you may
help them remove that area with your craft knife)
SESSION 2
Part 4: Pre-planning
1. Revisit the image of the Adinkra Cloth in the slide show and have students recall how the
artists used pattern and repetition to create their design.
2. Next, with a pencil and practice paper, have students plan out their composition using their
two symbols, showing evidence of their understanding of pattern and repetition.
Part 5: Printing
1. Now it is time to print the design on the 12x12 square of art paper. Using a water-based
marker, thoroughly color the foam shape. Apply a second and third coat of marker this first
time to ensure the foam is thoroughly saturated with ink.
2. Stamp the design on the white art paper.
3. Continue this procedure until the pattern fills the sheet.
Part 6: Finishing
1. After dry, mount the Adinra patterned square to the larger square of colored paper using a
glue stick.
2. Re-visit the Adinkra Cloth on slide 13 from the presentation and have students identify the
simple shapes such as lines, diamonds, etc. that are used to connect the squares of pattern in
the composiotn.
3. Use the dark markers to create a simple pattern on the colored border using just 1 element
(i.e. lines OR diamonds OR “s” curves.
Part 7: Assemble the Collaborative Cloth
Mount all of the student 12x12 squares into a grid pattern on bulletin board paper. After
display, you can always cut the “quilt” back apart for students to take their individual work
home.
This project is funded in part by the
South Carolina Arts Commission which receives support from
the National Endowment for the Arts.
Additional support is provided by
The Winthrop Family Allendale/Hampton Fund which is managed by
Coastal Community Foundation of S.C.
