
Extensibility Guide | PUBLIC
Validate Customer Addresses Using a
Microservice
© 2022 SAP SE or an SAP aliate company. All rights reserved.
THE BEST RUN
Content
1 Purpose...................................................................3
2 Prerequisites...............................................................4
3 Version I: Retrieve Data Quality Level (Key User Extensibility Scenario)...................5
3.1 Version I: Congure SAP Data Quality Management, Microservices..........................5
3.2 Version I: Conguration Steps within the SAP S/4HANA Cloud System.......................6
Create Custom Code List.....................................................7
Create Custom Business Object for Shipping Address.................................8
Version I: Set Up Communication............................................... 9
Version I: BAdI Implementation................................................12
3.3 Test Version I: Retrieve Data Quality Level........................................... 13
4 Version II: Receive Suggestions to Correct Faulty Addresses (Key User Extensibility
Scenario)................................................................. 15
4.1 Version II: Congure SAP Data Quality Management, Microservices.........................15
4.2 Version II: Conguration Steps within the SAP S/4HANA Cloud System......................15
Create Custom Business Object for Faulty Address..................................16
Version II: BAdI Implementation................................................18
4.3 Test Version II: Receive Suggestions to Correct Faulty Addresses...........................19
5 Version III: Address Validation App (Side-by-Side Extensibility Scenario).................22
5.1 Version III: Conguration Steps within the SAP S/4HANA Cloud System..................... 22
Version III: Set Up Communication .............................................22
5.2 Side-by-Side App Implementation Steps on SAP Business Technology Platform................24
Import App in SAP Web IDE.................................................. 24
Congure Destinations on SAP Business Technology Platform..........................25
5.3 Test Version III: Address Validation App.............................................27
5.4 Optional Steps: Provide Access to Side-by-Side App from SAP Fiori Launchpad................ 27
Deploy the App...........................................................28
Add Tile for Custom UI to SAP Fiori Launchpad.....................................28
6 Appendix.................................................................30
6.1 Issues....................................................................30
6.2 Document History........................................................... 30
2
PUBLIC
Validate Customer Addresses Using a Microservice
Content

1 Purpose
Note
This sample scenario is for learning purposes only. It is intended to give you an understanding of the
various technical aspects related to extending SAP S/4HANA Cloud. The sample scenario may not always
be available in a readily consumable state due to the continuous improvements being made in the
underlying products or services. If this is the case, appropriate adaptations based on the latest
documentation of the respective products or services are required.
This scenario showcases how to consume outbound HTTP services directly in restricted ABAP coding within
SAP S/4HANA Cloud. It shows how the SAP Data Quality Management, microservice from SAP Business
Technology Platform can be used to check and correct address data stored on SAP S/4HANA Cloud.
The scenario is related to another sample extension (scope item 1RW: product-ordering scenario) in which
one-time customers order products and submit their address details. This is where the address validation
scenario comes into the picture: Once the address details are available in SAP S/4HANA Cloud, the SAP Data
Quality Management service is called, the address entered is validated, and a response to SAP S/4HANA Cloud
is provided. The scenario basically covers three separate versions, or subscenarios, respectively:
1. Key User scenario: Addresses are validated from SAP Data Quality Management service. SAP Data Quality
Management service responds and indicates if the quality of the address is of high or low level.
2. Key User scenario: Addresses are validated from SAP Data Quality Management service. SAP Data Quality
Management service responds with the quality level and, in case of a low quality level, oers improved
quality address suggestions for the corresponding faulty address.
3. Side-by-side scenario: A custom app running on SAP Business Technology Platform is introduced, and you
can use this to check and conrm the suggestions.
Validate Customer Addresses Using a Microservice
Purpose
PUBLIC 3
2 Prerequisites
To perform the steps in this document, you need to make sure that the following prerequisites have been met:
Prerequisites Details
SAP S/4HANA
Cloud System
You have admin access to an SAP S/4HANA Cloud system. Make sure that the following business cat
alogs are assigned to the roles that your user has:
• SAP_CORE_BC_EXT
• SAP_CORE_BC_COM
SAP Business Tech
nology Platform
You have an SAP Business Technology Platform account.
SAP Data Quality Management, microservice is available on your SAP Business Technology Platform.
Note that SAP Data Quality Management, microservice will only be available for a limited time in the
trial landscape.
For more information on account types and on purchasing an enterprise account, refer to SAP Busi
ness Technology Platform Accounts.
Note
For non-productive/testing purposes, you can use an SAP Business Technology Platform trial ac
count. Find more information here on how to get a trial account .
However, if want to try out this sample scenario, you need to have a productive SAP Business
Technology Platform Neo subaccount.
You have access to the SAP Web IDE. For more information, refer to Open SAP Web IDE.
4
PUBLIC
Validate Customer Addresses Using a Microservice
Prerequisites

3 Version I: Retrieve Data Quality Level (Key
User Extensibility Scenario)
This section shows you how to congure the SAP Data Quality Management service and what to bear in mind
during the conguration within the SAP S/4HANA Cloud system.
Refer to the following subsections to learn more about the key user extensibility scenario.
3.1 Version I: Congure SAP Data Quality Management,
Microservices
Use
The SAP Data Quality Management, microservices application oers cloud-based microservices for address
cleansing, geocoding, and reverse geocoding. You can embed address cleansing and enrichment services
within any business process or application. This allows you to quickly reap the value of complete and accurate
address data.
SAP Data Quality Management, microservices is an application hosted on SAP Business Technology Platform,
in an account referred to as the provider account. All SAP Data Quality Management, microservices customers
access the application hosted on this provider account.
In this guide, we're conguring the SAP Data Quality Management microservices application for address
cleansing and geocoding, with or without suggestion lists.
This address cleansing solution uses reference data from global postal authorities for 240+ countries and
territories to validate or correct addresses. With address cleansing, you can quickly and easily correct, parse,
standardize, validate, and enhance address data.
SAP Data Quality Management, microservices for location data is available on SAP Business Technology
Platform and on API Hub.
For more information, see also Data Quality Management, Microservices for Location Data
Prerequisite
You've downloaded the AddressValidation.json le from the GitHub repository (see the
AddressValidation_DQS folder ).
Validate Customer Addresses Using a Microservice
Version I: Retrieve Data Quality Level (Key User Extensibility Scenario)
PUBLIC 5
Procedure
1. Log on to your SAP Business Technology Platform account.
Note
If you use the trial account, choose Neo Trial.
2. In the SAP Business Technology Platform cockpit, go to Services on the left pane.
3. Under Business Services, go to Data Quality Service.
4. To enable the service (it's not enabled by default), choose Enable.
5. Once the service is enabled, go to the Take Action section and choose Congure Service.
6. On the SAP Data Quality Management, microservices for location data screen, choose the Congurations
tile.
Note
On this screen, you have the possibility to copy an existing conguration (rst, choose Actions, then
Copy to) and make changes to the input or output data model, or to import a conguration (choose
Import in the upper right corner of the screen). For more information, refer to Data Quality
Management, Microservices for Location Data .
7. You've downloaded the JSON les in the AddressValidation_DQS folder from the GitHub repository .
Choose Import a Conguration in the upper right section of the screen.
8. On the Import Conguration dialog box, select the AddressValidation.json le via Import.
9. For version 2, import the AddressValidation_Suggestions.json le as well.
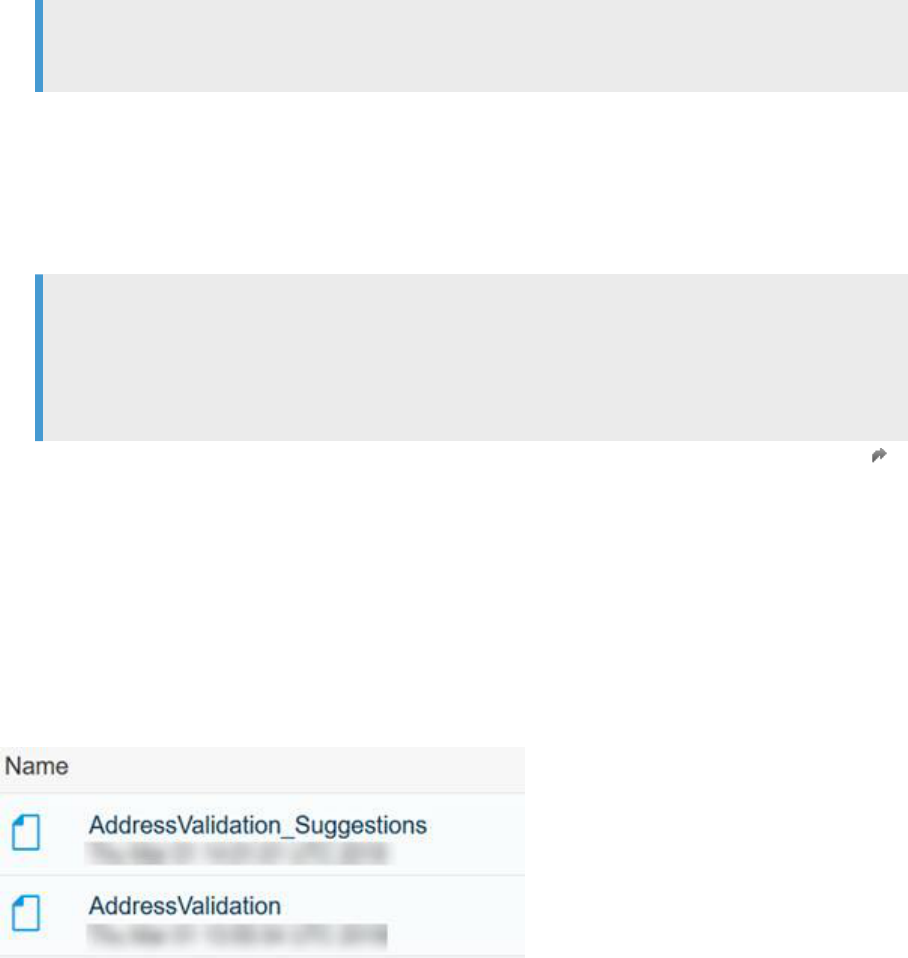
Result
You've imported two conguration les:
3.2 Version I: Conguration Steps within the SAP S/4HANA
Cloud System
This sections provides you with an overview of what to bear in mind during the conguration process.
6
PUBLIC
Validate Customer Addresses Using a Microservice
Version I: Retrieve Data Quality Level (Key User Extensibility Scenario)
3.2.1 Create Custom Code List
A code list contains a list of values and descriptions and is used, for example, to provide dropdown lists on UIs.
In the Custom Business Object app, you can dene a code list data type for your solution and use it when you
create your custom business object.
Code lists can be created and assigned directly to a custom eld in the Custom Field and Logic app during the
creation of a new custom eld, if the code list data type is selected for to the Type eld. However, such a code
list is tied to the specic custom eld and can't be reused when creating other elds.
In the following steps, you're creating a new custom code list that can be reused subsequently for the creation
of elds in as many custom business objects as needed.
Prerequisites
Your user has a role that is assigned to the Extensibility catalog (SAP_CORE_BC_EXT).
Procedure
1. Access the SAP Fiori launchpad of your SAP S/4HANA Cloud.
2. To launch the Custom Business Objects SAP Fiori app, choose the corresponding SAP Fiori tile in the
Extensibility catalog.
3. Go to the Custom Code Lists tab.
4. To create a new custom code list, choose New.
5. In the General Information section, enter a name for the custom code list (for example,
DataQualityLevel). The Code List ID is populated automatically based on the value provided for the
custom code list name (for example,
YY1_DATAQUALITYLEVEL).
Note
Don't change the entry (2) for Maximum Code Length.
6. Go to Code Value and choose New to create or add the code list entries as follows:
Code
Description
HI Data Quality is High
LO Data Quality is Low
7. To complete the creation of the new custom code list, choose Save and Publish in the lower right corner of
the screen.
Validate Customer Addresses Using a Microservice
Version I: Retrieve Data Quality Level (Key User Extensibility Scenario)
PUBLIC 7
3.2.2 Create Custom Business Object for Shipping Address
In this step, you're creating a custom business object on the SAP S/4HANA Cloud system. A custom business
object contains a set of user-dened elds. During the publishing process, the SAP S/4HANA Cloud system will
automatically create respective database tables in the background. A basic maintenance UI is automatically
created. For more information on custom business objects, refer to How to Create Custom Business Objects.
Custom business objects can be accessed from outside SAP S/4HANA via an automatically generated OData
service.
In this scenario, you're using this service to store detailed order information of one-time customers outside of
the side-by-side application running on the SAP Business Technology Platform
Note
Using custom business objects in this scenario allows you to store data directly next to the standard order
data within SAP S/4HANA, without requiring additional storage on the SAP Business Technology Platform.
For example, storing data on SAP S/4HANA allows you to use data within custom CDS views, custom
business logic, or in-app reports. Depending on the use case in a productive scenario, such data would be
better stored on the SAP Business Technology Platform. In order to avoid renaming eorts (in the code) as
well as confusion, stick to the names in the examples when walking through the process.
Prerequisite
Your user has a role that is assigned to the Extensibility catalog (SAP_CORE_BC_EXT).
Procedure
1. Access the SAP Fiori launchpad.
2. To launch the Custom Business Objects SAP Fiori app, choose the corresponding SAP Fiori tile in the
Extensibility catalog.
3. To create a new custom business object, go to the Custom Business Objects tab and choose New.
4. A new window opens. Enter the name of the business object. The Identier and Plural Name elds will be
populated automatically based on the value provided in the Name eld:
Field Name Field Value
Name
Customer Record
Identier CUSTOMERRECORD
Plural Name Customer Records
5. To create a new business object, choose Create.
8
PUBLIC
Validate Customer Addresses Using a Microservice
Version I: Retrieve Data Quality Level (Key User Extensibility Scenario)

6. Select the following checkboxes: Determination and Validation, UI Generation, Service Generation, and to
navigate to the next screen and to maintain the elds for the structure. Can Be Associated.
7. Choose Go to Fields and Logic
8. In the Fields section, choose New to navigate to the next screen and and create the following elds.
Note
For this sample scenario, make sure that you stick to the exact eld names (they are case-sensitive).
See the entry details below (If the Description eld is there by default, just ignore it).
Field Name
Type
Length
Comment
Order ID Text 20 Mark this eld as Key.
Last Name Text 20
First Name Text 20
Phone Number Text 20
Shipping Address Text 60
Postcode Text 20
Country Text 20
City Text 20
Quality Level Code List Code list eld should be:
YY1_DATAQUALITYLE
VEL
DQM Response Text 255
9. Go back.
10. Choose Publish.
3.2.3 Version I: Set Up Communication
This chapter describes how to set up the communication in SAP S/4HANA to communicate with the SAP Data
Quality Management service.
Validate Customer Addresses Using a Microservice
Version I: Retrieve Data Quality Level (Key User Extensibility Scenario)
PUBLIC 9
3.2.3.1 Create Communication System and User
Procedure
1. Access the SAP Fiori launchpad.
2. Go to the Communication Systems app.
3. Choose New.
4. Enter a system ID (for example, COM_BTP) and a system name.
5. Choose OK.
6. On the Communication System screen, enter a host name (such as dqmmicrou23133c2f-
XXXtrial.hanatrial.ondemand.com
).
Note
To obtain the host name, follow these steps:
1. Go to your SAP Business Technology Platform account and navigate to Services.
2. Open the SAP Data Quality Management service. Choose Application URL under Take Action.
3. A new tab opens with a list of available endpoints.
From the Address Cleanse URL, copy this part of the URL: dqmmicrou23133c2f-
XXXtrial.hanatrial.ondemand.com
Caution
The host name will be dierent for user-based authentication and certicate-based authentication.
Make sure that you use the correct endpoint depending on the authentication method. In this example,
take the URL from the Available endpoints section at the top ).
7. Make an entry in the Logical System eld.
8. To create a user for inbound communication, in the User for Inbound Communication section, choose Add
(the + icon).
9. In the dialog box, choose New User.
10. Enter a user name, a description, and a password. Note the user and password down since you'll need this
information later to create a destination on SAP Business Technology Platform.
11. Choose Create and choose OK in the dialog box. The user will now be added.
12. To create a user for outbound communication, in the User for Outbound Communication section, choose
Add (the + icon).
13. In the dialog box, maintain an authentication method.
14. For testing purposes, basic authentication with User Name and Password is used as authentication
method. Enter the user name (that is, the e-mail user) and the password of your SAP Business Technology
Platform account. Choose Create to add the user.
15. Choose Save at the bottom of the screen.
16. Save the new communication system and check that the status is Active.
10
PUBLIC
Validate Customer Addresses Using a Microservice
Version I: Retrieve Data Quality Level (Key User Extensibility Scenario)
3.2.3.2 Create Custom Communication Scenario
A communication scenario bundles inbound and outbound communication design-time artifacts and is the
basis for communication between systems. Each communication arrangement must be based on a
communication scenario. Since we want to enable consumption for our custom business object, we must
create a custom communication scenario.
Procedure
1. Access the SAP Fiori launchpad.
2. Go to the Custom Communication Scenarios app.
3. Choose New.
4. Enter a communication scenario ID: CUSTOMERRECORD (the ID will then be YY1_CUSTOMERRECORD).
Note
Stick to the exact name given here for this walkthrough scenario (it’s also case-sensitive).
5. Enter a description.
6. Choose New.
7. Go to the Outbound Services tab.
8. Choose Add.
9. Enter a description: DQS.
10. Enter the Outbound Service ID as: DQS (the ID will then be YY1_DQS_REST).
Note
Here as well, stick to the name given for this walkthrough.
11. Enter the URL path without https://. Choose the correct URL based on whether your authentication
method is user-based or certicated-based, for example; dqmmicrou23133c2f-
XXXXtrial.cert.hanatrial.ondemand.com/dq/addressCleanse.
12. Choose Create.
13. The service should now be displayed in the list.
14. Choose Publish.
Note
The status must be Published for further processing.
3.2.3.3 Create Communication Arrangement
In this scenario, the SAP S/4HANA Cloud system sends address data to the SAP Data Quality Management,
microservice and receives a response.
Validate Customer Addresses Using a Microservice
Version I: Retrieve Data Quality Level (Key User Extensibility Scenario)
PUBLIC 11
To allow outbound communication from the SAP S/4HANA tenant, we need to create a communication
arrangement. The communication arrangement denes which system (communication system) and user can
call which APIs (communication scenarios).
In this example, you create a communication arrangement and allow access to the custom communication
scenario as well as our custom business object (see above) using a technical user.
Procedure
1. Access the SAP Fiori launchpad.
2. Go to the Communication Arrangements app.
3. Choose New to create a new communication arrangement.
4. Select the communication scenario you created earlier.
5. Leave the default arrangement name.
6. Choose Create.
7. In the Common Data section, select the Communication Systemvia the value help icon. The communication
system was created in the Create Communication System and User [page 10] section (for example;
COM_BTP).
8. The technical user that was created in the previous step is added automatically to the Outbound
Communication section.
9. In the Outbound Services section, make sure that the Service Status checkbox for Active is selected and
that the default value for Port: is 443.
10. In the Path eld, enter: /dq/addressCleanse
11. The Service URL will be populated automatically like this: host URL from communication system + path
entered in communication arrangement, for example; https://dqmmicrou23133c2f-
XXXXtrial.hanatrial.ondemand.com:443/dq/addressCleanse.
12. Choose Save.
13. To ensure that the Service URL is correct, choose Check Connection and conrm that the test was
successful.
14. Go to the Custom Communication Scenarios app again.
15. Search for the communication scenario created earlier and open it.
16. Select the Communication Arrangements tab, you will nd that the communication arrangement you've
created in this section will be visible here.
3.2.4 Version I: BAdI Implementation
In this step, you're implementing a business add-in (BAdI) that sends the address entered to the DQS service.
12
PUBLIC
Validate Customer Addresses Using a Microservice
Version I: Retrieve Data Quality Level (Key User Extensibility Scenario)
Prerequisites
You need the code from the V1_BADI-CustomerRecord.abap le within the GitHub repository (see the
BADIs folder).
Procedure
1. Access the SAP Fiori launchpad.
2. To launch the Custom Business Objects SAP Fiori app, choose the corresponding tile in the Extensibility
catalog.
3. Open the custom business object created in the previous chapter (YY1_CUSTOMERRECORD).
4. Choose Go to Fields and Logic.
5. Go to the Determination and Validation tab.
6. Choose After Modication under Determination Logic.
7. Choose Create Draft.
8. Copy the ABAP code from the le (V1_BADI-CustomerRecord.abap) and paste it to the Draft Logic
section.
Note
If you provided dierent names for the elds of the custom business object to those described here,
make sure you adapt them in the BAdI code as well.
The same applies to the Conguration Name eld in the BAdI. It should match the name of the SAP
Data Quality Management conguration (in this example, it is AddressValidation), see section Version
II: Congure SAP Data Quality Management, Microservices [page 15] .
9. Choose Save.
10. Choose Publish.
3.3 Test Version I: Retrieve Data Quality Level
In this step, you're testing the implementation of Version I: Retrieve Data Quality Level (Key User Extensibility
Scenario) [page 5].
You're creating an address entry in the custom business object. The SAP Data Quality Management service
validates the address and tells you whether the quality level of the address is high or low.
Procedure
1. Access the SAP Fiori launchpad.
Validate Customer Addresses Using a Microservice
Version I: Retrieve Data Quality Level (Key User Extensibility Scenario)
PUBLIC 13
2. To launch the Custom Business Objects SAP Fiori app, choose the corresponding SAP Fiori tile in the
Extensibility catalog.
3. Open the custom business object created in the section Create Custom Business Object for Shipping
Address [page 8] (YY1_CUSTOMERRECORD).
4. Choose Go to Generated.
5. On the Customer Record screen, choose Create Object (the + icon).
6. Provide the following entries for testing purposes:
Field Name
Value
Order ID
0001
Last Name
Test1
Shipping Address
Dietmar-Hopp-Allee 1
Postcode
69190
City
Walldorf
7. Choose Save.
8. As a result, the Quality Level eld should be populated with: Data Quality is Low (LO), the QM
response eld is: No country specified.
9. Choose Edit for this customer record.
10. Make an entry for Country, for example: <GERMANY>
As a result, the Quality Level eld should be populated with: Data Quality is High (HI), denoting that
the SAP Data Quality Management service validated the address as correct.
As another test, you could enter a faulty shipping address, for example: <Dietmar-Alle 1> resulting in alow
quality level and with the SAP Data Quality Management response: City, region, and postcode are
valid, but unable to match street name to directory.
Note
In the case of minor errors in the address, the service corrects it automatically. For example, if you enter
Dietmar-Hop-Alle 1 in the Shipping Address eld, on choosing Save, the address will be corrected to
Dietmar-Hopp-Allee 1.
14
PUBLIC
Validate Customer Addresses Using a Microservice
Version I: Retrieve Data Quality Level (Key User Extensibility Scenario)
4 Version II: Receive Suggestions to
Correct Faulty Addresses (Key User
Extensibility Scenario)
This version of the scenario is an extension of the previous version. Here, the SAP Data Quality Management
service not only provides the quality level of the entered address but also suggests corrections to faulty
addresses, which can then be manually updated in the custom business object. To store the suggestions, a new
custom business object will be created.
As a prerequisite to this version, make sure that you've already implemented Version I: Retrieve Data Quality
Level (Key User Extensibility Scenario) [page 5].
The steps described in the section Version I: Conguration Steps within the SAP S/4HANA Cloud System [page
6] are already implemented.
4.1 Version II: Congure SAP Data Quality Management,
Microservices
For version II, you need to have another conguration for the SAP Data Quality Management service in place to
receive address suggestions.
Procedure
Refer to the section Version I: Congure SAP Data Quality Management, Microservices [page 5] to learn how to
import the predelivered conguration (AddressValidation_Suggestions.json).
If you've already done this, you can skip this step.
4.2 Version II: Conguration Steps within the SAP S/
4HANA Cloud System
This sections provides you with an overview of what to bear in mind during the conguration process.
Validate Customer Addresses Using a Microservice
Version II: Receive Suggestions to Correct Faulty Addresses (Key User Extensibility
Scenario)
PUBLIC 15
4.2.1 Create Custom Business Object for Faulty Address
In this step, you're creating a second custom business object to store the low quality/faulty addresses and the
suggestions coming from the SAP Data Quality Management service.
Procedure
1. Access the SAP Fiori launchpad.
2. To launch the Custom Business Objects SAP Fiori app, choose the corresponding SAP Fiori tile in the
Extensibility catalog.
3. To create a new custom business object, choose New under Custom Business Objects.
4. A new window will be opened for creating a new business object. In the Name eld, enter the name of the
business object. The Identier and Plural Name elds will populated automatically based on the value
provided for the eld name.
Field Name Field Value
Name
Faulty Address
Identier FAULTYADDRESS
Plural name Faulty Addresses
5. Choose Create to create a new business object.
6. Select the Determination and Validation, UI Generation, and Service Generation checkboxes.
7. Choose Go to Fields and Logic to navigate to next screen and maintain the elds for the structure.
8. Choose New in the Fields section and create elds as follows:
Field Name
Type Length Comment
Address ID Text 20 Mark this eld as Key.
Customer Record Association to Busi
ness Object
Business Object eld should be:
YY1_CUSTOMERRECORD
Note
Select the business object created in
version I. To make sure that the cus
tom business object appears in the
list, select the
Can be associated
checkbox.
Quality Level
Code List Code List eld should be:
YY1_DATAQUALITYLEVEL
Shipping Address Text 60
16 PUBLIC
Validate Customer Addresses Using a Microservice
Version II: Receive Suggestions to Correct Faulty Addresses (Key User Extensibility
Scenario)
Field Name Type Length Comment
Postcode Text 20
City Text 20
Country Text 20
DQM Response Text 255
Date of Validation Timestamp
Proposal Accepted Checkbox
Note
You need to stick to the names for this example scenario.
Don't select any of the elds as read-only.
If the Description eld is there by default, just ignore it.
9. Go back and choose New in the Structure section to add a subnode under Faulty Address.
10. Enter a name suggestion (Identier and Plural name are automatically populated).
11. For the Suggestion subnode, choose Go to Fields and Logic.
12. Create the following elds:
Note
None of the elds should be read-only.
Field Name
Type Length
Address Delivery Text 60
Selection Text 20
Single Address Text 255
Range Type Text 20
Last Line Text 20
SecSideIndicator Text 20
PrimSideIndicator Text 20
Note
Refer to the documentation on Help Portal on the Suggestion List Properties.
13. Go back.
14. Choose Publish.
Validate Customer Addresses Using a Microservice
Version II: Receive Suggestions to Correct Faulty Addresses (Key User Extensibility
Scenario)
PUBLIC 17
4.2.2 Version II: BAdI Implementation
In this step, you're implementing a BAdI for both custom business objects (while the BAdI for the customer
record custom business object from version I will be replaced).
Prerequisites
You need the code from these les within the GitHub repository (see the BADIs folder):
• V2_BADI-CustomerRecord.abap
• V2_BADI-FaultyAddress.abap
4.2.2.1 BAdI for Faulty Address Custom Business Object
In this step, you're implementing a BAdI for the new faulty address custom business object to validate the
user's input on the faulty address business object and to ensure that the faulty address and the customer
record stay in synch at all times. This can be ensured by sending the user’s input on the faulty address business
object to the customer record business object, which will trigger the BAdI on the customer record. The BAdI on
the customer record sends the address to the SAP Data Quality Management service and updates both the
customer record and the faulty address according to the response from the SAP Data Quality Management
service.
Procedure
1. Access the SAP Fiori launchpad.
2. To launch the Custom Business Objects SAP Fiori app, choose the corresponding SAP Fiori tile in the
Extensibility catalog.
3. Open the faulty address custom business object created in the previous chapter.
4. Choose Go to Fields and Logicin the faulty address node.
5. In the Determination and Validation section, choose After Modication under Determination Logic.
6. Choose Create Draft.
7. Copy the code from this le: V2_BADI-FaultyAddress.abap, and paste it into the Draft Logic section.
Note
If you provided dierent names for the elds of the custom business object to those described here,
make sure that you adapt them in the BAdI code.
8. The same applies to the Conguration Name eld in the BAdI. It should match the name of the SAP Data
Management conguration (in this example, it's AddressValidation), see section Version II: Congure SAP
Data Quality Management, Microservices [page 15].
18
PUBLIC
Validate Customer Addresses Using a Microservice
Version II: Receive Suggestions to Correct Faulty Addresses (Key User Extensibility
Scenario)
9. Choose Save.
10. Choose Publish.
4.2.2.2 BAdI for Customer Record Custom Business Object
In this step, you're implementing the new BAdI that sends the address entered to the SAP Data Quality
Management service.
Note
This BAdI is dierent from that of version I.
Procedure
1. Access the SAP Fiori launchpad.
2. To launch the Custom Business Objects SAP Fiori app, choose the corresponding SAP Fiori tile in the
Extensibility catalog.
3. Open the custom business object (Customer Record) that you created in the section Create Custom
Business Object for Shipping Address [page 8].
4. Choose Go to Fields and Logic.
5. In the Determination and Validation section, choose After Modication under Determination Logic.
6. Choose Create Draft.
7. Remove or replace the existing ABAP code. Copy the code from this le: V2_BADI-
CustomerRecord.abap and paste it into the Draft Logic section.
Note
If you provided dierent names for the elds of the custom business object than those described here,
make sure that you adapt them in the BAdI code. The same applies to the Conguration Name eld in
the BAdI. It should match the name of the SAP Data Quality Management conguration (in this
example,it is AddressValidation), see section Version II: Congure SAP Data Quality Management,
Microservices [page 15].
8. Choose Save.
9. Choose Publish.
4.3 Test Version II: Receive Suggestions to Correct Faulty
Addresses
In this step, you're testing the implementation of Version II: Receive Suggestions to Correct Faulty Addresses
(Key User Extensibility Scenario) [page 15]. You'll create a faulty address entry in the customer record custom
Validate Customer Addresses Using a Microservice
Version II: Receive Suggestions to Correct Faulty Addresses (Key User Extensibility
Scenario)
PUBLIC 19
business object. The faulty address will be validated by the SAP Data Quality Management service. The service
tells you that the quality level of the address is low and provides some suggestions for an improved address in
the faulty address custom business object where the faulty address was stored. You can then manually accept
the suggested address and replace the faulty address.
Procedure
1. Access the SAP Fiori launchpad.
2. To launch the Custom Business Objects SAP Fiori app, choose the corresponding SAP Fiori tile in the
Extensibility catalog.
3. Open the custom business object you created in the section Create Custom Business Object for Shipping
Address [page 8] (YY1_CUSTOMERRECORD).
4. Choose Go to Generated UI.
5. On the Customer Record screen, choose Create Object (the + icon).
6. Provide the following entries for testing purposes. Ignore the remaining elds (Any fault in the address is
intentional).
Field Name
Value
Order ID
0002
Last Name
Test2
Shipping Address
Dietmar-Allee
Postcode
69190
Country
Germany
City
Walldorf
7. Choose Save.
8. As a result, in the Quality Level eld, it says: Data Quality is Low (LO).
9. In a new tab, open the faulty address custom business object (YY1_FAULTYADDRESS) and go to the
generated UI.
10. Choose Go.
11. You see the entry of the customer record custom business object in the list of faulty addresses.
12. Select the entry.
13. Go to the Suggestions section.
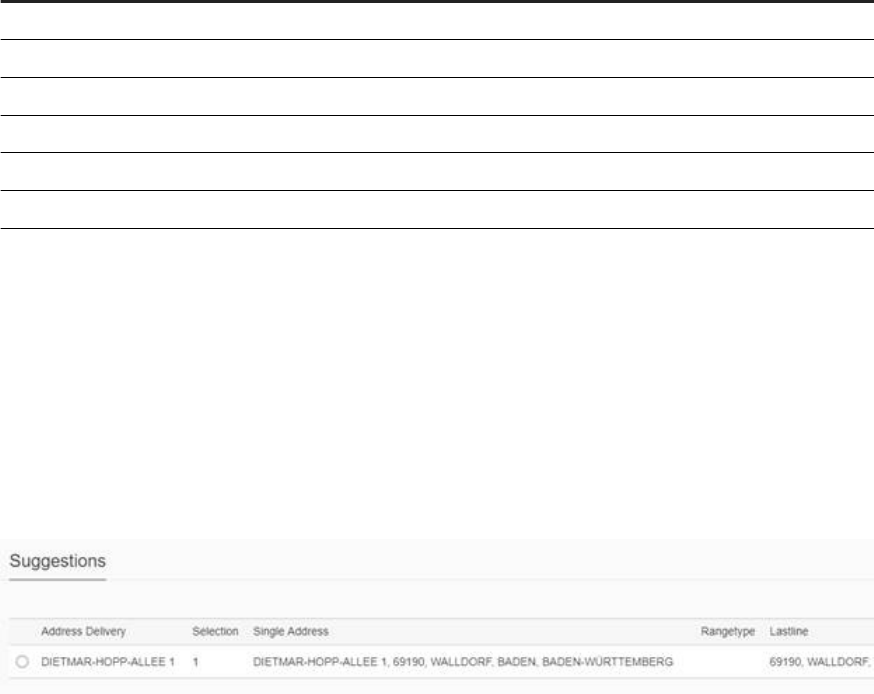
14. The SAP Data Quality Management service suggests a correct address (in this case Dietmar-Hopp-Allee
to replace the faulty Dietmar-Allee).
15. Choose Edit.
20
PUBLIC
Validate Customer Addresses Using a Microservice
Version II: Receive Suggestions to Correct Faulty Addresses (Key User Extensibility
Scenario)
16. Since in this version, a manual correction of the faulty address is intended, copy the address from the
Address Delivery eld in the Suggestions section and paste it into the Shipping Address eld on the Faulty
Address tab. Don't make any other changes (for example, don't select the Proposal Accepted checkbox).
17. Choose Save.
18. The quality level should switch from LO to HI.
Validate Customer Addresses Using a Microservice
Version II: Receive Suggestions to Correct Faulty Addresses (Key User Extensibility
Scenario)
PUBLIC 21

5 Version III: Address Validation App (Side-
by-Side Extensibility Scenario)
This version describes how you can create a side-by-side app calling a service from SAP S/4HANA Cloud. In
principal, the side-by-side app displays the faulty addresses and the suggestions, which you can select and
conrm.
Prerequisites
You've already implemented Version I: Conguration Steps within the SAP S/4HANA Cloud System [page 6]
and Version II: Conguration Steps within the SAP S/4HANA Cloud System [page 15].
5.1 Version III: Conguration Steps within the SAP S/
4HANA Cloud System
5.1.1 Version III: Set Up Communication
5.1.1.1 Create Communication System and User
1. Access the SAP Fiori launchpad.
2. Go to the Communication Systems app.
3. Open the communication system created in Version 1 in the section Create Communication System and
User [page 10].
4. Choose Edit.
5. Choose Add in the User for Inbound Communication section.
6. Choose New User and you're redirected to the Create Communication User page.
7. Enter a user name (for example: S4_Cloud_User), a description, and a password
Note
Password requirements:
• minimum 8 characters
• contains at least 1 digit (0-9)
• contains at least 1 uppercase character (A-Z)
• contains at least 1 special character
22
PUBLIC
Validate Customer Addresses Using a Microservice
Version III: Address Validation App (Side-by-Side Extensibility Scenario)

8. Choose Create. The user that you created is listed under User for Inbound Communication.
9. Choose Save to save the communication system.
5.1.1.2 Create Custom Communication Scenario
1. Access the SAP Fiori launchpad.
2. Go to the Custom Communication Scenarios app.
3. Choose New.
4. Enter a communication scenario ID, for example: <FAULTYADDRESS> (the ID will then be YY1_
FAULTYADDRESS).
5. Enter a description.
6. Choose New.
7. Go to Inbound Services.
8. Choose Add.
9. Choose the service via the checkbox: YY1_FAULTYADDRESS_CDS.
10. Choose OK.
11. The service is now displayed in the list.
12. Choose Publish.
Note
The status must be Published for further processing.
5.1.1.3 Create Communication Arrangement
Procedure
1. Access the SAP Fiori launchpad.
2. Go to the Communication Arrangements app.
3. Choose New to create a new communication arrangement.
4. Select the communication scenario that you created in the section Create Custom Business Object for
Faulty Address [page 16] (YY1_FAULTYADDRESS).
5. You can use the default name for the communication arrangement.
6. Choose Create.
7. In the Common Data section, select the communication system via the value help icon. The system was
created in the section Create Communication System and User [page 22].
8. The technical user that was created in the section Create Communication System and User [page 22] is
added automatically to the Inbound Communication section.
Validate Customer Addresses Using a Microservice
Version III: Address Validation App (Side-by-Side Extensibility Scenario)
PUBLIC 23
9. The OData URL of the faulty address service can be found in the Inbound services (for example: https://
XXXX-api.s4hana.ondemand.com/sap/opu/odata/sap/YY1_FAULTYADDRESS_CDS Make a note of
this part of the URL since you’ll need it later on:
https://XXXX-api.s4hana.ondemand.com
10. Choose Save.
5.2 Side-by-Side App Implementation Steps on SAP
Business Technology Platform
5.2.1 Import App in SAP Web IDE
Prerequisites
You've enabled the SAP Web IDE service on SAP Business Technology Platform.
Note
If you haven't enabled the SAP Web IDE service yet, proceed as follows:
1. Access your SAP Business Technology Platform account.
2. In the SAP Business Technology Platform cockpit, go to Services.
3. In the Services list, choose SAP Web IDE.
4. Choose Enable.
5. Choose Go to Service in the Take Action section.
6. Your SAP Web IDE is launched.
Procedure
1. Download the sample app from GitHub to your local drive.
Note
Sample extension scenarios are designed to help you get an overall understanding of various
extensibility concepts/patterns. SAP recommends not to use these samples for any productive usage.
2. Unzip the downloaded zip le.
24
PUBLIC
Validate Customer Addresses Using a Microservice
Version III: Address Validation App (Side-by-Side Extensibility Scenario)
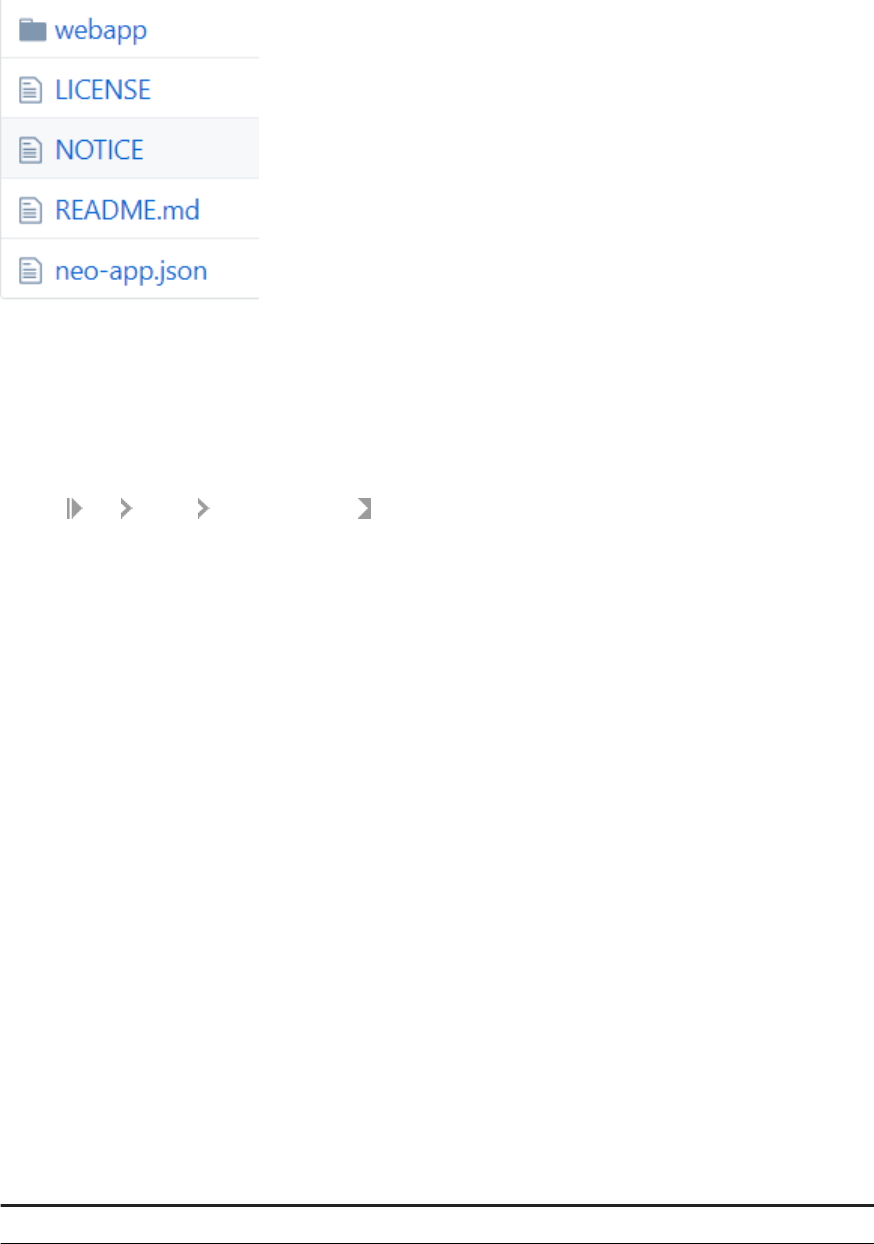
3. Create a new zip le so that you have mandatorily the webapp folder and the neo-app.json le included in
the root of the zip (without any other parent folder in the zip having the les included):
4. Access SAP Web IDE. You can access it as follows:
1. From the SAP Business Technology Platform cockpit, in the navigation bar on the left side, go to
Services.
2. On the right side, scroll down and choose the SAP Web IDE tile to open the SAP Web IDE Service page.
3. On the Service page, choose the Go to Service link to open the SAP Web IDE in a new browser tab.
4. We recommend that you bookmark this URL to access it easily.
5. Choose File Import From File System .
6. Select the zip le you created and import it. The le is extracted automatically.
Result
You have imported the app code into your SAP Web IDE.
5.2.2 Congure Destinations on SAP Business Technology
Platform
5.2.2.1 Destination for SAP S/4HANA
1. Log on to your SAP Business Technology Platform account.
2. Choose Connectivity on the left pane.
3. Choose Destinations.
4. Create a new destination with the following attributes:
Field Name
Value
Name
S4HC_BO_FaultyAddress
Validate Customer Addresses Using a Microservice
Version III: Address Validation App (Side-by-Side Extensibility Scenario)
PUBLIC 25
Field Name Value
Type
HTTP (this includes HTTPS, which is used)
Description
S4HC_BO_FaultyAddress
URL
https://XXXX-api.s4hana.ondemand.com (this is the URL
from the communication arrangement you noted down; note that you
only need the rst part of the URL)
Proxy Type
Internet
Authentication
Basic Authentication
User The communication user created in section Create Communication
System and User [page
22] (for example; S4_Cloud_User).
Password The password of the communication user created in sectionCreate
Communication System and User [page 22]
5. Choose New Property (each time) in the Additional Properties section and create entries as follows:
Field Name
Value
WebIDEEnabled
True
WebIDESystem
S4HC_BO_FaultyAddress
WebIDEUsage
odata_gen, odata_xs
Use default JDK truststore Leave the checkbox selected.
6. Choose Save.
5.2.2.2 Destination for SAP Data Quality Management
Service
Note
This destination is automatically created when the SAP Data Quality Management service is enabled.
Parameters such as: Name, Type, URL, Proxy Type and Authentication are automatically congured upon
creation.
1. Open the SAP Data Quality Management service destination.
2. Choose Edit.
3. As authentication, choose BasicAuthentication.
4. Enter the credentials of your SAP Business Technology Platform user under User (the e-mail of our SAP
Business Technology Platform account user) and Password.
5. Note
TrustAll is set to True.
6. Choose Save.
26
PUBLIC
Validate Customer Addresses Using a Microservice
Version III: Address Validation App (Side-by-Side Extensibility Scenario)
5.3 Test Version III: Address Validation App
1. Access the customer record custom business object in your SAP S/4HANA Cloud system.
2. Choose Go then Create Object (the + icon).
3. Create the following entries (errors are intentional to provide an example for faulty addresses):
Field Name
Value
Order ID
0003
Last Name
Test 3
Shipping Address
Dietmar-Allee 1
Postcode
69190
Country
Germany
City
Walldorf
4. Choose Save.
5. You've created an object to which the SAP Data Quality Management service responses with low
quality.
6. In the side-by-side app, you can now check whether the faulty address object is displayed. Ideally, you
receive a suggestion indicating the correct address. You can accept this suggestion.
7. To test the app in a preview, access SAP Web IDE.
8. Right-click the root folder of the imported app.
9. Choose Run Run as Web Application .
10. The app is displayed in a new window. The app fetches the data from the faulty address custom business
object.
11. From the dropdown list at the top left of the screen, select Quality Low.
12. Choose the object you entered previously in the custom business object.
13. In the detail view on the right side of the screen, select the checkbox of the suggestion (in this example,
only one suggestion is displayed).
14. Choose Accept on the lower right part of the screen.
15. Select Quality High from the dropdown list. You can see the corrected address (the quality level is now
high).
16. You've accepted an address suggestion via the side-by-side app.
5.4 Optional Steps: Provide Access to Side-by-Side App
from SAP Fiori Launchpad
This section describes how you can provide access to the side-by-side app from your SAP Fiori launchpad.
Validate Customer Addresses Using a Microservice
Version III: Address Validation App (Side-by-Side Extensibility Scenario)
PUBLIC 27

5.4.1 Deploy the App
1. Access SAP Web IDE.
2. Right-click the root folder of the side-by-side app.
3. Choose Deploy Deploy to SAP Business Technology Platform .
4. In the dialog box, choose Deploy a new application.
5. If needed, change the application name.
6. Choose Deploy.
7. Once the deployment is successful (a dialog box is displayed), choose the Open the application’s page in
the SAP Business Technology Platform cockpit link.
8. On the page of the app in the SAP Business Technology Platform cockpit, go to the Active Version section,
and nd the URL of the app.
9. Note the URL down since you'll need it later on.
5.4.2 Add Tile for Custom UI to SAP Fiori Launchpad
In this step, you're adding a tile for the custom UI (that has been deployed to SAP Business Technology
Platform) to your SAP Fiori launchpad.
Prerequisites
You're logged on as a user with the administrator role assigned and you have access to the Extensibility catalog.
Procedure
1. Access the SAP Fiori launchpad.
2. Open the Custom Tiles app.
3. Choose New.
4. Enter a title and an ID for the app tile (for example: <Address Validation>).
5. Choose Create.
6. On the Custom Tile Details screen, enter the URL of the side-by-side app.
7. You can add further details to the app tile, for example, you can add an icon.
8. Choose Yes to save your changes.
9. Choose Assign Catalogs.
10. On the Custom Catalog Extensions screen, choose Add.
11. In the Add Business Catalog dialog box, select the catalogs to which you want to add the custom tile, for
example the Extensibility catalog (SAP_CORE_BC_EXT).
12. Choose OK.
28
PUBLIC
Validate Customer Addresses Using a Microservice
Version III: Address Validation App (Side-by-Side Extensibility Scenario)

13. Select the catalog in the Used in Business Catalog section.
14. Choose Publish.
15. In the dialog box, choose Conrm.
16. To proceed, the status must be Published.
17. Go back to the SAP Fiori launchpad.
18. Go to the Extensibility group where you can nd the recently added tile for the custom UI (if you can't nd
it, refresh your browser. To check if the app has been assigned to the group, go to the App Finder via the
user icon in the top left corner of the screen.
19. Choose the app tile.
20.The side-by-side application is displayed in a new tab.
Note
Via the Custom Catalog Extensions app, you can add tiles for the (automatically generated) UIs of custom
business objects to the SAP Fiori launchpad. Select, for example,YY1_CUSTOMERRECORD_SCBO from the
list and proceed as described above.
Validate Customer Addresses Using a Microservice
Version III: Address Validation App (Side-by-Side Extensibility Scenario)
PUBLIC 29
6 Appendix
6.1 Issues
Please note that SAP does not oer any ocial support for the sample code (see the SAP SAMPLE CODE
LICENSE AGREEMENT on GitHub). However, feel free to use the Issues section on GitHub if you have any
problems. We recommend that you
browse through the known issues section before creating a new issue
.
6.2 Document History
Revision Date Change
1.0 2018-05-28 Document created.
1.1 2019-02-20 Import App in SAP Web IDE [page 24]
section updated.
1.2 2019-06-03 Prerequisites [page 4] section updated
1.3 2019-09-13 Issues [page 30] section added.
30 PUBLIC
Validate Customer Addresses Using a Microservice
Appendix

Important Disclaimers and Legal Information
Hyperlinks
Some links are classied by an icon and/or a mouseover text. These links provide additional information.
About the icons:
• Links with the icon : You are entering a Web site that is not hosted by SAP. By using such links, you agree (unless expressly stated otherwise in your
agreements with SAP) to this:
• The content of the linked-to site is not SAP documentation. You may not infer any product claims against SAP based on this information.
• SAP does not agree or disagree with the content on the linked-to site, nor does SAP warrant the availability and correctness. SAP shall not be liable for any
damages caused by the use of such content unless damages have been caused by SAP's gross negligence or willful misconduct.
• Links with the icon : You are leaving the documentation for that particular SAP product or service and are entering a SAP-hosted Web site. By using such
links, you agree that (unless expressly stated otherwise in your agreements with SAP) you may not infer any product claims against SAP based on this
information.
Videos Hosted on External Platforms
Some videos may point to third-party video hosting platforms. SAP cannot guarantee the future availability of videos stored on these platforms. Furthermore, any
advertisements or other content hosted on these platforms (for example, suggested videos or by navigating to other videos hosted on the same site), are not within
the control or responsibility of SAP.
Beta and Other Experimental Features
Experimental features are not part of the ocially delivered scope that SAP guarantees for future releases. This means that experimental features may be changed by
SAP at any time for any reason without notice. Experimental features are not for productive use. You may not demonstrate, test, examine, evaluate or otherwise use
the experimental features in a live operating environment or with data that has not been suciently backed up.
The purpose of experimental features is to get feedback early on, allowing customers and partners to inuence the future product accordingly. By providing your
feedback (e.g. in the SAP Community), you accept that intellectual property rights of the contributions or derivative works shall remain the exclusive property of SAP.
Example Code
Any software coding and/or code snippets are examples. They are not for productive use. The example code is only intended to better explain and visualize the syntax
and phrasing rules. SAP does not warrant the correctness and completeness of the example code. SAP shall not be liable for errors or damages caused by the use of
example code unless damages have been caused by SAP's gross negligence or willful misconduct.
Bias-Free Language
SAP supports a culture of diversity and inclusion. Whenever possible, we use unbiased language in our documentation to refer to people of all cultures, ethnicities,
genders, and abilities.
Validate Customer Addresses Using a Microservice
Important Disclaimers and Legal Information
PUBLIC 31

www.sap.com/contactsap
© 2022 SAP SE or an SAP aliate company. All rights reserved.
No part of this publication may be reproduced or transmitted in any form
or for any purpose without the express permission of SAP SE or an SAP
aliate company. The information contained herein may be changed
without prior notice.
Some software products marketed by SAP SE and its distributors
contain proprietary software components of other software vendors.
National product specications may vary.
These materials are provided by SAP SE or an SAP aliate company for
informational purposes only, without representation or warranty of any
kind, and SAP or its aliated companies shall not be liable for errors or
omissions with respect to the materials. The only warranties for SAP or
SAP aliate company products and services are those that are set forth
in the express warranty statements accompanying such products and
services, if any. Nothing herein should be construed as constituting an
additional warranty.
SAP and other SAP products and services mentioned herein as well as
their respective logos are trademarks or registered trademarks of SAP
SE (or an SAP aliate company) in Germany and other countries. All
other product and service names mentioned are the trademarks of their
respective companies.
Please see https://www.sap.com/about/legal/trademark.html for
additional trademark information and notices.
THE BEST RUN
