
Oracle® Fusion Middleware
Developing Applications for Oracle WebLogic
Server
14c (14.1.1.0.0)
F18296-11
July 2024
Oracle Fusion Middleware Developing Applications for Oracle WebLogic Server, 14c (14.1.1.0.0)
F18296-11
Copyright © 2007, 2024, Oracle and/or its affiliates.
This software and related documentation are provided under a license agreement containing restrictions on use and
disclosure and are protected by intellectual property laws. Except as expressly permitted in your license agreement or
allowed by law, you may not use, copy, reproduce, translate, broadcast, modify, license, transmit, distribute, exhibit,
perform, publish, or display any part, in any form, or by any means. Reverse engineering, disassembly, or decompilation
of this software, unless required by law for interoperability, is prohibited.
The information contained herein is subject to change without notice and is not warranted to be error-free. If you find
any errors, please report them to us in writing.
If this is software, software documentation, data (as defined in the Federal Acquisition Regulation), or related
documentation that is delivered to the U.S. Government or anyone licensing it on behalf of the U.S. Government, then
the following notice is applicable:
U.S. GOVERNMENT END USERS: Oracle programs (including any operating system, integrated software, any
programs embedded, installed, or activated on delivered hardware, and modifications of such programs) and Oracle
computer documentation or other Oracle data delivered to or accessed by U.S. Government end users are "commercial
computer software," "commercial computer software documentation," or "limited rights data" pursuant to the applicable
Federal Acquisition Regulation and agency-specific supplemental regulations. As such, the use, reproduction,
duplication, release, display, disclosure, modification, preparation of derivative works, and/or adaptation of i) Oracle
programs (including any operating system, integrated software, any programs embedded, installed, or activated on
delivered hardware, and modifications of such programs), ii) Oracle computer documentation and/or iii) other Oracle
data, is subject to the rights and limitations specified in the license contained in the applicable contract. The terms
governing the U.S. Government's use of Oracle cloud services are defined by the applicable contract for such services.
No other rights are granted to the U.S. Government.
This software or hardware is developed for general use in a variety of information management applications. It is not
developed or intended for use in any inherently dangerous applications, including applications that may create a risk of
personal injury. If you use this software or hardware in dangerous applications, then you shall be responsible to take all
appropriate fail-safe, backup, redundancy, and other measures to ensure its safe use. Oracle Corporation and its
affiliates disclaim any liability for any damages caused by use of this software or hardware in dangerous applications.
Oracle®, Java, MySQL, and NetSuite are registered trademarks of Oracle and/or its affiliates. Other names may be
trademarks of their respective owners.
Intel and Intel Inside are trademarks or registered trademarks of Intel Corporation. All SPARC trademarks are used
under license and are trademarks or registered trademarks of SPARC International, Inc. AMD, Epyc, and the AMD logo
are trademarks or registered trademarks of Advanced Micro Devices. UNIX is a registered trademark of The Open
Group.
This software or hardware and documentation may provide access to or information about content, products, and
services from third parties. Oracle Corporation and its affiliates are not responsible for and expressly disclaim all
warranties of any kind with respect to third-party content, products, and services unless otherwise set forth in an
applicable agreement between you and Oracle. Oracle Corporation and its affiliates will not be responsible for any loss,
costs, or damages incurred due to your access to or use of third-party content, products, or services, except as set forth
in an applicable agreement between you and Oracle.
Contents
Preface
Audience xvi
Documentation Accessibility xvi
Diversity and Inclusion xvi
Related Resources xvii
Conventions xvii
1
Overview of WebLogic Server Application Development
WebLogic Server and the Java EE Platform 1-3
Overview of Java EE Applications and Modules 1-4
Web Application Modules 1-4
Servlets 1-4
JavaServer Pages 1-4
More Information on Web Application Modules 1-5
Enterprise JavaBean Modules 1-5
EJB Documentation in WebLogic Server 1-5
Additional EJB Information 1-5
Connector Modules 1-6
Enterprise Applications 1-6
Java EE Programming Model 1-6
Packaging and Deployment Overview 1-7
WebLogic Web Services 1-7
JMS and JDBC Modules 1-8
WebLogic Diagnostic Framework Modules 1-8
Using an External Diagnostics Descriptor 1-9
Defining an External Diagnostics Descriptor 1-9
Coherence Grid Archive (GAR) Modules 1-9
Bean Validation 1-9
XML Deployment Descriptors 1-10
Automatically Generating Deployment Descriptors 1-15
Java-based Command-line Utilities 1-15
Upgrading Deployment Descriptors From Previous Releases of Java EE and WebLogic
Server 1-16
iii

Deployment Plans 1-16
Development Tools 1-17
Java API Reference and the wls-api.jar File 1-17
Using the wls-api.jar File 1-18
Using the weblogic.jar File 1-18
Apache Ant 1-18
Using a Third-Party Version of Ant 1-19
Changing the Ant Heap Size 1-19
Source Code Editor or IDE 1-20
Database System and JDBC Driver 1-20
Web Browser 1-20
Third-Party Software 1-20
2
Using Ant Tasks to Configure and Use a WebLogic Server Domain
Overview of Configuring and Starting Domains Using Ant Tasks 2-1
Starting Servers and Creating Domains Using the wlserver Ant Task 2-2
Basic Steps for Using wlserver 2-2
Sample build.xml Files for wlserver 2-3
wlserver Ant Task Reference 2-4
Configuring a WebLogic Server Domain Using the wlconfig Ant Task 2-7
What the wlconfig Ant Task Does 2-7
Basic Steps for Using wlconfig 2-8
wlconfig Ant Task Reference 2-9
Main Attributes 2-9
Nested Elements 2-9
create 2-10
delete 2-10
set 2-11
get 2-11
query 2-12
invoke 2-12
Example of Creating a Security Realm with the wlconfig Ant Task 2-13
Using the libclasspath Ant Task 2-13
libclasspath Task Definition 2-14
libclasspath Ant Task Reference 2-14
Main libclasspath Attributes 2-14
Nested libclasspath Elements 2-15
librarydir 2-15
library 2-15
Example libclasspath Ant Task 2-15
iv

3
Using the WebLogic Maven Plug-In
Installing Maven 3-1
Configuring the WebLogic Maven Plug-In 3-2
How to use the WebLogic Maven Plug-in 3-2
Basic Configuration POM File 3-5
Maven Plug-In Goals 3-6
appc 3-8
create-domain 3-11
deploy 3-13
distribute-app 3-17
install 3-21
list-apps 3-26
purge-tasks 3-28
redeploy 3-30
remove-domain 3-33
start-app 3-34
start-server 3-36
stop-app 3-38
stop-server 3-40
undeploy 3-42
uninstall 3-45
update-app 3-46
wlst 3-49
wlst-client 3-52
ws-clientgen 3-57
wsgen 3-62
wsimport 3-66
ws-wsdlc 3-73
ws-jwsc 3-76
4
Creating a Split Development Directory Environment
Overview of the Split Development Directory Environment 4-2
Source and Build Directories 4-2
Deploying from a Split Development Directory 4-3
Split Development Directory Ant Tasks 4-4
Using the Split Development Directory Structure: Main Steps 4-4
Organizing Java EE Components in a Split Development Directory 4-5
Source Directory Overview 4-6
Enterprise Application Configuration 4-8
Web Applications 4-8
v

EJBs 4-9
Important Notes Regarding EJB Descriptors 4-10
Organizing Shared Classes in a Split Development Directory 4-10
Shared Utility Classes 4-11
Third-Party Libraries 4-11
Class Loading for Shared Classes 4-12
Generating a Basic build.xml File Using weblogic.BuildXMLGen 4-12
weblogic.BuildXMLGen Syntax 4-13
Developing Multiple-EAR Projects Using the Split Development Directory 4-14
Organizing Libraries and Classes Shared by Multiple EARs 4-14
Linking Multiple build.xml Files 4-15
Best Practices for Developing WebLogic Server Applications 4-16
5
Building Applications in a Split Development Directory
Compiling Applications Using wlcompile 5-1
Using includes and excludes Properties 5-2
wlcompile Ant Task Attributes 5-2
Nested javac Options 5-3
Setting the Classpath for Compiling Code 5-3
Library Element for wlcompile and wlappc 5-3
Building Modules and Applications Using wlappc 5-4
wlappc Ant Task Attributes 5-4
wlappc Ant Task Syntax 5-6
Syntax Differences between appc and wlappc 5-6
weblogic.appc Reference 5-6
weblogic.appc Syntax 5-6
weblogic.appc Options 5-6
6
Deploying and Packaging from a Split Development Directory
Deploying Applications Using wldeploy 6-1
Packaging Applications Using wlpackage 6-1
Archive versus Exploded Archive Directory 6-2
wlpackage Ant Task Example 6-2
wlpackage Ant Task Attribute Reference 6-2
7
Developing Applications for Production Redeployment
What is Production Redeployment? 7-1
Supported and Unsupported Application Types 7-2
Additional Application Support 7-2
vi

Programming Requirements and Conventions 7-2
Applications Should Be Self-Contained 7-3
Versioned Applications Access the Current Version JNDI Tree by Default 7-3
Security Providers Must Be Compatible 7-4
Applications Must Specify a Version Identifier 7-4
Applications Can Access Name and Identifier 7-4
Client Applications Use Same Version when Possible 7-4
Assigning an Application Version 7-4
Application Version Conventions 7-5
Upgrading Applications to Use Production Redeployment 7-5
Accessing Version Information 7-5
8
Using Java EE Annotations and Dependency Injection
Annotation Processing 8-1
Annotation Parsing 8-2
Deployment View of Annotation Configuration 8-2
Compiling Annotated Classes 8-2
Dynamic Annotation Updates 8-3
Dependency Injection of Resources 8-3
Application Life Cycle Annotation Methods 8-4
Standard JDK Annotations 8-4
javax.annotation.PostConstruct 8-4
javax.annotation.PreDestroy 8-5
javax.annotation.Resource 8-5
javax.annotation.Resources 8-7
Standard Security-Related JDK Annotations 8-7
javax.annotation.security.DeclareRoles 8-7
javax.annotation.security.DenyAll 8-8
javax.annotation.security.PermitAll 8-8
javax.annotation.security.RolesAllowed 8-8
javax.annotation.security.RunAs 8-8
9
Using Contexts and Dependency Injection for the Java EE Platform
About CDI for the Java EE Platform 9-3
Defining a Managed Bean 9-5
Injecting a Bean 9-5
Defining the Scope of a Bean 9-6
Overriding the Scope of a Bean at the Point of Injection 9-7
Using Qualifiers 9-7
Defining Qualifiers for Implementations of a Bean Type 9-7
vii

Applying Qualifiers to a Bean 9-9
Injecting a Qualified Bean 9-10
Providing Alternative Implementations of a Bean Type 9-10
Defining an Alternative Implementation of a Bean Type 9-11
Selecting an Alternative Implementation of a Bean Type for an Application 9-12
Applying a Scope and Qualifiers to a Session Bean 9-12
Applying a Scope to a Session Bean 9-13
Applying Qualifiers to a Session Bean 9-13
Using Producer Methods, Disposer Methods, and Producer Fields 9-13
Defining a Producer Method 9-13
Defining a Disposer Method 9-14
Defining a Producer Field 9-15
Initializing and Preparing for the Destruction of a Managed Bean 9-15
Initializing a Managed Bean 9-15
Preparing for the Destruction of a Managed Bean 9-16
Intercepting Method Invocations and Life Cycle Events of Bean Classes 9-16
Defining an Interceptor Binding Type 9-17
Defining an Interceptor Class 9-18
Identifying Methods for Interception 9-20
Enabling an Interceptor 9-21
Applying an Interceptor on a Producer 9-21
Decorating a Managed Bean Class 9-22
Defining a Decorator Class 9-22
Enabling a Decorator Class 9-24
Assigning an EL Name to a CDI Bean Class 9-24
Defining and Applying Stereotypes 9-26
Defining a Stereotype 9-26
Applying Stereotypes to a Bean 9-27
Using Events for Communications Between Beans 9-27
Defining an Event Type 9-28
Sending an Event 9-28
Handling an Event 9-29
Injecting a Predefined Bean 9-30
Injecting and Qualifying Resources 9-31
Using CDI With JCA Technology 9-33
Configuring a CDI Application 9-34
Enabling and Disabling CDI 9-35
Enabling and Disabling CDI for a Domain 9-35
Implicit Bean Discovery 9-36
Enabling and Disabling Implicit Bean Discovery for a Domain 9-36
Supporting Third-Party Portable Extensions 9-37
Using the Built-in Annotation Literals 9-37
viii
Using the Configurator Interfaces 9-38
Bootstrapping a CDI Container 9-38
10
Java API for JSON Processing
About JavaScript Object Notation (JSON) 10-1
Object Model API 10-2
Creating an Object Model from JSON Data 10-2
Creating an Object Model from Application Code 10-3
Navigating an Object Model 10-3
Writing an Object Model to a Stream 10-5
Streaming API 10-5
Reading JSON Data Using a Parser 10-6
Writing JSON Data Using a Generator 10-7
New Features for JSON Processing 10-8
JSON Pointer 10-8
JSON Patch 10-9
JSON Merge Patch 10-10
11
Java API for JSON Binding
About Default Mapping 11-1
About Customized Mapping 11-2
Standard Support to Handle Application or JSON Media Type for JAX-RS 11-2
12
Understanding WebLogic Server Application Classloading
Java Classloading 12-2
Java Classloader Hierarchy 12-2
Loading a Class 12-3
prefer-web-inf-classes Element 12-3
Changing Classes in a Running Program 12-4
Class Caching With the Policy Class Loader 12-4
Class Caching With Application Class Data Sharing 12-5
WebLogic Server Application Classloading 12-6
Overview of WebLogic Server Application Classloading 12-6
Application Classloader Hierarchy 12-7
Custom Module Classloader Hierarchies 12-8
Declaring the Classloader Hierarchy 12-9
User-Defined Classloader Restrictions 12-11
Servlet Reloading Disabled 12-12
Nesting Depth 12-12
ix

Module Types 12-12
Duplicate Entries 12-12
Interfaces 12-12
Call-by-Value Semantics 12-12
In-Flight Work 12-12
Development Use Only 12-12
Individual EJB Classloader for Implementation Classes 12-13
Application Classloading and Pass-by-Value or Reference 12-14
Using a Filtering Classloader 12-14
What is a Filtering Classloader 12-15
Configuring a Filtering Classloader 12-15
Resource Loading Order 12-15
Resolving Class References Between Modules and Applications 12-16
About Resource Adapter Classes 12-17
Packaging Shared Utility Classes 12-17
Manifest Class-Path 12-17
Using the Classloader Analysis Tool (CAT) 12-18
Opening the CAT Interface 12-18
How CAT Analyzes Classes 12-19
Identifying Class References through Manifest Hierarchies 12-19
Sharing Applications and Modules By Using Java EE Libraries 12-20
Adding JARs to the Domain /lib Directory 12-20
13
Creating Shared Java EE Libraries and Optional Packages
Overview of Shared Java EE Libraries and Optional Packages 13-2
Optional Packages 13-3
Library Directories 13-4
Versioning Support for Libraries 13-4
Shared Java EE Libraries and Optional Packages Compared 13-5
Additional Information 13-6
Creating Shared Java EE Libraries 13-6
Assembling Shared Java EE Library Files 13-6
Assembling Optional Package Class Files 13-7
Editing Manifest Attributes for Shared Java EE Libraries 13-7
Packaging Shared Java EE Libraries for Distribution and Deployment 13-9
Referencing Shared Java EE Libraries in an Enterprise Application 13-9
Overriding context-roots Within a Referenced Enterprise Library 13-11
URIs for Shared Java EE Libraries Deployed As a Standalone Module 13-12
Referencing Optional Packages from a Java EE Application or Module 13-12
Using weblogic.appmerge to Merge Libraries 13-14
Using weblogic.appmerge from the CLI 13-14
x
Using weblogic.appmerge as an Ant Task 13-15
Integrating Shared Java EE Libraries with the Split Development Directory Environment 13-15
Deploying Shared Java EE Libraries and Dependent Applications 13-15
Web Application Shared Java EE Library Information 13-16
Using WebApp Libraries With Web Applications 13-16
Accessing Registered Shared Java EE Library Information with LibraryRuntimeMBean 13-17
Order of Precedence of Modules When Referencing Shared Java EE Libraries 13-17
Best Practices for Using Shared Java EE Libraries 13-18
14
Programming Application Life Cycle Events
Understanding Application Life Cycle Events 14-2
Registering Events in weblogic-application.xml 14-3
Programming Basic Life Cycle Listener Functionality 14-3
Configuring a Role-Based Application Life Cycle Listener 14-4
Examples of Configuring Life Cycle Events with and without the URI Parameter 14-5
Understanding Application Life Cycle Event Behavior During Redeployment 14-6
Programming Application Version Life Cycle Events 14-6
Understanding Application Version Life Cycle Event Behavior 14-6
Types of Application Version Life Cycle Events 14-7
Example of Production Deployment Sequence When Using Application Version Life
Cycle Events 14-7
15
Programming Context Propagation
Understanding Context Propagation 15-1
Programming Context Propagation: Main Steps 15-2
Programming Context Propagation in a Client 15-3
Programming Context Propagation in an Application 15-4
16
Programming JavaMail with WebLogic Server
Overview of Using JavaMail with WebLogic Server Applications 16-1
Understanding JavaMail Configuration Files 16-2
Configuring JavaMail for WebLogic Server 16-2
Sending Messages with JavaMail 16-3
Reading Messages with JavaMail 16-4
17
Threading and Clustering Topics
Using Threads in WebLogic Server 17-1
Using the Work Manager API for Lower-Level Threading 17-2
xi

Programming Applications for WebLogic Server Clusters 17-2
18
Developing OSGi Bundles for WebLogic Server Applications
Understanding OSGi 18-2
Features Provided in WebLogic Server OSGi Implementation 18-2
Configuring the OSGi Framework 18-3
Configuring OSGi Framework Instances 18-4
Configuring OSGi Framework Instance From Administration Console 18-5
Configuring OSGi Framework Instance From config.xml 18-6
Configuring OSGi Framework Instance From WLST 18-6
Configuring OSGi Framework Instance from a Java Program 18-7
Parameter Required for Installing Bundles in the Framework 18-9
Configuring OSGi Framework Persistence 18-10
Using OSGi Services 18-10
Connecting to an OSGi Console 18-10
Creating OSGi Bundles 18-11
Deploying OSGi Bundles 18-11
Preparing to Deploy an OSGi Bundle on a Target System 18-11
Preparing to Deploy Bundles as Enterprise Applications 18-12
Preparing to Deploy Bundles as Web Applications 18-12
Global Work Managers 18-13
Global Data Sources 18-13
Deploying OSGi Bundles in the osgi-lib Directory 18-14
Setting the Start Level and Run Level for a Bundle 18-14
Accessing Deployed Bundle Objects From JNDI 18-15
Using OSGi Logging Via WebLogic Server 18-17
Configuring a Filtering ClassLoader for OSGi Bundles 18-17
OSGI Example 18-18
19
Using the WebSocket Protocol in WebLogic Server
Understanding the WebSocket Protocol 19-3
Limitations of the HTTP Request-Response Model 19-3
WebSocket Endpoints 19-4
Handshake Requests in the WebSocket Protocol 19-4
Messaging and Data Transfer in the WebSocket Protocol 19-5
Understanding the WebLogic Server WebSocket Implementation 19-5
WebSocket Protocol Implementation 19-6
WebLogic WebSocket Java API 19-6
Protocol Fallback for WebSocket Messaging 19-6
Sample WebSocket Applications 19-6
xii

Overview of Creating a WebSocket Application 19-6
Creating an Endpoint 19-7
Creating an Annotated Endpoint 19-7
Creating a Programmatic Endpoint 19-8
Specifying the Path Within an Application to a Programmatic Endpoint 19-9
Handling Life Cycle Events for a WebSocket Connection 19-10
Handling Life Cycle Events in an Annotated WebSocket Endpoint 19-10
Handling a Connection Opened Event 19-11
Handling a Message Received Event 19-11
Handling an Error Event 19-13
Handling a Connection Closed Event 19-14
Handling Life Cycle Events in a Programmatic WebSocket Endpoint 19-14
Defining, Injecting, and Accessing a Resource for a WebSocket Endpoint 19-15
Sending a Message 19-17
Sending a Message to a Single Peer of an Endpoint 19-17
Sending a Message to All Peers of an Endpoint 19-18
Ensuring Thread Safety for WebSocket Endpoints 19-19
Encoding and Decoding a WebSocket Message 19-19
Encoding a Java Object as a WebSocket Message 19-20
Decoding a WebSocket Message as a Java Object 19-22
Specifying a Part of an Endpoint Deployment URI as an Application Parameter 19-24
Maintaining Client State 19-25
Configuring a Server Endpoint Programmatically 19-26
Building Applications that Use the Java API for WebSocket 19-27
Deploying a WebSocket Application 19-27
Monitoring WebSocket Applications 19-29
Using WebSockets with Proxy Servers 19-31
Writing a WebSocket Client 19-32
Writing a Browser-Based WebSocket Client 19-32
Writing a Java WebSocket Client 19-33
Configuring a WebSocket Client Endpoint Programmatically 19-33
Connecting a Java WebSocket Client to a Server Endpoint 19-35
Setting the Maximum Number of Threads for Dispatching Messages from a
WebSocket Client 19-36
Securing a WebSocket Application 19-37
Applying Verified-Origin Policies 19-37
Authenticating and Authorizing WebSocket Clients 19-38
Authorizing WebSocket Clients 19-39
Establishing Secure WebSocket Connections 19-39
Avoiding Mixed Content 19-40
Specifying Limits for a WebSocket Connection 19-40
Enabling Protocol Fallback for WebSocket Messaging 19-40
xiii
Using the JavaScript API for WebSocket Fallback in Client Applications 19-41
Configuring WebSocket Fallback 19-41
Creating a WebSocket Object 19-43
Handling Life Cycle Events for a JavaScript WebSocket Client 19-44
Sending a Message from a JavaScript WebSocket Client 19-46
Packaging and Specifying the Location of the WebSocket Fallback Client Library 19-47
Enabling WebSocket Fallback 19-47
Migrating an Application to the JSR 356 Java API for WebSocket from the Deprecated API 19-47
Comparison of the JSR 356 API and Proprietary WebLogic Server WebSocket API 19-47
Converting a Proprietary WebSocket Server Endpoint to Use the JSR 356 API 19-49
Replacing the /* Suffix in a Path Pattern String 19-51
Replacing a /* Suffix that Represents Variable Path Parameters in an Endpoint URI 19-51
Replacing a /* Suffix that Represents Additional Data for an Endpoint 19-52
Example of Converting a Proprietary WebSocket Server Endpoint to Use the JSR 356
API 19-53
Example of Using the Java API for WebSocket with WebLogic Server 19-54
A
Enterprise Application Deployment Descriptor Elements
weblogic-application.xml Deployment Descriptor Elements A-1
weblogic-application A-2
ejb A-8
entity-cache A-9
max-cache-size A-10
xml A-11
parser-factory A-11
entity-mapping A-12
jdbc-connection-pool A-12
connection-factory A-13
pool-params A-14
driver-params A-18
security A-20
application-param A-20
classloader-structure A-21
listener A-21
singleton-service A-22
startup A-22
shutdown A-23
work-manager A-23
session-descriptor A-25
library-ref A-27
library-context-root-override A-28
xiv

fast-swap A-28
weblogic-application.xml Schema A-28
application.xml Schema A-29
B
wldeploy Ant Task Reference
Overview of the wldeploy Ant Task B-1
Basic Steps for Using wldeploy B-1
Sample build.xml Files for wldeploy B-2
wldeploy Ant Task Attribute Reference B-3
Main Attributes B-3
Nested <files> Child Element B-8
xv

Preface
This document describes building WebLogic Server e-commerce applications using the Java
Platform, Enterprise Edition (Java EE).
• Audience
• Documentation Accessibility
• Diversity and Inclusion
• Related Resources
• Conventions
Audience
This document is written for application developers who want to build WebLogic Server
applications using the Java Platform, Enterprise Edition (Java EE). It is assumed that readers
know Web technologies, object-oriented programming techniques, and the Java programming
language.
WebLogic Server applications are created by Java programmers, Web designers, and
application assemblers. Programmers and designers create modules that implement the
business and presentation logic for the application. Application assemblers assemble the
modules into applications that are ready to deploy on WebLogic Server.
Documentation Accessibility
For information about Oracle's commitment to accessibility, visit the Oracle Accessibility
Program website at
http://www.oracle.com/pls/topic/lookup?ctx=acc&id=docacc
.
Accessible Access to Oracle Support
Oracle customers who have purchased support have access to electronic support through My
Oracle Support. For information, visit
http://www.oracle.com/pls/topic/lookup?
ctx=acc&id=info
or visit
http://www.oracle.com/pls/topic/lookup?ctx=acc&id=trs
if you
are hearing impaired.
Diversity and Inclusion
Oracle is fully committed to diversity and inclusion. Oracle respects and values having a
diverse workforce that increases thought leadership and innovation. As part of our initiative to
build a more inclusive culture that positively impacts our employees, customers, and partners,
we are working to remove insensitive terms from our products and documentation. We are also
mindful of the necessity to maintain compatibility with our customers' existing technologies and
the need to ensure continuity of service as Oracle's offerings and industry standards evolve.
Because of these technical constraints, our effort to remove insensitive terms is ongoing and
will take time and external cooperation.
Preface
xvi
Related Resources
New and Changed WebLogic Server Features
For a comprehensive listing of the new WebLogic Server features introduced in this release,
see What's New in Oracle WebLogic Server.
Conventions
The following text conventions are used in this document:
Convention Meaning
boldface
Boldface type indicates graphical user interface elements associated with an
action, or terms defined in text or the glossary.
italic Italic type indicates book titles, emphasis, or placeholder variables for which
you supply particular values.
monospace
Monospace type indicates commands within a paragraph, URLs, code in
examples, text that appears on the screen, or text that you enter.
Preface
xvii

1
Overview of WebLogic Server Application
Development
Learn basic concepts about WebLogic Server applications, modules, and deployment
descriptors.
This chapter includes the following sections:
• WebLogic Server and the Java EE Platform
• Overview of Java EE Applications and Modules
• Web Application Modules
• Enterprise JavaBean Modules
• Connector Modules
• Enterprise Applications
• WebLogic Web Services
• JMS and JDBC Modules
• WebLogic Diagnostic Framework Modules
• Coherence Grid Archive (GAR) Modules.
• Bean Validation.
• XML Deployment Descriptors
• Deployment Plans
• Development Tools
• WebLogic Server and the Java EE Platform
WebLogic Server Java EE applications are based on standardized, modular components.
WebLogic Server provides a complete set of services for those modules and handles many
details of application behavior automatically, without requiring programming. Java EE
defines module behaviors and packaging in a generic, portable way, postponing runtime
configuration until the module is deployed on an application server.
• Overview of Java EE Applications and Modules
A WebLogic Server Java EE application consists of one of the following modules or
applications running on WebLogic Server: Web application modules, Enterprise
JavaBeans (EJB) modules, connector modules, enterprise applications, or Web services.
• Web Application Modules
A Web application on WebLogic Server includes some required and typically, some
optional files.
• Enterprise JavaBean Modules
Enterprise JavaBeans (EJB) technology is the server-side component architecture for the
development and deployment of component-based business applications. EJB technology
enables rapid and simplified development of distributed, transactional, secure, and
portable applications based on Java EE 8 technology.
1-1

• Connector Modules
Connectors (also known as resource adapters) contain the Java, and if necessary, the
native modules required to interact with an Enterprise Information System (EIS). A
resource adapter deployed to the WebLogic Server environment enables Java EE
applications to access a remote EIS. WebLogic Server application developers can use
HTTP servlets, JavaServer Pages (JSPs), Enterprise JavaBeans (EJBs), and other APIs to
develop integrated applications that use the EIS data and business logic.
• Enterprise Applications
An enterprise application consists of one or more Web application modules, EJB modules,
and resource adapters. It might also include a client application.
• WebLogic Web Services
Web services can be shared by and used as modules of distributed Web-based
applications. They commonly interface with existing back-end applications, such as
customer relationship management systems, order-processing systems, and so on. Web
services can reside on different computers and can be implemented by vastly different
technologies, but they are packaged and transported using standard Web protocols, such
as HTTP, thus making them easily accessible by any user on the Web.
• JMS and JDBC Modules
JMS and JDBC configurations are stored as modules, defined by an XML file that
conforms to the
weblogic-jms.xsd
and
jdbc-data-source.xsd
schema, respectively.
These modules are similar to standard Java EE modules. An administrator can create and
manage JMS and JDBC modules as global system resources, as modules packaged with
a Java EE application (as a packaged resource), or as standalone modules that can be
made globally available.
• WebLogic Diagnostic Framework Modules
The WebLogic Diagnostic Framework (WLDF) provides features for generating, gathering,
analyzing, and persisting diagnostic data from WebLogic Server instances and from
applications deployed to server instances.
• Coherence Grid Archive (GAR) Modules
A Coherence GAR module provides distributed in-memory caching and data grid
computing that allows applications to increase their availability, scalability, and
performance. GAR modules are deployed as both standalone modules and packaged with
Java EE applications (as a packaged resource). A GAR module may also be made globally
available.
• Bean Validation
The Bean Validation specification (JSR 380) defines a metadata model and API for
validating data in JavaBeans components. It is supported on both the server and Java EE
8 client; therefore, instead of distributing validation of data over several layers, such as the
browser and the server side, you can define the validation constraints in one place and
share them across the different layers.
• XML Deployment Descriptors
A deployment configuration refers to the process of defining the deployment descriptor
values required to deploy an enterprise application to a particular WebLogic Server
domain. The deployment configuration for an application or module is stored in three types
of XML document: Java EE deployment descriptors, WebLogic Server descriptors, and
WebLogic Server deployment plans.
• Deployment Plans
A deployment plan is an XML document that defines an application's WebLogic Server
deployment configuration for a specific WebLogic Server environment. A deployment plan
resides outside of an application's archive file, and can apply changes to deployment
properties stored in the application's existing WebLogic Server deployment descriptors.
Chapter 1
1-2

• Development Tools
To develop WebLogic Server applications, you need various tools such as Java API
Reference and the
wls-api.jar
file, source code editor or IDE, database system and
JDBC driver, and Web browser. You also need third party tools such as Apache Ant.
WebLogic Server and the Java EE Platform
WebLogic Server Java EE applications are based on standardized, modular components.
WebLogic Server provides a complete set of services for those modules and handles many
details of application behavior automatically, without requiring programming. Java EE defines
module behaviors and packaging in a generic, portable way, postponing runtime configuration
until the module is deployed on an application server.
WebLogic Server implements Java Platform, Enterprise Edition (Java EE) Version 8
technologies (see
http://www.oracle.com/technetwork/java/javaee/overview/
index.html
). Java EE is the standard platform for developing multi-tier enterprise applications
based on the Java programming language. The technologies that make up Java EE were
developed collaboratively by several software vendors.
Java EE 8 Platform Highlights
Java EE 8 continues to improve API and programming models needed for today's applications
and adds features requested by the community. This release modernizes support for many
industry standards and continues simplification of enterprise ready APIs. The key goals of the
Java EE 8 platform are to modernize the infrastructure for enterprise Java for the cloud and
microservices environments, emphasize HTML5 and HTTP/2 support, enhance ease of
development through new Contexts and Dependency Injection features, and further enhance
security and reliability of the platform.
For information about all the new Java EE 8 features supported in WebLogic Server, see Java
EE 8 Support in What's New in Oracle WebLogic Server.
WebLogic Server and Java EE Applications
WebLogic Server Java EE applications are based on standardized, modular components.
WebLogic Server provides a complete set of services for those modules and handles many
details of application behavior automatically, without requiring programming. Java EE defines
module behaviors and packaging in a generic, portable way, postponing run-time configuration
until the module is actually deployed on an application server.
Java EE includes deployment specifications for Web applications, EJB modules, Web services,
enterprise applications, client applications, and connectors. Java EE does not specify how an
application is deployed on the target server—only how a standard module or application is
packaged. For each module type, the specifications define the files required and their location
in the directory structure.
Java is platform independent, so you can edit and compile code on any platform, and test your
applications on development WebLogic Servers running on other platforms. For example, it is
common to develop WebLogic Server applications on a PC running Windows or Linux,
regardless of the platform where the application is ultimately deployed.
Refer to the Java EE specification at:
https://www.oracle.com/java/technologies/java-ee-
glance.html#javaee8
.
Chapter 1
WebLogic Server and the Java EE Platform
1-3

Overview of Java EE Applications and Modules
A WebLogic Server Java EE application consists of one of the following modules or
applications running on WebLogic Server: Web application modules, Enterprise JavaBeans
(EJB) modules, connector modules, enterprise applications, or Web services.
• Web application modules—HTML pages, servlets, JavaServer Pages, and related files.
See Web Application Modules.
• Enterprise JavaBeans (EJB) modules—entity beans, session beans, and message-driven
beans. See Enterprise JavaBean Modules.
• Connector modules—resource adapters. See Connector Modules.
• Enterprise applications—Web application modules, EJB modules, resource adapters and
Web services packaged into an application. See Enterprise Applications.
• Web services—See WebLogic Web Services.
A WebLogic application can also include the following WebLogic-specific modules:
• JDBC and JMS modules—See JMS and JDBC Modules.
• WebLogic Diagnostic FrameWork (WLDF) modules—See WebLogic Diagnostic
Framework Modules.
• Coherence Grid Archive (GAR) Modules—See Coherence Grid Archive (GAR) Modules.
Web Application Modules
A Web application on WebLogic Server includes some required and typically, some optional
files.
• At least one servlet or JSP, along with any helper classes.
• Optionally, a
web.xml
deployment descriptor, a Java EE standard XML document that
describes the contents of a WAR file.
• Optionally, a
weblogic.xml
deployment descriptor, an XML document containing WebLogic
Server-specific elements for Web applications.
• A Web application can also include HTML and XML pages with supporting files such as
images and multimedia files.
• Servlets
• JavaServer Pages
• More Information on Web Application Modules
Servlets
Servlets are Java classes that execute in WebLogic Server, accept a request from a client,
process it, and optionally return a response to the client. An
HttpServlet
is most often used to
generate dynamic Web pages in response to Web browser requests.
JavaServer Pages
JavaServer Pages (JSPs) are Web pages coded with an extended HTML that makes it
possible to embed Java code in a Web page. JSPs can call custom Java classes, known as
Chapter 1
Overview of Java EE Applications and Modules
1-4

tag libraries, using HTML-like tags. The
appc
compiler compiles JSPs and translates them into
servlets. WebLogic Server automatically compiles JSPs if the servlet class file is not present or
is older than the JSP source file. See Building Modules and Applications Using wlappc.
You can also precompile JSPs and package the servlet class in a Web application (WAR) file
to avoid compiling in the server. Servlets and JSPs may require additional helper classes that
must also be deployed with the Web application.
More Information on Web Application Modules
See the following documentation:
• Organizing Java EE Components in a Split Development Directory.
• Developing Web Applications, Servlets, and JSPs for Oracle WebLogic Server
• Developing JSP Tag Extensions for Oracle WebLogic Server
Enterprise JavaBean Modules
Enterprise JavaBeans (EJB) technology is the server-side component architecture for the
development and deployment of component-based business applications. EJB technology
enables rapid and simplified development of distributed, transactional, secure, and portable
applications based on Java EE 8 technology.
The EJB 3.2 specification provides simplified programming and packaging model changes.
The mandatory use of Java interfaces from previous versions has been removed, allowing
plain old Java objects to be annotated and used as EJB components. The simplification is
further enhanced through the ability to place EJB modules directly inside of Web applications,
removing the need to produce archives to store the Web and EJB components and combine
them together in an EAR file.
• EJB Documentation in WebLogic Server
• Additional EJB Information
EJB Documentation in WebLogic Server
For more information about using EJBs with WebLogic Server, see:
• For information about all the new features in EJB, see New Features and Changes in EJB
in Developing Enterprise JavaBeans for Oracle WebLogic Server.
• For information about basic EJB concepts and components, see Enterprise Java Beans
(EJBs) in Understanding Oracle WebLogic Server.
• For instructions on how to program, package, and deploy 3.2 EJBs on WebLogic Server,
see Developing Enterprise JavaBeans for Oracle WebLogic Server.
• For instructions on how to organize and build WebLogic Server EJBs in a split directory
environment, see Creating a Split Development Directory Environment.
• For more information on how to program and package 2.x EJBs, see Developing
Enterprise JavaBeans, Version 2.1, for Oracle WebLogic Server.
Additional EJB Information
To learn more about EJB concepts, such as the benefits of enterprise beans, the types of
enterprise beans, and their life cycles, visit the following Web sites:
Chapter 1
Enterprise JavaBean Modules
1-5

• EJB 3.2 Specification (JSR-345) at
http://jcp.org/en/jsr/summary?id=345
• The Enterprise Beans chapter of the Java EE 8 Tutorial at
https://javaee.github.io/
tutorial/partentbeans.html
• Java EE 8 Platform:
https://www.oracle.com/java/technologies/java-ee-
glance.html#javaee8
Connector Modules
Connectors (also known as resource adapters) contain the Java, and if necessary, the native
modules required to interact with an Enterprise Information System (EIS). A resource adapter
deployed to the WebLogic Server environment enables Java EE applications to access a
remote EIS. WebLogic Server application developers can use HTTP servlets, JavaServer
Pages (JSPs), Enterprise JavaBeans (EJBs), and other APIs to develop integrated
applications that use the EIS data and business logic.
To deploy a resource adapter to WebLogic Server, you must first create and configure
WebLogic Server-specific deployment descriptor,
weblogic-ra.xml
file, and add this to the
deployment directory. Resource adapters can be deployed to WebLogic Server as standalone
modules or as part of an enterprise application. See Enterprise Applications.
For more information on connectors, see Developing Resource Adapters for Oracle WebLogic
Server.
Enterprise Applications
An enterprise application consists of one or more Web application modules, EJB modules, and
resource adapters. It might also include a client application.
An enterprise application can be optionally defined by an
application.xml
file, which was the
standard Java EE deployment descriptor for enterprise applications.
• Java EE Programming Model
• Packaging and Deployment Overview
Java EE Programming Model
An important aspect of the Java EE programming model is the introduction of metadata
annotations. Annotations simplify the application development process by allowing a developer
to specify within the Java class itself how the application behaves in the container, requests for
dependency injection, and so on. Annotations are an alternative to deployment descriptors that
were required by older versions of enterprise applications (1.4 and earlier).
With Java EE annotations, the standard
application.xml
and
web.xml
deployment descriptors
are optional. The Java EE programming model uses the JDK annotations feature (see
https://javaee.github.io/javaee-spec/javadocs/
) for Web containers, such as EJBs,
servlets, Web applications, and JSPs. See Using Java EE Annotations and Dependency
Injection.
If the application includes WebLogic Server-specific extensions, the application is further
defined by a
weblogic-application.xml
file. Enterprise applications that include a client
module will also have a
client-application.xml
deployment descriptor and a WebLogic run-
time client application deployment descriptor. See Enterprise Application Deployment
Descriptor Elements.
Chapter 1
Connector Modules
1-6

Packaging and Deployment Overview
For both production and development purposes, Oracle recommends that you package and
deploy even standalone Web applications, EJBs, and resource adapters as part of an
enterprise application. Doing so allows you to take advantage of Oracle's split development
directory structure, which greatly facilitates application development. See Creating a Split
Development Directory Environment.
An enterprise application consists of Web application modules, EJB modules, and resource
adapters. It can be packaged as follows:
• For development purposes, Oracle recommends the WebLogic split development directory
structure. Rather than having a single archived EAR file or an exploded EAR directory
structure, the split development directory has two parallel directories that separate source
files and output files. This directory structure is optimized for development on a single
WebLogic Server instance. See Creating a Split Development Directory Environment.
Oracle provides the
wlpackage
Ant task, which allows you to create an EAR without having
to use the JAR utility; this is exclusively for the split development directory structure. See
Packaging Applications Using wlpackage.
• For development purposes, Oracle further recommends that you package standalone Web
applications and Enterprise JavaBeans (EJBs) as part of an enterprise application, so that
you can take advantage of the split development directory structure. See Organizing Java
EE Components in a Split Development Directory.
• For production purposes, Oracle recommends the exploded (unarchived) directory format.
This format enables you to update files without having to redeploy the application. To
update an archived file, you must unarchive the file, update it, then rearchive and redeploy
it.
• You can choose to package your application as a JAR archived file using the
jar
utility with
an
.ear
extension. Archived files are easier to distribute and take up less space. An EAR
file contains all of the JAR, WAR, and RAR module archive files for an application and an
XML descriptor that describes the bundled modules. See Packaging Applications Using
wlpackage.
The optional
META-INF/application.xml
deployment descriptor contains an element for each
Web application, EJB, and connector module, as well as additional elements to describe
security roles and application resources such as databases. If this descriptor is present the
WebLogic deployer picks the list of modules from this descriptor. However if this descriptor is
not present, the container guesses the modules from the annotations defined on the POJO
(plain-old-Java-object) classes. See Enterprise Application Deployment Descriptor Elements.
WebLogic Web Services
Web services can be shared by and used as modules of distributed Web-based applications.
They commonly interface with existing back-end applications, such as customer relationship
management systems, order-processing systems, and so on. Web services can reside on
different computers and can be implemented by vastly different technologies, but they are
packaged and transported using standard Web protocols, such as HTTP, thus making them
easily accessible by any user on the Web.
A Web service consists of the following modules, at a minimum:
• A Web service implementation hosted by a server on the Web. WebLogic JAX-WS web
services are hosted by WebLogic Server. A Web service module may include either Java
classes or EJBs that implement the Web service. Web services are packaged either as
Chapter 1
WebLogic Web Services
1-7

Web application archives (WARs) or EJB modules (JARs), depending on the
implementation.
• A standard for transmitting data and Web service invocation calls between the Web service
and the user of the Web service. WebLogic JAX-WS web services use Simple Object
Access Protocol (SOAP) 1.1 as the message format and HTTP as the connection protocol.
• A standard for describing the Web service to clients so they can invoke it. WebLogic Web
services use Web services Description Language (WSDL) 1.1, an XML-based
specification, to describe themselves.
• A standard for clients to invoke Web services—JAX-WS. See Developing JAX-WS Web
Services for Oracle WebLogic Server.
WebLogic Server also includes support for RESTful web services. For more information about
RESTful web services, see Developing and Securing RESTful Web Services for Oracle
WebLogic Server.
For more information about WebLogic Web services and the standards that are supported, see
Understanding WebLogic Web Services for Oracle WebLogic Server.
JMS and JDBC Modules
JMS and JDBC configurations are stored as modules, defined by an XML file that conforms to
the
weblogic-jms.xsd
and
jdbc-data-source.xsd
schema, respectively. These modules are
similar to standard Java EE modules. An administrator can create and manage JMS and JDBC
modules as global system resources, as modules packaged with a Java EE application (as a
packaged resource), or as standalone modules that can be made globally available.
With modular deployment of JMS and JDBC resources, you can migrate your application and
the required JMS or JDBC configuration from environment to environment, such as from a
testing environment to a production environment, without opening an enterprise application file
(such as an EAR file) or a JMS or JDBC standalone module, and without extensive manual
JMS or JDBC reconfiguration.
Application developers create application modules in an enterprise-level IDE or another
development tool that supports editing of XML files, then package the JMS or JDBC modules
with an application and pass the application to a WebLogic administrator to deploy.
For more information, see:
• Configuring JMS Application Modules for Deployment
• Configuring JDBC Application Modules for Deployment
WebLogic Diagnostic Framework Modules
The WebLogic Diagnostic Framework (WLDF) provides features for generating, gathering,
analyzing, and persisting diagnostic data from WebLogic Server instances and from
applications deployed to server instances.
For server-scoped diagnostics, some WLDF features are configured as part of the
configuration for the domain. Other features are configured as system resource descriptors
that can be targeted to servers (or clusters). For application-scoped diagnostics, diagnostic
features are configured as resource descriptors for the application.
Application-scoped instrumentation is configured and deployed as a diagnostic module, which
is similar to a diagnostic system module. However, an application module is configured in an
Chapter 1
JMS and JDBC Modules
1-8

XML configuration file named
weblogic-diagnostics.xml
which is packaged with the
application archive.
For detailed instructions for configuring instrumentation for applications, see Configuring
Application-Scoped Instrumentation.
• Using an External Diagnostics Descriptor
Using an External Diagnostics Descriptor
WebLogic Server also supports the use of an external diagnostics descriptor so you can
integrate diagnostic functionality into an application that has not imported diagnostic
descriptors. This feature supports the deployment view and deployment of an application or a
module, detecting the presence of an external diagnostics descriptor if the descriptor is defined
in your deployment plan (
plan.xml
).
• Defining an External Diagnostics Descriptor
Defining an External Diagnostics Descriptor
First, define the diagnostic descriptor as external and configure its URI in the
plan.xml
file. For
example:
<module-override>
<module-name>reviewService.ear</module-name>
<module-type>ear</module-type>
</module-descriptor>
<module-descriptor external="true">
<root-element>wldf-resource</root-element>
<uri>META-INF/weblogic-diagnostics.xml</uri>
...
...
</module-override>
<config-root>D:\plan</config-root>
Then place the external diagnostic descriptor file under the URI. Using the example above, you
would place the descriptor file under
d:\plan\ META-INF
.
Coherence Grid Archive (GAR) Modules
A Coherence GAR module provides distributed in-memory caching and data grid computing
that allows applications to increase their availability, scalability, and performance. GAR
modules are deployed as both standalone modules and packaged with Java EE applications
(as a packaged resource). A GAR module may also be made globally available.
A GAR module is defined by the coherence-application.xml deployment descriptor and must
conform to the
coherence-application.xsd
XML schema. The GAR contains the artifacts that
comprise a Coherence application: Coherence configuration files, application classes (such as
entry processors, aggregators, filters), and any dependencies that are required.
Bean Validation
The Bean Validation specification (JSR 380) defines a metadata model and API for validating
data in JavaBeans components. It is supported on both the server and Java EE 8 client;
therefore, instead of distributing validation of data over several layers, such as the browser and
Chapter 1
Coherence Grid Archive (GAR) Modules
1-9

the server side, you can define the validation constraints in one place and share them across
the different layers.
Bean validation is not only for validating beans. In fact, it can also be used to validate any Java
object.
Bean Validation and JNDI
Where required by the Java EE specifications, the default
Validator
and
ValidatorFactory
are located using JNDI under the names
java:comp/Validator
and
java:comp/
ValidatorFactory
. These two artifacts reflect the validation descriptor that is in scope.
Bean Validation Configuration
Bean validation can be configured by using XML descriptors or annotation.
• Descriptors:
– Descriptor elements override corresponding annotations.
– Weblogic Server allows one descriptor per module. Therefore, an application can have
several validation descriptors but only one is allowed per module scope.
– Validation descriptors are named
validation.xml
and are packaged in the
META-INF
directory, except for Web modules, where the descriptor is packaged in the
WEB-INF
directory.
• Annotations:
– Injection of the default
Validator
and
ValidatorFactory
is requested using the
@Resource
annotation. However, not all source files are scanned for this annotation.
– The WebLogic Connector uses bean validation internally to validate the connector
descriptors.
Once bean validation is configured, the standard set of container managed classes for a given
container will be scanned. For example, for EJBs, bean and interceptor classes are scanned.
Web application classes and ManagedBeans also support the injection of
Validator
and
ValidatorFactories
.
For more information about the classes that support bean validation, please see the related
component specifications for the list of classes that support dependency injection.
XML Deployment Descriptors
A deployment configuration refers to the process of defining the deployment descriptor values
required to deploy an enterprise application to a particular WebLogic Server domain. The
deployment configuration for an application or module is stored in three types of XML
document: Java EE deployment descriptors, WebLogic Server descriptors, and WebLogic
Server deployment plans.
This section describes the Java EE and WebLogic-specific deployment descriptors. See
Deployment Plans for information on deployment plans.
The Java EE programming model uses the JDK annotations feature for Web containers, such
as EJBs, servlets, Web applications, and JSPs. Annotations simplify the application
development process by allowing a developer to specify within the Java class itself how the
component behaves in the container, requests for dependency injection, and so on.
Annotations are an alternative to deployment descriptors that were required by older versions
of Web applications (2.4 and earlier), enterprise applications (1.4 and earlier), and Enterprise
JavaBeans (2.x and earlier). See Using Java EE Annotations and Dependency Injection.
Chapter 1
XML Deployment Descriptors
1-10
However, enterprise applications fully support the use of deployment descriptors, even though
the standard Java EE ones are not required. For example, you may prefer to use the old EJB
2.x programming model, or might want to allow further customizing of the EJB at a later
development or deployment stage; in these cases you can create the standard deployment
descriptors in addition to, or instead of, the metadata annotations.
Modules and applications have deployment descriptors—XML documents—that describe the
contents of the directory or JAR file. Deployment descriptors are text documents formatted with
XML tags. The Java EE specifications define standard, portable deployment descriptors for
Java EE modules and applications. Oracle defines additional WebLogic-specific deployment
descriptors for deploying a module or application in the WebLogic Server environment.
Table 1-1 lists the types of modules and applications and their Java EE-standard and
WebLogic-specific deployment descriptors.
Note:
The XML schemas for the WebLogic deployment descriptors listed in the following
table include elements from the
http://xmlns.oracle.com/weblogic/weblogic-
javaee/1.7/weblogic-javaee.xsd
schema, which describes common elements
shared among all WebLogic-specific deployment descriptors.
For the most current schema information, see
https://www.oracle.com/webfolder/
technetwork/weblogic/wls_14.1.1.0.0.html
.
Table 1-1 Java EE and WebLogic Deployment Descriptors
Module or Application Scope Deployment Descriptors
Web Application Java EE
web.xml
See the Servlet 4.0 Schema at
http://www.oracle.com/
webfolder/technetwork/jsc/xml/ns/javaee/web-
app_4_0.xsd
WEB-INF/beans.xml
—required only if the classes in the WAR file
are to participate in Contexts and Dependency Injection (CDI)
Schema:
http://www.oracle.com/webfolder/
technetwork/jsc/xml/ns/javaee/beans_2_0.xsd
See Using Contexts and Dependency Injection for the Java EE
Platform.
Web Application WebLogic
weblogic.xml
Schema:
http://xmlns.oracle.com/weblogic/weblogic-
web-app/1.9/weblogic-web-app.xsd
See weblogic.xml Deployment Descriptor Elements in Developing
Web Applications, Servlets, and JSPs for Oracle WebLogic Server.
Chapter 1
XML Deployment Descriptors
1-11

Table 1-1 (Cont.) Java EE and WebLogic Deployment Descriptors
Module or Application Scope Deployment Descriptors
Enterprise Bean 3.2 Java EE
ejb-jar.xml
See the EJB 3.2 Schema at
http://www.oracle.com/
webfolder/technetwork/jsc/xml/ns/javaee/ejb-
jar_3_2.xsd
META-INF/beans.xml
—required only if the classes in the EJB JAR
file are to participate in CDI
Schema:
http://www.oracle.com/webfolder/
technetwork/jsc/xml/ns/javaee/beans_2_0.xsd
See Using Contexts and Dependency Injection for the Java EE
Platform.
Enterprise Bean 3.2 WebLogic
weblogic-ejb-jar.xml
Schema
http://xmlns.oracle.com/weblogic/weblogic-ejb-
jar/1.7/weblogic-ejb-jar.xsdweblogic-rdbms-jar.xml
Schema:
http://xmlns.oracle.com/weblogic/weblogic-
rdbms-jar/1.2/weblogic-rdbms-jar.xsd
persistence-configuration.xml
Schema:
http://xmlns.oracle.com/weblogic/persistence-
configuration/1.0/persistence-configuration.xsd
See Developing Enterprise JavaBeans for Oracle WebLogic Server.
Enterprise Bean 3.0 Java EE
ejb-jar.xml
See the EJB 3.0 Schema at
http://www.oracle.com/
webfolder/technetwork/jsc/xml/ns/javaee/ejb-
jar_3_1.xsd
META-INF/beans.xml
—required only if the classes in the EJB JAR
file are to participate in CDI
Schema:
http://www.oracle.com/webfolder/
technetwork/jsc/xml/ns/javaee/beans_1_1.xsd
See Using Contexts and Dependency Injection for the Java EE
Platform.
Enterprise Bean 3.0 WebLogic
weblogic-ejb-jar.xml
Schema
http://xmlns.oracle.com/weblogic/weblogic-ejb-
jar/1.6/weblogic-ejb-jar.xsd
weblogic-rdbms-jar.xml
Schema:
http://xmlns.oracle.com/weblogic/weblogic-
rdbms-jar/1.2/weblogic-rdbms-jar.xsd
persistence-configuration.xml
Schema:
http://xmlns.oracle.com/weblogic/persistence-
configuration/1.0/persistence-configuration.xsd
See Developing Enterprise JavaBeans for Oracle WebLogic Server.
Enterprise Bean 2.1 Java EE
ejb-jar.xml
See the EJB 2.1 Schema at
http://java.sun.com/xml/ns/
j2ee/ejb-jar_2_1.xsd
Chapter 1
XML Deployment Descriptors
1-12

Table 1-1 (Cont.) Java EE and WebLogic Deployment Descriptors
Module or Application Scope Deployment Descriptors
Enterprise Bean 2.1 WebLogic
weblogic-ejb-jar.xml
Schema:
http://xmlns.oracle.com/weblogic/weblogic-
ejb-jar/1.6/weblogic-ejb-jar.xsd
See The weblogic-ejb-jar.xml Deployment Descriptor in Developing
Enterprise JavaBeans, Version 2.1, for Oracle WebLogic Server.
weblogic-cmp-rdbms-jar.xml
Schema:
http://xmlns.oracle.com/weblogic/weblogic-
rdbms-jar/1.2/weblogic-rdbms-jar.xsd
See The weblogic-cmp-rdbms-jar.xml Deployment Descriptor in
Developing Enterprise JavaBeans, Version 2.1, for Oracle WebLogic
Server.
Web services Java EE
webservices.xml
See the Web services 1.4 Schema at
http://www.oracle.com/
webfolder/technetwork/jsc/xml/ns/javaee/
javaee_web_services_1_4.xsd
Web services WebLogic
weblogic-webservices.xml
Schema:
http://xmlns.oracle.com/weblogic/weblogic-
webservices/1.1/weblogic-webservices.xsd
weblogic-wsee-clientHandlerChain.xml
Schema:
http://xmlns.oracle.com/weblogic/weblogic-
wsee-clientHandlerChain/1.0/weblogic-wsee-
clientHandlerChain.xsd
weblogic-webservices-policy.xml
Schema:
http://xmlns.oracle.com/weblogic/webservice-
policy-ref/1.1/webservice-policy-ref.xsd
weblogic-wsee-standaloneclient.xml
Schema:
http://xmlns.oracle.com/weblogic/weblogic-
wsee-standaloneclient/1.0/weblogic-wsee-
standaloneclient.xsd
See WebLogic Web Service Deployment Descriptor Element
Reference in WebLogic Web Services Reference for Oracle
WebLogic Server.
Resource Adapter Java EE
ra.xml
See the Connector 1.7 Schema at
http://www.oracle.com/
webfolder/technetwork/jsc/xml/ns/javaee/
connector_1_7.xsd
META-INF/beans.xml
—required only if the classes in the RAR file
are to participate in CDI
Schema:
http://www.oracle.com/webfolder/
technetwork/jsc/xml/ns/javaee/beans_2_0.xsd
See Using Contexts and Dependency Injection for the Java EE
Platform.
Resource Adapter WebLogic
weblogic-ra.xml
Schema:
http://xmlns.oracle.com/weblogic/weblogic-
connector/1.5/weblogic-connector.xsd
See weblogic-ra.xml Schema in Developing Resource Adapters for
Oracle WebLogic Server.
Chapter 1
XML Deployment Descriptors
1-13

Table 1-1 (Cont.) Java EE and WebLogic Deployment Descriptors
Module or Application Scope Deployment Descriptors
Enterprise Application Java EE
application.xml
See the Application 8 Schema at
http://www.oracle.com/
webfolder/technetwork/jsc/xml/ns/javaee/
application_8.xsd
Enterprise Application WebLogic
weblogic-application.xml
Schema:
http://xmlns.oracle.com/weblogic/weblogic-
application/1.8/weblogic-application.xsd
See weblogic-application.xml Deployment Descriptor Elements.
Client Application Java EE
application-client.xml
See the Application Client 8 Schema at
http://www.oracle.com/
webfolder/technetwork/jsc/xml/ns/javaee/application-
client_8.xsd
META-INF/beans.xml
—required only if the classes in the
application client JAR file are to participate in CDI
Schema:
http://www.oracle.com/webfolder/
technetwork/jsc/xml/ns/javaee/beans_2_0.xsd
See Using Contexts and Dependency Injection for the Java EE
Platform.
Client Application WebLogic
application-client.xml
Schema:
http://xmlns.oracle.com/weblogic/weblogic-
application-client/1.6/weblogic-application-
client.xsd
See Developing a Java EE Application Client (Thin Client) in
Developing Stand-alone Clients for Oracle WebLogic Server.
HTTP Pub/Sub Application WebLogic
weblogic-pubsub.xml
Schema:
http://xmlns.oracle.com/weblogic/weblogic-
pubsub/1.0/weblogic-pubsub.xsd
See Using the HTTP Publish-Subscribe Server in Developing Web
Applications, Servlets, and JSPs for Oracle WebLogic Server.
JMS Module WebLogic
FileName-jms.xml
, where
FileName
can be anything you want.
Schema:
http://xmlns.oracle.com/weblogic/weblogic-
jms/1.8/weblogic-jms.xsd
See Configuring JMS Application Modules for Deployment in
Administering JMS Resources for Oracle WebLogic Server.
JDBC Module WebLogic
FileName-jdbc.xml
, where
FileName
can be anything you want.
Schema:
http://xmlns.oracle.com/weblogic/jdbc-data-
source/1.6/jdbc-data-source.xsd
See Configuring JDBC Application Modules for Deployment in
Administering JDBC Data Sources for Oracle WebLogic Server.
Deployment Plan WebLogic
plan.xml
Schema:
http://www.oracle.com/webfolder/technetwork/
weblogic/deployment-plan/index.html
See Understanding WebLogic Server Deployment in Deploying
Applications to Oracle WebLogic Server.
Chapter 1
XML Deployment Descriptors
1-14

Table 1-1 (Cont.) Java EE and WebLogic Deployment Descriptors
Module or Application Scope Deployment Descriptors
Resource Deployment Plan WebLogic
resource-deployment-plan.xml
Schema:
http://xmlns.oracle.com/weblogic/resource-
deployment-plan/1.0/resource-deployment-plan.xsd
See Using Resource Deployment Plans in Using Oracle WebLogic
Server Multitenant.
WLDF Module WebLogic
weblogic-diagnostics.xml
Schema:
http://xmlns.oracle.com/weblogic/weblogic-
diagnostics/2.0/weblogic-diagnostics.xsd
See Deploying WLDF Application Modules in Configuring and Using
the Diagnostics Framework for Oracle WebLogic Server.
Coherence Modules WebLogic
coherence-application.xml
Schema: http://xmlns.oracle.com/coherence/coherence-
application/1.0/coherence-application.xsd
See Developing Oracle Coherence Applications for Oracle WebLogic
Server.
When you package a module or application, you create a directory to hold the deployment
descriptors—
WEB-INF
or
META-INF
—and then create the XML deployment descriptors in that
directory.
• Automatically Generating Deployment Descriptors
• Java-based Command-line Utilities
• Upgrading Deployment Descriptors From Previous Releases of Java EE and WebLogic
Server
Automatically Generating Deployment Descriptors
WebLogic Server provides a variety of tools for automatically generating deployment
descriptors. These are discussed in the sections that follow.
Java-based Command-line Utilities
WebLogic Server includes a set of Java-based command-line utilities that automatically
generate both standard Java EE and WebLogic-specific deployment descriptors for Web
applications and enterprise applications.
These command-line utilities examine the classes you have assembled in a staging directory
and build the appropriate deployment descriptors based on the servlet classes, and so on.
These utilities include:
•
java weblogic.marathon.ddinit.EarInit
— automatically generates the deployment
descriptors for enterprise applications.
•
java weblogic.marathon.ddinit.WebInit
— automatically generates the deployment
descriptors for Web applications.
For an example of
DDInit
, assume that you have created a directory called
c:\stage
that
contains the JSP files and other objects that make up a Web application but you have not yet
created the
web.xml
and
weblogic.xml
deployment descriptors. To automatically generate
them, execute the following command:
Chapter 1
XML Deployment Descriptors
1-15
prompt> java weblogic.marathon.ddinit.WebInit c:\stage
The utility generates the
web.xml
and
weblogic.xml
deployment descriptors and places them
in the
WEB-INF
directory, which
DDInit
will create if it does not already exist.
Upgrading Deployment Descriptors From Previous Releases of Java EE
and WebLogic Server
So that your applications can take advantage of the features in the current Java EE
specification and release of WebLogic Server, Oracle recommends that you always upgrade
deployment descriptors when you migrate applications to a new release of WebLogic Server.
To upgrade the deployment descriptors in your Java EE applications and modules, first use the
weblogic.DDConverter
tool to generate the upgraded descriptors into a temporary directory.
Once you have inspected the upgraded deployment descriptors to ensure that they are correct,
repackage your Java EE module archive or exploded directory with the new deployment
descriptor files.
Invoke
weblogic.DDConverter
with the following command:
prompt> java weblogic.DDConverter [options] archive_file_or_directory
where
archive_file_or_directory
refers to the archive file (EAR, WAR, JAR, or RAR) or
exploded directory of your enterprise application, Web application, EJB, or resource adapter.
The following table describes the
weblogic.DDConverter
command options.
Table 1-2 weblogic.DDConverter Command Options
Option Description
-d <
dir
>
Specifies the directory to which descriptors are written.
-help
Prints the standard usage message.
-quiet
Turns off output messages except error messages.
-verbose
Turns on additional output used for debugging.
The following example shows how to use the
weblogic.DDConverter
command to generate
upgraded deployment descriptors for the
my.ear
enterprise application into the subdirectory
tempdir
in the current directory:
prompt> java weblogic.DDConverter -d tempdir my.ear
Deployment Plans
A deployment plan is an XML document that defines an application's WebLogic Server
deployment configuration for a specific WebLogic Server environment. A deployment plan
resides outside of an application's archive file, and can apply changes to deployment
properties stored in the application's existing WebLogic Server deployment descriptors.
Administrators use deployment plans to easily change an application's WebLogic Server
configuration for a specific environment without modifying existing Java EE or WebLogic-
specific deployment descriptors. Multiple deployment plans can be used to reconfigure a single
application for deployment to multiple, differing WebLogic Server environments.
Chapter 1
Deployment Plans
1-16

After programmers have finished programming an application, they export its deployment
configuration to create a custom deployment plan that administrators later use for deploying
the application into new WebLogic Server environments. Programmers distribute both the
application deployment files and the custom deployment plan to deployers (for example,
testing, staging, or production administrators) who use the deployment plan as a blueprint for
configuring the application for their environment.
WebLogic Server provides the following tools to help programmers export an application's
deployment configuration:
•
weblogic.PlanGenerator
creates a template deployment plan with null variables for
selected categories of WebLogic Server deployment descriptors. This tool is
recommended if you are beginning the export process and you want to create a template
deployment plan with null variables for an entire class of deployment descriptors.
• The WebLogic Server Administration Console updates or creates new deployment plans
as necessary when you change configuration properties for an installed application. You
can use the WebLogic Server Administration Console to generate a new deployment plan
or to add or override variables in an existing plan. The WebLogic Server Administration
Console provides greater flexibility than
weblogic.PlanGenerator
, because it allows you to
interactively add or edit individual deployment descriptor properties in the plan, rather than
export entire categories of descriptor properties.
For complete and detailed information about creating and using deployment plans, see:
• Understanding WebLogic Server Deployment
• Exporting an Application for Deployment to New Environments
• Understanding WebLogic Server Deployment Plans
Development Tools
To develop WebLogic Server applications, you need various tools such as Java API Reference
and the
wls-api.jar
file, source code editor or IDE, database system and JDBC driver, and
Web browser. You also need third party tools such as Apache Ant.
This section describes required and optional tools for developing WebLogic Server
applications.
• Java API Reference and the wls-api.jar File
• Apache Ant
• Source Code Editor or IDE
• Database System and JDBC Driver
• Web Browser
• Third-Party Software
Java API Reference and the wls-api.jar File
Oracle provides the Oracle Fusion Middleware Java API Reference for Oracle WebLogic
Server, which defines all of the supported Java classes available for use when developing Java
EE applications for WebLogic Server. See the Java API Reference for Oracle WebLogic
Server.
In conjunction with the Java API Reference for Oracle WebLogic Server, Oracle recommends
using the
wls-api.jar
file to develop and compile Java EE applications for your WebLogic
Chapter 1
Development Tools
1-17
Server environment. The
wls-api.jar
file is located in the
wlserver/server/lib
directory of
your WebLogic Server distribution and offers the following benefits:
• developing more performant code based on tested best practices
• avoiding deprecated or unsupported code paths
• Using the wls-api.jar File
• Using the weblogic.jar File
Using the wls-api.jar File
Use the
wls-api.jar
file and the
api.jar
file to develop and compile your Java EE
applications in Integrated Development Environments (IDEs), such as Oracle JDeveloper. IDEs
provide an array of tools to simplify development of Java-based applications. The
wls-api.jar
file provides a clean and concise API jar to develop and run Java EE applications for WebLogic
environments.
Note:
The
wls-api.jar
file does not reference any Java EE classes. Oracle provides the
api.jar
file with a manifest classpath that includes access to Java EE JARs.
You may need to include the
weblogic.jar
file in the classpath of your development
environment to access tools such as WLST, the
weblogic.Deployer
utilty, and
weblogic.appc
.
Using the weblogic.jar File
You must continue to use the
weblogic.jar
file for runtime environments, as a client or to
develop and compile legacy applications. However, use the
wls-api.jar
file to develop and
compile Java EE applications for your WebLogic Server environment.
Apache Ant
The preferred Oracle method for building applications with WebLogic Server is Apache Ant.
Ant is a Java-based build tool. One of the benefits of Ant is that is it is extended with Java
classes, rather than shell-based commands. Oracle provides numerous Ant extension classes
to help you compile, build, deploy, and package applications using the WebLogic Server split
development directory environment.
Another benefit is that Ant is a cross-platform tool. Developers write Ant build scripts in
eXtensible Markup Language (XML). XML tags define the targets to build, dependencies
among targets, and tasks to execute in order to build the targets. Ant libraries are bundled with
WebLogic Server to make it easier for our customers to build Java applications out of the box.
To use Ant, you must first set your environment by executing either the
setExamplesEnv.cmd
(Windows) or
setExamplesEnv.sh
(UNIX) commands located in the
WL_SERVER\samples\domains\wl_server
directory, where
WL_SERVER
is your WebLogic Server
installation directory.
For a complete explanation of ant capabilities, see:
http://jakarta.apache.org/ant/manual/
index.html
Chapter 1
Development Tools
1-18

Note:
The Apache Jakarta Web site publishes online documentation for only the most
current version of Ant, which might be different from the version of Ant that is bundled
with WebLogic Server. Use the following command, after setting your WebLogic
environment, to determine the version of Ant bundled with WebLogic Server:
prompt> ant -version
To view the documentation for a specific version of Ant, such as the version included
with WebLogic Server, download the Ant zip file from
http://archive.apache.org/
dist/ant/binaries/
and extract the documentation.
For more information on using Ant to compile your cross-platform scripts or using cross-
platform scripts to create XML scripts that can be processed by Ant, refer to any of the
WebLogic Server examples, such as
ORACLE_HOME/wlserver/samples/server/examples/src/
examples/ejb20/basic/beanManaged/build.xml
, where
ORACLE_HOME
represents the directory
in which you installed WebLogic Server. For more information about the WebLogic Server code
examples, see Sample Applications and Code Examples in Understanding Oracle WebLogic
Server.
Also refer to the following WebLogic Server documentation on building examples using Ant:
ORACLE_HOME/wlserver/samples/server/examples/src/examples/examples.html
.
• Using a Third-Party Version of Ant
• Changing the Ant Heap Size
Using a Third-Party Version of Ant
You can use your own version of Ant if the one bundled with WebLogic Server is not adequate
for your purposes. To determine the version of Ant that is bundled with WebLogic Server, run
the following command after setting your WebLogic environment:
prompt> ant -version
If you plan to use a different version of Ant, you can replace the appropriate JAR file in the
WL_HOME\server\lib\ant
directory with an updated version of the file (where
WL_HOME
refers to
the main WebLogic installation directory, such as
c:\Oracle\Middleware\Oracle_Home\wlserver
) or add the new file to the front of your
CLASSPATH.
Changing the Ant Heap Size
By default the environment script allocates a heap size of 128 megabytes to Ant. You can
increase or decrease this value for your own projects by setting the
-X
option in your local
ANT_OPTS
environment variable. For example:
prompt> setenv ANT_OPTS=-Xmx128m
If you want to set the heap size permanently, add or update the
MEM_ARGS
variable in the scripts
that set your environment, start WebLogic Server, and so on, as shown in the following snippet
from a Windows command script that starts a WebLogic Server instance:
set MEM_ARGS=-Xms32m -Xmx200m
Chapter 1
Development Tools
1-19

See the scripts and commands in
WL_HOME/server/bin
for examples of using the
MEM_ARGS
variable.
Source Code Editor or IDE
You need a text editor to edit Java source files, configuration files, HTML or XML pages, and
JavaServer Pages. An editor that gracefully handles Windows and UNIX line-ending
differences is preferred, but there are no other special requirements for your editor. You can
edit HTML or XML pages and JavaServer Pages with a plain text editor, or use a Web page
editor such as Dreamweaver. For XML pages, you can also use an enterprise-level IDE with
DTD validation or another development tool that supports editing of XML files.
Database System and JDBC Driver
Nearly all WebLogic Server applications require a database system. You can use any DBMS
that you can access with a standard JDBC driver, but services such as WebLogic Java
Message Service (JMS) require a supported JDBC driver for Oracle, Sybase, Informix,
Microsoft SQL Server, or IBM DB2. See the Oracle Fusion Middleware Supported System
Configurations page on Oracle Technology Network to find out about supported database
systems and JDBC drivers.
Web Browser
Most Java EE applications are designed to be executed by Web browser clients. WebLogic
Server supports the HTTP 1.1 specification and is tested with current versions of the Firefox
and Microsoft Internet Explorer browsers.
When you write requirements for your application, note which Web browser versions you will
support. In your test plans, include testing plans for each supported version. Be explicit about
version numbers and browser configurations. Will your application support Secure Socket
Layers (SSL) protocol? Test alternative security settings in the browser so that you can tell
your users what choices you support.
If your application uses applets, it is especially important to test browser configurations you
want to support because of differences in the JVMs embedded in various browsers. One
solution is to require users to install the Java plug-in so that everyone has the same Java run-
time version.
Third-Party Software
You can use third-party software products to enhance your WebLogic Server development
environment. WebLogic Developer Tools Resources provides developer tools information for
products that support the application servers.
Note:
Check with the software vendor to verify software compatibility with your platform and
WebLogic Server version.
Chapter 1
Development Tools
1-20

2
Using Ant Tasks to Configure and Use a
WebLogic Server Domain
Learn about how to start and stop WebLogic Server instances and configure WebLogic Server
domains using WebLogic Ant tasks in your development build scripts.
This chapter includes the following sections:
• Overview of Configuring and Starting Domains Using Ant Tasks
• Starting Servers and Creating Domains Using the wlserver Ant Task
• Configuring a WebLogic Server Domain Using the wlconfig Ant Task
• Using the libclasspath Ant Task
• Overview of Configuring and Starting Domains Using Ant Tasks
WebLogic Server provides a pair of Ant tasks to help you perform common configuration
tasks in a development environment. The configuration tasks enable you to start and stop
WebLogic Server instances as well as create and configure WebLogic Server domains.
• Starting Servers and Creating Domains Using the wlserver Ant Task
The
wlserver
Ant task enables you to start, reboot, shutdown, or connect to a WebLogic
Server instance. The server instance may already exist in a configured WebLogic Server
domain, or you can create a new single-server domain for development by using the
generateconfig=true
attribute.
• Configuring a WebLogic Server Domain Using the wlconfig Ant Task
You can use the
wlconfig
Ant task or the WebLogic Scripting Tool (WLST) to configure a
WebLogic Server domain.
• Example of Creating a Security Realm with the wlconfig Ant Task
You can use this example to create a security realm with the wlconfig Ant task:
• Using the libclasspath Ant Task
Use the
libclasspath
Ant task to build applications that use libraries, such as application
libraries and Web libraries.
Overview of Configuring and Starting Domains Using Ant Tasks
WebLogic Server provides a pair of Ant tasks to help you perform common configuration tasks
in a development environment. The configuration tasks enable you to start and stop WebLogic
Server instances as well as create and configure WebLogic Server domains.
When combined with other WebLogic Ant tasks, you can create powerful build scripts for
demonstrating or testing your application with custom domains. For example, a single Ant build
script can:
• Compile your application using the
wlcompile
,
wlappc
, and Web services Ant tasks.
• Create a new single-server domain and start the Administration Server using the
wlserver
Ant task.
• Configure the new domain with required application resources using the
wlconfig
Ant
task.
2-1

• Deploy the application using the
wldeploy
Ant task.
• Automatically start a compiled client application to demonstrate or test product features.
The sections that follow describe how to use the configuration Ant tasks,
wlserver
and
wlconfig
.
Starting Servers and Creating Domains Using the wlserver Ant
Task
The
wlserver
Ant task enables you to start, reboot, shutdown, or connect to a WebLogic
Server instance. The server instance may already exist in a configured WebLogic Server
domain, or you can create a new single-server domain for development by using the
generateconfig=true
attribute.
When you use the
wlserver
task in an Ant script, the task does not return control until the
specified server is available and listening for connections. If you start up a server instance
using wlserver, the server process automatically terminates after the Ant VM terminates. If you
only connect to a currently-running server using the
wlserver
task, the server process keeps
running after Ant completes.
The
wlserver
WebLogic Server Ant task extends the standard
java
Ant task
(
org.apache.tools.ant.taskdefs.Java
). This means that all the attributes of the
java
Ant
task also apply to the
wlserver
Ant task. For example, you can use the
output
and
error
attributes to specify the name of the files to which output and standard errors of the
wlserver
Ant task is written, respectively. For full documentation about the attributes of the standard
Java Ant task, see Java on the Apache Ant site (
http://ant.apache.org/manual/Tasks/
java.html
).
• Basic Steps for Using wlserver
• Sample build.xml Files for wlserver
• wlserver Ant Task Reference
Basic Steps for Using wlserver
To use the
wlserver
Ant task:
1. Set your environment.
On Windows, execute the
setWLSEnv.cmd
command, located in the directory
WL_HOME\server\bin
, where
WL_HOME
is the top-level directory of your WebLogic Server
installation.
On UNIX, execute the
setWLSEnv.sh
command, located in the
directory
WL_HOME\server\bin
, where
WL_HOME
is the top-level directory of your WebLogic
Server installation.
Chapter 2
Starting Servers and Creating Domains Using the wlserver Ant Task
2-2
Note:
The
wlserver
task is predefined in the version of Ant shipped with WebLogic
Server. If you want to use the task with your own Ant installation, add the
following task definition in your build file:
<taskdef name="wlserver" classname="weblogic.ant.taskdefs.management.WLServer"/>
Note:
On UNIX operating systems, the
setWLSEnv.sh
command does not set the
environment variables in all command shells. Oracle recommends that you
execute this command using the Korn shell or bash shell.
2. Add a call to the
wlserver
task in the build script to start, shutdown, restart, or connect to a
server. See wlserver Ant Task Reference for information about
wlserver
attributes and
default behavior.
3. Execute the Ant task or tasks specified in the
build.xml
file by typing
ant
in the staging
directory, optionally passing the command a target argument:
prompt> ant
Use
ant -verbose
to obtain more detailed messages from the
wlserver
task.
Sample build.xml Files for wlserver
The following shows a minimal
wlserver
target that starts a server in the current directory
using all default values:
<target name="wlserver-default">
<wlserver/>
</target>
This target connects to an existing, running server using the indicated connection parameters
and user name/password combination:
<target name="connect-server">
<wlserver host="127.0.0.1" port="7001" username="weblogic" password="weblogic"
action="connect"/>
</target>
This target starts a WebLogic Server instance configured in the
config
subdirectory:
<target name="start-server">
<wlserver dir="./config" host="127.0.0.1" port="7001" action="start"/>
</target>
This target creates a new single-server domain in an empty directory, and starts the domain's
server instance:
<target name="new-server">
<delete dir="./tmp"/>
<mkdir dir="./tmp"/>
<wlserver dir="./tmp" host="127.0.0.1" port="7001"
Chapter 2
Starting Servers and Creating Domains Using the wlserver Ant Task
2-3
generateConfig="true" username="weblogic" password="weblogic" action="start"/>
</target>
wlserver Ant Task Reference
The following table describes the attributes of the
wlserver
Ant task.
Table 2-1 Attributes of the wlserver Ant Task
Attribute Description Data Type Required?
policy
The path to the security policy file for the WebLogic Server
domain. This attribute is used only for starting server
instances.
File No
dir
The path that holds the domain configuration (for example,
c:\Oracle\Middleware\user_projects\domains\mydo
main
). By default,
wlserver
uses the current directory.
File No
beahome
The path to the Middleware Home directory (for example,
c:\Oracle\Middleware
).
File No
weblogichome
The path to the WebLogic Server installation directory (for
example,
c:\Oracle\Middleware\wlserver_12.1
).
File No
servername
The name of the server to start, shutdown, reboot, or
connect to.
A WebLogic Server instance is uniquely identified by its
protocol, host, and port values, so if you use this set of
attributes to specify the server you want to start, shutdown or
reboot, you do not need to specify its actual name using the
servername
attribute. The only exception is when you want
to shutdown the Administration server; in this case you must
specify this attribute.
The default value for this attribute is
myserver
.
For more information on server naming convention, see
Domain and Server Name Restrictions in Understanding
Domain Configuration for Oracle WebLogic Server.
String Required only
when shutting
down the
Administration
server.
domainname
The name of the WebLogic Server domain in which the
server is configured.
String No
adminserverurl
The URL to access the Administration Server in the domain.
This attribute is required if you are starting up a Managed
Server in the domain.
String Required for
starting
Managed
Servers.
username
The user name of an administrator account. If you omit both
the
username
and
password
attributes,
wlserver
attempts
to obtain the encrypted user name and password values from
the
boot.properties
file. See Boot Identity Files in the
Administering Server Startup and Shutdown for Oracle
WebLogic Server for more information on
boot.properties
.
String No
password
The password of an administrator account. If you omit both
the
username
and
password
attributes,
wlserver
attempts
to obtain the encrypted user name and password values from
the
boot.properties
file. See Boot Identity Files in the
Administering Server Startup and Shutdown for Oracle
WebLogic Server for more information on
boot.properties
.
String No
Chapter 2
Starting Servers and Creating Domains Using the wlserver Ant Task
2-4

Table 2-1 (Cont.) Attributes of the wlserver Ant Task
Attribute Description Data Type Required?
pkpassword
The private key password for decrypting the SSL private key
file.
String No
timeout
The maximum time, in milliseconds, that
wlserver
waits for
a server to boot. This also specifies the maximum amount of
time to wait when connecting to a running server.
The default value for this attribute is
0
, which means that the
Ant task will wait indefinitely until the server transitions to
the
RUNNING
state.
long No
timeoutSeconds
The maximum time, in seconds, that
wlserver
waits for a
server to boot. This also specifies the maximum amount of
time to wait when connecting to a running server.
The default value for this attribute is
0
,which means that the
Ant task will wait indefinitely until the server transitions to the
RUNNING
state.
long No
productionmodeenab
led
Specifies whether a server instance boots in development
mode or in production mode.
Development mode enables a WebLogic Server instance to
automatically deploy and update applications that are in the
domain_name/autodeploy
directory (where
domain_name
is the name of a WebLogic Server domain). In other words,
development mode lets you use auto-deploy. Production
mode disables the auto-deployment feature. See Deploying
Applications and Modules for more information.
Valid values for this attribute are
True
and
False
. The
default value is
False
(which means that by default a server
instance boots in development mode.)
Note: If you boot the server in production mode by setting
this attribute to
True
, you must reboot the server to set the
mode back to development mode. Or in other words, you
cannot reset the mode on a running server using other
administrative tools, such as the WebLogic Server Scripting
Tool (WLST).
Boolean No
host
The DNS name or IP address on which the server instance is
listening.
The default value for this attribute is
localhost
.
String No
port
The TCP port number on which the server instance is
listening.
The default value for this attribute is
7001
.
int No
generateconfig
Specifies whether or not
wlserver
creates a new domain for
the specified server.
Valid values for this attribute are
true
and
false
. The
default value is
false
.
Boolean No
action
Specifies the action
wlserver
performs:
start
,
shutdown
,
reboot
, or
connect
.
The
shutdown
action can be used with the optional
forceshutdown
attribute perform a forced shutdown.
The default value for this attribute is
start
.
String No
Chapter 2
Starting Servers and Creating Domains Using the wlserver Ant Task
2-5

Table 2-1 (Cont.) Attributes of the wlserver Ant Task
Attribute Description Data Type Required?
failonerror
This is a global attribute used by WebLogic Server Ant tasks.
It specifies whether the task should fail if it encounters an
error during the build.
Valid values for this attribute are
true
and
false
. The
default value is
false
.
Boolean No
forceshutdown
This optional attribute is used in conjunction with the
action="shutdown"
attribute to perform a forced
shutdown. For example:
<wlserver
host="${wls.host}"
port="${port}"
username="${wls.username}"
password="${wls.password}"
action="shutdown"
forceshutdown="true"/>
Valid values for this attribute are true and
false. The default value is false
.
Boolean No
noExit
(Optional) Leave the server process running after Ant exits.
Valid values are
true
or
false
. The default value is
false
,
which means the server process will shut down when Ant
exits.
Boolean No
protocol
Specifies the protocol that the
wlserver
Ant task uses to
communicate with the WebLogic Server instance.
Valid values are
t3
,
t3s
,
http
,
https
, and
iiop
. The
default value is
t3
.
String No
forceImplicitUpgra
de
Specifies whether the
wlserver
Ant task, if run against an
8.1 (or previous) domain, should implicitly upgrade it.
Valid values are
true
or
false
. The default value is
false
,
which means that the Ant task does not implicitly upgrade the
domain, but rather, will fail with an error indicating that the
domain needs to be upgraded.
For more information about upgrading domains, see
Upgrading Oracle WebLogic Server.
Boolean No.
configFile
Specifies the configuration file for your domain.
The value of this attribute must be a valid XML file that
conforms to the XML schema as defined in the WebLogic
Server Domain Configuration Schema at
http://
xmlns.oracle.com/weblogic/domain/1.0/
domain.xsd
.
The XML file must exist in the Administration Server's root
directory, which is either the current directory or the directory
that you specify with the
dir
attribute.
If you do not specify this attribute, the default value is
config.xml
in the directory specified by the
dir
attribute. If
you do not specify the dir attribute, then the default domain
directory is the current directory.
String No.
Chapter 2
Starting Servers and Creating Domains Using the wlserver Ant Task
2-6
Table 2-1 (Cont.) Attributes of the wlserver Ant Task
Attribute Description Data Type Required?
useBootProperties
Specifies whether to use the
boot.properties
file when
starting a WebLogic Server instance. If this attribute is set to
true
, WebLogic Server uses the user name and encrypted
password stored in the
boot.properties
file to start rather
than any values set with the
username
and
password
attributes.
Note: The values of the
username
and
password
attributes
are still used when shutting down or rebooting the WebLogic
Server instance. The
useBootProperties
attribute applies
only when starting the server. Valid values for this attribute
are
true
and
false
. The default value is
false
.
Boolean No
verbose
Specifies that the Ant task output additional information as it
is performing its action.
Valid values for this attribute are
true
and
false
. The
default value is
false
.
Boolean No
Configuring a WebLogic Server Domain Using the wlconfig Ant
Task
You can use the
wlconfig
Ant task or the WebLogic Scripting Tool (WLST) to configure a
WebLogic Server domain.
The following sections describe how to use the
wlconfig
Ant task to configure a WebLogic
Server domain.
Note:
For equivalent functionality, you should use the WebLogic Scripting Tool (WLST).
See Understanding the WebLogic Scripting Tool.
• What the wlconfig Ant Task Does
• Basic Steps for Using wlconfig
• wlconfig Ant Task Reference
• Main Attributes
• Nested Elements
What the wlconfig Ant Task Does
The
wlconfig
Ant task enables you to configure a WebLogic Server domain by creating,
querying, or modifying configuration MBeans on a running Administration Server instance.
Specifically,
wlconfig
enables you to:
• Create new MBeans, optionally storing the new MBean Object Names in Ant properties.
• Set attribute values on a named MBean available on the Administration Server.
Chapter 2
Configuring a WebLogic Server Domain Using the wlconfig Ant Task
2-7
• Create MBeans and set their attributes in one step by nesting set attribute commands
within create MBean commands.
• Query MBeans, optionally storing the query results in an Ant property reference.
• Query MBeans and set attribute values on all matching results.
• Establish a parent/child relationship among MBeans by nesting create commands within
other create commands.
Basic Steps for Using wlconfig
1. Set your environment in a command shell. See Basic Steps for Using wlserver for details.
Note:
The
wlconfig
task is predefined in the version of Ant shipped with WebLogic
Server. If you want to use the task with your own Ant installation, add the
following task definition in your build file:
<taskdef name="wlconfig" classname="weblogic.ant.taskdefs.management.WLConfig"/>
2.
wlconfig
is commonly used in combination with
wlserver
to configure a new WebLogic
Server domain created in the context of an Ant task. If you will be using
wlconfig
to
configure such a domain, first use
wlserver
attributes to create a new domain and start the
WebLogic Server instance.
3. Add an initial call to the
wlconfig
task to connect to the Administration Server for a
domain. For example:
<target name="doconfig">
<wlconfig url="t3://localhost:7001" username="weblogic"
password=password>
</target>
4. Add nested
create
,
delete
,
get
,
set
, and
query
elements to configure the domain.
5. Execute the Ant task or tasks specified in the
build.xml
file by typing
ant
in the staging
directory, optionally passing the command a target argument:
prompt> ant doconfig
Use
ant -verbose
to obtain more detailed messages from the
wlconfig
task.
Note:
Since WLST is the recommended tool for domain creation scripts, you should
refer to the WLST offline sample scripts that are installed with the software. The
offline scripts demonstrate how to create domains using the domain templates
and are located in the following directory:
WL_HOME\common\templates\scripts\wlst
, where
WL_HOME
refers to the top-level
installation directory for WebLogic Server. For example, the
basicWLSDomain.py
script creates a simple WebLogic domain, while
sampleMedRecDomain.py
creates
a domain that defines resources similar to those used in the Avitek MedRec
sample. See Understanding the WebLogic Scripting Tool.
Chapter 2
Configuring a WebLogic Server Domain Using the wlconfig Ant Task
2-8
wlconfig Ant Task Reference
The following sections describe the attributes and elements that can be used with
wlconfig
.
Main Attributes
The following table describes the main attributes of the
wlconfig
Ant task.
Table 2-2 Main Attributes of the wlconfig Ant Task
Attribute Description Data Type Required
?
url
The URL of the domain's Administration Server. String Yes
username
The user name of an administrator account. String No
password
The password of an administrator account.
To avoid having the plain text password appear in the build file or in
process utilities such as
ps
, first store a valid user name and
encrypted password in a configuration file using the WebLogic
Scripting Tool (WLST)
storeUserConfig
command. Then omit
both the
username
and
password
attributes in your Ant build file.
When the attributes are omitted,
wlconfig
attempts to login using
values obtained from the default configuration file.
If you want to obtain a user name and password from a non-default
configuration file and key file, use the
userconfigfile
and
userkeyfile
attributes with
wlconfig
.
See the command reference for
storeUserConfig
in the
Understanding the WebLogic Scripting Tool for more information on
storing and encrypting passwords.
String No
failonerror
This is a global attribute used by WebLogic Server Ant tasks. It
specifies whether the task should fail if it encounters an error during
the build. This attribute is set to true by default.
Boolean No
userconfigfile
Specifies the location of a user configuration file to use for
obtaining the administrative user name and password. Use this
option, instead of the
username
and
password
attributes, in your
build file when you do not want to have the plain text password
shown in-line or in process-level utilities such as
ps
.
Before specifying the
userconfigfile
attribute, you must first
generate the file using the WebLogic Scripting Tool (WLST)
storeUserConfig
command
as described in the Understanding
the WebLogic Scripting Tool.
File No
userkeyfile
Specifies the location of a user key file to use for encrypting and
decrypting the user name and password information stored in a
user configuration file (the
userconfigfile
attribute).
Before specifying the
userkeyfile
attribute, you must first
generate the key file using the WebLogic Scripting Tool (WLST)
storeUserConfig
command
as described in the Understanding
the WebLogic Scripting Tool.
File No
Nested Elements
wlconfig
also has several elements that can be nested to specify configuration options:
Chapter 2
Configuring a WebLogic Server Domain Using the wlconfig Ant Task
2-9
• create
• delete
• set
• get
• query
• invoke
• create
• delete
• set
• get
• query
• invoke
create
The
create
element creates a new MBean in the WebLogic Server domain. The
wlconfig
task
can have any number of
create
elements.
A
create
element can have any number of nested
set
elements, which set attributes on the
newly-created MBean. A
create
element may also have additional, nested
create
elements
that create child MBeans.
The
create
element has the following attributes.
Table 2-3 Attributes of the create Element
Attribute Description Data Type Required?
name
The name of the new MBean object to create. String No (
wlconfig
supplies a default
name if none is
specified.)
type
The MBean type. String Yes
property
The name of an optional Ant property that holds the object
name of the newly-created MBean.
Note: If you nest a
create
element inside of another
create
element, you cannot specify the
property
attribute for the
nested
create
element.
String No
delete
The
delete
element removes an existing MBean from the WebLogic Server domain.
delete
takes a single attribute:
Chapter 2
Configuring a WebLogic Server Domain Using the wlconfig Ant Task
2-10

Table 2-4 Attribute of the delete Element
Attribute Description Data Type Required?
mbean
The object name of the
MBean to delete.
String Required when the
delete
element is a direct child
of the
wlconfig
task. Not required when nested
within a
query
element.
set
The
set
element sets MBean attributes on a named MBean, a newly-created MBean, or on
MBeans retrieved as part of a query. You can include the
set
element as a direct child of the
wlconfig
task, or nested within a
create
or
query
element.
The
set
element has the following attributes:
Table 2-5 Attributes of the set Element
Attribute Description Data Type Required?
attribute
The name of the MBean attribute to set. String Yes
value
The value to set for the specified MBean attribute.
You can specify multiple object names (stored in Ant
properties) as a value by delimiting the entire value list with
quotes and separating the object names with a semicolon.
String Yes
mbean
The object name of the MBean whose values are being set.
This attribute is required only when the
set
element is
included as a direct child of the main
wlconfig
task; it is not
required when the set element is nested within the context of
a
create
or
query
element.
String Required only when the
set
element is a direct child of
the
wlconfig
task.
domain
This attribute specifies the JMX domain name for Security
MBeans and third-party SPI MBeans. It is not required for
administration MBeans, as the domain corresponds to the
WebLogic Server domain.
Note: You cannot use this attribute if the
set
element is
nested inside of a
create
element.
String No
get
The
get
element retrieves attribute values from an MBean in the WebLogic Server domain.
The
wlconfig
task can have any number of
get
elements.
The
get
element has the following attributes.
Table 2-6 Attributes of the get Element
Attribute Description Data Type Required?
attribute
The name of the MBean attribute whose value you want
to retrieve.
String Yes
property
The name of an Ant property that will hold the retrieved
MBean attribute value.
String Yes
Chapter 2
Configuring a WebLogic Server Domain Using the wlconfig Ant Task
2-11

Table 2-6 (Cont.) Attributes of the get Element
Attribute Description Data Type Required?
mbean
The object name of the MBean you want to retrieve
attribute values from.
String Yes
query
The
query
elements finds MBean that match a search pattern.
The query element supports the following nested child elements:
•
set
—performs set operations on all MBeans in the result set.
•
get
—performs get operations on all MBeans in the result set.
•
create
—each MBean in the result set is used as a parent of a new MBean.
•
delete
—performs delete operations on all MBeans in the result set.
•
invoke
—invokes all matching MBeans in the result set.
wlconfig
can have any number of nested
query
elements.
query
has the following attributes:
Table 2-7 Attributes of the query Element
Attribute Description Data Type Required?
domain
The name of the WebLogic Server domain in which to search
for MBeans.
String No
type
The type of MBean to query. String No
name
The name of the MBean to query. String No
pattern
A JMX query pattern. String No
property
The name of an optional Ant property that will store the query
results.
String No
domain
This attribute specifies the JMX domain name for Security
MBeans and third-party SPI MBeans. It is not required for
administration MBeans, as the domain corresponds to the
WebLogic Server domain.
String No
invoke
The
invoke
element invokes a management operation for one or more MBeans. For WebLogic
Server MBeans, you usually use this command to invoke operations other than the
getAttribute
and
setAttribute
that most WebLogic Server MBeans provide.
The
invoke
element has the following attributes.
Chapter 2
Configuring a WebLogic Server Domain Using the wlconfig Ant Task
2-12

Table 2-8 Attributes of the invoke Element
Attribute Description Data Type Required?
mbean
The object name of the MBean you want to
invoke.
String You must specify either the
mbean
or
type
attribute of the
invoke element.
type
The type of MBean to invoke. String You must specify either the
mbean
or
type
attribute of the
invoke element.
methodName
The method of the MBean to invoke. String Yes
arguments
The list of arguments (separated by spaces) to
pass to the method specified by the
methodName
attribute.
String No
Example of Creating a Security Realm with the wlconfig Ant Task
You can use this example to create a security realm with the wlconfig Ant task:
Example 2-1 Creating a Security Realm with wlconfig
<wlconfig url="t3://myhost:7001"
username="weblogic"
password="password">
<create type="weblogic.management.security.Realm" name="MyRealm"
property="new.provider">
<set attribute="DefaultRealm" value="false"/>
<create name="MyAuthenticator"
type="weblogic.security.providers.authentication.DefaultAuthenticator" realm="MyRealm"/>
<create name="MyAuthorizer"
type="weblogic.security.providers.authorization.DefaultAuthorizer" realm="MyRealm"/>
<create name="MyRoleMapper"
type="weblogic.security.providers.authorization.DefaultRoleMapper" realm="MyRealm"/>
<create name="MyCredentialMapper"
type="weblogic.security.providers.credentials.DefaultCredentialMapper" realm="MyRealm"/>
<create name="MyCertPathProvider"
type=""weblogic.security.providers.pk.WebLogicCertPathProvider" realm="MyRealm"/>
</create>
<set mbean="Security:Name=MyRealm" attribute="CertPathBuilder"
value="Security:Name=MyRealmMyCertPathProvider"/>
</wlconfig>
Using the libclasspath Ant Task
Use the
libclasspath
Ant task to build applications that use libraries, such as application
libraries and Web libraries.
The following sections describe how to build applications:
• libclasspath Task Definition
• wlserver Ant Task Reference
• Example libclasspath Ant Task
• libclasspath Task Definition
• libclasspath Ant Task Reference
Chapter 2
Example of Creating a Security Realm with the wlconfig Ant Task
2-13
• Main libclasspath Attributes
• Nested libclasspath Elements
• Example libclasspath Ant Task
libclasspath Task Definition
To use the task with your own Ant installation, add the following task definition in your build file:
<taskdef name="libclasspath" classname="weblogic.ant.taskdefs.build.LibClasspathTask"/>
libclasspath Ant Task Reference
The following sections describe the attributes and elements that can be used with the
libclasspath
Ant task.
• Main libclasspath Attributes
• Nested libclasspath Elements
Main libclasspath Attributes
The following table describes the main attributes of the
libclasspath
Ant task.
Table 2-9 Attributes of the libclasspath Ant Task
Attribute Description Required
basedir
The root of .
ear
or
.war
file to extract from. Either
basedir
or
basewar
is
required.
basewar
The name of the .war file to extract from. If
basewar
is specified,
basedir
is
ignored and the library referenced in
basewar
is used as the
.war
file to
extract classpath or resourcepath
information from.
tmpdir
The fully qualified name of the directory to be used for
extracting libraries.
Yes.
classpathpropert
y
Contains the classpath for the referenced libraries.
For example, if
basedir
points to a
.war
file that references
Web application libraries in the
weblogic.xml
file, the
classpathproperty
contains the
WEB-INF/classes
and
WEB-INF/lib
directories of the Web application libraries.
Additionally, if
basedir
points to a
.war
file that has
.war
files under
WEB-INF/bea-ext
, the
classpathproperty
contains the
WEB-INF/classes
and
WEB-INF/lib
directories for the Oracle extensions.
At least one of the two attributes is
required.
resourcepathprop
erty
Contains library resources that are not classes.
For example, if
basedir
points to a
.war
file that has
.war
files under
WEB-INF/bea-ext
,
resourcepathproperty
contains the roots of the exploded extensions.
Chapter 2
Using the libclasspath Ant Task
2-14

Nested libclasspath Elements
libclasspath
also has two elements that can be nested to specify configuration options. At
least one of the elements is required when using the
libclasspath
Ant task:
• librarydir
• library
librarydir
The following attribute is required when using this element:
dir
—Specifies that all files in this directory are registered as available libraries.
library
The following attribute is required when using this element:
file
—Register this file as an available library.
Example libclasspath Ant Task
This section provides example code of a
libclasspath
Ant task:
Example 2-2 Example libclasspath Ant Task Code
.
.
.
<taskdef name="libclasspath"
classname="weblogic.ant.taskdefs.build.LibClasspathTask"/>
<!-- Builds classpath based on libraries defined in weblogic-application.xml. -->
<target name="init.app.libs">
<libclasspath basedir="${src.dir}" tmpdir="${tmp.dir}"
classpathproperty
="app.lib.classpath">
<librarydir dir="${weblogic.home}/common/deployable-libraries/"/>
</libclasspath>
<echo message="app.lib.claspath is ${app.lib.classpath}" level="info"/>
</target>
.
.
.
Chapter 2
Using the libclasspath Ant Task
2-15
3
Using the WebLogic Maven Plug-In
Apache Maven is a software tool for building and managing Java-based projects. WebLogic
Server provides support for Maven through the provisioning of plug-ins that enable you to
perform various operations on WebLogic Server from within a Maven environment.
The
weblogic-maven-plugin
provides enhanced functionality to install, start and stop servers,
create domains, execute WLST scripts, and compile and deploy applications. With the
weblogic-maven-plugin
, you can install WebLogic Server from within your Maven environment
to fulfill the local WebLogic Server requirement when needed.
The following sections describe using
weblogic-maven-plugin
:
• Installing Maven
• Configuring the WebLogic Maven Plug-In
• Maven Plug-In Goals
See Building Java EE Projects for WebLogic Server with Maven in Developing Applications
Using Continuous Integration for additional Maven documentation.
• Installing Maven
To use the
weblogic-maven-plugin
plug-in, you must first have a functional Maven
installation and a Maven repository.
• Configuring the WebLogic Maven Plug-In
Use the pre-built JAR file and accompanying POM file to install and configure
weblogic-
maven-plugin
.
• Maven Plug-In Goals
See an alphabetical listing of all the Maven plug-in goals.
Installing Maven
To use the
weblogic-maven-plugin
plug-in, you must first have a functional Maven installation
and a Maven repository.
Maven is not included in the WLS 14.1.1.0.0 installation. You can download and install your
own copy of Maven from the Maven Web site:
http://maven.apache.org
. Make sure you set
any required variables as detailed in that documentation, such as
M2_HOME
and
JAVA_HOME
.
Note:
The
weblogic-maven-plugin
sets the Java protocol handler to
weblogic.net
. To use
the default JDK protocol handlers, specify the system property
-
DUseSunHttpHandler=true
in the JVM that executes Maven. To do this, override the
environment variable
MAVEN_OPTS
inside the
mvn.bat
or
mvn.sh
files to set the
appropriate value. For example:
set MAVEN_OPTS="-DUseSunHttpHandler=true"
.
3-1

For detailed information on installing and using Maven to build applications and projects, see
the Maven Users Centre at
http://maven.apache.org/users/index.html
.
Configuring the WebLogic Maven Plug-In
Use the pre-built JAR file and accompanying POM file to install and configure
weblogic-
maven-plugin
.
Complete the following steps to install and configure
weblogic-maven-plugin
:
1. Install the Oracle Maven sync plug-in and run the push goal:
a. Change the directory to:
ORACLE_HOME\oracle_common\plugins\maven\com\oracle\maven\oracle-maven-
sync\14.1.1
b.
mvn install:install-file -DpomFile=oracle-maven-sync-14.1.1.pom -
Dfile=oracle-maven-sync-14.1.1.jar
c.
mvn com.oracle.maven:oracle-maven-sync:push -
DoracleHome=c:\oracle\middleware\oracle_home\
2. To validate successful installation of the plug-in, use the Maven
help:describe
goal. For
more information, see the Apache help plug-in describe goal documentation.
mvn help:describe -DgroupId=com.oracle.weblogic
-DartifactId=weblogic-maven-plugin -Dversion=14.1.1-0-0
• How to use the WebLogic Maven Plug-in
• Basic Configuration POM File
How to use the WebLogic Maven Plug-in
There are two ways to invoke the goals in the WebLogic Maven plug-in:
• From a Maven project POM.
• From the command line.
The
appc, wsgen, wsimport, ws-jwsc, ws-wsdlc,
and
ws-clientgen
goals require a POM.
Other goals will work either way. For example,
install, wlst, wlst-client, start-server,
or
stop-server
work either from a POM or the command line.
The preferred and recommended way is to use a Maven POM file.
To invoke a WebLogic Maven plug-in goal from a POM file, do the following:
1. Add a build section to your POM if you do not already have one.
2. Add a plug-in section to the build section for the WebLogic Maven plug-in.
3. Add an execution section to the WebLogic Maven plug-in's
plugin
section for each goal
that you want to execute. This section must provide the necessary parameters for the goal,
and map the goal to a phase in the Maven Lifecycle.
The following shows an example of the necessary additions, including a few goals. The
detailed descriptions of each goal later in this section present the details for parameters and
examples for each goal.
If you map multiple goals to the same lifecycle phase, they are typically executed in the order
you list them in the POM.
Chapter 3
Configuring the WebLogic Maven Plug-In
3-2

Example 3-1 Modifying the POM File
<build>
<plugins>
<plugin>
<!-- This is the configuration for the
weblogic-maven-plugin
-->
<groupId>com.oracle.weblogic</groupId>
<artifactId>weblogic-maven-plugin</artifactId>
<version>14.1.1-0-0</version>
<configuration>
<middlewareHome>/fmwhome/wls14110</middlewareHome>
</configuration>
<executions>
<!-- Execute the appc goal during the package phase -->
<execution>
<id>wls-appc</id>
<phase>package</phase>
<goals>
<goal>appc</goal>
</goals>
<configuration>
<source>${project.build.directory}/${project.name}.${project.packaging}</source>
</configuration>
</execution>
<!-- Deploy the application to the WebLogic Server in the
pre-integration-test phase
-->
<execution>
<id>wls-deploy</id>
<phase>pre-integration-test</phase>
<goals>
<goal>deploy</goal>
</goals>
<configuration>
<!--The admin URL where the app is deployed.
Here use the plugin's default value t3://localhost:7001-->
<adminurl>t3://127.0.0.1:7001</adminurl>
<user>weblogic</user>
<password>password</password>
<!--The location of the file or directory to be deployed-->
<source>${project.build.directory}/${project.build.finalName}.${project.packaging}</
source>
<!--The target servers where the application is deployed.
Here use the plugin's default value AdminServer-->
<targets>AdminServer</targets>
<verbose>true</verbose>
<name>${project.build.finalName}</name>
</configuration>
</execution>
<!-- Stop the application in the pre-integration-test phase -->
<execution>
<id>wls-stop-app</id>
<phase>pre-integration-test</phase>
<goals>
<goal>stop-app</goal>
</goals>
<configuration>
<adminurl>t3://127.0.0.1:7001</adminurl>
<user>weblogic</user>
<password>password</password>
Chapter 3
Configuring the WebLogic Maven Plug-In
3-3

<name>${project.build.finalName}</name>
</configuration>
</execution>
</executions>
</plugin>
</plugins>
</build>
Table 3-1 lists the phases in the default Maven lifecycle.
Table 3-1 Maven Lifecycle Phases
Phase Description
validate Validates the project is correct and all necessary information is available.
compile Compiles the source code of the project.
test Tests the compiled source code using a suitable unit testing framework.
These tests should not require the code be packaged or deployed.
package Takes the compiled code and package it in its distributable format, such
as a JAR.
integration-test Processes and deploys the package if necessary into an environment
where integration tests can be run.
verify Runs any checks to verify the package is valid and meets quality criteria.
install Installs the package into the local repository, for use as a dependency in
other projects locally.
deploy In an integration or release environment, copies the final package to the
remote repository for sharing with other developers and projects.
Table 3-2 shows the most common mappings of goals to phases
Table 3-2 Common Mapping of Goals to Phases
Phase Goal
validate
ws-clientgen, ws-wsdlc
compile
ws-jwsc
test NA
package
appc
pre-integration-test
1
install, create-domain, start-server,
distribute-app, deploy, purge-tasks,
redeploy, update-app, start-app, stop-app,
wlst, wlst-client,
and
list-apps
post-integration-test
2
remove-domain, undeploy, stop-server,
uninstall
verify NA
install NA
deploy NA
Chapter 3
Configuring the WebLogic Maven Plug-In
3-4

1
The integration-test phase has pre sub-phases that are executed before the actual execution of any integration
tests, respectively.
2
The integration-test phase has post sub-phases that are executed after the actual execution of any integration tests,
respectively.
Basic Configuration POM File
Example 3-2 illustrates a basic Java EE Web application pom.xml file that demonstrates the
use of the weblogic-maven-plugin appc goal.
Example 3-2 Basic Configuration pom.xml File
<project xmlns="http://maven.apache.org/POM/4.0.0"
xmlns:xsi="http://www.w3.org/2001/XMLSchema-instance"
xsi:schemaLocation="http://maven.apache.org/POM/4.0.0
http://maven.apache.org/xsd/maven-4.0.0.xsd">
<modelVersion>4.0.0</modelVersion>
<groupId>demo.sab</groupId>
<artifactId>maven-demo</artifactId>
<version>1.0-SNAPSHOT</version>
<packaging>war</packaging>
<name>maven-demo</name>
<properties>
<endorsed.dir>${project.build.directory}/endorsed</endorsed.dir>
<project.build.sourceEncoding>UTF-8</project.build.sourceEncoding>
</properties>
<dependencies>
<dependency>
<groupId>com.oracle.weblogic</groupId>
<artifactId>weblogic-server-pom</artifactId>
<version>14.1.1-0-0</version>
<type>pom</type>
<scope>provided</scope>
</dependency>
</dependencies>
<build>
<plugins>
...
...
<!-- WebLogic Server 14c Maven Plugin -->
<plugin>
<groupId>com.oracle.weblogic</groupId>
<artifactId>weblogic-maven-plugin</artifactId>
<version>14.1.1-0-0</version>
</plugin>
<configuration>
</configuration>
<executions>
<execution>
<id>wls-appc</id>
<phase>package</phase>
<goals>
<goal>appc</goal>
</goals>
<configuration>
<source>${project.build.directory}/${project.name}.
Chapter 3
Configuring the WebLogic Maven Plug-In
3-5

${project.packaging}</source>
</configuration>
</execution>
</executions>
</plugins>
</build>
</project>
Maven Plug-In Goals
See an alphabetical listing of all the Maven plug-in goals.
Table 3-3 lists all the
weblogic-maven-plugin
goals. Each goal is described in detail in the
sections that follow.
Table 3-3 Maven Plug-In Goals
Goal Name Description
appc Generates and compiles the classes needed to deploy EJBs and JSPs to
WebLogic Server. Also validates the deployment descriptors for compliance
with the current specifications at both the individual module level and the
application level. Does not require a local server installation.
create-domain Creates a domain for WebLogic Server using a domain template. This goal
supports specifying the domain directory (the last directory determines the
domain name) and the administrative username and password. For more
complex domain creation, use the
wlst
goal.
deploy Deploys WebLogic Server applications and modules to a running server.
Supports all deployment formats; for example, WAR, JAR, RAR, and such.
distribute-app Prepares deployment files for deployment by copying deployment files to
target servers and validating them.
install Installs WebLogic Server.
list-apps Lists the deployment names for applications and standalone modules
deployed, distributed, or installed in the domain.
purge-tasks Flushes out retired deployment tasks.
redeploy Redeploys a running application or part of a running application.
remove-domain Removes a domain directory.
start-app Starts an application deployed on WebLogic Server.
start-server Starts WebLogic Server. This goal starts WLS by running a local start script.
For starting remote servers using the node manager, use the wlst goal
instead.
stop-app Stops an application.
stop-server Stops WebLogic Server. This goal stops WLS by running a local start script.
For stopping remote servers using the node manager, use the wlst goal
instead.
undeploy Undeploys the application from WebLogic Server. Stops the deployment unit
and removes staged files from target servers.
uninstall Uninstalls WebLogic Server.
update-app Updates an application's deployment plan by redistributing the plan files and
reconfiguring the application based on the new plan contents.
wlst WLST wrapper for Maven.
Chapter 3
Maven Plug-In Goals
3-6
Table 3-3 (Cont.) Maven Plug-In Goals
Goal Name Description
wlst-client WLST wrapper that does not require a local server install for WLST online
commands.
ws-clientgen Generates client Web service artifacts from a WSDL.
wsgen JAX-WS service endpoint implementation class and generates all of the
portable artifacts for a JAX-WS Web service.
wsimport Maven goal that parses a WSDL and binding files and generates the Java
code needed to access it
ws-jwsc Builds a JAX-WS Web service.
ws-wsdlc Generates a set of artifacts and a partial Java implementation of the Web
service from a WSDL.
• appc
• create-domain
• deploy
• distribute-app
• install
• list-apps
• purge-tasks
• redeploy
• remove-domain
• start-app
• start-server
• stop-app
• stop-server
• undeploy
• uninstall
• update-app
• wlst
• wlst-client
• ws-clientgen
• wsgen
• wsimport
• ws-wsdlc
• ws-jwsc
Chapter 3
Maven Plug-In Goals
3-7

appc
Full Name
com.oracle.weblogic:weblogic-maven-plugin:appc
Description
Generates and compiles the classes needed to deploy EJBs and JSPs to WebLogic Server.
Also validates the deployment descriptors for compliance with the current specifications at both
the individual module level and the application level. Does not require a local server
installation.
Parameters
Table 3-4 appc Parameters
Name Type Required Description
altappdd java.lang.String
false Specifies an alternate descriptor. May be used to specify
an alternate
application.xml
for an
.ear
deployment or
an alternate
web.xml
or
ejb.xml
for standalone module
deployments.
altwlsappdd java.lang.String
false Specifies the path to an alternative WebLogic Server
application deployment descriptor.
basicClientJar boolean
false When true, does not include deployment descriptors in
client JARs generated for EJBs. Default value is:
false
classpath java.lang.String
false This parameter is deprecated in this release and ignored.
Use the standard Maven dependency model instead to
manipulate the effective CLASSPATH during a build.
clientJarOutputDi
r
java.lang.String
false Specifies a directory where generated client JARs will be
written.
commentary boolean
false This parameter is deprecated in this release.
compiler java.lang.String
false Specifies the Java compiler for compiling class files from
the generated Java source code. The Java compiler
program should be in your
PATH
unless you specify the
absolute path to the compiler explicitly. Default value is:
javac
compilerClass java.lang.String
false The class that invokes the compiler. Default value is:
com.sun.tools.javac.Main
continueCompilati
on
boolean
false When true, continues compilation even when there are
errors in the JSP files. Default value is:
false
debug boolean
false When true, compiles debugging information into class files.
Default value is:
false
deprecation boolean
false When true, warns about the use of deprecated methods in
the generated Java source file when compiling the source
file into a class file. Default value is:
false
destdir java.io.File
false Specifies the directory where compiled class files are
written. Use this parameter to place compiled classes in a
directory that is already in your
CLASSPATH
.
enableHotCodeGen boolean
false This parameter is deprecated in this release.
Chapter 3
Maven Plug-In Goals
3-8

Table 3-4 (Cont.) appc Parameters
Name Type Required Description
forceGeneration boolean
false When true, forces the generation of EJB and JSP classes.
Otherwise, the classes will not be regenerated if it is
determined to be unnecessary. Default value is:
false
idl boolean
false When true, generates IDL for EJB remote interfaces.
Default value is:
false
idlDirectory java.lang.String
false Specifies the directory where IDL files will be written.
Default: the target directory or JAR
idlFactories boolean
false When true, generates factory methods for valuetypes.
Default value is:
false
idlMethodSignatur
es
java.lang.String
false Specifies the method signatures used to trigger IDL code
generation.
idlNoAbstractInte
rfaces
boolean
false When true, does not generate abstract interfaces and
methods or attributes that contain them. Default value is:
false
idlNoValueTypes boolean
false Does not generate valuetypes or the methods and
attributes that contain them. Default value is:
false
idlOrbix boolean
false When true, generates IDL somewhat compatible with Orbix
C++. Default value is:
false
idlOverwrite boolean
false When true, overwrites existing IDL files. Default value is:
false
idlVerbose boolean
false When true, displays additional status information for IDL
generation. Default value is:
false
idlVisibroker boolean
false When true, generates IDL somewhat compatible witih
Visibroker C++. Default value is:
false
ignorePlanValidat
ion
boolean
false When true, ignores the plan file if it does not exist.
iiop boolean
false When true, generates CORBA stubs for EJBs. Default
value is:
false
iiopDirectory java.lang.String
false Specifies the directory where IIOP stub files will be written.
Default: the target directory or JAR
keepgenerated boolean
false When true, preserves the generated
.java
files. Default
value is:
false
libraries java.lang.String
false A comma-separated list of libraries.
librarydir java.io.File
false Registers all the files in the specified directory as libraries.
lineNumbers boolean
false When true, adds JSP line numbers to generated class files
to aid in debugging. Default value is:
false
manifest java.io.File
false This parameter is deprecated in this release. Use the
standard Maven mechanism to specify the Manifest during
packaging.
maxfiles java.lang.Integer
false Specifies the maximum number of generated Java files to
be compiled at one time.
middlewareHome java.lang.String
false This parameter is deprecated in this release and ignored.
Chapter 3
Maven Plug-In Goals
3-9

Table 3-4 (Cont.) appc Parameters
Name Type Required Description
noexit boolean
false When true, does not exit from the execution of the
appc
goal when encountering JSP compile errors. Default value
is:
true
normi boolean
false This parameter is deprecated in this release.
nowarn boolean
false When true, suppresses compiler warnings. Default value
is:
false
nowrite boolean
false This parameter is deprecated in this release.
optimize boolean
false When true, compiles with optimization on. Default value is:
false
output java.io.File
false Specifies an alternate output archive or directory. When not
set, the output is placed in the source archive or directory.
plan java.io.File
false Specifies the path to an optional deployment plan.
quiet boolean
false When true, turns off output except for errors.
runtimeFlags java.lang.String
false Passes a list of options to the compiler.
serverClasspath java.lang.String
false This parameter is deprecated in this release and ignored.
Use the standard Maven dependency model instead to
manipulate the effective CLASSPATH.
source java.io.File
false Specifies the path to the source files. Default value is: $
{project.build.directory}/${project.artifactId}.$
{project.packaging}
sourceVersion java.lang.String
false Limits the compatibility of the Java files to a JDK no higher
than specified. For example "1.5". The default value is the
JDK version of the Java compiler used.
supressCompiler boolean
false This parameter is deprecated in this release and ignored.
Use the standard Maven dependency model instead to add
the target classes to the effective CLASSPATH during a
build.
targetVersion java.lang.String
false Specifies the minimum level of the JVM required to run the
compiled class files. For example, "1.5". The default value
is the JDK version of the Java compiler used.
verbose
boolean false When true, displays additional status information during the
compilation process. Default value is:
false
verboseJavac boolean
false When true, enables verbose output from the Java compiler.
Default value is:
false
weblogicHome java.lang.String
false This parameter is deprecated in this release and ignored.
writeInferredDesc
riptors
boolean
false When true, writes out the descriptors with inferred
information including annotations.
Usage Example
The
appc
goal executes the WebLogic Server application compiler utility to prepare an
application for deployment.
<execution>
<id>wls-appc</id>
<phase>package</phase>
<goals>
Chapter 3
Maven Plug-In Goals
3-10
<goal>appc</goal>
</goals>
<configuration>
<source>${project.build.directory}/${project.name}.${project.packaging}</source>
</configuration>
</execution>
Example 3-3 shows typical
appc
goal output.
Example 3-3 appc
$ mvn com.oracle.weblogic:weblogic-maven-plugin:appc
-Dsource=target/basicWebapp.war -DforceGeneration=true
[INFO] Scanning for projects...
[INFO]
[INFO] ------------------------------------------------------------------------
[INFO] Building basicWebapp 1.0-SNAPSHOT
[INFO] ------------------------------------------------------------------------
[INFO]
[INFO] --- weblogic-maven-plugin:14.1.1-0-0:appc (default-cli) @ main-test ---
[INFO] Running weblogic.appc on
/home/oracle/src/tests/main-test/target/basicWebapp.war
[INFO] ------------------------------------------------------------------------
[INFO] BUILD SUCCESS
[INFO] ------------------------------------------------------------------------
[INFO] Total time: 7.901s
[INFO] Finished at: Wed Aug 19 10:52:46 EST 2015
[INFO] Final Memory: 26M/692M
[INFO]
create-domain
Full Name
com.oracle.weblogic:weblogic-maven-plugin:create-domain
Description
Creates a domain for WebLogic Server using a domain template. This goal supports specifying
the domain directory (the last directory determines the domain name) and the administrative
username and password. For more complex domain creation, use the
wlst
goal.
Note:
Beginning in version 12.2.1, there is a single unified version of WLST that
automatically includes the WLST environment from all products in the
ORACLE_HOME
.
Chapter 3
Maven Plug-In Goals
3-11

Parameters
Table 3-5 create-domain Parameters
Name Type Required Description
domainHome java.lang.Strin
g
true Specifies the directory to use for creating the domain. This
goal takes the name of the last subdirectory specified as the
domain name and sets the new domain's name to that value.
For example, domainHome=/weblogic/domains/MyNewDomain
causes the domain name to be set to 'MyNewDomain'.
domainTemplate java.lang.Strin
g
false Specifies the domain template file to use to create the domain.
The default domain template included with WebLogic Server is
used when this parameter is not specified.
failOnDomainExist
s
boolean
false When
true
and the domain to be created already exists, the
build fails and an exception is thrown. When
false
and the
domain to be created already exists, the build is successful
and the existing domain is not overwritten. If the domain does
not exist, this parameter has no effect. Default value is:
false
middlewareHome java.lang.Strin
g
true The path to the Oracle Middleware install directory.
password java.lang.Strin
g
true
Specifies the administrative password.
serverClasspath java.lang.Strin
g
false This parameter is deprecated and ignored in this release.
user java.lang.Strin
g
true
Specifies the administrative user name.
weblogicHome java.lang.Strin
g
false This parameter is deprecated and ignored in this release.
wlstVersion java.lang.Strin
g
false Deprecated. As of version 12.2.1, there is a single, unified
version of WLST. This parameter is deprecated and ignored.
workingDir java.lang.Strin
g
false The current working directory where the create-domain goal
executes. The default value is: ${project.build.directory}/
weblogic-maven-plugin
Usage Example
Use the
create-domain
goal to create a WebLogic Server domain from a specified WebLogic
Server installation. You specify the location of the domain using the
domainHome
configuration
parameter.
When creating a domain, a user name and password are required. You can specify these using
the
user
and
password
configuration parameters in your POM file or by specifying them on the
command line.
The domain name is taken from the last subdirectory specified in
domainHome
.
<execution>
<id>wls-create-domain</id>
<phase>pre-integration-test</phase>
<goals>
<goal>create-domain</goal>
</goals>
<configuration>
Chapter 3
Maven Plug-In Goals
3-12

<middlewareHome>c:/dev/wls14110</middlewareHome>
<domainHome>${project.build.directory}/base_domain</domainHome>
<user>weblogic</user>
<password>password</password>
</configuration>
</execution>
Example 3-4 shows typical command output from the execution of the
create-domain
goal.
Example 3-4 create-domain
mvn com.oracle.weblogic:weblogic-maven-plugin:create-domain
-DdomainHome=c:\oracle\middleware\oracle_home\user_projects\domains\maven-domain
-DmiddlewareHome=c:\oracle\middleware\oracle_home -Duser=weblogic -Dpassword=password
[INFO] Scanning for projects...
[INFO]
[INFO] ------------------------------------------------------------------------
[INFO] Building WebLogic Server Maven Plugin 14.1.1-0-0
[INFO] ------------------------------------------------------------------------
[INFO]
[INFO] --- weblogic-maven-plugin:14.1.1-0-0:create-domain (default-cli) @
weblogic-maven-plugin ---
[INFO] [create-domain]Domain creation script:
readTemplate(r'C:/oracle/middleware/oracle_home/wlserver/common/templates/wls/wls.jar')
set('Name', 'maven-domain')
cd('/Security/maven-domain/User/weblogic')
set('Name', 'weblogoc')
set('Password', '***')
writeDomain(r'c:/oracle/middleware/oracle_home/user_
projects/domains/maven-domain')
[INFO] [wlst]script temp file = C:/Users/user/AppData/Local/Temp/
test6066166061714573929.py
[INFO] [wlst]Executing: [cmd:[C://windows\\system32\\cmd.exe, /c,
C:\oracle\middleware\oracle_home\wlserver\common\bin\wlst.cmd
C:\Users\user\AppData\Local\Temp\test6066166061714573929.py ]]
[INFO] Process being executed, waiting for completion.
[INFO] [exec]
[INFO] [exec] Initializing WebLogic Scripting Tool (WLST) ...
[INFO] [exec]
[INFO] [exec] Welcome to WebLogic Server Administration Scripting Shell
[INFO] [exec]
[INFO] [exec] Type help() for help on available commands
[INFO] [exec]
[INFO] [wlst][cmd:[C:\\windows\\system32\\cmd.exe, /c,
C:\oracle\middleware\oracle_home\wlserver\common\bin\wlst.cmd
C:\Users\user\AppData\Local\Temp\test6066166061714573929.py ]] exit code=0
[INFO] ------------------------------------------------------------------------
[INFO] BUILD SUCCESS
[INFO] ------------------------------------------------------------------------
[INFO] Total time: 18.276s
[INFO] Finished at: Wed Aug 19 13:13:25 EDT 2015
[INFO] Final Memory: 9M/23M
[INFO] ------------------------------------------------------------------------
deploy
Full Name
com.oracle.weblogic:weblogic-maven-plugin:deploy
Chapter 3
Maven Plug-In Goals
3-13

Description
Deploys WebLogic Server applications and modules to a running server. Supports all
deployment formats; for example, WAR, JAR, RAR, and such. Does not require a local server
installation.
Parameters
Table 3-6 deploy Parameters
Name Type Required Description
adminurl java.lang.String
false Specifies the listen address and listen port of the
Administration Server. Default value is: t3://localhost:7001
advanced boolean
false When true, prints advanced usage options.
altappdd java.lang.String
false Specifies an alternate descriptor. May be used to specify an
alternate application.xml for an .ear deployment or an
alternate web.xml or ejb.xml for standalone module
deployments.
appversion java.lang.String
false Version of the application to start.
debug boolean
false When true, displays debug-level messages to the standard
output. Default value is: false
enableSecurityVal
idation
boolean
false When true, enables validation of security data. Default value
is: false
examples boolean
false When true, displays examples of how to use this plug-in.
external_stage boolean
false When true, indicates that the user wants to copy the
application in the server staging area externally or using a
third-party tool. When specified, WebLogic Server looks for
the application under StagingDirectoryName(of target server)/
applicationName. Default value is: false
failOnError boolean
false When true, forces the Mojo to fail the build upon encountering
an error if it would otherwise just log the error. Default value is:
true
id java.lang.String
false Specifies an optional, user-supplied, unique deployment task
identifier.
libimplver java.lang.String
false Implementation version of a Java EE library or optional
package. This option can be used only if the library or
package does not include an implementation version in its
manifest file.
library boolean
false Deploy as a shared Java EE library or optional package.
libspecver java.lang.String
false Specification version of a Java EE library or optional package.
This option can be used only if the library or package does not
include a specification version in its manifest file.
middlewareHome java.lang.String
false This parameter is deprecated in this release and ignored.
name java.lang.String
false Specifies the deployment name to assign to a newly-deployed
application or standalone module.
nostage boolean
false When true, does not copy the deployment files to target
servers, but leaves them in a fixed location, specified by the
source parameter. By default, nostage is true for the
Administration Server and stage is true for the Managed
Server targets.
Chapter 3
Maven Plug-In Goals
3-14

Table 3-6 (Cont.) deploy Parameters
Name Type Required Description
noversion boolean
false When true, ignores all version related code paths on the
Administration Server. Default value is: false
nowait boolean
false When true, initiates multiple tasks and then monitors them
later with the -list action. Default value is: false
password java.lang.String
false Specifies the administrative password.
plan java.lang.String
false Specifies the path to the deployment plan.
remote boolean
false When true, specifies that the plug-in is not running on the
same machine as the Administration Server. In this case, the
source parameter specifies a path on the server, unless the
upload parameter is also used. Default value is: false
retiretimeout java.lang.Intege
r
false Specifies the number of seconds before WebLogic Server
undeploys the currently-running version of this application or
module so that clients can start using a new version. When
not specified, a graceful retirement policy is assumed. Default
value is: -1
securityModel java.lang.String
false Specifies the security model to be used for this deployment,
overriding the default security model for the security realm.
Possible values are: DDOnly, CustomRoles,
CustomRolesAndPolicies, and Advanced.
serverClasspath java.lang.String
false This parameter is deprecated in this release and ignored.
source java.lang.String
false Specifies the address of the artifact to deploy. The address
can be one of the following:
• A colon (:) separated list of Maven coordinates of the
form: groupId:artifactId:packaging:classifier:version.
• An archive file or exploded archive directory on the local
system. For example, /home/myhome/myapps/
helloworld.war.
• A remote HTTP URL (http://foo/a/b.ear).
stage boolean
false When true, indicates that the application needs to be copied
into the target server staging area before deployment. By
default, nostage is true for the Administration Server and
stage is true for the Managed Server targets.
submoduletargets java.lang.String
false Specifies JMS Server targets for resources defined within a
JMS application module. Possible values have the form:
[email protected]@target or submoduleName@target.
targets java.lang.String
false Specifies a comma-separated list of targets for the current
operation. The default is AdminServer.
timeout java.lang.Intege
r
false Specifies the maximum number of seconds WebLogic Server
will wait for the deployment task to complete. The default
value of -1 means wait forever. Default value is: -1
upload boolean
false When true, copies the source files to the Administration
Server's upload directory prior to deployment. Use this setting
when running the plug-in remotely (using the remote
parameter) and when the user lacks normal access to the
Administration Server's file system. Default value is: false.
Chapter 3
Maven Plug-In Goals
3-15
Table 3-6 (Cont.) deploy Parameters
Name Type Required Description
usenonexclusivelo
ck
boolean
false When true, the deployment operation uses an existing lock,
already acquired by the same user, on the domain. This
parameter is helpful in environments where multiple
deployment tools are used simultaneously and one of the
tools has already acquired a lock on the domain configuration.
Default value is: false.
user java.lang.String
false Specifies the administrative user name.
userConfigFile java.lang.String
false Specifies the location of a user configuration file to use for the
administrative user name and password instead of specifying
the user name and password directly in plain text.
userKeyFile java.lang.String
false Specifies the location of a user key file to use for encrypting
and decrypting the user name and password stored in the
user configuration file.
verbose boolean
false When true, displays additional status information. Default
value is: false
version boolean
false When true, prints the version information. Default value is:
false
weblogicHome java.lang.String
false This parameter is deprecated in this release and ignored.
Usage Example
Use this goal to deploy an application.
<execution>
<id>wls-deploy</id>
<phase>pre-integration-test</phase>
<goals>
<goal>deploy</goal>
</goals>
<configuration>
<adminurl>t3://127.0.0.1:7001</adminurl>
<user>weblogic</user>
<password>password</password>
<source>${project.build.directory}/${project.build.finalName}
.${project.packaging}</source>
<targets>AdminServer</targets>
<verbose>true</verbose>
<name>${project.build.finalName}</name>
</configuration>
</execution>
Example 3-5 shows typical
deploy
goal output.
Example 3-5 deploy
mvn com.oracle.weblogic:weblogic-maven-plugin:deploy
-Dsource=C:\webservices\MySimpleEjb.jar
-Dpassword=password -Duser=weblogic
[INFO] Scanning for projects...
Chapter 3
Maven Plug-In Goals
3-16
[INFO]
[INFO]
------------------------------------------------------------------------
[INFO] Building WebLogic Server Maven Plugin 14.1.1-0-0
[INFO]
------------------------------------------------------------------------
[INFO]
[INFO] --- weblogic-maven-plugin:14.1.1-0-0:deploy (default-cli) @ weblogic-
mave
n-plugin ---
weblogic.Deployer invoked with options: -noexit -adminurl t3://
localhost:7001 -
deploy -user weblogic -source C:\webservices\MySimpleEjb.jar -targets
AdminServe
r
<Aug 19, 2015> <Info> <J2EE Deployment SPI> <BEA-260121> <Initiati
ng deploy operation for application, MySimpleEjb [archive:
C:\webservices\MySimp
leEjb.jar], to AdminServer .>
Task 0 initiated: [Deployer:149026]deploy application MySimpleEjb on
AdminServer
.
Task 0 completed: [Deployer:149026]deploy application MySimpleEjb on
AdminServer
.
Target state: deploy completed on Server AdminServer
[INFO]
------------------------------------------------------------------------
[INFO] BUILD SUCCESS
[INFO]
------------------------------------------------------------------------
[INFO] Total time: 9.042s
[INFO] Finished at: Wed Aug 19 13:41:11 EDT 2015
[INFO] Final Memory: 10M/25M
distribute-app
Full Name
com.oracle.weblogic:weblogic-maven-plugin:distribute-app
Description
Prepares deployment files for deployment by copying deployment files to target servers and
validating them. Does not require a local server installation.
Parameters
Table 3-7 distribute-app Parameters
Name Type Required Description
adminurl java.lang.Stri
ng
false Specifies the listen address and listen port of the
Administration Server. Default value is: t3://localhost:7001
Chapter 3
Maven Plug-In Goals
3-17

Table 3-7 (Cont.) distribute-app Parameters
Name Type Required Description
advanced boolean
false When true, prints advanced usage options.
debug boolean
false When true, displays debug-level messages to the standard
output. Default value is: false
enableSecurityValida
tion
boolean
false When true, enables validation of security data. Default value
is: false
examples boolean
false When true, displays examples of how to use this plug-in.
external_stage boolean
false When true, indicates that the user wants to copy the
application in the server staging area externally or using a
third-party tool. When specified, WebLogic Server looks for
the application under StagingDirectoryName(of target server)/
applicationName. Default value is: false
failOnError boolean
false When true, forces the Mojo to fail the build upon encountering
an error if it would otherwise just log the error. Default value
is: true
id java.lang.Stri
ng
false Specifies an optional, user-supplied, unique deployment task
identifier.
middlewareHome java.lang.Stri
ng
false This parameter is deprecated in this release and ignored.
name java.lang.Stri
ng
false Specifies the deployment name to assign to a newly-deployed
application or standalone module.
nostage boolean
false When true, does not copy the deployment files to target
servers, but leaves them in a fixed location, specified by the
source parameter. By default, nostage is true for the
Administration Server and stage is true for the Managed
Server targets.
noversion boolean
false When true, ignores all version related code paths on the
Administration Server. Default value is: false
nowait boolean
false When true, initiates multiple tasks and then monitors them
later with the -list action. Default value is: false
password java.lang.Stri
ng
false Specifies the administrative password.
plan java.lang.Stri
ng
false Specifies the path to the deployment plan.
remote boolean
false When true, specifies that the plug-in is not running on the
same machine as the Administration Server. In this case, the
source parameter specifies a path on the server, unless the
upload parameter is also used. Default value is: false
retiretimeout java.lang.Inte
ger
false Specifies the number of seconds before WebLogic Server
undeploys the currently-running version of this application or
module so that clients can start using a new version. When
not specified, a graceful retirement policy is assumed. Default
value is: -1
securityModel java.lang.Stri
ng
false Specifies the security model to be used for this deployment,
overriding the default security model for the security realm.
Possible values are: DDOnly, CustomRoles,
CustomRolesAndPolicies, and Advanced.
Chapter 3
Maven Plug-In Goals
3-18

Table 3-7 (Cont.) distribute-app Parameters
Name Type Required Description
serverClasspath java.lang.Stri
ng
false This parameter is deprecated in this release and ignored.
source java.lang.Stri
ng
false Specifies the address of the artifact to distribute. The address
can be one of the following:
• A colon (:) separated list of Maven coordinates of the
form: groupId:artifactId:packaging:classifier:version.
• An archive file or exploded archive directory on the local
system. For example, /home/myhome/myapps/
helloworld.war.
• A remote HTTP URL (http://foo/a/b.ear).
stage boolean
false When true, indicates that the application needs to be copied
into the target server staging area before deployment. By
default, nostage is true for the Administration Server and
stage is true for the Managed Server targets.
submoduletargets java.lang.Stri
ng
false Specifies JMS Server targets for resources defined within a
JMS application module. Possible values have the form:
[email protected]@target or submoduleName@target.
targets java.lang.Stri
ng
false Specifies a comma-separated list of targets for the current
operation. When not specified, all configured targets are
used. For a new application, the default target is the
Administration Server.
timeout java.lang.Inte
ger
false Specifies the maximum number of seconds WebLogic Server
will wait for the deployment task to complete. The default
value of -1 means wait forever. Default value is: -1
upload boolean
false When true, copies the source files to the Administration
Server's upload directory prior to deployment. Use this setting
when running the plug-in remotely (using the remote
parameter) and when the user lacks normal access to the
Administration Server's file system. Default value is: false
user java.lang.Stri
ng
false Specifies the administrative user name.
userConfigFile java.lang.Stri
ng
false Specifies the location of a user configuration file to use for the
administrative user name and password instead of specifying
the user name and password directly in plain text.
userKeyFile java.lang.Stri
ng
false Specifies the location of a user key file to use for encrypting
and decrypting the user name and password stored in the
user configuration file.
verbose boolean
false When true, displays additional status information. Default
value is: false
version boolean
false When true, prints the version information. Default value is:
false
weblogicHome java.lang.Stri
ng
false This parameter is deprecated in this release and ignored.
Use this goal to prepare deployment files for deployment.
<execution>
<id>wls-distribute-app</id>
<phase>pre-integration-test</phase>
Chapter 3
Maven Plug-In Goals
3-19

<goals>
<goal>distribute-app</goal>
</goals>
<configuration>
<adminurl>t3://127.0.0.1:7001</adminurl>
<user>weblogic</user>
<password>password</password>
<source>${project.build.directory}/${project.build.finalName}
.${project.packaging}</source>
<targets>cluster1</targets>
<verbose>true</verbose>
<name>${project.build.finalName}</name>
</configuration>
</execution>
Example 3-6 shows typical
distribute-app
goal output.
Example 3-6 distribute-app
$ mvn com.oracle.weblogic:weblogic-maven-plugin:distribute-app
-Dadminurl=t3://localhost:7001 -Dstage=true -DmiddlewareHome=/maven/wls14110
-Dname=cluster-test -Duser=weblogic -Dpassword=password -Dtargets=cluster1
-Dsource=target/cluster-test-1.0-SNAPSHOT.war
[INFO] Scanning for projects...
[INFO]
[INFO]
------------------------------------------------------------------------
[INFO] Building cluster-test 1.0-SNAPSHOT
[INFO]
------------------------------------------------------------------------
[INFO]
[INFO] --- weblogic-maven-plugin:14.1.1-0-0:distribute-app (default-cli) @
cluster-test ---
weblogic.Deployer invoked with options: -noexit -adminurl t3://localhost:7001
-distribute -user weblogic -name cluster-test -source
/home/oracle/src/tests/uber-test/cluster-test/
target/cluster-test-1.0-SNAPSHOT.war -targets cluster1 -stage
<Aug 19, 2015> <Info> <J2EE Deployment SPI> <BEA-260121>
<Initiating distribute operation for application, cluster-test [archive:
/home/oracle/src/tests/uber-test/cluster-test/
target/cluster-test-1.0-SNAPSHOT.war], to cluster1 .>
Task 0 initiated: [Deployer:149026]distribute application cluster-test on
cluster1.
Task 0 completed: [Deployer:149026]distribute application cluster-test on
cluster1.
Target state: distribute completed on Cluster cluster1
[INFO]
------------------------------------------------------------------------
[INFO] BUILD SUCCESS
[INFO]
------------------------------------------------------------------------
[INFO] Total time: 6.953s
[INFO] Finished at: Wed Aug 19 14:10:00 EST 2015
[INFO] Final Memory: 15M/429M
Chapter 3
Maven Plug-In Goals
3-20
[INFO]
------------------------------------------------------------------------
install
Full Name
com.oracle.weblogic:weblogic-maven-plugin:install
Description
Installs WebLogic Server from a JAR file.
Parameters
Table 3-8 install Parameters
Name Type Required Description
artifactLocatio
n
java.lang.Stri
ng
true Specifies the address of the installation. The address can be one of
the following:
• A colon (:) separated list of Maven coordinates of the form:
groupId:artifactId:packaging:classifier:version.
• A file on the local system (/home/myhome/myapps/
wls_generic.jar).
• A remote HTTP URL (http://myarchive/installers/
wls_generic.jar).
Chapter 3
Maven Plug-In Goals
3-21

Table 3-8 (Cont.) install Parameters
Name Type Required Description
installCommand java.lang.Stri
ng
false Installs the product with a binary or jar installer (including the
quickstart installers.) The following macros are supported:
• @INSTALLER_FILE@ - the path to the installer file.
• @INSTALL_TO_LOCATION@ - the target directory (only
relevant for the quickstart installer).
• @JAVA_HOME@ - path to the Java home.
• @JAVA_TMPDIR@ - path to the Java temporary directory.
• @RESPONSE_FILE@ - path to the OUI silent installer
response file.
• @INV_PTR_LOC_FILE@ - path to the OUI invPtrLoc file.
JAR installer example:
@JAVA_HOME@/bin/java -Xms512m -Xmx1024m -
Djava.io.tmpdir=@JAVA_TMPDIR@ -jar @INSTALLER_FILE@ -
silent -responseFile @RESPONSE_FILE@ -invPtrLoc
@INV_PTR_LOC_FILE@
Quick Start JAR installer example:
@JAVA_HOME@/bin/java -Xms512m -Xmx1024m -
Djava.io.tmpdir=@JAVA_TMPDIR@ -jar @INSTALLER_FILE@
ORACLE_HOME=@INSTALL_TO_LOCATION@
This parameter is optional.
If specified for a quickstart installer when the
supplementalQuickStartLocation parameter is supplied, the same
command is used for the supplemental quickstart installer by
replacing the @INSTALLER_FILE@ macro with the file location
derived from the supplementalQuickStartLocation parameter.
If the @INSTALLER_FILE@ macro is not being used, the install
goal replaces the argument following the '-jar' argument in the
installCommand string with the supplemental quickstart installer
JAR file name.
installDir java.lang.Stri
ng
true
Deprecated. Use the middlewareHome parameter instead.
invPtrLoc java.lang.Stri
ng
false The silent installer inventory location file. This is required on Unix-
based platforms when using the binary or JAR installers.
middlewareHome java.lang.Stri
ng
false The ORACLE_HOME directory to install into when using the
quickstart installer.
quickStartInsta
ller
boolean
false Indicates that this is a quickstart installer. The quickstart installer
requires you to specify the artifactLocation and installDir parameter.
All other parameters are ignored when this parameter is set to true.
The default value is false.
response java.lang.Stri
ng
false Deprecated. Use the responseFile parameter instead.
responseFile java.lang.Stri
ng
false The silent installer response file. This is required when using the
binary or jar installers.
supplementalQui
ckStartLocation
java.lang.Stri
ng
false The Quick Start supplemental installer.
Chapter 3
Maven Plug-In Goals
3-22
Usage Example
Use this goal to install WebLogic Server into a local directory so it can be used to execute
other goals, as well as to create a WebLogic Server domain for deploying and testing the
application represented as the Maven project.
Note:
The install goal creates a single managed server called
myserver
, and does not
create a domain. Most other goals, including create-domain, use a default server
name of
AdminServer
. You therefore need to override the default
AdminServer
server
name in your POM.
This goal installs WebLogic Server using a specified installation distribution. You specify the
location of the distribution using the
artifactLocation
configuration parameter, which can be
the location of the distribution as a file on the file system; an HTTP URL which can be
accessed; or a Maven coordinate of the distribution installed in a Maven repository. Specify the
artifactLocation
configuration element in the
weblogic-maven-plugin
section of the
pom.xml
file, or by using the
–DartifactLocation
property when invoking Maven.
Example 3-7 shows an example of installing WebLogic Server using a JAR file on a Windows-
based system.
Example 3-7 Install From JAR File
mvn com.oracle.weblogic:weblogic-maven-plugin:install
-DartifactLocation=c:\wls-temp\wls_jrf_generic.jar
-DinstallDir=C:\test-maven -DresponseFile=c:\wls-temp\response.txt
[INFO] Scanning for projects...
[INFO]
[INFO]
------------------------------------------------------------------------
[INFO] Building Maven Stub Project (No POM) 1
[INFO]
------------------------------------------------------------------------
[INFO]
[INFO] --- weblogic-maven-plugin:14.1.1-0-0:install (default-cli) @
standalone-p
om ---
[INFO] [install]ORACLE_HOME = C:\test-maven\Oracle\Middleware\Oracle_Home
[INFO] Executing: [cmd:[C:\\Windows\\System32\\cmd.exe, /c,
C:\weblogic\dev\AUT
O_D~1\x86_64\JDK180~3\JDK18~1.0_4\jre\bin\java.exe -Xms1024m -Xmx1024m -
Djava.io
.tmpdir=C:\Users\user\AppData\Local\Temp\ -jar c:\wls-temp\wls_jrf_g
eneric.jar -silent -responseFile c:\wls-temp\response.txt ]]
[INFO] Process being executed, waiting for completion.
[INFO] [exec] Launcher log file is C:\Users\user\AppData\Local\Temp\OraInsta
ll2015-04-23_09-45-13AM\launcher2015-04-23_09-45-13AM.log.
[INFO] [exec] Extracting
files..................................................
..............................................................................
..
Chapter 3
Maven Plug-In Goals
3-23

...................................
[INFO] [exec] Starting Oracle Universal Installer
[INFO] [exec]
[INFO] [exec] Checking if CPU speed is above 300 MHz. Actual 2491 Passed
[INFO] [exec] Checking swap space: must be greater than 512 MB Passed
[INFO] [exec] Checking if this platform requires a 64-bit JVM. Actual 64 Pa
ssed (64-bit not required)
[INFO] [exec]
[INFO] [exec]
[INFO] [exec] Preparing to launch the Oracle Universal Installer from
C:\Users\
user\AppData\Local\Temp\OraInstall2015-04-23_09-45-13AM
[INFO] [exec] Log: C:\Users\user\AppData\Local\Temp\OraInstall2015-04-23_09-
45-13AM\install2015-04-23_09-45-13AM.log
[INFO] [exec] Copyright (c) 1996, 2015, Oracle and/or its affiliates. All
rights
reserved.
[INFO] [exec] Reading response file..
[INFO] [exec] -nocheckForUpdates / SKIP_SOFTWARE_UPDATES flag is passed and
henc
e skipping software update
[INFO] [exec] Skipping Software Updates...
[INFO] [exec] Starting check : CertifiedVersions
[INFO] [exec] Expected result: One of 6.1,6.2,6.3
[INFO] [exec] Actual Result: 6.1
[INFO] [exec] Check complete. The overall result of this check is: Passed
[INFO] [exec] CertifiedVersions Check: Success.
[INFO] [exec] Starting check : CheckJDKVersion
[INFO] [exec] Expected result: 1.8.0_40
[INFO] [exec] Actual Result: 1.8.0_40-ea
[INFO] [exec] Check complete. The overall result of this check is: Passed
[INFO] [exec] CheckJDKVersion Check: Success.
[INFO] [exec] Validations are enabled for this session.
[INFO] [exec] Verifying data......
[INFO] [exec] Copying Files...
[INFO] [exec] -----------20%----------40%----------60%----------80%-----Visit
ht
tp://www.oracle.com/support/policies.html for Oracle Technical Support
policies.
[INFO] [exec] ---100%
[INFO] [exec]
[INFO] [exec] The installation of Oracle Fusion Middleware 14c Infrastructure
14
.1.1.0.0 completed successfully.
[INFO] [exec] Logs successfully copied to C:\weblogic\src
\inventory\logs.
[INFO] Installer exited with code: 0
[INFO]
------------------------------------------------------------------------
[INFO] BUILD SUCCESS
Example 3-8 shows an example of installing WebLogic Server using a JAR file and the
installCommand
parameter on a Windows-based system.
Chapter 3
Maven Plug-In Goals
3-24

Example 3-8 Install From JAR File With installCommand
mvn com.oracle.weblogic:weblogic-maven-plugin:install
-DinstallCommand="@JAVA_HOME@/bin/java -Xms512m -Xmx1024m
-jar @INSTALLER_FILE@ -silent -responseFile c:\wls-temp\response.txt"
-DartifactLocation=c:\wls-temp\wls_jrf_generic.jar
-DresponseFile=c:\wls-temp\response.txt
INFO] Scanning for projects...
[INFO]
[INFO]
------------------------------------------------------------------------
[INFO] Building Maven Stub Project (No POM) 1
[INFO]
------------------------------------------------------------------------
[INFO]
[INFO] --- weblogic-maven-plugin:14.1.1-0-0:install (default-cli) @
standalone-p
om ---
[INFO] [install]ORACLE_HOME = C:\test-maven\Oracle\Middleware\Oracle_Home
[INFO] Executing: [cmd:[C:\\Windows\\System32\\cmd.exe, /c,
C:\weblogic\dev\AUT
O_D~1\x86_64\JDK180~3\JDK18~1.0_4\jre/bin/java -Xms512m -Xmx1024m -jar
c:\wls-t
emp\wls_jrf_generic.jar -silent -responseFile c:\wls-temp\response.txt]]
[INFO] Process being executed, waiting for completion.
[INFO] [exec] Launcher log file is C:\Users\user\AppData\Local\Temp\OraInsta
ll2015-04-23_10-58-13AM\launcher2015-04-23_10-58-13AM.log.
[INFO] [exec] Extracting
files..................................................
..............................................................................
..
.................
[INFO] [exec] Starting Oracle Universal Installer
[INFO] [exec]
[INFO] [exec] Checking if CPU speed is above 300 MHz. Actual 2491 Passed
[INFO] [exec] Checking swap space: must be greater than 512 MB Passed
[INFO] [exec] Checking if this platform requires a 64-bit JVM. Actual 64
Pa
ssed (64-bit not required)
[INFO] [exec]
[INFO] [exec]
[INFO] [exec] Preparing to launch the Oracle Universal Installer from
C:\Users\
user\AppData\Local\Temp\OraInstall2015-04-23_10-58-13AM
[INFO] [exec] Log: C:\Users\user\AppData\Local\Temp\OraInstall2015-04-23_10-
58-13AM\install2015-04-23_10-58-13AM.log
[INFO] [exec] Copyright (c) 1996, 2015, Oracle and/or its affiliates. All
rights
reserved.
[INFO] [exec] Reading response file..
[INFO] [exec] -nocheckForUpdates / SKIP_SOFTWARE_UPDATES flag is passed and
henc
e skipping software update
[INFO] [exec] Skipping Software Updates...
[INFO] [exec] Starting check : CertifiedVersions
[INFO] [exec] Expected result: One of 6.1,6.2,6.3
Chapter 3
Maven Plug-In Goals
3-25

[INFO] [exec] Actual Result: 6.1
[INFO] [exec] Check complete. The overall result of this check is: Passed
[INFO] [exec] CertifiedVersions Check: Success.
[INFO] [exec] Starting check : CheckJDKVersion
[INFO] [exec] Expected result: 1.8.0_40
[INFO] [exec] Actual Result: 1.8.0_40-ea
[INFO] [exec] Check complete. The overall result of this check is: Passed
[INFO] [exec] CheckJDKVersion Check: Success.
[INFO] [exec] Validations are enabled for this session.
[INFO] [exec] Verifying data......
[INFO] [exec] Copying Files...
[INFO] [exec] -----------20%----------40%----------60%----------80%-----Visit
ht
tp://www.oracle.com/support/policies.html for Oracle Technical Support
policies.
[INFO] [exec] ---100%
[INFO] [exec]
[INFO] [exec] The installation of Oracle Fusion Middleware 14c Infrastructure
14
.1.1.0.0 completed successfully.
[INFO] [exec] Logs are located here: C:\Users\user\AppData\Local\Temp\OraIns
tall2015-04-23_10-58-13AM.
[INFO] Installer exited with code: 0
[INFO]
------------------------------------------------------------------------
[INFO] BUILD SUCCESS
[INFO]
------------------------------------------------------------------------
list-apps
Full Name
com.oracle.weblogic:weblogic-maven-plugin:list-apps
Description
Lists the deployment names for applications and standalone modules deployed, distributed, or
installed in the domain. Does not require a local server installation.
Parameters
Table 3-9 list-apps Parameters
Name Type Required Description
adminurl java.lang.String
false Specifies the listen address and listen port of the
Administration Server. Default value is:
t3://
localhost:7001
advanced boolean
false When true, prints advanced usage options.
debug boolean
false When true, displays debug-level messages to the standard
output. Default value is:
false
examples boolean
false When true, displays examples of how to use this plug-in.
Chapter 3
Maven Plug-In Goals
3-26

Table 3-9 (Cont.) list-apps Parameters
Name Type Required Description
failOnError boolean
false When true, forces the Mojo to fail the build upon encountering
an error if it would otherwise just log the error. Default value is:
true
middlewareHome java.lang.String
false This parameter is deprecated in this release and ignored.
noversion boolean
false When true, ignore all version-related code paths on the
Administration Server. Default value is:
false
nowait boolean
false When true, initiates multiple tasks and then monitors them
later with the
-list
action.
password java.lang.String
false Specifies the administrative password.
remote boolean
false When true, specifies that the plug-in is not running on the
same machine as the Administration Server. In this case, the
source
parameter specifies a path on the server, unless the
upload
parameter is also used.
serverClasspath java.lang.String
false This parameter is deprecated in this release and ignored.
timeout java.lang.Integer
false Specifies the maximum number of seconds WebLogic Server
will wait for the deployment task to complete. The default value
of -1 means wait forever. Default value is:
-1
user java.lang.String
false Specifies the administrative user name.
userConfigFile java.lang.String
false Specifies the location of a user configuration file to use for the
administrative user name and password instead of specifying
the user name and password directly in plain text.
userKeyFile java.lang.String
false Specifies the location of a user key file to use for encrypting
and decrypting the user name and password stored in the user
configuration file.
verbose boolean
false When true, displays additional status information. Default value
is:
false
version boolean
false When true, prints the version information. Default value is:
false
weblogicHome java.lang.String
false This parameter is deprecated in this release and ignored.
Use the list-apps goal to list the deployment names.
<execution>
<id>wls-list-apps</id>
<phase>pre-integration-test</phase>
<goals>
<goal>list-apps</goal>
</goals>
<configuration>
<adminurl>t3://127.0.0.1:7001</adminurl>
<user>weblogic</user>
<password>password</password>
</configuration>
</execution>
Example 3-9 shows typical
list-apps
goal output.
Chapter 3
Maven Plug-In Goals
3-27

Example 3-9 list-apps
mvn com.oracle.weblogic:weblogic-maven-plugin:list-apps
-Duser=weblogic -Dpassword=password
[INFO] Scanning for projects...
[INFO]
[INFO] ------------------------------------------------------------------------
[INFO] Building WebLogic Server Maven Plugin 14.1.1.0
[INFO] ------------------------------------------------------------------------
[INFO]
[INFO] --- weblogic-maven-plugin:14.1.1-0-0:list-apps (default-cli) @ weblogic-m
aven-plugin ---
weblogic.Deployer invoked with options: -noexit -adminurl t3://localhost:7001 -
listapps -user weblogic
SamplesSearchWebApp
stockBackEnd
ajaxJSF
asyncServlet30
singletonBean
webFragment
examplesWebApp
mainWebApp
annotation
MySimpleEjb
stockFrontEnd
jsfBeanValidation
programmaticSecurity
entityBeanValidation
faceletsJSF
bookmarkingJSF
stockAdapter
noInterfaceViewInWAR
jdbcDataSource.war
asyncMethodOfEJB
calendarStyledTimer
cdi
jaxrs
criteriaQuery
portableGlobalJNDIName
multipartFileHandling
elementCollection
Number of Applications Found : 27
[INFO] ------------------------------------------------------------------------
[INFO] BUILD SUCCESS
[INFO] ------------------------------------------------------------------------
[INFO] Total time: 8.656s
[INFO] Finished at: Wed Aug 19 11:33:51 EDT 2015
[INFO] Final Memory: 11M/28M
[INFO] ------------------------------------------------------------------------
C:\Oracle\Middleware\Oracle_Home\wlserver\server\lib>
purge-tasks
Full Name
com.oracle.weblogic:weblogic-maven-plugin:purge-tasks
Description
Flushes out retired deployment tasks.
Chapter 3
Maven Plug-In Goals
3-28

Parameters
Table 3-10 purge-tasks Parameters
Name Type Required Description
adminurl java.lang.String
false Specifies the listen address and listen port of the
Administration Server. Default value is:
t3://
localhost:7001
debug boolean
false When true, compiles debugging information into class files.
Default value is:
false
failOnError boolean
false When true, forces the Mojo to fail the build upon
encountering an error if it would otherwise just log the error.
Default value is:
true
password java.lang.String
false Specifies the administrative password.
user java.lang.String
false Specifies the administrative user name.
userConfigFile java.lang.String
false Specifies the location of a user configuration file to use for
the administrative user name and password instead of
specifying the user name and password directly in plain text.
userKeyFile java.lang.String
false Specifies the location of a user key file to use for encrypting
and decrypting the user name and password stored in the
user configuration file.
verbose boolean
false When true, displays additional status information during the
deployment process. Default value is:
false
Use the purge-tasks goal to flush out retired deployment tasks.
<execution>
<id>wls-purge</id>
<phase>pre-integration-test</phase>
<goals>
<goal>purge-tasks</goal>
</goals>
<configuration>
<adminurl>t3://127.0.0.1:7001</adminurl>
<user>weblogic</user>
<password>
password
</password>
</configuration>
</execution>
Example 3-11 shows typical
purge-tasks
goal output.
Example 3-10 purge-tasks
mvn com.oracle.weblogic:weblogic-maven-plugin:purge-task
s -Duser=weblogic -Dpassword=password
[INFO] Scanning for projects...
[INFO]
[INFO] ------------------------------------------------------------------------
[INFO] Building Maven Stub Project (No POM) 1
[INFO] ------------------------------------------------------------------------
[INFO]
[INFO] --- weblogic-maven-plugin:14.1.1-0-0:purge-tasks (default-cli) @ standalo
ne-pom ---
weblogic.Deployer invoked with options: -noexit -purgetasks -user weblogic -adm
inurl t3://localhost:7001
Chapter 3
Maven Plug-In Goals
3-29

Currently there are no retired tasks.
[INFO] ------------------------------------------------------------------------
[INFO] BUILD SUCCESS
[INFO] ------------------------------------------------------------------------
[INFO] Total time: 13.139s
[INFO] Finished at: Wed Aug 19 11:33:51 EDT 2015
[INFO] Final Memory: 8M/24M
[INFO] ------------------------------------------------------------------------
redeploy
Full Name
com.oracle.weblogic:weblogic-maven-plugin:redeploy
Description
Redeploys a running application or part of a running application. Does not require a local
server installation.
Parameters
Table 3-11 redeploy Parameters
Name Type Required Description
adminurl java.lang.Strin
g
false Specifies the listen address and listen port of the Administration
Server. Default value is:
t3://localhost:7001
appversion java.lang.Strin
g
false Version of the application to start.
deleteFiles java.lang.Strin
g
false Removes the files specified in this parameter while leaving the
application activated. This parameter is valid only for unarchived
deployments.
examples boolean
false When true, displays examples of how to use this plug-in.
failOnError boolean
false When true, forces the Mojo to fail the build upon encountering an error
if it would otherwise just log the error. Default value is:
true
id java.lang.Strin
g
false Specifies an optional, user-supplied, unique deployment task
identifier.
libimplver java.lang.Strin
g
false Implementation version of a Java EE library or optional package. This
option can be used only if the library or package does not include an
implementation version in its manifest file.
library
boolean false Deploy as a shared Java EE library or optional package.
libspecver java.lang.Strin
g
false Specification version of a Java EE library or optional package. This
option can be used only if the library or package does not include a
specification version in its manifest file.
middlewareHo
me
java.lang.Strin
g
false This parameter is deprecated in this release and ignored.
name java.lang.Strin
g
false Specifies the deployment name to assign to a newly-deployed
application or standalone module.
password java.lang.Strin
g
false Specifies the administrative password.
Chapter 3
Maven Plug-In Goals
3-30

Table 3-11 (Cont.) redeploy Parameters
Name Type Required Description
plan java.lang.Strin
g
false Specifies the path to the deployment plan.
remote boolean
false When true, specifies that the plug-in is not running on the same
machine as the Administration Server. In this case, the
source
parameter specifies a path on the server, unless the
upload
parameter is also used.
removePlanOv
erride
boolean
false Removes an overridden deployment plan during a
redeploy
or
update
deployment action.
To remove an application override, specify the
removePlanOverride
attribute.
retiretimeou
t
java.lang.Integ
er
false Specifies the number of seconds before WebLogic Server undeploys
the currently running version of this application or module so that
clients can start using a new version. When not specified, a graceful
retirement policy is assumed. Default value is:
-1
rmiGracePeri
od
java.lang.Integ
er
false Specifies the number of seconds in the grace period for RMI requests
during graceful shutdown. Can be used only when the
graceful
parameter is
true
. The default value of
-1
means no grace period.
Default value is:
-1
serverClassp
ath
java.lang.Strin
g
false This parameter is deprecated in this release and ignored.
source java.lang.Strin
g
false Specifies the address of the artifact to redeploy. The address can be
one of the following:
• A colon (:) separated list of Maven coordinates of the form:
groupId:artifactId:packaging:classifier:version.
• An archive file or exploded archive directory on the local system.
For example, /home/myhome/myapps/helloworld.war.
• A remote HTTP URL (http://foo/a/b.ear).
submoduletar
gets
java.lang.Strin
g
false Specifies JMS Server targets for resources defined within a JMS
application module. Possible values have the form:
submod@mod-
jms.xml@target
or
submoduleName@target
.
targets java.lang.Strin
g
false Specifies a comma-separated list of targets for the current operation.
The default target is AdminServer.
timeout java.lang.Integ
er
false Specifies the maximum number of seconds WebLogic Server will wait
for the deployment task to complete. The default value of -1 means
wait forever. Default value is:
-1
upload boolean
false When true, copies the specified source files to the Administration
Server's
upload
directory prior to redeployment. Use this setting
when running the plug-in remotely (using the
remote
parameter) and
when the user lacks normal access to the Administration Server's file
system. Default value is:
false
user java.lang.Strin
g
false Specifies the administrative user name.
userConfigFi
le
java.lang.Strin
g
false Specifies the location of a user configuration file to use for the
administrative user name and password instead of specifying the user
name and password directly in plain text.
Chapter 3
Maven Plug-In Goals
3-31

Table 3-11 (Cont.) redeploy Parameters
Name Type Required Description
userKeyFile java.lang.Strin
g
false Specifies the location of a user key file to use for encrypting and
decrypting the user name and password stored in the user
configuration file.
verbose boolean
false When true, displays additional status information during the
deployment process. Default value is:
false
version boolean
false When true, prints the version information. Default value is:
false
weblogicHome java.lang.Strin
g
false This parameter is deprecated in this release and ignored.
Use the redeploy goal to redeploy an application or part of that application.
<execution>
<id>wls-redeploy</id>
<phase>pre-integration-test</phase>
<goals>
<goal>redeploy</goal>
</goals>
<configuration>
<adminurl>t3://127.0.0.1:7001</adminurl>
<user>weblogic</user>
<password>
password
</password>
<source>${project.build.directory}/${project.build.finalName}.${project.packaging}</sour
ce>
<name>${project.build.finalName}</name>
</configuration>
</execution>
Example 3-11 shows typical
redeploy
goal output.
Example 3-11 redeploy
mvn com.oracle.weblogic:weblogic-maven-plugin:redeploy -Dsou
rce=C:\Oracle\Middleware\Oracle_Home\wlserver\server\lib\MySimpleEjb.jar -Duser
=weblogic -Dpassword=password -Dname=ExampleEJB
[INFO] Scanning for projects...
[INFO]
[INFO] ------------------------------------------------------------------------
[INFO] Building WebLogic Server Maven Plugin 14.1.1.0
[INFO] ------------------------------------------------------------------------
[INFO]
[INFO] --- weblogic-maven-plugin:14.1.1-0-0:redeploy (default-cli) @ weblogic-ma
ven-plugin ---
weblogic.Deployer invoked with options: -noexit -adminurl t3://localhost:7001 -
redeploy -user weblogic -name ExampleEJB -source C:\Oracle\Middleware\Oracle_Hom
e\wlserver\server\lib\MySimpleEjb.jar -targets AdminServer
<Aug 19, 2015> <Info> <J2EE Deployment SPI> <BEA-260121> <Initiat
ing redeploy operation for application, ExampleEJB [archive: C:\Oracle\Middlewar
e\Oracle_Home\wlserver\server\lib\MySimpleEjb.jar], to AdminServer .>
Task 3 initiated: [Deployer:149026]deploy application ExampleEJB on AdminServer.
Task 3 completed: [Deployer:149026]deploy application ExampleEJB on AdminServer.
Target state: redeploy completed on Server AdminServer
[INFO] ------------------------------------------------------------------------
Chapter 3
Maven Plug-In Goals
3-32
[INFO] BUILD SUCCESS
[INFO] ------------------------------------------------------------------------
[INFO] Total time: 6.322s
[INFO] Finished at: Wed Aug 19 11:33:51 EDT 2015
remove-domain
Full Name
com.oracle.weblogic:weblogic-maven-plugin:remove-domain
Description
Removes a domain directory. The domain must not be running for this goal to succeed. This is
a convenience goal for the simple use case. If the domain is already removed, stdout prints a
status message but the goal does not fail.
Parameters
Table 3-12 remove-domain Parameters
Name Type Required Description
domainHome java.lang.String
true The path to the domain directory.
workingDir java.lang.String
false Specifies the current working directory.
Default value is:
${project.build.directory}/weblogic-
maven-plugin)
Use the remove-domain goal to remove a domain directory.
<execution>
<id>wls-remove-domain</id>
<phase>pre-integration-test</phase>
<goals>
<goal>remove-domain</goal>
</goals>
<configuration>
<domainHome>${project.build.directory}/base_domain</domainHome>
</configuration>
</execution>
Example 3-13 shows typical
remove-domain
goal output.
Example 3-12 remove-domain
mvn com.oracle.weblogic:weblogic-maven-plugin:remove-domain
-DdomainHome=C:\Oracle\Middleware\Oracle_Home\user_projects\domains\base_domain
:
[INFO] [remove-domain]Executing: [cmd:[C:\\Windows\\System32\\cmd.exe, /c, rmdir
/Q /S C:\Oracle\Middleware\Oracle_Home\user_projects\domains\base_domain]]
[INFO] Process being executed, waiting for completion.
[INFO] [remove-domain][cmd:[C:\\Windows\\System32\\cmd.exe, /c, rmdir /Q /S C:\O
racle\Middleware\Oracle_Home\user_projects\domains\base_domain]] exit code=0
[INFO] ------------------------------------------------------------------------
[INFO] BUILD SUCCESS
[INFO] ------------------------------------------------------------------------
[INFO] Total time: 4:01.074s
[INFO] Finished at: Wed Aug 19 11:33:51 EDT 2015
Chapter 3
Maven Plug-In Goals
3-33

[INFO] Final Memory: 8M/20M
[INFO] ------------------------------------------------------------------------
start-app
Full Name
com.oracle.weblogic:weblogic-maven-plugin:start-app
Description
Starts an application deployed on WebLogic Server. Does not require a local server
installation.
Parameters
Table 3-13 start-app Parameters
Name Type Required Description
adminmode boolean
false When true, switches the application to administration mode
so that it accepts only administration requests via a
configured administration channel. When false, production
mode is assumed. Default value is:
false
adminurl java.lang.String
false Specifies the listen address and listen port of the
Administration Server. Default value is:
t3://
localhost:7001
advanced boolean
false When true, prints advanced usage options.
appversion java.lang.String
false Specifies the version identifier of the application. When not
specified, the currently active version of the application is
assumed.
debug boolean
false When true, displays debug-level messages to the standard
output. Default value is:
false
domainHome java.lang.String
false This parameter is deprecated in this release and ignored.
examples boolean
false When true, displays examples of how to use this plug-in.
failOnError boolean
false When true, forces the Mojo to fail the build upon
encountering an error if it would otherwise just log the
error. Default value is:
true
id java.lang.String
false Specifies an optional, user-supplied, unique deployment
task identifier.
middlewareHome java.lang.String
false This parameter is deprecated in this release and ignored.
name java.lang.String
false Specifies the deployment name to assign to a newly-
deployed application or standalone module.
noversion boolean
false When true, ignores all version-related code paths on the
Administration Server. Default value is:
false
nowait boolean
false When true, initiates multiple tasks and then monitors them
later with the
-list
action.
password java.lang.String
false Specifies the administrative password.
planversion java.lang.String
false Specifies the version of the deployment plan. When not
specified, the currently active version of the application's
deployment plan is assumed.
Chapter 3
Maven Plug-In Goals
3-34

Table 3-13 (Cont.) start-app Parameters
Name Type Required Description
remote boolean
false When true, specifies that the plug-in is not running on the
same machine as the Administration Server. In this case,
the
source
parameter specifies a path on the server,
unless the
upload
parameter is also used. Default value
is:
false
retiretimeout java.lang.Integer
false Specifies the number of seconds before WebLogic Server
undeploys the currently running version of this application
or module so that clients can start using a new version.
When not specified, a graceful retirement policy is
assumed. Default value is:
-1
serverClasspath java.lang.String
false This parameter is deprecated in this release and ignored.
submoduletarget
s
java.lang.String
false Specifies JMS Server targets for resources defined within a
JMS application module. Possible values have the form:
[email protected]@target
or
submoduleName@target
.
targets java.lang.String
false Specifies a comma-separated list of targets for the current
operation. When not specified, all configured targets are
used. For a new application, the default target is all targets
to which the application is deployed.
timeout java.lang.Integer
false Specifies the maximum number of seconds WebLogic
Server will wait for the deployment task to complete. The
default value of
-1
means wait forever. Default value is:
-1
user java.lang.String
false Specifies the administrative user name.
userConfigFile java.lang.String
false Specifies the location of a user configuration file to use for
the administrative user name and password instead of
specifying the user name and password directly in plain
text.
userKeyFile java.lang.String
false Specifies the location of a user key file to use for
encrypting and decrypting the user name and password
stored in the user configuration file.
verbose boolean
false When true, displays additional status information during the
deployment process. Default value is:
false
version boolean
false When true, prints the version information. Default value is:
false
weblogicHome java.lang.String
false This parameter is deprecated in this release and ignored.
Use the start-app goal to start an application.
<execution>
<id>wls-start-app</id>
<phase>pre-integration-test</phase>
<goals>
<goal>start-app</goal>
</goals>
<configuration>
<adminurl>t3://localhost:7001</adminurl>
<user>weblogic</user>
<password>
password
</password>
<name>${project.build.finalName}</name>
Chapter 3
Maven Plug-In Goals
3-35

</configuration>
</execution>
Example 3-13 shows typical
start-app
goal output.
Example 3-13 start-app
mvn com.oracle.weblogic:weblogic-maven-plugin:start-app
-Duser=weblogic -Dpassword=password -Dname=ExampleEJB
[INFO] Scanning for projects...
[INFO]
[INFO] ------------------------------------------------------------------------
[INFO] Building WebLogic Server Maven Plugin 14.1.1.0
[INFO] ------------------------------------------------------------------------
[INFO]
[INFO] --- weblogic-maven-plugin:14.1.1-0-0:start-app (default-cli) @ weblogic-m
aven-plugin ---
weblogic.Deployer invoked with options: -noexit -adminurl t3://localhost:7001 -
start -user weblogic -name ExampleEJB -retiretimeout -1
<Aug 19, 2015> <Info> <J2EE Deployment SPI> <BEA-260121> <Initiat
ing start operation for application, ExampleEJB [archive: null], to configured t
argets.>
Task 5 initiated: [Deployer:149026]start application ExampleEJB on AdminServer.
Task 5 completed: [Deployer:149026]start application ExampleEJB on AdminServer.
Target state: start completed on Server AdminServer
[INFO] ------------------------------------------------------------------------
[INFO] BUILD SUCCESS
[INFO] ------------------------------------------------------------------------
[INFO] Total time: 6.053s
[INFO] Finished at: Wed Aug 19 11:33:51 EDT 2015
[INFO] Final Memory: 10M/26M
[INFO] ------------------------------------------------------------------------
start-server
Full Name
com.oracle.weblogic:weblogic-maven-plugin:start-server
Description
Starts WebLogic Server from a script in the current working directory. This is a convenience
goal for the simple use case. If the server is already started, stdout prints a status message but
the goal does not fail.
Parameters
Table 3-14 start-server Parameters
Name Type Required Description
command java.lang.String[
]
false Specifies the script to start WebLogic Server. If this
parameter is not specified, it will default to either
startWebLogic.sh
or
startWebLogic.cmd
, based on
the platform.
domainHome java.lang.String
false Specifies the path to the WebLogic Server domain. Default
value is:
${basedir}/Oracle/Domains/mydomain
Chapter 3
Maven Plug-In Goals
3-36

Table 3-14 (Cont.) start-server Parameters
Name Type Required Description
httpPingUrl java.lang.String
false Specifies the URL that, when pinged, will verify that the
server is running.
middlewareHome java.lang.String
false This parameter is deprecated in this release and ignored.
serverClasspath java.lang.String
false This parameter is deprecated in this release and ignored.
timeoutSecs java.lang.Integer
false Specifies in seconds, the timeout for the script. Valid when
the
waitForExit
parameter is
true
. A zero (
0
) or
negative value indicates that the script will not timeout.
Default value is:
-1
weblogicHome java.lang.String
false This parameter is deprecated in this release and ignored.
Usage Example
The
start-server
goal executes a
startWebLogic
command on a given domain, starting the
WebLogic Server instance.
<execution>
<id>wls-wlst-start-server</id>
<phase>pre-integration-test</phase>
<goals>
<goal>start-server</goal>
</goals>
<configuration>
<domainHome>${project.build.directory}/base_domain</domainHome>
</configuration>
</execution>
Example 3-14 shows typical
start-server
goal output.
Example 3-14 start-server
mvn com.oracle.weblogic:weblogic-maven-plugin:start-server
-DdomainHome=c:\oracle\middleware\oracle_home\user_projects\domains\wl_server
[INFO] Scanning for projects...
[INFO]
[INFO] ------------------------------------------------------------------------
[INFO] Building WebLogic Server Maven Plugin 14.1.1-0-0
[INFO] ------------------------------------------------------------------------[INFO]
[INFO] --- weblogic-maven-plugin:14.1.1-0-0:start-server (default-cli)
@ weblogic-maven-plugin ---
.[INFO] Starting server in domain:
c:\oracle\middleware\oracle_home\user_projects\domains\wl_server
[INFO] Check stdout file for details:
c:\oracle\middleware\oracle_home\user_projects\domains\wl_server\server-21831141069721263
86.out
[INFO] Process being executed, waiting for completion.
.............
[INFO] Server started successful
[INFO] ------------------------------------------------------------------------
[INFO] BUILD SUCCESS
[INFO] ------------------------------------------------------------------------
[INFO] Total time: 37.725s
[INFO] Finished at: Wed Aug 19 11:33:51 EDT 2015
[INFO] Final Memory: 8M/23M
Chapter 3
Maven Plug-In Goals
3-37

stop-app
Full Name
com.oracle.weblogic:weblogic-maven-plugin:stop-app
Description
Stops an application. Does not require a local server installation.
Parameters
Table 3-15 stop-app Parameters
Name Type Required Description
adminmode boolean
false When true, switches the application to administration mode so
that it accepts only administration requests via a configured
administration channel. When false, production mode is
assumed. Default value is:
false
adminurl java.lang.String
false Specifies the listen address and listen port of the Administration
Server. Default value is:
t3://localhost:7001
advanced boolean
false When true, prints advanced usage options.
appversion java.lang.String
false Specifies the version identifier of the application. When not
specified, the currently active version of the application is
assumed.
debug boolean
false When true, displays debug-level messages to the standard
output. Default value is:
false
domainHome java.lang.String
false This parameter is deprecated in this release and ignored.
examples boolean
false When true, displays examples of how to use this plug-in.
failOnError boolean
false When true, forces the Mojo to fail the build upon encountering
an error if it would otherwise just log the error. Default value is:
true
graceful boolean
false When true, stops the application after existing
HTTP
clients have
completed their work. When not specified, force shutdown is
assumed.
id java.lang.String
false Specifies an optional, user-supplied, unique deployment task
identifier.
ignoresessions boolean
false When true, ignores pending
HTTP
sessions during graceful
shutdown. Can be used only when the
graceful
parameter is
true
. Default value is:
false
middlewareHome java.lang.String
false This parameter is deprecated in this release and ignored.
name java.lang.String
false Specifies the deployment name to assign to a newly-deployed
application or standalone module.
noversion boolean
false When true, ignores all version-related code paths on the
Administration Server. Default value is:
false
nowait boolean
false When true, initiates multiple tasks and then monitors them later
with the
-list
action.
password java.lang.String
false Specifies the administrative password.
Chapter 3
Maven Plug-In Goals
3-38

Table 3-15 (Cont.) stop-app Parameters
Name Type Required Description
planversion java.lang.String
false Specifies the version of the deployment plan. When not
specified, the currently active version of the application's
deployment plan is assumed.
remote boolean
false When true, specifies that the plug-in is not running on the same
machine as the Administration Server. In this case, the
source
parameter specifies a path on the server, unless the
upload
parameter is also used. Default value is:
false
rmiGracePeriod java.lang.Integer
false Specifies the number of seconds in the grace period for RMI
requests during graceful shutdown. Can be used only when the
graceful
parameter is
true
. The default value of
-1
means no
grace period. Default value is:
-1
serverClasspath java.lang.String
false This parameter is deprecated in this release and ignored.
submoduletarget
s
java.lang.String
false Specifies JMS Server targets for resources defined within a
JMS application module. Possible values have the form:
[email protected]@target
or
submoduleName@target
.
targets java.lang.String
false Specifies a comma-separated list of targets for the current
operation. When not specified, all configured targets are used.
timeout java.lang.Integer
false Specifies the maximum number of seconds WebLogic Server
will wait for the deployment task to complete. The default value
of
-1
means wait forever. Default value is:
-1
user java.lang.String
false Specifies the administrative user name.
userConfigFile java.lang.String
false Specifies the location of a user configuration file to use for the
administrative user name and password instead of specifying
the user name and password directly in plain text.
userKeyFile java.lang.String
false Specifies the location of a user key file to use for encrypting and
decrypting the user name and password stored in the user
configuration file.
verbose boolean
false When true, displays additional status information. Default value
is:
false
version boolean
false When true, prints the version information. Default value is:
false
weblogicHome java.lang.String
false This parameter is deprecated in this release and ignored.
Use the stop-app goal to stop an application.
<execution>
<id>wls-start-app</id>
<phase>pre-integration-test</phase>
<goals>
<goal>start-app</goal>
</goals>
<configuration>
<adminurl>t3://localhost:7001</adminurl>
<user>weblogic</user>
<password>password</password>
<name>${project.build.finalName}</name>
</configuration>
</execution>
Chapter 3
Maven Plug-In Goals
3-39

Example 3-15 shows typical
stop-app
goal output.
Example 3-15 stop-app
mvn com.oracle.weblogic:weblogic-maven-plugin:stop-app -Dus
er=weblogic -Dpassword=password -Dname=ExampleEJB
[INFO] Scanning for projects...
[INFO]
[INFO] ------------------------------------------------------------------------
[INFO] Building WebLogic Server Maven Plugin 14.1.1.0
[INFO] ------------------------------------------------------------------------
[INFO]
[INFO] --- weblogic-maven-plugin:14.1.1-0-0:stop-app (default-cli)
@ weblogic-ma
ven-plugin ---
weblogic.Deployer invoked with options: -noexit
-adminurl t3://localhost:7001 -
stop -user weblogic -name ExampleEJB
<Aug 19, 2015> <Info>
<J2EE Deployment SPI> <BEA-260121> <Initiat
ing stop operation for application, ExampleEJB [archive: null],
to configured ta
rgets.>
Task 6 initiated: [Deployer:149026]stop application ExampleEJB on
AdminServer.
Task 6 completed: [Deployer:149026]stop application ExampleEJB on
AdminServer.
Target state: stop completed on Server AdminServer
[INFO] ------------------------------------------------------------------------
[INFO] BUILD SUCCESS
[INFO] ------------------------------------------------------------------------
[INFO] Total time: 6.028s
[INFO] Finished at: Wed Aug 19 11:33:51 EDT 2015
[INFO] Final Memory: 10M/29M
[INFO] ------------------------------------------------------------------------
C:\Oracle\Middleware\Oracle_Home\wlserver\server\lib>
stop-server
Full Name
com.oracle.weblogic:weblogic-maven-plugin:stop-server
Description
Stops WebLogic Server from a script in the current working directory. This is a convenience
goal for the simple use case. If the server is already stopped, stdout prints a status message
but the goal does not fail.
Parameters
Table 3-16 stop-server Parameters
Name Type Required Description
adminurl java.lang.String
false Specifies the listen address and listen port of the Administration
Server. Default value is:
t3://localhost:7001
Chapter 3
Maven Plug-In Goals
3-40

Table 3-16 (Cont.) stop-server Parameters
Name Type Required Description
command java.lang.Strin
g[]
false Specifies the script to stop WebLogic Server. This will default to
stopWebLogic.sh
or
stopWebLogic.cmd,
based on the
platform.
domainHome java.lang.String
false Specifies the path to the WebLogic Server domain. Default value
is:
${basedir}/Oracle/Domains/mydomain
middlewareHome java.lang.String
false This parameter is deprecated in this release and ignored.
outputLog java.lang.String
false Specifies the log file to which the script output will be redirected.
When not specified, it defaults to
stdout
.
password java.lang.String
true
Specifies the administrative password.
timeoutSecs java.lang.Intege
r
false Specifies, in seconds, the timeout for the script. This is valid
when the
waitForExit
parameter is
true
. A zero (
0
) or
negative value indicates that the script will not timeout. Default
value is:
-1
user java.lang.String
true
Specifies the administrative user name.
waitForExit boolean
false When true, the plug-in should wait for the script to complete.
Default value is:
true
weblogicHome java.lang.String
false This parameter is deprecated in this release and ignored.
workingDir java.lang.String
false Specifies the working directory for the script. If you do not specify
this attribute, it defaults to the current working directory. Default
value is:
${project.base.directory}
Usage Example
The
stop-server
goal stops a server instance using the
stopWebLogic
script in the specified
domain.
<execution>
<id>wls-wlst-stop-server</id>
<phase>post-integration-test</phase>
<goals>
<goal>stop-server</goal>
</goals>
<configuration>
<domainHome>${project.build.directory}/base_domain</domainHome>
<user>weblogic</user>
<password>
password
</password>
<adminurl>t3://localhost:7001</adminurl>
</configuration>
</execution>
Example 3-16 shows typical
stop-server
goal output.
Example 3-16 stop-server
mvn com.oracle.weblogic:weblogic-maven-plugin:stop-server
-DdomainHome=c:\oracle\middleware\oracle_home\userprojects\domains\wl_server
-DworkingDir=c:\oracle\middleware\oracle_home\user_projects\domains\wl_server
-Duser=weblogic -Dpassword=password
[INFO] Scanning for projects...
[INFO]
[INFO] ------------------------------------------------------------------------
Chapter 3
Maven Plug-In Goals
3-41

[INFO] Building WebLogic Server Maven Plugin 14.1.1-0-0
[INFO] ------------------------------------------------------------------------
[INFO]
[INFO] --- weblogic-maven-plugin:14.1.1-0-0:stop-server (default-cli)
@ weblogic
-maven-plugin ---
[INFO] Stop server in domain:
c:\oracle\middleware\oracle_home\user_projects\dom
ains\wl_server
[INFO] Process being executed, waiting for completion.
[INFO] [exec] Stopping Weblogic Server...
[INFO] [exec]
[INFO] [exec] Initializing WebLogic Scripting Tool (WLST) ...
[INFO] [exec]
[INFO] [exec] Welcome to WebLogic Server Administration Scripting Shell
[INFO] [exec]
[INFO] [exec] Type help() for help on available commands
[INFO] [exec]
[INFO] [exec] Connecting to t3://localhost:7001 with userid weblogic ...
[INFO] [exec] Successfully connected to Admin Server "AdminServer" that belongs
to domain "wl_server".
[INFO] [exec]
[INFO] [exec] Warning: An insecure protocol was used to connect to the
[INFO] [exec] server. To ensure on-the-wire security, the SSL port or
[INFO] [exec] Admin port should be used instead.
[INFO] [exec]
[INFO] [exec] Shutting down the server AdminServer with force=false while connec
ted to AdminServer ...
[INFO] [exec] WLST lost connection to the WebLogic Server that you were
[INFO] [exec] connected to, this may happen if the server was shutdown or
[INFO] [exec] partitioned. You will have to re-connect to the server once the
[INFO] [exec] server is available.
[INFO] [exec] Disconnected from weblogic server: AdminServer
[INFO] [exec] Disconnected from weblogic server:
[INFO] [exec]
[INFO] [exec]
[INFO] [exec] Exiting WebLogic Scripting Tool.
[INFO] [exec]
[INFO] [exec] Done
[INFO] [exec] Stopping Derby Server...
[INFO] [exec] Derby server stopped.
[INFO] ------------------------------------------------------------------------
[INFO] BUILD SUCCESS
[INFO] ------------------------------------------------------------------------
[INFO] Total time: 23.270s
[INFO] Finished at: Wed Aug 19 11:33:51 EDT 2015
[INFO] Final Memory: 9M/23M
[INFO] ------------------------------------------------------------------------
undeploy
Full Name
com.oracle.weblogic:weblogic-maven-plugin:undeploy
Description
Undeploys the application from WebLogic Server. Stops the deployment unit and removes
staged files from target servers. Does not require a local server installation.
Chapter 3
Maven Plug-In Goals
3-42

Parameters
Table 3-17 undeploy Parameters
Name Type Required Description
adminurl java.lang.Strin
g
false Specifies the listen address and listen port of the Administration
Server. Default value is:
t3://localhost:7001
advanced boolean
false When true, prints advanced usage options.
appversion java.lang.Strin
g
false Specifies the version identifier of the application. When not
specified, the currently active version of the application is assumed.
debug boolean
false When true, displays debug-level messages to the standard output.
Default value is:
false
examples boolean
false When true, displays examples of how to use this plug-in.
failOnError boolean
false When true, forces the Mojo to fail the build upon encountering an
error if it would otherwise just log the error. Default value is:
true
graceful boolean
false When true, stops the application after existing
HTTP
clients have
completed their work. When not specified, forced shutdown is
assumed.
id java.lang.Strin
g
false Specifies an optional, user-supplied, unique deployment task
identifier.
ignoresessions boolean
false When true, ignores pending
HTTP
sessions during graceful
shutdown. Can be used only when the
graceful
parameter is
true
. Default value is:
false
middlewareHome java.lang.Strin
g
false This parameter is deprecated in this release and ignored.
name java.lang.Strin
g
false Specifies the deployment name to assign to a newly-deployed
application or standalone module.
noversion boolean
false When true, ignores all version-related code paths on the
Administration Server. Default value is:
false
nowait boolean
false When true, initiates multiple tasks and then monitors them later with
the
-list
action.
password java.lang.Strin
g
false Specifies the administrative password.
planversion java.lang.Strin
g
false Specifies the version of the deployment plan. When not specified,
the currently active version of the application's deployment plan is
assumed.
remote boolean
false When true, specifies that the plug-in is not running on the same
machine as the Administration Server. In this case, the
source
parameter specifies a path on the server, unless the
upload
parameter is also used. Default value is:
false
rmiGracePeriod java.lang.Integ
er
false Specifies the number of seconds in the grace period for RMI
requests during graceful shutdown. Can be used only when the
graceful
parameter is
true
. The default value of
-1
means no
grace period. Default value is:
-1
serverClasspat
h
java.lang.Strin
g
false This parameter is deprecated in this release and ignored.
Chapter 3
Maven Plug-In Goals
3-43

Table 3-17 (Cont.) undeploy Parameters
Name Type Required Description
submoduletarge
ts
java.lang.Strin
g
false Specifies JMS Server targets for resources defined within a JMS
application module. Possible values have the form:
submod@mod-
jms.xml@target
or
submoduleName@target
.
targets java.lang.Strin
g
false Specifies a comma-separated list of targets for the current
operation. When not specified, all configured targets are used.
timeout java.lang.Integ
er
false Specifies the maximum number of seconds WebLogic Server will
wait for the deployment task to complete. The default value of
-1
means wait forever. Default value is:
-1
user java.lang.Strin
g
false Specifies the administrative user name.
userConfigFile java.lang.Strin
g
false Specifies the location of a user configuration file to use for the
administrative user name and password instead of specifying the
user name and password directly in plain text.
userKeyFile java.lang.Strin
g
false Specifies the location of a user key file to use for encrypting and
decrypting the user name and password stored in the user
configuration file.
verbose boolean
false When true, displays additional status information during the
deployment process. Default value is:
false
version boolean
false When true, prints the version information. Default value is:
false
weblogicHome java.lang.Strin
g
false This parameter is deprecated in this release and ignored.
Use the undeploy goal to undeploy an application from WebLogic Server.
<execution>
<id>wls-undeploy</id>
<phase>post-integration-test</phase>
<goals>
<goal>undeploy</goal>
</goals>
<configuration>
<adminurl>t3://127.0.0.1:7001</adminurl>
<user>weblogic</user>
<password>
password
</password>
<name>${project.build.finalName}</name>
</configuration>
</execution>
Example 3-17 shows typical
undeploy
goal output.
Example 3-17 undeploy
mvn com.oracle.weblogic:weblogic-maven-plugin:undeploy
-Duser=weblogic -Dpassword=password -Dname=ExampleEJB
[INFO] Scanning for projects...
[INFO]
[INFO] ------------------------------------------------------------------------
[INFO] Building WebLogic Server Maven Plugin 14.1.1.0
[INFO] ------------------------------------------------------------------------
[INFO]
[INFO] --- weblogic-maven-plugin:14.1.1-0-0:undeploy (default-cli)
@ weblogic-ma
Chapter 3
Maven Plug-In Goals
3-44
ven-plugin ---
weblogic.Deployer invoked with options: -noexit
-adminurl t3://localhost:7001 -
undeploy -user weblogic -name ExampleEJB -targets AdminServer
<Aug 19, 2015> <Info> <J2EE Deployment SPI>
<BEA-260121> <Initiat
ing undeploy operation for application, ExampleEJB [archive: null],
to AdminServ
er .>
Task 7 initiated: [Deployer:149026]remove application ExampleEJB
on AdminServer.
Task 7 completed: [Deployer:149026]remove application ExampleEJB
on AdminServer.
Target state: undeploy completed on Server AdminServer
[INFO] ------------------------------------------------------------------------
[INFO] BUILD SUCCESS
[INFO] ------------------------------------------------------------------------
[INFO] Total time: 6.114s
[INFO] Finished at: Wed Aug 19 11:33:51 EDT 2015
[INFO] Final Memory: 9M/26M
[INFO] ------------------------------------------------------------------------
uninstall
Full Name
com.oracle.weblogic:weblogic-maven-plugin:uninstall
Description
Uninstalls WebLogic Server.
Parameters
Table 3-18 uninstall Parameters
Name Type Required Description
invPtrLoc java.io.File
true This parameter is deprecated and ignored.
middlewareHome java.lang.Strin
g
true The Oracle Middleware installation directory. This parameter is
required when uninstalling a server installed using the
Quickstart installer. Otherwise, it is ignored and the location in
the responseFile is used.
response java.io.File
true Deprecated. Use the responseFile parameter.
responseFile java.io.File
true The silent installer response file. This is required when using
the binary or JAR installers.
Example 3-18 shows an example of uninstalling WebLogic Server in a JAR file installation.
Example 3-18 uninstall in JAR Installation
mvn com.oracle.weblogic:weblogic-maven-plugin:uninstall -DresponseFile=c:\wls-
temp\response.txt
[INFO] Scanning for projects...
[INFO]
Chapter 3
Maven Plug-In Goals
3-45

[INFO]
------------------------------------------------------------------------
[INFO] Building Maven Stub Project (No POM) 1
[INFO]
------------------------------------------------------------------------
[INFO]
[INFO] --- weblogic-maven-plugin:14.1.1-0-0:uninstall (default-cli) @
standalone
-pom ---
[INFO] [uninstall]ORACLE_HOME = C:\test-maven\Oracle\Middleware\Oracle_Home
[INFO] [uninstall]ORACLE_HOME = C:\test-maven\Oracle\Middleware\Oracle_Home
[INFO] Executing: [cmd:[C:\\Windows\\System32\\cmd.exe, /c, C:\test-
maven\Oracl
e\Middleware\Oracle_Home\oui\bin\deinstall.cmd -noconsole -deinstall -silent -
re
sponseFile c:\wls-temp\response.txt]]
[INFO] Process being executed, waiting for completion.
[INFO] Installer exited with code: 0
[INFO]
------------------------------------------------------------------------
[INFO] BUILD SUCCESS
[INFO]
------------------------------------------------------------------------
update-app
Full Name
com.oracle.weblogic:weblogic-maven-plugin:update-app
Description
Updates an application's deployment plan by redistributing the plan files and reconfiguring the
application based on the new plan contexts. Does not require a local server installation.
Parameters
Table 3-19 update-app Parameters
Name Type Required Description
adminurl java.lang.String
false Specifies the listen address and listen port of the Administration
Server. Default value is:
t3://localhost:7001
advanced boolean
false When true, prints advanced usage options.
appversion java.lang.String
false Specifies the version identifier of the application. When not
specified, the currently active version of the application is
assumed.
debug boolean
false When true, displays debug-level messages to the standard
output. Default value is:
false
domainHome java.lang.String
false This parameter is deprecated in this release and ignored.
examples boolean
false When true, displays examples of how to use this plug-in.
failOnError boolean
false When true, forces the Mojo to fail the build upon encountering an
error if it would otherwise just log the error. Default value is:
true
Chapter 3
Maven Plug-In Goals
3-46
Table 3-19 (Cont.) update-app Parameters
Name Type Required Description
id java.lang.String
false Specifies an optional, user-supplied, unique deployment task
identifier.
middlewareHom
e
java.lang.String
false This parameter is deprecated in this release and ignored.
name java.lang.String
false Specifies the deployment name to assign to a newly-deployed
application or standalone module.
noversion boolean
false When true, ignores all version-related code paths on the
Administration Server. Default value is:
false
nowait boolean
false When true, initiates multiple tasks and then monitors them later
with the
-list
action.
password java.lang.String
false Specifies the administrative password.
plan java.lang.String
false Specifies the location of the deployment plan.
planversion java.lang.String
false Specifies the version of the deployment plan. When not specified,
the currently active version of the application's deployment plan is
assumed.
remote boolean
false When true, specifies that the plug-in is not running on the same
machine as the Administration Server. In this case, the
source
parameter specifies a path on the server, unless the
upload
parameter is also used. Default value is:
false
removePlanOve
rride
boolean
false Removes an overridden deployment plan during a
redeploy
or
update
deployment action.
To remove an application override, specify the
removePlanOverride
attribute.
rmiGracePerio
d
java.lang.Integer
false Specifies the number of seconds in the grace period for RMI
requests during graceful shutdown. Can be used only when the
graceful
parameter is
true
. The default value of
-1
means no
grace period. Default value is:
-1
serverClasspa
th
java.lang.String
false This parameter is deprecated in this release and ignored.
submoduletarg
ets
java.lang.String
false Specifies JMS Server targets for resources defined within a JMS
application module. Possible values have the form:
submod@mod-
jms.xml@target
or
submoduleName@target
.
targets java.lang.String
false The targets on which to update the application or module. This
attribute can be a comma-separated list. If no targets are
specified, all targets are updated.
timeout java.lang.Integer
false Specifies the maximum number of seconds WebLogic Server will
wait for the deployment task to complete. The default value of
-1
means wait forever. Default value is:
-1
upload boolean
false When true, copies the source files to the Administration Server's
upload directory prior to deployment. Use this setting when
running the plug-in remotely (using the
remote
parameter) and
when the user lacks normal access to the Administration Server's
file system. Default value is:
false
user java.lang.String
false Specifies the administrative user name.
Chapter 3
Maven Plug-In Goals
3-47

Table 3-19 (Cont.) update-app Parameters
Name Type Required Description
userConfigFil
e
java.lang.String
false Specifies the location of a user configuration file to use for the
administrative user name and password instead of specifying the
user name and password directly in plain text.
userKeyFile java.lang.String
false Specifies the location of a user key file to use for encrypting and
decrypting the user name and password stored in the user
configuration file.
verbose boolean
false When true, displays additional status information. Default value is:
false
version boolean
false When true, prints the version information. Default value is:
false
weblogicHome java.lang.String
false This parameter is deprecated in this release and ignored.
Use the update-app goal to update an application's deployment plan.
<execution>
<id>wls-update-app</id>
<phase>pre-integration-test</phase>
<goals>
<goal>update-app</goal>
</goals>
<configuration>
<adminurl>t3://127.0.0.1:7001</adminurl>
<user>weblogic</user>
<password>
password
</password>
<name>${project.build.finalName}</name>
<plan>${basedir}/misc/myplan.xml</plan>
</configuration>
</execution>
Example 3-19 shows typical
wlst
goal output.
Example 3-19 update-app
$ mvn com.oracle.weblogic:weblogic-maven-plugin:update-app -Duser=weblogic
-Dpassword=password -Dadminurl=t3://localhost:7001 -Dplan=misc/myplan.xml
-Dname=basicWebapp
[INFO] Scanning for projects...
[INFO]
[INFO] ------------------------------------------------------------------------
[INFO] Building basicWebapp 1.0-SNAPSHOT
[INFO] ------------------------------------------------------------------------
[INFO]
[INFO] --- weblogic-maven-plugin:14.1.1-0-0:update-app (default-cli)
@ main-test ---
weblogic.Deployer invoked with options: -noexit -adminurl
t3://localhost:7001 -update -user weblogic -plan
/home/oracle/src/tests/main-test/misc/myplan.xml -name basicWebapp -targets AdminServer
<Aug 19, 2015> <Info> <J2EE Deployment SPI> <BEA-260121>
<Initiating update operation for application, basicWebapp [archive: null],
to AdminServer .>
Task 10 initiated: [Deployer:149026]update application basicWebapp on
AdminServer.
Task 10 completed: [Deployer:149026]update application basicWebapp on
AdminServer.
Chapter 3
Maven Plug-In Goals
3-48

Target state: update completed on Server AdminServer
[INFO] ------------------------------------------------------------------------
[INFO] BUILD SUCCESS
[INFO] ------------------------------------------------------------------------
[INFO] Total time: 10.651s
[INFO] Finished at: Wed Aug 19 11:33:51 EDT 2015
[INFO] Final Memory: 18M/435M
[INFO] ------------------------------------------------------------------------
wlst
Full Name
com.oracle.weblogic:weblogic-maven-plugin:wlst
Description
This goal is a wrapper for the WLST scripting tool. It requires a server install for WLST online
commands.
Parameters
Table 3-20 wlst Parameters
Name Type Required Description
args java.lang.Str
ing
false Deprecated. Use the scriptArgs parameter to specify the arguments
as a list of scriptArg elements.
Specifies a string value containing command-line arguments to pass
to the WLST Python interpreter. The arguments are delimited by
spaces. An argument that contains embedded spaces should be
quoted either with single quotes or with escaped double quotes. For
example, here is a string for args that contains two parameters:
"'Thomas Paine' \"Now is the time that tries men's
souls.\""
debug boolean
false When true, displays additional status information.
Default value is:
false
executeScriptBefor
eFile
boolean
false When true, specifies whether a script, if supplied, executes before or
after the file, if supplied. Either a file or a script is required, and both
are allowed. See
filename
and
script
parameters.
Default value is:
true
failOnError boolean
false When true, the Maven build fails if the
wlst
goal fails. The default
value is
true
, and consequently any error condition will cause the
build to fail. In some cases, setting
failOnError
to
false
will allow
the
wlst
goal to ignore the error.
Default value is:
true
fileName java.lang.Str
ing
false Specifies the file path of the WLST Python script to execute. Either a
fileName
or a
script
parameter must be specified, and both are
allowed.
middlewareHome java.lang.Str
ing
true The path to the Oracle Middleware install directory.
Chapter 3
Maven Plug-In Goals
3-49
Table 3-20 (Cont.) wlst Parameters
Name Type Required Description
propertiesFile java.lang.Str
ing
false Specifies the path to a Java properties file. The property names
become defined variables in the WLST Python interpreter and are
initialized to the values supplied. For example, if the properties file
contains the line
"foobar: Very important stuff"
, the variable
foobar
can be used in a Python statement in the following manner:
"print('foobar has the value: ' + foobar)"
.
script java.lang.Str
ing
false Specifies an inline WLST Python script, for example,
"
print('Hello, world!')
".
Because Python uses indentation to demarcate nested code blocks,
scripts that contain multiple lines must be specified in the POM
without any indentation within the pom.xml, unless required for code
block demarcation.
scriptArgs java.lang.Str
ing
false Specifies the command-line arguments to pass to the WLST Jython
interpreter as a list of string values. If the argument contains any
embedded whitespace, the caller must include enclosing single
quotes or escaped double quotes within the scriptArg element's
value. If scriptArgs is specified, the args parameter (deprecated) is
ignored.
serverClasspath java.lang.Str
ing
false This parameter is deprecated and ignored in this release.
weblogicHome java.lang.Str
ing
false This parameter is deprecated and ignored in this release.
wlstVersion java.lang.Str
ing
false This parameter is deprecated and ignored in this release.
workingDir java.lang.Str
ing
false The current working directory where the wlst-script and create-
domain goal executes. The default value is: $
{project.build.directory}/weblogic-maven-plugin
Usage Example
The
wlst
goal enables the WebLogic Scripting Tool (WLST) to be used to execute scripts that
configure resources or perform other operations on a WebLogic Server domain. The
wlst
Maven goal uses the WebLogic Server WLST standard environment so you can use it with all
your existing WLST scripts.
You can use the
wlst
goal to execute an external WLST script specified with the
fileName
configuration parameter, or you can specify a sequence of WLST commands within the
pom.xml
file using the
script
configuration element:
<execution>
<id>wls-wlst-server</id>
<phase>post-integration-test</phase>
<goals>
<goal>wlst</goal>
</goals>
<configuration>
<middlewareHome>c:/dev/wls14110</middlewareHome>
<fileName>${project.basedir}/misc/configure_resources.py</fileName>
<args>t3://localhost:7001 weblogic password AdminServer</args>
<script>
print('This is a WLST inline script\n')
print('Next, we run a WLST script to create JMS resources on the server\n')
Chapter 3
Maven Plug-In Goals
3-50

</script>
<executeScriptBeforeFile>true</executeScriptBeforeFile>
</configuration>
</execution>
Example 3-20 shows typical
wlst
goal output.
Example 3-20 wlst
mvn com.oracle.weblogic:weblogic-maven-plugin:wlst
-DfileName=create-datasource.py
[INFO] Scanning for projects...
[INFO]
[INFO] ------------------------------------------------------------------------
[INFO] Building maven-demo 1.0
[INFO] ------------------------------------------------------------------------
[INFO]
[INFO] --- weblogic-maven-plugin:14.1.1-0-0:wlst (default-cli) @ maven-demo ---
[INFO] ++====================================================================++
[INFO] ++ weblogic-maven-plugin: wlst ++
[INFO] ++====================================================================++
*** Creating DataSource ***
Connecting to t3://localhost:7001 with userid weblogic ...
Successfully connected to Admin Server 'AdminServer' that belongs to domain 'mydomain'.
Warning: An insecure protocol was used to connect to the
server. To ensure on-the-wire security, the SSL port or
Admin port should be used instead.
Location changed to edit tree. This is a writable tree with
DomainMBean as the root. To make changes you will need to start
an edit session via startEdit().
For more help, use help(edit)
Starting an edit session ...
Started edit session, please be sure to save and activate your
changes once you are done.
Activating all your changes, this may take a while ...
The edit lock associated with this edit session is released
once the activation is completed.
Activation completed
Location changed to serverRuntime tree. This is a read-only tree with ServerRuntimeMBean
as the root.
For more help, use help(serverRuntime)
**** DataSource Details ****
Name: cp
Driver Name: Oracle JDBC driver
DataSource: oracle.jdbc.xa.client.OracleXADataSource
Properties: {user=demo}
State: Running
[INFO] ------------------------------------------------------------------------
[INFO] BUILD SUCCESS
By default, the
wlst
goal is bound to the pre-integration-test phase. To override the default
phase binding for a goal, you can explicitly bind plug-in goals to a particular life cycle phase,
Chapter 3
Maven Plug-In Goals
3-51

for example, to the post-integration-test phase, as shown below. The
pom.xml
file binds the
wlst
goal to both the pre- and post-integration-test phases (a dual phase target). As shown,
you can run different scripts in different phases, overriding the default settings, and make
modifications according to your needs.
Example
pom.xml
file
<project>
....
<executions>
<execution>
<id>WLS_SETUP_RESOURCES</id>
<phase>pre-integration-test</phase>
<goals>
<goal>wlst</goal>
</goals>
<configuration>
<fileName>src/main/wlst/create-datasource.py</fileName>
</configuration>
</execution>
<execution>
<id>WLS_TEARDOWN_RESOURCES</id>
<phase>post-integration-test</phase>
<goals>
<goal>wlst</goal>
</goals>
<configuration>
<fileName>src/main/wlst/remove-datasource.py</fileName>
</configuration>
</execution>
</executions>
....
</project>
wlst-client
Full Name
com.oracle.weblogic:weblogic-maven-plugin:wlst-client
Description
This goal is a WLST wrapper that does not require a local server install for WLST online
commands. If a local server install is not present, this goal supports only WLST online
commands.
Parameters
Table 3-21 wlst-client Parameters
Name Type Required Description
args java.lang.Stri
ng
false Deprecated. Use the scriptArgs parameter to specify the
arguments as a list of scriptArg elements.
debug boolean
false When true, displays additional status information.
Default value is:
false
Chapter 3
Maven Plug-In Goals
3-52
Table 3-21 (Cont.) wlst-client Parameters
Name Type Required Description
executeScriptBefo
reFile
boolean
false When true, specifies whether a script, if supplied, executes before
or after the file, if supplied. Either a file or a script is required, and
both are allowed. See
filename
and
script
parameters.
Default value is:
true
failOnError boolean
false When true, the Maven build fails if the
wlst
goal fails. The default
value is
true
, and consequently any error condition will cause the
build to fail. In some cases, setting
failOnError
to
false
will
allow the
wlst
goal to ignore the error.
Default value is:
true
fileName java.lang.Stri
ng
false Specifies the file path of the WLST Python script to execute. Either
a
fileName
or a
script
parameter must be specified, and both
are allowed.
middlewareHome java.lang.Stri
ng
false The path to the Oracle Middleware install directory.
This parameter is required for any WLST offline commands. If a
WLST script uses offline commands without specifying a valid
middlewareHome, this
wlst-client
goal fails.
propertiesFile java.lang.Stri
ng
false Specifies the path to a Java properties file. The property names
become defined variables in the WLST Python interpreter and are
initialized to the values supplied. For example, if the properties file
contains the line
"foobar: Very important stuff"
, the
variable
foobar
can be used in a Python statement in the following
manner:
"print('foobar has the value: ' + foobar)"
.
script java.lang.Stri
ng
false Specifies an inline WLST Python script, for example,
"
print('Hello, world!')
".
Because Python uses indentation to demarcate nested code
blocks, scripts that contain multiple lines must be specified in the
POM without any indentation within the pom.xml, unless required
for code block demarcation.
scriptArgs java.lang.Str
ing
false Specifies the command-line arguments to pass to the WLST
Jython interpreter as a list of string values. If the argument
contains any embedded whitespace, the caller must include
enclosing single quotes or escaped double quotes within the
scriptArg element's value. If scriptArgs is specified, the args
parameter (deprecated) is ignored.
Running Scripts With Fusion Middleware Dependencies
If you use the wlst-client goal to run WLST scripts that contain Fusion Middleware
dependencies, you must first include the com.oracle.fmwshare dependency to pull in the
necessary libraries needed by those scripts.
The com.oracle.fmwshare dependency must be listed before any Fusion Middleware
dependencies.
For example, to run a WLST script for SOA, add a dependency on com.oracle.fmwshare and
SOA, similar to the following:
<plugin>
<groupId>com.oracle.weblogic</groupId>
<artifactId>weblogic-maven-plugin</artifactId>
<version>14.1.1-0-0</version>
Chapter 3
Maven Plug-In Goals
3-53

<executions>
<execution>
<id>soa-wlst-client</id>
<goals>
<goal>wlst-client</goal>
</goals>
<configuration>
<fileName>${project.basedir}/misc/doSoaStuff.py</fileName>
<scriptArgs>
<scriptArg>${adminUserName}</scriptArg>
<scriptArg>${adminPassword}</scriptArg>
<scriptArg>${adminUrl}</scriptArg>
</scriptArgs>
</configuration>
</execution>
</executions>
<dependencies>
<dependency>
<groupId>com.oracle.fmwshare</groupId>
<artifactId>fmwshare-wlst-dependencies</artifactId>
<version>14.1.1-0-0</version>
<type>pom</type>
</dependency>
<dependency>
<groupId>com.oracle.soa</groupId>
<artifactId>soa-wlst-dependencies</artifactId>
<version>14.1.1-0-0</version>
<type>pom</type>
</dependency>
</dependencies>
</plugin>
Usage Example
The
wlst-client
goal enables the WebLogic Scripting Tool (WLST) to be used to execute
scripts that configure resources or perform other operations on a WebLogic Server domain.
The
wlst-client
goal does not require a local server install for WLST online commands.
The
wlst-client
Maven goal uses the WebLogic Server WLST standard environment so you
can use it with all your existing WLST scripts.
You can use the
wlst-client
goal to execute an external WLST script specified with the
fileName
configuration parameter, you can specify a sequence of WLST commands within the
pom.xml
file using the
script
configuration element, or you can use both mechanisms.
For example:
<execution>
<id>wls-wlst-server</id>
<phase>post-integration-test</phase>
<goals>
<goal>wlst-client</goal>
</goals>
<configuration>
<fileName>${project.basedir}/misc/configure_resources.py</fileName>
<args>t3://some-host:7001 weblogic
password
AdminServer</args>
<script>
print('This is a WLST inline script\n')
print('Next, we run a WLST script to create JMS resources on the server\n')
</script>
<executeScriptBeforeFile>true</executeScriptBeforeFile>
Chapter 3
Maven Plug-In Goals
3-54

</configuration>
</execution>
Example 3-20 shows typical
wlst-client
goal output.
Example 3-21 wlst-client
mvn com.oracle.weblogic:weblogic-maven-plugin:wlst-client
-DfileName=create-datasource.py
[INFO] Scanning for projects...
[INFO]
[INFO] ------------------------------------------------------------------------
[INFO] Building maven-demo 1.0
[INFO] ------------------------------------------------------------------------
[INFO]
[INFO] --- weblogic-maven-plugin:14.1.1-0-0:wlst (default-cli) @ maven-demo ---
[INFO] ++====================================================================++
[INFO] ++ weblogic-maven-plugin: wlst ++
[INFO] ++====================================================================++
*** Creating DataSource ***
Connecting to t3://some-host:7001 with userid weblogic ...
Successfully connected to Admin Server 'AdminServer' that belongs to domain 'mydomain'.
Warning: An insecure protocol was used to connect to the
server. To ensure on-the-wire security, the SSL port or
Admin port should be used instead.
Location changed to edit tree. This is a writable tree with
DomainMBean as the root. To make changes you will need to start
an edit session via startEdit().
For more help, use help(edit)
Starting an edit session ...
Started edit session, please be sure to save and activate your
changes once you are done.
Activating all your changes, this may take a while ...
The edit lock associated with this edit session is released
once the activation is completed.
Activation completed
Location changed to serverRuntime tree. This is a read-only tree with ServerRuntimeMBean
as the root.
For more help, use help(serverRuntime)
**** DataSource Details ****
Name: cp
Driver Name: Oracle JDBC driver
DataSource: oracle.jdbc.xa.client.OracleXADataSource
Properties: {user=demo}
State: Running
[INFO] ------------------------------------------------------------------------
[INFO] BUILD SUCCESS
As another example, assume that you have the following simple WLST script:
try:
connect('weblogic','password','t3://10.151.69.120:7001')
listApplications()
Chapter 3
Maven Plug-In Goals
3-55

print('TEST PASS')
except:
print('TEST FAIL')
You can supply this WLST script with the
fileName
configuration parameter, as shown in
Example 3-22.
Example 3-22 wlst-client Script Example
C:\Oracle\Middleware\Oracle_Home\oracle_common\plugins\maven\com\oracle\maven\or
acle-maven-sync\14.1.1>mvn com.oracle.weblogic:weblogic-maven-plugin:wlst-client
-DfileName=test.py
[INFO] Scanning for projects...
[INFO]
[INFO] ------------------------------------------------------------------------
[INFO] Building Maven Stub Project (No POM) 1
[INFO] ------------------------------------------------------------------------
[INFO]
[INFO] --- weblogic-maven-plugin:14.1.1-0-0:wlst-client (default-cli) @ standalo
ne-pom ---
[INFO] [wlst-client]No middlewareHome specified.
Connecting to t3://10.151.69.120:7001 with userid weblogic ...
Successfully connected to Admin Server "AdminServer" that belongs to domain "bas
e_domain".
Warning: An insecure protocol was used to connect to the
server. To ensure on-the-wire security, the SSL port or
Admin port should be used instead.
jaxwsejb30ws
TEST PASS
[INFO] ------------------------------------------------------------------------
[INFO] BUILD SUCCESS
[INFO] ------------------------------------------------------------------------
[INFO] Total time: 29.197s
[INFO] Finished at: Wed Aug 19 11:33:51 EDT 2020
[INFO] Final Memory: 18M/45M
By default, the
wlst
goal is bound to the pre-integration-test phase. To override the default
phase binding for a goal, you can explicitly bind plug-in goals to a particular life cycle phase,
for example, to the post-integration-test phase, as shown below. The
pom.xml
file binds the
wlst
goal to both the pre- and post-integration-test phases (a dual phase target). As shown,
you can run different scripts in different phases, overriding the default settings, and make
modifications according to your needs.
Example
pom.xml
file
<project>
....
<executions>
<execution>
<id>WLS_SETUP_RESOURCES</id>
<phase>pre-integration-test</phase>
<goals>
<goal>wlst</goal>
</goals>
<configuration>
<fileName>src/main/wlst/create-datasource.py</fileName>
</configuration>
</execution>
<execution>
Chapter 3
Maven Plug-In Goals
3-56

<id>WLS_TEARDOWN_RESOURCES</id>
<phase>post-integration-test</phase>
<goals>
<goal>wlst</goal>
</goals>
<configuration>
<fileName>src/main/wlst/remove-datasource.py</fileName>
</configuration>
</execution>
</executions>
....
</project>
exit() is Trapped
exit()
exits WLST from the user session and closes the scripting shell. By default, WLST calls
System.exit(0)
for the current WLST JVM when exiting WLST. Because wlst-client runs
inside the same JVM as the Maven build process, the entire Maven build process would exit.
To provide for this, the Maven implementation traps WLST
exit()
calls and throws an
exception.
Calling exit() explicitly from a WLST script is discouraged.
For example, assume you were to modify the previous WLST script example to include
exit()
,
as follows:
try:
connect('weblogic','password','t3://10.151.69.120:7001')
listApplications()
exit()
print('TEST PASS')
except:
print('TEST FAIL')
When the Maven implementation traps
exit()
, it throws an exception:
Warning: An insecure protocol was used to connect to the
server. To ensure on-the-wire security, the SSL port or
Admin port should be used instead.
jaxwsejb30ws
Exiting WebLogic Scripting Tool.
TEST FAIL
[INFO] ------------------------------------------------------------------------
[INFO] BUILD SUCCESS
[INFO] ------------------------------------------------------------------------
[INFO] Total time: 29.250s
[INFO] Finished at: Wed Aug 19 11:33:51 EDT 2020
[INFO] Final Memory: 19M/45M
[INFO] ------------------------------------------------------------------------
ws-clientgen
Deprecated
This goal is deprecated in this release.
Chapter 3
Maven Plug-In Goals
3-57
Full Name
com.oracle.weblogic:weblogic-maven-plugin:ws-clientgen
Description
Parameters
Table 3-22 briefly describes the
ws-clientgen
parameters. These parameters are more fully
described in Table 2-3 WebLogic-specific Attributes of the clientgen Ant Task in WebLogic Web
Services Reference for Oracle WebLogic Server.
Table 3-22 ws-clientgen Parameters
Name Type Required Description
binding
bindings
java.lang.String
false Specifies one or more customization files that specify JAX-WS and
JAXB custom binding declarations or SOAP handler files. If there is
only one binding element, both
<binding>./filename</binding>
and
<bindings><binding>./filename</binding></bindings>
are allowed.
See Table 3-23 for a description of
bindings
parameters.
catalog java.lang.String
false Specifies an external XML catalog file to resolve external entity
references.
For more information about creating XML catalog files, see Using XML
Catalogs in Developing JAX-WS Web Services for Oracle WebLogic
Server
copyWsdl boolean
false Controls where the WSDL should be copied in the ws-clientgen goal 's
destination dir.
debug boolean
false Turns on additional debug output.
debugLevel boolean
false Uses Ant debug levels.
destDir java.io.File
true Specifies the directory into which the ws-clientgen goal generates the
client source code, WSDL, and client deployment descriptor files.
You must specify either the
destFile
or
destDir
attribute, but not
both.
failOnError boolean
false Specifies whether the ws-clientgen goal continues executing in the
event of an error. The default value is True.
fork boolean
false Specifies whether to execute javac using the JDK compiler externally.
The default value is false.
genRuntimeCat
alog
boolean
false Specifies whether the ws-clientgen goal should generate the XML
catalog artifacts in the client runtime environment. This value defaults
to true.
includeAntRun
time
boolean
false Specifies whether to include the Ant run-time libraries in the classpath.
includeJavaRu
ntime
boolean
false Specifies whether to include the default run-time libraries from the
executing VM in the classpath.
jmstransportc
lient
JMSTransportClie
nt
false Invoking a WebLogic Web service using JMS transport.
Table 3-25 describes the parameters of the
jmstransportclient
parameter.
packageName java.lang.String
false Specifies the package name into which the generated client interfaces
and stub files are packaged.
Chapter 3
Maven Plug-In Goals
3-58

Table 3-22 (Cont.) ws-clientgen Parameters
Name Type Required Description
produce
produces
FileSet
List<FileSet>
false There is only one FileSet.
There is more than one FileSet.
verbose boolean
false Turns on verbose output
wsdl java.lang.String
true Specifies a full path name or URL of the WSDL that describes a Web
service (either WebLogic or non-WebLogic) for which the client
component files should be generated.
wsdlLocation java.lang.String
false Controls the value of the wsdlLocation attribute generated on the
WebService
or
WebServiceProvider
annotation.
xauthfile java.lang.String
false Specifies the authorization file.
xmlCatalog java.lang.String
false Not used.
Table 3-23 describes the parameters of the
bindings
parameter.
Table 3-23 Binding Parameters
Name Type Required Description
file java.lang.Strin
g
false Specifies a customization file that contains JAX-WS and JAXB
custom binding declarations or SOAP handler files.
Table 3-24 describes the parameters of the
xmlCatalog
parameter.
Table 3-24 xmlCatalog Parameters
Name Type Required Description
refid java.lang.String
false Specifies the directories (separated by semi-colons) that the
ws-
jwsc
goal should search for JWS files to compile.
Table 3-25 describes the parameters of the
jmstransportclient
parameter.
Table 3-25 jmstransportclient Parameters
Name Type Required Description
destinationName java.lang.Strin
g
false JNDI name of the destination queue or topic. Default value is
com.oracle.webservices.jms.RequestQueue
.
destinationType java.lang.Strin
g
false Valid values include: QUEUE or TOPIC. Default value is QUEUE.
replyToName java.lang.Strin
g
false JNDI name of the JMS destination to which the response
message is sent.
targetService java.lang.Strin
g
false Port component name of the Web service.
jndiInitialContext
Factory
java.lang.Strin
g
false Name of the initial context factory class used for JNDI lookup.
Default value is
weblogic.jndi.WLInitialContextFactory
.
Chapter 3
Maven Plug-In Goals
3-59

Table 3-25 (Cont.) jmstransportclient Parameters
Name Type Required Description
jndiConnectionFact
oryName
java.lang.Strin
g
NA JNDI name of the connection factory that is used to establish a
JMS connection. Default value is
com.oracle.webservices.jms.ConnectionFactory
.
jndiUrl java.lang.Strin
g
NA JNDI provider URL. Default value is
t3://localhost:7001
.
deliveryMode java.lang.Strin
g
NA Delivery mode indicating whether the request message is
persistent. Valid values are PERSISTENT and
NON_PERSISTENT. Default value is PERSISTENT.
timeToLive long
false Lifetime, in milliseconds, of the request message. Default value
is 180000L.
priority int
false JMS priority associated with the request and response message.
Default value is 0.
jndiContextParamet
er
java.lang.Strin
g
false JNDI properties, in a format like:
someParameterName1=someValue1 ,
someParameterName2=someValue2.
bindingVersion java.lang.Strin
g
false Version of the SOAP JMS binding. Default value is 1.0.
runAsPrincipal java.lang.Strin
g
false Principal used to run the listening MDB.
runAsRole java.lang.Strin
g
false Role used to run the listening MDB.
messageType java.lang.Strin
g
false Message type to use with the request message. Valid values are
com.oracle.webservices.api.jms.JMSMessageType.BYTE
S
and
com.oracle.webservices.api.jms.JMSMessageType.TEXT
. Default value is BYTES.
enableHttpWsdlAcce
ss
boolean
false Boolean flag that specifies whether to publish the WSDL through
HTTP. Default value is true.
mdbPerDestination boolean
false Boolean flag that specifies whether to create one listening
message-driven bean (MDB) for each requested destination.
Default value is true.
activationConfig java.lang.Strin
g
false Activation configuration properties passed to the JMS provider.
contextPath java.lang.Strin
g
false The deployed context of the web service.
serviceUri java.lang.Strin
g
false Web service URI portion of the URL.
portName java.lang.Strin
g
false The name of the port in the generated WSDL.
Usage Example
The
ws-clientgen
goal generates client Web service artifacts from a WSDL.
This goal benefits from the convention-over-configuration approach, allowing you to execute it
using the defaults of the project.
Chapter 3
Maven Plug-In Goals
3-60

There are two ways to run the ws-clientgen goal:
• From the command line. For example, after you define an alias:
mvn –DvariableName1=value1 –DvariableName2=value2
com.oracle.weblogic:weblogic-maven-plugin:ws-clientgen
• By specifying the Maven
generate-resources
life cycle phase. Then run
mvn generate-
resources
in the same directory of pom.xml.
To do this, modify the
pom.xml
file to specify the
generate-resources
life cycle phase, the
ws-clientgen
goal, and include any parameters you need to set. Consider the following
example:
<?xml version="1.0" encoding="UTF-8" standalone="no"?>
<project>
<modelVersion>4.0.0</modelVersion>
<groupId>maven_plugin.simple</groupId>
<artifactId>maven_plugin_simple</artifactId>
<version>1.0</version>
<build>
<plugins>
<plugin>
<groupId>com.oracle.weblogic</groupId>
<artifactId>weblogic-maven-plugin</artifactId>
<version>14.1.1-0-0</version>
<executions>
<execution>
<id>clientgen</id>
<phase>generate-resources</phase>
<goals>
<goal>ws-clientgen</goal>
</goals>
<configuration>
<wsdl>${basedir}/AddNumbers.wsdl</wsdl>
<dest${project.build.outputDirectory}</destDir>
<packageName>maven_plugin.simple.client</packageName>
</configuration>
</execution>
</executions>
</plugin>
</plugins>
</build>
</project>
Example 3-23 shows typical
ws-clientgen
goal output.
Example 3-23 ws-clientgen
mvn -f C:\maven-doc\jwsc-test-2\clientgen_pom.xml generate-resources
[INFO] Scanning for projects...
[INFO]
[INFO]
------------------------------------------------------------------------
[INFO] Building maven_plugin_simple 1.0
[INFO]
------------------------------------------------------------------------
[INFO]
Chapter 3
Maven Plug-In Goals
3-61

[INFO] --- weblogic-maven-plugin:14.1.1-0-0:ws-clientgen (clientgen) @
maven_plugin_sim
ple ---
[INFO] Executing standalone...
[INFO] Executing Maven goal 'clientgen'...
calling method public static void
weblogic.wsee.tools.clientgen.MavenClientGen.e
xecute(org.apache.maven.plugin.logging.Log,java.util.Map) throws
java.lang.Throw
able
[INFO] Consider using <depends>/<produces> so that wsimport won't do
unnecessary
compilation
[WARNING] parsing WSDL...
[WARNING]
[WARNING]
[WARNING]
[WARNING] Generating code...
[WARNING]
[WARNING]
[WARNING] Compiling code...
[WARNING]
[INFO]
------------------------------------------------------------------------
[INFO] BUILD SUCCESS
wsgen
Full Name
com.oracle.weblogic:weblogic-maven-plugin:wsgen
Description
Maven goal that reads a JAX-WS service endpoint implementation class and generates all of
the portable artifacts for a JAX-WS Web service. Use the
wsgen
goal when you are starting
from Java classes.
You can then package the service endpoint interface and implementation class, value types,
and generated classes, if any, into a WAR file, and deploy the WAR to a Web container.
The
wsgen
goal provides a wrapper for the JAX-WS Maven wsgen plug-in goal.
Parameters
Table 3-26 describes the
wsgen
parameters.
Table 3-26 wsgen Parameters
Name Type Required Description
args java.lang.Strin
g
false Specifies optional command-line options. Multiple elements can
be specified, and each token must be placed in its own list.
Chapter 3
Maven Plug-In Goals
3-62

Table 3-26 (Cont.) wsgen Parameters
Name Type Required Description
destDir java.io.File
false Specifies the full pathname of where to place output generated
classes. Use
xnocompile
to turn this off. The default is
$
{project.build.outputDirectory})
.
encoding java.lang.Strin
g
false Specifies the character encoding of the output files, such as the
deployment descriptors and XML files. Examples of character
encodings are SHIFT-JIS and UTF-8. The default value is platform
dependent.
extension boolean
false
extension
is always set to
true
and you do not need to set it.
Extensions are not limited to Oracle JAX-WS vendor extensions.
executable java.lang.Strin
g
false Name of the executable. Can be
wsgen
.
genWsdl boolean
false Specifies that a WSDL file should be generated in
$
{resourceDestDir}
. By default, the WSDL is not generated.
inlineSchemas boolean
false Generates inline schemas in a generated WSDL. The default is
false
.
The
genWsdl
parameter must be set to
true
.
jmstransportserv
ice
boolean
false Use JMS transport for Web services. It can be omitted. See
Table 3-34 for a description of
jmstransportservice
parameters.
keep boolean
false Specifies whether to keep generated files. The default is
true
.
metadata java.io.File
false Metadata file for the
wsgen
task, as described in External Web
Service Metadata in JAX-WS Release Documentation.
Unmatched files are ignored.
portName java.lang.Strin
g
false Specify the port name to use in the generated WSDL. The
genWsdl
parameter must be set to
true
.
protocol java.lang.Strin
g
false Use in conjunction with
genWsdl
to specify the protocol to use in
the
wsdl:binding
. The
genWsdl
parameter must be set to
true
.
Valid values are
soap1.1
and
Xsoap1.2
.
The default is soap
soap1.1
.
Xsoap1.2
is non-standard and you
can use it only in conjunction with the extension option.
resourceDestDir java.io.File
false Specifies the directory to contain the generated WSDL files. The
default is
${project.build.directory}/generated-
sources/wsdl
. The
genWsdl
parameter must be set to true.
sei java.lang.Strin
g
false Specifies the service endpoint implementation class name.
servicename java.lang.Strin
g
false Specify the service name (
wsdl:servicename
) to use in the
generated WSDL. The
genWsdl
parameter must be set to true.
sourceDestDir java.io.File
false Specify where to place generated source files. This parameter
also sets
keep
to true. The default is
$
{project.build.directory}/generated-sources/wsgen
.
verbose boolean
false Output messages about what the tool is doing.
Default value is:
false
.
vmArgs java.util.List
false Specify optional JVM options. You can specify multiple elements,
and each token must be placed in its own list.
Chapter 3
Maven Plug-In Goals
3-63

Table 3-26 (Cont.) wsgen Parameters
Name Type Required Description
xdonotoverwrite boolean
false No description provided
xnocompile boolean
false Turns off compilation after code generation, and lets the generated
sources be compiled by Maven during the compilation phase. The
default is
false
.
This parameter also sets
keep
to true.
Usage Example
The
wsgen
goal reads a JAX-WS service endpoint implementation class and generates all of
the portable artifacts for a JAX-WS Web service.
Specify the Maven
process-classes
life cycle phase. Then, run
mvn process-classes
in the
same directory of the POM file.
To do this, modify the
pom.xml
file to specify the
process-classes
life cycle phase, the
wsgen
goal, and include any parameters you need to set. Consider the following example:
<?xml version="1.0" encoding="UTF-8" standalone="no"?>
<project>
<modelVersion>4.0.0</modelVersion>
<groupId>maven_plugin.simple</groupId>
<artifactId>maven_plugin_simple</artifactId>
<version>1.0</version>
<build>
<sourceDirectory>.</sourceDirectory>
<plugins>
<plugin>
<groupId>com.oracle.weblogic</groupId>
<artifactId>weblogic-maven-plugin</artifactId>
<version>14.1.1-0-0</version>
<executions>
<execution>
<id>wsgen</id>
<phase>process-classes</phase>
<goals>
<goal>wsgen</goal>
</goals>
<configuration>
<destDir>${project.build.directory}/wsgenOutput/</destDir>
<sei>myexample.IPInfo</sei>
<verbose>true</verbose>
<genWsdl>true</genWsdl>
</configuration>
</execution>
</executions>
</plugin>
</plugins>
</build>
</project>
Chapter 3
Maven Plug-In Goals
3-64

Example 3-24 shows typical
wsgen
goal output.
Example 3-24 wsgen
mvn -Dfile=pom.xml process-classes
[INFO] Scanning for projects...
[INFO]
[INFO]
------------------------------------------------------------------------
[INFO] Building maven_plugin_simple 1.0
[INFO]
------------------------------------------------------------------------
[INFO]
[INFO] --- maven-resources-plugin:2.5:resources (default-resources) @
maven_plug
in_simple ---
[debug] execute contextualize
[WARNING] Using platform encoding (Cp1252 actually) to copy filtered
resources,
i.e. build is platform dependent!
[INFO] skip non existing resourceDirectory
C:\Oracle\Middleware\Oracle_Home\orac
le_common\plugins\maven\com\oracle\maven\oracle-maven-
sync\14.1.1\src\main\resou
rces
[INFO]
[INFO] --- maven-compiler-plugin:2.3.2:compile (default-compile) @
maven_plugin_
simple ---
[WARNING] File encoding has not been set, using platform encoding Cp1252,
i.e. b
uild is platform dependent!
[INFO] Compiling 1 source file to
C:\Oracle\Middleware\Oracle_Home\oracle_common
\plugins\maven\com\oracle\maven\oracle-maven-sync\14.1.1\target\classes
[INFO]
[INFO] --- weblogic-maven-plugin:14.1.1-0-0:wsgen (wsgen) @
maven_plugin_simple
---
[INFO] Processing: myexample.IPInfo
[WARNING] Using platform encoding (Cp1252), build is platform dependent!
[INFO] jaxws:wsgen args: [-keep, -s,
'C:\Oracle\Middleware\Oracle_Home\oracle_co
mmon\plugins\maven\com\oracle\maven\oracle-maven-sync\14.1.1\target\generated-
so
urces\wsgen', -d,
'C:\Oracle\Middleware\Oracle_Home\oracle_common\plugins\maven\
com\oracle\maven\oracle-maven-sync\14.1.1\target\wsgenOutput', -verbose, -
extens
ion, -wsdl, -r,
'C:\Oracle\Middleware\Oracle_Home\oracle_common\plugins\maven\co
m\oracle\maven\oracle-maven-sync\14.1.1\target\generated-sources\wsdl',
myexampl
e.IPInfo]
myexample\jaxws\GetIpAddress.java
myexample\jaxws\GetIpAddressResponse.java
Chapter 3
Maven Plug-In Goals
3-65

[INFO]
------------------------------------------------------------------------
[INFO] BUILD SUCCESS
[INFO]
------------------------------------------------------------------------
[INFO] Total time: 21.309s
[INFO] Finished at: Wed Aug 19 11:33:51 EDT 2015
[INFO] Final Memory: 8M/32M
[INFO]
------------------------------------------------------------------------
In this example, the
wsgen
goal creates the following files:
target
classes
META-INF
wsdl
IPInfoService.wsdl
IPInfoService_schema1.xsd
myexample
IPInfo.class
generated-sources
wsdl
IPInfoService.wsdl
IPInfoService_schema1.xsd
wsgen
myexample
jaxws
GetIpAddress.java
GetIpAddressResponse.java
wsgenoutput
myexample
jaxws
GetIpAddress.class
GetIpAddressResponse.class
wsimport
Full Name
com.oracle.weblogic:weblogic-maven-plugin:wsimport
Description
Maven goal that parses a WSDL and binding files and generates the Java code needed to
access it. Use the
wsimport
goal when you are starting from a WSDL.
The
wsimport
goal provides a wrapper for the JAX-WS Maven wsimport goal.
Parameters
Table 3-27 describes the
wsimport
parameters.
Chapter 3
Maven Plug-In Goals
3-66

Table 3-27 wsimport Parameters
Name Type Required Description
args java.lang.String
false Specifies optional command-line options. Multiple elements can
be specified, and each token must be placed in its own list.
bindingDirectory java.io.File
false Directory containing binding files.
bindingFiles java.util.List
false List of files to use for bindings. If not specified, all
.xml
files in
the
bindingDirectory
are used.
catalog java.io.File
false Catalog file to resolve external entity references support TR9401,
XCatalog, and OASIS XML Catalog format.
destDir java.io.File
false Specifies the full pathname of where to place output generated
classes. Use
xnocompile
to turn this off. The default is
$
{project.build.outputDirectory})
.
encoding java.lang.String
false Specifies the character encoding of the output files, such as the
deployment descriptors and XML files. Examples of character
encodings are SHIFT-JIS and UTF-8. The default is platform
dependent.
executable java.lang.String
false Name of the executable. Can be
wsimport
.
extension boolean
false
extension
is always set to
true
and you do not need to set it.
Extensions are not limited to Oracle JAX-WS vendor extensions.
genJWS boolean
false Generate stubbed JWS implementation file. The default is
false
.
httpproxy java.lang.String
false Set HTTP/HTTPS proxy. Format is
[
user[:password]@]proxyHost[:proxyPort]
.
implDestDir java.io.File
false Specify where to generate JWS implementation file.
implPortName java.lang.String
false Local portion of port name for generated JWS implementation.
Implies
genJWS=true
. Note: It is a QName string, formatted as:
"{" + Namespace URI + "}" + local part.
implServiceName java.lang.String
false Local portion of service name for generated JWS
implementation. Implies
genJWS=true
. Note: It is a QName
string, formatted as: "{" + Namespace URI + "}" + local part.
jmstransportclien
t
JMSTransportClie
nt
false Invoking a WebLogic Web service using JMS transport.
Table 3-25 describes the parameters of the
jmstransportclient
parameter.
jmsUri jmsUri
false Override jmsUri defined in a WSDL file. Requires
extension=true
.
keep boolean
false Specifies whether to keep generated files. The default is
true
.
packageName java.lang.String
false The package in which the source files will be generated.
quiet boolean
false Suppress wsimport output. The default is
false
.
sourceDestDir java.io.File
false Specify where to place generated source files. This parameter
also sets
keep
to true. The default is
$
{project.build.directory}/generated-sources/
wsimport
.
staleFile java.io.File
false The folder containing flag files used to determine if the output is
stale.
If you do not specify a folder, the default is
$
{project.build.directory}/jaxws/stale
.
Chapter 3
Maven Plug-In Goals
3-67
Table 3-27 (Cont.) wsimport Parameters
Name Type Required Description
target java.lang.String
false Generate code as per the given JAXWS specification version.
Setting "
2.0
" will cause JAX-WS to generate artifacts that run
with JAX-WS 2.0 runtime.
verbose boolean
false Output messages about what the tool is doing. Default value is:
false
.
vmArgs java.lang.String
false Specify optional JVM options. You can specify multiple elements,
and each token must be placed in its own list.
wsdlDirectory java.io.File
false Directory containing WSDL files.
wsdlFiles java.util.List
false List of files to use for WSDLs. If not specified, all .wsdl files in the
wsdlDirectory
will be used.
wsdlLocation java.lang.String
false
@WebService.wsdlLocation
and
@WebServiceClient.wsdlLocation
value.
Can end with asterisk, in which case relative path of the WSDL
will be appended to the given
wsdlLocation
.
Example:
...
<configuration>
<wsdlDirectory>src/mywsdls</wsdlDirectory>
<wsdlFiles>
<wsdlFile>a.wsdl</wsdlFile>
<wsdlFile>b/b.wsdl</wsdlFile>
<wsdlFile>${basedir}/src/mywsdls/
c.wsdl</wsdlFile>
</wsdlFiles>
<wsdlLocation>http://example.com/
mywebservices/*</wsdlLocation>
</configuration>
...
wsdlLocation
for
a.wsdl
will be http://example.com/
mywebservices/a.wsdl
wsdlLocation
for
b/b.wsdl
will be http://example.com/
mywebservices/b/b.wsdl
wsdlLocation
for
${basedir}/src/mywsdls/c.wsdl
will be
file://absolute/path/to/c.wsdl
Note: External binding files cannot be used if asterisk notation is
in place.
wsdlUrls java.util.List
false
List of external WSDL URLs to be compiled.
xadditionalHeader
s
boolean
false Maps headers not bound to the request or response messages
to Java method parameters.
xauthFile java.io.File
false Specify the location of authorization file.
xdebug boolean
false Turn on debug message. The default is
false
.
xdisableAuthentic
ator
boolean
false Disable Authenticator used by JAX-WS RI,
xauthfile
will be
ignored if set.
Chapter 3
Maven Plug-In Goals
3-68

Table 3-27 (Cont.) wsimport Parameters
Name Type Required Description
xdisableSSLHostna
meVerification
boolean
false Disable the SSL Hostname verification while fetching WSDL(s).
xjcArgs java.util.List
false Specify optional XJC-specific parameters that should simply be
passed to xjc using -B option of WsImport command.
Multiple elements can be specified, and each token must be
placed in its own list.
xnoAddressingData
Binding
boolean
false Binding W3C
EndpointReferenceType
to Java. By default
WsImport follows spec and does not bind
EndpointReferenceType
to Java and uses the spec provided
W3CEndpointReference
.
xnocompile boolean
false Turns off compilation after code generation, and lets the
generated sources be compiled by Maven during the compilation
phase. The default is
true
.
This parameter also sets
keep
to true.
xuseBaseResourceA
ndURLToLoadWSDL
boolean
false No description provided by JAX-WS Maven wsimport.
Usage Example
The
wsimport
goal parses a WSDL and binding files and generates Java code needed to
access the Web service.
You can use the
wsimport
goal in two ways:
• To generate the client-side artifacts. Then, implement the client to invoke the Web service.
• To create your own implementation of the Web service. Use
wsimport
goal with the
genJWS
parameter to generate portable artifacts and a stubbed implementation file. You then
implement the service endpoint.
Specify the Maven
generate-sources
life cycle phase. Then, run
mvn generate-sources
in the
same directory of the POM file.
Assume that you want to import the WSDL shown in Example 3-25.
Example 3-25 WSDL to Import
<?xml version='1.0' encoding='UTF-8'?><!-- Published by JAX-WS RI at
http://jax-ws.dev.java.net. RI's version is JAX-WS RI 2.2.9-b14041
svn-revision#14041. --><!-- Generated by JAX-WS RI at
http://jax-ws.dev.java.net. RI's version is JAX-WS RI 2.2.9-b14041
svn-revision#14041. --><definitions
xmlns:wsu="http://docs.oasis-open.org/wss/2004/01/oasis-200401-wss-wssecurity-
uti
lity-1.0.xsd" xmlns:wsp="http://www.w3.org/ns/ws-policy" xmlns:wsp1_
2="http://schemas.xmlsoap.org/ws/2004/09/policy"
xmlns:wsam="http://www.w3.org/2007/05/addressing/metadata"
xmlns:soap="http://schemas.xmlsoap.org/wsdl/soap/"
xmlns:tns="http://ws.web.wls.my.org/"
xmlns:xsd="http://www.w3.org/2001/XMLSchema"
xmlns="http://schemas.xmlsoap.org/wsdl/"
targetNamespace="http://ws.web.wls.my.org/" name="SampleWs">
Chapter 3
Maven Plug-In Goals
3-69

<types>
<xsd:schema>
<xsd:import namespace="http://ws.web.wls.my.org/"
schemaLocation="x.xsd"/>
</xsd:schema>
</types>
<message name="hello">
<part name="parameters" element="tns:hello"/>
</message>
<message name="helloResponse">
<part name="parameters" element="tns:helloResponse"/>
</message>
<portType name="SampleWs">
<operation name="hello">
<input wsam:Action="http://ws.web.wls.my.org/SampleWs/
helloRequest" message="tns:hello"/>
<output wsam:Action="http://ws.web.wls.my.org/SampleWs/
helloResponse" message="tns:helloResponse"/>
</operation>
</portType>
<binding xmlns:soapjms="http://www.w3.org/2010/soapjms/"
name="SampleWsPortBinding" type="tns:SampleWs">
<soapjms:jndiInitialContextFactory>weblogic.jndi.WLInitialContextFactory</
soapjms:jndiInitialContextFactory>
<soapjms:jndiConnectionFactoryName>com.oracle.webservices.api.jms.ConnectionFa
ctory</soapjms:jndiConnectionFactoryName>
<soapjms:jndiUrl>t3://localhost:7001</soapjms:jndiUrl>
<soapjms:bindingVersion>SOAP_JMS_1_0</soapjms:bindingVersion>
<soapjms:destinationName>com.oracle.webservices.api.jms.RequestQueue</
soapjms:destinationName>
<soapjms:targetService>SampleWs</soapjms:targetService>
<soapjms:timeToLive>180000</soapjms:timeToLive>
<soapjms:deliveryMode>PERSISTENT</soapjms:deliveryMode>
<soapjms:priority>0</soapjms:priority>
<soapjms:messageType>BYTES</soapjms:messageType>
<soapjms:destinationType>QUEUE</soapjms:destinationType>
<soap:binding transport="http://www.w3.org/2010/soapjms/"
style="document"/>
<operation name="hello">
<soap:operation soapAction=""/>
<input>
<soap:body use="literal"/>
</input>
<output>
<soap:body use="literal"/>
</output>
</operation>
</binding>
<service name="SampleWs">
<port name="SampleWsPort" binding="tns:SampleWsPortBinding">
<soap:address
location="jms:jndi:com.oracle.webservices.api.jms.RequestQueue?
targetService=Sampl
eWs&jndiURL=t3://
Chapter 3
Maven Plug-In Goals
3-70

localhost:7001&messageType=BYTES&deliveryMode=PERSISTENT"/>
</port>
</service>
</definitions>
To import this WSDL, modify the
pom.xml
file to specify the
generate-sources
life cycle phase,
the
wsimport
goal, the WSDL location, and include any parameters you need to set. This
example uses a local WSDL file for demonstration purposes.
Consider the following example:
<?xml version="1.0" encoding="UTF-8" standalone="no"?>
<project>
<modelVersion>4.0.0</modelVersion>
<groupId>maven_plugin.simple</groupId>
<artifactId>maven_plugin_simple</artifactId>
<version>1.0</version>
<build>
<plugins>
<plugin>
<groupId>com.oracle.weblogic</groupId>
<artifactId>weblogic-maven-plugin</artifactId>
<version>14.1.1-0-0</version>
<executions>
<execution>
<id>wsimport-jmssample</id>
<goals>
<goal>wsimport</goal>
</goals>
<phase>generate-sources</phase>
<configuration>
<wsdlFiles>
<wsdlFile>${basedir}/import-example/SampleWs.wsdl</wsdlFile>
</wsdlFiles>
<genJWS>true</genJWS>
</configuration>
</execution>
</executions>
</plugin>
</plugins>
</build>
</project>
Example 3-26 shows typical
wsimport
goal output.
Example 3-26 wsimport
mvn -Dfile=pom.xml generate-sources
[INFO] Scanning for projects...
[INFO]
[INFO]
------------------------------------------------------------------------
[INFO] Building maven_plugin_simple 1.0
[INFO]
------------------------------------------------------------------------
Chapter 3
Maven Plug-In Goals
3-71

[INFO]
[INFO] --- weblogic-maven-plugin:14.1.1-0-0:wsimport (wsimport-jmssample) @
mave
n_plugin_simple ---
[INFO] Processing: file:/C:/Oracle/Middleware..../import-example/SampleWs.wsdl
[WARNING] Using platform encoding (Cp1252), build is platform dependent!
[INFO] jaxws:wsimport args: [-keep, -s,
'C:\Oracle\Middleware\...\import-example\target\generated-sources\wsimport', -
d,
'C:\Oracle\Middleware...\import-example\target\classes', -extension,
-Xnocompile, -jms, -jmsuri, jms:jndi:null?targetServi
ce=null, -httpproxy:some-proxy-name, -generateJWS, -implDestDir,
'C:\Oracle\Middleware...\import-example',
"file:/C:/Oracle/Middleware...import-example/SampleWs.wsdl"]
parsing WSDL...
Generating code...
[INFO]
------------------------------------------------------------------------
[INFO] BUILD SUCCESS
[INFO]
------------------------------------------------------------------------
[INFO] Total time: 20.888s
[INFO] Finished at: Finished at: Wed Aug 19 11:33:51 EDT 2015
[INFO] Final Memory: 7M/23M
[INFO]
------------------------------------------------------------------------
In this example, the
wsimport
goal creates the following files:
org
my
wls
web
ws
SampleWs_SampleWsPortImpl.java
target
classes
generated-sources
wsimport
org
my
wls
web
ws
Hello.java
HelloResponse.java
ObjectFactory.java
package-info.java
SampleWs.java
SampleWs_Service.java
jaxws
Chapter 3
Maven Plug-In Goals
3-72
stale
.2b48c6ef28bc8a45aa2da4246c0c4ac90cf82c57
ws-wsdlc
Deprecated
This goal is deprecated in this release.
Full Name
com.oracle.weblogic:weblogic-maven-plugin:ws-wsdlc
Description
Maven goal to generate a set of artifacts and a partial Java implementation of the Web service
from a WSDL.
The
ws-wsdlc
goal provides a Maven wrapper for the wsdlc Ant task, which is described in
WebLogic Web Services Reference for Oracle WebLogic Server.
Parameters
Table 3-28 briefly describes the
ws-wsdlc
parameters. These parameters are more fully
described in Table 2-3 WebLogic-specific Attributes of the clientgen Ant Task in WebLogic Web
Services Reference for Oracle WebLogic Server.
Table 3-28 ws-wsdlc Parameters
Name Type Required Description
bindings java.lang.Strin
g
false Customization files that specify JAX-WS and JAXB custom binding
declarations or SOAP handler files.
catalog java.lang.Strin
g
false Specifies an external XML catalog file.
For more information about creating XML catalog files, see Using
XML Catalogs in Developing JAX-WS Web Services for Oracle
WebLogic Server
debug boolean
false Specifies the flag to set when debugging the process. Default value
is false.
debugLevel java.lang.Strin
g
false Uses Ant debug levels.
destImplDir java.lang.Strin
g
false Specifies the directory into which the stubbed-out JWS
implementation file is generated.
destJavadocDir java.lang.Strin
g
false Specifies the directory into which the Javadoc that describes the
JWS interface is generated.
destJwsDir java.lang.Strin
g
true Specifies the directory into which the JAR file that contains the JWS
interface and data binding artifacts should be generated.
explode boolean
false Specifies the flag to set if you want exploded output. Defaults to true.
failOnError boolean
false Specifies whether the ws-clientgen goal continues executing in the
event of an error. The default value is true
fork boolean
false Specifies whether to execute javac using the JDK compiler
externally. The default value is false.
Chapter 3
Maven Plug-In Goals
3-73
Table 3-28 (Cont.) ws-wsdlc Parameters
Name Type Required Description
includeAntRunt
ime
boolean
false Specifies whether to include the Ant run-time libraries in the
classpath. The default value is true.
includeJavaRun
time
boolean
false Specifies whether to include the default run-time libraries from the
executing VM in the classpath. The default value is false.
optimize boolean
false Specifies the flag to set if you want optimization. Defaults to true.
packageName java.lang.Strin
g
false Specifies the package into which the generated JWS interface and
implementation files should be generated.
srcPortName java.lang.Strin
g
false Specifies the name of the WSDL port from which the JWS interface
file should be generated. Set the value of this parameter to the value
of the
name
parameter of the
port
parameter that corresponds to
the Web service port for which you want to generate a JWS
interface file.
The
port
parameter is a child of the
service
parameter in the
WSDL file. If you do not specify this attribute,
ws-wsdlc
generates a
JWS interface file from the service specified by
srcServiceName
.
srcServiceName java.lang.Strin
g
false Specifies the name of the Web service from which the JWS interface
file should be generated.
srcWsdl java.lang.Strin
g
true Specifies the name of the WSDL from which to generate the JAR file
that contains the JWS interface and data binding artifacts.
verbose boolean
false Specifies the flag to set if you want verbose output. Default value is
false.
Usage Example
The
ws-wsdlc
goal generates a set of artifacts and a partial Java implementation of the Web
service from a WSDL.
This goal benefits from the convention-over-configuration approach, allowing you to execute it
using the defaults of the project.
There are two ways to run the
ws-wsdlc
goal:
• From the command line. For example, after you define an alias:
mvn –DvariableName1=value1 –DvariableName2=value2
com.oracle.weblogic:weblogic-maven-plugin:ws-wsdlc
• By specifying the Maven
generate-resources
life cycle phase.
To do this, modify the
pom.xml
file to specify the
generate-resources
life cycle phase, the
ws-wsdlc
goal, and include any parameters you need to set. Then run
mvn generate-
resources
in the same directory of pom.xml.
<?xml version="1.0" encoding="UTF-8" standalone="no"?>
<project>
<modelVersion>4.0.0</modelVersion>
<groupId>maven_plugin.simple</groupId>
<artifactId>maven_plugin_simple</artifactId>
<version>1.0</version>
<build>
<plugins>
Chapter 3
Maven Plug-In Goals
3-74

<plugin>
<groupId>com.oracle.weblogic</groupId>
<artifactId>weblogic-maven-plugin</artifactId>
<version>14.1.1-0-0</version>
<executions>
<execution>
<id>wsdlc</id>
<phase>generate-resources</phase>
<goals>
<goal>ws-wsdlc</goal>
</goals>
<configuration>
<srcWsdl>${basedir}/AddNumbers.wsdl</srcWsdl>
<destJwsDir>${project.build.directory}/jwsImpl</destJwsDir>
<destImplDir>${project.build.directory}/output</destImplDir>
<packageName>maven_plugin.simple</packageName>
<verbose>true</verbose>
</configuration>
</execution>
</executions>
</plugin>
</plugins>
</build>
</project>
Example 3-27 shows typical
ws-wsdlc
goal output.
Example 3-27 ws-wsdlc
mvn -f wsdlc_pom.xml generate-resources
[INFO] Scanning for projects...
[INFO]
[INFO]
------------------------------------------------------------------------
[INFO] Building maven_plugin_simple 1.0
[INFO]
------------------------------------------------------------------------
[INFO]
[INFO] --- weblogic-maven-plugin:14.1.1-0-0:ws-wsdlc (wsdlc) @
maven_plugin_simple ---
[INFO] Executing standalone...
[INFO] Executing Maven goal 'wsdlc'...
calling method public static void
weblogic.wsee.tools.wsdlc.MavenWsdlc.execute(o
rg.apache.maven.plugin.logging.Log,java.util.Map) throws java.lang.Throwable
Catalog dir = C:\Users\maven\AppData\Local\Temp\_ckr59b
Download file [AddNumbers.wsdl] to C:\Users\maven\AppData\Local\Temp\_ckr59b
srcWsdl is redefined as [ C:\Users\maven\AppData\Local\Temp\_ckr59b\AddNumber
s.wsdl ]
[INFO]
------------------------------------------------------------------------
[INFO] BUILD SUCCESS
Chapter 3
Maven Plug-In Goals
3-75
ws-jwsc
Deprecated
This goal is deprecated in this release.
Full Name
com.oracle.weblogic:weblogic-maven-plugin:ws-jwsc
Description
Maven goal to build a JAX-WS web service.
The
ws-jwsc
goal provides a Maven wrapper for the jwsc Ant task, which is described in
WebLogic Web Services Reference for Oracle WebLogic Server.
Note:
The
ws-jwsc
goal does not work with the JAX-RPC-only JWS annotations described
in WebLogic-Specific Annotations
Nested Configuration in module Elements
The
ws-jwsc
goal supports nested configuration elements, as shown in bold in Example 3-28.
See Introduction to the POM for information on Maven projects with multiple modules.
Example 3-28 Nested Configuration Elements
<?xml version="1.0" encoding="UTF-8" standalone="no"?>
<project>
<modelVersion>4.0.0</modelVersion>
<groupId>com.test.ws</groupId>
<artifactId>test-ws-jwsc1</artifactId>
<version>1.0</version>
<build>
<plugins>
<plugin>
<groupId>com.oracle.weblogic</groupId>
<artifactId>weblogic-maven-plugin</artifactId>
<version>14.1.1-0-0</version>
<executions>
<execution>
<id>first-jwsc</id>
<phase>generate-resources</phase>
<goals>
<goal>ws-jwsc</goal>
</goals>
<configuration>
<srcDir>${basedir}/src/main/java</srcDir>
<destDir>${project.build.directory}/jwscOutput
/${project.build.finalName}</destDir>
<listfiles>true</listfiles>
Chapter 3
Maven Plug-In Goals
3-76

<debug>true</debug>
<module>
<name>pocreate</name>
<contextPath>mypub</contextPath>
<compiledWsdl>D:\maven-test\order_wsdl.jar</compiledWsdl >
<jws>
<file>examples/wsee/jwsc/POCreateImpl.java</file>
<transportType>
<type>WLHttpTransport</type>
<serviceUri>POCreate</serviceUri>
<portName>POCreatePort</portName>
</transportType>
</jws>
<jws>
…
</jws>
<descriptors>
<descriptor>"resources/web.xml"<descriptor/>
<descriptor>"resources/weblogic.xml"<descriptor />
</descriptors>
</module>
<module>
…
</module>
</modules>
</configuration>
</execution>
</executions>
</plugin>
</plugins>
</build>
</project>
These nested configuration elements for
ws-jwsc
have the following conditions:
• You must use at least one of the following elements:
jws
,
jwses
,
module
, or
modules
.
• Collection elements such as
jwses
and
modules
elements can be omitted.
• If there is only one child element within the collection element, the collection element can
also be removed.
For example, if there is only one
jws
element, use
jws
. If there are multiple
jws
elements,
add all of the
jws
elements under a
jwses
element.
• As with the JWSC ant task, if
module
has only one
jws
child element, then other sub
elements of
module
can be nested into
jwsc
and
jwsc/transportType
.
Example 3-29 shows an example without a module
element
in which the
jws
parameter is a
child of
ws-jwsc
.
Example 3-29 jws Element as Child of ws-jwsc Goal
<?xml version="1.0" encoding="UTF-8" standalone="no"?>
<project>
<modelVersion>4.0.0</modelVersion>
Chapter 3
Maven Plug-In Goals
3-77

<groupId>com.test.ws</groupId>
<artifactId>test-ws-jwsc</artifactId>
<version>1.0</version>
<build>
<plugins>
<plugin>
<groupId>com.oracle.weblogic</groupId>
<artifactId>weblogic-maven-plugin</artifactId>
<version>14.1.1-0-0</version>
<executions>
<execution>
<id>first-jwsc</id>
<phase>compile</phase>
<goals>
<goal>ws-jwsc</goal>
</goals>
<configuration>
<srcDir>${basedir}/src/main/java</srcDir>
<destDir>${project.build.directory}/jwscOutput/
${project.build.finalName}</destDir>
<jws> <!-- no parent <module> -->
<file>examples/wsee/jwsc/POCreateImpl.java</file>
<compiledWsdl>${project.build.directory}/
purchaseorder_wsdl.jar>
<transportType>
<type>WLHttpTransport</type>
</transportType>
</jws>
</configuration>
</execution>
</executions>
</plugin>
</plugins>
</build>
</project>
ws-jwsc Parameters
Table 3-29 briefly describes the
ws-jwsc
parameters. These parameters are more fully
described in Table 2-3 WebLogic-specific Attributes of the clientgen Ant Task in WebLogic Web
Services Reference for Oracle WebLogic Server.
Table 3-29 ws-jwsc Parameters
Name Type Required Description
applicationXm
l
java.lang.Stri
ng
false Specifies the full name and path of the application.xml deployment
descriptor of the Enterprise Application. If you specify an existing file, the
ws-jwsc goal updates it to include the Web services information. However,
jwsc does not automatically copy the updated application.xml file to the
destDir; you must manually copy this file to the destDIR. If the file does
not exist, jwsc creates it.
The ws-jwsc goal also creates or updates the corresponding weblogic-
application.xml file in the same directory. If you do not specify this
attribute, jwsc creates or updates the file destDir/META-INF/
application.xml, where destDir is the jwsc attribute.
Chapter 3
Maven Plug-In Goals
3-78

Table 3-29 (Cont.) ws-jwsc Parameters
Name Type Required Description
debug boolean
false Turns on additional debug output.
destDir java.lang.Stri
ng
true Specifies the full pathname of the directory that will contain the compiled
JWS files, XML Schemas, WSDL, and generated deployment descriptor
files, all packaged into a JAR or WAR file.
destEncoding java.lang.Stri
ng
false Specifies the character encoding of the output files, such as the
deployment descriptors and XML files. Examples of character encodings
are SHIFT-JIS and UTF-8. The default value of this attribute is UTF-8.
jws Jws
false There is only one <jws> element.
See Table 3-30 for a description of
jws
parameters.
jwses Jws
false It contains more than one< jws> element.
keepGenerated boolean
false Specifies whether the Java source files and artifacts generated by this
goal should be regenerated if they already exist.
If you specify false, new Java source files and artifacts are always
generated and any existing artifacts are overwritten. If you specify true,
the goal regenerates only those artifacts that have changed, based on the
timestamp of any existing artifacts
listfiles boolean
false Specifies whether to list all of the files.
module Module
false It contains one <module> element.
See Table 3-31 for a description of
module
parameters.
modules Module
false It contains more than one <module> element.
optimize boolean
false Specifies the flag to set when optimization is required. Defaults to true.
sourcepath java.lang.Stri
ng
true The full pathname of top-level directory that contains the Java files
referenced by the JWS file, such as JavaBeans used as parameters or
user-defined exceptions.
srcDir java.lang.Stri
ng
true Specifies the full pathname of the top-level directory that contains the
JWS file you want to compile.
srcEncoding java.lang.Stri
ng
false Specifies the character encoding of the input files, such as the JWS file or
configuration XML files.
Examples of character encodings are SHIFT-JIS and UTF-8. The default
value of this attribute is the character encoding set for the JVM.
verbose boolean
false Specifies verbose output
jws Parameter
As described in jws, the
jws
parameter specifies the name of a JWS file that implements your
Web service and for which the
ws-jwsc
goal should generate Java code and supporting
artifacts, and then package them into a deployable WAR file inside of an Enterprise
Application.
You can specify the
jws
parameter in two ways:
• An immediate child element of the
ws-jwsc
goal. In this case,
ws-jwsc
generates a
separate WAR file for each JWS file. You typically use this method if you are specifying just
one JWS file to the
ws-jwsc
goal.
Chapter 3
Maven Plug-In Goals
3-79

• A child element of the
module
parameter, which in turn is a child of the
ws-jwsc
goal. In this
case,
ws-jwsc
generates a single WAR file that includes all the generated code and
artifacts for all the JWS files grouped within the module parameter.
This method is useful if you want all JWS files to share supporting files, such as common
Java data types.
Table 3-30 describes the child parameters of the
jws
parameter. The description specifies
whether the parameter applies in the case that
jws
is a child of the
ws-jwsc
goal, is a child of
module
, or both.
Table 3-30 jws Parameters
Name Type Required Description Child of ws-
jwsc, module,
or both
compiledWsdl java.lang.Str
ing
false Specifies the full pathname of the JAR file generated
by the
ws-wsdlc
goal based on an existing WSDL file.
Only required for the "starting from WSDL" use case.
both
contextPath java.lang.Str
ing
false Specifies the deployed context of the web service. ws-jwsc
explode boolean
false Specifies the flag to set when you want exploded
output. Defaults to true.
ws-jwsc
file java.lang.Str
ing
true The name of the JWS file that you want to compile.
The ws-jwsc goal looks for the file in the srcdir
directory.
both
generateWsdl boolean
true Specifies whether the generated WAR file includes the
WSDL file in the WEB-INF directory. Default value is
false.
both
jmstransportse
rvice
boolean
false Use JMS transport for Web services. It can be omitted.
See Table 3-34 for a description of
jmstransportservice
parameters.
ws-jwsc
name java.lang.Str
ing
false Specifies the name of the generated WAR file (or
exploded directory, if the explode attribute is set to
true) that contains the deployable Web service.
ws-jwsc
transportType transportType
false Used when it contains only one transport
type
element. It can be omitted.
See Table 3-33 for a description of
transportType
parameters.
both
transportTypes transportType
false Used when it contains more than one transport
type
element. It can be omitted.
See Table 3-33 for a description of
transportType
parameters.
both
wsdlOnly boolean
false Specifies that only a WSDL file should be generated
for this JWS file. The default value is false.
ws-jwsc
module Parameters
As described in module, the
module
parameter groups one or more
jws
parameters together so
that their generated code and artifacts are packaged in a single Web application (WAR) file.
The
module
parameter is a child of the
ws-jwsc
goal.
Table 3-31 describes the parameters of the module parameter.
Chapter 3
Maven Plug-In Goals
3-80

Table 3-31 module Parameters
Name Type Required Description
clientgen java.lang.Strin
g
false There is only one <clientgen> element. It can be omitted.
clientgens java.lang.Strin
g
false There is more than one <clientgen> element. It can be omitted.
contextPath java.lang.Strin
g
false Specifies the deployed context of the Web service.
descriptor java.lang.Strin
g
false Specifies the web.xml descriptor to use if a new one should not be
generated. The path should be fully qualified. The files should be
separated by ", ".
ejbWsInWar boolean
false Specifies whether to package EJB-based Web services in a WAR file
instead of a JAR file.
explode boolean
false Specifies the flag to set when you want exploded output. Defaults to
true.
FileSet FileSet
false Used when it contains one FileSet element. It can be omitted.
FileSets FileSet
false Used when it contains more than one FileSet element. It can be
omitted.
generateWsdl boolean
true Specifies whether the generated WAR file includes the WSDL file in the
WEB-INF directory. Default value is false.
jws Jws
false Used when it contains one jws element. It can be omitted.
jwses Jws
false Used when it contains more than one jws element. It can be omitted.
name java.lang.Strin
g
false Specifies the name of the WAR to use when evaluating the ear file.
wsdlOnly boolean
false Specifies that only a WSDL file should be generated for this JWS file.
The default value is false.
zipfileset
java.lang.Strin
g
false There is only one <zipfileset> element.
FileSet Parameters
As described in jwsfileset, the
FileSet
parameter specifies one or more directories in which
the
ws-jwsc
goal searches for JWS files to compile. The list of JWS files that
ws-jwsc
finds is
then treated as if each file had been individually specified with the
jws
parameter of
module
.
The
FileSet
parameter is a child of the
ws-jwsc
goal.
Table 3-32 describes the parameters of the FileSet parameter.
Table 3-32 FileSet Parameters
Name Type Required Description
srcDir java.lang.Stri
ng
true Specifies the directories (separated by semi-colons) that the ws-jwsc
goal should search for JWS files to compile.
prefix java.lang.Stri
ng
false Prefix to use.
Chapter 3
Maven Plug-In Goals
3-81
Table 3-32 (Cont.) FileSet Parameters
Name Type Required Description
sourceInclude
s
java.lang.Stri
ng
false Specifies the explicit includes-list for the file set.
sourceExclude
s
java.lang.Stri
ng
false Specifies the explicit excludes-list for the file set.
TransportType Parameters
As described in WLHttpTransport, WLHttpsTransport, and WLJMSTransport, you use transport
parameters to specify the transport type, context path, and service URI sections of the URL
used to invoke the Web service, as well as the name of the port in the generated WSDL.
The
ws-jwsc
goal combines these transport parameters into one,
TransportType
.
Table 3-32 describes the parameters of the
transportType
parameter.
Table 3-33 transportType Parameters
Name Type Required Description
transportTypeName java.lang.Stri
ng
true Specifies the value is WLHttpTransport, WLHttpsTransport, or
WLJMSTransport.
Default value is WLHttpTransport.
serviceUri java.lang.Stri
ng
false Specifies the Web service URI portion of the URL.
contextPath java.lang.Stri
ng
false Specifies the deployed context of the Web service.
portName java.lang.Stri
ng
false Specifies the name of the port in the generated WSDL.
Table 3-34 describes the parameters of the
jmstransportservice
parameter.
Table 3-34 jmstransportservice Parameters
Name Type Required Description
destinationName java.lang.St
ring
false JNDI name of the destination queue or topic. Default value is
com.oracle.webservices.jms.RequestQueue
.
destinationType java.lang.St
ring
false Valid values include: QUEUE or TOPIC. Default value is QUEUE.
replyToName java.lang.St
ring
false JNDI name of the JMS destination to which the response message is
sent.
targetService java.lang.St
ring
false Port component name of the Web service.
jndiInitialContex
tFactory
java.lang.St
ring
false Name of the initial context factory class used for JNDI lookup. Default
value is
weblogic.jndi.WLInitialContextFactory
.
jndiConnectionFac
toryName
java.lang.St
ring
JNDI name of the connection factory that is used to establish a JMS
connection. Default value is
com.oracle.webservices.jms.ConnectionFactory
.
Chapter 3
Maven Plug-In Goals
3-82

Table 3-34 (Cont.) jmstransportservice Parameters
Name Type Required Description
jndiUrl java.lang.St
ring
JNDI provider URL. Default value is
t3://localhost:7001
.
deliveryMode java.lang.St
ring
Delivery mode indicating whether the request message is persistent.
Valid values are PERSISTENT and NON_PERSISTENT. Default
value is PERSISTENT.
timeToLive long
false Lifetime, in milliseconds, of the request message. Default value is
180000L.
priority int
false JMS priority associated with the request and response message.
Default value is 0.
jndiContextParame
ter
java.lang.St
ring
false JNDI properties, in a format like:
someParameterName1=someValue1 ,
someParameterName2=someValue2.
bindingVersion java.lang.St
ring
false Version of the SOAP JMS binding. Default value is 1.0.
runAsPrincipal java.lang.St
ring
false Principal used to run the listening MDB.
runAsRole java.lang.St
ring
false Role used to run the listening MDB.
messageType java.lang.St
ring
false Message type to use with the request message. Valid values are
com.oracle.webservices.api.jms.JMSMessageType.BYTES
and
com.oracle.webservices.api.jms.JMSMessageType.TEXT
.
Default value is BYTES.
enableHttpWsdlAcc
ess
boolean
false Boolean flag that specifies whether to publish the WSDL through
HTTP. Default value is true.
mdbPerDestination boolean
false Boolean flag that specifies whether to create one listening message-
driven bean (MDB) for each requested destination. Default value is
true.
activationConfig java.lang.St
ring
false Activation configuration properties passed to the JMS provider.
contextPath java.lang.St
ring
false The deployed context of the web service.
serviceUri java.lang.St
ring
false Web service URI portion of the URL.
portName java.lang.St
ring
false The name of the port in the generated WSDL.
Usage Example
The
ws-jwsc
goal builds a JAX-WS web service.
This goal benefits from the convention-over-configuration approach, allowing you to execute it
using the defaults of the project.
To run the
ws-jwsc
goal, specify the Maven
generate-resources
phase.
Chapter 3
Maven Plug-In Goals
3-83

To do this, modify the
pom.xml
file to specify the
generate-resources
phase, the
ws-jwsc
goal,
and include any pa parameters you need to set. Then run
mvn generate-resources
in the
same directory of pom.xml.
<?xml version="1.0" encoding="UTF-8" standalone="no"?>
<project>
<modelVersion>4.0.0</modelVersion>
<groupId>maven_plugin.simple</groupId>
<artifactId>maven_plugin_simple</artifactId>
<version>1.0</version>
<build>
<plugins>
<plugin>
<groupId>com.oracle.weblogic</groupId>
<artifactId>weblogic-maven-plugin</artifactId>
<version>14.1.1-0-0</version>
<executions>
<execution>
<id>jwsc</id>
<phase>generate-resources</phase>
<goals>
<goal>ws-jwsc</goal>
</goals>
<configuration>
<destDir>${project.build.directory}/jwscOutput/
<listfiles>true</listfiles>
<debug>true</debug>
<jws> <!-- no parent <module> -->
<file>examples/wsee/jwsc/POCreateImpl.java</file>
<compiledWsdl>${project.build.directory}/
purchaseorder_wsdl.jar>
<transportType>
<type>WLHttpTransport</type>
</transportType>
</jws>
<verbose>true</verbose>
</configuration>
</execution>
</executions>
</plugin>
</plugins>
</build>
</project>
Example 3-30 shows typical
ws-jwsc
goal output.
Example 3-30 ws-jwsc
mvn -f jwsc_pom.xml generate-resources
INFO] Scanning for projects...
[INFO]
[INFO]
------------------------------------------------------------------------
[INFO] Building maven_plugin_simple 1.0
Chapter 3
Maven Plug-In Goals
3-84

[INFO]
------------------------------------------------------------------------
[INFO]
[INFO] --- weblogic-maven-plugin:14.1.1-0-0:ws-jwsc (jwsc) @
maven_plugin_simple ---
[INFO] Executing standalone...
INFO] Executing Maven goal 'jwsc'...
calling method public static void
weblogic.wsee.tools.jws.MavenJwsc.execute(org.apache.maven.plugin.logging.Log,
java.util.Map) throws java.lang.Throwable
[EarFile] Application File : C:\maven-doc\jwsc-test-2\output\META-
INF\application.xml
[INFO]
------------------------------------------------------------------------
[INFO] BUILD SUCCESS
Chapter 3
Maven Plug-In Goals
3-85

4
Creating a Split Development Directory
Environment
To create a WebLogic Server split development directory that you can use to develop a Java
EE application or module, you have to organize the Java EE components and shared classes,
generate a basic build.xml file, and develop multiple EAR projects.
This chapter includes the following sections:
• Overview of the Split Development Directory Environment
• Using the Split Development Directory Structure: Main Steps
• Organizing Java EE Components in a Split Development Directory
• Organizing Shared Classes in a Split Development Directory
• Generating a Basic build.xml File Using weblogic.BuildXMLGen
• Developing Multiple-EAR Projects Using the Split Development Directory
• Best Practices for Developing WebLogic Server Applications
• Overview of the Split Development Directory Environment
The WebLogic split development directory environment consists of a directory layout and
associated Ant tasks that help you repeatedly build, change, and deploy Java EE
applications.
• Using the Split Development Directory Structure: Main Steps
In a split development directory structure, you can develop and deploy applications faster,
simplify build scripts, and integrate with source control systems.
• Organizing Java EE Components in a Split Development Directory
The split development directory structure requires each project to be staged as a Java EE
enterprise application. Oracle therefore recommends that you stage even standalone Web
applications and EJBs as modules of an enterprise application, to benefit from the split
directory Ant tasks. This practice also allows you to easily add or remove modules at a
later date, because the application is already organized as an EAR.
• Organizing Shared Classes in a Split Development Directory
The WebLogic split development directory also helps you store shared utility classes and
libraries that are required by modules in your enterprise application.
• Generating a Basic build.xml File Using weblogic.BuildXMLGen
After you set up your source directory structure, use the
weblogic.BuildXMLGen
utility to
create a basic
build.xml
file.
weblogic.BuildXMLGen
is a convenient utility that generates
an Ant build.xml file for enterprise applications that are organized in the split development
directory structure. The utility analyzes the source directory and creates build and deploy
targets for the enterprise application as well as individual modules. It also creates targets
to clean the build and generate new deployment descriptors.
• Developing Multiple-EAR Projects Using the Split Development Directory
Projects that require building multiple enterprise applications simultaneously require
slightly different conventions and procedures in organizing libraries and classes shared by
multiple EARs and linking multiple build.xml files.
4-1

• Best Practices for Developing WebLogic Server Applications
The WebLogic Server documentation library includes a number of recommended best
practices for application development, including topics such as packaging, distribution,
deployment, and more.
Overview of the Split Development Directory Environment
The WebLogic split development directory environment consists of a directory layout and
associated Ant tasks that help you repeatedly build, change, and deploy Java EE applications.
Compared to other development frameworks, the WebLogic split development directory
provides these benefits:
• Fast development and deployment. By minimizing unnecessary file copying, the split
development directory Ant tasks help you recompile and redeploy applications quickly
without first generating a deployable archive file or exploded archive directory.
• Simplified build scripts. The Oracle-provided Ant tasks automatically determine which
Java EE modules and classes you are creating, and build components in the correct order
to support common classpath dependencies. In many cases, your project build script can
simply identify the source and build directories and allow Ant tasks to perform their default
behaviors.
• Easy integration with source control systems. The split development directory provides
a clean separation between source files and generated files. This helps you maintain only
editable files in your source control system. You can also clean the build by deleting the
entire build directory; build files are easily replaced by rebuilding the project.
• Source and Build Directories
• Deploying from a Split Development Directory
• Split Development Directory Ant Tasks
Source and Build Directories
The source and build directories form the basis of the split development directory environment.
The source directory contains all editable files for your project—Java source files, editable
descriptor files, JSPs, static content, and so forth. You create the source directory for an
application by following the directory structure guidelines described in Organizing Java EE
Components in a Split Development Directory.
The top level of the source directory always represents an enterprise application (
.ear
file),
even if you are developing only a single Java EE module. Subdirectories beneath the top level
source directory contain:
• Enterprise Application Modules (EJBs and Web applications)
Note:
The split development directory structure does not provide support for developing
new Resource Adapter components.
• Descriptor files for the enterprise application (
application.xml
and
weblogic-
application.xml
)
• Utility classes shared by modules of the application (for example, exceptions, constants)
Chapter 4
Overview of the Split Development Directory Environment
4-2
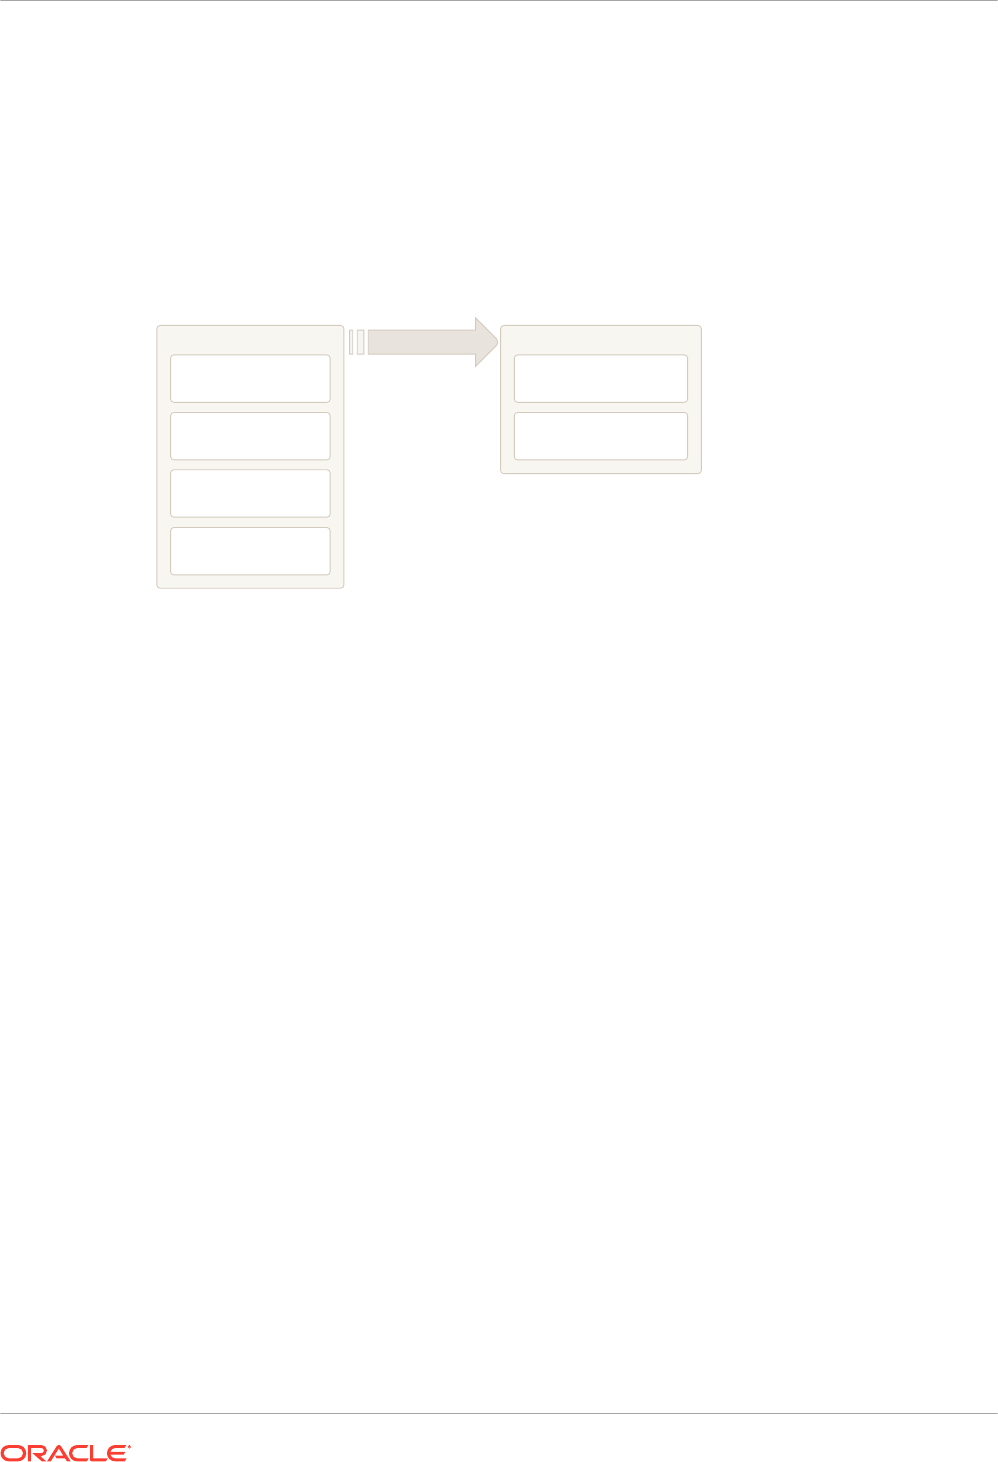
• Libraries (compiled
.jar
files, including third-party libraries) used by modules of the
application
The build directory contents are generated automatically when you run the
wlcompile
ant task
against a valid source directory. The
wlcompile
task recognizes EJB, Web application, and
shared library and class directories in the source directory, and builds those components in an
order that supports common class path requirements. Additional Ant tasks can be used to build
Web services or generate deployment descriptor files from annotated EJB code.
Figure 4-1 Source and Build Directories
Source Directory
Java Source, JSPs,
Annotated .EJB
Static HTML and
Graphics
Editable Deployment
Descriptors
Third-Party
JAR Files
Build Directory
Compiled Classes
Generated Deployment
Descriptors
Build Process
The build directory contains only those files generated during the build process. The
combination of files in the source and build directories form a deployable Java EE application.
The build and source directory contents can be place in any directory of your choice. However,
for ease of use, the directories are commonly placed in directories named
source
and
build
,
within a single project directory (for example,
\myproject\build
and
\myproject\source
).
Deploying from a Split Development Directory
All WebLogic Server deployment tools (
weblogic.Deployer
,
wldeploy
, and the WebLogic
Server Administration Console) support direct deployment from a split development directory.
You specify only the build directory when deploying the application to WebLogic Server.
WebLogic Server attempts to use all classes and resources available in the source directory for
deploying the application. If a required resource is not available in the source directory,
WebLogic Server then looks in the application's build directory for that resource. For example,
if a deployment descriptor is generated during the build process, rather than stored with source
code as an editable file, WebLogic Server obtains the generated file from the build directory.
WebLogic Server discovers the location of the source directory by examining
the
.beabuild.txt
file that resides in the top level of the application's build directory. If you
ever move or modify the source directory location, edit the
.beabuild.txt
file to identify the
new source directory name.
Deploying Applications Using wldeploy describes the
wldeploy
Ant task that you can use to
automate deployment from the split directory environment.
Figure 4-2 shows a typical deployment process. The process is initiated by specifying the build
directory with a WebLogic Server tool. In the figure, all compiled classes and generated
deployment descriptors are discovered in the build directory, but other application resources
(such as static files and editable deployment descriptors) are missing. WebLogic Server uses
Chapter 4
Overview of the Split Development Directory Environment
4-3
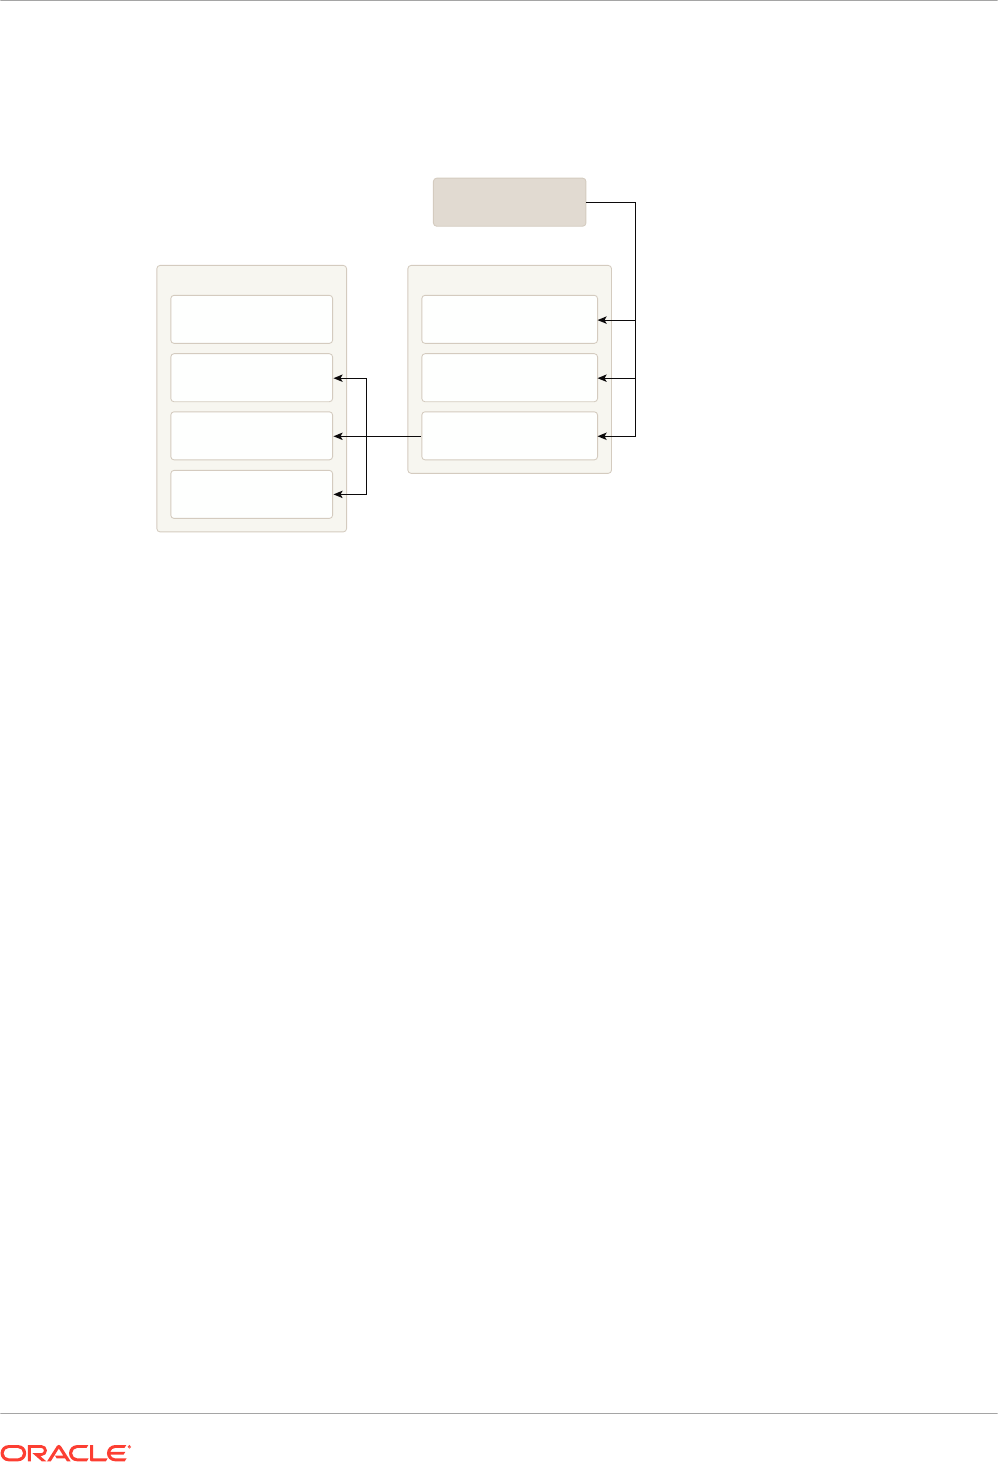
the hidden
.beabuild.txt
file to locate the application's source directory, where it finds the
required resources.
Figure 4-2 Split Directory Deployment
Source Directory
Java Source, JSPs,
Annotated .EJB
Static HTML and
Graphics
Editable Deployment
Descriptors
Third-Party
JAR Files
Build Directory
Compiled Classes
Generated Deployment
Descriptors
.beabuild.txt
Deploy
Split Development Directory Ant Tasks
Oracle provides a collection of Ant tasks designed to help you develop applications using the
split development directory environment. Each Ant task uses the source, build, or both
directories to perform common development tasks:
•
wlcompile
—This Ant task compiles the contents of the source directory into subdirectories
of the build directory.
wlcompile
compiles Java classes and also processes
annotated
.ejb
files into deployment descriptors, as described in Compiling Applications
Using wlcompile.
•
wlappc
—This Ant task invokes the appc compiler, which generates JSPs and container-
specific EJB classes for deployment. See Building Modules and Applications Using
wlappc.
•
wldeploy
—This Ant task deploys any format of Java EE applications (exploded or
archived) to WebLogic Server. To deploy directly from the split development directory
environment, you specify the build directory of your application. See wldeploy Ant Task
Reference.
•
wlpackage
—This Ant task uses the contents of both the source and build directories to
generate an EAR file or exploded EAR directory that you can give to others for
deployment.
Using the Split Development Directory Structure: Main Steps
In a split development directory structure, you can develop and deploy applications faster,
simplify build scripts, and integrate with source control systems.
The following steps illustrate how you use the split development directory structure to build and
deploy a WebLogic Server application.
1. Create the main EAR source directory for your project. When using the split development
directory environment, you must develop Web applications and EJBs as part of an
Chapter 4
Using the Split Development Directory Structure: Main Steps
4-4

enterprise application, even if you do not intend to develop multiple Java EE modules. See
Organizing Java EE Components in a Split Development Directory.
2. Add one or more subdirectories to the EAR directory for storing the source for Web
applications, EJB components, or shared utility classes. See Organizing Java EE
Components in a Split Development Directory and Organizing Shared Classes in a Split
Development Directory.
3. Store all of your editable files (source code, static content, editable deployment
descriptors) for modules in subdirectories of the EAR directory. Add the entire contents of
the source directory to your source control system, if applicable.
4. Set your WebLogic Server environment by executing either the
setWLSEnv.cmd
(Windows)
or
setWLSEnv.sh
(UNIX) script. The scripts are located in the
WL_HOME\server\bin\
directory, where
WL_HOME
is the top-level directory in which WebLogic Server is installed.
Note:
On UNIX operating systems, the
setWLSEnv.sh
command does not set the
environment variables in all command shells. Oracle recommends that you
execute this command using the Korn shell or bash shell.
5. Use the
weblogic.BuildXMLGen
utility to generate a default
build.xml
file for use with your
project. Edit the default property values as needed for your environment. See Generating a
Basic build.xml File Using weblogic.BuildXMLGen.
6. Use the default targets in the
build.xml
file to build, deploy, and package your application.
See Generating a Basic build.xml File Using weblogic.BuildXMLGen for a list of default
targets.
Organizing Java EE Components in a Split Development
Directory
The split development directory structure requires each project to be staged as a Java EE
enterprise application. Oracle therefore recommends that you stage even standalone Web
applications and EJBs as modules of an enterprise application, to benefit from the split
directory Ant tasks. This practice also allows you to easily add or remove modules at a later
date, because the application is already organized as an EAR.
Note:
If your project requires multiple EARs, see also Developing Multiple-EAR Projects
Using the Split Development Directory.
The following sections describe the basic conventions for staging the following module types in
the split development directory structure:
• Enterprise Application Configuration
• Web Applications
• EJBs
Chapter 4
Organizing Java EE Components in a Split Development Directory
4-5

• Shared Utility Classes
• Third-Party Libraries
The directory examples are taken from the
splitdir
sample application installed in
ORACLE_HOME\wlserver\samples\src\examples\splitdir
, where
ORACLE_HOME
represents the
directory in which the WebLogic Server code examples are configured. For more information
about the WebLogic Server code examples, see Sample Applications and Code Examples in
Understanding Oracle WebLogic Server.
• Source Directory Overview
• Enterprise Application Configuration
• Web Applications
• EJBs
• Important Notes Regarding EJB Descriptors
Source Directory Overview
The following figure summarizes the source directory contents of an enterprise application
having a Web application, EJB, shared utility classes, and third-party libraries. The sections
that follow provide more details about how individual parts of the enterprise source directory
are organized.
Chapter 4
Organizing Java EE Components in a Split Development Directory
4-6
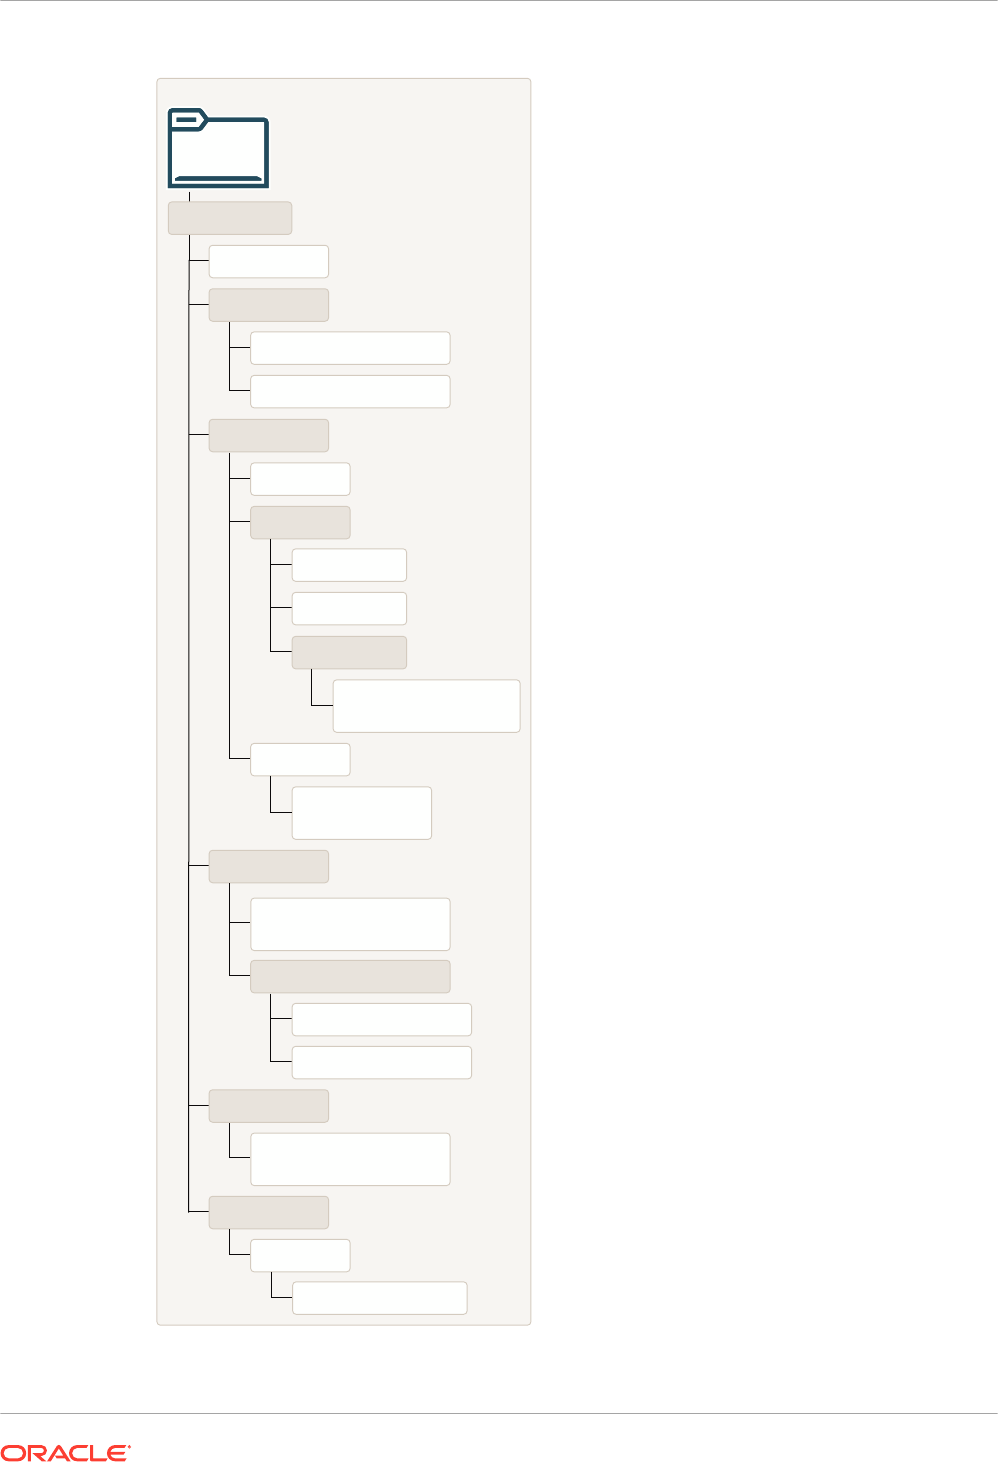
Figure 4-3 Overview of Enterprise Application Source Directory
Source
build.xml
helloWorldEar
Java Source Files
(in package directories)
Java Source Files
(in package directories)
application.xml
META-INF
weblogic-application.xml
helloWebApp
hello.jsp
WEB-INF
web.xml
weblogic.xml
src
static
HTML, Graphics,
Static files*
helloEJB
META-INF
weblogic-ejb-jar.xml
ejb-jar.xml*
appUtils
Java Source Files
(in package directories)
APP-INF
lib
Third-Party JAR Files
Chapter 4
Organizing Java EE Components in a Split Development Directory
4-7
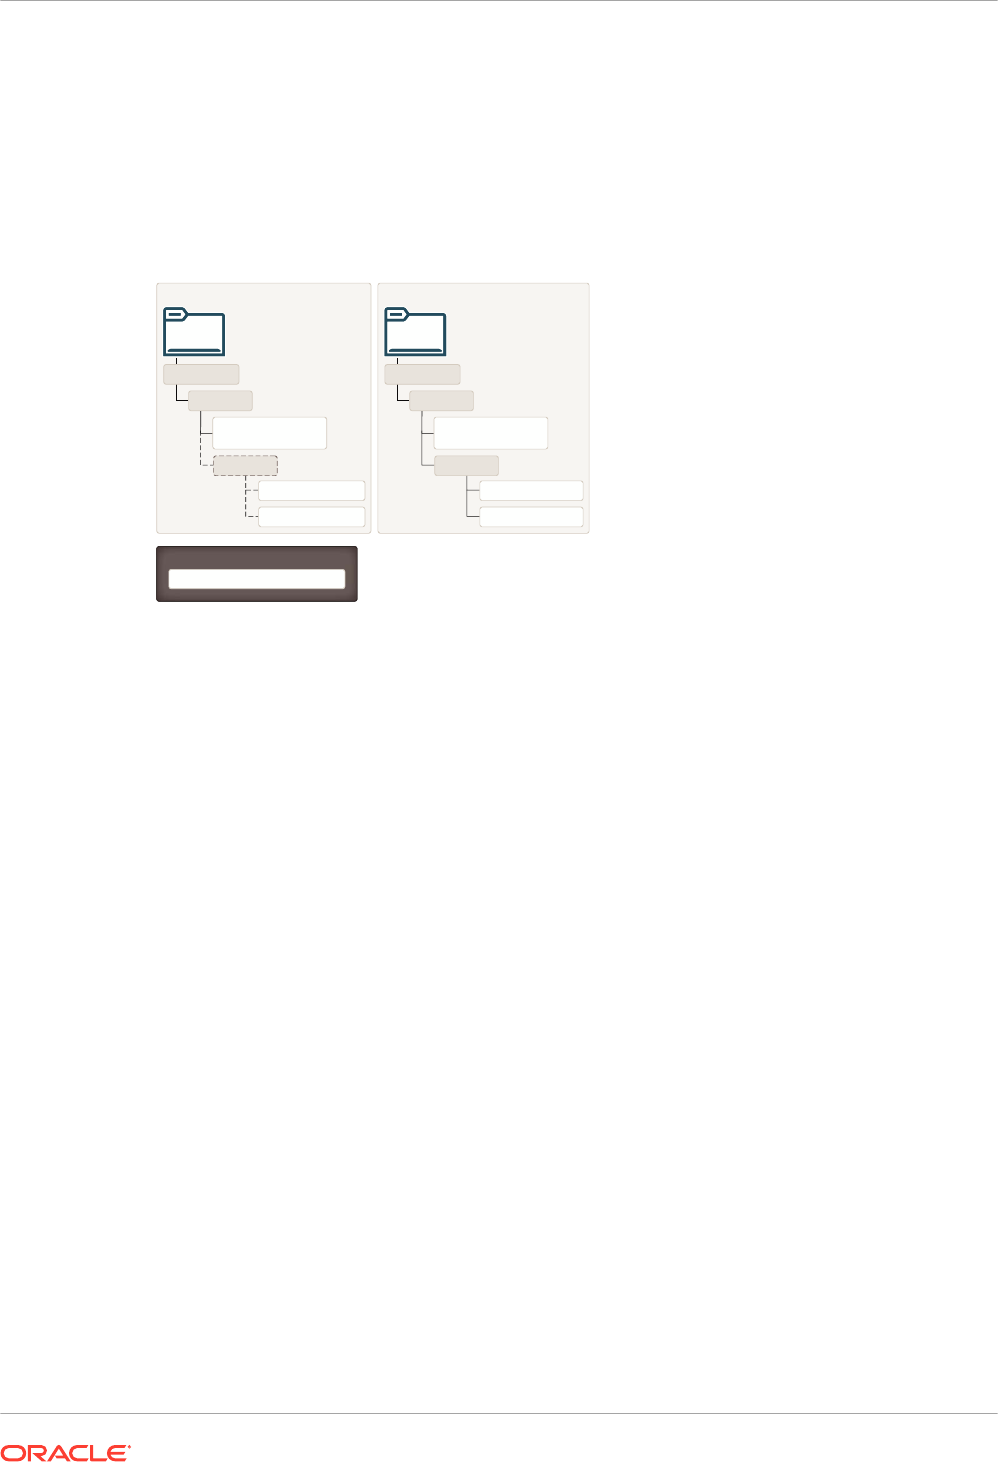
Enterprise Application Configuration
The top level source directory for a split development directory project represents an enterprise
application. The following figure shows the minimal files and directories required in this
directory.
Figure 4-4 Enterprise Application Source Directory
Source
helloEJB
helloWorldEar
Java Source Files
(in package directories)
META-INF*
ejb-jar.xml*
weblogic-ejb-jar.xml*
Build
helloEJB
Java Class Files
(in package directories)
META-INF
ejb-jar.xml
weblogic-ejb-jar.xml
Key
* Not used in helloWorldEar sample
helloWorldEar
The enterprise application directory will also have one or more subdirectories to hold a Web
application, EJB, utility class, and/or third-party Jar file, as described in the following sections.
Web Applications
Web applications use the basic source directory layout shown in the figure below.
Chapter 4
Organizing Java EE Components in a Split Development Directory
4-8
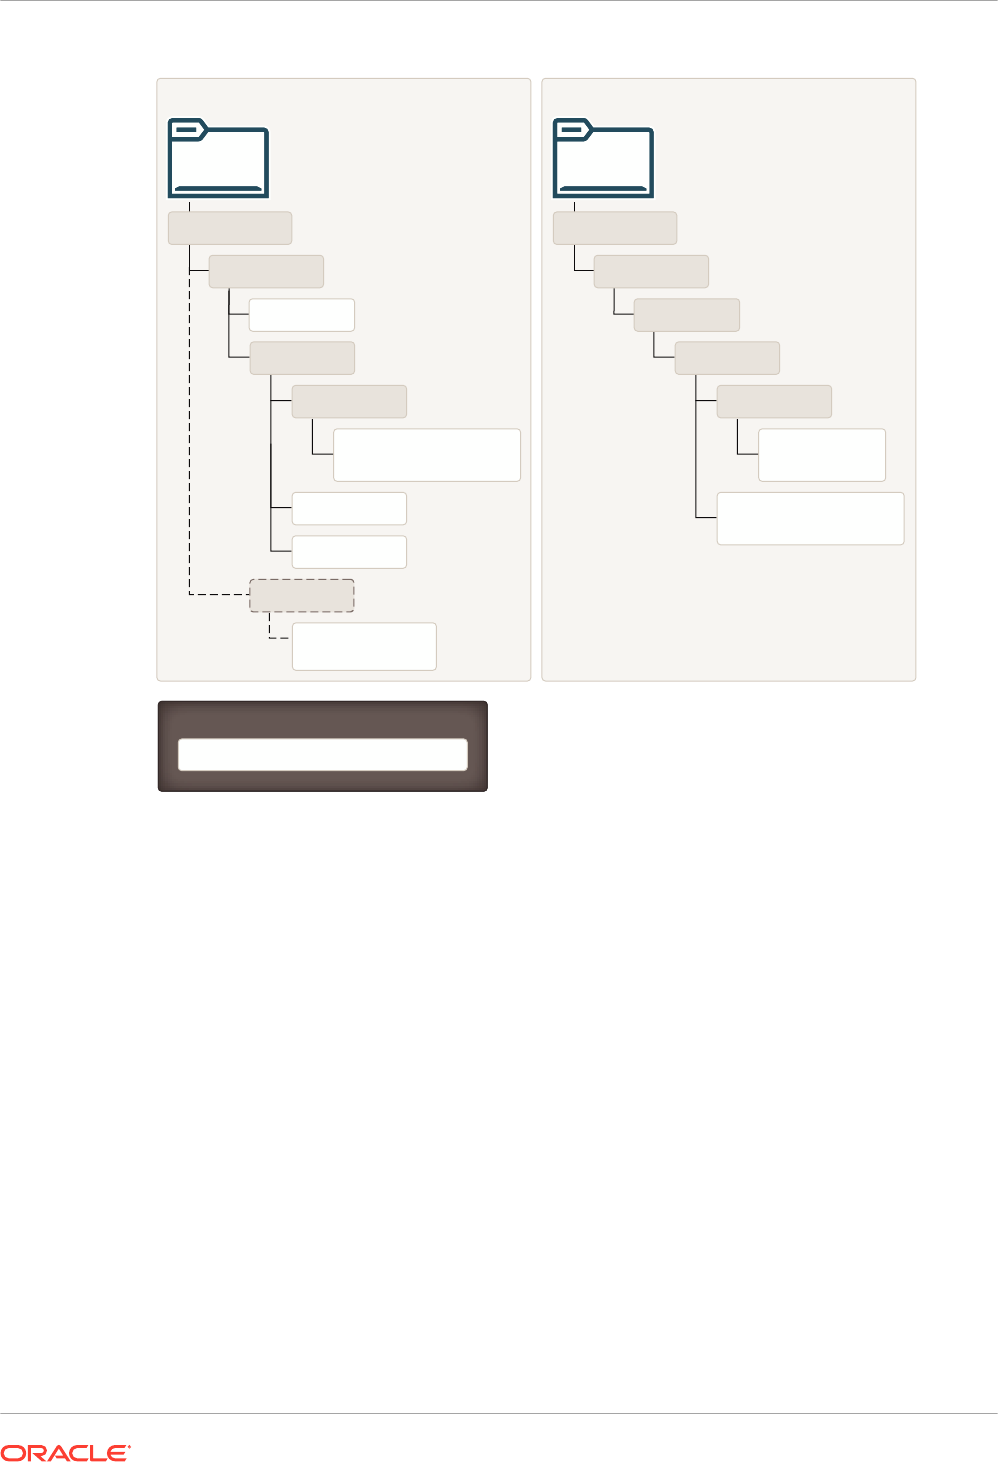
Figure 4-5 Web Application Source and Build Directories
Source
hellowebApp
helloWorldEar
Java Source Files
(in package directories)
WEB-INF
src
Key
* Not used in helloWorldEar sample
hello.jsp
web.xml
weblogic.xml
static*
HTML, Graphics,
Static files
Build
hellowebApp
helloWorldEar
Compiled JSPs
and Servlets
classes
jsp_servlet
WEB-INF
Java Class Files
(in package directories)
The key directories and files for the Web application are:
•
helloWebApp\
—The top level of the Web application module can contain JSP files and
static content such as HTML files and graphics used in the application. You can also store
static files in any named subdirectory of the Web application (for example,
helloWebApp\graphics
or
helloWebApp\static
.)
•
helloWebApp\WEB-INF\
—Store the Web application's editable deployment descriptor files
(
web.xml
and
weblogic.xml
) in the
WEB-INF
subdirectory.
•
helloWebApp\WEB-INF\src
—Store Java source files for Servlets in package subdirectories
under
WEB-INF\src
.
When you build a Web application, the
appc
Ant task and
jspc
compiler compile JSPs into
package subdirectories under
helloWebApp\WEB-INF\classes\jsp_servlet
in the build
directory. Editable deployment descriptors are not copied during the build process.
EJBs
EJBs use the source directory layout shown in the figure below.
Chapter 4
Organizing Java EE Components in a Split Development Directory
4-9
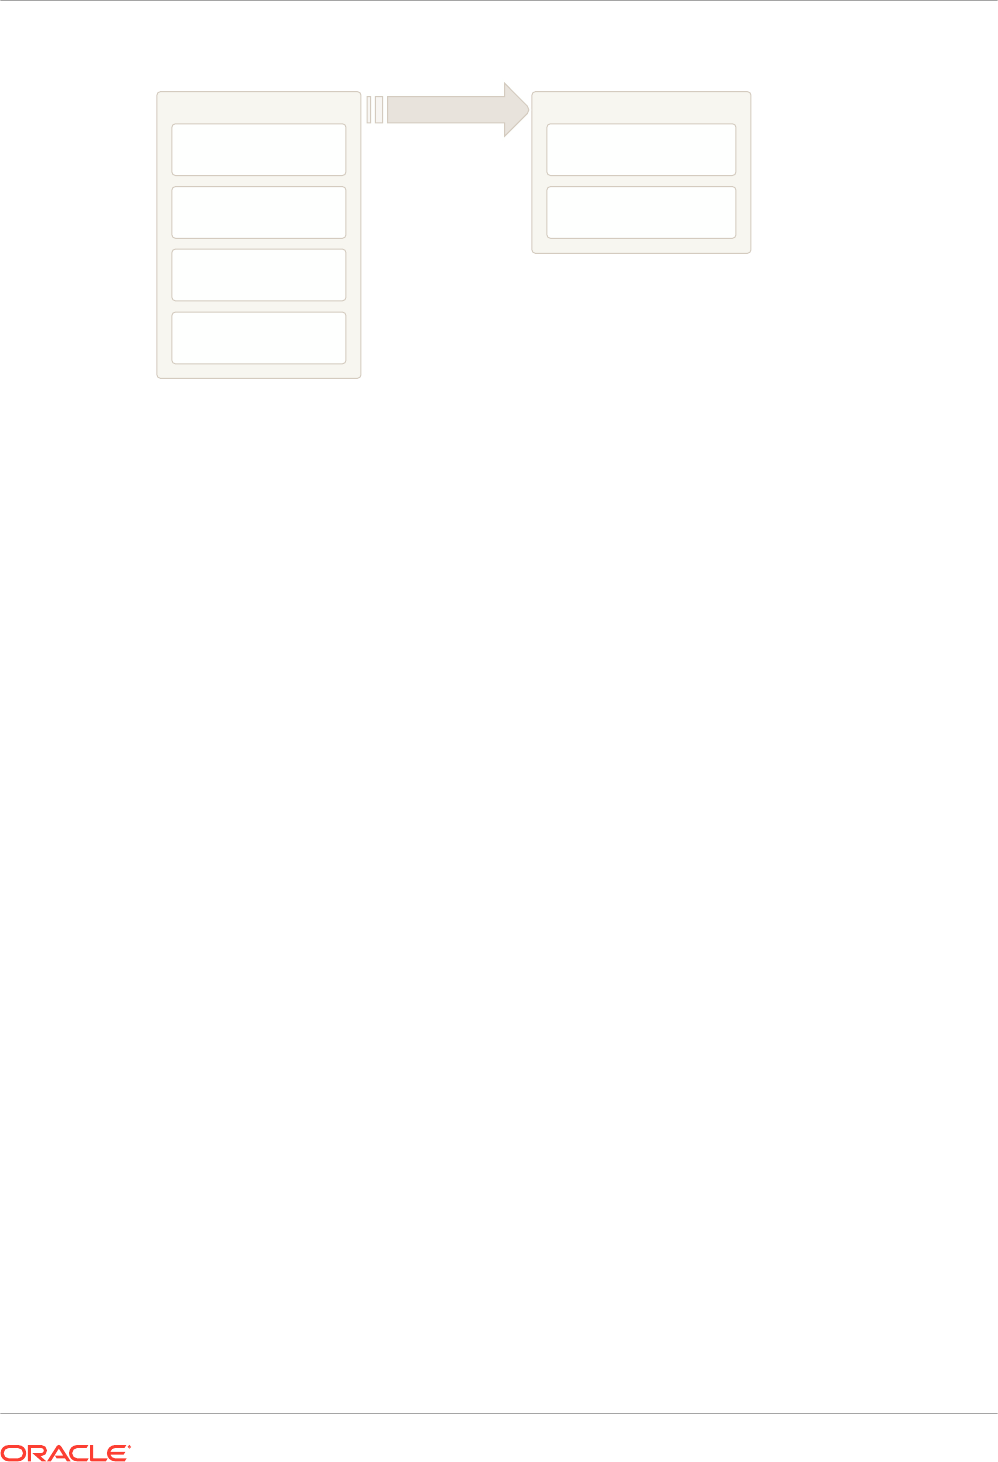
Figure 4-6 EJB Source and Build Directories
Source Directory
Java Source, JSPs,
Annotated .EJB
Static HTML and
Graphics
Editable Deployment
Descriptors
Third-Party
JAR Files
Build Directory
Compiled Classes
Generated Deployment
Descriptors
Build Process
The key directories and files for an EJB are:
•
helloEJB\
—Store all EJB source files under package directories of the EJB module
directory. The source files can be either
.java
source files, or annotated
.ejb
files.
•
helloEJB\META-INF\
—Store editable EJB deployment descriptors (ejb-jar.xml and
weblogic-ejb-jar.xml) in the
META-INF
subdirectory of the EJB module directory. The
helloWorldEar
sample does not include a
helloEJB\META-INF
subdirectory, because its
deployment descriptors files are generated from annotations in the
.ejb
source files. See
Important Notes Regarding EJB Descriptors.
During the build process, EJB classes are compiled into package subdirectories of the
helloEJB
module in the build directory. If you use annotated
.ejb
source files, the build
process also generates the EJB deployment descriptors and stores them in the
helloEJB\META-INF
subdirectory of the build directory.
Important Notes Regarding EJB Descriptors
EJB deployment descriptors should be included in the source
META-INF
directory and treated
as source code only if those descriptor files are created from scratch or are edited manually.
Descriptor files that are generated from annotated
.ejb
files should appear only in the build
directory, and they can be deleted and regenerated by building the application.
For a given EJB component, the EJB source directory should contain either:
• EJB source code in
.java
source files and editable deployment descriptors in
META-INF
or:
• EJB source code with descriptor annotations in
.ejb
source files, and no editable
descriptors in
META-INF.
In other words, do not provide both annotated
.ejb
source files and editable descriptor files for
the same EJB component.
Organizing Shared Classes in a Split Development Directory
The WebLogic split development directory also helps you store shared utility classes and
libraries that are required by modules in your enterprise application.
Chapter 4
Organizing Shared Classes in a Split Development Directory
4-10
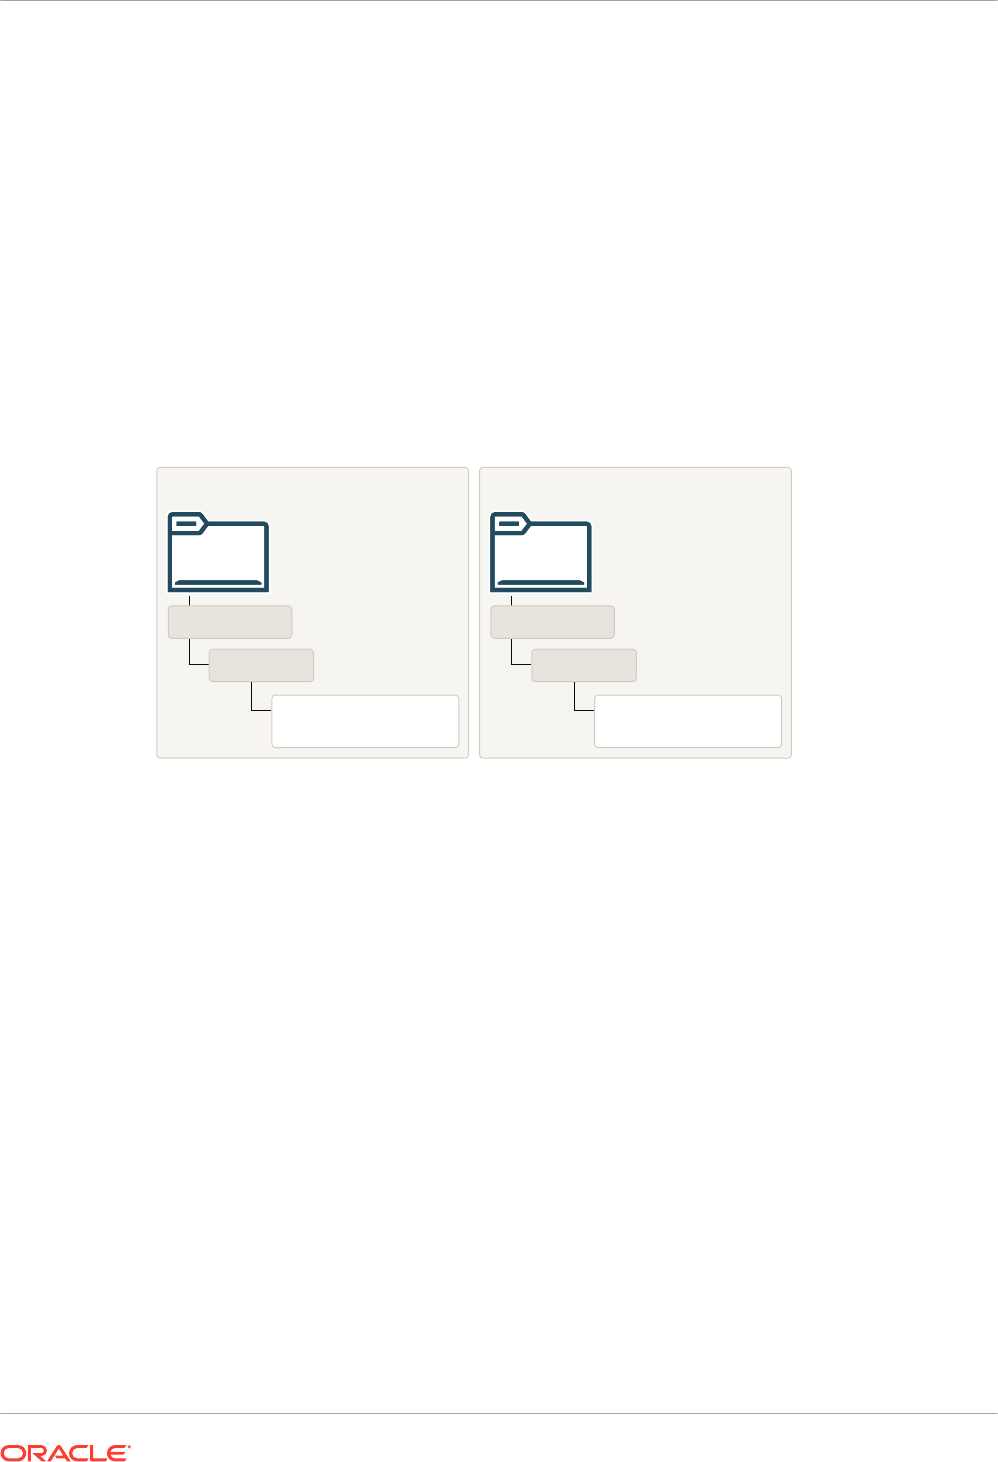
The following sections describe the directory layout and classloading behavior for shared utility
classes and third-party JAR files.
• Shared Utility Classes
• Third-Party Libraries
• Class Loading for Shared Classes
Shared Utility Classes
Enterprise applications frequently use Java utility classes that are shared among application
modules. Java utility classes differ from third-party JARs in that the source files are part of the
application and must be compiled. Java utility classes are typically libraries used by application
modules such as EJBs or Web applications.
Figure 4-7 Java Utility Class Directory
Source
appUtils
helloWorldEar
Java Source Files
(in package directories)
Build
APP-INF
helloWorldEar
Java Class Files
(in package directories)
Place the source for Java utility classes in a named subdirectory of the top-level enterprise
application directory. Beneath the named subdirectory, use standard package subdirectory
conventions.
During the build process, the
wlcompile
Ant task invokes the javac compiler and compiles
Java classes into the
APP-INF/classes/
directory under the build directory. This ensures that
the classes are available to other modules in the deployed application.
Third-Party Libraries
You can extend an enterprise application to use third-party
.jar
files by placing the files in the
APP-INF\lib\
directory, as shown below:
Chapter 4
Organizing Shared Classes in a Split Development Directory
4-11

Figure 4-8 Third-party Library Directory
Source
APP-INF
lib
helloWorldEar
Third-Party JAR Files
Third-party JARs are generally not compiled, but may be versioned using the source control
system for your application code. For example, XML parsers, logging implementations, and
Web application framework JAR files are commonly used in applications and maintained along
with editable source code.
During the build process, third-party JAR files are not copied to the build directory, but remain
in the source directory for deployment.
Class Loading for Shared Classes
The classes and libraries stored under
APP-INF/classes
and
APP-INF/lib
are available to all
modules in the enterprise application. The application classloader always attempts to resolve
class requests by first looking in
APP-INF/classes
, then
APP-INF/lib
.
Generating a Basic build.xml File Using weblogic.BuildXMLGen
After you set up your source directory structure, use the
weblogic.BuildXMLGen
utility to create
a basic
build.xml
file.
weblogic.BuildXMLGen
is a convenient utility that generates an Ant
build.xml file for enterprise applications that are organized in the split development directory
structure. The utility analyzes the source directory and creates build and deploy targets for the
enterprise application as well as individual modules. It also creates targets to clean the build
and generate new deployment descriptors.
Additionally, optional packages are supported as Java EE shared libraries in
weblogic.BuildXMLGen
, whereby all manifests of an application and its modules are scanned
to look for optional package references. If optional package references are found they are
added to the compile and
appc
tasks in the generated
build.xml
file.
For example, if a library located at
lib\echolib.jar
is referenced as an optional package, the
tasks generated by
weblogic.BuildXMLGen
will contains an
appc
task that would appear as
follows:
<target name="appc" description="Runs weblogic.appc on your application">
<wlappc source="${dest.dir}" verbose="${verbose}">
<library file="lib\echolib\echolib.jar" />
</wlappc>
</target>
The compile and
appc
tasks for modules also use the l
ib\echolib\echolib.jar
library.
Chapter 4
Generating a Basic build.xml File Using weblogic.BuildXMLGen
4-12

• weblogic.BuildXMLGen Syntax
weblogic.BuildXMLGen Syntax
The syntax for
weblogic.BuildXMLGen
is as follows:
java weblogic.BuildXMLGen [options] <source directory>
where
options
include:
•
-help
—Print standard usage message.
•
-version
—Print version information.
•
-projectName <project name>
—Name of the Ant project.
•
-d <directory>
—Directory where
build.xml
is created. The default is the current
directory.
•
-file <build.xml>
—Name of the generated build file.
•
-librarydir <directories>
—Create build targets for shared Java EE libraries in the
comma-separated list of directories. See Creating Shared Java EE Libraries and Optional
Packages.
•
-username <username>
—User name for deploy commands.
•
-password <password>
—User password.
After running
weblogic.BuildXMLGen
, edit the generated
build.xml
file to specify properties
for your development environment. The list of properties you need to edit are shown in the
listing below:
Example 4-1 build.xml Editable Properties
<!-- BUILD PROPERTIES ADJUST THESE FOR YOUR ENVIRONMENT -->
<property name="tmp.dir" value="/tmp" />
<property name="dist.dir" value="${tmp.dir}/dist"/>
<property name="app.name" value="helloWorldEar" />
<property name="ear" value="${dist.dir}/${app.name}.ear"/>
<property name="ear.exploded" value="${dist.dir}/${app.name}_exploded"/>
<property name="verbose" value="true" />
<property name="user" value="USERNAME" />
<property name="password" value="PASSWORD" />
<property name="servername" value="myserver" />
<property name="adminurl" value="iiop://localhost:7001" />
In particular, make sure you edit the
tmp.dir
property to point to the build directory you want to
use. By default, the
build.xml
file builds projects into a subdirectory
tmp.dir
named after the
application (
/tmp/helloWorldEar
in the above listing).
The following listing shows the default main targets created in the
build.xml
file. You can view
these targets at the command prompt by entering the
ant -projecthelp
command in the EAR
source directory.
Example 4-2 Default build.xml Targets
appc Runs weblogic.appc on your application
build Compiles helloWorldEar application and runs appc
clean Deletes the build and distribution directories
compile Only compiles helloWorldEar application, no appc
compile.appStartup Compiles just the appStartup module of the application
compile.appUtils Compiles just the appUtils module of the application
Chapter 4
Generating a Basic build.xml File Using weblogic.BuildXMLGen
4-13

compile.build.orig Compiles just the build.orig module of the application
compile.helloEJB Compiles just the helloEJB module of the application
compile.helloWebApp Compiles just the helloWebApp module of the application
compile.javadoc Compiles just the javadoc module of the application
deploy Deploys (and redeploys) the entire helloWorldEar application
descriptors Generates application and module descriptors
ear Package a standard J2EE EAR for distribution
ear.exploded Package a standard exploded J2EE EAR
redeploy.appStartup Redeploys just the appStartup module of the application
redeploy.appUtils Redeploys just the appUtils module of the application
redeploy.build.orig Redeploys just the build.orig module of the application
redeploy.helloEJB Redeploys just the helloEJB module of the application
redeploy.helloWebApp Redeploys just the helloWebApp module of application
redeploy.javadoc Redeploys just the javadoc module of the application
undeploy Undeploys the entire helloWorldEar application
Developing Multiple-EAR Projects Using the Split Development
Directory
Projects that require building multiple enterprise applications simultaneously require slightly
different conventions and procedures in organizing libraries and classes shared by multiple
EARs and linking multiple build.xml files.
The split development directory examples and procedures described previously have dealt with
projects consisting of a single enterprise application. Projects that require building multiple
enterprise applications simultaneously require slightly different conventions and procedures, as
described in the following sections.
Note:
The following sections refer to the MedRec sample application, which consists of
three separate enterprise applications as well as shared utility classes, third-party
JAR files, and dedicated client applications. The MedRec source and build directories
are installed under
ORACLE_HOME/user_projects/domain/medrec
, where
ORACLE_HOME
is the directory you specified as Oracle Home when you installed
Oracle WebLogic Server. For more information about the WebLogic Server samples,
see Sample Applications and Code Examples in Understanding Oracle WebLogic
Server.
• Organizing Libraries and Classes Shared by Multiple EARs
• Linking Multiple build.xml Files
Organizing Libraries and Classes Shared by Multiple EARs
For single EAR projects, the split development directory conventions suggest keeping third-
party JAR files in the
APP-INF/lib
directory of the EAR source directory. However, a multiple-
EAR project would require you to maintain a copy of the same third-party JAR files in the
APP-
INF/lib
directory of each EAR source directory. This introduces multiple copies of the source
JAR files, increases the possibility of some JAR files being at different versions, and requires
additional space in your source control system.
Chapter 4
Developing Multiple-EAR Projects Using the Split Development Directory
4-14
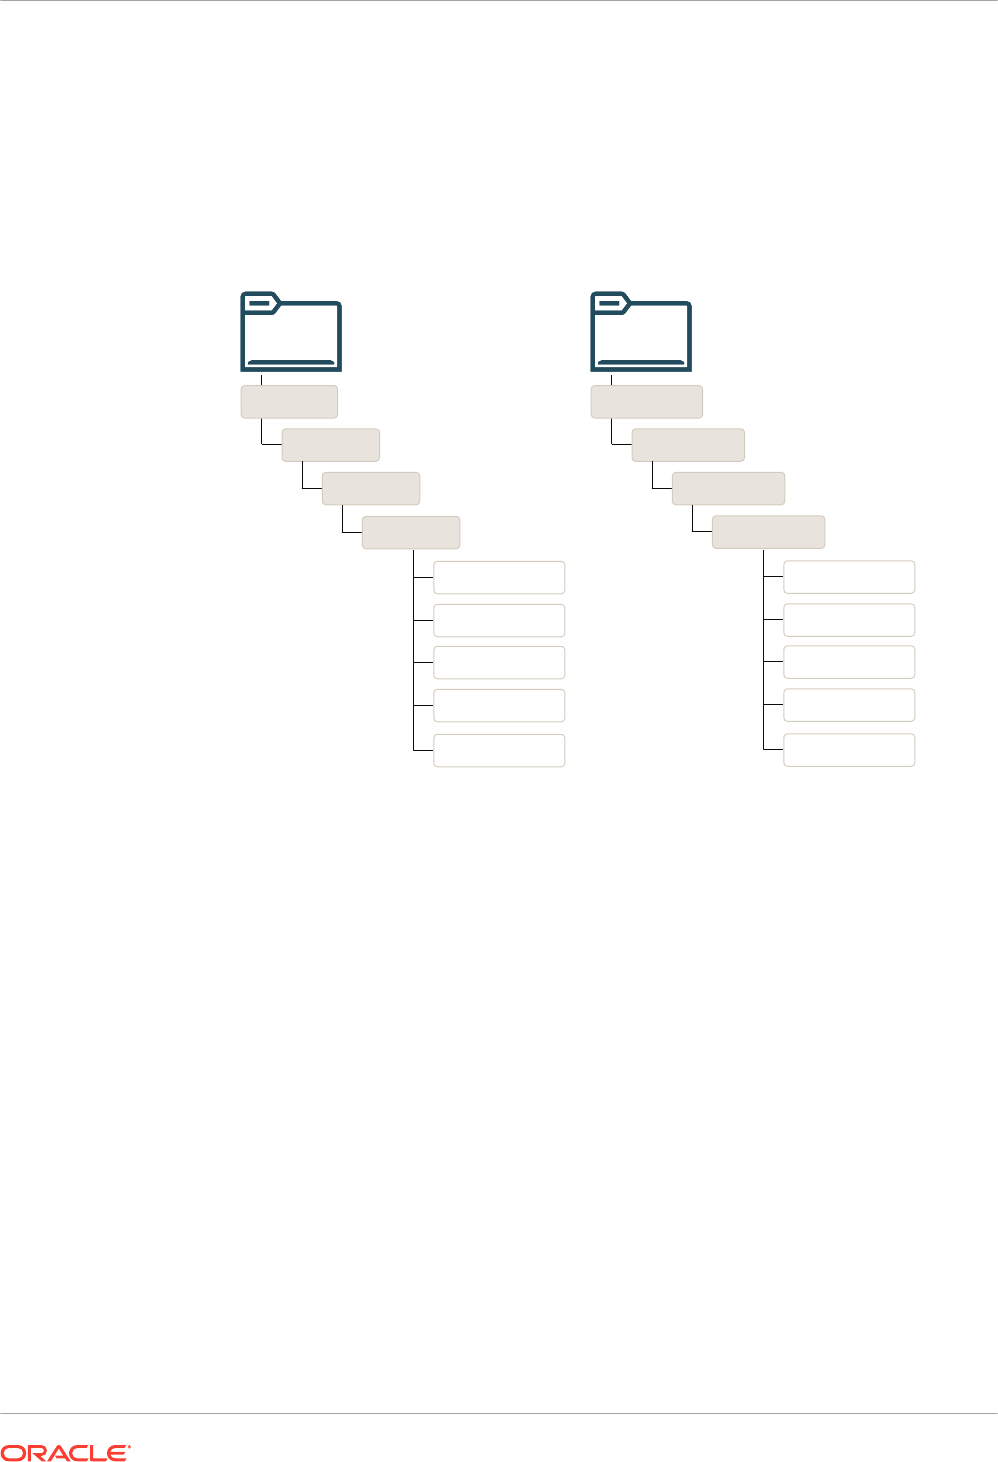
To address these problems, consider editing your build script to copy third-party JAR files into
the
APP-INF/lib
directory of the build directory for each EAR that requires the libraries. This
allows you to maintain a single copy and version of the JAR files in your source control system,
yet it enables each EAR in your project to use the JAR files.
The MedRec sample application installed with WebLogic Server uses this strategy, as shown in
the following figure.
Figure 4-9 Shared JAR Files in MedRec
medrecEar
APP-INF
build
lib
exceptions.jar
commons-*.jar
utils.jar
struts.jar
value.jar
physicianEar
APP-INF
build
lib
exceptions.jar
commons-*.jar
utils.jar
struts.jar
value.jar
MedRec takes a similar approach to utility classes that are shared by multiple EARs in the
project. Instead of including the source for utility classes within the scope of each ear that
needs them, MedRec keeps the utility class source independent of all EARs. After compiling
the utility classes, the build script archives them and copies the JARs into the build directory
under the
APP-INF/LIB
subdirectory of each EAR that uses the classes, as shown in figure
Figure 4-9.
Linking Multiple build.xml Files
When developing multiple EARs using the split development directory, each EAR project
generally uses its own
build.xml
file (perhaps generated by multiple runs of
weblogic.BuildXMLGen
.). Applications like MedRec also use a main
build.xml
file that calls
the other
build.xml
files for each EAR in the application suite.
Ant provides a core task (named
ant
) that allows you to execute other project build files within
a main
build.xml
file. The following line from the MedRec main build file shows its usage:
<ant inheritAll="false" dir="${root}/startupEar" antfile="build.xml"/>
The above task instructs Ant to execute the file named
build.xml
in the
/startupEar
subdirectory. The
inheritAll
parameter instructs Ant to pass only user properties from the
main build file to the
build.xml
file in
/startupEar
.
Chapter 4
Developing Multiple-EAR Projects Using the Split Development Directory
4-15

MedRec uses multiple tasks similar to the above to build the
startupEar
,
medrecEar
, and
physicianEar
applications, as well as building common utility classes and client applications.
Best Practices for Developing WebLogic Server Applications
The WebLogic Server documentation library includes a number of recommended best
practices for application development, including topics such as packaging, distribution,
deployment, and more.
Oracle recommends the following "best practices" for application development.
• Package applications as part of an enterprise application. See Packaging Applications
Using wlpackage.
• Use the split development directory structure. See Organizing Java EE Components in a
Split Development Directory.
• For distribution purposes, package and deploy in archived format. See Packaging
Applications Using wlpackage.
• In most other cases, it is more convenient to deploy in exploded format. See Archive
versus Exploded Archive Directory.
• Never deploy untested code on a WebLogic Server instance that is serving production
applications. Instead, set up a development WebLogic Server instance on the same
computer on which you edit and compile, or designate a WebLogic Server development
location elsewhere on the network.
• Even if you do not run a development WebLogic Server instance on your development
computer, you must have access to a WebLogic Server distribution to compile your
programs. To compile any code using WebLogic or Java EE APIs, the Java compiler needs
access to the
weblogic.jar
file and other JAR files in the distribution directory. Install
WebLogic Server on your development computer to make WebLogic distribution files
available locally.
Chapter 4
Best Practices for Developing WebLogic Server Applications
4-16

5
Building Applications in a Split Development
Directory
To build WebLogic Server Java EE applications in WebLogic split development directory
environment you have to compile applications using
wlcompile
and build modules and
applications using
wlappc
.
This chapter includes the following sections:
• Compiling Applications Using wlcompile
• Building Modules and Applications Using wlappc
• Compiling Applications Using wlcompile
You can use the
wlcompile
Ant task to invoke the javac compiler to compile your
application's Java components in a split development directory structure.
• Building Modules and Applications Using wlappc
To reduce deployment time, use the
weblogic.appc
Java class (or its equivalent Ant task
wlappc
) to pre-compile a deployable archive file, (WAR, JAR, or EAR). Precompiling with
weblogic.appc
generates certain helper classes and performs validation checks to ensure
your application is compliant with the current Java EE specifications.
Compiling Applications Using wlcompile
You can use the
wlcompile
Ant task to invoke the javac compiler to compile your application's
Java components in a split development directory structure.
The basic syntax of
wlcompile
identifies the source and build directories, as in this command
from the
helloWorldEar
sample:
<wlcompile srcdir="${src.dir}" destdir="${dest.dir}"/>
Note:
Deployment descriptors are no longer mandatory as of Java EE 5; therefore,
exploded module directories must indicate the module type by using the .
war
or
.jar
suffix when there is no deployment descriptor in these directories. The suffix is
required so that
wlcompile
can recognize the modules. The
.war
suffix indicates the
module is a Web application module and the
.jar
suffix indicates the module is an
EJB module.
The following is the order in which events occur using this task:
1.
wlcompile
compiles the Java components into an output directory:
ORACLE_HOME
wlserver\samples\server\examples\build\helloWorldEar\APP-INF\classes\
5-1

where
ORACLE_HOME
represents the directory in which the WebLogic Server code examples
are configured. For more information about the WebLogic Server code examples, see
Sample Applications and Code Examples in Understanding Oracle WebLogic Server.
2.
wlcompile
builds the EJBs and automatically includes the previously built Java modules in
the compiler's classpath. This allows the EJBs to call the Java modules without requiring
you to manually edit their classpath.
3. Finally,
wlcompile
compiles the Java components in the Web application with the EJB and
Java modules in the compiler's classpath. This allows the Web applications to refer to the
EJB and application Java classes without requiring you to manually edit the classpath.
• Using includes and excludes Properties
• wlcompile Ant Task Attributes
• Nested javac Options
• Setting the Classpath for Compiling Code
• Library Element for wlcompile and wlappc
Using includes and excludes Properties
More complex enterprise applications may have compilation dependencies that are not
automatically handled by the wlcompile task. However, you can use the include and exclude
options to wlcompile to enforce your own dependencies. The includes and excludes properties
accept the names of enterprise application modules—the names of subdirectories in the
enterprise application source directory—to include or exclude them from the compile stage.
The following line from the
helloWorldEar
sample shows the
appStartup
module being
excluded from compilation:
<wlcompile srcdir="${src.dir}" destdir="${dest.dir}"
excludes="appStartup"/>
wlcompile Ant Task Attributes
Table 5-1 contains Ant task attributes specific to
wlcompile
.
Table 5-1 wlcompile Ant Task Attributes
Attribute Description
srcdir
The source directory.
destdir
The build/output directory.
classpath
Allows you to change the classpath used by
wlcompile
.
includes
Allows you to include specific directories from the build.
excludes
Allows you to exclude specific directories from the build.
librarydir
Specifies a directory of shared Java EE libraries to add to the classpath.
See Creating Shared Java EE Libraries and Optional Packages.
Chapter 5
Compiling Applications Using wlcompile
5-2

Nested javac Options
The
wlcompile
Ant task can accept nested javac options to change the compile-time behavior.
For example, the following
wlcompile
command ignores deprecation warnings and enables
debugging:
<wlcompile srcdir="${mysrcdir}" destdir="${mybuilddir}">
<javac deprecation="false" debug="true"
debuglevel="lines,vars,source"/>
</wlcompile>
Setting the Classpath for Compiling Code
Most WebLogic services are based on Java EE standards and are accessed through standard
Java EE packages. The WebLogic and other Java classes required to compile programs that
use WebLogic services are packaged in the
wls-api.jar
file in the
lib
directory of your
WebLogic Server installation. In addition to
wls-api.jar
, include the following in your
compiler's
CLASSPATH
:
• The
lib\tools.jar
file in the JDK directory, or other standard Java classes required by
the Java Development Kit you use.
• The
examples.property
file for Apache Ant (for examples environment). This file is
discussed in the WebLogic Server documentation on building examples using Ant located
at:
samples\server\examples\src\examples\examples.html
• Classes for third-party Java tools or services your programs import.
• Other application classes referenced by the programs you are compiling.
Library Element for wlcompile and wlappc
The
library
element is an optional element used to define the name and optional version
information for a module that represents a shared Java EE library required for building an
application, as described in Creating Shared Java EE Libraries and Optional Packages. The
library
element can be used with both
wlcompile
and
wlappc
, described in Building Modules
and Applications Using wlappc.
The name and version information are specified as attributes to the library element, described
in Table 5-2.
Table 5-2 Library attributes
Attribute Description
file
Required filename of a Java EE library
name
The optional name of a required Java EE library.
specificationversion
An optional specification version required for the
library.
implementationversion
An optional implementation version required for the
library.
The format choices for both
specificationversion
and
implementationversion
are
described in Referencing Shared Java EE Libraries in an Enterprise Application. The following
output shows a sample
library
reference:
Chapter 5
Compiling Applications Using wlcompile
5-3
<library file="c:\mylibs\lib.jar" name="ReqLib" specificationversion="920"
implementationversion="1.1" />
Building Modules and Applications Using wlappc
To reduce deployment time, use the
weblogic.appc
Java class (or its equivalent Ant task
wlappc
) to pre-compile a deployable archive file, (WAR, JAR, or EAR). Precompiling with
weblogic.appc
generates certain helper classes and performs validation checks to ensure
your application is compliant with the current Java EE specifications.
The application-level checks include checks between the application-level deployment
descriptors and the individual modules, as well as validation checks across the modules.
Additionally, optional packages are supported as Java EE shared libraries in
appc
, whereby all
manifests of an application and its modules are scanned to look for optional package
references.
wlappc
is the Ant task interface to the
weblogic.appc
compiler. The following section describe
the
wlappc
options and usage. Both
weblogic.appc
and the
wlappc
Ant task compile modules
in the order in which they appear in the
application.xml
deployment descriptor file that
describes your enterprise application.
• wlappc Ant Task Attributes
• wlappc Ant Task Syntax
• Syntax Differences between appc and wlappc
• weblogic.appc Reference
• weblogic.appc Syntax
• weblogic.appc Options
wlappc Ant Task Attributes
Table 5-3 describes Ant task options specific to
wlappc
. These options are similar to the
weblogic.appc
command-line options, but with a few differences.
Note:
See weblogic.appc Reference for a list of
weblogic.appc
options.
See also Library Element for wlcompile and wlappc.
Table 5-3 wlappc Ant Task Attributes
Option Description
print
Prints the standard usage message.
version
Prints
appc
version information.
output <file>
Specifies an alternate output archive or directory. If not set,
the output is placed in the source archive or directory.
Chapter 5
Building Modules and Applications Using wlappc
5-4

Table 5-3 (Cont.) wlappc Ant Task Attributes
Option Description
forceGeneration
Forces generation of EJB and JSP classes. Without this flag,
the classes may not be regenerated (if determined to be
unnecessary).
lineNumbers
Adds line numbers to generated class files to aid in
debugging.
writeInferredDescriptors
Specifies that the application or module contains deployment
descriptors with annotation information.
basicClientJar
Does not include deployment descriptors in client JARs
generated for EJBs.
idl
Generates IDL for EJB remote interfaces.
idlOverwrite
Always overwrites existing IDL files.
idlVerbose
Displays verbose information for IDL generation.
idlNoValueTypes
Does not generate valuetypes and the methods/attributes
that contain them.
idlNoAbstractInterfaces
Does not generate abstract interfaces and methods/attributes
that contain them.
idlFactories
Generates factory methods for valuetypes.
idlVisibroker
Generates IDL somewhat compatible with Visibroker 4.5 C+
+.
idlOrbix
Generates IDL somewhat compatible with Orbix 2000 2.0 C+
+.
idlDirectory <dir>
Specifies the directory where IDL files will be created
(default: target directory or JAR)
idlMethodSignatures <>
Specifies the method signatures used to trigger IDL code
generation.
iiop
Generates CORBA stubs for EJBs.
iiopDirectory <dir>
Specifies the directory where IIOP stub files will be written
(default: target directory or JAR)
keepgenerated
Keeps the generated
.java
files.
librarydir
Specifies a directory of shared Java EE libraries to add to the
classpath. See Creating Shared Java EE Libraries and
Optional Packages.
compiler <java.jdt>
Selects the Java compiler to use. Defaults to JDT.
debug
Compiles debugging information into a class file.
optimize
Compiles with optimization on.
nowarn
Compiles without warnings.
verbose
Compiles with verbose output.
deprecation
Warns about deprecated calls.
normi
Passes flags through to Symantec's sj.
runtimeflags
Passes flags through to Java runtime
classpath <path>
Selects the classpath to use during compilation.
Chapter 5
Building Modules and Applications Using wlappc
5-5
Table 5-3 (Cont.) wlappc Ant Task Attributes
Option Description
clientJarOutputDir <dir>
Specifies a directory to place generated client jar files. If not
set, generated jar files are placed into the same directory
location where the JVM is running.
advanced
Prints advanced usage options.
wlappc Ant Task Syntax
The basic syntax for using the
wlappc
Ant task determines the destination source directory
location. This directory contains the files to be compiled by
wlappc
.
<wlappc source="${dest.dir}" />
The following is an example of a
wlappc
Ant task command that invokes two options (
idl
and
idlOrverWrite
) from Table 5-3.
<wlappc source="${dest.dir}"idl="true" idlOrverWrite="true" />
Syntax Differences between appc and wlappc
There are some syntax differences between
appc
and
wlappc
. For appc, the presence of a flag
in the command is a Boolean. For
wlappc
, the presence of a flag in the command means that
the argument is required.
To illustrate, the following are examples of the same command, the first being an
appc
command and the second being a
wlappc
command:
java weblogic.appc -idl foo.ear
<wlappc source="${dest.dir} idl="true"/>
weblogic.appc Reference
The following sections describe how to use the command-line version of the
appc
compiler.
The
weblogic.appc
command-line compiler reports any warnings or errors encountered in the
descriptors and compiles all of the relevant modules into an EAR file, which can be deployed to
WebLogic Server.
weblogic.appc Syntax
Use the following syntax to run
appc
:
prompt>java weblogic.appc [options] <ear, jar, or war file or directory>
weblogic.appc Options
The following are the available
appc
options:
Option
Description
-print
Prints the standard usage message.
Chapter 5
Building Modules and Applications Using wlappc
5-6

Option Description
-version
Prints
appc
version information.
-output <file>
Specifies an alternate output archive or directory. If not set, the
output is placed in the source archive or directory.
-forceGeneration
Forces generation of EJB and JSP classes. Without this flag, the
classes may not be regenerated (if determined to be unnecessary).
-library
<file[[@name=<string>]
[@libspecver=<version>]
[@libimplver=<version|
string>]]>
A comma-separated list of shared Java EE libraries. Optional name
and version string information must be specified in the format
described in Referencing Shared Java EE Libraries in an Enterprise
Application.
-writeInferredDescriptors
Specifies that the application or module contains deployment
descriptors with annotation information.
-lineNumbers
Adds line numbers to generated class files to aid in debugging.
-basicClientJar
Does not include deployment descriptors in client JARs generated
for EJBs.
-idl
Generates IDL for EJB remote interfaces.
-idlOverwrite
Always overwrites existing IDL files.
-idlVerbose
Displays verbose information for IDL generation.
-idlNoValueTypes
Does not generate valuetypes and the methods/attributes that
contain them.
-idlNoAbstractInterfaces
Does not generate abstract interfaces and methods/attributes that
contain them.
-idlFactories
Generates factory methods for valuetypes.
-idlVisibroker
Generates IDL somewhat compatible with Visibroker 4.5 C++.
-idlOrbix
Generates IDL somewhat compatible with Orbix 2000 2.0 C++.
-idlDirectory <dir>
Specifies the directory where IDL files will be created (default: target
directory or JAR)
-idlMethodSignatures <>
Specifies the method signatures used to trigger IDL code
generation.
-iiop
Generates CORBA stubs for EJBs.
-iiopDirectory <dir>
Specifies the directory where IIOP stub files will be written (default:
target directory or JAR)
-keepgenerated
Keeps the generated
.java
files.
-compiler <javac>
Selects the Java compiler to use.
-g
Compiles debugging information into a class file.
-O
Compiles with optimization on.
-nowarn
Compiles without warnings.
-verbose
Compiles with verbose output.
-deprecation
Warns about deprecated calls.
-normi
Passes flags through to Symantec's sj.
-J<option>
Passes flags through to Java runtime.
-classpath <path>
Selects the classpath to use during compilation.
Chapter 5
Building Modules and Applications Using wlappc
5-7

Option Description
-clientJarOutputDir <dir>
Specifies a directory to place generated client jar files. If not set,
generated jar files are placed into the same directory location where
the JVM is running.
-advanced
Prints advanced usage options.
Chapter 5
Building Modules and Applications Using wlappc
5-8

6
Deploying and Packaging from a Split
Development Directory
To deploy and package WebLogic Server Java EE applications in WebLogic split development
directory environment use
wldeploy
and
wlpackage
tasks.
This chapter includes the following sections:
• Deploying Applications Using wldeploy
• Packaging Applications Using wlpackage
• Deploying Applications Using wldeploy
The
wldeploy
task provides an easy way to deploy directly from the split development
directory.
wlcompile
provides most of the same arguments as the
weblogic.Deployer
directory.
• Packaging Applications Using wlpackage
Use
wlpackage
when you want to deliver your application to another group or individual for
evaluation, testing, performance profiling, or production deployment.
Deploying Applications Using wldeploy
The
wldeploy
task provides an easy way to deploy directly from the split development
directory.
wlcompile
provides most of the same arguments as the
weblogic.Deployer
directory.
To deploy from a split development directory, you simply identify the build directory location as
the deployable files, as in:
<wldeploy user="${user}" password="${password}"
action="deploy" source="${dest.dir}"
name="helloWorldEar" />
The above task is automatically created when you use
weblogic.BuildXMLGen
to create the
build.xml
file.
See wldeploy Ant Task Reference, for a complete command reference.
Packaging Applications Using wlpackage
Use
wlpackage
when you want to deliver your application to another group or individual for
evaluation, testing, performance profiling, or production deployment.
The
wlpackage
Ant task uses the contents of both the source and build directories to create
either a deployable archive file (
.EAR
file), or an exploded archive directory representing the
enterprise application (exploded
.EAR
directory).
• Archive versus Exploded Archive Directory
• wlpackage Ant Task Example
• wlpackage Ant Task Attribute Reference
6-1

Archive versus Exploded Archive Directory
For production purposes, it is convenient to deploy enterprise applications in exploded
(unarchived) directory format. This applies also to standalone Web applications, EJBs, and
connectors packaged as part of an enterprise application. Using this format allows you to
update files directly in the exploded directory rather than having to unarchive, edit, and
rearchive the whole application. Using exploded archive directories also has other benefits, as
described in Deployment Archive Files Versus Exploded Archive Directories in Deploying
Applications to Oracle WebLogic Server.
You can also package applications in a single archived file, which is convenient for packaging
modules and applications for distribution. Archive files are easier to copy, they use up fewer file
handles than an exploded directory, and they can save disk space with file compression.
The Java classloader can search for Java class files (and other file types) in a JAR file the
same way that it searches a directory in its classpath. Because the classloader can search a
directory or a JAR file, you can deploy Java EE modules on WebLogic Server in either a JAR
(archived) file or an exploded (unarchived) directory.
wlpackage Ant Task Example
In a production environment, use the
wlpackage
Ant task to package your split development
directory application as a traditional EAR file that can be deployed to WebLogic Server.
Continuing with the MedRec example, you would package your application as follows:
<wlpackage tofile="\physicianEAR\physicianEAR.ear"
srcdir="\physicianEAR"
destdir="\build\physicianEAR"/>
<wlpackage todir="\physicianEAR\explodedphysicianEar"
srcdir="\src\physicianEAR"
destdir="\build\physicianEAR" />
wlpackage Ant Task Attribute Reference
The following table describes the attributes of the
wlpackage
Ant task.
Table 6-1 Attributes of the wlpackage Ant Task
Attribute Description Data Type Required?
tofile
Name of the EAR archive file into which the
wlpackage
Ant task packages the split development
directory application.
String You must specify one of the following
two attributes:
tofile
or
todir
.
todir
Name of an exploded directory into which the
wlpackage
Ant task packages the split development
directory application.
String You must specify one of the following
two attributes:
tofile
or
todir
.
srcdir
Specifies the source directory of your split
development directory application.
The source directory contains all editable files for your
project—Java source files, editable descriptor files,
JSPs, static content, and so forth.
String Yes.
Chapter 6
Packaging Applications Using wlpackage
6-2

Table 6-1 (Cont.) Attributes of the wlpackage Ant Task
Attribute Description Data Type Required?
destdir
Specifies the build directory of your split development
directory application.
It is assumed that you have already executed the
wlcompile
Ant task against the source directory to
generate the needed components into the build
directory; these components include compiled Java
classes and generated deployment descriptors.
String Yes.
Chapter 6
Packaging Applications Using wlpackage
6-3

7
Developing Applications for Production
Redeployment
You can program and maintain applications with WebLogic Server using the production
redeployment strategy.
This chapter includes the following sections:
• What is Production Redeployment?
• Supported and Unsupported Application Types
• Programming Requirements and Conventions
• Assigning an Application Version
• Upgrading Applications to Use Production Redeployment
• Accessing Version Information
• What is Production Redeployment?
Production redeployment enables an administrator to redeploy a new version of an
application in a production environment without stopping the deployed application or
otherwise interrupting the application's availability to clients.
• Supported and Unsupported Application Types
Production redeployment only supports HTTP clients and RMI clients. Your development
and design team must ensure that applications using production redeployment are not
accessed by an unsupported client.
• Programming Requirements and Conventions
WebLogic Server performs production redeployment by deploying two instances of an
application simultaneously. You must observe certain programming conventions to ensure
that multiple instances of the application can co-exist in a WebLogic Server domain.
• Assigning an Application Version
Oracle recommends that you specify the version identifier in the
MANIFEST.MF
of the
application, and automatically increment the version each time a new application is
released for deployment. This ensures that production redeployment is always performed
when the administrator redeploys the application.
• Upgrading Applications to Use Production Redeployment
You can upgrade applications for deployment to WebLogic Server to use production
redeployment.
• Accessing Version Information
Your application code can use new MBean attributes to retrieve version information for
display, logging, or other uses.
What is Production Redeployment?
Production redeployment enables an administrator to redeploy a new version of an application
in a production environment without stopping the deployed application or otherwise interrupting
the application's availability to clients.
7-1

Production redeployment works by deploying a new version of an updated application
alongside an older version of the same application. WebLogic Server automatically manages
client connections so that only new client requests are directed to the new version. Clients
already connected to the application during the redeployment continue to use the older, retiring
version of the application until they complete their work.
See Using Production Redeployment to Upgrade Applications for more information.
Supported and Unsupported Application Types
Production redeployment only supports HTTP clients and RMI clients. Your development and
design team must ensure that applications using production redeployment are not accessed by
an unsupported client.
WebLogic Server does not detect when unsupported clients access the application, and does
not preserve unsupported client connections during production redeployment.
Enterprise applications can contain any of the supported Java EE module types. Enterprise
applications can also include application-scoped JMS and JDBC modules.
If an enterprise application includes a JCA resource adapter module, the module:
• Must be JCA 1.5 compliant
• Must implement the
weblogic.connector.extensions.Suspendable
interface
• Must be used in an application-scoped manner, having
enable-access-outside-app
set to
false
(the default value).
Before resource adapters in a newer version of the EAR are deployed, resource adapters in
the older application version receive a callback. WebLogic Server then deploys the newer
application version and retires the entire older version of the EAR.
For a complete list of production redeployment requirements for resource adapters, see
Production Redeployment in Developing Resource Adapters for Oracle WebLogic Server.
• Additional Application Support
Additional Application Support
Additional production redeployment support is provided for enterprise applications that are
accessed by inbound JMS messages from a global JMS destination, and that use one or more
message-driven beans as consumers. For this type of application, WebLogic Server suspends
message-driven beans in the older, retiring application version before deploying message-
driven beans in the newer version. Production redeployment is not supported with JMS
consumers that use the JMS API for global JMS destinations. If the message-driven beans
need to receive all messages published from topics, including messages published while bean
are suspended, use durable subscribers.
Programming Requirements and Conventions
WebLogic Server performs production redeployment by deploying two instances of an
application simultaneously. You must observe certain programming conventions to ensure that
multiple instances of the application can co-exist in a WebLogic Server domain.
The following sections describe each programming convention required for using production
redeployment:
• Applications Should Be Self-Contained
Chapter 7
Supported and Unsupported Application Types
7-2

• Versioned Applications Access the Current Version JNDI Tree by Default
• Security Providers Must Be Compatible
• Applications Must Specify a Version Identifier
• Applications Can Access Name and Identifier
• Client Applications Use Same Version when Possible
• Applications Should Be Self-Contained
• Versioned Applications Access the Current Version JNDI Tree by Default
• Security Providers Must Be Compatible
• Applications Must Specify a Version Identifier
• Applications Can Access Name and Identifier
• Client Applications Use Same Version when Possible
Applications Should Be Self-Contained
As a best practice, applications that use the in-place redeployment strategy should be self-
contained in their use of resources. This means you should generally use application-scoped
JMS and JDBC resources, rather than global resources, whenever possible for versioned
applications.
If an application must use a global resource, you must ensure that the application supports
safe, concurrent access by multiple instances of the application. This same restriction also
applies if the application uses external (separately-deployed) applications, or uses an external
property file. WebLogic Server does not prevent the use of global resources with versioned
applications, but you must ensure that resources are accessed in a safe manner.
Looking up a global JNDI resource from within a versioned application results in a warning
message. To disable this check, set the JNDI environment property
weblogic.jndi.WLContext.ALLOW_GLOBAL_RESOURCE_LOOKUP
to
true
when performing the
JNDI lookup.
Similarly, looking up an external application results in a warning unless you set the JNDI
environment property,
weblogic.jndi.WLContext.ALLOW_EXTERNAL_APP_LOOKUP
, to
true
.
Versioned Applications Access the Current Version JNDI Tree by Default
WebLogic Server binds application-scoped resources, such as JMS and JDBC application
modules, into a local JNDI tree available to the application. As with non-versioned applications,
versioned applications can look up application-scoped resources directly from this local tree.
Application-scoped JMS modules can be accessed via any supported JMS interfaces, such as
the JMS API or a message-driven bean.
Application modules that are bound to the global JNDI tree should be accessed only from
within the same application version. WebLogic Server performs version-aware JNDI lookups
and bindings for global resources deployed in a versioned application. By default, an internal
JNDI lookup of a global resource returns bindings for the same version of the application.
If the current version of the application cannot be found, you can use the JNDI environment
property
weblogic.jndi.WLContext.RELAX_VERSION_LOOKUP
to return bindings from the
currently active version of the application, rather than the same version.
Chapter 7
Programming Requirements and Conventions
7-3

Note:
Set
weblogic.jndi.WLContext.RELAX_VERSION_LOOKUP
to
true
only if you are certain
that the newer and older version of the resource that you are looking up are
compatible with one another.
Security Providers Must Be Compatible
Any security provider used in the application must support the WebLogic Server application
versioning SSPI. The default WebLogic Server security providers for authorization, role
mapping, and credential mapping support the application versioning SSPI.
Applications Must Specify a Version Identifier
In order to use production redeployment, both the current, deployed version of the application
and the updated version of the application must specify unique version identifiers. See
Assigning an Application Version.
Applications Can Access Name and Identifier
Versioned applications can programmatically obtain both an application name, which remains
constant across different versions, and an application identifier, which changes to provide a
unique label for different versions of the application. Use the application name for basic display
or error messages that refer to the application's name irrespective of the deployed version. Use
the application ID when the application must provide unique identifier for the deployed version
of the application. See Accessing Version Information for more information about the MBean
attributes that provide the name and identifier.
Client Applications Use Same Version when Possible
As described in What is Production Redeployment?, WebLogic Server attempts to route a
client application's requests to the same version of the application until all of the client's in-
progress work has completed. However, if an application version is retired using a timeout
period, or is undeployed, the client's request will be routed to the active version of the
application. In other words, a client's association with a given version of an application is
maintained only on a "best-effort basis."
This behavior can be problematic for client applications that recursively access other
applications when processing requests. WebLogic Server attempts to dispatch requests to the
same versions of the recursively-accessed applications, but cannot guarantee that an
intermediate application version is not undeployed manually or after a timeout period. If you
have a group of related applications with strict version requirements, Oracle recommends
packaging all of the applications together to ensure version consistency during production
redeployment.
Assigning an Application Version
Oracle recommends that you specify the version identifier in the
MANIFEST.MF
of the
application, and automatically increment the version each time a new application is released
for deployment. This ensures that production redeployment is always performed when the
administrator redeploys the application.
Chapter 7
Assigning an Application Version
7-4
For testing purposes, a deployer can also assign a version identifier to an application during
deployment and redeployment. See Assigning a Version Identifier During Deployment and
Redeployment in Deploying Applications to Oracle WebLogic Server.
• Application Version Conventions
Application Version Conventions
WebLogic Server obtains the application version from the value of the
Weblogic-Application-
Version
property in the
MANIFEST.MF
file. The version string can be a maximum of 215
characters long, and must consist of valid characters as identified in Table 7-1.
Table 7-1 Valid and Invalid Characters
Valid ASCII Characters Invalid Version Constructs
a-z ..
A-Z .
0-9
period ("."), underscore ("_"), or hyphen
("-") in combination with other
characters
For example, the following manifest file content describes an application with version
"
v920.beta
":
Manifest-Version: 1.0
Created-By: 1.4.1_05-b01 (Sun Microsystems Inc.)
Weblogic-Application-Version: v920.beta
Upgrading Applications to Use Production Redeployment
You can upgrade applications for deployment to WebLogic Server to use production
redeployment.
If you are upgrading applications for deployment to WebLogic Server 9.2 or later, note that the
Name
attribute retrieved from
AppDeploymentMBean
now returns a unique application identifier
consisting of both the deployed application name and the application version string.
Applications that require only the deployed application name must use the new
ApplicationName
attribute instead of the
Name
attribute. Applications that require a unique
identifier can use either the
Name
or
ApplicationIdentifier
attribute, as described in
Accessing Version Information.
Accessing Version Information
Your application code can use new MBean attributes to retrieve version information for display,
logging, or other uses.
The following table describes the read-only attributes provided by
ApplicationMBean
.
Chapter 7
Upgrading Applications to Use Production Redeployment
7-5

Table 7-2 Read-Only Version Attributes in ApplicationMBean
Attribute Name Description
ApplicationName
A String that represents the deployment name of the application
VersionIdentifier
A String that uniquely identifies the current application version across all versions of the
same application
ApplicationIdentifier
A String that uniquely identifies the current application version across all deployed
applications and versions
ApplicationRuntimeMBean
also provides version information in the new read-only attributes
described in the following table.
Table 7-3 Read-Only Version Attributes in ApplicationRuntimeMBean
Attribute Name Description
ApplicationName
A String that represents the deployment name of the application
ApplicationVersion
A string that represents the version of the application.
ActiveVersionState
An integer that indicates the current state of the active application version. Valid states
for an active version are:
• ACTIVATED—indicates that one or more modules of the application are active and
available for processing new client requests.
• PREPARED—indicates that WebLogic Server has prepared one or more modules
of the application, but that it is not yet active.
• UNPREPARED—indicates that no modules of the application are prepared or
active.
See the Java API Reference for Oracle WebLogic Server for more information.
Note that the currently active version does not always correspond to the last-deployed
version, because the administrator can reverse the production redeployment process.
See Rolling Back the Production Redeployment Process in Deploying Applications to
Oracle WebLogic Server.
Chapter 7
Accessing Version Information
7-6

8
Using Java EE Annotations and Dependency
Injection
Learn about Java EE MetaData annotations and dependency injection (DI) in WebLogic
Server.
This chapter includes the following sections:
• Annotation Processing
• Dependency Injection of Resources
• Standard JDK Annotations
• Standard Security-Related JDK Annotations
• Annotation Processing
Annotations simplify the application development process by allowing developers to
specify within the Java class itself how the application component behaves in the
container, requests for dependency injection, and so on. Annotations are an alternative to
deployment descriptors that were required by older versions of enterprise applications
(Java EE 1.4 and earlier).
• Dependency Injection of Resources
Dependency injection (DI) allows application components to declare dependencies on
external resources and configuration parameters via annotations. The container reads
these annotations and injects resources or environment entries into the application
components.
• Standard JDK Annotations
Examine a listing of reference information related to standard JDK annotations.
• Standard Security-Related JDK Annotations
Examine a listing of reference information related to standard security-related JDK
annotations.
Annotation Processing
Annotations simplify the application development process by allowing developers to specify
within the Java class itself how the application component behaves in the container, requests
for dependency injection, and so on. Annotations are an alternative to deployment descriptors
that were required by older versions of enterprise applications (Java EE 1.4 and earlier).
With Java EE annotations, the standard
application.xml
and
web.xml
deployment descriptors
are optional. The Java EE programming model uses the JDK annotations feature for Web
containers, such as EJBs, servlets, Web applications, and JSPs (see
https://
javaee.github.io/javaee-spec/javadocs/
).
• Annotation Parsing
• Deployment View of Annotation Configuration
• Compiling Annotated Classes
• Dynamic Annotation Updates
8-1

Annotation Parsing
The application components can use annotations to define their needs. Annotations reduce or
eliminate the need to deal with deployment descriptors. Annotations simplify the development
of application components. The deployment descriptor can still override values defined in the
annotation. One usage of annotations is to define fields or methods that need Dependency
Injection (DI). Annotations are defined on the POJO (plain old Java object) component classes
like the EJB or the servlet.
An annotation on a field or a method can declare that fields/methods need injection, as
described in Dependency Injection of Resources. Annotations may also be applied to the class
itself. The class-level annotations declare an entry in the application component's environment
but do not cause the resource to be injected. Instead, the application component is expected to
use JNDI or component context lookup method to lookup the entry. When the annotation is
applied to the class, the JNDI name and the environment entry type must be specified
explicitly.
Deployment View of Annotation Configuration
The Java EE Deployment API [JSR88] provides a way for developers to examine deployment
descriptors. For example, consider an EJB Module that has no deployment descriptors.
Assuming that it has some classes that have been declared as EJBs using annotations, a user
of Session Helper will still be able to deal with the module as if it had the deployment
descriptor. So the developer can modify the configuration information and it will be written out
in a deployment plan. During deployment, such a plan will be honored and will override
information from annotations.
Compiling Annotated Classes
The WebLogic Server utility
appc
(and its Ant equivalent
wlappc
) and
Appmerge
support
metadata annotations. The
appmerge
and
appc
utilities take an application or module as inputs
and process them to produce an output application or module respectively. When used with
-
writeInferredDescriptors
flag, the output application/module will contain deployment
descriptors with annotation information. The descriptors will also have the
metadata-complete
attribute set to
true
, as no annotation processing needs to be done if the output application or
module is deployed directly. However, setting of
metadata-complete
attribute to
true
will also
restrict
appmerge
and
appc
from processing annotations in case these tools are invoked on a
previously processed application or module.
The original descriptors must be preserved in such cases to with an
.orig
suffix. If a developer
wants to reapply annotation processing on the output application, they must restore the
descriptors and use the
-writeInferredDescriptors
flag again. If
appmerge
or
appc
is used
with
-writeInferredDescriptors
on an enterprise application for which no standard
deployment descriptor exists, the descriptor will be generated and written out based on the
inference rules in the Java EE specification.
For more information on using
appc
, see weblogic.appc Reference. For more information on
using
appmerge
, see Using weblogic.appmerge to Merge Libraries.
Chapter 8
Annotation Processing
8-2

Dynamic Annotation Updates
Deployed modules can be updated using
update
deployment operation. If such an update has
changes to deployment descriptor or updated classes, the container must consider annotation
information again while processing the new deployment descriptor.
Containers use the descriptor framework's two-phase update mechanism to check the
differences between the current and proposed descriptors. This mechanism also informs the
containers about any changes in the non-dynamic properties. The containers then deal with
such non-dynamic changes in their own specific ways. The container must perform annotation
processing on the proposed descriptor to make sure that it is finding the differences against the
right reference.
Similarly, some of the classes from a module could be updated during an update operation. If
the container knows that these classes could affect configuration information through
annotations, it makes sure that nothing has changed.
Dependency Injection of Resources
Dependency injection (DI) allows application components to declare dependencies on external
resources and configuration parameters via annotations. The container reads these
annotations and injects resources or environment entries into the application components.
Dependency injection is simply an easier-to-program alternative to using the
javax
interfaces
or JNDI APIs to look up resources.
A field or a method of an application component can be annotated with the
@Resource
annotation. Note that the container will unbox the environment entry as required to match it to
a primitive type used for the injection field or method. Example 8-1 illustrates how an
application component uses the
@Resource
annotation to declare environment entries.
Example 8-1 Dependency Injection of Environment Entries
// fields
// The maximum number of tax exemptions, configured by the Deployer.
@Resource int maxExemptions;
// The minimum number of tax exemptions, configured by the Deployer.
@Resource int minExemptions;
…..
}
In the above code the
@Resource
annotation has not specified a name; therefore, the container
would look for an
env-entry
name called
<class-name>/maxExemptions
and inject the value of
that entry into the
maxExemptions
variable. The field or method may have any access qualifier
(public, private, etc.). For all classes except application client main classes, the fields or
methods must not be static. Because application clients use the same life cycle as Java EE
applications, no instance of the application client main class is created by the application client
container. Instead, the static main method is invoked. To support injection for the application
client main class, the fields or methods annotated for injection must be static.
• Application Life Cycle Annotation Methods
Chapter 8
Dependency Injection of Resources
8-3

Application Life Cycle Annotation Methods
An application component may need to perform initialization of its own after all resources have
been injected. To support this case, one method of the class can be annotated with the
@PostConstruct
annotation. This method will be called after all injections have occurred and
before the class is put into service. This method will be called even if the class doesn't request
any resources to be injected. Similarly, for classes whose life cycle is managed by the
container, the
@PreDestroy
annotation can be applied to one method that will be called when
the class is taken out of service and will no longer be used by the container. Each class in a
class hierarchy may have
@PostConstruct
and
@PreDestroy
methods.
The order in which the methods are called matches the order of the class hierarchy, with
methods on a superclass being called before methods on a subclass. From the Java EE side
only the application client container is involved in invoking these life cycle methods for Java EE
clients. The life cycle methods for Java EE clients must be static. The Java EE client just
supports the
@PostConstruct
callback.
Standard JDK Annotations
Examine a listing of reference information related to standard JDK annotations.
• javax.annotation.PostConstruct
• javax.annotation.PreDestroy
• javax.annotation.Resource
• javax.annotation.Resources
For information about EJB-specific annotations for WebLogic Server Enterprise JavaBeans,
see Developing Enterprise JavaBeans for Oracle WebLogic Server.
For information about Web component-specific annotations WebLogic Server applications, see
WebLogic Annotation for Web Components in Developing Web Applications, Servlets, and
JSPs for Oracle WebLogic Server.
• javax.annotation.PostConstruct
• javax.annotation.PreDestroy
• javax.annotation.Resource
• javax.annotation.Resources
javax.annotation.PostConstruct
Target: Method
Specifies the life cycle callback method that the application component should execute before
the first business method invocation and after dependency injection is done to perform any
initialization. This method will be called after all injections have occurred and before the class
is put into service. This method will be called even if the class doesn't request any resources to
be injected.
You must specify a
@PostConstruct
method in any component that includes dependency
injection.
Only one method in the component can be annotated with this annotation.
Chapter 8
Standard JDK Annotations
8-4

The method annotated with
@PostConstruct
must follow these requirements:
• The method must not have any parameters, except in the case of EJB interceptors, in
which case it takes an javax.interceptor.InvocationContext object as defined by the EJB
specification.
• The return type of the method must be
void
.
• The method must not throw a checked exception.
• The method may be
public
,
protected
,
package private
or
private
.
• The method must not be
static
except for the application client.
• The method may be
final
or
non-final
, except in the case of EJBs where it must be
non-final
.
• If the method throws an unchecked exception, the class must not be put into service. In the
case of EJBs, the method annotated with PostConstruct can handle exceptions and
cleanup before the bean instance is discarded.
This annotation does not have any attributes.
javax.annotation.PreDestroy
Target: Method
Specifies the life cycle callback method that signals that the application component is about to
be destroyed by the container. You typically apply this annotation to methods that release
resources that the class has been holding.
Only one method in the bean class can be annotated with this annotation.
The method annotated with
@PreDestroy
must follow these requirements:
• The method must not have any parameters, except in the case of EJB interceptors, in
which case it takes an javax.interceptor.InvocationContext object as defined by the EJB
specification.
• The return type of the method must be
void
.
• The method must not throw a checked exception.
• The method may be
public
,
protected
,
package private
or
private
.
• The method must not be
static
except for the application client.
• The method may be
final
or
non-final
, except in the case of EJBs where it must be
non-final
.
• If the method throws an unchecked exception, the class must not be put into service. In the
case of EJBs, the method annotated with
PreDestroy
can handle exceptions and cleanup
before the bean instance is discarded.
This annotation does not have any attributes.
javax.annotation.Resource
Target: Class, Method, Field
Specifies a dependence on an external resource, such as a JDBC data source or a JMS
destination or connection factory.
Chapter 8
Standard JDK Annotations
8-5
If you specify the annotation on a field or method, the application component injects an
instance of the requested resource into the bean when the bean is initialized. If you apply the
annotation to a class, the annotation declares a resource that the component will look up at
runtime.
Attributes
Table 8-1 Attributes of the javax.annotation.Resource Annotation
Name Description Data Type Required?
name
Specifies the JNDI name of the resource.
If you apply the
@Resource
annotation to a field, the default value of the
name
attribute is the field name, qualified by the class name. If you apply
it to a method, the default value is the component property name
corresponding to the method, qualified by the class name. If you apply
the annotation to class, there is no default value and thus you are
required to specify the attribute.
String
No
type
Specifies the Java data type of the resource.
If you apply the
@Resource
annotation to a field, the default value of the
type
attribute is the type of the field. If you apply it to a method, the
default is the type of the component property. If you apply it to a class,
there is no default value and thus you are required to specify this
attribute.
Class
No
authenticat
ionType
Specifies the authentication type to use for the resource.
Valid values for this attribute are:
•
AuthenticationType.CONTAINER
•
AuthenticationType.APPLICATION
Default value is
AuthenticationType.CONTAINER
Authenticati
onType
No
shareable
Indicates whether a resource can be shared between this component
and other components.
Valid values for this attribute are
true
and
false
. Default value is
true
.
Boolean
No
mappedName
Specifies a WebLogic Server-specific name to which the component
reference should be mapped.
However, if you do not specify a JNDI name in the WebLogic
deployment descriptor file, then the value of
mappedName
will always be
used as the JNDI name to look up. For example:
@Resource(mappedName = "http://www.bea.com";)
URL url;
@Resource(mappedName="customerDB")
DataSource db;
@Resource(mappedName = "jms/ConnectionFactory")
ConnectionFactory connectionFactory;
@Resource(mappedName = "jms/Queue")
Queue queue;
In other words,
MappedName
is honored as JNDI name only when there
is no JNDI name specified elsewhere, typically in the WebLogic
deployment descriptor file.
String
No
description
Specifies a description of the resource.
String
No
Chapter 8
Standard JDK Annotations
8-6

javax.annotation.Resources
Target: Class
Specifies an array of
@Resource
annotations. Since repeated annotations are not allowed, the
Resources annotation acts as a container for multiple resource declarations.
Attributes
Table 8-2 Attributes of the javax.annotation.Resources Annotation
Name Description Data Type Required?
value
Specifies the array of
@Resource
annotations.
Resource[]
Yes
Standard Security-Related JDK Annotations
Examine a listing of reference information related to standard security-related JDK annotations.
• javax.annotation.security.DeclareRoles
• javax.annotation.security.DenyAll
• javax.annotation.security.PermitAll
• javax.annotation.security.RolesAllowed
• javax.annotation.security.RunAs
• javax.annotation.security.DeclareRoles
• javax.annotation.security.DenyAll
• javax.annotation.security.PermitAll
• javax.annotation.security.RolesAllowed
• javax.annotation.security.RunAs
javax.annotation.security.DeclareRoles
Target: Class
Defines the security roles that will be used in the Java EE container.
You typically use this annotation to define roles that can be tested from within the methods of
the annotated class, such as using the
isUserInRole
method. You can also use the annotation
to explicitly declare roles that are implicitly declared if you use the
@RolesAllowed
annotation
on the class or a method of the class.
You create security roles in WebLogic Server using the WebLogic Server Administration
Console. For information about security, see Manage Security Roles.
Attributes
Chapter 8
Standard Security-Related JDK Annotations
8-7

Table 8-3 Attributes of the javax.annotation.security.DeclareRoles Annotation
Name Description Data Type Required?
value
Specifies an array of security roles that
will be used in the Java EE container.
String[]
Yes
javax.annotation.security.DenyAll
Target: Method
Specifies that no security role is allowed to access the annotated method, or in other words,
the method is excluded from execution in the Java EE container.
This annotation does not have any attributes.
javax.annotation.security.PermitAll
Target: Method
Specifies that all security roles currently defined for WebLogic Server are allowed to access the
annotated method.
This annotation does not have any attributes.
javax.annotation.security.RolesAllowed
Target: Class, Method
Specifies the list of security roles that are allowed to access methods in the Java EE container.
If you specify it at the class-level, then it applies to all methods in the application component. If
you specify it at the method-level, then it only applies to that method. If you specify the
annotation at both the class- and method-level, the method value overrides the class value.
You create security roles in WebLogic Server using the WebLogic Server Administration
Console. For information about security, see Manage Security Roles.
Attributes
Table 8-4 Attributes of the javax.annotation.security.RolesAllowed Annotation
Name Description Data Type Required?
value
List of security roles that are allowed to
access methods of the Java EE container.
String[]
Yes
javax.annotation.security.RunAs
Target: Class
Specifies the security role which actually executes the Java EE container.
The security role must exist in the WebLogic Server security realm and map to a user or group.
For information about security, see Manage Security Roles.
Attributes
Chapter 8
Standard Security-Related JDK Annotations
8-8
Table 8-5 Attributes of the javax.annotation.security.RunAs Annotation
Name Description Data Type Required?
value
Specifies the security role that the Java
EE container should run as.
String
Yes
Chapter 8
Standard Security-Related JDK Annotations
8-9

9
Using Contexts and Dependency Injection for
the Java EE Platform
WebLogic Server provides an implementation of the Contexts and Dependency Injection (CDI)
specification. The CDI specification defines a set of services for using injection to specify
dependencies in an application. CDI provides contextual life cycle management of beans, type-
safe injection points, a loosely coupled event framework, loosely coupled interceptors and
decorators, alternative implementations of beans, bean navigation through the Unified
Expression Language (EL), and a service provider interface (SPI) that enables CDI extensions
to support third-party frameworks or future Java EE components.
This chapter includes the following sections:
• About CDI for the Java EE Platform
• Defining a Managed Bean
• Injecting a Bean
• Defining the Scope of a Bean
• Overriding the Scope of a Bean at the Point of Injection
• Using Qualifiers
• Providing Alternative Implementations of a Bean Type
• Applying a Scope and Qualifiers to a Session Bean
• Using Producer Methods_ Disposer Methods_ and Producer Fields
• Initializing and Preparing for the Destruction of a Managed Bean
• Intercepting Method Invocations and Life Cycle Events of Bean Classes
• Decorating a Managed Bean Class
• Assigning an EL Name to a CDI Bean Class
• Defining and Applying Stereotypes
• Using Events for Communications Between Beans
• Injecting a Predefined Bean
• Injecting and Qualifying Resources
• Using CDI With JCA Technology
• Configuring a CDI Application
• Supporting Third-Party Portable Extensions
• Enabling and Disabling CDI
• Enabling and Disabling Implicit Bean Discovery
• About CDI for the Java EE Platform
CDI for the Java EE Platform specification was formerly called Web Beans. CDI injection
simplifies the use of managed beans with JSF technology in Web applications.
9-1

• Defining a Managed Bean
A managed bean is the basic component in a CDI application and defines the beans that
CDI can create and manage.
• Injecting a Bean
To use the beans that you define, inject them into another bean that an application such as
a JavaServer Faces can use.
• Defining the Scope of a Bean
The scope of a bean defines the duration of a user's interaction with an application that
uses the bean. To enable a Web application to use a bean that injects another bean class,
the bean must be able to hold state over the duration of the user's interaction with the
application.
• Overriding the Scope of a Bean at the Point of Injection
Overriding the scope of a bean at the point of injection enables an application to request a
new instance of the bean with the default scope
@Dependent
. The
@Dependent
scope
specifies that the bean's life cycle is the life cycle of the object into which the bean is
injected.
• Using Qualifiers
Qualifiers enable you to provide more than one implementation of a particular bean type.
• Providing Alternative Implementations of a Bean Type
The environments for the development, testing, and production deployment of an
enterprise application may be very different. Differences in configuration, resource
availability, and performance requirements may cause bean classes that are appropriate to
one environment to be unsuitable in another environment. By providing alternative
implementations of a bean type, you can modify an application at deployment time to meet
such differing requirements.
• Applying a Scope and Qualifiers to a Session Bean
CDI enables you to apply a scope and qualifiers to a session bean.
• Using Producer Methods, Disposer Methods, and Producer Fields
A producer method is a method that generates an object that can then be injected. A
disposer method enables an application to perform customized cleanup of an object that a
producer method returns. A producer field is a field of a bean that generates an object.
• Initializing and Preparing for the Destruction of a Managed Bean
CDI managed bean classes and their superclasses support the annotations for initializing
and preparing for the destruction of a managed bean.
• Intercepting Method Invocations and Life Cycle Events of Bean Classes
Intercepting a method invocation or a life cycle event of a bean class interposes an
interceptor class in the invocation or event. When an interceptor class is interposed,
additional actions that are defined in the interceptor class are performed.
• Decorating a Managed Bean Class
Decorating a managed bean class enables you to intercept invocations of methods in the
decorated class that perform operations with business semantics.
• Assigning an EL Name to a CDI Bean Class
EL enables components in the presentation layer to communicate with managed beans
that implement application logic.
• Defining and Applying Stereotypes
In a large application in which several beans perform similar functions, you may require the
same set of annotations to be applied to several bean classes. Defining a stereotype
requires you to define the set of annotations only once.
Chapter 9
9-2

• Using Events for Communications Between Beans
Events enable beans to communicate information without any compilation-time
dependency.
• Injecting a Predefined Bean
Predefined beans are injected with dependent scope and the predefined default qualifier
@Default
.
• Injecting and Qualifying Resources
Java EE 5 resource injection relies on strings for configuration. Typically, these strings are
JNDI names that are resolved when an object is created. CDI ensures type-safe injection
of beans by selecting the bean class on the basis of the Java type that is specified in the
injection point.
• Using CDI With JCA Technology
WebLogic Server supports CDI in embedded resource adapters and global resource
adapters. To enable a resource adapter for CDI, provide a
beans.xml
file in the
META-INF
directory of the packaged archive of the resource adapter.
• Configuring a CDI Application
Configuring a CDI application enables CDI services for the application. You must configure
a CDI application to identify the application as a CDI application. No special declaration,
such as an annotation, is required to define a CDI managed bean. And no module type is
defined specifically for packaging CDI applications.
• Enabling and Disabling CDI
CDI for a domain is enabled by default. However, even when an application does not use
CDI, there is some CDI initialization that occurs when you deploy an application in
WebLogic Server. To maximize deployment performance for applications that do not use
CDI, you can disable CDI.
• Implicit Bean Discovery
CDI 1.1 and Java EE 7 introduced the concept of implicit bean archives. An implicit bean
archive is an archive of a JAR or a WAR file that does not contain a beans.xml file; it
contains beans that can be managed by CDI.
• Supporting Third-Party Portable Extensions
CDI is intended to be a foundation for frameworks, extensions, and integration with other
technologies.
• Using the Built-in Annotation Literals
CDI 2.0 introduces new built-in annotation literals that can be used for creating instances
of annotations.
• Using the Configurator Interfaces
CDI 2.0 introduced some new configurator interfaces which can be used for dynamically
defining or modifying CDI objects.
• Bootstrapping a CDI Container
CDI 2.0 provides the standard API for bootstrapping a CDI container in Java SE. You must
explicitly bootstrap the CDI container using the
SeContainerInitializer
abstract class
and its static method
newInstance()
.
About CDI for the Java EE Platform
CDI for the Java EE Platform specification was formerly called Web Beans. CDI injection
simplifies the use of managed beans with JSF technology in Web applications.
CDI is specified by Java Specification Request (JSR) 365: Contexts and Dependency Injection
for the Java 2.0. CDI uses the following related specifications:
Chapter 9
About CDI for the Java EE Platform
9-3

• JSR 330: Dependency Injection for Java
• Java EE 8 Managed Beans Specification, which is a part of JSR 366: Java Platform,
Enterprise Edition 8 (Java EE 8) Specification
• Interceptors specification, which is a part of JSR 345: Enterprise JavaBeans 3.2
CDI provides the following features:
• Contexts. This feature enables you to bind the life cycle and interactions of stateful
components to well-defined but extensible life cycle contexts.
• Dependency injection. This feature enables you to inject components into an application
in a type-safe way and to choose at deployment time which implementation of a particular
interface to inject.
CDI is integrated with the major component technologies in Java EE, namely:
• Servlets
• JavaServer Pages (JSP)
• JavaServer Faces (JSF)
• Enterprise JavaBeans (EJB)
• Java EE Connector architecture (JCA)
• Web services
Such integration enables standard Java EE objects, such as Servlets and EJB components, to
use CDI injection for dependencies. CDI injection simplifies, for example, the use of managed
beans with JSF technology in Web applications.
See Introduction to Contexts and Dependency Injection for the Java EE Platform in the Java
EE 8 Tutorial.
CDI 2.0 Examples
Oracle provides Java EE 8 examples that demonstrate new features in CDI 2.0, such as:
• Asynchronous Events – Demonstrates how to produce async events and how singleton
EJBs can consume these events.
• Observer Ordering – Demonstrates how singleton EJBs can consume events according to
the priority.
• Interception Factory – Demonstrates how to produce a class instance with adding the
specified annotation dynamically by InterceptionFactory.
For more information, see the CDI 2.0 examples in the WebLogic Server distribution kit:
Oracle_HOME\wlserver\samples\server\examples\src\examples\javaee8\cdi
where
ORACLE_HOME
represents the directory in which you installed WebLogic Server. See
Sample Applications and Code Examples in Understanding Oracle WebLogic Server.
CDI 1.1 Example
A Java EE 7 example that show how to use CDI is provided in the cdi sample application,
which is installed in
Oracle_HOME\wlserver\samples\server\examples\src\examples\javaee7\cdi
where
ORACLE_HOME
represents the directory in which you installed WebLogic Server. See
Sample Applications and Code Examples in Understanding Oracle WebLogic Server.
Chapter 9
About CDI for the Java EE Platform
9-4
Defining a Managed Bean
A managed bean is the basic component in a CDI application and defines the beans that CDI
can create and manage.
A bean is a source of the objects that CDI can create and manage. See About Beans in The
Java EE 8 Tutorial.
To define a managed bean, define a top-level plain old Java object (POJO) class that meets
either of the following conditions:
• The class is defined to be a managed bean by any other Java EE specification.
• The class meets all of the conditions that are required by JSR 346 as listed in About CDI
Managed Beans in The Java EE 8 Tutorial.
Note:
No special declaration, such as an annotation, is required to define a managed bean.
To make the managed beans of an application available for injection, you must
configure the application as explained in Configuring a CDI Application.
Injecting a Bean
To use the beans that you define, inject them into another bean that an application such as a
JavaServer Faces can use.
See Injecting Beans in The Java EE 8 Tutorial.
CDI ensures type-safe injection of beans by selecting the bean class on the basis of the Java
type that is specified in the injection point, not the bean name. CDI also determines where to
inject a bean from the Java type in the injection point.
In this respect, CDI bean injection is different than the resource injection that was introduced in
the Java EE 5 specification, which selects the resource to inject from the string name of the
resource. For example, a data source that is injected with the javax.annotation.Resource
annotation is identified by its string name.
To inject a bean, obtain an instance of the bean by creating an injection point in the class that
is to use the injected bean. Create the injection point by annotating one of the following
program elements with the
javax.inject.Inject
annotation:
• An instance class field
• An initializer method parameter
• A bean constructor parameter
Example 9-1 shows how to use the
@Inject
annotation to inject a bean into another bean.
Example 9-1 Injecting a Bean into Another Bean
This example annotates an instance class field to inject an instance of the bean class
Greeting
into the class
Printer
.
import javax.inject.Inject;
...
Chapter 9
Defining a Managed Bean
9-5

public class Printer {
@Inject Greeting greeting;
...
}
Defining the Scope of a Bean
The scope of a bean defines the duration of a user's interaction with an application that uses
the bean. To enable a Web application to use a bean that injects another bean class, the bean
must be able to hold state over the duration of the user's interaction with the application.
To define the scope of a bean, annotate the class declaration of the bean with the scope. The
javax.enterprise.context
package defines the following scopes:
•
@RequestScoped
•
@SessionScoped
•
@ApplicationScoped
•
@ConversationScoped
•
@Dependent
For information about these scopes, see Using Scopes in The Java EE 8 Tutorial.
If you do not define the scope of a bean, the scope of the bean is
@Dependent
by default. The
@Dependent
scope specifies that the bean's life cycle is the life cycle of the object into which
the bean is injected.
The predefined scopes except
@Dependent
are contextual scopes. CDI places beans of
contextual scope in the context whose life cycle is defined by the Java EE specifications. For
example, a session context and its beans exist during the lifetime of an HTTP session. Injected
references to the beans are contextually aware. The references always apply to the bean that
is associated with the context for the thread that is making the reference. The CDI container
ensures that the objects are created and injected at the correct time as determined by the
scope that is specified for these objects.
Example 9-2 shows how to define the scope of a bean.
Example 9-2 Defining the Scope of a Bean
This example defines the scope of the
Accountant
bean class to be
@RequestScoped
.
The
Accountant
class in this example is qualified by the
@BeanCounter
qualifier. For more
information, see Using Qualifiers.
package com.example.managers;
import javax.enterprise.context.RequestScoped;
@RequestScoped
@BeanCounter
public class Accountant implements Manager
{
...
}
Chapter 9
Defining the Scope of a Bean
9-6
Overriding the Scope of a Bean at the Point of Injection
Overriding the scope of a bean at the point of injection enables an application to request a new
instance of the bean with the default scope
@Dependent
. The
@Dependent
scope specifies that
the bean's life cycle is the life cycle of the object into which the bean is injected.
The CDI container provides no other life cycle management for the instance. For more
information about scopes, see Defining the Scope of a Bean.
Note:
The effects of overriding the scope of a bean may be unpredictable and undesirable,
particularly if the overridden scope is
@Request
or
@Session
.
To override the scope of a bean at the point of injection, inject the bean by using the
javax.enterprise.inject.New
annotation instead of the
@Inject
annotation. For more
information about the
@Inject
annotation, see Injecting a Bean.
Using Qualifiers
Qualifiers enable you to provide more than one implementation of a particular bean type.
When you use qualifiers, you select between implementations at development time. See Using
Qualifiers in The Java EE 8 Tutorial.
Note:
To select between alternative implementations at deployment time, use alternatives
as explained in Providing Alternative Implementations of a Bean Type.
Using qualifiers involves the tasks that are explained in the following sections:
• Defining Qualifiers for Implementations of a Bean Type
• Applying Qualifiers to a Bean
• Injecting a Qualified Bean
• Defining Qualifiers for Implementations of a Bean Type
• Applying Qualifiers to a Bean
• Injecting a Qualified Bean
Defining Qualifiers for Implementations of a Bean Type
A qualifier is an application-defined annotation that enables you to identify an implementation
of a bean type. Define a qualifier for each implementation of a bean type that you are
providing.
Chapter 9
Overriding the Scope of a Bean at the Point of Injection
9-7
Define qualifiers only if you are providing multiple implementations of a bean type and if you
are not using alternatives. If no qualifiers are defend for a bean type, CDI applies the
predefined qualifier
@Default
when a bean of the type is injected.
Note:
CDI does not require a qualifier to be unique to a particular bean. You can define a
qualifier to use for more than one bean type.
To define a qualifier:
1. Define a Java annotation type to represent the qualifier.
2. Annotate the declaration of the annotation type with the
javax.inject.Qualifier
annotation.
3. Specify that the qualifier is to be retained by the virtual machine at run time.
Use the
java.lang.annotation.Retention(RUNTIME)
meta-annotation for this purpose.
4. Specify that the qualifier may be applied to the program elements
METHOD
,
FIELD
,
PARAMETER
, and
TYPE
.
Use the
java.lang.annotation.Target({METHOD, FIELD, PARAMETER, TYPE})
meta-
annotation for this purpose.
The following examples show how to define qualifiers
@BeanCounter
and
@PeopleManager
for
different implementations of the same bean type.
Example 9-3 Defining the @BeanCounter Qualifier
This example defines the
@BeanCounter
qualifier.
package com.example.managers;
import static java.lang.annotation.ElementType.FIELD;
import static java.lang.annotation.ElementType.METHOD;
import static java.lang.annotation.ElementType.PARAMETER;
import static java.lang.annotation.ElementType.TYPE;
import static java.lang.annotation.RetentionPolicy.RUNTIME;
import java.lang.annotation.Retention;
import java.lang.annotation.Target;
import javax.inject.Qualifier;
@Qualifier
@Retention(RUNTIME)
@Target({METHOD, FIELD, PARAMETER, TYPE})
public @interface BeanCounter {}
Example 9-4 Defining the @PeopleManager Qualifier
This example defines the
@PeopleManager
qualifier.
package com.example.managers;
import static java.lang.annotation.ElementType.FIELD;
import static java.lang.annotation.ElementType.METHOD;
import static java.lang.annotation.ElementType.PARAMETER;
Chapter 9
Using Qualifiers
9-8
import static java.lang.annotation.ElementType.TYPE;
import static java.lang.annotation.RetentionPolicy.RUNTIME;
import java.lang.annotation.Retention;
import java.lang.annotation.Target;
import javax.inject.Qualifier;
@Qualifier
@Retention(RUNTIME)
@Target({METHOD, FIELD, PARAMETER, TYPE})
public @interface PeopleManager {}
Applying Qualifiers to a Bean
Applying qualifiers to a bean identifies the implementation of the bean type. You can apply any
number of qualifiers or no qualifiers to a bean. If you do not apply any qualifiers to a bean, CDI
implicitly applies the predefined qualifier
@Default
to the bean.
Note:
CDI does not require a qualifier to be unique to a particular bean. You can apply the
same qualifier to different types of beans in the set of beans that are available in the
application.
To apply qualifiers to a bean, annotate the class declaration of the bean with each qualifier to
apply. Any qualifier that you apply to a bean must be defined as explained in Defining
Qualifiers for Implementations of a Bean Type.
The following examples show how to apply the qualifiers
@BeanCounter
and
@PeopleManager
to
different implementations of the
Manager
bean type.
Example 9-5 Applying the @BeanCounter Qualifier to a Bean
This example applies the
@BeanCounter
qualifier to the
Accountant
class. The
Accountant
class is an implementation of the
Manager
bean type. The
@BeanCounter
qualifier is defined in
Example 9-3.
package com.example.managers;
...
@BeanCounter
public class Accountant implements Manager
{...}
Example 9-6 Applying the@ PeopleManager Qualifier to a Bean
This example applies the
@PeopleManager
qualifier to the
Boss
class. The
Boss
class is an
implementation of the
Manager
bean type. The
@PeopleManager
qualifier is defined in
Example 9-4.
package com.example.managers;
...
@PeopleManager
public class Boss implements Manager
{...}
Chapter 9
Using Qualifiers
9-9

Injecting a Qualified Bean
To inject a qualified bean, create an injection point and annotate the injection point with the
bean's qualifiers. The qualifiers at the injection point define the overall requirements of the
injection target. The CDI application must contain a CDI managed bean that matches the type
of the injection point and the qualifiers with which the injection point is annotated. Otherwise, a
deployment error occurs. For more information about how to create an injection point, see
Injecting a Bean.
If you do not annotate the injection point, the predefined qualifier
@Default
is applied to the
injection point by default.
CDI resolves the injection point by first matching the bean type and then matching
implementations of that type with the qualifiers in the injection point.
Only one active bean class may match the bean type and qualifiers in the injection point.
Otherwise, an error occurs.
A bean class is active in one of the following situations:
• The bean class is an alternative that is enabled.
• The bean class is not an alternative and no alternatives for its bean type are enabled.
For information about alternatives, see Providing Alternative Implementations of a Bean Type.
Example 9-7 shows how to inject a qualified bean.
Example 9-7 Injecting a Qualified Bean
This example injects the
@BeanCounter
implementation of the
Manager
bean type. The
Manager
bean type is implemented by the following classes:
•
Accountant
, which is shown in Example 9-5
•
Boss
, which is shown in Example 9-6
In this example, the
Accountant
class is injected because the bean type and qualifier of this
class match the bean type and qualifier in the injection point.
package com.example.managers;
...
import javax.inject.Inject;
...
public class PennyPincher {
@Inject @BeanCounter Manager accountant;
...
}
Providing Alternative Implementations of a Bean Type
The environments for the development, testing, and production deployment of an enterprise
application may be very different. Differences in configuration, resource availability, and
performance requirements may cause bean classes that are appropriate to one environment to
be unsuitable in another environment. By providing alternative implementations of a bean type,
you can modify an application at deployment time to meet such differing requirements.
Different deployment scenarios may also require different business logic in the same
application. For example, country-specific sales tax laws may require country-specific sales tax
business logic in an order-processing application.
Chapter 9
Providing Alternative Implementations of a Bean Type
9-10
CDI enables you to select from any number of alternative bean type implementations for
injection instead of a corresponding primary implementation. See Using Alternatives in CDI
Applications in The Java EE 8 Tutorial.
Note:
To select between alternative implementations at development time, use qualifiers as
explained in Using Qualifiers.
Providing alternative implementations of a bean type involves the tasks that are explained in
the following sections:
• Defining an Alternative Implementation of a Bean Type
• Selecting an Alternative Implementation of a Bean Type for an Application
• Defining an Alternative Implementation of a Bean Type
• Selecting an Alternative Implementation of a Bean Type for an Application
Defining an Alternative Implementation of a Bean Type
To define an alternative implementation of a bean type:
1. Write a bean class of the same bean type as primary implementation of the bean type.
To ensure that any alternative can be injected into an application, you must ensure that all
alternatives and the primary implementation are all of the same bean type. For information
about how to inject a bean, see Injecting a Bean.
2. Annotate the class declaration of the implementation with the
javax.enterprise.inject.Alternative
annotation.
Note:
To ensure that the primary implementation is selected by default, do not annotate
the class declaration of the primary implementation with
@Alternative
.
The following examples show the declaration of the primary implementation and an alternative
implementation of a bean type. The alternative implementation is a mock implementation that
is intended for use in testing.
Example 9-8 Declaring a Primary Implementation of a Bean Type
This example declares the primary implementation
OrderImpl
of the bean type
Order
.
package com.example.orderprocessor;
...
public class OrderImpl implements Order {
...
}
Example 9-9 Declaring an Alternative Implementation of a Bean Type
This example declares the alternative implementation
MockOrderImpl
of the bean type
Order
.
The declaration of the primary implementation of this bean type is shown in Example 9-8.
Chapter 9
Providing Alternative Implementations of a Bean Type
9-11

package com.example.orderprocessor;
...
import javax.enterprise.inject.Alternative;
@Alternative
public class MockOrderImpl implements Order {
...
}
Selecting an Alternative Implementation of a Bean Type for an Application
By default, CDI selects the primary implementation of a bean type for injection into an
application. If you require an alternative implementation to be injected, you must select the
alternative explicitly.
To select an alternative implementation for an application:
1. Add a
class
element for the alternative to the
alternatives
element in the
beans.xml
file.
2. In the
class
element, provide the fully qualified class name of the alternative.
For more information about the
beans.xml
file, see Configuring a CDI Application.
Example 9-16 shows a
class
element in the
beans.xml
file for selecting an alternative
implementation of a bean type.
Example 9-10 Selecting an Alternative Implementation of a Bean Type
This example selects the alternative implementation
com.example.orderprocessor.MockOrderImpl
.
...
<alternatives>
<class>com.example.orderprocessor.MockOrderImpl</class>
</alternatives>
...
Applying a Scope and Qualifiers to a Session Bean
CDI enables you to apply a scope and qualifiers to a session bean.
A session bean is an EJB component that meets either of the following requirements:
• The class that implements the bean is annotated with one of the following annotations:
–
javax.ejb.Singleton
, which denotes a singleton session bean
–
javax.ejb.Stateful
, which denotes a stateful session bean
–
javax.ejb.Stateless
, which denotes a stateless session bean
• The bean is listed in the
ejb-jar.xml
deployment-descriptor file.
For more information about session beans, see the following documents:
• Developing Enterprise JavaBeans for Oracle WebLogic Server
• Developing Enterprise JavaBeans, Version 2.1, for Oracle WebLogic Server
• Applying a Scope to a Session Bean
• Applying Qualifiers to a Session Bean
Chapter 9
Applying a Scope and Qualifiers to a Session Bean
9-12
Applying a Scope to a Session Bean
The scopes that CDI allows you to apply to a session bean depend on the type of the session
bean as shown in Table 9-1.
Table 9-1 Allowed CDI Scopes for Session Beans
Session Bean Type Allowed Scopes
Singleton Either of the following scopes:
• Dependent
• Application
Stateful Any
Stateless Dependent
For more information about scopes in CDI, see Defining the Scope of a Bean.
When CDI injects a reference to a stateful session bean, CDI creates the bean, injects the
bean's fields, and manages the stateful session bean according to its scope. When the context
is destroyed, CDI calls the stateful session bean's remove method to remove the bean.
Applying Qualifiers to a Session Bean
CDI allows you to apply any qualifier to a session bean. CDI does not restrict the type of
qualifier that you can apply to a session bean. For more information about qualifiers in CDI,
see Using Qualifiers.
Using Producer Methods, Disposer Methods, and Producer
Fields
A producer method is a method that generates an object that can then be injected. A disposer
method enables an application to perform customized cleanup of an object that a producer
method returns. A producer field is a field of a bean that generates an object.
A producer field is a simpler alternative to a producer method.
See Using Producer Methods, Producer Fields, and Disposer Methods in CDI Applications in
The Java EE 8 Tutorial.
• Defining a Producer Method
• Defining a Disposer Method
• Defining a Producer Field
Defining a Producer Method
A producer method enables an application to customize how CDI managed beans are created.
This customization involves overriding the process that CDI normally uses to resolve beans. A
producer method enables you to inject an object that is not an instance of a CDI bean class.
A producer method must be a method of a CDI bean class or session bean class. However, a
producer method may return objects that are not instances of CDI bean classes. In this
situation, the producer method must return an object that matches a bean type.
Chapter 9
Using Producer Methods, Disposer Methods, and Producer Fields
9-13
A producer method can have any number of parameters. If necessary, you can apply qualifiers
to these parameters. All parameters of a producer method are injection points. Therefore, the
parameters of a producer method do not require the
@Inject
annotation.
To define a producer method, annotate the declaration of the method with the
javax.enterprise.inject.Produces
annotation.
If the producer method sometimes returns null, set the scope of the method to dependent.
Note:
Calling a producer method directly in application code does not invoke CDI.
For an example of the definition of a producer method, see Example 9-11.
Defining a Disposer Method
If you require customized cleanup of an object that a producer method returns, define a
disposer method in the class that declares the producer method.
To define a disposer method, annotate the disposed parameter in the declaration of the
method with the
javax.enterprise.inject.Disposes
annotation. The type of the disposed
parameter must be the same as the return type of the producer method.
A disposer method matches a producer method when the disposed object's injection point
matches both the type and qualifiers of the producer method. You can define one disposer
method to match to several producer methods in the class.
Example 9-11 shows how to use the
@Produces
annotation to define a producer method and
the
@Disposes
annotation to define a disposer method.
Example 9-11 Defining a Producer Method and Disposer Method
This example defines the producer method
connect
and the disposer method
close
.
The producer method
connect
returns an object of type
Connection
. In the disposer method
close
, the parameter
connection
is the disposed parameter. This parameter is of type
Connection
to match the return type of the producer method.
At run time, the CDI framework creates an instance of
SomeClass
and then calls the producer
method. Therefore, the CDI framework is responsible for injecting the parameters that are
passed to the producer method.
The scope of the producer method is
@RequestScoped
. When the request context is destroyed,
if the
Connection
object is in the request context, CDI calls the disposer method for this object.
In the call to the disposer method, CDI passes the
Connection
object as a parameter.
import javax.enterprise.inject.Produces;
import javax.enterprise.inject.Disposes;
import javax.enterprise.context.RequestScoped;
public class SomeClass {
@Produces @RequestScoped
public Connection connect(User user) {
return createConnection(user.getId(),
user.getPassword());
Chapter 9
Using Producer Methods, Disposer Methods, and Producer Fields
9-14
}
private Connection createConnection(
String id, String password) {...}
public void close(@Disposes Connection connection) {
connection.close();
}
}
Defining a Producer Field
A producer field is a simpler alternative to a producer method. A producer field must be a field
of a managed bean class or session bean class. A producer field may be either static or
nonstatic, subject to the following constraints:
• In a session bean class, the producer field must be a static field.
• In a managed bean class, the producer field can be either static or nonstatic.
To define a producer field, annotate the declaration of the field with the
javax.enterprise.inject.Produces
annotation.
If the producer field may contain a null when accessed, set the scope of the field to dependent.
Note:
Using a producer field directly in application code does not invoke CDI.
Producer fields do not have disposers.
Initializing and Preparing for the Destruction of a Managed Bean
CDI managed bean classes and their superclasses support the annotations for initializing and
preparing for the destruction of a managed bean.
These annotations are defined in JSR 250: Common Annotations for the Java Platform. For
more information, see Using Java EE Annotations and Dependency Injection.
• Initializing a Managed Bean
• Preparing for the Destruction of a Managed Bean
Initializing a Managed Bean
Initializing a managed bean specifies the life cycle callback method that the CDI framework
should call after dependency injection but before the class is put into service.
To initialize a managed bean:
1. In the managed bean class or any of its superclasses, define a method that performs the
initialization that you require.
2. Annotate the declaration of the method with the
javax.annotation.PostConstruct
annotation.
Chapter 9
Initializing and Preparing for the Destruction of a Managed Bean
9-15
When the managed bean is injected into a component, CDI calls the method after all
injection has occurred and after all initializers have been called.
Note:
As mandated by JSR 250, if the annotated method is declared in a superclass,
the method is called unless a subclass of the declaring class overrides the
method.
Preparing for the Destruction of a Managed Bean
Preparing for the destruction of a managed bean specifies the life cycle callback method that
signals that an application component is about to be destroyed by the container.
To prepare for the destruction of a managed bean:
1. In the managed bean class or any of its superclasses, define a method that prepares for
the destruction of the managed bean.
In this method, perform any cleanup that is required before the bean is destroyed, such a
releasing resources that the bean has been holding.
2. Annotate the declaration of the method with the
javax.annotation.PreDestroy
annotation.
CDI calls the method before starting the logic for destroying the bean.
Note:
As mandated by JSR 250, if the annotated method is declared in a superclass,
the method is called unless a subclass of the declaring class overrides the
method.
Intercepting Method Invocations and Life Cycle Events of Bean
Classes
Intercepting a method invocation or a life cycle event of a bean class interposes an interceptor
class in the invocation or event. When an interceptor class is interposed, additional actions that
are defined in the interceptor class are performed.
An interceptor class simplifies the maintenance of code for tasks that are frequently performed
and are separate from the business logic of the application. Examples of such tasks are
logging and auditing.
Chapter 9
Intercepting Method Invocations and Life Cycle Events of Bean Classes
9-16
Note:
The programming model for interceptor classes is optimized for operations that are
separate from the business logic of the application. To intercept methods that perform
operations with business semantics, use a decorator class as explained in
Decorating a Managed Bean Class.
The interceptors that were introduced in the Java EE 5 specification are specific to EJB
components. For more information about Java EE 5 interceptors, see Specifying Interceptors
for Business Methods or Life Cycle Callback Events in Developing Enterprise JavaBeans for
Oracle WebLogic Server.
CDI enables you to use interceptors with the following types of Java EE managed objects:
• CDI managed beans
• EJB session beans
• EJB message-driven beans
Note:
You cannot use interceptors with EJB entity beans because CDI does not support
EJB entity beans.
See Using Interceptors in CDI Applications in The Java EE 8 Tutorial.
Intercepting method invocations and life cycle events of bean classes involves the tasks that
are explained in the following sections:
• Defining an Interceptor Binding Type
• Defining an Interceptor Class
• Identifying Methods for Interception
• Enabling an Interceptor
• Defining an Interceptor Binding Type
• Defining an Interceptor Class
• Identifying Methods for Interception
• Enabling an Interceptor
• Applying an Interceptor on a Producer
In CDI 1.x, the interceptor is not bound to a producer bean. CDI 2.0 introduces the
interface
javax.enterprise.inject.spi.InterceptionFactory<T>
, which allows to apply
interceptors programmatically to the return value of a producer method.
Defining an Interceptor Binding Type
An interceptor binding type is an application-defined annotation that associates an interceptor
class with an intercepted bean. Define an interceptor binding type for each type of interceptor
that you require.
Chapter 9
Intercepting Method Invocations and Life Cycle Events of Bean Classes
9-17

Note:
CDI does not require an interceptor binding type to be unique to a particular
interceptor class. You can define an interceptor binding type to use for more than one
interceptor class.
To define an interceptor binding type:
1. Define a Java annotation type to represent the interceptor binding type.
2. Annotate the declaration of the annotation type with the
javax.interceptor.InterceptorBinding
annotation.
3. Specify that the interceptor binding type is to be retained by the virtual machine at run time.
Use the
java.lang.annotation.Retention(RUNTIME)
meta-annotation for this purpose.
4. Specify that the interceptor binding type may be applied to the program elements
METHOD
and
TYPE
.
Use the
java.lang.annotation.Target({METHOD, TYPE})
meta-annotation for this
purpose.
Example 9-12 Defining An Interceptor Binding Type
This example defines the
@Transactional
interceptor binding type.
package com.example.billpayment.interceptor;
import static java.lang.annotation.ElementType.METHOD;
import static java.lang.annotation.ElementType.TYPE;
import static java.lang.annotation.RetentionPolicy.RUNTIME;
import java.lang.annotation.Retention;
import java.lang.annotation.Target;
import javax.interceptor.InterceptorBinding;
@InterceptorBinding
@Target({METHOD, TYPE})
@Retention(RUNTIME)
public @interface Transactional {}
Defining an Interceptor Class
An interceptor class is used to interpose in method invocations or life cycle events that occur in
an associated target bean class. In an interceptor class, provide the code for tasks that are
frequently performed and are separate from the business logic of the application, such as
logging and auditing.
To define an interceptor class:
1. Define a Java class to represent the interceptor.
2. Annotate the declaration of the class with the following annotations:
•
javax.interceptor.Interceptor
• The interceptor binding types that are defined for the class
You can apply any number of interceptor binding types to an interceptor class.
Chapter 9
Intercepting Method Invocations and Life Cycle Events of Bean Classes
9-18
Note:
CDI does not require an interceptor binding type to be unique to a particular
interceptor class. You can apply the same interceptor binding type to multiple
interceptor classes.
3. Implement the interceptor methods in the class.
CDI does not require the signature of an interceptor method to match the signature of the
intercepted method.
4. Identify the interceptor methods in the class.
An interceptor method is the method that is invoked when a method invocation or a life
cycle event of a bean class is intercepted.
To identify an interceptor method, annotate the declaration of the method with the
appropriate annotation for the type of the interceptor method.
Interceptor Method Type Annotation
Method invocation
javax.interceptor.AroundInvoke
EJB timeout
javax.interceptor.AroundTimeout
Initialization of a managed bean or EJB
component
javax.annotation.PostConstruct
Destruction of a managed bean or EJB
component
javax.annotation.PreDestroy
Activation of a stateful session bean
javax.ejb.PostActivate
Passivation of a stateful session bean
javax.ejb.PrePassivate
Note:
An interceptor class can have multiple interceptor methods. However, an
interceptor class can have no more than one interceptor method of a given type.
Example 9-13 shows how to define an interceptor class.
Example 9-13 Defining an Interceptor Class
This example defines the interceptor class for which the
@Transactional
interceptor binding
type is defined. The
manageTransaction
method of this class is an interceptor method. The
@Transactional
interceptor binding is defined in Example 9-12.
package com.example.billpayment.interceptor;
import javax.annotation.Resource;
import javax.interceptor.*;
...
@Transactional @Interceptor
public class TransactionInterceptor {
@Resource UserTransaction transaction;
@AroundInvoke
public Object manageTransaction(InvocationContext ctx)
throws Exception {
...
Chapter 9
Intercepting Method Invocations and Life Cycle Events of Bean Classes
9-19

}
}
Identifying Methods for Interception
Identifying methods for interception associates the methods with the interceptor that is invoked
when the methods are invoked. CDI enables you to identify all methods of a bean class or only
individual methods of a bean class for interception.
• To identify all methods of a bean class for interception, annotate the declaration of the
bean class with the appropriate interceptor binding type.
• To identify an individual method of a bean class for interception, annotate the declaration of
the method with the appropriate interceptor binding type.
CDI does not require the signature of an intercepted method to match the signature of the
interceptor method. To determine the arguments and return type of an intercepted method, an
interceptor must query an interceptor context. Therefore, you can intercept any method or life
cycle event in a bean class without any knowledge at compilation time of the interfaces of bean
class.
Note:
An implementation of a Java EE 5 interceptor must be declared in the annotation on
the method that is to be intercepted. A CDI interceptor uses an interceptor binding to
identify an interceptor method and to relate an intercepted method to its interceptor
method. Both the intercepted method and the interceptor method must be annotated
with the binding. In this way, the intercepted method and the interceptor are related to
each other only through the interceptor binding.
Example 9-14 Identifying All Methods of a Bean Class for Interception
This example identifies all methods of the
ShoppingCart
class for interception by the
@Transactional
interceptor.
package com.example.billpayment.interceptor;
@Transactional
public class ShoppingCart {
...
}
Example 9-15 Identifying an Individual Method of a Class for Interception
This example identifies only the
checkout
method of the
ShoppingCart
class for interception by
the
@Transactional
interceptor.
package com.example.billpayment.interceptor;
public class ShoppingCart {
...
@Transactional public void checkout() {
...
}
}
Chapter 9
Intercepting Method Invocations and Life Cycle Events of Bean Classes
9-20

Enabling an Interceptor
By default, an interceptor is disabled. If you require an interceptor to be interposed in method
invocations and events, you must enable the interceptor explicitly.
To enable an interceptor:
1. Add a
class
element for the interceptor to the
interceptors
element in the
beans.xml
file.
2. In the
class
element, provide the fully qualified class name of the interceptor.
Ensure that the order of t he
class
elements in the
beans.xml
file matches the order in
which the interceptors are to be invoked.
CDI interceptors are invoked in the order in which they are declared in the
beans.xml
file.
Interceptors that are defined in the
ejb-jar.xml
file or by the
javax.interceptor.Interceptors
annotation are called before the CDI interceptors.
Interceptors are called before CDI decorators.
Note:
Java EE 5 interceptors are invoked in the order in which they are annotated on
an intercepted method.
For more information about the
beans.xml
file, see Configuring a CDI Application.
Example 9-16 shows a
class
element in the
beans.xml
file for enabling an interceptor class.
Example 9-16 Enabling an Interceptor Class
This example enables the interceptor class
com.example.billpayment.interceptor.TransactionInterceptor
. The interceptor class is
defined in Example 9-13.
...
<interceptors>
<class>com.example.billpayment.interceptor.TransactionInterceptor</class>
</interceptors>
...
Applying an Interceptor on a Producer
In CDI 1.x, the interceptor is not bound to a producer bean. CDI 2.0 introduces the interface
javax.enterprise.inject.spi.InterceptionFactory<T>
, which allows to apply interceptors
programmatically to the return value of a producer method.
The
InterceptionFactory
interface allows to create a wrapper instance whose method
invocations are intercepted by method interceptors and forwarded to a provided instance.
publicinterfaceInterceptionFactory<T> {
InterceptionFactory<T> ignoreFinalMethods();
AnnotatedTypeConfigurator<T> configure();
T createInterceptedInstance(T instance);
}
Chapter 9
Intercepting Method Invocations and Life Cycle Events of Bean Classes
9-21
You can obtain an implementation of
InterceptionFactory
by calling the
BeanManager.createInterceptionFactory()
. The following example shows a producer
method using the
InterceptionFactory
:
@Produces
@RequestScoped
public Product createInterceptedProduct(InterceptionFactory<Product>
interceptionFactory) {
interceptionFactory.configure().add(ActionBinding.Literal.INSTANCE);
return interceptionFactory.createInterceptedInstance(new Product());
}
See Using Interceptors in CDI Applications in Java EE 8 Tutorial for more information about
using interceptors.
Decorating a Managed Bean Class
Decorating a managed bean class enables you to intercept invocations of methods in the
decorated class that perform operations with business semantics.
You can decorate any managed bean class.
Note:
The programming model for decorator classes is optimized for operations that
perform the business logic of the application. To intercept methods that are separate
from the business logic of an application, use an interceptor class as explained in
Intercepting Method Invocations and Life Cycle Events of Bean Classes.
See Using Decorators in The Java EE 8 Tutorial.
Decorating a managed bean class involves the tasks that are explained in the following
sections:
• Defining a Decorator Class
• Enabling a Decorator Class
• Defining a Decorator Class
• Enabling a Decorator Class
Defining a Decorator Class
A decorator class intercepts invocations of methods in the decorated class that perform
operations with business semantics. A decorator class and an interceptor class are similar
because both classes provide an around-method interception. However, a method in a
decorator class has the same signature as the intercepted method in the decorated bean
class.
To define a decorator class:
1. Write a Java class that implements the same interface as the bean class that you are
decorating.
Chapter 9
Decorating a Managed Bean Class
9-22
If you want to intercept only some methods of the decorated class, declare the decorator
class as an abstract class. If you declare the class as abstract, you are not required to
implement all the methods of the bean class that you are decorating.
2. Annotate the class declaration of the decorator class with the
javax.decorator.Decorator
annotation.
3. Implement the methods of the decorated bean class that you want to intercept.
If the decorator class is a concrete class, you must implement all the methods of the bean
class that you are decorating.
You must ensure that the intercepting method in a decorator class has the same signature
as the intercepted method in the decorated bean class.
4. Add a delegate injection point to the decorator class.
A decorator class must contain exactly one delegate injection point. A delegate injection
point injects a delegate object, which is an instance of the decorated class, into the
decorator object.
You can customize how any method in the decorator object handles the implementation of
the decorated method. CDI allows but does not require the decorator object to invoke the
corresponding delegate object. Therefore, you are free to choose whether the decorator
object invokes the corresponding delegate object.
a. In the decorator class, inject an instance of the bean class that you are decorating.
b. Annotate the injection point with the
javax.decorator.Delegate
annotation.
c. Apply qualifiers that you require to the injection point, if any.
If you apply qualifiers to the injection point, the decorator applies only to beans whose
bean class matches the qualifiers of the injection point.
Note:
No special declaration, such as an annotation, is required to define a decorated bean
class. An enabled decorator class applies to any bean class or session bean that
matches the bean type and qualifiers of the delegate injection point.
Example 9-17 shows the definition of a decorator class.
Example 9-17 Defining a Decorator Class
This example defines the decorator class
DataAccessAuthDecorator
. This class decorates any
bean of type
DataAccess
.
Because only some methods of the decorated class are to be intercepted, the class is declared
as an abstract class. This class injects a delegate instance
delegate
of the decorated
implementation of the
DataAcess
bean type.
import javax.decorator.*;
import javax.inject.Inject;
import java.lang.Override;
...
@Decorator
public abstract class DataAccessAuthDecorator
implements DataAccess {
@Inject @Delegate DataAccess delegate;
Chapter 9
Decorating a Managed Bean Class
9-23
@Override
public void delete(Object object) {
authorize(SecureAction.DELETE, object);
delegate.delete(object);
}
private void authorize(SecureAction action, Object object) {
...
}
}
Enabling a Decorator Class
By default, a decorator class is disabled. If you require a decorator class to be invoked in a CDI
application, you must enable the decorator class explicitly.
To enable an decorator class:
1. Add a
class
element for the decorator class to the
decorators
element in the
beans.xml
file.
2. In the
class
element, provide the fully qualified class name of the decorator class.
Ensure that the order of the
class
elements in the
beans.xml
file matches the order in
which the decorator classes are to be invoked.
Note:
Any interceptor classes that are defined for an application are invoked before the
application's decorator classes.
For more information about the
beans.xml
file, see Configuring a CDI Application.
Example 9-18 shows a
class
element in the
beans.xml
file for enabling a decorator class.
Example 9-18 Enabling a Decorator Class
This example enables the decorator class
com.example.billpayment.decorator.DataAccessAuthDecorator
.
...
<decorators>
<class>com.example.billpayment.decorator.DataAccessAuthDecorator</class>
</decorators>
...
Assigning an EL Name to a CDI Bean Class
EL enables components in the presentation layer to communicate with managed beans that
implement application logic.
Components in the presentation layer are typically JavaServer Faces (JSF) pages and
JavaServer Pages (JSP) pages. See JSP Expression Language in Developing Web
Applications, Servlets, and JSPs for Oracle WebLogic Server.
Chapter 9
Assigning an EL Name to a CDI Bean Class
9-24

In the scripting languages in JSP pages and JSF pages, the syntax of an injected variable is
identical to the syntax of a built-in variable of these languages. Any CDI bean that is injected
into a JSP page or JSF page must be accessible through an EL name. See Giving Beans EL
Names in The Java EE 8 Tutorial.
To assign an EL name to a CDI bean class, annotate the class declaration of the bean class
with the
javax.inject.Named
annotation.
If you do not specify a name, the EL name is the unqualified class name with the first character
in lower case. For example, if the unqualified class name is
ShoppingCart
, the EL name is
shoppingCart
.
To specify a name, set the
value
element of the
@Named
annotation to the name that you
require.
Note:
To assign an EL name to a CDI bean class, you must annotate the bean class
declaration with the
@Named
annotation. If the class is not annotated with
@Named
, the
CDI bean class does not have an EL name.
The following example shows how to use the
@Named
annotation to assign an EL name to a
CDI bean class. This example assigns the EL name
cart
to the
ShoppingCart
class.
import javax.enterprise.context.SessionScoped;
@SessionScoped
@Named("cart")
public class ShoppingCart {
public String getTotal() {
...
}
...
}
Any bean that a JSP page or JSF page accesses must conform to the JavaBeans standard. To
access a CDI managed bean from a JSP page or JSF page through the bean's EL name, use
a syntax that is similar to the syntax for JavaBeans components.
The following example shows how an instance of the
ShoppingCart
class is accessed in a JSF
page through the EL name that is assigned to the class.
Example 9-19 Accessing a Bean Through its EL Name
This example accesses an instance of the
ShoppingCart
class to display the value of its
total
property in a JSF page.
This property is returned by the
getTotal
getter method of the
ShoppingCart
class.
...
<h:outputText value="#{cart.total}"/>
...
Chapter 9
Assigning an EL Name to a CDI Bean Class
9-25

Defining and Applying Stereotypes
In a large application in which several beans perform similar functions, you may require the
same set of annotations to be applied to several bean classes. Defining a stereotype requires
you to define the set of annotations only once.
You can then use the stereotype to guarantee that the same set of annotations is applied to all
bean classes that require the annotations. See Using Stereotypes in The Java EE 8 Tutorial.
Defining and applying stereotypes involves the tasks that are explained in the following
sections:
• Defining a Stereotype
• Applying Stereotypes to a Bean
• Defining a Stereotype
• Applying Stereotypes to a Bean
Defining a Stereotype
A stereotype is an application-defined annotation type that incorporates other annotation types.
To define a stereotype:
1. Define a Java annotation type to represent the stereotype.
2. Annotate the declaration of the annotation type with the following annotations:
•
javax.enterprise.inject.Stereotype
• The other annotation types that you want the stereotype to incorporate
You can specify the following annotation types in a stereotype:
– A default scope—see Defining the Scope of a Bean
–
@Alternative
—see Providing Alternative Implementations of a Bean Type
– One or more interceptor bindings—see Intercepting Method Invocations and Life
Cycle Events of Bean Classes
–
@Named
—see Assigning an EL Name to a CDI Bean Class
3. Specify that the stereotype is to be retained by the virtual machine at run time.
Use the
java.lang.annotation.Retention(RUNTIME)
meta-annotation for this purpose.
4. Specify that the stereotype may be applied to the program element
TYPE
.
Use the
java.lang.annotation.Target(TYPE)
meta-annotation for this purpose.
The following example shows the definition of a stereotype.
Example 9-20 Defining a Stereotype
This example defines the stereotype
@Action
, which specifies the following for each bean that
the stereotype annotates:
• The default scope is request scope unless the scope is overridden with a scope
annotation.
Chapter 9
Defining and Applying Stereotypes
9-26

• The default EL name is assigned to the bean unless the name is overridden with the
@Named
annotation.
• The interceptor bindings
@Secure
and
@Transactional
are applied to the bean. The
definition of these interceptor bindings is beyond the scope of this example.
import javax.enterprise.inject.Stereotype;
import javax.inject.Named;
import javax.enterprise.context.RequestScoped;
import static java.lang.annotation.ElementType.TYPE;
import static java.lang.annotation.RetentionPolicy.RUNTIME;
import java.lang.annotation.Retention;
import java.lang.annotation.Target;
@RequestScoped
@Secure
@Transactional
@Named
@Stereotype
@Target(TYPE)
@Retention(RUNTIME)
public @interface Action {}
Applying Stereotypes to a Bean
To apply stereotypes to a bean, annotate the class declaration of the bean with each
stereotype to apply. You can apply any number of stereotypes to a bean. Any stereotype that
you apply to a bean must be defined as explained in Defining a Stereotype.
Example 9-21 shows how to apply stereotypes to a bean.
Example 9-21 Applying Stereotypes to a Bean
This example applies the stereotypes
@Action
and
@Mock
to the bean class
MockLoginAction
.
The definition of the
@Action
stereotype is shown in Example 9-20. The definition of the
@Mock
stereotype is beyond the scope of this example.
@Action
@Mock
public class MockLoginAction extends LoginAction {
...
}
Using Events for Communications Between Beans
Events enable beans to communicate information without any compilation-time dependency.
At run time, your application may perform operations that generate information or cause state
changes that must be communicated between beans. For example, an application may require
stateful beans in one architectural tier of the application to synchronize their internal state with
state changes that occur in a different tier.
Events enable beans to communicate this information without any compilation-time
dependency. One bean can define an event, another bean can send the event, and yet another
bean can handle the event. The beans can be in separate packages and even in separate tiers
of the application. See Using Events in The Java EE 8 Tutorial.
Using events for communications between beans involves the tasks that are explained in the
following sections:
Chapter 9
Using Events for Communications Between Beans
9-27

• Defining an Event Type
• Sending an Event
• Handling an Event
• Defining an Event Type
• Sending an Event
• Handling an Event
Defining an Event Type
An event type is a Java class that represents the information that you want to communicate
between beans. For example, an event type may represent the state information that a stateful
bean must synchronize with state changes in a different tier of an application.
Define an event type for each set of changes that you want to communicate between beans.
To define an event type:
1. Define a Java class to represent the event type.
Ensure that the class meets these requirements:
• The class is declared as a concrete Java class.
• The class has no type variables.
The event types of the event include all superclasses and interfaces of the run time
class of the event object. An event type must not contain a type variable. Any Java
type can be an observed event type.
2. If necessary, define any qualifiers to further distinguish events of this type. For more
information, see Defining Qualifiers for Implementations of a Bean Type.
3. Provide code in the class to populate the event payload of event objects that are
instantiated from the class.
The event payload is the information that you want the event to contain. You can use a
JavaBeans property with getter and setter methods to represent an item of information in
the event payload.
Sending an Event
To communicate a change that occurs in response to an operation, your application must send
an event of the correct type when performing the operation. CDI provides a predefined event
dispatcher object that enables application code to send an event and select the associated
qualifiers at run time.
To send an event:
1. Obtain an instance of the event type to send.
2. Call methods of the event instance to populate the event payload of the event object that
you are sending.
3. Inject an instance of the parameterized
javax.enterprise.event.Event
interface.
If you are sending a qualified event, annotate the injection point with the event qualifier.
4. Call the
fire
method of the injected
Event
instance.
Chapter 9
Using Events for Communications Between Beans
9-28

• In the call to the
fire
method, pass as a parameter the event instance that you are
sending. This method fires the event synchronously and notifies any observer
methods.
• The event can be fired asynchronously using the
fireAsync()
method. Invocation of
this method returns immediately and the obserer methods are notified asynchronously.
See Firing Events in The Java EE 8 Tutorial.
Example 9-22 shows how to send an event.
Example 9-22 Sending an Event
This example injects an instance of the event of type
User
with the qualifier
@LoggedIn
. The
fire
method sends only
User
events to which the
@LoggedIn
qualifier is applied.
import javax.enterprise.event.Event;
import javax.enterprise.context.SessionScoped;
import javax.inject.Inject;
import java.io.Serializable;
@SessionScoped
public class Login implements Serializable {
@Inject @LoggedIn Event<User> userLoggedInEvent;
private User user;
public void login(Credentials credentials) {
//... use credentials to find user
if (user != null) {
userLoggedInEvent.fire(user);
}
}
...
}
Handling an Event
Any CDI managed bean class can handle events.
To handle an event:
1. In your bean class, define a method to handle the event.
Note:
If qualifiers are applied to an event type, define one method for each qualified
type.
2. In the signature of the method, define a parameter for passing the event to the method.
Ensure that the type of the parameter is the same as the Java type of the event.
3. Annotate the parameter in the method signature with the
javax.enterprise.event.Observes
annotation.
If necessary,
Chapter 9
Using Events for Communications Between Beans
9-29

• set elements of the
@Observes
annotation to specify whether the method is conditional
or transactional. See Using Observer Methods to Handle Events in The Java EE 8
Tutorial.
• set the observer method order using
@Priority
annotation to specify the order in
which the observer methods for an event are invoked. See Observer Method Ordering
in The Java EE 8 Tutorial.
4. If the event type is qualified, apply the qualifier to the annotated parameter.
5. In the method body, provide code for handling the event payload of the event object.
Example 9-23 shows how to declare an observer method for receiving qualified events of a
particular type. Example 9-24 shows how to declare an observer method for receiving all
events of a particular type.
Example 9-23 Handling a Qualified Event of a Particular Type
This example declares the
afterLogin
method in which the parameter
user
is annotated with
the
@Observes
annotation and the
@LoggedIn
qualifier. This method is called when an event of
type
User
with the qualifier
@LoggedIn
is sent.
import javax.enterprise.event.Observes;
public void afterLogin(@Observes @LoggedIn User user) {
...
}
Example 9-24 Handling Any Event of a Particular Type
This example declares the
afterLogin
method in which the parameter
user
is annotated with
the
@Observes
annotation. This method is called when any event of type
User
is sent.
import javax.enterprise.event.Observes;
public void afterLogin(@Observes User user) {
...
}
Injecting a Predefined Bean
Predefined beans are injected with dependent scope and the predefined default qualifier
@Default
.
CDI provides predefined beans that implement the following interfaces:
javax.transaction.UserTransaction
Java Transaction API (JTA) user transaction.
java.security.Principal
The abstract notion of a principal, which represents any entity, such as an individual, a
corporation, and a login ID.
The principal represents the identity of the current caller. Whenever the injected principal is
accessed, it always represents the identity of the current caller.
For example, a principal is injected into a field at initialization. Later, a method that uses the
injected principal is called on the object into which the principal was injected. In this situation,
the injected principal represents the identity of the current caller when the method is run.
Chapter 9
Injecting a Predefined Bean
9-30

javax.validation.Validator
Validator for bean instances.
The bean that implements this interface enables a
Validator
object for the default bean
validation
ValidatorFactory
object to be injected.
javax.validation.ValidatorFactory
Factory class for returning initialized
Validator
instances.
The bean that implements this interface enables the default bean validation
ValidatorFactory
object to be injected.
To inject a predefined bean, create an injection point by using the
javax.annotation.Resource
annotation to obtain an instance of the bean. For the bean type, specify the class name of the
interface that the bean implements.
Predefined beans are injected with dependent scope and the predefined default qualifier
@Default
.
For more information about injecting resources, see Resource Injection in The Java EE 8
Tutorial.
Example 9-25 shows how to use the
@Resource
annotation to inject a predefined bean.
Example 9-25 Injecting a Predefined Bean
This example injects a user transaction into the servlet class
TransactionServlet
. The user
transaction is an instance of the predefined bean that implements the
javax.transaction.UserTransaction
interface.
import javax.annotation.Resource;
import javax.servlet.http.*;
...
public class TransactionServlet extends HttpServlet {
@Resource UserTransaction transaction;
...
}
Injecting and Qualifying Resources
Java EE 5 resource injection relies on strings for configuration. Typically, these strings are
JNDI names that are resolved when an object is created. CDI ensures type-safe injection of
beans by selecting the bean class on the basis of the Java type that is specified in the injection
point.
Even in a CDI bean class, Java EE 5 resource injection is required to access real resources
such as data sources, Java Message Service (JMS) resources, and Web service references.
Because CDI bean classes can use Java EE 5 resource injection, you can use producer fields
to minimize the reliance on Java EE 5 resource injection. In this way, CDI simplifies how to
encapsulate the configuration that is required to access the correct resource.
To minimize the reliance on Java EE 5 resource injection:
1. Use Java EE 5 resource injection in only one place in the application.
2. Use producer fields to translate the injected resource type into a CDI bean.
You can the inject this CDI bean into the application in the same way as any other CDI
bean.
For more information about producer fields, see Defining a Producer Field.
The following example shows how to use Java EE 5 annotations to inject resources.
Chapter 9
Injecting and Qualifying Resources
9-31

import javax.annotation.Resource;
import javax.persistence.PersistenceContext;
import javax.persistence.PersistenceUnit;
import javax.ejb.EJB;
import javax.xml.ws.WebServiceRef;
...
public class SomeClass {
@WebServiceRef(lookup="java:app/service/PaymentService")
PaymentService paymentService;
@EJB(ejbLink="../payment.jar#PaymentService")
PaymentService paymentService;
@Resource(lookup="java:global/env/jdbc/CustomerDatasource")
Datasource customerDatabase;
@PersistenceContext(unitName="CustomerDatabase")
EntityManager customerDatabasePersistenceContext;
@PersistenceUnit(unitName="CustomerDatabase")
EntityManagerFactory customerDatabasePersistenceUnit;
...
}
The following example shows how to inject the same set of resources by combining Java EE 5
resource injection with CDI producer fields.
The declaration of the
SomeClass
class is annotated with
@ApplicationScoped
to set the scope
of this bean to application. The
@Dependent
scope is implicitly applied to the producer fields.
import javax.enterprise.context.ApplicationScoped;
import javax.enterprise.inject.Produces;
import javax.annotation.Resource;
import javax.persistence.PersistenceContext;
import javax.persistence.PersistenceUnit;
import javax.ejb.EJB;
javax.xml.ws.WebServiceRef;
...
@ApplicationScoped
public class SomeClass {
@Produces
@WebServiceRef(lookup="java:app/service/PaymentService")
PaymentService paymentService;
@Produces
@EJB(ejbLink="../their.jar#PaymentService")
PaymentService paymentService;
@Produces @CustomerDatabase
@Resource(lookup="java:global/env/jdbc/CustomerDatasource")
Datasource customerDatabase;
@Produces @CustomerDatabase
@PersistenceContext(unitName="CustomerDatabase")
EntityManager customerDatabasePersistenceContext;
@Produces @CustomerDatabase
@PersistenceUnit(unitName="CustomerDatabase")
EntityManagerFactory customerDatabasePersistenceUnit;
Chapter 9
Injecting and Qualifying Resources
9-32

...
}
CDI enables you to use Java EE resources in CDI applications in a way that is consistent with
CDI. To use Java EE resources in this way, inject the resources as CDI beans into other beans.
The following example shows how to inject a Java EE resource as a CDI bean into another
bean.
This example injects a persistence unit resource into a request-scoped bean.
import javax.enterprise.context.RequestScoped;
import javax.enterprise.inject.Inject;
@RequestScoped
public class SomeOtherClass {
...
@Inject @CustomerDatabase
private EntityManagerFactory emf;
...
}
Another class, for example
YetAnotherClass
, could inject a field of type
SomeOtherClass
. If an
instance of
SomeOtherClass
does not already exist in the current request context, CDI
performs the following sequence of operations:
1. Constructing the instance of
SomeOtherClass
2. Injecting the reference to the entity manager factory by using the producer field.
3. Saving the new instance of
SomeOtherClass
in the current request context
In every case, CDI injects the reference to this instance of
SomeOtherClass
into the field in
YetAnotherClass
. When the request context is destroyed, the instance of
SomeOtherClass
and
its reference to the entity manager factory are destroyed.
Using CDI With JCA Technology
WebLogic Server supports CDI in embedded resource adapters and global resource adapters.
To enable a resource adapter for CDI, provide a
beans.xml
file in the
META-INF
directory of the
packaged archive of the resource adapter.
For more information about the
beans.xml
file, see Configuring a CDI Application.
All classes in the resource adapter are available for injection. All classes in the resource
adapter can be CDI managed beans except for the following classes:
• Resource adapter beans. These beans are classes that are annotated with the
javax.resource.spi.Connector
annotation or are declared as corresponding elements in
the resource adapter deployment descriptor
ra.xml
.
• Managed connection factory beans. These beans are classes that are annotated with
the
javax.resource.spi.ConnectionDefinition
annotation or the
javax.resource.spi.ConnectionDefinitions
annotation, or are declared as
corresponding elements in
ra.xml
.
• Activation specification beans. These beans are classes that are annotated with the
javax.resource.spi.Activation
annotation or are declared as corresponding elements in
ra.xml
.
Chapter 9
Using CDI With JCA Technology
9-33

• Administered object beans. These beans are classes that are annotated with the
javax.resource.spi.AdministeredObject
annotation or are declared as corresponding
elements in
ra.xml
.
Configuring a CDI Application
Configuring a CDI application enables CDI services for the application. You must configure a
CDI application to identify the application as a CDI application. No special declaration, such as
an annotation, is required to define a CDI managed bean. And no module type is defined
specifically for packaging CDI applications.
To configure a CDI application, provide a file that is named
beans.xml
in the packaged archive
of the application. The
beans.xml
file must be an instance of the extensible markup language
(XML) schema
beans_2_0.xsd
.
If your application does not use any alternatives, interceptors, or decorators, the
beans.xml
file
can be empty. However, you must provide the
beans.xml
file even if the file is empty.
If your CDI application uses alternatives, interceptors, or decorators, you must enable these
items by declaring them in the
beans.xml
file. For more information, see:
• Selecting an Alternative Implementation of a Bean Type for an Application
• Enabling an Interceptor
• Enabling a Decorator Class
The required location of the
beans.xml
file depends on the type of the application:
• For a Web application, the
beans.xml
file must be in the
WEB-INF
directory.
• For an EJB module, resource archive (RAR) file, application client JAR file, or library JAR
file, the
beans.xml
file must be in the
META-INF
directory.
You can provide CDI bean archives in the
lib
directory of an EJB module. You must provide a
beans.xml
file in the
META-INF
directory of each CDI bean archive the
lib
directory of an EJB
module.
Example 9-26 shows a
beans.xml
file for configuring a CDI application.
Example 9-26 beans.xml File for Configuring a CDI Application
This example configures a CDI application by enabling the following classes:
• The alternative implementation
com.example.orderprocessor.MockOrderImpl
• The interceptor class
com.example.billpayment.interceptor.TransactionInterceptor
• The decorator class
com.example.billpayment.decorator.DataAccessAuthDecorator
<?xml version="1.0" encoding="UTF-8"?>
<beans xmlns="http://xmlns.jcp.org/xml/ns/javaee"
xmlns:xsi="http://www.w3.org/2001/XMLSchema-instance"
xsi:schemaLocation="
http://xmlns.jcp.org/xml/ns/javaee
http://xmlns.jcp.org/xml/ns/javaee/beans_1_1.xsd">
<alternatives>
<class>com.example.orderprocessor.MockOrderImpl</class>
</alternatives>
<interceptors>
<class>com.example.billpayment.interceptor.TransactionInterceptor</class>
</interceptors>
Chapter 9
Configuring a CDI Application
9-34

<decorators>
<class>com.example.billpayment.decorator.DataAccessAuthDecorator</class>
</decorators>
</beans>
Enabling and Disabling CDI
CDI for a domain is enabled by default. However, even when an application does not use CDI,
there is some CDI initialization that occurs when you deploy an application in WebLogic
Server. To maximize deployment performance for applications that do not use CDI, you can
disable CDI.
You can control whether CDI is enabled in the domain by setting the
Policy
parameter on the
CDI container. When this parameter is set to
Enabled
, CDI is enabled for all applications in the
domain. When the
Policy
parameter is set to
Disabled
, CDI is disabled for all applications in
the domain.
You can disable CDI only for a domain.
• Enabling and Disabling CDI for a Domain
Enabling and Disabling CDI for a Domain
To disable CDI for every application that is deployed to a domain, add the following lines to the
config.xml file:
<domain>
<cdi-container>
<policy>Disabled</policy>
</cdi-container>
<domain>
You can use the WLST scripting tool to enable or disable CDI for a domain. The following
examples demonstrate how to use WLST to enable and disable CDI for a domain whether you
are online or offline.
Example 9-27 Enabling CDI While Online
In the following example, WebLogic Server is running. The arguments username and password
represent the credentials for the user who is connecting WLST to the server, and url represents
the listen address and listen port of the server instance (for example, localhost:7001). Also
note that domain represents the domain name.
connect('user','password','url')
domainConfig()
edit()
cd('CdiContainer/mydomain')
startEdit()
set('Policy','Enabled') // 'Enabled' or 'Disabled'
validate()
save()
activate(block="true")
Chapter 9
Enabling and Disabling CDI
9-35

Example 9-28 Enabling CDI While Offline
In the following example, domain represents the path of your domain (for example, /
oracle/wls/mydomain). Also note that
mydomain
must match the domain name.
readDomain('domain')
create('mydomain','CdiContainer')
cd('CdiContainer/mydomain')
set('Policy','Enabled') // 'Enabled' or 'Disabled'
updateDomain()
closeDomain()
Implicit Bean Discovery
CDI 1.1 and Java EE 7 introduced the concept of implicit bean archives. An implicit bean
archive is an archive of a JAR or a WAR file that does not contain a beans.xml file; it contains
beans that can be managed by CDI.
This can significantly increase the time that it takes to deploy an application. This increase in
time is especially noticeable when applications built for releases prior to Java EE 7 are
deployed on a Java EE 7 application server. To be compatible with CDI 1.0, WebLogic Server
contains an option that sets the container to ignore the archive even when the beans.xml file
is not present.
You control whether implicit bean discovery is enabled in the domain by setting the
implicit-
bean-discovery-enabled
parameter on the CDI container. When this parameter is set to
1
,
implicit bean discovery is enabled for all applications in the domain. When the
implicit-bean-
discovery-enabled
parameter is set to
0
, implicit bean discovery is disabled for all applications
in the domain.
You can disable implicit bean discovery only for a domain.
• Enabling and Disabling Implicit Bean Discovery for a Domain
Enabling and Disabling Implicit Bean Discovery for a Domain
To disable implicit bean discovery for every application that is deployed to a domain, add the
following lines config.xml file:
<domain>
<cdi-container>
<implicit-bean-discovery-enabled>false</implicit-bean-discobery-enabled>
</cdi-container>
<domain>
You can use WLST scripting too to enable or disable this feature. The following examples
demonstrate how to use WLST to enable and disable implicit bean discovery for a domain
whether you are online or offline.
Example 9-29 Enabling Implicit Bean Discovery Using WLST Online
In the following example, WebLogic Server is running. The arguments username and password
represent the credentials for the user who is connecting WLST to the server, and url represents
Chapter 9
Implicit Bean Discovery
9-36

the listen address and listen port of the server instance (for example, localhost:7001). Also
note that domain represents the domain name.
connect('user','password','url')
domainConfig()
edit()
cd('CdiContainer/mydomain')
startEdit()
set('ImplicitBeanDiscoveryEnabled',1) // 1 to enable 0 to disable
validate()
save()
activate(block="true")
Example 9-30 Enabling Implicit Bean Discovery Using WLST Offline
In the following example, domain represents the path of your domain (for example, /
oracle/wls/mydomain). Also note that
mydomain
must match the domain name.
readDomain(domain)
create('mydomain','CdiContainer')
cd('CdiContainer/mydomain')
set('ImplicitBeanDiscoveryEnabled',1)
// 1 to enable 0 to disable
updateDomain()
closeDomain()
Supporting Third-Party Portable Extensions
CDI is intended to be a foundation for frameworks, extensions, and integration with other
technologies.
CDI exposes SPIs that enable the development of portable extensions to CDI, such as:
• Integration with business process management engines
• Integration with third-party frameworks such as Spring, Seam, GWT or Wicket
• New technology that is based upon the CDI programming model
The SPIs that enable the development of portable extensions to CDI are provided in the
javax.enterprise.inject.spi
package.
Code in CDI extensions can handle events that are sent by the CDI framework.
For more information, see "Portable extensions" in JSR 365: Contexts and Dependency
Injection for the Java EE platform.
Using the Built-in Annotation Literals
CDI 2.0 introduces new built-in annotation literals that can be used for creating instances of
annotations.
The following are the new built-in annotations that define a
Literal
static nested class:
Table 9-2 Built-in Annotation Literals
Classes Package
Any javax.enterprise.inject
Default javax.enterprise.inject
Chapter 9
Supporting Third-Party Portable Extensions
9-37
Table 9-2 (Cont.) Built-in Annotation Literals
Classes Package
New javax.enterprise.inject
Specialized javax.enterprise.inject
Veteod javax.enterprise.inject
Alternative javax.enterprise.inject
Typed javax.enterprise.inject
Nonbinding javax.enterprise.util
Initialized javax.enterprise.context
Destroyed javax.enterprise.context
RequestScoped javax.enterprise.context
SessionScoped javax.enterprise.context
ApplicationScoped javax.enterprise.context
Dependent javax.enterprise.context
ConversationScoped javax.enterprise.context
Syntax
Example 9-31 Built-in Annotation Literals
Default defaultLiteral = new Default.Literal();
Using the Configurator Interfaces
CDI 2.0 introduced some new configurator interfaces which can be used for dynamically
defining or modifying CDI objects.
The newly introduced configurator interfaces are:
•
AnnotatedTyeConfigurator
•
InjectionPointConfigurator
•
BeanAttributesConfigurator
•
BeanConfigurator
•
ObserverMethodConfigurator
•
ProducerConfigurator
See Using the Configurators Interfaces in Java EE 8 Tutorial for more information.
Bootstrapping a CDI Container
CDI 2.0 provides the standard API for bootstrapping a CDI container in Java SE. You must
explicitly bootstrap the CDI container using the
SeContainerInitializer
abstract class and its
static method
newInstance()
.
You can configure the CDI container using the API
javax.enterprise.inject.se.SeContainerInitializer
before it is bootstrapped and the
Chapter 9
Using the Configurator Interfaces
9-38


10
Java API for JSON Processing
WebLogic Server supports the Java API for JSON Processing 1.1 (JSR 374) by including the
JSR-374 reference implementation for use with applications deployed on a WebLogic Server
instance.
This chapter includes the following sections:
• About JavaScript Object Notation (JSON)
• Object Model API
• Streaming API
• New Features for JSON Processing
To learn more about JSON concepts, see Java API for JSON Processing in the Java EE 8
Tutorial.
• About JavaScript Object Notation (JSON)
JSON is a lightweight data-interchange format that is widely used as a common format to
serialize and deserialize data in applications that communicate with each other over the
Internet. These applications are often created using different programming languages and
run in very different environments.
• Object Model API
The object model API is a high-level API that provides immutable object models for JSON
object and array structures.
• Streaming API
The streaming API is a low-level API designed to process large amounts of JSON data
efficiently.
• New Features for JSON Processing
About JavaScript Object Notation (JSON)
JSON is a lightweight data-interchange format that is widely used as a common format to
serialize and deserialize data in applications that communicate with each other over the
Internet. These applications are often created using different programming languages and run
in very different environments.
JSON is suited to this scenario because it is an open standard, it is easy to read and write, and
it is more compact than other representations. RESTful web services typically make extensive
use of JSON as the format for the data inside requests and responses, with the JSON
representations usually being more compact than the counterpart XML representations since
JSON does not have closing tags.
The Java API for JSON Processing provides a convenient way to process (parse, generate,
transform, and query) JSON text. For generating and parsing JSON data, there are two
programming models, which are similar to those used for XML documents:
• The object model creates a tree that represents the JSON data in memory. The tree can
then be navigated and analyzed. Although the JSON data created in memory is immutable
and cannot be modified, the object model is the most flexible and allows for processing
that requires access to the complete contents of the tree. However, it is often slower than
10-1

the streaming model and requires more memory. The object model generates JSON output
by navigating the entire tree at once.
For information about using the object model, see Object Model API.
• The streaming model uses an event-based parser that reads JSON data one element at
a time. The parser generates events and stops for processing when an object or an array
begins or ends, when it finds a key, or when it finds a value. Each element can be
processed or discarded by the application code, and then the parser proceeds to the next
event. This approach is adequate for local processing, in which the processing of an
element does not require information from the rest of the data. The streaming model
generates JSON output to a given stream by making a function call with one element at a
time.
For information about using the streaming model, see Streaming API.
Object Model API
The object model API is a high-level API that provides immutable object models for JSON
object and array structures.
These JSON structures are represented as object models using the Java types
JsonObject
and
JsonArray
. The interface
javax.json.JsonObject
provides a map view to access the
unordered collection of zero or more name-value pairs from the model. Similarly, the
javax.json.JsonArray
interface provides a list view to access the ordered sequence of zero
or more values from the model.
The object model API uses builder patterns to create these object models. The
javax.json.JsonObjectBuilder
and
javax.json.JsonArrayBuilder
interfaces provide
methods to create models of type
JsonObject
and
JsonArray
, respectively.
These object models can also be created from an input source using the
javax.json.JsonReader
interface. Similarly, these object models can be written to an output
source using the
javax.json.JsonWriter
interface.
The following sections show examples of using the object model API:
• Creating an Object Model from JSON Data
• Creating an Object Model from Application Code
• Navigating an Object Model
• Writing an Object Model to a Stream
• Creating an Object Model from JSON Data
• Creating an Object Model from Application Code
• Navigating an Object Model
• Writing an Object Model to a Stream
Creating an Object Model from JSON Data
The following example shows how to create an object model from JSON data in a text file:
import java.io.FileReader;
import javax.json.Json;
import javax.json.JsonReader;
import javax.json.JsonStructure;
...
Chapter 10
Object Model API
10-2

JsonReader reader = Json.createReader(new FileReader("jsondata.txt"));
JsonStructure jsonst = reader.read();
The object reference
jsonst
can be either of type
JsonObject
or of type
JsonArray
, depending
on the contents of the file.
JsonObject
and
JsonArray
are subtypes of
JsonStructure
. This
reference represents the top of the tree and can be used to navigate the tree or to write it to a
stream as JSON data.
Creating an Object Model from Application Code
The following example shows how to create an object model from application code:
import javax.json.Json;
import javax.json.JsonObject;
...
JsonObject model = Json.createObjectBuilder()
.add("firstName", "Duke")
.add("lastName", "Java")
.add("age", 18)
.add("streetAddress", "100 Internet Dr")
.add("city", "JavaTown")
.add("state", "JA")
.add("postalCode", "12345")
.add("phoneNumbers", Json.createArrayBuilder()
.add(Json.createObjectBuilder()
.add("type", "mobile")
.add("number", "111-111-1111"))
.add(Json.createObjectBuilder()
.add("type", "home")
.add("number", "222-222-2222")))
.build();
The object reference model represents the top of the tree, which is created by nesting
invocations to the
add
methods and is built by invoking the
build
method. The
javax.json.JsonObjectBuilder
interface contains the following
add
methods:
JsonObjectBuilder add(String name, BigDecimal value)
JsonObjectBuilder add(String name, BigInteger value)
JsonObjectBuilder add(String name, boolean value)
JsonObjectBuilder add(String name, double value)
JsonObjectBuilder add(String name, int value)
JsonObjectBuilder add(String name, JsonArrayBuilder builder)
JsonObjectBuilder add(String name, JsonObjectBuilder builder)
JsonObjectBuilder add(String name, JsonValue value)
JsonObjectBuilder add(String name, long value)
JsonObjectBuilder add(String name, String value)
JsonObjectBuilder addNull(String name)
The
javax.json.JsonArrayBuilder
interface contains similar
add
methods that do not have a
name (key) parameter. You can nest arrays and objects by passing a new
JsonArrayBuilder
object or a new
JsonObjectBuilder
object to the corresponding
add
method, as shown in this
example.
The resulting tree represents the JSON data from JSON Syntax.
Navigating an Object Model
The following example shows a simple approach to navigating an object model:
Chapter 10
Object Model API
10-3

import javax.json.JsonValue;
import javax.json.JsonObject;
import javax.json.JsonArray;
import javax.json.JsonNumber;
import javax.json.JsonString;
...
public static void navigateTree(JsonValue tree, String key) {
if (key != null)
System.out.print("Key " + key + ": ");
switch(tree.getValueType()) {
case OBJECT:
System.out.println("OBJECT");
JsonObject object = (JsonObject) tree;
for (String name : object.keySet())
navigateTree(object.get(name), name);
break;
case ARRAY:
System.out.println("ARRAY");
JsonArray array = (JsonArray) tree;
for (JsonValue val : array)
navigateTree(val, null);
break;
case STRING:
JsonString st = (JsonString) tree;
System.out.println("STRING " + st.getString());
break;
case NUMBER:
JsonNumber num = (JsonNumber) tree;
System.out.println("NUMBER " + num.toString());
break;
case TRUE:
case FALSE:
case NULL:
System.out.println(tree.getValueType().toString());
break;
}
}
The
navigateTree
method can be used with the models shown in Creating an Object Model
from JSON Data and Creating an Object Model from Application Code as follows:
navigateTree(model, null);
The
navigateTree
method takes two arguments: a JSON element and a key. The key is used
only to help print the key-value pairs inside objects. Elements in a tree are represented by the
JsonValue
type. If the element is an object or an array, a new invocation to this method is
made for every element contained in the object or array. If the element is a value, it is printed to
standard output.
The
JsonValue.getValueType
method identifies the element as an object, an array, or a value.
For objects, the
JsonObject.keySet
method returns a set of strings that contains the keys in
the object, and the
JsonObject.get(String name)
method returns the value of the element
whose key is
name
. For arrays,
JsonArray
implements the
List<JsonValue>
interface. You can
use enhanced
for
loops with the
Set<String>
instance returned by
JsonObject.keySet
and
with instances of
JsonArray
, as shown in this example.
The
navigateTree
method for the model shown in Creating an Object Model from Application
Code produces the following output:
OBJECT
Key firstName: STRING Duke
Chapter 10
Object Model API
10-4

Key lastName: STRING Java
Key age: NUMBER 18
Key streetAddress: STRING 100 Internet Dr
Key city: STRING JavaTown
Key state: STRING JA
Key postalCode: STRING 12345
Key phoneNumbers: ARRAY
OBJECT
Key type: STRING mobile
Key number: STRING 111-111-1111
OBJECT
Key type: STRING home
Key number: STRING 222-222-2222
Writing an Object Model to a Stream
The object models created in Creating an Object Model from JSON Data and Creating an
Object Model from Application Code can be written to a stream using the
javax.json.JsonWriter
interface as follows:
import java.io.StringWriter;
import javax.json.JsonWriter;
...
StringWriter stWriter = new StringWriter();
JsonWriter jsonWriter = Json.createWriter(stWriter);
jsonWriter.writeObject(model);
jsonWriter.close();
String jsonData = stWriter.toString();
System.out.println(jsonData);
The Json.createWriter method takes an output stream as a parameter. The
JsonWriter.writeObject method writes the object to the stream. The JsonWriter.close
method closes the underlying output stream.
The following example uses try-with-resources to close the JSON writer automatically:
StringWriter stWriter = new StringWriter();
try (JsonWriter jsonWriter = Json.createWriter(stWriter)) {
jsonWriter.writeObject(model);
}
String jsonData = stWriter.toString();
System.out.println(jsonData);
Streaming API
The streaming API is a low-level API designed to process large amounts of JSON data
efficiently.
This API consists of the following interfaces:
Chapter 10
Streaming API
10-5
Interface Description
javax.json.stream.JsonParser
Contains methods to parse JSON in a streaming way.
This interface provides forward, read-only access to JSON data
using the pull parsing programming model. In this model the
application code controls the thread and calls methods in the parser
interface to move the parser forward or to obtain JSON data from
the current state of the parser.
javax.json.stream.JsonGenerator
Contains methods to write JSON to an output source in a streaming
way.
This interface provides methods to write JSON to an output source.
The generator writes name-value pairs in JSON objects and values
in JSON arrays.
The following sections show examples of using the streaming API:
• Reading JSON Data Using a Parser
• Writing JSON Data Using a Generator
• Reading JSON Data Using a Parser
• Writing JSON Data Using a Generator
Reading JSON Data Using a Parser
The streaming API is the most efficient approach for parsing JSON text. The following example
shows how to create a
JsonParser
object and how to parse JSON data using events:
import javax.json.Json;
import javax.json.stream.JsonParser;
...
JsonParser parser = Json.createParser(new StringReader(jsonData));
while (parser.hasNext()) {
JsonParser.Event event = parser.next();
switch(event) {
case START_ARRAY:
case END_ARRAY:
case START_OBJECT:
case END_OBJECT:
case VALUE_FALSE:
case VALUE_NULL:
case VALUE_TRUE:
System.out.println(event.toString());
break;
case KEY_NAME:
System.out.print(event.toString() + " " +
parser.getString() + " - ");
break;
case VALUE_STRING:
case VALUE_NUMBER:
System.out.println(event.toString() + " " +
parser.getString());
break;
}
}
This example consists of three steps:
1. Obtain a parser instance by invoking the
Json.createParser
static method.
Chapter 10
Streaming API
10-6

2. Iterate over the parser events using the
JsonParser.hasNext
and the
JsonParser.next
methods.
3. Perform local processing for each element.
The example shows the ten possible event types from the parser. The parser's
next
method
advances it to the next event.
For the event types
KEY_NAME
,
VALUE_STRING
, and
VALUE_NUMBER
, you can obtain the content of
the element by invoking the
JsonParser.getString
method.
For
VALUE_NUMBER
events, you can also use the following methods:
START_OBJECT
KEY_NAME firstName - VALUE_STRING Duke
KEY_NAME lastName - VALUE_STRING Java
KEY_NAME age - VALUE_NUMBER 18
KEY_NAME streetAddress - VALUE_STRING 100 Internet Dr
KEY_NAME city - VALUE_STRING JavaTown
KEY_NAME state - VALUE_STRING JA
KEY_NAME postalCode - VALUE_STRING 12345
KEY_NAME phoneNumbers - START_ARRAY
START_OBJECT
KEY_NAME type - VALUE_STRING mobile
KEY_NAME number - VALUE_STRING 111-111-1111
END_OBJECT
START_OBJECT
KEY_NAME type - VALUE_STRING home
KEY_NAME number - VALUE_STRING 222-222-2222
END_OBJECT
END_ARRAY
END_OBJECT
Writing JSON Data Using a Generator
The following example shows how to write JSON data to a file using the streaming API:
FileWriter writer = new FileWriter("test.txt");
JsonGenerator gen = Json.createGenerator(writer);
gen.writeStartObject()
.write("firstName", "Duke")
.write("lastName", "Java")
.write("age", 18)
.write("streetAddress", "100 Internet Dr")
.write("city", "JavaTown")
.write("state", "JA")
.write("postalCode", "12345")
.writeStartArray("phoneNumbers")
.writeStartObject()
.write("type", "mobile")
.write("number", "111-111-1111")
.writeEnd()
.writeStartObject()
.write("type", "home")
.write("number", "222-222-2222")
.writeEnd()
.writeEnd()
.writeEnd();
gen.close();
This example obtains a JSON generator by invoking the
Json.createGenerator
static method,
which takes a writer or an output stream as a parameter. The example writes JSON data to the
Chapter 10
Streaming API
10-7

test.txt
file by nesting invocations to the
write
,
writeStartArray
,
writeStartObject
, and
writeEnd
methods. The
JsonGenerator.close
method closes the underlying writer or output
stream.
New Features for JSON Processing
The
javax.json
API supports new features of JSON Processing such as JSON Pointer, JSON
Patch, and JSON Merge Patch. These features can be used to retrieve, transform or
manipulate values in an object model.
This section includes the following topics:
• JSON Pointer
• JSON Patch
• JSON Merge Patch
In this section, the following sample JSON document is used to demonstrate the new features
of JSON Processing. This sample contains name-value pairs and the value for the name
"phoneNumbers"
used in this sample, is an array whose elements are two objects.
{
"firstName": "Duke",
"lastName": "Java",
"age": 18,
"streetAddress": "100 Internet Dr",
"city": "JavaTown",
"state": "JA",
"postalCode": "12345",
"phoneNumbers": [
{ "Mobile": "111-111-1111" },
{ "Home": "222-222-2222" }
]
}
• JSON Pointer
JSON Pointer defines a string syntax for referencing a location in the target.
• JSON Patch
• JSON Merge Patch
JSON Pointer
JSON Pointer defines a string syntax for referencing a location in the target.
A JSON Pointer, when applied to a target
JsonValue
, defines a reference location in the target.
An empty JSON Pointer string defines a reference to the target itself.
JsonPointer
provides the following methods:
where
contacts
is
JsonObject contacts = Json.createReader(new
StringReader(jsonstring)).readObject();
•
add()
- Adds new value or member.
/*add*/
JsonPointer pointer = Json.createPointer("/email");
contacts = pointer.add(contacts,Json.createValue("[email protected]"));
Chapter 10
New Features for JSON Processing
10-8

•
containsValue()
- Checks if the value is present.
/*containsValue*/
JsonPointer pName = Json.createPointer("/firstName");
boolean exist = pName.containsValue(“John”);
•
getValue()
- Fetches a single value.
/*getValue*/
JsonPointer pPhone = Json.createPointer("/phoneNumber/0");
Jsonvalue mobileNumber = (pPhone.getValue(contacts);
•
remove()
- Removes the value at the target location.
/*remove*/
JsonPointer pRemove = Json.createPointer("/phoneNumber/0");
contacts = pRemove.remove(contacts);
•
replace()
- Replaces the value at the target location.
/*replace*/
JsonPointer pAge = Json.createPointer("/age");
pAge.replace(contacts,30);
The following is the resultant JSON document after running the JSON Pointer examples:
{
"firstName": "Duke",
"lastName": "Java",
"age": 30,
"email": "[email protected]",
"streetAddress": "100 Internet Dr",
"city": "JavaTown",
"state": "JA",
"postalCode": "12345",
"phoneNumbers": [
{ "Home": "222-222-2222" }
]
}
See JSON Pointer RFC.
JSON Patch
JSON Patch defines a format for expressing a sequence of operations to be applied to a JSON
document.
JsonPatch
mainly consists of two interfaces:
•
JsonPatch
- Provides
apply()
,
toJsonArray()
methods.
•
JsonPatchBuilder
- Provides
add()
,
copy()
,
move()
,
replace()
,
remove()
, and
test()
methods.
A
JsonPatch
can be constructed using the following approaches:
Chapter 10
New Features for JSON Processing
10-9

• Constructing a JSON Patch with
JsonPatchBuilder
JsonObject contacts = buildPerson();
JsonPatchBuilder builder = Json.createPatchBuilder();
JsonObject result = builder.add("/email","[email protected]")
.replace("/age", 30)
.remove("/phoneNumber")
.test("/firstName", "John")
.copy("/address/lastName", "/
lastName")
.build()
.apply(contacts);
• Constructing a JSON Patch with
JsonPatch
JsonArray patch=Json.createArrayBuilder().add(Json.createObjectBuilder()
.add("op","replace")
.add("path","/age")
.add("value", 30))
.build();
JsonPatch jsonPatch = Json.createPatch(patch);
JsonObject result1 = jsonPatch.apply(buildPerson());
command: [{"op":"replace","path":"/age","value":30}
See JSON Patch RFC.
JSON Merge Patch
JSON Merge Patch defines a format and processing rules for applying operations to a JSON
document that are based upon specific content of the target document.
JsonMergePatch
describes changes to be made to a target JSON document using a syntax
that closely mimics the document being modified.
Table 10-1 JsonMergePatch syntax
Original Patch Result
{"a":"b"} {"a":"c"} {"a":"c"}
{"a":"b"} {“b":"c"} {"a":"b","b":"c"}
{"a":"b"} {"a":null} {}
{"a":"b“,"b":"c"} {"a":null} {"b":"c"}
You can create a JSON Merge Patch from:
• An existing
JSONMergePatch
JsonValue contacts = ... ; // The target to be patched
JsonValue patch = ... ; // JSON Merge Patch
JsonMergePatch mergePatch = Json.createMergePatch(patch);
JsonValue result = mergePatch.apply(contacts);
Chapter 10
New Features for JSON Processing
10-10

• A difference between two
JsonValues
//The source object
JsonValue source = ... ;
// The modified object
JsonValue target = ... ;
// The diff between source and target in a Json Merge Patch format
JsonMergePatch mergePatch = Json.createMergeDiff(source,target);
See JSON Merge Patch RFC.
If you selected to install the Server Examples, the JSON P 1.1 examples are located in the
ORACLE_HOME\wlserver\samples\server\examples\src\examples\javaee8\jsonp
directory,
where
ORACLE_HOME
represents the directory in which you installed WebLogic Server.
Chapter 10
New Features for JSON Processing
10-11

11
Java API for JSON Binding
JSON Binding (JSON-B) is a standard binding layer for converting Java objects to or from
JSON messages. Oracle WebLogic Server 14.1.1.0.0 supports the Java API for JSON Binding
1.0 (JSR 367) specification by including the JSR-367 reference implementation for use with
applications deployed on a WebLogic Server instance.
JSON-B defines a default mapping algorithm for converting existing Java classes to JSON,
while enabling developers to customize the mapping process through the use of Java
annotations. For more information, see:
• JSON Binding in The Java EE 8 Tutorial.
• JSON Binding 1.0 Users Guide
• JSON Binding package summary
This chapter includes the following sections:
• About Default Mapping
• About Customized Mapping
• Standard Support to Handle Application or JSON Media Type for JAX-RS
• About Default Mapping
Default mapping is a set of rules used by the JSON-B engine by default without any
customization annotations and custom configuration provided.
• About Customized Mapping
You can customize your mapping in many ways. Use JSON-B annotations for compile time
customizations and
JsonbConfig
class for runtime customizations.
• Standard Support to Handle Application or JSON Media Type for JAX-RS
In a product that supports the Java API for JSON-B, implementations must support entity
providers for all Java types supported by JSON-B in combination with the media types -
application/json
,
text/json
, and any other media types matching
*/json
or
*/*+json
.
About Default Mapping
Default mapping is a set of rules used by the JSON-B engine by default without any
customization annotations and custom configuration provided.
This mapping is used for serializing and deserializing basic Java types (such as
java.lang.String
,
java.lang.Long
, and
java.lang.Boolean
), Java SE types (such as
java.math.BigInteger
and
java.util.Optional
), and Java date and time classes.
The main entry point in JSON-B is the
Jsonb
class. It provides a set of overloaded
toJson
and
fromJson
methods to serialize Java objects to JSON documents and deserialize them back.
Jsonb
instances are thread safe and can be reused. It is recommended to have a single
instance per configuration type.
You can map an object, a collection, or a generic collection:
• Mapping an object
11-1

To map an object, you must first create a
Jsonb
instance, and use the
toJson
method to
serialize to JSON and the
fromJson
method to deserialize back to an object.
• Mapping a collection or a generic collection
JSON-B supports collections and generic collections handling. For proper deserialization,
the runtime type of the resulting object needs to be passed to JSON-B during
deserialization.
For more information about default mapping, see:
• Default Mapping in JSON Binding 1.0 Users Guide
• Using the Default Mapping in The Java EE 8 Tutorial
About Customized Mapping
You can customize your mapping in many ways. Use JSON-B annotations for compile time
customizations and
JsonbConfig
class for runtime customizations.
JSON-B supports the following customizations:
• Creating custom configurations with formatted output
• Changing property names
• Customizing the order of serialized properties
• Ignoring properties
• Changing the default null handling
• Using custom instantiation
• Changing the date and number formats
• Using binary encoding
• Using adapters
• Using serializer and deserializer classes
• Using strict I-JSON support
For more information about customized mapping, see:
• Customized Mapping in JSON Binding 1.0 Users Guide
• Using Customizations in The Java EE 8 Tutorial
Standard Support to Handle Application or JSON Media Type for
JAX-RS
In a product that supports the Java API for JSON-B, implementations must support entity
providers for all Java types supported by JSON-B in combination with the media types -
application/json
,
text/json
, and any other media types matching
*/json
or
*/*+json
.
Chapter 11
About Customized Mapping
11-2
Note:
If both JSON-B and JSON-P are supported in the same environment, entity providers
for JSON-B take precedence over those for JSON-P, for all types except
JsonValue
and its sub-types. Note the precedence with JSON-P.
If you selected to install the WebLogic Server Examples, you'll find an example that
demonstrates how to use the Java API for JSON Binding with JAX-RS in the
ORACLE_HOME\wlserver\samples\server\examples\src\examples\javaee8\jsonb\jaxrs
directory of your WebLogic Server distribution, where
ORACLE_HOME
represents the directory in
which you installed WebLogic Server. For more information about the WebLogic Server code
examples, see Sample Applications and Code Examples in Understanding Oracle WebLogic
Server.
Chapter 11
Standard Support to Handle Application or JSON Media Type for JAX-RS
11-3

12
Understanding WebLogic Server Application
Classloading
Java classloader is a part of the Java virtual machine (JVM) that loads classes into memory.
WebLogic Server Java EE application classloading enables WebLogic Server to host multiple
isolated applications within the same JVM.
This chapter includes the following sections:
• Java Classloading
• WebLogic Server Application Classloading
• Resolving Class References Between Modules and Applications
• Using the Classloader Analysis Tool (CAT)
• Sharing Applications and Modules By Using Java EE Libraries
• Adding JARs to the Domain /lib Directory
• Java Classloading
Classloaders are a fundamental module of the Java language. A classloader is a part of
the Java virtual machine (JVM) that loads classes into memory; a classloader is
responsible for finding and loading class files at run time. Every successful Java
programmer needs to understand classloaders and their behavior.
• WebLogic Server Application Classloading
WebLogic Server classloading is centered on the concept of an application. An application
is normally packaged in an Enterprise Archive (EAR) file containing application classes.
WebLogic Server application classloading allows WebLogic Server to host multiple isolated
applications within the same JVM.
• Resolving Class References Between Modules and Applications
WebLogic Server deploys applications in separate classloaders to maintain independence
and to facilitate dynamic redeployment and undeployment. Because of this, you need to
package your application classes in such a way that each module has access to the
classes it depends on.
• Using the Classloader Analysis Tool (CAT)
CAT is a Web-based class analysis tool that simplifies filtering classloader configuration
and aids you in analyzing classloading issues, such as detecting conflicts, debugging
application classpaths and class conflicts, and proposes solutions to help you resolve
them.
• Sharing Applications and Modules By Using Java EE Libraries
Java EE libraries provide an easy way to share one or more different types of Java EE
modules among multiple enterprise applications.
• Adding JARs to the Domain /lib Directory
WebLogic Server includes a
lib
subdirectory, located in the domain directory, that you can
use to add one or more JAR files, so that the JAR file classes are available within a
separate system level classloader to all Java EE applications running on WebLogic Server
instances in the domain.
12-1

Java Classloading
Classloaders are a fundamental module of the Java language. A classloader is a part of the
Java virtual machine (JVM) that loads classes into memory; a classloader is responsible for
finding and loading class files at run time. Every successful Java programmer needs to
understand classloaders and their behavior.
• Java Classloader Hierarchy
• Loading a Class
• prefer-web-inf-classes Element
• Changing Classes in a Running Program
• Class Caching With the Policy Class Loader
• Class Caching With Application Class Data Sharing
• Java Classloader Hierarchy
• Loading a Class
• prefer-web-inf-classes Element
• Changing Classes in a Running Program
• Class Caching With the Policy Class Loader
The Policy Class Loader (PCL) is the default system class loader when starting WebLogic
Server using a startWebLogic script. The Policy Class Loader improves class loader
performance and server startup time through class caching and indexing and is supported
in any WebLogic mode (development or production).
• Class Caching With Application Class Data Sharing
The Application Class Data Sharing (AppCDS) is a class loader optimization that supports
archive files of predefined, validated, and linked classes.
Java Classloader Hierarchy
Classloaders contain a hierarchy with parent classloaders and child classloaders. The
relationship between parent and child classloaders is analogous to the object relationship of
super classes and subclasses. The bootstrap classloader is the root of the Java classloader
hierarchy. The Java virtual machine (JVM) creates the bootstrap classloader, which loads the
Java development kit (JDK) internal classes and
java.*
packages included in the JVM. (For
example, the bootstrap classloader loads
java.lang.String
.)
The extensions classloader is a child of the bootstrap classloader. The extensions classloader
loads any JAR files placed in the extensions directory of the JDK. This is a convenient means
to extending the JDK without adding entries to the classpath. However, anything in the
extensions directory must be self-contained and can only refer to classes in the extensions
directory or JDK classes.
The system classpath classloader extends the JDK extensions classloader. The system
classpath classloader loads the classes from the classpath of the JVM. Application-specific
classloaders (including WebLogic Server classloaders) are children of the system classpath
classloader.
Chapter 12
Java Classloading
12-2
Note:
What Oracle refers to as a "system classpath classloader" is often referred to as the
"application classloader" in contexts outside of WebLogic Server. When discussing
classloaders in WebLogic Server, Oracle uses the term "system" to differentiate from
classloaders related to Java EE applications or libraries (which Oracle refers to as
"application classloaders").
Loading a Class
Classloaders use a delegation model when loading a class. The classloader implementation
first checks its cache to see if the requested class has already been loaded. This class
verification improves performance in that its cached memory copy is used instead of repeated
loading of a class from disk. If the class is not found in its cache, the current classloader asks
its parent for the class. Only if the parent cannot load the class does the classloader attempt to
load the class. If a class exists in both the parent and child classloaders, the parent version is
loaded. This delegation model is followed to avoid multiple copies of the same form being
loaded. Multiple copies of the same class can lead to a
ClassCastException
.
Classloaders ask their parent classloader to load a class before attempting to load the class
themselves. Classloaders in WebLogic Server that are associated with Web applications can
be configured to check locally first before asking their parent for the class. This allows Web
applications to use their own versions of third-party classes, which might also be used as part
of the WebLogic Server product. The prefer-web-inf-classes Element section discusses this in
more detail.
prefer-web-inf-classes Element
The
weblogic.xml
Web application deployment descriptor contains a
<prefer-web-inf-
classes>
element (a sub-element of the
<container-descriptor>
element). By default, this
element is set to
False
. Setting this element to
True
subverts the classloader delegation model
so that class definitions from the Web application are loaded in preference to class definitions
in higher-level classloaders. This allows a Web application to use its own version of a third-
party class, which might also be part of WebLogic Server. See weblogic.xml Deployment
Descriptor Elements.
When using this feature, you must be careful not to mix instances created from the Web
application's class definition with instances created from the server's definition. If such
instances are mixed, a
ClassCastException
results.
Example 12-1 illustrates the
prefer-web-inf-classes
element, its description and default
value.
Example 12-1 prefer-web-inf-classes Element
/**
* If true, classes located in the WEB-INF directory of a web-app will be
* loaded in preference to classes loaded in the application or system
* classloader.
* @default false
*/
boolean isPreferWebInfClasses();
void setPreferWebInfClasses(boolean b);
Chapter 12
Java Classloading
12-3
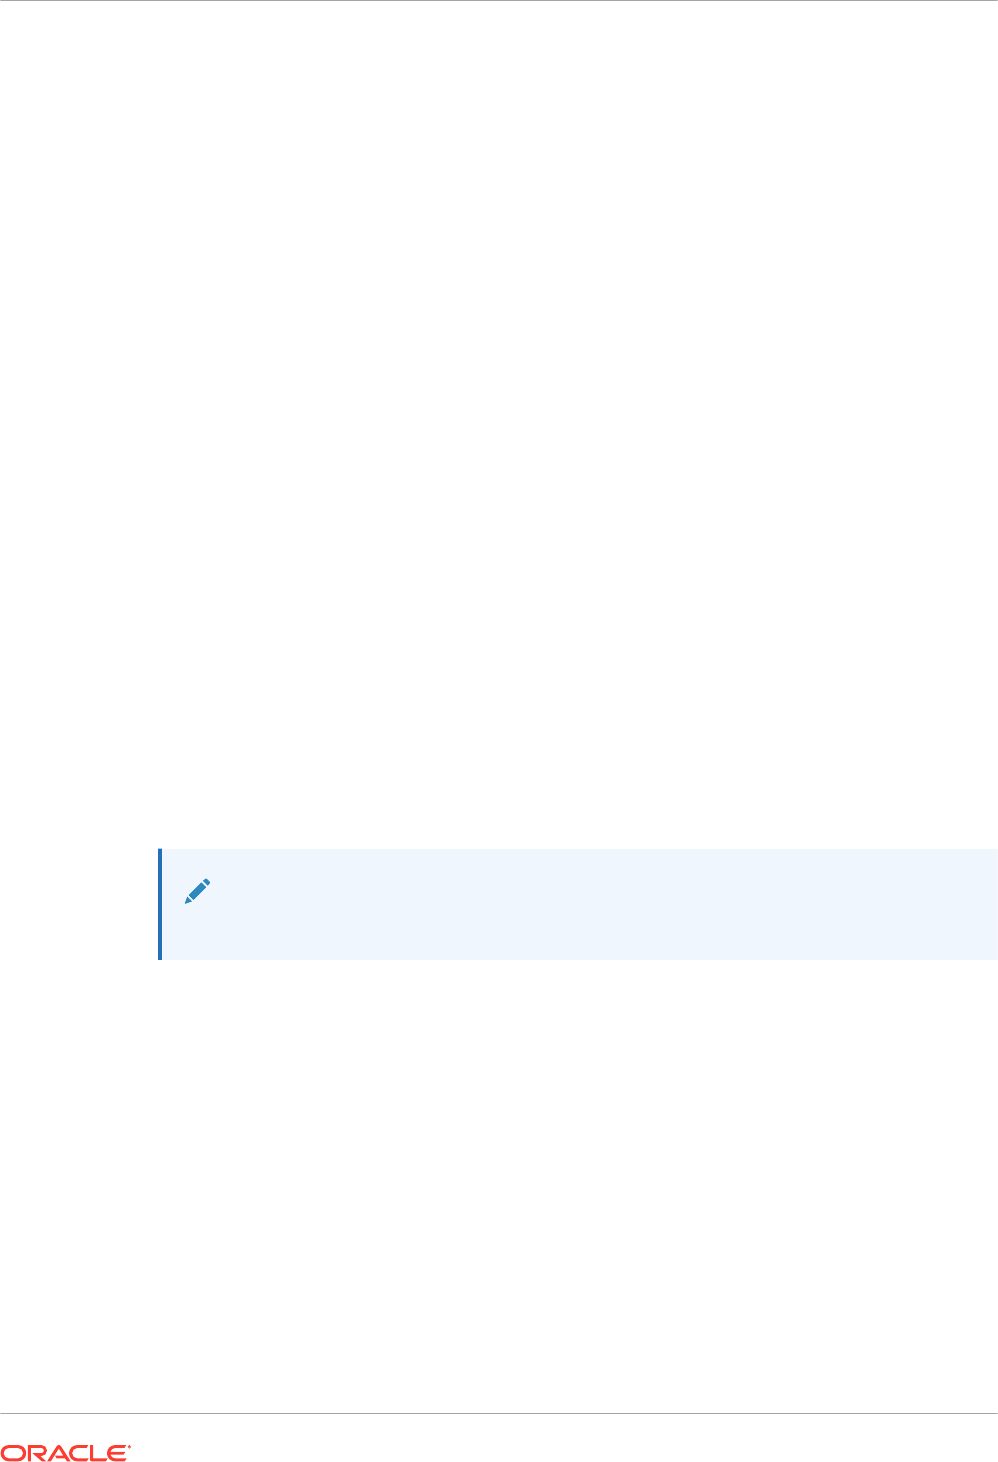
Changing Classes in a Running Program
WebLogic Server allows you to deploy newer versions of application modules such as EJBs
while the server is running. This process is known as hot-deploy or hot-redeploy and is closely
related to classloading.
Java classloaders do not have any standard mechanism to undeploy or unload a set of
classes, nor can they load new versions of classes. In order to make updates to classes in a
running virtual machine, the classloader that loaded the changed classes must be replaced
with a new classloader. When a classloader is replaced, all classes that were loaded from that
classloader (or any classloaders that are offspring of that classloader) must be reloaded. Any
instances of these classes must be re-instantiated.
In WebLogic Server, each application has a hierarchy of classloaders that are offspring of the
system classloader. These hierarchies allow applications or parts of applications to be
individually reloaded without affecting the rest of the system. WebLogic Server Application
Classloading discusses this topic.
Class Caching With the Policy Class Loader
The Policy Class Loader (PCL) is the default system class loader when starting WebLogic
Server using a startWebLogic script. The Policy Class Loader improves class loader
performance and server startup time through class caching and indexing and is supported in
any WebLogic mode (development or production).
The Policy Class Loader caches loaded classes in a cache file. Upon subsequent starts, the
cached classes are preloaded in bulk, improving performance in use cases that load a large
number of classes from the system class loader, such as server startup. The Policy Class
Loader also contains an eager index, which maps package names and JAR files containing the
source code. This index improves lookup time for classes and reduces the time spent looking
for missing classes or resources. Cached files are generated in the
DOMAIN_HOME/servers/
weblogic_name/cache/classloader
directory.
Note:
Class Caching with the Policy Class Loader is only supported for JDK 8.
Policy Class Loader by default has the class caching not enabled. In WebLogic Server 12.1.3,
you could enable class caching in development mode by setting the
CLASS_CACHE
environment
variable in the
startWebLogic
script. For pre-existing 12.1.3 start scripts, continue to use the
CLASS_CACHE
variable to enable class caching. See Configuring Class Caching in Developing
Applications for Oracle WebLogic Server 12c (12.1.3).
As of WebLogic Server 12.2.1, new domains use the Policy Class Loader by default for class
caching. Any 12.1.3 domains that upgrade to 12.2.1 also automatically use the Policy Class
Loader.
Chapter 12
Java Classloading
12-4

Note:
If you want to disable the Policy Class Loader and use the standard system class
loader in JVM, set
USE_JVM_SYSTEM_LOADER=true
when you run the
startWebLogic
script.
Class Caching With Application Class Data Sharing
The Application Class Data Sharing (AppCDS) is a class loader optimization that supports
archive files of predefined, validated, and linked classes.
This implementation improves the startup time of Oracle WebLogic Server and allows multiple
JVMs on the same machine to share memory pages, thereby reducing overall memory usage.
To use this feature, do the following:
1. Generate Class List During WebLogic Server Trial
2. Generate AppCDS Archive
3. Run WebLogic Server With AppCDS Archive
Generate Class List During WebLogic Server Trial
Generate a class list by starting the WebLogic Server with the following option:
./startWebLogic.sh generateClassList
By default, the class list will be generated at
$DOMAIN_HOME/WebLogic.classlist
. You can
change this by setting the value of
APPCDS_CLASS_LIST
when starting the WebLogic Server. For
example:
APPCDS_CLASS_LIST=my.classlist ./startWebLogic.sh generateClassList
When you use class caching with AppCDS, the Policy Class Loader (PCL) will be disabled.
Generate AppCDS Archive
Generate an AppCDS archive using the command:
./generateArchive.sh
By default, the class list file will be available at
$DOMAIN_HOME/WebLogic.classlist
, and the
archive file will be generated at
$DOMAIN_HOME/WebLogic.jsa
. You can change these filenames
by setting the value of
APPCDS_CLASS_LIST
and
APPCDS_ARCHIVE
respectively, when running the
generateArchive.sh
command. For example:
APPCDS_CLASS_LIST=my.classlist APPCDS_ARCHIVE=myArchive.jsa ./
generateArchive.sh
Chapter 12
Java Classloading
12-5

Run WebLogic Server With AppCDS Archive
After you generate an AppCDS archive, run the WebLogic Server using this archive:
./startWebLogic.sh useArchive
You can change the default location of the AppCDS archive by setting the value of
APPCDS_ARCHIVE
when starting the WebLogic Server. For example:
APPCDS_ARCHIVE=myArchive.jsa ./startWebLogic.sh useArchive
AppCDS is not compatible with Policy Class Loader. Therefore, Policy Class Loader will be
disabled.
WebLogic Server Application Classloading
WebLogic Server classloading is centered on the concept of an application. An application is
normally packaged in an Enterprise Archive (EAR) file containing application classes.
WebLogic Server application classloading allows WebLogic Server to host multiple isolated
applications within the same JVM.
• Overview of WebLogic Server Application Classloading
• Application Classloader Hierarchy
• Custom Module Classloader Hierarchies
• Individual EJB Classloader for Implementation Classes
• Application Classloading and Pass-by-Value or Reference
• Using a Filtering Classloader
• Overview of WebLogic Server Application Classloading
• Application Classloader Hierarchy
• Custom Module Classloader Hierarchies
• Declaring the Classloader Hierarchy
• User-Defined Classloader Restrictions
• Individual EJB Classloader for Implementation Classes
• Application Classloading and Pass-by-Value or Reference
• Using a Filtering Classloader
• What is a Filtering Classloader
• Configuring a Filtering Classloader
• Resource Loading Order
Overview of WebLogic Server Application Classloading
WebLogic Server classloading is centered on the concept of an application. An application is
normally packaged in an Enterprise Archive (EAR) file containing application classes.
Everything within an EAR file is considered part of the same application. The following may be
part of an EAR or can be loaded as standalone applications:
Chapter 12
WebLogic Server Application Classloading
12-6

• An Enterprise JavaBean (EJB) JAR file
• A Web application WAR file
• A resource adapter RAR file
Note:
See the following sections for more information:
– For information on resource adapters and classloading, see About Resource
Adapter Classes.
– For information on overriding generic application files while classloading, see
Generic File Loading Overrides in Deploying Applications to Oracle
WebLogic Server.
If you deploy an EJB and a Web application separately, they are considered two applications. If
they are deployed together within an EAR file, they are one application. You deploy modules
together in an EAR file for them to be considered part of the same application.
Every application receives its own classloader hierarchy; the parent of this hierarchy is the
system classpath classloader. This isolates applications so that application A cannot see the
classloaders or classes of application B. In hierarchy classloaders, no sibling or friend
concepts exist. Application code only has visibility to classes loaded by the classloader
associated with the application (or module) and classes that are loaded by classloaders that
are ancestors of the application (or module) classloader. This allows WebLogic Server to host
multiple isolated applications within the same JVM.
Application Classloader Hierarchy
WebLogic Server automatically creates a hierarchy of classloaders when an application is
deployed. The root classloader in this hierarchy loads any EJB JAR files in the application. A
child classloader is created for each Web application WAR file.
Because it is common for Web applications to call EJBs, the WebLogic Server application
classloader architecture allows JavaServer Page (JSP) files and servlets to see the EJB
interfaces in their parent classloader. This architecture also allows Web applications to be
redeployed without redeploying the EJB tier. In practice, it is more common to change JSP files
and servlets than to change the EJB tier.
The following graphic illustrates this WebLogic Server application classloading concept.
Chapter 12
WebLogic Server Application Classloading
12-7
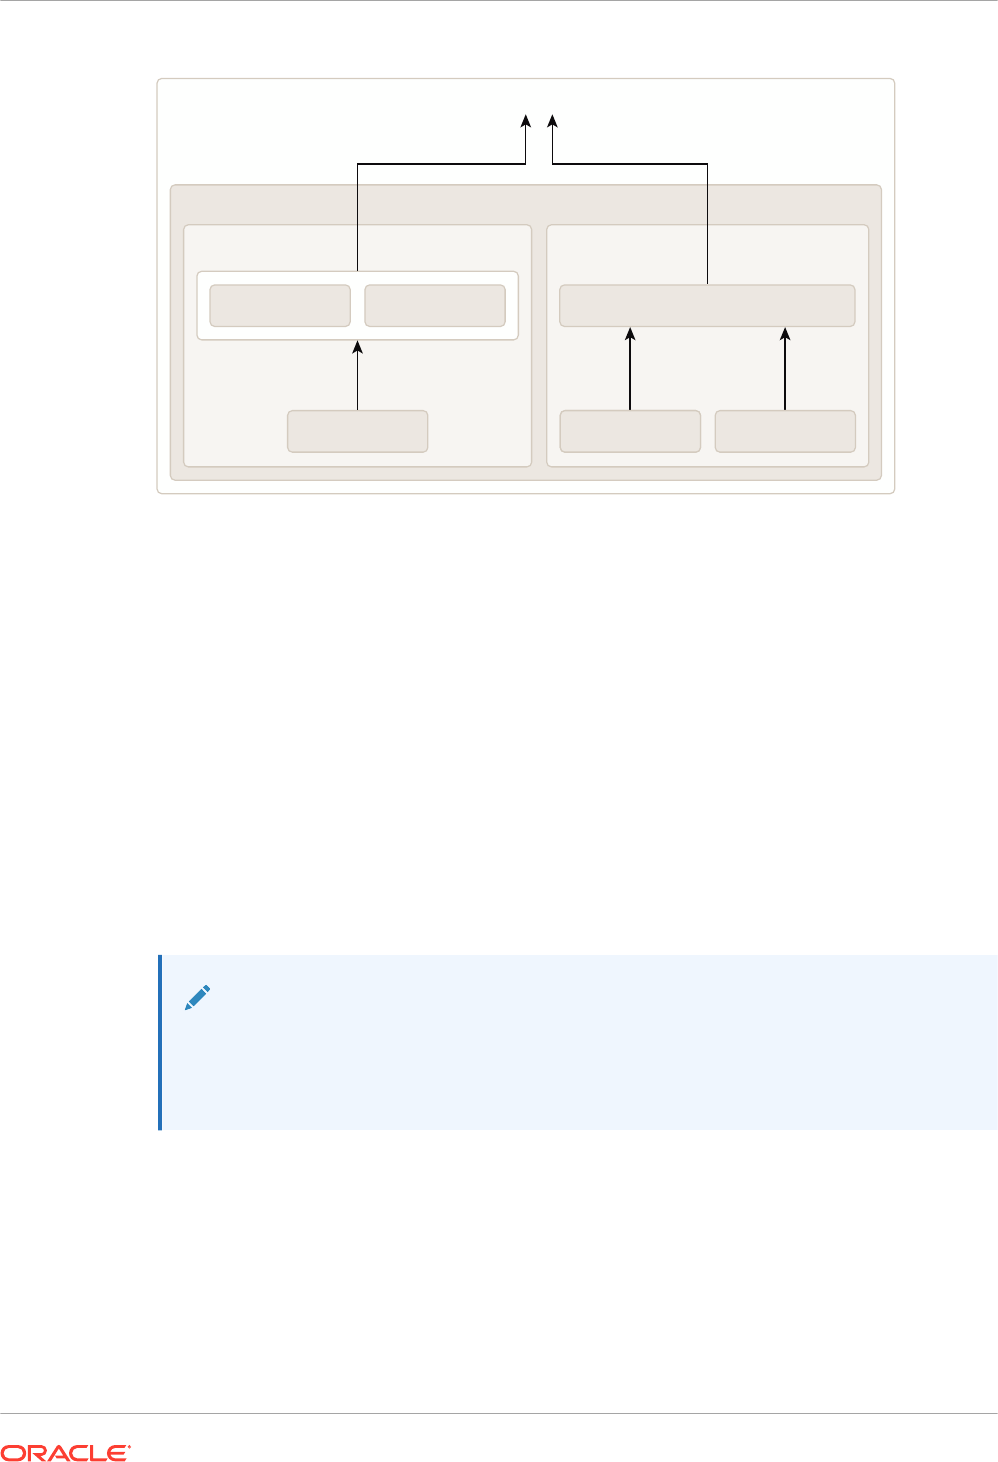
Figure 12-1 WebLogic Server Classloading
System Classpath Loader
WebLogic Server
Application 1
EJB 1
WebApp 1
EJB 2
Application 2
EJB 3
WebApp 1WebApp 2 WebApp 3
If your application includes servlets and JSPs that use EJBs:
• Package the servlets and JSPs in a WAR file
• Package the Enterprise JavaBeans in an EJB JAR file
• Package the WAR and JAR files in an EAR file
• Deploy the EAR file
Although you could deploy the WAR and JAR files separately, deploying them together in an
EAR file produces a classloader arrangement that allows the servlets and JSPs to find the EJB
classes. If you deploy the WAR and JAR files separately, WebLogic Server creates sibling
classloaders for them. This means that you must include the EJB home and remote interfaces
in the WAR file, and WebLogic Server must use the RMI stub and skeleton classes for EJB
calls, just as it does when EJB clients and implementation classes are in different JVMs. This
concept is discussed in more detail in the next section Application Classloading and Pass-by-
Value or Reference.
Note:
The Web application classloader contains all classes for the Web application except
for the JSP class. The JSP class obtains its own classloader, which is a child of the
Web application classloader. This allows JSPs to be individually reloaded.
Custom Module Classloader Hierarchies
You can create custom classloader hierarchies for an application allowing for better control
over class visibility and reloadability. You achieve this by defining a
classloader-structure
element in the
weblogic-application.xml
deployment descriptor file.
The following diagram illustrates how classloaders are organized by default for WebLogic
applications. An application level classloader exists where all EJB classes are loaded. For
each Web module, there is a separate child classloader for the classes of that module.
Chapter 12
WebLogic Server Application Classloading
12-8
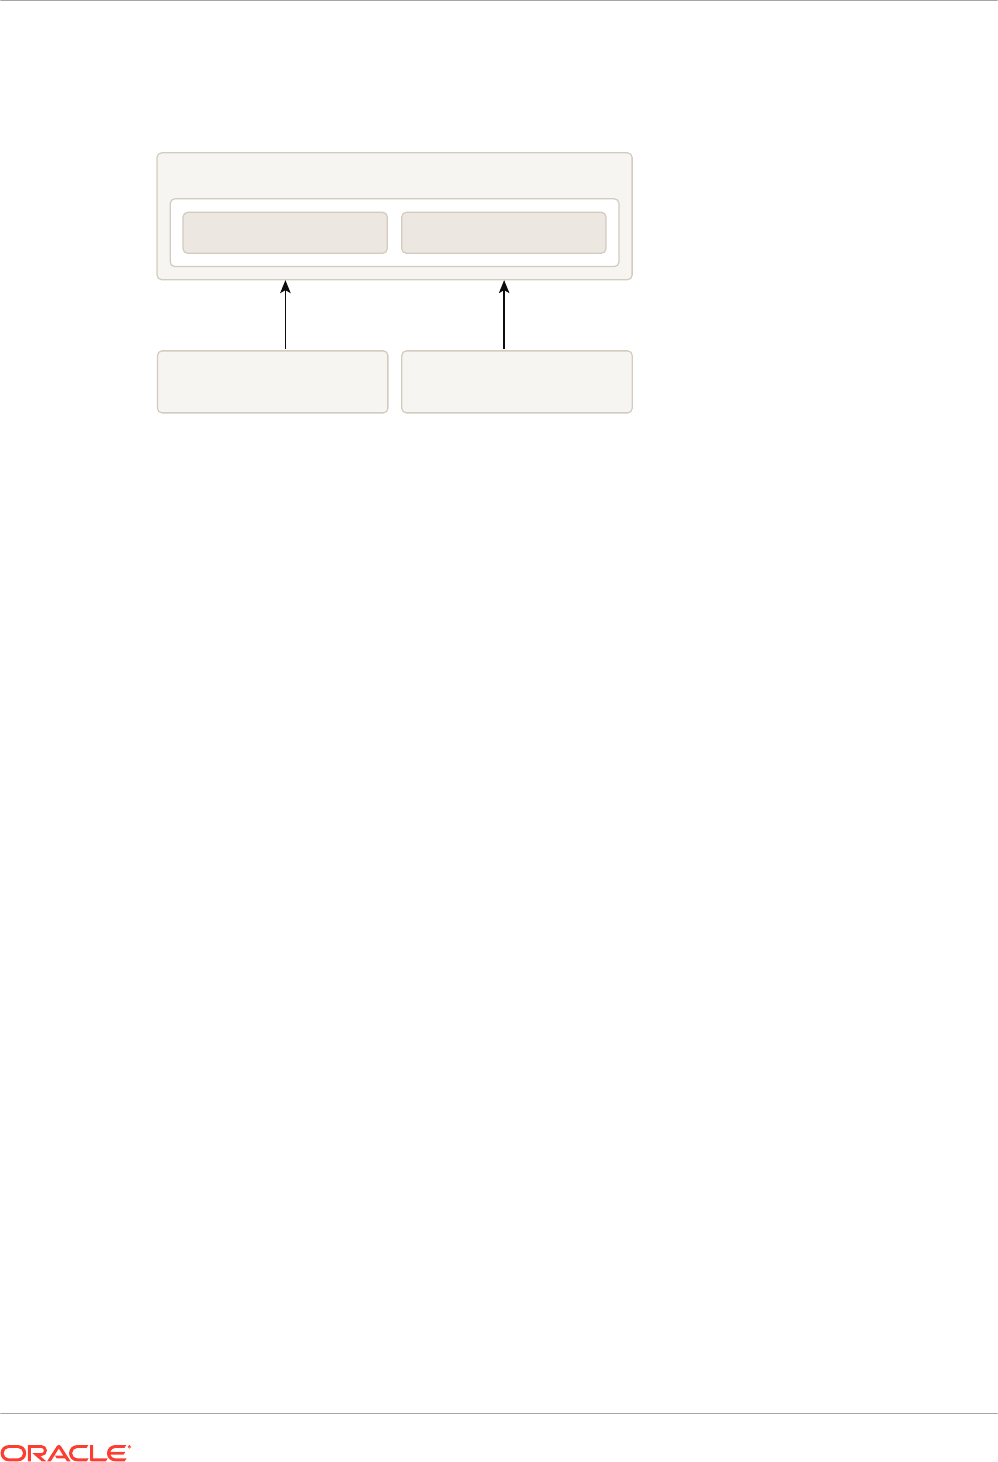
For simplicity, JSP classloaders are not described in the following diagram.
Figure 12-2 Standard Classloader Hierarchy
Application Classloader
[EJB 1] [EJB 2]
Web Application 1
Classloader
Web Application 2
Classloader
This hierarchy is optimal for most applications, because it allows call-by-reference semantics
when you invoke EJBs. It also allows Web modules to be independently reloaded without
affecting other modules. Further, it allows code running in one of the Web modules to load
classes from any of the EJB modules. This is convenient, as it can prevent a Web module from
including the interfaces for EJBs that it uses. Note that some of those benefits are not strictly
Java EE-compliant.
The ability to create custom module classloaders provides a mechanism to declare alternate
classloader organizations that allow the following:
• Reloading individual EJB modules independently
• Reloading groups of modules to be reloaded together
• Reversing the parent child relationship between specific Web modules and EJB modules
• Namespace separation between EJB modules
Declaring the Classloader Hierarchy
You can declare the classloader hierarchy in the WebLogic-specific application deployment
descriptor
weblogic-application.xml
.
The DTD for this declaration is as follows:
<!ELEMENT classloader-structure (module-ref*, classloader-structure*)>
<!ELEMENT module-ref (module-uri)>
<!ELEMENT module-uri (#PCDATA)>
The top-level element in
weblogic-application.xml
includes an optional
classloader-
structure
element. If you do not specify this element, then the standard classloader is used.
Also, if you do not include a particular module in the definition, it is assigned a classloader, as
in the standard hierarchy. That is, EJB modules are associated with the application root
classloader, and Web application modules have their own classloaders.
The
classloader-structure
element allows for the nesting of
classloader-structure
stanzas, so that you can describe an arbitrary hierarchy of classloaders. There is currently a
limitation of three levels. The outermost entry indicates the application classloader. For any
modules not listed, the standard hierarchy is assumed.
Chapter 12
WebLogic Server Application Classloading
12-9
Note:
JSP classloaders are not included in this definition scheme. JSPs are always loaded
into a classloader that is a child of the classloader associated with the Web module to
which it belongs.
For more information on the DTD elements, refer to Enterprise Application Deployment
Descriptor Elements.
The following is an example of a classloader declaration (defined in the
classloader-
structure
element in
weblogic-application.xml
):
<classloader-structure>
<module-ref>
<module-uri>ejb1.jar</module-uri>
</module-ref>
<module-ref>
<module-uri>web3.war</module-uri>
</module-ref>
<classloader-structure>
<module-ref>
<module-uri>web1.war</module-uri>
</module-ref>
</classloader-structure>
<classloader-structure>
<module-ref>
<module-uri>ejb3.jar</module-uri>
</module-ref>
<module-ref>
<module-uri>web2.war</module-uri>
</module-ref>
<classloader-structure>
<module-ref>
<module-uri>web4.war</module-uri>
</module-ref>
</classloader-structure>
<classloader-structure>
<module-ref>
<module-uri>ejb2.jar</module-uri>
</module-ref>
</classloader-structure>
</classloader-structure>
</classloader-structure>
The organization of the nesting indicates the classloader hierarchy. The above stanza leads to
a hierarchy shown in the following diagram.
Chapter 12
WebLogic Server Application Classloading
12-10
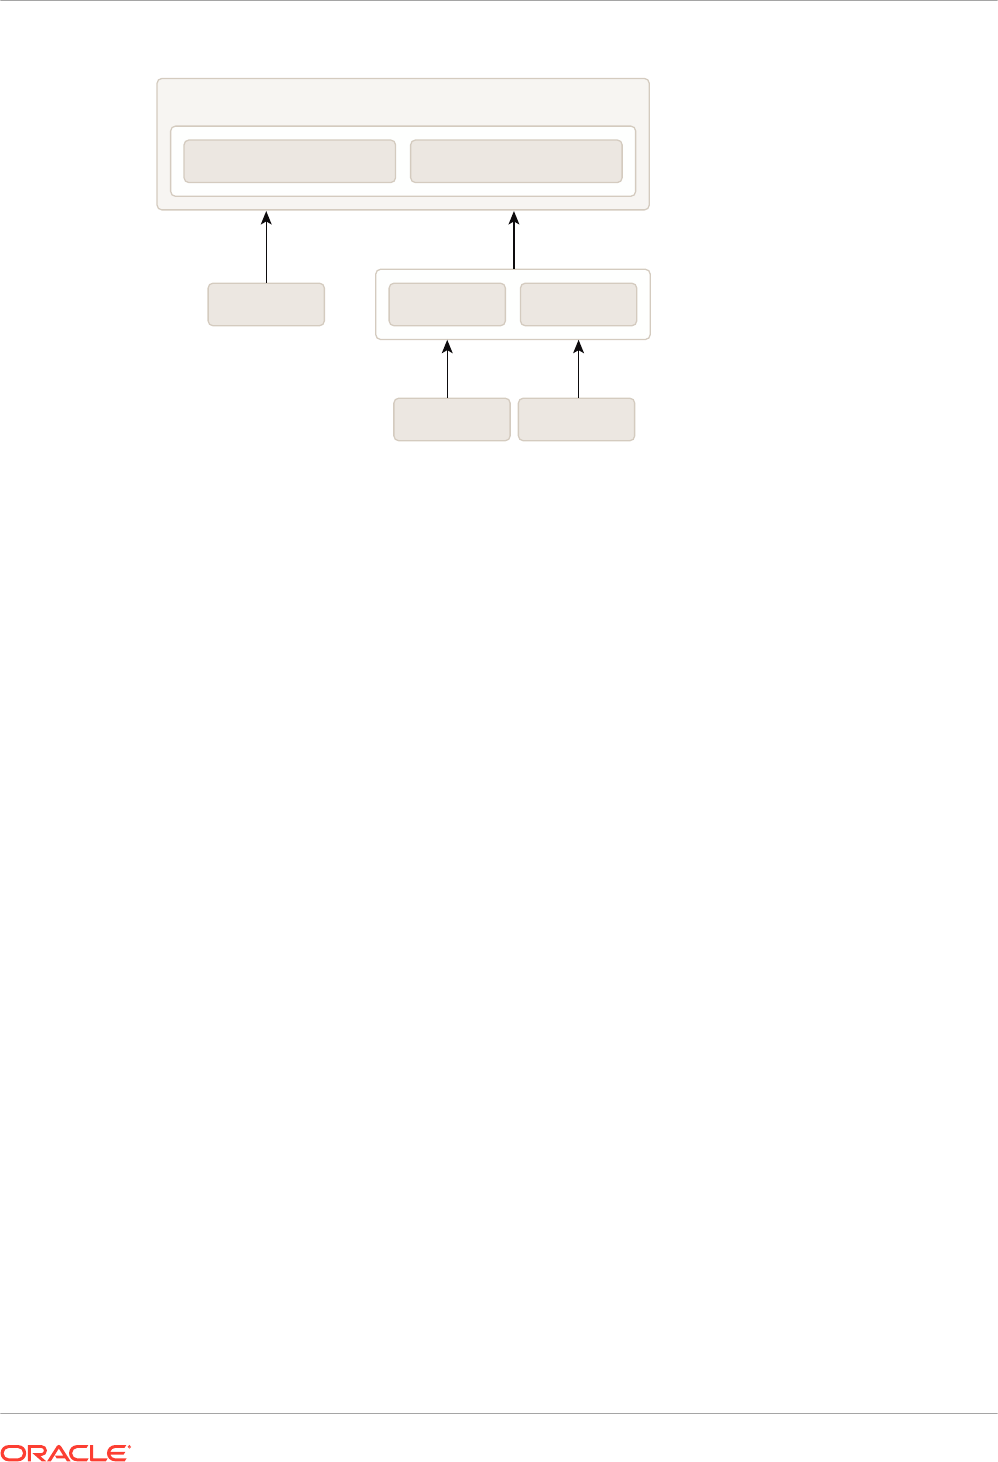
Figure 12-3 Example Classloader Hierarchy
Application Classloader
[EJB 1] [WEB 3]
[EJB 3] [WEB 2][WEB 1]
[WEB 4] [EJB 2]
User-Defined Classloader Restrictions
User-defined classloader restrictions give you better control over what is reloadable and
provide inter-module class visibility. This feature is primarily for developers. It is useful for
iterative development, but the reloading aspect of this feature is not recommended for
production use, because it is possible to corrupt a running application if an update includes
invalid elements. Custom classloader arrangements for namespace separation and class
visibility are acceptable for production use. However, programmers should be aware that the
Java EE specifications say that applications should not depend on any given classloader
organization.
Some classloader hierarchies can cause modules within an application to behave more like
modules in two separate applications. For example, if you place an EJB in its own classloader
so that it can be reloaded individually, you receive call-by-value semantics rather than the call-
by-reference optimization Oracle provides in our standard classloader hierarchy. Also note that
if you use a custom hierarchy, you might end up with stale references. Therefore, if you reload
an EJB module, you should also reload the calling modules.
There are some restrictions to creating user-defined module classloader hierarchies; these are
discussed in the following sections.
• Servlet Reloading Disabled
• Nesting Depth
• Module Types
• Duplicate Entries
• Interfaces
• Call-by-Value Semantics
• In-Flight Work
• Development Use Only
Chapter 12
WebLogic Server Application Classloading
12-11

Servlet Reloading Disabled
If you use a custom classloader hierarchy, servlet reloading is disabled for Web applications in
that particular application.
Nesting Depth
Nesting is limited to three levels (including the application classloader). Deeper nestings lead
to a deployment exception.
Module Types
Custom classloader hierarchies are currently restricted to Web and EJB modules.
Duplicate Entries
Duplicate entries lead to a deployment exception.
Interfaces
The standard WebLogic Server classloader hierarchy makes EJB interfaces available to all
modules in the application. Thus other modules can invoke an EJB, even though they do not
include the interface classes in their own module. This is possible because EJBs are always
loaded into the root classloader and all other modules either share that classloader or have a
classloader that is a child of that classloader.
With the custom classloader feature, you can configure a classloader hierarchy so that a
callee's classes are not visible to the caller. In this case, the calling module must include the
interface classes. This is the same requirement that exists when invoking on modules in a
separate application.
Call-by-Value Semantics
The standard classloader hierarchy provided with WebLogic Server allows for calls between
modules within an application to use call-by-reference semantics. This is because the caller is
always using the same classloader or a child classloader of the callee. With this feature, it is
possible to configure the classloader hierarchy so that two modules are in separate branches
of the classloader tree. In this case, call-by-value semantics are used.
In-Flight Work
Be aware that the classloader switch required for reloading is not atomic across modules. In
fact, updates to applications in general are not atomic. For this reason, it is possible that
different in-flight operations (operations that are occurring while a change is being made) might
end up accessing different versions of classes depending on timing.
Development Use Only
The development-use-only feature is intended for development use. Because updates are not
atomic, this feature is not suitable for production use.
Chapter 12
WebLogic Server Application Classloading
12-12
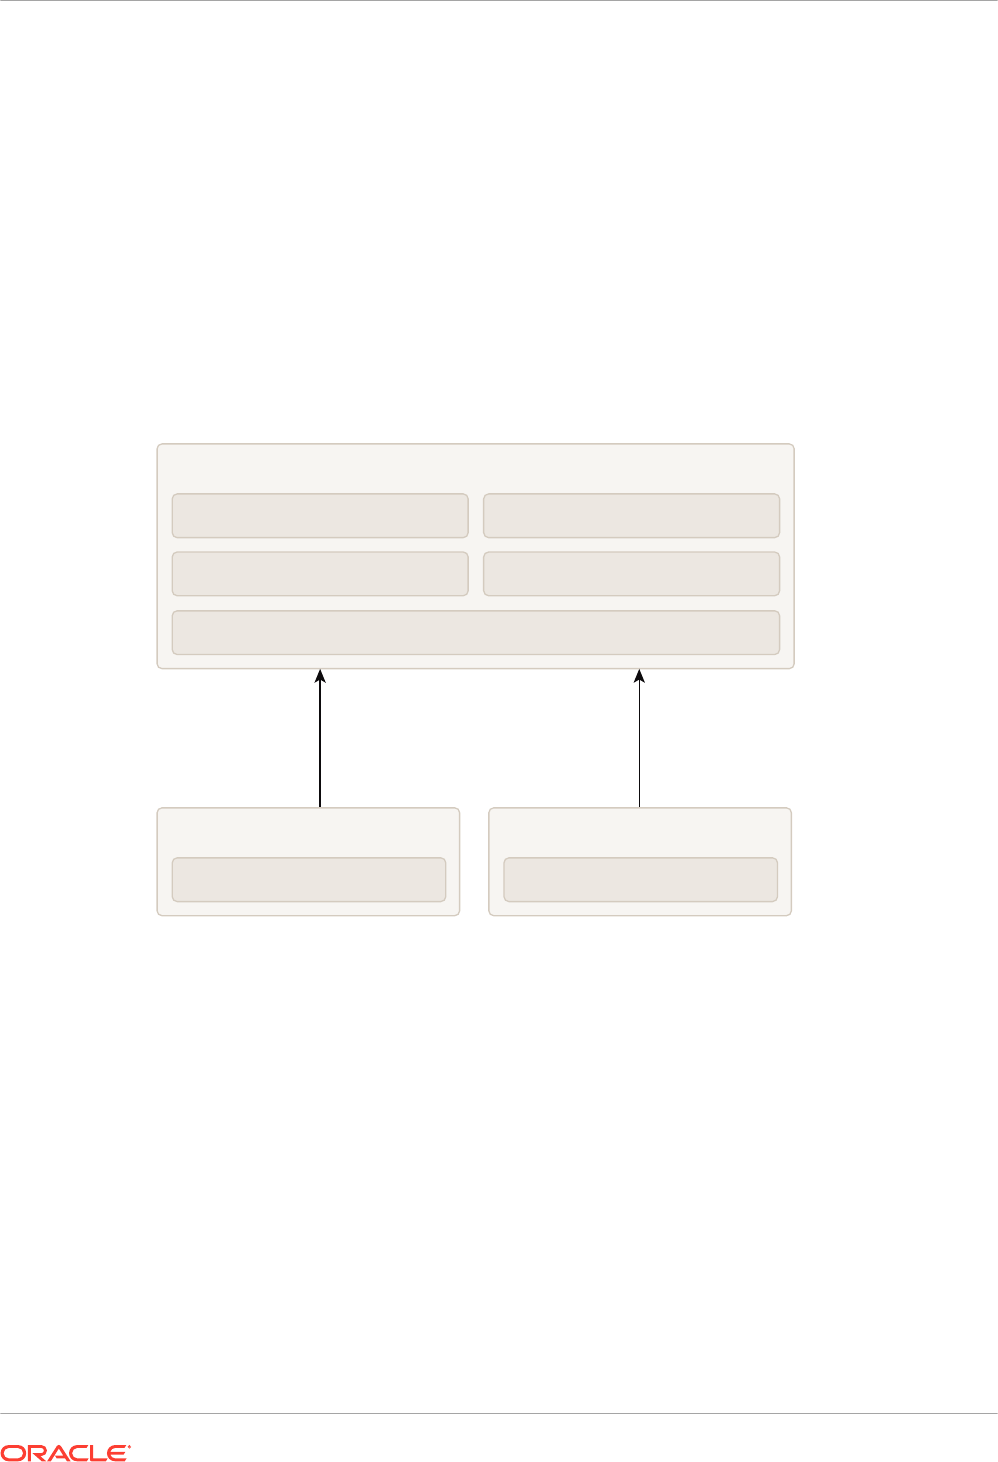
Individual EJB Classloader for Implementation Classes
WebLogic Server allows you to reload individual EJB modules without requiring you to reload
other modules at the same time and having to redeploy the entire EJB module. This feature is
similar to how JSPs are currently reloaded in the WebLogic Server servlet container.
Because EJB classes are invoked through an interface, it is possible to load individual EJB
implementation classes in their own classloader. This way, these classes can be reloaded
individually without having to redeploy the entire EJB module. Below is a diagram of what the
classloader hierarchy for a single EJB module would look like. The module contains two EJBs
(
Foo
and
Bar
). This would be a sub-tree of the general application hierarchy described in the
previous section.
Figure 12-4 Example Classloader Hierarchy for a Single EJB Module
Module Classloader
Foo.class
FooHome.class
Bar.class
BarHome.class
[Any other classes either generated or from the JAR file]
Foo Classloader
Foolmpl.class
Bar Classloader
Barlmpl.class
To perform a partial update of files relative to the root of the exploded application, use the
following command line:
Example 12-2 Performing a Partial File Update
java weblogic.Deployer -adminurl url -user user -password password
-name myapp -redeploy myejb/foo.class
After the
-redeploy
command, you provide a list of files relative to the root of the exploded
application that you want to update. This might be the path to a specific element (as above) or
a module (or any set of elements and modules). For example:
Example 12-3 Providing a List of Relative Files for Update
java weblogic.Deployer -adminurl url -user user -password password
-name myapp -redeploy mywar myejb/foo.class anotherejb
Given a set of files to be updated, the system tries to figure out the minimum set of things it
needs to redeploy. Redeploying only an EJB
impl
class causes only that class to be
Chapter 12
WebLogic Server Application Classloading
12-13
redeployed. If you specify the whole EJB (in the above example,
anotherejb
) or if you change
and update the EJB home interface, the entire EJB module must be redeployed.
Depending on the classloader hierarchy, this redeployment may lead to other modules being
redeployed. Specifically, if other modules share the EJB classloader or are loaded into a
classloader that is a child to the EJB's classloader (as in the WebLogic Server standard
classloader module) then those modules are also reloaded.
Application Classloading and Pass-by-Value or Reference
Modern programming languages use two common parameter passing models: pass-by-value
and pass-by-reference. With pass-by-value, parameters and return values are copied for each
method call. With pass-by-reference, a pointer (or reference) to the actual object is passed to
the method. Pass by reference improves performance because it avoids copying objects, but it
also allows a method to modify the state of a passed parameter.
WebLogic Server includes an optimization to improve the performance of Remote Method
Interface (RMI) calls within the server. Rather than using pass by value and the RMI
subsystem's marshalling and unmarshalling facilities, the server makes a direct Java method
call using pass by reference. This mechanism greatly improves performance and is also used
for EJB 2.0 local interfaces.
RMI call optimization and call by reference can only be used when the caller and callee are
within the same application. As usual, this is related to classloaders. Because applications
have their own classloader hierarchy, any application class has a definition in both classloaders
and receives a ClassCastException error if you try to assign between applications. To work
around this, WebLogic Server uses call-by-value between applications, even if they are within
the same JVM.
Note:
Calls between applications are slower than calls within the same application. Deploy
modules together as an EAR file to enable fast RMI calls and use of the EJB 2.0 local
interfaces.
Using a Filtering Classloader
In WebLogic Server, any JAR file present in the system classpath is loaded by the WebLogic
Server system classloader. All applications running within a server instance are loaded in
application classloaders which are children of the system classloader. In this implementation of
the system classloader, applications cannot use different versions of third-party JARs which
are already present in the system classloader. Every child classloader asks the parent (the
system classloader) for a particular class and cannot load classes which are seen by the
parent.
For example, if a class called
com.foo.Baz
exists in both
$CLASSPATH
as well as the application
EAR, then the class from the
$CLASSPATH
is loaded and not the one from the EAR. Since
weblogic.jar
is in the
$CLASSPATH
, applications cannot override any WebLogic Server
classes.
The following sections define and describe how to use a filtering classloader:
• What is a Filtering Classloader
• Configuring a Filtering Classloader
Chapter 12
WebLogic Server Application Classloading
12-14

• Resource Loading Order
What is a Filtering Classloader
The
FilteringClassLoader
provides a mechanism for you to configure deployment descriptors
to explicitly specify that certain packages should always be loaded from the application, rather
than being loaded by the system classloader. This allows you to use alternate versions of
applications such as Xerces and Ant. Though the
FilteringClassLoader
lets you bundle and
use 3rd party JARs in your application, it is not recommended that you filter out API classes,
like classes in
javax
packages or
weblogic
packages.
The
FilteringClassLoader
sits between the application classloader and the system
classloader. It is a child of the system classloader and the parent of the application classloader.
The
FilteringClassLoader
intercepts the
loadClass(String className)
method and
compares the
className
with a list of packages specified in
weblogic-application.xml
file. If
the package matches the
className
, the
FilteringClassLoader
throws a
ClassNotFoundException
. This exception notifies the application classloader to load this class
from the application.
Configuring a Filtering Classloader
To configure the
FilteringClassLoader
to specify that a certain package is loaded from an
application, add a
prefer-application-packages
descriptor element to
weblogic-
application.xml
which details the list of packages to be loaded from the application. The
following example specifies that
org.apache.log4j.*
and
antlr.*
packages are loaded from
the application, not the system classloader:
<prefer-application-packages>
<package-name>org.apache.log4j.*</package-name>
<package-name>antlr.*</package-name>
</prefer-application-packages>
The
prefer-application-packages
descriptor element can also be defined in
weblogic.xml
.
See
prefer-application-packages
.
You can specify that a certain package be loaded for a WAR file included within an EAR file by
configuring the
FilteringClassLoader
in the
weblogic.xml
file of the WAR file.
For example,
A.ear
contains
B.war
.
A.ear
defines the
FilteringClassLoader
in
weblogic-
application.xml
, and
B.war
defines a different
FilteringClassLoader
in
weblogic.xml
.
When you deploy
A.ear
,
B.war
loads the package defined in the
FilteringClassLoader
in
weblogic.xml
. The WAR-level
FilteringClassLoader
has priority over the EAR-level
FilteringClassLoader
for this WAR file.
For aid in configuring filtering classloaders, see Using the Classloader Analysis Tool (CAT).
Resource Loading Order
The resource loading order is the order in which
java.lang.ClassLoader
methods
getResource()
and
getResources()
return resources. When filtering is enabled, this order is
slightly different from the case when filtering is disabled. Filtering is enabled implies that there
are one or more package patterns in the
FilteringClassLoader
. Without any filtering (default),
the resources are collected in the top-down order of the classloader tree. For instance, if Web
(1) requests resources, the resources are grouped in the following order: Sys (3), App (2) and
Web(1). See Example 12-4.
Chapter 12
WebLogic Server Application Classloading
12-15

Note:
The resources are returned in the default Java EE delegation model beneath the
FilteringClassLoader
. Only the resources from the parent of the
FilteringClassLoader
are appended to the end of the enumeration being returned.
Example 12-4 Using the System Classloader
System (3)
|
App (2)
|
Web (1)
To be more explicit, given a resource
/META-INF/foo.xml
which exists in all the classloaders,
would return the following list of URLs:
META-INF/foo.xml - from the System ClassLoader (3)
META-INF/foo.xml - from the App ClassLoader (2)
META-INF/foo.xml - from the Web ClassLoader (1)
When filtering is enabled, the resources from the child of the
FilteringClassLoader
(an
application classloader) down to the calling classloader are returned before the ones from the
system classloader. In Example 12-5, if the same resource existed in all the classloaders (D),
(B) and (A) one would get them in the following order if requested by the Web classloader:
META-INF/foo.xml - from the App ClassLoader (B)
META-INF/foo.xml - from the Web ClassLoader (A)
META-INF/foo.xml - from the System ClassLoader (D)
Example 12-5 Using a Filtering Classloading Implementation
System (D)
|
FilteringClassLoader (filterList := x.y.*) (C)
|
App (B)
|
Web (A)
If the application classloader requested the same resource, the following order would be
obtained.
META-INF/foo.xml - from the App ClassLoader (B)
META-INF/foo.xml - from the System ClassLoader (D)
For
getResource()
, only the first descriptor is returned and
getResourceAsStream()
returns
the
inputStream
of the first resource.
Resolving Class References Between Modules and Applications
WebLogic Server deploys applications in separate classloaders to maintain independence and
to facilitate dynamic redeployment and undeployment. Because of this, you need to package
your application classes in such a way that each module has access to the classes it depends
on.
Chapter 12
Resolving Class References Between Modules and Applications
12-16

Your applications may use many different Java classes, including Enterprise Beans, servlets
and JavaServer Pages, utility classes, and third-party packages. In some cases, you may have
to include a set of classes in more than one application or module. This section describes how
WebLogic Server uses multiple classloaders so that you can stage your applications
successfully.
For more information about analyzing and resolving classloading issues, see Using the
Classloader Analysis Tool (CAT).
• About Resource Adapter Classes
• Packaging Shared Utility Classes
• Manifest Class-Path
About Resource Adapter Classes
Each resource adapter now uses its own classloader to load classes (similar to Web
applications). As a result, modules like Web applications and EJBs that are packaged along
with a resource adapter in an application archive (EAR file) do not have visibility into the
resource adapter's classes. If such visibility is required, you must place the resource adapter
classes in APP-INF/classes. You can also archive these classes (using the JAR utility) and
place them in the APP-INF/lib of the application archive.
Make sure that no resource-adapter specific classes exist in your WebLogic Server system
classpath. If you need to use resource adapter-specific classes with Web modules (for
example, an EJB or Web application), you must bundle these classes in the corresponding
module's archive file (for example, the JAR file for EJBs or the WAR file for Web applications).
Packaging Shared Utility Classes
WebLogic Server provides a location within an EAR file where you can store shared utility
classes. Place utility JAR files in the
APP-INF/lib
directory and individual classes in the
APP-
INF/classes
directory. (Do not place JAR files in the
/classes
directory or classes in the
/lib
directory.) These classes are loaded into the root classloader for the application.
This feature obviates the need to place utility classes in the system classpath or place classes
in an EJB JAR file (which depends on the standard WebLogic Server classloader hierarchy).
Be aware that using this feature is subtly different from using the manifest
Class-Path
described in the following section. With this feature, class definitions are shared across the
application. With manifest
Class-Path
, the classpath of the referencing module is simply
extended, which means that separate copies of the classes exist for each module.
Manifest Class-Path
The Java EE specification provides the manifest
Class-Path
entry as a means for a module to
specify that it requires an auxiliary JAR of classes. You only need to use this manifest
Class-
Path
entry if you have additional supporting JAR files as part of your EJB JAR or WAR file. In
such cases, when you create the JAR or WAR file, you must include a manifest file with a
Class-Path
element that references the required JAR files.
The following is a simple manifest file that references a
utility.jar
file:
Manifest-Version: 1.0 [CRLF]
Class-Path: utility.jar [CRLF]
Chapter 12
Resolving Class References Between Modules and Applications
12-17
In the first line of the manifest file, you must always include the
Manifest-Version
attribute,
followed by a new line (CR | LF |CRLF) and then the
Class-Path
attribute. More information
about the manifest format can be found at:
https://docs.oracle.com/en/java/javase/11/
docs/specs/jar/jar.html
The manifest
Class-Path
entries refer to other archives relative to the current archive in which
these entries are defined. This structure allows multiple WAR files and EJB JAR files to share a
common library JAR. For example, if a WAR file contains a manifest entry of
y.jars
, this entry
should be next to the WAR file (not within it) as follows:
/<directory>/x.war
/<directory>/y.jars
The manifest file itself should be located in the archive at
META-INF/MANIFEST.MF
.
See
http://docs.oracle.com/javase/tutorial/deployment/jar/manifestindex.html
.
Using the Classloader Analysis Tool (CAT)
CAT is a Web-based class analysis tool that simplifies filtering classloader configuration and
aids you in analyzing classloading issues, such as detecting conflicts, debugging application
classpaths and class conflicts, and proposes solutions to help you resolve them.
CAT is a stand-alone Web application, distributed as a single WAR file,
wls-cat.war
, exposing
its features through a Web-based front end. CAT is deployed as an internal on-demand
application only in development mode. Deployment happens upon first access. If the server is
running in production mode, it is not deployed automatically. You can deploy it in production
mode; there are no limitations on its use, but you must deploy it manually, just like any other
Web application. The CAT Web application is located at
WL_HOME/server/lib/wls-cat.war
.
You can deploy it to any WebLogic Server version 10.3.x and later.
Note:
CAT is not supported on IBM SDK for Java because some functions of the CAT
application depend on HotSpot implementation.
• Opening the CAT Interface
• How CAT Analyzes Classes
• Identifying Class References through Manifest Hierarchies
Opening the CAT Interface
CAT has a simple Web GUI that displays all your currently running applications and modules.
To begin using CAT:
• In the WebLogic Server Administration Console, select Deployments > app_name >
Testing and then select the Classloader Analysis Tool link. Enter your console login
credentials.
~ Or ~
• Open your browser to
http://wls-host:port/wls-cat/
and then enter your console login
credentials.
Chapter 12
Using the Classloader Analysis Tool (CAT)
12-18

In the navigation pane, select the application or module that you want to analyze; a brief
description of it is shown in the right-side pane. Use the right-side pane to perform actions and
analyses on the selected application or module, such as:
• Analyze classloading conflicts
• View the system and application classloaders
• Generate reports
How CAT Analyzes Classes
CAT analyzes classes loaded by the system classpath classloader and the WebLogic Server
main application classloaders, defined here as the filtering, application, and module
classloaders. You can perform analysis at the class, package, or JAR level. The results for
each action you select can be shown in either a basic view or a detailed view.
Here are some of the tasks which you can perform using CAT:
• Display basic information about applications and modules
• Analyze classloading conflicts
• Review proposed solutions
• Get suggestions for configuring filtering classloaders
• Display the classloader hierarchy and the entire classpath for each classloader
• Search for a class (or a resource) on a classloader
Identifying Class References through Manifest Hierarchies
Applications can have multiple manifest references to classes that are not directly present in
the applications's classpath, but which are chained into the Classpath by manifest references.
In some cases, application developers may not be aware that additional classes have been
unknowingly pulled into the application's classpath from other JARs, which in turn have
manifest references to other JARs.
CAT has the ability to search through an application's or module's classpath to detect and
display the underlying chained manifest references, as shown in the following Sample EAR
with Manifest Hierarchies example:
cat4mf.ear
+- ejb.jar
+- web-mf-in-root.war
+- lib
+- applib.jar
+- apputil_1.jar
+- apputil_1_1.jar
+- apputil_1_1_1.jar
+- apputil_1_2.jar
+- apputil_1_2_1.jar
+- ejbutil_1.jar
+- ejbutil_1_1.jar
+- ejbutil_1_2.jar
+- ejbutil_1_2_1.jar
+- webutil_1.jar
+- webutil_1_1.jar
+- webutil_1_1_1.jar
+- webutil_2.jar
+- webutil_2_1.jar
Chapter 12
Using the Classloader Analysis Tool (CAT)
12-19

The
ejb.jar
has a manifest reference to
ejbutil_1.jar
, which has references to both
ejbutil_1_1.jar
and
ejbutil_1_2.jar
, which has a further reference to
ejbutil_1_2_1.jar
,
as follows:
ejb.jar
-> ejbutil_1.jar
-> ejbutil_1_1.jar
-> ejbutil_1_2.jar
-> ejbutil_1_2_1.jar
Using CAT to Display the Manifest References
1. Open the CAT tool, as described in Opening the CAT Interface.
2. Use the navigation pane to select the running application or module to analyze.
Note: The manifest references can best be analyzed from the module level rather than the
application level.
3. In the Summary for Application pane, click the Classloader Tree view to list all the
classloaders for the selected application/module.
• Selecting the detailed view from the menu displays the classpath of each classloader.
• The hash code of each classloader is an active URL.
4. Click the classloader hash code URL you want to analyze.
5. The Classloader page defaults to the basic view, so select the detailed view to see the
classpath and the classes loaded by the classloader.
6. Enter one of the loaded classnames in the Resource to analyze field (using the format
pckgname.classname
, and click Analyze Resource.
7. The Manifest References section of the detailed output provides the list of chained
manifest references for the selected classname.
Continuing with Sample EAR with Manifest Hierarchies example, the output should look
like this:
path/to/user_projects/applications/cat4mf/y79s0z/ejb.jar
path/to/user_projects/applications/cat4mf/y79s0z/ejbutil_1.jar
path/to/user_projects/applications/cat4mf/y79s0z/ejbutil_1_2.jar
path/to/user_projects/applications/cat4mf/y79s0z/ejbutil_1_2_1.jar
Sharing Applications and Modules By Using Java EE Libraries
Java EE libraries provide an easy way to share one or more different types of Java EE
modules among multiple enterprise applications.
A Java EE library is a single module or collection of modules that is registered with the Java
EE application container upon deployment. For more information, see Creating Shared Java
EE Libraries and Optional Packages.
Adding JARs to the Domain
/lib
Directory
WebLogic Server includes a
lib
subdirectory, located in the domain directory, that you can use
to add one or more JAR files, so that the JAR file classes are available within a separate
Chapter 12
Sharing Applications and Modules By Using Java EE Libraries
12-20

system level classloader to all Java EE applications running on WebLogic Server instances in
the domain.
The JARS in the domain
/lib
directory will not be appended to the system classpath. The
classloader that gets created is a child of the system classloader. Any classes that are in JARs
in the domain
/lib
directory will only be visible to Java EE applications, such as EAR files.
Classes in the system classpath cannot access classes in the domain
/lib
directory.
The
lib
subdirectory is intended for JAR files that change infrequently and are required by all
or most applications deployed in the server. For example, you might use the
lib
directory to
store third-party utility classes that are required by all Java EE deployments in a domain. Third-
party utility classes will be made available because the domain
/lib
classloader will be the
parent of any Java EE application.
The
lib
directory is not recommended as a general-purpose method for sharing a JARs
between one or two applications deployed in a domain, or for sharing JARs that need to be
updated periodically. If you update a JAR in the
lib
directory, you must reboot all servers in the
domain in order for applications to realize the change. If you need to share a JAR file or Java
EE modules among several applications, use the Java EE libraries feature described in
Creating Shared Java EE Libraries and Optional Packages.
To share JARs using the
lib
directory:
1. Shutdown all servers in the domain.
2. Copy the JAR file(s) to share into a
lib
subdirectory of the domain directory. For example:
mkdir DOMAIN_HOME\wl_server\lib
cp c:\3rdpartyjars\utility.jar
DOMAIN_HOME\wl_server\lib
Note:
WebLogic Server must have read access to the
lib
directory during startup.
The Administration Server does not automatically copy files in the
lib
directory
to Managed Servers on remote machines. If you have Managed Servers that do
not share the same physical domain directory as the Administration Server, you
must manually copy JAR file(s) to the
domain_name/lib
directory on the
Managed Server machines.
3. Start the Administration Server and all Managed Servers in the domain.
Chapter 12
Adding JARs to the Domain /lib Directory
12-21

13
Creating Shared Java EE Libraries and
Optional Packages
You can share components and classes among applications using shared Java EE libraries
and optional packages supported in WebLogic Server.
This chapter includes the following sections:
• Overview of Shared Java EE Libraries and Optional Packages
• Creating Shared Java EE Libraries
• Referencing Shared Java EE Libraries in an Enterprise Application
• Referencing Optional Packages from a Java EE Application or Module
• Using weblogic.appmerge to Merge Libraries
• Integrating Shared Java EE Libraries with the Split Development Directory Environment
• Deploying Shared Java EE Libraries and Dependent Applications
• Web Application Shared Java EE Library Information
• Using WebApp Libraries With Web Applications
• Accessing Registered Shared Java EE Library Information with LibraryRuntimeMBean
• Order of Precedence of Modules When Referencing Shared Java EE Libraries
• Best Practices for Using Shared Java EE Libraries
• Overview of Shared Java EE Libraries and Optional Packages
The shared Java EE library feature in WebLogic Server provides an easy way to share one
or more different types of Java EE modules among multiple enterprise applications. A
shared Java EE libraries can be referenced by enterprise applications and you can also
create libraries that can be referenced only by another Web application.
• Creating Shared Java EE Libraries
You can deploy the Java EE modules such as an EJB, a Web application, an enterprise
application, a plain Java class, and others as a shared Java EE library. These modules can
be shared among multiple enterprise applications in WebLogic Server.
• Referencing Shared Java EE Libraries in an Enterprise Application
A Java EE application can reference a registered shared Java EE library using entries in
the application's
weblogic-application.xml
deployment descriptor.
• Referencing Optional Packages from a Java EE Application or Module
Any Java EE archive (JAR, WAR, RAR, EAR) can reference one or more registered
optional packages using attributes in the archive's manifest file.
• Using weblogic.appmerge to Merge Libraries
You can use
weblogic.appmerge
to understand a library merge by examining the merged
application you have written to disk.
• Integrating Shared Java EE Libraries with the Split Development Directory Environment
You can generate a basic build.xml file in the shared Java EE library directories and then
build the applications in a split development directory.
13-1

• Deploying Shared Java EE Libraries and Dependent Applications
Shared Java EE libraries are registered with one or more WebLogic Server instances by
deploying them to the target servers and indicating that the deployments are to be shared.
Shared Java EE libraries must be targeted to the same WebLogic Server instances you
want to deploy applications that reference the libraries.
• Web Application Shared Java EE Library Information
Some of the shared Java EE libraries can be referenced only by enterprise applications.
You can also create libraries that can be referenced only by another Web application. The
functionality is very similar to application libraries, although the method of referencing them
is slightly different.
• Using WebApp Libraries With Web Applications
Just as standard shared Java EE applications can be deployed to WebLogic Server as
application-libraries
, a standard Web application can be deployed to WebLogic Server
as a
webapp-library
so that other Web applications can refer to these libraries.
• Accessing Registered Shared Java EE Library Information with LibraryRuntimeMBean
You can use different types of MBeans to obtain information about the shared Java EE
library and access the libraries that the applications use.
• Order of Precedence of Modules When Referencing Shared Java EE Libraries
When an enterprise application references one or more shared Java EE libraries, and the
application is deployed to WebLogic Server, the server internally merges the information in
the
weblogic-application.xml
file of the referencing enterprise application with the
information in the deployment descriptors of the referenced libraries.
• Best Practices for Using Shared Java EE Libraries
Overview of Shared Java EE Libraries and Optional Packages
The shared Java EE library feature in WebLogic Server provides an easy way to share one or
more different types of Java EE modules among multiple enterprise applications. A shared
Java EE libraries can be referenced by enterprise applications and you can also create
libraries that can be referenced only by another Web application.
A shared Java EE library is a single module or collection of modules that is registered with the
Java EE application container upon deployment. A shared Java EE library can be any of the
following:
• standalone EJB module
• standalone Web application module
• multiple EJB modules packaged in an enterprise application
• multiple Web application modules package in an enterprise application
• single plain JAR file
Oracle recommends that you package a shared Java EE library into its appropriate archive file
(EAR, JAR, or WAR). However, for development purposes, you may choose to deploy shared
Java EE libraries as exploded archive directories to facilitate repeated updates and
redeployments.
After the shared Java EE library has been registered, you can deploy enterprise applications
that reference the library. Each referencing application receives a reference to the required
library on deployment, and can use the modules that make up the library as if they were
packaged as part of the referencing application itself. The library classes are added to the
class path of the referencing application, and the primary deployment descriptors of the
Chapter 13
Overview of Shared Java EE Libraries and Optional Packages
13-2
referencing application or module are merged (in memory) with those of the modules that
make up the shared Java EE library.
In general, this topic discusses shared Java EE libraries that can be referenced only by
enterprise applications. You can also create libraries that can be referenced only by another
Web application. The functionality is very similar to application libraries, although the method of
referencing them is slightly different. See Web Application Shared Java EE Library Information
for details.
Note:
WebLogic Server also provides a simple way to add one or more JAR files to the
WebLogic Server System classpath, using the
lib
subdirectory of the domain
directory. See Adding JARs to the Domain /lib Directory.
• Optional Packages
• Library Directories
• Versioning Support for Libraries
• Shared Java EE Libraries and Optional Packages Compared
• Additional Information
Optional Packages
WebLogic Server supports optional packages as described at
https://docs.oracle.com/
javase/8/docs/technotes/guides/extensions/extensions.html
with versioning described in
Optional Package Versioning (see
https://docs.oracle.com/javase/8/docs/technotes/
guides/extensions/versioning.html
). Optional packages provide similar functionality to Java
EE libraries, allowing you to easily share a single JAR file among multiple applications. As with
Java EE libraries, optional packages must first be registered with WebLogic Server by
deploying the associated JAR file as an optional package. After registering the package, you
can deploy Java EE modules that reference the package in their manifest files.
Optional packages are also supported as Java EE shared libraries in
weblogic.BuildXMLGen
,
whereby all manifests of an application and its modules are scanned to look for optional
package references. If optional package references are found they are added to the
wlcompile
and
appc
tasks in the generated
build.xml
file.
Optional packages differ from Java EE libraries because optional packages can be referenced
from any Java EE module (EAR, JAR, WAR, or RAR archive) or exploded archive directory.
Java EE libraries can be referenced only from a valid enterprise application.
For example, third-party Web application Framework classes needed by multiple Web
applications can be packaged and deployed in a single JAR file, and referenced by multiple
Web application modules in the domain. Optional packages, rather than Java EE libraries, are
used in this case, because the individual Web application modules must reference the shared
JAR file. (With Java EE libraries, only a complete enterprise application can reference the
library).
Chapter 13
Overview of Shared Java EE Libraries and Optional Packages
13-3

Note:
Oracle documentation and WebLogic Server utilities use the term library to refer to
both Java EE libraries and optional packages. Optional packages are called out only
when necessary.
Library Directories
The Java EE platform provides several mechanisms for applications to use optional packages
and shared libraries. Libraries can be bundled with an application or may be installed
separately for use by any application. An EAR file may contain a directory that contains
libraries packaged in JAR files. The
library-directory
element of the EAR file's deployment
descriptor contains the name of this directory. If a
library-directory
element isn't specified,
or if the EAR file does not contain a deployment descriptor, the directory named
lib
is used.
An empty
library-directory
element may be used to specify that there is no library directory.
All files in this directory (but not in subdirectories) with a
.jar
extension must be made
available to all components packaged in the EAR file, including application clients. These
libraries may reference other libraries, either bundled with the application or installed
separately.
This feature is similar to the
APP-INF/lib
feature supported in WebLogic Server. If both
APP-
INF/lib
and
library-directory
exist, then the jars in the
library-directory
would take
precedence; that is, they would be placed before the
APP-INF/lib
jar files in the classpath. For
more information on
APP-INF/lib
, see Resolving Class References Between Modules and
Applications and Organizing Shared Classes in a Split Development Directory.
Versioning Support for Libraries
WebLogic Server supports versioning of shared Java EE libraries, so that referencing
applications can specify a required minimum version of the library to use, or an exact, required
version. WebLogic Server supports two levels of versioning for shared Java EE libraries, as
described in the Optional Package Versioning document at
https://docs.oracle.com/
javase/8/docs/technotes/guides/extensions/versioning.html
:
• Specification Version—Identifies the version number of the specification (for example, the
Java EE specification version) to which a shared Java EE library or optional package
conforms.
• Implementation Version—Identifies the version number of the actual code implementation
for the library or package. For example, this would correspond to the actual revision
number or release number of your code. Note that you must also provide a specification
version in order to specify an implementation version.
As a best practice, Oracle recommends that you always include version information (a
specification version, or both an implementation and specification version) when creating
shared Java EE libraries. Creating and updating version information as you develop shared
components allows you to deploy multiple versions of those components simultaneously for
testing. If you include no version information, or fail to increment the version string, then you
must undeploy existing libraries before you can deploy the newer one. See Deploying Shared
Java EE Libraries and Dependent Applications.
Versioning information in the referencing application determines the library and package
version requirements for that application. Different applications can require different versions of
a given library or package. For example, a production application may require a specific
Chapter 13
Overview of Shared Java EE Libraries and Optional Packages
13-4

version of a library, because only that library has been fully approved for production use. An
internal application may be configured to always use a minimum version of the same library.
Applications that require no specific version can be configured to use the latest version of the
library. Referencing Shared Java EE Libraries in an Enterprise Application.
Shared Java EE Libraries and Optional Packages Compared
Optional packages and shared Java EE libraries have the following features in common:
• Both are registered with WebLogic Server instances at deployment time.
• Both support an optional implementation version and specification version string.
• Applications that reference shared Java EE libraries and optional packages can specify
required versions for the shared files.
• Optional packages can reference other optional packages, and shared Java EE libraries
can reference other shared Java EE libraries.
Optional packages differ from shared Java EE Libraries in the following basic ways:
• Optional packages are plain JAR files, whereas shared Java EE libraries can be plain JAR
files, Java EE enterprise applications, or standalone Java EE modules (EJB and Web
applications). This means that libraries can have valid Java EE and WebLogic Server
deployment descriptors. Any deployment descriptors in an optional package JAR file are
ignored.
• Any Java EE application or module can reference an optional package (using
META-INF/
MANIFEST.MF
), whereas only enterprise applications and Web applications can reference a
shared Java EE library (using
weblogic-application.xml
or
weblogic.xml
).
In general, use shared Java EE libraries when you need to share one or more EJB, Web
application or enterprise application modules among different enterprise applications. Use
optional packages when you need to share one or more classes (packaged in a JAR file)
among different Java EE modules.
Plain JAR files can be shared either as libraries or optional packages. Use optional packages if
you want to:
• Share a plain JAR file among multiple Java EE modules
• Reference shared JAR files from other shared JARs
• Share plain JARs as described by the Java EE 5.0 specification
Use shared Java EE libraries to share a plain JAR file if you only need to reference the JAR file
from one or more enterprise applications, and you do not need to maintain strict compliance
with the Java EE specification.
Note:
Oracle documentation and WebLogic Server utilities use the term shared Java EE
library to refer to both libraries and optional packages. Optional packages are called
out only when necessary.
Chapter 13
Overview of Shared Java EE Libraries and Optional Packages
13-5

Additional Information
For information about deploying and managing shared Java EE libraries, optional packages,
and referencing applications from the administrator's perspective, see Deploying Shared Java
EE Libraries and Dependent Applications in Deploying Applications to Oracle WebLogic
Server.
Creating Shared Java EE Libraries
You can deploy the Java EE modules such as an EJB, a Web application, an enterprise
application, a plain Java class, and others as a shared Java EE library. These modules can be
shared among multiple enterprise applications in WebLogic Server.
To create a new shared Java EE library:
1. Assemble the shared Java EE library into a valid, deployable Java EE module or
enterprise application. The library must have the required Java EE deployment descriptors
for the Java EE module or for an enterprise application.
See Assembling Shared Java EE Library Files.
2. Assemble optional package classes into a working directory.
See Assembling Optional Package Class Files.
3. Create and edit the
MANIFEST.MF
file for the shared Java EE library to specify the name
and version string information.
See Editing Manifest Attributes for Shared Java EE Libraries.
4. Package the shared Java EE library for distribution and deployment.
See Packaging Shared Java EE Libraries for Distribution and Deployment.
• Assembling Shared Java EE Library Files
• Assembling Optional Package Class Files
• Editing Manifest Attributes for Shared Java EE Libraries
• Packaging Shared Java EE Libraries for Distribution and Deployment
Assembling Shared Java EE Library Files
The following types of Java EE modules can be deployed as a shared Java EE library:
• An EJB module, either an exploded directory or packaged in a JAR file.
• A Web application module, either an exploded directory or packaged in a WAR file.
• An enterprise application, either an exploded directory or packaged in an EAR file.
• A plain Java class or classes packaged in a JAR file.
• A shared Java EE library referenced from another library. (See Web Application Shared
Java EE Library Information.)
Shared Java EE libraries have the following restrictions:
• You must ensure that context roots in Web application modules of the shared Java EE
library do not conflict with context roots in the referencing enterprise application. If
necessary, you can configure referencing applications to override a library's context root.
See Referencing Shared Java EE Libraries in an Enterprise Application.
Chapter 13
Creating Shared Java EE Libraries
13-6

• Shared Java EE libraries cannot be nested. For example, if you are deploying an EAR as a
shared Java EE library, the entire EAR must be designated as the library. You cannot
designate individual Java EE modules within the EAR as separate, named libraries.
• As with any other Java EE module or enterprise application, a shared Java EE library must
be configured for deployment to the target servers or clusters in your domain. This means
that a library requires valid Java EE deployment descriptors as well as WebLogic Server-
specific deployment descriptors and an optional deployment plan. See Deploying
Applications to Oracle WebLogic Server.
Oracle recommends packaging shared Java EE libraries as enterprise applications, rather than
as standalone Java EE modules. This is because the URI of a standalone module is derived
from the deployment name, which can change depending on how the module is deployed. By
default, WebLogic Server uses the deployment archive filename or exploded archive directory
name as the deployment name. If you redeploy a standalone shared Java EE library from a
different file or location, the deployment name and URI also change, and referencing
applications that use the wrong URI cannot access the deployed library.
If you choose to deploy a shared Java EE library as a standalone Java EE module, always
specify a known deployment name during deployment and use that name as the URI in
referencing applications.
Assembling Optional Package Class Files
Any set of classes can be organized into an optional package file. The collection of shared
classes will eventually be packaged into a standard JAR archive. However, because you will
need to edit the manifest file for the JAR, begin by assembling all class files into a working
directory:
1. Create a working directory for the new optional package. For example:
mkdir /apps/myOptPkg
2. Copy the compiled class files into the working directory, creating the appropriate package
sudirectories as necessary. For example:
mkdir -p /apps/myOptPkg/org/myorg/myProduct
cp /build/classes/myOptPkg/org/myOrg/myProduct/*.class /apps/myOptPkg/org/myOrg/
myProduct
3. If you already have a JAR file that you want to use as an optional package, extract its
contents into the working directory so that you can edit the manifest file:
cd /apps/myOptPkg
jar xvf /build/libraries/myLib.jar
Editing Manifest Attributes for Shared Java EE Libraries
The name and version information for a shared Java EE library are specified in the
META-INF/
MANIFEST.MF
file. Table 13-1 describes the valid shared Java EE library manifest attributes.
Chapter 13
Creating Shared Java EE Libraries
13-7

Table 13-1 Manifest Attributes for Java EE Libraries
Attribute Description
Extension-Name
An optional string value that identifies the name of the shared Java EE library. Referencing
applications must use the exact
Extension-Name
value to use the library.
As a best practice, always specify an
Extension-Name
value for each library. If you do not
specify an extension name, one is derived from the deployment name of the library. Default
deployment names are different for archive and exploded archive deployments, and they can
be set to arbitrary values in the deployment command.
Specification-Version
An optional String value that defines the specification version of the shared Java EE library.
Referencing applications can optionally specify a required
Specification-Version
for a
library; if the exact specification version is not available, deployment of the referencing
application fails.
The
Specification-Version
uses the following format:
Major/minor version format, with version and revision numbers separated by periods (such as
"9.0.1.1")
Referencing applications can be configured to require either an exact version of the shared
Java EE library, a minimum version, or the latest available version.
The specification version for a shared Java EE library can also be set at the command-line
when deploying the library, with some restrictions. See Deploying Shared Java EE Libraries
and Dependent Applications.
Implementation-
Version
An optional String value that defines the code implementation version of the shared Java EE
library. You can provide an
Implementation-Version
only if you have also defined a
Specification-Version
.
Implementation-Version
uses the following formats:
• Major/minor version format, with version and revision numbers separated by periods (such
as "9.0.1.1")
• Text format, with named versions (such as "9011Beta" or "9.0.1.1.B")
If you use the major/minor version format, referencing applications can be configured to
require either an exact version of the shared Java EE library, a minimum version, or the latest
available version. If you use the text format, referencing applications must specify the exact
version of the library.
The implementation version for a shared Java EE library can also be set at the command-line
when deploying the library, with some restrictions. See Deploying Shared Java EE Libraries
and Dependent Applications.
To specify attributes in a manifest file:
1. Open (or create) the manifest file using a text editor. For the example shared Java EE
library, you would use the commands:
cd /apps/myLibrary
mkdir META-INF
emacs META-INF/MANIFEST.MF
For the optional package example, use:
cd /apps/myOptPkg
mkdir META-INF
emacs META-INF/MANIFEST.MF
2. In the text editor, add a string value to specify the name of the shared Java EE library. For
example:
Extension-Name: myExtension
Chapter 13
Creating Shared Java EE Libraries
13-8
Applications that reference the library must specify the exact
Extension-Name
in order to
use the shared files.
3. As a best practice, enter the optional version information for the shared Java EE library.
For example:
Extension-Name: myExtension
Specification-Version: 2.0
Implementation-Version: 9.0.0
Using the major/minor format for the version identifiers provides the most flexibility when
referencing the library from another application (see Table 13-2)
Note:
Although you can optionally specify the Specification-Version and
Implementation-Version at the command line during deployment, Oracle
recommends that you include these strings in the
MANIFEST.MF
file. Including
version strings in the manifest ensures that you can deploy new versions of the
library alongside older versions. See Deploying Shared Java EE Libraries and
Dependent Applications.
Packaging Shared Java EE Libraries for Distribution and Deployment
If you are delivering the shared Java EE Library or optional package for deployment by an
administrator, package the deployment files into an archive file (an
.EAR
file or standalone
module archive file for shared Java EE libraries, or a simple
.JAR
file for optional packages) for
distribution. See Deploying Applications Using wldeploy.
Because a shared Java EE library is packaged as a standard Java EE application or
standalone module, you may also choose to export a library's deployment configuration to a
deployment plan, as described in Deploying Applications to Oracle WebLogic Server. Optional
package
.JAR
files contain no deployment descriptors and cannot be exported.
For development purposes, you may choose to deploy libraries as exploded archive directories
to facilitate repeated updates and redeployments.
Referencing Shared Java EE Libraries in an Enterprise
Application
A Java EE application can reference a registered shared Java EE library using entries in the
application's
weblogic-application.xml
deployment descriptor.
Table 13-2 describes the XML elements that define a library reference.
Table 13-2 weblogic-application.xml Elements for Referencing a Shared Java EE Library
Element Description
library-ref library-ref
is the parent element in which you define a reference to a shared Java EE library.
Enclose all other elements within
library-ref
.
Chapter 13
Referencing Shared Java EE Libraries in an Enterprise Application
13-9

Table 13-2 (Cont.) weblogic-application.xml Elements for Referencing a Shared Java EE Library
Element Description
library-name
A required string value that specifies the name of the shared Java EE library to use.
library-
name
must exactly match the value of the
Extension-Name
attribute in the library's manifest file.
(See Table 13-2.)
specification-
version
An optional String value that defines the required specification version of the shared Java EE
library. If this element is not set, the application uses a matching library with the highest
specification version. If you specify a string value using major/minor version format, the
application uses a matching library with the highest specification version that is not below the
configured value. If all available libraries are below the configured
specification-version
, the
application cannot be deployed. The required version can be further constrained by using the
exact-match
element, described below.
If you specify a String value that does not use major/minor versioning conventions (for example,
9.2BETA) the application requires a shared Java EE library having the exact same string value in
the
Specification-Version
attribute in the library's manifest file. (See Table 13-2.)
implementation-
version
An optional String value that specifies the required implementation version of the shared Java EE
library. If this element is not set, the application uses a matching library with the highest
implementation version. If you specify a string value using major/minor version format, the
application uses a matching library with the highest implementation version that is not below the
configured value. If all available libraries are below the configured
implementation-version
,
the application cannot be deployed. The required implementation version can be further
constrained by using the
exact-match
element, described below.
If you specify a String value that does not use major/minor versioning conventions (for example,
9.2BETA) the application requires a shared Java EE library having the exact same string value in
the
Implementation-Version
attribute in the library's manifest file. (See Table 13-2.)
exact-match
An optional Boolean value that determines whether the application should use a shared Java EE
library with a higher specification or implementation version than the configured value, if one is
available. By default this element is false, which means that WebLogic Server uses higher-
versioned libraries if they are available. Set this element to true to require the exact matching
version as specified in the
specification-version
and
implementation-version
elements.
context-root
An optional String value that provides an alternate context root to use for a Web application
shared Java EE library. Use this element if the context root of a library conflicts with the context
root of a Web application in the referencing Java EE application.
Web application shared Java EE library refers to special kind of library: a Web application that is
referenced by another Web application. See Web Application Shared Java EE Library Information.
For example, this simple entry in the
weblogic-application.xml
descriptor references a
shared Java EE library,
myLibrary
:
<library-ref>
<library-name>myLibrary</library-name>
</library-ref>
In the above example, WebLogic Server attempts to find a library name
myLibrary
when
deploying the dependent application. If more than one copy of
myLibrary
is registered,
WebLogic Server selects the library with the highest specification version. If multiple copies of
the library use the selected specification version, WebLogic Server selects the copy having the
highest implementation version.
This example references a shared Java EE library with a requirement for the specification
version:
<library-ref>
<library-name>myLibrary</library-name>
Chapter 13
Referencing Shared Java EE Libraries in an Enterprise Application
13-10

<specification-version>2.0</specification-version>
</library-ref>
In the above example, WebLogic Server looks for matching libraries having a specification
version of 2.0 or higher. If multiple libraries are at or above version 2.0, WebLogic Server
examines the selected libraries that use Float values for their implementation version and
selects the one with the highest version. Note that WebLogic Server ignores any selected
libraries that have a non-Float value for the implementation version.
This example references a shared Java EE library with both a specification version and a non-
Float value implementation version:
<library-ref>
<library-name>myLibrary</library-name>
<specification-version>2.0</specification-version>
<implementation-version>81Beta</implementation-version>
</library-ref>
In the above example, WebLogic Server searches for a library having a specification version of
2.0 or higher, and having an exact match of
81Beta
for the implementation version.
The following example requires an exact match for both the specification and implementation
versions:
<library-ref>
<library-name>myLibrary</library-name>
<specification-version>2.0</specification-version>
<implementation-version>8.1</implementation-version>
<exact-match>true</exact-match>
</library-ref>
The following example specifies a
context-root
with the library reference. When a WAR
library reference is made from
weblogic-application.xml
, the
context-root
may be
specified with the reference:
<library-ref>
<library-name>myLibrary</library-name>
<context-root>mywebapp</context-root>
</library-ref>
• Overriding context-roots Within a Referenced Enterprise Library
• URIs for Shared Java EE Libraries Deployed As a Standalone Module
Overriding context-roots Within a Referenced Enterprise Library
A Java EE application can override
context-roots
within a referenced EAR library using
entries in the application's
weblogic-application.xml
deployment descriptor. Table 13-3
describes the XML elements that override
context-root
in a library reference.
Table 13-3 weblogic-application.xml Elements for Overriding a Shared Java EE Library
Element Description
context-root
An optional String value that overrides the
context-root
elements declared in libraries. In the
absence of this element, the library's
context-root
is used.
Only a referencing application (for example, a user application) can override the
context-root
elements declared in its libraries.
Chapter 13
Referencing Shared Java EE Libraries in an Enterprise Application
13-11

Table 13-3 (Cont.) weblogic-application.xml Elements for Overriding a Shared Java EE Library
Element Description
override-value
An optional String value that specifies the value of the
library-context-root-override
element
when overriding the context-root elements declared in libraries. In the absence of these elements, the
library's
context-root
is used.
The following example specifies a
context-root-override
, which in turn, refers to the old
context-root
specified in one of its libraries and the new
context-root
that should be used
instead. (override):
<library-ref>
<library-name>myLibrary</library-name>
<specification-version>2.0</specification-version>
<implementation-version>8.1</implementation-version>
<exact-match>true</exact-match>
</library-ref>
<library-context-root-override>
<context-root>webapp</context-root>
<override-value>mywebapp</override-value>
</library-context-root-override>
In the above example, the current application refers to
myLibrary
, which contains a Web
application with a
context-root
of
webapp
. The only way to override this reference is to
declare a
library-context-root-override
that maps
webapp
to
mywebapp
.
URIs for Shared Java EE Libraries Deployed As a Standalone Module
When referencing the URI of a shared Java EE library that was deployed as a standalone
module (EJB or Web application), note that the module URI corresponds to the deployment
name of the shared Java EE library. This can be a name that was manually assigned during
deployment, the name of the archive file that was deployed, or the name of the exploded
archive directory that was deployed. If you redeploy the same module using a different file
name or from a different location, the default deployment name also changes and referencing
applications must be updated to use the correct URI.
To avoid this problem, deploy all shared Java EE libraries as enterprise applications, rather
than as standalone modules. If you choose to deploy a library as a standalone Java EE
module, always specify a known deployment name and use that name as the URI in
referencing applications.
Referencing Optional Packages from a Java EE Application or
Module
Any Java EE archive (JAR, WAR, RAR, EAR) can reference one or more registered optional
packages using attributes in the archive's manifest file.
Chapter 13
Referencing Optional Packages from a Java EE Application or Module
13-12

Table 13-4 Manifest Attributes for Referencing Optional Packages
Attribute Description
Extension-List logical_name
[...]
A required String value that defines a logical name for an optional package
dependency. You can use multiple values in the
Extension-List
attribute to
designate multiple optional package dependencies. For example:
Extension-List: dependency1 dependency2
[
logical_name-
]Extension-Name
A required string value that identifies the name of an optional package dependency.
This value must match the
Extension-Name
attribute defined in the optional
package's manifest file.
If you are referencing multiple optional packages from a single archive, prepend the
appropriate logical name to the
Extension-Name
attribute. For example:
dependency1-Extension-Name: myOptPkg
[
logical_name-
]Specification-
Version
An optional String value that defines the required specification version of an optional
package. If this element is not set, the archive uses a matching package with the
highest specification version. If you include a
specification-version
value using
the major/minor version format, the archive uses a matching package with the highest
specification version that is not below the configured value. If all available package are
below the configured
specification-version
, the archive cannot be deployed.
If you specify a String value that does not use major/minor versioning conventions (for
example, 9.2BETA) the archive requires a matching optional package having the exact
same string value in the
Specification-Version
attribute in the package's
manifest file. (See Table 13-2.)
If you are referencing multiple optional packages from a single archive, prepend the
appropriate logical name to the
Specification-Version
attribute.
[
logical_name-
]Implementation-
Version
An optional String value that specifies the required implementation version of an
optional package. If this element is not set, the archive uses a matching package with
the highest implementation version. If you specify a string value using the major/minor
version format, the archive uses a matching package with the highest implementation
version that is not below the configured value. If all available libraries are below the
configured
implementation-version
, the application cannot be deployed.
If you specify a String value that does not use major/minor versioning conventions (for
example, 9.2BETA) the archive requires a matching optional package having the exact
same string value in the
Implementation-Version
attribute in the package's
manifest file. (See Table 13-2.)
If you are referencing multiple optional packages from a single archive, prepend the
appropriate logical name to the
Implementation-Version
attribute.
For example, this simple entry in the manifest file for a dependent archive references two
optional packages,
myAppPkg
and
my3rdPartyPkg
:
Extension-List: internal 3rdparty
internal-Extension-Name: myAppPkg
3rdparty-Extension-Name: my3rdPartyPkg
This example requires a specification version of 2.0 or higher for
myAppPkg
:
Extension-List: internal 3rdparty
internal-Extension-Name: myAppPkg
3rdparty-Extension-Name: my3rdPartyPkg
internal-Specification-Version: 2.0
This example requires a specification version of 2.0 or higher for
myAppPkg
, and an exact
match for the implementation version of
my3rdPartyPkg
:
Chapter 13
Referencing Optional Packages from a Java EE Application or Module
13-13

Extension-List: internal 3rdparty
internal-Extension-Name: myAppPkg
3rdparty-Extension-Name: my3rdPartyPkg
internal-Specification-Version: 2.0
3rdparty-Implementation-Version: 8.1GA
By default, when WebLogic Server deploys an application or module and it cannot resolve a
reference in the application's manifest file to an optional package, WebLogic Server prints a
warning, but continues with the deployment anyway. You can change this behavior by setting
the system property
weblogic.application.RequireOptionalPackages
to
true
when you start
WebLogic Server, either at the command line or in the command script file from which you start
the server. Setting this system property to
true
means that WebLogic Server does not attempt
to deploy an application or module if it cannot resolve an optional package reference in its
manifest file.
Using weblogic.appmerge to Merge Libraries
You can use
weblogic.appmerge
to understand a library merge by examining the merged
application you have written to disk.
weblogic.appmerge
is a tool that is used to merge libraries into an application, with merged
contents and merged descriptors. It also has the ability to write a merged application to disk.
• Using weblogic.appmerge from the CLI
• Using weblogic.appmerge as an Ant Task
• Using weblogic.appmerge from the CLI
• Using weblogic.appmerge as an Ant Task
Using weblogic.appmerge from the CLI
Invoke
weblogic.appmerge
using the following syntax:
java weblogic.appmerge [options] <ear, jar, war file, or directory>
where valid options are shown in Table 13-5:
Table 13-5 weblogic.appmerge Options
Option Comment
-help
Print the standard usage message.
-version
Print version information.
-output <file>
Specifies an alternate output archive or directory. If not set, output is placed in the
source archive or directory.
-plan <file>
Specifies an optional deployment plan.
-verbose
Provide more verbose output.
-library <file>
Comma-separated list of libraries. Each library may optionally set its name and
versions, if not already set in its manifest, using the following syntax:
<file> [@name=<string>@libspecver=<version> @libimplver=<version|
string>].
-librarydir <dir>
Registers all files in specified directory as libraries.
-writeInferredDescriptors
Specifies that the application or module contains deployment descriptors with
annotation information.
Chapter 13
Using weblogic.appmerge to Merge Libraries
13-14

Example:
$ java weblogic.appmerge -output CompleteSportsApp.ear -library
Weather.war,Calendar.ear SportsApp.ear
Using weblogic.appmerge as an Ant Task
The ant task provides similar functionality as the command line utility. It supports
source
,
output
,
libraryDir
,
plan
and
verbose
attributes as well as multiple
<library>
sub-elements.
Here is an example:
<taskdef name="appmerge" classname="weblogic.ant.taskdefs.j2ee.AppMergeTask"/>
<appmerge source="SportsApp.ear" output="CompleteSportsApp.ear">
<library file="Weather.war"/>
<library file="Calendar.ear"/>
</appmerge>
Integrating Shared Java EE Libraries with the Split Development
Directory Environment
You can generate a basic build.xml file in the shared Java EE library directories and then build
the applications in a split development directory.
The
BuildXMLGen
includes a
-librarydir
option to generate build targets that include one or
more shared Java EE library directories. See Generating a Basic build.xml File Using
weblogic.BuildXMLGen.
The
wlcompile
and
wlappc
Ant tasks include a
librarydir
attribute and
library
element to
specify one or more shared Java EE library directories to include in the classpath for
application builds. See Building Applications in a Split Development Directory.
Deploying Shared Java EE Libraries and Dependent Applications
Shared Java EE libraries are registered with one or more WebLogic Server instances by
deploying them to the target servers and indicating that the deployments are to be shared.
Shared Java EE libraries must be targeted to the same WebLogic Server instances you want
to deploy applications that reference the libraries.
If you try to deploy a referencing application to a server instance that has not registered a
required library, deployment of the referencing application fails. See Registering Libraries with
WebLogic Server in Deploying Applications to Oracle WebLogic Server for more information.
See Install a Java EE Library for detailed instructions on installing (deploying) a shared Java
EE library using the WebLogic Server Administration Console. See Target a Shared Java EE
Library to a Server or Cluster for instructions on using the WebLogic Server Administration
Console to target the library to the server or cluster to which the application that is referencing
the library is also targeted.
If you use the
wldeploy
Ant task as part of your iterative development process, use the
library
,
libImplVer
, and
libSpecVer
attributes to deploy a shared Java EE library. See
wldeploy Ant Task Reference, for details and examples.
After registering a shared Java EE library, you can deploy applications and archives that
depend on the library. Dependent applications can be deployed only if the target servers have
registered all required libraries, and the registered deployments meet the version requirements
Chapter 13
Integrating Shared Java EE Libraries with the Split Development Directory Environment
13-15
of the application or archive. See Deploying Applications that Reference Libraries in Deploying
Applications to Oracle WebLogic Server for more information.
Web Application Shared Java EE Library Information
Some of the shared Java EE libraries can be referenced only by enterprise applications. You
can also create libraries that can be referenced only by another Web application. The
functionality is very similar to application libraries, although the method of referencing them is
slightly different.
Note:
For simplicity, this section uses the term Web application library when referring to a
shared Java EE library that is referenced only by another Web application.
In particular:
• Web application libraries can only be referenced by other Web applications.
• Rather than update the
weblogic-application.xml
file, Web applications reference Web
application libraries by updating the
weblogic.xml
deployment descriptor file. The
elements are almost the same as those described in Referencing Shared Java EE
Libraries in an Enterprise Application; the only difference is that the
<context-root>
child
element of
<library-ref>
is ignored in this case.
• You cannot reference any other type of shared Java EE library (EJB, enterprise
application, or plain JAR file) from the
weblogic.xml
deployment descriptor file of a Web
application.
Other than these differences in how they are referenced, the way to create, package, and
deploy a Web application library is the same as that of a standard shared Java EE library.
Using WebApp Libraries With Web Applications
Just as standard shared Java EE applications can be deployed to WebLogic Server as
application-libraries
, a standard Web application can be deployed to WebLogic Server as
a
webapp-library
so that other Web applications can refer to these libraries.
Web application libraries facilitate the reuse of code and resources. Such libraries also help
you separate out third-party Web applications or frameworks that your Web application might
be using. Furthermore, common resources can be packaged separately as libraries and
referenced in different Web applications, so that you don't have to bundle them with each Web
application. When you include a
webapp-library
in your Web application, at deployment time
the container merges all the static resources, classes, and
JAR
files into your Web application.
The first step in using a WebApp library is to register a Web application as a
webapp-library
.
This can be accomplished by deploying a Web application using either the WebLogic Server
Administration Console or the
weblogic.Deployer
tool as a library. To make other Web
applications refer to this library, their
weblogic.xml
file must have a
library-ref
element
pointing to the
webapp-library
, as follows:
<library-ref>
<library-name>BaseWebApp</library-name>
<specification-version>2.0</specification-version>
Chapter 13
Web Application Shared Java EE Library Information
13-16

<implementation-version>8.1beta</implementation-version>
<exact-match>false</exact-match>
</library-ref>
When multiple libraries are present, the
CLASSPATH/resource
path precedence order follows
the order in which the
library-refs
elements appear in the
weblogic.xml
file.
Accessing Registered Shared Java EE Library Information with
LibraryRuntimeMBean
You can use different types of MBeans to obtain information about the shared Java EE library
and access the libraries that the applications use.
Each deployed shared Java EE library is represented by a
LibraryRuntimeMBean
. You can use
this MBean to obtain information about the library itself, such as its name or version. You can
also obtain the
ApplicationRuntimeMBean
s associated with deployed applications.
ApplicationRuntimeMBean
provides two methods to access the libraries that the application is
using:
•
getLibraryRuntimes()
returns the shared Java EE libraries referenced in the
weblogic-
application.xml
file.
•
getOptionalPackageRuntimes()
returns the optional packages referenced in the manifest
file.
See the Java API Reference for Oracle WebLogic Server.
Order of Precedence of Modules When Referencing Shared Java
EE Libraries
When an enterprise application references one or more shared Java EE libraries, and the
application is deployed to WebLogic Server, the server internally merges the information in the
weblogic-application.xml
file of the referencing enterprise application with the information in
the deployment descriptors of the referenced libraries.
The order in which WebLogic Server internally merges the information is as follows:
1. When the enterprise application is deployed, WebLogic Server reads its
weblogic-
application.xml
deployment descriptor.
2. WebLogic Server reads the deployment descriptors of any referenced shared Java EE
libraries. Depending on the type of library (enterprise application, EJB, or Web application),
the read file might be
weblogic-application.xml
,
weblogic.xml
,
weblogic-ejb-jar.xml
,
and so on.
3. WebLogic Server first merges the referenced shared Java EE library deployment
descriptors (in the order in which they are referenced, one at a time) and then merges the
weblogic-application.xml
file of the referencing enterprise application on top of the
library descriptor files.
As a result of the way the descriptor files are merged, the elements in the descriptors of the
shared Java EE libraries referenced first in the
weblogic-application.xml
file have
precedence over the ones listed last. The elements of the enterprise application's descriptor
itself have precedence over all elements in the library descriptors.
Chapter 13
Accessing Registered Shared Java EE Library Information with LibraryRuntimeMBean
13-17

For example, assume that an enterprise application called
myApp
references two shared Java
EE libraries (themselves packaged as enterprise applications):
myLibA
and
myLibB
, in that
order. Both the
myApp
and
myLibA
applications include an EJB module called
myEJB
, and both
the
myLibA
and
myLibB
applications include an EJB module called
myOtherEJB
.
Further assume that once the
myApp
application is deployed, a client invokes, via the
myApp
application, the
myEJB
module. In this case, WebLogic Server actually invokes the EJB in the
myApp
application (rather than the one in
myLibA
) because modules in the referencing
application have higher precedence over modules in the referenced applications. If a client
invokes the
myOtherEJB
EJB, then WebLogic Server invokes the one in
myLibA
, because the
library is referenced first in the
weblogic-application.xml
file of
myApp
, and thus has
precedence over the EJB with the same name in the
myLibB
application.
Best Practices for Using Shared Java EE Libraries
Keep in mind these best practices when developing shared Java EE libraries and optional
packages:
• Use shared Java EE Libraries when you want to share one or more Java EE modules
(EJBs, Web applications, enterprise applications, or plain Java classes) with multiple
enterprise applications.
• If you need to deploy a standalone Java EE module, such as an EJB JAR file, as a shared
Java EE library, package the module within an enterprise application. Doing so avoids
potential URI conflicts, because the library URI of a standalone module is derived from the
deployment name.
• If you choose to deploy a shared Java EE library as a standalone Java EE module, always
specify a known deployment name during deployment and use that name as the URI in
referencing applications.
• Use optional packages when multiple Java EE archive files need to share a set of Java
classes.
• If you have a set of classes that must be available to applications in an entire domain, and
you do not frequently update those classes (for example, if you need to share 3rd party
classes in a domain), use the domain
/lib
subdirectory rather than using shared Java EE
libraries or optional packages. Classes in the
/lib
subdirectory are made available (within
a separate system level classloader) to all Java EE applications running on WebLogic
Server instances in the domain.
• Always specify a specification version and implementation version, even if you do not
intend to enforce version requirements with dependent applications. Specifying versions
for shared Java EE libraries enables you to deploy multiple versions of the shared files for
testing.
• Always specify an
Extension-Name
value for each shared Java EE library. If you do not
specify an extension name, one is derived from the deployment name of the library. Default
deployment names are different for archive and exploded archive deployments, and they
can be set to arbitrary values in the deployment command
• When developing a Web application for deployment as a shared Java EE library, use a
unique context root. If the context root conflicts with the context root in a dependent Java
EE application, use the
context-root
element in the EAR's
weblogic-application.xml
deployment descriptor to override the library's context root.
• Package shared Java EE libraries as archive files for delivery to administrators or
deployers in your organization. Deploy libraries from exploded archive directories during
development to allow for easy updates and repeated redeployments.
Chapter 13
Best Practices for Using Shared Java EE Libraries
13-18

• Deploy shared Java EE libraries to all WebLogic Server instances on which you want to
deploy dependent applications and archives. If a library is not registered with a server
instance on which you want to deploy a referencing application, deployment of the
referencing application fails.
Chapter 13
Best Practices for Using Shared Java EE Libraries
13-19

14
Programming Application Life Cycle Events
Learn how to create applications that respond to WebLogic Server application life cycle events.
This chapter includes the following sections:
• Understanding Application Life Cycle Events
• Registering Events in weblogic-application.xml
• Programming Basic Life Cycle Listener Functionality
• Examples of Configuring Life Cycle Events with and without the URI Parameter
• Understanding Application Life Cycle Event Behavior During Re-deployment
• Programming Application Version Life Cycle Events
Note:
Application-scoped startup and shutdown classes have been deprecated as of
release 9.0 of WebLogic Server. The information in this chapter about startup
and shutdown classes is provided only for backwards compatibility. Instead, you
should use life cycle listener events in your applications.
• Understanding Application Life Cycle Events
Application life cycle listener events provide handles on which developers can control
behavior during deployment, undeployment, and redeployment. Learn how you can use
the application life cycle listener events.
• Registering Events in weblogic-application.xml
You must register the application life cycle listener events in the
weblogic-
application.xml
deployment descriptor in order to use them.
• Programming Basic Life Cycle Listener Functionality
You can create a listener by extending the abstract class (provided with WebLogic Server)
weblogic.application.ApplicationLifecycleListener
. The container then searches for
your listener.
• Examples of Configuring Life Cycle Events with and without the URI Parameter
You can configure application life cycle events with or without using the URI parameter in
the
weblogic-application.xml
deployment descriptor file.
• Understanding Application Life Cycle Event Behavior During Redeployment
Application life cycle events are only triggered if a full redeployment of the application
occurs. During a full redeployment of the application—provided the application life cycle
events have been registered—the application life cycle first commences the shutdown
sequence, next re-initializes its classes, and then performs the startup sequence.
• Programming Application Version Life Cycle Events
Learn how to create applications that respond to WebLogic Server application version life
cycle events.
14-1
Understanding Application Life Cycle Events
Application life cycle listener events provide handles on which developers can control behavior
during deployment, undeployment, and redeployment. Learn how you can use the application
life cycle listener events.
Four application life cycle events are provided with WebLogic Server, which can be used to
extend listener, shutdown, and startup classes. These include:
• Listeners—attachable to any event. Possible methods for Listeners are:
–
public void preStart(ApplicationLifecycleEvent evt) {}
The preStart event is the beginning of the prepare phase, or the start of the application
deployment process.
–
public void postStart(ApplicationLifecycleEvent evt) {}
The postStart event is the end of the activate phase, or the end of the application
deployment process. The application is deployed.
–
public void preStop(ApplicationLifecycleEvent evt) {}
The preStop event is the beginning of the deactivate phase, or the start of the
application removal or undeployment process.
–
public void postStop(ApplicationLifecycleEvent evt) {}
The postStop event is the end of the remove phase, or the end of the application
removal or undeployment process.
• Shutdown classes only get postStop events.
Note:
Application-scoped shutdown classes have been deprecated as of release 9.0 of
WebLogic Server. Use life cycle listeners instead.
• Startup classes only get preStart events.
Note:
Application-scoped shutdown classes have been deprecated as of release 9.0 of
WebLogic Server. Use life cycle listeners instead.
For Startup and Shutdown classes, you only implement a
main{}
method. If you
implement any of the methods provided for Listeners, they are ignored.
No
remove{}
method is provided in the
ApplicationLifecycleListener
,
because the events are only fired at startup time during deployment (prestart and
poststart) and shutdown during undeployment (prestop and poststop).
Chapter 14
Understanding Application Life Cycle Events
14-2

Registering Events in weblogic-application.xml
You must register the application life cycle listener events in the
weblogic-application.xml
deployment descriptor in order to use them.
See Enterprise Application Deployment Descriptor Elements. Define the following elements:
•
listener
—Used to register user defined application life cycle listeners. These are classes
that extend the abstract base class
weblogic.application.ApplicationLifecycleListener
.
•
shutdown
—Used to register user-defined shutdown classes.
•
startup
—Used to register user-defined startup classes.
Programming Basic Life Cycle Listener Functionality
You can create a listener by extending the abstract class (provided with WebLogic Server)
weblogic.application.ApplicationLifecycleListener
. The container then searches for
your listener.
You override the following methods provided in the WebLogic Server
ApplicationLifecycleListener
abstract class to extend your application and add any
required functionality:
•
preStart{}
•
postStart{}
•
preStop{}
•
postStop{}
Example 14-1 illustrates how you override the ApplicationLifecycleListener. In this example, the
public class MyListener extends ApplicationLifecycleListener.
Example 14-1 MyListener
import weblogic.application.ApplicationLifecycleListener;
import weblogic.application.ApplicationLifecycleEvent;
public class MyListener extends ApplicationLifecycleListener {
public void preStart(ApplicationLifecycleEvent evt) {
System.out.println
("MyListener(preStart) -- we should always see you..");
} // preStart
public void postStart(ApplicationLifecycleEvent evt) {
System.out.println
("MyListener(postStart) -- we should always see you..");
} // postStart
public void preStop(ApplicationLifecycleEvent evt) {
System.out.println
("MyListener(preStop) -- we should always see you..");
} // preStop
public void postStop(ApplicationLifecycleEvent evt) {
System.out.println
("MyListener(postStop) -- we should always see you..");
} // postStop
public static void main(String[] args) {
System.out.println
("MyListener(main): in main .. we should never see you..");
Chapter 14
Registering Events in weblogic-application.xml
14-3

} // main
}
Example 14-2 illustrates how you implement the shutdown class. The shutdown class is
attachable to preStop and postStop events. In this example, the public class
MyShutdown
does
not extend
ApplicationLifecycleListener
because a shutdown class declared in the
weblogic-application.xml
deployment descriptor does not need to depend on any WebLogic
Server-specific interfaces.
Example 14-2 MyShutdown
import weblogic.application.ApplicationLifecycleListener;
import weblogic.application.ApplicationLifecycleEvent;
public class MyShutdown {
public static void main(String[] args) {
System.out.println
("MyShutdown(main): in main .. should be for post-stop");
} // main
}
Example 14-3 illustrates how you implement the startup class. The startup class is attachable
to preStart and postStart events. In this example, the public class
MyStartup
does not extend
ApplicationLifecycleListener
because a startup class declared in the
weblogic-
application.xml
deployment descriptor does not need to depend on any WebLogic Server-
specific interfaces.
Example 14-3 MyStartup
import weblogic.application.ApplicationLifecycleListener;
import weblogic.application.ApplicationLifecycleEvent;
public class MyStartup {
public static void main(String[] args) {
System.out.println
("MyStartup(main): in main .. should be for pre-start");
} // main
}
• Configuring a Role-Based Application Life Cycle Listener
Configuring a Role-Based Application Life Cycle Listener
You can configure an application life cycle event with role-based capability where a user
identity can be specified to startup and shutdown events using the
run-as-principal-name
element. However, if the
run-as-principal-name
identity defined for the application life cycle
listener is an administrator, the application deployer must have administrator privileges;
otherwise, deployment will fail.
1. Follow the basic programming steps outlined in Programming Basic Life Cycle Listener
Functionality.
2. Within the
listener
element add the
run-as-principal-name
element to specify the user
who has privileges to startup and/or shutdown the event. For example:
<listener>
<listener-class>myApp.MySessionAttributeListenerClass</listener-class>
<run-as-principal-name>javajoe</run-as-principal-name>
</listener>
Chapter 14
Programming Basic Life Cycle Listener Functionality
14-4

The identity specified here should be a valid user name in the system. If
run-as-principal-
name
is not specified, the deployment initiator user identity will be used as the
run-as
identity
for the execution of the application life cycle listener.
Examples of Configuring Life Cycle Events with and without the
URI Parameter
You can configure application life cycle events with or without using the URI parameter in the
weblogic-application.xml
deployment descriptor file.
The following examples illustrate how you configure application life cycle events in the
weblogic-application.xml
deployment descriptor file. The URI parameter is not required. You
can place classes anywhere in the application
$CLASSPATH
. However, you must ensure that the
class locations are defined in the
$CLASSPATH
. You can place listeners in
APP-INF/classes
or
APP-INF/lib
, if these directories are present in the EAR. In this case, they are automatically
included in the
$CLASSPATH
.
The following example illustrates how you configure application life cycle events using the URI
parameter. In this case, the archive
foo.jar
contains the classes and exists at the top level of
the EAR file. For example:
myEar/foo.jar
.
Example 14-4 Configuring Application Life Cycle Events Using the URI Parameter
<listener>
<listener-class>MyListener</listener-class>
<listener-uri>foo.jar</listener-uri>
</listener>
<startup>
<startup-class>MyStartup</startup-class>
<startup-uri>foo.jar</startup-uri>
</startup>
<shutdown>
<shutdown-class>MyShutdown</shutdown-class>
<shutdown-uri>foo.jar</shutdown-uri>
</shutdown>
The following example illustrates how you configure application life cycle events without using
the URI parameter.
Example 14-5 Configuring Application Life Cycle Events without Using the URI
Parameter
<listener>
<listener-class>MyListener</listener-class>
</listener>
<startup>
<startup-class>MyStartup</startup-class>
</startup>
<shutdown>
<shutdown-class>MyShutdown</shutdown-class>
</shutdown>
Chapter 14
Examples of Configuring Life Cycle Events with and without the URI Parameter
14-5

Understanding Application Life Cycle Event Behavior During
Redeployment
Application life cycle events are only triggered if a full redeployment of the application occurs.
During a full redeployment of the application—provided the application life cycle events have
been registered—the application life cycle first commences the shutdown sequence, next re-
initializes its classes, and then performs the startup sequence.
For example, if your listener is registered for the full application life cycle set of events
(preStart, postStart, preStop, postStop), during a full re-deployment, you see the following
sequence of events:
1.
preStop{}
2.
postStop{}
3. Initialization takes place. (Unless you have set debug flags, you do not see the
initialization.)
4.
preStart{}
5.
postStart{}
Programming Application Version Life Cycle Events
Learn how to create applications that respond to WebLogic Server application version life cycle
events.
• Understanding Application Version Life Cycle Event Behavior
• Types of Application Version Life Cycle Events
• Example of Production Deployment Sequence When Using Application Version Life Cycle
Events
• Understanding Application Version Life Cycle Event Behavior
• Types of Application Version Life Cycle Events
• Example of Production Deployment Sequence When Using Application Version Life Cycle
Events
Understanding Application Version Life Cycle Event Behavior
WebLogic Server provides application version life cycle event notifications by allowing you to
extend the
ApplicationVersionLifecycleListener
class and specify a life cycle listener in
weblogic-application.xml
. See Enterprise Application Deployment Descriptor Elements and
Examples of Configuring Life Cycle Events with and without the URI Parameter.
Application version life cycle events are invoked:
• For both static and dynamic deployments.
• Using either anonymous ID or using user identity.
• Only if the current application is versioned; otherwise, version life cycle events are ignored.
• For all application versions, including the version that registers the listener. Use the
ApplicationVersionLifecycleEvent.isOwnVersion
method to determine if an event
Chapter 14
Understanding Application Life Cycle Event Behavior During Redeployment
14-6
belongs to a particular version. See the
ApplicationVersionLifecycleEvent
class for
more information on types of version life cycle events.
Types of Application Version Life Cycle Events
Four application version life cycle events are provided with WebLogic Server:
•
public void preDeploy(ApplicationVersionLifecycleEvent evt)
– The
preDeloy
event is invoked when an application version deploy or redeploy
operation is initiated.
•
public void postDeploy(ApplicationVersionLifecycleEvent evt)
– The
postDeloy
event is invoked when an application version is deployed or redeployed
successfully.
•
public void preUndeploy(ApplicationVersionLifecycleEvent evt)
– The
preUndeloy
event is invoked when an application version undeploy operation is
initiated.
•
public void postDelete(ApplicationVersionLifecycleEvent evt)
– The
postDelete
event is invoked when an application version is deleted.
Note:
A
postDelete
event is only fired after the entire application version is
completely removed. It does not include a partial undeploy, such as
undeploying a module or from a subset of targets.
Example of Production Deployment Sequence When Using Application
Version Life Cycle Events
The following table provides an example of a deployment (V1), production redeployment (V2),
and an undeploy (V2).
Table 14-1 Sequence of Deployment Actions and Application Version Life Cycle Events
Deployment action Time Version V1 Version V2
Deployment of Version
V1
T0
preDeploy(V1)
invoked.
Deployment of Version
V1
T1 Deployment starts.
Deployment of Version
V1
T2 Application life cycle listeners for V1 are
registered.
Deployment of Version
V1
T3 V1 is active version, Deployment is complete.
Deployment of Version
V1
T4
postDeploy(V1)
invoked.
Deployment of Version
V1
T5 Application Listeners gets
postDeploy(V1)
.
Chapter 14
Programming Application Version Life Cycle Events
14-7

Table 14-1 (Cont.) Sequence of Deployment Actions and Application Version Life Cycle Events
Deployment action Time Version V1 Version V2
Production
Redeployment of Version
V2
T6
preDeploy(V2)
invoked.
Production
Redeployment of Version
V2
T7 Application version listener receives
preDeploy(V1)
.
Production
Redeployment of Version
V2
T8 Deployment starts.
Production
Redeployment of Version
V2
T9 Application life cycle listeners for V2
are registered.
Production
Redeployment of Version
V2
T10 If deploy(V2) succeeds, V1 ceases to be active
version.
If deploy(V2) succeeds, V2 replaces
V1 as active version.
Deployment is complete.
Production
Redeployment of Version
V2
T11
postDeploy(V2)
invoked.
Note: This event occurs even if the
deployment fails.
Production
Redeployment of Version
V2
T12 Application version listener gets
postDeploy(V2)
. If deploy(V2) fails, V1
remains active.
Production
Redeployment of Version
V2
T13 Application listeners gets
postDeploy(V2)
.
Production
Redeployment of Version
V2
T14 If deploy(V2) succeeds, V1 begins retirement.
Production
Redeployment of Version
V2
T15 Application listeners for V1 are unregistered.
Production
Redeployment of Version
V2
T16 V1 is retired.
Undeployment of V2 T17
preUndeploy(v2)
invoked.
Undeployment of V2 T18 Application listeners gets
preUndeploy(v2)
invoked.
Undeployment of V2 T19 Undeployment begins.
Undeployment of V2 T20 V2 is no longer active version.
Undeployment of V2 T21 Application version listeners for V2
are unregistered.
Undeployment of V2 T22 Undeployment is complete.
Undeployment of V2 T23 If the entire application is
undeployed,
postDelete(V2)
is
invoked.
Note: This event occurs even if the
undeployment fails.
Chapter 14
Programming Application Version Life Cycle Events
14-8

15
Programming Context Propagation
Learn how to use the context propagation APIs in WebLogic Server applications.
This chapter includes the following sections:
• Understanding Context Propagation
• Programming Context Propagation: Main Steps
• Programming Context Propagation in a Client
• Programming Context Propagation in an Application
• Understanding Context Propagation
Context propagation allows programmers to associate information with an application,
which is then carried along with every request. Furthermore, downstream components can
add or modify this information so that it can be carried back to the originator.
• Programming Context Propagation: Main Steps
You can associate information to a request on a client, retrieve that information on the
server, and then retrieve the value updated by the server instance using context
propagation.
• Programming Context Propagation in a Client
You can program context propagation to get “associated” user information when a client
invokes an application.
• Programming Context Propagation in an Application
You can program context propagation to get the user data and other associated
information when the applications are invoked.
Understanding Context Propagation
Context propagation allows programmers to associate information with an application, which is
then carried along with every request. Furthermore, downstream components can add or
modify this information so that it can be carried back to the originator.
Context propagation attaches information to a request through a
WorkContext
. This information
follows the request to any process that supports context propagation through a
PropagationMode
. Context propagation is also known as work areas, work contexts, or
application transactions.
Common use-cases for context propagation are any type of application in which information,
usually related to the request, needs to be carried outside the application or to another
application, rather than the information being an integral part of the application. Examples of
these use cases include diagnostics monitoring, application transactions, and application load-
balancing. The ability of context propagation to tie information to a request greatly simplifies
managing such data, in contrast to maintaining a map of request data in each application and
then implementing custom code to transmit such information between applications or threads.
However, context propagation can occur within an application. For example, if an application
submits work through a Work Manager, part of the processing occurs in different threads.
Context propagation uses a
PropagationMode
to carry information to other threads.
15-1

Programming context propagation has two parts: first you code the client application to create
a
WorkContextMap
and
WorkContext
, and then add user data to the context, and then you code
the invoked application itself to get and possibly use this data. The invoked application can be
of any type: EJB, Web service, servlet, JMS topic or queue, and so on. See Programming
Context Propagation: Main Steps for details.
The WebLogic context propagation APIs are in the
weblogic.workarea
package. The following
table describes the main interfaces and classes.
Table 15-1 Interfaces and classes of the WebLogic Context Propagation API
Interface or Class Description
WorkContextMap
Interface Main context propagation interface used to tag applications with data and propagate that
information via application requests.
WorkContextMaps
is part of the client or
application's JNDI environment and can be accessed through JNDI by looking up the
name
java:comp/WorkContextMap
.
WorkContext
Interface Interface used for marshaling and unmarshaling the user data that is passed along with an
application. This interface has four implementing classes for marshaling and unmarshaling
the following types of data: simple 8-bit ASCII contexts (
AsciiWorkContext
), long
contexts (
LongWorkContext
), Serializable context (
SerializableWorkContext
), and
String contexts (
StringWorkContext
).
WorkContext
has one subinterface,
PrimitiveWorkContext
, used to specifically
marshal and unmarshal a single primitive data item.
WorkContextOutput/Input
Interfaces
Interfaces representing primitive streams used for marshaling and unmarshaling,
respectively,
WorkContext
implementations.
PropagationMode
Interface Defines the propagation properties of
WorkContexts
. Specifies whether the WorkContext
is propagated locally, across threads, across RMI invocations, across JMS queues and
topics, or across SOAP messages. If not specified, default is to propagate data across
remote and local calls in the same thread.
PrimitiveContextFactory
Class
Convenience class for creating
WorkContexts
that contain only primitive data.
For the complete API documentation about context propagation, see the
weblogic.workarea
Javadocs
.
Programming Context Propagation: Main Steps
You can associate information to a request on a client, retrieve that information on the server,
and then retrieve the value updated by the server instance using context propagation.
The following procedure describes the high-level steps to use context propagation with
WebLogic Server. This example demonstrates how to associate information to a request on a
client, how to retrieve that information on the server, and then how to retrieve the value
updated by the server instance. It is assumed in the procedure that you have already set up
your iterative development environment and have an existing client and application that you
want to update to use context propagation by using the
weblogic.workarea
API.
1. Update your client application to create the
WorkContextMap
and
WorkContext
objects and
then add user data to the context.
See Programming Context Propagation in a Client.
2. If your client application is standalone (rather than running in a Java EE component
deployed to WebLogic Server), ensure that its CLASSPATH includes the Java EE
application client, also called the thin client.
Chapter 15
Programming Context Propagation: Main Steps
15-2
See Developing Stand-alone Clients for Oracle WebLogic Server.
3. Update your application (EJB, Web service, servlet, and so on) to also create a
WorkContextMap
and then get the context and user data that you added from the client
application.
See Programming Context Propagation in an Application.
Programming Context Propagation in a Client
You can program context propagation to get “associated” user information when a client
invokes an application.
The following sample Java code shows a standalone Java client that invokes a Web service;
the example also shows how to use the
weblogic.workarea.*
context propagation APIs to
associate user information with the invoke. The code relevant to context propagation is shown
in bold and explained after the example.
For the complete API documentation about context propagation, see the
weblogic.workarea
Javadocs
.
Note:
See Developing JAX-WS Web Services for Oracle WebLogic Server for information
on creating Web services and client applications that invoke them.
package examples.workarea.client;
import java.rmi.RemoteException;
import javax.xml.rpc.ServiceException;
import javax.xml.rpc.Stub;
import javax.naming.InitialContext;
import javax.naming.NamingException;
import weblogic.workarea.WorkContextMap;
import weblogic.workarea.WorkContext;
import weblogic.workarea.PrimitiveContextFactory;
import weblogic.workarea.PropagationMode;
import weblogic.workarea.PropertyReadOnlyException;
/**
* This is a simple standalone client application that invokes the
* the <code>sayHello</code> operation of your WorkArea Web service.
*
*/
public class Main {
public final static String SESSION_ID= "session_id_key";
public static void main(String[] args)
throws ServiceException, RemoteException, NamingException,
PropertyReadOnlyException{
YourWorkAreaService service = new YourWorkAreaService(args[0] + "?WSDL");
YourWorkAreaPortType port = service.getWorkAreaPort();
WorkContextMap map = (WorkContextMap)new InitialContext().lookup("java:comp/
WorkContextMap");
WorkContext stringContext = PrimitiveContextFactory.create("A String
Context");
// Put a string context
map.put(SESSION_ID, stringContext, PropagationMode.SOAP);
try {
Chapter 15
Programming Context Propagation in a Client
15-3

String result = null;
result = port.sayHello("Hi there!");
System.out.println( "Got result: " + result );
} catch (RemoteException e) {
throw e;
}
}
}
In the preceding example:
• The following code shows how to import the needed
weblogic.workarea.*
classes,
interfaces, and exceptions:
import weblogic.workarea.WorkContextMap;
import weblogic.workarea.WorkContext;
import weblogic.workarea.PrimitiveContextFactory;
import weblogic.workarea.PropagationMode;
import weblogic.workarea.PropertyReadOnlyException;
• Substitute your implementation of the
WorkArea
service and port for your Web service for
YourWorkAreaService
and
YourWorkAreaPortType
.
• The following code shows how to create a
WorkContextMap
by doing a JNDI lookup of the
context propagation-specific JNDI name
java:comp/WorkContextMap
:
WorkContextMap map = (WorkContextMap)
new InitialContext().lookup("java:comp/WorkContextMap");
• The following code shows how to create a
WorkContext
by using the
PrimitiveContextFactory
. In this example, the
WorkContext
consists of the simple String
value
A String Context
. This String value is the user data that is passed to the invoked
Web service.
WorkContext stringContext =
PrimitiveContextFactory.create("A String Context");
• The following code saves the
stringContext
under the
SESSION_ID
key in the
WorkContextMap
. Specifying the propagation mode of
SOAP
causes the propagation of the
stringContext
along any
SOAP
message sent to servers supporting context propagation.
map.put(SESSION_ID, stringContext, PropagationMode.SOAP);
Programming Context Propagation in an Application
You can program context propagation to get the user data and other associated information
when the applications are invoked.
The following sample Java code shows a simple Java Web service (JWS) file that implements
a Web service. The JWS file also includes context propagation code to get the user data that is
associated with the invoke of the Web service. The code relevant to context propagation is
shown in bold and explained after the example.
For the complete API documentation about context propagation, see the
weblogic.workarea
Javadocs
.
Chapter 15
Programming Context Propagation in an Application
15-4
Note:
See Developing JAX-WS Web Services for Oracle WebLogic Server for information
on creating Web services and client applications that invoke them.
package examples.workarea;
import javax.naming.InitialContext;
// Import the Context Propagation classes
import weblogic.workarea;
import weblogic.workarea.WorkContextMap;
import weblogic.workarea.WorkContext;
import javax.jws.WebMethod;
import javax.jws.WebService;
import weblogic.jws.WLHttpTransport;
@WebService(name="WorkAreaPortType",
serviceName="WorkAreaService",
targetNamespace="http://example.org")
@WLHttpTransport(contextPath="workarea",
serviceUri="WorkAreaService",
portName="WorkAreaPort")
/**
* This JWS file forms the basis of simple WebLogic
* Web service with a single operation: sayHello
*
*/
public class WorkContextAwareWebService {
public final static String SESSION_ID = "session_id_key";
@WebMethod()
public String sayHello(String message) {
try {
WorkContextMap map = (WorkContextMap) new InitialContext().lookup("java:comp/
WorkContextMap");
WorkContext localwc = map.get(SESSION_ID);
WorkContext modifiedLocalWC = PrimitiveContextFactory.create(localwc.get() + "
could be replaced by a new value...");
map.put(SESSION_ID, newLocalWC, PropagationMode.SOAP);
System.out.println("local context: " + localwc);
System.out.println("sayHello: " + message);
return "The server received message: " + message + ", with SESSION_ID: " + localwc;
} catch (Throwable t) {
return "error";
}
}
}
In the preceding example:
• The following code shows how to import the needed context propagation APIs; in this
case, only the WorkContextMap and WorkContext interfaces are needed:
import weblogic.workarea.WorkContextMap;
import weblogic.workarea.WorkContext;
• The following code shows how to create a
WorkContextMap
by doing a JNDI lookup of the
context propagation-specific JNDI name
java:comp/WorkContextMap
:
WorkContextMap map = (WorkContextMap)
new InitialContext().lookup("java:comp/WorkContextMap");
Chapter 15
Programming Context Propagation in an Application
15-5

• The propagation mode is
SOAP
only, meaning that propagation occurs both to the server
with the request and to the client with the response. The following code shows how the
server instance could modify the
stringContext
:
WorkContext modifiedLocalWC = PrimitiveContextFactory.create(localwc.get() + " could
be replaced by a new value...");
• The following code replaces the work context with an updated value. When retrieving
SESSION_ID
on the client after the server returns the response, the value updated by the
server is now present on the client.
map.put(SESSION_ID, newLocalWC, PropagationMode.SOAP);
Chapter 15
Programming Context Propagation in an Application
15-6

16
Programming JavaMail with WebLogic Server
Learn how to program JavaMail with WebLogic Server to add email capabilities to your
WebLogic Server applications.
This chapter includes the following sections:
• Overview of Using JavaMail with WebLogic Server Applications
• Understanding JavaMail Configuration Files
• Configuring JavaMail for WebLogic Server
• Sending Messages with JavaMail
• Reading Messages with JavaMail
• Overview of Using JavaMail with WebLogic Server Applications
WebLogic Server includes the JavaMail API version 1.5 reference implementation. Using
the JavaMail API, you can add email capabilities to your WebLogic Server applications.
JavaMail provides access from Java applications to Internet Message Access Protocol
(IMAP)- and Simple Mail Transfer Protocol (SMTP)-capable mail servers on your network
or the Internet. It does not provide mail server functionality; you must have access to a mail
server to use JavaMail.
• Understanding JavaMail Configuration Files
JavaMail depends on configuration files that define the mail transport capabilities of the
system. The
weblogic.jar
file contains the standard configuration files which enable IMAP
and SMTP mail servers for JavaMail and define the default message types JavaMail can
process.
• Configuring JavaMail for WebLogic Server
To configure JavaMail for use in WebLogic Server, you create a mail session in the
WebLogic Server Administration Console. This allows server-side modules and
applications to access JavaMail services with JNDI, using session properties you
preconfigure for them.
• Sending Messages with JavaMail
You can send a message using JavaMail within a WebLogic Server module.
• Reading Messages with JavaMail
The JavaMail API provides several options for reading messages, such as reading a
specified message number or range of message numbers, or pre-fetching specific parts of
messages into the folder's cache.
Overview of Using JavaMail with WebLogic Server Applications
WebLogic Server includes the JavaMail API version 1.5 reference implementation. Using the
JavaMail API, you can add email capabilities to your WebLogic Server applications. JavaMail
provides access from Java applications to Internet Message Access Protocol (IMAP)- and
Simple Mail Transfer Protocol (SMTP)-capable mail servers on your network or the Internet. It
does not provide mail server functionality; you must have access to a mail server to use
JavaMail.
16-1

Documentation for using the JavaMail API is available at
https://javaee.github.io/
javamail/
. This section describes how you can use JavaMail in the WebLogic Server
environment.
The
weblogic.jar
file contains the following JavaMail API packages:
•
javax.mail
•
javax.mail.event
•
javax.mail.internet
•
javax.mail.search
The
weblogic.jar
also contains the Java Activation Framework (JAF) package, which
JavaMail requires.
The
javax.mail
package includes providers for Internet Message Access protocol (IMAP) and
Simple Mail Transfer Protocol (SMTP) mail servers. There is a separate POP3 provider for
JavaMail, which is not included in
weblogic.jar
. You can download the POP3 provider at
https://maven.java.net/content/repositories/releases/com/sun/mail/pop3
and add it to
the WebLogic Server classpath if you want to use it.
Understanding JavaMail Configuration Files
JavaMail depends on configuration files that define the mail transport capabilities of the
system. The
weblogic.jar
file contains the standard configuration files which enable IMAP
and SMTP mail servers for JavaMail and define the default message types JavaMail can
process.
Unless you want to extend JavaMail to support additional transports, protocols, and message
types, you do not have to modify any JavaMail configuration files. If you do want to extend
JavaMail, see
https://javaee.github.io/javamail/ThirdPartyProducts
. Then add your
extended JavaMail package in the WebLogic Server classpath in front of
weblogic.jar.
Configuring JavaMail for WebLogic Server
To configure JavaMail for use in WebLogic Server, you create a mail session in the WebLogic
Server Administration Console. This allows server-side modules and applications to access
JavaMail services with JNDI, using session properties you preconfigure for them.
For example, by creating a mail session, you can designate the mail hosts, transport and store
protocols, and the default mail user in the WebLogic Server Administration Console so that
modules that use JavaMail do not have to set these properties. Applications that are heavy
email users benefit because the mail session creates a single
javax.mail.Session
object and
makes it available via JNDI to any module that needs it.
For information on using the WebLogic Server Administration Console to create a mail session,
see Configure access to JavaMail in the Oracle WebLogic Server Administration Console
Online Help.
You can override any properties set in the mail session in your code by creating a
java.util.Properties
object containing the properties you want to override. See Sending
Messages with JavaMail. Then, after you look up the mail session object in JNDI, call the
Session.getInstance()
method with your
Properties
object to get a customized session.
Chapter 16
Understanding JavaMail Configuration Files
16-2

Sending Messages with JavaMail
You can send a message using JavaMail within a WebLogic Server module.
Here are the steps to send a message with JavaMail:
1. Import the JNDI (naming), JavaBean Activation, and JavaMail packages. You will also
need to import
java.util.Properties:
import java.util.*;
import javax.activation.*;
import javax.mail.*;
import javax.mail.internet.*;
import javax.naming.*;
2. Look up the Mail Session in JNDI:
InitialContext ic = new InitialContext();
Session session = (Session) ic.lookup("myMailSession");
3. If you need to override the properties you set for the Session in the WebLogic Server
Administration Console, create a
java.util.Properties
object and add the properties you
want to override. Then call
getInstance()
to get a new Session object with the new
properties.
Properties props = new Properties();
props.put("mail.transport.protocol", "smtp");
props.put("mail.smtp.host", "mailhost");
// use mail address from HTML form for from address
props.put("mail.from", emailAddress);
Session session2 = session.getInstance(props);
4. Construct a
MimeMessage
. In the following example, to, subject, and messageTxt are String
variables containing input from the user.
Message msg = new MimeMessage(session2);
msg.setFrom();
msg.setRecipients(Message.RecipientType.TO,
InternetAddress.parse(to, false));
msg.setSubject(subject);
msg.setSentDate(new Date());
// Content is stored in a MIME multi-part message
// with one body part
MimeBodyPart mbp = new MimeBodyPart();
mbp.setText(messageTxt);
Multipart mp = new MimeMultipart();
mp.addBodyPart(mbp);
msg.setContent(mp);
5. Send the message.
Transport.send(msg);
The JNDI lookup can throw a
NamingException
on failure. JavaMail can throw a
MessagingException
if there are problems locating transport classes or if communications with
the mail host fails. Be sure to put your code in a try block and catch these exceptions.
Chapter 16
Sending Messages with JavaMail
16-3

Reading Messages with JavaMail
The JavaMail API provides several options for reading messages, such as reading a specified
message number or range of message numbers, or pre-fetching specific parts of messages
into the folder's cache.
The JavaMail API allows you to connect to a message store, which could be an IMAP server or
POP3 server. Messages are stored in folders. With IMAP, message folders are stored on the
mail server, including folders that contain incoming messages and folders that contain archived
messages. With POP3, the server provides a folder that stores messages as they arrive. When
a client connects to a POP3 server, it retrieves the messages and transfers them to a message
store on the client.
Folders are hierarchical structures, similar to disk directories. A folder can contain messages or
other folders. The default folder is at the top of the structure. The special folder name INBOX
refers to the primary folder for the user, and is within the default folder. To read incoming mail,
you get the default folder from the store, and then get the INBOX folder from the default folder.
The API provides several options for reading messages. See the JavaMail API for more
information.
Here are steps to read incoming messages on a POP3 server from within a WebLogic Server
module:
1. Import the JNDI (naming), JavaBean Activation, and JavaMail packages. You will also
need to import
java.util.Properties:
import java.util.*;
import javax.activation.*;
import javax.mail.*;
import javax.mail.internet.*;
import javax.naming.*;
2. Look up the Mail Session in JNDI:
InitialContext ic = new InitialContext();
Session session = (Session) ic.lookup("myMailSession");
3. If you need to override the properties you set for the Session in the WebLogic Server
Administration Console, create a
Properties
object and add the properties you want to
override. Then call
getInstance()
to get a new Session object with the new properties:
Properties props = new Properties();
props.put("mail.store.protocol", "pop3");
props.put("mail.pop3.host", "mailhost");
Session session2 = session.getInstance(props);
4. Get a
Store
object from the Session and call its
connect()
method to connect to the mail
server. To authenticate the connection, you need to supply the mailhost, user name, and
password in the connect method:
Store store = session.getStore();
store.connect(mailhost, username, password);
5. Get the default folder, then use it to get the INBOX folder:
Folder folder = store.getDefaultFolder();
folder = folder.getFolder("INBOX");
6. Read the messages in the folder into an array of Messages:
Message[] messages = folder.getMessages();
Chapter 16
Reading Messages with JavaMail
16-4

7. Operate on messages in the Message array. The Message class has methods that allow
you to access the different parts of a message, including headers, flags, and message
contents.
Reading messages from an IMAP server is similar to reading messages from a POP3 server.
With IMAP, however, the JavaMail API provides methods to create and manipulate folders and
transfer messages between them. If you use an IMAP server, you can implement a full-
featured, Web-based mail client with much less code than if you use a POP3 server. With
POP3, you must provide code to manage a message store via WebLogic Server, possibly
using a database or file system to represent folders.
Chapter 16
Reading Messages with JavaMail
16-5

17
Threading and Clustering Topics
Learn how to use threads in WebLogic Server as well as how to program applications for use
in WebLogic Server clusters.
This chapter includes the following sections:
• Using Threads in WebLogic Server
• Using the Work Manager API for Lower-Level Threading
• Programming Applications for WebLogic Server Clusters
• Using Threads in WebLogic Server
WebLogic Server is a sophisticated, multi-threaded application server and it carefully
manages resource allocation, concurrency, and thread synchronization for the modules it
hosts. To obtain the greatest advantage from WebLogic Server's architecture, construct
your application modules created according to the standard Java EE APIs.
• Using the Work Manager API for Lower-Level Threading
The Work Manager provides a simple API for concurrent execution of work items. This
enables Java EE-based applications (including servlets and EJBs) to schedule work items
for concurrent execution, which will provide greater throughput and increased response
time.
• Programming Applications for WebLogic Server Clusters
There are certain requirements and restrictions when you deploy JSPs and servlets, and
EJBs to a WebLogic Server cluster. Also you need to understand the implications of
binding clustered objects in the JNDI tree when you develop EJBs or custom RMI objects
in a cluster.
Using Threads in WebLogic Server
WebLogic Server is a sophisticated, multi-threaded application server and it carefully manages
resource allocation, concurrency, and thread synchronization for the modules it hosts. To
obtain the greatest advantage from WebLogic Server's architecture, construct your application
modules created according to the standard Java EE APIs.
In most cases, avoid application designs that require creating new threads in server-side
modules:
• Applications that create their own threads do not scale well. Threads in the JVM are a
limited resource that must be allocated thoughtfully. Your applications may break or cause
WebLogic Server to thrash when the server load increases. Problems such as deadlocks
and thread starvation may not appear until the application is under a heavy load.
• Multithreaded modules are complex and difficult to debug. Interactions between
application-generated threads and WebLogic Server threads are especially difficult to
anticipate and analyze.
In some situations, creating threads may be appropriate, in spite of these warnings. For
example, an application that searches several repositories and returns a combined result set
can return results sooner if the searches are done asynchronously using a new thread for each
repository instead of synchronously using the main client thread.
17-1

If you must use threads in your application code, create a pool of threads so that you can
control the number of threads your application creates. Like a JDBC connection pool, you
allocate a given number of threads to a pool, and then obtain an available thread from the pool
for your runnable class. If all threads in the pool are in use, wait until one is returned. A thread
pool helps avoid performance issues and allows you to optimize the allocation of threads
between WebLogic Server execution threads and your application.
Be sure you understand where your threads can deadlock and handle the deadlocks when
they occur. Review your design carefully to ensure that your threads do not compromise the
security system.
To avoid undesirable interactions with WebLogic Server threads, do not let your threads call
into WebLogic Server modules. For example, do not use enterprise beans or servlets from
threads that you create. Application threads are best used for independent, isolated tasks,
such as conversing with an external service with a TCP/IP connection or, with proper locking,
reading or writing to files. A short-lived thread that accomplishes a single purpose and ends (or
returns to the thread pool) is less likely to interfere with other threads.
Avoid creating daemon threads in modules that are packaged in applications deployed on
WebLogic Server. When you create a daemon thread in an application module such as a
servlet, you will not be able to redeploy the application because the daemon thread created in
the original deployment will remain running.
Be sure to test multithreaded code under increasingly heavy loads, adding clients even to the
point of failure. Observe the application performance and WebLogic Server behavior and then
add checks to prevent failures from occurring in production.
Using the Work Manager API for Lower-Level Threading
The Work Manager provides a simple API for concurrent execution of work items. This enables
Java EE-based applications (including servlets and EJBs) to schedule work items for
concurrent execution, which will provide greater throughput and increased response time.
After an application submits work items to a Work Manager for concurrent execution, the
application can gather the results. The Work Manager provides common "join" operations,
such as waiting for any or all work items to complete. The Work Manager for Application
Servers specification provides an application-server-supported alternative to using lower-level
threading APIs, which are inappropriate for use in managed environments such as servlets and
EJBs, as well as being too difficult to use for most applications.
See Using Work Managers to Optimize Scheduled Work in Administering Server Environments
for Oracle WebLogic Server
Programming Applications for WebLogic Server Clusters
There are certain requirements and restrictions when you deploy JSPs and servlets, and EJBs
to a WebLogic Server cluster. Also you need to understand the implications of binding
clustered objects in the JNDI tree when you develop EJBs or custom RMI objects in a cluster.
JSPs and servlets that will be deployed to a WebLogic Server cluster must observe certain
requirements for preserving session data. See Requirements for HTTP Session State
Replication in Administering Clusters for Oracle WebLogic Server for more information.
EJBs deployed in a WebLogic Server cluster have certain restrictions based on EJB type. See
Understanding WebLogic Enterprise JavaBeans in Developing Enterprise JavaBeans, Version
2.1, for Oracle WebLogic Serverfor information about the capabilities of different EJB types in a
Chapter 17
Using the Work Manager API for Lower-Level Threading
17-2

cluster. EJBs can be deployed to a cluster by setting clustering properties in the EJB
deployment descriptor.
If you are developing either EJBs or custom RMI objects for deployment in a cluster, also refer
to Using WebLogic JNDI in a Clustered Environment in Developing JNDI Applications for
Oracle WebLogic Server to understand the implications of binding clustered objects in the JNDI
tree.
Chapter 17
Programming Applications for WebLogic Server Clusters
17-3

18
Developing OSGi Bundles for WebLogic
Server Applications
Learn about the OSGi environment in WebLogic Server and how to deploy OSGi bundles to
WebLogic Server. Developers who want to use OSGi in their applications can easily share
OSGi facilities, such as the OSGi service registry, class loaders, and other OSGi services.
For general information about OSGi, see
http://www.osgi.org
.
This chapter includes the following sections:
• Understanding OSGi
• Features Provided in WebLogic Server OSGi Implementation
• Configuring the OSGi Framework
• Creating OSGi Bundles
• Deploying OSGi Bundles
• Accessing Deployed Bundle Objects From JNDI
• Using OSGi Logging Via WebLogic Server
• Configuring a Filtering ClassLoader for OSGi Bundles
• OSGI Example
• Understanding OSGi
OSGi is a Java modularity system developed and maintained by the OSGi Alliance, of
which Oracle is a member.
• Features Provided in WebLogic Server OSGi Implementation
WebLogic Server allows you to configure and manage one or more instances of an OSGi
framework. You can also create and deploy your own OSGi bundles.
• Configuring the OSGi Framework
OSGi framework provides a secure and managed Java framework. You can configure and
manage one or more instances of the framework and ensure persistence.
• Creating OSGi Bundles
You use the OSGi API bundle that is located in wlserver/server/lib/
org.apache.felix.org.apache.felix.main.jar to create your own OSGi bundle.
• Deploying OSGi Bundles
After you create an OSGi bundle you can deploy the OSGi bundle on a target system and
in the
osgi-lib
directory. In WebLogic Server you can deploy OSGi bundles from inside a
JAR, EAR, or WAR file.
• Accessing Deployed Bundle Objects From JNDI
After the OSGi server has been booted, a bundle object is placed into the local server
JNDI tree. Applications can therefore get this bundle from JNDI and thereafter use that as
the entry point into the OSGi system.
18-1

• Using OSGi Logging Via WebLogic Server
The Apache Felix implementation of the OSGi Log service is installed by default when you
install WebLogic Server. The OSGi bundle registers with the OSGi logging service and
sends logs from the OSGi logger to the WebLogic Server logger.
• Configuring a Filtering ClassLoader for OSGi Bundles
You can use a filtering classloader to specify the use of alternate library versions that are
deployed as OSGi bundles.
• OSGI Example
WebLogic Server includes two simple example OSGi bundles: client and server. The
server bundle (ServerBundle) exports a packet that the client bundle (ClientBundle)
imports. The example produces an HTML page that displays the deployed OSGi bundles.
Understanding OSGi
OSGi is a Java modularity system developed and maintained by the OSGi Alliance, of which
Oracle is a member.
The OSGi specifications and related Javadoc together describe a comprehensive operating
environment for Java applications:
• You can download the OSGi Service Platform Core Specification from
https://
docs.osgi.org/specification/
.
• The OSGi Javadoc is available from
https://docs.osgi.org/specification/
.
As described on the OSGi Alliance Web page, "The OSGi Alliance is a worldwide consortium
of technology innovators that advances a proven and mature process to create open
specifications that enable the modular assembly of software built with Java technology.
Modularity reduces software complexity; OSGi is the best model to modularize Java.."
The OSGi Architecture Web page further describes the OSGi technology as "...a set of
specifications that define a dynamic component system for Java. These specifications enable a
development model where applications are (dynamically) composed of many different
(reusable) components. The OSGi specifications enable components to hide their
implementations from other components while communicating through services, which are
objects that are specifically shared between components. This surprisingly simple model has
far reaching effects for almost any aspect of the software development process."
OSGi offers you the following benefits:
• Versioning of package wiring, for both implementors and users of interfaces.
• The "uses" directive allows for intelligent wiring of class loaders and helps ensure a
consistent class space.
• Flexible and dynamic security.
• Dynamic service wiring through an active registry.
• Various standard OSGi specifications provided by multiple vendors.
Features Provided in WebLogic Server OSGi Implementation
WebLogic Server allows you to configure and manage one or more instances of an OSGi
framework. You can also create and deploy your own OSGi bundles.
WebLogic Server allows you to add a list of OSGi frameworks (maintained via
OsgiFrameWorkMBean MBeans) to the server configuration. After the OSGi framework has
Chapter 18
Understanding OSGi
18-2

been booted, a bundle object for the framework is placed into the local server JNDI tree.
Applications can then get this bundle from JNDI and thereafter use that as their entry point into
the OSGi system.
Applications can also deploy their own OSGi bundles. One specific OSGi bundle from the
chosen framework instance can be used in the application classloader hierarchy.
WebLogic Server allows you to:
• Configure and manage one or more instances of an OSGi framework from the Weblogic
Server Administration Console and WLST.
WebLogic Server includes the Apache Felix implementation of the OSGi framework. See
http://felix.apache.org
for information on Felix.
• Create and deploy your own OSGi bundles.
WebLogic Server includes an OSGi bundle containing the OSGi API. You can use this API
to create your own OSGi bundles.
• One specific OSGi bundle from the chosen framework instance can be used in the
application classloader hierarchy.
• Access OSGi bundles directly from JNDI.
• Deploy and undeploy OSGi bundles.
• Log OSGi status via the WebLogic Server logging mechanism.
• Incorporate the OSGi services of your choice.
• Enable OSGi persistence.
• Manage OSGi bundle start levels for deployed bundles.
These topics are described in the sections that follow.
Configuring the OSGi Framework
OSGi framework provides a secure and managed Java framework. You can configure and
manage one or more instances of the framework and ensure persistence.
As described in the OSGi Service Platform Core Specification, "The Framework forms the core
of the OSGi Service Platform Specifications. It provides a general-purpose, secure, and
managed Java framework that supports the deployment of extensible and downloadable
applications known as bundles. "
WebLogic Server includes the Felix implementation of OSGi framework. You can configure and
manage one or more instances of the Felix OSGi framework.
Note:
WebLogic Server supports only the Felix framework. Other OSGi Frameworks are
not supported and have not been tested.
• Configuring OSGi Framework Instances
• Configuring OSGi Framework Persistence
• Configuring OSGi Framework Instances
Chapter 18
Configuring the OSGi Framework
18-3

• Configuring OSGi Framework Persistence
• Using OSGi Services
• Connecting to an OSGi Console
Configuring OSGi Framework Instances
WebLogic Server includes an OSGi framework by default, but it does not automatically start it.
You must configure WebLogic Server to boot an OSGi framework when WebLogic Server
boots. You can do this in four ways, according to your preference:
• Use the WebLogic Server Administration Console to configure an OSGi framework
instance.
• Edit the
DOMAIN_HOME\config\config.xml
deployment descriptor file to add an entry for
the OSGi server and set the attribute values. You specify the OSGi framework you want
the WebLogic Server instance to use.
• Use WLST to create the OSGi framework and set the attribute values. WLST then stores
the values in the
DOMAIN_HOME\config\config.xml
deployment descriptor file.
• Write a Java program to create the OSGi framework and set the attribute values.
In all four cases, configuration of an OSGi framework instance is controlled by the
OsgiFrameWorkMBean. For each framework associated with an OsgiFrameWorkMBean,
WebLogic Server boots an OSGi framework with a unique name.
You configure the OSGi framework attributes shown in Table 18-1.
Table 18-1 OSGi Framework Attributes
Attribute Usage
Target This attribute is required. You must select a target (servers or clusters) on
which an MBean will be deployed from the list of servers or clusters in the
current domain on which this item can be deployed.
Name The name of the framework instance. The name of a given framework instance
must be unique within a WebLogic Server server instance.
Implementation Class The name of the framework implementation class for the
org.osgi.framework.launch.FrameworkFactory
class. The default value
is
org.apache.felix.framework.FrameworkFactory
.
Deploy Installation
Bundles
Determines whether OSGi bundles are installed in the framework. This
attribute is "populate" by default. See Parameter Required for Installing
Bundles in the Framework for more information.
Dynamically Created Determines whether the MBean is created dynamically or is persisted to
config.xml
. The configuration is always persisted if you use the WebLogic
Server Administration Console and this attribute is not displayed.
Init Properties The standard Felix properties to be used when initializing the framework. All
standard properties and all properties specific to the framework can be set.
See Example 18-3 for an example of setting the Init Properties from a Java
program.
The Apache Felix Framework Configuration Properties are described in
http://felix.apache.org/documentation/subprojects/apache-
felix-framework/apache-felix-framework-configuration-
properties.html
.
Chapter 18
Configuring the OSGi Framework
18-4
Table 18-1 (Cont.) OSGi Framework Attributes
Attribute Usage
Framework Boot
delegation
The name of the
org.osgi.framework.bootdelegation
property. Note that
this value, if set, will take precedence over anything specified in the init-
properties.
Framework System
Packages Extra
The name of the
org.osgi.framework.system.packages.extra
property.
Note that this value, if set, will take precedence over anything specified in the
init-properties.
Register Global Data
Sources
Boolean. Returns true if global data sources should be added to the OSGi
service registry.
Register Global Work
Managers
Boolean. Returns true if global work managers should be added to the OSGi
service registry.
• Configuring OSGi Framework Instance From Administration Console
• Configuring OSGi Framework Instance From config.xml
• Configuring OSGi Framework Instance From WLST
• Configuring OSGi Framework Instance from a Java Program
• Parameter Required for Installing Bundles in the Framework
Configuring OSGi Framework Instance From Administration Console
You can configure an OSGi framework from the WebLogic Server Administration Console.
Perform the following steps:
1. In the WebLogic Server Administration Console, expand Services in the left panel.
2. Click OSGi Frameworks in the left panel.
3. On the Summary of OSGi Frameworks page, click New.
If you have already created an OSGi framework, you can instead click Clone to use an
existing framework as the basis for a new one.
4. On the Creating a New OSGi Framework page, name this framework instance. The name
must be unique.
5. Click Next.
6. On the OSGI Framework Targets page, select the servers or clusters to which you would
like to deploy this OSGi framework.
7. Click Finish.
8. On the Summary of OSGi Frameworks page, select the framework you just created.
9. On the Settings for Framework page, examine the defaults to make sure that they are
correct for your environment. See Table 18-1 for a description of the attributes.
See Configure OSGi Frameworks in the Oracle WebLogic Server Administration Console
Online Help.
Chapter 18
Configuring the OSGi Framework
18-5

Configuring OSGi Framework Instance From config.xml
Example 18-1 shows an example of updating
config.xml
to add the OSGi framework to be
used by WebLogic Server. Add the
<osgi-framework>
element just before the
</domain>
element.
If you need to add multiple OSGi framework instances, add multiple
<osgi-framework>
elements. Remember that each <name> element must be unique within the server.
After you add this element, you must reboot the WebLogic Server instance.
Example 18-1 Configuring OSGi Framework Instance From config.xml
<osgi-framework>
<name>test-osgi-frame</name>
<target>AdminServer</target>
</osgi-framework>
Configuring OSGi Framework Instance From WLST
Example 18-2 shows an example of using WLST to add the OSGi framework to be used by the
WebLogic Server instance.
Example 18-2 Configuring OSGi Framework Instance From WLST
java weblogic.WLST
connect('weblogic', 'password')
edit()
startEdit()
wls:/mydomain/edit !>
cmo.createOsgiFramework('test-osgi-frame')
[MBeanServerInvocationHandler]com.bea:Name=test-osgi-frame,Type=OsgiFramework
targetServer=cmo.lookupServer('AdminServer')
cd('OsgiFrameworks')
cd('test-osgi-frame')
cmo.addTarget(targetServer)
wls:/mydomain/edit !> save()
wls:/mydomain/edit !> activate()
wls:/mydomain/edit/OsgiFrameworks> ls('a')
drw- test-osgi-frame
wls:/mydomain/edit/OsgiFrameworks> cd('test-osgi-frame')
wls:/mydomain/edit/OsgiFrameworks/test-osgi-frame> ls('a')
-rw- DeployInstallationBundles populate
-rw- DeploymentOrder 1000
-r-- DynamicallyCreated false
-rw- FactoryImplementationClass org.apache.felix.framework.F
rameworkFactory
-r-- Id 0
-rw- InitProperties null
-rw- Name test-osgi-frame
-rw- Notes null
-rw- OrgOsgiFrameworkBootdelegation null
-rw- OrgOsgiFrameworkSystemPackagesExtra null
-rw- RegisterGlobalDataSources true
-rw- RegisterGlobalWorkManagers true
-r-- Type OsgiFramework
Chapter 18
Configuring the OSGi Framework
18-6

Configuring OSGi Framework Instance from a Java Program
Example 18-3 shows an example of using a Java program to add the OSGi framework to be
used by the WebLogic Server instance. Comments in the code describe each operation.
Example 18-3 Configuring OSGi Framework from Java Program
/**...imports omitted
*/
/**
* Create an OSGi framework instance with the designated name
*
* @param frameworkName
*/
protected void createOSGiFrameworkInstance(String frameworkName) {
createOSGiFrameworkInstance(frameworkName, null, null, null, null, null);
}
protected void createOSGiFrameworkInstance(String frameworkName,
String isRegisterGlobalWorkManagers,
String isRegisterGlobalDataSources,
String deployInstallationBundles,
String orgOsgiFrameworkBootdelegation,
String orgOsgiFrameworkSystemPackagesExtra) {
createOSGiFrameworkInstance(frameworkName,
null,
isRegisterGlobalWorkManagers,
isRegisterGlobalDataSources,
deployInstallationBundles,
orgOsgiFrameworkBootdelegation,
orgOsgiFrameworkSystemPackagesExtra);
}
/**
* Create a fresh framework
*
* @param isRegisterGlobalWorkManagers
* @param isRegisterGlobalDataSources
* @param deployInstallationBundles
* @param orgOsgiFrameworkBootdelegation
* @param orgOsgiFrameworkSystemPackagesExtra
*/
protected void createOSGiFrameworkInstance(String frameworkName,
Properties initProp,
String isRegisterGlobalWorkManagers,
String isRegisterGlobalDataSources,
String deployInstallationBundles,
String orgOsgiFrameworkBootdelegation,
String orgOsgiFrameworkSystemPackagesExtra) {
frameworkInstances.add(frameworkName);
if (initProp == null) {
initProp = new Properties();
}
initProp.setProperty("wlstest.framework.instance.name", frameworkName);
//initProp.setProperty("felix.cache.locking", "false");
//initProp.setProperty("org.osgi.framework.storage.clean", "onFirstInit");
MBeanServerConnection connection = null;
Chapter 18
Configuring the OSGi Framework
18-7

try {
// Initiate the necessary MBean facilities.
connection = initConnection();
// Switch the edit session on.
ObjectName domainMBean = startEditSession(connection);
// Get the current WebLogic server MBean:
ObjectName serverMBean = null;
ObjectName[] serverMBeans = (ObjectName[]) connection.getAttribute(domainMBean, "Servers");
for (ObjectName objectName : serverMBeans) {
log("found server: " + objectName);
serverMBean = objectName;
}
// Get or create an OsgiFrameworkMBean:
ObjectName osgiFrameworkMBean = null;
ObjectName[] osgiFrameworkMBeans = (ObjectName[]) connection.getAttribute(domainMBean,
"OsgiFrameworks");
log("osgiFrameworkMBeans.length=" + osgiFrameworkMBeans.length);
for (ObjectName objectName : osgiFrameworkMBeans) {
String osgiFrameworkName = (String) connection.getAttribute(objectName, "Name");
log("--------------> " + osgiFrameworkName);
if (osgiFrameworkName.equals(frameworkName)) {
osgiFrameworkMBean = objectName;
log("Found OSGi framework instance: " + frameworkName);
break;
}
}
if (osgiFrameworkMBean != null) {
log("Will destroy the framework instance: " + osgiFrameworkMBean);
connection.invoke(osgiFrameworkMBean,
"removeTarget",
new Object[] { serverMBean },
new String[] { "javax.management.ObjectName" });
connection.invoke(domainMBean,
"destroyOsgiFramework",
new Object[] { osgiFrameworkMBean },
new String[] { "javax.management.ObjectName" });
}
log("Will create a new framework instance from scratch");
osgiFrameworkMBean = (ObjectName) connection.invoke(domainMBean,
"createOsgiFramework",
new Object[] { frameworkName },
new String[] { "java.lang.String" });
// Set common properties:
if (initProp != null) {
Attribute initPropAttr = new Attribute("InitProperties", initProp);
connection.setAttribute(osgiFrameworkMBean, initPropAttr);
}
Attribute systemPackagesExtraAttr = new Attribute("OrgOsgiFrameworkSystemPackagesExtra",
"javax.naming,weblogic.work,javax.sql");
connection.setAttribute(osgiFrameworkMBean, systemPackagesExtraAttr);
connection.invoke(osgiFrameworkMBean,
"addTarget",
new Object[] { serverMBean },
new String[] { "javax.management.ObjectName" });
// Set individual property to the OSGi framework instance:
Chapter 18
Configuring the OSGi Framework
18-8

if (isRegisterGlobalWorkManagers != null) {
Attribute attr = new Attribute("RegisterGlobalWorkManagers",
Boolean.parseBoolean(isRegisterGlobalWorkManagers));
connection.setAttribute(osgiFrameworkMBean, attr);
}
if (isRegisterGlobalDataSources != null) {
Attribute attr = new Attribute("RegisterGlobalDataSources",
Boolean.parseBoolean(isRegisterGlobalDataSources));
connection.setAttribute(osgiFrameworkMBean, attr);
}
if (deployInstallationBundles != null) {
Attribute attr = new Attribute("DeployInstallationBundles", deployInstallationBundles);
connection.setAttribute(osgiFrameworkMBean, attr);
}
if (orgOsgiFrameworkBootdelegation != null) {
Attribute attr = new Attribute("OrgOsgiFrameworkBootdelegation", orgOsgiFrameworkBootdelegation);
connection.setAttribute(osgiFrameworkMBean, attr);
}
if (orgOsgiFrameworkSystemPackagesExtra != null) {
Attribute attr = new Attribute("OrgOsgiFrameworkSystemPackagesExtra",
orgOsgiFrameworkSystemPackagesExtra);
connection.setAttribute(osgiFrameworkMBean, attr);
}
MBeanInfo mi = connection.getMBeanInfo(osgiFrameworkMBean);
log("Attributes are as below:");
for (MBeanAttributeInfo mai : mi.getAttributes()) {
Object value = connection.getAttribute(osgiFrameworkMBean, mai.getName());
System.out.printf(" %-40s = %s\n", mai.getName(), value);
}
// Save your changes
ObjectName cfgMgr = (ObjectName) connection.getAttribute(service, "ConfigurationManager");
connection.invoke(cfgMgr, "save", null, null);
Parameter Required for Installing Bundles in the Framework
The OsgiFrameWorkMBean MBean
Deploy Installation Bundles
attribute controls whether
or not bundles present in the
osgi-lib
directory (described later in this chapter in Deploying
OSGi Bundles in the osgi-lib Directory) are actually installed into the framework.
The
Deploy Installation Bundles
parameter accepts the following values:
•
ignore
— None of the bundles in this directory are installed and started.
•
populate
— The bundles are installed and started if possible. This is the default.
Furthermore, a few extra packages are added to the boot delegation classpath parameters
in order to enable the bundles in the
osgi-lib
directory if they are not already there.
It is not be considered a failure that causes the system to not boot if these bundles do not
properly resolve and therefore cannot be started.
Chapter 18
Configuring the OSGi Framework
18-9

Configuring OSGi Framework Persistence
OSGi has a persistence mechanism, described in
http://www.osgi.org/javadoc/r4v43/
core/org/osgi/framework/launch/Framework.html
, in which all installed bundles must be
started in accordance with each bundle's persistent autostart setting.
This persistence mechanism is disabled by default. However, you can use the standard Felix
Init property shown in Table 18-1 to enable the OSGi persistence mechanism.
Note: WebLogic Server is not directly involved in the OSGi persistence mechanism. In
particular, WebLogic Server does not fail the data over to other servers.
Using OSGi Services
You can make standard OSGi services available to your OSGi bundle. To do this, import the
correct packages for the Felix framework and make sure that the application bundle has the
required authorization.
These services are described in the OSGi Service Platform Core Specification (
https://
www.osgi.org/resources/
) and include but are not limited to standard Framework supplied
services such as the Package Admin Service, Conditional Permission Admin Service, or the
StartLevel Service.
See the Apache Felix Tutorial Example 1, Service Event Listener Bundle for an example of
creating a simple bundle that listens for OSGi service events.
Connecting to an OSGi Console
To view details such as the versions, lifecycle state, and others in the OSGi framework that you
configured, you have to connect to an OSGi console. There are many Felix consoles.
However, WebLogic Server includes the Apache Felix implementation of the OSGi framework.
WebLogic Server release includes a version of Apache Felix that corresponds to the OSGi R6
framework. For information about the specific version of Apache Felix that is included in
WebLogic Server, see Third-Party Products in Oracle Fusion Middleware in Oracle® Fusion
Middleware Licensing Information User Manual. The content of this document applies to all
versions of WebLogic Server 12c. This framework is packaged as
org.apache.felix.org.apache.felix.main.jar in the WebLogic Server distribution. There are other
shells and consoles such as the GoGo console, all of them involve the same basic steps.
1. Getting the required bundles
2. Starting the required bundles
3. Connecting to the console
To connect to Apache Felix Remote Shell in the development environment, do the following:
1. Download the Felix Shell and Felix Remote Shell bundles from the downloads page in
http://felix.apache.org.
2. Install and start these bundles in one of following ways:
• Place the bundles under $ORACLE_HOME/wlserver/server/osgi-lib
• Create an application that contains these two bundles and then deploy that application
after creating the OSGi framework.
3. Create and start an OSGi framework from the WebLogic Server console.
Chapter 18
Configuring the OSGi Framework
18-10

Use telnet to connect to the console which listens on localhost port 6666 by default.
• help lists all the available commands
• ps lists all bundles and what state they are in
Creating OSGi Bundles
You use the OSGi API bundle that is located in wlserver/server/lib/
org.apache.felix.org.apache.felix.main.jar to create your own OSGi bundle.
See the Apache Felix Tutorial Example 1, Service Event Listener Bundle for an example of
creating a simple bundle. As described in this example, the
Import-Package
attribute of the
manifest file informs the framework of the bundle's dependencies on external packages. All
bundles with an activator must import
org.osgi.framework
because it contains the core OSGi
class definitions.
Deploying OSGi Bundles
After you create an OSGi bundle you can deploy the OSGi bundle on a target system and in
the
osgi-lib
directory. In WebLogic Server you can deploy OSGi bundles from inside a JAR,
EAR, or WAR file.
• Preparing to Deploy an OSGi Bundle on a Target System
• Deploying OSGi Bundles in the osgi-lib Directory
• Preparing to Deploy an OSGi Bundle on a Target System
• Deploying OSGi Bundles in the osgi-lib Directory
Preparing to Deploy an OSGi Bundle on a Target System
You can deploy OSGi bundles from inside a JAR, EAR, or WAR file, as appropriate for your
application.
Before you do this, you must first specify which OSGi framework you want your bundle to use,
and identity the bundle to WebLogic Server.
Note:
If the OSGi framework instance you specify does not exist on the target server, the
OSGi bundle fails to deploy.
How you do this depends on whether your bundle is inside a WAR file or an EAR file:
• WAR — The framework instance and bundle name must be in an element in the Web
application's
weblogic.xml
deployment descriptor file.
• EAR — The framework instance and bundle name must be in an element in the
application's
weblogic-application.xml
deployment descriptor file.
If the EAR file contains WAR files, then the bundles inside the WAR files are deployed
using the
weblogic.xml
deployment descriptor file from the embedded WAR files.
The sections that follow describe the required steps in detail.
Chapter 18
Creating OSGi Bundles
18-11

For more information about WebLogic Server deployment descriptors, see Deploying
Applications to Oracle WebLogic Server.
• Preparing to Deploy Bundles as Enterprise Applications
• Preparing to Deploy Bundles as Web Applications
• Global Work Managers
• Global Data Sources
Preparing to Deploy Bundles as Enterprise Applications
Before you deploy your OSGi bundle, you must first:
1. Use either the
DOMAIN_HOME\config\config.xml
deployment descriptor file or WLST to
add an entry for the OSGi framework, as described in Configuring OSGi Framework
Instances.
2. In the EAR file that contains the OSGi bundle, add both the name of the OSGi framework
and the name of the bundle itself to the
weblogic-application.xml
deployment descriptor
file.
Example 18-1 shows an example of updating
config.xml
to add the OSGi framework used by
the WebLogic Server.
Example 18-4 shows an example of updating
weblogic-application.xml
to add both the
name of the OSGi framework and the name and location of the bundle.
Example 18-4 Adding the Framework and Bundle to weblogic-application.xml
<osgi-framework-reference>
<name>test-osgi-frame</name>
<application-bundle-symbolic-name>com.oracle.weblogic.test.client
</application-bundle-symbolic-name>
<bundles-directory>rashi/osgi-lib</bundles-directory>
</osgi-framework-reference>
The stanza in Example 18-4 tells the WebLogic Server to attach to the OSGi framework named
"test-osgi-frame" and to find the bundle in that server with the symbolic name
com.oracle.weblogic.test.client
in order to find classes from that OSGi framework.
Preparing to Deploy Bundles as Web Applications
Before you install your bundle as a WAR file, you must first:
1. Use either the
DOMAIN_HOME\config\config.xml
deployment descriptor file or WLST to
add an entry for the OSGi framework, as described in Configuring OSGi Framework
Instances.
2. Add both the name of the OSGi framework and the name of the bundle itself to the web
application's
weblogic.xml
deployment descriptor file.
Example 18-1 shows an example of updating
config.xml
to add the OSGi framework used by
the WebLogic Server.
Example 18-5 shows an example of updating
weblogic.xml
to add both the name of the OSGi
framework and the name and location of the bundle.
Chapter 18
Deploying OSGi Bundles
18-12

Example 18-5 Adding the Framework and Bundle to weblogic.xml
<osgi-framework-reference>
<name>test-osgi-frame</name>
<application-bundle-symbolic-name>com.oracle.weblogic.test.client
</application-bundle-symbolic-name>
<bundles-directory>rashi/osgi-lib</bundles-directory>
</osgi-framework-reference>
The stanza in Example 18-4 tells the WebLogic Server to attach to the OSGi framework named
"test-osgi-frame" and to find the bundle in that server with the symbolic name
com.oracle.weblogic.test.client
in order to find classes from that OSGi framework.
Global Work Managers
Work Managers prioritize work based on rules you define and by monitoring actual run time
performance statistics. This information is then used to optimize the performance of your
application. See Using Work Managers to Optimize Scheduled Work in Administering Server
Environments for Oracle WebLogic Server.
The OSGi implementation can take advantage of global work managers if the Register Global
Work Managers MBean attribute is set to true, as described in Table 18-1.
You can determine which global work manager is in use from a Java application, as shown in
Example 18-7.
Example 18-6 Determining Global Work Managers
// Get the global scoped work manager service:
ServiceReference[] refWmSvcs = bc.getServiceReferences(WorkManager.class.getCanonicalName(),
"(name=GlobalScopedWorkManager)");
if (refWmSvcs != null) {
logger.setAttribute(frameworkInstanceName, bundleIdentifier + "_WorkManager_Count",
refWmSvcs.length);
for (int i = 0; i < refWmSvcs.length; i++) {
ServiceReference refWmSvc = refWmSvcs[i];
WorkManager wm = (WorkManager) bc.getService(refWmSvc);
logger.setAttribute(frameworkInstanceName, bundleIdentifier + "_WorkManager" + (i + 1),
wm.getName());
bc.ungetService(refWmSvc);
}
}
Global Data Sources
In WebLogic Server, you can configure database connectivity by configuring JDBC data
sources and multi data sources and then targeting or deploying the JDBC resources to servers
or clusters in your WebLogic domain, as described in WebLogic Server Data Sources in
Understanding Oracle WebLogic Server.
The OSGi implementation can take advantage of global data sources if the Register Global
Data Sources MBean attribute is set to true, as described in Table 18-1.
You can determine which global data source is in use from a Java application, as shown in
Example 18-7.
Example 18-7 Determining Global Data Sources
// Get the global data source services:
Chapter 18
Deploying OSGi Bundles
18-13

ServiceReference[] refDsSvcs =
bc.getServiceReferences(DataSource.class.getCanonicalName(), "(name=OsgiDS)");
if (refDsSvcs != null) {
logger.setAttribute(frameworkInstanceName, bundleIdentifier + "_DataSource_Count",
refDsSvcs.length);
for (int i = 0; i < refDsSvcs.length; i++) {
String data = null;
ServiceReference refDsSvc = refDsSvcs[i];
DataSource ds = (DataSource) bc.getService(refDsSvc);
Connection conn = null;
Statement stmt = null;
ResultSet rs = null;
try {
conn = ds.getConnection();
stmt = conn.createStatement();
rs = stmt.executeQuery("select * from dual");
rs.next();
data = rs.getString(0);
} catch (SQLException e) {
Deploying OSGi Bundles in the osgi-lib Directory
Note:
The OsgiFrameWorkMBean MBean
Deploy Installation Bundles
attribute controls
whether or not bundles present in the
osgi-lib
directory are actually installed, as
described in Parameter Required for Installing Bundles in the Framework. This
attribute is true by default, and the bundles are installed.
To deploy a bundle with the start-level of 1, create the
WL_HOME/server/osgi-lib
directory if it
does not already exist, and then copy the archive file (EAR, WAR) file to it.
Any files in this directory that end with
.jar
,
.ear
, or
.war
are considered an OSGi bundle to
be installed into a framework when it starts.
WL_HOME/server/osgi-lib
is consulted only when the server first boots, and is not monitored
for changes thereafter. If you add a new OSGi bundle to the
WL_HOME/server/osgi-lib
directory and want to deploy it, you must reboot WebLogic Server.
• Setting the Start Level and Run Level for a Bundle
Setting the Start Level and Run Level for a Bundle
To deploy a bundle with the start-level of 1, copy the archive file (EAR, WAR) file to the
WL_HOME/server/osgi-lib
directory.
In addition, the
WL_HOME/server/osgi-lib
directory supports a start- and run-level scheme
based on subdirectories.
If you create subdirectories with names that begin with a number between 1 and 32K (for
example
2
,
3
,
4
), then the archive files under those directories are installed and started with the
given run-level.
Chapter 18
Deploying OSGi Bundles
18-14

Accessing Deployed Bundle Objects From JNDI
After the OSGi server has been booted, a bundle object is placed into the local server JNDI
tree. Applications can therefore get this bundle from JNDI and thereafter use that as the entry
point into the OSGi system.
The
org.osgi.framework.Bundle
is placed into the
java:app/osgi/Bundle
JNDI environment
of the application.
One specific OSGi bundle from the chosen framework instance can be used in the application
classloader hierarchy.
Example 18-8 shows how to access a bundle that you create from JNDI.
Example 18-8 Accessing Your OSGi Bundle From JNDI
public static final String BUNDLE_JNDI_NAME = "java:app/osgi/Bundle";
...
String bundleSymbolicName = null;
Bundle bundle = null;
OsgiInfo info = new OsgiInfo();
List<String> errorMessages = new ArrayList<String>();
try {
Context initCtx = new InitialContext();
bundle = (Bundle) initCtx.lookup(Constants.BUNDLE_JNDI_NAME);
} catch (NamingException e) {
errorMessages.add(e.toString());
System.out.println("Failed to lookup bundle from JNDI due to " + e);
}
if (bundle != null) {
bundleSymbolicName = bundle.getSymbolicName() + "_" + bundle.getVersion();
info.setCurrentBundle(bundleSymbolicName);
BundleContext bc = bundle.getBundleContext();
if (bc != null) {
// Get the start level service:
StartLevel startLevelSvc = null;
ServiceReference startLevelSr = bc.getServiceReference("org.osgi.service.startlevel.StartLevel");
if (startLevelSr != null) {
startLevelSvc = (StartLevel) bc.getService(startLevelSr);
}
List<String> allInstalledBundles = new ArrayList<String>();
List<String> allActivatedBundles = new ArrayList<String>();
Map<String, List<String>> services = new HashMap<String, List<String>>();
Map<String, String> startLevels = new HashMap<String, String>();
for (Bundle b : bc.getBundles()) {
// Collect all the installed and activated bundles:
String bundleId = b.getSymbolicName() + "_" + b.getVersion();
allInstalledBundles.add(bundleId);
if (b.getState() == Bundle.ACTIVE) {
allActivatedBundles.add(bundleId);
Chapter 18
Accessing Deployed Bundle Objects From JNDI
18-15

}
// Collect the registered services:
ServiceReference[] srs = b.getRegisteredServices();
if (srs != null) {
List<String> list = new ArrayList<String>();
for (ServiceReference sr : srs) {
list.add(sr + "-->" + bc.getService(sr));
}
services.put(bundleId, list);
}
// Collect the start levels:
if (startLevelSvc != null) {
startLevels.put(bundleId, startLevelSvc.getBundleStartLevel(b) + "");
}
}
info.setAllInstalledBundles(allInstalledBundles);
info.setAllActivatedBundles(allActivatedBundles);
info.setRegisteredServices(services);
info.setStartLevels(startLevels);
// Query the work manager services:
List<String> workManagers = new ArrayList<String>();
try {
ServiceReference[] wmSrs = bc.getServiceReferences(WorkManager.class.getCanonicalName(), null);
if (wmSrs != null) {
for (ServiceReference sr : wmSrs) {
WorkManager wm = (WorkManager) bc.getService(sr);
workManagers.add(wm.getName());
}
}
} catch (InvalidSyntaxException e) {
e.printStackTrace(System.out);
}
info.setWorkManagers(workManagers);
// Query the data source services:
List<String> dataSources = new ArrayList<String>();
try {
ServiceReference[] dsSrs = bc.getServiceReferences(DataSource.class.getCanonicalName(), null);
if (dsSrs != null) {
for (ServiceReference sr : dsSrs) {
dataSources.add(sr.getProperty("name").toString());
}
}
} catch (InvalidSyntaxException e) {
e.printStackTrace(System.out);
}
info.setDataSources(dataSources);
}
}
String bundleFileName = null;
try {
BundleIntrospect introspection = new BundleIntrospect();
bundleFileName = introspection.whichBundleFile();
info.setCurrentBundleFileName(bundleFileName);
} catch (Throwable e) {
errorMessages.add(e.toString());
Chapter 18
Accessing Deployed Bundle Objects From JNDI
18-16
//e.printStackTrace(System.out);
}
info.setErrorMessages(errorMessages);
return info;
}
}
Using OSGi Logging Via WebLogic Server
The Apache Felix implementation of the OSGi Log service is installed by default when you
install WebLogic Server. The OSGi bundle registers with the OSGi logging service and sends
logs from the OSGi logger to the WebLogic Server logger.
The Apache Felix implementation of the OSGi Log service is installed by default in the
installation directory
WL_HOME/server/osgi-lib
.
An OSGi bundle
com.oracle.weblogic.osgi.logger_relnum.jar
is also installed in
WL_HOME/
server/osgi-lib
. This bundle registers itself with the OSGi logging service and sends logs
from the OSGi logger to the WebLogic Server logger.
The logger system name is
OSGiForApps
. The messages severity levels are mapped between
OSGi and WebLogic Server as shown in Table 18-2.
Table 18-2 OSGi and WebLogic Server Logging Severity Mapping
OSGi Severity Levels WebLogic Server Severity Level
LogLevel.LOG_ERROR Severities.ERROR
LogLevel.LOG_WARNING Severities.WARNING
LogLevel.LOG_INFO Severities.INFO
LogLevel.LOG_DEBUG Severities.DEBUG
Configuring a Filtering ClassLoader for OSGi Bundles
You can use a filtering classloader to specify the use of alternate library versions that are
deployed as OSGi bundles.
To configure the
FilteringClassLoader
to specify that a certain package is loaded from an
application, add a
prefer-application-packages
descriptor element to
weblogic-
application.xml
, which details the list of packages to be loaded from the application. The
following example specifies that
org.apache.log4j.*
and
antlr.*
packages are loaded from
the application, not the system classloader:
<prefer-application-packages>
<package-name>org.apache.log4j.*</package-name>
<package-name>antlr.*</package-name>
</prefer-application-packages>
Place packages in
WEB-INF/lib
or in
WEB-INF/osgi-lib
if the package is an OSGi bundle. You
can either add OSGi bundle dependencies directly to
WEB-INF/osgi-lib
or configure the
org.osgi.framework.system.packages.extra
property (see Table 18-1) in your OSGi
framework instance to export the necessary
javax
packages that the application needs.
Chapter 18
Using OSGi Logging Via WebLogic Server
18-17

For more information on filtering classloaders, see Using a Filtering ClassLoader.
OSGI Example
WebLogic Server includes two simple example OSGi bundles: client and server. The server
bundle (ServerBundle) exports a packet that the client bundle (ClientBundle) imports. The
example produces an HTML page that displays the deployed OSGi bundles.
WebLogic Server includes an example that demonstrates how to deploy OSGi bundles to
WebLogic Server. If you installed the WebLogic Server examples, the OSGi example source
code is available in
ORACLE_HOMEwl_server/examples/src/examples/osgi/osgiApp
, where
ORACLE_HOME
represents the directory in which the WebLogic Server code examples are
configured. For more information about the WebLogic Server code examples, see Sample
Applications and Code Examples in Understanding Oracle WebLogic Server.
Chapter 18
OSGI Example
18-18

19
Using the WebSocket Protocol in WebLogic
Server
WebLogic Server supports the WebSocket protocol (RFC 6455), which provides full-duplex
communications between two peers over the TCP protocol. The WebLogic Server
implementation of the WebSocket protocol and its accompanying API enable you to develop
and deploy applications that communicate bidirectionally with clients. Although you can use the
WebSocket protocol for any type of client-server communication, the implementation is most
commonly used to communicate with browsers running Web pages that use the World Wide
Web Consortium (W3C) JavaScript WebSocket API. The WebLogic Server implementation of
the WebSocket protocol also supports Java clients.
This chapter includes the following sections:
• Understanding the WebSocket Protocol
• Understanding the WebLogic Server WebSocket Implementation
• Overview of Creating a WebSocket Application
• Creating an Endpoint
• Handling Life Cycle Events for a WebSocket Connection
• Defining, Injecting, and Accessing a Resource for a WebSocket Endpoint
• Sending a Message
• Encoding and Decoding a WebSocket Message
• Specifying a Part of an Endpoint Deployment URI as an Application Parameter
• Maintaining Client State
• Configuring a Server Endpoint Programmatically
• Building Applications that Use the Java API for WebSocket
• Deploying a WebSocket Application
• Using WebSockets with Proxy Servers
• Writing a WebSocket Client
• Securing a WebSocket Application
• Enabling Protocol Fallback for WebSocket Messaging
• Migrating an Application to the JSR 356 Java API for WebSocket from the Deprecated API
• Example of Using the Java API for WebSocket with WebLogic Server
• Understanding the WebSocket Protocol
WebSocket is an application protocol that provides simultaneous two-way communication
over a single TCP connection between a client and a server. The WebSocket protocol
enables the client and the server to send data independently.
• Understanding the WebLogic Server WebSocket Implementation
The WebLogic Server WebSocket implementation supports JSR 356 Java API for
Websocket.
19-1

• Overview of Creating a WebSocket Application
The Java API for WebSocket (JSR-356) enables you to create, configure, and deploy
WebSocket endpoints in web applications. The WebSocket client API specified in JSR-356
also enables you to access remote WebSocket endpoints from any Java application.
• Creating an Endpoint
The container creates one instance of an endpoint for each connection to its deployment
URI. Each instance retains user state for each connection and simplifies development.
• Handling Life Cycle Events for a WebSocket Connection
Different life cycle events for a WebSocket connection such as connection opened,
message received, error, and connection closed are handled differently in an annotated
endpoint and a programmatic endpoint.
• Defining, Injecting, and Accessing a Resource for a WebSocket Endpoint
The Java API for WebSocket allows you to use Contexts and Dependency Injection (CDI)
to inject and access a resource that a WebSocket endpoint requires. You can use the
injected resource from within a method for handling a lifecycle event for a WebSocket
connection.
• Sending a Message
The Java API for WebSocket enables you to send text messages, binary messages, and
ping frames from an endpoint to its connected peers.
• Encoding and Decoding a WebSocket Message
The Java API for WebSocket provides support for converting between WebSocket
messages and custom Java types by using encoders and decoders. This mechanism
simplifies WebSocket applications because it decouples the business logic from the
serialization and deserialization of objects.
• Specifying a Part of an Endpoint Deployment URI as an Application Parameter
The
ServerEndpoint
annotation enables you to use a level 1 URI template to specify parts
of an endpoint deployment URI as application parameters. A URI template describes a
range of URIs through variable expansion.
• Maintaining Client State
Because the container creates an instance of the endpoint class for every connection, you
can define and use instance variables to store client state information.
• Configuring a Server Endpoint Programmatically
The Java API for WebSocket enables you to configure how the container creates server
endpoint instances.
• Building Applications that Use the Java API for WebSocket
The Java API for WebSocket is located within the
wlserver/server/lib/api.jar
file. To
build applications that use the Java API for WebSocket, define this library in the classpath
when compiling the application.
• Deploying a WebSocket Application
In WebLogic Server, you deploy a WebSocket application as part of a standard Java EE
Web application archive (WAR), either as a standalone Web application or a WAR module
within an enterprise application.
• Monitoring WebSocket Applications
You can monitor message statistics and runtime properties for WebSocket applications and
endpoints. Endpoint-level monitoring collects information per individual endpoint, while
application-level monitoring aggregates information from all endpoints deploying in the
given application.
• Using WebSockets with Proxy Servers
Clients accessing WebSocket applications must either connect directly to the WebLogic
Server instance or through a Web proxy server that supports the WebSocket protocol.
Chapter 19
19-2

• Writing a WebSocket Client
A WebSocket client application is typically a browser-based client. The Java API for
WebSocket can also be used to write a Java WebSocket client.
• Securing a WebSocket Application
In WebLogic Server, you deploy a WebSocket application as a Web application archive
(WAR), either as a standalone Web application or a WAR module within an enterprise
application. Therefore, many security practices that you apply to securing Web applications
can apply to WebSocket applications.
• Enabling Protocol Fallback for WebSocket Messaging
Protocol fallback provides a mechanism for using an alternative transport for WebSocket
messaging when the WebSocket protocol is not supported. Typically the WebSocket
protocol is not supported either because the WebSocket object is not available or because
WebSocket frames are blocked by a firewall. In this release, the only supported alternative
transport is HTTP Long Polling.
• Migrating an Application to the JSR 356 Java API for WebSocket from the Deprecated API
To ensure compatibility of your WebSocket applications with future releases of WebLogic
Server, use the JSR 356 Java API for WebSocket instead of the deprecated packages.
• Example of Using the Java API for WebSocket with WebLogic Server
Examine an example in which a server endpoint echoes text that a user has sent from a
client. When the user sends a text message, the server appends the text (from your
server) to the message and sends the message back to the user.
Understanding the WebSocket Protocol
WebSocket is an application protocol that provides simultaneous two-way communication over
a single TCP connection between a client and a server. The WebSocket protocol enables the
client and the server to send data independently.
As part of the HTML5 specification (
http://www.w3.org/TR/html5/
), the WebSocket Protocol
is supported by most browsers. A browser that supports the WebSocket protocol provides a
JavaScript API to connect to endpoints, send messages, and assign callback methods for
WebSocket events (such as opened connections, received messages, and closed
connections).
For general information about the WebSocket Protocol, see
http://tools.ietf.org/html/
rfc6455
.
• Limitations of the HTTP Request-Response Model
• WebSocket Endpoints
• Handshake Requests in the WebSocket Protocol
• Messaging and Data Transfer in the WebSocket Protocol
Limitations of the HTTP Request-Response Model
In the traditional request-response model used in HTTP, the client requests resources and the
server provides responses. The exchange is always initiated by the client; the server cannot
send any data without the client requesting it first. This model worked well for the World Wide
Web when clients made occasional requests for documents that changed infrequently, but the
limitations of this approach are increasingly apparent as content changes quickly and users
expect a more interactive experience on the web. The WebSocket protocol addresses these
limitations by providing a full-duplex communication channel between the client and the server.
Chapter 19
Understanding the WebSocket Protocol
19-3

Combined with other client technologies, such as JavaScript and HTML5, WebSocket enables
web applications to deliver a richer user experience.
WebSocket Endpoints
In a WebSocket application, the server publishes a WebSocket endpoint and the client uses
the endpoint's URI to connect to the server.
A WebSocket endpoint is represented by a URI in one of the following formats:
ws://host:port/path?query
wss://host:port/path?query
The
ws
scheme represents an unencrypted WebSocket connection.
The
wss
scheme represents an encrypted WebSocket connection.
The remaining components in these formats are as follows:
host
The host as defined in [RFC3986], Section 3.2.2.
port
Optional. The port as defined in [RFC3986], Section 3.2.3. The default port number is 80 for
unencrypted connections and 443 for encrypted connections.
path
The path as defined in [RFC3986], Section 3.3. In a WebSocket endpoint, the path indicates
the location of the endpoint within a server.
query
Optional. A query as defined in [RFC3986], Section 3.4.
Handshake Requests in the WebSocket Protocol
To initiate a WebSocket connection, the client sends a handshake request to a WebSocket
endpoint that the server has published. The client locates the endpoint by using the end point's
URI. The connection is established if the handshake request passes validation, and the server
accepts the request. The handshake is compatible with existing HTTP-based infrastructure:
web servers interpret the handshake as an HTTP connection upgrade request.
Example 19-1 Handshake Request from a WebSocket Client
The following example shows a handshake request from a client.
GET /path/to/websocket/endpoint HTTP/1.1
Host: localhost
Upgrade: websocket
Connection: Upgrade
Sec-WebSocket-Key: xqBt3ImNzJbYqRINxEFlkg==
Origin: http://localhost
Sec-WebSocket-Version: 13
Example 19-2 Server Response to a Handshake Request from a WebSocket Client
The following example shows a handshake from a server in response to a handshake request
from a client.
HTTP/1.1 101 Switching Protocols
Upgrade: websocket
Chapter 19
Understanding the WebSocket Protocol
19-4

Connection: Upgrade
Sec-WebSocket-Accept: K7DJLdLooIwIG/MOpvWFB3y3FE8=
The server applies a known operation to the value of the
Sec-WebSocket-Key
header to
generate the value of the
Sec-WebSocket-Accept
header. The client applies the same
operation to the value of the
Sec-WebSocket-Key
header. If the result matches the value
received from the server, the connection is established successfully. The client and the server
can send messages to each other after a successful handshake.
Messaging and Data Transfer in the WebSocket Protocol
The WebSocket protocol is symmetrical after the connection has been established: the client
and the WebLogic Server instance can send messages to each other at any time while the
connection is open, and they can close the connection at any time. Typically, clients connect to
only one server, but servers accept connections from multiple clients.
WebSocket supports text messages (encoded as UTF-8) and binary messages. The control
frames in WebSocket are close, ping, and pong (a response to a ping frame). Ping and pong
frames may also contain application data.
Understanding the WebLogic Server WebSocket Implementation
The WebLogic Server WebSocket implementation supports JSR 356 Java API for Websocket.
For more information about the Java API for WebSocket, see the JSR 356 specification
http://www.jcp.org/en/jsr/detail?id=356
:
Note:
The proprietary WebLogic Server WebSocket API that was introduced in release
12.1.2 is deprecated but remains supported for backward compatibility.
Although the JSR 356 Java API for WebSocket coexists with the proprietary
WebLogic Server WebSocket API, an application cannot contain calls to both APIs.
Only one of the APIs can be used in an application.
Information about how to use the deprecated API is available in the documentation
for Oracle WebLogic Server 12c (12.1.2) in Chapter 17, Using WebSockets in
WebLogic Server in Developing Applications for Oracle WebLogic Server 12c
(12.1.2).
The WebLogic Server WebSocket implementation includes the following components:
• WebSocket Protocol Implementation
• WebLogic WebSocket Java API
• Protocol Fallback for WebSocket Messaging
• Sample WebSocket Applications
• WebSocket Protocol Implementation
• WebLogic WebSocket Java API
• Protocol Fallback for WebSocket Messaging
Chapter 19
Understanding the WebLogic Server WebSocket Implementation
19-5

• Sample WebSocket Applications
WebSocket Protocol Implementation
The WebSocket protocol implementation in WebLogic Server is provided by the reference
implementation of JSR 356 Java API for WebSocket. This implementation of the WebSocket
protocol handles connection upgrades, establishes and manages connections, and handles
exchanges with the client.
WebLogic WebSocket Java API
The WebLogic WebSocket API is provided by the reference implementation of JSR 356 Java
API for WebSocket. This API consists of the following packages:
javax.websocket.server
This package contains annotations, classes, and interfaces to create and configure server
endpoints.
javax.websocket
This package contains annotations, classes, interfaces, and exceptions that are common to
client and server endpoints.
The API reference documentation for these packages is available in the following sections of
the Java EE 8 Specification APIs:
• Package javax.websocket
• Package javax.websocket.server
Protocol Fallback for WebSocket Messaging
Protocol fallback provides a mechanism for using an alternative transport for WebSocket
messaging when the WebSocket protocol is not supported. Typically the WebSocket protocol is
not supported either because the WebSocket object is not available or because WebSocket
frames are blocked by a firewall. In this release, the only supported alternative transport is
HTTP Long Polling.
Protocol fallback enables you to rely on standard programming APIs to perform WebSocket
messaging regardless of whether or not the runtime environment supports the WebSocket
protocol. For more information, see Enabling Protocol Fallback for WebSocket Messaging.
Sample WebSocket Applications
If the WebLogic Server Examples component is installed and configured on your machine, you
can use the WebSocket examples to demonstrate using WebSockets in WebLogic Server. For
more information about running these examples, see Sample Applications and Code Examples
in Understanding Oracle WebLogic Server.
Overview of Creating a WebSocket Application
The Java API for WebSocket (JSR-356) enables you to create, configure, and deploy
WebSocket endpoints in web applications. The WebSocket client API specified in JSR-356
also enables you to access remote WebSocket endpoints from any Java application.
The process for creating and deploying a WebSocket endpoint is as follows:
Chapter 19
Overview of Creating a WebSocket Application
19-6

1. Create an endpoint class.
2. Implement the lifecycle methods of the endpoint.
3. Add your business logic to the endpoint.
4. Deploy the endpoint inside a web application.
Creating an Endpoint
The container creates one instance of an endpoint for each connection to its deployment URI.
Each instance retains user state for each connection and simplifies development.
The Java API for WebSocket enables you to create the following kinds of endpoints:
• Annotated endpoints
• Programmatic endpoints
The process is different for programmatic endpoints and annotated endpoints. In most cases, it
is easier to create and deploy an annotated endpoint than a programmatic endpoint.
Note:
As opposed to servlets, WebSocket endpoints are instantiated multiple times. The
container creates one instance of an endpoint for each connection to its deployment
URI. Each instance is associated with one and only one connection. This behavior
facilitates keeping user state for each connection and simplifies development
because only one thread is executing the code of an endpoint instance at any given
time.
• Creating an Annotated Endpoint
• Creating a Programmatic Endpoint
• Specifying the Path Within an Application to a Programmatic Endpoint
Creating an Annotated Endpoint
Creating an annotated endpoint enables you to handle life cycle events for a WebSocket
connection by annotating methods of the endpoint class. For more information, see Handling
Life Cycle Events in an Annotated WebSocket Endpoint. An annotated endpoint is deployed
automatically with the application.
The Java API for WebSocket enables you to create annotated server endpoints and annotated
client endpoints.
To created an annotated server endpoint:
1. Write a Plain Old Java Object (POJO) class to represent the server endpoint.
The class must have a public no-argument constructor.
2. Annotate the class declaration of the POJO class with the
javax.websocket.server.ServerEndpoint
annotation.
This annotation denotes that the class represents a WebSocket server endpoint.
Chapter 19
Creating an Endpoint
19-7

3. .Set the value element of the
ServerEndpoint
annotation to the relative path to which the
endpoint is to be deployed.
The path must begin with a forward slash (/).
Example 19-3 Declaring an Annotated Server Endpoint Class
The following example shows how to declare an annotated server endpoint class. For an
example of how to declare a programmatic endpoint class to represent the same endpoint, see
Example 19-5.
This example declares the annotated server endpoint class
EchoEndpoint
. The endpoint is to
be deployed to the /echo path relative to the application.
import javax.websocket.server.ServerEndpoint;
...
@ServerEndpoint("/echo")
public class EchoEndpoint {
...
}
Example 19-4 Declaring an Annotated Client Endpoint Class
To create an annotated client endpoint:
1. Write a Plain Old Java Object (POJO) class to represent the client endpoint.
The class can have a constructor that takes arguments. However, to connect such an
endpoint to a server endpoint, you must use the variant of the connectToServer method
that takes an instance. You cannot use the variant that takes a class. For more information,
see Connecting a Java WebSocket CLient to a Server Endpoint
2. Annotate the class declaration of the POJO class with the
javax.websocket.ClientEndpoint
annotation.
This annotation denotes that the class represents a WebSocket client endpoint.
The following example shows how to declare an annotated client endpoint class.
This example declares the annotated client endpoint class
ExampleEndpoint
.
import javax.websocket.ClientEndpoint;
...
@ClientEndpoint
public class ExampleEndpoint {
...
}
Creating a Programmatic Endpoint
Creating a programmatic endpoint requires you to handle life cycle events for a WebSocket
connection by overriding methods of the endpoint's superclass. For more information, see
Handling Life Cycle Events in a Programmatic WebSocket Endpoint. A programmatic endpoint
is not deployed automatically with the application. You must deploy the endpoint explicitly. For
more information, see Specifying the Path Within an Application to a Programmatic Endpoint.
To create a programmatic endpoint, extend the
javax.websocket.Endpoint
class.
Example 19-5 shows how to declare a programmatic endpoint class. For an example of how to
declare an annotated endpoint class to represent the same endpoint, see Example 19-3.
Chapter 19
Creating an Endpoint
19-8

Example 19-5 Declaring a Programmatic Endpoint Class
This example declares the programmatic endpoint class
EchoEndpoint
. For an example that
shows how to specify the path within an application to this endpoint, see Example 19-6.
import javax.websocket.Endpoint;
...
public class EchoEndpoint extends Endpoint {
...
}
Specifying the Path Within an Application to a Programmatic Endpoint
To enable remote clients to connect to a programmatic endpoint, you must specify the path
within an application to the endpoint.
To specify the path within an application to a programmatic endpoint:
1. Invoke the
javax.websocket.server.ServerEndpointConfig.Builder.create
static
method to obtain an instance of the
javax.websocket.server.ServerEndpointConfig.Builder
class.
In the invocation of the
create
method, pass the following information as parameters to the
method:
• The class of the endpoint
• The path relative to the application at which the endpoint is to be available
2. Invoke the
build
method on the
ServerEndpointConfig.Builder
object that you obtained
in the previous step.
When you deploy your application, the endpoint is available at the following URI:
ws://host:port/application/path
The replaceable items in this URI are as follows:
host
The host on which the application is running.
port
The port on which WebLogic Server listens for client requests.
application
The name with which the application is deployed.
path
The path that you specified in the invocation of the
create
method.
For example, the URI to the endpoint at the
/echo
path relative to the
/echoapp
application
running on the local host is
ws://localhost:8890/echoapp/echo
.
Example 19-6 shows how to perform this task in a single line of Java code.
Example 19-6 Specifying the Path Within an Application to a Programmatic Endpoint
This example specifies
/echo
as the path within an application to the programmatic endpoint
EchoEndpoint
from Example 19-5.
import javax.websocket.server.ServerEndpointConfig.Builder;
...
Chapter 19
Creating an Endpoint
19-9

ServerEndpointConfig.Builder.create(EchoEndpoint.class, "/echo").build();
...
Handling Life Cycle Events for a WebSocket Connection
Different life cycle events for a WebSocket connection such as connection opened, message
received, error, and connection closed are handled differently in an annotated endpoint and a
programmatic endpoint.
How to handle life cycle events for a WebSocket connection depends on whether the endpoint
of the connection is an annotated endpoint or a programmatic endpoint. For more information,
see:
• Handling Life Cycle Events in an Annotated WebSocket Endpoint
• Handling Life Cycle Events in a Programmatic WebSocket Endpoint
• Handling Life Cycle Events in an Annotated WebSocket Endpoint
• Handling Life Cycle Events in a Programmatic WebSocket Endpoint
Handling Life Cycle Events in an Annotated WebSocket Endpoint
Handling a life cycle event in an annotated WebSocket involves the following tasks:
1. Adding a method to your endpoint class to handle the event
The allowed method parameters are defined by the annotation that you will use to
designate the event.
2. Annotating the method declaration with the annotation that designates the event that the
method is to handle.
Table 19-1 lists the life cycle events in a WebSocket endpoint and the annotations available in
the
javax.websocket
package to designate the methods that handle them. The examples in
the table show the most common parameters for these methods. Each example in the table
includes an optional
javax.websocket.Session
parameter. A
Session
object represents a
conversation between a pair of WebSocket endpoints.
For details about the combinations of parameters that are allowed by an annotation, see the
API reference documentation for the annotation.
Table 19-1 Annotations in javax.websocket for WebSocket Endpoint Lifecycle Events
Event Annotation Example
Connection opened
OnOpen
@OnOpen
public void open(Session session,
EndpointConfig conf)
{ }
Message received
OnMessage
@OnMessage
public String message (String msg) { }
Chapter 19
Handling Life Cycle Events for a WebSocket Connection
19-10
Table 19-1 (Cont.) Annotations in javax.websocket for WebSocket Endpoint Lifecycle
Events
Event Annotation Example
Error
OnError
@OnError
public void error(Session session,
Throwable error) { }
Connection closed
OnClose
@OnClose
public void close(Session session,
CloseReason reason)
{ }
• Handling a Connection Opened Event
• Handling a Message Received Event
• Handling an Error Event
• Handling a Connection Closed Event
Handling a Connection Opened Event
Handle a connection opened event to notify users that a new WebSocket conversation has
begun.
To handle a connection opened event, annotate the method for handling the event with the
OnOpen
annotation.
Example 19-7 shows how to handle a connection opened event.
Example 19-7 Handling a Connection Opened Event
This example prints the identifier of the session when a WebSocket connection is opened.
import javax.websocket.OnOpen;
import javax.websocket.Session;
...
@OnOpen
public void openedConnection (Session session) {
System.out.println("WebSocket opened: " + session.getId());
}
...
Handling a Message Received Event
The Java API for WebSocket enables you to handle the following types of incoming messages:
• Text messages
• Binary messages
• Pong messages
1. Add a method to your endpoint class to handle the type of the incoming message.
Chapter 19
Handling Life Cycle Events for a WebSocket Connection
19-11
Ensure that the data type of the parameter for receiving the message is compatible with
the type of the message as shown in the following table.
Message Type Data Type of the Parameter for Receiving the Message
Text Any one of the following data types depending on how the message is to be
received:
• To receive the whole message:
java.lang.String
• To receive the whole message converted to a Java primitive or class
equivalent to that type: the primitive or class equivalent
• To receive the message in parts:
String
and boolean pair
• To receive the whole message as a blocking stream:
java.io.Reader
• To receive the message encoded as a Java object: any type for which the
endpoint has a text decoder (
javax.websocket.Decoder.Text
or
javax.websocket.Decoder.TextStream
)
Binary Any one of the following data types depending on how the message is to be
received:
• To receive the whole message: byte array or
java.nio.ByteBuffer
• To receive the message in parts: byte array and boolean pair, or
ByteBuffer
and boolean pair
• To receive the whole message as a blocking stream:
java.io.InputStream
• To receive the message encoded as a Java object: any object type for
which the endpoint has a binary decoder
(
javax.websocket.Decoder.Binary
or
javax.websocket.Decoder.BinaryStream
)
Pong
javax.websocket.PongMessage
2.
Annotate the method declaration with the
OnMessage
annotation.
You can have at most three methods annotated with
@OnMessage
in an endpoint, one
method for each message type: text, binary, and pong.
Note:
For an annotated endpoint, you add methods for handling incoming messages to
your endpoint class. You are not required to create a separate message handler
class. However, for a programmatic endpoint, you must create a separate message
handler class.
To compare how to handle incoming messages for an annotated endpoint and a
programmatic endpoint, see Example 19-8 and Example 19-12.
Example 19-8 Handling Incoming Text Messages for an Annotated Endpoint
The following example shows how to handle incoming text messages for an annotated
endpoint.
This example replies to every incoming text message by sending the message back to the
peer of this endpoint. The method that is annotated with the
OnMessage
annotation is a method
of the endpoint class, not a separate message handler class.
For an example of how to perform the same operation for a programmatic endpoint, see
Example 19-12.
Chapter 19
Handling Life Cycle Events for a WebSocket Connection
19-12

import java.io.IOException;
import javax.websocket.OnMessage;
import javax.websocket.Session;
...
@OnMessage
public String onMessage(String msg) throws IOException {
return msg;
}
...
Example 19-9 Handling all Types of Incoming Messages
This example handles incoming text messages, binary messages, and pong messages. Text
messages are received whole as
String
objects. Binary messages are received whole as
ByteBuffer
objects.
import java.nio.ByteBuffer;
import javax.websocket.OnMessage;
import javax.websocket.PongMessage;
import javax.websocket.Session;
...
@OnMessage
public void textMessage(Session session, String msg) {
System.out.println("Text message: " + msg);
}
@OnMessage
public void binaryMessage(Session session, ByteBuffer msg) {
System.out.println("Binary message: " + msg.toString());
}
@OnMessage
public void pongMessage(Session session, PongMessage msg) {
System.out.println("Pong message: " +
msg.getApplicationData().toString());
}
...
Handling an Error Event
You need handle only error events that are not modeled in the WebSocket protocol, for
example:
• Connection problems
• Runtime errors from message handlers
• Conversion errors in the decoding of messages
To handle an error event, annotate the method for handling the event with the
OnError
annotation.
Example 19-10 shows how to handle an error event.
Example 19-10 Handling an Error Event
This example prints a stack trace in response to an error event.
import javax.websocket.OnError;
import javax.websocket.Session;
...
@OnError
Chapter 19
Handling Life Cycle Events for a WebSocket Connection
19-13

public void error(Session session, Throwable t) {
t.printStackTrace();
...
}
Handling a Connection Closed Event
You need handle a connection closed event only if you require some special processing before
the connection is closed, for example, retrieving session attributes such as the ID, or any
application data that the session holds before the data becomes unavailable after the
connection is closed.
To handle a connection closed event, annotate the method for handling the event with the
OnClose
annotation.
Example 19-11 shows how to handle a connection closed event.
Example 19-11 Handling a Connection Closed Event
This example prints the message
Someone is disconnecting...
in response to a connection
closed event.
import javax.websocket.OnClose;
import javax.websocket.Session;
...
@OnClose
public void bye(Session remote) {
System.out.println("Someone is disconnecting...");
}
...
Handling Life Cycle Events in a Programmatic WebSocket Endpoint
Table 19-2 summarizes how to handle lifecycle events in a programmatic WebSocket endpoint.
Table 19-2 Handling Life Cycle Events in a Programmatic WebSocket Endpoint
Event How to Handle
Connection opened Override the abstract
onOpen
method of the
Endpoint
class.
Message received
1. Declare that your endpoint class implements the message handler interface
javax.websocket.MessageHandler.Partial
or
javax.websocket.MessageHandler.Whole
.
2. Register your message handler by invoking the
addMessageHandler
method of your endpoint's
Session
object.
3. Implement the
onMessage
method of the message handler interface that
your endpoint class implements.
Error Optional: Override the
onError
method of the
Endpoint
class.
If you do not override this method, the
onError
method that your endpoint
inherits from the
Endpoint
class is called when an error occurs.
Connection closed Optional: Override the
onClose
method of the
Endpoint
class.
If you do not override this method, the
onClose
method that your endpoint
inherits from the
Endpoint
class is called immediately before the connection is
closed.
Chapter 19
Handling Life Cycle Events for a WebSocket Connection
19-14

Example 19-12 shows how handle incoming text messages for a programmatic endpoint by
handling connection opened events and message received events.
Example 19-12 Handling Incoming Text Messages for a Programmatic Endpoint
This example echoes every incoming text message. The example overrides the
onOpen
method
of the
Endpoint
class, which is the only abstract method of this class.
The
Session
parameter represents a conversation between this endpoint and the remote
endpoint. The
addMessageHandler
method registers message handlers, and the
getBasicRemote
method returns an object that represents the remote endpoint.
The message handler is implemented as an anonymous inner class. The
onMessage
method of
the message handler is invoked when the endpoint receives a text message.
For more information about sending a message, see Sending a Message.
For an example of how to perform the same operation for an annotated endpoint, see
Example 19-8.
import java.io.IOException;
import javax.websocket.EndpointConfig;
import javax.websocket.MessageHandler;
import javax.websocket.Session;
...
@Override
public void onOpen(final Session session, EndpointConfig config) {
session.addMessageHandler(new MessageHandler.Whole<String>() {
@Override
public void onMessage(String msg) {
try {
session.getBasicRemote().sendText(msg);
} catch (IOException e) { ... }
}
});
}
...
Defining, Injecting, and Accessing a Resource for a WebSocket
Endpoint
The Java API for WebSocket allows you to use Contexts and Dependency Injection (CDI) to
inject and access a resource that a WebSocket endpoint requires. You can use the injected
resource from within a method for handling a lifecycle event for a WebSocket connection.
For more information about CDI, see Using Contexts and Dependency Injection for the Java
EE Platform.
To define, inject, and access a resource for a WebSocket endpoint:
1. Define a managed bean to represent the resource to inject.
For more information, see Defining a Managed Bean.
2. In the endpoint class, inject the managed bean.
For more information, see Injecting a Bean.
3. From within the relevant method, invoke methods of the injected bean as required.
Chapter 19
Defining, Injecting, and Accessing a Resource for a WebSocket Endpoint
19-15

The following examples show how to define, inject, and access a resource for a WebSocket
endpoint:
• Example 19-13
• Example 19-14
Example 19-13 Defining a Managed Bean for a WebSocket Endpoint
This example defines the managed bean class
InjectedSimpleBean
.
import javax.annotation.PostConstruct;
public class InjectedSimpleBean {
private static final String TEXT = " (from your server)";
private boolean postConstructCalled = false;
public String getText() {
return postConstructCalled ? TEXT : null;
}
@PostConstruct
public void postConstruct() {
postConstructCalled = true;
}
}
Example 19-14 Injecting and Accessing a Resource for a WebSocket Endpoint
This example injects an instance of the
InjectedSimpleBean
managed bean class into the
server endpoint
SimpleEndpoint
. When the endpoint receives a message, it invokes the
getText
method on the injected bean. The method returns the text
(sent from your server)
.
The endpoint then sends back a message which is a concatenation of the original message
and gathered data.
The
InjectedSimpleBean
managed bean class is defined in Example 19-13.
import javax.websocket.OnMessage;
import javax.websocket.server.ServerEndpoint;
import javax.annotation.PostConstruct;
import javax.inject.Inject;
@ServerEndpoint(value = "/simple")
public class SimpleEndpoint {
private boolean postConstructCalled = false;
@Inject
InjectedSimpleBean bean;
@OnMessage
public String echo(String message) {
return postConstructCalled ?
String.format("%s%s", message, bean.getText()) :
"PostConstruct was not called";
}
@PostConstruct
public void postConstruct() {
postConstructCalled = true;
Chapter 19
Defining, Injecting, and Accessing a Resource for a WebSocket Endpoint
19-16

}
}
Sending a Message
The Java API for WebSocket enables you to send text messages, binary messages, and ping
frames from an endpoint to its connected peers.
• Text messages
• Binary messages
• Ping frames
• Sending a Message to a Single Peer of an Endpoint
• Sending a Message to All Peers of an Endpoint
• Ensuring Thread Safety for WebSocket Endpoints
Sending a Message to a Single Peer of an Endpoint
To send a message to a single peer of an endpoint:
1. Obtain the
Session
object from the connection.
The
Session
object is available as a parameter in the lifecycle methods of the endpoint.
How to obtain this object depends on whether the message that you are sending is a
response to a message from a peer.
• If the message is a response, obtain the
Session
object from inside the method that
received the message.
• If the message is not a response, store the
Session
object as an instance variable of
the endpoint class in the method for handling a connection opened event. Storing the
Session
object in this way enables you to access it from other methods.
2. Use the
Session
object to obtain an object that implements one of the subinterfaces of
javax.websocket.RemoteEndpoint
.
• If you are sending the message synchronously, obtain a
RemoteEndpoint.Basic
object. This object provides blocking methods for sending a message.
To obtain a
RemoteEndpoint.Basic
object, invoke the
Session.getBasicRemote()
method.
• If you are sending the message asynchronously, obtain a
RemoteEndpoint.Async
object. This object provides non-blocking methods for sending a message.
To obtain a
RemoteEndpoint.Async
object, invoke the
Session.getAsyncRemote()
method.
3. Use the
RemoteEndpoint
object that you obtained in the previous step to send the
message to the peer.
The following list shows some of the methods you can use to send a message to the peer:
•
void RemoteEndpoint.Basic.sendText(String text)
Send a text message to the peer. This method blocks until the whole message has
been transmitted.
•
void RemoteEndpoint.Basic.sendBinary(ByteBuffer data)
Chapter 19
Sending a Message
19-17

Send a binary message to the peer. This method blocks until the whole message has
been transmitted.
•
void RemoteEndpoint.sendPing(ByteBuffer appData)
Send a ping frame to the peer.
•
void RemoteEndpoint.sendPong(ByteBuffer appData)
Send a pong frame to the peer.
Example 19-15 demonstrates how to use this procedure to reply to every incoming text
message. For an example of how to send a message as the return value of a method, see
Example 19-8.
Example 19-15 Sending a Message to a Single Peer of an Endpoint
This example replies to every incoming text message by sending the message back to the
peer of this endpoint.
import java.io.IOException;
import javax.websocket.OnMessage;
import javax.websocket.Session;
...
@OnMessage
public void onMessage(Session session, String msg) {
try {
session.getBasicRemote().sendText(msg);
} catch (IOException e) { ... }
}
...
Sending a Message to All Peers of an Endpoint
Some WebSocket applications must send messages to all connected peers of the application's
WebSocket endpoint, for example:
• A stock application must send stock prices to all connected clients.
• A chat application must send messages from one user to all other clients in the same chat
room.
• An online auction application must send the latest bid to all bidders on an item.
However, each instance of an endpoint class is associated with one and only one connection
and peer. Therefore, to send a message to all peers of an endpoint, you must iterate over the
set of all open WebSocket sessions that represent connections to the same endpoint.
To send a message to all peers of an endpoint:
1. Obtain the set of all open WebSocket sessions that represent connections to the endpoint.
Invoke the
getOpenSessions
method on the endpoint's
Session
object for this purpose.
2. Send the message to each open session that you obtained in the previous step.
a. Use the session to obtain a
RemoteEndpoint
object.
b. Use the
RemoteEndpoint
object to send the message.
See Sending a Message to a Single Peer of an Endpoint
Example 19-16 Sending a Message to All Peers of an Endpoint
This example forwards incoming text messages to all connected peers.
Chapter 19
Sending a Message
19-18

import java.io.IOException;
import javax.websocket.OnMessage;
import javax.websocket.Session;
import javax.websocket.server.ServerEndpoint;
...
@ServerEndpoint("/echoall")
public static class EchoAllEndpoint {
@OnMessage
public void messageReceived(Session session, String msg) {
for (Session sess : session.getOpenSessions()) {
try {
sess.getBasicRemote().sendText(msg);
} catch (IOException e) {
// handle exception
}
}
}
}
Ensuring Efficiency when Sending a Message to All Peers of an Endpoint
In a real-world application, in which many messages are being sent, you can use multiple
threads to ensure that the application sends messages efficiently.
If too many WebSocket connections are open, using one thread to broadcast messages is
inefficient, because the time it takes for a client to receive a message depends on its location in
the iteration process. If thousands of WebSocket connections are open, then iteration is slow,
causing some clients to receive messages early and other clients to receive messages much
later. This delay is unacceptable in certain situations; for example, a stock application should
ensure that each client receives stock price data as early as possible.
To increase efficiency, the application can partition open WebSocket connections into groups
and then use multiple threads to broadcast messages to each group of WebSocket
connections.
Ensuring Thread Safety for WebSocket Endpoints
The Java API for WebSocket specification requires that Java EE implementations instantiate
endpoint classes once per connection. This requirement facilitates the development of
WebSocket endpoints because you are guaranteed that only one thread is executing the code
in a WebSocket endpoint class at any given time. When you introduce a new thread in an
endpoint, you must ensure that variables and methods accessed by more than one thread are
thread safe.
Encoding and Decoding a WebSocket Message
The Java API for WebSocket provides support for converting between WebSocket messages
and custom Java types by using encoders and decoders. This mechanism simplifies
WebSocket applications because it decouples the business logic from the serialization and
deserialization of objects.
An encoder takes a Java object and produces a representation that can be transmitted as a
WebSocket text message or binary message. For example, encoders typically produce
JavaScript Object Notation (JSON), Extensible Markup Language (XML), or binary
representations. A decoder performs the reverse function: it reads a WebSocket message and
creates a Java object.
Chapter 19
Encoding and Decoding a WebSocket Message
19-19
Note:
If you want to send and receive multiple Java types as the same type of WebSocket
message, define the types to extend a common class. For example, if you want to
send and receive the Java types
MessageA
and
MessageB
as text messages, define
the types to extend the common class
Message
.
Defining the types in this way enables you to implement a single decoder class for
multiple types.
• Encoding a Java Object as a WebSocket Message
• Decoding a WebSocket Message as a Java Object
Encoding a Java Object as a WebSocket Message
You can have more than one encoder for text messages and more than one encoder for binary
messages. Like endpoints, encoder instances are associated with one and only one
WebSocket connection and peer. Therefore, only one thread is executing the code of an
encoder instance at any given time.
To encode a Java object as a WebSocket message:
1. For each custom Java type that you want to send as a WebSocket message, implement
the appropriate interface for the type of the WebSocket message:
• For a text message, implement
javax.websocket.Encoder.Text<T>
.
• For a binary message, implement
javax.websocket.Encoder.Binary<T>
.
These interfaces specify the
encode
method.
2. Specify that your endpoint will use your encoder implementations.
• For an annotated endpoint, add the names of your encoder implementations to the
encoders
optional element of the
ServerEndpoint
annotation.
• For a programmatic endpoint, pass a list of the names of your encoder
implementations as a parameter of the
encoders
method of a
javax.websocket.server.ServerEndpointConfig.Builder
object.
3. Use the
sendObject(Object data)
method of the
RemoteEndpoint.Basic
or
RemoteEndpoint.Async
interfaces to send your objects as messages.
The container looks for an encoder that matches your type and uses it to covert the object
to a WebSocket message.
The following examples show how to send the Java types
com.example.game.message.MessageA
and
com.example.game.message.MessageB
as text
messages:
• Example 19-17
• Example 19-18
• Example 19-19
Example 19-17 Implementing an Encoder Interface
This example implements the
Encoder.Text<MessageA>
interface.
Chapter 19
Encoding and Decoding a WebSocket Message
19-20

package com.example.game.encoder;
import javax.websocket.EncodeException;
import javax.websocket.Encoder;
import javax.websocket.EndpointConfig;
import com.example.game.message.MessageA;
...
public class MessageATextEncoder implements Encoder.Text<MessageA> {
@Override
public void init(EndpointConfig ec) { }
@Override
public void destroy() { }
@Override
public String encode(MessageA msgA) throws EncodeException {
// Access msgA's properties and convert to JSON text...
return msgAJsonString;
}
...
}
The implementation of
Encoder.Text<MessageB>
is similar.
Example 19-18 Defining Encoders for an Annotated WebSocket Endpoint
This example defines the encoder classes
MessageATextEncoder.class
and
MessageBTextEncoder.class
for the WebSocket server endpoint
EncEndpoint
.
package com.example.game;
import javax.websocket.server.ServerEndpoint;
import com.example.game.encoder.MessageATextEncoder;
import com.example.game.encoder.MessageBTextEncoder;
...
@ServerEndpoint(
value = "/myendpoint",
encoders = { MessageATextEncoder.class, MessageBTextEncoder.class }
...
)
public class EncEndpoint { ... }
Example 19-19 Sending Java Objects Encoded as WebSocket Messages
This example uses the
sendObject
method to send
MessageA
and
MessageB
objects as
WebSocket messages.
import javax.websocket.Session;
...
import com.example.game.message.MessageA;
import com.example.game.message.MessageB;
...
MessageA msgA = new MessageA(...);
MessageB msgB = new MessageB(...);
session.getBasicRemote.sendObject(msgA);
session.getBasicRemote.sendObject(msgB);
...
Chapter 19
Encoding and Decoding a WebSocket Message
19-21

Decoding a WebSocket Message as a Java Object
Unlike encoders, you can have at most one decoder for binary messages and one decoder for
text messages. Like endpoints, decoder instances are associated with one and only one
WebSocket connection and peer, so only one thread is executing the code of a decoder
instance at any given time.
To decode a WebSocket message as a Java object:
1. Implement the appropriate interface for the type of the WebSocket message:
• For a text message, implement
javax.websocket.Decoder.Text<T>
.
• For a binary message, implement
javax.websocket.Decoder.Binary<T>
.
These interfaces specify the
willDecode
and
decode
methods.
2. Specify that your endpoint will use your decoder implementations.
• For an annotated endpoint, add the names of your decoder implementations to the
decoders
optional element of the
ServerEndpoint
annotation.
• For a programmatic endpoint, pass a list of the names of your decoder
implementations as a parameter of the
decoders
method of a
javax.websocket.server.ServerEndpointConfig.Builder
object.
3. Ensure that the method in your endpoint for handling a message received event takes your
custom Java type as a parameter.
See Handling Life Cycle Events for a WebSocket Connection.
When the endpoint receives a message that can be decoded by one of the decoders you
specified, the container calls the method that takes your custom Java type as a parameter
if this method exists.
The following examples show how to decode WebSocket text messages as the Java types
com.example.game.message.MessageA
and
com.example.game.message.MessageB
:
• Example 19-20
• Example 19-21
• Example 19-22
These examples assume that the Java types
com.example.game.message.MessageA
and
com.example.game.message.MessageB
extend the
com.example.game.message.Message
class.
Example 19-20 Implementing a Decoder Interface
This example implements the
Decoder.Text<Message>
interface.
Because only one decoder for text messages is allowed for an endpoint, the implementation is
a decoder for the
Message
superclass. This decoder is used for decoding the subclasses of
Message
.
package com.example.game.decoder;
import javax.websocket.DecodeException;
import javax.websocket.Decoder;
import javax.websocket.EndpointConfig;
import com.example.game.message.Message;
import com.example.game.message.MessageA;
import com.example.game.message.MessageB;
Chapter 19
Encoding and Decoding a WebSocket Message
19-22

...
public class MessageTextDecoder implements Decoder.Text<Message> {
@Override
public void init(EndpointConfig ec) { }
@Override
public void destroy() { }
@Override
public Message decode(String string) throws DecodeException {
// Read message...
if ( /* message is an A message */ )
return new MessageA(...);
else if ( /* message is a B message */ )
return new MessageB(...);
}
@Override
public boolean willDecode(String string) {
// Determine if the message can be converted into either a
// MessageA object or a MessageB object...
return canDecode;
}
}
Example 19-21 Defining a Decoder for an Annotated WebSocket Endpoint
This example defines the decoder class
MessageTextDecoder.class
for the WebSocket server
endpoint
EncEndpoint
.
For completeness, this example also includes the definitions of the encoder classes
MessageATextEncoder.class
and
MessageBTextEncoder.class
from Example 19-18.
package com.example.game;
import javax.websocket.server.ServerEndpoint;
import com.example.game.encoder.MessageATextEncoder;
import com.example.game.encoder.MessageBTextEncoder;
import com.example.game.decoder.MessageTextDecoder;
...
@ServerEndpoint(
value = "/myendpoint",
encoders = { MessageATextEncoder.class, MessageBTextEncoder.class },
decoders = { MessageTextDecoder.class }
)
public class EncEndpoint { ... }
Example 19-22 Receiving WebSocket Messages Encoded as Java Objects
This example defines the method
message
that receives
MessageA
objects and
MessageB
objects.
import javax.websocket.OnMessage;
import javax.websocket.Session;
...
import com.example.game.message.Message;
import com.example.game.message.MessageA;
import com.example.game.message.MessageB;
...
@OnMessage
public void message(Session session, Message msg) {
if (msg instanceof MessageA) {
// We received a MessageA object...
Chapter 19
Encoding and Decoding a WebSocket Message
19-23

else if (msg instanceof MessageB) {
// We received a MessageB object...
}
}
Specifying a Part of an Endpoint Deployment URI as an
Application Parameter
The
ServerEndpoint
annotation enables you to use a level 1 URI template to specify parts of
an endpoint deployment URI as application parameters. A URI template describes a range of
URIs through variable expansion.
For more information about URI templates, see
http://tools.ietf.org/html/rfc6570
.
To specify a part of an endpoint deployment URI as an application parameter:
1. Set the
value
element of the
ServerEndpoint
annotation to the URI template that you want
to use.
In the URI template, enclose each variable for expansion in a pair of braces.
2. Declare each variable for expansion as a parameter in a method for handling one of the
following types of event:
• Connection opened
• Connection closed
• Message received
The type of the parameter can be
String
, a primitive type, or a boxed version of them.
3. Annotate the declaration of the parameter with the
javax.websocket.server.PathParam
annotation.
4. Set the value element of the
PathParam
annotation to the name of the variable.
5. In the body of the method that takes the parameter, provide logic for expanding the
variable.
Example 19-23 shows how to specify a part of an endpoint deployment URI as an application
parameter.
Example 19-23 Specifying a Part of an Endpoint Deployment URI as an Application
Parameter
This example specifies an endpoint deployment URI as a URI template that contains the
variable
{room-name}
. The variable is expanded through the
roomName
parameter of the
open
method to determine which chat room the user wants to join.
import javax.websocket.EndpointConfig;
import javax.websocket.OnOpen;
import javax.websocket.Session;
import javax.websocket.server.PathParam;
import javax.websocket.server.ServerEndpoint;
@ServerEndpoint("/chatrooms/{room-name}")
public class ChatEndpoint {
@OnOpen
public void open(Session session,
EndpointConfig c,
@PathParam("room-name") String roomName) {
Chapter 19
Specifying a Part of an Endpoint Deployment URI as an Application Parameter
19-24

// Add the client to the chat room of their choice ...
}
...
}
Code in the body of the
open
method to expand the
{room-name}
variable is not shown in this
example.
If the endpoint is deployed inside a web application called
chatapp
at a local Java EE server in
port 8080, clients can connect to the endpoint using any of the following URIs:
http://localhost:8080/chatapp/chatrooms/currentnews
http://localhost:8080/chatapp/chatrooms/music
http://localhost:8080/chatapp/chatrooms/cars
http://localhost:8080/chatapp/chatrooms/technology
Maintaining Client State
Because the container creates an instance of the endpoint class for every connection, you can
define and use instance variables to store client state information.
In addition, the
Session.getUserProperties
method provides a modifiable map to store user
properties.
To store information common to all connected clients, you can use class (static) variables;
however, you are responsible for ensuring thread-safe access to them.
Example 19-24 shows how to maintain client state.
Example 19-24 Maintaining Client State
This example replies to incoming text messages with the contents of the previous message
from each client.
import java.io.IOException;
import javax.websocket.OnMessage;
import javax.websocket.OnOpen;
import javax.websocket.Session;
import javax.websocket.server.ServerEndpoint;
@ServerEndpoint("/delayedecho")
public class DelayedEchoEndpoint {
@OnOpen
public void open(Session session) {
session.getUserProperties().put("previousMsg", " ");
}
@OnMessage
public void message(Session session, String msg) {
String prev = (String) session.getUserProperties()
.get("previousMsg");
session.getUserProperties().put("previousMsg", msg);
try {
session.getBasicRemote().sendText(prev);
} catch (IOException e) { ... }
}
}
Chapter 19
Maintaining Client State
19-25

Configuring a Server Endpoint Programmatically
The Java API for WebSocket enables you to configure how the container creates server
endpoint instances.
You can provide custom endpoint configuration logic for:
• Accessing the details of the handshake request for a WebSocket connection
• Performing custom checks on the
Origin
HTTP header
• Modifying the WebSocket handshake response
• Choosing a WebSocket subprotocol from those requested by the client
• Controlling the instantiation and initialization of endpoint instances
• Specifying the extensions that a server endpoint will support
To configure a server endpoint programmatically:
1. Extend the
javax.websocket.server.ServerEndpointConfig.Configurator
class.
2. Override the methods that perform the configuration operations for which you require
custom logic, as shown in the following table.
Configuration Operation Method to Override
Accessing the details of the handshake request
for a WebSocket connection
modifyHandshake
Performing custom checks on the
Origin
HTTP
header
checkOrigin
Modifying the WebSocket handshake response
modifyHandshake
Choosing a WebSocket subprotocol from those
requested by the client
getNegotiatedSubprotocol
Controlling the instantiation and initialization of
endpoint instances
getEndpointInstance
Specifying the extensions that a server endpoint
will support
getNegotiatedExtensions
3. In the server endpoint class, set the
configurator
element of the
ServerEndpoint
annotation to the configurator class.
The following examples show how to configure a server endpoint programmatically:
• Example 19-25
• Example 19-26
Example 19-25 Extending the ServerEndpointConfig.Configurator Class
This example extends the
ServerEndpointConfig.Configurator
class to make the handshake
request object available to endpoint instances.
import javax.websocket.HandshakeResponse;
import javax.websocket.server.ServerEndpointConfig.Configurator;
import javax.websocket.server.HandshakeRequest;
...
public class CustomConfigurator extends ServerEndpointConfig.Configurator {
@Override
Chapter 19
Configuring a Server Endpoint Programmatically
19-26

public void modifyHandshake(ServerEndpointConfig conf,
HandshakeRequest req,
HandshakeResponse resp) {
conf.getUserProperties().put("handshakereq", req);
}
...
}
Example 19-26 Specifying a Custom Configurator for a Server Endpoint Class
This example specifies the custom configurator class
CustomConfigurator.class
for the
server endpoint class
MyEndpoint
.
The custom configurator enables instances of the server endpoint class to access the
handshake request object. The server endpoint class uses the handshake request object to
access the details of the handshake request, such as its headers or the
HttpSession
object.
import javax.websocket.EndpointConfig;
import javax.websocket.HandshakeResponse;
import javax.websocket.OnOpen;
import javax.websocket.Session;
import javax.websocket.server.HandshakeRequest;
import javax.websocket.server.ServerEndpoint;
import java.util.List;
import java.util.Map;
...
@ServerEndpoint(
value = "/myendpoint",
configurator = CustomConfigurator.class
)
public class MyEndpoint {
@OnOpen
public void open(Session s, EndpointConfig conf) {
HandshakeRequest req = (HandshakeRequest) conf.getUserProperties()
.get("handshakereq");
Map<String,List<String>> headers = req.getHeaders();
...
}
}
Building Applications that Use the Java API for WebSocket
The Java API for WebSocket is located within the
wlserver/server/lib/api.jar
file. To build
applications that use the Java API for WebSocket, define this library in the classpath when
compiling the application.
You can also use Maven to build applications that use the Java API for WebSocket. If you are
using Maven, obtain the Maven artifact that contains the Java API for WebSocket from maven
central as
javax.websocket.javax.websocket-api:1.0
. For more information, see Using the
WebLogic Maven Plug-In.
Deploying a WebSocket Application
In WebLogic Server, you deploy a WebSocket application as part of a standard Java EE Web
application archive (WAR), either as a standalone Web application or a WAR module within an
enterprise application.
Chapter 19
Building Applications that Use the Java API for WebSocket
19-27
You do not need to configure the WebSocket endpoint in the
web.xml
file, or any other
deployment descriptor, or perform any type of dynamic operation to register or enable the
WebSocket endpoint.
However, you can optionally set the context initialization properties the are listed in Table 19-3.
To indicate that these properties are specific to WebLogic Server and not part of the JSR 356
specification, their fully qualified names contain the prefix
weblogic.websocket
.
Table 19-3 Context Initialization Properties for a WebSocket Application
Property Type Description
weblogic.websocket.tyrus.in
coming-buffer-size
Intege
r
The maximum underlying buffer size in bytes for receiving
messages. The application cannot process messages that
are larger than this size.
This parameter affects the following server sessions and
client sessions:
•
All server sessions in the same application
•
Only client sessions that are connected with the
server-instantiated
javax.websocket.server.ServerContainer
object in the application
You can override this setting for clients sessions by
setting a property of the same name for a client
endpoint. For more information, see Configuring a
WebSocket Client Endpoint Programmatically.
The default buffer size is 4194315, of which 4 Mbytes are
for the payload and 11 bytes are for the frame overhead.
weblogic.websocket.tyrus.se
ssion-max-idle-timeout
Intege
r
The maximum period in milliseconds after which an idle
connection times out. The default value is 30000, which
corresponds to 30 seconds.
weblogic.websocket.tyrus.cl
uster
String
WebSocket cluster uses Coherence as part of its
implementation to establish communication among all the
members in the cluster. WebSocket clustering enables
horizontal scaling, allows you to send messages to all
members of the cluster, increases the maximum number
of connected clients, and decreases broadcast execution
time. Clustering is disabled by default.
To enable clustering set the value to true.
Example 19-27 shows how to set context initialization properties for a WebSocket application.
Example 19-27 Setting Context Initialization Properties for a WebSocket Application
This example sets context initialization parameters for a WebSocket application as follows:
• The maximum underlying buffer size for receiving messages is set to 16777227 bytes.
• The maximum period after which an idle connection times out is set to 60,000 milliseconds,
which corresponds to 1 minute.
• Enable WebSocket cluster using managed Coherence server to establish communication
among all members.
Chapter 19
Deploying a WebSocket Application
19-28
Note:
Clustering requires a managed Coherence server with local storage enabled.
See, Configure Coherence Cluster Member Storage Settings in Administering
Clusters for Oracle WebLogic Server.
<?xml version="1.0" encoding="UTF-8"?>
<web-app version="3.0" ...>
...
<context-param>
<param-name>weblogic.websocket.tyrus.incoming-buffer-size</param-name>
<param-value>16777227</param-value>
</context-param>
<context-param>
<param-name>weblogic.websocket.tyrus.session-max-idle-timeout</param-name>
<param-value>60000</param-value>
</context-param>
<context-param>
<param-name>weblogic.websocket.tyrus.cluster </param-name>
<param-value>true</param-value>
</context-param>
</web-app>
Monitoring WebSocket Applications
You can monitor message statistics and runtime properties for WebSocket applications and
endpoints. Endpoint-level monitoring collects information per individual endpoint, while
application-level monitoring aggregates information from all endpoints deploying in the given
application.
WebSocket Monitoring Properties
The following table details the types of properties monitored at runtime and whether monitoring
occurs at the application or endpoint level. For message-related properties, WebLogic Server
uses bytes for message size and distinguishes three types of messages: text, binary, and
control.
Property Description Monitoring Level
Open session count The number of current open
sessions for the WebSocket
application or endpoint.
application, endpoint
Maximum open sessions count The highest number of open
sessions for the WebSocket
application or endpoint since
server startup.
application, endpoint
Error counts The list of errors with the number
of times each error has occurred.
Errors are represented by
throwable class names.
application, endpoint
Chapter 19
Monitoring WebSocket Applications
19-29

Property Description Monitoring Level
Sent messages count The number of sent messages for
the WebSocket application or
endpoint since monitoring began.
Statistics are provided per
individual message type (text,
binary, and control) and as a total
count.
application, endpoint
Received messages count The number of received
messages for the WebSocket
application or endpoint since
monitoring began.
Statistics are provided per
individual message type (text,
binary, and control) and as a total
count.
application, endpoint
Sent messages count per second The number of sent messages
per second for the WebSocket
application or endpoint since
monitoring began.
Statistics are provided per
individual message type (text,
binary, and control) and as a total
count.
application, endpoint
Received messages count per
second
The number of received
messages per second for the
WebSocket application or
endpoint since monitoring began.
Statistics are provided per
individual message type (text,
binary, and control) and as a total
count.
application, endpoint
Minimum sent message size The smallest sent message size
for the WebSocket application or
endpoint since monitoring began.
Statistics are provided per
individual message type (text,
binary, and control) and as a total
count.
application, endpoint
Minimum received message size The smallest received message
size for the WebSocket
application or endpoint since
monitoring began.
Statistics are provided per
individual message type (text,
binary, and control) and as a total
count.
application, endpoint
Maximum sent message size The largest sent message size for
the WebSocket application or
endpoint since monitoring began.
Statistics are provided per
individual message type (text,
binary, and control) and as a total
count.
application, endpoint
Chapter 19
Monitoring WebSocket Applications
19-30

Property Description Monitoring Level
Maximum received message size The largest received message
size for the WebSocket
application or endpoint since
monitoring began.
Statistics are provided per
individual message type (text,
binary, and control) and as a total
count.
application, endpoint
Average sent message size The average sent message size
for the WebSocket application or
endpoint since monitoring began.
Statistics are provided per
individual message type (text,
binary, and control) and as a total
count.
application, endpoint
Average received message size The average received message
size for the WebSocket
application or endpoint since
monitoring began.
Statistics are provided per
individual message type (text,
binary, and control) and as a total
count.
application, endpoint
Endpoint path The path on which the endpoint is
registered, relative to the
application context root.
endpoint only
Endpoint class name The name of the endpoint class. endpoint only
To access monitored metrics for WebSocket applications and endpoints at runtime, use the
following MBeans:
•
WebAppComponentRuntimeMBean
•
WebsocketApplicationRuntimeMBean
•
WebsocketBaseRuntimeMBean
•
WebsocketEndpointRuntimeMBean
•
WebsocketMessageStatisticsRuntimeMBean
To use the Administration Console or Fusion Middleware Control to monitor WebSocket
applications and endpoints, see the following online help topics:
• Monitoring WebSocket applications in Oracle WebLogic Server Administration Console
Online Help
Using WebSockets with Proxy Servers
Clients accessing WebSocket applications must either connect directly to the WebLogic Server
instance or through a Web proxy server that supports the WebSocket protocol.
The following proxy servers support the WebSocket protocol:
• Oracle HTTP Server
• Apache HTTP Server when used with the Oracle WebLogic Server Proxy Plug-In
Chapter 19
Using WebSockets with Proxy Servers
19-31

For information about the specific versions of Apache HTTP Server supported for use with the
Oracle WebLogic Server Proxy Plug-In, see the Oracle Fusion Middleware Supported System
Configurations page on the Oracle Technology Network.
Writing a WebSocket Client
A WebSocket client application is typically a browser-based client. The Java API for
WebSocket can also be used to write a Java WebSocket client.
• Writing a Browser-Based WebSocket Client
• Writing a Java WebSocket Client
Writing a Browser-Based WebSocket Client
A browser-based WebSocket client application is typically a composite of HTML5 technologies,
including HTML markup, CSS3, and JavaScript that makes use of the WebSocket JavaScript
API. For more information about HTML5, see
http://www.w3.org/TR/html5/
.
Most browsers support the W3C WebSocket API that can be used to create and work with the
WebSocket protocol. For information about the W3C WebSocket API, see:
http://
www.w3.org/TR/websockets/
.
If the WebSocket protocol is not guaranteed to be supported in the runtime environment, use
the JavaScript API for WebSocket fallback in your browser-based client. This API provides an
implementation of the standard W3C WebSocket API. The API also provides a mechanism for
using an alternative transport for WebSocket messaging when the WebSocket protocol is not
supported. For more information, see Enabling Protocol Fallback for WebSocket Messaging.
The following steps show an example of the execution flow on a client that is sending
messages to a WebLogic Server instance using the WebSockets Protocol.
1. The client opens a WebSocket connection to the server hosting the WebSocket endpoint,
using the
ws://
or
wss://
protocol prefix. For more information, see Establishing Secure
WebSocket Connections.
var url = ((window.location.protocol == "https:") ? "wss:" : "ws:")
+ "//" + window.location.host
+ "/websocket-helloworld-wls/helloworld_delay.ws";
var ws = new WebSocket(url);
2. The client registers listeners with the WebSocket object to respond to events, such as
opening, closing, and receiving messages. Based on the event and the information
received, the client performs the appropriate action.
ws.onopen = function(event) {
document.getElementById("status").innerHTML = "OPEN"
}
ws.onmessage = function(event) {
msg = event.data
document.getElementById("short_msg").innerHTML =
event.data;
}
3. The client sends messages to the server over the WebSocket object as needed by the
application.
function sendMsg() {
// Check if connection is open before sending
Chapter 19
Writing a WebSocket Client
19-32

if(ws == null || ws.readyState != 1) {
document.getElementById("reason").innerHTML
= "Not connected can't send msg"
} else {
ws.send(document.getElementById("name").value);
}
}
<input id="send_button" class="button" type="button" value="send"
onclick="sendMsg()"/>
Writing a Java WebSocket Client
The
javax.websocket
package contains annotations, classes, interfaces, and exceptions that
are common to client and server endpoints. Use the APIs in this package for writing a Java
WebSocket client in the same way as for writing a server. Additional programming tasks that
are specific to writing a client are described in the subsections that follow.
• Configuring a WebSocket Client Endpoint Programmatically
• Connecting a Java WebSocket Client to a Server Endpoint
• Setting the Maximum Number of Threads for Dispatching Messages from a WebSocket
Client
Configuring a WebSocket Client Endpoint Programmatically
WebLogic Server provides properties for configuring how the container creates client endpoint
instances. To indicate that these properties are specific to WebLogic Server and not part of the
JSR 356 specification, their fully qualified names contain the prefix
weblogic.websocket
.
WebLogic Server provides properties for the following:
• HTTP proxy configuration. WebLogic Server supports client connections to a remote
server WebSocket endpoint through an HTTP proxy as defined in the WebSocket Protocol
(RFC 6455).
Properties for HTTP proxy configuration are listed in Table 19-4.
• Secure Sockets Layer (SSL) configuration. WebLogic Server supports client
connections to a remote server WebSocket endpoint over SSL with wss scheme.
Properties for SSL configuration are listed in Table 19-5.
• Buffer size for incoming messages. WebLogic Server supports limiting the size of
incoming messages for WebSocket client endpoints.
Properties for buffer size configuration are described in Table 19-6.
Table 19-4 HTTP Proxy Configuration Properties for a Java WebSocket Client
Property Type Description
weblogic.websocket.clie
nt.PROXY_HOST
String
The name of the HTTP proxy host. If you are configuring
proxy settings for a JavaScript client, you must specify this
property.
weblogic.websocket.clie
nt.PROXY_PORT
Integer
Optional. The port number for connections to the HTTP
proxy host. If you specify an HTTP proxy host without the
port number, the port number defaults to 80.
Chapter 19
Writing a WebSocket Client
19-33
Table 19-4 (Cont.) HTTP Proxy Configuration Properties for a Java WebSocket Client
Property Type Description
weblogic.websocket.clie
nt.PROXY_USERNAME
String
Optional. The user name for logging in to the proxy host.
weblogic.websocket.clie
nt.PROXY_PASSWORD
String
Optional. The user name for logging in to the proxy host.
Table 19-5 SSL Configuration Properties for a Java WebSocket Client
Property Type Description
weblogic.websocket.clien
t.SSL_PROTOCOLS
String
Optional. A comma-separated list of supported versions of
the SSL protocol.
weblogic.websocket.clien
t.SSL_TRUSTSTORE
String
Optional. The path to the keystore file, which contains the
security certificates for use in SSL encryption.
weblogic.websocket.clien
t.SSL_TRUSTSTORE_PWD
String
Optional. The password for the keystore.
Table 19-6 Buffer-Size Configuration Properties for a Java WebSocket Client
Property Type Description
weblogic.websocket.tyrus
.incoming-buffer-size
Intege
r
The maximum underlying buffer size in bytes for receiving
messages. The client cannot process messages that are
larger than this size.
If set, this property overrides the value of the context
initialization property of the same name that is described in
Table 19-3.
The default buffer size is 4194315, of which 4 Mbytes are for
the payload and 11 bytes are for the frame overhead.
Note:
Configure a client endpoint before connecting the client to its server endpoint.
To configure a WebSocket client endpoint programmatically:
1. Obtain a
javax.websocket.ClientEndpointConfig
object.
a. Invoke the
javax.websocket.ClientEndpointConfig.Builder.create
static method
to obtain an instance of the
ClientEndpointConfig.Builder
class.
b. Invoke the
build
method on the
ClientEndpointConfig.Builder
object that you
obtained in the previous step.
2. Set each configuration property that you want to change to its new value.
a. Invoke the
getUserProperties
method on the
ClientEndpointConfig
object that you
obtained in the previous step to obtain a modifiable
java.util.Map
object that contains
the user properties.
Chapter 19
Writing a WebSocket Client
19-34

b. Invoke the
put
method on the
Map
object that you obtained in the previous step.
In the invocation of the
put
method, provide the property name and its new value as
parameters to the method.
Example 19-28 shows how to configure a WebSocket client endpoint programmatically.
Example 19-28 Configuring a WebSocket Client Endpoint Programmatically
This example programmatically configures a WebSocket client endpoint as follows:
• The name of the HTTP proxy host is set to
proxy.example.com
.
• The port number for connections to the HTTP proxy host is set to 80.
• The path to the keystore file is set to
/export/keystore
.
• The password for the keystore is set to the
keystore_password
.
• The maximum underlying buffer size for receiving messages is set to 16777227 bytes, that
is 16 Mbytes for the payload and 11 bytes for the frame overhead.
...
import javax.websocket.ClientEndpointConfig;
...
ClientEndpointConfig cec = ClientEndpointConfig.Builder.create().build();
// configure the proxy host
cec.getUserProperties().put("weblogic.websocket.client.PROXY_HOST",
"proxy.example.com");
// configure the proxy port
cec.getUserProperties().put("weblogic.websocket.client.PROXY_PORT", 80);
// configure the trust keystore path
cec.getUserProperties().put("weblogic.websocket.client.SSL_TRUSTSTORE",
"/export/keystore");
// configure the trust keystore's password
cec.getUserProperties().put("weblogic.websocket.client.SSL_TRUSTSTORE_PWD",
"keystore_password");
// for receiving 16 Mbyte payload
cec.getUserProperties().put("weblogic.websocket.tyrus.incoming-buffer-size",
16 * 1024 * 1024 + 11);
...
Connecting a Java WebSocket Client to a Server Endpoint
To connect a Java WebSocket client to a server endpoint:
1. Invoke the
javax.websocket.ContainerProvider.getWebSocketContainer()
static
method to obtain the client's
javax.websocket.WebSocketContainer
instance.
2. Invoke the overloaded
connectToServer
method on the
WebSocketContainer
object that
you obtained in the previous step.
The variant of the method to invoke depends on whether the endpoint is an annotated
endpoint or a programmatic endpoint and whether support for Java EE services such as
dependency injection are required.
Endpoint Type
Support for Java
EE Services
Variant of the connectToServer Method
Annotated Not required
connectToServer(Object
annotatedEndpointInstance, URI path)
Annotated Required
connectToServer(Class<?>
annotatedEndpointClass, URI path)
Chapter 19
Writing a WebSocket Client
19-35
Endpoint Type Support for Java
EE Services
Variant of the connectToServer Method
Programmatic Not required
connectToServer(Endpoint endpointInstance,
ClientEndpointConfig cec, URI path)
Programmatic Required
connectToServer(Class<? extends Endpoint>
endpointClass, ClientEndpointConfig cec, URI
path)
In the invocation of the
connectToServer
method, provide the following information as
parameters to the method:
• The client WebSocket endpoint
• The complete path to the server WebSocket endpoint
If the client endpoint is a programmatic endpoint, you must also provide configuration
information for the endpoint.
Example 19-4 shows how to connect a Java WebSocket client to a server endpoint.
Example 19-29 Connecting a Java WebSocket Client to a Server Endpoint
This example connects the Java WebSocket client
ClientExample
to the WebSocket server
endpoint at
ws://example.com:80/echoserver/echo
. The WebSocket client endpoint is
represented by the class
ExampleEndpoint
. The declaration of the
ExampleEndpoint
class is
shown in Example 19-4.
import java.io.IOException;
import java.net.URI;
import javax.websocket.CloseReason;
import javax.websocket.ContainerProvider;
import javax.websocket.Session;
import javax.websocket.WebSocketContainer;
...
public class ClientExample {
public static void main(String[] args) throws Exception {
WebSocketContainer container = ContainerProvider.getWebSocketContainer();
Session session = container.connectToServer(ExampleEndpoint.class,
new URI("ws://example.com:80/echoserver/echo"));
...
session.close();
}
Setting the Maximum Number of Threads for Dispatching Messages from a
WebSocket Client
By default, the maximum number of threads for dispatching messages from a WebSocket
client depends on how many processors are available:
• If 20 or fewer processors are available, the maximum number of threads is 20.
• If more than 20 processors are available, the maximum number of threads is equal to the
number of available processors.
To set the maximum number of threads for dispatching messages from a WebSocket client:
Chapter 19
Writing a WebSocket Client
19-36

• In the
java
command to launch your client application, set the system property
weblogic.websocket.client.max-aio-threads
to the number that you require.
Example 19-30 shows how to set the maximum number of threads for dispatching messages
from a WebSocket client.
Example 19-30 Setting the Maximum Number of Threads for Dispatching Messages
from a WebSocket Client
This example sets the maximum number of threads for dispatching messages from the
WebSocket client
ClientExample
to 50.
java -Dweblogic.websocket.client.max-aio-threads=50 ClientExample
Securing a WebSocket Application
In WebLogic Server, you deploy a WebSocket application as a Web application archive (WAR),
either as a standalone Web application or a WAR module within an enterprise application.
Therefore, many security practices that you apply to securing Web applications can apply to
WebSocket applications.
For information about Web application security, see Developing Secure Web Applications in
Developing Applications with the WebLogic Security Service.
The following sections describe security considerations for WebSocket applications in
WebLogic Server:
• Applying Verified-Origin Policies
• Authenticating and Authorizing WebSocket Clients
• Establishing Secure WebSocket Connections
• Avoiding Mixed Content
• Applying Verified-Origin Policies
• Authenticating and Authorizing WebSocket Clients
• Establishing Secure WebSocket Connections
• Avoiding Mixed Content
• Specifying Limits for a WebSocket Connection
Applying Verified-Origin Policies
Modern browsers use same-origin policies to prevent scripts that are running on Web pages
loaded from one origin from interacting with resources from a different origin. The WebSocket
Protocol (RFC 6455) uses a verified-origin policy that enables the server to decide whether or
not to consent to a cross-origin connection.
When a script sends an opening handshake request to a WebSocket application, an
Origin
HTTP header is sent with the WebSocket handshake request. If the application does not verify
the
Origin
, then it accepts connections from any origin. If the application is configured not to
accept connections from origins other than the expected origin, then the WebSocket
application can reject the connection.
You can ensure that the WebSocket application verifies the
Origin
by extending the
javax.websocket.server.ServerEndpointConfig.Configurator
class.
Chapter 19
Securing a WebSocket Application
19-37

The following code example demonstrates applying a verified-origin policy:
...
import javax.websocket.server.ServerEndpointConfig;
public class MyConfigurator extends ServerEndpointConfig.Configurator {
...
private static final String ORIGIN = "http://www.example.com:7001";
@Override
public boolean checkOrigin(String originHeaderValue) {
return ORIGIN.equals(originHeaderValue)
}
}
...
For more information, see Configuring a Server Endpoint Programmatically.
Note:
Nonbrowser clients (for example, Java clients) are not required to send an
Origin
HTTP header with the WebSocket handshake request. If a WebSocket handshake
request does not include an
Origin
header, then the request is from a nonbrowser
client; if a handshake request includes an
Origin
header, then the request may be
from either a browser or a nonbrowser client.
Because nonbrowser clients can send arbitrary
Origin
headers, the browser origin
security model is not recommended for nonbrowser clients.
Authenticating and Authorizing WebSocket Clients
The WebSocket Protocol (RFC 6455) does not specify an authentication method for
WebSocket clients during the handshake process. You can use standard Web container
authentication and authorization functionality to prevent unauthorized clients from opening
WebSocket connections on the server.
All configurations of the
<auth-method>
element that are supported for Web applications can
also be used for WebSocket applications. These authentication types include BASIC, FORM,
CLIENT-CERT, and so on. See Developing Secure Web Applications in Developing
Applications with the WebLogic Security Service.
You can secure the path to the endpoint within your application by configuring the relevant
<security-constraint>
element in the
web.xml
deployment descriptor file of the WebSocket
application. By configuring
<security-constraint>
, clients must authenticate themselves
before sending WebSocket handshake requests. Otherwise, the server rejects the WebSocket
handshake request. For more information about the
<security-constraint>
element, see
web.xml Deployment Descriptor Elements in Developing Web Applications, Servlets, and JSPs
for Oracle WebLogic Server.
The following code example demonstrates securing the path to the endpoint within your
application, where the path is
/demo
:
<security-constraint>
<web-resource-collection>
<web-resource-name>Secured WebSocket Endpoint</web-resource-name>
<url-pattern>/demo</url-pattern>
Chapter 19
Securing a WebSocket Application
19-38

<http-method>GET</http-method>
</web-resource-collection>
<auth-constraint>
<role-name>user</role-name>
</auth-constraint>
</security-constraint>
<login-config>
<auth-method>FORM</auth-method>
<form-login-config>
<form-login-page>/login.jsp</form-login-page>
<form-error-page>/error.jsp</form-error-page>
</form-login-config>
</login-config>
<security-role>
<role-name>user</role-name>
</security-role>
• Authorizing WebSocket Clients
Authorizing WebSocket Clients
You can configure a WebSocket application to implement BASIC and DIGEST authentication
methods and authorize certain clients by manipulating handshake message headers through
the
javax.websocket.ClientEndpointConfig.Configurator
class. If the application does not
authorize a client to create a WebSocket connection, the server rejects the WebSocket
handshake request from that client.
To check the value of the origin header that the client passed during the opening handshake,
use the
checkOrigin
method of the
javax.websocket.server.ServerEndpointConfig.Configurator
class. To provide custom
checks, you can override this method. For more information, see Configuring a Server
Endpoint Programmatically.
A JSR356 code example for Authorization is required.
Establishing Secure WebSocket Connections
To establish a WebSocket connection, the client sends a handshake request to the server.
When using the
ws
scheme to open the WebSocket connection, the handshake request is a
plain HTTP request; the data being transferred over the established WebSocket connection is
not encrypted.
To establish a secure WebSocket connection and prevent data from being intercepted,
WebSocket applications should use the
wss
scheme. The
wss
scheme ensures that clients
send handshake requests as HTTPS requests, encrypting transferred data by TLS/SSL.
You can configure a WebSocket application to accept only HTTPS handshake requests, where
all WebSocket connections must be encrypted and unencrypted WebSocket handshake
requests are rejected. Specify the
<user-data-constraint>
element in the
web.xml
deployment descriptor file of the WebSocket application. For more information about the
<user-data-constraint>
element, see web.xml Deployment Descriptor Elements in
Developing Web Applications, Servlets, and JSPs for Oracle WebLogic Server.
The following code example demonstrates configuring the
<user-data-constraint>
element:
<security-constraint>
<web-resource-collection>
<web-resource-name>Secured WebSocket Endpoint</web-resource-name>
<url-pattern>/demo</url-pattern>
Chapter 19
Securing a WebSocket Application
19-39

<http-method>GET</http-method>
</web-resource-collection>
<auth-constraint>
<role-name>user</role-name>
</auth-constraint>
<user-data-constraint>
<transport-guarantee>CONFIDENTIAL</transport-guarantee>
</user-data-constraint>
</security-constraint>
Avoiding Mixed Content
If a script attempts to open a WebSockets connection through the
ws://
URI (using a plain
HTTP request), but the top-level Web page is retrieved through an HTTPS request, the Web
page is referred to as mixed content. Although most browsers no longer allow mixed content,
some still do. WebSocket applications should avoid mixed content, because it allows certain
information that should be protected, such as
JSESSIONID
and cookies, to be exposed.
For more information about mixed content, see "Web Security Context: User Interface
Guidelines" at
http://www.w3.org/TR/wsc-ui/#securepage
.
Specifying Limits for a WebSocket Connection
By specifying limits for a WebSocket connection, you can prevent clients from exhausting
server resources, such as memory, sockets, and so forth.
You can specify the following limits for a WebSocket connection:
• Maximum message size. To set the maximum message size for a WebSocket
connection, set the
maxMessageSize
element of the
onMessage
annotation to the size in
bytes.
• Idle timeout value. To set the idle timeout value for a WebSocket connection, invoke one
of the following methods:
– For an individual connection, invoke the
setMaxIdleTimeout
method of the
Session
object.
– For the entire container, invoke the
setDefaultMaxSessionIdleTimeout
method of a
WebSocketContainer
object.
Enabling Protocol Fallback for WebSocket Messaging
Protocol fallback provides a mechanism for using an alternative transport for WebSocket
messaging when the WebSocket protocol is not supported. Typically the WebSocket protocol is
not supported either because the WebSocket object is not available or because WebSocket
frames are blocked by a firewall. In this release, the only supported alternative transport is
HTTP Long Polling.
Protocol fallback enables you to rely on standard programming APIs to perform WebSocket
messaging regardless of whether or not the runtime environment supports the WebSocket
protocol.
Chapter 19
Enabling Protocol Fallback for WebSocket Messaging
19-40
Note:
To support WebSocket fallback, the server must use the JSR 356 Java API for
WebSocket, not the proprietary WebLogic Server WebSocket API.
• Using the JavaScript API for WebSocket Fallback in Client Applications
• Packaging and Specifying the Location of the WebSocket Fallback Client Library
• Enabling WebSocket Fallback
Using the JavaScript API for WebSocket Fallback in Client Applications
The JavaScript API for WebSocket fallback provides an implementation of the standard W3C
WebSocket API and additional APIs to facilitate WebSocket fallback. For information about the
JavaScript API for WebSocket fallback, see JavaScript API Reference for WebSocket Fallback.
For information about the W3C WebSocket API, see:
http://www.w3.org/TR/websockets/
.
When you use the standard W3C WebSocket JavaScript API, code your application without
regard to whether the WebSocket protocol is supported.
• Configuring WebSocket Fallback
• Creating a WebSocket Object
• Handling Life Cycle Events for a JavaScript WebSocket Client
• Sending a Message from a JavaScript WebSocket Client
Configuring WebSocket Fallback
WebLogic Server provides properties for configuring WebSocket fallback as listed in
Table 19-7.
Table 19-7 WebSocket Fallback Configuration Properties
Property Type Default Description
baseUrl
string . The location of the
scripts
directory, relative to the
HTML context of the page.
The structure of the
scripts
directory must be
preserved. The
scripts
directory can be moved to
wherever it can be reached, but its content must not
change after it was created.
debug
integer 0 The debug level.
ENCODE_FOR_IE_BE
LOW
integer 10 The version of the Internet Explorer browser below which
Base16 encoding is to be used for framed data.
ENFORCE_ENCODING
Boolean false Whether Base16 encoding is to be used.
NB_TRY_FOR_EACH_
TRANSPORT
integer 2 The maximum number of consecutive retries to establish
a connection on a given transport.
PING_INTERVAL
integer 25000 Interval in milliseconds between consecutive pings to the
server.
Chapter 19
Enabling Protocol Fallback for WebSocket Messaging
19-41
Table 19-7 (Cont.) WebSocket Fallback Configuration Properties
Property Type Default Description
SERVER_PING_ENAB
LED
Boolean true Whether pings from the client to the server are enabled.
transport
string none The enforced transport, which can be one of the following
transports:
•
WebSocket
•
XMLHttpRequest
TRY_AGAIN_INTERV
AL
integer 1000 The number of seconds after which an unsuccessful
connection attempt is repeated with the same transport.
The retry count for the transport is not incremented.
If the attempt fails within this number of milliseconds, the
retry count is incremented by 1.
WEBSOCKET_CREATI
ON_TIMEOUT
integer 1000 The number of milliseconds after which creation of a
WebSocket connection is considered to have failed.
If the WebSocket protocol is available, WebLogic Server uses that protocol even if protocol
fallback is enabled. WebLogtic Server uses the value of the
TRY_AGAIN_INTERVAL
property and
the
NB_TRY_FOR_EACH_TRANSPORT
property as follows to determine whether the WebSocket
protocol is available if a connection attempt fails:
• If the connection is not established within
TRY_AGAIN_INTERVAL
milliseconds, the attempt is
repeated with same transport. The retry count for this transport is not incremented.
• If the attempt fails within
TRY_AGAIN_INTERVAL
milliseconds, the retry count is incremented
by 1.
• If the retry count reaches the value of
NB_TRY_FOR_EACH_TRANSPORT
, the next transport is
tried.
• If the retry count for the last transport reaches the value of
NB_TRY_FOR_EACH_TRANSPORT
,
the connection is closed, that is, the
onclose
function is called on the client.
To configure WebSocket fallback:
1. Construct a JSON object in which you set the configuration properties that you require.
For details about these properties, see Table 19-7.
2. Pass the object as a parameter to one of the following functions:
• If the fallback mechanism cannot be guaranteed to be present, pass the object as the
parameter to the
OraSocket.configure
function before constructing the WebSocket
object.
To ensure that your application does not fail if the JavaScript library for WebSocket
fallback is unavailable, call the
OraSocket.configure
function in a
try
/
catch
block.
• Otherwise, pass the object as the second, optional parameter of the WebSocket
object's constructor.
Example 19-31 shows how to configure WebSocket fallback.
Example 19-31 Configuring WebSocket Fallback
This example enforces the
XMLHttpRequest
transport, sets the debug level to 10, and disables
pings from the client to the server.
Chapter 19
Enabling Protocol Fallback for WebSocket Messaging
19-42

...
try {
var config = {};
config = { transport: XMLHttpRequest, debug: 10, SERVER_PING_ENABLED: false };
OraSocket.config(config);
} catch (err) {
console.log("Error creating WebSocket:" + JSON.stringify(err));
}
...
Creating a WebSocket Object
A WebSocket object represents a WebSocket connection from the client to a remote host.
To create a WebSocket object, invoke the
WebSocket
constructor, passing the following
information as parameters:
• The URL to which the client should connect
• Optionally, a JSON object that contains configuration settings for WebSocket fallback
For more information about the JSON object, see Configuring WebSocket Fallback.
Example 19-32 shows how to create a WebSocket object.
Example 19-32 Creating a WebSocket Object
This example creates the WebSocket Object
ws
. The example uses standard JavaScript
functions to determine the URL to which the client should connect from the URL of the
document that contains this code.
...
var URI_SUFFIX = "/websocket-101/ws-101-app";
var ws;
var connectionStatus = "Connecting...";
var calledBy = document.location.toString();
var machine, port, secured;
var regExp = new RegExp("(http|ws)(.?):[/]{2}([^/|^:]*):?(\\d*)/(.*)");
var matches = regExp.exec(calledBy);
secured = matches[2];
machine = matches[3];
port = matches[4];
...
statusFld = document.getElementById('status');
...
try
{
var wsURI = "ws" + secured + "://" + machine + ":" + port + URI_SUFFIX;
ws = new WebSocket(wsURI);
}
catch (err)
{
var mess = 'WebSocket creation error:' + JSON.stringify(err);
connectionStatus = "<font color='red'>Unable to connect.</font>";
if (statusFld !== undefined)
statusFld.innerHTML = mess;
else
alert(mess);
}
...
Chapter 19
Enabling Protocol Fallback for WebSocket Messaging
19-43

Handling Life Cycle Events for a JavaScript WebSocket Client
Handling lifecycle events for a JavaScript WebSocket client involves writing the
WebSocket
object's callback functions as listed in Table 19-8. The table also provides a cross-reference to
an example that shows how to handle each type of event.
Table 19-8 Callback Functions for Handling Life Cycle Events
Event Callback Function Example
Connection opened
onopen
Example 19-33
Message received
onmessage
Example 19-34
Error
onerror
Example 19-35
Connection closed
onclose
Example 19-36
Note:
The creation of the
ws
WebSocket
object in the examples is shown in Example 19-32.
Example 19-33 Handling a Connection Opened Event for a JavaScript WebSocket
Client
This example uses standard JavaScript functions to display the current date and time followed
by the message
Connection opened
when a connection is opened.
...
ws.onopen = function()
{
try
{
var text;
try
{
text = 'Message:';
}
catch (err)
{
text = '<small>Connected</small>';
}
promptFld.innerHTML = text;
if (nbMessReceived === 0)
statusFld.innerHTML = "";
statusFld.innerHTML += ((nbMessReceived === 0?"":"<br>") + "<small>" +
(new Date()).format("d-M-Y H:i:s._ Z") +
"</small>:<font color='blue'>" +
' Connection opened.' + "</font>");
statusFld.scrollTop = statusFld.scrollHeight;
nbMessReceived++;
}
catch (err) {}
};
...
Chapter 19
Enabling Protocol Fallback for WebSocket Messaging
19-44

Example 19-34 Handling a Message Received Event for a JavaScript WebSocket Client
This example uses standard JavaScript functions to display the current time followed by the
content of the message when a message is received.
...
ws.onmessage = function(message) // message/event
{
var json = {};
if (typeof(message.data) === 'string')
{
try
{
json = JSON.parse(message.data);
}
catch (e)
{
console.log(e);
console.log('This doesn\'t look like valid JSON: ' + message.data);
}
}
if (json.type !== undefined && json.type === 'message' &&
typeof(json.appdata.text) === 'string') // it's a single message, text
{
var dt = new Date();
/**
* Add message to the chat window
*/
var existing = contentFld.innerHTML; // Content already there
var toDisplay = "";
try { toDisplay = json.appdata.text; }
catch (err) {}
contentFld.innerHTML = existing +
('At ' +
+ (dt.getHours() < 10 ? '0' + dt.getHours() : dt.getHours()) + ':'
+ (dt.getMinutes() < 10 ? '0' + dt.getMinutes() : dt.getMinutes())
+ ': ' + toDisplay + '<br>');
contentFld.scrollTop = contentFld.scrollHeight;
}
else // Unexpected
{
var payload = {};
}
};
...
Example 19-35 Handling an Error Event for a JavaScript WebSocket Client
This example uses standard JavaScript functions to display the current date and time followed
by an error message when an error occurs.
...
ws.onerror = function(error)
{
if (nbMessReceived === 0)
statusFld.innerHTML = "";
statusFld.innerHTML += ((nbMessReceived === 0?"":"<br>") + "<small>" +
(new Date()).format("d-M-Y H:i:s._ Z") +
"</small>:<font color='red'>" + error.err + "</font>");
statusFld.scrollTop = statusFld.scrollHeight;
nbMessReceived++;
};
...
Chapter 19
Enabling Protocol Fallback for WebSocket Messaging
19-45

Example 19-36 Handling a Connection Closed Event for a JavaScript WebSocket Client
This example uses standard JavaScript functions to display the current date and time followed
by the message
Connection closed
when a connection is closed.
...
ws.onclose = function()
{
if (nbMessReceived === 0)
statusFld.innerHTML = "";
statusFld.innerHTML += ((nbMessReceived === 0?"":"<br>") + "<small>" +
(new Date()).format("d-M-Y H:i:s._ Z") +
"</small>:<font color='blue'>" + ' Connection closed' +
"</font>");
promptFld.innerHTML = 'Connection closed';
};
...
Sending a Message from a JavaScript WebSocket Client
To send a message from a JavaScript WebSocket client:
1. Define a function for sending the message.
2. In the body of the function for sending the message, call the
send
function of the
WebSocket
object.
3. Call the function that you defined for sending the message.
The following examples shows how to send a message from a JavaScript WebSocket client:
• Example 19-37
• Example 19-38
Example 19-37 Defining a Function for Sending a Message
This example defines the function
send
for sending a message.
The creation of the
ws
WebSocket
object in this example is shown in Example 19-32.
...
var send = function(mess)
{
ws.send(mess);
};
...
Example 19-38 Calling a Function for Sending a Message
This example calls the
send
function for sending the contents of the text field when the user
clicks Send.
The definition of the
send
function is shown in Example 19-37.
...
<input type="text" id="input" style="border-radius:2px; border:1px solid #ccc;
margin-top:10px; padding:5px; width:400px;"
placeholder="Type your message here"/>
<button onclick="javascript:send(document.getElementById('input').value);">Send</button>
...
Chapter 19
Enabling Protocol Fallback for WebSocket Messaging
19-46

Packaging and Specifying the Location of the WebSocket Fallback Client
Library
Package the
orasocket.min.js
file in the
scripts
directory of your web application.
In the client application, add the following
script
element to specify the location of
orasocket.min.js
.
<script type="text/javascript" src="scripts/orasocket.min.js"></script>
Enabling WebSocket Fallback
By default, WebSocket fallback is disabled.
To enable WebSocket fallback, set the
com.oracle.tyrus.fallback.enabled
context
parameter to
true
in the application's deployment descriptor file
web.xml
.
<?xml version="1.0" encoding="UTF-8"?>
<web-app version="3.0" ...>
...
<context-param>
<description>Enable fallback mechanism</description>
<param-name>com.oracle.tyrus.fallback.enabled</param-name>
<param-value>true</param-value>
</context-param>
</web-app>
Migrating an Application to the JSR 356 Java API for WebSocket
from the Deprecated API
To ensure compatibility of your WebSocket applications with future releases of WebLogic
Server, use the JSR 356 Java API for WebSocket instead of the deprecated packages.
As of WebLogic Server 12.1.3, the packages
weblogic.websocket
and
weblogic.websocket.annotation
are deprecated and will be removed in a future release.
After these packages have been removed, you will no longer be able to use these packages
for connections over the WebSocket protocol.
• Comparison of the JSR 356 API and Proprietary WebLogic Server WebSocket API
• Converting a Proprietary WebSocket Server Endpoint to Use the JSR 356 API
• Replacing the /* Suffix in a Path Pattern String
• Example of Converting a Proprietary WebSocket Server Endpoint to Use the JSR 356 API
Comparison of the JSR 356 API and Proprietary WebLogic Server
WebSocket API
Table 19-9 shows the proprietary WebLogic Server WebSocket API and the corresponding
JSR 356 API to use to perform tasks for developing a WebSocket application. The table shows
only the JSR 356 API to use for an annotated endpoint. For each task, the table also provides
a cross-reference to instructions for performing the task by using the JSR 356 API.
Chapter 19
Migrating an Application to the JSR 356 Java API for WebSocket from the Deprecated API
19-47
Table 19-9 Comparison of the JSR 356 API and Proprietary WebLogic Server
WebSocket API
Task Proprietary WebLogic Server
WebSocket API
JSR 356 API Instructions
Create a server
endpoint class
1.
WebSocketListener
interface
or
WebSocketAdapter
superclass
2.
WebSocket
annotation
ServerEndpoint
annotation
Creating an
Annotated
Endpoint
Handle a
connection opened
event
onOpen
method of a
WebSocketListener
object
OnOpen
annotation on the
method that handles the
event
Handling a
Connection
Opened Event
Handle a message
received event
One of the following variants of the
overloaded
onMessage
method of
a
WebSocketListener
object:
• For a message that consists of
a text data frame:
onMessage(WebSocketConne
ction connection, String
payload)
• For a message that consists of
a binary data frame:
onMessage(WebSocketConne
ction connection, byte[]
payload)
OnMessage
annotation on
the method that handles
the event
Handling a
Message
Received Event
Handle an error
event
onError
method of a
WebSocketListener
object
OnError
annotation on the
method that handles the
event
Handling an
Error Event
Handle a
connection closed
event
onClose
method of a
WebSocketListener
object
OnClose
annotation on the
method that handles the
event
Handling a
Connection
Closed Event
Send a message One of the following methods of a
WebSocketConnection
object:
•
send(String message)
•
send(byte[] message)
•
sendPing
•
sendPong
•
stream(boolean last,
String fragment)
•
stream(boolean last,
byte[] fragment, int
off, int length)
1.
Session
interface
2. One of the following
methods of the
Session
object
getBasicRemote()
getAsyncRemote()
3. One of the following
methods of the
RemoteEndpoint.Ba
sic
object or
RemoteEndpoint.As
ync
object:
sendText
sendBinary
sendPing
sendPong
Sending a
Message to a
Single Peer of an
Endpoint
Chapter 19
Migrating an Application to the JSR 356 Java API for WebSocket from the Deprecated API
19-48

Table 19-9 (Cont.) Comparison of the JSR 356 API and Proprietary WebLogic Server
WebSocket API
Task Proprietary WebLogic Server
WebSocket API
JSR 356 API Instructions
Send a message to
all peers connected
to an endpoint
1.
getWebSocketContext
method of a
WebSocketConnection
object
2.
getWebSocketConnections
method of the
WebSocketContext
object
obtained by the previous call
getOpenSessions
method of the
Session
object
Sending a
Message to All
Peers of an
Endpoint
Set the maximum
message size for a
WebSocket
connection
maxMessageSize
element of the
WebSocket
annotation
maxMessageSize
element
of the
onMessage
annotation
Set the idle timeout
value for a
WebSocket
connection
timeout
element of the
WebSocket
annotation
One of the following APIs:
• For an individual
connection:
setMaxIdleTimeout
method of the
Session
object
• For the entire
container:
setDefaultMaxSess
ionIdleTimeout
method of a
WebSocketContaine
r
object
Set the maximum
number of open
connections on a
WebSocket
connection
maxConnections
element of the
WebSocket
annotation
Not supported by JSR 356
Java API for Websocket
Converting a Proprietary WebSocket Server Endpoint to Use the JSR 356
API
To convert a proprietary WebSocket server endpoint to use the JSTR 356 API:
1. Convert your
WebSocket
class to an annotated server endpoint class.
Converting a
WebSocket
class to an annotated endpoint class requires fewer changes than
converting the
WebSocket
class to a programmatic endpoint class.
a. Convert the
WebSocket
class to a POJO class by removing the
extends
WebSocketAdapter
clause or
implements WebSocketListener
clause from the class
declaration.
b. Replace the
weblogic.websocket.annotation.WebSocket
annotation on the class
declaration with the
javax.websocket.server.ServerEndpoint
annotation.
For more information, see Creating an Annotated Endpoint.
Chapter 19
Migrating an Application to the JSR 356 Java API for WebSocket from the Deprecated API
19-49
Note:
If the
pathPatterns
element of your existing endpoint contains the
/*
suffix,
you must rewrite your code to achieve the same result as the
/*
suffix. For
more information, see Replacing the /* Suffix in a Path Pattern String.
2. Annotate the declaration of each method for handling a life cycle event with the annotation
that designates the event that the method handles.
For more information, see Handling Life Cycle Events in an Annotated WebSocket
Endpoint.
3. Replace each reference to the
weblogic.websocket.WebSocketConnection
interface with
a reference to the
javax.websocket.Session
interface.
4. Replace each method invocation on the
WebSocketConnection
object with an invocation of
the corresponding method on the
Session
object.
For example, the
close
method of a
WebSocketConnection
object takes a
weblogic.websocket.ClosingMessage
object as a parameter. In the
close
method of a
Session
object the corresponding parameter is a
javax.websocket.CloseReason
object.
5. Change each method invocation on a
Session
object to send a message as follows:
a. Add an invocation of the
getBasicRemote
method or
getAsyncRemote
method to obtain
a reference to the object that represents the peer of this endpoint.
b. Replace the method in the deprecated API for sending the message with the
corresponding method in the JSR 356 API.
The method of the JSR 356 API is a method of the
javax.websocket.RemoteEndpoint.Basic
object or
javax.websocket.RemoteEndpoint.Async
object to which you obtained a reference in
the previous step.
For more information, see Sending a Message.
Deprecated API
Method
RemoteEndpoint.Basic
Method
RemoteEndpoint.Async Method
send(String
message)
sendText(String text)
One of the following methods:
sendText(String text)
sendText(String text, SendHandler
handler)
send(byte[]
message)
sendBinary
(ByteBuffer
data)
One of the following methods:
sendBinary (ByteBuffer data)
sendBinary(ByteBuffer data,
SendHandler handler)
sendPing(byte[]
message)
sendPing(ByteBuffer
applicationData)
sendPing(ByteBuffer
applicationData)
sendPong(byte[]
message)
sendPong(ByteBuffer
applicationData)
sendPong(ByteBuffer
applicationData)
stream(boolean
last, String
fragment)
sendText(String
partialMessage,
boolean isLast)
No corresponding method.
Chapter 19
Migrating an Application to the JSR 356 Java API for WebSocket from the Deprecated API
19-50
Deprecated API
Method
RemoteEndpoint.Basic
Method
RemoteEndpoint.Async Method
stream(boolean
last, byte[]
fragment, int
off, int length)
sendBinary(ByteBuffer
partialByte, boolean
isLast)
No corresponding method.
6. Replace references in
import
clauses to classes in the deprecated API with references to
the classes in the JSR 356 API that your endpoint uses.
7. Recompile and re-deploy the application that uses the server endpoint.
Replacing the /* Suffix in a Path Pattern String
The
pathPatterns
element of the
WebSocket
annotation in the deprecated API accepts the
/*
suffix in a path pattern string. The
/*
suffix matches the path pattern with any resource path
that starts with the path pattern before the
/*
suffix. For example, the resource path
/ws/chat
is matched by path pattern
/ws/*
.
No equivalent to the
/*
suffix exists in the JSR 356 API. If your existing endpoint relies on
the
/*
suffix, you must rewrite your code to achieve the same result as the
/*
suffix. How to
rewrite your code depends on whether the
/*
suffix represents variable path parameters in an
endpoint URI or additional data for an endpoint.
• Replacing a /* Suffix that Represents Variable Path Parameters in an Endpoint URI
• Replacing a /* Suffix that Represents Additional Data for an Endpoint
Replacing a /* Suffix that Represents Variable Path Parameters in an Endpoint URI
The
/*
suffix in a path pattern string might represent one or more variable path parameters in
an endpoint URI. In this situation, use a URI template instead of the
/*
suffix.
The JSR 356 API supports only level 1 URI templates in which path parameters are clearly
separated by slashes (
/
). Therefore, in the URI template, you must define one variable for
expansion for each variable path parameter that replaces the
/*
suffix in your existing
endpoint.
For example, if one variable path parameter replaces the
/*
suffix in your existing endpoint,
define a URI template similar to the following example:
/ws/{param1}
The URI
/ws/test
matches the template in the preceding example. The
param1
variable is
expanded to
test
.
Similarly, if two variable path parameters replace the
/*
suffix in your existing endpoint, define
a URI template similar to the following example:
/ws/{param1}/{param2}
The URI
/ws/test/chat
matches the template in the preceding example. The
param1
variable
is expanded to
test
and the
param2
variable is expanded to
chat
.
For more information, see Specifying a Part of an Endpoint Deployment URI as an Application
Parameter.
Chapter 19
Migrating an Application to the JSR 356 Java API for WebSocket from the Deprecated API
19-51

Replacing a /* Suffix that Represents Additional Data for an Endpoint
The
/*
suffix in a path pattern string might represent additional data for an endpoint that is
transferred as part of the URI. In this situation, use query parameters instead of the
/*
suffix.
The JSR 356 specification does not forbid or restrict the use of query parameters in any way.
Therefore, you can use a query parameter to transfer any data provided that the following
conditions are met:
• URLs are shorter than their maximum allowed length.
• All data is properly encoded.
To obtain an endpoint's query parameters, invoke the method of the endpoint's
Session
object
that obtains the parameters in the required format:
• To obtain the parameters as a single string that contains the entire query, invoke the
getQueryString
method. See Example 19-39.
• To obtain the parameters as a map that contains a list of query parameters, invoke the
getRequestParameterMap
method. See Example 19-40.
Example 19-39 Obtaining Query Parameters as a Single String
This example obtains the query parameters in the request URI
/echo?
foo=bar,baz,mane,padme,hum
as the application output
"# foo=bar,baz,mane,padme,hum"
.
import javax.websocket.OnOpen;
import javax.websocket.Session;
import javax.websocket.server.ServerEndpoint;
...
@ServerEndpoint("/echo")
public class EchoEndpoint {
@OnOpen
public void onOpen(Session session) throws IOException {
System.out.println("# " + session.getQueryString());
}
// ...
}
Example 19-40 Obtaining Query Parameters as a Map
This example obtains the query parameters in the request URI
/echo?
foo=bar&foo=baz&foo=mane&foo=padme&foo=hum
as the
List<String>
# [bar, baz, mane, padme, hum]
.
import javax.websocket.OnOpen;
import javax.websocket.Session;
import javax.websocket.server.HandshakeRequest;
import javax.websocket.server.ServerEndpoint;
import java.util.List;
import java.util.Map;
...
@ServerEndpoint("/echo")
public class EchoEndpoint {
@OnOpen
public void onOpen(Session session) throws IOException {
System.out.println("# " + session.getRequestParameterMap().get("foo"));
Chapter 19
Migrating an Application to the JSR 356 Java API for WebSocket from the Deprecated API
19-52

}
// ...
}
Example of Converting a Proprietary WebSocket Server Endpoint to Use the
JSR 356 API
Example 19-41 shows how to convert a proprietary WebSocket server endpoint to use he JSR
356 API from the deprecated API.
Example 19-41 Converting a WebSocket Server Endpoint to Use the JSR 356 API
This example shows the changes that are required to convert a WebSocket server endpoint to
the use JSR 356 API instead of the deprecated API.
In this example, lines of deprecated code are commented out with the
//
comment characters.
Lines of code from the JSR 356 API are indicated by the comment
//JSR 356
.
package examples.webapp.html5.websocket;
//import weblogic.websocket.ClosingMessage; Deprecated
//import weblogic.websocket.WebSocketAdapter; Deprecated
//import weblogic.websocket.WebSocketConnection; Deprecated
//import weblogic.websocket.annotation.WebSocket; Deprecated
import javax.websocket.CloseReason; //JSR 356
import javax.websocket.OnMessage; //JSR 356
import javax.websocket.Session; //JSR 356
import javax.websocket.server.ServerEndpoint; //JSR 356
import java.io.IOException;
//@WebSocket( Deprecated
// timeout = -1, Deprecated
// pathPatterns = {"/ws"} Deprecated
//)
@ServerEndpoint("/ws") //JSR 356
//public class MessageListener extends WebSocketAdapter { Deprecated
public class MessageListener {
//@Override Not required. Replaced by @OnMessage in a POJO class
@OnMessage //JSR 356
//public void onMessage(WebSocketConnection connection, String payload) { Deprecated
public void onMessage(Session connection, String payload) //JSR 356
throws IOException { //JSR 356
// Sends message from the browser back to the client.
String msgContent = "Message \"" + payload + "\" has been received by server.";
try {
// connection.send(msgContent); Deprecated
connection.getBasicRemote().sendText(msgContent); //JSR 356
} catch (IOException e) {
// connection.close(ClosingMessage.SC_GOING_AWAY); Deprecated
connection.close(new //JSR 356
CloseReason(CloseReason.CloseCodes.GOING_AWAY, "Going away.")); //JSR 356
}
}
}
Chapter 19
Migrating an Application to the JSR 356 Java API for WebSocket from the Deprecated API
19-53

Example of Using the Java API for WebSocket with WebLogic
Server
Examine an example in which a server endpoint echoes text that a user has sent from a client.
When the user sends a text message, the server appends the text (from your server) to the
message and sends the message back to the user.
Example 19-42 Using the Java API for WebSocket with WebLogic Server
package com.example.websocket.sample.echo;
import java.io.IOException;
import javax.websocket.OnError;
import javax.websocket.OnMessage;
import javax.websocket.OnOpen;
import javax.websocket.Session;
import javax.websocket.server.ServerEndpoint;
@ServerEndpoint("/echo")
public class EchoEndpoint {
@OnOpen
public void onOpen(Session session) throws IOException {
session.getBasicRemote().sendText("onOpen is invoked.");
}
@OnMessage
public String echo(String message) {
return message + " (from server)";
}
@OnError
public void onError(Throwable t) {
t.printStackTrace();
}
}
Chapter 19
Example of Using the Java API for WebSocket with WebLogic Server
19-54

A
Enterprise Application Deployment Descriptor
Elements
Learn about enterprise application deployment descriptors such as
application.xml
(a Java
EE standard deployment descriptor) and
weblogic-application.xml
(a WebLogic-specific
application deployment descriptor).
With Java EE annotations, the standard
application.xml
deployment descriptor is optional.
Annotations simplify the application development process by allowing developers to specify
within the Java class itself how the application component behaves in the container, requests
for dependency injection, and so on. Annotations are an alternative to deployment descriptors
that were required by older versions of enterprise applications (Java EE 1.4 and earlier). See
Using Java EE Annotations and Dependency Injection.
The
weblogic-application.xml
file is also optional if you are not using any WebLogic Server
extensions.
This chapter includes the following sections:
• weblogic-application.xml Deployment Descriptor Elements
• weblogic-application.xml Schema
• application.xml Schema
• weblogic-application.xml Deployment Descriptor Elements
The
weblogic-application.xml
file is the WebLogic Server-specific deployment
descriptor extension for the
application.xml
Java EE deployment descriptor. This is
where you configure features such as shared Java EE libraries referenced in the
application and EJB caching.
• weblogic-application.xml Schema
• application.xml Schema
weblogic-application.xml Deployment Descriptor Elements
The
weblogic-application.xml
file is the WebLogic Server-specific deployment descriptor
extension for the
application.xml
Java EE deployment descriptor. This is where you
configure features such as shared Java EE libraries referenced in the application and EJB
caching.
The following sections describe the many of the individual elements that are defined in the
weblogic-application.xml Schema.
The file is located in the
META-INF
subdirectory of the application archive. The following
sections describe elements that can appear in the file.
• weblogic-application
• ejb
• max-cache-size
• xml
A-1

• jdbc-connection-pool
• security
• application-param
• classloader-structure
• listener
• singleton-service
• startup
• shutdown
• work-manager
• session-descriptor
• library-ref
• library-context-root-override
• fast-swap
weblogic-application
The
weblogic-application
element is the root element of the application deployment
descriptor.
The following table describes the elements you can define within a
weblogic-application
element.
Table A-1 weblogic-application Elements
Element Required? Maximum
Number In File
Description
<ejb>
Optional 1 Contains information that is specific to the EJB modules that are
part of a WebLogic application. Currently, one can use the
ejb
element to specify one or more application level caches that can
be used by the application's entity beans.
For more information on the elements you can define within the
ejb
element, see ejb.
<xml>
Optional 1 Contains information about parsers and entity mappings for
XML processing that is specific to this application.
For more information on the elements you can define within the
xml
element, see xml.
<jdbc-
connection-
pool>
Optional Unbounded Zero or more. Specifies an application-scoped JDBC connection
pool.
For more information on the elements you can define within the
jdbc-connection-pool
element, see jdbc-connection-pool.
<security>
Optional 1 Specifies security information for the application.
For more information on the elements you can define within the
security
element, see security.
Appendix A
weblogic-application.xml Deployment Descriptor Elements
A-2

Table A-1 (Cont.) weblogic-application Elements
Element Required? Maximum
Number In File
Description
<application-
param>
Optional Unbounded Zero or more. Used to specify un-typed parameters that affect
the behavior of container instances related to the application.
The parameters listed here are currently supported. Also, these
parameters in
weblogic-application.xml
can determine
the default encoding to be used for requests and for responses.
•
webapp.encoding.default
—Can be set to a string
representing an encoding supported by the JDK. If set, this
defines the default encoding used to process servlet
requests and servlet responses. This setting is ignored if
webapp.encoding.usevmdefault
is set to
true
. This
value is also overridden for request streams by the
input-
charset
element of
weblogic.xml
.
•
webapp.encoding.usevmdefault
—Can be set to
true
or
false
. If
true
, the system property
file.encoding
is
used to define the default encoding.
The following parameter is used to affect the behavior of Web
applications that are contained in this application.
•
webapp.getrealpath.accept_context_path
—This is
a compatibility switch that may be set to
true
or
false
. If
set to
true
, the context path of Web applications is allowed
in calls to the servlet API
getRealPath
.
Example:
<application-param>
<param-name>webapp.encoding.default
</param-name>
<param-value>UTF8</param-value>
</application-param>
For more information on the elements you can define within the
application-param
element, see application-param.
Appendix A
weblogic-application.xml Deployment Descriptor Elements
A-3

Table A-1 (Cont.) weblogic-application Elements
Element Required? Maximum
Number In File
Description
<classloader-
structure>
Optional Unbounded A classloader-structure element allows you to define the
organization of classloaders for this application. The declaration
represents a tree structure that represents the classloader
hierarchy and associates specific modules with particular nodes.
A module's classes are loaded by the classloader that its
associated with this element.
Example:
<classloader-structure>
<module-ref>
<module-uri>ejb1.jar</module-uri>
</module-ref>
</classloader-structure>
<classloader-structure>
<module-ref>
<module-uri>ejb2.jar</module-uri>
</module-ref>
</classloader-structure>
For more information on the elements you can define within the
classloader-structure
element, see classloader-structure.
<listener>
Optional Unbounded Zero or more. Used to register user-defined application lifecycle
listeners. These are classes that extend the abstract base class
weblogic.application.ApplicationLifecycleListener
.
For more information on the elements you can define within the
listener
element, see listener.
<singleton-
service>
Optional Unbounded Zero or more. Used to register user-defined singleton services.
These are classes that implement the interface
weblogic.cluster.singleton.SingletonService
.
For more information on the elements you can define within the
singleton-service
element, see singleton-service.
<startup>
Optional Unbounded Zero or more. Used to register user-defined startup classes.
For more information on the elements you can define within the
startup
element, see startup.
Note: Application-scoped startup and shutdown classes have
been deprecated as of release 9.0 of WebLogic Server. Instead,
you should use lifecycle listener events in your applications. For
details, see Programming Application Life Cycle Events
<shutdown>
Optional Unbounded Zero or more. Used to register user defined shutdown classes.
For more information on the elements you can define within the
shutdown
element, see shutdown.
Note: Application-scoped startup and shutdown classes have
been deprecated as of release 9.0 of WebLogic Server. Instead,
you should use lifecycle listener events in your applications. For
details, see Programming Application Life Cycle Events.
Appendix A
weblogic-application.xml Deployment Descriptor Elements
A-4

Table A-1 (Cont.) weblogic-application Elements
Element Required? Maximum
Number In File
Description
<module>
Optional Unbounded Represents a single WebLogic application module, such as a
JMS or JDBC module.
This element has the following child elements:
•
name
—The name of the module.
•
type
—The type of module. Valid values are JMS, JDBC,
Interception, or GAR.
•
path
—The path of the XML file that fully describes the
module, relative to the root of the enterprise application.
The following example shows how to specify a JMS module
called
Workflows
, fully described by the XML file
jms/
Workflows-jms.xml
:
<module>
<name>Workflows</name>
<type>JMS</type>
<path>jms/Workflows-jms.xml</path>
</module>
<library-ref>
Optional Unbounded A reference to a shared Java EE library.
For more information on the elements you can define within the
library
element, see library-ref.
<fair-share-
request>
Optional Unbounded Specifies a fair share request class, which is a type of Work
Manager request class. In particular, a fair share request class
specifies the average percentage of thread-use time required to
process requests.
The
<fair-share-request>
element can take the following
child elements:
•
name
—The name of the fair share request class.
•
fair-share
—An integer representing the average
percentage of thread-use time.
See Using Work Managers to Optimize Scheduled Work.
<response-
time-request>
Optional Unbounded Specifies a response time request class, which is a type of Work
manager class. In particular, a response time request class
specifies a response time goal in milliseconds.
The
<response-time-request>
element can take the
following child elements:
•
name
—The name of the response time request class.
•
goal-ms
—The integer response time goal.
See Using Work Managers to Optimize Scheduled Work.
Appendix A
weblogic-application.xml Deployment Descriptor Elements
A-5

Table A-1 (Cont.) weblogic-application Elements
Element Required? Maximum
Number In File
Description
<context-
request>
Optional Unbounded Specifies a context request class, which is a type of Work
manager class. In particular, a context request class assigns
request classes to requests based on context information, such
as the current user or the current user's group.
The
<context-request>
element can take the following child
elements:
•
name
—The name of the context request class.
•
context-case
—An element that describes the context.
The
<context-case>
element can itself take the following child
elements:
•
user-name
or
group-name
—The user or group to which
the context applies.
•
request-class-name
—The name of the request class.
See Using Work Managers to Optimize Scheduled Work.
<max-threads-
constraint>
Optional Unbounded Specifies a
max-threads-constraint
Work Manager
constraint. A Work Manager constraint defines minimum and
maximum numbers of threads allocated to execute requests and
the total number of requests that can be queued or executing
before WebLogic Server begins rejecting requests.
The max-threads constraint limits the number of concurrent
threads executing requests from the constrained work set.
The
<max-threads-constraint>
element can take the
following child elements:
•
name
—The name of the max-thread-constraint.
• Either
count
or
pool-name
—The integer maximum
number of concurrent threads, or the name of a connection
pool which determines the maximum.
See Using Work Managers to Optimize Scheduled Work.
<min-threads-
constraint>
Optional Unbounded Specifies a
min-threads-constraint
Work Manager
constraint. A Work Manager constraint defines minimum and
maximum numbers of threads allocated to execute requests and
the total number of requests that can be queued or executing
before WebLogic Server begins rejecting requests.
The min-threads constraint guarantees a number of threads the
server will allocate to affected requests to avoid deadlocks.
The
<min-threads-constraint>
element can take the
following child elements:
•
name
—The name of the min-thread-constraint.
•
count
—The integer minimum number of threads.
See Using Work Managers to Optimize Scheduled Work.
Appendix A
weblogic-application.xml Deployment Descriptor Elements
A-6
Table A-1 (Cont.) weblogic-application Elements
Element Required? Maximum
Number In File
Description
<capacity>
Optional Unbounded Specifies a
capacity
Work Manager constraint. A Work
Manager constraint defines minimum and maximum numbers of
threads allocated to execute requests and the total number of
requests that can be queued or executing before WebLogic
Server begins rejecting requests.
The capacity constraint causes the server to reject requests
only when it has reached its capacity.
The
<capacity>
element can take the following child elements:
•
name
—The name of the capacity constraint.
•
count
—The integer thread capacity.
See Using Work Managers to Optimize Scheduled Work.
<work-manager>
Optional Unbounded Specifies the Work Manager that is associated with the
application.
For more information on the elements you can define within the
work-manager
element, see work-manager.
See Using Work Managers to Optimize Scheduled Work for
detailed information on Work Managers.
<application-
admin-mode-
trigger>
Optional Unbounded Specifies the number of stuck threads needed to bring the
application into administration mode.
You can specify the following child elements:
•
max-stuck-thread-time
—The maximum amount of
time, in seconds, that a thread should remain stuck.
•
stuck-thread-count
—Number of stuck threads that
triggers the stuck thread work manager.
<session-
descriptor>
Optional Unbounded Specifies a list of configuration parameters for servlet sessions.
For more information on the elements you can define within the
<session-descriptor>
element, see session-descriptor.
<library-
context-root-
override>
Optional Unbounded Zero or more. Used to override the context-root of a Web
module specified in the deployment descriptor of a library
referenced by this application.
For more information on the elements you can define within the
<library-context-root-override>
element, see library-
context-root-override.
<component-
factory-class-
name>
Optional 1 Used to enable the Spring extension by setting this element to
org.springframework.jee.interfaces.SpringComponen
tFactory
. This element exists in EJB, Web, and application
descriptors. A module-level descriptor overwrites an application-
level descriptor. If set to null (default), the Spring extension is
disabled.
<prefer-
application-
packages>
Optional 1 Used for filtering ClassLoader configuration. Specifies a list of
packages for classes that must always be loaded from the
application.
Appendix A
weblogic-application.xml Deployment Descriptor Elements
A-7

Table A-1 (Cont.) weblogic-application Elements
Element Required? Maximum
Number In File
Description
<prefer-
application-
resources>
Optional 1 Used for filtering ClassLoader configuration. Specifies a list of
resources that must always be loaded from the application, even
if the resources are found in the system classloader.
Note that the resource loading behavior is different from the
resource loading behavior when
<prefer-application-
packages>
is used.
In that case, application resources get a preference over system
resources. The resources captured in this element are never
looked up in the system classloader.
<fast-swap>
Optional 1 Specifies whether FastSwap deployment is used to minimize
redeployment since Java classes are redefined in-place without
reloading the ClassLoader.
See Using FastSwap Deployment to Minimize Redeployment in
Deploying Applications to Oracle WebLogic Server.
For information on the elements you can define within the
<fast-swap>
element, see fast-swap.
<ready-
registration>
Optional 1 To use the ReadyApp framework, register an EAR-based
application with the framework by adding the following code to
the application's WebLogic deployment descriptor META-
INF\weblogic-application.xml:
<wls:ready-registration>true</wls:ready-
registration>
When the application starts, the state of the application is set to
NOT READY.
Note: The prefix
wls:
may not be required, depending on the
contents of the weblogic-application.xml file. If the
rest of the tags do not have the prefix, you can ignore the prefix.
For more information, see Deploying Applications to Oracle
WebLogic Server.
ejb
The following table describes the elements you can define within an
ejb
element.
Appendix A
weblogic-application.xml Deployment Descriptor Elements
A-8

Table A-2 ejb Elements
Element Required
?
Maximum
Number in File
Description
<entity-cache>
Optional Unbounded Zero or more. The
entity-cache
element is used to define a
named application level cache that is used to cache entity EJB
instances at runtime. Individual entity beans refer to the
application-level cache that they must use, referring to the cache
name. There is no restriction on the number of different entity
beans that may reference an individual cache.
To use application-level caching, you must specify the cache
using the
<entity-cache-ref>
element of the
weblogic-ejb-
jar.xml
descriptor. Two default caches named
ExclusiveCache
and
MultiVersionCache
are used for this
purpose. An application may explicitly define these default
caches to specify non-default values for their settings. Note that
the caching-strategy cannot be changed for the default caches.
By default, a cache uses
max-beans-in-cache
with a value of
1000 to specify its maximum size.
Example:
<entity-cache>
<entity-cache-name>ExclusiveCache</entity-cache-
name>
<max-cache-size>
<megabytes>50</megabytes>
</max-cache-size>
</entity-cache>
For more information on the elements you can define within the
entity-cache
element, see entity-cache.
<start-mbds-with-
application
Optional
1 Allows you to configure the EJB container to start Message
Driven BeanS (MDBS) with the application. If set to true, the
container starts MDBS as part of the application. If set to false,
the container keeps MDBS in a queue and the server starts them
as soon as it has started listening on the ports.
• entity-cache
entity-cache
The following table describes the elements you can define within a
entity-cache
element.
Table A-3 entity-cache Elements
Element Required? Maximum
Number in File
Description
<entity-cache-
name>
Required 1 Specifies a unique name for an entity bean cache. The
name must be unique within an ear file and may not be
the empty string.
Example:
<entity-cache-name>ExclusiveCache</entity-
cache-name>
Appendix A
weblogic-application.xml Deployment Descriptor Elements
A-9
Table A-3 (Cont.) entity-cache Elements
Element Required? Maximum
Number in File
Description
<max-beans-in-
cache>
Optional
If you specify this
element, you cannot
also specify
<max-
cache-size>
.
1 Specifies the maximum number of entity beans that are
allowed in the cache. If the limit is reached, beans may
be passivated. This mechanism does not take into
account the actual amount of memory that different
entity beans require. This element can be set to a value
of 1 or greater.
Default Value:
1000
<max-cache-size>
Optional
If you specify this
element, you cannot
also specify
<max-
beans-in-cache>
.
1 Used to specify a limit on the size of an entity cache in
terms of memory size—expressed either in terms of
bytes or megabytes. A bean provider should provide an
estimate of the average size of a bean in the
weblogic-ejb-jar.xml
descriptor if the bean uses a
cache that specifies its maximum size using the
max-
cache-size
element. By default, a bean is assumed to
have an average size of 100 bytes.
For more information on the elements you can define
within the
ejb
element, see max-cache-size.
<max-queries-in-
cache>
Optional 1 Specifies the maximum SQL queries that can be
present in the entity cache at a given moment.
<caching-
strategy>
Optional 1 Specifies the general strategy that the EJB container
uses to manage entity bean instances in a particular
application level cache. A cache buffers entity bean
instances in memory and associates them with their
primary key value.
The
caching-strategy
element can only have one of
the following values:
•
Exclusive
—Caches a single bean instance in
memory for each primary key value. This unique
instance is typically locked using the EJB
container's exclusive locking when it is in use, so
that only one transaction can use the instance at a
time.
•
MultiVersion
—Caches multiple bean instances
in memory for a given primary key value. Each
instance can be used by a different transaction
concurrently.
Default Value:
MultiVersion
Example:
<caching-strategy>Exclusive</caching-
strategy>
max-cache-size
The following table describes the elements you can define within a
max-cache-size
element.
Appendix A
weblogic-application.xml Deployment Descriptor Elements
A-10

Table A-4 max-cache-size Elements
Element Required? Maximum
Number in File
Description
<bytes>
You must specify either
<bytes>
or
<megabytes>
1 The size of an entity cache in terms of memory
size, expressed in bytes.
<megabytes>
You must specify either
<bytes>
or
<megabytes>
1 The size of an entity cache in terms of memory
size, expressed in megabytes.
xml
The following table describes the elements you can define within an
xml
element.
Table A-5 xml Elements
Element Required
?
Maximum
Number in File
Description
<parser-
factory>
Optional 1 The parent element used to specify a particular XML parser or transformer
for an enterprise application.
For more information on the elements you can define within the
parser-
factory
element, see parser-factory.
<entity-
mapping>
Optional Unbounded Zero or More. Specifies the entity mapping. This mapping determines the
alternative entity URI for a given public or system ID. The default place to
look for this entity URI is the
lib/xml/registry
directory.
For more information on the elements you can define within the
entity-
mapping
element, see entity-mapping.
• parser-factory
• entity-mapping
parser-factory
The following table describes the elements you can define within a
parser-factory
element.
Table A-6 parser-factory Elements
Element Required? Maximum
Number in File
Description
<saxparser-
factory>
Optional 1 Allows you to set the SAXParser Factory for the XML parsing
required in this application only. This element determines the
factory to be used for SAX style parsing. If you do not specify the
saxparser-factory
element setting, the configured SAXParser
Factory style in the Server XML Registry is used.
Default Value: Server XML Registry setting
Appendix A
weblogic-application.xml Deployment Descriptor Elements
A-11
Table A-6 (Cont.) parser-factory Elements
Element Required? Maximum
Number in File
Description
<document-builder-
factory>
Optional 1 Allows you to set the Document Builder Factory for the XML
parsing required in this application only. This element determines
the factory to be used for DOM style parsing. If you do not specify
the
document-builder-factory
element setting, the configured
DOM style in the Server XML Registry is used.
Default Value: Server XML Registry setting
<transformer-
factory>
Optional 1 Allows you to set the Transformer Engine for the style sheet
processing required in this application only. If you do not specify a
value for this element, the value configured in the Server XML
Registry is used.
Default value: Server XML Registry setting.
entity-mapping
The following table describes the elements you can define within an
entity-mapping
element.
Table A-7 entity-mapping Elements
Element Required
?
Maximum
Number in File
Description
<entity-mapping-
name>
Required 1 Specifies the name for this entity mapping.
<public-id>
Optional 1 Specifies the public ID of the mapped entity.
<system-id>
Optional 1 Specifies the system ID of the mapped entity.
<entity-uri>
Optional 1 Specifies the entity URI for the mapped entity.
<when-to-cache>
Optional 1 Legal values are:
• cache-on-reference
• cache-at-initialization
• cache-never
The default value is
cache-on-reference
.
<cache-timeout-
interval>
Optional 1 Specifies the integer value in seconds.
jdbc-connection-pool
Note:
The
jdbc-connection-pool
element is deprecated. To define a data source in your
enterprise application, you can package a JDBC module with the application. See
Configuring JDBC Application Modules for Deployment in Administering JDBC Data
Sources for Oracle WebLogic Server.
Appendix A
weblogic-application.xml Deployment Descriptor Elements
A-12
The following table describes the elements you can define within a
jdbc-connection-pool
element.
Table A-8 jdbc-connection-pool Elements
Element Required? Maximum
Number in File
Description
<data-source-
jndi-name>
Required 1 Specifies the JNDI name in the application-specific JNDI tree.
<connection-
factory>
Required 1 Specifies the connection parameters that define overrides for default
connection factory settings.
•
user-name
—Optional. The
user-name
element is used to
override
UserName
in the
JDBCDataSourceFactoryMBean
.
•
url
—Optional. The
url
element is used to override
URL
in the
JDBCDataSourceFactoryMBean
.
•
driver-class-name
—Optional. The
driver-class-name
element is used to override
DriverName
in the
JDBCDataSourceFactoryMBean
.
•
connection-params
—Zero or more.
•
parameter+
(
param-value
,
param-name
)—One or more
For more information on the elements you can define within the
connection-factory
element, see connection-factory.
<pool-params>
Optional 1 Defines parameters that affect the behavior of the pool.
For more information on the elements you can define within the
pool-
params
element, see pool-params.
<driver-params>
Optional 1 Sets behavior on WebLogic Server drivers.
For more information on the elements you can define within the
driver-params
element, see driver-params.
<acl-name>
Optional 1 DEPRECATED.
• connection-factory
• pool-params
• driver-params
connection-factory
The following table describes the elements you can define within a
connection-factory
element.
Table A-9 connection-factory Elements
Element Required? Maximum
Number in File
Description
<factory-name>
Optional 1 Specifies the name of a
JDBCDataSourceFactoryMBean
in the
config.xml
file.
Appendix A
weblogic-application.xml Deployment Descriptor Elements
A-13

Table A-9 (Cont.) connection-factory Elements
Element Required? Maximum
Number in File
Description
<connection-
properties>
Optional 1 Specifies the connection properties for the connection factory.
Elements that can be defined for the
connection-properties
element are:
•
user-name
—Optional. Used to override UserName in the
JDBCDataSourceFactoryMBean.
•
password
—Optional. Used to override Password in the
JDBCDataSourceFactoryMBean.
•
url
—Optional. Used to override URL in the
JDBCDataSourceFactoryMBean.
•
driver-class-name
—Optional. Used to override DriverName in
the JDBCDataSourceFactoryMBean
•
connection-params
—Zero or more. Used to set parameters
which will be passed to the driver when making a connection.
Example:
<connection-params>
<parameter>
<description>Desc of param
</description>
<param-name>foo</param-name>
<param-value>xyz</param-value>
</parameter>
</connection-params>
pool-params
The following table describes the elements you can define within a
pool-params
element.
Appendix A
weblogic-application.xml Deployment Descriptor Elements
A-14

Table A-10 pool-params Elements
Element Required? Maximum
Number in File
Description
<size-
params>
Optional 1 Defines parameters that affect the number of connections in the pool.
•
initial-capacity
—Optional. The
initial-capacity
element
defines the number of physical database connections to create when
the pool is initialized. The default value is
1
.
•
max-capacity
—Optional. The
max-capacity
element defines the
maximum number of physical database connections that this pool
can contain. Note that the JDBC Driver may impose further limits on
this value. The default value is
1
.
•
capacity-increment
—Optional. The
capacity-increment
element defines the increment by which the pool capacity is
expanded. When there are no more available physical connections to
service requests, the pool creates this number of additional physical
database connections and adds them to the pool. The pool ensures
that it does not exceed the maximum number of physical connections
as set by
max-capacity
. The default value is
1
.
•
shrinking-enabled
—Optional. The
shrinking-enabled
element
indicates whether or not the pool can shrink back to its
initial-
capacity
when connections are detected to not be in use.
•
shrink-period-minutes
—Optional. The
shrink-period-
minutes
element defines the number of minutes to wait before
shrinking a connection pool that has incrementally increased to meet
demand. The
shrinking-enabled
element must be set to
true
for
shrinking to take place.
•
shrink-frequency-seconds
—Optional.
•
highest-num-waiters
—Optional.
•
highest-num-unavailable
—Optional.
<xa-params>
Optional
1 Defines the parameters for the XA DataSources.
•
debug-level
—Optional. Integer. The
debug-level
element
defines the debugging level for XA operations. The default value is
0
.
•
keep-conn-until-tx-complete-enabled
—Optional. Boolean. If
you set the
keep-conn-until-tx-complete-enabled
element to
true
, the XA connection pool associates the same XA connection
with the distributed transaction until the transaction completes.
•
end-only-once-enabled
—Optional. Boolean. If you set the
end-
only-once-enabled
element to
true
, the
XAResource.end()
method is only called once for each pending
XAResource.start()
method.
•
recover-only-once-enabled
—Optional. Boolean. If you set the
recover-only-once-enabled element to true, recover is only called one
time on a resource.
•
tx-context-on-close-needed
—Optional. Set the
tx-context-
on-close-needed
element to
true
if the XA driver requires a
distributed transaction context when closing various JDBC objects
(for example, result sets, statements, connections, and so on). If set
to
true
, the SQL exceptions that are thrown while closing the JDBC
objects in no transaction context are swallowed.
•
new-conn-for-commit-enabled
—Optional. Boolean. If you set the
new-conn-for-commit-enabled
element to
true
, a dedicated XA
connection is used for commit/rollback processing of a particular
distributed transaction.
Appendix A
weblogic-application.xml Deployment Descriptor Elements
A-15
Table A-10 (Cont.) pool-params Elements
Element Required? Maximum
Number in File
Description
<xa-params>
Continued...
Optional 1 •
prepared-statement-cache-size
—Deprecated. Optional. Use
the prepared-statement-cache-size element to set the size of the
prepared statement cache. The size of the cache is a number of
prepared statements created from a particular connection and stored
in the cache for further use. Setting the size of the prepared
statement cache to 0 turns it off.
Note:
Prepared-statement-cache-size
is deprecated. Use
cache-
size
in
driver-params/prepared-statement
. See driver-params for
more information.
•
keep-logical-conn-open-on-release
—Optional. Boolean. Set
the
keep-logical-conn-open-on-release
element to
true
, to
keep the logical JDBC connection open when the physical XA
connection is returned to the XA connection pool. The default value is
false
.
•
local-transaction-supported
—Optional. Boolean. Set the
local-transaction-supported
to
true
if the XA driver supports
SQL with no global transaction; otherwise, set it to
false
. The
default value is
false
.
•
resource-health-monitoring-enabled
—Optional. Set the
resource-health-monitoring-enabled
element to
true
to
enable JTA resource health monitoring for this connection pool.
Appendix A
weblogic-application.xml Deployment Descriptor Elements
A-16

Table A-10 (Cont.) pool-params Elements
Element Required? Maximum
Number in File
Description
<xa-params>
Continued...
Optional 1 •
xa-set-transaction-timeout
—Optional.
Used in: xa-params
Example:
<xa-set-transaction-timeout>
true
</xa-set-transaction-timeout>
•
xa-transaction-timeout
—Optional.
When the
xa-set-transaction-timeout
value is set to true, the
transaction manager invokes setTransactionTimeout on the resource
before calling XAResource.start. The Transaction Manager passes
the global transaction timeout value. If this attribute is set to a value
greater than 0, then this value is used in place of the global
transaction timeout.
Default value: 0
Used in: xa-params
Example:
<xa-transaction-timeout>
30
</xa-transaction-timeout>
•
rollback-localtx-upon-connclose
—Optional.
When the
rollback-localtx-upon-connclose
element is true,
the connection pool calls
rollback()
on the connection before
putting it back in the pool.
Default value: false
Used in: xa-params
Example:
<rollback-localtx-upon-connclose>
true </rollback-localtx-upon-connclose>
<login-
delay-
seconds>
Optional
1 Sets the number of seconds to delay before creating each physical
database connection. Some database servers cannot handle multiple
requests for connections in rapid succession. This property allows you to
build in a small delay to let the database server catch up. This delay
occurs both during initial pool creation and during the lifetime of the pool
whenever a physical database connection is created.
<leak-
profiling-
enabled>
Optional 1 Enables JDBC connection leak profiling. A connection leak occurs when a
connection from the pool is not closed explicitly by calling the
close()
method on that connection. When connection leak profiling is active, the
pool stores the stack trace at the time the connection object is allocated
from the pool and given to the client. When a connection leak is detected
(when the connection object is garbage collected), this stack trace is
reported.
This element uses extra resources and will likely slowdown connection
pool operations, so it is not recommended for production use.
Appendix A
weblogic-application.xml Deployment Descriptor Elements
A-17

Table A-10 (Cont.) pool-params Elements
Element Required? Maximum
Number in File
Description
<connection-
check-
params>
Optional 1 • Defines whether, when, and how connections in a pool is checked to
make sure they are still alive.
•
table-name
—Optional. The
table-name
element defines a table in
the schema that can be queried.
•
check-on-reserve-enabled
—Optional. If the check-on-reserve-
enabled element is set to true, then the connection will be tested
each time before it is handed out to a user.
•
check-on-release-enabled
—Optional. If the
check-on-
release-enabled
element is set to
true
, then the connection will
be tested each time a user returns a connection to the pool.
•
refresh-minutes
—Optional. If the
refresh-minutes
element is
defined, a trigger is fired periodically (based on the number of
minutes specified). This trigger checks each connection in the pool to
make sure it is still valid.
•
check-on-create-enabled
—Optional. If set to
true
, then the
connection will be tested when it is created.
•
connection-reserve-timeout-seconds
—Optional. Number of
seconds after which the call to reserve a connection from the pool will
timeout.
•
connection-creation-retry-frequency-seconds
—Optional.
The frequency of retry attempts by the pool to establish connections
to the database.
•
inactive-connection-timeout-seconds
—Optional. The number
of seconds of inactivity after which reserved connections will forcibly
be released back into the pool.
<connection-
check-
params>
Continued...
Optional
1 •
test-frequency-seconds
—Optional. The number of seconds
between database connection tests. After every test-frequency-
seconds interval, unused database connections are tested using
table-name
. Connections that do not pass the test will be closed
and reopened to re-establish a valid physical database connection. If
table-name
is not set, the test will not be performed.
•
init-sql
—Optional. Specifies a SQL query that automatically runs
when a connection is created.
<jdbcxa-
debug-level>
Optional 1 This is an internal setting.
<remove-
infected-
connections-
enabled>
Optional 1 Controls whether a connection is removed from the pool when the
application asks for the underlying vendor connection object. Enabling this
attribute has an impact on performance; it essentially disables the pooling
of connections (as connections are removed from the pool and replaced
with new connections).
driver-params
The following table describes the elements you can define within a
driver-params
element.
Appendix A
weblogic-application.xml Deployment Descriptor Elements
A-18

Table A-11 driver-params Elements
Element Required? Maximum
Number in File
Description
<statement>
Optional 1 Defines the
driver-params
statement. Contains the following optional
element:
profiling-enabled
.
Example:
<statement>
<profiling-enabled>true
</profiling-enabled>
</statement>
<prepared-
statement>
Optional 1 Enables the running of JDBC prepared statement cache profiling.
When enabled, prepared statement cache profiles are stored in
external storage for further analysis. This is a resource-consuming
feature, so it is recommended that you turn it off on a production
server. The default value is false.
•
profiling-enabled
—Optional.
•
cache-profiling-threshold
—Optional. The
cache-
profiling-threshold
element defines a number of statement
requests after which the state of the prepared statement cache is
logged. This element minimizes the output volume. This is a
resource-consuming feature, so it is recommended that you turn it
off on a production server.
•
cache-size
—Optional. The
cache-size
element returns the
size of the prepared statement cache. The size of the cache is a
number of prepared statements created from a particular
connection and stored in the cache for further use.
•
parameter-logging-enabled
—Optional. During SQL roundtrip
profiling it is possible to store values of prepared statement
parameters. The
parameter-logging-enabled
element enables
the storing of statement parameters. This is a resource-consuming
feature, so it is recommended that you turn it off on a production
server.
•
max-parameter-length
—Optional. During SQL roundtrip
profiling it is possible to store values of prepared statement
parameters. The
max-parameter-length
element defines
maximum length of the string passed as a parameter for JDBC
SQL roundtrip profiling. This is a resource-consuming feature, so
you should limit the length of data for a parameter to reduce the
output volume.
•
cache-type
—Optional.
<row-prefetch-
enabled>
Optional
1 Specifies whether to enable row prefetching between a client and
WebLogic Server for each ResultSet.
When an external client accesses a database using JDBC through
Weblogic Server, row prefetching improves performance by fetching
multiple rows from the server to the client in one server access.
WebLogic Server ignores this setting and does not use row prefetching
when the client and WebLogic Server are in the same JVM
Appendix A
weblogic-application.xml Deployment Descriptor Elements
A-19
Table A-11 (Cont.) driver-params Elements
Element Required? Maximum
Number in File
Description
<row-prefetch-
size>
Optional 1 Specifies the number of result set rows to prefetch for a client.
The optimal value depends on the particulars of the query. In general,
increasing this number increases performance, until a particular value
is reached. At that point further increases do not result in any
significant increase in performance.
Note: Typically you will not see any increase in performance after 100
rows. The default value should be adequate for most situations.
Valid values for this element are between 2 and 65536. The default
value is 48.
<stream-chunk-
size>
Optional 1 Specifies the data chunk size for streaming data types, which are
pulled from WebLogic Server to the client as needed.
security
The following table describes the elements you can define within a
security
element.
Table A-12 security Elements
Element Required? Maximum
Number in File
Description
<realm-name>
Optional 1 Names a security realm to be used by the application. If none is
specified, the system default realm is used
<security-role-
assignment>
Optional Unbounded Declares a mapping between an application-wide security role
and one or more WebLogic Server principals.
Example:
<security-role-assignment>
<role-name>
PayrollAdmin
</role-name>
<principal-name>
Tanya
</principal-name>
<principal-name>
Fred
</principal-name>
<principal-name>
system
</principal-name>
</security-role-assignment>
application-param
The following table describes the elements you can define within a
application-param
element.
Appendix A
weblogic-application.xml Deployment Descriptor Elements
A-20

Table A-13 application-param Elements
Element Required? Maximum
Number in File
Description
<description>
Optional 1 Provides a description of the application parameter.
<param-name>
Required 1 Defines the name of the application parameter.
<param-value>
Required 1 Defines the value of the application parameter.
classloader-structure
The following table describes the elements you can define within a
classloader-structure
element.
Table A-14 classloader-structure Elements
Element Required? Maximum
Number in File
Description
<module-ref>
Optional Unbounded The following list describes the elements you can define within a
module-ref
element:
•
module-uri
—Zero or more. Defined within the
module-ref
element.
<classloader-
structure>
Optional Unbounded Allows for arbitrary nesting of classloader structures for an
application. However, for this version of WebLogic Server, the
depth is restricted to three levels.
listener
The following table describes the elements you can define within a
listener
element.
Table A-15 listener Elements
Element Required? Maximum Number in File Description
<listener-class>
Required 1 Name of the user's
implementation of
ApplicationLifecycleLis
tener
.
<listener-uri>
Optional 1 A JAR file within the EAR that
contains the implementation.
If you do not specify the
listener-uri
, it is assumed
that the class is visible to the
application.
Appendix A
weblogic-application.xml Deployment Descriptor Elements
A-21
Table A-15 (Cont.) listener Elements
Element Required? Maximum Number in File Description
<run-as-principal-name>
Optional 1 Specific a user identity to
startup and shutdown
application lifecycle events.
The identity specified here
should be a valid user name
in the system. If
run-as-
principal-name
is not
specified, the deployment
initiator user identity will be
used as the
run-as
identity
for the execution of the
application lifecycle listener.
Note: If the
run-as-
principal-name
identity
defined for the application
lifecycle listener is an
administrator, the application
deployer must have
administrator privileges;
otherwise, deployment will
fail.
singleton-service
The following table describes the elements you can define within a
singleton-service
element.
Table A-16 singleton-service Elements
Element Required? Maximum
Number in File
Description
<class-name>
Required 1 Defines the name of the class to be run when the application is being
deployed.
<singleton-
uri>
Optional 1 Defines a JAR file within the EAR that contains the
singleton-service
.
If
singleton-uri
is not defined, then its assumed that the class is visible
to the application.
startup
The following table describes the elements you can define within a
startup
element.
Note:
Application-scoped startup and shutdown classes have been deprecated as of
release 9.0 of WebLogic Server. Instead, you should use lifecycle listener events in
your applications. For details, see Programming Application Life Cycle Events.
Appendix A
weblogic-application.xml Deployment Descriptor Elements
A-22
Table A-17 startup Elements
Element Required
?
Maximum Number
in File
Description
<startup-
class>
Required 1 Defines the name of the class to be run when the application is being
deployed.
<startup-
uri>
Optional 1 Defines a JAR file within the EAR that contains the
startup-class
. If
startup-uri
is not defined, then its assumed that the class is visible to
the application.
shutdown
The following table describes the elements you can define within a
shutdown
element.
Note:
Application-scoped startup and shutdown classes have been deprecated as of
release 9.0 of WebLogic Server. Instead, you should use lifecycle listener events in
your applications. For details, see Programming Application Life Cycle Events.
Table A-18 shutdown Elements
Element Required
Optional
Maximum
Number in File
Description
<shutdown-
class>
Required 1 Defines the name of the class to be run when the application is
undeployed.
<shutdown-uri>
Optional 1 Defines a JAR file within the EAR that contains the
shutdown-
class
. If you do not define the
shutdown-uri
element, it is
assumed that the class is visible to the application.
work-manager
The following table describes the elements you can define within a work-manager element.
See Using Work Managers to Optimize Scheduled Work for examples and information on Work
Managers.
Table A-19 work-manager Elements
Element Required
?
Maximum
Number in File
Description
<name>
Required 1 The name of the Work Manager.
Appendix A
weblogic-application.xml Deployment Descriptor Elements
A-23
Table A-19 (Cont.) work-manager Elements
Element Required
?
Maximum
Number in File
Description
<response-time-
request-class>
Optional 1 See the description of the
<response-time-request>
element in
weblogic-application for information on this child element of
<work-
manager>
.
If you specify this element, you cannot also specify
<fair-share-
request-class>
,
<context-request-class>
, or
<request-
class-name>
.
<fair-share-
request-class>
Optional 1 See the description of the
<fair-share-request>
element in
weblogic-application for information on this child element of
<work-
manager>
.
If you specify this element, you cannot also specify
<response-
time-request-class>
,
<context-request-class>
, or
<request-class-name>
.
<context-request-
class>
Optional 1 See the description of the
<context-request>
element in
weblogic-application for information on this child element of
<work-
manager>
.
If you specify this element, you cannot also specify
<fair-share-
request-class>
,
<response-time-request-class>
, or
<request-class-name>
.
<request-class-
name>
Optional 1 The name of the request class.
If you specify this element, you cannot also specify
<fair-share-
request-class>
,
<context-request-class>
, or
<response-
time-request-class>
.
<min-threads-
constraint>
Optional 1 See the description of the
<min-threads-constraint>
element
in weblogic-application for information on this child element of
<work-manager>
.
If you specify this element, you cannot also specify
<min-
threads-constraint-name>
.
<min-threads-
constraint-name>
Optional 1 The name of the min-threads constraint.
If you specify this element, you cannot also specify
<min-
threads-constraint>
.
<max-threads-
constraint>
Optional 1 See the description of the
<max-threads-constraint>
element
in weblogic-application for information on this child element of
<work-manager>
.
If you specify this element, you cannot also specify
<max-
threads-constraint-name>
.
<max-threads-
constraint-name>
Optional 1 The name of the max-threads constraint.
If you specify this element, you cannot also specify
<max-
threads-constraint>
.
<capacity>
Optional 1 See the description of the
<capacity>
element in weblogic-
application for information on this child element of
<work-
manager>
.
If you specify this element, you cannot also specify
<capacity-
name>
.
<capacity-name>
Optional 1 The name of the thread capacity constraint.
If you specify this element, you cannot also specify
<capacity>
.
Appendix A
weblogic-application.xml Deployment Descriptor Elements
A-24

Table A-19 (Cont.) work-manager Elements
Element Required
?
Maximum
Number in File
Description
<work-manager-
shutdown-trigger>
Optional 1 Used to specify a Stuck Thread Work Manager component that can
shut down the Work Manager in response to stuck threads.
You can specify the following child elements:
•
max-stuck-thread-time
—The maximum amount of time, in
seconds, that a thread should remain stuck.
•
stuck-thread-count
—Number of stuck threads that triggers
the stuck thread work manager.
If you specify this element, you cannot also specify
<ignore-
stuck-threads>
.
<ignore-stuck-
threads>
Optional 1 Specifies whether the Work Manager should ignore stuck threads
and never shut down even if threads become stuck.
If you specify this element, you cannot also specify
<work-
manager-shutdown-trigger>
.
session-descriptor
The following table describes the elements you can define within a session-descriptor element.
Table A-20 session-descriptor Elements
Element Require
d?
Maximum
Number in File
Description
<timeout-secs>
Optional 1 Specifies the number of seconds after which the session times out.
Default value is 3600 seconds.
<invalidation-
interval-secs>
Optional 1 Specifies the number of seconds of the invalidation trigger interval.
Default value is 60 seconds.
<debug-enabled>
Optional 1 Specifies whether debugging is enabled for HTTP sessions.
Default value is
false
.
<id-length>
Optional 1 Specifies the length of the session ID.
Default value is 52.
<tracking-enabled>
Optional 1 Specifies whether session tracking is enabled between HTTP
requests.
Default value is
true
.
<cache-size>
Optional 1 Specifies the cache size for JDBC and file persistent sessions.
Default value is 1028.
<max-in-memory-
sessions>
Optional 1 Specifies the maximum sessions limit for memory/replicated
sessions.
Default value is -1, or unlimited.
<cookies-enabled>
Optional 1 Specifies the Web application container should set cookies in the
response.
Default value is
true
.
<cookie-name>
Optional 1 Specifies the name of the cookie that tracks sessions.
Default name is
JSESSIONID
.
Appendix A
weblogic-application.xml Deployment Descriptor Elements
A-25

Table A-20 (Cont.) session-descriptor Elements
Element Require
d?
Maximum
Number in File
Description
<cookie-path>
Optional 1 Specifies the session tracking cookie path.
Default value is
/
.
<cookie-domain>
Optional 1 Specifies the session tracking cookie domain.
Default value is
null
.
<cookie-comment>
Optional 1 Specifies the session tracking cookie comment.
Default value is
null
.
<cookie-secure>
Optional 1 Specifies whether the session tracking cookie is marked secure.
Default value is
false
.
<cookie-max-age-
secs>
Optional 1 Specifies that maximum age of the session tracking cookie.
Default value is
-1
, or unlimited.
<persistent-store-
type>
Optional 1 Specifies the type of storage for session persistence.
You can specify the following values:
•
memory
—Default value.
•
replicated
—Requires clustering.
•
replicated_if_clustered
—Defaults to
memory
in non-
clustered case.
•
file
•
jdbc
•
cookie
<persistent-store-
cookie-name>
Optional 1 Specifies the name of the cookie that holds the attribute name and
values when using
cookie
-based session persistence.
Default value is
WLCOOKIE
.
<persistent-store-
dir>
Optional 1 Specifies the name of the directory when using
file
-based session
persistence. The directory is relative to the temporary directory
defined for the Web application.
Default value is
session_db
.
<persistent-store-
pool>
Optional 1 Specifies the name of the JDBC connection pool when using
jdbc
-
based session persistence.
<persistent-store-
table>
Optional 1 Specifies the name of the database table when using
jdbc
-based
session persistence.
Default value is
wl_servlet_sessions
.
<jdbc-column-name-
max-inactive-
interval>
Optional 1 Alternative name for the
wl_max_inactive_interval
column
name when using
jdbc
-based session persistence. Required for
certain databases that do not support long column names
<jdbc-connection-
timeout-secs>
Optional 1 DEPRECATED
<url-rewriting-
enabled>
Optional 1 Specifies whether URL rewriting is enabled.
Default value is
true
.
Appendix A
weblogic-application.xml Deployment Descriptor Elements
A-26
Table A-20 (Cont.) session-descriptor Elements
Element Require
d?
Maximum
Number in File
Description
<http-proxy-
caching-of-cookies>
Optional 1 Specifies whether WebLogic Server adds the following HTTP header
to the response:
Cache-control: no-cache=set-cookie
This header specifies that proxy caches should not cache the
cookies.
Default value is
true
, which means that the header is NOT added.
Set this element to
false
if you want the header added to the
response.
<encode-session-id-
in-query-params>
Optional 1 Specifies whether WebLogic Server should encode the session ID in
the path parameters.
Default value is
false
.
<monitoring-
attribute-name>
Optional 1 Used to tag runtime information for different sessions. For example,
set this element to
username
if you have a
username
attribute that is
guaranteed to be unique.
<sharing-enabled>
Optional 1 Specifies whether HTTP sessions are shared across multiple Web
applications.
Default value is
false
.
library-ref
The following table describes the elements you can define within a
library-ref
element.
See Creating Shared Java EE Libraries and Optional Packages, for additional information and
examples.
Table A-21 library Elements
Element Required? Maximum
Number in File
Description
<library-name>
Required 1 Specifies the name of the referenced shared Java EE library.
<specification-
version>
Optional 1 Specifies the minimum specification-version required.
<implementation-
version>
Optional 1 Specifies the minimum implementation-version required.
<exact-match>
Optional 1 Specifies whether there must be an exact match between the
specification and implementation version that is specified and that
of the referenced library.
Default value is
false
.
<context-root>
Optional 1 Specifies the context-root of the referenced Web application's
shared Java EE library.
Appendix A
weblogic-application.xml Deployment Descriptor Elements
A-27
library-context-root-override
The following table describes the elements you can define within a
library-context-root-
override
element to override
context-root
elements within a referenced EAR library. See
library-ref.
See Creating Shared Java EE Libraries and Optional Packages, for additional information and
examples.
Table A-22 library-context-root-override Elements
Element Require
d?
Maximum
Number in File
Description
<context-
root>
Optional 1 Overrides the
context-root
elements declared in libraries. In the absence
of this element, the library's
context-root
is used.
Only a referencing application (for example, a user application) can override
the
context-root
elements declared in its libraries.
<override-
value>
Optional 1 Specifies the value of the
library-context-root-override
element
when overriding the
context-root
elements declared in libraries. In the
absence of these elements, the library's
context-root
is used.
fast-swap
The following table describes the elements you can define within a
fast-swap
element.
For more information about FastSwap Deployment, see Using FastSwap Deployment to
Minimize Redeployment in Deploying Applications to Oracle WebLogic Server.
Table A-23 fast-swap Elements
Element Required? Maximum
Number in File
Description
<enabled>
Optional 1 Set to
true
to enable FastSwap deployment in your application.
<refresh-interval>
Optional 1 FastSwap checks for changes in application classes when an
incoming HTTP request is received. Subsequent HTTP requests
arriving within the
refresh-interval
seconds will not trigger a
check for changes. The first HTTP request arriving after the
refresh-interval
seconds have passed, will cause FastSwap
to perform a class-change check again.
<redefinition-
task-limit>
Optional 1 FastSwap class redefinitions are performed asynchronously by
redefinition tasks. They can be controlled and inspected using JMX
interfaces.
Specifies the number of redefinition tasks that will be retained by
the FastSwap system. If the number of tasks exceeds this limit,
older tasks are automatically removed.
weblogic-application.xml Schema
See
http://xmlns.oracle.com/weblogic/weblogic-application/1.6/weblogic-
application.xsd
for the XML Schema of the
weblogic-application.xml
deployment
descriptor file.
Appendix A
weblogic-application.xml Schema
A-28


B
wldeploy Ant Task Reference
Learn about the different tools to deploy applications and standalone modules to WebLogic
Server.
This chapter includes the following sections:
• Overview of the wldeploy Ant Task
• Basic Steps for Using wldeploy
• Sample build.xml Files for wldeploy
• wldeploy Ant Task Attribute Reference
• Overview of the wldeploy Ant Task
The
wldeploy
Ant task enables you to perform
weblogic.Deployer
functions using
attributes specified in an Ant XML file.
• Basic Steps for Using wldeploy
To use the wldeploy Ant task you must perform several required and some optional steps.
• Sample build.xml Files for wldeploy
Examine these sample
build.xml
files which show how to deploy an application on a
single WebLogic Server instance, undeploy the application, perform a partial redeploy of
the application, undeploy a particular file in the application, and deploy a Java EE library.
• wldeploy Ant Task Attribute Reference
Overview of the wldeploy Ant Task
The
wldeploy
Ant task enables you to perform
weblogic.Deployer
functions using attributes
specified in an Ant XML file.
You can use
wldeploy
along with other WebLogic Server Ant tasks to create a single Ant build
script that:
• Builds your application from source, using
wlcompile
,
appc
, and the Web services Ant
tasks.
• Creates, starts, and configures a new WebLogic Server domain, using the
wlserver
and
wlconfig
Ant tasks.
• Deploys a compiled application to the newly-created domain, using the
wldeploy
Ant task.
See Using Ant Tasks to Configure and Use a WebLogic Server Domain, for more information
about
wlserver
and
wlconfig
. See Building Applications in a Split Development Directory, for
information about
wlcompile
.
Basic Steps for Using wldeploy
To use the wldeploy Ant task you must perform several required and some optional steps.
1. Set your environment.
B-1
On Windows platforms, execute the
setWLSEnv.cmd
command, located in the directory
WL_HOME\server\bin
, where
WL_HOME
is the top-level directory of your WebLogic Server
installation.
On UNIX, execute the
setWLSEnv.sh
command, located in the directory
WL_HOME/server/
bin
, where
WL_HOME
is the top-level directory of your WebLogic Server installation.
Note:
On UNIX operating systems, the
setWLSEnv.sh
command does not set the
environment variables in all command shells. Oracle recommends that you
execute this command using the Korn shell or bash shell.
2. In the staging directory, create the Ant build file (
build.xml
by default). If you want to use
an Ant installation that is different from the one installed with WebLogic Server, start by
defining the
wldeploy
Ant task definition:
<taskdef name="wldeploy" classname="weblogic.ant.taskdefs.management.WLDeploy"/>
3. If necessary, add task definitions and calls to the
wlserver
and
wlconfig
tasks in the build
script to create and start a new WebLogic Server domain. See Using Ant Tasks to
Configure and Use a WebLogic Server Domain, for information about
wlserver
and
wlconfig
.
4. Add a call to
wldeploy
to deploy your application to one or more WebLogic Server
instances or clusters. See Sample build.xml Files for wldeploy and wldeploy Ant Task
Attribute Reference.
5. Execute the Ant task or tasks specified in the
build.xml
file by typing
ant
in the staging
directory, optionally passing the command a target argument:
prompt> ant
Sample build.xml Files for wldeploy
Examine these sample
build.xml
files which show how to deploy an application on a single
WebLogic Server instance, undeploy the application, perform a partial redeploy of the
application, undeploy a particular file in the application, and deploy a Java EE library.
The following example shows a
wldeploy
target that deploys an application to a single
WebLogic Server instance:
<target name="deploy">
<wldeploy
action="deploy" verbose="true" debug="true"
name="DeployExample" source="output/redeployEAR"
user="weblogic" password="weblogic"
adminurl="t3://localhost:7001" targets="myserver" />
</target>
The following example shows a corresponding task to undeploy the application; the example
shows that when you undeploy or redeploy an application, you do not specify the source
archive file or exploded directory, but rather, just its deployed name:
<target name="undeploy">
<wldeploy
action="undeploy" verbose="true" debug="true"
name="DeployExample"
Appendix B
Sample build.xml Files for wldeploy
B-2

user="weblogic" password="weblogic"
adminurl="t3://localhost:7001" targets="myserver"
failonerror="false" />
</target>
The following example shows how to perform a partial redeploy of the application; in this case,
just a single WAR file in the application is redeployed:
<target name="redeploy_partial">
<wldeploy
action="redeploy" verbose="true"
name="DeployExample"
user="weblogic" password="weblogic"
adminurl="t3://localhost:7001" targets="myserver"
deltaFiles="examples/general/redeploy/SimpleImpl.war" />
</target>
The following example uses the nested
<files>
child element of
wldeploy
to specify a
particular file in the application that should be undeployed:
<target name="undeploy_partial">
<wldeploy
action="undeploy" verbose="true" debug="true"
name="DeployExample"
user="weblogic" password="weblogic"
adminurl="t3://localhost:7001" targets="myserver"
failonerror="false">
<files
dir="${current-dir}/output/redeployEAR/examples/general/redeploy"
includes="SimpleImpl.jsp" />
</wldeploy>
</target>
The following example shows how to deploy a Java EE library called
myLibrary
whose source
files are located in the
output/myLibrary
directory:
<target name="deploy">
<wldeploy action="deploy" name="myLibrary"
source="output/myLibrary" library="true"
user="weblogic" password="weblogic"
verbose="true" adminurl="t3://localhost:7001"
targets="myserver" />
</target>
wldeploy Ant Task Attribute Reference
The following sections describe the attributes and child element
<files>
of the
wldeploy
Ant
task.
• Main Attributes
• Nested <files> Child Element
Main Attributes
The following table describes the main attributes of the
wldeploy
Ant task.
These attributes mirror some of the arguments of the
weblogic.Deployer
command. Oracle
provides an Ant task version of the
weblogic.Deployer
command so that developers can
easily deploy and test their applications as part of the iterative development process. Typically,
Appendix B
wldeploy Ant Task Attribute Reference
B-3
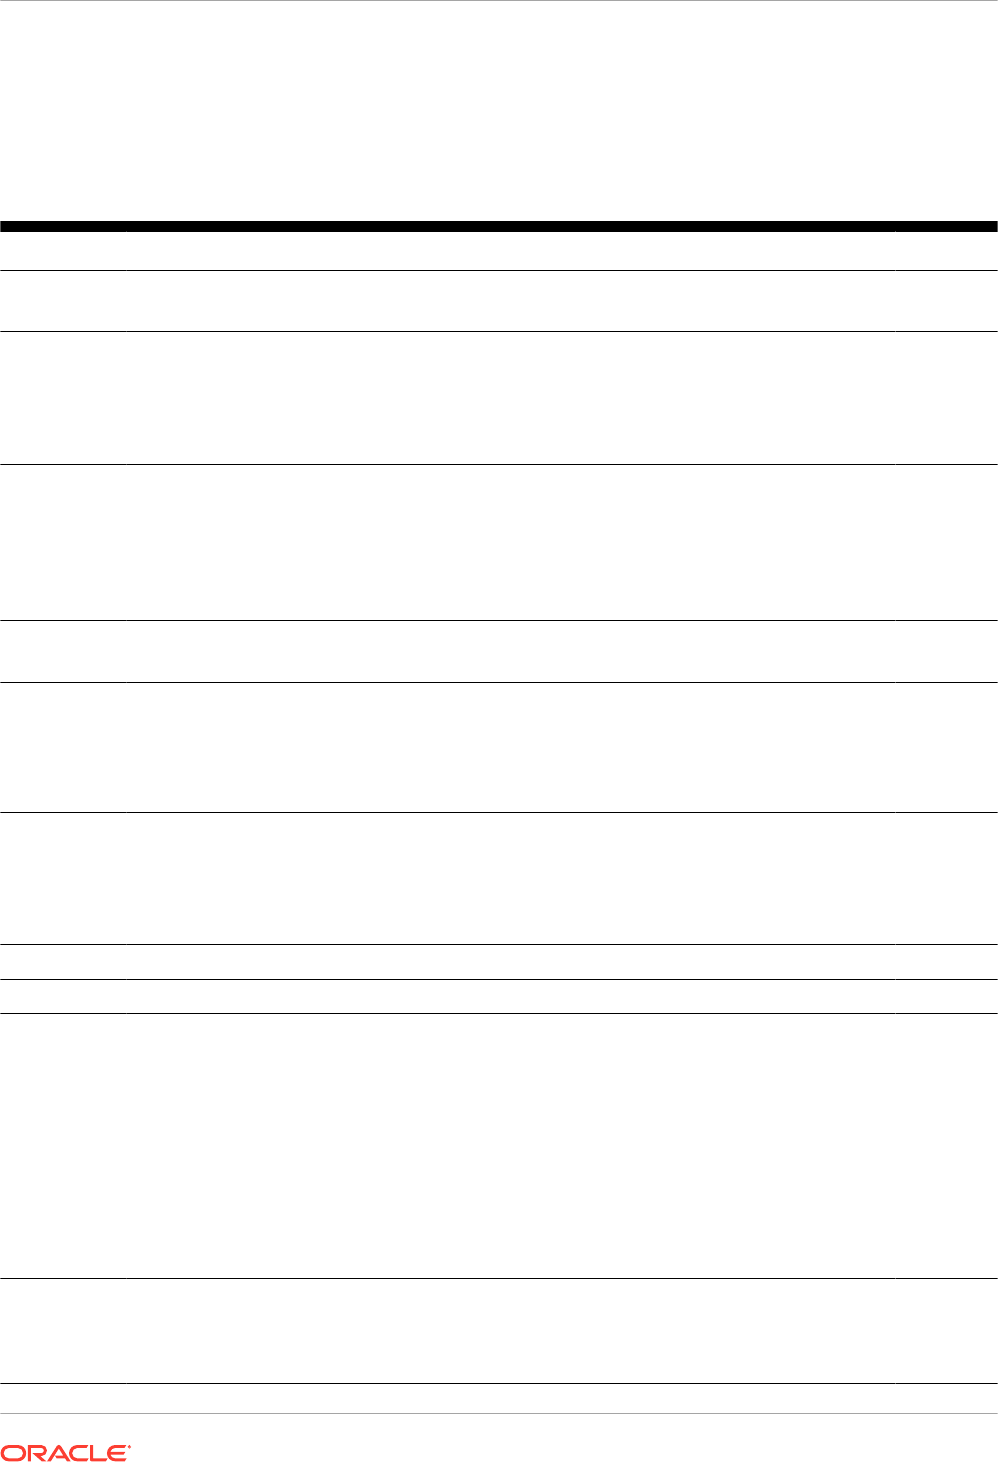
however, administrators use the
weblogic.Deployer
command, and not the
wldeploy
Ant task,
to deploy applications in a production environment. For that reason, see the weblogic.Deployer
Command-Line Reference in Deploying Applications to Oracle WebLogic Server for the full and
complete definition of the attributes of the
wldeploy
Ant task. The table below is provided just
as a quick summary.
Table B-1 Attributes of the wldeploy Ant Task
Attribute Description Data Type
action
The deployment action to perform.
Valid values are
deploy
,
cancel
,
undeploy
,
redeploy
,
distribute
,
start
, and
stop
.
String
adminmode
Specifies that the deployment action puts the application into Administration mode.
Administration mode restricts access to an application to a configured Administration channel.
Valid values for this attribute are
true
and
false
. Default value is
false
, which means that by
default the application is deployed in production mode so that all clients can access it
immediately.
Boolean
adminurl
The URL of the Administration Server.
The format of the value of this attribute is
protocol://host:port
, where
protocol
is either
http
or
t3
,
host
is the host on which the Administration Server is running, and
port
is the
port which the Administration Server is listening.
Note: In order to use the HTTP protocol, you must enable the http tunnelling option in the
WebLogic Server Administration Console.
String
allversions
Specifies that the action (redeploy, stop, and so on) applies to all versions of the application.
Valid values for this attribute are
true
and
false
. The default value is
false
.
Boolean
altappdd
Specifies the name of an alternate Java EE deployment descriptor (
application.xml
) to use
for deployment.
If you do not specify this attribute, and you are deploying an enterprise application, the default
deployment descriptor is called
application.xml
and is located in the META-INF
subdirectory of the main application directory or archive (specified by the
source
attribute.)
String
altwlsappdd
Specifies the name of an alternate WebLogic Server deployment descriptor (
weblogic-
application.xml
) to use for deployment.
If you do not specify this attribute, and you are deploying an enterprise application, the default
deployment descriptor is called
weblogic-application.xml
and is located in the META-INF
subdirectory of the main application directory or archive (specified by the
source
attribute.)
String
appversion
The version identifier of the deployed application. String
debug
Enable
wldeploy
debugging messages. Boolean
deleteFiles
Specifies whether to remove static files from a server's staging directory.
This attribute is valid only for unarchived deployments, and only for applications deployed using
stage
mode. You must specify target servers when using this attribute.
Specifying the
deleteFiles
attributes indicates that WebLogic Server should remove only
those files that it copied to the staging area during deployment.
This attribute can be used only in combination with
action="redeploy"
.
Because the
deleteFiles
attribute deletes all specified files, Oracle recommends that you
use caution when using the
deleteFiles
attribute and that you do not use it in production
environments.
Valid values for this attribute are true and false. Default value is false.
Boolean
deltaFiles
Specifies a comma- or space-separated list of files, relative to the root directory of the
application, which are to be redeployed.
Use this attribute only in conjunction with
action="redeploy"
to perform a partial redeploy of
an application.
String
Appendix B
wldeploy Ant Task Attribute Reference
B-4

Table B-1 (Cont.) Attributes of the wldeploy Ant Task
Attribute Description Data Type
enableSecur
ityValidati
on
Specifies whether or not to enable validation of security data.
Valid values for this attribute are true and false. Default value is false.
Boolean
externalSta
ge
Specifies whether the deployment uses
external_stage
deployment mode.
In this mode, the Ant task does not copy the deployment files to target servers; instead, you
must ensure that deployment files have been copied to the correct subdirectory in the target
servers' staging directories.
You can specify only one of the following attributes:
stage
,
nostage
, or
external_stage
. If
none is specified, the default deployment mode to Managed Servers is
stage
; the default
mode to the Administration Server and in single-server cases is
nostage
.
See Controlling Deployment File Copying with Staging Modes.
Boolean
failonerror
This is a global attribute used by WebLogic Server Ant tasks. It specifies whether the task
should fail if it encounters an error during the build.
Valid values for this attribute are true and false. Default value is true.
Boolean
graceful
Stops the application after existing HTTP clients have completed their work.
You can use this attribute only when stopping or undeploying an application, or in other words,
you must also specify either the
action="stop"
or
action="undeploy"
attributes.
Valid values for this attribute are
true
and
false
. Default value is
false
.
Boolean
id
Identification used for obtaining status or cancelling the deployment.
You assign a unique ID to an application when you deploy it, and then subsequently use the ID
when redeploying, undeploying, stopping, and so on.
If you do not specify this attribute, the Ant task assigns a unique ID to the application.
String
ignoresessi
ons
This option immediately places the application into Administration mode without waiting for
current HTTP sessions to complete.
You can use this attribute only when stopping or undeploying an application, or in other words,
you must also specify either the
action="stop"
or
action="undeploy"
attributes.
Valid values for this attribute are
true
and
false
. Default value is
false
.
Boolean
libImplVer
Specifies the implementation version of a Java EE library or optional package.
This attribute can be used only if the library or package does not include a implementation
version in its manifest file. You can specify this attribute only in combination with the
library
attribute.
See Creating Shared Java EE Libraries and Optional Packages.
String
library
Identifies the deployment as a shared Java EE library or optional package. You must specify
the
library
attribute when deploying or distributing any Java EE library or optional package.
Valid values for this attribute are
true
and
false
. Default value is
false
.
See Creating Shared Java EE Libraries and Optional Packages.
Boolean
libSpecVer
Provides the specification version of a Java EE library or optional package.
This attribute can be used only if the library or package does not include a specification version
in its manifest file. You can specify this attribute only in combination with the
library
attribute.
See Creating Shared Java EE Libraries and Optional Packages.
String
name
The deployment name for the deployed application.
If you do not specify this attribute, WebLogic Server assigns a deployment name to the
application, based on its archive file or exploded directory.
String
Appendix B
wldeploy Ant Task Attribute Reference
B-5
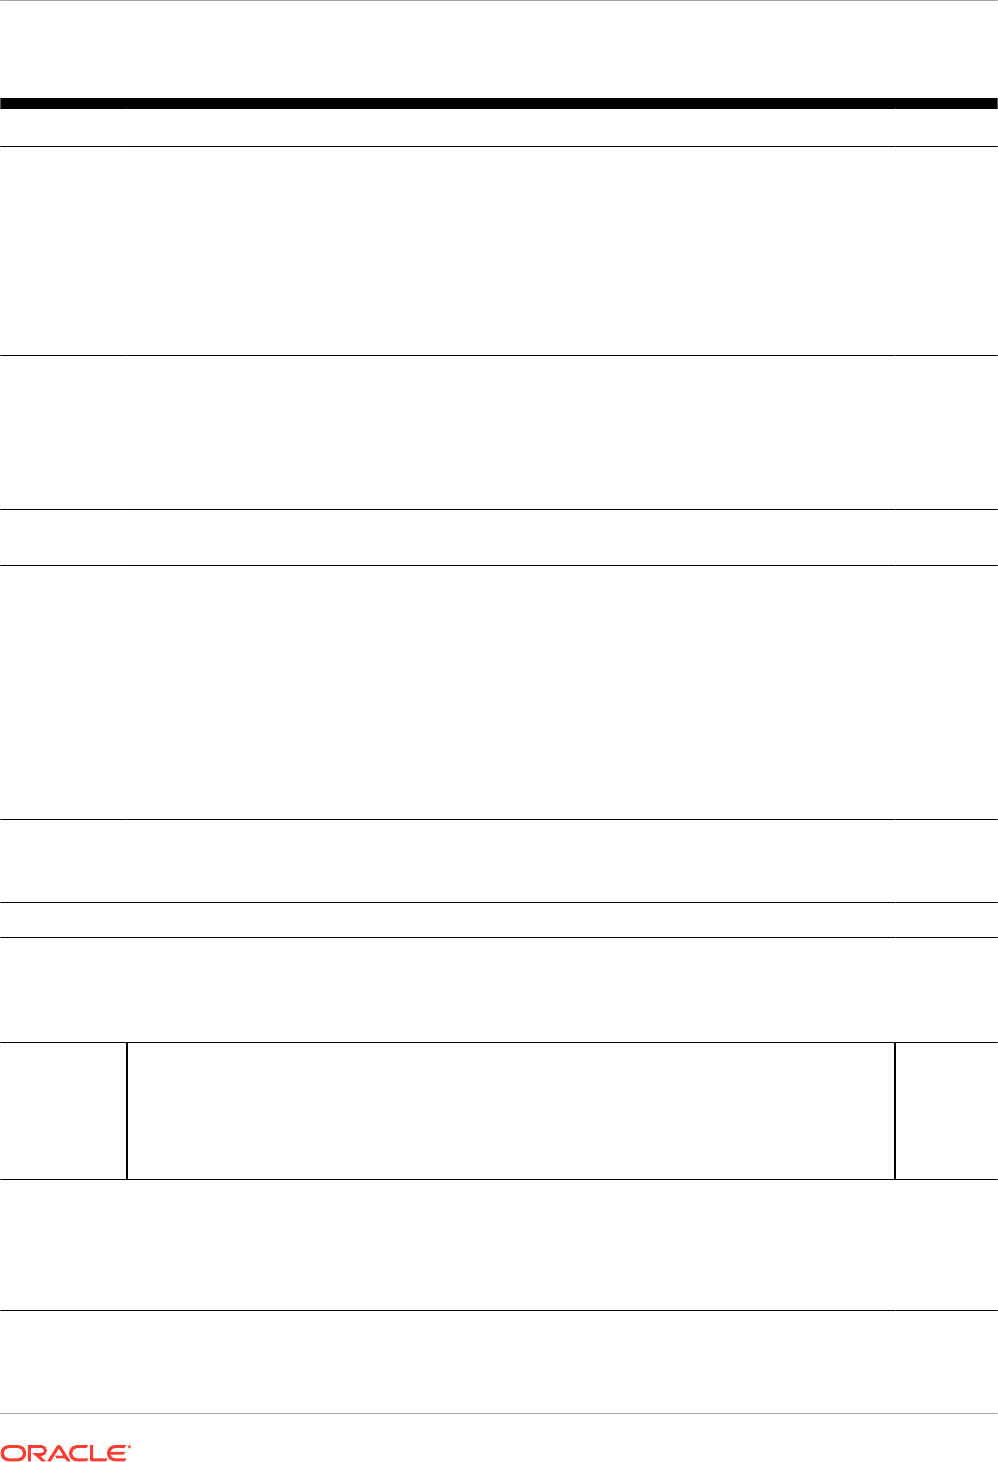
Table B-1 (Cont.) Attributes of the wldeploy Ant Task
Attribute Description Data Type
nostage
Specifies whether the deployment uses nostage deployment mode.
In this mode, the Ant task does not copy the deployment files to target servers, but leaves them
in a fixed location, specified by the
source
attribute. Target servers access the same copy of
the deployment files.
You can specify only one of the following attributes:
stage
,
nostage
, or
external_stage
. If
none is specified, the default deployment mode to Managed Servers is
stage
; the default
mode to the Administration Server and in single-server cases is
nostage
.
See Controlling Deployment File Copying with Staging Modes.
Boolean
noversion
Indicates that the
wldeploy
Ant task should ignore all version related code paths on the
Administration Server. This behavior is useful when deployment source files are located on
Managed Servers (not the Administration Server) and you want to use the external_stage
staging mode.
If you use this option, you cannot use versioned applications.
Valid values for this attribute are true and false. Default value is false.
Boolean
nowait
Specifies whether
wldeploy
returns immediately after making a deployment call (by deploying
as a background task).
Boolean
password
The administrative password.
To avoid having the plain text password appear in the build file or in process utilities such as
ps
,
first store a valid user name and encrypted password in a configuration file using the WebLogic
Scripting Tool (WLST)
storeUserConfig
command. Then omit both the
username
and
password
attributes in your Ant build file. When the attributes are omitted,
wldeploy
attempts
to login using values obtained from the default configuration file.
If you want to obtain a user name and password from a non-default configuration file and key
file, use the
userconfigfile
and
userkeyfile
attributes with
wldeploy
.
See the command reference for
storeUserConfig
in the WLST Command Reference for
WebLogic Server for more information on storing and encrypting passwords.
String
plan
Specifies a deployment plan to use when deploying the application or module.
By default,
wldeploy
does not use an available deployment plan, even if you are deploying
from an application root directory that contains a plan.
String
planversion
The version identifier of the deployment plan. String
remote
Specifies whether the server is located on a different machine. This affects how filenames are
transmitted.
Valid values for this attribute are
true
and
false
. Default value is
false
, which means that
the Ant task assumes that all source paths are valid paths on the local machine.
Boolean
removePlanO
verride
Removes an overridden deployment plan during a redeploy or update deployment action.
To remove an application override, specify the removePlanOverride attribute.
You can specify the removePlanOverride attribute for the redeploy deployment actions.
For more information about overriding application configuration, see Overriding Application
Configuration in Using WebLogic Server MT.
String
retiretimeo
ut
Specifies the number of seconds before WebLogic Server undeploys the currently-running
version of this application or module so that clients can start using the new version.
It is assumed, when you specify this attribute, that you are starting, deploying, or redeploying a
new version of an already-running application.
See Redeploying Applications in a Production Environment.
int
Appendix B
wldeploy Ant Task Attribute Reference
B-6
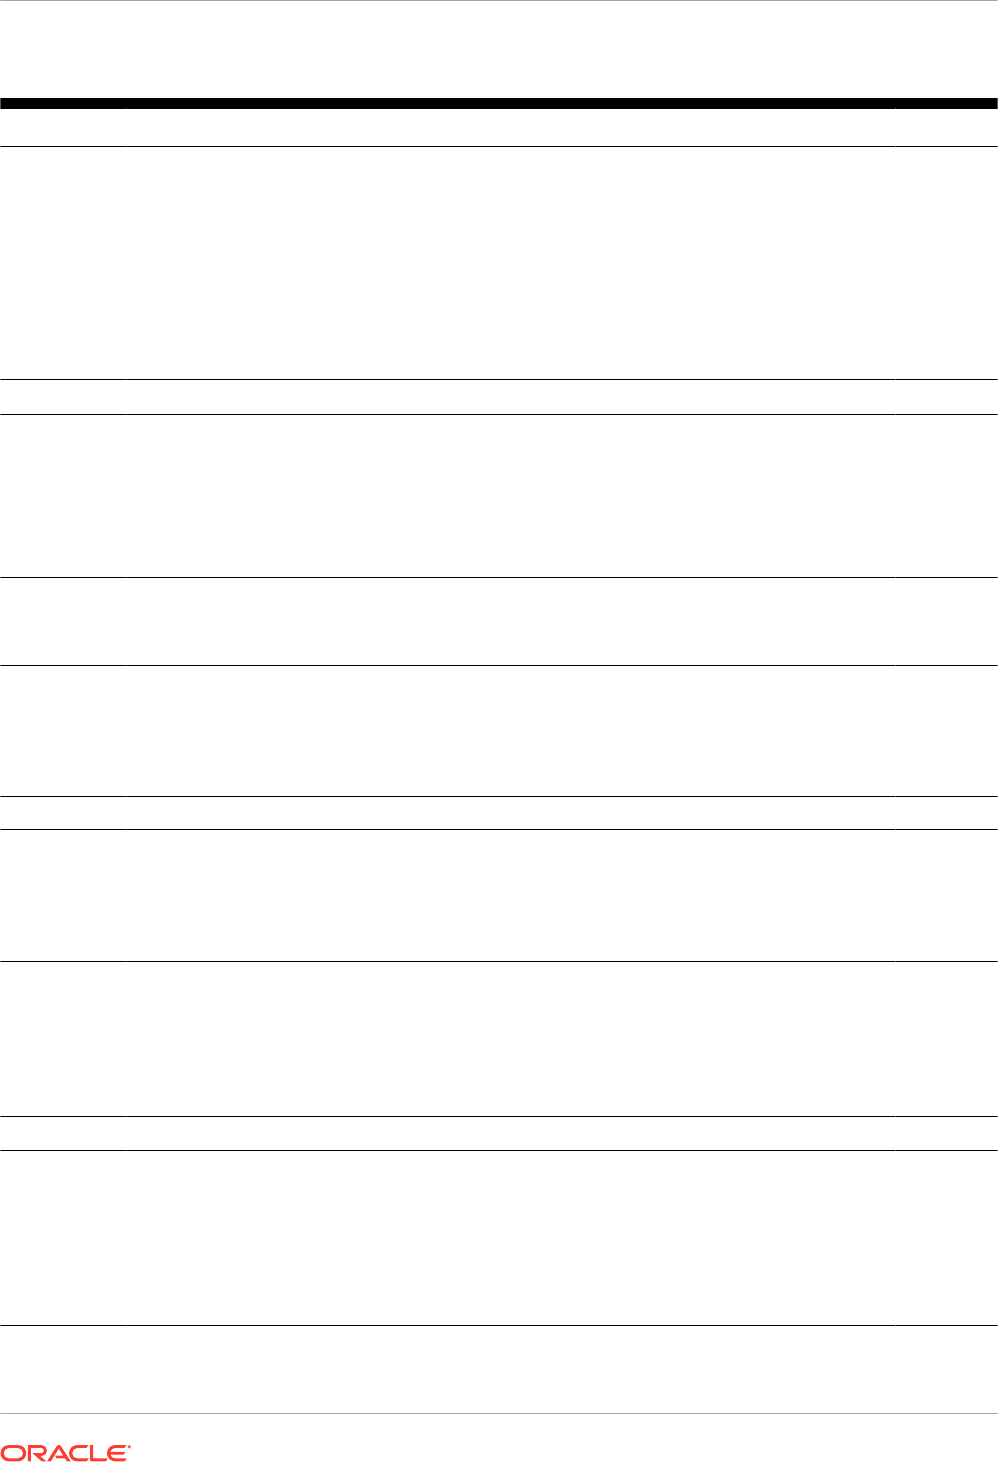
Table B-1 (Cont.) Attributes of the wldeploy Ant Task
Attribute Description Data Type
securityMod
el
Specifies the security model to use for this deployment. Possible security models are:
• Deployment descriptors only
• Customize roles
• Customize roles and policies
• Security realm configuration (advanced model)
Valid actual values for this attribute are
DDOnly
,
CustomRoles
,
CustomRolesAndPolicy
, or
Advanced
.
See Options for Securing Web application and EJB Resources for more information on these
security models.
String
source
The archive file or exploded directory to deploy. File
stage
Specifies whether the deployment uses stage deployment mode.
In this mode, the Ant task copies deployment files to target servers' staging directories.
You can specify only one of the following attributes:
stage
,
nostage
, or
external_stage
. If
none is specified, the default deployment mode to Managed Servers is
stage
; the default
mode to the Administration Server and in single-server cases is
nostage
.
See Controlling Deployment File Copying with Staging Modes.
Boolean
submoduleta
rgets
Specifies JMS server targets for resources defined within a JMS application module.
The value of this attribute is a comma-separated list of JMS server names.
See Using Sub-Module Targeting with JMS Application Modules.
String
targets
The list of target servers to which the application is deployed.
The value of this attribute is a comma-separated list of the target servers, clusters, or virtual
hosts.
If you do not specify a target list when deploying an application, the target defaults to the
Administration Server instance.
String
timeout The maximum number of seconds to wait for a deployment to succeed. int
upload
Specifies whether the source file(s) are copied to the Administration Server's upload directory
prior to deployment.
Use this attribute when you are on a remote machine and you cannot copy the deployment files
to the Administration Server by other means.
Valid values for this attribute are
true
and
false
. Default value is
false
.
Boolean
usenonexclu
sivelock
Specifies that the deployment action (deploy, redeploy, stop, and so on) uses the existing lock
on the domain that has already been acquired by the same user performing the action.
This attribute is particularly useful when the user is using multiple deployment tools (Ant task,
command line, WebLogic Server Administration Console, and so on) simultaneously and one of
the tools has already acquired a lock on the domain.
Valid values for this attribute are
true
and
false
. Default value is
false
.
Boolean
user
The administrative user name. String
userconfigf
ile
Specifies the location of a user configuration file to use for obtaining the administrative user
name and password. Use this option, instead of the
user
and
password
attributes, in your
build file when you do not want to have the plain text password shown in-line or in process-level
utilities such as
ps
.
Before specifying the
userconfigfile
attribute, you must first generate the file using the
WebLogic Scripting Tool (WLST)
storeUserConfig
command as described in the WLST
Command Reference for WebLogic Server.
String
Appendix B
wldeploy Ant Task Attribute Reference
B-7
Table B-1 (Cont.) Attributes of the wldeploy Ant Task
Attribute Description Data Type
userkeyfile
Specifies the location of a user key file to use for encrypting and decrypting the user name and
password information stored in a user configuration file (the
userconfigfile
attribute).
Before specifying the
userkeyfile
attribute, you must first generate the key file using the
WebLogic Scripting Tool (WLST)
storeUserConfig
command as described in the WLST
Command Reference for WebLogic Server.
String
verbose
Specifies whether
wldeploy
displays verbose output messages. Boolean
Nested <files> Child Element
The
wldeploy
Ant task also includes the
<files>
child element that can be nested to specify a
list of files on which to perform a deployment action (for example, a list of JSPs to undeploy.)
Note:
Use of
<files>
to redeploy a list of files in an application has been deprecated as of
release 9.0 of WebLogic Server. Instead, use the
deltaFiles
attribute of wldeploy.
The
<files>
element works the same as the standard
<fileset>
Ant task (except for the
difference in actual task name). Therefore, see the Apache Ant Web site at
http://
ant.apache.org/manual/Types/fileset.html
for detailed reference information about the
attributes you can specify for the
<files>
element.
Appendix B
wldeploy Ant Task Attribute Reference
B-8
