
Wisconsin Spring 2022 Testing
ACT Aspire
Room Supervisor Manual
Online Summative Testing
www.act.org

CONTACTS AND RESOURCES
Contact Information
ACT Aspire Customer Care
• Phone: 855.730.0400, 7:00 a.m. – 6:00 p.m. Central time, Monday through Friday
• Email: [email protected]
Resources
Website URL
ACT Privacy Policy act.org/content/act/en/privacy-policy.html
ACT Calculator Policy act.org/calculator-policy.html
Phone: 800.498.6481
PearsonAccess
next
aspire.act.org
Wisconsin State Testing (ACT-hosted web page),
which contains the Schedule of Events and other
documents
act.org/stateanddistrict/wisconsin
ACT Aspire product page act.org/aspire
TestNav
™
Support Site
https://support.assessment.pearson.com/
display/TN/TestNav+8+Online+Support
Accessibility Supports
The ACT-hosted web page includes accessibility resources, including:
• ACT Aspire Accessibility Supports Guide
• Spanish Audio of Verbal Instructions (for examinees)
• Braille Notes (for the room supervisor)
• ACT-Authorized Bilingual Word-to-Word Dictionaries
These items can be found under Step 5: Administration on the ACT-hosted web page.
Prepare Your Examinees
There are two resources available for examinees who wish to prepare for testing:
• Student Sandbox
• Exemplar Test Question Booklets - each booklet (one for each subject and grade)
describes reporting categories, standards, depth-of-knowledge levels, and correct
responses.
These items can be found under Step 4: Preparation on the ACT-hosted web page.
© 2021 by ACT, Inc. All rights reserved. MA28003WI.CJ6832
Contents
Overview 1
Introduction 1
Policies 2
General Testing 2
Standardized Procedures 2
Test Security 2
Investigations 3
Equal Treatment 3
Fair Testing Practices 3
ACT Privacy Policy 3
Administration
and Online Testing
Platforms 4
Administration Requirements and
Resources 4
Administration and Online Testing
Platforms 4
Test Format 4
Access PearsonAccess
next
4
Navigating Administrations in
PearsonAccess
next
5
Information Icon 5
Test Staff 6
Staff Roles and Responsibilities 6
Description of User Roles 6
Test Facilities 8
Facility Requirements 8
Introduction 8
Room Type, Size, and Setup 8
Seating Arrangements—Online
Testing 8
Seating Arrangement Examples—Online
Testing 9
Work Surfaces 9
Desirable Testing Conditions 9
Online Testing Guidelines 10
Ensuring Quiet Test Sessions 10
Test Administration 11
Test Administration Requirements 11
Test Times by Grade and Subject 11
Allowed and Prohibited Items in the Test
Room 11
Accessibility and Accommodations 13
Prohibited Behavior 13
Irregularities 14
Test Administration
Instructions 16
Set Up Test Sessions 16
Create Test Sessions Manually 16
Edit Test Sessions 17
Delete Test Sessions 17
Add Students to Sessions 18
Move Students between Sessions 18
Remove Students from Sessions 19
Change an Examinee's Test Format 19
Set Up for Test Day 21
Prepare Test Sessions 21
Print Student Authorization Testing
Tickets - Individual Session 21
Print Student Authorization Testing
Tickets - Multiple Sessions 22
Start and Unlock a Test Session 22
Launch Application on Computers 23
Administer the Test 24
Answering Questions 24
Toggle Timer 24
Inactivity Timer 24
Proctor Extended Time Code 24
Allowing Students to Leave the Test
Room 25
Unlock/Lock a Test Session 25
View Examinee Status in a Session 26
Resume an Interrupted Test 27
Exit Testing for Breaks - Securely Extend
Session Over Multiple Days 28
Direct Examinees to Log Out of
TestNav 28
Resume Testing for Breaks - Securely
Extend Session Over Multiple Days 28
Stop a Test Session 28
Mark Tests Complete 29
Confirm Test Session Status 29
Post-Test Cleanup 30
i
OVERVIEW | INTRODUCTION
OVERVIEW
Introduction
This manual contains instructions for ACT
®
Aspire
®
test administration.
It is important that you become familiar with the procedures and instructions in this manual in
advance of the test day to ensure that the tests are administered in a standard manner.
Additional training and test administration resources are available through the ACT-hosted web
page.
1
POLICIES | GENERAL TESTING
POLICIES
General Testing
Standardized Procedures
Uniformly administering tests ensures examinees’ academic skills are accurately measured.
Testing staff assume a vital role in carrying out standardized testing procedures.
As with all standardized testing, it is critical that the procedures you employ are identical
to those at other test locations. ACT provides policies, requirements, and administration
instructions to help create a fair testing environment for all examinees. All testing staff are
required to read the materials provided by ACT. Adherence to the standardized policies and
procedures outlined in the materials is mandatory.
To ensure a secure and valid testing experience, you must understand that, among
other things, the following actions by you or any other individual violate ACT policies and
procedures:
• Accessing or obtaining a test booklet or test questions prior to the test for any reason*
• Photocopying, making an electronic copy, or keeping a personal copy of the test or of any
test items*
• Taking notes about test questions or any paraphrase of test questions to aid in preparing
examinees for testing
• Aiding or assisting an examinee with a response or answer to a secure test item, including
providing formulas
• Rephrasing test questions for examinees
• Creating an answer key or “crib sheet” of answers to test questions
• Editing or changing examinee answers after completion of the test, with or without the
examinee’s permission
• Allowing examinees to test in an unsupervised setting
• Leaving test materials in an unsecured place or unattended
• Failing to properly report and document incidents of prohibited behavior involving
examinees, staff, or others
• Allowing examinees to test longer than the permitted time
• Failing to return and account for all testing materials after the testing session has ended
*An exception is provided for examinees who require accessibility supports. See the ACT
Aspire Accessibility Supports Guide, found under Step 3: Accommodation on the ACT-hosted
web page.
Test Security
To ensure the integrity of your examinees’ ACT Aspire results, testing personnel must
protect the security of test materials as described in this manual. ACT Aspire materials are
copyrighted by ACT or its licensors and cannot be duplicated, copied, resold, or redistributed
for commercial or other use, and also must be returned to ACT after testing. ACT Aspire
assessments must be administered by school or district personnel.
2
POLICIES | GENERAL TESTING
Investigations
In cases of suspected or documented irregularities, all testing staff are obligated to cooperate
fully with ACT and the designated state education agency or district assessment office in
subsequent investigations and respond to requests for information in a timely manner.
Equal Treatment
All staff are required to administer and supervise the test in a nondiscriminatory manner and
in accordance with all applicable laws, including the Americans with Disabilities Act (ADA),
Individuals with Disabilities Education Act (IDEA), and Section 504 of the Rehabilitation Act.
Fair Testing Practices
ACT endorses the Code of Fair Testing Practices in Education and the Code of Professional
Responsibilities in Educational Measurement, which guide the conduct of those involved in
educational testing. ACT is committed to ensuring that each of its testing programs upholds
the guidelines in each Code. You may locate copies of these codes through the following
organizations:
• Code of Fair Testing Practices in Education: American Psychological Association
(www.apa.org)
• Code of Professional Responsibilities in Educational Measurement: National Council on
Measurement in Education (www.ncme.org)
ACT Privacy Policy
Examinees' scores and other information are governed by the ACT Privacy Policy (act.org/
content/act/en/privacy-policy.html).
3
ADMINISTRATION AND ONLINE TESTING PLATFORMS | ADMINISTRATION REQUIREMENTS AND RESOURCES
ADMINISTRATION AND ONLINE
TESTING PLATFORMS
Administration
Requirements and
Resources
Administration and Online Testing Platforms
Your testing staff will need to use the online testing system to enable examinee testing.
For ACT Aspire you will use the following components of the online testing system:
•
PearsonAccess
next
(aspire.act.org): This is where you will perform administrative tasks,
perform room supervisor tasks, and view report data.
Note: As a security feature, PearsonAccess
next
automatically closes after 15 minutes of
inactivity. An on-screen warning is provided two minutes before the session closes.
• TestNav: This is where examinees will sign in to take tests.
The district test coordinator from the organization will be invited to PearsonAccess
next
by ACT
and be assigned the role of Administration Test Coordinator. Additional users can be invited
to the system by the administration test coordinator or test coordinator using the user import
file, or manually. Invitation emails will be sent to any new contacts created in the system. This
email invitation will allow users to set their own login credentials. Existing users will not receive
an email invitation. Refer to the Wisconsin User Role Matrix on the ACT-hosted web page
under Step 1: Orientation for detailed access information by role.
Test Format
The English test for ACT Aspire is composed of selected-response (multiple-choice) questions.
The writing test includes one constructed-response item only. The other three subject tests
(math, science, and reading) include a combination of selected response and constructed-
response items; all constructed responses must be provided in English. Online tests also have
technology-enhanced items. Summative testing is administered either online or on paper. All
paper tests must be approved by the Wisconsin Department of Public Instruction (DPI).
Access PearsonAccess
next
1.
Open your web browser and go to PearsonAccess
next
(aspire.act.org), or follow the link in
the email you receive when your account is created.
Note: ACT or someone with appropriate permissions must create your account
before you can access the system. The email with this information comes from
4
ADMINISTRATION AND ONLINE TESTING PLATFORMS | ADMINISTRATION REQUIREMENTS AND RESOURCES
2. Select the Sign In button near the right side of the screen.
The login page appears.
3. Enter your username and password.
4. Select the Login button.
Navigating Administrations in PearsonAccess
next
Your user account may be attached to multiple administrations. Therefore, when you log in to
PearsonAccess
next
, it is important to be aware of the specific administration into which you've
authenticated. If your user account is attached to multiple administrations, and if your user
name is the same within these administrations, you may toggle back and forth between your
administrations.
When you log in, you will see the last administration into which you authenticated. To change
administrations, use the drop-down menu in the upper-right area of your screen. From the
drop-down menu, select the testing administration and year you want to view.
Information Icon
Throughout PearsonAccess
next
the information icon (a lowercase "i" in a blue circle) can be
selected to view additional details.
5
TEST STAFF | STAFF ROLES AND RESPONSIBILITIES
TEST STAFF
Staff Roles and
Responsibilities
Description of User Roles
Users should be assigned only one role in PearsonAccess
next
. The role with the highest
level of access needed by the user should be assigned to the user. Refer to the Wisconsin
User Role Matrix on the ACT-hosted web page under Step 1: Orientation for detailed access
information by role.
Administration Test Coordinator: Typically only one user is assigned this role per
organization. This role can perform all Test Coordinator tasks as well as create and edit users
and undo test submissions.
Test Coordinator: This role can perform all test coordinator tasks described below.
Technical Coordinator: This role installs and configures testing system software and helps
the test coordinator set up computers for testing.
Room Supervisor: This role can perform all room supervisor tasks described below.
Full Access Educator: This role gives the same access as the Reports Only Educator role,
but also allows users to manage sessions.
Reports Only Educator: This role gives educators who will not manage sessions access to
reporting data for students based on reporting groups.
Report: This role gives access to reports and aggregated data for all students within an
organization.
Proctor: As test rooms increase in size, proctors may be used to assist the room supervisors.
This is not an assigned role in PearsonAccess
next
.
Wisconsin Staff Confidentiality Policy
Wisconsin policy requires that the designated district assessment coordinator read and sign
the appropriate confidentiality agreement found on the DPI website and return it to the DPI
Office of Educational Accountability.
All testing staff must read and sign the appropriate confidentiality agreement form found on the
DPI website and retain at their district/school level.
Room Supervisors
A room supervisor is required in each room to read directions and monitor examinees.
Typically, teachers will administer the tests to examinees during regular class periods.
Depending on the number of examinees in a class, you may wish to assign proctors to assist
the room supervisor with distributing and collecting test materials and with monitoring testing.
Another staff member (proctor) is recommended if a room has 31 or more examinees.
Be sure that everyone involved in test administration has access to the appropriate room
supervisor manual and is familiar with its contents. All manuals are periodically updated, so
6
TEST STAFF | STAFF ROLES AND RESPONSIBILITIES
it is important to check the ACT-hosted web page for updated versions before each new test
administration.
Before test day, all testing personnel should read all of the testing instructions carefully,
particularly the verbal instructions, which will be read aloud to examinees on test day.
Room Supervisor Qualifications
The test coordinator should confirm that the room supervisor(s) meet all of the following
criteria. Each room supervisor should be:
• Proficient in English.
• Experienced in testing and classroom management.
• A staff member of the school or district where the test administration will take place.
To protect both examinees and the room supervisor from questions of possible conflict of
interest, relatives or guardians of examinees taking ACT Aspire should not serve in the role of
room supervisor in the same test room as the examinee relative. It is permissible for relatives
or guardians of testing examinees to serve as a room supervisor in the same school/district as
a related examinee, provided that examinee tests in a different room. In such circumstances,
the district/school should monitor the testing process so that room supervisors who have a
relative testing do not handle the test materials of the relative without another responsible
individual present.
Private consultants or individual tutors whose fees are paid by an examinee or examinee’s
family should not serve as a room supervisor.
Room Supervisor Responsibilities
• Read and thoroughly understand the policies, procedures, and instructions in the
appropriate room supervisor manual and other materials provided.*
• Supervise a test room.
• Start a test session.
• Help examinees sign in to TestNav if administering online tests.*
• Read test instructions.
• Properly time tests.
• Move around the room during testing to be sure examinees are working on the correct test
and to observe examinee behavior.*
• Monitor TestNav as needed.
• Pay careful attention to monitoring examinees’ behavior during the entire testing session.*
• Before dismissing examinees - online testing: collect and account for all student
authorization testing tickets and scratch paper.*
• Ensure examinees have stopped testing and have correctly signed out of TestNav.*
• Complete documentation of any testing irregularities.
• For online testing, stop test sessions after all examinees have completed testing.
*Proctors may assist with these activities.
Proctor Responsibilities
Proctors can assist the room supervisor in the administration of the tests according to the
policies and procedures in the appropriate room supervisor manual. Staff members should
meet the same qualifications as a room supervisor.
Proctors may assist the room supervisor by performing the following, additional activities:
• Verify the timing of the test with the room supervisor.
• Report any irregularities to the room supervisor immediately.
• Accompany examinees to the rest room if more than one leaves during the timed portion of
the test.
• Serve as a hall monitor and assist in multiple rooms.
7
TEST FACILITIES | FACILITY REQUIREMENTS
TEST FACILITIES
Facility Requirements
Introduction
The test coordinator must select the test site and reserve rooms for the test administration.
Test sites and rooms must meet several requirements that help ensure a fair and secure test
environment.
Note: All examinees testing in the same room are required to take the same subject tests.
Room Type, Size, and Setup
Select rooms that are not so small as to be crowded or so large that test security will be difficult
to maintain. The maximum testing capacity of a room is determined by the number of properly
spaced seats it can accommodate.
ACT recommends:
• Using single-level classrooms
• Avoiding multiple-level seating (it makes it easier to see another examinee's test)
To ensure a fair and secure testing environment:
• Cover or remove material that may give examinees an unfair advantage, such as charts,
strategy maps, or other aids relevant to test taking, problem solving, writing essays, or test
topics. (Geographic maps and the periodic table do not need to be covered.)
• Ensure that examinees will be able to hear the room supervisor without difficulty; if
necessary, arrange for a microphone.
• Examinees testing with extended time must be tested in a separate room from examinees
testing with standard time.
• Arrange the room so that:
~ The room supervisor will be facing the examinees during testing.
~ Testing staff can freely circulate the room and have a clear view of all examinees and
materials.
~ Seating minimizes the possibility of prohibited behavior.
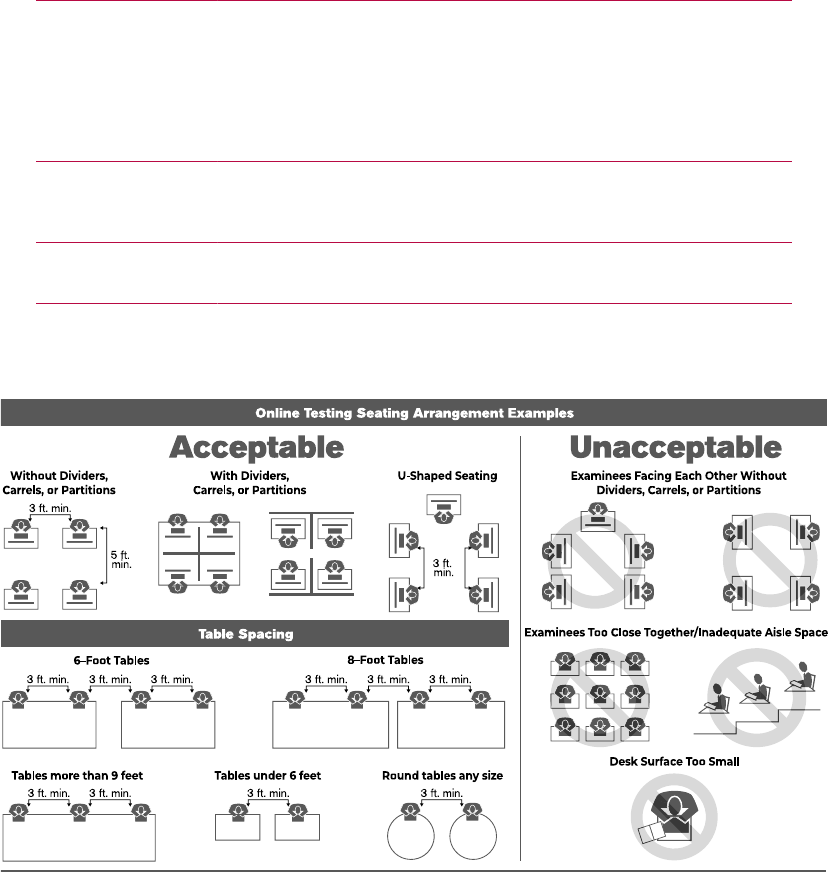
Seating Arrangements—Online Testing
Seating arrangements must minimize any possibility of prohibited behavior. For online testing,
it is critical that examinees cannot see each other’s screens. The following table contains
additional requirements.
8
TEST FACILITIES | FACILITY REQUIREMENTS
If the room has… Then workstations…
No carrels, dividers,
or partitions between
workstations
• Must face the same direction (except when using a U-shaped
configuration)
• Must be spaced so examinees are at least three feet apart (side-to-side
measured shoulder-to-shoulder) and at least five feet apart (front-to-back
measured head-to-head)
• Must be set up so that examinees in one row cannot see the screens of
other examinees' computers in front of or to the side of them
Carrels, dividers, or
partitions between
workstations
• Do not need to face the same direction
• May face the wall or each other if there is adequate privacy between
examinees
U-shaped seating
configuration
• Must face outward from the center of the U-shaped configuration
• Must be spaced at least three feet apart
Seating Arrangement Examples—Online Testing
Work Surfaces
Work surfaces must be smooth, hard surfaces large enough for examinees to work comfortably
with the items needed for testing. Temporary surfaces that rest on the chair arms or the back of
the row in front must be approved in advance by ACT. Lapboards are not allowed.
Note: For left-handed examinees, use standard left-handed desks or work surfaces that are
large enough for these examinees to work comfortably. If you have only right-handed desks
available, place two desks together at the far end of a row so left-handed examinees can use
both surfaces.
Desirable Testing Conditions
Most room supervisors will administer the tests to their examinees in the school’s computer
lab during regular class periods. You may test all examinees in a given grade and subject at
9
TEST FACILITIES | FACILITY REQUIREMENTS
the same time if facilities and schedules permit. To minimize distractions during testing, all
examinees in a room must take the same subject test.
Rooms used for testing should offer ample seating, good lighting, comfortable temperatures, a
quiet atmosphere, and freedom from distraction. Adhering to the following guidelines will help
minimize the possibility that examinees will look at each other’s work.
Online Testing Guidelines
Because of the nature of online testing and typical computer lab arrangements, the following
guidelines are recommended:
• If computers can be moved, arrange them in such a way that examinees will not be able to
see each other's work (computer screen or scratch paper).
• If computers cannot be moved, take steps to seat examinees in such a way that they
cannot see each other's work. U-shaped seating arrangements are acceptable if they meet
this guideline.
• If available, place privacy guards on the sides of computer monitors to provide additional
privacy.
• TestNav should be the only application running on the computer during testing. If an
examinee has exited the test, do not restart or resume the test for the examinee.
• Testing staff should move around the room regularly. This will discourage examinees from
any prohibited behaviors.
Ensuring Quiet Test Sessions
Take the following actions to ensure quiet test sessions:
• Ask the building’s administration to turn off audible signals that normally sound at the
beginning and end of classes.
• Consider including the cancellation of fire, tornado, or lock down drills during the testing
window. As a reminder, there's monthly siren testing that occurs statewide.
• Ensure that announcements are not made on the public address system during test
sessions.
• Post signs outside the test rooms to warn others that testing is in progress and that quiet is
required.
10

TEST ADMINISTRATION | TEST ADMINISTRATION REQUIREMENTS
TEST ADMINISTRATION
Test Administration
Requirements
Test Times by Grade and Subject
The timing of each subject test varies by subject and grade. For Summative testing, when
English Text to Speech Audio (English TTS Audio), Spanish Text + Audio, or English Text to
Speech Audio + Orienting Description (English TTS Audio + Orienting Description) is selected
within the Personal Needs Profile (PNP), the online tests will launch with 300% extra time
already included.
The following tables provide test times in minutes for standard forms and audio forms.
Grade English Math Reading Science Writing
EHS 45 75 65 60 40
Test Times by Grade and Subject (in minutes) - Standard Testing
Grade English Math Reading Science Writing
EHS N/A 225 N/A 180 120
Test Times by Grade and Subject (in minutes) - English TTS Audio, English TTS
Audio + Orienting Description
Grade English Math Reading Science Writing
EHS N/A 225 N/A 180 120
Test Times by Grade and Subject (in minutes) - Spanish Text + Audio
Note:
• EHS = Early High School (Grades 9-10)
• N/A = Not applicable (extended testing time is not an option for these subject tests)
Allowed and Prohibited Items in the Test Room
Calculator Policy
The Calculator Policy varies by grade. Examinees are allowed, but not required, to use an
authorized calculator on the mathematics test.
TestNav includes a calculator tool for all applicable mathematics tests.
11

TEST ADMINISTRATION | TEST ADMINISTRATION REQUIREMENTS
The use of calculators is not permitted on any other subject test. Unless a hand-held calculator
is provided by the school, each examinee is responsible for bringing a calculator to the test
and making sure it works properly. Examinees may bring a backup calculator and extra
batteries, but they may not have more than one calculator on the desk or in operation at a time.
Examinees are not allowed to share calculators during testing.
It is the school’s responsibility to confirm that all calculators used by examinees are authorized
before testing. See the Calculator Policy on the ACT-hosted web page, under Step 5:
Administration.
Note: All problems can be solved without the use of a calculator.
Materials Provided by the School
Testing sites will provide the following items for each test room:
Item Description
Timers Provide each room supervisor with two accurate timepieces in order
to time each test.
Pencils You may instruct examinees ahead of time to bring pencils, but it is
generally advisable to provide a supply of pencils in each room.
• Online testing does not require pencils, but examinees may use
them with scratch paper.
Pencil sharpener Provide a pencil sharpener in each test room.
Scratch paper Examinees may use scratch paper if they request it. For each blank
sheet, instruct examinees to write the following information on the top
of the sheet:
• First and last name
• School name
• Test subject
• School grade
Examinees testing online may use their student authorization testing
ticket as scratch paper. If they do so, there is no need to write the
information listed above.
Room supervisors will collect the scratch paper after testing and
return the sheets to the test coordinator with the other testing
materials. At the end of testing, securely destroy the scratch paper or
securely retain it for one year per local guidelines.
Calculators The school may choose to provide calculators to examinees or the
examinees may bring their own calculator to test. See the Calculator
Policy.
Materials Provided by the School
Electronic Devices
Examinees are not allowed to have cell phones or any electronic communication devices on
their person. Preferably, examinees should not bring electronic devices into the test room; if
they do, these devices are to be turned off and put away. A warning to examinees to not set
alarms is included in the verbal instructions.
Note: Alarms can distract examinees. Make sure staff alarms are off as well.
Wisconsin Policy: Electronic devices needed for accommodations such as blood sugar
monitoring are acceptable. The device must be held by the room supervisor or proctor during
testing and used only for its medical purpose under the direct supervision of testing staff.
12
TEST ADMINISTRATION | TEST ADMINISTRATION REQUIREMENTS
Unauthorized Testing Aids
The use of notes or any English dictionary is not permitted. Only bilingual word-to-word
dictionaries are permitted if the examinee is authorized to use one. See the ACT-Authorized
Bilingual Word-to-Word Dictionaries on the ACT-hosted web page under Administration.
Accessibility and Accommodations
ACT strives to provide equal access to all examinees, recognizing that some examinees need
technological and other forms of support to be able to test fairly and to the best of their abilities.
The need for accessibility is universal.
Administration of ACT Aspire with accessibility supports is a local decision. In ACT Aspire,
any examinee—with or without an identified disability—may use accessibility supports that
appropriately match the examinee’s needs. ACT recommends that examinees who use
accommodations have a formally documented need as well as relevant knowledge and
familiarity with these tools. Policy decisions regarding who may use accommodations rests
with your local governing educational authority. Refer to your local educational policy for
specific advice related to accommodations use.
Any formal qualifying procedure that is required by your educational authority must be
completed prior to completing the Personal Needs Profile (PNP) process.
Those with test coordinator permissions in PearsonAccess
next
must select accommodations
through the online PNP process in PearsonAccess
next
prior to an examinee beginning to test.
For additional information about accommodations and accessibility supports, see the
ACT Aspire Accessibility Supports Guide on the ACT-hosted web page, under Step 3:
Accommodation. Refer to the ACT Aspire Test Coordinator Manual for accessibility and
accommodations support guidance for specific test day activities.
Prohibited Behavior
The following examinee behaviors are prohibited during administration of the tests:
• Looking at another examinee's test booklet, answer document, or computer/device screen
display
• Giving or receiving assistance
• Disturbing other examinees
• Using notes or other unauthorized aids
• Using a calculator on any test other than the mathematics test
• Sharing a calculator with another examinee
• Using any device, including calculators, to share or exchange information at any time
during the tests, the break, or after testing (All electronic communication devices, including
cell phones, must be turned off and put away from the time the examinee is admitted to test
until dismissal after testing concludes.)
• Attempting to remove test materials, including test questions or answers, from the test
room by any means
• Exhibiting confrontational, threatening, or unruly behavior
• Creating a disturbance or allowing an alarm or phone to sound in the test room
• For online testing, using any tool not contained within the online testing system
The direct observation of prohibited behavior requires the room supervisor to dismiss the
examinee and mark the examinee’s test with a Do Not Report code. Some organizations may
require a review of testing irregularities before tests are marked as Do Not Report. Please refer
to your local policies.
If you suspect an examinee is engaged in this activity, discreetly warn the examinee that
the activity is prohibited, direct the examinee to resume testing, and continue to observe the
examinee closely. Document your suspicions and actions using the irregularity reporting tool in
PearsonAccess
next
.
13
TEST ADMINISTRATION | TEST ADMINISTRATION REQUIREMENTS
Irregularities
ACT Irregularity Policy
The irregularity reporting tool in PearsonAccess
next
is intended for use primarily by school
personnel to record any test administration irregularities that may affect examinee scores or
the analysis of ACT Aspire results. Recording an irregularity for an examinee is not the same
as marking the examinee’s test with a Do Not Report code and dismissing the examinee for
prohibited behavior. Testing personnel should use the irregularity reporting tool to report any
irregularities occurring within the room. Instructions for submitting an Irregularity Report can be
found under “Submit an Irregularity Report.”
Document any of the following:
• An examinee engages in a prohibited behavior
• An examinee becomes ill or leaves the room during testing (except for bathroom breaks)
• An examinee fails to follow instructions (responds to questions randomly, obviously does
not read questions prior to responding, or refuses to respond to questions)
• A general disturbance or distraction occurs that could affect one or more examinees’
results
• An examinee questions the accuracy or validity of an item
• An examinee has a technical issue that interrupts testing (online testing)
• A test is mistimed
In situations where an examinee can resume testing after illness, or a general disturbance,
room supervisors should allow it. Instructions for resuming a test can be found under “Resume
an Interrupted Test” in the appropriate ACT Aspire Room Supervisor Manual.
Irregularities in the Environment category encompass external factors that may affect
examinee testing, including outside noises, hot/cold room temperatures, power outages,
severe weather, and emergency evacuations.
The Examinee category of irregularities includes examinee behaviors that may affect their
performance or the performance of other examinees. These include the exhibition of prohibited
behaviors described previously, examinee complaints about testing conditions, challenges of
test items, arriving late for testing, or not showing up for testing.
Item challenges require the following information to be provided in the irregularity report:
• Examinee's name
• Grade level
• Subject test
• Test item
The Staff category includes actions testing staff may engage in that affect testing. These
include failure to follow testing procedures such as mistiming a test or not reading the verbal
instructions from the room supervisor manual, or other inappropriate behavior like engaging in
personal communication via other staff, telephone, or text during testing.
The Technical category pertains to the performance of online testing and includes system
failure, slowness, or freezing; difficulties launching the test or with examinees using TestNav;
and other system issues (e.g., problems with using a keyboard, mouse, monitor, or other
related hardware).
Submit an Irregularity Report
Submit an irregularity report in PearsonAccess
next
for each occurrence of a group or individual
irregularity. Report and describe in detail any irregularity, especially those that could affect test
scores. Include the names of any examinees involved.
1. Select the Testing icon.
2. Select Student Tests to access the Student Tests screen.
14
TEST ADMINISTRATION | TEST ADMINISTRATION REQUIREMENTS
3. Check the box next to the examinee(s) affected by this irregularity or type under Find
Student Tests, then select Search.
Note: If the irregularity affects an entire room, select all examinees present in that room. If
it affects the entire test site, select all examinees present at the test site.
4. In the Tasks pane, select Manage Irregularities and then select Start. The Manage
Irregularities screen appears, displaying all tests for the selected examinees.
5. Check the box next to each of the selected tests.
6. Enter Irregularity Date/Time, Irregularity Type, and Comments at the top of the screen.
• Be sure the Irregularity Date/Time reflects the date and time the irregularity occurred.
This can be typed in or entered using the calendar/clock icon pop-ups located to the
right of this field. Select the calendar icon to access the calendar and choose the
correct date. Next, select the clock icon at the bottom of the calendar and choose the
correct time.
• The comments field allows a maximum of 1000 characters. If that is insufficient to
provide necessary information, include the statement “Additional details on file” in the
comments field, and keep a full written account of the irregularity in your files for 12
months.
7. Select Apply to Selected.
8. If another irregularity affects the same test(s), take the following actions:
a. Uncheck the boxes next to each test.
b. Select the “+” icon to the right of each examinee to add another entry line to each
examinee.
c. Check the box next to the new line.
The new irregularity will be applied to all lines where the boxes are checked. Any
existing information in those lines will be overwritten and lost. Be sure only blank lines
are checked before proceeding.
d. Repeat steps 6–8.
9. When finished entering irregularities, select Save.
10. Select Exit Tasks.
15
TEST ADMINISTRATION INSTRUCTIONS | SET UP TEST SESSIONS
TEST ADMINISTRATION
INSTRUCTIONS
Set Up Test Sessions
All examinees testing online must be assigned to a test session for each subject they are
testing. Examinees testing paper should not be assigned to a test session. You have two
options for adding sessions: 1) Import Student Registration Import File; or 2) Import Student
PNP and Test Information File. Review the file layouts for requirements of each and choose the
best option for your school.
Note: If you need to make a change to a test session contact your test coordinator.
Create Test Sessions Manually
1. Select the Testing icon.
2. Select Sessions to access the Sessions screen.
From here you can search for specific sessions. In the Search drop-down menu, select
Show all results to see a list of all sessions. You also may apply a filter by entering
additional details.
3. In the Tasks pane, select Create/Edit Sessions in the drop-down menu.
4. Select the Start button.
The Create/Edit Sessions screen appears.
5. Complete all required fields:
• Session Name: Name the session so it can be easily identified.
• Organization: If the organization is not already selected, select it from the drop-down
menu.
• Test Assigned: Select the test to be administered.
• Form Group Type: The form group type “Main” from the drop-down menu is
automatically assigned.
• Scheduled Start Date: Select the date of the session; this must be within the testing
window determined by your local governing educational authority.
• Scheduled Start Time (not required): Leave this as the default (01:00 AM).
Note: To use the Scheduled Start Time field for internal scheduling purposes, change
it to the actual test start time. Test sessions may be started prior to the scheduled start
date and time.
• Precaching Computer: Discuss with the technical coordinator to determine what to
enter.
16
TEST ADMINISTRATION INSTRUCTIONS | SET UP TEST SESSIONS
6. Add/remove students to the new session (optional - students may be added at a later
time):
a. Select inside the Students field.
A list of available examinees appears.
b. Select an examinee from the list (find an examinee by entering their name in the field).
c. Select Group/Class to add groups of examinees to a test session.
d. To add additional examinees, repeat steps 6 a–c.
e. To remove an examinee, select the “X” next to the examinee’s name within the
Students field.
7. Select the Create button.
A "Success - Changes Saved" message appears.
8. Select the Exit Tasks button.
The Sessions screen appears.
Edit Test Sessions
Note: Test sessions that have a Session Status of In Progress or Stopped cannot be edited.
1. Select the Testing icon.
2. Select Sessions to access the Sessions screen.
From here you can search for specific sessions. In the Search drop-down menu, select
Show all results to see a list of all sessions. You also may apply a filter by entering
additional details.
3. Select the check box next to the test session to be edited.
4. In the Tasks pane, select Create/Edit Sessions in the drop-down menu.
5. Select the Start button.
The Create/Edit Sessions screen appears.
6. From the side menu, select a test session to edit.
The test session information is displayed.
7. Edit the session.
8. Select the Save button.
A "Success - Changes Saved" message appears.
9. To edit additional sessions, repeat the steps above.
10. Select the Exit Tasks button.
The Sessions screen appears.
Delete Test Sessions
Note: All examinees must be removed from a session before that session can be deleted. See
Remove Students from Sessions. Examinees cannot be removed from a test session if tests
have been completed.
1. Select the Testing icon.
2. Select Sessions to access the Sessions screen.
From here you can search for specific sessions. In the Search drop-down menu, select
Show all results to see a list of all sessions. You also may apply a filter by entering
additional details.
3. Select the check box next to the test session to be deleted.
4. In the Tasks pane, select Delete Sessions in the drop-down menu.
5. Select the Start button.
The Delete Sessions screen appears.
17
TEST ADMINISTRATION INSTRUCTIONS | SET UP TEST SESSIONS
6. Select the check box next to the session name.
7. Select the Delete button.
A "Success - Changes Saved" message appears.
8. Select the Exit Tasks button.
The Sessions screen appears.
Add Students to Sessions
1. Select the Testing icon.
2. Select Students in Sessions to access the Students in Sessions screen.
3. Select the Add a Session button in the Session List pane to add a session to edit.
4. Select a session to edit.
5. Select the Add Selected button.
6. In the Tasks pane, select the check box next to Add Students to Sessions in the drop-
down menu.
7. Select the Start button.
The Add Students to Sessions screen appears.
8. Select the session to which examinees will be added from the Session drop-down menu.
9. In the Search drop-down menu, select the check box next to Show all results.
10. Check the box next to each examinee to be added to this session.
11. Select the Add button.
A "Success - Changes Saved" message appears.
12. Select the Exit Tasks button.
The Students in Sessions screen appears.
Move Students between Sessions
In order to move an examinee to a new session, the new session must be set up with the
appropriate matching test assignment or created through the steps below.
1. Select the Testing icon.
2. Select Students in Sessions to access the Students in Sessions screen.
3. Select the Add a Session button in the Session List pane to add a session to edit.
4. Select a session to edit.
5. Select the Add Selected button.
6. Select the check box next to the examinee to be moved.
7. In the Tasks pane, select the check box next to Move Students between Sessions.
8. Select the Start button.
The Move Students between Sessions screen appears. The Tests field will prepopulate.
9. Select in the Sessions pane and select a session to add for the examinee.
Alternatively, select the Create Session button to create a new session.
10. Select the box under the new session to which you want to move the examinee’s test.
You may select all examinees' tests by checking the box next to the session name.
11. Select Move.
A "Success - Changes Saved" message appears.
12. Select the Exit Tasks button.
The Students in Sessions screen appears.
18
TEST ADMINISTRATION INSTRUCTIONS | SET UP TEST SESSIONS
Remove Students from Sessions
1. Select the Testing icon.
2. Select Students in Sessions to access the Students in Sessions screen.
3. Select the Add a Session button in the Session List pane to add a session to edit.
4. Select a session to edit.
5. Select the Add Selected button.
6. In the Session List, select the session(s) from which you want to remove an examinee(s).
The session information appears.
7. Select the check box next to the examinee to be removed.
8. In the Tasks pane, select the check box next to Remove Students from Sessions.
9. Select the Start button.
The Remove Students from Sessions screen appears.
10. Select the check box next to the examinee to be removed.
11. Select the Remove button.
A "Success - Changes Saved" message appears.
12. Select the Exit Tasks button.
The Students in Sessions screen appears.
Change an Examinee's Test Format
Note: When DPI runs the initial student data load, all students will have a delivery format set to
online. For any student who requires paper testing, the delivery format must be changed.
An examinee's test format must be changed before test materials are scheduled to be shipped.
Refer to your Schedule of Events for when this activity occurs. If the date has passed, an
additional order will need to be created.
Note: If the examinee is being moved from online to paper, remove the examinee from the test
session. If the examinee is being moved from paper to online, add the examinee to an existing
test session.
1. Select the Setup icon.
2. Select Students to access the Students screen.
The Students screen appears with a list of examinees. From here you can search for
specific students. In the Search drop-down menu, select Show all results to see a list of all
students. You also may apply a filter by entering additional details.
3. Check the box next to the examinee to be edited.
4. In the Tasks pane, check the box next to Manage Student Tests.
5. Select the Start button.
The Manage Student Tests screen appears.
6. Select the grade for the examinee you wish to edit from the Student Tests menu.
7. Select the appropriate subject test from the drop-down menu under that grade.
8. In the Delivery Format field, select the new test delivery format.
Note: You can change an examinee’s test delivery format from online to paper or vice
versa.
9. Select the Create button.
Note: If the test already was assigned, select the Save button.
A "Success - Changes Saved" message appears.
19
TEST ADMINISTRATION INSTRUCTIONS | SET UP TEST SESSIONS
10. Select the Exit Tasks button.
The Students screen appears.
20

TEST ADMINISTRATION INSTRUCTIONS | SET UP FOR TEST DAY
Set Up for Test Day
Prepare Test Sessions
This task should be performed once for each test session. For multiple-day testing, this task
should be performed the day before the first sitting. PNPs must be complete before preparing
the session.
1. Select the Testing icon.
2. Select Sessions to access the Sessions screen.
From here you can search for specific sessions. In the Search drop-down menu, select
Show all results to see a list of all sessions. You also may apply a filter by entering
additional details.
3. Select the check box next to the session(s) that will be administered in the upcoming days.
Note: Test sessions should be prepared 1–2 days before test day.
4. In the Tasks pane, select Show Students in Sessions & Control Sessions in the drop-
down menu.
The Students in Sessions screen appears.
5. Use the following table to determine your next step:
To prepare… Take the following actions…
All sessions a. In the Session List pane, select the
Combined View button to select multiple
sessions.
b. Select the Prepare All Sessions button.
A single session a. In the Session List pane, select a session.
b. Select the Prepare Session button.
6. Allow a few moments for the session(s) to prepare.
7. Select the Refresh button.
The session(s) status is Ready.
Note: Do not start the test session(s) until the day of testing.
Print Student Authorization Testing Tickets - Individual
Session
1. Select the Testing icon.
2. Select Sessions to access the Sessions screen.
3. Select the check box next to the session(s) for which you want to print student
authorization testing tickets.
4. In the Tasks pane, select Show Students in Sessions & Control Sessions in the drop-
down menu.
The Students in Sessions screen appears.
5. In the Session List, select the session(s) for which you want to print student authorization
testing tickets.
The session information appears.
21

TEST ADMINISTRATION INSTRUCTIONS | SET UP FOR TEST DAY
6. Use the following table to determine your next step:
To print student authorization testing tickets
for…
Take the following actions…
All examinees a. Open the Resources drop-down menu.
b. Select Print all for this session under the
Student Testing Tickets section.
c. Select a print format (1 per page is the
default).
An individual examinee or a small group of
examinees
a. Select the examinee(s) for whom to print a
ticket.
b. In the Resources menu, select Print
selected for this session under the
Student Testing Tickets section.
c. Select a print format (1 per page is the
default).
7. Print the student authorization testing tickets using your browser.
Note: Make sure the printer properties are not set to print 2-sided.
8. Repeat the steps above to retrieve and print student authorization testing tickets for other
sessions.
Print Student Authorization Testing Tickets - Multiple
Sessions
1. Select the Testing icon.
2. Select Sessions to access the Sessions screen.
3. Select the check box next to the session(s) for which you want to print student
authorization testing tickets.
4. In the Tasks pane, select Generate Test Tickets in the drop-down menu.
5. Select the Start button.
The Generate Test Tickets screen appears.
6. Select Generate Test Tickets.
Note: Sessions will be separated by a header sheet. Tickets will be printed one page per
examinee. Make sure your printer is not set to 2-sided printing.
Start and Unlock a Test Session
On the morning of test day, this task must be performed for each test session. It must be
completed to enable room supervisors to unlock their sessions. Sessions can only be unlocked
individually.
1. Select the Testing icon.
2. Select Sessions to access the Sessions screen.
From here you can search for specific sessions. In the Search drop-down menu, select
Show all results to see a list of all sessions. You also may apply a filter by entering
additional details.
3. Check the box next to the session(s) that will be administered today.
4. In the Tasks pane, select Show Students in Sessions & Control Sessions in the drop-
down menu.
The Students in Sessions screen appears.
22

TEST ADMINISTRATION INSTRUCTIONS | SET UP FOR TEST DAY
5. Use the following table to determine your next step.
To start… Take the following actions…
All sessions a. In the Session List pane, select the
Combined View button to select multiple
sessions.
b. Select the Start All Sessions button.
An individual session a. In the Session List, select a session.
b. Select the Start Session button.
The Start Session button becomes a Stop Session button, and a padlock appears next
to the test.
Note: In the examinee pane, notice that Student Test Status is marked as Ready, but
has a padlock. This indicates that the test is locked. The session should be unlocked only
when testing is ready to begin.
6. To unlock a session, slide the button next to the session to the right to unlock the test.
The test session is now marked as In Progress.
Note: If this step is not performed, examinees cannot access the test session in TestNav.
An error message will appear indicating the test session is locked.
7.
Allow PearsonAccess
next
to run during the test session. Do not log out or power off the
computer.
8. Select the locked padlock icon in the session lock/unlock control to lock the test session.
Note: An examinee's test session should be locked if the examinee is provided a break.
Note: If not all students in a test session completed testing, lock the session instead of
marking the session as "Marked Complete." Only stop a session when all students have
tested or those not testing are removed.
Launch Application on Computers
1.
Open an approved browser and launch PearsonAccess
next
on an administrative computer.
2. Launch the TestNav application on all test computers.
Note: If the room is being used for text-to-speech examinees, the room supervisor should
ensure that the volume on the testing computers is turned on. Headphones are required
when text-to-speech is used for more than one examinee.
23
TEST ADMINISTRATION INSTRUCTIONS | ADMINISTER THE TEST
Administer the Test
Answering Questions
Specific instructions about guessing are included in the verbal instructions for each test. If
examinees ask you about guessing, refer them to these instructions or repeat the appropriate
section for the examinee. Do not comment on or add to the printed instructions in any way. You
can answer questions about the general test instructions before testing starts.
Do not answer questions regarding individual test items. You may respond to such questions
by providing appropriate administration directions or suggestions like “Do the best you can.”
If examinees note typographical errors or ambiguities in particular test items, instruct them to
do the best that they can and then include an explanation of their questions or comments using
the irregularity reporting tool in PearsonAccess
next
.
Toggle Timer
An examinee may choose to view or hide the timer by selecting the stopwatch icon. When five
minutes remain on the test, a message will briefly display next to the stopwatch icon.
Inactivity Timer
TestNav will log an examinee out after an inactive period of 20 minutes (i.e., no keyboard or
mouse activity) if the examinee does not respond to a text pop-up window that appears on the
screen. If a system logout occurs, and the examinee needs to finish testing, follow these steps:
1.
Resume the examinee’s test in PearsonAccess
next
(see "Resume an Interrupted Test").
2. Instruct the examinee to log back in to TestNav to complete the test.
3. To provide additional time for the examinee, enter the Proctor Extended Time Code on the
TestNav screen before final answers are submitted by the examinee.
Note: Providing additional time by entering the Proctor Extended Time Code disables the
countdown timer. Closely monitor the examinee to ensure completion of the test according
to the test times (see Test Times by Grade and Subject).
Note: The examinee will have the testing time remaining when the examinee was
automatically logged out.
Proctor Extended Time Code
If a student's accommodations requirement includes extended time testing, but that
accommodation was not added to their Personal Needs Profile prior to preparing test sessions,
the Proctor Extended Time Code should be used. Use this code if time expires on a test for
a student who requires extended time. The student will receive a message window when the
timer ends: "Warning: If you do not select 'Submit Final Answers' you may not get a score for
this test." This window includes a Proctor Only link, where you can enter the proctor password.
Do not select the Submit Final Answers button; otherwise, you won't be able to return to the
test. Follow these instructions to access the Proctor Extended Time Code.
1. Select the Testing icon.
2. Select Sessions to access the Sessions screen.
3. In the table, select the check box next to the session you want to view.
4. In the Select Tasks menu, select Show Students in Sessions and Control Sessions.
The Students in Sessions screen appears.
24
TEST ADMINISTRATION INSTRUCTIONS | ADMINISTER THE TEST
5. In the Session List, select the session containing the examinee who requires extended
time.
6. Open the Resources drop-down menu.
7. Select Proctor Extended Time Code.
The code will open in a new window.
8. On the student's screen in the TestNav app, select the Proctor Only link.
9. Enter the proctor password then select the Continue button.
A final screen appears where you may select either Untimed or Enter Time.
10. Select an option (typically Enter Time), then enter the number of minutes and select the
Continue button.
The student is placed back into the test where they left off and the timer will begin counting
down from the number of minutes entered.
Allowing Students to Leave the Test Room
Examinees may be allowed to use the bathroom during the timed portion of the tests. Only one
examinee may leave the testing room at a time without being accompanied by testing staff.
“Direct Examinees to Log Out of TestNav” provides instructions for signing out of TestNav.
Signing out of TestNav stops the timer until the examinee signs back in after the break.Collect
the examinee's authorization testing ticket and any scratch paper before the examinee leaves
the room. Return the ticket and scratch paper when the examinee returns. If the examinee
signed out of TestNav, follow instructions under "Resume an Interrupted Test" after the
examinee's return.
Such absences do not need to be recorded as an irregularity in the irregularity reporting tool in
PearsonAccess
next
. Do not leave examinees unsupervised in a test room at any time.
Unlock/Lock a Test Session
Before examinees can log in to the test session in TestNav, the test session must be unlocked.
Sessions can only be unlocked individually. Take the following steps to unlock a test session.
1. Select the Testing icon.
2. Select Sessions to access the Sessions screen.
3. Select the drop-down menu on the Search button and select the check box next to Show
all results.
A list of test sessions appears.
4. Select the check box next to the session you will be administering today.
5. In the Tasks pane, select Show Students in Sessions & Control Sessions in the drop-
down menu.
The Students in Sessions screen appears.
6. In the Session List, select the session you want to unlock.
That session’s information appears.
7. Verify that each student's Student Test Status is Ready in the table and that the session is
locked.
8. Select the right side of the test button (padlock button) to unlock the test.
The Student Test Status changes from Ready (with a padlock) to Ready (no padlock).
Allow time for the system to process this activity.
Note: If this step is not performed, examinees cannot access the test session in TestNav.
An error message will appear indicating the test session is locked.
25

TEST ADMINISTRATION INSTRUCTIONS | ADMINISTER THE TEST
9. To lock the test session, select the left side of the test button (padlock button) to the left.
The Student Test Status changes from Ready (no padlock) to Ready (with a padlock).
Note: If not all students in a test session completed testing, lock the session instead of
marking the session as "Marked Complete." Only stop a session when all students have
tested or those not testing are removed.
View Examinee Status in a Session
1. Select the Testing icon.
2. Select Sessions to access the Sessions screen.
3. In the table, select the check box next to each session you want to view.
The Filters, including Session status, can be used to narrow your search results.
4. In the Select Tasks menu, select Show Students in Sessions & Control Sessions.
The Students in Sessions screen appears.
5. In the Session List, select the session containing the examinee status you want to view.
The session’s information appears.
6. Search to find the examinee(s) whose status you want to view.
Examinee status is shown in the Student Test Status column of the list of examinees.
Select the secondary filters to view additional filters, including the Student Test Status filter,
to narrow your search. The following table describes the possible status conditions.
Status Description
Ready The examinee has not yet started the test.
Active The examinee has logged in and started the test.
Note: If the examinee exits the test, but the status
remains set at Active, the examinee cannot resume testing
unless the status is changed to Resumed or Resumed
Upload. Resumed Upload is used when the examinee
needs to resume their test from another workstation.
Resume must be selected first, then Resumed Upload.
Exited The examinee has exited TestNav but has not submitted test
responses for the current test.
Note:
The examinee cannot resume testing in the session
unless the examinee’s status is changed to Resumed or
Resumed Upload.
If the examinee will not resume testing for any reason, the
examinee’s status must be changed to Marked Complete.
Resumed or Resumed Upload The examinee has been authorized to resume the test, but has
not yet logged in.
Completed The test has been submitted by the examinee through TestNav.
Marked Complete The examinee has exited TestNav and will not resume testing.
Examinees are marked complete by the room supervisor or test
coordinator in PearsonAccess
next
.
26

TEST ADMINISTRATION INSTRUCTIONS | ADMINISTER THE TEST
7. Select an examinee's status by selecting the link that appears when hovering status in the
Student Test Status column.
Selecting an examinee's status will provide more detailed information about that
examinee's test and item progress (e.g., number of test items answered; number of test
items remaining; etc.).
Student Monitoring Dashboard
If your session has 50 or fewer students you will see a blue icon next to the session name. If
you select the icon, a new window will open displaying a list of the students, their test status,
and test progress. The Student Monitoring Dashboard automatically refreshes every 30
seconds.
Resume an Interrupted Test
If examinees were logged out of TestNav during a test session, take these steps to resume
testing in that session for the affected examinees.
Note: The test session must be unlocked before proceeding. Only examinees in Exited or
Active status can be resumed. If beginning another sitting for a multiple-day session, see
“Resume Testing for the Breaks—Securely Extend Session over Multiple-Day Accessibility
Support” before proceeding.
1. Select the Testing icon.
2. Select Sessions to access the Sessions screen.
From here you can search for specific sessions. In the Search drop-down menu, select
Show all results to see a list of all sessions. You also may apply a filter by entering
additional details.
3. Select the check box next to the sessions you want to view.
4. In the Select Tasks menu, select Show Students in Sessions & Control Sessions.
The Students in Sessions screen appears.
5. In the Session List, select the appropriate session.
6. Find the examinee(s) whose test you want to resume.
7. Use the table below to determine your next step:
Number of examinees to resume Actions
Single examinee a. Select the drop-down menu next to the
examinee’s status.
b. Select Resume.
Multiple examinees at once a. Select the check box next to the examinees
whose status is to be updated.
b. In the Tasks pane, select Resume Student
Tests in the drop-down menu.
c. Select the Start button. The Resume
Student Tests screen appears.
d. Select the check box next to the examinees’
names to confirm the selection.
e. Select Resume.
Note: If the examinee’s test has
been submitted, before resuming,
the Administration Test Coordinator
needs to choose Undo Student Test
Submission from the task list in the
Students in Session page.
8. If necessary, start TestNav on each examinee’s computer.
27
TEST ADMINISTRATION INSTRUCTIONS | ADMINISTER THE TEST
Exit Testing for Breaks - Securely Extend Session Over
Multiple Days
For accessibility supports that require testing over multiple days, the test session must be
exited at the end of each sitting and then resumed at the beginning of the next sitting.
1. Direct the examinee(s) to log out of TestNav.
2.
In PearsonAccess
next
, lock the test session.
Note: Do not mark the examinee’s test complete.
Direct Examinees to Log Out of TestNav
Instruct the examinee(s) to take the following steps to log out of TestNav:
1. Select Sign out of TestNav from the user drop-down menu at the top of their screen.
2. Confirm by selecting Save & Return Later.
The examinee is logged out and the timer on the examinee’s test is stopped. On the
administrative computer, the examinee’s status is Exited.
Resume Testing for Breaks - Securely Extend Session
Over Multiple Days
1.
In PearsonAccess
next
, unlock the test session. (See “Unlock/Lock a Test Session.”)
2. Resume the Exited status test for each examinee. (See “Resume an Interrupted Test.")
3. Start TestNav on each examinee’s computer.
4. After examinees are seated, redistribute the student authorization testing tickets.
Note: If the examinee used the student authorization testing ticket as scratch paper, give
the examinee a new ticket.
5. Give examinees a fresh sheet of scratch paper and instruct them to write their name and
date at the top.
6. Direct the examinee(s) to log in.
The examinee(s) will see the screen where they left off.
7. Continue testing.
Stop a Test Session
After all examinees have completed the last test, take the following steps to stop the test
session.
1. Select the Testing icon.
2. Select Sessions to access the Sessions screen.
From here you can search for specific sessions. In the Search drop-down menu, select
Show all results to see a list of all sessions. You also may apply a filter by entering
additional details.
3. Select the check box next to the test session(s) to be stopped.
4. In the Tasks pane, select Show Students in Sessions & Control Sessions in the drop-
down menu.
The Students in Sessions screen appears.
5. In the Session List, select the session you want to stop.
That session’s information appears.
28
TEST ADMINISTRATION INSTRUCTIONS | ADMINISTER THE TEST
6. On the Students in Sessions screen, verify that all examinees in the session have a
Student Test Status of Completed or Marked Complete.
7. If an examinee's status is other than Completed or Marked Complete, use the following
table to determine the next steps to take:
Examinee status Action
Examinee(s) did not begin testing (e.g.,
absent; not admitted)
The test coordinator must remove the
examinee’s name from the test session.
Examinee(s) began testing but did not finish
and will not resume (e.g., dismissed; illness)
Mark the examinee’s test complete.
8. Select the Stop Session button.
The session is stopped. The button becomes a Restart Session button.
Mark Tests Complete
When an examinee submits their last test, the examinee’s status is automatically updated to
Completed. If an examinee does not finish testing (e.g., dismissal; illness), the room supervisor
must manually mark the examinee’s test complete.
Note: If not all students in a test session completed testing, lock the session instead of
marking the session as "Marked Complete."
1. Select the Testing icon.
2. Select Sessions to access the Sessions screen.
3. Select the check box next to the test session(s) to be stopped.
4. In the Tasks pane, select Show Students in Sessions & Control Sessions in the drop-
down menu.
The Students in Sessions screen appears.
5. In the Session List, select the session you want to view.
That session’s information appears.
6. On the Students in Sessions screen, select the check box next to each examinee to be
marked complete.
7. In the Tasks pane, select Mark Student Tests Complete.
8. Select the Start button.
The Mark Student Tests Complete screen appears.
9. Select the check box next to each test to be marked complete.
10. Enter a reason in the Reason field.
11. Select the Mark Complete button.
The Student Test Status now indicates Marked Complete.
12. Select the Exit Tasks button.
The Students in Sessions screen appears. The Student Test Status for selected
examinees indicates Marked Complete.
Confirm Test Session Status
1. Verify that test sessions continuing in another sitting (testing over multiple days) are
locked.
2. Verify that completed test sessions (session in which all examinees have a status of
Completed or Marked Complete) are stopped.
29
TEST ADMINISTRATION INSTRUCTIONS | POST-TEST CLEANUP
Post-Test Cleanup
After testing, it is the responsibility of the room supervisor or test coordinator to sign in to
PearsonAccess
next
and check the status of each examinee’s test in the session that has just
concluded. If necessary, the room supervisor or test coordinator can submit an examinee’s test
on their behalf, if the examinee did not do so, by changing the Student Test Status to Marked
Complete.
Ensure that any examinee who was absent or missed the test session has made up the test
or has been removed from the session. Once all examinees have completed testing, or the
allotted time has expired, the test coordinator must take action to ensure that all test sessions
are stopped.
Note: Sessions must be stopped before reports are available.
Accessibility Transcription Instructions
If an examinee responds in a non-standard format, the response must be transcribed. If the
examinee tests online, transcribe responses into TestNav. If the examinee tests on paper,
transcribe responses onto the answer document that was sent with the paper testing materials.
Examinee work not transcribed will not be scored. The room supervisor must arrange for
transcription to occur as soon as possible after the examinee completes a test session. Online
transcription must occur prior to the test being submitted for scoring.
See the ACT Aspire Accessibility Supports Guide on the ACT-hosted web page under
Verification for more information on which supports require transcription.
Post-Test Checklist
•
Once all examinees have completed testing, stop all test sessions in PearsonAccess
next
.
If an examinee is assigned to a test session but is not able to test, remove that examinee
from the test session. Mark all tests that have been started, but not finished, as complete.
• Ensure that all tests are submitted and all testing devices are signed out of TestNav.
• Collect and account for all examinees' student authorization testing tickets and scratch
paper before allowing them to leave the test room.
• Use the names on the tickets and sheets to determine who did not return the tickets or
scratch paper. Investigate as necessary to retrieve all materials that were distributed; the
security of the test questions is of utmost importance.
• Report any testing irregularities that occurred during the testing session using the
irregularity reporting tool on PearsonAccess
next
.
• If part of your local procedures, return all student authorization testing tickets and scratch
paper to the test coordinator.
30

VERBAL INSTRUCTIONS | INTRODUCTORY STEPS
VERBAL INSTRUCTIONS
Introductory Steps
Study these instructions before test day. In some cases, multiple versions of the verbal
instructions for each subject are provided to address different grade levels of examinees. On
the test day, follow the instructions for the subject test being administered in your room. It may
be helpful to mark or highlight the appropriate set of instructions in this manual ahead of time.
Reading the Verbal Instructions
To ensure standardized conditions, room supervisors must read the verbal instructions loudly,
clearly, and exactly as written. This ensures all examinees receive consistent, accurate
instructions.
• Read aloud only those instructions in the shaded boxes; do not depart from this text.
• Do not read aloud the text in [brackets]; instead, use text that is appropriate for the specific
instruction.
• Text in (parentheses) is optional.
• Pause frequently and wait for examinees to finish the task before proceeding. Where an
ellipsis (…) appears, a pause in reading instructions is recommended.
• Look at examinees to be sure they are following instructions.
• Read the instructions that are appropriate for your test room.
• Perform tasks only when directed to do so.
Test Times
The test times indicated in the verbal instructions reflect standard testing conditions.
For examinees testing with accommodations, adjust the verbal instructions to reflect the
appropriate test times (see "Test Times by Grade and Subject" in the Test Administration
section of this manual).
Turn to the instructions that apply to the test you are administering.
31

VERBAL INSTRUCTIONS | ENGLISH: GRADES 9–10
English: Grades 9–10
1. After all examinees have been admitted, seated, and have a pencil or pen, greet the
examinees and make any general announcements, then begin the verbal instructions.
2. Say:
You are about to take a test related to your coursework. You should try your best
and do your own work. It is best to answer every question even if you are not
sure of your answer.
Please clear your desks of everything except your pencils or pens …
I’m going to hand out your Student Authorization Testing Ticket now.
(I’m also going to hand out your scratch paper. Write your first and last name,
school name, subject you are starting to test, and school grade at the top of the
scratch paper when you receive it.)
You will return this material before being dismissed.
3. Distribute the Student Authorization Testing Tickets.
a. Hand examinees their testing tickets individually.
b. Do not allow examinees to pass testing tickets back or across aisles.
c. Keep an exact count of the number of testing tickets distributed.
4. Say:
Please look at the Student Authorization Testing Tickets that I (we) just passed
out. At the top of the testing ticket you should see your name. Below your
birthdate [name and grade of the subject test] should be listed. Raise your hand
if you do not see your name or the [name and grade of the subject test] on the
ticket …
5. Say:
Find the username and password printed on your Student Authorization
Testing Ticket and type them into the boxes on your screen. After you type this
information into the boxes, click the Sign In button … After signing in, do not click
on anything on the screen until I tell you to. Raise your hand if you need help
signing in or if your name and [name of the subject test] are not listed on your
screen …
6. Move around the room to confirm that examinees have signed in to the correct test. Assist
examinees having trouble signing in.
7. Say:
We are almost ready to begin testing. The use of notes or dictionaries, any
electronic device, or an alarm on a wristwatch or cell phone is not permitted.
32

VERBAL INSTRUCTIONS | ENGLISH: GRADES 9–10
8. Say:
Scratch work should be done on the scratch paper and/or testing ticket I (we)
handed out. If you need additional scratch paper during testing, raise your hand
and I will come to you.
Be sure to use your scroll arrows to move your screen to ensure you see the
entire item. If you are asked to type an answer on the screen, you must type in
English.
Raise your hand if you have any questions about the test instructions …
9. Answer any questions.
10. Say:
Please read the test directions on your screen silently as I read them aloud …
11. Say:
This test asks questions about writing in English. Some questions are based on
short passages.
• Read each passage before you answer the questions.
• Some questions ask you to select your answer from several possible choices.
Click the circle next to the answer you think is best.
• If you decide to change your answer, click the circle next to your new answer.
• Some questions refer to specific text. In many cases, you will be given
alternatives for this text. Choose the best alternative. If you think the original
text is best, choose "NO CHANGE."
• Some questions may ask you to work with objects on the screen. Follow the
directions on the screen to answer those questions.
• Some questions on this test may not count toward your score. If you get stuck
on a question, you may want to skip it and come back to it later if you have
time left.
It is best to answer every question even if you are not sure that your answer is
correct.
12. Say:
Read the next statement and when done you may click on the Start button and
then Start on the next screen and begin working…
Each examinee’s test will be individually timed by the TestNav system. It is important that
you also monitor the time and begin to watch toward the end of the allotted time.
13. During the test, do the following:
a. Set your stopwatch or interval timer for the test time. The figure below is provided to
aid with timekeeping.
START 5 minutes remaining STOP
b. If an examinee finishes their tests before others, instruct them to sit quietly until
everyone has completed the test. They should not be allowed to do other work or look
at any materials while they wait.
14. Confirm that all examinees have submitted their final answers, then make the
announcement.
33

VERBAL INSTRUCTIONS | ENGLISH: GRADES 9–10
15. Say:
I (we) will now collect your Student Authorization Testing Ticket and scratch
paper. Please remain quietly in your seats until I dismiss you.
16. While examinees remain in their seats, follow the instructions below:
a. Individually collect the testing tickets and scratch paper from each examinee.
b. Do not allow the testing tickets or the scratch paper to be passed to the front, side, or
back of the row.
c. Dismiss examinees only after you have accounted for the student authorization testing
tickets and scratch paper.
17. If you are going to administer another test, make sure that every computer has been
navigated back to the examinee sign-in page.
For the next test being administered, locate the verbal instructions for the appropriate
subject and grade level.
34

VERBAL INSTRUCTIONS | MATH: GRADES 9–10
Math: Grades 9–10
1. After all examinees have been admitted, seated, and have a pencil or pen, greet the
examinees and make any general announcements, then begin the verbal instructions.
2. Say:
You are about to take a test related to your coursework. You should try your best
and do your own work. It is best to answer every question even if you are not
sure of your answer.
Please clear your desks of everything except your pencils or pens …
I’m going to hand out your Student Authorization Testing Ticket now.
(I’m also going to hand out your scratch paper. Write your first and last name,
school name, subject you are starting to test, and school grade at the top of the
scratch paper when you receive it.)
You will return this material before being dismissed.
3. Distribute the Student Authorization Testing Tickets.
a. Hand examinees their testing tickets individually.
b. Do not allow examinees to pass testing tickets back or across aisles.
c. Keep an exact count of the number of testing tickets distributed.
4. Say:
Please look at the Student Authorization Testing Tickets that I (we) just passed
out. At the top of the testing ticket you should see your name. Below your
birthdate [name and grade of the subject test] should be listed. Raise your hand
if you do not see your name or the [name and grade of the subject test] on the
ticket …
5. If you are administering an audio test to any examinees, please be sure to have them
adjust the volume on their computer and headphones before signing in.
Refer to the Audio Check feature on the sign-in screen.
6. Ensure all examinees have the correct student authorization testing ticket.
7. Say:
Find the username and password printed on your Student Authorization
Testing Ticket and type them into the boxes on your screen. After you type this
information into the boxes, click the Sign In button … After signing in, do not click
on anything on the screen until I tell you to. Raise your hand if you need help
signing in or if your name and [name of the subject test] are not listed on your
screen …
8. Move around the room to confirm that examinees have signed in to the correct test. Assist
examinees having trouble signing in.
35

VERBAL INSTRUCTIONS | MATH: GRADES 9–10
9. Say:
Scratch work should be done on the scratch paper and/or testing ticket I (we)
handed out. If you need additional scratch paper during testing, raise your hand
and I will come to you.
Be sure to use your scroll arrows to move your screen to ensure you see the
entire item. If you are asked to type an answer on the screen, you must type in
English.
Raise your hand if you have any questions about the test instructions …
10. Answer any questions.
11. Say:
Please read the test directions on your screen silently as I read them aloud …
36

VERBAL INSTRUCTIONS | MATH: GRADES 9–10
12. Say:
This test asks questions about mathematics.
You may use scratch paper to do calculations, drawings, and other work. Scratch
paper will not be scored.
Some questions have 5 choices: A, B, C, D, and E.
• Click the circle next to the answer you think is correct.
• If you decide to change your answer, click the circle next to your new answer.
Some questions may give you other directions, for example, about moving
objects on the screen.
• Follow the directions on the screen to answer those questions.
Some questions may ask you to type your answer in a box.
• Click in the box and type your answer there.
• If you are typing an explanation,
~ be especially sure to read the question carefully.
~ answer the question as completely as you can.
~ explain your thoughts and ideas clearly.
~ read what you have written to be sure it says what you want it to say.
~ your answer will be evaluated on how well it explains and justifies the
mathematics of the question.
~ if you use calculations to support your answer, give both the result and
what you calculated (for example, in addition to giving 3.3, also tell that it
was a calculation of 23 ÷ 7 rounded to tenths).
You are allowed to use a calculator for any problems you choose; however, some
of the problems may best be done without using a calculator.
Note: Unless indicated otherwise, you should assume the following:
a. Diagrams are NOT necessarily drawn to scale.
b. Geometric figures are in a plane.
c. The word line indicates a straight line.
d. The word average indicates arithmetic mean.
(For example, is the average of 1, 7, and 3.)
13. Say:
Some of the questions on this test may not count toward your score. If you get
stuck on a question, you may want to skip it and come back to it later if you have
time left.
It is best to answer every question even if you are not sure your answer is
correct.
37

VERBAL INSTRUCTIONS | MATH: GRADES 9–10
14. Say:
Read the next statement and when done you may click on the Start button and
then Start on the next screen and begin working…
Each examinee’s test will be individually timed by the TestNav system. It is important that
you also monitor the time and begin to watch toward the end of the allotted time.
15. During the test, do the following:
a. Set your stopwatch or interval timer for the test time. The figure below is provided to
aid with timekeeping.
START 5 minutes remaining STOP
b. If an examinee finishes their tests before others, instruct them to sit quietly until
everyone has completed the test. They should not be allowed to do other work or look
at any materials while they wait.
16. Confirm that all examinees have submitted their final answers, then make the
announcement.
17. Say:
I (we) will now collect your Student Authorization Testing Ticket and scratch
paper. Please remain quietly in your seats until I dismiss you.
18. While examinees remain in their seats, follow the instructions below:
a. Individually collect the testing tickets and scratch paper from each examinee.
b. Do not allow the testing tickets or the scratch paper to be passed to the front, side, or
back of the row.
c. Dismiss examinees only after you have accounted for the student authorization testing
tickets and scratch paper.
19. If you are going to administer another test, make sure that every computer has been
navigated back to the examinee sign-in page.
For the next test being administered, locate the verbal instructions for the appropriate
subject and grade level.
38

VERBAL INSTRUCTIONS | READING: GRADES 9-10
Reading: Grades 9-10
1. After all examinees have been admitted, seated, and have a pencil or pen, greet the
examinees and make any general announcements, then begin the verbal instructions.
2. Say:
You are about to take a test related to your coursework. You should try your best
and do your own work. It is best to answer every question even if you are not
sure of your answer.
Please clear your desks of everything except your pencils or pens …
I’m going to hand out your Student Authorization Testing Ticket now.
(I’m also going to hand out your scratch paper. Write your first and last name,
school name, subject you are starting to test, and school grade at the top of the
scratch paper when you receive it.)
You will return this material before being dismissed.
3. Distribute the Student Authorization Testing Tickets.
a. Hand examinees their testing tickets individually.
b. Do not allow examinees to pass testing tickets back or across aisles.
c. Keep an exact count of the number of testing tickets distributed.
4. Say:
Please look at the Student Authorization Testing Tickets that I (we) just passed
out. At the top of the testing ticket you should see your name. Below your
birthdate [name and grade of the subject test] should be listed. Raise your hand
if you do not see your name or the [name and grade of the subject test] on the
ticket …
5. Ensure all examinees have the correct student authorization testing ticket.
6. Say:
Find the username and password printed on your Student Authorization
Testing Ticket and type them into the boxes on your screen. After you type this
information into the boxes, click the Sign In button … After signing in, do not click
on anything on the screen until I tell you to. Raise your hand if you need help
signing in or if your name and [name of the subject test] are not listed on your
screen …
7. Move around the room to confirm that examinees have signed in to the correct test. Assist
examinees having trouble signing in.
8. Say:
We are almost ready to begin testing. The use of notes or dictionaries, any
electronic device, or an alarm on a wristwatch or cell phone is not permitted.
39

VERBAL INSTRUCTIONS | READING: GRADES 9-10
9. Say:
Scratch work should be done on the scratch paper and/or testing ticket I (we)
handed out. If you need additional scratch paper during testing, raise your hand
and I will come to you.
Be sure to use your scroll arrows to move your screen to ensure you see the
entire item. If you are asked to type an answer on the screen, you must type in
English.
Raise your hand if you have any questions about the test instructions …
10. Answer any questions.
11. Say:
Please read the test directions on your screen silently as I read them aloud …
12. Say:
This test asks you to read and then answer questions about each of several
reading passages.
• Some questions ask you to select your answer from several possible choices.
Click the circle next to the answer you think is best.
• If you decide to change your answer, click the circle next to your new answer.
• Some questions ask you to write an answer. Click in the box and type your
answer there. Before you begin to type, read the question carefully. Answer
the question as completely as you can. Explain your thoughts and ideas
clearly. Read what you have written to be sure it says what you want it to say.
These questions are worth more points than the other questions on the test.
• You may use scratch paper to plan your writing. Scratch paper will not be
scored.
• Some questions may ask you to work with objects on the screen. Follow the
directions on the screen to answer those questions.
13. Say:
Some of the questions on this test may not count toward your score. If you get
stuck on a question, you may want to skip it and come back to it later if you have
time left.
It is best to answer every question even if you are not sure your answer is
correct.
14. Say:
Read the next statement and when done you may click on the Start button and
then Start on the next screen and begin working…
Each examinee’s test will be individually timed by the TestNav system. It is important that
you also monitor the time and begin to watch toward the end of the allotted time.
40

VERBAL INSTRUCTIONS | READING: GRADES 9-10
15. During the test, do the following:
a. Set your stopwatch or interval timer for the test time. The figure below is provided to
aid with timekeeping.
START 5 minutes remaining STOP
b. If an examinee finishes their tests before others, instruct them to sit quietly until
everyone has completed the test. They should not be allowed to do other work or look
at any materials while they wait.
16. Confirm that all examinees have submitted their final answers, then make the
announcement.
17. Say:
I (we) will now collect your Student Authorization Testing Ticket and scratch
paper. Please remain quietly in your seats until I dismiss you.
18. While examinees remain in their seats, follow the instructions below:
a. Individually collect the testing tickets and scratch paper from each examinee.
b. Do not allow the testing tickets or the scratch paper to be passed to the front, side, or
back of the row.
c. Dismiss examinees only after you have accounted for the student authorization testing
tickets and scratch paper.
19. If you are going to administer another test, make sure that every computer has been
navigated back to the examinee sign-in page.
For the next test being administered, locate the verbal instructions for the appropriate
subject and grade level.
41

VERBAL INSTRUCTIONS | SCIENCE: GRADES 9-10
Science: Grades 9-10
1. After all examinees have been admitted, seated, and have a pencil or pen, greet the
examinees and make any general announcements, then begin the verbal instructions.
2. Say:
You are about to take a test related to your coursework. You should try your best
and do your own work. It is best to answer every question even if you are not
sure of your answer.
Please clear your desks of everything except your pencils or pens …
I’m going to hand out your Student Authorization Testing Ticket now.
(I’m also going to hand out your scratch paper. Write your first and last name,
school name, subject you are starting to test, and school grade at the top of the
scratch paper when you receive it.)
You will return this material before being dismissed.
3. Distribute the Student Authorization Testing Tickets.
a. Hand examinees their testing tickets individually.
b. Do not allow examinees to pass testing tickets back or across aisles.
c. Keep an exact count of the number of testing tickets distributed.
4. Say:
Please look at the Student Authorization Testing Tickets that I (we) just passed
out. At the top of the testing ticket you should see your name. Below your
birthdate [name and grade of the subject test] should be listed. Raise your hand
if you do not see your name or the [name and grade of the subject test] on the
ticket …
5. If you are administering an audio test to any examinees, please be sure to have them
adjust the volume on their computer and headphones before signing in.
Refer to the Audio Check feature on the sign-in screen.
6. Ensure all examinees have the correct student authorization testing ticket.
7. Say:
Find the username and password printed on your Student Authorization
Testing Ticket and type them into the boxes on your screen. After you type this
information into the boxes, click the Sign In button … After signing in, do not click
on anything on the screen until I tell you to. Raise your hand if you need help
signing in or if your name and [name of the subject test] are not listed on your
screen …
8. Move around the room to confirm that examinees have signed in to the correct test. Assist
examinees having trouble signing in.
9. Say:
We are almost ready to begin testing. The use of notes or dictionaries, any
electronic device, or an alarm on a wristwatch or cell phone is not permitted.
42

VERBAL INSTRUCTIONS | SCIENCE: GRADES 9-10
10. Say:
Scratch work should be done on the scratch paper and/or testing ticket I (we)
handed out. If you need additional scratch paper during testing, raise your hand
and I will come to you.
Be sure to use your scroll arrows to move your screen to ensure you see the
entire item. If you are asked to type an answer on the screen, you must type in
English.
Raise your hand if you have any questions about the test instructions …
11. Answer any questions.
12. Say:
Please read the test directions on your screen silently as I read them aloud …
13. Say:
This test asks you to read several passages about scientific topics. After reading
a passage, use the information in the passage to answer each question.
• Some questions ask you to select your answer from several possible choices.
Click the circle next to the answer you think is best.
• If you decide to change your answer, click the circle next to your new answer.
• Some questions ask you to write an answer. Click in the box and type your
answer there. Before you begin to type, read the question carefully. Answer
the question as completely as you can. Explain your thoughts and ideas
clearly. Read what you have written to be sure it says what you want it to say.
Some of these questions are worth more than one point.
• You may use scratch paper to plan your writing. Scratch paper will not be
scored.
• Some questions may ask you to work with objects on the screen. Follow the
directions on the screen to answer those questions.
14. Say:
Some of the questions on this test may not count toward your score. If you get
stuck on a question, you may want to skip it and come back to it later if you have
time left.
You should try to answer every question even if you are not sure your answer is
best.
15. Say:
Read the next statement and when done you may click on the Start button and
then Start on the next screen and begin working…
Each examinee’s test will be individually timed by the TestNav system. It is important that
you also monitor the time and begin to watch toward the end of the allotted time.
43

VERBAL INSTRUCTIONS | SCIENCE: GRADES 9-10
16. During the test, do the following:
a. Set your stopwatch or interval timer for the test time. The figure below is provided to
aid with timekeeping.
START 5 minutes remaining STOP
b. If an examinee finishes their tests before others, instruct them to sit quietly until
everyone has completed the test. They should not be allowed to do other work or look
at any materials while they wait.
17. Confirm that all examinees have submitted their final answers, then make the
announcement.
18. Say:
I (we) will now collect your Student Authorization Testing Ticket and scratch
paper. Please remain quietly in your seats until I dismiss you.
19. While examinees remain in their seats, follow the instructions below:
a. Individually collect the testing tickets and scratch paper from each examinee.
b. Do not allow the testing tickets or the scratch paper to be passed to the front, side, or
back of the row.
c. Dismiss examinees only after you have accounted for the student authorization testing
tickets and scratch paper.
20. If you are going to administer another test, make sure that every computer has been
navigated back to the examinee sign-in page.
For the next test being administered, locate the verbal instructions for the appropriate
subject and grade level.
44

VERBAL INSTRUCTIONS | WRITING: GRADES 9–10
Writing: Grades 9–10
1. After all examinees have been admitted, seated, and have a pencil or pen, greet the
examinees and make any general announcements, then begin the verbal instructions.
2. Say:
You are about to take a test related to your coursework. You should try your best
and do your own work. It is best to answer every question even if you are not
sure of your answer.
Please clear your desks of everything except your pencils or pens …
I’m going to hand out your Student Authorization Testing Ticket now.
(I’m also going to hand out your scratch paper. Write your first and last name,
school name, subject you are starting to test, and school grade at the top of the
scratch paper when you receive it.)
You will return this material before being dismissed.
3. Distribute the Student Authorization Testing Tickets.
a. Hand examinees their testing tickets individually.
b. Do not allow examinees to pass testing tickets back or across aisles.
c. Keep an exact count of the number of testing tickets distributed.
4. Say:
Please look at the Student Authorization Testing Tickets that I (we) just passed
out. At the top of the testing ticket you should see your name. Below your
birthdate [name and grade of the subject test] should be listed. Raise your hand
if you do not see your name or the [name and grade of the subject test] on the
ticket …
5. If you are administering an audio test to any examinees, please be sure to have them
adjust the volume on their computer and headphones before signing in.
Refer to the Audio Check feature on the sign-in screen.
6. Ensure all examinees have the correct student authorization testing ticket.
7. Say:
Find the username and password printed on your Student Authorization
Testing Ticket and type them into the boxes on your screen. After you type this
information into the boxes, click the Sign In button … After signing in, do not click
on anything on the screen until I tell you to. Raise your hand if you need help
signing in or if your name and [name of the subject test] are not listed on your
screen …
8. Move around the room to confirm that examinees have signed in to the correct test. Assist
examinees having trouble signing in.
9. Say:
We are almost ready to begin testing. The use of notes or dictionaries, any
electronic device, or an alarm on a wristwatch or cell phone is not permitted.
45

VERBAL INSTRUCTIONS | WRITING: GRADES 9–10
10. Say:
Scratch work should be done on the scratch paper and/or testing ticket I (we)
handed out. If you need additional scratch paper during testing, raise your hand
and I will come to you.
Be sure to use your scroll arrows to move your screen to ensure you see the
entire item. If you are asked to type an answer on the screen, you must type in
English.
Raise your hand if you have any questions about the test instructions …
11. Answer any questions.
12. Say:
Please read the test directions on your screen silently as I read them aloud …
13. Say:
This is a test of your writing skills. You will have 40 minutes to write an essay
in English. Before you begin planning and writing your essay, read the writing
prompt carefully to understand exactly what you are being asked to do.
Your essay will be evaluated based on your ability to:
• explain and analyze a topic.
• support your ideas.
• stay focused on the task throughout the essay.
• organize ideas in a logical way.
• use language clearly and effectively according to the conventions of standard
written English.
Only your final essay that you write in the answer space provided will be scored.
You may use the scratch paper provided to plan your essay. You may make
revisions to your work in the text box on the computer screen as much as you
would like, but click the “submit” button only when you have completed your
essay.
Only the final submitted essay will be scored.
If you finish early, review and edit your essay to be sure it says what you want it
to say.
14. Say:
Read the next statement and when done you may click on the Start button and
then Start on the next screen and begin working…
Each examinee’s test will be individually timed by the TestNav system. It is important that
you also monitor the time and begin to watch toward the end of the allotted time.
15. During the test, do the following:
a. Set your stopwatch or interval timer for the test time. The figure below is provided to
aid with timekeeping.
START 5 minutes remaining STOP
b. If an examinee finishes their tests before others, instruct them to sit quietly until
everyone has completed the test. They should not be allowed to do other work or look
at any materials while they wait.
46

VERBAL INSTRUCTIONS | WRITING: GRADES 9–10
16. Confirm that all examinees have submitted their final answers, then make the
announcement.
17. Say:
I (we) will now collect your Student Authorization Testing Ticket and scratch
paper. Please remain quietly in your seats until I dismiss you.
18. While examinees remain in their seats, follow the instructions below:
a. Individually collect the testing tickets and scratch paper from each examinee.
b. Do not allow the testing tickets or the scratch paper to be passed to the front, side, or
back of the row.
c. Dismiss examinees only after you have accounted for the student authorization testing
tickets and scratch paper.
19. If you are going to administer another test, make sure that every computer has been
navigated back to the examinee sign-in page.
For the next test being administered, locate the verbal instructions for the appropriate
subject and grade level.
47